Events / Plays and Dates
In this section, we explain the Event/Play setup window and take you through the set up of an event. During the installation of your software, several naming conventions were setup in the Appearance section of Company Preferences. This allows you to name the events "Plays," "Concerts," "Games," "Events," or whatever term your organization uses. The terms are completely interchangeable and mean the same thing. For the purposes of these web pages, we will refer to them as either a Play or an Event.
You must enter Play and date information before tickets can be sold. Each play can have a number of performance dates, called a series. The price code values for each series can be unique.
Opening the Plays and Dates Window
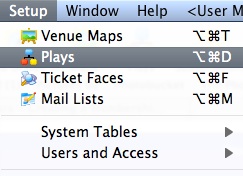
Select Setup >> Plays from Theatre Manager's main menu. Alternatively, click the Play  button in the main Theatre Manager toolbar / ribbon bar.
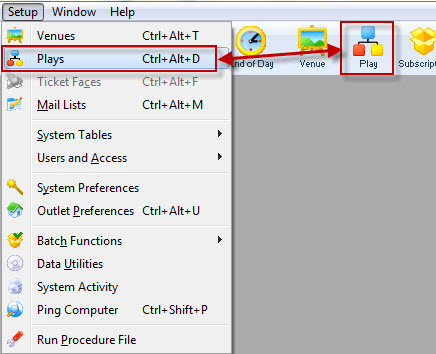
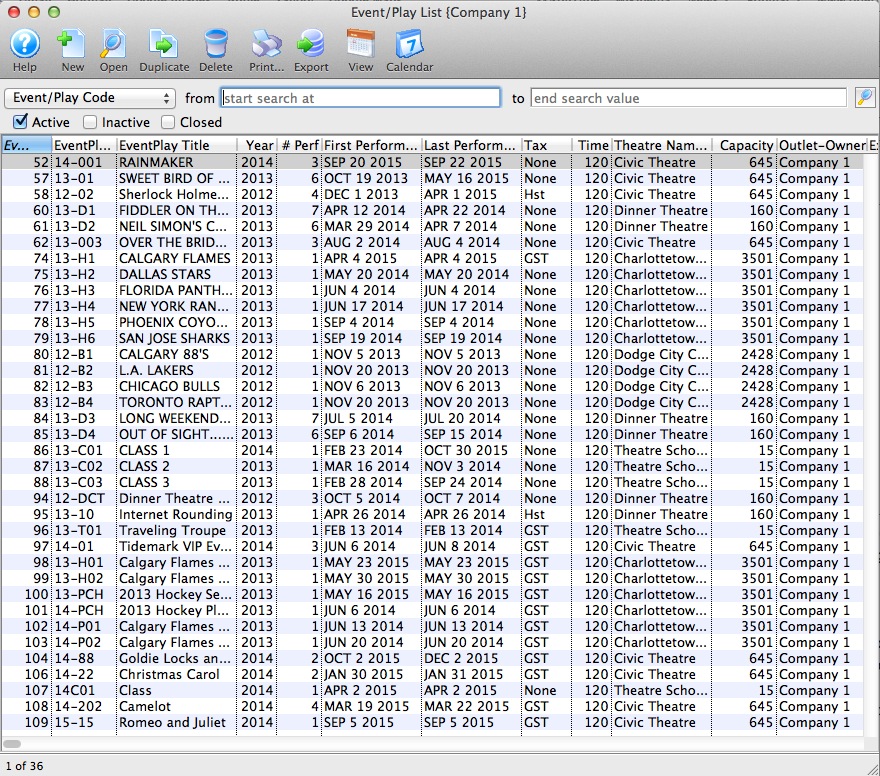
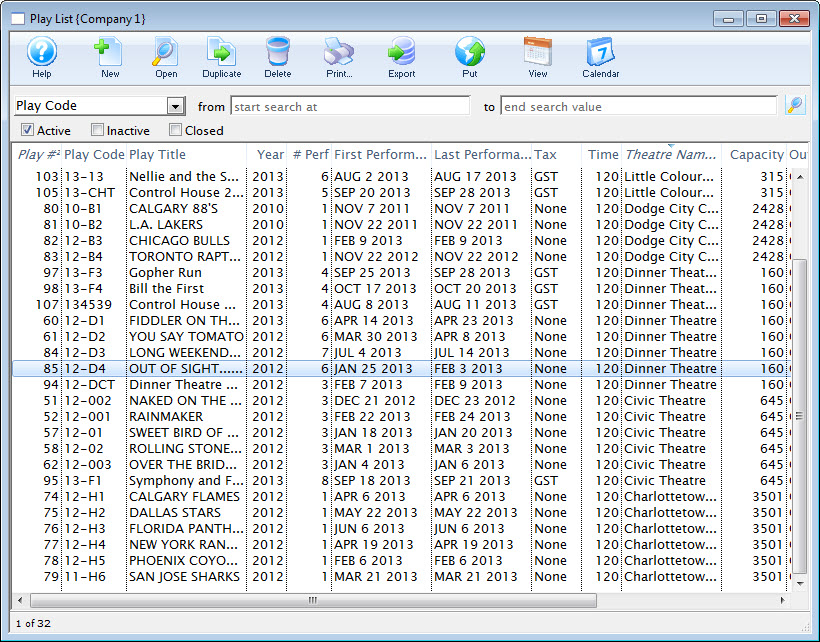
The Play List window opens.
Event / Play List
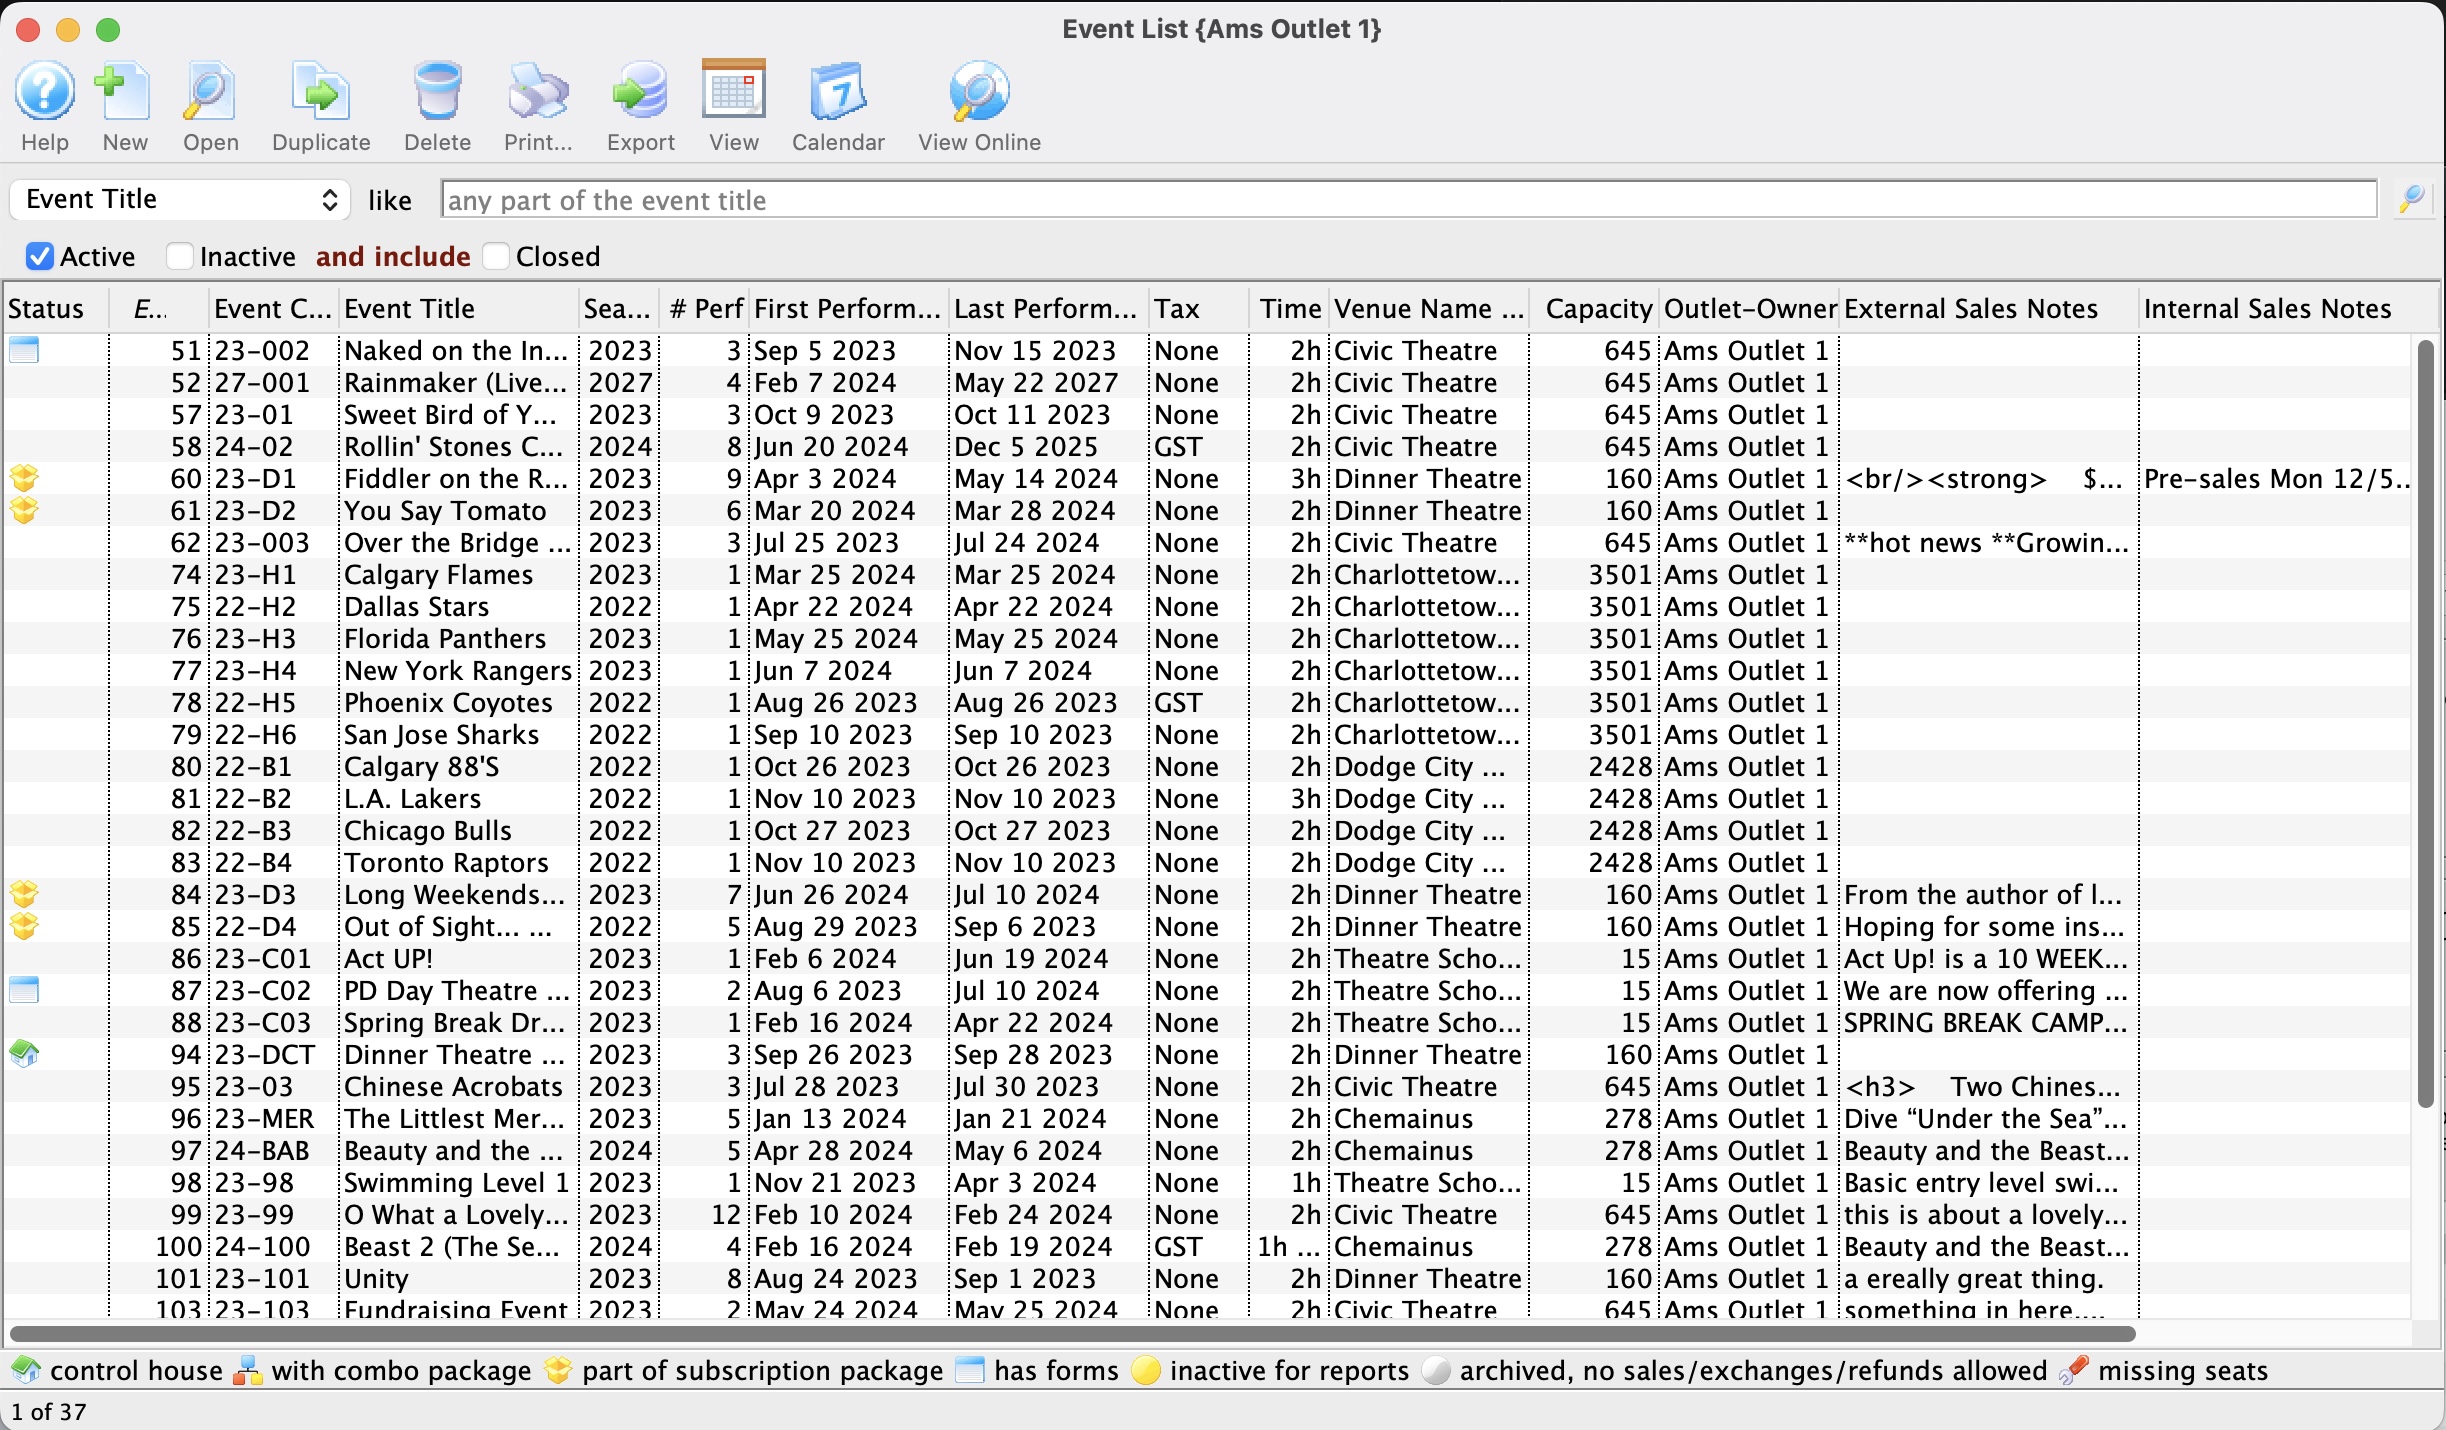
Parts of the Play List Window

|
Adds a new Play. Click here for more information on creating events. |

|
Opens the selected Play. Click here for more information on editing an event. |
 |
Creates a copy of the selected event. When you click the button, you are given options how you want to duplicate the event (as per the choices below). you can:

|
 |
Deletes the selected Play. For more information on deleting events click here. |

|
Generates a report of the Play List to the screen or default print location. |
 |
Exports the Play List in a tab-delimited format. |
 |
Clicking the button, puts any images or pictures associated with the event, onto the FTP site. |
 |
Changes the view of the plays, from list to calendar or calendar to list. |
 |
View the items attached to the play / event as a calendar. | Search Field | With the search fields, you can change how you search the Play List Window. Click here for more information. |
| Active | Check this to show all active events in the list. |
| Inactive | Check this to show all inactive events in the list. |
| Closed | Check this to show all closed events in the list. |
Duplicating One or More Events
Clicking the duplicate button to copy events will show a sub menu where you can:
- Duplicate multiple events, their performances, pricing and onsale settings - which is useful when preparing for the next season or session of classes.
- Duplicate only the minimal key event header (the play and accounting tabs) so that you can custom build the marketing data, performances and all other information on the event.
Duplicating only event Information (second option above)
If events and performances change significantly from year to year where there is no pattern to the events or pricing, then sometimes the best way to get started with an event is to find one that uses the same accounting and just duplicate the event and accounting tabs. You will have a quick basis for making another event and can add performances as you wish.
Duplicating all data for one or more events
Duplicating an entire event copies everything. This could be used to create the basis for next year's season or for the next session of courses very quickly. The duplication process lets you:
- Enter a starting date for the first event
- Change the day of each event on a one by one basis
- Change the name of the event
- Change performance times
- Change performance codes
- Decrease the number of performances (adding more performances can be done later manually)
- Indicate if the marketing information should e cleared
- Indicate if the onsales flags should be altered for you
IT can be used any number of times on any number of events. For example if you have a set of courses, you may want to do them all at one time. If you have a season of 5 events, you might do this 5 times if the offset dates between events varies from year to year.
Setting key parameters for the copy options
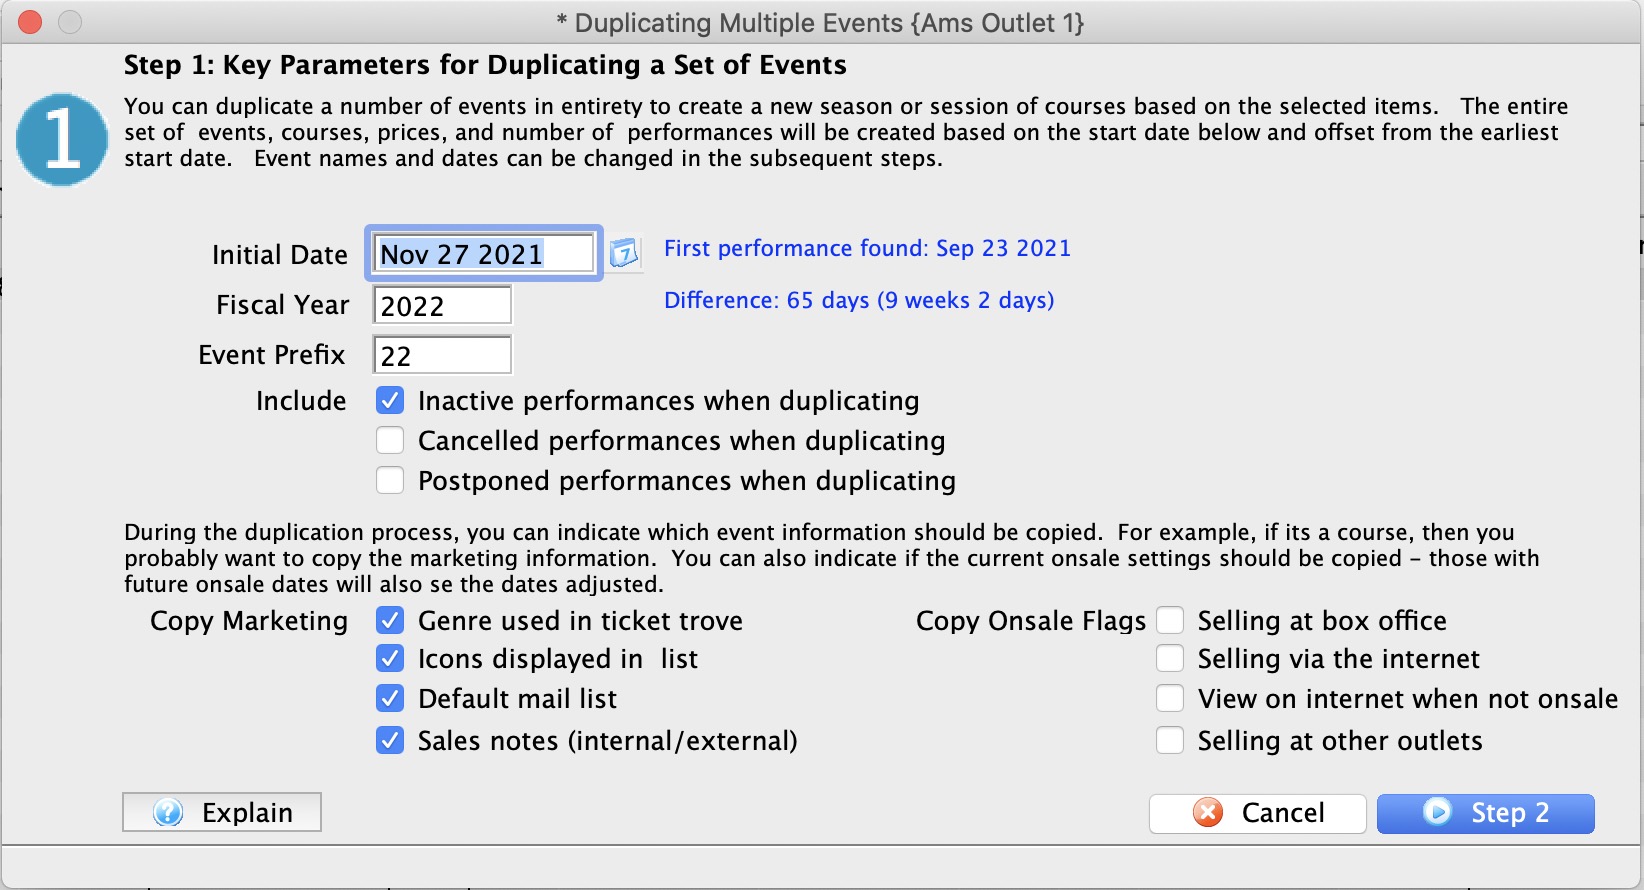
The first step of copying an entire season or session of classes is to provide some key items so Theatre Manager can build a suggestion for you. You will need:
- The initial date for the first performance - when you want the first new performance to occur. All performance and on-sales dates are calculated based on their offset from this date. For example. if the date entered is January 1, and you are duplicating 3 performances that are each two days apart, they receive dates of January 1, 3 and 5
- Fiscal Year All events have a season - you can specify the default for the new events. This can be changed on the second screen on an event by event basis if you are duplicating events that cross seasons.
- The event prefix. The default is the last two digits of the year. However, you can enter up to 5 characters. This will replace the characters in the proposed event list at the beginning. Example: if the event prefix is 17 and the current event codes are 16-ABC and 16-DEF, Theatre Manager will suggest 17-ABC and 17-DEF
- Copy Marketing: indicate which of the fields on the marketing tab should be copied to the new event. For courses, you probably want to copy everything if the sessions are being repeated. For events, you probably do not want to copy anything. If nothing is copied, the data will be set blank.
- Include flags
- Include Inactive Performances will include performances that you have set inactive
- Include Cancelled Performances will included performances that are indicated as cancelled. You probably don't want to do that
- Include Postponed Performances will included performances that are indicated as postponed. You probably don't want to do that
- Copy Onsale Flags: indicate which onsale flags you want to copy from the original events.
- If copied, then the current setting of the flag for that event is copied to the new event.
- If not copied, the event is left off sale.
- If onsale dates were used in the original event, they will be adjusted to be the same number of days prior to performance. Example: if the onsale date was 58 days prior to the performance date, then the copied one will have an onsale date 58 days prior to the new performance date.
Customizing the event list after the proposed dates
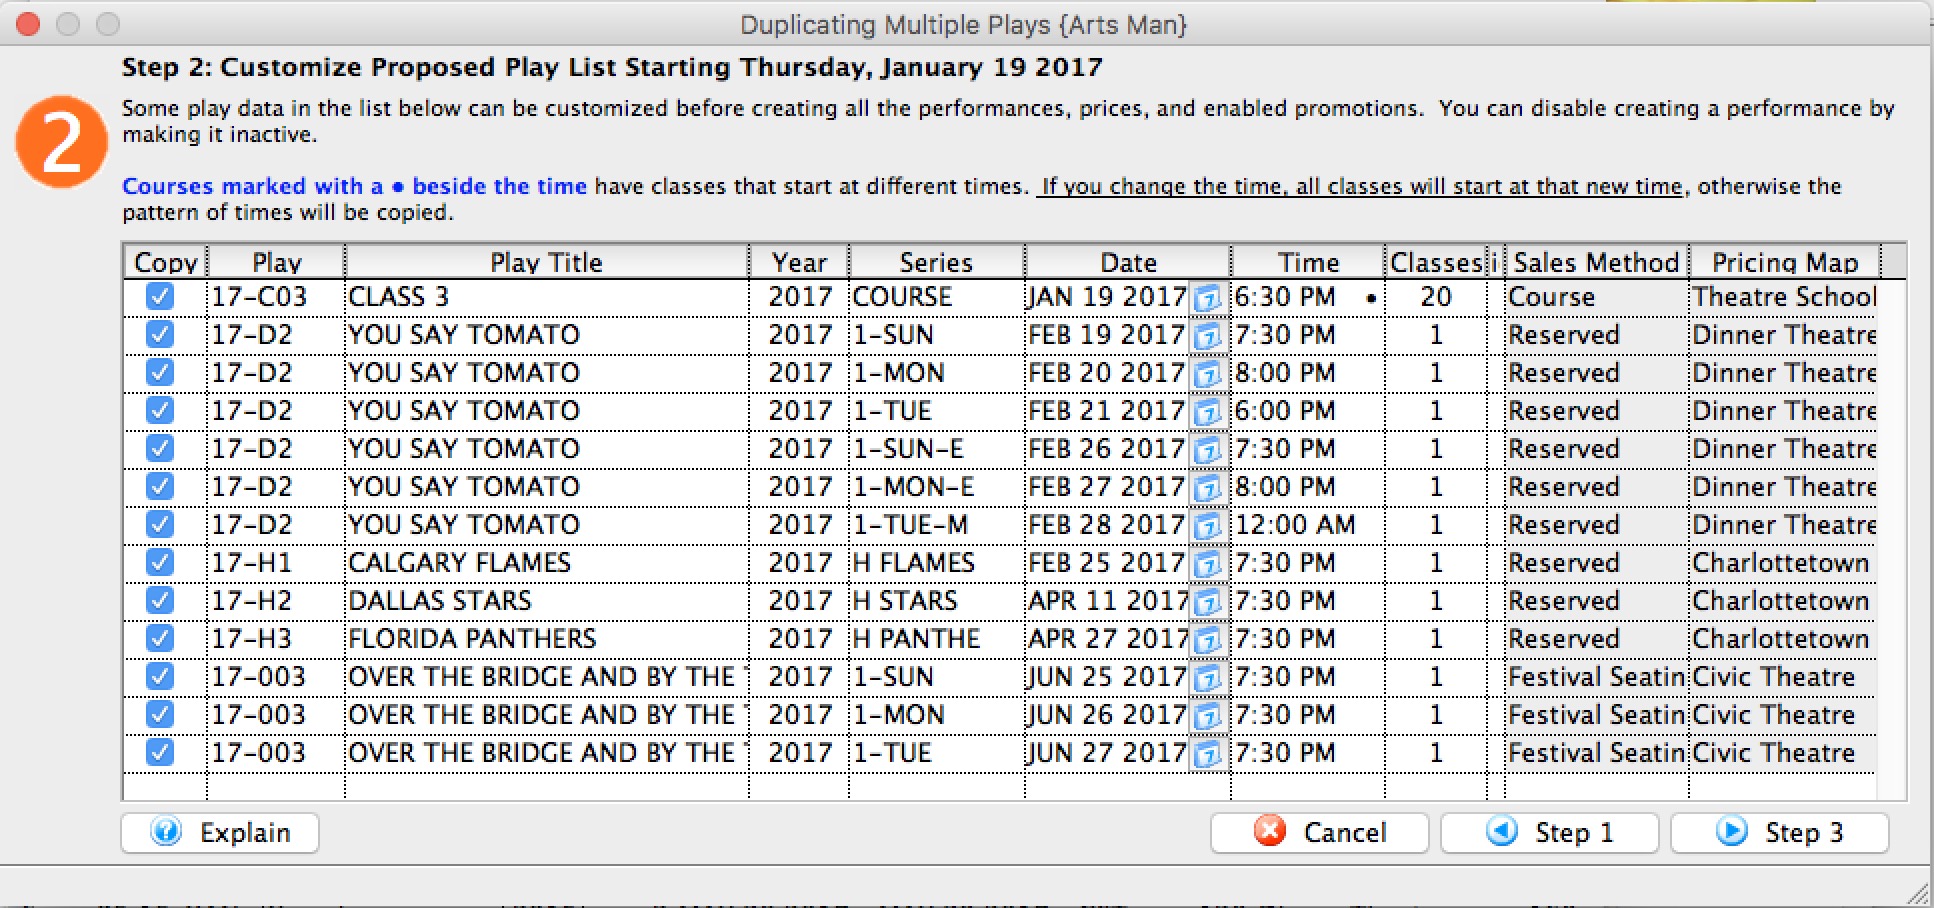 Once you have provided on the initial parameters (and clicked the next button), the system will propose a slate of new events for you.
On this list, you can:
- Disable copying of some of the performances
- Customize some of the event codes. If you change one for one event, it changes all of them for the same event.
- Change the event titles if they are not the same for the next season or session. Sometimes they are, but if not, changing one title for one event will change all similar events to the same title.
- Change the season/fiscal year for an event
- Change the performance code. Changing one of them only changes that specific one - there is no way to change a number of them to be the same.
- Change the date of an individual performance
- Change the time of an individual performance. Note: if there is a '•' after a date, it means that for this course, at least one time is different - meaning that the class dates and times are varied throughout the run of the course. If you do not change the time here, then the copied classes within that course will also have varied times that match the original course. However, if you change this time, then ALL classes in the course will take on the new time.
Finding Events / Plays
You can access the list of Plays (Events) two ways. First, you can to select the list from the main Theatre Manager toolbar / ribbon bar.

Or you can select Plays in the Setup drop down menu.
Finding a Play Using the Search Button
This find method is best used when you have the event number since it only returns the event closest to your criteria.
- Open the Play List window.
Click here for more information.
- Press <RETURN> or <ENTER>, or use the mouse to select the Search
 Button.
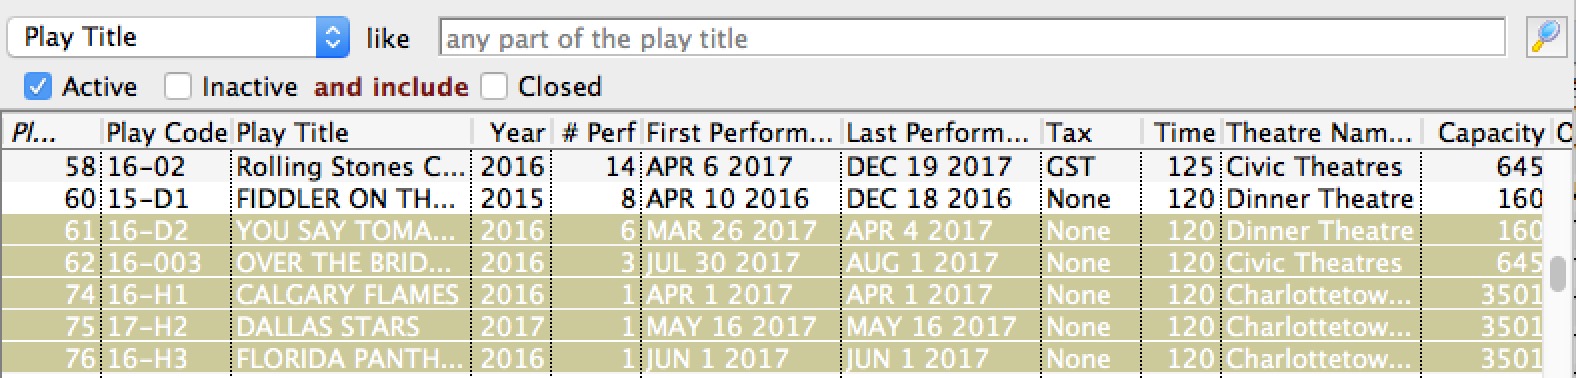
Finding a Play Using The Play List Window
This is a useful search method if you do not have the event number. This method will return a list of all events which match your selected criteria. Then you can choose the correct event.
- Open the Play List window.
Click here for more information.
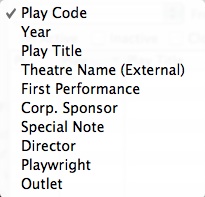
- Choose a search field from the drop down list.
There are ten fields to choose from:
- Enter search criteria in the From and To Fields
The criteria you enter in the "from" and "to" fields will be based on the field selected in the drop down list to the left of the field. In the above picture you search by Event code. When entering criteria you can be specific or general. That is, if you are searching by Event Code, you can enter the entire event code into the search field ("99-01" - will find the specific event) or you can just enter the first part of the event will find all Events that have event codes beginning with "99-").
- Click the Search Button.
All events matching the search criteria are returned.
- Double click on an event to open the Play Setup window.
Tabs In Events / Plays and Dates
Events/Play Tab
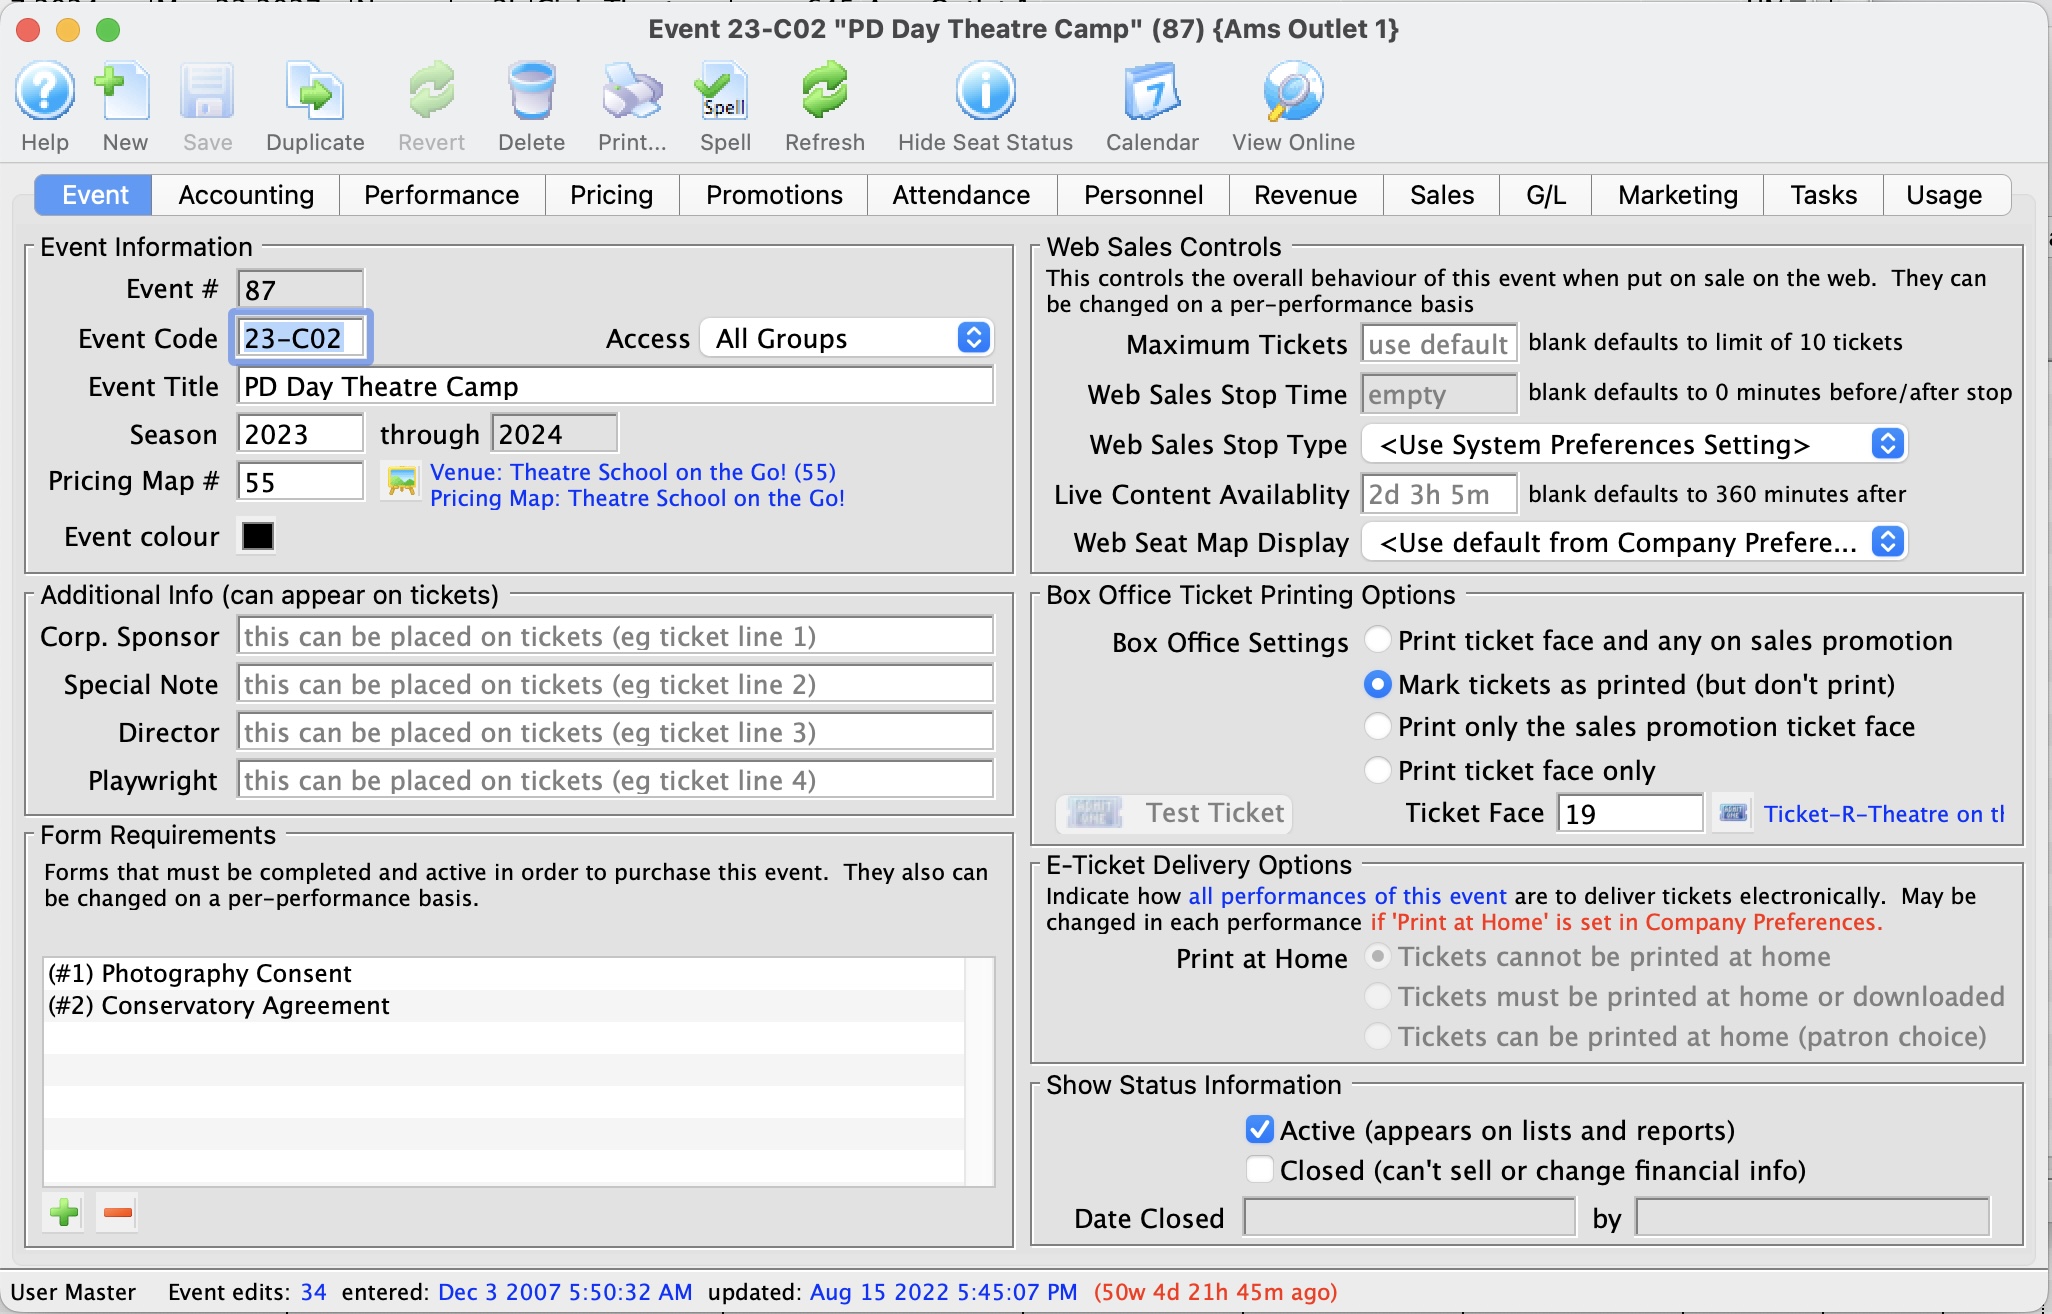
Parts of the Play Tab
Play Information |
|
| Play # | Unique play number generated by Theatre Manager. |
| Access Groups | Specify which groups of people can access the data |
| Play Code | A quick reference for a play. It is recommended that play codes start with the fiscal year of the performance, followed by the play number. This allows for quickly generating reports on plays by year.
If there is more than one venue or different types of series, for example a main-stage and a second stage series, a character code can be included after the year. See below:
|
| Play Colour | You can override the normal play colour displayed on the calendar by selecting a different colour from the colour palette. |
| Play Title | Official title of the play as it will appear on the ticket or internet.
If the play title is perfect for the internet, yet too long to print on a ticket face, you can adjust your ticket face to split it at word boundaries using the tStringFields.$splitString( P_PLAY_TITLE, width, segment) ticket face calculation. |
| Season | Year the play takes place. This is based on the financial year. |
| Pricing Map | Displays the Venue and Number of the Pricing Map that the play will be performed in. Plays which are to be sold with reserved seats must take place in venues that have had seats created. Plays sold as general admission, Festival Sales or Traveling Troupe, may be sold to plays with or without seats created. Click to learn how to change a map for an event. |
 |
Theatre map search button. To open a list of possible theatre maps to choose from click the button. From the list double click on a map to select it. There are rules for switching venues or pricing maps. The new venue or pricing map must:
|
Additional Information |
|
| Corporate Sponsor | Name of the sponsor for the production. Additional sponsors could be entered in the notes field. This information can be printed on tickets. |
| Special Note | Additional information such as warnings or special messages that may be required for an play. This information can be printed on tickets. |
| Director | Director of the play. This information can be printed on tickets. |
| Playwright | Playwright of the play. This information can be printed on tickets. |
Form Requrements |
|
| Forms |
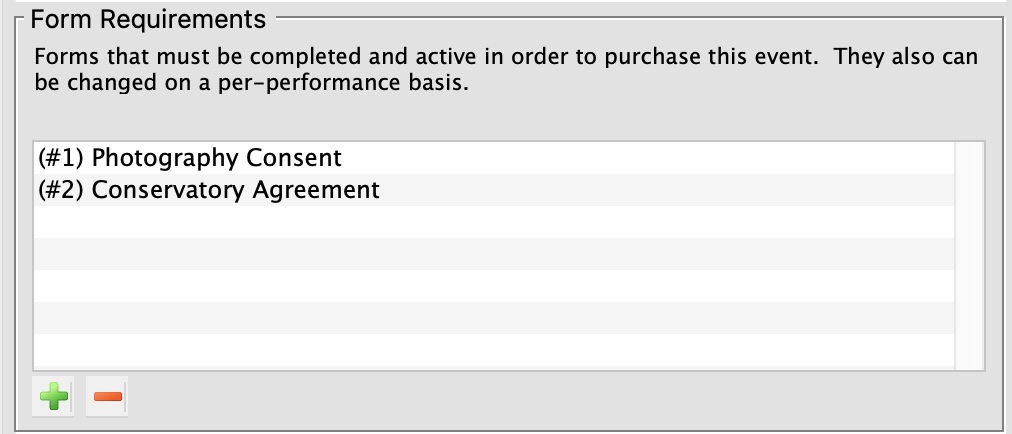 Add or remove
the forms
that may be required when people buy tickets to the event. You can set the forms on the event (which apply to the entire event) or on the performance, if the performances are to have distinct form requirements.
Add or remove
the forms
that may be required when people buy tickets to the event. You can set the forms on the event (which apply to the entire event) or on the performance, if the performances are to have distinct form requirements.
If the FORM itself is marked:
The forms that a patron has filled out are in the 'forms' tab on the patron window. |
Show Status Information |
|
| Active | Status of the play for reporting purposes. |
| Closed | Status of the play for ticket sales and postings. If a show is closed, it means that no further ticket sales, exchanges, or refunds are allowed. We suggest closing a show shortly after the event is reconciled and any royalties are paid. It means if people miss an event, they can no longer have their tickets exchanged for other events or for a donation - so close it when you figure you no longer want this to happen.
There is a feature during year end rollover that asks you to if you want to close all the prior fiscal year events - we suggest using that feature if you have not closed shows throughout the season. |
| Date Closed | This field displays the date the play was set to prevent sales and financial changes. |
| By | This field displays the initials of the employee who closed the play. |
Web Sales Controls |
|||
| Maximum Tickets | Sets the maximum number of tickets to be sold in an cart for this play via web sales.
If the Box Office will allow a patron to have more than the allotted number of tickets, the tickets will need to be sold by a Box Office staff member and not via the internet. Numbers entered here override those entered as global defaults in the System Preferences Web tab.
|
||
| Web Sales Stop Time | Number of minutes before/after the performance start time in which to remove a performance from the Internet. Time set here overrides the defaults set in the system preferences web tab. Click here for more information.
|
||
| Web Sales Stop Type |
Indicates whether the stop time is before or after the performance begins. Typically, you want the performances to cease being sold online before the actual performance time. However, there are a couple of instances where you might to stop sales after the performance starts, such as:
|
||
| Live Content Availability | The default time, in minutes, after the start of a performance in which a live streaming video will be available. If nothing specified, it uses the default from the system preferences web tab. | ||
| Web Seat Map Display | This option allows you to specify how you would like the map to display for web sales. Options in the Drop Down selection are:
|
||
Ticket Printing Information |
|
| Print selected ticket face | Choose to print ticket for this play (is the default setting) |
| Ticket Face | The ticket face selected for the play. The ticket face number can be typed manually or selected. |
 |
Click to open a list of possible ticket faces to choose from. Double click on a ticket face to select it. By leaving this field blank a built in default ticket face design will be used for printing tickets. |
| Mark ticket as printed (but don't print) | Will not print a ticket for the play all though when tickets are sold they will appear printed. |
| Only Print Sales Promotion ticket face | Prints a ticket based upon the promotion selected. For more information regarding printing tickets by promotion refer to Promotion Detail. |
 |
Click to print a test ticket for this play. | E-Ticket Delivery Options | These indicate how all performances of the play are to deliver electronically. You can change these for each individual peroformance. Click for more information on
|
| Print at Home | Options are:
|
Accounting Tab
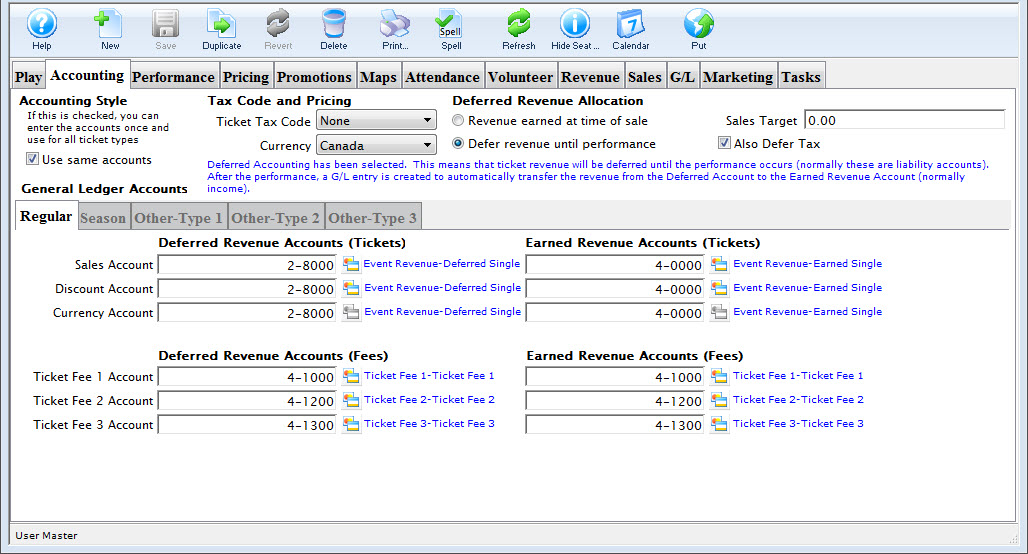
Taxes to Apply to Tickets
Select the tax rate to apply to the BASE PRICE OF THE TICKET ONLY. This will apply up to three taxes to the event. If there are taxes on the various fees in the promotion, then they are set in the sales promotion Calculation Tab.
Deferred Revenue
In general, deferred revenue results when payment for goods and services (tickets to an event) is received in advance of the goods (the event). Deferred Revenue is a Liability until the event has passed. Theatre Manager then transfers the revenue from the liability account to the earned revenue accounts. Checking the box beside Use Deferred Revenue will define this event as a deferred revenue event. You will be required to insert the necessary set of General Ledger Liability Accounts for recording the deferred revenue. Refer to the section, General Ledger Setting Up the Chart of Accounts for more information on determining a Chart of Accounts.
|
If the event is set for deferred revenue accounting and the company preferences is set to roll over all events at year end; Theatre Manager will change the deferred revenue setting to earned revenue for all events that were rolled over.
The reason is so that any new performances or extended runs for rolled over events will take on the earned revenue setting. |
Posting Accounts
There are six different types of accounts used in combination with Events. They are:
- a Sales Account
- an Exchange Account
- a Refund Account
- a Discount Account
- a Markup Account
- three levels of Ticket Fee Accounts.
- Regular
- Season
- Other-Type 1
- Other-Type 2
- Other-Type 3.
As well, there are five different ticket categories for each type of ticket. They are:
Depending on how your accounting system is designed, you may want to set up all account types with the same general ledger account. For example, the same general ledger account can be entered for all revenue accounts -- the general ledger will record all revenue for the event into one account. Separate general ledger accounts can be entered for all revenue accounts -- the general ledger will record each type of revenue for the event in a separate account. Refer to the section, General Ledger Setting Up the Chart of Accounts for more information on determining whether to use a detailed versus a simplified general ledger number setup.
| Sales Account | Designates the general ledger account number used to record revenue received through new ticket sales for the event. |
| Exchange Account | Designates the general ledger account number used to record revenue gain or revenue loss through ticket exchanges for the event. |
| Refund Account | Designates the general ledger account number used to record revenue loss through ticket refunds for the event. |
| Discount Account | Designates the general ledger account number used to record the net value of ticket discounts through ticket sales, ticket exchanges, and ticket refunds for the event. |
| Markup Account | Designates the general ledger account number used to record the net value of ticket markups through to ticket sales, ticket exchanges, and ticket refunds for the event. |
| Ticket Fee Accounts | Designates the general ledger account number used to record the net value of per ticket service charges applied to ticket sales, ticket exchanges, and ticket refunds for the event. |
Ticket Types
Theatre Manager can also breakdown your ticket sales for an event into five separate sections.

This allows you to keep track of how your tickets are being sold. The "Other Type" Tabs can be renamed in Default Data: Appearance. Under each of these tabs are independent deferred revenue and earned revenue accounts for each type. Thus allowing you to designate separate accounts for each revenue for all types.
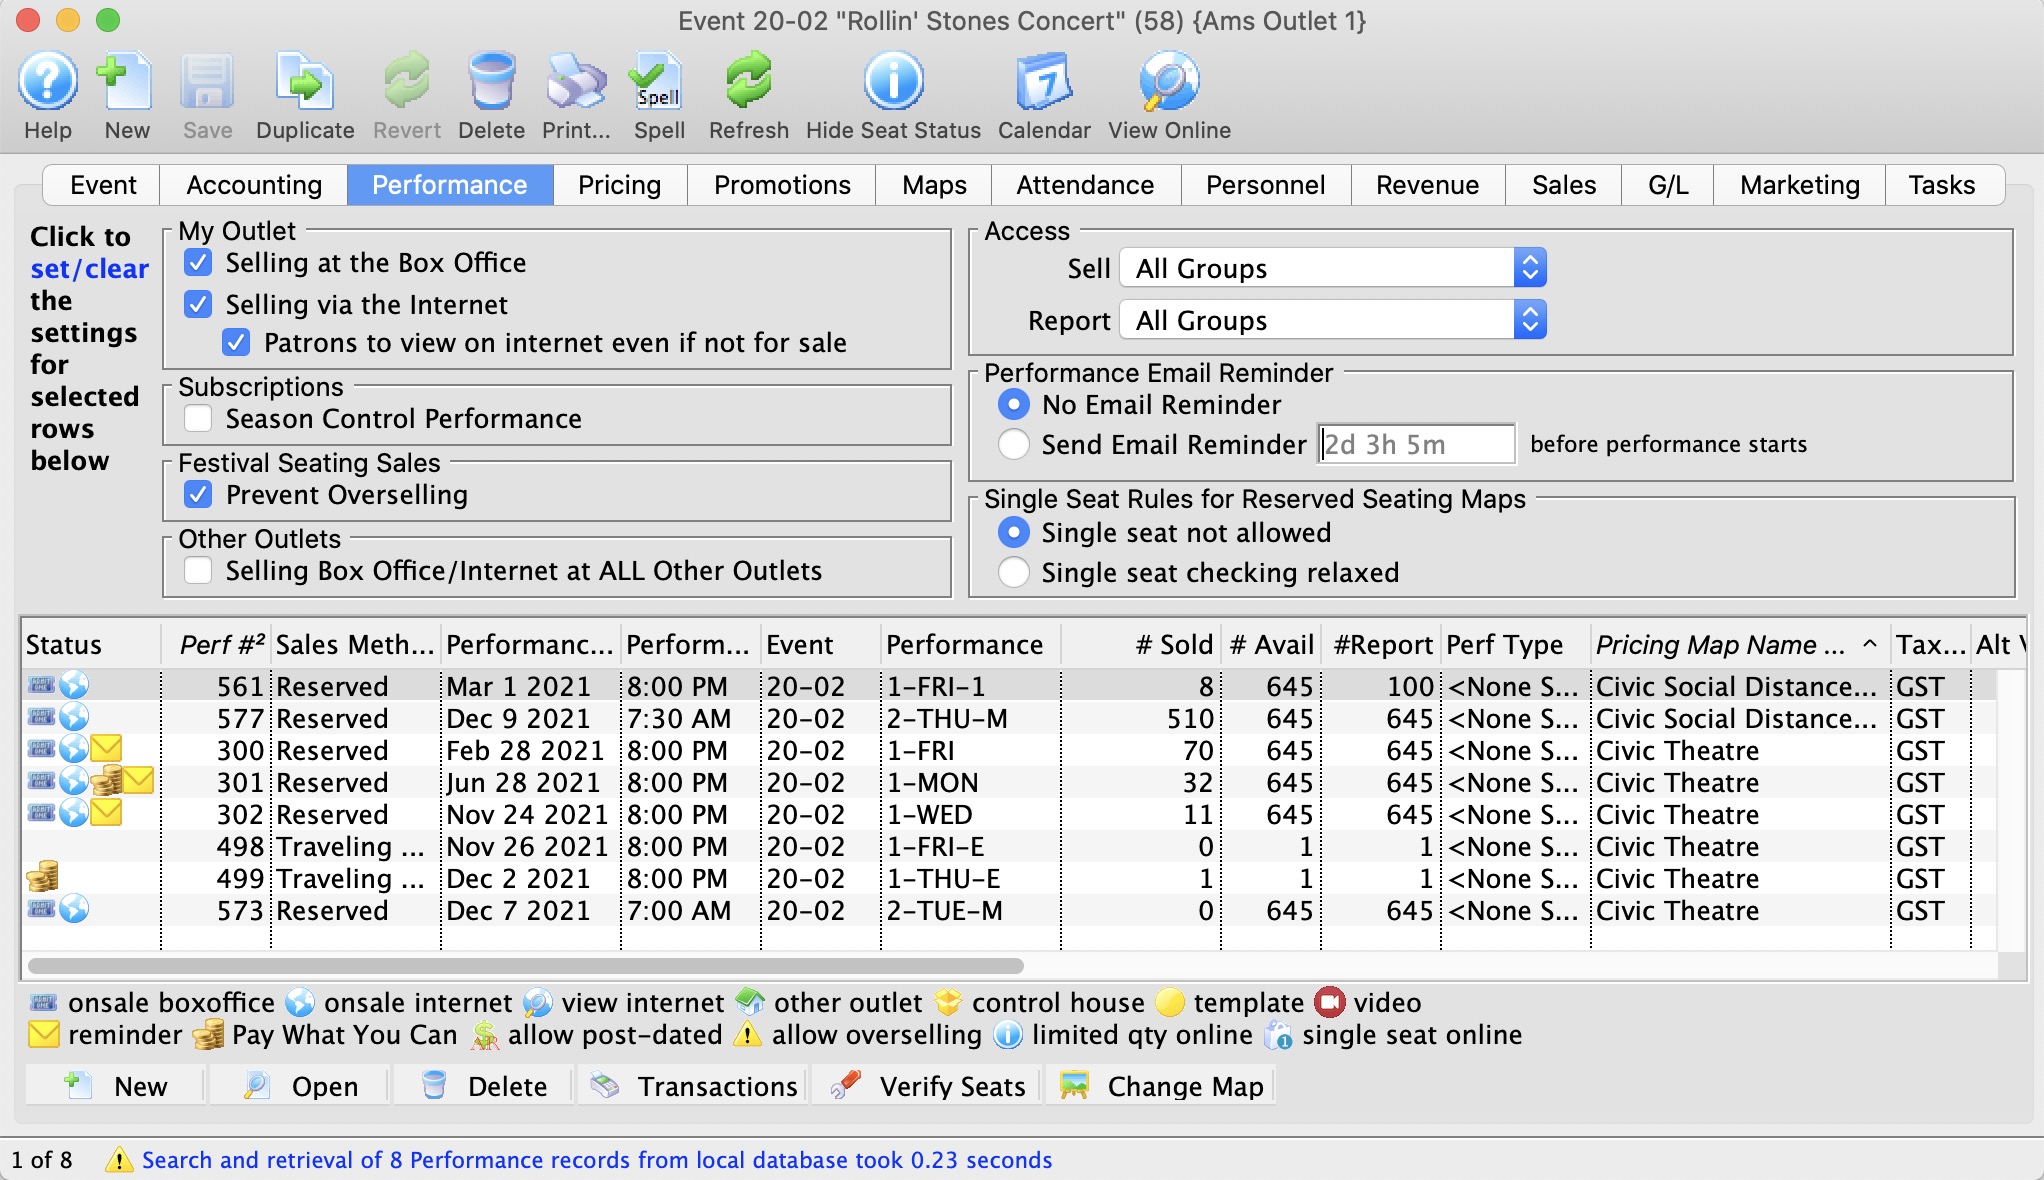
Performance Tab
 |
NOTE: the upper part of the window is only active if some performances are selected in the list. When performances are selected, clicking the buttons in the upper half of the window will change the settings in each selected performance. |
For example:
- Select 3 performances
- Select (or de-select) allow to sell internet or another option
- Those 3 performances will (or will not) be able to be sold online. The change is immediate.
My Outlet - Sale Settings |
|
| Selling at the Box Office | Checking this box allows you to sell the performance at the Box Office. |
| Selling via the Internet | Checking this box allows you to sell the performance on the Internet. |
| Patrons Can view if not for sale | If checked, then the event can be set to show online as coming up, even if not yet for sale. It allows pre-announcing events without enabling for sale. |
Subscriptions |
|
| Season Control House | Checking this box allows the performance to be used in a Control House for subscribers. |
Festival Seating Sales |
|
| Prevent Overselling | Checking this box prevents the performance from being oversold. |
Other Outlet - Sale Settings |
|
| Selling at ALL Other Outlets | Checking this box allows you to sell the performance at other outlets. If you allow a performance to be sold at another outlet, you can now specify which outlets have the capability so that each performance can be sold by different people. |
Access |
|
| Sell | Allows you to control what user access groups have the ability to sell this performance at the box office. |
| Report | Allows you to control what user access groups have the ability to run reports containing this performance. |
Performance Email Reminder | |
| Send Reminder | You can indicate if you want an email reminder sent to patrons who purchase to a performance. This email can be customized to each event or performance by duplicating and editing a web page, or you can use a default one. |
| Reminder in Advance Time |
If you do want an email reminder sent for any performance, then you can indicate how far in advance of the performance it should be sent. This value is typed in weeks, days, hours, and minutes format. Example values are:
Any ticket to the event bought closer to the performance than the email reminder time will receive an immediate reminder. |
Single Seat Rules for Reserved Seating Maps | |
| Single Seats not allowed | Means that a patron selecting tickets online will not be able to make a seat selection anywhere in the map that would leave a single ticket. This option is designed to maximize revenue and is the recommended/default option. |
| Single seat checking disabled/relaxed |
 Means that a patron can pick any seat they want and leave single seats on the map. This maximizes patron choice, so the patron could:
|
List of Performances and Corresponding Settings
The lower half of the window shows each performance and the settings that are enabled for it.
Performance Information in the list |
|
| Status | The list of icons indicating the primary status of each Performance (refer to the legend at the bottom of the list) |
| Perf # | Unique performance number generated by Theatre Manager. |
| Sales Method | Type of seating used for the performance, typically either Festival or Reserved. |
| Date | Date of the performance. |
| Time | Time of the performance. |
| Event/Play | A quick reference for the Event/Play Code. |
| # Sold | Number of seats sold for this performance. | # Available | Number of seats currently available for purchase for this performance. |
| # Report | Number of seats currently used for reporting. |
| Perf Type | This is a versitile, customizable code table field you can use to flag specific performances. You can use it for display on the web and it can also be used like the Genre flag for TicketTrove. It can also be used for reports to narrow down searching for specific performances. Click here for more information on Pef Type. |
| Box Office? | Whether the performance is available for sale at the Box Office. |
| Web? | Whether the performance is available for sale on the Internet. |
| Outlet? | Whether the performance is available for sale at an outlet. |
| Subscription? | Whether the performance is available for sale via a subscription. |
| Oversell? | Whether overselling is allowed for this performance. |
| Play # | The Play number that this performance is part of. |
Additional Buttons |
There are additional columns of information that can be displayed in this window. Right click on the column header to check/uncheck desired columns. |
 |
Creates a new performance and opens the Performance Setup Window. Click here for more information. |
 |
Opens one or more Performance Setup Window(s) for the selected performances. |
 |
Deletes the selected performance. Click here for more information. |
| Shows all transactions for the selected performance. | |
 |
Verifies all seats for the selected performance. It is best to do this when no other users are logged in. |
| Convert Earned to Deferred |
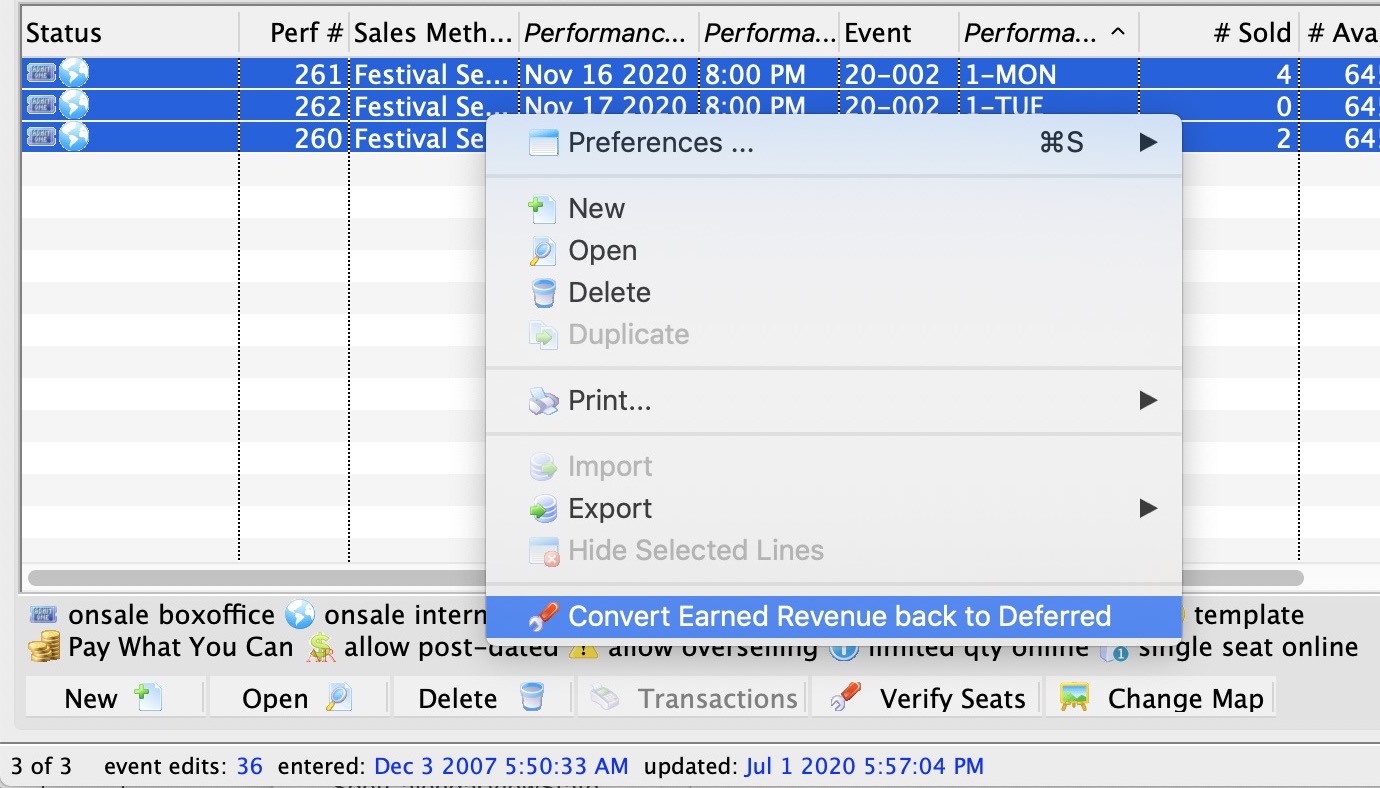 There is a feature on the context menu that allows you to convert earned revenue back to deferred if the performance has been rolled over already. You can select one or more performances and roll them all back.
The feature is described in more detail on the |
Performance Detail Window

The tabs available within the Performance Detail window include:
Performance Setup Tab
General Performance Information | |||||
| Performance # | This is the performance number assigned by Theatre Manager. | ||||
| Performance Date | The date of the performance. | ||||
| Time | The time of the performance. | ||||
| Performance or Series Code | The unique code which defines the performance. They must be unique within the event. It is really helpful if the performance code has the same pattern across events used in managing subscriptions. | ||||
Sales Method and Pricing Map | |||||
| Sales Method | the method of selling seats used for the performance. This is typically either Festival or Reserved seating. Click here for more information on the selections available.
Note: you can change one sales method to another if there are no tickets sold for the performance.
|
||||
| Default Price Code | The price code that is most common should be set as default to save time at selling time. Click here for more information on price codes. | ||||
| Pricing Map | The Pricing map associated with the Event / Play. | ||||
| Alternate Pricing Map | This is used if after the first run of the play you need to switch to a new venue after sales have begin. This may occur if you require an extra venue to run the play or if you switch the venue to a smaller establishment to better use your seats.
Not valid for Reserved Seating. |
||||
Template Setup | |||||
| Template Performance | Indicate if the performance is to be considered a template. If it is a template, you can use this performance:
|
||||
| Template Description | If the performance is to be a template, then a description needs to be provided when to identify what you are attempting to duplicate. | ||||
Access | |||||
| Access | Allows you to control what security levels have the ability to
|
||||
Email Reminder | |||||
| Send Reminder |
You can indicate if you want an email reminder sent to patrons who purchase to a performance. This email can be customized to each event or performance by duplicating and editing a web page, or you can use a default one.
|
||||
| Reminder in Advance Time |
If you do want an email reminder sent for any performance, then you can indicate how far in advance of the performance it should be sent. This value is typed in weeks, days, hours, and minutes format. Example values are:
Any ticket to the event bought closer to the performance than the email reminder time will receive an immediate reminder. |
||||
Miscellaneous | |||||
| Perf Type | This is a versitile, customizable code table field you can use to flag specific performances. You can use it for display on the web and it can also be used like the Genre flag for TicketTrove. It can also be used for reports to narrow down searching for specific performances. Refer to Performance Type code table for more information. | ||||
| Notification | For selecting a workflow notification to be sent when a sale occurs for this performance. This it not normally selected, but may be useful for a special event or course. | ||||
Accounting Tab
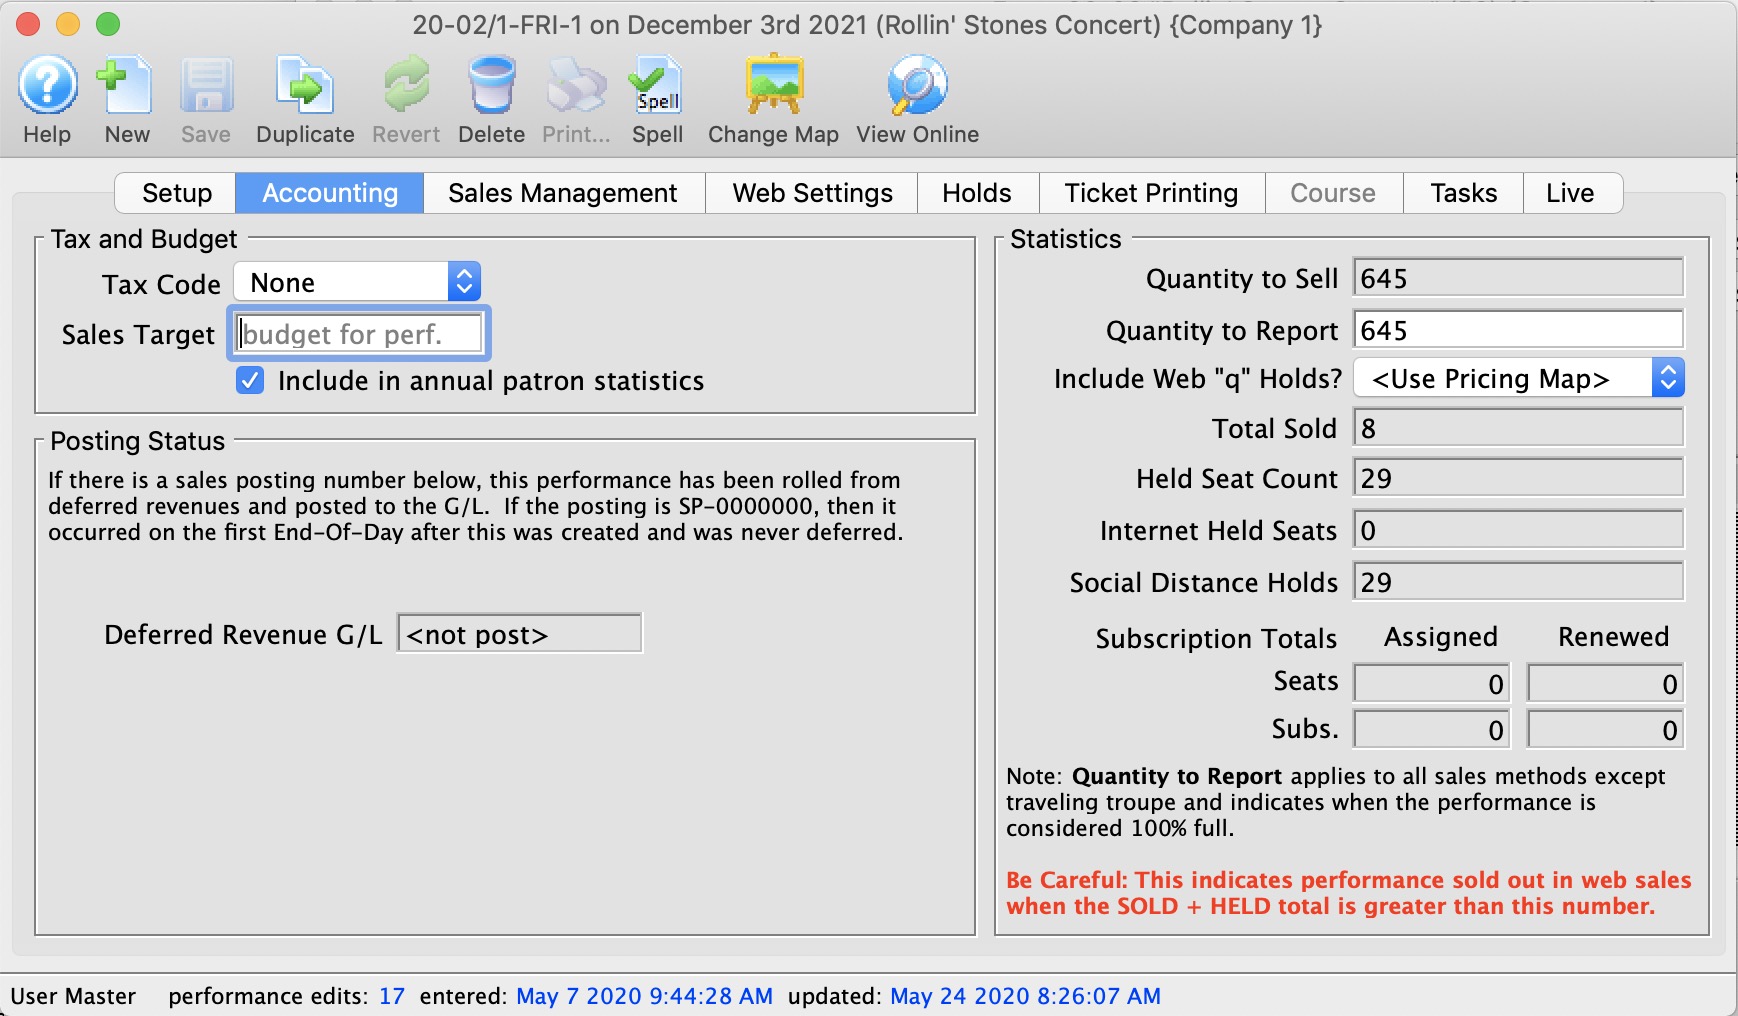
Tax and Budget | |||||
| Tax Code | A unique tax code applicable to this performance only. Click here for more information on the Tax Tables. | ||||
| Sales Target | The budgeted amount this performance is planned to bring in. This is a 'static' field and is not used in reporting. | ||||
| Include in Annual Patron Statistics | Enable the check box to include the performance in the patron statistics tab summary that is calculated for each patron and shown on the patron window.
if you change this setting and:
|
||||
Statistics | |||||
| Quantity To Sell | The number of tickets available for sale. | ||||
| Quantity To Report | The number to be used when the venue is considered 100% sold out. It is normally always the same as the Quantity to Sell.
When might it be different? The feature is intended to be used if you have a scaled house for actor equity purposes and equity lets you sell your venue at a lower size. You would be holding these 'standing room' tickets -- which equity has allowed you to have for overflow crowds only. If you need the extra seats, you then pay actor equity rates for the expanded venue site to use all seats for that performance. Online Availability is affected by this number
If you have a general admission venue where you should only have 300 seats, then you can set the available capacity at 350 and the reporting capacity at 300. This will limit online sales to 300. However, at the box office, you can 'oversell' the event - like airlines - based on your own calculated no-show factor. |
||||
| Include Web 'q' Holds? | Indicates how the social distance holds are to be included in the quantity to report online (refer to quantity to report above). You can:
|
||||
| Total Sold | A running count of the total sales for this performance. | ||||
| Held Seat Count | This is the number of seats currently being held. For Festival seating you can input a new number to raise or lower the number of holds. For Reserved seating you will need to change the holds on the Venue Map. | ||||
| Internet Held Seats | Additional seats that are being withheld from sale on the Internet. | ||||
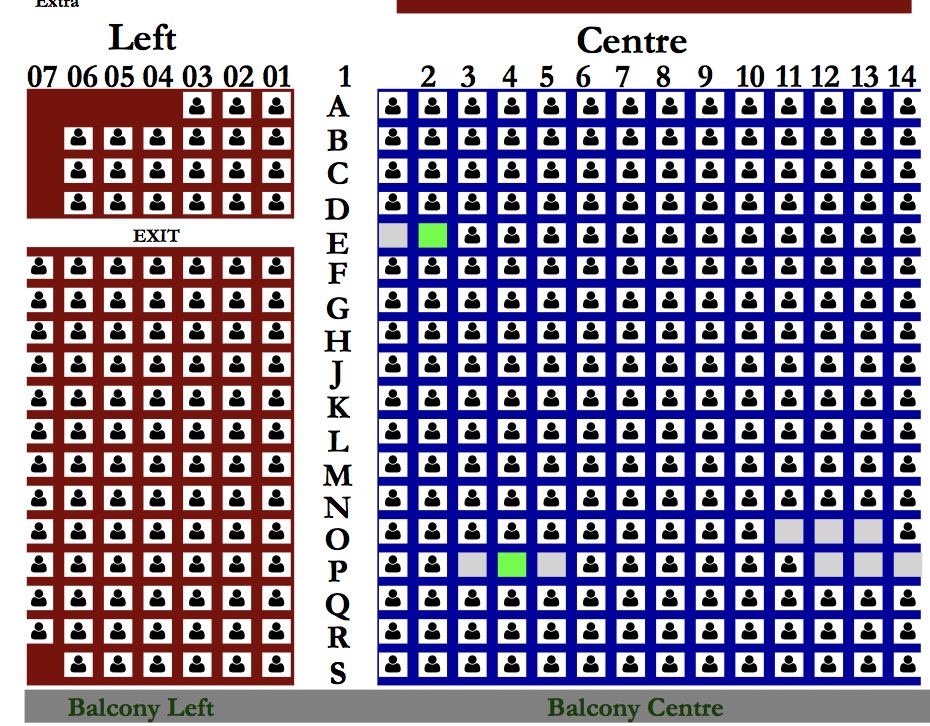
| Social Distance Holds | The is the current count of the seats held with the social distance hold letter. This special hold code is specified in System Preferences as the associated seat hold code. | ||||
Posting Status | |||||
| Accounting Posting - Deferred Revenue G/L | If the performance has occured, then the posting account for the sales will be listed here. A sales posting of
|
||||
| Convert Earned Revenue Back to Deferred |
 You will only see the Convert Earned Revenue Back to Deferred button if you are:
|
||||
Converting Earned to Deferred Revenue
This can be done from two places
- From the performance detail window as shown below. Use this if you want to do just one performance
- From the performance setup list on the play tab using the context menu. Use this if you want to roll back a number of performances for an event.
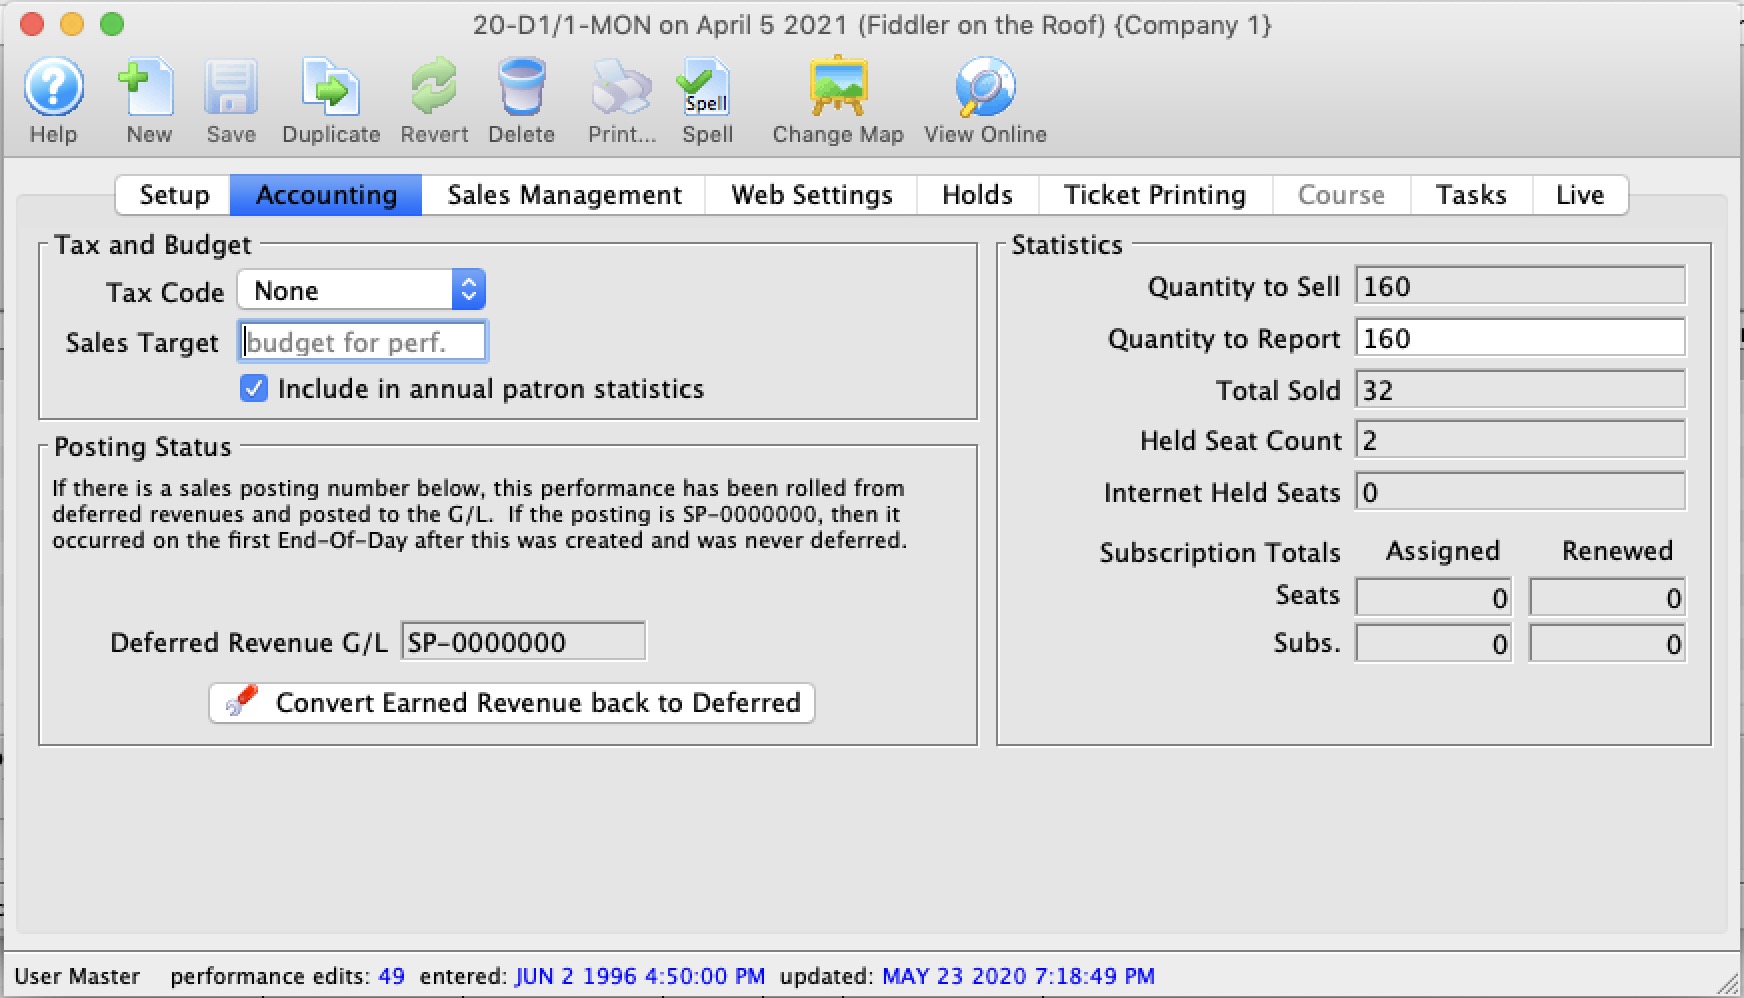
You will see the Convert Earned Revenue Back To Deferred button under the following conditions:
- You are logged in as a Master User or Outlet Administrator
- The performance has a GL number that indicates it is rolled over to earned revenue (or was always using earned revenue). This is indicated by the Sales Posting Number which can look like:
- SP-xxxxxxx. This indicates the performance has has been rolled from deferred revenues and posted to the G/L in sales posting SP-xxxxxxx
- SP-0000000. This indicates that the performance was never posted to deferred revenue and was marked as only using earned revenue when the first End-Of-Day was run after the performance was created.
- The Performance date and time must be in the future. You cannot roll back the earned revenue to deferred if the performance is in the past
 |
Before attempting to do this process for the first time, you may wish to get advice from support and see one in action. |
 |
Create sales entries if you have made any recent sales to the performances.
-and then- Do not run the create sales entry process during end of day while rolling back from earned to deferred. |
|
You can continue selling tickets at the box office or online for the performances you are intending to rollback. |
To create GL entry that will Rollback Earned to Deferred
Be very careful with editing or setting up the accounts. If you do not adhere to the steps, money will get rolled back, but maybe not to the place you expect.
- OPTIONAL STEP
Note: only adjust the accounts if they were never right in the first place. If the accounts are right and the event was rolled over by mistake, skip to step 2.
On the Accounting Tab, you may need to make the following changes:
- Deferred Revenue Allocation: Change this option from 'Revenue earned at time of sale' to Defer until .. after performance. If the option is already marked deferred, no change is required.
- Only change the following settings if you are rolling back ALL FUTURE PERFORMANCES. Otherwise to not change the following:
- Also defer Taxes: changing this setting makes it possible to put taxes into a deferred account.
- Accounting Style: changing this setting allows you to split out regular, season and other ticket types into separate deferred accounts.
- Accounting tabs: you can change the accounts that you want to roll back the deferred income to. You will need to set up the accounts first if they do not exist.
- If you didn't change any of the above on the accounting window, and the sole reason that you are rolling back revenue is because you had to post pone the event and simply moved the date forward, then you can click the Convert Earned Revenue back to Deferred without much worry.
if you have made accounting setup changes, take a Screenshot of your G/L tab before clicking the button so you can compare the values before and after
- Close the performance detail window.
- On the Event window, click the Refresh button on the tool bar and then go to the G/L entry tab. Review that the account totals are where you expect them to be.
If they are not, please contact support for assistance.
Sales Management
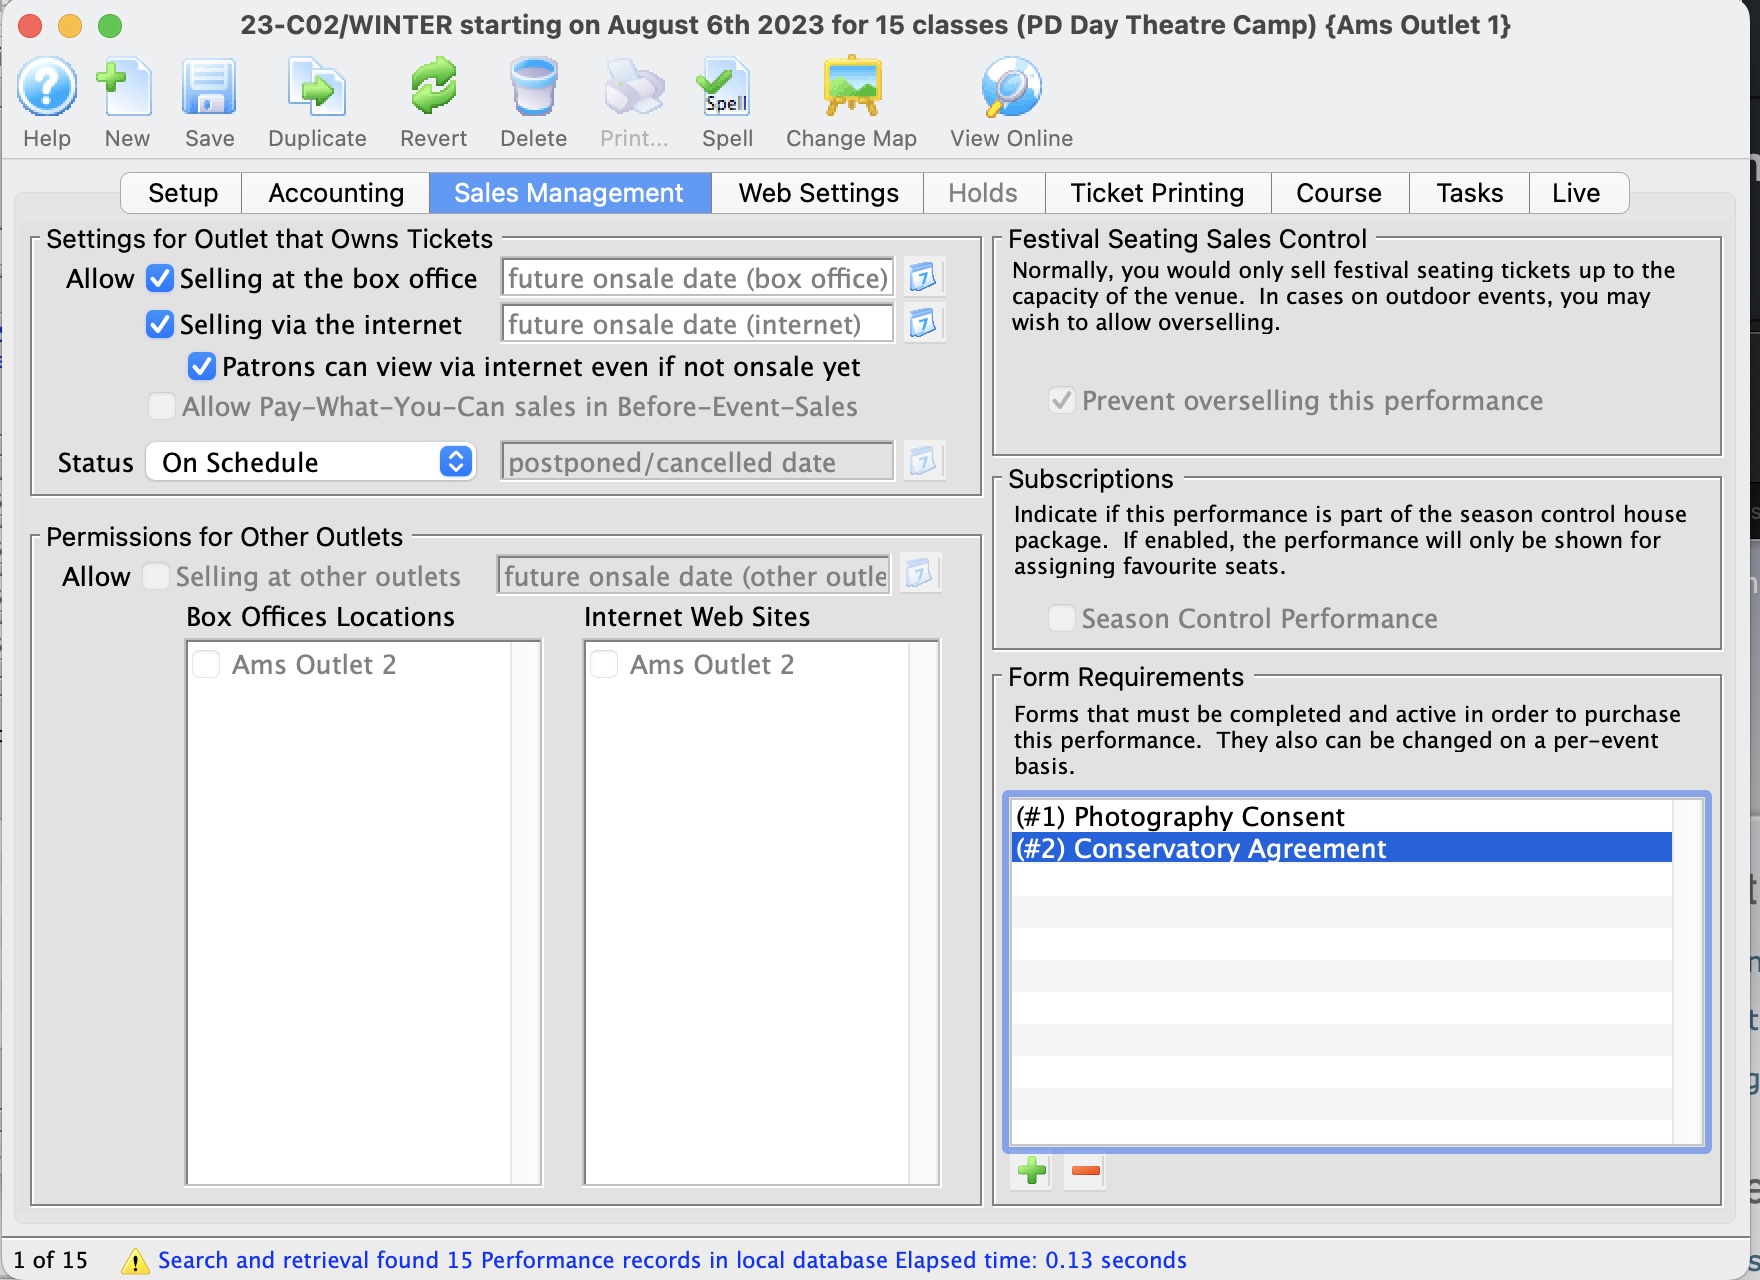
Settings for Outlet that Owns Tickets | |||||
| Allow Selling Tickets - At the Box Office | Allows the selling of tickets at the Box Office. In the input field on the right, you can set the date and time that tickets are to be released for sale. | ||||
| Allow Selling Tickets - Via the Internet | Allows the selling of tickets via the Internet. In the input field on the right, you can set the date and time that tickets are to be released for sale. | ||||
| Patron can view Performance on Internet | If you want the world to know when performance dates are (including your web site and Ticket Trove), but you do not yet want to allow them to be sold online (and there is no definitive onsale date), you can mark the performance so that 'patrons can view performance online'. When this occurs, the event will show up online in the right place , but the buy button will be disabled and the user will be informed to call the box office. | ||||
| Allow Tickets - As Pay-What-You-Can in Before-Event-Sales | When using the Before-Event-Sales function, this allows tickets to be sold as Pay-What-You-Can. | ||||
| Status |
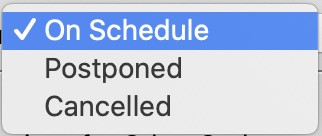 You can postpone or cancel a performance. If you do so:
|
||||
Permissions for Other Outlets | |
| Allow Tickets - At Other Outlets | Allows the selling of tickets at Other Outlets. In the input field on the right, you can set the date and time that tickets are to be released for sale.
You can also specify which outlet will sell for the performance from the list on the right. Click here for more information on enabling for outlet sales. |
Festival Seating Sales Control | |
| Sales Controls - Prevent Overselling | This field can only be accessed if you are selling using the Festival or Inventory methods. |
Subscriptions | |
| Season Control Performance | If this is a Control house performance, the check box will be enabled. It also lists the Assigned Seats, the Subscription Seats which have been assigned, the number of Seats Renewed and the Subscriptions Renewed. |
Form Requrements |
|
| Forms |
Add or remove the forms that may be required when people buy tickets to the event. You can set the forms on the event (which apply to the entire event) or on the performance, if the performances are to have distinct form requirements.
If the FORM itself is marked:
The forms that a patron has filled out are in the 'forms' tab on the patron window. |
Web Settings
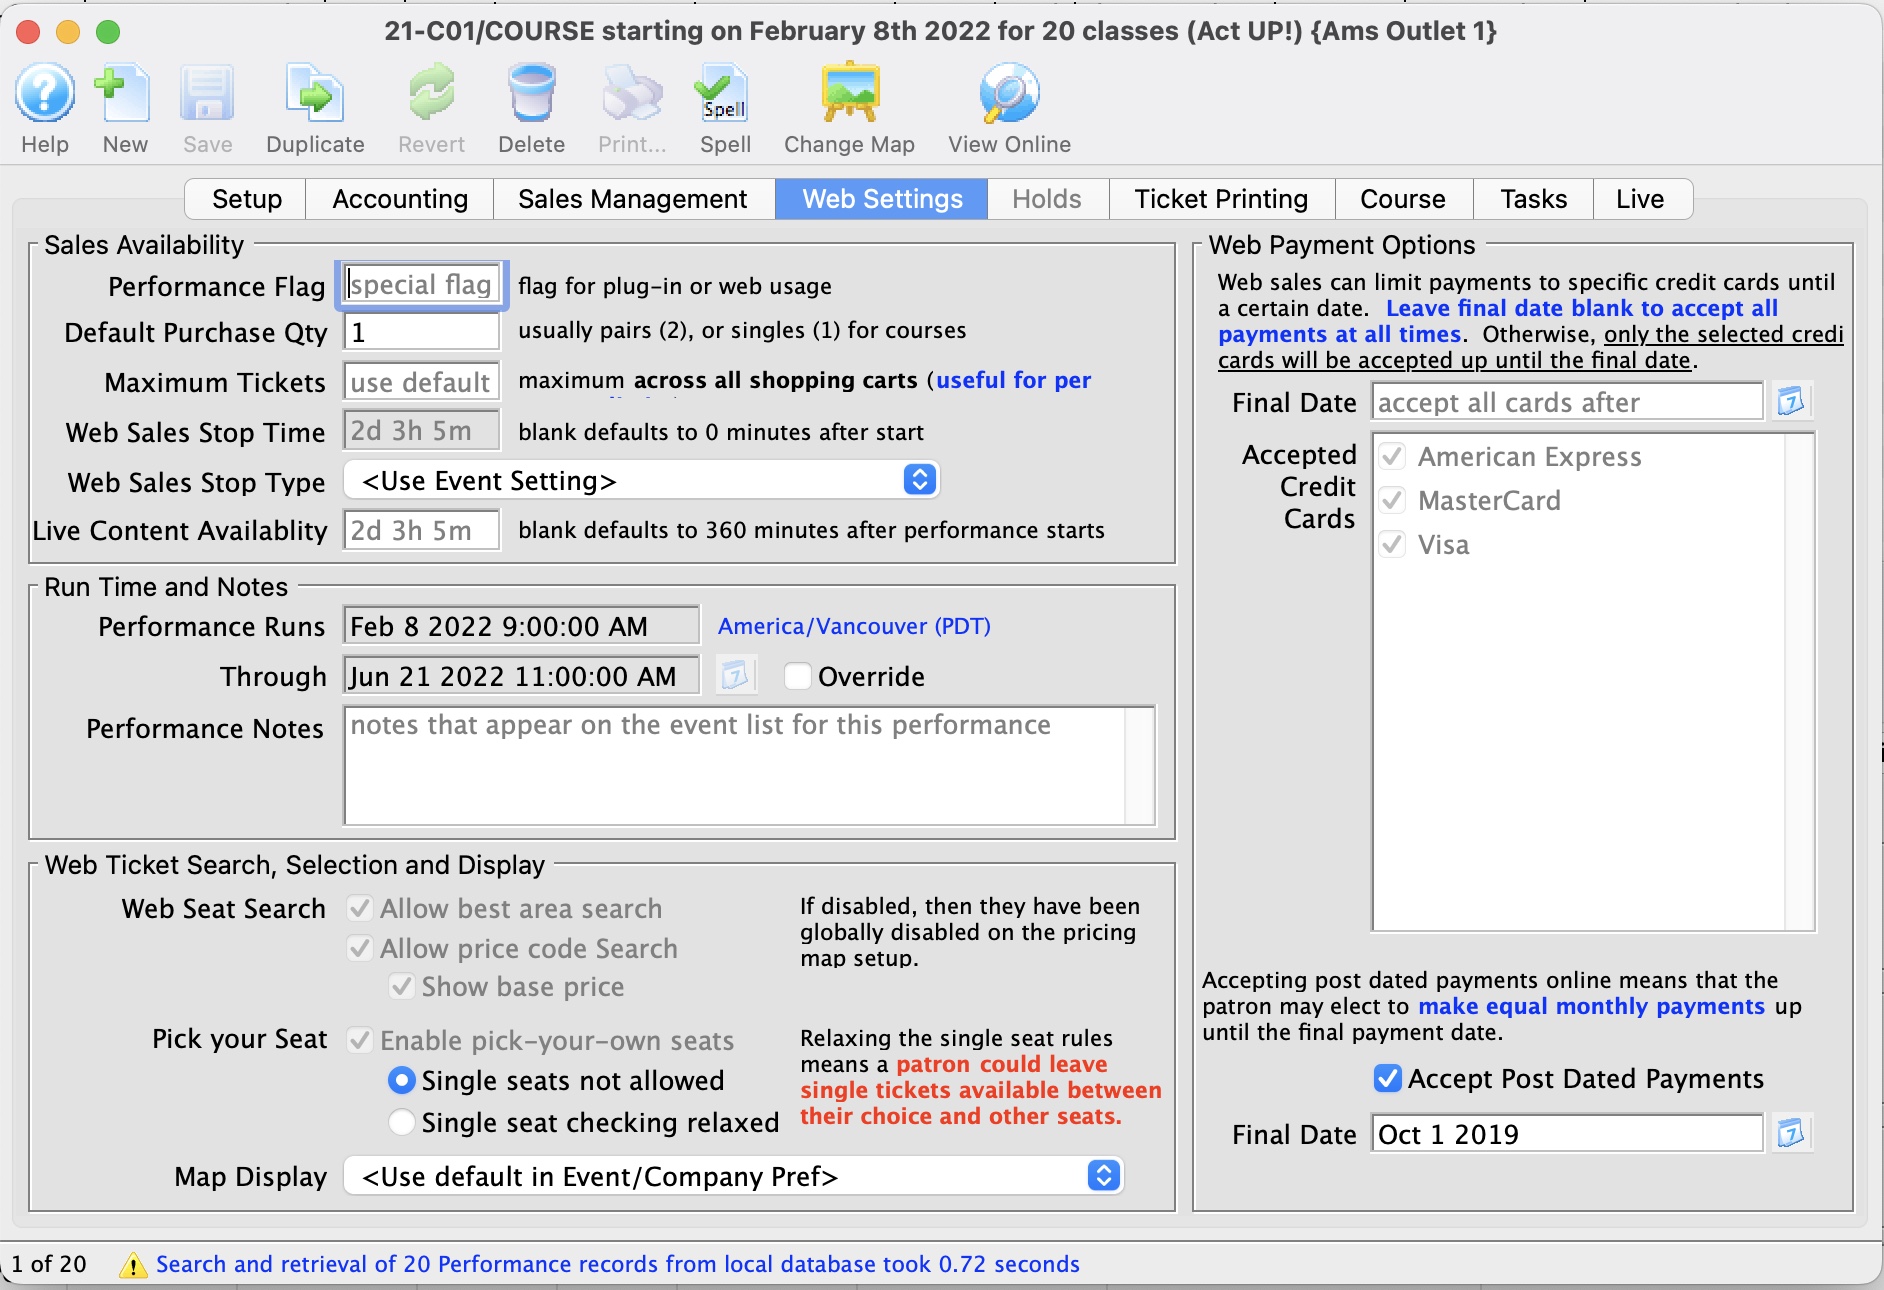
Sales Availability |
|||
| Performance Flag | A special flag used to denote Performance. This is typically used for a plug-in for Web Sales. | ||
| Default Purchase Quantity | The number of tickets the online sale will suggest as a purchase quantity. The user can choose any number, however you may set the default here. | ||
| Maximum Tickets | The number of tickets that a patron can buy from the Internet for this performance.
If specified here, the maximum is applied across all carts. i,e,. the patron cannot buy more than XX tickets to this performance, period, whether in one cart or many carts. If not provided, the default is from the event or system preferences, which ever is provided.
|
||
| Web Sales Stop Time | Number of minutes before/after the performance start time in which to remove the performance from the Internet. If nothing specified, it uses the default from the event or system preferences, which ever is provided.
|
||
| Web Sales Stop Type |
Indicates whether the stop time is before or after the performance begins. Typically, you want the performances to cease being sold online before the actual performance time. However, there are a couple of instances where you might need to stop sales after the performance begins, such as:
|
||
| Live Content Availability | The default time, in minutes, after the start of a performance in which a live streaming video will be available. If nothing specified, it uses the default from the event or system preferences, which ever is provided. | ||
Run Time and Notes |
|
| Performance Runs (from) | The date that the performance starts. it is always determined by the performance date and time of start and cannot be changed.
The runs from .. through .. date is what is displayed in the event list online. |
| Through (end date) | The date range indicating when the performance ends. It is defaulted as follows:
|
| Over-ride checkbox | If the performance runs through date is not reflective of the actual class run time (or any performance of any type), click the 'Override' button and enter your own end date of the run.
This must be after the start of the performance. If you change the start time of the performance to. be ahead of this date,, the runs through date will change, regardless if it is set on over-ride. |
| Performance Notes | Additional performance notes to be placed on the Internet for patrons to read. These appear beside the specific performance in the event listing on the web. |
Web Ticket Search, Selection and Display |
|
| Web Seat Search Options | You can check/uncheck to enable/disable
|
| Pick your Seat search options | pick-your-own seat search for this performance if it is reserved seating. Pick you own can be enabled for an entire pricing map and, by default, for the performance. If you do not want pick your own for this performance, then turn it off.
|
| Web Seat Map Display | If you are not using pick your own seating, this setting indicates how you would like the map to display for web sales. You can show only the seats available to the patron, all others are blank, or you can choose to show all the seats, those that are taken have their codes masked or not, or a generic map of the venue. These settings can be used to override the settings made on the Setup >> Company Preferences >> Web Options tab. Options are:
|
Payment Settings for the web |
|||
| Final Date |
If entered, this represents the final date after which all credit cards will be accepted for this performance. Before that final date, only the credit card types in the 'accepted credit card' list will be shown on the online payment window - and only if tickets for the specific performance are in the cart.
If the patron has multiple performances in the cart, each with their own designated credit cards, then online sales will restrict the visible card types to only those that are available for all performances in the cart (i.e. it takes the most restrictive list). If the date is blank, then you cannot restrict credit card payments - and all cards will be accepted |
||
| Accepted Credit Cards |
Click to select the credit card payment types that can be accepted online - if this performance is in the patrons shopping cart. A final date must be specified. After that time, all credit card types will be accepted.
|
||
| Enable Post Dated Payments | Click to indicate of the patron can elect to pay for this performance using post dated payments online. | ||
| Final Payment Date | If post dated payments are accepted, indicate the date by which all payments must be made. Theatre Manager will generate equal monthly payments for the user and offer them that choice online. | ||
Holds Tab
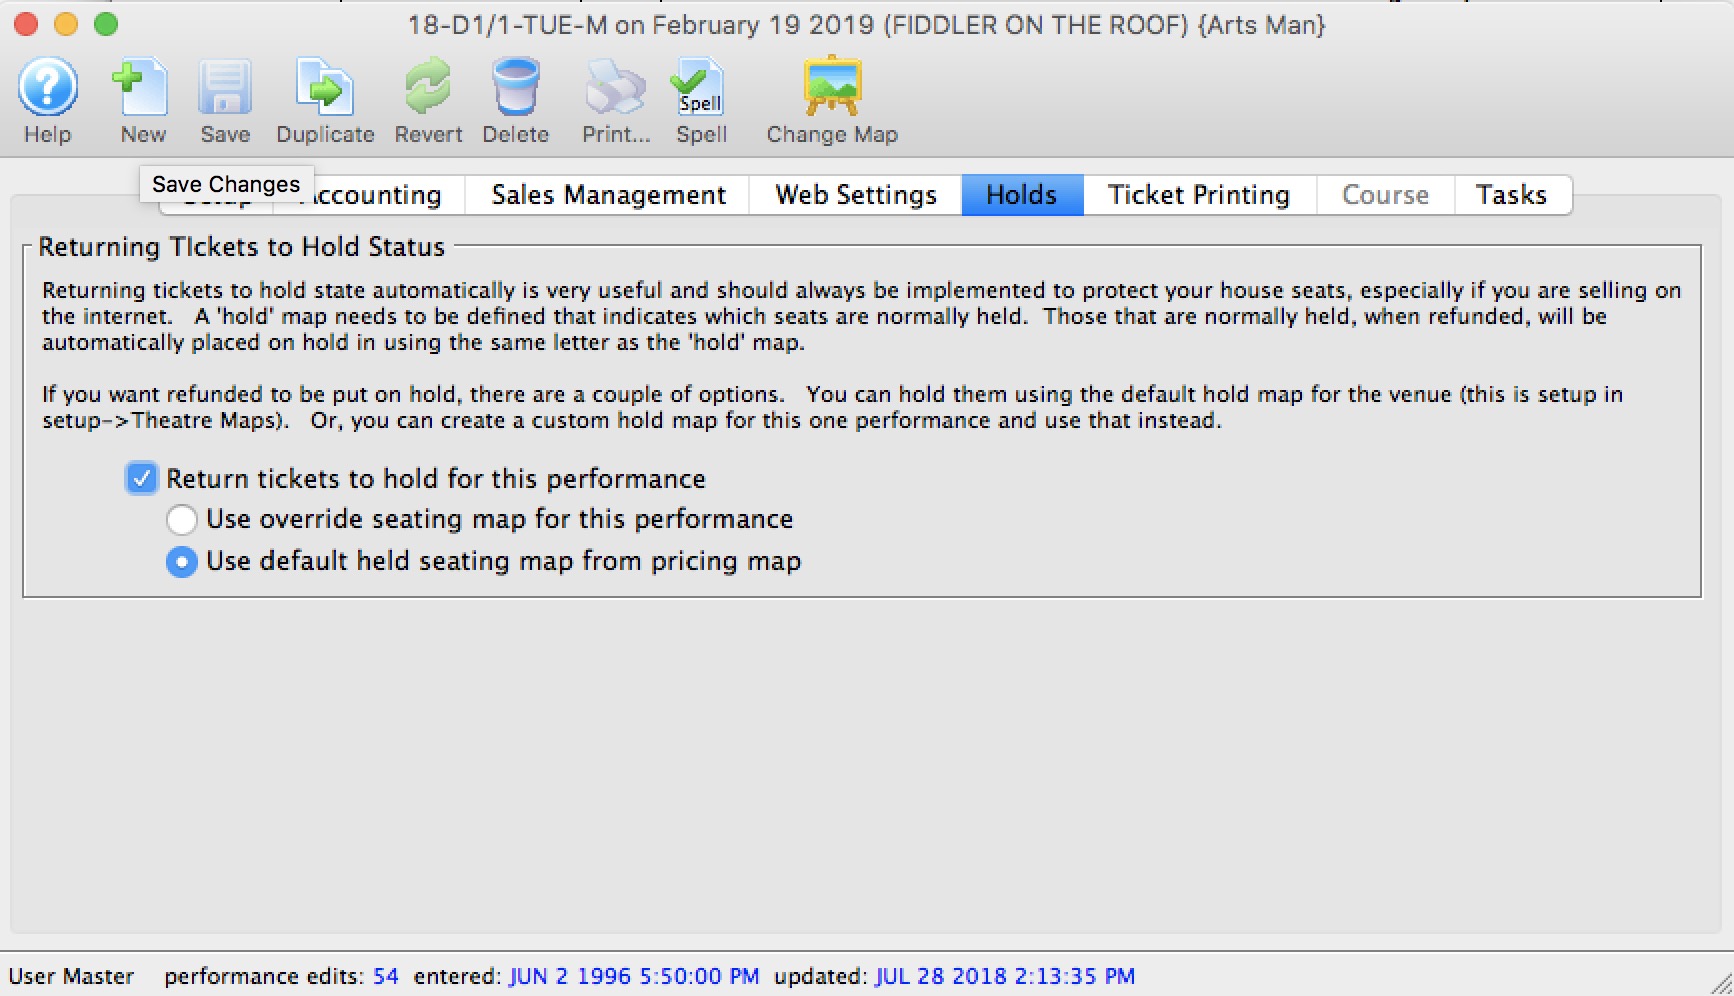
Returning Tickets to Hold Status | |
| Return tickets to hold for this performance | If a ticket is refunded, any seat with a default hold will return to hold status. All other seats remain available for purchase. |
| Use over-ride seating map for this performance | Allows you to specify your own custom return-to-hold map to be used when the ticket is refunded. For example, you may want different holds on an opening night performance thank all other performances. |
| Use default seating map from theatre | Uses the default holds on the pricing map when the ticket is refunded.
if you change the pricing maps 'default return to hold' settings, it only affects tickets being returned from that point on. |
|
Please make sure that the design of your social distance pricing maps take into account which seats are normally held on creation of a new performance and which ones are specified on the return to hold map. |
Ticket Printing Tab
Ticket printing options and e-ticket delivery for print at home are most often enabled and disabled in the Play tab of the Event window. You can over-ride the settings to allow them to be different for every performance.
For the steps on Turning on Print at Home Options at the Individual Event level, Click here.
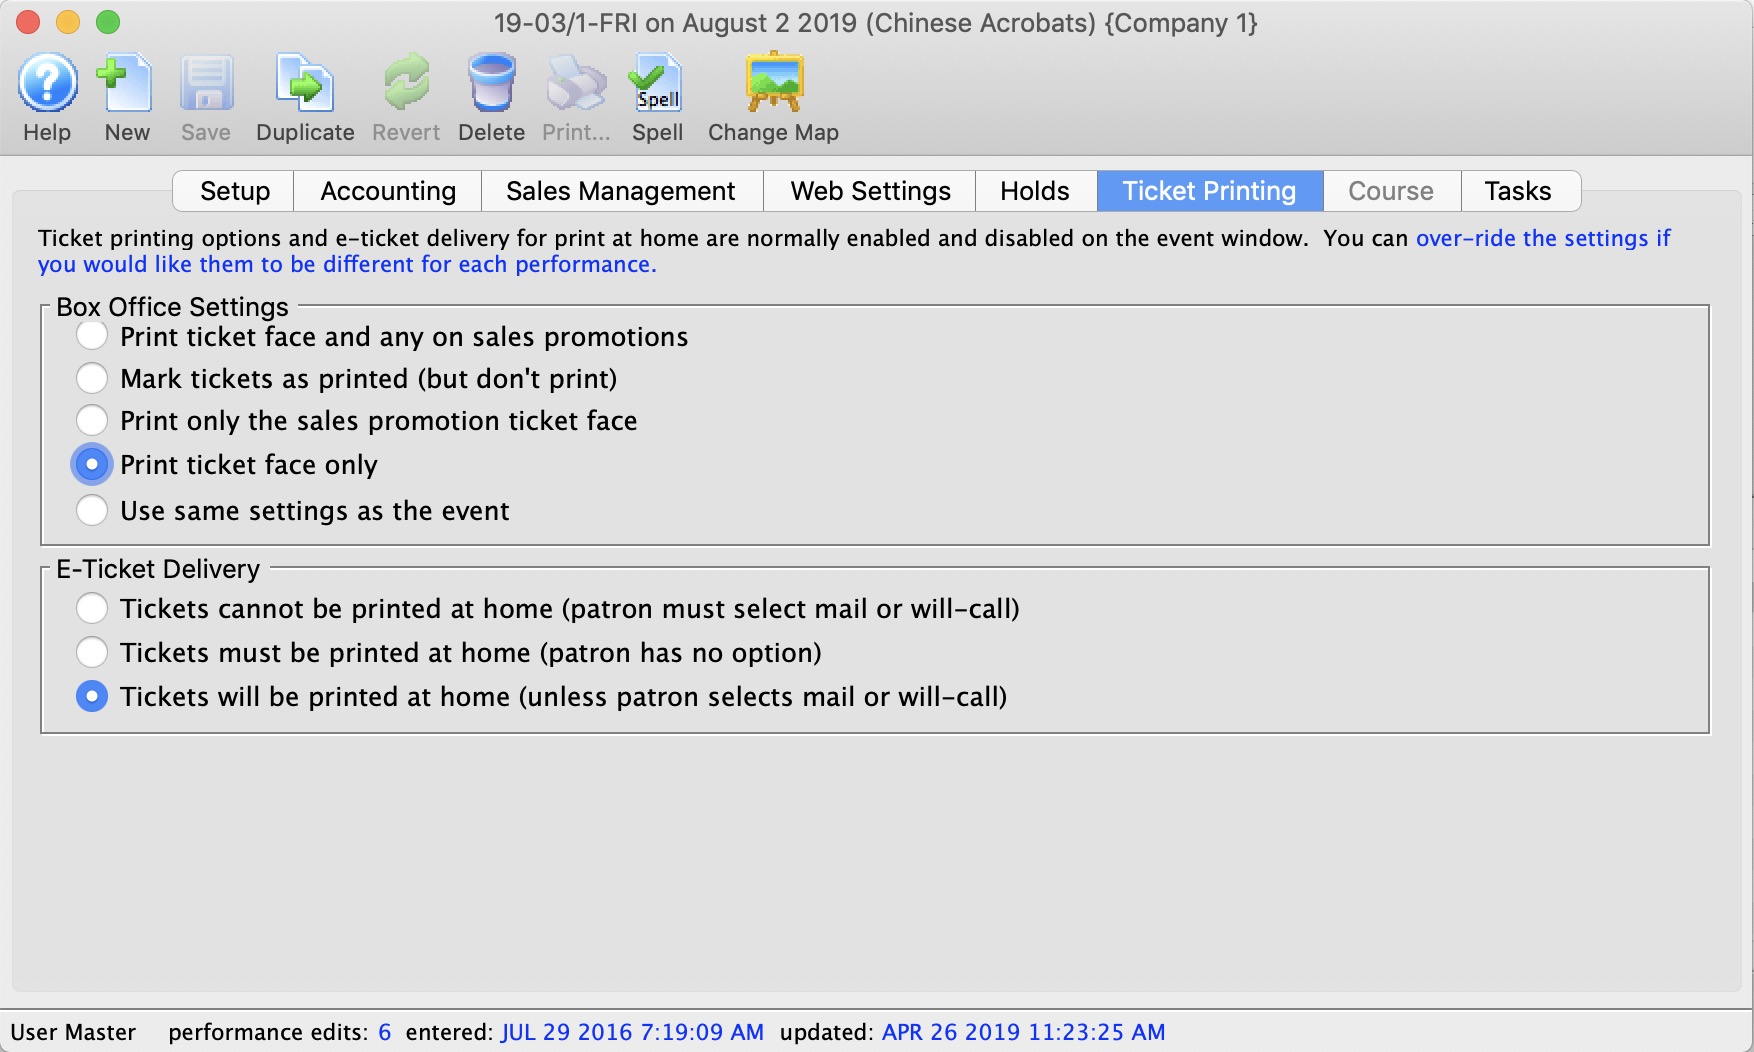
Parts of the Ticket Printing Tab
Box Office Settings | |
Selections are:
|
|
E-Ticket Delivery | |
Selections are:
|
|
Course
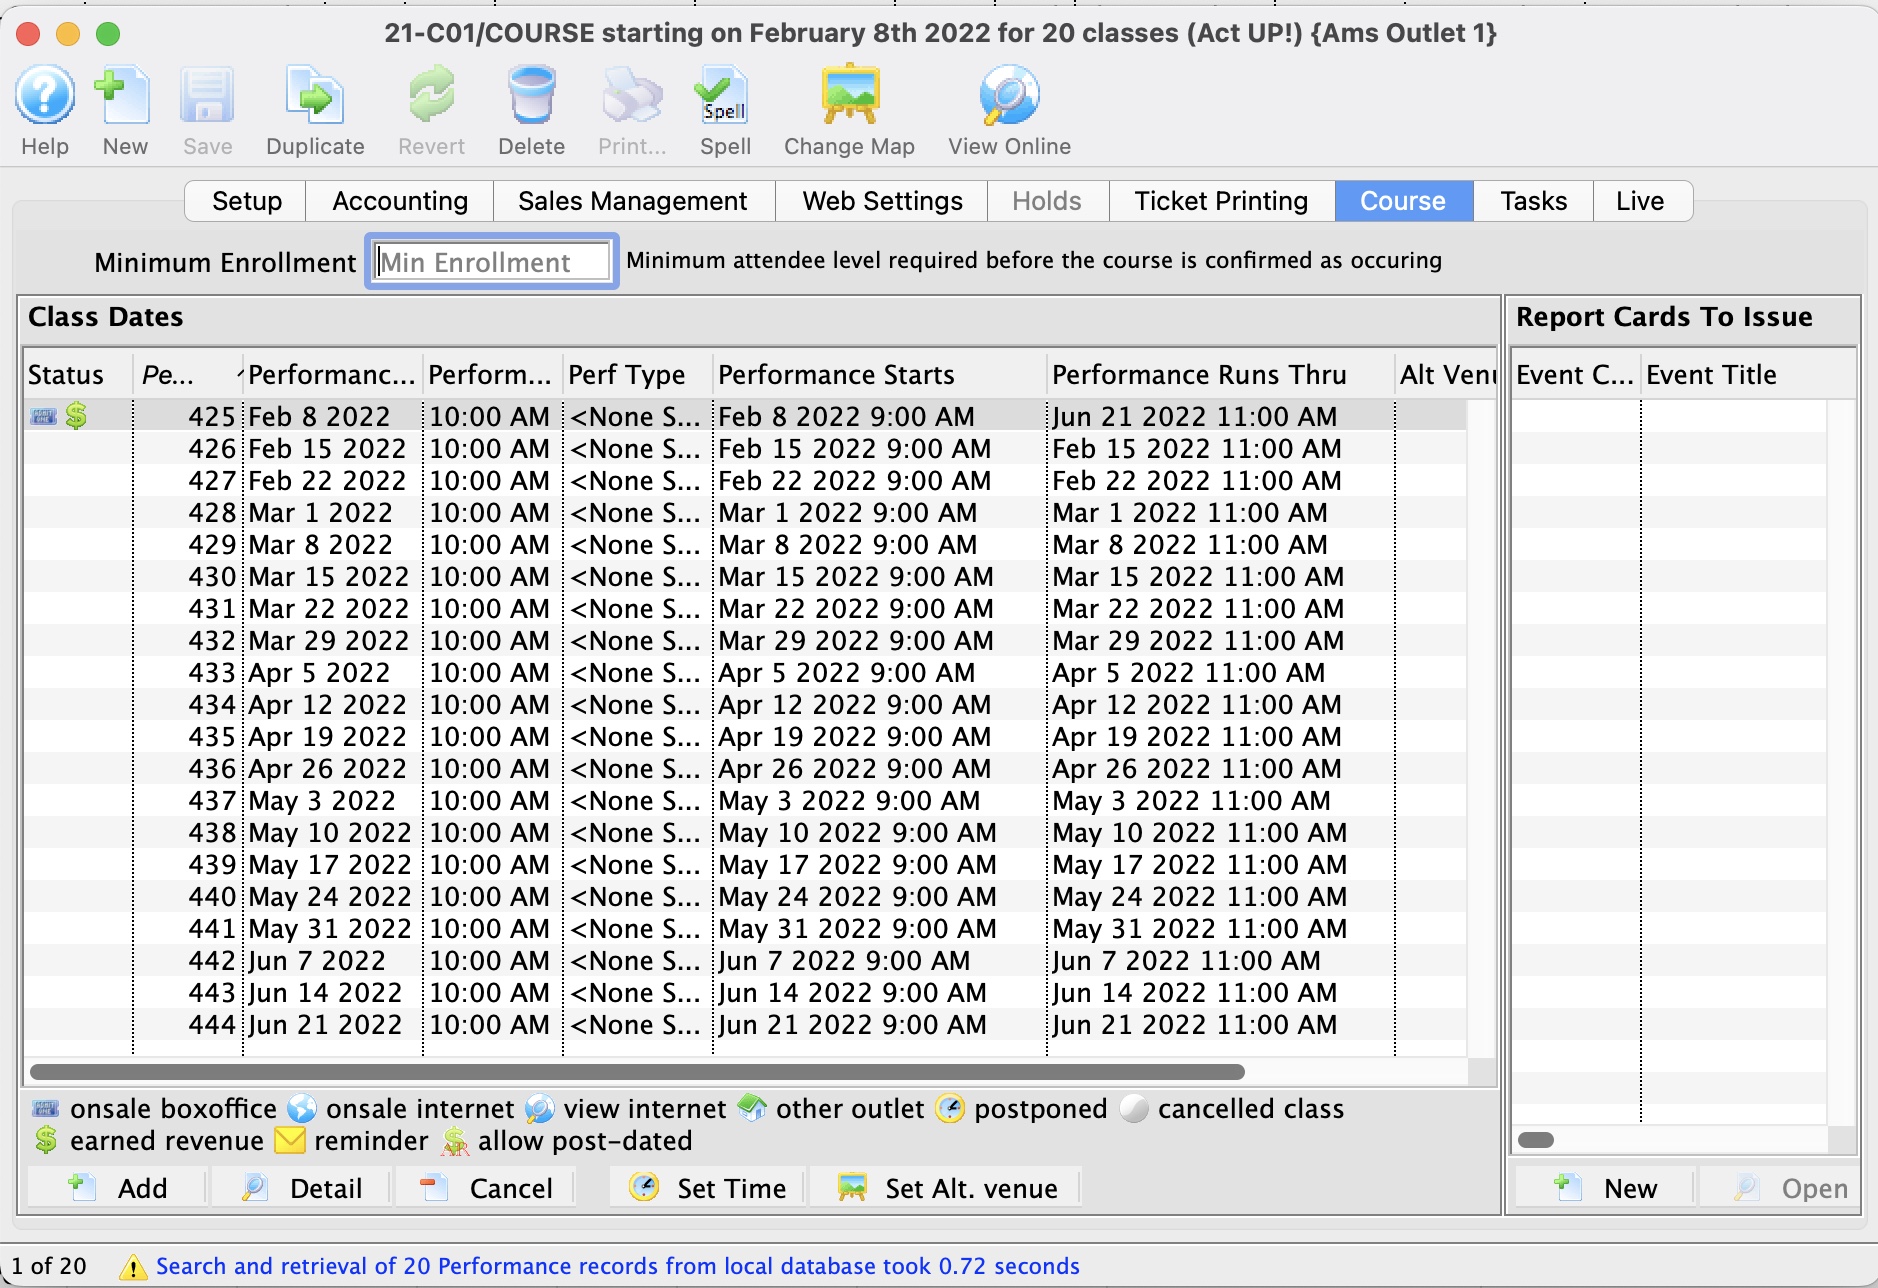
- On the left side of the Courses Tab, Class Dates and information are displayed.
- On the right side of the Courses Tab, Report Cards issued for a Course are displayed. For more information about Report Cards, click here.
|
The performance runs from and through dates are automatically calculated as follows:
|
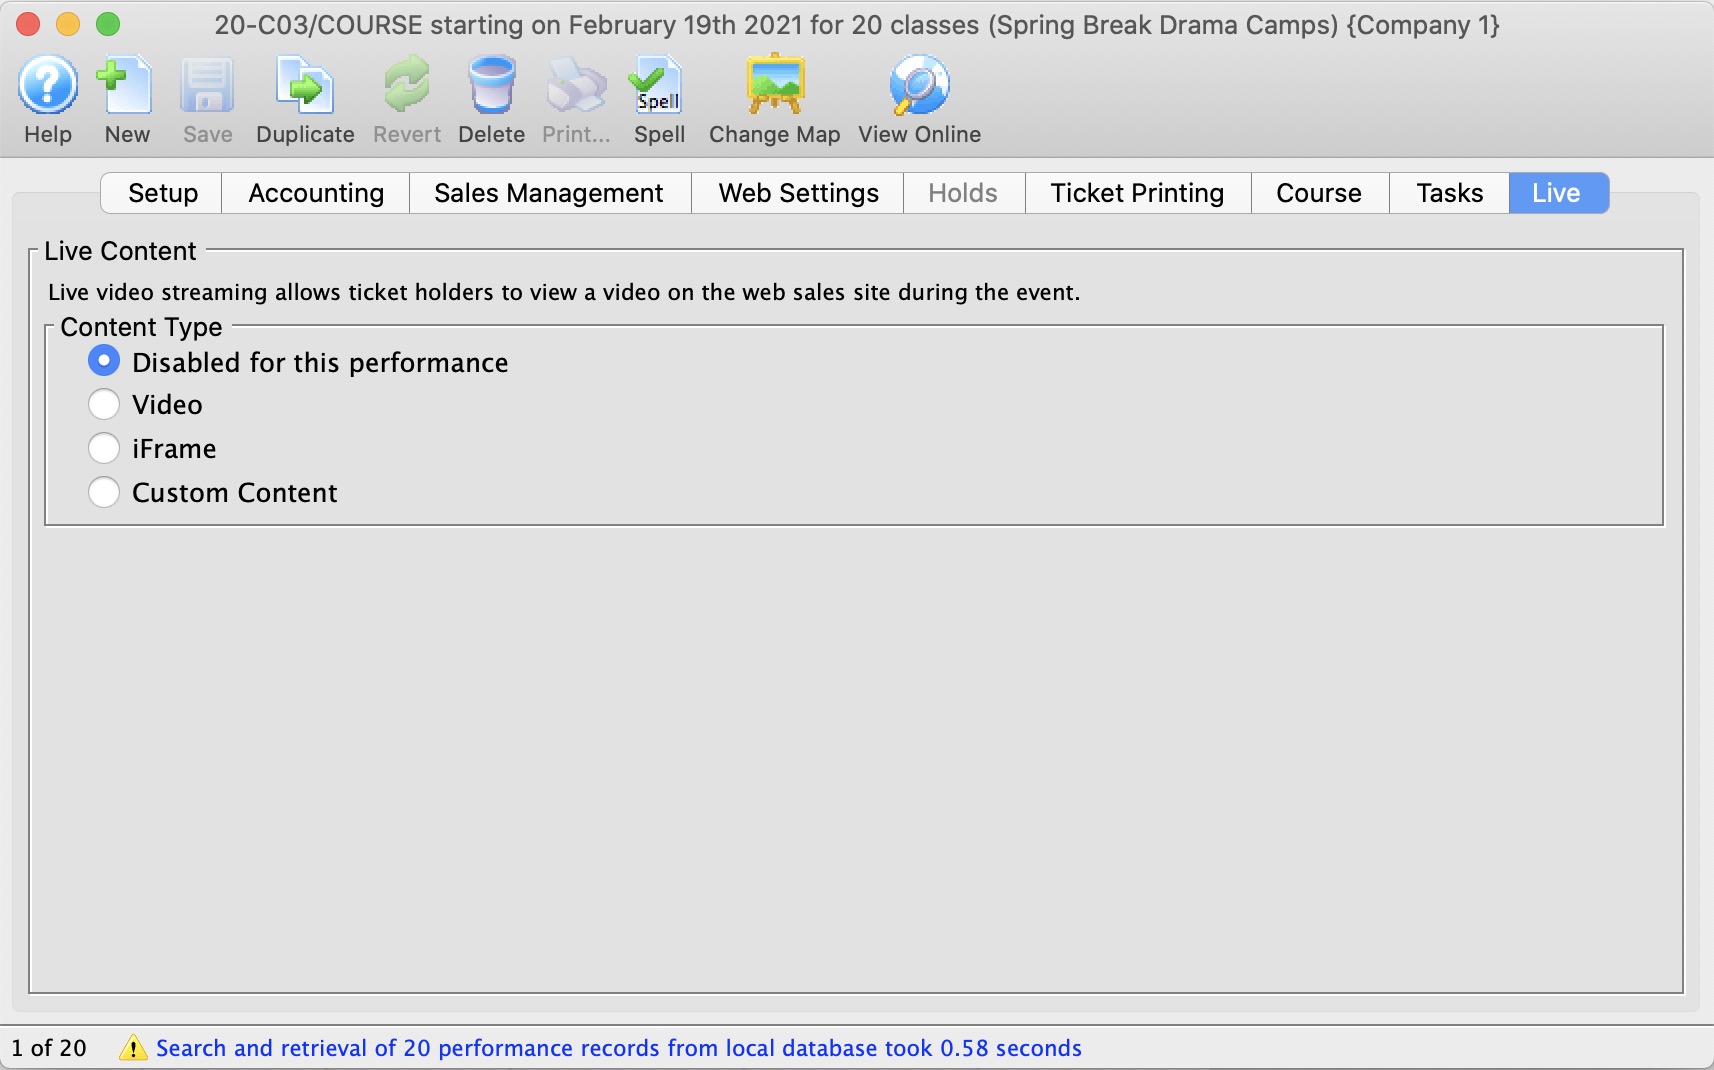
Live Content
|
Refer to the web page Live Web Content for an explanation of the process. |
|
While there are a number of streaming solutions and we don't recommend a particular one over the other (each has its benefits), the one that venues seem to like most is boxcast due to its variety of streaming formats. |
|
Live content is available for all performance sales methods. This means that live content can be accessed by patrons with mobile devices during a live in-person show. |
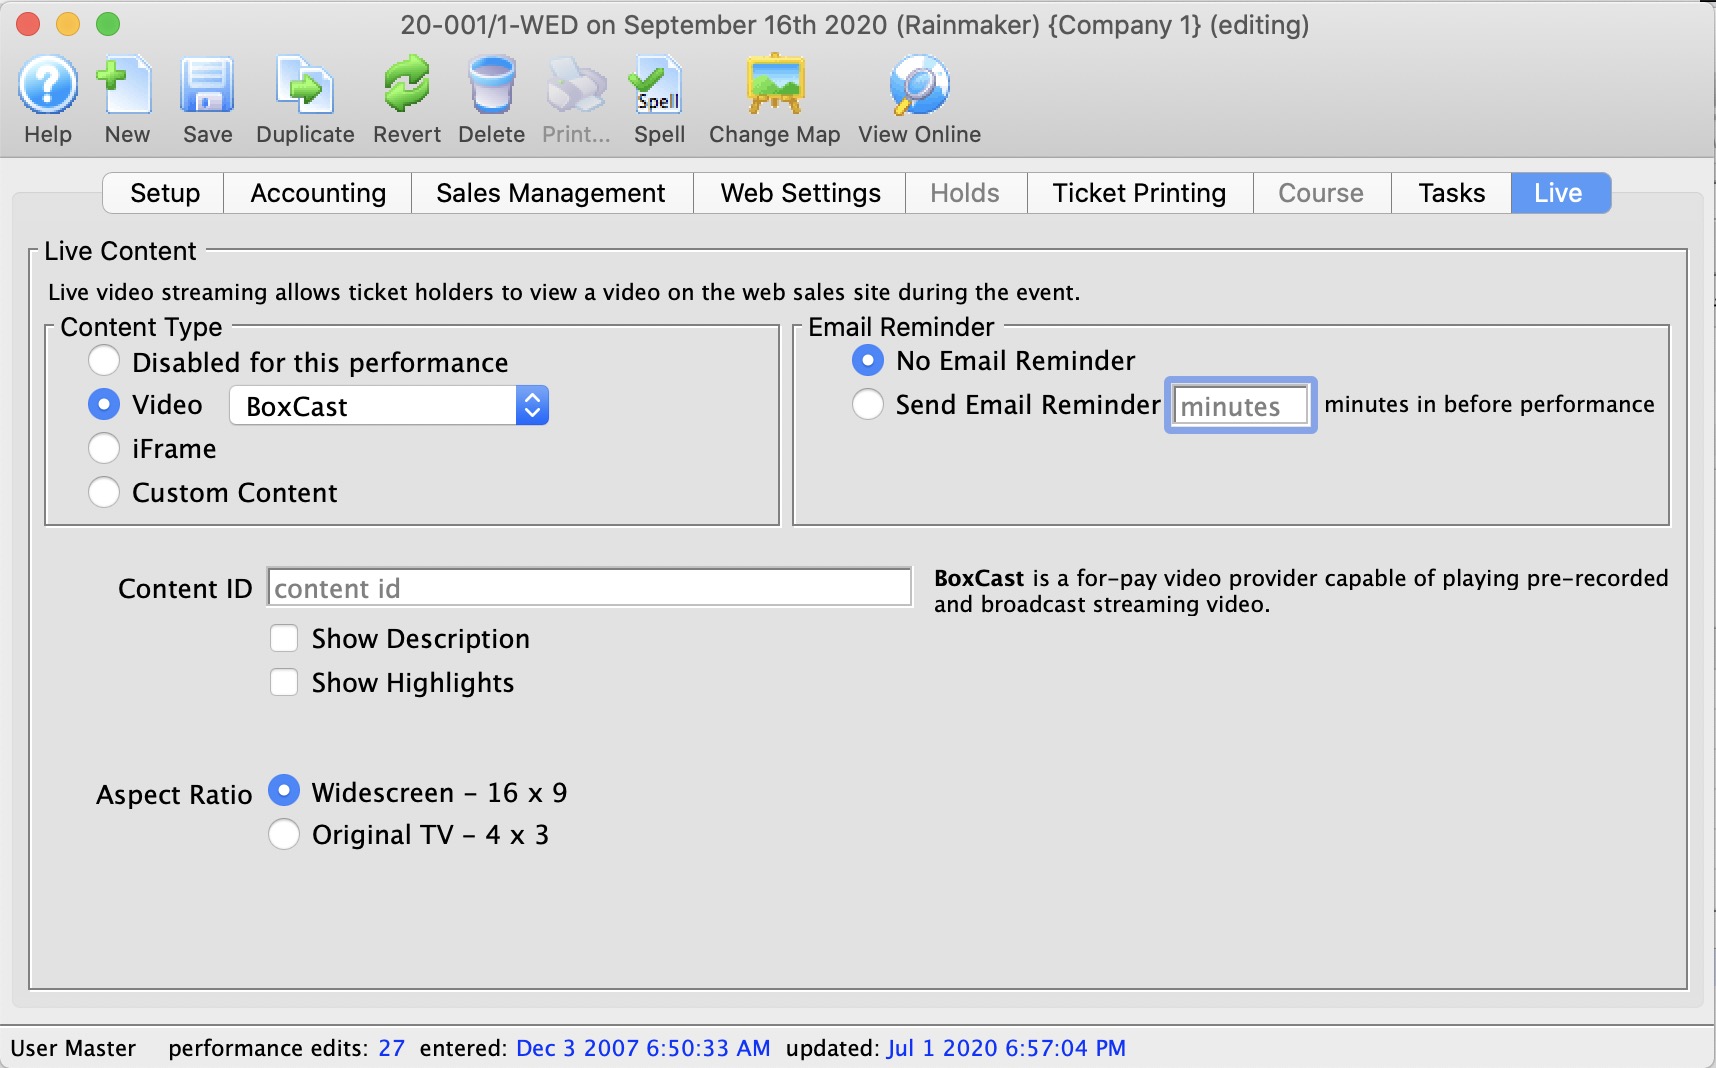
Live Content Type | |
| Content Type |
Which type of content will be live for this performance.
Options:
|
Video Service |
The video service provider that will be used for content containing videos. Supported Video Providers:
|
Live Content Availability
The length of time a live stream video can be viewed online after the performance date/time is managed at three levels. These consist of:
- System Preferences
- Event (overrides System Preferences)
- Performance (overrides Event)
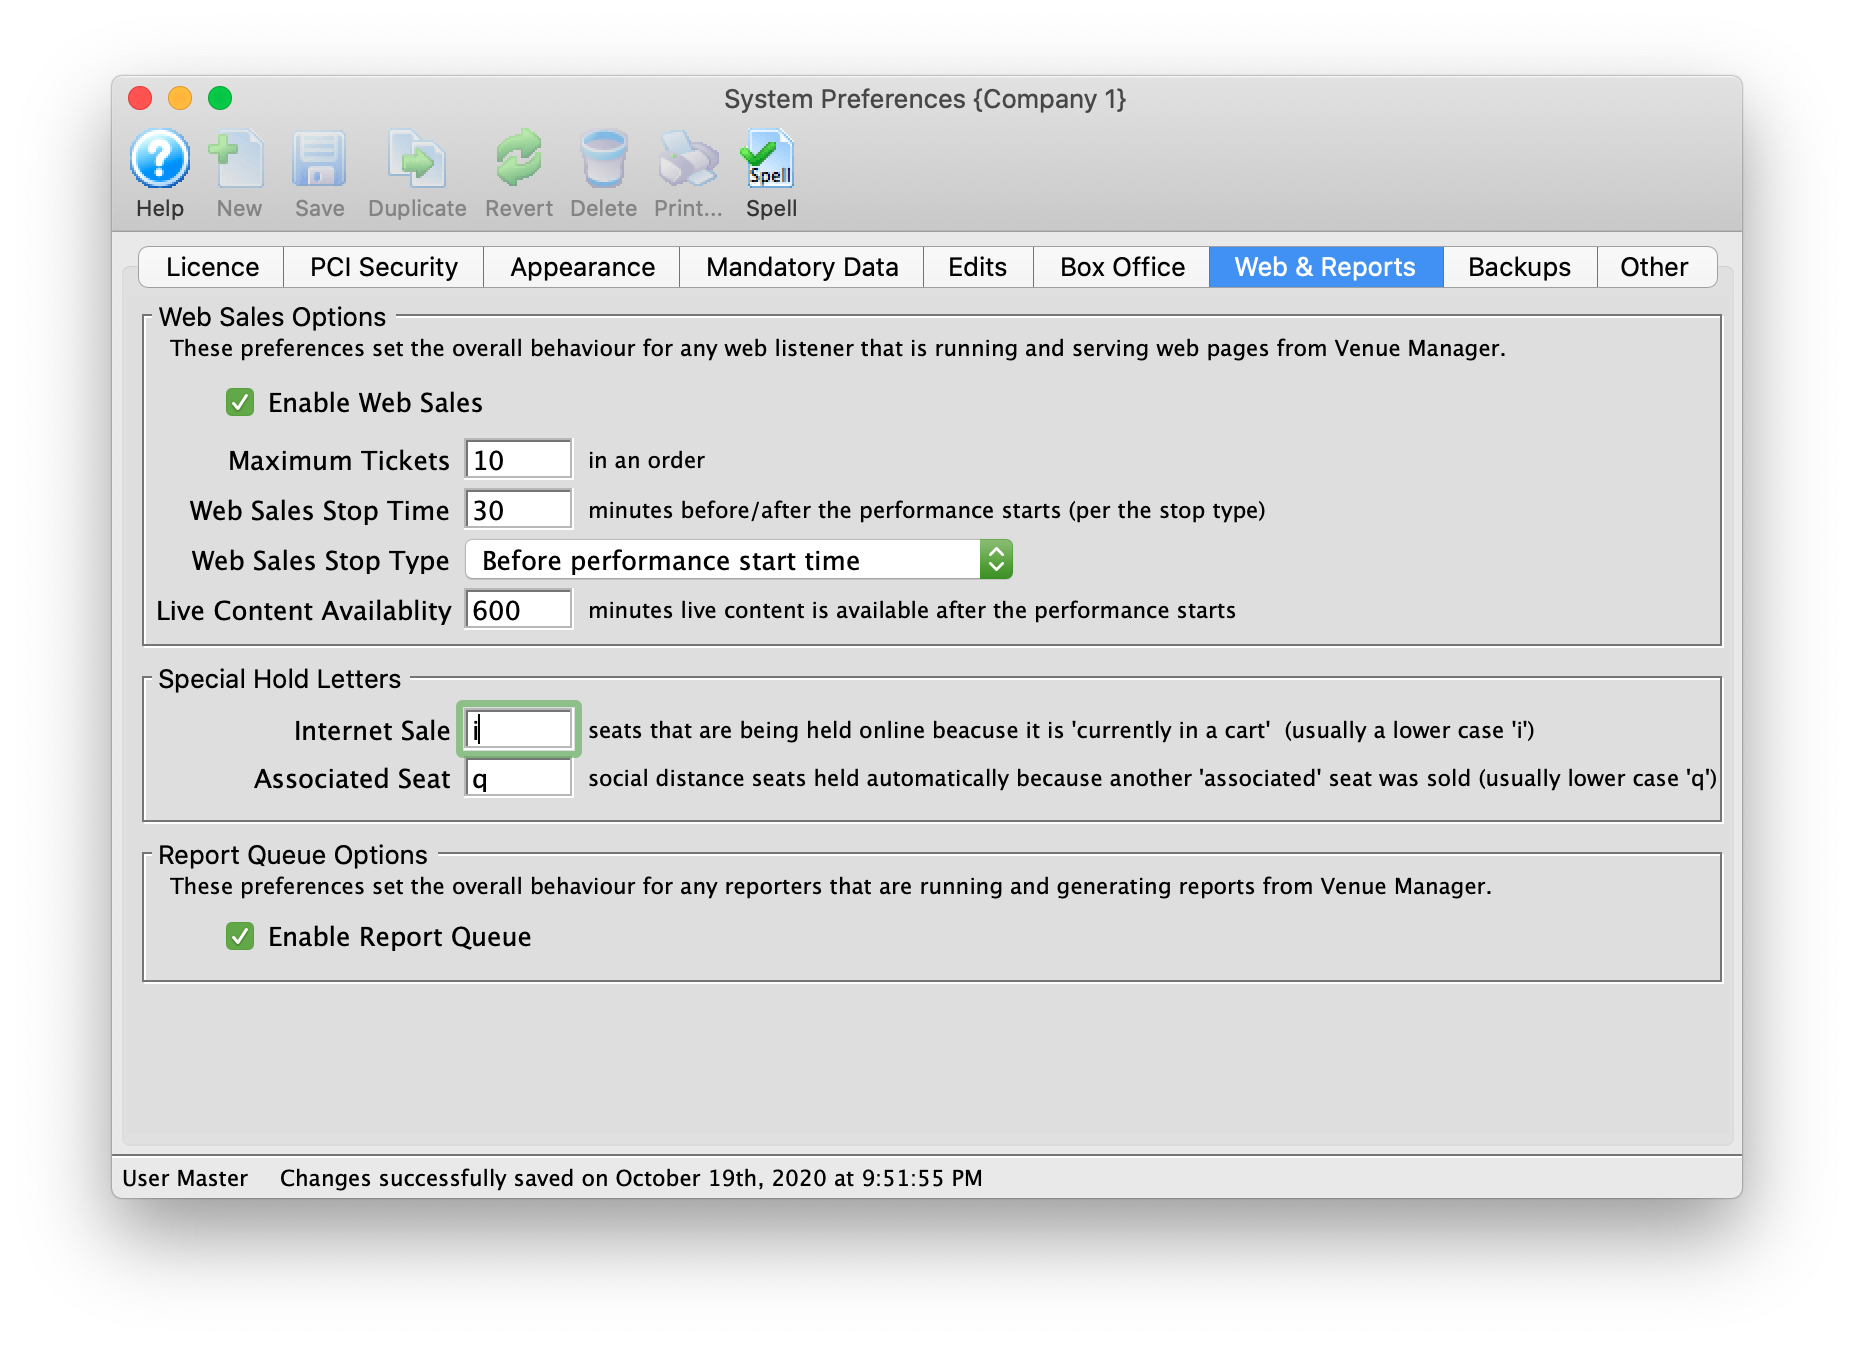
The software default allows for viewing streamed performances up to six hours after the date/time of the performance. Editing the Live Content Availability setting in the Web & Reports tab of System Preferences alters the default for the system. This setting can be overridden in the Event tab on a per event bases as required. In turn the Event setting can be overridden at performance level in the Web Settings tab of the Performance Detail window.
Examples of where the default setting might be altered include:
- A prerecorded video where, when purchased, a patron can continue to view the video at their leisure for days/weeks following the initial performance date/time. In other words, On Demand Streaming.
- A recorded class or course where an attending student may go back to review the lesson.
- A recorded meeting or event where a patron is unable to attend at the time of the meeting can go back and watch a replay.
System Preferences
The Live Content Availability setting is located in the Web & Reports tab of System Preferences. This setting is only accessible while logged into Theatre Manager as the Master User.
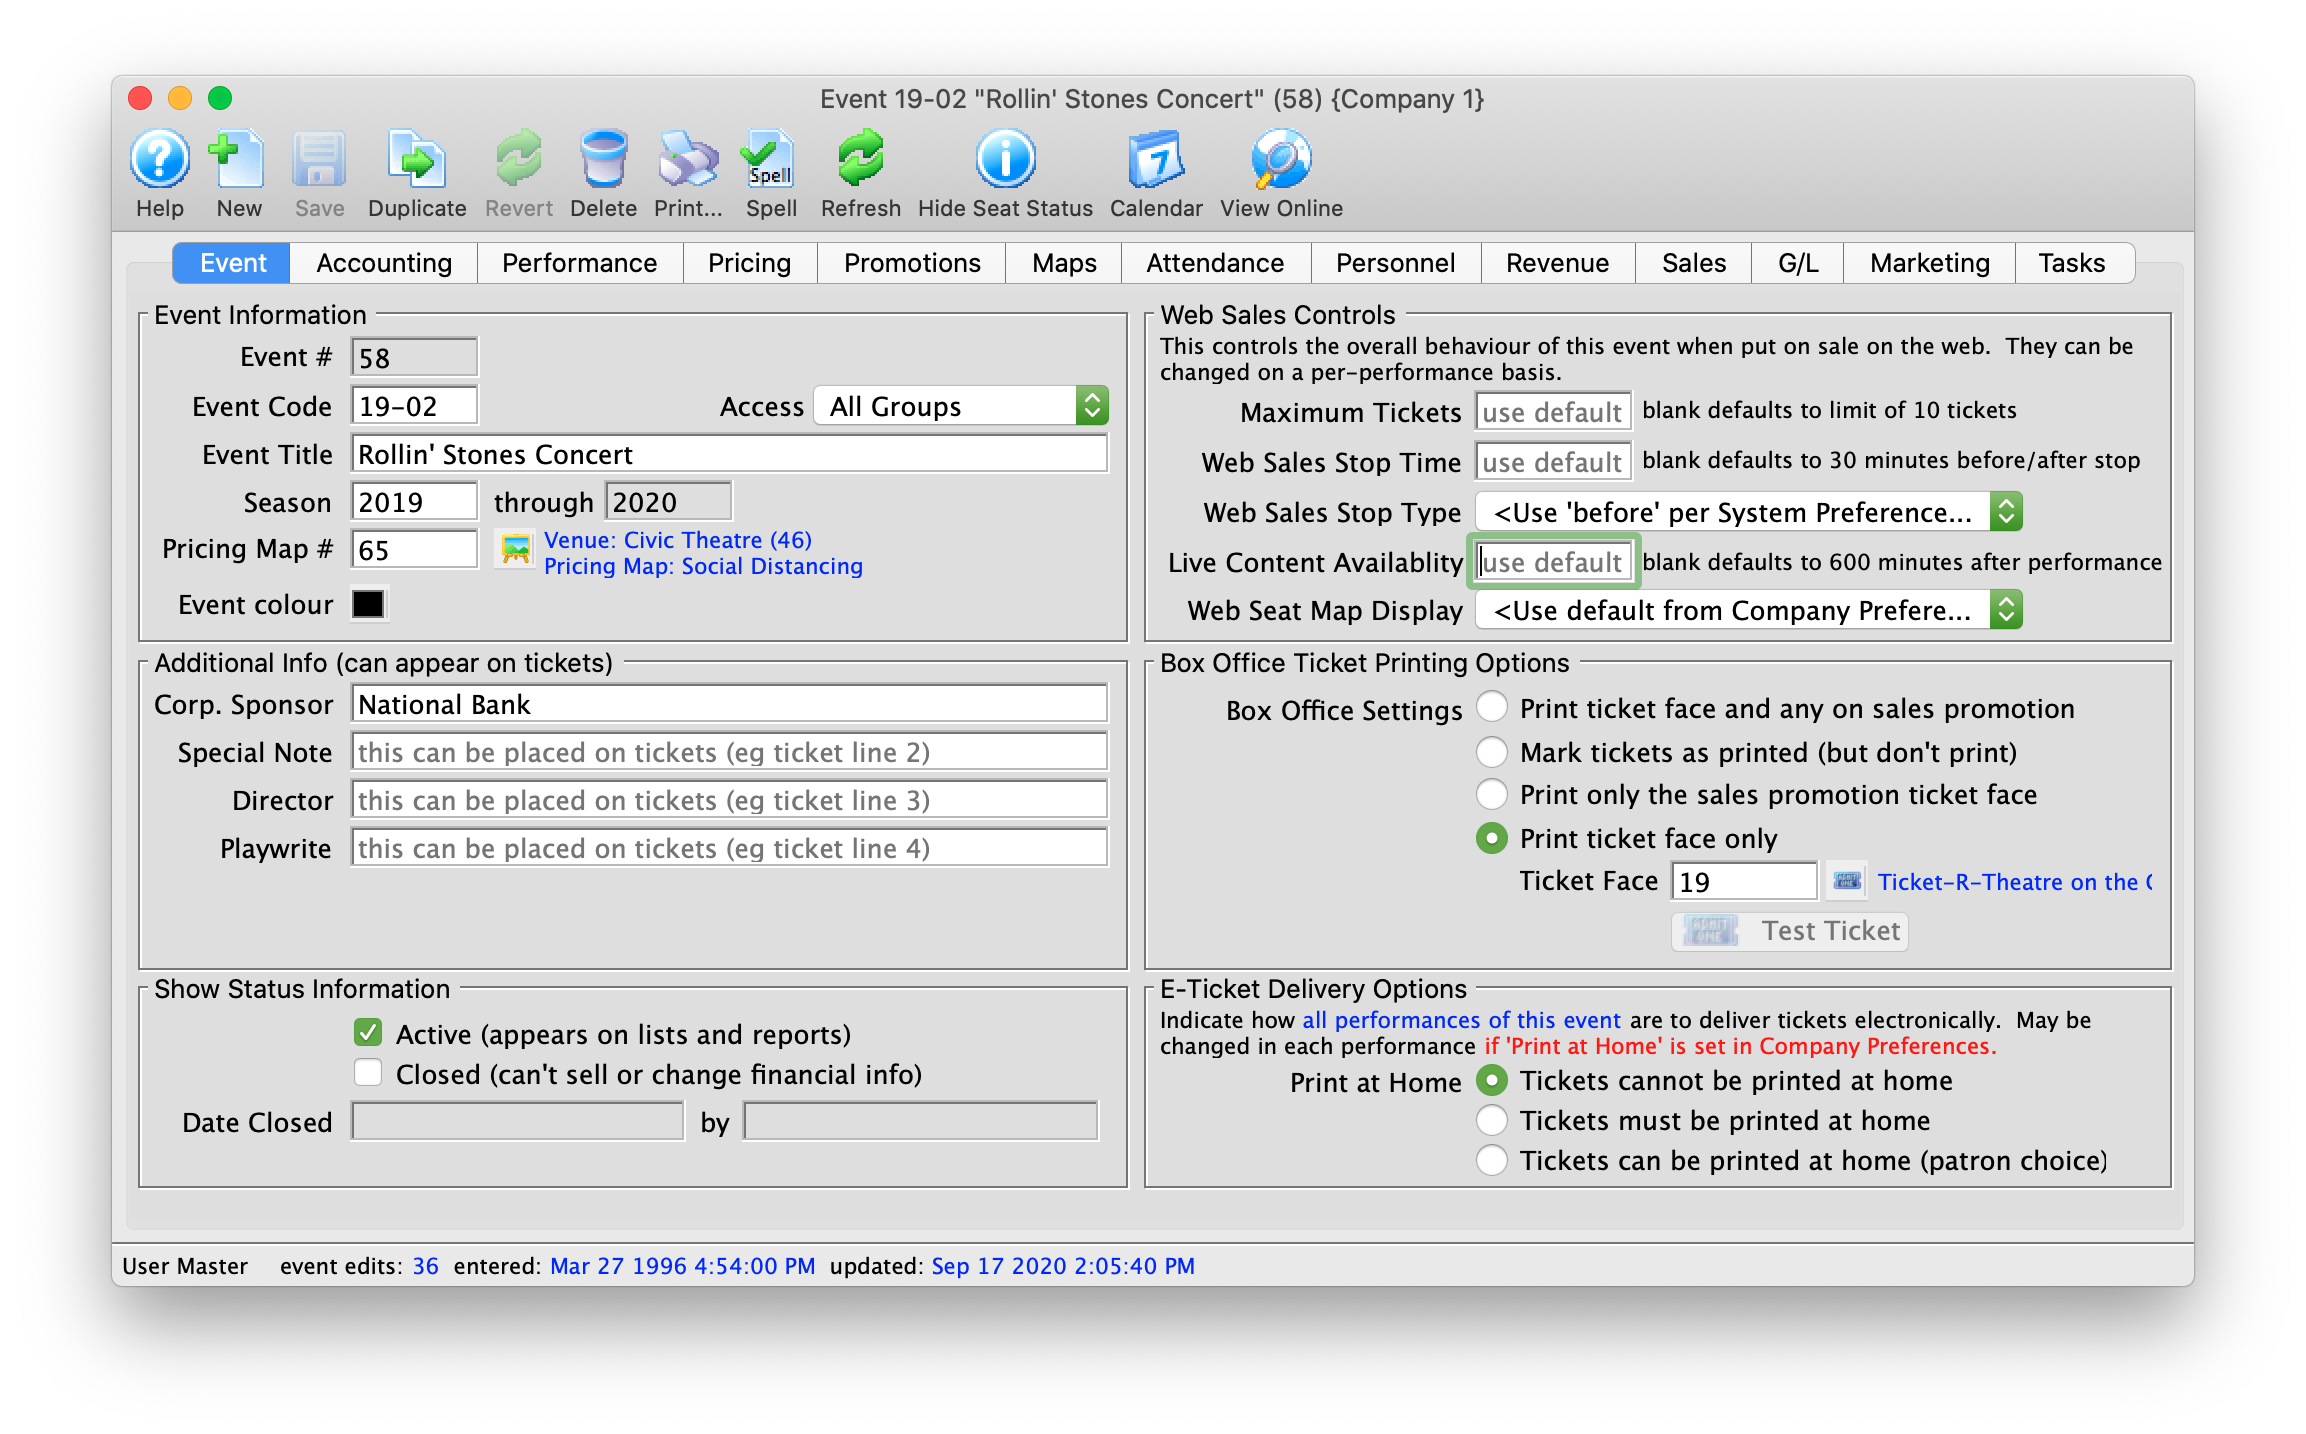
Event
The Live Content Availability setting is managed in the Event tab of the event setup under Web Sales Controls.
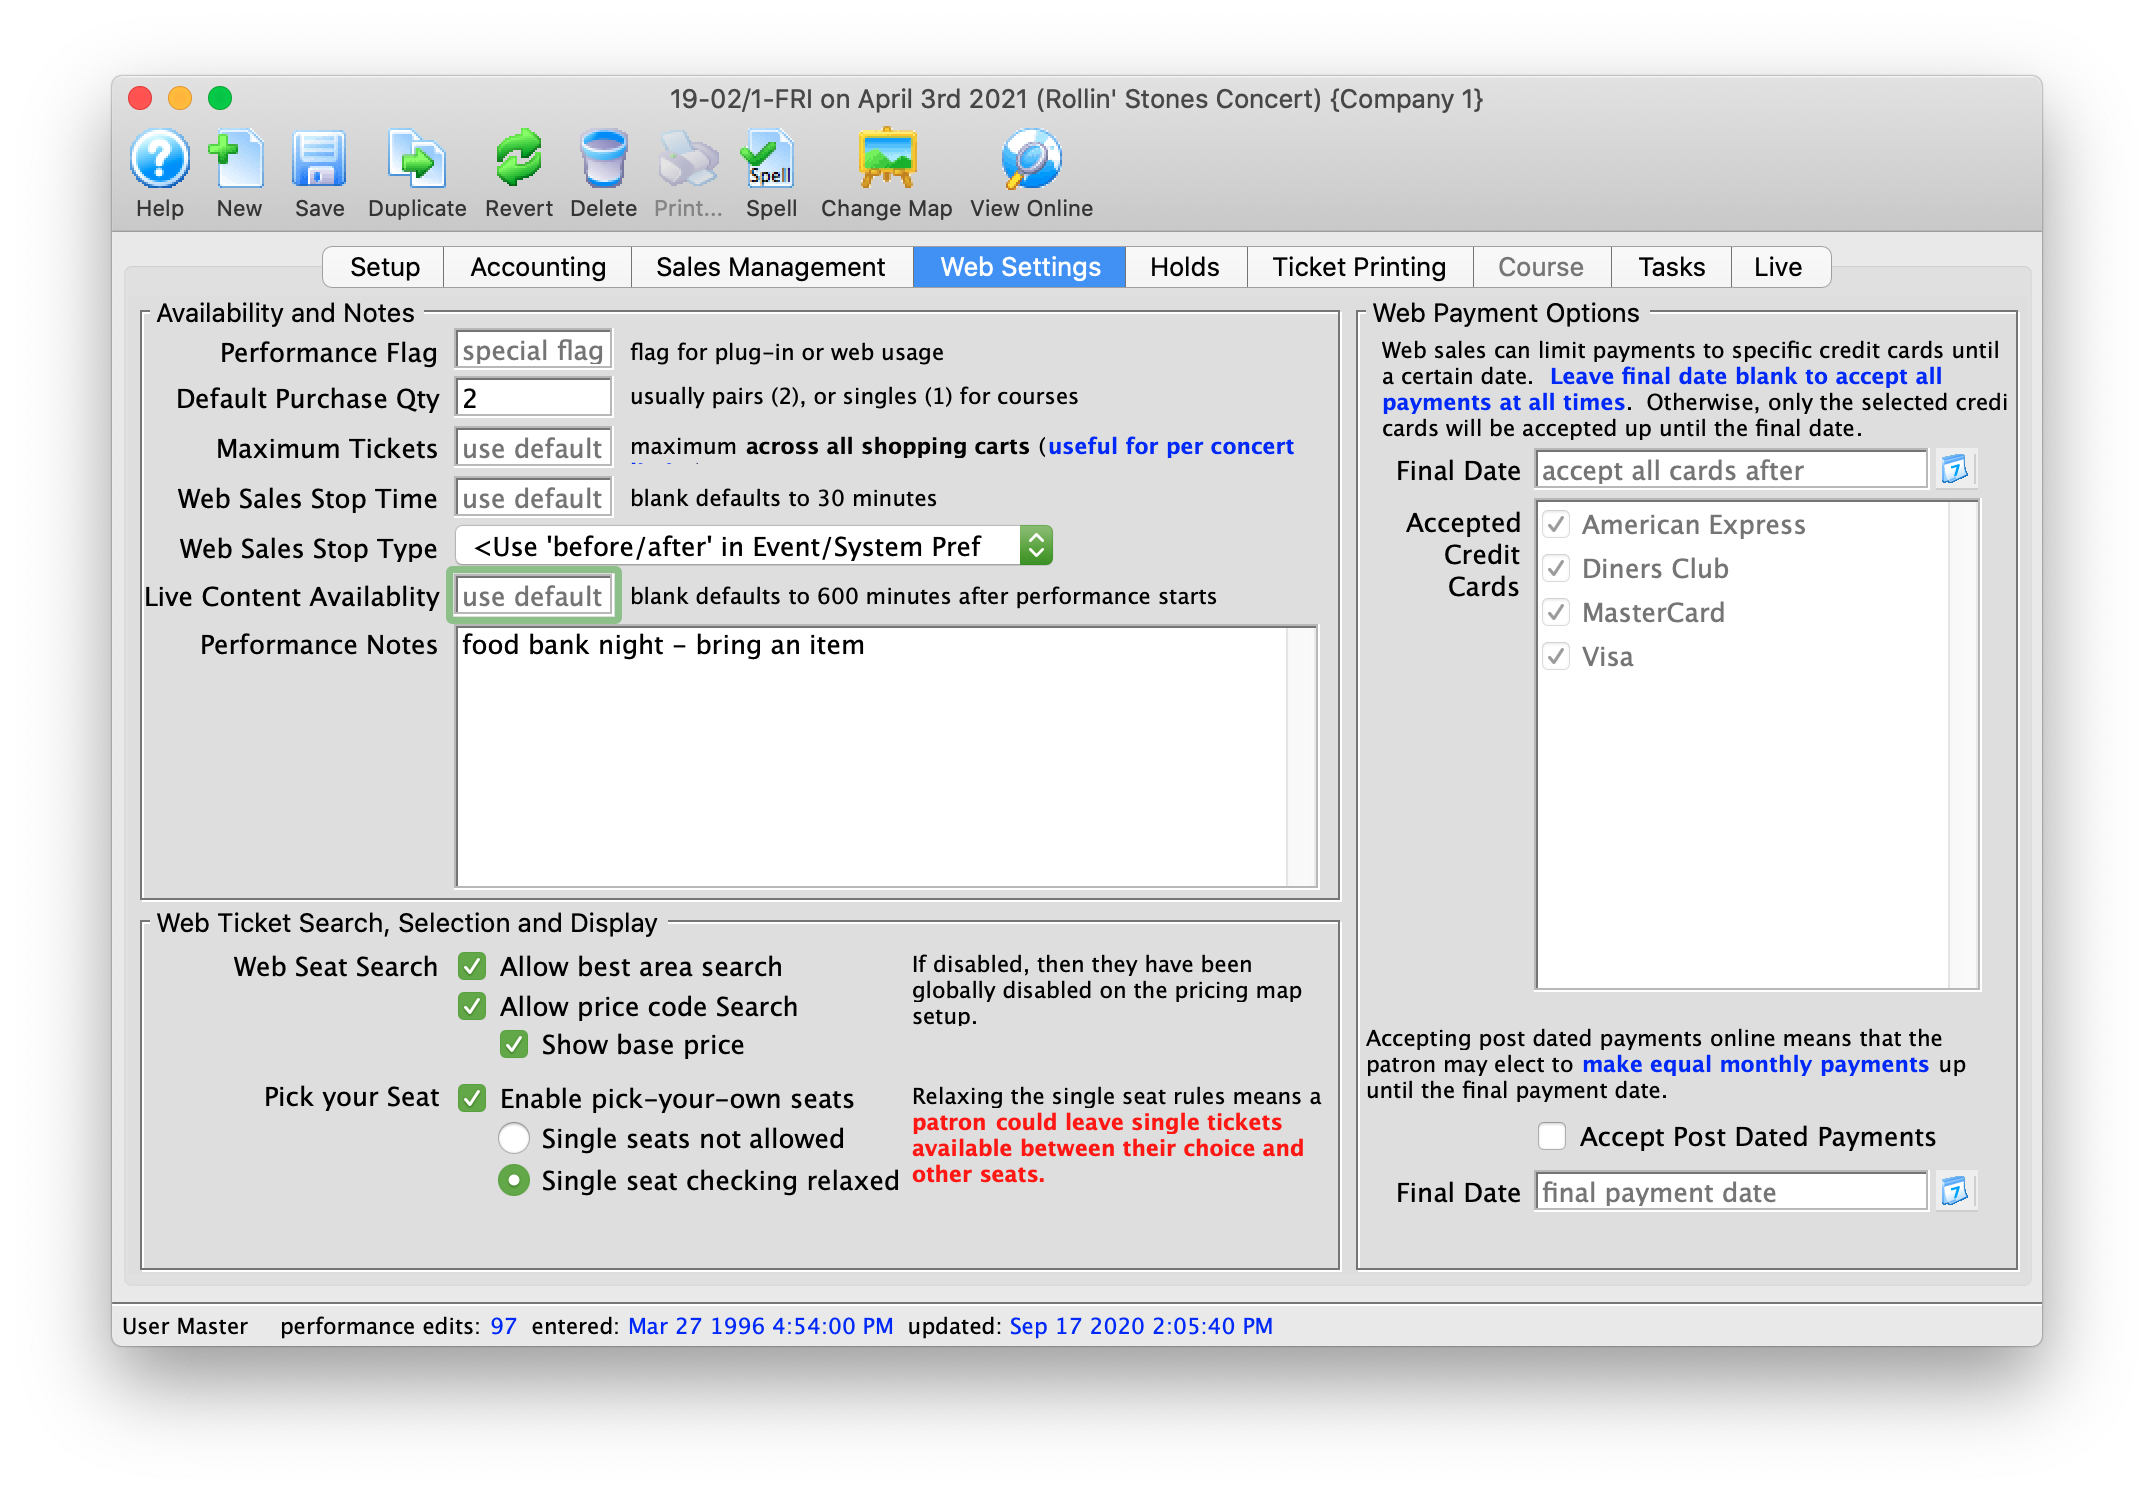
Performance
The Web Settings tab is located in the Performance Detail window. This is accessed by double clicking on a Performance anywhere in the Event setup.
BoxCast
BoxCast is a for-pay video provider capable of playing pre-recorded and broadcast streaming video
BoxCast (Video Provider) | |
| Content ID | The unique BoxCast content ID. The content ID is inserted into the TM Web Pages. |
| Show Description | Show a description of the video |
| Show Highlights |
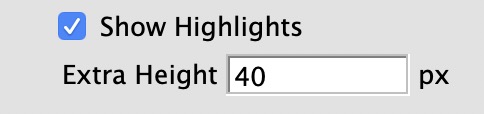 Show the highlights of the video. If you allow highlights, you will be asked fort the amount of 'extra space' to place below the video - in pixels
|
| Aspect Ratio | The aspect ratio of the video that will be played. The aspect ratio is the ratio of height to width of the video. Most modern content is in the Widescreen 16x9 format. You can specify original broadcast TV 4 x 3 |
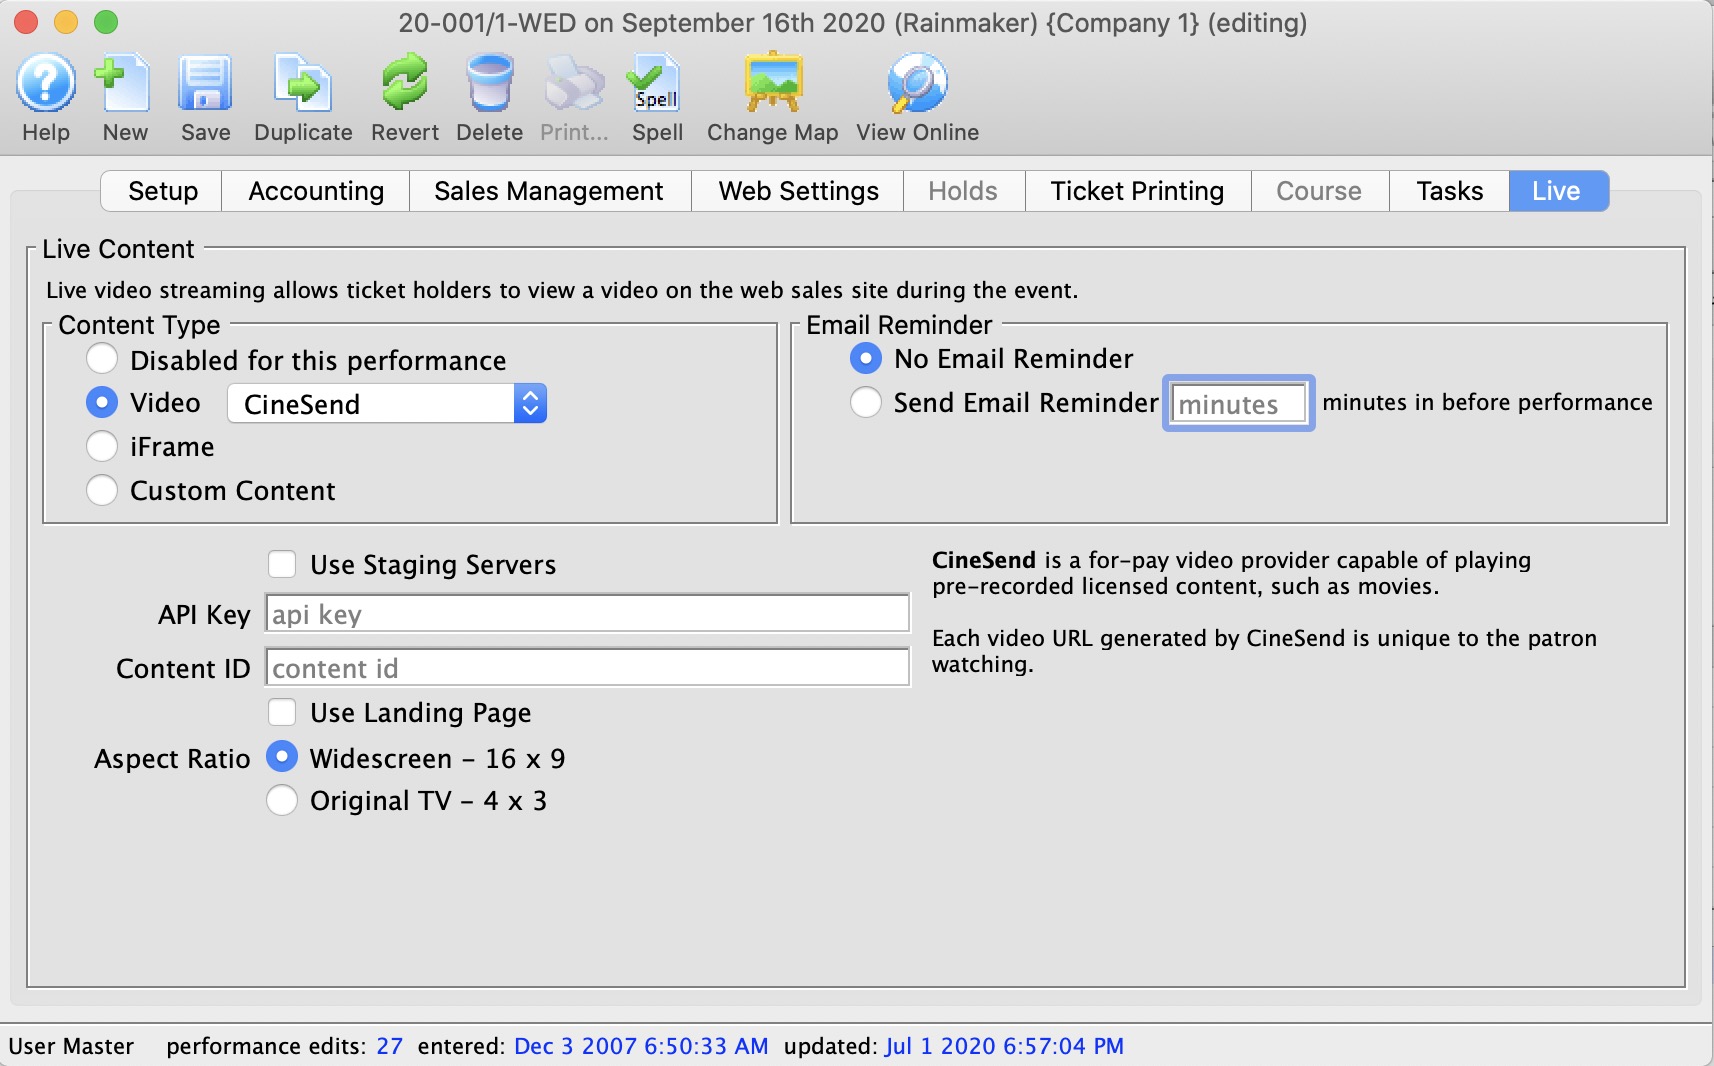
CineSend
CineSend (paid service) | |
| API Key |
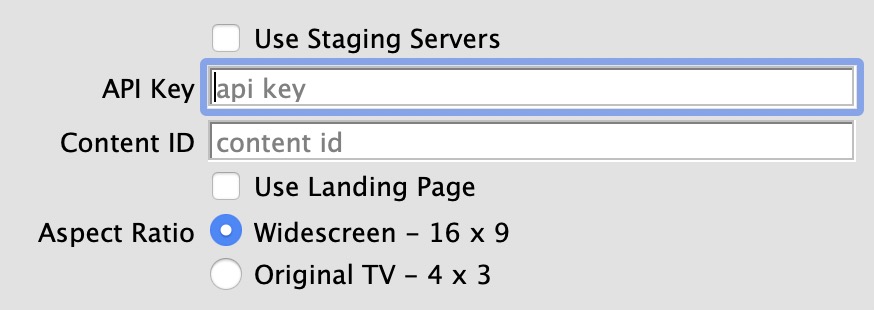 The API key for your account at CineSend
|
| Content ID | A unique ID given to your content by CineSend |
| Use Landing Page | Use the landing page at CineSend that has additional links available |
| Aspect Ratio | The aspect ratio of the video that will be played. The aspect ratio is the ratio of height to width of the video. Most modern content is in the Widescreen 16x9 format. You can specify original broadcast TV 4 x 3 |
DaCast
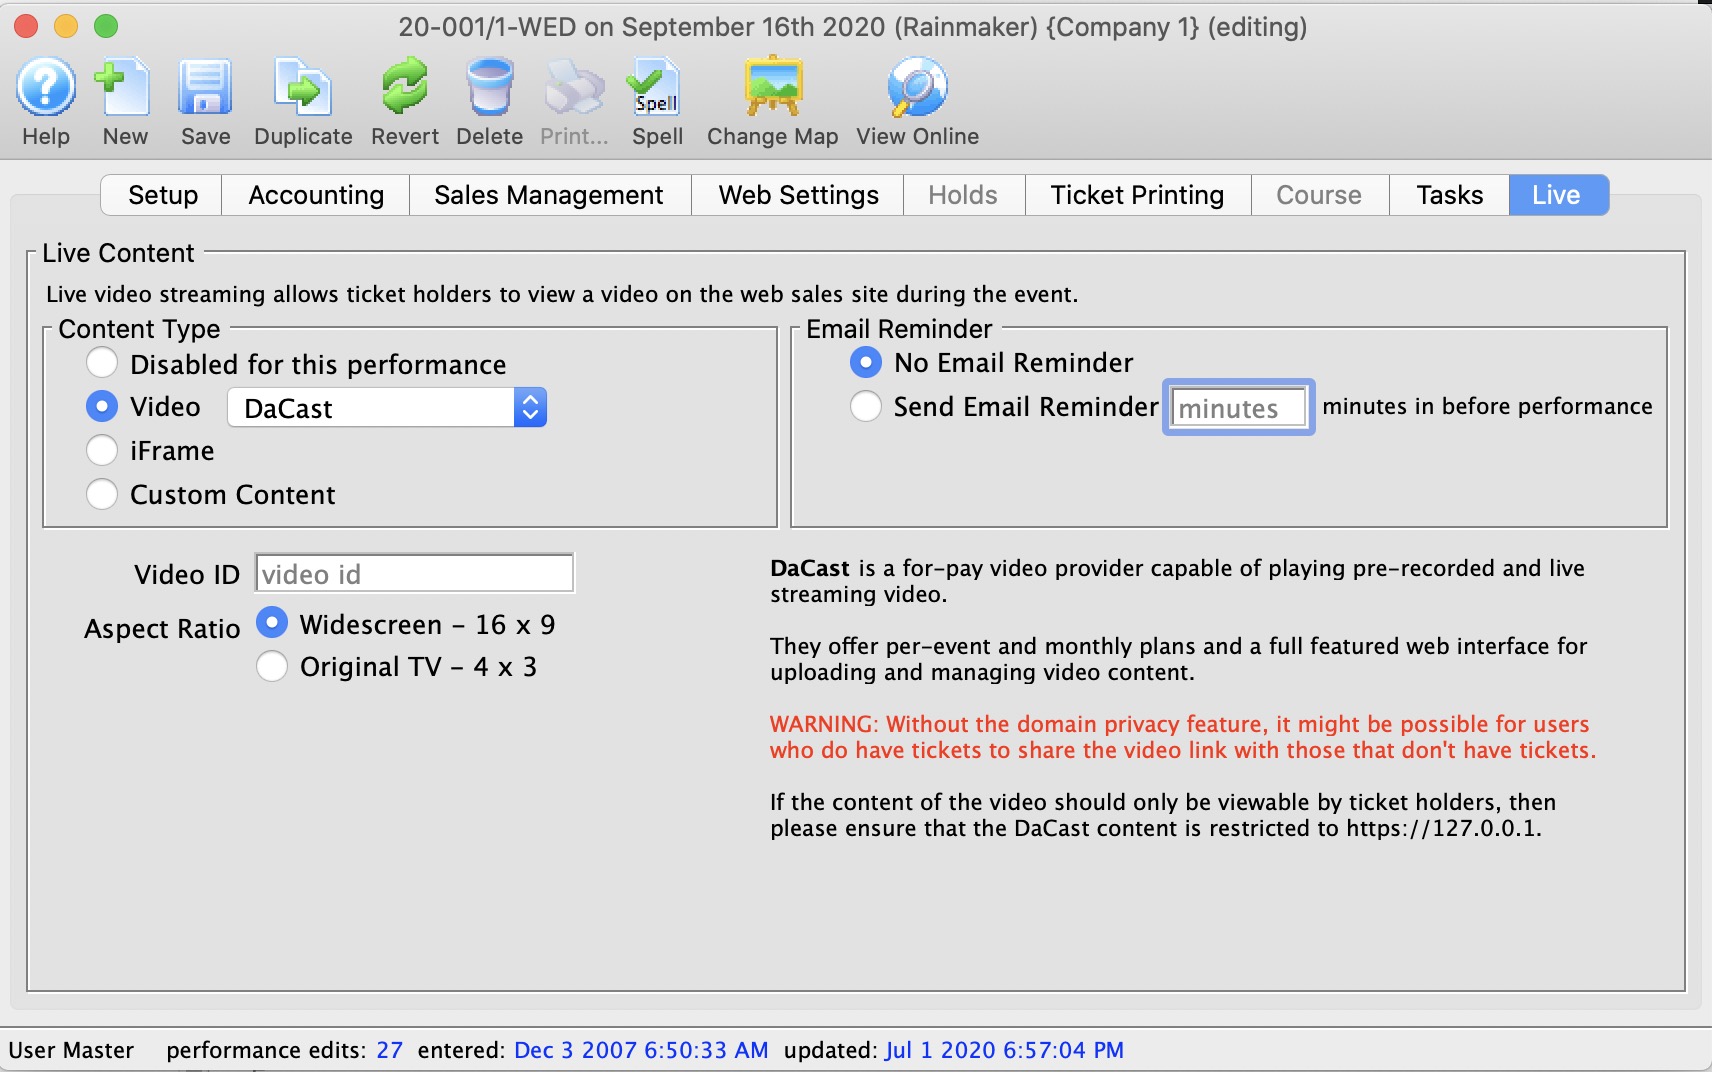
DaCast (Video Provider) | |
| Video ID | The unique DaCast video ID. The video ID is inserted into the DaCast API on the TM Web Pages. |
| Aspect Ratio | The aspect ratio of the video that will be played. The aspect ratio is the ratio of height to width of the video. Most modern content is in the Widescreen 16x9 format. You can specify original broadcast TV 4 x 3 |
Vimeo
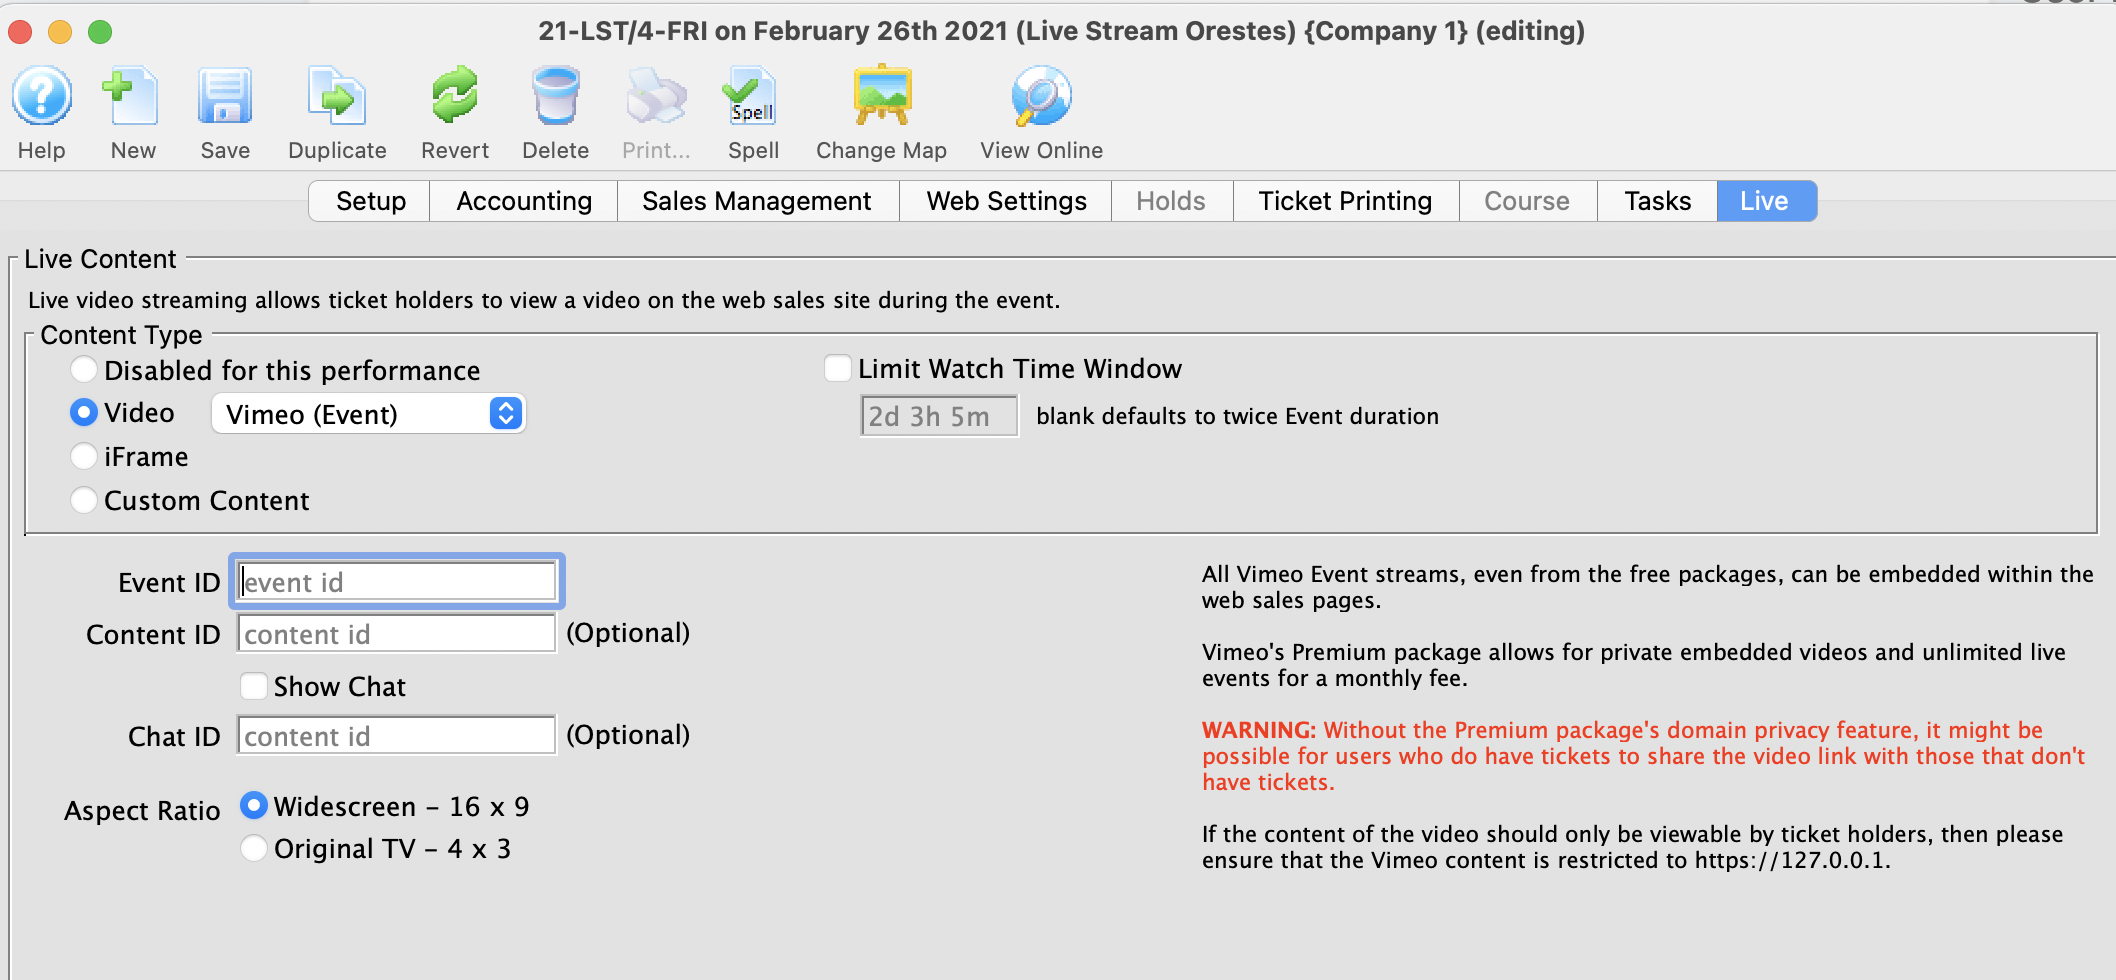
Vimeo (Video Provider) | |
| Event ID |
The unique Vimeo video ID. The ID is a number, like 148751763. If the Vimeo URL looks like https://vimeo.com/148751763 then the Vimeo Video ID is the numbers 148751763
|
| Chat ID | The unique Vimeo Chat ID. The ID is a number and letter combination at the end of the URL, like https://vimeo.com/148751763/1244df87rbj2. |
| Aspect Ratio | The aspect ratio of the video that will be played. The aspect ratio is the ratio of height to width of the video. Most modern content is in the Widescreen 16x9 format. |
Vimeo
Vimeo supports both pre-recorded and live streaming content. In order to do truly private content -- content that is not also available on Vimeo's free, public website -- a subscription to Vimeo Premium is required. The subscription permits access to the "domain level privacy" feature which restricts videos playback so that it can only occur on your Theatre Manager website -- e.g. tickets.yourvenue.org. Important to also set Hide From Vimeo option on your Vimeo account to allow playback on other websites. More details on the various levels of Vimeo privacy, and their implications, can be found on the Vimeo privacy, explained website.
If you're looking for a way to save money, then you can use lower privacy options, but beware that doing so might allow ticket buyers to share the video link with other ticket buyers, and you might miss out on ticket sales.
Setting up Vimeo in Theatre Manager

- Determine your video's Vimeo Video ID.
- A number, like
148751763. If the Vimeo URL looks like https://vimeo.com/148751763 then the Vimeo Video ID is the numbers148751763
- A number, like
- Determine the video's Aspect Ratio
- Widescreen (16x9)
- Original TV (4x3)
- Open Theatre Manager
- Locate the Event that contains the Live Performance
- Locate the performance on the Events & Dates window
- Edit the performance
- Click the Live tab
- Select Vimeo from the Video Service drop-down menu
- Enter the Vimeo Video ID
- Select the video's Aspect Ratio
YouTube
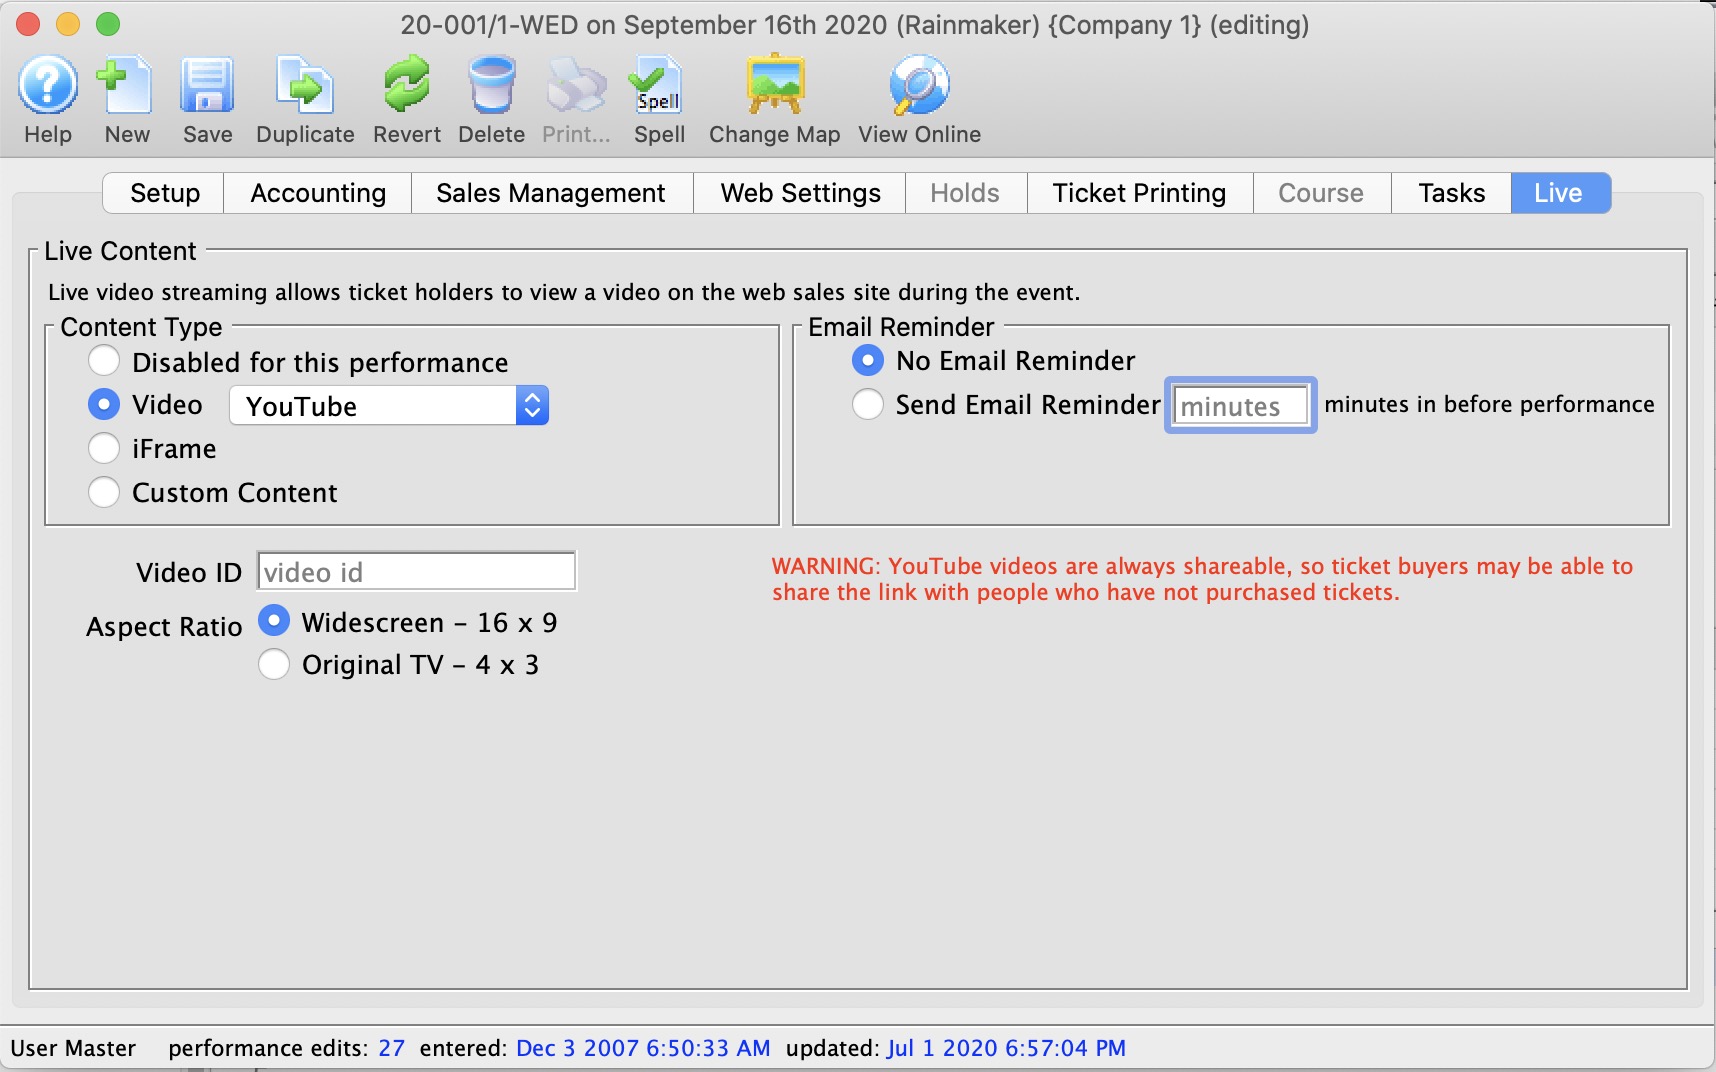
YouTube (Video Provider) | |
| Video ID |
The unique YouTube video ID. The ID is a mix of case-sensitive characters and numbers, like M7lc1UVf-VE. If the YouTube URL looks like https://www.youtube.com/watch?v=M7lc1UVf-VE then the YouTube Video ID is the part after the v=: M7lc1UVf-VE
|
| Aspect Ratio | The aspect ratio of the video that will be played. The aspect ratio is the ratio of height to width of the video. Most modern content is in the Widescreen 16x9 format. |
YouTube
YouTube is a very popular video streaming service. The service itself is free, but videos are always accessible from the YouTube page. It can be a good choice for events that are free to access -- where it's not a problem that the video is accessible from youtube.com. It's not possible to restrict access to only your ticketing website with YouTube.
Setting up YouTube in Theatre Manager
- Determine your video's YouTube Video ID.
- A case sensitive mix of characters and numbers, like
M7lc1UVf-VE. If the YouTube URL looks like https://www.youtube.com/watch?v=M7lc1UVf-VE then the YouTube Video ID is the part after thev=:M7lc1UVf-VE
- A case sensitive mix of characters and numbers, like
- Determine the video's Aspect Ratio
- Widescreen (16x9)
- Original TV (4x3)
- Open Theatre Manager
- Locate the Event that contains the Live Performance
- Locate the performance on the Events & Dates window
- Edit the performance
- Click the Live tab
- Select YouTube from the Video Service drop-down menu
- Enter the YouTube Video ID
- Select the video's Aspect Ratio
video.js
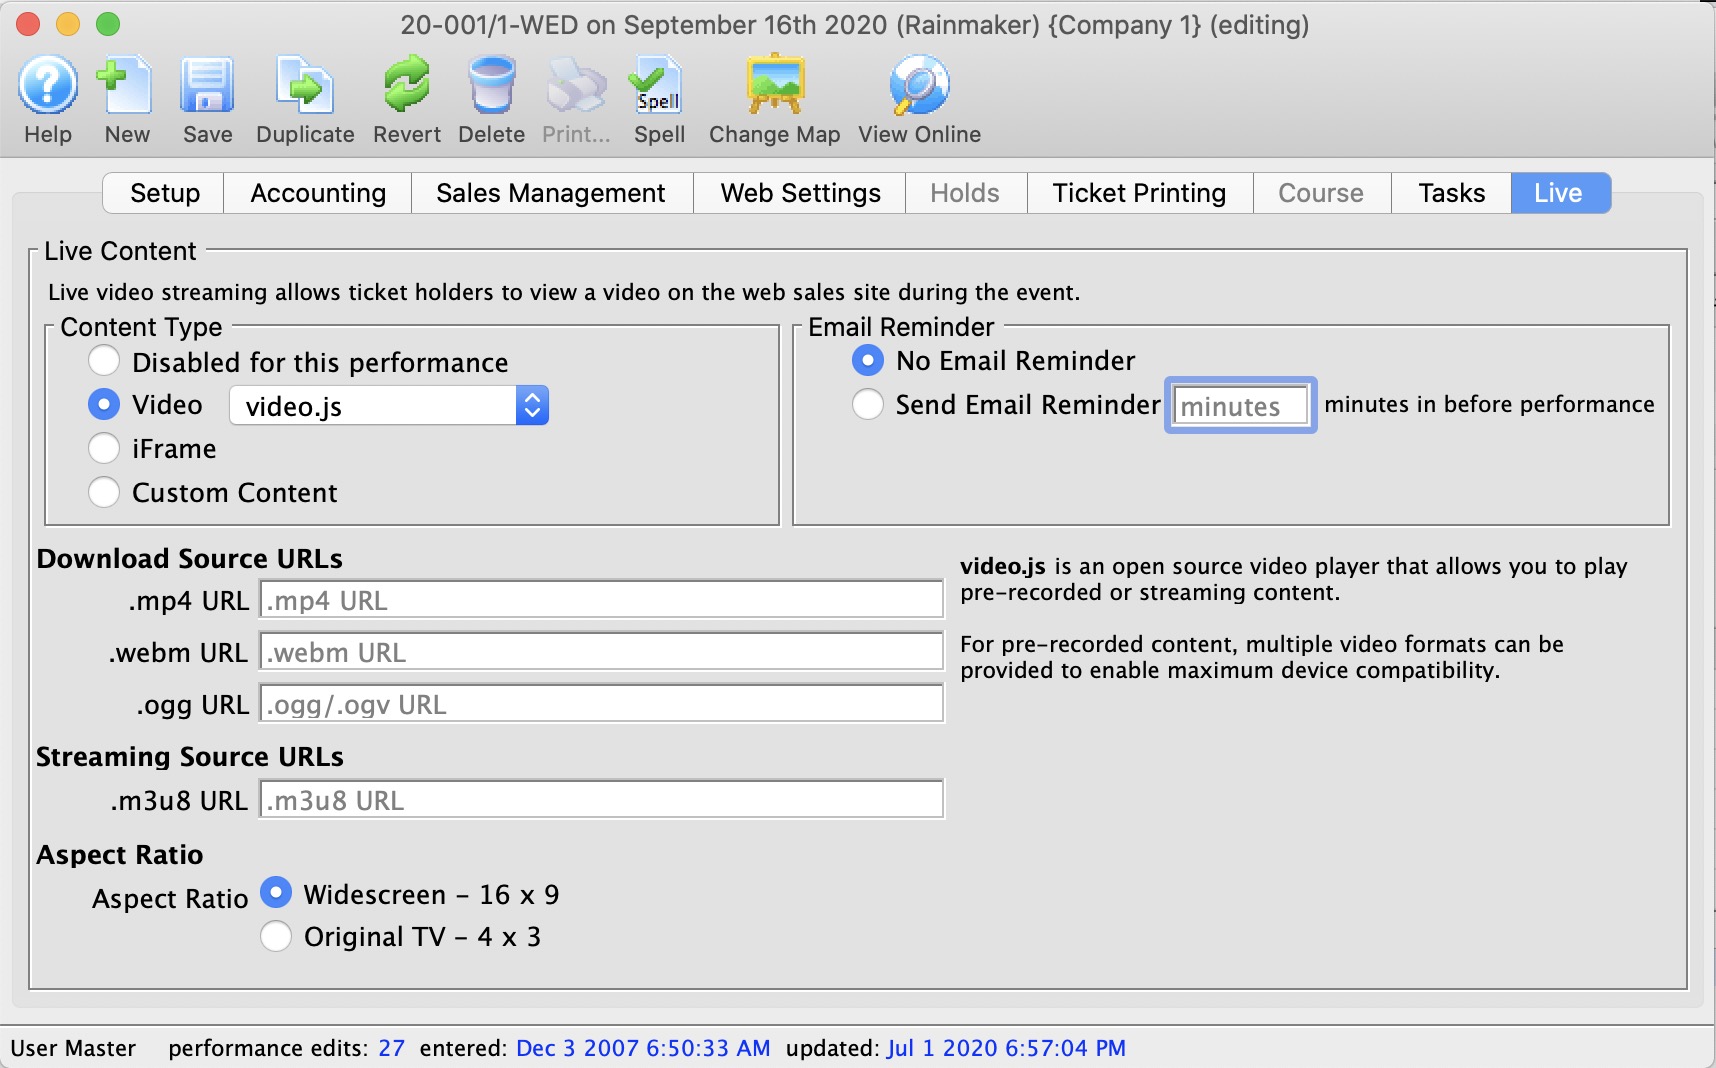
Video.js (open source video player) | |
| Download Source URL's |
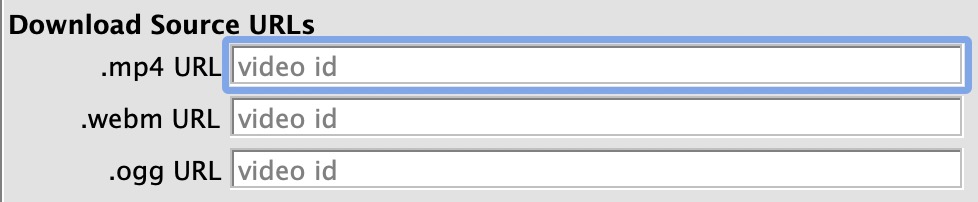 If using a pre-recorded video then these URLs allow you to specify customized formats, optimized for certain devices. Most devices support H.264 .mp4, but additional formats can be added. See the video.js video support matrix for more details.
|
| Streaming Source URL's |
 If using live streaming video then HLS .m3u8 is the only live streaming option. See the video.js video support matrix for more details.
|
| Aspect Ratio | The aspect ratio of the video that will be played. The aspect ratio is the ratio of height to width of the video. Most modern content is in the Widescreen 16x9 format. You can specify original broadcast TV 4 x 3 |
Transaction List
The following represent a list of transaction which have occurred for a selected performance. For more information on Transactions, Click here.
![]()
You view these from the going to the Performance Tab and selecting a performance. Then click the Transactions ![]() button.
button.
Pricing - Price Codes
This section is:
- a description of the Price List,
- Setting a Default Price Code for a performance (box office only)
- Copying Prices from one performance to all selected. This is useful for making each weekend performance the same price as another.
- Duplicating Prices which copies prices and promotions from another event for all the matching series codes. This is useful once you have set up the first event of a season and want to make all the other the same -and-
- Editing Prices
Pricing Information
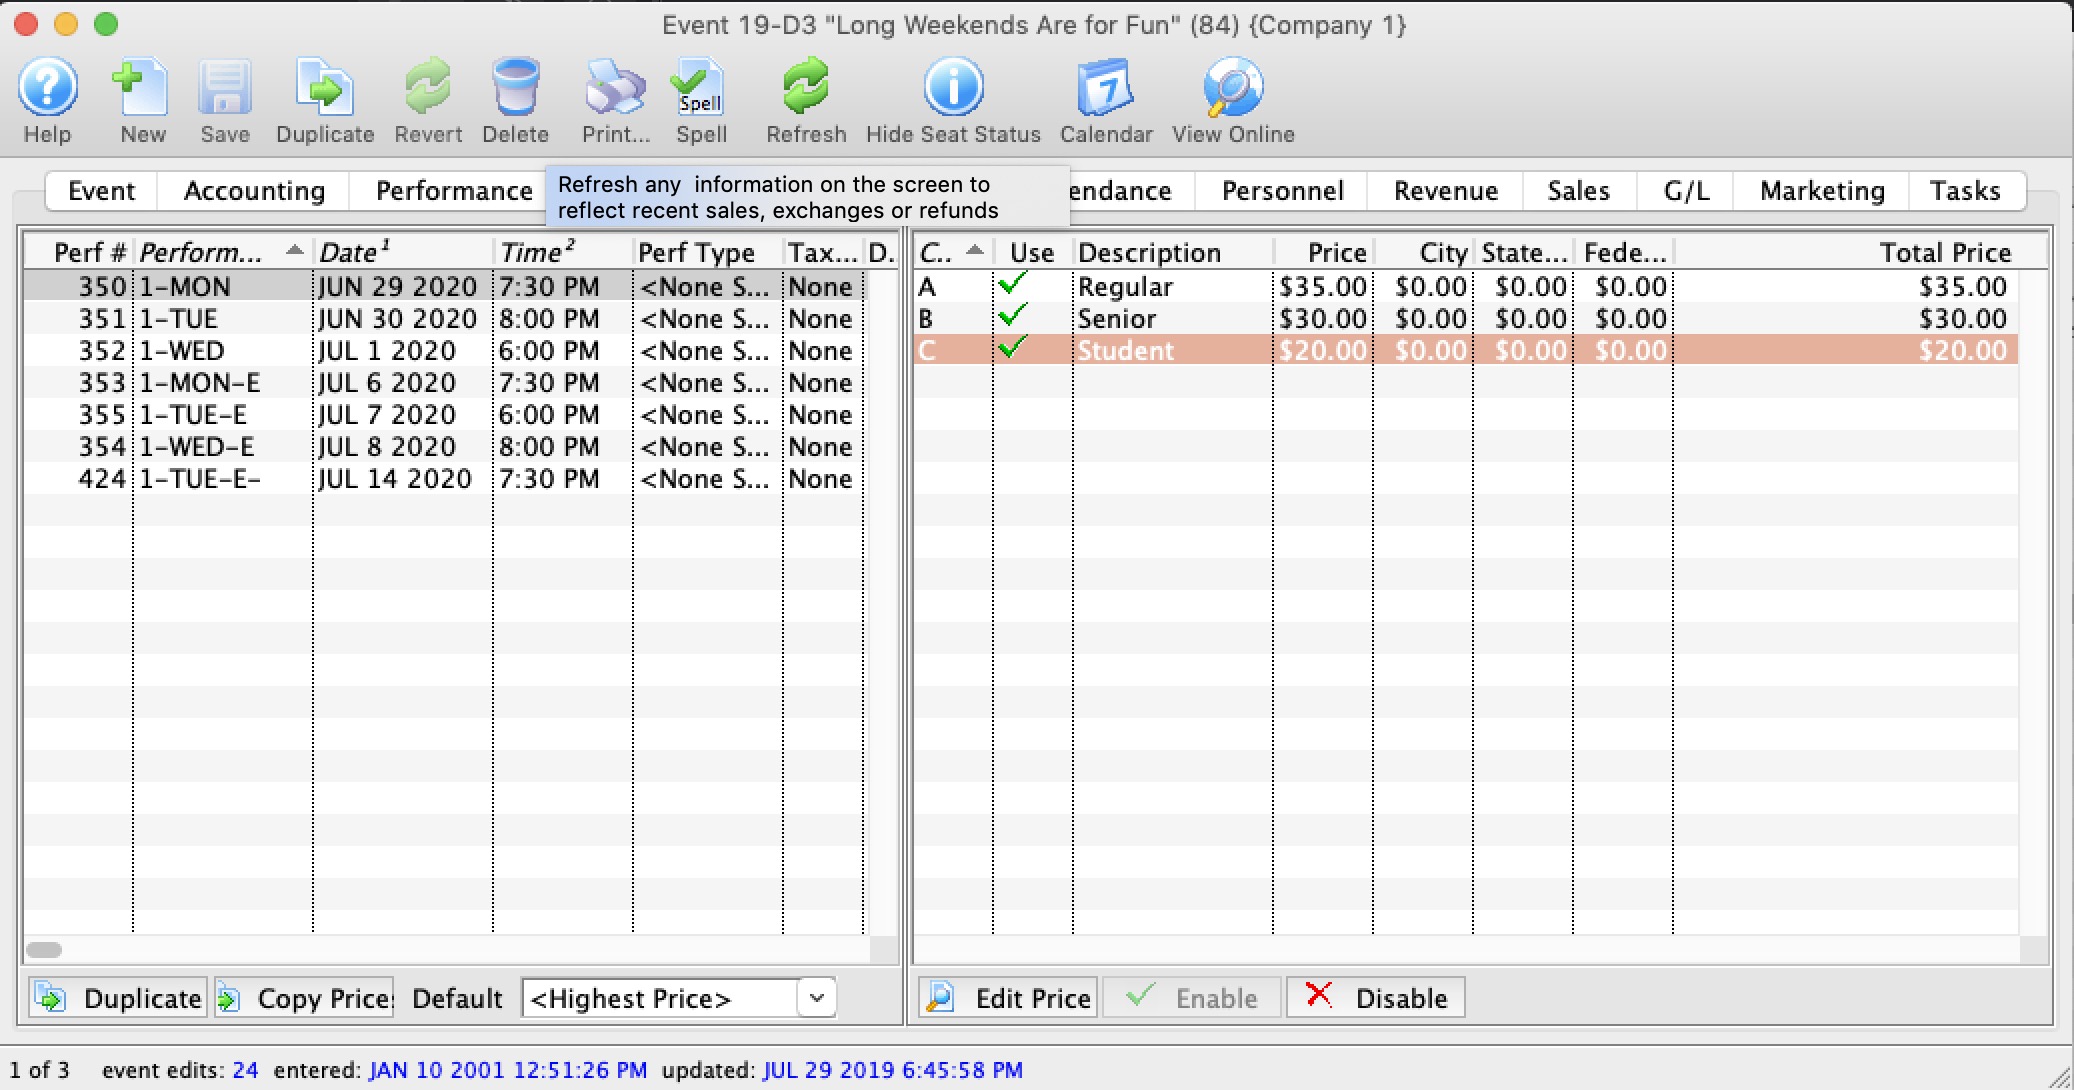
 Pricing information for the selected performance on the left side displays the price list on the right side of the window. When you click on different performances on the lest, the price list will change to reflect that performance.
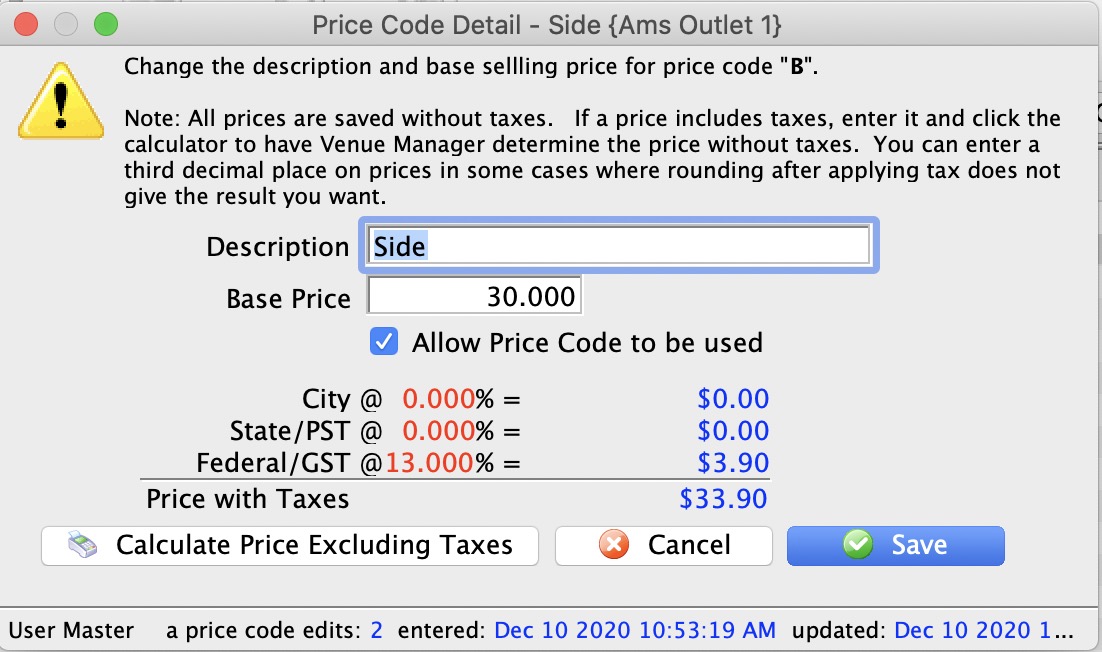
If you want to change one of the prices for the performance, the just double click on it. to see the edit window on the right. Make any changes, including activating/inactivating it and save.
|
If you calculate price excluding taxes and the newly calculated based price does not return the full price you want, try enter a fractional price. eg, instead of a price of $12.65, you might try adding almost half a cent to see if $12.654 works, |
In the list, from left to right the price list displays:
| Code | Displays the single character code that is associated with this price. This character was assigned in the Price Code field in the Venue Map window. |
| Use? | Check box field. If the box is checked then the price code is available for use by the performance that is highlighted in the performance list. |
| Description | The description you give to easily identify the price code. For example, Adult, Child, Senior, Student. Or alternatively: Front, Mezzanine, Loge, Balcony. |
| Price | Displays the dollar value of the price code. For example, $10.00, 15.00... etc. |
| City | Displays the amount of city tax charged on the price code. |
| State/PST | Displays the amount of provincial / state tax that is charged on the price code. |
| Federal/GST | Displays the amount of Federal tax charged on the price code. |
| Price + Tax | Displays the total price of the price code with all taxes included. |
| Enable | Enable the selected price codes all at one time (you can use context menu as well, or edit them one at a time) |
| Disable | Disable the selected price codes all at one time (you can use context menu as well, or edit them one at a time) |
Duplicate Prices
In Theatre Manager , you can duplicate the prices from an entire event already built in Theatre Manager to the new event you are creating.
- Click on the Pricing
 Tab of the Events and Dates Window.
Pricing information should now display on the right side of the Events and Dates window.
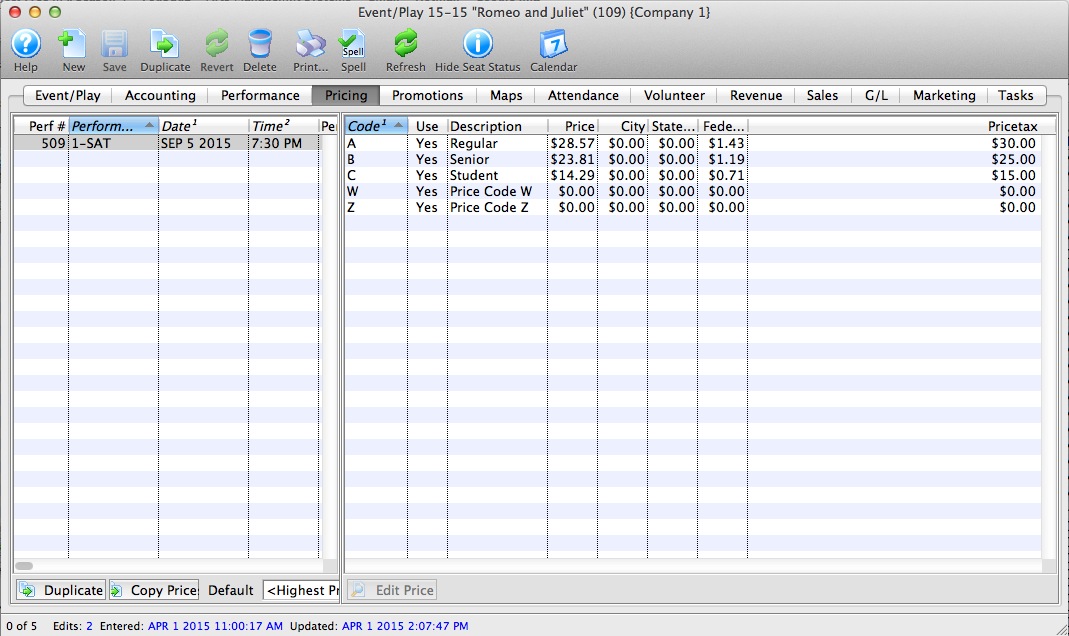
- Click the Duplicate Prices
 button.
The Duplicate Price Wizard window opens.
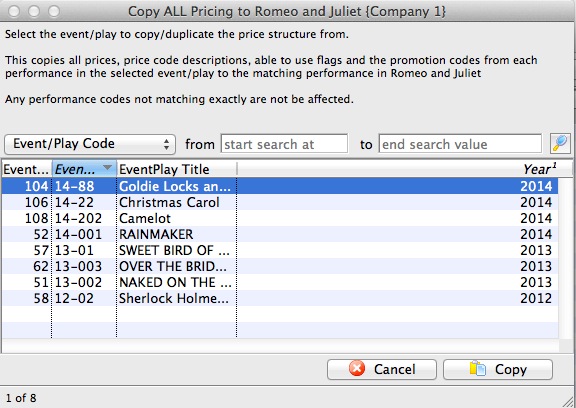
- Select the event you wish to copy all prices from.
Click the
 button.
The rule here is that Theatre Manager will duplicate the pricing for each performance from an existing event. The Event you copy from MUST have the same number of performances with the same naming convention: i.e. 1-SAT, 2-FRI etc. If not the case advance to the more selective process of Copying Prices
Copying Prices
In Theatre Manager , you can copy prices to a single performance or group of performances, from any performance saved in Theatre Manager.
- Click on the Pricing Tab of the Events and Dates Window.
Pricing information should now display on the right side of the Events and Dates window.
- Select the performances that you want to Copy Prices to.
To do this, click on the first performance you want to copy prices to, then drag you cursor over the remaining performances from the performances list on the left side of the window. Alternately, you can click the first performance, and then hold <CTRL> (Windows) or <COMMAND> (Mac) and click each additional performance.
- Click the Copy Prices
 button.
The Copy Price Wizard window opens.
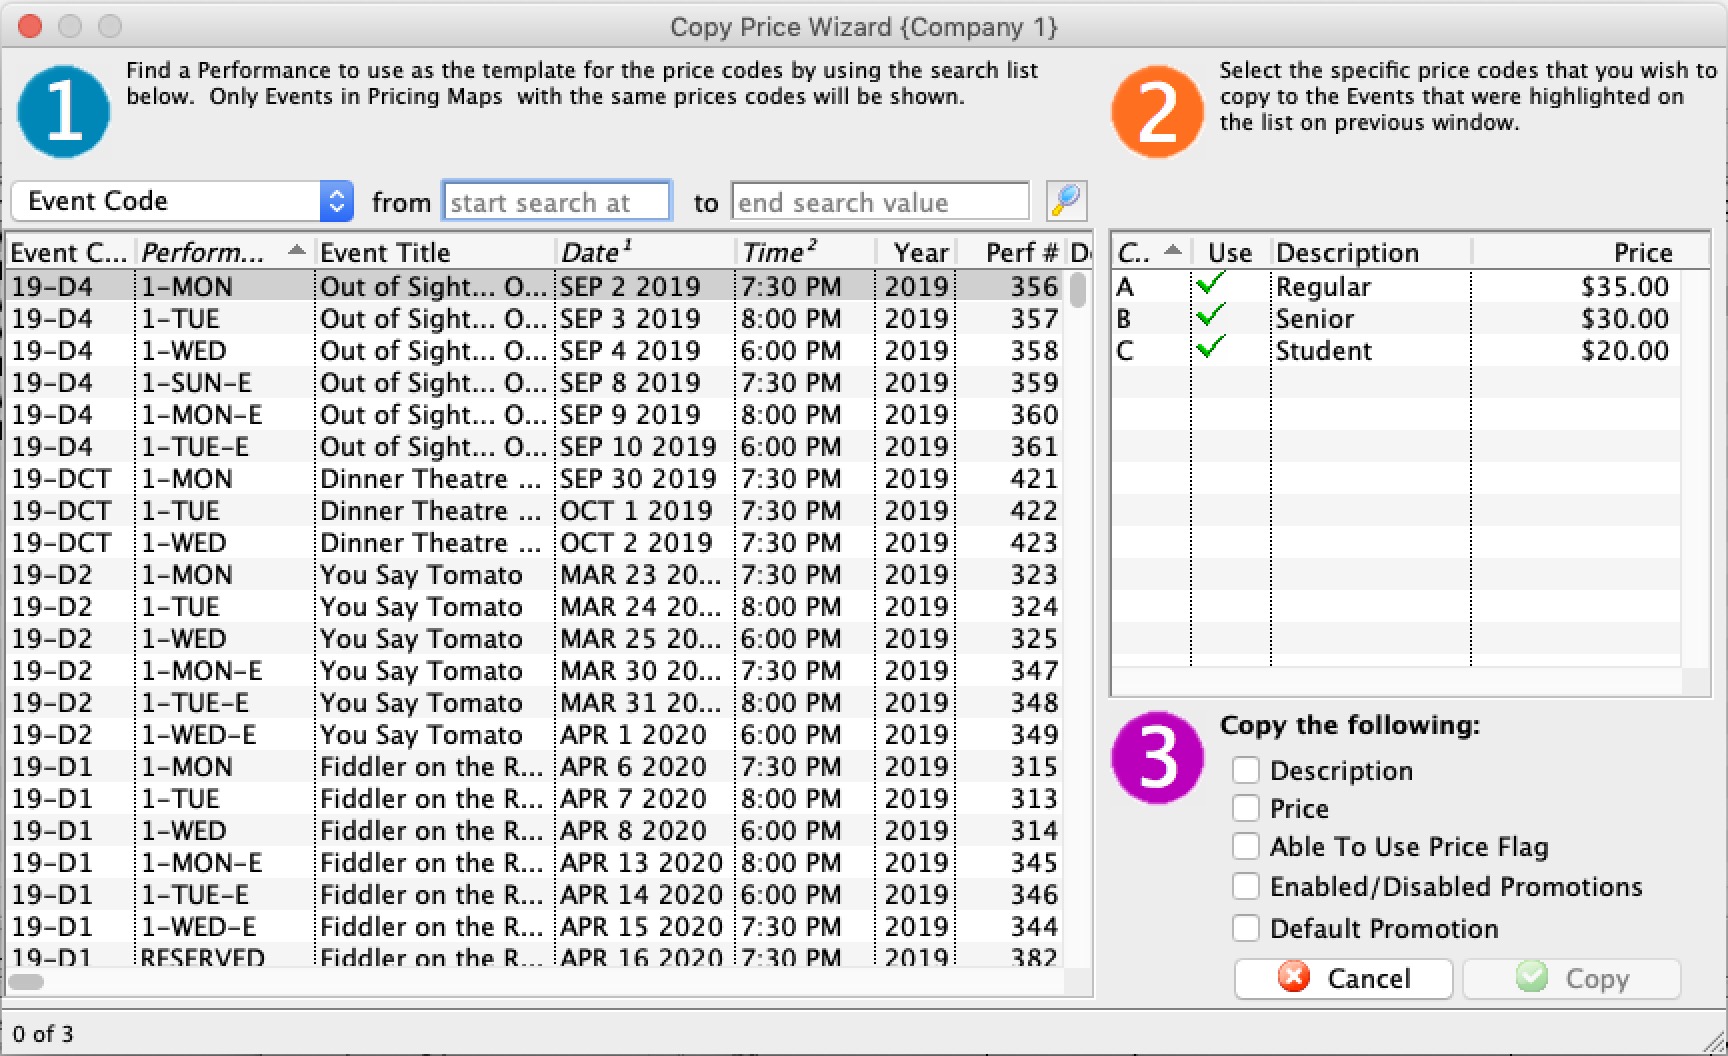
- In Step 1, select the performance to use as a Pricing Template.
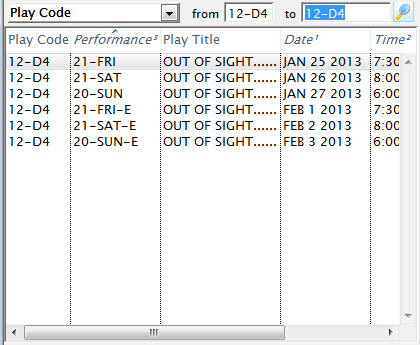
To further refine your search, click the drop down list under the 1. You can then choose a different five search fields. They are:
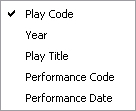
Select a search field, and you can further restrict the search using the "from" and "to" fields to enter criteria. For example, the (picture) below displays a successful search for performance that have Play Codes starting with 07.
- In Step 2, you select the performance that you want to use as a Pricing Template.
As you select plays, their price codes are displayed on the left and the performance's price codes are displayed on the right.
- Choose the Price Codes you want to copy.
Highlight the Price Codes you want. You can select all, none, or some of the price codes to be copied.
- In Step 3, you choose which Attributes of the Price Code to copy.
There are four parts of the price code that you can copy across. The Description, the Price, Able To Use Flag, and Enabled/Disabled Promotions. To copy an attribute put a check in the box beside the attribute desired.
- Click the Copy
 button.
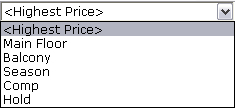
Selecting a Default Price Code
|
Note: Default price only applies to box office sales.
Web sales always default to selecting the highest price because patrons generally accept any price offered. They never look to pay more, but they may look to pay less if it applies. Psychologically, if a computer offers a lower price, then people assume it must be right and nobody looks. The default price list only shows one line of price, so if you want to show more prices for customers online, you can edit rowTicketReserve.html to show more lines - allowing the patron to see and then pick a price easier. |
Each performance (series) can have its own default price code setting.
- Click on the Pricing Tab of the Event Setup Window.
Pricing information will display on the right side of the Event Setup Window.
- Select the performance to set the Default Price Code for.
Click on the performance from the performance list. The prices for this performance display in the price list on the right side of the window.
- Open the Default Price Code drop down list.
A list of usable price codes is displayed.
- Select the Price Code to be the Default.
Do this by clicking on a price code from the list.
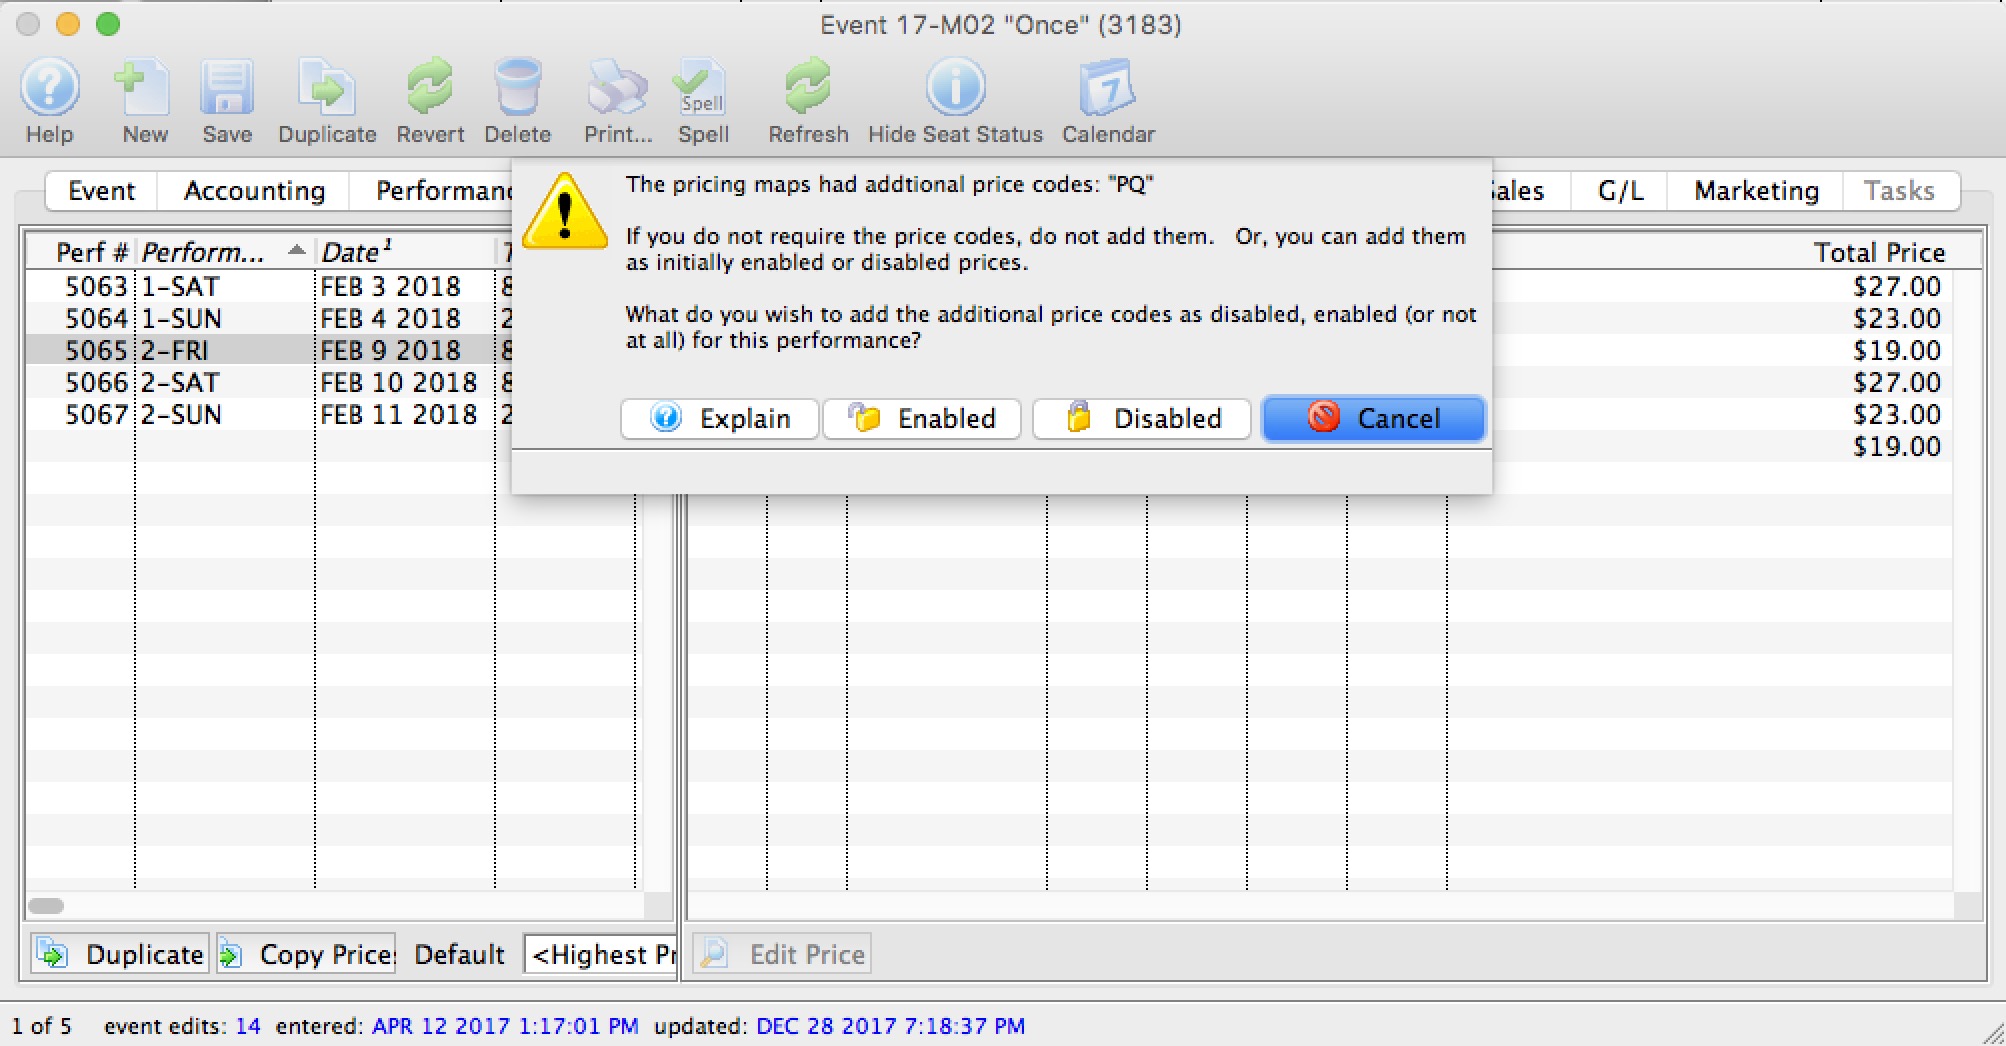
Adding New Price Codes from Venue
If new price zones are found when looking at pricing for a performance that do not have corresponding prices, you will see an alert dialog that asks what you want to do with those additional pricing zones. You can:
- Cancel adding the new pricing zones - which means that the new prices will not be created. This is the best option as pricing is not changed.
- Add the pricing zones to the performance as initially disabled, which means that the price codes are added as zero price, but not enabled for purchasing. This is a safe option since the price codes are added, but nobody can use them until you set prices.
- Add the price zones as initially enabled, which means that the prices are instantly available as zero price tickets. This is the least safe option, but probably what you would pick if the event is not available for sale online. If a performance is available for sale online, the disabled setting is automatically be used for that performance.
|
You will only receive this message to add prices if:
|
Promotion Tab
|
By default, ALL promotions are available to the performance when it is created. |
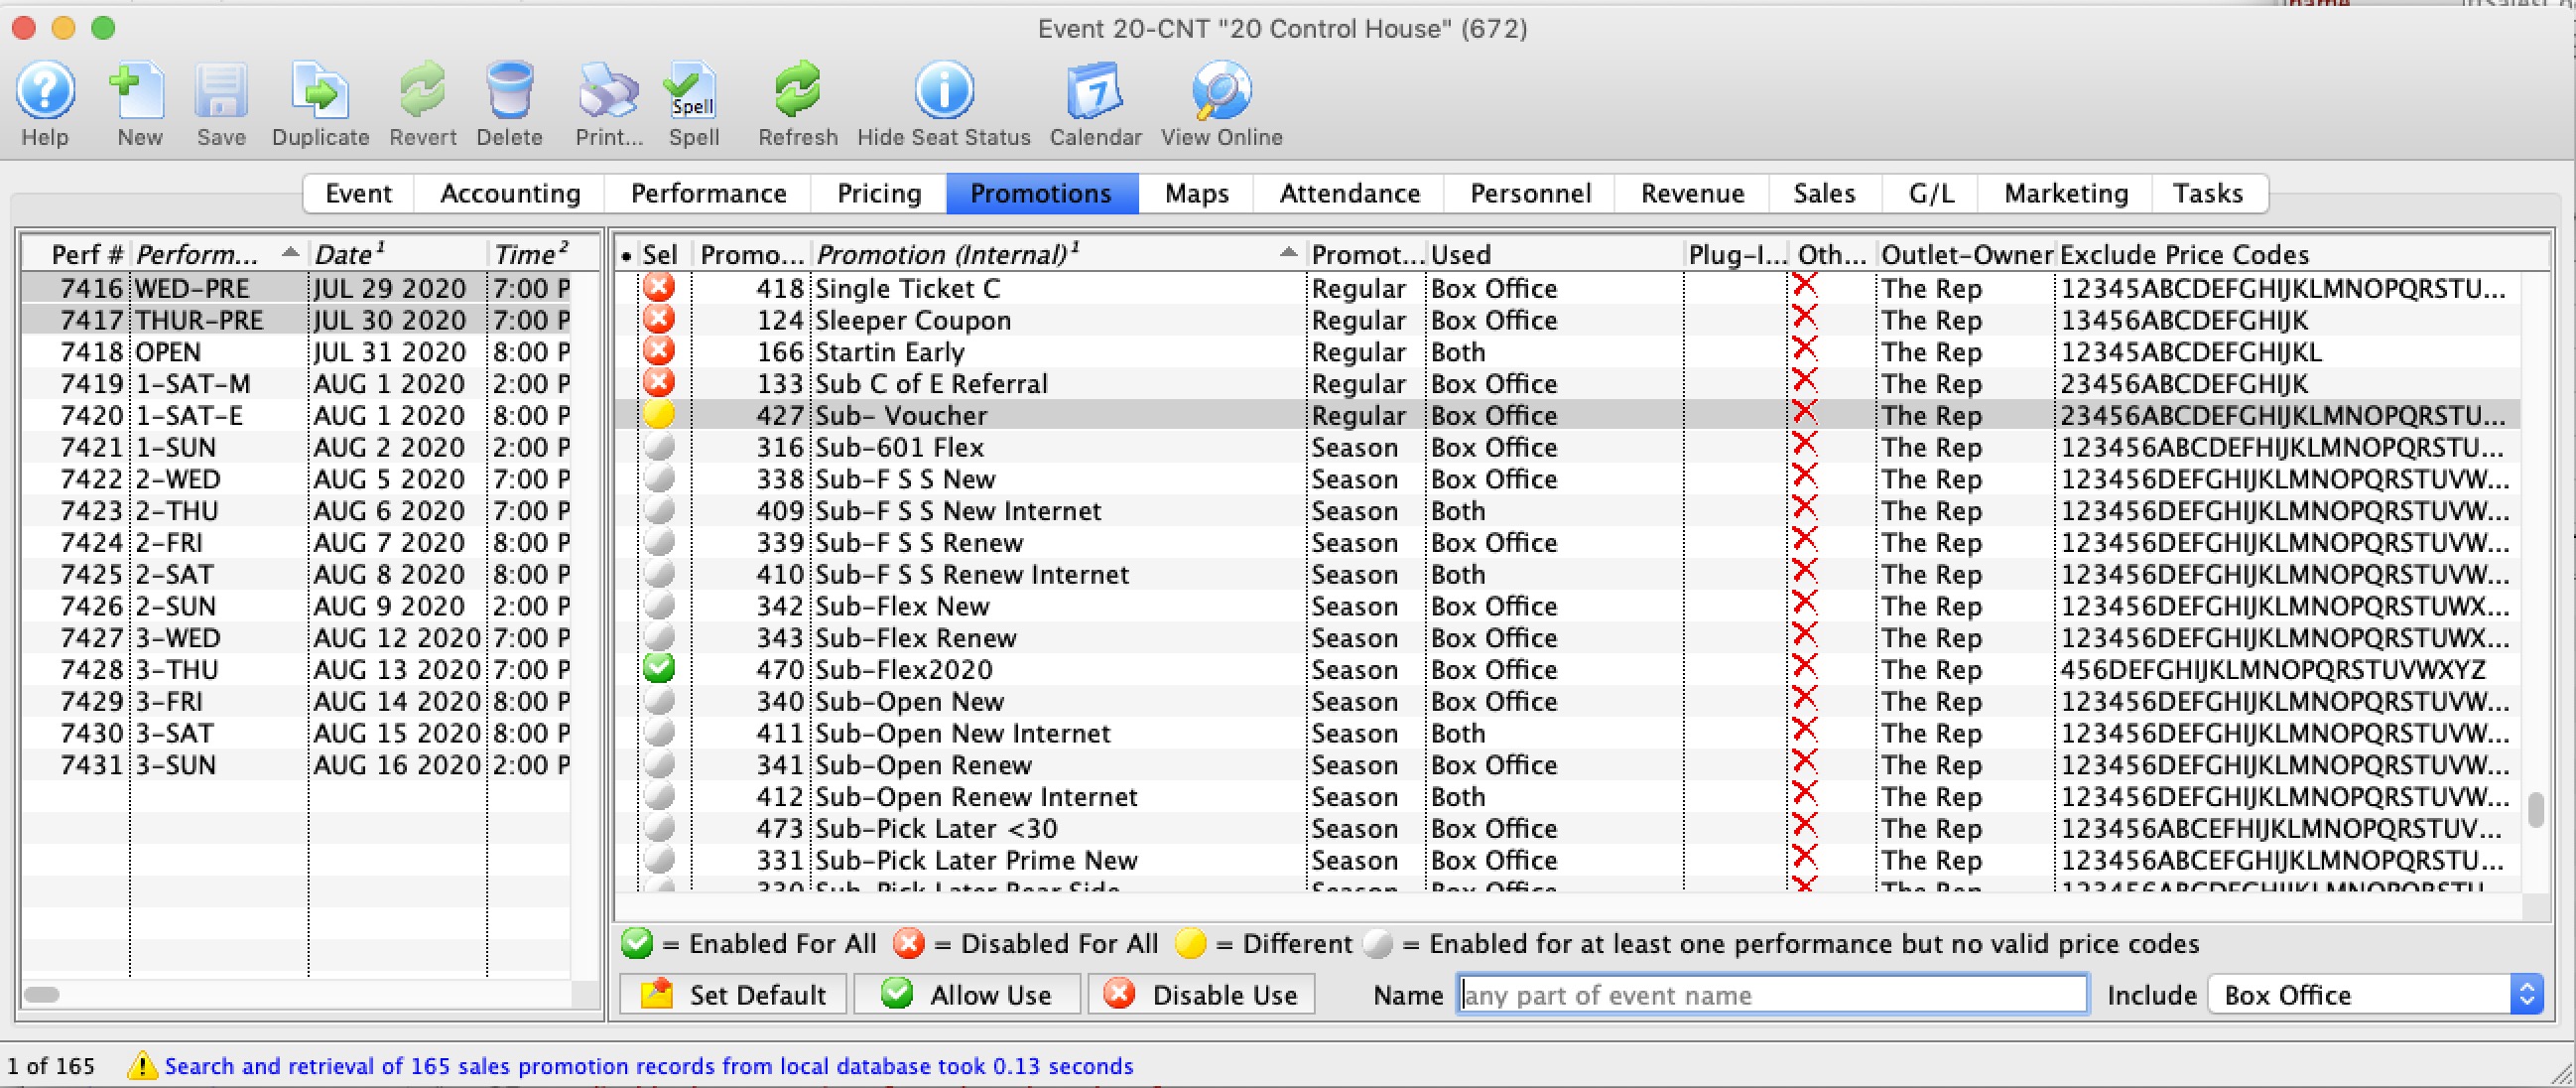
Parts of the Promotions Tab
| Performance # | Number of performance assigned in order of creation. |
| Performance Code | Code assigned based on the week and day of the performance. |
| Performance Date | The date of the performance. |
| Peformance Time | Time of the performance |
| Sel | Displays one of the four icons
|
| Seq# | System defined number for the Promotion |
| Promotion | Name of the Promotion |
| Promotion Type | Ticket Type for G/L Posting |
| Used | Where the Promotion can be used for a sale |
| Other Outlet | Indicates if the Promotion is available at another Outlet |
 |
Sets the Promotion as the default for the selected Performance |
 |
Allows the promotion for use with the selected performance. Click here for information on enabling promotions for a performance. |
 |
Disables the promotion for the selected performance. Click here for information on enabling promotions for a performance. |
| Name | Enter part of the sales promotion name to search for only those that match the filters below. |
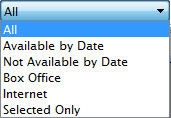
|
Gives you alternate selections to filter the list displayed. Choices are:
|

Maps Tab
 From this tab, you can
- View the current house dressing for a reserved seating event.
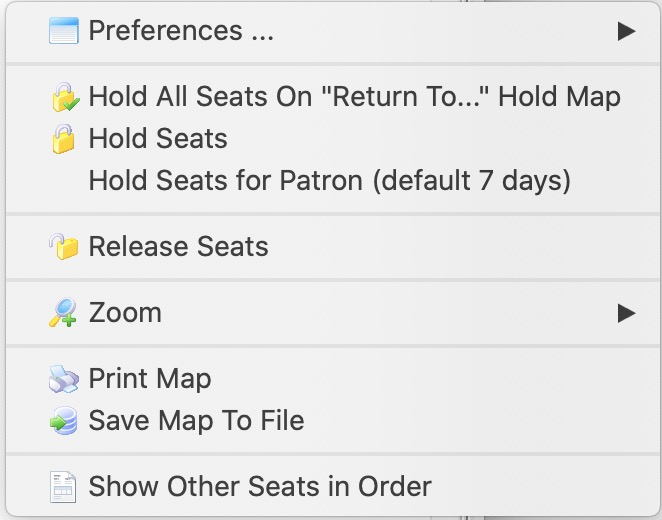
- add and release holds for the selected performance.
- create a different return to hold map for each performance if you want tickets returned to hold when they are refunded in a different way that the venue default.
- Print the map with the holds right before the performance - for the front of house staff.
- see the Hold and Sold count and their effect on online sales based on the reporting capacity settings.
- etc
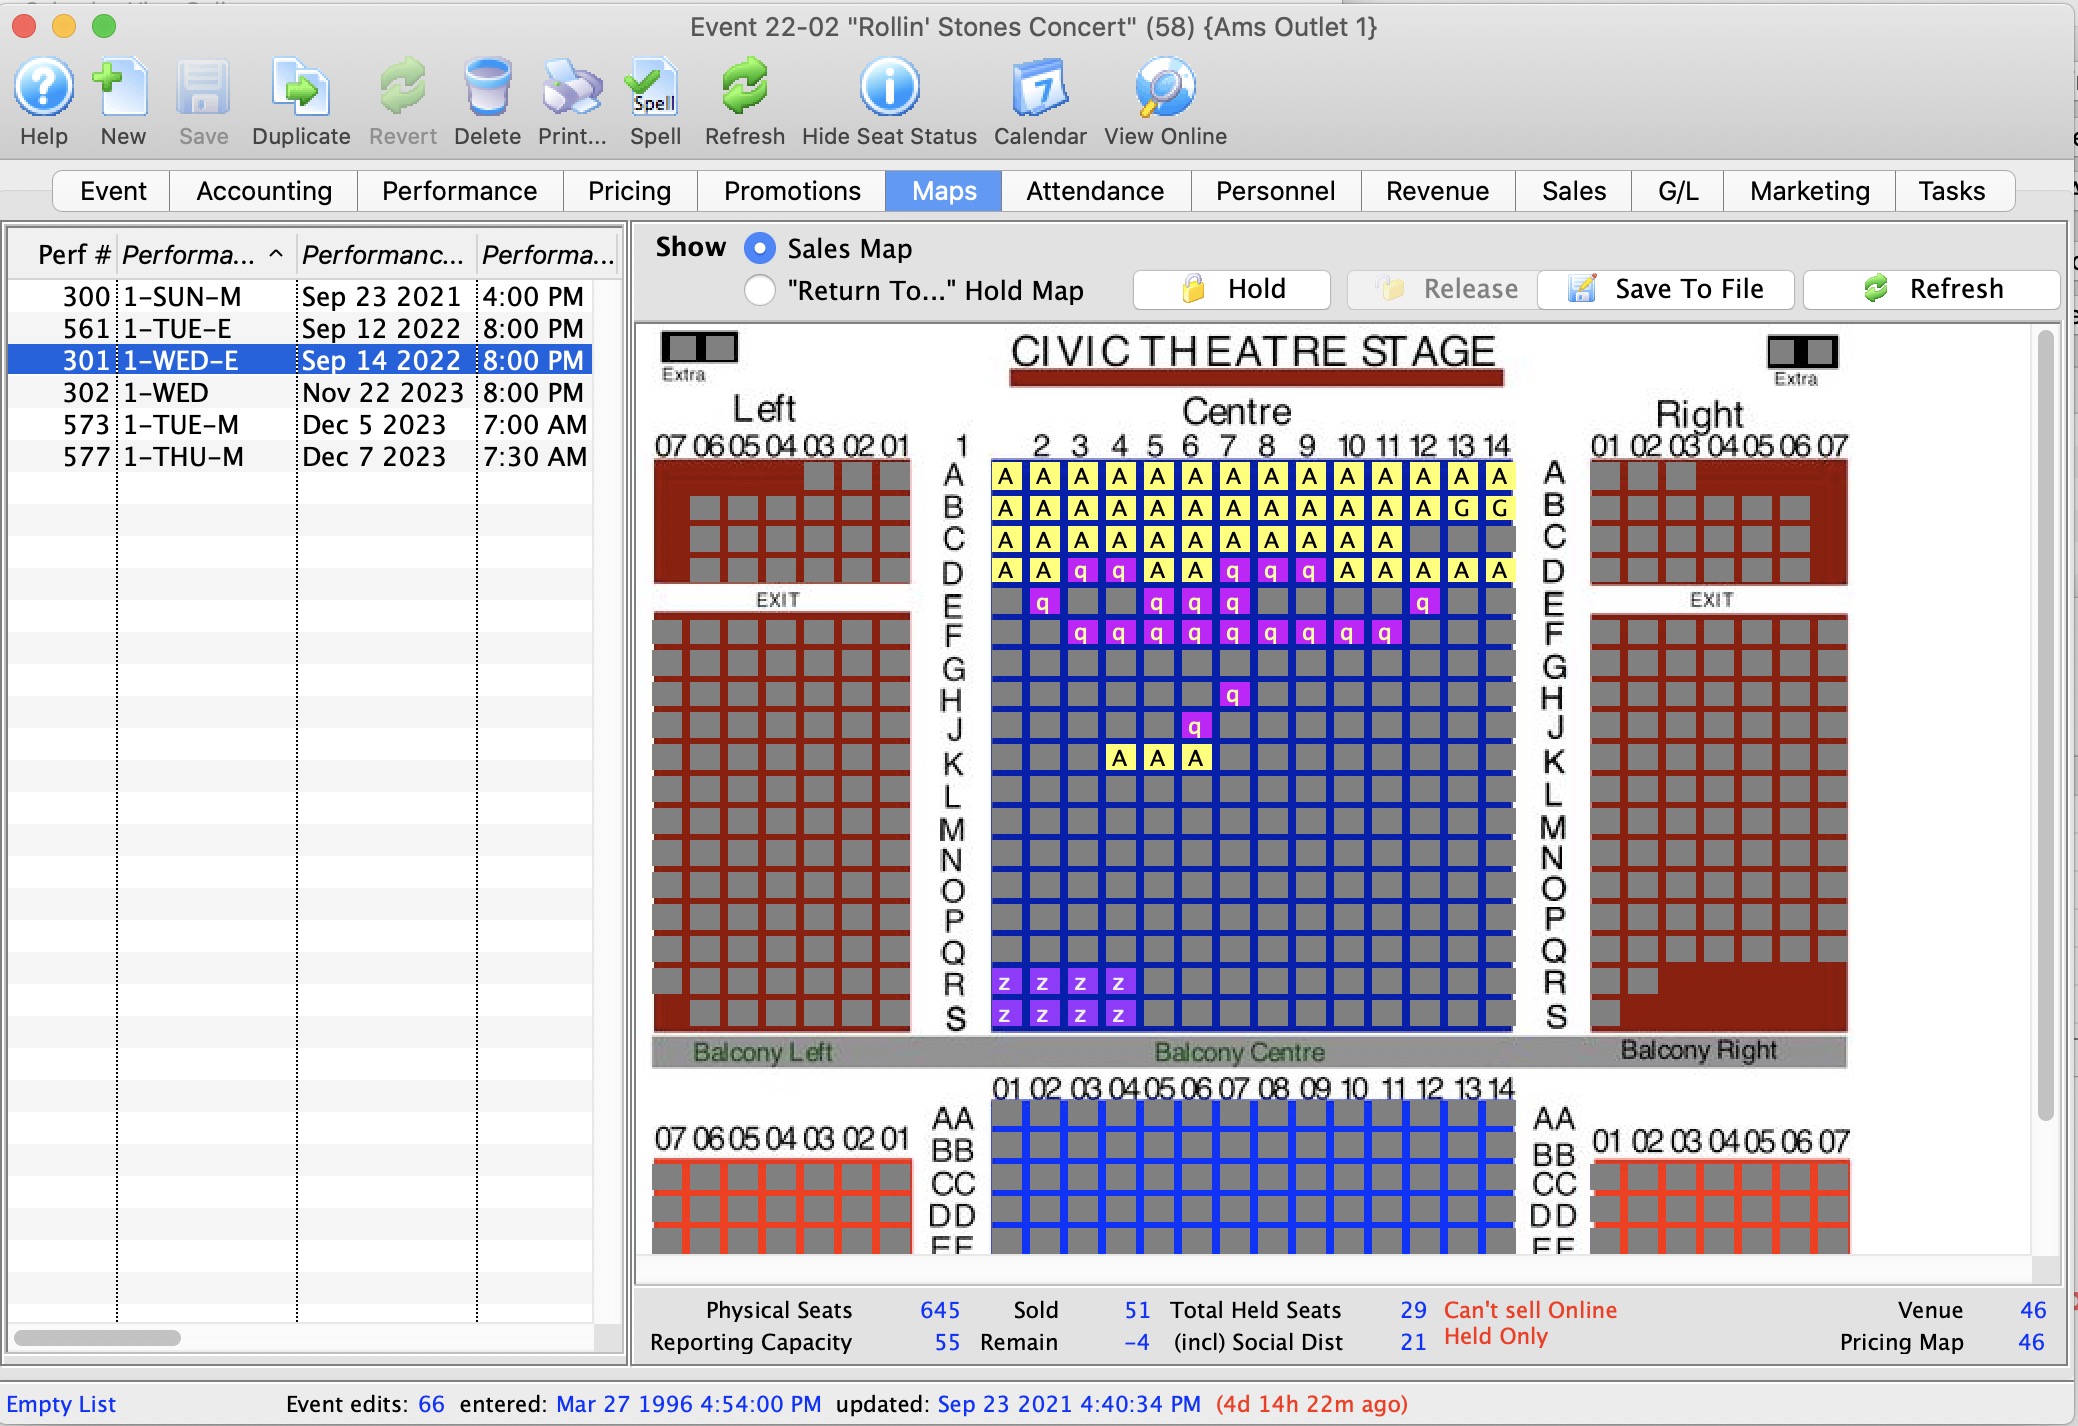
|
To help manage online sales based on reporting capacity, a table below the map window shows current physical capacity, reporting capacity, sold, held (and social distance held) totals.
The remaining seats indicated how many more seats can still be sold online. When it is negative, online sales are prevented because you have reached reporting capacity, even if there are seats left that can be sold to the performance. |
Parts of the Maps Tab
Performance Information |
|
| Performance # | Unique performance number generated by Theatre Manager. |
| Performance Code | A quick reference for the performance. |
| Performance Date | Date of the performance. |
| Performance Time | Time of the performance. |
| # Sold | Number of seats currently sold for the performance. |
| # Held | Number of seats currently held for the performance. |
| Sales Method | Type of seating used for the performance, typically either Festival or Reserved. |
| Play # | Sequence number of the event. |
Additional Buttons |
|
 |
Shows the current map as it appears in the Ticket Selection process.
|
 |
Shows the default holds map for the venue as set in Theatre Maps. |
| Checked in Seats Map | Shows the seats that have been purchased and:
|
 |
Allows a seat to be held by a letter code for the selected performance. |
 |
Allows a seat to be released for sale for the selected performance. |
 |
Prints a graphical version of the "House Dressing" for the selected performance. Click here for more information on printing the Graphic Map by Performance. |
 |
If you add holds in the theatre map for a performance that has already been set up, you will need to go into each performance in the event:
|
Seat Availability Calculations (bottom of Map)
|
|||
| Physical Seats | The number of seats that are physically placed on the pricing map that could be sold, held or available to be sold. | ||
| Reporting Capacity | The number of seats that is considered the maximum that could be sold. Most often, it is the same as the Physical seats in the venue. However, you can alter it to be a lower or higher number at any time.
Making it lower has some ramifications:
|
||
| Sold | The number of seats sold to that performance. This should be the same number as the attendance count for that performance. You should be able to see that number of tickets assigned to patrons. | ||
| Total Held Seats | Indicates the number of 'held' seats for this performance. These are all the lower case letters of ALL types, regardless of purpose (usher, social distance, light board holds, artist holds, subscription holds - they are all counted in this number) | ||
| (incl) Social Distance |
This number represents the count of tickets marked a social distance using the social distance hold letter specified in system preferences.
Note: The total hplds - social distance holds = the number of holds assigned for some other purpose. This number just breaks those out for clarity. |
||
| Remain |
The number of tickets remaining represents the count remaining that can be sold online.
|
||
| Red Message |
If you see a red message, Theatre Manager is interpreting the numbers for you.
| ||

Attendance Tab
- Set the attendance the day of the performance - Setting attendance allows you to track which patrons with tickets actually attended the performance.
- Refund tickets - The refund function is for ease of use if:
- on the day of the performance a patron decides that they would like to refund their ticket you can do so without having to change windows.
- the promoter cancels the show and you want to mass refund of all the tickets back to the system and give patrons their money back, or turn it into a donation or Gift Certificate.
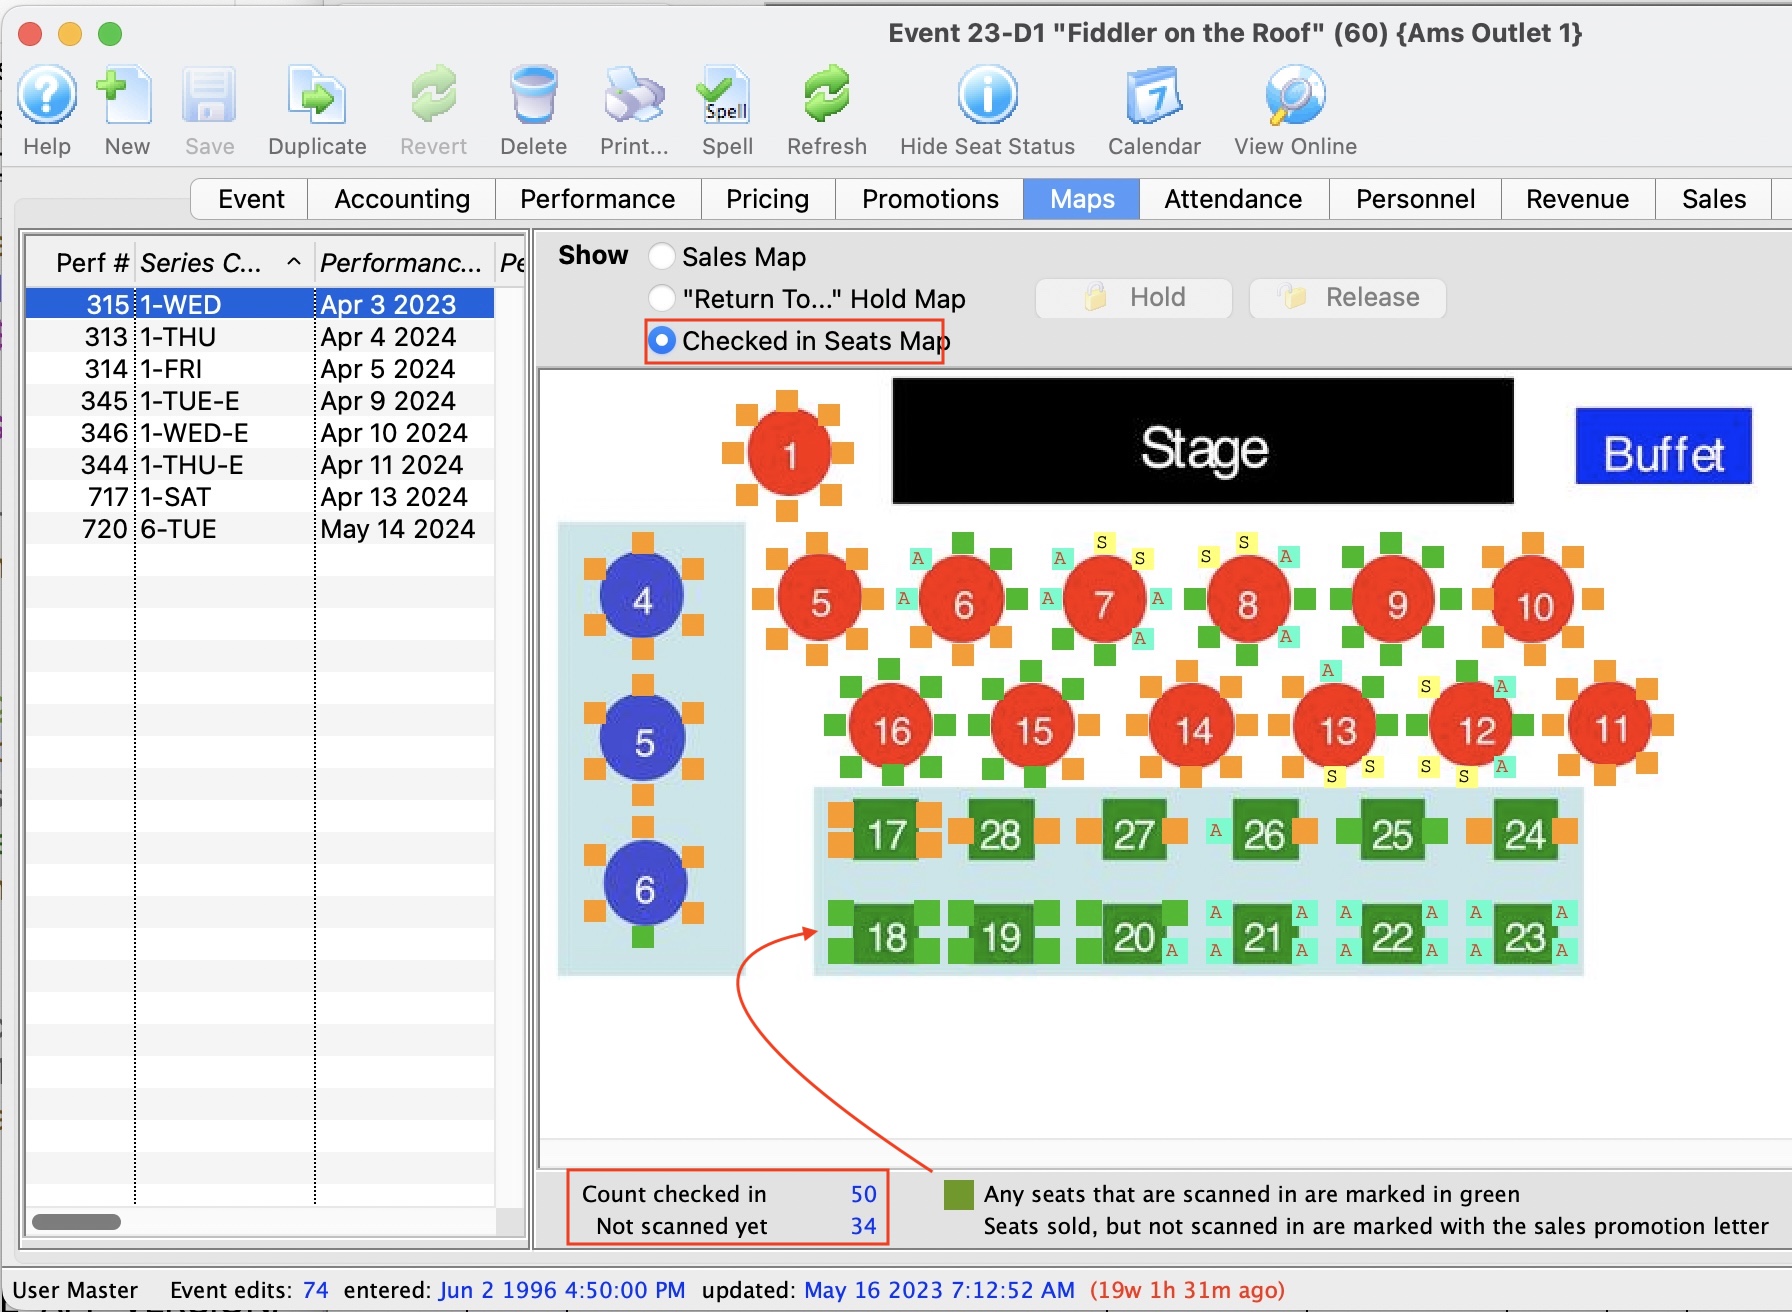
Context Menu Features
Use the context menu to do a lot of things to the orders such as
- Add tickets to an order
- Pay for the order if it has a balance
- Exchange tickets for another event if you are using this for a waitlist event or it is cancelled
- Assign the ticket to another patron if somebody else is picking it up
- Reprice the ticket for a gala so that you can add a donation when the gala ticket is purchased online
- etc.
Parts of the Attendance Tab
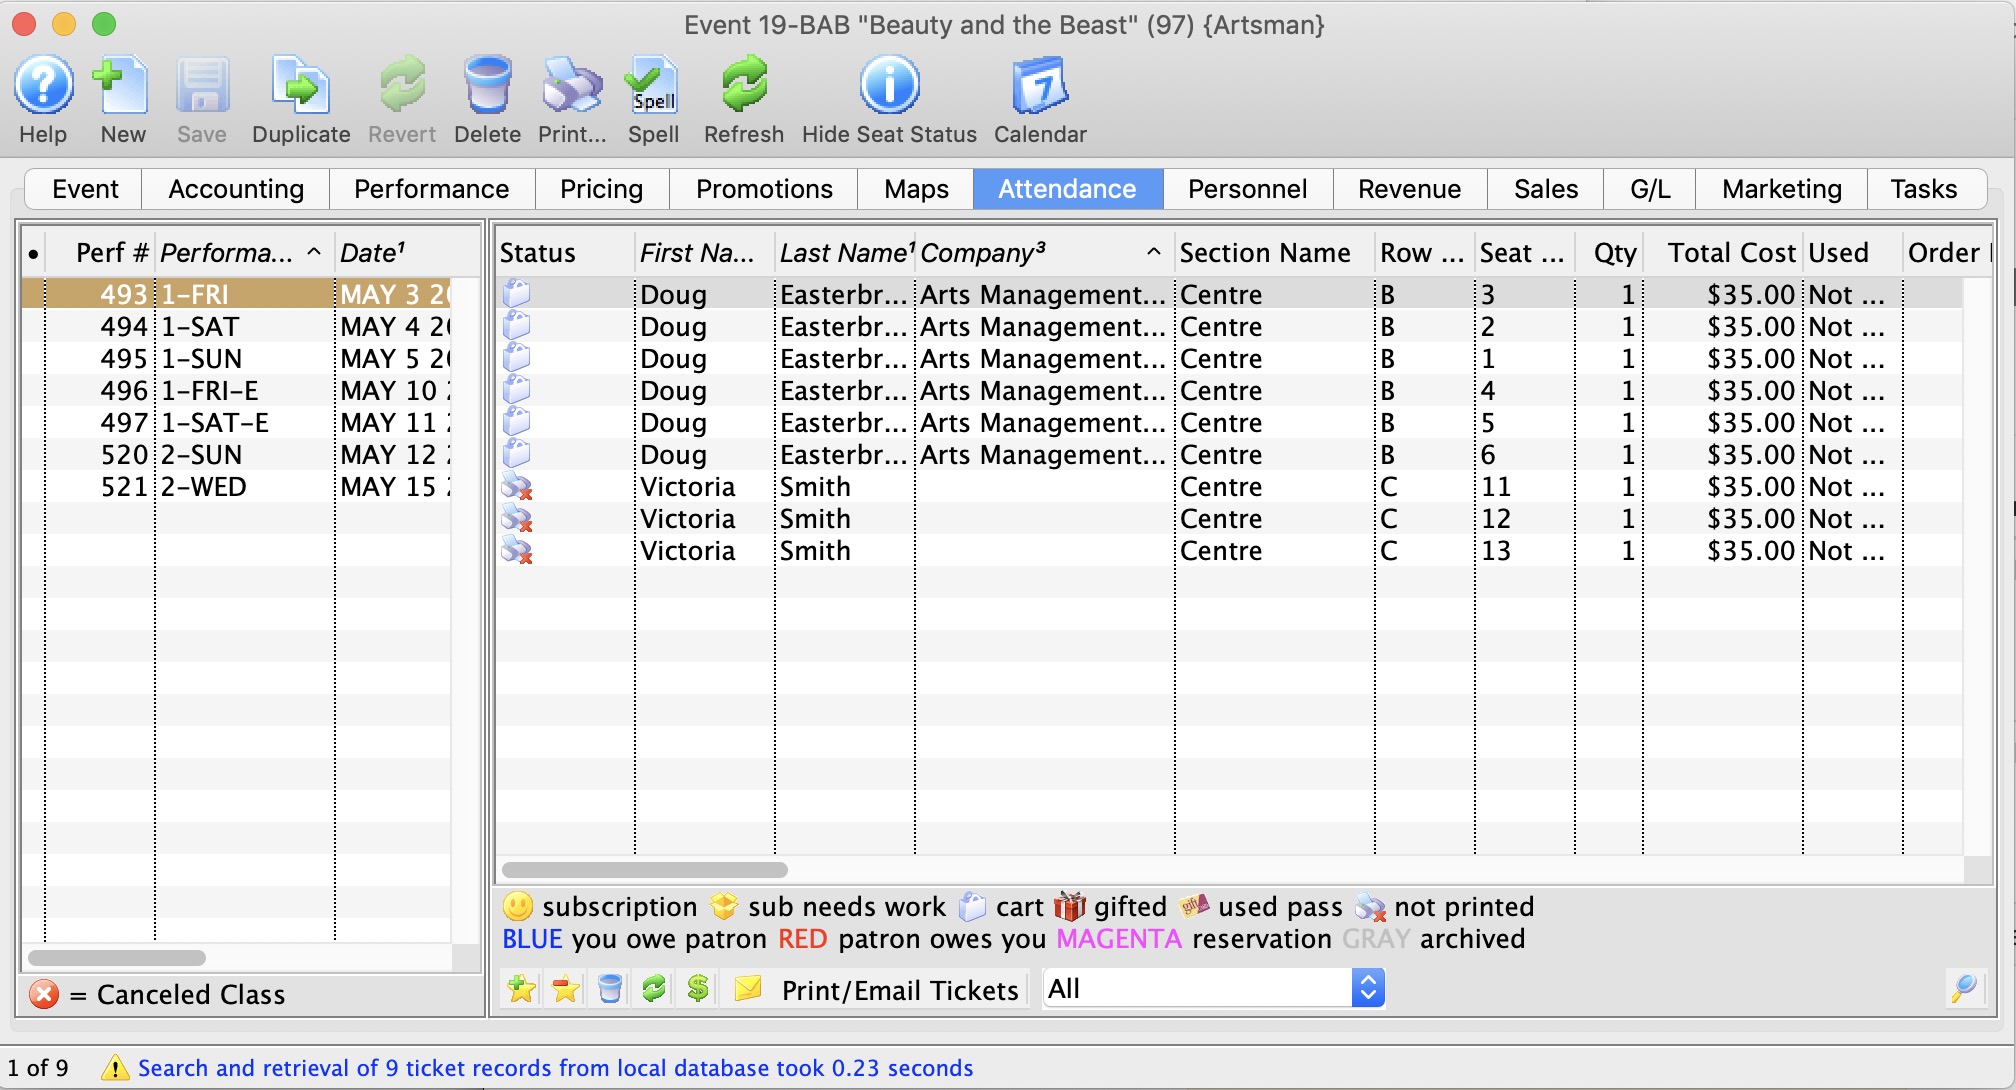
Performance # Number of performance assigned in order of creation. Performance Code Code assigned based on the week and day of the performance. Performance Date The date of the performance. Purchase # Purchase reference number. First Name Patron's first name. Last Name Patron's last name. Company Company the patron works for. Section Section the patron is seated in. Row # Row the patron is seated in. Seat # Seat number the patron is seated in. Quantity Number of admittance per ticket. 
Sets the attendance for the performance. This is only available on the day of the performance or after it has taken place. 
Clears the attendance of the performance. This is only available on the day of the performance or after it has taken place. 
Print the selected tickets for this performance that are not yet printed. 
Does a Mass Refund of the selected tickets back to the patron using the credit card used to pay for the event. 
Transfers the selected ticket(s) to another performance.
Transfer Tickets to Another Performance
Occasionally, you may need to transfer all the tickets from one performance to another. Rather than doing this individually, you can transfer them in a batch by using the wizard on the Attendance tab of the Event setup. This can be helpful when:
- You have cancelled the performance and need to re-seat patrons in another performance
- You want to move a subscription package to another performance
- You need to transfer people into a HOLD or WAIT LIST performance
- Anytime a mass re-seating of patrons is required
- You are considering moving all patrons to a venue with different orientation and capacity instead of simply changing venue.
The transfer function moves all selected tickets by matching seat codes for reserved seating events (festival seating events cannot be transferred in this fashion). Tickets for festival seating events will need to be manually exchanged. Tickets are not re-priced when they are transferred and do not affect order balances.
|
Tickets will not be moved if:
|
To transfer tickets from one performance to another:
- Bring up the Events List in the Setup menu, or by clicking on the icon on the main tool ribbon.
- Click the
 icon to populate the list with your events.
- Double click on the Event containing the performance you wish to transfer the tickets FROM.
- Click on the
 tab
tab
- Highlight the performance on the left that you are transferring the tickets FROM.
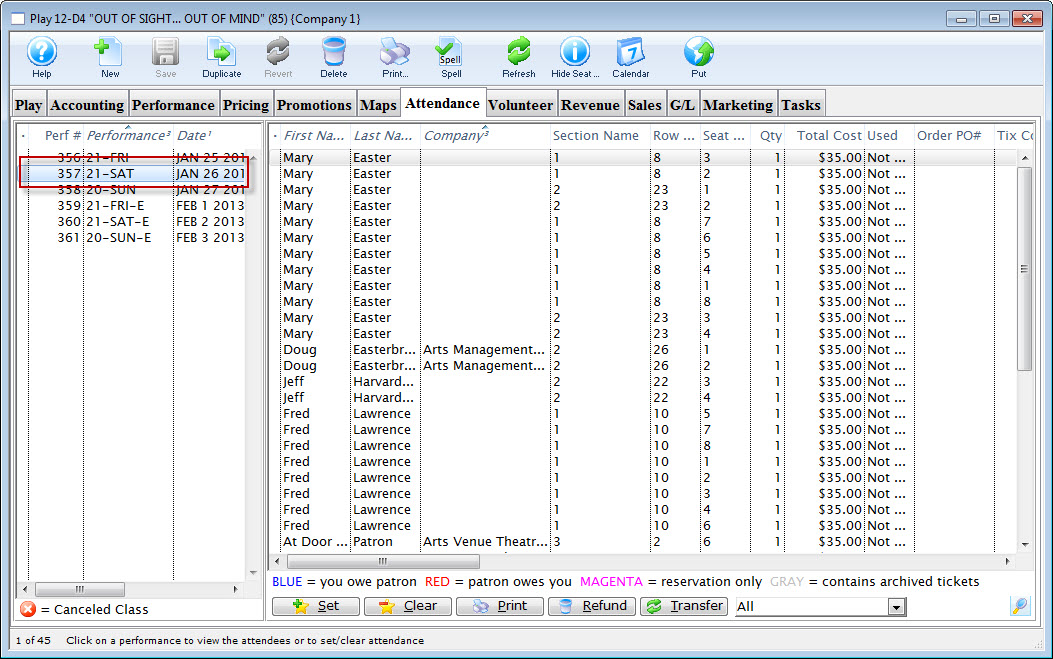
- Highlight the ticket(s) on the right that you wish to transfer.
You can select some or all of the tickets, allowing you to transfer only a sub-group of the total attendance.
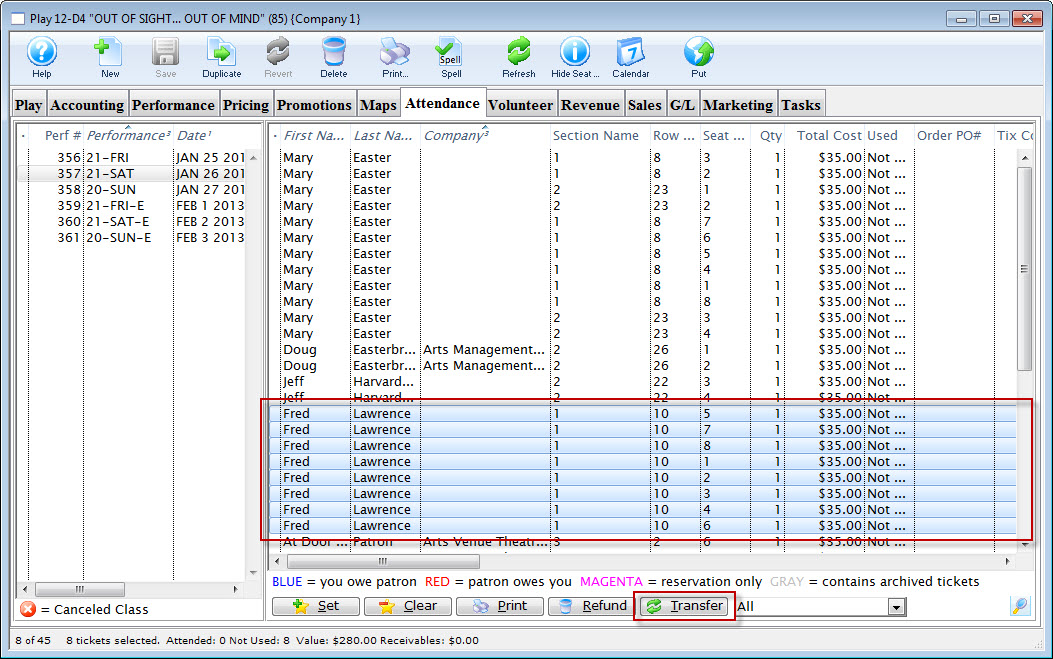
- Click the Transfer
 button at the bottom of the window.

- Enter the performance number you want to transfer the tickets TO.
Alternatively, you can use the
 icon to search for the performance.
 - Select whether you want to transfer:
- Only the selected ticket(s) (in this example, eight tickets), or
- All of the tickets within this performance
- Click the Transfer
 button.
The Transfer Confirmation opens.
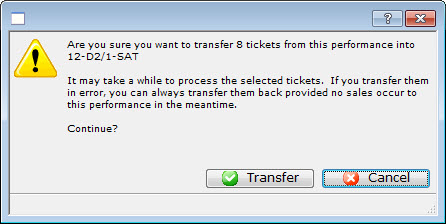
- After you have reviewed the information, click the Transfer
 button.
The valid tickets will be transferred to the new performance.
Volunteer Tab
|
"Volunteer" is a broad term meaning "Personnel," "Volunteers," "Staff," or a variety of other terms. The field refers to any person assigned to an activity - whether they are paid or unpaid. you may have a mixture of paid and unpaid staff within the same event, for example Ushers (who are unpaid) and Run Crew (who are compensated). Since the name of the field is customizable, some organizations may retain the term "Volunteer," while others change it to reflect their own terminology. The nomenclature in your database may be different than "Volunteer." |
This Volunteer tab displays a list of the volunteers (personnel) assigned to each performance of the event, and what their task will be during the performance.

Parts of the Volunteer tab
| Performance Information | On the left side of the window, the listing of performances including the sequence number of the performance, series code, and performance date. |
| Volunteer Information | On the right side of the window, the listing of volunteers assigned to a specific performance. |
 |
Allows you to look up and add a volunteer to the selected performance. |
 |
Brings up the Volunteer Activity Detail window for the selected patron. |
 |
Allows you to remove a volunteer from the selected performance. |
| Show volunteer working entire event | Enabling the check box, displays the volunteers who are working for the entire play. Disabling shows the volunteers who are working the selected performance only. |
Adding Volunteers to an Event
|
"Volunteer" is a broad term meaning "Personnel," "Volunteers," "Staff," or a variety of other terms. The field refers to any person assigned to an activity - whether they are paid or unpaid. you may have a mixture of paid and unpaid staff within the same event, for example Ushers (who are unpaid) and Run Crew (who are compensated). Since the name of the field is customizable, some organizations may retain the term "Volunteer," while others change it to reflect their own terminology. The nomenclature in your database may be different than "Volunteer." |
Adding volunteers to an event is as easy as "drag and drop" from a contact list to the Volunteers window in Event Setup, or using the convenient button at the bottom of the Volunteers tab.
- Open an event through the Setup>>Events & Dates menu, or by clicking the button.
Proceed to the
 tab.
tab.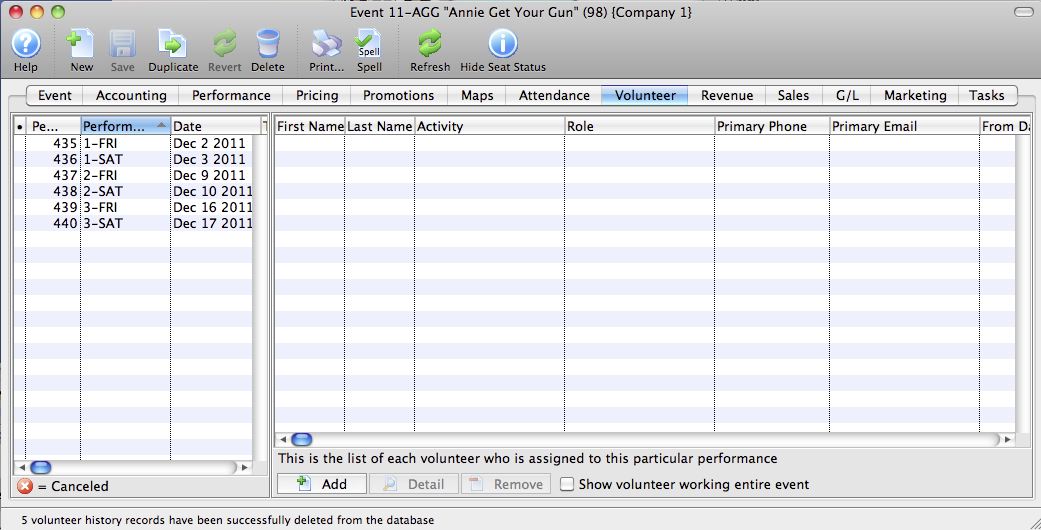
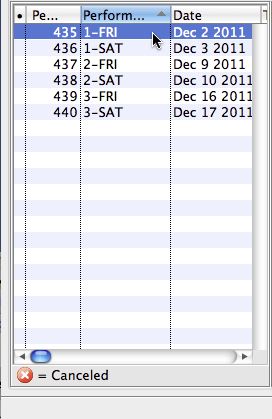
- Highlight the performance on the left-hand side to which you want to add volunteers.
- Click the button at the bottom of the window.
A contact lookup window of Active Volunteers opens.
Patrons must be listed in their patron records as active volunteers with positions they are able to perform. For more information on setting up patrons as volunteers, click here.
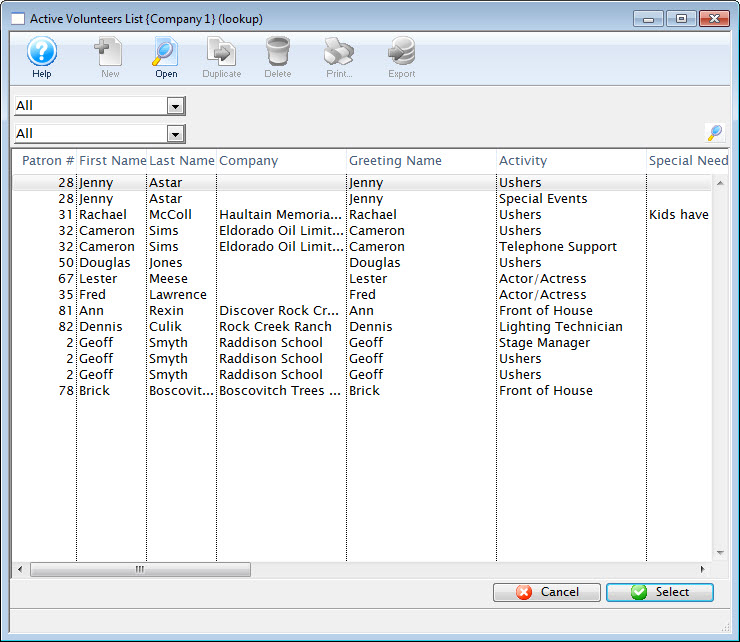
- Highlight the volunteer in the lookup that you wish to add to the performance.
Some patrons will appear more than once in the lookup, indicating they are capable of performing more than one position.
Click the
 button.
Your chosen patron now appears on the Volunteer tab of the event setup.
- Repeat to assign all volunteers
After adding all your volunteers, you may want to edit the details of their assignments to be more specific on the task they are to perform (for example, Ushers may be assigned to "Orchestra" or "Balcony" or "Coat Check," and Run Crew may be assigned to "Fly Loft" or "Spot Operator" or "Grip").
Editing a Volunteer Assignment
After adding all your volunteers, you may want to edit the details of their assignments to be more specific on the task they are to perform (for example, Ushers may be assigned to "Orchestra" or "Balcony" or "Coat Check," and Run Crew may be assigned to "Fly Loft" or "Spot Operator" or "Grip").
- Open an event through the Setup>>Events & Dates menu, or by clicking the button.
Proceed to the
tab.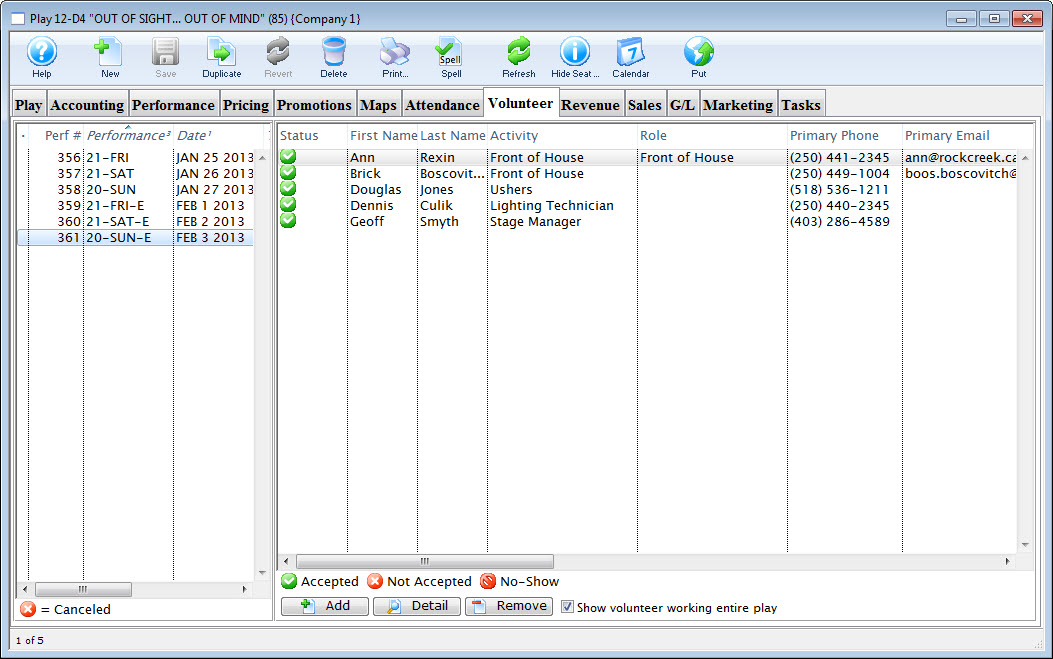
- On the left side of the window, highlight the performance you want to add volunteers to.
The list of volunteers currently assigned to that performance are displayed.
- Click on the volunteer to change their assignment.
- Click the
 button.
The Activity Detail window opens.
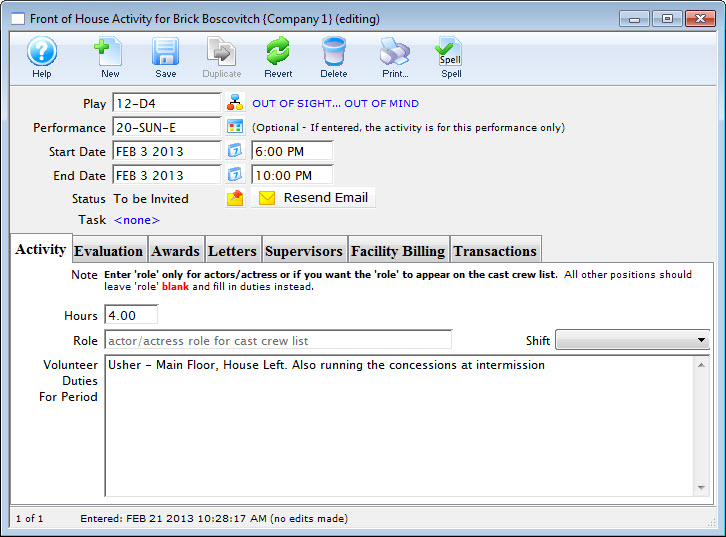
- Edit the Activity Details as necessary.
- Click the Save
 button and close the Activity window to return to the Event >> Volunteer tab.
Removing a Volunteer Assigned to an Event
If a Volunteer is unable to perform the assignment, or you need to remove them from the Volunteers list for any reason, You can do this in the Volunteer tab of the event.
To remove a volunteer from a performance or event, you perform the following steps:
- Open an event through the Setup>>Events & Dates menu, or by clicking the button.
Proceed to the
tab. - On the left side of the window, highlight the performance to remove the volunteer from.
The list of volunteers assigned to that performance opens.
- Click on the volunteer to be removed.
- Click the button.
- Click the
 button.
A confirmation dialog opens.
Revenue Tab
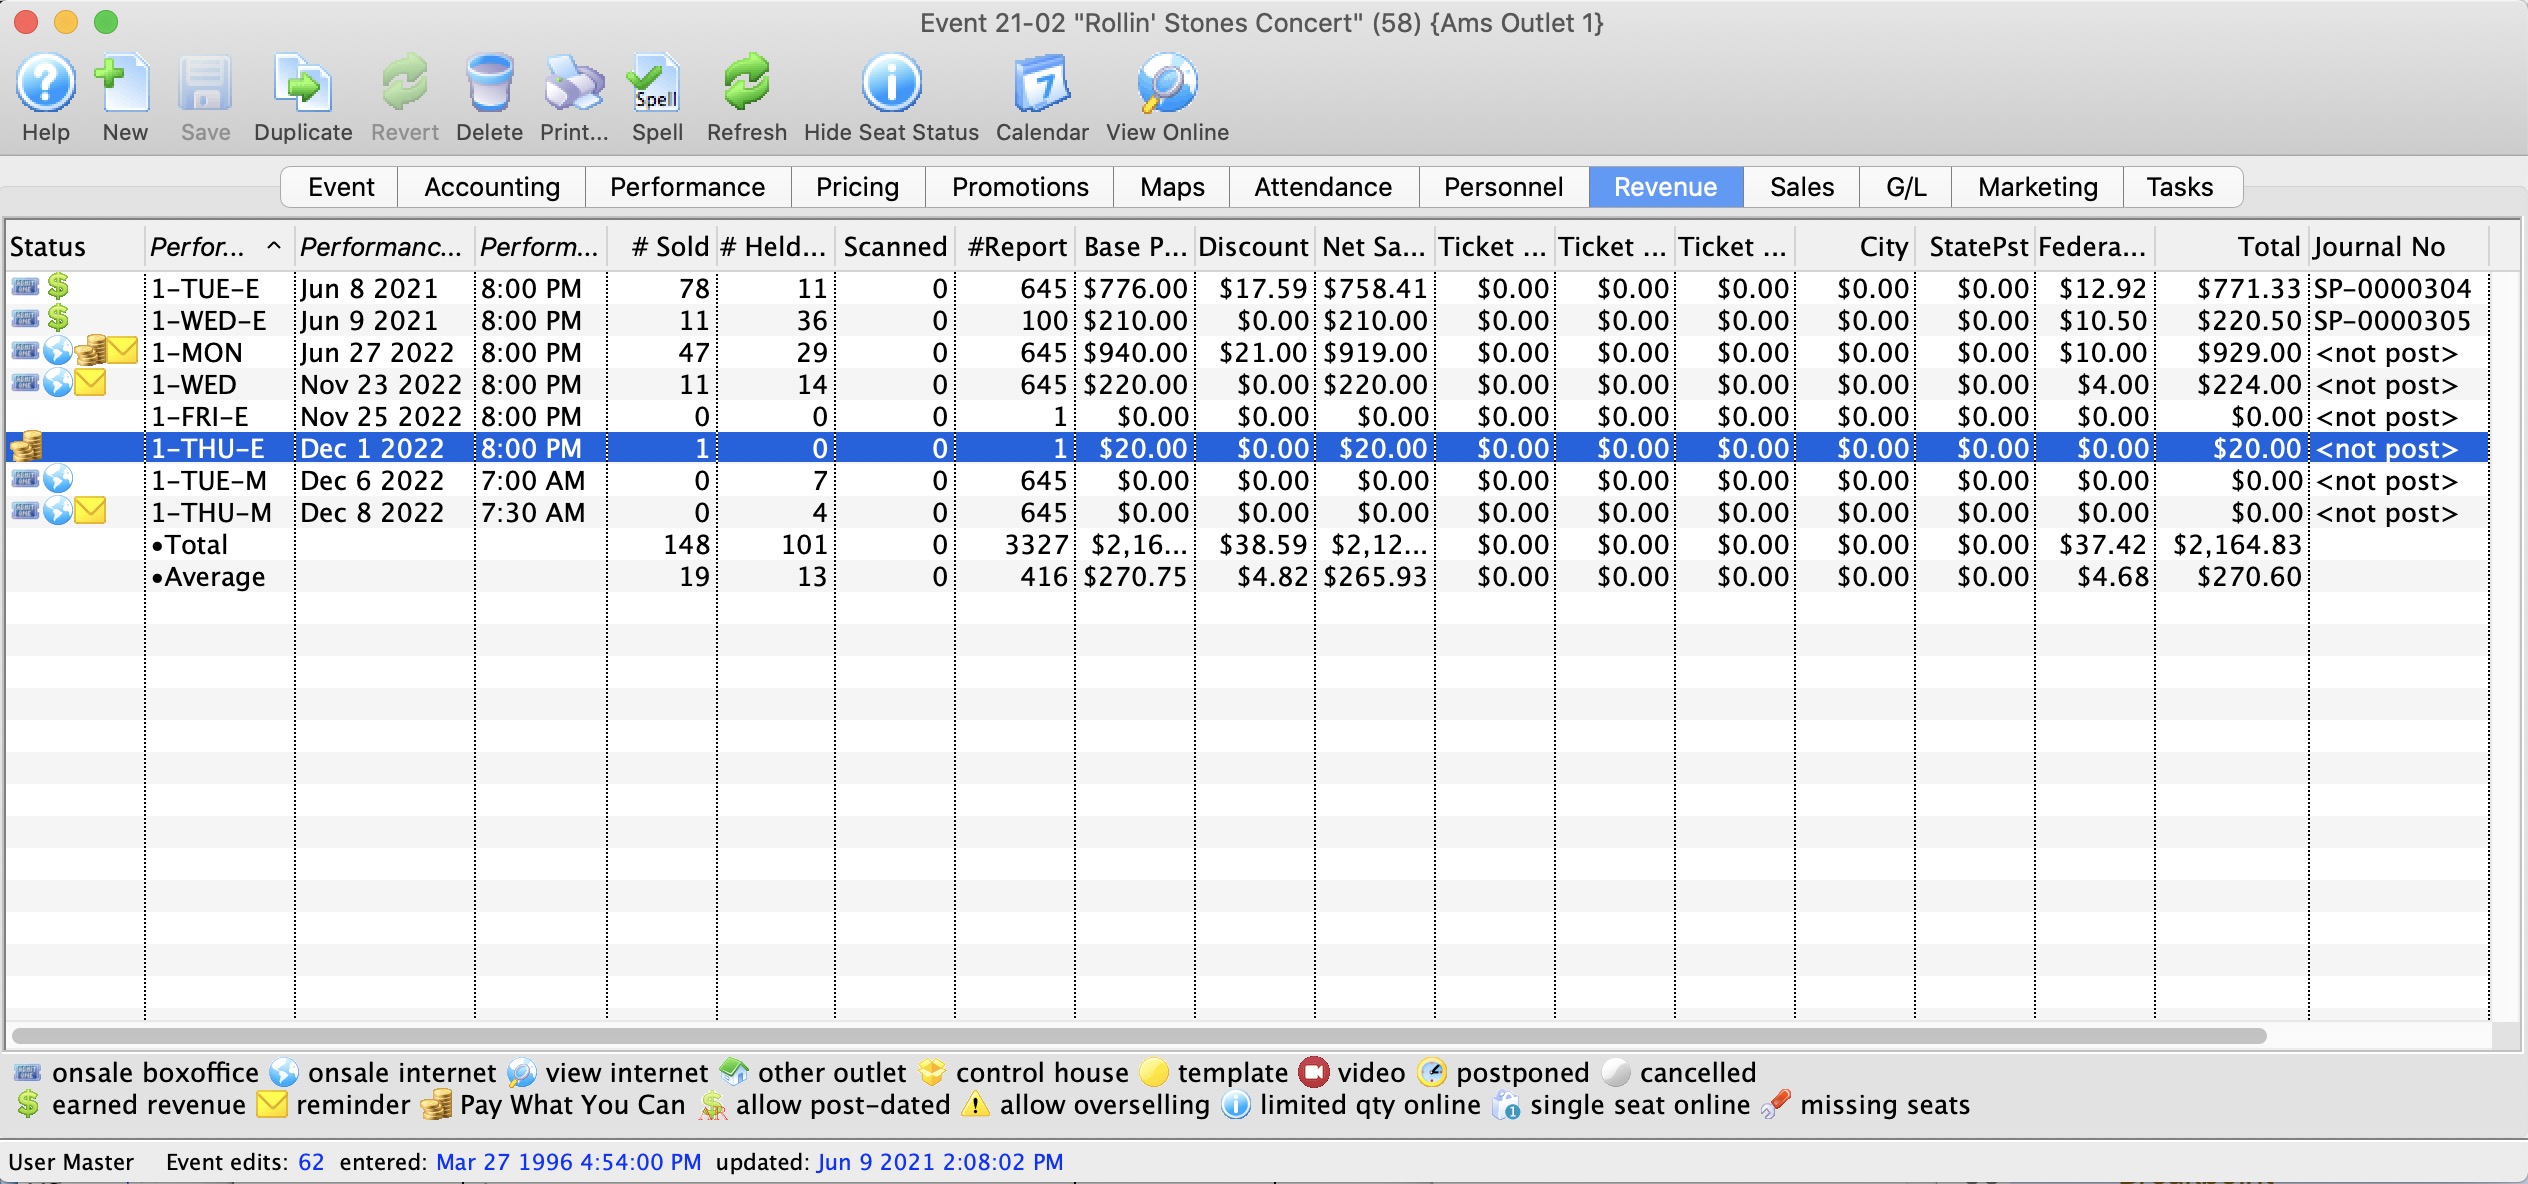
Below is an explanation about each column on this tab.
| Performance Code | This is the code used to track the performance by. |
| Performance Date | The date of the performance. |
| Performance Time | The time of the performance. |
| # Sold | The current number of tickets sold to the performance. |
| # Report | The number of tickets being used for reporting. |
| Scanned | The number of tickets where the patron was marked as attending the event, either from scanning them in using a wireless scanner or by manually setting attendance for the event. |
| Price | The base price pf the ticket. |
| Discount | The total of all discounts. |
| Gross Sales | The total amount of sales minus all discounts, fees, and taxes. |
| Ticket Fee 1 | Total of all fees categorized to this fee. |
| Ticket Fee 2 | Total of all fees categorized to this fee. |
| Ticket Fee 3 | Total of all fees categorized to this fee. |
| City Tax | The total of all City taxes. |
| State / PST Tax | The total of all State or PST taxes. |
| Federal / GST Tax | The total of all Federal or GST taxes. |
| Total | The total of all money collected during payment. This includes fees and taxes. |
| Journal No Code |
If the performance has occurred and you are using deferred revenue accounting, this will be the G/L number that it was posted to.
If the sales posting is SP-000000, then:
If the Journal code is something like SP-xxxxxx, then double click on the line to see the journal entry that shows the quantity of tickets sole and revenues at time or rollover during end of day. Note: the '$' in the status column also indicates that the performance has been rolled over to earned revenue. |
| Performance # | The performance number assigned by Theatre Manager based on order inputted. |
Sales Tab
The Sales tab displays a detailed summary of the sales analysis taken in for the event event. Each line displays the NET number of tickets that were sold, the gross sales in dollars, the amount of markups in dollars, the amount of discounts in dollars, the price before tax, the amount of tax in dollars (each tax level is broken out separately), and the net sales. The price before tax is the gross sales + markups - discounts + 3 levels of ticket fees. The Net Sales is the price before tax + 3 levels of taxes.
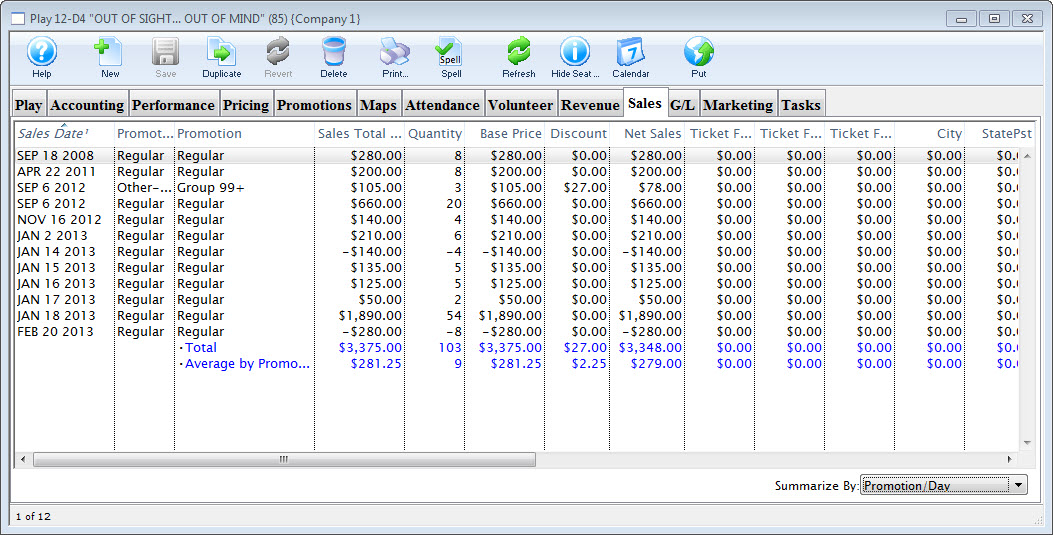
Parts of the Sales Tab
| Sales Date | Date of the sale |
| Promotion Type | Type for G/L Posting |
| Promotion | The name of the promotion |
| Sales Total Price | The total of the sales to the event / play. |
| Quantity | The number of tickets being used for reporting. |
| Base Price | The base price pf the ticket. |
| Discount | The total of all discounts. |
| Net Sales | The total amount of sales minus all discounts, fees, and taxes. |
| Ticket Fee 1 | Total of all fees categorized to this fee. |
| Ticket Fee 2 | Total of all fees categorized to this fee. |
| Ticket Fee 3 | Total of all fees categorized to this fee. |
| City Tax | The total of all City taxes. |
| State / PST Tax | The total of all State or PST taxes. |
| Federal / GST Tax | The total of all Federal or GST taxes. |
| Total | The total of all money collected during payment. This includes fees and taxes. |
| Sales Amount | The total of all money collected |
| Sales Quantity | The numner sold |
| Exchange Amount | Sales that were exchanges |
| Exchange Quantity | Total tickets exchanged |
| Refund Amount | Sales that were refunded |
| Refund Qunatity | Total tickets refunded |
| Commission | Commissions Paid |
| Outlet - Owner | Outlet who owns the event |
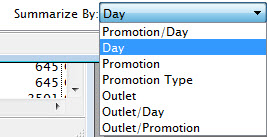 |
Allows you to change the display summary to more closely suit your organizational needs. Choices are:
|
G/L Entries Tab
Refer to how to balance the event after it closes
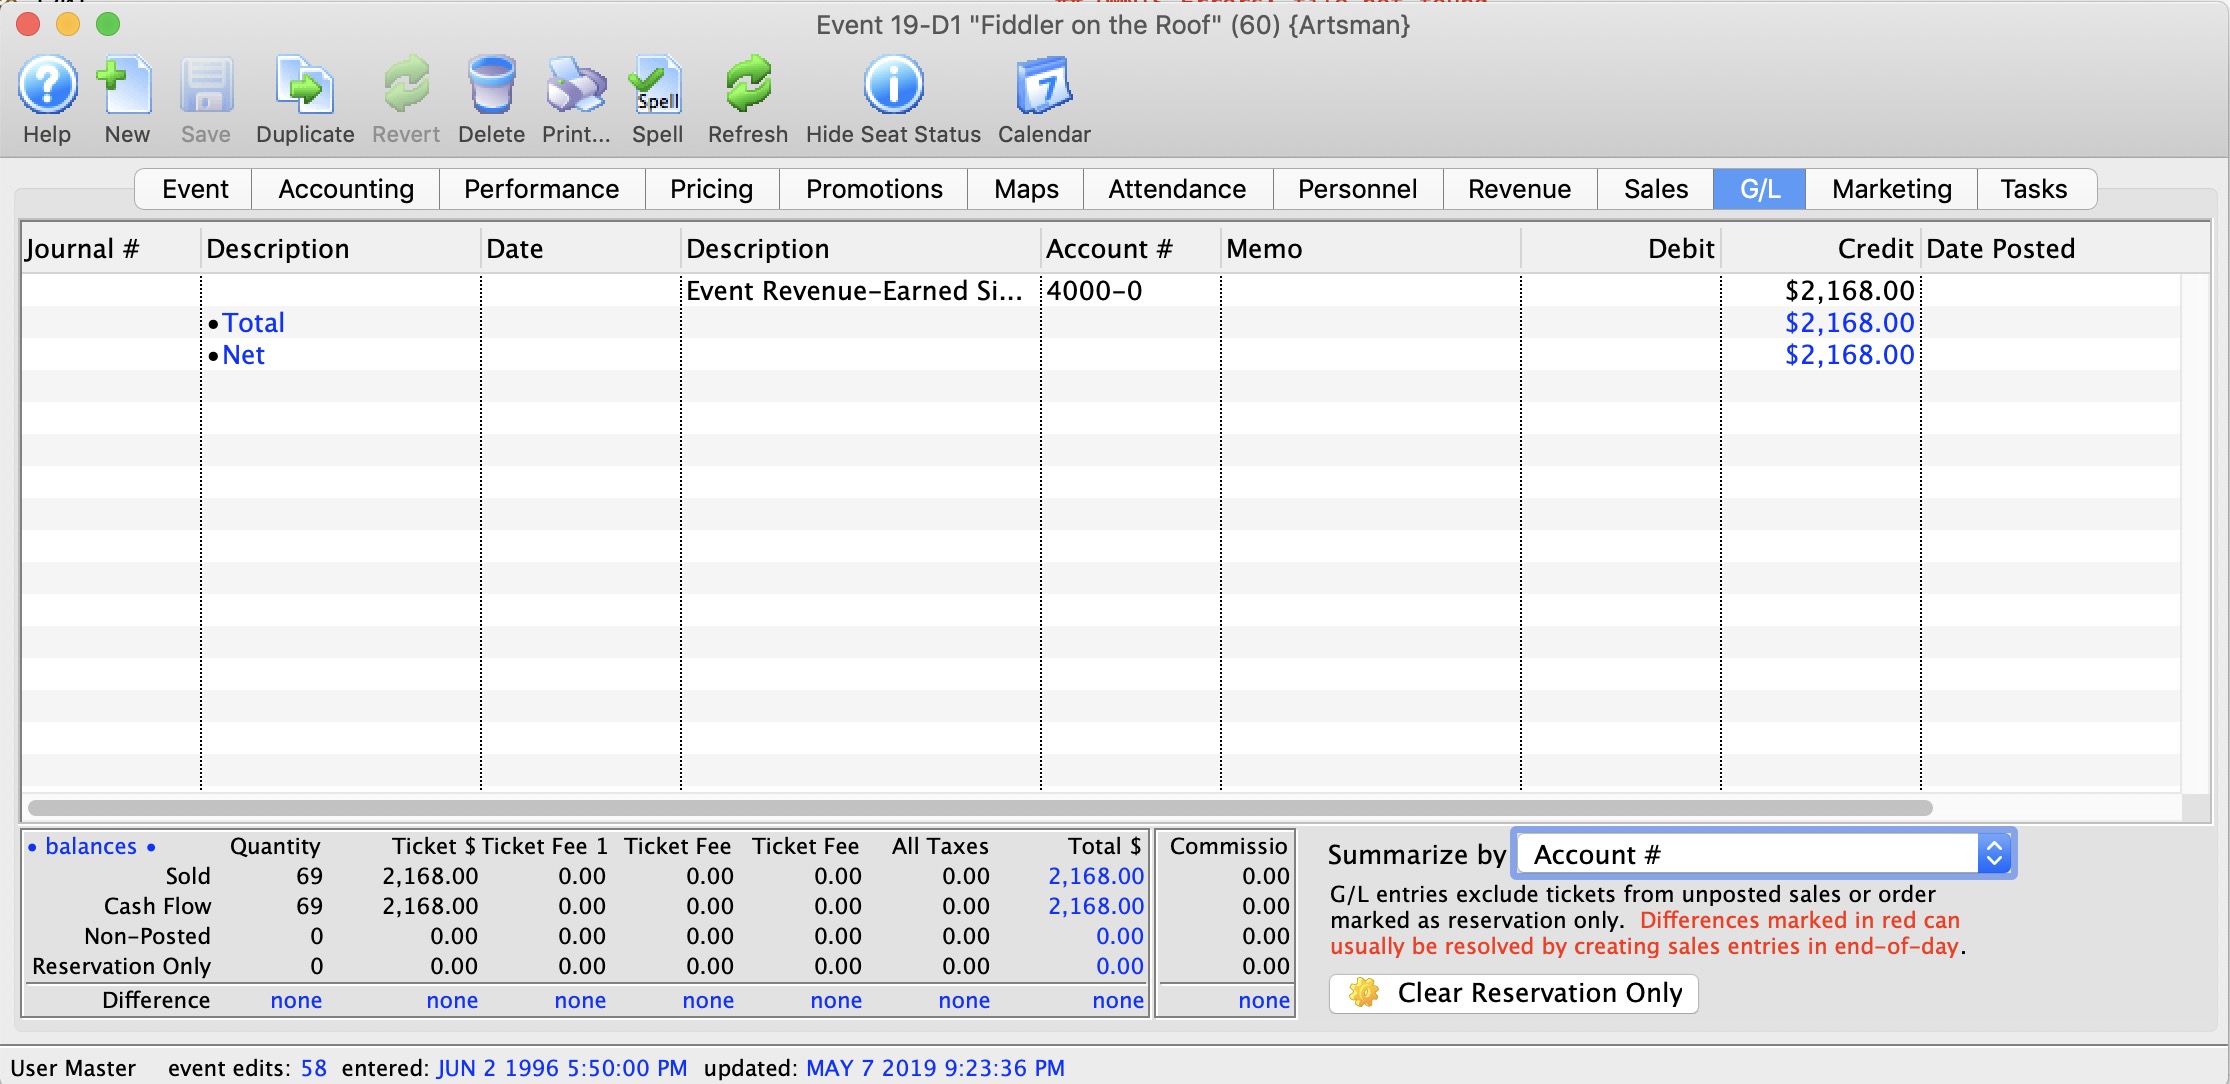
Parts of the G/L Tab
| Journal Number | The specific journal number associated with the G/L entry. |
| Description | Whether the entry is a Sales Posting, Deposit Posting, or manual G/L entry |
| Date | Date the G/L entry took place |
| Account # | The G/L Account number. |
| Memo | A single memo line, generated by Theatre Manager to indicate in the ledger the purpose of the entry. |
| Debit | The debit amount associated with the G/L entry. |
| Credit | The credit amount associated with the G/L entry. |
| Date Posted | The date the entry was posted to the G/L. |
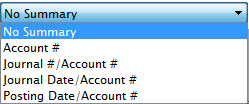 |
You can adjust the summary options by choosing the drop down menu. Selections are:
|
| G/L entries do not include tickets from unposted sales or orders marked as reservation only. All difference lines should be zero if the event balances. Click the Clear Reservations only button, to reset the reservation only flag for all tickets sold to this play. | |
| Summary Table | At the bottom of the window is a summary listing of the revenue from:
To the right is a commission total. That generally should have totals at the bottom that are zero as well. However, in an outlet version, if one outlet sells the ticket and the owning outlet refunds the ticket, then you will see non-zero totals. That indicates tickets were exchanged or refunded or the user by the owner of the event and the original outlet is still is due their commissions on the work they did. |
Balancing after event completed
- Making sure that all parts of the event balance (tickets, compared to daily sales, compared to the general ledger
- Verifying that all revenue is in the proper earned accounts (and nothing is left in the deferred accounts if you were doing deferred revenue accounting -and-
- If everything balances, then close the event to prevent further ticket sales, exchanges or refunds from occurring to the event. If you subsequently find that you want to refund a ticket, you can reopen the event, then close it again after the refund is done.
|
The best time to balance the event is after the last performance has occurred and after you have done end of day to move all deferred revenue into earned. |

Verifying that Ticket Inventory and Financials Transactions Balance
The quickest check is that the word • balances • appears at the top left of the lower part fo the screen. If it says this, it usually means that all the other aspects below balance.
The meaning of the various lines ay the bottom are:
- Sold Line is the number of sold tickets from inventory. This is the absolute revenue, most correct values for sales to the event:
- Quantity The number of tickets sold from inventory
- Ticket $ This is the values of tickets sold, less discounts - or the net sales
- Ticket Fee 1 The total amount of ticket fee 1 for all the sold tickets. If you have named ticket fee 1 something specific, it's name will appear here.
- Ticket Fee 2 The total amount of ticket fee 2 for all the sold tickets.
- Ticket Fee 3 The total amount of ticket fee 3 for all the sold tickets.
- All Taxes The value of all the taxes attached to the sold tickets (local, provincial/state, Federal
- Total $ The total amount of money taken in for all the tickets. it is the ticket$ + ticket fees + all taxes
- Commission If you set up paying commission for tickets, this will be the total commission associated with the sold tickets. it is NOT part of the Total sales, since it would be an expense payable.
- Cash Flow Line: is the summary of all ticket transactions created from tickets sales.. The values is each column should be exactly the same as the values from the Sold Line form Inventory. If it is not, then some transactions have not been created from end of day, or somebody was playing with transactions and may have duplcaited them. Contact Arts Management support if you find they do not match
- Non-Posted: Transactions may exist, but may not have been posited during end if day. If there are values in this row, it means you should complete end of day. before attenpting to balance.
- Reservation Only: Some tickets may have been marked as reservation only - which is an ancient practice of selling tickets before they were paid for and not telling accounting. if you see any number is this row and you are done with the event, then
- Click the Clear Reservation Only button to unmark the tickets and make then enter the accounting system
- Run your end of day. All data in the 'non-posted' and 'Reservation only' rows should move up into the sold and cash flow lines
- Run a report to find receivables for the event to see if some tickets should be returned because they were school or group sales that did not attend and wouldn't be paying
- Start your comparison again
|
If end of day has been run and the values at the bottom of this area all say the difference is 'none', then ticket inventory and transactions balance.
That reinforces the confidence in the GL entries discussed below. |
|
If some lines are not quite right, there are two things that might find the difference:
|
Verifying that Ticket Inventory and GL are in the right place
Once you haven 'none' in the difference row, we need to see what the make sure that the state of the accounts that post to the GL are correct.
-
If using deferred revenue accounting, you should see some of your deferred accounts in the upper list. However, they should all be zero. If they are not zero, then there are two possible problems:
- You might still have the last performance to roll over. If you roll over each performance on the day after, then you may need to wait till the day after the event and do end of day. That should fix it. if it does not, then its probably the next problem
- or, somebody changed the deferred accounts in the middle of the sales for this event. That's usually obvious one of your deferred accounts is negative and matches the amount in your other deferred accounts. That means you need to make a GL entry to put things in the right place (in theatre manager)
- The earned accounts should match up to the Sold inventory line. If you have separated out ticket revenue, taxes and fees into separate G/Ls, then the numbers will be obvious. if you didn't. you might have to add up a few numbers to see that they are right.
- Finally, the Net Credit should be the same as the 'Total $' in the 'Sold' column
Marketing Tab
In the Marketing tab, you can configure the Marketing notes for the play. You can also add the play to a mail list and include external and internal notes for your Box Office Staff. Information you enter on this page will appear on your page in the Ticket Trove iPhone and iPad app.
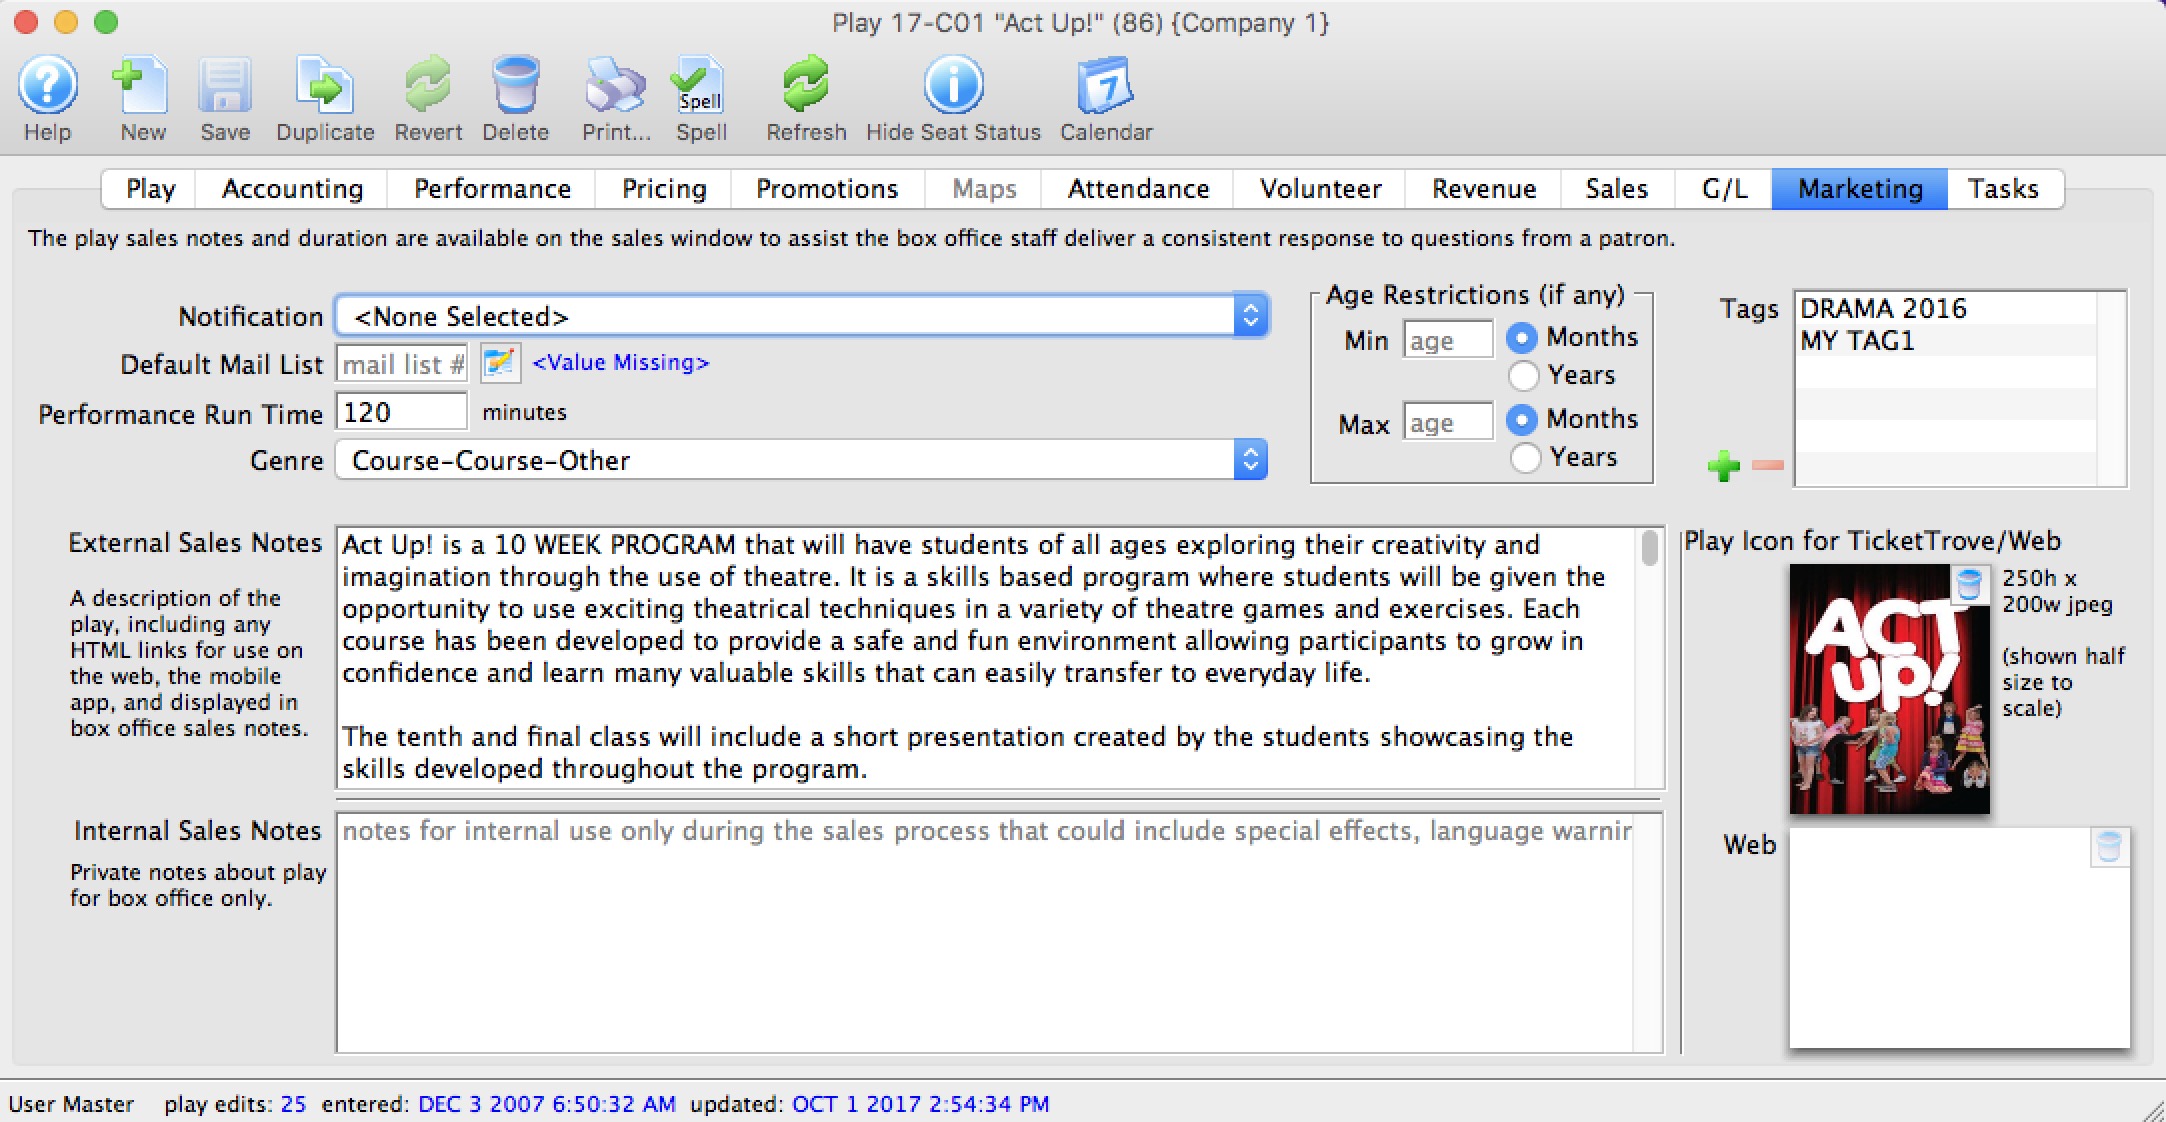
Parts of the Marketing Tab
| Notification | The email notification that will be sent when tickets are purchased to this play. Click here for info on work flow notifications. |
| Default Mail List | Allows you to assign this play to a specific mail list. |
| Running Time | Running time or duration of each performance in minutes. Also displays for Web Sales, facility management calendars and in the calendars exportable in .ics format. |
| Genre | Genre is a setting for events that is common across all Theatre Manager customers. Currently, there are about 30 classifications which will be used in the iPhone/iPad app to help customers find entertainment to their liking. |
| External Sales Notes | Marketing notes for both your Box Office staff and for Web Sales. |
| Internal Sales Notes | Marketing notes that appear to you Box Office staff, but not on the Web. |
| Event Icon for Web/iPhone App | If there is a graphic in the event, entering it here will display the graphic for all performances of the event. |
| Tags | You can add any number of tags to the event. |
Add an Image to the Event / Play Window
You can add two images to your web sales for each event quite easily. One image is the smaller picture to the left of each event listing. The other is a larger picture (poster style) when the event is selected online. The smaller image also serves as the picture used in the TicketTrove app. If the image is added to either of these two locations, then the TMServer (SecondGen Web Listener) will automatically pick up the image and place it on your website.
If no image is added to the smaller box on the MARKETING tab of the event setup, then the default image from Setup>>Company Preferences>>REPORTS/MISC tab is used.
To add an image for Web Sales and Ticket Trove, you perform the following steps:
- Find the Event you want to add the images to.
Click the Marketing tab.
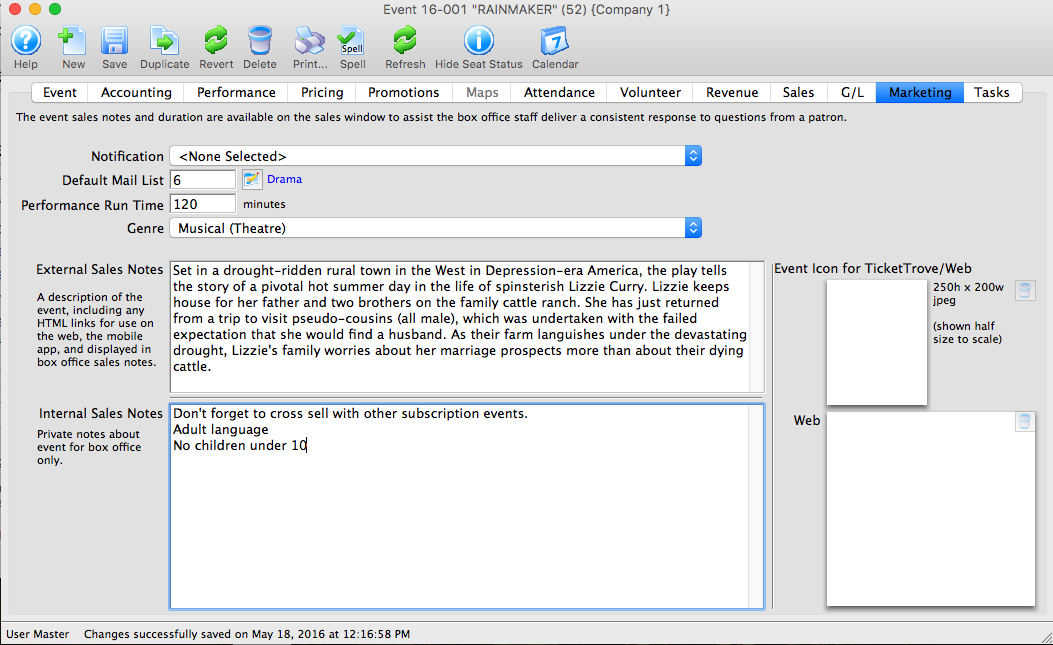
- Open your Operating System File Manager/Finder.
- Drag and drop your images into the Play Icon for Ticket Trove / Web display box.
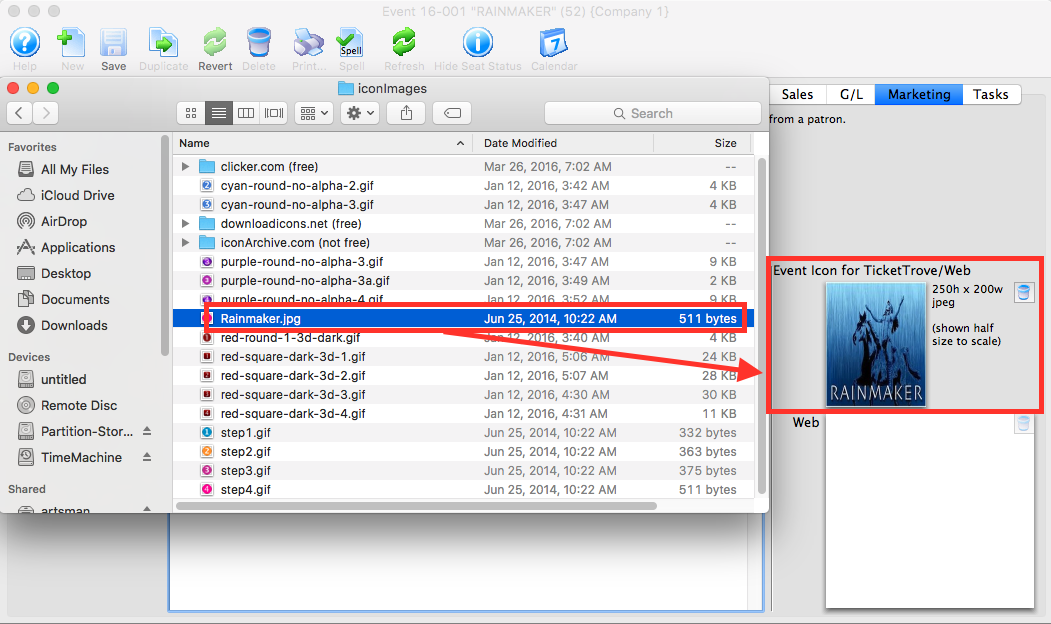
The Ticket Trove image must be 250 pixels high x 200 pixels wide
- Add the web image in the same manner as the TicketTrove icon.
This image has no size restraints, however for speed of loading we recommend small sized (kbs not mbs) images.
- Reload or Refresh your web browser to see the update image.
Removing an Image from the Marketing Tab of an Event / Play
- Open the Marketing Tab of the Event/Play Setup.
For instructions on how to access the Event/Play Setup, click here.
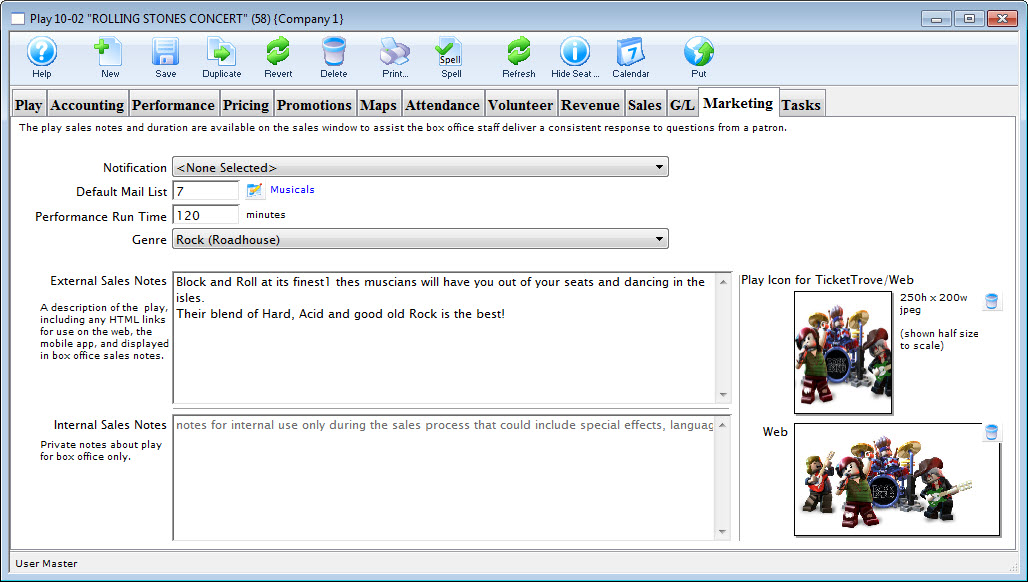
- The images previously placed, display in the icon boxes on the right of the screen, click on the trashcan
 icon.
icon.
This removes the image from the database and it will no longer be displayed on the web site.
Tasks Tab
Any tasks associated with an event / play can also be seen in the Event / Play window. From here you can add tasks and associate them with resources, so you can create all the tasks needed for a particular event / play. These can then be added to a project and billed.
Tasks are added on the left side. Once a task has been added, you can select the task and add the resource on the right side.
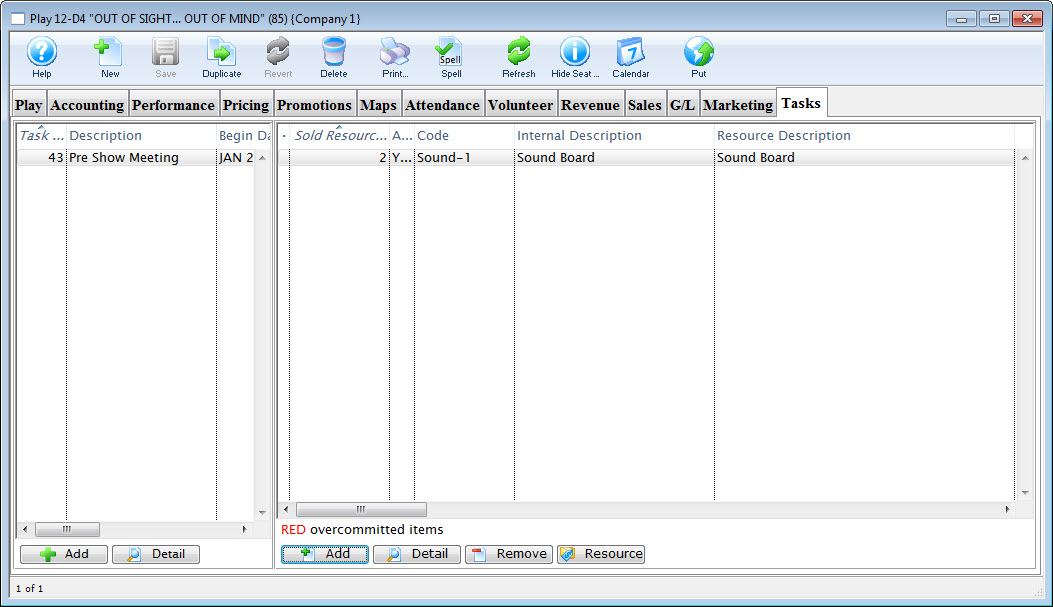
Click on the Calendar button in the window's top toolbar to view all tasks, performances, and/or volunteers associated with the event / play in a new calendar.
For more information on Tasks, click here. For more information on Resources, click here.
Parts of the Tasks Tab
Task Information |
|
| Task # | The task number as displayed in the task # field of the Task window. |
| Description | Name that shows in the resource list and elsewhere in Theatre Manager. |
| Begin / End Date | Dates as entered in the Task Detail window. |
| Task Notes | Any Notes associated with the task. |
 |
Opens the Task Detail window to add a new task. Click to go to the Add Task page. |
|
The Detail button opens the Task window for the selected item. |
Resource Information |
|
| Sold Resource # | Displays the Project number of the Project |
| Code | The unique Resource Code assigned to the particular resource. |
| Internal Description | The internal description for the resource (shows only inside the Theatre Manager application). |
| Resource Description | The name of the resource. |
| Quantity | The quantity of the specific resource listed in the database. |
|
Opens the Resource Detail window to add a new resource. Click to go to the Add Resource page. |
|
Opens the Detail window for the selected resouce for review or edititng |
|
Removes the selected Resource from the list |
 |
Opens the Resource Detail window displaying all the information on the selected resource. |
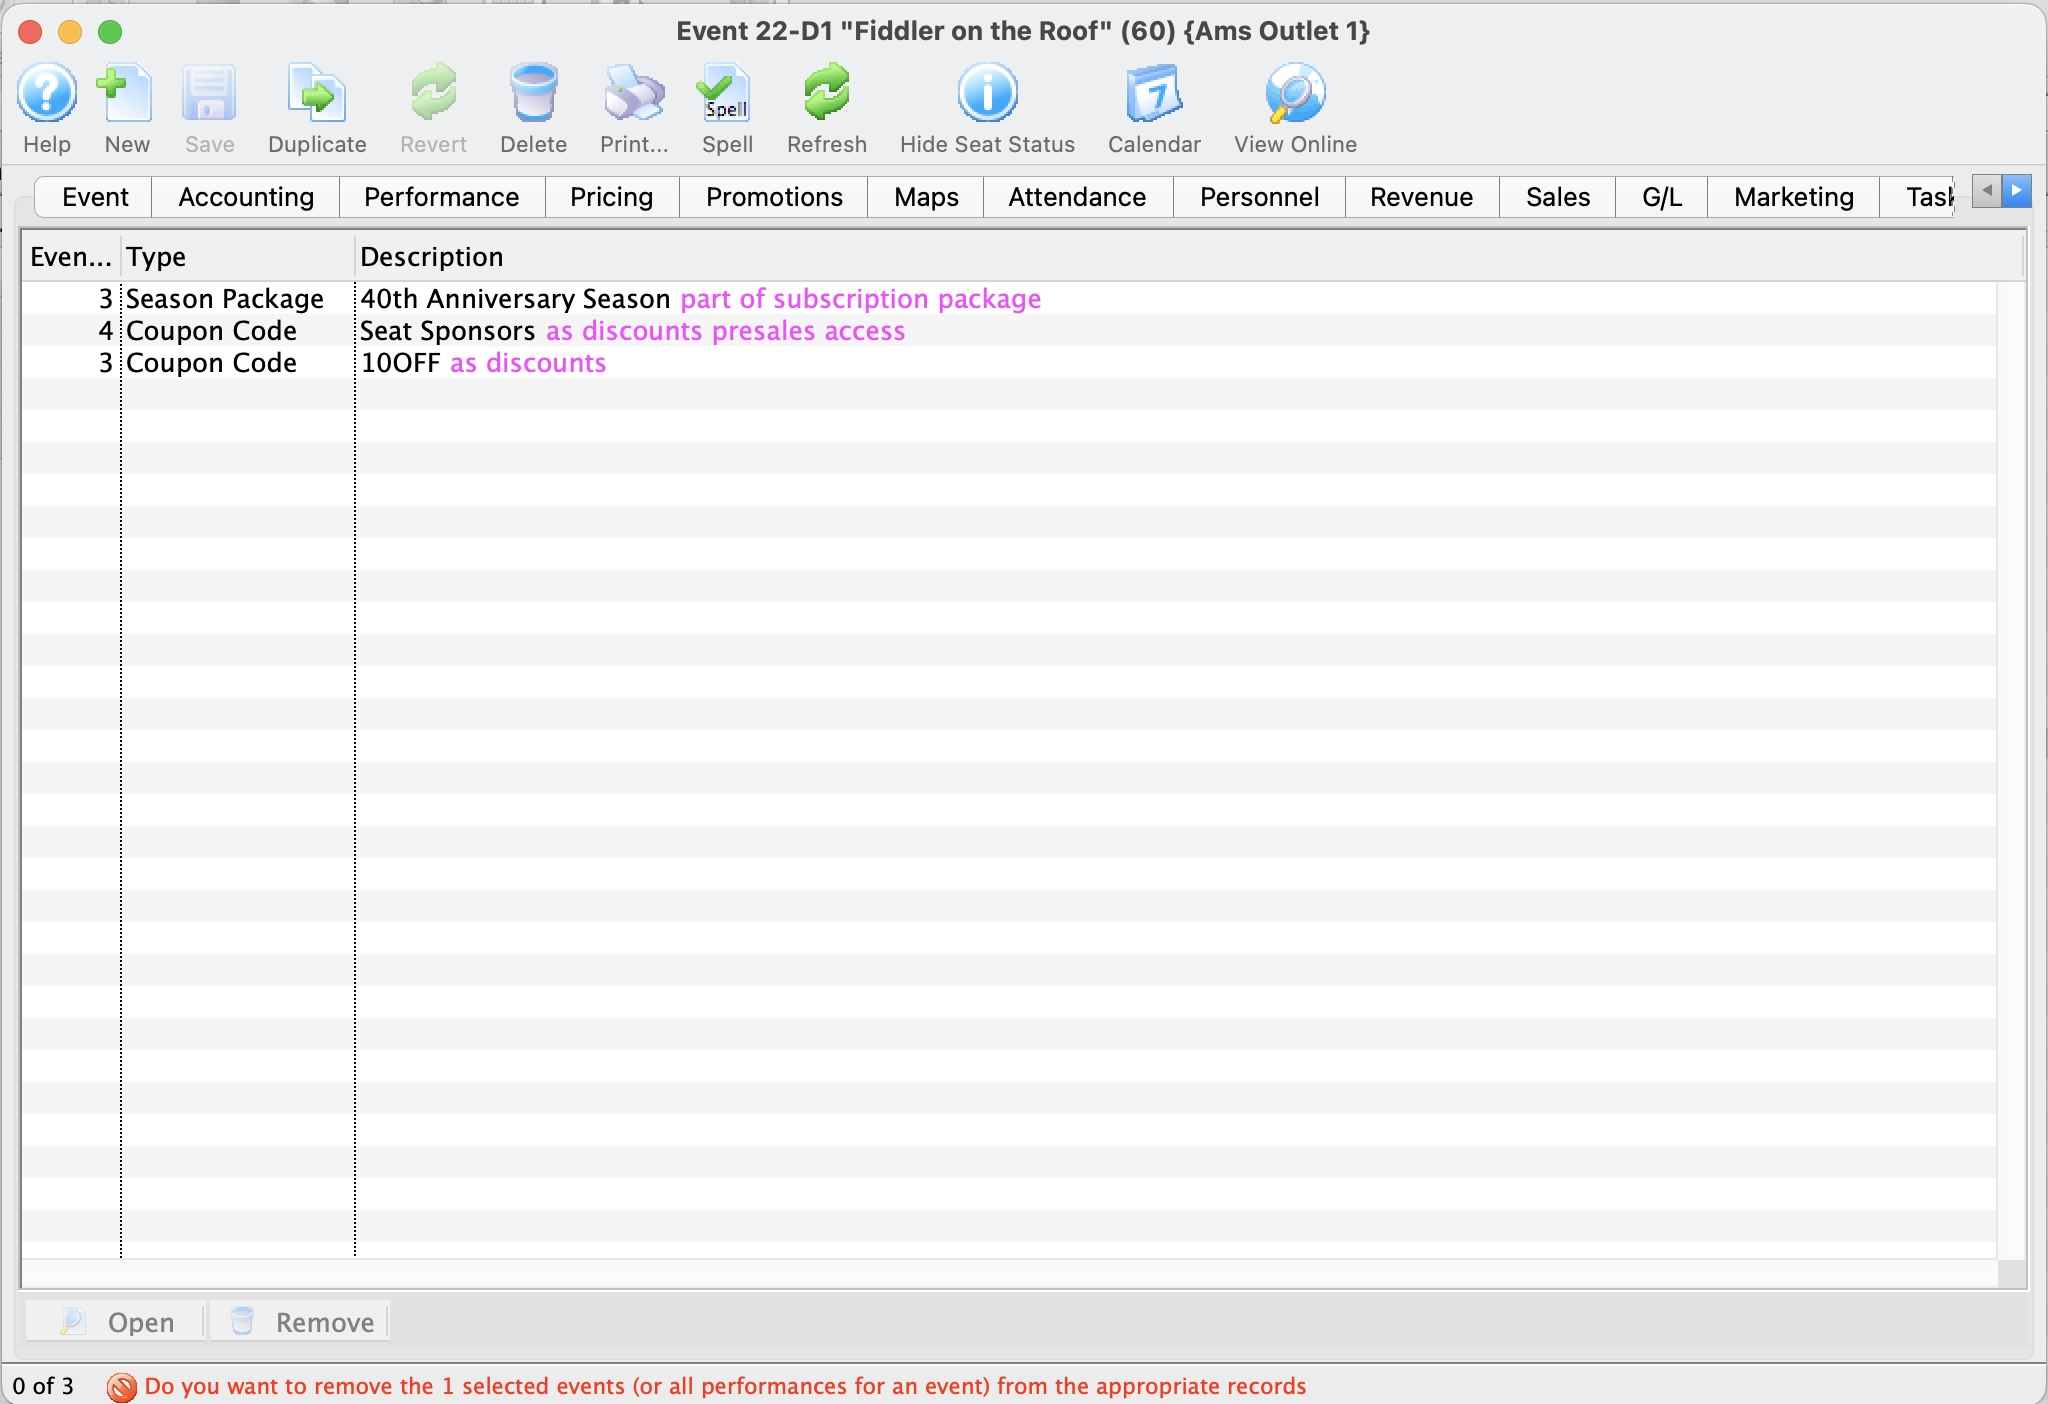
Creating a New Event / Play
Creating New Events / Plays
|
Typical time to program an entire season of 8 or so plays is usually easily done within a morning (including coffee). |
Creating the event (Summary of Steps)
To create an event from scratch, you use the steps that follow. Links are provided to explain each window in detail. The general steps are:
- Name the event
- Set up the Accounting
- Enter the Marketing information and images
- Create the performances (you can do this as many times as you need if your patterns are interesting, or want add performances later)
- Price the tickets for the performances
- Enable any discounting you want on the performances
- and then you are done, ready to sell the tickets
Step by step creating the event
- Open the Event / Play List Window.
Click here to learn how to access this window.
- Click the New button.
The fields are blanked to allow you to add new data.

- Enter the Event / Play information.
Click here for more information on Event / Play Information tab.
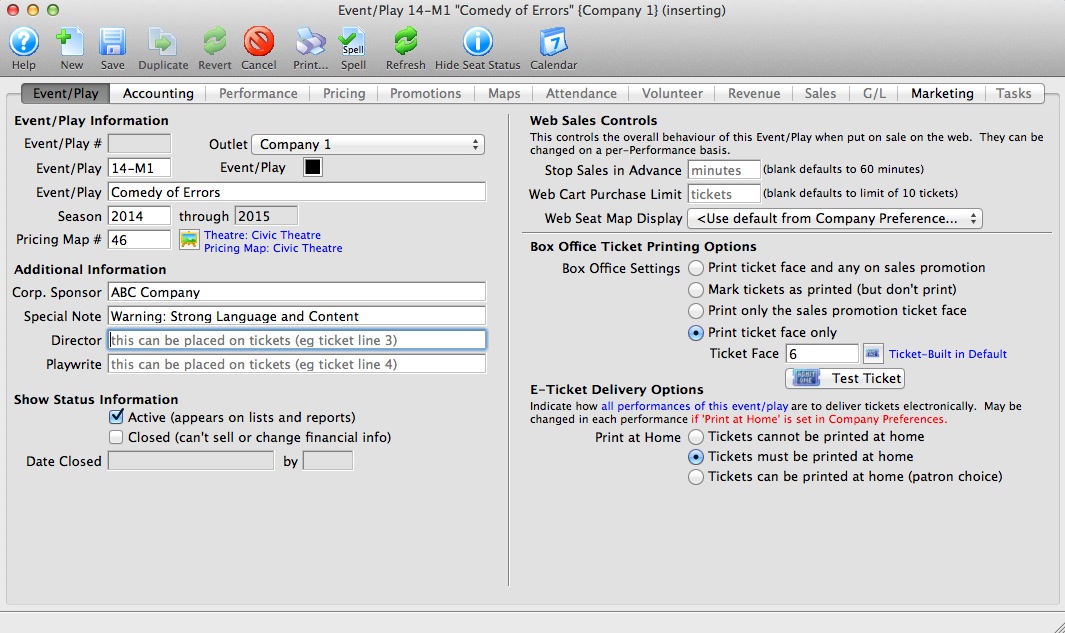
- Click the Accounting tab.
This is more fully described in Accounting setup. If account codes for events do not vary, it can be easier to simply start by duplicating a prior event and then change the name of the duplicated one.
When accounting is set up, click the Save button to activate the rest of the tabs.
You may want to create some general ledger account number for the new event / play pror to setting up the event. If so, refer to General Ledger Accounts for more information. Venues that do profit/loss by event using class codes, category codes, or job cost code (the name depends on your financial system), often use the same accounts for each event they set up and, instead, rely on the job code in end of day accounting separation in the revenues by event report.
- Click the Marketing tab.
Refer to Marketing Tab for more information. This is where you provide any images, text and genre's that will appear in the online sales module.
- Click the Performances tab.
This allows you to set up and number of performances using many different sales methods (eg a mixture of reserved, general admission, touring, classes and more, if all are related.
- Click the Pricing tab.
After performances are entered, you need to set the Base prices for each pricing zone you created in your venue. Once you set up one performance, you can copy those prices to the other performances if they are similar.
- Click the Promotions tab.
Promotions are a way of setting the valid discounts on tickets for each performance. You typically start with your menu of available promotions and disable the ones you don't want to allow for a performance. For example, you may not want group sales or certain comps on opening night.
- You can now start selling the event
The remaining tabs show information about the current state of sales such as:
- Maps - shows which seats are taken on any reserved seating performance at a glance
- Attendance - shows who is coming to the event
- Personnel - indicates who is working each performance if you are tracking these things for volunteers or facility management
- Revenue - shows total sales for each performance
- Sales - allows various summarizations of WHEN people bought tickets to correlate to marketing events or onsales
- G/L - shows the journal entries showing sales posted to the accounting system via the end of day process
- Tasks - shows any tasks assigned to the event for any purpose. The can be renter related tasks (move in/move out), or technical activities like maintenance and cleaning, or admin activities like backstage tours
Adding Performances
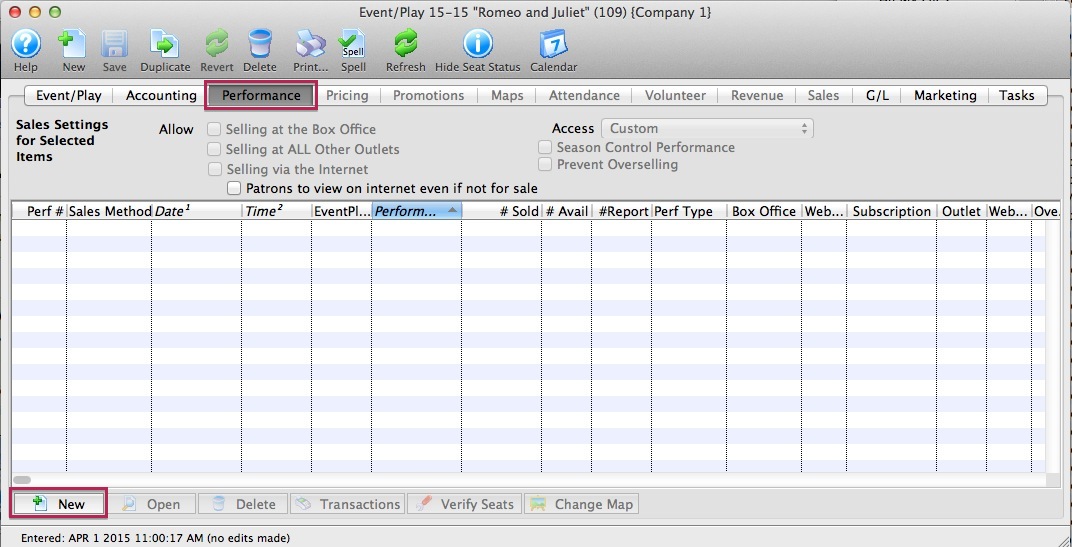 Once you have created an event you can add the performances to sell tickets to.
If you have:
- created your event, refer to the add performance wizard that guides you through the process.
- Click on the New button on the performance tab to start.
- not yet created an event, click to learn how to create an event
There a subtle difference when the actual ticket inventory is created.
Reserved Seating
Tickets are created at the same time as the performance is created. One ticket is created for each seat in the theatre so that tickets always exist for every seat. This ensures that there can never be a double seating issue!
All other sales methods
Tickets are created at time of sale and a ticket can represent an admission of a number of people (e.g. admit 10). If a ticket always represents one admission, the number of tickets created will be similar to reserved seating.
Step 1: Number of Performances
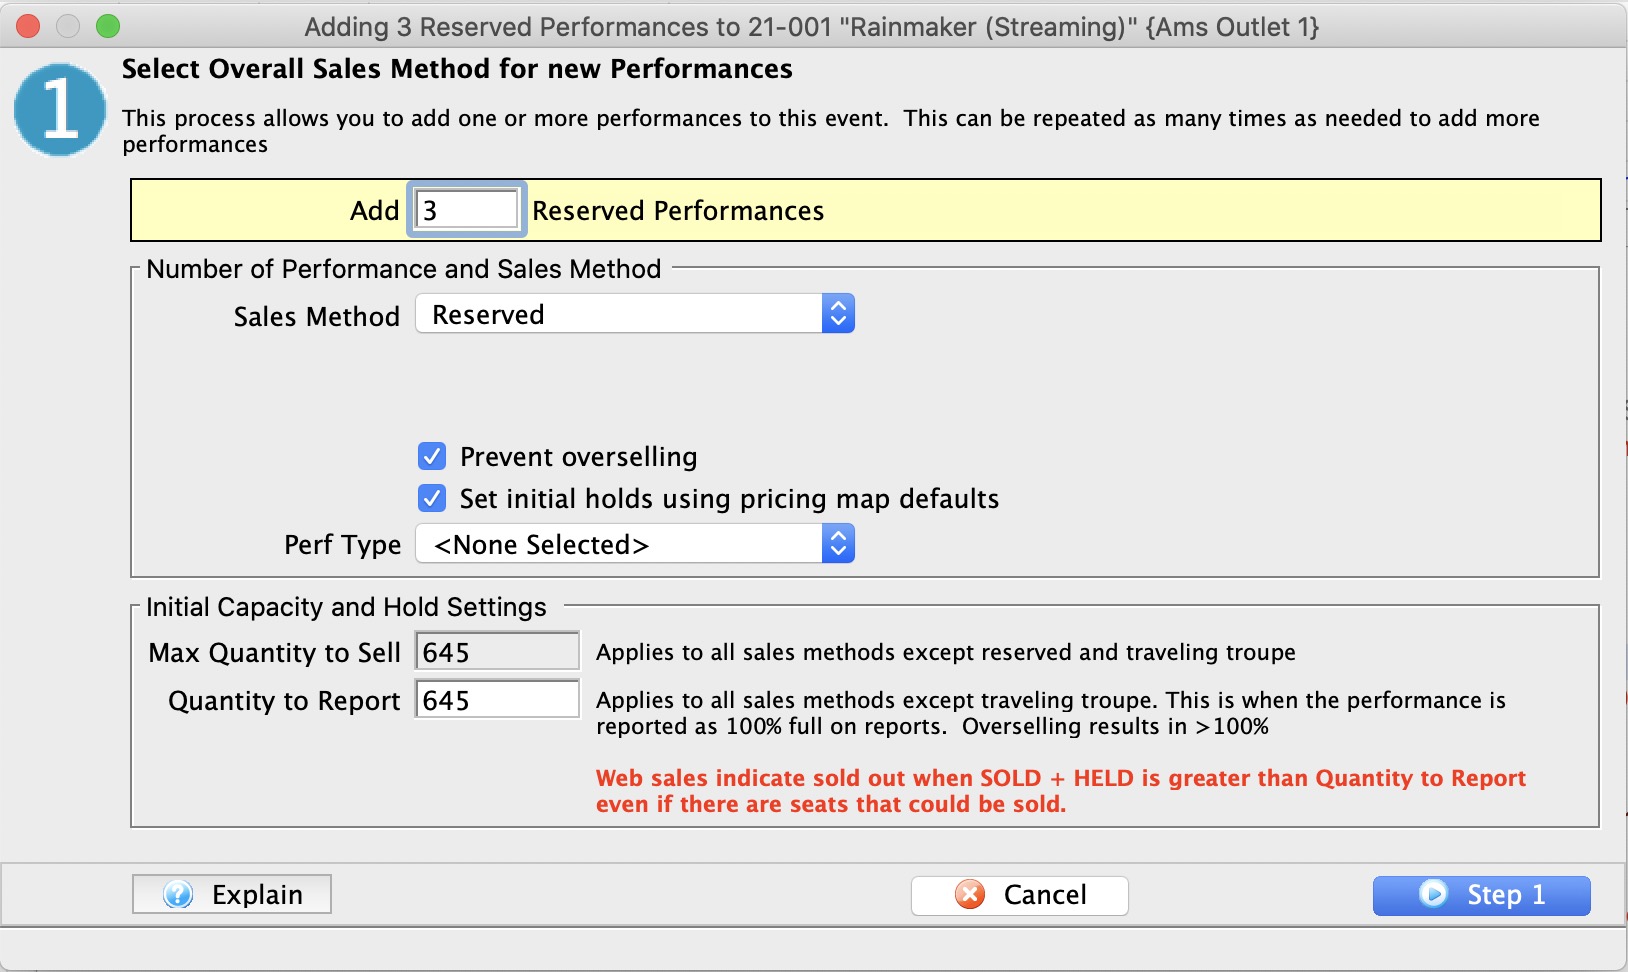
The first step is to identify the primary sales method and the number of tickets that can be sold in each performance. The data required is:
| Number of Performances |
Enter the number of new performances you want to add.
If you have
|
Sales Method and Map Settings | |||||||||||||||||||||||||||||||
| Sales Method |
The sales method indicates to Theatre Manager how you want to manage the sale. The three key methods are General Admission/Festival Seating, Reserved, and Course/Classes.
In the Sales Method drop down list, choose the primary type of seating that will be used in this performance. You can change it later on a per performance basis in the calendar.
|
||||||||||||||||||||||||||||||
| Performance Type | Performance type is a customizable code table field you can use to flag specific performances. You can use it for display on the web. It can also be used for reports to narrow down searching for specific performances in reports. | ||||||||||||||||||||||||||||||
| Prevent Overselling |
This field indicates if you want to prevent sales to occur over the Max Quantity to Sell amount. It might be useful to deselect the option for outdoor events where there is no practical limit to the number of tickets that can be sold.
This only applies to General Admission/Festival Seating. |
||||||||||||||||||||||||||||||
| Set Initial Holds |
On a pricing map, you can set up a standard holds in the venue for house, sound, ushers, artists etc. When you click this optionL
|
||||||||||||||||||||||||||||||
Capacity and Reporting | |
| Max quantity to sell |
For reserved events, this cannot be changed as it is the total seats in the pricing map. For other sales methods, you can restrict the number of sales to this value.
For example, you may normally have 400 seats in your theatre, but the designer has created a set that obstructs 50 seats. You do not want to create another theatre map, or you just don't have access to them. Enter a quantity of 350 seats to sell. That will be your house total for that event. |
| Quantity to report |
Use this setting to indicate when you tell online sales and reports that you are 100% full. It includes all SOLD and HELD seats.
In the prior example, If you have 400 seat house and 50 blocked seats, you can sell 350 seats. If you indicate that the Quantity to Report is 275, then web sales will stop when SOLDS + HOLDS > 275, leaving 75 seats unavailable online. Refer to further description of meaning of Quantity to Report in performance setup This option is not applicable for Traveling Troupe. |
Step 2: Initial Sales Settings for Performances
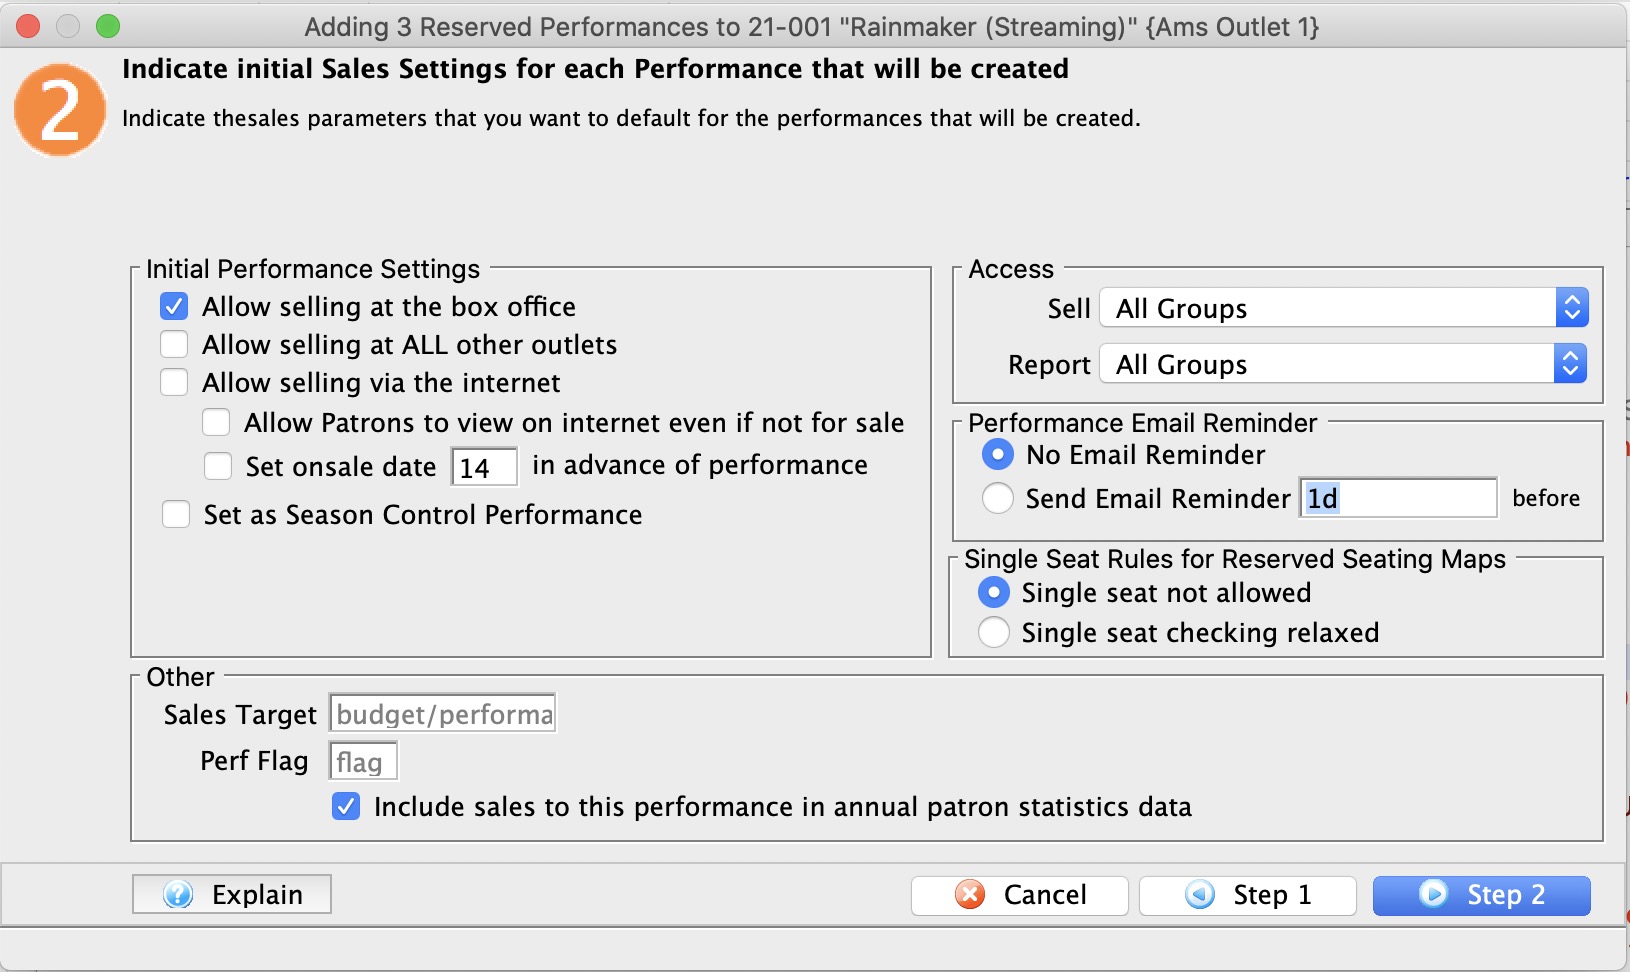
Initial performance settings let you set up how you would like the event to work. These can be changed:
- individually on the performance detail and
- some can be changed en masse on the performance list
Initial Performance Settings |
|
| Selling at the Box Office | Checking this box allows you to sell the performance at the Box Office. |
| Selling at ALL Other Outlets | Checking this box allows you to sell the performance at other outlets. If you allow a performance to be sold at another outlet, you can now specify which outlets have the capability so that each performance can be sold by different people. |
| Selling via the Internet | Checking this box allows you to sell the performance on the Internet. |
| Allow Patrons To view if not for sale | If checked, then the event can be set to show online as coming up, even if not yet for sale. It allows pre-announcing events without enabling for sale. |
| Set onsale date in advance of performance |
When creating a number of new performances, you may want to stagger when they go on sale online.
If you enter a value for the number of days in advance of the performance, then theatre Manager will automatically calculate the onsale date based on the performance date during initial creation of the performance. For example, you may want to set the onsale date 3 months in advance of a long running show. |
| Season Control House | Checking this box allows the performance to be used in a Control House for subscribers. |
Other |
|
| Sales Target | You can enter the sales target for each performance. All performances will get the same value and is placed on some reports.
If the target is to be different on each performance, you will have to correct it after the fact on the performance window for each performance. The Sales Summary-Quick report can be configured to shows this data in the parameters tab. |
| Perf Flag | A special flag used to denote Performance. This is typically used for a plug-in for Web Sales. |
| Include in Patron Statistics | Include any sales totals for this event in each patron's annual patron statistics tab at the bottom of the patron window. Normally you would want this. |
Access |
|
| Sell | Allows you to control what user access groups have the ability to sell this performance at the box office. |
| Report | Allows you to control what user access groups have the ability to run reports containing this performance. |
Performance Email Reminder | |
| Send Reminder | You can indicate if you want an email reminder sent to patrons who purchase to a performance. This email can be customized to each event or performance by duplicating and editing a web page, or you can use a default one. |
| Reminder in Advance Time |
If you do want an email reminder sent for any performance, then you can indicate how far in advance of the performance it should be sent. This value is typed in weeks, days, hours, and minutes format. Example values are:
Any ticket to the event bought closer to the performance than the email reminder time will receive an immediate reminder. |
Single Seat Rules for Reserved Seating Maps | |
| Single Seats not allowed | Means that a patron selecting tickets online will not be able to make a seat selection anywhere in the map that would leave a single ticket. This option is designed to maximize revenue and is the recommended/default option. |
| Single seat checking disabled/relaxed |
Means that a patron can pick any seat they want and leave single seats on the map. This maximizes patron choice, so the patron could:
|
Step 3: Performance Date Pattern
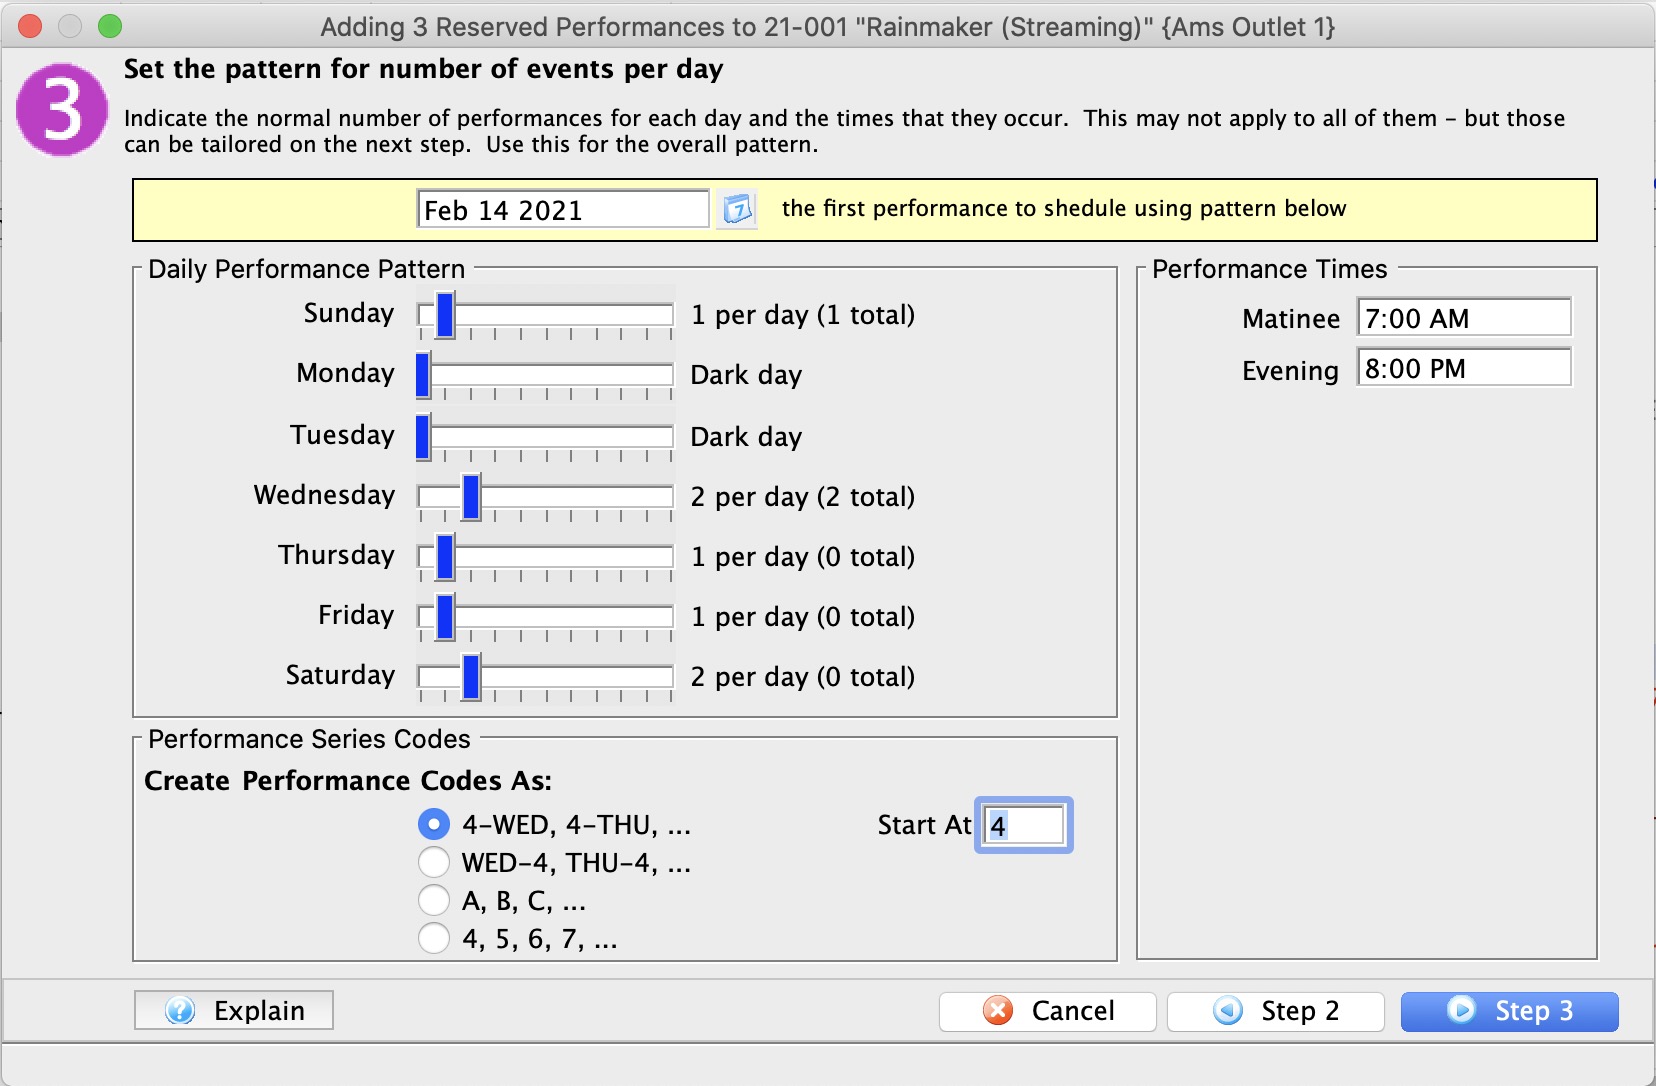
| Date of First Performance |
Enter the date of the First Performance (if no performances already exist,) or the next Performance (if you are just adding another performance).
The date that is entered here is not written in stone. It can be altered in the calendar by dragging a performance and/or it can be edited after the fact if you want to move a performance. It is meant to be used as a guide in creating all performances for the event. |
Daily Performance Pattern |
|
| Weekdays |
Using the slider for each day, select the maximum number of performances (up to 10) that typically occur on each weekday
If you have multiple performances on a specific day of the week, select that number and additional performance times will appear on the right hand side. The number of performances is to be used as a general pattern when setting up the performances date and times. |
Performance Times |
|
| Time slots | If there is a day of the week that has more then one performance then you may set a matinee time as well as an evening time. These times are to be used as a general guide line when setting up an event. They can be changed at anytime after the performance has been created. |
Performance Series Codes |
|
| Create Codes as | Refer to Performance Codes for more information |
Performance or Series Codes
|
It is important to know that each performance within the event code MUST be unique. |
|
Comparable performances in multiple events can have the same series code so that you can manage or sell a subscription. Selling a subscription will sell all events (in the season package) with the same performance/series code. |

If it is important to find a particular performance (1st Friday) for several events at the same time, each series should have the same code. This becomes very usefully when a patron is booking a season subscription and would like to attend the same time every month. Establishing a consistent nomenclature for the Event and Performance codes saves time during the sales process.
The following examples are recommended as an easy way for the sales person to verify that they have the correct performance. Codes should be in a week - day - performance format.
Week Long Performances
The following example would allow for easy comparison of week-long runs of shows.
| 1-SAT | For the performance on the first Saturday. |
| 2-SUN-M | For the matinee performance on the second Sunday . |
| 3-SAT-E | For the evening performance on the third Saturday. |
| 3-SAT-M | For matinee performance on the third Saturday. |
| 3-SAT-A | For morning performance on the third Saturday. |
Single Day Performances
If you do not have multiple performances per day the next example would allow for an easy comparison of the days of the week.
| SAT-1 | For the performance on the first Saturday. |
| SUN-1 | For the performance on the first Sunday . |
| SAT-2 | For the performance on the second Saturday. |
| SUN-2 | For the performance on the second Sunday. |
Multiple Performance Event/Play
If you have multiple performances per day the next example would allow for an easy comparison of the performances per day.
| 1-SAT-1 | For the first performance on the first Saturday. |
| 1-SAT-2 | For the second performance on the first Saturday. |
| 1-SAT-3 | For the third performance on the first Saturday. |
| 1-SAT-4 | For the fourth performance on the first Saturday. |
Single Performance for an Event/Play
If you have an event/play with only one performance, create the performance code as follows.
| SHOW | For the performance of a play where there will be only one performance. |
| CONCERT | For the performance of a Symphony, Band or music. |
| GAME | For the performance of a sporting type event/play. |
| DRAW | For the performance of a curling event/play. |
Step 4: Review Performances on Calendar
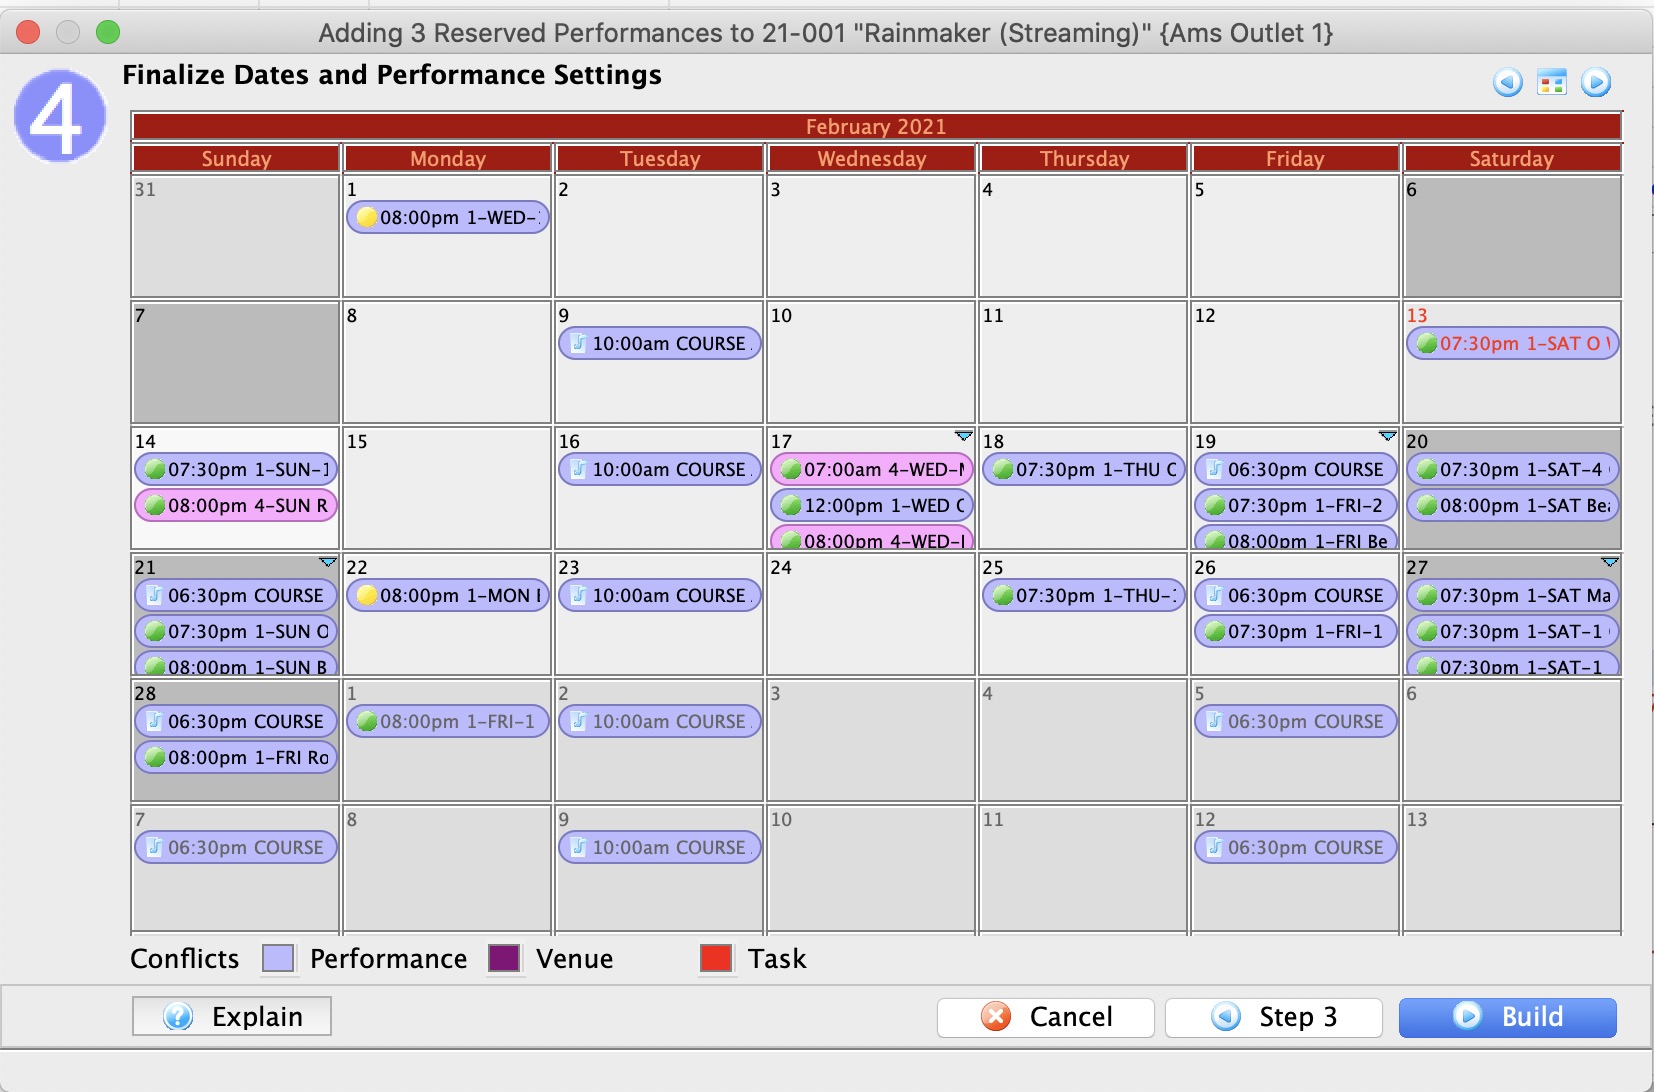
After you click the Step 3 button, the Step 3 window - Adding a Performance, opens.
- Review the calendar.
As performances can span months, use the forward - back
 buttons to move through the calendar.
You can use the middle button to switch the view to 2 week, week or daily view. In those views you can drag events to move them to another time slot or day.
You can also change the time of a performance by right clicking on a performance and changing the time. On the popup list, you can only select from a list of times that have already been used for performances.
Possible 'conflicts' will be colour coded and highlighted on the calendar and are broken into 3 parts:
- Performance - which means there is another performance at any time on that day and possibly in another venue
- Venue - which means that there is something else in that venue
- Task - which means that there is some tasks in the venue that may represent conflicts on those days.
- To finish, click the Build
 button.
To go back, push the Step 2
 , or Cancel
  if you do not want to finish setting up the performance.
When you push the Build
 button, the Build Performance list dialog opens.
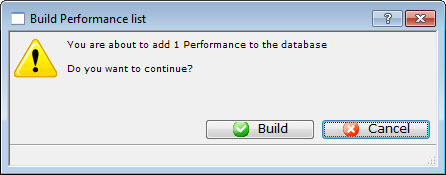
- Click the Build
 button.
The Adding performance verification window opens.
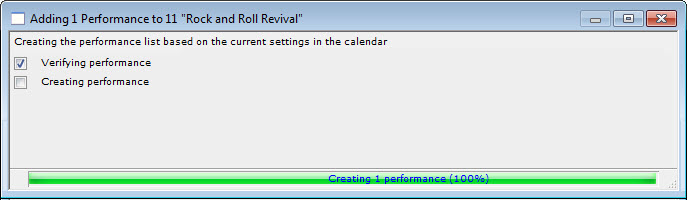
- Close the window and you are returned to the Performance tab of the Play window and the performance you entered is displayed.
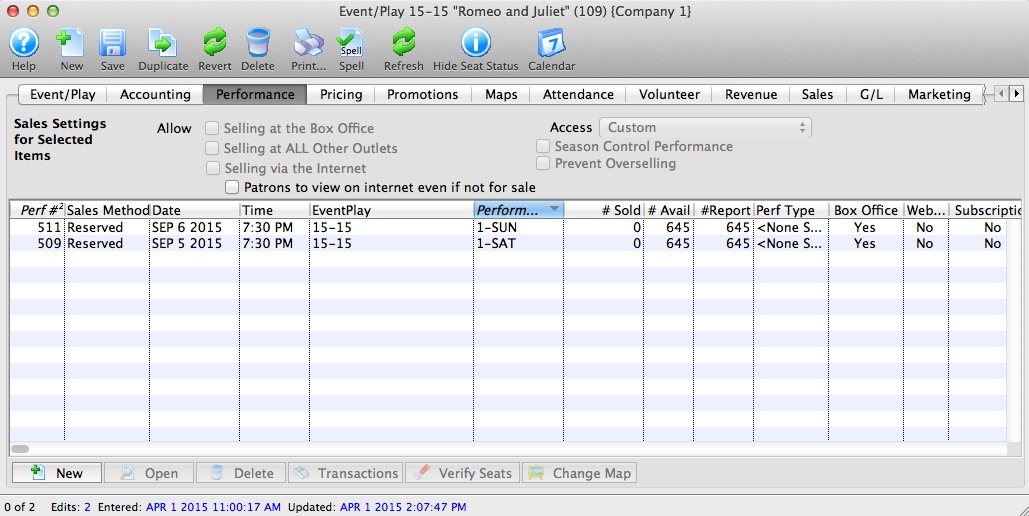
Assign Promotions to a Performance
|
By default, ALL promotions are available to the performance when it is created. |
To add a promotion to a performance, you carry out the following steps:
- Open the Event Setup window.
- Click on the Promotions Tab.
A list of all the performances for the event is displayed on the left side of the window.
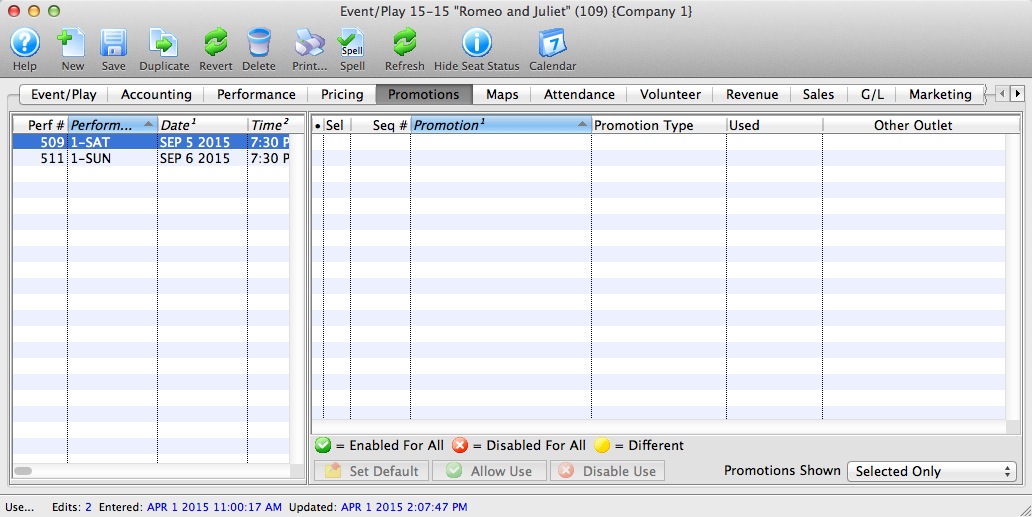
- Select the performance you want to add promotions to.
Click a performance to select it. Only one performance may be selected since each may contain different promotion data.
- Select the promotions you want to use.
Click a promotion to select / deselect it.
- Click the Allow Use button.
 A green check mark in the Sel column shows the promotion is available for the performance. The checked promotions will appear in the buy window when selling tickets to that performance.
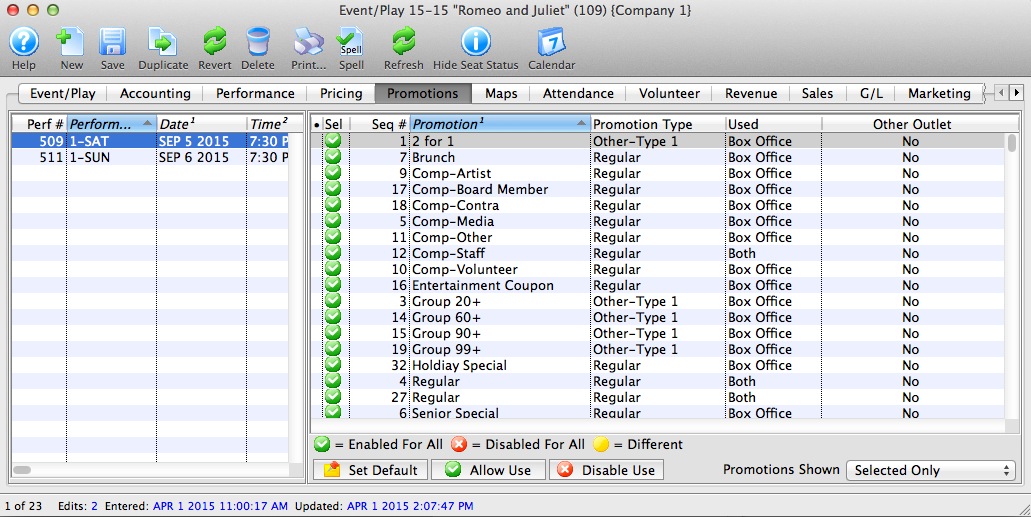
Disabling Promotions for a Performance
- Open the Event Setup window.
-
Click on the Promotions Tab.
- Select the performance.
Click a performance to select it. Only one performance may be selected since each may contain different promotion data.
- Select the promotions you want to remove.
Do this by highlighting the promotions you want to clear.
- Click the Disable Use button.
 A red X appears in the Sel column shows the promotion. The X'd promotions will now not appear in the buy window when selling tickets to that performance.
Editing an Event / Play
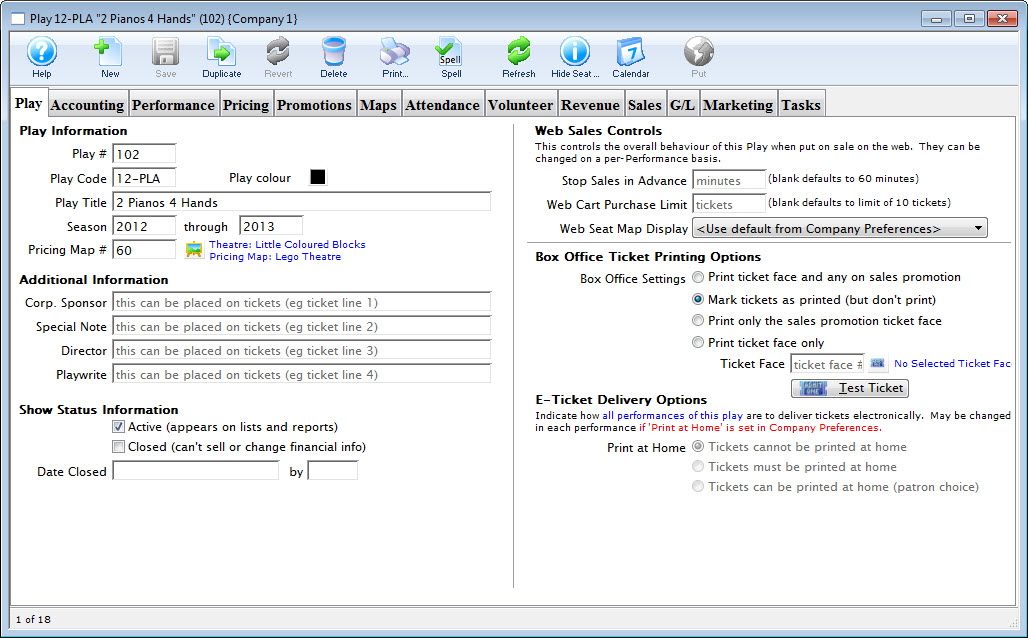
Editing Performances
Each series of performances can be edited after being created. You may be required to change the time or date of the performance or some other attribute. There are different editing options for each of the different sales methods, however they are similar. Before details are explained about editing each performance type. It is useful to know how to access the series detail window so you can start editing.
- Find the Event with the performance you wish to edit.
Click here to learn how to find events.
- Open the Event / Play Setup window.
Double click on the event/paly or press the Open
button.The Event/Play opens.
- Click on the Performances tab.
The Performance Tab opens.
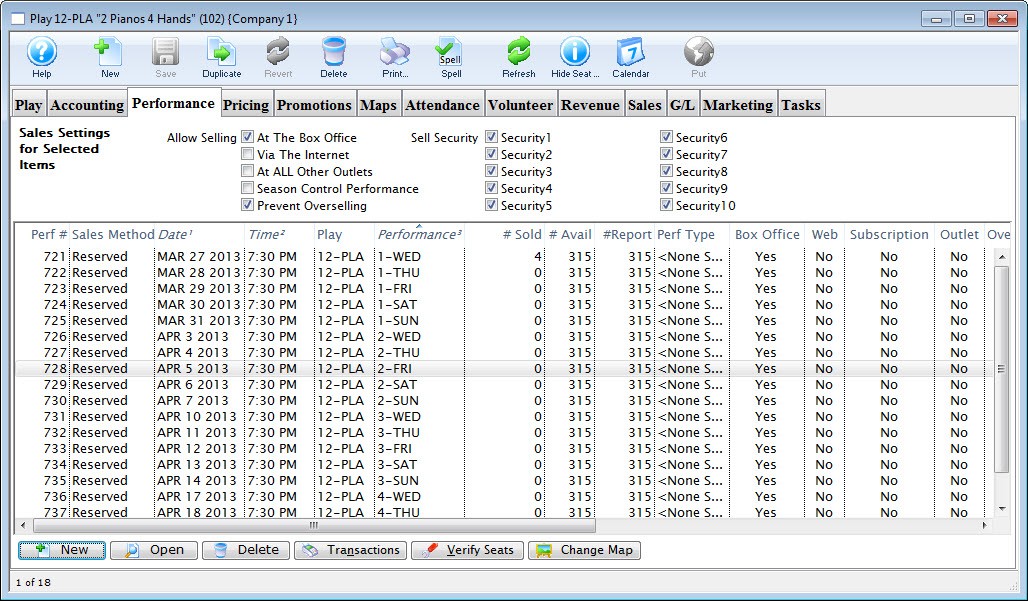
- Double click on a performance to open the Performance Detail Window.
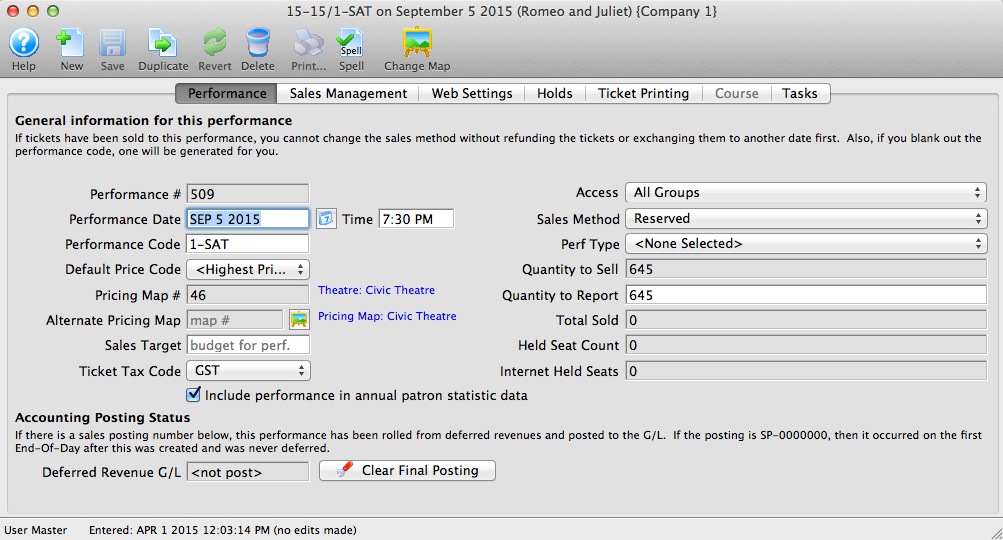
The detail window is the same for each sales method. Depending on the sales method you may not have access to some fields. Click here for a detailed description of this window.
Allow a Performance to be Sold at Another Outlet
If you allow a performance to be sold at another outlet, you can now specify which outlets have the capability so that each performance can be sold by different people.
|
You will need to enable the promotions for another outlet. Click here for more information on enabling promotions for another outlet. |
To allow a performance to be sold at a different outlet, you perform the following steps:
- Open the required event.
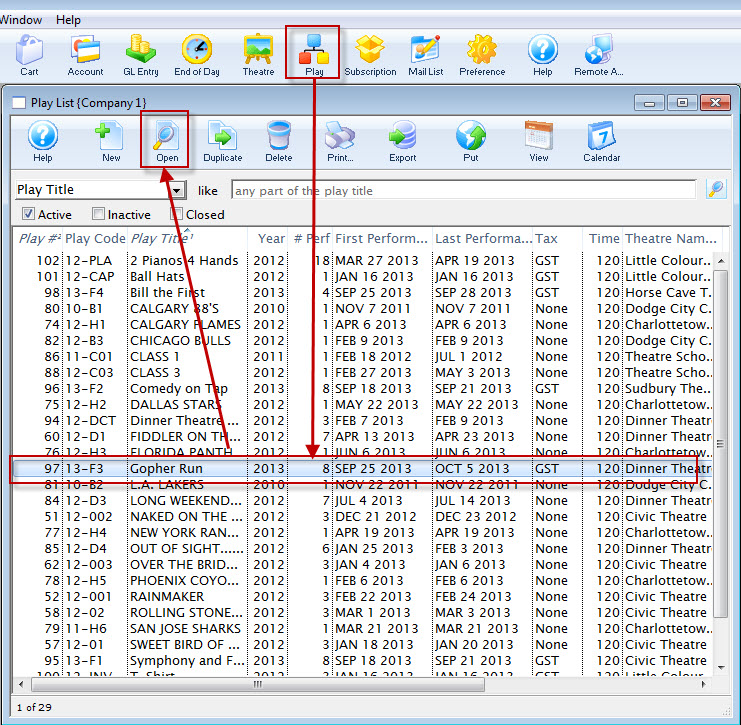
- Click the Performance Tab.
If you have enabled the Performance Codes, you can enable Allow Selling at ALL other outlets.

To enable selling at other outlets for specific performances:
- Open the selected performance.
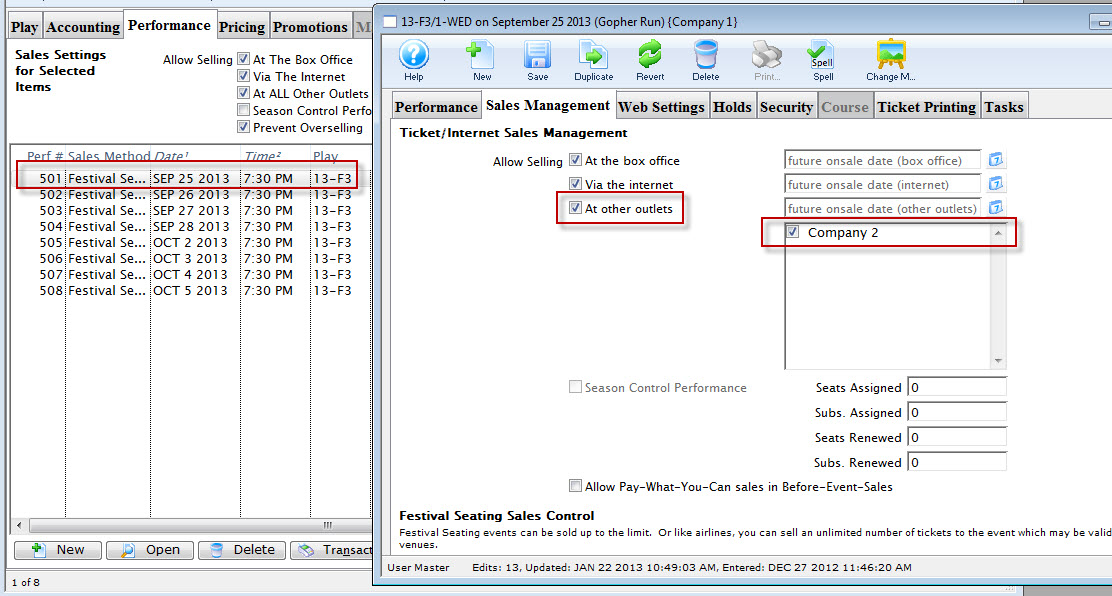
- Open the Sales Management tab.
Click here for more information on the Sales Management tab.
- Enable At other outlets.
Outlets that can sell the tickets, for the performance can be selected from the list on the right.
Changing a Performance From Reserved to General
Changing a Performance From Reserved to General Admission / Festival Seating
There are times when a performance sales method may need to be changed from Reserved seating to General Admission seating. The director/promoter may have changed their mind about the seating configuration, the performance may have been build incorrectly, or social impact may mandate the change.
A performance can always be updated from Reserved to General Admission even if seats have already been sold. Tickets previously allocated to a reserved seat are simply changed to no longer reflect a seat allocation in the database. However, a performance cannot be moved from General Admission to Reserved seating after seats have been sold as Theatre Manager has no way of knowing where to seat patrons who have previously purchased. The steps below outline how to change a performance after it has been built.
- Find the event / play you want to hold seats for.
Click here to learn how to find an event / play.

- Open the event / play by selecting it in the list and clicking Open or by double clicking it.
- Select the Performance tab

- Open the Performance Detail window
Each performance will need to be updated one at a time.

- Click the Sales Method drop down.

- Select General Admission or Festival Seating depending on your database configuration.

- Click Yes to the continue message.

- Select the Accounting tab in the Performance Detail window.

- Update the Quantity to Sell field to accurately reflect the total number of seats to be sold for the Performance.

The steps above can be repeated for each performance within an event as needed. Once a performance has been updated it can be marked available for sale at the Box Office and Online.
Live Web Content
|
Live streaming content is set up in the Live tab in the performance's detail window and is described below. |
|
If you set a time limit in a watch window, and somebody exceeds it, so that that cannot see their event. Clear their attendance flag and then they can re-watch the item. |
Live Content Styles:
- Video streaming for an online-only event
- Embedded iFrame
- Mobile-friendly "Custom Content" for the performance
Live Video Performance (Virtual Events)
Online-only video performances allow you to show streaming video at a specific time to ticket buyers. The video can either be pre-recorded or live streaming, depending on your selected video provider.
Supported Video Providers:
- Vimeo Setup - web site for Vimeo
- YouTube setup - web site for YouTube
- DaCast Setup - web site for DaCast
- Video.js Setup - web site for Video.js
- CineSend Setup - web site for CineSend
- BoxCast Setup - web site for BoxCast
Aside: Producing Video Content
If you're looking for tools to start recording and streaming live video, then a good place to start is OpenBroadcaster Software (OBS). The OBS Beginner Tutorial gives a good introductory video walkthrough. OpenBroadcaster Software supports a wide range of video providers. The primary way to use OBS is to send an RTMP Stream to the video provider. In turn the video provider will "duplicate" the stream and send it out to all live users. In other words, the video provider handles all the bandwidth required to broadcast your stream to hundreds, or even thousands, of users.
Live Experience
Theatre Manager comes with a default set of web pages for a full live video experience. The experience has three parts
Discovery
Users can enter the live show by clicking the Watch button under Tickets for Upcoming Performances in their home

Users will also be made aware of any Live tickets they have if they are logged in and have a ticket to a live performance occurring in the next 6 hours.

Pre-Show
The pre-show helps build excitement for the upcoming event. It has a countdown timer that let's users know when the event will begin

Show
The in-show displays a minimal frame for the video, so that the video content is front and center

Supplementary content (Coming Soon)
Supplementary content is information that you'd like to be available on an attendee's smartphone, for the duration of the event. This type of content is most suited to events that are interactive and require audience participation. For example, an outdoor festival that might have maps to various activities. Or a "Theatre in the Wild" event where audiences can self-direct to one of several small performances in different locations.
Common Questions
Question: Zoom is designed for video conferencing. Can it be integrated as a video streaming option?
Answer: We've looked into Zoom however it might not be the choice that you're looking for. At least not directly embedded streaming links into the Theatre Manager web pages. Zoom makes the assumption that what you're doing is more of a webinar -- that everyone in the meeting is an active participant. For live streaming events, that's often not the case. Usually, one person is doing the filming while the others are watching.
If you're attempting to use Zoom purely for it's easy-setup, you may want to consider one of two things:
- Connect Zoom to Vimeo Live
- Switch setups to OpenBroadcaster Software for streaming to Vimeo. It's quite easy.
If you're using Zoom because you want audience participation, then that's something else entirely. Zoom does have integration points with web pages which would require engineering effort within your webpages to treat the interaction that it allows the audience interaction in the correct way.
You could very easily do this kind of event outside of the live streaming portion of Theatre Manager by sending Zoom invites to the patron's email address via a Form Letter email. The attendance reports could be used to know who to let into the class or not, and you could mark attendance using a Course Attendance Report or in Theatre Manager directly.
You may also be interested in the Managed Courses feature in Theatre Manager, which can allow user web access to setting a class attendance. That would allow the Meeting Moderator or Class instructor that isn't a Theatre Manager employee to mark attendance, and also see who is in their meeting/class.
Question: Using the free version of Vimeo, the webpage the video is embedded in appears not to be secure as I can see the video ID link in the HTML coding of the page. A patron can right click and find the static link by both via the "save as..." function or the inspect element function. The "save as..." function is the most concerning for us as it is the most simple and easily exploitable. Can the web page security be updated to prevent this?
Answer: The Theatre Manager web sales and the Vimeo and YouTube links that are embedded in the page are secured by HTTPS, which ensures that the content streamed to your user's computers is private and can not be seen by other users. Theatre Manager requires that level of security in order to pass PCI compliance, and we take that notion of security very seriously. Theatre Manager is very secure for your users.
When it comes to Live Streaming video though, what you're referring to is the Gate Control required for a live streaming event, such that only ticket buyers are allowed access to the stream. As of today, that is only possible with Vimeo when using the paid Premium Live Streaming Plan.
The Vimeo feature you'd need is called "Domain Privacy", and it allows you to restrict playback of a video to only people that are viewing the video from your website, which requires a Theatre Manager login and a Theatre Manager ticket to watch. In other words, while people could copy and paste the Vimeo link, it wouldn't help them, because the video would only play through your site's tickets.yourcompanyname.com URL.
The reason that this is the only way for true Gate Control is that it's not possible to fully obfuscate or hide the link that's embedded in the page. There are some ways to attempt to disable that right-click context menu, but many browsers won't respect those options because the same options can be used to make abusive websites. Further, there are actually many other ways that you can see the Vimeo or YouTube link beside right-click, and your patrons could copy and paste it from those as well. YouTube, for example, has no controls for Domain Privacy and so it's not possible for us to restrict the video to only your website.
You're left with a couple choices:
- Trust. Hope that people just don't share the link, or if they do, hopefully it doesn't impact sales enough to matter. This option is part of the "free" package options, but your sales could be lower than they might otherwise be with good Gate Control. You could even potentially acknowledge that it's possible, and have a "plea" on the website that mentions the importance of buying a ticket -- the idea seems far fetched, but many news sites have had success with similar pleas for adblockers.
- Use Vimeo Professional with Domain Privacy: This will allow you full Gate Control, and it won't matter if users copy and paste links, because they won't work outside your website.
In this instance we're at the mercy of the video CDNs -- YouTube and Vimeo -- and what their options allow us to do. Of the two choices, Vimeo is the more flexible, and the one we currently recommend. We'll continue to look for other CDNs that can guarantee tight Gate Control on the web site for live streaming.
Editing Price Codes
There are two different reasons for editing price codes:
One - to initially set up the prices for the price codes.
Two - to alter an all ready set up price.
- Select the Play you want to adjust and click the Open button.
- Open the Pricing tab.
For more detailed information about the Pricing Tab, click here.
- Select the Performance that you want to Edit Price Codes for.
Do this by clicking on the specific performance from the performance list on the left side of the Play Setup window. The prices for this performance will display in the price list on the right side of the Play Setup Window.
- Select the the Price Code you want to edit and click the Edit Price
 button.
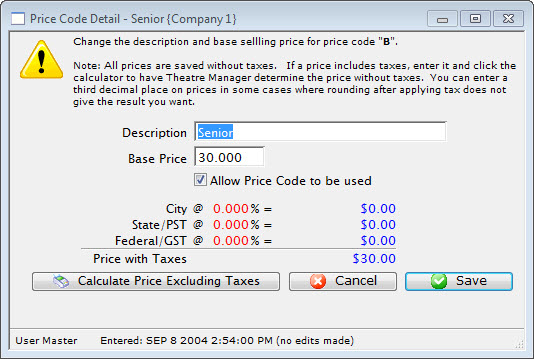
- Enter a description for the Price Code.
Common price code descriptions are Adult, Student, Senior, etc.
- Enter a Base Price.
The price that is entered here is the ticket price before taxes have been added on. If your company likes to have nice round ticket prices after taxes then you can use the Calculate Price Excluding Tax Feature. It is explained further down the page.
- Click Save
 button.
Doing this accepts the changes to the price code. Clicking Cancel
would canceled the changes.
Calculating Prices Excluding Taxes
- Enter the Selling Price you want to end up with after taxes.
In this example we will use $10.00 and a 7% tax rate.
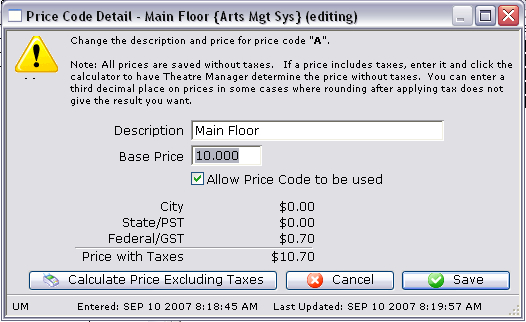
- Click the Calculate Price Excluding Taxes
 Button.
The selling price will now display as the price before taxes. In this example the $40.00 Price Code turned into a $38.099 Price Code. Look to the calculation to see how the tax was broken out to create $10.00 final price ticket.
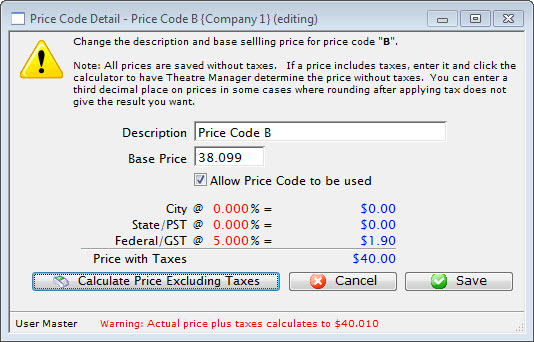
- Click Save button.
This accepts the changes to the price code.
Verifying Seats
|
If you change a venue map, when there are events already on sale, you MUST verify the seats on each performance to re-index the new name to the seat in the event. |
This is an internal database verification that ensures all tickets have been created and are properly setup. The verification routine has one key function - to determine if there are any missing reserved seats. This should never happen - verification will detect and correct the issue.
- Click the Event
 button in the Theatre Manager ribbon bar.
- Locate the Event with the Performances to be Verified.
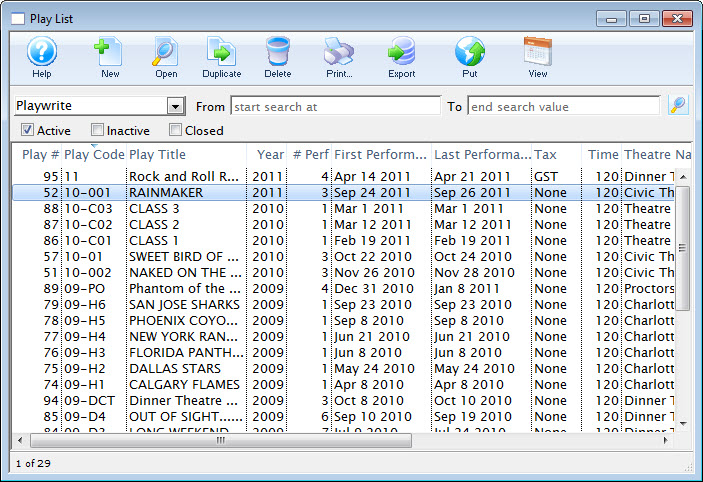
- Open the Event by double clicking on it.
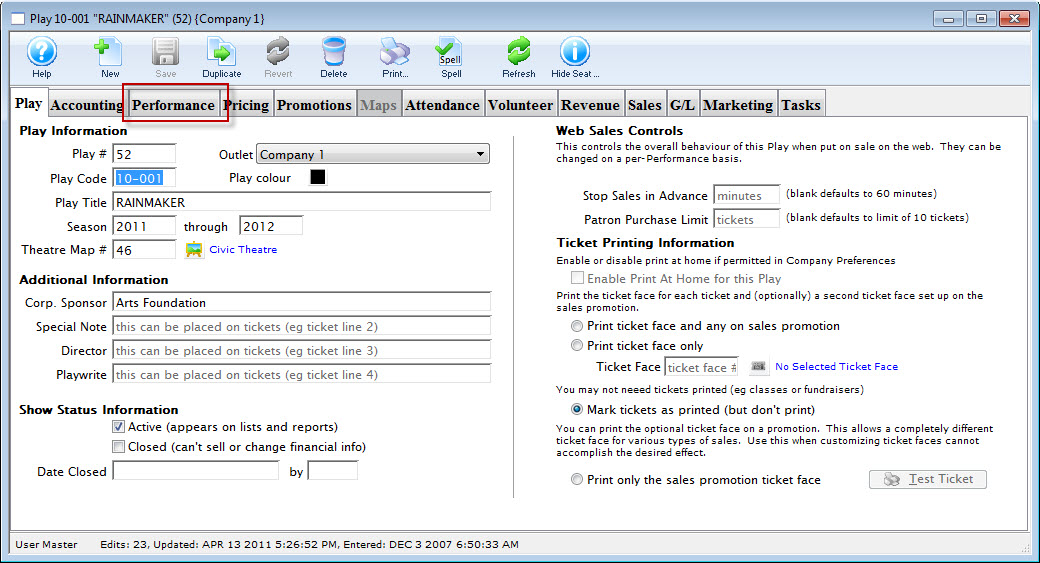
- Select the Performance tab.
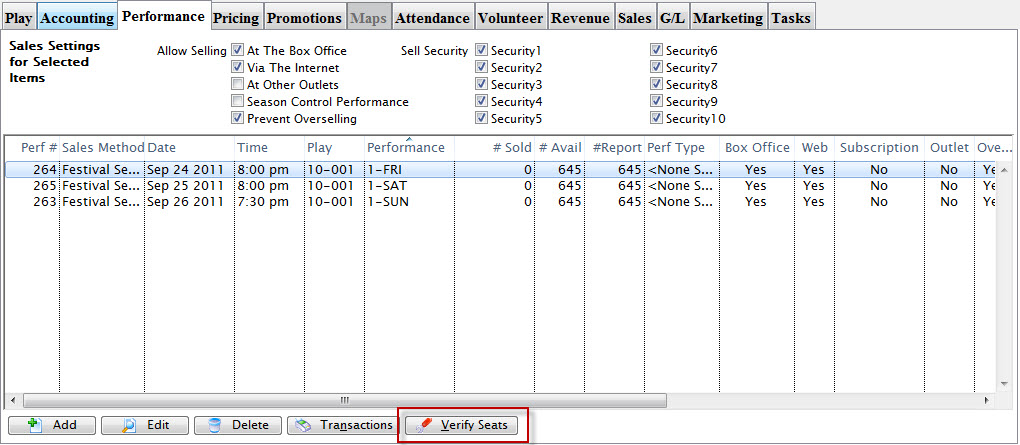
Single click on the performance to be verified. You can select multiple performances at a time if needed.
- Click the Verify Seats button.
The Verify Seats warning dialog opens.
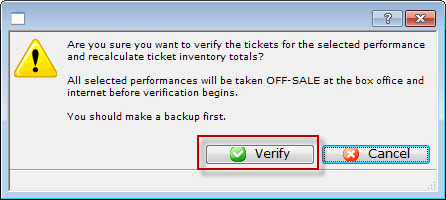
- To continue, click the Verify
 button.
The progress bar at the bottom of the window will state the function and the progress.
When the Verify process has completed, the Performances will no longer be available for sale at the Box Office. They will need to be marked as available before tickets can be sold.
Setting Attendance
You use setting attendance to keep track of how many patrons attended a performance versus the number of tickets sold. This feature is beneficial for deciding how much can be oversold to a festival house. You may have discovered there is a consistent 'no show' rate of 15% to 20% and can then adjust sales to match the trend. Another use for this feature is calculating royalties based on the number of patrons that actually attended the performance, not based on the number of tickets sold.
|
It is important to remember that this feature only works if you have the ticket and the patron number printed on the ticket, or a bar code that contains one or both of those numbers. |
To set attendance, you perform the following steps:
- Click the button in the Theatre Manager Ribbon bar.
- Double click on the Play / Event to set attendance for.
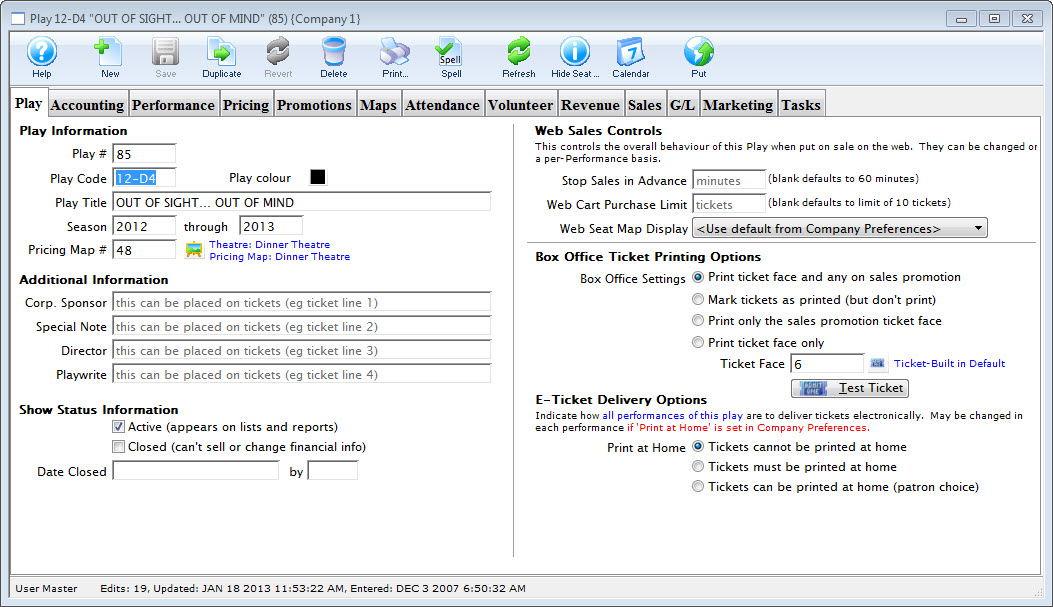
- Click the Attendance tab.
- Select the performance to set attendance for.
Choose the performance by clicking on the corect date in the column on the left side of the Attendance Tab.
- Click the button.
The Set Attendance button is only accessible if the performance you have selected has already taken place or will be performed that day.
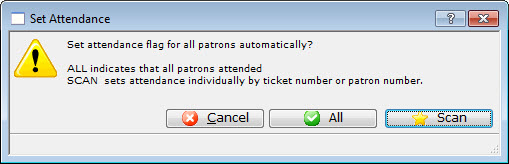
- Click the All
 button to set the attendance flag to "Attended" for all patrons and tickets.
Use this option if you are sure that all the tickets were redeemed for the performance.
- Click the Scan
 button to manually enter attendance.
The 'Attendance: Patrons who came' window opens.

- Enter the patron number, ticket number or click in the ticket number field and scan the ticket.
If you enter the patron number, all of the tickets the patron purchased will appear in the window. If you enter the ticket number or scanning the ticket, only that ticket will appear.
- Click the Accept
 button.
To speed up the process, press the <RETURN> key to accept the ticket # / Patron #. If you are using a bar code scanner, set the default to include an automatic <RETURN> after each scan. If the tickets have a bar code on them, then either the patron number or the ticket number can be scanned in. It depends on what information has been encoded in the bar code.
If too many tickets have been selected, and not all should be marked as attended, highlight those to remove and click the Clear Attend
 button. The tickets are removed from the list.
 - Click the Finished
 button when all data has been entered .
This marks all tickets entered in the list as Attended.
Clear Tickets Incorrectly Marked as Attended From a Play
To clear tickets incorrectly marked as 'Attended' from a play, you perform the following steps:
If a mistake is made in setting attendance, attendance for the entire performance (or optionally, specific tickets) can be cleared.
|
If you set a time limit in a watch window, and somebody exceeds it, so that that cannot see their event. Clear their attendance flag and then they can re-watch the item. |
- Click the button in the Theatre Manager Ribbon bar.
- Double click on the Play / Event to clear attendance for.
- Click the tab.
- Select the performance you want to Clear Attendance from.
The tickets for that performance are displayed in the attendance list.
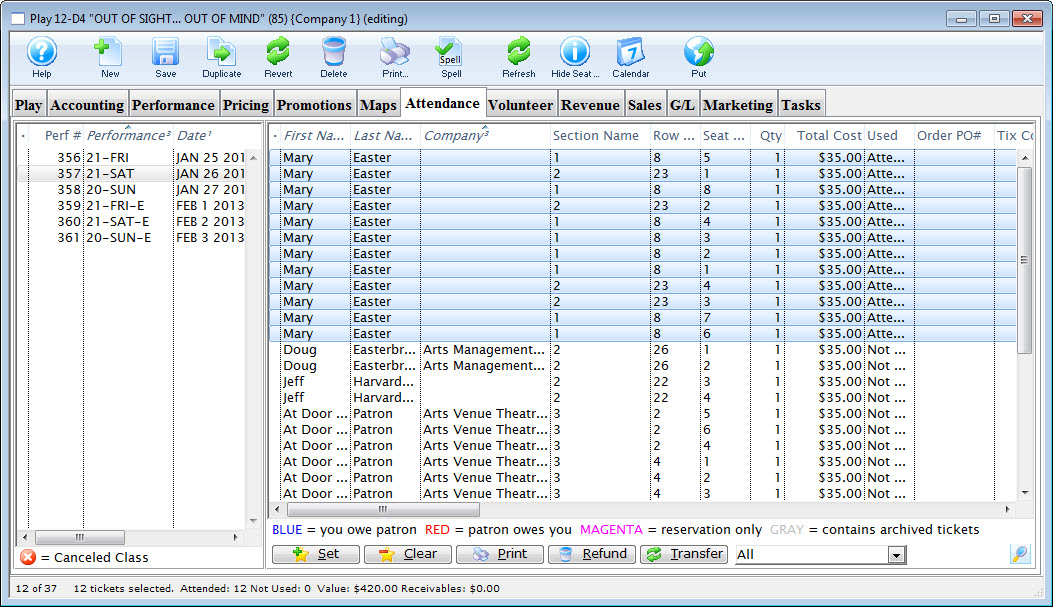
- If clearing attendance for a select group of tickets, highlight them in the right hand window.
- Click the button.

- Click the All button to clear the attendance flag for all patrons and tickets.
- Click the
 button to only clear attendance for the tickets selected.
Selecting a Performance for Attendance
You can select a performance you want to set attendance for from the Patron Attendance window.
To Start selecting a performance, you perform the following steps:
- From the main menu bar, choose Accounting >> Confirm Attendance.
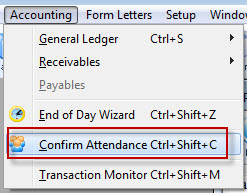
The Patron Attendance list window opens.
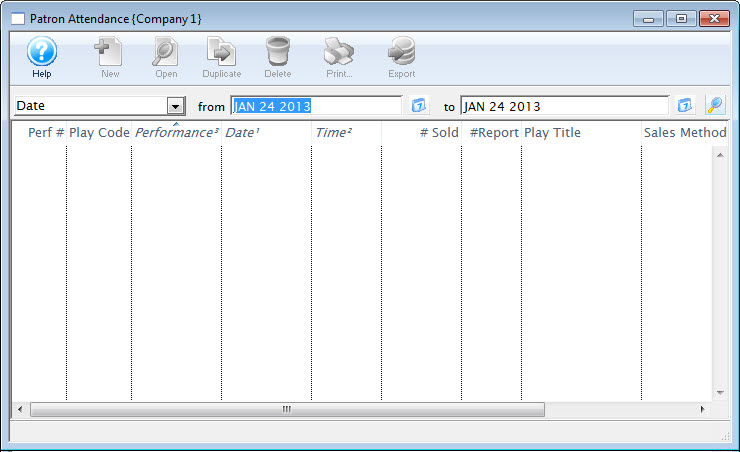
- Enter Search Criteria.
The search criteria is entered in the From and To fields and is based on the field listed in the drop down list.
- Click the Search button.
A list of performances opens.
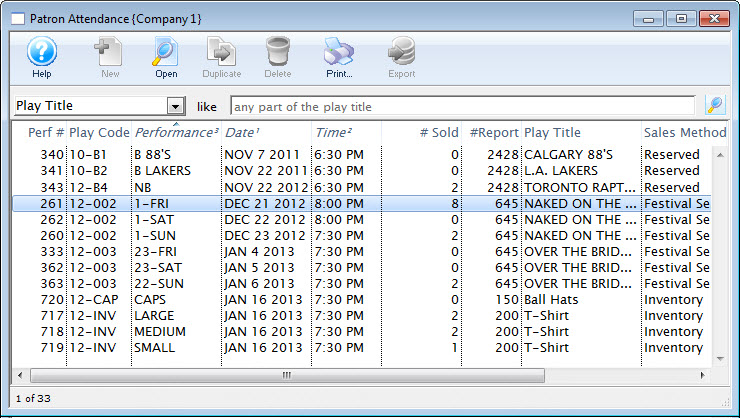
- Double click on a performance to select it. Once selected, the performance will open.
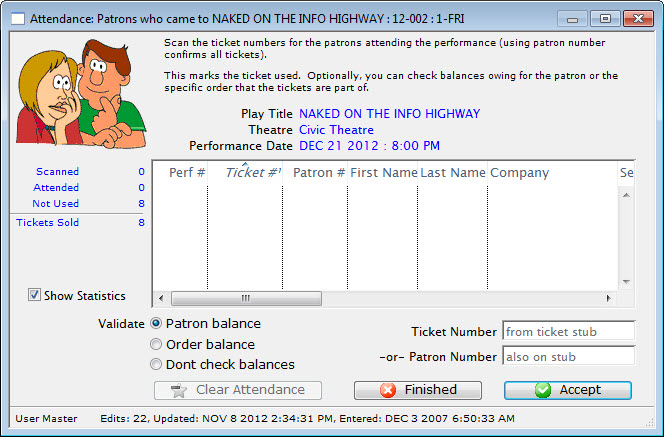
- Continue at Step 8 of the Set Attended section of Setting Attendance.
Adding a Fee to a Ticket Price
There are times you will want to add a fee to a ticket price. For example, adding a fee when selling tickets for another group.
The steps below outline how to add a fee to a ticket price.
- Add a Fee to a Sales Promotion.
- For information on creating a sales promotion click here.
- On the promotion Calculation tab, enter the fee you wish to charge into Ticket Fee box 1. - Alter the event Account tab.
- Select the event the fee is to be applied to. For more information on events click here.
- Under the event Accounting tab, specify what G/L account the ticket fee should be posted to in the Ticket Fee 1 Account box under the Earned Revenue Accounts (Fees) section.
- For more information on the accounting tab click here. - Alter the event Pricing tab.
- Under the event Pricing tab, alter the prices for performances if the fee is to be built into the price.
- For more information on the Pricing tab click here - Enable the promotion for the event performances.
- Enable the promotion from Step 1 under the Promotions tab.
- For more information on the Promotions tab click here.
You have now successfully set-up the ticket fee. When the Sales Promotion you created is selected during the ticket sales process, it will add the fee on top of the base ticket price.
Change the Map For an Event
You can change the Pricing Map an event uses, even if it is reserved seating. it works best if the venues are the same and you are just changing price zones for dynamic pricing. however, you can change to any other venues (larger or smaller) with some ramificatiosn
|
You can be change a venue to another while sales are occurring. The process takes moments.
You may want to refer to how to Create a new pricing map. |
|
If you change to a venue that is a completely different orientation with more or fewer seats and no tickets have been sold, you may just have to verify seats for the affected performances.
HOWEVER, if it is a reserved seating performance:
|
There are rules for switching Pricing Maps. The new Pricing Map must:
- Be active.
- Have the same valid price codes in the new Pricing Map.
- Have the same seating capacity and seats must be named (reserved seating only).
- When changing the reserved seating map for an event, you can select some other Pricing Map.
- When changing the reserved seating map for one performance, you can only select other pricing maps within the venue.
- When changing the map for a general admission performance, you set the alternate venue as before.
- If using the Outlet Edition, the map MUST be owned by the same outlet. People from outside your outlet cannot change pricesmaps or price codes for you.
To change the Pricing Map, you perform the following steps:
|
If the new map has a price code that is not in the map you copied from, it will NOT be available to add. Also, If you are replacing the pricing map for one or more performances, you must ensure all maps being used have the same price codes. Your pricing map can have unused price codes in its description. |
- Click the Play/Event button.
The Play list opens.
- Find the specified event and click the Open button.
The Play / Event window opens.
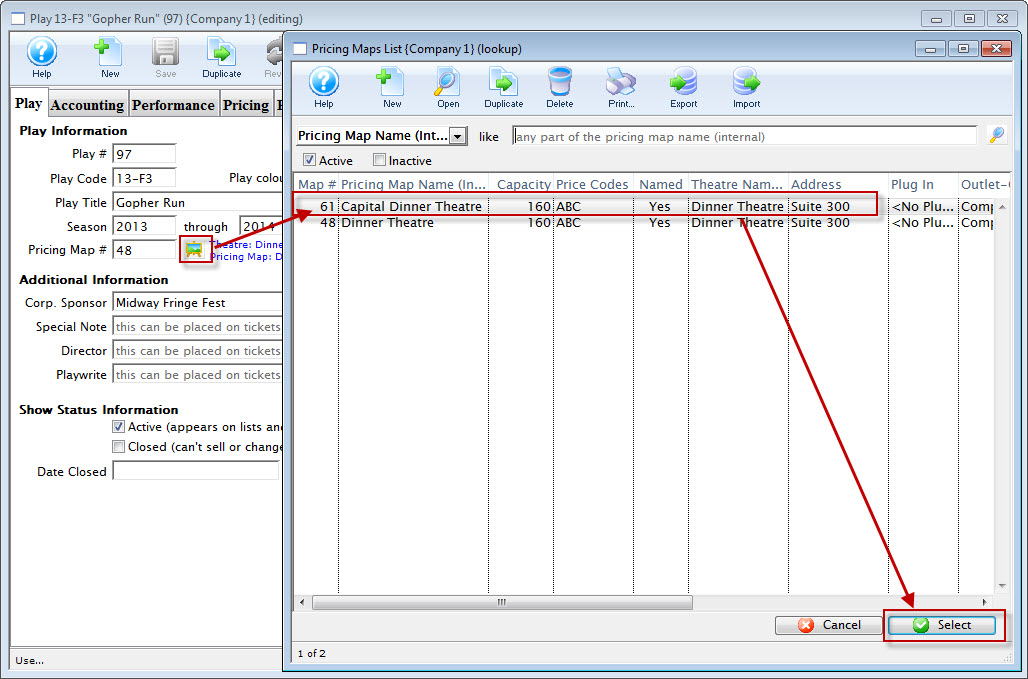
- Click the Venue
 button.
The pricing map list window opens, displaying the alternate maps that match the Pricing Map rules.
- Choose the appropriate map and click the Select button.
The Change Map Confirmation opens.
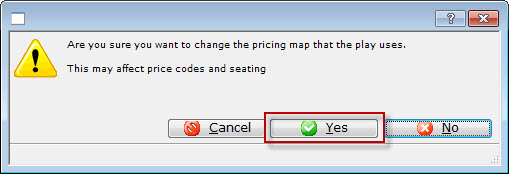
- Click the Yes
 button.
- Verify Seats if capacities are different
Refer to Verifying seats which might be needed after changing venues for a performance.
Ramifications of different Venue Orientation
- Case 1: all general admission performances
- Case 2: reserved seating performance with nothing sold to it yet
- Case 3: changing maps to a venue with the same orientation, seating and capacity - probably duplicated from another map and created for price zone changes
- Case 4: changing map for another venue with completely different seating, orientation, size and with tickets sold
CASE 1: General Admission Performances
You can change the venues at any time.
CASE 2: Reserved Seating Performances with no seats sold
If there are no seats sold yet to the reserved seating performance, then there is little impact.
- Change to the new venue (whether it has more os less seating capacity
- Verify the seats in the performances
- you can now sell tickets
CASE 3: Venue with same orientation and reserved seating, seats can be sold
If a venue is really the same, with same seats, similar size, with perhaps a few seats removed for orchestra pit, or if the price zones are different for the purpose of dynamic pricing.... then change the venue that the performance is in.
However, if seats are already sold, be aware of the following ramification. Seats in the new venue have the same seat numbers as the original venue. This may cause patrons to be split into different areas.
Refer to the image and the description below:
If you simply used the new venue and made more seats, then people may not have seats where you think.
This happens because Theatre Manager:
CASE 4: Reserved seating events with seats sold and completely different venue orientations
Another approach that may help avoid the issue below is using the Transfer seats from one performance to another.
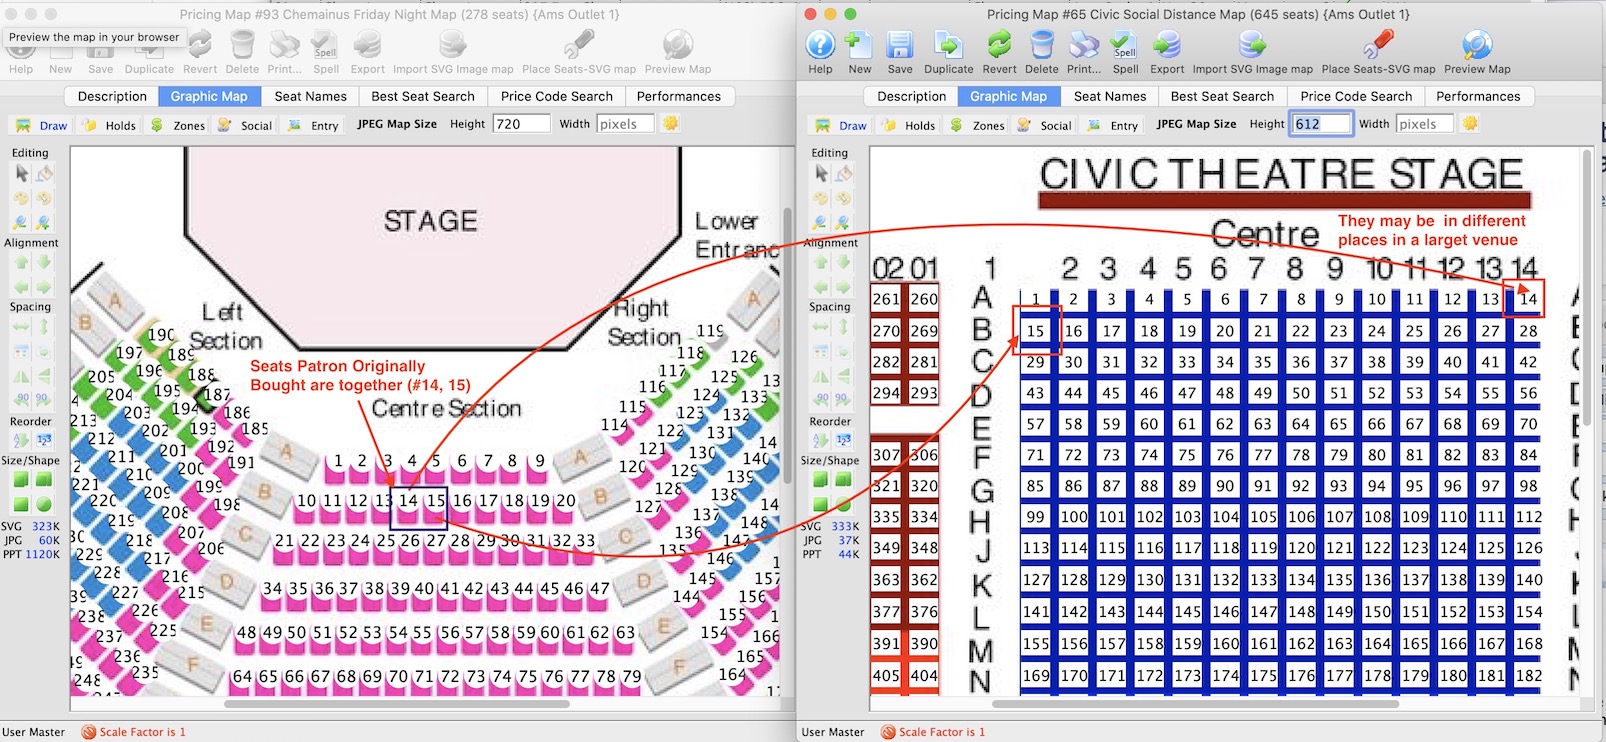
The left venue represents 'smaller' venue.
The right venue represents a larger venue
so, changing a venue in this manner, while it works, is really intended for moving to spaces that are equivalently set up -- as in dynamic pricing.
Updating Holds on a Map
Updating Holds on a Map
There are times when the map in a performance may need to be updated to reflect the default holds on the venue map for the event. The performance may have been built without using default map holds or the map for the event/performance may have been updated and include new holds. The steps below provide an outline on how to update the performance to reflect the holds using in the venue map:
- Find the event / play you want to hold seats for.
Click here to learn how to find an event / play.
- Open the event / play by selecting it in the list and clicking Open or by double clicking it.
- Select the Maps tab

- Highlight the Performance(s) on the left side of the window.
Should you need to hold seats for multiple performances at a time simply select multiple date/times from the list on the left side of the window.

- Right click on the Map to view the options menu.

- Select Hold All Seats On "Return To..." Hold Map

Once the holds have been updated seats will be held with the default letters from the venue map for those performances selected on the left. All holds appear as lower case letters on the map. Changing the hold colour can be done in the Box Office tab of Systems Preferences by a Master User.

Deleting a Performance
Hiding a Performance
Normally you want to delete a performance completely (see next section), but if you cant, then:
- Find the performance as per below and try delete it, as per the instructions below
- if it won't delete, then target="_blank">double click the performance to edit it. Change:
- The performance date to be the first day of the run
- The performance code to be something like 'DONTUSE'
- Set it so that it can't be on sale at the box office or online
- for added safety, put an on-sale date in that is AFTER the date of the performance for both online and box office - that way if anybody ever changes the onsale flags, it will prevent the performance from showing up
Rules for Deleting a Performance:
You can only truly delete a performance if:
- You have "Delete" user privileges the Play information under the data tab of Employee Setup.
- The play must not be archived.
- No tickets have been sold to the performance.
- No transactions created for this performance.
To start, you perform the following steps:
- Open the Play List Window.
Click here for more information on opening the Play list window.
- Open the Play you want to remove the performance from.
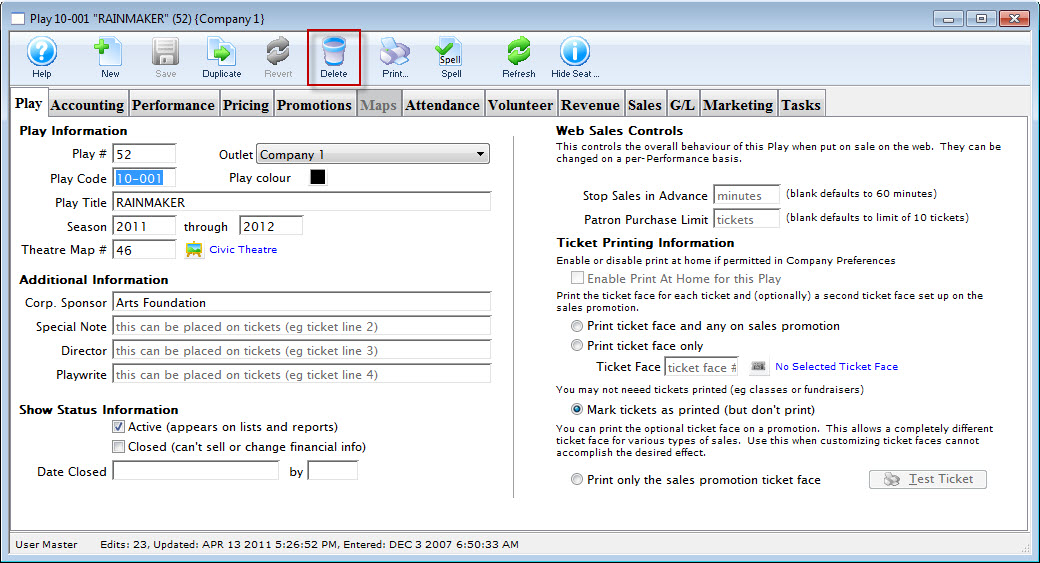
- Review the Performance Tab to ensure that no ticket have been sold to the performance.

- Click the Delete button.
The Delete Performance dialog opens.

- Click the Delete Button to delete the performance.
|
Note the # SOLD column in the performance list. Quantity must be zero for each performance in the list. |
Change The Map For Specific Performances
Your venue is running a special event. Perhaps, one evening performance is to only have two Price Codes. All the seats on the main floor of the theatre are to be sold at the Adult Price only (your price code A) and all the raised seats are to be sold at a different Price Code, Price Code B. Or you want to implement Demand Pricing for the event where you can change the price codes for a range of seats.
You have created a new map for your venue. Click here for more information on creating the new map. Once the map is created, you can now go on and change the map for the specified performance.
|
To move from one map to another the maps must be within the same venue. They should contain the same number of seats and have identical seat codes. The maps will should probably contain the same Price Codes, however the new map may have more or less Price Codes than the original.
If there are new price codes in the new venue, you must view event and click on price tab to receive a message to add price codes. Only then can new base price codes be added to a performance. |
- Click the Play/Event button.
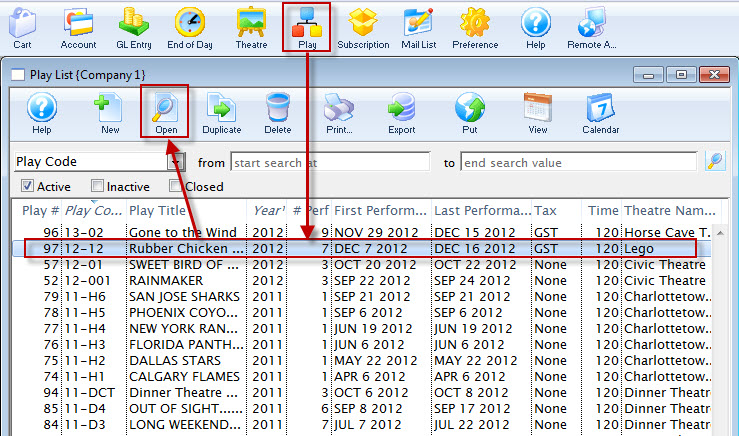
The Play list opens.
- Find the specified event and click the Open button.
The Play / Event window opens.
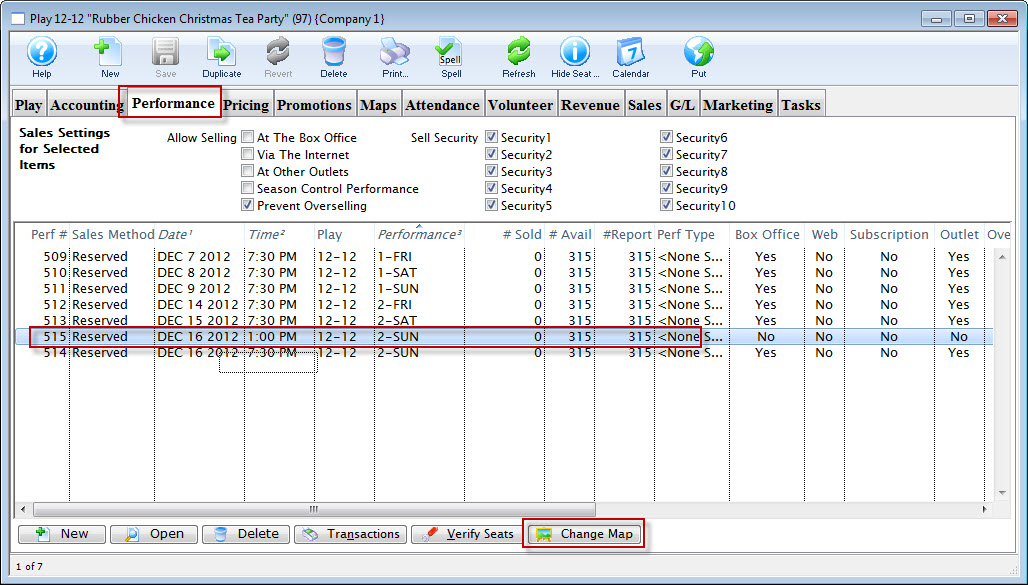
- Click the Performance tab. Highlight the specific performance and click the Change Map
 button.

The Pricing Map list for the selected venue opens.
- Choose the map you require.
- Click the Select button.
A confirmation dialog opens.
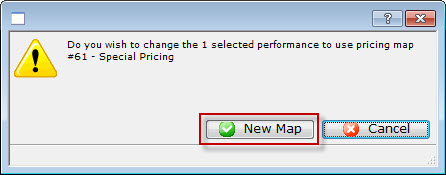
- To complete the change of the map for the selected event / play, click the New Map
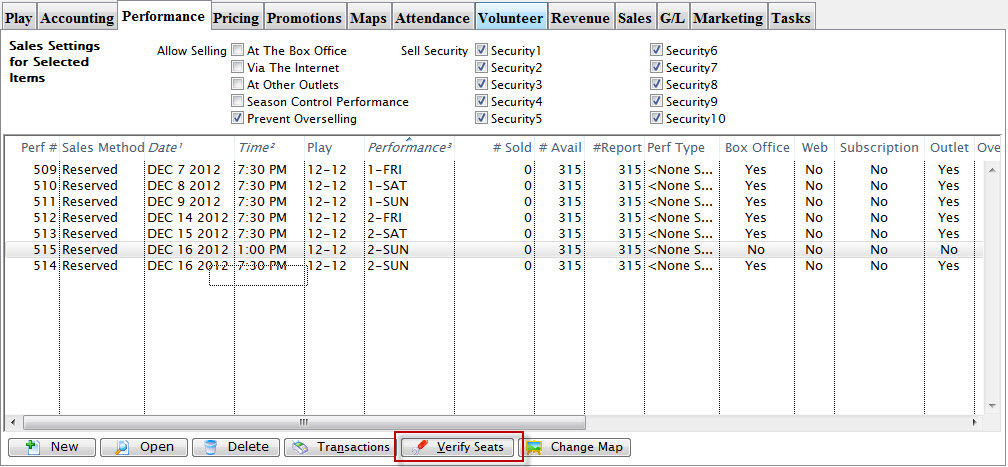
You are returned to the Performance tab.
- Click the Verify Seats
 button.
The Verify Seats confirmation dialog opens.
- Click the Verify
 button.
You are returned to the Performance tab.
- Open the performance and review all tabs to ensure all the information is correct.
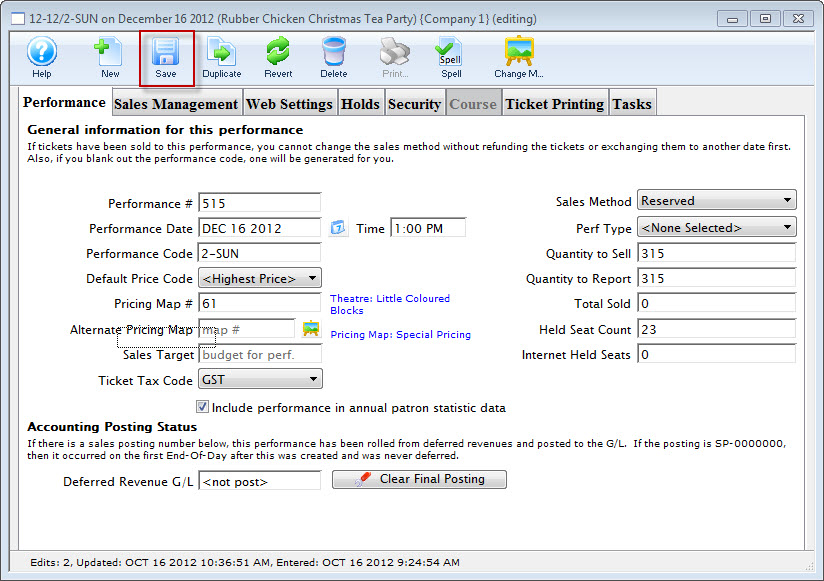
If you have made any changes, make sure you click the Save
button.
You can now select seats for the special event from the special map.
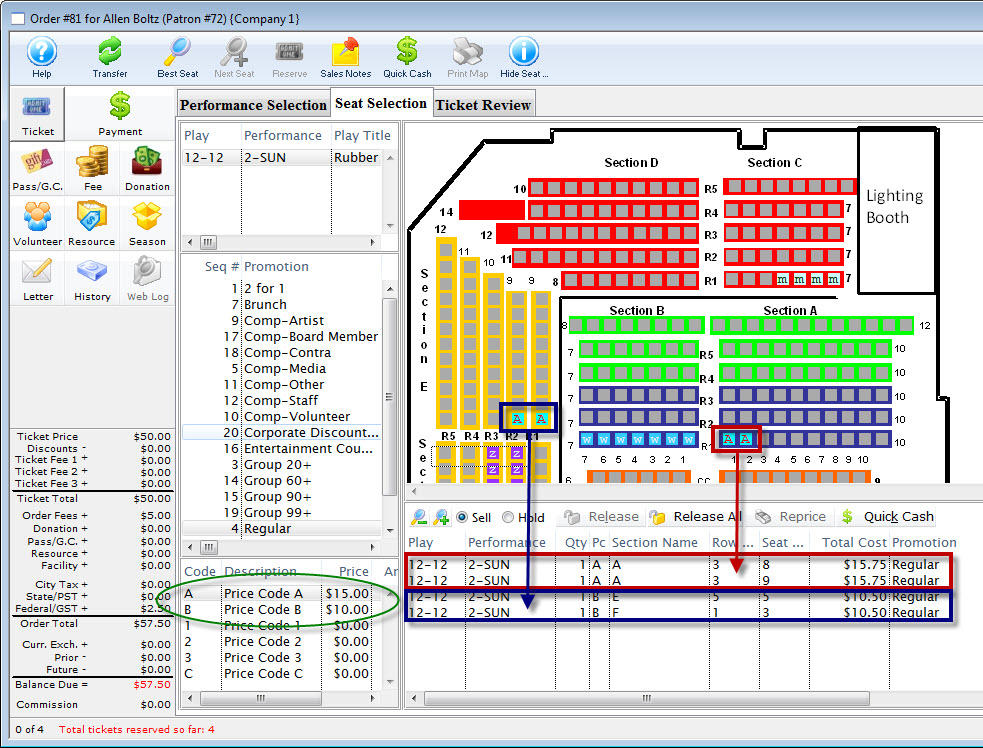
Deleting a Play / Event
Deleting a play may only be necessary if the play was entered into the database incorrectly, inadvertently, or has been canceled. You can delete a play if all tickets sold have been refunded or exchanged out of the performance and the End of Day Wizard has been completed.
Rules for Deleting a Play:
You can delete only if:
- You have Delete user privileges the Play information under the data tab of Employee Setup.
- All general ledger detail records have been archived that are associated with this play.
- There are no Daily Sales Summary information associated with this play.
- The play is not a Control House for any Season Subscription Package.
- There are no Volunteer History records assigned to this play.
- All necessary ticket based analysis reports have been been printed for this play.
- Open the Play List Window.
Click here for more information on opening the Play list window.
- Open the Play to delete.
- Click the Delete
 Button in the Plays window.
After you click the delete button the Delete Play dialog opens.
- Click Delete
 to delete the performance.
Clicking the Cancel
button cancels the deletion.If the Sales Method is Reserved Seating, then all tickets that were previously created for this series will also be deleted.
To delete a Play / Event, you perform the following steps:
Closing Events / Plays
An event marked "Closed" that is not marked "Active" will not appear in the Play List, report or mail list selections, and cannot have further sales or changes in financial information. Key events / plays (such as your main stage series) should always remain "Active."
In general, you should close an event / play:
- After verifying that the event tickets and revenue balance
- When you are finished paying royalties and run your royalty reports
- When you want to prevent exchanges from old events / plays (such as for subscribers)
- When you no longer want to see them in mail list criteria and reports - perhaps after a number of years
- If they are past rentals that are not pertinent to your general business operations.
Options to close An Event / Play
You can do this one of three ways:
- Perform the steps that follow to close an individual event
- Close all events for past years using an option during year end rollover
- Select a number of events in the event list, right click and close them
Closing a Single Event Manually
- Find the event / play you want to close.
Click here to learn how to find an event / play.
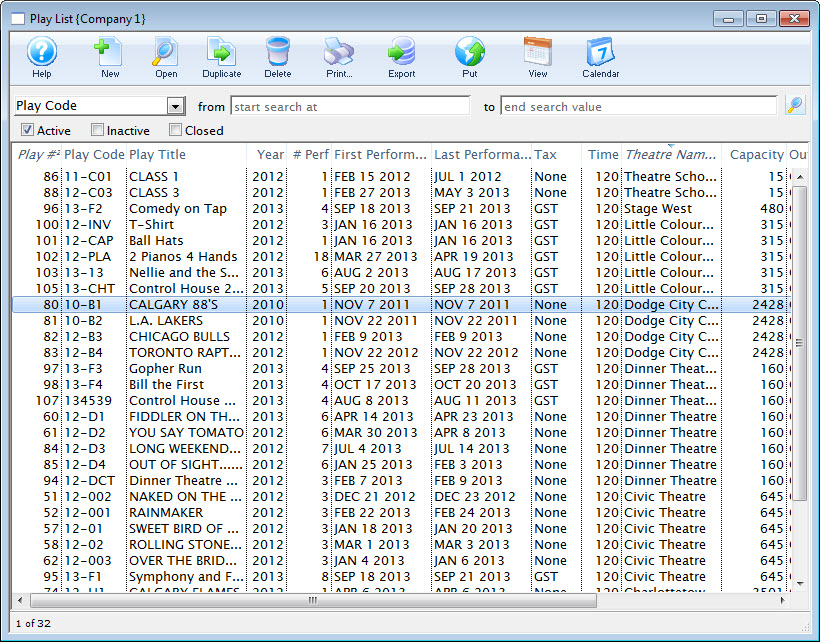
- Open the event / play and locate the status selections in the Event / Play tab of the Events & Dates window.
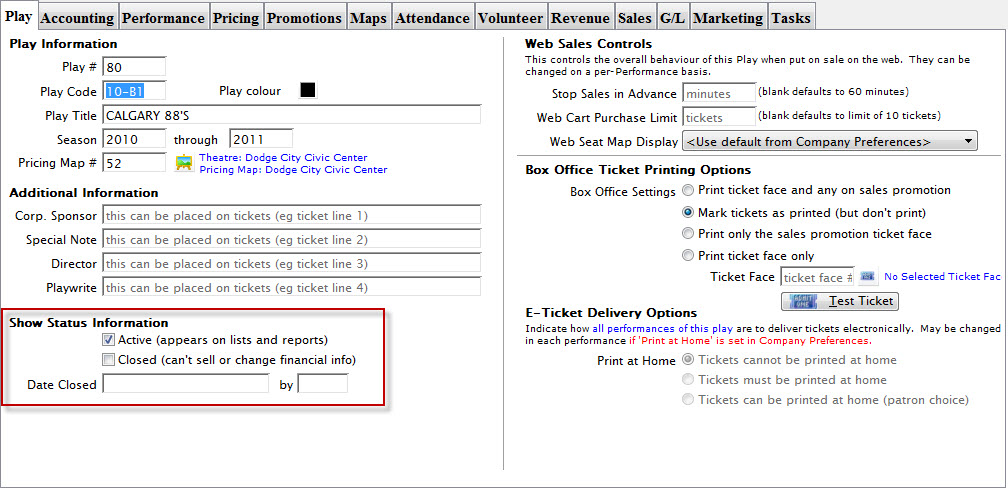
- Check the box next to Closed. A Close the Play dialog opens, asking you to verify closing the event / play.
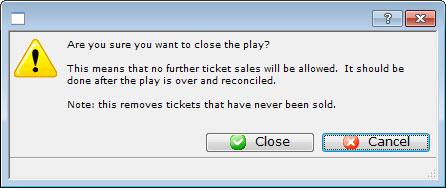
- Click the Closed
 button to mark the event / play closed.
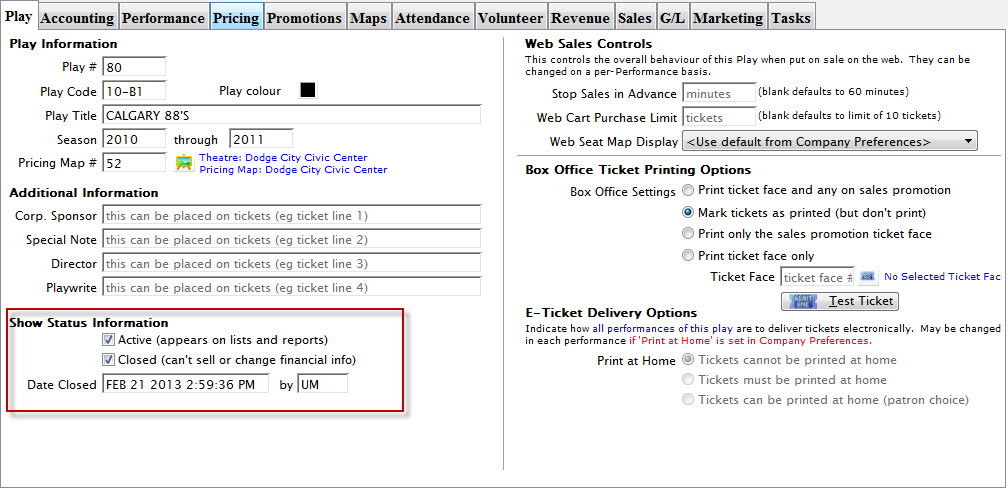
|
You can search for Closed events / plays in the Event / Play List by clicking the Closed box in the Event / Play List Window before entering search parameters. Then you can open a closed event and remove the check from the Closed Status box to re-open that event / play. |
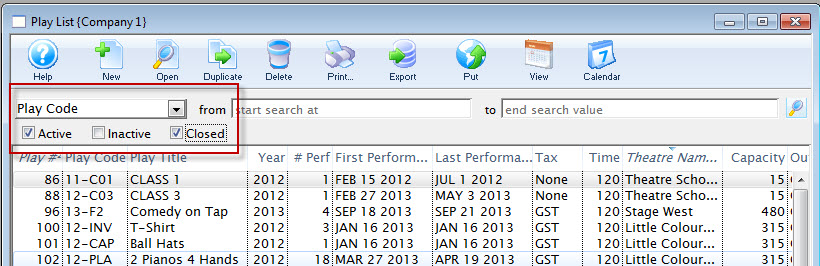
Creating a General Admission Event & Performance(s)
Before you add an event / play into Theatre Manager, a general ledger account number must be created for the new event / play. Refer to General Ledger Accounts for more information.
In the Event / Play window, there are eight different account number fields in five different ticket types. The eight accounts are:
- Sales
- Exchange
- Refund
- Discount
- Markup
- Ticket Fee account 1
- Ticket Fee account 2
- Ticket Fee account 3
The five ticket types are:
- Regular
- Season
- Other Type 1
- Other Type 2
- Internet
Depending on how your accounting system is setup:
- You may need to create only one G/L account for the entire event / play, or
- You may need a separate account for each of the account number fields in each of the five ticket type categories.
- Open the Event / Play List Window.
Click here to learn how to access this window.
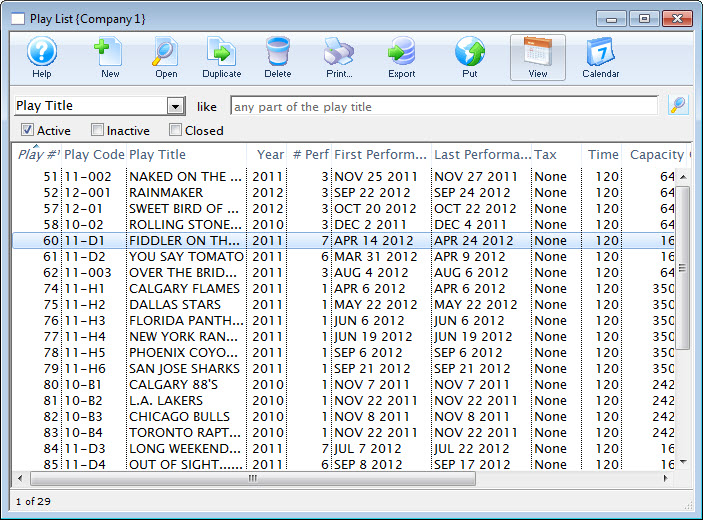
- Click the New button.
The fields are blanked to allow you to add new data.
- Enter the Event / Play information.
Click here for more information on Event / Play Information tab.
- Enter the Accounting information.
For more information on the Accounting Tab, Click here.
- Enter the required information on the Marketing Tab.
For more information on the Marketing Tab, Click here.
- Click the Save button.
- Click the Event's Performance tab. Then the New
 button.
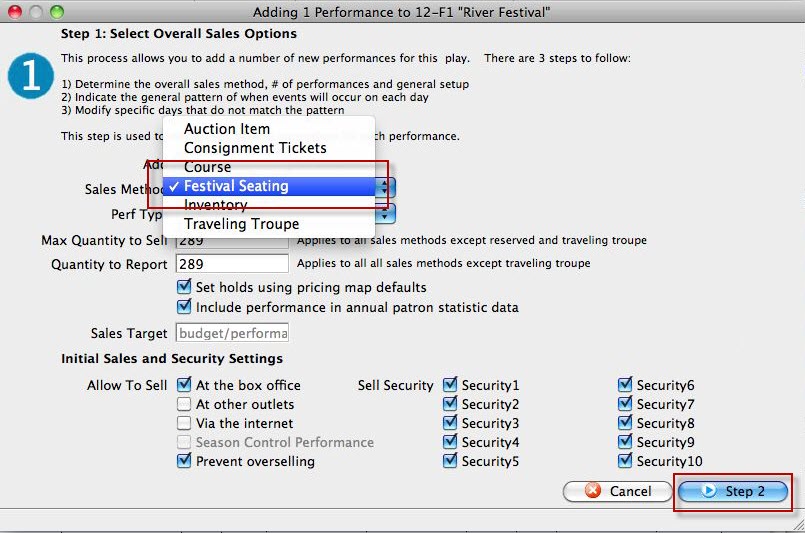
The Adding Perfromance window opens.
- In the Sales Method list, choose festival. For more information on this window Click here.
Review the other fields and when complete, click the Step 2 button.
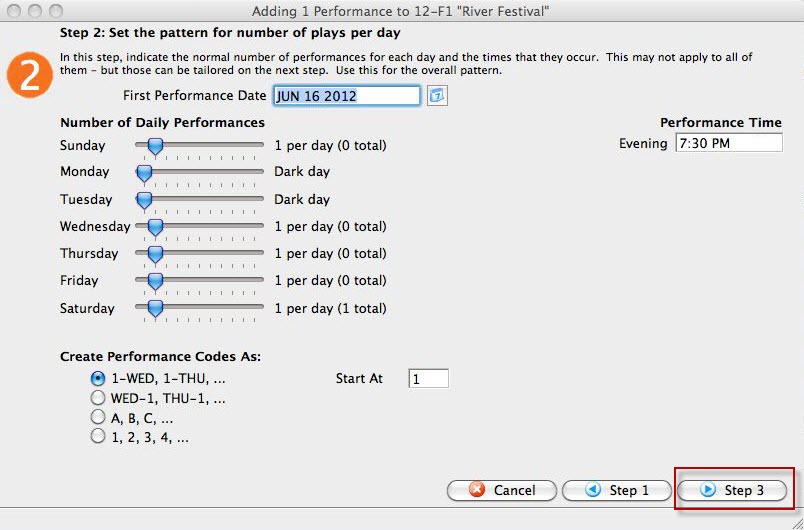
- In step 2, you set the pattern for the number of plays per day.
For more information on how to enter data in this window, click here.
- Click the Step 3 button.
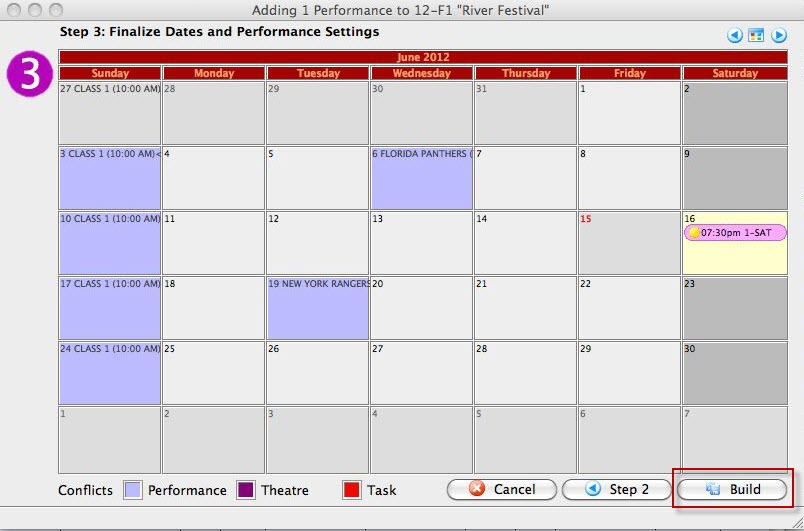
- In step 3, you finalize the performance.
For more information on Step 3, click here.
- Now you have finished setting up the perfrormances, click the Build button.
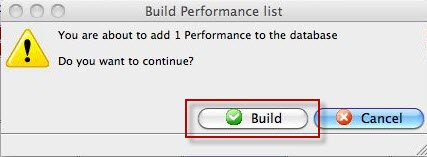
The Build confirmation dialog opens.
- Click Build again.
To start, you perform the following steps:
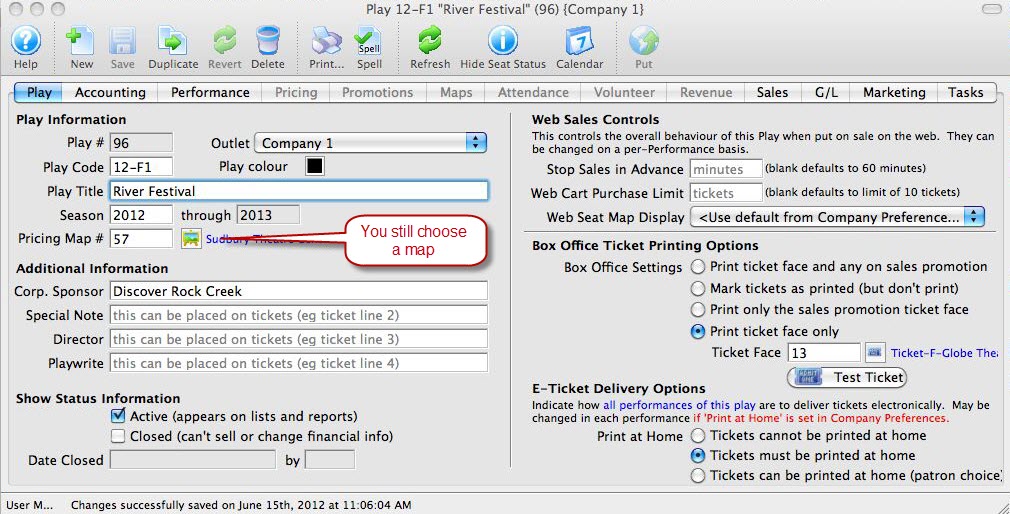
You have now created your Event. Next we add the Peformances.

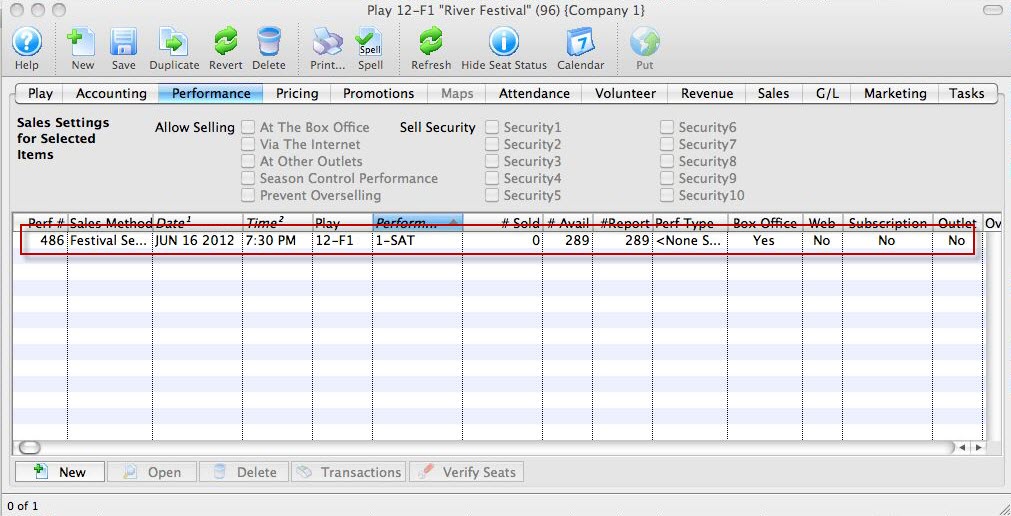
Your performance is now added to the event.
Click here for information on selling Festival tickets.
Creating an Event for Traveling Troupe Performances
Theatre Manager has a Performance Type/Sales Mode for Traveling Troupe performances. It is a method to record each run-out performance traveling group does, including the income from the run-out, activities of the group while they're traveling, and attendance/demographic data about the audience.
There are a few steps to setting up a Traveling Troupe performance.
- Create an Event under which to add the performances.
Typically, all traveling troupe performances are recorded under one Event. For step-by-step instructions on setting up events in Theatre Manager, click here.
- Assign a map to the event.
The traveling troupe method only sells 1 "ticket" to the venue contact for the show, so it does not matter which map is assigned here. Location details are filled out on a per-performance basis, so the map location/seats/etc are truly immaterial to this particular Event.
- Fill out the Accounting Tab with the appropriate accounts for the income from the various run-outs.
- Select a Genre from the dropdown list on the Marketing tab.
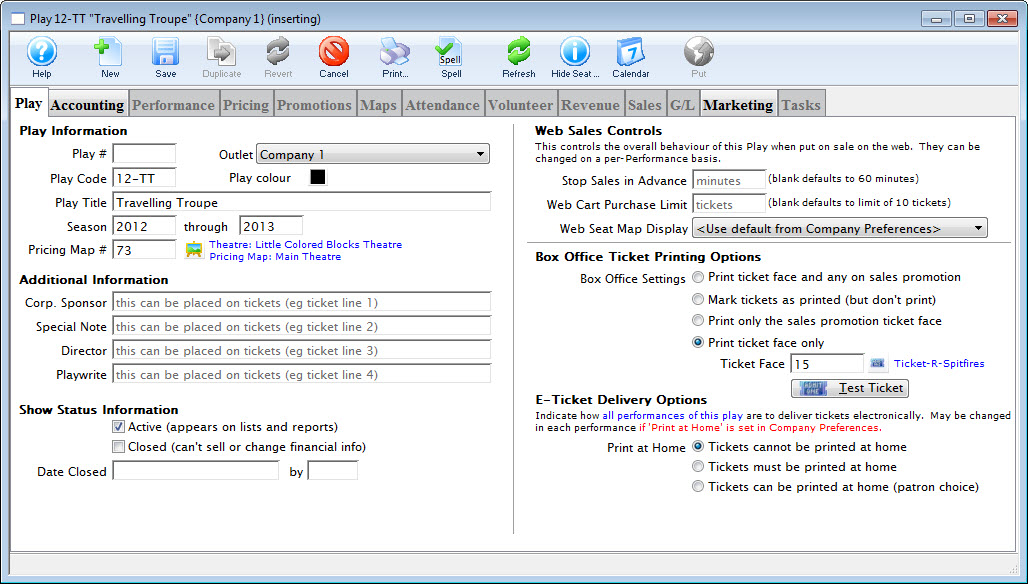
- Click the Save button.
- On the Performance tab, click the New to add a new performance.
You can start with just one or as many as you'd like. The traveling troupe sales method allows for quick adding of performances directly from the sales window, so not all shows need be set up at once.
- Select "Traveling Troupe" for the performance type.
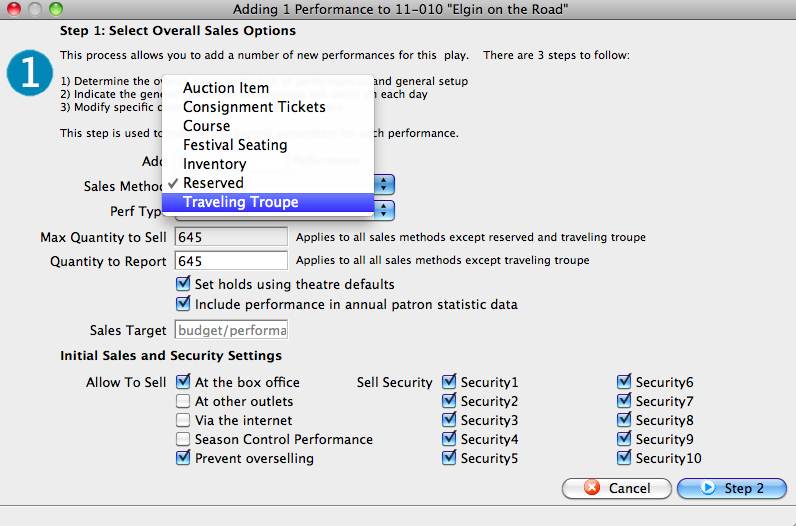
This "triggers" Theatre Manager to display the traveling troupe sales window when you sell the performance. For more information about creating Performances, click here.
- Set up a promotion to use for traveling troupe performances.

Tickets and revenue for all the performances will need to be recorded under a promotion, so it is best to set one up for the specific use.
The calculation could be for $0 (a comp) because the sales process allows for an override of the cost of the performance to match the contracted amount for the show. For instructions for creating promotions, click here.
There is an option in Setup >> System Tables >> Code Tables used in the Traveling Troupe sales process to record important activities/times for the chamber group (call times, rehearsals, etc).
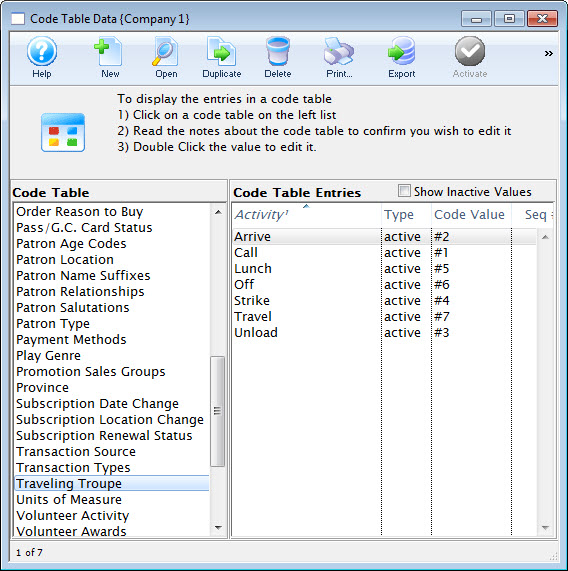
For information this option in code tables, click here. To learn how to add values to code tables, click here.
- Set the access for the employees who will be selling the traveling troupe performances.
Go to Setup >> Users and Access >> Employee List. Revise the employee access settings revised to include the ability to adjust the price of the performance.
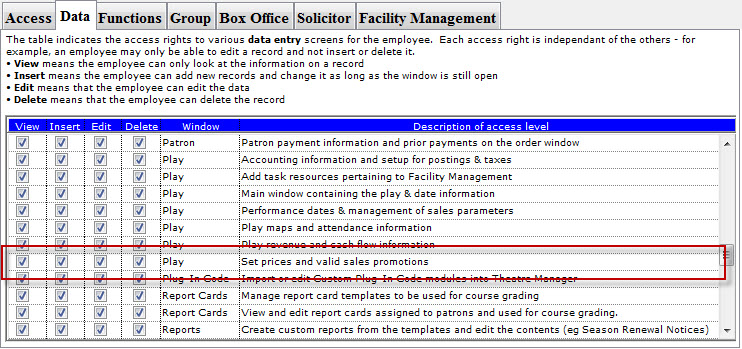
Select the employees one by one.
- On the Functions Tab of the access settings, ensure the employee(s) have a check next to Ticket Sales - Set the price of a traveling troupe performance during the sales process.
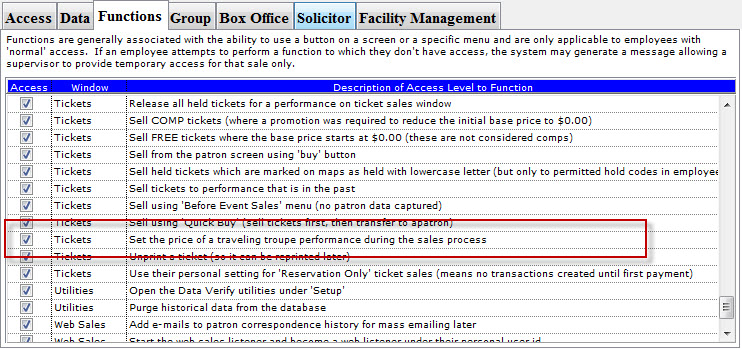
- Then you sell the performance to the road venue, using the primary contact at the venue as the patron to whom the performance is sold.
For instructions on how to do so, click here.
- Creating a Travelling Troupe Performance (just for the purpose of the template)
- Next, go to the performance setup tab >> On the Template Performance Section, check the template performance checkbox and enter a description.

You can also add performances on the fly from the Order window. Highlight the Travelling Troupe performance, from the right-click menu, choose New performance.
or
Click the Add Play button in the Order window toolbar / ribbon bar.
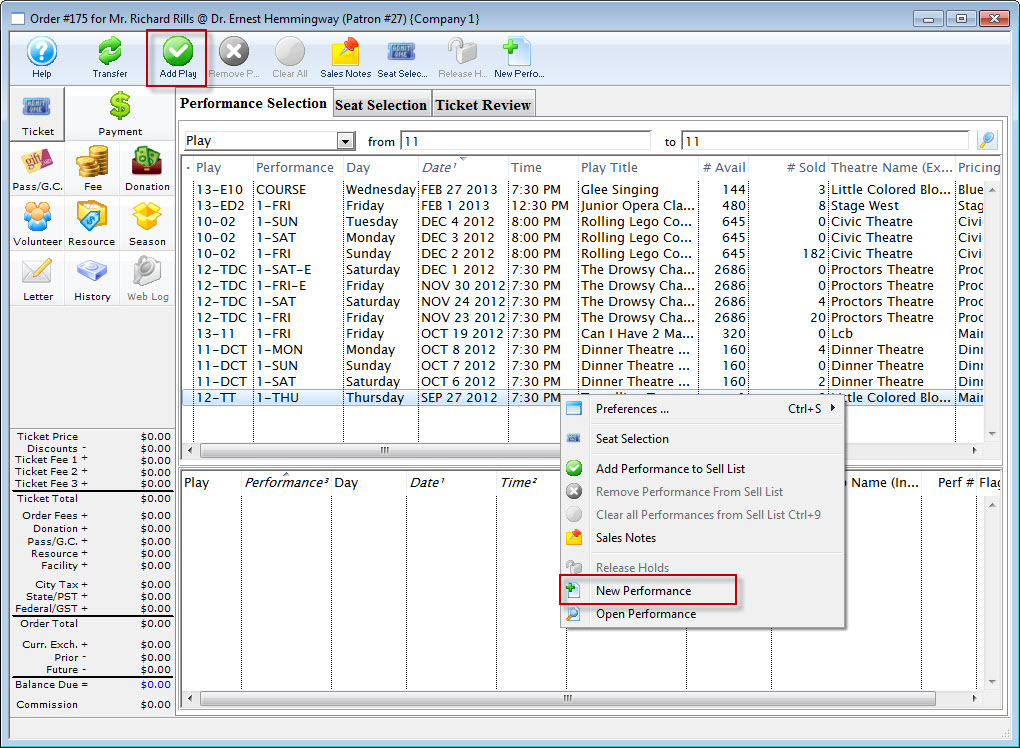
Note: Adding performances on the fly from the Order window requires the creation of a Performance Template with a future date that can be duplicated.
A Performance Template can be setup by;
Duplicating an Event / Play
- Select Setup >> Plays from Theatre Manager's main menu. Alternatively, click the Play button in the main Theatre Manager toolbar / ribbon bar.
The Play List window opens.
- Highlight the Event / Play you want to duplicate.
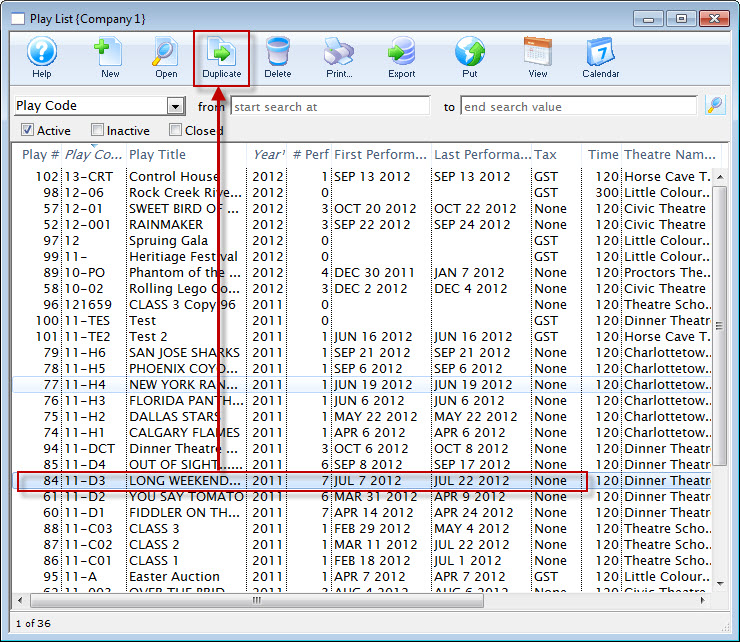
- Click the Duplicate button.
- Open the Duplicate Event/Play for editing.
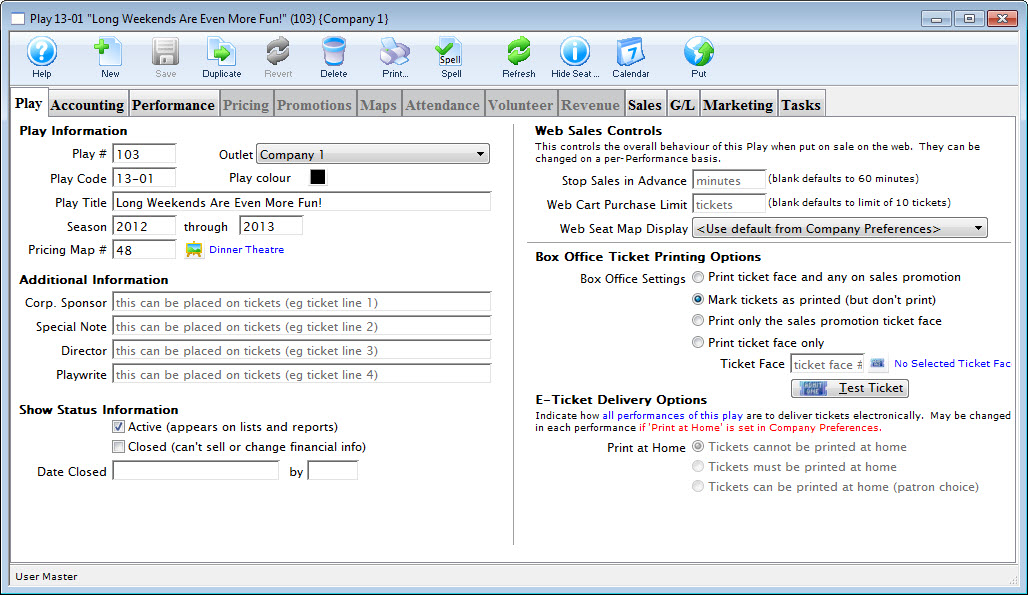
For more information on finding events, click here.

A duplicate event /play is now available for you to edit.
You can now change:
- Information on the Event/Play Information tab
- Accounting Tab (the information from the play/event should have been duplicated
- On the Marketing tab, set the genre and make any notes you want to include online.
- When you have completed your editing, click the Save button.
You can now add your performances on the Performances tab. Click here for more information on adding performances.
Merchandise Setup (deprecated/Old Way)
|
This approach is Deprecated:
Please do not use this method any more. We suggest using resources and inventory instead. You can also have direct links to inventory (like t-shirts) from any web page. |
You can use Theatre Manager to sell merchandise at the Box Office and via the Web by setting up an Event for merchandise sales. To do this, you would perform the following steps:
- Create a new map just for merchandise sales. This will be a general admission map so only the information under the description tab will be required.
- Build your merchandise event using the merchandise map from above.
- Create a performance for each piece of merchandise.
Take note of the performance numbers as you build. These will be used in steps below.
- Duplicate and edit the tmVenueDefault.html page found in the tmVenue folder.
Change the name of the duplicated page to tmVenue**.html where ** represents the map number from Step 1.
Edit the content of the page to advertise your merchandise.
- Duplicate TMticketsPrice_MapDefault.html and the TMticketsSection_MapDefaultf.html pages.
Note the f at the end of the second page.
Change the work Default to the Map number from Step 1.
Alter the line for the map image within the page to reference the image for the merchandise item. By change the line as outlined before Theatre Manager will reference the image sharing the same item number as the performance number.
Locate the following:
F_HTML_SEATMAP&selected_only=no&img_quality=75" border="0">
The TMticketsPrice_Map page may look like this:
F_HTML_SEATMAP&selected_only=yes&selected_border=144&selected_color=007700&img_quality=75" border="0">
Replace both with:
PB_SEQ.gif" target="window_blank">
PB_SEQ.gif" width="392" height="200" border="0">
Click on image for larger view
- Save pictures of the merchandise in the order of the events. Alter the names of the pictures to say item**.gif where ** represents the performance the item will be sold as. Place these pictures in the tmGIFS folder within the web pages.
Working with Auction Items
A number of organizations are now using auctions as a standard fundraiser during the season. Theatre Manager supports the selling of auction items.
Setup a Donation Campaign - Optional
Most often items used in the auction are donated by other organizations. By setting up a donation campaign, these items can be tracked and receipts can be issued for the donation.
- Setup a donation campaign for the items received.
Click here for more information on setting up a donation campaign.
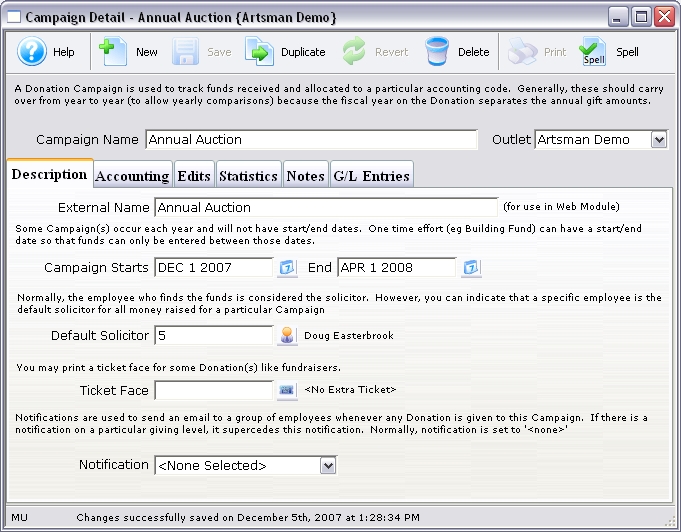
- Enter the donations to the Patron record.
Use the description field to describe the auction item. Using one of the donor fields, classify the gifts received. Examples of classifications are travel, gourmet, electronics, theatre, etc.
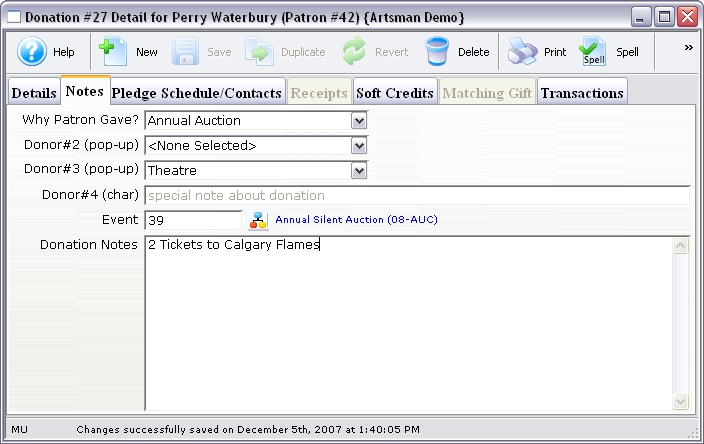
- Use 'Gift In-Kind' as the payment method.
- Print a report on the donation campaign to have a list of all auction items.
Setting up the Event with Auction Items
- Create a new event called Auction with the season.
Click here for more information on creating an event.
An example would be Auction 2007.
- Create a new performance as 'Sales Method' Auction Item.
Click here for more information on adding a performance.
Set the 'Quantity to Sell' as the total number of Auction Items available.
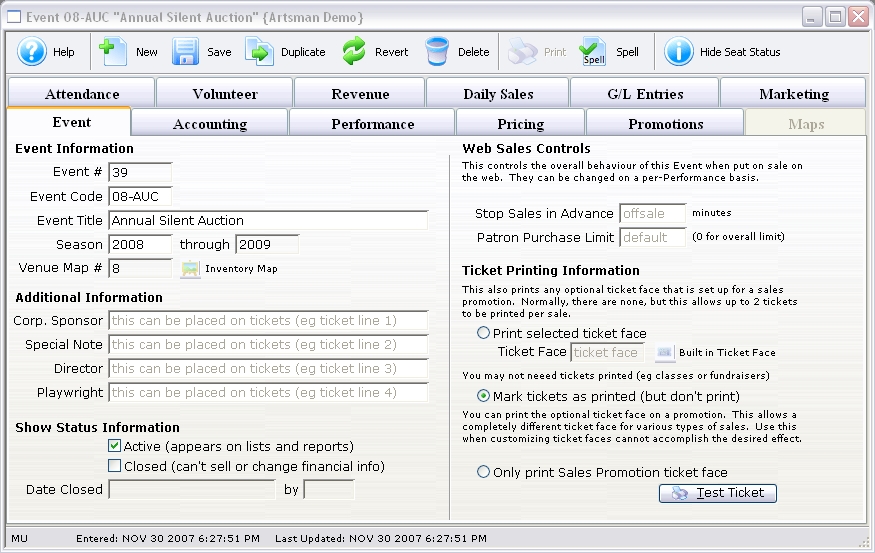
- Create a new performance as 'Sales Method' General Admission. - Optional
An additional performance can be used to track admission to the auction.
The Night of the Auction
- All running bids for auctions will be tracked separately at the tables.
- At the end of the auction, pull all the auction tracking forms.
- Find the winning patron in the database and sell a ticket to the auction item performance.
The ticket order window will have additional information for handling auction items.
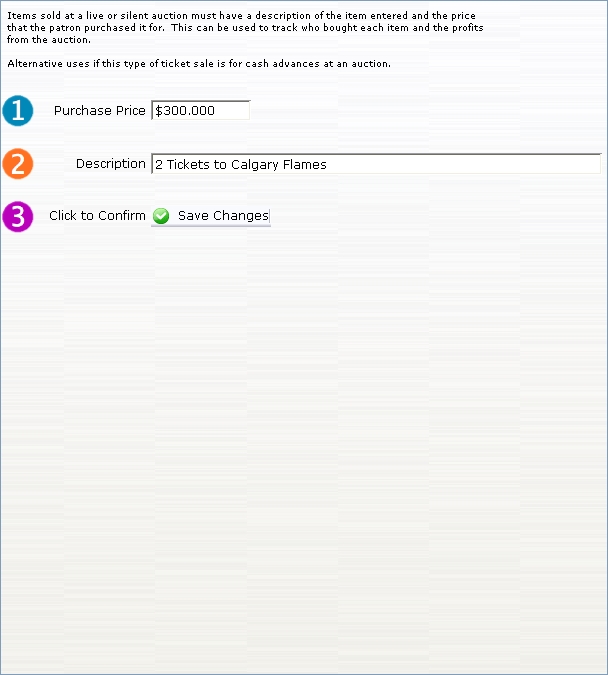
- Enter the price and description of the item.
- Go to the Payment window and place the order 'On Account.'
- Repeat Steps 3-5 for each additional auction item.
If a patron has won more than one auction item, make sure to add the items to one order.
- When the patron comes to the Box Office to pay, go to the order in their Patron record.
Orders are stored on the Order tab of the Patron record.
- Select the order and then click on the Payment button.
A receipt can be printed so the patron has payment verification when they pick up their item from the table.