Season Subscription Management
The Season Subscription module is used for setting up season packages that patron's can subscribe to. When subscribed to a season package, the patron has the ability to pick their favorite seats for each package. These seats remain the same for each performance. Each performance also happens in the same time frame. For example, a patron can subscribe to the first Friday performance of each event, or the second Sunday matinee for each event.
The Season Subscription module allows an organization to:
- Maintain patron's favorite seats.
- Maintain various packages of season subscription configurations.
- Automate the sending and printing of subscription renewal notices.
- Automate the Booking procedure for Single or Multiple Subscriptions.
The season subscription module provides the organization:
- A built-in assurance that no two patrons can have the same favorite seat.
- An automated process can be used to determine the patron's favorite seats.
- Ability to purge old, unused, or non-renewed patron subscription history and favorite seats.
- Ability to book tickets for season subscriptions quickly.
- Ability to release tickets for non-renewed season subscriptions.
- Ability to release unpaid tickets for a specific performance of a play.
The online help for Season Subscriptions is broken into seven sections:
| Setting Up Season Packages |
Covers:
|
| Selling a Season Subscription | The steps to selling using the following options:
|
| Editing a Season Package |
You can add or change subscriptions in the following areas:
|
| Sending tickets to an outside printer |
How to export the Ticket Data using:
|
| Print Renewal Notices |
|
| Troubleshooting Season Ticket Sales | Common errors and what to do to resolve them |
| The Subscription Windows |
Overview of the following windows: |
Setting Up Season Packages
A season subscription is a ticket package which allows Patrons to lock in the same seats and performance nights for each show in the defined season. For example, if they always attend on Thursday evenings, you can sell them a Thursday evening subscription.
This section steps you through the process of setting up your season packages right from a whole new season to rolling over this year's season to next year.
Planning Season Packages
Things to Think About
First of all, determine the events that will be part of the season package. Patrons will need to be able to attend performances during the same time frame for each event. This means the events in the season package should have performance that happen on the same day of the week. For example, patrons can subscribe to a season package that is only the first Friday (1-FRI) of each event.
Second, think about the price codes and promotions needed for the season package. Each season package may need multiple pricing levels and promotions depending on the number of areas of the venue and the pricing structure of the organization. You should have set up all of these prior to creating a season package. Click here for more information on setting up sales promotions.
Third, the organization needs to determine how the rollout of the season package will be handled, and how the patrons will be renewed each season. Some questions to ask are:
- Do season package subscribers receive a benefit from being a subscriber?
- Does the subscriber receive an opportunity to book earlier that other patrons?
Building a Control House
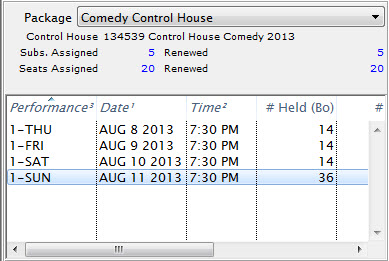
Every Season Package requires a Control House. The Control House is a completely separate event from the rest of the season's performances and acts as the place saver for the patrons favorite seats. It is used to track:
- The evening they will be attending.
- Where the patron prefers to sit.
- The price/promotion to use for each seat.
- If the patron renewed their seats (or not).
It is important the accuracy of the Control House be maintained, as the season is booked. By the end of the subscription process (even after partial subscriptions are sold well into the season), sales in the control house must reflect the preferred/favourite seats.
This control house is used by Theatre Manager to allocate seats to patrons for the coming season.
Building a control house is like building any other event with a couple of subtle differences. These are:
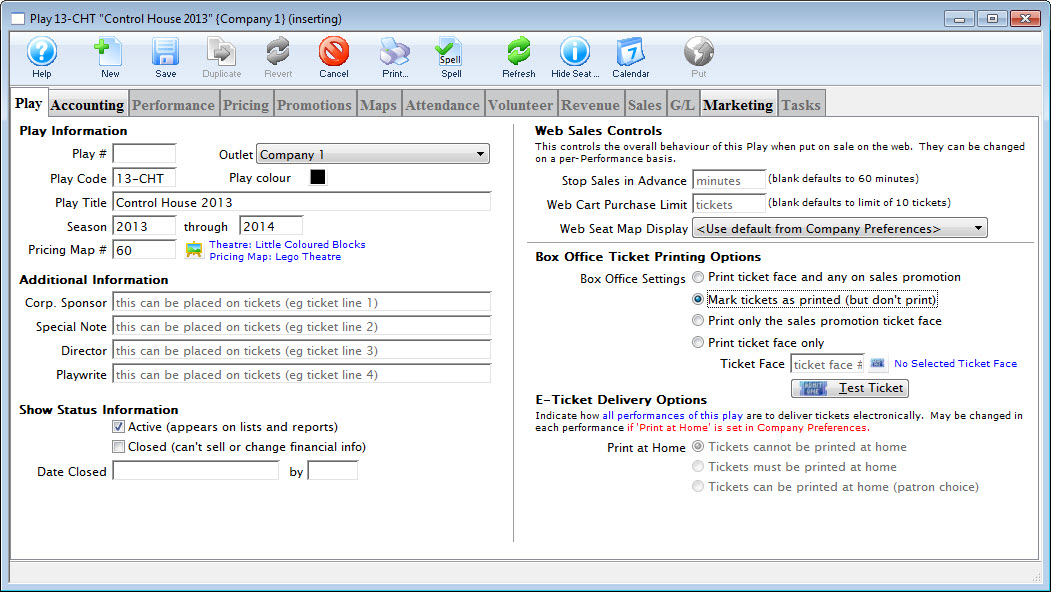
- The event cannot be sold on the internet and must be marked as use in a control house (performance tab).
- The price of each ticket is zero (price tab).
- There should only be subscription promotions enabled (promotion tab).
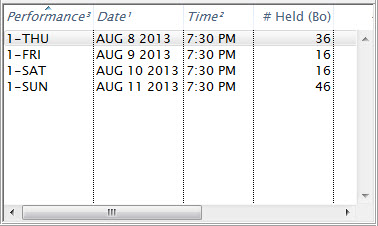
- There should be one control house performance for each night you have in your regular season. For example:
- If there are two weekends for a total of 6 shows
- Friday, Saturday, Sunday and Friday, Saturday, Sunday
- You make the same six performances in the control house
- the performance codes in the control house MUST match those in the rest of the season.
Setting Up a Control House
- Click the Events
 button at the top of the window.
- Click the New
 button in the Event List window.
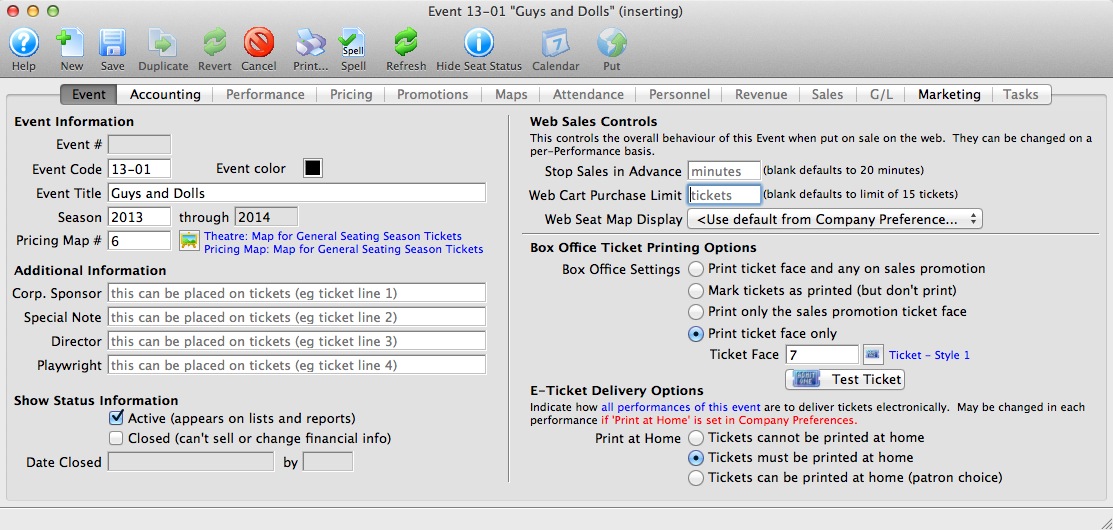
- Enter the desired Event Code, Event Title, Season and Venue Map.
- Change the Ticket Printing Information to Mark Tickets As Printed.
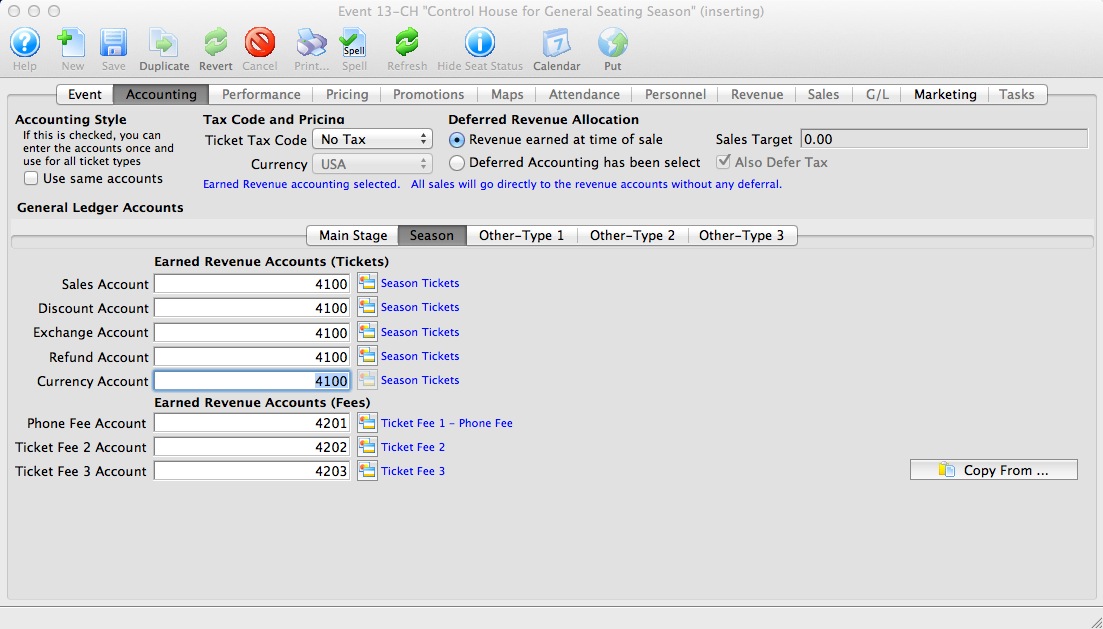
- Select the Accounting
 tab and enter the desired G/L accounts.
No monies should pass through these G/L accounts. The Control House is simply a place save for Favorite Seats.
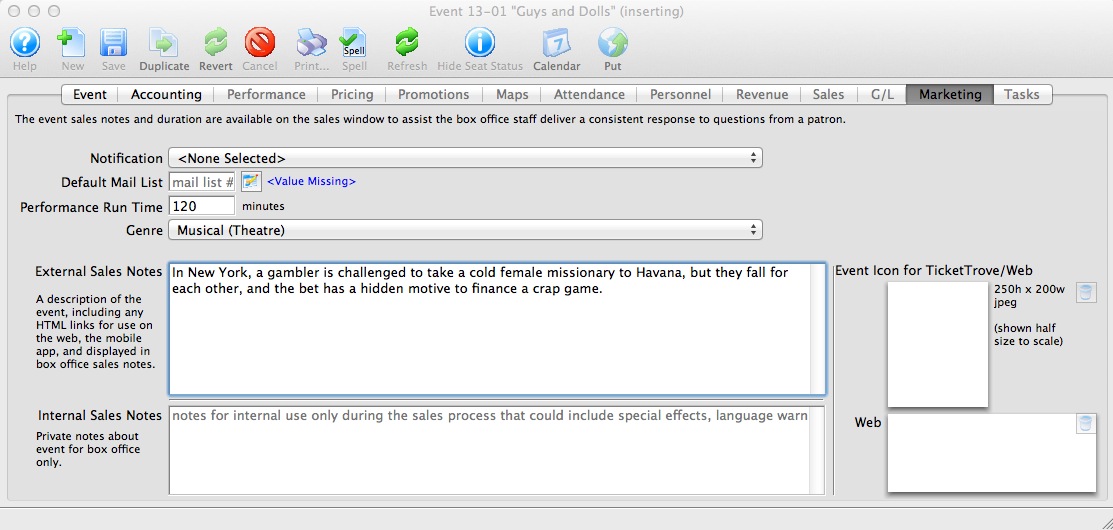
- Select the Marketing
 tab and enter the desired G/L accounts.
Information must be entered on the Marketing Tab for a new event to be saved.
- Click the Save
 button.
The Performance Tab is now available for selection.
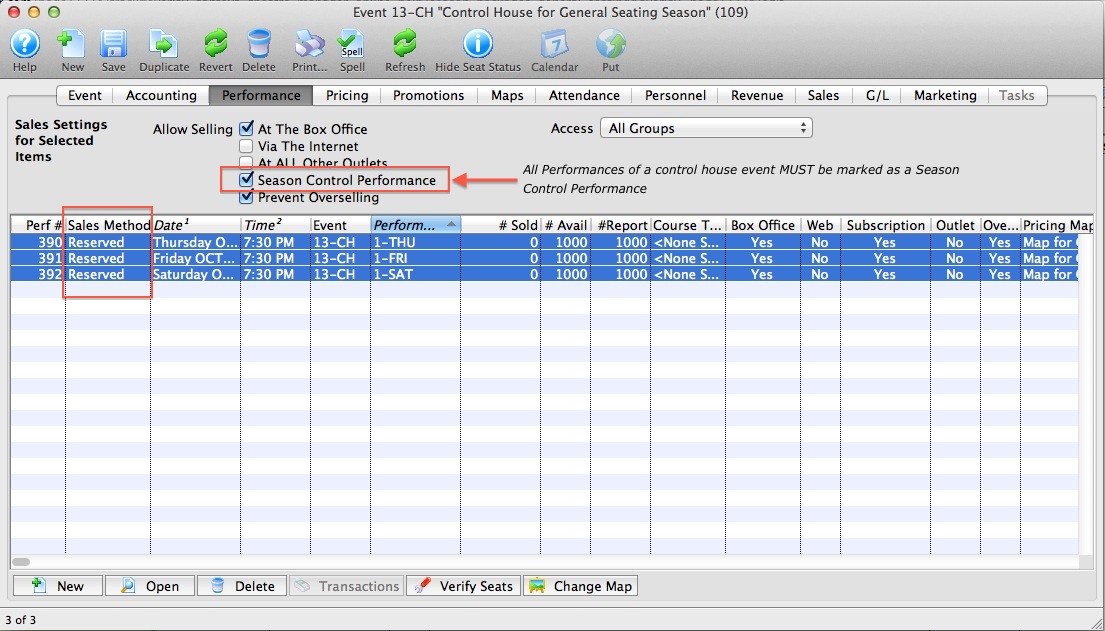
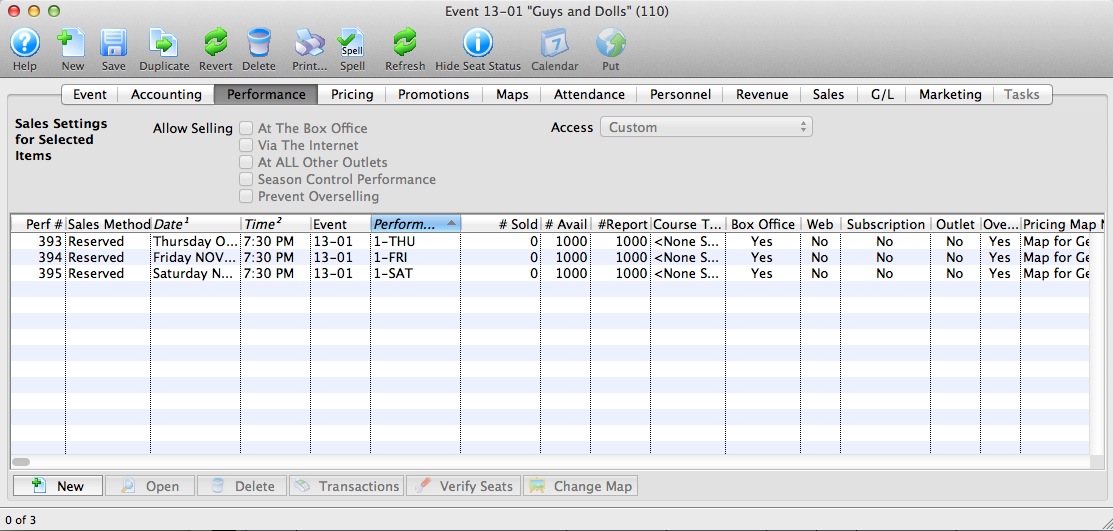
- Select the Performance
 tab, then click the New
  button.
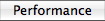
The Add Performance - Step 1 window opens.
- Enter the number of Performances in the Add field.
- Select Reserved as the Sales Method and ensure Season Control Performance is selected in the Initial Sales and Security Settings.
- Click the Step 2
 button.
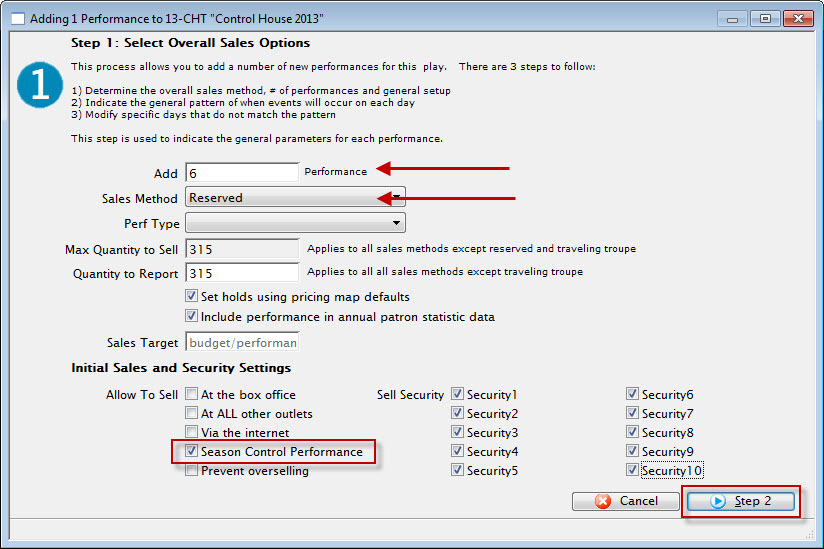
The Step 2 window opens.
- Enter the First Performance Date and the Performance Time.
The First Performance Date should be a date following the coming season. It should fall on the same day the run of the season package generally begins. The Performance Time should match that of the season run.
- Move the Number of Daily Performance sliders to match that of the run. Then choose a Create Performance Code As option.
Theatre Manager uses the Performance Code to match the dates the patron will be booked into within the Season. It's imperative the Season Code matches from Event to Event within the season package.
- Click the Step 3
 button. and review the Performance dates and time for accuracy.
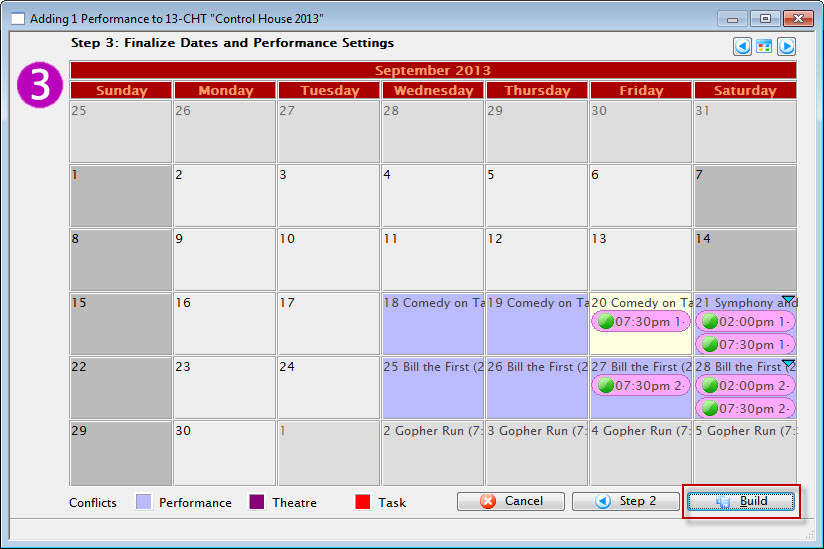
- Click the Build
 button.
The build confirmation opens.
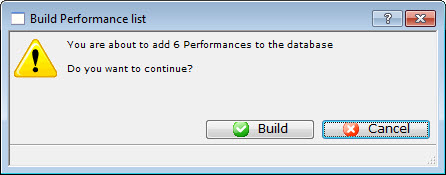
- Click the Build button to confirm the creation of the Performances.
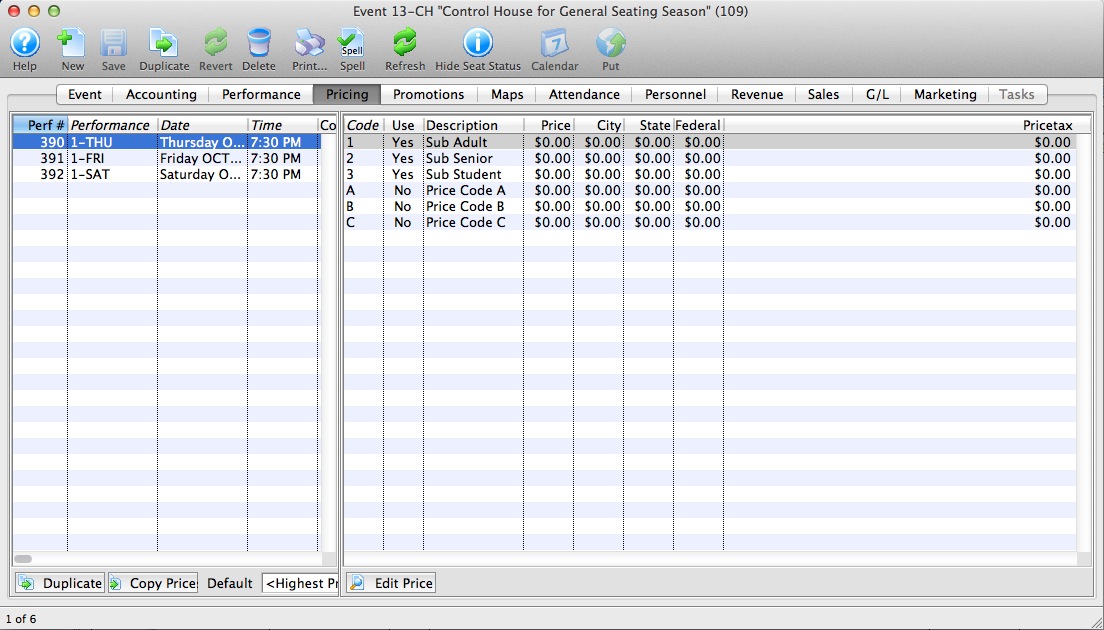
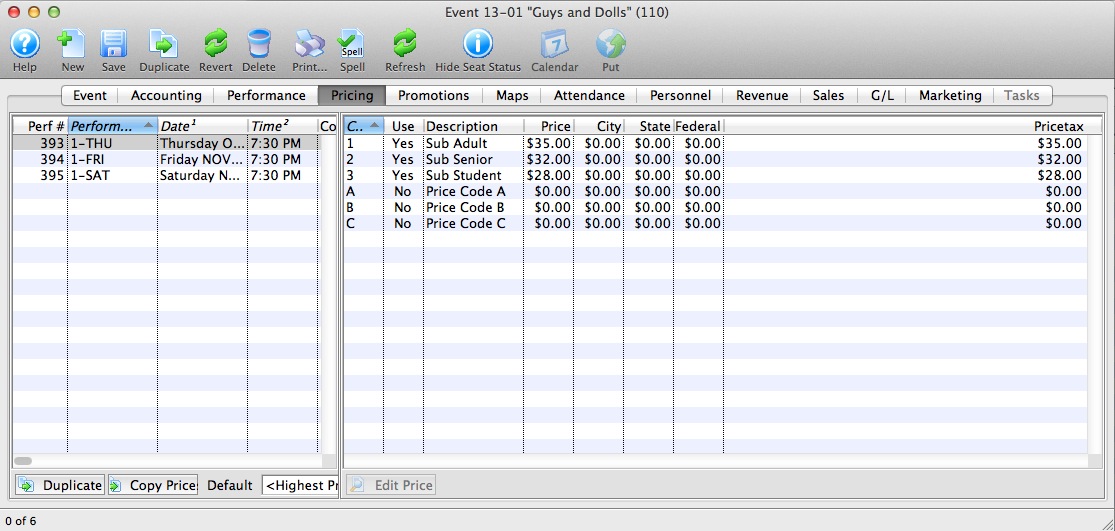
- Select the Pricing
 tab. Then select the first Performance in the left column.
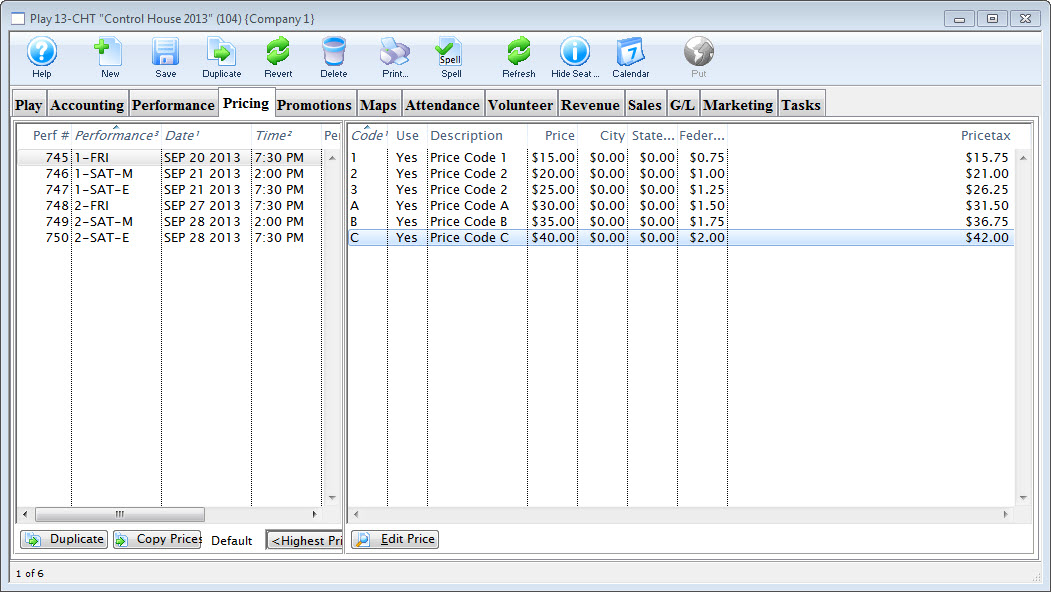
- Review the pricing structure in the right column.
Double click on each price individually to edit it.
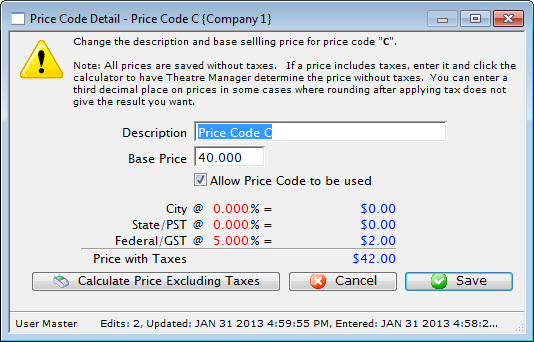
- Change the Description for Price Codes to match those currently in the season.
Do Not add a value in the Base Price field. Leave this field blank.
- Uncheck the Allow Price Code to be Used option for those Prices Codes that do not apply to the Season pricing structure.
Repeat for the remaining Performances in the left column.
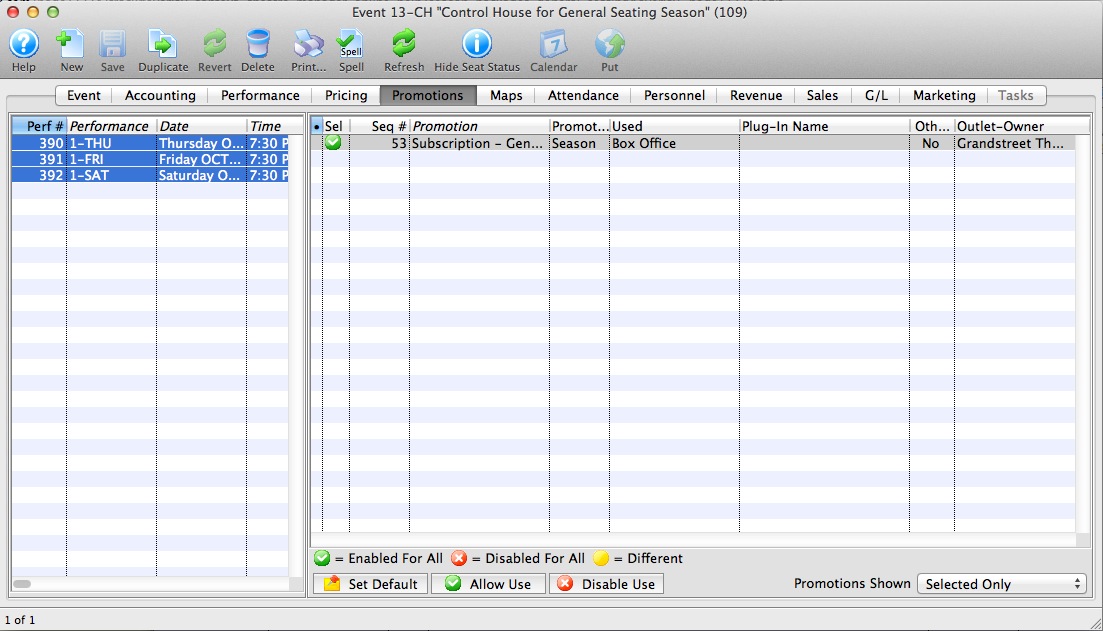
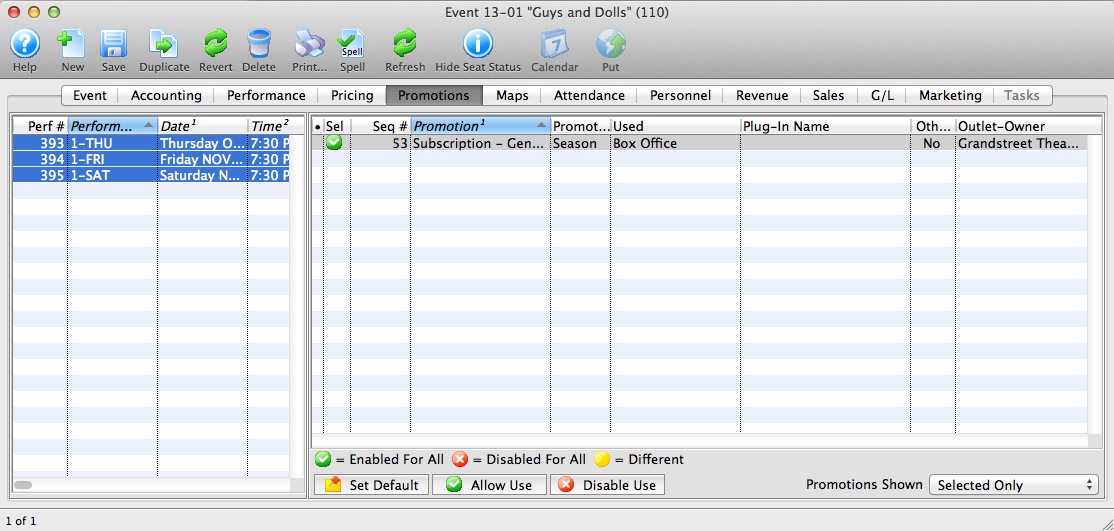
- Select the Promotions
 tab. Then choose the first Performance in the left column.
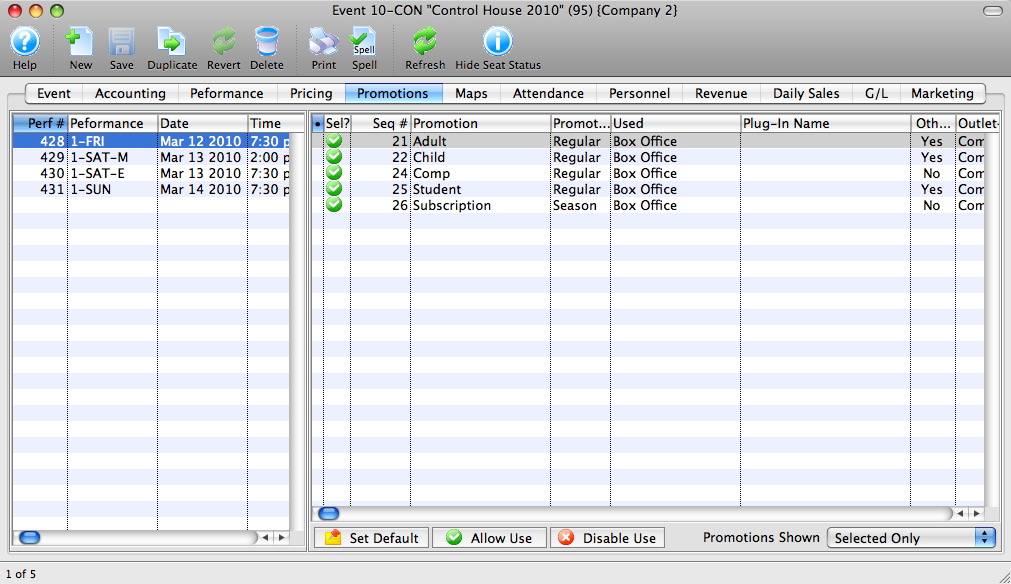
- Highlight all promotions that do not apply to this Performance and all Promotions that are Not Season promotions.
- Click the Disable Use
 button at the bottom of the window.
The Control House is now built and ready to be added to the Season Package. For details steps on how to create a New Season Package, click here. Or for steps on Rolling Over an existing season package, click here.
Creating a New Season Package
Season Packages are designed to providing patrons the opportunity to purchase the same series of performances within a select group of events while maintaining the same seat and pricing structure.
This help page is designed to be used if you have not done Season Subscriptions through Theatre manager in the past. If you are rolling over a previous season package, please visit the Season Rollover help page.
To create a new Season Package, you perform the following steps:
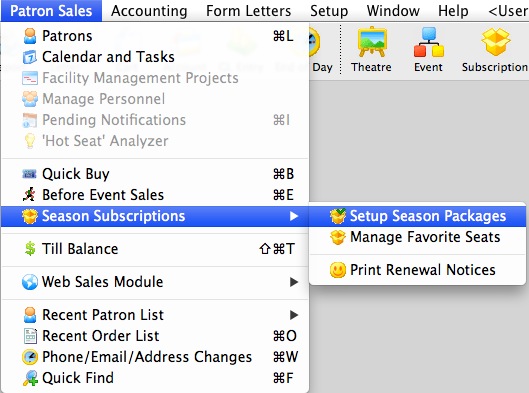
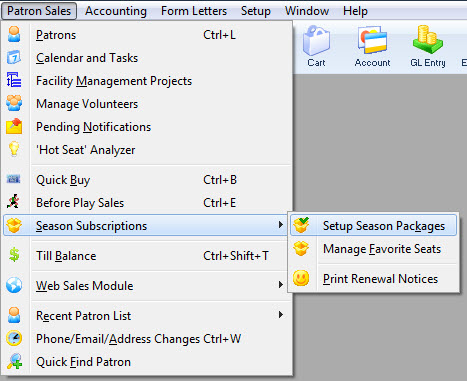
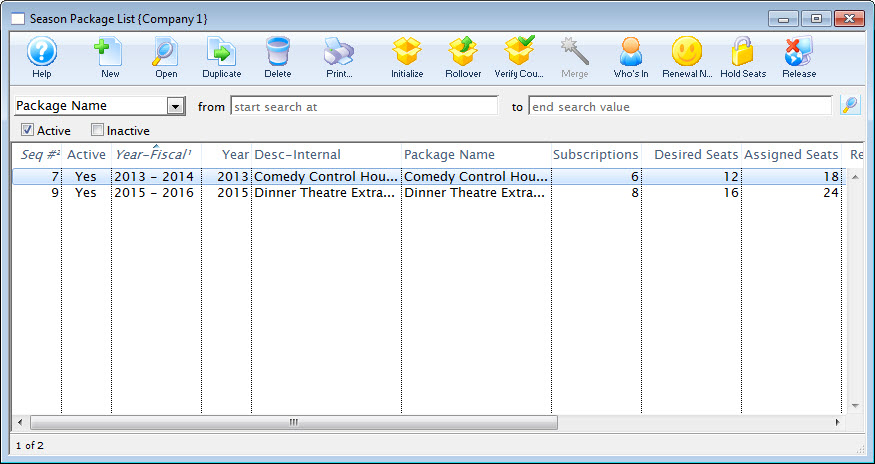
- Click Patron Sales >> Season Reservations >> Setup Season Packages.
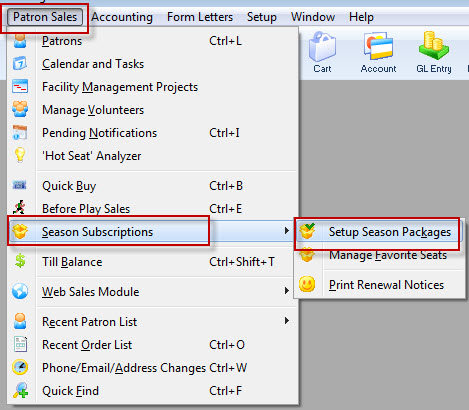
The Season Package List window opens.
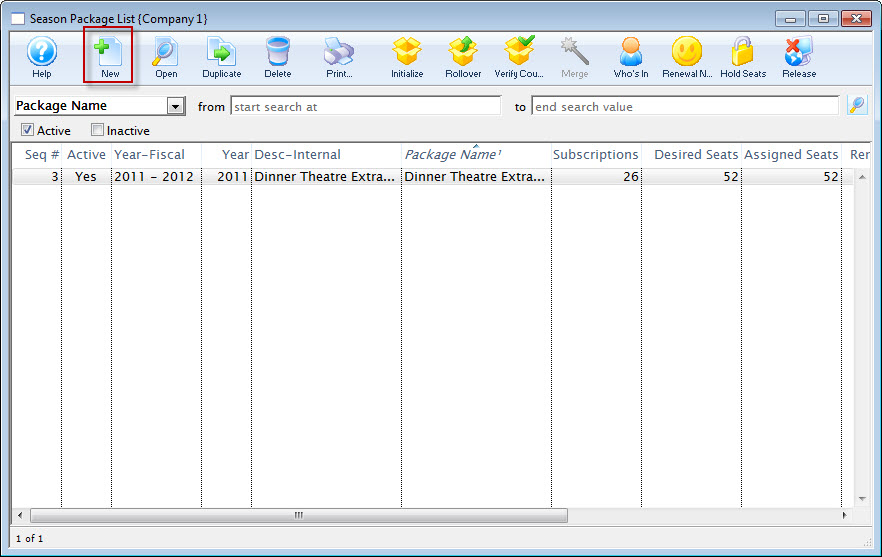
For more information on the Season Package List window, click here.
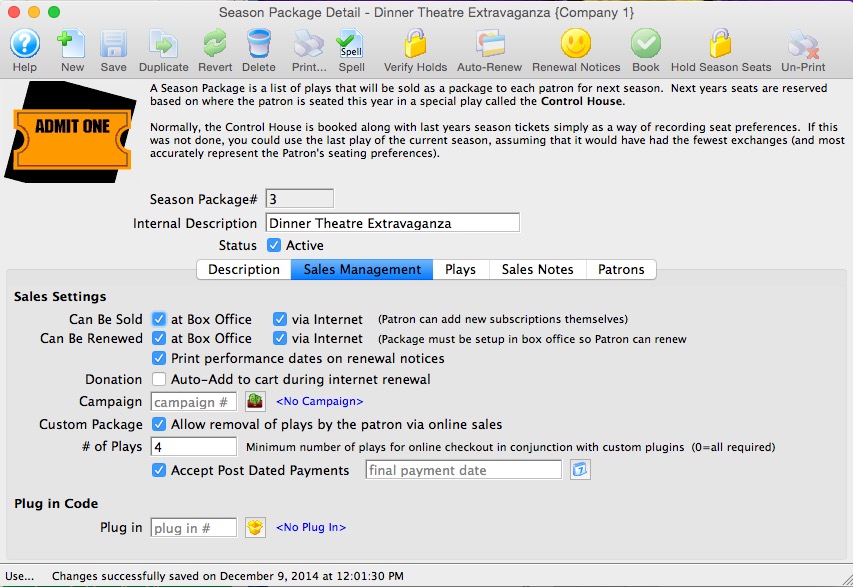
- Click on the New button at the top
of the page. The Season Package Detail window opens.
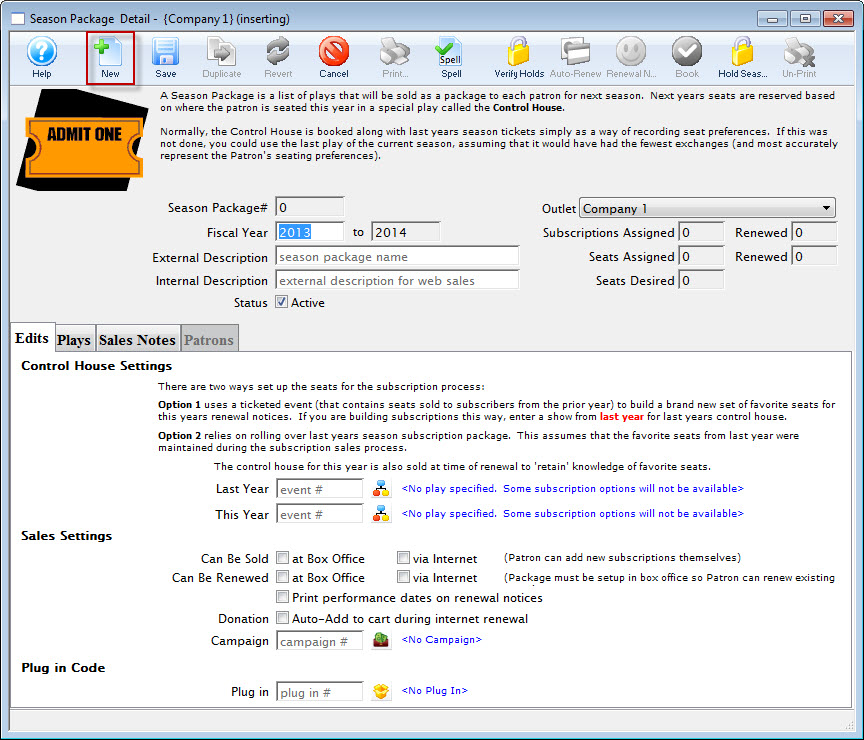
For more information on the Season Package Detail window, click here.
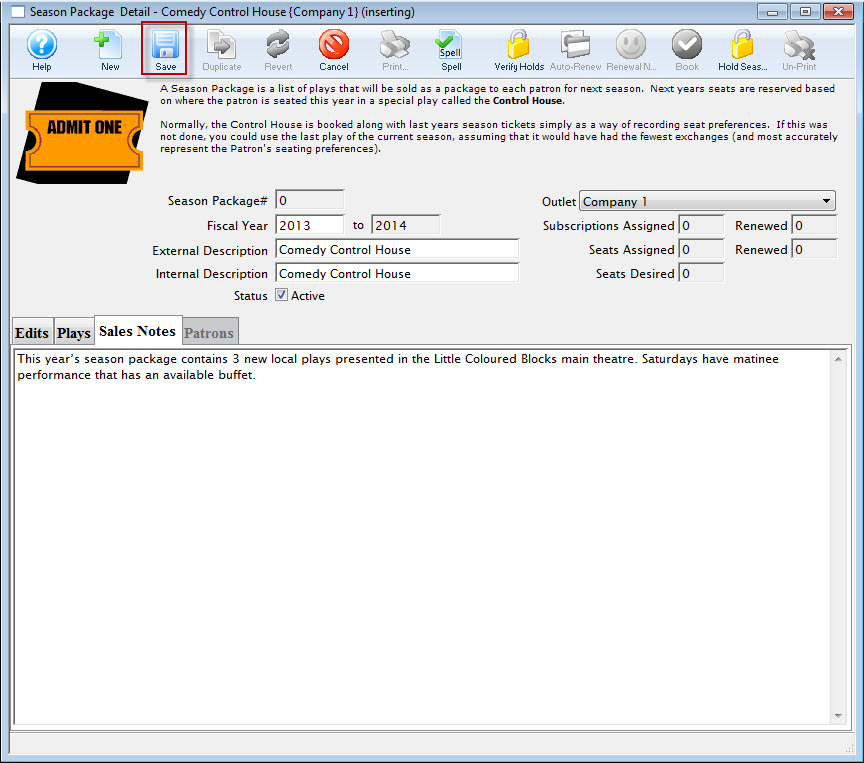
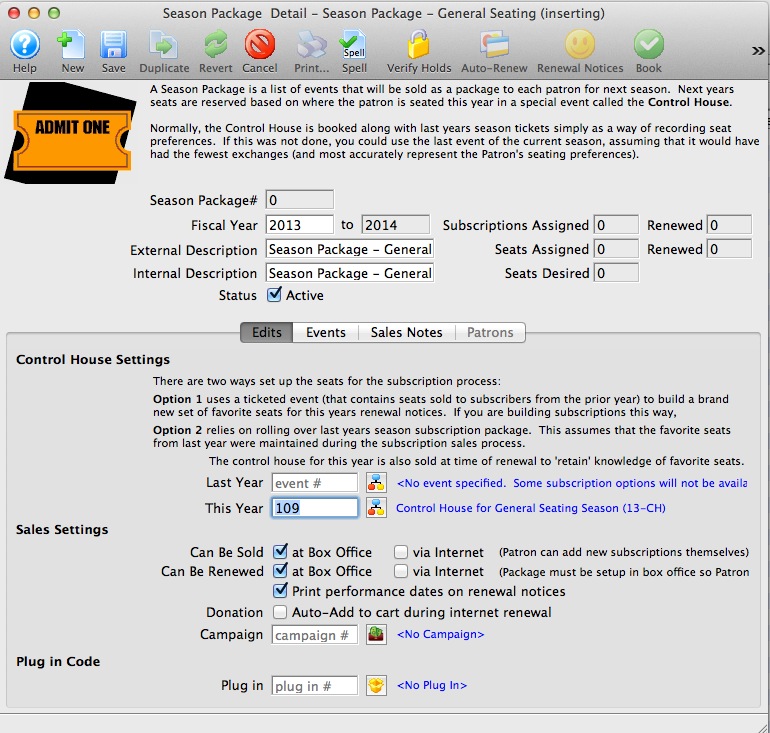
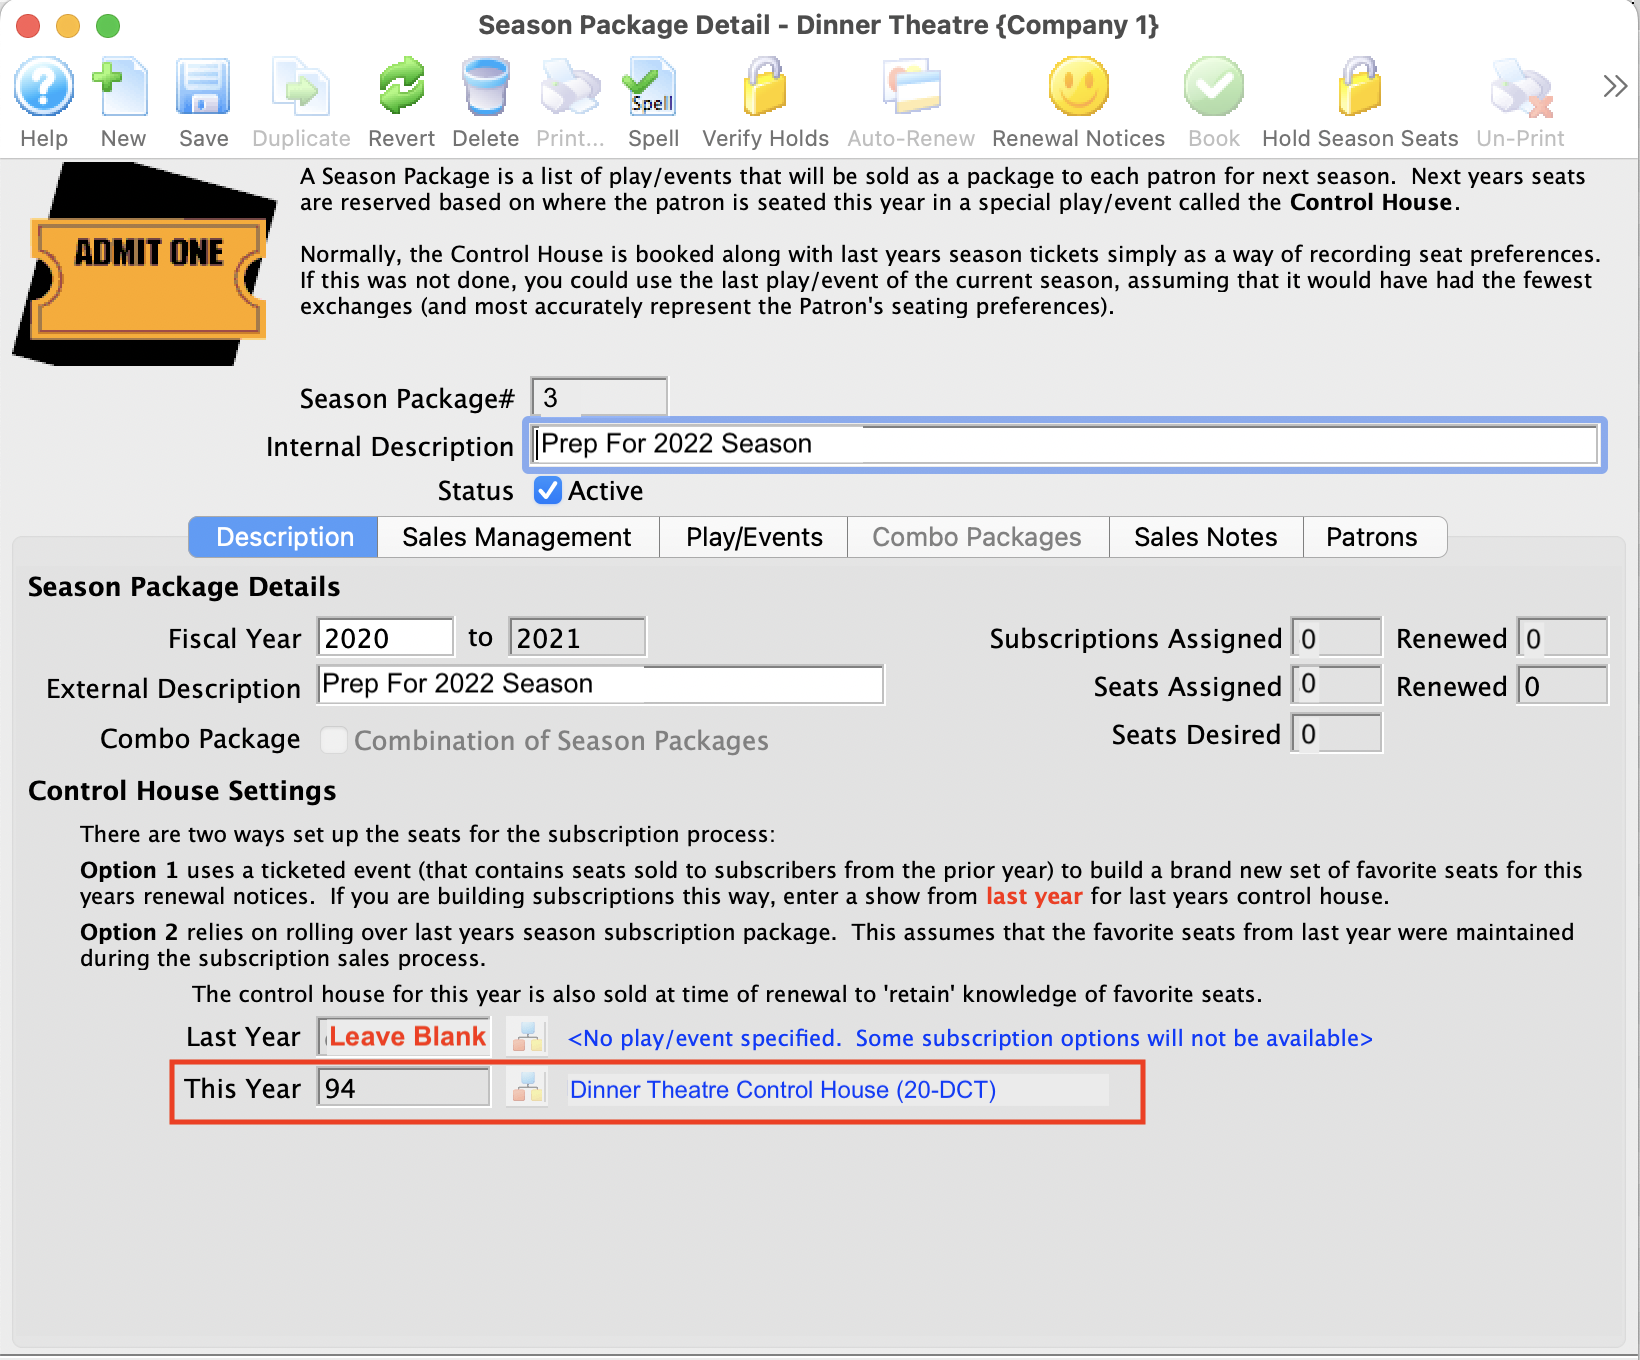
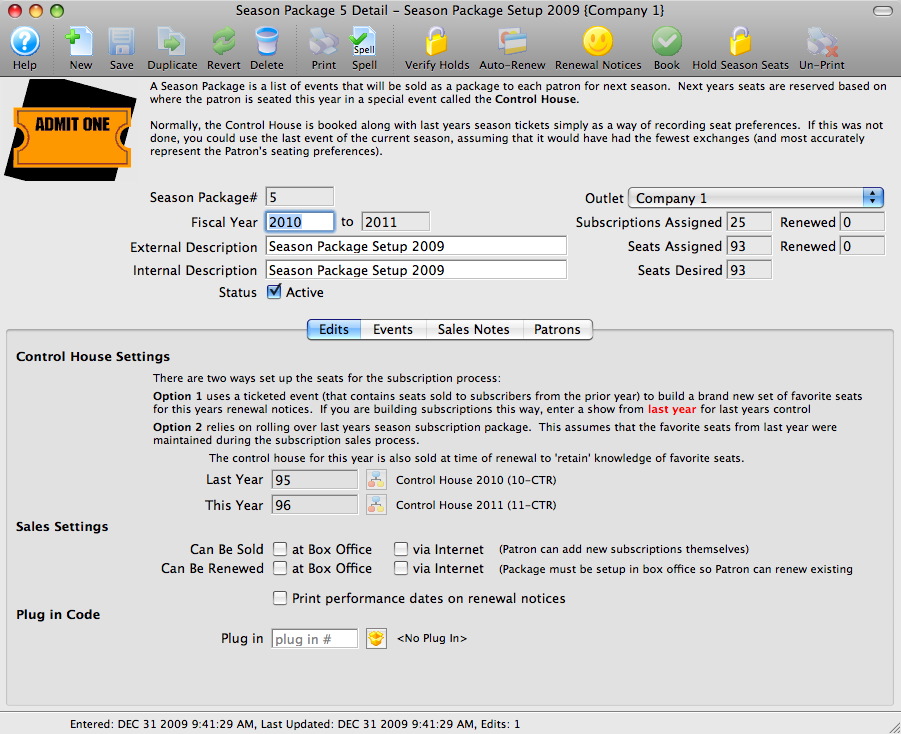
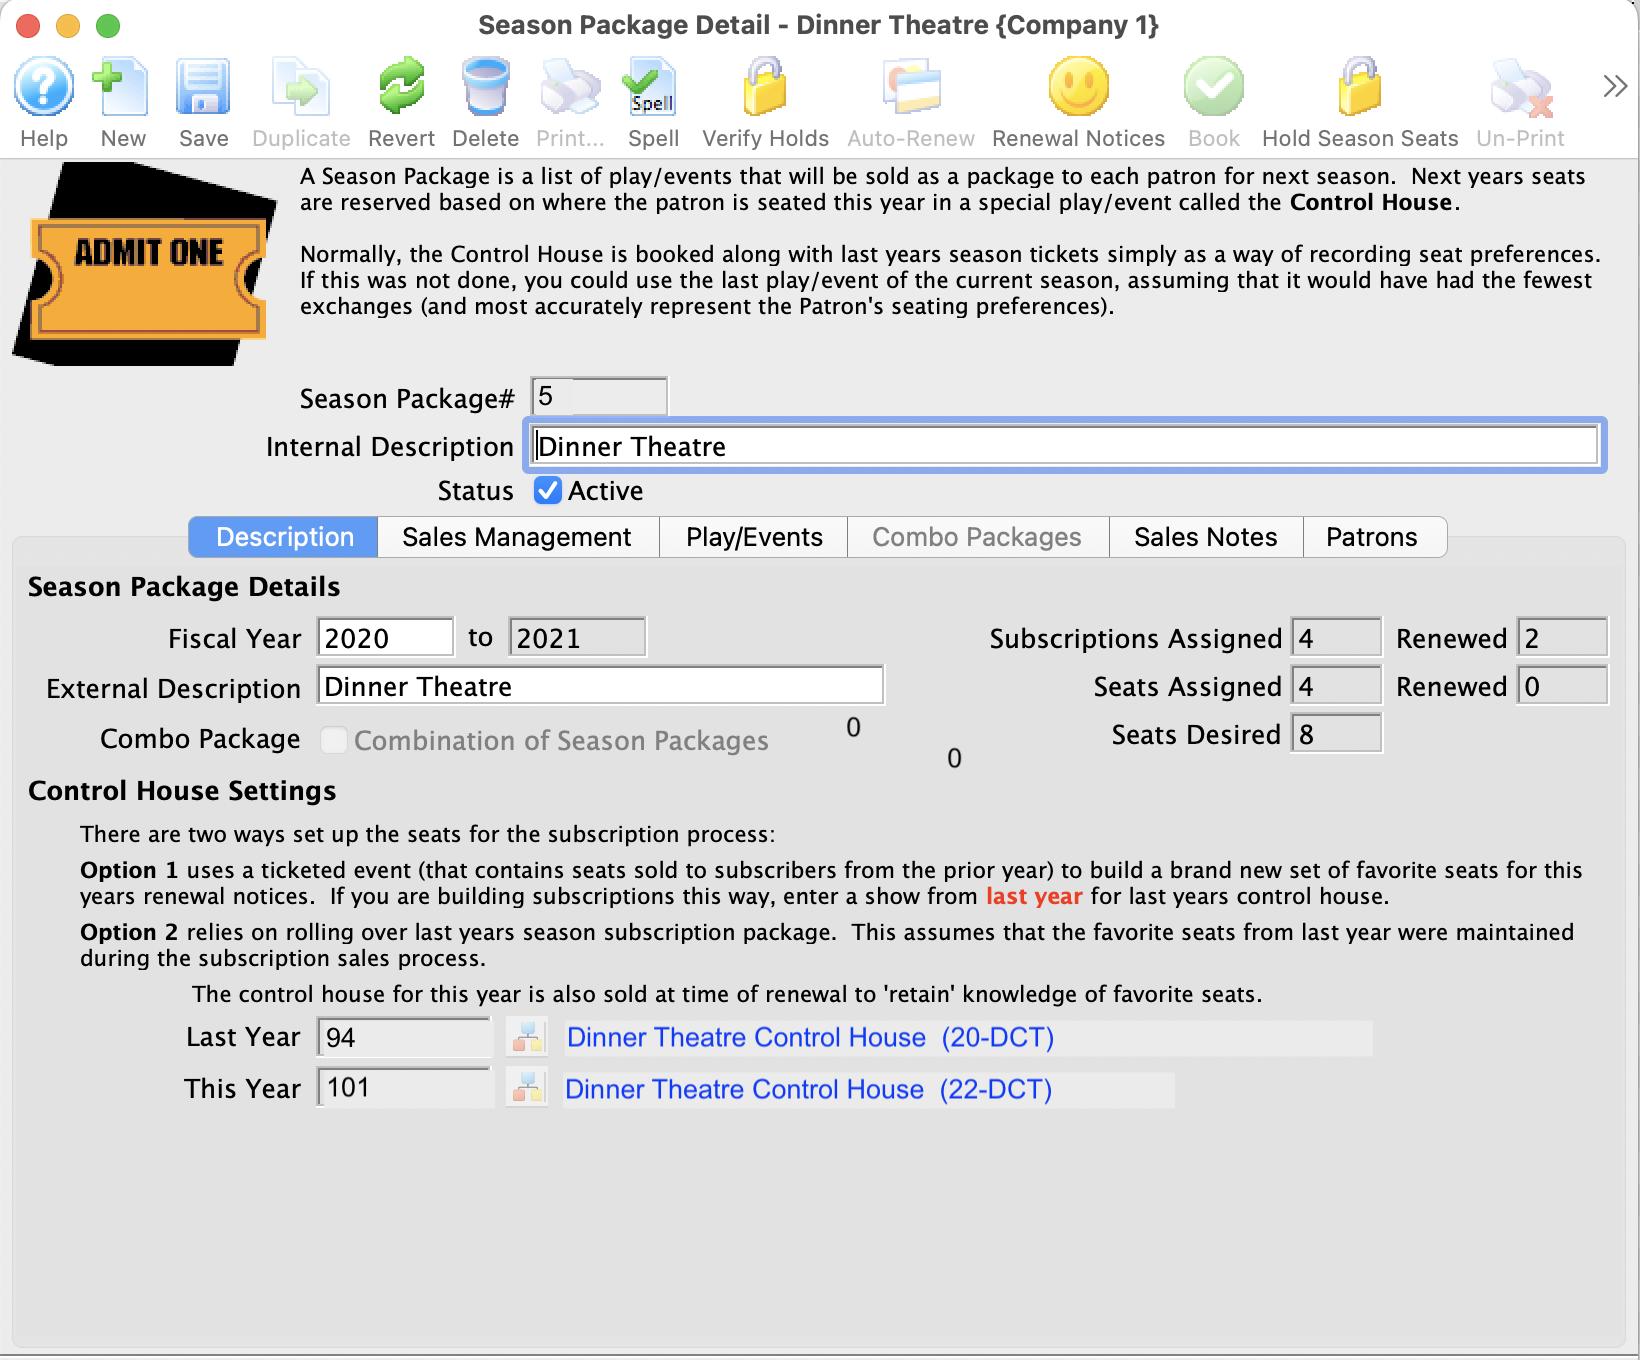
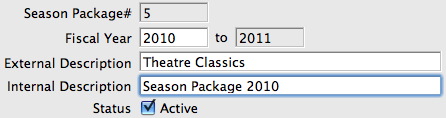
- Enter Fiscal Year, External Description and Internal Description for the season package.
The Fiscal Year To field will update when the Fiscal Year is altered. The External Description can be displayed in the online ticketing module, ticket faces and in the renewal notices.
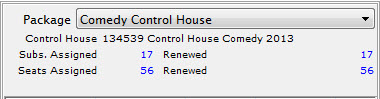
- Enter the Control House number in the This Year field.

The Control House needs to be created before the season package can be built. The Event Lookup
 icon can be used to locate the Control House. The Control House can not be an event from the previous year. It must be an event specific to the season package.
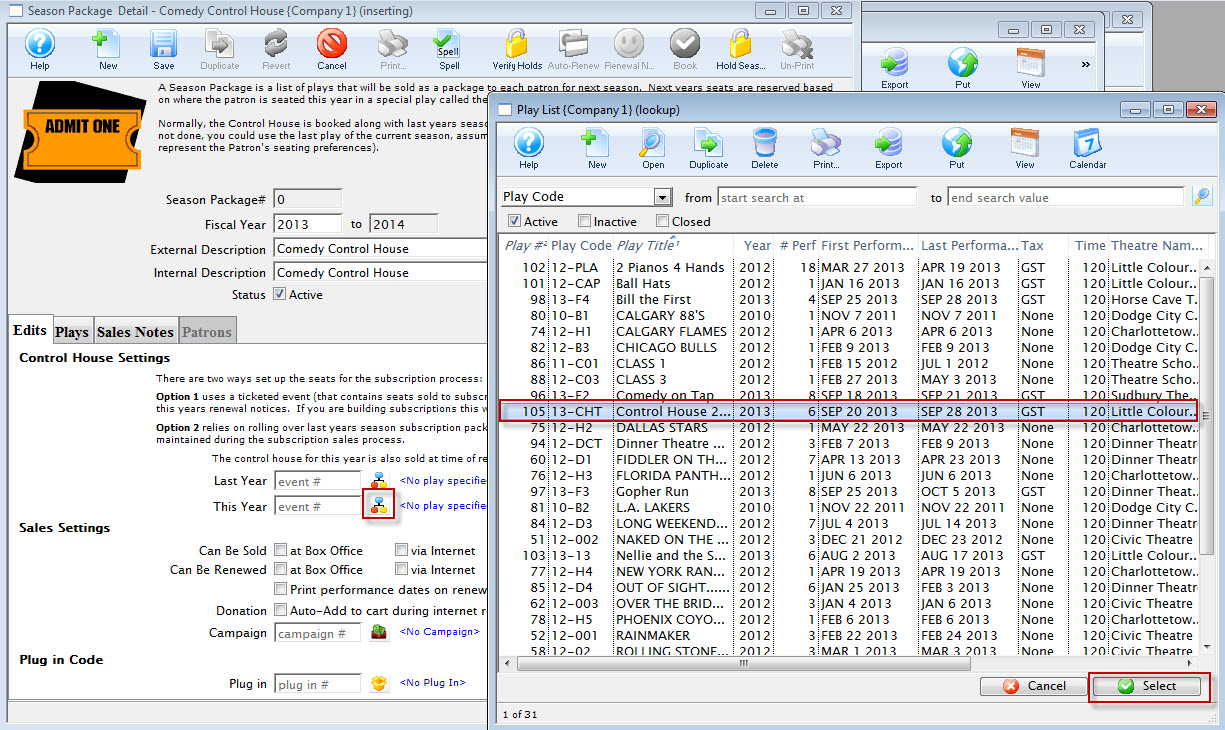
- Check off the desired Sales Settings options depending on where the season can be sold and renewed.

It is not recommended the season be available on the web until all setup has been confirmed and the season package is tested for accuracy.

- If required, check off the option to Print Performance Dates on Renewal Notices.
- Clicking the to enable the Donation Auto-Add to cart during renewal allows you to specify the suggested donation for that subscription.
There are now multiple ways to ask for a donation on the season renewal form: As in previous versions of Theatre Manager, you could enter a fixed amount and/or percentage of the subscription value to suggest a donation for the patron.
- You can now call up each subscription and enter a specific amount on an individual basis.
- From the manage favourite seats window, you can select some subscribers and suggest a donation for them all.
- You can select seats on the map and suggest a donation for all people in a specific area.

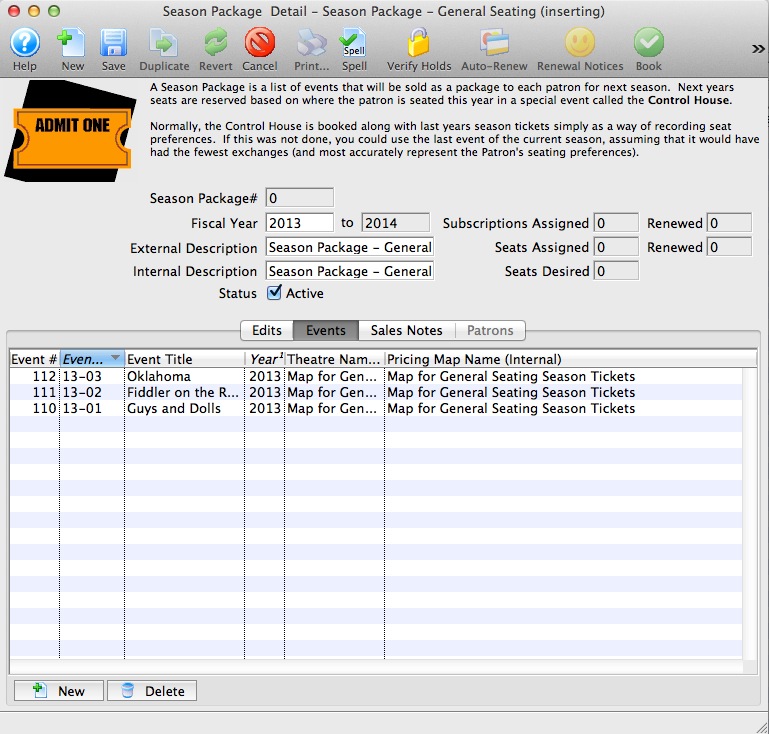
- Select the Events
 tab.
tab.
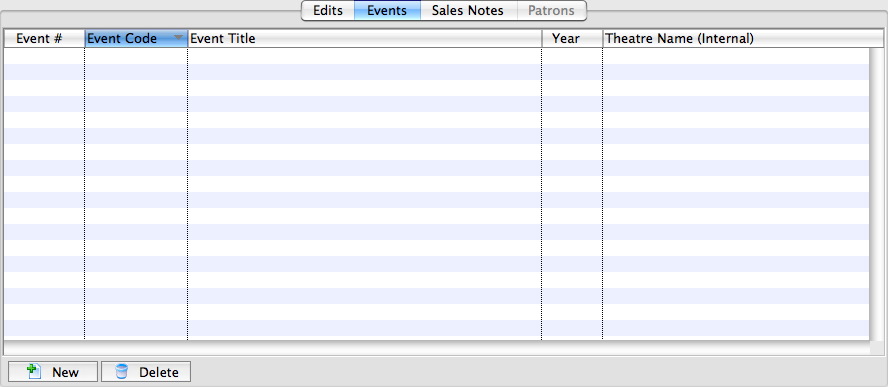
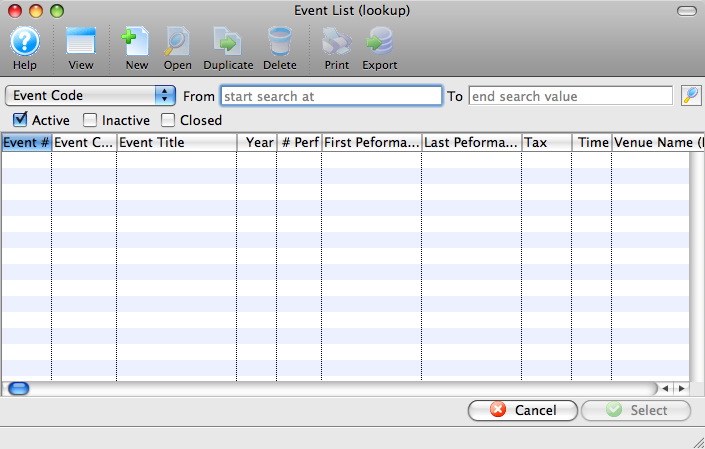
- Click the New button.
The Event List window opens.
For more information on the Event Lookup List window, Click here.
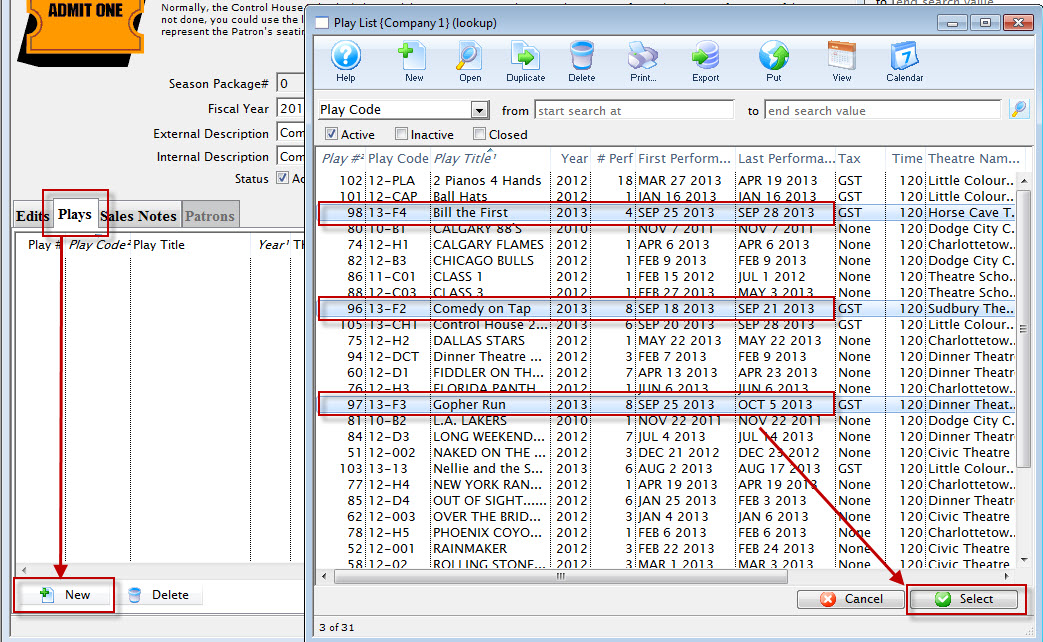
- Select the events to be added to the Season Package.
- Click the Select
 button.
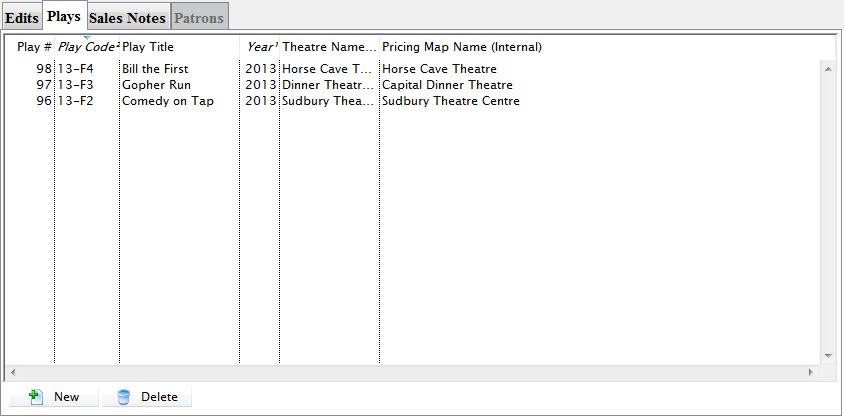
The Events for the coming season will populate into the Events tab.
- Select on the Sales Notes
 tab.
tab.
- Enter detailed notes for the season package.
- Click the Save button.
Theatre Manager will save the Season Package to the database and give it a unique Season Package #. The Season Package can now be used for the coming season.
Patrons can be added to the season package, seats assigned and subscriptions renewed.
Season Combo Packages
Season Combo Packages enable online subscription purchases for new patrons and renewing patrons since it guides them through the steps in selecting seats in each of the venues.
|
Season Combo Packages can be made up of multiple subscription packages. Where as each subscription package can only belong to a single Season Combo Package. |
For more information on the Season Package Detail window, click here.
Setting up a Subscription Combo Package
- Create a Season Package for the 1st Subscription Package for events held in venue 'A'.
- Create a Season Package for the 2nd Subscription Package for events held in venue 'B'.
- Create a Season Combo Package associating both the 1st and 2nd Subscription Packages created above.
Using Combo Packages for New Subscribers
Refer to Combo Packages for New Subscriptions for more information.
Using Combo Packages for Renewing Subscribers
Refer to Combo Packages for Renewing Subscriptions for more information.
Renewal Notices and Combo Packages
Refer to Printing Season Renewal Notices for Combo Packages for more information.
Creating a Season Combo Package
Season Combo Packages are designed to guide patrons through the process when purchasing a new subscription or renewing an existing subscription when the Season Subscription events span multiple venues.
To create a new Season Combo Package, perform the following steps:
- Click Patron Sales >> Season Subscriptions >> Setup Season Packages.
The Season Package List window opens.
For more information on the Season Package List window, click here.
- Click the New button at the top of the window.
The Season Package Detail window opens.
For more information on the Season Package Detail window, click here.
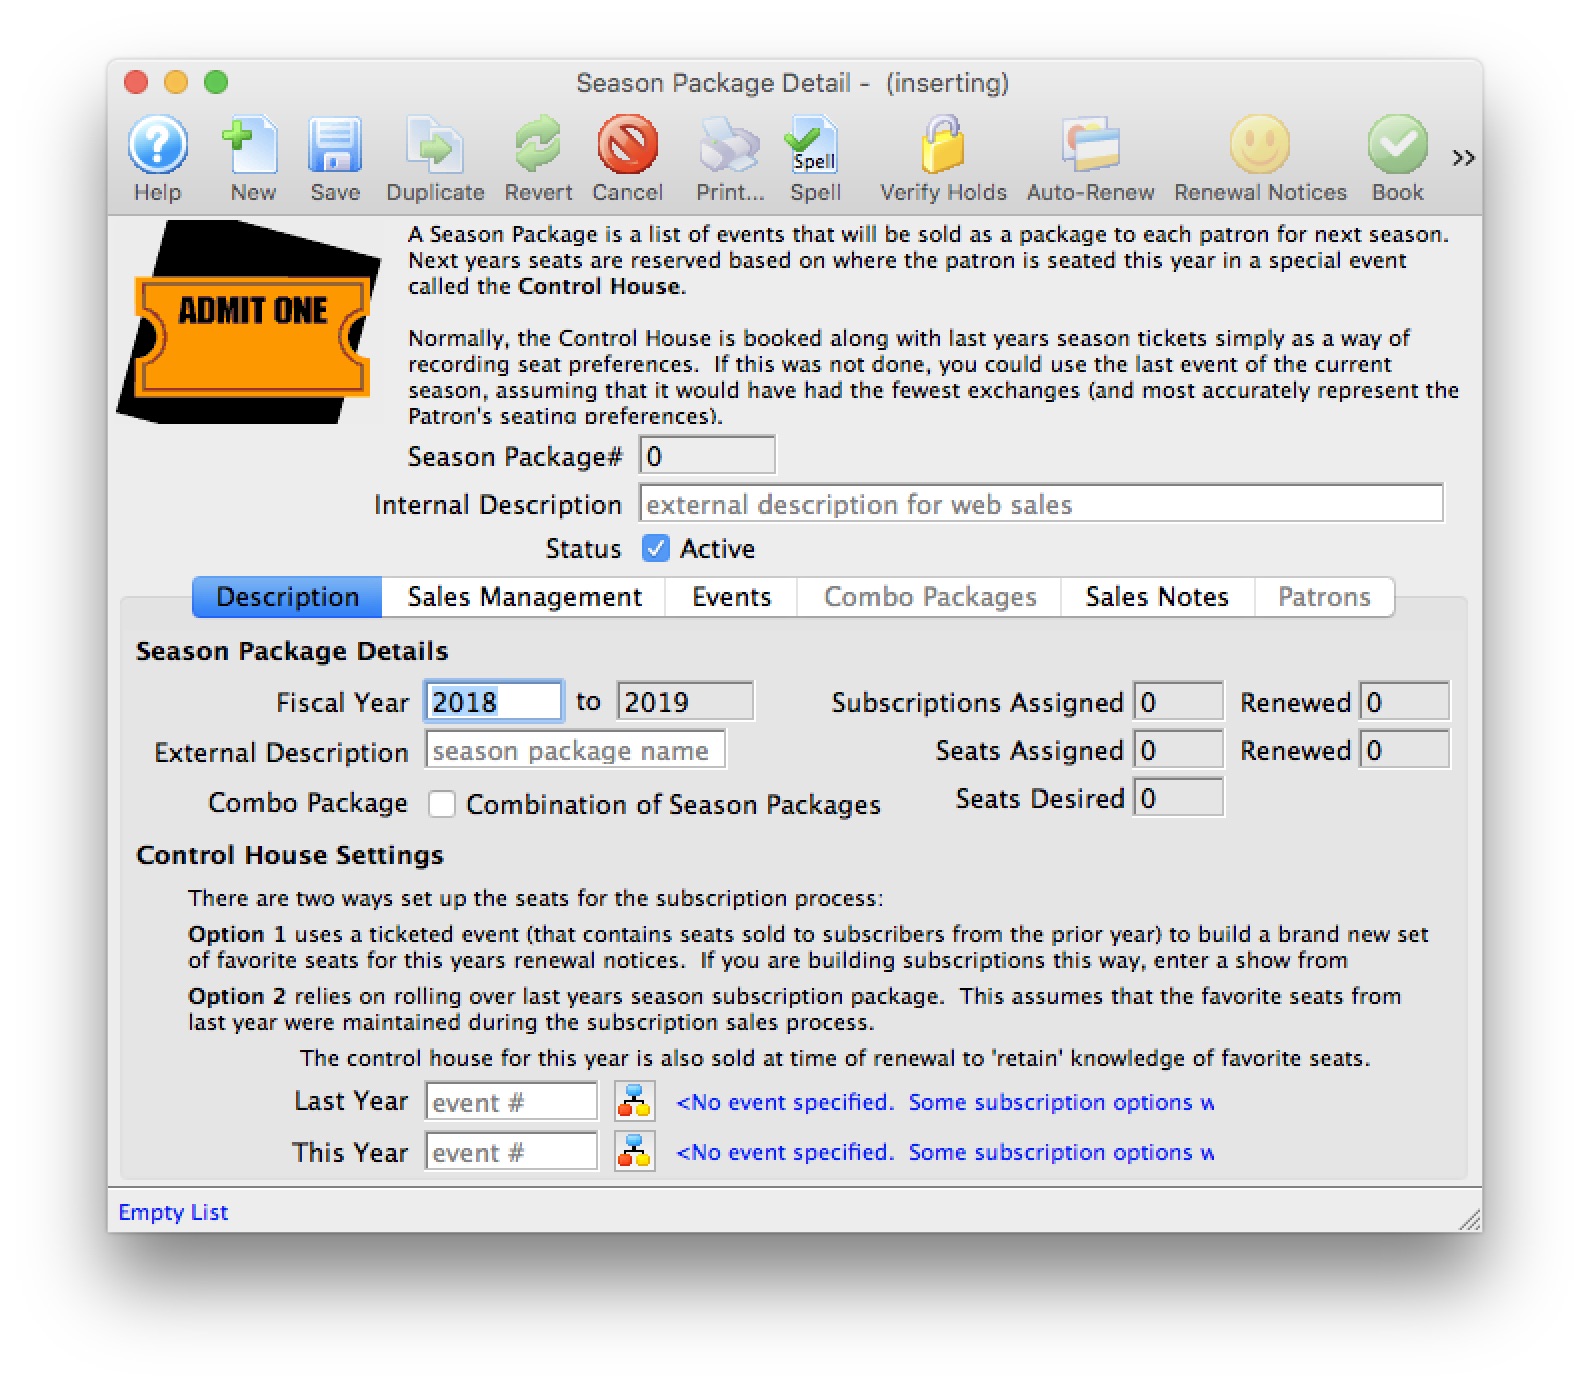
- Enter Internal Description, Fiscal Year, and External Description for the season combo package.
The Fiscal Year To field will update when the Fiscal Year is altered. The External Description can be displayed in the online ticketing module, ticket faces and in the renewal notices.
- Select the Combo Package checkbox option.
The Sales Managment and Events tabs will be disabled. The Combo Package tab will be enabled.
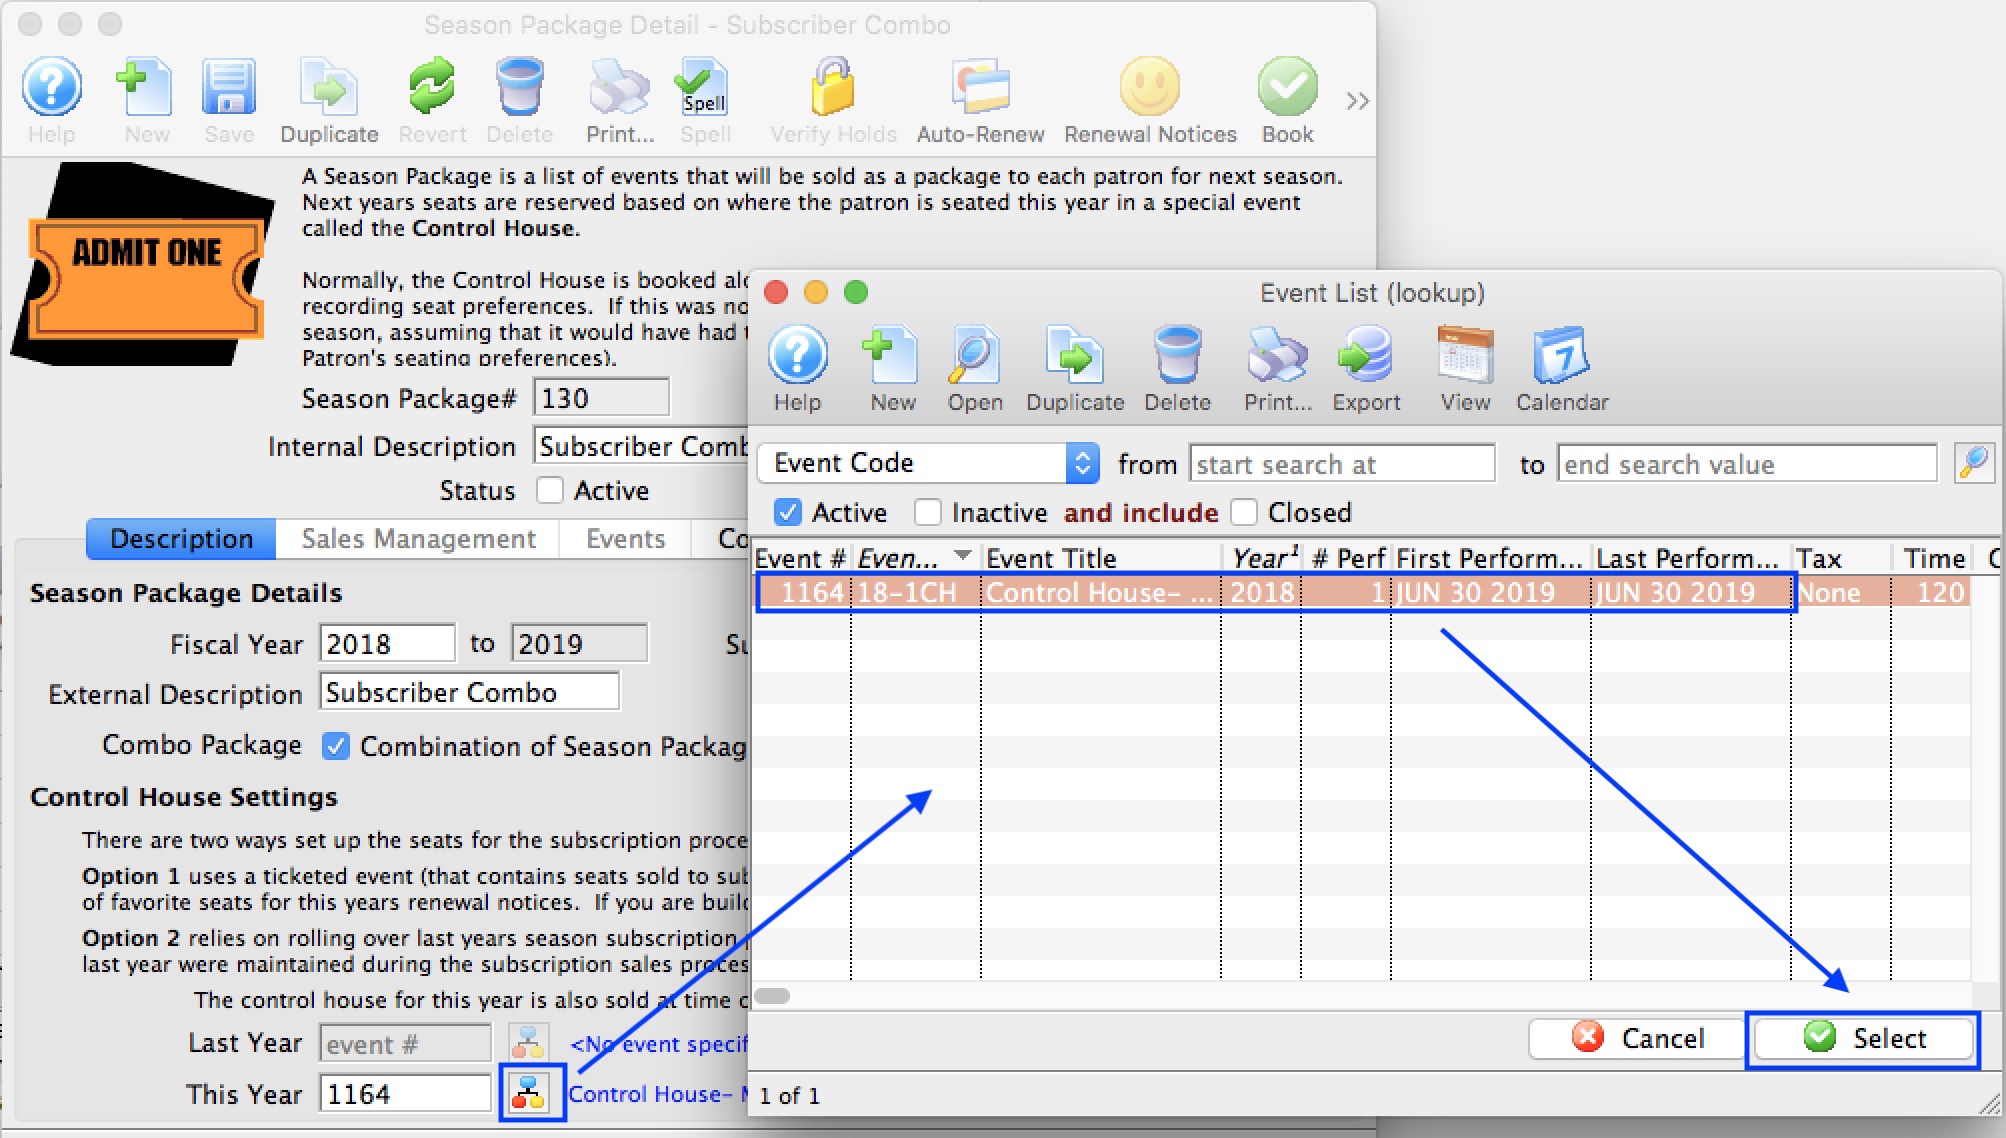
- Enter the Control House number in the This Year field.
The Control House needs to be created before the season package can be built. The Event Lookup
icon can be used to locate the Control House. The Control House can not be an event from the previous year. It must be an event specific to the season package. 
With mutliple season packages, there are mutliple control houses to choose from. Choose the control house that best represents the primary season package. The venue seating chart for this control house will then be used for online sales during the season package renewal process.
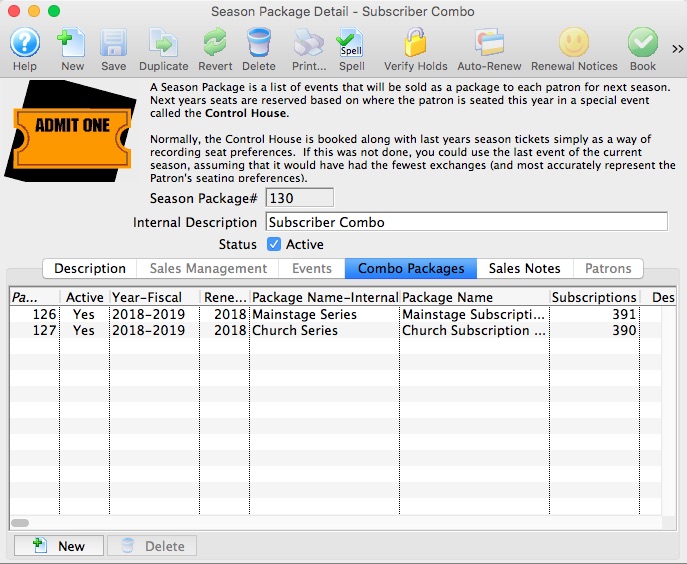
- Click the Combo Packages
 tab.
tab.
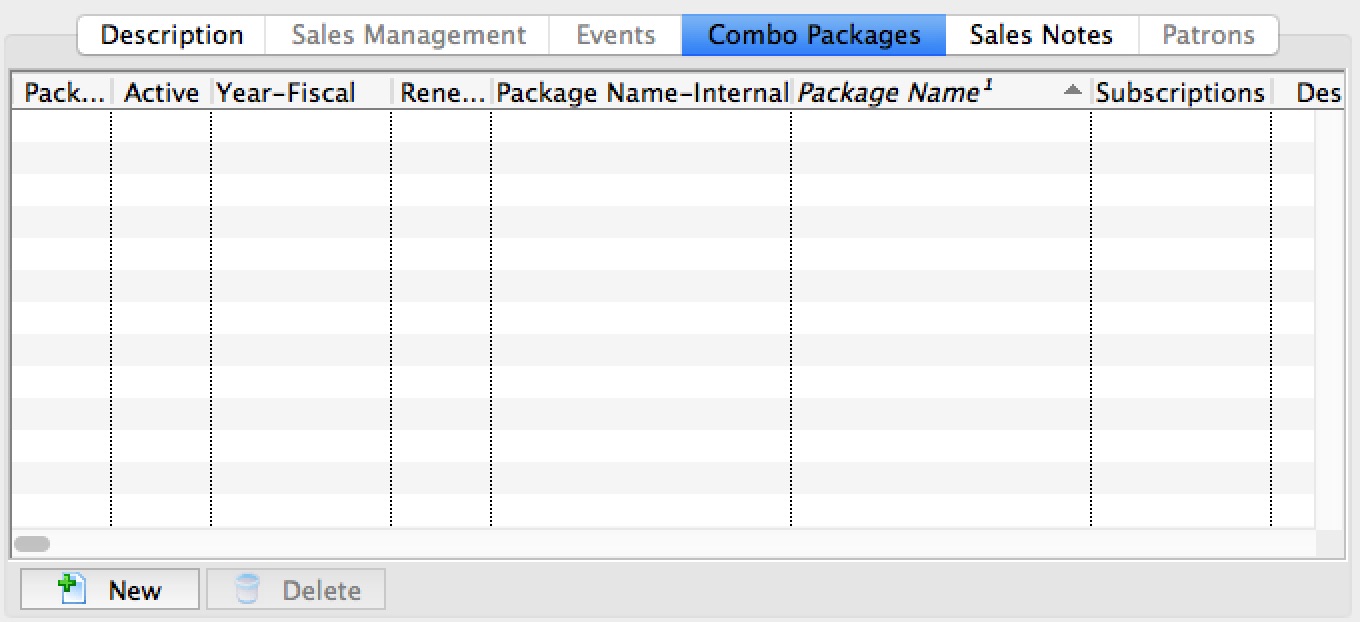
- Click the New button.
The Season Packages List window opens.
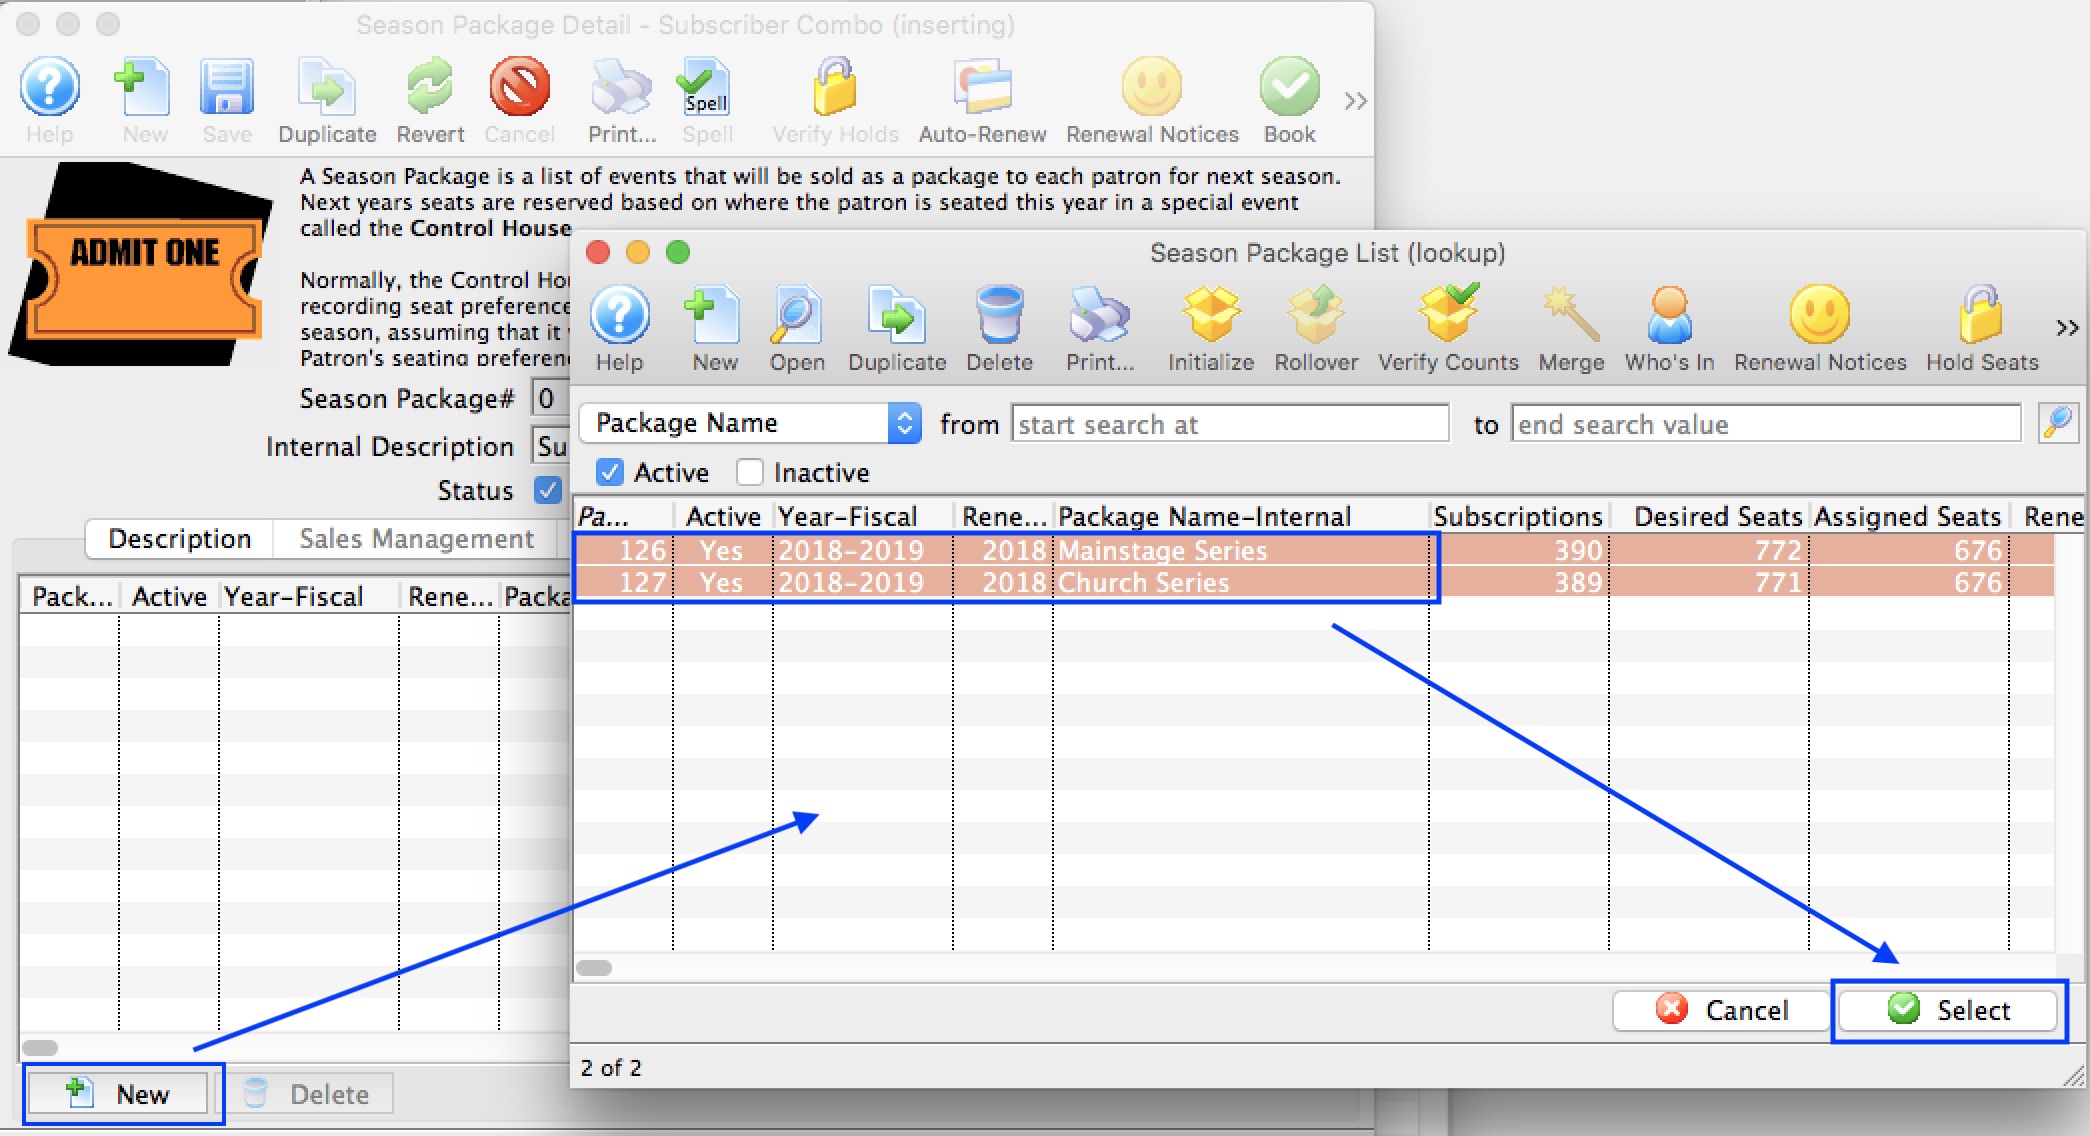
For more information on the Season Package Lookup List window, Click here.
- Select the Season Packages to be added to the Season Combo Package.
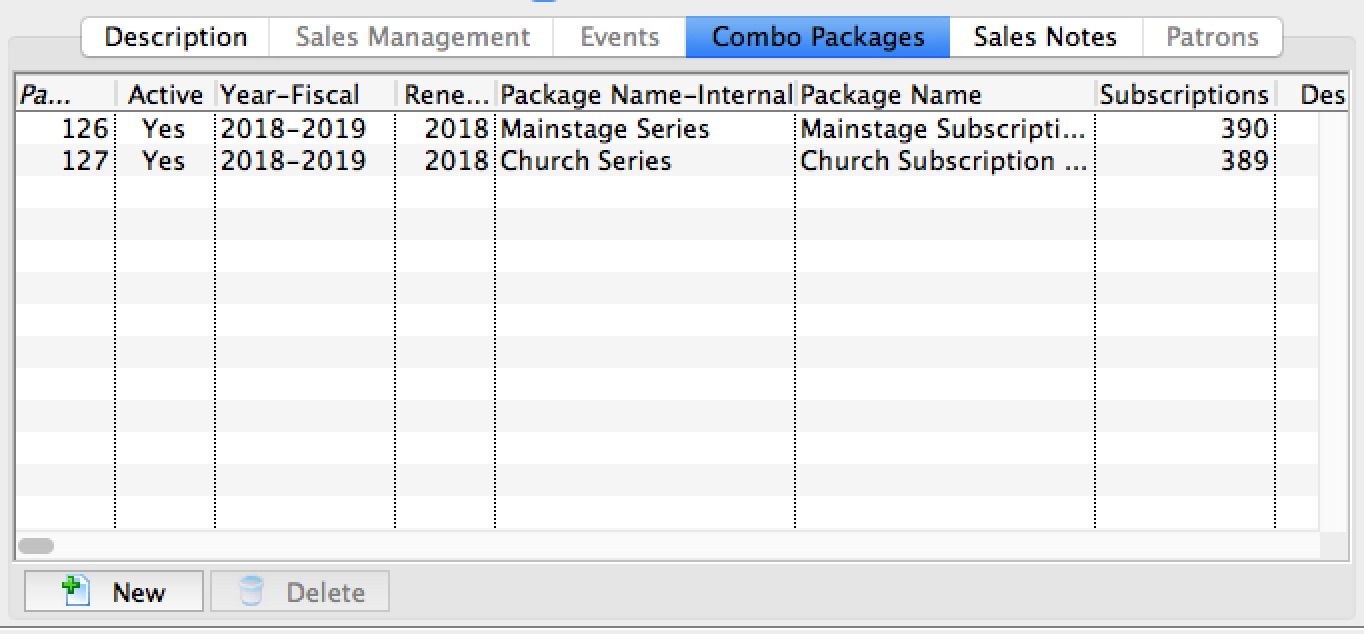
- Click the Select button.
The Season Packages will populate into the Combo Packages tab.
- Click on the Sales Notes tab.
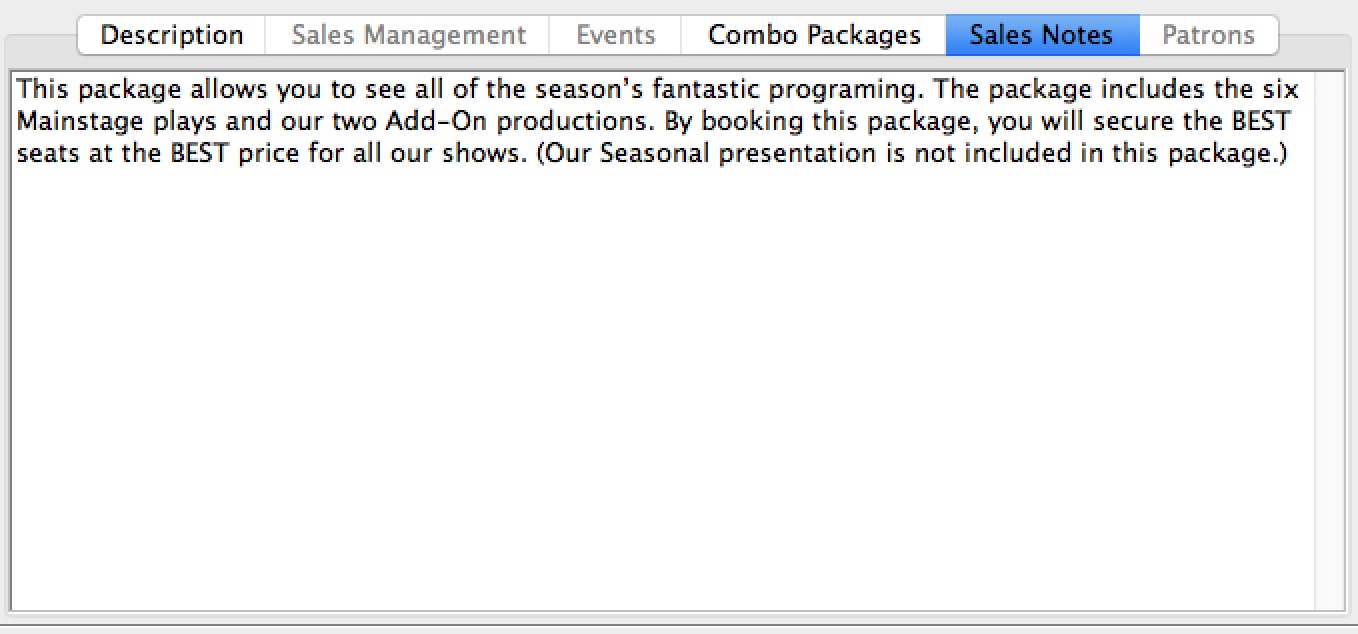
- Enter detailed notes for the season combo package.
- Click the Save button.
Theatre Manager will save the Season Combo Package to the database and assign it a unique Season Package #. The Season Combo Package can now be used for the coming season.
Using Combo Packages for New Subscribers
Season Combo Packages offer the patron a convenient way to select favorite seats within each season package's venue to assign to the events. The process is that the patron would select their favorite seats for the 1st season package, then the web sales module would automatically display the search criteria for the 2nd season package. Upon successful seat selection of the 2nd season package's seats, if there was a 3rd season package, the web sales module would automatically display the search criteria for the 3rd season package. This process would continue until all the season packages had their seats assigned. Once completed, the patron would be shown their shopping cart to review their complete season.
|
Season Combo Packages are only applied to online new and renewal web sale subscriptions. New and renewal Subscription Combo Packages in the box office follow the same procedures as using a standard subscription package as outline in Selling Season Subscriptions. |
An example of how the process appears online
- Click the Subscriptions
 button in the top toolbar.
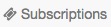
The web module will display the available new and renewal packages available for selection.
- Click New Subscription
 beside the new season package.
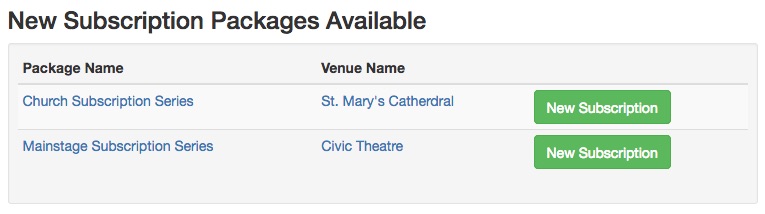
With a combo package, the patron is able to start the subscription series from any of the packages that are part of the combo package. If you choose, there are options available to customize the subscription web page to only display the primary subscription.
- Choose the desired season series.
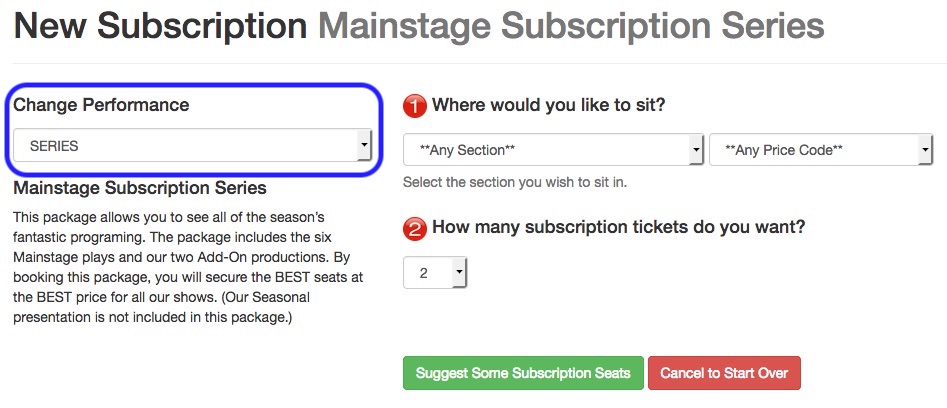
- Choose the desired seating area.
- Choose the desired number of subscription seats.
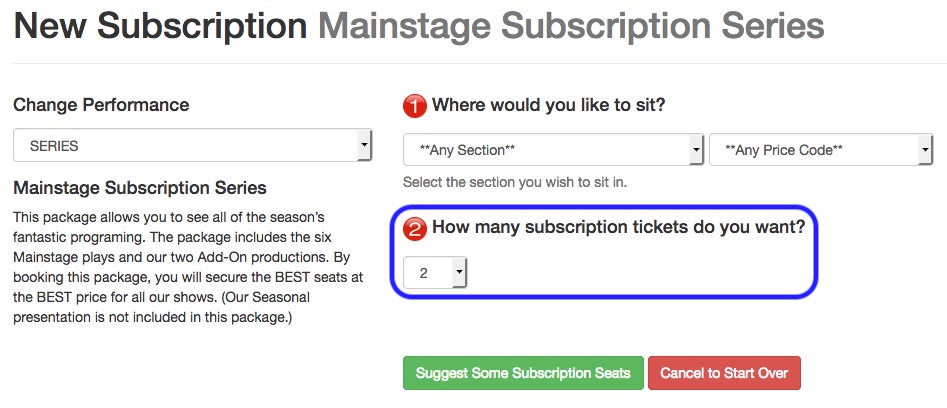
- Click Suggest Some Subscription Seats.

The web module will now locate the best available seats based on the selection criteria.
- Choose a Subscription Price Option.

- Click Add Subscription
 to Shopping Cart.
- The web module will now repeat the above steps starting at step #4 for the next season package.
The Season Series selection option is determined during the 1st package's seat selection. If the subsequent 2nd, 3rd, 4th, etc. Season Series is also available as the 1st Season Series, the Season Series option is defaulted to be the same series for all remaining Season Packages. This ensures that the Season Packages purchased in the same grouping remain in the same series.
- After the final season package has seats assigned, the patron is shown their shopping cart to review their new season subscription.
Using Combo Packages for Renewing Subscribers
Season Combo Packages offer the patron a convenient way to automatically renew all the season subscriptions within a single Season Combo Package.
|
Season Combo Packages are only applied to online new and renewal web sale subscriptions. New and renewal Subscription Combo Packages in the box office follow the same procedures as using a standard subscription package as outline in Selling Season Subscriptions. |
|
When the patron renews any one of the season packages, all the associated season packages linked by the Season Combo Package will also be renewed. The same is true if the patron cancels any one of the season packages, all the associated season packages linked by the Season Combo Package will also be cancelled. |
An example of how the process appears online:
- Click the Subscriptions button in the top toolbar.
The web module will display the available new and renewal packages available for selection.
- Click Renew.

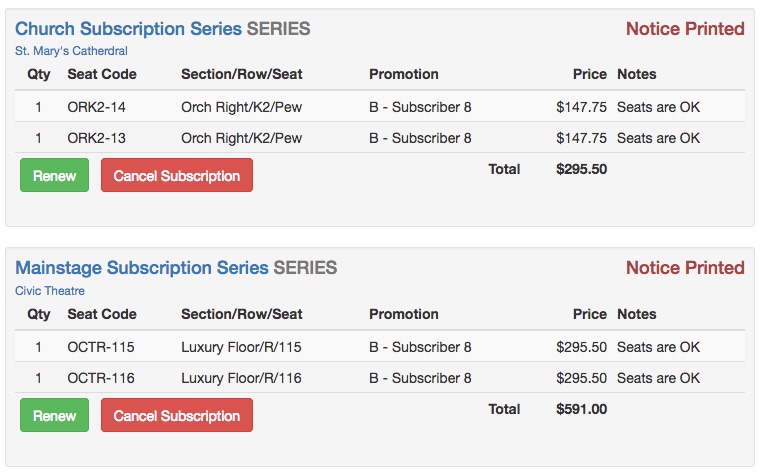
With a combo package, the patron is able to start the subscription series from any of the packages that are part of the combo package. If you choose, there are options available to customize the subscription web page to only display the primary subscription.
- Make any seat change requests.
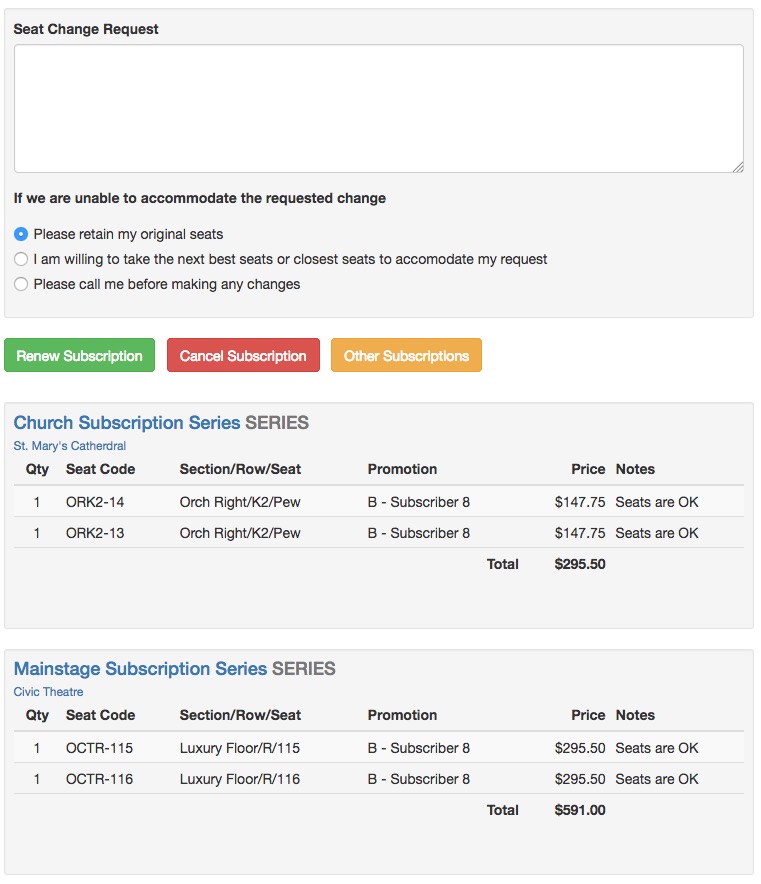
With a combo package, each of the individual series are displayed to the patron for review.
- Click Renew Subscription.
- The patron is shown their shopping cart to review their renewed season subscription.
Renewal Notices and Combo Packages
Season Combo Packages do not impact the printing of season subscription renewal notices. When printing the season renewal notices, include the various season packages offered in the selection criteria. This will present each of the season packages on a single renewal notice for the patron Each package's seats will continue to be priced separately.
|
Season Combo Packages are only applied to online new and renewal web sale subscriptions. New and renewal Subscription Combo Packages in the box office follow the same procedures as using a standard subscription package as outline in Selling Season Subscriptions. |
Season Packages for General Seating
These instructions outline the process of creating a General Admission season ticket package - sometimes referred to Festival Seating.
Assumption: that you have never sold general seating season ticket through the Season Subscription Module in the past.
Step #1: Build a New Map
This step is essential as the Season Renewal Process is based on three fundamentals: Same Venue, Same night and Same Seats. Even though this if for general admission you must treat is as if it was reserved seating to use the Season Module for season tickets.
- Click the Theatre button
 at the top of the window
 - Click the New button
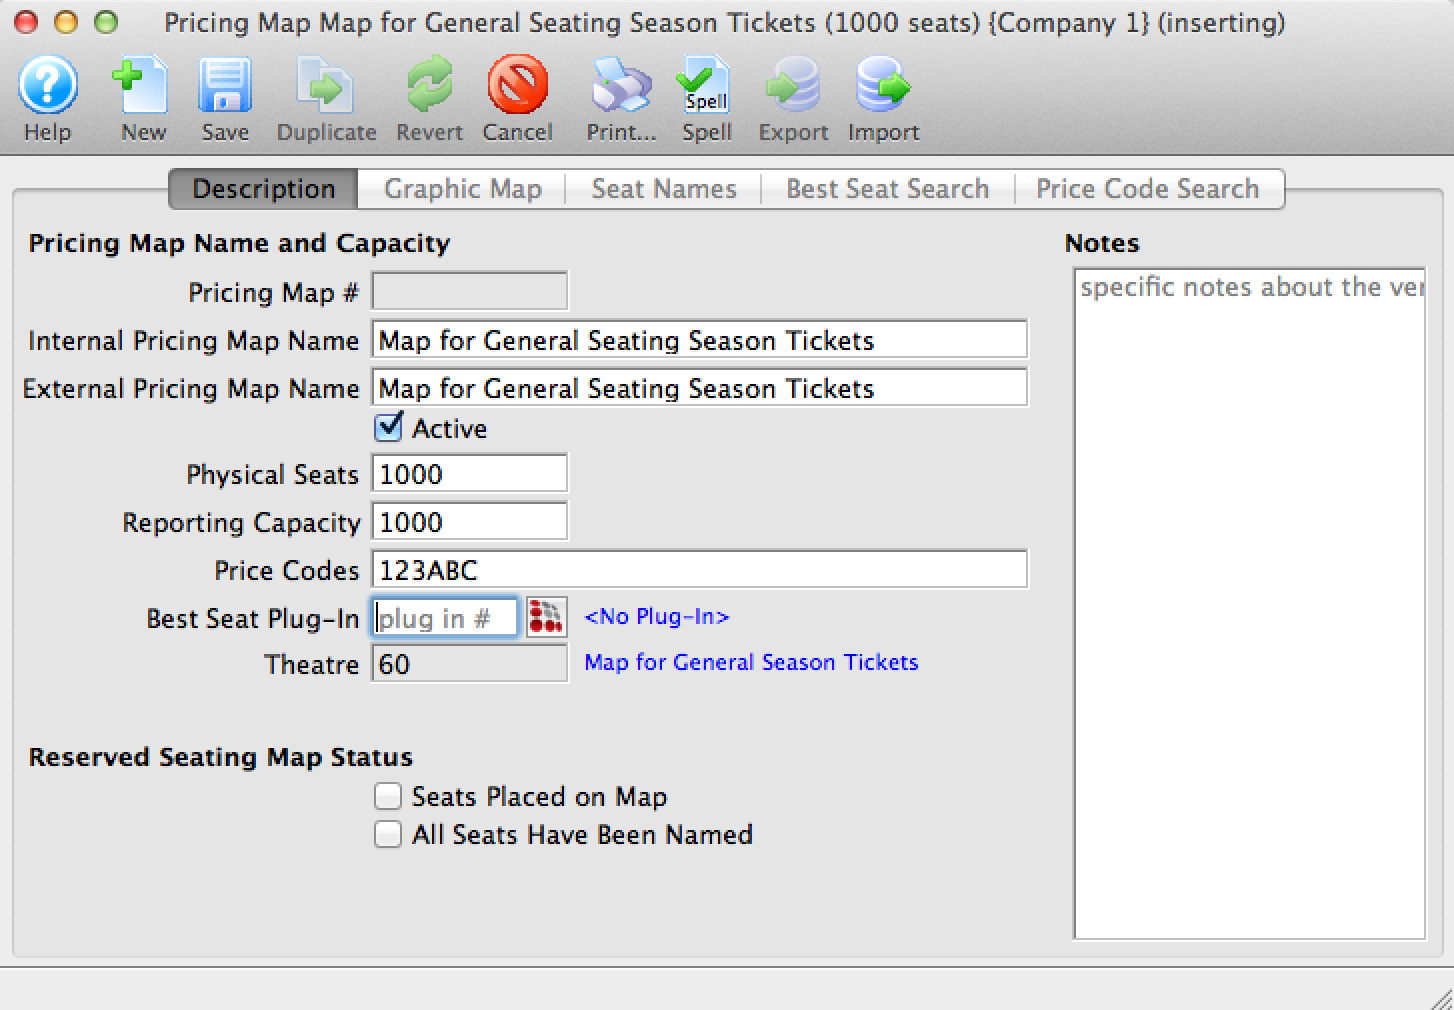
- Enter the mandatory data for the map
- Click Save from the tool bar at the top
- Click the New button
 to create a new pricing map
 - The Capacity should be the total number of subscription available for sale in the General Admission package
- Enter the same Price Code letters as would be available in the standard General Admission map
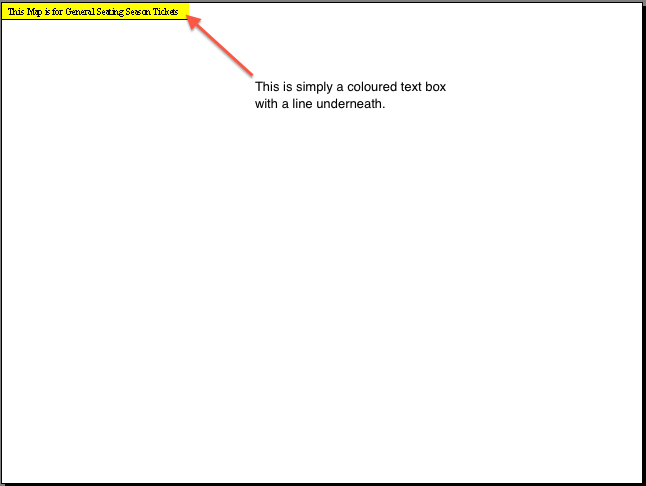
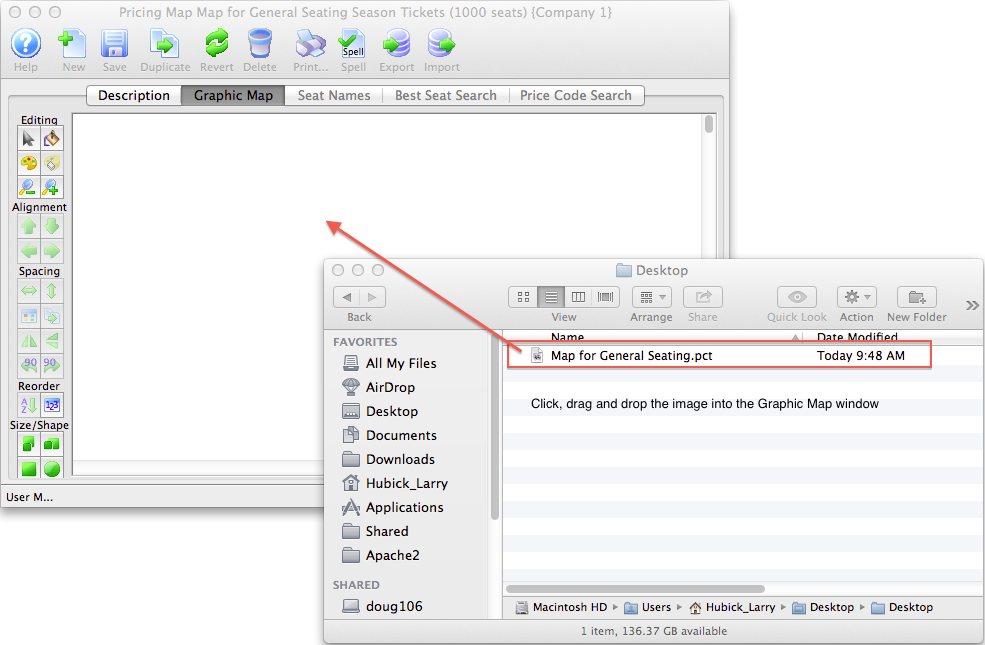
- Open Powerpoint and draw a big box
- Save the Powerpoint ans use open office to convert it to SVG
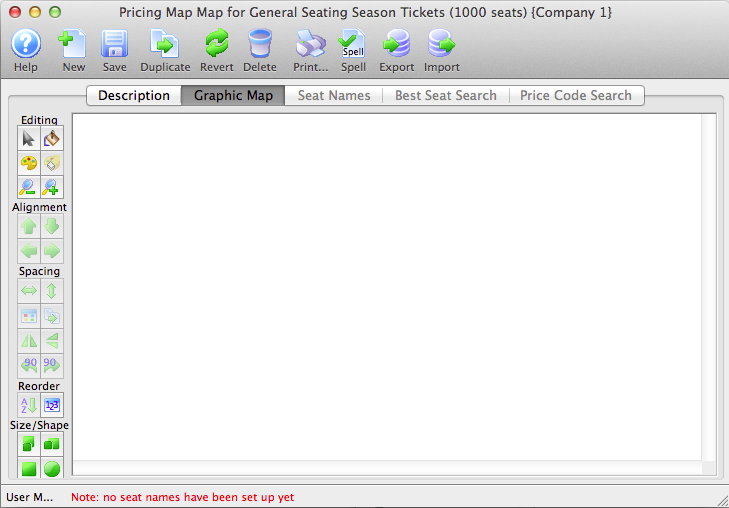
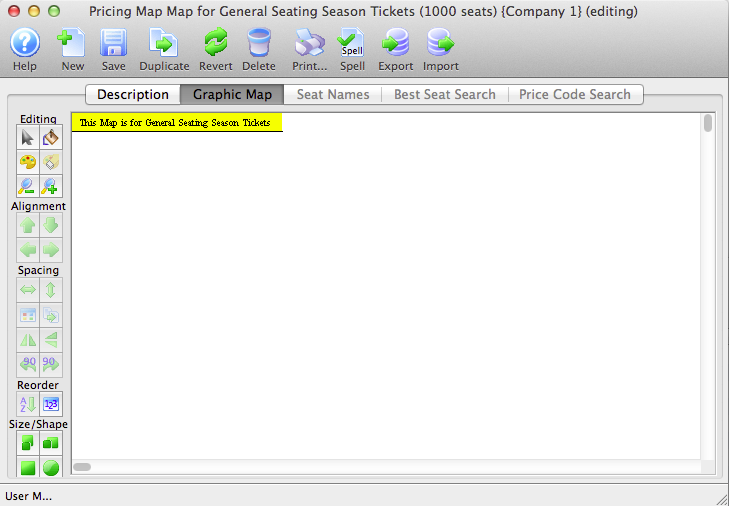
- Drag and drop the image into the Graphic Map tab
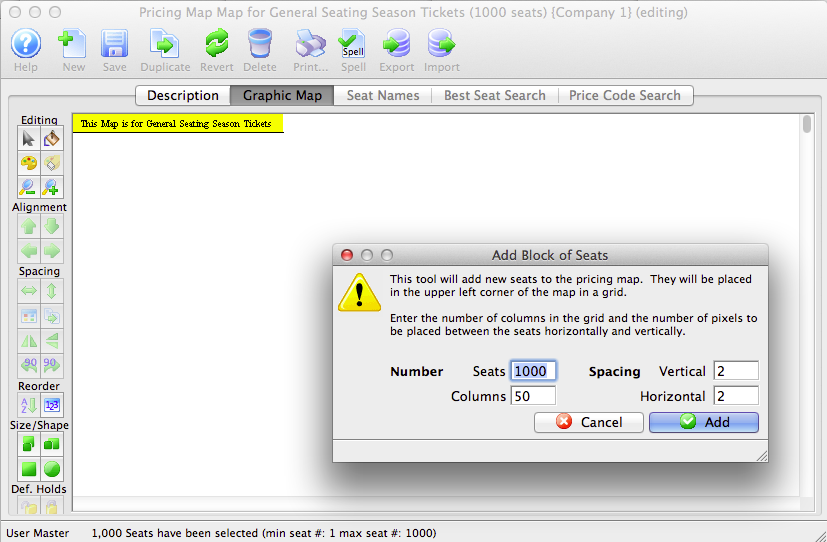
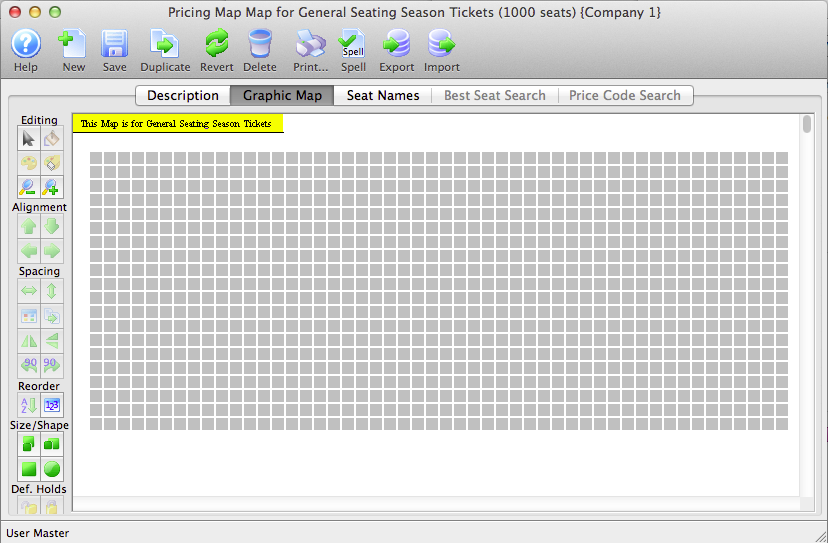
- Add the total number of seats to the map
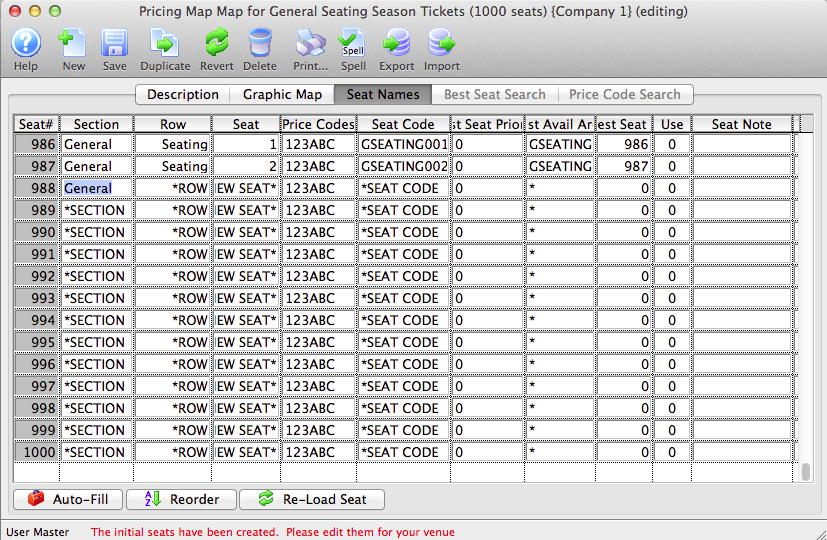
- Select the Seat Names tab
- Enter the General in the Section field, Admission in the Row field and the number 1 in the Seat field (Note: If your package has a specific name you may choose to enter these details in the Section and Row fields. e.i. Section field = Flex and the Row field = Pass)
- Click and hold the Tab key on the keyboard to fill in the remaining seat names

(Note: Placing and design are only for box office esthetics and are at your desecration)
Click here for information on creating your graphic map.
Step #2: Determine Last Years Subscribers
Option 1: Using Reports
- Open Reports

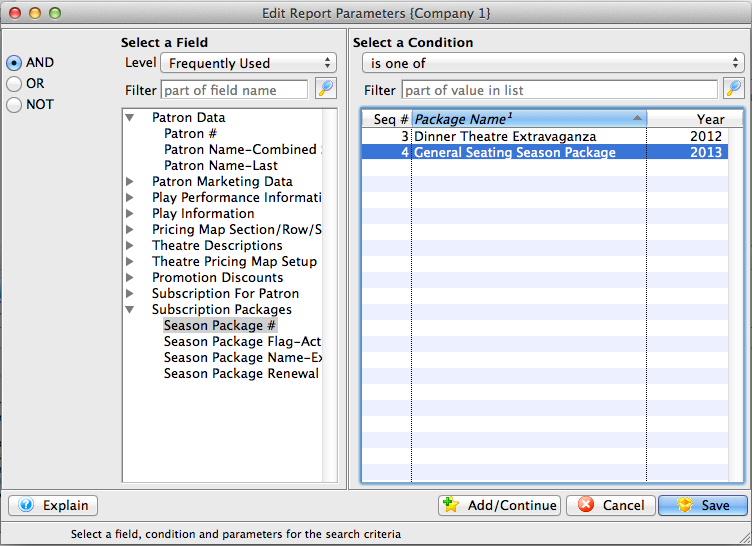
- Run the Season Subscription and Subscription Packages >> Favorite Seats report
- The Criteria should be similar to: Season Package # is one of (the General Admission Package)
Options 2: Create a Mail List
If you don't have a former season package then determine your last years subscribers by creating a mail list.- Open Mail List

- Click New to create a new mail list
- Define the mail list by name and description
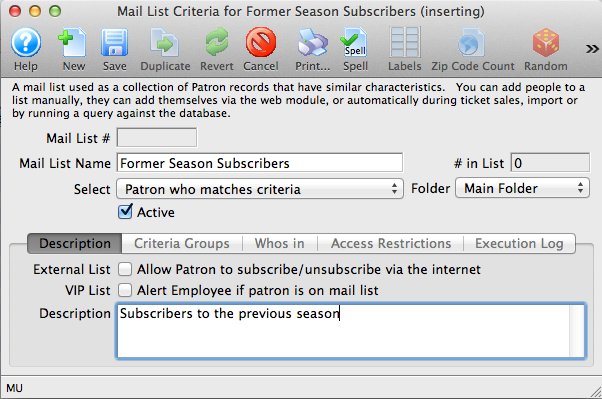
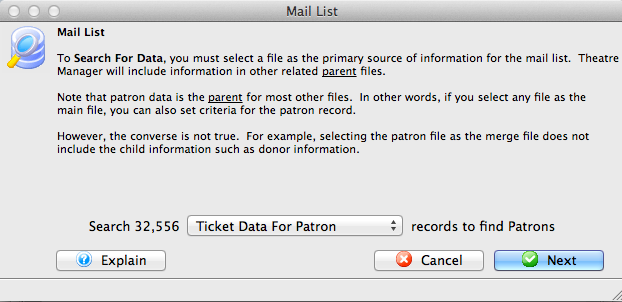
- The Criteria should be similar to: Using Ticket Data for a Patron as the file
- Click Done

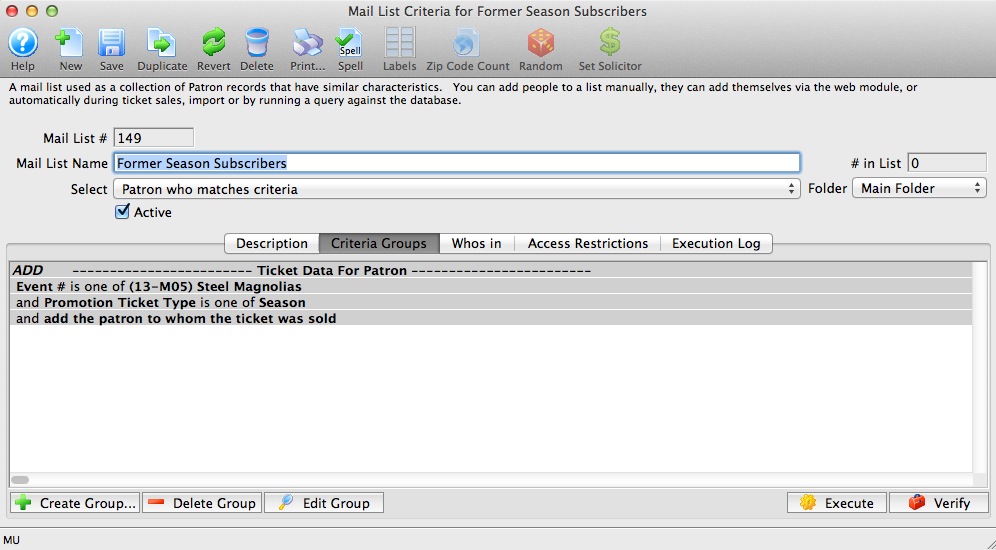
- Click Execute

Criteria to use: Event # is one of [pick an event from your current season]
and Promotion Ticket Type is one of [Season]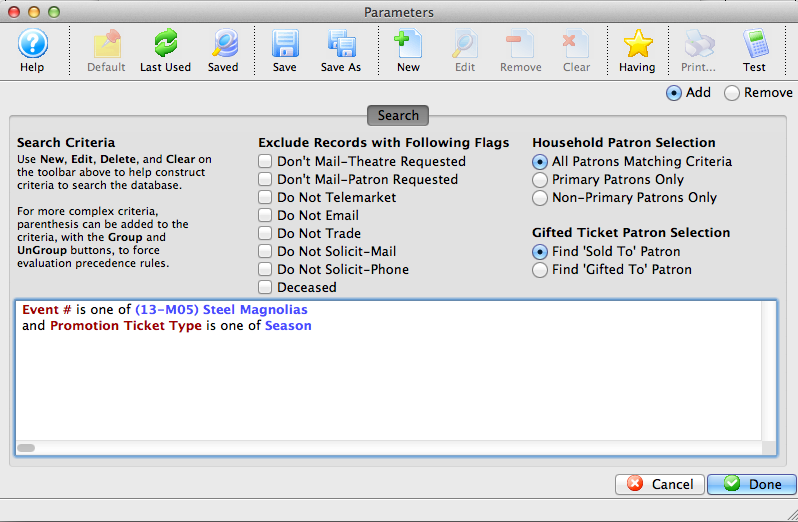
Step #3: Build a Control House
- Build a new Event using the Map created in Step 1. Click
 to create a new event
 - Enter the details similar to the following, defining the event as a control house
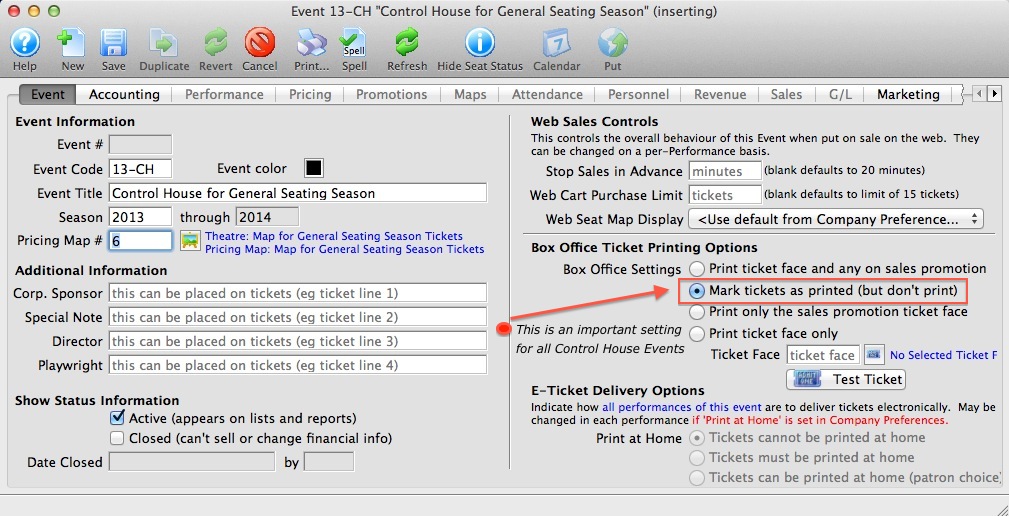
- Mark Tickets as printed as a physical ticket will not be needed for this Event
•This is very important as you don't want tickets to print out for any control house event - The G/L accounts should be the same as a traditional Control House
- The Performances will be Reserved Seating
- Ensure the check box Use As A Control House is checked
- Name Price Codes to reflect the season and disable those not needed
- All Price Codes should be $0.00
- Disable all non Subscription Promotions
Step #4: Build Next Years Events As Reserved Seating
- Build next years Events using the Map created Step 1. Click to create a new event
- Ensure the Season year reflects next years season
- The G/L accounts should be the same as the traditional season event setup

- Set the Marketing information for the event
- The Performances will be Reserved Seating
What is also important for season packages is that the naming convention of the performance series codes match in every performance of event event in the season package. - The Price Codes should reflect the desired pricing for each seat
- All applicable Promotions should be made available
- Repeat to add all events that will be part of the season package
Step #5: Create the New Season Package
- From the Patron Sales Menu >> Season Subscriptions >> Setup Season Packages
- Click to create a new season package
- Enter the details of the season package: Fiscal Year, External and Internal Description, The control house event for THIS YEAR and how it can be sold
- Click the event tab and add the actual events to the season package
Step #6: Adding Previously Identified Season Ticket Holders to the Package
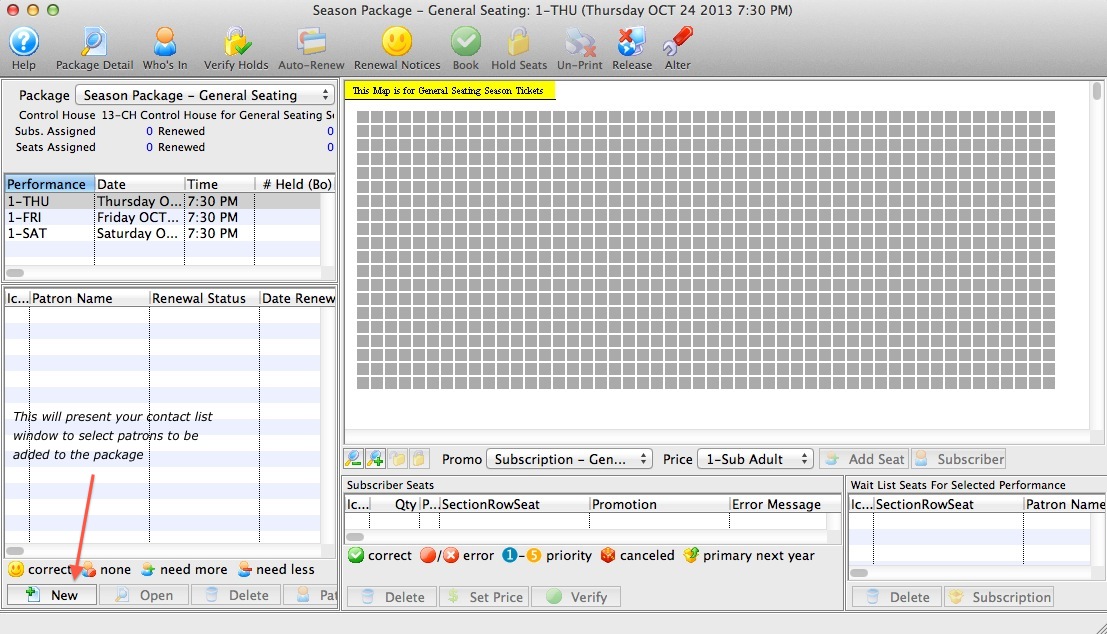
- Click
 to open the Season Subscription Module
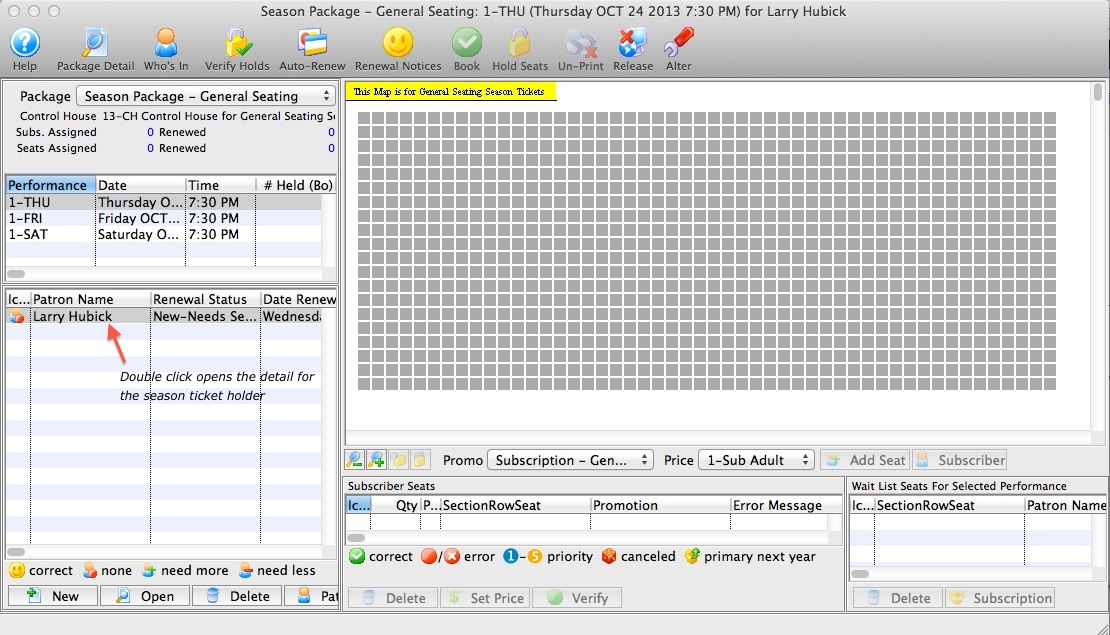
 - Using either the report of subscribers or the mail list created in Step #2 click the to begin to add patrons to the package
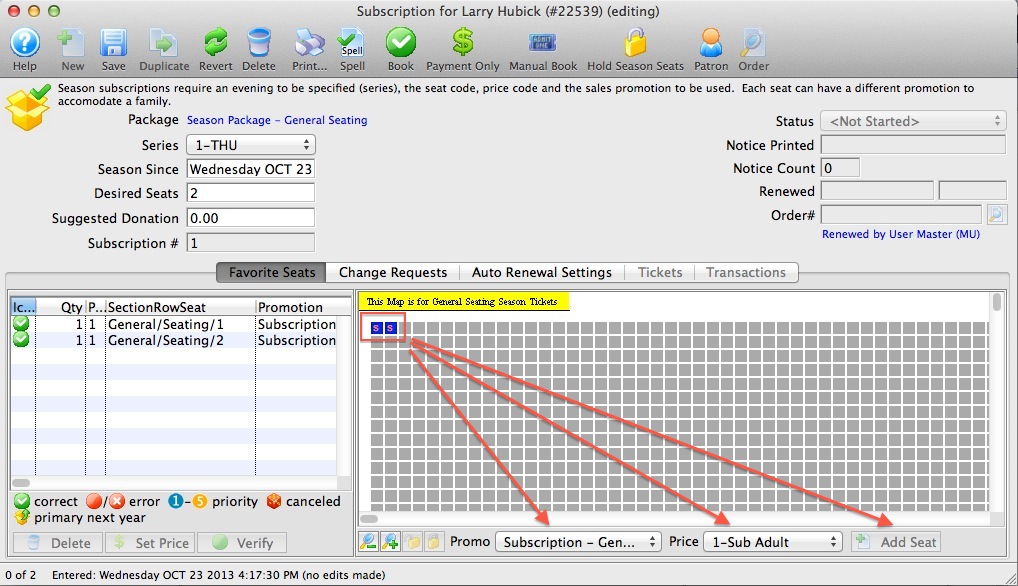
- Once added to the package, double click on the patron to access the detail
- Once in the detail, select one seat for each subscription. Set the Promotion and Price code and add seats.
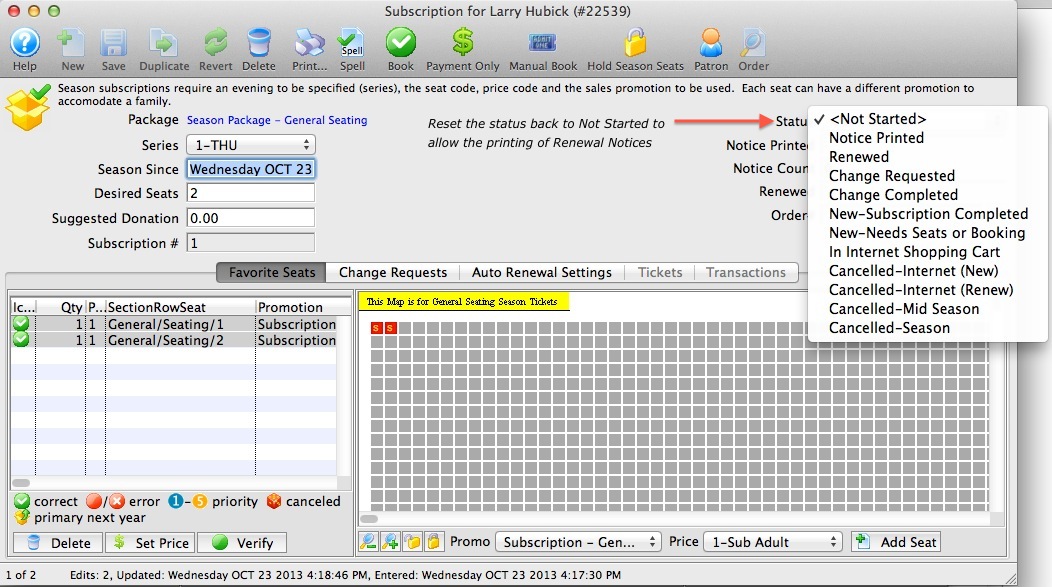
- Reset the status from New back to Not Started. This will allow the printing of Renewal Notices.
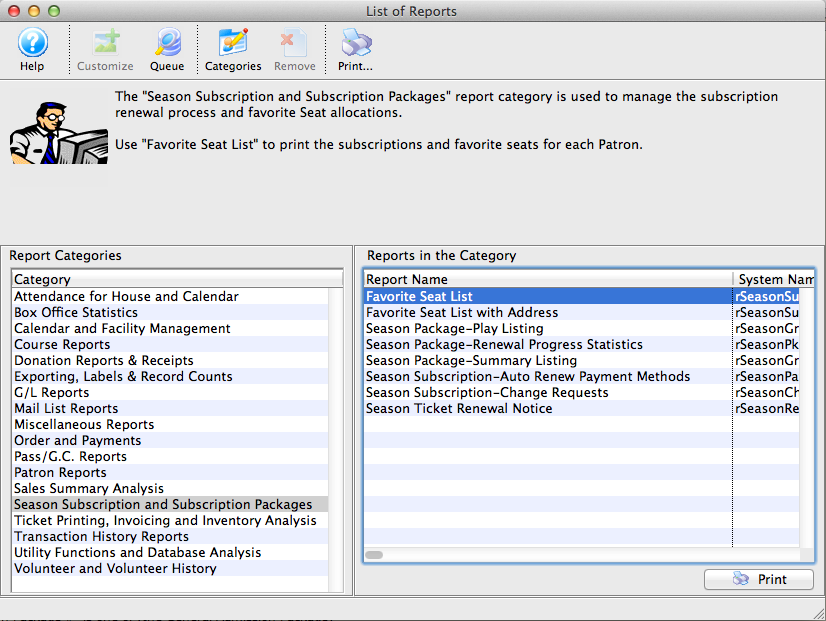
Step #7: Print Renewal Notices
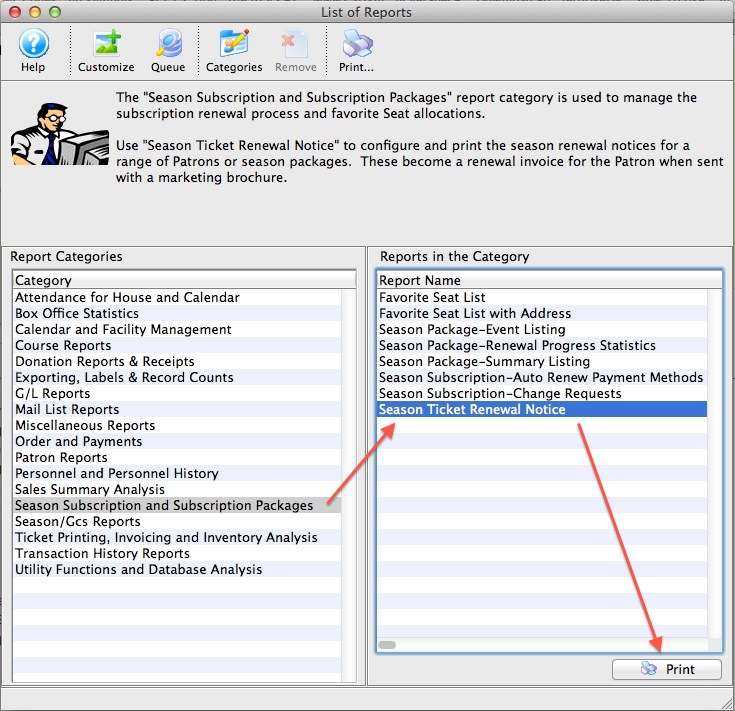
- Click the Reports Button from the main tool bar.
- Select the Report Category: Season Subscriptions and Subscription Packages and then Season Ticket Renewal Notice, click Print.
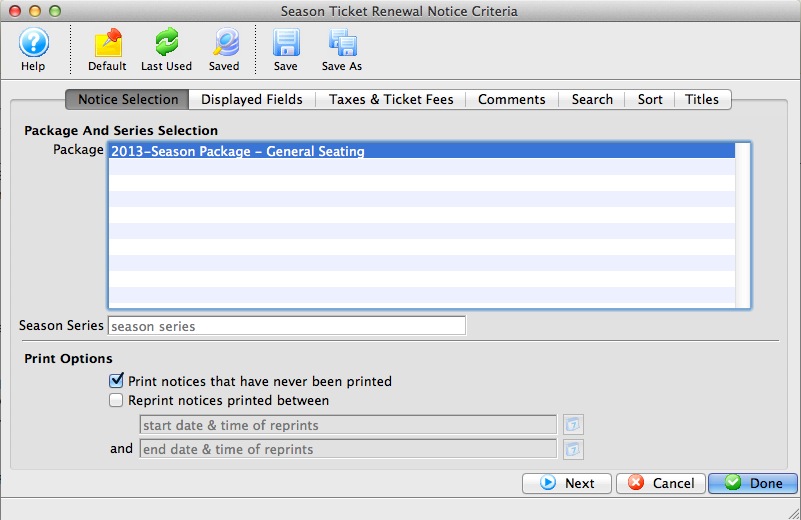
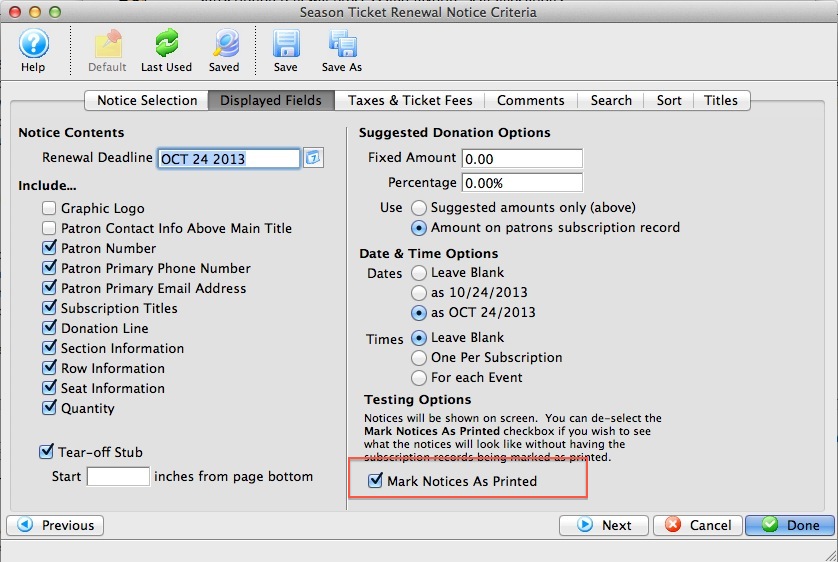
- Select the General Seating Season Package, then advance to the Displayed Fields Tab
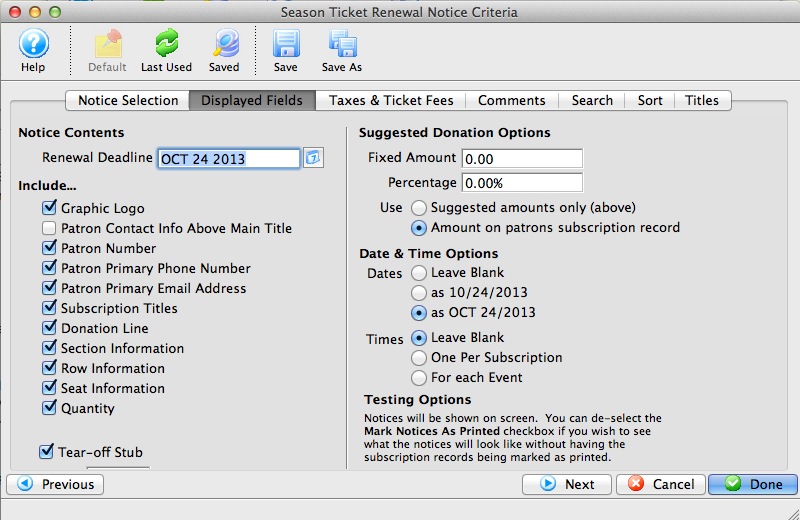
- Set your parameters for the invoice content, then advance to the Taxes and Ticket Fees Tab
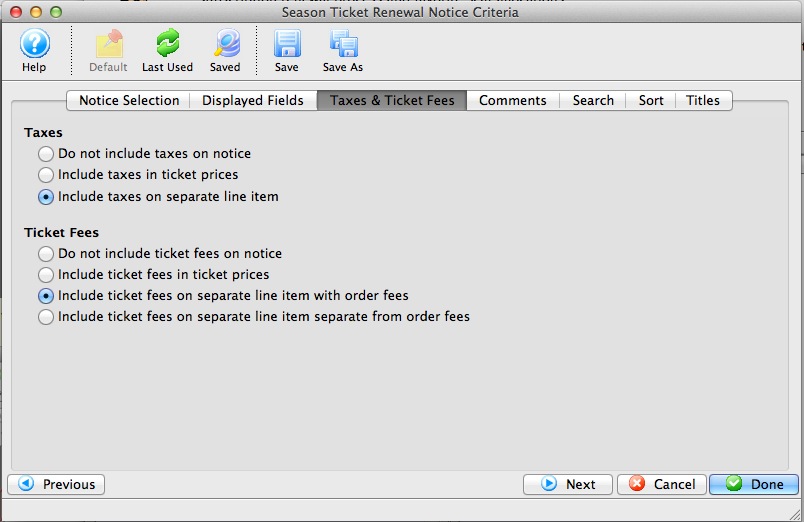
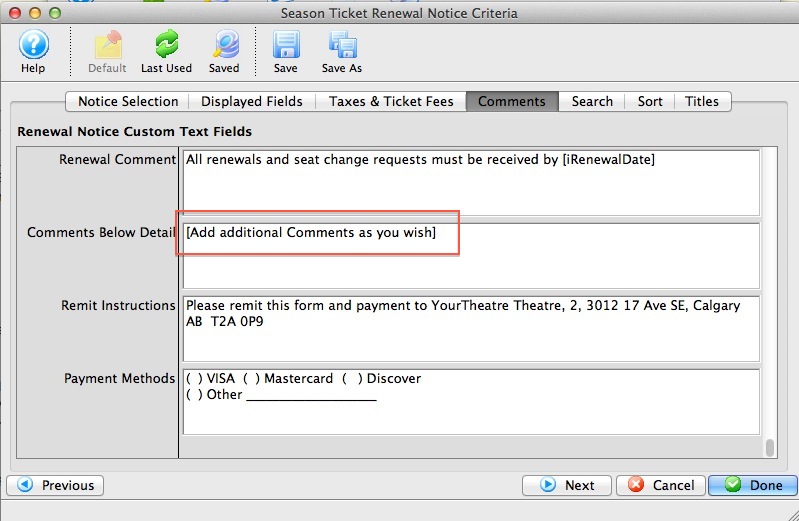
- Set your parameters for the display of fees and taxes as appropriate, then advance to the comment tab
- Review the comments fields and add Additional Comment as you wish, then advance to the search tab
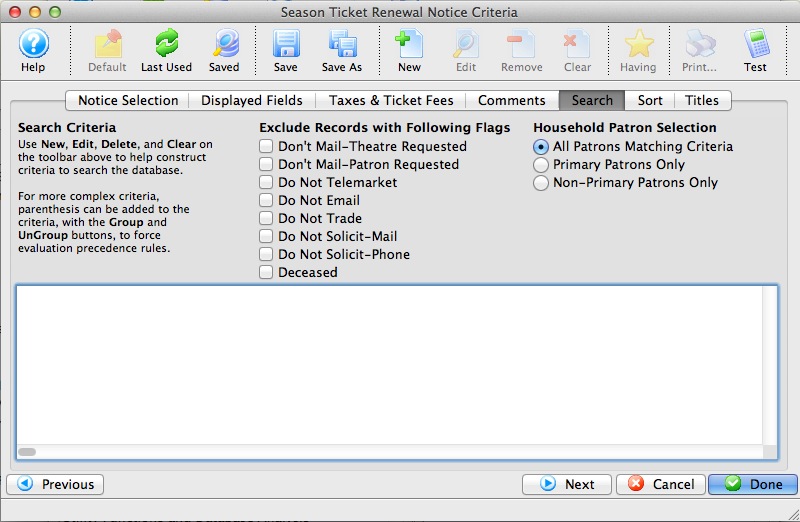
- Search parameters can be left blank to print notices for all patrons or you can specify criteria to print by performance, then advance to the sort tab
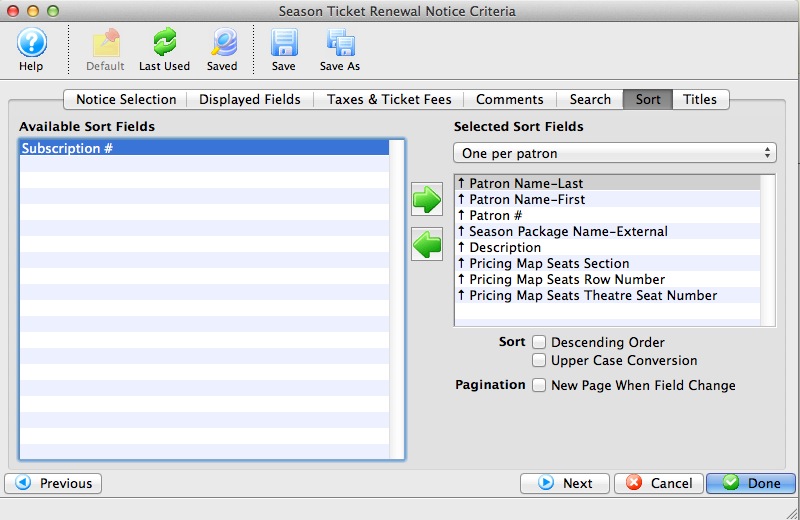
- Default sort is by patron last name. This cannot be altered. Advance to the Title Tab
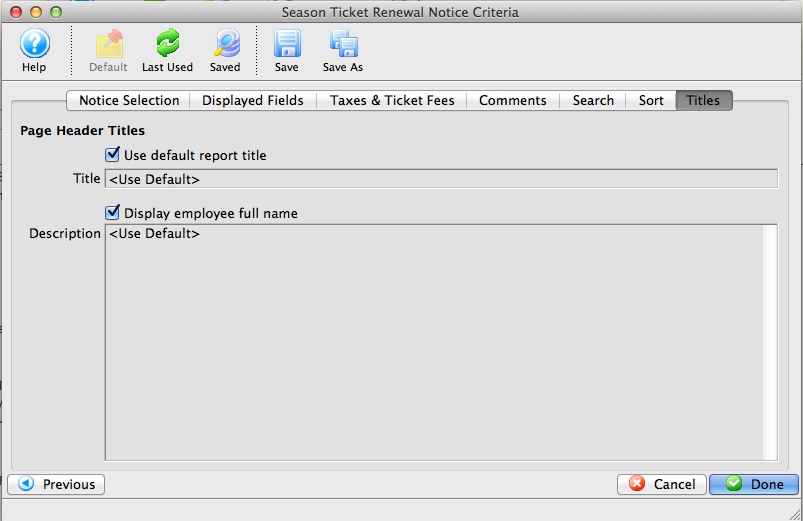
- Default window, there are no edits needed here. Click Done

- A Progress/Status window will appear, click proceed.
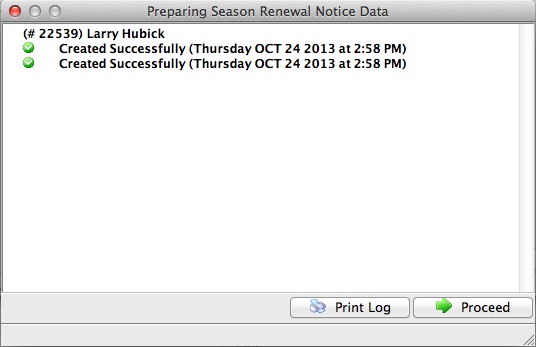
- The Renewal Notices will present on screen for Preview

- You can repeat this process as many times needed until the content is to your liking
- When ready to print, run through this process one more time and in Step 4 [ Display Fields ] change the Testing Options to Mark Notices As Printed. When notices come to screen for final time, send the notices to the printer. This step will then alter all patrons renewal status to Notice Printed.
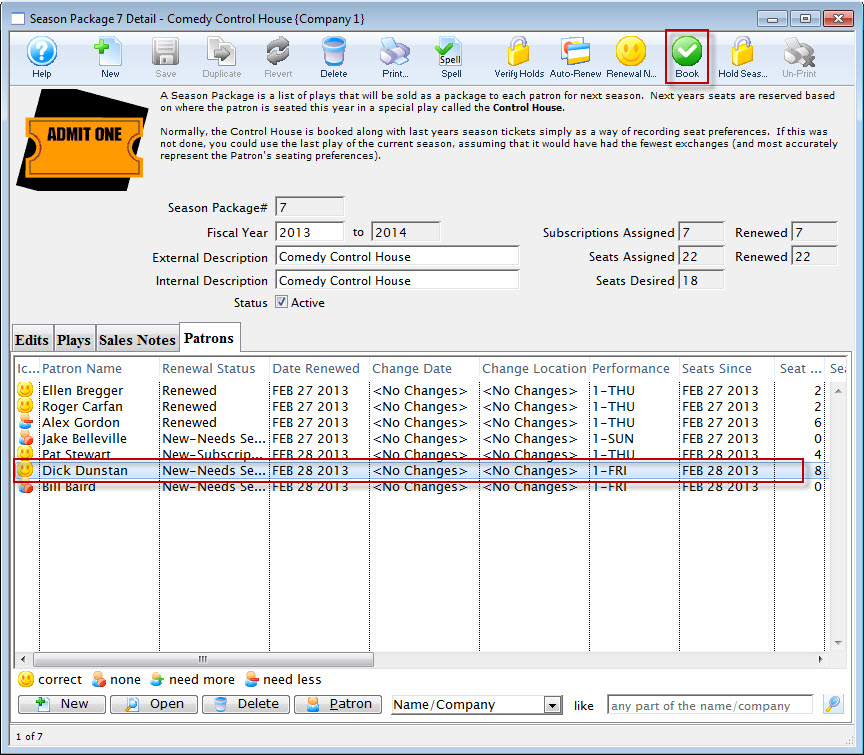
Step #8: Book Season Renewals
- Access the Patrons Record from the Contact list

- Select the Season tab to access the season package
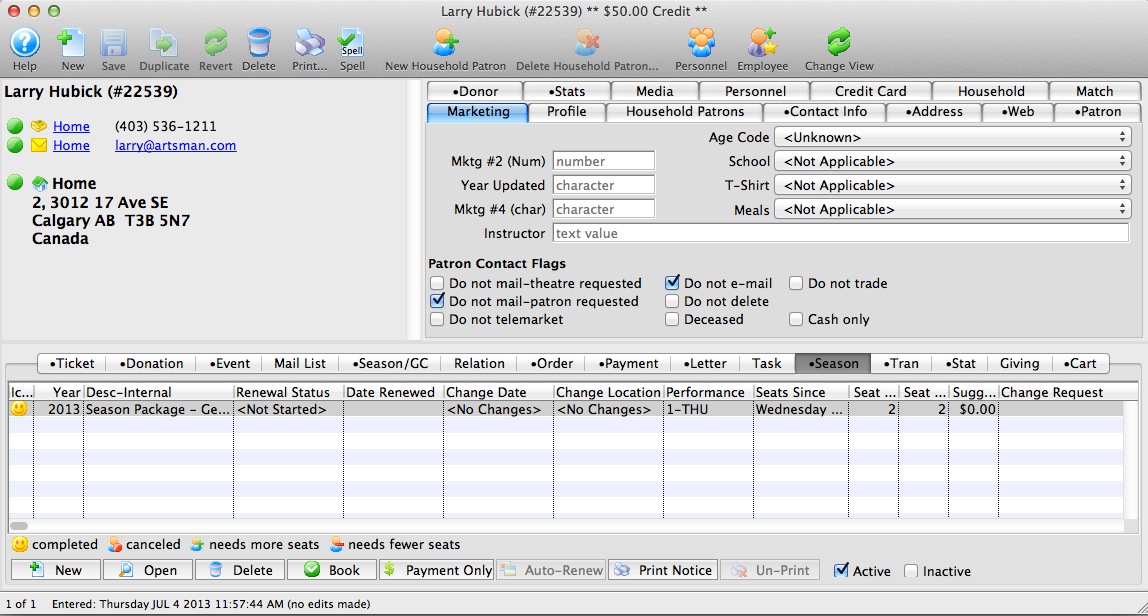
- Double click on the package to review the package for accuracy
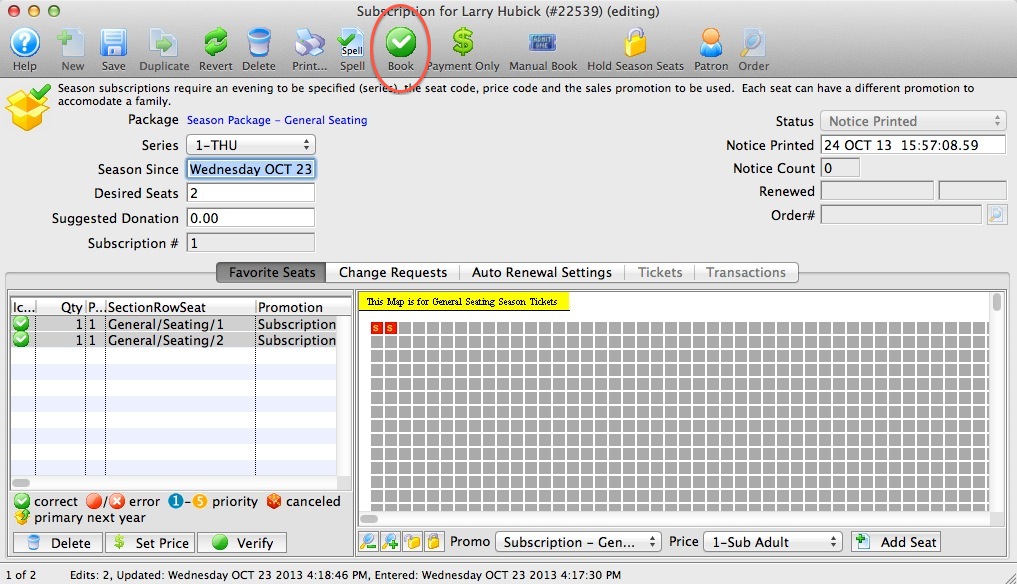
- Click the Book button

- The payment window will appear to make payment for the season tickets. The season package for this patron is now RENEWED
Creating a New Season Package Using an Existing Event
When you make the decision to use Theatre Manager for Season Subscriptions, you may already have a past event showing where a patrons’ favorite seating is located. This Event can be used as a base to create the Season Subscription for the coming year.
To complete the setup of a Season Package from an existing Event you will require three things:
- An event where season ticket purchasers have been booked into their favorite seats using the price and promotion code they will pay for the season.
- An empty Control House in preparation for next Season. For more information on setting up a Control House click here.
- The Events for the coming season to be setup in Theatre Manager. For more information on building new Events click here.
To create a New Season Package using an Existing Event as a Control House, you perform the following steps:
- Click Patron Sales >> Season Reservations >> Setup Season Packages.
The Season Package List window opens.
For more information on the Season Package List window, click here.
- Click on the New button at the top of the page. The Season Package Detail window opens.
For more information on the Season Package Detail window, click here.
- Enter Fiscal Year, External Description and Internal Description for the season package.
The Fiscal Year To field will update when the Fiscal Year is altered. The External Description can be displayed in the online ticketing module, ticket faces and in the renewal notices.
- This Year field, enter the Event number for the Event containing the Patron Favorite Seats in the This Year field.
The Event selected for This Year field should be a past event - where season subscription patrons have already purchased tickets and the tickets were booked using a Season Sale Promotion. This Event should be set under the Performance tab as a Season Control Performance. This setting is required to use the Event for Control House purposes. The Event can not be available for sale online and be indicated as a Season Control Performance. The Event Lookup
icon can be used to locate the past Event. - Click the Save button.
- Click the Verify Holds
 button at the top of the window.
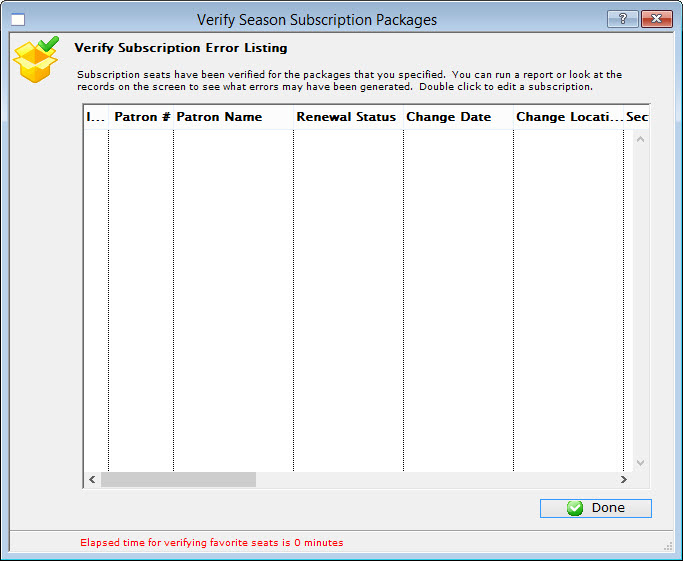
The Verify Season Subscription Packages window opens.
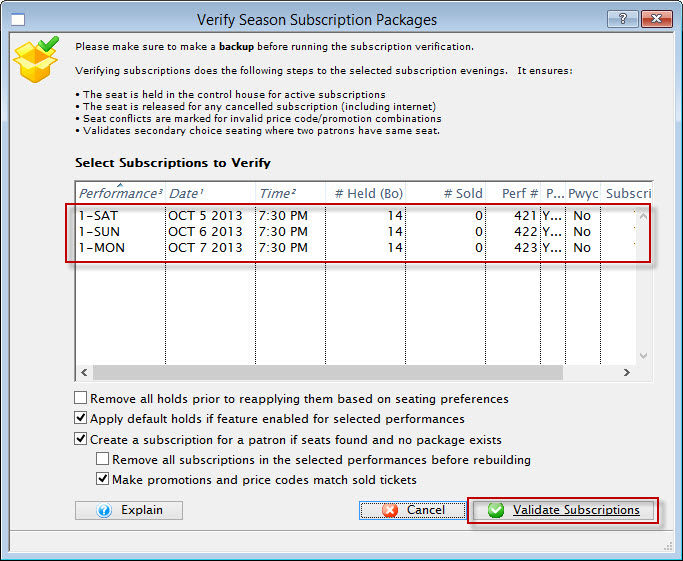
- Highlight all listed Performances.
- Click the Validate Subscription
 button and let the process run.
- Click the Done button window.
- Close and open the Season Package Detail window to refresh the displayed information. The Subscription Totals will be populated with the information for the Event listed in the This Year field.

- Close the Season Package Detail window.
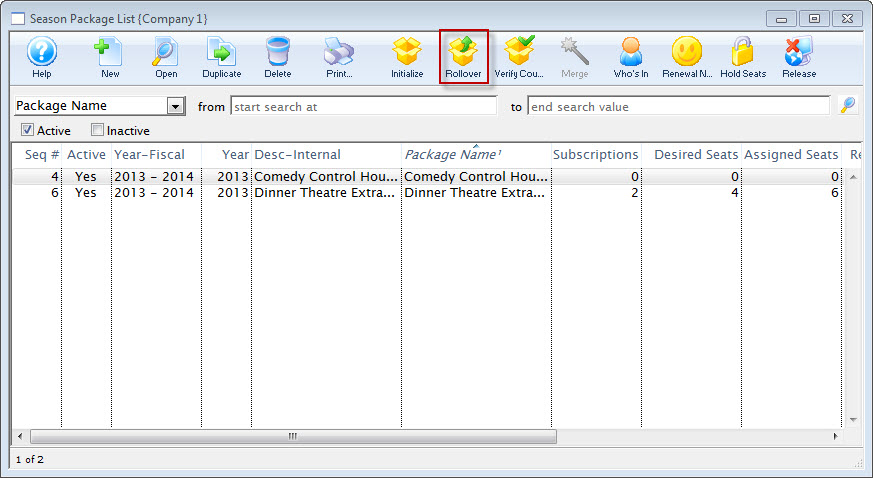
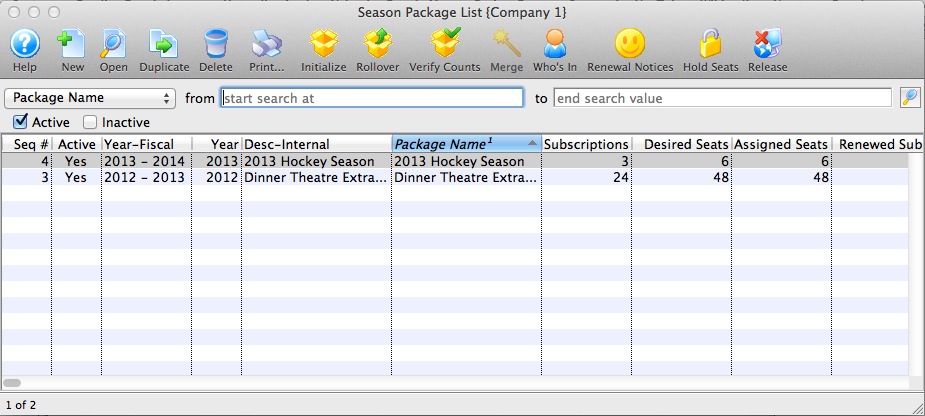
- Single click on the Season Package you created to select it in the Season Package List window.
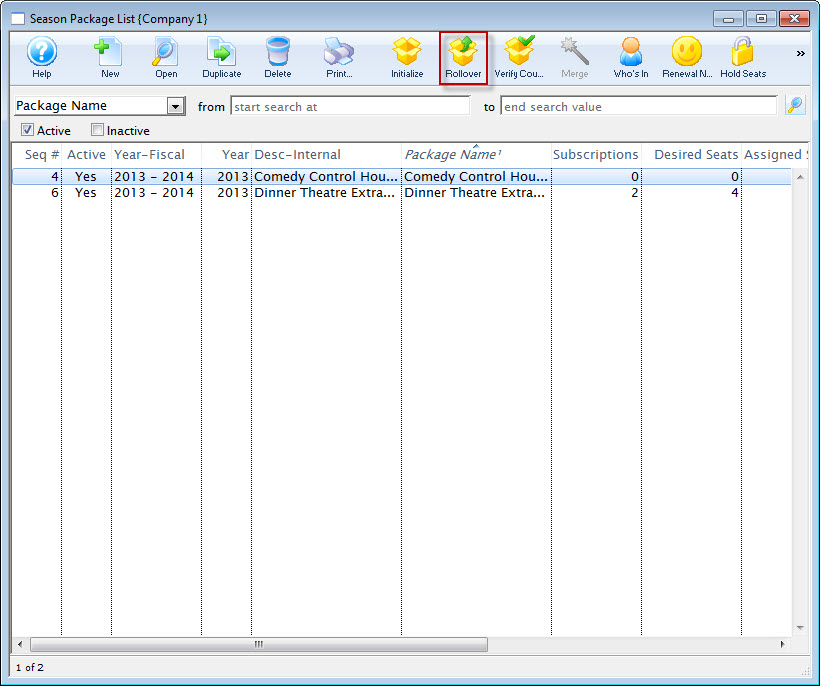
- Click the Roll Over
 button at the top of the window.
The Season Package Rollover window opens.
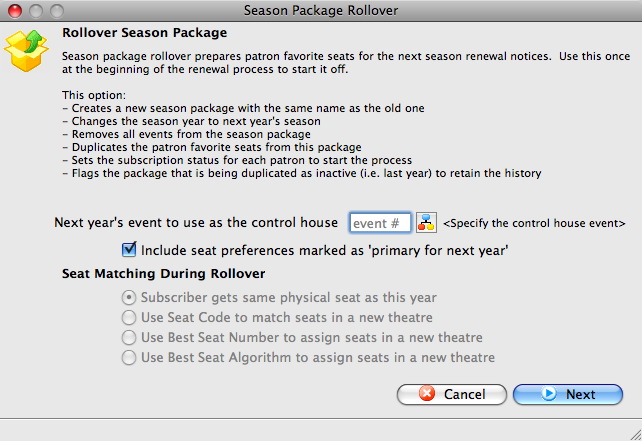
- Enter the Control House for next year in the Next Year's Event To Use As A Control House field.
Create the Control House before the season package is rolled over. Use the Event Lookup icon to locate the Control House. The Control House can not be an event from the previous year. It must be an event specific to the season package.
For more information on building a Control House click here.
- Click the Next
 button in the lower right corner.
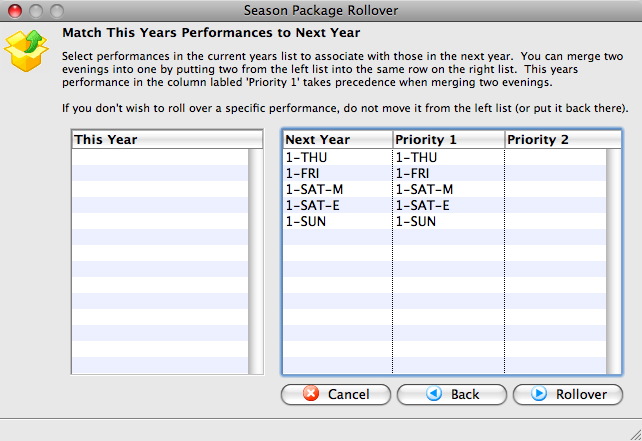
- Match the Performance Codes in the This Year column with those in the Next Year Column.
Drag the Performance Codes from the This Year column into the Priority 1 or Priority2 column. This tells Theatre Manager which performances from the prior season, patrons should be assign to. Use the Priority 2 column when the number of performances from the prior year is greater then the coming year. Theatre Manager will seat subscribers in the Priority 1 column first. Then it will seat subscribers from the performance in the Priority 2 column. If seats are not available for the patron from the Priority 2 column, they will be placed on the wait list.
- Click the Rollover
 button in the lower right corner of the window.
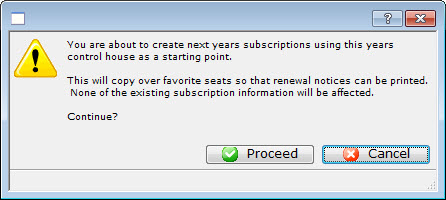
The Rollover Confirmation window opens.
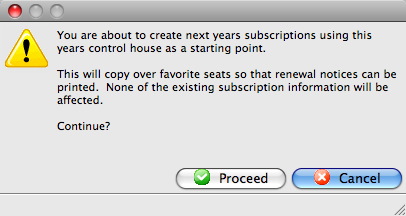
- Click the Proceed
 button and let the process run.
This process can take some time, depending on the number of patrons in the season package.
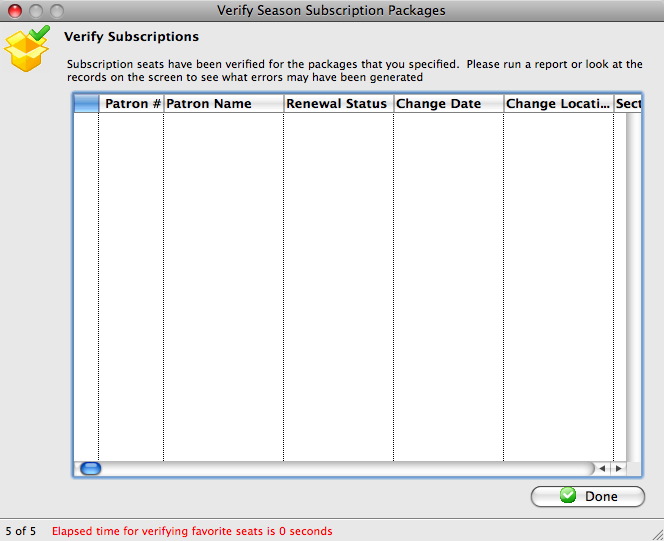
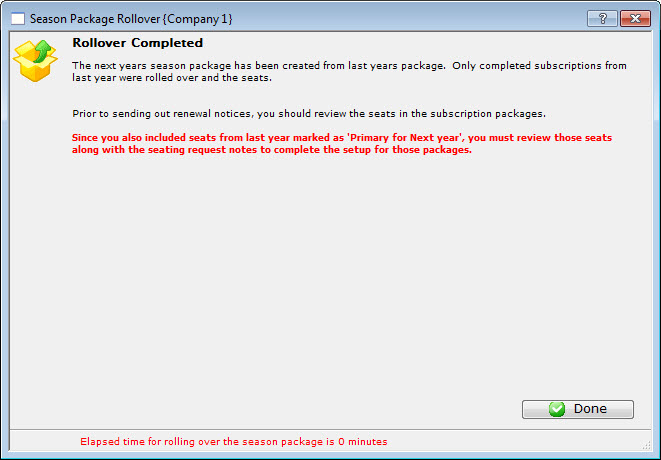
When complete, the Rollover Completed window opens.
- Click the Done button.
- Double click on the Season Package to open it.
Edit the External and Internal Description fields to accurately reflect the name of the Season Package.
- Check off the desired Sales Settings options depending on where the season can be sold and renewed.
It is not recommended the season be available on the web until all setup has been confirmed and the season package is tested for accuracy.
If required, check off the option to Print Performance Dates on Renewal Notices.
- Select the Events tab.
- Click the New button in the lower left corner.
The Event List window opens.
For more information on the Event Lookup List window, click here.
- Select the events to add to the Season Package.
To select multiple events, use the <SHIFT> key to select a series of events, or the <CTRL> key (Windows) or the <OPTION> key (Mac) to select multiple individual events.
- Click the Select
 button in the lower right corner.
- Select on the Sales Notes tab.
Enter detailed notes for the season package.
- Click the Save
 button.
The Events for the coming season will populate into the Events tab.
The Season package can now be used for the coming season. Patrons can be added to the season package, seats assigned and subscriptions renewed.
Season Roll Over
|
Only the following subscription statuses can be rolled over (even if never sold):
|
To Roll Over your Season, you perform the following steps:
- Look at last years subscription packages and verify that people have the correct subscription status and seat count. That means
- Look for patrons that are marked renewed that actually cancelled mid season - change the status to cancelled mid season.
- Find people who have subscription seats, but have no package (you could use a mail list to find them). This means someone did not set up the favourite seats during the sale and the season's events were booked manually. If they should be a subscriber, create their favourite seats and mark their package New-Subscription completed
- Look for subscriptions where the number of seats do not match the requested count (the icons are different on the manage favourite seats window), and see if they should be subscribers by adding or taking away seats and marking them completed.
- The key is that any subscriptions that are in new or renewed status will be rolled over. Any that are:
, - Notice printed, or
- Cancelled
- Click Patron Sales -> Season Reservations-> Setup Season Packages.
The Season Package List window opens.
For more information on the Season Package List window, click here.
- Single click on last year's season package to select it.
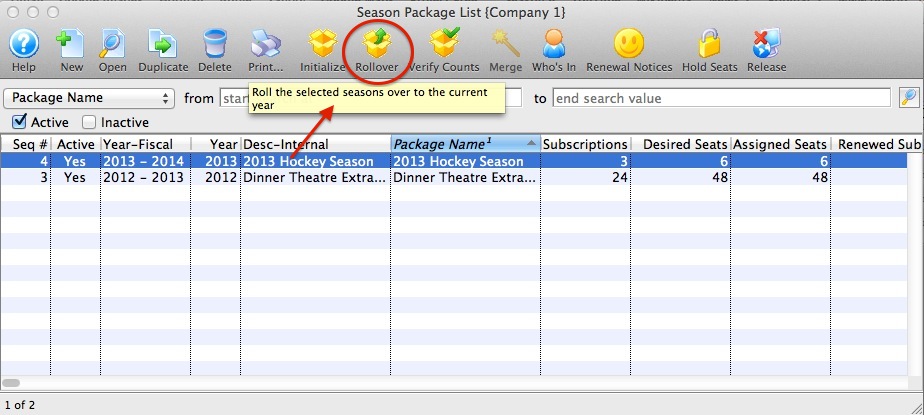
- Click the Rollover
 button.
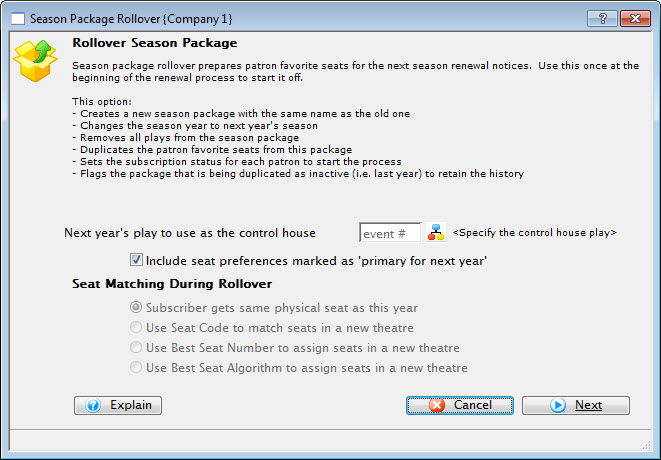
The Season Package Rollover window opens.
For more information on the Seat Matching During Rollover options click here.
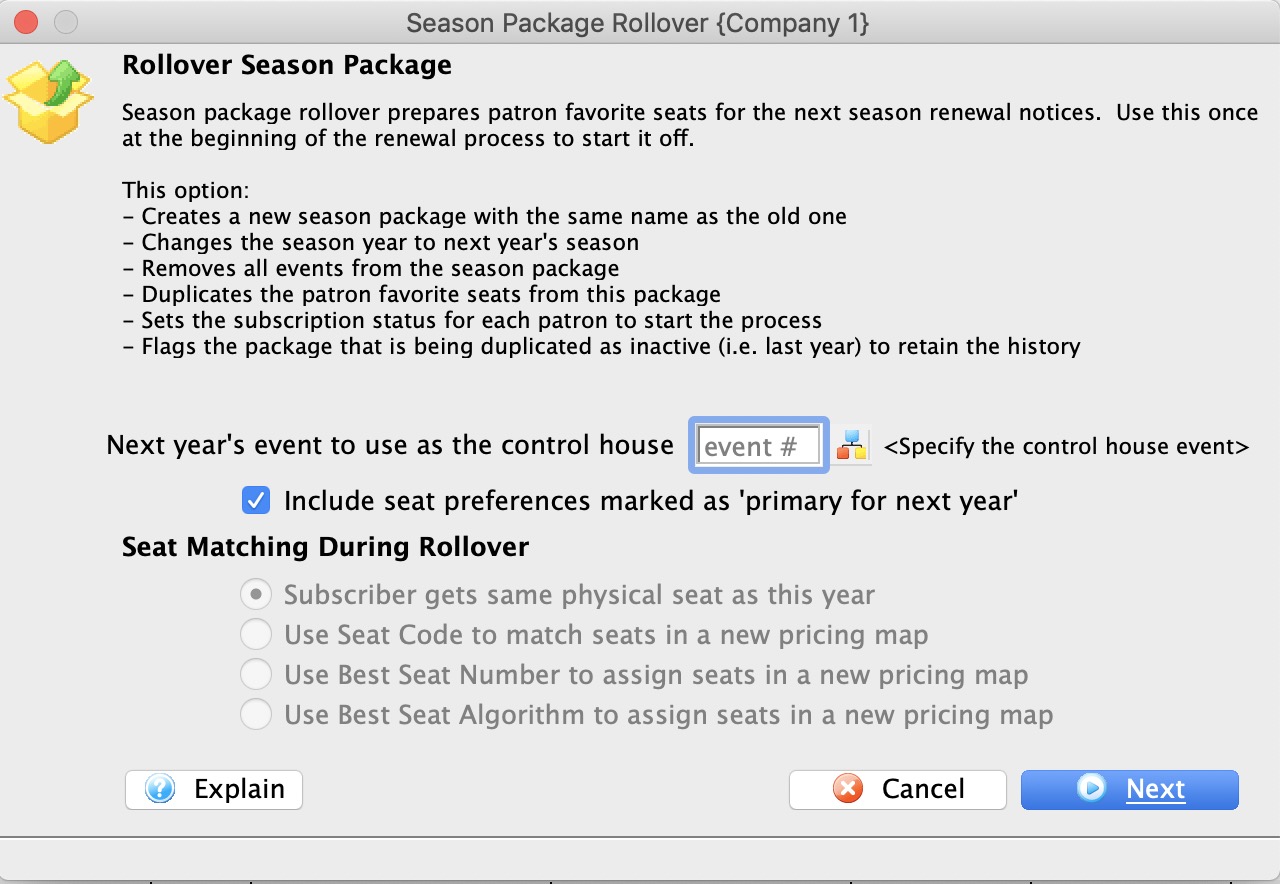
- Enter the Control House number in the Next Year's Event to Use as the Control House field.

The Control House needs to be created before the season package can be rolled over. The Event Lookup
icon can be used to locate the Control House. The Control House can not be an
event from the previous year. It must be an event specific to the season package. If necessary, Check off the Include Seat Preferences Marked As Primary For Next Year box.
- Choose the desired Seat Matching During Rollover.
The vailable options will be based on the map used in last years control house compared with this years control house.
- Click the Next
 button.
The Season Package Rollover Match window opens.
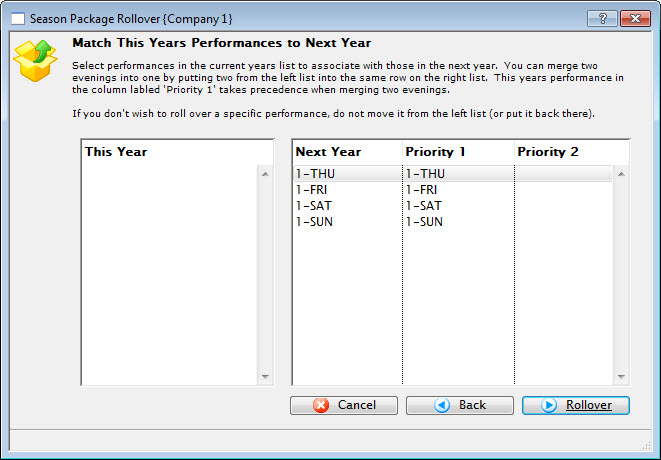
This window is designed to match Performance Series Codes for individual performances. It's possible the codes used last year may be different from the coming season. If so they opens in the column on the left.
Additionally a performance from last year may no longer be taking place this year. This may require
- moving subscribers into a new Series for the coming season. In this case, the old series code will be matched with a different series code that corresponds to the same night. Example: if your last year series codes A, B and C and they now match to 1-FRI, 1-SAT and 1-SUN, then the mappings for 'Next Year' and 'Priority 1' columns will be:
- 1-FRI will be filled with people from 'A'
- 1-SAT will be filled with people from 'B'
- 1-SUN will be filled with people from 'C'
-or-
- combining two of last years series into one performance in the coming year. The Performance Series Code that you are cancelling can be placed in the Priority 2 column and the subscriptions managed after the rollover to accommodate patrons with no seating. For example, suppose you are combining 2-FRI and 3-FRI into a single performance called X-FRI, then the columns will be:
- Next year will be called 'X-FRI'
- Priority 1 will be 2-FRI. These people will be guaranteed to get their seats in X-FRI
- Priority 2 will be 3-FRI. These people will be given seats in X-FRI if they are not taken. If they are taken already by a 2-FRI subscriber, they will not be assigned seats
- moving subscribers into a new Series for the coming season. In this case, the old series code will be matched with a different series code that corresponds to the same night. Example: if your last year series codes A, B and C and they now match to 1-FRI, 1-SAT and 1-SUN, then the mappings for 'Next Year' and 'Priority 1' columns will be:
- Drag the Performance Codes from the This Year column and drop them in the Priority 1 or Priority 2 column.
- Click the Rollover
 button.
The Rollover Confirmation dialog opens.
- Click the Proceed
 button.
The Season Package Rollover status window opens.
This window can take several minutes. This process should not be interrupted.
The Season Package Rollover Completed window opens.
- Click the Done button.
The Rollover process is now complete. The season year has been updated. Next Year's Events can now be added to the Season Package and the Sales Settings can be set.
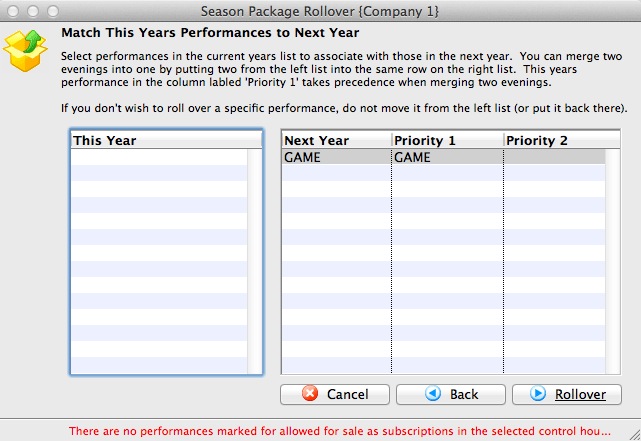
Season Roll Over for Hockey Playoffs
The Season Rollover process can be used manage season ticket holders seats for sporting events which can run over into a playoff series. The process takes the favorite seats held by the present season ticket holder and prepares them to be booked into the same seating locations for the playoff series.
|
This process assumes you currently use the Season Subscription Module for your Regular Season Tickets and that you have created your play off games and a corresponding control house as well. |
- Click Patron Sales >> Season Reservations >> Setup Season Packages.
The Season Package List window opens.
For more information on the Season Package List window, click here.
- Single click on the Regular Hockey Season Package to select it.
- Click the Rollover button.
The Season Package Rollover window opens.

For more information on the Seat Matching During Rollover options click here.
- Enter the Control House number of the Playoff Control House in the Next Year's Plays to Use as the Control House field.
Click the Next
button. The Control House needs to be created before the playoff season package can be rolled over. The Event Lookup
icon can be used to locate the Control House. The Control House can not be an
event from the previous year. It must be an event specific to the season package. This window is designed to match Performance Series Codes for individual performances. Typically for sporting events the Performance series code is edited to be GAME.
- Click the Rollover button.
The Rollover Confirmation dialog opens.
- Click the Proceed
button.
The Season Package Rollover status window opens.
This window can take several minutes. This process should not be interrupted.
The Season Package Rollover Completed window opens.
- Click the Done button.
Strategies for Playoff Packages
Playoff Games for sporting events can often consist of several round as the team advances. The following will outline methods for Playoff Packages.
For a Playoff series lets consider your team will play four rounds of two home games each ( eight games in all ).
Option #1: One Package ( All Inclusive )
For this options you will have creates all the playoff games and one control house game. You will roll over the regular season package once and add all games in one package. Patrons will be booked and will pay for all eight games of the playoff series.
Option #2: One Package for each Round ( Two Games Each )
For this option you will have created all the playoff games and FOUR control house games, one control house for each round. You will roll over the regular season package four time and add two of the eight games to the package. Patrons can then book to the next round as they wish and as the team advances.
Option #3: One Package for each Playoff Game
For this option you will have created all the playoff games and ONE control house games for each playoff game ( eight control houses ). You will roll over the regular season package eight times and add one of the eight games to the package. Patrons can book "al la carte" for each play off of their choosing yet preserving their favourite seats.
|
Which ever option is chosen you will use the Regular Season Subscription Package as the benchmark, roll it over for the subsequent playoff packages. This will mark the package inactive but you can reactive it to use again. |
Seat Matching During Rollover
You can easily roll subscriptions over to another year. Just indicate the new control house and proceed. Normally, your theatre map for each year will be the same, but sometimes you reconfigure your house or use a different venue. Theatre Manager can handle both situations.
If the venue of the control house is the same from year to year, you can only pick the option 'Subscribers get same Physical Seat as this year”.
If you are using a different venue or map layout, Theatre Manager does not know how to allocate seats and will give you 3 options. These are:
- Use Seat Codes to Match Seats in a new theatre. Theatre Manager will look at the seat code for the current subscription and go look for the same seat code in a new map.
If your venue is the same venue for all intents (the same number of seats, or a couple added) and you are just changing the price code boundaries, this is the best option. It would also work well, when the venues are completely different and you took some care in setting up the new venue to match the seat codes in both venues. This approach means -- if I was sitting in Seat code AA01 in venue 1, it could be mapped to the same seat code AA01 in the completely different venue.
- Use Best Seat Number to assign seats. Theatre Manager will reassign seats in the new venue using best seat number. If I have the 10th best seat in venue 1, I will get the 10th best seat in venue 2. This re-assignment will work well, unless the section sizes mean the seats will cross aisle boundaries. For example, seats 10 and 11 are together in venue 1 and they are across aisles or in different rows in venue 2, you will have some manual reseating. This option works in some instances, but not for all situations.
- Use Best Seat Algorithm is a variation of the second option. The difference is --if I have best seats 10 and 11 in venue 1, Theatre Manager will process my subscription near the head of the queue. If that makes me the 4th subscriber in line for tickets (e.g. all others in best seats 1 to 9 have 2 or 3 tickets). Theatre Manager will process my subscription rollover 4th. It will use the best seat algorithm to find the best seating available. It might mean that I get sat further forward or further back so that more seats are filled. Using this option, you will find your subscribers tend to get moved together and their relative position changes a little.
Selling Season Subscriptions
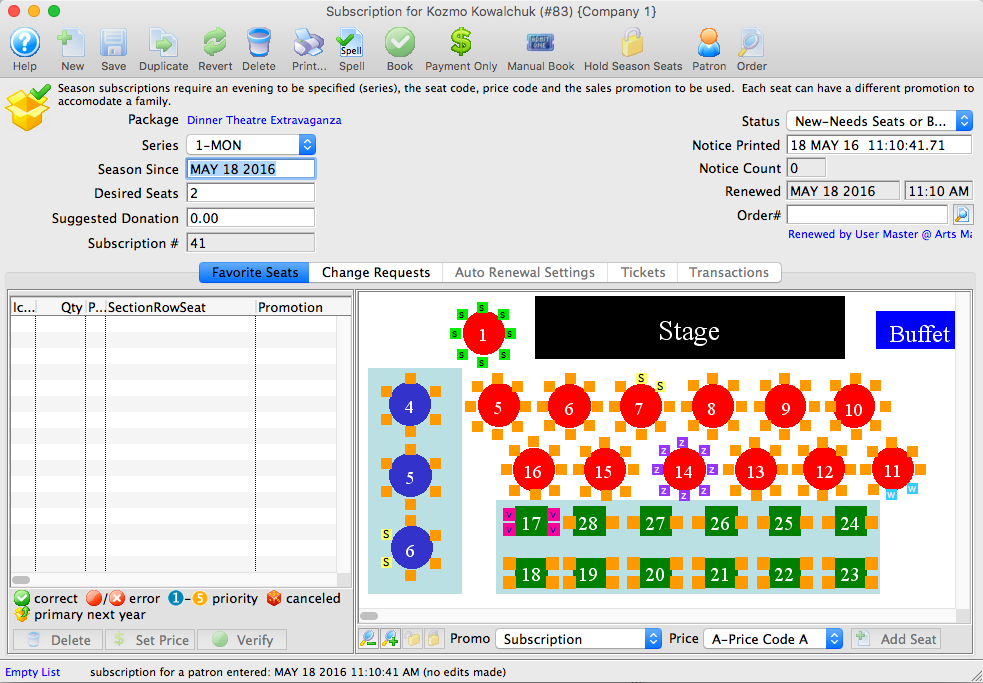
Favorite Seats Window
A season subscription is a ticket package which allows you to lock in the same seats and performance nights for each show in venue's season. Patrons can attend performances on on the same night and in the same seats.
Below are the options in selling a Season Subscription in the Favorite Seats window.
Adding Patrons to a Season Package
Patrons can be added directly to a season package through the Manage Favorite Seats window. This gives you the ability to manage patrons within the season package, on mass, or individually.
To add patrons to a season subscription Package using the Manage Favorite Seats window, you perform the following steps:
- Click the Subscription button in the main Theatre Manager toolbar / ribbon bar.
The Manage Favorite Seats window opens.
For more information on the Manage Favorite Seats window click here.
- Click the Add button in the lower left corner.
The Contact List opens.
For more information on the Contact List click here.
- Search for the patron to be added to the season.
Single click on a patron to select their record. To select multiple patrons, use the <SHIFT> key, or the <CTRL> key (Windows) or the <OPTION> key (Mac) to select multiple individuals.
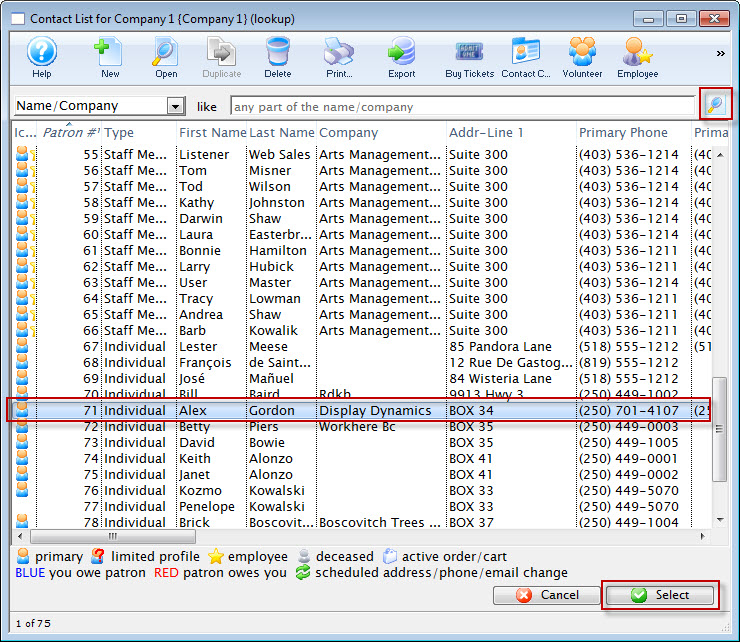
- Click the Select button.
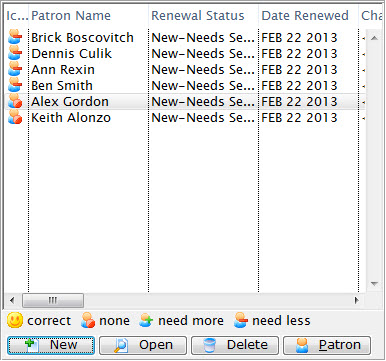
The patrons are added to the Patron List in the lower left corner of the Manage Favorite Seats window.

For more information on the Patron List area click here.
The Patrons are now added to the Season Package. Patrons can also be added from a Mail List by dragging and dropping the selected names into the Patron List area of the Manage Favorite Seats window. Once added to the season package the patrons are ready to be issued favorite seats.
Adding Favorite Seats in the Manage Favorite Seats Window
Each patron is assigned Favorite Seats in the season package. These seats determine where Theatre Manager will book the patron in the season, as well as, which performance and pricing structure will be used for the seats booked. For a patron's Favorite Seats to be selected, they must first be a part of the season package. For information on subscribing a patron to a Season Package, click here.
To selecting a patron's favorite seats in the Manage Favorite Seats window, you perform the following steps:
- Click the Subscription button in the main Theatre Manager toolbar / ribbon bar.
The Manage Favorite Seats window opens.
For more information on the Manage Favorite Seats window click here.
- Choose the required Season Package and Performance.
For more information on the Package and Performance list area click here.
- Single click the patron to add favorite seats for from the Patron List area.
For more information on the Patron List area click here.
- Highlight the desired seats for the Subscription.
Seats can be selected by using the mouse to drag a box over the preferred seats, or by holding the <SHIFT> key and clicking each seat.
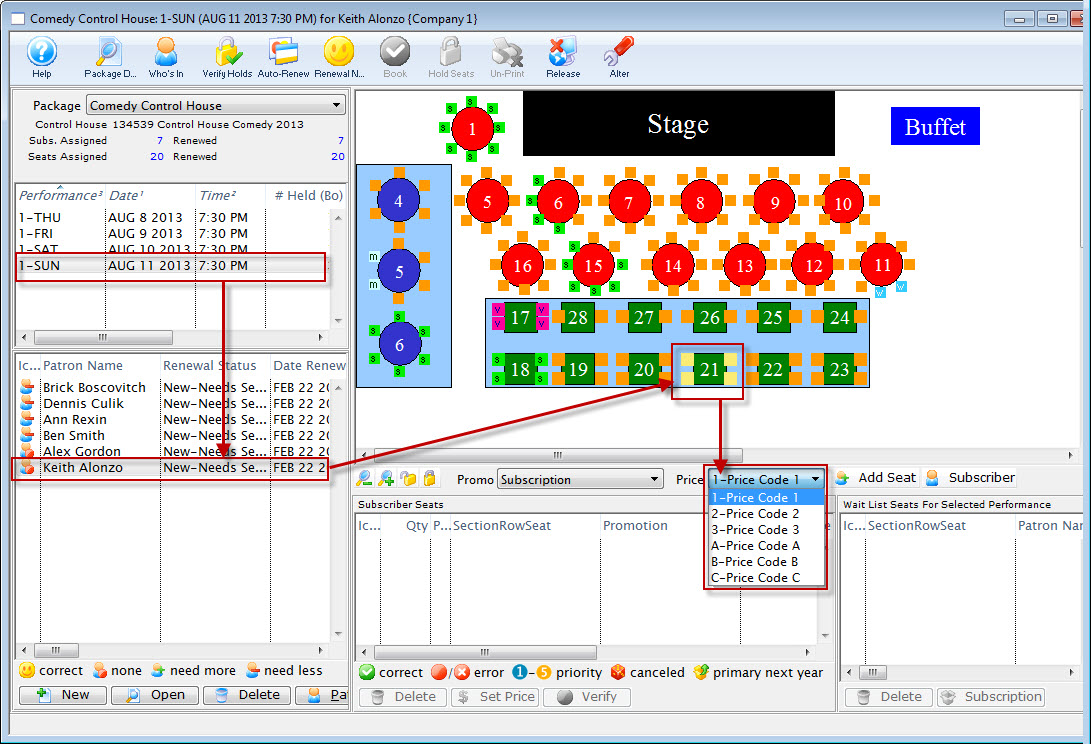
- Select the correct Promotion and Price Code for the subscription located under the map.
- Click the Add Seat
 button.
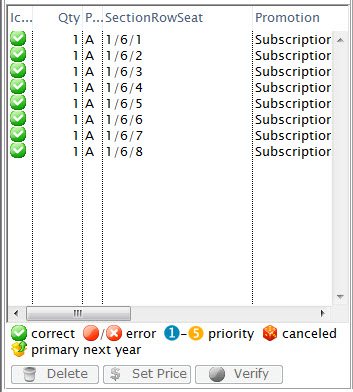
The seats are added to the Seat Selection area of the Patron Subscription Detail window.
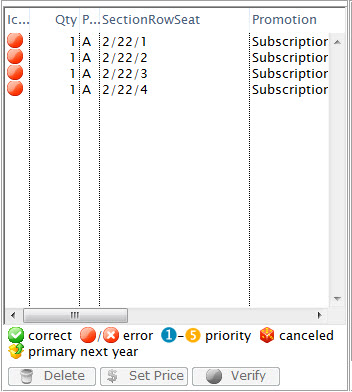
For more information on the Seat List area click here.
The patron now has their favorite seats set up in the control house. The seats can be seen at the bottom of the Manage Favorite Seats window. The seats are also indicated on the map represented by a lower case s. As seats are booked they appear on the map. The patron is now ready to book their season subscription.
Using Manage Favorite Seats to Book Subscriptions
- Click Subscription button in the main Theatre Manager toolbar / ribbon bar.
The Manage Favorite Seats window opens.
For more information on the Manage Favorite Seats window click here.
- Select the season from the Season Package drop down in the upper left corner of the Manage Favorite Seats window.
- Choose the performance from the Performance List.
This is found to the left of the Manage Favorite Seats window.
For more information on the Season Package and Performance list area click here.
- In the Patron list, find the patron you want to manage the seats for.
The list is found in the lower left corner of the Manage Favorite Seats window.
For more information on the Patron List area click here.
- Select the patron by single clicking on their name.
- Then, click the Book
 button at the top of the window.
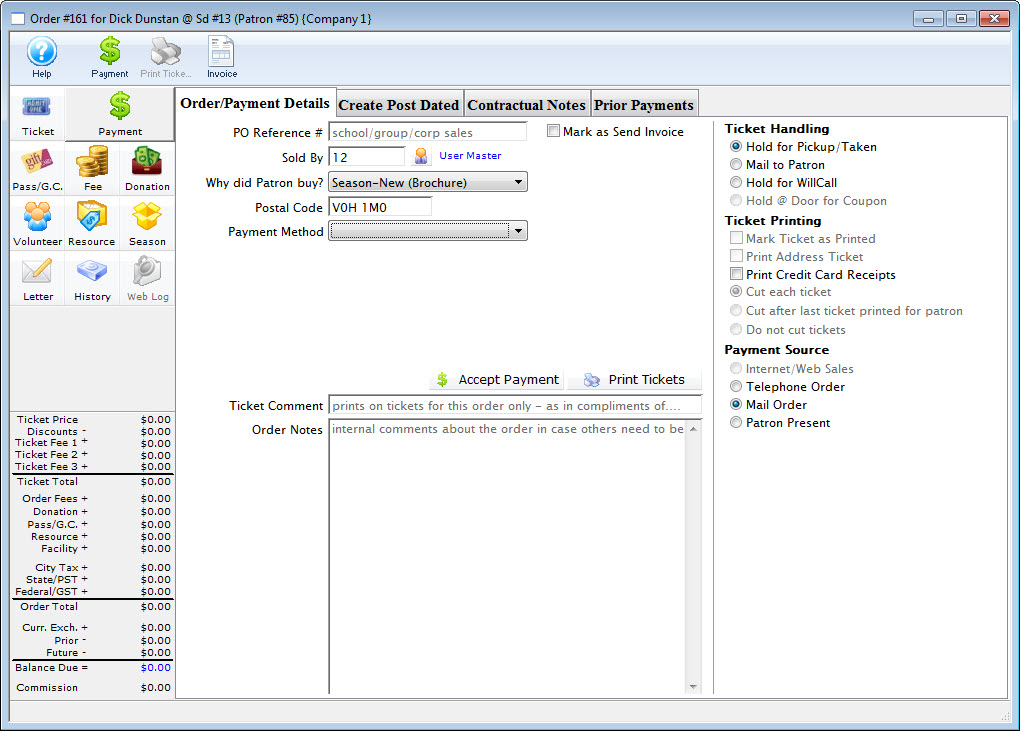
The Order opens to the Payment window.
- Choose the type of payment from the Payment Method drop down list and enter the payment details and accept the payment.
If the tickets are to be printed immediately, select Print Tickets. If the tickets will be Batch Printed later, select the Accept Payment button.
- The payment window closes and the Manage Favorite Seats window opens.
The patron status, in the season package automatically updates.
For more information on the Payment window click here.
The patrons tickets have now been booked and the patrons Favorite Seats Detail window reflects the changes.
Wait Listing Seats for a Patron
When patrons want to select seats that have already been chosen by another patron, you will need to create a wait list for the seats. Then, when the original patron releases those seats, they are available to the next patron on the wait list.
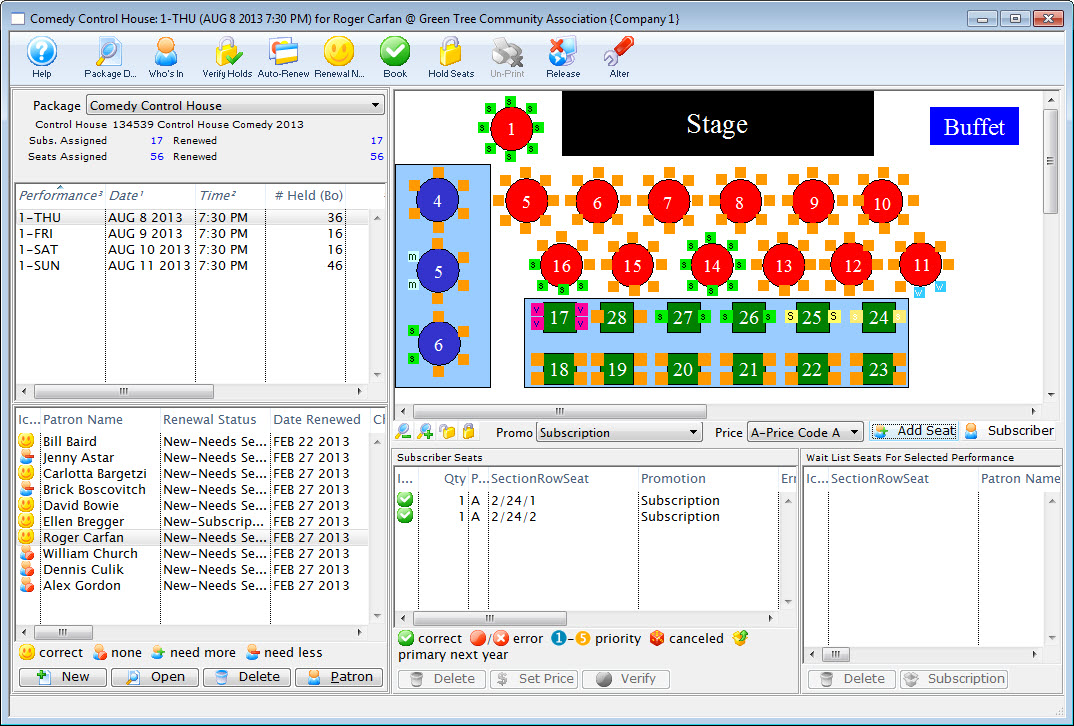
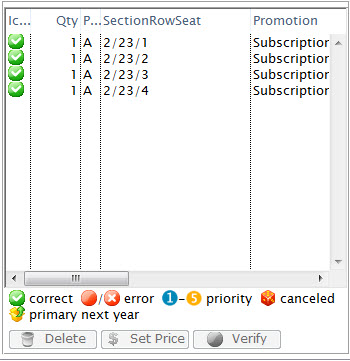
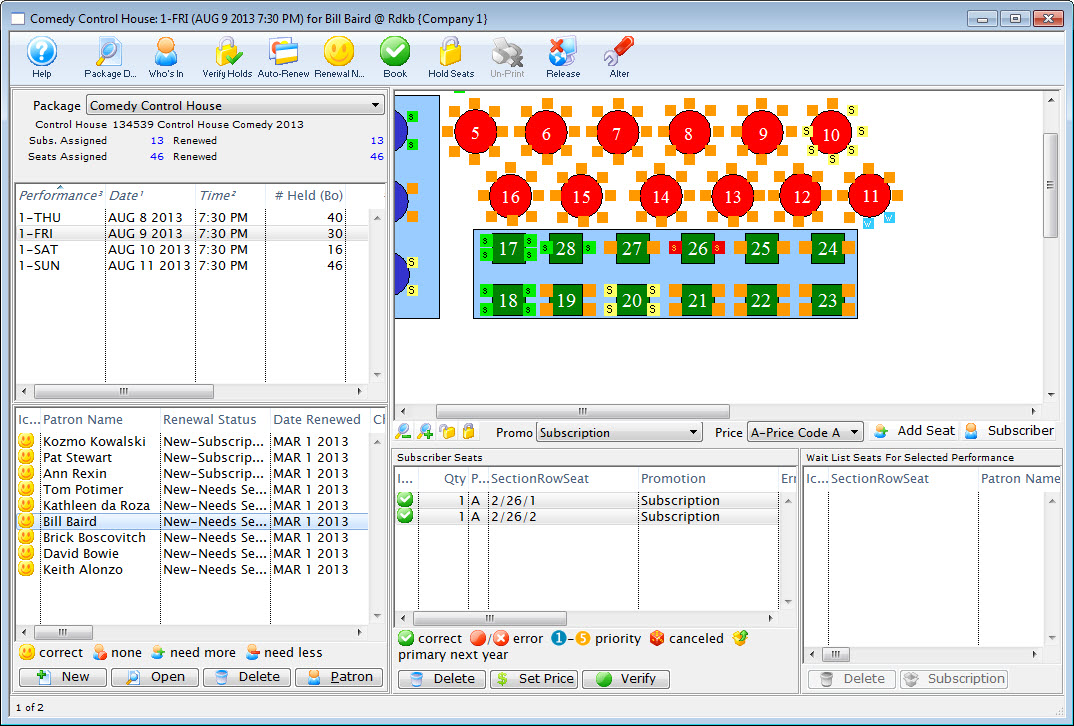
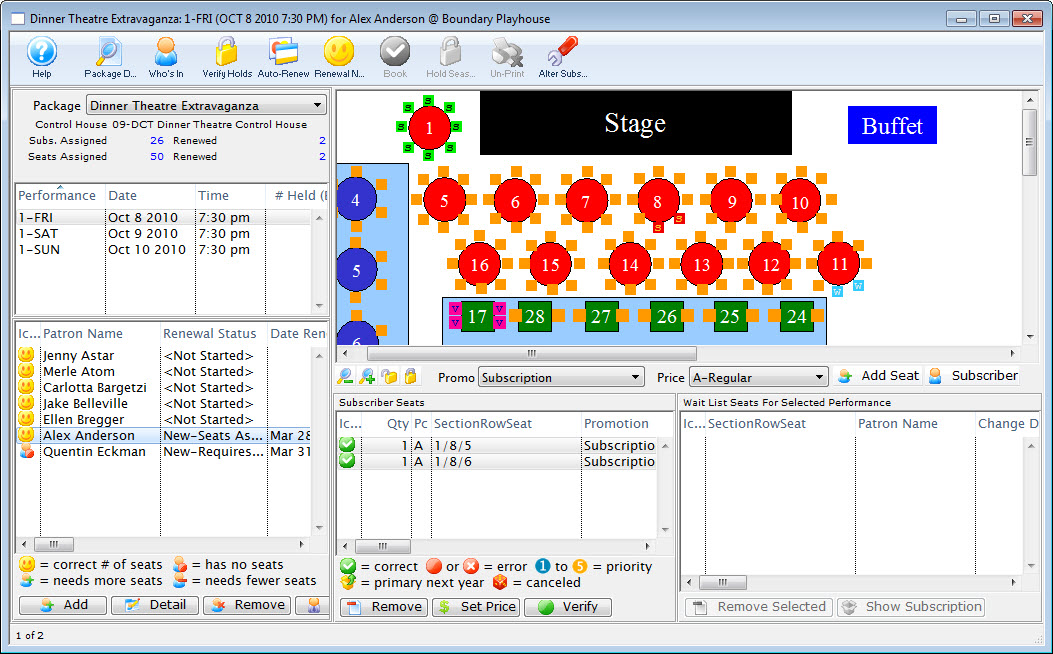
To start, here is a picture of the color coding on the graphic venue map when selecting a patron's Favorite Seats.

- Seats with a red background are those the currently selected patron has set as their Favorite Seats.
- Seats with a blue background are those another patron has selected as their Favorite Seats.
- Seats with a yellow background are those which are currently selected but not assigned to a patron yet.
To start, you perform the following steps:
- Click the Subscription button in the Main Theatre Manager toolbar / ribbon bar.
The Manage Favorite Seats window opens.
For more information on the Manage Favorite Seats window click here.
- In the upper left corner of the window, select the season from the Package drop down.
- Select the performance from the Performance List to the left of the Manage Favorite Seats window.
For more information on the Package and Performance list area click here.
- Find the patron in the Patron List
This is found in the lower left corner of the Manage Favorite Seats window.
For more information on the Patron List area click here.
- Single click on the patron, and choose the desired seats - currently being held by another patron.

- Click the Add Seat button.
The Wait List warning message opens.
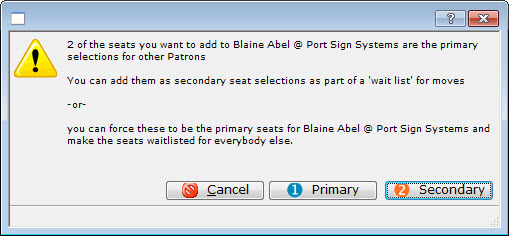
- Click the Secondary
 button.
The seats will be added to the Seat List area.
If the Primary
 button is selected, you will give the selected seats to the patron instead of being wait listed. The seats will be listed as Primary in their Season Package. The patron who previously held the seats will be moved down in priority and be added to the wait list.
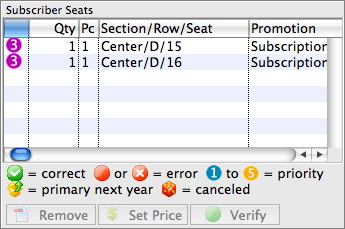
For more information on the Seat List area click here.
The patron is now on the Wait List for the desired seats. All patrons who are currently on the wait list can be seen in the Wail List area of the Manage Favorite Seats window located in the lower right corner. For more information on making a patron the primary on a set of seats, click here.
Selling Season Subscriptions From the Patron Record
Adding Patrons to a Season Package
You can add patrons to a season package in the Patron Window. Employee access can be altered to allow employees access to subscribing patrons to the season package specifically from the Patron Window.
To start, you perform the following steps:
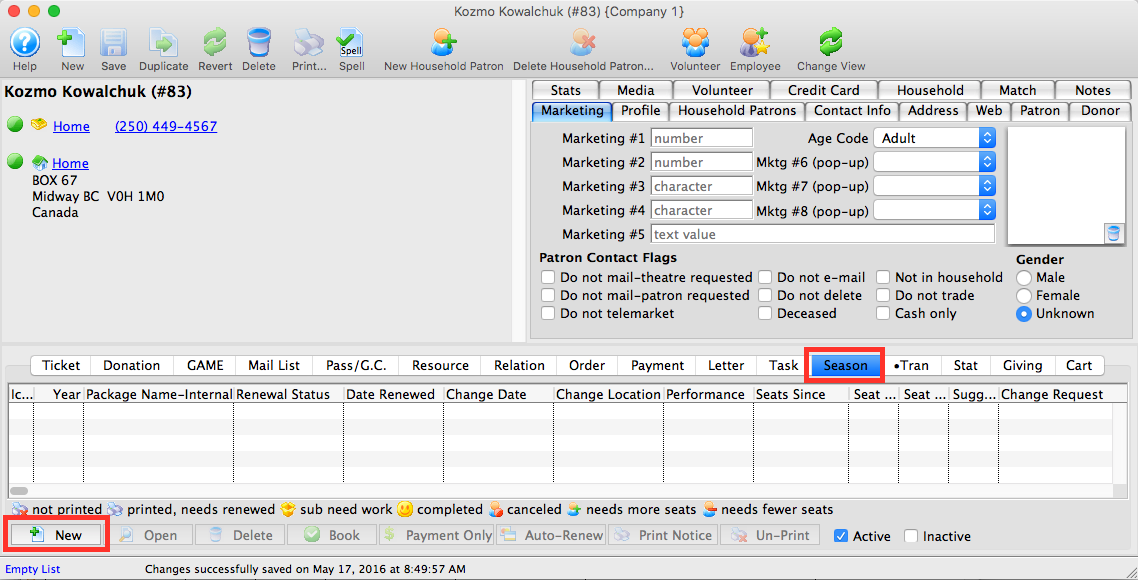
- Open the Patron Window.
For information on accessing the Patron Window click here.
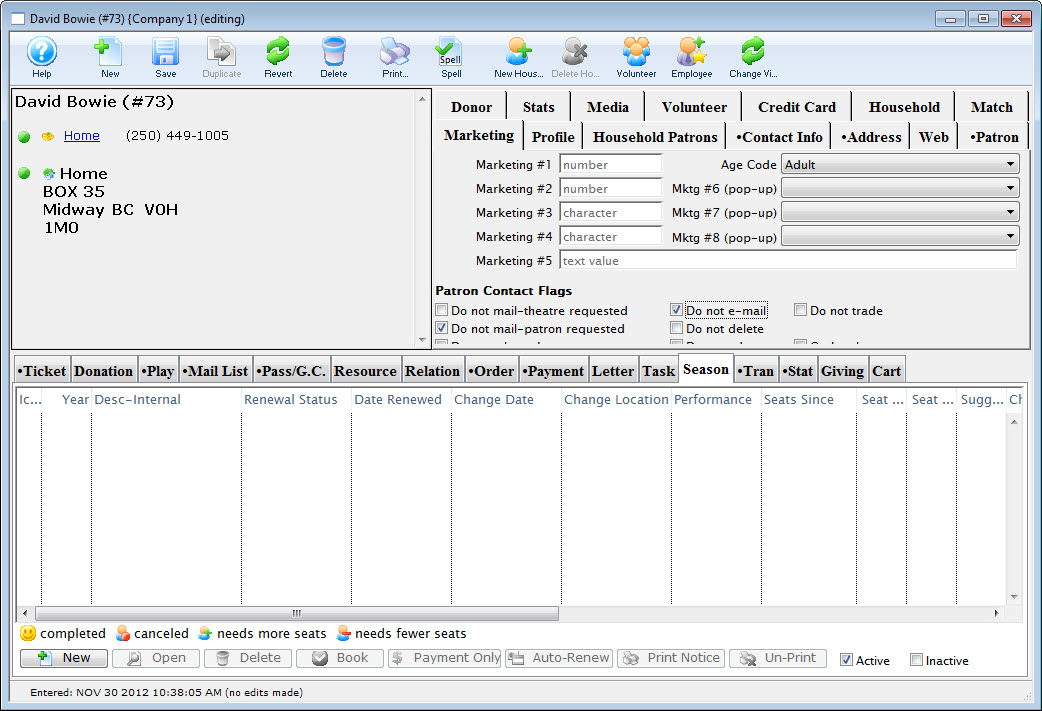
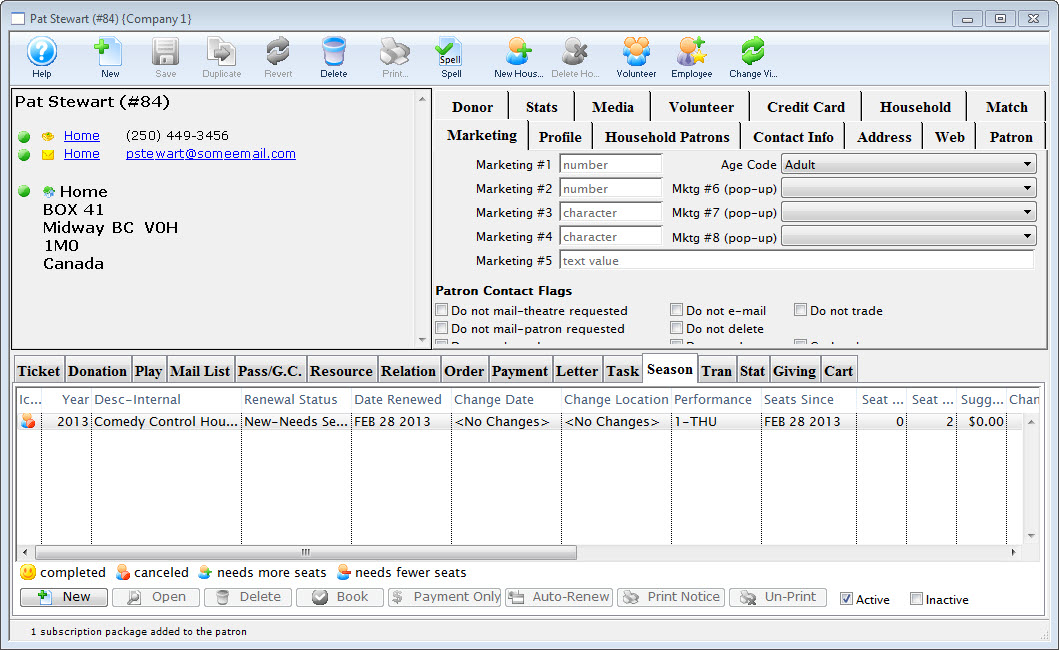
- Select the Season
 tab in the Patron Record.
 - Click the New button.
The Select A Season Package window opens.

The Select A Season Package window will not open if there is only one active season package.
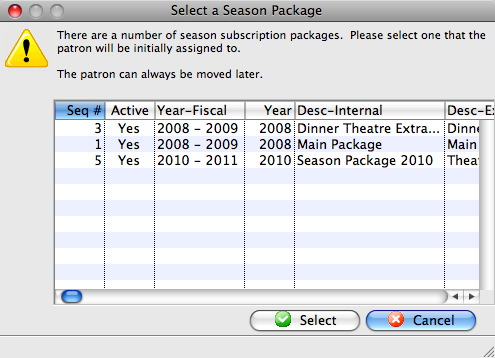
- Single click the desired Season Package and click the Select button.
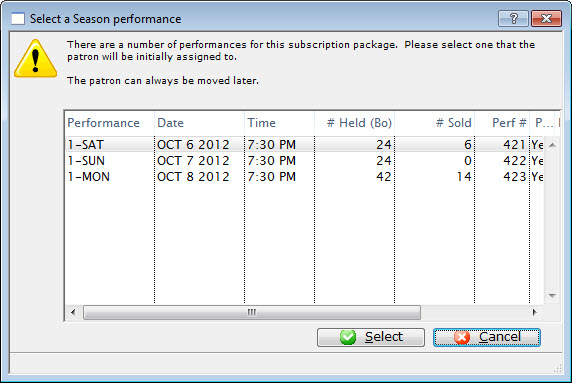
The Select A Season Performance window opens.
The Select A Season Performance window will not open if there is only one performance in the season package.
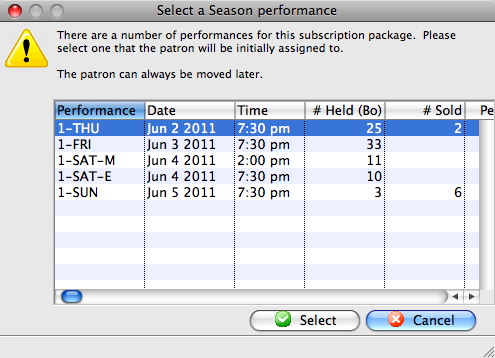
- Select the desired Performance and then click the Select button.
The Subscription Detail window opens.

For more information on the Subscription Detail window click here.
The Patron has been added to the Season Package. Once added to the season package the patron can be assigned favorite seats.
Adding Favorite Seats from the Patron Window
Once you have added a patron to a season package, the patron's favorite seats can be assigned. Favorite seats indicate the location the patron wishes to sit in, as well as the price and promotion, to be used for the season subscription.
To add favorite seats to a season package from the patron window, you perform the following steps:
- Open the Patron Window.
For more information on how to access the Patron Window click here.
- Select the Season tab in the Patron Record. Then select the season package to add the favorite seats to.
For more information on the Season tab click here.
- Click the Open
 button.
The Subscription Detail window opens.
For more information on the Subscription Detail window click here.
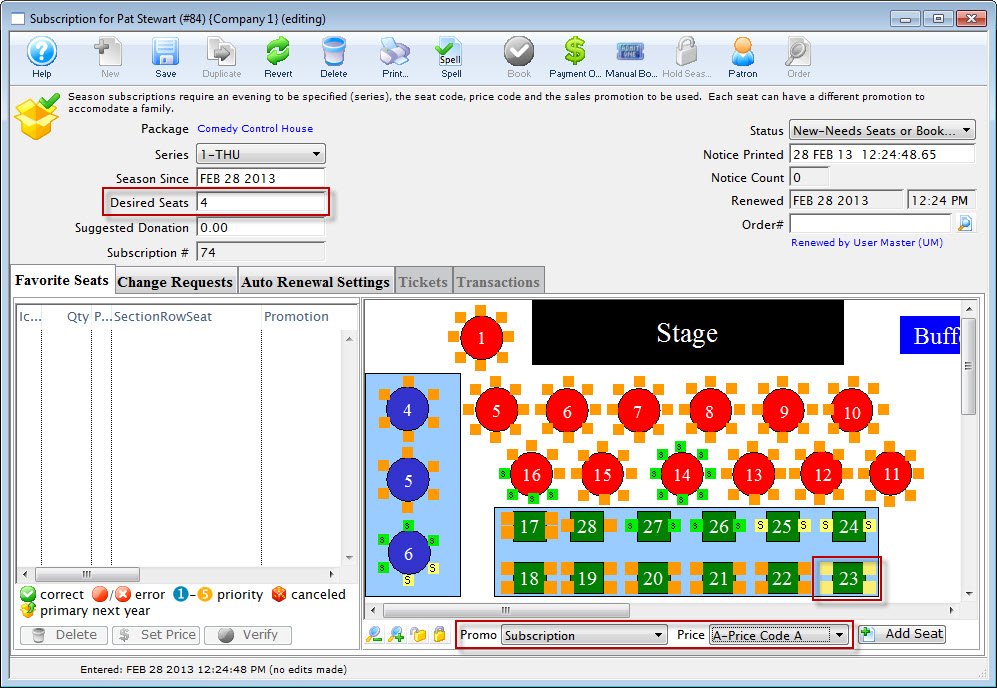
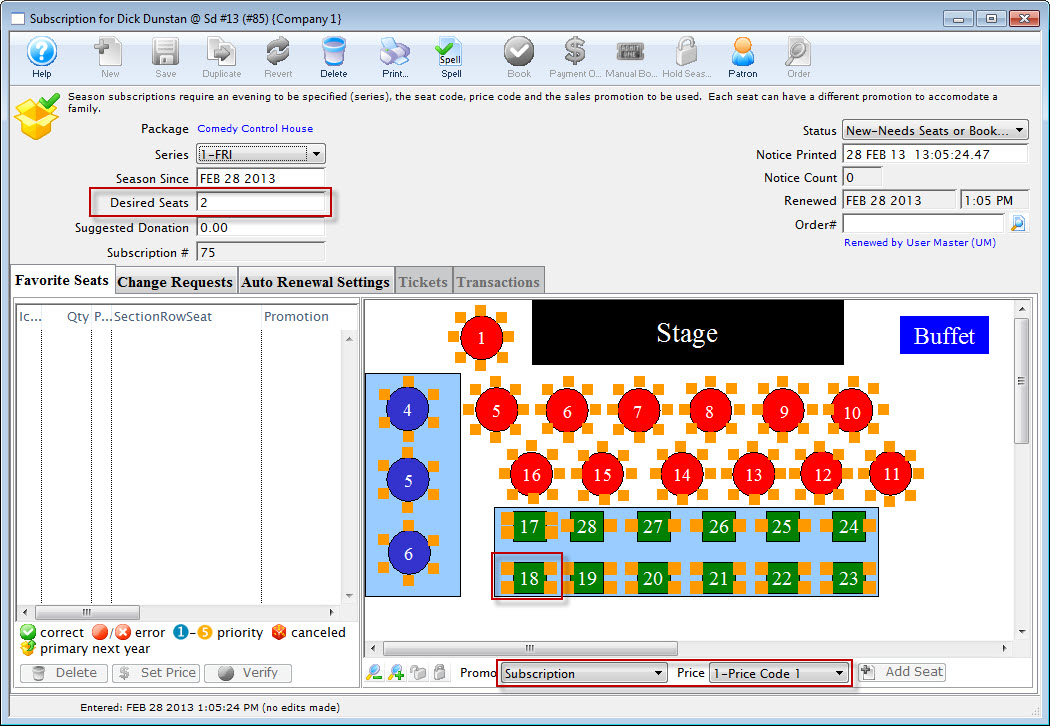
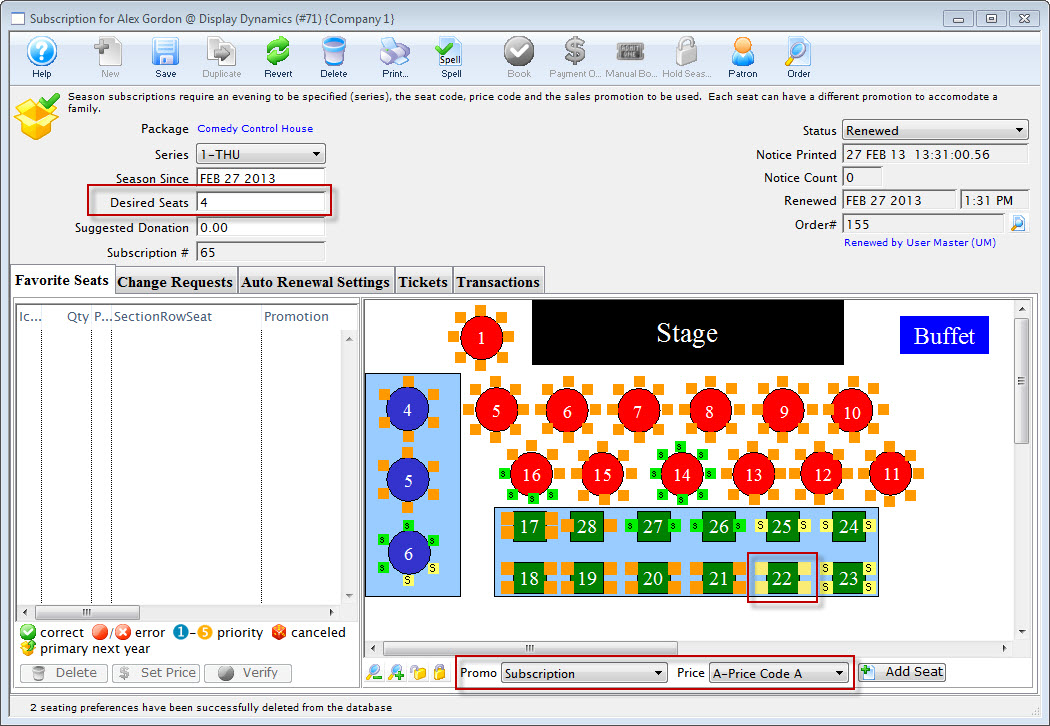
- Edit the Desired Seats field to match the number of seats the patron requires in the season package.
- Highlight the seats the patron wants for their Subscription.
You select seats by using the mouse to drag a box over the preferred seats, or by holding the <SHIFT> key and clicking each seat.
- Choose the correct Promotion and Price Code for the subscription.
- Click the Add Seat button.
The seats are added to the Seat Selection area of the Patron Subscription Detail window.
For more information on the Seat List area click here.
The patron now has favorite seats within the control house. The seats can be seen in the seating section of the Subscription Detail window on the left. The seats are also indicated on the map represented by a lower cases. The patron is now ready to book their season subscription.
Booking Subscriptions from a Patron Record
Once a patron has been added to a season package and their subscription contains favorite seats the season package can be booked.
To book the season package, you perform the following steps:
- Open the Patron Window.
For more information on how to access the Patron Window click here.
- Select the Season tab in the Patron Record. Then the Season Package(s) to book.
Several season packages can be booked at the same time. Use the
key to select multiple season packages, or the key (Windows) or the For more information on the Season tab click here.
- Click the Book
 button.
The Order opens to the Payment window.
For more information on the Payment window click here.
- Select the type of payment from the Payment Method drop-down list and enter the payment details. Then, accept the payment.
If the tickets are to be printed now select Print Tickets. If the tickets will be Batch Printed at a later date select the Accept Payment button.
The payment window closes and you are returned to the Patron record.
The status of the Season Package is automatically updated.
The patrons tickets are now booked and they are displayed on the tickets tab. The Season Package status is updated and the patron has been booked into Next Years Control House.
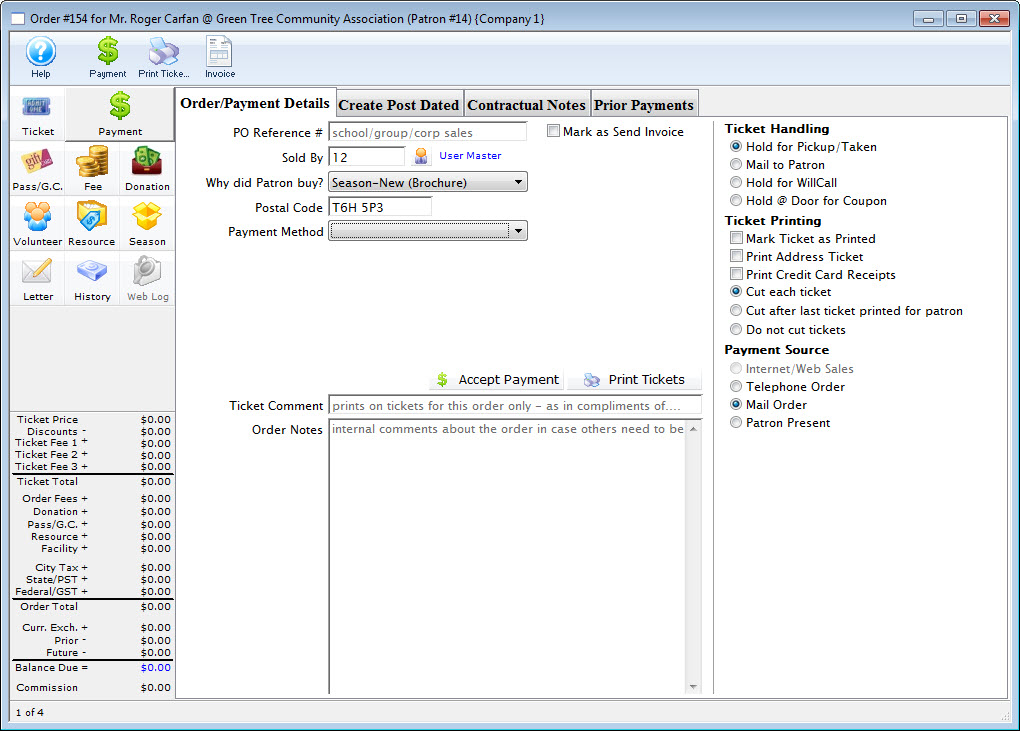
Order Window
This section contains the information to subscribe a patron to a season package through the order window.
Subscribing a Patron to a Season Package via the Order Window
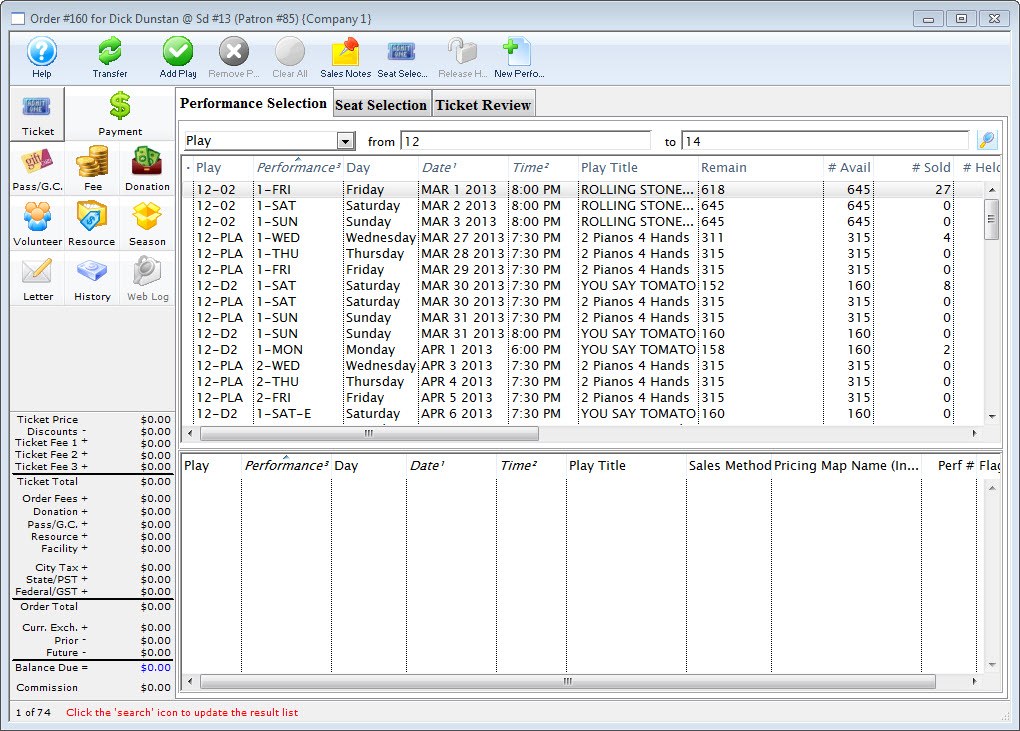
In the Order window, you can subscribe a patron to a Season Package, and book the seats along with other purchases. To start, you perform the following steps:
- Open the Patron record for the purchasing patron.
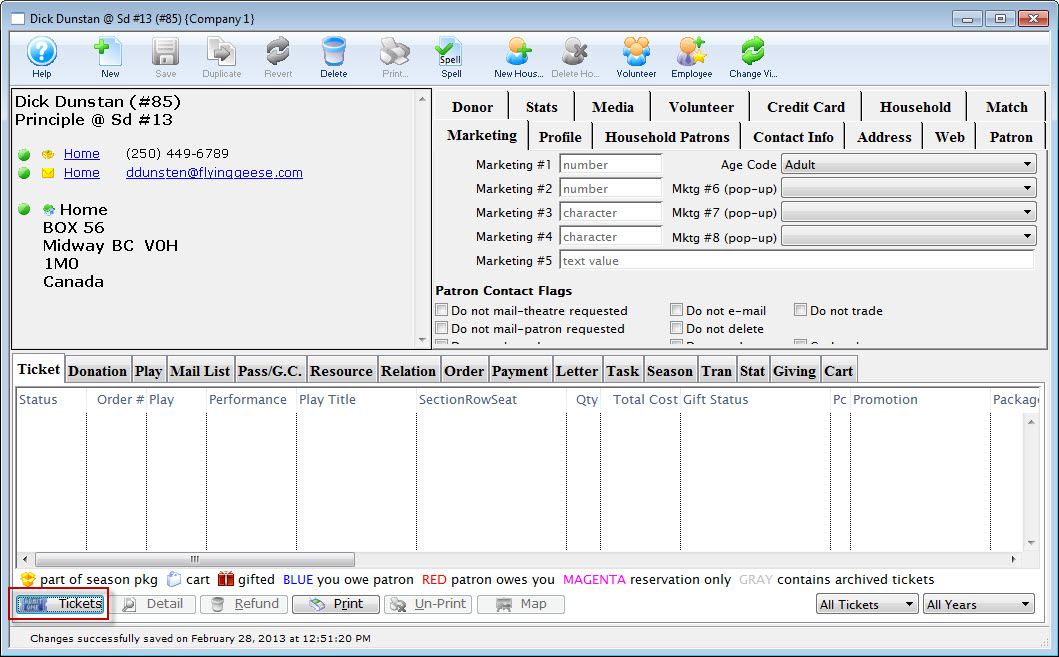
For more information on how to access the Patron record click here.
- Click the Tickets
 button in the the Ticket tab.
The Order window opens.
- Click the Season
 button.
The Season Subscription display opens.
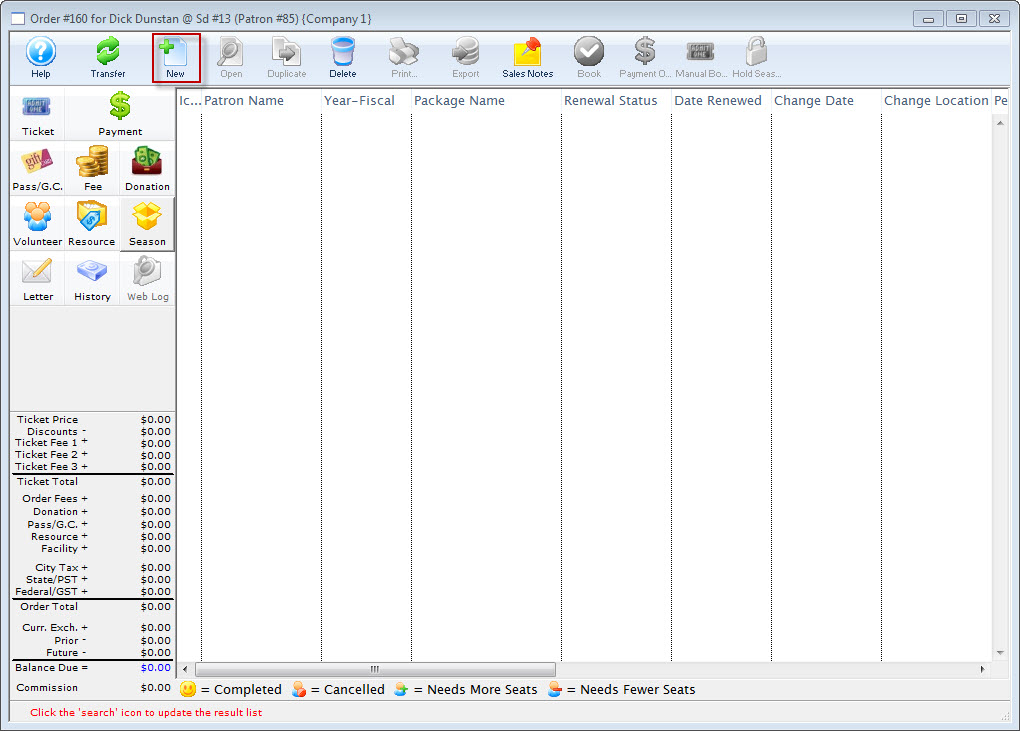
- Click the New button.
The Select A Season Package dialog opens.
The Select A Season Package window does not open if there is only one active season package.

- Click to highlight the requested season package for the patron, and then click the Select button.
The Select a Season performance dialog opens.
The window does not open if there is only one performance in the season package.
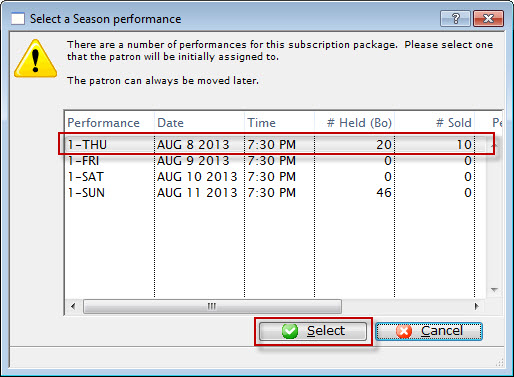
- Click to highlight the requested Performance. Then press the Select button.
The Subscription Detail window opens to the Favorite Seats tab.
For more information on the Subscription Detail window click here.
- In the Desired Seats field, enter the number of seats the patron requests.
- Highlight the seats the patron wants for their Subscription.
You can select seats using the mouse to drag a box over the preferred seats, or by holding the <SHIFT> key and clicking each seat.
- At the bottom of the map, choose the correct Promotion and Price Code.
- Click the Add Seat button.
The seats are added to the Seat Selection area of the Patron Subscription Detail window.
For more information on the Seat List area click here.
- Close the Subscription Detail window.
- Click the Book button in the Subscription window ribbon bar.
- In the Payment Method drop down, select the method of payment, enter the payment details and accept the payment.
If the tickets are to be printed now select Print Tickets. If the tickets will be Batch Printed at a later date select the Accept Payment button.
The Payment window opens.
For more information on the Payment window click here.
The Order window closes and you are returned to Patron record.
The patron's season tickets have now been booked and the season package is now displayed in the Season tab.
| Click here for quick reference information on Buy a Season Subscription (from the order window) |
Reference Guide |
Cheatsheet |
Flash |
MP4 |


Season Package Detail Window
The following selections show you how to sell a Season Package in the Season Package Detail window.
Adding Patrons to a Season in the Season Detail Window
When a patron wants to take part in a season package, they need to subscribe to the season package before they select favorite seats and have their season package booked.
To add a patron to a Season Package in the Season Detail window, you perform the following steps:
- Click Patron Sales >> Season Reservations >> Setup Season Packages.
The Season Package List window opens.
Click here for more information on the Season Package List window.
- Select the requested season package, Click the Open
 button.
The Season Package Detail window opens.
Click here for more information on the Season Package Detail window.
- Select the Patron
 tab.
tab.
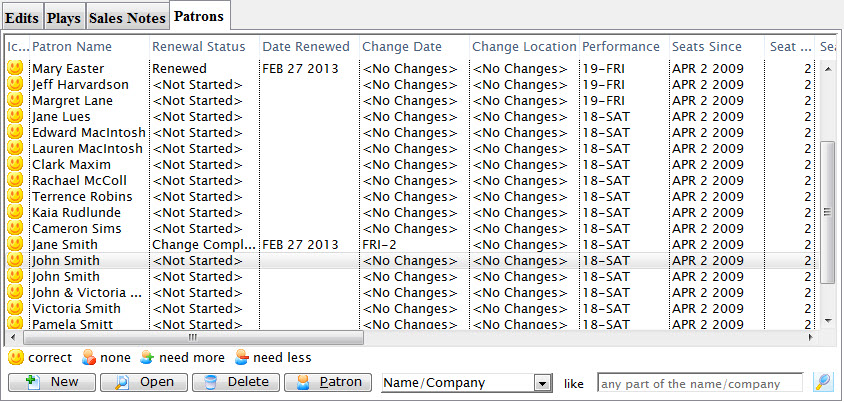
- Click the New button.
The Patron Lookup List window opens.

Click here for more information on the Patron Lookup List window.
- Search for and click on the patron you are adding to the season package.
- Click the Select button.
If there is more than one performance series, the Season Performance Selection window will open.
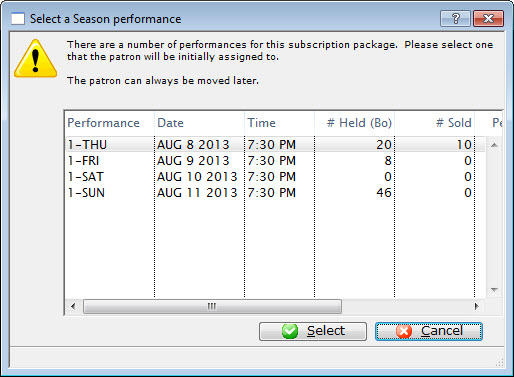
- Select the Performance the patron wants and click the Select button.
You are returned to the Season Package Patrons tab.
For more information on adding favorite seats to the season package click here.
Adding Favorite Seats in the Season Package Window
To add the patron's favorite seats to their season package, you would perform the following steps:
- Click Patron Sales >> Season Reservations >> Setup Season Packages.
The Season Package List window opens.
Click here for more information on the Season Package List window.
- Click to highlight the season package, then click the Open button in the Season Package List ribbon bar.
The Season Package Detail window opens.
Click here for more information on the Season Package Detail window.
- Select the Patrons tab.
- Click to highlight the patron wanting seats, then click the Detail
 button.
The Patron Subscription Detail window for the selected patron opens.
Click here for more information on the Patron Subscription Detail window.
- In the Desired Seats field, enter the number of seats the patron wants in their season package.
- Highlight the seats the patron wants in their subscription.

You can select seats by using the mouse to drag a box over the preferred seats, or by holding the <SHIFT> key and clicking each seat.
- At the bottom of the map, choose the Promotion and Price Codes.
- Click the Add Seat button.
The seats are added to the Seat Selection area of the Patron Subscription Detail window.
For more information on the Seat List area click here.
- Click the Save button.
- Close the Patron Subscription Detail window.
The patron is added to the season package. To learn how to add a patron to a season package click here.
Booking a Subscription from the Season Package Window
To book a subscription from the Season Package window, you perform the following steps:
- Click Patron Sales >> Season Reservations >> Setup Season Packages.
The Season Package List window opens.
Click here for more information on the Season Package List window.
- Click to highlight the season package, then click the Open button.
The Season Package Detail window opens.
Click here for more information on the Season Package Detail window.
- Select the Patrons tab.
- Click to highlight the patron, then click the Book button.
The Order opens to the Payment window.

For more information on the Payment window click here.
- Choose the payment type from the Payment Method drop down list, enter the payment details and accept the payment.
If the tickets are to be printed now select Print Tickets. If the tickets will be Batch Printed at a later date select the Accept Payment button.
The payment window closes and you are returned to the Season Subscription Detail window. The patron status in the season package is automatically updated.
The patrons tickets are booked and the Season Subscription Detail window reflects the changes you have made.
Selling New Subscriptions During the Renewal Period
You have a great season ahead of you, and everyone wants to get in on the subscription process! You have promised all your existing subscribers that they will get the same seats they had last year. So what do you do with all the patrons who want to buy new subscriptions while at the same time honoring your promise to your existing subscribers? You don't want to have checks and credit card numbers lying around for months waiting until you can sell new subscriptions, and you want to get the money in the bank where you can use it to grow your business.
This help page discusses how to deal with the new subscribers that want to "buy in" before you have completed renewing your existing subscribership.
Your process may vary, however the typical chronology of events in the renewal period for Season Subscriptions is:
- Renewal notices are printed and sent
- Renewals are received back from patrons
- Regular ("straight") renewals with no changes are processed immediately
- Renewals with changes are processed for payments only, but no changes to the seat assignments are made at this time
- The Change Request tab in the Favorite Seats file is filled out for reference during change request fulfillment
- New subscriptions may be sold, but as with the above change requests, payments are processed, but seat assignments are not made
- The renewal deadline passes
- A short period is allowed for existing subscribers to get their renewals in (generally 7 - 14 days)
- Change requests are processed and seated using the Season Subscription-Change Requests report
- New subscriptions that were sold during the renewal period are seated
- New (and very late renewing) subscriptions are sold and immediately processed.
Process a Payment without booking a subscription
When a patron wants to purchase a new subscription during the renewal period, you will need to explain that you can process their payment, but cannot assign their seat until all existing subscribers have been seated. Following that (and you can provide the renewal deadline), you will be able to assign seats to new subscribers.
- In most instances, subscriptions are assigned in the same order they reached your office. It benefits the patron to subscribe early for the best seats, even if the seats cannot be actually assigned for months.
There are two methods that you can use to process a payment without booking a subscription.
Method 1 (Recommended):
- Open the Patron Window.
For information on accessing the Patron Window click here.
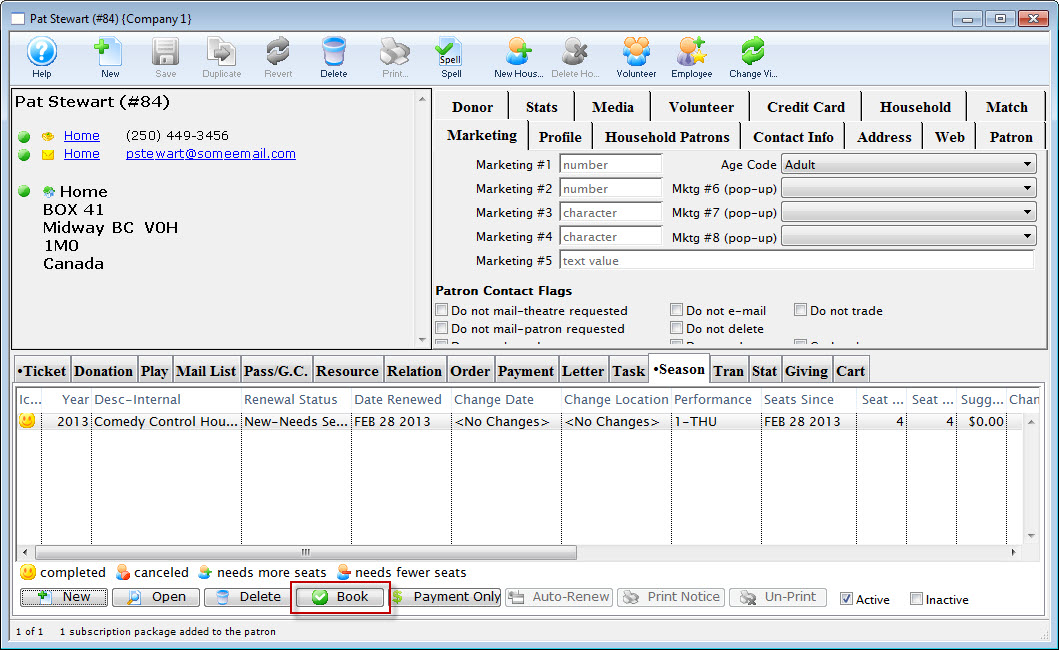
- Select the Season tab in the Patron Record.
- Click the New button.
The Select A Season Package window opens.
The Select A Season Package window will not open if there is only one active season package.
- Single click the desired Season Package and click the Select button.
The Subscription Detail window opens.
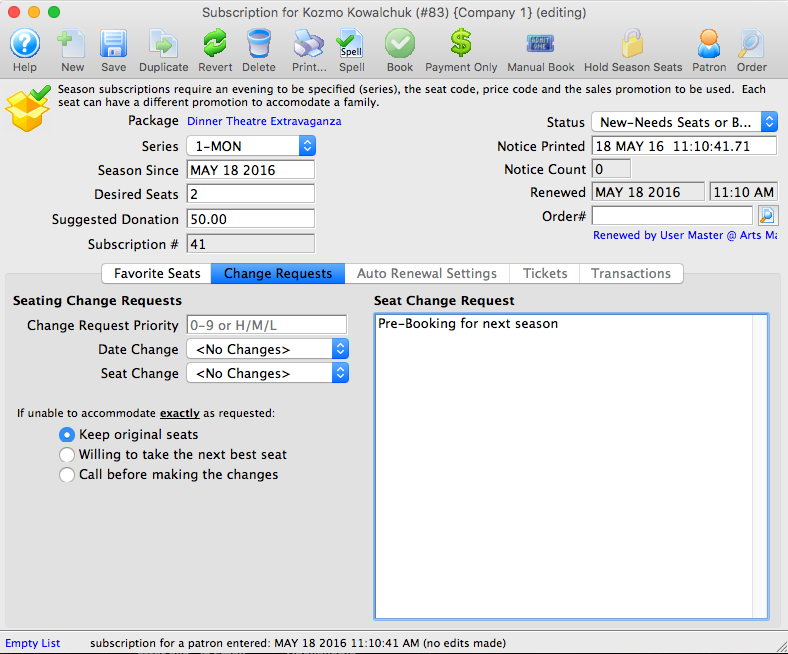
- At the top, indicate:
- The correct series
- The date of the request (this will default to today's date)
- The number of desired seats
- The suggested donation amount specific for this subscription
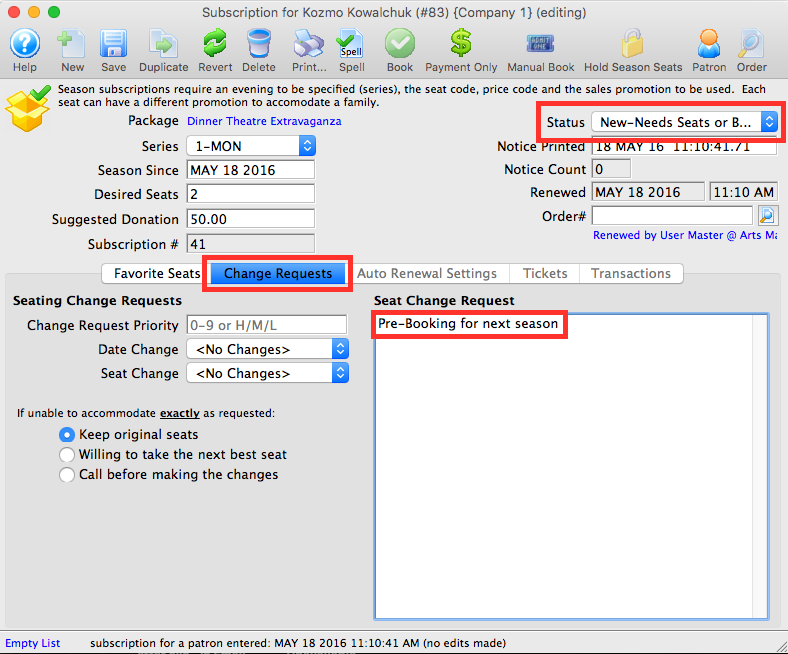
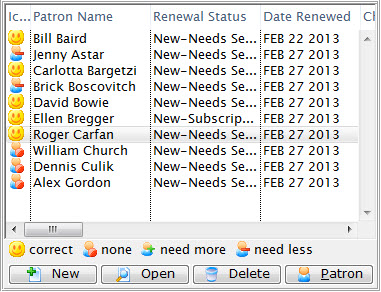
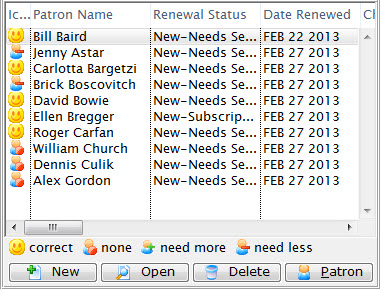
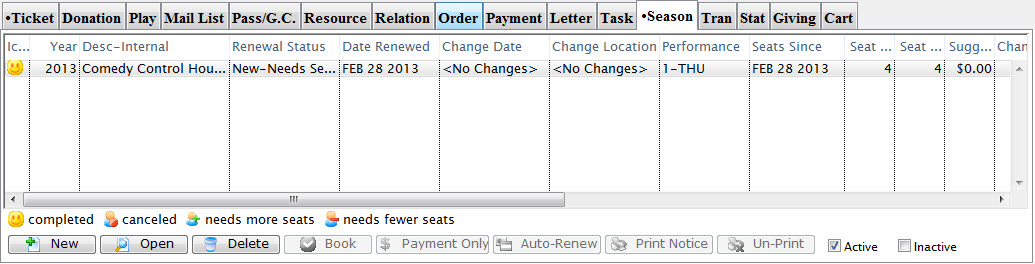
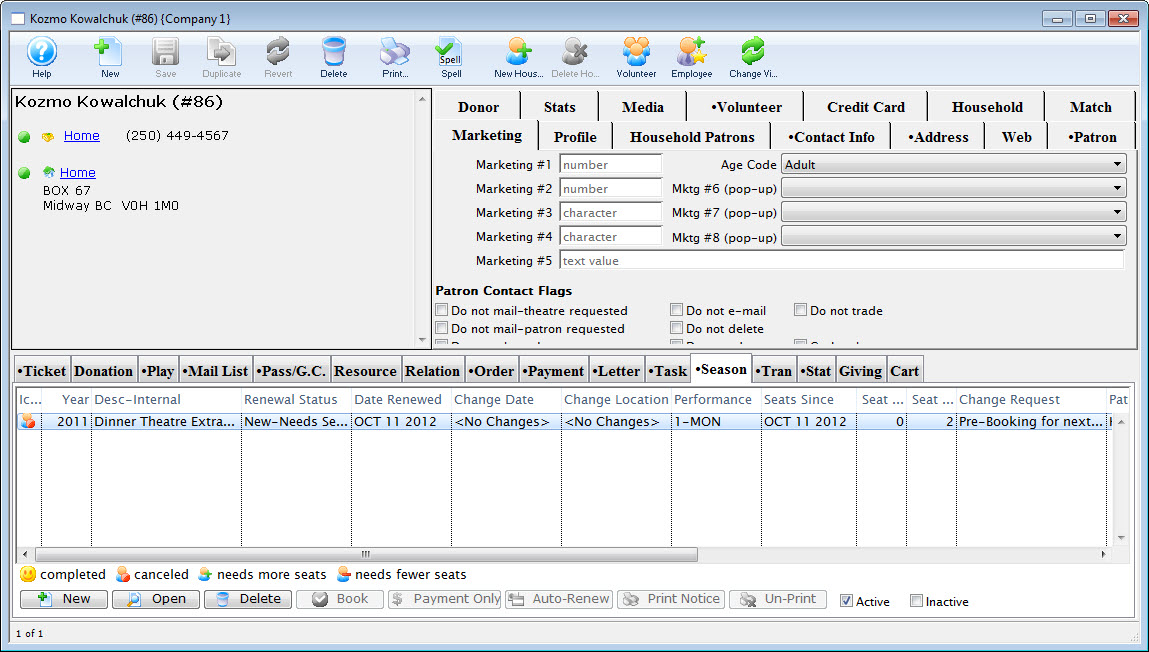
- Change the Status to "New-Needs Seats or Booking".
- Click on the Change Requests
 tab.
tab.
Add any notes about the seat request in the Seat Change Request text box.
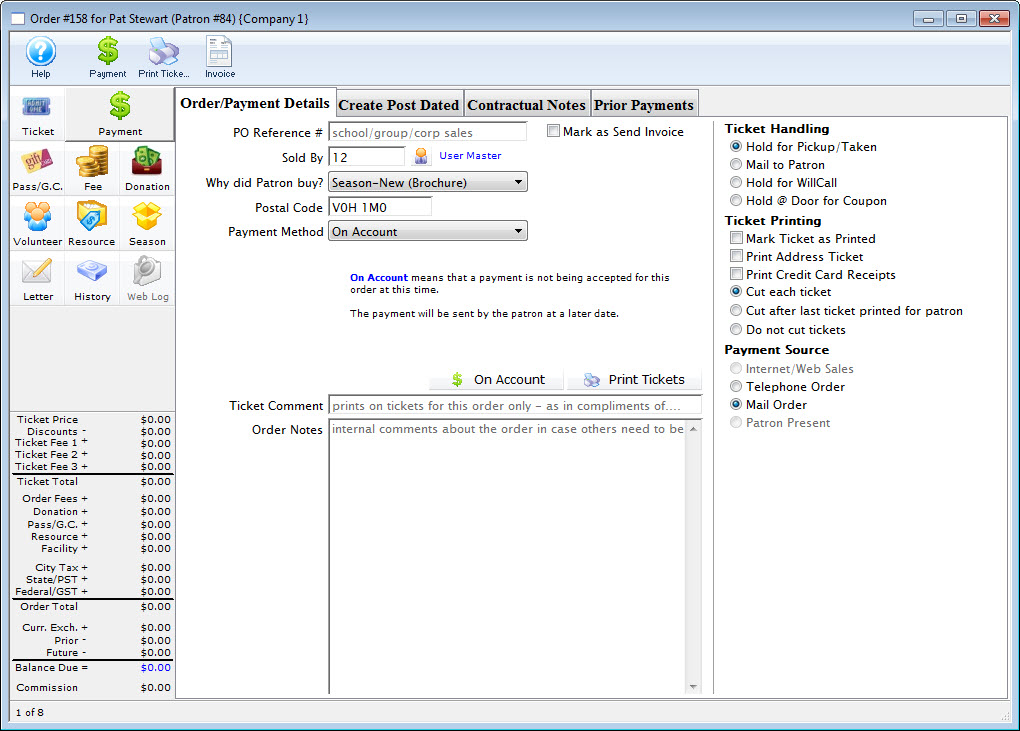
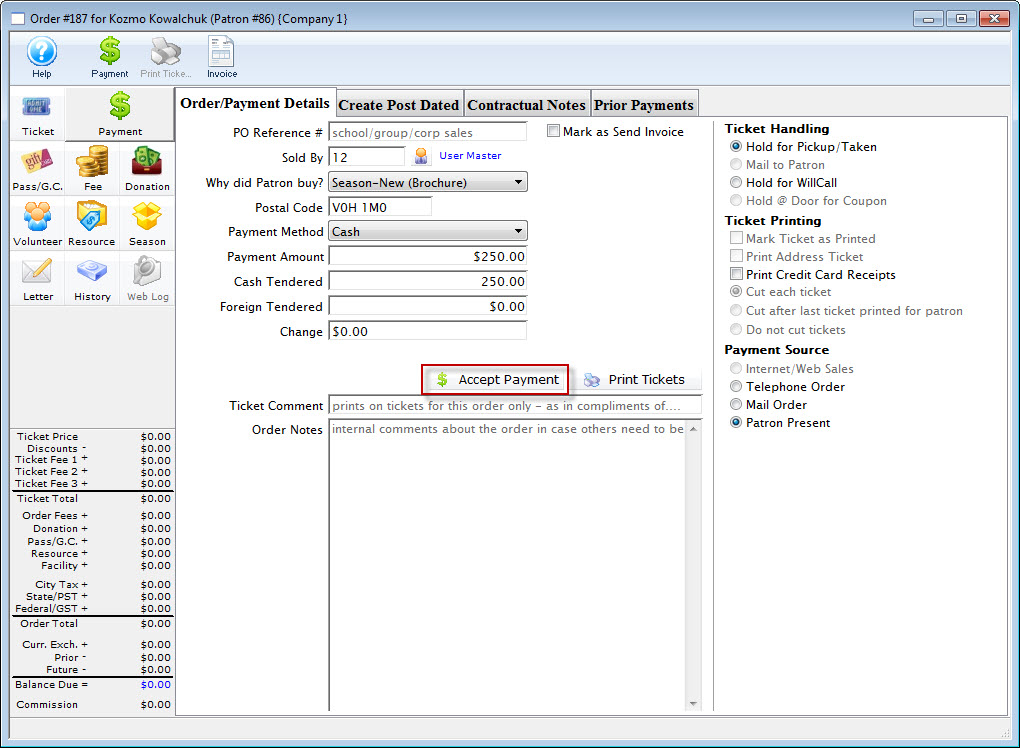
- Click the Payment Only
 button.
 - Add the payment amount for the expected subscription.
- Process the payment.
The payment window opens.
When you are able to assign and book the tickets:
- Locate the patron record.
- Select the Season tab, and double click on the season package.
- Add the seats to the Favorite Seats tab.
- Click the Book button.
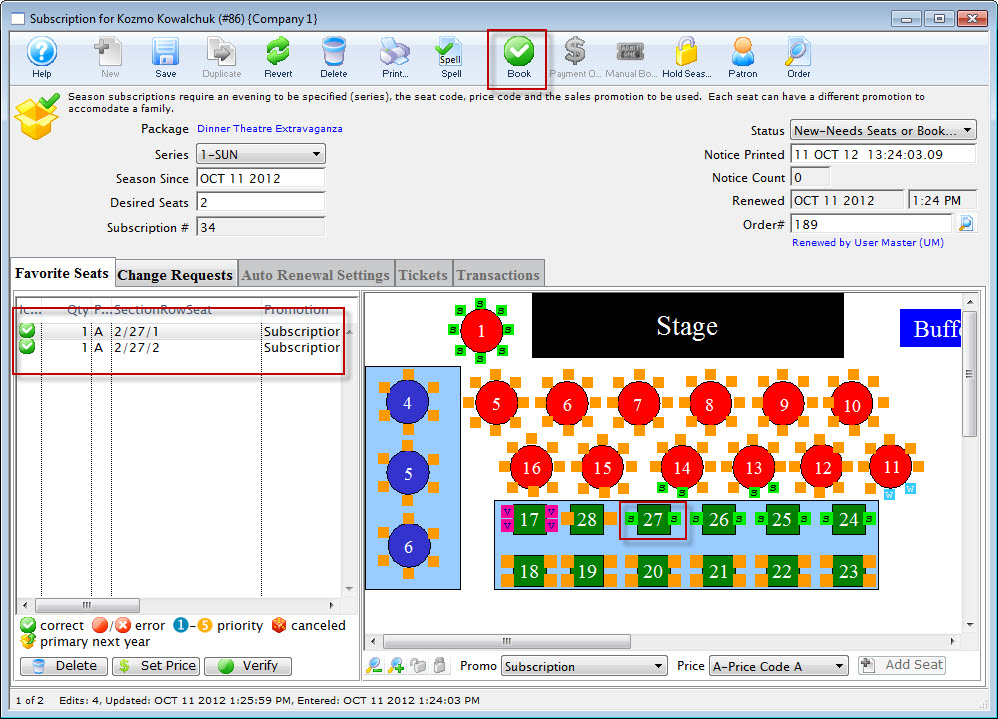
The payment window opens, but because of the prior payment, the balance due should be zero. If it is not, review the tickets assigned in the Ticket Review tab, and the prior payment to ensure they are correct.
Method 2 (Optional):
Method 2 is sometimes preferred by auditors who like to see that the patron has something of value, rather than the company having just processed a payment without giving anything in return. Most people understand the concept of Gift Certificates, so auditors will ask that you issue a Gift Certificate (or other Membership) in exchange for the payment. Then, when you are able to process the subscription, use the Gift Certificate to pay for the tickets.
The end result is the same - the patron has given you money, you have put it in your bank, and then that money - at a future date - pays for the tickets.
Editing a Season Package
Managing Favorite Options
There are a number of tools you can use in the Manage Favorite Seats Window. The Manage Favorite Seats window is another way of accessing the patrons subscribed to a season package.
You access the Manage Favorite Seats window by clicking Patron Sales >> Season Reservations >> Manage Favorite Seats:
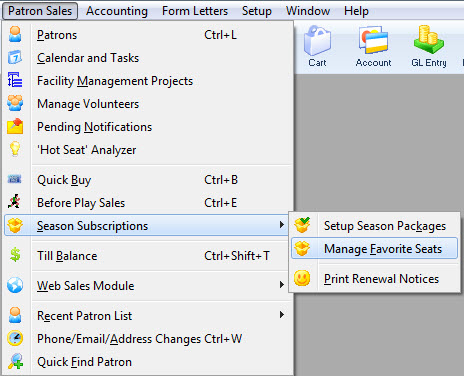
Or by clicking the Subscription button found in the Theatre Manager ribbon bar.
The Season Subscriptions window opens.
For more information on the Manage Favorite Seats window, click here.
Altering Favorite Seats in the Manage Favorite Seats Window
In the Manage Favorite Seats window, you can change patrons’ performances, seating locations or their pricing structure. To do this, you perform the following steps:
- To start, click Patron Sales >> Season Reservations >> Manage Favorite Seats.
Alternatively, you can click the Subscriptions button in the main Theatre Manager toolbar / ribbon bar.
The Manage Favorite Seats window opens.
- Find the patron you are changing the seats for, in the Patron list.
- Double click on the patron to open the Patron Subscription Detail window.
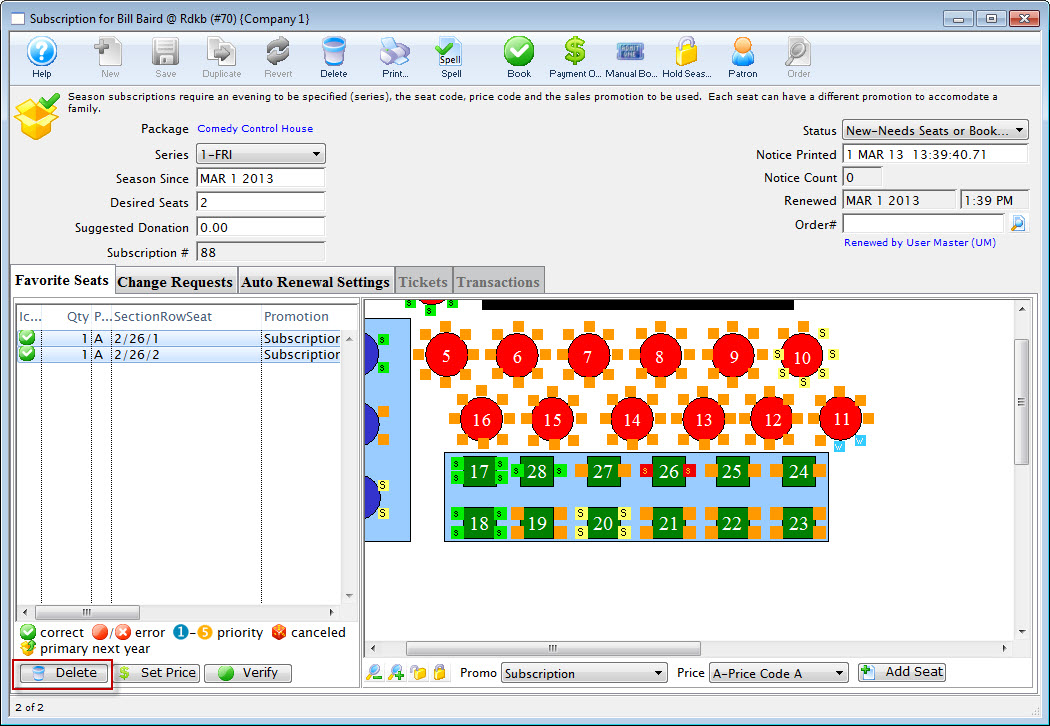
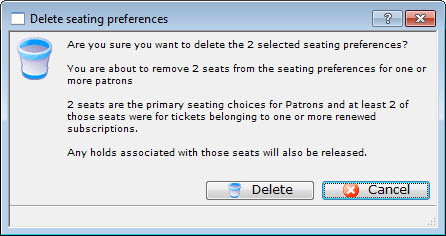
- Highlight the patron's existing seats in the Seat Selection area of the Patron Subscription Detail window and click the Delete
 button.
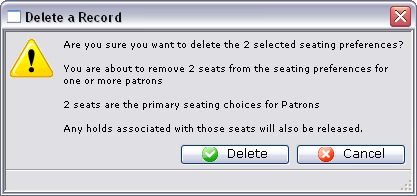
The Delete Confirmation dialog opens.
- Click the Delete button in the confirmation window.
This removes the seats from the favorite seats for this season package. It does not remove the seats from the control house.
- Make the necessary changes, such as:
Select the desired Performance Code from the Series drop down.
Change the Desired Seats field to equal the number of subscriptions in the season package.
Choose the correct Promotion and Price Code for the subscription.
Choose the seat(s) for the Subscription.
- When you have finished making changes, click the Add Seat button.
The seats are added to the Seat Selection area.
- Close the Patron Subscription Detail window.

The patron's favorite seats are updated in the season package.
This doe not effect the seats in last years control house. The patron's seats appear in the Subscriber Seats section of the window and they are shown on the map represented by a lower case s.
Removing a Subscriber in the Manage Favorite Seats Window
Patrons can cancel or choose not to renew season subscriptions. You need to remove them from the season. You can do this in the Manage Favorite Seats window.To do this, you would perform the following steps:
- To start, click Patron Sales >> Season Reservations >> Manage Favorite Seats.
Alternatively, you can click the Subscriptions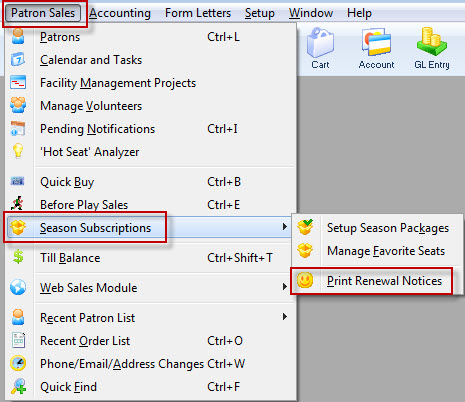
 button in the Theatre Manager ribbon bar.
The Manage Favorite Seats window opens.
- Find the patron you are removing in the Patron list.
- Double click on the patron to open the Patron Subscription Detail window.
- Highlight the patron's existing seats in the Seat Selection area of the Patron Subscription Detail window and click the Remove
 button.
The Delete Confirmation dialog opens.
- Click the Delete
 button in the confirmation window.
This removes the seats from the favorite seats for this season package. It does not remove the seats from the control house.
- The Manage Favorite seats window opens. The patron has no seats in the Seat List section.
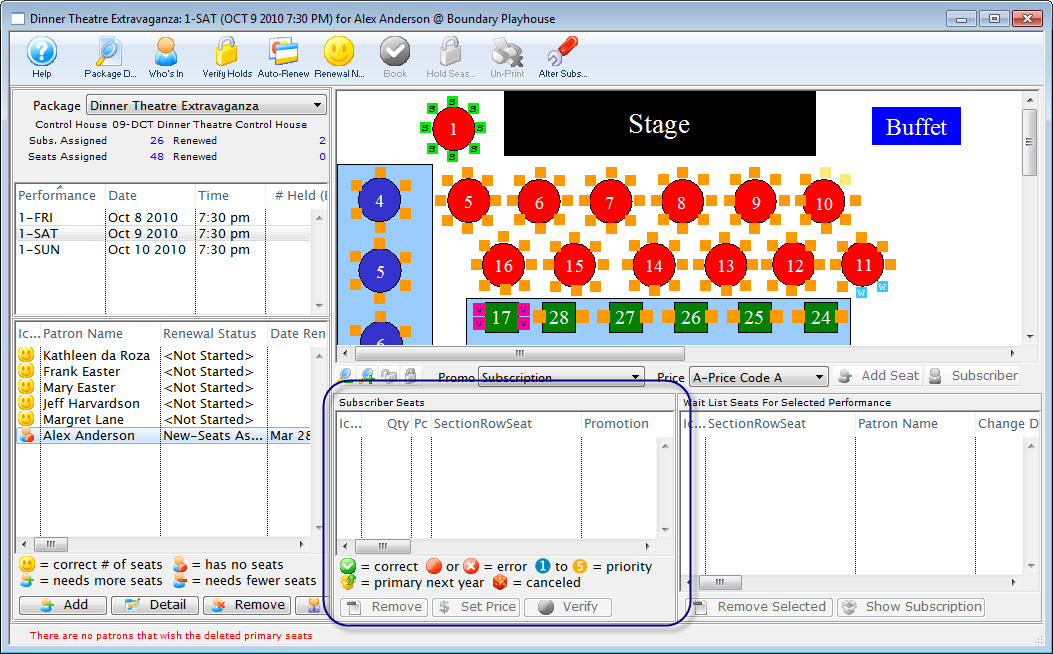
- Click on the name of the patron in the Patron List and click the Remove
 button.
The Delete Subscription for a Patron Confirmation dialog opens.
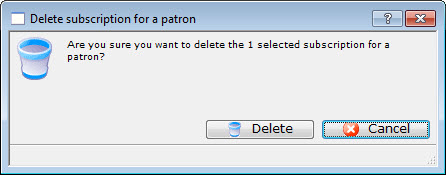
- Click the Delete
 button in the confirmation window.
The subscription for the patrons has been deleted. The Subscriber will no longer appear in the Patron List of the Manage Favorite Seats.
However, if the season is rolled over, the patron's seats will still appear in the as sold seats in the Map of the Manage Favorite seats. The map reads seats from the Last Years Control House as well as current, new and updated season subscription information. To remove the sold seats from the Control House they will need to be refunded in the patron record.Moving a Patron from the Wait List
In the event that a patron decides to stop renewing their subscription, the seats that the patron held will need to be released. However, there may be other patrons that are on a wait list for those seats, and will now need to be made primary holder.
- Select the patron from whom you are releasing the seats.
In the seating section of the window, the patron's seats are listed. The seats are also highlighted on the map.
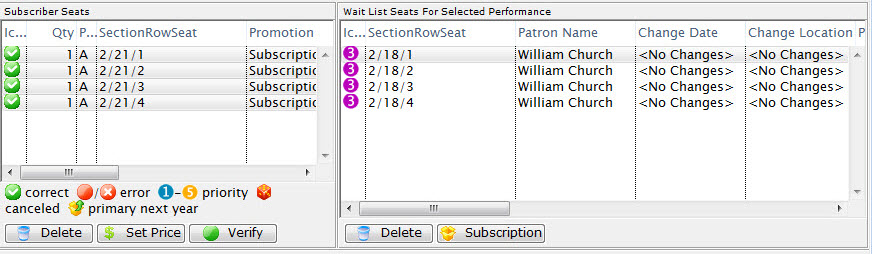
- Select the seats in the Subscriber Seats section of the Favorite Seats window, and click the Delete
 button at the bottom.
A warning dialog opens.
- Click the Delete
 button.
The seats are removed from the patron's subscription.

- In the Wait List Seats for Selected section, select the seats and patron who has next priority on the seats.
- Right click on the selected seats to open the context menu.
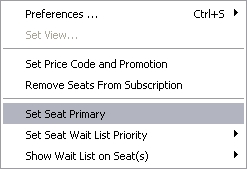
- Select the Set Seat Primary option.
Theatre Manager makes the new patron primary holder of the seats, and removes them from the wait list.
To ensure the seats moved properly, select the patron in the patron section, or click on the seats on the venue map. The new primary patron for the seats is displayed.
Auto Renewal in the Manage Favorite Seats Window
The Auto-Renewal process gives you the ability to renew season subscriptions within a series on mass. When you do this you create an order, books the season subscription and authorise the payments using the options you select. Alternatively, you can place the payments for outstanding orders on account.
|
This process cannot be easily reversed. |
To start, you perform the following steps:
- Click Patron Sales >> Season Reservations >> Manage Favorite Seats.
The Manage Favorite Seats window opens.
- Select the season from the Season Package drop down list.
- Choose the performance from the Performance List.
- Highlight the patrons in the Patron List, whose subscriptions you are Auto Renewing.
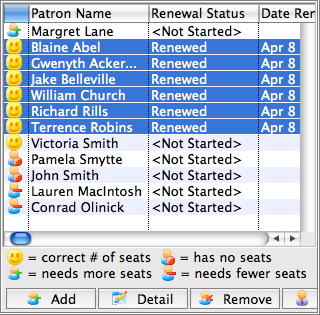
- Click the Auto-Renew
 button.
The Season Subscription Auto-Renewal window opens.
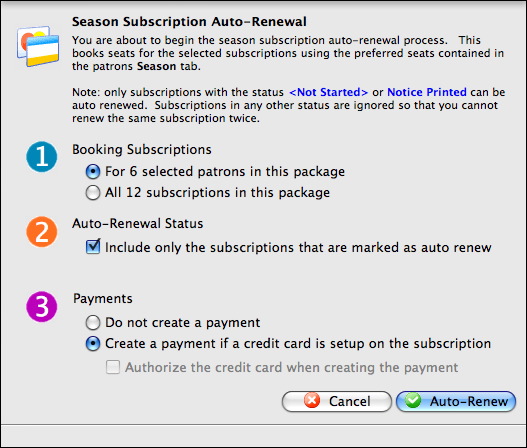
- In step 1, you choose the season packages to be auto-renewed.
The Selected Patrons option auto-renews only the patrons you selected in the previous window. The Subscriptions option will auto-renew all the subscriptions you have not cancelled or already renewed using the individual series code.
- In Step 2, select the Auto-Renewal Status.
When checked, only those subscriptions with auto-renew options checked in the Patron Season Detail window, are Auto-Renewed. If left unchecked, all the selected season subscriptions are Auto-Renewed regardless of the Patron Season Detail preferences.
- In Step 3, you determine the Payment option.
The Do Not Create a Payment option will place the outstanding balances on account creating an entry in the Accounts Receivable. The Create Payment option will add a payment to the newly created season subscription order. The payment will either appear in the Deposit window of the End of Day Wizard if the Authorization option is checked off it will appear as standard authorized transaction. If it is left unchecked, it will appear as an unauthorized card.
- Click the Auto-Renew
 button.
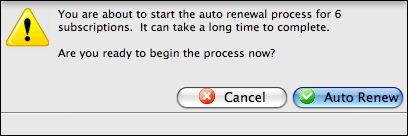
- Click the Auto-Renew button.
The Auto-Renewal process can tak some time to run. This process should not be interrupted.
The Auto-Renew Confirmation opens.
When comple, in the lower left corner of the Manage Favorite Seats window displays a confirmation message that the Auto-Renewal process is complete.
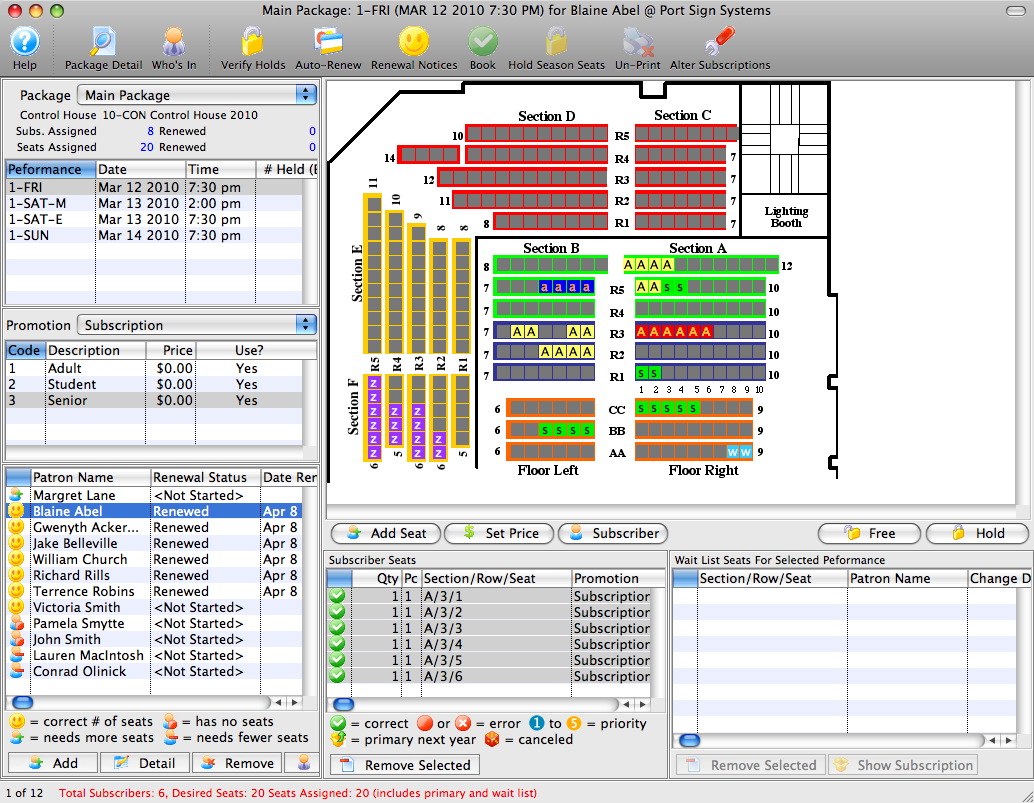
The selected season package(s) are renewed. The seats, for each performance in the subscription have been sold into the order. Depending on the payment option selected, the order may or may not have an outstanding balance.
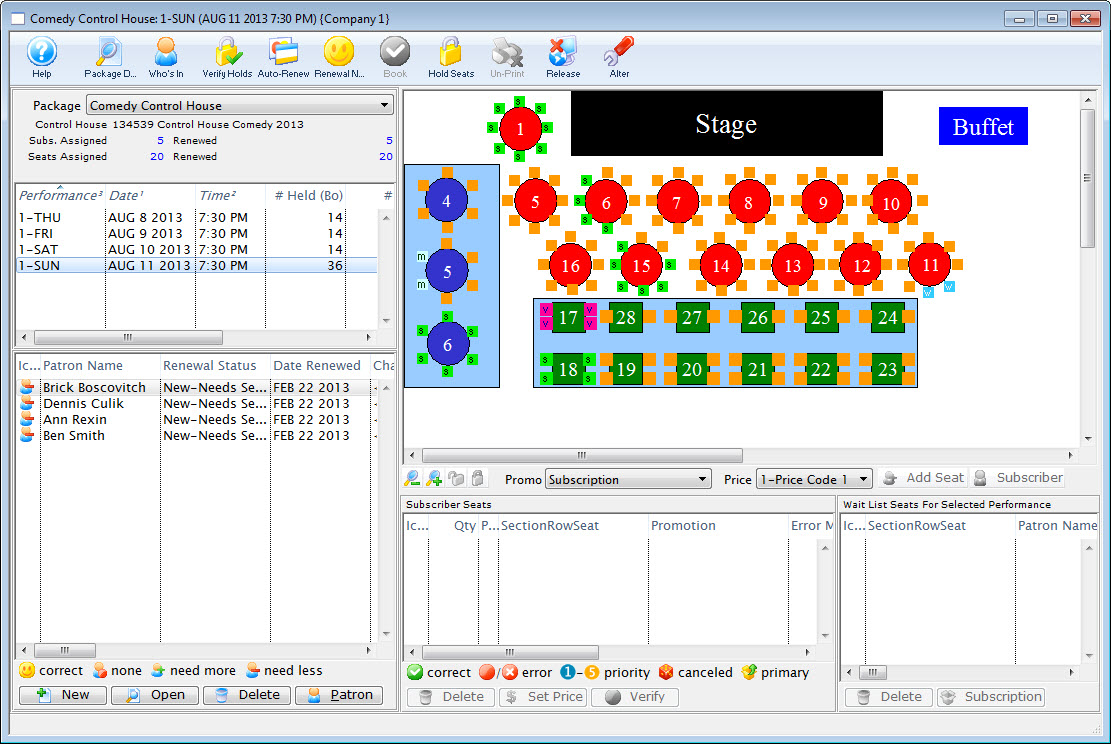
Holding Season Seats in the Manage Favorite Seats Window
Holding Favorite Seats filters through the events within the season and holds the patrons favorite seats for each performance within the season package. This feature is often used when single ticket sales begin prior to the renewal process completing.
Holding Season Seats through the Manage Favorite Seats window offers the ability to pick and choose which patrons seats should be held. If all unrenewed seats require holding the Season Package List Hold option may be a faster solution.
- Click Subscription button at the top of the window.
- The Manage Favorite Seats window opens.
- Select the correct season from the Season Package drop down list.
- Select the correct performance from the Performance List.
- In the Patron list, highlight the patrons with subscriptions to be held.
- Click the Hold Season Seats
 button.
The Hold Season Subscription Options window opens.
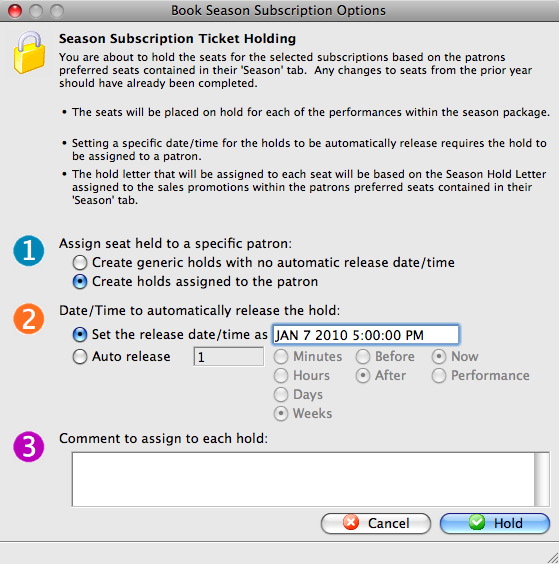
- In Step 1, choose the assignment option.
Choosing to assign the holds to the patron allows you to hover over the seat, within the performances, and see to whom the seat belongs. If you choose not to assign the seats to the patron, the seats are held, but the subscriber details will remain anonymous.
- In step 2, establish the date and time the seats are released.
Theatre Manager automatically releases the holds on the date and time entered.
- In Step 3, enter any comments about the holds.
The comments entered, appear when the cursor hovers over the seats within the performance.
- Click the Hold
 button.
The Hold Confirmation window opens.
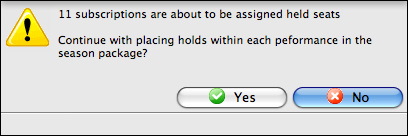
- Click the Yes
 button.
The Manage Favorite Seats window opens and the seats are held within the performances.
The patrons' seats selected are held until the date you entered, then the seats are released. If you need to extend the hold, you can repeat this process. Booking a season subscription will override the hold without having to release it.
Altering Season Subscriptions in the Manage Favorite Seats Window
You use Altering Season Subscriptions to change price code or promotion structures assigned to the favorite seats of a season subscriptions.
Examples are: The end of the Early Bird Renewal deadline--where you convert Early Bird Sales Promotions to standard Season Subscription Sales Promotions. Alternatively, when the season pricing structure has changes and an option offered last year is not available for the coming year.
You cannot undo these changes. You must plan them out before using this feature. The Altering Subscription tool accesses the favorite seats within the season package and alters the pricing structure. It does not affect historical season subscription packages. Changes made affect the entire season package not only the selected patrons or series.
- Click the Subscription button at the top of the window in Theatre Manager.
The Manage Favorite Seats window opens.
- Click the Alter Subscription
 button.
The Alter Promotion Window opens.
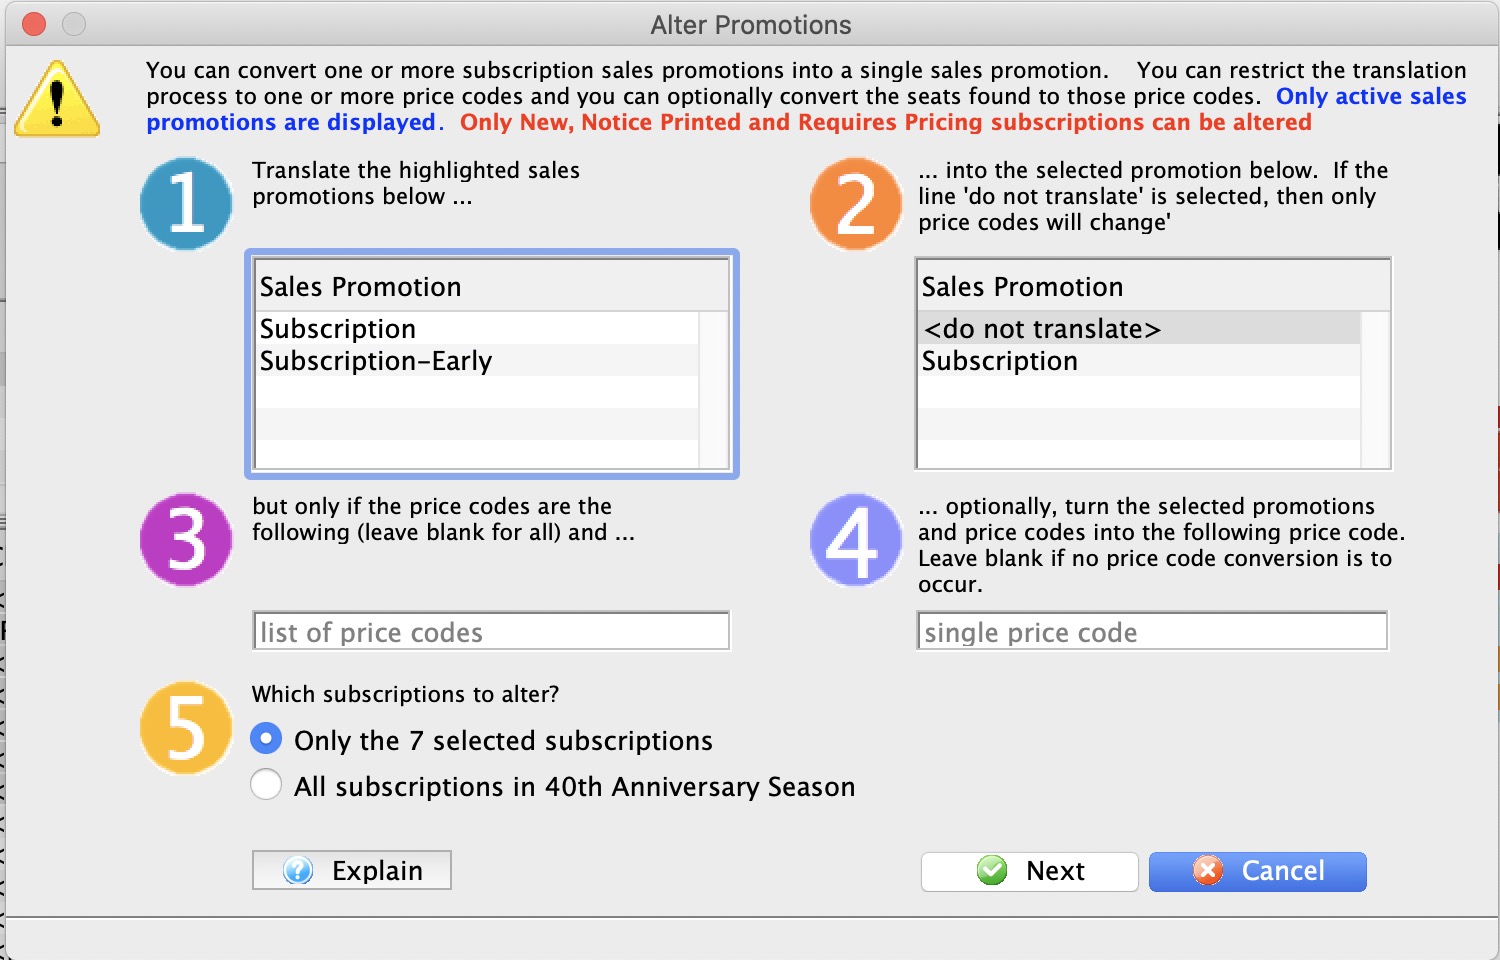
- Step 1: select one or more Sales Promotion to be converted FROM.
- Step 2: select the Sales Promotion that you want it to be converted in to
- Step 3 enter one or more specific Price Codes that you want to convert from.
- If you want to convert two or three prices codes into one, enter price codes like ABC
- If you want to limit to only converting the promotions on one price code, enter it into both the FROM and the TO fields
- If only the Sales Promotions require altering leave the Price Code fields blank.
- Step 4: enter the Specific Price Code you want to convert to.
- Step 5: if you have selected some subscription packages before clicking the 'alter' button, you can confirm that you wish to only change those ones, or ignore al of them and change all subscription packages for all evenings
Only one TO Price Code can be entered at at time. Theatre Manager takes the Price Codes listed in Step 3 and combines them into the Price Code listed in Step 4. If multiple Price Codes require exchanging you will need to run the process separately for each Price Code to be exchanged TO.
- Click the Alter
 button.
The Alter Confirmation window opens.
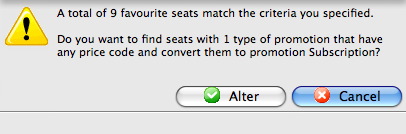
- Click the Alter button.
The Manage Favorite Seats window opens when the alteration is complete.
The Promotions and Price Codes are changed in the Season Package. Theatre Manager has updated the Favorite Seats for the coming season.
Season Package List Options
Roll Over
The Season Roll Over will prepare the season for the coming year by creating a new Season Package. It will alter the Last Years Control House by replacing it with the This Years Control House and will prompt for a new Control House for the This Years field. It will match Performances within the Control House from the Last Years Control House with those in the This Years Control House. It will then move the patrons into the new season package and prepare them for the renewal process in the coming season.
For step by step instructions on Rolling Over the season package click here.
Verifying Counts
Verify Counts recalculates the number of patrons and seats within a season subscription. It is not to be confused with Verify Holds.
To start, you perform the following steps:
- Click Patron Sales >> Season Reservations >> Setup Season Packages.
The Season Package List window opens.
For more information on the Season Package List window, click here.
- Single click on the Season Package you want to Verify the Counts for.
- Click the Verify Counts
 button.
The Verify Season Package window opens.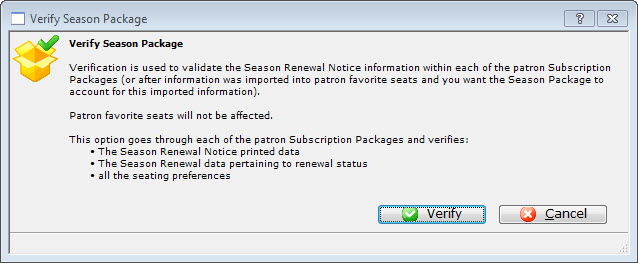
1. Verification is used to validate the Season Renewal Notice information within each of the patron Subscription Packages (or after information was imported into favorite seats and you wan the Season Package to account for this imported information).
Patron favorite seats will not be affected.
The option goes through each of the Patron Subscription Packages and verifies:- The Season Renewal Notice printed data.
- The Season Renewal data pertaining to renewal status.
- All the seating preferences.
- Click the Verify
 button.
You are retruned to the Season Package List window.
The counts in the season package have be recalculated and updated. They appear in the list and inside the Season Package Detail window.
Initializing a Season Package
Using the initialize button on a season package will clear all renewal information. This is used for the purposes of starting over.
- On the main menu bar, click on Patron Sales >> Season Reservations >> Setup Season Packages.
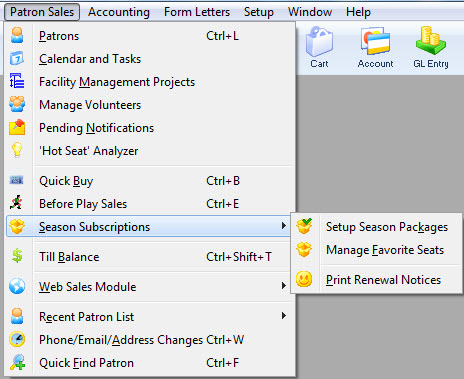
The Season Package List window opens.
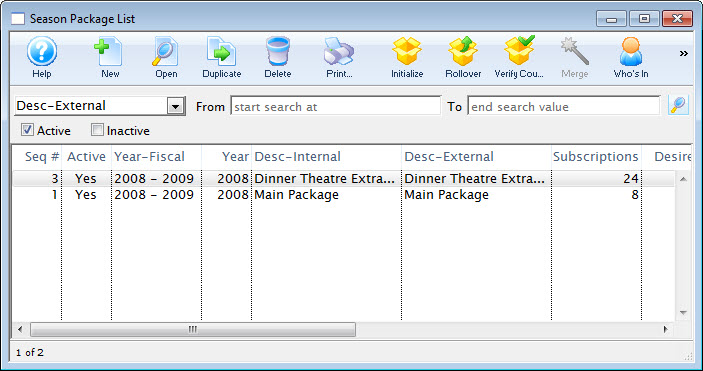
Click here for more information on the Season Package List window.
- Select the season package to be initialized and then click on the Initialize
 button.
The initialize Season Package dialog opens.
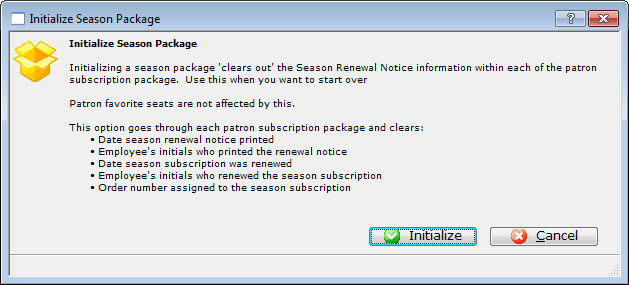
This process clears out the following information:
- Season Renewal Notice information- Date season renewal notice printed- Date the season subscription weas renewed- Employee who renewed the information- Order Number assigned to the season subscription- Read the warning, if everything is appropriate, click the Initialize
 button.
Theatre Manager initializes the season package. When complete, you are returned to the Season Package List window.
- Read the warning, if everything is appropriate, click the Initialize
Whos In Season Package List Window
The Who's In List will display the patrons appearing in the Season Package in a Contact List window.
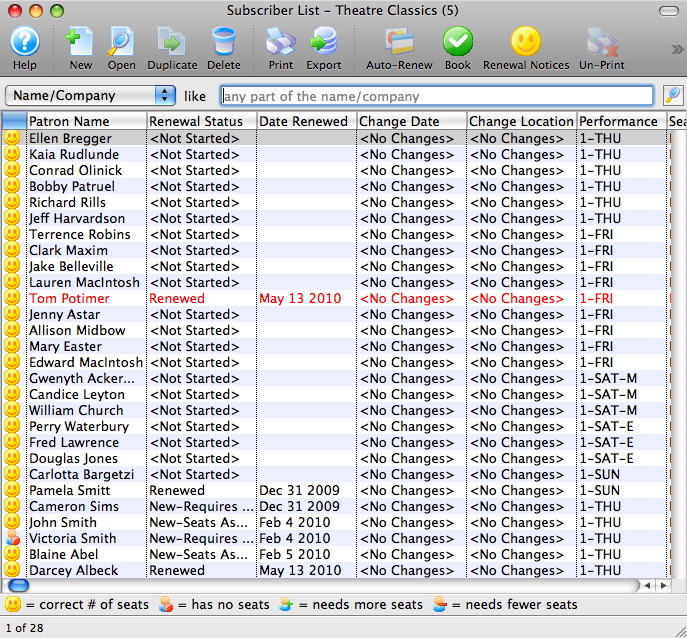
Holding Seats in the Season Package List Window
Holding Favorite Seats filters through the events within the season and holds the patrons favorite seats for each performance within the season package. You use this feature when single ticket sales begin prior to the renewal process completing.
Holding Favorite Seats within the Season Package List window holds the seats for every patron within the season package who has not yet renewed. If more selective holds are required the Manage Favorite Seats Hold options may be more applicable.
- Click Patron Sales >> Season Reservations >> Setup Season Packages.
The Season Package List window opens.
- Click on the Season Package to select it. Then click the Hold Season Seats button at the top of the window.
The Book Season Subscription Options window opens.
For more information on the Book Season Subscription Options window click here.
- In Step 1, choose the assignment option.
When you assign the holds to the patron, you can hover over the seat, within the performances, and view who the seat belongs to. Choosing not to assign the seats to the patron, holds the seat but the subscriber details remain anonymous.
- In Step 2, set the Date and time the seats are released.
Theatre Manager automatically releases the holds for the date and time entered or, at the set Auto Release time.
- In Step 3, enter any comments about the holds.
These comments will appear when the cursor hovers over the seats within the performance.
- Click the Hold button.
The Hold Confirmation window opens.
- Click the Yes button.
The Season Package List window opens and the seats are held within the performances.
The subscribers seats are held until the date indicated in the Hold Season Subscription Option window. At that date and time, the seats are released.
If the hold needs to be extended, access the Season Package List window run the Hold Season Seats process again. The seats are held until the release date, the patron renews their subscription or the hold is overridden in the event. Booking a season subscription will override the hold without having to release it.
Season Packages Detail Options
Verifying Holds in a Season Subscription Package
You use Verify Holds to recalculate the totals for the selected Season Subscription Package.
You can also use this tool to add patrons to the season when they were not booked through the Season Subscriptions Module but, booked manually, such as, a regular ticket sale. The options you select, determine the details of the Verify process.
To Verify Holds, you perform the following steps:
- Click Patron Sales >> Season Reservations >> Setup Season Packages.
The Season Package List window opens.
For more information on the Season Package List window, click here.
- Click to highlight the Season Package you want to verify. Then, click the Open button.
The Package Detail window opened.
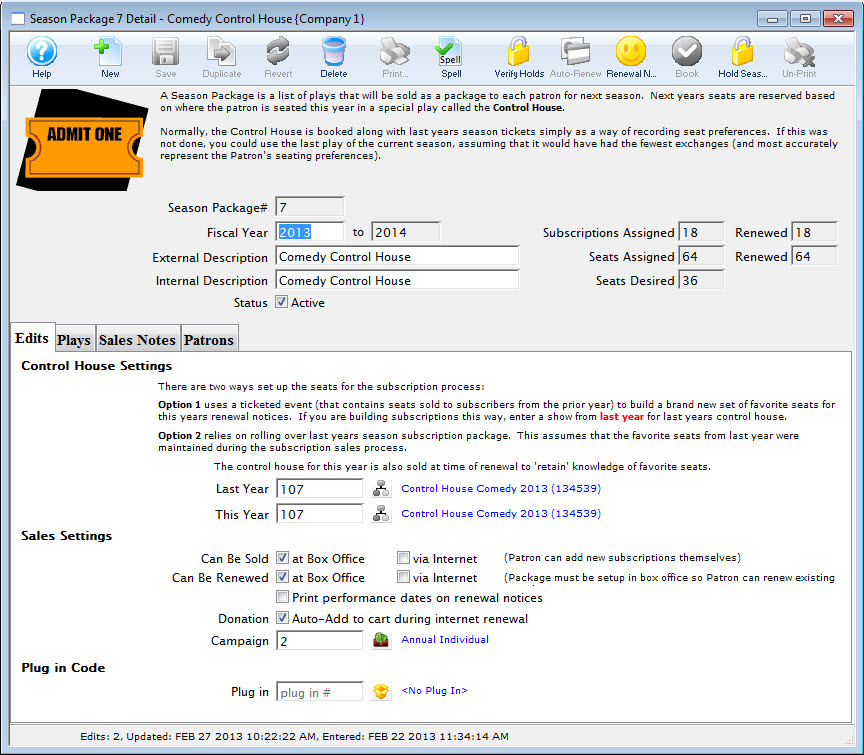
For more information on the Package Detail window, click here.
- Click the Verify Holds button.
The Verify Season Subscription Packages window opens.
- Highlight all the performances listed. Make your check box selections, then click the Validate Subscription button.
Let the process run.
- Click the Done button.
Auto Renewal in the Season Package Detail Window
|
You can mark an individual subscription as auto-renew in the patrons subscription detail window - auto renew tab |
|
This Process cannot be easily undone. |
- Click Patron Sales >> Season Reservations >> Setup Season Package.
The Season Package List window opens.
- Double click on the Season Package to be Auto Renewed.
- Click the Auto-Renew button.
The Season Subscription Auto-Renewal window opens.
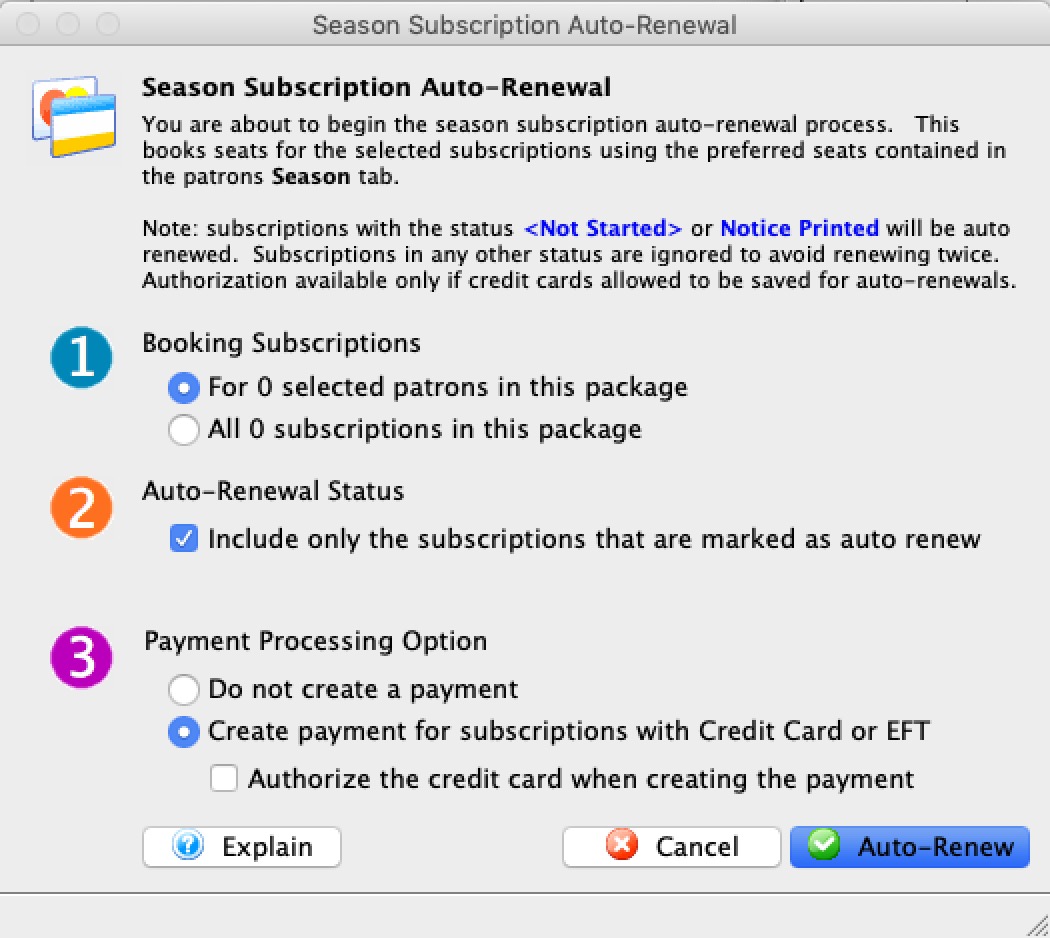
For more information on the Season Subscription Auto-Renewal window click here.
- In Step 1, choose the season packages to be auto-renewed.
The Selected Patrons option only auto-renews the patrons you selected in the previous window. The Subscriptions option auto-renews all subscriptions that have not been canceled or already renewed for the individual series code.
- In Step 2, select the Auto-Renewal Status.
When enabled--only subscriptions with the Auto-Renew options checked in the Patron Season Detail window are Auto-Renewed. If left unchecked, all the selected season subscriptions will be Auto-Renewed despite the Patron Season Detail preferences.
- In Step 3, pick the the Payment option.
The Do Not Create a Payment option places the outstanding balances on account and creates an entry in the Accounts Receivable. The Create Payment option adds a payment to the newly created season subscription order. This payment will appear in the Deposit window of the End of Day Wizard. If the Authorization option is checked, it appears as standard authorized transaction. If left unchecked it appears as an unauthorized card.
- Click the Auto-Renew button in the lower right corner.
The Auto-Renew Confirmation window opens.
- Click the Auto-Renew button.
Auto-renew can take time to complete. Do not interupt the process.
The selected season package is renewed. The seats for each performance, within the subscription have been sold into the order. Depending on the payment option selected the order may or may not have an outstanding balance.
Booking a Patron's Subscription from the Season Package Detail Window
To booking a patron's subscription from the Season Package Detail Window, you would perform the following steps:
- Click Patron Sales >> Season Reservations >> Setup Season Packages.
The Season Package List window opens.
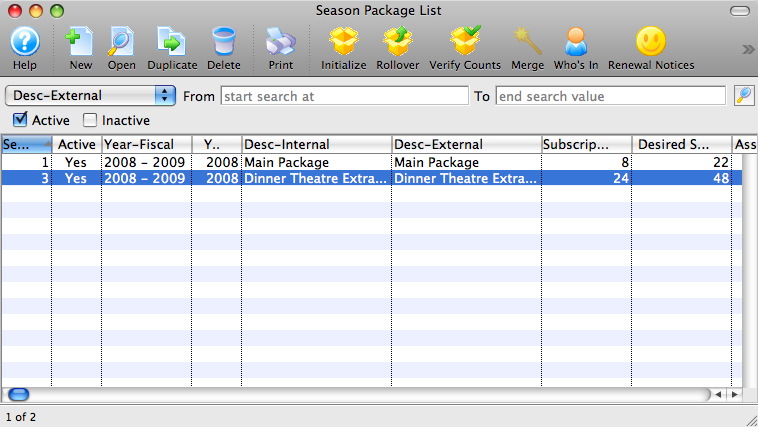
Click here for more information on the Season Package List window.
- Click to select the desired season package. Then, click the Open
 button.
The Season Package Detail window opens.
Click here for more information on the Season Package Detail window.
- Select the Patrons tab.
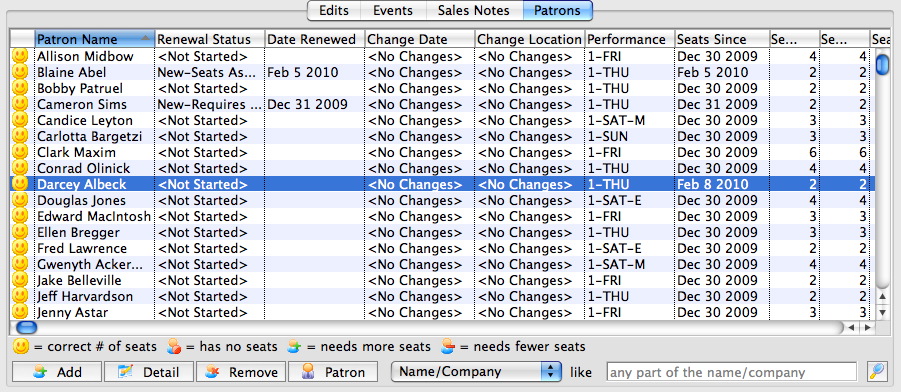
- Click the patron to select them. Then click the Book button.
The Order opens to the Payment window.
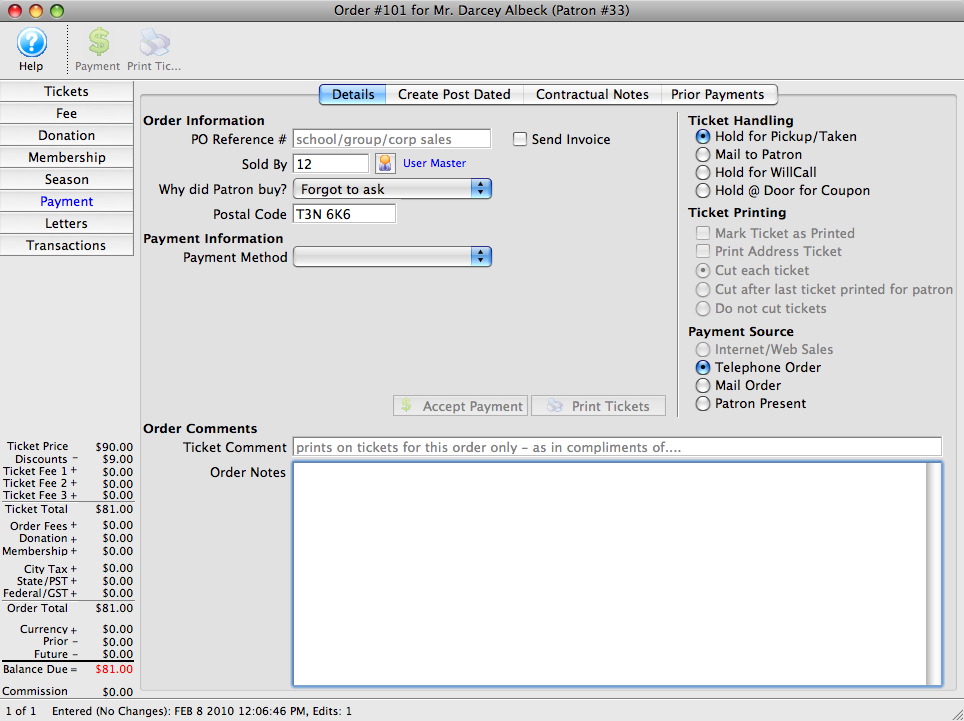
For more information on the Payment window click here.
- In the Payment Method drop list select the form of payment. Enter the payment details and accept the payment.
If the tickets are to be printed now, select Print Tickets. If the tickets will be Batch Printed at a later date select the Accept Payment button.
The payment window closes and the Season Subscription Detail window opens.
The patron status in the season package is updated.
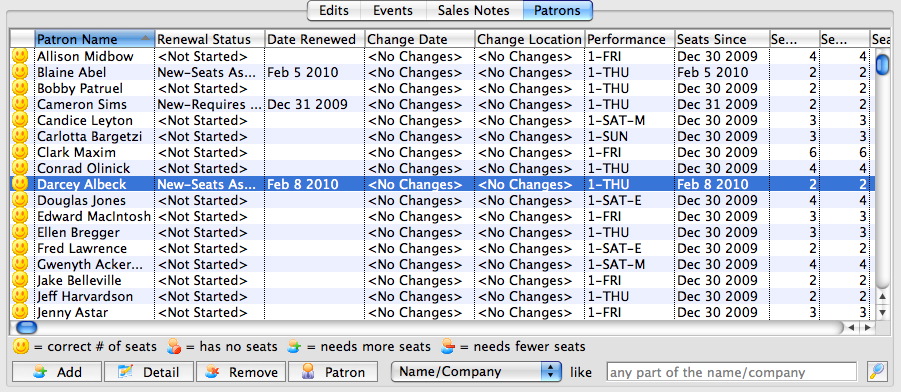
The patron's tickets are booked and the Season Subscription Detail window shows the changes.
Holding Season Seats from the Subscription Detail Window
This function filters through the events within the season package and holds the patrons favorite seats for each performance within the season package. You can use this, when single ticket sales begin before the Season Renewal process completes.
To hold seats from the subscription detail window, you perform the following steps:
- Click Patron Sales >> Season Reservations >> Setup Season Package.
The Season Package List window opens.
- Double click to open the desired season package.
- Click the Hold Season Seats button.
The Hold Season Subscription Options window opens.
For more information on the Hold Season Subscription Options window click here.
- In Step 1, choose the assignment option.
When you choose to assign the holds to the patron, you can hover over the seat in the performances and view who the seat belongs to. Choosing not to assign the seats, holds the seat but the subscriber details remain anonymous.
- In Step 2, you determine the Date and Time the seats are released.
Theatre Managerautomatically releases the holds on the date and at the time entered or at the set Auto Release time.
- In step 3, enter any comments about the holds.
These comments will appear when the cursor hovers over the seats within the performance.
- Click the Hold button.
The Hold Confirmation window opens.
- In the confirmation window, click the Yes button.
The patron seats you have selected are held until the date set in the Hold Season Subscription Option window. In that date and time, the seats are released. If the hold needs to be extended, the Manage Favorite Seats window can be accessed and you can do the Hold Season Seats process again. The seats are held until the release date, the patron renews their subscription or the held is overridden in the event. Booking a season subscription overrides the hold without releasing it.
Adding Events To a Season Package
To add events to a Season package, you perform the following steps:
- Click Patron Sales >> Season Reservations >> Setup Season Packages.
The Season Package List window opens.
For more information on the Season Package List window, click here. - Select the Package to add the Events to. Then click the Open button at the top of the Season Package List window.
The Season Package Detail window opens.
For more information on the Season Subscription Detail window click here. - Select the Events tab.
- Click the New button in the lower left corner.
The Event List window opens.
For more information on the Event Lookup List window, Click here. - Select the events to be added to the Season Package.
To select multiple events, use the <SHIFT> key to select a series of events, or the <CTRL> key (Windows) or the <OPTION> key on the Mac.
Click the Select button.
The Events for the coming season will populate into the Events tab.
- Close the Season Subscription Detail window.
Altering Sales Settings
To Alter Season Subscription Sales Settings, you perform the following steps:
- Click Patron Sales >> Season Reservations >> Setup Season Packages.
The Season Package List window opens.
For more information on the Season Package List window, click here.
- Select the Package where the Sales Setting needs altering. Then, click the Open button at the top of the Season Package List window.
The Season Package Detail window opens.
For more information on the Season Subscription Detail window click here.
- Check or Uncheck the Sales Setting options as required.
- Close the Season Subscription Detail window.
Exporting Season Ticket Data for Off Site Printing
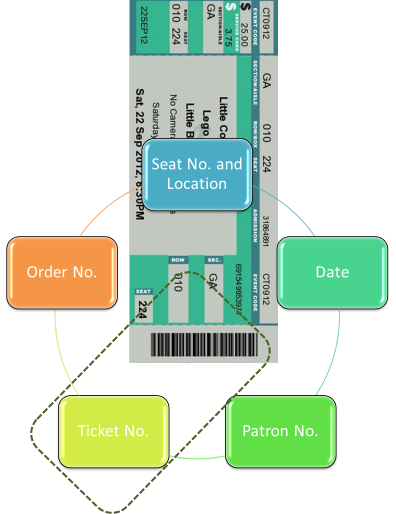
First you need to consider if you are printing the whole house for each show ahead of time (before selling them)
or, are you having the already sold subscription tickets printed.
If you are having an outside agency print the whole house, ahead of selling, then you will need to contact us for our help in getting the data export for the print house. We ask that you speak with us for the details and we will require remote access to the database server.
If you are printing already sold tickets, then that unique ticket number on each ticket is already keyed to the seat information in the Theatre Manager database. The barcode needs to be based on the ticket number.
You can export patron information, show information, seat location, etc. to print on the ticket face, then have the barcode set to just be the ticket number.
Then, when you scan the bar code, it will reference the ticket number in the Theatre Manager database, which is a unique number and references all of the other data tied together in the system.
The best way to get the data for the tickets, is to use the Reports, Form Letters, Labels, Exporting Record Counts category, Export Data function. It can also be found under File >> Import/Export >> Export Data.To export data in a .txt format, you perform the following steps:
- Open the Reports window by clicking on the Reports
 button.
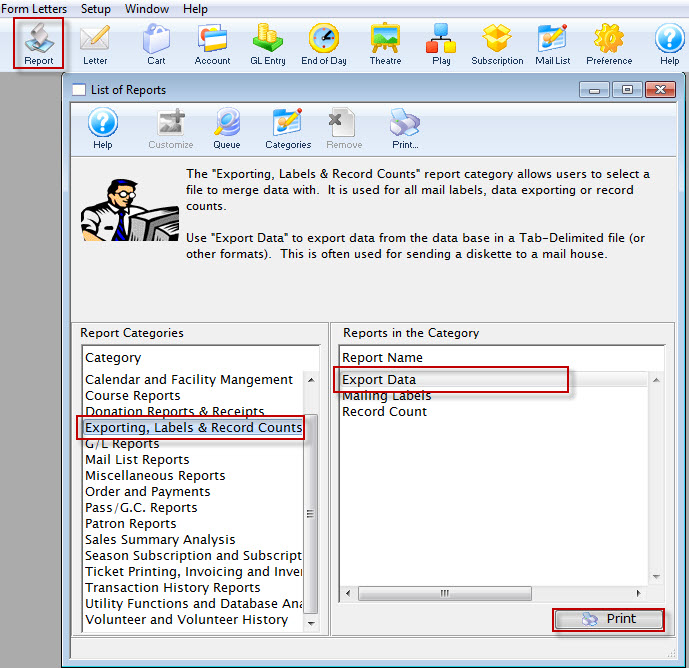
Click here for more information on the Reports window.
- Click on the Form Letters, Labels, Exporting & Record Counts category on the left hand side, and then double click on the Export Data category on the right hand side.
The Export Data dialog opens.
- Use the drop down menu to select Ticket Data Per Performance as the parent files to use.
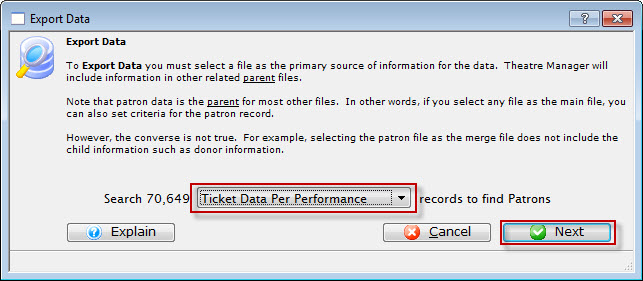
Remember that in Theatre Manager, data is contained in different areas so make sure the information being exported does not cross two different sets of parent files.
- Click the Next button.
The Parameters window opens with default criteria in the Search tab.
Click here for more information on the Parameters window.
- Remove the Marketing Flags.
- Click the New button.
Click here for more information on adding criteria.
- Set the criteria to:
Event # is one of (highlight all appropriate Season events)

- Under the Sort Tab, you could choose Patron last Name, Patron First Name.
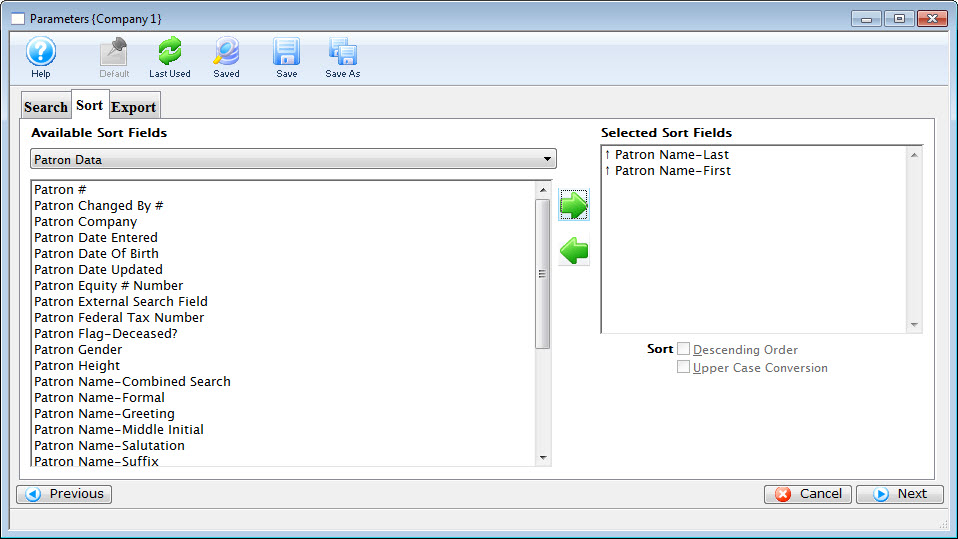
- On the Export Tab, choose Patron Data from the Available Export Fields.
Select: Patron Name - Last, Patron Name - First, Patron Company.
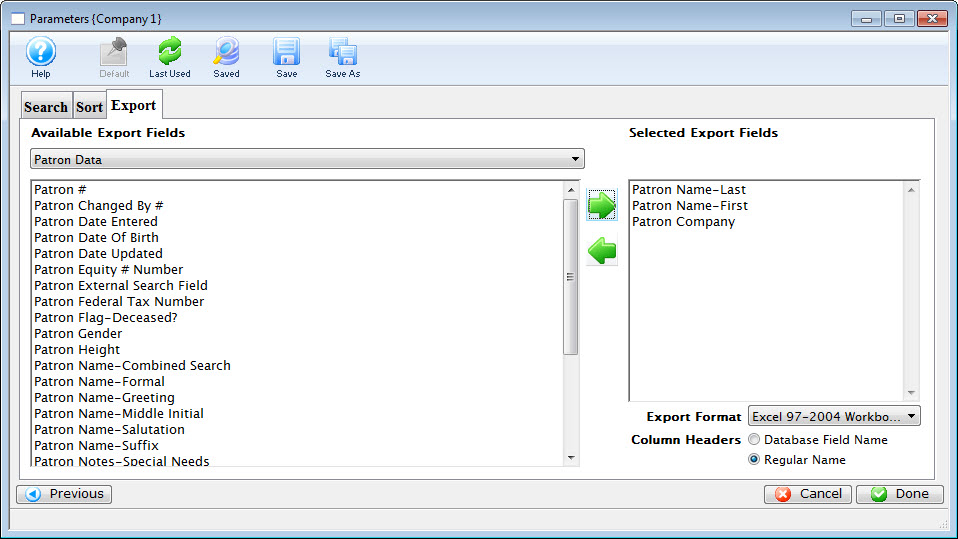
- Choose Pricing Map Section/Row/Seat Descriptions from the Available Export Fields.
Select: Map Seats Section, Row Number, Seat Number.
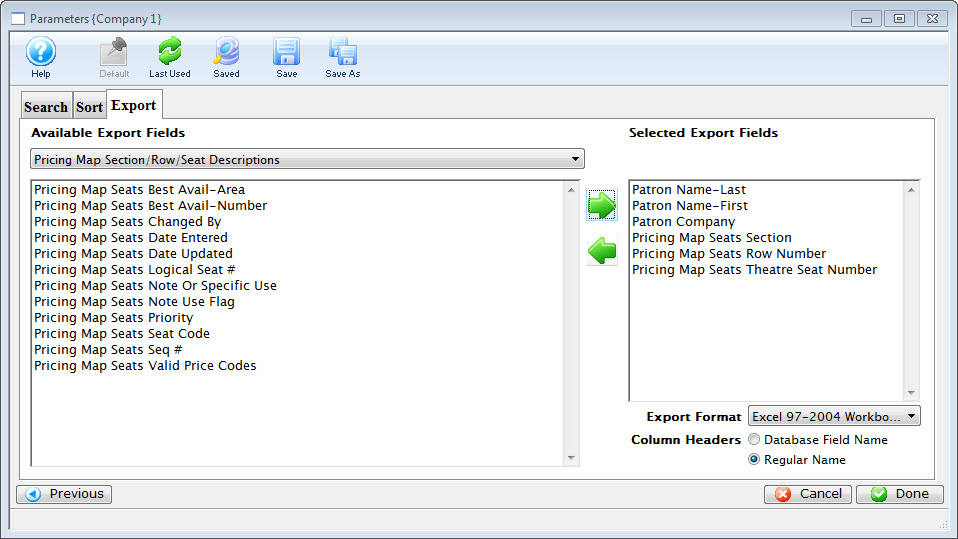
- Choose Ticket Data Per Performance from the Available Export Fields.
Select: Ticket #.
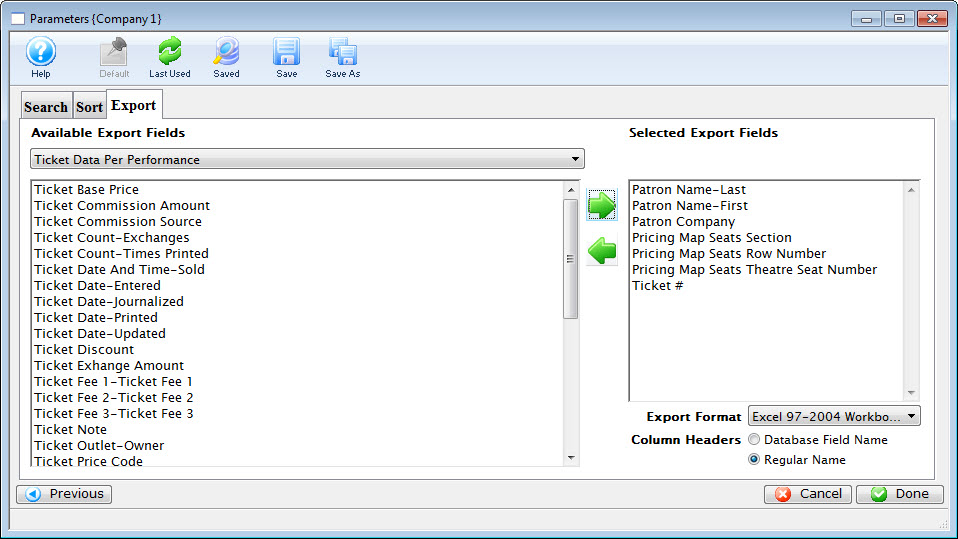
- Choose Performance (Play/Event/Game)Information from the Available Export Fields.
Select: Performance (Play/Event/Game) Code, Performance (Play/Event/Game) Name.
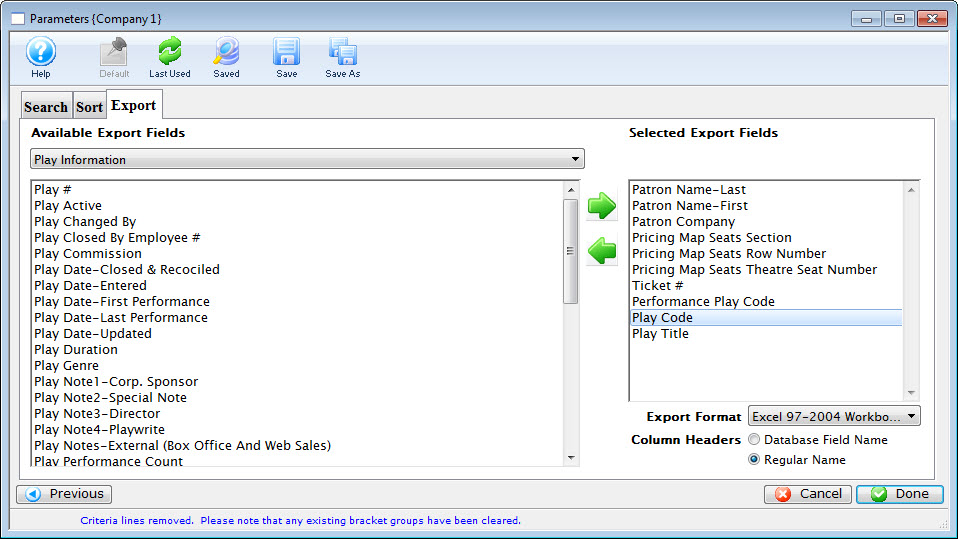
- Choose the format from the drop down list and click the Done button.
The above fields for selection are guidelines only. Assess which information you want to appear on your ticket. The important field for the bar code is the Ticket Number.
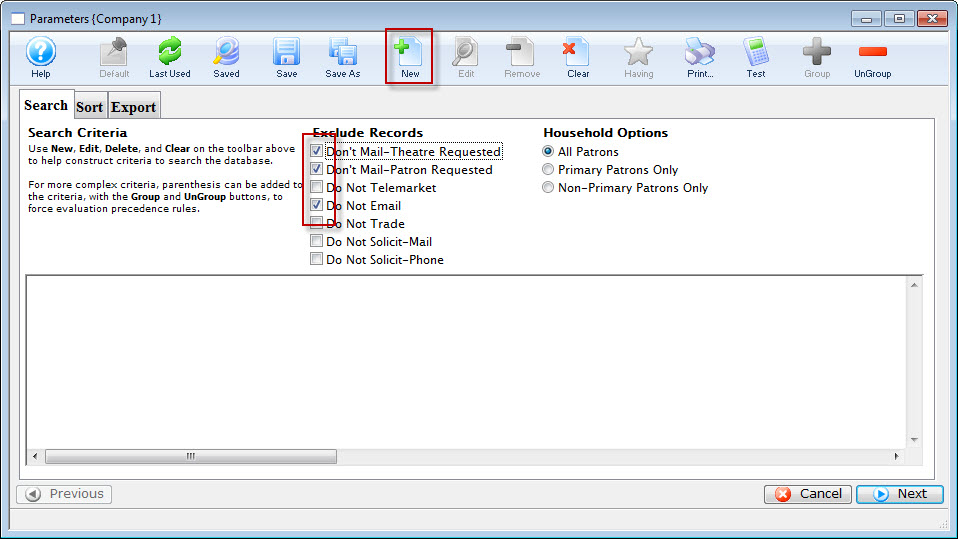
Printing Renewal Notices
Printing renewal notices is done at the end or beginning of each season to remind patrons that it is time to renew their package subscription.
- Click on the Patron Sales menu from the main menu bar.
- Go to Season Reservations >> Print Renewal Notices.
The Season Ticket Renewal Notice Criteria window opens.

For more information on the Season Ticket Renewal Notice Criteria window, click here. For more information on printing renewal notices, click here.
Customized Renewal Notices
In Theatre Manager, you can customize your Season Renewal Notice to print it in a different format than the standard notice. For more information on printing the standard notice, click here.
Customized renewal notices contain the same information as the standard notice, however you can customize your form by moving the data around on the page, or you can delete the fields you do not want to appear. Printing your customized renewal notice is done through the reports menu.
- Open the Reports module, and select the Season Subscription and Subscription Packages category.
- Highlight (single click) the Season Ticket Renewal Notice report.
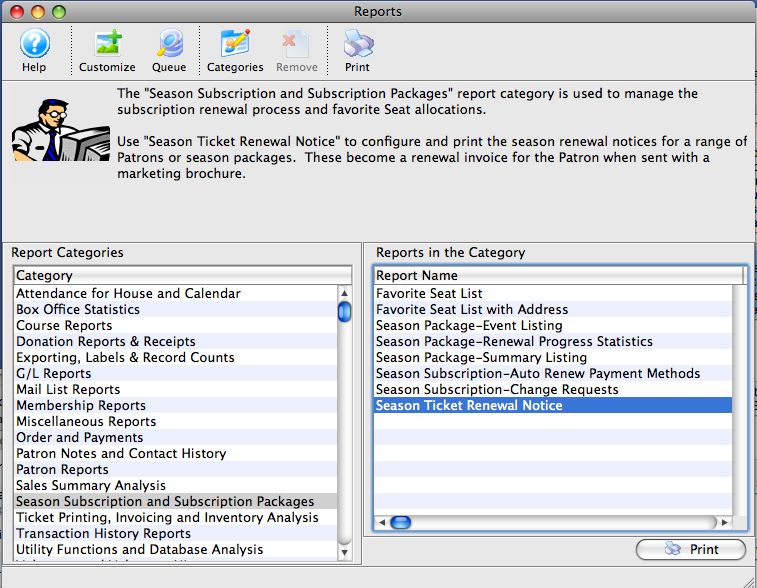
- Click the Customize
 button.
The Customizing Custom Season Ticket Renewal Notice window opens.
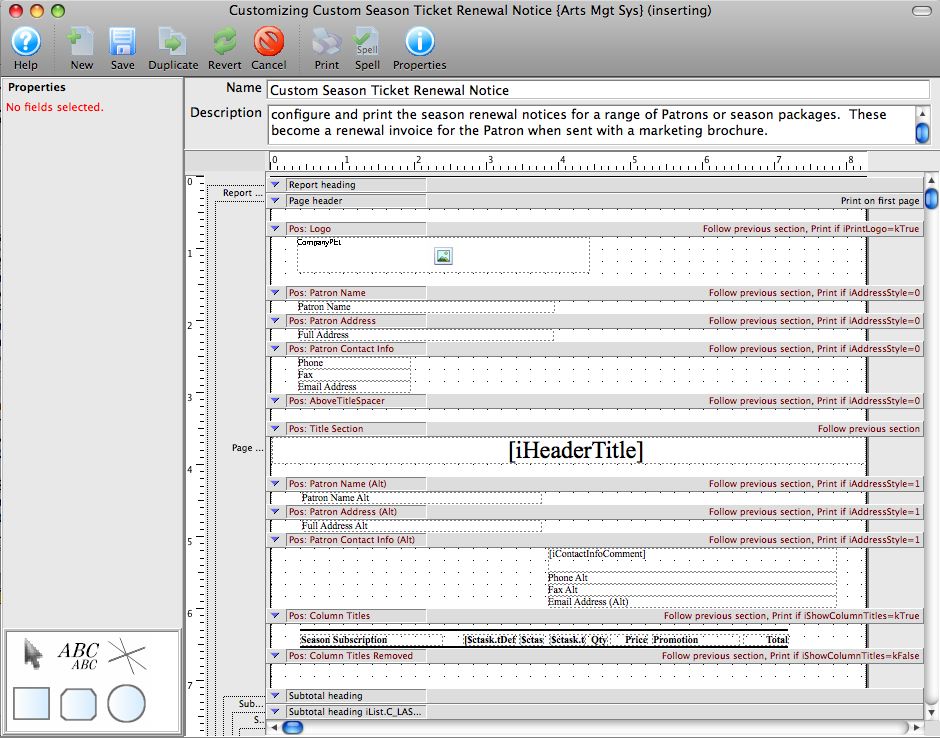
- Make your edits.
- Click on the ABC icon in the lower left toolbox.
- Draw a box on the renewal notice in the location you want the new text box.
- A new menu appears on the left to choose the font and point size. Select the font and size you wish to use.
- Double click on the box you drew.
- Enter the text you want to appear in the box.
- Use the formatting tools in the text box to bold, italicize, underline or change the font color.
- Click anywhere outside the box to close the editing window.
- Name your customized Renewal Notice at the top, and give it a description.
- Click the Save button.
| Margins | Edit the vertical margins in each section by raising and lowering the gray bars in between the sections. |
|
Edit the left margin by placing your cursor at the far left of the page, and clicking and dragging the start of the page left or right. Edit the page margins by clicking on the Properties Changing the top margin lowers the print on the page as shown.
| |
| Graphics | Boxes, circles, rounded boxes or new text blocks can be added and edited using the toolbox in the lower left corner. You add shapes and lines by clicking on the appropriate tool in the toolbox in the lower left corner, then drawing the item within the customized notice. |
| Text | Existing text is edited by double clicking on the text box within the custom notice and editing it within the box. Close the box, by clicking anywhere off the box. You can also edit the contents of existing text blocks within each section, or add text blocks. You can remove fields from the notice entirely if you choose not to use them. |
|
To add a new text box: |
 icon.
icon.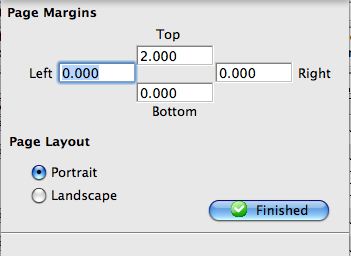

Once you have saved your Customized Renewal Notice, you can access it either through the Reports menu:
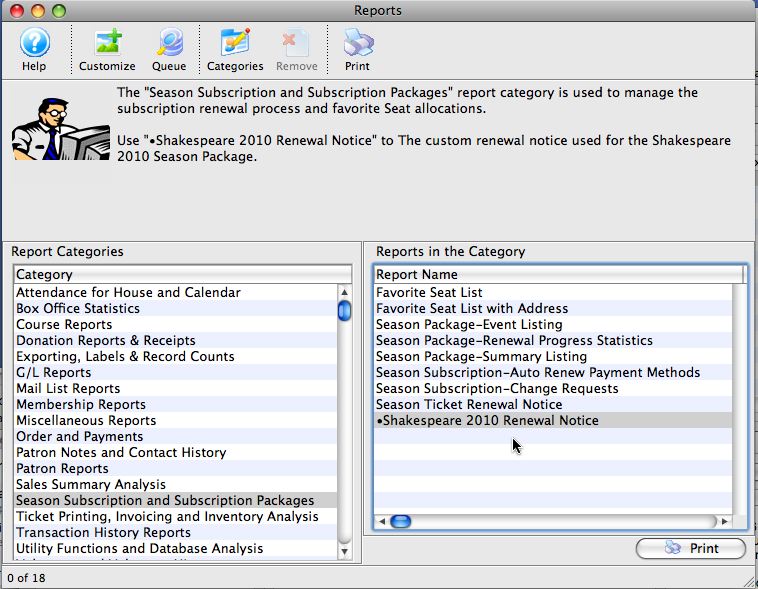
or through the Patron window on the Season tab , under the Print Notice  button.

For more information on printing renewal notices, click here.
Print Notices from the Manage Favorite Seats Window
Notices can be printed directly from the Manage Favorite Seats window. To start, you perform the following steps:
- Click the Subscription button in the Theatre Manager ribbon bar.
The Manage Favorite Seats window opens.
- Highlight the patron to print the notices for and click the Renewal Notice
 button.
The Season Ticket Renewal Notice Criteria window opens.
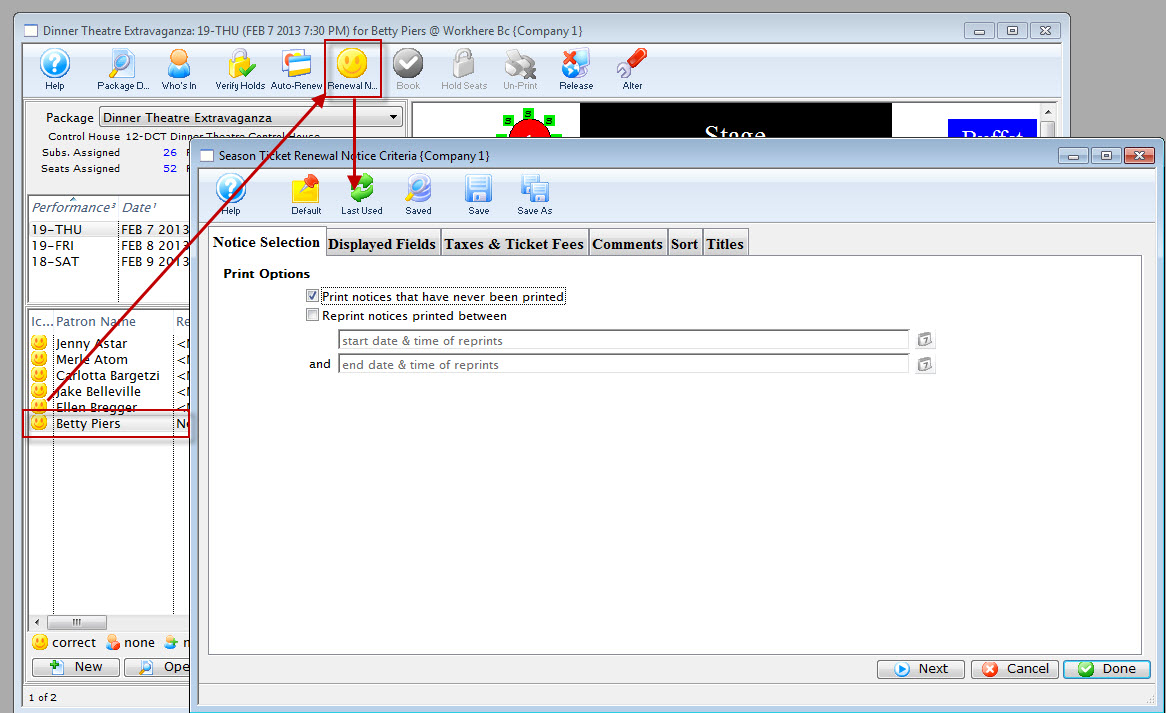
- Choose the Options you want to print.
To reprint notices previously printed, use the reprint option.
Click here for more information on the Notice Selection tab.
- Then click the Next
 button.
The Displayed Fields tab of the window opens.
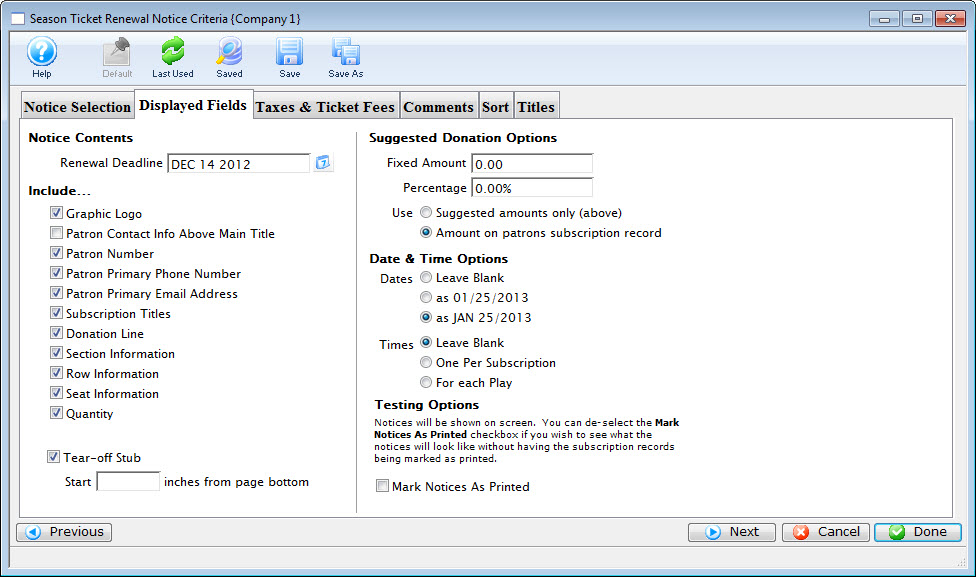
- Select the fields you want to have printed on the renewal notices. Then click the Next button.
Click here for more information on the Display Fields tab.
The Taxes & Ticket Fees tab of the window opens.
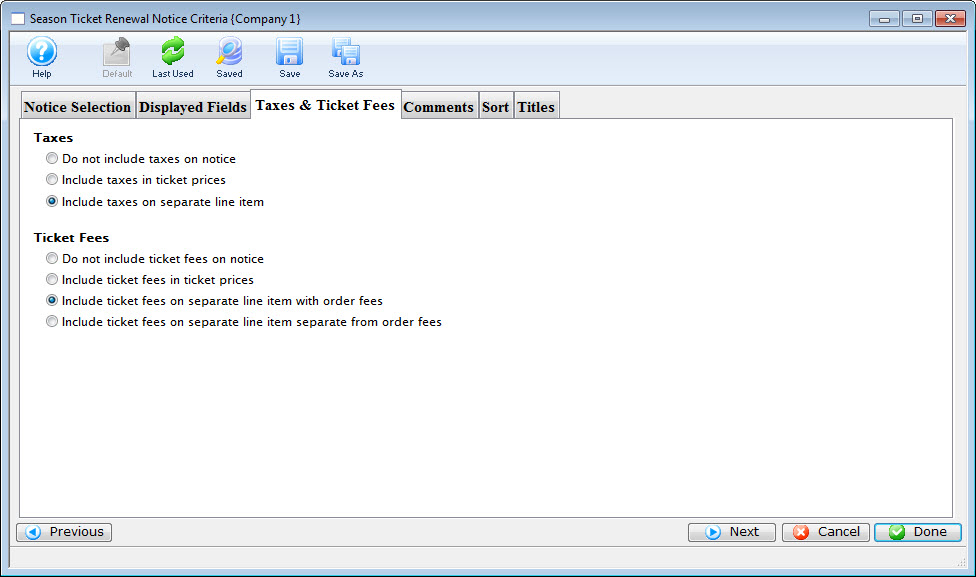
Click here for more information on the Taxes & Ticket Fees tab.
- Make the appropriate selections. Then click the Next button.
The Comments tab opens.
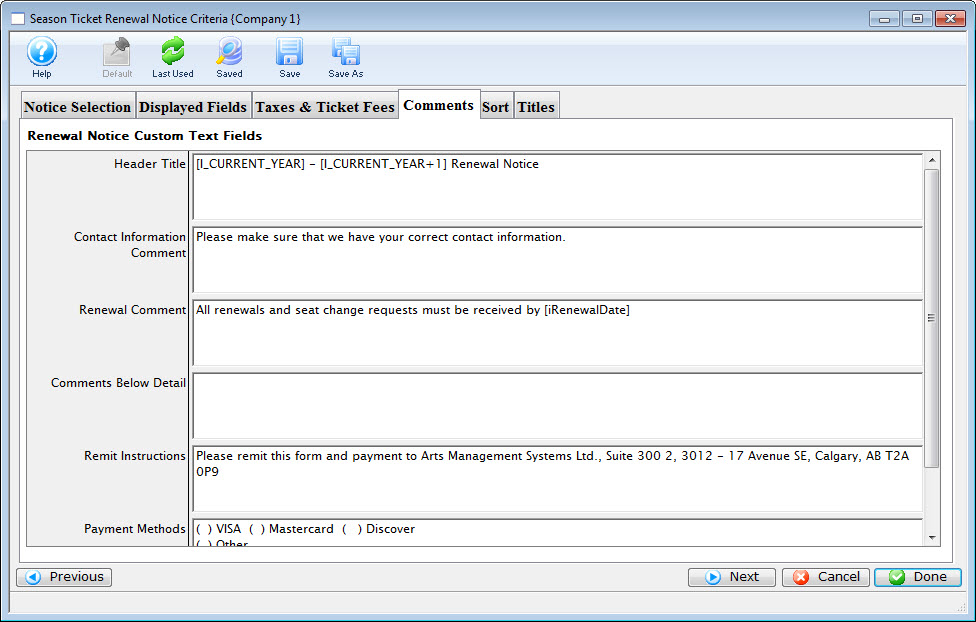
Click here for more information on the Comments tab.
- Edit the comment fields on the notice. Then click the Next button.
The Sort tab opens.
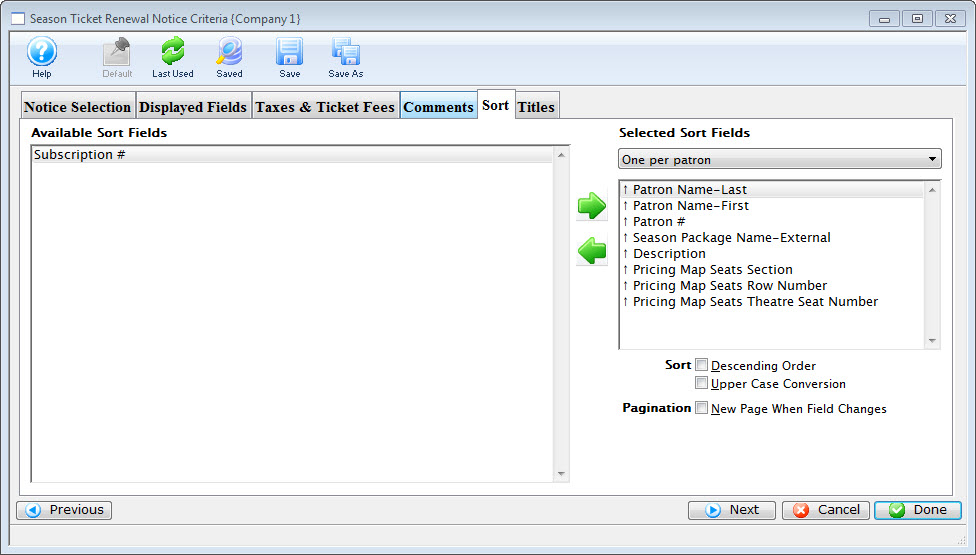
Click here for more information on the Sort tab.
- Make the appropriate selections. Then click the Next button.
The Title tab opens.
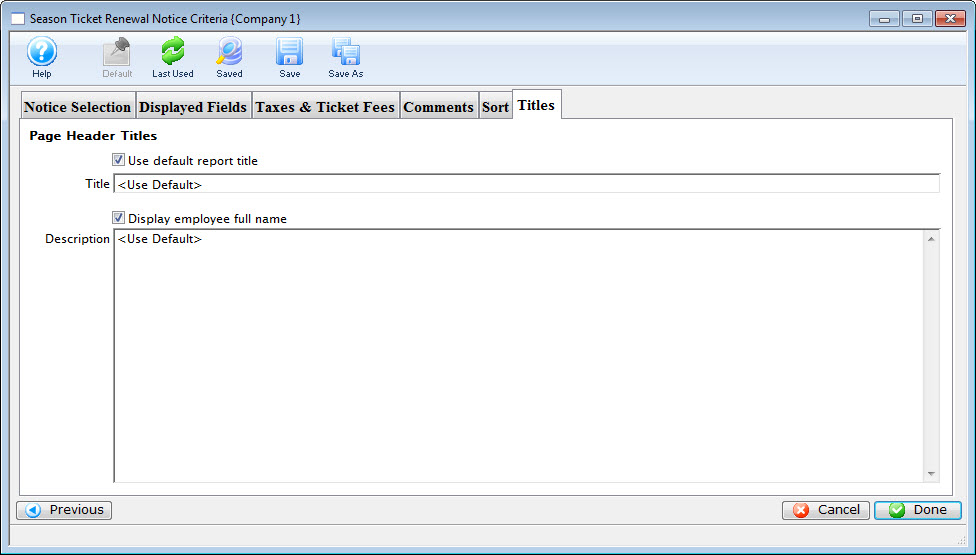
- You can enter a a new title and description and click the Done button.
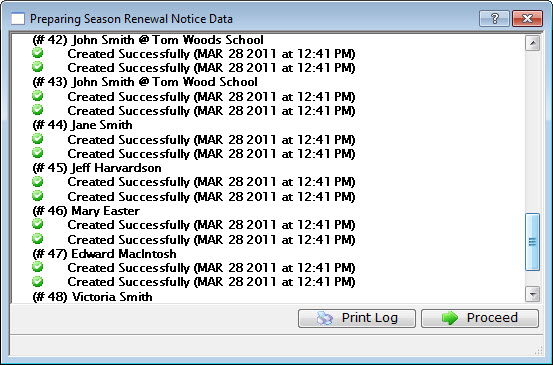
- Click the Proceed
 button to see a preview of the completed notices.
The Print
 button will print the notices without previewing them. To make changes before previewing the notices, simply close the Renewal Notices Data window.
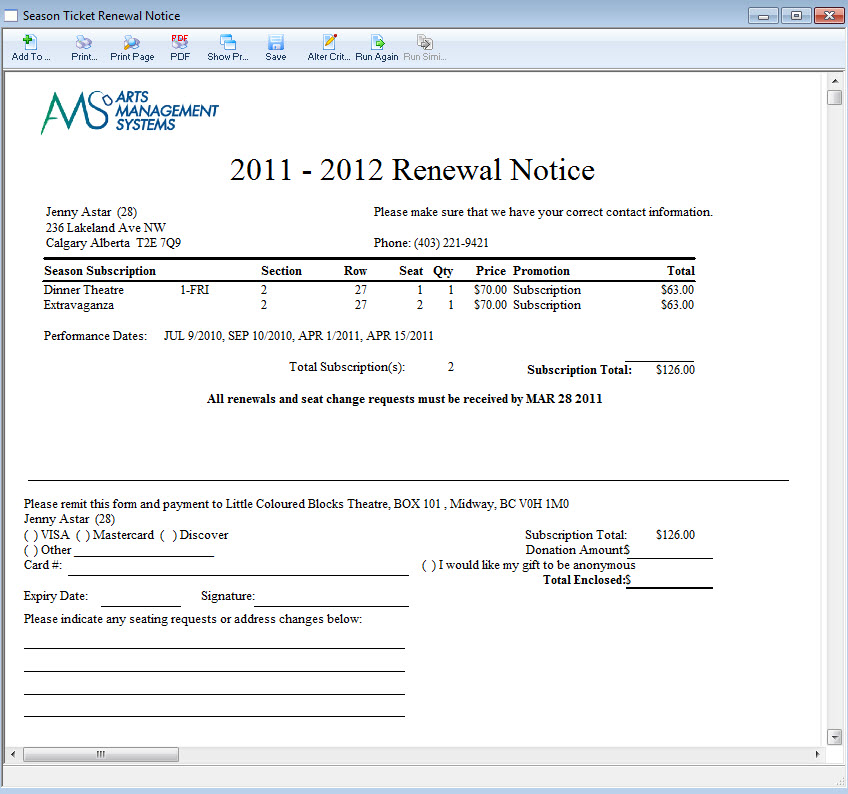
Click here for information on the Finished Report window.
You can now print the documents to a printer, or pdf (for emailing).
Printing Renewal Notices From the Detail Window
- Click Patron Sales >> Season Reservations >> Setup Season Packages.
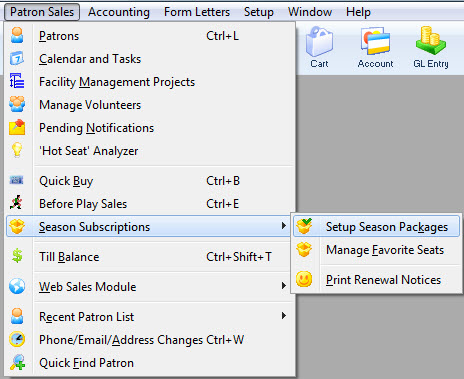
The Season Package List window opens.
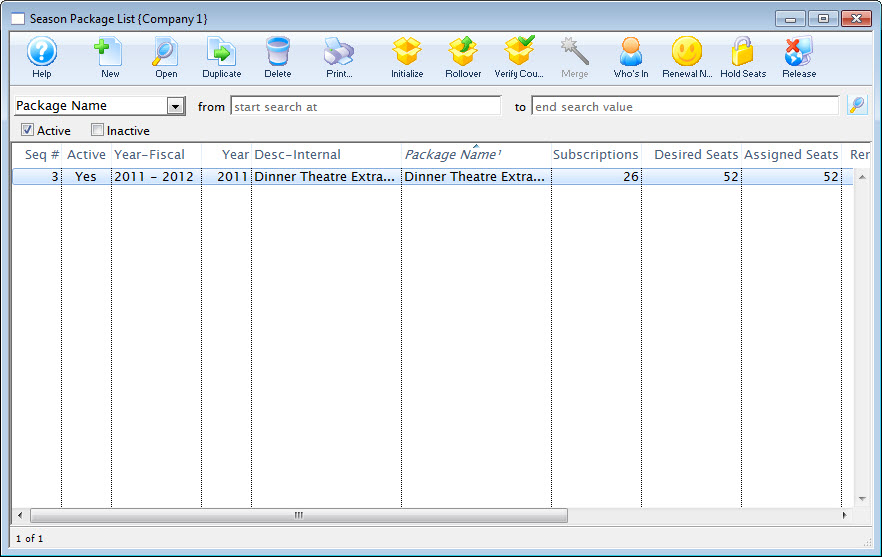
Click here for more information on the Season Package List window.
- Single click on the desired season package to select it.
- Click the Open button at the top of the window.
The Season Package Detail window opens.
Click here for more information on the Season Package Detail window.
- Highlight the patron to print the notices for and click the Renewal Notice button.
The Season Ticket Renewal Notice Criteria window opens.
- Choose the Options you want to print.
To reprint notices previously printed, use the reprint option.
Click here for more information on the Notice Selection tab.
- Then click the Next button.
The Displayed Fields tab of the window opens.
- Select the fields you want to have printed on the renewal notices. Then click the Next button.
Click here for more information on the Display Fields tab.
The Taxes & Ticket Fees tab of the window opens.
Click here for more information on the Taxes & Ticket Fees tab.
- Make the appropriate selections. Then click the Next button.
The Comments tab opens.
Click here for more information on the Comments tab.
- Edit the comment fields on the notice. Then click the Next button.
The Sort tab opens.
Click here for more information on the Sort tab.
- Make the appropriate selections. Then click the Next button.
The Title tab opens.
- You can enter a a new title and description and click the Done button.
- Click the Proceed button to see a preview of the completed notices.
The Print
button will print the notices without previewing them. To make changes before previewing the notices, simply close the Renewal Notices Data window.Click here for information on the Finished Report window.
You can now print the documents to a printer, or pdf (for emailing).
Printing Season Subscription Renewal Notices
Printing renewal notices usually happens each season to notify patrons that it is time to renew their subscription to a season package.
- On the main menu bar, click on Patron Sales >> Season Subscriptions >> Print Renewal Notices.
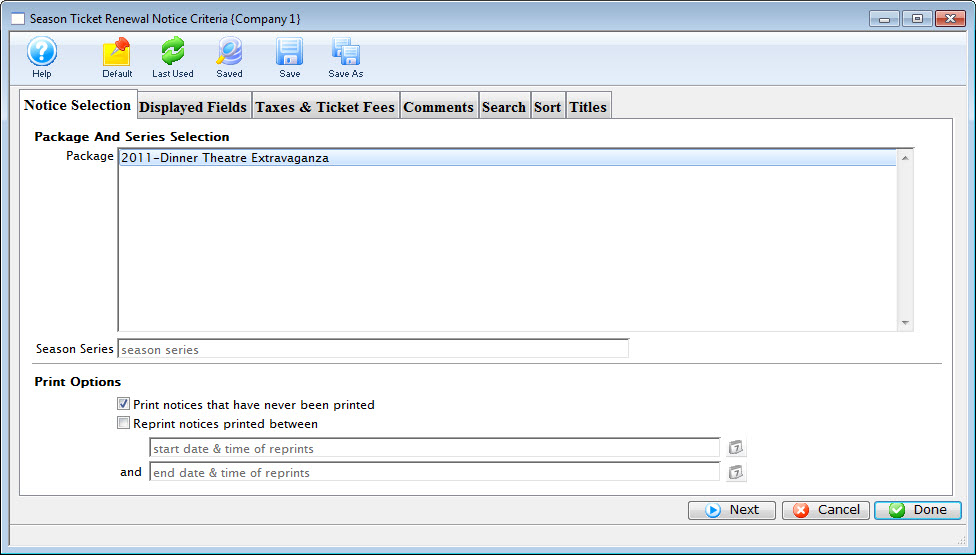
The Season Ticket Renewal Notice Criteria window opens.
- Choose the Options you want to print.
To reprint notices previously printed, use the reprint option.
Click here for more information on the Notice Selection tab.
- Then click the Next button.
The Displayed Fields tab of the window opens.
- Select the fields you want to have printed on the renewal notices. Then click the Next button.
Click here for more information on the Display Fields tab.
The Taxes & Ticket Fees tab of the window opens.
Click here for more information on the Taxes & Ticket Fees tab.
- Make the appropriate selections. Then click the Next button.
The Comments tab opens.
Click here for more information on the Comments tab.
- Edit the comment fields on the notice. Then click the Next button.
The Sort tab opens.
Click here for more information on the Sort tab.
- Make the appropriate selections. Then click the Next button.
The Title tab opens.
- You can enter a a new title and description and click the Done button.
- Click the Proceed button to see a preview of the completed notices.
The Print
button will print the notices without previewing them. To make changes before previewing the notices, simply close the Renewal Notices Data window.Click here for information on the Finished Report window.
You can now print the documents to a printer, or pdf (for emailing).
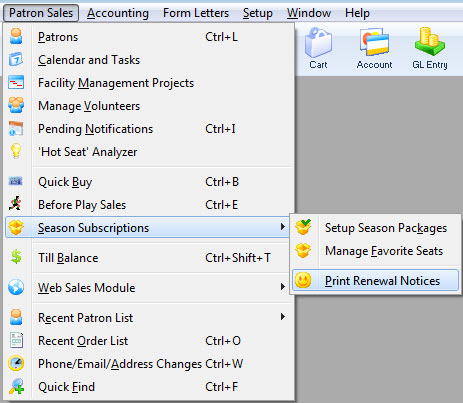
Season Ticket Renewal Notice Critera Window
The following, describe the different tabs available in the creation of the Subscription Notices
Selection Tab
You use the Season Ticket Renewal Notice Selection tab to determine which packages will have renewal notices printed in this run.
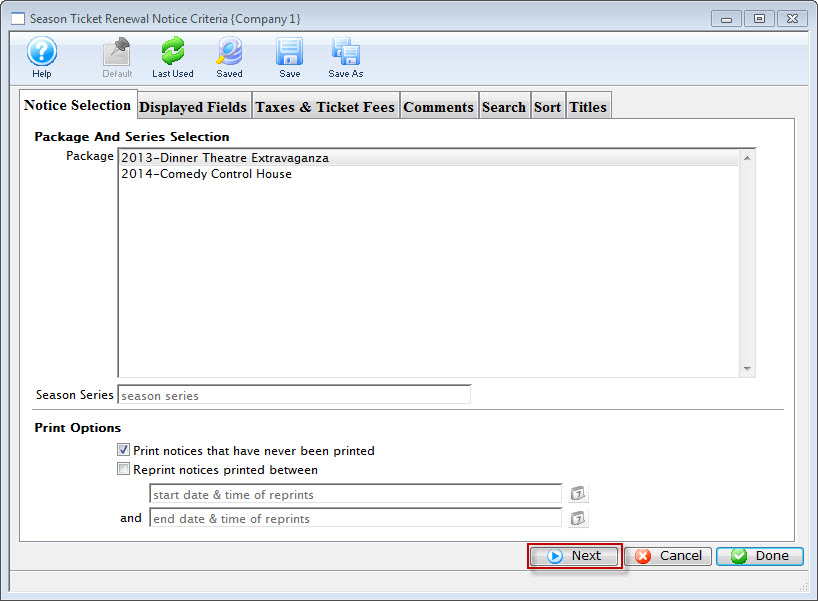
Parts of the Season Ticket Renewal Notice Selection Tab
Package and Series Selection |
|
| Package | Select the packages for which season renewal notices are to be printed. To select multiple packages, either use the SHIFT key to select a series of packages or the CTRL key (Windows) or OPTION key (Mac) to select multiple individual packages. |
| Season Series | Enter the season that the package will be part of. |
Print Options |
|
| Print notices that have never been printed | When checked, only notices that have never been printed will be searched for based on the package selections. |
| Reprint notices printed between | When checked, two dates will need to be entered by the user. Theatre Manager will find all renewal notices that were printed during that time frame and select them for printing. |
 |
This button will open the mini-calendar for easier entry of dates. |
|
Moves to the next tab of the process. |
 |
Cancels the renewal notices process. |
|
Leave the criteria entry process and begins assembling the renewal notices. |
Display Fields Tab
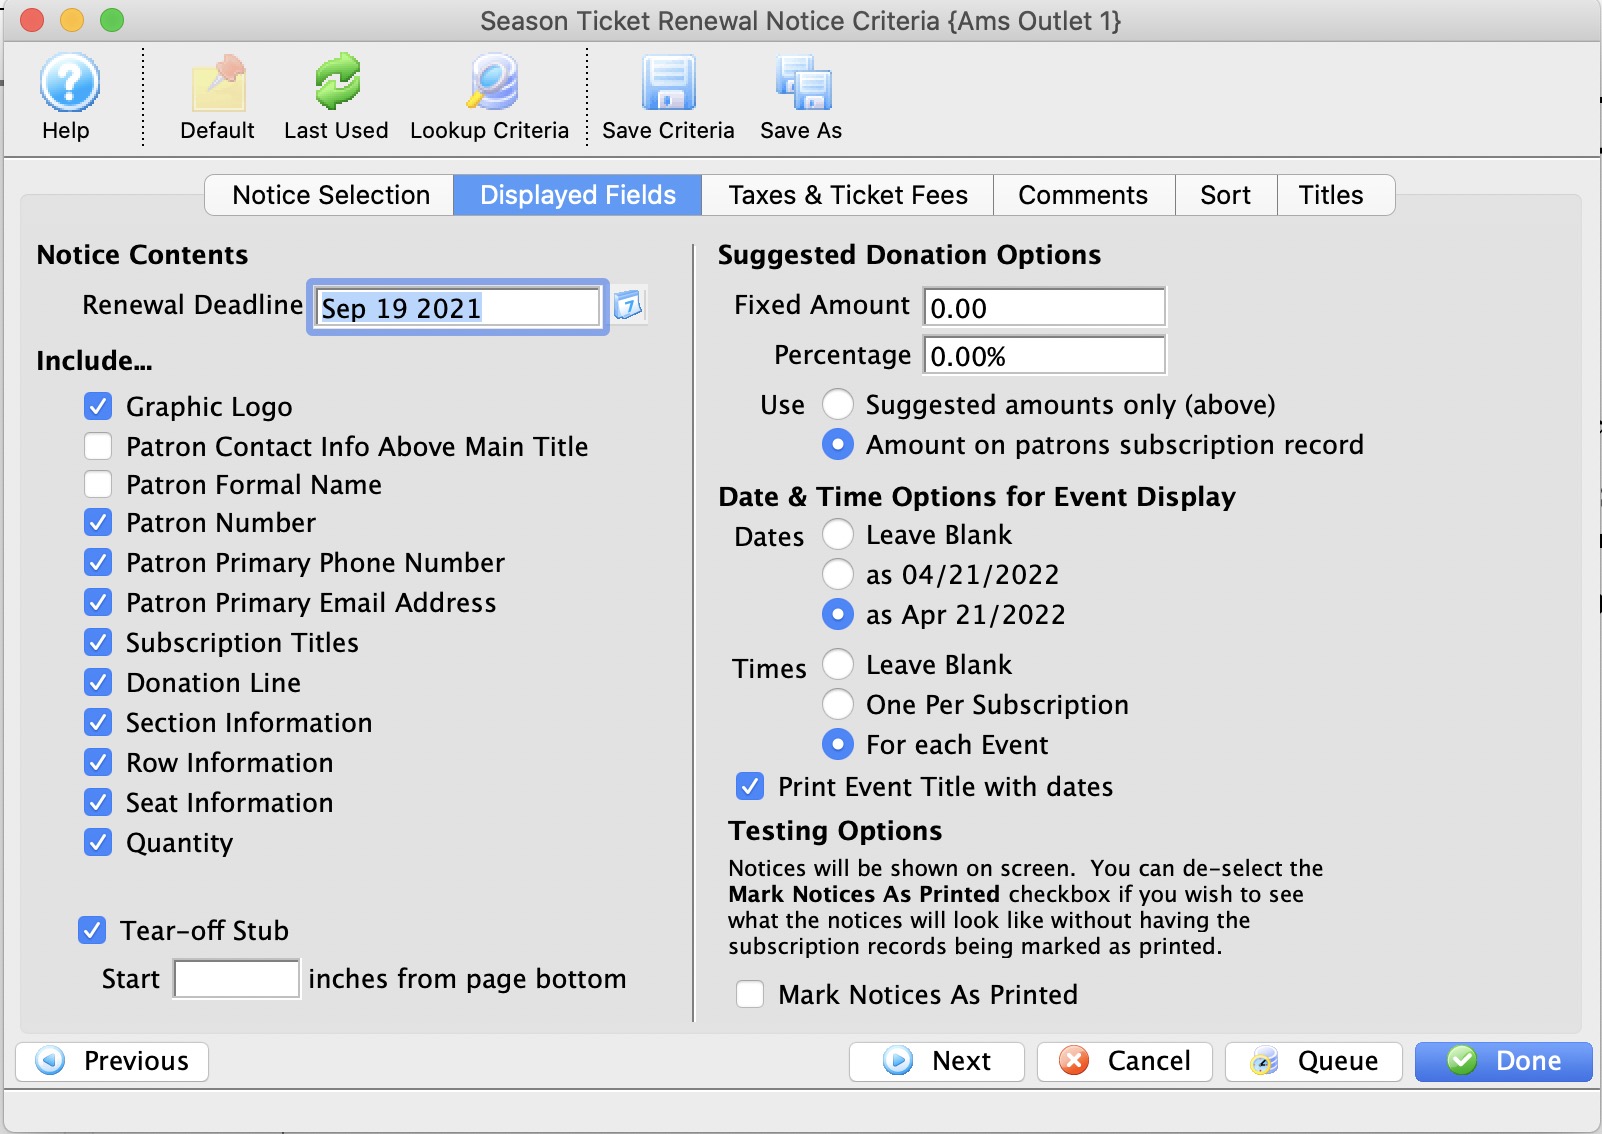
Parts of the Season Ticket Renewal Display Fields Tab
Notice Contents |
|
| Renewal Deadline | The date until which the patron's seats will be held for renewal. After this date, the seats will be made available to other patrons. |
 |
This button will open the mini-calendar for easier entry of dates. |
| Patron Contact Info Above Main Title | When checked, the patron's contact information will be moved above the title on the renewal notice. |
| Patron Number | When checked, the patron number of the patron will be included on the renewal notice. |
| Patron Primary Phone Number | When checked, the patron's primary phone number will be included on the renewal notice. |
| Patron Primary Email Address | When checked, the patron's primary email address will be included on the renewal notice. |
| Subscription Titles | When checked, the subscription titles will be included on the renewal notice. |
| Donation Line | When checked, the donation line will be included on the renewal notice. |
| Tear-Off Stub | When checked, a tear-off stub will be included on the renewal notice. |
| Section Information | When checked, the section information for the seats the patron holds will be included on the renewal notice. |
| Row Information | When checked, the row information for the seats the patron holds will be included on the renewal notice. |
| Seat Information | When checked, the seat information for the seats the patron holds will be included on the renewal notice. |
| Quantity | When checked, the quantity of seats will be included on the renewal notice. |
| Do not include taxes on the notice | When selected, taxes will not be included on the renewal notice. |
| Include taxes in ticket prices | When selected, the taxes will be included in the ticket prices on the renewal notice. |
| Include taxes on separate line item | When selected, the taxes will be listed as a separate item on the renewal notice. |
Suggested Donation Options |
|
| Fixed Amount | Allows for a fixed amount suggested donation to be included with the renewal notice. |
| Percentage | Allows for a percentage based suggested donation to be included with the renewal notice. |
Date & Time Options |
|
| Leave Blank | When selected there will be no date information printed on the renewal notice. |
| As Numerical (MM/DD/YYYY) | When selected, the date on the renewal notice will be listed in numerical format. |
| As Written (Month/DD/YYYY) | When selected, the date on the renewal notice will be listed in written format. |
| Leave Blank | When selected there will be no time information printed on the renewal notice. |
| One per subscription | When selected, the time will be listed once on the renewal notice. |
| For each event | When selected, the time for each performance will be listed on the renewal notice. |
| Print Event Title with Dates | If clicked, the event title will be printed along with the dates/times on the lower part of the renewal notices |
Testing Options |
|
| Mark Notices As Printed | When checked, the notices will be marked as printed once viewed on the screen. |
 |
Moves to the previous tab of the process. |
|
Moves to the next tab of the process. |
|
Cancels the renewal notices process. |
|
Leave the criteria entry process and begins assembling the renewal notices. |
Comments Tab
The Season Ticket Renewal Comments tab is used to adjust the comments that print on the renewal notice.
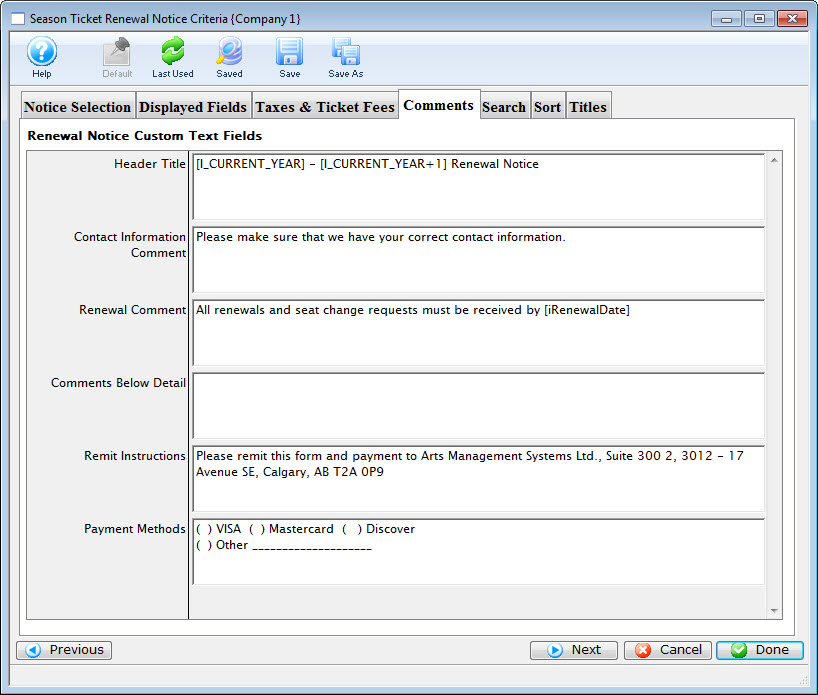
Parts of the Season Ticket Renewal Comments Tab
Renewal Notice Custom Text Fields |
|
| Header Title | Allows you to enter a custom header on your renewal notice. |
| Contact Information Comment | Allows adjustment of the default text that prints on the renewal notice in the renewal comments section. |
| Renewal Comment | Allows adjustment of the default text that prints on the renewal notice in the renewal comments section. |
| Comment Below Detail | Allows adjustment of the default text that prints on the renewal notice in the comments section under the package detail. |
| Remit Instructions | Allows adjustment of the default text that prints on the renewal notice in the remit instructions section. |
| Payment Methods | Allows adjustment of the default text that prints on the renewal notice in the payment methods section. |
 |
Moves to the previous tab of the process. |
|
Moves to the next tab of the process. |
|
Cancels the renewal notices process. |
|
Leave the criteria entry process and begins assembling the renewal notices. |
Search Criteria Tab
The Search Criteria tab is used to add the criteria to the report to find the specific information in the database that is needed. All reports need to have criteria selected or the report will pull all information from the database. This can take a very long time and make a very long report. By adding criteria, the reports only finds the specific information needed. Click here for detailed information on adding criteria.
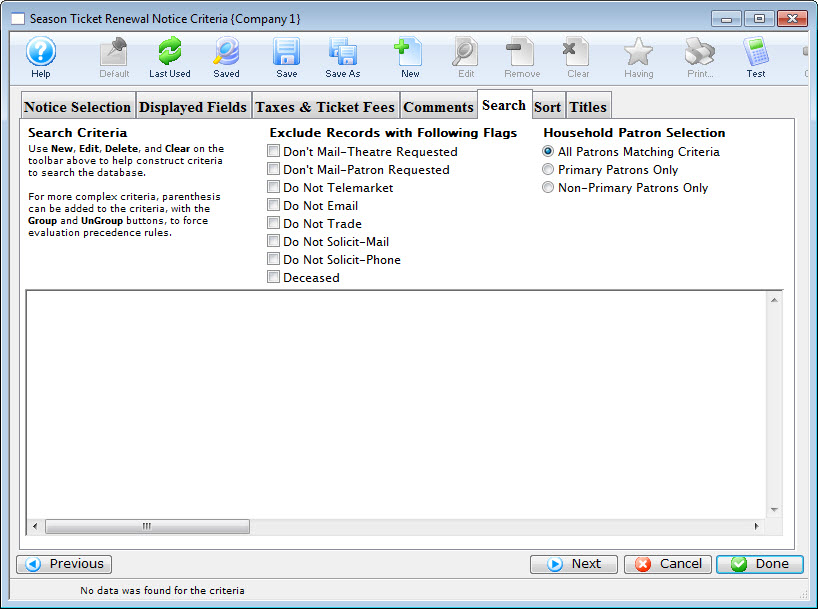
Parts of the Season Ticket Renewal Notice Search Criteria Tab
 |
If available, uses the default search criteria for this report. |
 |
If this report has previously been run, this button will add theprevious criteria. |
 |
Opens a list of saved criteria for this report. |
|
Saves the current criteria to be used later. |
 |
Saves the current criteria to be used later and opens a dialog to name this criteria. |
|
Opens the Add/Edit Parameter window to facilitate adding new criteria. Click here for more information on the Add/Edit Parameter window. |
 |
Opens the currently selected criteria in the Add/Edit Parameter window to allow adjustments. |
 |
Deletes the currently selected criteria. |
| Deletes all criteria from the Search tab. | |

|
Tests the current criteria to see how many records will be returned. A message will appear at the bottom of the window showing the number of records to be returned. |
 |
Prints a listing of the criteria currently in the Search tab. |
 |
Groups the currently selected criteria. This forces the criteria to take precedence in the search. |
 |
Ungroups the currently selected criteria. |
| |
Cancels that adding of criteria and returns the user to the Report window. |
| |
Completes the addition of criteria and the sorting of data, and begins to generate the report. Click here for more information on the Finished Report window. |
| |
Completes the addition of criteria and the sorting of data, and takes you to the next page of information for the selected report. |
|
Quick reference information for Reports Criteria |
Saved Criteria
To SAVE your criteria
- Build your criteria as you normally would in your Report, Mail List or Export.
- Click the
 icon at the top of the Criteria window.
- A new window will pop up with an opportunity to name (or rename) your criteria. The window will show the criteria for reference.
Select a name that is descriptive for you and others to remember. For example:
- 2018 Donors-All Campaigns, or
- 2018 Event Purchasers or
- Volunteers last year but not this year
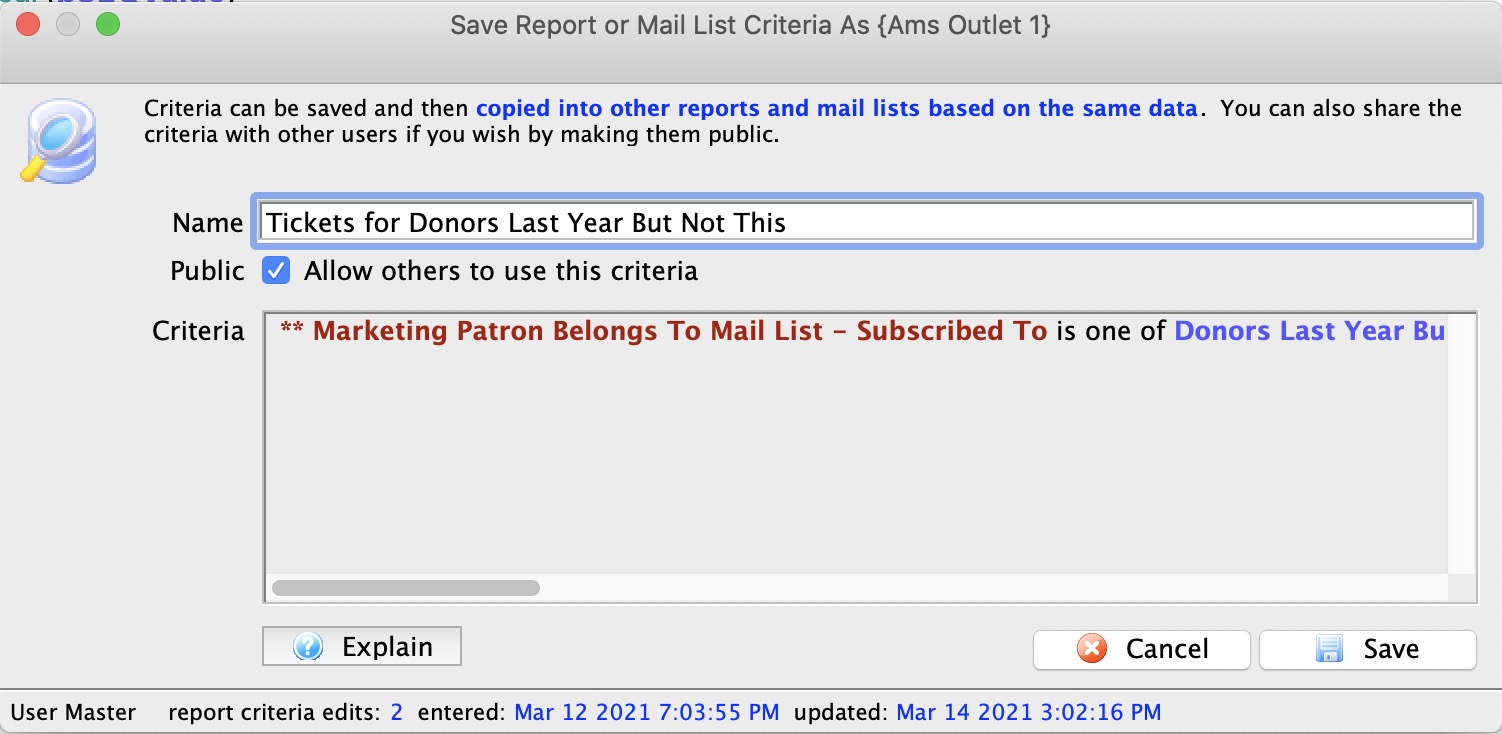
- If you want others to be able to view or use this criteria, click the
 box below the Criteria Name field. If you do not select this box, others can use this criteria, but cannot change it.
- A new window will pop up with an opportunity to name (or rename) your criteria. The window will show the criteria for reference.
- Click the
 button.
To retrieve your SAVED criteria
- Open any criteria window and click the
 icon at the top.
 - A list of your Saved Criteria will appear, including all the available saved criteria sets available for use with this Report, Mail List, or Export of data.
- Select the criteria you want to use either by double clicking on it, or single clicking and then clicking
 in the lower right corner.
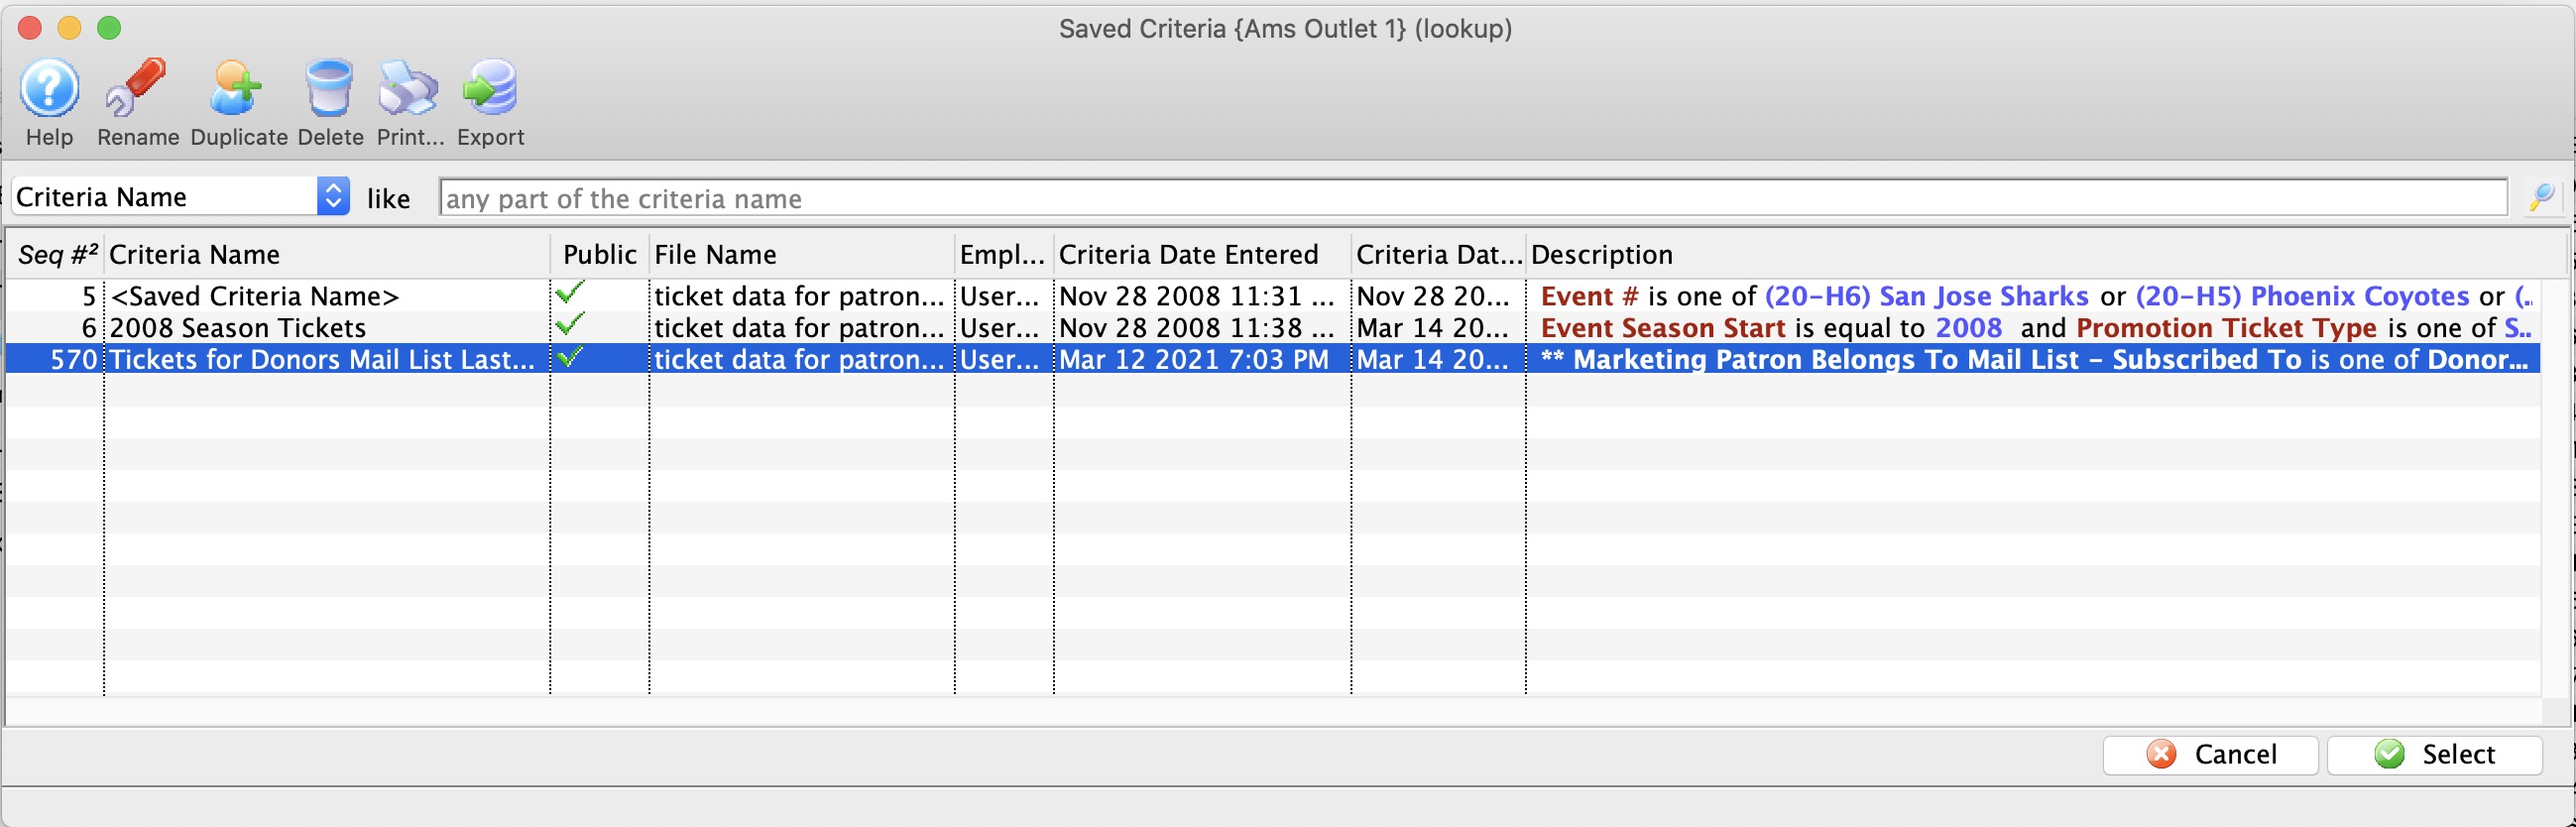
Sort Tab
You use the Season Ticket Renewal Sort tab to adjust how the renewal notices are sorted when printed.
Parts of the Season Ticket Renewal Sort Tab
Available Sort Fields |
|
| Sort Fields | A list of the sort fields available to be used. |
 |
Adds the currently selected field to the sort field list. |
 |
Removes the currently selected field from the sort field list. |
Selected Sort Fields |
|
| Sort Fields | A list of the currently selected fields to be used for sorting. |
Sort Field Parameters |
|
| Sort in Descending Order | When checked the notices will be sorted in descending order by this field. |
| Upper Case Conversion | When checked any information in this field will be written in upper case. |
| New Page When Field Changes | When checked a new page will be started when this field changes. |
|
Moves to the previous tab of the process. |
|
Cancels the renewal notices process. |
|
Leave the criteria entry process and begins assembling the renewal notices. |
Troubleshooting Season Ticket Sales
Book Button Not Accessible In Season Package (At The Box Office)
The Book button is located in the Season tab of the Patron window and the bottom of the tab or in the Season Package Detail window. If the Book button is greyed out in the Season tab it means something in the details of the season package for this Patron are not correct. Start by double clicking on the Season Package and reviewing the pack information.
- Does the Subscription contain seats?
Without seats in the package the package cannot be booked. For details on adding seats to the Season Package Detail window please click here.
- Do the number of seats in the package match the Desired Seats field?
Theatre Manager requires the Desired Seats field to contain a count of the number of seats in the package. If the number in this field does not match the number of seats in the package the package cannot be renewed. The field is designed to manage season packages where the patron wishes to increase or decrease the seats within their package but the seating locations have not yet been assigned or confirmed.
- Is the Status of the Package set to a non-renewed or non-cancelled status?
A package that have already been renewed, is marked as renewed or is marked as cancelled cannot be renewed. If someone has previously attempted to renew the package but failed to complete the renewal the package may be marked as renewed even though it shouldn't be. Change the Status drop down in the upper right corner to
. This will allow the package to be renewed ago as long as the seats have not been purchased.
Can't Alter Next Years Control House
As soon as the season subscription package is rolled over the Last Year and This Year fields become grey and cannot be altered. If you choose the wrong Control House during the rollover process you'll need to roll the package over again. To roll the package again you'll need to activate it again.
Reactivating A Season Package
- Click Patron Sales >> Season Subscriptions >> Setup Season Packages.
- Check the Inactive box in the Season Package List window.
- Double click on the Package that needs to be active again.
- Check the Active status box located under the Internal Description field.
- Save and close the window.
The package is now active and can be rolled over again. It may be a good idea to make the incorrect package Inactive before rolling over the package once more. This will help keep the packages straight during the setup process.
Changing Price Of Season Tickets
Changing the Price of a season subscription seat should be done before the seat is renewed. If the seat has already been renewed then the Quick Exchange option will need to be used to alter the price of the tickets. The season package needs to be updated regardless if the seats have been booked or not.
- Open the patron record.
- Select the Season tab.
- Double click on the Season Package.
- Select first set of tickets left column that require a price change.
Select tickets where the change in prices with result in the same price code and promotion for the selected seats.
- Choose the correct Promotion and Price Code from the drop downs located under the Map.
- Click the Set Price button located under the list of tickets.
The Promotion and Price Code for the selected seats will now be updated. Repeat the above three steps for any additional tickets that need to be changed.
Patrons Missing From Season Package After Renewing
- Refund the manually booked season subscription tickets in the patron record.
Do not refund the payment. Place the balance on the Order On Account.
- Select the Orders tab in the Patron record.
- Locate and double click on the Order with the outstanding balance (in blue).
- Click the
 button on the left side of the window.
 - Single click on the Season Package in the list.
- Click the button.
The payment window will open.
- In the Payment Method drop down, select the method of payment, enter the payment details and accept the payment.
The tickets are now a part of the Season Package and have been booked correctly.
Patrons Missing From Season Package After Rollover
Patrons missing from the season package window after the rollover process general mean the patrons were not booked into last years season package using the season package module. If the patrons were not booked properly into the season package it's best to go back to last years package, correct the patron subscriptions and rollover again. This method will ensure accurate history from prior years and will roll the patrons into the come seasons package. Start by reactivating the season package from last year.
Reactivating A Season Package
- Click Patron Sales >> Season Subscriptions >> Setup Season Packages.
- Check the Inactive box in the Season Package List window.
- Double click on the Package that needs to be active again.
- Check the Active status box located under the Internal Description field.
- Save.
In the Patron tab of the season package click the magnifying glass in the lower right of the window. This will populate the list with all the patrons who are a part of the season package. Double click on each patron to open the Subscription Patron Detail window. Alter the Status of the subscription in the upper right corner of the window to accurately reflect the status from the past year. If the patron changed their seating location or the price point they purchased tickets using this should also be updated.
Once all the seats have been updated the package can be rolled over again. It may be a good idea to make the incorrect package Inactive before rolling over the package once more. This will help keep the packages straight during the setup process.
Troubleshooting Season Tickets Online
Package Says I Need To Be Logged In to Buy Seats
If Theatre Manager indicates you must be logged in before you can renew your season package the can by sold via the Internet box is not checked in the package setup.
- Go to Patron Sales >> Season Packages >> Setup Season Packages.
- Double click on the desired Season Package.
- Check the box for Can Be Sold >> Via Internet.
- Click the Save button at the top of the window.
- Clear the Cache on the web listener.
- Refresh the Season Subscription page in the web browser to see the change.
My Season Package Does Not Appear Online
The package needs to be available for sale online in order to appear in the online sales.
- Go to Patron Sales >> Season Packages >> Setup Season Packages.
- Double click on the desired Season Package.
- Check the box for Can Be Sold >> Via Internet.
Patrons who have not logged into the online sales or who have never had a season subscription can purchase a new subscription online.
- Check the box for Can Be Renewed >> Via Internet.
Patrons who have purchased to a season packages in the past that has been rolled over can renew their seats online.
- Click the Save button at the top of the window.
- Clear the Cache on the web listener.
- Refresh the Season Subscription page in the web browser to see the change.
Clicking Find Best Seats Loops Back to the Seat Selection Page
Theatre Manager reserves Season Subscription Promotions for the Season Subscription Module. This means when a Season Promotion is marked as available for sale via the Internet it will not be offered as an option for single tickets.
- Go to Setup >> System Tables >> Sales Promotions.
- Double click on the desired Season Sales Promotion.
- Select the Edits tab.
- Check the box for Via The Internet.
- Click the Save button at the top of the window.
- Clear the Cache on the web listener.
- Refresh the Season Subscription page in the web browser to see the change.
The Subscription Button Does Not Appear In The Online Sales Window
The Subscription button is a part of the default web pages. If it does not appear it was most likely commented out by the web designer in the past.
- Open the WebPagesEN/tmCustome folder.
- Locate and edit the tmnavButtons.html page.
- Move the Subcription button reference or uncomment the button within the page.
- Save the page.
- Clear the Cache on the web listener.
- Refresh the Season Subscription page in the web browser to see the change.
Subscription Windows
The following describe the different areas in the subscription module and what they are used for.
Manage Favorite Seats Window
Parts of the Manage Favorite Seats Window
 |
Opens the Package Detail window. Click here for more information on the Package Detail window. |
 |
Opens the Package Subscription List window showing all patrons that are currently subscribed to the season package. Click here for more details on the Who's In button. |
 |
Reviews the season subscriptions within the season package and validates the seats.Click here for details on how to Verify Holds. |
 |
Renews the selected season packages on mass. Click here for more information on the Renewal Notices. |
|
Begins the process for issuing renewal notices for the selected season package. Click here for more information on the Renewal Notices. |
|
Renews the patrons favorite seats for the events within the season package. Click here for more information on booking a patron's subscription. |
 |
Holds all favorite seats for the performances in the selected season package.Click here for step by step instructions on how to use the Held Season Seats. |  |
Removes the Notice Printed status for the selected season package for the purpose of reprinting the renewal notices. |
 |
Alters the Price and Promotion structure from Last Year's Control House to meet the requirements for the coming year. Click here for more information on the Alter Subscriptions process. |
| Season Package Section | The Season Package section of the window allows for switching between season packages. Click here for more information on the Season Package section. |
| Seat Management and Pricing Map Section | Seat Management and Pricing Map Section of the window displays the pricing map for the season. It allows for the price and promotion of the tickets to be altered and indicates errors in the seating. It can also be used to remove seats from the season package. Click here for more information on the Pricing section. |
| Patron Section | The Patron section of the window shows the patrons currently in the Season package. It allows for adding, removing and editing of the patrons season package. Click here for more information on the Patron section. |
| Seat Section | The Seat section of the window displays the wait list for seats. Any patrons who have been allocated a priority, other then first, for seats will appear in this area. Click here for more information on the Seating section of the window. |
Package Management Section
You use the Package Management Section to select the package patrons are being added, edited or updated to.
Parts of the Package Management Section
| Package | A drop down menu for selecting the active season package to alter. |
| Subs. Assigned | The number of subscriptions currently assigned to the package. |
| Renewed | The number of subscriptions currently renewed in the package. |
| Seats Assigned | The number of seats currently assigned in the package. |
| Renewed | The number of seats that have been renewed, as part of the package. This counts seats that are actually booked. |
| Performance | The performance code for the control house being used. |
| Date | The date of the performance for the control house. |
| Time | The time of the performance for the control house. |
| # Held (BO) | The number of seats currently being held by the box office in the control house. |
Seat Management Patron Section
You use the Seat Management Patron Section to add or edit patrons subscribed to the season package.
Parts of the Seat Management Patron Section
| Patron Name | Name of the subscriber. |
| Renewal Status | The current status of the patron's subscription. |
| Date Renewed | The last date the patron renewed their subscription |
| Change Date | The last date a seating change was requested. |
| Change Location | The location of the seating change that was requested. |
| Performance | The performance code for the control house they are part of. |
| Seats Since | The date that the subscriber first subscribed. |
| Seat Count - Current | The number of seats currently held as part of the subscription. |
| Seat Count - Desired | The number of seats the subscriber would like to have. |
| Seating Request Comments | Any comment added for a seating request. |
| Priority of Seating | The priority given to the seating change request. |
| Patron # | The patron's record number. |
| First Name | The first name of the patron. |
| Last Name | The last name of the patron. |
| Company | The company the patron works for. |
|
Adds a new patron to the season package. For more information on adding a patron to a season package, click here. |
|
Opens the patron's subscription record. Click here for more information on the Patron Subscription Detail window. |
|
Deleted the patron from the season package. If the patron already has booked seats, the tickets will need to be refunded also. |
 |
Opens the patron window for the selected patron. Click here for more information on the patron window. |
Set Suggested Donation
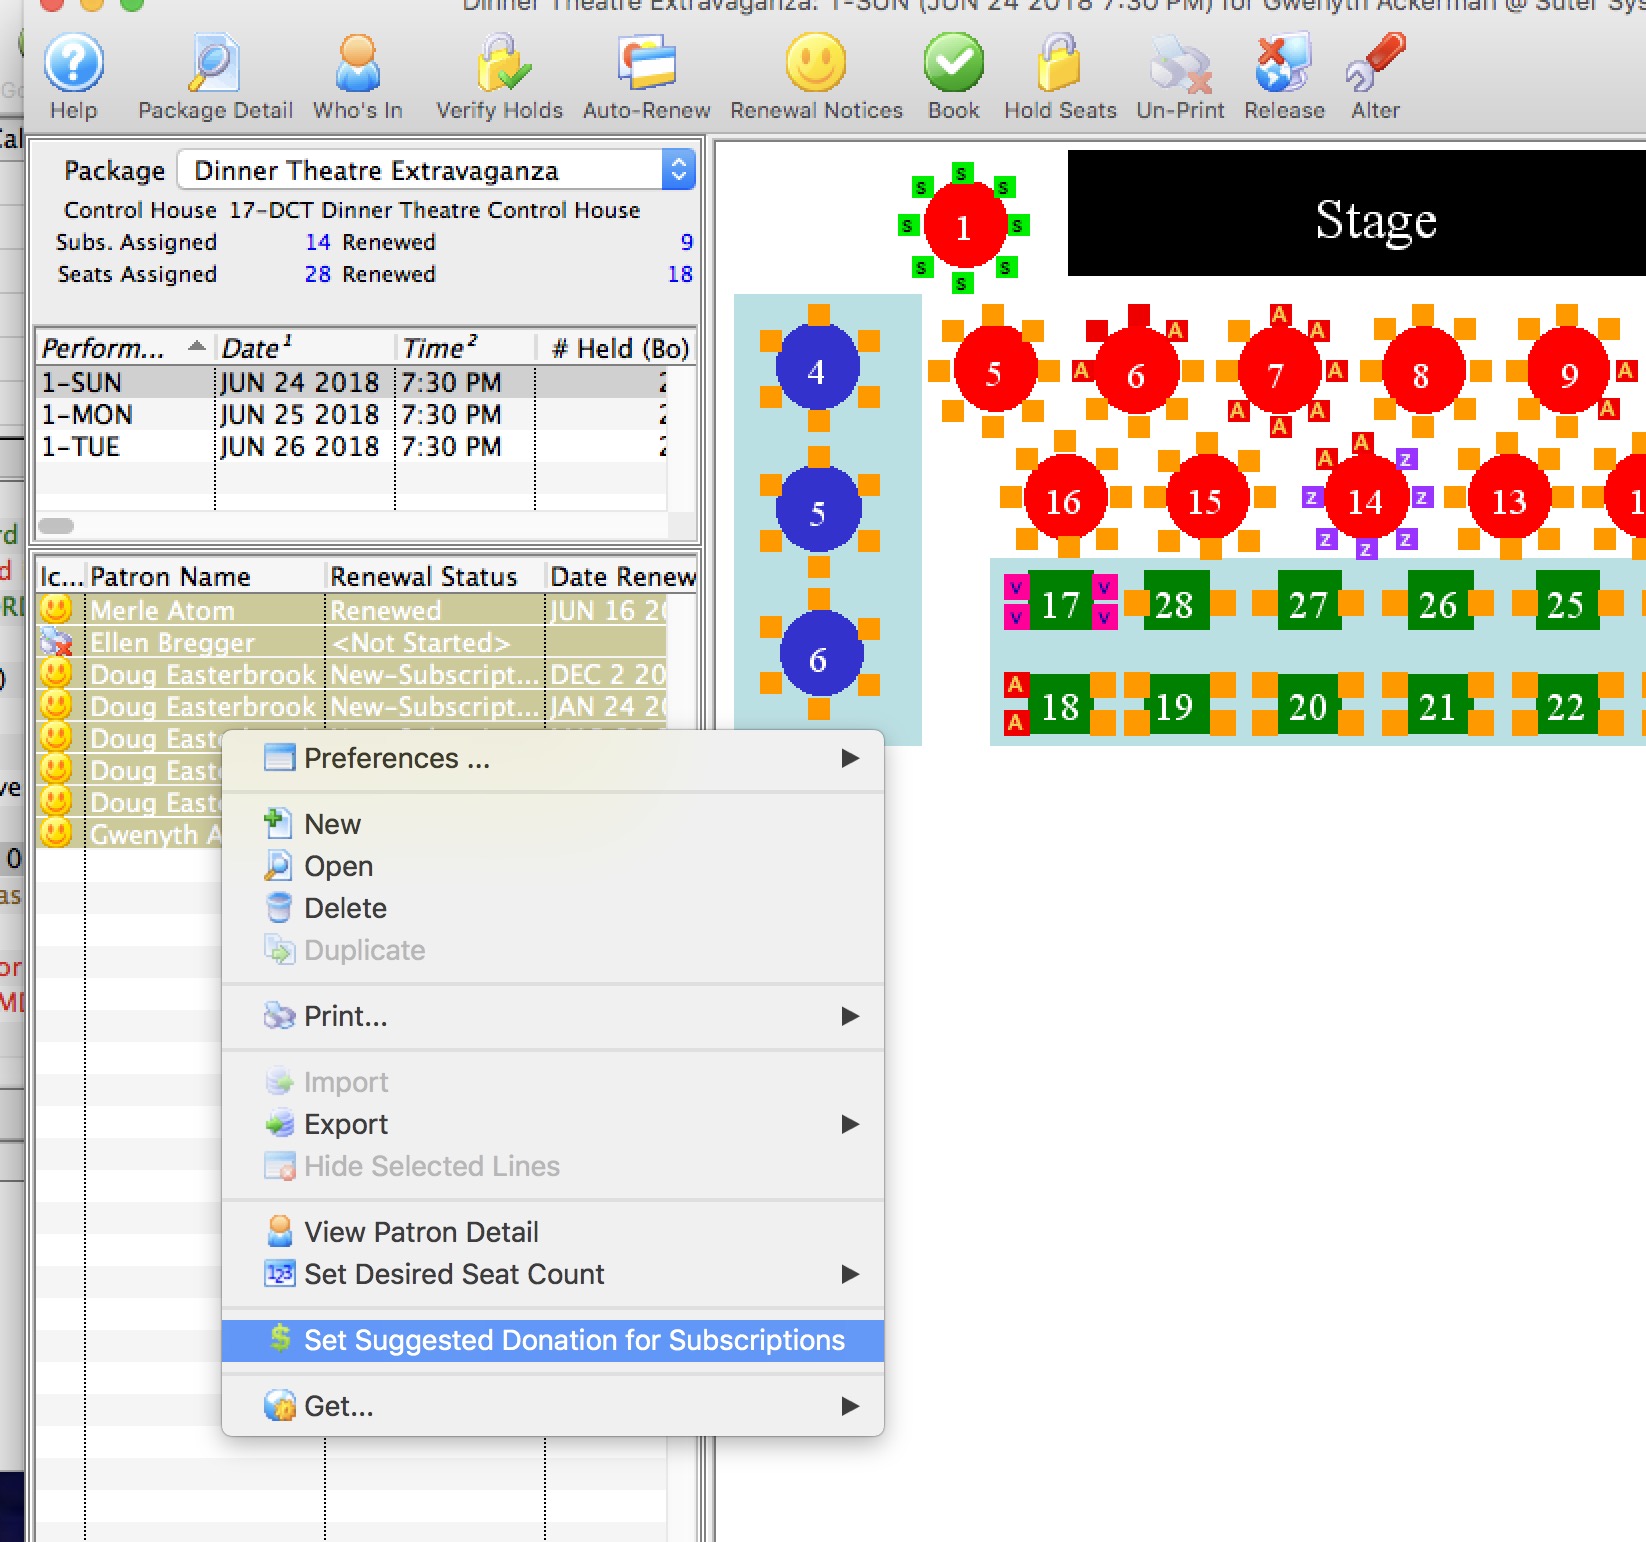 There are a four ways to set a suggested donation for patrons when sending out the subscription renewal notices. You can set:
- a specific suggested donation for all subscriptions - for example $100.00, which is set as an option when printing renewal notices
- a suggestion that is a percentage value of the total subscription - for example 15%, which is set as an option when printing renewal notices
- a different suggested amount for each patron - which is entered directly on the favourite seats subscription window.
- a custom value for each donor based on a calculation from prior donation history (which is described below)
Or, a variation on the above 4 options where you:
- assign something based on past history.
- then look at the bands of suggested donations (eg 100-125, 200-250) .. and then re-assign some donors a new specific donation that is a manual round-up or to the next giving level.
This would mean:
- running the process once to set the initial amount
- then re-running it for selected patrons to set specific amounts as much as you want.

Setting a suggestion based on Historical Giving
Option 4 allows you to select one or more subscriptions and calculate a custom amount based on past giving history. You can use this feature:
- as many times as you want to recalculate or replace any existing suggested donation
- differently for groups of subscribers so that opening night subscribers might use different set of criteria than the rest of the run
- to over-ride some previous settings for one or more patrons
To use the feature:
- Open the window to manage patron subscriptions
- On the bottom left corner, select one or more subscriptions
- Right-click to see the context menu.
- Select 'Select Suggested Donation for Subscriptions' from the menu
- The window that appears below will appear
- Make your choices as to how to calculate the suggested donation for the patron
- Click Proceed

Seat Management Seating Section
You use the Seat Management Seating Section to add or alter the seats the patron is subscribed or wait listed for.
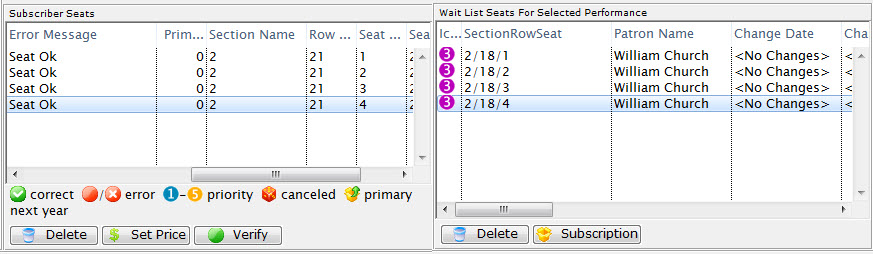
Parts of the Seat Management Patron Section
Subscriber Seats |
|
| Icon | |
| Quantity | The number of seats that patron has. |
| Price Code | The price code used for the seats. |
| Section/Row/Seat | The section, row and seat for the seats the subscriber has. |
| Promotion | The promotion for the seats the subscriber has. |
| Error Message | Any error messages in regards to subscribing a patron to these seats. |
| Primary Seat | The primary seat of the patron. |
| Section | The section of the seat. |
| Row # | The row number of the seat. |
| Seat # | The seat number of the seat. |
| Seat Code | The seat code for the seat. |
|
Deletes the selected seat. |
 |
Change the subscription Price/Promotion of the selected seats in the package. |
|
Verify the selected primary seats to ensure they have the correct status. |
Wait List Seats for Selected |
|
| Section/Row/Seat | The section, row and seat number for the wait listed seats. |
| Patron Name | The patron who is on the wait list for the seats. |
| Change Date | The date the patron on the wait list requested the seating change. |
| Change Location | The location the patron on the wait list requested. |
| Priority of Seating | The priority of the patron in the seating change request. |
| Seating Request Comments | Any comments in conjunction with the seating request change. |
| Promotion | The promotion for the seats. |
| Renewal Status | The renewal status of the patron on the wait list for the seats. |
| Primary Seats | The primary seats for the patron. |
| Section | The section of the seats. |
| Row # | The row number of the seats. |
| Seat # | The seat number of the seats. |
| Price Code | The price code for the seats. |
| Last Name | The last name of the patron on the wait list for the seats. |
| First Name | The first name of the patron on the wait list for the seats. |
| Company | The name of the company of the patron on the wait list for the seats. |
| Quantity | The quantity of seats the patron is requesting. |
|
This button is unavailable in this section. |
 |
Shows the subscription package for the selected seat. |
Seat Management and Pricing Map Section
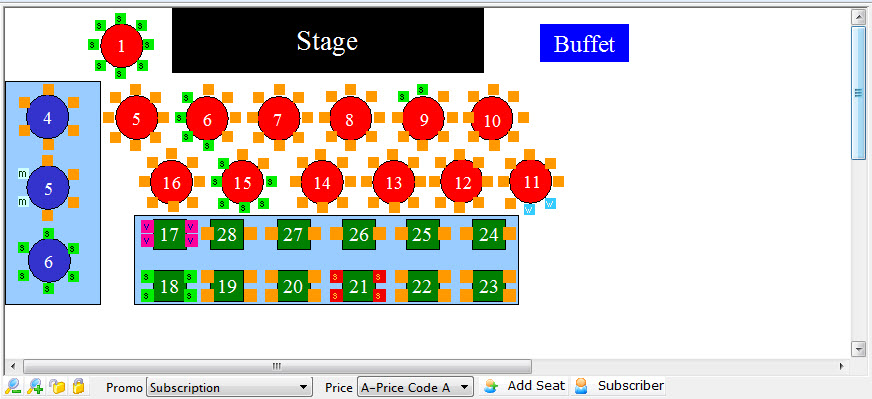
Parts of the Seat Management Section
| The Pricing Map |
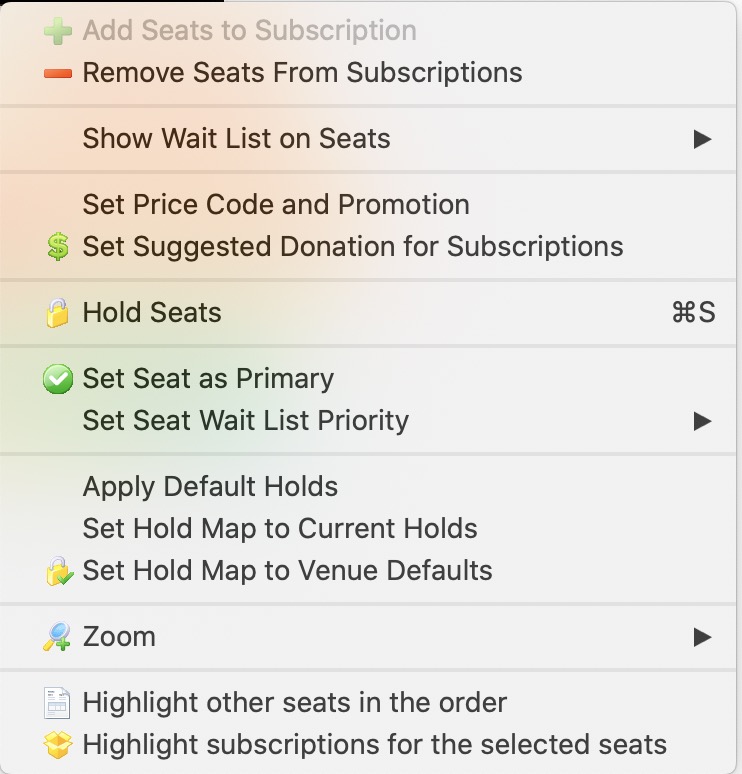 The Pricing Map for the Season Venue. Here you can:
You can use the Context menu to access some additional features. |
 |
Zoom in on the Map. |
 |
Zoom out on the map. |
 |
When a seat is selected, clicking the un-lock button releases it for sale. |
 |
Allows you to put a hold on a seat using the selected letter. |
 |
A drop down menu to select from the available promotions. |
 |
The price code to use for the seats being subscribed. |
|
Adds the Seat to the selected subscribers favorites. |
 |
Shows the Subscribers that have those seats, either primary or secondary. |
| Highlight Subscriptions | If you select a number of seats in an area, this menue item will let you highlight the subscribers with those seats. |
Subscription Patron Detail Window

Parts of the Subscription Window
|
This button is unavailable in this window. Patrons can have one SubscriptionDetail per season package. Additional Season packages are added through the Season tab in the patron window, the Season tab in the Order window or the Manage Favourite Seats window. | ||||||||||||||||||||||||||||||||||||||||||||||||||||||||||||||||||||||||||||||
|
Saves the changed information in the Subscription Patron Detail window. | ||||||||||||||||||||||||||||||||||||||||||||||||||||||||||||||||||||||||||||||
 |
This button is unavailable in this window as patrons can only have one Subscription Detail per season package. | ||||||||||||||||||||||||||||||||||||||||||||||||||||||||||||||||||||||||||||||
 |
Alters the information in the Subscription Patron Detail window back to the last time it was saved or opened. | ||||||||||||||||||||||||||||||||||||||||||||||||||||||||||||||||||||||||||||||
 |
Deletes the Subscription for the patron removing them from the season package all together. | ||||||||||||||||||||||||||||||||||||||||||||||||||||||||||||||||||||||||||||||
|
Generates a report of the patrons favorite seats for the season subscription package. | ||||||||||||||||||||||||||||||||||||||||||||||||||||||||||||||||||||||||||||||
 |
Checks the spelling for all text fields in the Subscription Patron Detail window. | ||||||||||||||||||||||||||||||||||||||||||||||||||||||||||||||||||||||||||||||
|
Begins the order process by adding all seats in the package to an order, changing the status of the package and take the user to the payment window to complete the sales process. Click here for more information on booking tickets. | ||||||||||||||||||||||||||||||||||||||||||||||||||||||||||||||||||||||||||||||
|
Can indicate a patron has intends to renew but does not wish to renew in the current location. Creates an Order with a Payment for a value entered at the time of processing while updating the status of the package to Change Requested but not booking seats for the patron. Can be used to collect deposits towards renewal requests. | ||||||||||||||||||||||||||||||||||||||||||||||||||||||||||||||||||||||||||||||
 |
Opens an Order window to allow for individual selection of performances for the season package. This feature can be used when a new subscriber books after the season renewal deadline. Seats can be chosen per performance based on availability. | ||||||||||||||||||||||||||||||||||||||||||||||||||||||||||||||||||||||||||||||
|
Holds the seats for each performance within the season package to prevent selling. A payment is not required to hold the seats. | ||||||||||||||||||||||||||||||||||||||||||||||||||||||||||||||||||||||||||||||
|
Opens the patron detail window for the selected patron. | ||||||||||||||||||||||||||||||||||||||||||||||||||||||||||||||||||||||||||||||
 |
Opens the Order to veiw, select or change its contents. | ||||||||||||||||||||||||||||||||||||||||||||||||||||||||||||||||||||||||||||||
| Package | Displays the title of the package the patron is subscribed to. | ||||||||||||||||||||||||||||||||||||||||||||||||||||||||||||||||||||||||||||||
| Series | The Performance Code for the day that the patron will be attending. Use the drop down menu to change the performance code if necessary. | ||||||||||||||||||||||||||||||||||||||||||||||||||||||||||||||||||||||||||||||
| Season Since | The date the patron was first added to the season package. | ||||||||||||||||||||||||||||||||||||||||||||||||||||||||||||||||||||||||||||||
| Suggested Donation | The field allows you to specify the suggested donation for that subscription. This amount can be optionally automatically added to the shopping cart during an online subscription renewal. The patron still has the option to remove the suggested donation from their shopping cart prior to payment. This suggested donation can also be printed on season renewal notices to encourage a patron to donate. The suggested donation amount does not get automatically added to orders processed as manually booked season renewals or as auto-renew season renewals processed by the box office. During the process of renewing the subscription via the box office, the suggested amount is used purely as reference guideline as a starting amount to donate. Direct discussion with the patron will determine if donation should be added to the order and at what amount. | ||||||||||||||||||||||||||||||||||||||||||||||||||||||||||||||||||||||||||||||
| Subscription # | The Season Subscriptions reference number. | ||||||||||||||||||||||||||||||||||||||||||||||||||||||||||||||||||||||||||||||
| Status | The status of the subscription package. The drop down menu allows for manual changes to the status of the subscription. These can be displayed on subscription reports
Valid values and meanings are:
|
||||||||||||||||||||||||||||||||||||||||||||||||||||||||||||||||||||||||||||||
| Notice Printed | The date the renewal notice was last printed for the patron. | ||||||||||||||||||||||||||||||||||||||||||||||||||||||||||||||||||||||||||||||
| Renewed | The date the patron renewed their subscription to the season package. | ||||||||||||||||||||||||||||||||||||||||||||||||||||||||||||||||||||||||||||||
| Order # | The order number of subscription was renewed in. | ||||||||||||||||||||||||||||||||||||||||||||||||||||||||||||||||||||||||||||||
 |
This tab is used for setting the patron's favorite seats as part of the season package. Click here for more information on the Favorite Seats tab. | ||||||||||||||||||||||||||||||||||||||||||||||||||||||||||||||||||||||||||||||
 |
This tab is used to manage seating change requests for the patron. Click here for more information on the Change Requests tab. | ||||||||||||||||||||||||||||||||||||||||||||||||||||||||||||||||||||||||||||||
 |
This tab is used for managing the patron's auto-renewal of their subscription to the season package. Click here for more information on the Auto Renewal Settings tab. | ||||||||||||||||||||||||||||||||||||||||||||||||||||||||||||||||||||||||||||||
 |
This tab lists the tickets that have been booked as a part of the season package. Click here for more information on the Favorite Seats tab. | ||||||||||||||||||||||||||||||||||||||||||||||||||||||||||||||||||||||||||||||
| This tab indicates the transaction details for the season subscription. Click here for more information on the Favorite Seats tab. |
Subscription Favorite Seats Tab
You use the Subscription Favorite Seats tab to select the seats for the patron's subscription to the season package.
Parts of the Subscription Favorite Seats Tab
|
You use this tab to manage seating change requests for the patron. Click here for more information on the Change Requests tab. |
|
You use this tab to manage the patron's auto-renewal of their subscription to the season package. Click here for more information on the Auto Renewal Settings tab. |
|
You use this drop down list to select the appropriate price code for the subscription. |
|
You use this drop down list to select the appropriate promotion for the subscription. |
|
Adds the Seat to the selected subscribers favorites. |
| Status Icon | |
| Quantity | The number of seats. |
| Price Code | The price code used for the seat. |
| Section/Row/Seat | The section, row and seat number of the seat. |
| Promotion | The promotion used for the seat. |
| Error Message | Any messages in regards to booking the seat for the subscription. |
| Primary Seat | The primary seat in the subscription. |
| Section | The section of the seat. |
| Row | The row of the seat. |
| Seat | The seat number of the seat. |
| Seat Code | The seat code for the seat. |
| Price Map | The graphic map is used for selecting the seats for the subscription. It works similarly to the Order window graphic map, however, once the seats are highlighted, double click on one of the seats to add them to the subscription. Alternately, double click on each seat to add them to the subscription. |
|
This button is unavailable in this window. |
|
Changes the subscription price/promotion of the selected seats in the package. |
|
Verify the selected primary seats to ensure they have the correct status. |
Subscription Change Requests Tab
You use the Subscription Change Requests tab for tracking outstanding seating change requests for the patron.
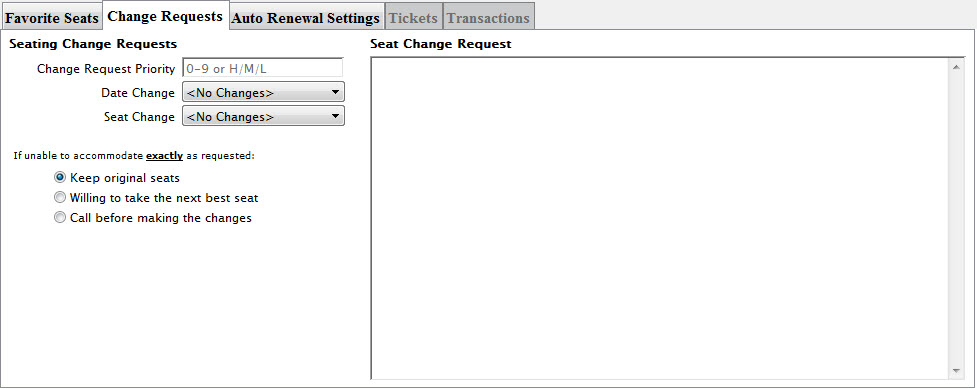
Parts of the Subscription Change Requests Tab
Seating Change Requests |
|
| Change Request Priority | The number of the priority level given to this change request between 1-9 or H/M/L. |
| Date Change | A drop down menu listing the available date changes for the season package. The list of dates are adjustable by the organization in the Subscription Date Change System Tables >> Code Tables data. |
| Seat Change | A drop down menu listing the available seat changes for the season package. The list of seat change options are adjustable by the organization in the Subscription Location Change System Table >> Code Tables data. |
| Keep original seats | When denoted, if the seat change request is not able to be exactly matched, the patron will retain their existing seats. |
| Willing to take the next best seat | When denoted, if the seat change request is not able to be exactly matched, the patron will take the next best seats available. |
| Call before making the changes | When denoted, if the seat change request is not able to be exactly matched, the patron should be called before making any changes. |
Seat Change Request |
|
| An area for notes related to the patron's seating change request. | |
Subscriptions Auto Renewal Settings Tab
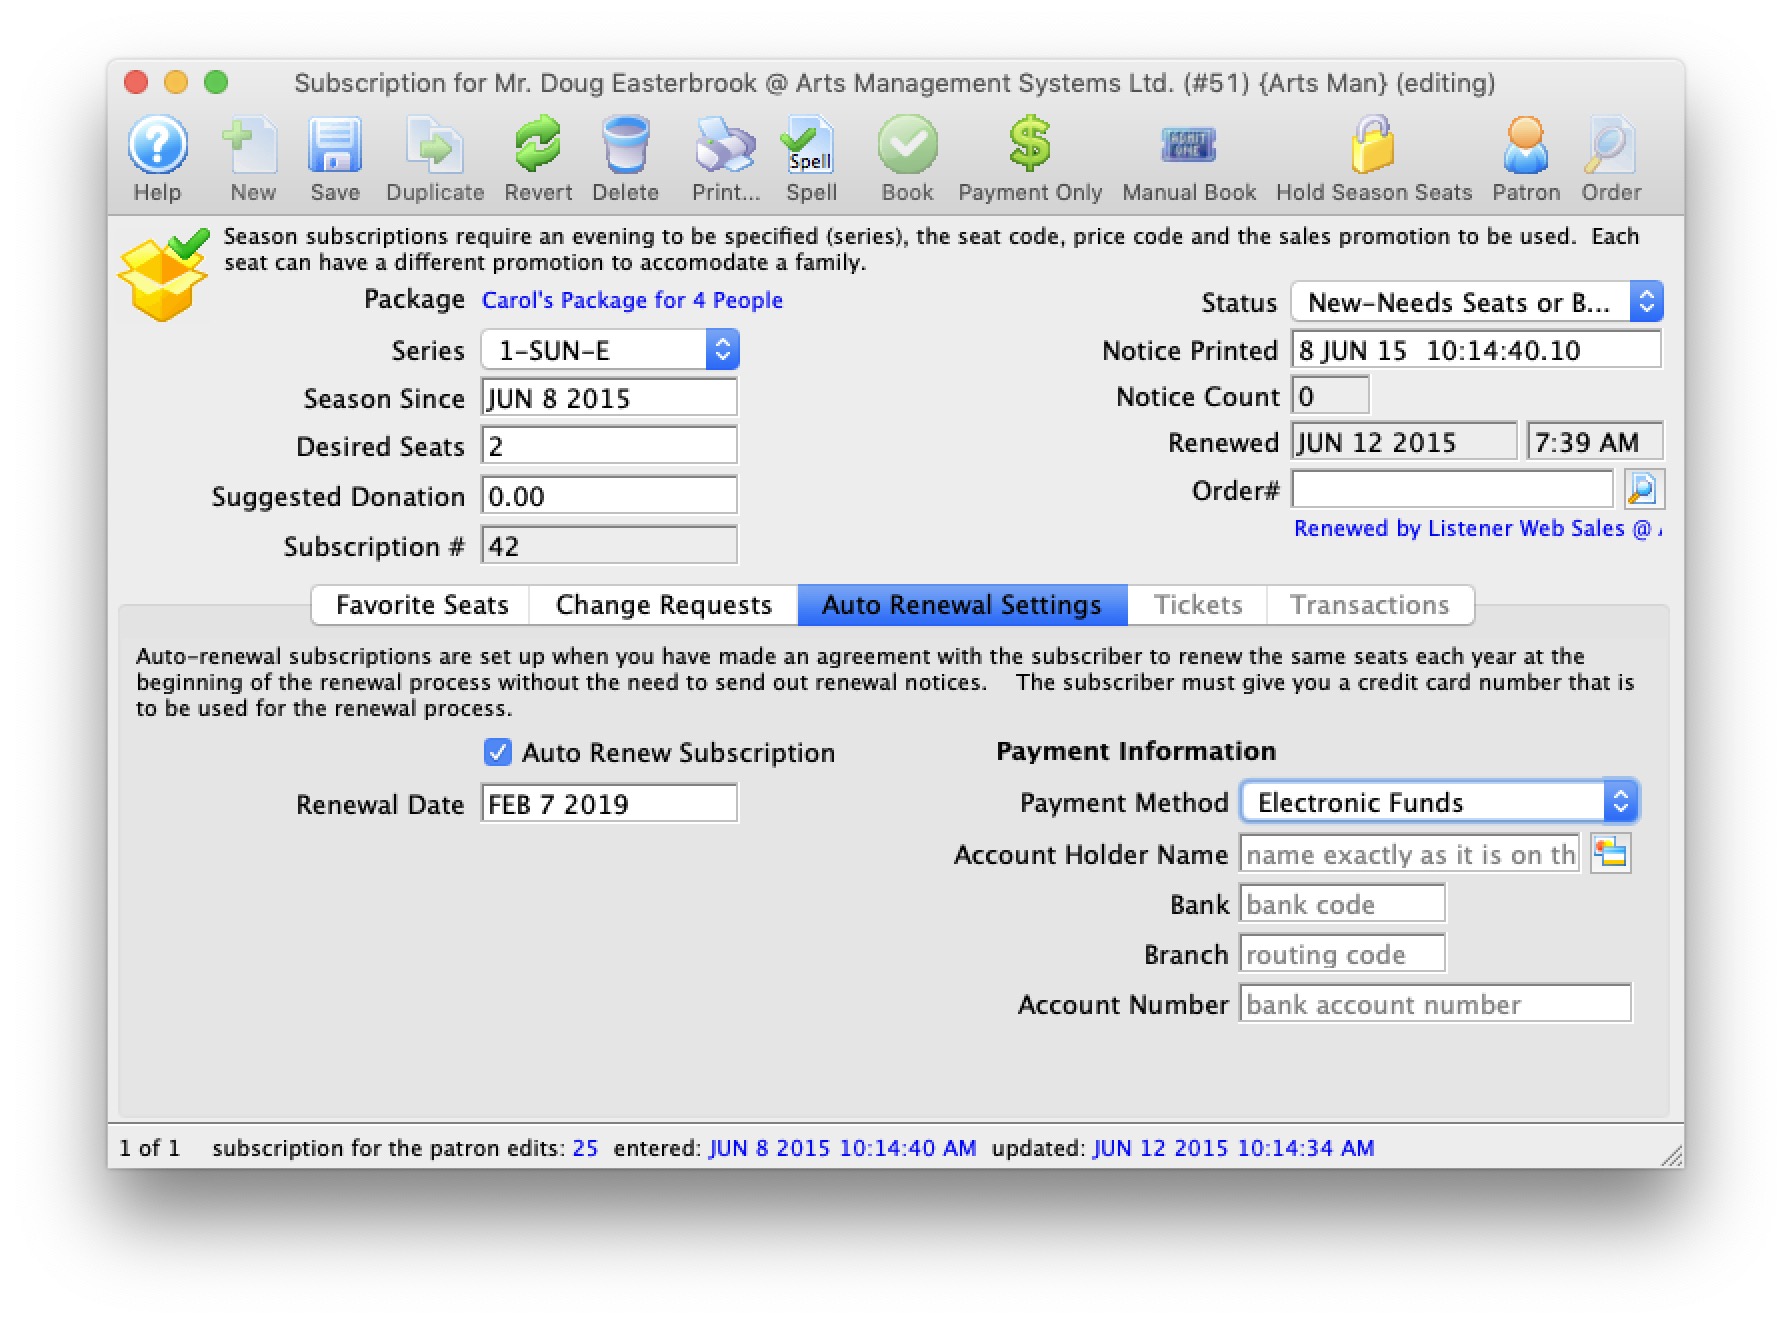
Parts of the Subscription Auto Renewal Settings Tab
| Auto Renew Subscription | When checked, the subscription is set to be automatically renewed and to use the payment information listed below. |
| Renewal Date | The date that the auto-renew option for this subscription package was enabled. |
| Payment Method | 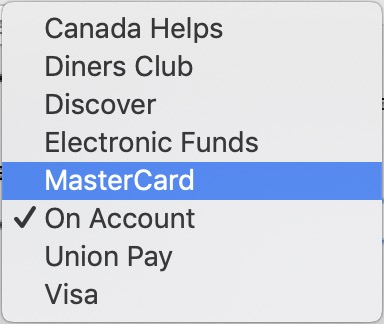 You can select payment methods from one of the following:
|
 |
For Credit Cards, opens the Credit Card Lookup List window to find credit cards attached to this patron. A new card can also be added from this window. |
Season Subscription Tasks
Subscriptions Tickets Tab
This tab becomes available when the patron's tickets are renewed.
You use the Subscription Tickets tab to review and change ticketing information for the patron.
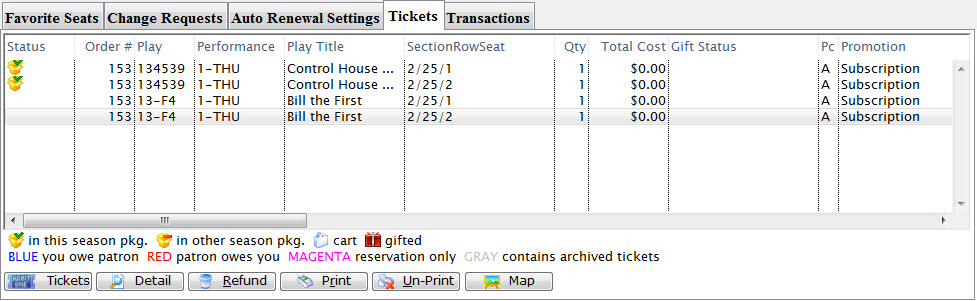
Parts of the Subscription Tickets Tab
| Status |  . . |
| Order # | The number of the order associate with the tickets. |
| Play | The unique play number generated by Theatre Manager. |
| Performance | A quick reference for the performance. |
| Play Title | The title of the play associated with the tickets. |
| Section/Row/Seat | The section, row and seat for the seats the subscriber. |
| Quantity | The number of seats that patron has. |
| Total Cost | Displays the amount paid for the ticket. |
| Gift Status | If the ticket was given or received as a gift. |
| Promotion | The promotion for the seats.. |
|
Opens the tickets sub menu to change the tickets for the selected order. |
 |
Opens the Ticket Data window containing detailed information for the selected ticket. |
 |
Returns the selected ticket to the box office for resale. If they have not been printed or posted they will be deleted and not refunded. This process also clears the printed flag. |
 |
Prints the selected rows if they have not been printed. |
 |
Sets the selected tickets to Un-Printed status so they can be printed again. |
 |
Prints the map report showing the location of the selected tickets in the theatre. |
Subscription Transaction Tab
![]()
The Transaction Tab shows all the transactions that have occurred for the patron.
Parts of the Transaction Tab
| Seq# | A unique number used to track the transaction |
| Trans Date | Date and time the transaction took place. |
| Journal No | A unique journal number for tracking the transaction line. |
| Code | The transaction code used to describe the type of transaction. |
| Transaction Desc | Description of the transaction. |
| Order # | The order number for the transaction. This number can be used to track the transaction by order. |
| Play Code | Play code is only displayed if the transaction effects and event. |
| Performance Code | Performance code is only displayed if the transaction effects a performance. |
| Type | The type of transaction. |
| Description of Entry | Detail on the the purpose of the transaction. |
|
Can be used to manually enter a transaction. |
|
Opens the detail window of the transaction. |
|
Deletes the selected transaction. |
| Used to search for specific transactions. |
Searching Transactions
- Open the Transaction
 tab.
tab.
The Transaction tab is located on the Patron Window.
- Select a search field from the menu.
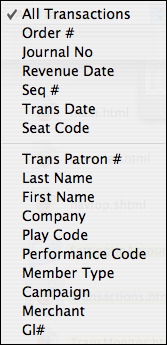
- Fill the To and From fields with the parameters to
search.

- Click the Search
 button.
The results of the search will be displayed in the table.
Season Package Detail Window
The Season Package Detail window displays the components of the package. It highlights the Control House, the Events within the package and where the package is available for sale.

Parts of the Season Package Detail Window
Window Toolbar Icons |
|
|
Opens a new Season Package Detail window to setup a new Season Package. |
|
Saves the changes made to the existing Season Package Detail window. |
|
Reverses any changes or updates to the Season Package Detail window back to the last time changes were saved. |
|
Deletes the current open season package. |
|
Generates a report when columns are present based on the information selected. |
|
Reviews the fields currently displayed within the Season Package Detail window and displays any spelling errors. |
|
Checks, clears, sets, and Verify Holds on reserved seating performances within the Control House's Season Package. |
|
Automatically Renews Selected Season Subscriptions for Patrons within the Package and places balances on account. |
|
Prints Season Subscription Renewal Notices for the Selected Patrons or all Patrons within the Season Package. |
|
Books all available seats within the Season Package for the selected patrons. This button is only active when one or more patrons are selected under the Patrons tab of the Season Package Detail window. |
|
Holds season seats for each Performance in the Season Package for the selected patrons. This button is only active when one or more patrons are selected under the Patrons tab of the Season Package Detail window. |
|
Changes the selected patrons season subscriptions status from Notice Printed to Not Started and removes the previous Season Renewal Notices. This button is only active when one or more patrons are selected under the Patrons tab of the Season Package Detail window. |
Window Tabs |
|
| The Description Setup for the Season Package. | |
| The Sales Management details on the Season Package. | |
| The Events that will be booked as a part of the Season Package. | |
| The combination of different Season Packages grouped together to form a single Combined Season Package. | |
| Detailed Sales Notes about the Season Package that can be displayed in the web sales pages. | |
| List of Patrons that have a subscribed to the Season Package. | |
The Season Package Detail Description Tab
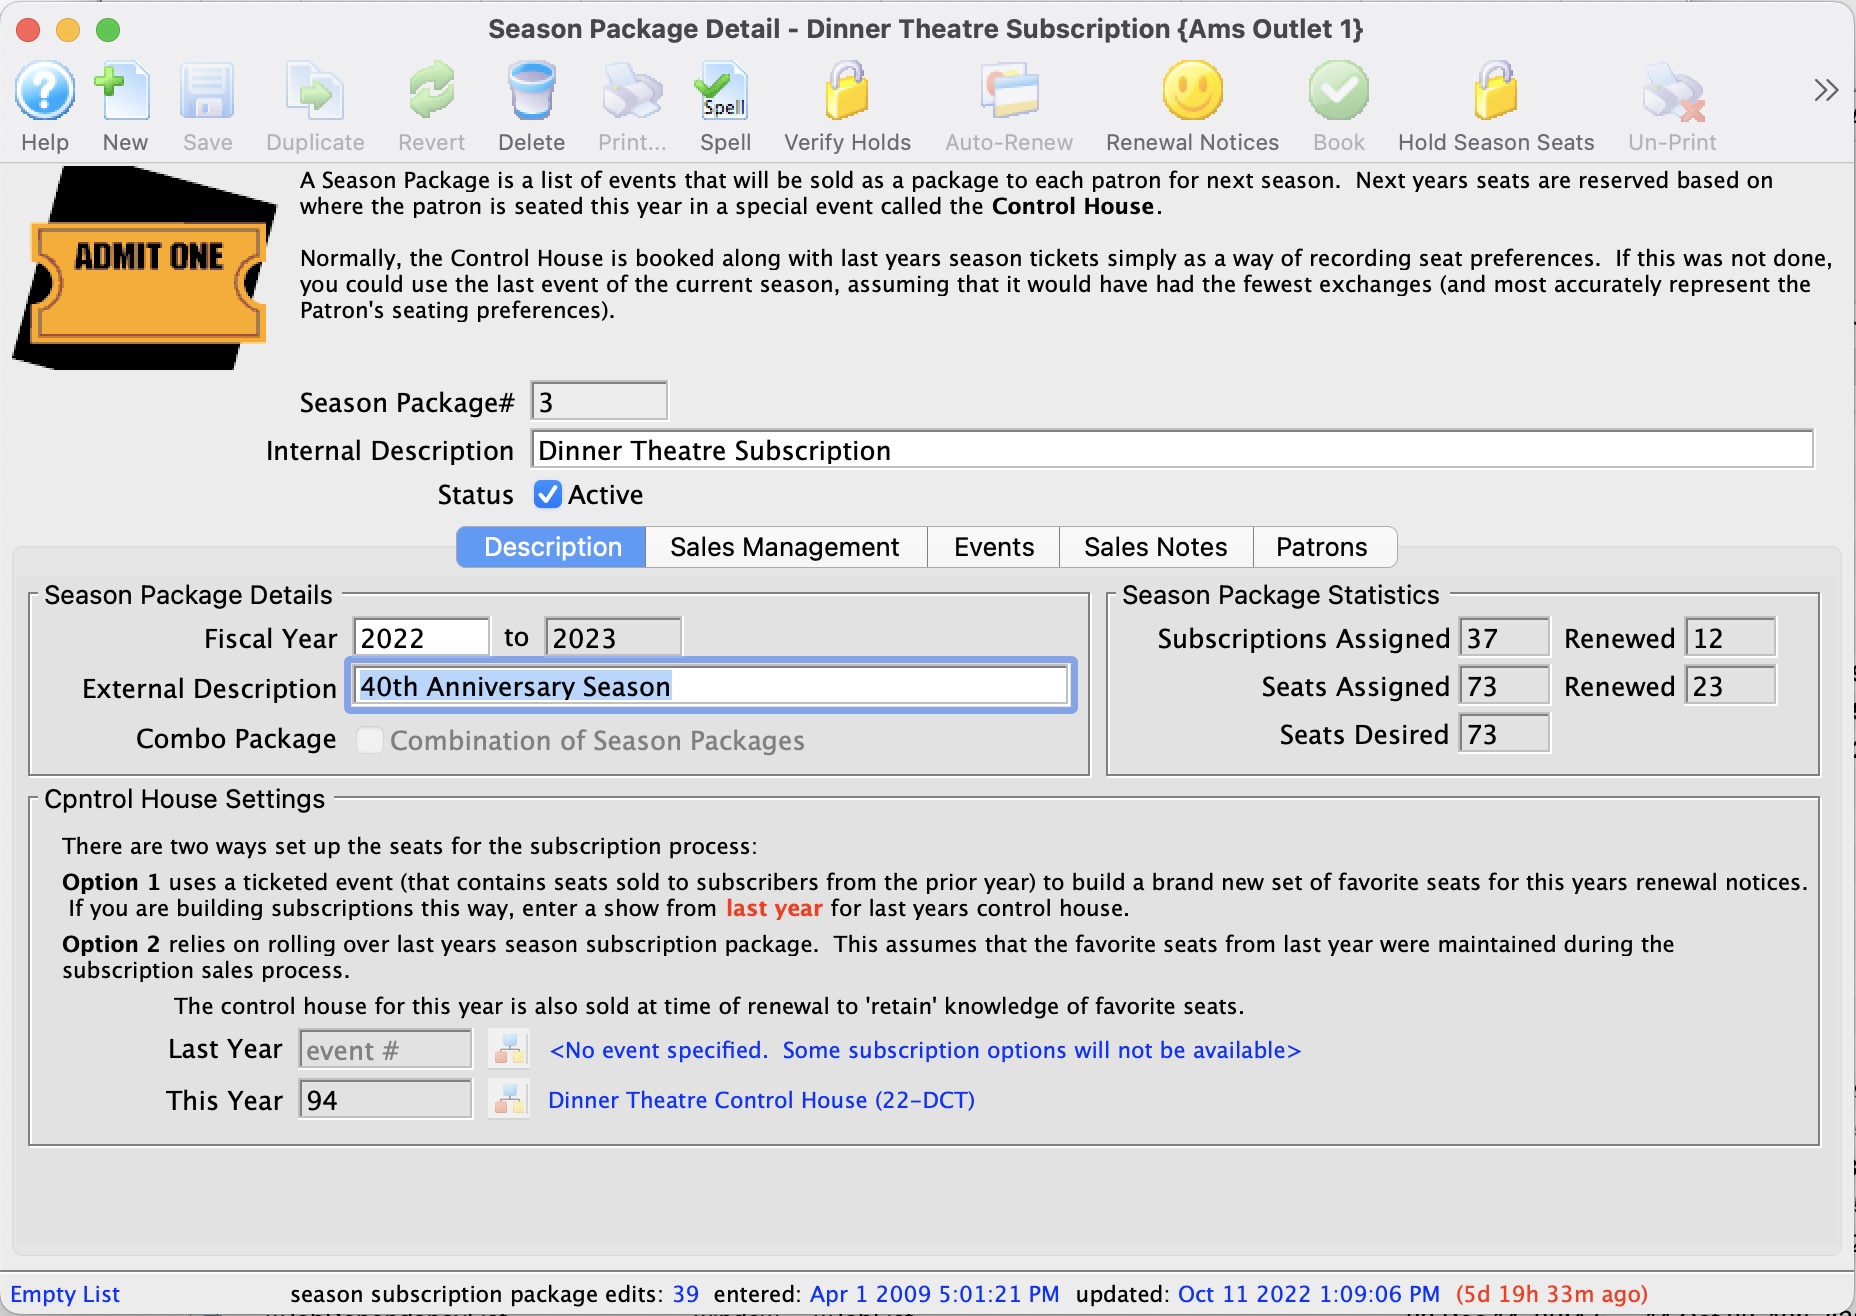
Parts of the Season Package Detail Description Tab
Season Package Details |
|
| Internal Description | The internal description given to the season package suitable for use within Theatre Manager. |
| Status | Indicates if the season package is available for use. |
| Fiscal Year | The season renewal year that the season package is for. |
| External Description | The external description given to the season package suitable for use on the web site and season renewal notices. |
| Combo Package | Indicates that this season package is an combo (or umbrella package) made up of one or more other season packages. The other season packages have the favourite seats for each venue - which allows selling or renewing a subscription that is in multiple venues. For example:
Note: if you do not want the individual package to be purchased, do not make them for sale online - only make the combo package for sale online. |
| Subscriptions Assigned | The number of subscriptions that have been assigned within this season package. |
| Subscriptions Renewed | The number of subscriptions that have renewed their season package. |
| Seats Assigned | The number of seats that have been assigned to this season package. |
| Seats Renewed | The number of seats that have been renewed to this season package. |
| Seats Desired | The number of desired seats in the subscription package. This is what patrons have asked for and is not necessarily the same as the primary/secondary seat count. |
Control House Settings |
|
| Last Year | The control house from last years subscription package that was used to rollover the confirmed subscriptions into this years package. |
| |
Opens the Play Lookup List window to choose the Control House. |
| This Year | The event that will contain and control the favorite seat map for this years subscriptions sales. |
The Season Package Detail Sales Management Tab
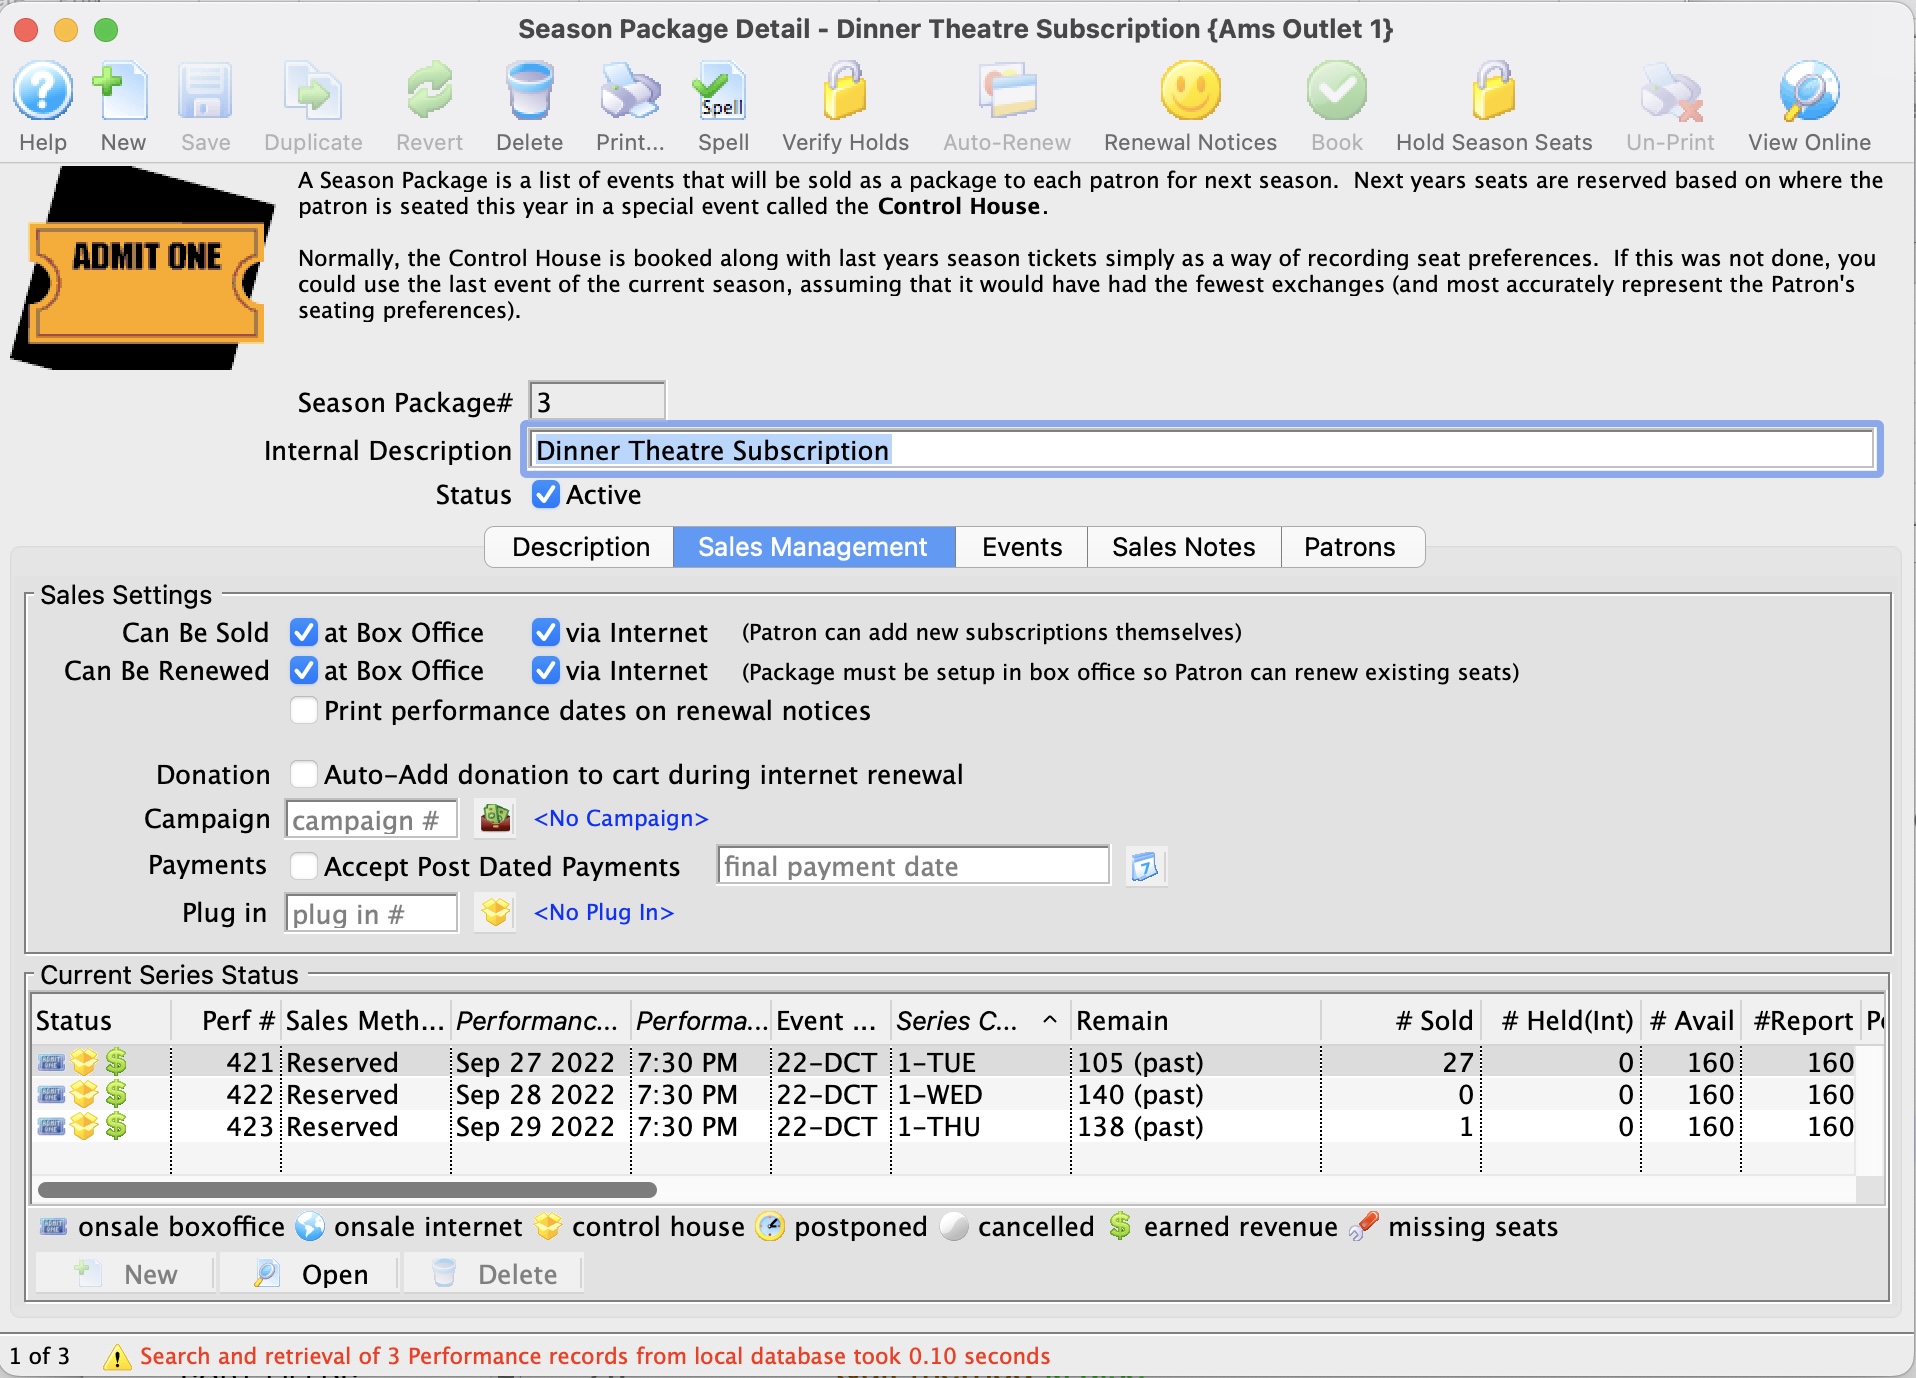
Parts of the Season Package Detail Sales Management Tab
Sales Settings |
|
| Can Be Sold at Box Office | When checked, allows the season package to be sold at the Box Office. |
| Can Be Sold via Internet | When checked, allows the season package to be sold on the internet. |
| Can Be Renewed at Box Office | When checked, allows a season subscriber to renew their package(s) at the Box Office. |
| Can Be Renewed via Internet | When checked, allows a season subscriber to renew their packages(s) via the internet. |
| Print Performance Dates on Renewal Notices | The performance dates for the new season will be printed on the renewal notices. This is helpful in the situation where you may want to print renewal notices but have not determined the final set of performance dates. |
| Donation - Auto-Ddd to Cart | Auto adds a suggested donation amount to the shopping cart when renewing an online subscription. |
| Campaign | The Donation Campaign to use if a donation is to be auto-added when the patron renews their online subscription. |
 |
Clicking the icon, opens the Campaign List window to choose the donation campaign to be auto-added to the cart when the subscription is renewed online and 'Auto-Add to Cart' has been enabled. |
| Accept Post Dated Payments | Indicates that this season package can have post dated payments created as a form of payment when renewing an online subscription. |
| Final Payment Date | The final date that a post dated payment for this season package can be applied on when renewing an online subscription. |
Plug In Code |
|
| Plug In | The number of the customized Plug-In Module that is being used for this season package. |
 |
Clicking the icon, opens the Plug-In List window to choose the customized plug-in for this season package. |
The Season Package Detail Events / Plays Tab
The Season Package Detail Event / Plays tab is used for adding events to a season package.
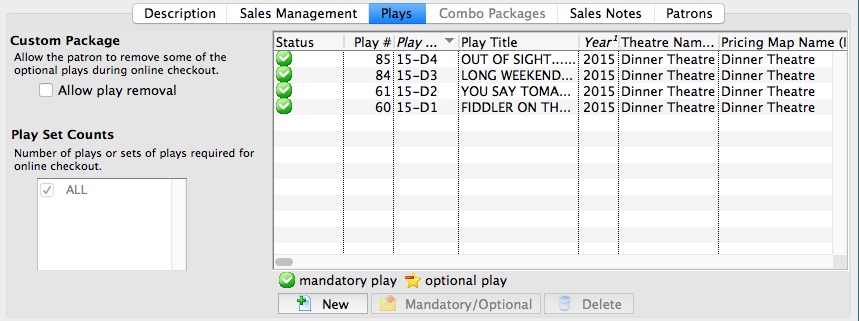
Parts of the Season Package Detail Event Tab
Custom Package |
|
| Allow Event Removal | Indicates if the patron is allowed to remove optional events from the season package during the online subscription checkout process. |
Event Set Counts |
|
| Select Number of Events | Select the number of events or sets of event counts required for online subscription checkout |
Event List Columns |
|
| Status | Indicates if the event is a mandatory event or optional event within the season package. |
| Event # | The sequence number of the event. |
| Event Code | The event code for the event. |
| Event Title | The title of the event. |
| Year | The season year that the event falls under. |
| Theatre Name (Internal) | The internal name of the venue that the event takes place in. |
| Pricing Map Name (Internal) | The internal name of the venue's pricing map that the event takes place in. |
|
Adds an event to the list of events in the season package. |
| You can indicate which events are optional as far as the package goes. When the event is optional, the patron can remove that event online if they choose to.
Note:
|
|
|
Removes the selected event from the season package. This only removes the event from within the season package and doesn't delete the event. |
The following is an example of an online season subscription with optional events, highlighted in red. In the 'Remove' column, the optional events have the option to be removed from the shopping cart prior to checkout.
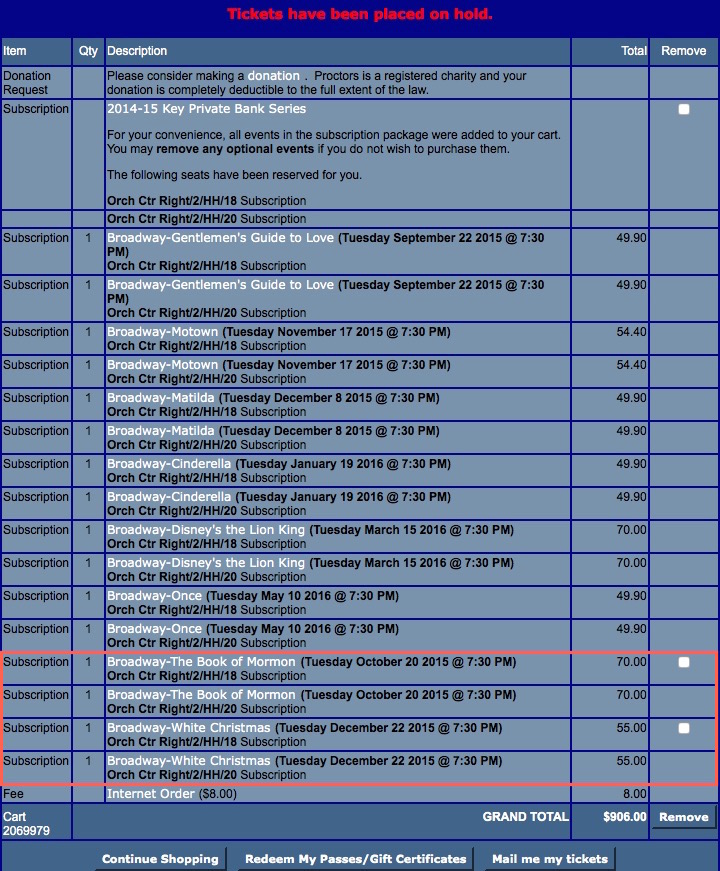
The Season Package Detail Combo Packages Tab
|
When selling a NEW season package online using the combo package, the patron will be asked for favourite seats in each package as part of the process. |
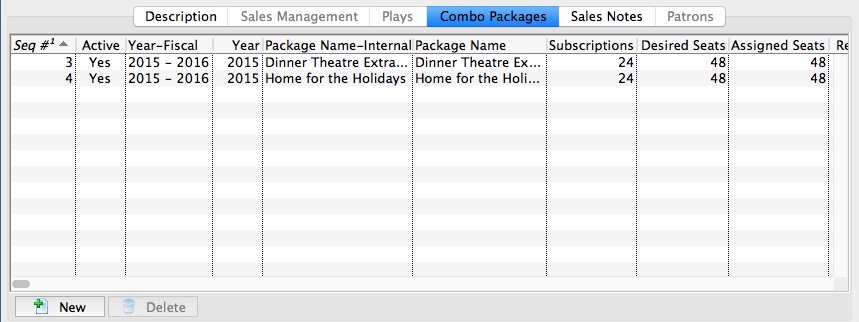
Parts of the Season Package Detail Combo Packages Tab
Season Package List Columns |
|
| Seq # | The sequence number for the season package. |
| Active | Shows whether the season package is active or not. |
| Year-Fiscal | The fiscal year to which the season package is currently set. |
| Year | The season year to which the season package is currently set. |
| Package Name-Internal | The internal description given to the season package. |
| Package Name | The external description given to the season package suitable for use on the web site and season renewal notices. |
| Subscriptions | The total number of subscriptions in the season package. |
| Desired Seats | The number of favorite seats that were desired by patrons for the season package. |
| Assigned Seats | The number of favorite seats that were able to be fulfilled for patrons in the season package. |
| Renewed Subs | The number of subscriptions that are renewals from the previous fiscal year. |
| Renewed Seats | The number of seats that were renewals from the previous fiscal year. |
| Combo | Indicates that this season package is made up of other season packages. |
| Pricing Map Name-Internal | The name of the venue's pricing map that the season package is a part of. |
|
Adds a different season package to the set of linked/combined season packages. |
|
Removes the selected season package from the linked/combined season package list. This only removes the season package from within this set of linked/combined season packages and doesn't delete the season package. |
The Season Package Detail Sales Notes Tab
The Season Package Detail Sales Notes tab is used for entering any sales notes about the season package. These notes are viewable by patrons when selling online season packages.
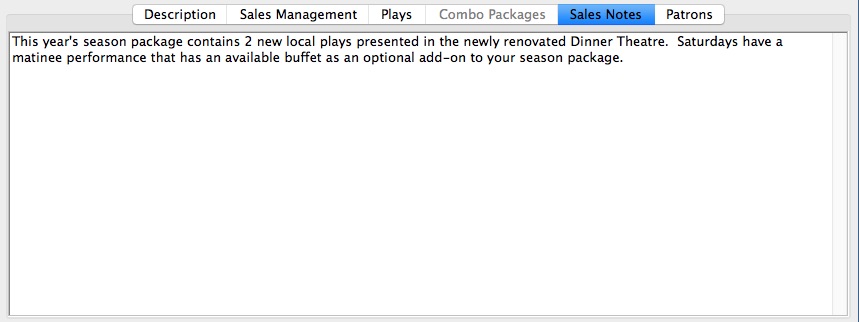
Parts of the Season Package Detail Sales Notes Tab
| Text Field | Area to enter detailed sales notes pertaining to the season package for display during the online subscription process. |
The Season Package Detail Patrons Tab
The Season Package Detail Patron tab lists the patrons currently within the Season Package. Patron's season packages can be managed from this window.
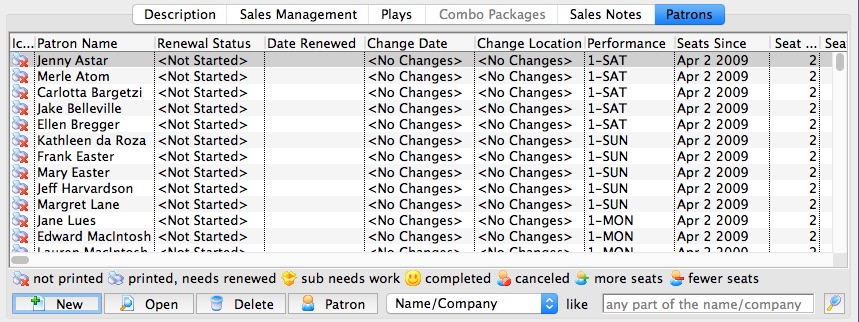
Parts of the Season Package Detail Patron Tab
Columns |
|
| Icon |  |
| Patron Name | Name of the patron the Season Subscription is booked under. |
| Renewal Status | Current state of the Patron's Season Subscription within this package |
| Date Renewed | Date the patron renewed their season subscription. This field is blank if the patron has not yet renewed. |
| Change Date | Series date within the Season Package the patron wishes to relocate to. |
| Change Location | Desired location the patron wishes to relocate to. |
| Performance | Current series code the patron is booked into. |
| Seats Since | Date the patron first became a Season Subscriber |
| Seat Count-Current | Number of seats currently assigned in the patron's Season Package. |
| Seat Count-Desired | Number of seats the patron wished to have for the Season Package. |
|
Adds patrons to the season package. |
|
Opens the patron's subscription detail record. |
|
Deleted the patron from the season package. If the patron already has booked seats, the tickets will need to be refunded from the patron window. |
|
Opens the patron window for the selected patron. |
 |
Search option drop down option for viewing patrons within the season package. |
 |
Searches the Season Package using the desired search option. |
Season Package List Window
The Season Package List window provides a detailed list of current and historical season packages.
Parts of the Season Package List Window
Window Toolbar Icons |
|
|
Opens the Season Package Detail window in order to create a new Season Package. |
|
Opens the selected season package for the purpose of editing in the Season Package Detail window. |
|
Creates a duplicate of the selected season package. |
|
Deletes the selected season package. |
|
Prints the season packages in the Season Package List window. |
 |
Initializes the selected season package by clearing all patrons from the package. |
|
Performs a Season Package Rollover the selected season package to the current year. |
|
Verifies the selected season package to ensure that all counts are correct. |
 |
Merges the selected season packages together. All records will also be merged together. |
|
Shows a listing of which patrons are part of the selected season package. |
|
Begins the process for issuing Season Renewal Notices for the selected season package. |
|
Holds all favorite seats for the performances in the selected season package. |
 |
Makes any seats for subscriptions released on the internet into secondary seats so they are available for other patrons to choose from when purchasing a new season subscription. |
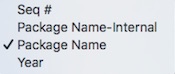 |
A drop down menu listing the available ways to search for a season package. |
|
The Search button to begin a search for a season package. |
| Active | Indicates to search for 'active' season packages. |
| Inactive | Indicates to search for 'inactive' season packages. |
List Columns |
|
| Seq # | The sequence number for the season package. |
| Active | Shows whether the season package is active or not. |
| Year-Fiscal | The fiscal year to which the season package is currently set. |
| Year | The season year to which the season package is currently set. |
| Package Name-Internal | The internal description given to the season package. |
| Package Name | The external description given to the season package suitable for use on the web site and season renewal notices. |
| Subscriptions | The total number of subscriptions in the season package. |
| Desired Seats | The number of favorite seats that were desired by patrons for the season package. |
| Assigned Seats | The number of favorite seats that were able to be fulfilled for patrons in the season package. |
| Renewed Subs | The number of subscriptions that are renewals from the previous fiscal year. |
| Renewed Seats | The number of seats that were renewals from the previous fiscal year. |
| Combo | Indicates that this season package is made up of other season packages. |
| Pricing Map Name-Internal | The name of the venue's pricing map that the season package is a part of. |
Book Season Subscription Options
You use the Book Season Subscription Options window to hold Season Subscription Seats within the Events of the Season Package. This is determined by the details of the window.
For more information on how to access the Book Season Subscription Options window click here.
Parts of the Season Package List Window
 |
Choose the assignment option.
You can choose to create a generic hold with no release data and time or create a hold assigned to the patron. |
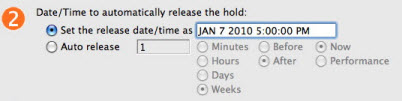 |
Determine the Date and Time the seats are released.
Theatre Managerautomatically releases the holds on the date and at the time entered or at the set Auto Release time. |
 |
Enter any comments about the holds. |
Season Subscription Auto-Renewal Window
The Book Season Subscription Options
The Season Subscription Auto-Renewal window renews selected season subscriptions where the status of the subscription is Not Started or Notice Printed. For more information on how to access the Season Subscription Auto-Renewal window click here.
|
You can mark an individual subscription as auto-renew in the patrons subscription detail window - auto renew tab |
|
Only subscriptions with the status Not Started or Notice Printed can be auto-renewed. Subscriptions in any other status are ignored so that you can not renew the same subscription twice. |
Parts of the Season Subscription Auto-Renewal
 |
Make your selection for some or all tje patrons in a package. |
 |
Auto-Renewal Choose to include all (un-checked box) or only those subscriptions marked as auto renew (checked). |
 |
Make your selection from the list.
If the payment method on the individual subscription for the patron is:
|