Direct Credit Card Processing Options
 |
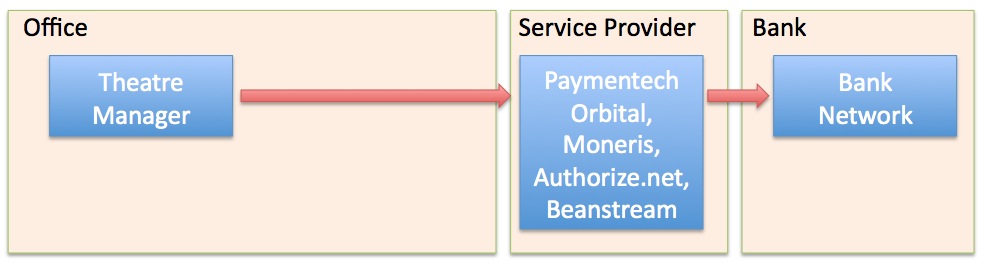
Theatre Manager transmits data directly to your processor over a secure HTTPS connection authenticated by a user ID and password unique to your merchant account and supplied only to you by the bank. Refer to each processor to see their additional capabilities. PCI DSS 4.1 |
 |
If you are considering changing merchant provider, be sure to read:
|
These online processors are able to manage multiple authorizations at once, making for a faster and smoother buying experience both for direct Theatre Manager users and for patrons buying online.
The following diagram illustrates the authorization flow.
Merchant Processing Service Providers
The merchant providers supported in Theatre Manager and various features of each are:
| Theatre Manager Help Link | Processor Marketing Website | Account Setup Contact Information | Hosted Payments | Merchant Profiles | Linked Refunds | Independent Refunds | PinPad | PCI compliance Options |
| Bambora™ | Bambora™
formerly Beanstream |
click for contact info | No | February 2021 | Yes | No | No | C or D |
| Paymentech Orbital™ | Paymentech Orbital™. | click for contact info | No | Yes | Yes | Yes | No | C or D |
| Elavon™ VirtualMerchant | Elavon™ Virtual Merchant main processor. | click for contact info | No | Yes | Yes | Yes | No | C or D |
| Moneris™ | Moneris eSelect Plus™ direct processing or hosted payments | click for contact info | Yes | Yes** | Yes | Yes | Yes | A-EP, B-IP, C or D |
| Authorize.net™ | Authorize.net™ | No | Yes | Yes | Yes | No | C or D | |
| Elavon™ (private brand) | derivative of Elavon™ and specific to city of Miami | City of Miami only | No | No | No | Yes | No | C or D |
 |
Hosted Payments: is a feature where the Theatre Manager web site's payment page will redirect to the service provider's web site. Any card data entered there never enters your network, allowing PCI Schedule 'A-EP' compliance - limiting the amount of PCI compliance documentation you require. |
|
Merchant Profiles is a feature where Theatre Manager obtains a token from your merchant provider to replace the credit card number in your database. Token's mean that you are not storing credit card data that is subject to PCI compliance - all card data could then be shredded. However, you retain the ability to do post dated payments or provide refunds through the saved token that is unique to the patron and your organization.
** Note: Merchant profiles not recommended for Moneris because they charge too much. |
Bambora Installation
|
Bambora implements user id and password authentication over https connections to provide compliance with PCI DSS 4.1 |
|
A unique feature of Bambora allows refunding against an original credit cards purchase, even if the credit card has been shredded. This is useful for venues that do not wish to store credit cards and may need to refund to cancelled events periodically long after the original payment. |
Please contact Arts Management to discuss the process of getting a Merchant Account from Bambora.
After Bambora has provided you with a merchant account, installation is quite straightforward. Once set up, funds gets authorized as 'Card Not Present' and then deposited right to your own bank upon settlement from Theatre Manager. This account information you are provided is all you need in the merchant setup windows (in the pages that follow) to begin secure credit card authorization.
Bambora needs an account setup for authorization and one for online viewing of the account data. You can set up multiple accounts for online access the data so some people can view data and others have more access to transactions and history.
- Bambora - uses the Merchant Portal via a web browser to "view the transactions" that have occurred. This account setup might need to be used during the EOD deposit process to verify transactions as required.
- Merchant User ID and Password - uses Bambora to allow authorizations to occur and be settled but not be viewed. This information is what needs to be entered into Theatre Manager's Merchant account to allow authorizations to occur.
|
The user ids and passwords for both of the above are different and should not be interchanged or confused with each other. Follow the appropriate setup steps for each. |
After following the setup for both accounts, make sure to:
- test the gateway
- Disable requirements for CVV2 and AVS in the online interface and allow those be managed from Theatre Manager merchant setup and set each employee to require CVV2.
Bambora Setup - Contact Information
- Settle any existing credit card batch (run an End of Day)
- Create a new merchant account in Theatre Manager
- Follow the steps to change your merchant provider
Then you can start using Bambora.
If you have any questions directly related to your Bambora merchant account setup, please contact your Bambora Representative directly. Contact Arts Management if you have questions about how to setup Theatre Manager to reference and authorize credit cards using your Bambora account.
Bambora Gateway Account
The User ID and Password setup is arranged by Arts Management from Bambora and is entered into the Setup --> System Tables --> Merchant Accounts window as below:
Software Type
The following values are set on the software type tab per the diagram below:
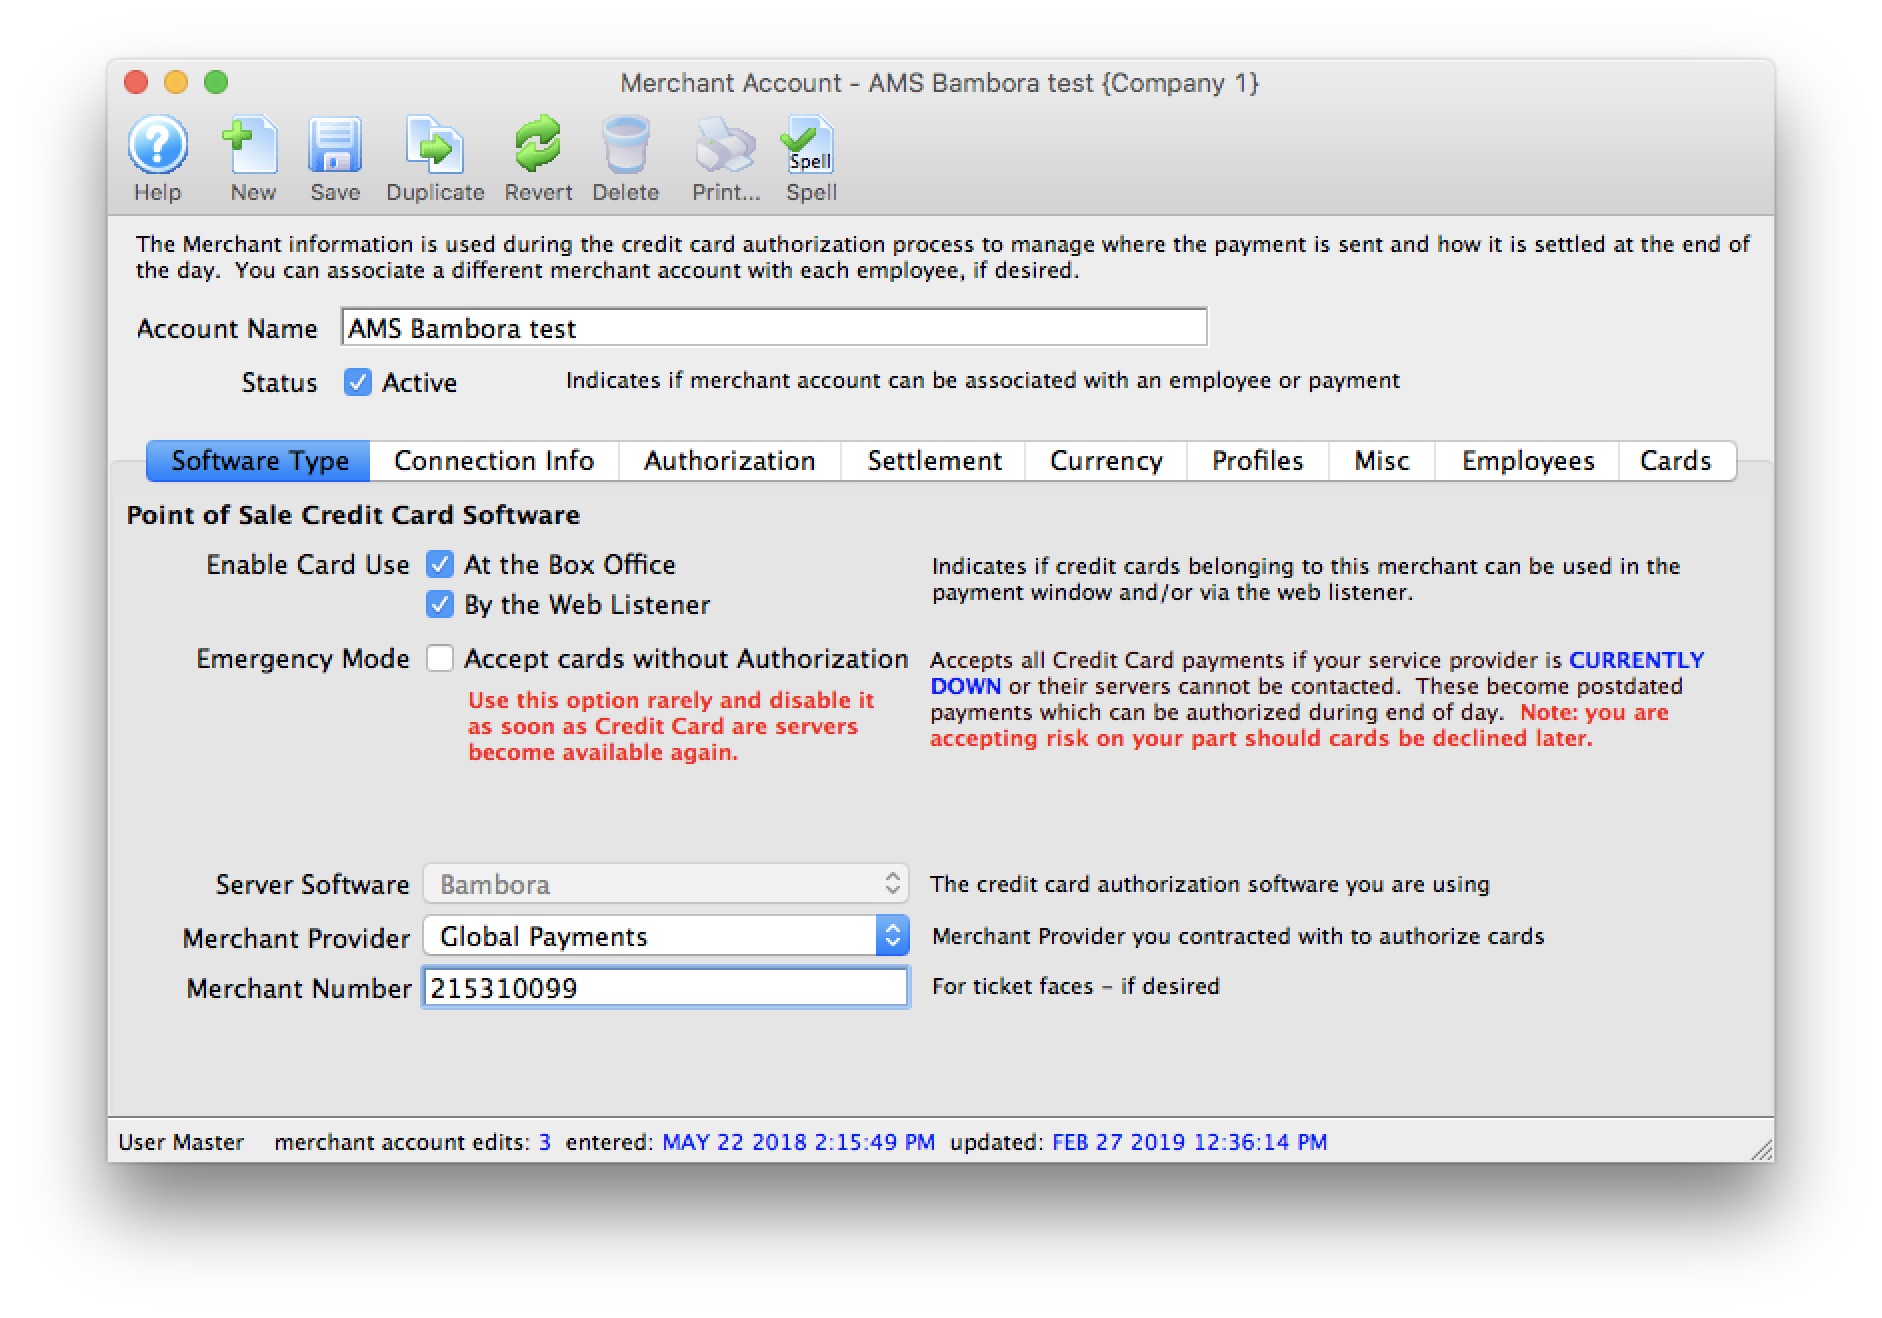
- Set the server software to be Bambora.
- The merchant provider - select the merchant services provider.
- The merchant number is for use on ticket faces and for contacting Bambora support.
Connection Info
The following entries are set on the Connection Info tab per the diagram below:
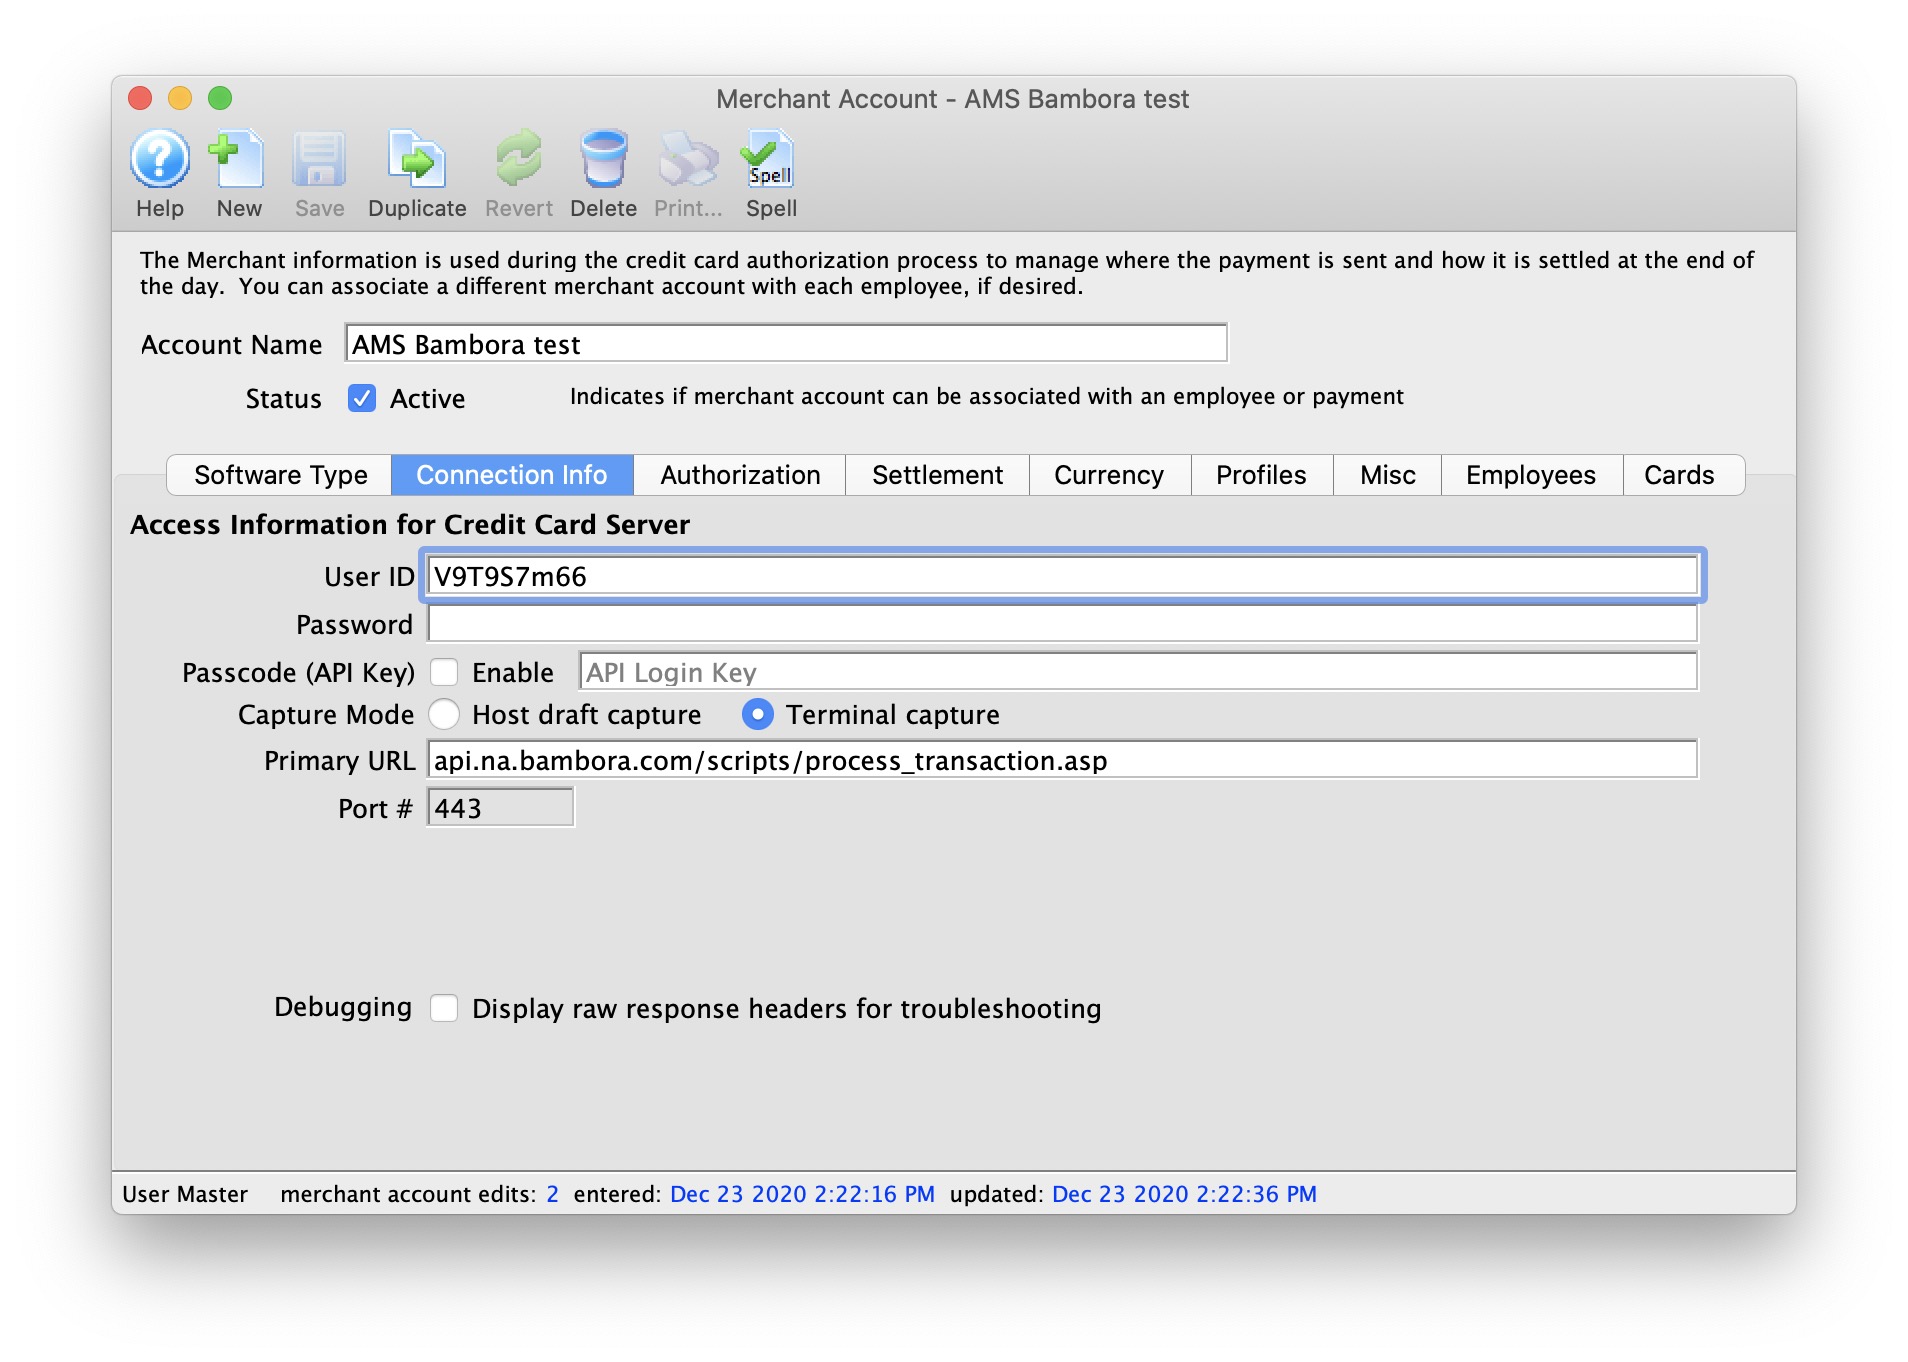
- User ID - provided through Bambora. The user id remains constant for the life of the account.
- Password - the password is auto generated for you. You can change it via the online interface to generate a new 'secret' key. If you do that, you can expire your old password right away or allow both old and new to co-exist for up to 24 hours.
- Passcode (API Key) Enabled - check this box if using the Payment Passcode API feature for connections rather than suppling the User ID/Password combination for each transaction processed.
- Passcode (API Key) - Payment API Passcode. The passcode (different then the User ID Password) assigned to the merchant account via the online Bambora web portal.

If Merchant Profiles are enabled and you get an authentication error, you might be using your Profiles API Key instead of your Payments API Key, so double check!
- Capture Mode - select Host Capture or Terminal Capture for End-Of-Day deposit processing.
- Primary URL - is always api.na.bambora.com/scripts/process_transaction.asp
- Port - is always 443
Merchant Profiles
|
Theatre Manager's interface with Bambora to maintain Merchant Profiles is currently under development. This feature has been disabled for activation until completion of the enhancement. |
The following entries are set on the Profiles tab per the diagram below:

- Enable Profiles - set to Active if Merchant Profiles will be used.
- Profiles API Login Key - Unique Profiles API Key for your Bambora merchant account. This identifier is different than the Merchant ID and User ID on the Connections tab.
Creating and modifying Payment Profiles requires you use your Profiles API Key. If you get an authentication error you might be using your Payments API Key, so double check!
- Profiles API URL - is always api.na.bambora.com/v1/profiles This URL is different than the URL on the Connections tab.
|
Refer to Merchant Profiles for further information on functionality. |
Employee and Card Setup
- To assign employees to this merchant account, click on the 'Employee' tab and find the employees to assign. In a multi merchant setup situation, drag only those employees that will use this merchant account as the default.
While some employees may have permission to use multiple merchant accounts, viewing their name here is the default merchant account assigned to them for charging cards. If the employee wants to use another merchant account, they will need to select it on the payment window.
- Click on the 'card' tab to select which credit card payment methods are associated with this merchant account.
If you need to have multiple merchant accounts and both are to take Visa (for example), you will need two Visa payment methods and assign one of them to each merchant account.
|
if you are switching from one merchant services provider software to another, you can open both merchant accounts and drag the employees from one window to the other. You can do the same for the credit card payment methods - to make the switch easy and fast. |
Any future dated 'post dated payments' associated with the card you drag to another merchant provider will automatically be re-assigned to authorize on the new merchant provider card network.
Testing Bambora
- Search for yourself in the database or create a new patron that is yourself
- Create a new order and buy a ticket
- On the payment window, select the credit card you want to use and do a test authorization
- If you get an authorization with a message indicating AVS match and/or CVV2 match, then the setup is correct
- Log in to your Bambora online account and view the batch to see that your transaction is there
- In Theatre Manager, void the credit card payment. It will appear in Bambora that the charge is still there with as a PA (pre-auth). That means it will be ignored
- Try another authorization and then do an End Of Day (i.e. SETTLEMENT) and make sure the amount makes it to the bank in the next day or so
Trouble Shooting Bambora Issues
- If you get a response that looks like it is HTML or XML and indicates that it was not authorized, then your user id/password is probably wrong (please verify), or something is incorrectly set up in Bambora and you will have to contact their merchant support group.
- If you get a message during end of day that will not allow cards to settle, make sure your provider has set you up to allow BACKEND transactions. These are used to convert 'authorize-only' transactions that are done during to the day to 'PAC' (fully processed) transactions during the end of day process
Bambora Web Terminal
- The Bambora Transaction List which is a filter that can be used to show the transactions of interest in a specific date range.
- You can see the Transaction Detail about any line by clicking on the credit card icon in each row. At the bottom of each transaction detail is a small table listing all other transactions that are related so that you can see a history pertaining to an authorization.
Transaction List
The Bambora transaction list lets you view the transactions that have occurred. Normally, you would only want to see those since the last end of day, but you can decide which data you want to view. To alter the search, the top part of the list contains date search range, the ability to limit the number of transactions per page and more. You may also view more detail about a transaction by clicking the credit card icon that is on the same line as the transaction.
The important thing to note is the types of transactions and how Theatre Manager creates them. Specifically:
- All payments sent for authorization will have a transaction type of 'PA'. This means Pre-Authorization. It is only a hold on the customers credit card. The the end of day is not done, this money will fall off the transaction list and you will not get your money.
- When you do End of Day, Theatre Manager takes all payments that it authorized that day and turns them into 'PAC' - effectively completing them. Transactions that are 'completed' are swept to your bank at 11:59:59 pm. This means a few things
- If you do not do end of day on any specific day, nothing will go to the bank until you compete an end of day.
- If you two multiple end of days in the same day, Theatre Manager sees them as more than one posting. Bambora aggregates all the PAC's into one amount on your bank statement.
- You will see AT LEAST TWO transactions for each customer. You will see a PA transaction and then you will see a corresponding PAC transaction that completes the PA. A successful authorization is a PA with a blue checkmark followed by a transaction some time later that is a PAC with a blue checkmark.
- You may see some 'R' transactions -- or refunds. Those are always swept to your bank each night, even if you do not do an end of day. Sorry, but that's the way Bambora works. We suggest making absolutely sure that you do an end of day in each day that refund occurs. For that reason, you may wish to limit who can do refunds.
Transaction Detail

The Bambora transaction detail contains a lot of information about the payment, most of which is self explanatory. It is accessed by clicking on the 'credit card' icon on the list window.
Theatre Manager currently uses 3 of the reference fields at the bottom of the screen to provide:
- ref1 - contains the Theatre Manager patron number on the account that the ticket was sold under
- ref2 - contains the Theatre Manager order number
- ref3 - contains the name of the user who processed the credit card
At the bottom of the detail window is a table that shows the related transactions.
Related Transactions
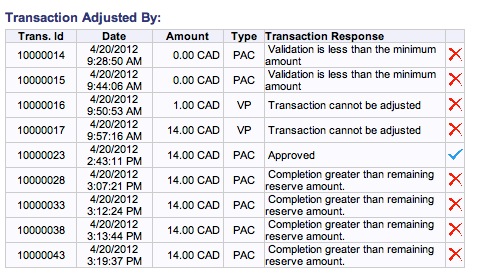
At the bottom of the transaction detail, there is a table that shows all the related transactions in Bambora. This is probably most pertinent to the original 'PA' transaction. If it has been converted to a 'PAC' transaction, you will see multiple lines as part of the Transaction Detail window that shows all the other transactions that affected this transaction.
Ultimately, all that matters is that you see a blue checkmark beside the PAC transaction, which means it was swept to the bank. In the example below, we see one.
Implication from Interrupted End of Day
However, we also see a number of other transactions with a red X that are related to the PA. If you see those, it may be because an error caused the EOD process to stop (without finishing in Theatre Manager) and so you re-ran it. Bambora only allows one PAC for each PA. A second PAC gives an 'error' but does not affect the outcome.
Paymentech Orbital Installation
|
Paymentech Orbital implements either user ID and password authentication; or access from specified IP addresses over HTTPS connections to provide compliance with PCI DSS 4.1 |
Installation is quite straightforward. You would contact Paymentech using information provided by Arts Management, and they create a Merchant Account for you. Money gets authorized by Paymentech as 'Card Not Present' and then deposited right to your own bank upon settlement from Theatre Manager. This account information that you are provided is all you need to set up in the merchant setup window below to provide secure credit card authorization.
Paymentech Orbital will need to provide the following 2 account setups (both are required):
- Orbital Virtual Terminal - uses the Orbital Gateway via a web browser to "view the transactions" that have occurred. This account setup is used during the Een Of Day deposit process to review your transactions prior to the settlement process.
- Certified Connection for User ID and Password - uses the Orbital Gateway to allow authorizations to occur but not be viewed. This information is what needs to be entered into Theatre Manager's merchant account to allow authorizations to occur.
|
The user IDs and passwords for both of the above are completely different and should not be interchanged or confused with each other. Follow the appropriate setup steps for each. |
After following the setup for both accounts, make sure to test the gateway.
Paymentech Orbital - Contact Information
- In Canada, contact:
Amit Dhawan
Chase Merchant Services
100 Consilium Place
17th Floor
Toronto, Ontario M1H 3E3
(647) 500-9872
www.chasepaymentech.ca
amit.dhawan@chase.com - Ask for a Paymentech Orbital account to be set up
Please note you may encounter with Paymentech:
- a need to sign a 3-year contract for this account. Depending on your transaction volumes, you may able to request a 1-year trial if your organization meets the requirements
- if you will be a new client to Paymentech, it will take up to two weeks to establish and setup your merchant account
- Paymentech may request that all transactions flowing through your organization (Box office point of sale business as well as the ecommerce sales) flow through this new account.
Please note you may encounter with your existing merchant privider:
- may require 30 days written notice of cancellation
Once your Orbital account is set up, the following steps will need to happen:
- Settle any existing credit card batch (run an End of Day)
- Create a new merchant account in Theatre Manager
- Follow the steps to change your merchant provider
Then you can start using Paymentech Orbital.
If you have any questions directly related to your Orbital merchant account setup, please contact Orbital Technical Support at 1-866-645-1314. Contact Arts Management if you have questions about how to setup Theatre Manager to reference and authorize credit cards using your Orbital merchant account.
Orbital Gateway Account
The Orbital Gateway Certified Connection for User ID and Password setup is obtained from Paymentech Orbital and is entered into the Setup --> System Tables --> Merchant Accounts window as below:
Software Type
The following values are set on the software type tab per the diagram below:
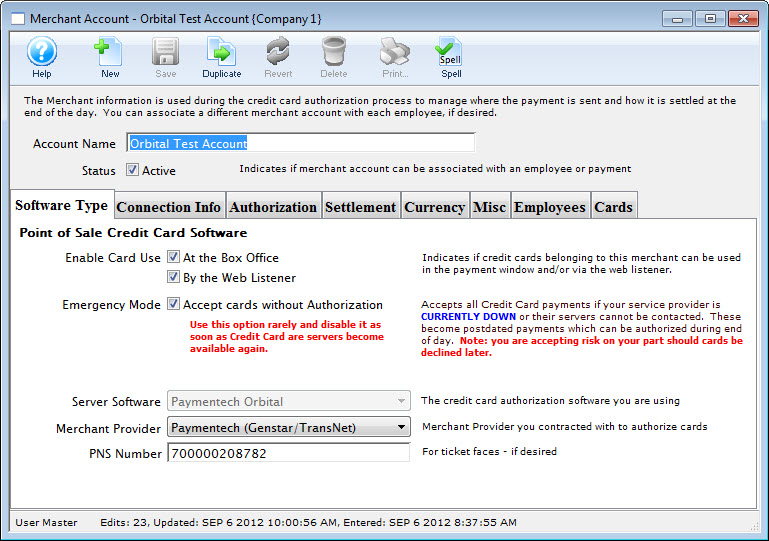
- Set the server software to be Paymentech Orbital
- The merchant provider will automatically be set for you
- The PNS number is provided by Paymentech and will need to go into the PNS/Merchant number field - enter in the PNS# (not the merchant number) for your Orbital account. It is typically 12 digits long and generally starts with 720000
Connection Info
The following entries are set on the Connection Info tab per the diagram below:
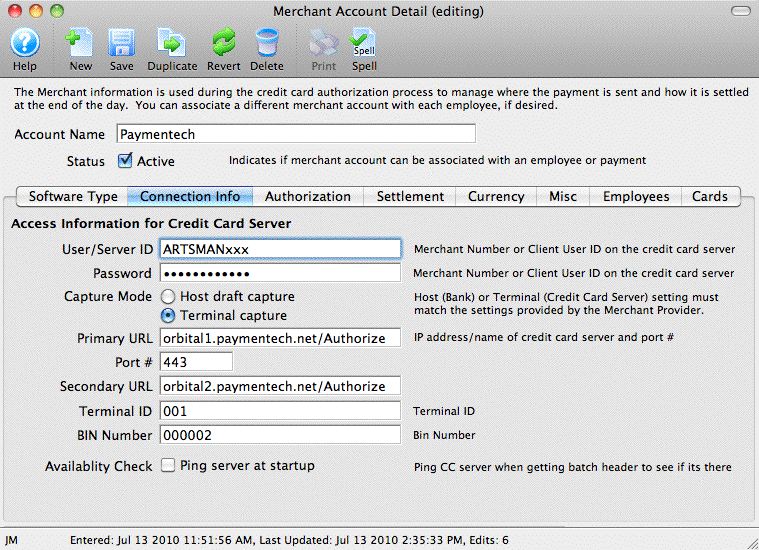
- User/Server ID - provided by Paymentech and is the user ID for the Certified Connection gateway, not to the Orbital Virtual Terminal (they are not the same thing - the Orbital Virtual Terminal is the online interface).
- Password - provided by Paymentech and is the password for the Certified Connection gateway. It is also not the password for the Orbital Virtual Terminal.
- Primary URL - is always orbital1.chasepaymentech.com/Authorize
- Secondary URL - is always orbital2.chasepaymentech.com/Authorize
- Port - is always 443
- Terminal ID - provided by Paymentech and is usually 001
- BIN number - provided by Paymentech and is always 000002 for North American credit card processing.
Merchant Profiles
The following entries are set on the Profiles tab per the diagram below:
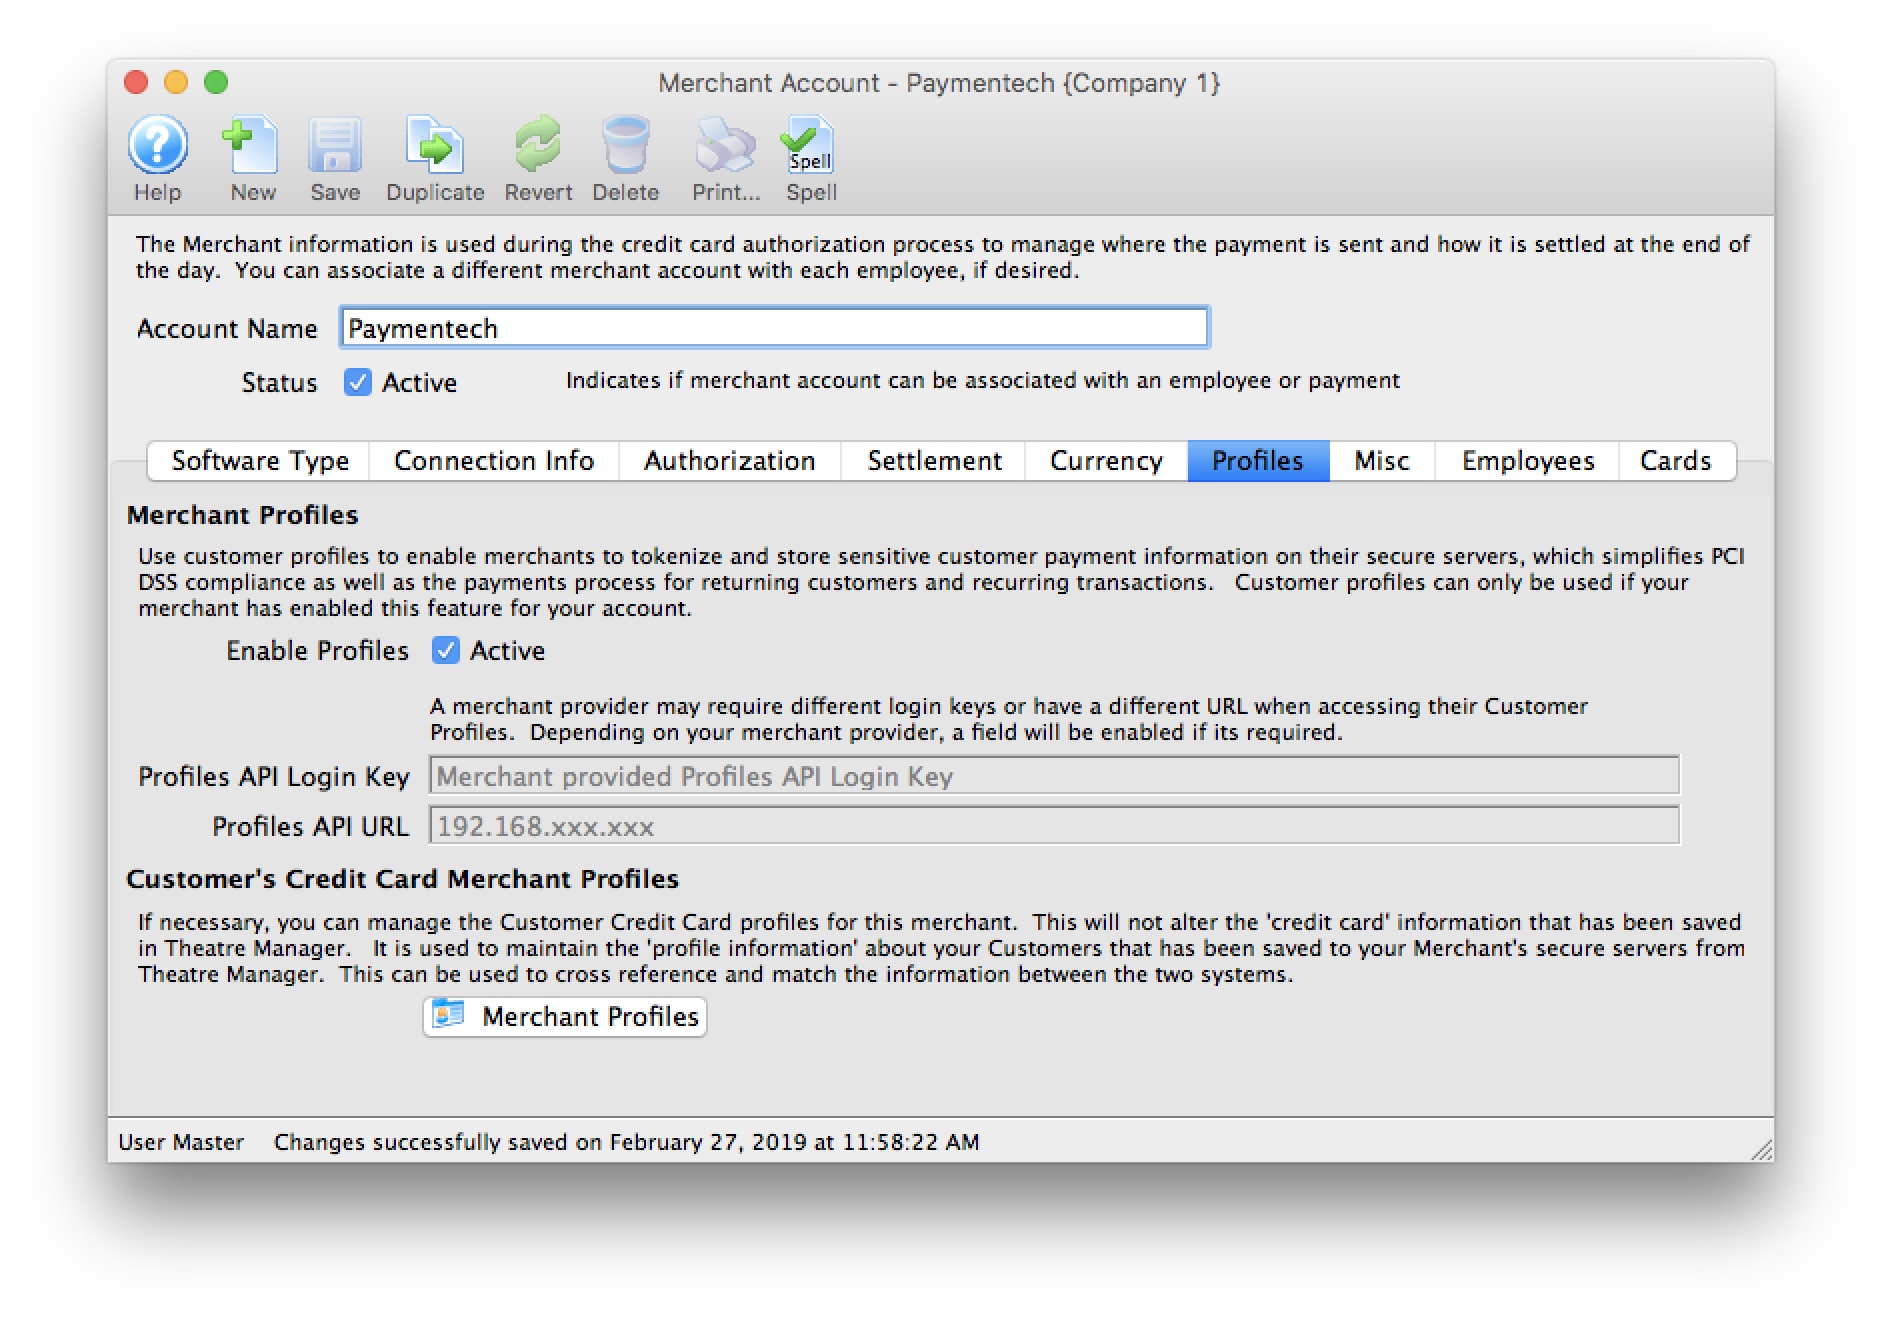
- Enable Profiles - set to Active if Merchant Profiles will be used.
- Profiles API Login Key - not required. Paymentech Orbital uses the same connection information from the Connection Info tab.
- Profiles API URL - not required. Paymentech Orbital uses the same connection information from the Connection Info tab.
|
Refer to Merchant Profiles for further information on functionality. |
Employee and Card Setup
- To assign employees to this merchant account, click on the Employee tab and find the employees to assign. In a multi-merchant setup situation, drag those employees that should use this merchant account by default from the same employee tab in another merchant record. While some employees may have permission to use multiple merchant accounts, viewing their name here shows the default merchant account assigned to them for charging cards. If the employee is able to use another merchant account, they will need to select it on the payment window.
- Click on the Card tab to select which credit card payment methods are associated with this merchant account.
If you need to have multiple merchant accounts and both are to take Visa (for example), you will need two Visa payment methods and assign one of them to each merchant account.
|
If you are switching from one merchant services provider software to another, you can open both merchant accounts and drag the employees from one window to the other. You can do the same for the credit card payment methods - to make the switch easy and fast. |
Any future dated 'post dated payments' associated with the card you drag to another merchant provider will automatically be reassigned to authorize on the new merchant provider card network.
Orbital Virtual Terminal
The Orbital Virtual Terminal requires:
- User ID - provided by Paymentech and is the user ID for the Orbital Virtual Terminal gateway.
- Password - provided by Paymentech and is the password for the Orbital Virtual Terminal gateway
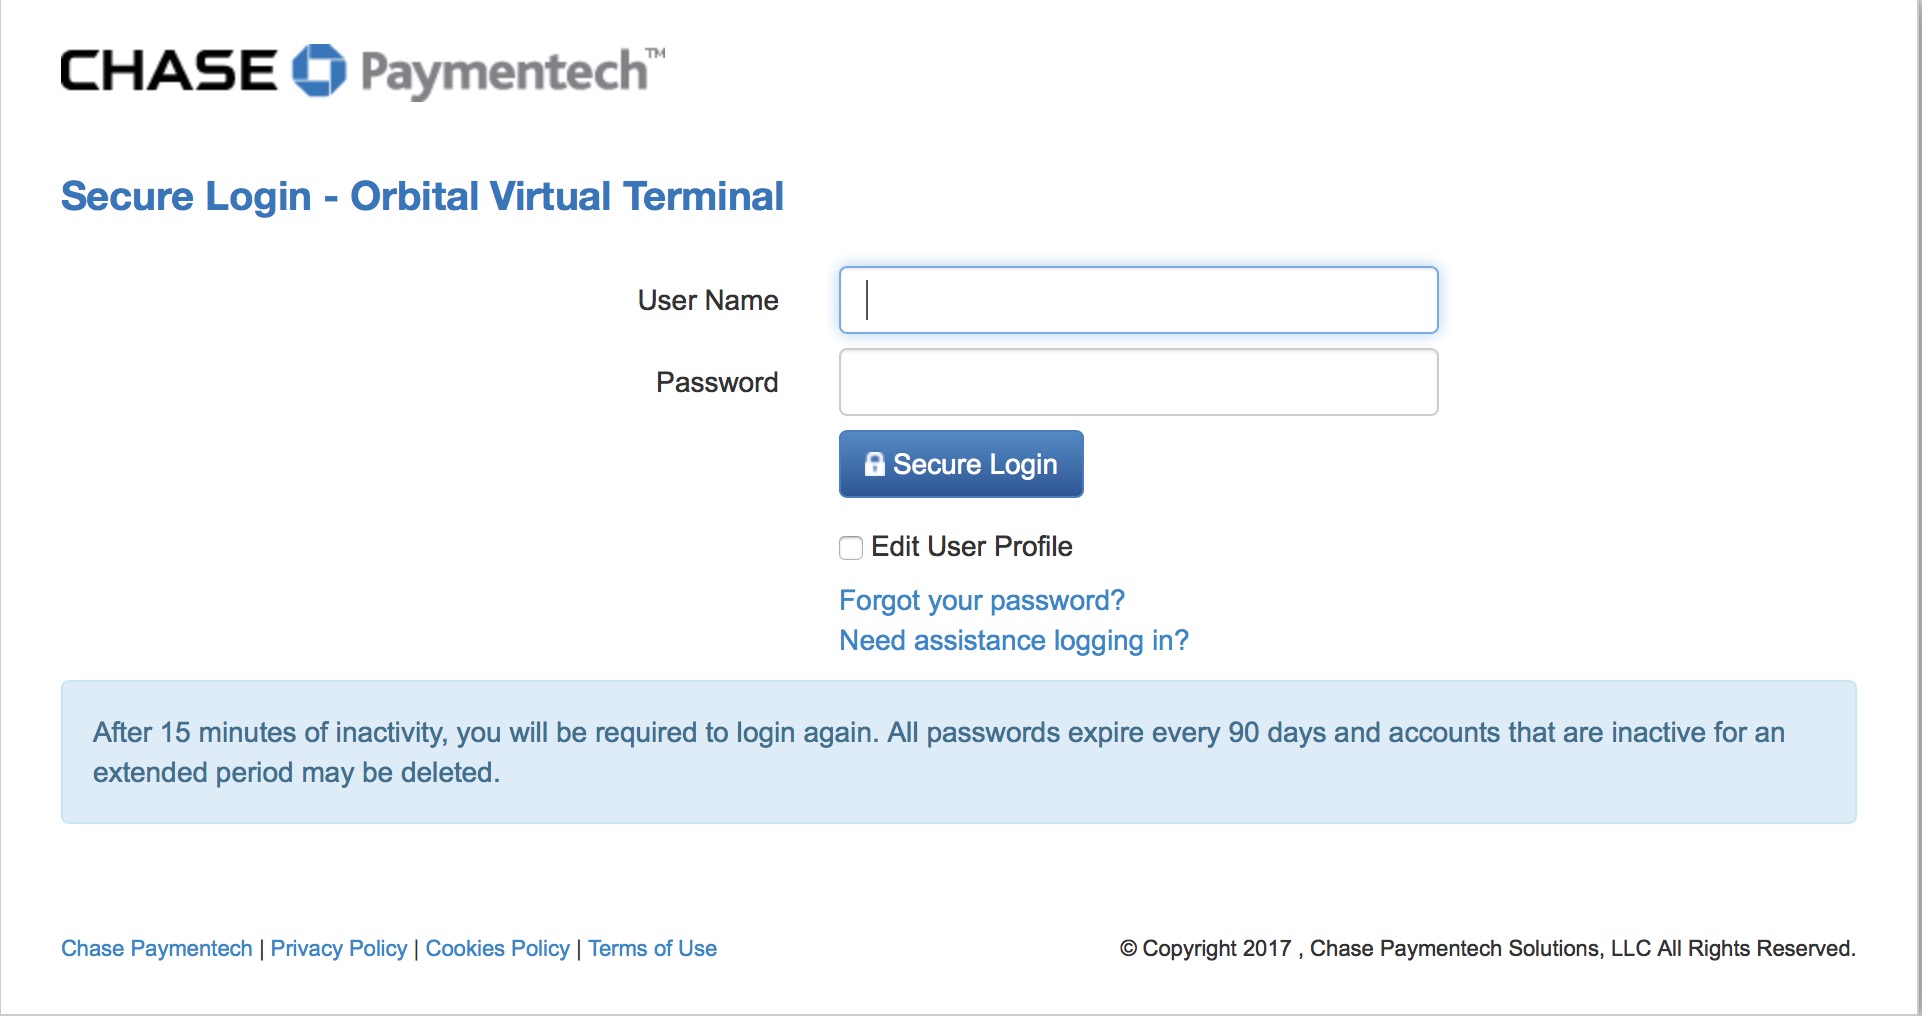
- Orbital Virtual Terminal Gateway - is always accessed via a web browser through https://secure.paymentech.com/manager. This is used to verify current and past batches, look at transactions, generate reports and manage your Orbital Gateway account.
All users of the Orbital Virtual Terminal in conjunction with Theatre Manager are encouraged to download the Virtual Terminal Users Manual directly from Chase Paymentech. There is also a Virtual Terminal Quick Reference Guide available from the same site.
Orbital Virtual Terminal - Account Setting for Manual Settlement
- User ID - provided by Paymentech and is the user ID for the Orbital Virtual Terminal gateway.
- Password - you created after your initial access/activation for the Orbital Virtual Terminal gateway
- Orbital Virtual Terminal Gateway - is always accessed via a web browser through https://secure.paymentech.com/manager.
This is used to verify current and past batches, look at transactions, generate reports and manage your Orbital Gateway account.
- Log into your Virtual Terminal Account and from the Tab selection at the top click on Admin, then General Admin from the drop-down menu as shown in the following image.

- The following setting window will appear.
Note the Auto Settle Section of the settings.
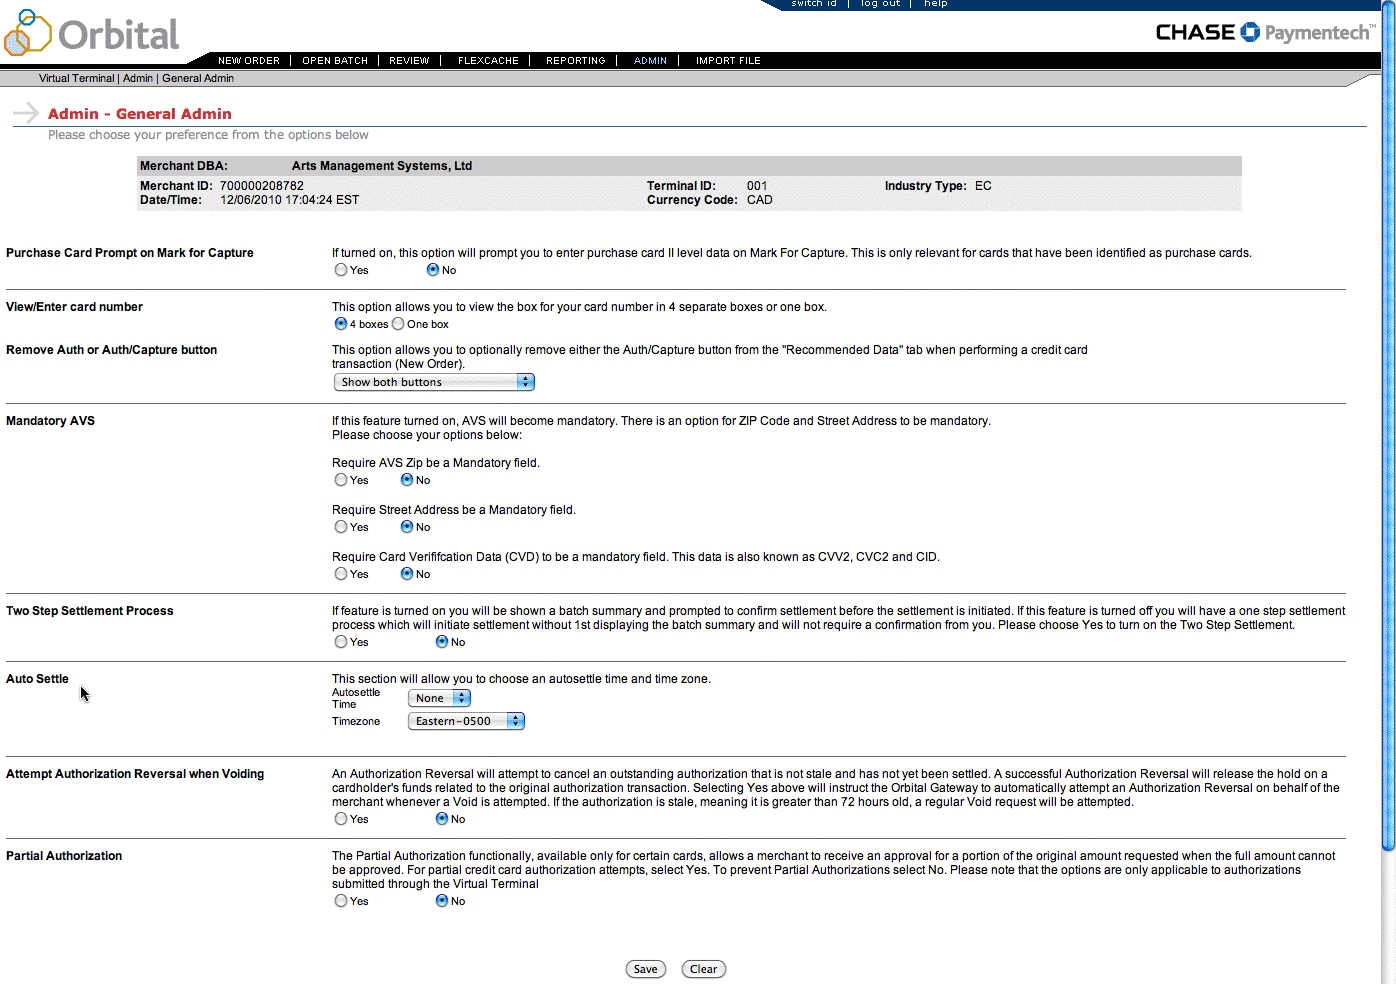
- Make sure the Auto Settle Time is set to NONE.

Testing Orbital Gateway
- Find yourself in the database or create a new patron that is yourself
- Create a new order and attempt to buy a ticket
- On the payment window, select the credit card you want to use and do a test authorization
- If you get an authorization with a message indicating AVS match and/or CVV2 match, then the setup is correct
- Log in to your Orbital Virtual terminal account and view the batch to see that your transaction is there
- In Theatre Manager, void the credit card payment and then confirm in the Orbital Virtual Terminal that the charge is marked as void
Trouble Shooting
If you get a response that looks like it is HTML or XML and indicates that it was not authorized, then your user ID/password is probably wrong (please verify), or Paymentech set up the account to require a specific IP. Contact your Paymentech representative and tell them of the issue so that they can correct it. They may put you in touch with the Gateway people. You can inform the Paymentech Gateway support staff that you need to be able to authorize via user ID and password (per their standard setup instructions for Theatre Manager).
Availability of Settled Batches
Chase Paymentech send out a bulletin in May 2015:
Beginning June 29, 2015, we’re changing the Orbital Batch Data Retention Policy for our Orbital Batch subscribers. This change is intended to increase data security as well as reduce the operational burden of maintaining authorization response files on our redundant servers.
QUICK SUMMARY:
- Effective June 29 2015, Orbital Batch response files will be available for download for seven days
- This change increases security and reduces operational burdens
- After seven days, files can only be retrieved by the Partner Relationship Management team
For More Information: Contact the Partner Relationship Management Team at 888.818.5128, option 4 or via e-mail at IntegratorSupport@ChasePaymentech.com.
Elavon Installation
|
Elavon implements either user ID and password authentication; or access from specified IP addresses over HTTPS connections to provide compliance with PCI DSS 4.1 |
Installation is quite straightforward. You would contact Elavon using information provided by Arts Management, and they create a Merchant Account for you. Money gets authorized by Elavon as 'Card Not Present' or as 'Swiped Card' and then deposited right to your own bank upon settlement from Theatre Manager. This account information that you are provided is all you need to set up in the merchant setup window below to provide secure credit card authorization.
Elavon will need to provide the following 2 account setups (both are required):
- Elavon Virtual Terminal - uses the Elavon VirtualMerchant Gateway via a web browser to "view the transactions" that have occurred. This account setup is used during the EOD deposit process to review your transactions prior to the settlement process.
- Certified Connection for User ID and Password - uses the Elavon Gateway to allow authorizations to occur but not be viewed. This information is what needs to be entered into Theatre Manager's Merchant account to allow authorizations to occur.
|
The user IDs and passwords for both of the above are completely different and should not be interchanged or confused with each other. Follow the appropriate setup steps for each. |
After following the setup for both accounts, make sure to test the gateway.
Elavon - Contact Information
US Clients:
1-855-770-0526
Canadian Clients:
1-844-352-8661
Ask for an Elavon Virtual Terminal account to be set up
Once your Merchant Account information is provided to you, the following steps will need to happen:
- Settle any existing credit card batch (run an End of Day)
- Create a new merchant account in Theatre Manager
- Follow the steps to change your merchant provider
Then you can start using Elavon Virtual Merchant.
If you have any questions directly related to your Elavon merchant account setup, please contact them directly. Contact Arts Management if you have questions about how to setup Theatre Manager to reference and authorize credit cards using your Elavon merchant account.
Elavon Gateway Account
The Elavon Gateway Setup for User ID and Password setup is obtained from Elavon and is entered into the Setup --> System Tables --> Merchant Accounts window as below:
Software Type
The following values are set on the software type tab per the diagram below:
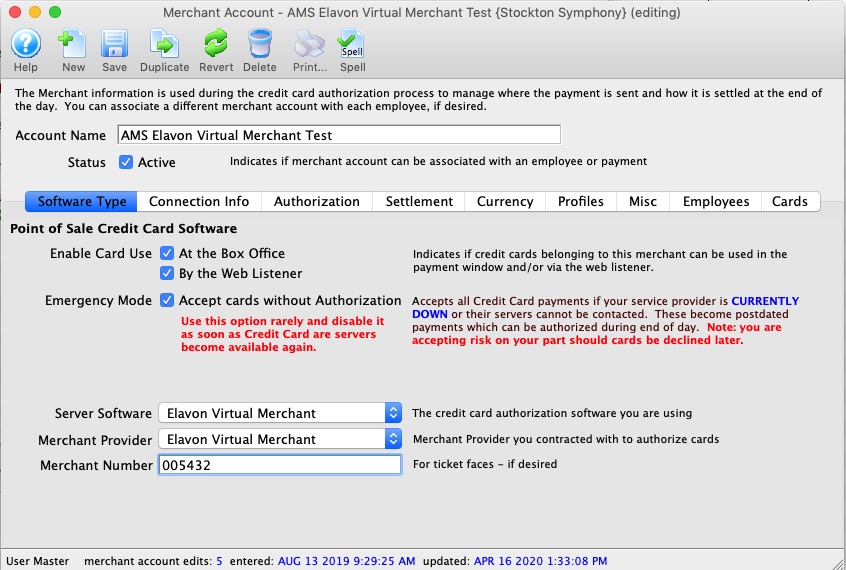
- Set the server software to be Elavon Virtual Merchant
- The merchant provider will automatically be set for you
- The merchant number is provided by Elavon and will need to go into the Merchant number field. It is typically 6 or 7 digits.
This number may be referred to by Elavon Support as the Virtual Merchant Account ID or Converge Account ID. The Elavon Developer guide calls the the Virtual Terminal Merchant ID. Look for the Account ID: on the Welcome to the VirtualMerchant Application form.
Elavon will provide both a Merchant Account ID and a Converge Account ID when setting up the account. Enter the Converge Account ID into the Merchant number field.
Connection Info
The following entries are set on the Connection Info tab per the diagram below:
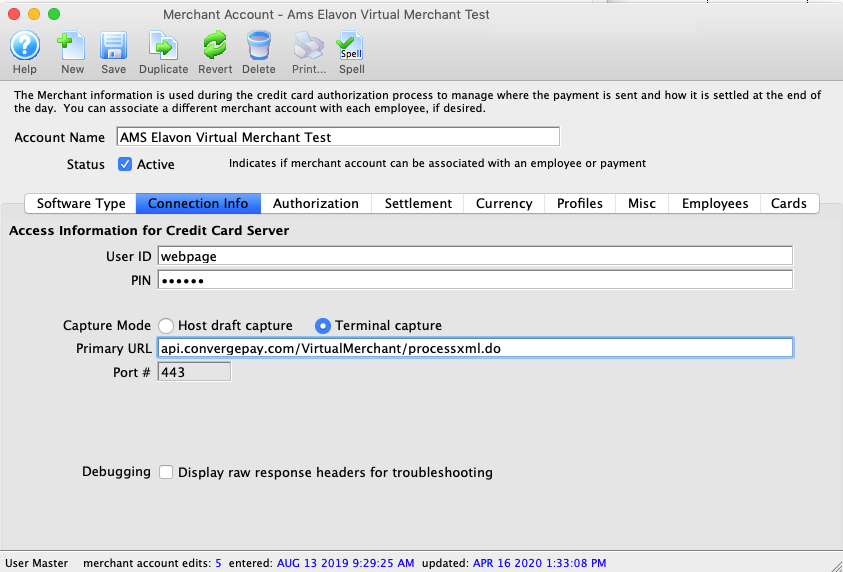
- User id - provided by Elavon and is the user id for the gateway, not to the Elavon VirtualMerchant Account (they are not the same thing - the latter is the online interface).
- Password - provided by Elavon and is the password for the gateway. It is not the password for the Elavon VirtualMerchant Account.
- Primary URL - is always api.convergepay.com/VirtualMerchant/processxml.do
- Port - is always 443
Merchant Profiles
The following entries are set on the Profiles tab per the diagram below:
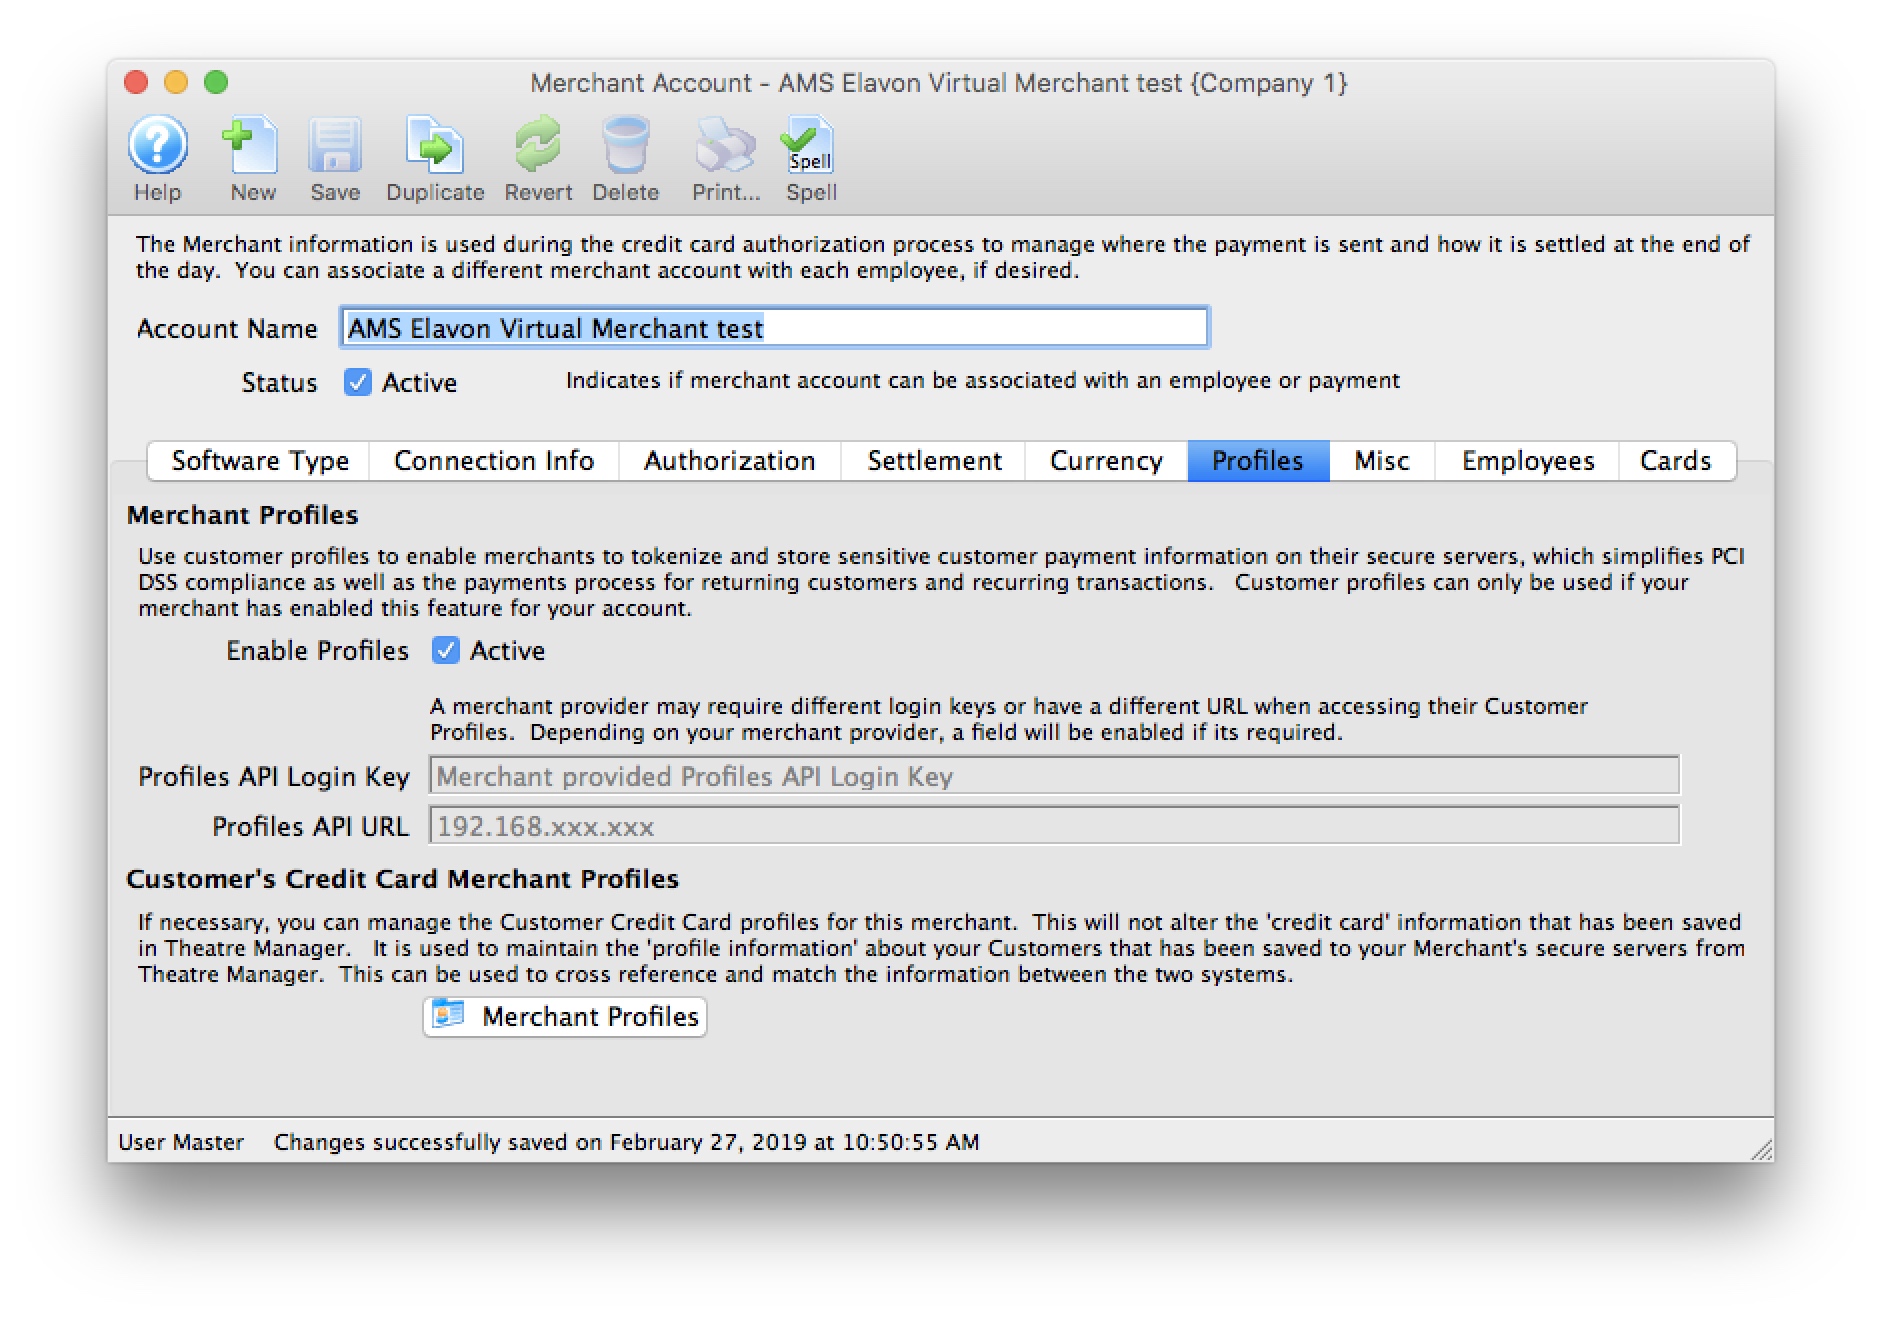
- Enable Profiles - set to Active if Merchant Profiles will be used.
- Profiles API Login Key - not required. Elavon uses the same connection information from the Connection Info tab.
- Profiles API URL - not required. Elavon uses the same the connection information from the Connection Info tab.
|
Refer to Merchant Profiles for further information on functionality. |
Employee and Card Setup
- To assign employees to this merchant account, click on the Employee tab and find the employees to assign. In a multi-merchant setup situation, drag those employees that should use this merchant account by default from the same employee tab in another merchant record. While some employees may have permission to use multiple merchant accounts, viewing their name here means this is the default merchant account assigned to them for charging cards. If the employee is able to use another merchant account, they will need to select it on the payment window.
- Click on the Card tab to select which credit card payment methods are associated with this merchant account.
If you need to have multiple merchant accounts and both are to take Visa (for example), you will need two Visa payment methods and assign one of them to each merchant account.
|
if you are switching from one merchant services provider software to another, you can open both merchant accounts and drag the employees from one window to the other. You can do the same for the credit card payment methods - to make the switch easy and fast. |
Any future dated 'post dated payments' associated with the card you drag to another merchant provider will automatically be reassigned to authorize on the new merchant provider card network.
Elavon Virtual Merchant - Account Setting for Manual Settlement
- Account ID - provided by Elavon and is the Virtual Merchant Account ID.
- Password - you created after your initial access/activation for the Virtual Merchant
- Log into your Virtual Merchant Account and from the Tab selection at the top click on Terminal >> Advanced >> System Setup from the drop-down menu as shown in the following image.
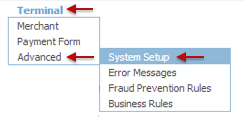
- The following setting window will appear.
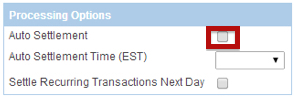
Note the Auto Settle Section of the settings.
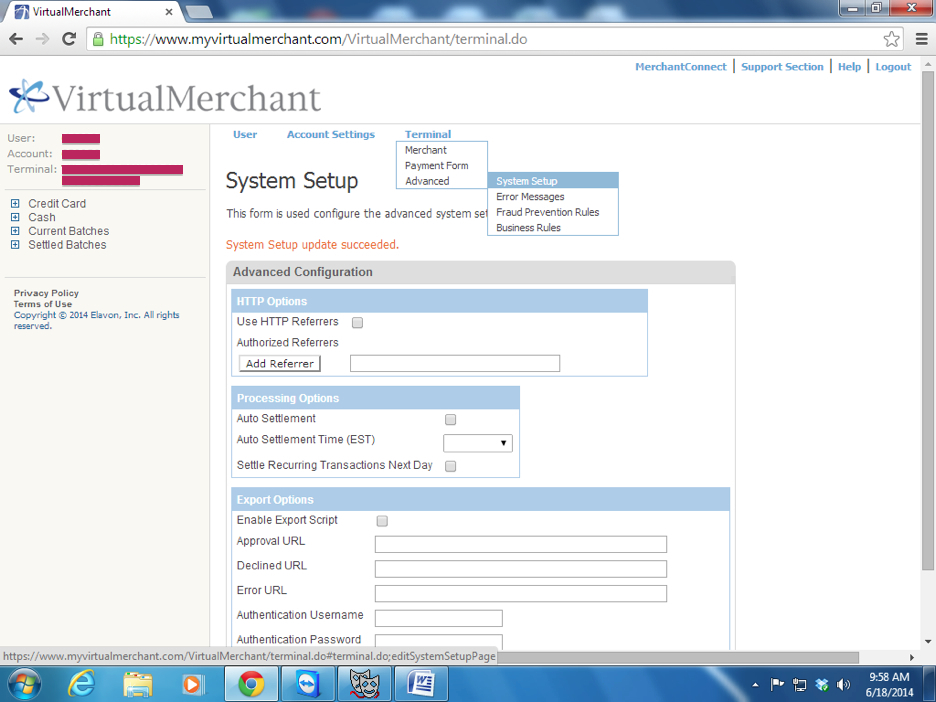
- Make sure the Auto Settlement box is not checked.
- Save your changes by clicking the save button at the bottom of the settings window
Elavon Virtual Merchant Web Portal Login
- User ID - provided by Elavon and is the user ID for the Elavon VirtualMerchant gateway.
- Password - provided by Elavon and is the password for the Elavon VirtualMerchant gateway
- Elavon VirtualMerchant 'Converge' Gateway - is always accessed via a web browser through https://www.convergepay.com/converge-webapp/#!/login. This is used to verify current and past batches, look at transactions, generate reports and manage your Elavon account.
All users of the Elavon VirtualMerchant in conjunction with Theatre Manager are encouraged to download the VirtualMerchant Users Manual directly from Elavon.
Testing Elavon Gateway
- Find yourself in the database or create a new patron that is yourself
- Create a new order and attempt to by a ticket
- On the payment window, select the credit card you want to use and do a test authorization
- If you get an authorization with a message indicating AVS match and/or CVV2 match, then the setup is correct
- Log in to your Elavon VirtualMerchant account and view the batch to see that your transaction is there
- In Theatre Manager, void the credit card payment and then confirm in the orbital Virtual Terminal that the charge is marked as void
Trouble Shooting
If you get a response that looks like it is HTML or XML and indicates that it was not authorized, then your user ID/password is probably wrong (please verify), or Paymentech set up the account to require a specific IP. Contact your Elavon representative and tell them of the issue so that they can correct it. They may put you in touch with the Gateway people. You can inform Elavon Gateway support staff that you need to be able to authorize via user ID and password (per their standard setup instructions for Theatre Manager).
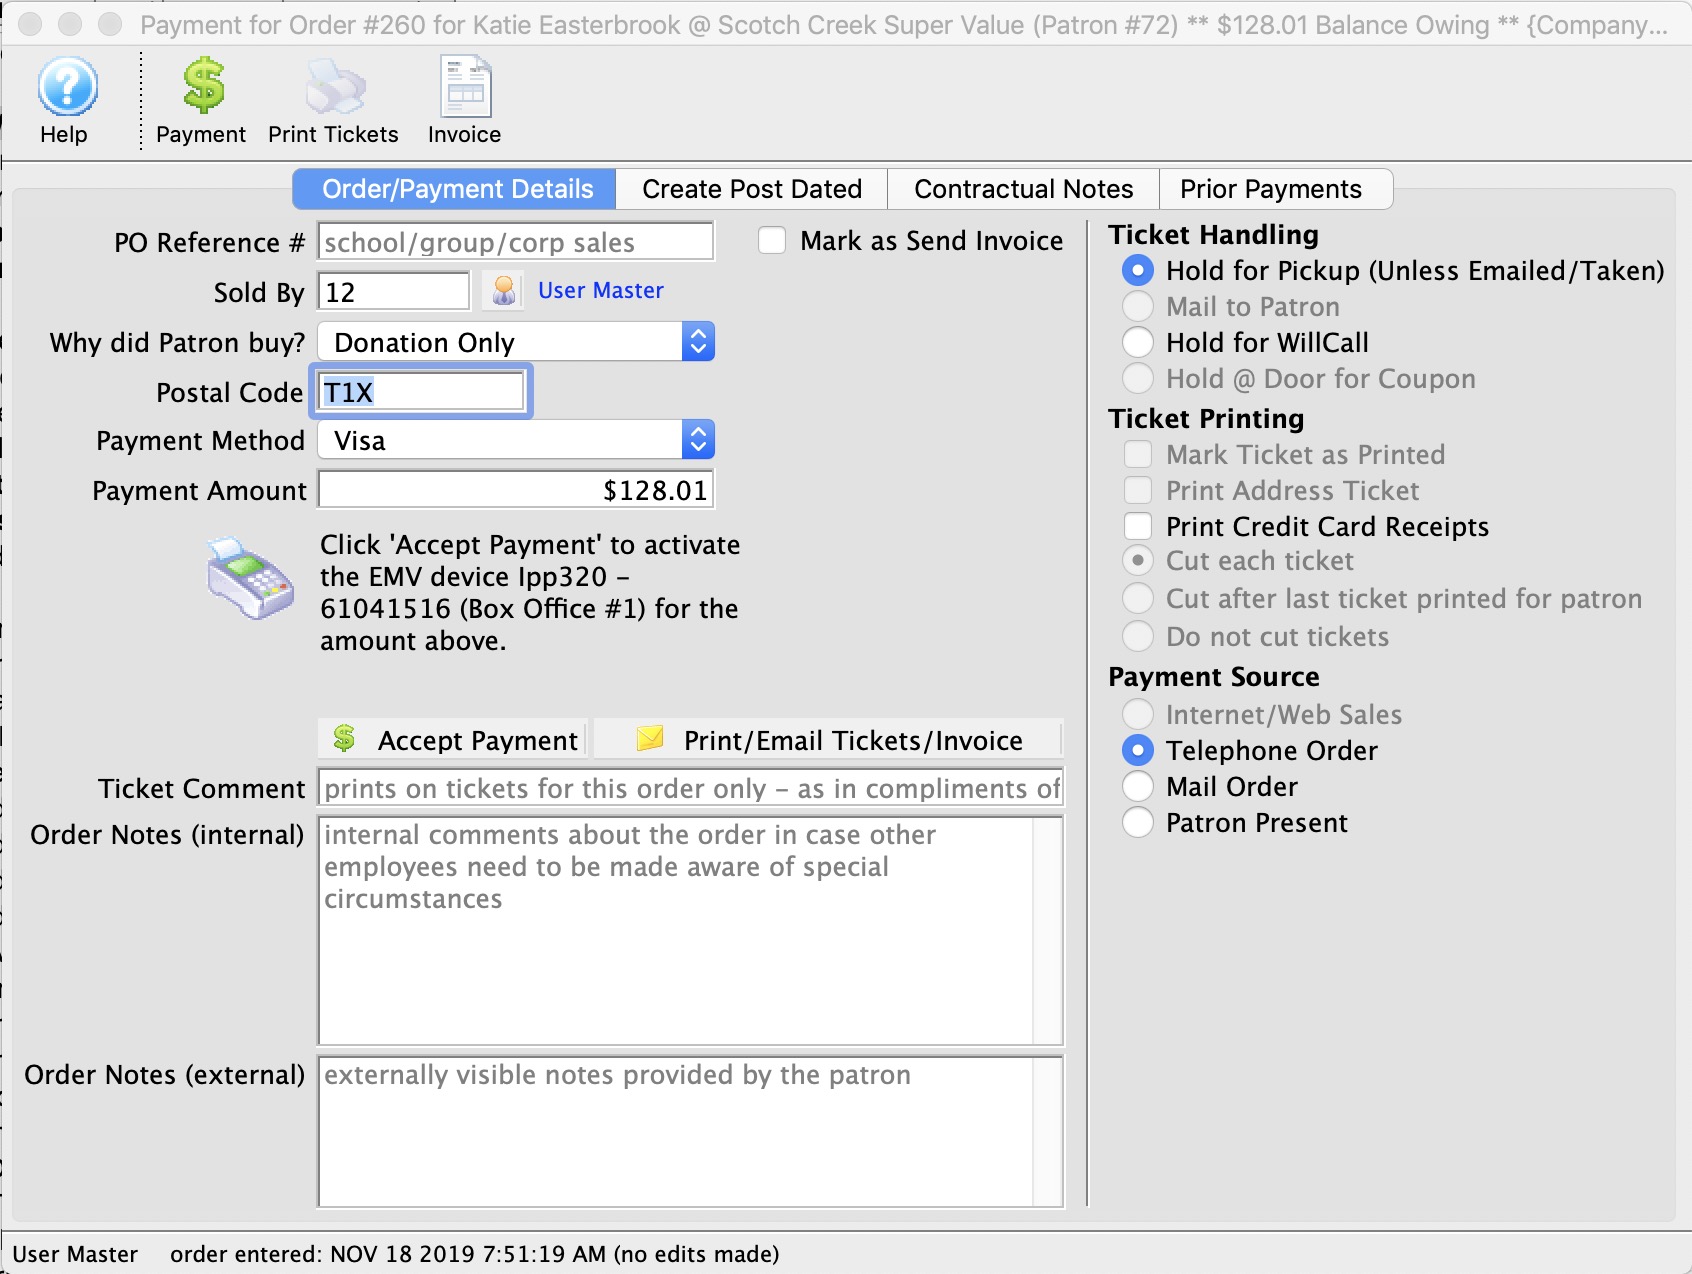
Moneris Installation
Moneris eSelectplus Payment Gateway
Theatre Manager supports two Moneris processing options:
- Moneris Gateway Account - where Theatre Manager sends a credit card provided to Moneris, receives the approval and is able to store the encrypted card (depends on PCI settings in company preferences). This option is used for box office credit card authorizations -and- for web sales with the benefit of supporting post dated credit card payments is using PCI schedule C.
- Hosted Payment Page - this option can be only be used for web sales. Instead of accepting credit cards, the web interface passes control to the Moneris Hosted Payment Page, meaning that the customer is actually typing the card information directly into Moneris and Theatre Manager never sees it. This enables much less stringent PCI reporting.
- Schedule A-EP - if the venue only uses hosted payments for e-commerce and no cards at box office
- Schedule C - if the venue still enters card data into Theatre Manager at the box office
- EMV devices - this option can be used for box office. Instead of typing cards into Theatre Manager, or using stand alone EMV devices, Moneris offers a 'cloud' connection to some pin pad devices - like the Verifone P400. If set up through Moneris eSelect and cloud connection, Theatre Manager will tell the device to start the authorization process, along with the amount and record the resulting acceptance or decline. This enables much less stringent PCI reporting.
- Schedule A-EP - if the venue only uses hosted payments for e-commerce and no cards at box office
- Schedule B-IP - if the venue uses EMV pin pads like the P400 through the Moneris cloud connection
|
You may also want to have Moneris add two features to your account at time of your merchant account setup:
|
|
By default, your eSelectplus account will be set to automatically settle each night between 10 and 11PM Eastern time. You MUST CHANGE this option to settle manually which simplifies your end of day processing and makes it easier to reconcile bank statements to your accounting system |
The merchant account number, Store ID and ECR Terminal ID will be sent to you in a document from Moneris. That document will also contain instructions for you to log in to the eSelectplus gateway to activate your account. Once you do that, you can obtain the API Token that will be required by the Theatre Manager merchant account setup.
Some sample test accounts are available, if needed.
Also, visit Misc Moneris Support for additional daily status information.
Moneris Setup - Contact Information
|
Contact our Moneris support representative: Nandini @ 1 (877) 825-0361 X 4117 to have your account setup. You want to request the eSelectplus product/account. |
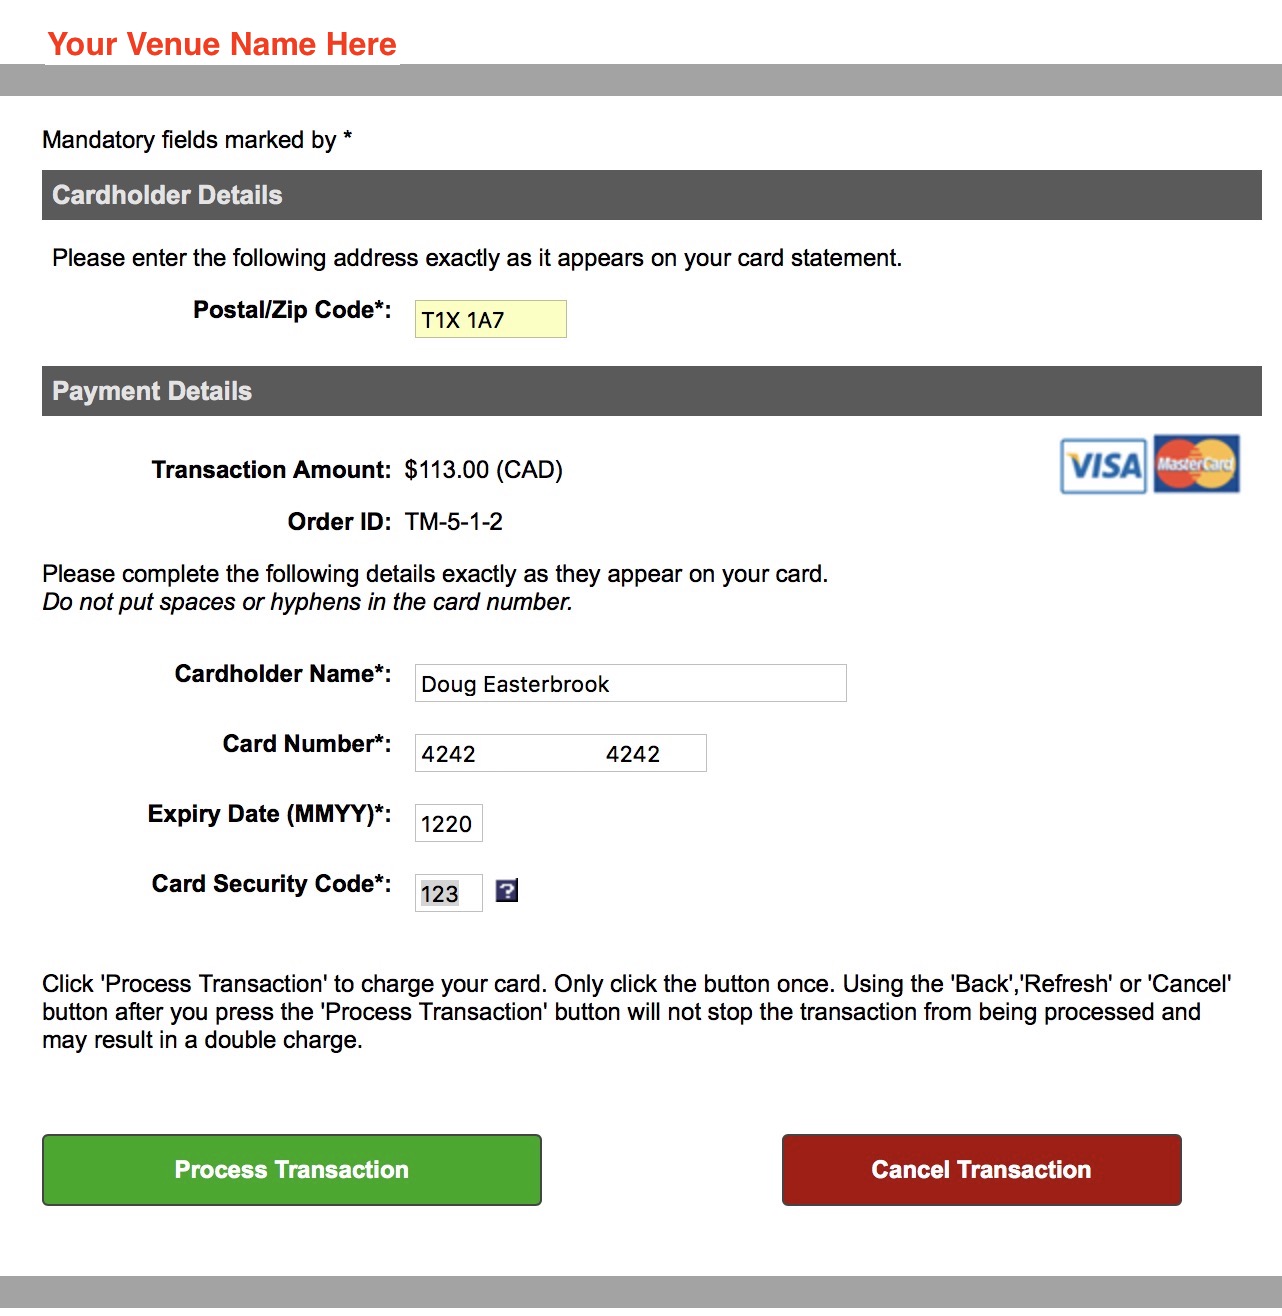
Direct Processing vs Hosted Payment
- Moneris Gateway Account - where Theatre Manager sends a credit card provided to Moneris, receives the approval and is able to store the encrypted card (depends on PCI settings in company preferences). This option is used for box office credit card authorizations -and- for web sales with the benefit of supporting post dated credit card payments is using PCI schedule C.
- Hosted Payment Page - this option can be used for web sales. Instead of accepting credit cards, the web interface passes control to the Moneris Hosted Payment Page, meaning that the customer is actually typing the card information directly into Moneris and Theatre Manager never sees it.
Note that this same account needs e-select plus setup for settlement. It means box office can use the one merchant account for hosted payment online and normal credit card authorization at the box office. This helps support PCI Schedule 'A-EP' compliance for internet sales.
- Moneris EMV - Moneris supports cloud based connection to some EMV pin-pad devices. Those can be set up as a pin pad device and associated with a workstation using Theatre Manager. This helps support PCI Schedule 'B-IP' compliance for box office.
 |
Moneris charges far too much money for their merchant profile feature. For this reason it is not recommended for use with Theatre Manager. |
Activate Moneris Account and Common Setup
 To activate your eSelectplus account and obtain your API Token:
- Navigate to theMoneris Activation page. You will need:
- Moneris Merchant ID:
- Moneris Store ID
- Follow the prompts to verify and setup the account
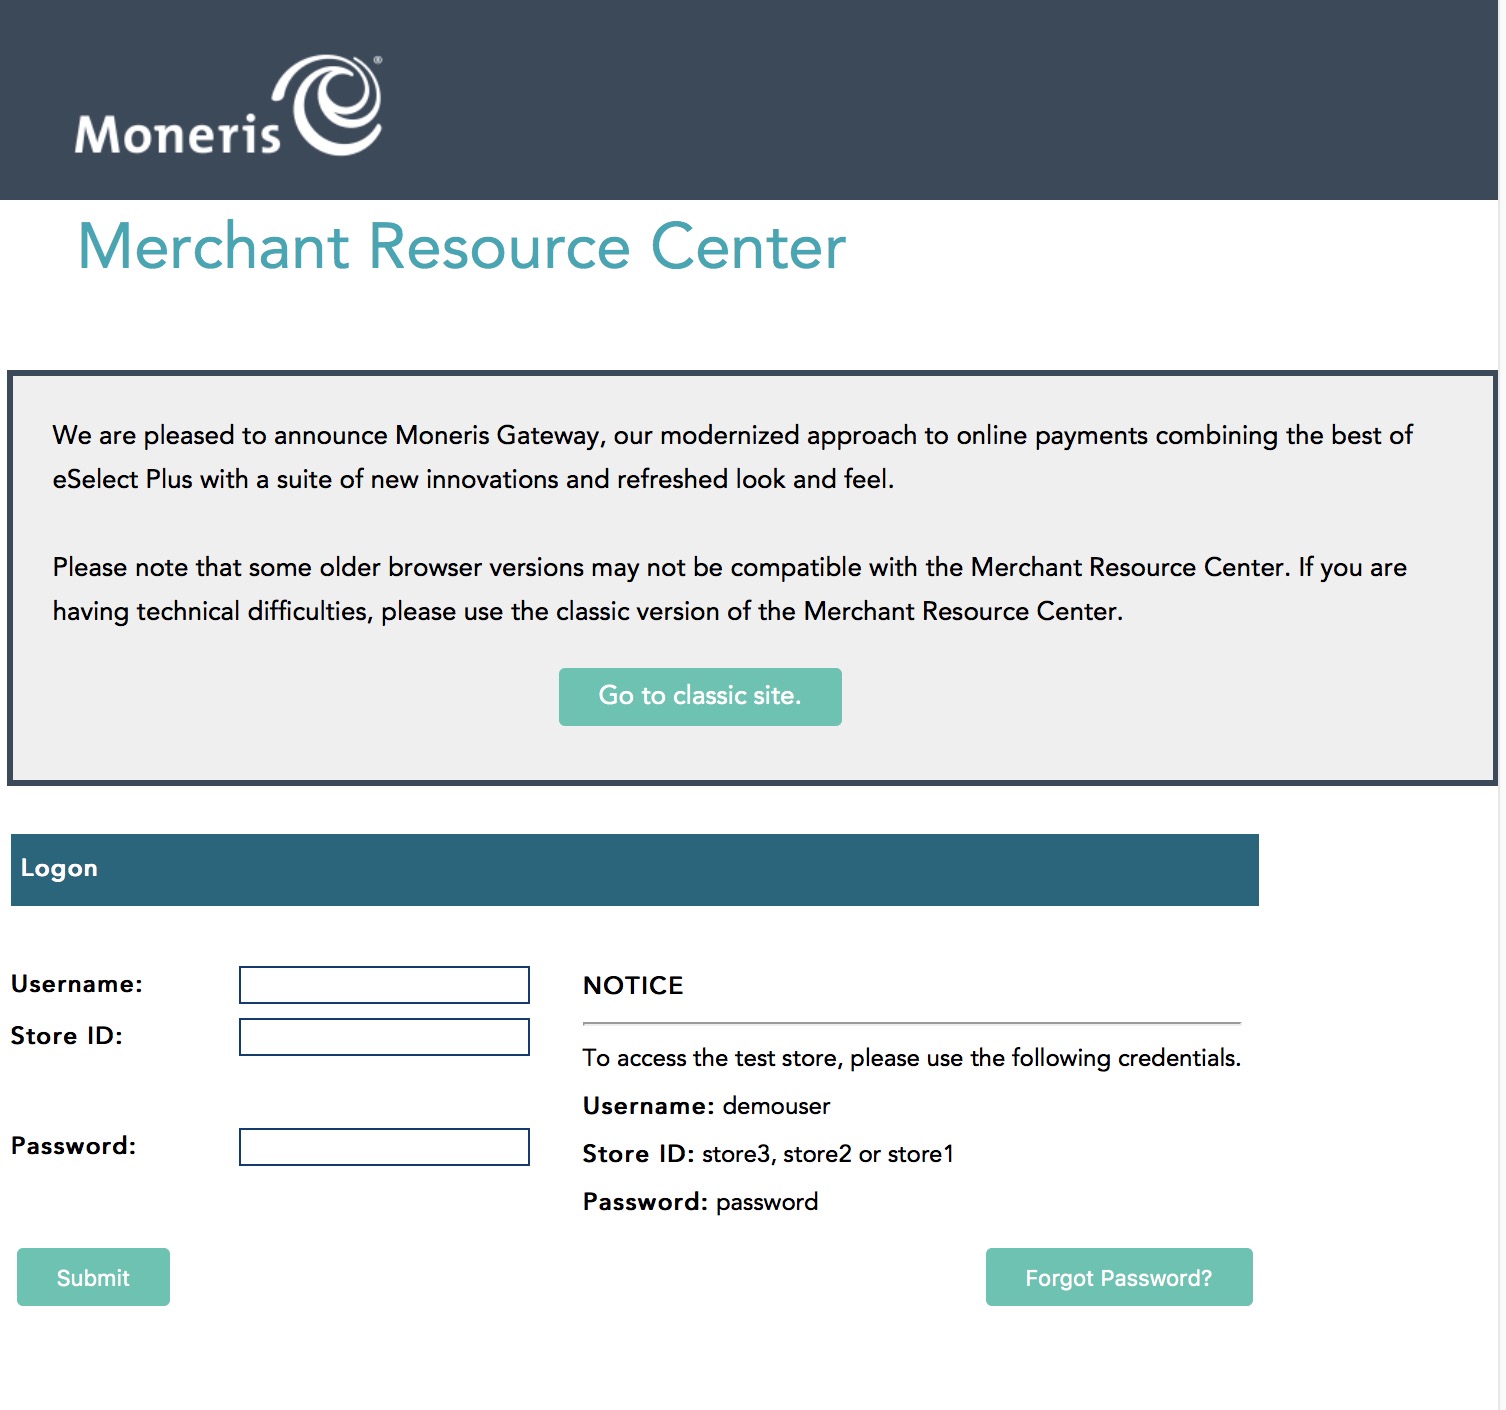
- Navigate to the Moneris online Merchant Resource Centre
- You will need the previously setup:
- Username
- Store ID
- Password:
- Proceed to generate your API Token
|
Future log-ins will require the Username, Store ID, and permanent password that you will set up using the one-use password. Make sure that information is stored somewhere safe in your office and shared among the appropriate staff. Arts Management will not have access to that information if it is lost. |
Obtain Moneris E-Select Plus API Token
This is used when you want Theatre Manager to retain card information within the system (encrypted) for box office sales, or web sales or for settlement for hosted payment page.
- Once logged into the account online, you should plainly see the API Token. Copy and paste that into a document to store/send to Arts Management along with the info sent you by Moneris so that we may assist setting up the merchant account in Theatre Manager.
- If you do not see the API Token, in the Moneris Virtual Terminal go to Admin > Store Settings and the API Token will be displayed at the top of the page
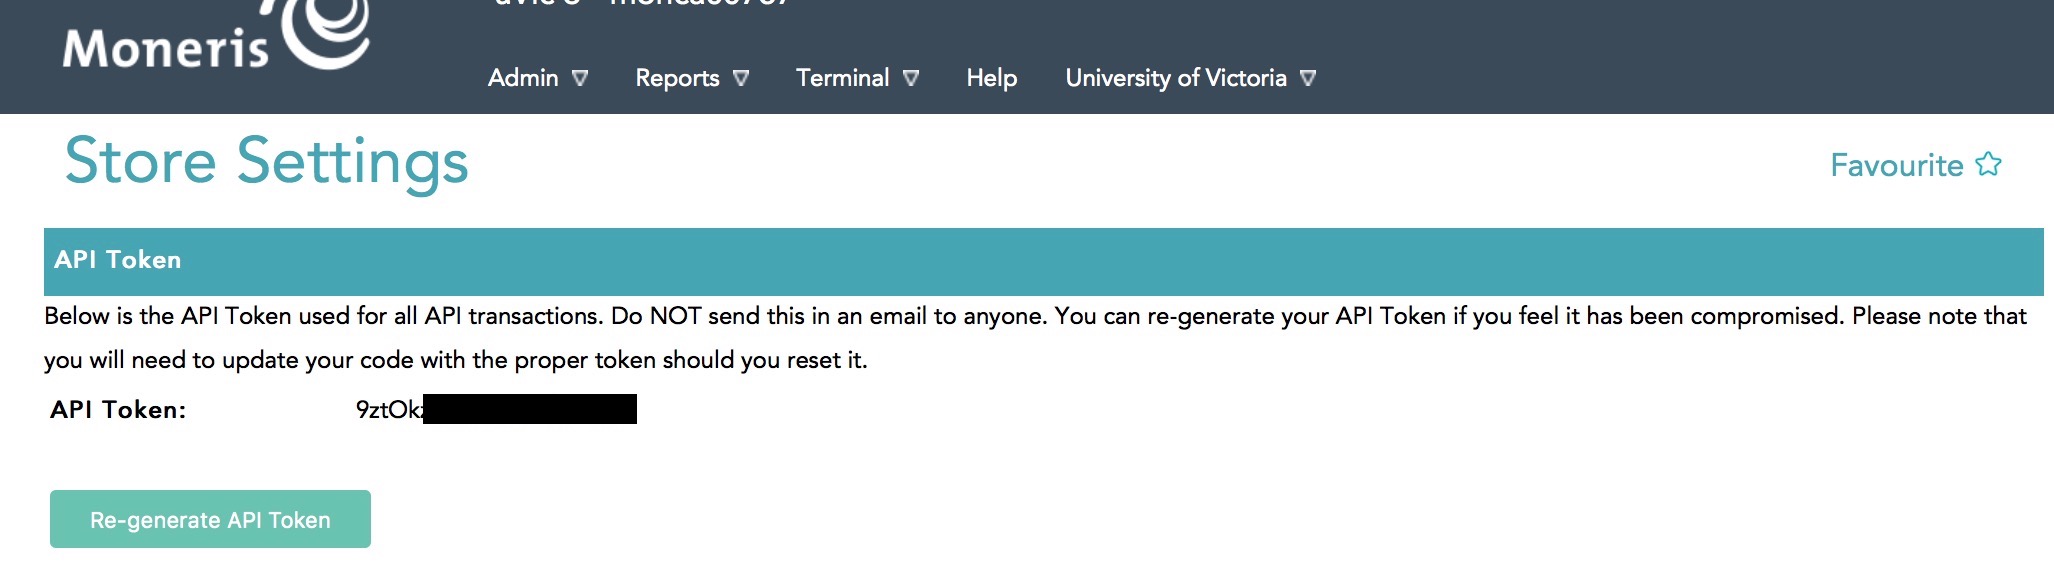
|
Note:The API Token above has been removed for security. Where the black square appears, a combination of upper-case and lower-case letters and numbers will comprise your store's API Token. |
Regenerate the API Token
|
This process should only be undertaken in consultation with both Moneris Support and Arts Management Support. The API Token must match the Theatre Manager merchant account setup in order for credit card processing to work. |
Moneris Support may advise you to re-generate the API Token for your store in certain circumstances or for security reasons. It is done on the Admin->Store Settings page as shown below. You will be asked to click the Re-Generate API Token. If you are advised to do so, you will need to put that new token into the merchant account settings.
Please contact support@artsman.com if you are unsure where to make this change within the Theatre Manager merchant account.
Set eSelectplus to Manual Settlement
|
By default, your eSelectplus account will be set to automatically settle each night between 10 and 11PM Eastern time. You MUST CHANGE this option to settle manually which simplifies your end of day processing and makes it easier to reconcile bank statements to your accounting system. |
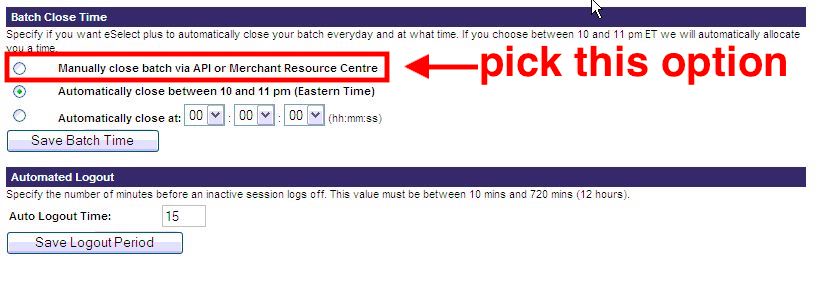
To alter this setting:
- Log into the eSelectplus Virtual Terminal
- Go to Admin > Store Settings
- Scroll down the page until you see the Batch Close selections
- Change the radio button to the Manually Close option

Moneris Gateway Account
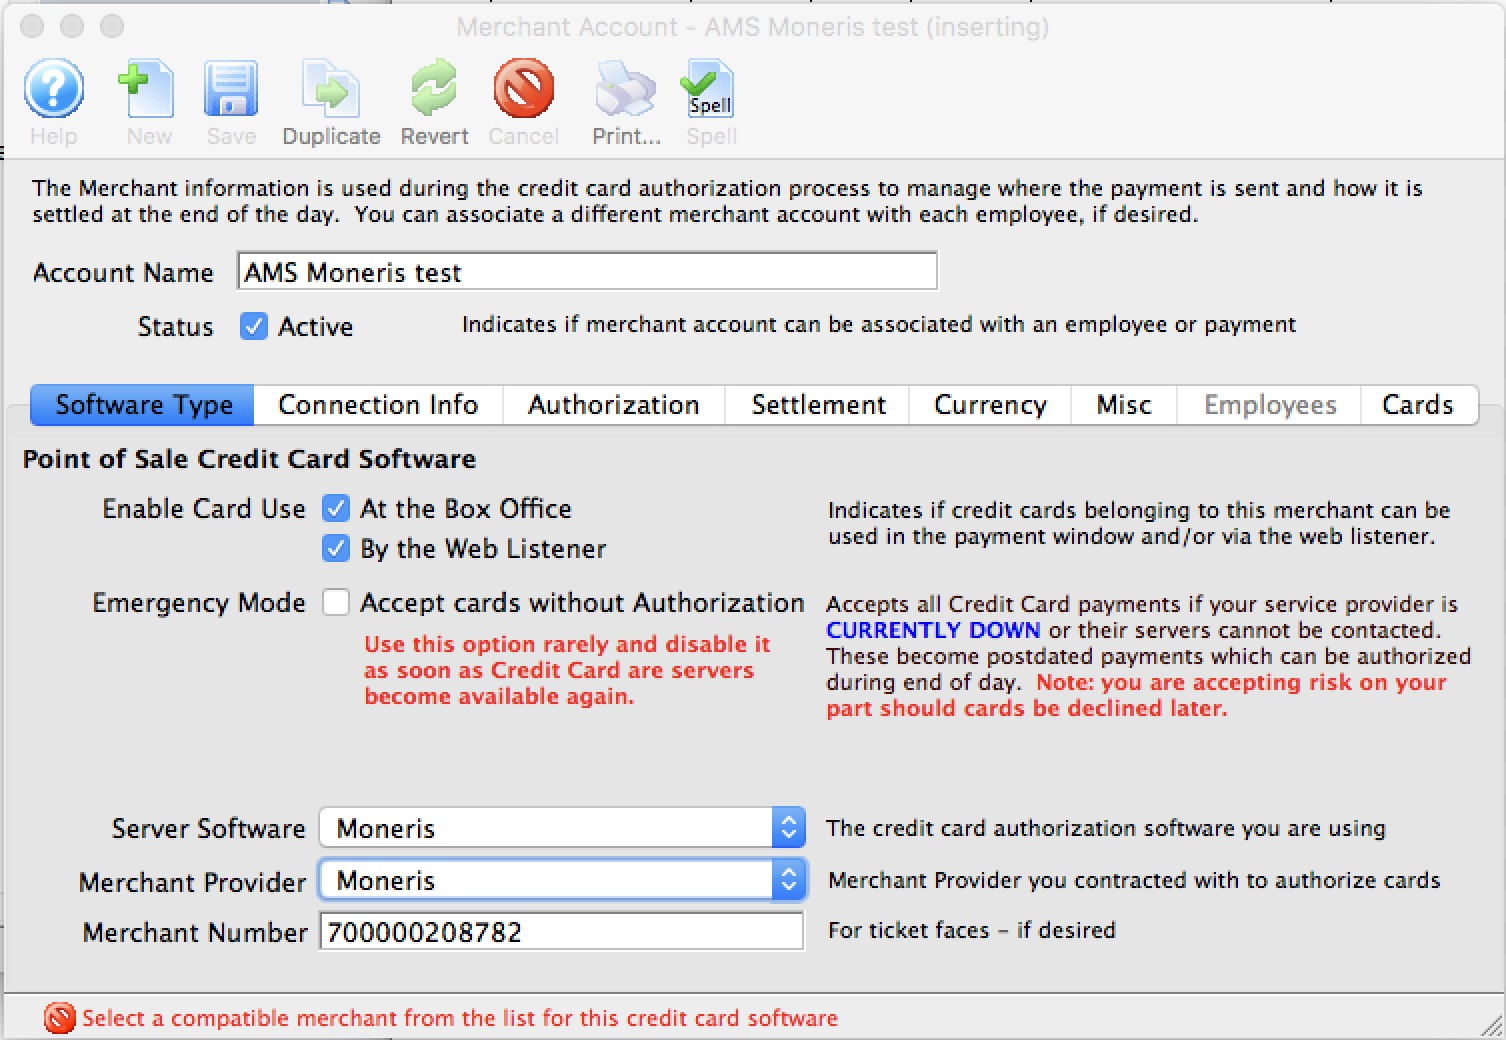
Once the Moneris account has been activated and all the information in the following list has been obtained, the Merchant Account in Theatre Manager can be set up on each of the tabs that follow:
- Server Software - Moneris (setting selected in TM)
- Merchant Provider - Moneris (setting selected in TM)
- Merchant Account Number - xxxxxxxxxx (from Moneris merchant services)
- Store ID - xxxxxx (from Moneris merchant services)
- API Token/Password - xxxxxxxxxx (from Moneris Online Portal store settings)
- Primary URL for LIVE authorizations: - www3.moneris.com/gateway2/servlet/MpgRequest (typed into TM)
- ECR Terminal ID - 66xxxx (from Moneris merchant services)
Tabs with specific setup info are described in the following help pages. Other tabs like the Employees and Cards tabs are populated the same as described here.
Moneris Gateway Account Software Tab
- Server software - set to Moneris
- Merchant Provider - set to Moneris
- Merchant Number - is the Merchant Number from the document sent by Moneris
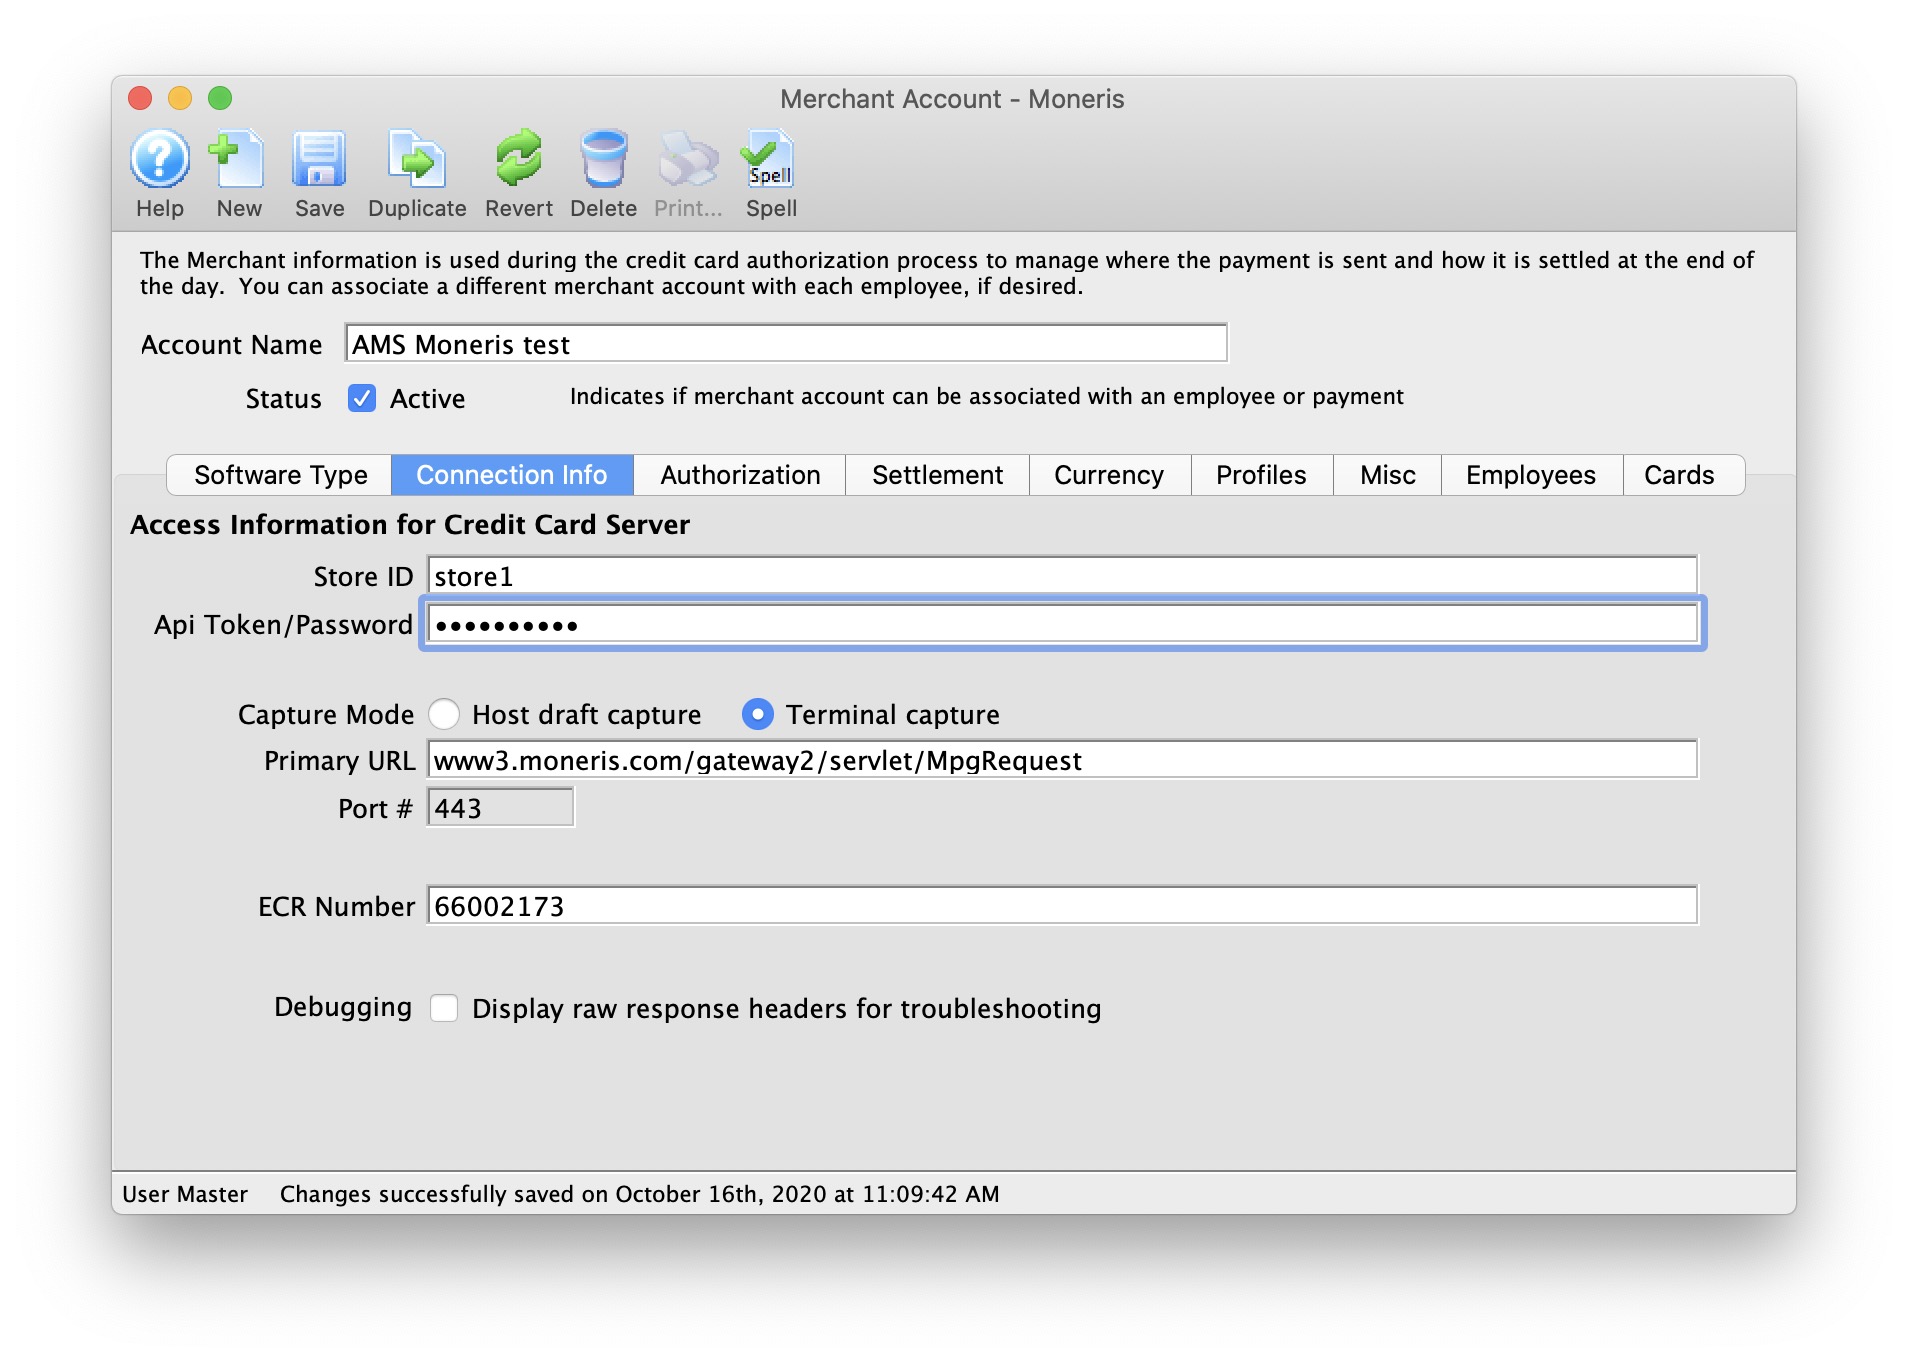
Moneris Gateway Account Connection Info
- Store ID - provided by Moneris on the setup information
- API Token - obtained from the online Moneris portal
- ECR Terminal ID - provided by Moneris on the setup information
- Primary URL (Canada) - should be www3.moneris.com/gateway2/servlet/MpgRequest
- Primary URL (USA) - should be esplus.moneris.com/gateway_us/servlet/MpgRequest
- Port - should be 443
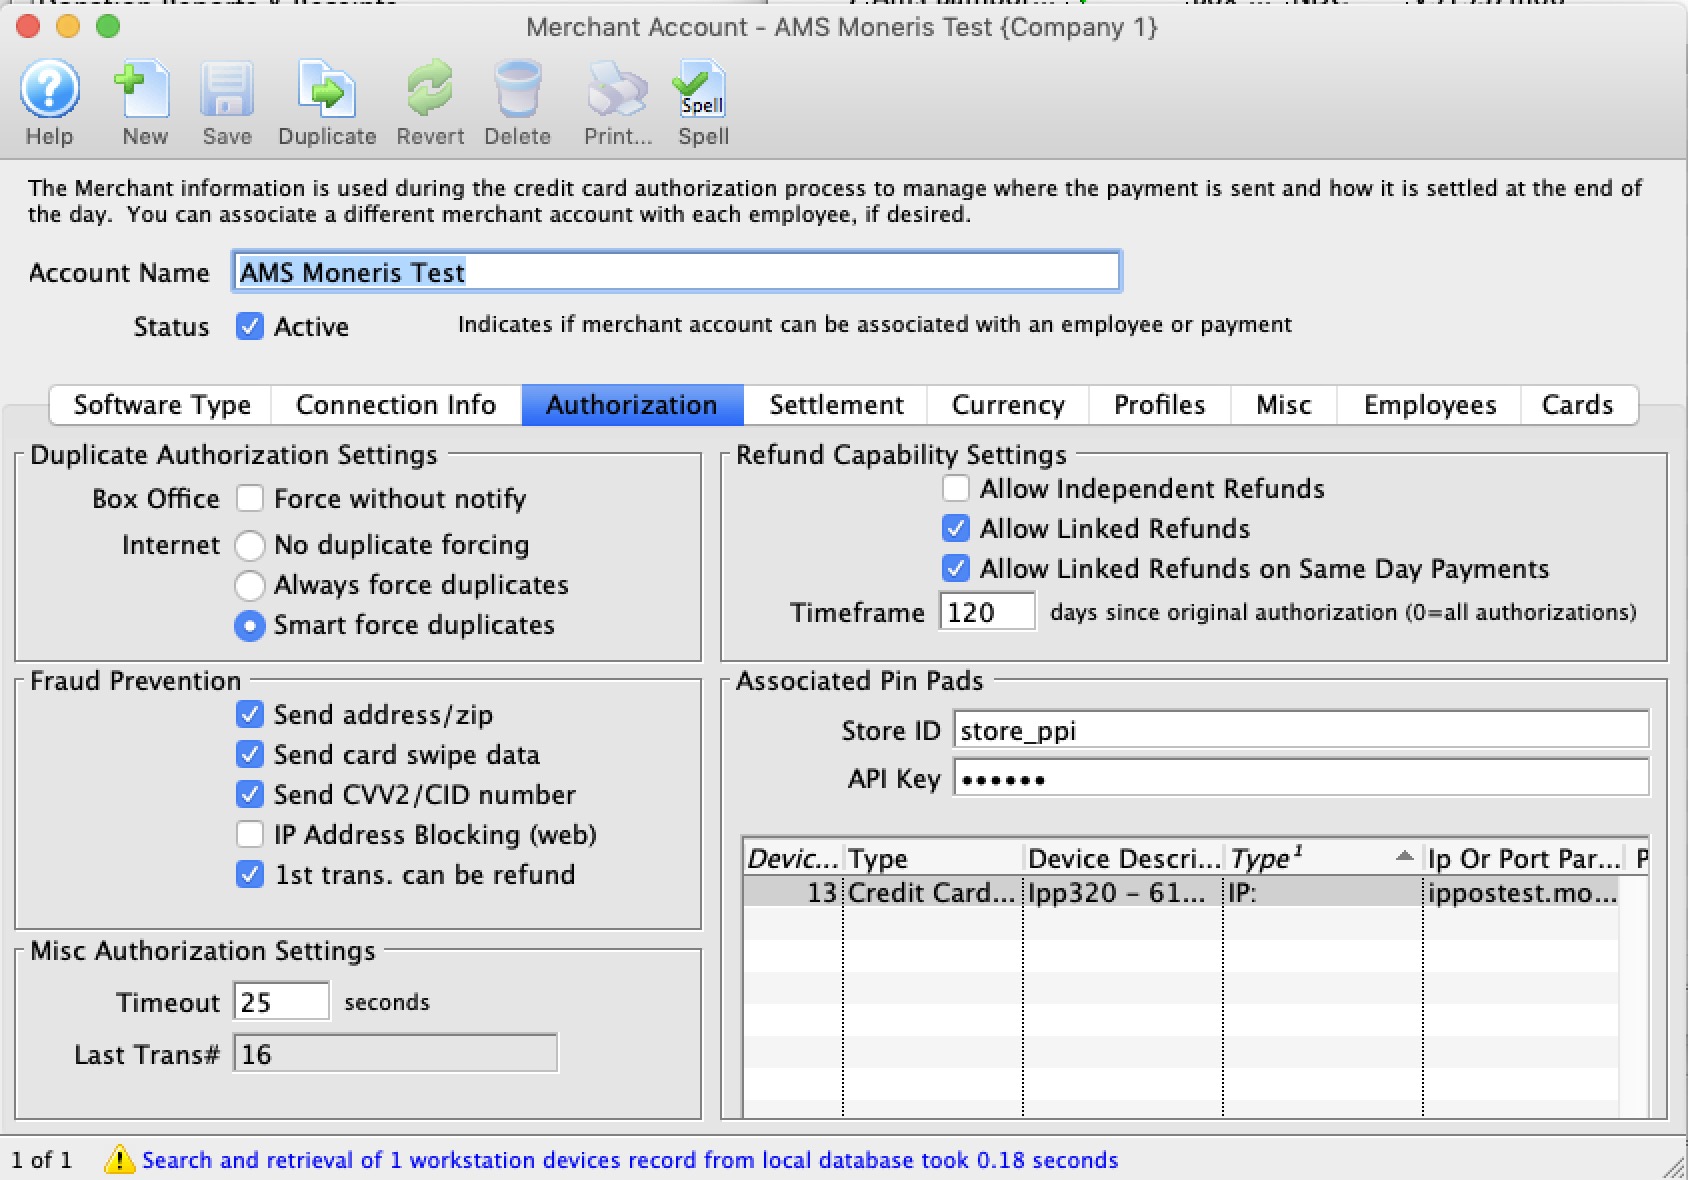
Moneris Gateway Account Authorization
- Send address/zip - verify the setting for this feature. At one time, Moneris does not provide AVS by default and it an account add-on. If a test authorization results in a no permissions for avs_info error, unchecking this box will eliminate the error since TM will no longer send AVS info.
- Pin Pad store info, if using the P400's
|
Refer to general help page for more info. |
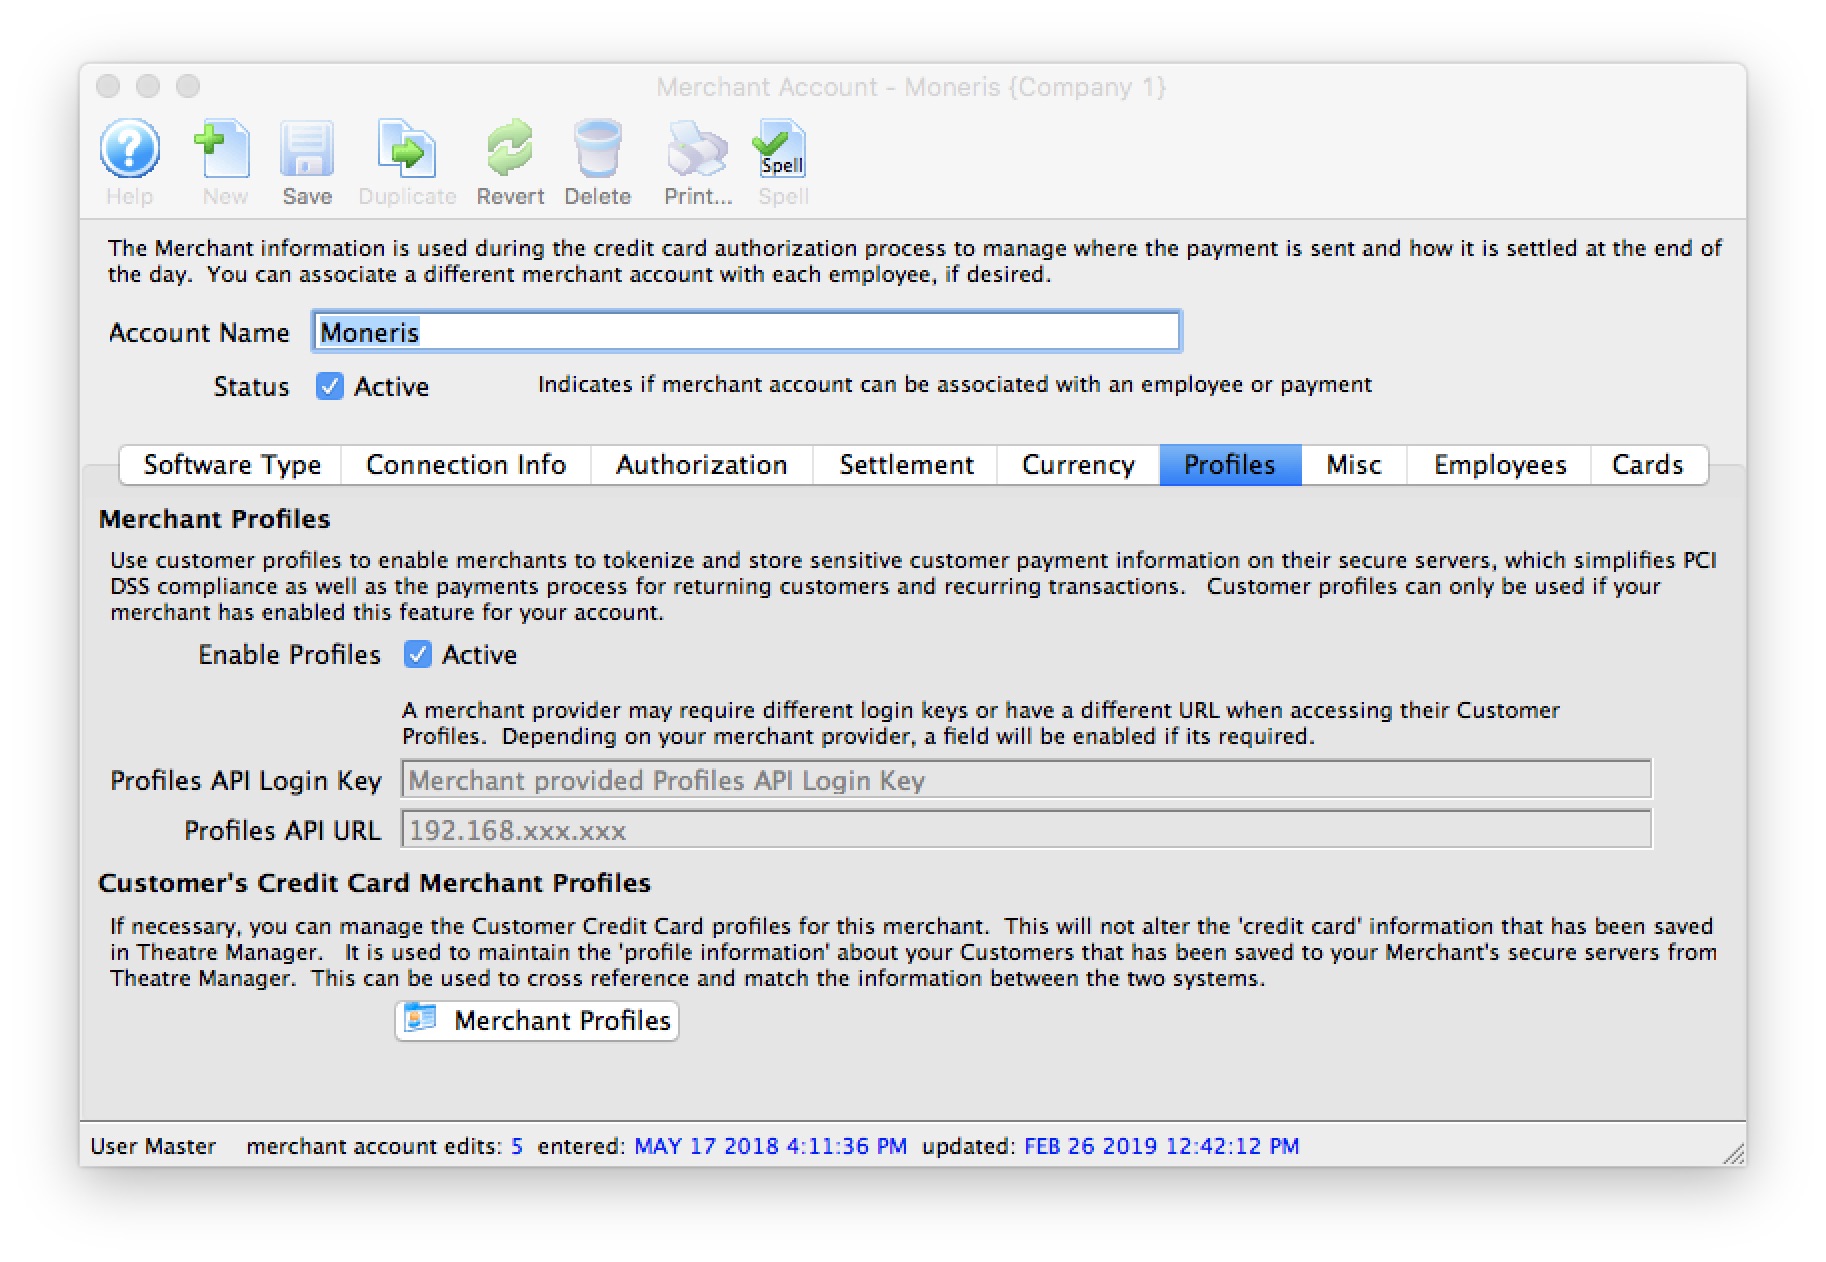
Moneris Gateway Account Profiles Tab
- Enable Profiles - set to Active if Merchant Profiles will be used.
- Profiles API Login Key - not required. Moneris uses the same connection information from the Connection Info tab.
- Profiles API URL - not required. Moneris uses the same the connection information from the Connection Info tab.
|
Refer to Merchant Profiles for further information on functionality. In general, using Moneris Merchant Profiles are not recommended because they charge for this feature, unlike other merchant providers. |
Moneris Hosted Checkout Page
|
Hosted Checkout option is used if you want Theatre Manager to use Moneris for online credit card payments with an embedded web page. It is possible to be SAQ A compliant for your web sales since Moneris takes the credit card within an iframe and card data does not enter your network. |
|
|
If you use hosted payments for web sales, you will also need an E-Select plus account for settlement. Box office sales can use this same merchant account and will automatically authorize against the e-select plus account. This means that you only need one merchant account set up even though it is processing via different pathways, one for web and one for box office. | |
|
You may also be able to accept payments like apple-pay online, digital wallets, online interac, verified by visa, multi currency, etc. Make sure to talk to Moneris about what is possible and what you want to accept. | |
|
If you are already using Moneris Hosted Payment Page, refer to the conversion process to Moneris Checkout to see what is involved. | |
|
Note: using Moneris Checkout disables use of online post dated payments since card data is not provided by Moneris and, therefore, cannot be saved. Recurring Payments initiated by the box office will still work. | |
Setup Process
The best process to configure this option is:
- Obtain your online portal connection information from Moneris
- Configure all the settings within the online portal
- Use the Theatre Manager Merchant Account Setup for Moneris Hosted Checkout Page
- Verify all credit card types you want to take in payment method code tables
- If you are already using Moneris hosted payments or box office payments, you may not need to do anything
- If you plan on taking advantage of other credit card types online (that you may not want to accept in the box office), you will need to add them to the payment types.
- It is very important that card types you set up online are in the payment code tables.
- Test:
- Authorizations through the TM Web services
- Attempted Authorizations but Cancel through the TM Web services by going online to buy something (use test cards)
- Verify the display on the web to see that it matches what ou picked in the online portal setup and shows your name and settings you wish
- Voids from Theatre Manager
- End of Day Settlement
Online Portal Setup
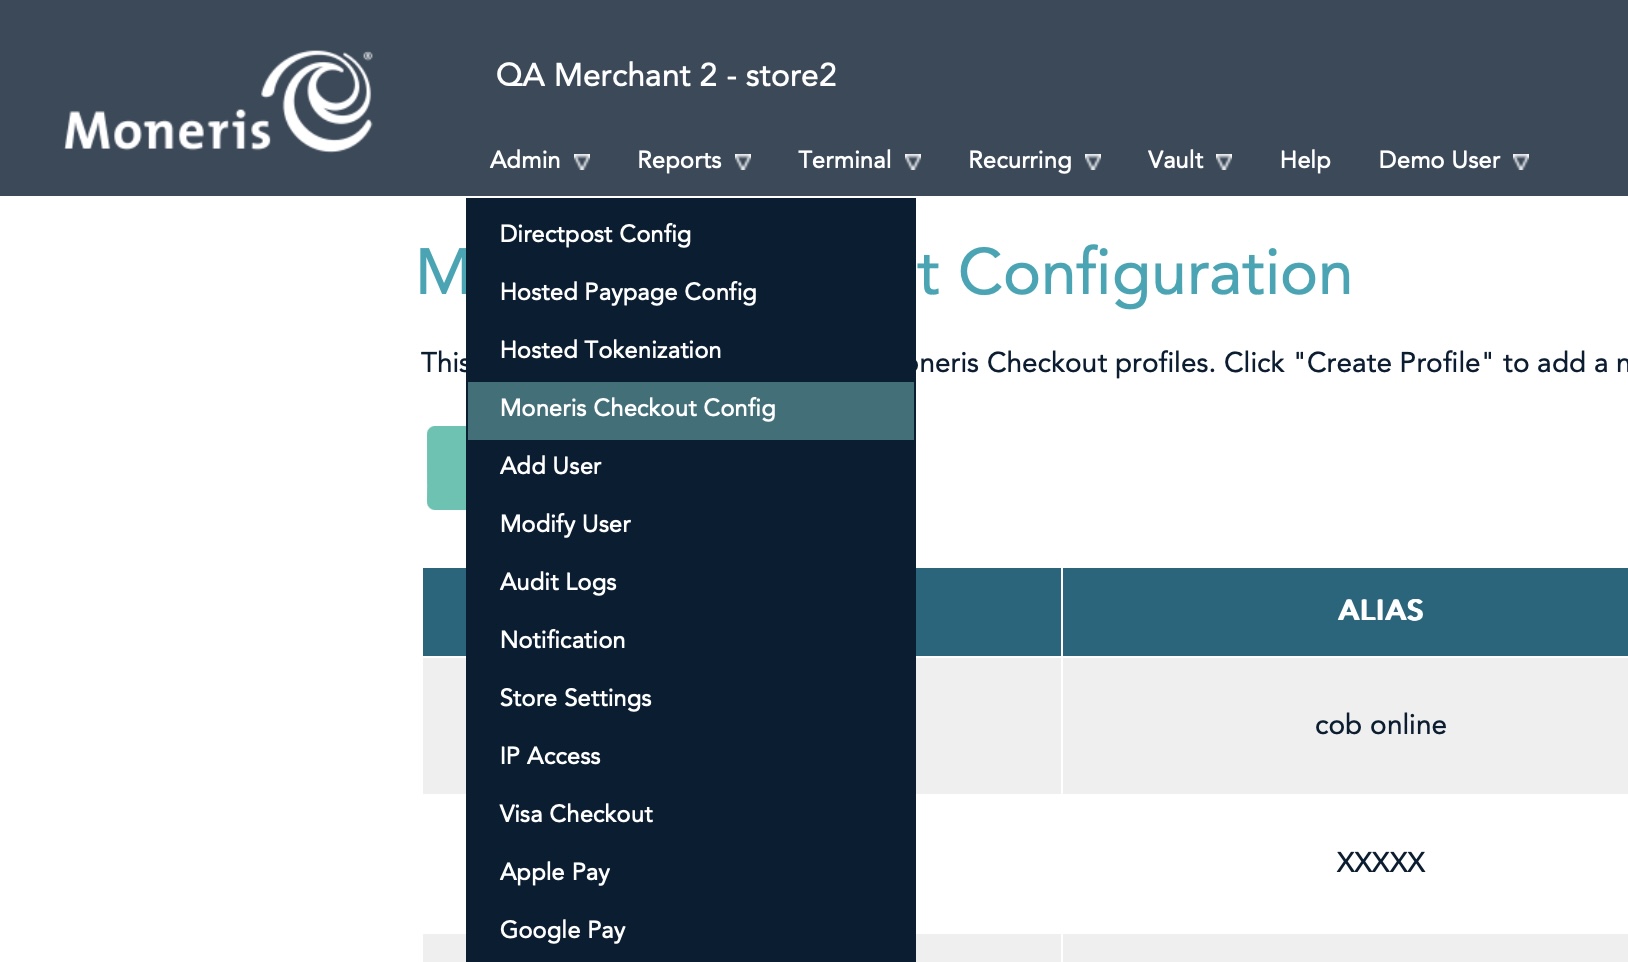
You will need to log into your Moneris Resource Center online account
Once you are logged into the online account setup, select Admin->Hosted Checkout config option per the image to the right.
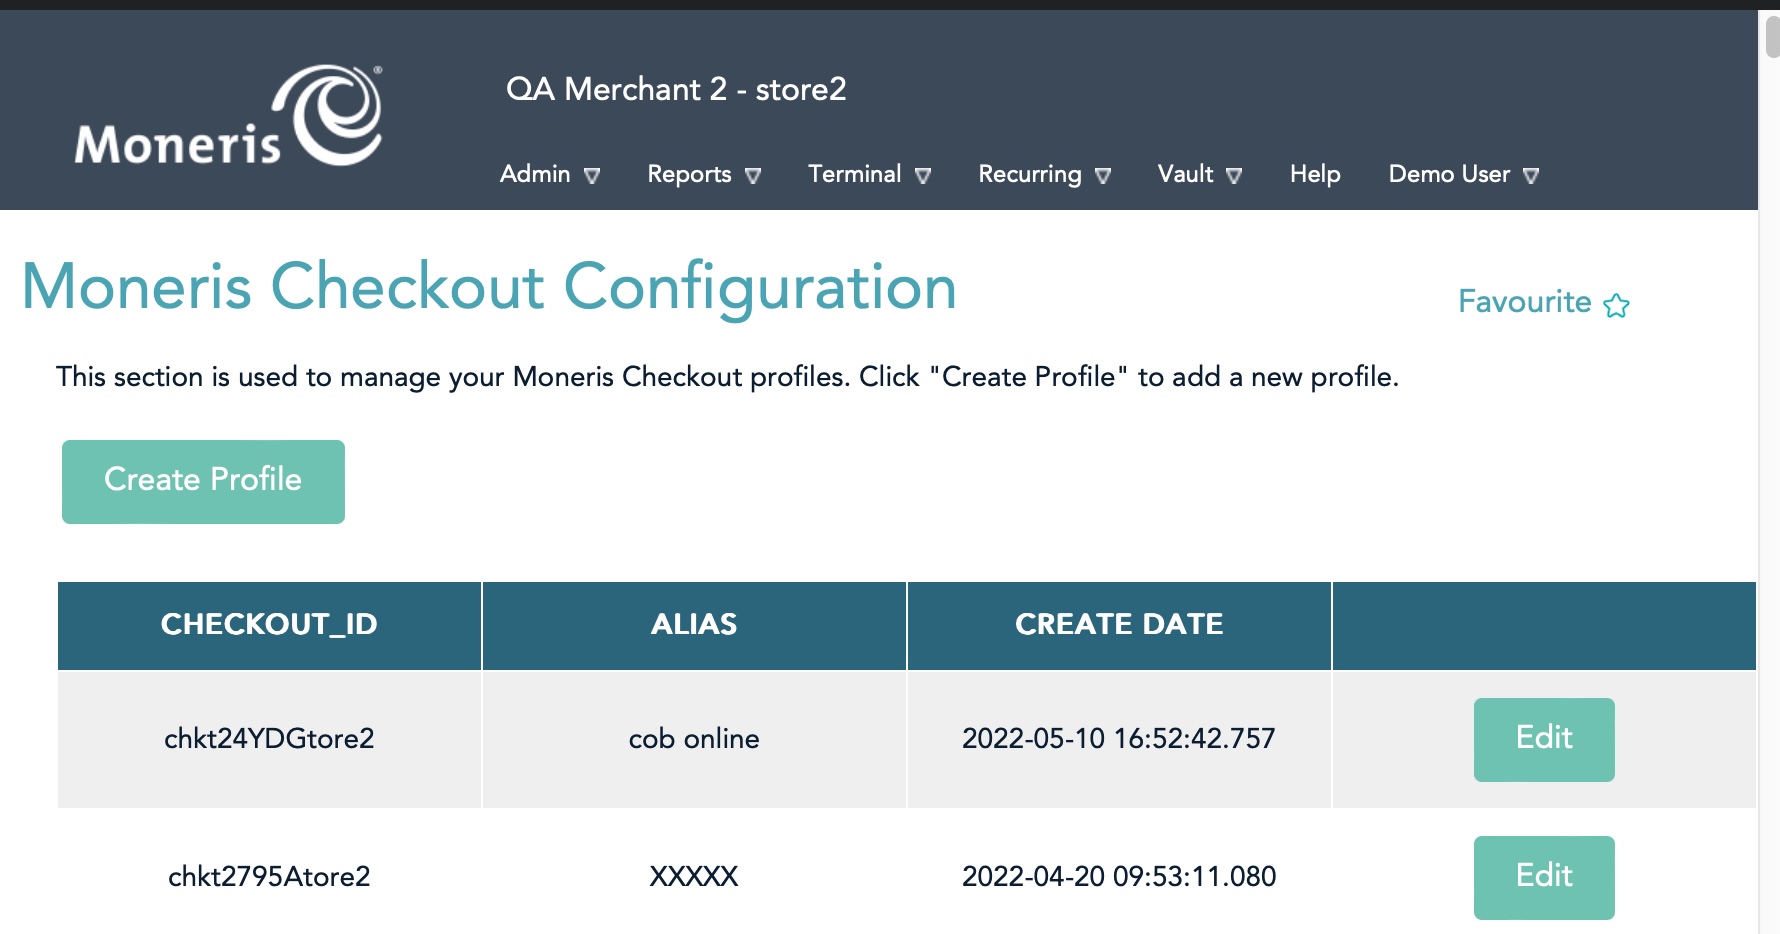
You will see a screen similar to the bottom of the web page that lists all the configurations you have made. You can have many of them, and all you need to do is enter the Checkout_ID in Theatre Manager merchant setup to use the one you prefer.
Creating a New Profile
- If you see no lines in the list, click the Create Profile to make the following for Theatre Manager:
- CHECKOUT_ID
- ALIAS
- You will be asked to confirm that you want to create a new profile.
Click OK
- Click the Edit Name on the upper left and you will see the window below
Enter in an alias like 'Theatre Manager'
.

Edit an existing Configuration
If you see the Checkout_id that you want to change in the list below, you can Edit by clicking the edit button. Then process to the next pages for more information about the setup.
Checkout Type
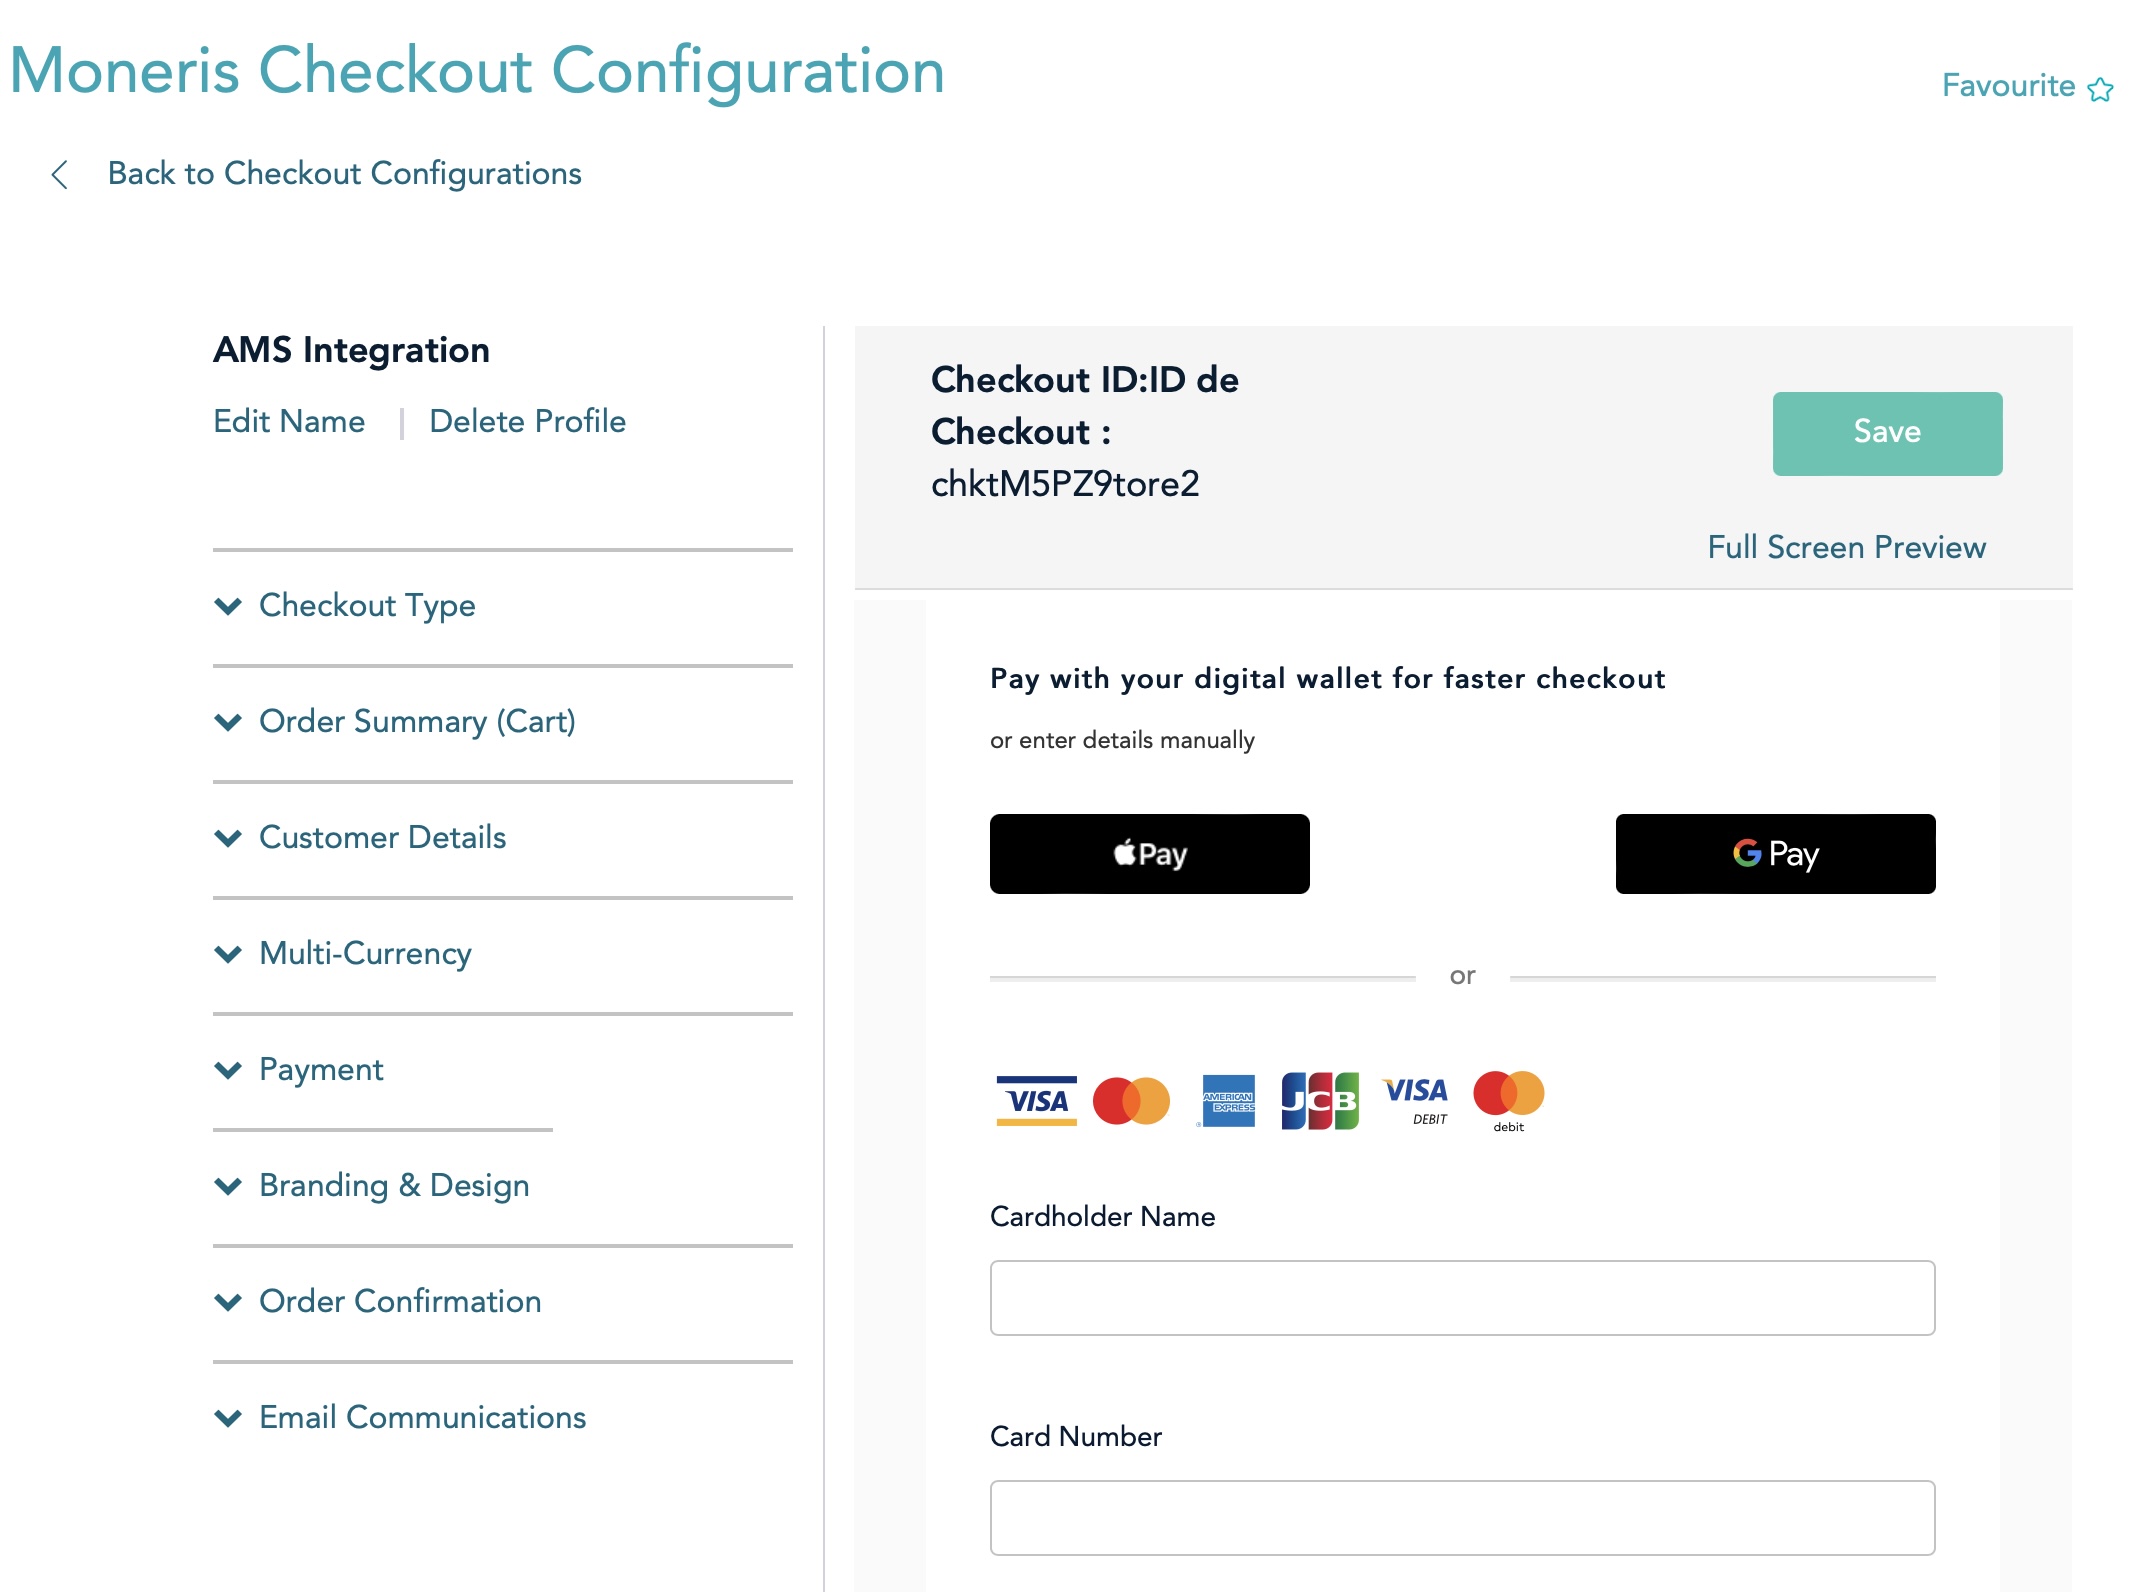
Set the checkout Type
- Click the section that says Checkout Type
- Click the option I have my custom order form and want to use Moneris simply for payment processing.
- Click 'Checkout Type' to collapse it
Order Summary (cart)
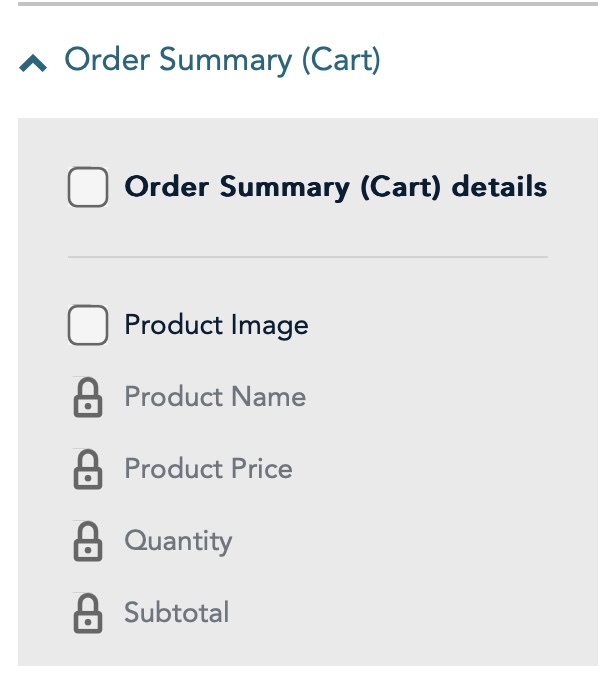 There is nothing to select on the Order Summary Cart since you have your own custom form as part of Theatre Manager.
Make sure the options look like the image to the right.
Customer Details
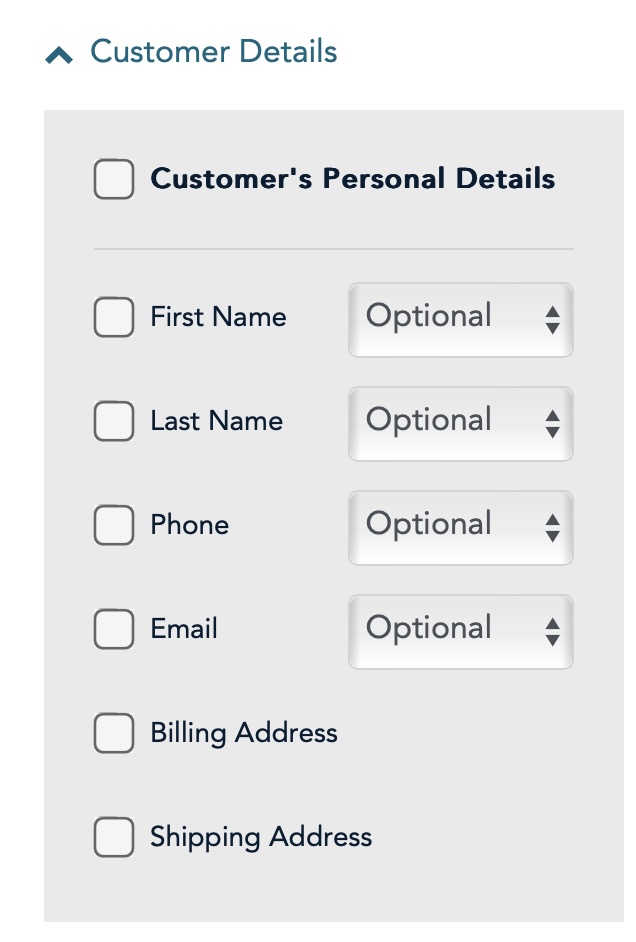 There is nothing to select on the Customer Details since you have your own custom web site as part of Theatre Manager.
Make sure the options look like the image to the right.
Multi Currency
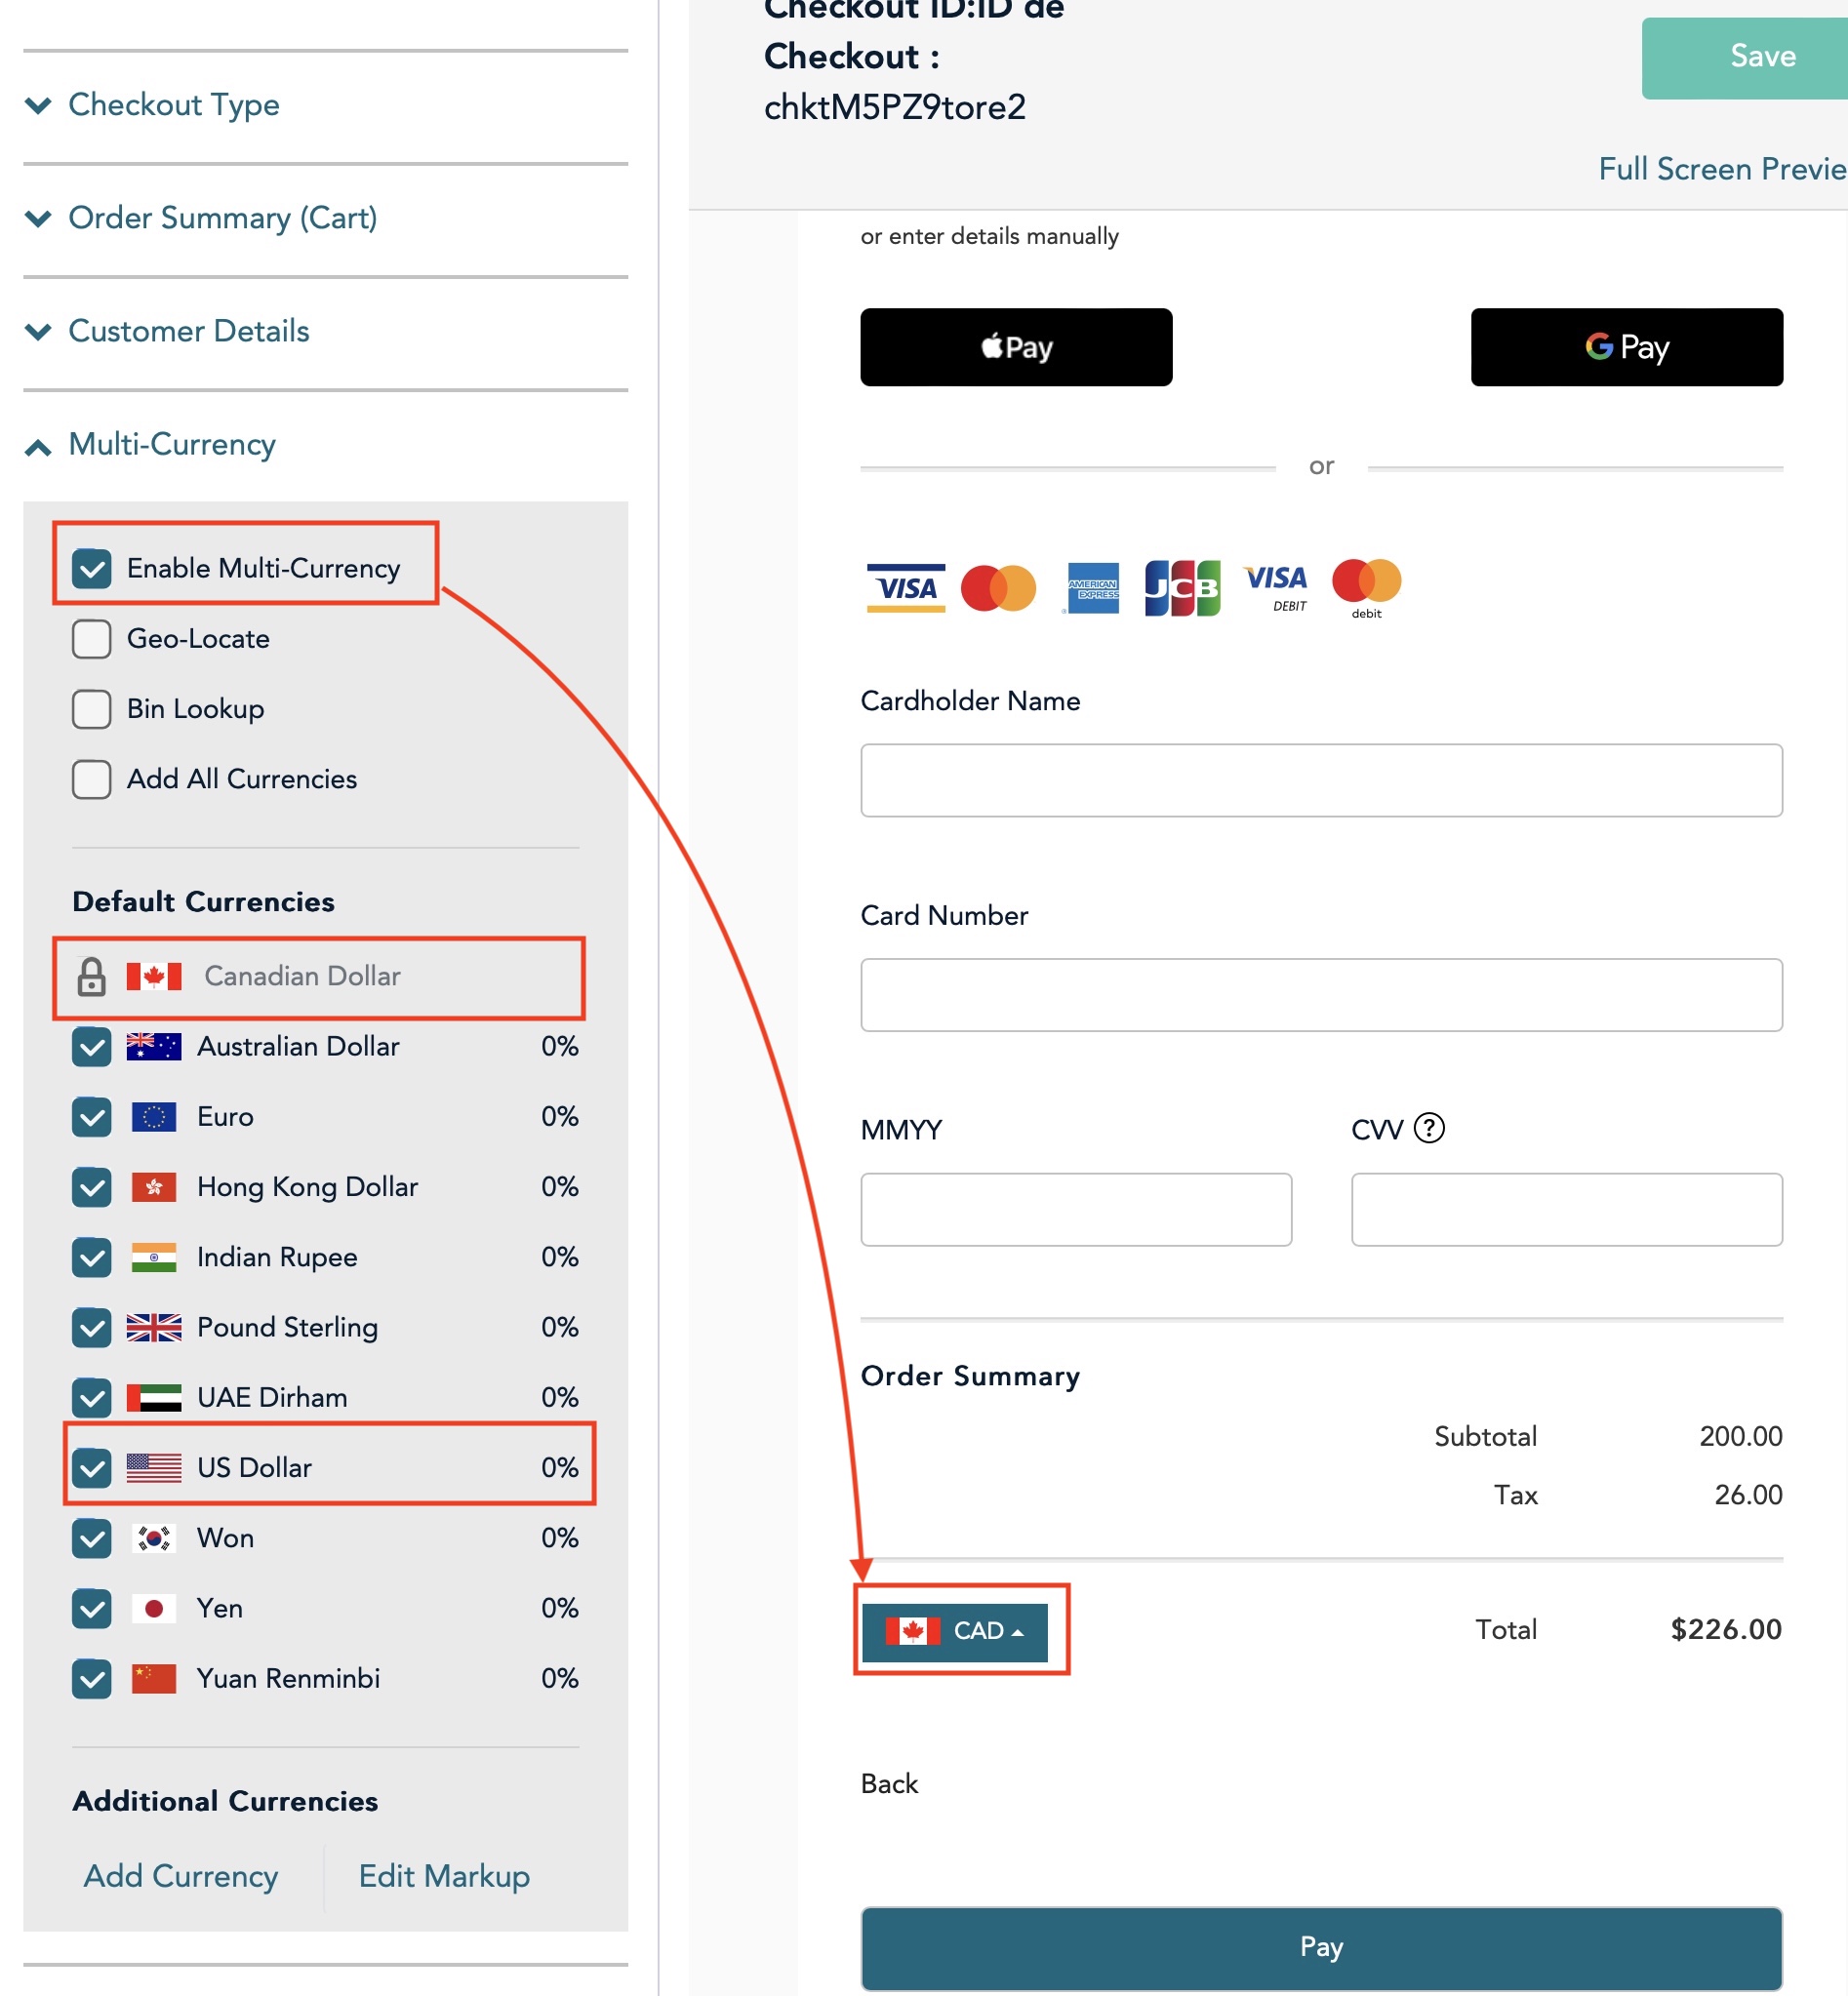 Most likely, you will NOT need to accept multiple currencies.
Since that is the case, UNCHECK the enable multi-currency button. that will cause the currency choices to disappear from the the area indicated on the checkout form
If, however, you do want to take some selected currencies (such as USD, or where ever your main customers come from, then CHECK the enable multi-currency button.
If you do that, you will also need to check and uncheck the currencies that you wish to accept.
We understand that all currencies are converted to CAD and so you will receive CAD in your bank account.
Payment Options
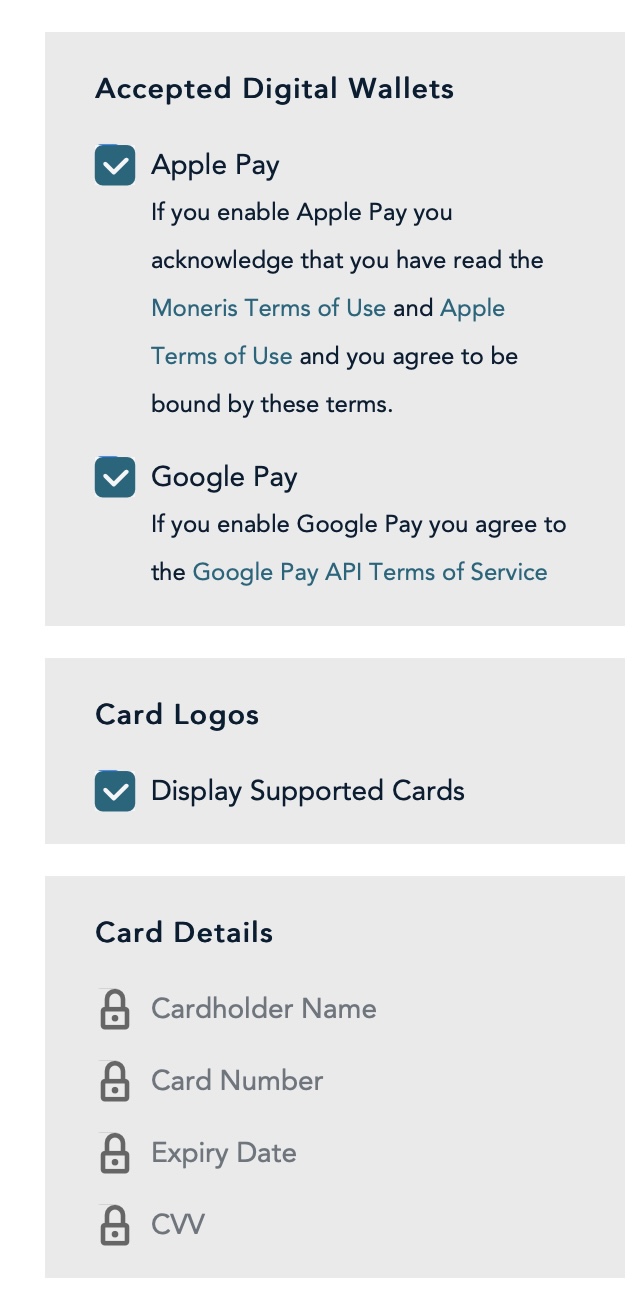 Indicate what digital wallets you want to accept. There are two main ones at time of writing
- Apple Pay
- Google Pay
Click the Display Supported Cards checkbox to show miniature logos of the cards you accept on your web site.
There are more options that you should make the same as the image to the right.
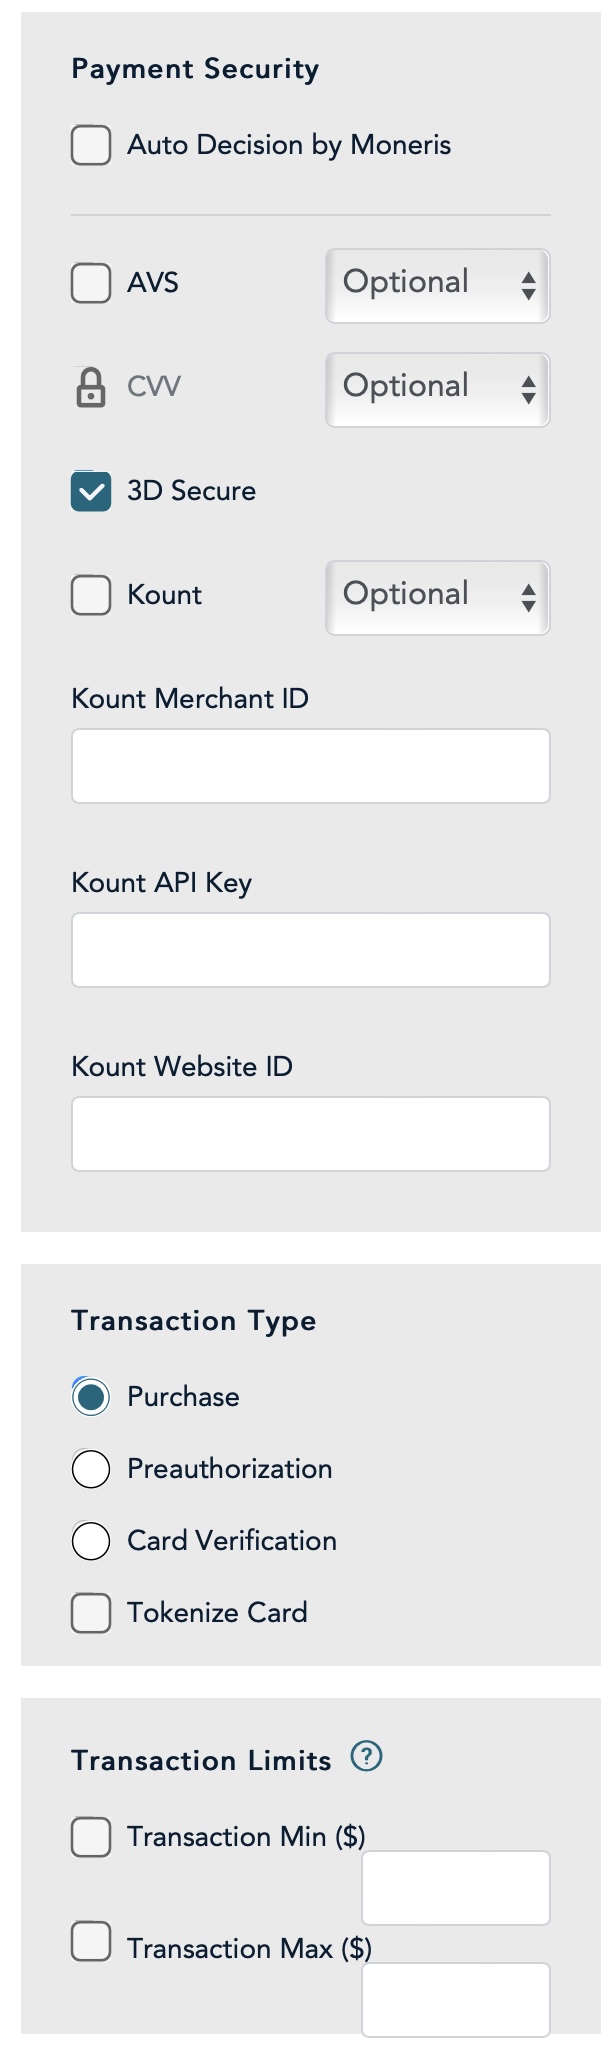
You MUST select Transaction Type as Purchase
Branding and Design
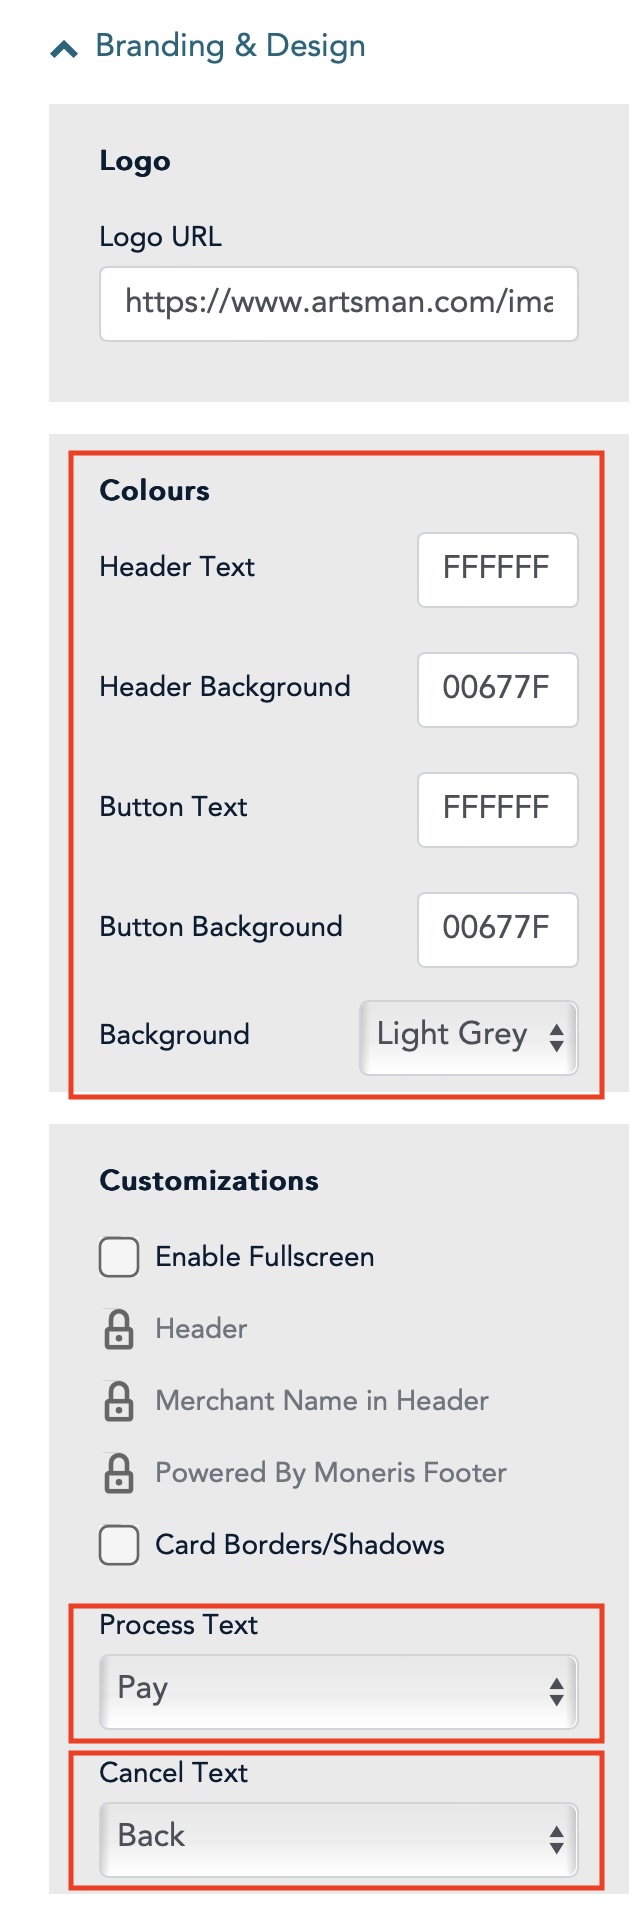 There are three areas that are highlighted that we think you may want to change:
- Colours -these are colours that the web page will be displayed in. They use the internet RGB hex colours and you can change these to suit your web site theme.
- Process Text - this is the text that will display on the button to accept the patrons credit card and to process it. You may select what you wish. We suggest Pay
- Cancel Text - this is the text that will display on he screen to allow the use to use the 'Back' button. You may select what you wish. We suggest Back
Order Confirmation
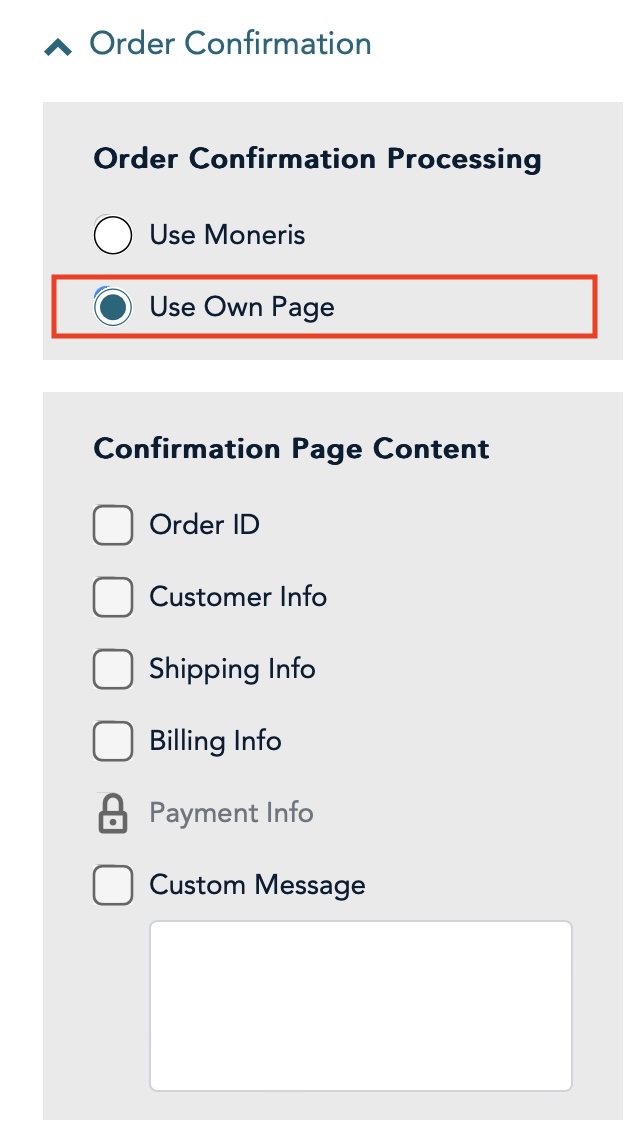 For this section, you must select Use Own Page and nothing else. This is because Theatre Manager must receive the confirmation Moneris that the card was accepted or rejected before it will process the shopping carts.
Email Communications
 Uncheck all of the options to the right, if any are checked
Theatre Manager Setup
Once the Moneris account has been activated and all the information in the following list has been obtained, the Merchant Account in Theatre Manager can be set up on each of the tabs that follow:
- Server Software - Moneris (setting selected in TM)
- Merchant Provider - Moneris Checkout Page (setting selected in TM)
- Main Store Id - xxxxxxxxxx (provided by Moneris merchant services and used to login to Moneris online portal)
- Hosted Store ID - xxxxxx (generated in Moneris online portal)
- Checkout ID - xxxxxx (generated in Moneris online portal)
- Primary URL for LIVE authorizations - set automatically
- ECR Number - 66xxxx (provided by Moneris on the setup information)
- api_token - obtained from the Moneris online portal
Tabs with specific setup info are described in the following help pages. Other tabs like the Employees and Cards tabs are populated the same as described here.
Moneris Hosted Checkout Software Type
- Account Name - enter a description indicating that the purpose of this account is for Hosted Payments
- Status - click to make it active, if not already
- Enable Card Use by Web Listener - click to make it active, if not already. Hosted Checkout Page can be used for online sales to try to be PCI Schedule A compliant
- Server Software - Moneris (setting selected in TM)
- Merchant Provider - Moneris Checkout (setting selected in TM)
- Main Store Id - xxxxxxxxxx (This is your Moneris Store # provided by Moneris. It should be a combination of letters and numbers. This is NOT your Merchant # OR ps_store_id. If the Moneris Store # is incorrect, Theatre Manager will NOT be able to close the credit card batch on the gateway server.)
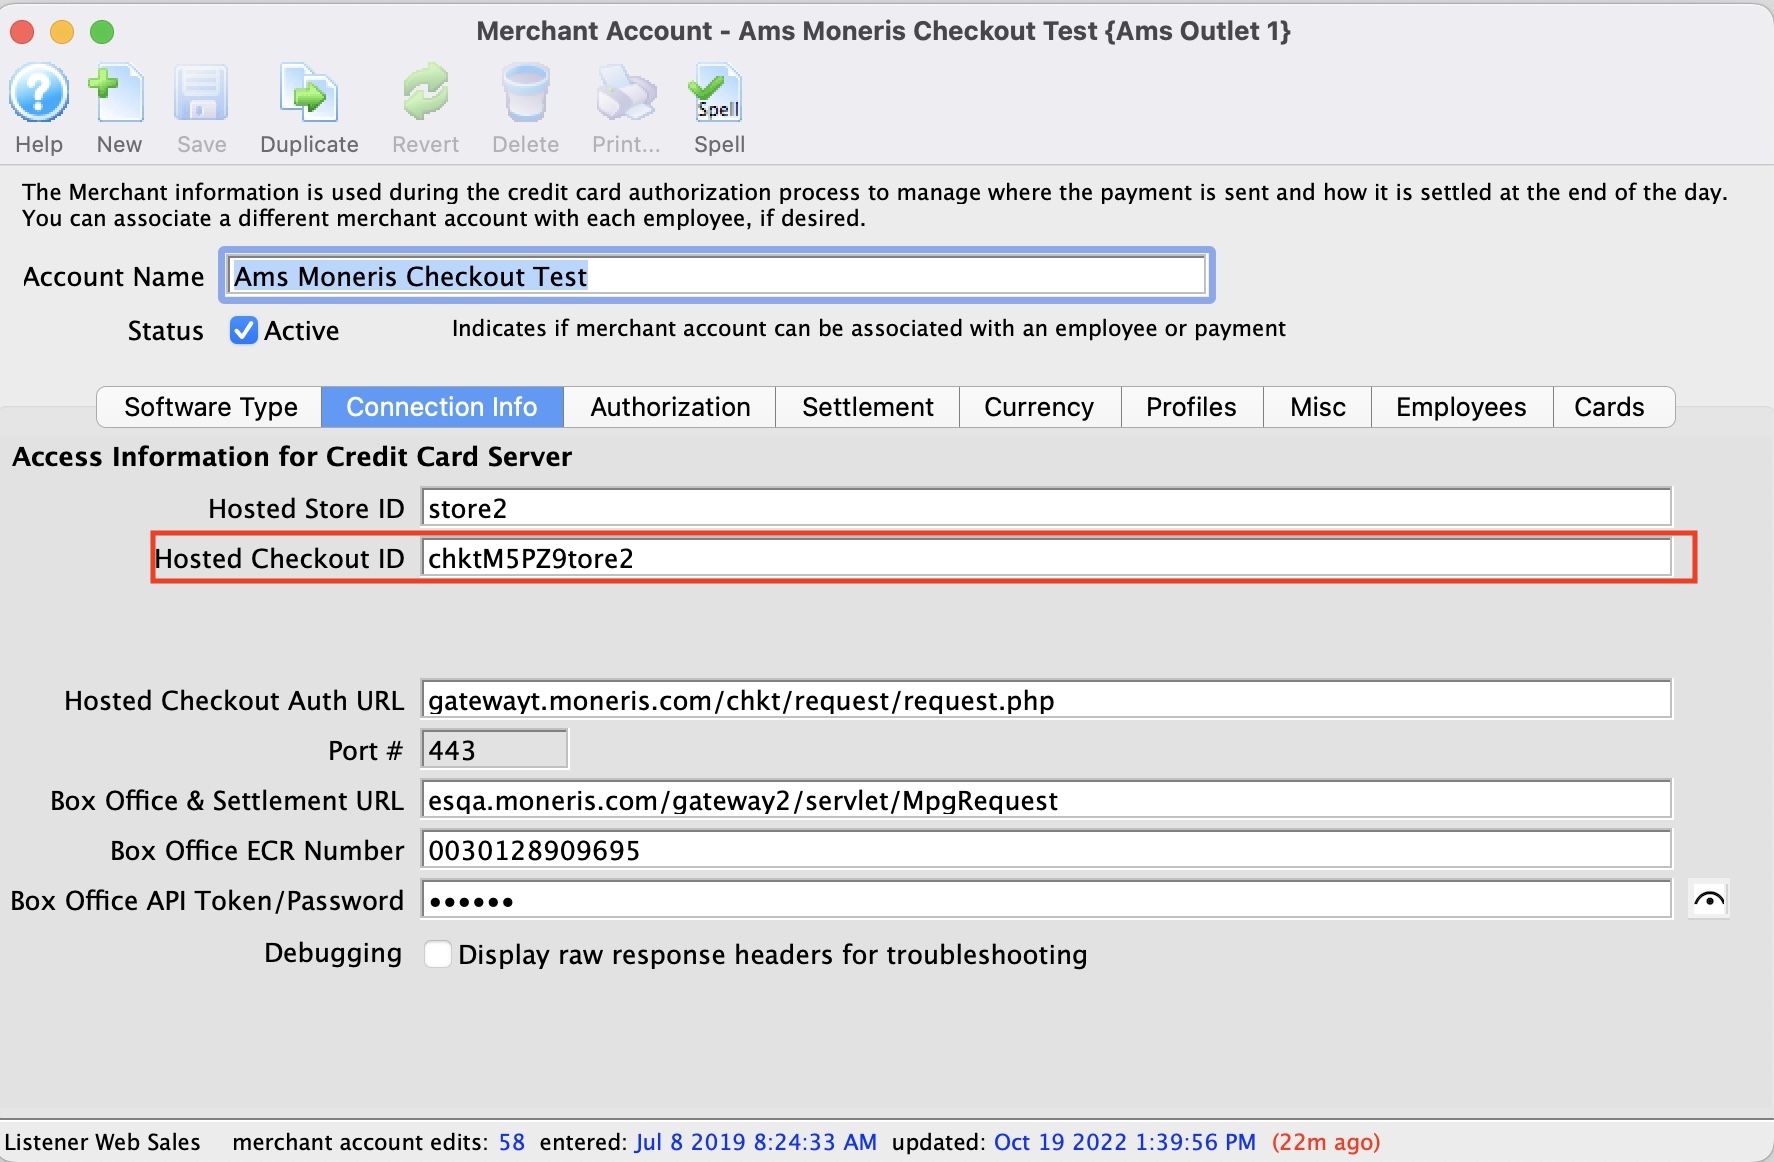
Hosted Checkout Connection Info
- ps_store_id - xxxxxx (generated in Moneris online portal)
- Hosted Checkout ID - xxxxxx (generated in Moneris online portal)
- Authorization URL - automatically set for you
- Settlement URL - automatically set for you
- Port - must be 443
- ECR Number - 66xxxx (provided by Moneris on the setup information)
- api_token - obtained from the Moneris online portal
The Web Experience
|
It is very important to note that the credit card is being entered from the user's browser directly into the Moneris web site. This allows a venue to have:
|
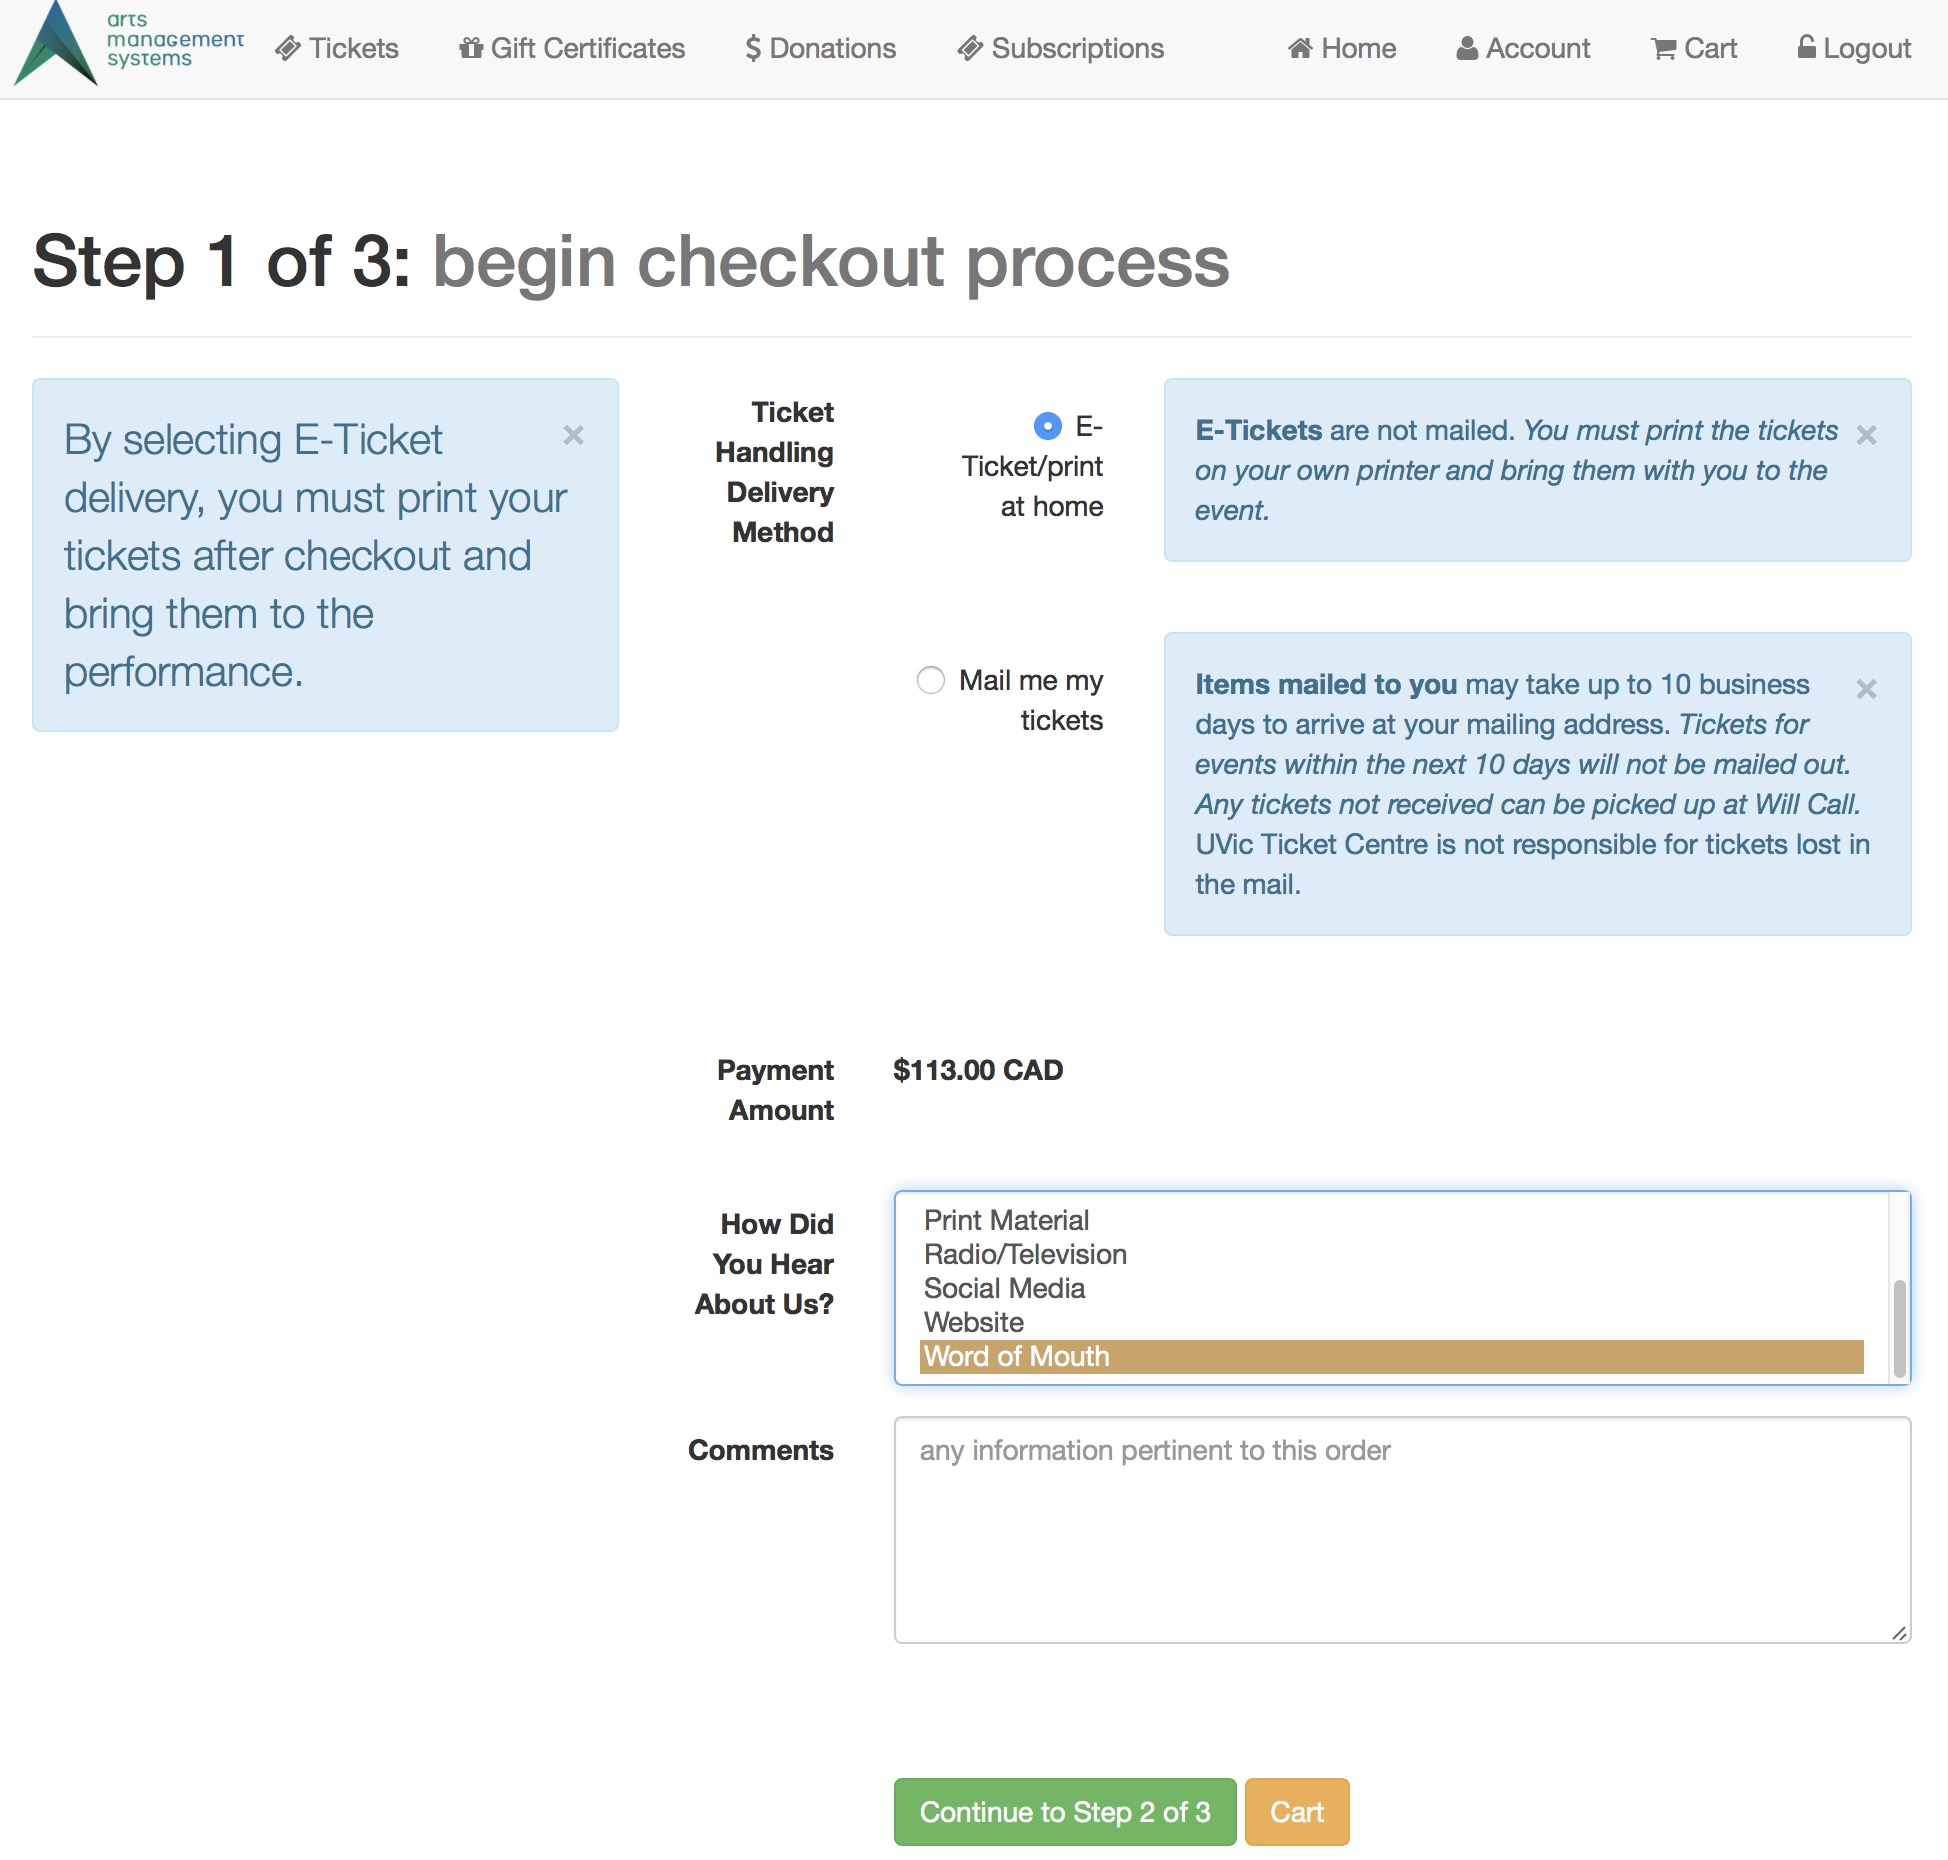 Step 1 of the checkout process illustrates that most of the checkout window appears the same.
The singular difference is that the credit card entry data is missing. Card entry shows up on step 3. |
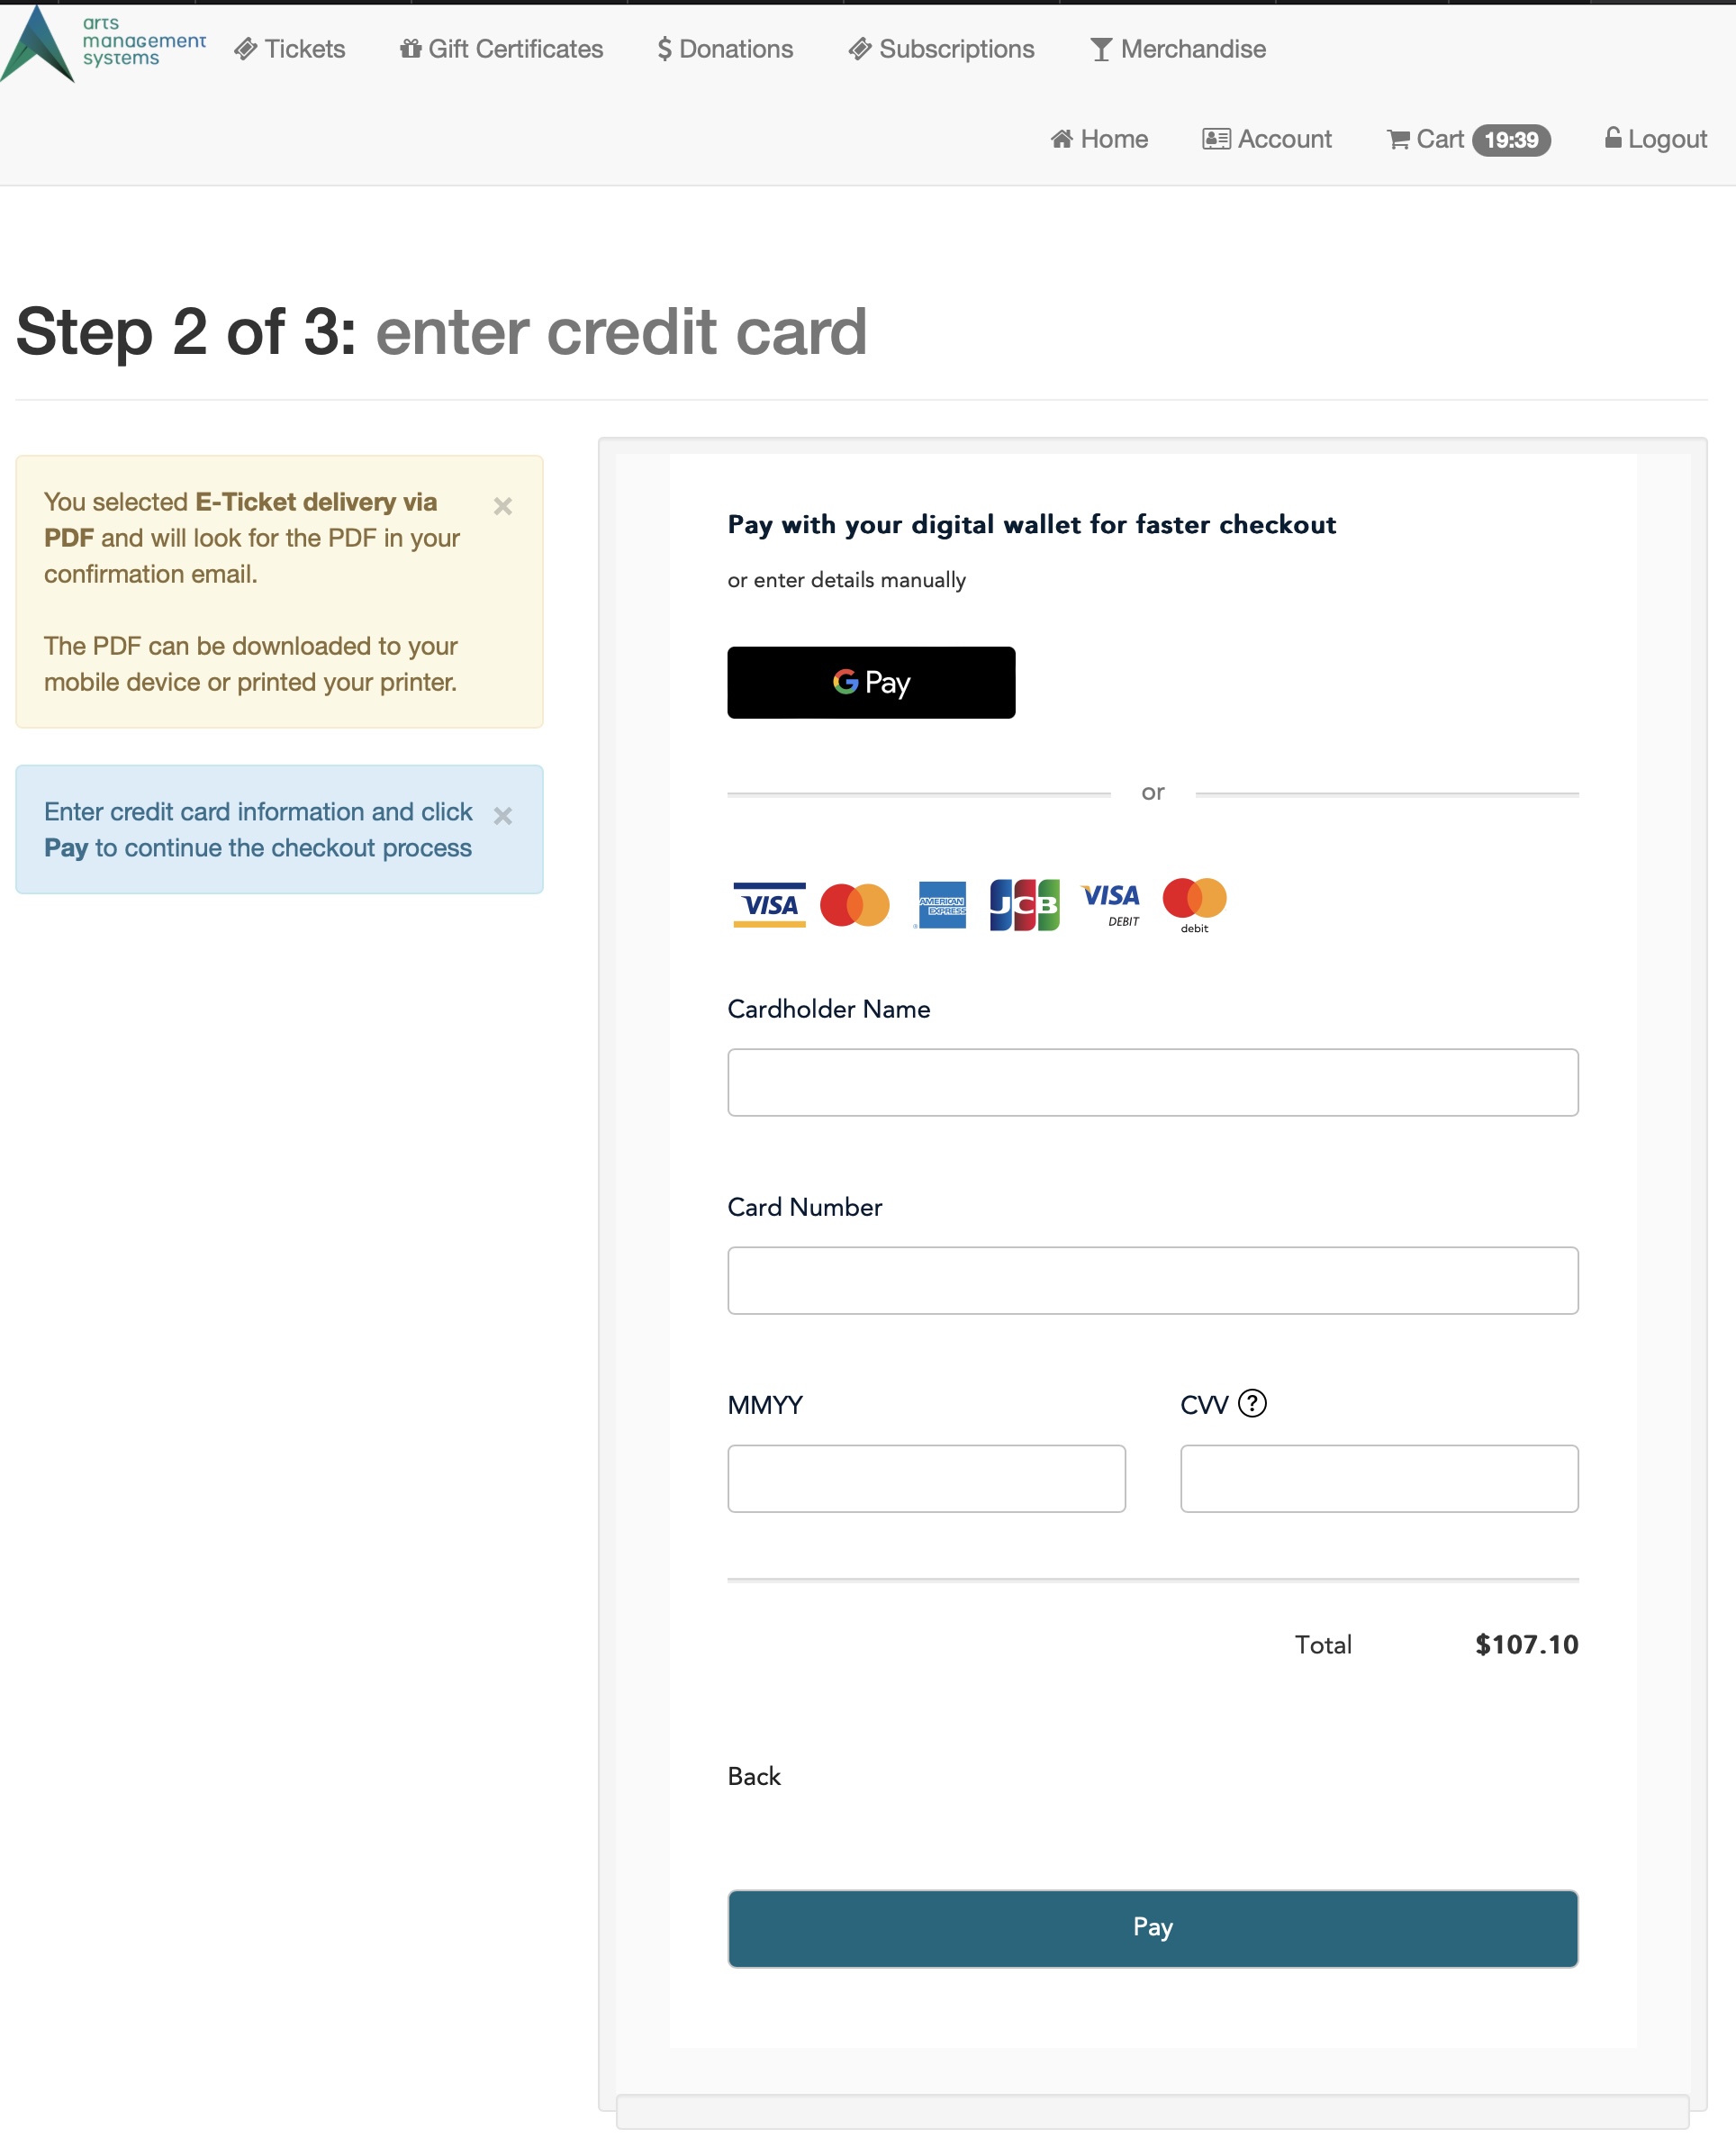 Step 2 shows an example of the actual hosted payment page.
From step 1, the user's browser is directed to the Moneris web site where they enter:
|
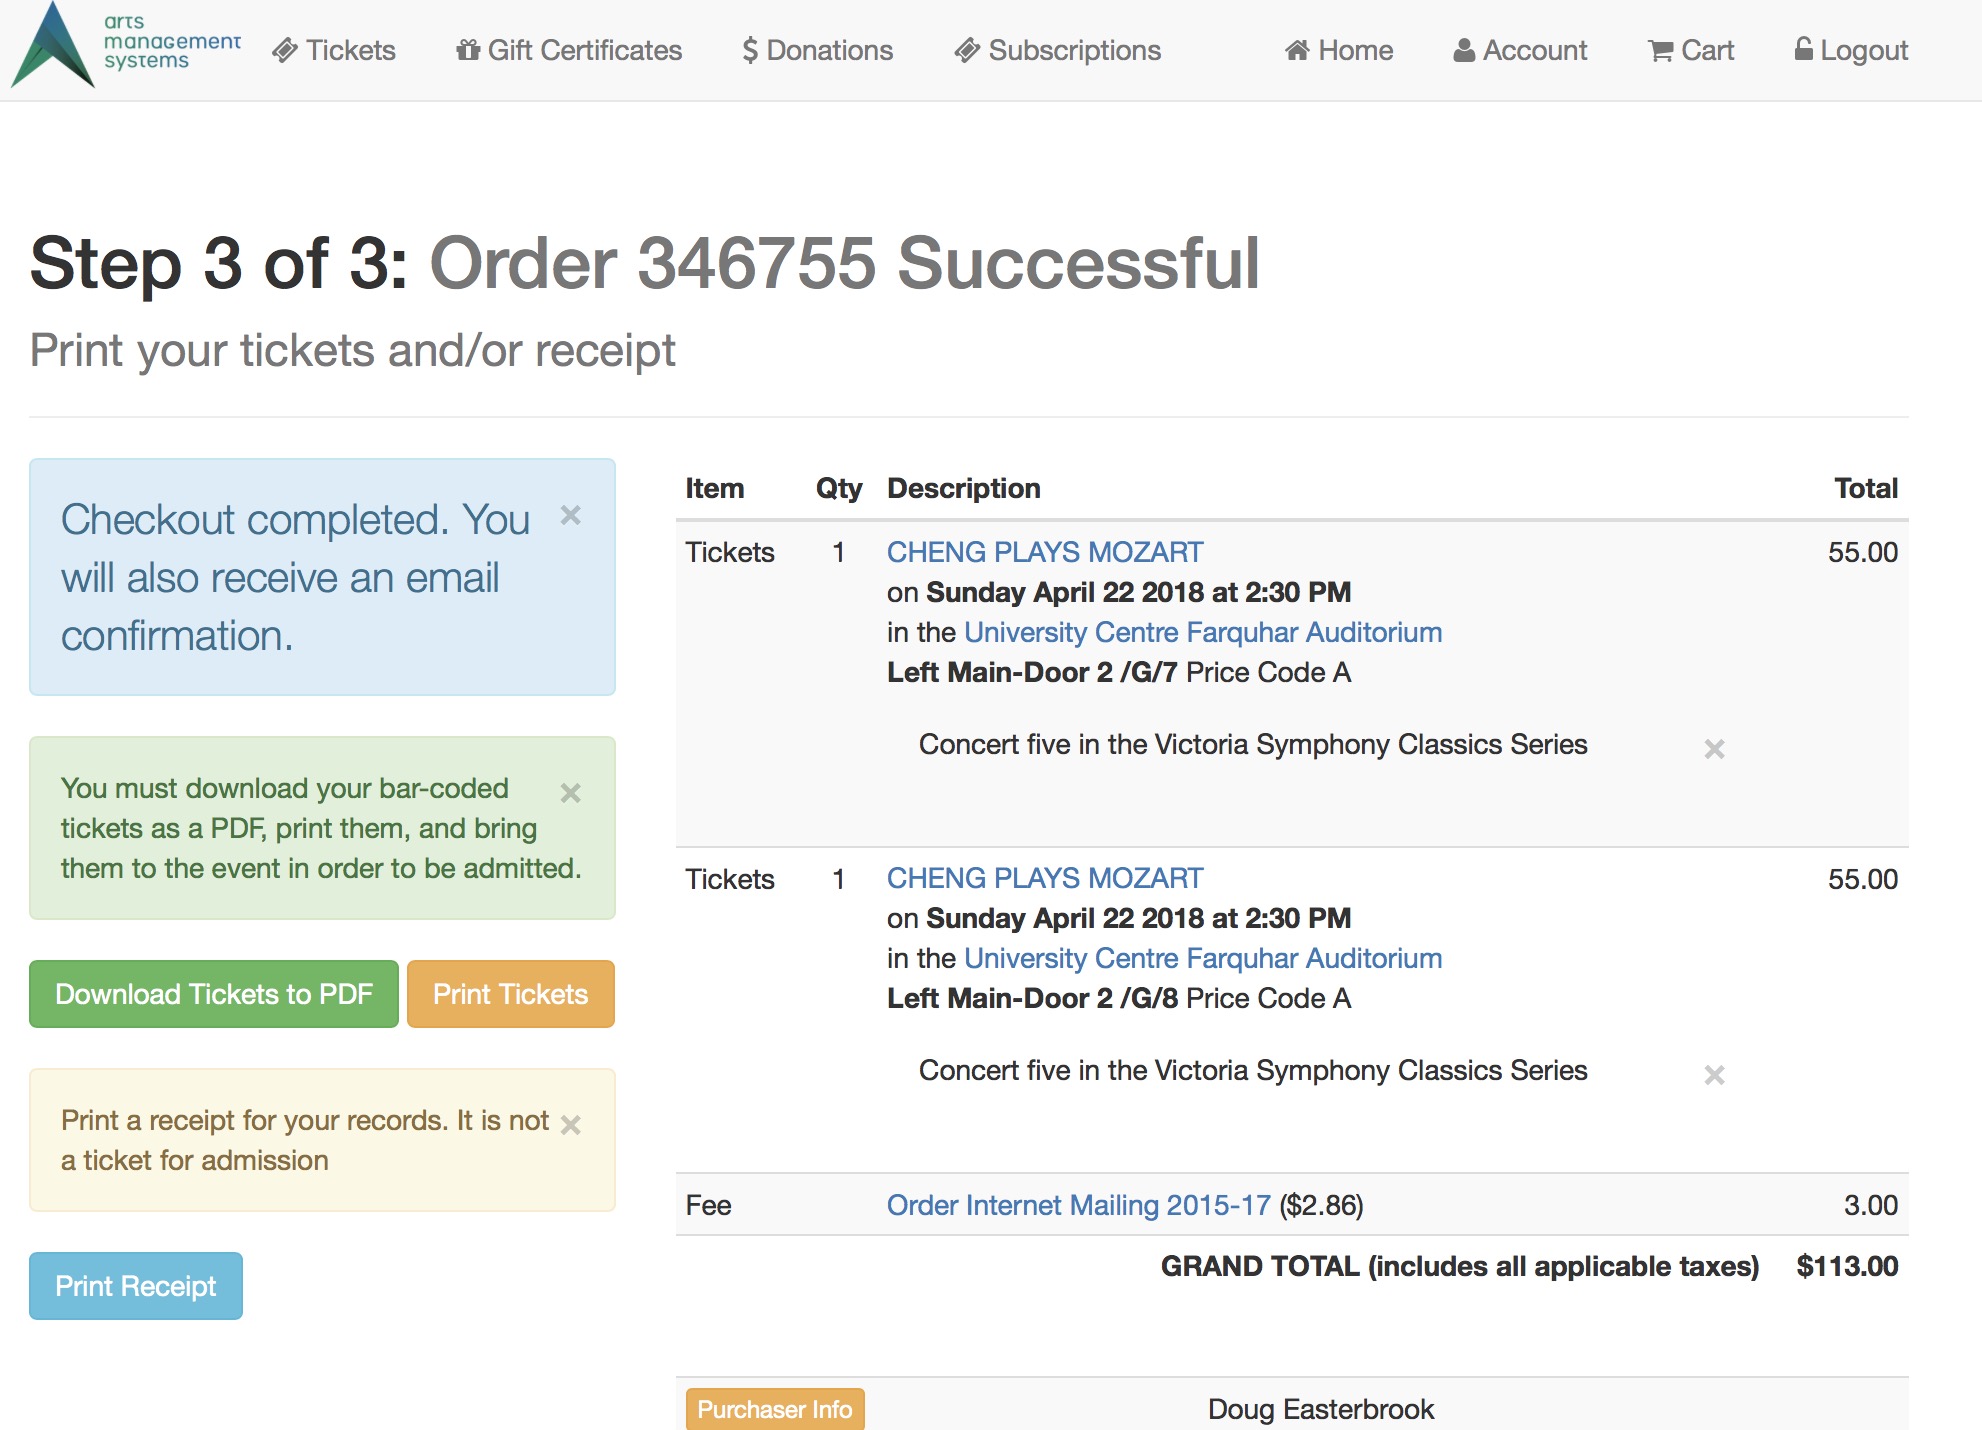 Step 3 remains the same.
This shows the confirmation page where the user can use the print at home feature if enabled. |
Converting HPP to Moneris Checkout
- Log on to your online Moneris E-Select Plus account
- Follow the instructions to make a Moneris Checkout Page and copy the Checkout ID
- Change your merchant settings in Theatre Manager from Hosted Payments to Moneris Checkout (see below)
- Put the Checkout ID into the right place in Theatre Managaer
- tmCheckout.html
- You will have to update the web page if you have altered it in the past.
- If you have not changed it (i.e. it is not in your web page directory), then you are done
- You may need to add some credit card types like JCB, UPAY into code tables
- If you have implemented restrictive outgoing firewall rules, you may need to review those to allow the Moneris checkout page to render in your organization's internal networks. It should not affect any patrons at home
Converting Moneris Hosted Payment to Moneris Checkout
Once you have your Checkout ID, all you need to do is change two things in your merchant setup:
- Complete your current end of day and settle all your credit cards
- Open the Setup->System Tables-> Merchant Account list
- Find the current/active Moneris Hosted Payment Page account in the list and double click on it
- On the Software Type tab
click on the Merchant Provider popup. Change it:
- From Moneris Hosted Pay Page - Deprecated
- To Moneris Checkout

-
On the Connection Info Tab:
- Locate the field called Hosted Checkout ID
- Save the contents of the field from the HPP setup, in case you need to put it back in later to reverse the process back to HPP
- Paste in the checkout ID you created on the Moneris web site
- Save the merchant record
- Go to your online sales and try it out. The checkout process should be similar to the example. If it is not similar, please contact us.
- Go to your online Moneris Portal and make sure that it indicates that the card is authorized
- Try to void the credit card payment in Theatre Manager you just put through online
- Go to your online Moneris Portal and make sure that it indicates that the card is now voided
Moneris Hosted Payment Page (deprecated)
|
In late 2022, Moneris is replacing the Hosted Payment Page option with the Hosted Checkout Page option. It should require a little change to your merchant account setup in order to switch over.
Refer to the conversion process from HPP to Moneris Checkout |
A Moneris Hosted Payment Page is part of the Admin->Hosted PayPage config option.
|
Hosted Payment Page option is used if you want Theatre Manager to switch over to the Moneris site for online credit card payments. It is possible to be SAQ A compliant for your web sales since the web site no longer takes credit cards (Moneris does). |

|
|
If you use hosted payments for web sales, you will also need an E-Select plus account for settlement. Box office sales can use this same merchant account and will automatically authorize against the e-select plus account. This means that you only need one merchant account set up even though it is processing via different pathways, one for web and one for box office. | |
|
Moneris Hosted Payments requires that your web page timeout is 60 minutes in company preferences - it cannot be less. This is because Moneris payment acceptance is 60 minutes and we cannot close carts until their payment page has timed out. | |
|
You may also be able to accept payments like apple-pay online, online interac, verified by visa, etc. Make sure to talk to Moneris about what is possible and what you want to accept. |
Setup Process
The best process to configure this option is:
- Obtain your online portal connection information from Moneris
- Configure all the settings within the online portal
- Use the Theatre Manager Merchant Account Setup for Moneris Hosted Payment Page
- Test:
- Authorizations through the TM Web services
- Attempted Authorizations but Cancel through the TM Web services by going online to buy something (use test cards)
- Verify the display on the web to see that it matches what ou picked in the online portal setup and shows your name and settings you wish
- Voids from Theatre Manager
- End of Day Settlement
Online Portal Setup
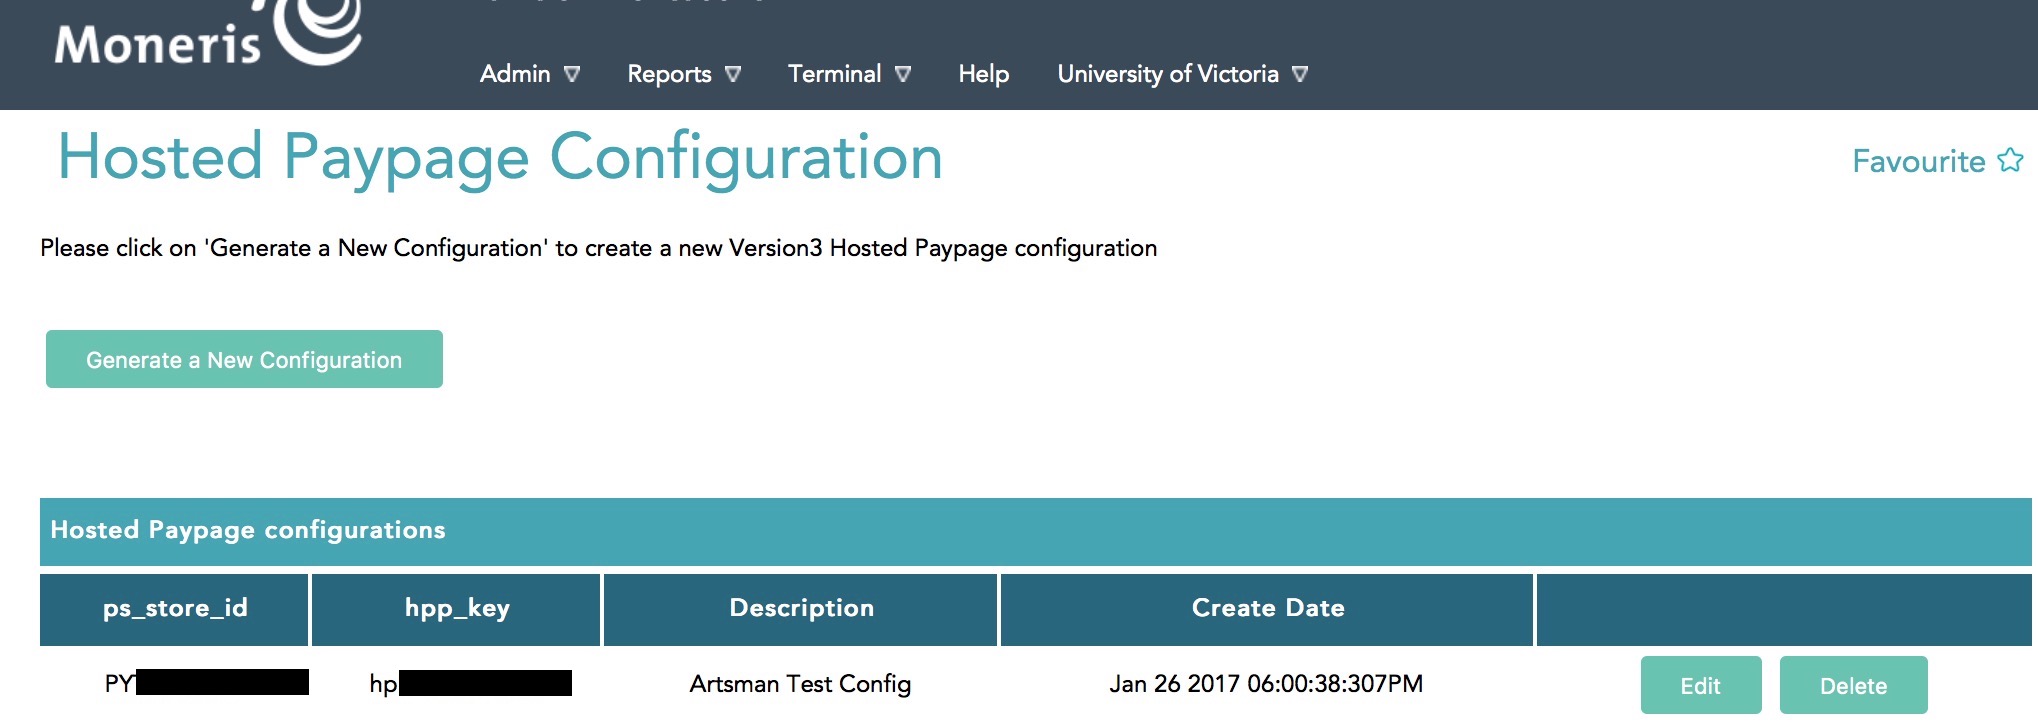
Once you are logged into the online account setup, select Admin->Hosted PayPage config option.
You will see a screen similar to below.
- If you see no lines in the list, click the Generate a New Configuration to make the following for Theatre Manager:
- ps_store_id
- hpp_key
- If you see your ps_store_id in the list below, you can edit or verify information by proceeding to the next pages.
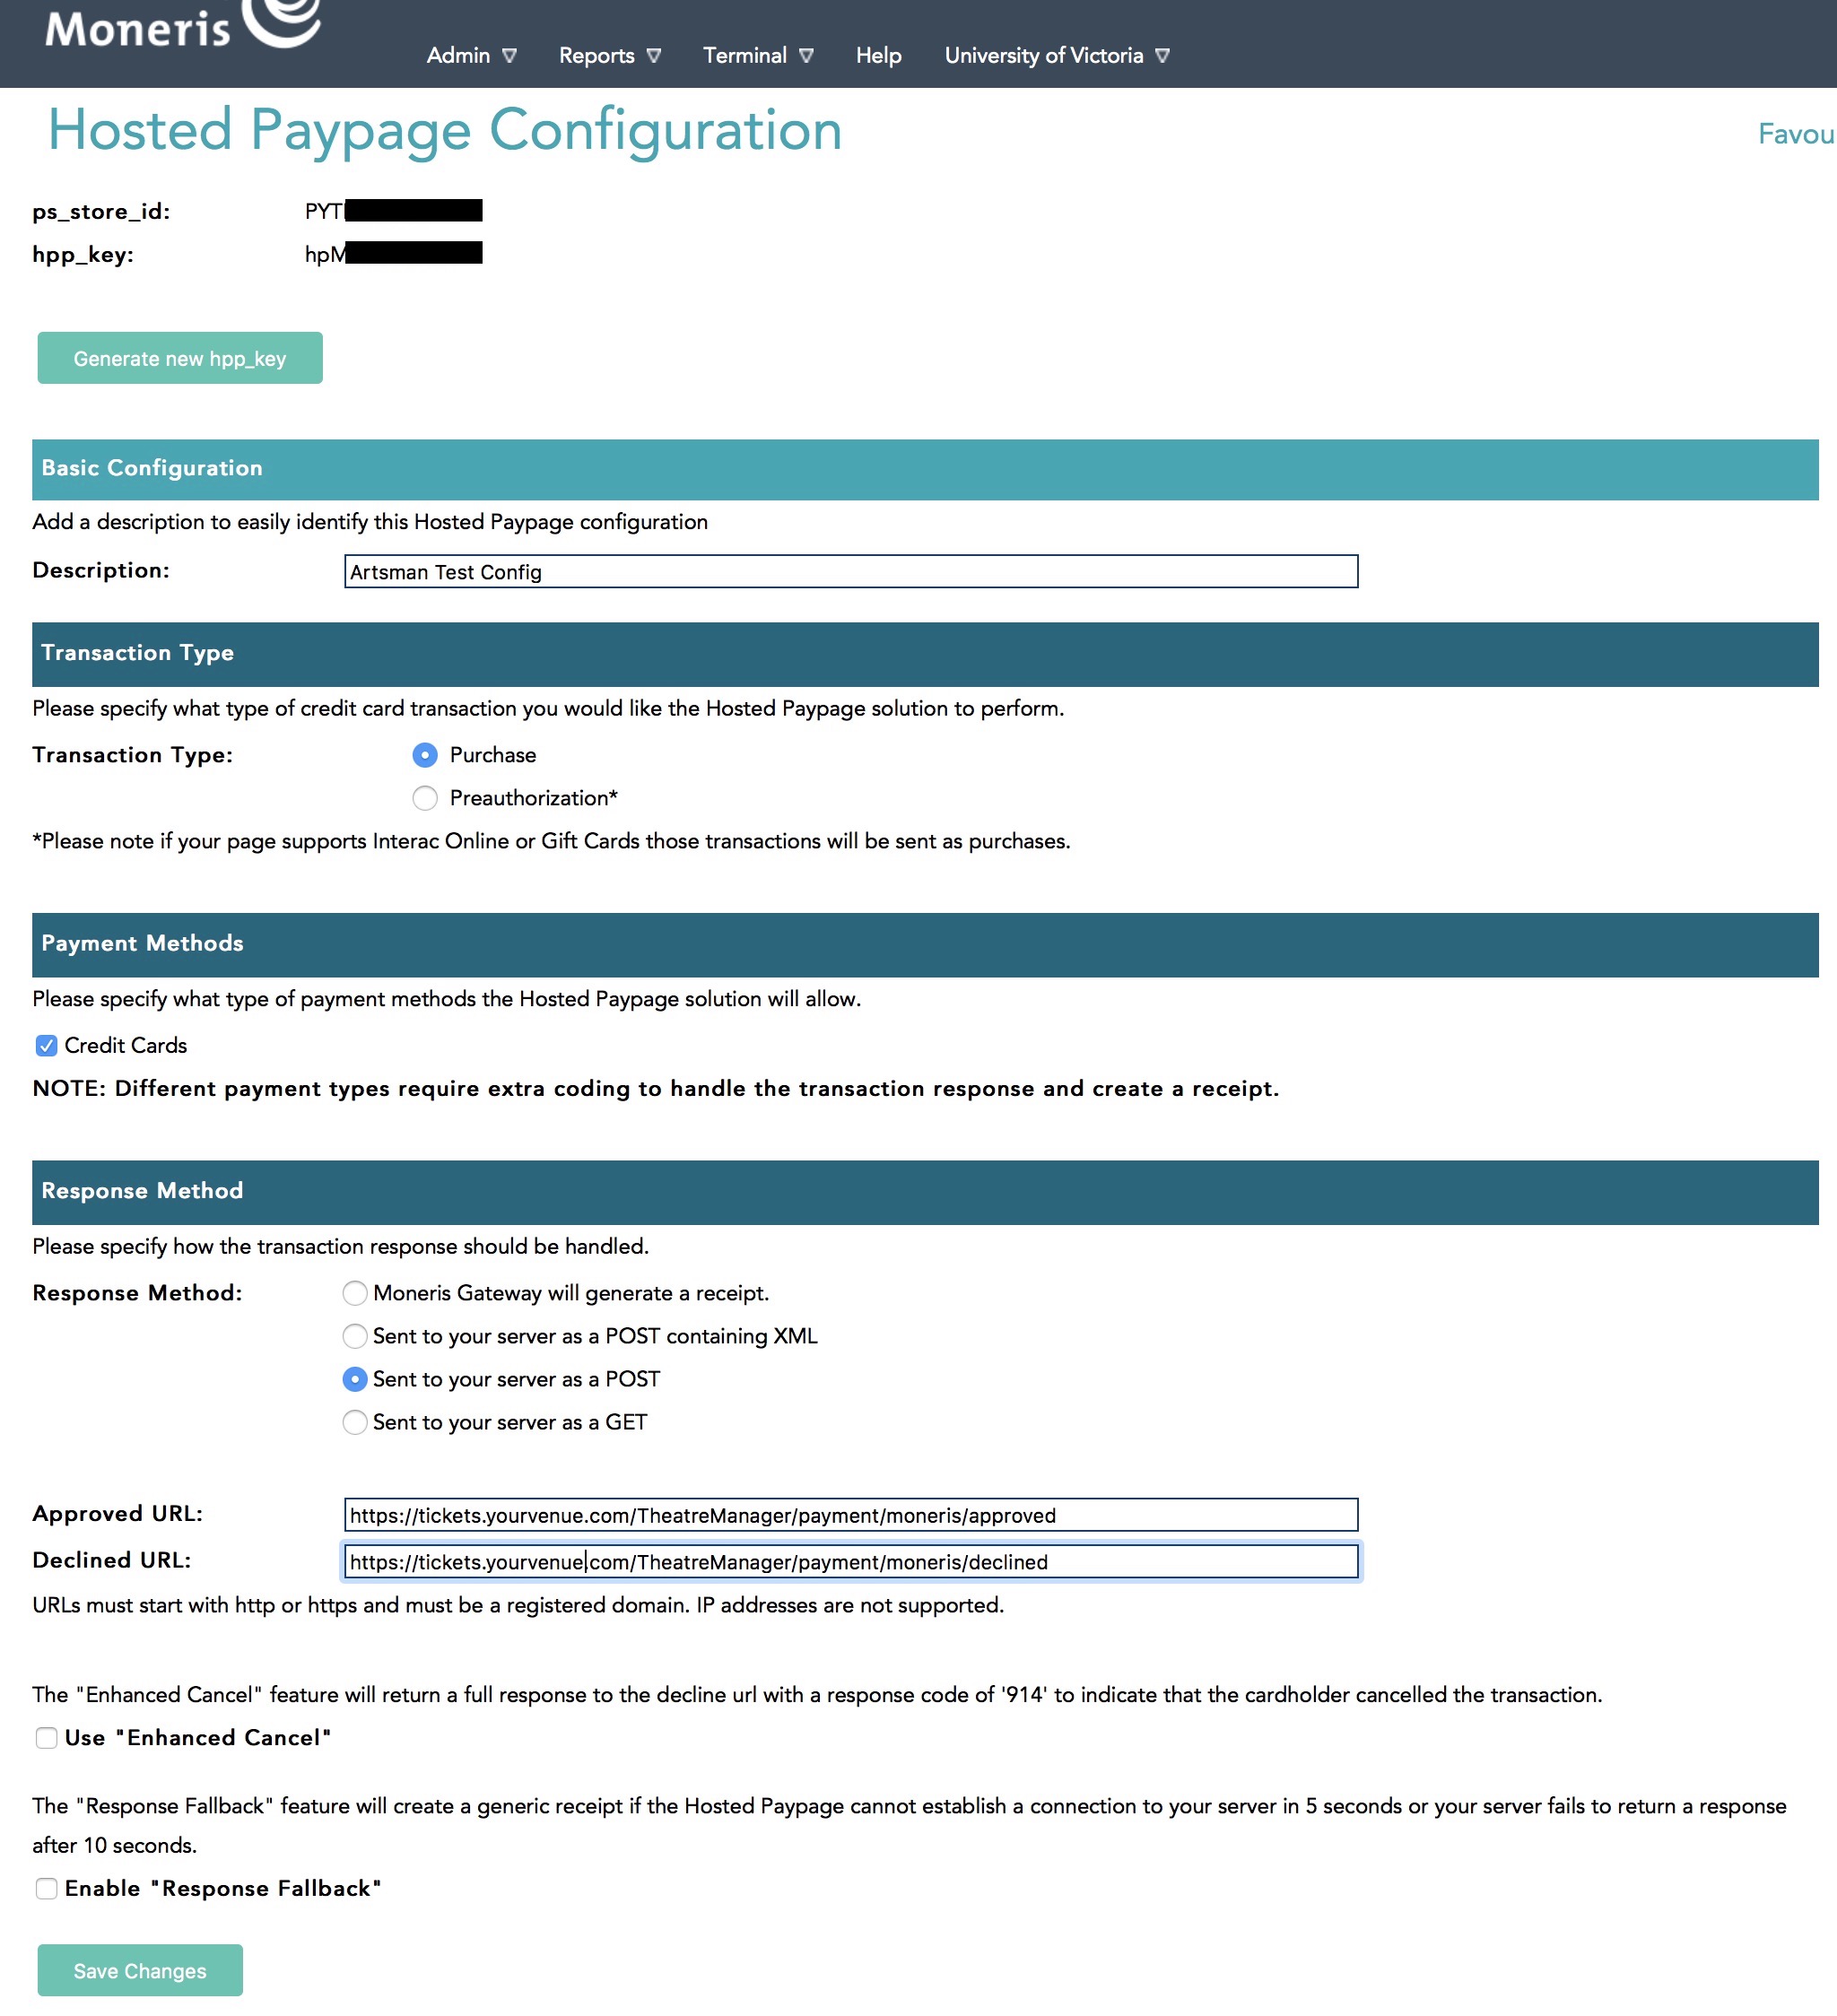
Hosted Paypage Basic Configuration
Once you are logged into the online account setup, select Admin->Hosted PayPage config option.
Once you see your ps_store_id, click the 'Edit Button and you will see a screen similar to below.
Data Setup
Enter data into the window above per the instructions:
- Description - enter a description of the hosted payment page - it could be your venue's name or bank.
- Transaction Type - must be set to Purchase
- Payment Methods - must be Credit Cards
- Response Method - must be Sent to your server as a POST
- Approved URL - must be https://tickets.yourvenue.org/TheatreManager/payment/moneris/approved
- Declined URL - must be https://tickets.yourvenue.org/TheatreManager/payment/moneris/declined
- Use "Enhanced Cancel" - should NOT be checked
- Enable "Response Fallback" - should NOT be checked.
If you change anything on this page, be sure to click Save Changes under this section.
Hosted Paypage Appearance Configuration
Once you are logged into the online account setup, select Admin->Hosted PayPage config option.
Scroll down until you see a section that says Paypage Appearance and click Configure Appearance.

 A new window will open similar to below and the settings you place here control how the hosted payment page will appear to the patron.
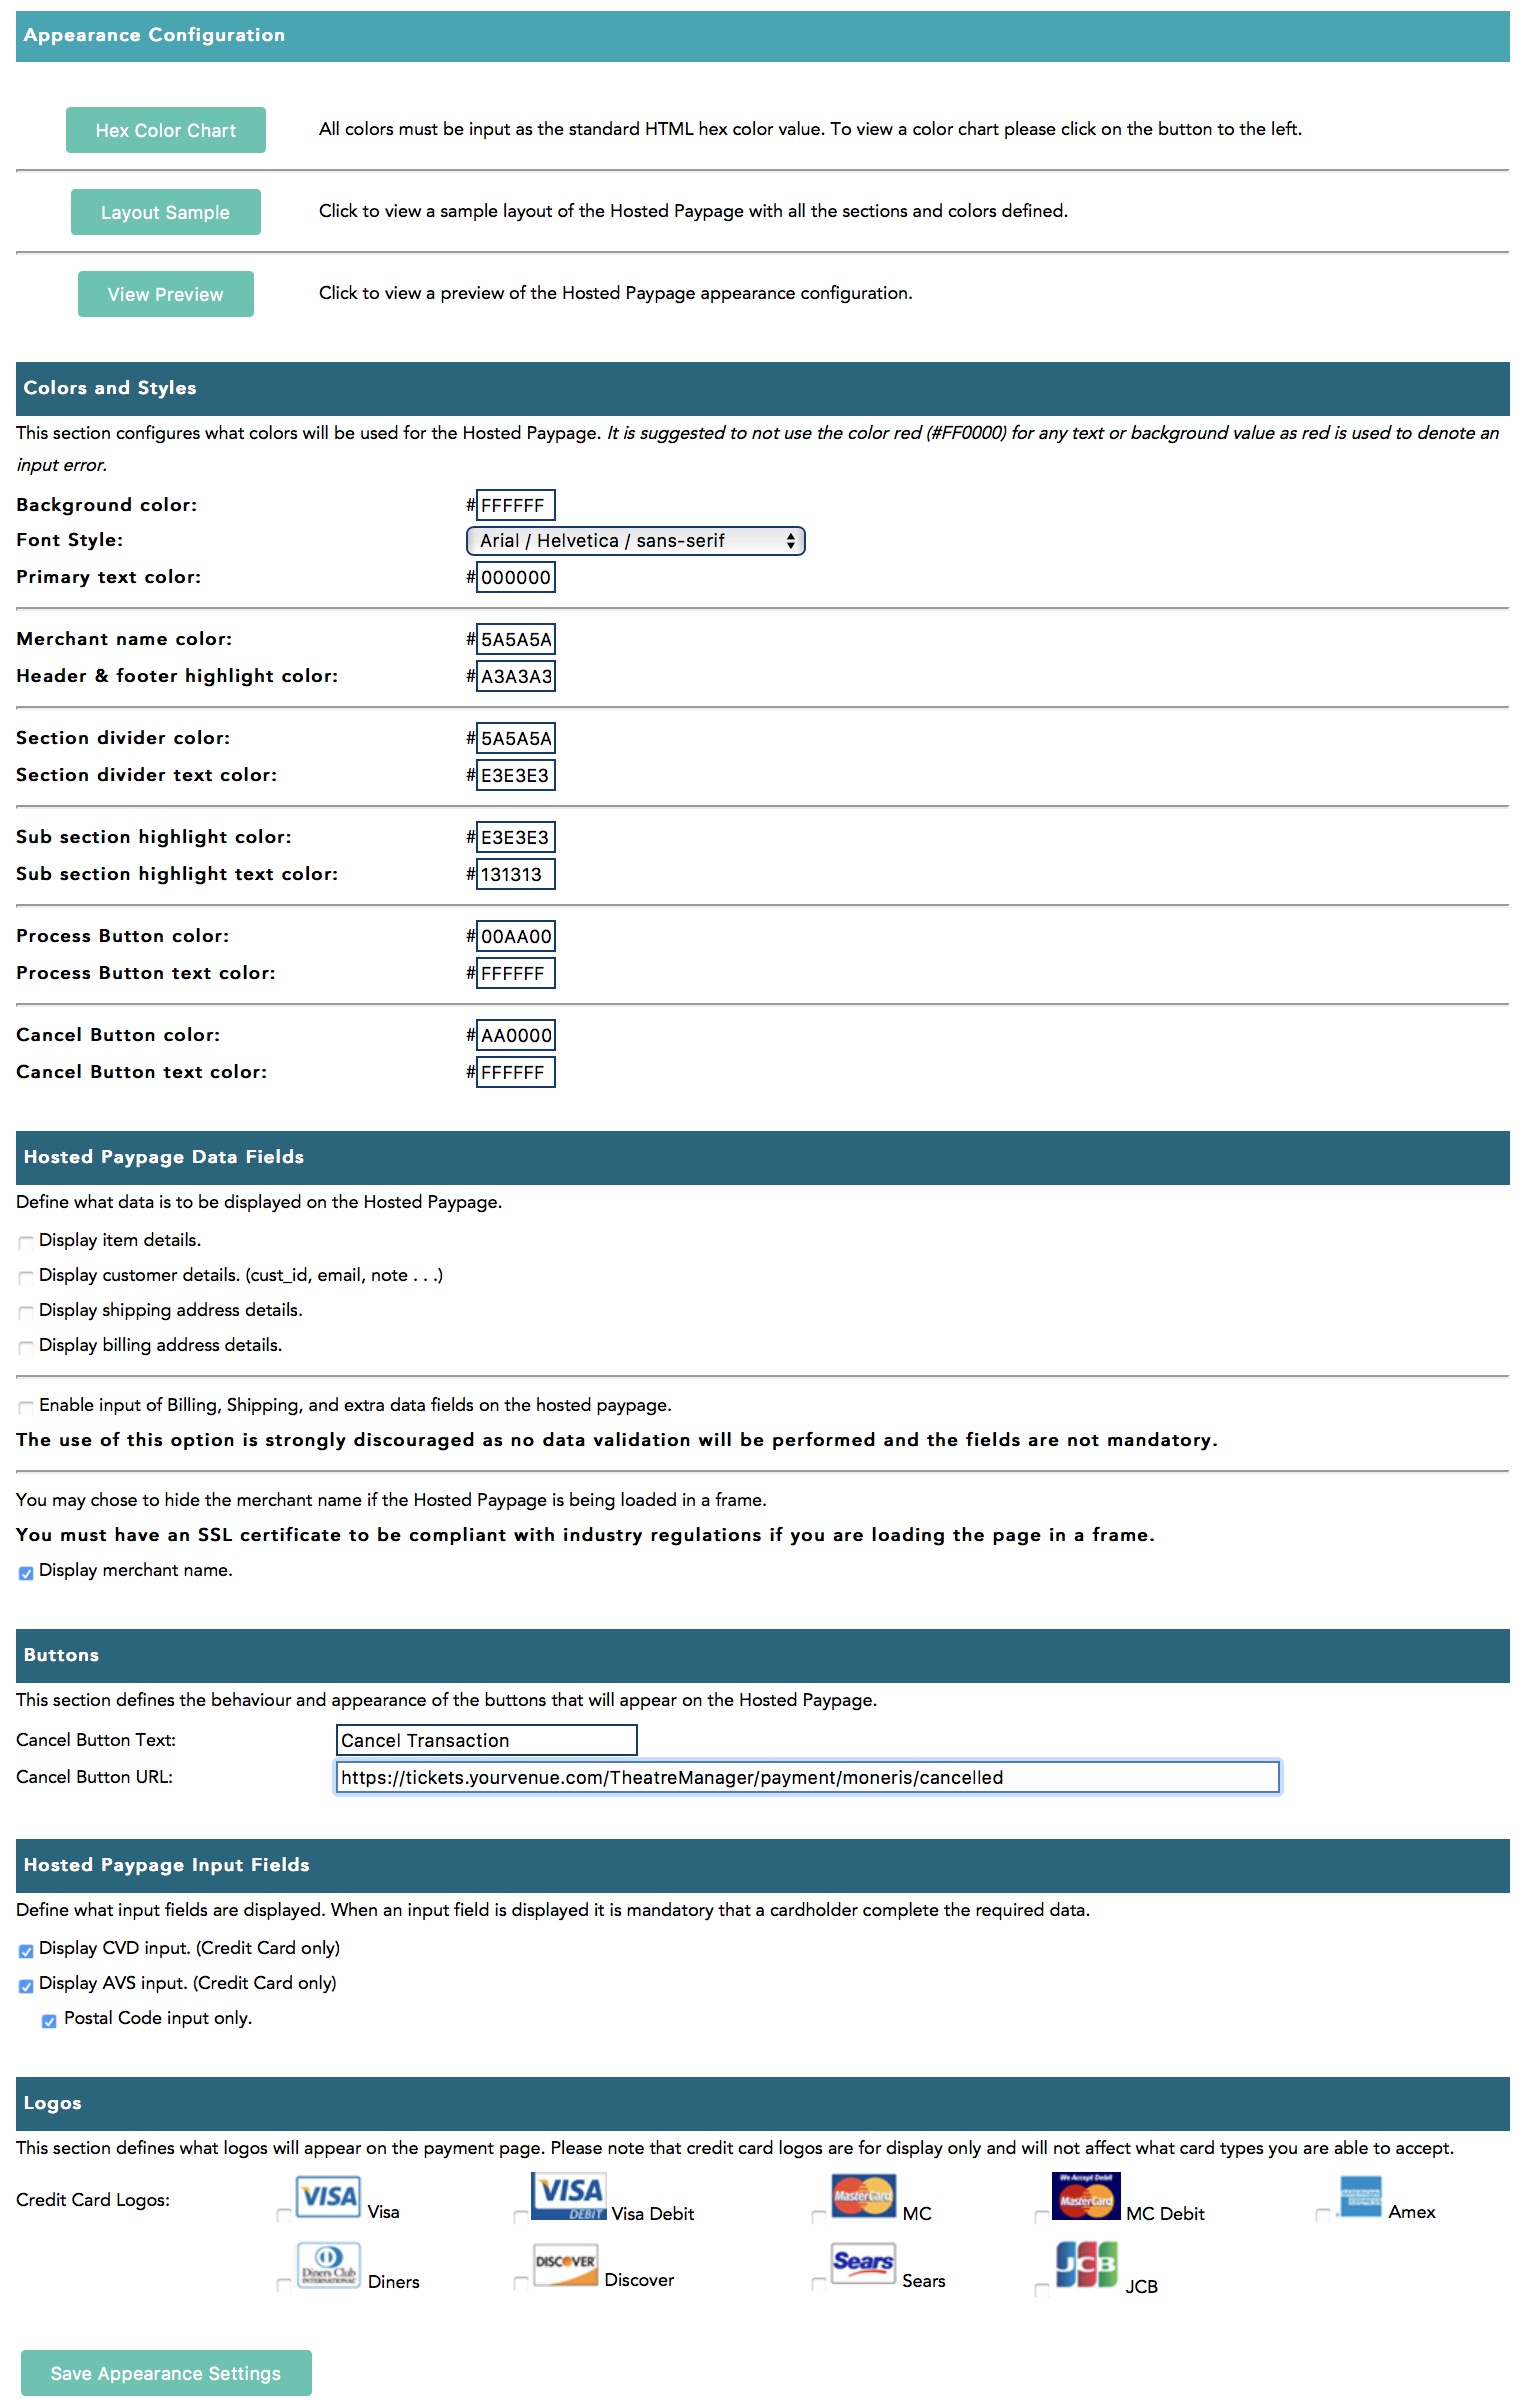
Appearance Configuration
At the top are 3 buttons that are helpers for you:
- Hex Colour Chart - which shows colours that can be placed into the 'Colours and styles' area. They are samples in a numeric format with examples. If you are familiar with setting colours of items on web pages, you can use any colour you wish.
- Layout Sample - shows a picture of the various parts of the payment page that can be displayed
- View Preview - will show what your payment page will look like after altering the settings. Our sample is to the right based on settings below
Colours and Styles
In this section, enter the colours for various parts of the payment page window. Use this to set colours as indicated.
Hosted Paypage Data Fields
Make settings as follows:
- Display Item Details - uncheck. Theatre Manager does not send this information to Moneris
- Display Customer Details - uncheck. Theatre Manager does not send this information to Moneris
- Display Shipping Address Details - uncheck. Theatre Manager does not send this information to Moneris
- Display Billing Address Details - uncheck. Theatre Manager does not send this information to Moneris
- Enable input of Billing, Shipping, and extra fields - uncheck. Theatre Manager does not respond to this data if enabled
- Display Merchant Name - Check this if you wish - it will display your merchant name from elsewhere in the Moneris config
Buttons
There should only be two things to set here:
- Cancel Button Text - enter the words that you want to show to the user should they decide that they do not want to continue with authorization. Could be word like 'Cancel', 'Cancel Transaction','I Give up', 'Go Back to Cart', etc. Make sure and try an authorization so that you like what it says and that it is consistent with the behaviour of the window
- Cancel Button URL - must be https://tickets.yourvenue.org/TheatreManager/payment/moneris/cancelled where tickets.yourvenue.org is the URL to your ticketing web site
Hosted Paypage Input Fields
The settings are:
- Display CVD Input (Credit Card Only) - we suggest checking this to allow input of the number on the back of the card
- Display AVS Input (Credit Card Only) - (optional) check this to allow input of address info for address verification if you wish customers to provide it. It does not go to Theatre Manager
- Postal Code Input Only) - (optional) if you want address verification, this restricts address input to the postal code only. its probably the preferred option for AVS checking
Logos
If you wish, you can click on the credit card logos that you accept. It simply displays the logo on the payment page.
Hosted Paypage Response/Receipt Data
Once you are logged into the online account setup, select Admin->Hosted PayPage config option.
Scroll down until you see a section that says Response/Receipt Data and click Configure Response Fields.

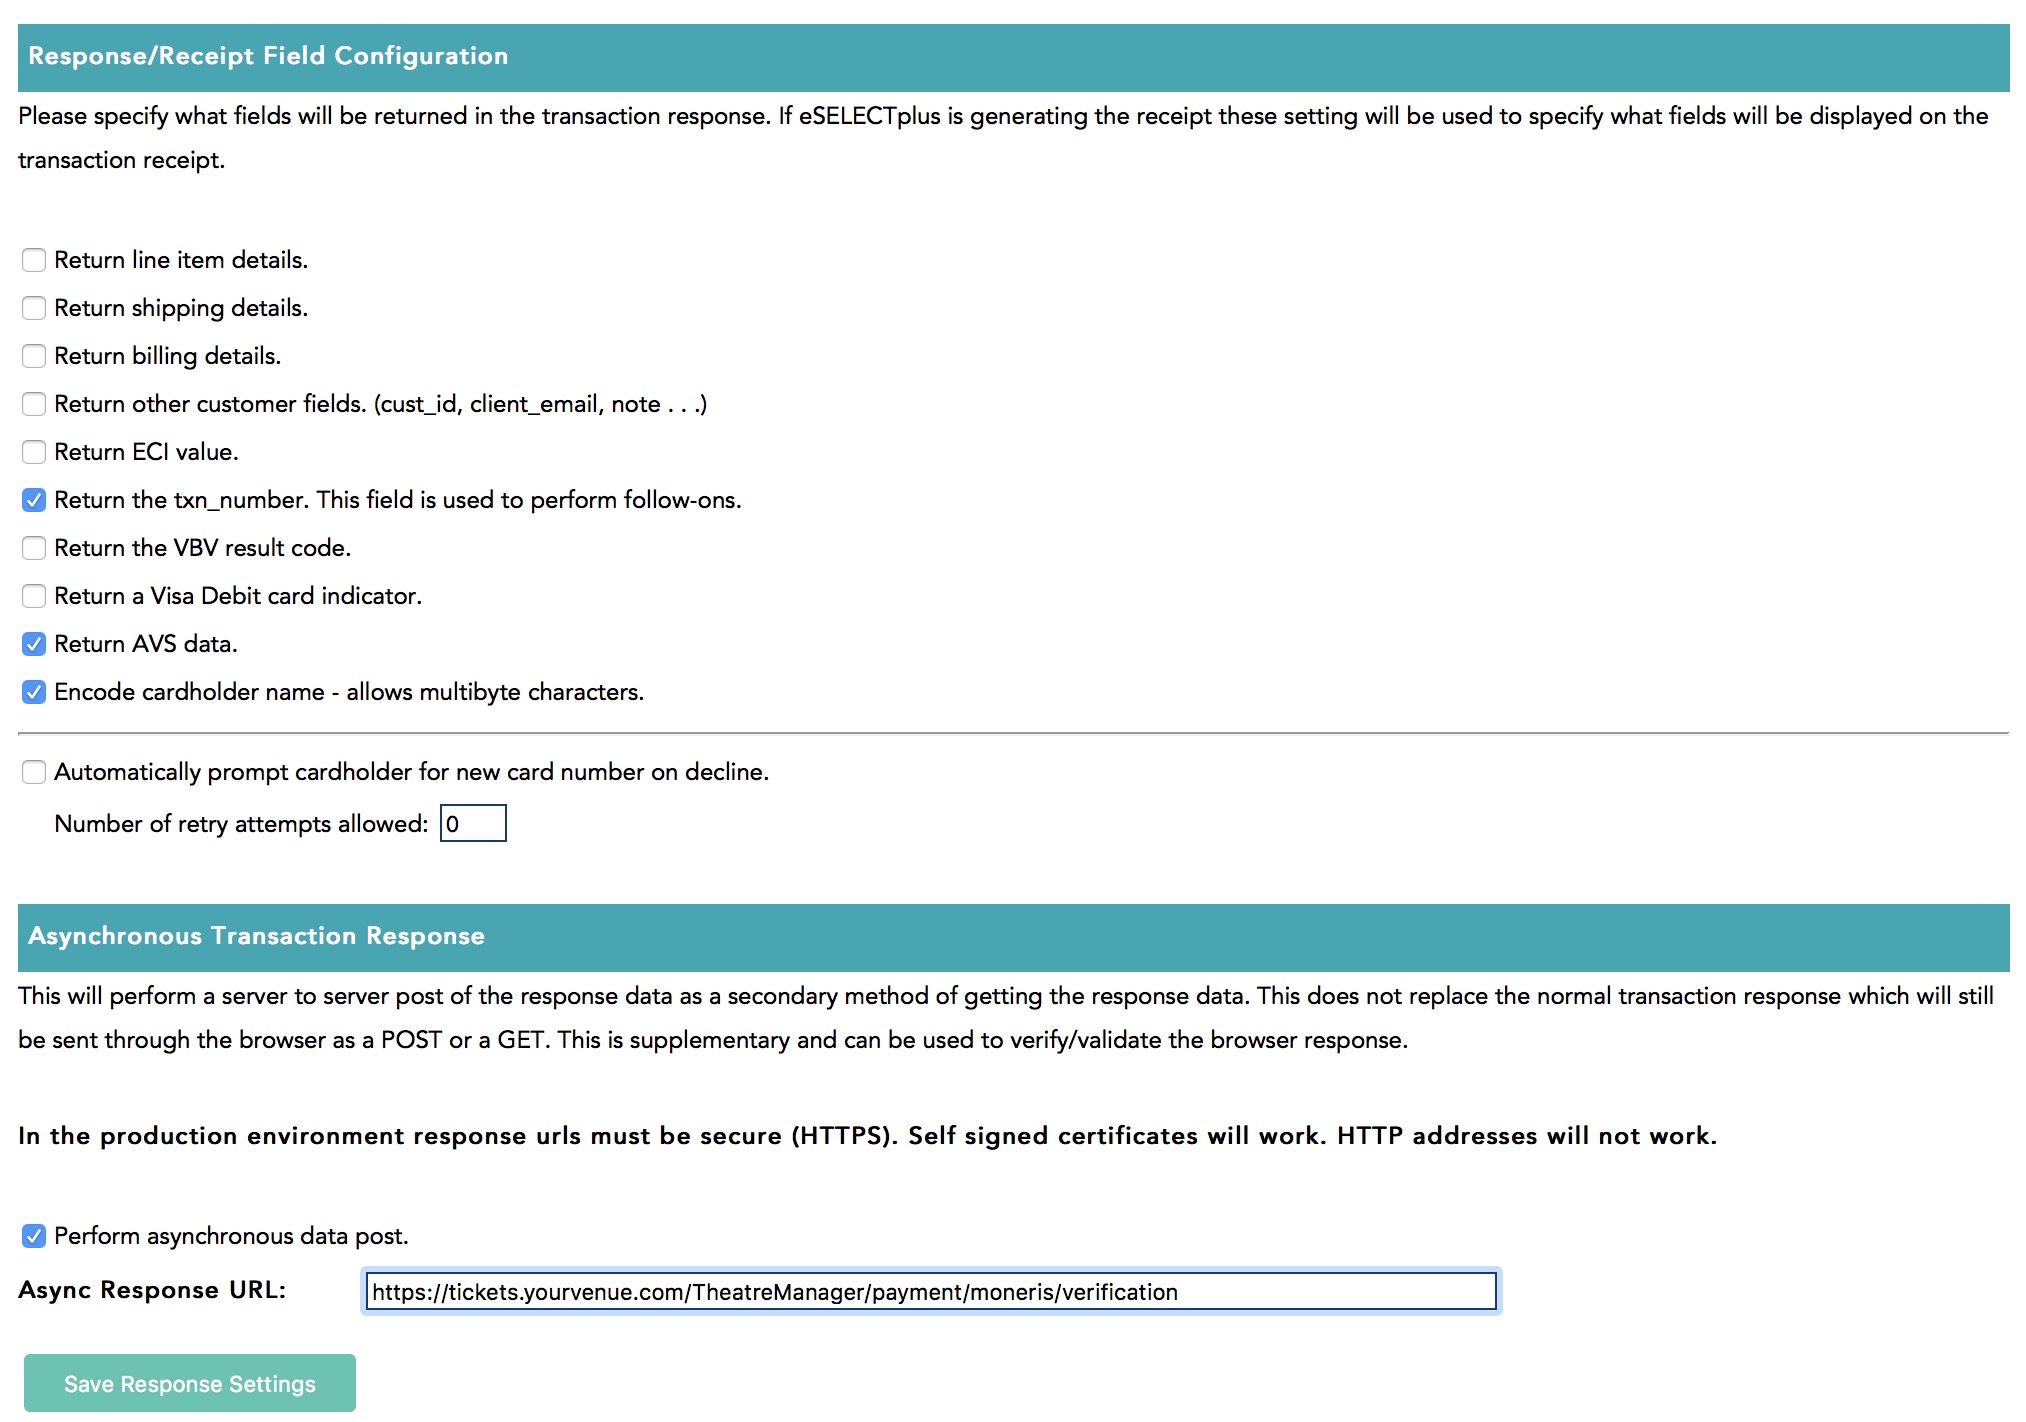
Response/Receipt Field Configuration
Set the options as follows:
- Return line item details - uncheck this, it is not used by Theatre Manager
- Return shipping details - uncheck this, it is not used by Theatre Manager
- Return billing details - uncheck this, it is not used by Theatre Manager
- Return other customer fields - uncheck this, it is not used by Theatre Manager
- Return ECI value - uncheck this, it is not used by Theatre Manager
- Return the txn_number. - you MUST CHECK THIS as it can be used in Theatre Manager to void transactions
- Return the VBV value - uncheck this, Verified by Visa is not used by Theatre Manager
- Return Visa Debit card indicator - uncheck this, it is not used by Theatre Manager
- Return AVS data - only CHECK THIS if you are wanting Moneris to check the postal code and you've allowed it as input on this screen
- Encode carholder name - allows multi byte characters - you MUST CHECK THIS since Theate Manager understands unicode characters - allows customers to put accents in their names.
- Automatically promptcardholder for a new card after a decline - check or uncheck this you wish
Asynchronous Transaction Response
Set the options as follows:
- Perform asynchronous data post - you MUST CHECK THIS as Theatre Manager relies on this feature to tell it what is going on during the credit card authorization
- Async Response URL - this must be https://tickets.yourvenue.org/TheatreManager/payment/moneris/verification where tickets.yourvenue.org is the URL to your ticketing web site
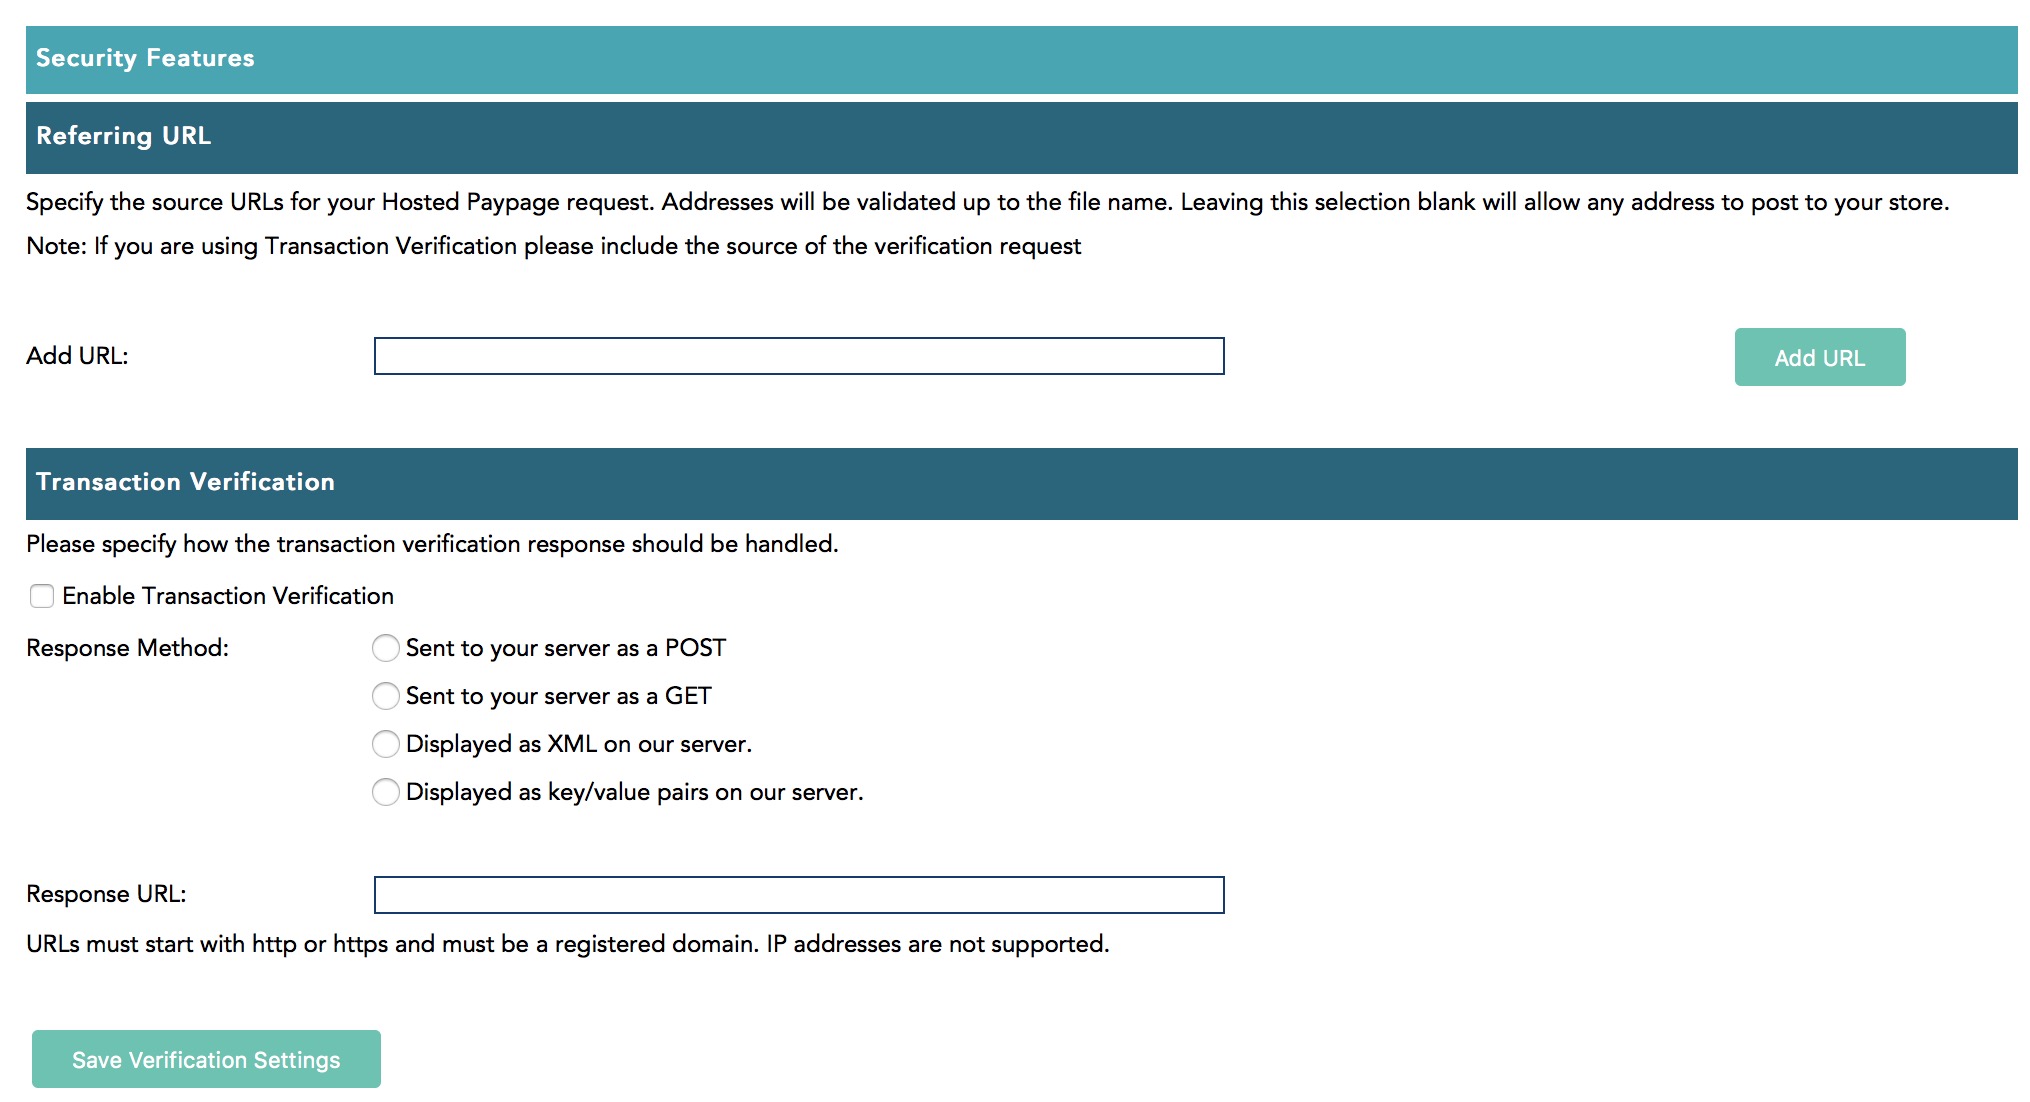
Hosted Paypage Security Features
Once you are logged into the online account setup, select Admin->Hosted PayPage config option.
Scroll down until you see a section that says Response/Receipt Data and click Configure Response Fields.

Referring URL
- Leave all data blank
Transaction Verification
- Non of the fields are required for processing. The can be left blank or unchecked
- The Referring URL section contains an Add URL: field. The ticketing site, https://tickets.yourvenue.org, can be added to this field to ensure it's the only source for processing.
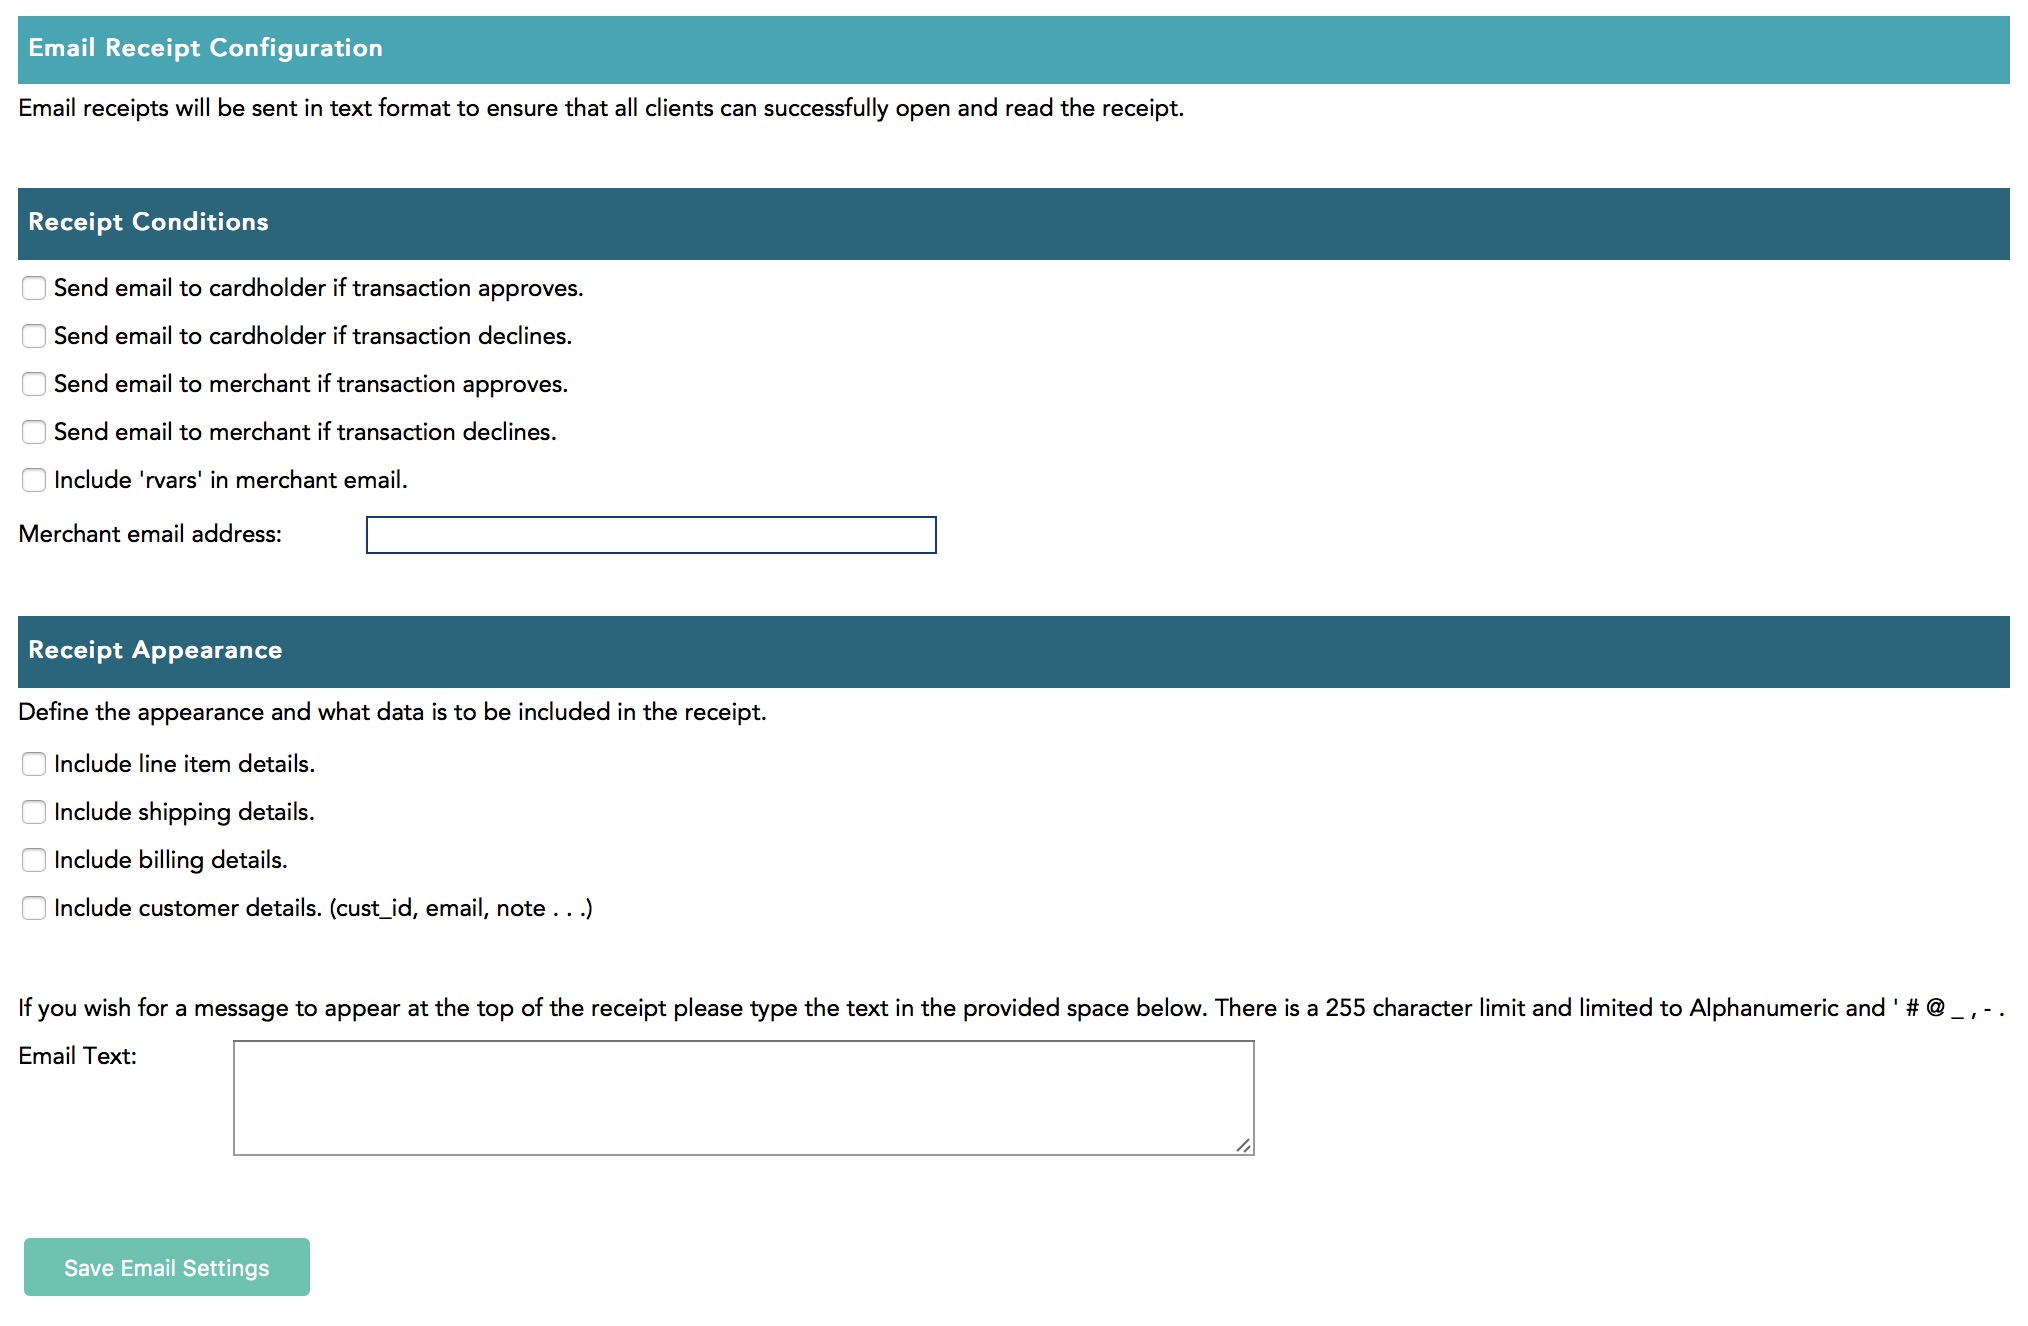
Moneris Hosted Payment Email Receipts
Once you are logged into the online account setup, select Admin->Hosted PayPage config option.
Scroll down until you see a section that says Email Receipts and click Configure Email Receipts.

Receipt Conditions
Theatre Manager handles all confirmation of purchases to the patron. This section is not used, although, if you wish, you might want to send emails to the MERCHANT' for audit purposes.
- Leave all data blank or unchecked.
Receipt Appearance
Theatre Manager handles the receipt to the patron.
- Leave all data blank or unchecked
Theatre Manager Setup
Once the Moneris account has been activated and all the information in the following list has been obtained, the Merchant Account in Theatre Manager can be set up on each of the tabs that follow:
- Server Software - Moneris (setting selected in TM)
- Merchant Provider - Moneris (Hosted Pay Page) (setting selected in TM)
- Main Store Id - xxxxxxxxxx (provided by Moneris merchant services and used to login to Moneris online portal)
- ps_store_id - xxxxxx (generated in Moneris online portal)
- hpp_key - xxxxxx (generated in Moneris online portal)
- Primary URL for LIVE authorizations - www3.moneris.com/gateway2/servlet/MpgRequest
- ECR Number - 66xxxx (provided by Moneris on the setup information)
- api_token - obtained from the Moneris online portal
Tabs with specific setup info are described in the following help pages. Other tabs like the Employees and Cards tabs are populated the same as described here.
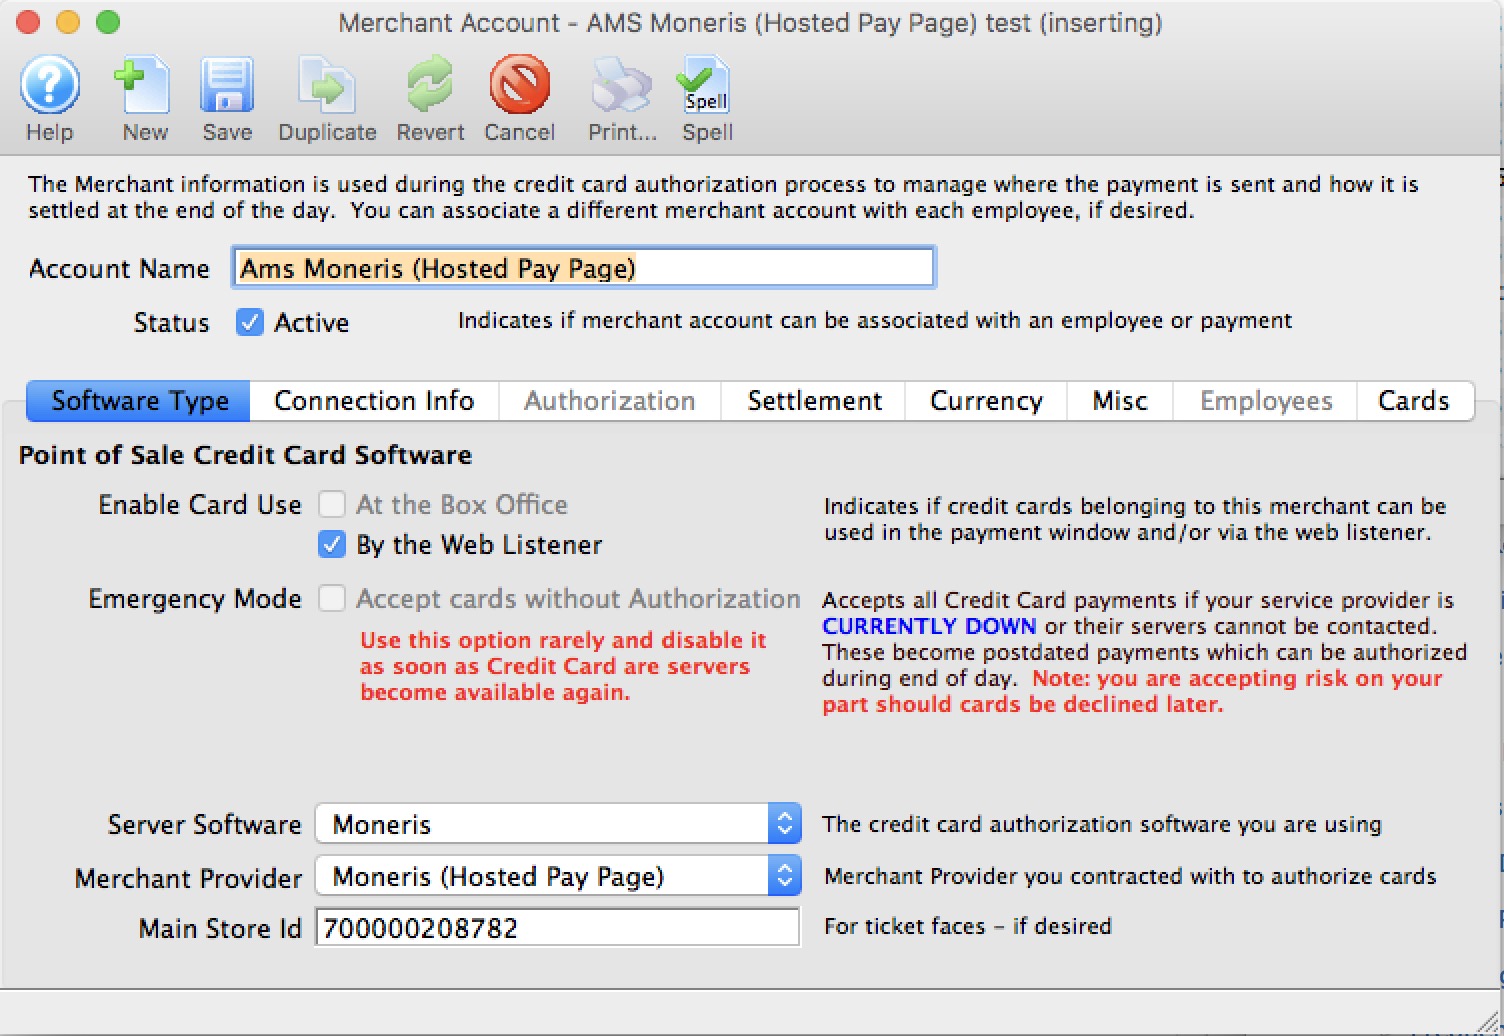
Moneris Hosted Payment Software Type
- Account Name - enter a description indicating that the purpose of this account is for Hosted Payments
- Status - click to make it active, if not already
- Enable Card Use by Web Listener - click to make it active, if not already. Hosted Payment Page can be used for online sales to try to be PCI Schedule A compliant
- Server Software - Moneris (setting selected in TM)
- Merchant Provider - Moneris (Hosted Pay Page) (setting selected in TM)
- Main Store Id - xxxxxxxxxx (This is your Moneris Store # provided by Moneris. It should be a combination of letters and numbers. This is NOT your Merchant # OR ps_store_id. If the Moneris Store # is incorrect, Theatre Manager will NOT be able to close the credit card batch on the gateway server.)
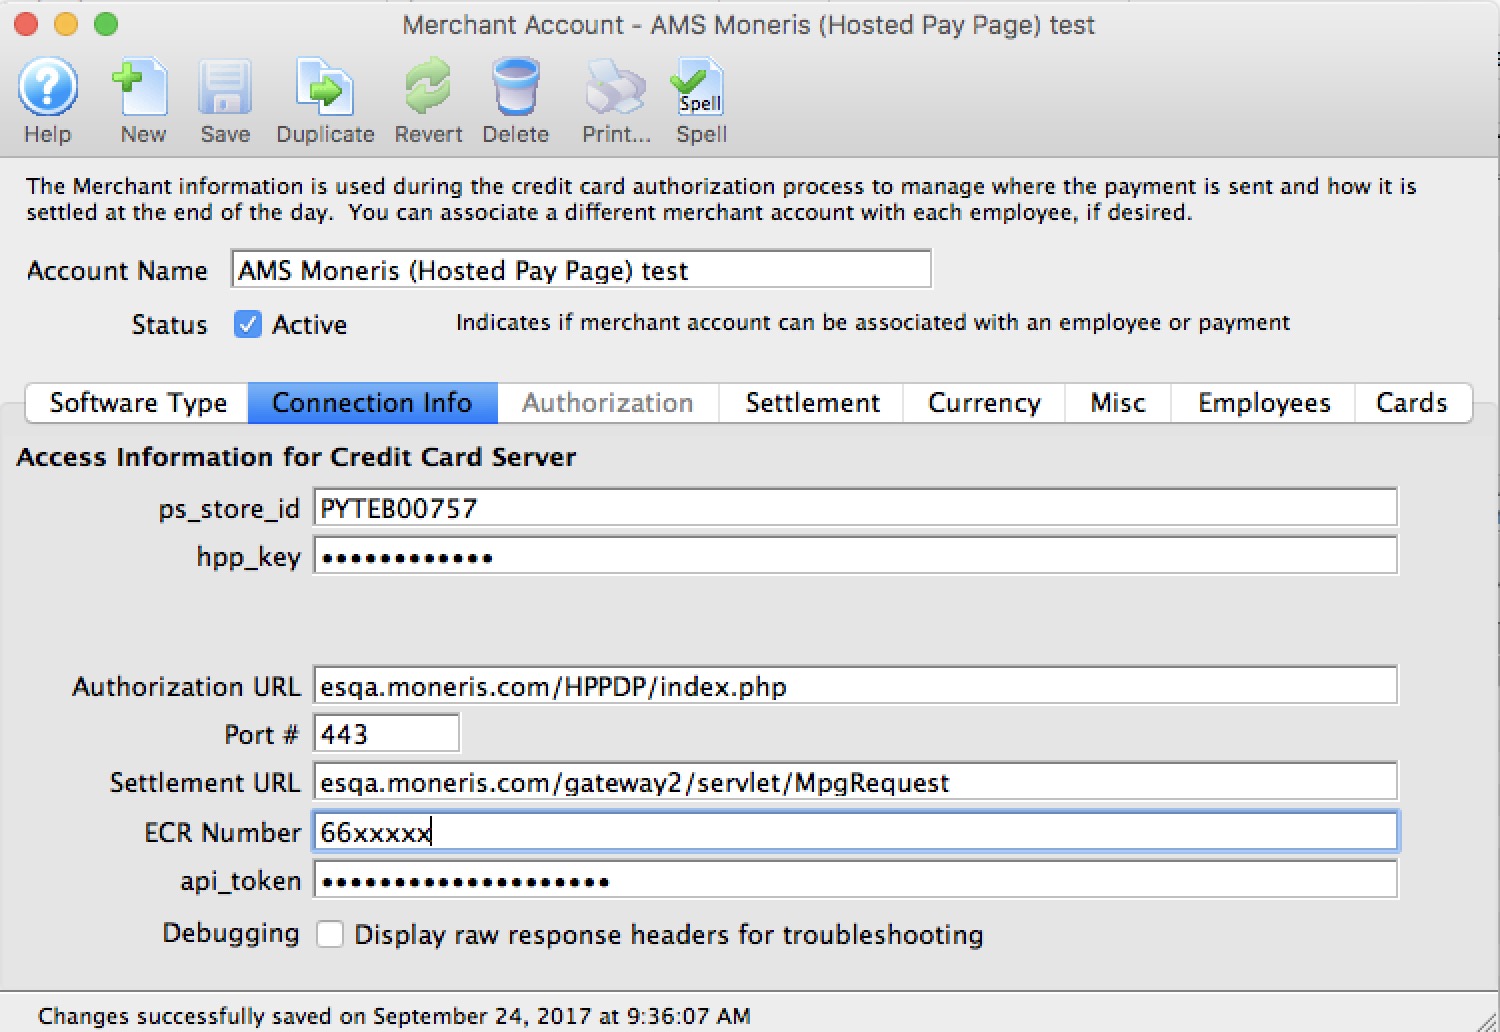
Moneris Hosted Payment Connection Info
- ps_store_id - xxxxxx (generated in Moneris online portal)
- hpp_key - xxxxxx (generated in Moneris online portal)
- Authorization URL - automatically set for you
- Settlement URL - automatically set for you
- Authorization URL - must be esplus.moneris.com/DPHPP/index.php
- Settlement URL - must be esplus.moneris.com/gateway_us/servlet/MpgRequest
- Port - must be 443
- ECR Number - 66xxxx (provided by Moneris on the setup information)
- api_token - obtained from the Moneris online portal
The Web Experience
|
It is very important to note that the credit card is being entered from the user's browser directly into the Moneris web site. This allows a venue to have:
|
|
Step 1 of the checkout process illustrates that most of the checkout window appears the same.
The singular difference is that the credit card entry data is missing. Card entry shows up un step 3. |
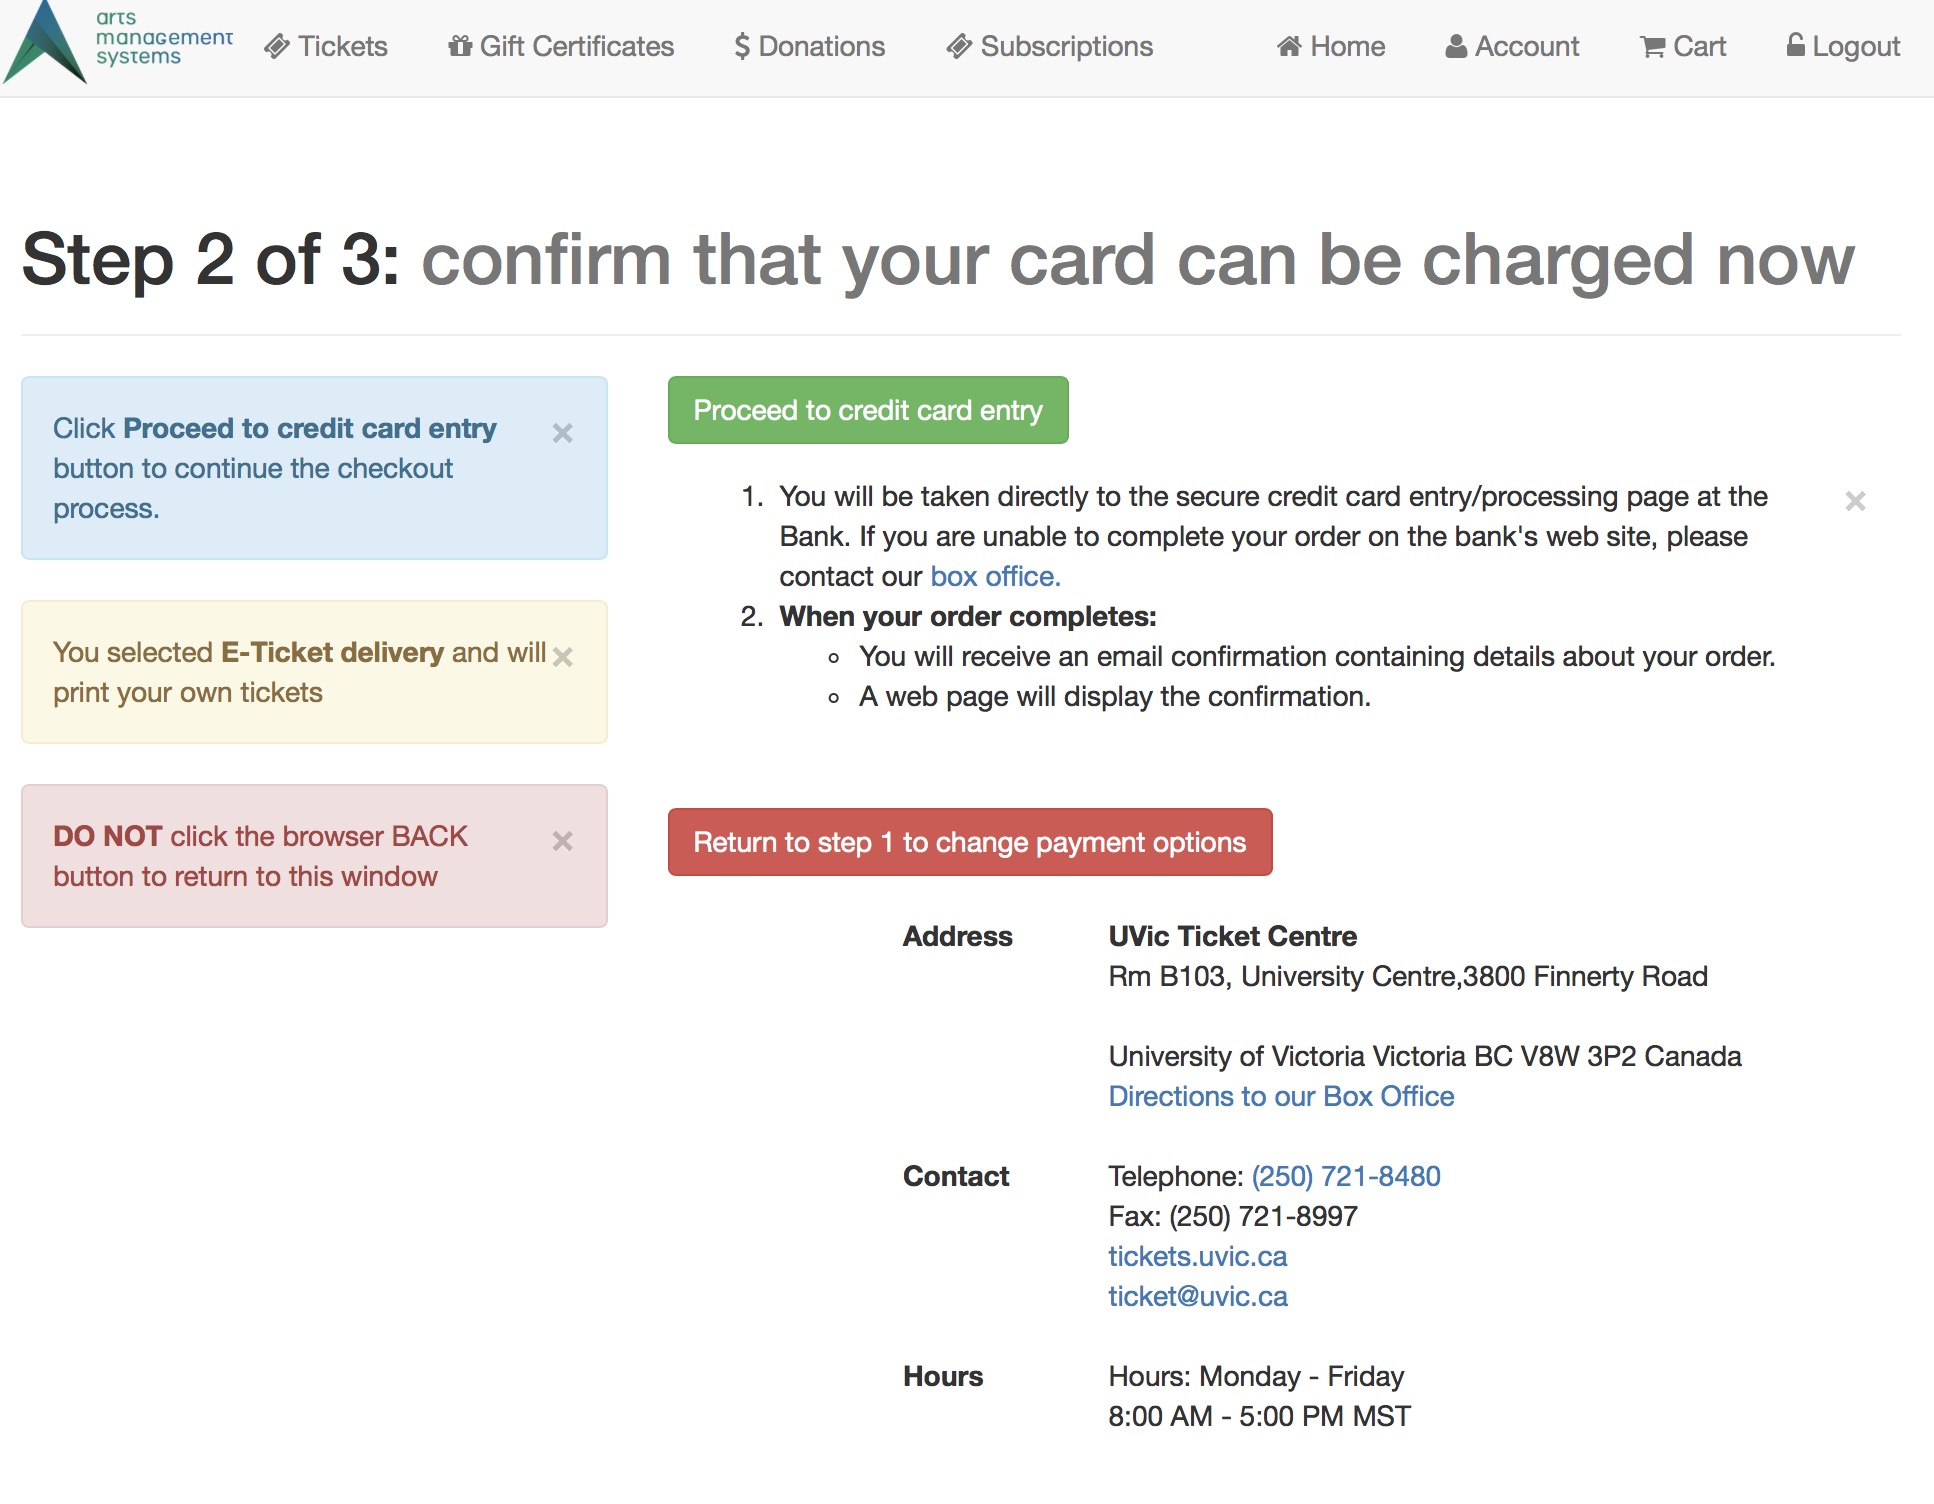 Step 2 remains the same. The user can continue or go back.
|
 Step 3 shows an example of the actual hosted payment page.
From step 2, the user's browser is directed to the Moneris web site where they enter:
|
|
Step 4 remains the same.
This shows the confirmation page where the user can use the print at home feature if enabled. |
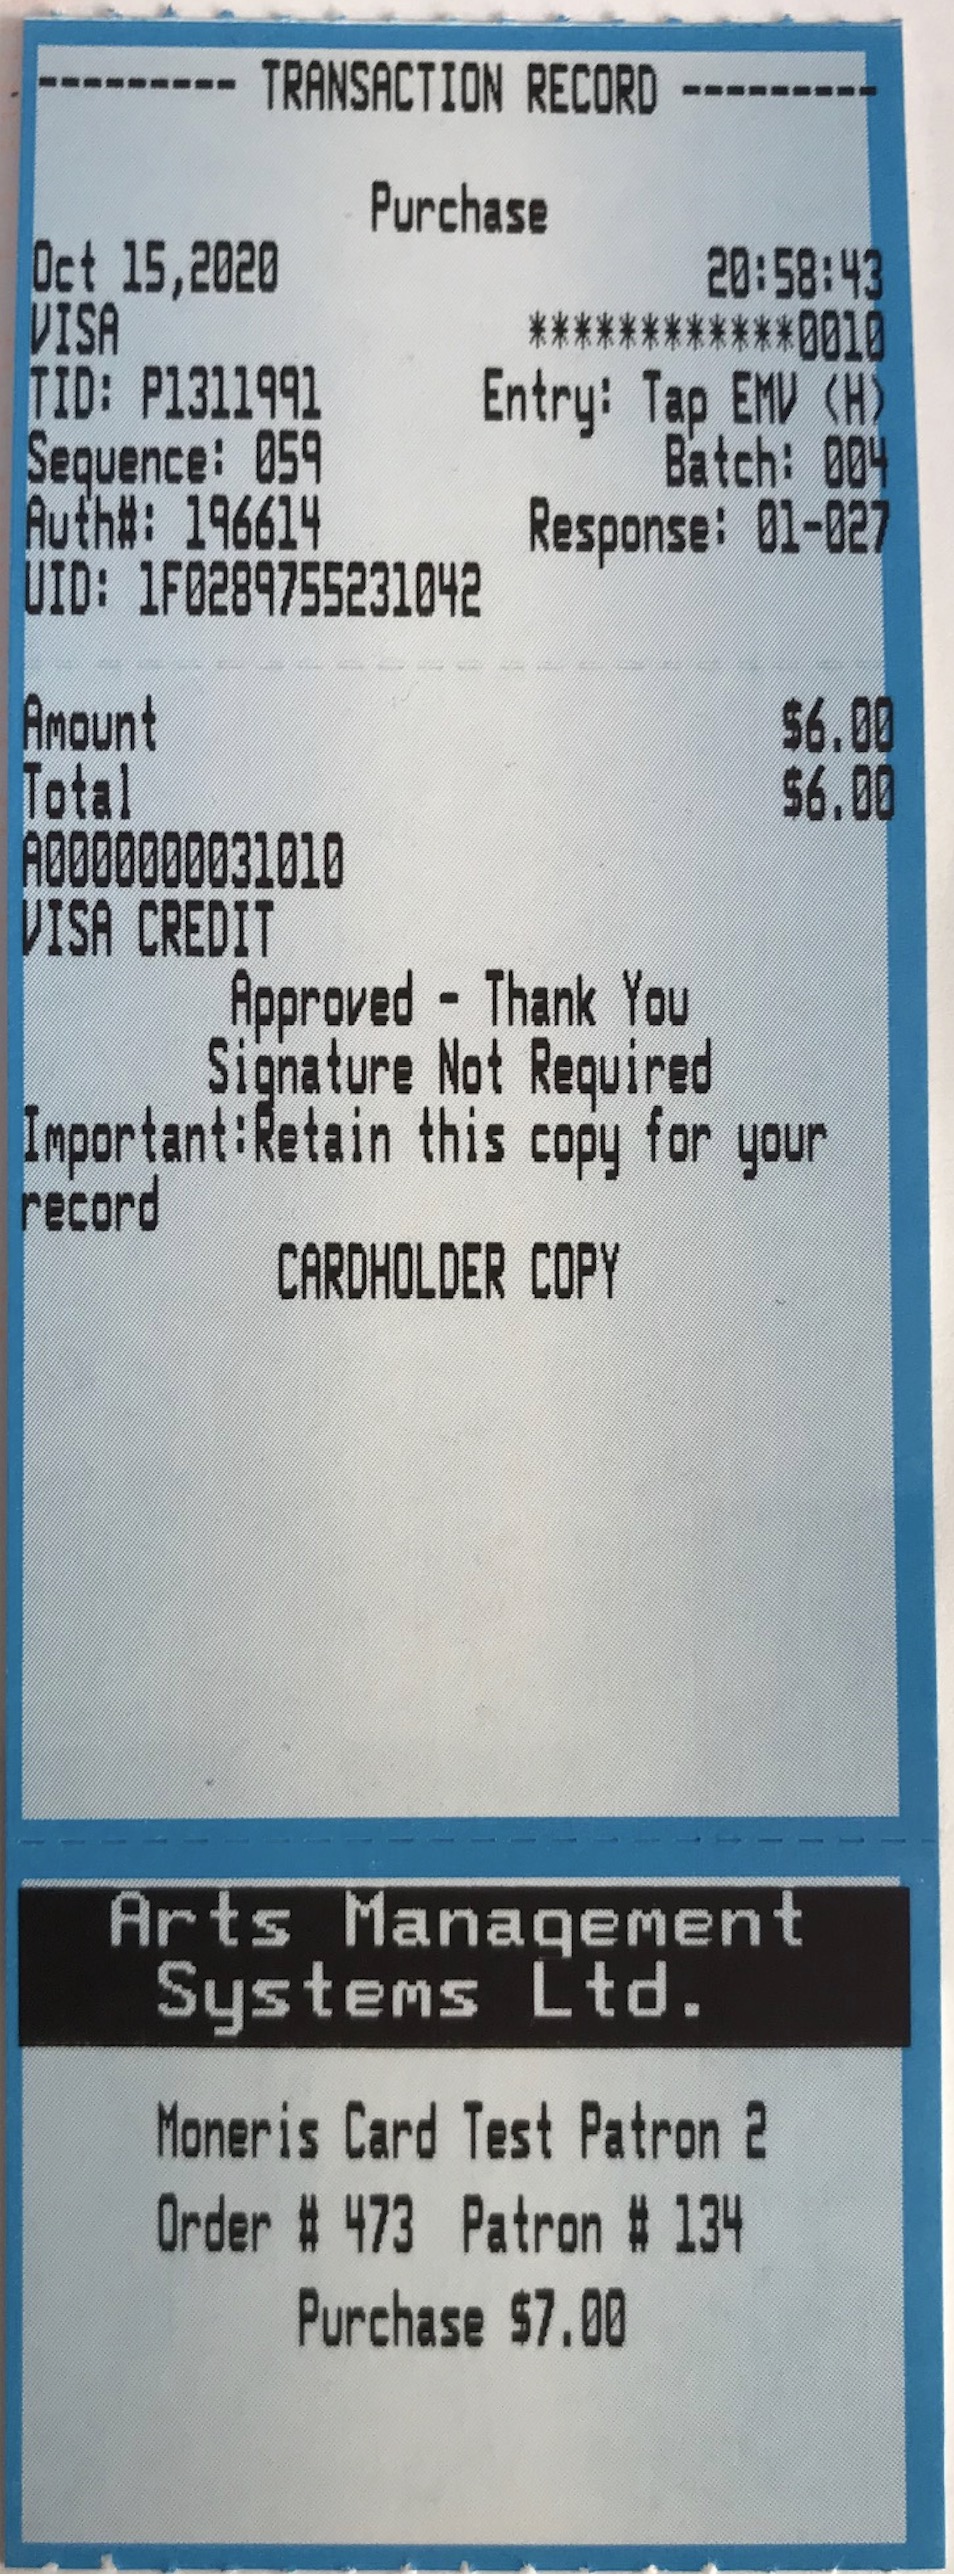
Moneris EMV Devices for Box office
- Verifone P400 (the only recommended device - no others work)
|
Be sure to READ THE PRO's AND CON's of using the P400 before deciding to use them and ordering them from Moneris. |
Refer to accepting a payment on the payment window for EMV Pin Pad credit cards to see how the process works and how similar it is to other payment methods. When using pinpads, you do not receive the credit card data for TM - so you cannot use this method for post dated payments and recurring sales.
Please refer to Moneris EMV PinPad Setup Steps to see how to integrate with Theatre Manager.
|
EMV devices must be set up as a pin pad device and then must be associated with a workstation using Theatre Manager. Multiple workstations can use the same EMV device is you wish. |
|
Pin Pads are settled during end of day. if you receive any message about an imbalance on a pin pad, please refer to the Moneris Pin Pad End Of Day troubleshooting tips. |
|
If an EMV device is assigned to the workstation, the user simply selects any one of the credit card types as payment during the payment process, and Theatre Manager will activate the EMV device. |
|
You may need to import a new ticket face for payments to satisfy Moneris signature & receipt requirements. |
|
You CANNOT VOID a pin pad authorization. You must add a payment to the order and make it a REFUND (Moneris' rules) |
Pro & Con of using Moneris Pin Pads
On the whole, the P400 helps for new sales, INTERAC and tapping for payment. It slows the mass refund process when a show is cancelled because it requires calling each person who bought at the box office to get their card and enter it manually.
| Pro | Con | ||
|
|
Moneris Pin Pad Setup Steps
 The following is the general list of steps you have to follow to get the Moneris EMV pin pad to work with Theatre Manager at the box office or for other departments.
Theatre Manager is designed that the EMV devices can be shared between workstations. However, you probably want one for each box office window and one for the rest of the office to manually enter cards.
|
You can use Moneris EMV devices, even if you still want to use your existing provider. You just need to set up an EMV only merchant account in Theatre Manager. |
|
Note: check the firmware version of your pinpad. Version 19.05 works. 19.06 is known to be broken. Contact Moneris if you need to ask them to fix it. |
Pre-Preparation Steps (with Moneris) for CLOUD EMV DEVICES (P400)
You will need a Moneris E-Select+ account. You need to contact Moneris for this - Arts Management cannot arrange one.
- If you DO NOT HAVE an E-Select+ account, contact Moneris. It might involve changing you merchant provider - and you might want to talk to the support team about:
- pro's/con's of changing completely to Moneris and/or
- feature comparison of Moneris to other providers and/or
- OR (if you want), you can keep your existing merchant provider and only use Moneris for EMV pin pad authorizations.
- If you have an E-select+ Account
- Contact your Moneris representative to arrange for the number of P400 cloud connected device you think you need.
- You must tell Moneris that you are using it with Theatre Manger
- Moneris must provision it with their software, so get them to confirm they will do that to work with Theatre Manager
- Theatre Manager can share EMV devices amongst workstations. However, you probably want:
- one for each box office window and
- maybe also one for the rest of the office to manually enter cards.
|
Very Important: DO NOT allow Moneris to settle the EMV devices automatically at a preset time each day. Theatre Manager will settle the devices during end of day to make accounting far more straightforward. |
Theatre Manager Setup Steps (after you have your EMV devices)
Once you have your Moneris information and pin pads, follow these steps in Theatre Manager:
| Step | Item | General Instructions | ||
| 1 | Turn off Power saving |
The pin pad requires a constant connection to the database while the authorization is occurring. there are two things to do:
|
||
| 2 | Plug in the Pin Pad |
Download this abridged version of the Moneris P400 installation instructions and follow it until the steps say come back to this web page to do the remainder of the steps
|
||
| 3 | Moneris Merchant Account |
Make sure you have a Moneris Merchant Account set up in Theatre Manager. I you already have a moneris account for hosted payments or web sales, you likely should use the same one.
On the authorization tab in the pin-pad area of the Theatre Manager merchant setup, please:
|
||
| 4 | Plug in EMV Devices |
Physically plug the EMV devices in, power them up and connect them to your ethernet network.
Place the devices where you think they will be best used for your box office and administration areas. The EMV devices will go through a startup process and should eventually show a screen with a pairing number on them. |
||
| 5 | Create Device Records |
In Theatre Manager, open the Device List. For each pin pad that you have:
If pairing does not occur:
|
||
| 6 | Edit Hardware Preferences |
After pairing all devices in as above, you will need to go to each workstation and decide which EMV device is associated with the workstation.
| ||
| 7 | Payment Receipts | You will need to import a new payment receipt ticket face designed specifically to satisfy Moneris signature & receipt requirements | ||
| 8 | Setting up Payment Methods |
|
||
| 9 | Restart Theatre Manager |
|
||
| 10 | Optional tests |
|
||
| 11 | Debugging |
If you are having trouble with getting pinpad authorization to work, there are some troubleshooting tips:
|
Moneris Receipt Ticket Faces
|
Payment receipts are optional and can be printed on demand. However, if you have customers who request a receipt, Moneris has specific requirements if the payment was made using EMV devices.
We have created one you can download and import that meets Moneris requirements and is designed specifically for the P400. |
 If you need to print receipts for Moneris Pin Pad authorizations, you will need to set up your ticket faces as follows:
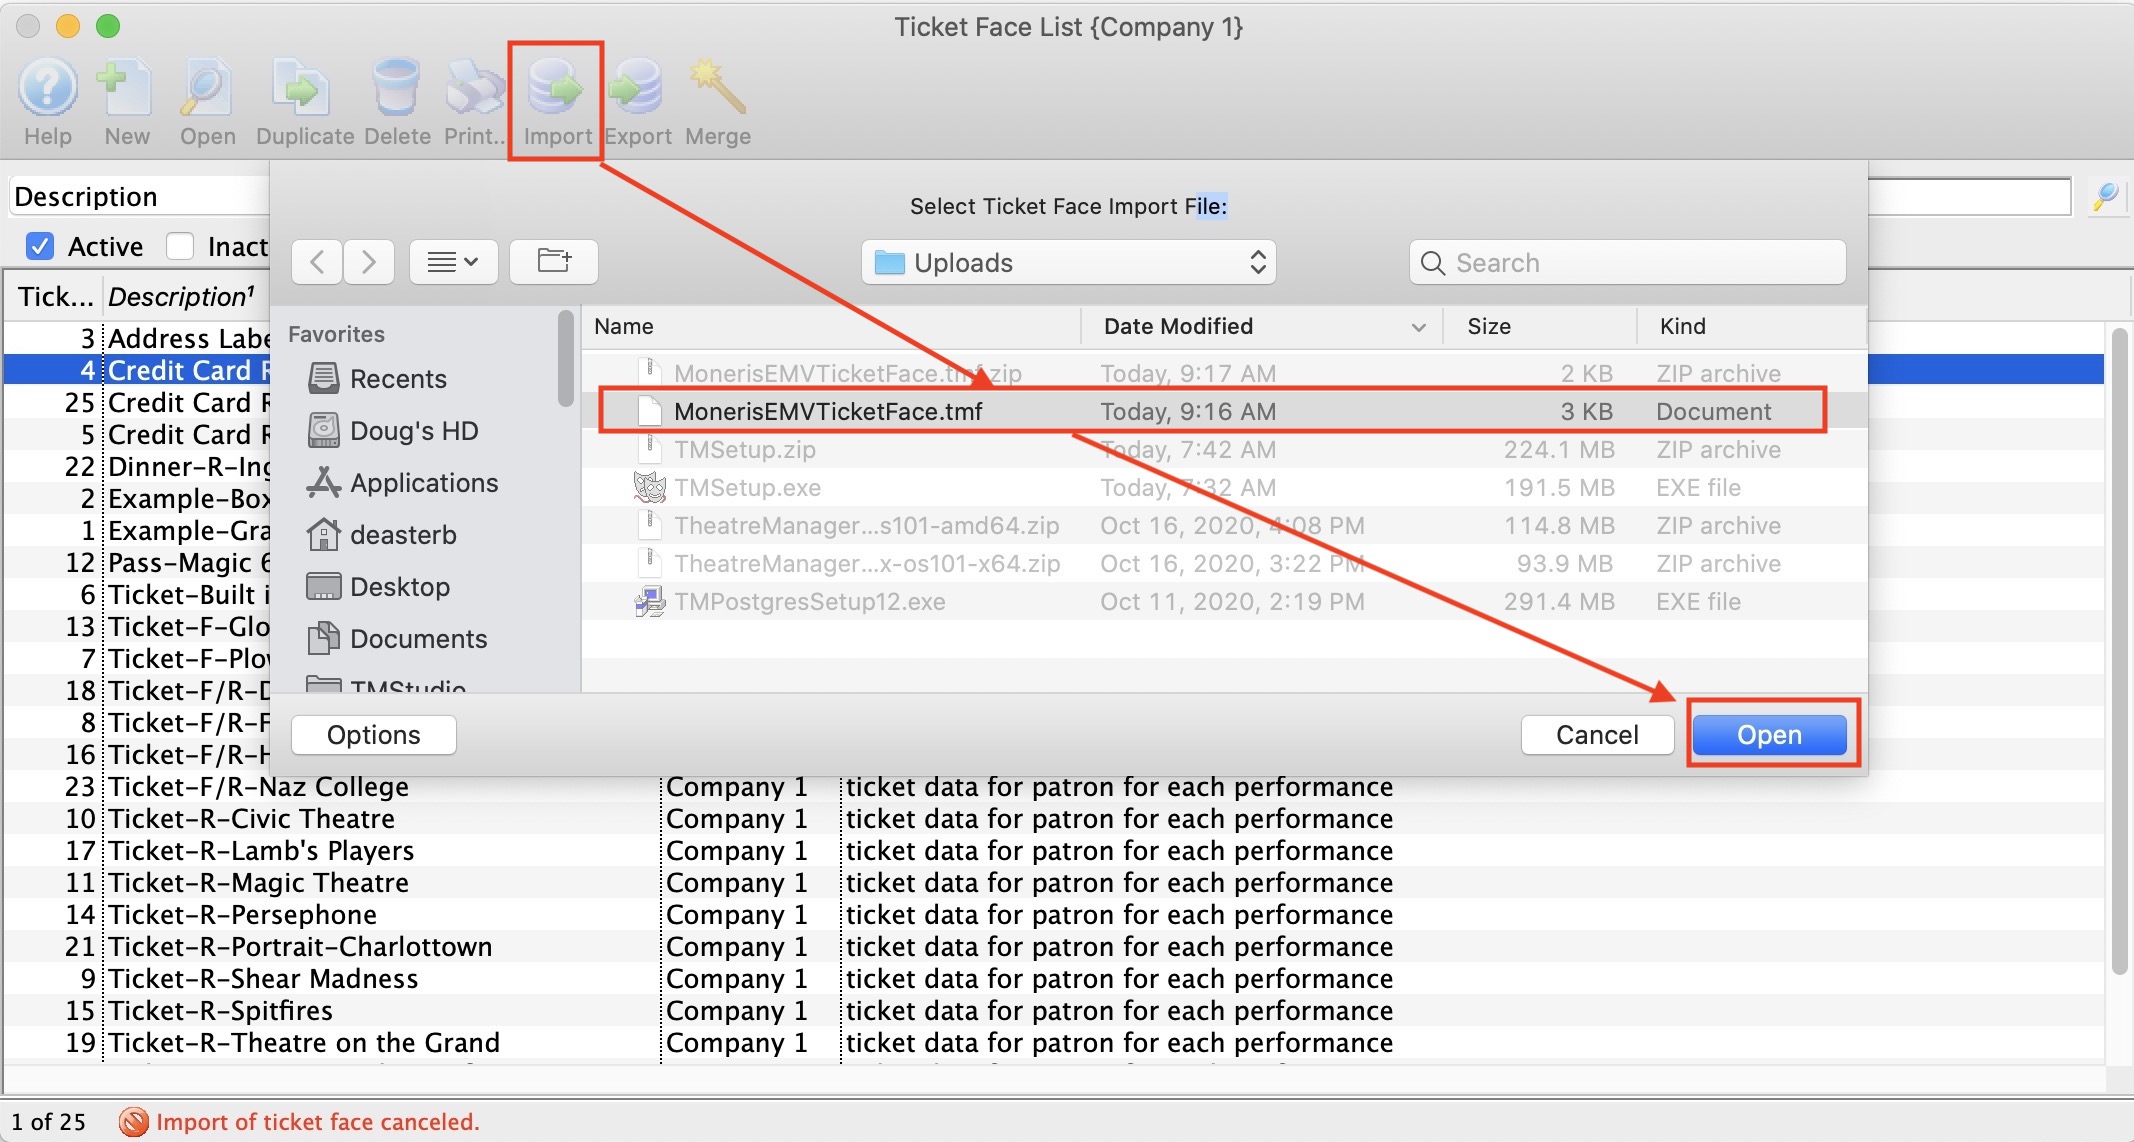
- Download a template Moneris EMV ticket face from the ArtsMan web site
- Unzip the file so that you see the MonerisEMVTicketFace.tmf file on your desktop
- Open the list of Ticket Faces window which should look similar to the image to the right.
- Click the Import button at the top of the window
- look for the file called MonerisEMVTicketFace.tmf on your desktop and import it
- after importing the new ticket face, it will appear in the list of ticket faces. Look for the ticket face number of this Moneris EMV ticket face in the list. It will be used in the next step
You have now imported a ticket face file. You can now edit this ticket face if you want to make any additional customized changes to the receipt layout based on any possible ticket face background images you may have preprinted on the ticket stock.
Additional Steps to implement the ticket face
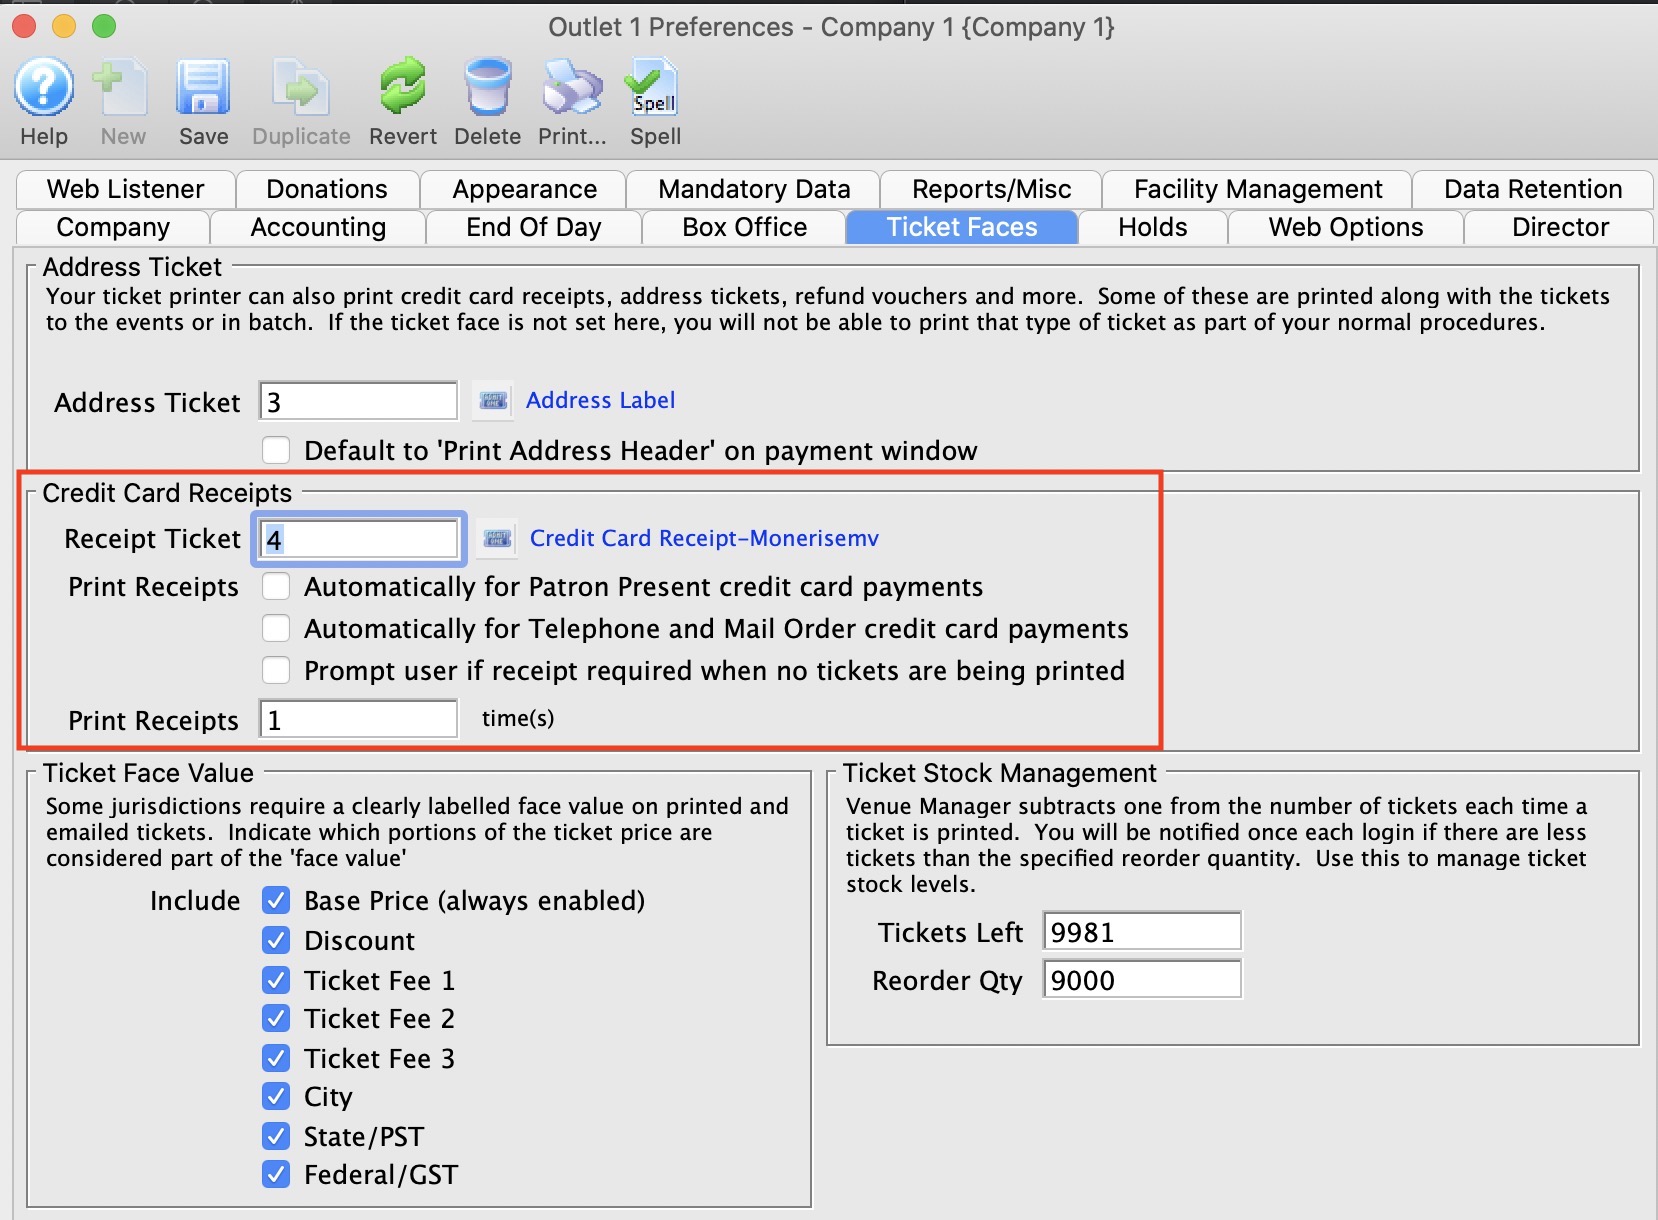 After importing the ticket face, you will have to decide a few things on the company preferences Ticket Faces Tab under the section Credit Card Receipts. All the fields/options in this area may need adjustment.
- Receipt Ticket - Change the ticket face number there to be the one you recorded above
- Print Receipts - has 3 options to consider:
- Automatically for Patron Present. Moneris give you the option of always printing a receipt, or only printing a receipt on demand. We recommend only printing a receipt on demand. Uncheck this option unless you always want to print are receipt of the ticket printer for any credit card payment.
- Automatically for Telephone and Mail Order. Moneris may require a signature for card numbers typed into the EMV machine for payments taken over the phone since the card is not present. Check this option if you wish, although we recommend not. The better alternative is to batch print the receipt along with tickets if emailing or holding at will call. The receipt should automatically include a signature line.
- Prompt User if receipt required If you are unsure if you want to print receipts for tapped in chip/pin authorizations, but you want to give the patron the choice, you can check this option.
- We recommend not to since this adds an extra prompt you have to agree to when selling payments at the box office.
- If you don't print the receipt you can go to the payment window and print a receipt if asked.
- For years, most people have neither asked for nor requireda reeipt. This is even more true these days of social distancing.
- again, receipts can always be batch printed for will call or mail to patron tickets.
- Print Receipts xx times. This is designed for situations where you, the merchant, want a receipt copy as well as the customer. It you always, print for the customer, enter 1. If you want one for yourself as well, enter 2.
Moneris does not require you to print one for yourself if they are stored electronically and can be reprinted. Theatre Manager stores all payments and Moneris EMV responses precisely for this purpose so you can reprint later if need be. We suggest not printing a merchant copy in this electronic age.
Moneris Test Accounts
|
These values are open for general testing from all sources - so you may see more than just your test transactions in the virtual gateway. |
|
They only work for the Moneris Gateway Account and will not work for Hosted Payment Page testing |
The following values will enable you to enter the test environment for the gateway:
- Merchant Account Number 700000208782
- Store ID store1
- API Token/Password yesguy
- Primary URL for TEST authorizations esqa.moneris.com/gateway2/servlet/MpgRequest
- Port # 443
- ECR Terminal ID 66002173
Where TM Data goes in Moneris
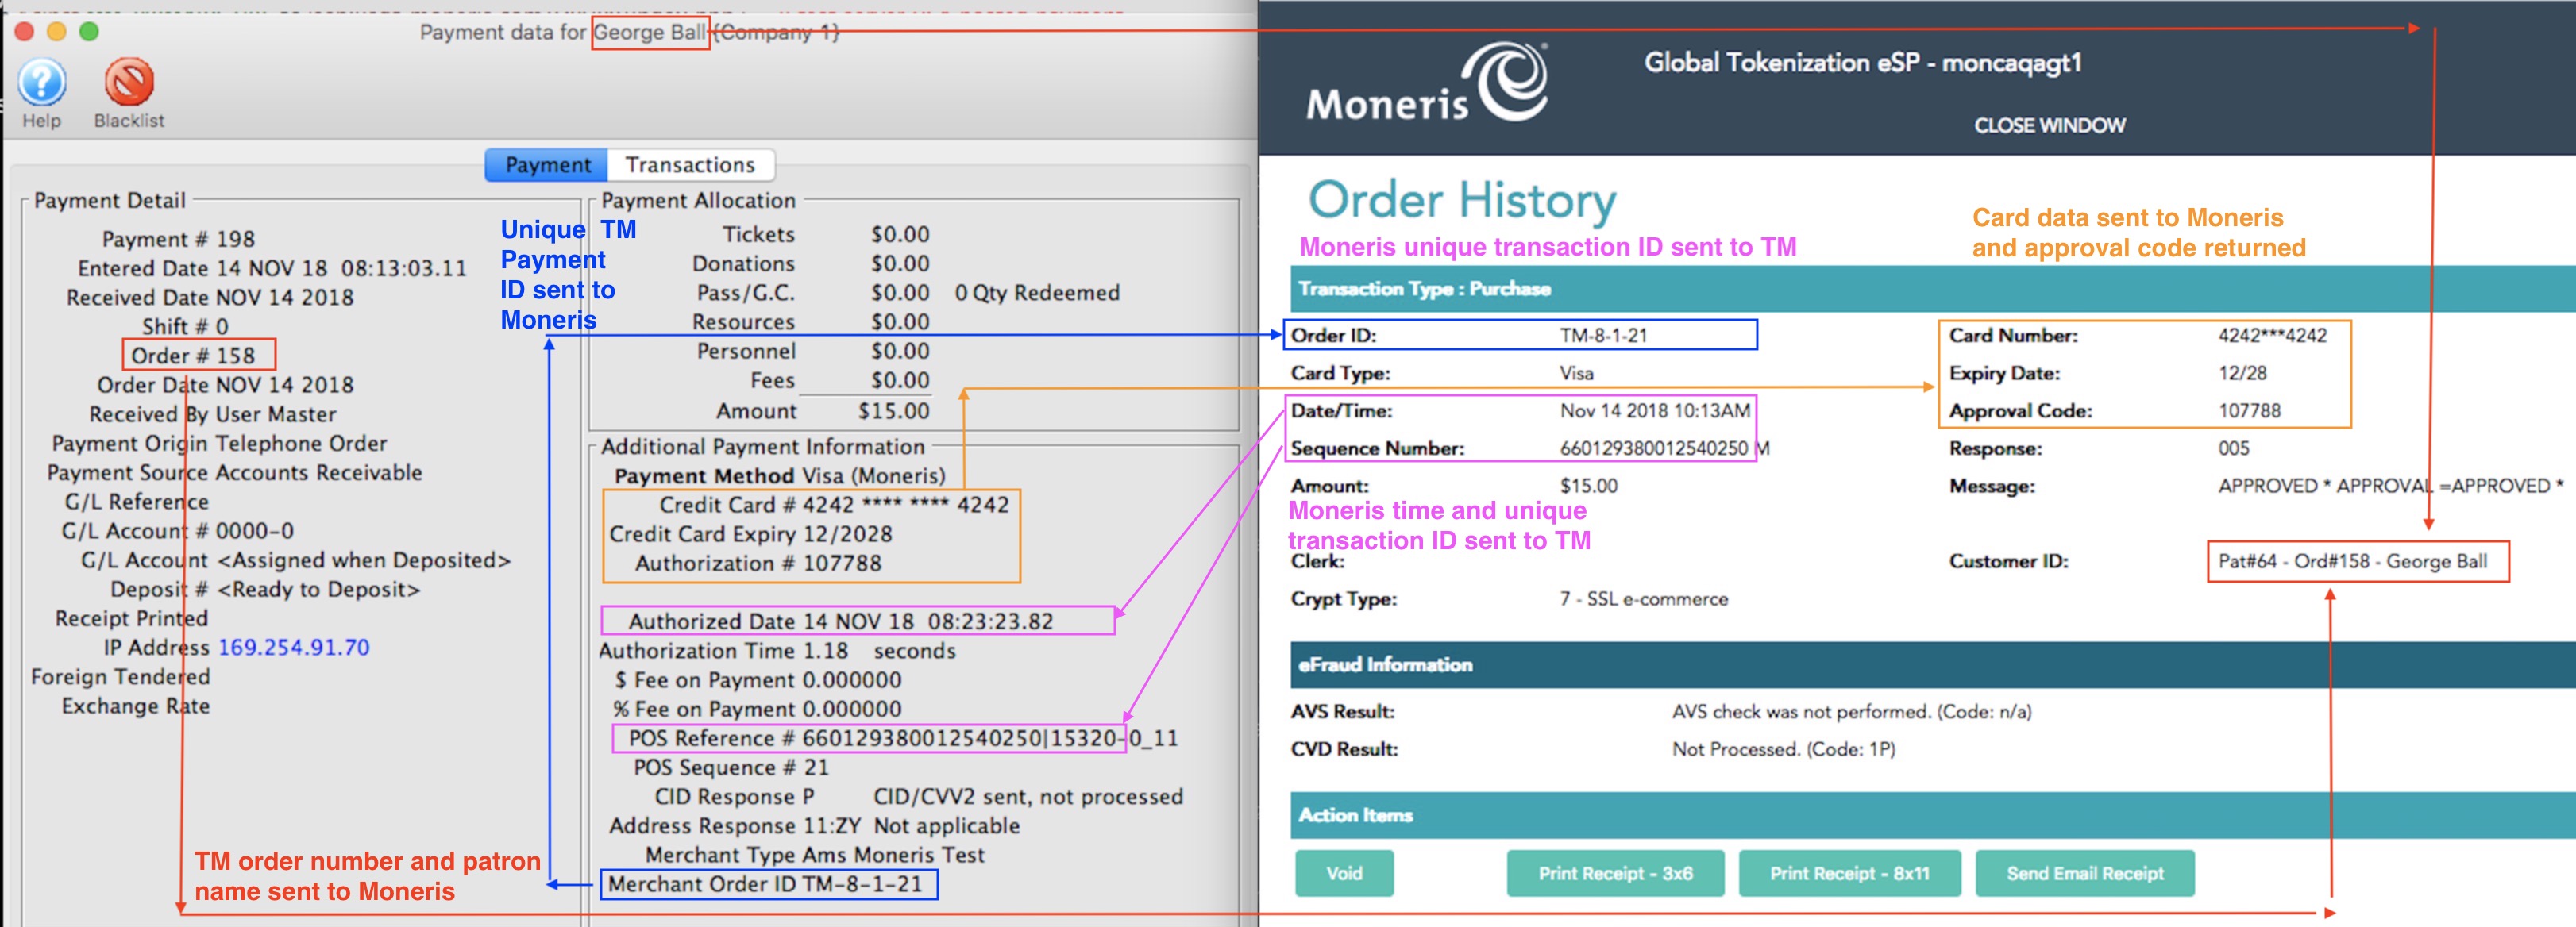
It is sometimes helpful to know where card data goes in the merchant portal to troubleshooting and cross reference purposes. The above diagram shows how to cross reference date on the payment window in Theatre Manager and Moneris' online portal.
Data Sent by Theatre Manager to Moneris
- Patron number, order number (that the payment is associated with) and current patron name is put into the Moneris Customer ID field. If you see this data in Theatre Manager, it should help you find the patron or order in TM, either by order number, patron number, or patron name. Note that since patron names can be changed at any time and patrons can be merged, order number(red lines)
- Card and expiry date are sent to Moneris, which returns the authorization code. (orange lines)
- Theatre Manager makes up a system wide unique number for Moneris to refer to thus specific payment authorization attempt (blue lines). They always look like TM-X-Y-ZZZZZZ where:
- TM- means the authorization came from Theatre Manager. If it doesn't start with TM, somebody did it manually or via some other method.
- X- is the unique number of the merchant record in Theatre Manager. This is in case you have set up multiple Moneris merchant accounts for different reasons. (eg one for box office and one for development - which is not really recommended
- Y- is the TM outlet number that sent the authorization to Moneris
- ZZZZZZ is a unique number generated by TM for each authorization attempt. If an attempt is made and fails, it will consume a number and the next attempt at authorization will use a new value for ZZZZZZ
Data returned to TM by Moneris
TM tracks the
- Moneris Sequence number - which is a unique number generated by Moneris for successful authorizations.
- Moneris Authorization Time - which is the date/time of day that the authorization occurred. If the dates are different, it will be because Theatre Manager has stored them in time zone adjusted time. (pink lines)
Troubleshooting Moneris Account Setup
Below are a list of some of the errors that may be encountered during processing using Moneris as a merchant provider:
P400 - Reversing Pin Pad Authorizations (cannot void or delete)
|
If you are using a Moneris P400 connected to your workstation, you cannot void or delete a credit card entered using the pin pad.
Moneris does not support voiding in the pin pad because they require a log for each interaction. So you must refund. |
|
You many see a button on the lower left that says Linked. IF you click on it and the original payment was taken online, you will be able to refund against that payment without needing the card. |
Refunding a payment with the P400
Instead, you will need to
- Add a payment to the order. Refer to the general process for more information.
- Select a credit card payment method when it becomes time in the process from the first step.
You will see a window like below:
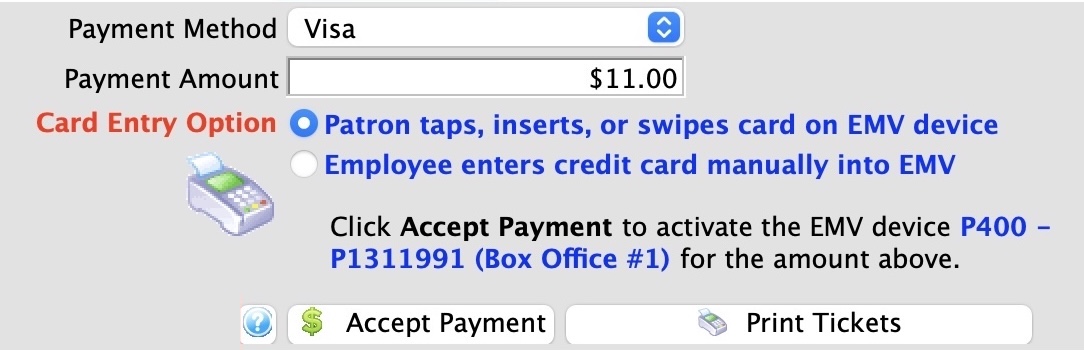
- Enter a NEGATIVE AMOUNT for the payment to indicate a refund.
- (optionally), click the button to enter the card data manually if the customer gave you their card over the phone
- Click the Refund Payment button. The customer's action change depending if you selected
- Patron taps, inserts, or swipes card on EMV device:
- the customer will need to tap or insert their card on the pin pad
- The customer must be present at the box office with their credit card for them to do this.
- Employee enters credit card manually into EMV
- you will need to enter the full card number and expiry date on the pin pad since card data is never entered into TM.
- This is useful for refunds when the customer is not present and they gave you their card over the phone.
- Patron taps, inserts, or swipes card on EMV device:
No Permissions For AVS_Info
No Permissions For AVS_Info
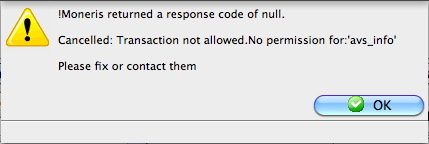
When the merchant account is setup in Theatre Manager and a test transaction is processed the error message above may appear. This error message is the result of missing options in the setup of the Merchant Account by Moneris. To correct the issue:
- the Moneris representative will need to be contacted.
- A request will need to be submitted to enable AVG and CID/CVV2 processing. This process can take up to 5 business days.
- Additional Moneris account setup charges will apply for implementing these charges.
Moneris Returned A Response Code of NULL
Mandatory Address in Patron Records
- Login to Theatre Manager as the Master User.
- Click Setup >> System Preferences.
- Select the Mandatory Data tab.
- Check the boxes in Full Profile Patron Data for:
- Patron Address
- Patron Postal Code (Zip Code)
- Click Save.
An address and postal code (zip code) will now be required for all patron records added or updated in Theatre Manager.
Turning Off Credit Card Address Verification
- Click Setup >> System Tables >> Merchant Accounts.
- Double click on the current Merchant Account to open it.
- Select the Authorization tab.
- Remove the check from Fraud Prevention >> Send address/zip.
- Click Save.
The Address and Postal Code (Zip Code) will no longer be sent with the credit card number for authorization.
Transaction Not Allowed: ind_refund -5
|
Independent Refunds is a Moneris add-on feature. You must contact them if you receive the message below and you want to issue refunds to patron's credit cards. |
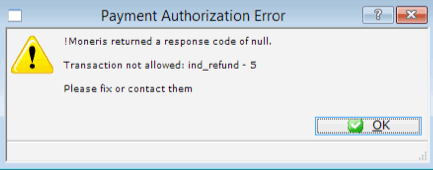 Your Moneris merchant account and/or your Store ID may need to be setup to process Independent Refunds if you want to allow credit card refunds in Theatre Manager. Since this is entirely a dependant on Moneris and how they setup your merchant account, enabling independent refunds requires that you:
- Contact your MONERIS REPRESENTATIVE
- Tell them that you want to issue refunds to credit cards
- MONERIS may ask you for additional banking information
- Test out a refund for a small amount to ensure it works, other wise you'll get the message above
Even if the merchant account is enabled for refunds and refunds can be performed through the web portal, Independent Refunds must be enabled for the Store ID before a refund will be accepted by Moneris from Theatre Manager.
Should Moneris detect suspicious activity on the account they could remove the option to process Independent Refunds to protect the account from fraud. To enable this feature once more the person who setup the Moneris account will need to contact them directly. A verbal request to enable Independent Refunds will need to be made and the following information well be required throughout the call:
- Merchant Account Number & Store ID
- Full Business Address
- Deposit Bank Name
- Deposit Bank Account Number
Authorize.net Installation
|
Authorize.net implements either user ID and password authentication over HTTPS connections to provide compliance with PCI DSS 4.1 |
Please contact Arts Management to discuss the process of getting a Merchant Account from Authorize.net or use the merchant provider contact info and inform them that you will be using Theatre Manager as they are aware of the proper setup.
After Authorize.net has provided you with a merchant account, installation is quite straightforward. Once set up, funds gets authorized as 'Card Not Present' and then deposited right to your own bank upon settlement from Theatre Manager. This account information you are provided is all you need in the merchant setup windows (in the pages that follow) to begin secure credit card authorization.
Authorize.net needs one account set up for authorization and one for online viewing of the account data. You can set up multiple accounts for online access of the data, so some people can view data and others have more access to transactions and history.
- Authorize.net - uses the Merchant Portal via a web browser to "view the transactions" that have occurred. This account setup might need to be used during the End Of Day deposit process to verify transactions if you have more than 1000 authorizations between each End of Day.
- Merchant User ID and Password - uses Authorize.net to allow authorizations to occur and be settled but not be viewed. This information is what needs to be entered into Theatre Manager's Merchant account to allow authorizations to occur.
|
The user IDs and passwords for both of the above are different and should not be interchanged or confused with each other. Follow the appropriate setup steps for each. |
|
After following the setup for both accounts, make sure to:
|
Authorize.net contact information
Shannon Maher, Sr.
Sales Manager
National Merchant Alliance
7415 West 130th Street, Suite #270
Overland Park, KS 66213
(913) 906-9595
smaher@nmainfo.com
Authorize.Net Gateway Account
The User ID and Password setup is arranged by Arts Management from Authorize.Net and is entered into the Setup --> System Tables --> Merchant Accounts window as below:
Software Type
The following values are set on the software type tab per the diagram below:
- Set the server software to be Authorize.net
- The merchant provider will automatically be set for you
- The merchant number is for use on ticket faces and for contacting Authorize.Net support.
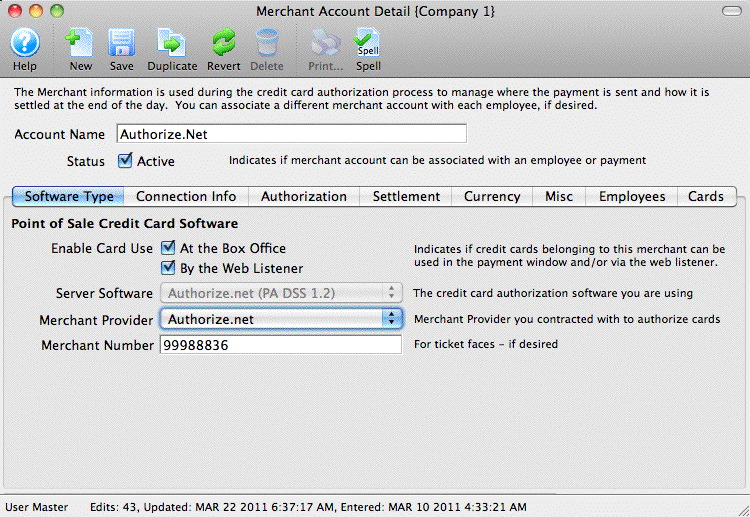
Connection Info
The following entries are set on the Connection Info tab per the diagram below:
- User/Server ID - provided through Authorize.net. The user ID remains constant for the life of the account and is generally an MD5 version of your main account UserID
- Password - the password is auto generated for you. You can change it via the online interface to generate a new 'secret' key. If you do that, you can expire your old password right away or allow both old and new to co-exist for up to 24 hours.
- Primary URL - is always secure.authorize.net/gateway/transact.dll and is used for authorization only
- Secondary URL - is always api.authorize.net/xml/v1/request.api and is used during the settlement process.
- Port - is always 443
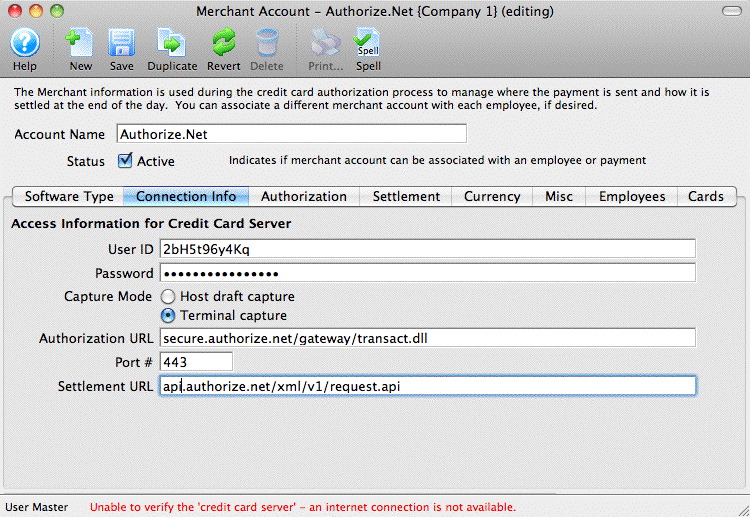
Merchant Profiles
The following entries are set on the Profiles tab per the diagram below if you are going to use merchant profiles and have an agreement with your merchant provider:
- Enable Profiles - set to Active if Merchant Profiles will be used.
- Profiles API Login Key - not required. Authorize.Net uses the same connection information from the Connection Info tab.
- Profiles API URL - is always api.authorize.net/xml/v1/request.api
|
Refer to Merchant Profiles for further information on functionality. |
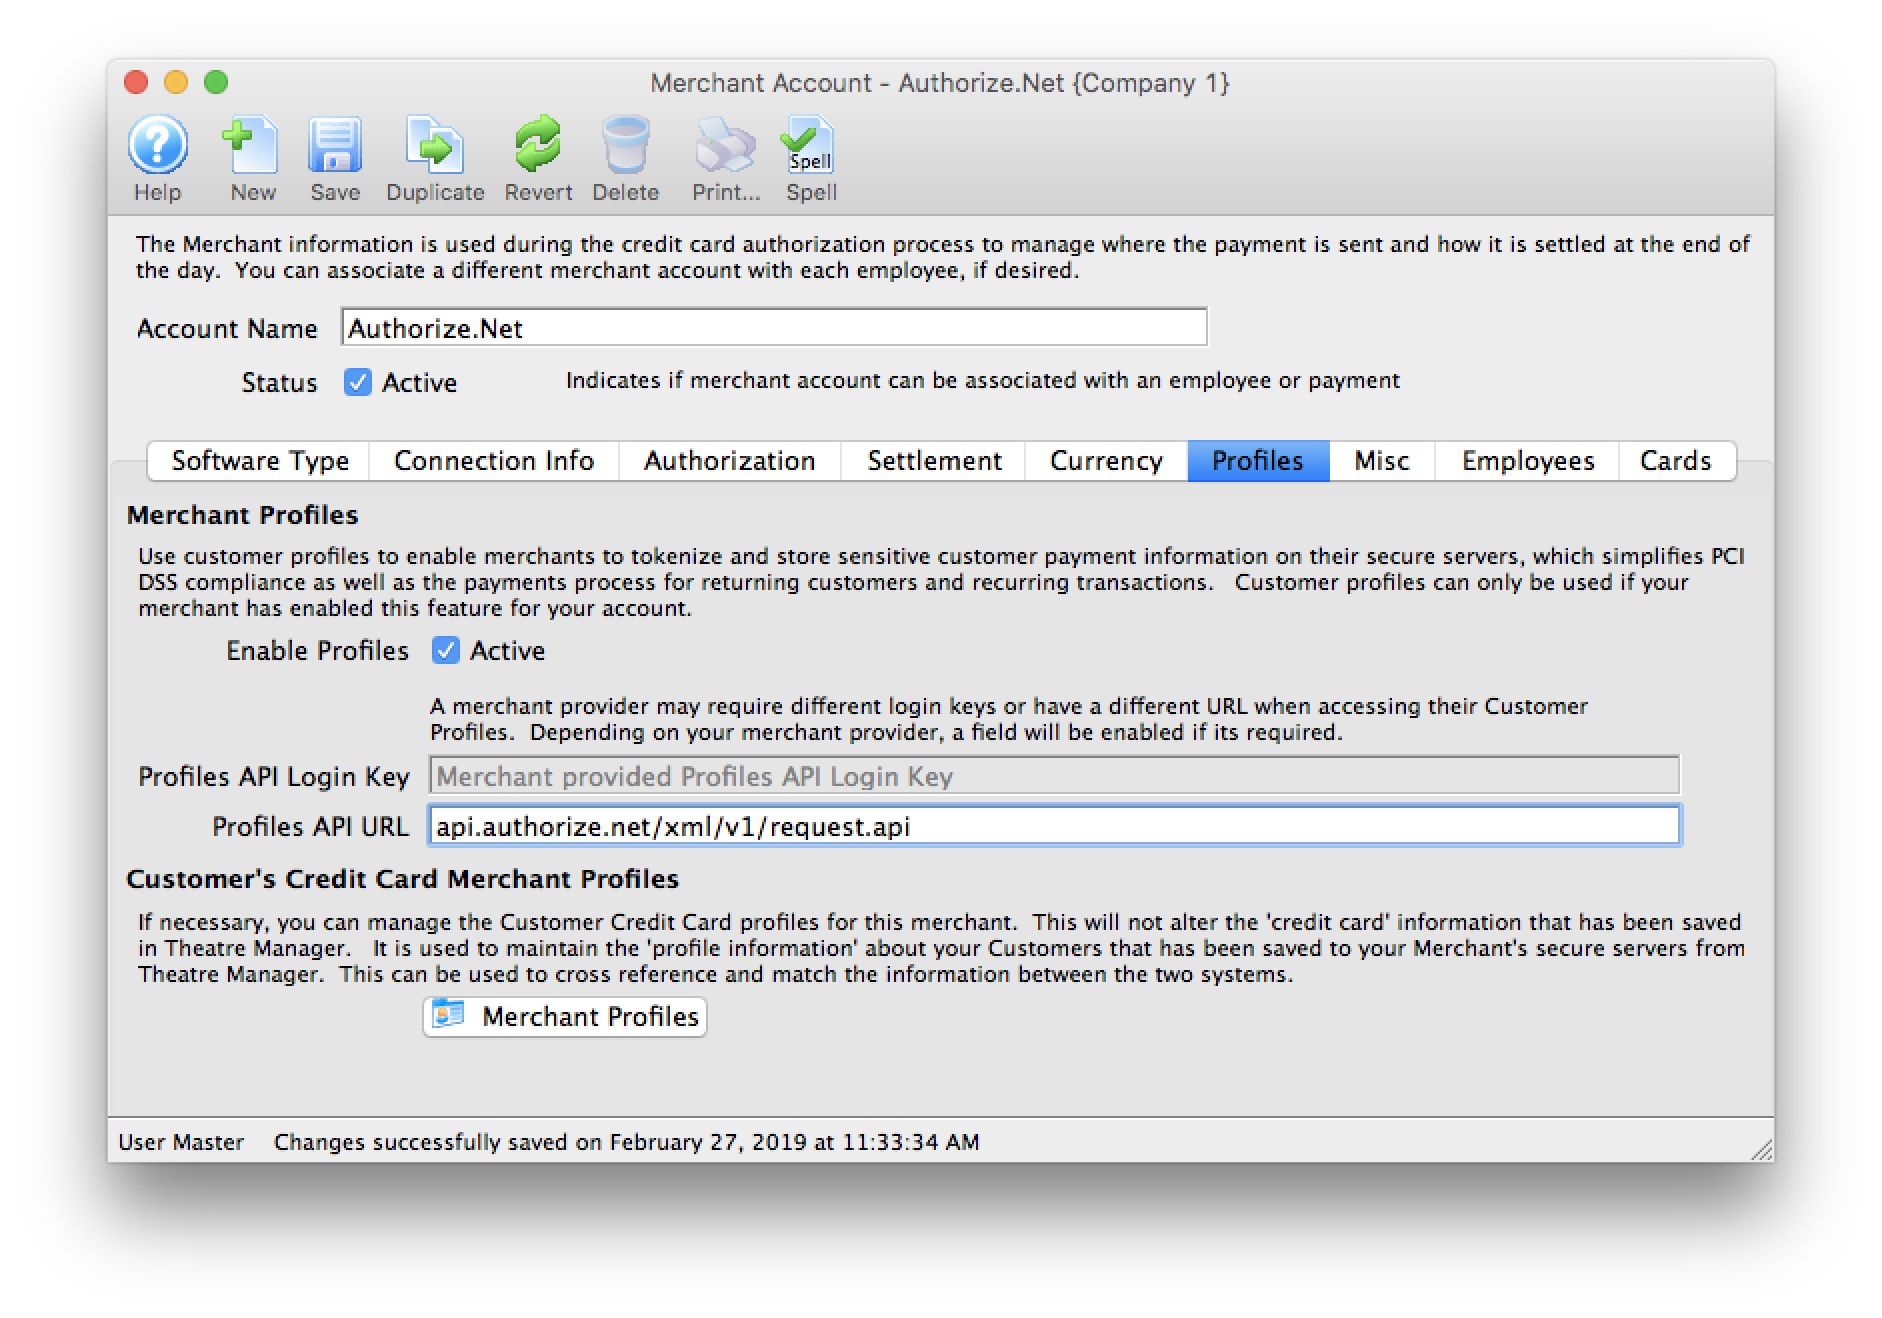
Testing Authorize.net
- Find yourself in the database or create a new patron for yourself
- Create a new order and attempt to buy a ticket or Gift Certificate
- On the payment window, select the credit card you want to use and do a test authorization
- If you get an authorization with a message indicating AVS match and/or CVV2 match, then the setup is correct
- Log in to your Authorize.net Online Merchant Account and view the batch to see that your transaction is there
- In Theatre Manager, void the credit card payment and then confirm in the Online Merchant Account that the charge is marked as void
Trouble Shooting
Authorization Response looks like HTML or XML
 If you get an authorization response that:
- looks like it is HTML or XML and indicates that it was not authorized:
- specifically indicates that the API key is wrong
If you merchant account still doesn't authorize after verifying it, log in to the Authorize.net Online Merchant Account and
- Click on 'Account' button at the top.
- Click on the MD5 hash at the middle of the screen
- Get a new MD5 hash key (API Key) for your account and put it into the merchant setup screen - connection info tab under the password
- Try to authorize a card again
Error on Settlement
If an error occurs during the initial part of settlement, you may not have the 'Transaction Details API' enabled. If this occurs, log in to the Online Merchant account and then
- Click on 'Account' button at the top.
- Click on the Transaction Details API link
- Enter the answer to your 'secret question'
- Click Enable Transaction Details API button if it is not already enabled
If issues persist, contact Arts Management and let us know so that we can help get it corrected.
Authorization Number: 000000
When processing a test charge, if you get an Authorization Number: 000000, this means the account is still in TEST mode at Authorize.net. Log into your Authorize.net account, and change the setting from TEST mode to LIVE mode.
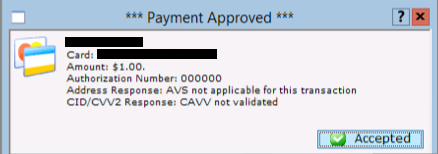
Specific Authorize.net Account Settings
- Apply to Authorize.net to allow unrestricted refunds for your venue.
- Enable transaction details so that Theatre Manager can obtain batch information and allow End of Day settlement.
- Specify the sweep time where Authorize.net takes completed End of Day transactions and moves them to the bank.
Setting Transaction IP Velocity Filter
Authorize.net allows you to define the number of transactions received from the same IP address within the course of an hour. The default value in the gateway is set to 10 transactions per hour. This setting, while helpful for fraud detection, does not take into account the number of transactions processed at the box office and needs to be increased.
- Open your online gateway to Authorize.net and select Fraud Detection Suites in the right column.
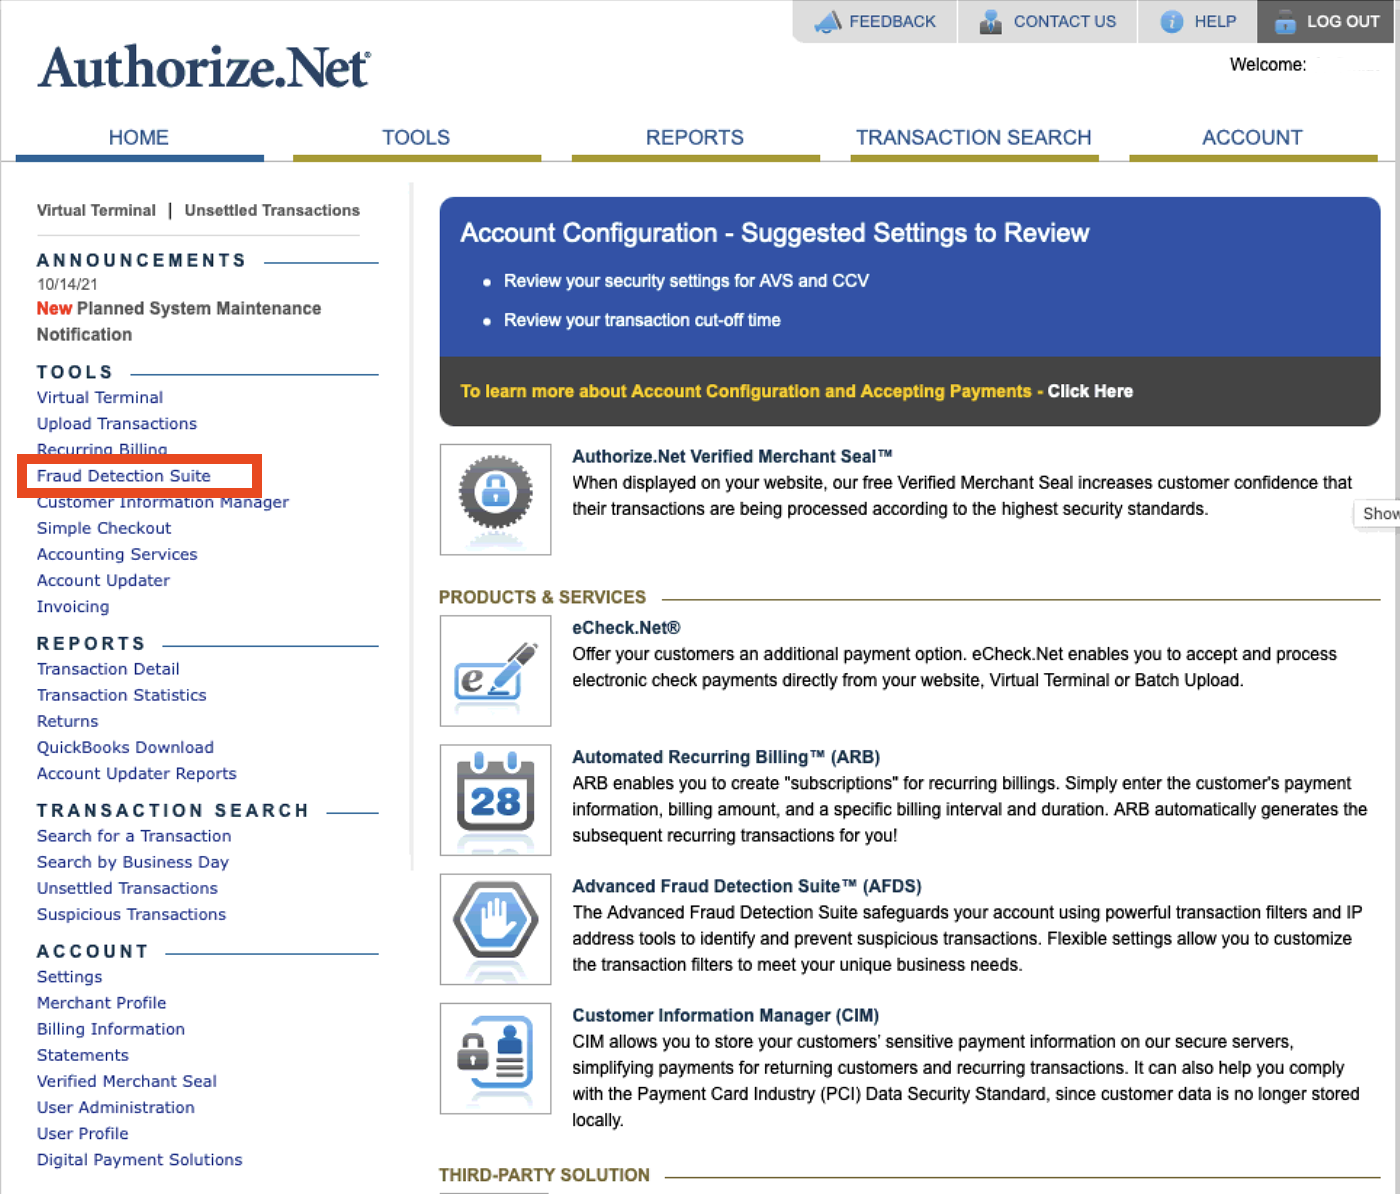
- Under Card Testing Settings select Transaciton IP Velocity Filter
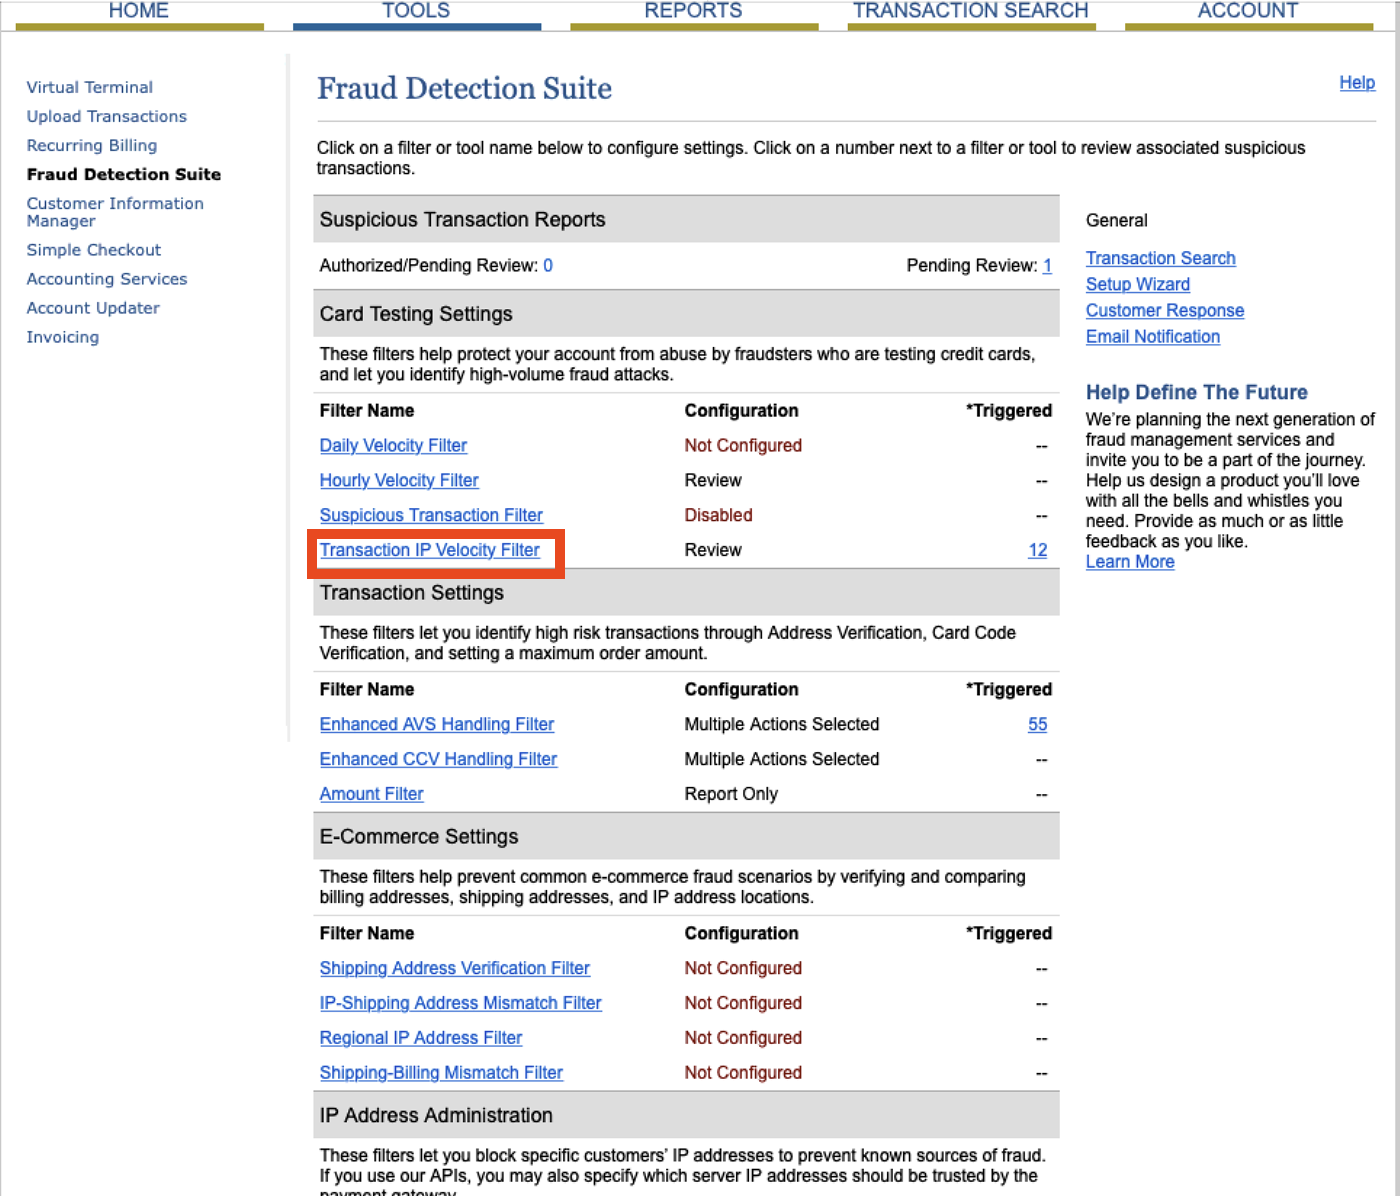
- In the Transaction IP Velocity Threshold section of the page increase the Allow transactions from the same IP address per hour value.
This value should be set based on the number of transactions your organizations processes in the office per hour during peak sales times. Depending on the size of your organization this may mean 50, 100, or possible 500.
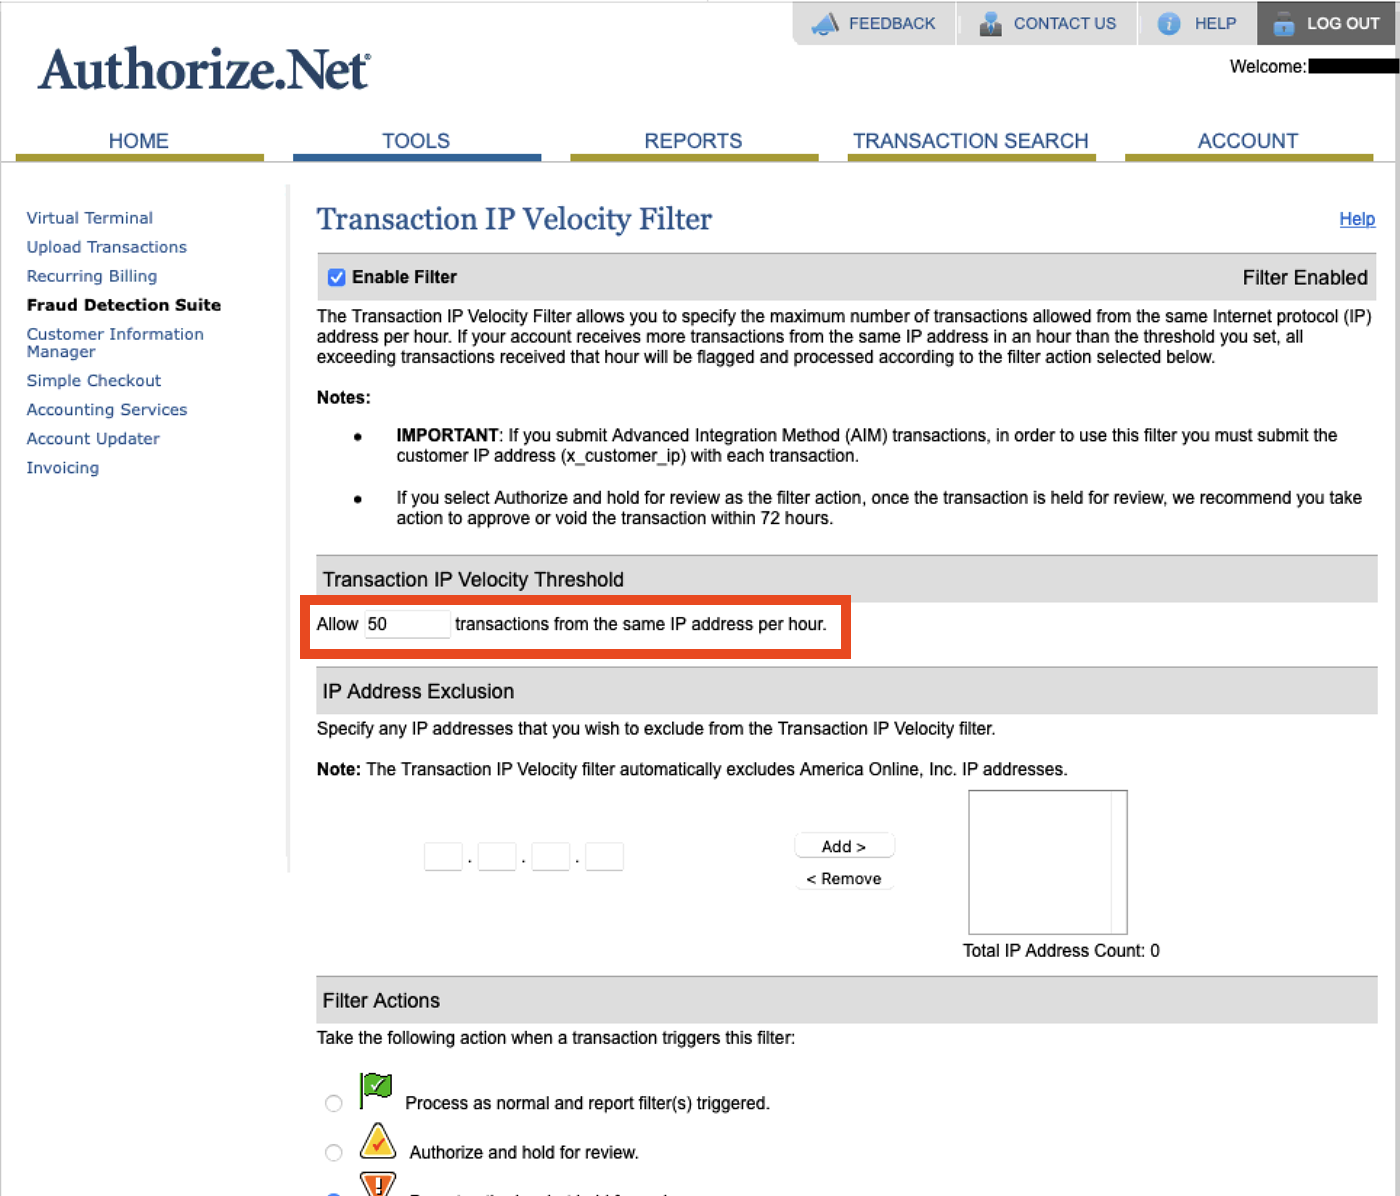
- Click the Save button at the bottom of the window.
Transaction Receipt Email
Authorize.net sends an email to the Gateway user for each payment processed through the account. This feature can be disabled using the steps below. You will be required to
- In the Authorize.net Gateway select Account at the top of the window.
- Select User Profile in the left column and click the Edit Profile Information button under Profile and Security Settings.
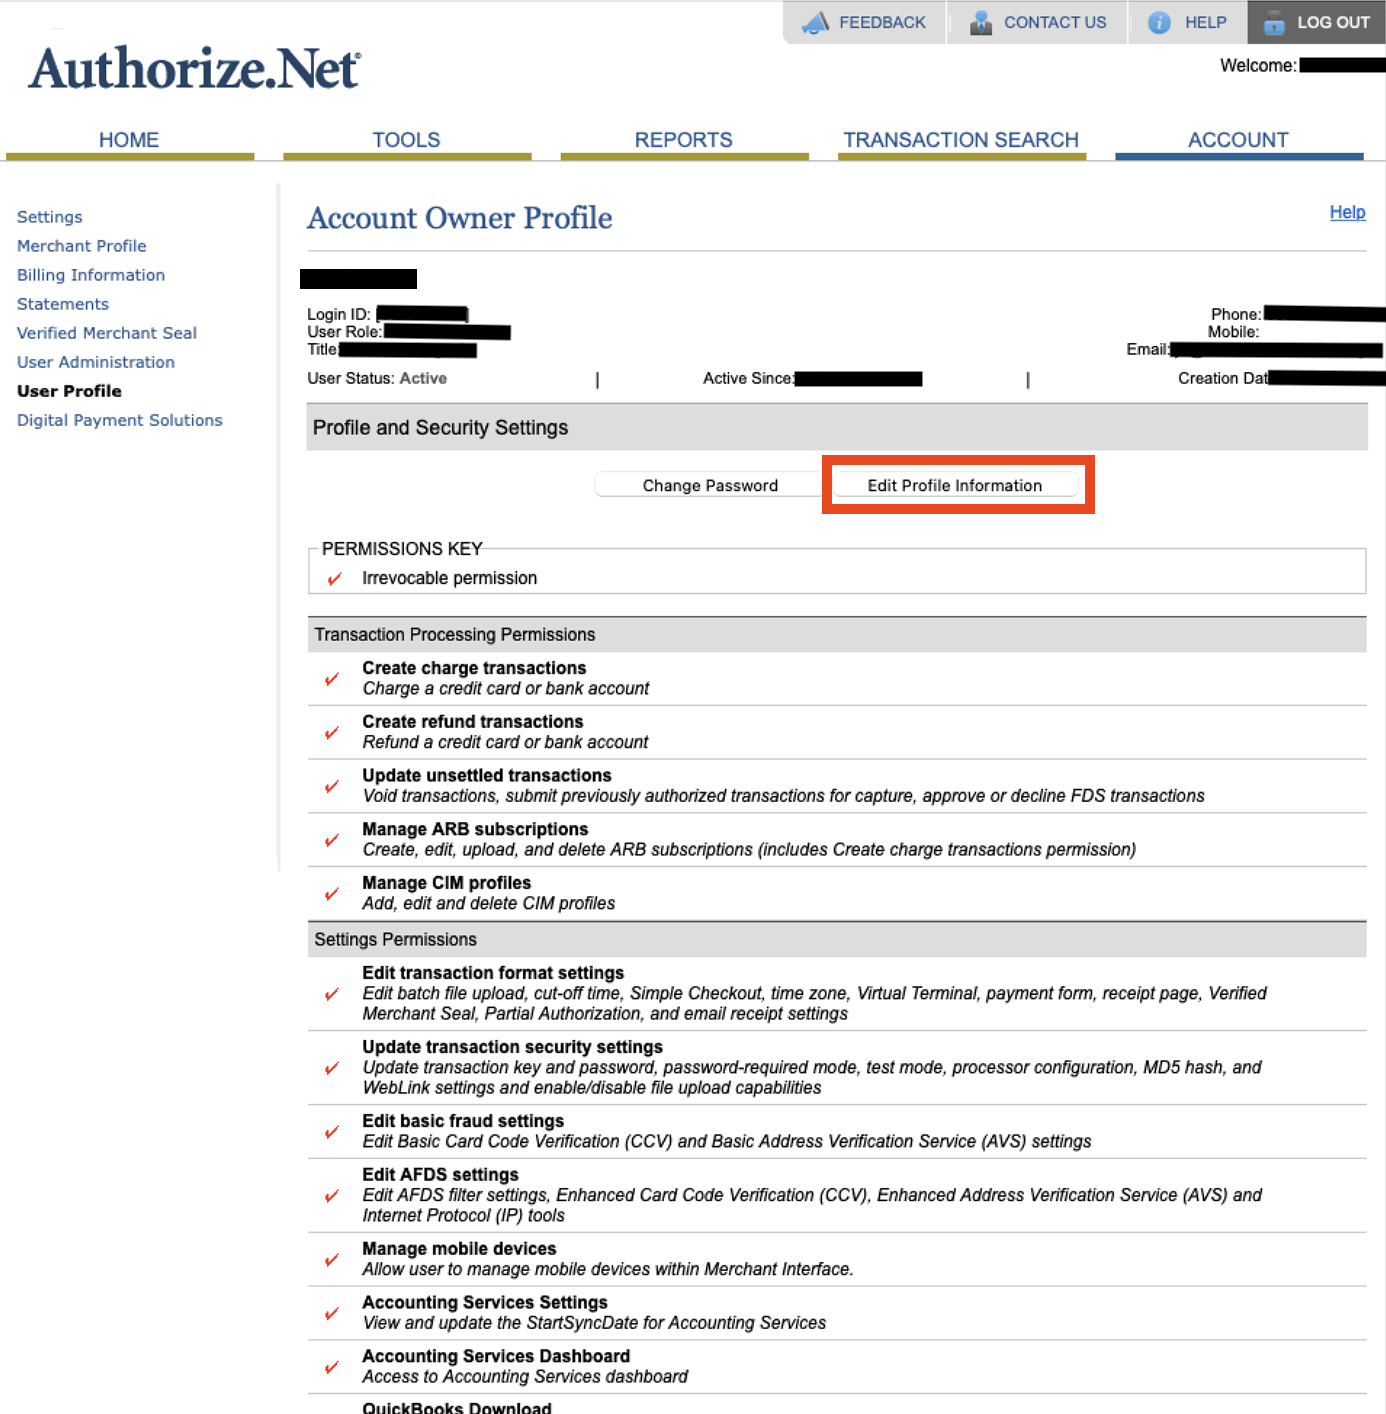
- Under Transaction Emails remove the check next to Transaction Receipt.
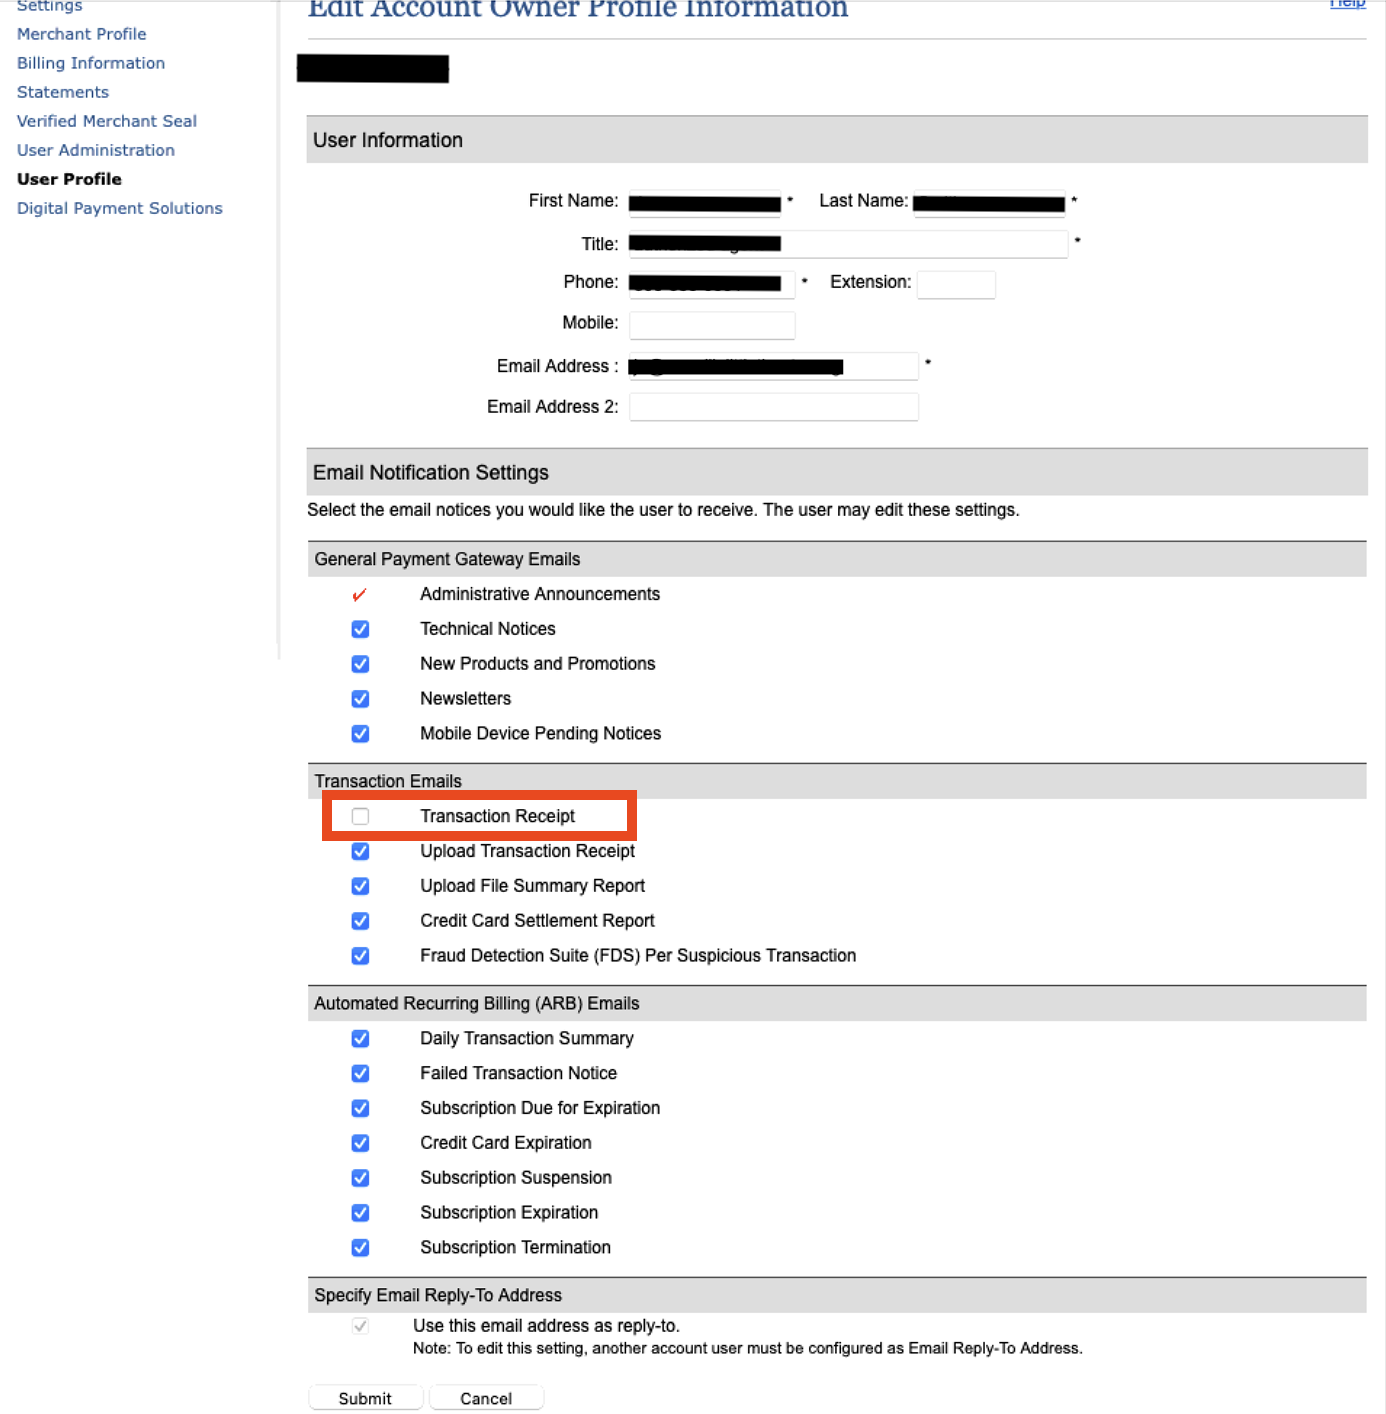
- Scroll to the bottom of the page and click the Save button.
Clicking Save will generate a pop-up window asking to send a verification pin to the email address on the account. Follow the steps and add the pin to complete the process.
Authorize.net Address Verification Settings
To set these parameters, you perform the following steps:
- Open your online gateway to Authorize.net and choose Account >> Settings.
The main Settings window opens.
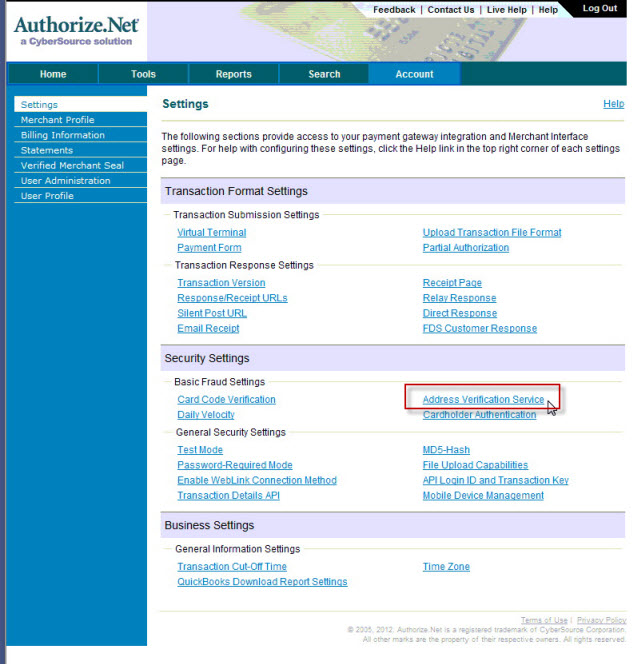
- In the Security Settings section, click on Address Verification Service.
The following window displays.
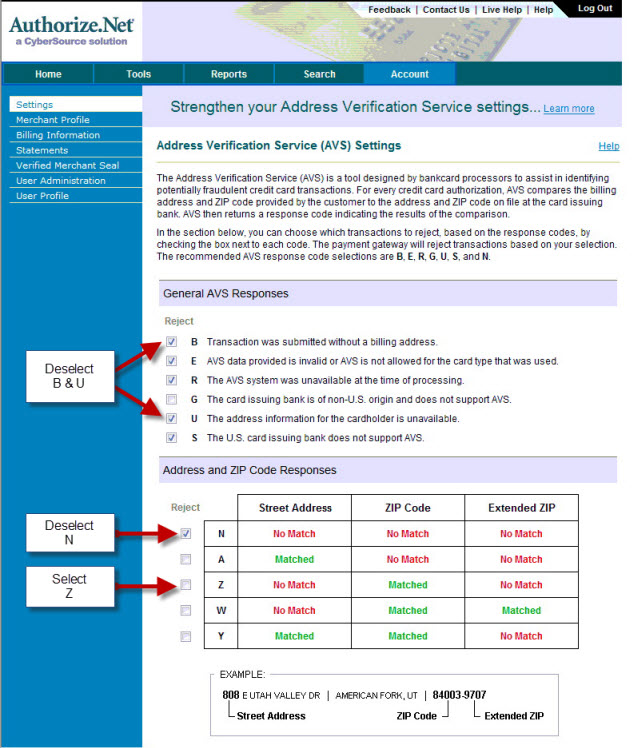
- Ensure the following settings are enabled:
General AVS Responses
B - Transaction was submitted without a billing address √ E - AVS Data provided is invalid or AVS is not allowed for the card type used √ R - The AVS system was unavailable at the time of processing G - The card issuing bank is of non-US origin and does not support AVS. U - The address information for the cardholder is unavailable √ S - the US card bank does not support AVS Address and Zip Code Resources
N A √ Z W Y
When complete, your page will look like the following:
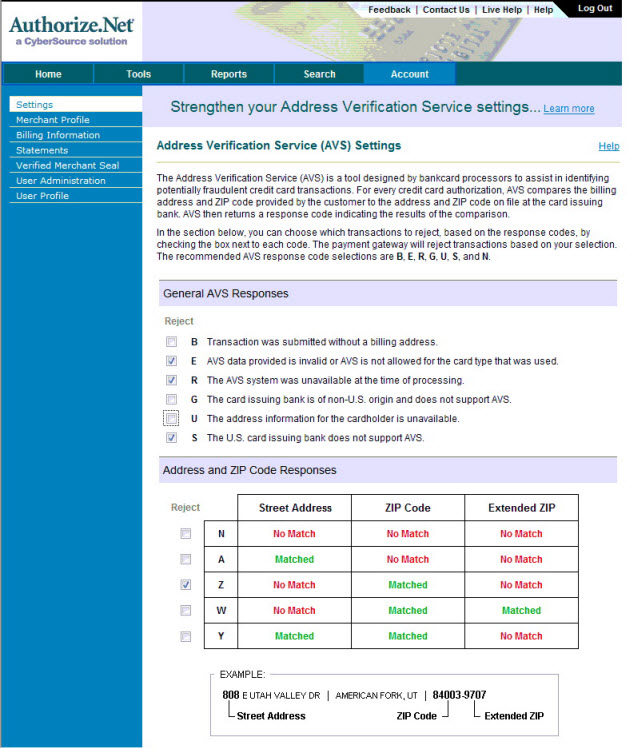
Allowing refunds with Authorize.net
http://www.authorize.net/files/ecc.pdf
|
NOTE: You do not need this feature if you typically refund money against the original order within 120 days of purchase and up to the original authorized amount.
An occasional refund needed that is past 120 days can be accomplished via the Authorize.net web interface. Only apply for this feature if you constantly need to refund money outside the original order and/or outside 120 days (and don't wish to refund to a gift certificate for store credit. |
Once the form is filled out, faxed back to Authorize.net, and processed by Authorize.net's customer support team, clients will be able to process refunds through Theatre Manager - sometimes within hours, sometimes up to 2 days later. The sure way to know is to check the status of your Expanded Credit Capabilities.
To check the status of your Expanded Credit Capabilities, you can look directly within the gateway for your Authorize.net account.
- Go to the home page
- Click on the Merchant Profile link on the left hand side
A series of settings will appear, including 'Additional Services.' The Expanded Credit Capabilities should read 'Enabled."
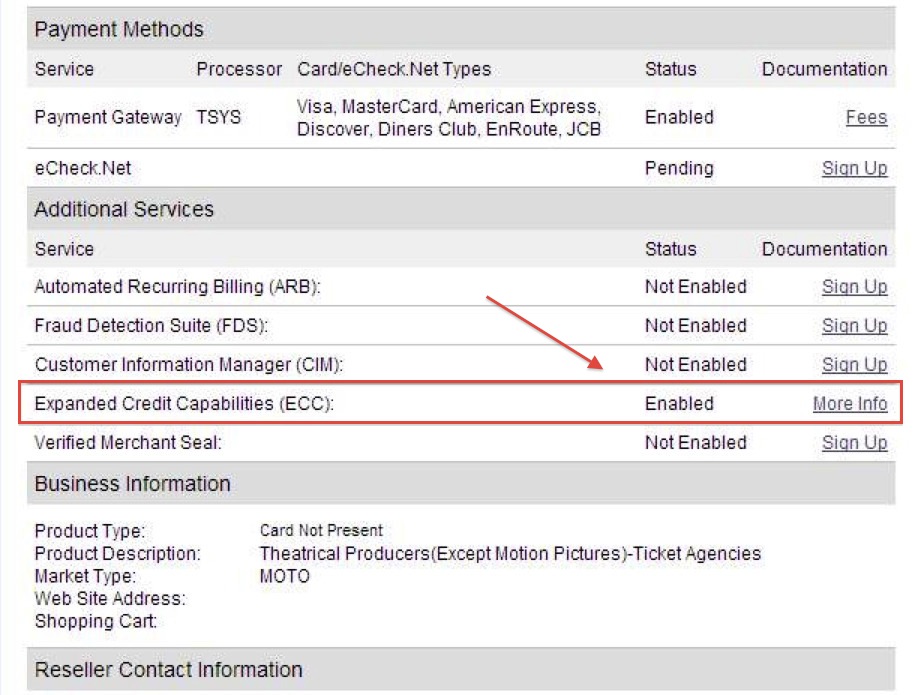
|
This is only for processing refunds in a separate batch, after the End of Day deposit has been done for the original charge. In cases where the card is to be refunded before settlement, users should instead Void and Delete the payment in Theatre Manager. Then the tickets can be refunded to clear the order balance that will be created when the payment is voided. There is no additional setup required through Authorize.net in order to process voids. |
|
Refunds are processed immediately by Authorize.net. YOU CANNOT VOID A REFUND
If you fail to settle a batch containing a refund before the Authorize.net sweep time, you will receive a warning during the End of Day that the batch may be out of balance (even if it is not). |
|
It is also important to note that the ECC form will allow users to run a refund in any amount to a card without matching up the refund amount to the original charge. Because of this, there are a couple of important considerations:
|
Enabling Transaction Details API in order to settle during End of Day
- Log into your Authorize.net account
- Select the Account button at the top right of the toolbar
- Choose Settings from the Menu at the left
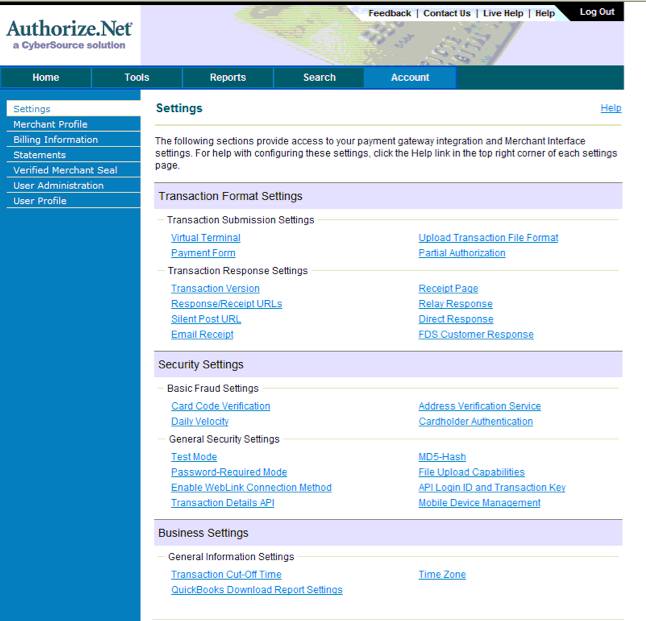
- Select the Transaction Details API option under Security Settings
- You will be prompted to enter your secret question/answer that you set up when you created your account. Then click the Enable Transaction Details API button
- You will be taken back to the main Settings screen. To check that the settings have taken effect, go back to Transaction Details API
- When enabled, your screen shows you an option to Disable as below (do not do this).
- You will now be able to settle through the Theatre Manager End of Day Wizard. For more information about the Wizard, click here.
Setting the Sweep Time for Settlement
- Sign in to the Authorize.net interface
- Choose the Virtual Terminal option at the left
- Choose the Transaction Cut-Off Time option under Business Settings.
- You'll see the current sweep or settlement time in the middle of the page (3:00 PM PDT in the example). Change the time using the drop down choices at the bottom of the page and click Submit. Our recommendation is to set this time sometime between 12AM and 4AM local time.
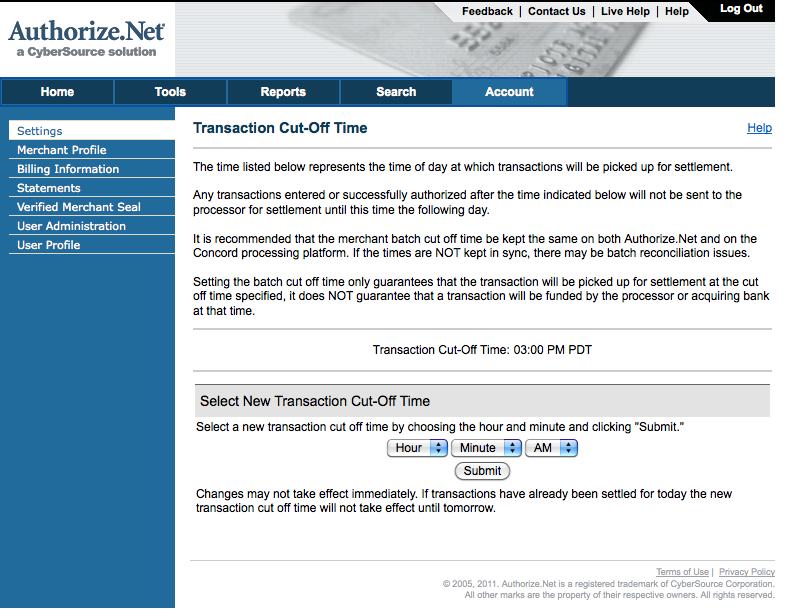
Authorize.Net Troubleshooting
- The official status for Authorize.net web site
- The developer web site which may indicate some troubles before the official status site
- The debug option in the merchant set up which can be used to show the raw data for the request sent to authorize.net and the response received from their servers.
- Make sure your Authorize.net API key is correct in Theatre Manager - you may want to test your account again and/or follow the setup procedures to verify your account info is entered properly
Elavon (private) Installation
The Elavon-Private Merchant account was written to process payments using Elavon as the processor and working in conjunction with an existing customized interface. This is only available to certain municipal organizations in Florida.
This section of the online help contains details on how to configure a Merchant Account in Theatre Manager to process payments, refunds and settle a batch using this interface.
The information that Theatre Manager requires from Elavon setup will be:
- Agency ID: xxxxxxxxxx
- Admin ID: xxxxxx
- Password: xxxxxxxxxx
- Primary URL for authorizations:
- Port #: 443
The Agency ID, Admin ID and password will be sent in a document from Elavon. That document will also contain instructions for you to log in to the Elavon online gateway to activate your account. The Primary URL should be obtained from the IT company that setup the customized interface.
Elavon Gateway Setup
The Elavon Merchant Account information is obtained from Elavon. The Primary URL will be provided by the IT company that created the custom interface. This information is entered into Theatre Manager under Setup >> System Tables >> Merchant Accounts.
Software Type
The following values are set on the Software Type tab per the diagram below:
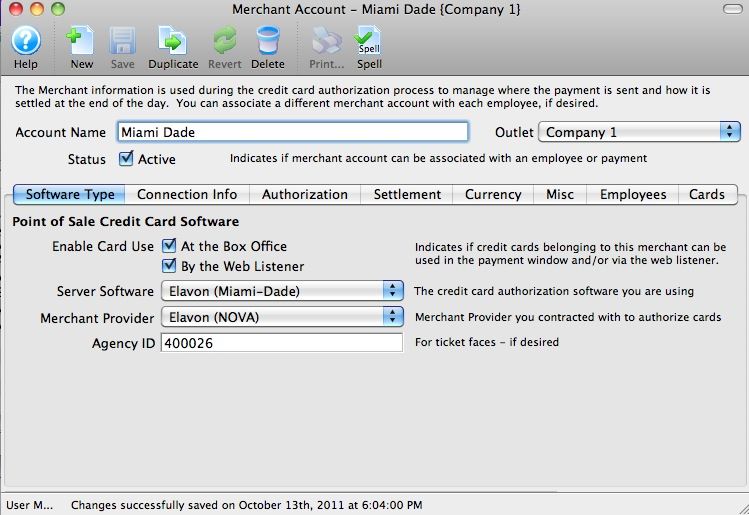
- Enter an Account Name for the Merchant Account.
- The Status Active, At the Box Office and By the Web Listener boxes should both be checked.
- Set the server software to be Elavon-Private.
- The merchant provider will automatically be set to Elavon (NOVA).
- The Agency ID is provided by Elavon and will need to go into the Agency ID field - enter in the Agency ID (not the merchant number) for the Elavon account which is typically 6 digits.
Connection Info
The following entries are set on the Connection Info tab per the diagram below:
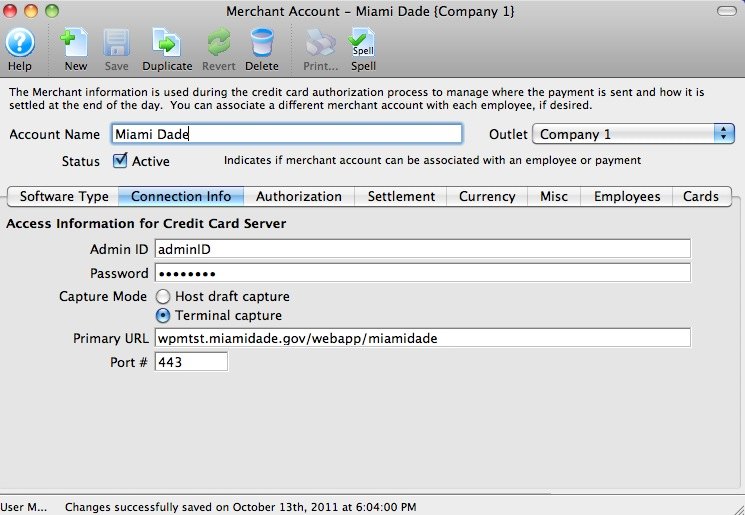
- An Admin ID will be provided by Elavon and is required to process refunds using this merchant account. This is a mandatory field in the Merchant Account Setup.
- The Password is also provided by Elavon and is required to process refunds. This is a mandatory field in the Merchant Account Setup.
- The IT company that created the customized interface will proved the Primary URL.
- The Port will always be 443. Payments, refunds and batch settlement will all be processed using this port. Local work stations that need to process payments will need this port open for communication.
Authorization
For fraud prevention, Elavon accounts in Theatre Manager will be automatically set up to send address info and Track II data. Verify the Authorization tab matches the image below.
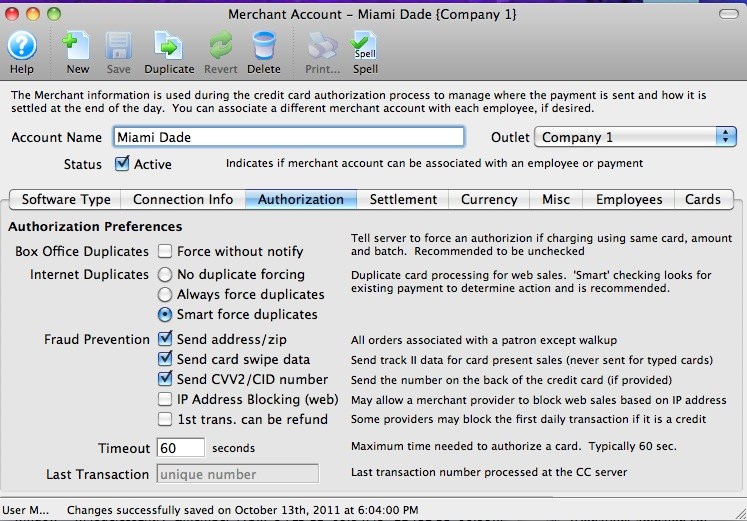
Merchant Profiles
|
Due to custom interface limitations that may exist in a Private Installation, Merchant Profiles are unavailable for Elavon (Private Installations). |
The following entries are set on the Profiles tab per the diagram below:
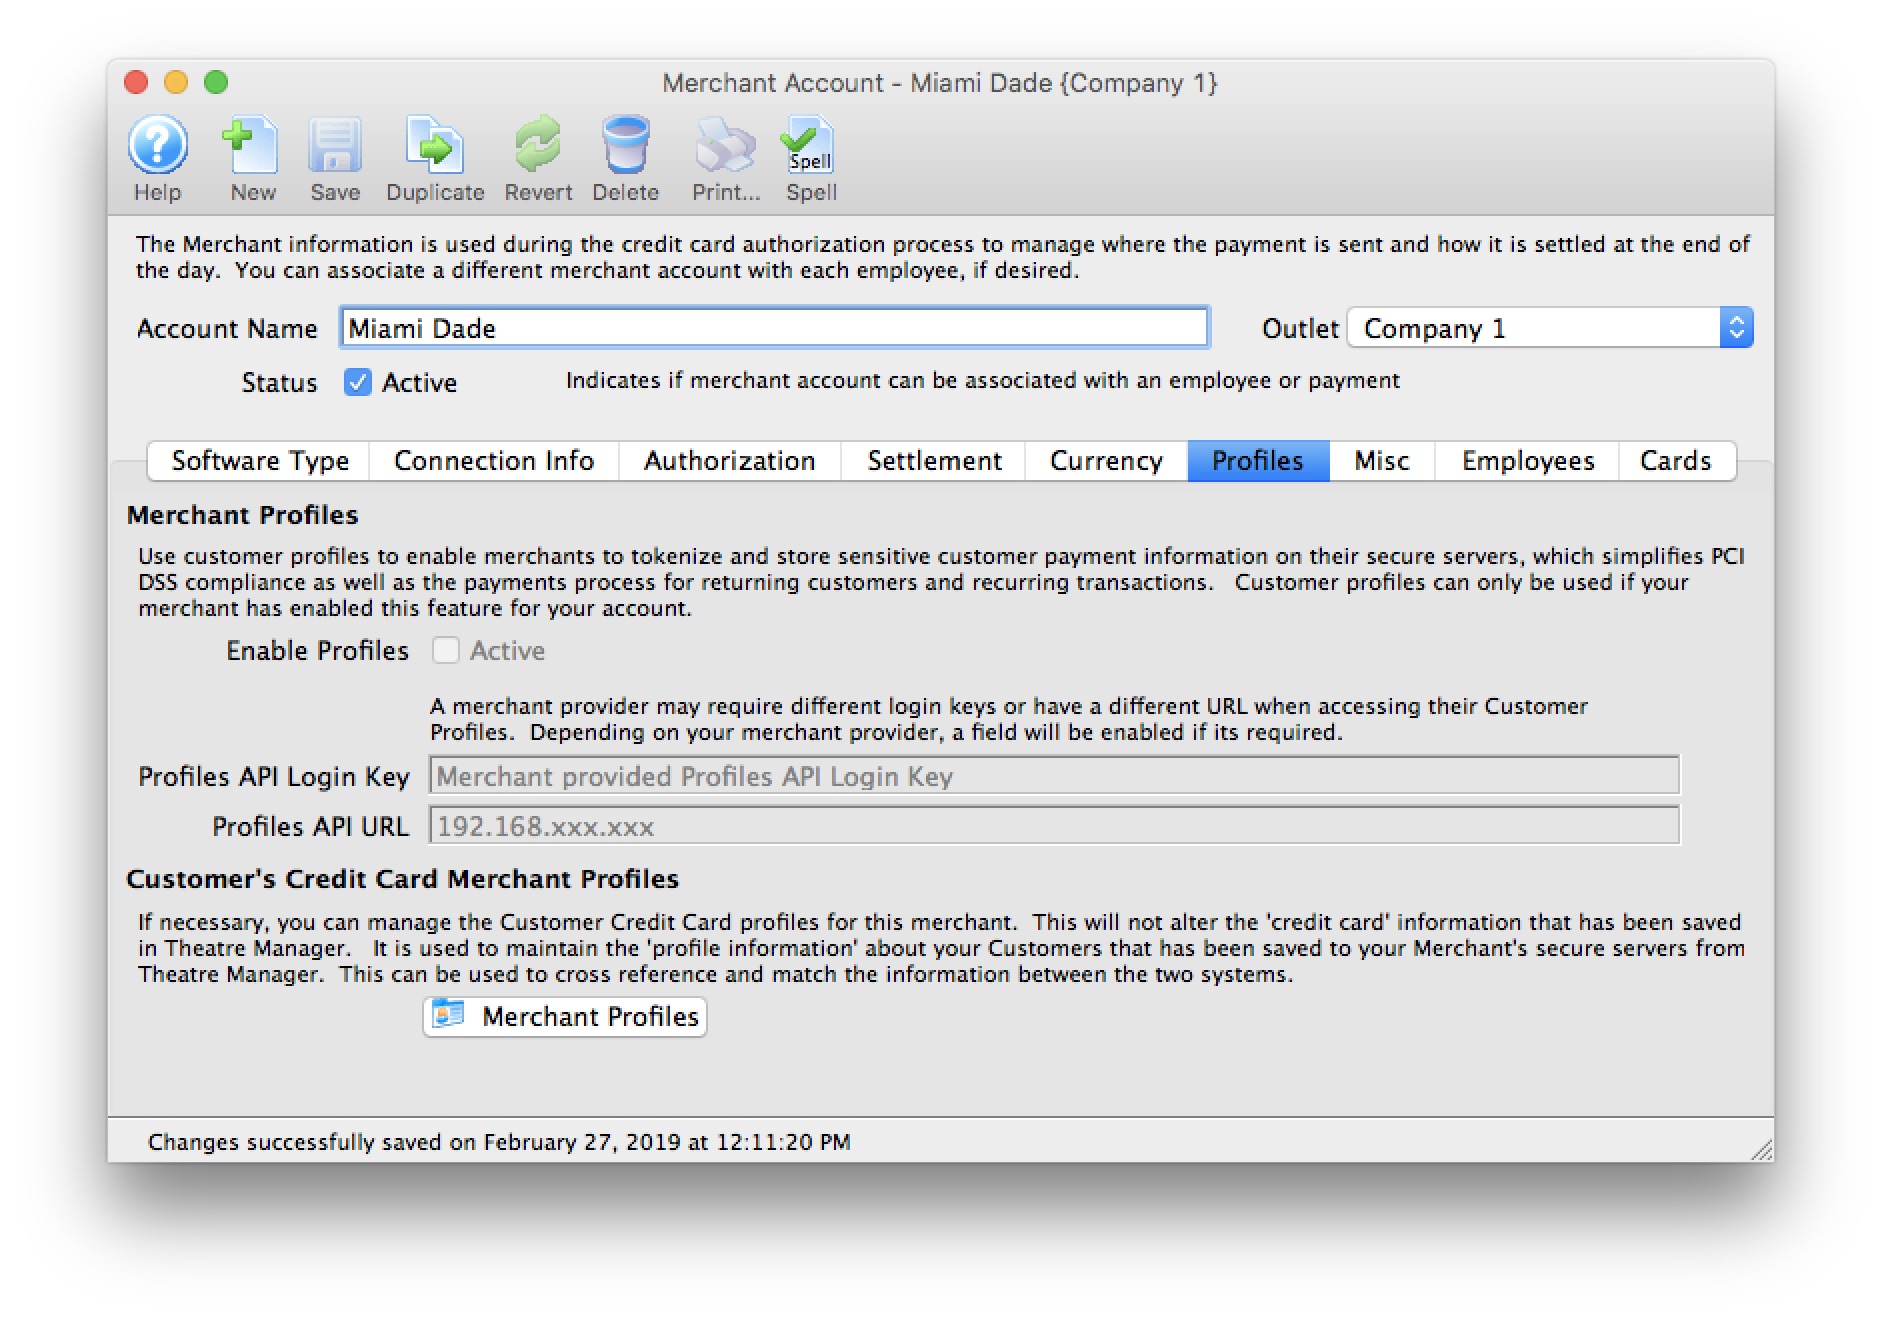
- Enable Profiles - disabled feature. Merchant Profiles are unable for Elavon (Private Installations).
- Profiles API Login Key - not required. Elavon uses the same connection information from the Connection Info tab.
- Profiles API URL - not required. Elavon uses the same the connection information from the Connection Info tab.
|
Refer to Merchant Profiles for further information on functionality. |