
Main menu
You are here
QuickBooks Online
 |
Quickbooks Desktop has a different IIF format than Quickbooks Online. Please refer the help page for the version of Quickbooks that you are using.
Neither version accepts the format of the other. |
|
For step by step instructions on importing CSV or Excel files into QuickBooks, visit QuickBooks Support at Import Journal Entries in QuickBooks Online. |
|
QuickBooks help may say to turn off account numbers in Quickbooks. DO NOT TURN THEM OFF.
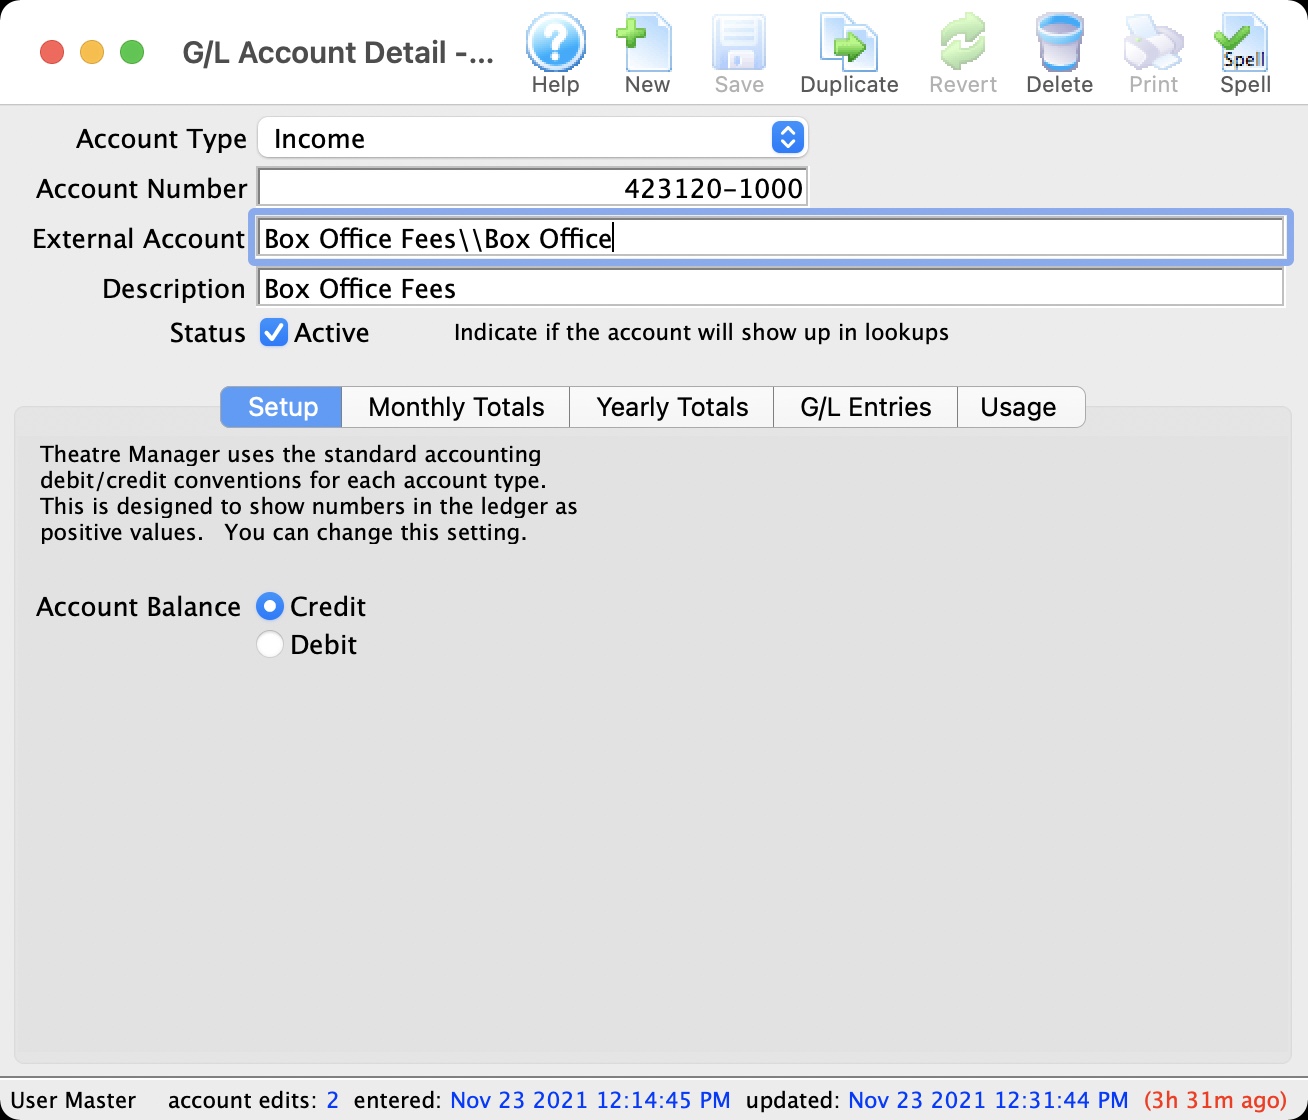
While Quickbooks indicates is able to match on either Account Name or Account Number, it is simply too much effort to keep account name matching character for character. Theatre Manager places the contents of the External Account field in the export file. This is the best to match TM accounts to Quickbooks using a field that generally should never change. |
QuickBooks Online - Detail
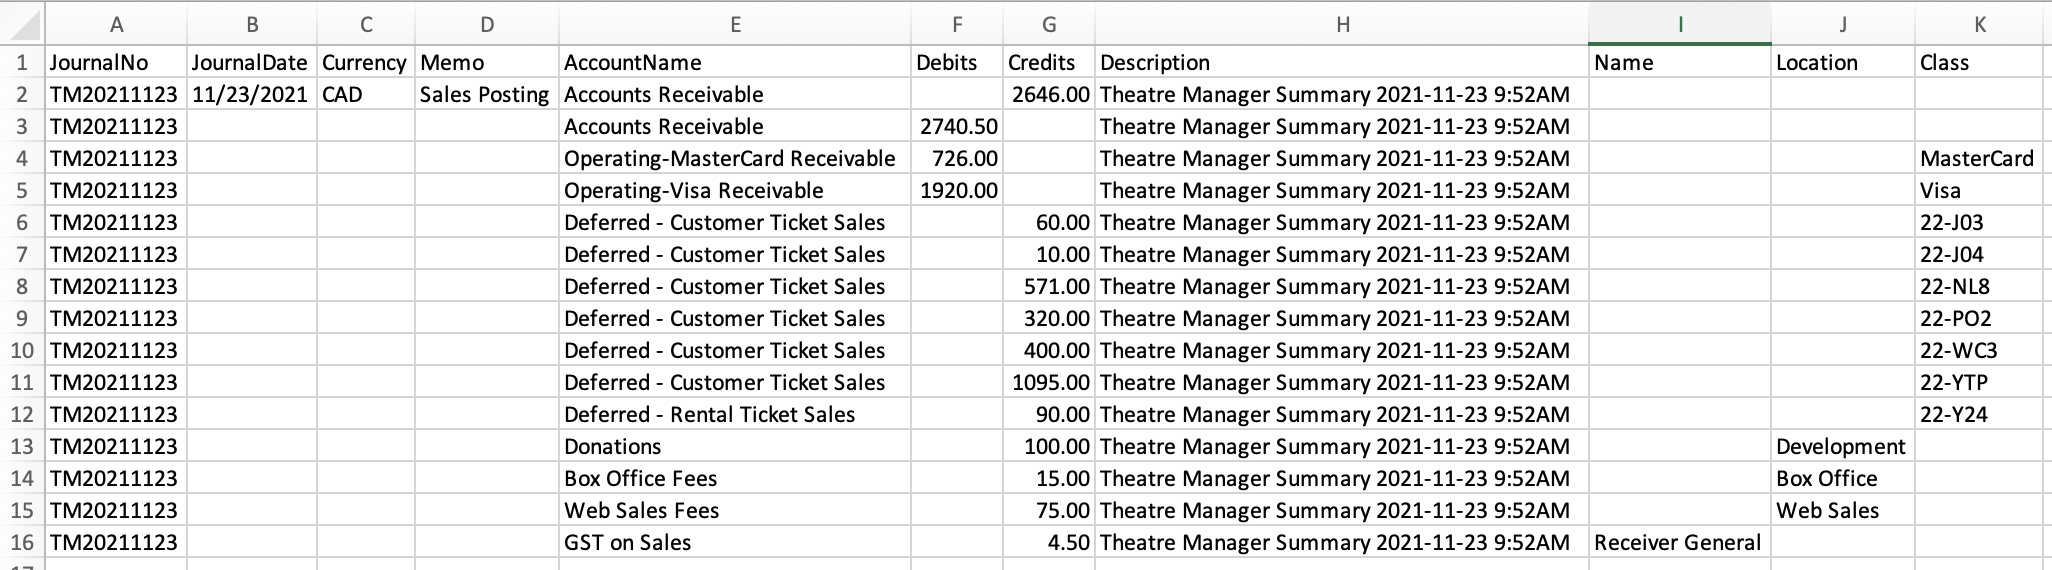
The QuickBooks - Detail export exports each detail line within the G/L Entry. Each deposit and sales posting are exported as their own separate entries within the export file. This allows an exact match of each GL entry to crossover into QuickBooks (line for line).

QuickBooks Online - Summary
The QuickBooks - Summary export creates a summarized version of the deposit and sales postings for each posting date. The deposit and sales postings lines are summarized into a single entry for each posting date within the export file.
Parts of the QuickBooks Export File
| JournalNo | Journal Entry Reference Number.
|
||||
| JournalDate |
|
||||
| Currency | A valid Currency Code. Required for multi-currency databases.
| ||||
| Memo | The Journal Entry Description for this G/L Entry (Sales Posting, Deposit Posting). | ||||
| AccountName | The name or account number of the QuickBook's account. Theatre Manager's External Account value (name or number) will be used to create the export file.
|
||||
| Debits | The Debit Amount of the transaction. | ||||
| Credits | The Credit Amount of the transaction. | ||||
| Description | The memo text associated with the transaction.
|
||||
| Name | The name of the Agency Vendor.
|
||||
| Location | The location of the transaction.
|
||||
| Class | The name of the class that applies to the transaction.
|
Vendor is a Sales Tax Agency
In QuickBooks, you may have set a Vendor as a Sales Tax Agency for your tax account(s).
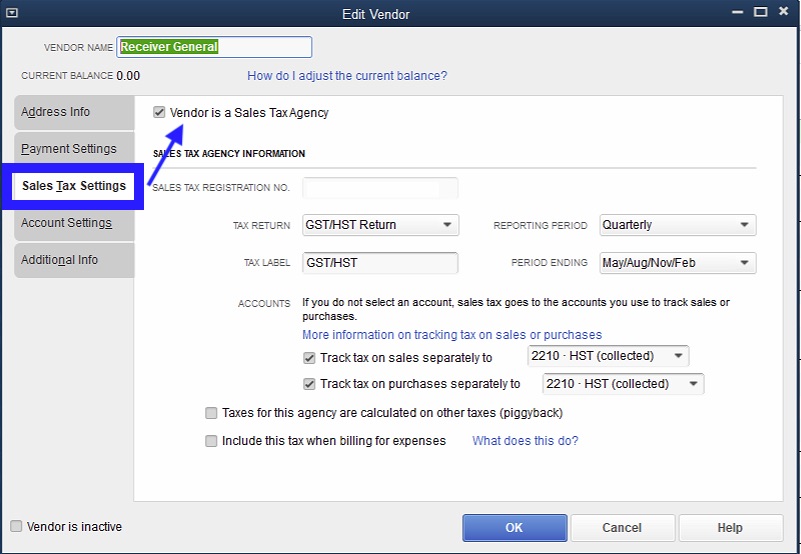
If QuickBooks is set up in this manner, the following example illustrates how to set up the External Account description. It must be set as [AccountNameOrNumber]\[VendorName]\[Location] where a backslash (\) separates the 3 fields.
|
During the export process, the External Account field will be automatically parsed into the 3 separate values for AccountName, Name, and Location when a backslash (\) is within the External Account field. |

Location Tracking
In QuickBooks, you may have enabled Location tracking.
If QuickBooks is set up in this manner, the following example illustrates how to set up the External Account description. It must be set as [AccountNameOrNumber]\[VendorName]\[Location] where a backslash (\) separates the 3 fields.
|
During the export process, the External Account field will be automatically parsed into the 3 separate values for AccountName, Name, and Location when a backslash (\) is within the External Account field. |
Common Questions
 |
QuickBooks has a requirement that a valid Customer/Vendor is included when posting to the built-in Accounts Receivable or Accounts Payment accounts. QuickBooks can not assign a receivable or a payable to 'nobody', it requires a Customer/Vender that is previously set up within QuickBooks.
The solution is as simple as avoiding any postings directly to the QuickBooks account types of Accounts Receivable and Accounts Payable. Rather, create a separate standard (non A/R) asset account and call it (for example) "A/R for Theatre Manager" and separate liability account and call it (for example) "A/P for Theatre Manager" and reference those account numbers in Theatre Manager's External Account value (name or number) used to create the export file. This way, there is no need to maintain Customers/Payees/Vendors in the export file as these accounts are just standard Asset / Liability and not linked to a special account type. This way when you import the amount into QuickBooks, it will go against the standard asset account and not against the built-in accounts receivable account in QuickBooks. When you want to see the details that make up the "A/R for Theatre Manager" or the "A/P for Theatre Manager" account, go directly to Theatre Manager for the details, rather than QuickBooks. To recap, create a standard Asset & and a standard Liability account to use to post to in QuickBooks. |