Pricing Maps
A Pricing Map is a slightly more esoteric concept at work inside a venue. It is not just a physical layout of seats for a venue, but can also be a different pricing structure for those seats.
- If the venue is a theatre, the seating may be fixed - but a Pricing Map allows you to have different pricing layouts for the same seating arrangement. For one event, all seats use the same Price Code. While for another event (still within the same venue, but using a different Pricing Map) you might break down the seating with the Center Orchestra being the highest price seats, the Side Orchestra being a little lower, and the Balcony lower still.
- If the venue is a Dinner Theatre, the seating may change from event to event. The overall capacity of the room stays the same, but the configuration of seats changes each time the venue is used. Each new configuration is the same Venue, but is a new Pricing Map.
- For conference room or classroom venues, it may suffice just to have a Festival Seating (or "General Admission") Pricing Map, or you can have a Festival Seating Pricing Map for some events, and a Reserved Seating Pricing Map for other events.
Click here, for quick reference information for Venues and Maps
There are four steps to Creating a new Pricing Map. They are:
- Creating the graphic for the map. Click here for more information.
- Placing the seats on the pricing map. Click here for more information.
- Create the logical seats. Click here for more information.
- Create the seat names. Click here for more information.
Parts of the Pricing Map Window
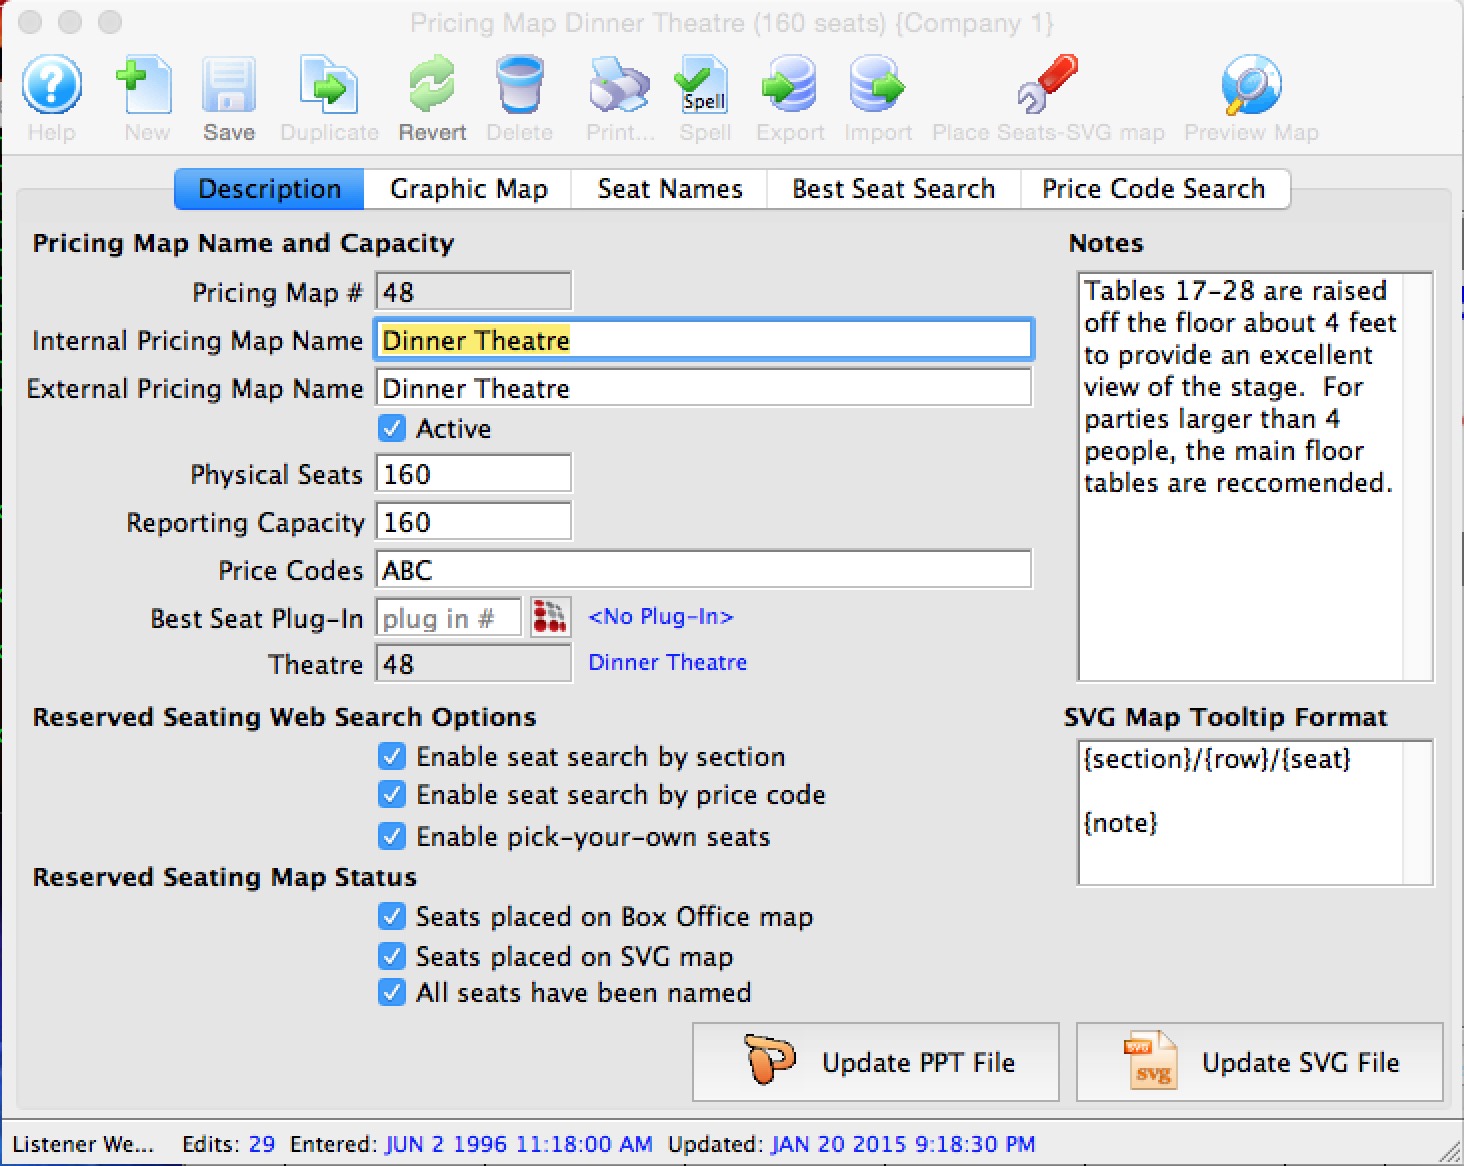
Parts of the Window
| Description |
The Description Tab - here you enter or look at:
Click here for more information on the Description tab. |
 |
Shows the graphic image for the map and places each of the seats. On
this window you can:
|
 |
Seat Names Tab - determines the name of each seat within the venue.
Click here for more information on the Seat Names Tab |
 |
Best Seat Search Tab - Here you can create a list of sections for patron's to choose from on your website.
Click here for more information on the Best Seats Tab. |
 |
Price Code Search Tab - Here you can create a list of sections for patron's to choose from on your website.
Click here for more information on the Best Seats Tab. |
Description Tab
| Pricing Map Name and Capacity | |||||
| Pricing Map Number | System generated number for the specified graphic map. | ||||
| Internal Pricing Map Name | The internal name is only be visible to internal Theatre Manager users. You can use this to designate things like 'venue - 2 price zones' or 'venue - summer season' to distinguish between uses of the price maps | ||||
| External Pricing Map Name | External name for the map and visible to patrons on web and ticket faces. | ||||
| Active | Indicates if the map can used or not and if it is to be used for reports. | ||||
| Physical Seats | This is the maximum number of people that can fit legally into the performance space. For some events, not all seats may be sold to the public. | ||||
| Reporting Capacity | The seating capacity of the theatre to be used in reports. The venue may have more seats than are allowed to be sold. The Reporting Capacity allows you to generate reports against what you are able to sell as opposed to what you have in the venue.
To be clear: the reporting capacity is almost always the same as the physical seating capacity. You can make it less than the number of physical seats. If you do this:
When might it be different? The feature is really only intended to be used if you have a scaled house for actor equity purposes and equity lets you sell your venue at a lower size. You would be holding these 'standing room' tickets -- which equity has allowed you to have for overflow crowds only. If you need the extra seats, you then pay actor equity rates for the expanded venue site to use all seats for that performance. Online Availability is affected by this number
If you have a general admission venue where you should only have 300 seats, then you can set the available capacity at 350 and the reporting capacity at 300. This will limit online sales to 300. However, at the box office, you can 'oversell' the event - like airlines - based on your own calculated no-show factor. |
||||
| Price Codes |
Enter the allowable base price zone categories. It is suggested to have no more than 5 or 6 base price zones in any theatre if possible and best if they do not overlap.
Some times you many need to use a two sets of pricing zones in your venue. eg:
| ||||
| Best Seat Plug-In | The number of the plugin used for searching for seats in this theatre. | ||||
| Theatre | The Venue Map to which this Pricing Map is associated. | ||||
| Reserved Seating Web Search Options | |||||
| Enable seat search by section | A checkbox to allow use of the Best Seat Search tab contents by online patrons. | ||||
| Enable seat search by price code | A checkbox to allow use of the Price Code Search tab contents by online patrons. | ||||
| Enable pick your own seats | A checkbox to allow use of the Pick-your-own search online. For this to be enabled, you must have:
|
||||
| Reserved Seating JPEG map size | |||||
| Height |
Pricing Maps are created by dropping an SVG file onto the Graphic Map tab. They are converted to a JPEG automatically for display purposes by the TM server.
SVG images, by definition, are scaleable vector graphics. It mans that they can scale up or down to any size you want.
|
||||
| Width |
This is normally blank if you want the SVG map converted to a JPEG with the same ratio in the X and Y coordinates (eg, if the SVG is converted 150% size in height, the width will be converted by the same ratio.
However if you want the SVG to have a different scale factor for width, you can specify a pixel width in this fields. |
||||
| Other Fields and buttons | |||||
| Notes | Notes for the venue. | ||||
| SVG ToolTip Format |
 You can add tooltips for seats in the online pick-your-own seat process to assist patrons data about their seat selections. You can put any combination of:
The keywords are below and can be in any order in the tooltip format
|
||||
| Insert PPT File |
Most graphic maps are created using Powerpoint - and you can save the source file as part of the database by either dragging the .PPT document onto the button, or clicking the button to find the map. Once the PPT is in the database, you can export it in the future if you want to make changes to the other graphic maps.
If the button says 'Insert PPT File', then you have not yet imported one. If the button says 'Update PPT File', you will be replacing the original version with the new version. | ||||
| Insert SVG File |
Online maps are displayed using SVG graphics. Pick your own seats also uses the same map. This is created from your PPT and merged with seat locations used at the box office so that the online and box office maps look quite similar. However, because they are separated, you have the opportunity to make more stylized maps online.
If the button says 'Insert SVG File', then you have not yet imported one. If the button says 'Update SVG File', you will be replacing the original version with the new version. | ||||
| Reserved Seating Map Status | |||||
| Seats Placed on Box Office Map | Indicates if all the seats have been placed on the graphic image. This is required for reserved seating sales through the graphic inteface. | ||||
| Seats Placed on SVG Map | Indicates if all the seats have been placed on the SVG image. This is required for pick your own reserved seating sales through internet | ||||
| All Seats Have Been Named | A flag indicating of the seats have been named for the theatre. This is required for a reserved seating event to take place in the theatre. | ||||
Select your Own Seat Setup Steps
|
NOTE: In order to see changes to pick-your-seat map online, you must re-create the pick your own seat map following the instructions. This is required for any changes to the main map such as:
|
What the Patron Sees

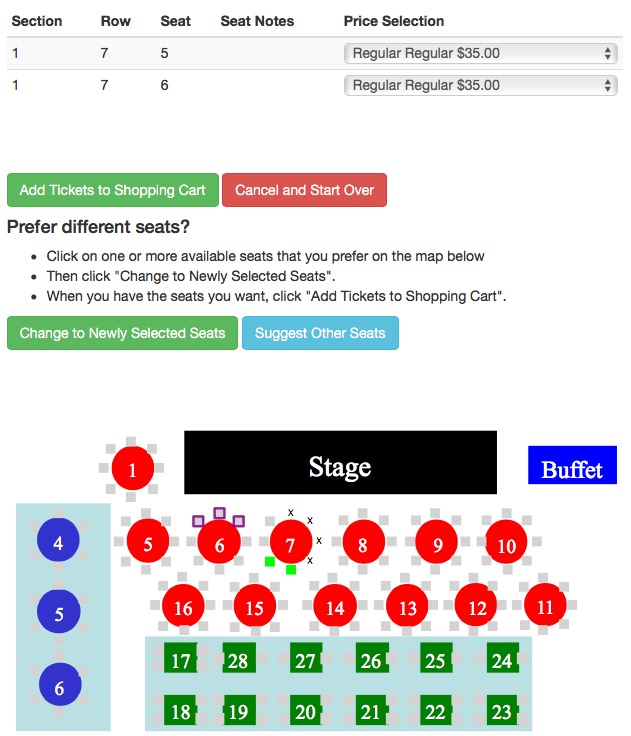 Select your own seats allows patrons to click on specific seats on a map online after an initial set of best seats has been selected by Theatre Manager. The process is designed for speed and flexibility for varying degrees of sales volumes. When the sales volume exceeds hundreds of sales per minute, obtaining seats through a pick-first process would be extremely difficult (can't click fast enough). Refer to What the Patron Sees for more detail.
Setup Pick Your Seats Process
Making an SVG map for use with pick your own seats can take as little as a few minutes if you have the original PPT Powerpoint file. The general steps are:
- Use one of Open Office or Adobe Illustrator and follow the instructions to Export your PPT as an SVG file
- Import the SVG map into Theatre Manager
- Use the Place Seats wizard and view/test the map
- Enable Pick Your Own checkbox on the pricing map
Use of pick your own seats can be:
- Enabled for all performances that using a specific a pricing map -and optionally-
- Disabled for some specific performances using the performances web settings if you don't want to use the feature.
|
There are some pre-requistes a venue must complete prior to enabling select-your-own-seat. You must
|
|
Pick your own is designed for modern browsers: IE11 and up, Safari, Chrome, Opera, Edge, Firefox running on Windows, OSX, IOS and Android. The few remaining users of IE 10 and earlier represent less than 4% of the marketplace. They:
|
Create SVG map for Pricing Map
 |
To make an SVG map, please find your original Powerpoint document, or if you've imported it into TM for safekeeping, you can export it to get the original file.
You must also have completed the steps to set up the graphic map under the Graphic Map tab for box office sales. |
Making an SVG Map from the Powerpoint document
The best way we have found to create a very useable SVG map will closely match your existing box office maps is to use Open Office (free) and your original PPT document. NOTE: Users must use the older Power Point file format of .ppt. The newer, default format of .pptx, can cause issues when being converted to .SVG.
- If you have not done so, export your PPT map from the database or find the original source document
- Tidy up your PPT document using Powerpoint before converting it to SVG.
- Use one of the following software options to convert a PPT into SVG format
- Open Office 4.1.4 (Recommended - free) or later which can be obtained from www.openoffice.org
- Adobe Illustrator CS6 (paid) - this can be found online for downloads - which we know some customers use. We have not tried the Adobe Illustrator Creative Cloud CC product (since it locks you into a subscription).
Note: after you have created an SVG document that is to your liking, you can use OpenOffice to make your PPT map edits from that point forward if you feel comfortable using it as an editing tool as well as a graphics format conversion tool.
Exporting the Original PPT Map
|
After making your final changes to the graphic map, you should save it to the database so that you can retrieve it later on - should you want to alter and aspect of the map or use it to make another pricing map for dynamic pricing.. |
Saving the original (Powerpoint) copy of the Map into the Database
Saving the original file that was used to create the maps:
- Select the Description tab on the Pricing Map editing window.
- Click on your powerpoint document
- Drag it on top of the button that will be labelled 'Import PPT File' or 'Update PPT File' as indicated below
- Release the mouse
- If the message at the bottom of the screen indicates 'Source PPT document imported', you are done.
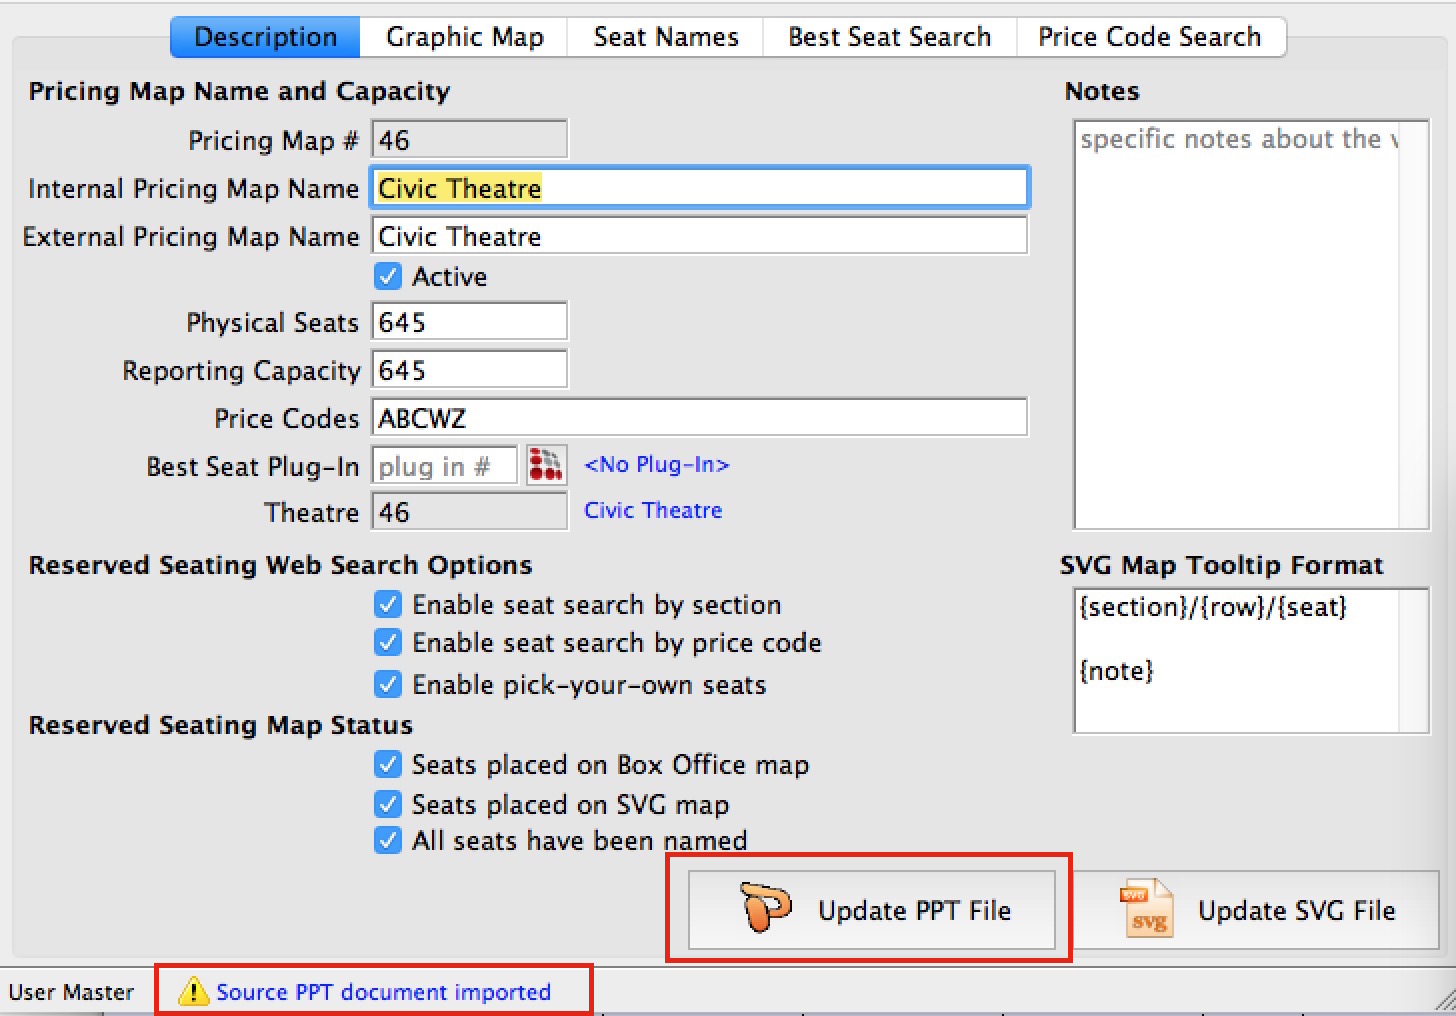
Exporting the Original PPT Map from the Database
If you have saved the original source drawing/map in the database as recommended, you can export it out again. Traditionally, we have used Powerpoint to create maps, but it has always been possible to use other drawing tools like OpenOffice.
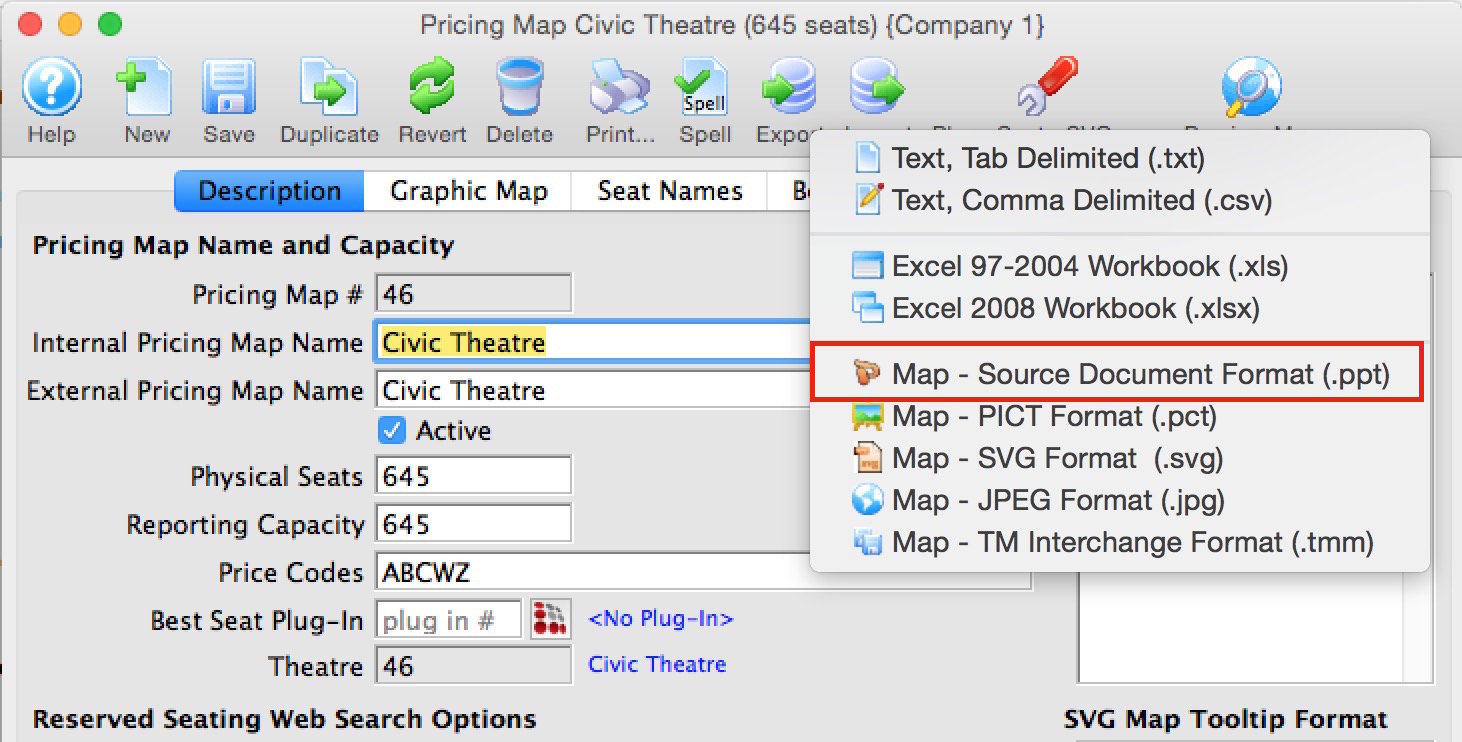
- Click on the Description Tab
- Click on the Export toolbar icon at the top of the screen
- Select Map - Source Document Format (.ppt)
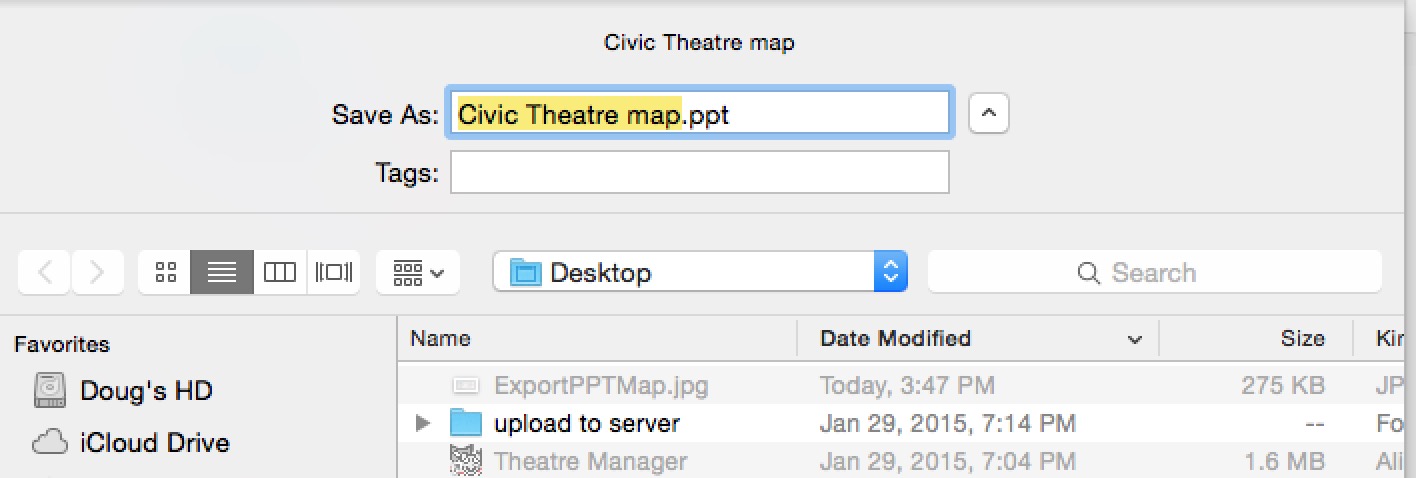
- Select the location to save the file- the desktop is a good place for working with it. It will default to a name that matches your pricing map name.
Prepare the PPT Document the First Time
 If this is the first time you are converting the pricing map PPT document to SVG to prepare it for pick-your-own seats, there are a few steps that will help in the process. Once you are happy with the map and it converts nicely to SVG, you should not have to do this step again.
- Open the document in Powerpoint (any version should work - these steps were tested with office 2008 for mac)
-
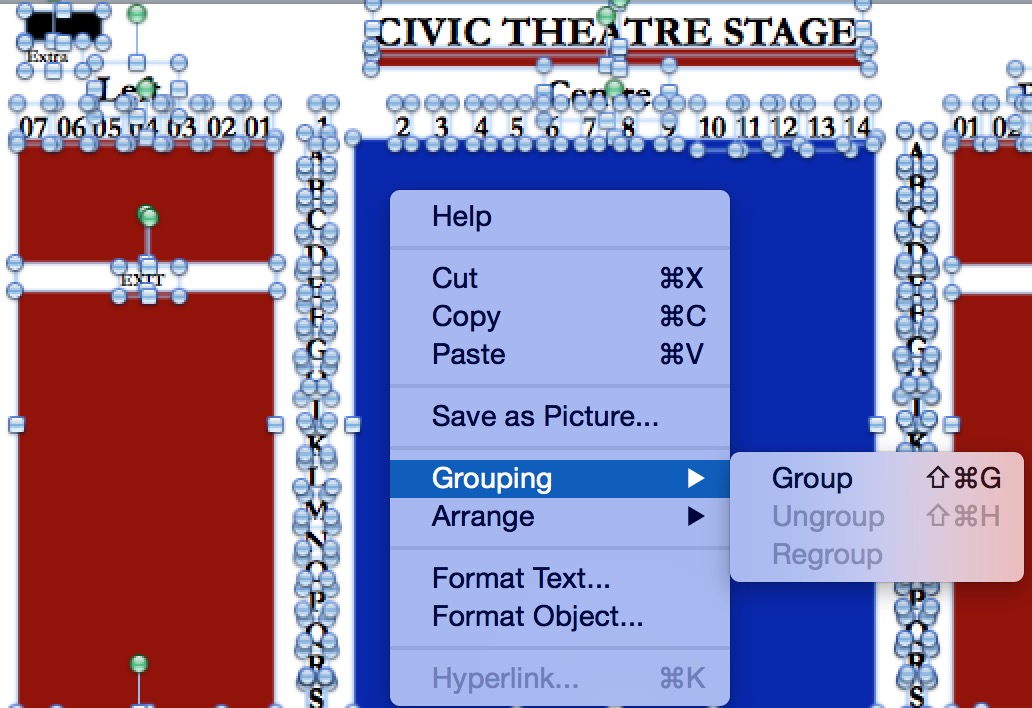
UNGROUP all objects:
- Select ALL of the objects on the drawing and UNGROUP them.
- Repeat the above steps until you can no longer ungroup any items on the picture
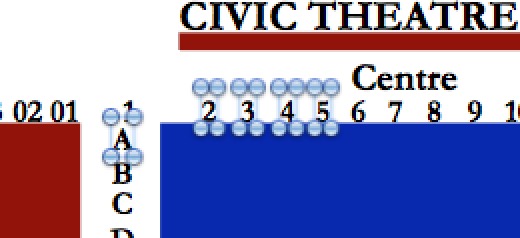 Fix any row or seat # text that used spaces to separate text and turn each row or seat # into individual objects. To do this:
- Look for the names of rows and/or seat numbers (as per the diagram)
- Make sure seat or row number is its own object. If not, re-do them so that they are and put things in the same position
- Each item must also be either vertical or horizontal. They cannot be rotated.
- Remove any large empty objects that contribute nothing to the map. Some maps seem to have a large white background object that is extraneous.
- We recommend that if you have a lot of white space at one end of your map or at the bottom that you crop the white space to make it look better online. You can do this by:
- Saving a copy of the PPT document before starting
- Select ALL objects on the Map
- If there is a lot of white space at the top or left of the document, dragging all objects the map up and to left to provide what you think is an acceptable margin
- Note the approximate amount of space you may wish to remove from right and bottom to make the map have a balanced margin
- Cut ALL the objects from the Map so that the map is empty.
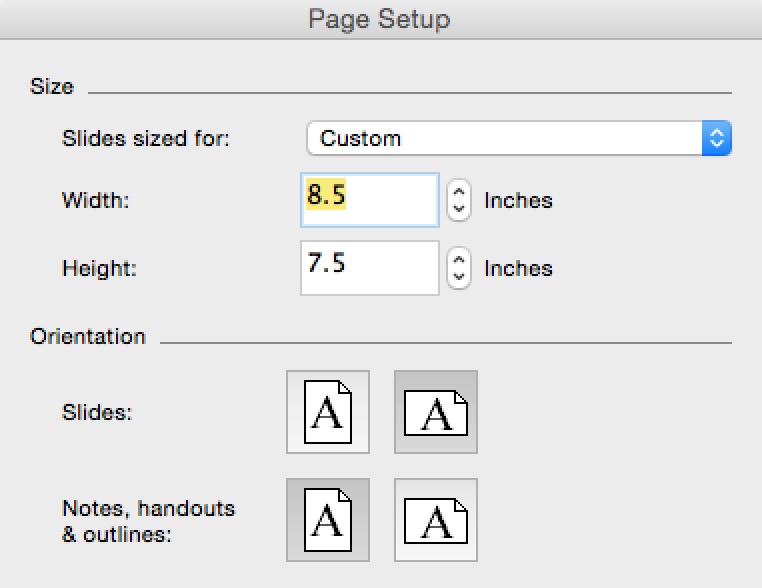 Go to Page Setup
- Write down the width and height measurements
- Subtract the amount of whitespace from the width and height. For example, if the document looks to have 2 inches of white space on the right, then make the width 2 inches smaller
- PASTE the objects back in to the document.
- If there is too much (or not enough) white space, then CUT all items, change the page size dimensions and PASTE again.
- Repeat until you like the look of the picture
|
If you make changes to the location of the background objects while tidying things up or altering the page size, please remember to update the box office sales map:
|
Convert PPT to SVG (using OpenOffice)
- Open Office is free. Use Version 4.1.4 or later from the link above.
- Some venues have used Adobe Illustrator CS6 effectively.
This page describes using then for its picture conversion capabilities (eg PPT to SVG).
- Open the PPT document Open Office. You can do this by using the File->Open menu after starting OpenOffice or you can drag your PPT document onto the empty window
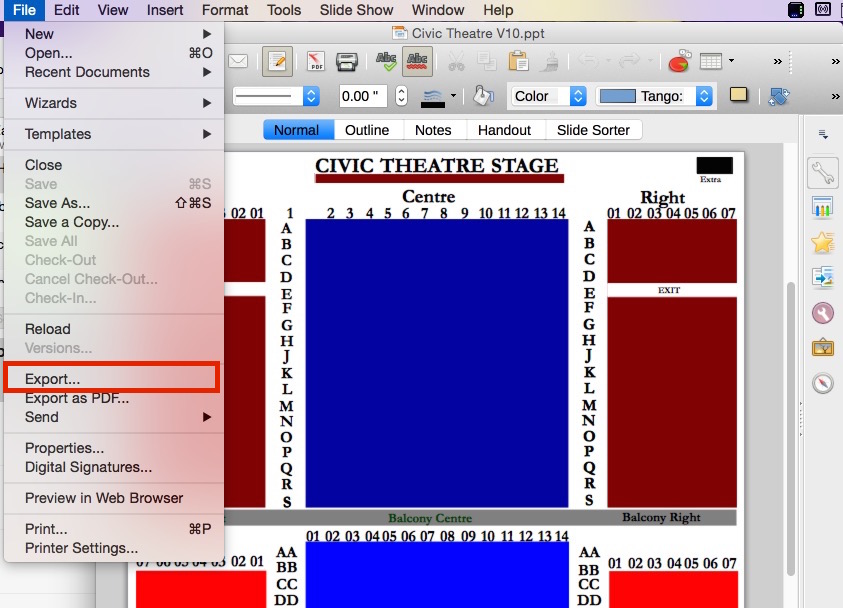
- Select File->Export option as per the picture below:
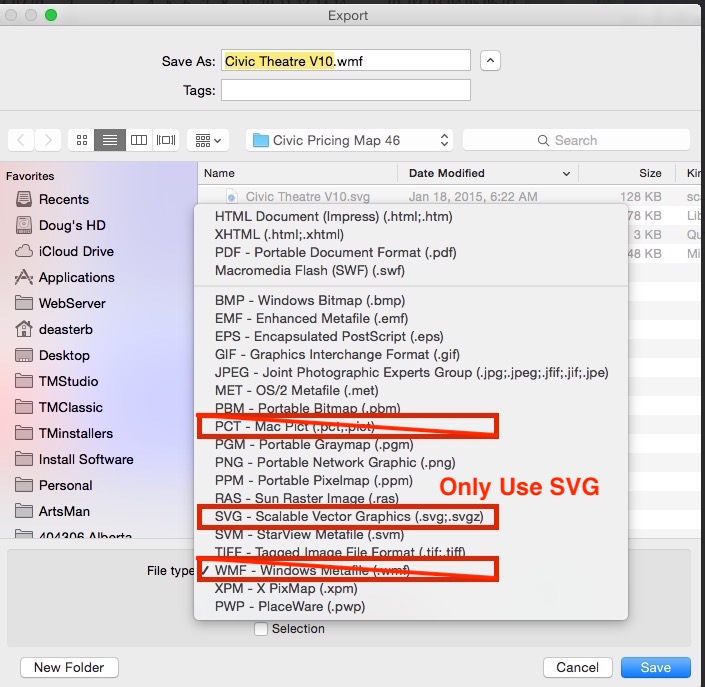
- When the File dialog opens, click the file type option and pick the export file type. There are a number of options but the ONE of interest is:
- SVG - Scaleable Vector Graphics - which is the one we will pick to get the SVG file
Merging Map with Pick-Your-Seats
|
Before doing this process, you must have created your SVG map and have it available or already have it imported. |
The merging maps process is required before you can enable pick your own seats online. It takes a previously created SVG map and automatically adds in the seat locations, tooltips, and the customized code that will make the maps work online
There are 4 steps:
- Import the SVG map into the Theatre Manager pricing map
- Set up or change the tooltip format to assist the Patron making a purchase online.
- Use the Place Seats SVG Map Wizard to merge in seat locations and tooltips to make the final map for pick your own online
- Previewing the SVG map and then testing it with online sales
|
You can repeat this process as many times as you want. It is usually just a click of a button and you will need to do it:
|
Importing SVG Map
To do this:
- Select the 'Description' tab on the Pricing Map editing window.
- Click on your SVG document
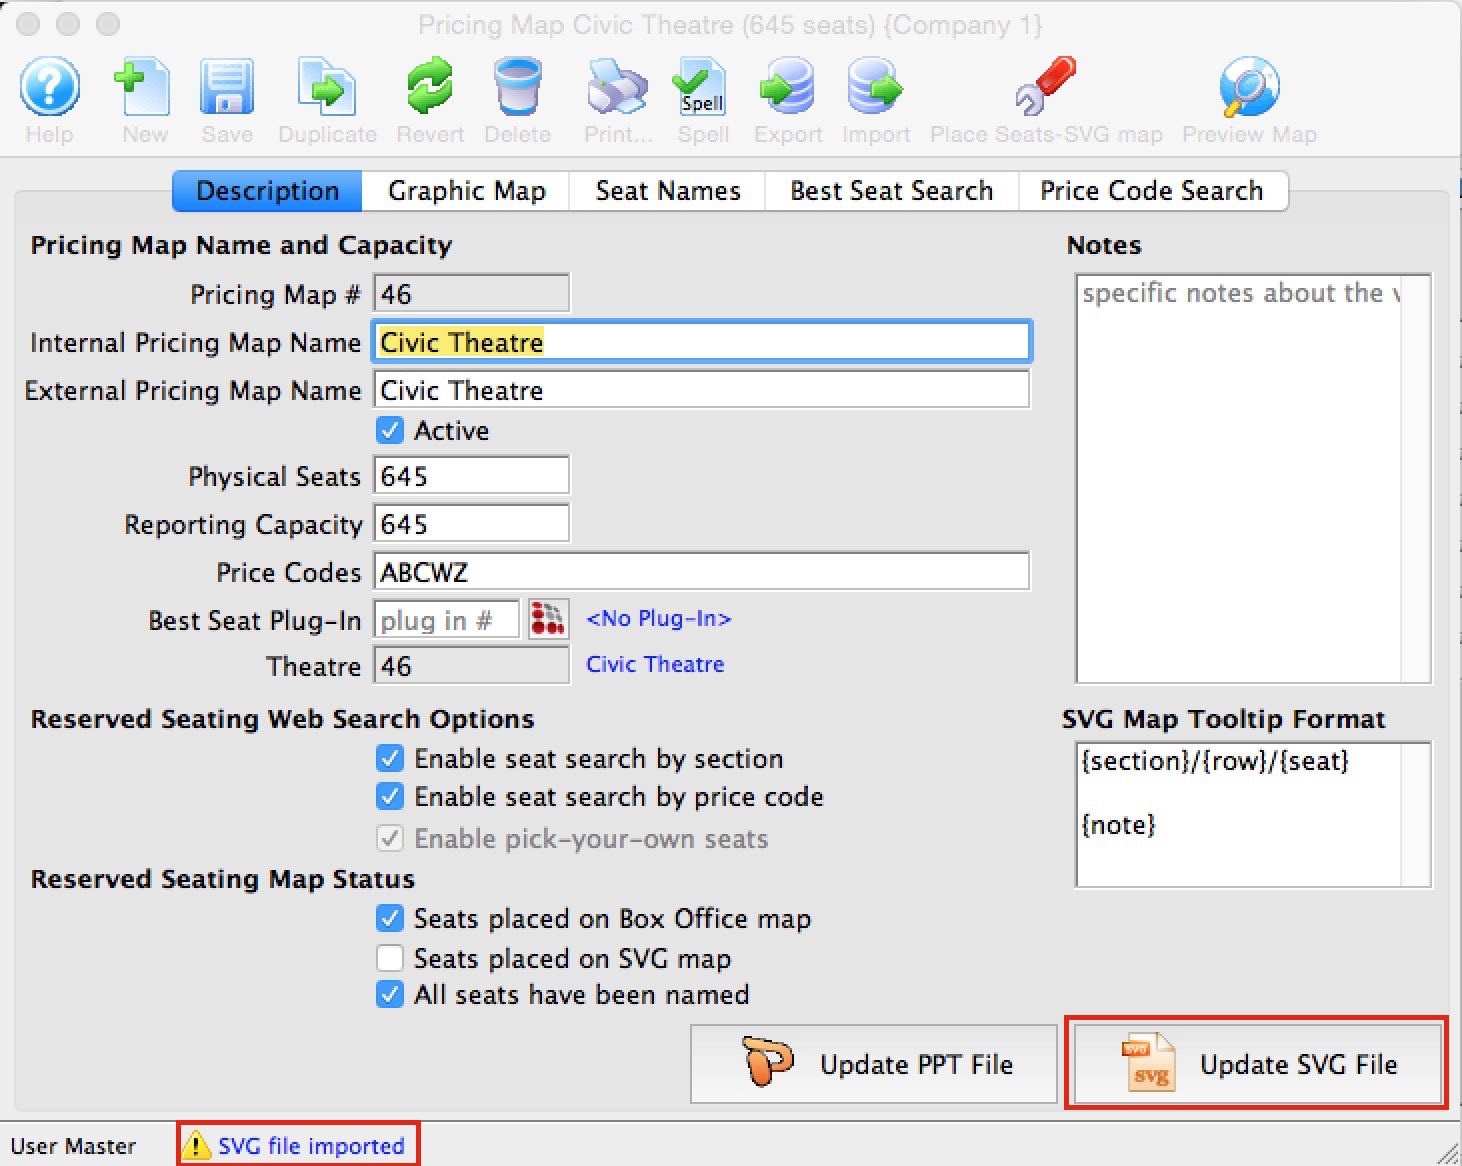
- Drag it on top of the button that will either be labelled 'Import SVG File' or 'Update SVG File' as indicated below
- Release the mouse
- If the message at the bottom of the screen indicates 'SVG file imported', you have completed the first step.
Set seat-tip Format for SVG Map
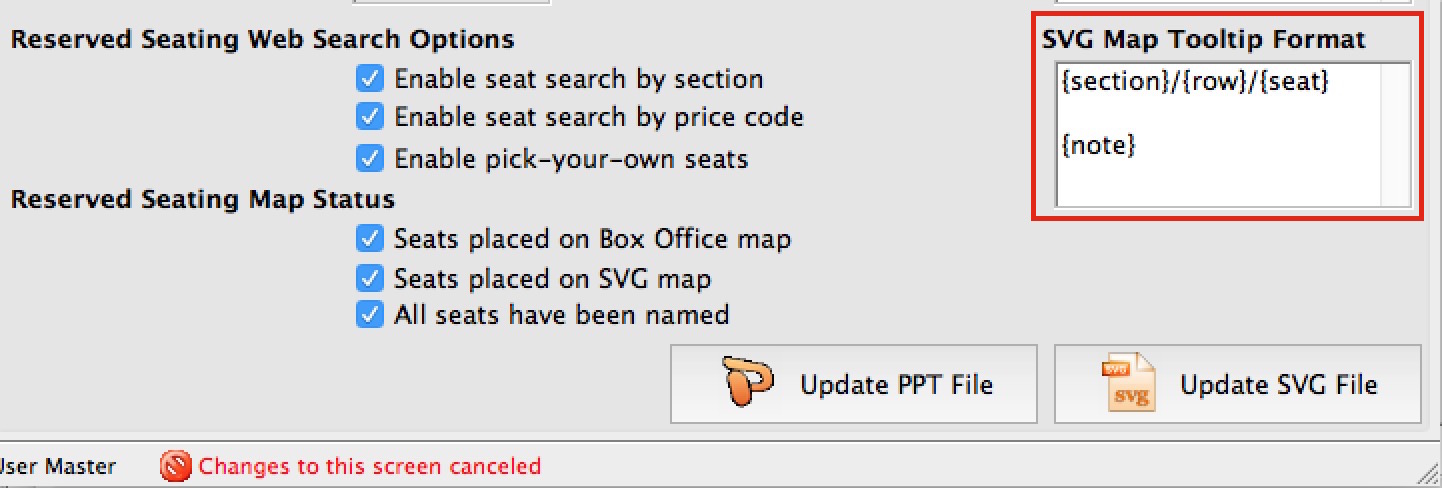 The example to the right causes the online map to show the {section}/{row}/{seat} and two lines below that, the seat {note} (if one exists).
To edit this field, simply type how you want the seat tip to look and which fields you want. You may use keywords, fixed text, and newlines to make it look as you wish such as:
- One or more of the following key words, in any order, which will be replaced by the actual values on each seat. Note: the { } are required and bolding was used for clarity only:
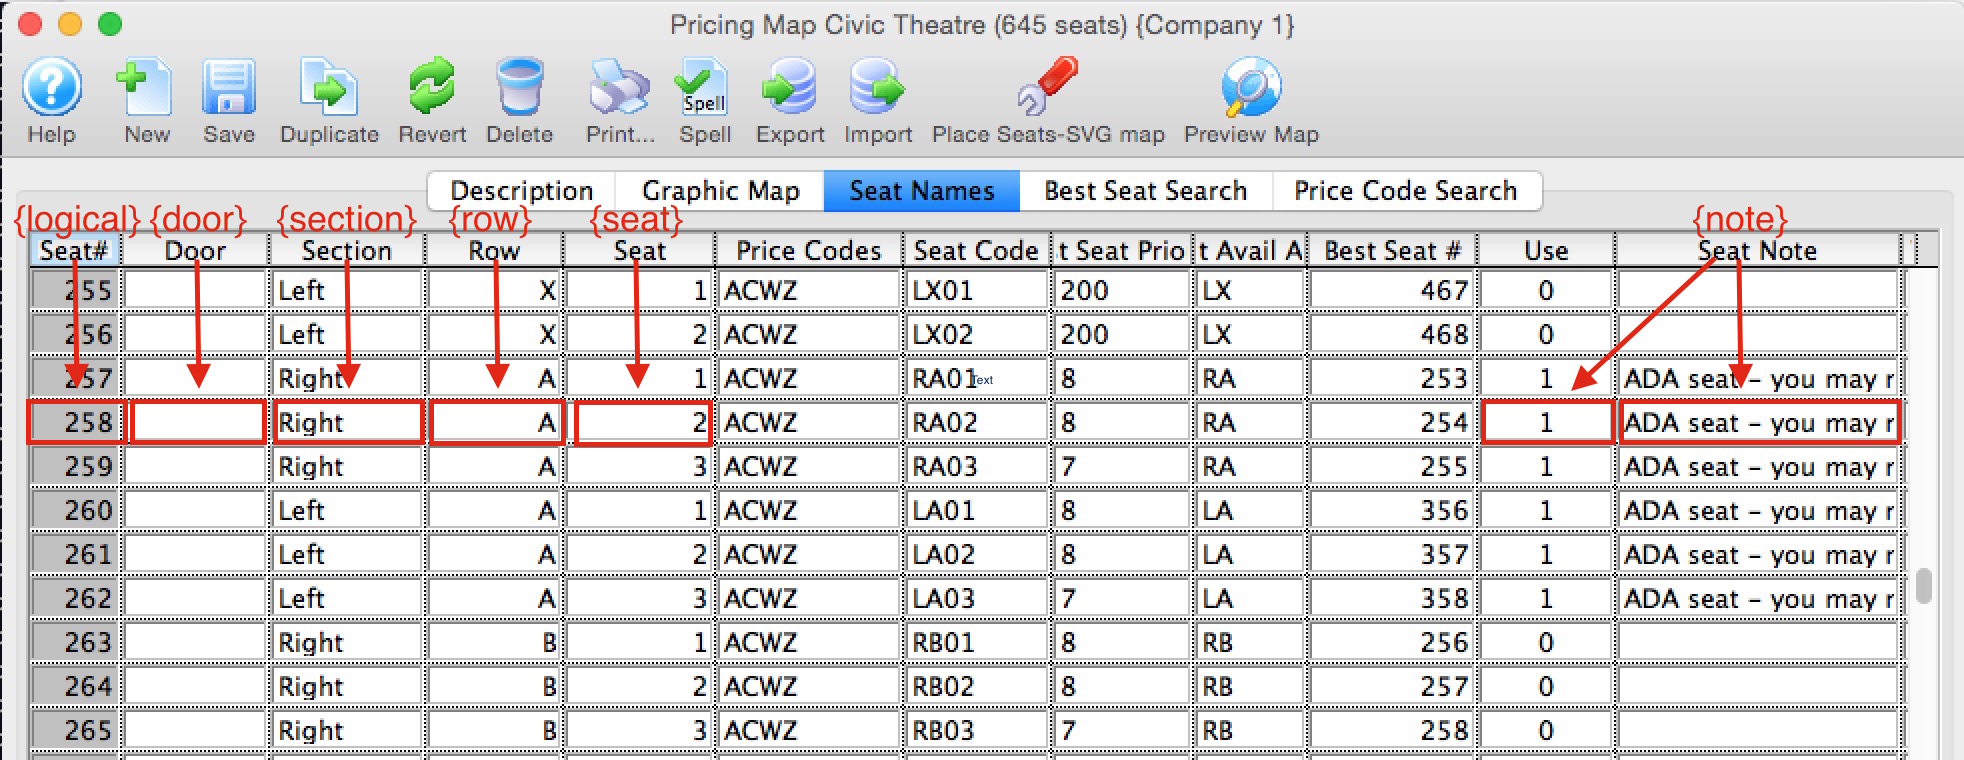
- {door} - adds the door description used for entry into the tip
- {section} - adds the section description to the tip
- {row} - adds the row into the tip
- {seat} - adds the seat number into the tip
- {notes} - adds the special seat notes to the tip - but only if the 'use' column in the seat names is set to 1
- {logical} - adds the logical seat number to the tip.
- Any standard text that you want which might assist the user. For example the tip can look like:
- {section} - {row} - {seat}
- Section: {section} Row: {row} Seat: {seat} Patrons should enter by door {door}
- Area: {section} Table #: {row}
- You can also add new lines if you want some data on separate lines
The diagram below shows how the seat tip fields relate to the columns on the Seat Names tab.
Place Seats SVG map Wizard
After preparing the SVG map per the previous instructions, you will need to use this wizard to merge the map with the rest of the programming code that will actually make it work. Fortunately, this is automated and is a quick process.
- Click the Place Seats SVG Format button on the toolbar to start the process. If you cannot, then make sure you have imported an SVG map .

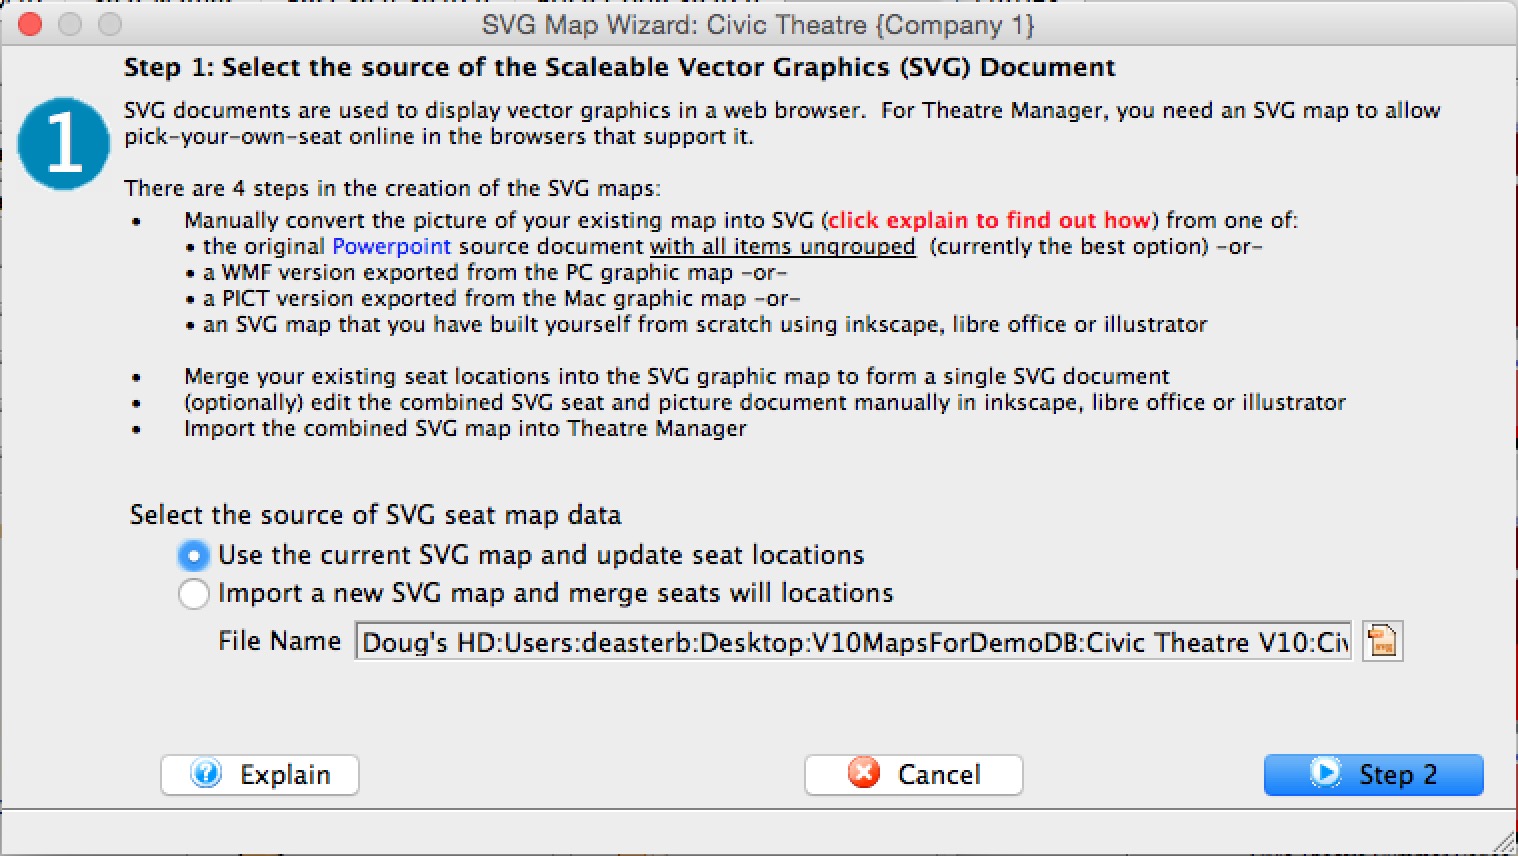
- The first step in the wizard asks you where to get your SVG map from. You can either:
- Use the SVG map that you have already imported into TM. If you select this option, it will replace all seat locations and seat tips in the existing map. This option may be best if all you are doing is changing seat tips, seat names, or have moved some seats on the graphic map.
- Specify the file name of the SVG graphics file and import a fresh copy prior to merging in the seat locations and tooltips. This option is better if you have completely edited or changed colours or background on the map and have made a new SVG file.
- Click Step 2 when ready to continue
-
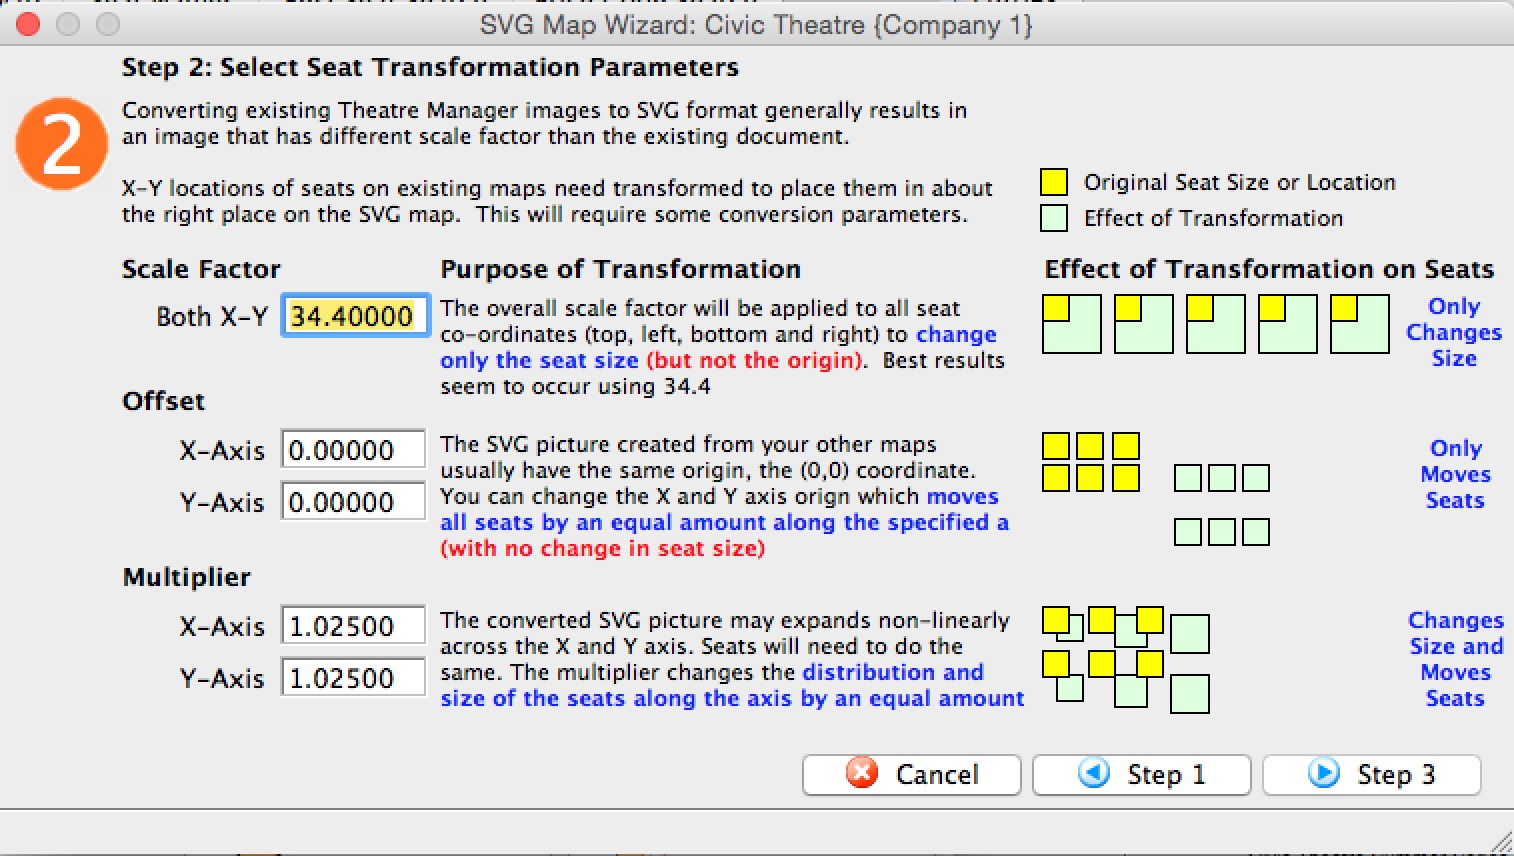
The second step copies the seating locations of the graphic map used for box office and automatically transforms existing seat locations so that they can be used with the SVG map.
Historically, different vector based image formats for the web use different scaling and origins. This means that X-Y seat locations for the box office maps have to be 'adjusted' slightly to work with the SVG map. This window shows the standard values that have been found to work with almost all powerpoint maps so far (providing that they have been cleaned up of a couple of things). If you are using an SVG exported from Powerpoint, you should not have to change any of these parameters - but in case you find you need to (eg: an export from Adobe Illustrator), the meaning of them are:
- Scale Factor (default is 34.4). Each seat on the map has a top-left and bottom-right X-Y position on the background image. The scale factor multiplies each X or Y position by the fixed amount to make seats 'bigger' but leave the origin of the seats the same. In other words, seats will not move - just get bigger to match the SVG background. (From customer reports, Adobe's setting may be 1.0 - meaning don't multiply)
- Offset (default 0.0). All maps and seats should start at the same origin, typically the 0,0 co-ordinate. If you want to move every object by the same amount in the X and/or Y direction, provide a value for the offset. This simply moves seats one way or another. It does not affect size or shape.
- Multiplier (default 1.025). This transformation is applied after the previous two. All seat co-ordinates are multiplied by the factors to stretch the seat locations out a little in the X and/or Y directions. (from customer reports, Adobe's setting is 1.0)
- Click Step 3 when ready to continue
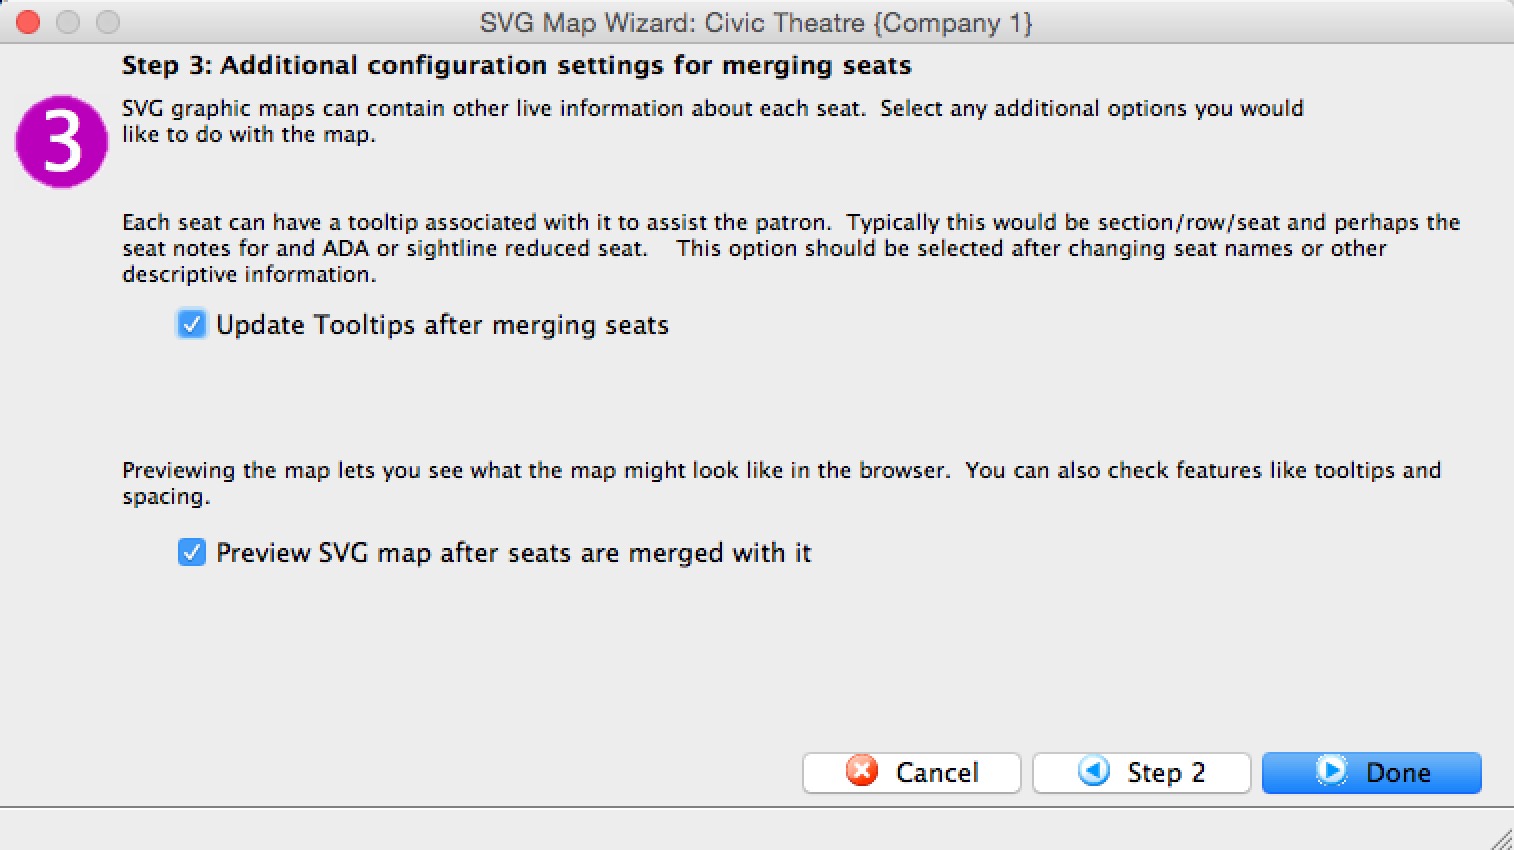
- The online maps have some customer assistance capabilities that can be added in. Select the ones you wish:
- Seat tips can be displayed when a patron hovers over a seat, or they can be left off the map.
- Indicate if you want to see a preview of the map after completing the process. It will open in your browser and you can interact with it by stretching it or trying the tooltips
- Click Done when ready to continue
Testing An SVG Map Online
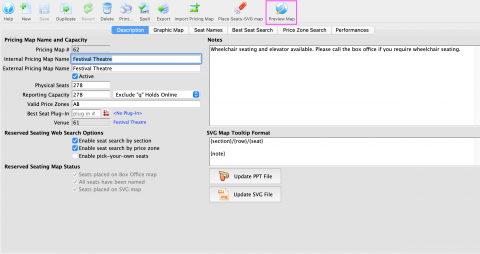
The Preview Button
After you have placed your seats on the Pricing Map, you can quickly Preview the Map Online by selecting the Preview Map button. This will jump you to the view of what patrons see online, and the preview displays the TM seats placed on the SVG file.
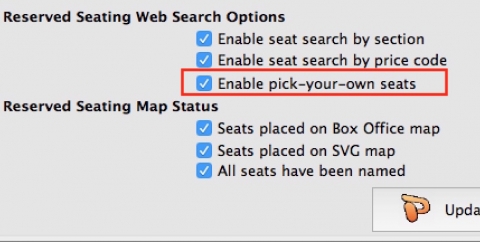
Enabling the Pick Your Seat Option
The online select-your-seat process has predefined computer code associated with each seat and it can be turned on in the Description tab of the Pricing Map itself.
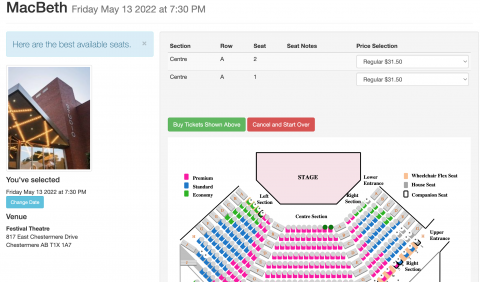
Testing online sales
You can test the online sales process by previewing the Event online, and running through the sales process. You can test all the Promotions, move from seat to seat, and test on mobile devices to ensure that the Map can be pulled and pinched the way you need it in terms of sizing.
Manually Editing an SVG Map
|
Editing an SVG map to add stylistic flourishes is possible, but Arts Management provides no support for maps changed in this manner. If an edit breaks the 'select-your-seats', you will need to figure out the cause or recreate the SVG map again. |
- OpenOffice (free)
- Adobe Illustrator CS6 (paid)
You must make sure that you do not change any of the SVG id and class markers that identify the seat locations for Theatre Manager. You can change a number of stylistic components, add legends, or do as you wish. Manually editing a map has some steps:
- You must have first:
- Used your PPT to create the initial SVG map
- and merged it with seat locations using the wizard
- Then you can do the following any number of times:
- Export the merged SVG from Theatre Manager using the Export button on the toolbar and selecting SVG - Format
- Edit it using one of the SVG graphic tools described above (Open Office, Illustrator) or any other one that you find works for you.
- Import the manually adjusted SVG Map back into Theatre Manager
- Preview the map
- Test using the map online to by tickets
Pick Your Seat - what the Patron sees

Select your own seats allows patrons to click on specific seats on a map online after an initial set of best seats has been selected by Theatre Manager. The process is designed for speed and flexibility for varying degrees of sales volumes. When the sales volume exceeds hundreds of sales per minute, obtaining seats through a pick-first process would be extremely difficult (can't click fast enough).
To ensure that patrons are satisfied, even in high volume scenarios, Theatre Manager uses the following process:
- First, offer patrons tickets using the best seats process. (Patron is now guaranteed at least those tickets)
- Then, allow patrons to spend as much time as they wish attempting to swap for seats more suited to their tastes, without losing their original seats.
- Also, allow patrons to 'reposition' the best seats algorithm by swapping for seats in the desired area, and then finding new best seats near the desired area.
The images below indicate what the patron will see online:
- The patron finds the event in the usual manner and clicks the buy button.
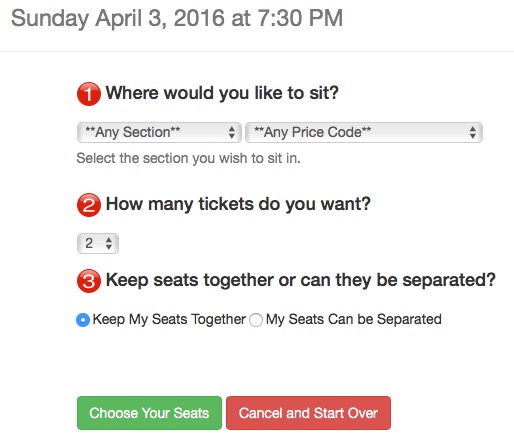
- They are presented with the normal quick selection process where they can select a location, price, quantity of tickets and whether the seats must be together or can be apart.
They then click the Find Best Seats to get a starting set of seats.
-
Seats are offered to the patron. They can change prices for the selected tickets and add them to the cart as they normally would. Alternatively, if they wish to have different seats, they can:
- Highlight:
- other seats in the map to get the new seats - or -
- existing seats in addition to new seats to get more seats - or -
- fewer tickets
- Click Swap for Selected Seats to change the tickets they are being offered -and-
- Repeat the above process as often as they want
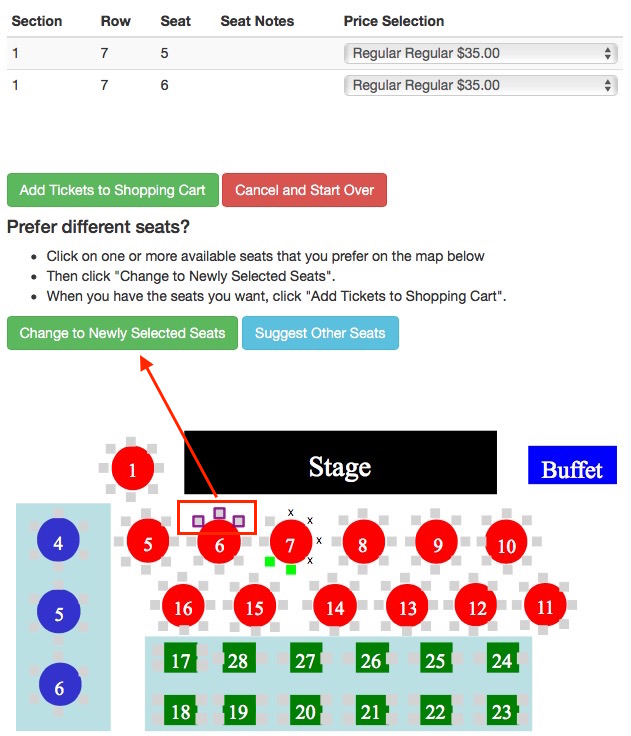
- Highlight:
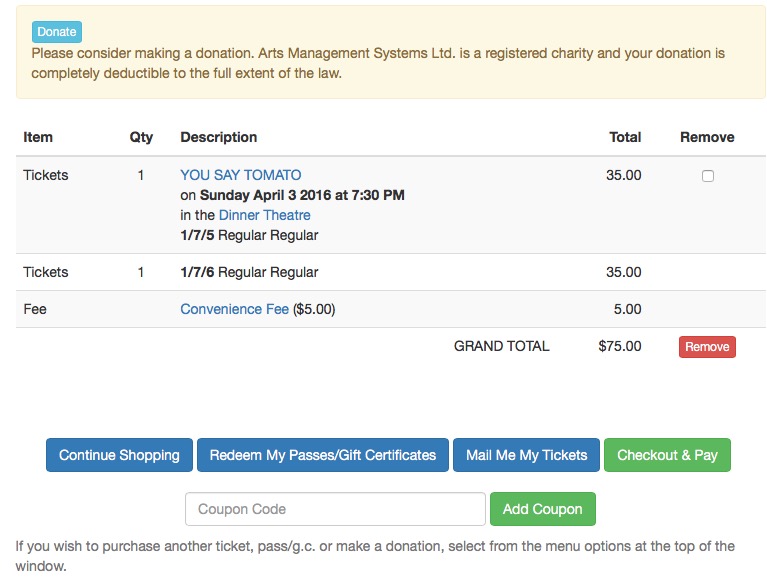
- When Add tickets To Cart is clicked, the most recent selection of seats in the top area is added to the cart.
Graphic Map Tab
- Creating the SVG map graphic:
- by either drawing it in a tool like Powerpoint or importing a completed map from another venue using Theatre Manager
- Adding seating locations to the graphic map that users/patrons can click on to pick seats
- Deciding which seats are typically held (i.e. default holds) upon the creation of a performance in that pricing map. Typical examples are: lighting/sound board, orchestra takeaway, ADA/Wheelchair seating, artist holds, development, media, and trouble seats.
- Defining the base pricing zones within the venue
- Creating social distance seats:
- Automatic holds for ADA companion seats
- Seats in a dinner theatre for two-top's so that a patron will not have a stranger sitting opposite
- With the Covid 19 pandemic, Social Distance seats that are held automatically when some are bought to maintain an appropriate distance between patrons in all directions.
-
Defining how you want patrons to enter the venue by creating order of entry zones within the venue. This is somewhat like airline boarding process where the flight attendant asks 'people in zone X to board'. The zone can be printed on tickets.
The difference is that you would design the order of entry based on minimizing interaction with people (instead of how much the patron paid or how often they came).
Draw: Building a Map
| Editing Tools Cheatsheet |
- Create the graphic map or picture of the venue for box office sales
- Set up your seating layout by placing seats.
- Set up or reorder the logical order of the seats on a map.
- When done changing seats, you will need to update the pick your own seats map for online sales
Parts of the Graphic Map Tab
 |
Selection arrow. |
 |
Adds a grid of seats to the map. |
 |
Adds a single seat to the map. |
 |
Removes selected seats from the map. |
 |
Zoom in on a selected section of the map. |
 |
Zoom out on a selected section of the map. |
 |
Aligns to the top of the selected seats. |
 |
Aligns to the bottom of the selected seats. |
 |
Aligns to the left of the selected seats. |
 |
Aligns to the right of the selected seats. |
 |
Evenly distributes selected seats horizontally based on the position of the end seats of the row. |
 |
Evenly distributes selected seats vertically based on the position of the end seats of the column. |
 |
Re-grids the seats allowing for adjusting the number of columns and spacing. |
 |
Duplicate the selected seats. |
 |
Flip selected seats horizontally. |
 |
Flip selected seats vertically. |
 |
Rotate selected seats 90 degrees to the left. |
 |
Rotate selected seats 90 degrees to the right. |
 |
Sort selected seats in ascending order. |
 |
Show / Hide seat numbers on the map. |
 |
High of the selected seats from 8 - 20. |
 |
Width of the selected seats from 8 - 20. |
 |
Set selected seats as squares. When selected prior to placing seats new seats will appear as squares. |
 |
Set selected seats as circles. When selected prior to placing seats new seats will appear as circles. |
Creating the Graphic for the Map - Step 1
Click here, for quick reference information for Venues and Maps
Theatre map graphics or pictures are not required if the venue is used for festival (General Admission) or Traveling Troupe ticket sales. If the intention is to sell reserved seats visually, a graphic representation of the theatre will need to be drawn in a graphic application and then placed into Theatre Manager. At this time, Arts Management recommends using a PowerPoint slide to draw the graphic image as it allows for small file size, and images can be saved in the correct format for both PC and Mac use.
|
If you intend to use the Select Your own Seats Online feature, your map will also need to be converted into an SVG file. You will need to have a PowerPoint or .emf file to start with, then convert it to SVG using OpenOffice |
Optimizing Graphic Map Size
|
Use vector based graphics (lines, squares, circles, letters, colour, etc) on your maps and do not use picture/image files (jpegs, tiffs, bitmaps, etc) or high bit depth (shadings and transparency) in order to minimize the size of the final graphic. Think simple - the graphic map that sits behind the seat squares does not need to be an elaborate representation of the venue. The purpose is to allow Box Office staff and online patrons to easily visualize the sections/zones within the venue. |
You can do a fantastic map with lines circles and colour using vector graphics and the file size will be 50K +/-. Adding a picture can jump the size to a megabyte without trying. Smaller file sizes result in faster performance transferring the maps from the database and building the suggested seat graphics for the web. Theatre Manager limits the graphic map file size to less than 500kb for PC's, less than 200kb for Mac's. Less is more.

Once you have created the graphic in PowerPoint, you can save it - as well as the SVG map - directly within the pricing map setup in Theatre Manager.
Adding the Graphic Map
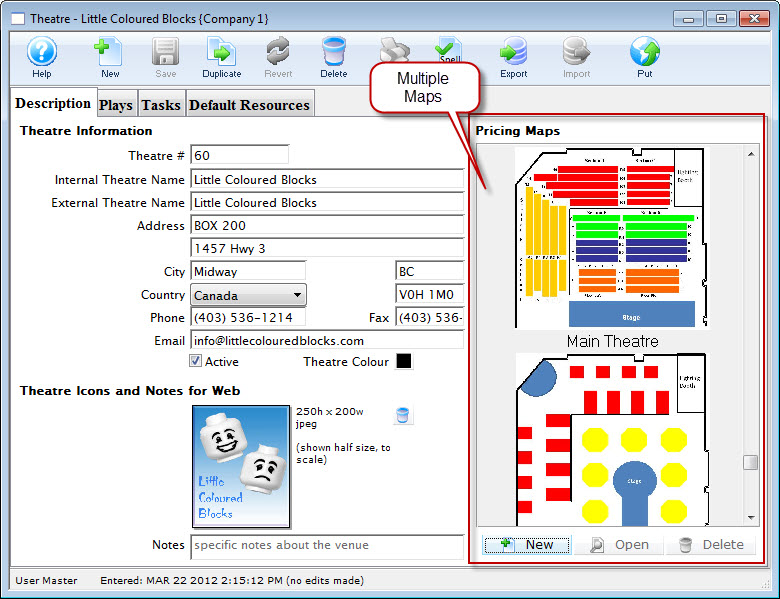
As noted earlier in this section, each Venue can contain multiple Pricing Maps.
- To add a new Pricing map, click the New
- Enter the Price Map Name and Capacity information.
- Enter the Price Codes you wish to use on this Pricing Map.
- Enable or disable the default Reserved Seating Search options you wish to use for this Pricing Map.
- Click here for more information about Enabling seat search by section.
- Click here for more information about Enabling seat search by Price Code.
- Click here for more information about Enabling Pick Your own Seats online.

The "Seats Placed" and "Seats Named" checkboxes will automatically populate when the map is complete.
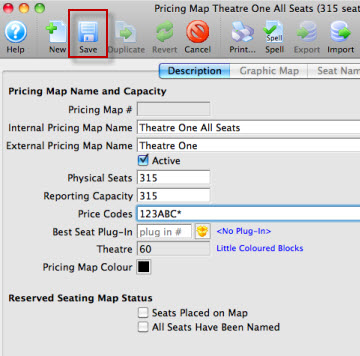
- When complete, click the Save
 button.
You can now add the Graphic Map.
- Click the Graphic Map
 tab.
tab.
The Graphic Map tab opens. Click here for more information on the graphic map tab.
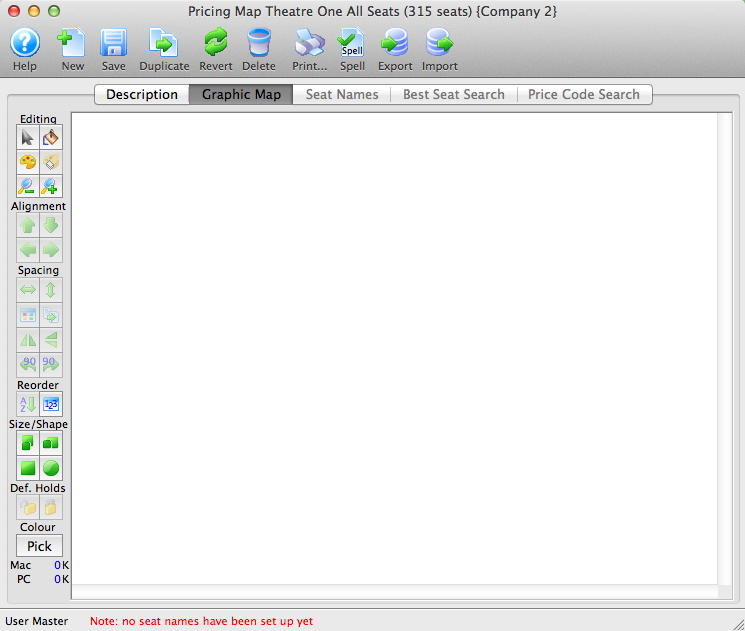
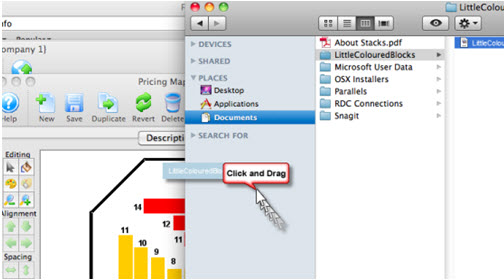
- Drag and Drop your graphic onto the Graphic Map page.
Click here for information on creating your graphic map in a program outside of Theatre Manager.
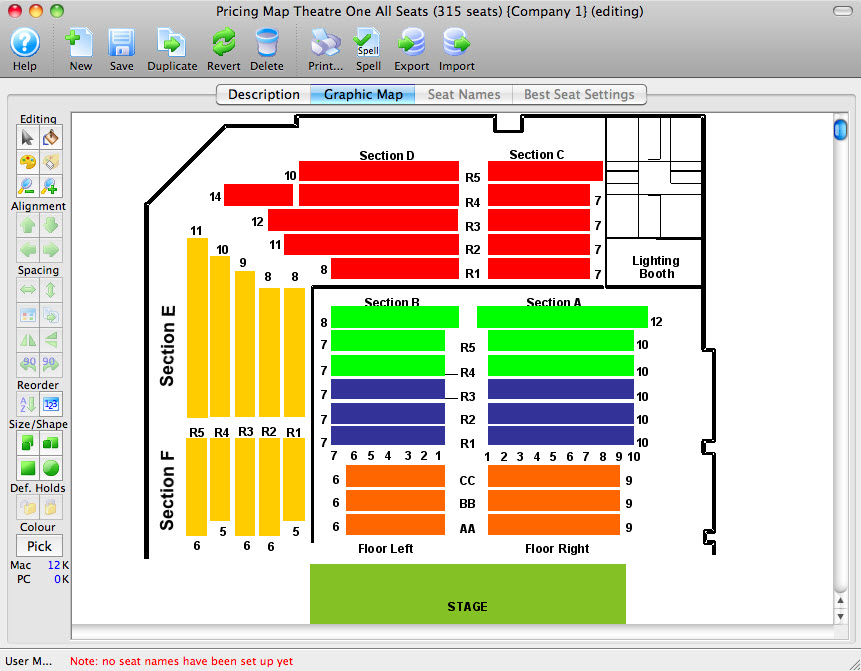
You can now add your seats to the map.
 button in the Theatre window.
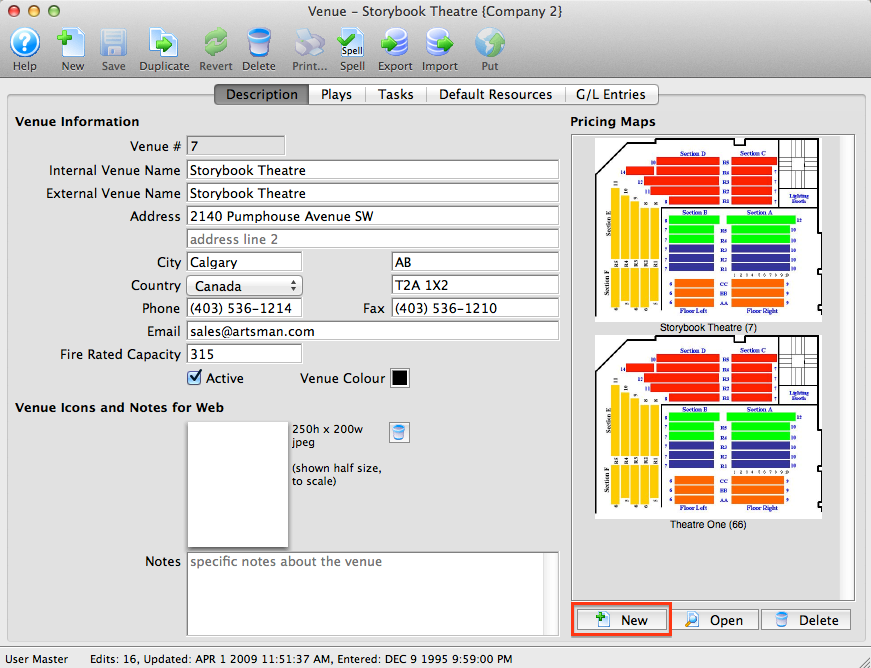
The Pricing Map opens. Click here for more information on the Pricing Map window.

Importing a Graphic Map
 |
All graphic maps start with e PPT document that is exported to an SVG |
When needed, open the PowerPoint image file in OpenOffice to create the SVG file.
The easiest way to place an SVG graphic map file is to simply DRAG the file from the folder it is located in and DROP it in the white space of the  tab in Theatre Manager.
- Open the Theatre Map Window.
Click here to learn how to access the window.
- Click on the Venue you wish to import a Graphic Map to, and then click the
Open
 button.
- Double-click on the Pricing Map on the right-hand side where you want to add a graphic.
- Click on the Graphic Map
 tab.
tab.
- DRAG the SVG file from the folder it is located in and DROP it in the white space of the Map Tab inside Theatre Manager.
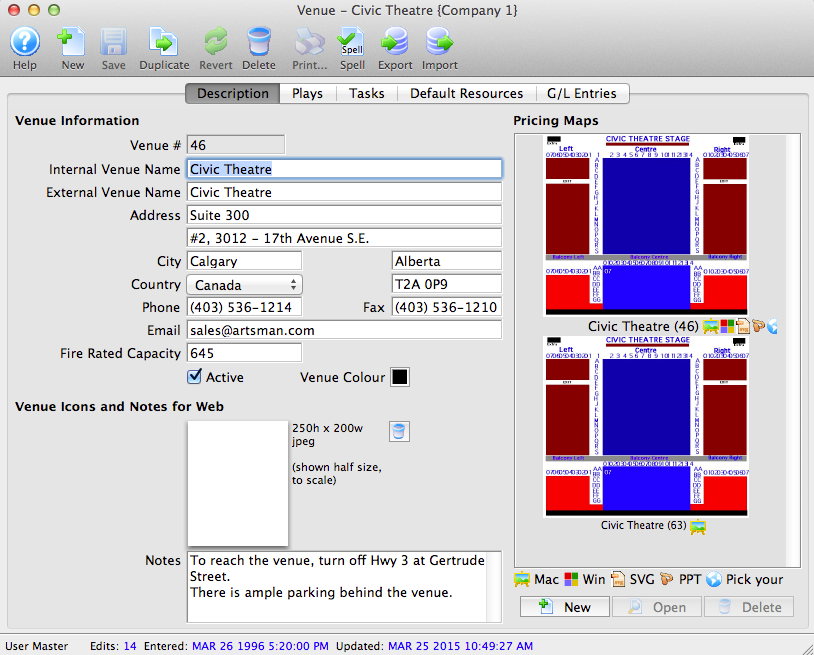
The Pricing Map opens. Click here for more information on the Pricing Map window.

Importing Theatre Map Files from other Venues
If your organization performs at another venue that also uses Theatre Manager, it may be helpful to import the Pricing Map they use rather than to build a map from scratch. You can edit the Pricing map later to reflect your Price Zones, however the graphic itself along with all the seats and their positioning can be imported into your database using this method. This can save you considerable time over creating a new Pricing Map. Please feel free to contact Arts Management Systems if you need assistance in discussing sharing the file with the other venue.
The map you wish to import must have been exported out of the neighbouring organization's database using the .tmm (TM Map Interchange) format.
To export a map using the .tmm format, perform the following steps:
- Open the Pricing Map that you want to save as a .tmm file.
- Click the
 button.
- Choose "TM Map Interchange Format (.tmm)" from the menu
- Save the file to a thumb drive or other location where you can retrieve it easily
To import a Theatre Map file, you would perform the following steps.
- Create a venue (if you do not already have one) for the imported Pricing Map.
- Open the Pricing Map Window for the venue.
Click here to learn how to access the window.
- Click the Import
 button.
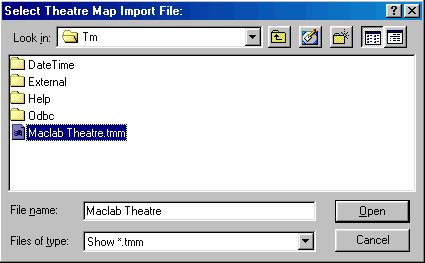
The Import Theatre Map window opens.

- Select the Theatre Map File you exported above.
- Click the Open
 button.
The Theatre Map window opens.
Add Price Codes to an Existing Pricing Map
Price Codes are composed of letters, numbers or characters and - in general - represent geographic regions of the venue. For example, "A" may represent the Orchestra Section, while "B" represents the Balcony. Furthermore, you can have multiple Price Codes on each seat that mean different things. An Orchestra seat may have both "A" and "1" enabled for "Single" (A) and "Subscription" (1) pricing.
When additional Price Codes are required for an event / play they need to be added at the map level. The Price Codes then become accessible in the Pricing tab of Events/Plays setup using the same map.
To add price codes, you perform the following steps:
- Click the Venue / Theatre
 button in the main Theatre Manager toolbar / ribbon bar.
The Theatre List window opens.
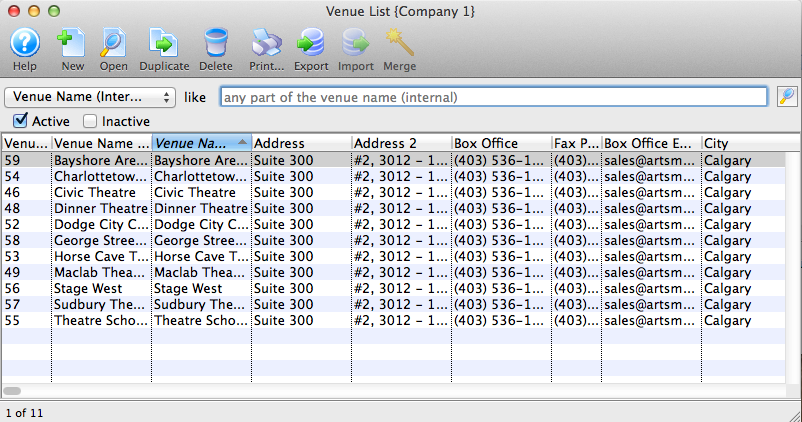
- Select the Theatre /Venue.
The Venue / Theatre window opens.

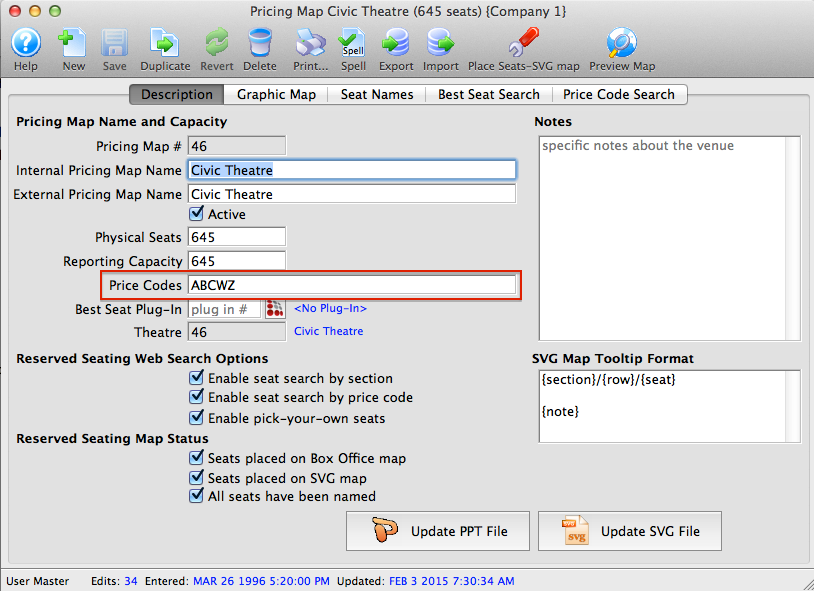
- Choose the Pricing map requiring the additional price codes (double click on it).
For more information on building a new map click here.
- Add the desired letter(s) to the Price Code field.

Price Code letters, numbers and symbols should be entered side by side without spaces, commas, dashes or other separators.
- Select the Seat Names tab at the top of the window.
For more informaton on the seat names tab click here.
- Add the letter(s) entered above in the Price Code column next to each seat needing access to this code. Alternatively the seat names can be exported, altered outside of Theatre Manager and imported back into the map.
For more information exporting seat names click here. For more information importing seat names click here.
- Click the Save
 button at the top of the window.
- Close the map.
The Price Code(s) have now been added to the Events / Plays using this map number. You may need to review existing Events / Plays to disable the new Price Code. You may also want to review the Disabled Price Codes field of your Sales Promotions to ensure the new Price Code is disabled where required.
For more information on disabling promotions click here.
Placing Seats on a Pricing Map - Step 2
When you use reserved seating, you need to place those seats on the graphic map in Theatre Manager. Prior to placing seats on the Pricing map, a graphic representation of the venue must be placed into the graphic map window. Click here for more detail. If the venue is non-graphical or will be used for festival seating (General Admission) or traveling troupe ticket sales, placing seats on the map is not required.
|
One of the keys to being successful in map building is to save your work frequently. |
- Click Setup >> Venue.
The Venue List window opens.
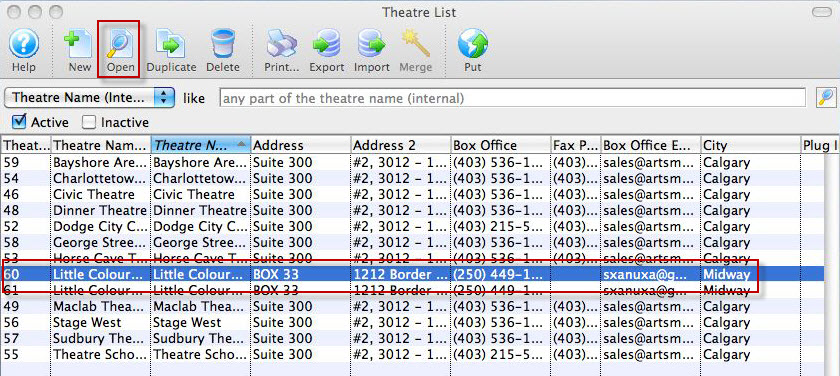
- Select the Venue, and click the Open
 button.
The Theatre window opens.
Click here to learn how to create a map if the map you want has not yet been created.
- Choose the Map you want to add the seats to and click the Open
 button.
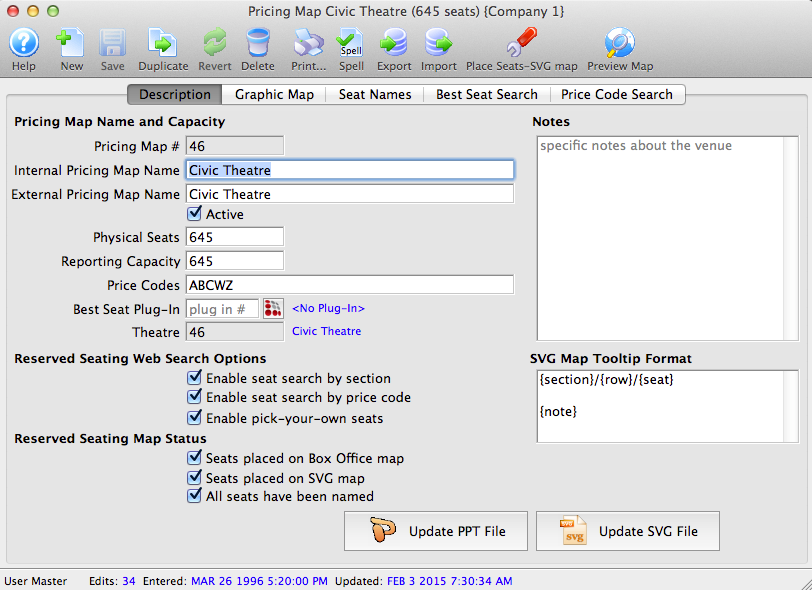
The Pricing Map window opens.
Click Here for a detailed description of this window and it's functions.
- Click the Graphic Map
 tab.
tab.
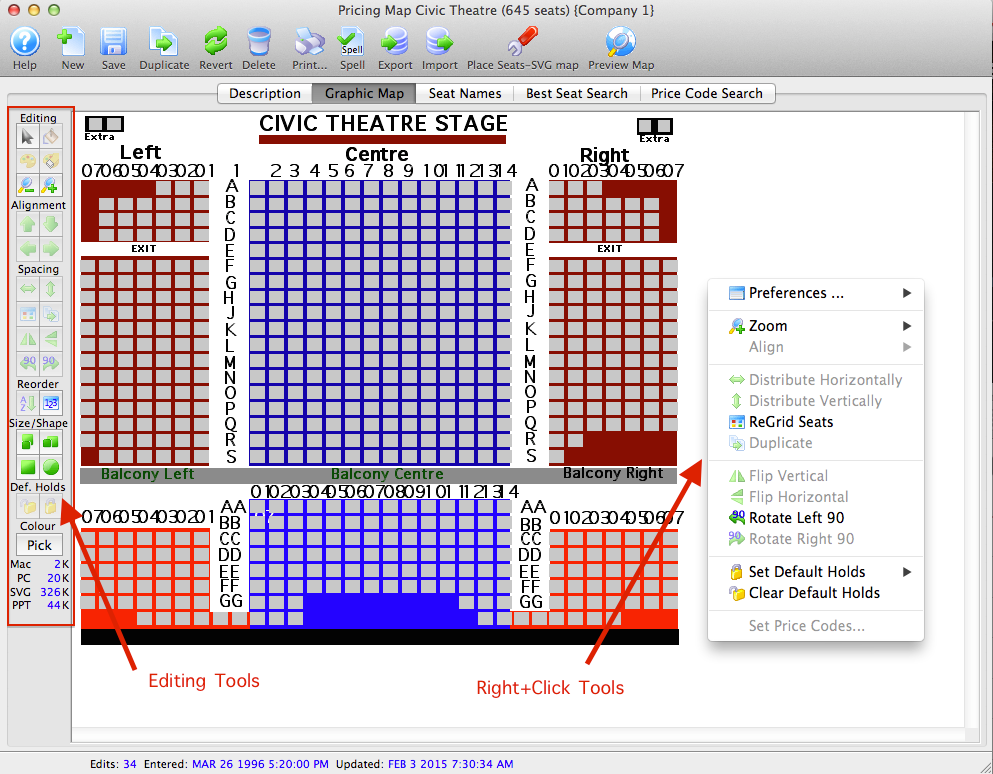
The graphic map window is displayed. You use the editing tools and the right-click menu tools to add your seats to the map.
- Decide if the seats will be square or circular.
Select the appropriate shape button

 .
.Round seats typically indicate "wheelchair" or ADA access seats.
- Click Add Grid of Seats
 button.
This will open the Add Block of Seats window to add a section of seats. The Add Seat
 button adds single seats to the map.
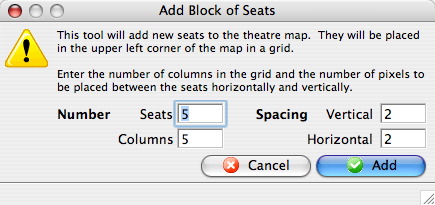
Number of Seats Enter the number of seats to be added. (It will default to the total number of seats remaining to be added to the theatre and will decrease as seats are added). Number of Columns Enter the number of columns (left to right) to place the seats into a grid. Spacing Vertical The number of pixels of vertical spacing (up and down) between the seats. Spacing Horizontal The number of pixels of horizontal spacing (left and right) between the seats. - Click the Add
 button.
This will place a grid (block) of seats in the upper left corner of the theatre map. Click on one of the added seats and drag the grid of seats into the appropriate place on the theatre map. Continue adding seats (grid by grid) until the total number of seats have been placed on the graphic representation.
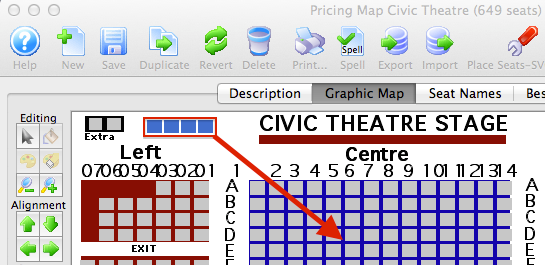
- Click the Save
 button.
Save frequently while adding seats. If an errors is made the Revert
 button can be used to return to the last saved point.
 - Select a row or column or seats.
Place the mouse above the upper left corner of the first seat to select, click and hold the mouse button and encircle the seats to align. Release the mouse to highlight the seats. To select multiple seats hold the <SHIFT> key and click on each seat.
- Duplicate similar section of the venue as needed.

Duplicates selected seats. 
Flips the selected seats vertically. 
Flips the selected seats horizontally. 
Rotates the selected seats 90 degrees to the left. 
Rotates the selected seats 90 degrees to the right . - Align the seats.
Once all the seats have been placed on the graphic representation, use the alignment buttons to ensure seats are straight within each row and column.

Be careful to not align a group of horizontal seats to the left or right (or vertical seats to the top or bottom) as they will "stack" on top of each other, and then need to be deleted and re-added.

Aligns the selected row with the top most seat in that row. 
Aligns the selected row with the bottom most seat in that row. 
Aligns the selected column to the left most seat in the column. 
Aligns the selected column to the right seat in the column. Ensure seats are evenly spaced and distributed using the functions described below.

Evenly distributes the selected seats horizontally. 
Evenly distributes the selected seats vertically. 
Opens the Distribute Seats Window allowing the selected seats to be distributed both horizontally and vertically. 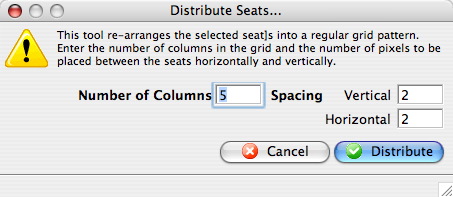

A few handy tricks when placing seats:
- Create a "ruler" out of 6 horizontal seats to use as an alignment guide for vertical columns. Do the same using 6 vertical seats to align rows. This allows you to easily align two seats directly over the last block of seats, two "spaces" representing an aisle, and two more seats directly over the next block of seats. Now you have perfect aisles.
- When placing seats individually in a horizontal line, place the first (and only the first) seat at the correct height. Place all subsequent seats in that row slightly below the correct height. Then use the alignment tool to bring all the subsequent seats up to the level of the first (and only) perfectly placed seat. The same is true for vertical placement (left and right).
- If your rows are offset (Row A has 17 seats, Row B has 18 seats, Row C has 17 seats, etc.), once you have the seats roughly placed, select the first seat in every other row by Control+clicking on them, and aligning them to the left or right. Then redistribute the seats in that row based off the perfectly placed first seat.
- While it may be enticing to place the seats in an arc if your venue is set up this way, because the Box Office will be selecting the seats by drawing a line through them or a box around them, arcs make it difficult to select seats in a single row. The best way to place the seats is always in a straight line.
- If you have side sections that are identical but oddly shaped (each row is a different length), build one section, then highlight it completely and use the duplicate tool, then the flip tool to add the opposing side.
- Click the Save
 button.
When all seats are placed the next step is to arrange the seats in a logical order so Theatre Manager can connect each seat to its name. Click here for information on reordering logical seats.

- Select the seat(s) that you want to hold on the graphic map. Then click on the hold tool, and select a letter code to hold the seat(s) with.
- When you are done, choose the Save
 Button.
Determining the color of sold seats on a map
In the creation of the graphic map, the image is actually performing many roles which are:
- Allowing you Draw and move seats (in this mode, they are gray)
- Set default Holds for the venue
- Show price zones which also allows you to set the Highlight color for price codes and sold seats at the box office.
- Set Social Distance seating
- Set Entry zones into the venue
When selling seats, the display color of the seat is determined when the map is created. You can determine the color of the sold seat by either:
- The Sales Promotion group used to sell the seat
- The Price Code used to sell the seat
|
If you add/change Map Display Letters on a Sales Promotion, you may want to update the map colours as described below. If you do not, the standard sold color of a yellow background having a text color of black will occur for the new/changed items. |
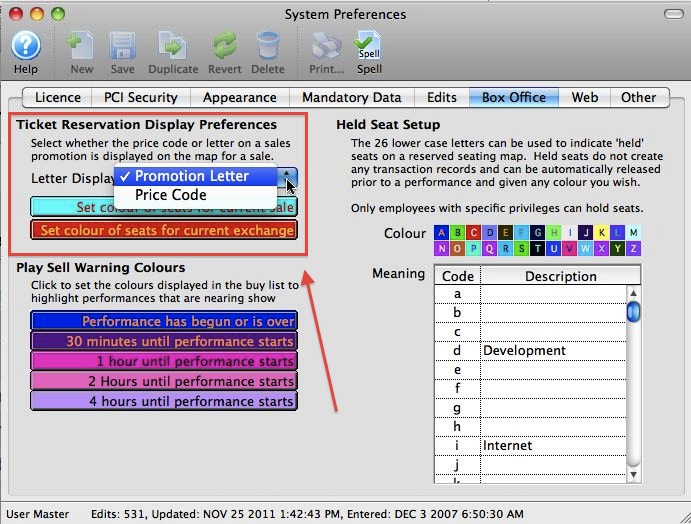 The setting that determines which parameter the colour will be based on is found in Setup -> System Preferences -> Box Office tab, in the Ticket Reservation Display Preferences area.
Click Zones under the Graphic Map tab
Initially, when you show the Pricing Zones on the map, all the seats are displayed as grey
To set the colours for sold seats:
- Click the colour button at the top right corner of the tool bar to change the colours. Theatre Manager gets all the letters from the price codes or sales promotions (depending on what you show on the map) and places them in a random fashion on the map.
- Click on a seat to change the color for that Sales Promotion Letter/Price Code when that letter is displayed on the map in sale mode.
- Choose a colour from the colour palette.
- Click
 to finish 'pick' mode. All seats will return to gray.
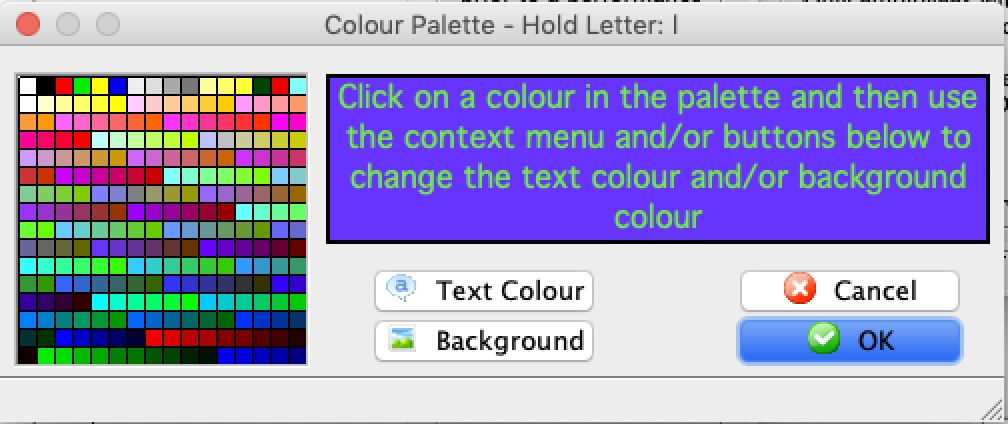
You can use the same process to change the 'unsold' seats from their default gray to another color. Simply click on a gray seat while in 'Pick' mode and set the color to your desired choice.
The actual colors are not visible to the user until the seat is sold, even though it is set in design mode.
Creating the Logical Seat Order - Step 3
Once you have placed all the seats on the map, the next step is to set those seats into a specific order so that the system can assign them the physical seating descriptions.
Each seat has its own number called a logical seat. The logical seats start numbering at 1, and continue through to the physical number of seats in the theatre. This is analogous to having a serial number stamped under each seat.
Since there are no two theatres, arenas, or performance spaces that are exactly alike, it is very difficult for Theatre Manager to automatically know what the seat names will be in the real world. Each seat in the Map is assigned a logical seat number, and those numbers can be arranged as needed. Once they are in a sequence that is easy to predict, each logical seat number is assigned a name. For example:
- Logical Seat # 1 would really be called Section Right, Row A, Seat 1.
The "serial numbers" just need to be arranged sequentially, and then named in the same sequence.
- Click the 123
 button on the left of the map.
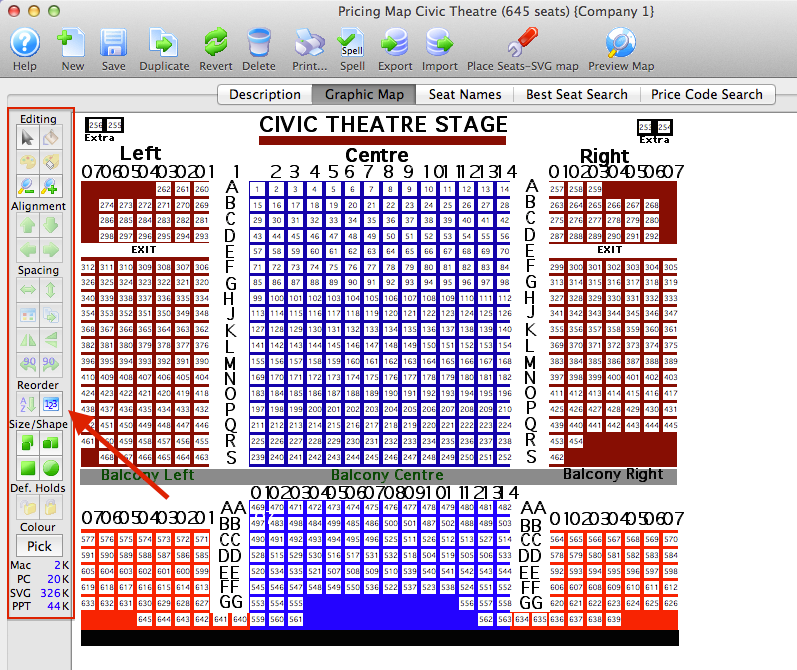
This shows each logical seat number, in the order that the seats were laid down. The number might be difficult to see, depending on the resolution of the monitor. Zoom in on the map for a closer view or hold the mouse over a seat to see its logical seat number.
- Select a section of seats to reorder.
This is done by clicking the mouse outside of a section of seats, holding down the mouse button and dragging a box around the section. Hold the Shift key on the keyboard while dragging a box to select multiple sections.
If there are multiple sections in the space, it may be easier to reorder the sections one at a time. If the space is arranged in rows and columns, and is roughly rectangular, it can be reordered all at once.
The reorder routine works horizontally and vertically, so seats must be in even rows and columns to work correctly. If a seat is above another seat, it will be assigned a non-sequential number based on the direction that is being reordered from.
For venues that have seating on angles, each row may need to be reordered individually to ensure each seat within each row gets the next sequential number.
- Click the Reorder
 button.
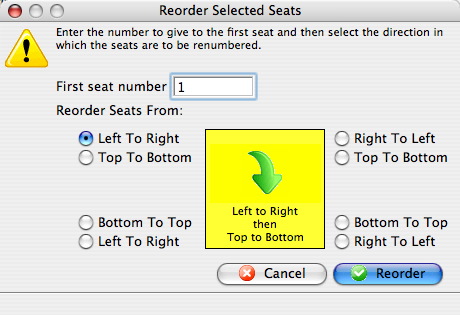
- Enter the first seat number for the section being reordered.
If reordering the first section, start with seat # 1. If reordering a section, after having already reordered other sections, make sure the seat number is the next sequential number from the last seat in the section previously reordered. This will ensure logical seat numbers are not taken from seats that have already been reordered.
- Decide which direction to reorder the seats.
Seats can be reordered starting in one corner, horizontally then vertically, or vertically then horizontally. Select the starting point from the sets of radio buttons surrounding the yellow square. The note inside the yellow square will indicate the direction Theatre Manager will sort the sequence.
- Click the Reorder
 button.
- Repeat steps 2 through 6 to reorder any other sections.
Once the seats have been reordered, you are ready to begin naming the seats. For more information of naming seats click here.
|
A few handy tricks when setting the Logical Seat order:
|
Holds: Setting Default Holds for Pricing Map
- House helds and trouble sats
- Obstructed sight lines
- wheelchair, handicapped and companions seating such as for the ADA seating (although, this might be better implemented in a much better way using associated/social distance holds for companions seats)
- Sound boards and other venue holds
- Typical artist holds - although, if these vary from performance to performance, they should not be placed in defaults holds
 |
Changing holds in this window only affects:
|
 |
After selectiong a range of seats, click this icon to remove the seats from the default venue hold . None of the existing performances will be affected. The default holds only affect future events that are created and the 'return to hold' map. |
 |
Creates a default hold code for the seat in the venue. Any new events created using this venue map can have these seats held automatically. Also, if the performance uses the standard 'return to hold' map for the venue, then any time a ticket is returned that is for one of these default holds, the ticket will be put back on hold. This provides a way of 'protecting' the seat. |
| Clears any default holds from all seats in the pricing map. Use this if you want to start with a clean slate. | |
 |
Zoom in on a selected section of the map. |
 |
Zoom out on a selected section of the map. |
Price Zones: setting base pricing zones
 |
Pricing zones can also be typed in or imported in the Seat Names tab since they are part of the seat name table. |
|
|||
 |
To use it:
|
||
 |
Zoom in on a selected section of the map. | ||
 |
Zoom out on a selected section of the map. | ||
| Price code selection |
|
Social: Creating Social Distancing Setup
Theatre Manager has provided this feature for years (formerly called associated seats) and it can be used for a variety of purposes such as:
- Automatic holds for ADA companion seats
- Seats in a dinner theatre for two-top's to avoid a patron sitting for dinner with a stranger sitting opposite.
- Similarly, Social Distance seats are held automatically when a groups are bought to maintain an appropriate distance between patrons in all directions.
 |
Before using the social distance seat function, be sure that you already have set the social distance/associated seat hold letter in System Preferences |
 |
Social distance seats can be exported as part of the Seat Names tab and imported into other similar pricing maps for tweaking. |
 |
If you want every seat in the pricing map to have a social distance barrier, then you have to set social distance seats for each and every seat in the venue. |
 |
If you have permanent house helds (eg for light board), DO NOT set social distance seats for permanent holds. Instead, set the rest of your social distance seating as if those seats are not there. If you want to make those permanent holds look like they are blocked, set the hold letter to 'q'. |
You can mix and match any of these purposes on a single map.
The functions are described in the following:
| Click on a seat |
|
||
| Select a range of seats |
Use SHIFT click on other seats to make non-rectangular selections. Those seats with:
After seats have been selected CLICK on one of those seats with a 'Q' in it and a menu automatically pops up allowing you to do one of three things (see image below):
|
||
| Clears the associated social distance seats from the selected seats. Use this if you want to start over for a range of seats. | |||
 |
Zoom in on a selected section of the map. | ||
 |
Zoom out on a selected section of the map. | ||
|
|
Back a seat - you can use this button to go back one seat and see what the associated social distance holds are for that seat.
The seat order is determined by the logical seat order set up in the Draw tab which may not the adjacent seat when you look at things visually. Using this feature, you can quickly scan the seats in a venue to see what is associated, without needing to click on them all. |
||
|
|
Forward a seat - you can use this button to go forward one seat and see what the associated social distance holds are for that seat.
The seat order is determined by the logical seat order set up in the Draw tab which may not the adjacent seat when you look at things visually. Using this feature, you can quickly scan the seats in a venue to see what is associated, without needing to click on them all. |
||
|
|
For example, a seat with an '8' in it is references by 8 other seats. Selling any one of those 8 other seats would result in this seat being held. Use this to determine if there is an anomaly in how you set things up. For example, if one seat in the middle of a number of '8' seats shows a '3', then there is probably a mistake in how some associated seats were set up to reference that seat. Seats closer to aisles or edges of the theatre seating should have lower usage numbers.
|
||
| Holds |
You might have tech holds in the venue, or the first two rows held that will never be sold. If this is the case, you may have a natural social distance barrier that behaves like an aisle. You don't have to include those held seats in the social distance seating. |
||
| Verify | This goes through all social distance seats and to determine if there is a conflict with any of the holds. Refer to the Verify Social Distance web page. |
Verify Social Distance
 |
It is very important that holds on a venue DO NOT conflict with social distance holds.
In other words held seats for things like lighting boards, ushers, donors, cannot appear as a 'q' hold for a social distance seat. The different types of holds must be mutually exclusive. |
Verifying Social distance holds
After you have set up all your social distance holds, you need to verify them against the permanent holds (return to holds) that you have set up for the venue and make sure they do not overlap.
In the image to the right, the Holds button was checked and you can see some of the permanent holds added to the venue. In this example, they are 3 aisle seats on the left side of the venue.
To find out if there are any conflicts with these holds, click the verify button. A conflict is defined as
- any social distance hold that uses one of these 3 holds as part of their social distance seat holds
- or, in other words, if you click on a seat to sell as social distance, is this permanent hold seat part of what would be held as a 'q' hold
Message shown for a conflict
After clicking the Verify button on the left, the system will look at all seats to see if there are issues. if it notices any conflicts, you will see an error message that pops up which looks similar to the one on the right.
Heat Map of Conflicts
The social distance map will change to show a 'heat map' to show:
- which seats conflict with the permanent holds
- how many times the seat conflicts
In the image to the right, you can see:
- the numbers 1, 2 and 3.
- For example:
- the seat marked 3 means that it conflicts with 3 holds.
- The seats marked 2 conflict with 2 holds.
Fixing a conflict
In all cases you need to fix these conflicts. In the example to the right, I clicked the seat marked 3 on the heatmap.
It show
- that the 3 aisle seats that are permanent holds will also turn into 'q' holds
- when sold - this is a conflict, because when released, they will be returned to hold, which will also return to old any seats that the hold seats are associated with.
To fix the seat
- select the social distance seats EXCLUDING the the three hold seats as per the image below.
- Pick the seat in the middle and set the seats as centre of the social distance map
- repeat for all seats in conflict.
- click the verify button again to make sure all conflicts are removed.
Entry Zones: setting the order of entry for patrons
- want to seat people at the front middle section of the venue first, followed by aisle seats.
- have a balcony where you can simultaneously seat people at the same time as the main floor
- have a number of entrances where you scan tickets that let people fill in different sids of the venue without coming into contact with each other
 |
This feature may seem familiar to the airline boarding process where an attendant calls Zone 1, then Zone 2 etc.
In a venue practicing social distance, the zones should be built in a way that lets people enter with minimal contact, both in lining up outside the venue and entering in. I.e. it wouldn't be price based |
 |
You do not need to use zones for managing entry into the venue. However, if you do, the zones will need to be added to the printed ticket faces. |
 |
Entry zones can also be typed in or imported in the Seat Names tab since they are part of the seat name table. |
|
|
|
| This will animate the entry zones to show you how people will be seated in the venue. The order of display will be 1-9 then A-Z, with a second between each letter. | |
| Clears any default holds from all seats in the pricing map. Use this if you want to start with a clean slate. | |
 |
Zoom in on a selected section of the map. |
 |
Zoom out on a selected section of the map. |
Zone will appear by default on the Print at Home Ticket without customizing.
Seat Names Tab
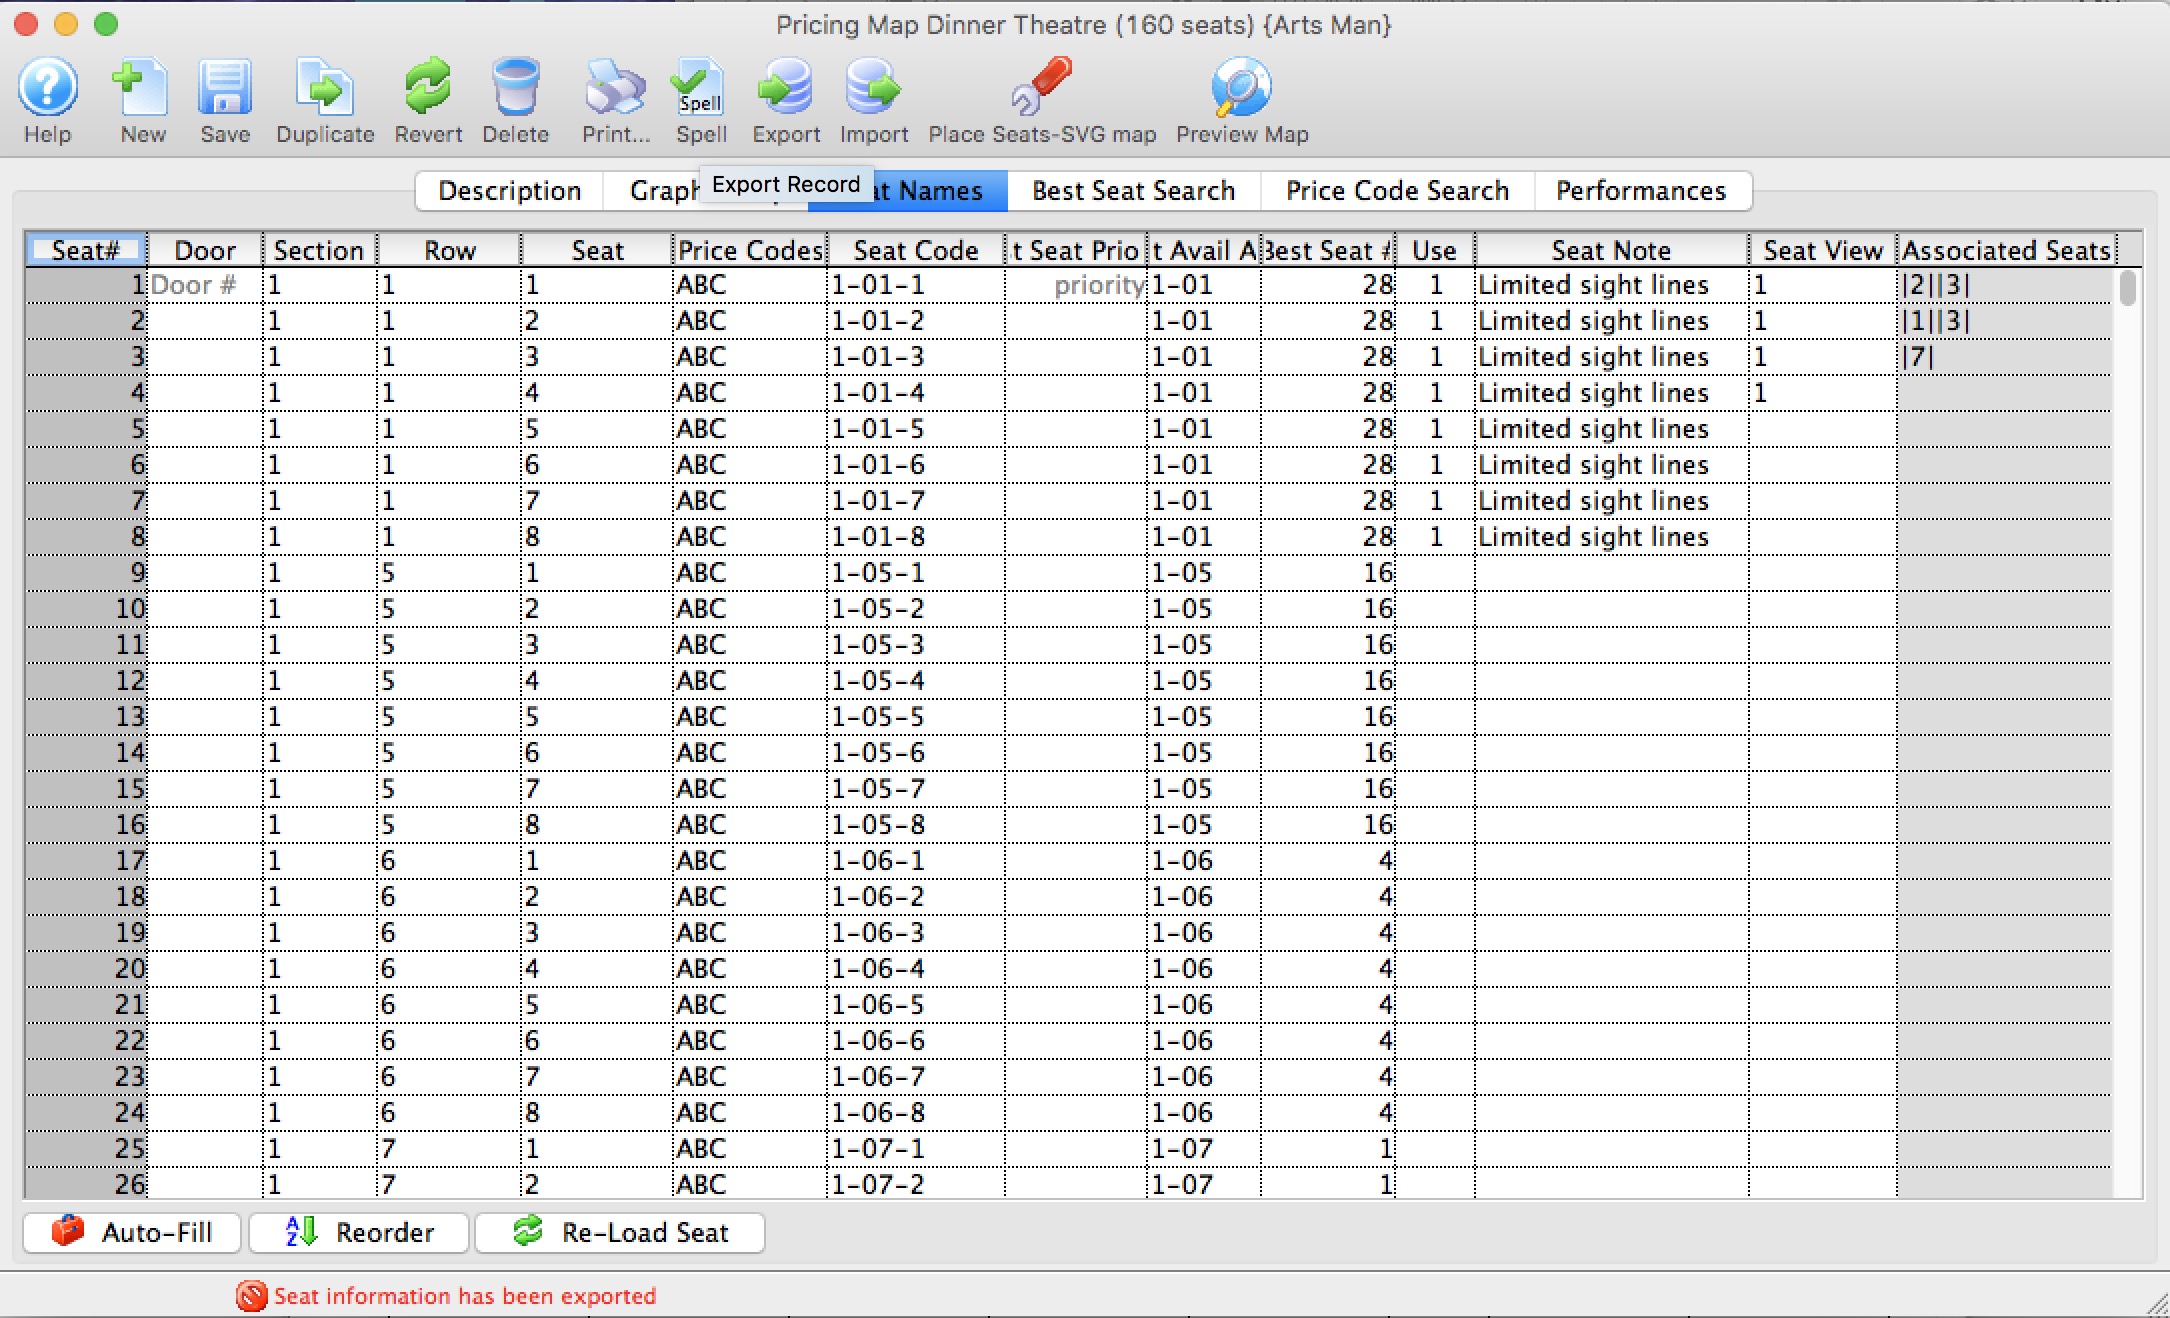
 |
Making changes to the Seat Names file of existing maps used for events either active or past may affect the tickets sold in terms of placement. If you are concerned about ramifications of making edits to "live" maps, please contact Arts Management Systems support at support@artsman.com prior to making them.
Changes that fixing spelling mistakes to seat names or alter the best seat area, number or seat notes may only affect the sales process and have less downstream consequences. |
 |
After changing seat names, notes or other values in this table, you waill need to use the Place Seats on the SVG map button to update the pick-your-own map. |
 |
Refer here ADA seating, if necessary. |
Parts of the Seat Names Tab
| Seat# | Determines the seat on the graphic map that this seat information applies to. This is the Logical Seat Number.
This number:
|
| Door | Door is completely optional. It can be used for venues that wish to tell the patron which is the easiest way to enter the venue so that can proceed to find where they sit (eg Door 5 or East Gate, etc). |
| Section | Section of the venue the seat is in. Examples are:
Do not put any other information into the section (i.e. do not put entrance door, or row number in it. Special case: if this is a Standing Room Only seat or a General Admission Seat in a reserved seat venue, then use the first word only ('Standing' or 'General') for section, the second word for row and the last word for the seat. |
| Row | Row name within the venue. (if Standing Room Only or General Admission Seat, use the middle word) |
| Seat | Seat number within the row. (if Standing Room Only seat or a General Admission Seat, use the last word) |
| Price Zones |
This is the Price Zones available for this specific seat location. Each seat must have at least one Price Code, and can have several Price Codes associated with it.
NOTE: generally there is only 1 price zone per seat, and more than two means you are probably not using sales promotions effectively eg Adult and Child are not price zones, they are two sales promotion discounts applied to the same seat. Refer to setting Price Zones in the venue if you want to do it graphically. |
| Seat Code |
Unique seat code representing this seat location. Typically, this is a combination of the Section (often abbreviated), Row and Seat to form a unique code for each seat to be used by the system.
You may need to have some leading zeros in your seat codes to handle a desired sort order when printing tickets. |
| Best Seat Priority |
This field is mainly used in conjunction with a database plug-in when making best available choices. It can also be used to select specific seats as a first offering like the aisle seats may be set to {1} as a priority so they would be offered first.
While this column is rarely used, it is designed so you can rank seats across the entire venue for relative equivalency for a plugin. For example all aisle (and companion seats) might be considered very good. Those seats may have equivalency with front row balcony. The a 'best seat' plugin could been used to 'find only seats that are considered xx good or better' for a person who has donated at a certain level or more. Values of this field are between 0 and 255. |
| Best Available Area |
A CONTIGUOUS Mini Area within a row or 'box' that the seat is located.
If you need to allow singles at the end of a row (or allow three out or four seats at a table to be sold) refer to the two seat pass system. Otherwise Theatre Manager will NOT sell the seats if it leaves a single. |
| Best Seat # | Determines the best available seat within the venue. This number is used for best available seating within the order purchase window. It also determines the order in which seats are available for internet sales. These numbers are always sequential and always unique. |
| Use |
Determines if a seat note should be displayed for this seat.
Set 'Use' to '1' if the seat note can be displayed, otherwise leave it blank. |
| Seat Note | Allows you to add a note for online sales to specifically notate this seat (such as "Partially Obstructed", or for ADA requirements: "Wheelchair," or "Removable Seat."). This information can appear online to web purchasers. |
| Seat View | Allows you to add a URL to an image of the stage from this seat (or range of seats). Adding a jpg or gif to your tmGifs folder and referencing it here can display to your patrons a "view from this seat" image. Generally, you add only a handful of images, rather than a single image for each individual seat. For more information click here. |
| Associated Seats / Social Distance |
This specified the other seats associated with this seat. If a seat is associated to one or more other seats, those other seats will be held if possible during a sale online - and taken out of use. This could be useful for:
|
| Entry Zone | The entry zone is a way for you to specify the order in which you want patrons to enter the venue. It can be considered like the approach airlines use. Eg 'everybody in zone x, please now enter the theatre' (except you would do it for social distance purposes to manage how people get in - not based on price or status). Refer to Entry Zones to see how to do it graphically. |
 |
Calculates value of a field based on Theatre Manager defined equations. |
 |
Renumbers the logical seat number in numeric order to assist with locating potential duplicate logical seat numbers. |
 |
Loads the seat names previously entered in the database for the venue. |
Naming Seats for the Price Map
 |
Making changes to the Seat Names file of existing maps used for events either active or past may affect the tickets sold in terms of placement. Prior to making edits to "live" maps, please contact Arts Management Systems support at support@artsman.com . |
 |
Seat codes and seat numbers are also discussed on other pages. |
Alphabetic Sorting on Computers
For purposes of discussing the following pages, you need to be aware of how computers sort alphabetic information. In some columns (door, section, row, seat), we likely do not care and can simply call the seats what they are. For most other columns, you need to be aware how computers sort things (Seat Code and Best Available Area). You will need to remember this when building a strategy for assigning best seats automatically
| Door, Section, Row, Seat |
Every seat must be given a physical location that the patrons understand. Theatre Manager provides a four level naming convention of door, section, row and seat (entrance door is optional). Each of these fields is alpha-numeric, so directions to the seat can be provided that represent the venues current naming conventions. Examples:
|
||
| Seat Code |
Seat codes need to be created in a mannder so that they sort properly using alphabetic sort. For example: computers sort alpha-numeric values like:
This way, when you print the tickets out for an order, they will print in the proper numeric sequence by seat code. If the highest seat number in your venue is three digits such as 115, then be sure to use three digits throughout (001, 002, 003, etc.) A good example of seat codes for Orchestra Left, AA 1 through 101 would be OLAA001, OLAA002 etc through OLAA101 |
||
| Best Available Area |
Generally, Best area is very similar to the Seat Code, but without the actual seat number on it. If the seat code for Orchestra Left, AA 101 is OLAA101, then the Best Area might be OLAA.
You many need some additional characters on the best area if you need to separate left side and right side of a vomitorium or aisle and its the same row. But in general, the Best Area defines a unique row, or pert of a row where if seats are purchased in that area, they are considered to be together.
|
||
| Best Seat Number |
These should be in sequential order within a Best Available Area so that Theatre Manager knows which seats are together.
For example: if your Orch Left, Row AA is Best Area is OLAA as per the above discussion on Best Area, then you would want seats to be in increasing order from the Aisle to the edge of the venue. Number the seats like 1 (for seats 109), 2 (for seat 108), 3 (for seats 107) etc up to 9 (for seat 101) then start the next row at seat 10 (in other words, do not duplicate the best seat numbers). |
|
In order to determine the Best Seats, Theatre Manager can use a two-pass system. This two-pass system can protect seats for a second pass. This is particularly helpful in a dinner theatre setting where two seats to each table want to be sold before additional seats to the table are sold. Please click the link above for more information on this advanced topic. |
Naming Seats
- Ensure all seats are in logical sequence.
- Click the Seat Names
 tab.
tab.
- The Initial Seat Setup confirmation window will appear.
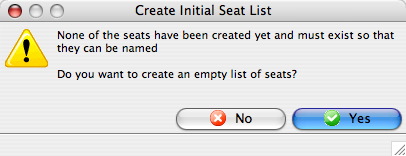
Click the Yes
 button.
The Seat Names window will populate.

- There are two options for inputting seat names:
a) Export the data out of Theatre Manager to a file and open the data in a spreadsheet program such as Microsoft Excel, edit and save the document in a tab-delimited format and import them back into Theatre Manager.
b) Click into each field in Theatre Manager and enter the data manually. Theatre Manager will assist in populating some of the data using predefined equations.
- Enter values for Section, Row and Seat Code.
Change the values of these fields to something meaningful to the theatre.
- Indicate which price codes are valid for the seat.
If the seat is in the front row, then a balcony price code would not be valid.
- Enter the Best Available Area and Best Available #.
Theatre Manager will use the area and number to create a sequential order from which to decide what the best available seats are. Have the best seats (or the seats to sell first) in a higher (ie. A-D) alphabetical area. The seat numbers are used for the system to decide on how many seats are available in an area.
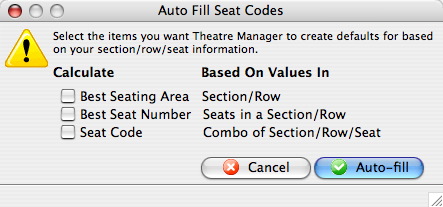
If entering names manually in Theatre Manager, the Auto-Fill
 button can be used to assign the best seating area, best seat number and the seat code.
- Repeat the above steps until all data for all the logical seats are entered for the venue.
- Click the Save
 button.
All seats must be named before the data can be saved.
Return to the Graphic map tab and hold the mouse over seats at random. Double check the seat location is correct and that each seat is named properly.
|
Using Excel is, by far, the easiest method of naming the seats. |
|
A few handy tricks when naming seats:
|
|
If you change a venue map, when there are events already on sale, you MUST verify the seats on each performance to re-index the new name to the seat in the event. Click here, for more information on verifying seats. |
Exporting Seat Names
You can export Seat Names to a text file for easy editing in most spreadsheet programs.
- Open the Pricing Map for editing.
Click here to learn how to edit Pricing Maps.
- Click the Seat Names
 tab.
tab.
The Seat Names window opens.

- Click the Export
 button.
- Choose your export format from the options from the list:

The Export Seat Names window opens.
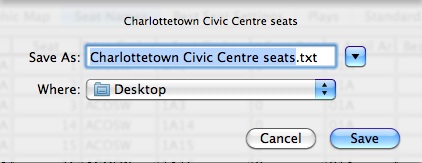
- Select the directory to export the seat names file to and change the file name as needed.
- Click the Save
 button.
The seats are exported to the selected directory in a text file in tab delimited format. The file can then be opened in most spreadsheet programs for editing.
Click here to learn how to Import the seat names file.
Importing Seat Names
When importing seat names the file must be in tab delimited format ie. after each entry there is a tab space and a carriage return at the end. Most spreadsheet programs should be able to save in this formation.
- Open the Pricing Map for editing.
Click here to learn how to open Pricing Maps.
- Click the Seat Names
 tab.
tab.
The Seat Names window opens.

- Click the Import
 button.
The Import Seat Name window opens.
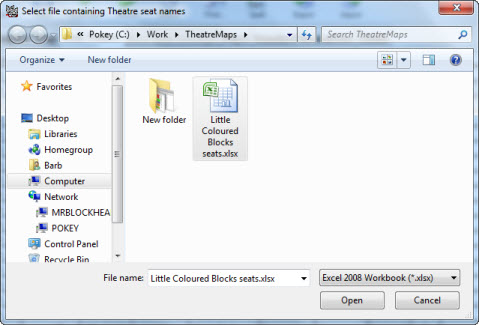
- Select the file containing the seat names to be imported.
The following file formats are supported:
- Excel (.xls)
- Excel (.xlxs)
- Tab delimited (.txt)
- Comma Delimited (.csv)
- Click the Open
 button.
The file will be imported into Seat Names window.
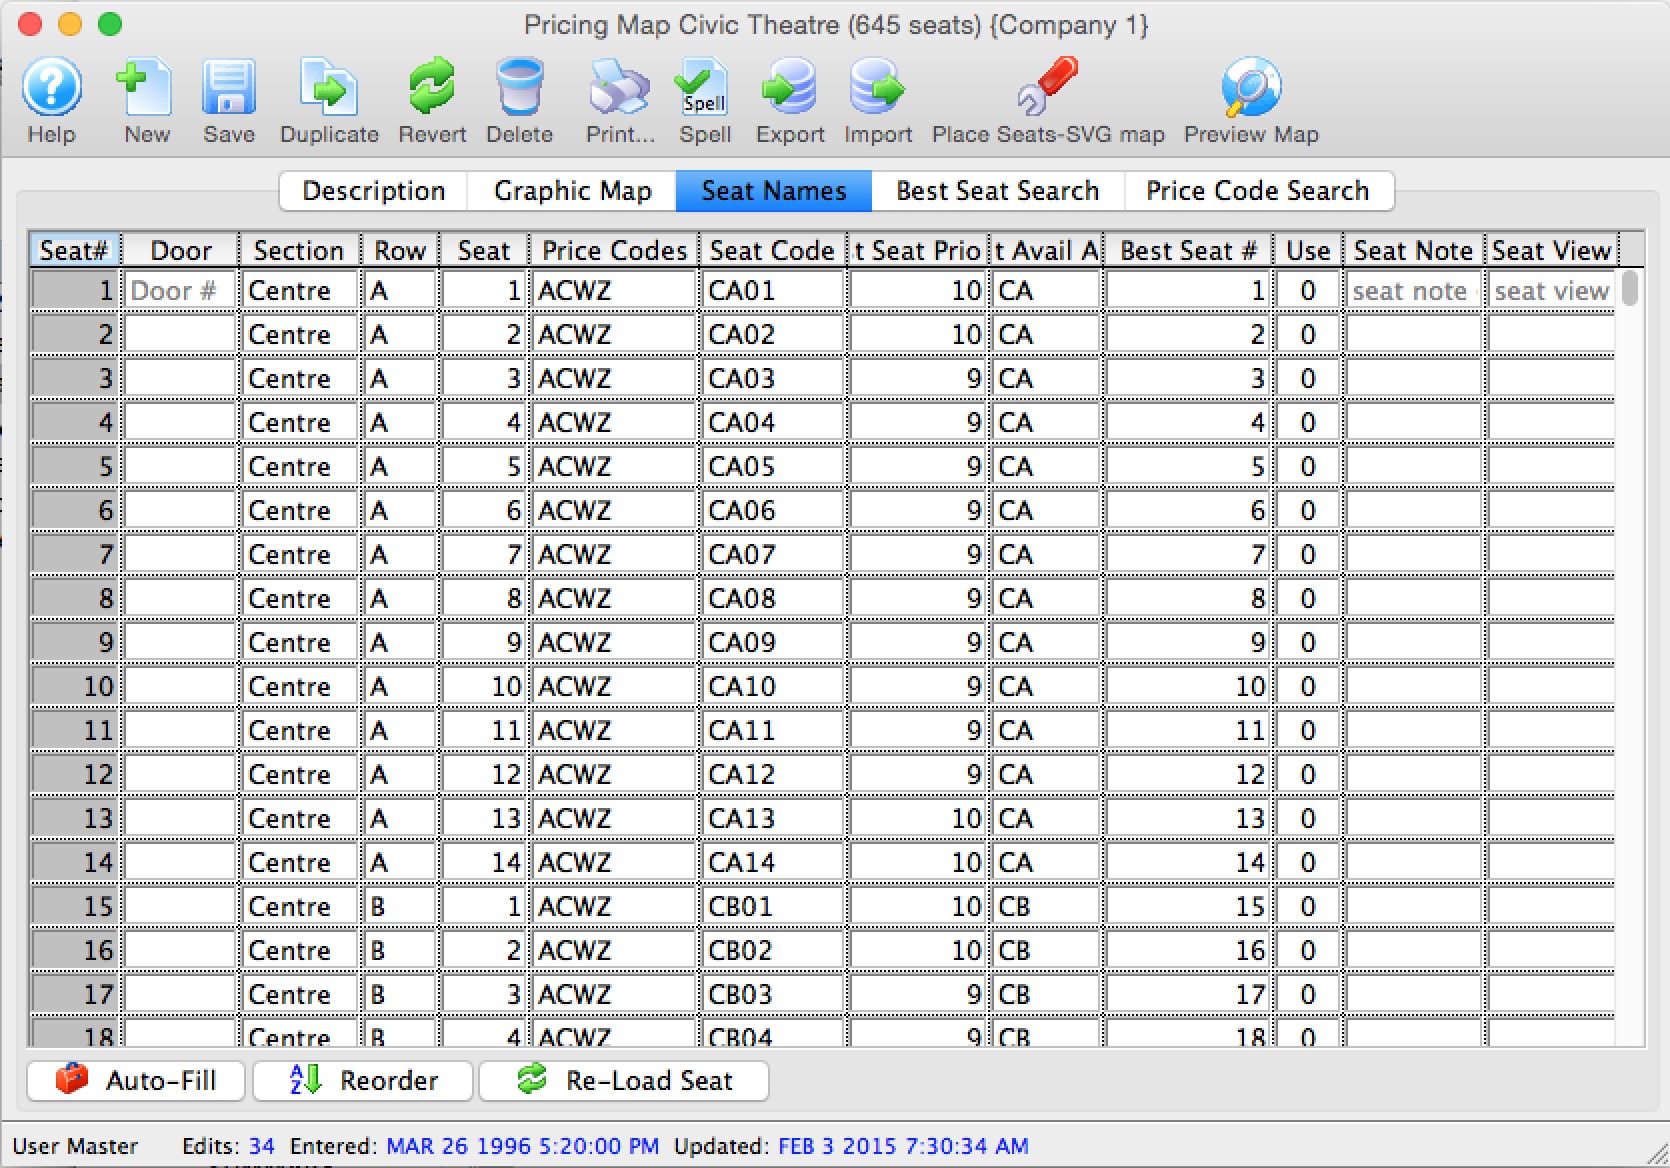
- Click the Save
 button.
The seat names have now been imported into Theatre Manager.
 |
If your spreadsheet has empty lines at the end, which are hard to see for find, you might see a message line the one below.
Theatre Manager is asking if you want lines with a logical seat number of zero and no Door/Section/Row/Seat data to be ignored. |
Changing Seat Names
|
Making changes to the Seat Names file of existing maps used for events either active or past may affect the tickets sold in terms of placement. Prior to making edits to "live" maps, please contact Arts Management Systems support at support@artsman.com . |
- Open the Pricing Map Window.
Click here to learn how to access the window.
- Click the Seat Name
 tab.
tab.

- Edit the seat names by clicking in a cell and changing the values
This is similar to adding seat names.
- Click the Save
 button to save the seats to the database.
If any plays/events have been created using this map the seats for each performance will need to be verified. This will update the tickets with the new seat information. Click here to learn how to verify seats.
How Theatre Manager Assigns Seats
In an effort to keep patrons who purchase multiple seats together, Theatre Manager will keep an order from crossing an aisle. In addition, the "Best Seat Algorithm" will also keep a single seat from remaining in a row. This means that if a party of 4 is looking for seats in a row that has only 5 seats, Theatre Manager will move on to the next row that has 6 or more seats so that an empty "single" isn't left. It is difficult to fill single seats, so they can be detrimental to maximizing your revenue.
To prevent Theatre Manager from assigning seats that span aisles, you need to set them up properly on the Seat Names tab.
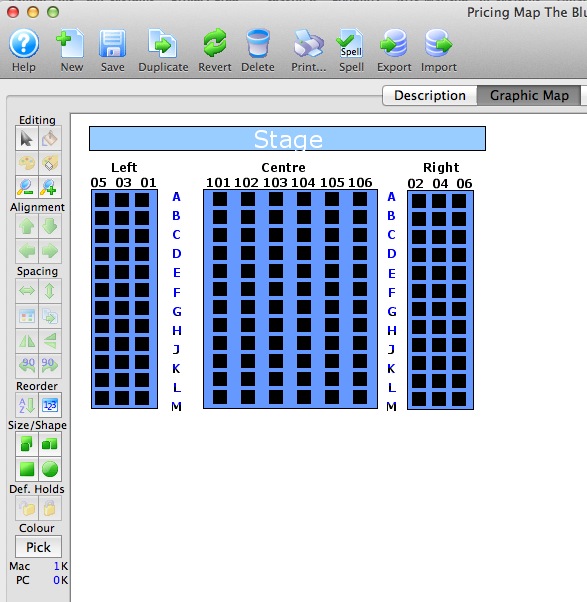
In this example, the venue has three seats in the left and right sections and six in the center section. When you set up the seat names, you want to ensure when four seats are selected, they do not go across the aisle, but are selected together. In this case, that means any groups of four or more will always be seated in the center section. The exception is if they choose the option online to have their seats separated.
Seats in a theatre are typically numbered from aisle to wall, or, in the case of the center sections, from left to right. Seat numbering is also typically Odd numbers on the left, Even numbers on the Right, and sequentially in the 100's in the center. The Rows are lettered front to back A - Z.
Seats in an arena are often simply numbered sequentially across the row, which is also numbered, but may be lettered. Theatre Manager accommodates all numbering and lettering schemes.
The example below is for the small theatre above.
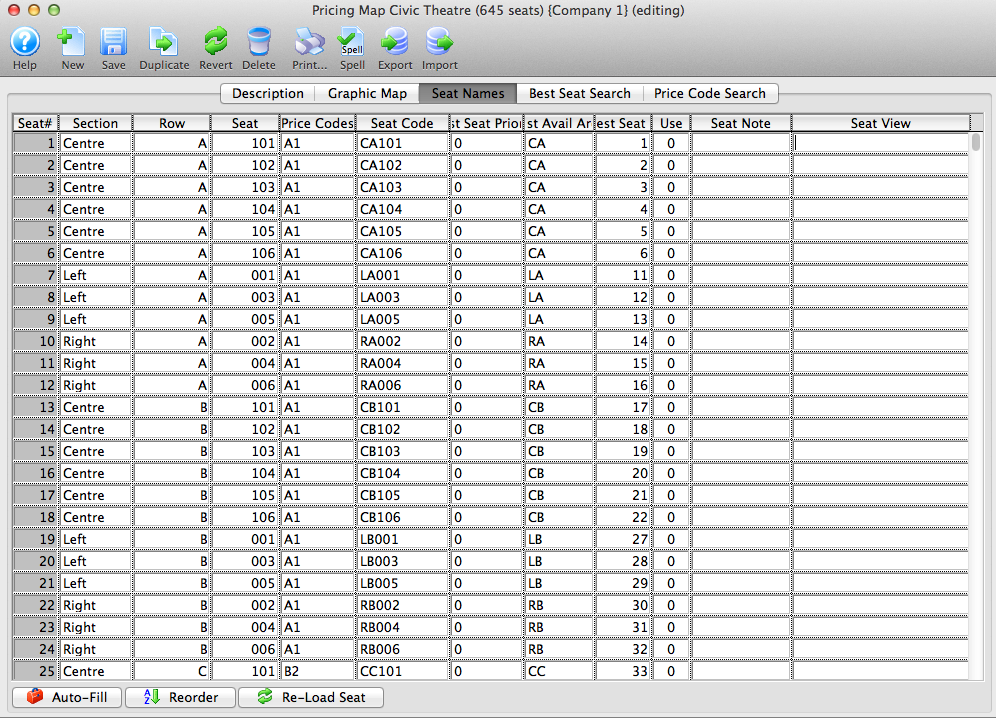
In the Seat Names tab of the pricing map, check the Section, and Best Available columns.
| Seat Numbers |
The seats numbers are names as you would naturally use them:
5, 3, 1, aisle 101, 102, 103, 104, 105, 106, aisle, 2, 4, 6 |
| Best Available Area |
The Best AVAILABLE AREA column takes into account the alpha sort order and should read
The the next row would be: |
| Best Seat Number |
For each seat in the Best Available Area above, you must identify the best seat number -- the order in which the seats are offered to the customer.
|
This way, Theatre Manager knows where there are natural breaks and how to suggest seats to people.
The Two-Pass system - Naming Seats for Dinner Theatre, Cabaret Seating, and Small Venues
For online sales, we have implemented a mechanism that tries to prevent leaving single seats and maximize your revenue. This web page is geared towards online sales only because Box Office personnel can do anything they wish to dress the house accordingly.
If you have the Seat Names file designed correctly for your venue, you can use web sales to accomplish a lot and fill your house. As humans, we have a great deal more perception abilities to make allowances for subtle changes in situations - but online, computers need to deal with hard parameters of sales rules.
For the vast majority of a venue, assigning the Best Available Area to go straight across a row, and then thread up and down through the venue makes a lot of sense. After all, most people want front and center, middle and center, or balcony front. It starts to breakdown in fringe seats at the edges of venues or the loges, or those odd little corners in venues that are usually in the least desirable seat areas. It also tends to breakdown in Dinner Theatre settings where you have lots of tables, but they only hold two or four patrons each (although we've seen six, eight or even ten seats at a table).
Therefore, Theatre Manager uses a 'two-pass' mechanism which can handle leftover seats for online sales in case the good seats have been taken.
This gives you:
- Revenue protection for the key seats
- A way to manipulate the lower quantile seats while still doing the best for revenues - and still allowing some to be left as singles.
Dinner Theatre and Cabaret Seating
Naming of seats on a Graphic Map for a Dining Room or Cabaret setting may need some adjustments in order to enable the booking of tables, specifically online booking where selecting best available is the default option. Consider a dining room setup of a series of tables of four where you will seat a party of two, three or four at a table. With no adjustments to the seat name chart of your Theatre Map the following could happen:
|
|
|
To achieve a favorable result we introduce the use of # ('pound'), and apply it to the Best Available Area code of the Seat Names in your Theatre Map setup.
You will need to edit the Best Available Area code on the seats as follows: The seat name of Table 1 may look like this.

By applying the # to two of the four seats as shown in the next image will result in the following.

Patron A requests two of four, or all four seats, and this table will be offered. Because when the # is applied to the Best Available Area code, the remaining two of four unsold seats will not be offered to the next Patron. Theatre Manager will then offer Table 2 - or the next table with seats available. Note that the use of the pound on a seat causes Theatre Manager to overlook that seat.
Now this scenario presents a problem for a patron seeking three seats. If you use # for two of the four seats at tables of four, there won't be a successful request for three seats as Theatre Manager will never leave one remaining seat.
If parties of three are a frequent booking for your venue, then what you need to do is to consider a selection of tables where you edit the Best Available Area code to utilize the two-pass system for only one of the four seats at the table as in the following image.

So the rule to follow when using the # to overlook seating is this:
Small Venue Seating
The same two-pass system can be applied when venues have sections with only three seats in a single row (typically on the sides of smaller venues, or the corners of 'Theatre in the Round').
For example, let's say you only have three seats on the Left side of Row A. We will assume that the seats are all empty and you did not use the '#' in the Best Seat Area.

If a patron asks online for one or three seats, they would get them. They would not get them if they asked for two. Theatre Manager would move the patron back a little bit in the venue until it could find two seats PLUS at least two left over.
Seats that are in the front row on the side are likely to be nearer to the tail end of desirable - probably in the last quartile. They are certainly not the absolute best seats in the house, which are generally more towards the center. So now you have a bit of flexibility to decide what to do with them if they are not going to be the first offered to patrons or the first that are snapped up in the Box Office.
If we use the best seat area and name them as follows:

Then this invokes the two-pass strategy for those seats. If all seats are open (in the entire venue), then if a patron asks for:
- One or three seats - nothing will be offered
- Two seats - then Seats 1 and 2 will be offered
So patrons wanting one or three seats will be moved back a couple of rows. Remember that this front-side area is low on the desired scale.
Now, suppose you have a full house and there are very few seats left to sell. But these three in the front-side, Row A, are all still available. If a patron asks for:
- One or three seats, nothing will be offered (See below)
- Two seats, then they will get something
Since we can't disappoint patrons wanting one or three seats, and if Theatre Manager cannot find any other seats in the venue, it will remember that it bypassed these ones and go back to them for a second pass. So, Theatre Manager will say:
- One seat requested - offer Seat 1
- Three seats requested - offer them all
- Two seats requested - offer Seats 1 and 2
Thus, the search process is designed so that:
- The majority of seats are taken care of in the first pass. This is how patrons work and how Box Office Managers dress the house normally.
- A second pass can be invoked if you are coming down to the wire (say the last quartile) where you want to be a little freer with how seats are offered.
Associated Seats
- ADA seats - where you want to automatically hold a companion seat for a period of time if the primary wheelchair seat is sold - at least until you can determine the patron's requirements
- Dinner Theatre Seating - especially where there are a number of two-top tables that are beside each other. In this case, if a patron buys one seat at a table, then the other can be held so that nobody sits opposite the purchaser. Other two-tops that are side by side can be separated for dining privacy.
- Social Distance Seating - where if somebody buys a seat, all seats around it are held automatically
How do associated seats sales work?
In the example below, the left image shows part of a venue that has not had sales yet. Some of the tables contain associated seats.
- After clicking or selecting seats on the map to sell (refer to the ones that will be selected on the left)
- The associated seats are immediately held using the (hold code in system preferences) to prevent sale by others (refer to the right diagram).
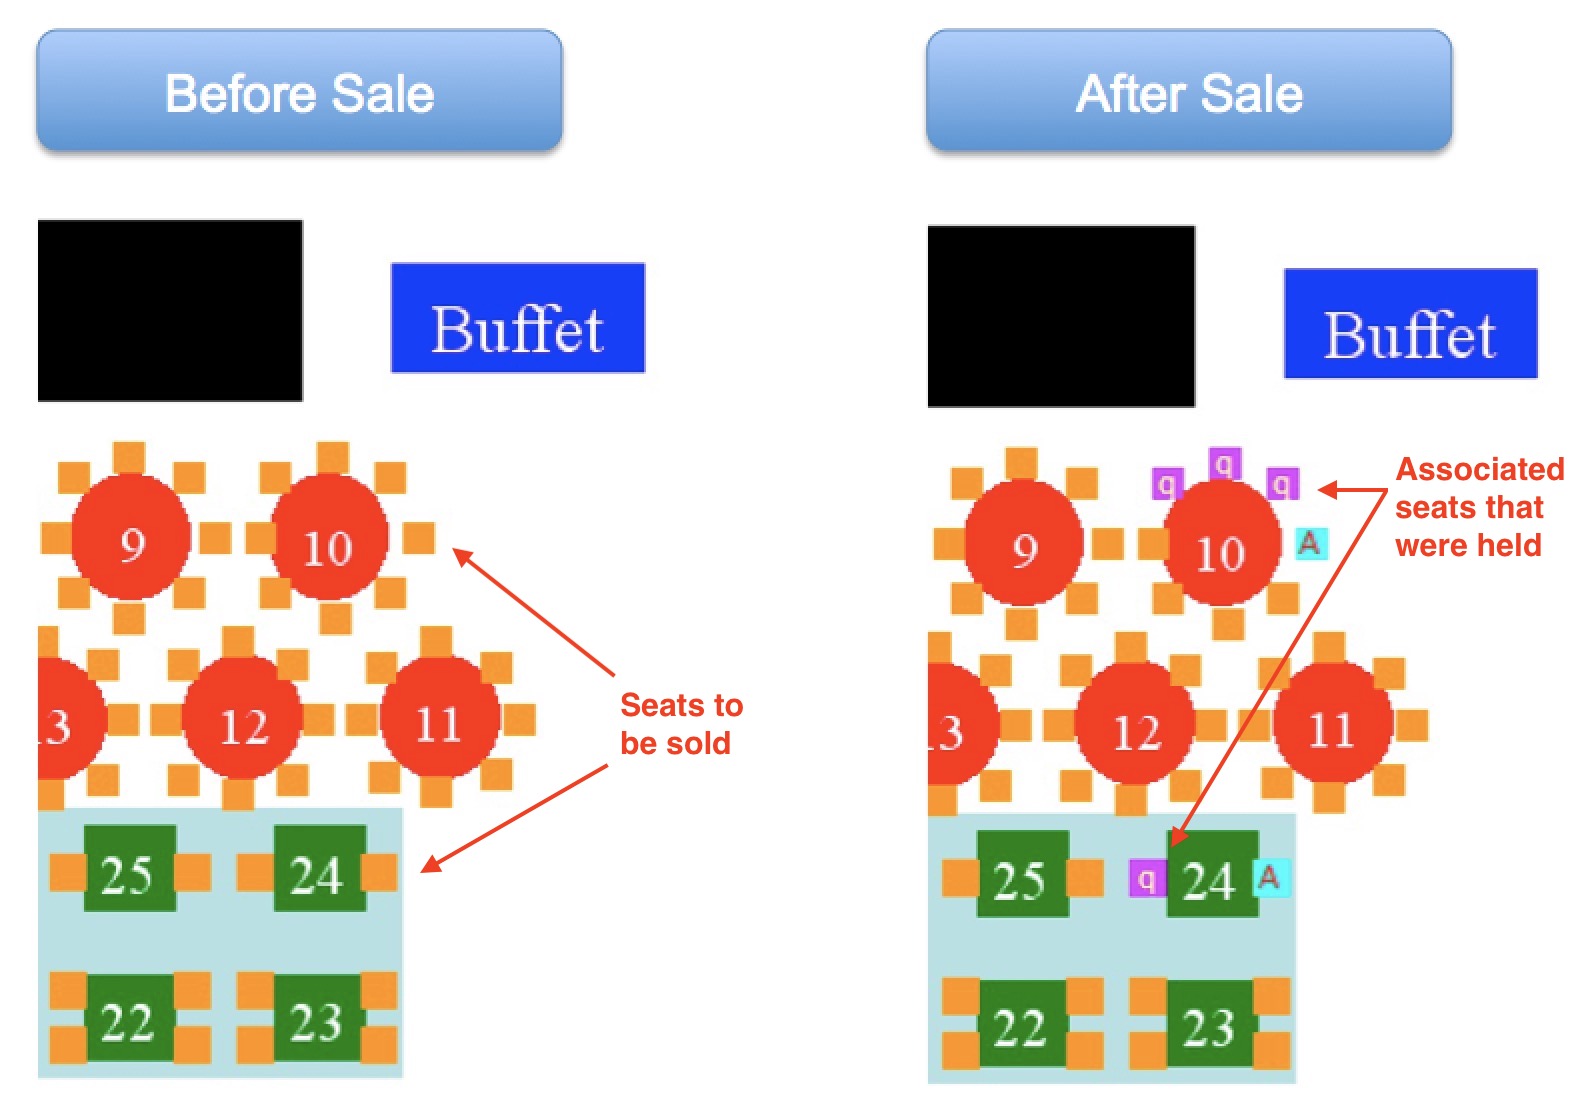
In the patron ticket window, the seats will show up as holds with the word Associated Seats in the icon column. These seats can easily be sold to the patron at a later date, if desired.
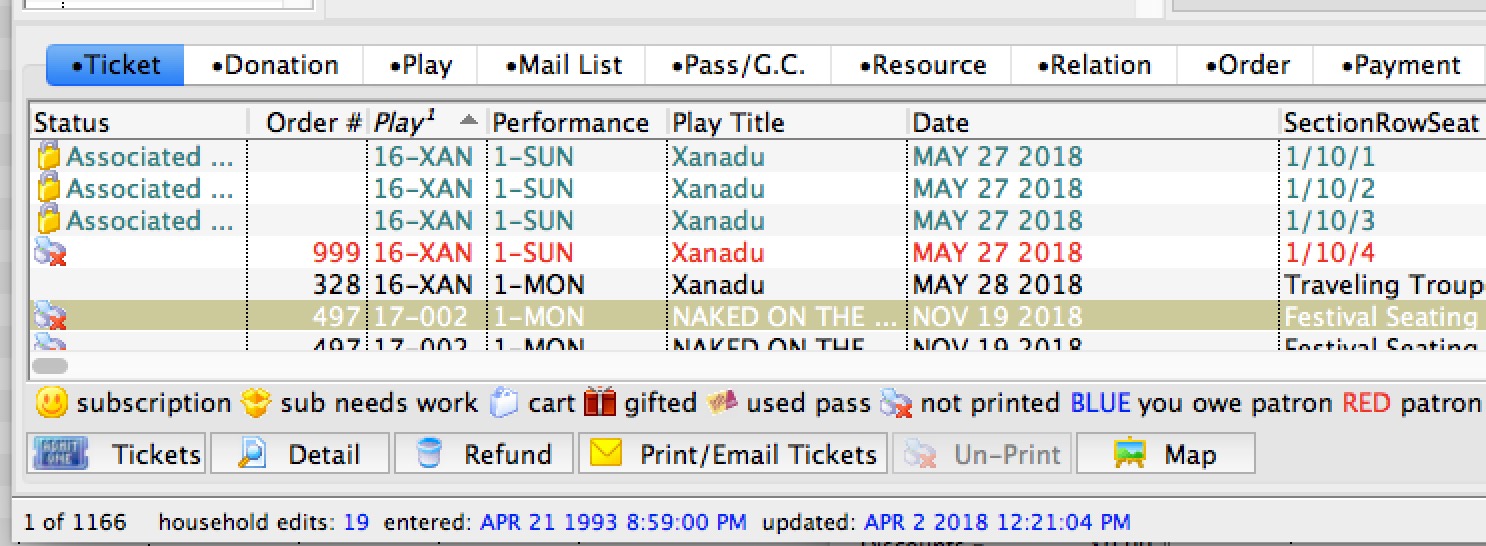
Where do associated seats work?
The short answer - everywhere a ticket is sold. Examples are:
- Selling a ticket online If:
- One or more seats are held in a cart, all associated seats are also held until the patron picks other seats using Next Best Seatsor using Pick your Own.
- The patron checks out, the holds are made permanent.
- The cart is abandoned, the associated seats are released
- At the box office during selecting a seat. It may be easier to drag select multiple associated seats when selling rather than clicking on them one at a time, otherwise you'll need to over-ride the hold
- During sale of a seat for a subscription package. All associated seats are held for all performances during the sale, if possible
 |
When making seats associated:
|
 |
You cannot use associated holds until an associated hold letter is specified in System Preferences |
Editing Associated Seats
 |
Normally you would use the Social Distance Map feature to create these graphically within Theatre Manager.
However, if you like excel formulas and want to create an initial social distance map for later tweaking, you can also set the associated social distance seats an import them. |
Associated seats can also be shown in the tab on the Seat Names tab on the Theatre Pricing Map window in the last column called Associated Seats. In the example, you can see that seats 1, 2 and 3 are associated with each other in some way.

Setting Associated seats
There are 2 ways to set an clear associated seats. You can:
- On the Social Distance Map, use the context menu to select two or more seats to associate them with each other bidirectionally. In this example, seats 1, 2 and 3 are dependant on each other so that:
- if any one is sold, the others will be held and
- if one is released, the others will be freed from hold.
- Export the map, edit the associated seats, and import them. With this approach, you can make one directional associations where:
- if seat 1 is sold, then 2 and 3 are held
- yet if seat 3 is sold, the other two night not be affected.
Editing the Associated Seats on the Map tab
The simplest way to set associated seats when there are only a few of them is to:
- Use the Graphic Map tab
- Select some seats that are associated - a table for example
- Use the context menu to associate the seats. any previous associations for the selected seats will be cleared and re-associated with each other.
- Repeat as required for all seats.
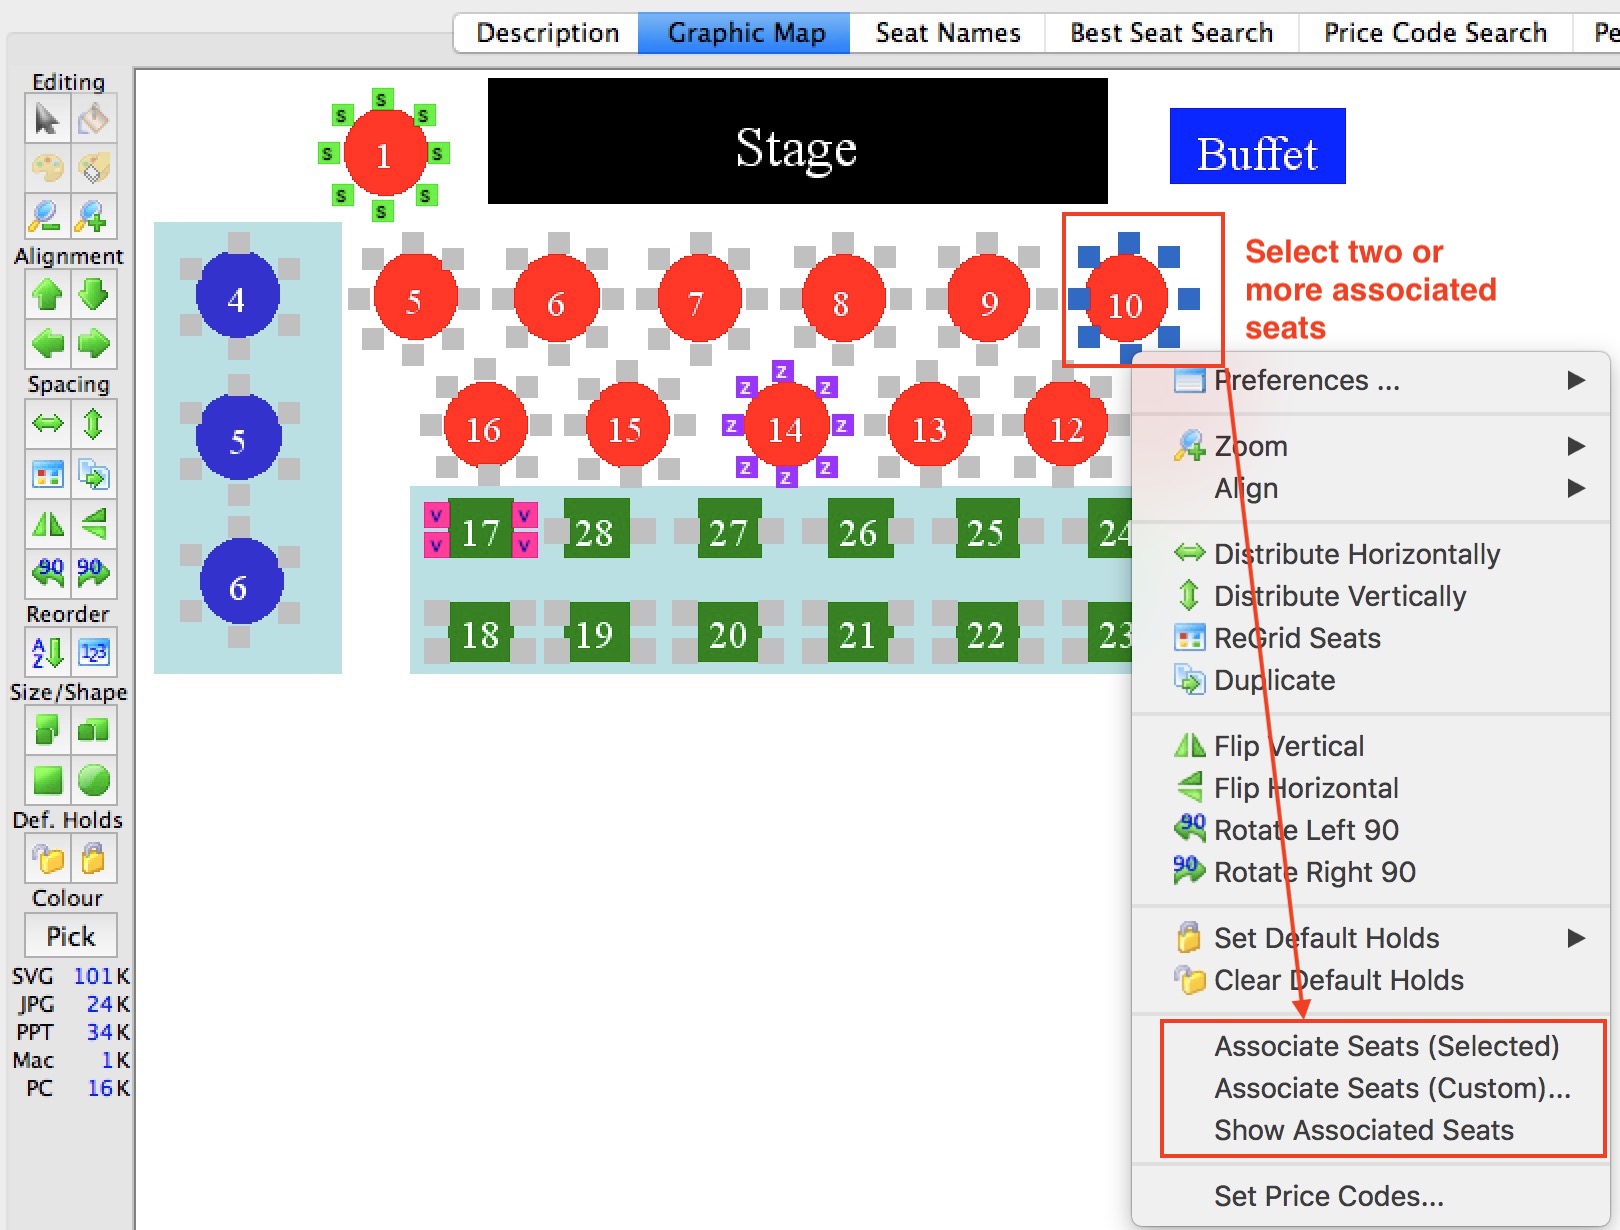
Editing the Associated Seats by Exporting/Importing
If you wish, you can edit the seat map in Excel to create the associated seats. This allows you to created custom uni-directional associations in any way you want.
To do so
- Export the Seat Names file
- In the column called Associated Seats, type the seat numbers that are associated, separated by a comma
- Import the Seat Names file
For example, the image below shows some more complex associated seat setup that were edited in the seat names file:
- if only seat 49 is sold (released), then Theatre Manager will hold (release) seats 50 through 56 as associated holds
- if seat 55 or 56 is sold (released), then Theatre Manager will only hold (release) seat 51 (might be an example of a companion seat)
- if seat 51 is sold (release), Theatre manager hold (release) seats 49 and 50 (which means that seats 55 and 56 per the above line are not affected).

Using Associated Seats For Social Distancing
 |
Normally you would use the Social Distance Map feature to create these graphically within Theatre Manager.
However, if you like excel formulas and want to create an initial social distance map for later tweaking, you can also set the associated social distance seats an import them. |
 |
You will need to decide how many seats you want to hold around the one being sold. It could be that:
|
It is possible to create a social distancing sales map using associated seats with purpose of:
- You sell a seat and the specified seats around the one you just sold are taken off sale
- If you release that seat, it will release the seats around it.
General steps to set up a social distancing sales map
The following is a recommended process for setting up social distance seating:
- Select and edit a venue you want to implement social distancing for
- Select the pricing map that you currently use and right-Click to duplicate it
- After duplicating the pricing map:
- edit the pricing map and:
- Change the internal name of the map to indicate it is for social distancing
- Alter any price codes if you want to offer fewer
- Click on the Graphic Map tab and
- edit the pricing map and:
- Edit your ticket face and add the zone number to the ticket face in some prominent way
- Find the events in the future and change the pricing map to the new one you just edited.
- Add some performance notes similar per the image below to give the patrons some assurance, or customize your ticket event list to indicate that the performance is sold with social distance in mind.
What does the Social Distance Map look like online?
Best Seat Search Tab
Using the seats you have defined, the patrons find the best seats in their preferred section. This is particularly practical when there is tiered pricing. Patrons do not have to keep looking for seats to find ones in the pricing section they desire.
 |
This is useful for venues where people like certain places within the venue. The search limits for only seats in that area. |
 |
Searching by area may have limited usefulness if you have enabled pick your own seating. If that is the case, you can turn this feature of on the description tab. |
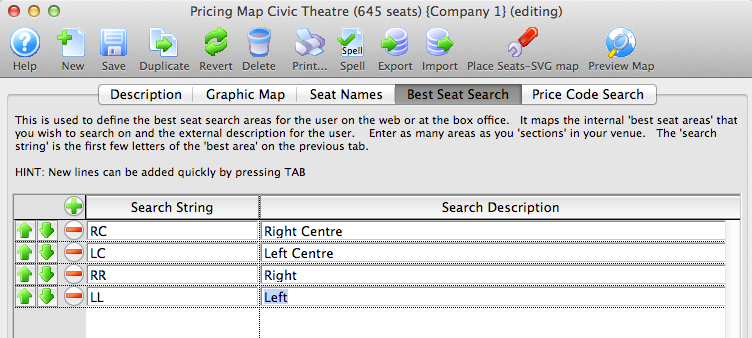
The Search String is what is used in the Seat Names tab to associate the seat with a section.
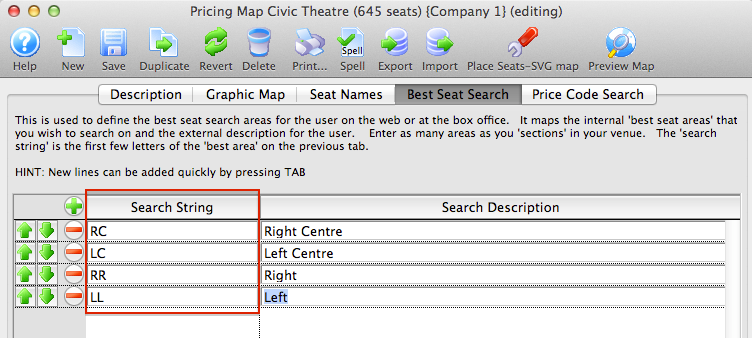
For example, for every seat you want in the "Right Centre" section, the Best Available Area column for the seats must contain the search string "RC".
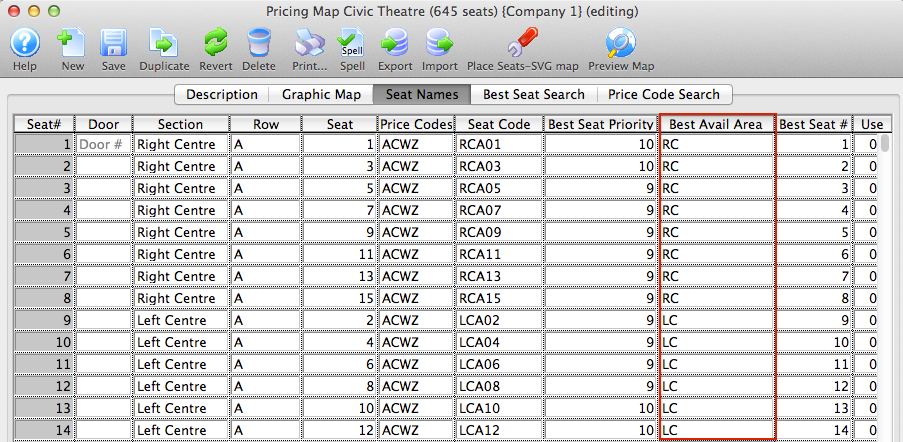
The Search Description is what is displayed online for the section.
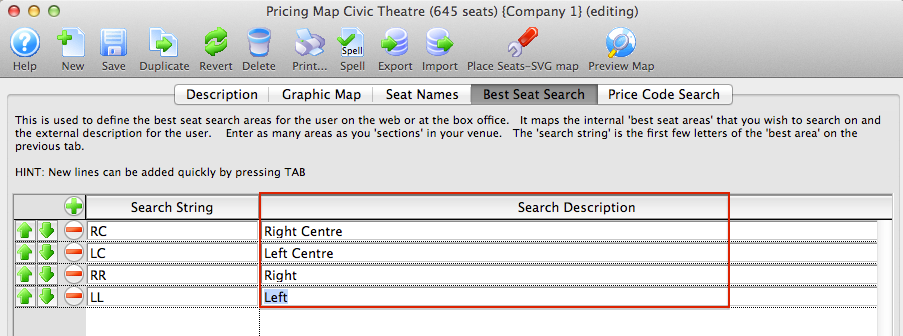
Search strings can be added by pressing the  button, or by pressing the tab key on the keyboard while the cursor is in the previous line.
Search strings can be removed by pressing the  button next to the corresponding line.
Search strings can be reordered for online display by highlighting the corresponding line and clicking the  buttons. This allows you to list the preferred sections first, followed by the less desirable sections towards the end of the list.
Price Code Search Tab
The example to the right shows what it searching in a section looks on the web site and the image below contains the price codes and names that are used for online searching. If you make a change in the pricing map, it will reflect on the web site.
 |
This is particularly useful when there is tiered pricing. Patrons only need to specify to look for seats in the price that they desire. |
 |
Conversely, searching by price may have limited usefulness if you have enabled pick your own seating. If that is the case, you can turn this feature of on the description tab. |
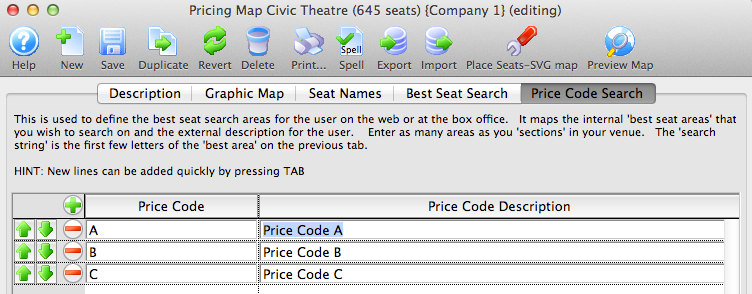
The Price Code is what is used in the Seat Names tab to associate the seat with a section.
For example, for every seat you want that has Price Code 1, the Price Code column for the seats must contain the search string "1".
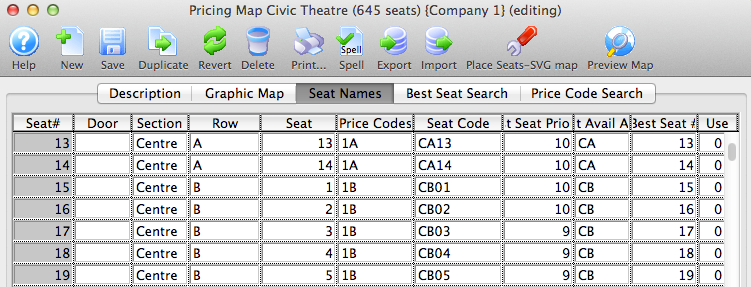
The Search Description is what is displayed online for the section.
Search strings can be added by pressing the  button, or by pressing the tab key on the keyboard while the cursor is in the previous line.
Search strings can be removed by pressing the  button next to the corresponding line.
Search strings can be reordered for online display by highlighting the corresponding linen and clicking the  buttons.
Exporting Theatre Maps For Use In Other Theatre Manager Databases
Exporting Theatre Map Files
There may be a time when you need to export your Theatre Map to send to Arts Management Systems.- Open the Venue window that contains the theatre map of interest.
- This link describes the difference between a Venue and. Theatre Map
- This link describes how to find the Venue containing the Theatre Map that you want to export
-
Find the Theatre Price Zone Map to be exported
On the right side of the venue information, is a list of price zone map configurations that can be used in that venue. You need to find the one that you want to export by:
- Scrolling down to find the on you want -or-
- Using the filter feature to find the one you want by:
- Typing the map number(s of the price zone map(s) you want to find. (if you know them). Separate multiple map numbers by comma's -or-
- Typing some part of the name you gave to the price zone map to make it memorable, like 'two zone map' or 'Orch and Balcony price map'. -or-
- Typing some words in the note field you put in the pricing map as a convenient way to find it
-
Double click on the price zone map to open it
- Click the Export Pricing Map to see the export options. Do two exports
- Export the seats in Excel Format
- Export the entire map in TM interchange format. This has the seats, image and all the rest of the data
- Click the Export Pricing Map to see the export options. Do two exports
- Import the two files into anothe database or outlet
Now, all the other outlet or company need to do is import those two files.
To do that
- Log into the other database as a user with permission
- Insert a new venue, if need be
- when you have created or found the venue that you want to add the venue map to, then:
- Click the Import Pricing Map button and pick the .tmm file you saved
- Click the Import Pricing Map button and pick the .tmm file you saved
- Open the pricing map and then click on the Name seats button.
- Click the Import seats button and pick the Excel Seat Map file you saved moments ago
Editing a Pricing Map
- Pricing Maps are accessed through the Setup >> Venue
menu.
Alternatively you can click on the Venue button in the Theatre Manager toolbar / ribbon bar.
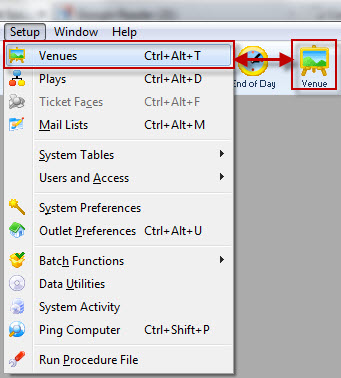
The Venue List window opens.
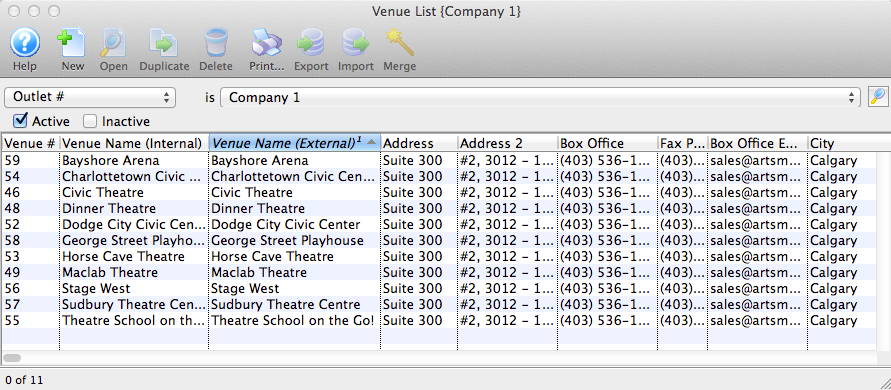
Click here, for more information on the Venue List window.
- Chose the Venue you want to view/edit from the list and click the Open
 button, alternatively, double click on the name of the venue.
The Venue window opens.

- Highlight the Pricing Map to be edited and click the Open
 button.
The Pricing Map window opens for the selected map.

- A deployed map cannot have the number of seats decreased.
- Adding seats to an existing map only affects current and future sales. You cannot go back and decrease the number of seats later.
- Click the Save
 button.
The changes made to the map are saved.
Edit the description tab for changes in map details, the graphic map tab for seating placement and the seat names tab for changes in the name of a seat.
|
To change the number of seats, it is first recommended you duplicate an existing pricing map and make your changes to the new map. |
To correct changes before saving click the Revert  button to revert back to the last saved point.
Changing Price Codes From the Map
For a fast way to change the scaling of a price map and its sections, you can select seats on the map and set or change the price codes on those selected seats.
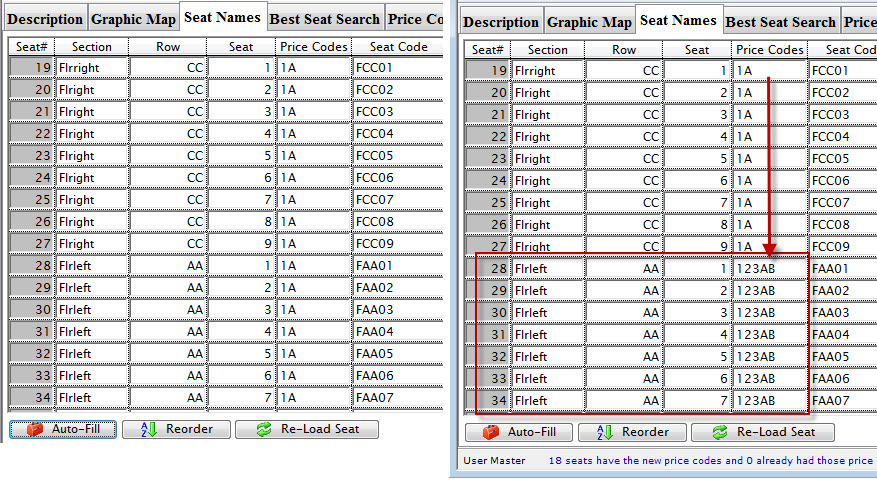
To dynamically change the seat codes, you perform the following steps:
- Open the pricing map you want to change the seat codes on.
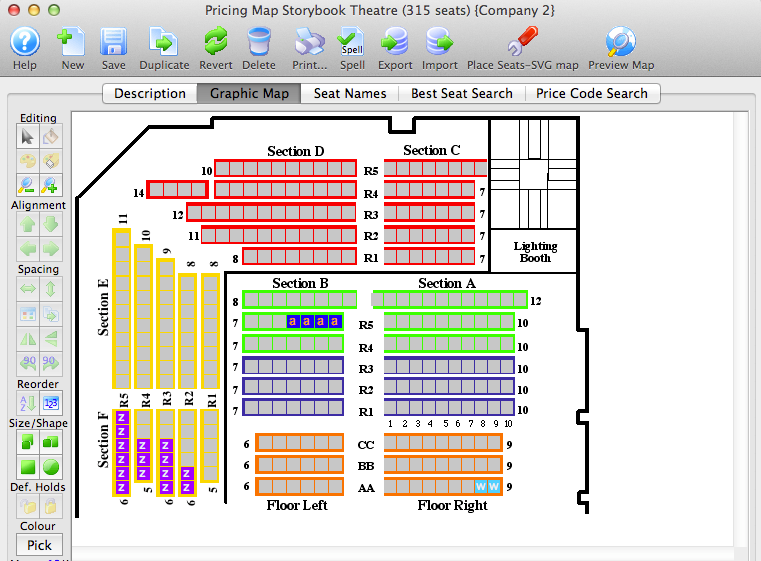
- Highlight the seats you want to change the codes on and open the right-click menu.
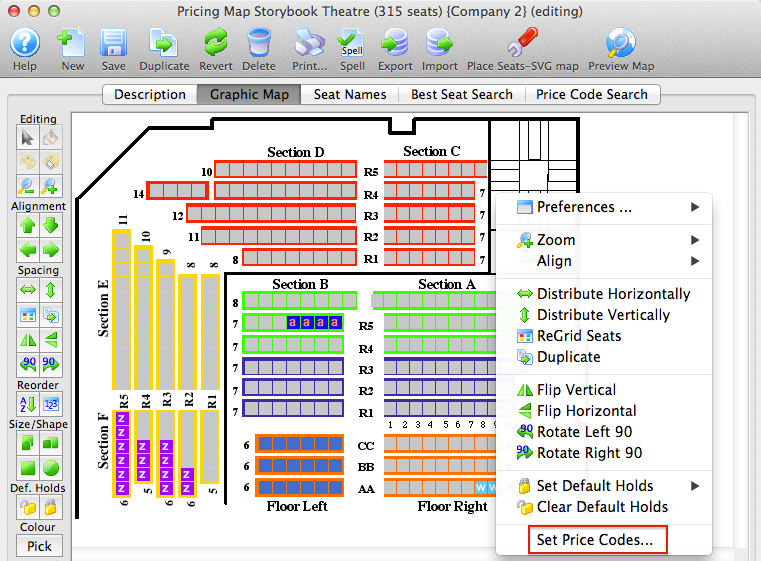
The Add Block of Seats dialog opens.
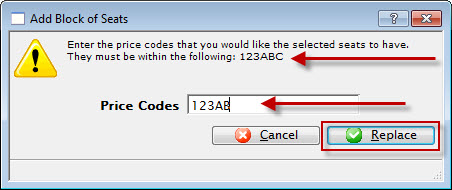
The dialog displays the available codes for the map in the top portion.
- Enter the codes you want to change the selected seats to.
- Click the Replace
 button.

The confirmation message displays your changes.
Increasing the Number of Seats
When increasing the number of seats, in a pricing map, it is important to take into consideration two things:
- You are increasing the number of seats by rearranging the existing seats, adding more to the stage or at strategic places in the venue for some events.
or
- You are increasing the size of an existing pricing map because you have physically added extra seats to a venue and all future events will have those extra seats.
|
To change the number of seats, it is first recommended you map a backup of the database. Once the backup is complete, duplicate an existing pricing map and make your changes to the new map.
|
To add movable seats to a map, you first Duplicate the existing price map:
- Open the Venue / Theatre.
Click here to learn how to edit a pricing map.
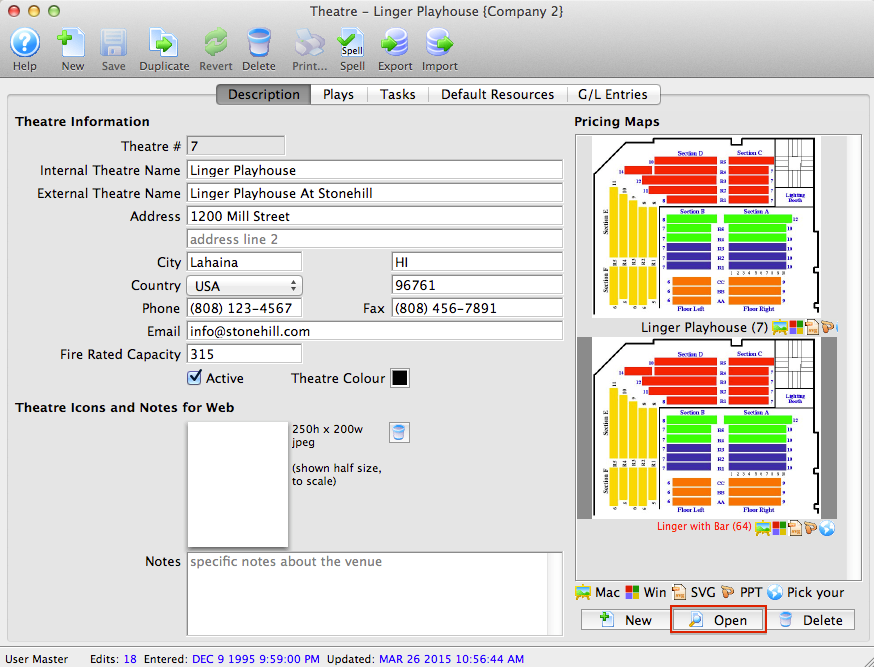
- Select the map you want to add the seats too.
The Pricing Map description window opens.
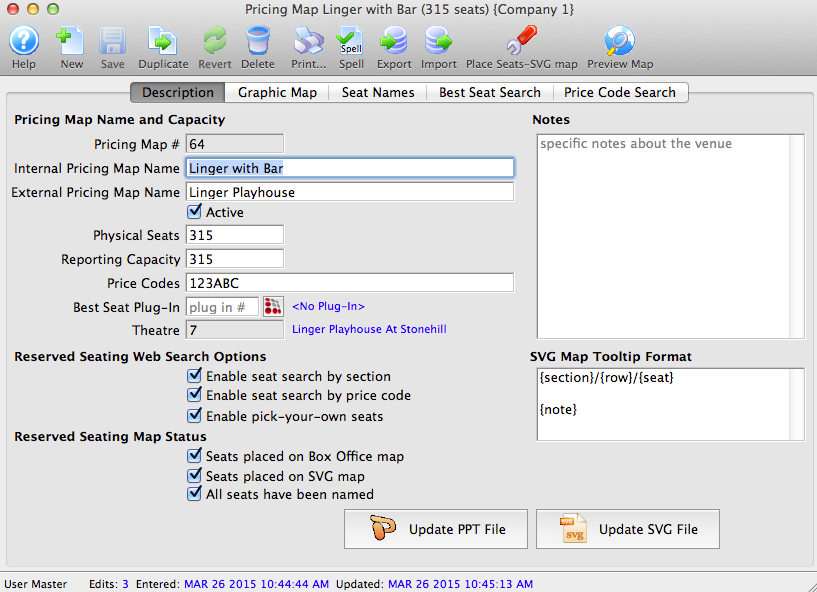
- Click the
 button.
The selected Map is duplicated and stored with the Name Copy ##.
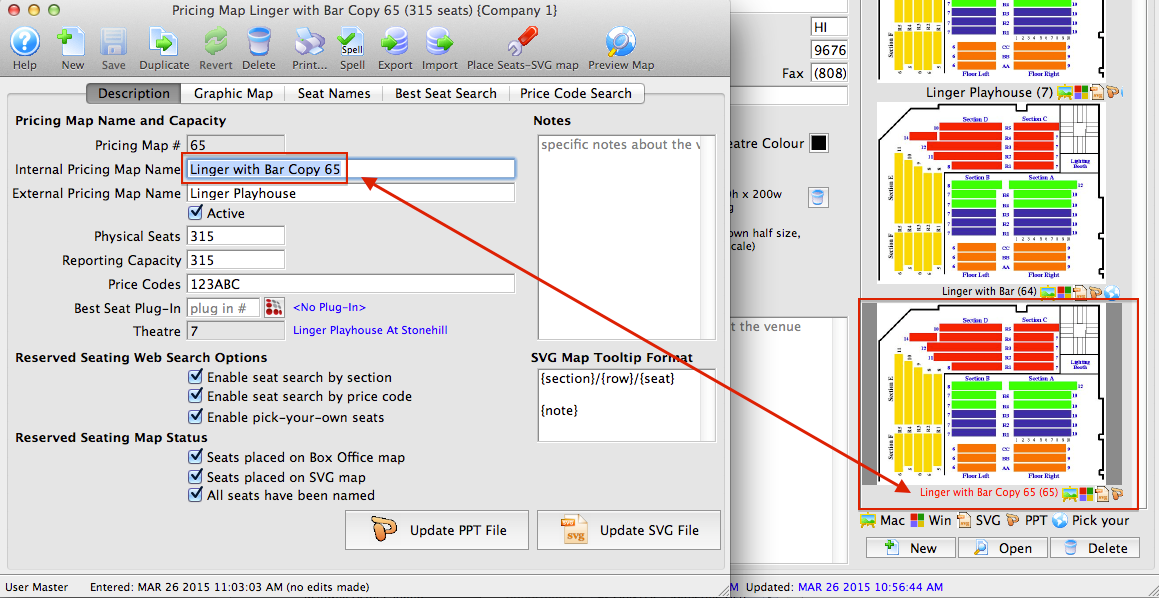
- Click the Save
 button.
The changes made to the map have now been saved.
If you are permanently increasing the number of seats and all future events will have these seats available, you can add them directly to the existing map.
|
A deployed map cannot have the number of seats decreased. Adding seats to an existing map affects current and future sales. ALL existing events for that venue are taken offline until the you have verified the seats for the event. You will need to follow up on each performance to verify the seats and turn them on for the performances. |
Increase the Number of Seats for the Map
- Increase the value in the Physical Seats field.
By increasing this number Theatre Manager will allow extra seats to be added to the graphic map and will increase the number of seats in the Seat Names tab.
- Increase the value in the Reporting Capacity if required.
The reporting capacity indicates the number of seats sold within the venue. Often it is the same value as the Physical Seats. However, some venues have seats they only sell when the rest of the seats are completely sold. These seats may be standing room or
- Click the
 button.
The Add a Block of Seats dialog opens.
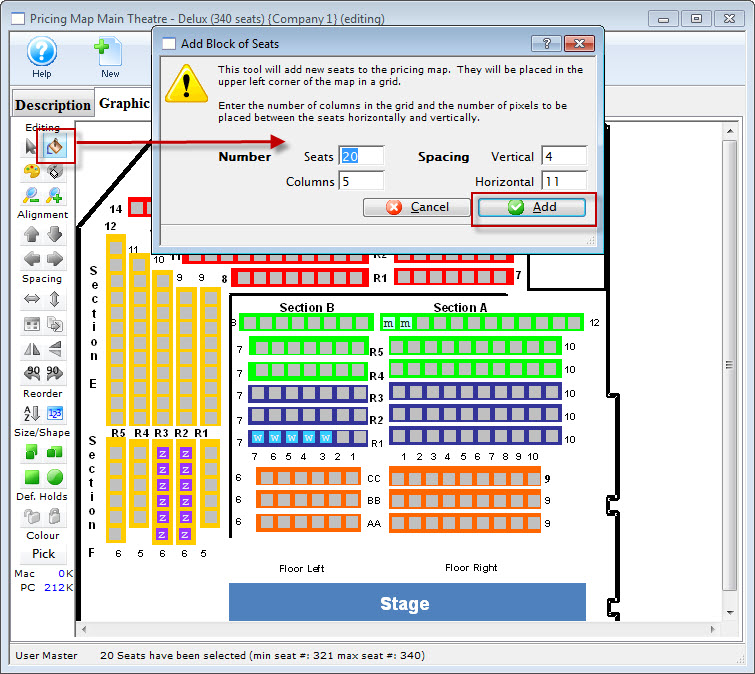
- Enter the appropriate parameters and click the
 button.
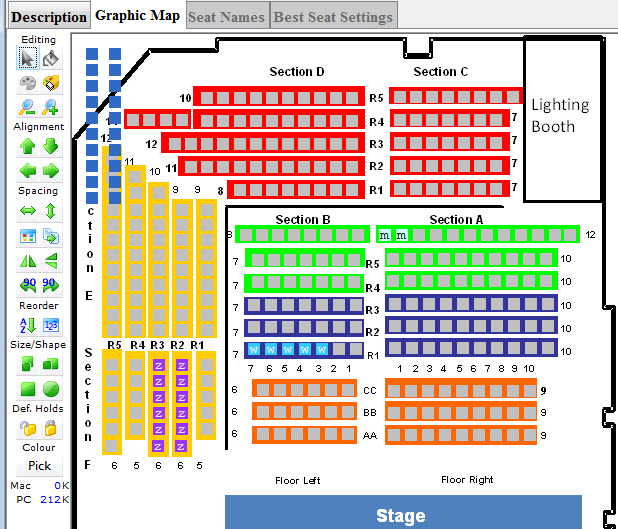
- Place the seats where they are to be added.
Click here, for more information on placing seats.
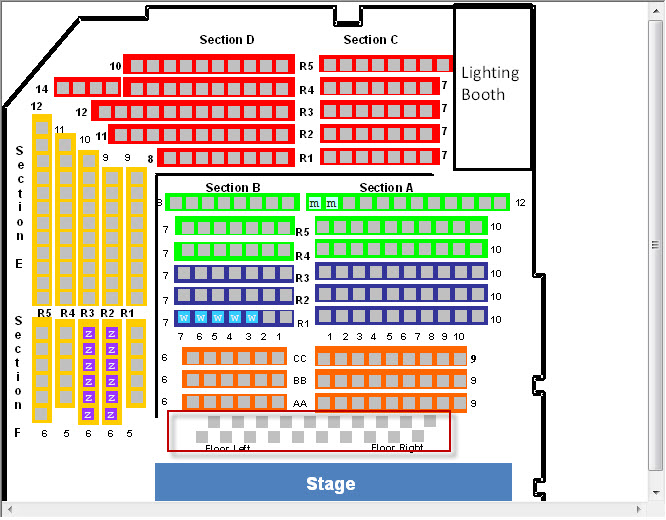
- Click the
 button.
If you make any errors, you can use the
 button to return to your last save point.
Placing the New Seats
In this example, the seats are being added in front of the stage and the graphic has been updated to accommodate the additional premium seats.
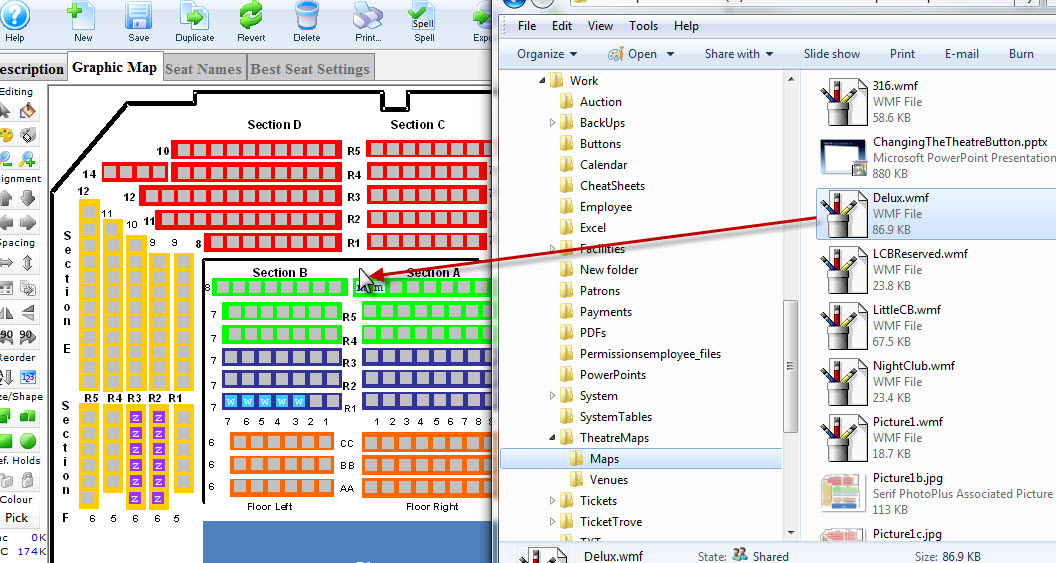
In the Graphic Map tab, add the new seats to the appropriate locations.
Logical Seat Numbers
- Click the
 button.
Notice the seats have been appended to the logical seat numbers.
- Highlight the seats to be re-numbered and click the
 button.
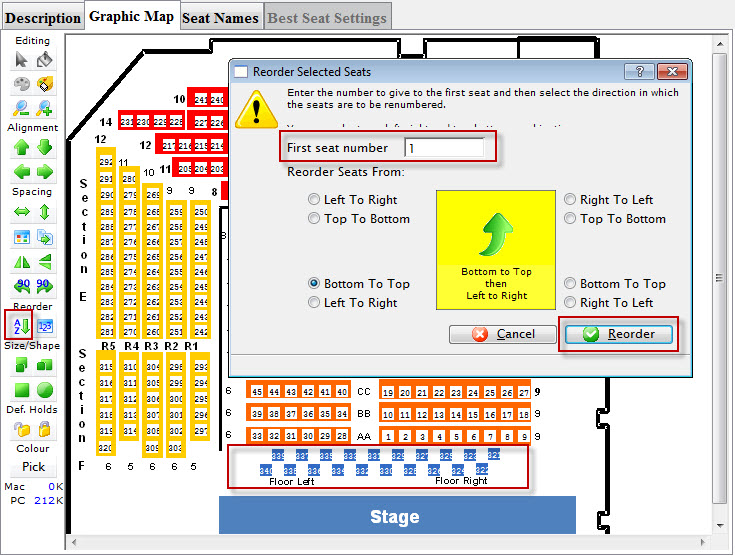
The Reorder Selected Seats dialog opens.
- Make the approriate enties. When complete, click the
 button.
When you are finished reordering the seats, click the
 button.
You now need to incorporate the new seats into the existing Logical Seat Numbers. Click here, for more information on logical seat numbers.
Naming the Seats
- Click here , for more information on renaming the seats.
There are two options for inputting seat names:
- Enter values for Section, Row and Seat Code.
Change the values of these fields to something meaningful to the theatre.
- Indicate which price codes are valid for the seat.
If the seat is in the front row, then a balcony price code would not be valid.
- Enter the Best Available Area and Best Available #.
Theatre Manager will use the area and number to create a sequential order from which to decide what the best available seats are. Have the best seats (or the seats to sell first) in a higher (ie. A-D) alphabetical area. The seat numbers are used for the system to decide on how many seats are available in an area.
If entering names manually in Theatre Manager, the
 button can be used to assign the best seating area, best seat number and the seat code.
- Repeat the above steps until all data for all the logical seats are entered for the venue.
- Click the
 button.
All seats must be named before the data can be saved.
Return to the Graphic map tab and hold the mouse over seats at random. Double check the seat location is correct and that each seat is named properly.
a) Export the data out of Theatre Manager to a file and open the data in a spreadsheet program such as Microsoft Excel, edit and save the document in a tab-delimited format and import them back into Theatre Manager.
b) Click into each field in Theatre Manager and enter the data manually. Theatre Manager will assist in populating some of the data using predefined equations.
Reducing the Number of Seats
|
To change the number of seats, it is first recommended you duplicate an existing pricing map and make your changes to the new map.
|
You have duplicated the pricing map for your venue and you are editing the Copy.
- Edit the Map Name and Capacity.

- Click the Graphic Map tab.

Highlight the seats you no longer want on the map ad then click the eraser icon at the top left of the screen. it is in the second icon row and is the right most icon on that row,
Note the seats have been removed from the seating map. If you want to remove items from the underlying graphic, you may need to export the map and edit in an external graphic software.
You can now go on and update the seating.
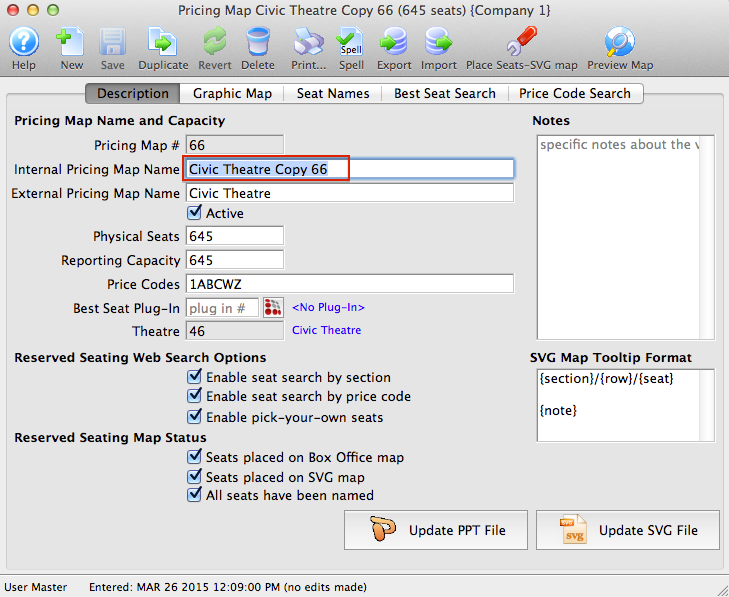
Exporting the Pricing Map Graphic
You may want to export a graphic file that has already been imported in Theatre Manager for editing.
- Theatre Maps is accessed through the Setup >> Theatre Maps
menu.
Alternatively you can click on the theatre maps button on the main Theatre Manager toolbar / ribbon bar.

The Theatre Map List window opens.

Click here, for more information on the Theatre Map List window.
- Chose the Map you want to view/edit from the list and click the Open
 button, alternatively, double click on the name of the map.
The Theatre Map window opens.

- Click on the Graphic Map
 tab.
tab.
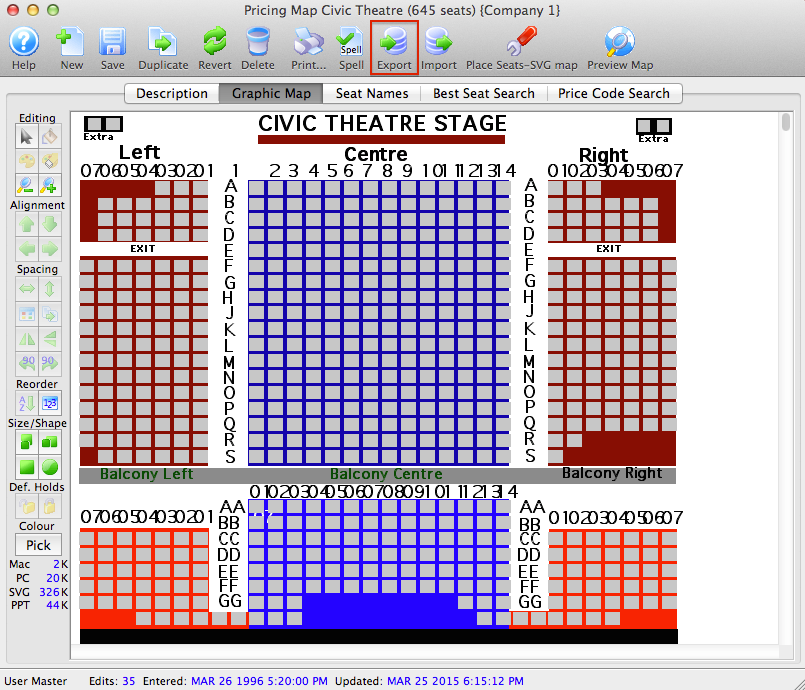
- Click the Export
 button.
A dialogue window will open allowing the option of exporting the Map as an SVG, PPT or JPG. The JPEG export will contain a picture of the entire map including the seats. The SVG will be only the graphical map without the seats. The size (in kb) is also listed with each file format.

After selecting an export format, the Save File for your OS window opens.
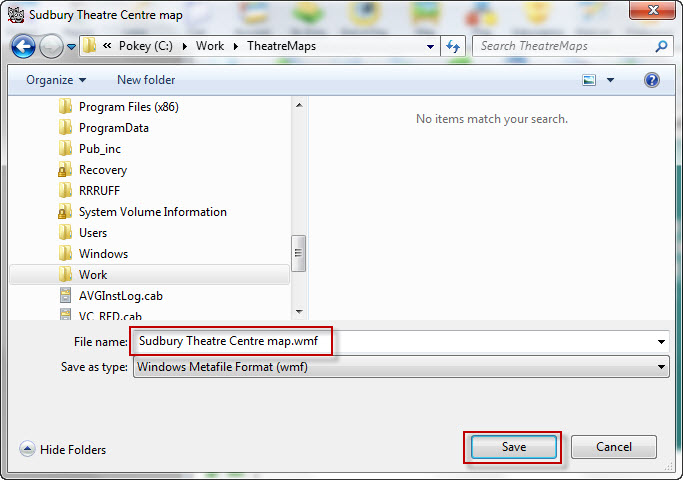
- Change the directory and/or the file name as required and click the Save
 button.
The file will be saved in the format specified and will be exported to the location specified and you can now change it as required.
Altering Existing Map Image
You may want to export a graphic file that has already been imported in Theatre Manager for editing.
- Theatre Maps is accessed through the Setup >> Theatre Maps
menu.
Alternatively you can click on the theatre maps button from the Theatre Manager main toolbar / ribbon bar.

The Theatre Map List window opens.

Click here, for more information on the Theatre Map List window.
- Chose the Map you want to view/edit from the list and click the Open
 button, alternatively, double click on the name of the map.
The Theatre Map window opens.
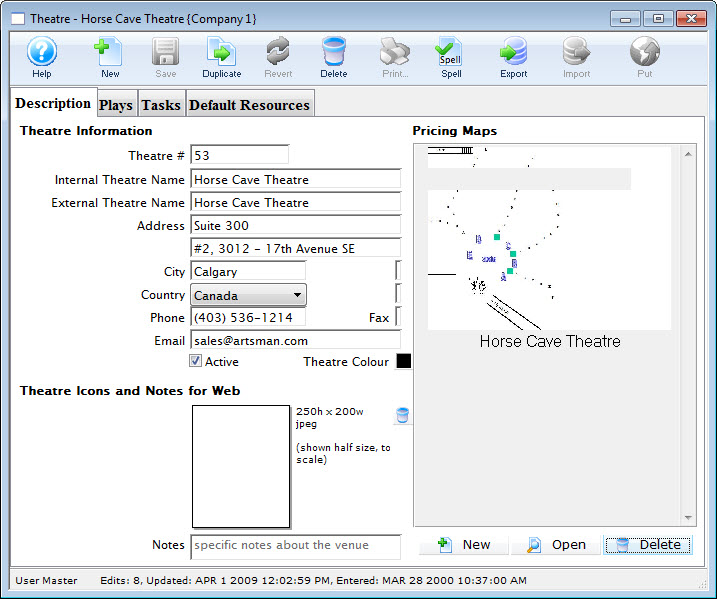
- Choose the map in the Pricing Map portion of the window and click the Open
 button.
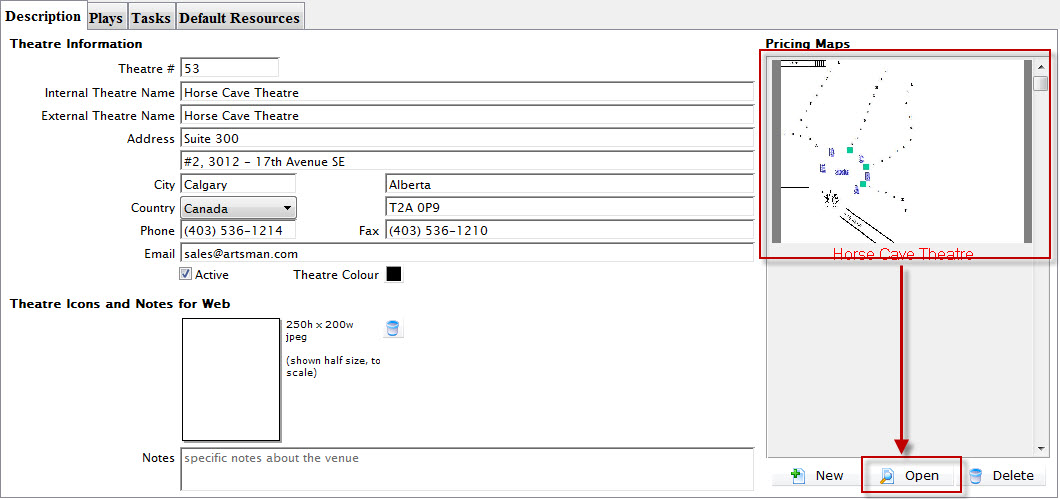
The Pricing Map Window for the selected Pricing Map opens.
- Click on the Graphic Map
 tab.
tab.

- Click the Export
 button.
A dialogue window will open allowing the option of exporting the Map as a JPEG file or SVG. The JPEG export will contain a picture of the entire map including the seats. The SVG will be only the graphical map without the seats.

After selecting an export format, the Save File for your OS window opens.
- Save the file.
- Open Powerpoint and create a new blank Powerpoint document.
- Choose Insert >> Picture >> From File.
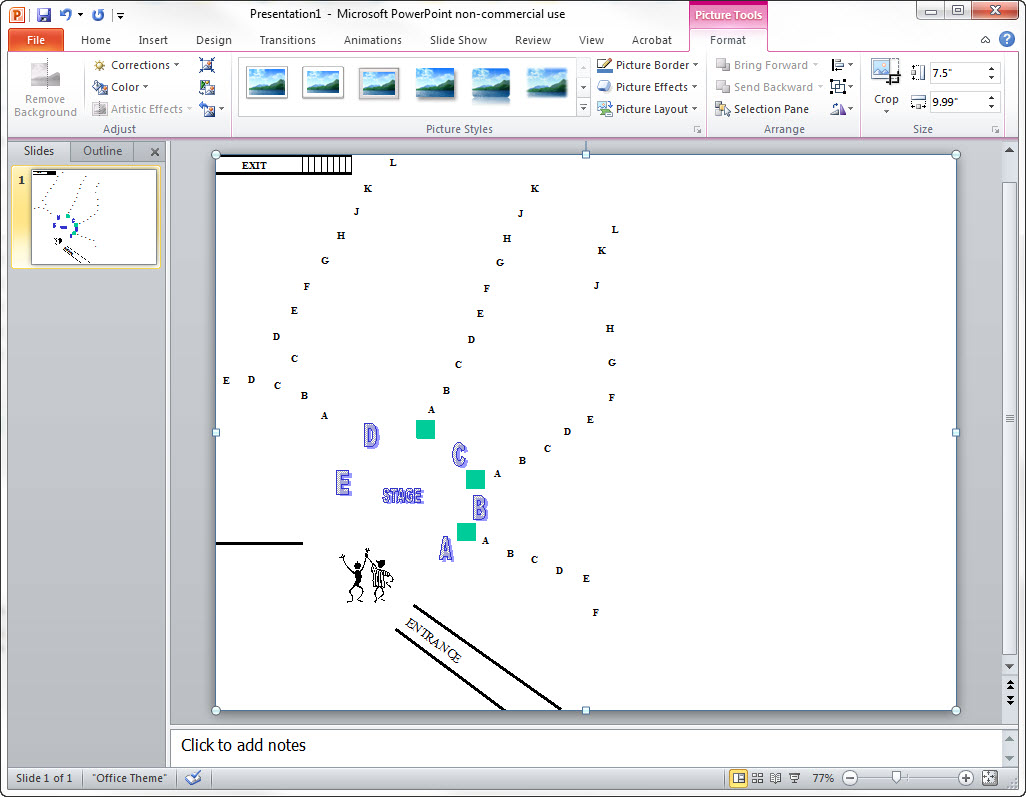
- Highlight the entire image and Right click to open the right-click menu.
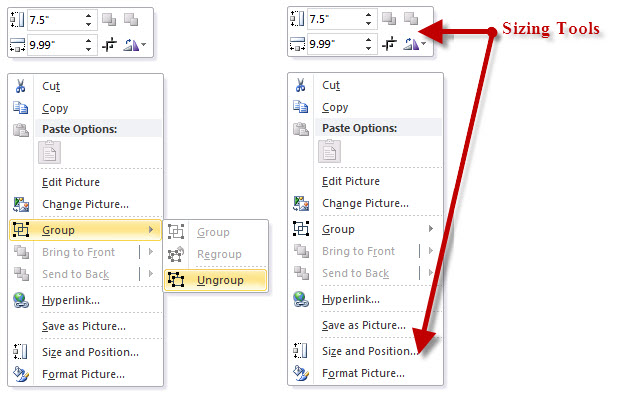
You have a number of different options. To resize the image, you can use the resizing tools available. To change elements in the image, choose Ungroup.
If you are upgrading from an earlier version of Theatre Manager where the map does not match the seats, increase the height and width by 33% Do this by multiplying the page size parameters for height and width by 1.333.
- Make any additional changes.
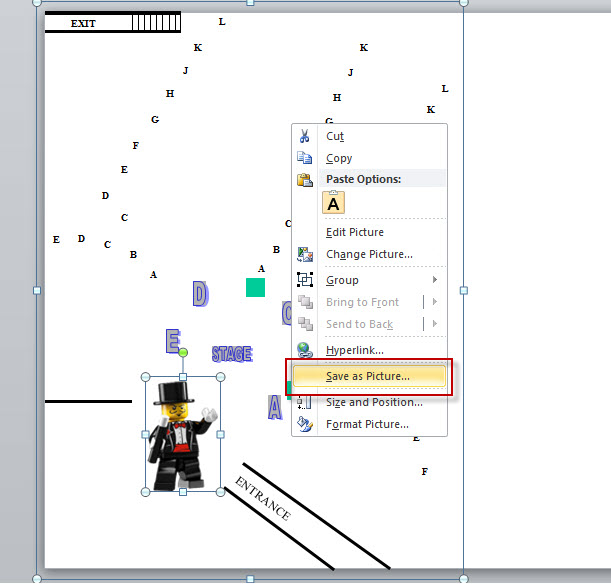
- Right click Save As Picture.
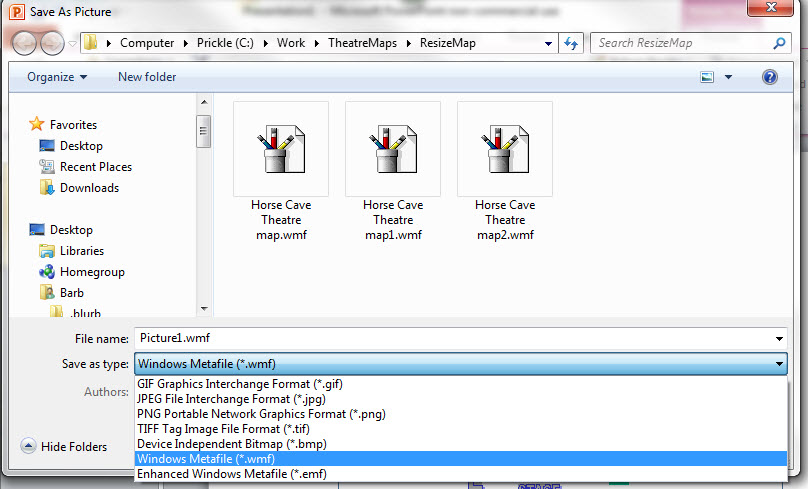
- Select SVG and Save.
- Open Theatre Manager and drag and drop the SVG on top of the Graphic Map.
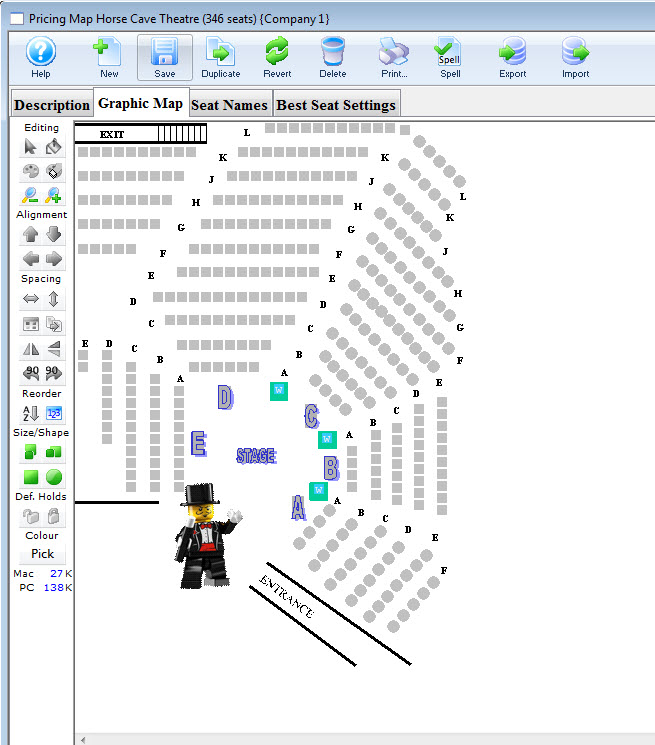
The image in the background will update and save to the database. If a mistake is made click the Revert to Save button at the top of the screen to undo the change before Saving or Closing the window.
Adding a Duplicate Map to Change Seat Pricing
Your venue is running a special event. One evening performance is to only have two Price Codes. All the seats on the main floor of the theatre are to be sold at the Adult Price only (your price code A) and all the raised seats are to be sold at a different Price Code, Price Code B. Or you want to implement Demand Pricing for the event.
Your standard seating map contains six codes ABC123.
Here are the steps you take to set up your venue to accomodate this new event, quickly and easily.
- Click the Venue
 button in the main Theatre Manager toolbar / ribbon bar.
The Venue listing opens, chose the correct venue by double-clicking.
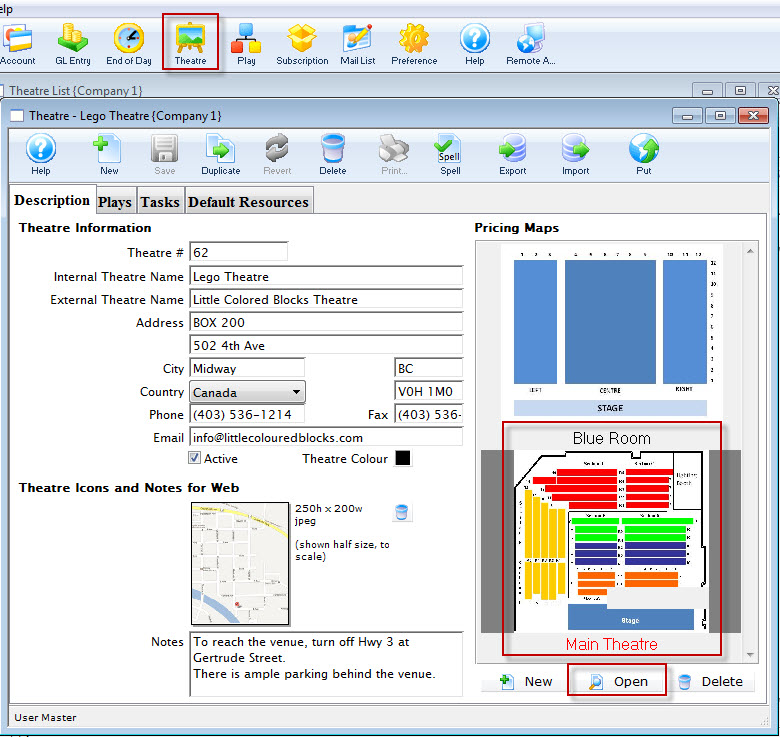
- Choose the pricing map to be duplicated and click the Open
 button.
The selected pricing map opens.
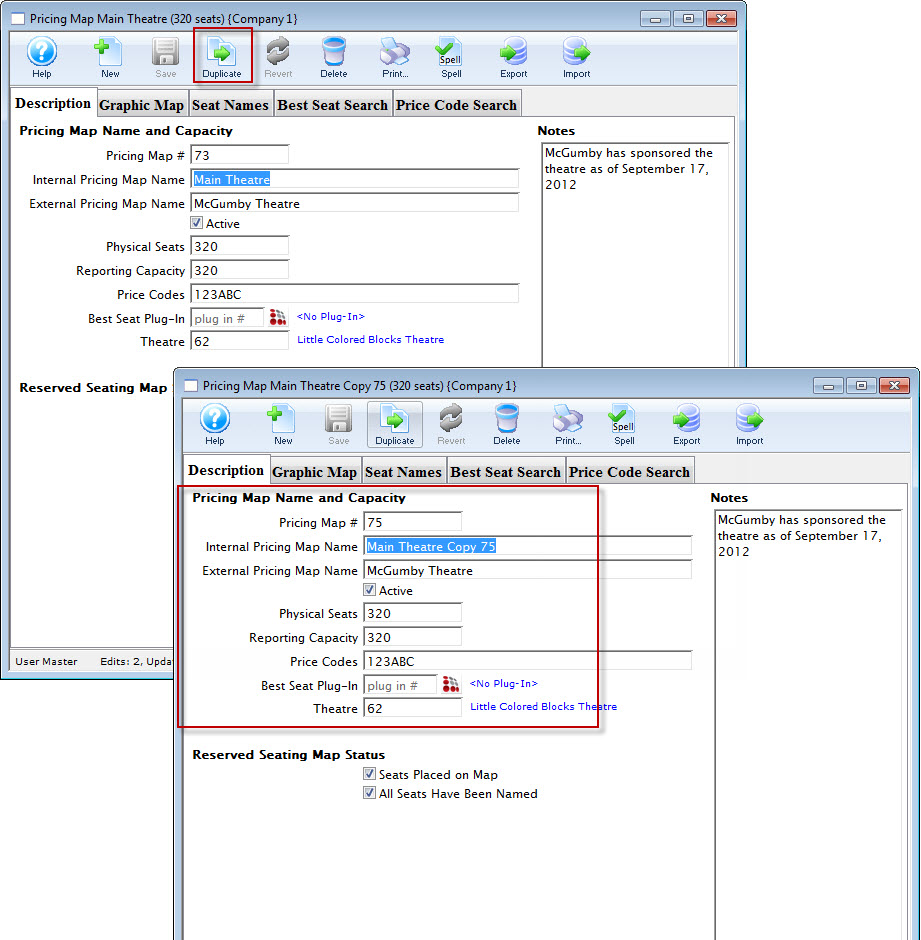
- Click the Duplicate
 button.
A Duplicate of your pricing map opens. Notice the differences:
- The Pricing Map number is changed.
- The Internal Pricing Map name has changed. You will want to give this a more meaningful name.
- Leave the rest of the selections.
- Click on the Graphic Map tab. If necessary, remove or add any holds.
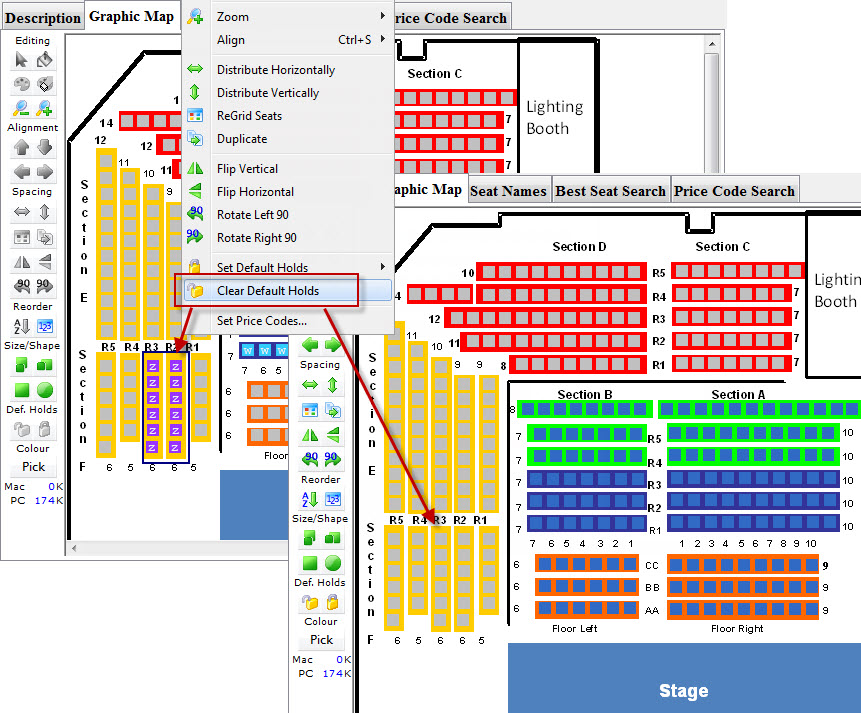
- Highlight the holds, use the right click menu and choose - Clear Default Holds.
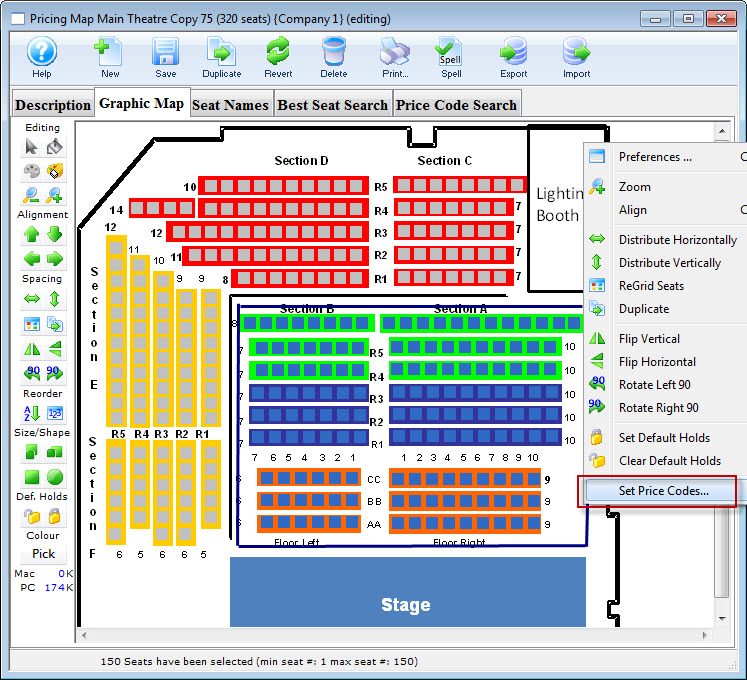
- Highlight the block of seats you want to change the code on and right click.
A data entry dialog opens.
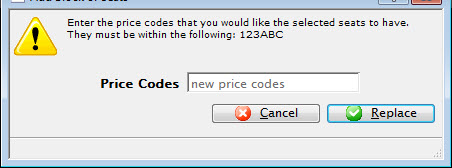
Enter the code you want the section to be.

If it is a code that is not in the map you copied from, it will NOT be available to add. Also, If you are replacing the pricing map for one or more performances, you must ensure all maps being used have the same price codes. Your pricing map can have unused price codes in its description.
- Enter the appropriate price code for the section.
If you click on the Seat Names tab, you see the Price Codes column contains the new Code.
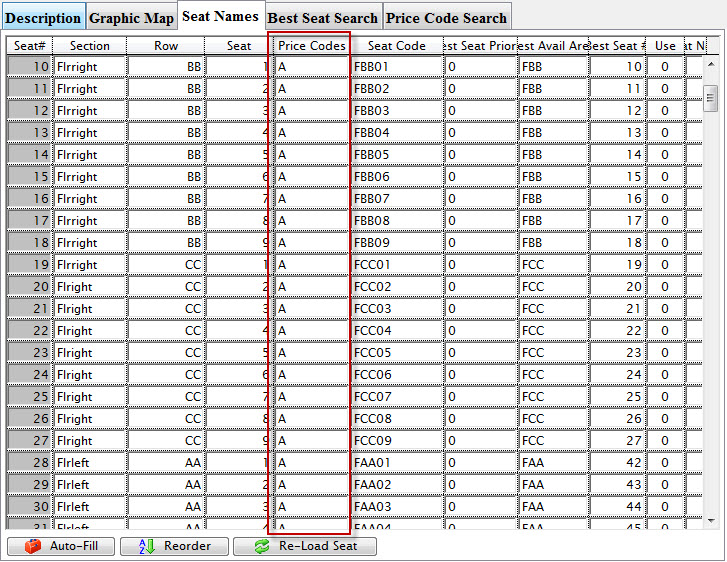
Continue until all the seats have the correct Price Code.
- Click the Save
 button.
- change the map for a specified performance.
- change the map for an entire event (i.e. all performances)
 |
You now have a duplicate map for your event and can now:
|
Duplicate a Pricing Map
|
To change the number of seats, it is first recommended you duplicate an existing pricing map and make your changes to the new map.
|
To duplicate a Pricing Map, you perform the following steps:
- Open the Venue.
- Open the Pricing Map you want to duplicate.
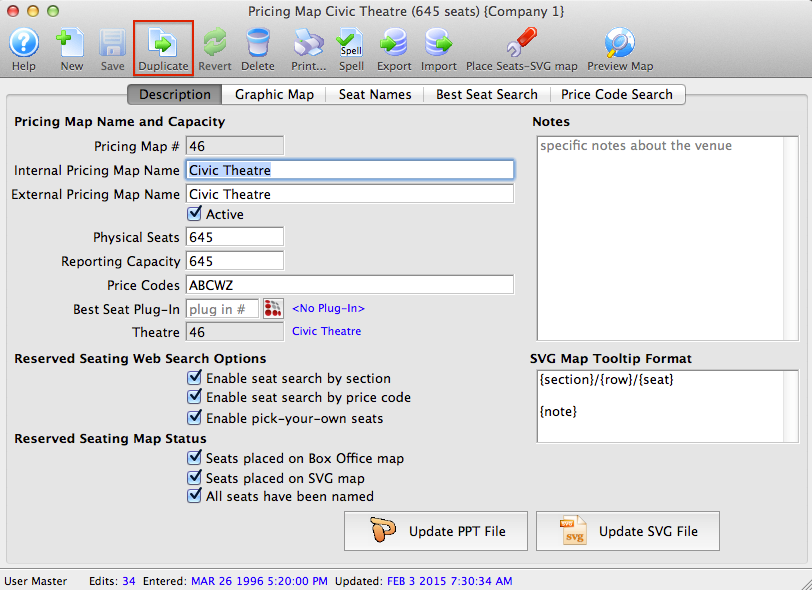
- Click the Duplicate
 button.

A NEW Pricing Map, a copy of the duplicated map opens.
You can now go on and edit the new map.
Transfer Pricing Map from one Venue to Another
- You are consolidating your various pricing maps because they really are one venue
- You want a similar pricing map in another venue (say, after duplicating a common one like a black box venue)
- Open the venue you want to transfer the pricing map from
- Open the venue that you want to transfer the pricing map to
- Drag the pricing map from the one venue to the other and drop it on the list of images of pricing maps
- Read the message and click Transfer if you want to continue
- After transferring the venue, you may need to put any events associated with the transferred pricing map back on sale (if they should be)

