Main menu
You are here
Adding a Promotion
To Add a new promotion, you perform the following steps:
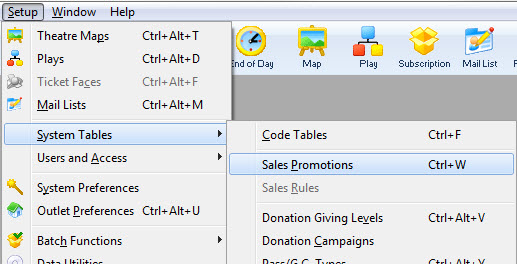
- Open the Sales Promotions window by clickinging Setup>>System Tables>>Sales Promotions.
The Sales Promotions list window opens.
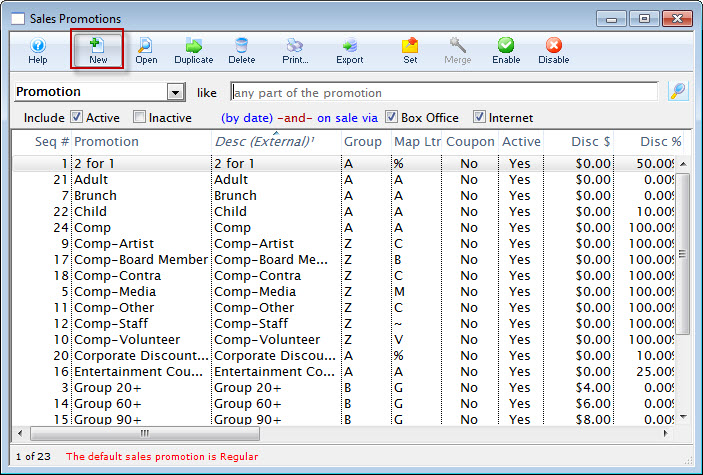
- Click the New
 button.
The Promotion Detail Window opens.

- Enter Sales promotion Name.
Try to give the promotion a name that is relatively self explanatory.
For example: If the promotion is a buy one get one free type of admission, name the promotion 2 for 1. Refer to Promotion Ideas Page for more promotion description examples.
- Enter the dates that the Promotion will be active.
The effective date is the date that the promotion takes effect, the thru date is the date that the promotion is good until. If the promotion does not have time constraints leave the date boxes empty.
- Enter Price Codes to be Excluded.
Excluded Price Codes are Price Codes that should not be effected by this Sales Promotion
- Assign the Promotion to a Report Subtotal Group.
Report Groups are a single letter or number that are used to group similar promotions together on reports. A subtotal will be printed for each group on reports. Classification of promotion codes make revenue reports more meaningful. Eg. The following groups could be used to classify your promotions:
A - Single Ticket Sales (regular, 2 for 1, General Admission).
D - Special Benefit Promotions (Dinner, Opening Gala, Development Events).
G - Group Tickets (Senior homes, Brownies).
M - Media Tickets (Critics, Editors).
S - Season Tickets (Earlybird, Season).
Z - Comp Tickets (Listed with a 'Z' so they appear last in reports)
These letters can be further defined in Code Table data.
- Select a Map Display Letter.
This is the letter that will appear on the seat in the Map
- Select the Per Ticket Fees.
This is where you can setup three levels of ticket fees. You can also decide which taxes will be applicable to those order fees. Once again clicking on the check box for that tax desired. Refer to Promotion Example Page for examples of Per Ticket Fees.
- Set Promotion Type.
Similar to the report groups, these classify similar sales promotions together. There are four possible selections to choose from. Regular Admission, Season Ticket, and three user defined fields. These promotion types are used in the same manner as the report groups.
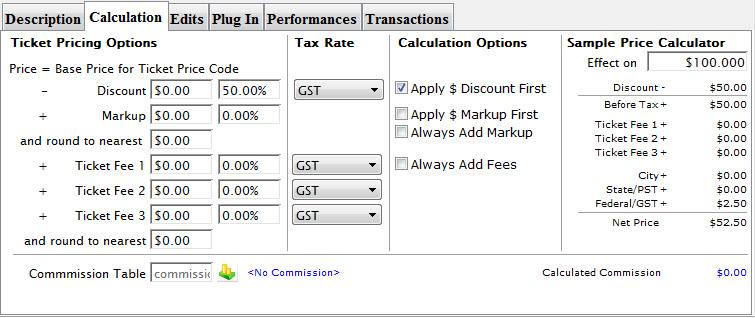
- Click on the Calculation tab.
- Enter the Base Price Calculation.
Here is where you enter a markup and/or a discount for the promotion. You can create a discount or markup based on dollars or percentage.
For example: You can create a discount of $10.00 or 25 % off of a given ticket price. You can also create a markup of $5.00 or 15 % on a given ticket price.
You can also use the markups and discounts in conjunction with each other, such as, create a promotion that has a discount of 100 % with a markup of $7.00. This promotion used on any ticket will yield a ticket with price of $7.00.
You can also decide which taxes are applicable to the promotion. Click on the check box for the taxes that should be included.
- When complete, click Save
 .
.
This finishes the process and saves the promotion. Refer to the section on Selling Tickets for details on how to apply the promotion during a ticket sale.