Course Management
Course Management Items In System Setup
Performance Field #1
Performance Field #1 is a customizable drop-down field used to describe a performance.
For example, you could call it Performance Type and populate it with genre descriptions like Comedy, Drama, or Musical.
You can use the Performance Field #1 in the Course module, to classifying Course Types.
In the example images in this section, Performance Field #1 has been called Course Type, and has been populated with Acting, Movement, Musical Theatre and Voice as groupings for classes. To change the name Performance Field #1 to Course Types, you perform the following steps:
- Choose Setup >> Company (or Outlet) Preferences <> Appearance Tab and scroll down to Performance Field #1 in the list on the left.
- Select the name on the right from Performance Field #1.
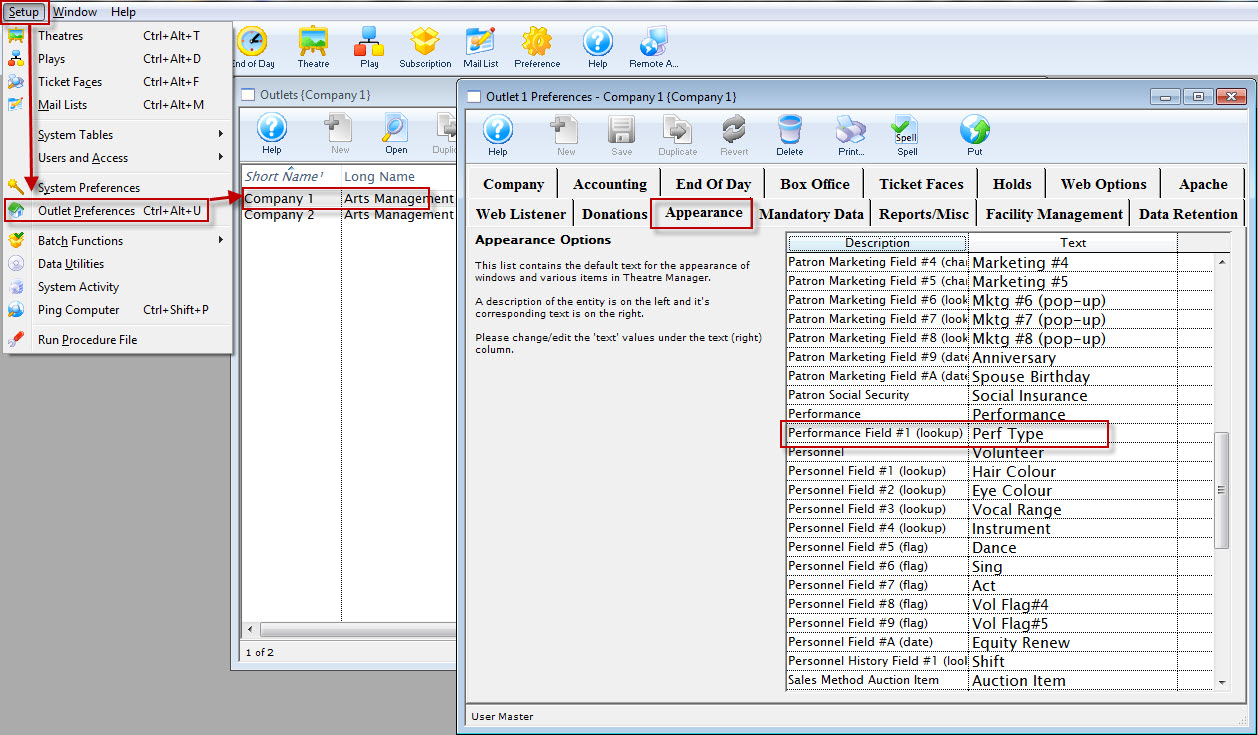
It may be the same, or it may have been previously changed for your organization.
- Change the name on the right to what is appropriate for your organization.

The change you make is Company (or Outlet) wide. Ensure, if the field has been used in the past, it is not currently in use or can it be altered to be more inclusive.
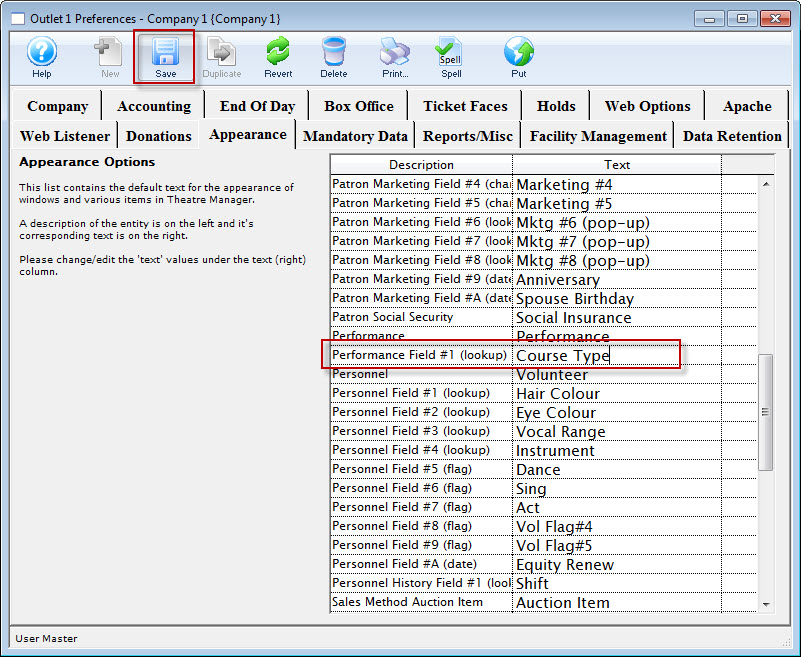
The Code Table name will also change from Perf Type to your entry.
- Click the Save
 button.
To populate the options available in Performance Field #1, please follow the instructions under Course Settings in Code Tables found here.
Searching By Performance Field #1
One of the benefits of using Performance Field #1 in conjunction with Courses is that you can search by that field in the Performance Selection screen while purchasing a Course.
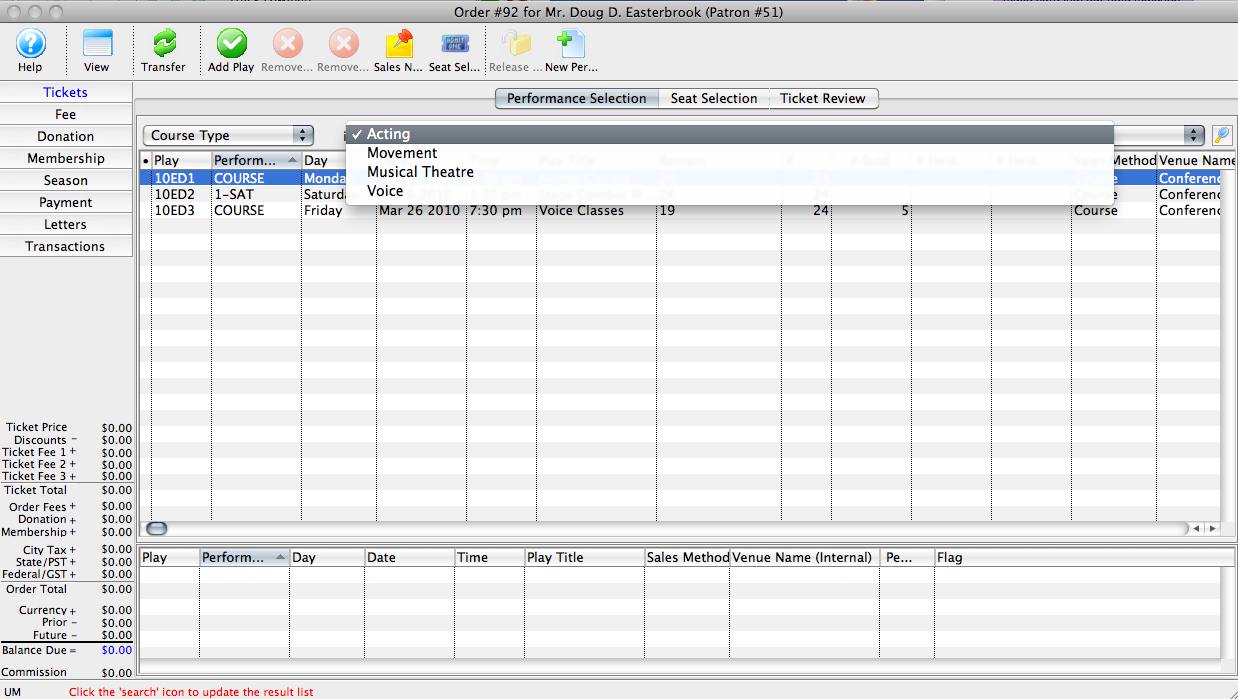
One of the benefits of using Performance Field #1 in conjunction with Courses is that you can search by that field in the Performance Selection screen while purchasing a Course.
Change the drop-down lookup menu at the top left to whatever you have named Performance Field #1 to search just for events or courses that fit one of its descriptors.
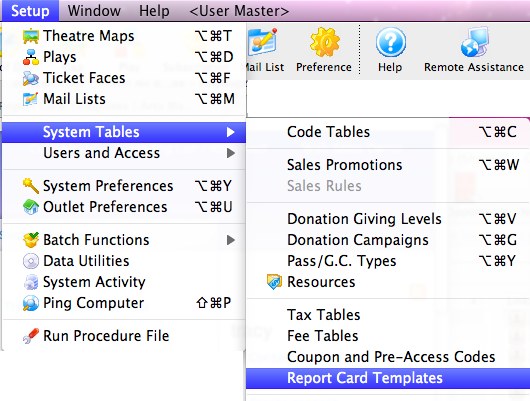
Course Settings In Code Tables
There are five code tables found in Setup >> System Tables >> Code Tables that need to be addressed when using the Courses Module. For more information, see:
- Instructor Setup, particularly the area of managing courses online if you wish to enable instructors to track attendance and add people via a tablet interface.
- Course Attendance Reason
- Course Level
- Report Card Categories
- Report Card Ratings
- Perf Type
Report Card Templates
Setting up a Course
Courses are set up in Theatre Manager just like any other event - in the Plays Window.
|
Your version may have been changed from the default "Plays" to "Events" or another similar title. |
To set up a course, you perform the following steps:
- Chose Main Theatre Manager menu item Setup >> Plays.
Alternatively
Click the Plays button in the Theatre Manager toolbar / ribbon bar.
The Play List Window opens.

- Click the New
 button in the Play List toolbar / ribbon bar to create a new record.
The Plays and Dates Window opens.
Entering the Course Title Information
To enter course title information, you perform the following steps:
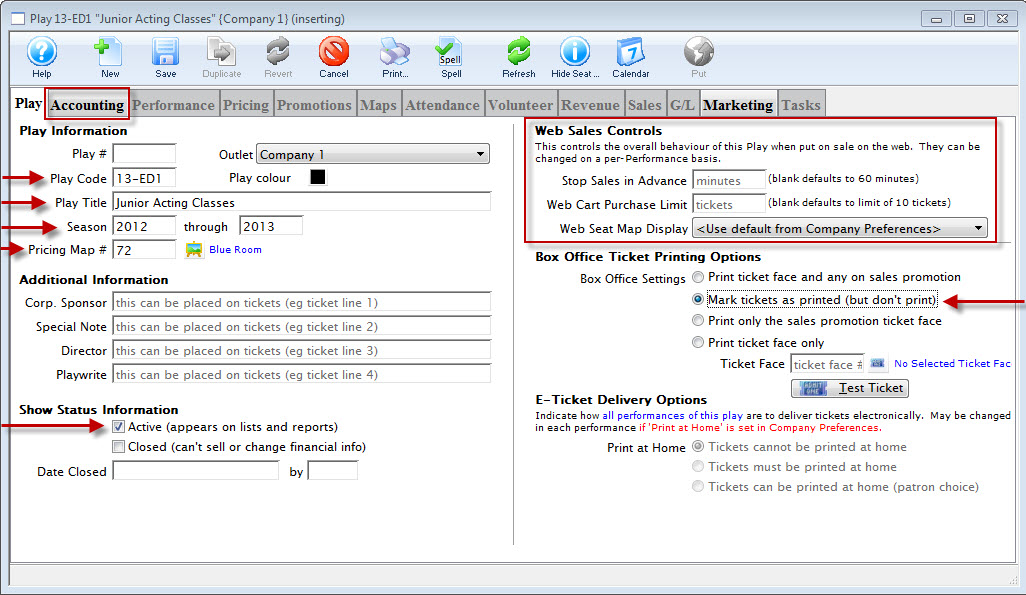
- Enter a Play Code for the Course.
In this the example - 13-ED1
Enter a code that is easy to remember and follows the naming conventions you may already have set at your venue for Play Codes. Play Codes must be unique and cannot be used again for future plays or courses. - Enter a Play Title that corresponds to the title of the Course.
- Enter the season information that corresponds to the timing of the Course.
- Enter a Pricing Map.
If you have not set up a Venue specifically for Courses, you may want to do so. It can be a Festival Seating (or General Admission) map, but one needs to be entered here. Click here for information about setting up a new Pricing Map.
- Ticket information does not have to be entered if no tickets will be printed for the course.
If this is the case, choose "Mark tickets as printed (but don't print)" under Ticket Printing Information.
- Ensure the Active Status box is checked.
This way, the course will show in the Plays List for purchase.
- Enter any Web Sales Controls desired on the top right.
For example:
If Advance sales shut off at a certain time before the start of the class or
If a patron is limited to the number of admissions they may purchase for this specific course (otherwise the program default limit on ticket purchases will apply).
- Make appropriate Ticket Printing selections.
|
You must enter Accounting information in the Accounting tab before you can Save the record. |
Accounting information is discussed on the next page.
Course Accounting Information
The Accounting Tab information is the same as for any other Play or Event.
For more information about the Accounting Tab, click here.
You may want to set up specific liability and income accounts in your Chart of Accounts to correlate to course revenues. To read about adding accounts to your G/L, click here.
Assigning the Course Genre
|
Genre is a general classification for events that is common to all Theatre Manager customers.
You cannot edit the Genre Table |
There are approximately 70 genre classifications which are used in the TicketTrove iPhone/iPad app and on the event search window on the web to help customers find entertainment to their liking. For Example: Customers can look for drama, hockey games, musicals, symphonies, ballet, etc.
Specifying a genre for a course or event is required.
Genres are listed in the Play / Event Genre code table. Click here for information on the Genre table.
To specify the Genere for your course, you perform the following steps:
- Click on the Marketing tab.
- Click the drop down list to select the appropriate Genre from the list.
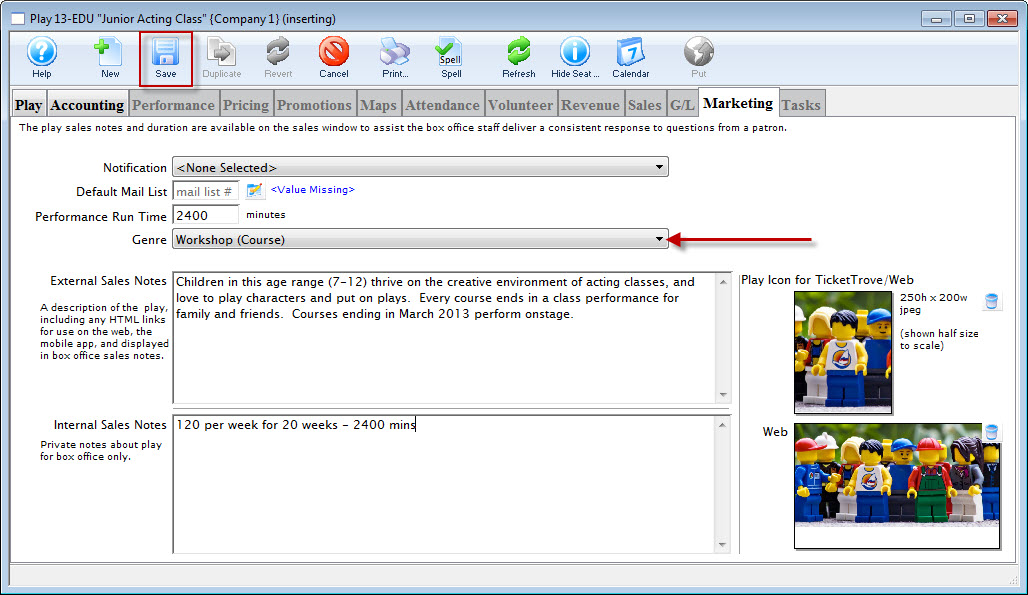
- Enter other information as required by your organization.
- When complete, click the Save button.
You can now go on and add classes (as performances).
Adding Course Performances (Classes)
To add Performances (or Classes) to your Course, select the Performance tab of the Plays and Dates window.
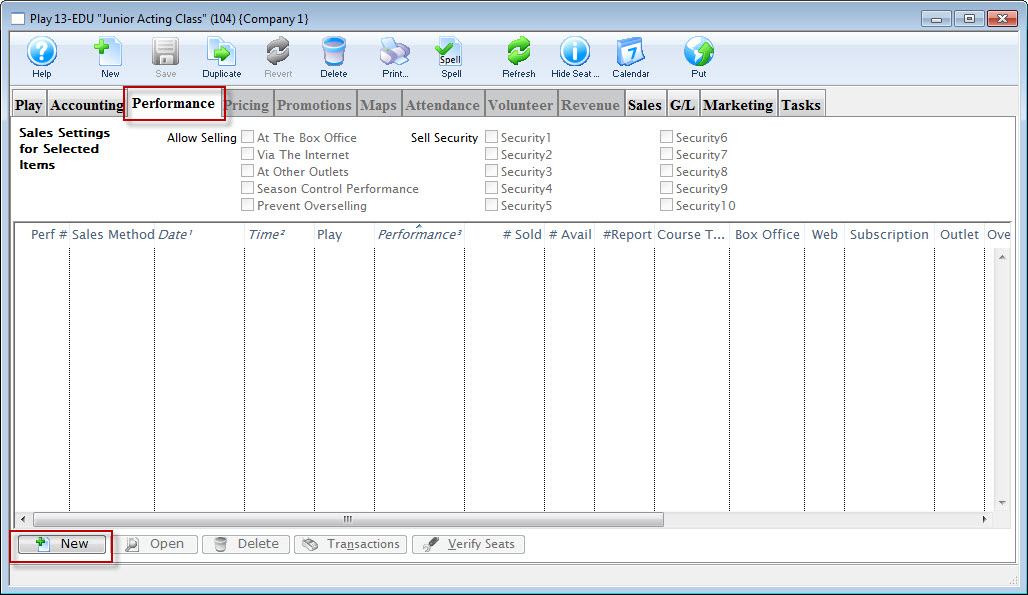
- Click the New
 button.
The Performance Wizard opens, beginning with Step One (details begin on the next page).
Adding A Class - Step One
To add a class, you perform the following steps:
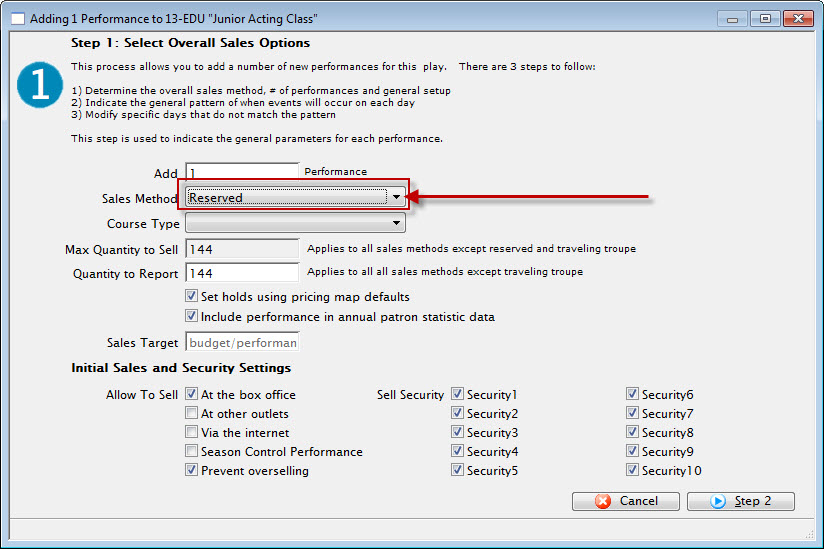
- Enter the number of Classes that will fall under this Course.
In this example - 20.
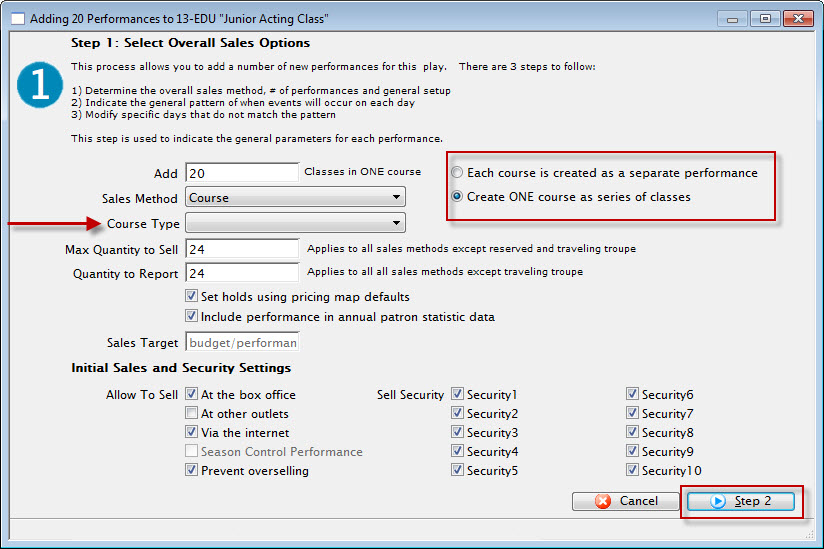
- Select "Course" as the Sales Method.
When "Course" has been selected, you will be given an option to either:

The difference is:
Each course is created as a separate performance Create ONE course as series of classes You can have multiple performances in your Course for patrons to choose from.
They can attend one session (or performance) and not the others.
This is useful if you are going to have one single class offered at several different times (just like any other event with multiple performances).
The individual classes can be sold separately
You are creating one Course that is a series of Classes
Patrons sign up to attend the whole series (this is the case in the example photos).
They purchase the entire series at once rather than separately.
Performance Field #1 is customizable. It is used for descriptions of a performance.
For example: You could use this field to group courses (or performances) by type--acting, voice, movement, etc (or drama, comedy, musical, etc).
- You can change the name of this field by following the instructions found here. In this example, the Field name has been changed to Course Type.
- You can populate options in this field by going to Setup >> System Tables >> Code Tables.
Locating the name of the field (which is whatever you have changed it to in Company Preferences) and following the instructions found here.
- The quantity to sell is based on the venue assigned to the Course.
If you think the Course may oversell the size of the venue, or if there is the possibility of adding more chairs to a venue, you can increase the quantity now.

you cannot increase the quantity to sell once the Course has been created. Changing the venue will not increase the quantity to sell.
The only way to increase the quantity is to create another event with a larger venue and move all the students out of this one and into the new one.
If there is a possibility of a higher quantity to sell, increase that value now.
- Check the boxes next to the sales outlets for the course (the box office, the internet, etc).
You cannot set a performance for sale Via the Internet until after pricing and promotions are set. You can check the box for Via the Internet at this step, but you will have to go back and edit the performance after setting Prices and Promotions and click Via the Internet under the Performance Tab of the Plays & Dates Window for the Course. For more information about this tab, click here.
- Set any appropriate Security controls for your venue.
- When you have everything set correctly, click the Step 2 button at the bottom right of the window.
Adding A Class - Step Two
In Step 2, you setup the pattern for the course. In this example, the course is running 1 day per week for 20 weeks at 4:30 pm.
- In Step Two, you set the date of the first session of the Course.
You can use the calendar lookup to the right of the data field to help choose the correct date.
- Use the sliders to select the number of Daily Performances for the classes in the course.
Make sure they correspond to the date you selected as a start date (for example, if you select Feb 1 and Feb 1 is a Monday, then you can't set Monday to zero performances).
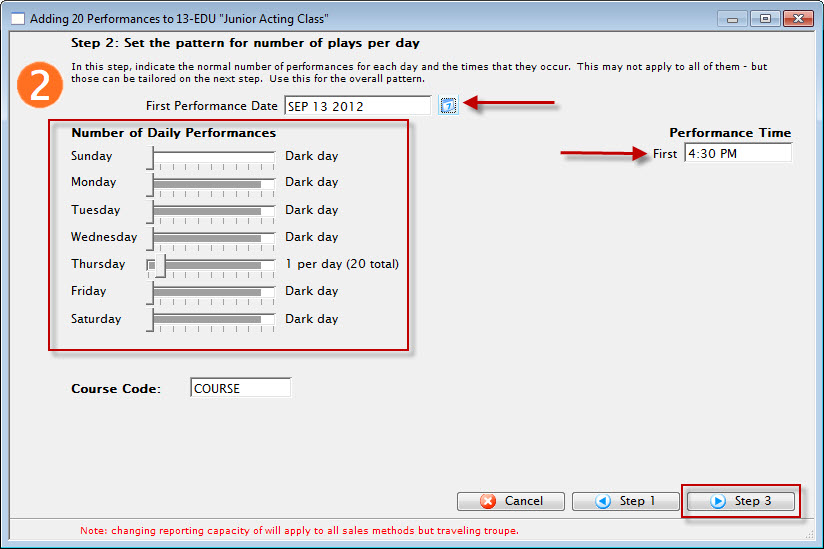
- Set the performance time for the start of each class in the course.
- Click the Step 3 button in the bottom right of the window.
Adding A Class - Step Three
In Step Three, you are presented with a Calendar View of the Classes in the Course.
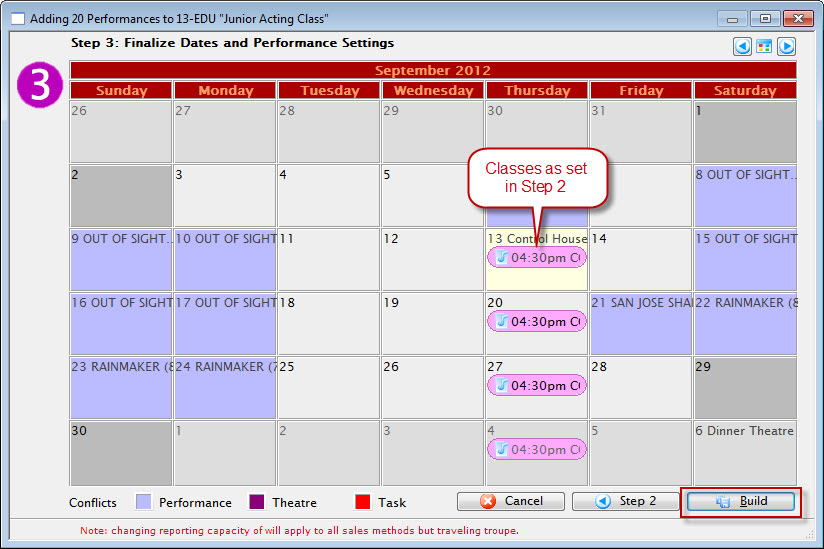
- If one or more of the classes starts at a different time than the Performance Time set in Step Two, you can drag that instance of the class on the Calendar to the appropriate start time for that class. You can also move classes to another day.
- When the Calendar looks the way you want, click the Build button in the bottom right corner.
The Build Performance dialog opens.
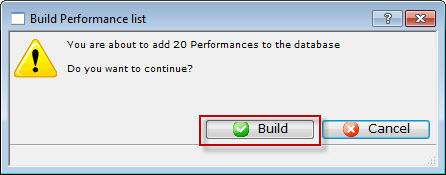
- Click the Build
 button to add your performances to the database, or Cancel to go back to the Steps.
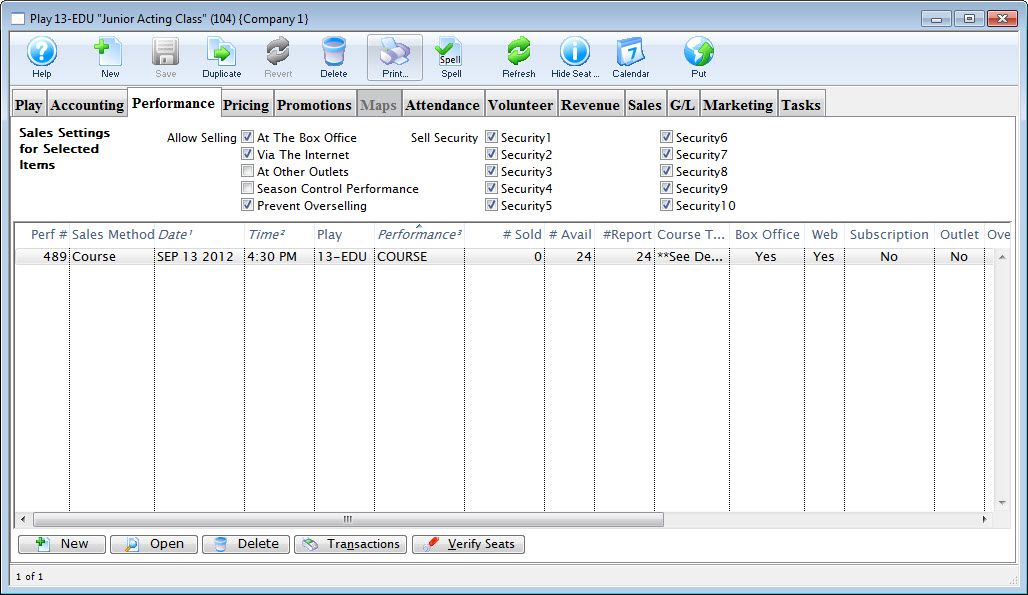
When you have completed building your classes, you are returned to the Performance Tab of the Plays and Dates window. The Course just entered populates window.
Setting Course Pricing
You set course pricing the same way Price Codes are set for any other Play or Event.
To set the price codes for your course, you perform the following steps:
- In the Play window, click the Pricing tab.
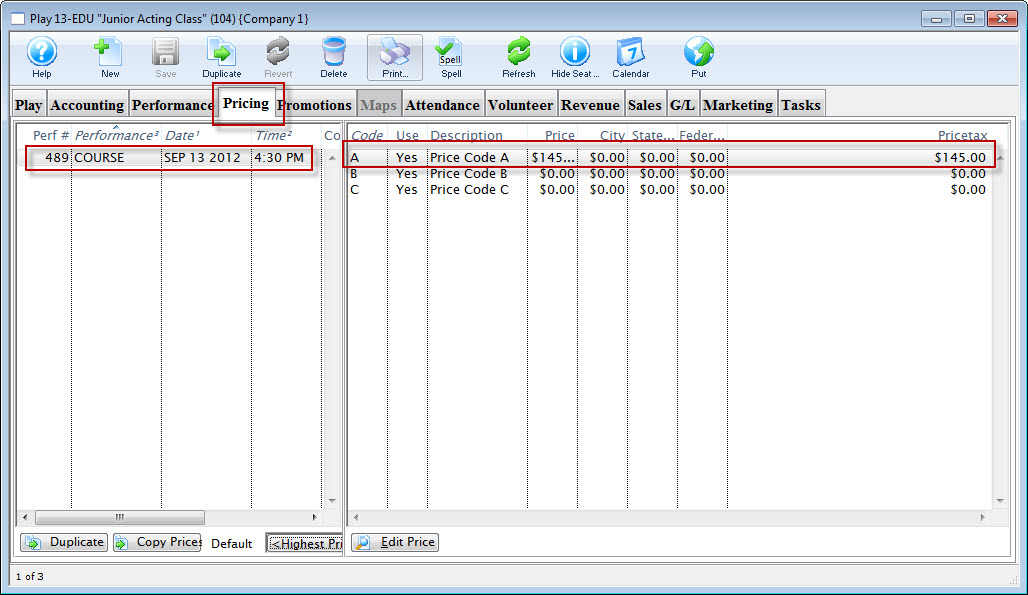
- On the left side of the window, highlight the course.
This enables the Price Codes on the right for editing.
- Double click on each Price Code to open the Price Code Detail window.
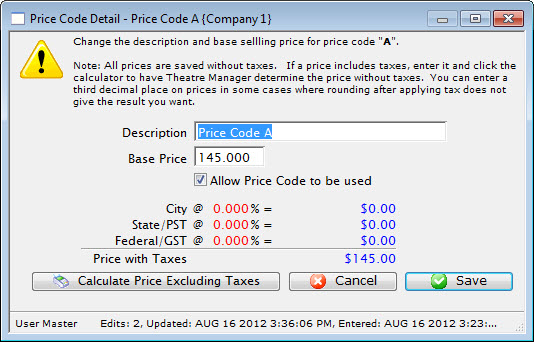
- Name the Price Code Description and/or set the price.
- When complete, click the Save
 button.
For more information about Price Codes, click here.
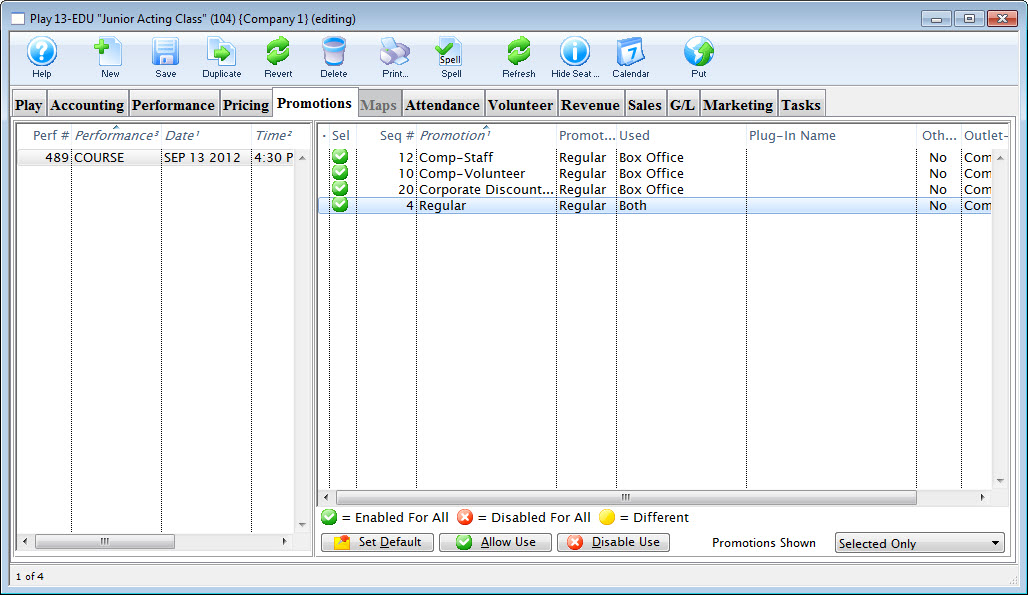
Enabling Course Promotions
Promotions, like Price Codes, are set in Courses the same way they are set for Plays or Events.
To set the price codes for your course, you perform the following steps:
- In the Play window, click the Promotions tab.
- On the left side, highlight the Course to populate the promotions for that Course in the list on the right.
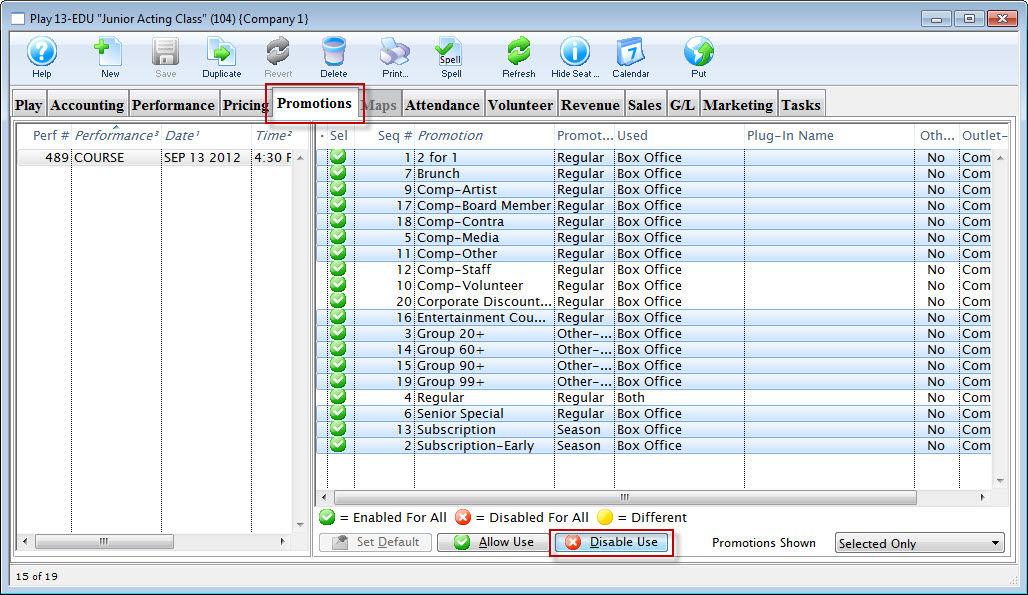
- Highlight promotions you do not want to use for that Course and click the Disable
 button to turn those promotions "off".
Promotions are set to "Enabled" by default.
If you change your mind or later decide to allow a promotion for use in the Course, you may have to change the drop-down in the bottom right corner to show All promotions (it may be set to only display enabled promotions)
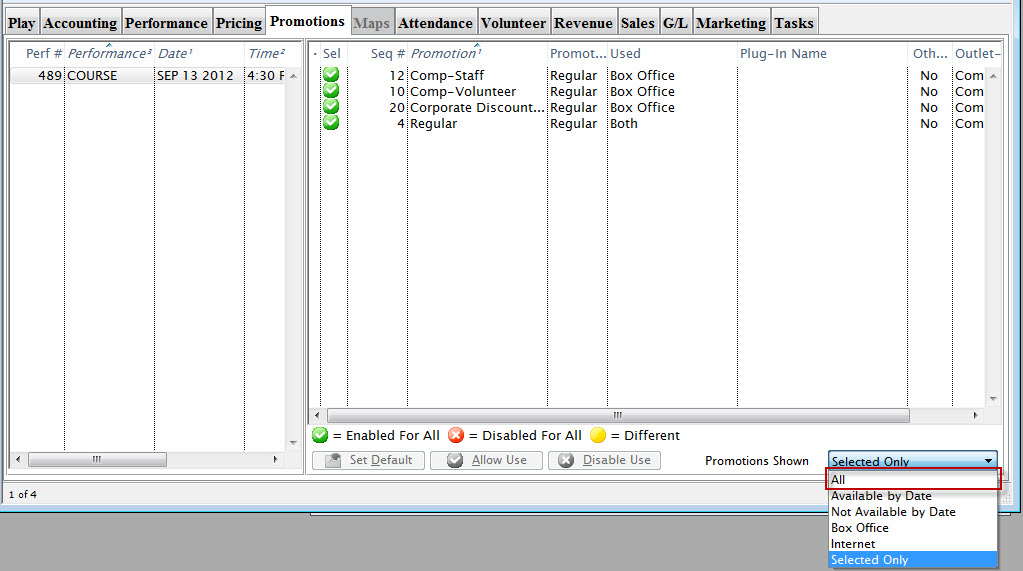
- Highlight the one or ones you'd like to enable and click the Allow Use
 button to turn those promotions back "on".
For more information about Promotions, please click here.
Once you have completed the entire process from entering the course title, accounting information, performances, prices and promotions, you are ready to start selling Courses.
If you want to make further adjustments to the Course, click here for information about accessing the Performance Detail tabs.
Redirecting link on your main website specifically for Courses
Creating a link to courses entails using the &search parameter in the event URL. By picking the right &search parameter you can:
- Show all courses by using the parameter &search=PB_SALES_METHOD=6 in the link. This is, by far, the easiest as
- it simply shows all courses -and-
- is immediately effective when new courses are created.
- Show selected events which can in the &search parameter. A sample is shown later on this help page.
- This has the advantage of allowing events sold as courses as well as a final 'parent' performance to be found in one list.
- It has the disadvantage that the web page link must be changed each time you have a new course
- A hybrid approach that may have a &search parameter that show all events sold as courses or some specific 'finale' performances.
An example of showing a link specific courses (Option 2 above)
A company has three Courses that are one-time events or workshops. Patrons can pick and choose or select all three if they'd like.
In our example, the company wants a link redirecting patrons to the list of Events/Courses (we'll discuss a need for a list of Performances/Classes further down).
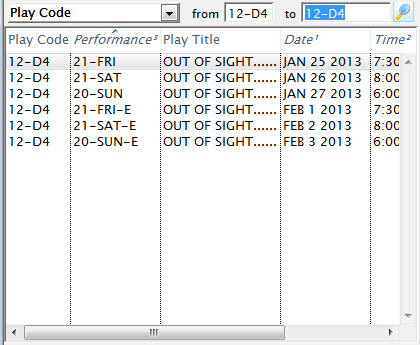
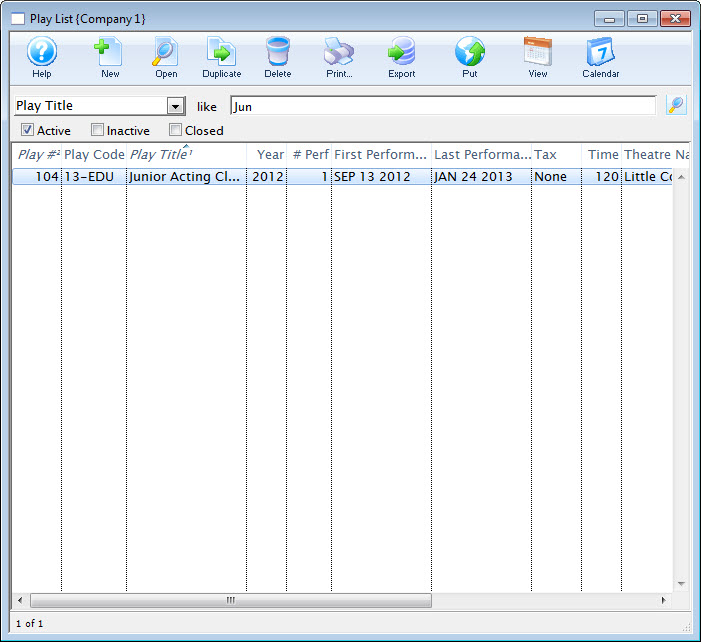
In the Event List in Theatre Manager, the Courses look like this:
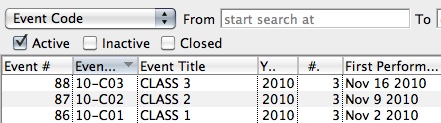
The Event # column is the one at the far left.
Those unique Event #'s - 86, 87, and 88 in the example - will belong to only the corresponding Event in the database and no others.>
"x, y and z" are representative of those unique Event #'s in the search string in the link discussed above for creating a link to a list of Events.
A link to these Courses will look like:
https://tickets.myserver.com/TheatreManager/1/login&event=0&search=P_SEQ IN(86,87,88)Similarly, you can create a link to a list of specific Performances for sale. This can be useful if your organization offers a Course made up of a series of Classes which can be purchased separately.
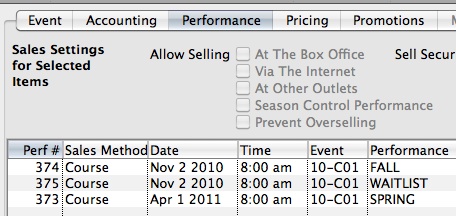
In this case, the Performance # works as the unique identifier for each Class in the Course.
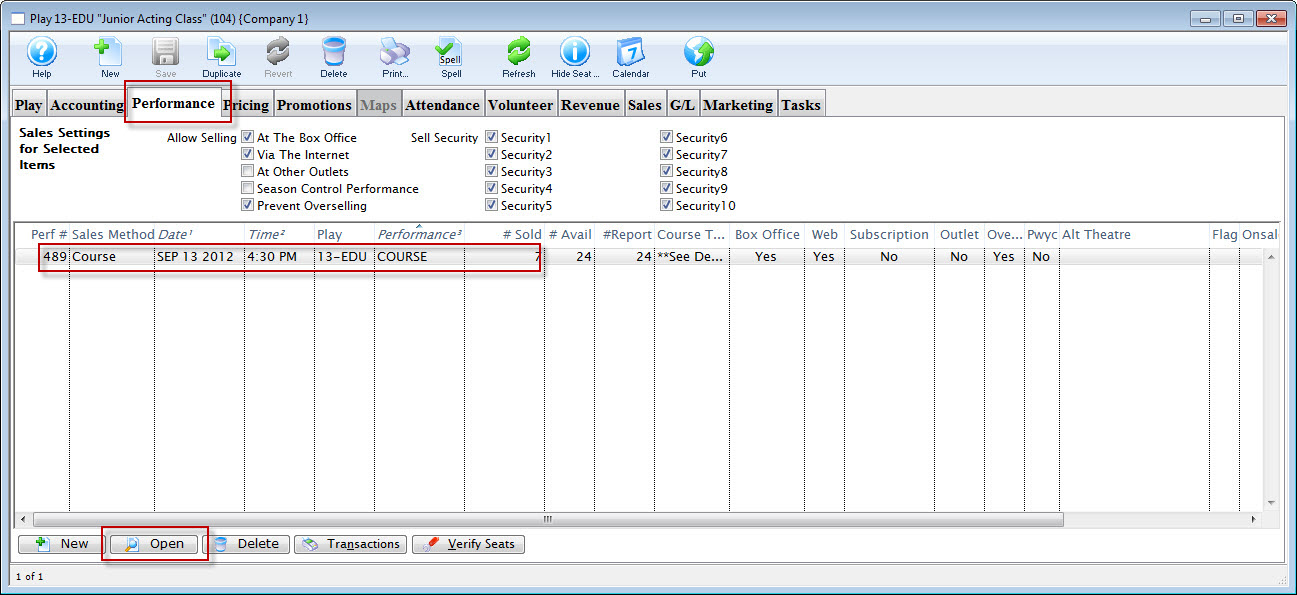
Under the Course (Event) Setup, in the Performance Tab, the Perf # column is on the far left of the list of performances:
In the example image, the Perf #'s are 373, 374 and 375. A link to a list of those Classes would look like:
https://tickets.myserver.com/TheatreManager/1/login&event=0&search=PB_SEQ IN(373,374,375)
Care should be taken when creating Courses and Classes that you change the Sales Method to "Course" in the Performance Setup stage of the Course Setup.
Online patrons can purchase a Course and then assign another patron as the attendee for the Course (helpful in cases where the parent buys a class for a child who will be attending). For this option to be available, Courses must be setup as Sales Method - Course. For more information about Courses in Theatre Manager, click here.

Editing an Existing Course
You may want to edit a Course or the classes within a Course.
Most of the information you will want to access can be found under the Performance Tab for the Course in the Plays and Dates (or Events) Window.
- To start, go to Setup > Plays or click the Plays
 button in the Theatre Manager toolbar.
- In the Plays List, look up your Course and select it from the list.
For information about how to use the Plays List lookup, click here.
- Select the Performance Tab of your Course Window.
Here, you can set the Sales Outlets for the Course by highlighting it in the list and checking the appropriate boxes at the top of the window.
After setting Price Codes and Promotions, you can check the Via the Internet button to sell the course online.
If necessary, you can also change Security Settings.
- Select the Course from the Performance list and click the Edit
 button to open the Performance Detail Window.
For informationon the Tabs in the courses window, Click here.
button to open the Performance Detail Window.
For informationon the Tabs in the courses window, Click here.
Selling a Course (helpful hints)
Courses created as individual events must be bought separately, just like any other event.
| Quick Reference information on buying a Ticket, click on the icon to launch the pdf or screencast. |
Quick Reference Guide |
Cheatsheet |
Flash Screencast |
MP3 Screencast |


To sell a course to a patron, you perform the following steps:
- Click the Patron
 button in the main Theatre Manager toolbar / ribbon bar.
The Contact List window opens.
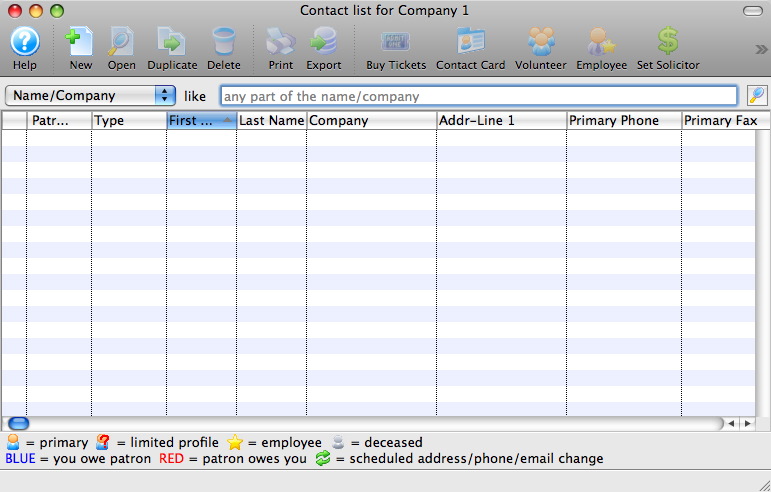
- Find the patron you are buying the course for in the contact list.
Single Click on the patron in the list to highlight. For more information on finding patrons click here.
- Open the patron window and click the Tickets
 button in the Tickets tab.
The Order Window opens.
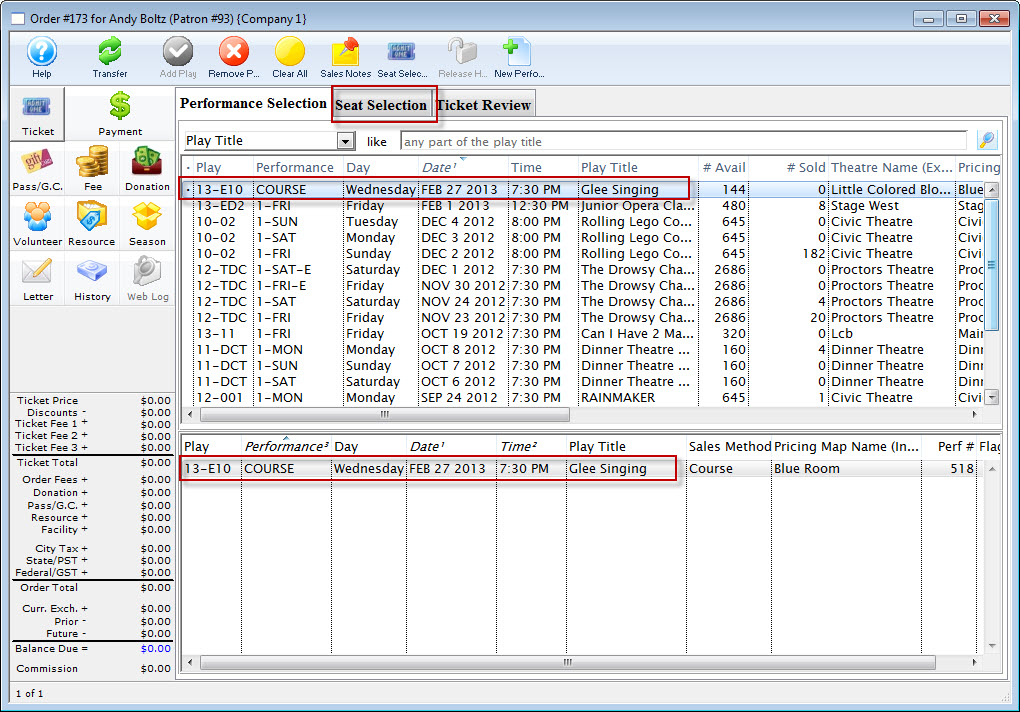
- Select the course(s) the patron would like to buy tickets for.
Click here to learn how to search for performances.
To select a single course double click on it.
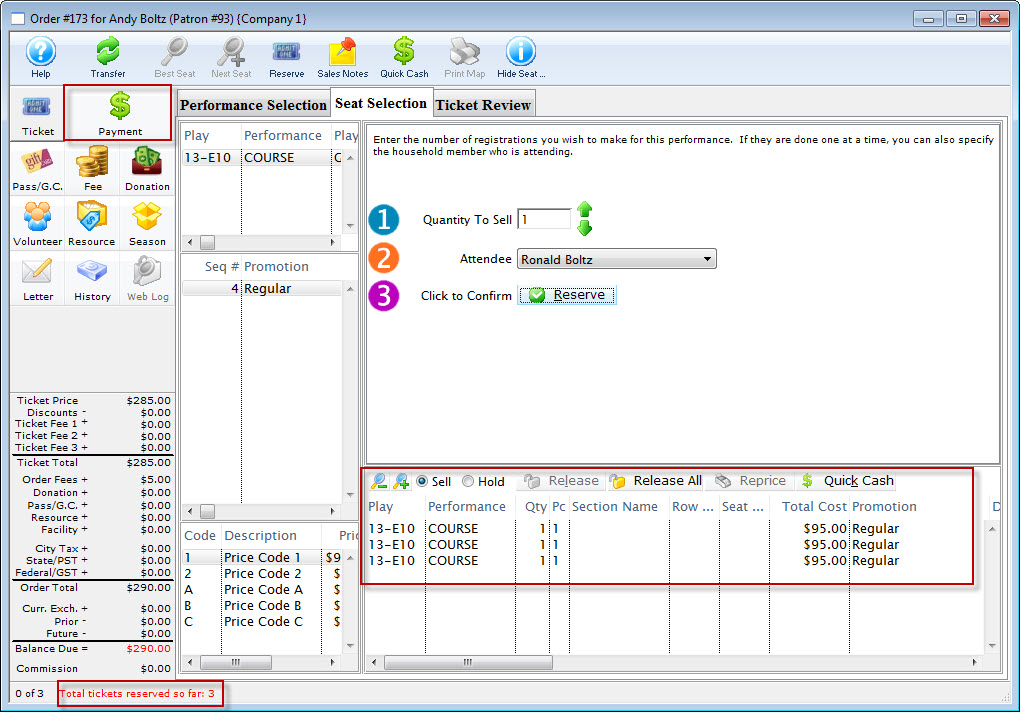
- Click the Seat Selection tab.
The Seat Selection window opens.
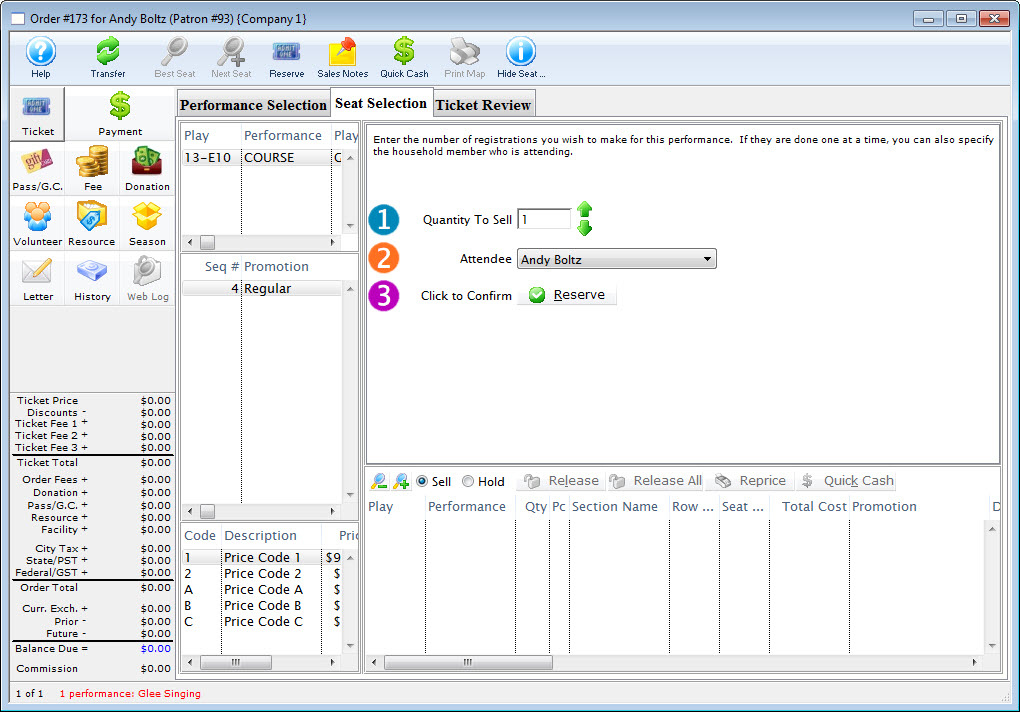
The course registration window to allows selection of any household member as the participant in the course rather than having to sell the course and make the change in the main patron ticket list. In a household with one or more parents and one or more children, this should be a convenient shortcut.
- Enter the Quantity to sell as 1.
- For Attendee, use the drop down list to select the appropriate attendee.
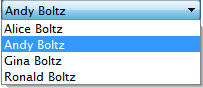
- Click the Reserve
 button.
To add other Attendees, you:
- Enter the Quantity to sell as 1.
- For Attendee, use the drop down list to select the appropriate attendee.
- Click the Reserve button.
Continue until you have selected all the Attendees.
- When you have completed adding attendees, click the Payment
 button.
The Order Payment window opens.
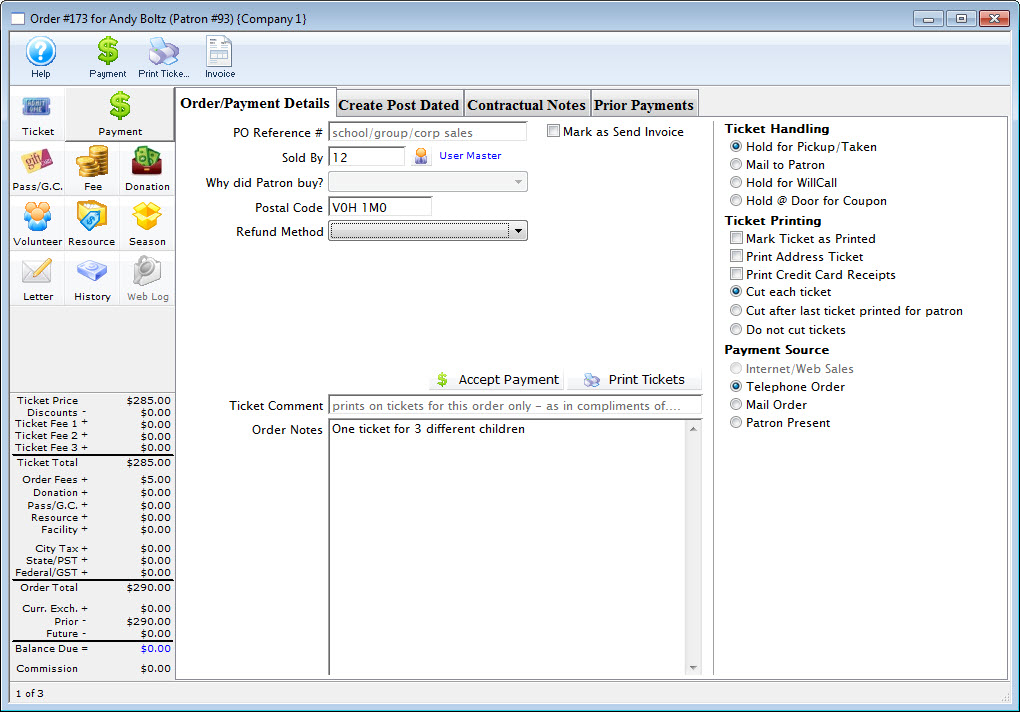
- Make the payment.
The ticket tab of the patron window displays the courses purchased for the household member.

Gifting Tickets and Courses
You can "gift" tickets to other household patrons or to unrelated patrons in Theatre Manager. This is especially useful for courses where parents frequently purchase classes for their child or children to attend.
Financial data remains attached to the purchaser's record, while the ticket is transferred to the receiver's account. The receiver is listed as the attendee to the event.
For more information about gifting tickets, click here.
Refunding a Partial Amount for a Course
- The patron could drop out and want a refund
- You could cancel it midsession because the instructor needed an extended leave
|
Once the course has commenced, completely refunding it means you lose knowledge that the patron started the course.
Instead, we want to create a way to retain attendance info, yet refund all or part of the tuition. |
Setup of a Fee to Refunding part of the Tuition
The first step is to create a new ticket fee that accepts negative values and make sure the employee permission is set if the refund amount is variable.
|
Note: when setting up the fee, make sure to talk to your accountant about the proper account for tracking purposes. |
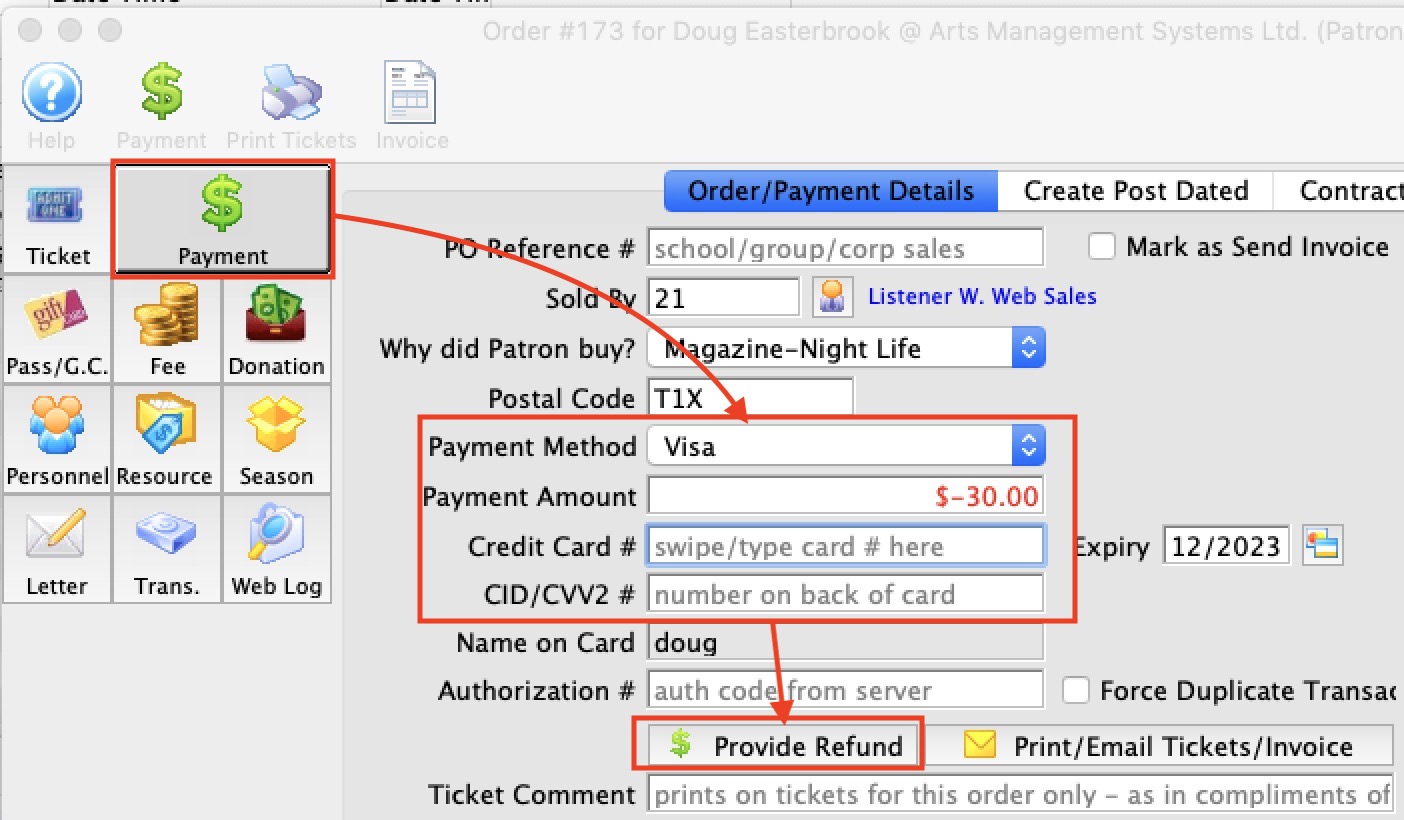
Steps to Refund part of the Course Cost
- Find the ticket for the course you want to refund tuition to
- highlight it in the ticket list
- Click the Tickets button at the bottom left of the patron screen
- Pick Add tickets to order - even though we will not add tickets to the order, this sets us up to merely modify it
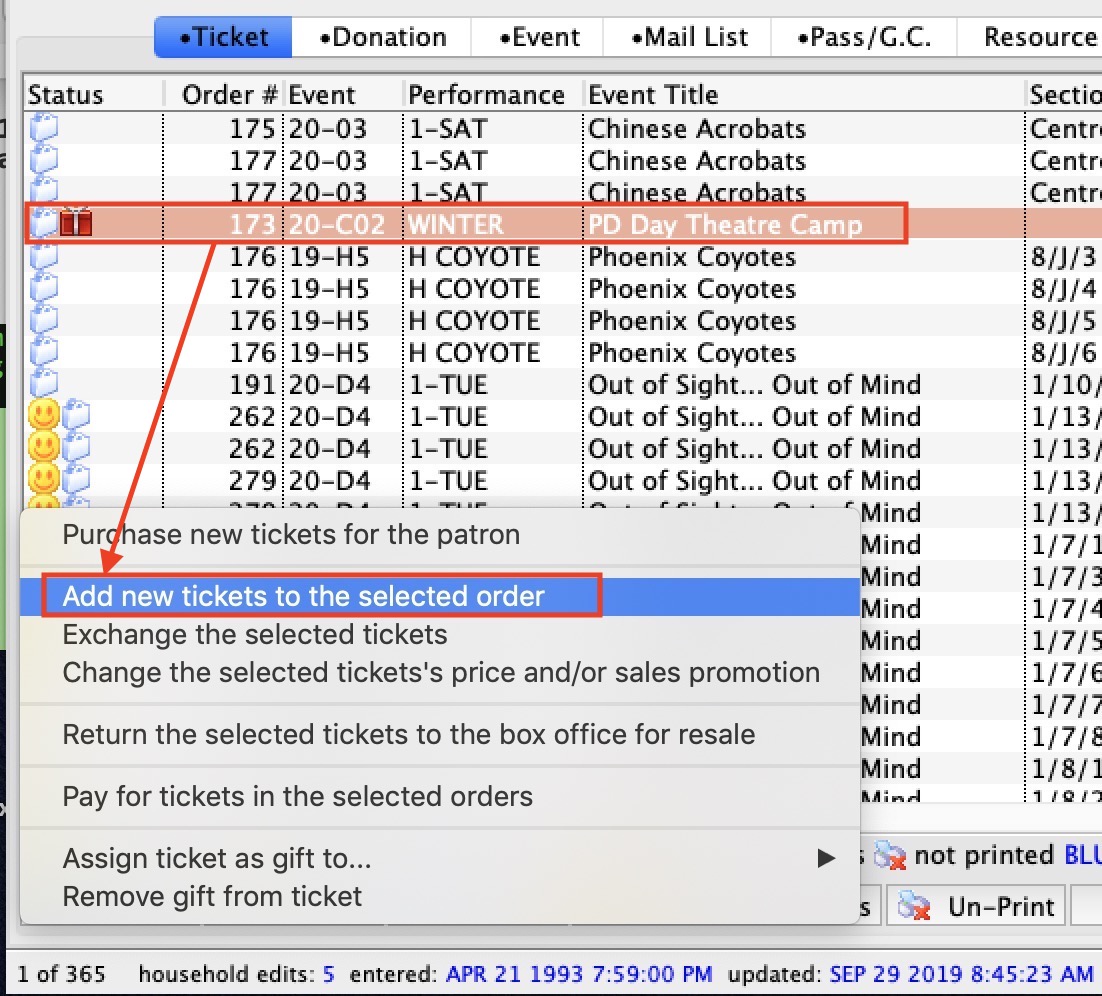
- On the order window
- Click the Fees Button
- Click the New button to add a new fee
- Select the fee called Tuition Refund
- Enter the amount amount you want to refund tuition by
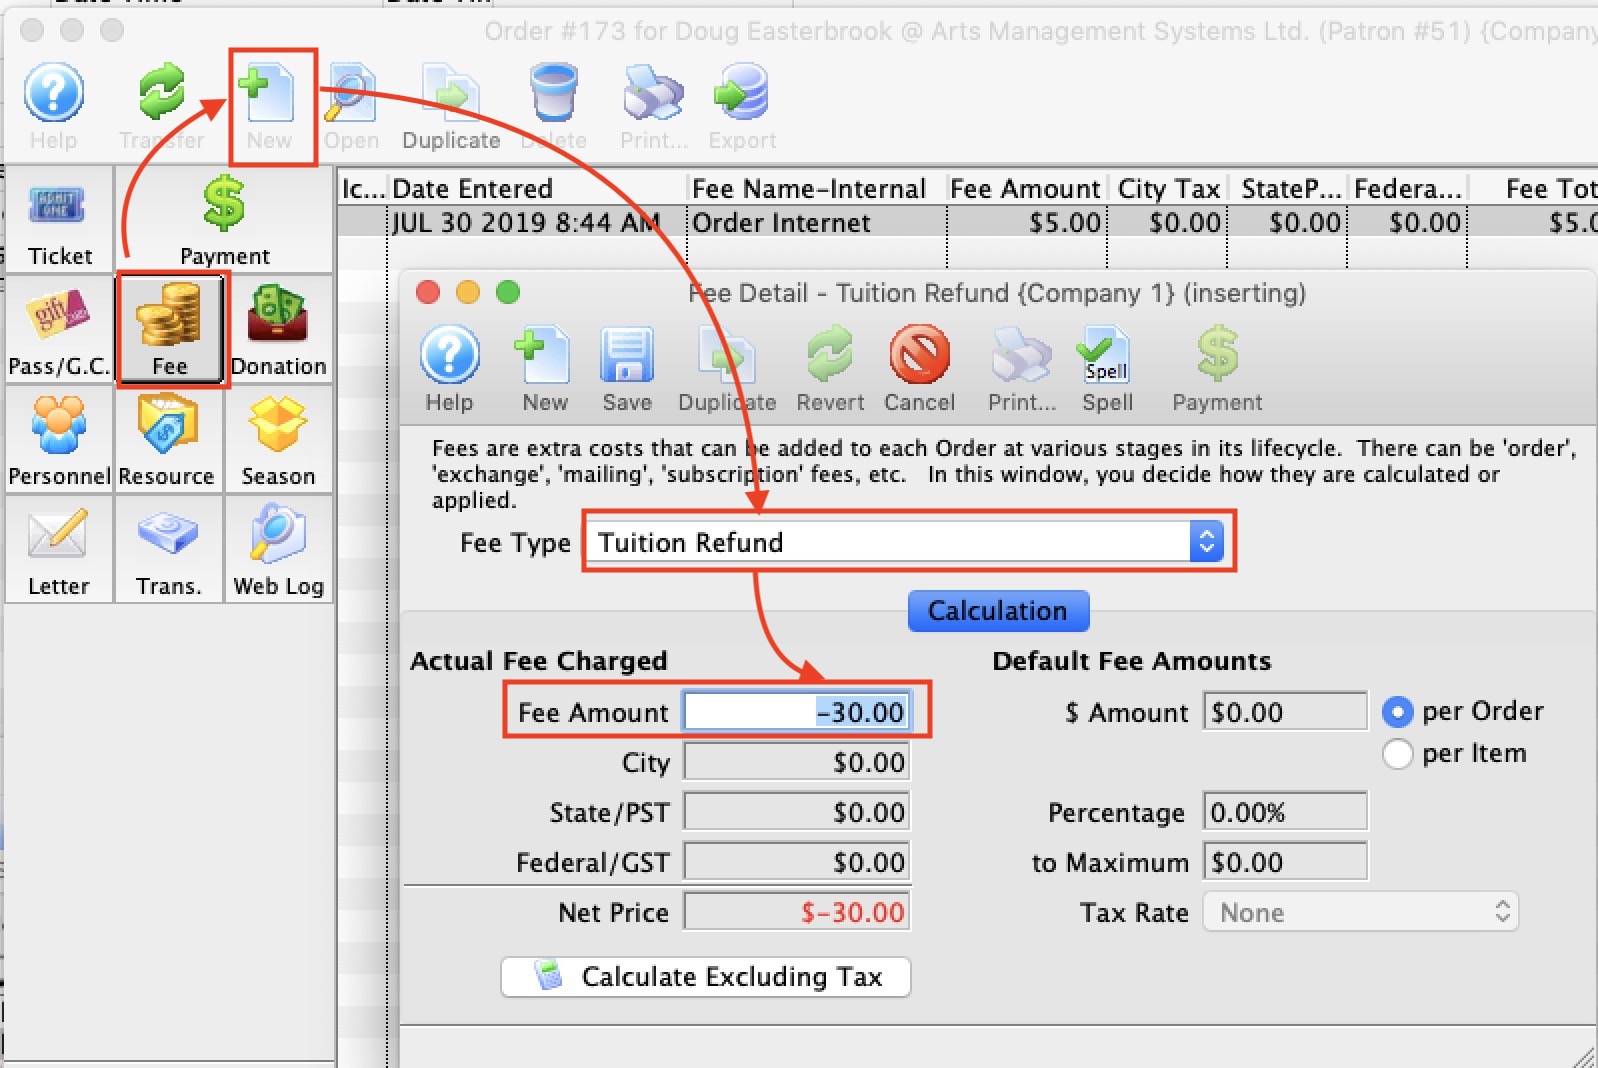
- Click the Payments Button
- Enter the refund method
- The amount to refund should be the same as the negative fee you added
- Enter card details, if refunding by card
- Click Refund Payment
Scholarships for Courses/Classes
|
"Membership" is a broad term meaning "Gift Certificates," "Flex Passes," "Vouchers," "Other Income" or a variety of other forms. Since the name of the field is customizable, some organizations may retain the term "Membership," while others change it to reflect their own terminology such as "GC/Pass," "Gift Certs." or even "Other Income." The nomenclature in your database may be different than "memberships." |
Creating the Scholarship Pass
A Scholarship Pass can be created new 'Dollar Value" pass using the following parameters:
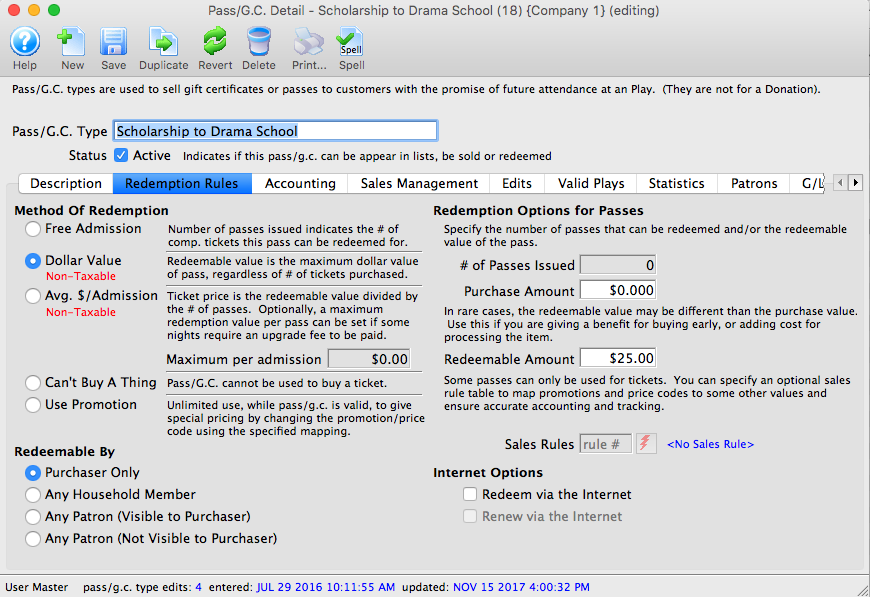
- On the Redemption Rules tab:
- Choose "Dollar Value" as the redemption method.
- Make the pass Redeemable by "Purchaser Only"
- Set the Purchase Amount as $0.00
- Set the Redeemable Amount to any value that scholarships are typically offered (this amount can be edited when the scholarship is issued to the student).
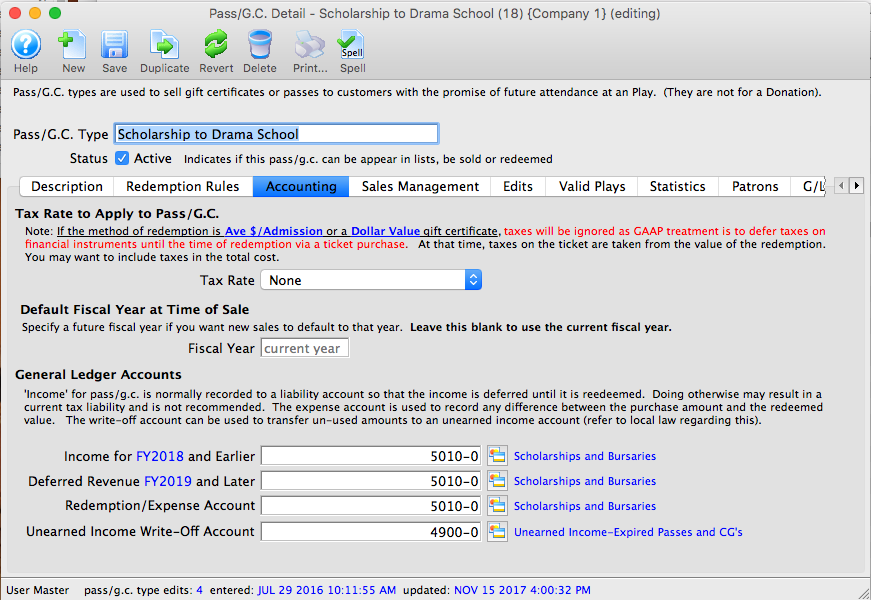
- On the Accounting tab:
- Set the Tax Rate to "None"
- Use a General Ledger Account number that represents an Expense for Scholarships for Income, Deferred Revenue and Redemption/Expense accounts. Use a standard income account for any Unearned Income/Write Off funds.
- On the Sales Management tab:
- In the Allow pass/gc to be Purchased section, check the box for "Via pass/gc tab on patron screen" only.
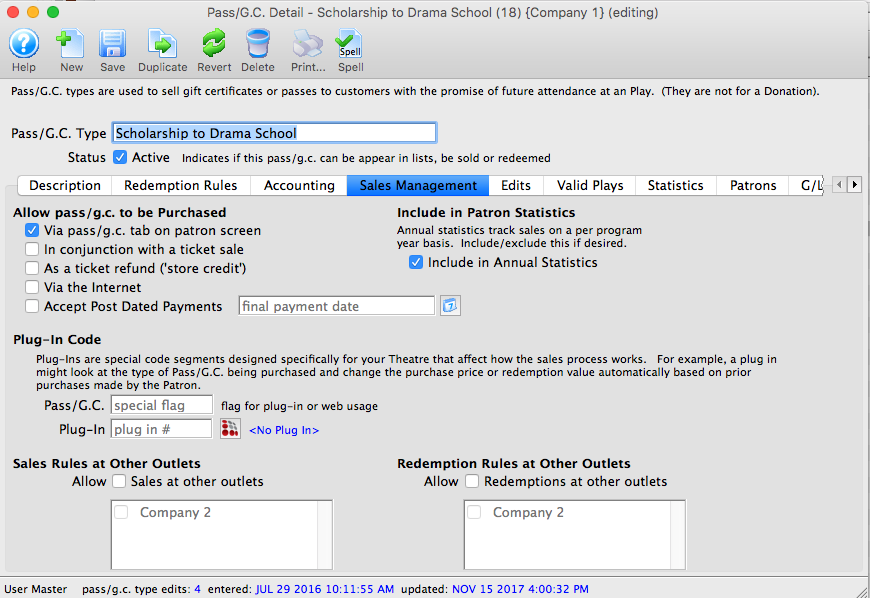
- In the Allow pass/gc to be Purchased section, check the box for "Via pass/gc tab on patron screen" only.
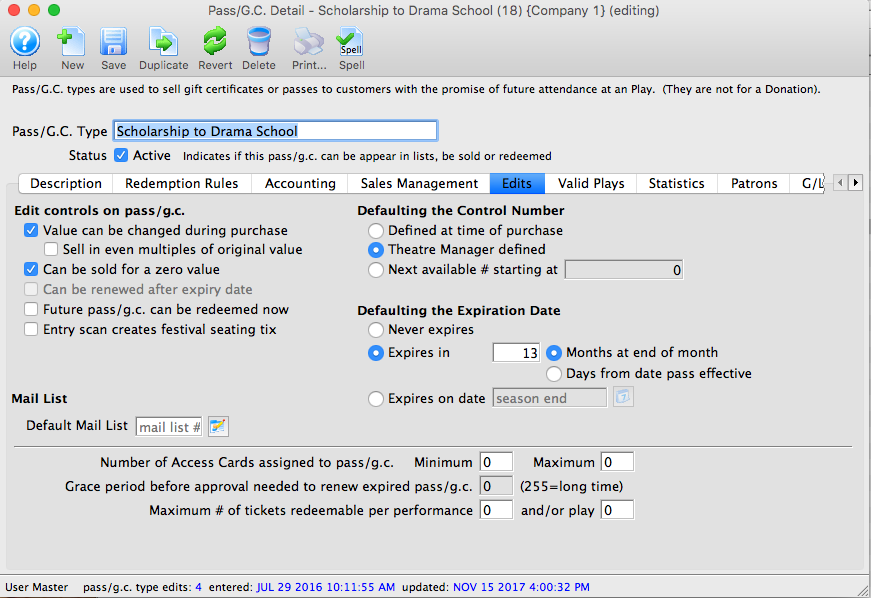
- On the Edits tab:
- Check the box for "Value can be changed during purchase"
- Check the box for "Can be sold for a zero value"
- In the Defaulting the Control Number section, choose "Theatre Manager defined"
- In the Defaulting the Expiration Date, choose "Expires on Date" and use the last date the pass is valid (very likely the end of the class).
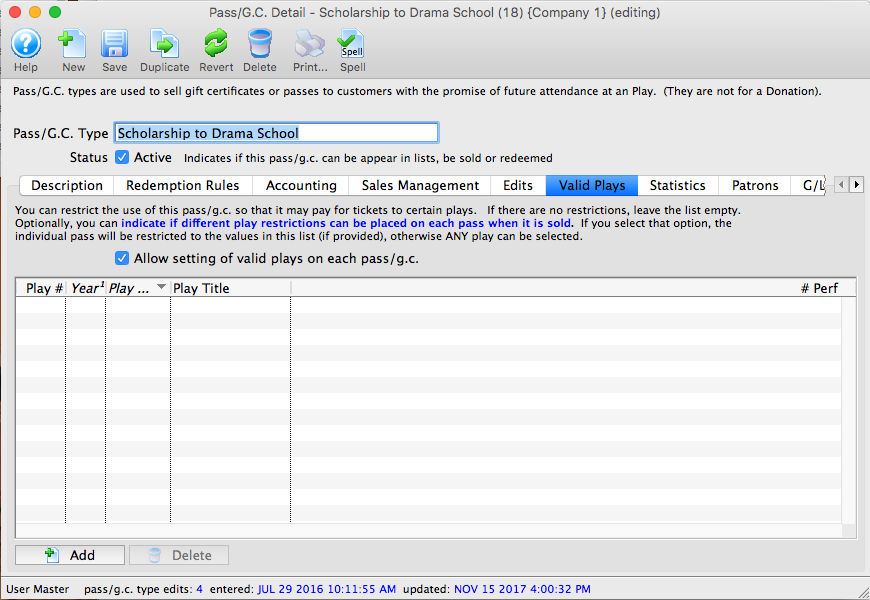
- On the Valid Plays tab:
- Check the box that says "Allow setting of valid plays on each pass/gc"
- Do not add any events to the listing at the bottom of the screen.
Awarding the scholarship to the student
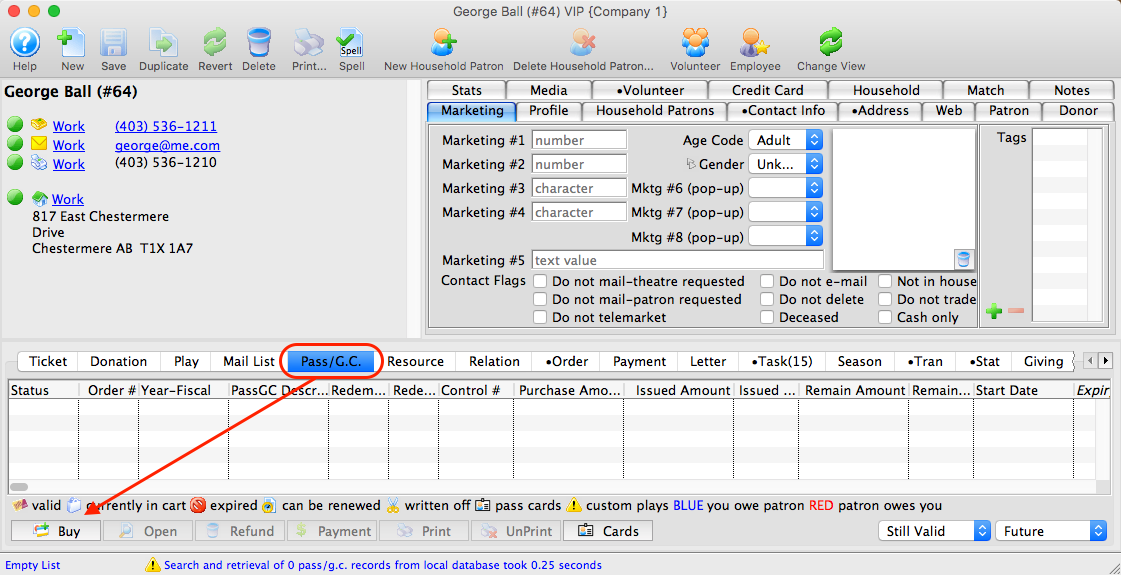
- Locate the Patron Record for the student who is to receive the scholarship
- Select the Pass/GC tab and click the BUY button
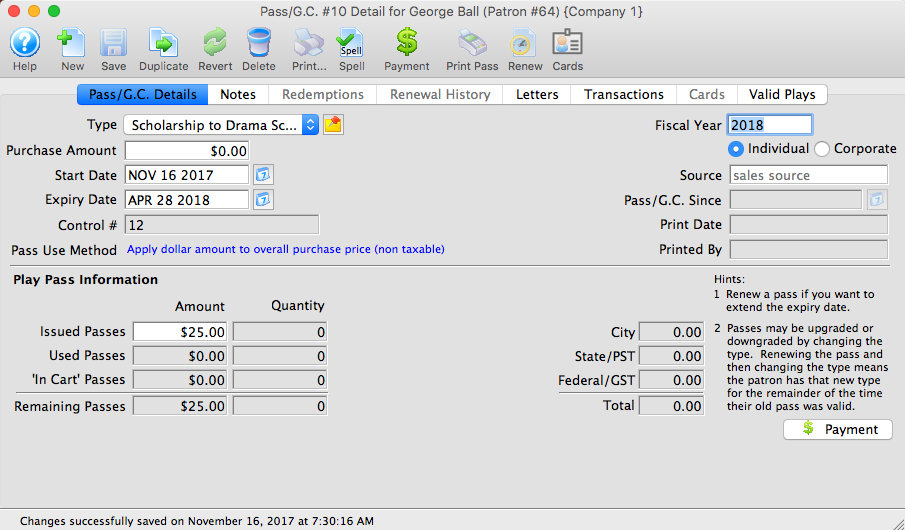
- Sell the student a new Scholarship.
- Leave the Purchase Amount as $0.00
- Edit the Issued Passes Amount to the value of the Scholarship desired
- Click Save
- Select the Valid Plays/Events tab
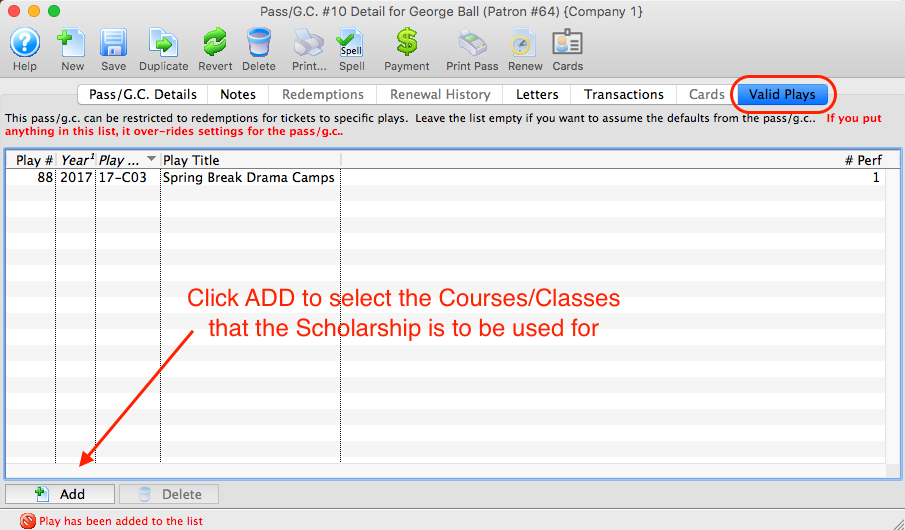
- Click the ADD button
- Select the Class/Course the scholarship is to be awarded for
Applying the scholarship to the class
- Sell the student a class
- When processing the payment for the class, choose PASS as the first payment method
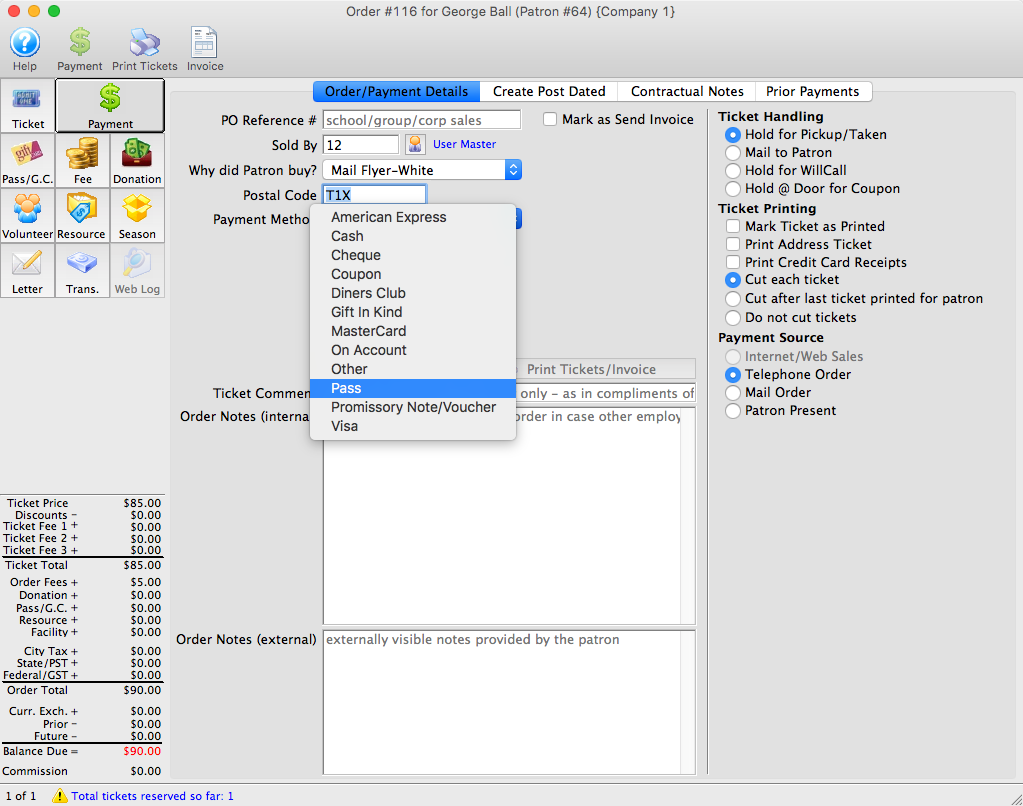
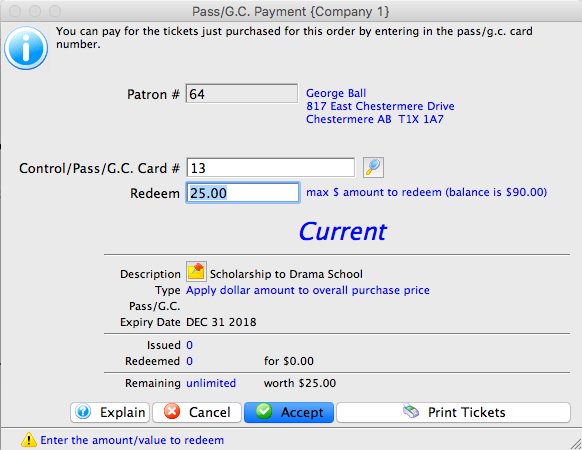
- Locate and apply the Scholarship pass to the Order
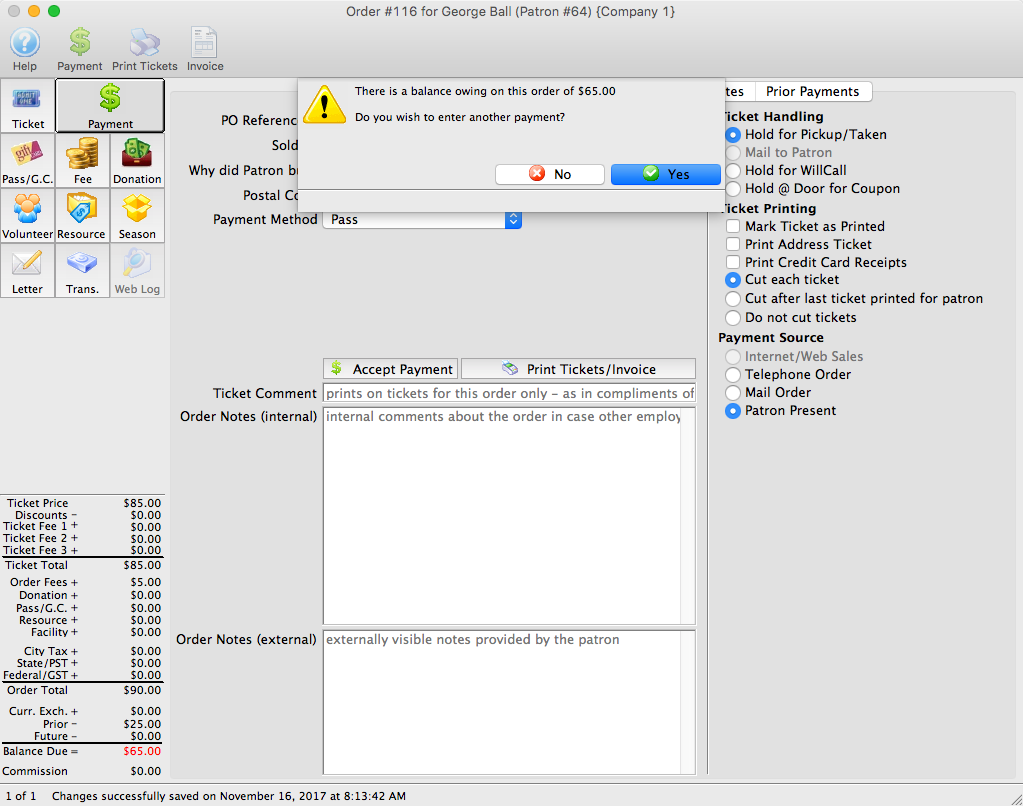
- Pay any remaining balance using the Payment Method tendered by the Purchaser.
Tabs in the Course Window
Play Tab in Courses
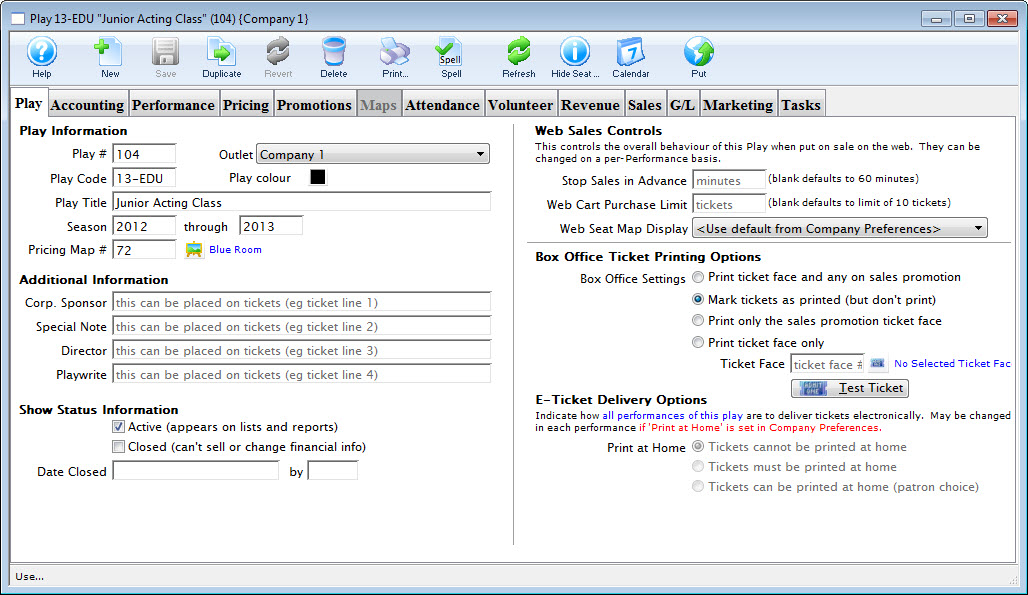
Parts of the Play Tab
Play Information |
|
| Play # | Unique play number generated by Theatre Manager. |
| Play Code | A quick reference for a Course. It is recommended that course codes start with the fiscal year of the course, followed by the course number. This allows for quickly generating reports on courses by year. If there is more than one venue or different types of series, a character code can be included after the year. |
| Play Colour | You can override the normal course colour displayed on the calendar by selecting a different colour from the colour palette. |
| Play Title | Official title of the course as it will appear on the ticket or internet. |
| Season | Year the course takes place. This is based on the financial year. |
| Theatre Map | Number of the venue map where the course takes place. Courses which are to be sold with reserved seats must take place in venues that have had seats created. Courses sold as general admission, Festival Sales or Traveling Troupe, may be sold to plays with or without seats created. |
 |
Theatre map search button. This button is only available when a new course is entered. To open a list of possible theatre maps to choose from click the button. From the list double click on a map to select it. |
Additional Information |
|
| Corporate Sponsor | Name of the sponsor for the production. Additional sponsors could be entered in the notes field. This information can be printed on tickets. |
| Special Note | Additional information such as warnings or special messages that may be required for an play. This information can be printed on tickets. |
| Director | Director of the play. This information can be printed on tickets. |
| Playwright | Playwright of the play. This information can be printed on tickets. |
Show Status Information |
|
| Active | Status of the course for reporting purposes. |
| Closed | Status of the course for ticket sales and postings. |
| Date Closed | This field displays the date the course was set to prevent sales and financial changes. |
| By | This field displays the initials of the employee who closed the course. |
Web Sales Controls |
|
| Stop Sales in Advance | Number of minutes prior to the course start time the course will be removed from web sales. |
| Patron Purchase Limit | Sets the maximum number of tickets to be sold in an order for this course via web sales. If the Box Office will allow a patron to have more than the allotted number of tickets, the tickets will need to be sold by a Box Office staff member and not via the internet. |
Ticket Printing Information |
|
| Print selected ticket face | Choose to print ticket for this play (is the default setting) |
| Ticket Face | The ticket face selected for the play. The ticket face number can be typed manually or selected. |
 |
Click to open a list of possible ticket faces to choose from. Double click on a ticket face to select it. By leaving this field blank a built in default ticket face design will be used for printing tickets. |
| Mark ticket as printed (but don't print) | Will not print a ticket for the course, all though when tickets are sold they will appear printed. |
| Only Print Sales Promotion ticket face | Prints a ticket based upon the promotion selected. For more information regarding printing tickets by promotion refer to Promotion Detail. |
 |
Click to print a test ticket for this course. |
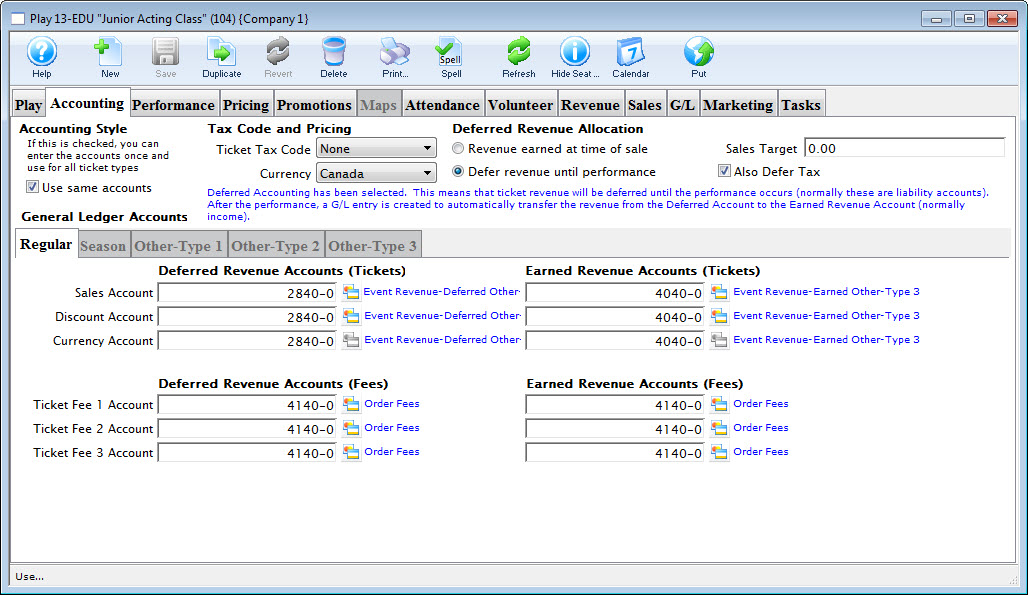
Accounting Tab in Courses
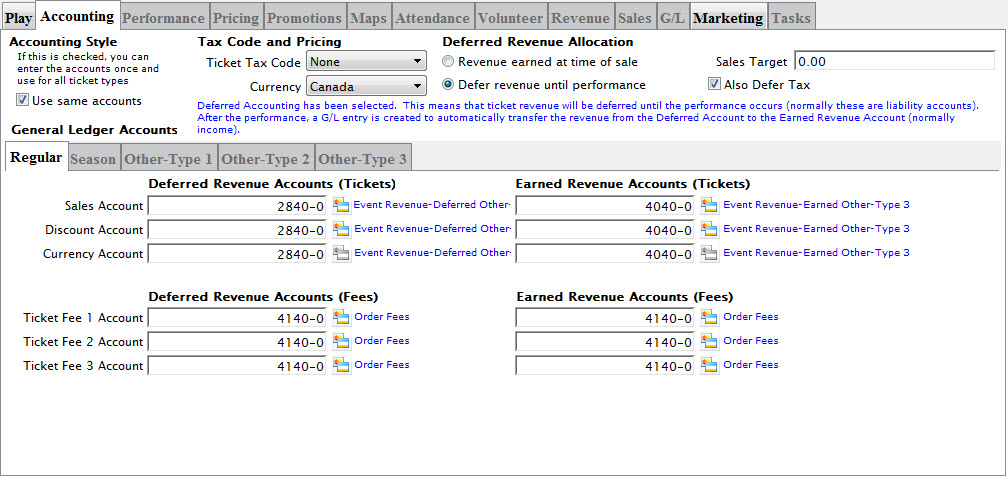
The Accounting Tab displays the accounting information for a course. It shows the general ledger accounts set for the event and the applicable taxes applied. As well, when the revenue will be received into the general ledger can be determined.
Parts of the Accounting Tab
Accounting Stype |
Use same accounts - When checked, you can enter the accounts once and use for all ticket types. |
Tax Code and Pricing |
|
| Ticket Tax Code | Select the tax rate to apply to the BASE PRICE ONLY. If there are taxes on the various fees in the promotion, then they are set in the sales promotion Calculation Tab. |
| Currency | The Currency the event is priced in |
Deferred Revenue Allocation |
|
| Revenue earned at time of sale | When selected, All sales go directly to the revenue account without deferral |
| Defer revenue until performance | The revenue will be deferred until the performance occurs (normally
these are liability accounts) After the performance a G/L entry is created
to automatically transfer the revenue drom the deferred account to the Earned Revenue Account (normally income).
Refer to the section, General Ledger Setting Up the Chart of Accounts for more information on determining a Chart of Accounts. |
| Sales Target | Target income |
| Also Defer Tax | Deferring taxes requires deffered tax accounts be set up in the G/L |
General Ledger Accounts |
|
| Regular | Accounts to use when posting tickets sold using a sales promotion marked as 'Regular' |
| Season | Accounts to use when posting tickets sold using a sales promotion marked as 'Season' |
| Other-Type 1 | Accounts to use when posting tickets sold using a sales promotion marked as 'Other-Type 1' |
| Other-Type 2 | Accounts to use when posting tickets sold using a sales promotion marked as 'Other-Type 2' |
| Other-Type 3 | Accounts to use when posting tickets sold using a sales promotion marked as 'Other-Type 3' |
Depending on how your accounting system is designed, you may want to set up all account types with the same general ledger account. For example, the same general ledger account can be entered for all revenue accounts -- the general ledger will record all revenue for the event into one account. Separate general ledger accounts can be entered for all revenue accounts -- the general ledger will record each type of revenue for the event in a separate account. Refer to the section, General Ledger Setting Up the Chart of Accounts for more information on determining whether to use a detailed versus a simplified general ledger number setup.
| Sales Account | Designates the general ledger account number used to record revenue received through new ticket sales for the event. |
| Exchange Account | Designates the general ledger account number used to record revenue gain or revenue loss through ticket exchanges for the event. |
| Refund Account | Designates the general ledger account number used to record revenue loss through ticket refunds for the event. |
| Discount Account | Designates the general ledger account number used to record the net value of ticket discounts through ticket sales, ticket exchanges, and ticket refunds for the event. |
| Markup Account | Designates the general ledger account number used to record the net value of ticket markups through to ticket sales, ticket exchanges, and ticket refunds for the event. |
| Ticket Fee Accounts | Designates the general ledger account number used to record the net value of per ticket service charges applied to ticket sales, ticket exchanges, and ticket refunds for the event. |
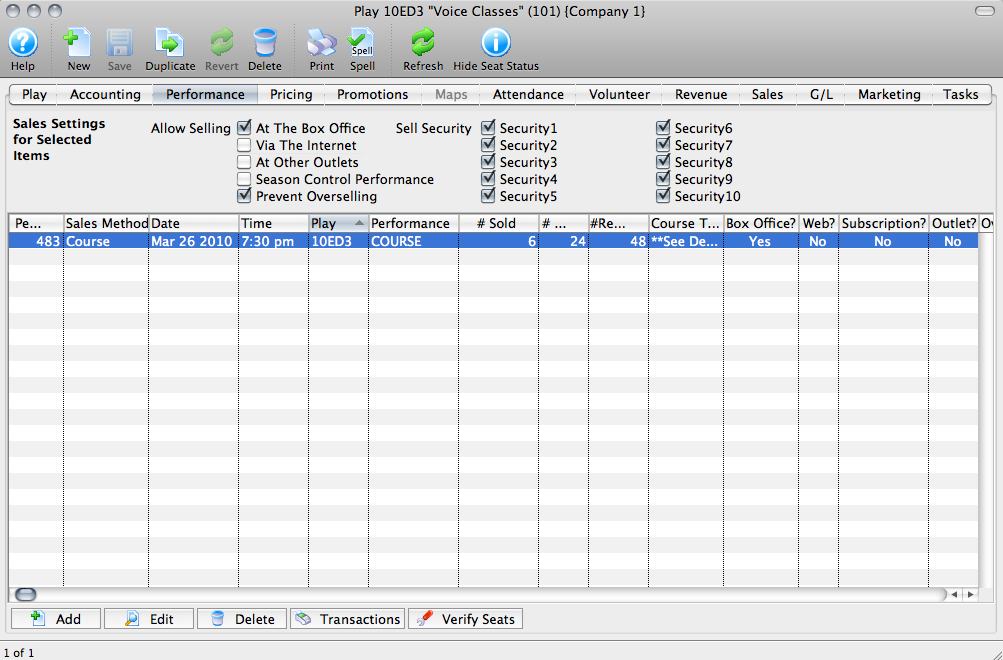
Performance Tab in Courses
The Performance Tab is used to create the classes that make up a Course. Class information cannot be added (and the tab will not be made available) until Course information and Accounting information have been entered and saved. If a course has already been set up you can access the Performance Tab at any time.
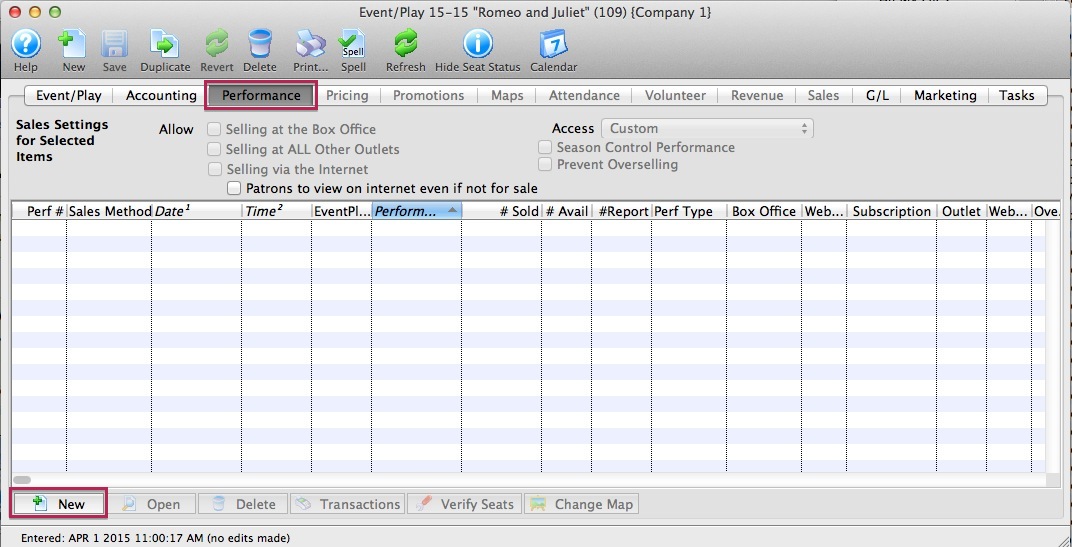
Parts of the Performance Tab
Sale Settings |
|
| At the Box Office | Checking this box allows you to sell theCourse at the Box Office. |
| Via the Internet | Checking this box allows you to sell the Course on the Internet. |
| At Other Outlets | Checking this box allows you to sell the Course at other outlets. |
| Season Control Performance | Checking this box allows the performance to be used in a Control House for subscribers. |
| Prevent Overselling | Checking this box prevents the performance from being oversold. |
| Sell Security | Allows you to control what security levels have the ability to sell this performance. Click here for more information on Sell Security. |
Performance Information |
|
| Performance # | Unique performance number generated by Theatre Manager. |
| Performance Code | A quick reference for the course. |
| Date | Date of the course. |
| Time | Time of the performance. |
| # Sold | Number of seats sold for this course. |
| # Held | Number of seats currently held for the course. |
| # Available | Number of seats currently available for purchase for this course. |
| Box Office? | Whether the course is available for sale at the Box Office. |
| Web? | Whether the course is available for sale on the Internet. |
| Outlet? | Whether the course is available for sale at an outlet. |
| Subscription? | Whether the course is available for sale via a subscription. |
| Oversell? | Whether overselling is allowed for this course. |
| Play # | The Play number that this course is part of. |
Additional Buttons |
|
 |
Creates a new class and opens the Course Setup Window. Click here for more information. |
 |
Opens one or more Class Setup Window(s) for the selected course. |
 |
Deletes the selected course. Click here for more information. |
| Shows all transactions for the selected course. | |
 |
Verifies all seats for the selected course. It is best to do this when no other users are logged in. |
Parts of the Course Detail Window
The Course Detail window opens when you double click on an existing Course. Through this window you are able to edit course data. Depending on which sales method is being used you may not have access to some data fields. For example if you are using the festival method you will be allowed to modify the quantity of seats you can sell whereas with reserved seating since every patron requires a seat you cannot access this field.

The tabs available within the Course Detail window include:
Course Detail Window - Performance Tab
As indicated in the image, many fields in the Performance Tab are not accessible once the Course has been created and built. For instance, the Quantity to Sell field cannot be changed.
The fields available for editing are:
| Performance Code | Defaults to Course for Course events |
| Default Price Code | You can change from the highest price default setting |
| Ticket Tax Code | where applicable |
| Check Box | for including the performance in annual patron statistics |
| Held Seat Count |
For holding seats (useful if you have overestimated the quantity to sell and have not yet reached full capacity). For example, if the venue usually holds 24 people but you *could* add 6 more chairs, you may have set the Quantity to Sell at 30 and you can hold 6 of those seats here for release once the 24 seats sell. |
Sales Management Tab
In the Sales Management Tab, you can set future onsale dates and times for sales outlets.
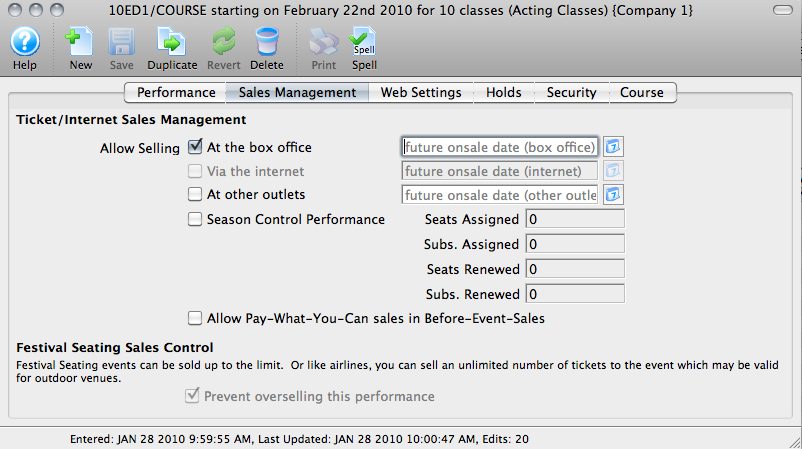
Though not necessarily valid for Courses, you can set a Performance as a Season Control Performance here.
The field for setting a Course or Performance as a Pay What You Can performance in Before Event Sales is found here. Courses can be sold in this way if you choose. For more information about Pay What You Can, click here.
Web Settings Tab
The Web Settings tab allows you to define a number of parameters for how the course is handled in Web Sales.
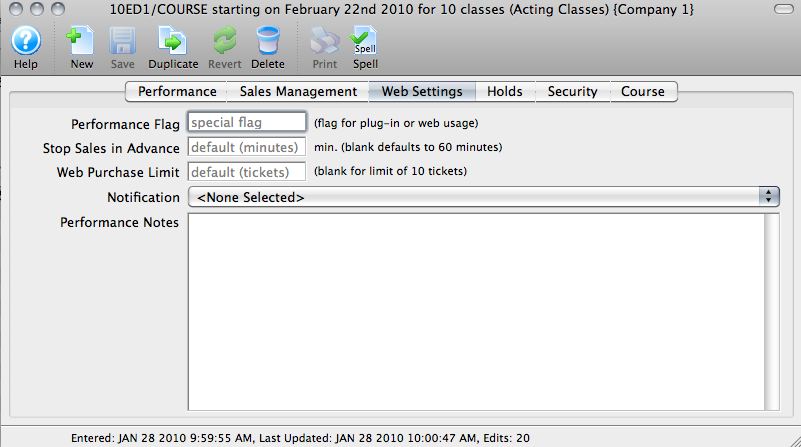
The Web Settings Tab allows you to set:
| Performance Flags | These are most often used for Web Sales plug-ins |
| time limit to stop advance sales | For example, You can shut down sales an hour before the class starts to "cap" it./td> |
| specify a limit of tickets | Limit the number of seats a patron can purchase (defult is 10) |
| Notifications | You can assign notifcations from the drop-down |
| Performance Notes | Anything entered here will be visible to ticket purchasers online |
Holds Tab
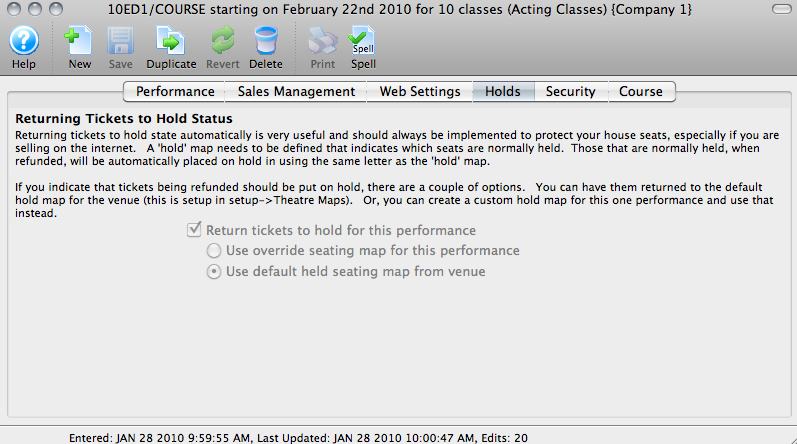
Returning tickets to "hold" only applies to Reserved Seating venues.
If your course is in a General Admission venue, this tab appears as in the image above, with the selection grayed out.
To set a number of holds in a GA venue, use the Holds area on the Performance Tab.
Security Tab
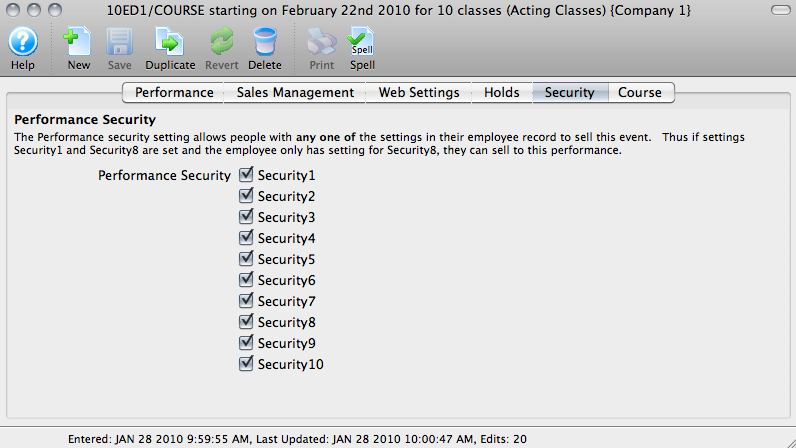 If your organization has Security Settings to determine which employees can sell which events, those can be defined here by checking the appropriate boxes.
Course Tab
Report Cards
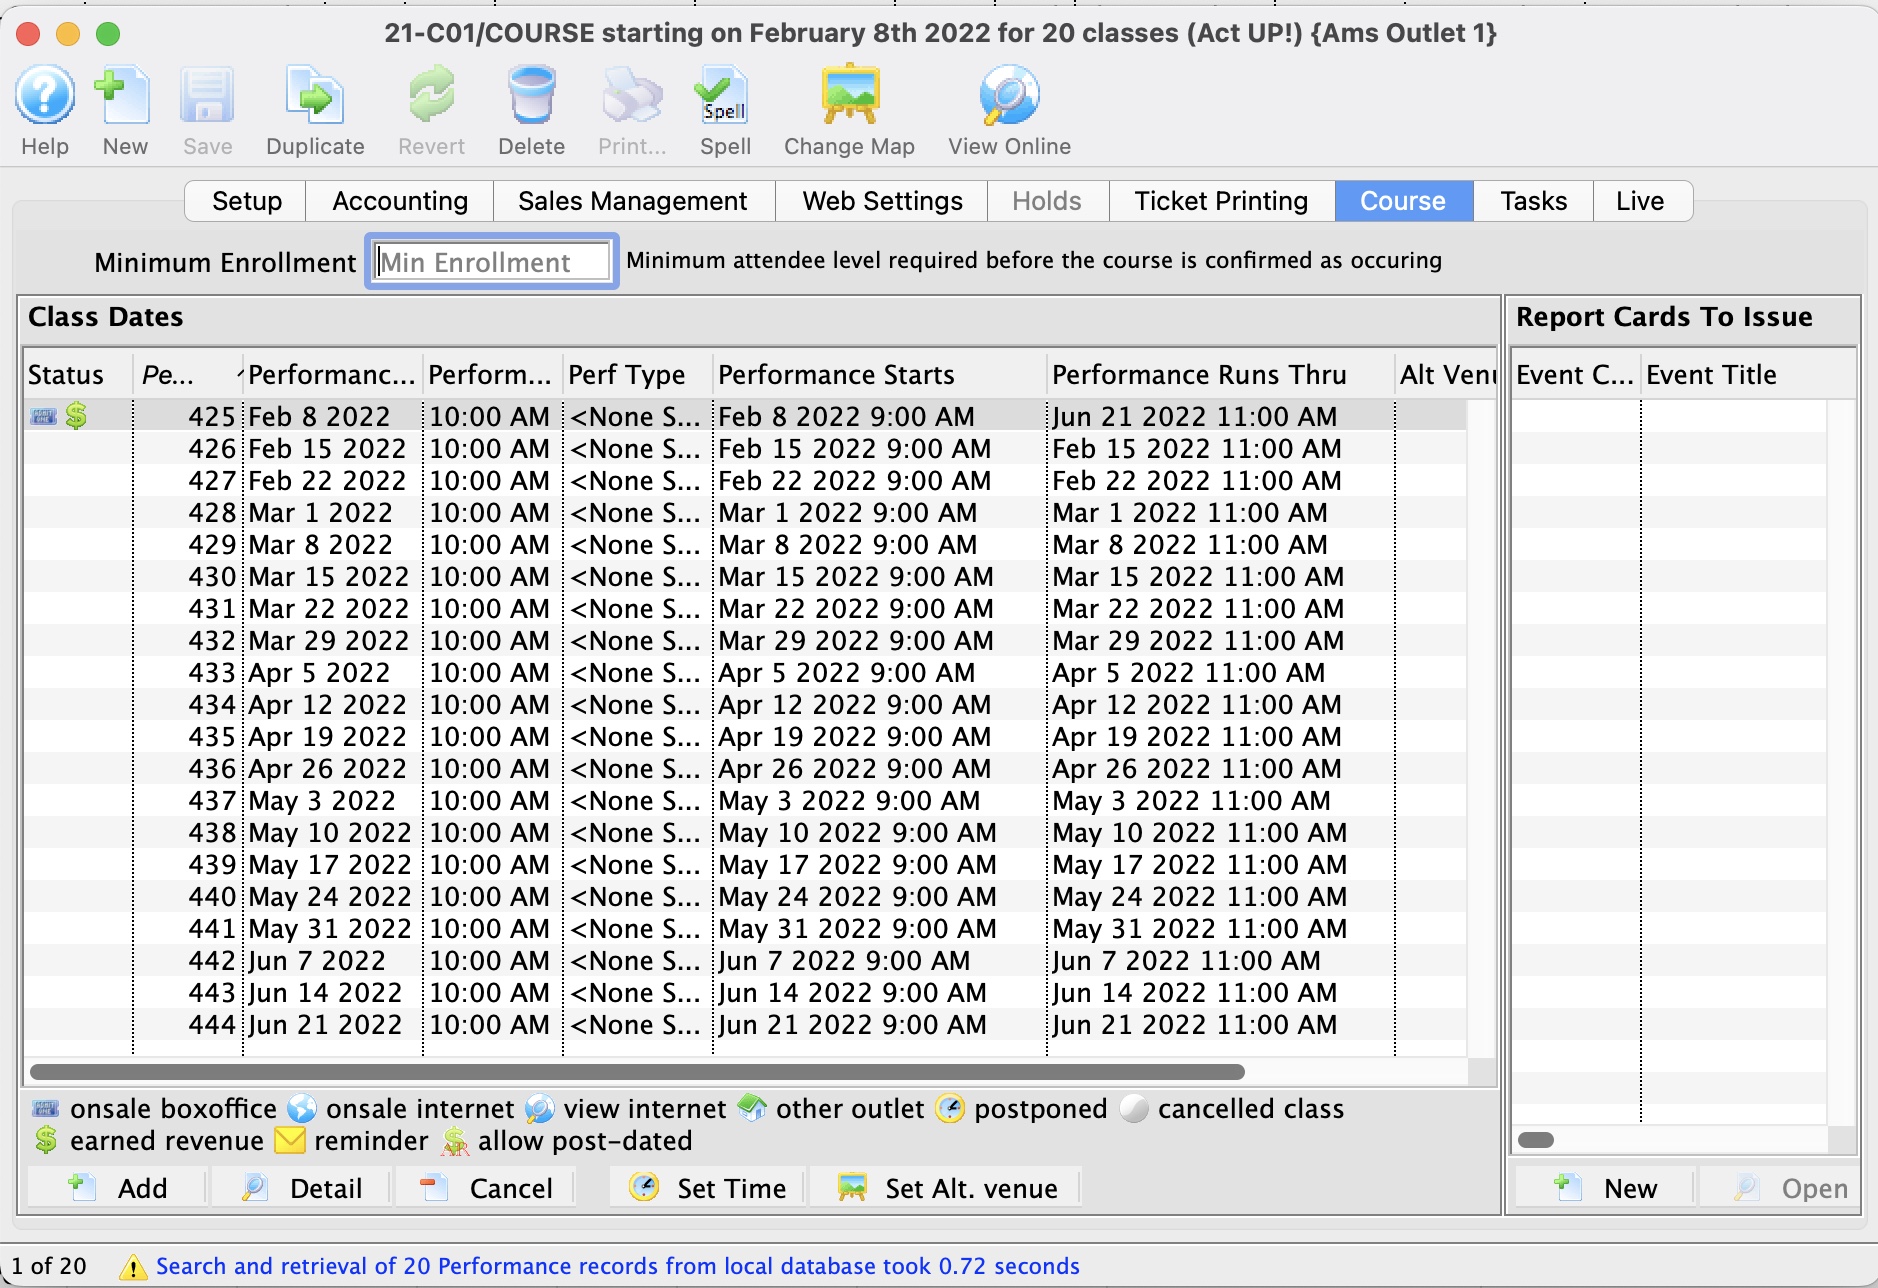
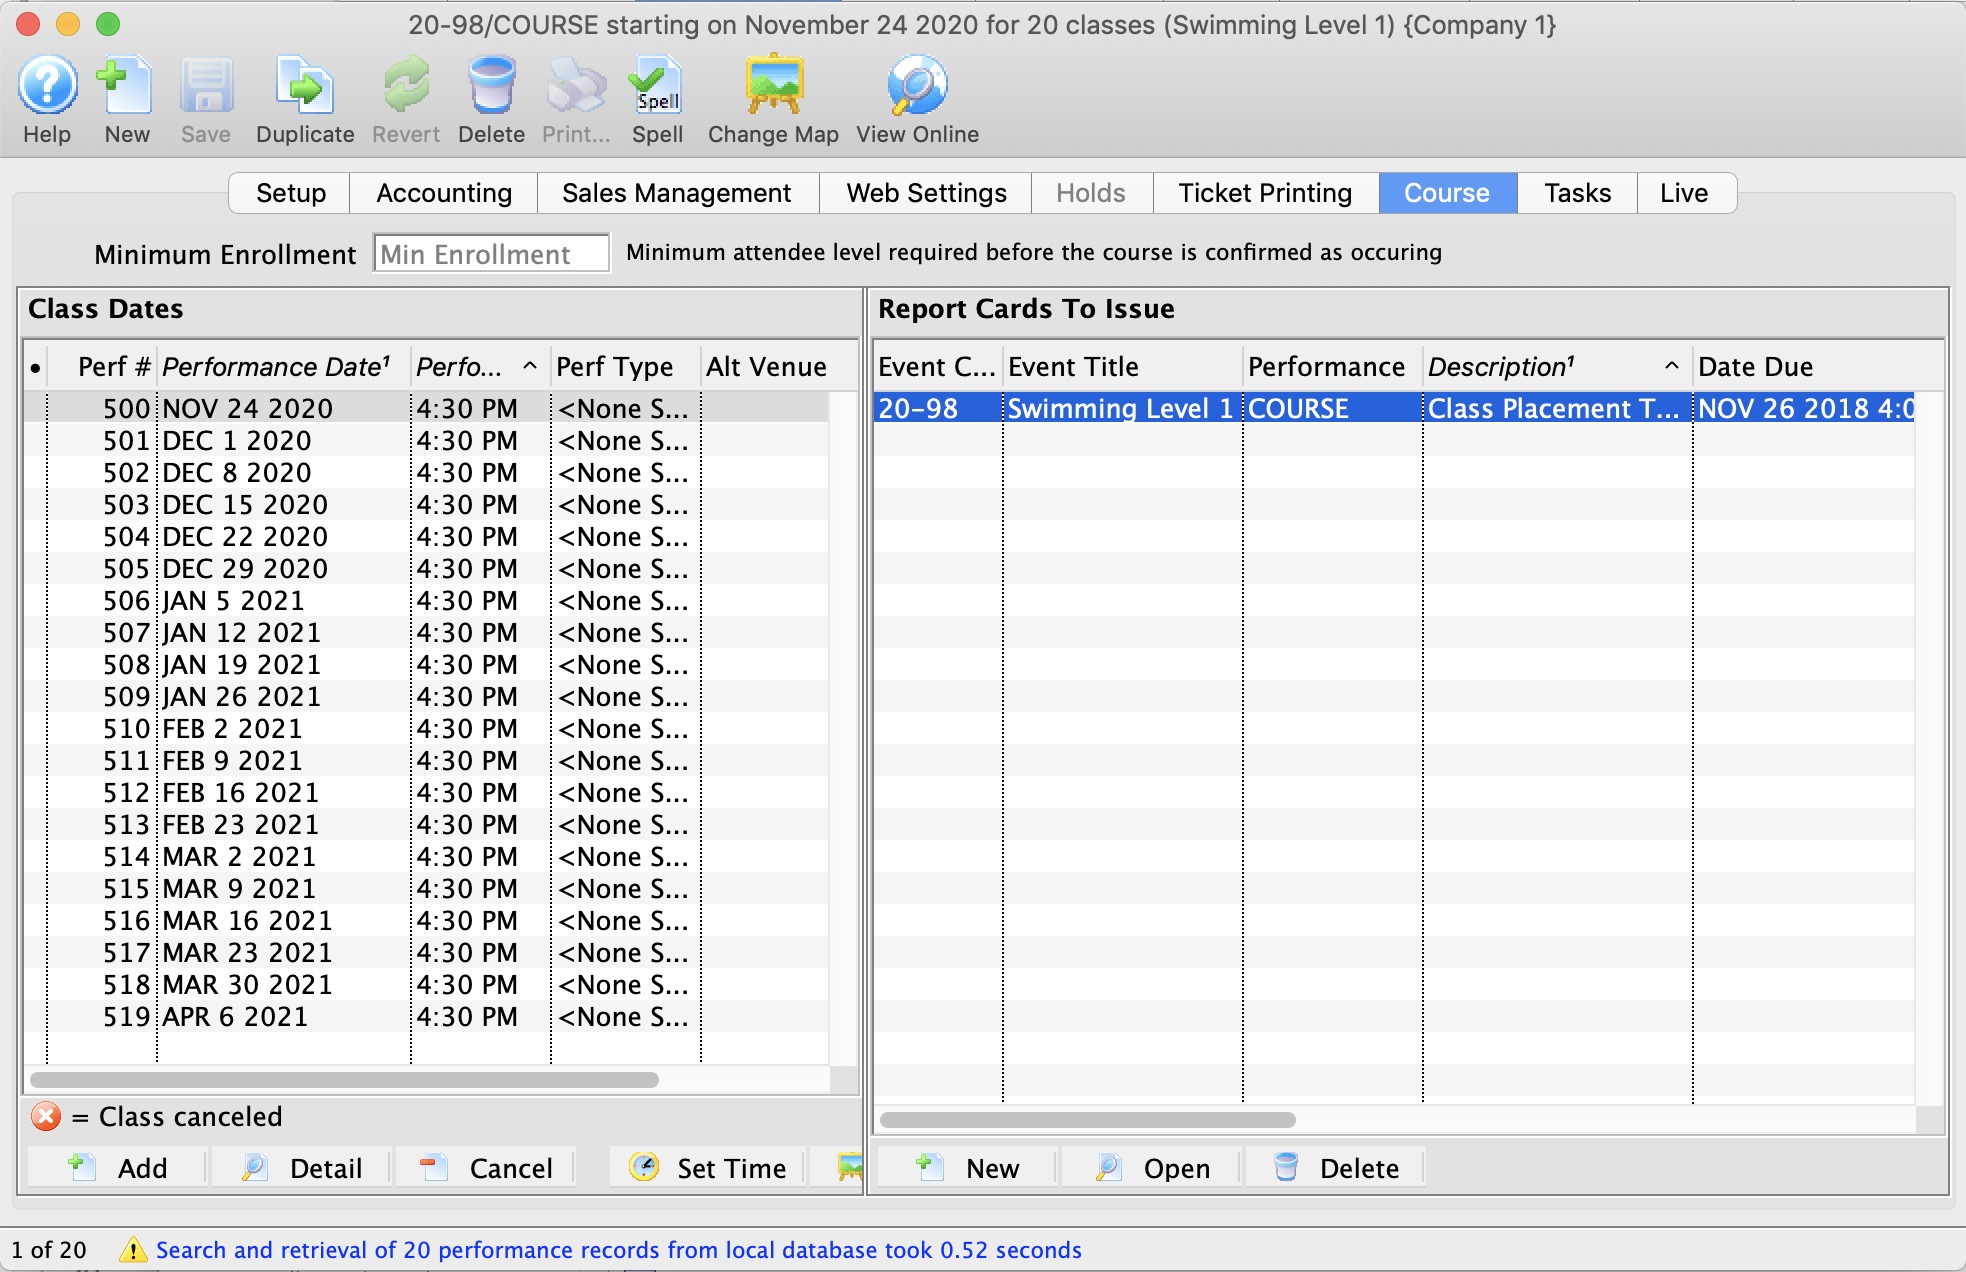
On the right side of the Courses Tab, Report Cards issued for a Course are displayed. For more information about Report Cards, click here.
Class dates
On the left side of the Courses Tab, Class Dates and information are displayed.
- If a Course has been set up, but does not have any transactions associated, you can alter settings in the Course Tab to remove sessions of the course using the Remove
 button.
 - Sessions of a Course can be set as active or not active via the checkbox next to their entry on the Courses Tab.
-
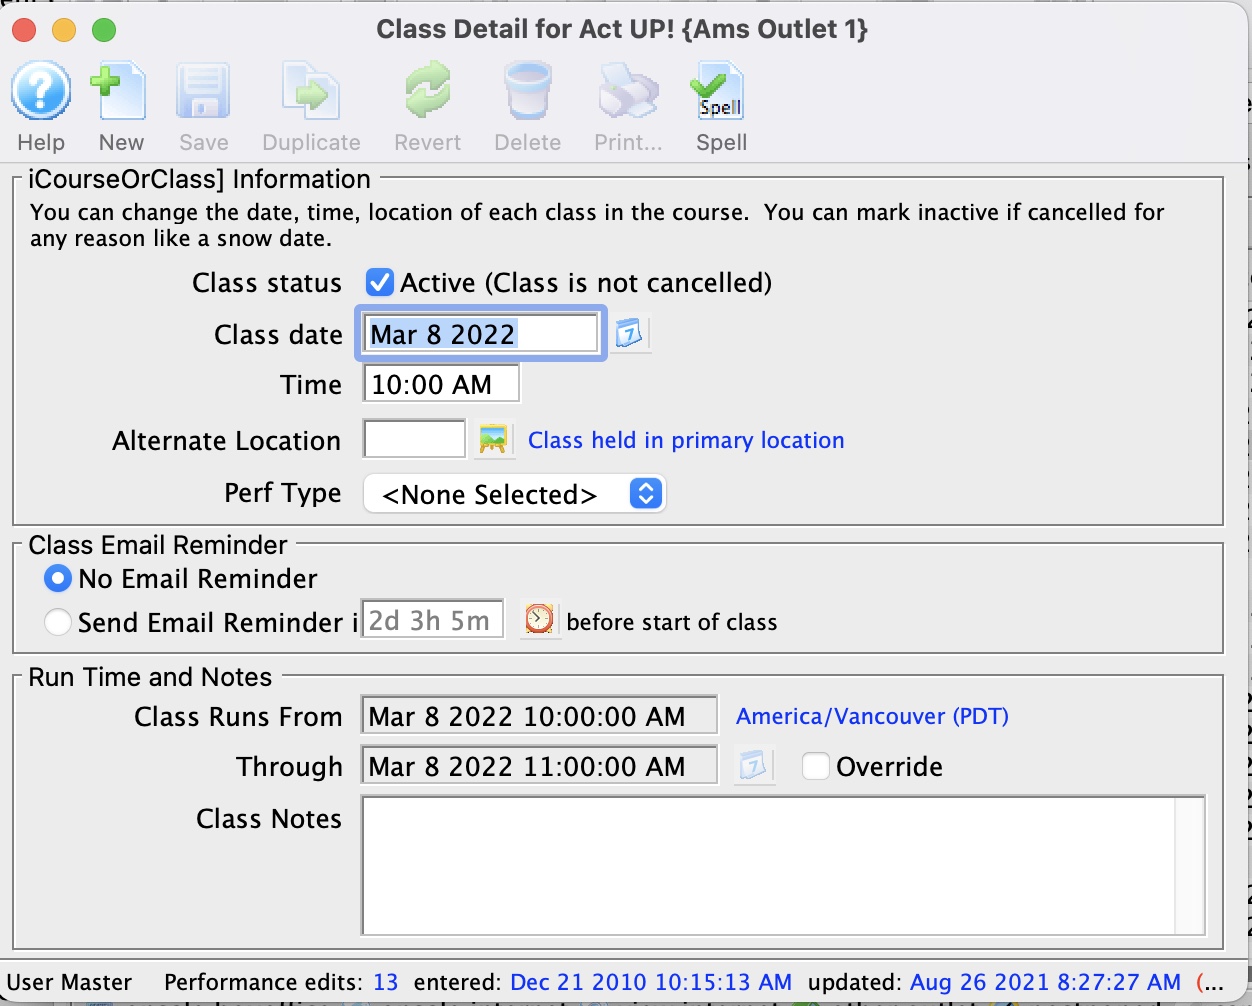 Class dates and times can be changed by:
- double clicking on a class date<'li>
- changing the appropriate fields window that opens
- you can change dates even after sales have occurred as it will simply move the class time. This might be useful for 'snow days', 'hurricane moments', 'public holidays' or any other cancellation (see example below)
- You can also tell Theatre Manager if individual reminders for each class are to be sent to the patron
- If your organization wants to alter the value of Performance Field #1 for a class within a Course, you can make that change here.
- If one or more classes for the Course take place in an Alternate Venue, you can change that. For example, a couple of classes could be in the rehearsal hall, some could be offsite at a school. If attendees or instructors have synced their purchase calendar to their devices, they will see the locations.
- For the primary class that is being sold, it is the beginning of the class through the end of the LAST CLASS
- For each of the other classes, the run time is simply the start of the class to the end of the class, based on the duration of each class.
|
Using an alternate venue will not affect the quantity of seats available for sale.
It only affects where you tell the instructor or students where to meet for that particular class - and shows in your facility management calendars. |
|
The performance runs from and through dates are automatically calculated as follows:
|

Ticket Printing Tab
Ticket printing and e-ticket delivery for print at home are normally enabled and disabled on the play window. You can over-ride the settings if you would like them to be different for every performance.
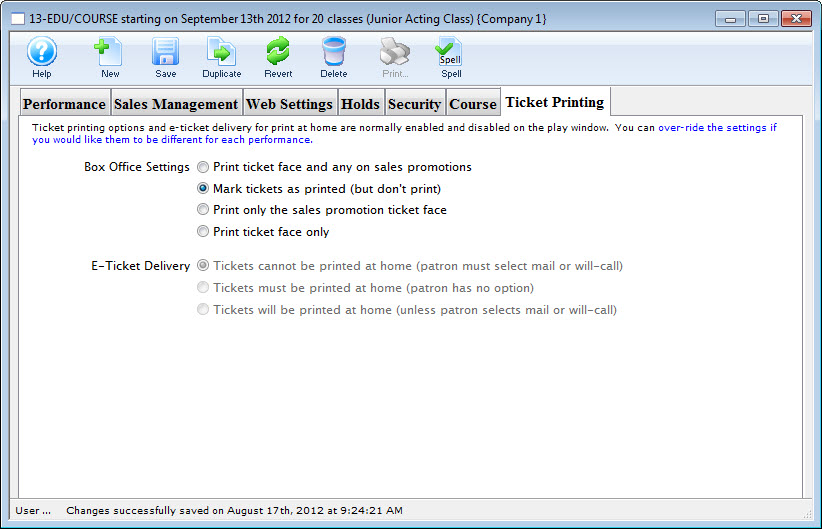
Parts of the Window
| Box Office Settings | Options are:
|
| E-Ticket Delivery | Options are:
|
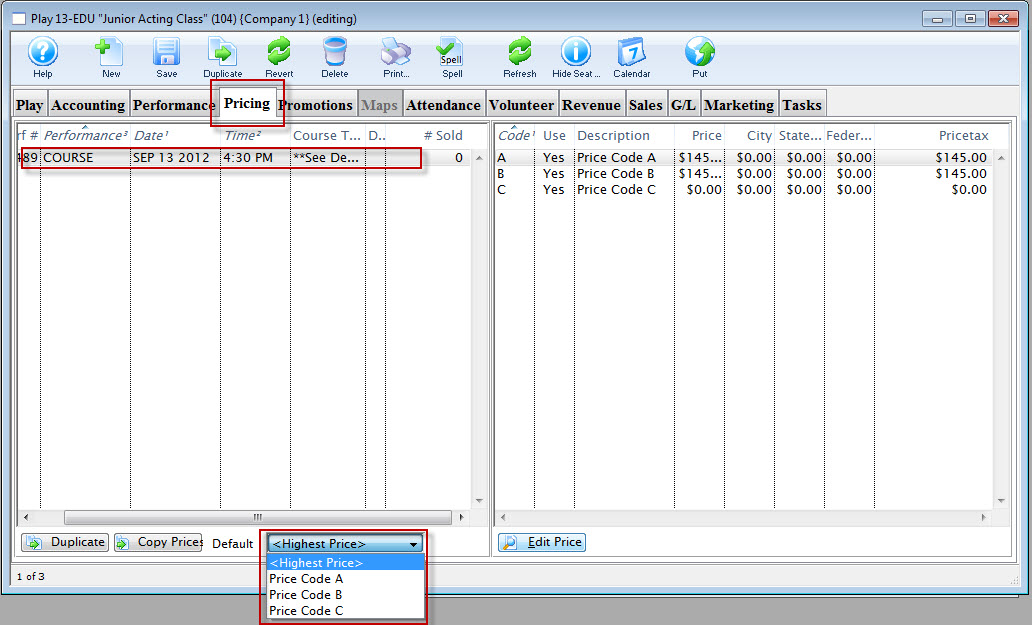
Pricing Tab in Courses
In the Pricing tab, you set course pricing the same way Price Codes are set for any other Play or Event.

Parts of the Pricing Tab
Pricing information for the selected performance on the left, displays in the price list on the right side of the Play Setup Window. When you click on different performances the price list will change. From left to right the price list displays:
Pricing Panes |
|
| Code | Displays the single character code that is associated with this price. This character was assigned in the Price Code field in the Venue Map window. |
| Use? | Check box field. If the box is checked then the price code is available for use by the performance that is highlighted in the performance list. |
| Description | The description you give to easily identify the price code. For example, Adult, Child, Senior, Student. Or alternatively: Front, Mezzanine, Loge, Balcony. |
| Price | Displays the dollar value of the price code. For example, $10.00, 15.00... etc. |
| City | Displays the amount of city tax charged on the price code. |
| State/PST | Displays the amount of provincial / state tax that is charged on the price code. |
| Federal/GST | Displays the amount of Federal tax charged on the price code. |
| Price + Tax | Displays the total price of the price code with all taxes included. |
 |
Duplicates the entire pricing structure from another course to this course. |
 |
Copies prices from one play to the selected structures. Click here for more information on Copying Prices. |
 |
Set the default price code for the selected courses. Click here for more information on setting a default. |
 |
Opens the selected price code for editting. |
Copying Prices
In Theatre Manager , you can copy prices to a single performance or group of performances, from any performance saved in Theatre Manager.
- Click on the Pricing Tab of the Events and Dates Window.
Pricing information should now display on the right side of the Events and Dates window.
- Select the performances that you want to Copy Prices to.
To do this, click on the first performance you want to copy prices to, then drag you cursor over the remaining performances from the performances list on the left side of the window. Alternately, you can click the first performance, and then hold <CTRL> (Windows) or <COMMAND> (Mac) and click each additional performance.
- Click the Copy Prices
Button.
The Copy Price Wizard window opens.
- In Step 1, select the performance to use as a Pricing Template.
To further refine your search click the drop down list under the 1. You can then choose a different five search fields. They are:
Select a search field, and you can further restrict the search using the "from" and "to" fields to enter criteria. For example, the (picture) below displays a successful search for performance that have Play Codes starting with 07.
- In Step 2, you select the performance that you want to use as a Pricing Template.
As you select plays on the right, their price codes are displayed on the left and the performance's price codes are displayed on the right.
- Select the Price Codes you want to copy.
Highlight the Price Codes you want. You can select all, none, or some of the price codes to be copied.
- In Step 3, you choose which Attributes of the Price Code to copy.
There are four parts of the price code that you can copy across. The Description, the Price, Able To Use Flag, and Enabled/Disabled Promotions. To copy an attribute put a check in the box beside the attribute desired.
- Click the Copy
 Button.
Selecting a Default Price Code for Courses
Each course (series) can have its own default price code setting.
- Click on the Pricing Tab of the Course Setup Window.
Pricing information displays on the right side of the Event Setup Window.
- Select the performance for which you are setting the Default Price Code.
Click on the performance from the performance list. The prices for this performance display in the price list on the right side of the window.
- Open the Default Price Code drop down list.
A list of usable price codes is displayed.
Select a Price Code to be the Default.
-
Do this by clicking on a price code from the list.
Promotions Tab in Courses
The Promotions tab is where you can add, edit or remove promotions availble when selling courses.
Parts of the Promotions Tab
| Promotion Name | The descriptive name of the promotion. |
| Promotion Type | Similar to the report groups, these classify similar sales promotions together. There are four possible selections to choose from. Regular Admission, Season Ticket, and three user defined fields. These promotion types are used in the same manner as the report groups. |
| Used | Sales outlet where the promotion can be used |
 |
Sets or disables the default promotion to be used for this class |
 |
Allows the selected promotions to be used when selling this class |
 |
Indicates that the selected promotion will not be used when selling this class |
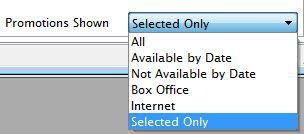 |
Allows you to choose which promotions are seen on the tab |
Attendance Tab in Courses
Parts of the Attendance Tab
| Performance # | Number of performance assigned in order of creation. |
| Performance Code | Code assigned based on the week and day of the performance. |
| Performance Date | The date of the performance. |
| Purchase # | Purchase reference number. |
| First Name | Patron's first name. |
| Last Name | Patron's last name. |
| Company | Company the patron works for. |
| Quantity | Number of admittance per ticket. |
| Section | Section the patron is seated in. |
| Row # | Row the patron is seated in. |
| Seat # | Seat number the patron is seated in. |
 |
Sets the attendance for the course. This is only available on the day of the course or after it has taken place. |
|
|
Clears the attendance of the course. This is only available on the day of the course or after it has taken place. |

|
Print the selected tickets for this course that are not yet printed. |

|
Refunds the selected ticket(s). |
|
|
Transfers the selected ticket(s) to another course. |
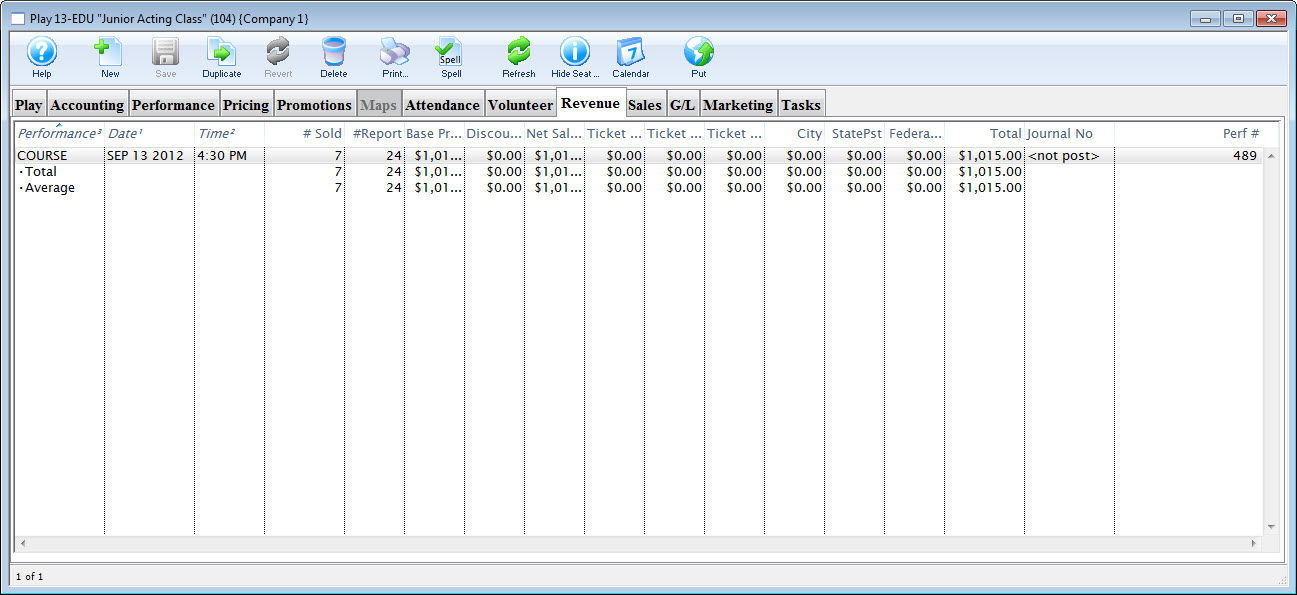
Revenue Tab in Courses
This tab displays a detailed summary of the revenue taken in for each course of an event. The Play is broken down into individual course.
Parts of the Revenue Tab
| Performance Code | This is the code used to track the course by. |
| Date | The date of the course. |
| Time | The time of the course. |
| # Sold | The current number of tickets sold to the course. |
| # Report | The number of tickets being used for reporting. |
| Price | The base price pf the ticket. |
| Discount | The total of all discounts. |
| Gross Sales | The total amount of sales minus all discounts, fees, and taxes. |
| Ticket Fee 1 | Total of all fees categorized to this fee. |
| Ticket Fee 2 | Total of all fees categorized to this fee. |
| Ticket Fee 3 | Total of all fees categorized to this fee. |
| City Tax | The total of all City taxes. |
| State / PST Tax | The total of all State or PST taxes. |
| Federal / GST Tax | The total of all Federal or GST taxes. |
| Total | The total of all money collected during payment. This includes fees and taxes. |
| Journal No Code | If the course has occured, the G/L number that it was posted to. |
| Performance # | The performance number assigned by Theatre Manager based on order inputted. |
Volunteer Tab in Courses
|
"Volunteer" is a broad term meaning "Personnel," "Volunteers," "Staff," or a variety of other terms. The field refers to any person assigned to an activity - whether they are paid or unpaid. you may have a mixture of paid and unpaid staff within the same event, for example Ushers (who are unpaid) and Run Crew (who are compensated). Since the name of the field is customizable, some organizations may retain the term "Volunteer," while others change it to reflect their own terminology. The nomenclature in your database may be different than "Volunteer." |
This Volunteer tab displays a list of the volunteers (personnel) assigned to each course, and what their task will be.

Parts of the Volunteer tab
| Performance Information | On the left side of the window, the listing of courses including the sequence number of the course, series code, and date. |
| Volunteer Information | On the right side of the window, the listing of volunteers assigned to a specific course. |
 |
Allows you to look up and add a volunteer to the selected course date. |
 |
Brings up the Volunteer Activity Detail window for the selected patron. |
 |
Allows you to remove a volunteer from the selected course. |
| Show volunteer working entire event | This feature is currently under development. |
Sales Tab in Courses
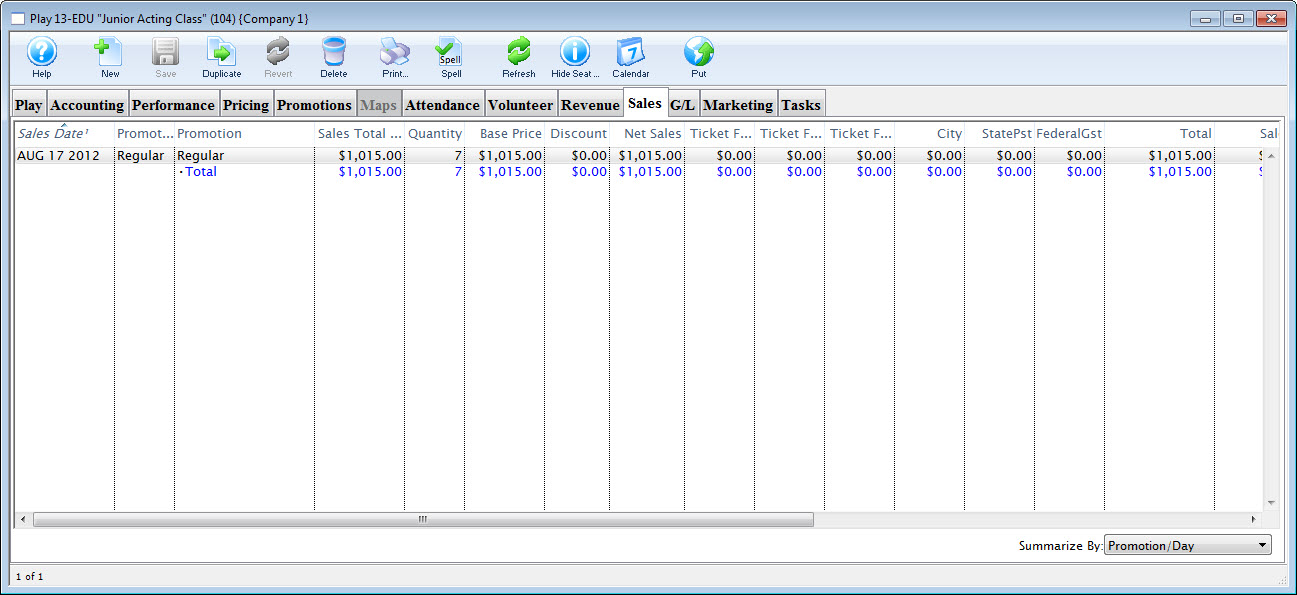
More Information to come.
G/L Tab in Courses
The G/L Entries tab displays a detailed summary of the transactions created and journalized to the general ledger for the general ledger accounts defined for this course.
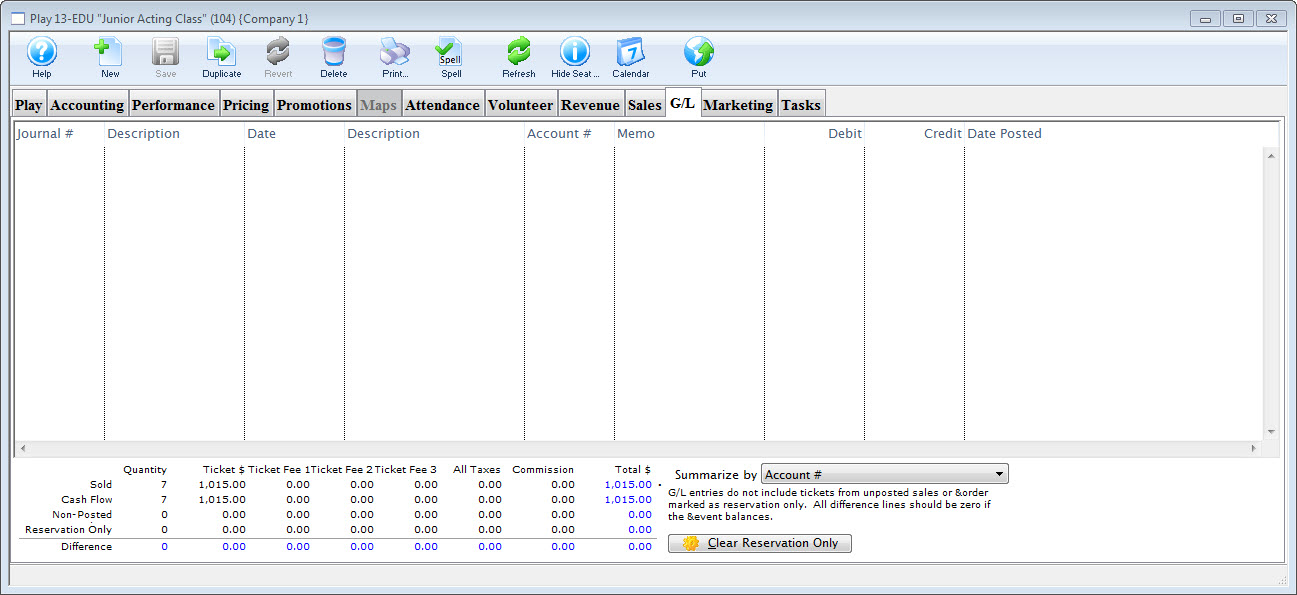
You can adjust the summary options by choosing the drop down menu in the bottom right hand corner of the window.
Marketing Tab in Courses
In the Marketing tab, you can configure the Marketing notes for the course. You can also add the course to a mail list and include external and internal notes for your Box Office Staff. Information you enter on this page will appear on your page in the Ticket Trove iPhone and iPad app.
Parts of the Marketing Tab
Available Actions |
|
| Notification | The email notification that will be sent when tickets are purchased to this course. Click here for info on work flow notifications. |
| Default Mail List | Allows you to assign this play to a specific mail list. |
| Running Time | Running time of each performance in minutes. Also displays for Web Sales. |
| Genre | Genre is a setting for events that is common across all Theatre Manager customers. Currently, there are about 30 classifications which will be used in the iPhone/iPad app to help customers find entertainment to their liking. |
| External Sales Notes | Marketing notes for both your Box Office staff and for Web Sales. |
| Internal Sales Notes | Marketing notes that appear to you Box Office staff, but not on the Web. |
| Event Icon for Web/iPhone App | If there is a graphic in the event, entering it here will display the graphic for all performances of the event. |
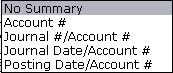
Tasks Tab in Courses
Any tasks associated with a course can also be seen in the Course window. From here you can add tasks and associate them with resources, so you can create all the tasks needed for a particular course. These can then be added to a project and billed.
Tasks are added on the left side. Once a task has been added, you can select the task and add the resource on the right side.
Click on the Calendar button in the window's top toolbar to view all tasks, performances, and/or volunteers associated with the event / play in a new calendar.
For more information on Tasks, click here.
Tracking Course Attendance
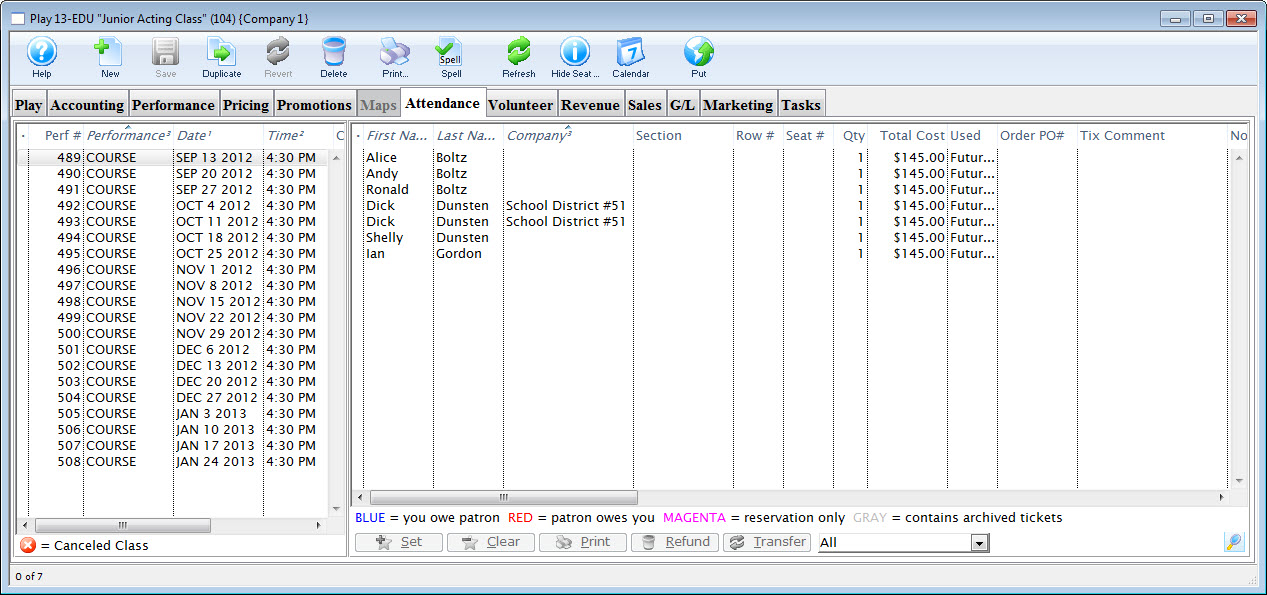
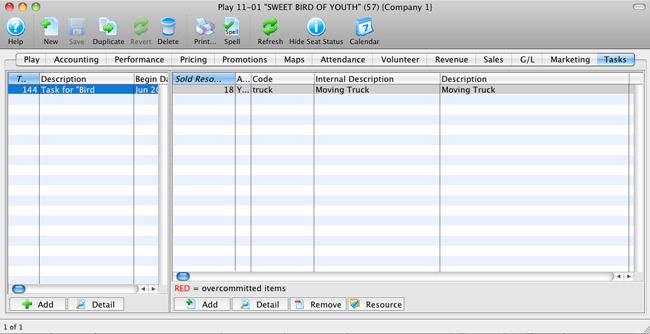
As patrons purchase tickets for Courses, they are automatically added to the Attendance Tab for that Course. Before the date of the first Course (or class), the attendance list can be viewed and printed. Once the first date arrives, the ability to set Attendance Reason is enabled via the Attendance Tab.
The image below shows the Attendance Tab for a Course which is set for a future date.

Patrons setting own absence reason for courses
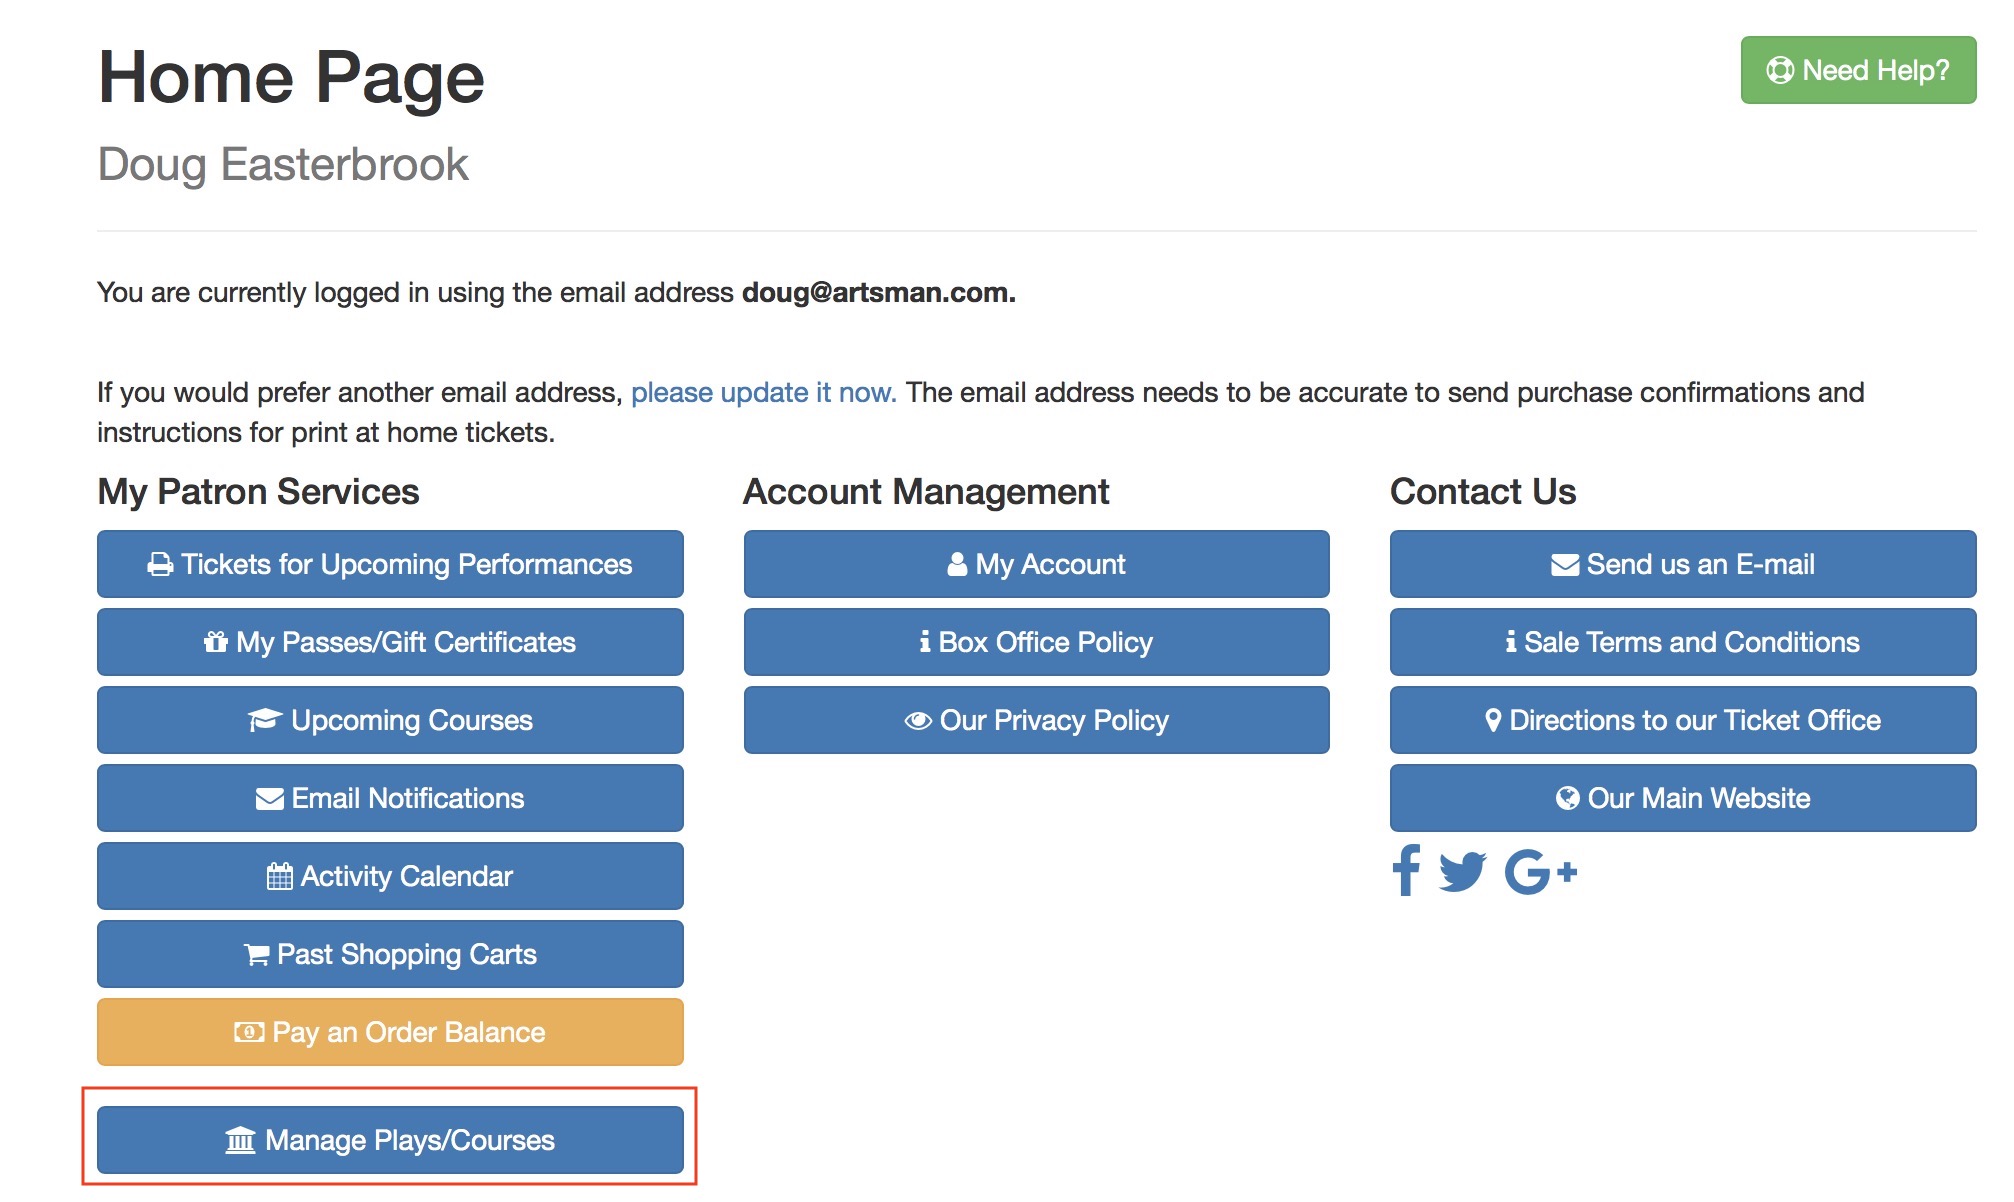
Patrons may be able to set their own absence reason in advance of the class using the web site. There is a button that is typically on the Home page called Manage Courses.
If this feature is allowed, you will want to set some absence reasons in code tables as being Patron Useable. The patron can then select the reason from one of those defined in code tables that they are allowed to use.
Setting Attendance Reason
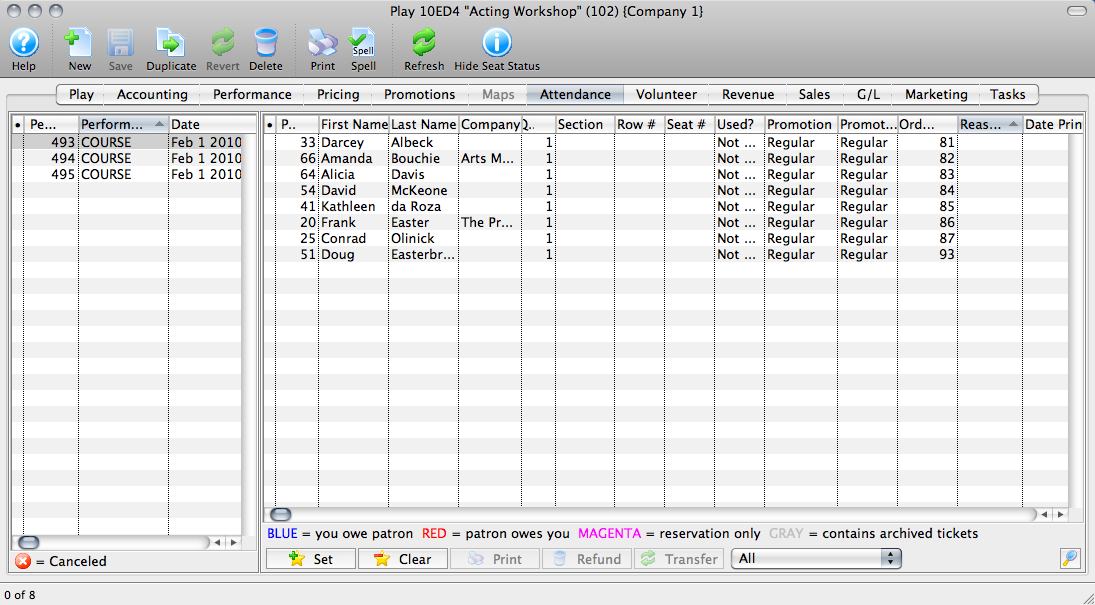
The image above shows a Course Attendance Tab for a Course which has already occurred but for which the Attendance Reasons have not been set. The "Reason" column is blank for all attendees.
To set Attendance Reasons:
- Highlight the Course in the left column to populate the Attendance list on the right.
- Highlight the first attendee in the list.
- Click the Set Attendance
 button on the bottom of the window.
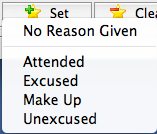
 - Choose the Attendance Reason from the menu that appears:
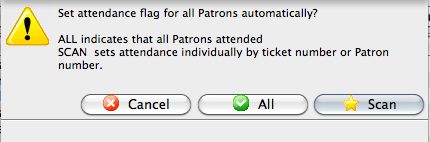
- A warning message will pop up asking if you want to set All attendees to the same reason at once, or if you'd like to Scan each one individually. Choose accordingly.
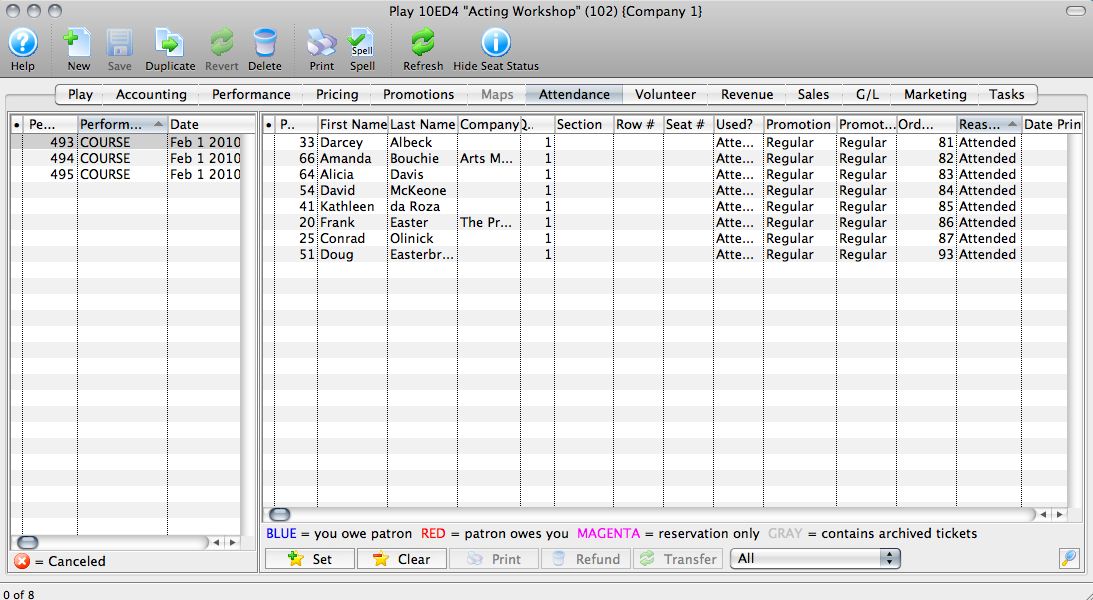
- The attendee(s) will be marked with the Reason chosen.
- If you need to clear the Reason for one or more attendees, highlight the first one in question and click the Clear Attendance
 button. The same menu will appear and you can either select a new reason or choose No Reason Given to clear the Reason column entirely for the selected attendee. You will also see the same warning asking if you want to Clear All or Scan each.
The image below shows the Attendance Tab with attendees' attendance reasons marked:
Use of Household and Relationships
- emergency contacts
- doctors
- who may pick up the child (or who may not)
- the other parent or guardian in a separated household
- etc.
This is a convenient use of relationships within Theatre Manager. You can set up the child in the parents household record and make associations with other people such as grandparents, etc and define the nature of the relationship.
The advantage of setting the child up in the patrons household means that when they purchase online, the patron can 'gift' the course to anybody in the family using the cart web page and effectively designate which of their children would be taking the course, drama camp, conservatory or what have you.
Report Cards
Being able to create, assign, and print report cards is part of the Courses module. Before report cards can be used, you need to set up the following in the Setup >> System Tables >>code tables:
- Report Card Templates, click here for more information,
- Course levels, to assign different levels or grades of classes, click here for more information,
- Report Card Categories for different areas to assess students, click here for more information,
- Report Card Ratings, to describe your system of assessment, click here for more information.
The next few pages will describe how to:
- create and assign report cards for a course based on the template(s) created in System Tables, and
- how to complete the report cards for each student.
Assigning Report Cards
To assign a report card to a Course, you perform the following steps:
- Open Play from Setup or use the Plays button in the Theatre Manager toolbar / ribbon bar.
- Search for the Course in the Plays List and select it to open up the Plays and Dates Window.
- Select the Performance Tab.
- Select the Course from the performance list and click the Open
 buttom.
The Performance Detal window opens.
- Select the Course Tab in the Detail Window.
- Under the Report Cards to Issue column on the left, click the New button to add a new report card.
The Report Card Detail window opens.
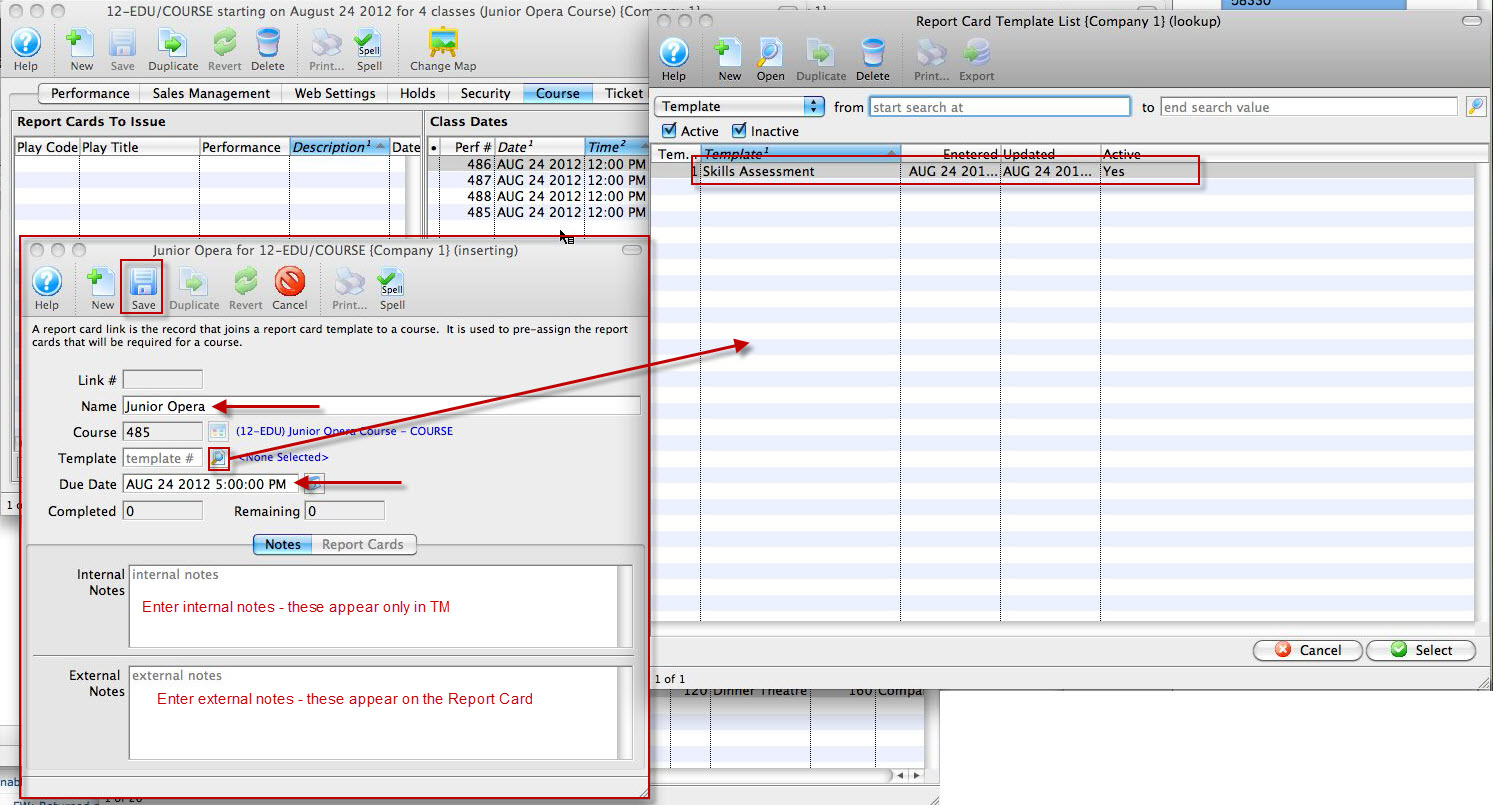
- Enter a name for the report card (e.g the name of the course).
- Using the lookup
 button, choose a Template from the list of report card templates.
 - Enter a due date for the report card.
- Under the Notes tab, Internal Notes are notes that will only appear within Theatre Manager. External Notes will print on every report card.
- Click the Save button.
The Report Card tab populates with the name of each student in the Course and enables the report card to be completed.
The Play List window opens.
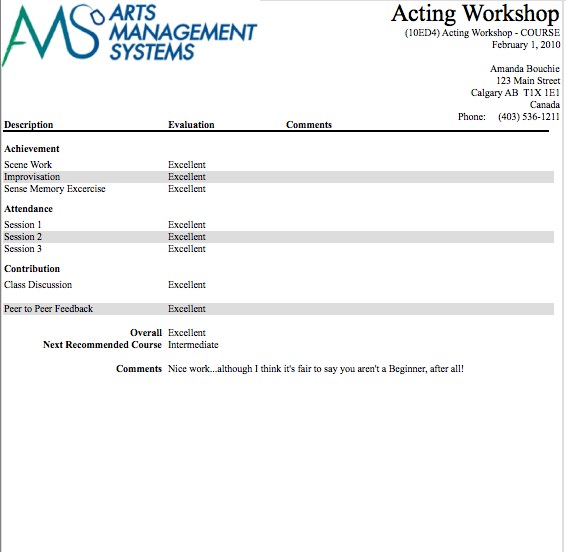
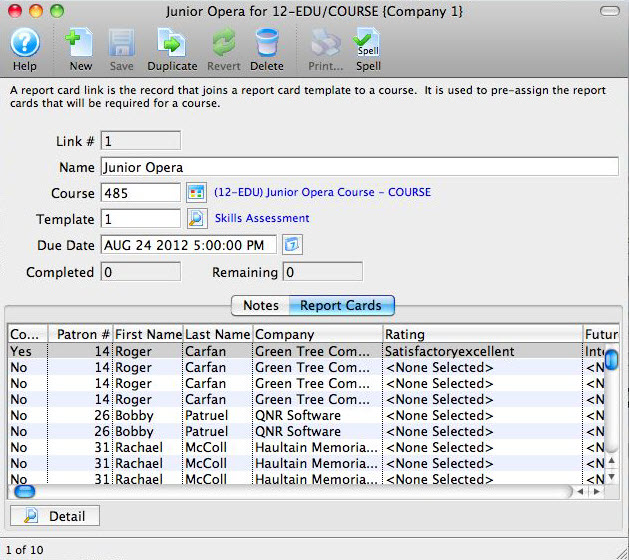
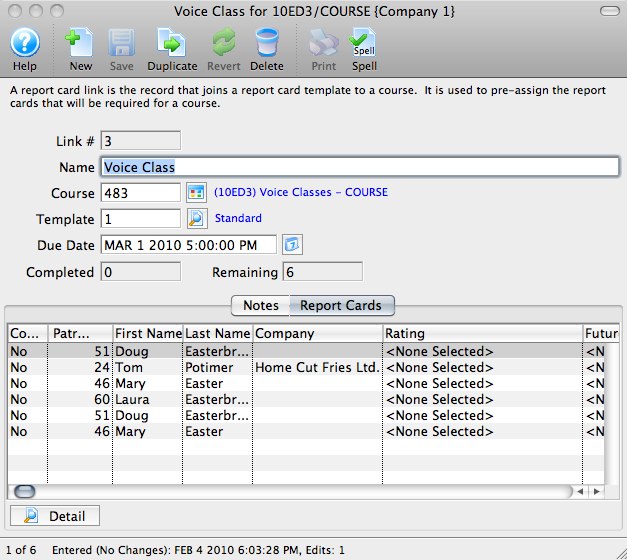
Completing Report Cards
Once you have clicked Save on the Report Card Insert Window, click the Report Cards tab. The list of students registered is available to issue report cards. This list comes from the Attendance tab for the Course.
In the top portion of the window (just above the Notes and Report Cards tabs) are the Completed and Remaining boxes. These show you the number of report cards that have been filled out and those that are left to be done.
- Double-click on a student's name to open up the student's report card record.
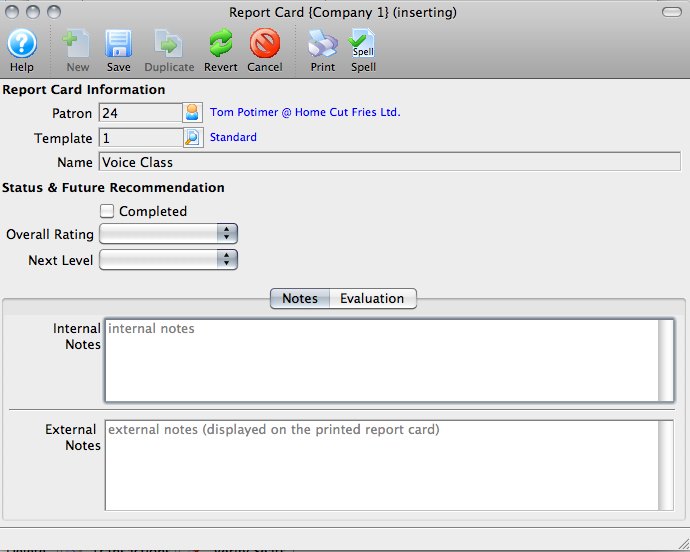
The Report Card Information is already populated.
Under Status & Future Recommendation, there is a checkbox to mark that Report Card completed, and there are two drop-down menus.
- Overall Rating is for the student's final grade or overall rating for the Course. This drop-down is populated from the Course Report Card Ratings from Code Tables.
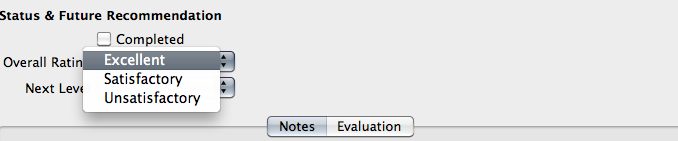
- Next Level will print on the report card as Next Recommended Course and is populated from the Course Level, also from Code Tables.

- The Internal and External Notes fields work in the individual report cards much like the same fields work in the Report Card Template. Internal Notes will only appear inside Theatre Manager, and External Notes will print on the student's report card. The notes in *this* window only apply to the selected student.
- Click the Evaluation tab to move on to assessing the student based on the Categories and individual items in the report card.
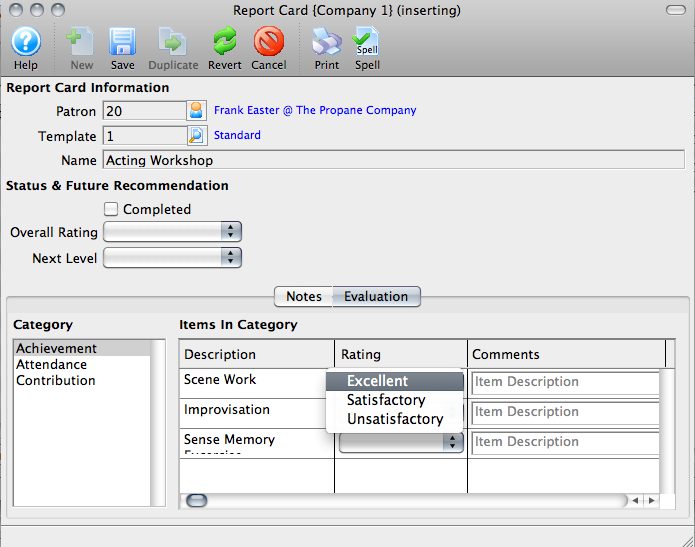
- Highlight a Category on the left to enable the items for each category as set up in the Report Card Template.
- Assign a Rating for each item under each Category. The comments beside each item will print on the report card in line with that item.
- Click the Save button.
Close the report card to move on to the next student in the Report Cards list.
Printing Report Cards
 button in the report card window, or from within Reports accessed via the Theatre Manager toolbar.
- Click the Reports
 button.
The List of Reports window opens.
- Select Course Reports >> Course Report Card.
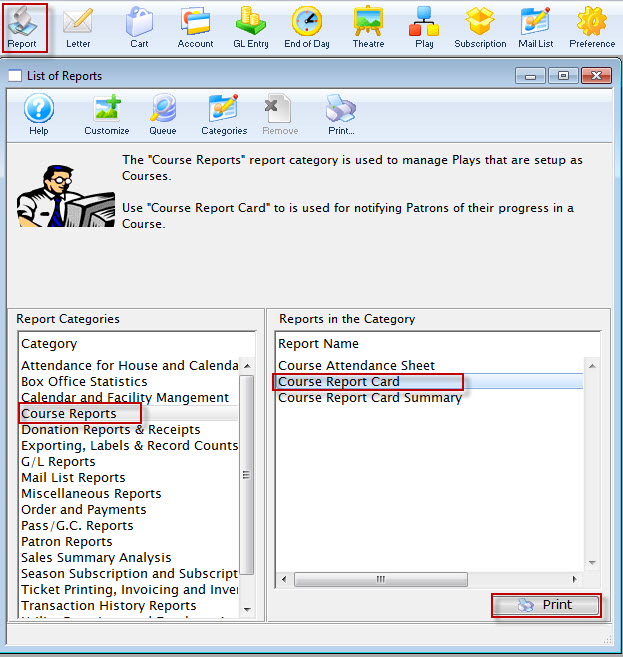
- Click the Print
 button.
The Course Report Card Criteria window opens.
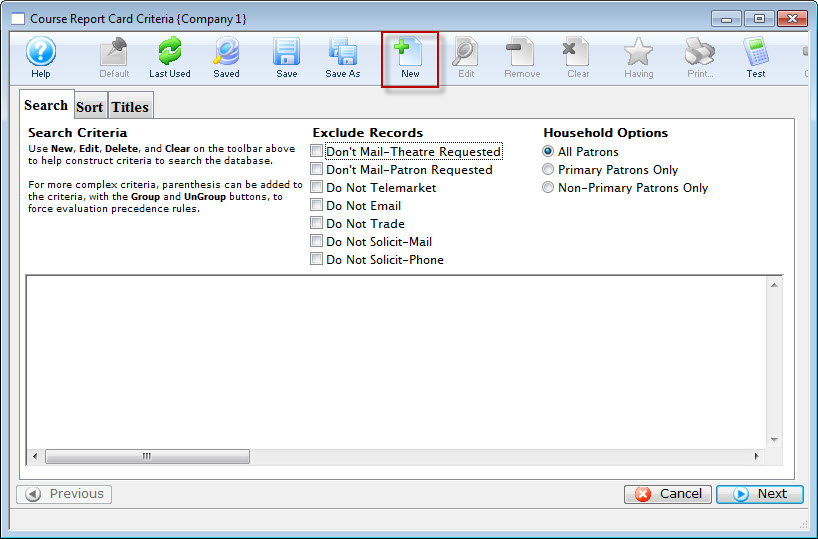
- Click the New button, to open the Edit Report Parameters window.
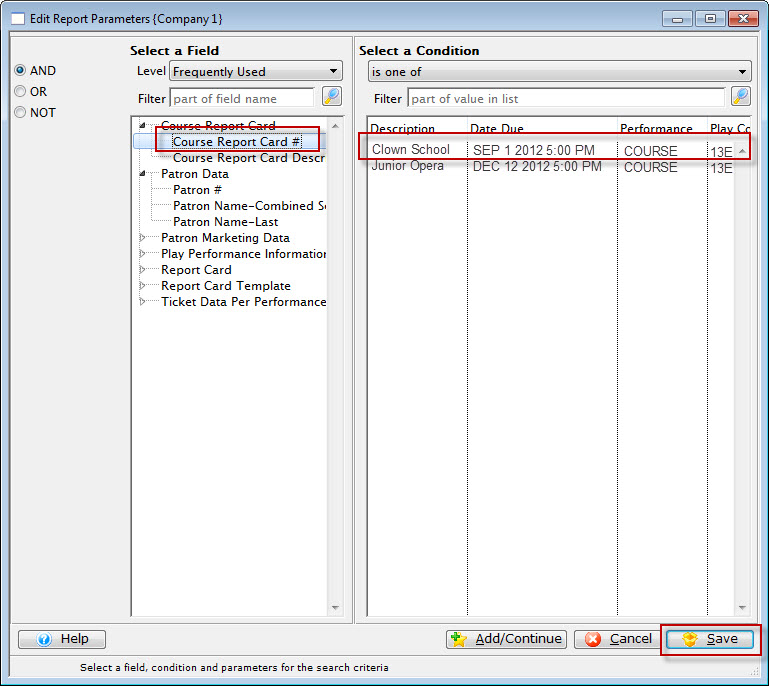
- Set the Criteria to Course Report Card #> is one of > select the Report Card you'd like to print.
- Click the Save button.
You are returned to the Course Report Card Criteria window Sort tab.
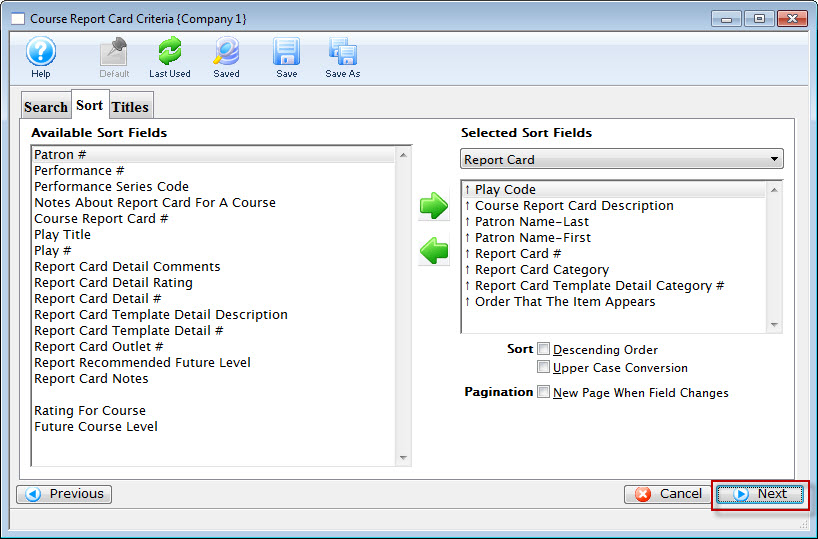
- Click the Next
 button.
The Titles Tab opens.

- Click the Done
 to print the report cards.
To print from Reports, you perform the following steps:
Online Event/Course Management

You can allow course instructors to manage some aspects of the student's attendance or front of house staff to manage guest arrival to an event via the online, depending on settings in code tables
 This can include:
- Setting Attendance for the students in each class of the course
- Setting Attendance for the guests arrival for an event
- Adding new patron to the class if you have previously been their instructor. This also means that a first time attendee must be added at the box office - to provide some control over student/teacher setup process
- refund patron and remove them from the class or event
- Reschedule the class in entirety
- add an extra class
What can this be used for?
This feature was intended to support various things like:
- Instructors taking attendance at the beginning of the class via a tablet and immediately tracking it in the database. eg did the ballet dancers or swimmers in a course come to the class. Or, did the conference participant attend a session?
- Instructors adding late registrants to a course they are teaching (if they taught them before)
- Instructors of personalized sports/fitness sessions being able to add registrants and use passes to pay for the session (if they have thought them before)
- Instructors being able to reschedule the class or add an additional one
- This feature is not just for instructors of courses or classes. It can be used to manage events to check in guests to a gala/special event, seminars, small member, or donor events where a guest list is used to greet guests as they arrive.
Adding A Student to a Class
- The class must have already been set up and in the future
- The instructor must have already taught the student in the past
Steps for adding a student online
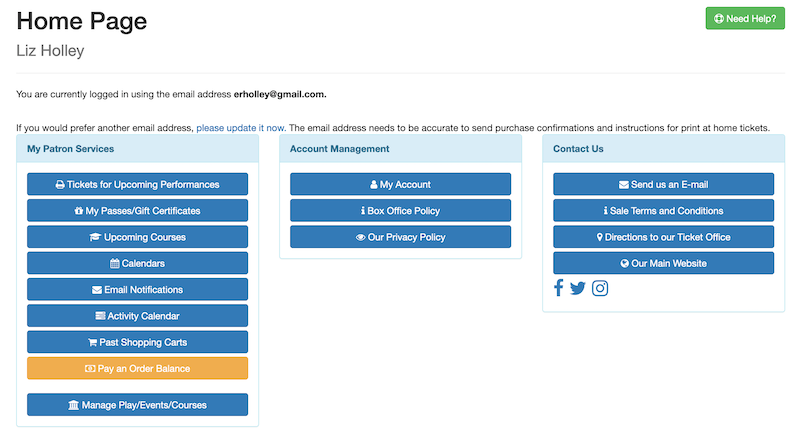
-
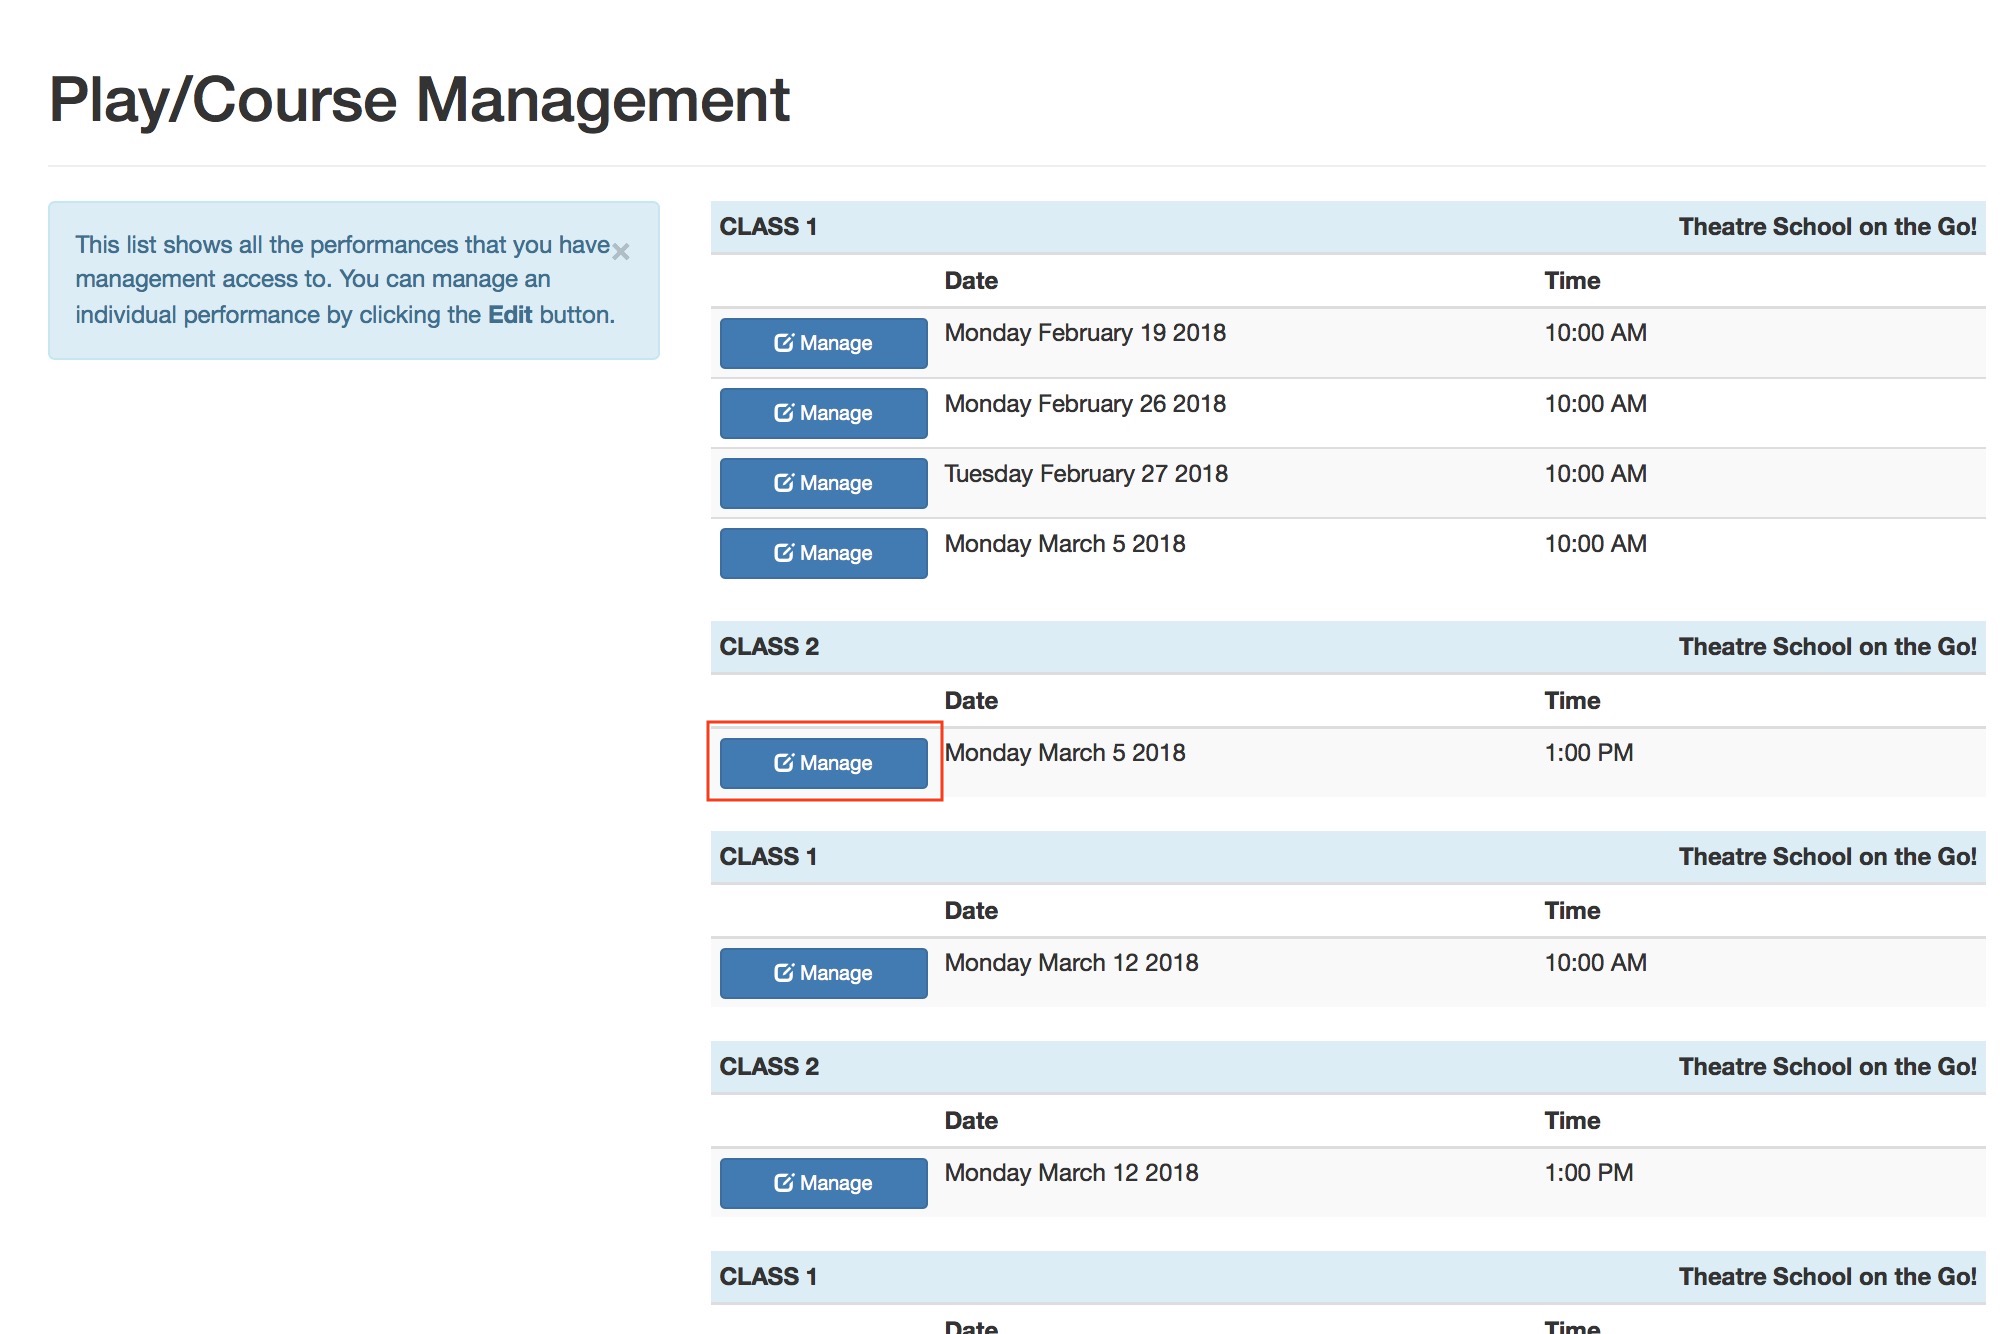
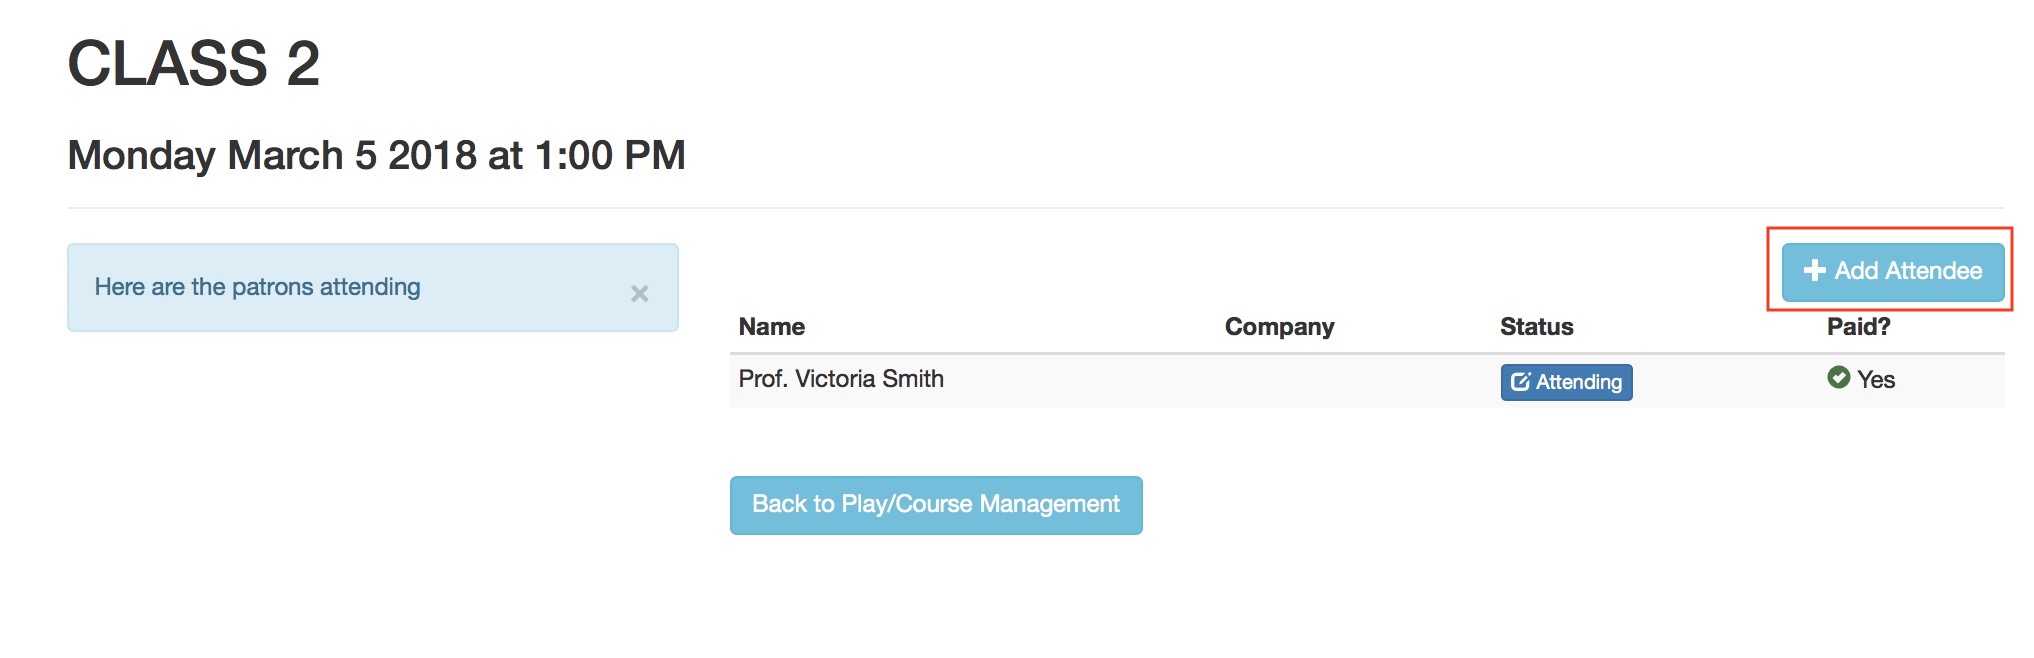
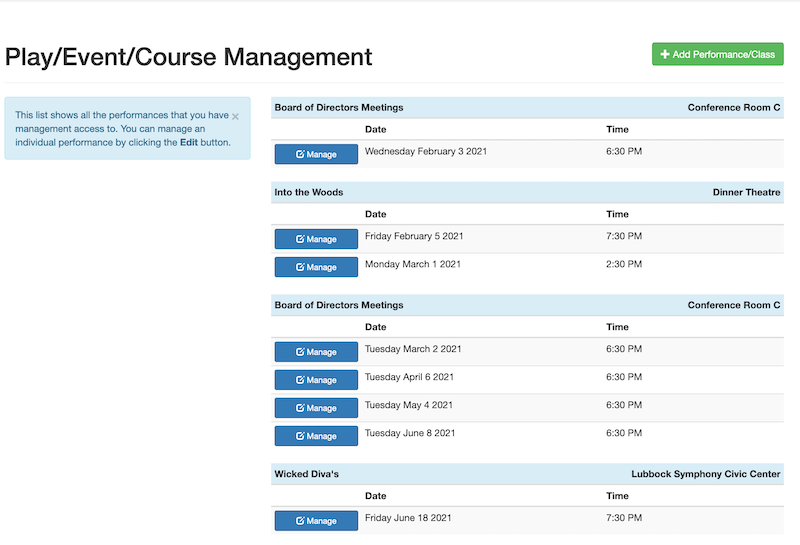
The instructor must log in to the online portal and ho to the home page. If they are allowed to manage classes, they will see Manage Play/Courses in their Patron Services area.
It is permissible to bookmark the link to manage performances - and it may involve a login to proceed.
- This will show a list of upcoming courses that they are allowed to manage as an instructor. They can select the course that they want to Manage and add a student to.
- To add a new student, click the Add Attendee button.
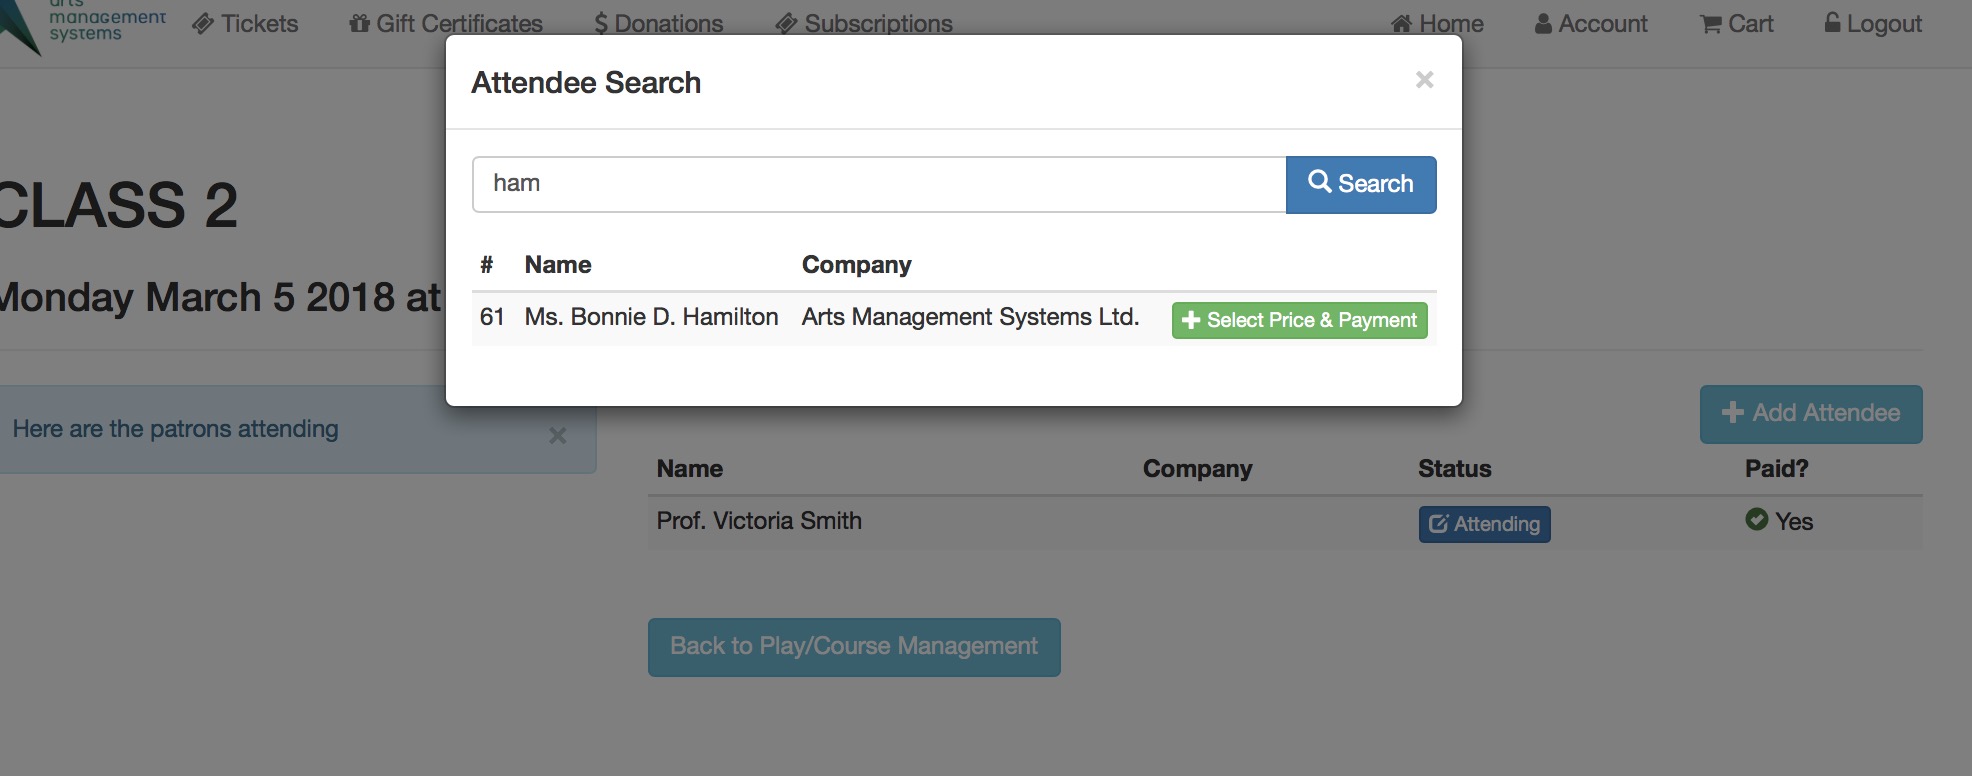
- A search window will appear. The instructor will need to:
- type some portion of the students name to find the patron in the database
- click the search button, and
- select the person from the list of those previously taught and click Select Price and Payment
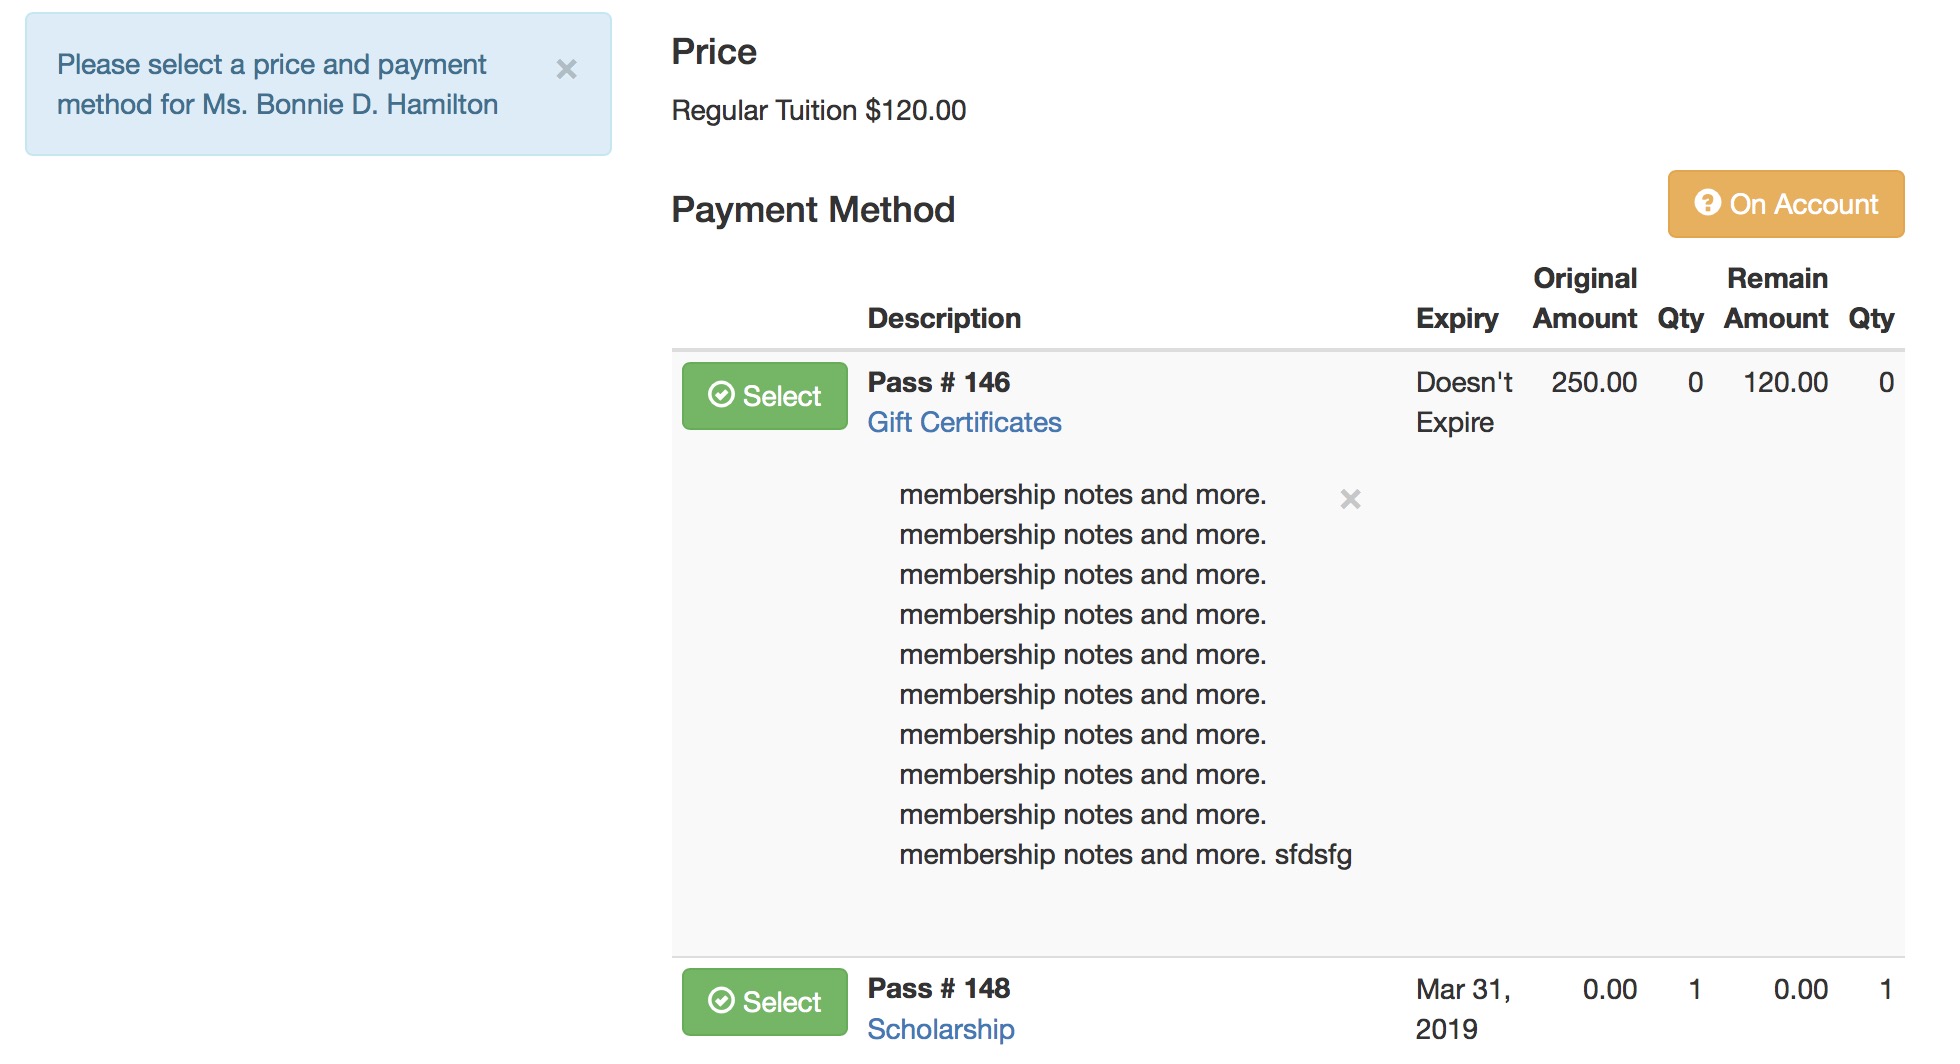
-
The instructor will be asked to Select a pass/gift certificate that will pay for the registration. The passes must be valid and belong to the patron. There is an option to place the registration On Account
- for the Box Office to apply a payment to the order later -or-
- the patron to deal with by paying for the order online.
Note that any notes particular to the pass type are shown - which means you can place some rules for the instructor if you wish.
-
After picking the pass to pay for the registration, the Instructor will need to confirm via the Pay With Pass ... button
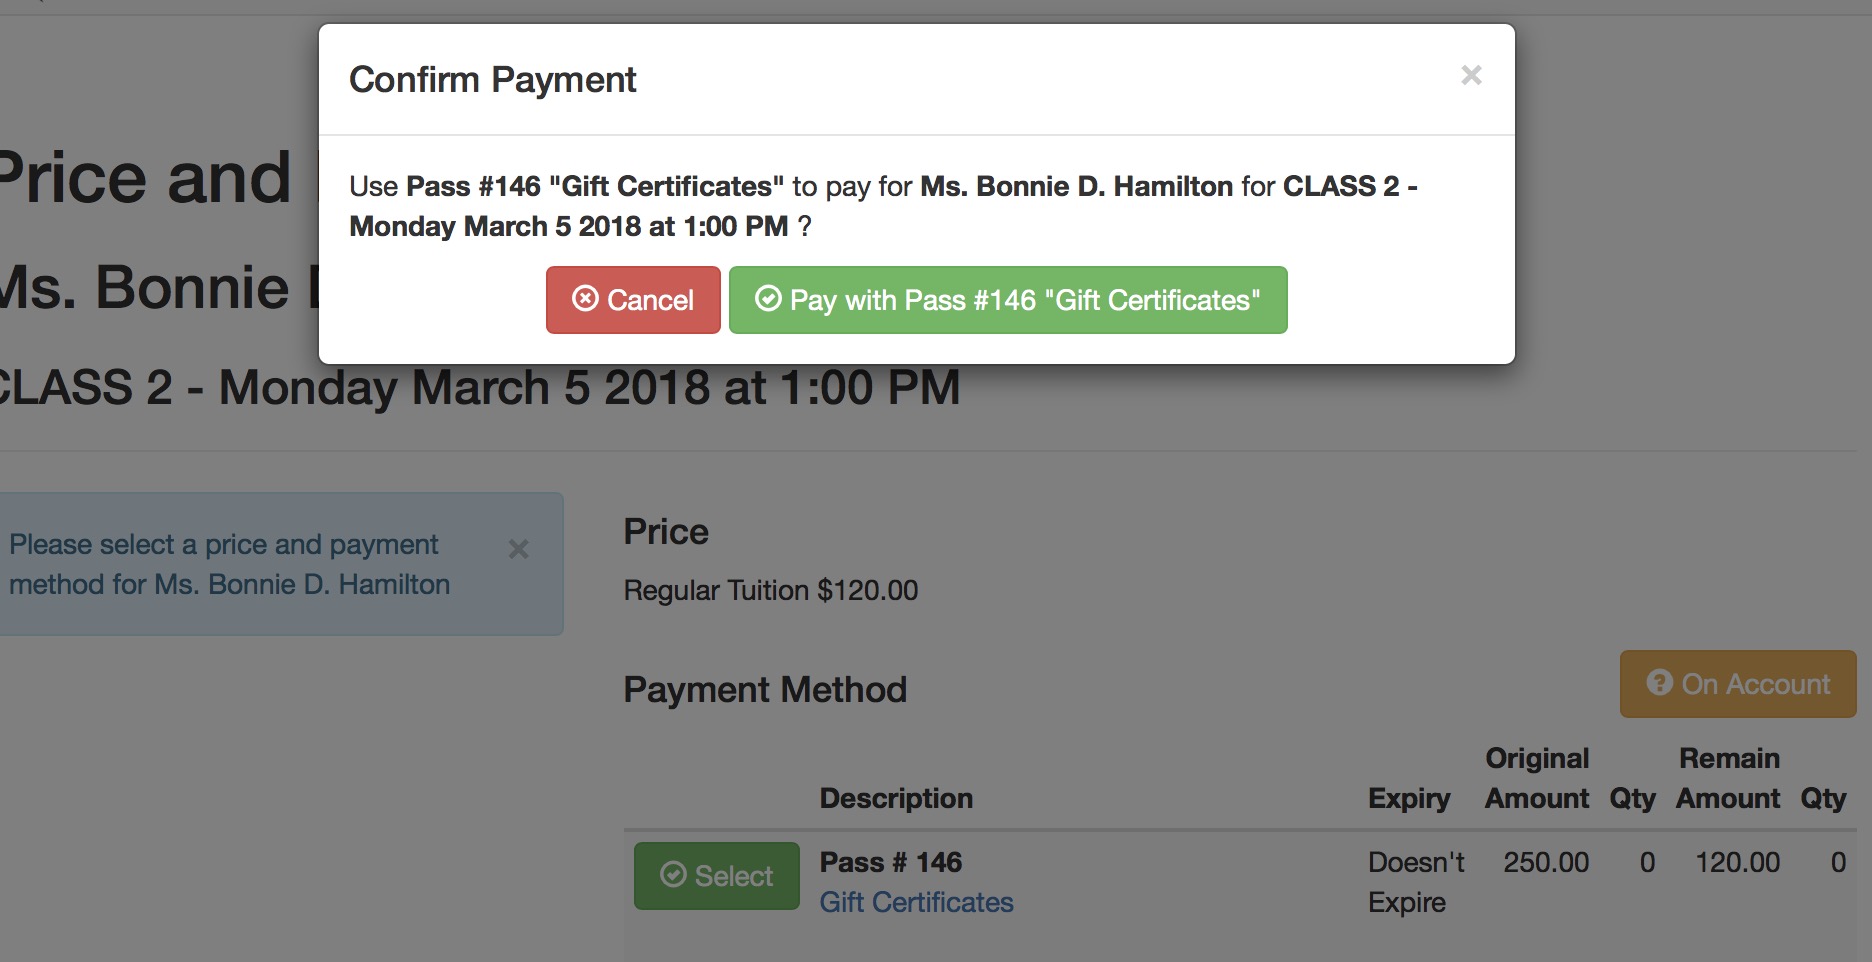
- After confirming payment, the Instructor will then see the student as part of the class roster - and they can take attendance if they wish - using the active attendance reasons in code tables
Manage Attendance in a Course
|
Taking attendance for a course requires some prior setup/permissions before it can be done via a tablet or computer |
|
The list of absence reasons are defined in the attendance reasons code table. |
Steps for Managing Attendance
-
The instructor must log in to the the ticketing site (tickets.yourvenuename.org) and go to the home page. If they are allowed to manage classes, they will see Manage Play/Courses in their Patron Services area.
It is permissible to bookmark the link to manage performances - and it may involve a login to proceed.
-
This will show a list of upcoming courses that they are allowed to manage as an instructor. They can select the course that they want to Manage and set the attendance for.

-
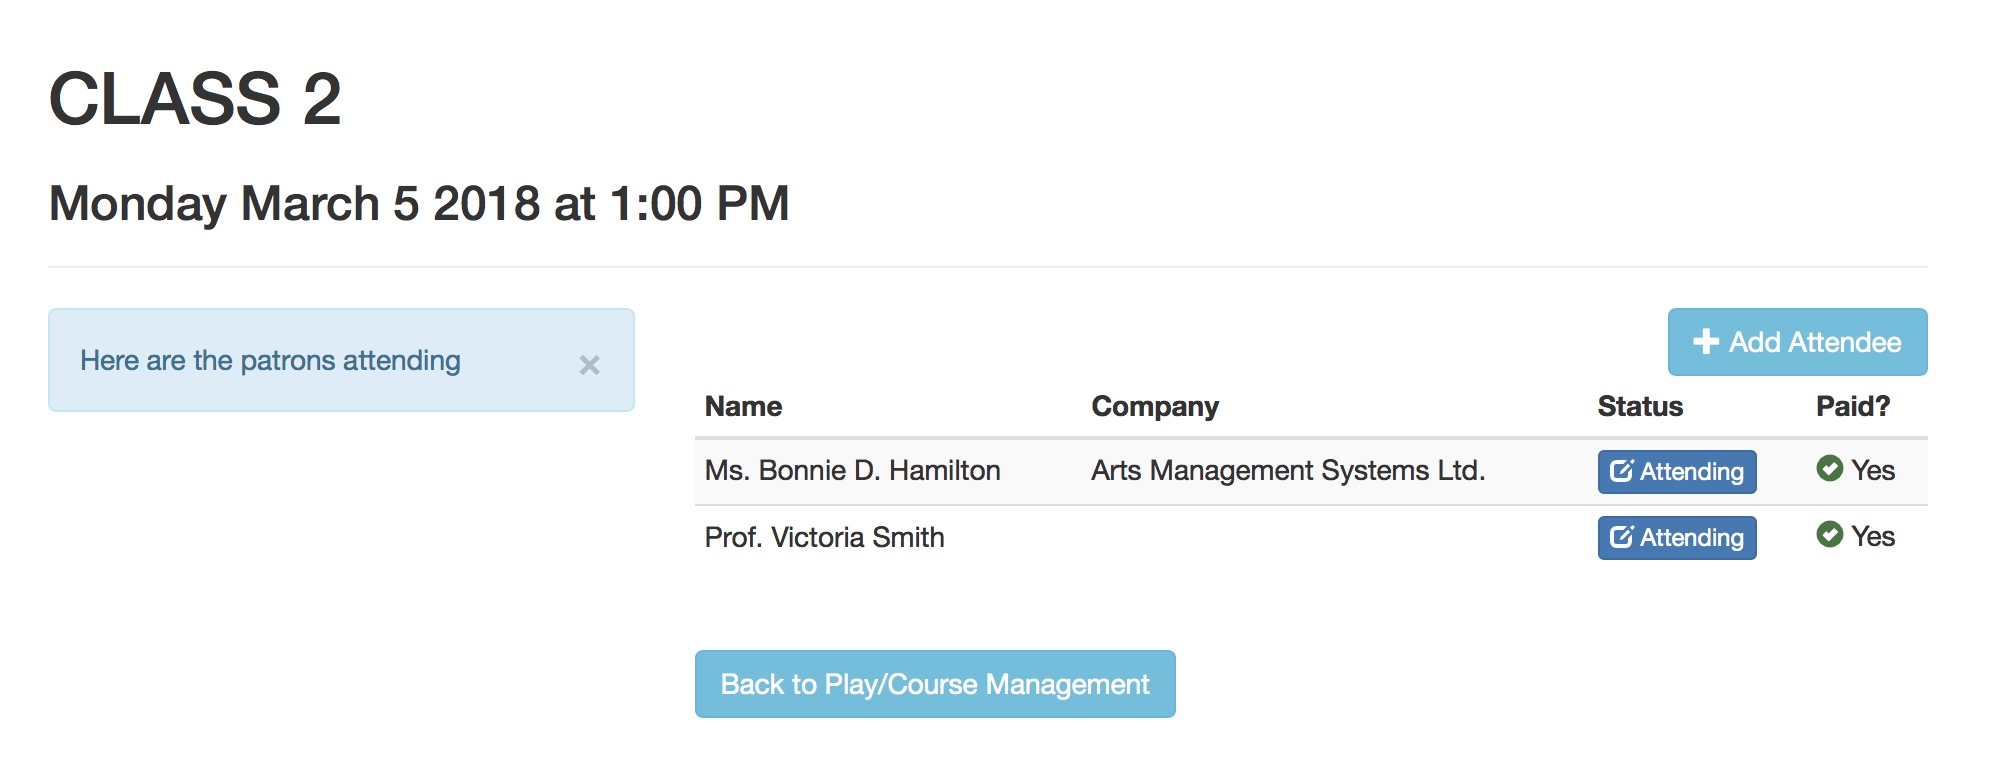
The instructor will see a list of attendees. To change the attendance status of the student, click the Attending button beside their name.
-
The Instructor
- will see a list of absence reasons, and
- can select one as the reason for missing the class, and
- click the Set Reason for Absence to mark the student absent
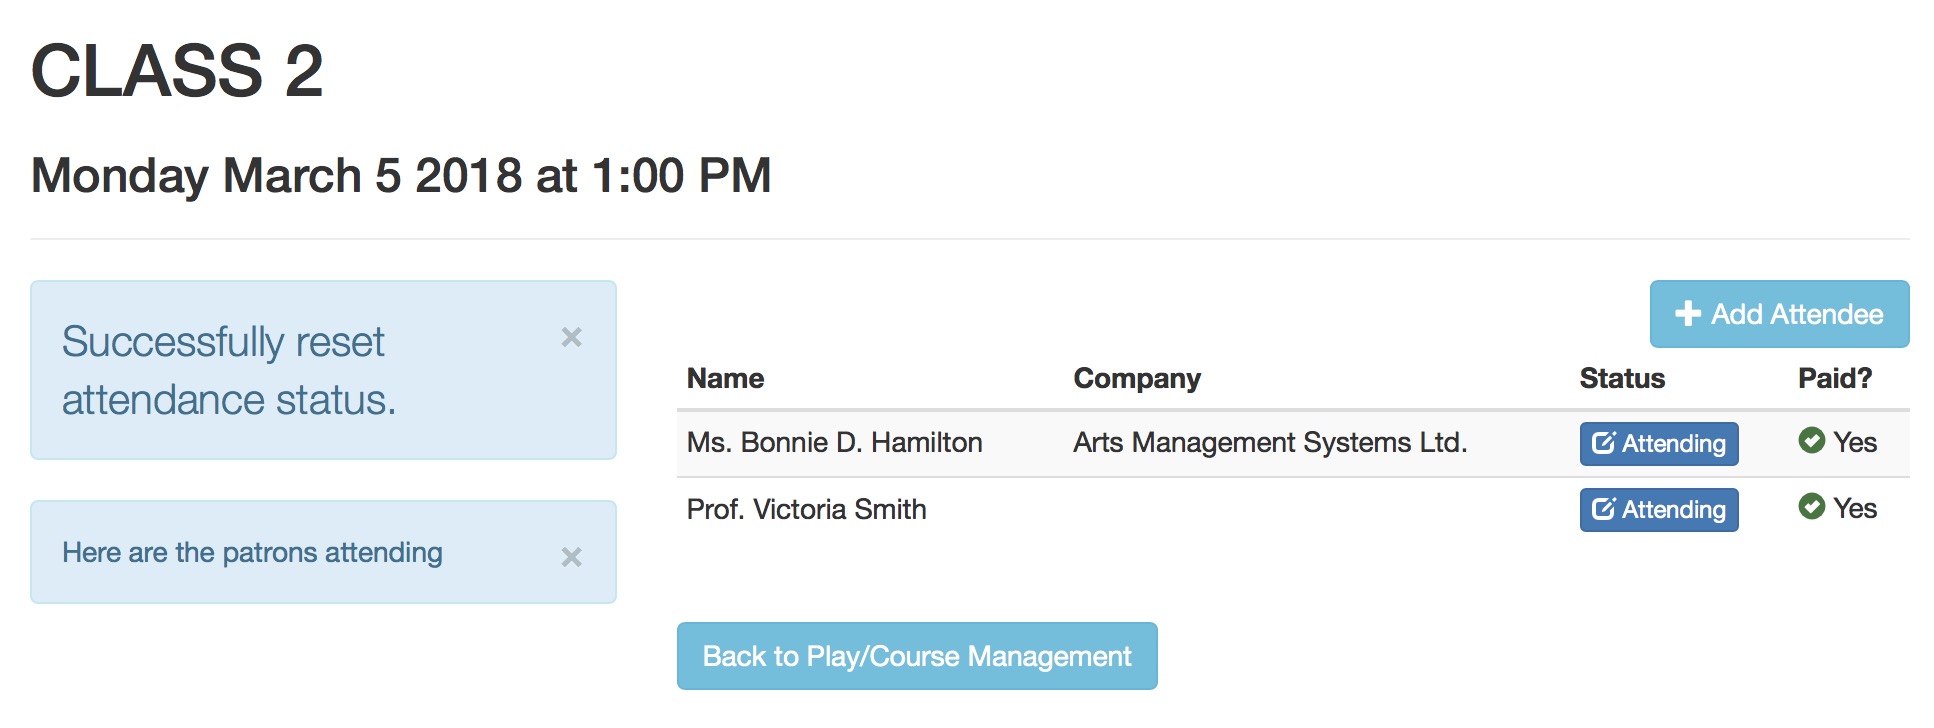
If a student is marked absent and they should be present, you can use these steps to clear the absence reason.
- After adding the attendance reason, the list of registrants will change to show why the Student is not able to attend.
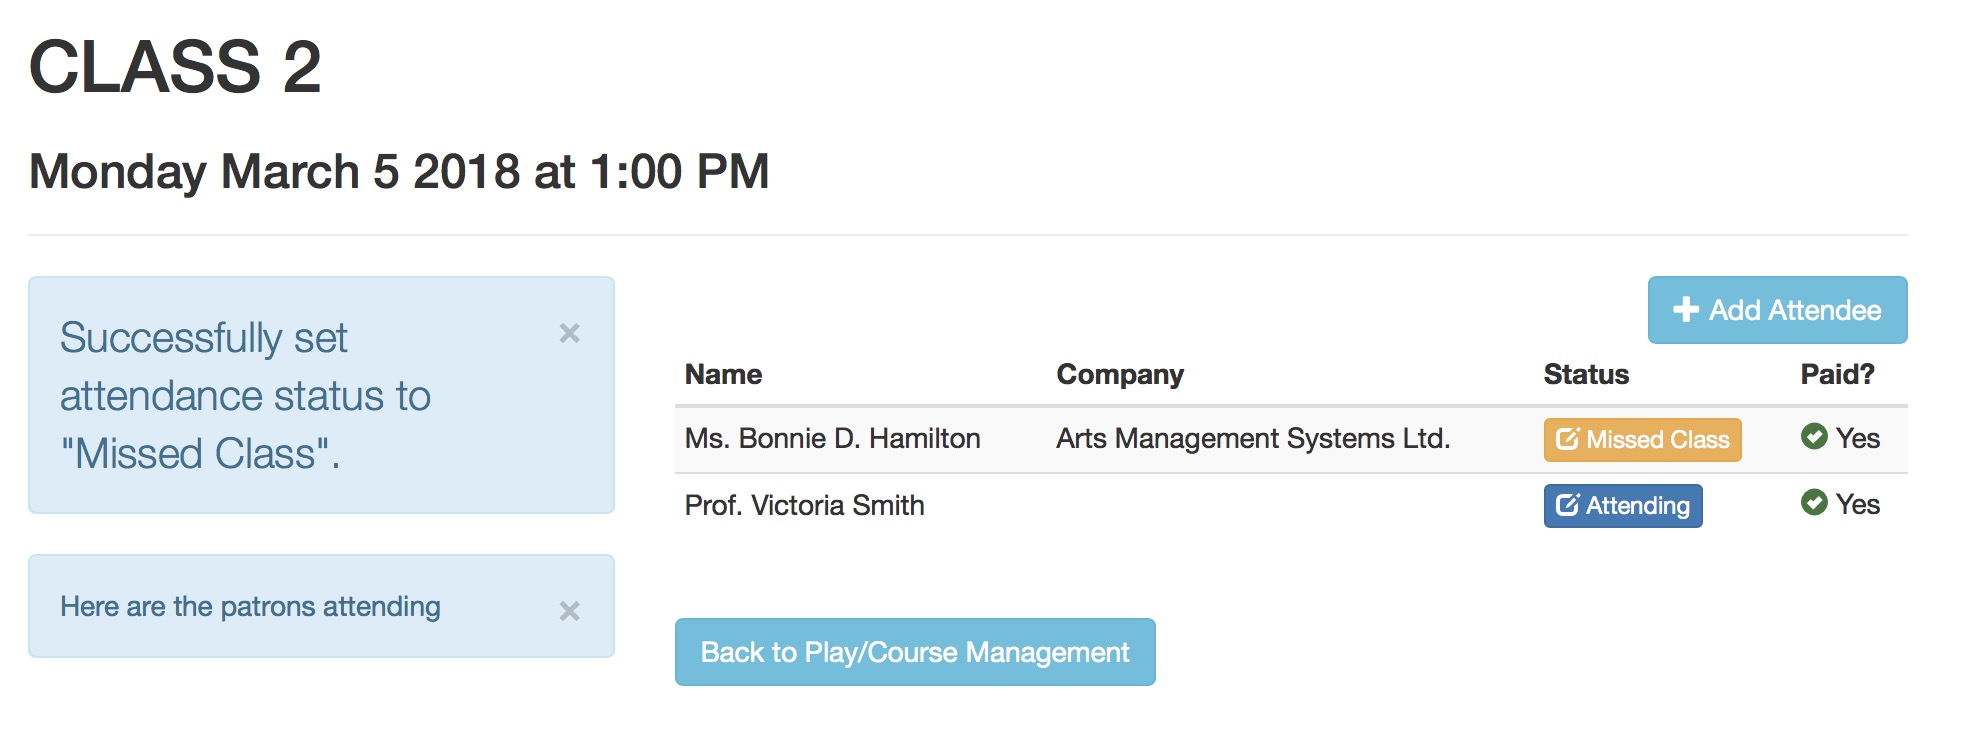
Clearing or Changing an Absence Reason
-
If a student was set absent by mistake, or arrives late and you want to change the attendance reason, all you need to is:
- start at the class roster
- Click on the absence reason button that is beside the patron name. This example says Attended-Late and is shown in orange (the typical bootstrap danger colour)
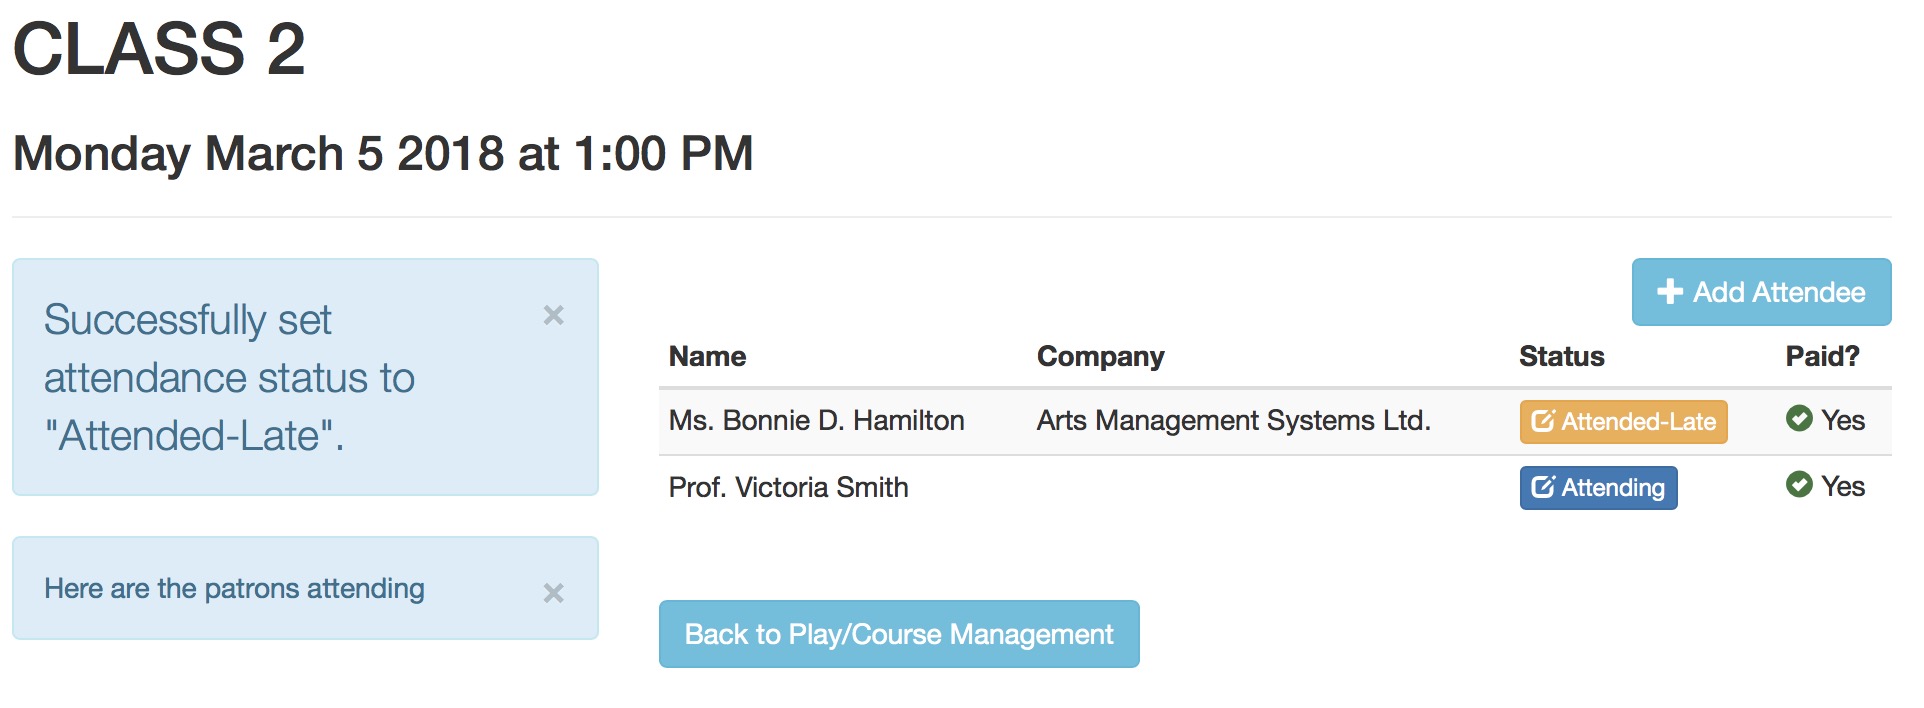
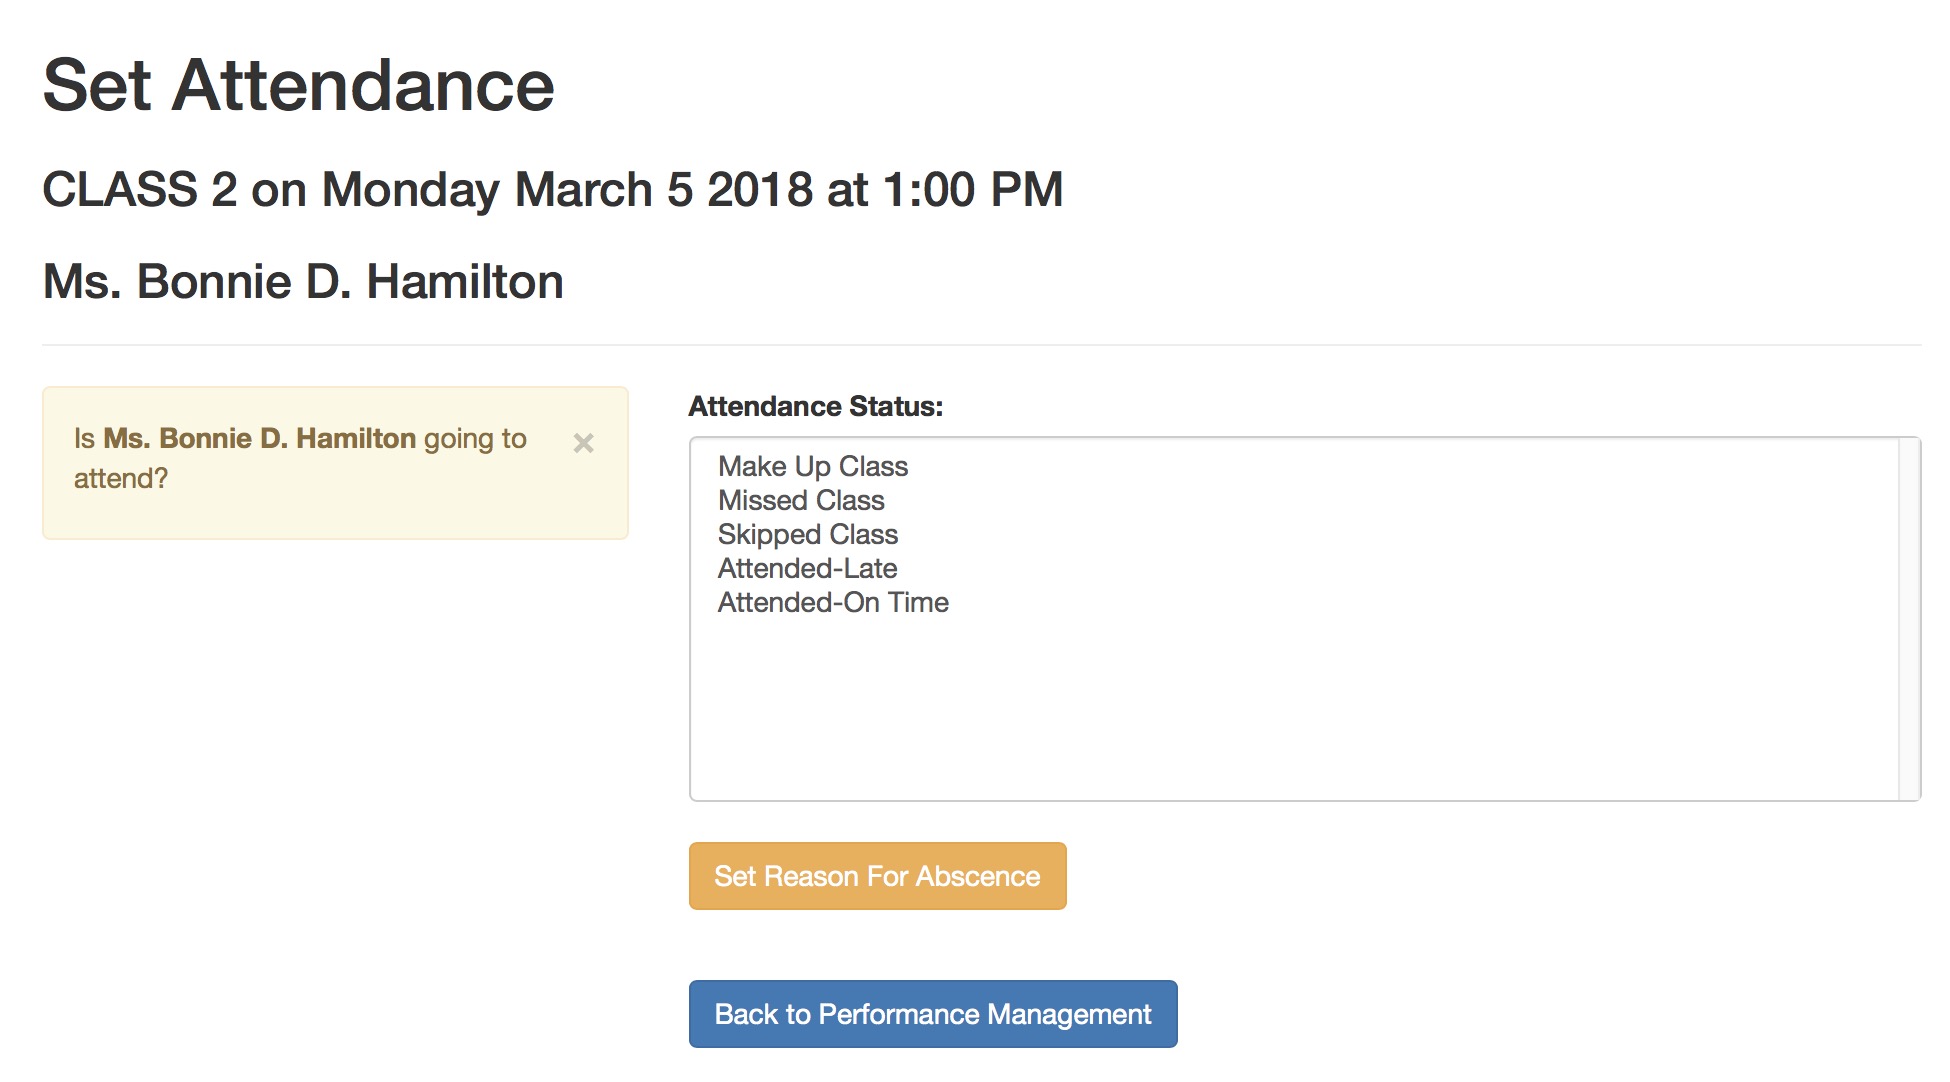
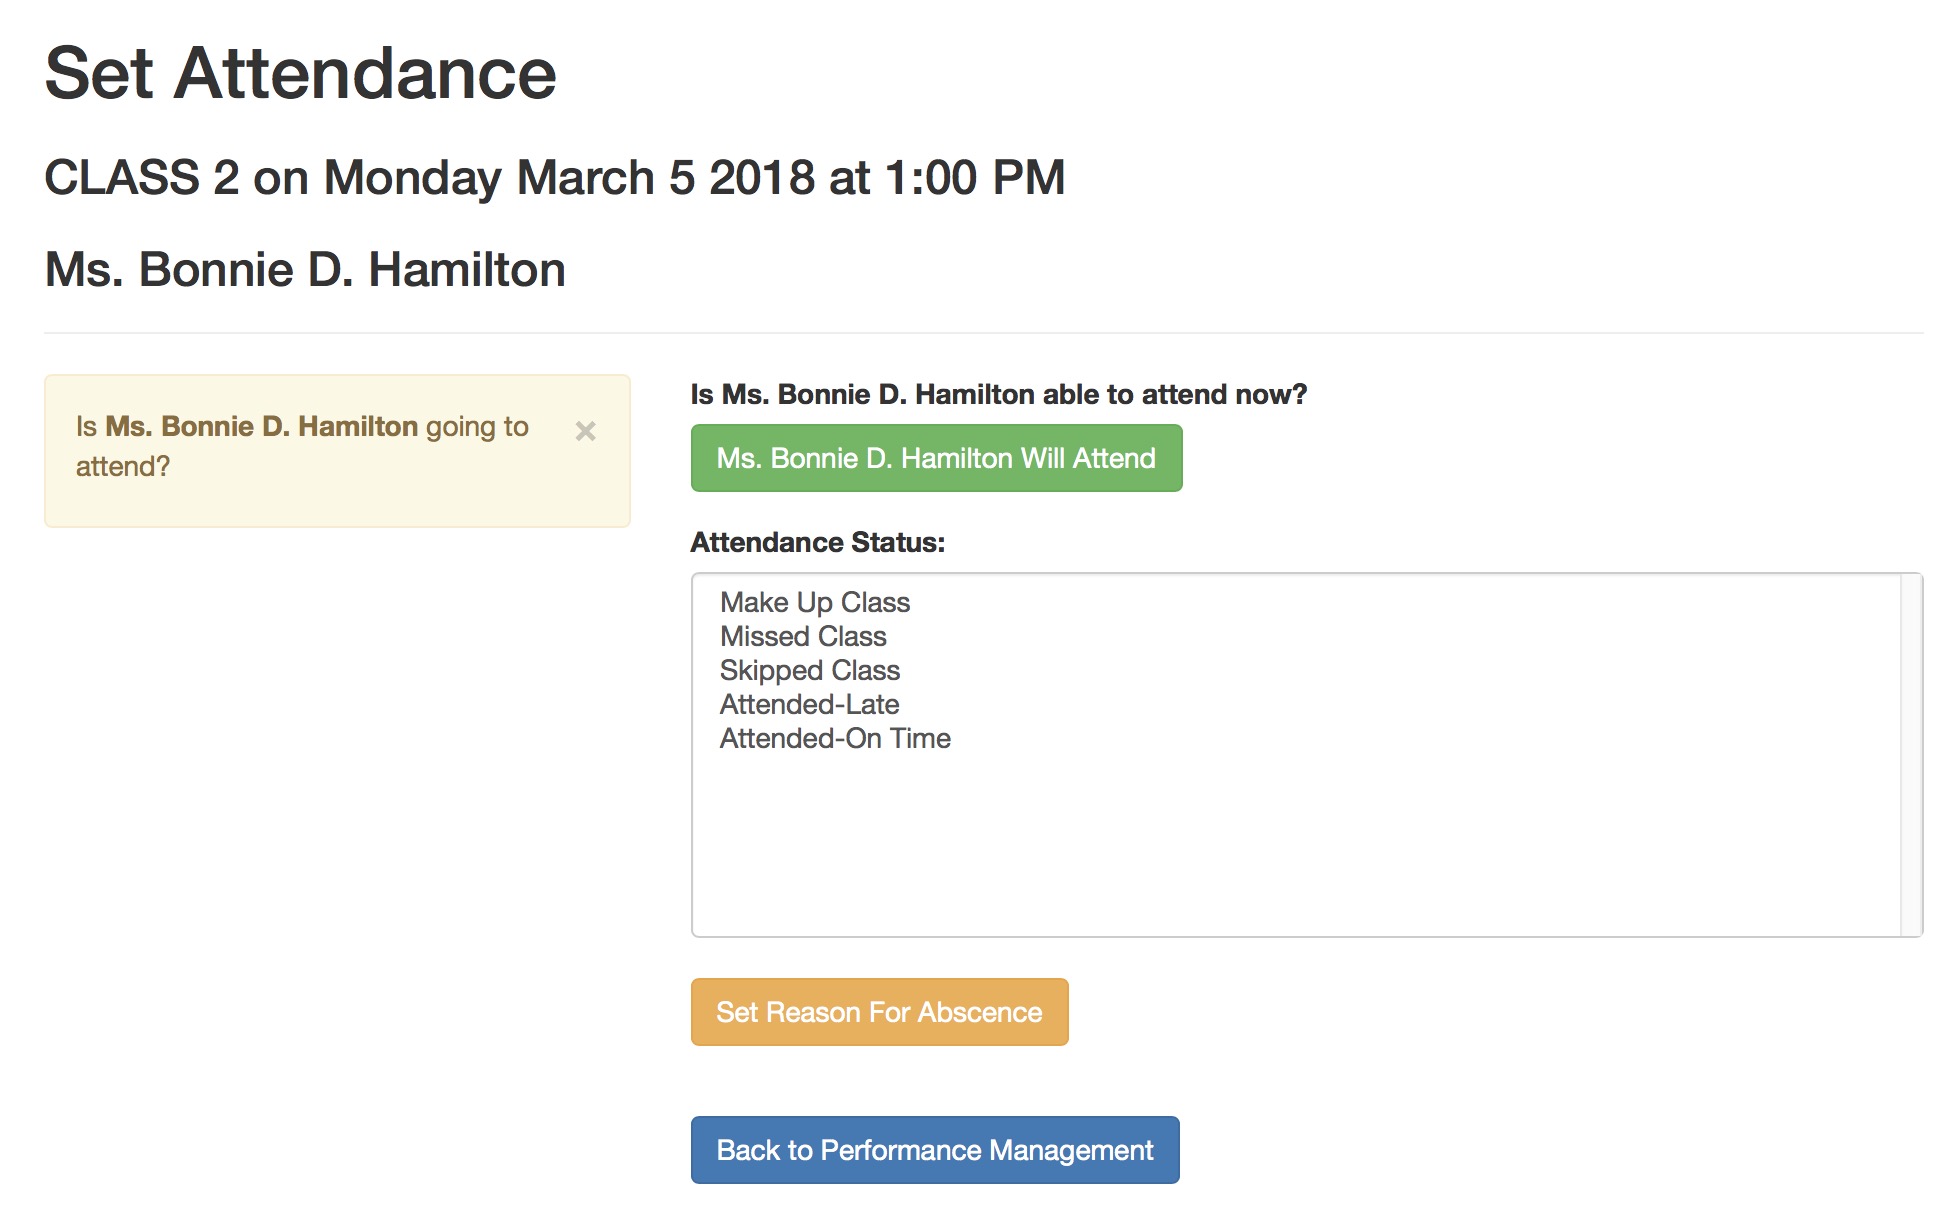
-
The attendance screen is shown. You will have two options:
- Clicking the button that says {Student Name] will attend, which clears the absence and sets the Student Attended
- Selecting a different absence reason and then clicking Set Reason For Absence
- Clicking the Back to Performance Management to make no changes to the data
- When back on the attendance list, the revised attendance status will be shown beside the student's name
![]()
Personnel Setup for taking Attendance on tablets
- The class or performance must have already been set up and in the future
- There must be a Volunteer or Personnel activity set up in code tables that allows the Set Attendance option.
- Typically that Activity code might be called 'Instructor' or 'Attendance Taker'. It could even be 'Usher' if desired.
- The staff member or volunteer must be permitted to do the activity code that has ticket scanning capability
- The staff member or volunteer with an activity code that allows scanning must be assigned to the performance you want them to scan attendance for in one of the three ways below:
- the volunteer/staff event activities window
- the volunteer detail window
- The personnel tab on the task window
Manage Attendance in a Event
|
Taking attendance for an event requires some prior setup/permissions before it can be done via a tablet or computer |
Steps for Managing Attendance
-
The front of house staff must log in to your ticketing site (tickets.yourvenuename.org) and go to the home page. If they are allowed to manage events, they will see Manage Play/Courses in their Patron Services area.
It is permissible to bookmark the link to manage performances - and it may involve a login to proceed.
-
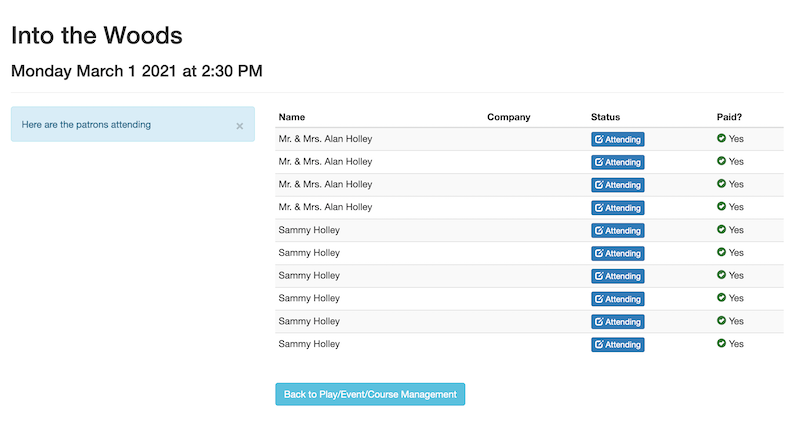
This will show a list of upcoming events that they are allowed to manage as a front of house staff. They can select the event that they want to Manage and set the attendance for.
-
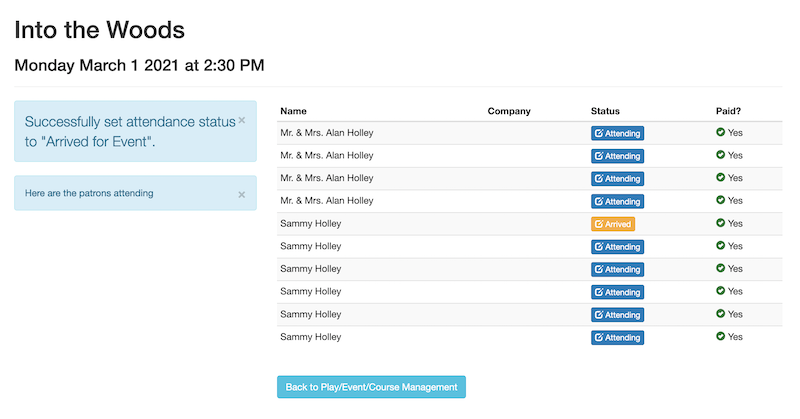
The front of house staff will see a list of attendees. To change the attendance status of a patron, click the Attending button beside their name.
-
Front of House Staff
- will see a list of Attendance Status
- can select the attending status to mark the patrons arrival for the event
- click the Set Reason for Absence to set the status
Patrons can be marked as a 'no show' at performance time. Should they arrive late, you can use these steps to clear the absence reason.
The list of absence or attendance reasons are defined in the attendance reasons code table.

- After adding the attendance status, the list of patrons will change to show who is checked in for the event.
Customers Paying their Own Balances
- Via the Upcoming Courses button on the home page, which also allows the patron to indicate if they will be absent at the course
- Using the Pay an Order Balance button that can be accessed from the home page or the shopping cart window
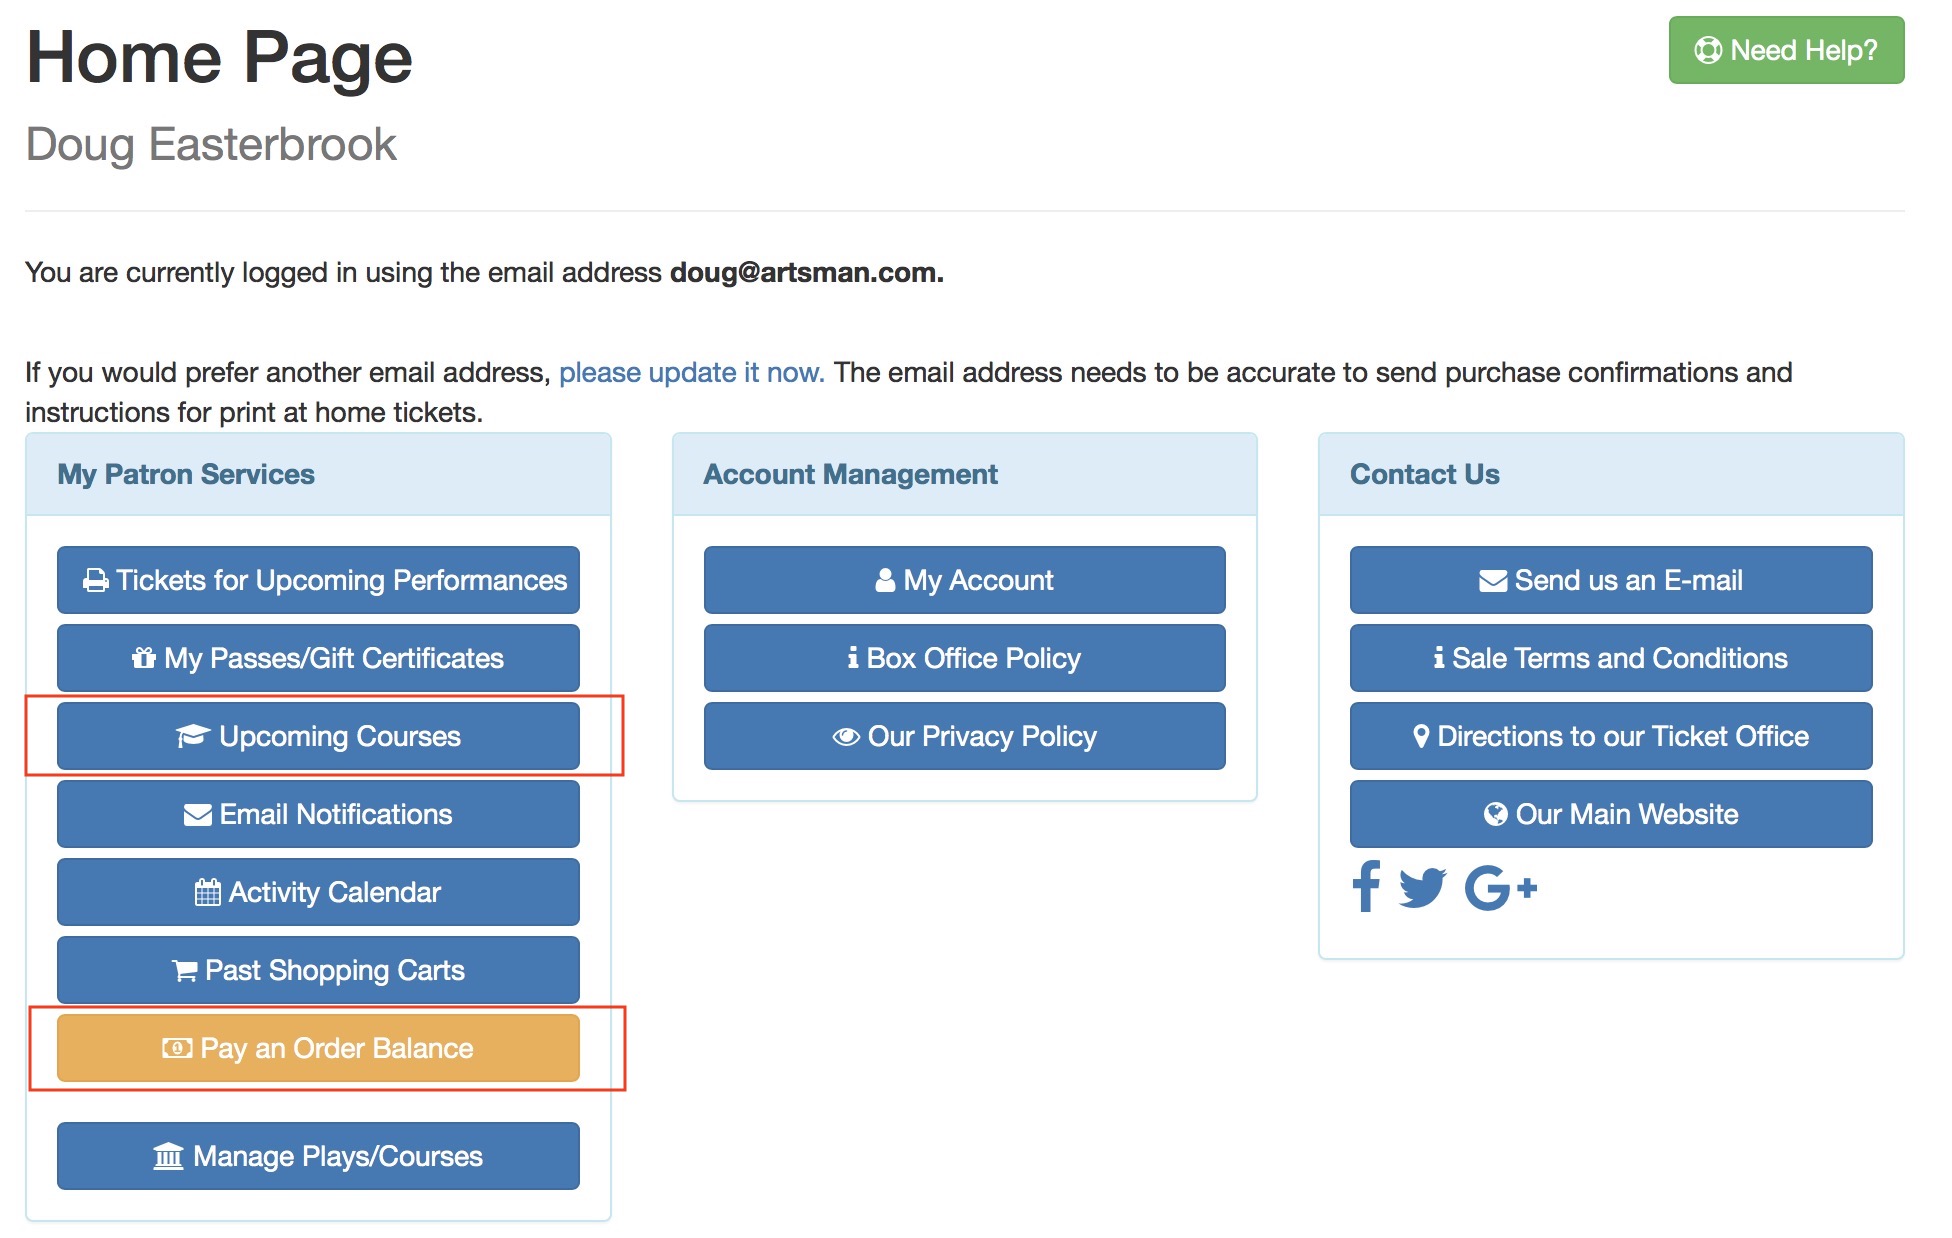
Manage Course or Pay Balance via Home Page
- Pay any balances on courses
- Indicate if they will be attending a class or not
Viewing Upcoming Courses
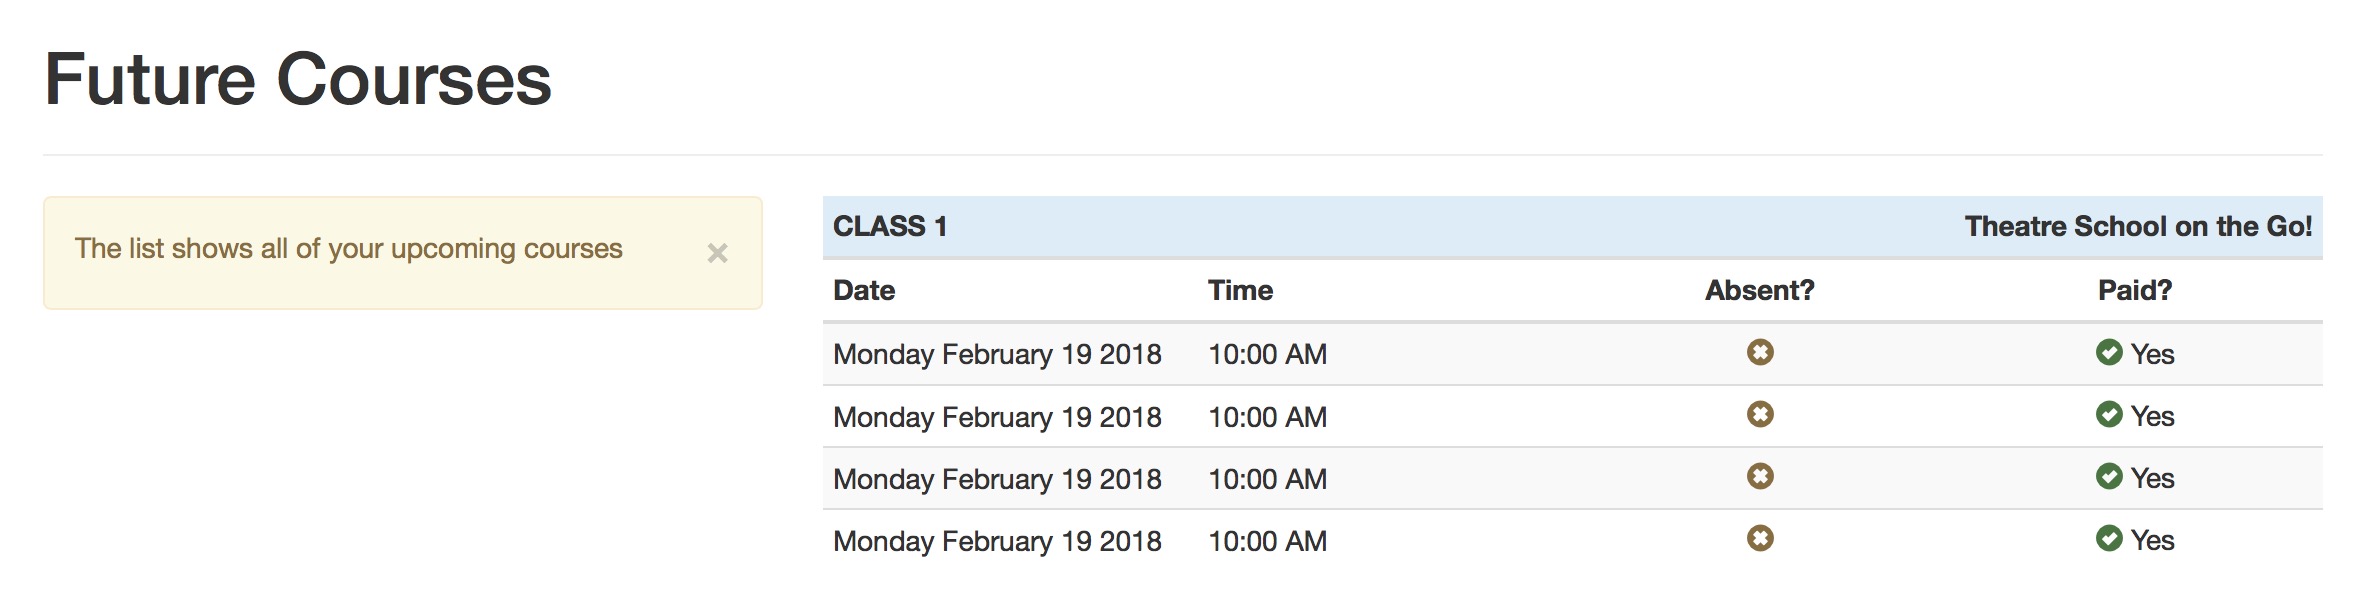
-
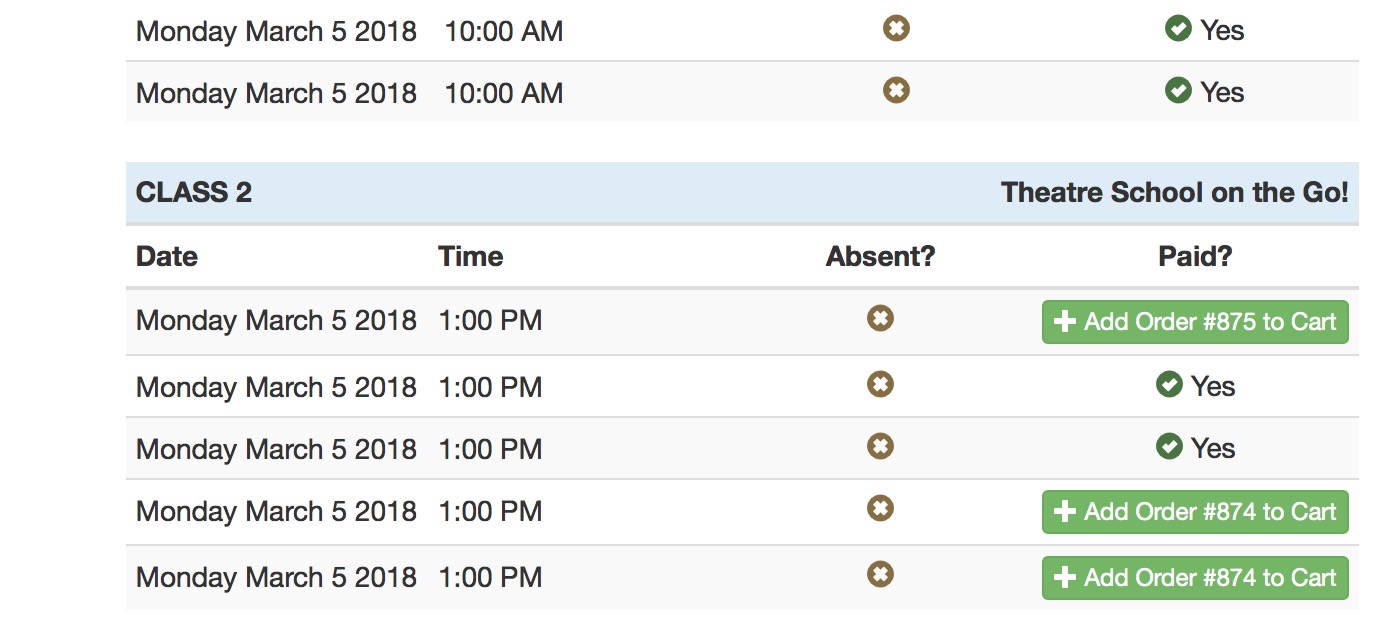
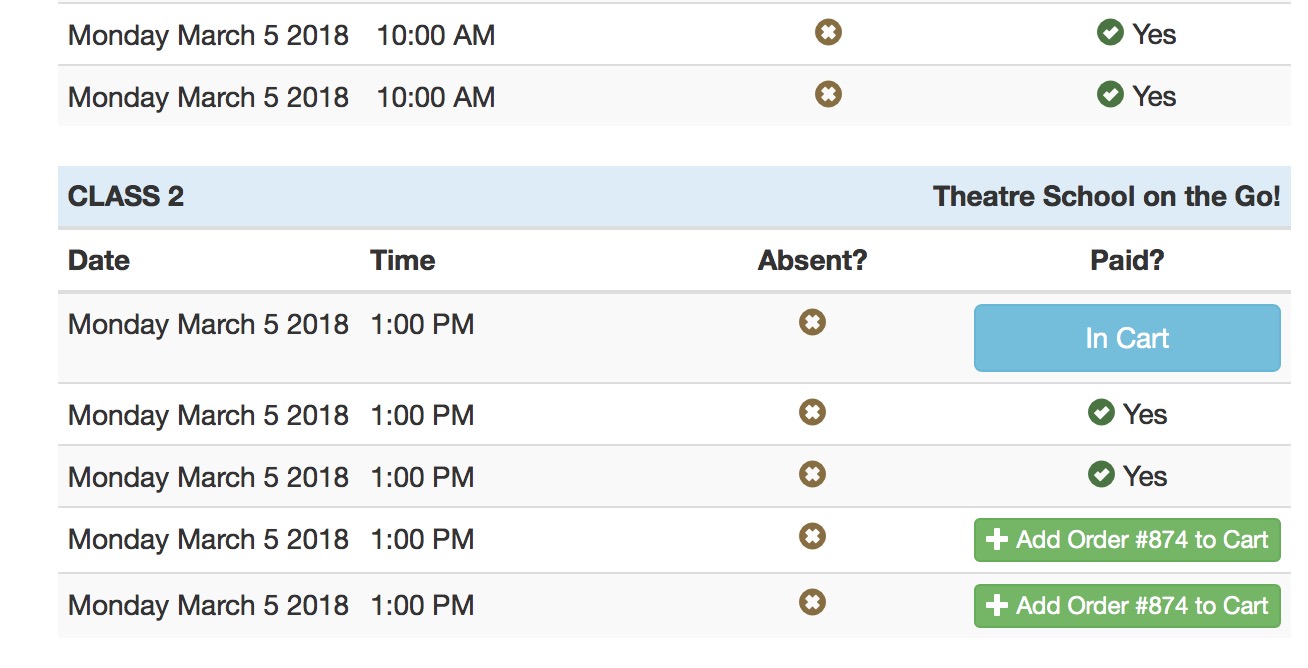
After clicking Upcoming Courses, the patron will see a list of courses/classes that they are enrolled in. In the example below, there is an outstanding balance on some registrations.
These are indicated with a button that says Add Order #xxx to Cart on the class that money is owed for.
- If the order is added to cart by the patron, the next page that is shown is the shopping cart containing the order (as shown below)
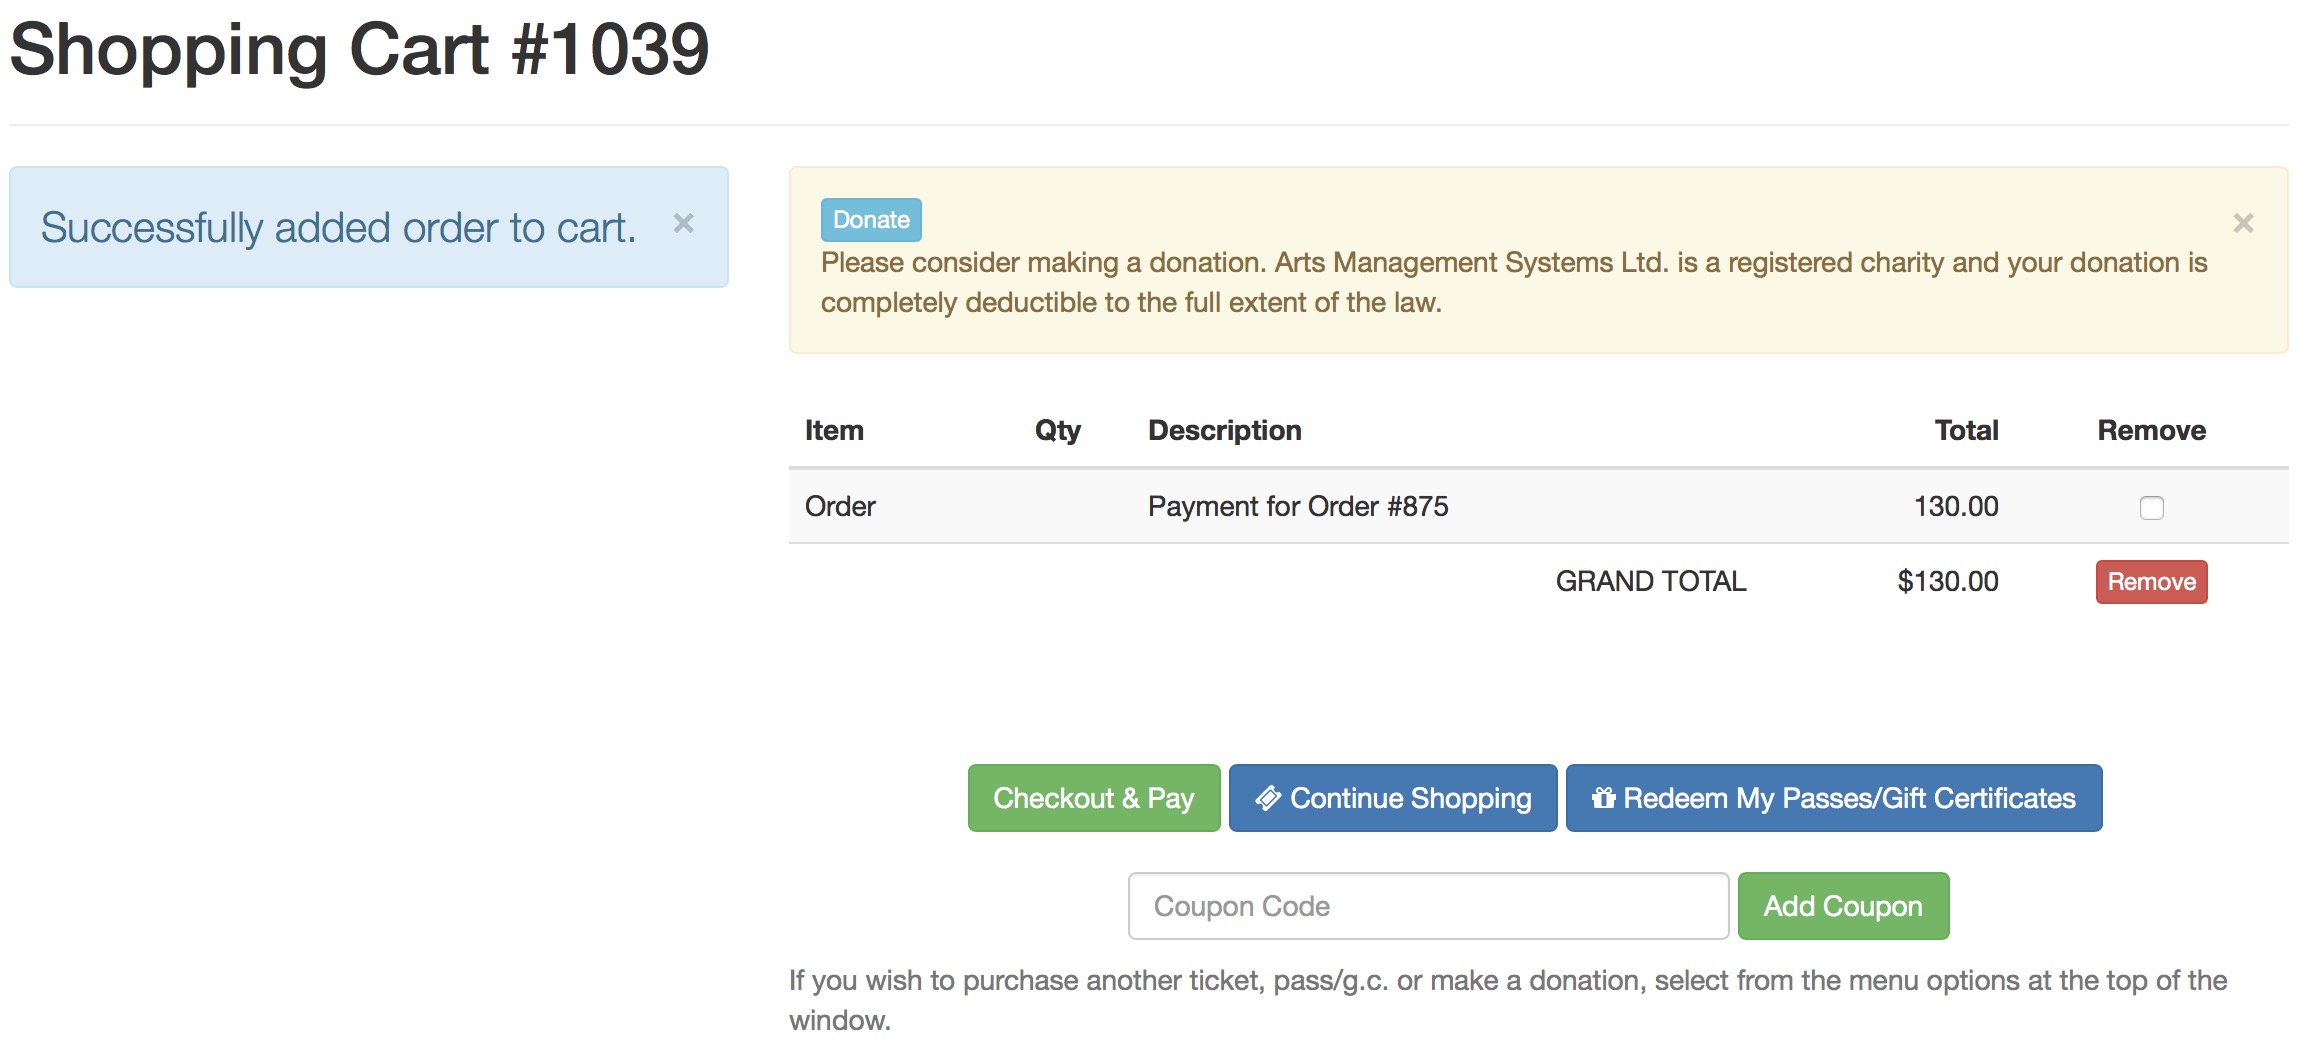
- Should the student end back up at the course list, if the button says In Cart, it means that the order has been added to the cart already and all the Student needs to do is checkout and pay.
Student Indicates reason for being absent
- From the Home page, they select Upcoming Courses which will provide a list of dates for the classes they are registered in.
-
In the column called Absent?, if they click the X inside the brown circle, they will see a list of absence reasons they can select from. This list contains only those from code tables that are patron usable.
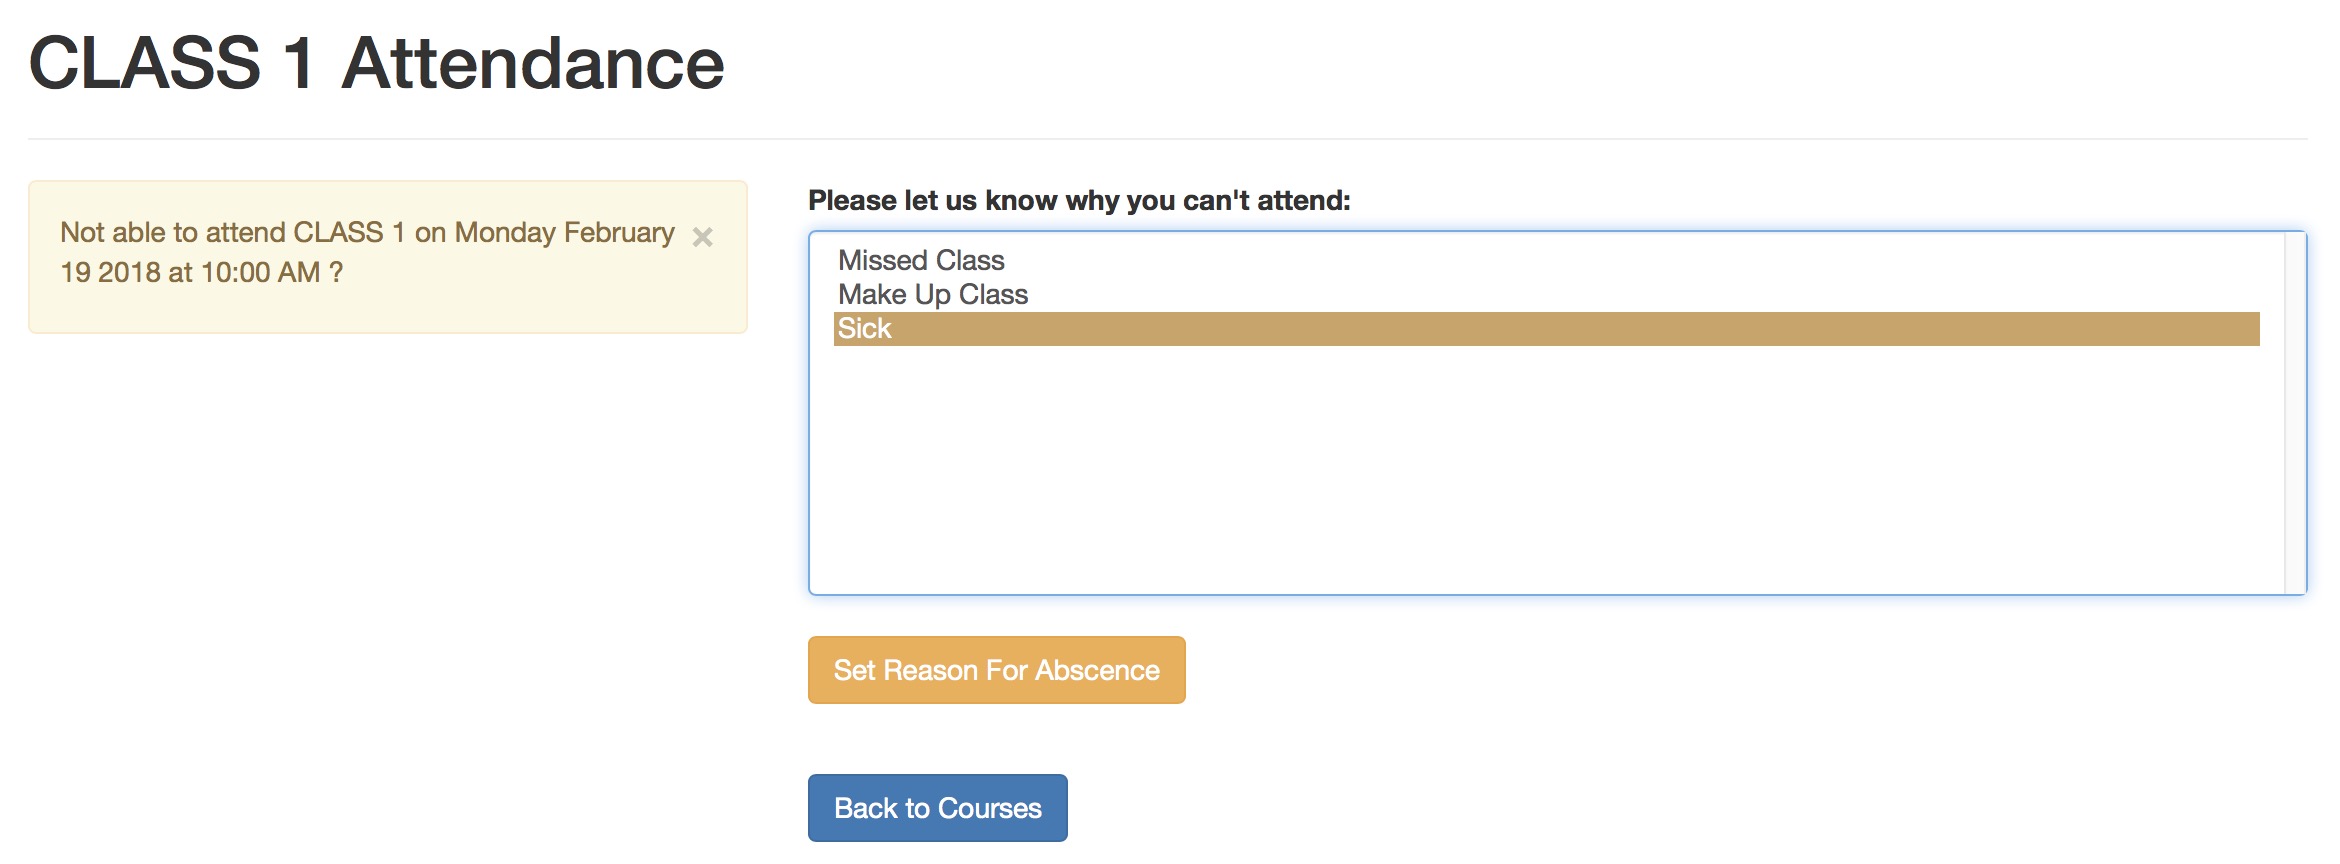
- After picking the absence reason, the student will see their current attendance history in the Absent? column. The student can clear or change any absence reason that is a button in that column. Any reason that is text is one that is set by the Instructor and is not patron changeable.

Pay order balances online (in general)
|
A payment for prior orders online follows the rules of applying a single payment for multiple orders |
|
The feature is enabled in company preferences-->Web Options-->Carts & Checkout under the checkout grouping of orders |
|
If you enable the feature, we suggest entering a useful comment in the order's external notes when you put the order on account. |
-
The outstanding balance list shows all the orders containing receivables that the patron will eventually pay for at some time. The patron can pick one and Add to Cart.
There are two conditions under which an order could appear on this window.
- If the student was registered by an instructor online and they put the order on account
- If the box office took a phone in or walk up order and put it on account -AND- indicated that the order balance could be paid online (refer to On Account payment on this page).
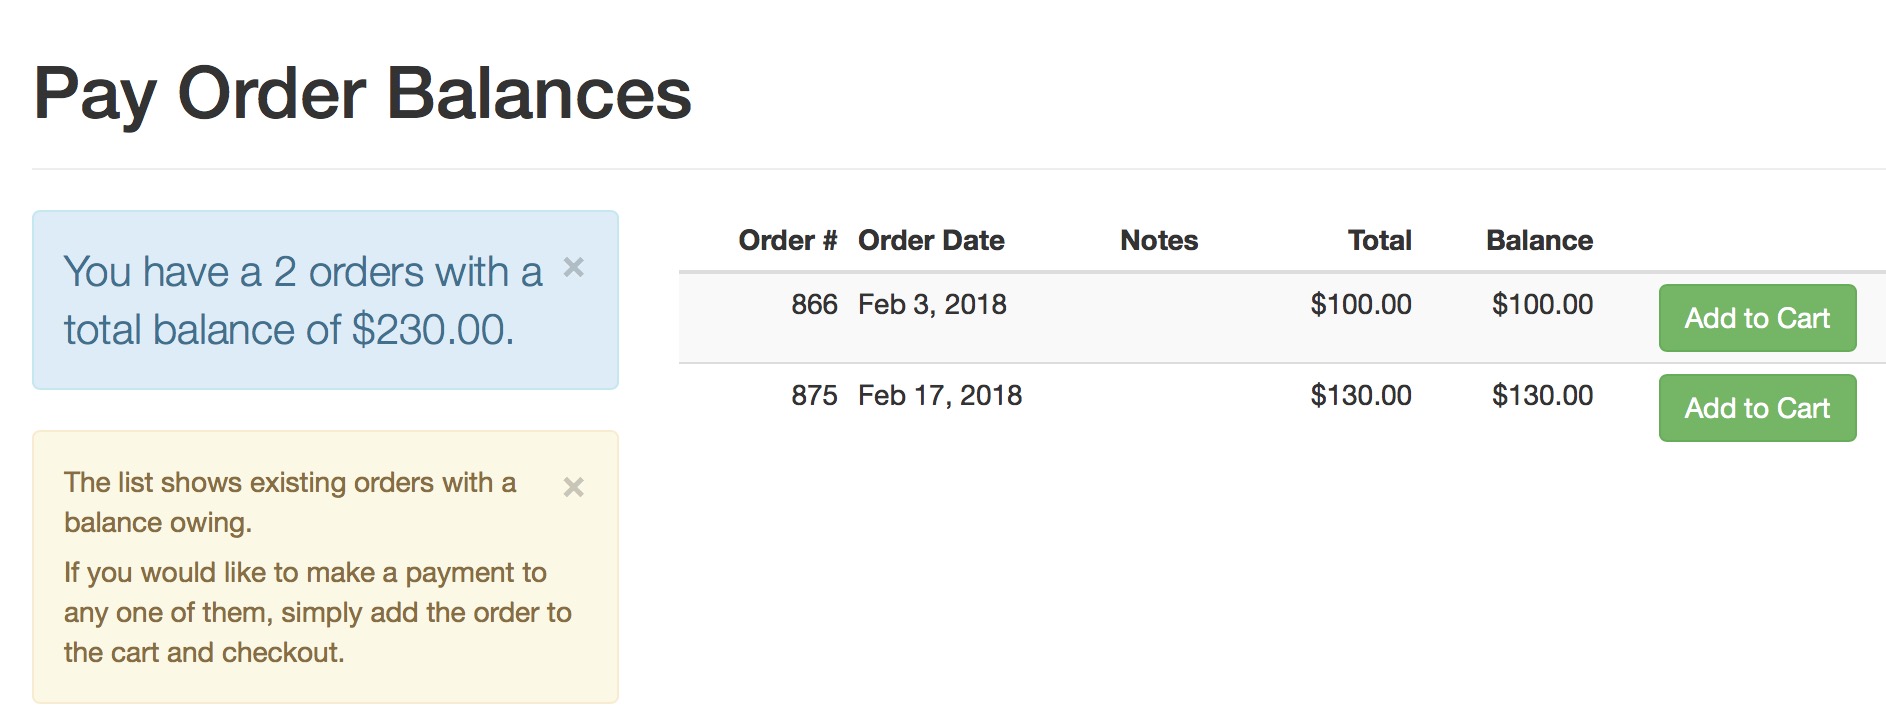
- When they do that, they will end up at the shopping cart, ready to continue shopping or to pay for the balance.