Payments Management

| |

| |

| |

|
The payment window is used to:
- record the payment method,
- enter a reason why the patron purchased the tickets,
- initiate invoicing,
- print tickets, and
- and record detailed order notes.
 |
New payment methods can be added in Code Tables |
Payment Window
|
This section describes the payment processes. Click if you would like to see the general features of the order window and selling other things.
|
The payment window has four tabs. These are:
| Order/Payment Details |
Allows entry of key data about the order such as:
|
| Create Post Dated |
This allows for several future payments to be added to the order so that it can be paid off over time. Typically these payments will be:
Click here for a complete description of the Create Post Dated tab. |
| Contractual Notes |
Contract information is used to:
|
| Prior Payments | Displays any payments that have previously made on this order. |
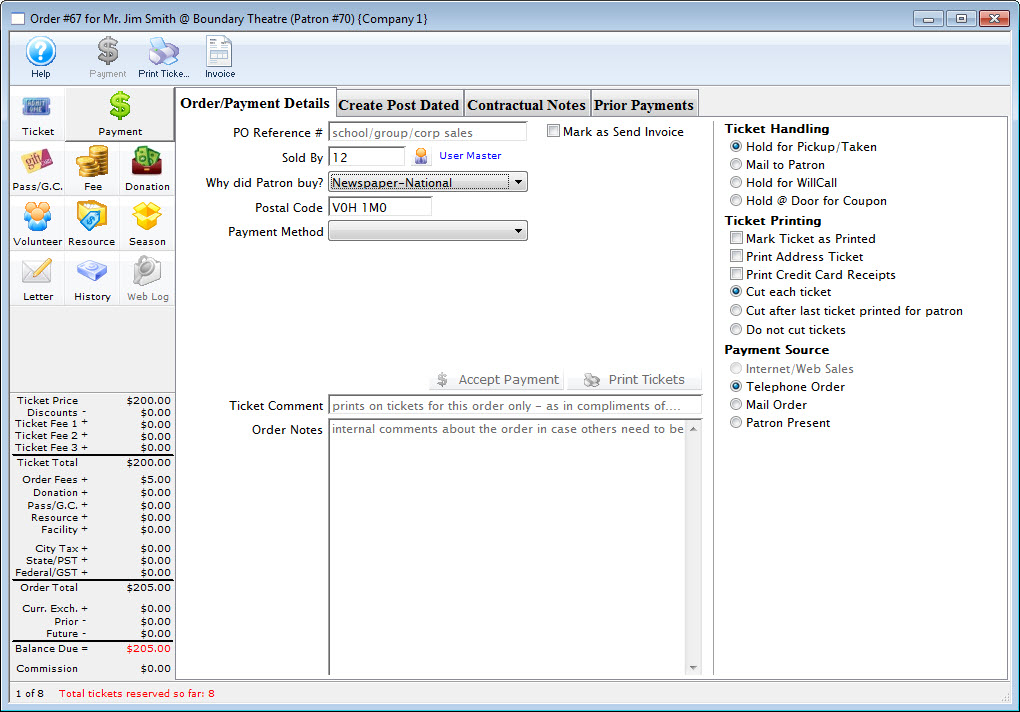
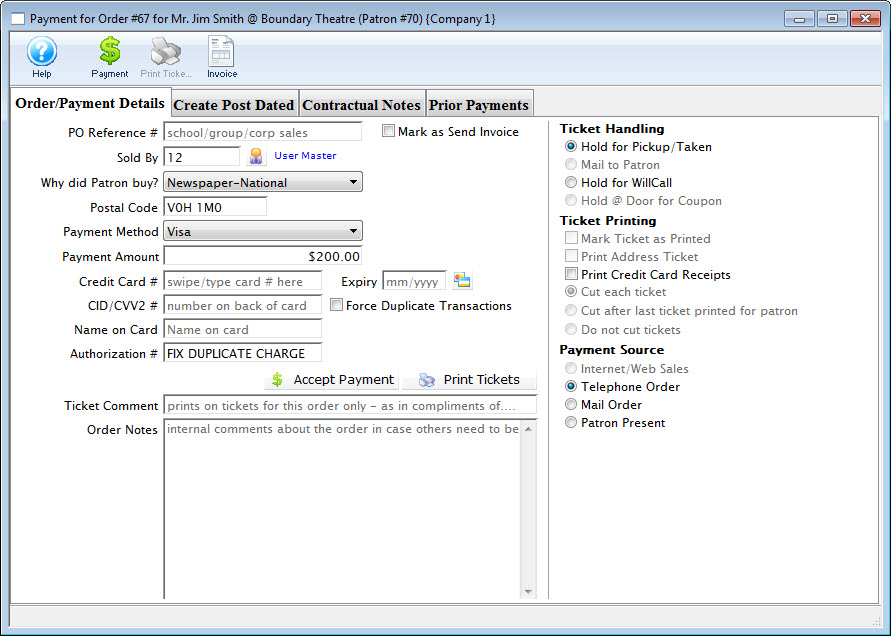
Order/Payment Details Tab
The payment window is used to record the payment method, enter a reason why the patron purchased the tickets, initiate invoicing, print tickets, and record detailed order notes. Each time tickets are sold, a donation is made or a membership purchase a unique Order Number is created. This number is displayed on the title bar of the Payment Window. For more information on:
- Creating a payment, click here.
- Accepting multiple payments, click here.
- Deleting a payment, click here.
Parts of the Order/Payment Detail Tab
| |
Accepts the entered payment. If the order is paid in full the order window will close without printing tickets in the order. |
 |
Accepts the entered payments. If the order is paid in full the tickets will be printed and the order window will close. |
| Invoice Button | Allows you to print an invoice to the screen for all items on the order and then print it or email it to the patron. |
| PO Reference # | Purchase order reference number. |
 |
If the order is paid in full an invoice will be sent. |
| Sold By | The user who was responsible for initiating the sale of the tickets
ie. a telemarketer. The Patron  icon can be used to select an employee code. icon can be used to select an employee code. |
| Why did Patron Buy? | Reason the patron bought the tickets. These values are setup in the Reasons to Buy Code Table. |
| Payment Method | Method of payment for the order. The values of the list are setup in the Payments Methods Code Table. |
| Payment Amount | The total the patron is currently paying. Partial Payments can be made as needed. |
| Ticket Handling | "Hold for Pickup" is when the patron will visit the Box Office prior to the performance to pickup their tickets.
"Mail to Patron" is when the patron request the tickets be mail. "Hold for Will Call" is when the patron will pickup there tickets at the door. "Hold @ Door for Coupon" is for Promotions that require coupons in order to be valid. |
| Ticket Printing | "Mark Ticket as Printed" displays a printed date for the ticket all though the ticket is never printed.
"Print Address Ticket" prints an additional ticket with the patrons address. The default address ticket can be selected under the Ticket Face tab in Company Preferences. "Print Credit Card Receipts" prints an additional ticket highlighting a summary of the purchase. The default summary ticket can be selected under the Ticket Face tab in Company Preferences. |
| Payment Source | |
| Internet/Web Sales is when the transaction is processed over the internet. A default fee amount can be added to this payment source. | |
| Telephone Order is when the transaction is taken over the internet. A default fee amount can be added to this payment source | |
| Mail Order is when the patron mails in the transaction request. A default fee amount can be added to this payment source. | |
| Patron Present is when the patron is in person to make the transaction. A default fee amount can be added to this payment source. | |
 |
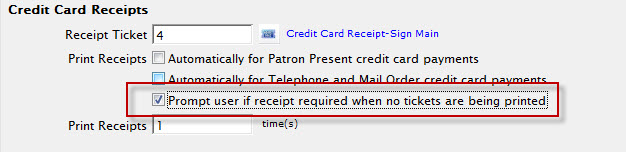
Accepts the entered payment. If the order is paid in full the order window will close without printing tickets in the order.
However, if the "Prompt user if receipt required when no tickets are being printed" option has been selected in the Ticket Faces tab of Company Preferences, You will be prompted to select a credit card/address ticket receipt. Click here for more information on the Print Ticket Options dialog. |

|
Accepts the entered payments. If the order is paid in full the tickets will be printed and the order window will close. |
| Ticket Comment | Can be used to print special information on the ticket ie. birthday wishes, complimentary tickets from. |
| Order Notes | Any specific notes about the order. |
| Purchase Summary Section | Accepts the post dated payment. The order window will close without printing tickets in the order. |
Print Ticket Options Dialog
If the "Prompt user if receipt required when no tickets are being printed" option has been selected in the Ticket Faces tab of Company Preferences, You will be prompted to select a credit card/address ticket receipt.

Parts of Print Ticket Options
| Ticket Header |
These options print additional tickets with extra information allong with the ticket that was selected:
|
| Ticket Items | These options print additional tickets for items contained within the
same orders along with the tickets that were selected:
|
| Ticket Printing | Enable to mark tickets as printed
without actually printing the tickets to the printer.
|
| Cutting Options | Ticket Cutting only works if your thermal printer supports this
feature. Use it to keep "Will Call" or "Subscription" tickets for a patron together:
|
To "Turn Off" this dialog:
- Select Setup >> Company Preferences >> Ticket Faces tab.
- Disable the Credit Card Receipts option - Prompt user if receipt required when no tickets are being printed.
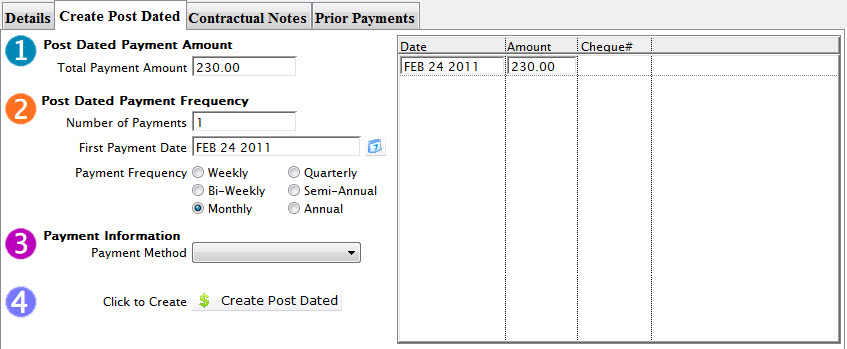
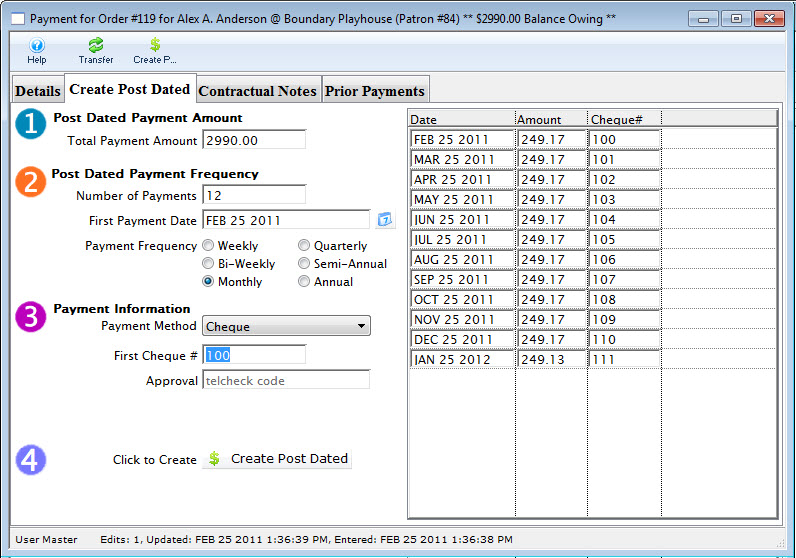
Create Post Dated Tab
Post Dated Payments are easily accepted and planned by Theatre Manager through the Post Dated Tab in the Payment view of the Order Window. The Payments can either be created at the time of sale or during a later payment. All calculations and post dated payments are automatic. However you may customize the payment plan to meet specific payment dates as required by the patron.
- For instuctions on creating Post Dated Payments, click here.
- To delete Post Dated Payements, click here.
- To run a Cash Flow Report of Post Dated paymants, click here.
| This function is availbale in the Order Window.
Transfers an order from one patron to another. For more information on transfering orders click here. |
|
|
This function is available in the Order Window. Accepts the post dated payment. The order window will close without printing tickets in the order. |
Step 1 |
Post Dated Payment Amount |
| Total Payment Amount | The total which the patron wishes to make post dated payments for. |
Step 2 |
Post Dated Payment Frequency |
| Number of Payments | Total number of payments to be made. |
| First Payment Date | Date which the first payment will be made. Enter a date or select from the calendar. |
| Payment Frequency | Periodic times payments will be made. Chose one of the following radio buttons:
Weekly, Bi-Weekly, Monthly. Quarterly, Semil-Annual, Annual |
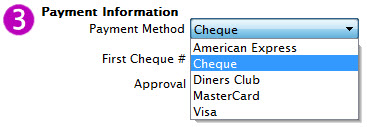
Step 3 |
Payment Informatuon |
| Payment Method | Choose from the drop down list the method that the payments are to be made. Only credit cards and cheques are accepted. |
Step 4 |
|
 |
Accepts the post dated payment. The order window will close without printing tickets in the order. |
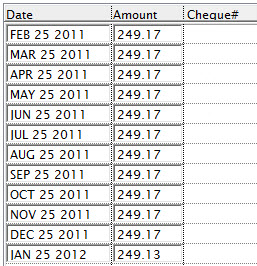
| Columns on the right | |
| Date | Date each payment will be received. |
| Amount | Value of the payment amount to be received on the given date. |
| Cheque# | The corrisponding cheque number for the payment as reference. |
Contractual Notes Tab
It is not applicable for most sales. It may be useful for educational or group sales where there is an initial deposit and a final payment due date. In addition, if a second patron is paying a portion of the ticket order (e.g. a granting agency for educational tickets), you can track who is to be co-invoiced.
For more information on entering contractual payments, click here
If a deposit date due (and amount) and final payment date due (and amount) are entered and the dates differ from the order date, they will be printed on the invoice. Exceptions to that are:
- The deposit due amount will not print if the patron has made payments that are in excess of the deposit amount. It make sense that the line should go away if the patron has at least paid at least the deposit
- The final payment amount will not print if the balance due is zero, meaning the order is fully paid.
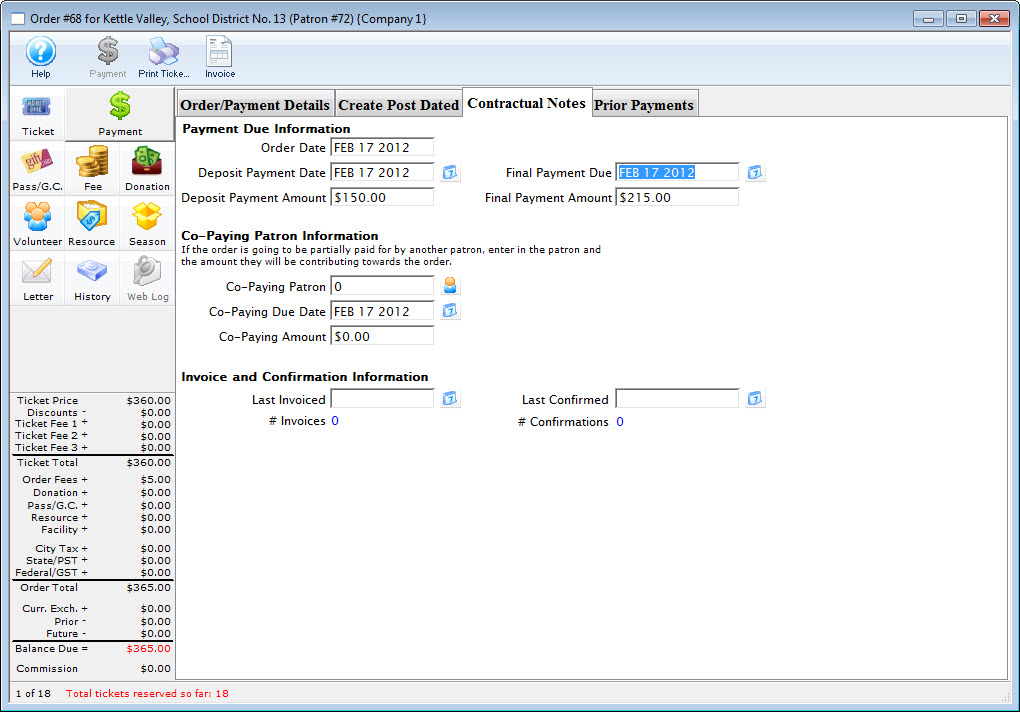
Payment Due Information |
|||
| Order Date | Date the order was placed | ||
| Deposit Payment Date | Date the deposit is due | ||
| Deposit Payment | Amount of the deposit | ||
| Final Payment Due date | Date the final payment is due
|
||
| Final Payment Amount | Amount of the final payment. This is directly based on the total, Deposit Payment and co-paying amount | ||
Co-Paying Patron Information |
|||
| Co-Paying Patron | The Patron who is sharing the cost of the order. Click the Patron icon to open the contact list and select a patron. |
||
| Co-Paying Due Date | The date which the co-payment amount is due | ||
| Co-Paying Amount | The amount which the co-payer is paying | ||
Invoice and Confirmation Information |
|||
| Last Invoiced | The date of the last invoice. | ||
| Last Confirmed | The date of the last confirmation | ||
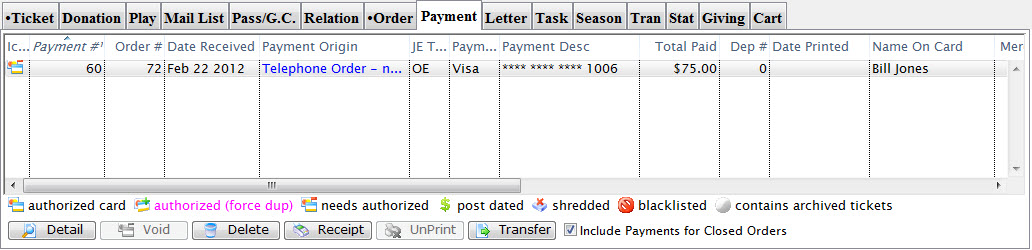
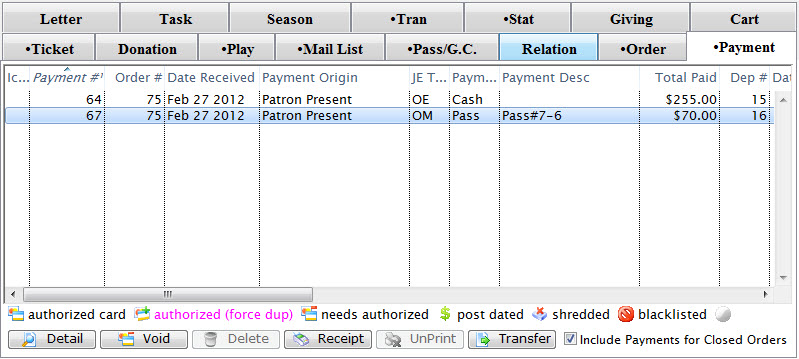
Prior Payments
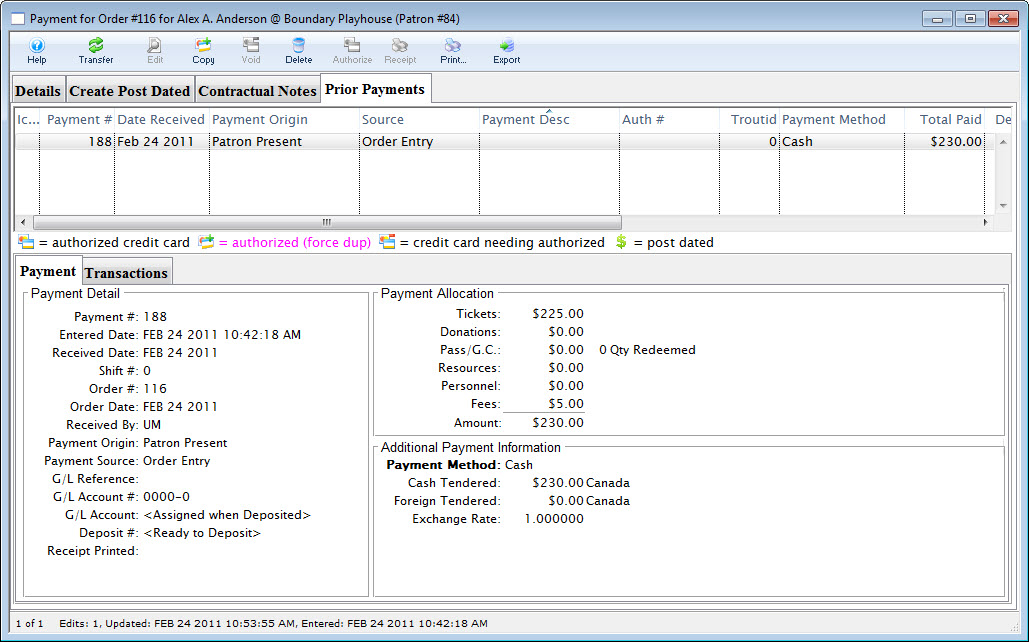
Parts of the Prior Payments Tab
| Payment # | Number The number given to the payment to tie it to the order. |
| Date Received | Date the payment was recieved. |
| Payment Origin | Where the payment came from. |
| Source | Represents the payment source. |
| Auth # | Credit card authorization number for credit card payments. |
| Payment Method | Method recieved for payment. |
| Total Paid | Value of the payment. |
| Dep # | Deposit number for the payment. |
| Outlet-Owner | Outlet responsible for collecting the payment. |
| Order # | The Order Number the payment is associated with. |
| Last Name | Last name of the patron associated with the payment. |
| First Name | First name of the patron associated with the payment. |
| Description | A Description of the payment. |

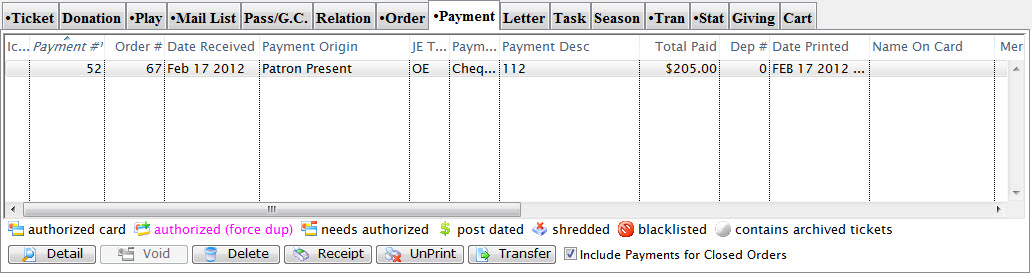
The Payment Tab displays payment details, the payment allocation and any additional payment information
![]()
Parts of the Transaction Tab
| Seq# | A unique number used to track the transaction |
| Trans Date | Date and time the transaction took place. |
| Journal No | A unique journal number for tracking the transaction line. |
| Code | The transaction code used to describe the type of transaction. |
| Transaction Desc | Description of the transaction. |
| Order # | The order number for the transaction. This number can be used to track the transaction by order. |
| Play Code | Play code is only displayed if the transaction effects and event. |
| Performance Code | Performance code is only displayed if the transaction effects a performance. |
| Type | The type of transaction. |
| Description of Entry |
Detail on the the purpose of the transaction. |
 |
Can be used to manually enter a transaction. |
 |
Opens the detail window of the transaction. |
 |
Deletes the selected transaction. |
| Used to search for specific transactions. |
Creating a Payment
- Selecting the Payment
 button in the Order window.
The order window can be accessed through the:
- Orders Tab or
- by Purchasing Tickets.
 Click for a detailed description of the Order Window and it's functions.
-
Verify the overall value of the order.
There is a summary of the value of items contained in the order to the lower left of the order window (example to the right). If you wish, you can add, change or remove items from the order by:
- Clicking on the Fees button.
- Passes, Gift Certificates and Memberships items can be changed by clicking on the Memberships button.
- Donations can be added by clicking on the Donation button.
 Select the Reason The Patron Bought
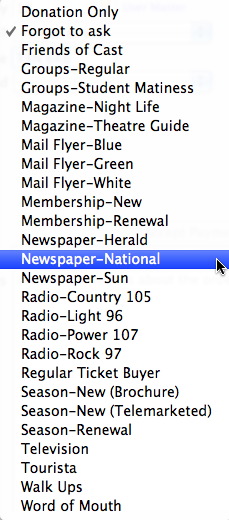
"Why did the Patron buy?" is used to record how the patron heard about the performances and why they are purchasing tickets.
This field is useful for analyzing customer purchase behavior. Refer to
- Mandatory Data to make this field mandatory or optional.
- The Reason to Buy section of the Code Tables for defining the reasons and setting default values.
Type the first letter of an item in the list, or scroll to select it. For example, if you type the letter N, the value in the field changes to "Newspapers". Entering a letter will make the first matching value from the list appear. If more than one value matches your entry, you can type enough letters to find the required value.
-
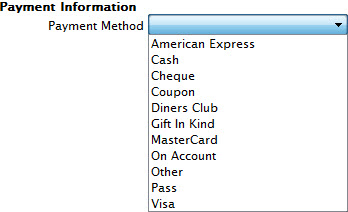
Select the payment or refund method.
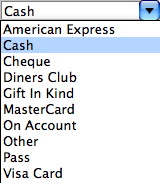
Ticket orders may be fully paid, partially paid, or not paid at all. Click in the Payment Method field. A list payment methods opens. Each payment option causes applicable data entry fields to be displayed. 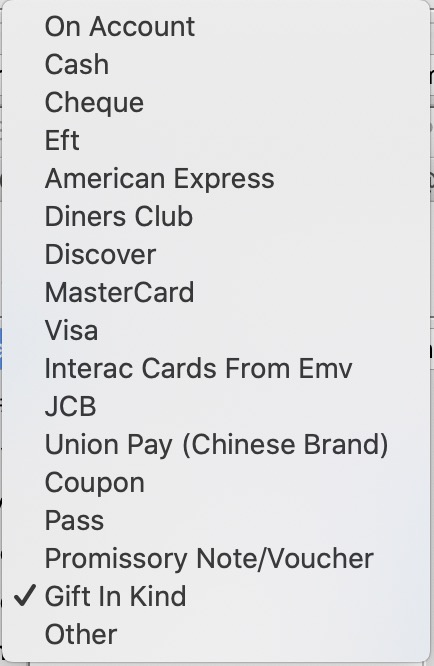
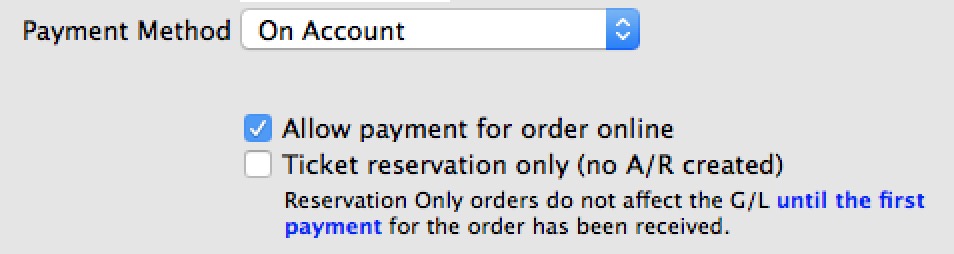
Refer to the Payment Method Variation help topic to see how each payment method affects the central part of the payment window. Payment Types can be changed in the Payment Code Tables. On Account means no payment received at this time. You will need to pay for the order later. - Enter any specific notes about this order
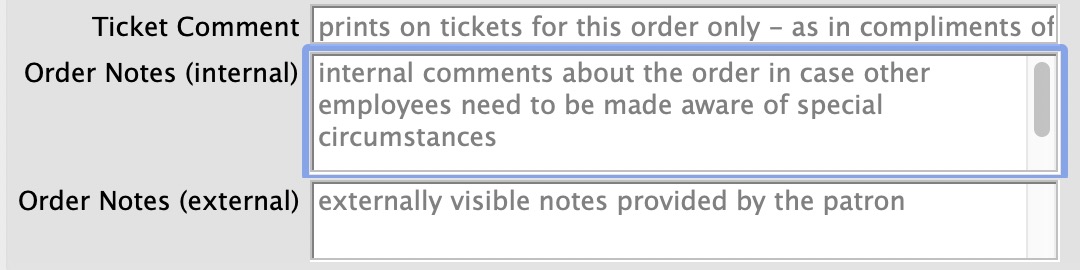
There are 3 comments that you can enter. These are:
- Ticket Comment which is intended to be printed on hard ticket stock. It might be used for things like 'birthday party for ...' if the patron is celebrating something special or 'tickets compliments of
' if the person buying many tickets is intending on giving them away to others and would like a little recognition - Order Notes (internal) which are for anything you want to note about the order for future reference
- Order Notes (external) which can be printed on reports and displayed the web and are purely for customer reference. Customers who enter notes when buying online cause this to be filled in as well.
- Ticket Comment which is intended to be printed on hard ticket stock. It might be used for things like 'birthday party for ...' if the patron is celebrating something special or 'tickets compliments of
- Select Send Invoice, if an invoice is requested to be sent.
- Click Print Tickets button to print tickets and receipts or click the Accept
Payment button to accept the payment without printing tickets.
Payment Method Variations
refer to the following sub windows to see how things changed for some key payment methods
- Cash
- Check or Cheque if in Canada
- Credit Cards
- If typed by hand or using a USB swipe
- If entered using an EMV pin pad. Only Moneris is supported at this time
- Coupons that might be applied to create a discount (like a 50% off coupon)
- Electronic Funds Transfer which helps setup up a special file to send to banks to cause direct deposit.
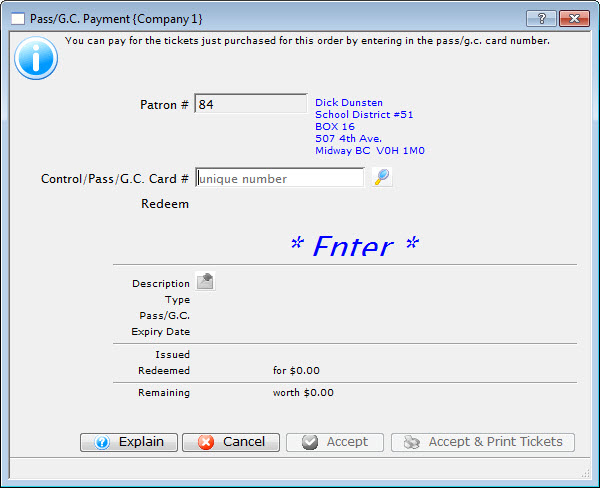
- Passes, Gift Certificates, or Membership Redemptions. This payment method is used to redeem Passes and Gift Certificates that have been sold to other patrons in the past and have been presented for redemption at the box office (or online).
- Gift In Kind which means that the patron is paying for their order using an item like a desk, advertising, sheep, donuts, lunch credits, etc - anything that the bank will not process
- On account which means no payment method is being taken now - it will be applied later
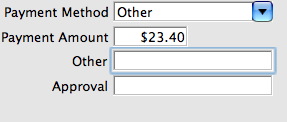
- Other which is representative of
- any of the other 'custom' payment methods you may have created in your payment method code table.
- Promissory Note is used to mark an order with a payment flag indicating that you have received a copy of a voucher promising payment from a customer and may have to refer to that in a future billing. Could be used for concierge orders from hotels
- The word 'other' might be replaced by your choice of words like Purchase Order, Stock Gift, etc

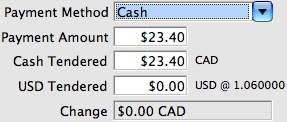
Payment Method Cash
| Payment Method | Description and instructions on use |
| Cash |
|
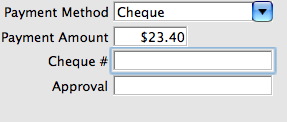
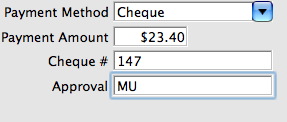
Payment Method Check/Cheque
| Payment Method | Description and instructions on use |
| Cheque |
|
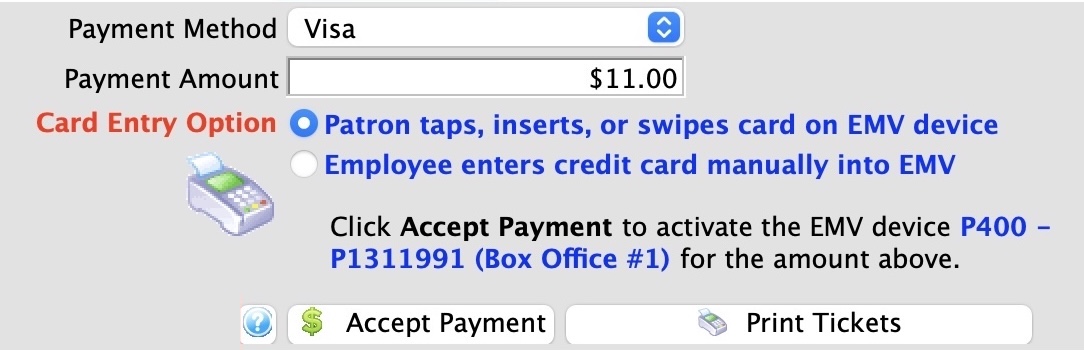
Payment Method Credit Card (EMV Pin Pad)
|
EMV Pin Pads are only valid for Moneris at this time. |
|
You can verify the correct communication steps are occurring with the pin pad device by looking at the web listener log for EMV devices |
|
If you expect to do a lot of manual card entries into the pin pad machine from phone sales, then please make sure your Authorization Timeout is 90 seconds - or at least sufficiently long enough to handle the process of manually putting the card number into the pinpad and getting an authorization. |
|
Moneris does not allow voiding payments taken via a pin pad. Instead, you must create a REFUND payment |
| Payment Method | Description and instructions on use |
| Credit Card (EMV Pin Pad) |
|
|
You many see a button on the lower left that says Type Card if you have been given permission to bypass use of the EMV device for manual card entry in employee security setup
This feature allows you to type the card, expiry, cvv2 into Theatre Manager and select a billing address. Payments taken this way allow future linked refunds, yet increase your PCI audit scope to Schedule 'C' or 'D' |
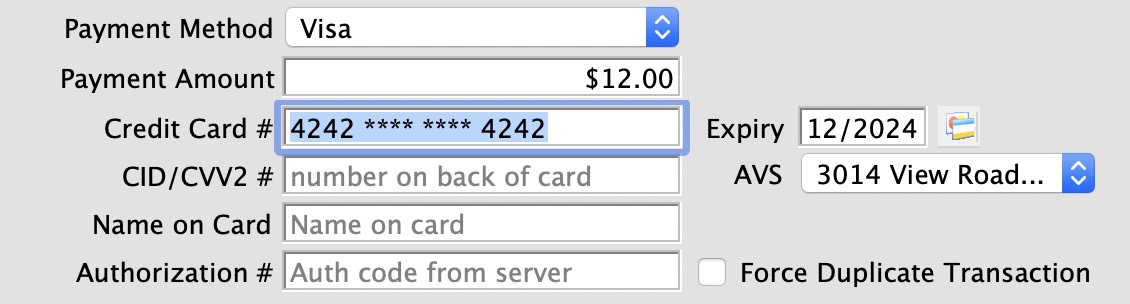
Payment Method Credit Card (USB SWIPE or Manual)
| Payment Method | Description and instructions on use | ||
| Credit Card (manually entered or USB Swipe) |
|

Payment Method EFT (Electronic Funds Transfer)
|
Using EFT for direct deposit on the payment window is described in detail.
You must have set up a merchant account for your EFT details along with creating the payment in the code tables. |
Payment Method Credit Card (Linked Refund)
There are two types of credit refunds:
- Linked Refunds: preferred by credit card providers to avert fraud as it only refunds to the card used on the original order
- Independent Refunds: return money to any card you wish. You may need permission from the credit card provider to use this type
Linked Refunds - Always attempt these First
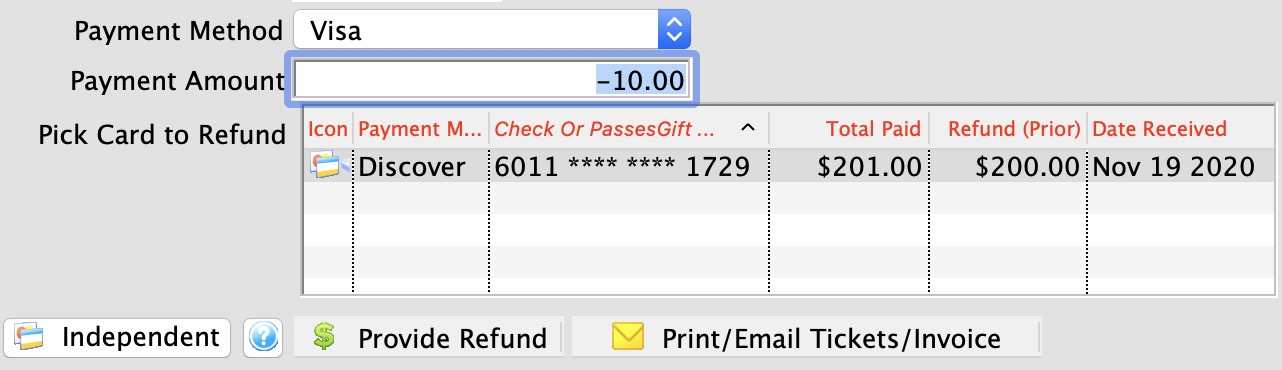
The system assumes that all credit card refunds are linked. The process of doing a refund occurs when the payment amount for a credit card is negative. Theatre Manager:
- displays the list of prior cards showing original authorized amount and refunded amount so far
- allows you to select a card for the refund. The amount you refund should be no more than the original authorization less any prior refunds. For example, if the original authorization is $100 and there are cumulative refunds of $75, then the maximum refund should be $25 for that card
- allows you to pick another card or another authorization to refund if there is more than one card option
Independent Refunds - Attempt Last
What if you need to refund to a completely different card from one in the list? If your merchant provider setup allows independent refunds, then the Independent Refund Button appears.
Click the button, the screen will change, and you will be able to refund to any card that you enter, or if using EMV device, put into the system.
|
Only credit cards authorized within the TIME limit set in your merchant setup will show up in the list.
The time limit should match that given by your credit card provider (typically between 120 and 400 days, depending on provider). Only extend the limit to see older cards after contacting your merchant provider. |
|
If you are working in an outlet situation, you cannot do linked refund to a credit acrd taken at another outlet. You can only refund to credit cards your outlet has taken |
|
If the Refund Payment is disabled, check the error message at the bottom of the window. Likely the card has not been deposited yet. That means you must either:
|
|
If you get a weird message from your merchant provider or still cannot refund after contacting them to adjust the limit, you can:
|
Payment Method On Account
| Payment Method | Description and instructions on use | ||
| On Account |
|
Payment Method Other
| Payment Method | Description and instructions on use |
| Other |
|
Payment Method Pass/Gift Certificate/Membership
|
Passes, Gift Certificates and membership payments are described in more detail in the section the describes all aspects of selling and redeeming them. |
Payment Method Promissory Note / Voucher
A Promissory Note/Voucher is a payment method used to record a voucher or pass purchased elsewhere, another outlet, another Vendor or sold not using Theatre Manager's Membership/Pass system.
To add a Promissory Note/Voucher payment you would perform the following steps:
- Selecting the Payment button in the Order window.
The order window can be accessed through the Orders Tab or when Purchasing tickets. Click here for a detailed description of this window and it's functions.
- Select Promissory Note/Voucher from the Payment Method drop down list.
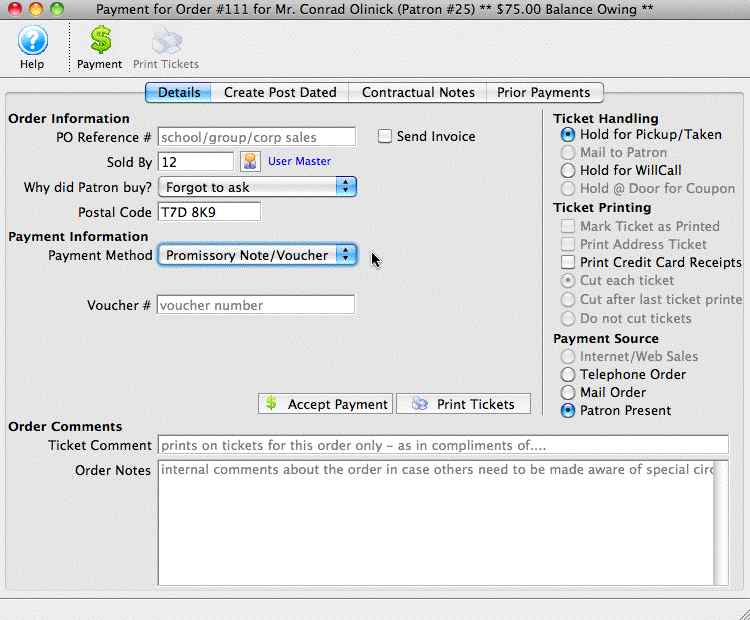
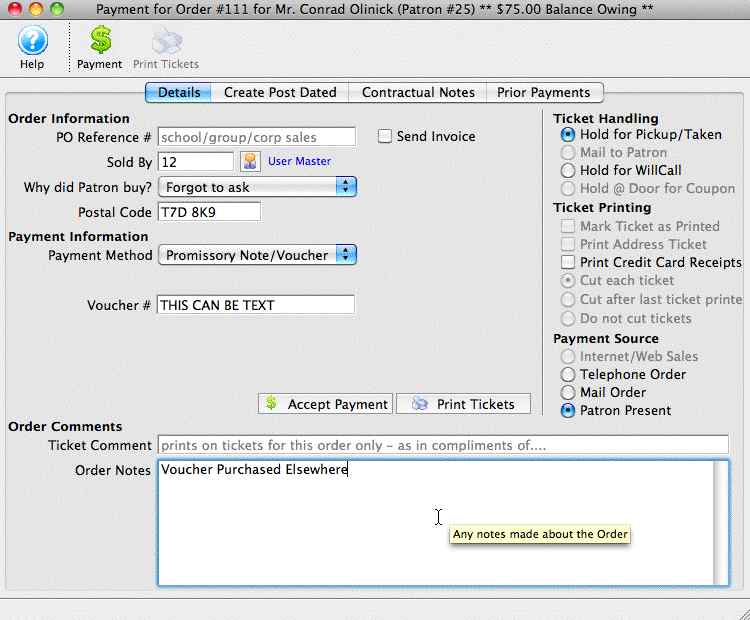
- Fill in the Voucher Number or reference.
This can be a number or text or a combination up to 16 Characters including spaces.
- Fill in an order note to reference the origin of the Promissory Note/ Voucher.
This note is referenced on reports generated based on orders.
- Click the Accept Payment button to complete the payment.
|
This does not pay for the order, you will be prompted for another payment. Respond No. The order balance will be on account as a receivable. |
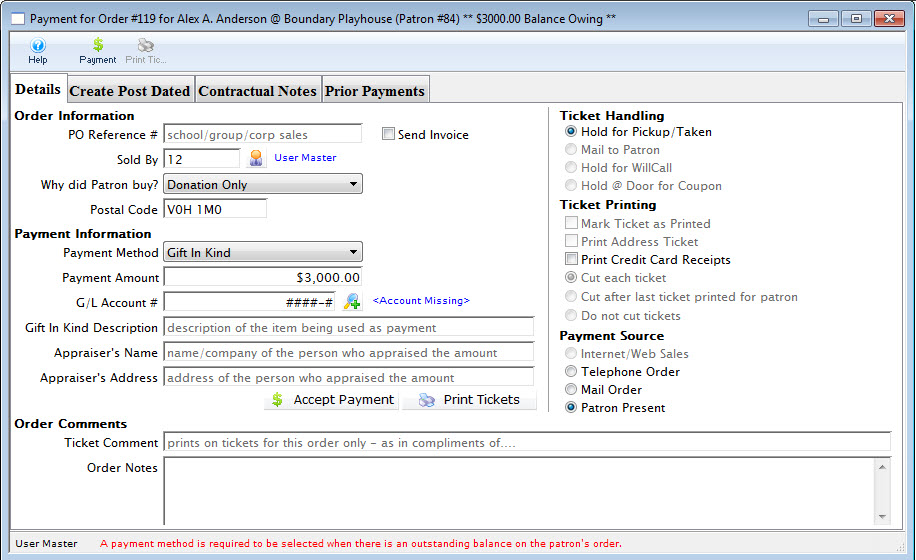
Payment Method Gift In Kind
|
Gift In Kind payments have some variations that are described in more detail.
It is especially important to fill all fields the Gift in Kind payment is for a donation since the data prints on tax receipts |
|
A gift in kind payment is used when you receive a material item ( i.e. non cash/card/check payments) like a donated desk, advertising, etc that needs to be allocated to a specific GL account. In all cases, you will need to provide a description, appraiser and address. |
|
A gift in kind payment is a specialty payment method. It ALWAYS exists in the database (like cash or check). if you don't see it in your payment list, please enable it in code tables. It's short code will be ~GIFT. |
| Payment Method | Description and instructions on use |
| Gift In Kind |
|
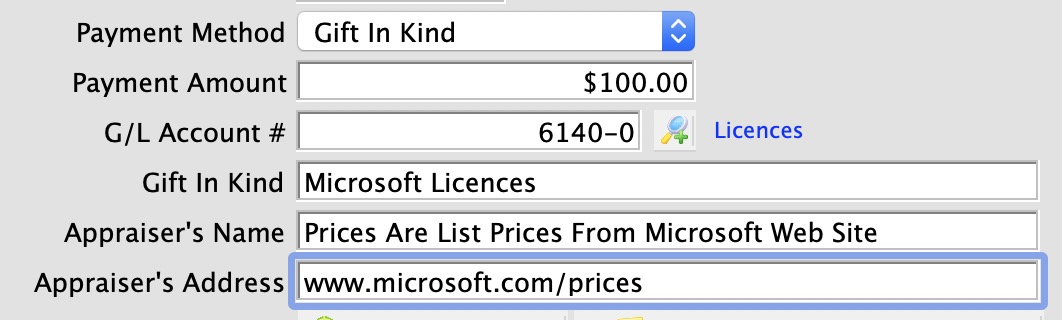
Gift In Kind Payment
|
A gift in kind payment is used when you receive a material item ( i.e. non cash/card/check payments) like a donated desk, advertising, etc that needs to be allocated to a specific GL account. In all cases, you will need to provide a description, appraiser and address.
If a Gift in Kind payment is used to pay for a donation, it is important to fill out the description and appraiser because they will appear on the tax receipts. Refer to your tax accountant/government rules as to appraiser requirements. Some places allow self appraisal and others only allow that to a certain dollar amount. In some cases cash receipt or internet page showing current price is valid. |
To add a Gift In Kind payment, you perform the following steps:
- Selecting the Payment button in the Order window.
The Order window can be accessed through the Orders Tab or when Purchasing tickets. Click here for a detailed description of this window and it's functions.
- Select Gift in Kind from the Payment Method pull down menu.
- Fill in the Gift in Kind field with a brief description of what the gift is.
- Select the G/L account you wish to charge the item to.
A G/L number can be typed directly into the field or the Account Lookup
 button to select the account from the list of GL accounts. Double click the account or click the Select
  button to accept the account.
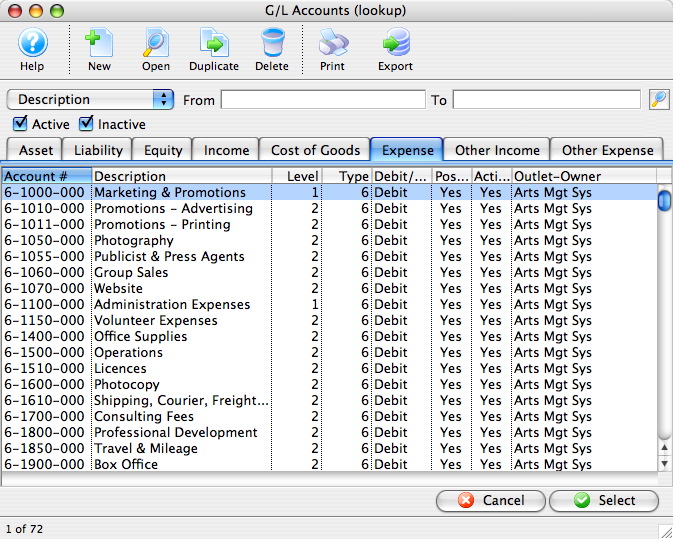
- Fill in the appraiser's name.
This may be required for audit purposes or for printing on tax receipts if the payment is for a donation.
- Click the Accept Payment
 button to complete the payment.
| For Quick Reference Information on Gifts In Kind, You can download a Screencast (online video demonstrations of the functions with narration). |
Flash ScreenCast |
MP4 ScreenCast |


Payment Method Coupon
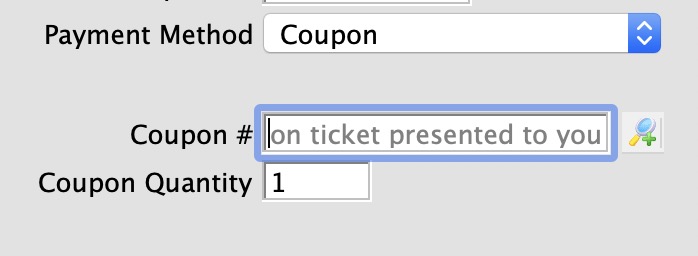
|
Coupon codes are described in detail in coupon setup.
Please refer that section to see how payments are applied. |
Accepting Multiple Payments
|
Multiple payments can generally be applied in any order that you want. There are a couple of exceptions. Anything that affects the actual price of the ticket must be applied first. For example, use these payment types before accepting any others:
|
- Open the Payment window.
Click here to learn how to access the payment window.
Click here for a detailed description of this window and it's functions.
- Select the payment method
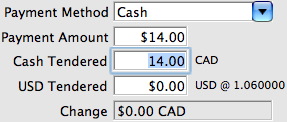
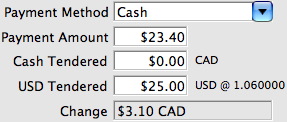
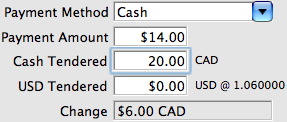
- Enter the amount of this payment method the patron would like to pay into the Payment Amount field.
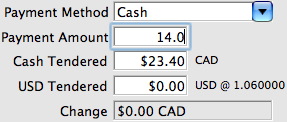
- Enter the amount of payment received into the Cash Tendered field.
Pressing the tab key on the keyboard will display the change owed to the patrons for the amount tendered. A patron may choose to pay with multiple payment methods and still require change for one or more of those methods.
- Fill in any other necessary information and click the Accept Payment button.
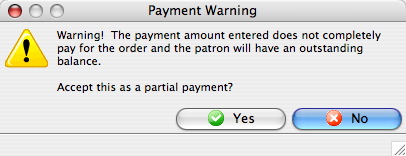
A confirmation window opens and asks you to confirm the partial payment.
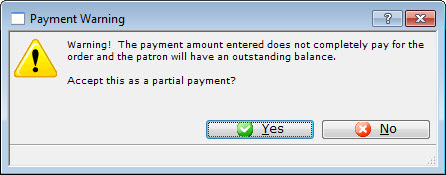
- Click the Yes
 button to accept the partial payment.
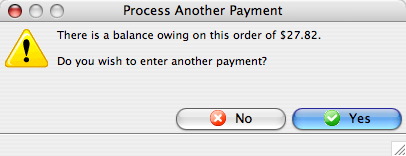
The Process Another Payment window opens.
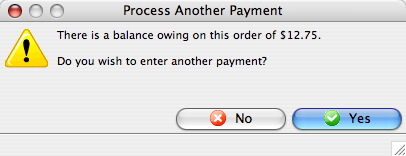
- Click the Yes
 button.
- Select the second payment type.
The remaining balance may be paid for in one or more payments. Repeat steps 2 through 6 above with the remaining payment methods as needed. If the payment is put On Account refer to Later Payments to learn how to add future payment to the order.
Adding Payments later - after the order is complete
Later Payments are used to perform a number of important functions such as:
- Enter payments after the initial sale has been completed
- Enter additional payments for an order
- Enter reversing payments
- Enter post-dated payments
- Add/Edit order and exchange fees
- Open the Patron Order Window by clicking on the Order Tab from the Patron Window.
Click Here for a detailed description of this window and it's functions.
- Select the order you want to add a payment to.

- Click the Payment button
- Change any data as needed.

Click here for a detailed description of this window and it's functions.
Refer to Creating Payments for more information.
- Click the Accept Payment button.
The payment is accepted and added to the order.

Force Duplicate Payment
Having the Force Duplicate option de-activated by default ensures that patrons are not double charged because of errors (either human error, an error between Theatre Manager and the credit card application, or an error between the credit card application and the merchant provider).
If the transaction is legitimate, check the box to have the patron’s credit card charged again for the same amount.
Creating Offsetting Payments to Clear A/R Balance
Theatre Manager uses a process called "Invoice Matching" in its accounting. This means each invoice (order) needs to balance to itself.
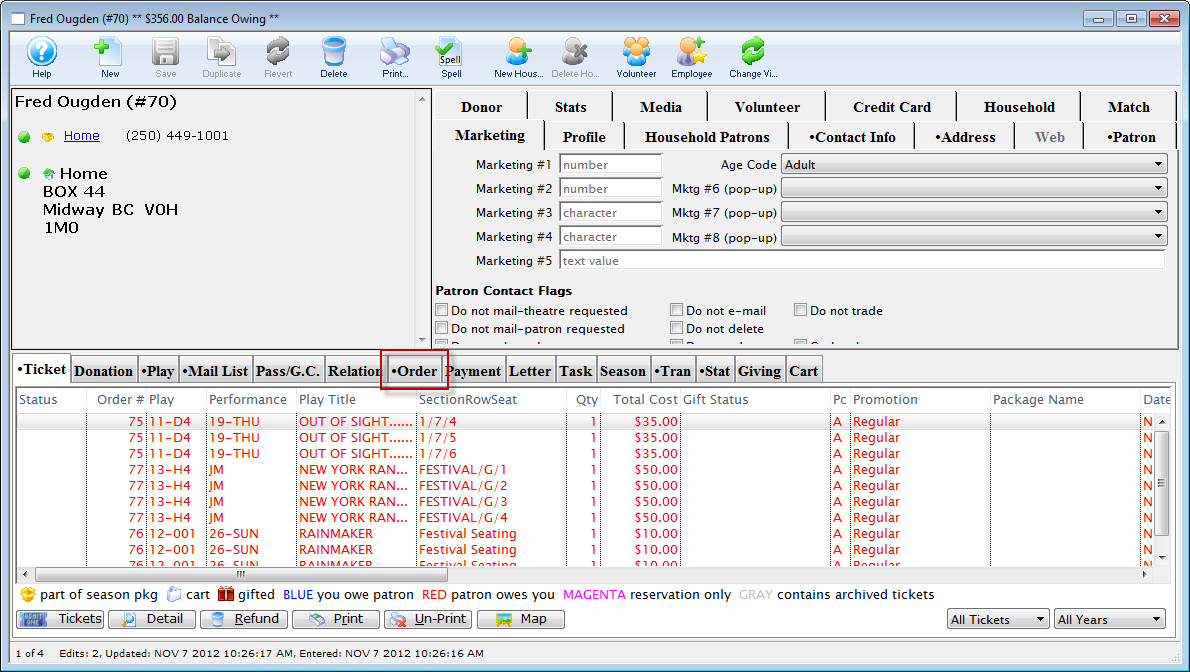
If you refunded tickets on one order (creating a credit balance to the patron), but purchased tickets in another order (creating a debit balance from the patron), then the orders are unbalanced. The patron account may appear good, but the orders within the patron record are unbalanced. This is why it is important to keep edits to an order within the order itself, and not create a separate order.
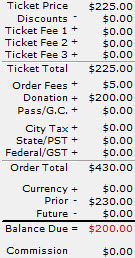
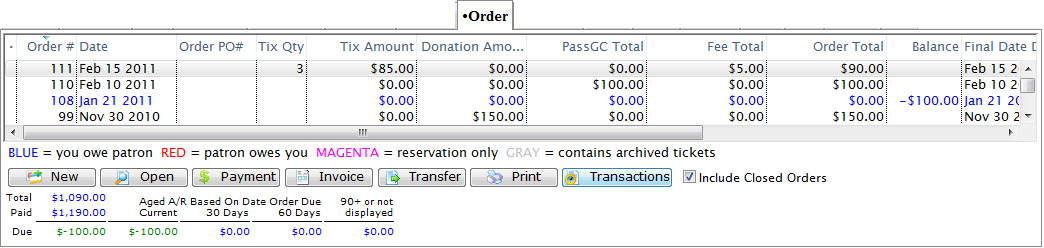
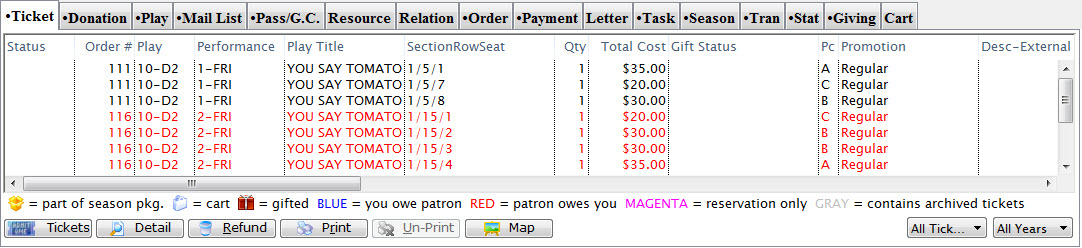
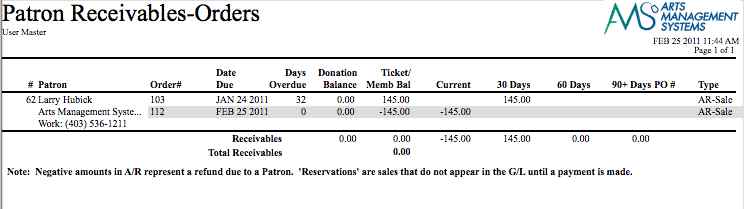
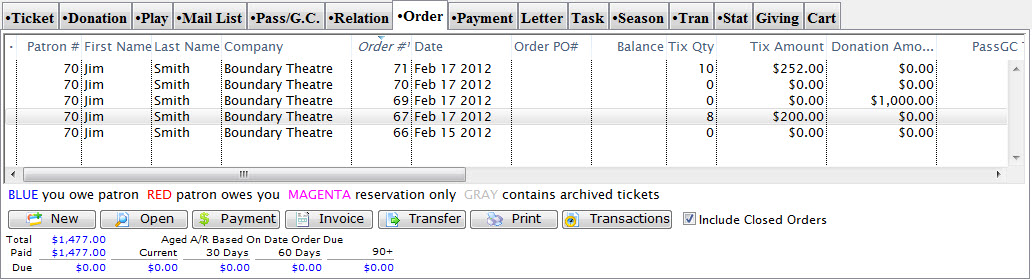
In this example, the patron has two orders. One with a balance due to the patron of $85, and one with a balance owing from the patron for $85. Note the Balance column on the right side of the image below.
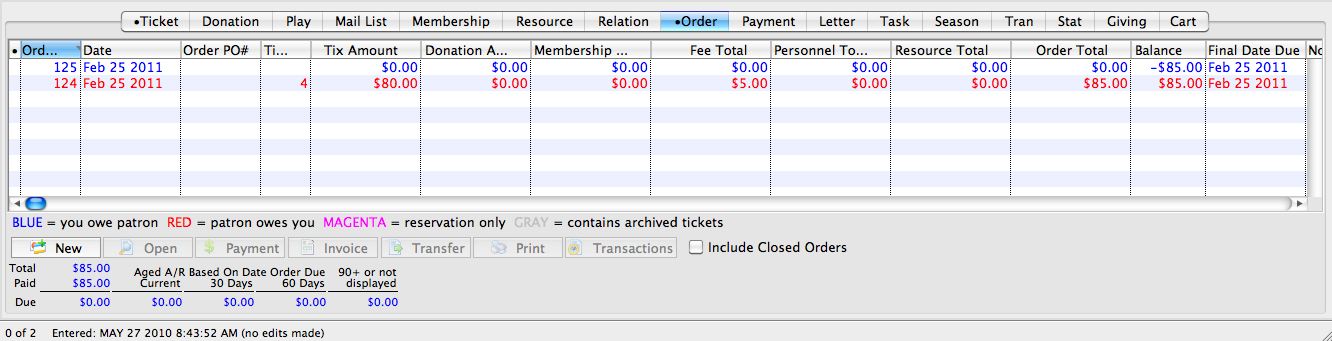
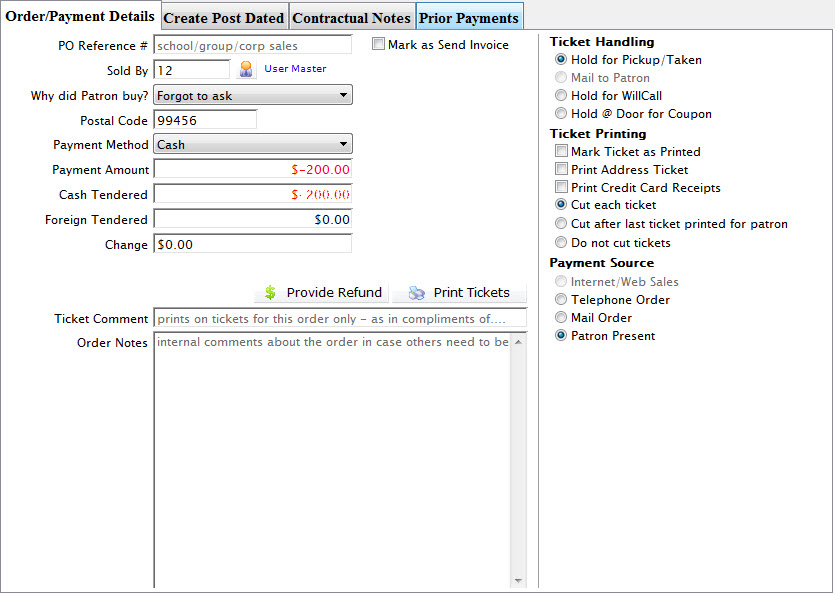
To repair this, you need to make a CASH refund to the credit balance order, and a CASH payment to the debit balance order.
To take care of the credit balance, you perform the following steps:
- Return to the patron record, and click the
 tab.
tab.
Select the credit balance order (the one in blue).
- Click the button.
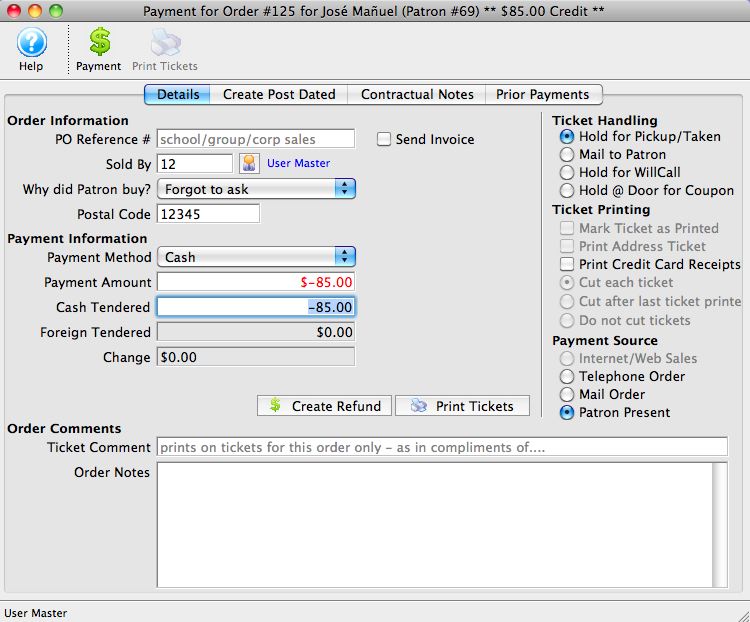
- In the Payment window, create a REFUND (negative payment) for the full value of the order.
Choose CASH as the payment method.
- Click
 button.
- Return to the patron record, and click on the tab
Highlight the debit balance order (the one in red).
- Click the button.
Make a payment for the full value of the order and use CASH as the payment method.
- Click
 button.
|
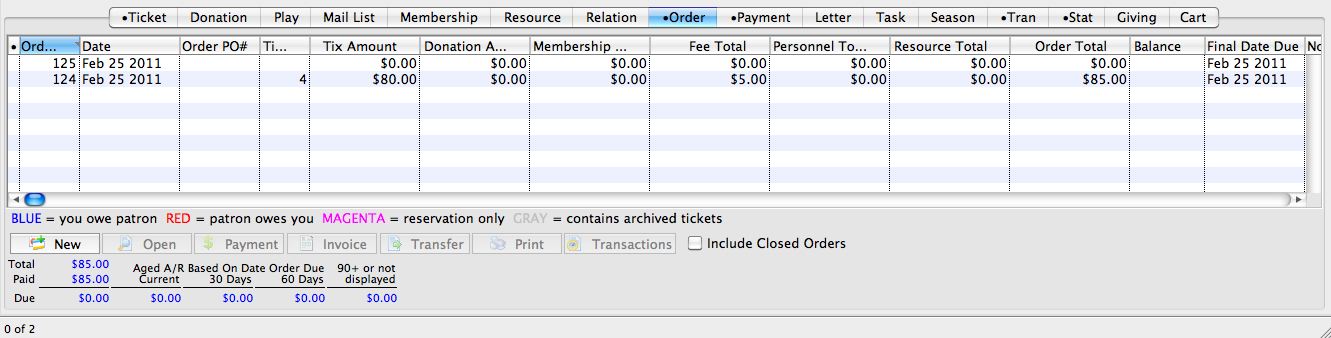
At your End Of Day, the GL Journal Entry Summary by Account will show a net effect to CASH of $0. The GL Journal Entry DETAIL by Account will show $85 CASH in, and $85 CASH out. |

Partial Payments
- Selecting the Payment button in the Order window.
The order window can be accessed through the Orders Tab or when Purchasing tickets. Click here for a detailed description of this window and it's functions.
- Select the payment method from the drop down list.
- Enter the amount for the payment method in the Payment Amount field.
- Enter the amount of payment received into the Cash Tendered field.
Pressing the tab key on the keyboard will display the change owed to the patrons for the amount tendered. A patron may choose to pay with multiple payment methods and still require change for one or more of those methods.
- Fill in any other necessary information and click the Accept Payment button.
A confirmation dialog opens, asking you to confirm the partial payment.
- Click the Yes button to accept the partial payment.
The Process Another Payment window opens.
- Click the Yes button.
- Select the 'On Account' as the second payment type.
If the payment is put On Account refer to Later Payments to learn how to add future payments to the order.
One Payment for Multiple Orders
|
NOTE: If you allow people to pay order balances online, please read:
|
The difference is subtle:
- Using a single payment for multiple orders splits the payment across multiple orders to pay them off partially or totally.
Since cash payment can be for any value (including $0.00), you can use this approach to clear out offsetting order balances. This has an effect much like transferring a payment from one order to another (since there will be a negative cash payment and a positive cash payment that offsets). Mostly, however, you will want to use this method to apply a single check against many orders.
- Transferring a single payment from one order to another is generally used when a single payment was misapplied to an order.
Where can payments for multiple orders be used?
Using one payment to pay for multiple orders can occur in five places in Theatre Manager:
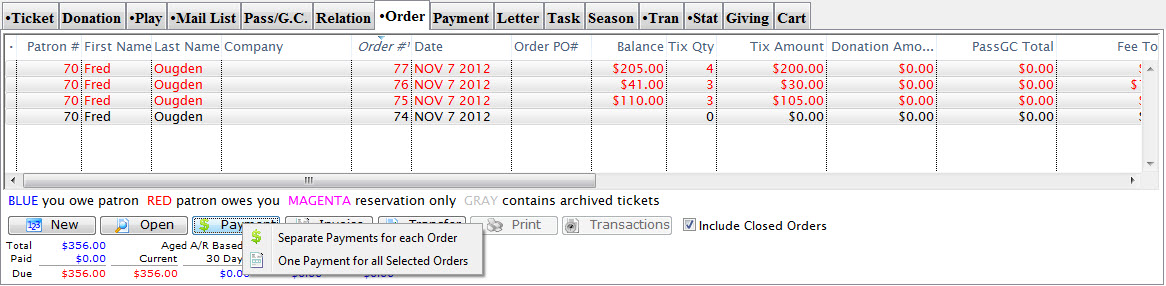
- Order tab on the patron window. This is most likely place to use this feature.
- Ticket list on the patron window. If you select tickets from multiple orders, and click 'apply payment to selected tickets', Theatre Manager will open the multiple order window.
- The accounts receivable window (from accounting menu or end of day wizard). If you select multiple orders (for the same patron), then you can also use the multiple payment window.
- attendance tab on the play/event window. If you select tickets for multiple orders (must be for the same patron), you can also apply payments to multiple selected orders.
- Pay Order Balances Online Feature. If this is enabled, the patron can choose to pay the balance for one or more unpaid orders in their cart via the ticketing web site.
|
Note: Only Cash, Check, Gift in Kind and your own custom payment methods may be used when applying a single payment to multiple orders. Credit cards cannot be applied directly to many payments. This mitigates possible future issues of refund against a credit card and because of how the merchant processors handle linked refunds. There is a workaround for credit cards (below) |
Tricking TM to use a credit card for multiple orders:
You will need to follow this process
- Use a credit card to pay for one specific order for the total amount for the total payment amount the patron is giving you (i.e. the total balance on all the orders they are paying).
Note: this will probably overpay the order and it is intentional.
- Select the over-paid order PLUS all the other underpaid orders.
- Apply a 'cash' payment for all the selected orders.
- The cash payment should total zero. This is because there is a negative balance on the order the card was applied to that offsets the positive balances on the other orders. This will not affect end of day because the net cash payment is zero.
Effect of paying for orders online
TM uses the 'trick' (above) to apply a card to multiple orders. It will:
- Apply the credit card payment to the order created by the cart for the entire balance of all tickets, fees, donations, passes, and prior orders added to the cart. This is:
- so the patron sees ONE charge on their credit card statement -and-
- the box office is able to meet credit card company refund policies, especially for linked refunds.
- Internally:
- TM creates a single credit payment that totals the cart value plus any prior orders that were added to the cart. That is to say, the cart gets the single payment in full for all orders -and-
- A second payment is added to the order to decrement its amount for the prior order total using cash -and-
- Adds more payments to the other orders paid online (that were in the cart). This applies that balance a series of cash payments to each of the orders paid online
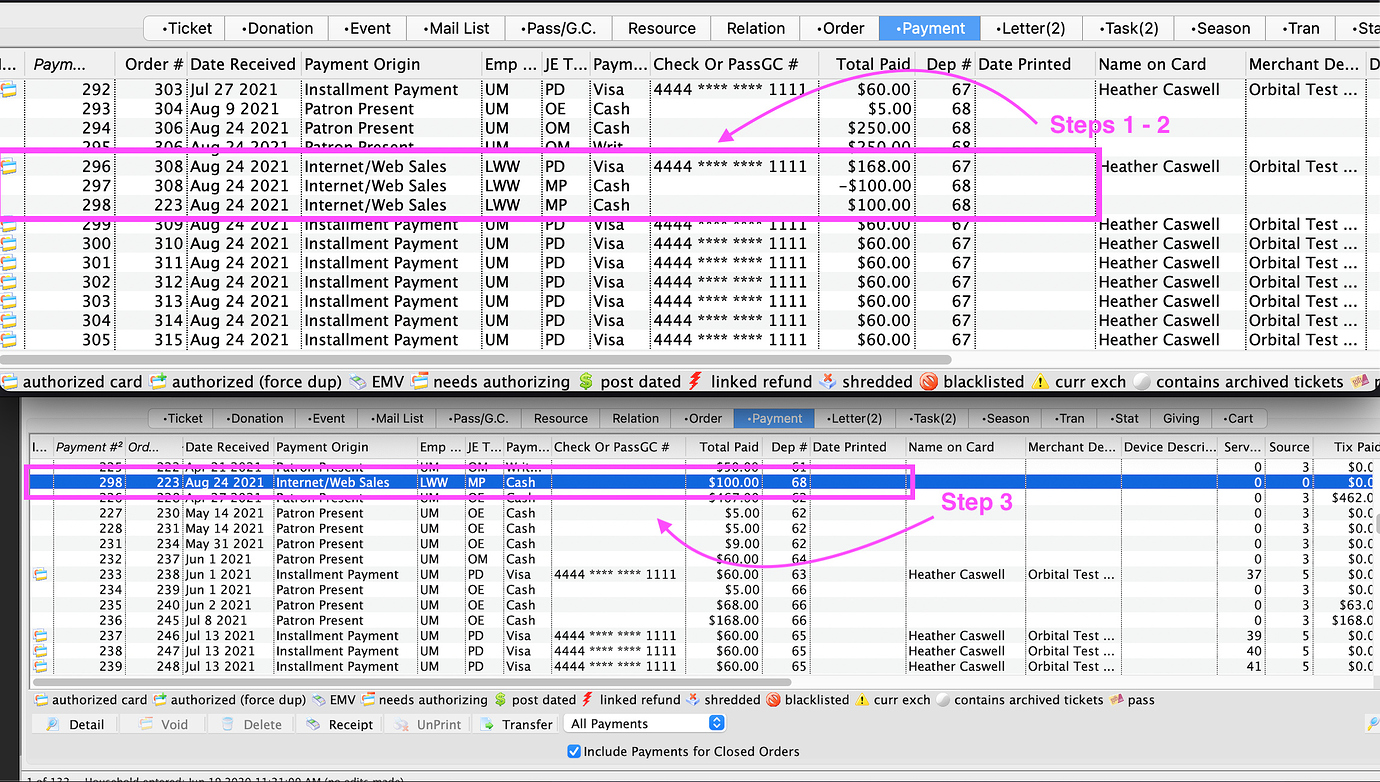
- Credit card payment to order #308 (which was created by the cart).
- Order #308 would be overpaid by $100.00 from the online payment.
- This $100.00 overpayment is the offsetting balance owing on the prior order #223.
- CASH credit of -$100.00 to order #308
- since the order is overpaid by $100.00,
- a CASH refund of -$100.00 applied to this order resulting in a $0.00 balance owing.
- CASH debit of $100.00 to the prior order #223
- the offsetting credit amount will be applied to the prior order
- resulting in a $0.00 balancing owing.
Applying a Single Payment for Multiple Orders
To apply one payment to multiple orders, you perform the following steps:
- Open the patron window making the payment on multiple orders.
Click here for information on how to find a patron.
- Click on the order tab.

- Select MORE that one order in the list of orders.
You can do this by click and using the Ctrl key on the PC or the Apple key on the Mac.
- Click the Payment button and select the multiple payment option.
Some tips:
- Select only the orders that you want to pay. Theatre Manager will automatically apply the full payment on the detail window to assist you.
- You can select orders that are already fully paid for -- those will appear in the payment window as well (because you selected them) but will not have a payment amount allocated to them.
- Any orders that are not yet paid for (but you didn't select) will automatically appear in the detail window with no amounts -- in case you change your mind about how you want to allocate payments to unpaid orders.
The Allocate Multiple Payments window opens.
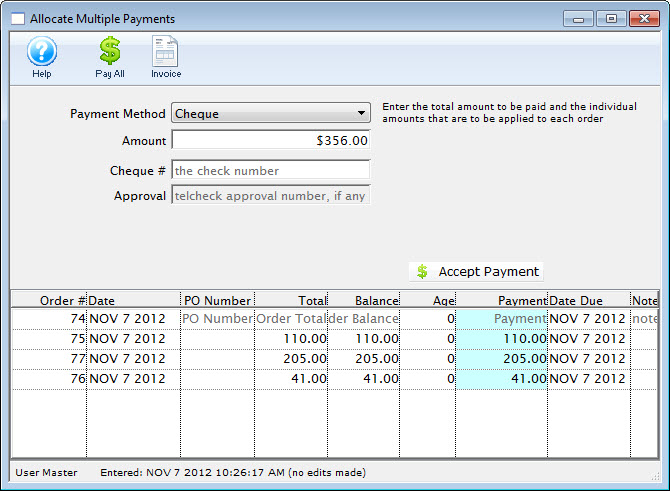
- Select the payment option, enter the amount and how you want to allocate the payment to the selected orders.
Some usage hints for this window are:
- The amounts will automatically default to the selected unpaid orders you selected from the order list
- If you type a new amount for the payment method, Theatre Manager reallocates the amount from the oldest order to the newest
- If you click 'Pay All' on the toolbar, it will pay out all outstanding invoices and set the total.
- You can enter a payment amount and then change each individual line. Any line with a zero payment will take part of whatever the total payment is until nothing is left
- Alternatively, if you change the detail line distribution and blank out the total, Theatre Manager will calculate it to be the sum of the payments.
- The total payment amount and sum of payment distributions must match
- All other payment rules must apply - such as check number, etc.
Post Dated Payments
- To delete Post Dated Payments, click here.
- To run a Cash Flow Report of Post Dated payments, click here.
- To see the criteria to use on any payment report to only see post dated payments, refer to this link
To create Post Dated payments, you perform the following steps:
- Open the Payment window.
Click here to learn how to access the payment window.
Click here for a detailed description of this window and it's functions.
- Click on the Create Post Dated
 tab.
tab.
- Change the total payment amount as required.

- Enter the number of payments which will be made.
- Enter the first payment date.
Type the first payment date or click the Calendar
 button to search the calendar.
- Select the frequency of the payments.

You can now change any of the suggested dates or the suggested amounts to create a customized payment plan. All you have to ensure is that the total of the amounts match the total of the post dated payments.
- Select the Payment Method.
- Enter either the credit card number and expiry date or the cheque numbers next to the payment dates.
- Click the Create Post Dated button to accept the payments.
The balance on the order becomes zero. The payment window can now be closed.

Once you have entered the number of payments and moved the cursor from the field the schedule of payments will be created.
 tab on the Patron window.
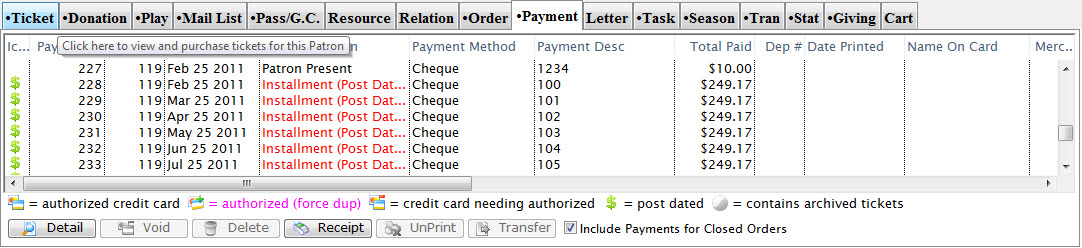
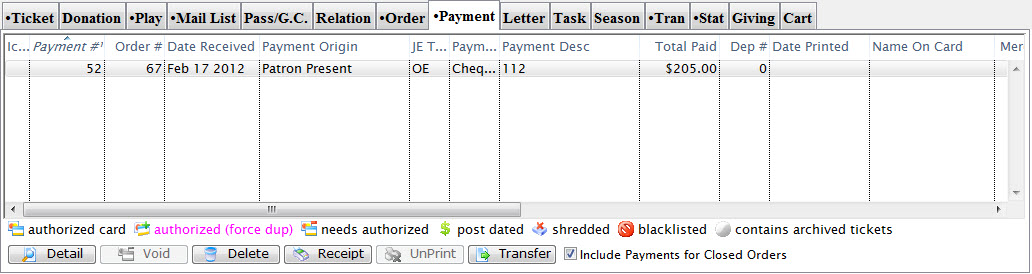
Notice that the Srce is labeled as PD(post-dated) and the deposit number is blank. This shows that they are future payments to be made by the patron.

Deleting Post Dated Payments
- Open the Patron Payments Window by clicking the Payments
 tab in the Patron Window.
For information on how to access the Patron window click here.
Click Here for a detailed Description of this window and it's functions.
- Select the Post Dated Payment you wish to delete
To find post dated payments easier sort the transactions by Srce and all postdated payments will be grouped together by PD.
- Click the Delete button.
A confirmation Window will appear

- Click the Delete button.
The value of the deleted payment will now appear as an outstanding balance on the account. For information on adding a payment to the order click here.
Reversing Payments
Once a payment has been deposited in Theatre Manager you cannot just delete it. A correcting entry must be placed in the General Ledger. This method is ideal for correcting when a wrong payment method has been used.
- Open the Patron Order Tab.
Click Here for a detailed description of this window and it's functions.
- Select the order you would like to add a payment reversion towards.
- Click the Payment button.
The Payment window will open. If the outstanding balance for the order is $0.00 the following confirmation window will open.
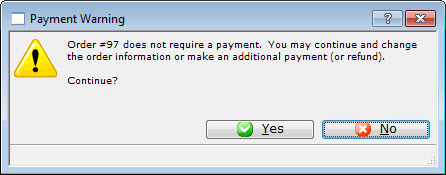
- Click the Yes to Continue

- Select the prior payment type.
If the prior payment type is unknown the Prior Payment
 tab can be selected. For more information on the Prior Payment tab click here.
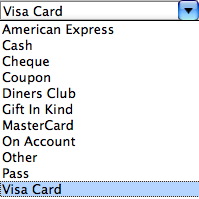
- Enter the refund amount.

- Enter any other applicable information.
- Click the Accept Payment button.
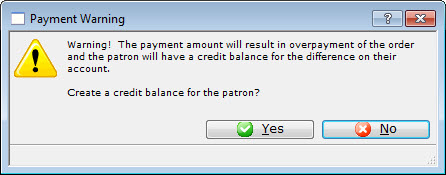
A Payment Warning dialog opens.
- Click the Yes button.
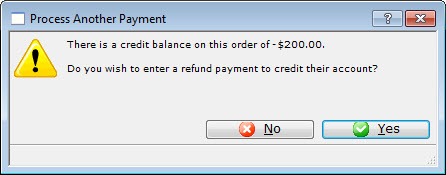
The Process Another Payment window will appear.
- Click the No
 button to close the payment window or the Yes button to add a new payment to the order.
Deleting a Payment
A Payment can be deleted easily if it has not been deposited. If you are trying to remove a payment which has been deposited refer to Reversing a Payment.
- Open the Payment tab from the Patron Window.
Click here to learn more about locating patron records.
Click here for a detailed description of this window and it's functions.
- Select the Payment to be deleted.
- Click the Delete button.
A Warning dialog opens asking you to confirm the payment deletion.
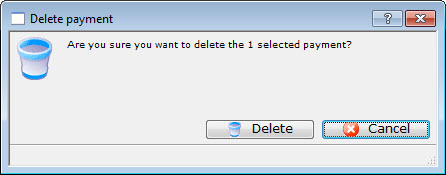
- Click the Delete
 button.
The Payment will be deleted and the confirmation message will appear at the bottom of the window.

The patron will now have an outstanding balance in their account.
For information on adding a payment to an order click here.
Single click on the payment to select it. Only one payment may be selected for deletion at a time.
Printing a Payment Receipt
Printing a receipt is used to provide patrons with a record of their payment. Receipts can be printed for credit card transactions at the time of sale. Receipts for most payment types can also be printed after the sale or reprinted if needed. The ticket face and default setting for printing a receipt can be found in the Ticket Face tab of the Company Preferences.
To print a receipt at the time of sale, you perform the following steps:
- Click the Payments button in the Order window.
Click Here for a detailed Description of this window and it's functions.
- Select the credit card payment method for which a receipt should be printed.
- Click the Print Tickets button.
If a ticket face has been setup the receipt will print with the tickets. If the Accept Payment
button is
clicked the receipt will print without tickets. The ticket face and default setting for printing a receipt can be found in the Ticket Face tab of the Company Preferences for more details on receipt setup.
Re-Printing a Receipt
- Open the Payment
 tab in the Patron window.
Click Here for a detailed Description of this window and it's functions.
- Select the payment for which a receipt should be printed.
Single clicking the payment to select it.
- Click the Receipt
 button.
The reprint receipt(s) dialog opens.
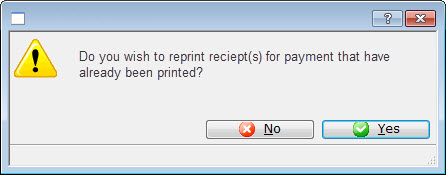
- Click the Yes button.
The receipt is re-printed.
Transferring Payments from One Order to Another
These instructions will guide you though the process of transferring a payment from one order to another. If a payment has been accepted for the wrong purchase it can be corrected by transferring the payment from within the Patron Payment Window.
|
You can only transfer payments between orders for the same patron, not between patrons. |
|
There is also a feature that allows using a single payment to pay for multiple orders
Sometimes this may be better than transferring the payment if the payment is a credit card, especially if your merchant provider only allows linked refunds. Transferring a card payment to another order will affect ability to refund. |
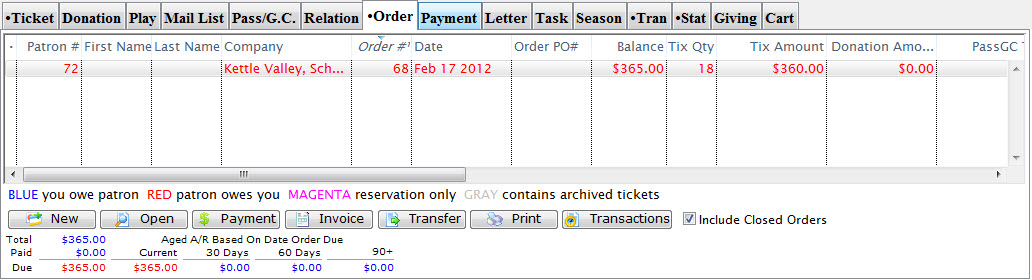
This circumstance can happen, if a sale is refunded from an order but no refund payment is applied. This means, On Account, then a new sale is created and the order is paid On Account. This results in two orders in a patron record, one will show money is owed to the patron and a second showing the patron owes money. It will reflect on the Receivables Based on Order Balances report traditionally run with the End of Day Reports. See the following example.
- Find the Patron with the payment to be transferred.
Click here for information on finding Patrons.
- Click on the Payment Tab in the Patron Record to display a list of payments.

- Locate the payment you want to transfer and single click to highlight it.
- Click the Transfer
 button located at the bottom of the window.
The Transfer Payment window opens.
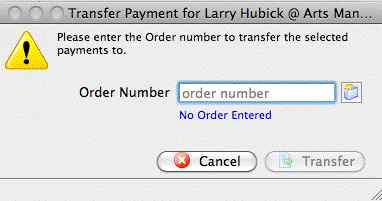
- Click the Order
 lookup button to display a list of the patron's payments.
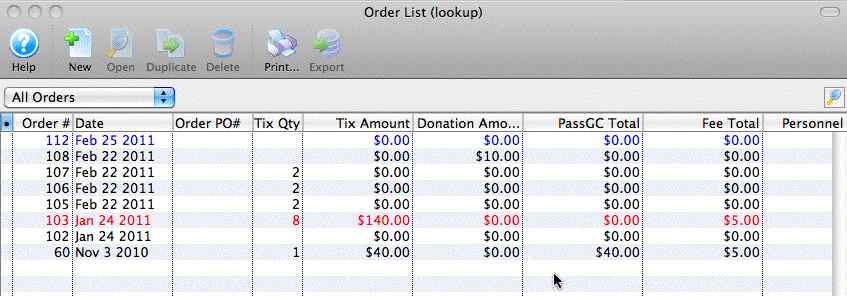
- Single Click on the payment in the list you want to transfer.
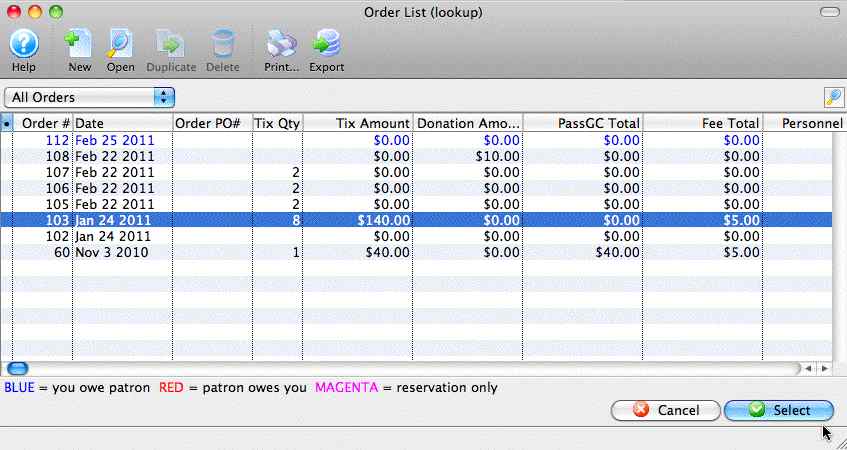
- Click the Select
 button.
The selected order information now appears in the transfer payment window.

- Click the Transfer
 button.
The payment is now transferred to the selected order.
Post Dated Payment Report Criteria
- Payment source contains PD, and
- Payment Deposit # is less than or equal to 0 (zero)
This will give you a listing of all the post dated payments that have not yet been deposited/charged.
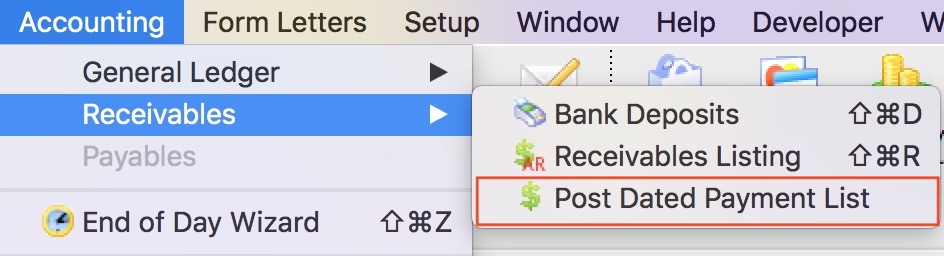 Alternatively, you can:
- use the feature in the accounting menu to see all post dated payments, revise the credit card if need be, or print a post dated payment report
-or-
- Print the post dated payment report from the reports tab in end of day wizard
When a post dated payment in entered into Theatre Manager, it has a deposit number of either 0 or -1 and is assigned a payment source of PD (Post Dated).
- 0 -- Means the Post Dated payment(s) were 'created' today.
- -1 - Means the Post Dated payment was 'created' prior to today.
The deposit numbers will stay at either 0 or -1 until the Post Dated payment becomes due and you actually charge/deposit the funds into your bank account. At that time the deposit number on the payment will be updated to reflect the deposit number for the current date.
With that in mind, you are able to run a payment report at any time to get a listing of all your outstanding Post Dated payments by referencing the Payment deposit number of 0 and -1 and the payment source is 'PD' (Post Dated).
If you are unable to locate the Payment Source field, change your Select a Field Level to 'All' rather then using Essential or Frequently Used in the top left hand corner of the field selection window.
Contractual Payment
Contractual Payments are used to maintain the order date, deposit date amount, final payment date amount, co-payer payment date amount. It is not applicable for most sales. However, it may be useful for educational or group sales where there is an initial deposit and a final payment due date. Or, if a second patron is paying a portion of the ticket order for example a granting agency for educational tickets), you can track who is to be co-invoiced.
- Click the Contractual Tab in the Payment view of the Orders Window.
Click Here for a detailed description of this window and it's functions.
- Enter the date and the amount of the initial deposit.
- Enter the final payment due date.
- If their is a Co-Payer enter there patron number.
You can also use the Patron
icon to search for a patron. Click Here for more information on finding patrons using the contact list.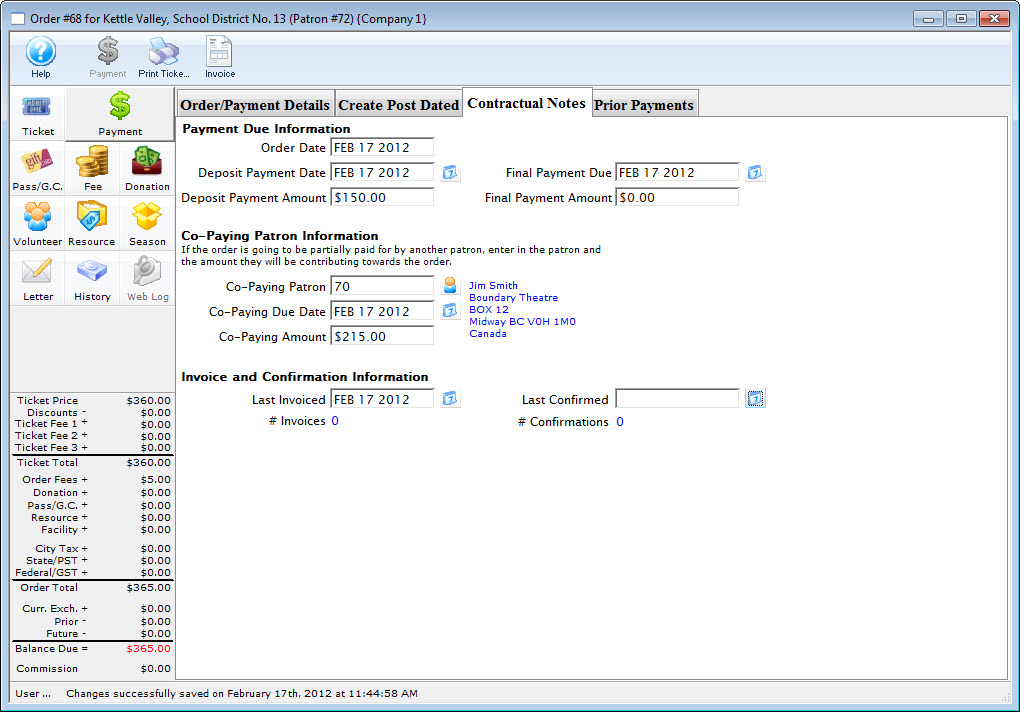
- Enter the payment date and amount that the co-payer is contributing.
- Return to the Detail
 tab.
tab.
- Complete the payment process. Click here for more information.
Credit Cards
Credit Cards are a a common method of accepting payment for everything you sell. Here are the links to all things credit Card related:
 |
The Credit Card Tab displays all credit cards on file for a patron. This tab is visible to employees with access. Click here for more information. |
 |
On the Credit Card tab, clicking this button Adds a new credit card to the patrons file. Click here for more information on Adding New Credit Cards. |
 |
On the Credit Card tab, clicking this button Opens the credit card detail window for editing. Click here for more information on Editting a Credit Cards. |
| |
On the Credit Card tab, clicking this button Deletes a credit card from the patron file. Once credit cards without transaction history can be deleted from the patron record. Click here for more information on Deleting a Credit Card. |
 |
On the Credit Card tab, clicking this button Shreds the selected credit card records if they exceed the minimum retention policy of # days. Theatre Manager can implement either Schedule "C" or "D" for the SAC. You can define a retention period for credit card information. Click here for more information. |
 |
You can use the Contact List to search and identify data attached to patrons that could be construed as a possible clear text credit card in violation of PCI guidelines. Click here for more information on data search. |
Post Authorization of Credit Cards
You use Post Authorization when an error "!CALL" comes back from the credit card server software. This error means you must call your credit card service provider as the merchant provider is questioning the charge to the patron's credit card and wants clarification. When talking to your credit card service provider, they will likely provide you an authorization number for the credit card charge you wish to make. After receiving the authorization number, you will need to create a Post Authorize payment in order to enter it into Theatre Manger and your credit card software.
When creating a Post Authorization payment, it creates the payment in Theatre Manager and in the credit card server software. It does not dial out to your merchant provider for an authorization because your credit card service provider has already created the transaction for you and will have provided you with a voice authorization.
- Open the Patron Order Window.
Click the Order Tab on the Patron Window.
- Highlight the order associated with the payment. Note there is a balance due.
- Click the
 button.
The Payment window opens.
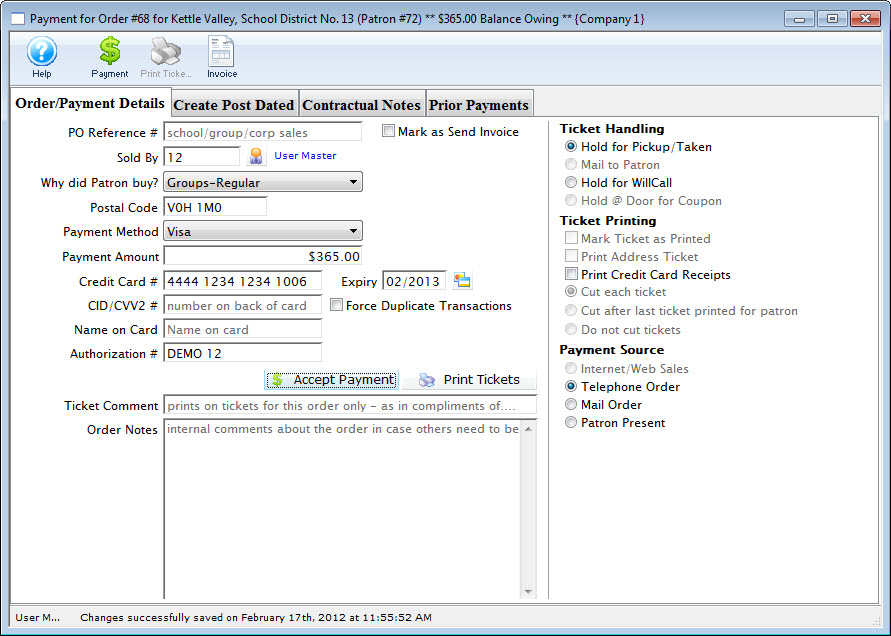
- Enter the credit card information on the payment window
including the authorization number provided by you credit card
service provider.
This authorization number must be entered exactly as shown on the original authorization. Replace DEMO 12 with your authorization number.
A Warning Dialog opens.
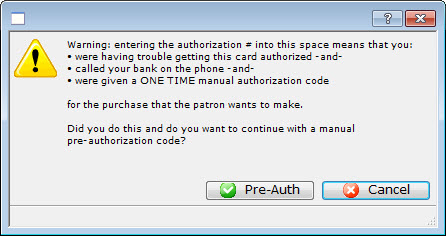
- Click the Pre-Authorization
 button.
You are returned to the Payments Window.
- Click the Accept Payment button.
Voiding Credit Card Payments
- Open the Patron Payment Window
Click the Payment Tab on the Patron Window to open this window.

Click here for a detailed Description of this window and it's functions.
- Select the Credit Card Payment to void.
Do this by single clicking the payment.
- Click the Void
 button.
The confirmation message which opens depends on when the credit card was authorized.
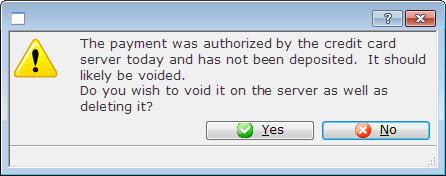
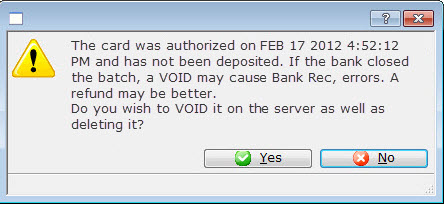
- Click Yes
to void the credit card using you online credit card server and delete it
from Theatre Manager.
A confirmation message displays in the status bar.

Reversing a Duplicate Credit Card Charge
You have been notified by your patron that they have been charged twice for a purchase, yet there is only one credit card payment record in Theatre Manager. This can happen if Theatre Manager "timed out" during the authorization process and the Credit Card Software was still processing the original payment transaction. A user then sucessfully authorized the same payment a second time, resulting in two payments recorded in your Credit Card Software and one payment in Theatre Manager.
Review your Authorizing Timeout Preference time in the Merchant Accounts Authorization tab, as an adjustment may be required.
|
A correction is only required if Theatre Manager 's deposit and the Credit Card Software totals do not match yet the deposit has been forced through and the Credit Card Software settled manually. |
Review End of Day Troubleshooting to prevent this from occurring.
Setting up a "Fake" Payment to be Refunded
- Open Setup >> System Tables >> Code Tables and click on Payment Types and double click on the credit card type the the duplicate charge was on.
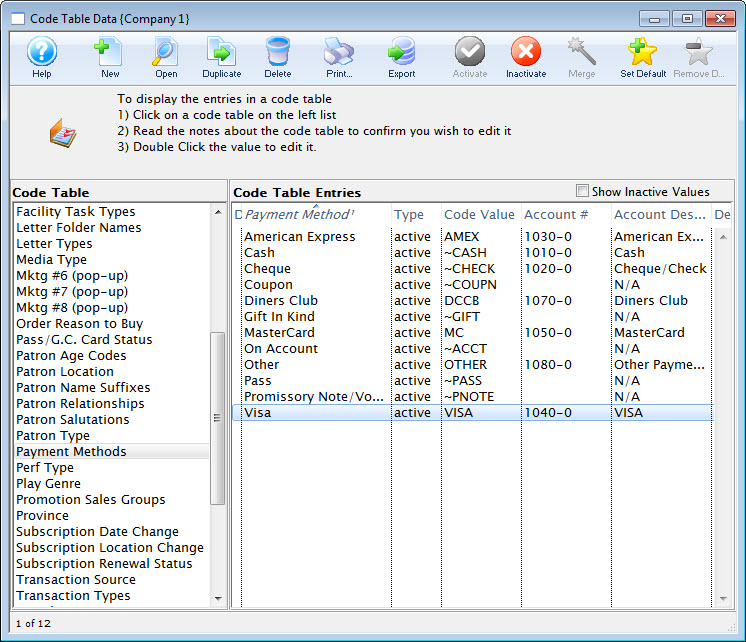
The Payment Methods window opens.
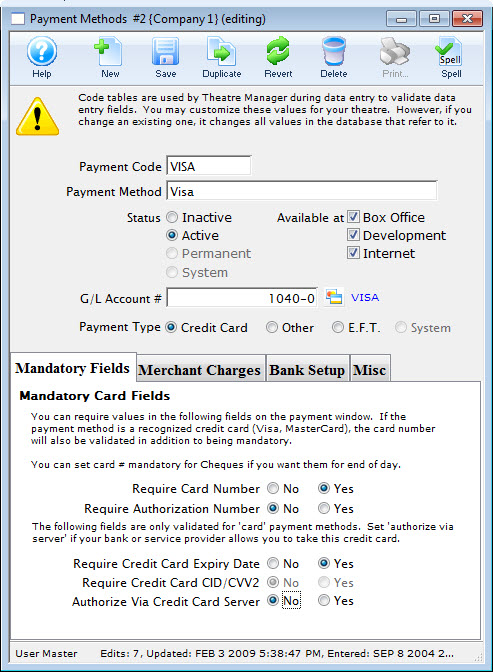
- Where it says "Authorize via Credit Card server" click the "NO" radio button.
- Click the Save
 button.
- Open the Patron Order window by clicking on the Order Tab from the Patron Window.
Click here for a detailed description of this window and it's functions.
- Highlight the order and click the Payment
 button.
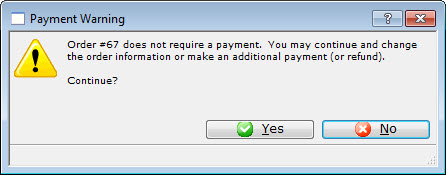
- Click the Yes button to continue.
The Payment window opens.
- Add a payment to the credit card by entering the amount that will be refunded later, as shown in the Payment Amount field.
- Enter in a ficticious Authorization Number, for example, "Fix Duplicate Charge".
- Click the Accept Payment button to complete the transaction.
As you have turned off credit card authorization through the server, the card will not be charged.
A warning dialog opens.
- Click the Yes button to continue.
A warning dialog opens.
- Click the Yes button.
A warning dialog opens.
- Click the No button.
Refunding the Duplicate Payment
|
If you have not completed the first step Setting up a "Fake" Payment" do that now, before doing the next section. |
- Open Setup >> System Tables >> Code Tables and click on Payment Types and double click on the credit card type that the duplicate charge was on.
The Payment Methods window opens.
- Where it says "Authorize via Credit Card server" click the "YES" radio button.
- Click the Save
 button.
- Open the Patron Order Window by clicking on the Order Tab from the Patron Window.
- Highlight the order and click the Payment button.
- Enter the refund amount.
- Click the Provide Refund
 button.
Completing this, the patron will be refunded the money that he/she was overcharged while Theatre Manager will retain the correct payment amount.
|
Theatre Manager's Deposit will not match your Online Credit Card Server's deposit amount. You will need to force the deposit and manually settle. |
Re-Authorizing a Credit Card Payment
If Theatre Manager has recorded a credit card payment as authorized but your credit card authorization software has no record of it you will need to re-authorize the payment.
- Open the Patron Payment Window
Click the
Payment Tab on the Patron Window.
Click here for a detailed description of this window and it's functions.
- Select a credit card payment and click Detail
 or double click the entry
The Payment Detail Window opens.
- Click the Re-Authorize Button

A Warning Window opens. Read the details of this window and only continue if you are completly sure the payment was never charged to the patron's card to avoid double billing.
- Click the Authorize Button

A Confirmation Window opens reminding you to complete this operation only if you are sure the card has not been billed.
- Click Yes

The card information will be sent to your merchant provider and a window will appear confirming the authorization
- Click OK
 to finish the process
|
If you are re-authorizing a credit card that has already been deposited your re-authorization will not appear in Theatre Manager's Deposit Window. The rre-athorization will only be recorded by the credit card authorization software. Thus a force deposit may be required if Theatre Manager's credit card totals do not match the records of the authorization software. Click here for more information on Force Depositing |
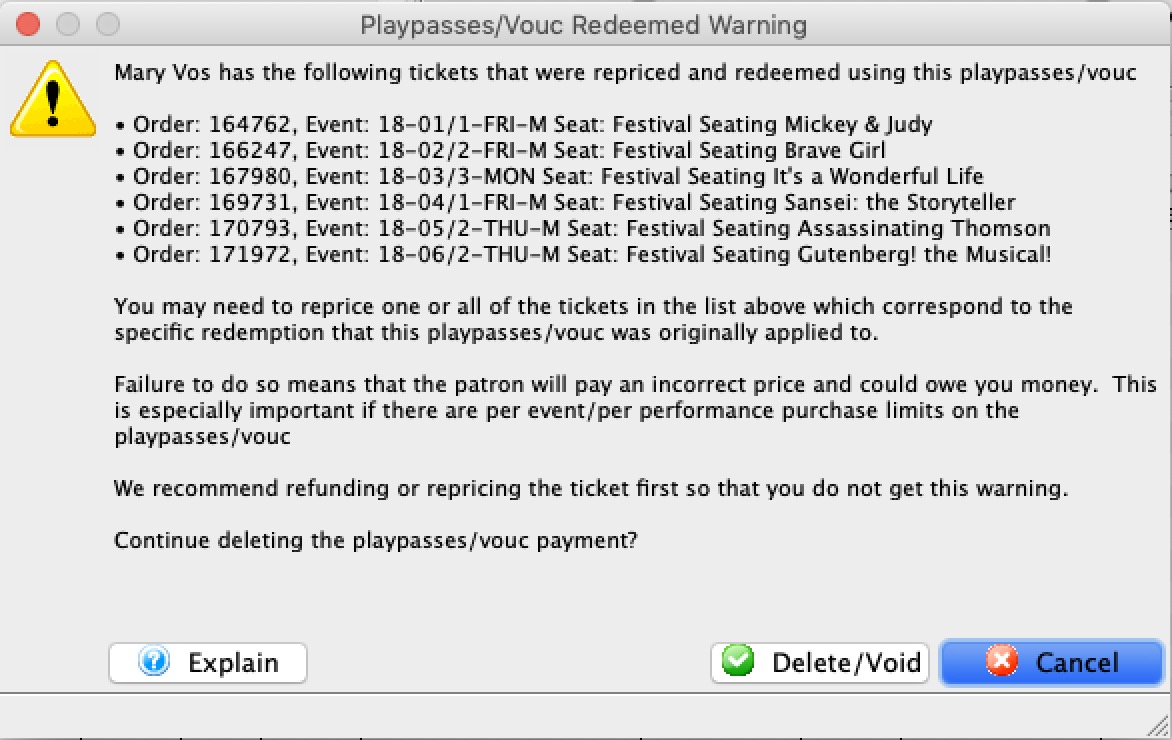
Voiding a Pass / GC Payment
Voiding a pass payment after it has been deposited involves the payment being voided and, if needed, a new payment entered for the purchase.
For example, I purchase 2 tickets to an event using a gift certificate. The next day (the end of Day process has been run) I change my mind. You can void my purchase and return the amount of the purchase to my gift certificate, using the following steps:
- Open the Patron Payments Tab in the Patron Window.
Click here for a description of this window and it's functions.
- Select the pass payment to be voided and click the Void
 button.
A Confirmation message displays in the footer and a new payment is added voiding the Pass / GC payment.
- Confirm that you want the pass voided and its value or quantity will be put back on the original pass
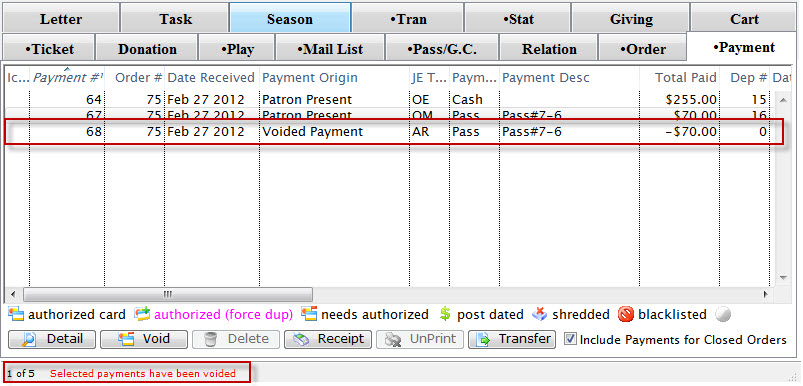
The patron will now have an outstanding balance on their account for the purchase total. Click Here for more information on making payments.
|
Since a pass payment typically alters the price of the ticket, if you void the pass, you may need to: |
EFT Payments
An electronic fund transfer (EFT) moves money from one account to another. The accounts can be at the same financial institution or two different financial institutions. The transaction is done electronically through the banking system network.
EFT transactions are also referred to as electronic banking. Everything is done paper-free, so there isn’t a need for cash or paper cheques/checks.
How does an EFT payment work?
In Canada, EFT payments are submitted through a secure web portal provided by the bank. The EFT payments are then processed by each bank withing their own secure network to transfer the funds between accounts.
In the USA, EFT payments are processed through the Automated Clearing House (ACH) network. ACH is a secure system that connects all U.S. financial institutions.
Because the financial institutions are connected, when the patron authorizes the electronic transfer of funds, the money will be taken from the patron's bank account and deposited directly into the venue's bank account.
Will Theatre Manager automatically submit the EFT file to my bank for processing?
No. Due to the requirement of submitting the EFT file through your bank's secure web portal and most banks limiting all direct file submission from 3rd party applications, Theatre Manager is unable to do it automatically. Theatre Manager will prepare, track, and create the EFT file that needs to be submitted for processing. It is the responsibility of the organization to submit the EFT file through the bank's secure web portal.
When does Theatre Manager create the EFT file that I can submit to my bank for processing?
During the End of Day process. The request to prepare and create the EFT file is initiated by the box office after the End-Of-Day Deposit process has been completed. Each file request and the frequency of those file requests is completely under your control. Theatre Manager does not mandate any specific schedule.
Where can EFT payments can be accepted in Theatre Manager?
Everywhere a typical payment can be entered via the box office.- through the payment window as a one time withdrawal
- through the dated payment window for:
- offering a 3 payment option for a Season Subscription
- offering a 3 payment option for a Theatre School Class
- offering a monthly installment plan for year long membership
- offering a monthly installment plan for a donation campaign
- ... using it as an effective way to save on credit card fees charged by the banks
- for Recurring Donations
- for Auto-Renewal Season Subscriptions
Setup Preperation for Accepting EFT Payments
The process for setup EFT payments is treated as a standard payment method accepted in the box office.
- Create a Merchant Provider for the Financial Institution where your bank account resides.
- Create an EFT Payment Method linked to the Merchant Provider.
- Set Employee Security - Functions for those employees who can create the EFT File for Submission to the financial instituation.
Daily Activity for Accepting EFT Payments
The process for accepting EFT payments is straight forward and is treated as just another payment method accepted in the box office. In this situation, you'll be asking to have the patron provide their bank account information.
- Accept EFT payments as a form of payment.
Creating the EFT File containing Patron's Payments
At a pre-determed time when you're ready to submit an EFT file for processing:
- Complete the Deposit the EFT Payments through the End-of-Day Wizard.
- Create the EFT File for Submission.
- Submit the EFT File to your Financial Institution for processing.
EFT Setup
Setup Preperation for Accepting EFT Payments
- Create a Merchant Provider for the Financial Institution where your bank account resides.
- Create an EFT Payment Method linked to the Merchant Provider.
- Set Employee Security - Functions for those employees who can create the EFT File for Submission to the financial instituation.
Merchant Provider Setup

Parts of the Merchant Account - Software Type Window
| Account Name | Name of the merchant account. |
| Status | Active status of the merchant account. |
EFT Merchant Provider Setup
- Create a new merchant account.
- Select Electronic Funds Transfer (EFT) Service as the Server Software.
- Select the Financial Instituation for the Bank Account accepting the funds as the Merchant Provider type.
- Enter the Merchant Number provided to you from your bank.
- Enter the Connection Information provided to you from your bank.
 |
A separate merchant provider will need to be created for each designated bank account that will receive EFT payments. For example, if your organization deposits monthly donors into Account A, and Government Grants into Account B, and you want to enable EFT Payments for both Accounts A & B, you will need to setup 2 Merchant Providers for each designated bank account. |
Software Type
Parts of the Merchant Account - Software Type
| Server Software | The EFT authorization software you are using. Choose Electronic Funds Transfer (EFT) Service. |
| Merchant Provider | Name of the Merchant Provider contracted to accept the EFT File for submission processing. |
| Merchant Number | Merchant or client ID number issued by the merchant provider and is placed on payment receipts. |
EFT Merchant Provider Setup
- Select Electronic Funds Transfer (EFT) Service as the Server Software.
- Select the Financial Instituation for the Bank Account accepting the funds as the Merchant Provider type.
- Enter the Merchant Number provided to you from your bank.
Connection Info
Parts of the Merchant Account - Connection Info (Canada)
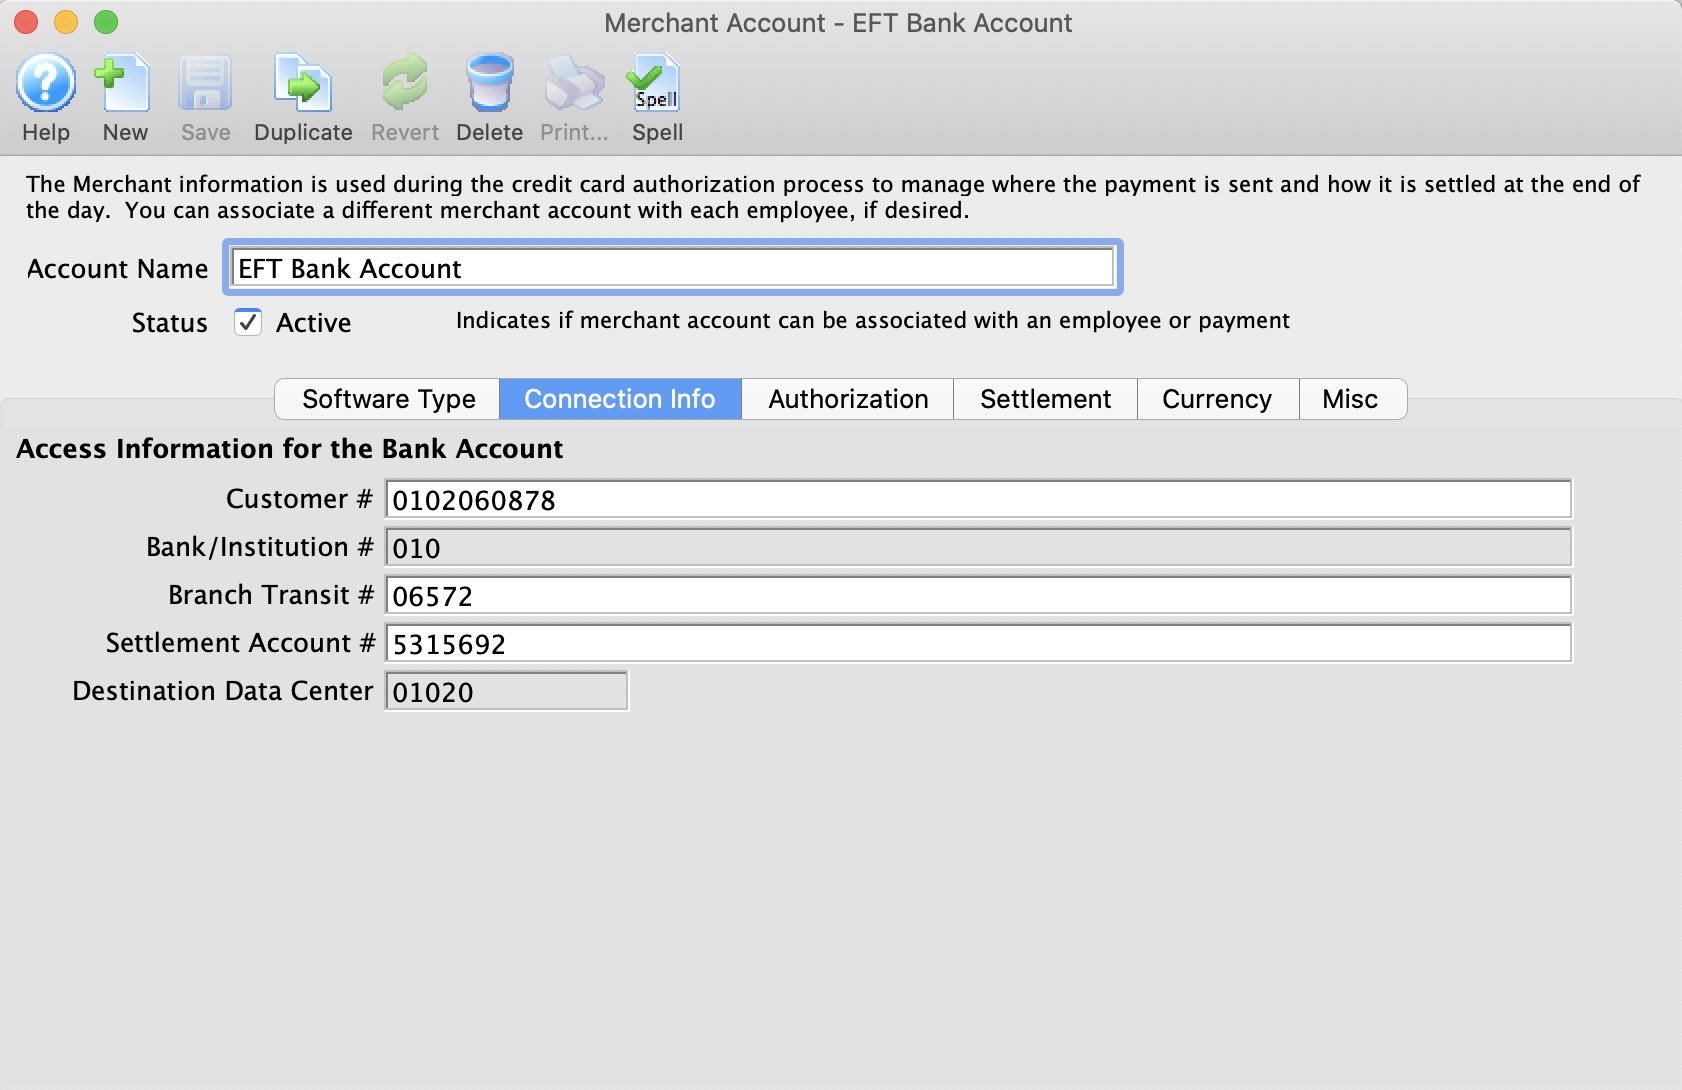
| Customer # | An unique customer number assigned by the financial institution to identify the sender of the EFT file. |
| Bank/Instituation # | The bank/institution number assigned to the financial instituation |
| Branch Transit # | The bank/institution branch number assigned to the financial instituation. |
| Settlement Account # | The account number provided to you by the bank/institution. |
| Destination Data Center | Destination Data Centre where the EFT file is to be processed. |
Parts of the Merchant Account - Connection Info Window (USA)
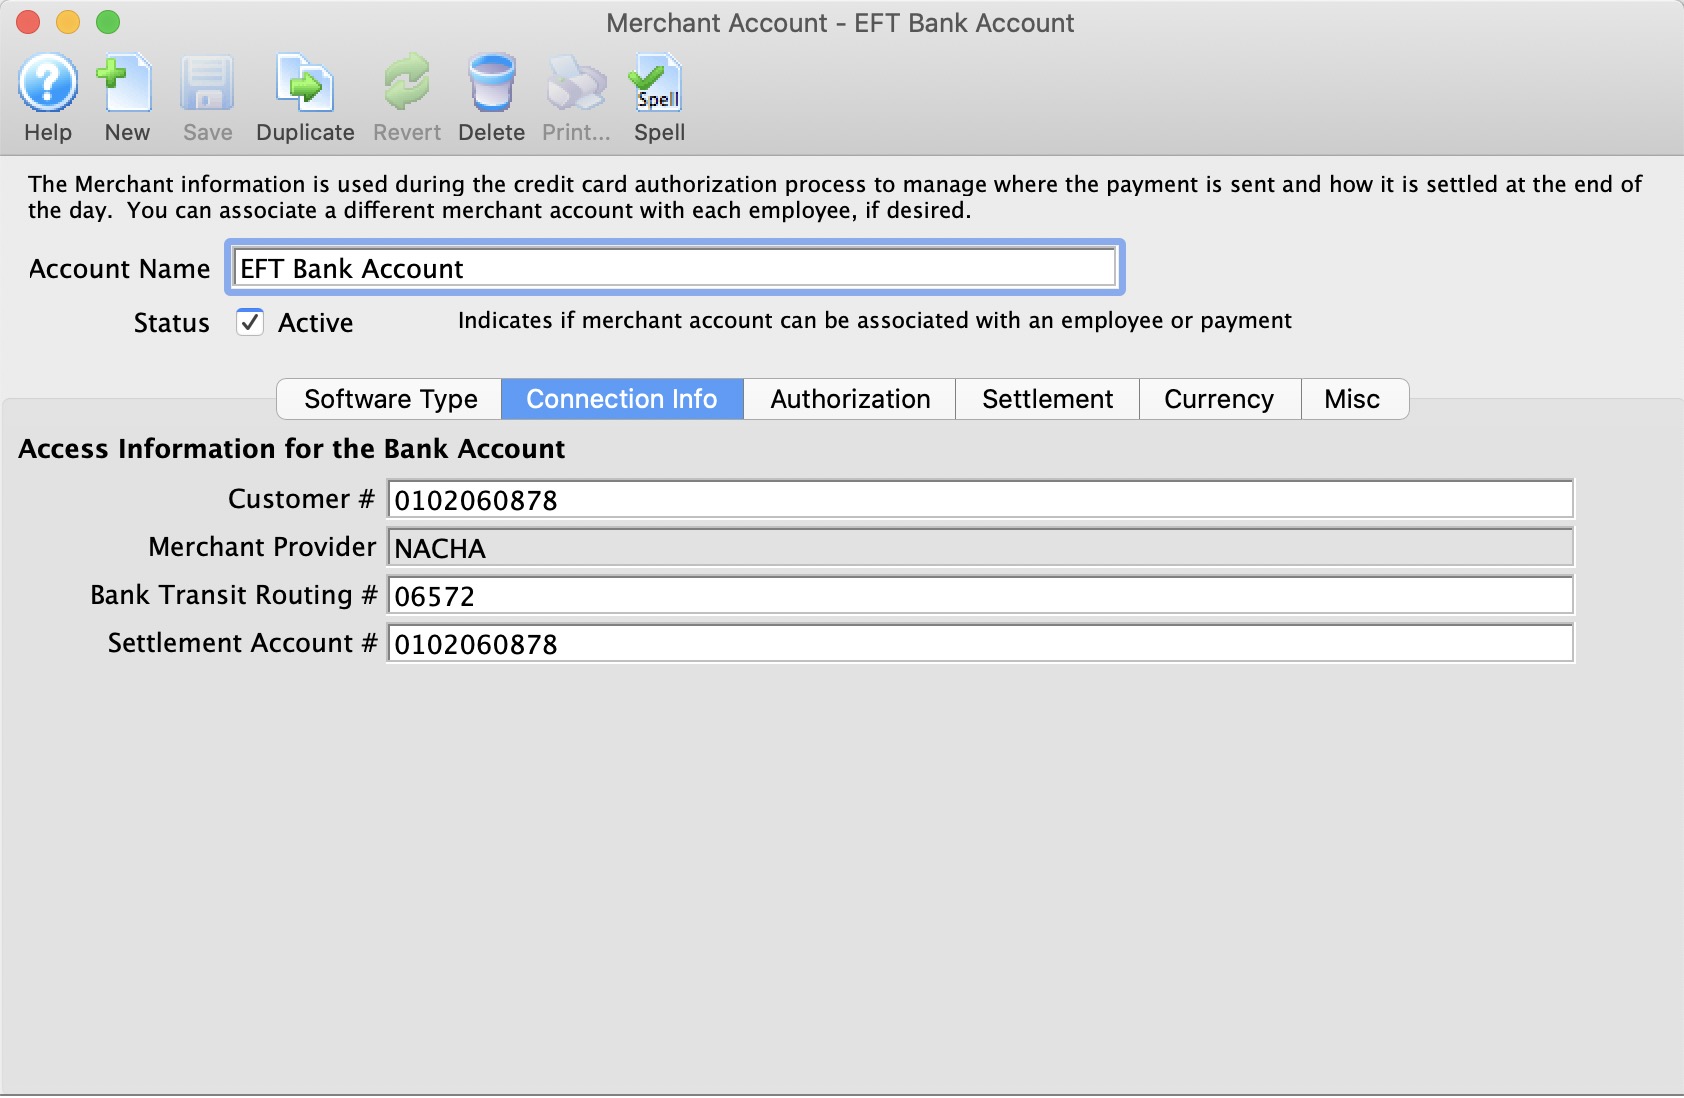
| Customer # | An unique customer number assigned by the financial institution to identify the sender of the EFT file. |
| Merchant Provider | The bank/institution number assigned to the financial instituation. Always will be NACHA. |
| Bank Transit Routing # | The bank/institution branch number assigned to the financial instituation. |
| Settlement Account # | The account number provided to you by the bank/institution. |
Authorization
Parts of the Merchant Account - Authorization
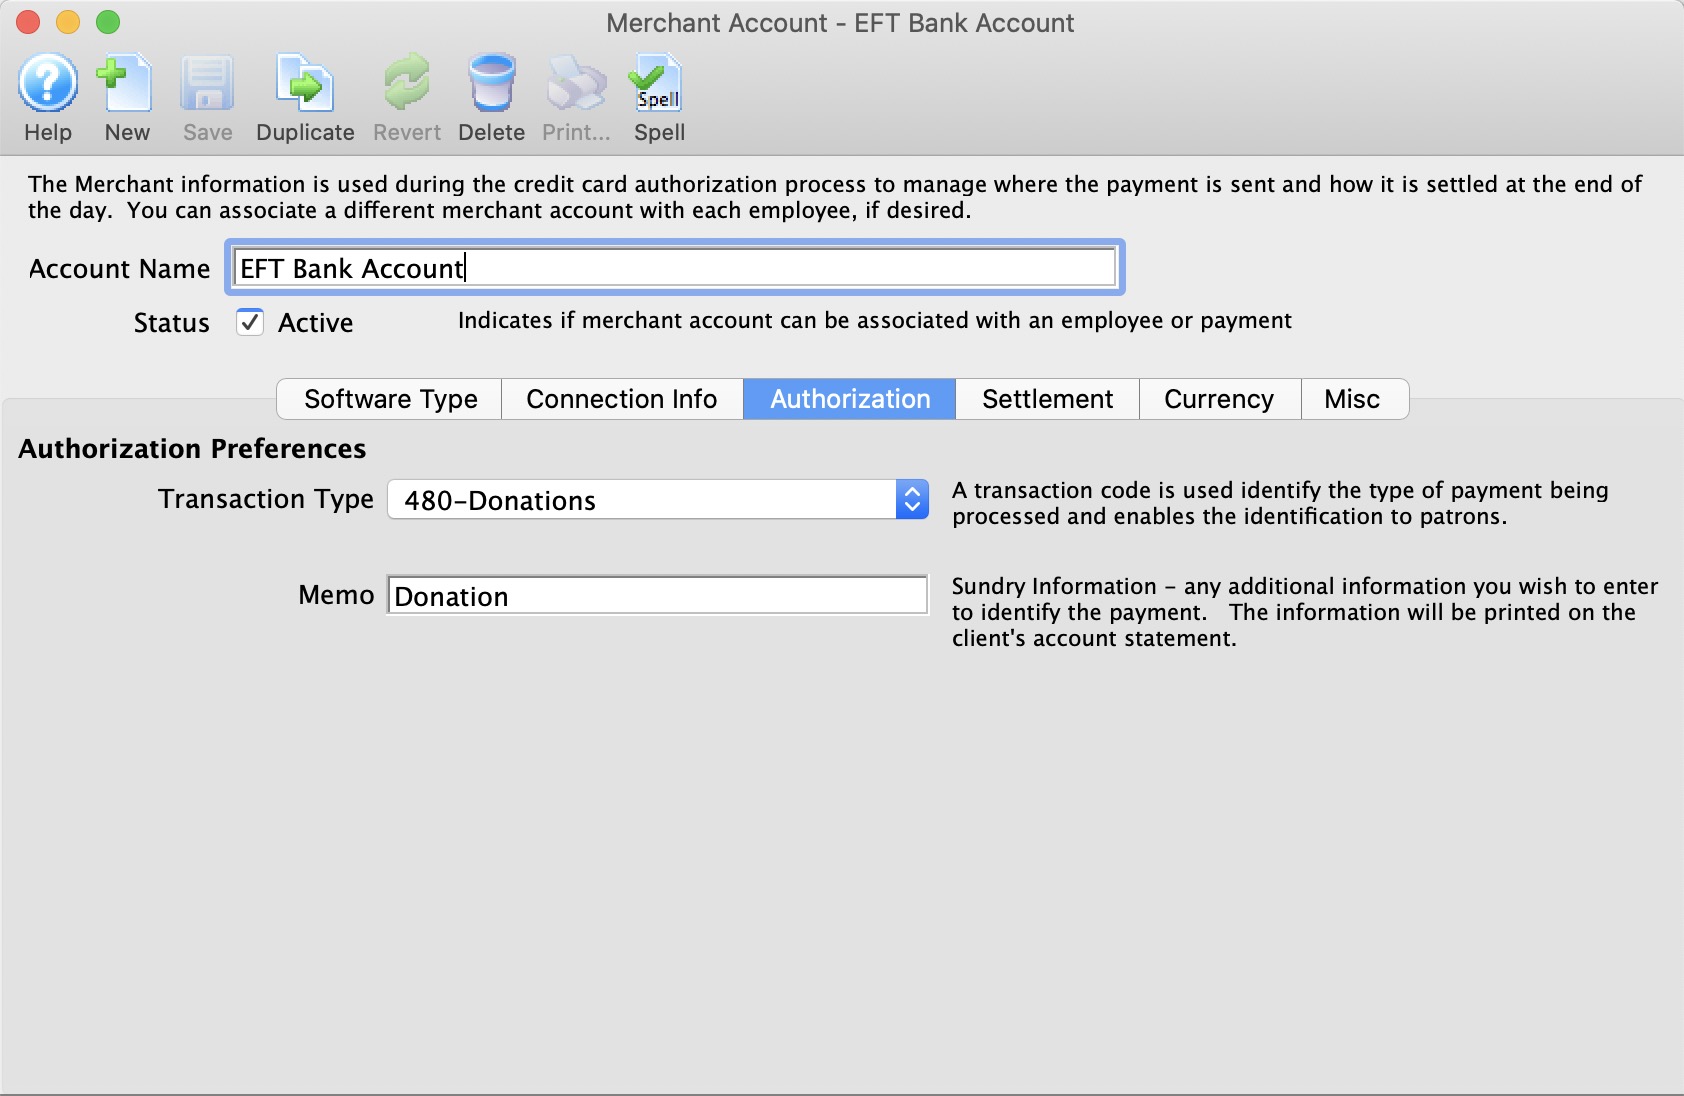
| Transaction Type | A transaction code is used identify the type of payment being processed and enables the identification to the patron. This code may appear on patron's bank statements. |
| Memo | Additional information to identify the EFT payment. This information may appear on patron's bank statements. |
Settlement
Parts of the Merchant Account - Settlement
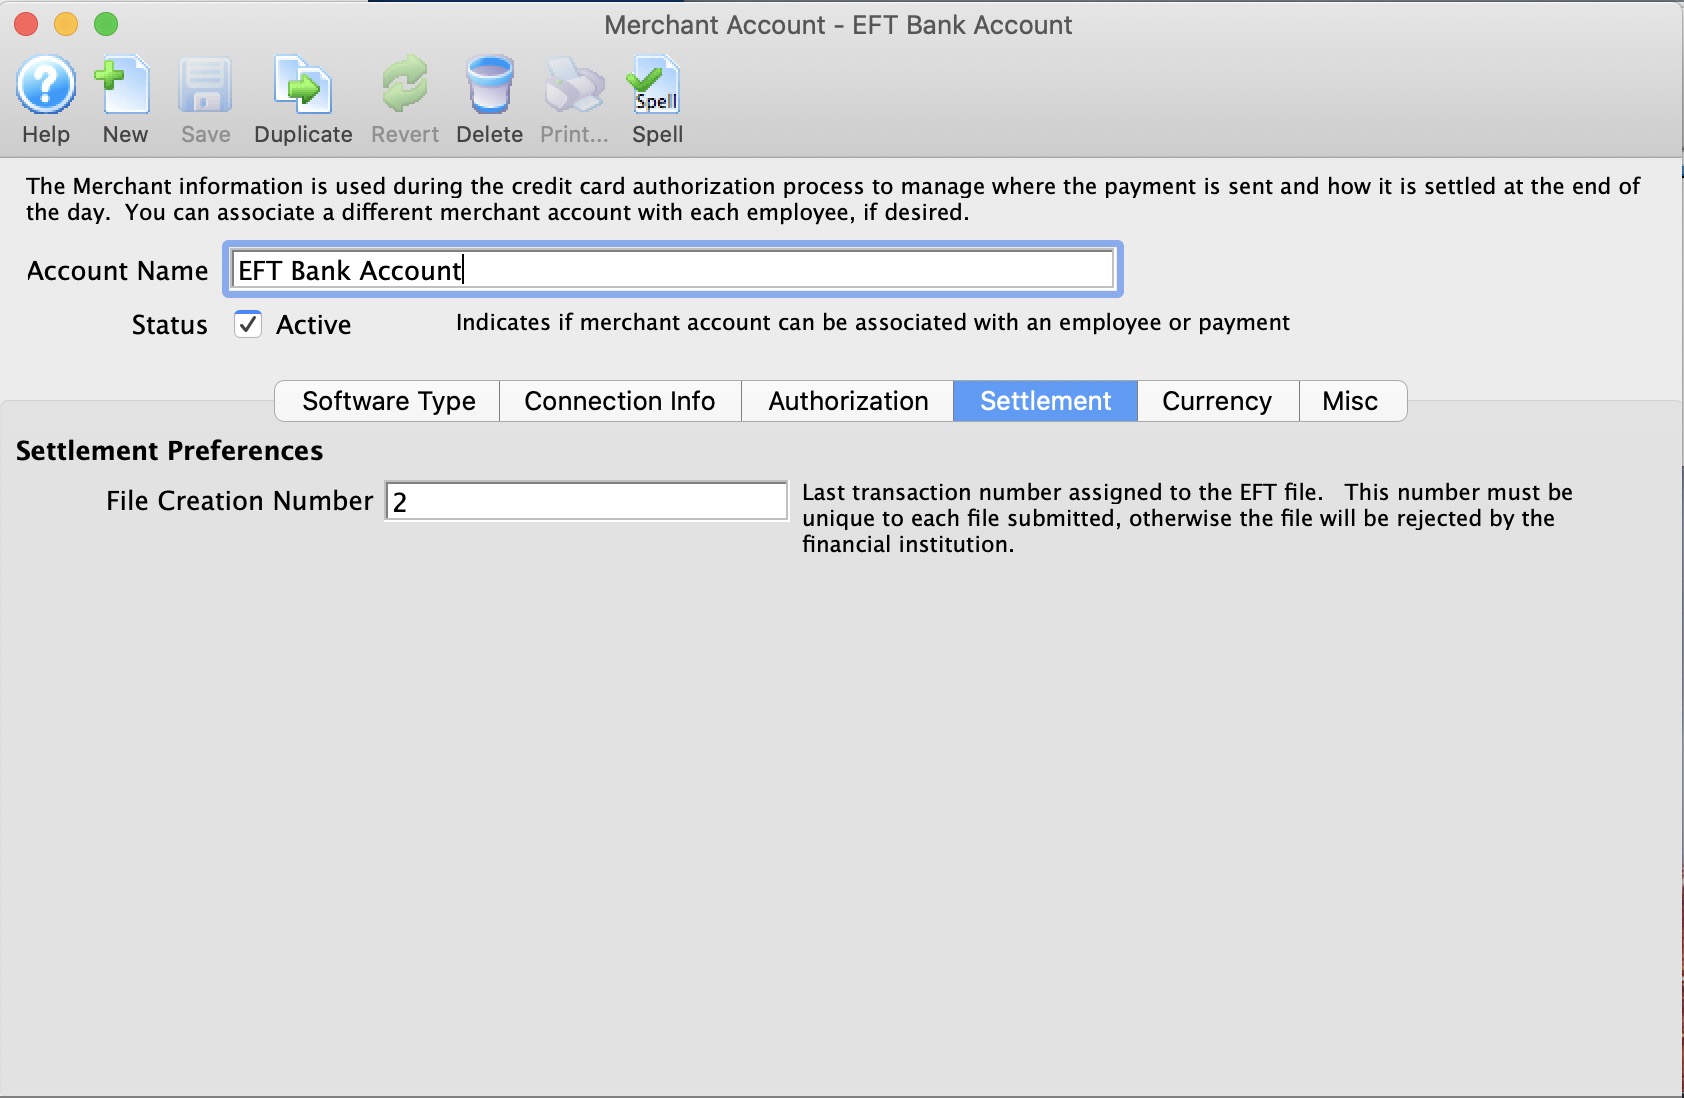
| File Creation Number | Last transaction number assigned to the EFT file. This number must be unique to each file submitted, otherwise the file will be rejected by the financial institution. |
File Creation Number Requirements:
- This number must begin at 0001 for all new accounts. This implies, leave the field empty when the merchant account is created or when you're ready to do your first EFT File creation.
- If a file creation number is skipped for any reason, your bank may reject the entire EFT file from processing.
- A file creation number can never be repeated.
- When the file creation number gets to 9999, the next number will be 0001. (I know, this breaks the rule above, but as we know, all rules are meant to be broken in special situations)
Currency
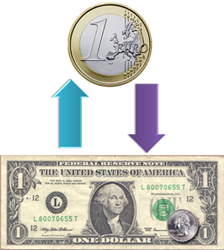
Normally, EFT accounts are in the same currency for the country you reside in. If you are able to process EFT Payments in another currency, then you need to know what that is. And it needs to be in your currency exchange table. When an EFT Payment is processed Theatre manager will:
Setup on this tab is particularly important if you are accepting foreign currencies in your box office. Click here for more information.
For more information about setting up Currency Exchange details and rates, click here.
Parts of the Merchant Account - Currency
Currency Country |
Select the desired country from the Currency Country drop down. |
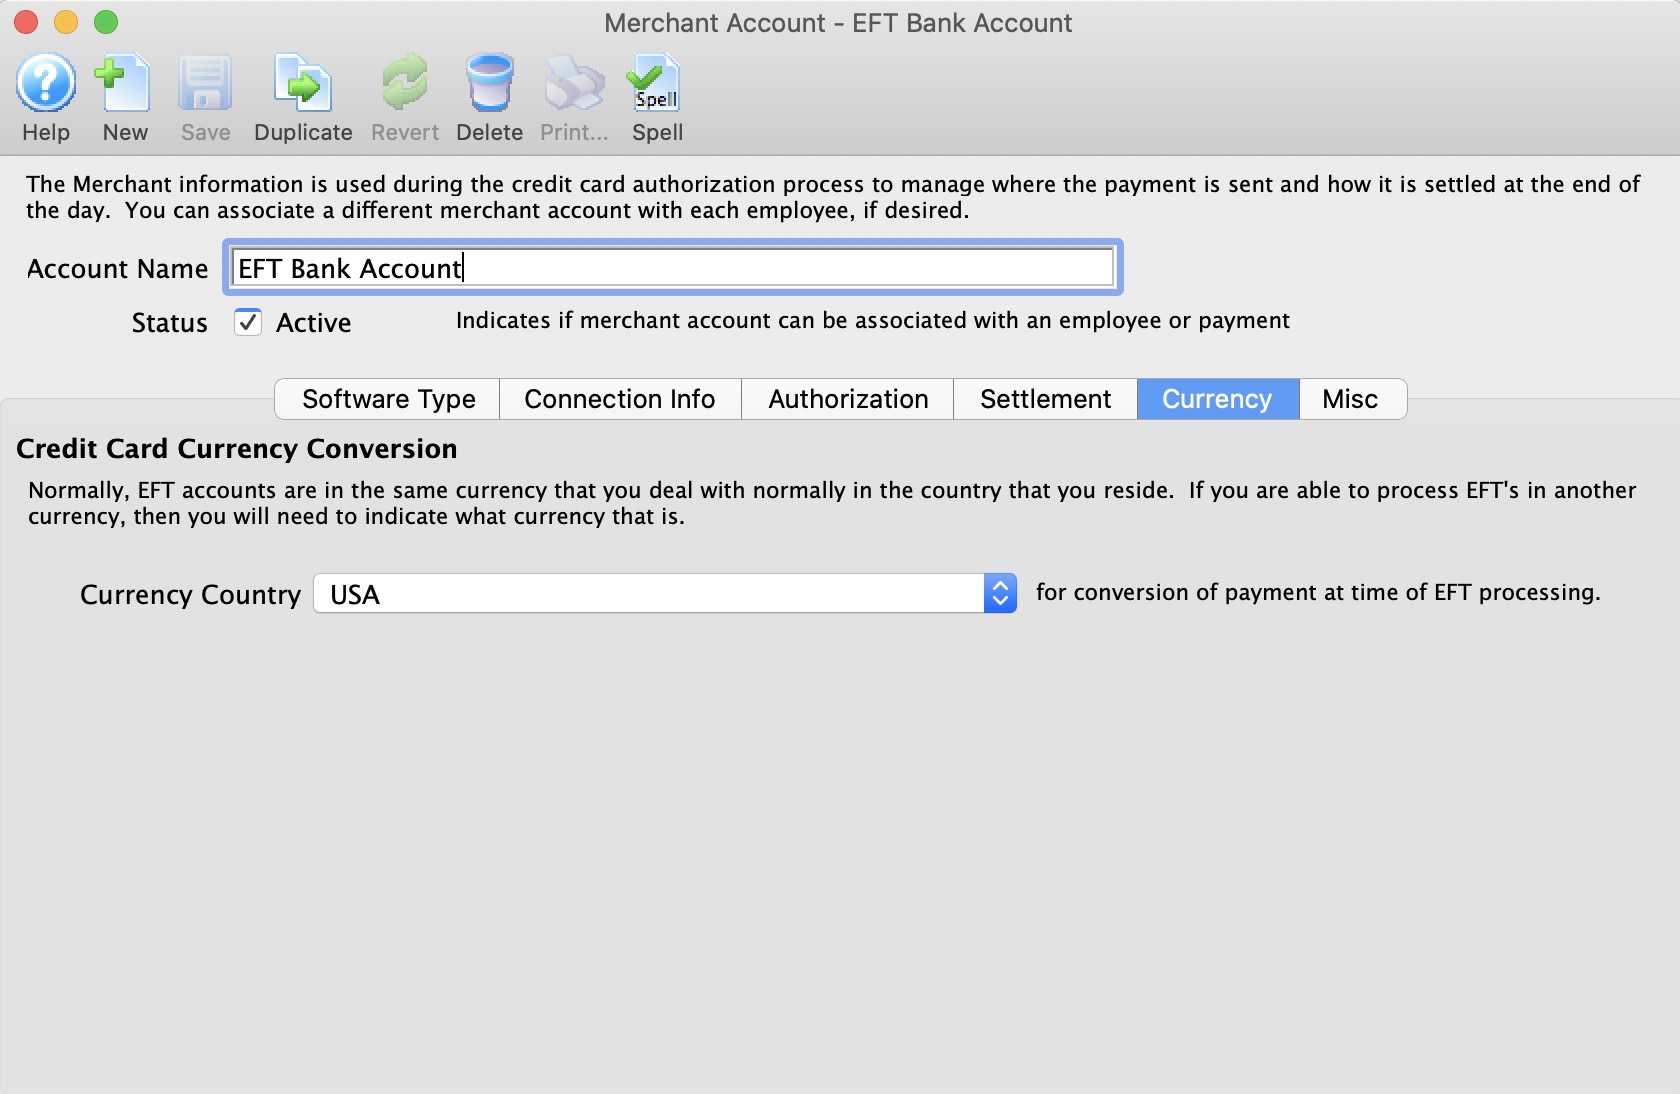
Miscellaneous
Parts of the Merchant Setup - Miscellaneous
The miscellaneous tab is used to provide contact information for your merchant provider or bank representative. Please put information into these fields so that your staff will know who to contact in case of error messages from the merchant provider.
Contact Person |
Enter the name of the Merchant Contact person when an error occurs with the EFT file submission to the bank. |
Phone Number |
Enter the phone number of the contact person |
Enter the e-mail address of the Contact person |
|
Opens an email to be sent to the address listed |

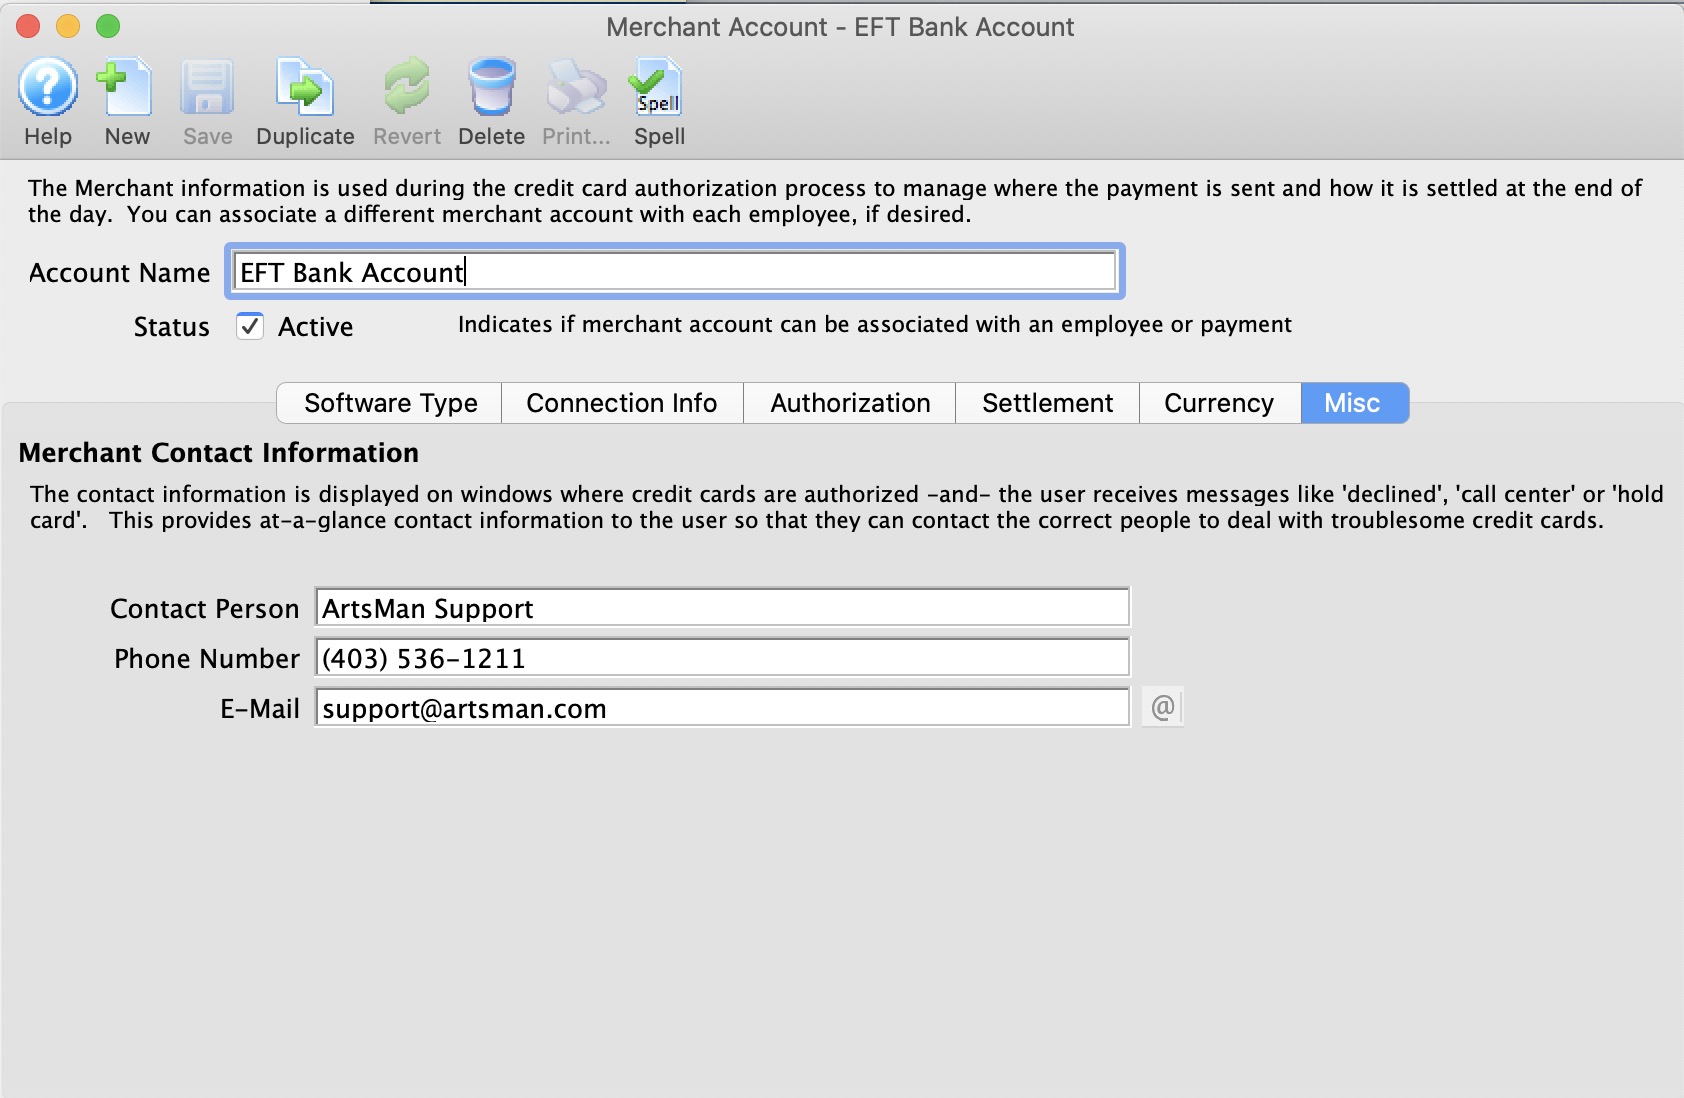
Payment Method Setup for EFT
EFT Payment Method Setup
- Create a new Payment Method in the Payment Methods Code Table.
- Set the Payment Type as E.F.T.
- Set the Merchant Account # to be the merchant account created as the Server Software type Electronic Funds Transfer (EFT) Service.
|
EFT Payment methods are available at the Box Office and Development only. |
|
You may want to change the GL Account # associated with the EFT payment method from using the standard “Bank Account-Chequing” (the assumption that it made it into the bank on the same day), change it to have its own account number based on a Clearing Account, or "A/R-EFT Clearing from Bank”. This way, if you want to ensure that GL account for “Bank Account-Chequing” is only updated when the $$ actually processed by the bank, you can monitor the bank statements, and manually create a GL Entry moving the funds from the clearing account to the “Bank Account-Chequing” when the bank has transferred over the funds. |
Employee Setup for EFT
EFT Employee Function Setup
- Edit the Employee(s) who will create the EFT File from Theatre Manager.
- Enable Create EFT bank transmission file in the functions tab under the Accounting options area for those employees who will be allowed to create the EFT File from Theatre Manager.
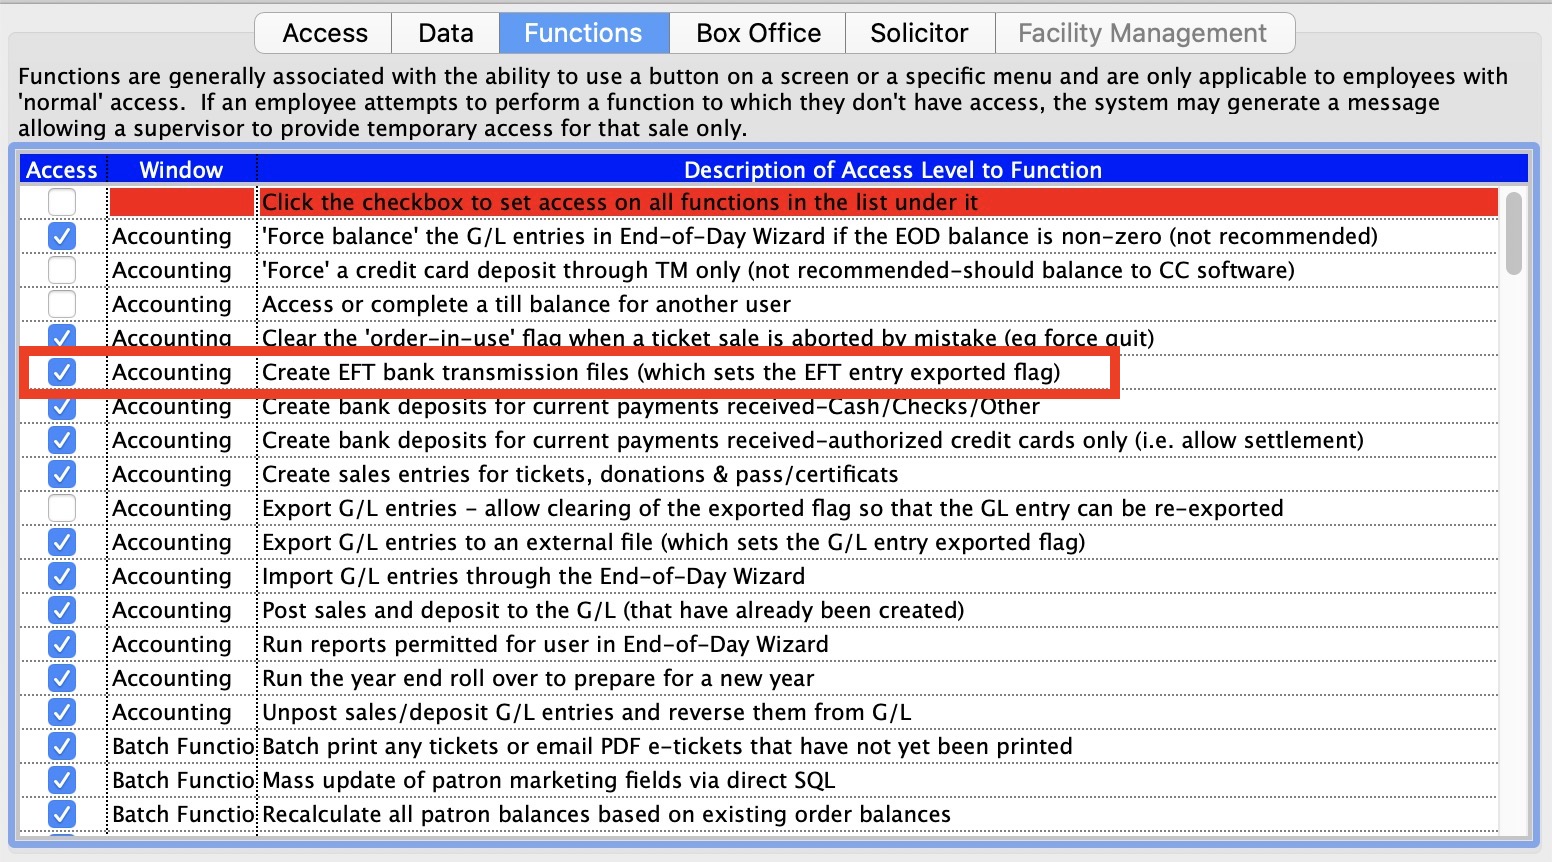
|
The employee who is able to create the EFT bank transmission files can be a different person from who may actually submit the file for processing with the bank. This allows the box office to prepare the file and someone else (i.e. the accountant or box office manager) to submit the file to the bank for processing. |
Creating an EFT Payment
EFT payments can be created:
- through the payment window
- through the dated payment window
- for Recurring Donations
- for Auto-Renewal Season Subscriptions
Creating an EFT Payment (Canada)
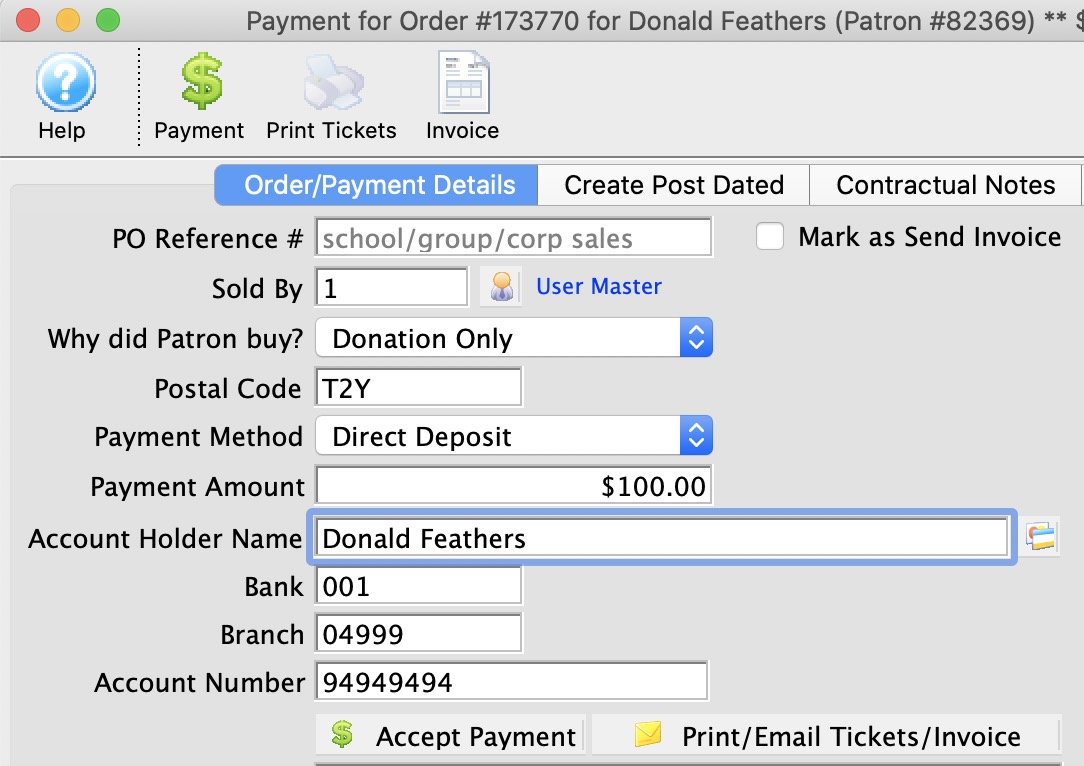
Parts of the EFT Payment Fields (Canada)
| Account Holder Name | The registered name on the patron's bank account |
| Bank | The bank/institution number of the patron's bank account. |
| Branch | The bank/institution branch number of the patron's bank account. |
| Account Number | The account number of the patron's bank account. |
(formatted as) Bank - Branch Transit - Account Number
Creating an EFT Payment (USA)
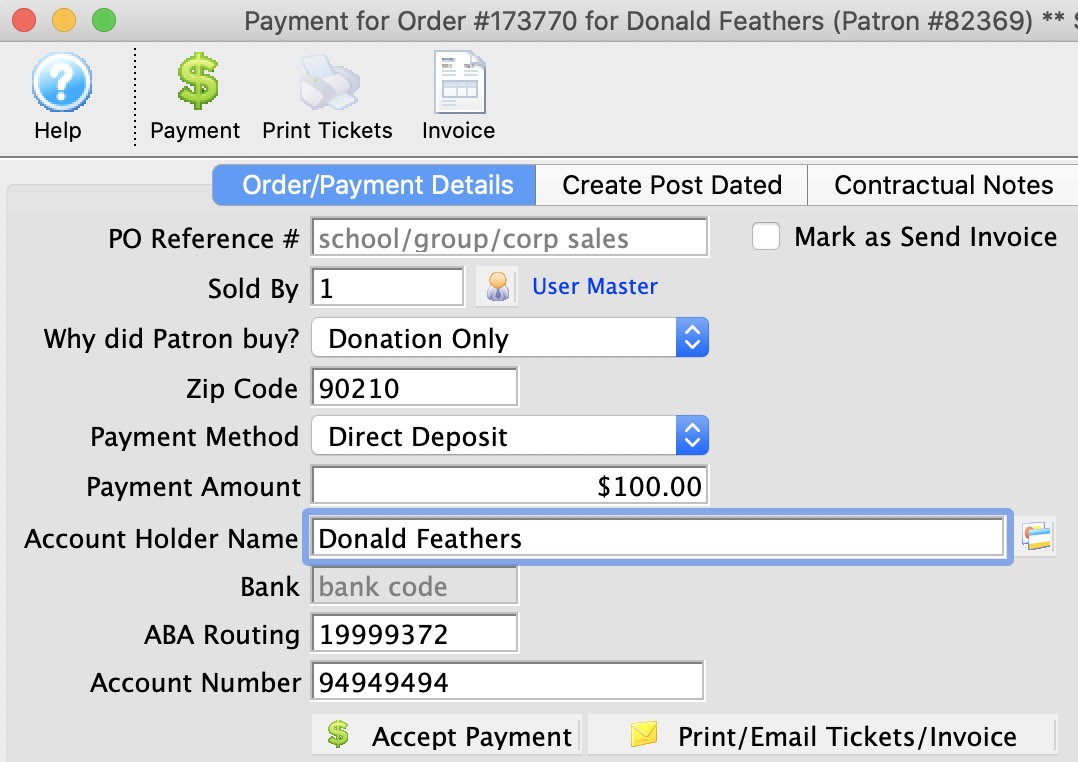
Parts of the EFT Payment Fields (USA)
| Account Holder Name | The registered name on the patron's bank account |
| Bank | Not Required. |
| ABA Routing | The bank/branch ABA routing number of the patron's bank account. |
| Account Number | The account number of the patron's bank account. |
(formatted as) Bank Transit Routing Number - Account Number
Editing an EFT Payment
Editing an EFT Payment follows the same rules as editing a non-credit card payment.
If the payment hasn't been deposited, it can be deleted and then re-entered.
If the payment has been deposited, it can be reversed and then re-entered.
Deleting an EFT Payment
Deleting an EFT Payment follows the same rules as deleting a non-credit card payment.
If the payment hasn't been deposited, it can be deleted.
If the payment has been deposited, it can be reversed.
Depositing EFT Payments
During the EOD deposit process, there is a prompt allowing to optionally ‘look for future’ EFT payments to include into the current deposit.
Case example assumptions:
- July 7 is today’s date.
- July 15 is your set of monthly EFT submissions.
By default, the EFT date will also be the current date (ie. July 7).
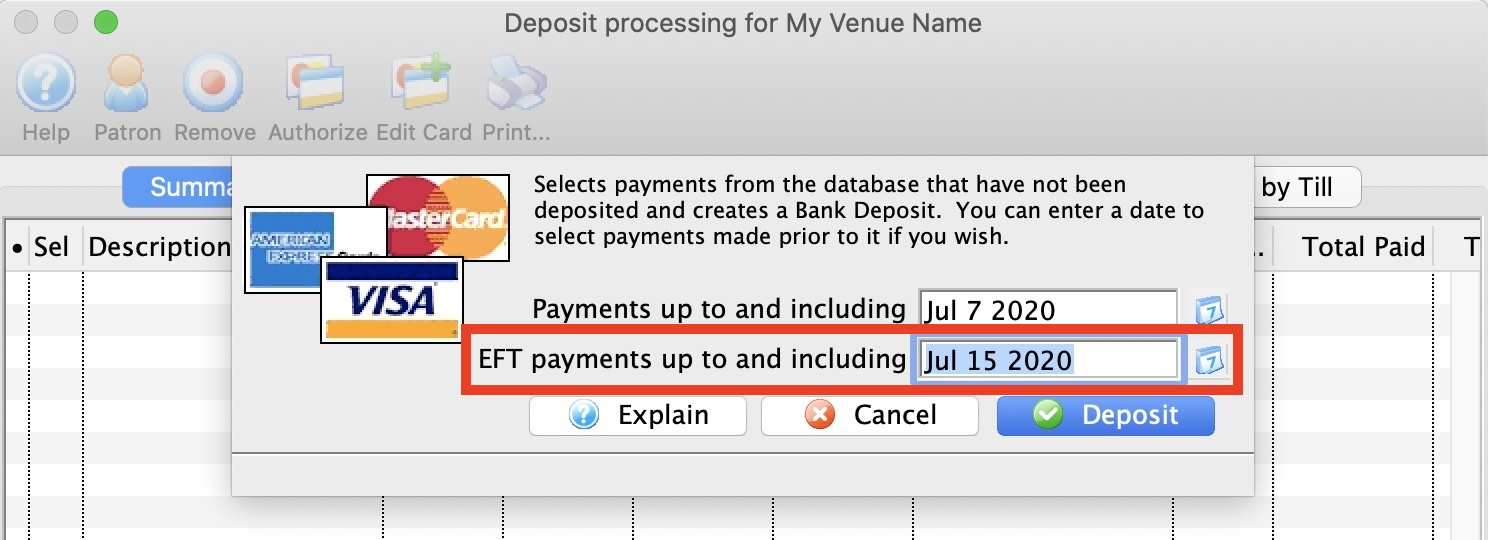
On July 7th or whenever you choose to during the month, you can set the EFT Payment date to be July 15. The deposit process will then include the July 15 EFT payments into the current deposit. It will ignore any other future dated payments (i.e. Cheque, Visa, MasterCard). After the future dated EFT’s have been deposited, you'll be able to create your EFT file for the minimum 2 business days in advance requirement.
Create EFT File for Submission
The process to create the EFT file for submission
- Complete your Sales / Deposit / Posting as normal through the End-of-Day Wizard. Deposit the EFT payments just as you would with cash.
- Run your EOD reports as normal.
- On the Reports screen, click the ‘Export EFT’ button.

- Only payments that have been posted to the General Ledger (meaning you need to complete the EOD process first), will be included in the EFT file.
- Once an EFT file is created for a set of payments, those payments are flagged and will not be part of any other EFT file.
- Choose the location of where the EFT file is to be created.
- The EFT file will now be created.
At this stage, Theatre Manager has completed its role.
- Submit the EFT file to your financial instituation's banking system for processing.
|
|
 |
Treat the EFT file with a high regard for security. It contains your company and patron's bank account information. We strongly recommend avoiding emailing this file whenever possible. |
|
The EFT file can be created up to 2 weeks in advance within Theatre Manager of the actual transfer date. Ideally, you would like to wait for a closer date to when you will actually submit the file for processing:
|
|
After the EFT file is created for a set of payments, a flag is set within Theatre Manager to avoid re-creating another EFT file using those same payments. This avoids accidentally creating another EFT file with the same set of payments resulting in multiple transfers of funds from the patron’s bank account.
Meaning, once the file is created, there is no method to automatically ‘undo’ or 're-create' the file. In a situation where you need to re-create the file or you somehow deleted the file, you will need to contact ArtsMan so we can assist you to use those payments set properly to be included in another EFT file. |
Submit EFT File for Processing
The EFT file must be manually submitted through your bank's secure web portal, as such it is the responsibility of the organization to submit the EFT file. Theatre Manager will prepare, track, and create the EFT file, but beyond that, the remainder of the process needs to be completed by the organization.
Typically, the steps will be:
- Log into your bank's secure web portal using an account id and password
- Navigate through the menu options to the EFT Upload File option
- Click the upload file button
- Choose the EFT File that was created from Theatre Manager.
- Click upload -or- submit -or- the button selection to confirm the upload of the file.
|
When the file is uploaded to the bank, the bank will perform a pre-process file validation on the contents of the file. If any initial processing errors are noted, a failure message should be provided to you either directly from the web portal or via an email to the primary account holder registered with the bank account. |
|
When the file is scheduled for processing, any post-processing errors should be provided to you either directly from the web portal or via an email to the primary account holder registered with the bank account. |
|
It's the responsibility of the venue to take corrective action if there are any errors provided by the bank when processing the file. Corrective action will depend on what the error is. |
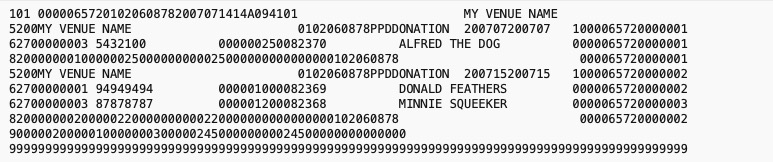
EFT File Format Examples
Most commonly there are five different record types that define an EFT File containing the EFT Payment transactions.
These record types include:
- File Header Record - This record designates the physical file characteristics and identifies the immediate origin and destination of the entries contained with the file. In addition, this record includes date, time, and file identification fields used to uniquely identify the file.
- Batch Header Record - This record identifies the originator and briefly describes the reason for the transactions. This record also identifies the settlement bank account and other transaction processing controls. The Batch Header Record indicates the effective entry date of all transactions within the batch. The information contained in the record applies uniformly to all subsequent Entry Detail Records in the batch.
- Entry Detail Record - The Entry Detail Records contain the information necessary to identify the patron's bank account (i.e. financial institution, account number, patron's name, and the debit or credit amount).
- Batch Control Record - Each batch control record contains the counts, hash totals, and total dollar controls for the preceding detail entries within the indicated batch.
- File Control Record - This overall file control record contains the dollar, entry, and hash total accumulations for all Batch Control Records in the file. This record also contains counts of the number of records and the number of batches within the file.
CIBC EFT Format
CIBC Layout - 80 character file format
Used by:
- 010 - Canadian Imperial Bank of Commerce (CIBC)

CPA-005 Layout
Canadian Payments Association CPA-005 Layout - 1464 byte file format
Used by:
- 001 - Bank of Montreal (BMO)
- 003 - Royal Bank of Canada (RBC)
- 004 - Toronto-Dominion Bank (TD Canada Trust)
- 006 - National Bank of Canada
- 016 - HSBC Canada
- 030 - Canadian Western Bank
- 039 - Laurentian Bank of Canada
- 219 - Alberta Treasury Branch (ATB)
- 540 - Manulife Bank
- 809 - Credit Union British Columbia


Central 1 Credit Union EFT Format
Central 1 Credit Union Layout - 1464 character file format
Used by:
- 828 - Credit Union Ontario
- 879 - Credit Union Manitoba
- 889 - Credit Union Saskatchewan
- 899 - Credit Union Alberta


NACHA EFT Format
National Automated Clearing House Association - NACHA Layout
This is the format for the USA Banks using the National Automated Clearing House Association (NACHA) for processing Automated Clearing House (ACH) transactions.
ScotiaBank EFT Format
ScotiaBank Layout - 105 character file format
Used by:
- 002 - Bank of Nova Scotia / ScotiaBank

FAQ Questions for EFT
There are a number of common questions that are asked when first starting to use EFT Payments. The goal of this section is to help find answers to those common questions to ease your mind on a specific situation you're experiencing.
Do I need to create an EFT file each time I deposit an EFT Payment?
No. You can deposit EFT payments at any time. When you choose to create the file, Theatre Manager will automatically include all the EFT payments that have not been previously submitted for transfer.
Keep in mind that there are limitations to past and future-dated transfers. If the EFT payment falls out of the date range restrictions set by the bank when the EFT transaction is processed, it will be rejected by the bank. Your bank will notify you of such rejections.
Do we have to date the payments 2 business days prior to the file processing date?
Does this mean we have to date the payments 2 business days prior to the 15th in Theatre Manager and I have to be in the office for those days?
No. You may continue to date all the payments in Theatre Manager as the 15th of the month as you do now.
Referring to this 2 day requirement…. some banks require 2 days as the minimum days in advance of the withdrawal date in order for them to process the withdrawals on your specified date. You are able to submit it 3 days in advance, or 4, or 5, or 6, or 7, etc. Meaning, you can submit the EFT file easily when you're in the office without making special trips to be there. In fact, some banks allow you to submit them 45 days in advance — but currently, Theatre Manager only allows 14 days in advance as a safety measure.
Let's say you create the export file on the night of July 11th. The EFT file will have a Creation Date of July 11, while all the payments within the file will still have a Transaction/Processing of July 15. This allows you to submit the file on July 12 or 13 or 14. The rule from the bank is, if the Transaction/Processing date falls on a weekend or holiday, the transaction will be processed on the next business day. In this example, as July 15 is a Saturday, the transactions will be processed on Monday July 17 from the bank.
As a reminder, if the file was created on July 11th, but for whatever reason you didn’t make it into the office until July 17th, all is still fine. You can submit that same EFT file upon your return and the transactions will be processed within the next 2 business days.
Note: There is a limit to this… you have up to 7 days after the File Creation date to submit it for processing. After 7 days, the file will be rejected by the bank. So in the example above, you would need to submit on July 17 upon your return to keep the file ‘valid’.
If something happens and the 17th is missed (as an example), no need to worry - let Arts Management Support know and we’ll assist in getting the EFT file formatted so you can submit it again.
How is the EFT File external name derived?
When the EFT File is created, its name was automatically set to ThePortTheatre20190514EFTElectronicFundsTransfer0021 Why is there additional information at the end?
Yes, the full file name is determined during the export process, not at the beginning. When you first start the process, you're provided the leading description and the trailing description is auto extended based on the payment method description and file creation sequence number.
The ThePortTheatre starts from the Short Name in company preferences.

The 20190514 is based on the current date in the yyyymmdd format.
The EFTElectronicFundsTransfer comes from the payment method description in code tables
 .
.
The 0021 is the file sequence number from the merchant account setup.
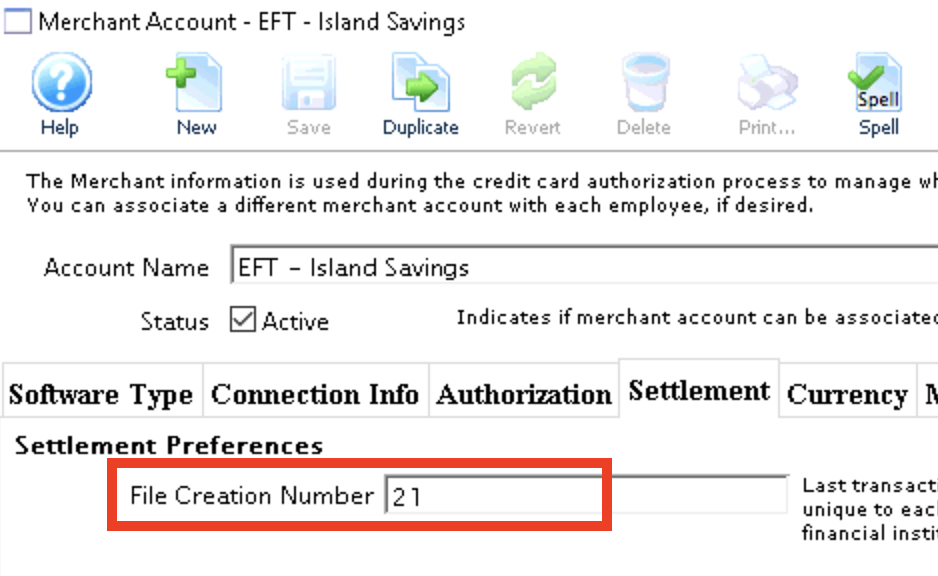
put them altogether (after removing spaces and special characters) you get ThePortTheatre20190514EFTElectronicFundsTransfer0021 with no 3 character file extention.
|
The EFT file created by Theatre Manager will not have a 3 character file extension.
Financial Instituations will reject the file if it contains a file extension. The EFT File is specifically created to conform to the specificiations provided by the Clearing House Association to successfully process EFT transactions. |
|
The EFT File external name is specifically named to allow for mutliple EFT merchant accounts and/or multiple EFT Payment Methods to have their EFT Files created at the same time. In most situations, you only have 1 file to submit. Potentially in other specifically designed and setup situations, there may be a desire to have 2 or more different files to submit. The naming convention allows for easily identifing which EFT Payments belong to each Merchant and/or Payment Method. |
How often can I sumbit an EFT file for processing?
How often can I sumbit an EFT file for processing?
I forgot to create the EFT file and submit it to the bank!
No problem. Create the EFT file during your next EOD process. Theatre Manager will automatically include all the EFT payments that have not been previously submitted for transfer, allowing you to submit the file for processing.
Keep in mind that there are limitations to past and future-dated transfers. If the EFT payment falls out of the date ranges, it will be rejected by the bank. Your bank will notify you of such rejections.
Is there a security setting on who is able to create the bank EFT file?
Yes. In the Employee Security settings for available functions, enable ‘Create EFT bank transmission file’ within the Accounting area.
This allows you to control the employees who are able to create the export file.
I’m leaving on vacation, can I create the EFT file in advance?
Yes. Theatre Manager allows you to create the EFT file 2 weeks in advance of the EFT payment date. This allows you to submit the EFT file to the bank before you leave on vacation, allowing the EFT payments to still be transferred to your company’s bank account on the correct transfer date.
My bank requires the EFT file to be submitted 2 days in advance
During the EOD deposit process, there is a prompt allowing to optionally ‘look for future’ EFT payments to include into the current deposit.
Case example assumptions:
- July 15 is your set of monthly EFT submissions.
- July 13 is today’s date.
By default, the EFT date will also be the current date (ie. July 13).
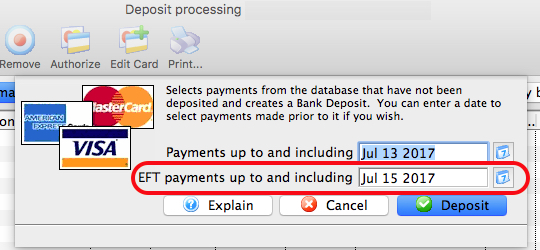
On July 13th or whenever you choose to during the month, you can set the EFT Payment date to be July 15. The deposit process will then include the July 15 EFT payments into the current deposit. It will ignore any other future dated payments (i.e. Cheque, Visa, MasterCard). After the future dated EFT’s have been deposited, you'll be able to create your EFT file for the minimum 2 business days in advance requirement.
When I pull the EFT payments in advance, they show in the current deposit reports
Case example assumptions:
- July 15 is your set of monthly EFT submissions.
- July 13 is the date that you choose to deposit the July 15 EFT payments.
- July 13 is the date that you created the EFT file for the bank.
The EFT payments will show on your deposit reports on July 13th. That will not change. It needs to show that you included the EFT in the current deposit summary.
Theatre Manager can not have those EFT payments automatically show in the July 15 deposit because Theatre Manager has no idea if the EFT file was submitted on time to the bank for July 15, or if the bank accepted/rejected it, or if the EFT file was submitted on July 16, 17, 20, or 30th instead.
If this is a concern, you may want to change the GL Account # associated with the EFT payment method. Instead of having it as “Bank Account-Chequing” (the assumption that it made it into the bank on the same day), change it to have its own account number based on a Clearing Account, or "A/R-EFT Clearing from Bank”. This way, if you want to ensure that GL account for “Bank Account-Chequing” is only updated when the $$ actually processed by the bank, you can monitor the bank statements, and manually create a GL Entry moving the funds from the clearing account to the “Bank Account-Chequing” when the bank has transferred over the funds.
This works in the same manner as Credit Cards. Even though you settle the credit card batch on May 30th, the actual $$ from those credit card sales may not make it to your bank account for 2+/- business days (or whatever your bank merchant agreements indicate). Those credit card payments will appear in Theatre Manager's May 30th deposit, not in the June 2nd deposit reports.
Where do I alter the starting value of the File Creation Number?
Each EFT file must have a unique and sequential ‘file creation number’. I need to alter this starting value.
The File Creation Number is a 4 digit number set within the Merchant Account information.
In the example above, setting the ‘last transaction number’ to 2, means the next EFT file creation will be 0003.
|
|
Where is the Transaction Code for the EFT Payment Defined?
The EFT file contains a Transaction Code for each payment. Where is this defined?
The 3 digit transaction code is set within the Merchant Account information.
![]()
You're able to choose from a list of acceptable codes determined by the financial instutation.
|
The Memo field ranges between 10 to 15 characters in length depending on your merchant provider definition of this field. It is additional information you can use to identify the payment. This information will be printed on the patron’s account statement. It is meant to be generic in nature and not specific to a patron. |
Why didn't the EFT Payments get into Today's EFT File?
I’m confused as to why the EFT Payments I entered into Theatre Manager today didn’t get created into the EFT File that was created during the End-of-Day Wizard.
Because the deposit entry that was created containing the EFT payments was not posted to the General Ledger. The EFT file creation process will only select deposited payments that have been posted to the general ledger. Creating the deposit is 1/2 way there; the deposit entry needs to be posted too.
In this case, the deposit was completed, but it was not posted to the general ledger.
Why was my EFT File Rejected with an Invalid Transmission Date?
I created the EFT File from Theatre Manager correctly, but when I attempted to submit it for processing with the bank it was rejected with an Invalid Transmission Date?
When the EFT File from Theatre Manager is created, there is a Transmission Date within the File Header Record to indicate when the file was created.
The banks have put in a restriction that if this Transmission Date is in the future or if it is more than 4 days prior to the submission date, the file will be rejected. The 4+/- days varies and is dependent on the bank.
This is a safety feature to protect you from accidentally submitting an old file to be processed again.
Contact ArtsMan Support and we will assist you in recreating the same EFT File again but with a current date so that you can resubmit for processing.