Web Sales Management
The internet sales module has a number of key features to enable a patron to buy from you. You don't need to spend time allocating tickets to another web ticket provider - and, as with all Theatre Manager modules - you control the final cost of all tickets, retain any fees you may wish to add for using the internet, and get the money immediately. Or, as many Theatre Manager users have expressed to us, keep the prices and fees low to facilitate a patron's use of the Internet.
Features and Benefits
The internet sales module has a number of key features to enable a patron to buy from you. You don't need to spend time allocating tickets to another web ticket provider - and, as with all Theatre Manager modules - you control the final cost of all tickets, retain any fees you may wish to add for using the internet, and get the money immediately. Or, as many Theatre Manager users have expressed to us, keep the prices and fees low to facilitate a patron's use of the Internet.
What can a patron do with the web sales module:
- Existing patrons can maintain their name and address information online
- New patrons can add their name and address to the database
- Logon via email address and password
- Both main patron and spouse can login separately and do their own purchases
- Patrons can purchase tickets, passes, gift certificates, make donationsand purchase anything that you currently sell using theatre manager
- Items that a patron purchased are added to a shopping cart and tickets are held on the venue for as long as you like (we recommend 10 or 15 minutes). If the patron has been inactive for that time period or fails to complete the sale, the tickets are automatically released for somebody else to purchase. The box office will see these tickets as 'holds' in their seating maps
- Purchasing tickets will use the 'best seat' feature. As with Theatre Manager, the web module will never leave a single seat - so you won't waste seat inventory to ensure that more customers can be seated without leaving empty seats.
- You decide which events, donations, passes, etc. are available for sale and the patron will only see those you've selected. Payments are made via credit card and appear in the end-of-day wizard. You do not need to do any additional processing when a sale is made over the Internet
- Patrons can elect to add themselves to selected mail lists. This feature is intended for a few mail lists that you wish the patron to have access to. For example, a patron could sign up for 'send me audition notices' or 'advise me of my performance dates' - those kinds of things.
- The internet sales module comes with fully customizable web pages. You can change the look and feel of any web page and integrate it into your existing web site. All you need is an HTML editor (such as Dreamweaver or any number of other page editors).
To try out the Web Module, please check our Test Drive the Demo page for additional information on the technology, performance, security, how to get the Internet modules, etc.
Online Calendars
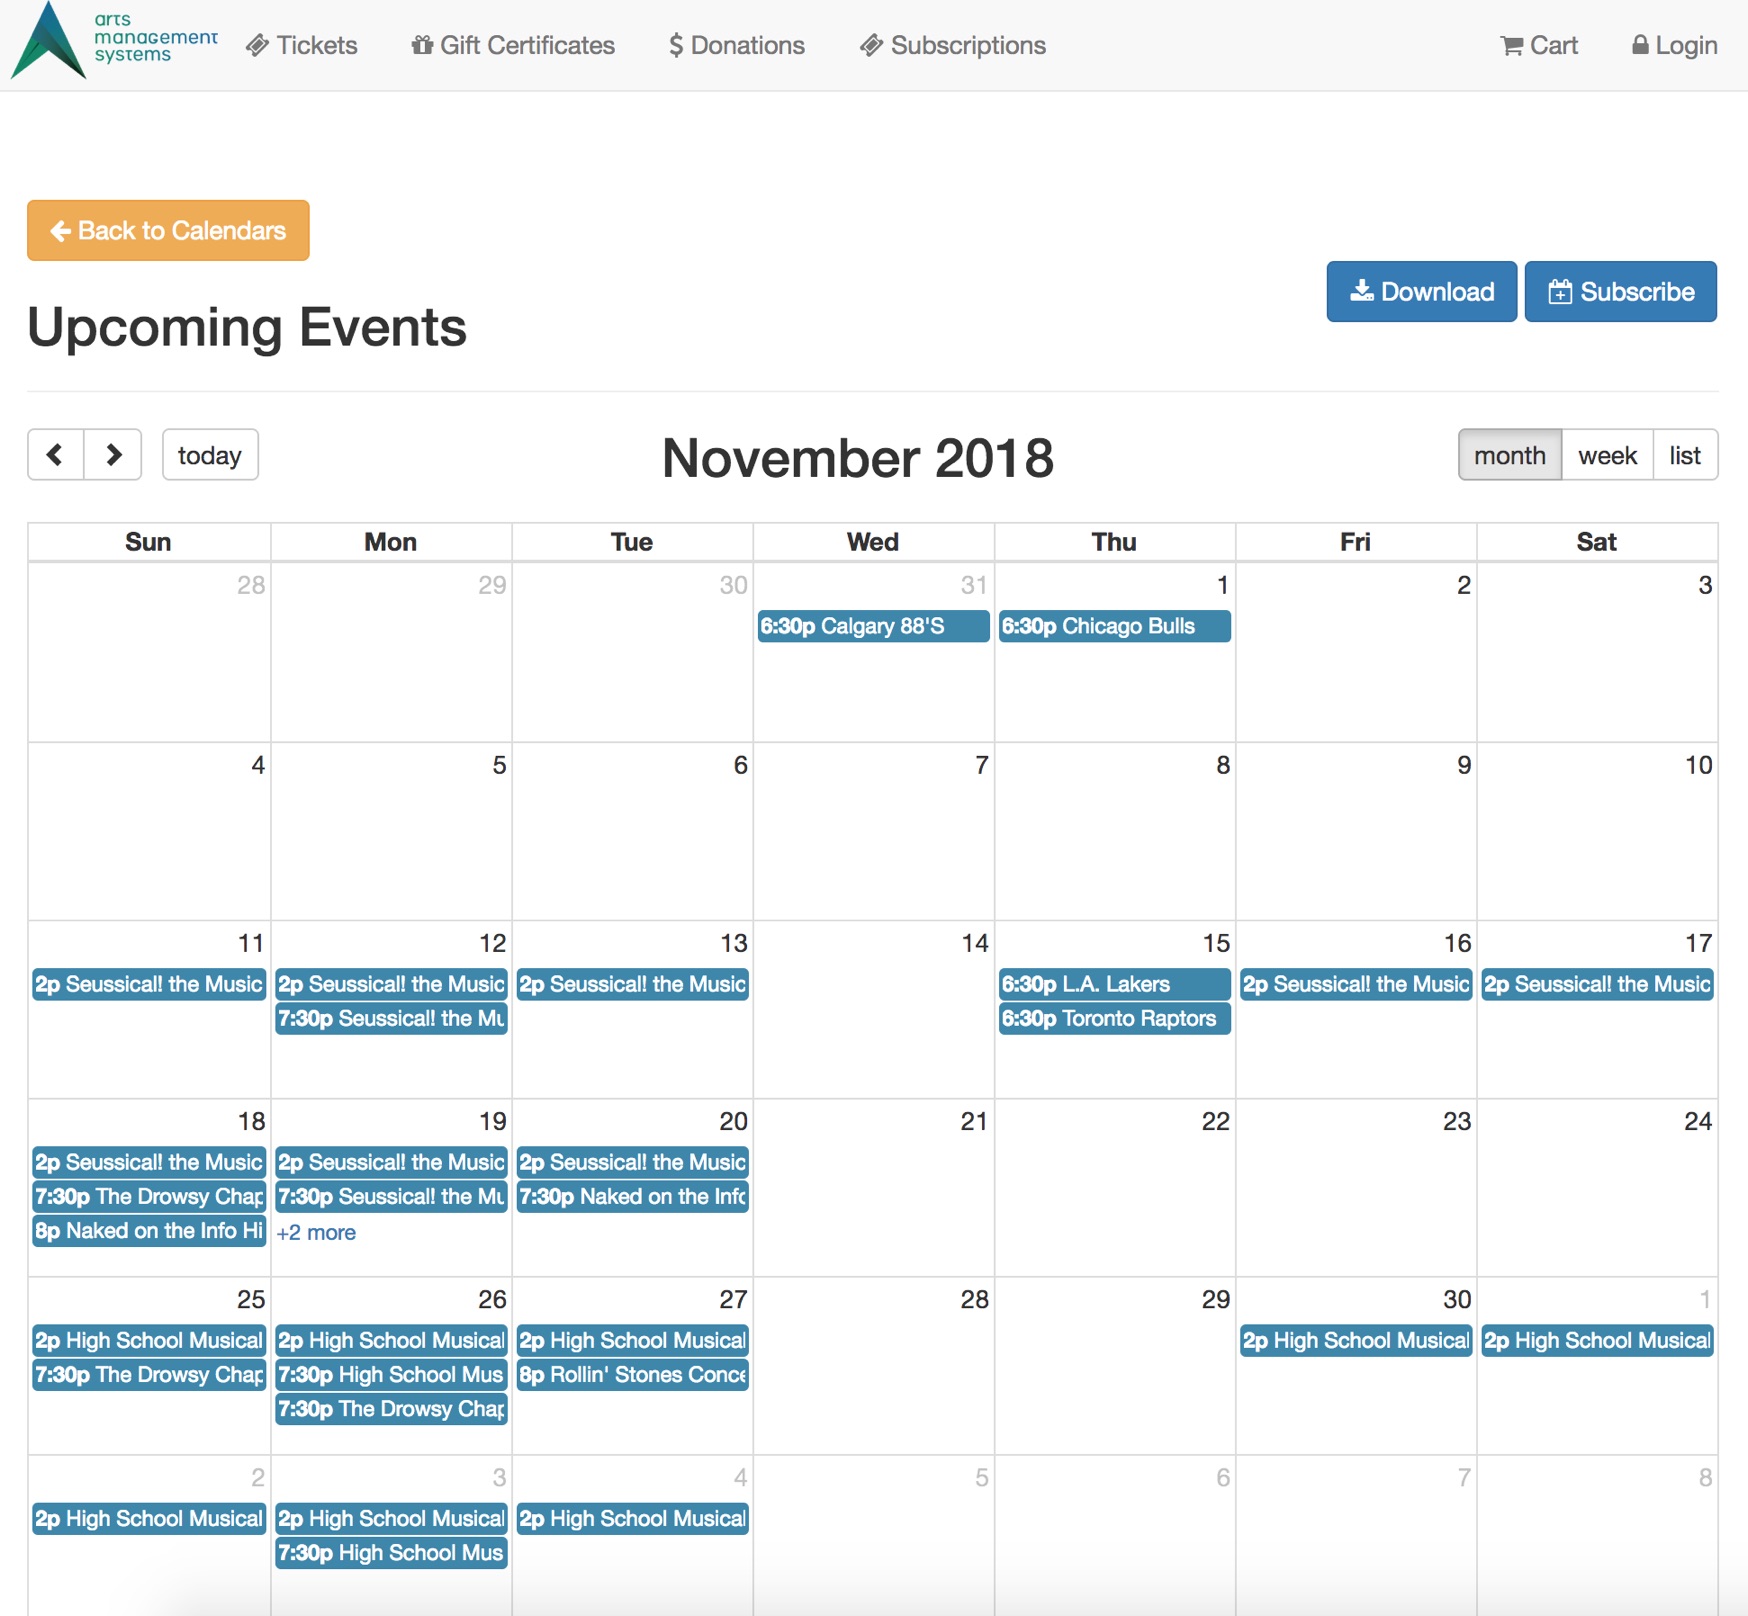
The online Calendar allows you to see Performances, past and present, that you may wish to purchase tickets for, have purchased tickets for our are participating in.
The Upcoming Event Calendar can be accessed through a direct link. It can also be added to the main marketing site using iFrames. The My Upcoming Events Calendar allows a quick view of Performances the patron has purchased tickets to. The My Upcoming Activities Calendar displays upcoming activities the patron is scheduled to participate in.
My Upcoming Activities Calendar
 |
refer to documentation in API section |
My Upcoming Events Calendar
|
refer to documentation in API section |
Upcoming Events Calendar
|
refer to documentation in API section |
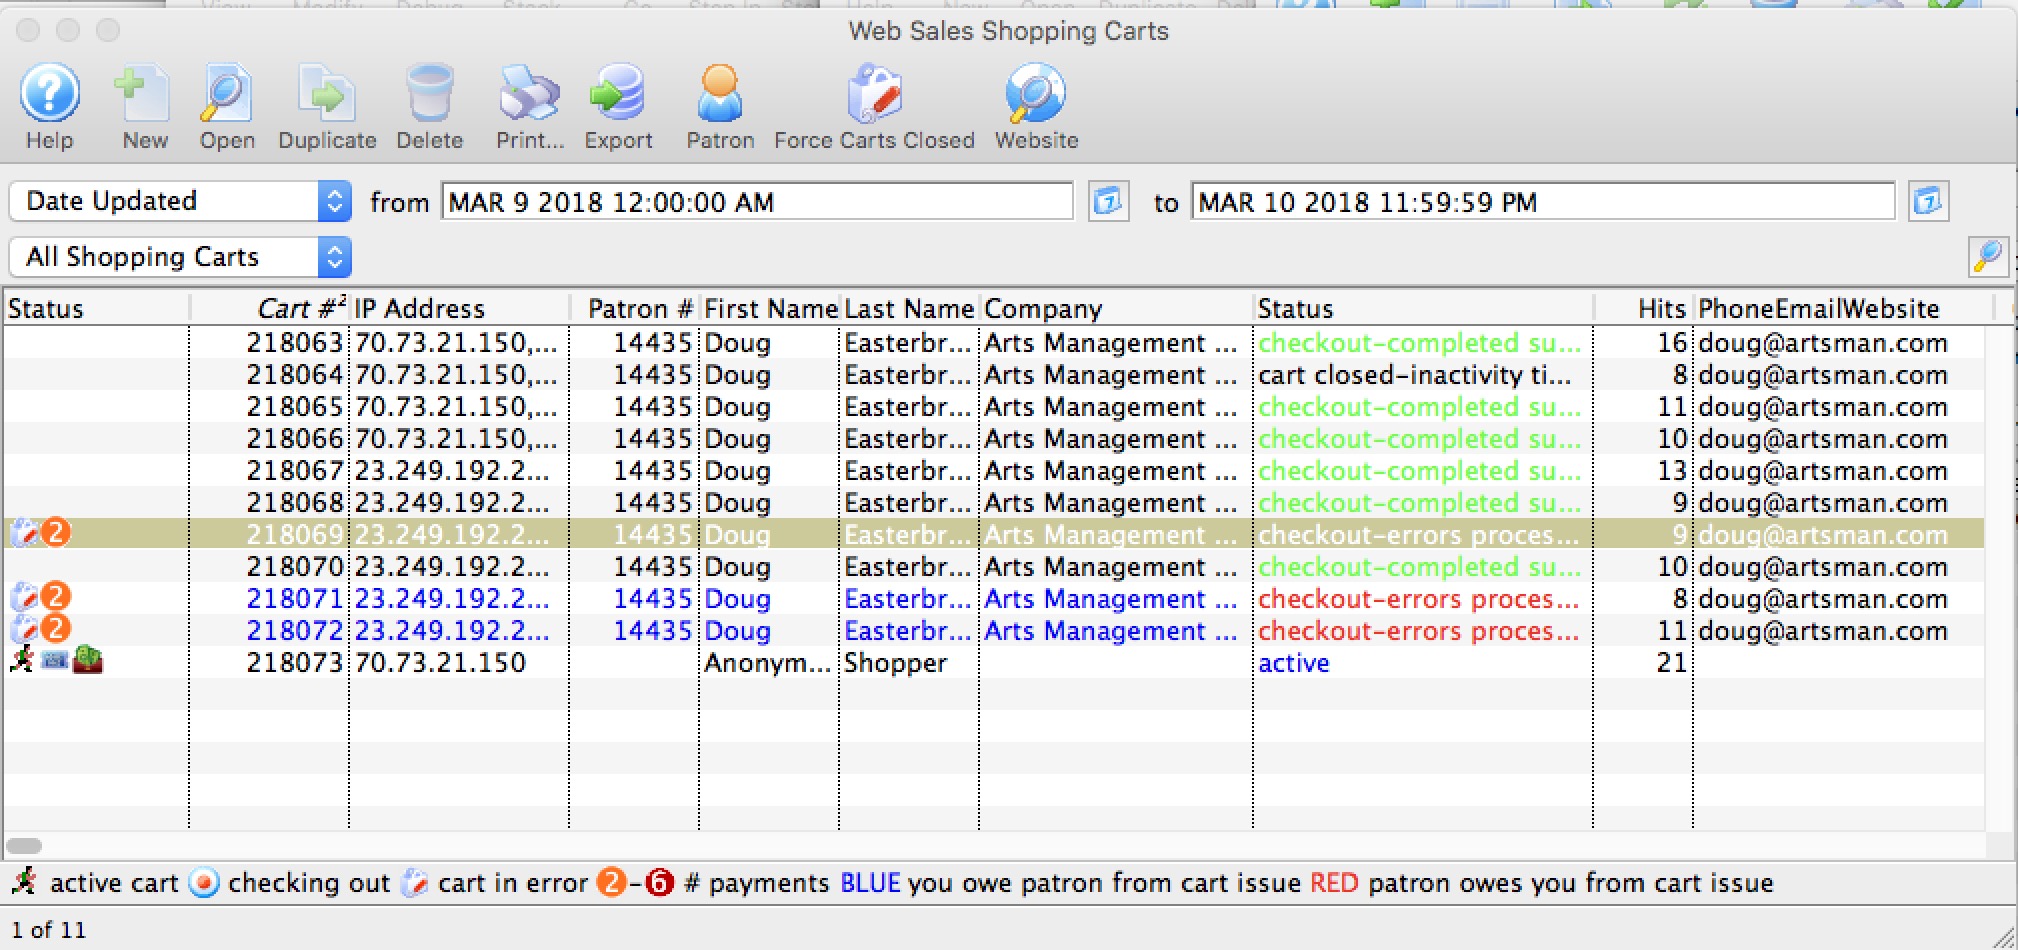
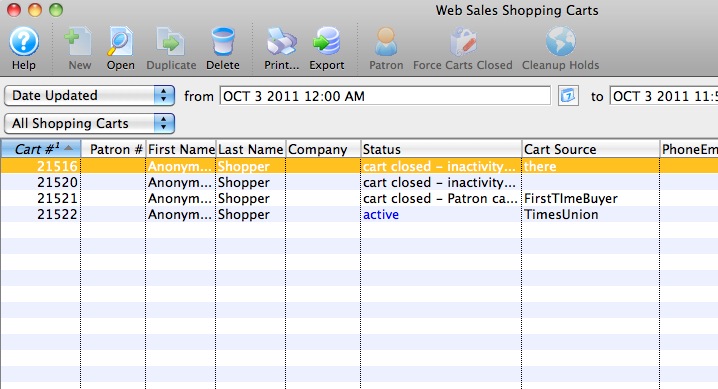
Shopping Carts
- The toolbar - to search for and see all the carts for a specific time range or status
- The patron window - to view all carts for a specific patron on the shopping cart tab
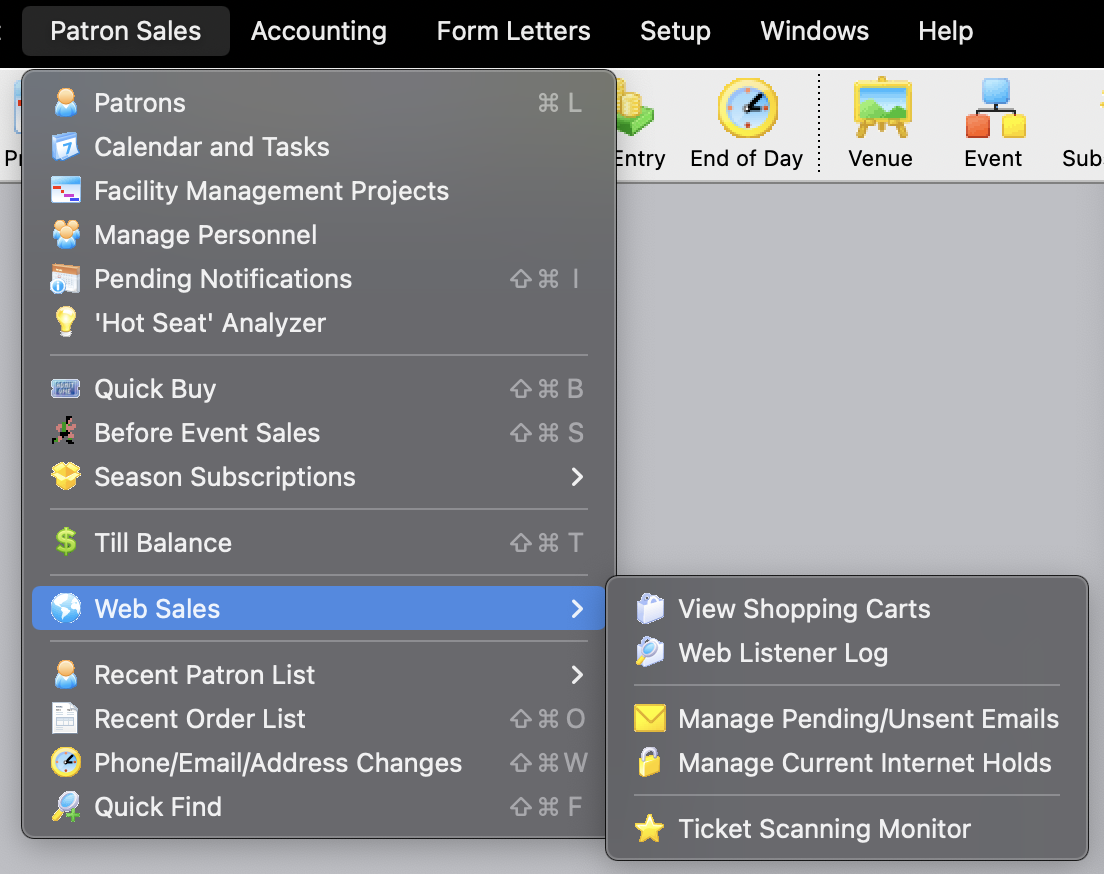
- by using 'Patron Sales ->Web Sales -> Shopping Carts
- is still active and the patron calls for assistance, you can also help them check their cart out manually and take over the sale for them.
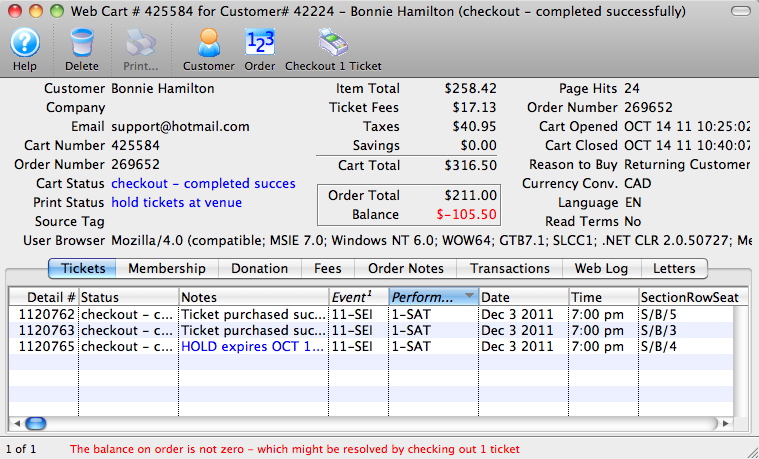
- is completed but there have been some tickets left on hold for some reason, you can also use the detail window to move those held tickets into the patrons record. Carts that are eligible for this are those that are completed, yet have an order balance as per line 1 of the example below.
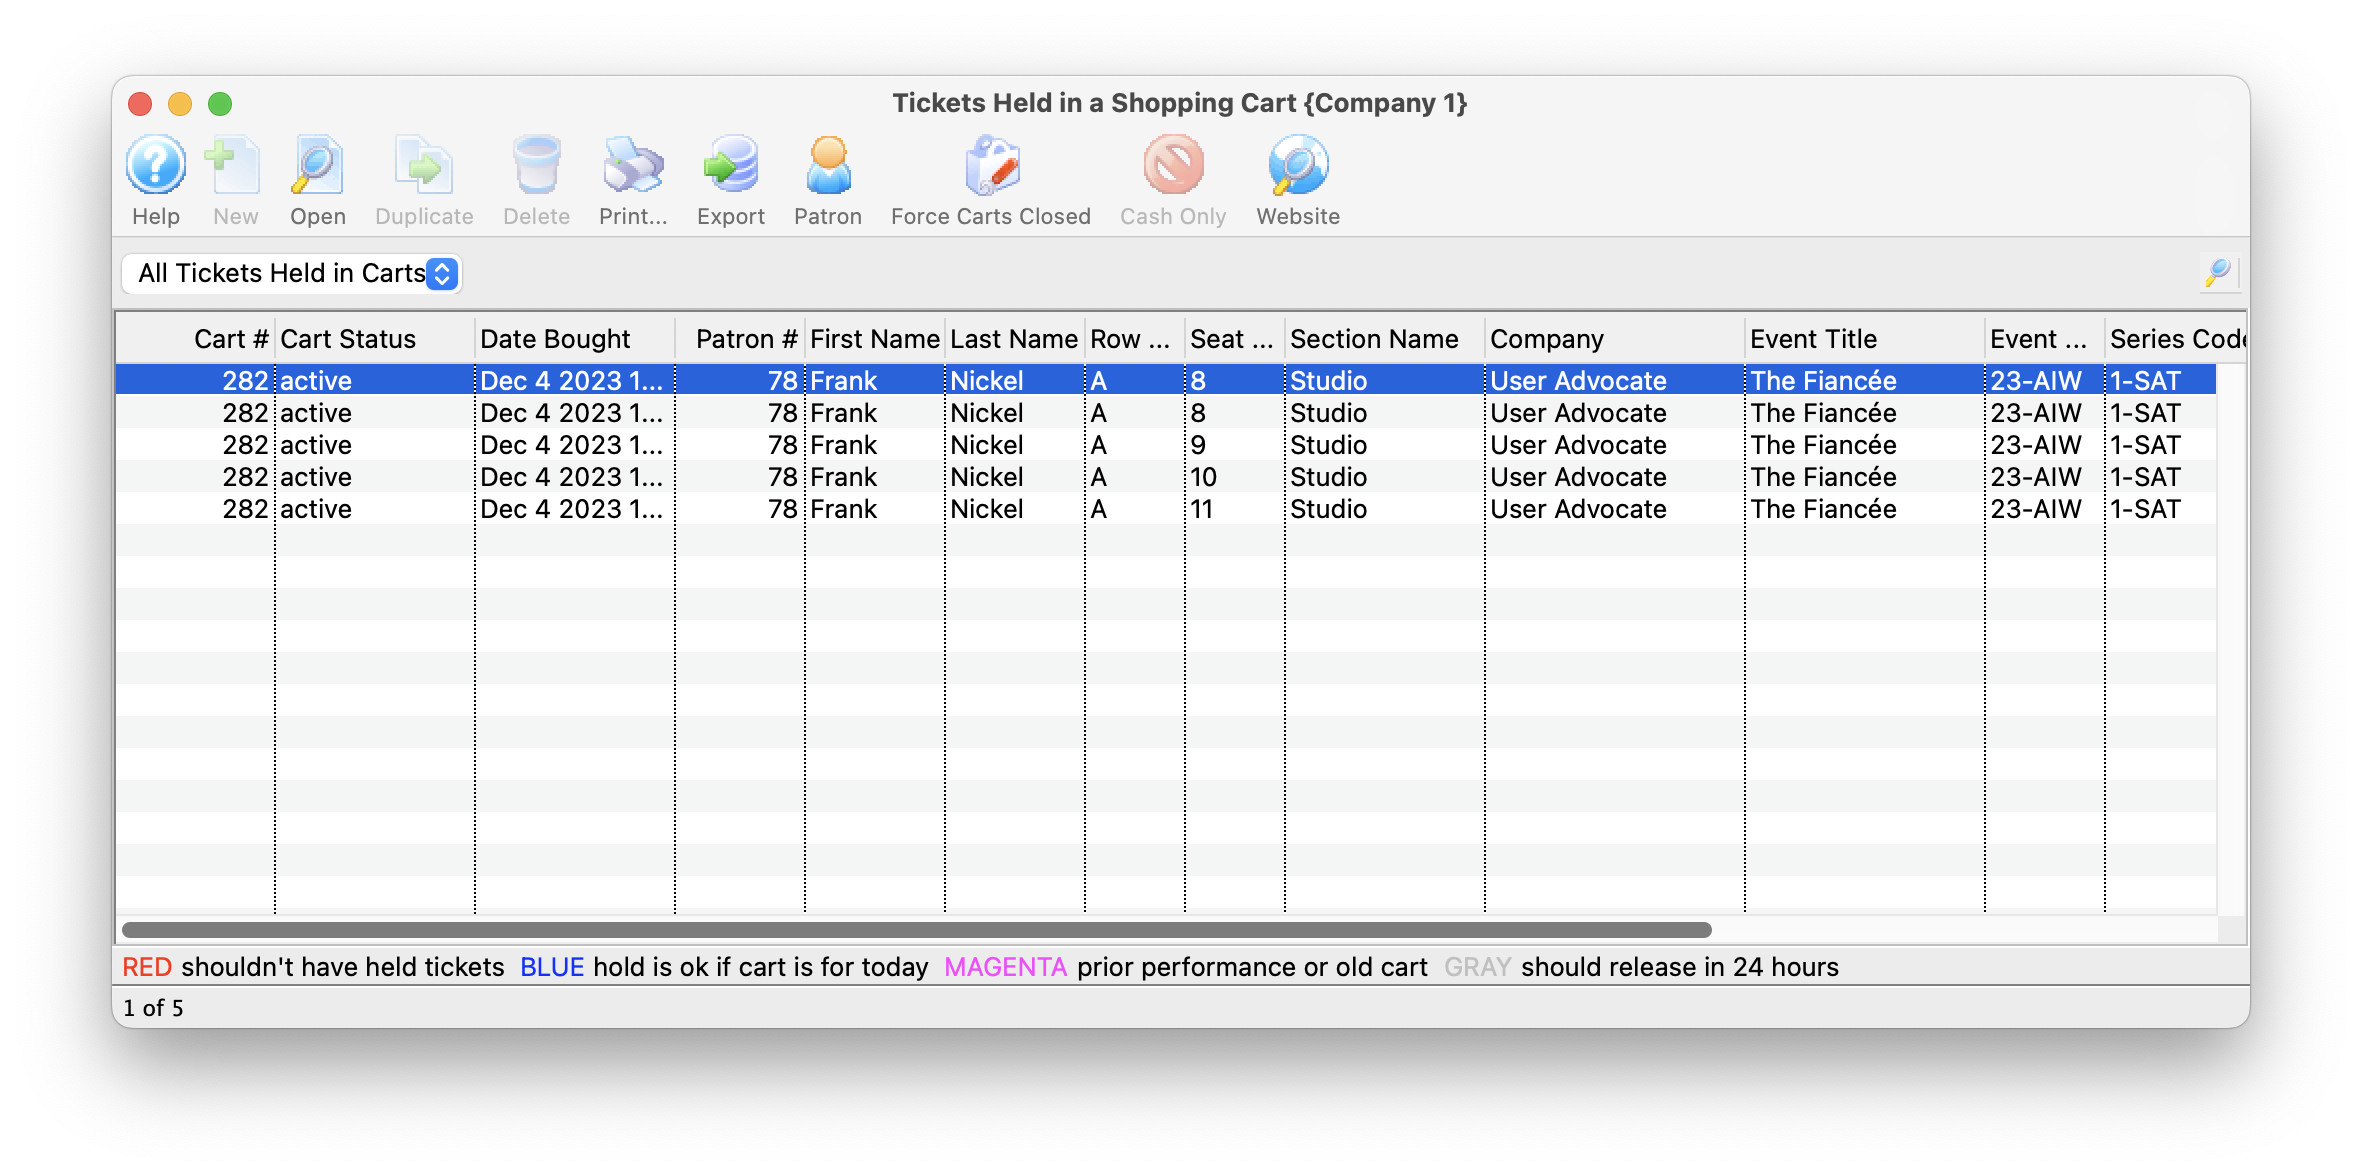
Manage Current Internet Holds
The window lists the status of the cart, the patron's information and the performance details. To refresh the list click the magnifying glass in the upper right corner of the window.
The Status column will indicate if the cart is Active or Expired.
- Tickets in an active cart can never be released - ever. Thats because the patron has them in their shopping cart and, essentially, that would stealing from them. You can, however:
- help the patron manually check out the shopping cart if they have logged in. You cannot do anything to anonymous shopping carts except let them expire -OR-
- you can force the cart closed so that the tickets will release when the hold expires
- Expired carts rarely contain held tickets. If they do:
- check the status of the ticket in a cart - if there was an issue checking the cart out, TM will hold the ticket for up to 96 hours so that you can manage this rare situation. You may need to add that ticket to the patrons cart, or use the Force Carts Closed button to manually release them.
- In the rare event that a ticket is stuck as held long after the cart has expired, please see the steps below the image for details on released expired holds.
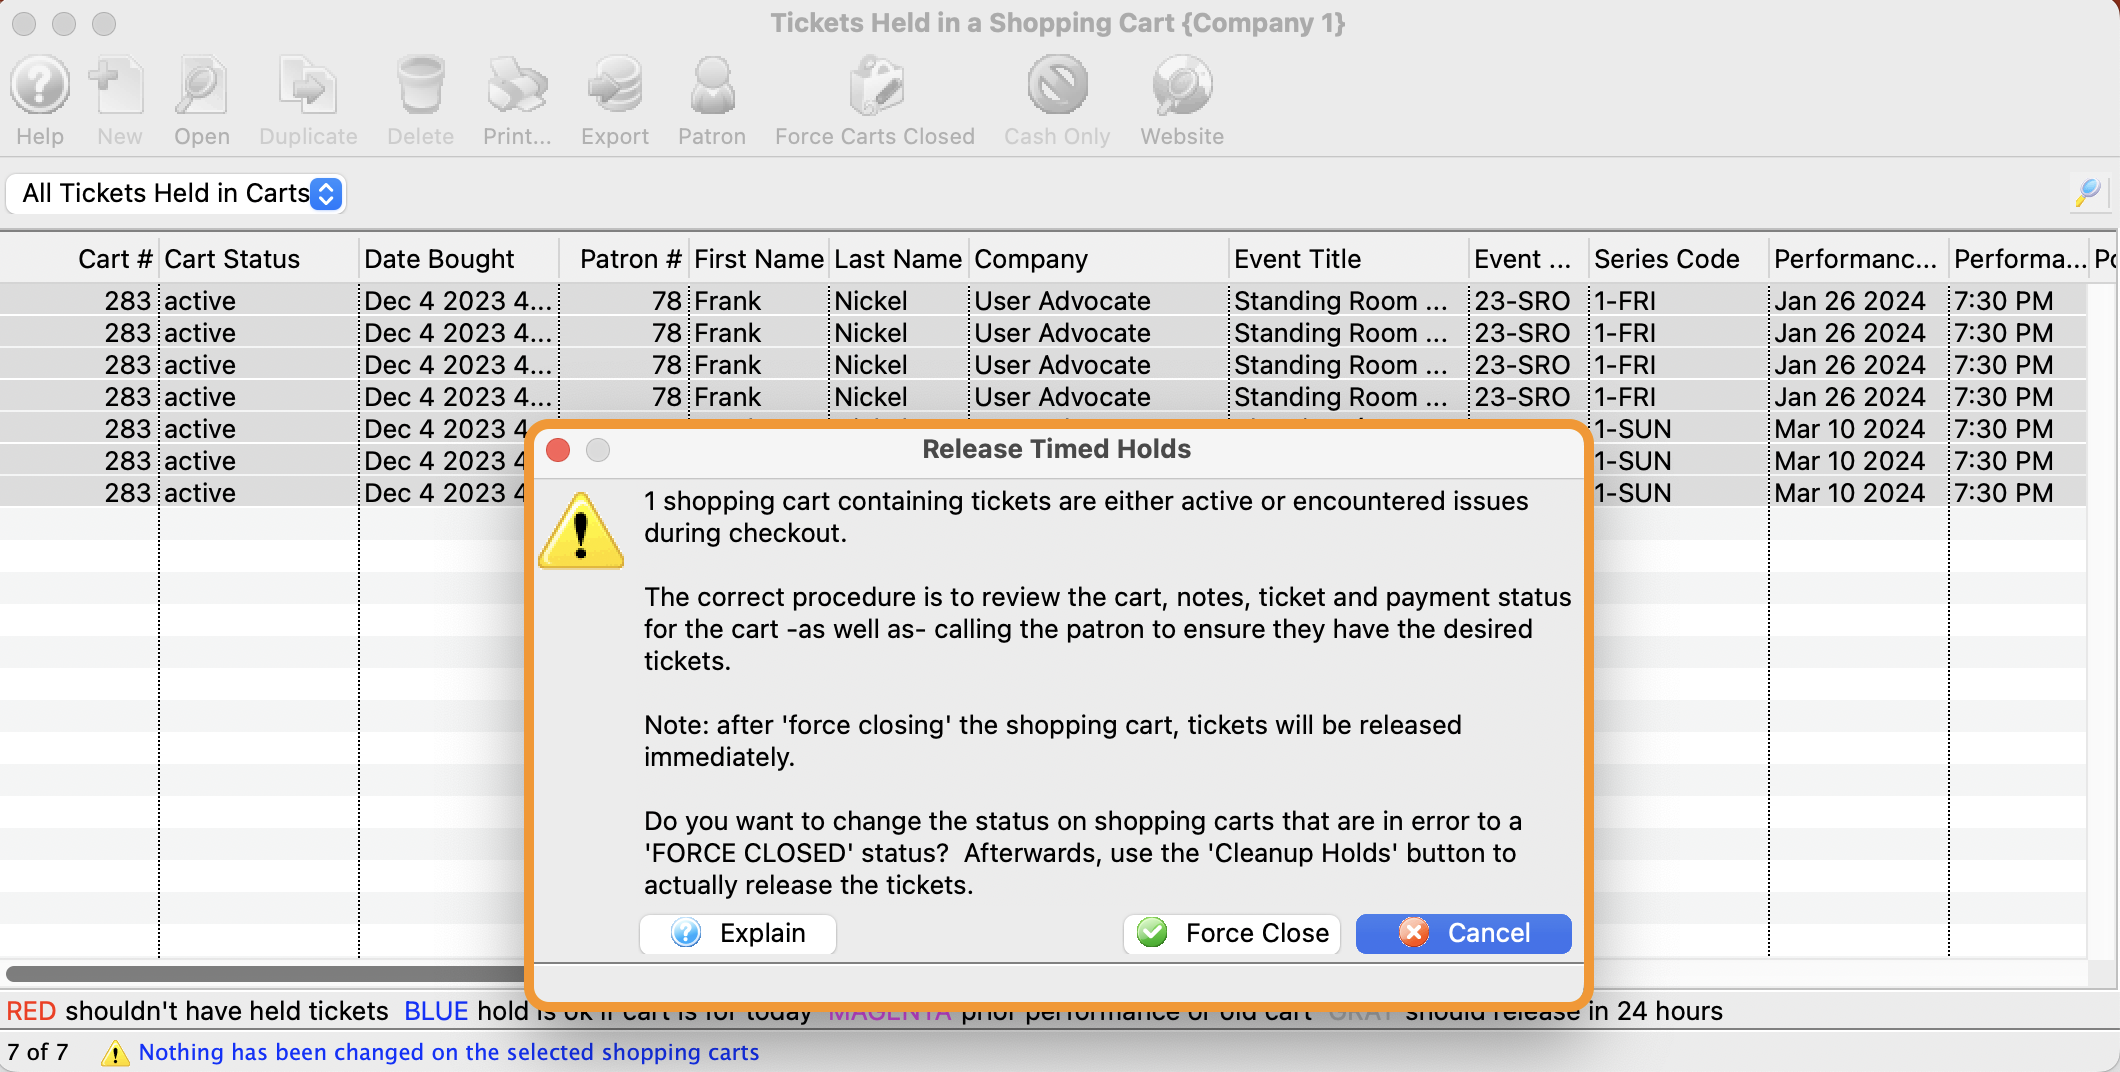
Forcing Carts Closed
If you chose not to manually check out the shopping cart for the patron, and the cart is active, you can force it closed. That means tickets will release in short order.
Forcing Carts Closed
- Opening the list of shopping carts and searching for the status codes of the ones you want to clean up
- Investigating why they are not complete, if necessary, and fulfilling ticket orders
- Selecting the carts
- Picking 'Force Carts Closed' in the menu
- You will see the image below. Selecting 'Force Close' will change the cart status to cart closed-operator forced it closed. Once carts are properly closed, the patron can be merged with other patrons.
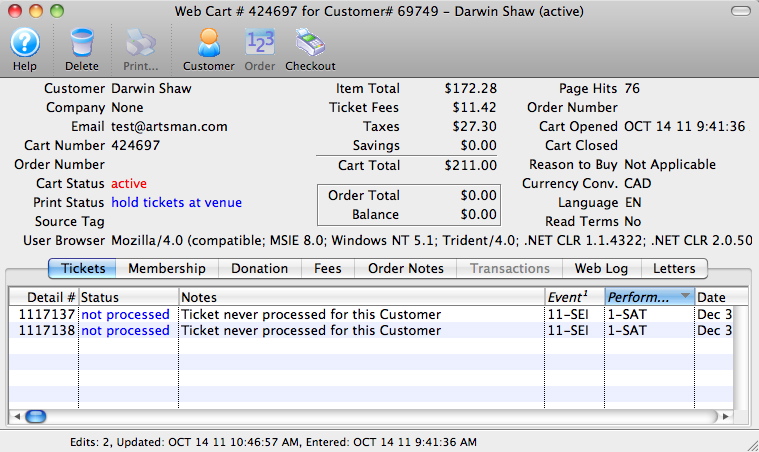
Shopping Cart Detail
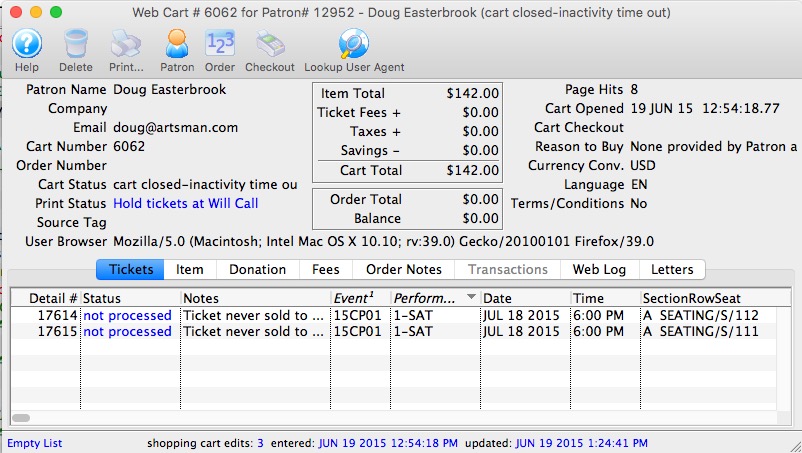
The shopping cart detail window shows what was in the patrons shopping cart and allows you do do some specific things for the patron. Each of the tabs is shown in separate sections.
On the main window, most of the fields deal with the status of the cart and its value. There are two other fields of particular interest:
- Source Tag - which is a convenient way of tying back how people started the shopping cart. This can be used to determine how many people bought from an eblast, or another web site referral -- if the &TMsource=xxx tag is placed on the referring URL.
- User Browser - is the complete string indicating the browser version, platform and application that was talking to the server. You can tell if somebody used a mobile phone, ticket trove, safari and/or a mac, PC or linux machine to talk to the web listener. Refer to the Lookup Use Agent button below.
The Toolbar works as follows:
- Help - Provides help
- Delete - allows a cart with no detail to be deleted
- Print - print some of the lists from the cart
- Customer - if the patron signed in, this will open the patron record for a complete view of the patron. If it is an anonymous cart, you cannot view the patron
- Order - if the patron went through the checkout process, then the cart will be tied to an order. The shopping cart window shows what they wanted to buy - clicking on the 'Order' will open up the order and let you change what they actually bought.
- Checkout - serves two functions, depending on the state of the cart.
- If the cart is 'Active' (and the patron logged in on the web), clicking on the 'Checkout' button will take the cart away from the web listener and add all the items in the cart to an order. At the end, you will be presented with the payment window so that you can ask the patron to provide a credit card.
This helps you assist customers who call in to complete their cart, especially if they are having issues with their card not being accepted or they are uncomfortable providing it online for some reason. - If the cart is 'complete' and already checked out, it is possible that there are some tickets that are still on hold in the cart. This can happen in very rare cases of high server load. If so, then you can complete the process and convert a ticket on hold in the cart to being sold to the patron at the click of a button.
- If the cart is 'Active' (and the patron logged in on the web), clicking on the 'Checkout' button will take the cart away from the web listener and add all the items in the cart to an order. At the end, you will be presented with the payment window so that you can ask the patron to provide a credit card.
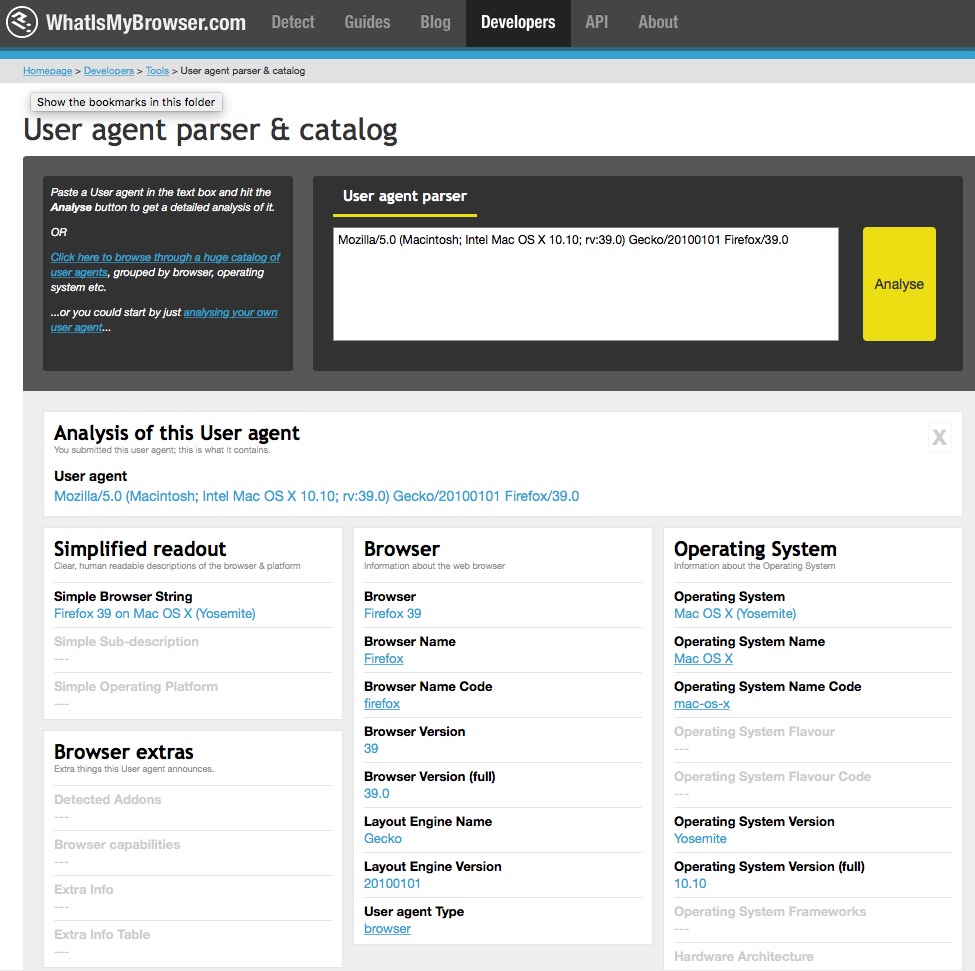
- Lookup User Agent - this will
- copy the user agent string to the clipboard automatically for you
- Open a web site that analyzes what a user string means
- paste in the user string
- Click 'Analyze' and that will interpret what the user string is for you (you can see a sample in the image below).
Web Cart Ticket Tab
- Ticket purchased successfully - which means the person wanted that ticket and still has it
- Hold expires on xxxx and is for patron - which means that the patron wanted the ticket and has it in their cart but has either not checked out yet, or abandoned the cart, or has checked out and there was a processing issue. In any of those cases, the ticket is on hold for the patron for some period of time
- Ticket is sold to another patron - means that the ticket in this cart is now owned by somebody else. It could be because the patron abandoned the cart, or the ticket was exchanged at some time in the past
- Ticket is not sold to anybody - means that the patron wanted the ticket and some time has passed -- and it is neither held nor sold to anybody. it means it is available should the patron call in and want it.
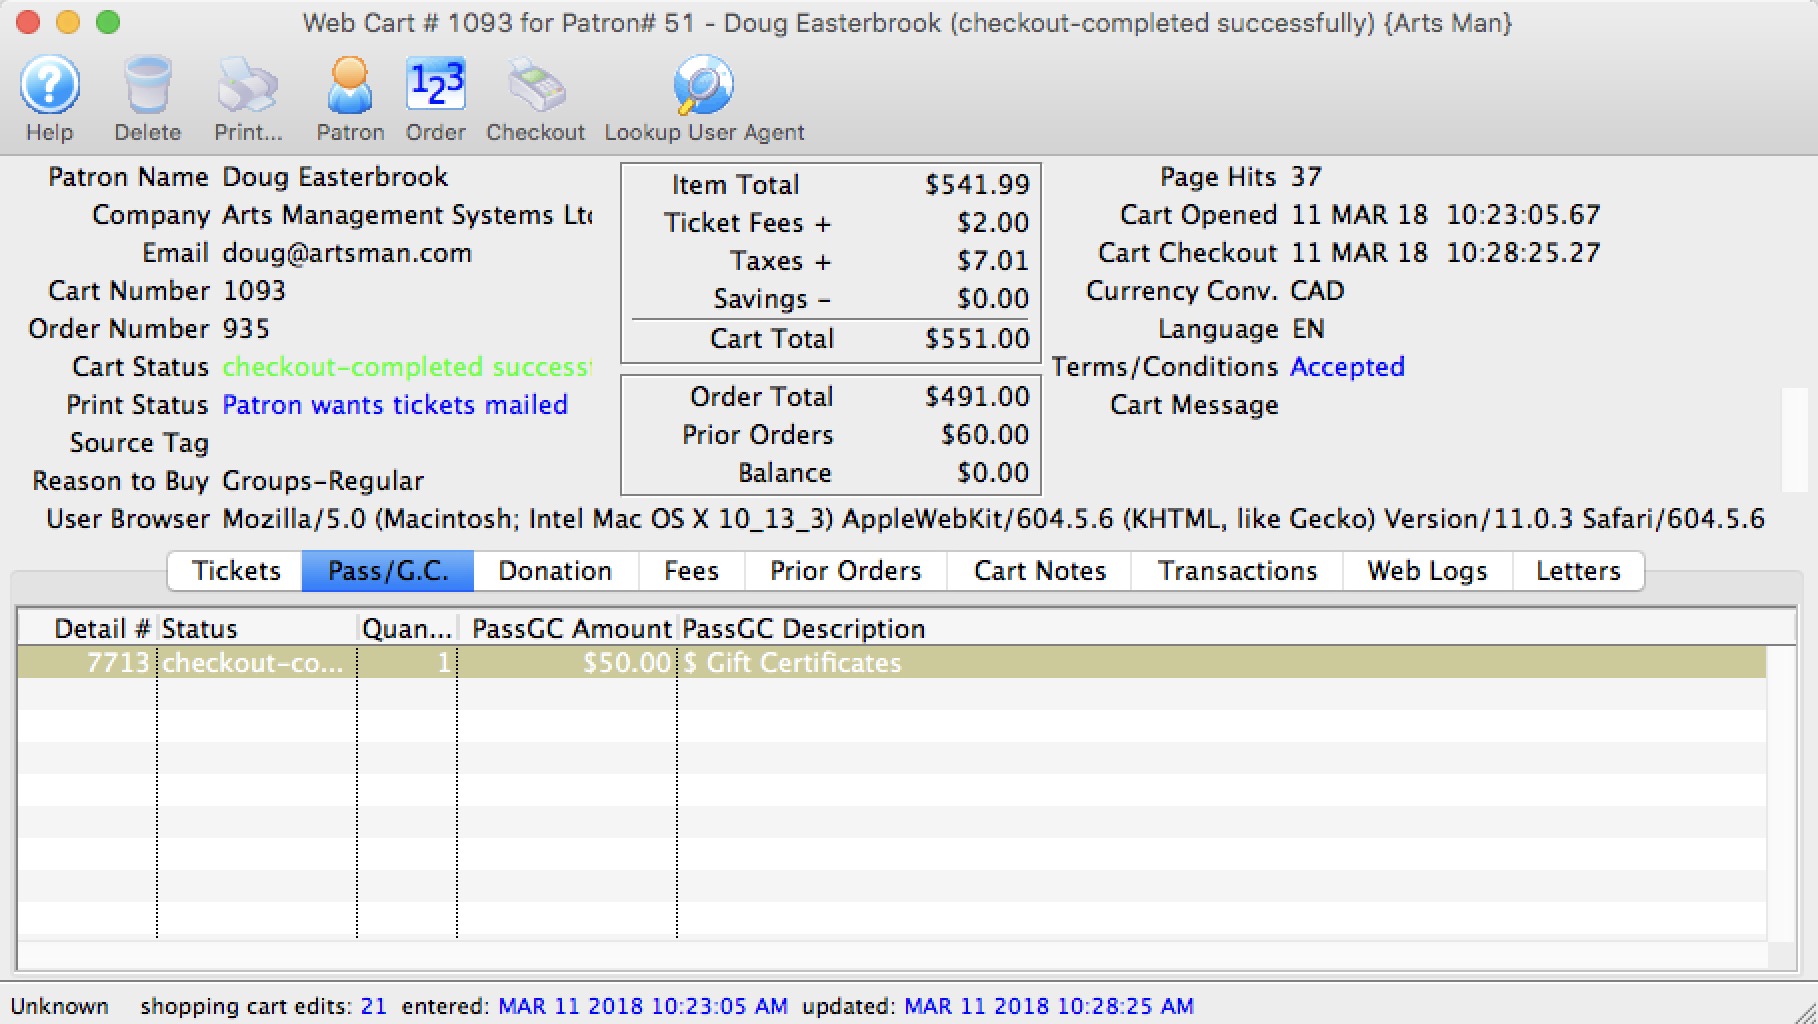
Web Cart Membership/Pass/GC tab
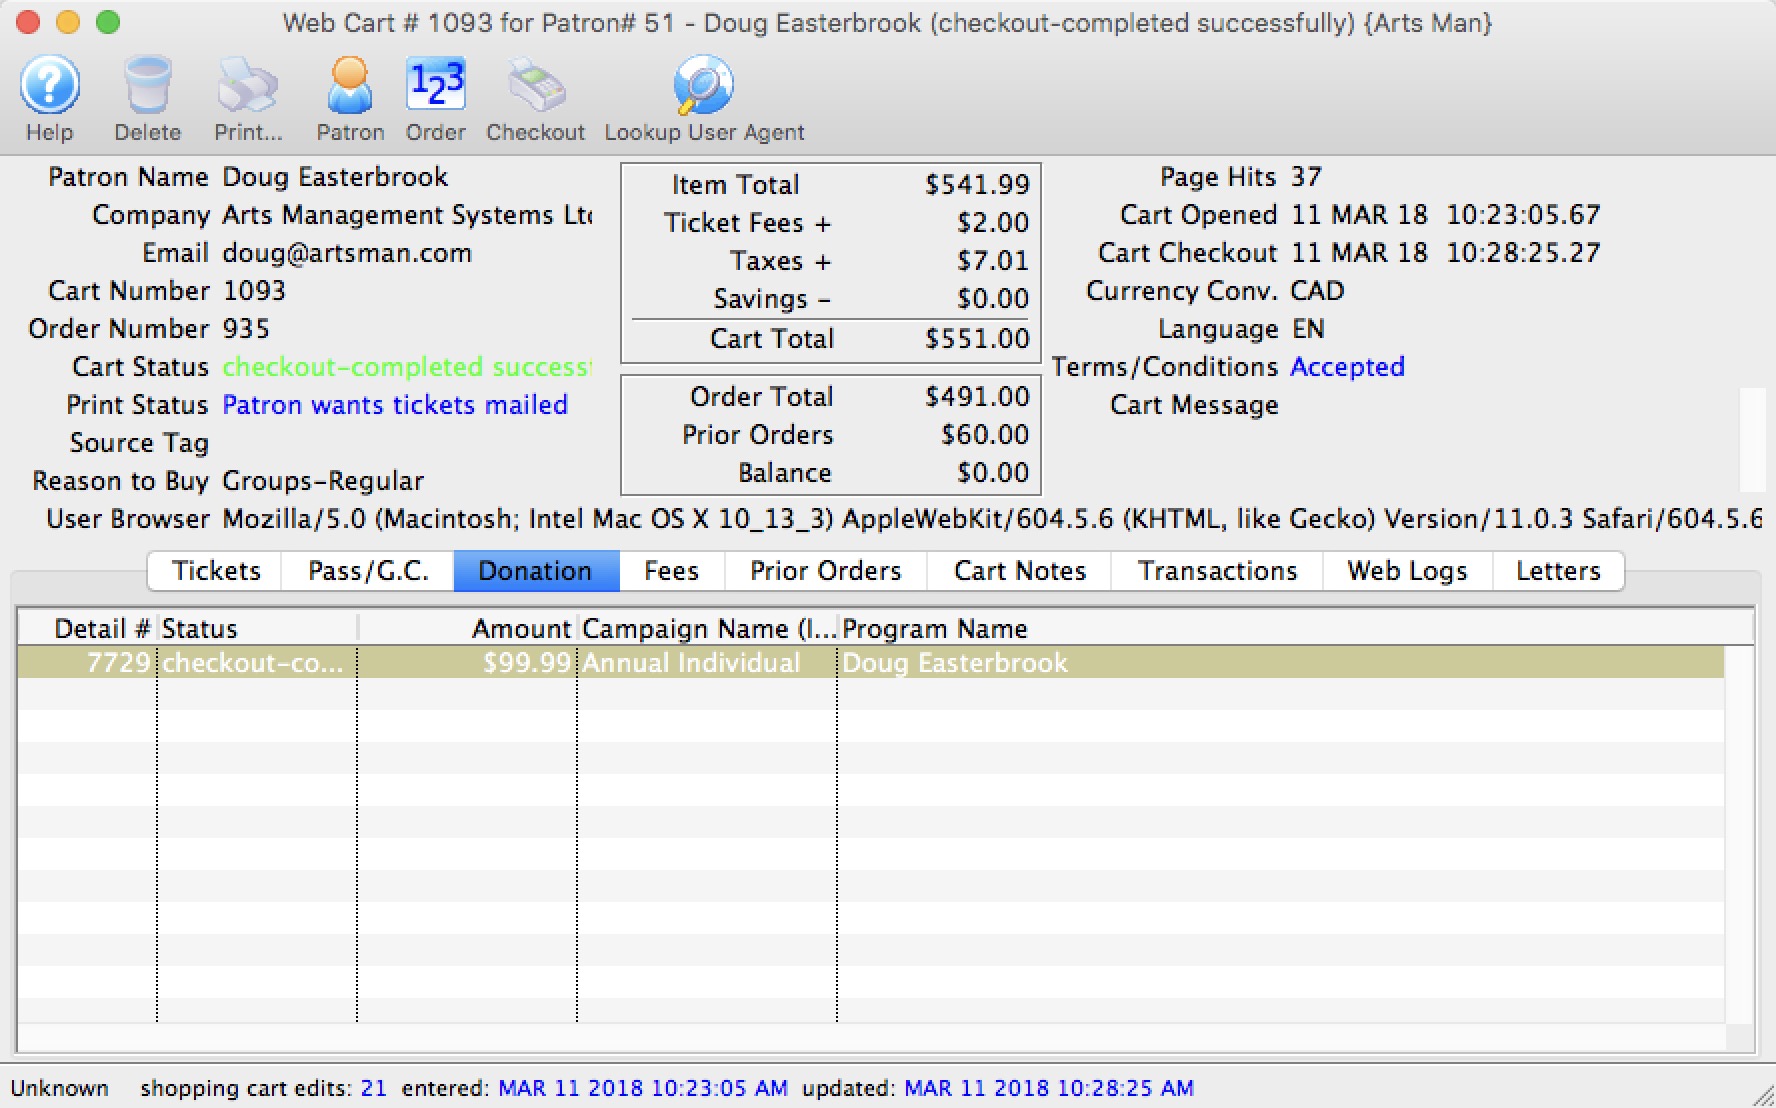
Web Cart Donation Tab
Web Cart Resource Tab
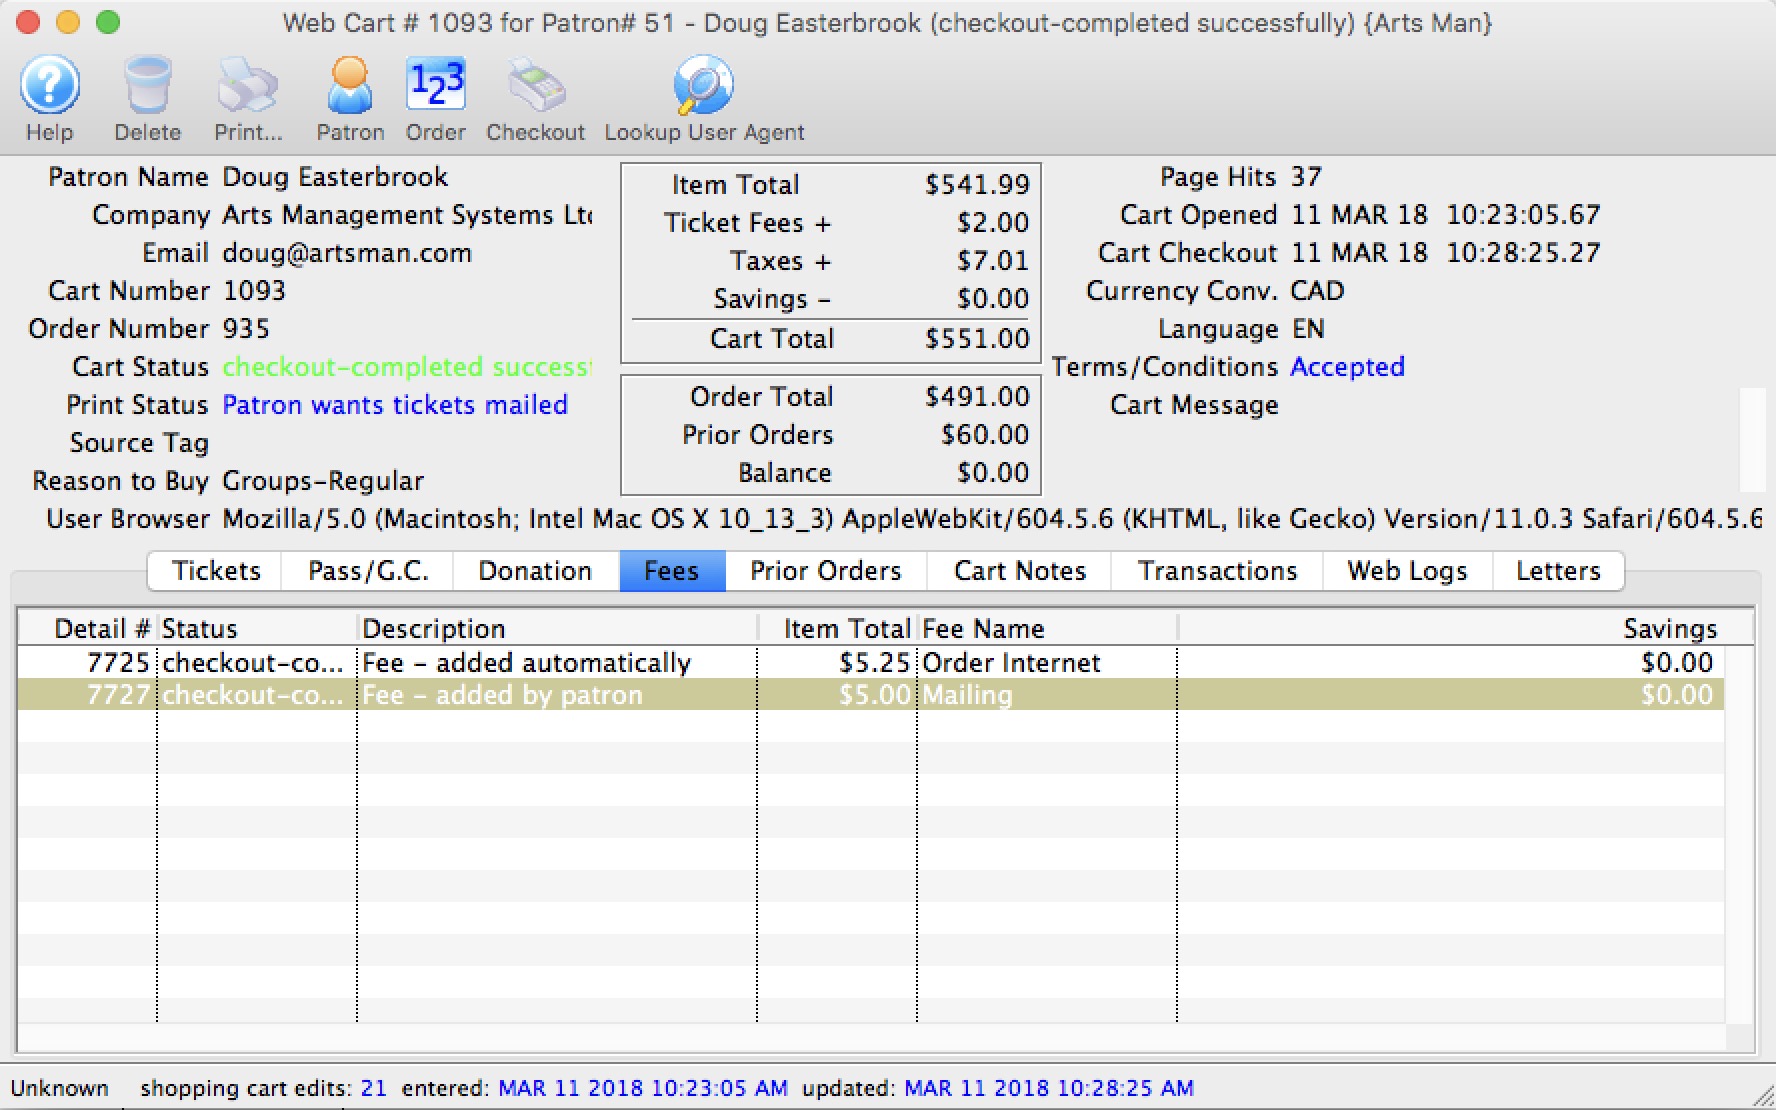
Web Cart Fee Tab
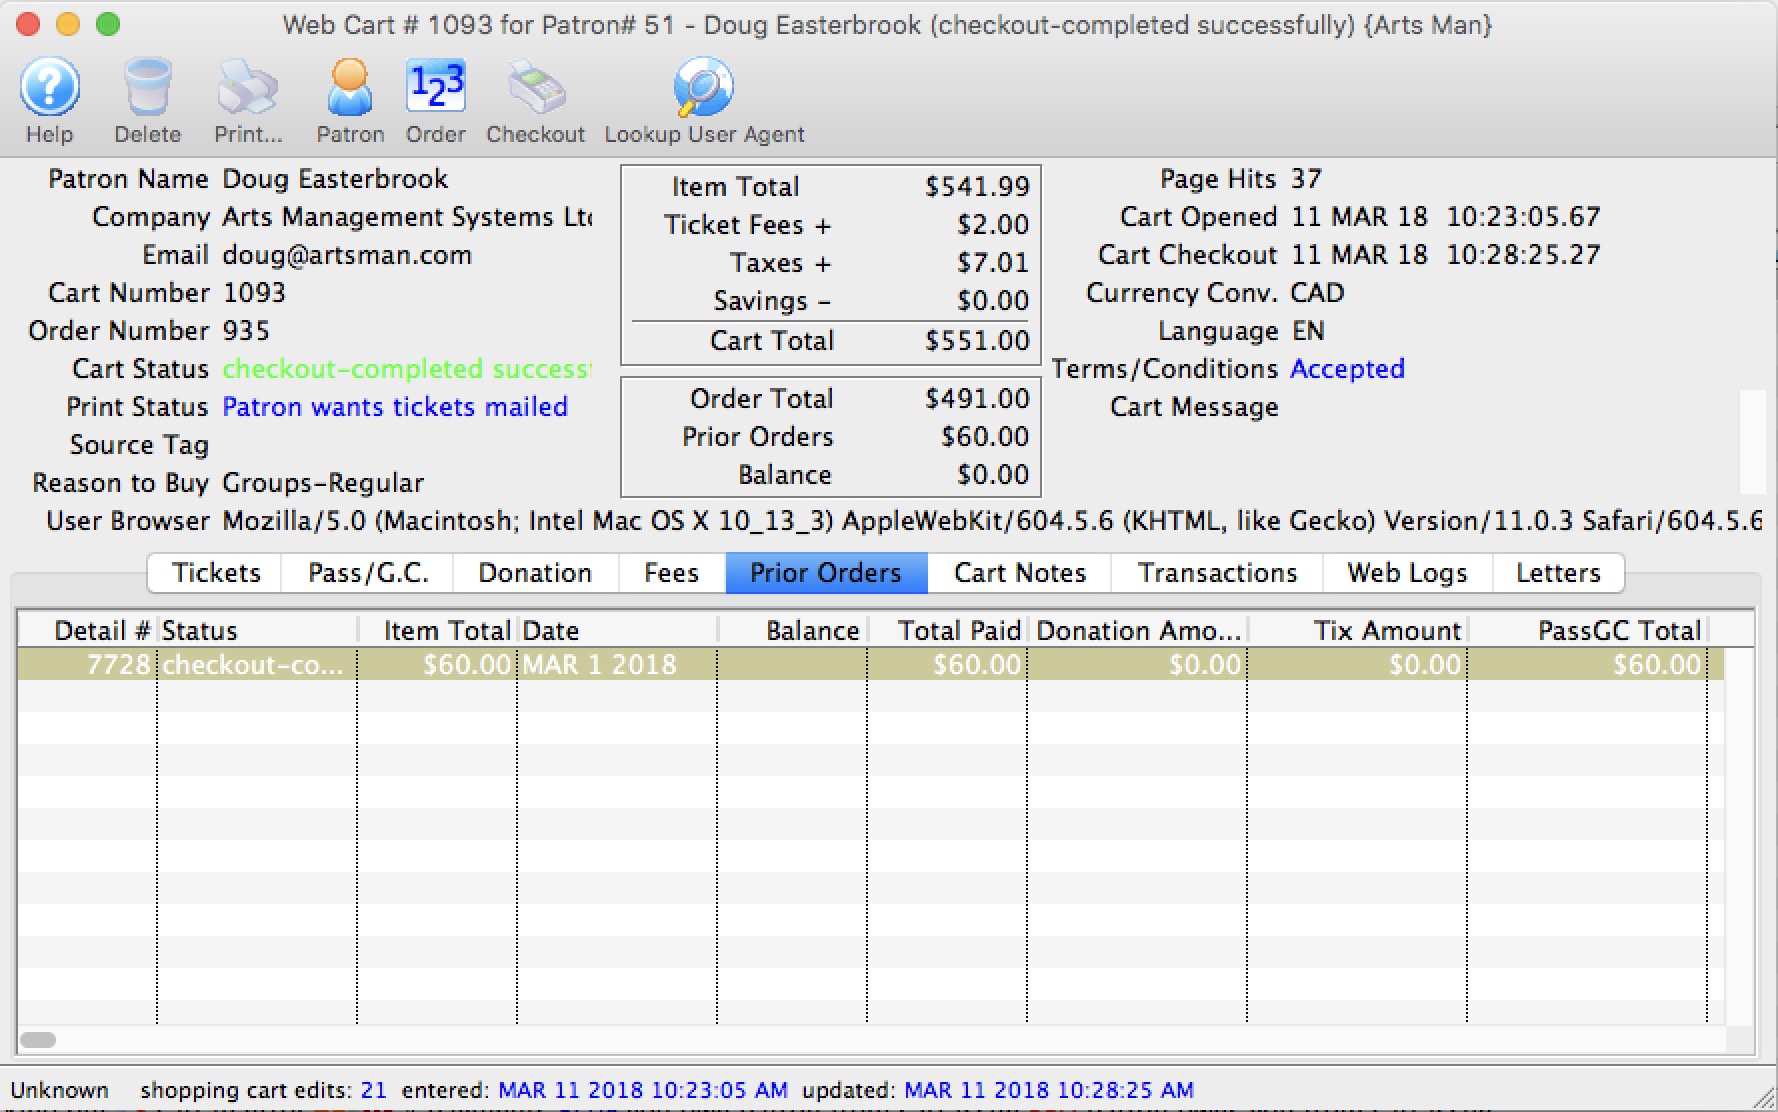
Web Cart Prior Orders
|
A payment for prior orders online follows the rules of applying a single payment for multiple orders
Example: If the prior order was $10.00, you will see THREE payment transactions as follows:
|
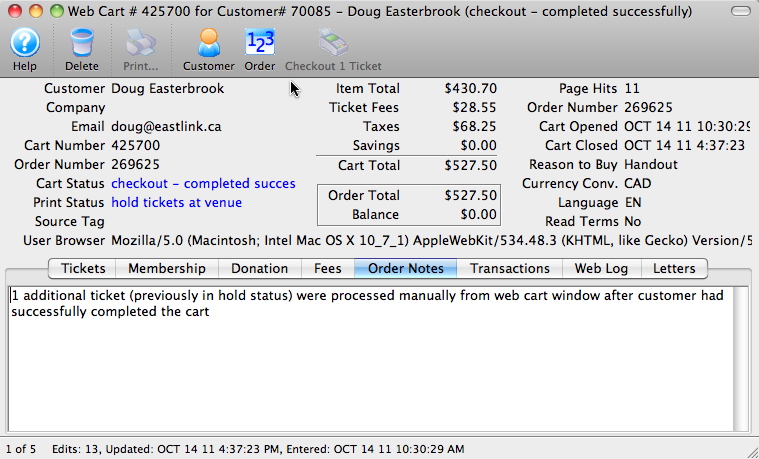
Web Cart Order Notes
Web Cart Transactions
![]()
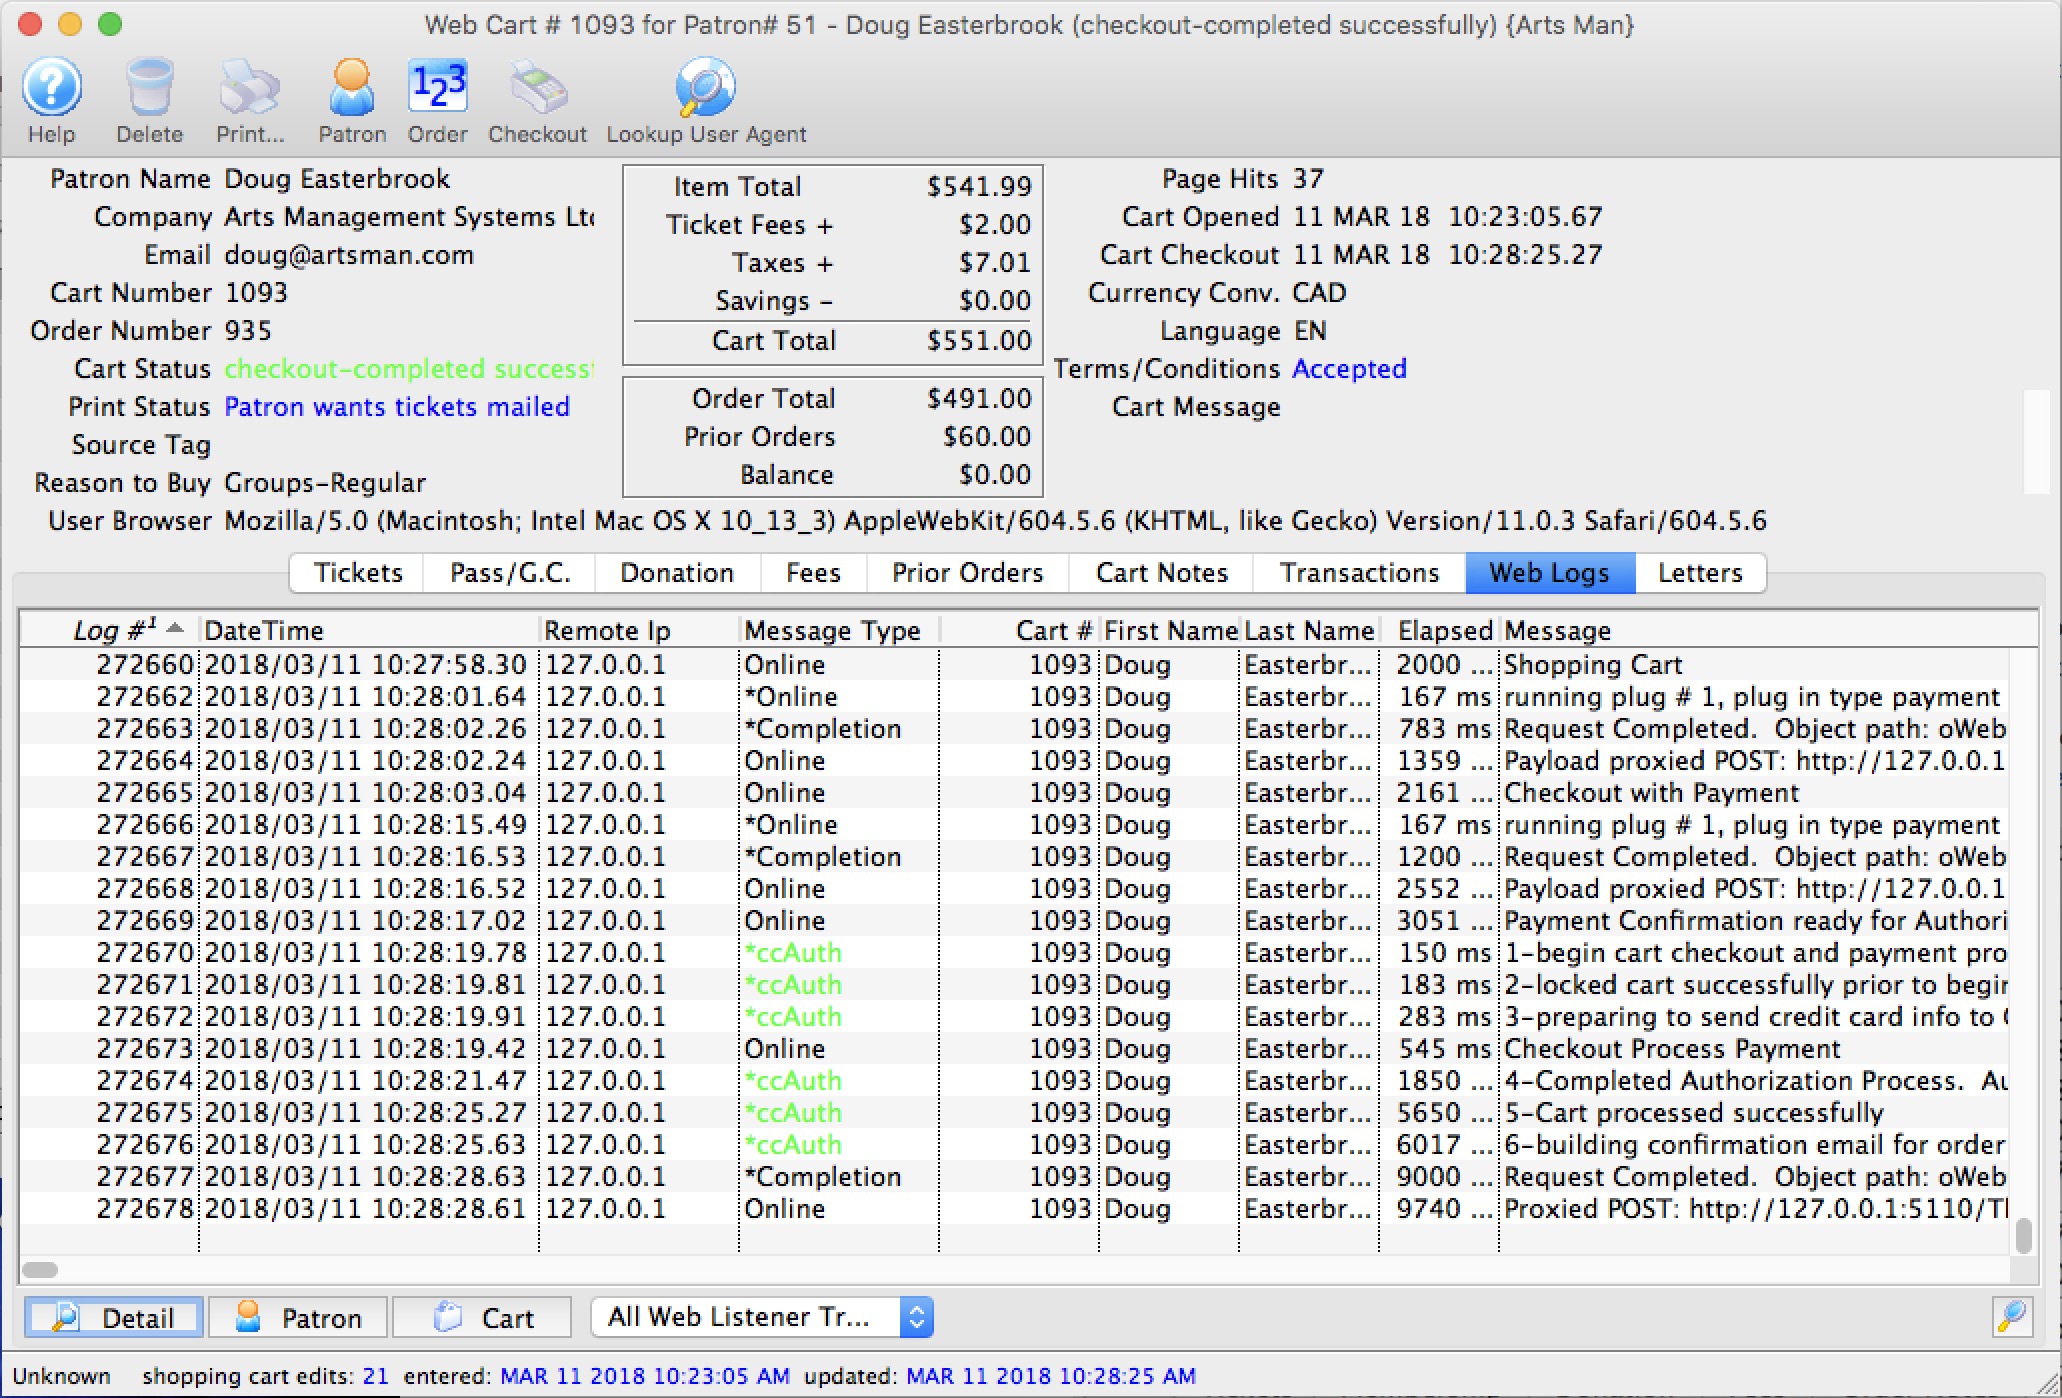
Web Cart Log
By looking at the cart, you can tell:
- when they started browsing
- which events they looked at
- what seats they added to their cart and the sections they were interested in
- If they discarded seats
- other fees, coupons, donations, etc that they placed in their cart
- when they logged in - if they were browsing anonymously)
- any issues with checkout such as declined cards
- any TM errors such as seats not priced properly
- and more
If you read this log carefully in the comments on the right side of the list (not shown in picture), you can actually tell which buttons that the patron clicked on their web browser and help them along if you are mentoring them through a sale.
As a patron clicks on web pages, you will need to use the 'search' icon on the lower right of list to refresh the current cart log. If the cart is still active and the patron calls you, you can take over the cart and check the cart out out on their behalf.
|
The most common complaint is card rejection. If a patron
|
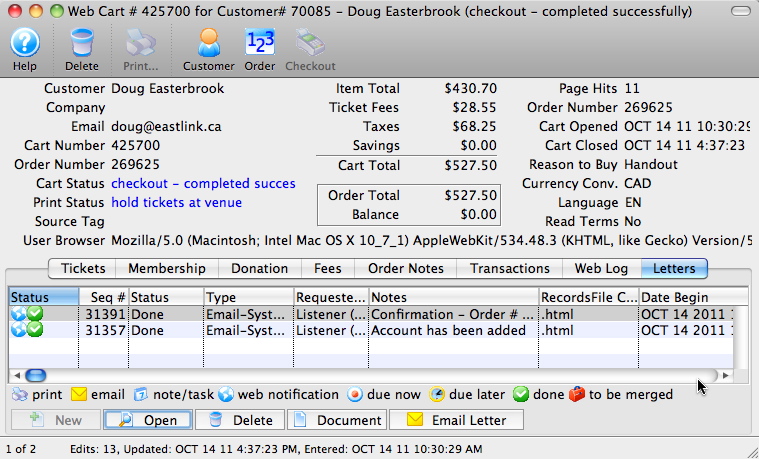
Web Cart Letters
Types of letters generated by TM could include:
- Forgotten password requests
- Patron added confirmations
- Patron changed their personal info confirmations
- The actual checkout confirmation emailed to the patron
Tracking the Online Cart Source
Many organizations wish to track how patrons purchasing online were brought to the online sales website. Generally, they are looking for answers to questions like:
- Did they click the link from the organization's main website?
- Did they follow a link in an email blast?
- Did they click a link from a partnering website?
How to use tmsource
The tmsource reference can be implemented two ways:
- An internet cookie can be created called 'tmsource'. The text within the cookie can contain up to 100 characters. Using a cookie will prevent the tmsource from appearing in the address bar. The cookie will need to be created by the organizations IT person or web designer.
- The tmsource option can be added to a link that points to an organizations online sales (See below for details).
Using tmsource is a character based field and does not require access to or changes within the Theatre Manager database. It does not require changes to the Code Tables within Theatre Manager. Do not put an '&' in the tmsource - as this is the parameter separator on URL's.
|
Note that parameters in a URL are case sensitive. Most keyword parameters are lower case unless they refer to an actual database variable. The documentation attempts to show proper case. |
Adding tmsource to a Link
To create a link containing a source, add &tmsource=XX to any online sales link. Replace XX with the desired text representing the source the patron would have used to access online sales. The value for tmsource can be any value that meets the organization's tracking needs. Some example of possible options are below (prefix them with https://):
- tickets.yourvenue.org/TheatreManager/1/login&event=0&tmsource=MainWebSiteBuyButton
- tickets.yourvenue.org/TheatreManager/1/login&event=0&tmsource=Eblast2014-10-05
- tickets.yourvenue.org/TheatreManager/1/login&event=0&tmsource=TimesUnion
- tickets.yourvenue.org/TheatreManager/1/login&event=0&tmsource=FirstTimeBuyer
How tmsource works with Theatre Manager
Theatre Manager will accept the FIRST tmsource for the shopping cart sent from the patron's IP address. Meaning if the tmsource is set by the sender/referrer site, it will reference that location. If the patron accesses online sales from a location that does not contain a tmsource reference, the source for the cart will remain blank.
If tmsource is not set and the patron uses the back button or a historical cart, it may draw on a prior source value. This could cause a historical cookie to be accessed and create an erroneous source. Chances of that happening are very limited.
Cookies created by Theatre Manager last until the checkout process is complete. If a patron accesses online sales using a link with a tmsource and they complete the check out process, then come back for a second purchase, the tmsource cookie will have already been discarded. The second purchase will have no source at all if the patron does not leave the online sales site or does not access the online sales site using the same method as the first sale. This is the intended action as the patron has not accessed the site for a location the organization is tracking.
tmsource and Theatre Manager
When a source is added to an online cart it can be seen in the Cart Detail window as the Source Tag.

When generating any report that has data tied to shopping carts, the tmsource can be found in the Parameters window as Shopping Cart - Header >> Shop Cart Source. You can use that on most ticketing reports.
|
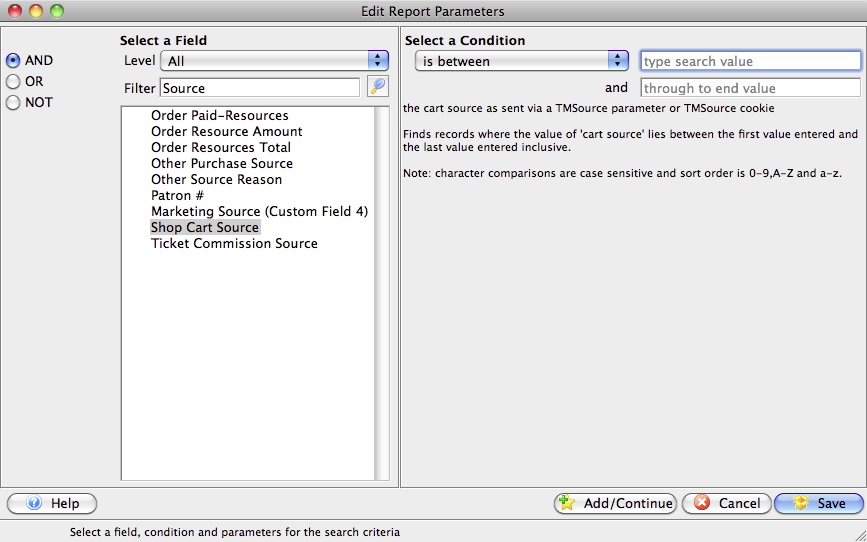
Looking at Source in the Shopping Cart List
In the Web Sales Shopping Cart, the tmsource value is located under the Cart Source column.
Checkout Cart on Behalf of Patron
- talk the patron through the sales process. If you look up the shopping cart, you can use the Web Log tab to see what the patron is doing -or-
- 'take over' the shopping cart on the patrons behalf after instructing them that they will no longer be able to continue.
|
You might need to do this is the patron:
|
|
To take over a shopping cart for a patron, the following must be true:
You cannot take over anonymous carts. Tickets in anonymous carts must expire due to cart timeout before they are accessible. |
Clicking on the 'Checkout' button provides a warning that you are about to take over the shopping cart for the patron and gives a chance to cancel the process. Once you continue with the checkout, the cart is marked complete and the patron will not be able to do anything with it.
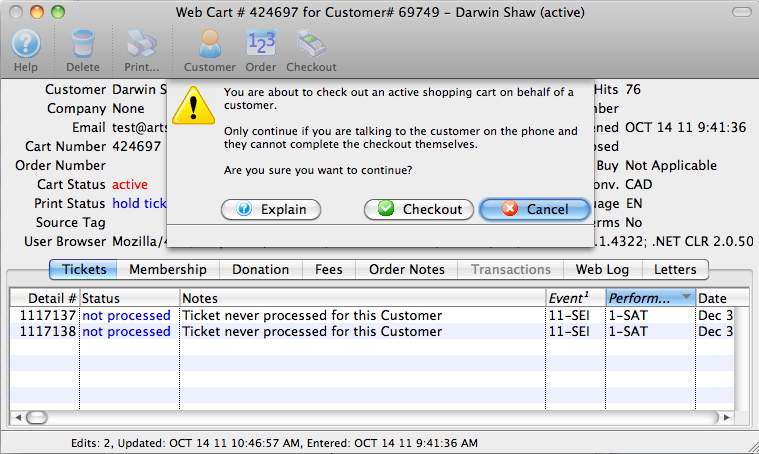
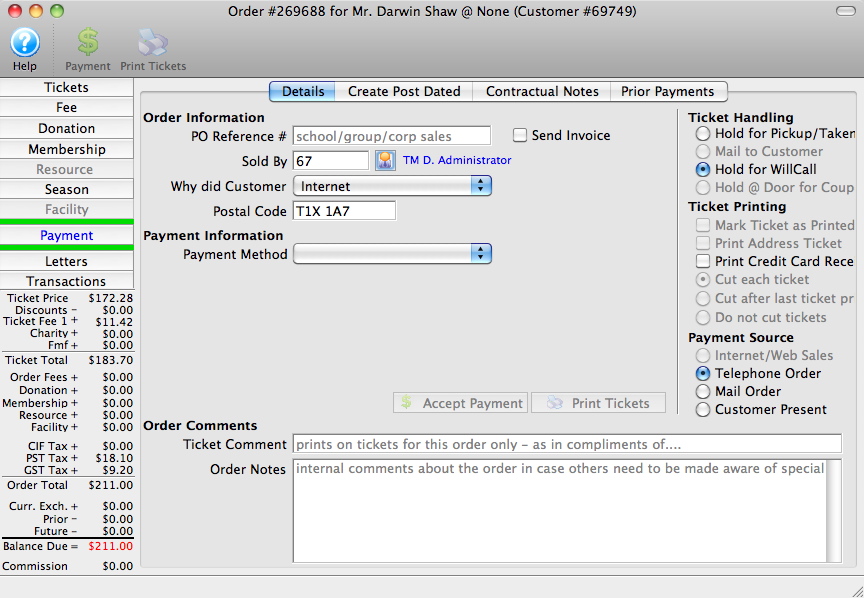
As per the picture below, if you continue checking the cart out manually, Theatre Manager will
- Create an order
- Attach it to the shopping cart
- Sell all tickets in the cart and attach to the order
- Add all applicable fees, donations and anything else in the cart to the order
- Stop at the normal payment window so that you can finish the order by asking the patron for a credit card
Note: you can also ask the patron if they want any other tickets and purchase them manually as if this were a normal box office order.
Complete Cart - Convert Holds to Solds
- The cart has been checked out and completed successfully with a payment made to it
- There is a balance due to the customer (it looks like an overpayment)
- And there is at least one ticket in the cart that is in the status of Hold expires on xxx and is for this patron
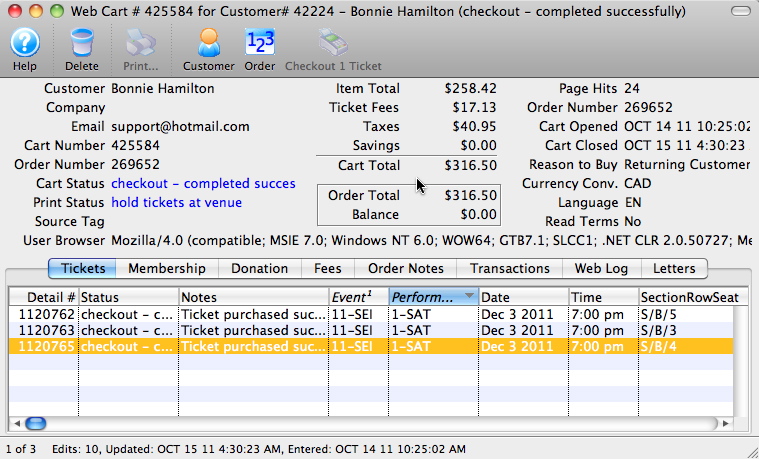
Click the 'Checkout x Ticket' button and you will see a dialog that confirms how many tickets Theatre Manager will attempt to convert from a hold status in this cart to a sold ticket for the patron and order number attached to this shopping cart.
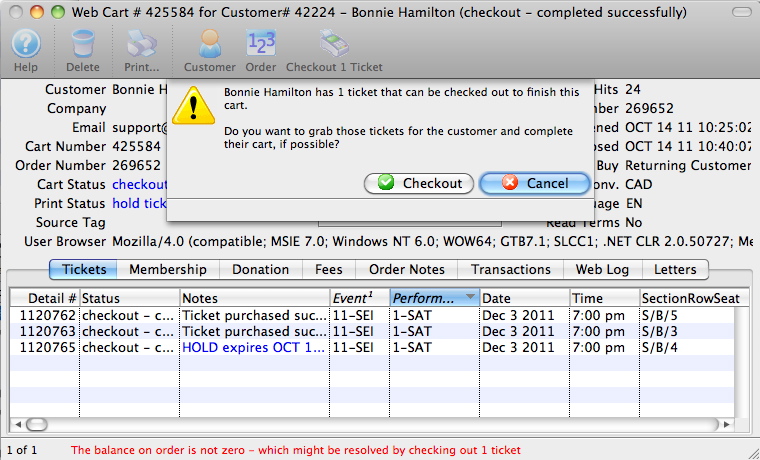
Theatre Manager makes absolutely sure that it can move the ticket from hold to sold for this patron. If there are no issue during the checkout process, then the balance for the order will go to zero and the ticket will change to sold.
This completes the patron cart.
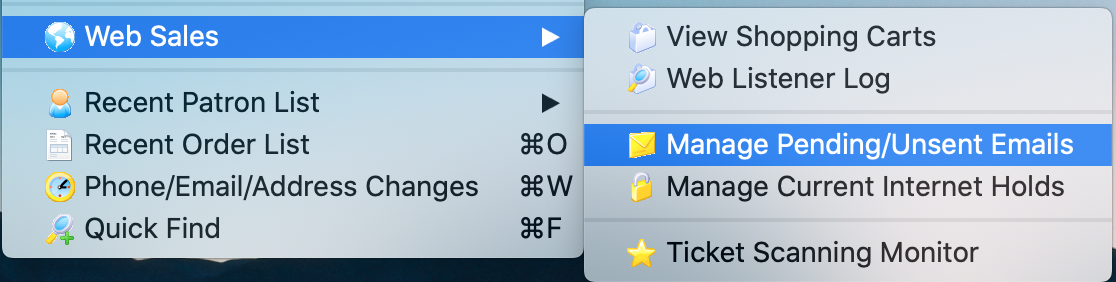
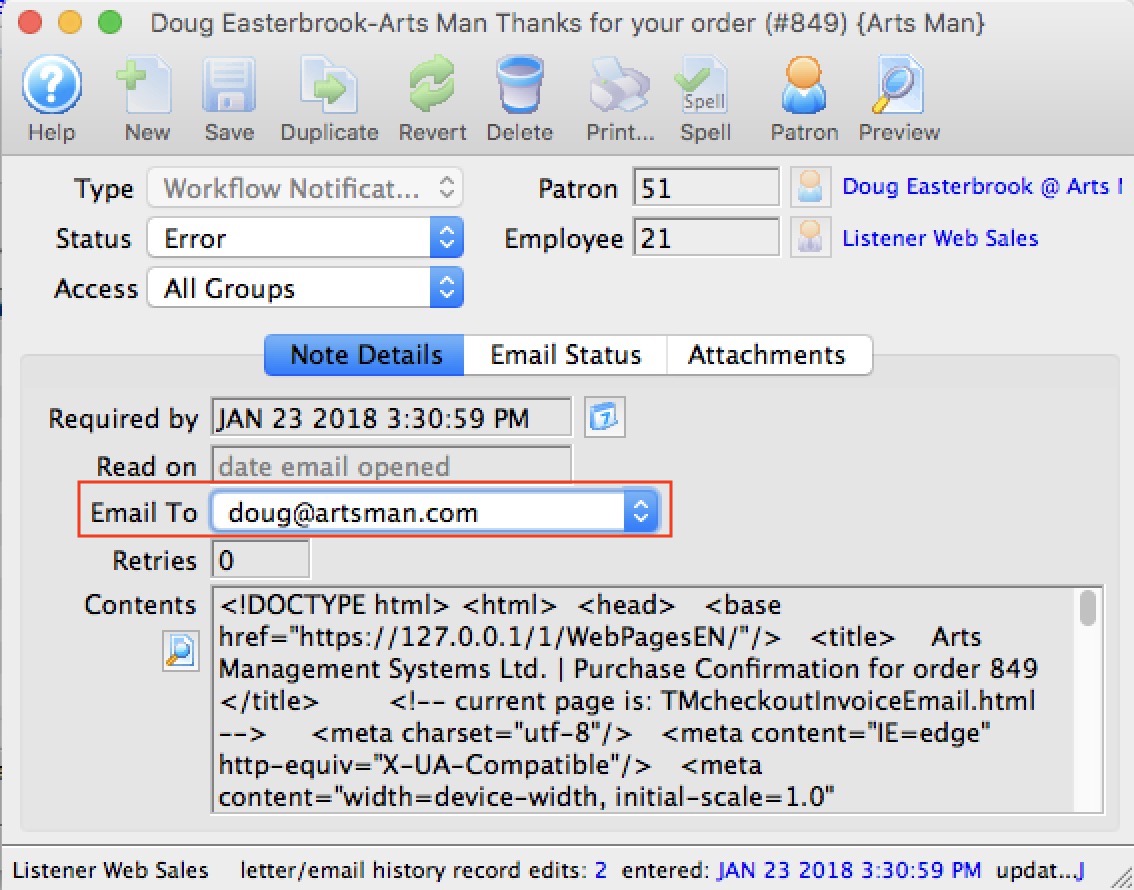
Manage Pending/Unsent Emails
|
Theatre Manager sends emails within 15 seconds after a customer causes one to be issued by the web site or from an email blast initiated by staff. This window only shows emails that are waiting to be sent Not Done or where an attempt was made to send them and there is an error
If you want to see when emails were sent, refer to this help page for the web listener log |
Typical Reasons Why Emails May Not Be Sent
Sometimes, emails may not get sent and manage email window allows you to review email issues on a daily basis.
- The patron asked for a password reset and did not get it. It is worth checking the web listener logs to make sure they typed their email correctly and/or it is in the database.
- You are using Gmail or Office 365 and are getting rate limited.
There gotcha's and limitations to using a free service like Gmail or Office 365 and we recommend against them for this reason. For our cloud clients, we use Mailgun. - Check your email setup to ensure credentials are correct. It could be one of three places:
- Company Preferences-Web Server if the email was coming from the web services such as for online purchases or eblasts
- Employee Email Setup if the email was sent using an individual employee's email
- Company Preferences-Meeting Server if the email was a meeting invitation sent by the facility management module.
- Look at the Manage Email window. You can:
- Review the error log on any one email that was not sent. You can use that on the troubleshooting procedures.
- some SMTP error messages and correction strategies may be especially interesting. - especially if your error is [10060] - unable to connect to mail server.
- If customers complain that they didn't get an email, then look at past history of emails/form letters that were queued to send (if you cannot see them in the pending email list, it probably means that:
- TM sent them to your SMTP server (you can check your SMTP Server logs) -and-
- The emails got lost between you and the patron -or -
- The emails went into the patron's junk mail folder -or-
-
 The patron was in a rush and typed an invalid email address or spelt their email address incorrectly. Some mistakes may seem pretty obvious or the patron may confirms a correction. eg, they put in:
- sheldon@gailm.com instead of sheldon@gmail.com or
- penny@yahoo..com instead of penny@yahoo.com
- Correct any obvious mistakes in email address in the patron contact card
- Double click on the email line and edit the email address to use the new email
- TM will mark the email as not done and then send it using the new email address
- your service provider forces you to change passwords every so often
- or some issue with your email service provider such as:
- Some server setting preventing relaying, which would show up in the log on a particular email, or
- Review some catch-all email troubleshooting procedures if something above isn't helpful.
Managing Emails that did not get sent
To Manage Pending or Unsent emails, select menu item Patron Sales >> Web Sales >> Manage Pending/Unsent Emails.. Once you have solved the reason emails were not sending, this window allows you to resend any in error, or pause some while you are looking for the issue.
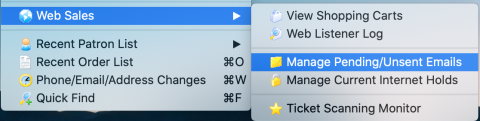
From the main menu bar, go to Patron Sales>>Web Sales>>Manage Pending/Unsent Emails.
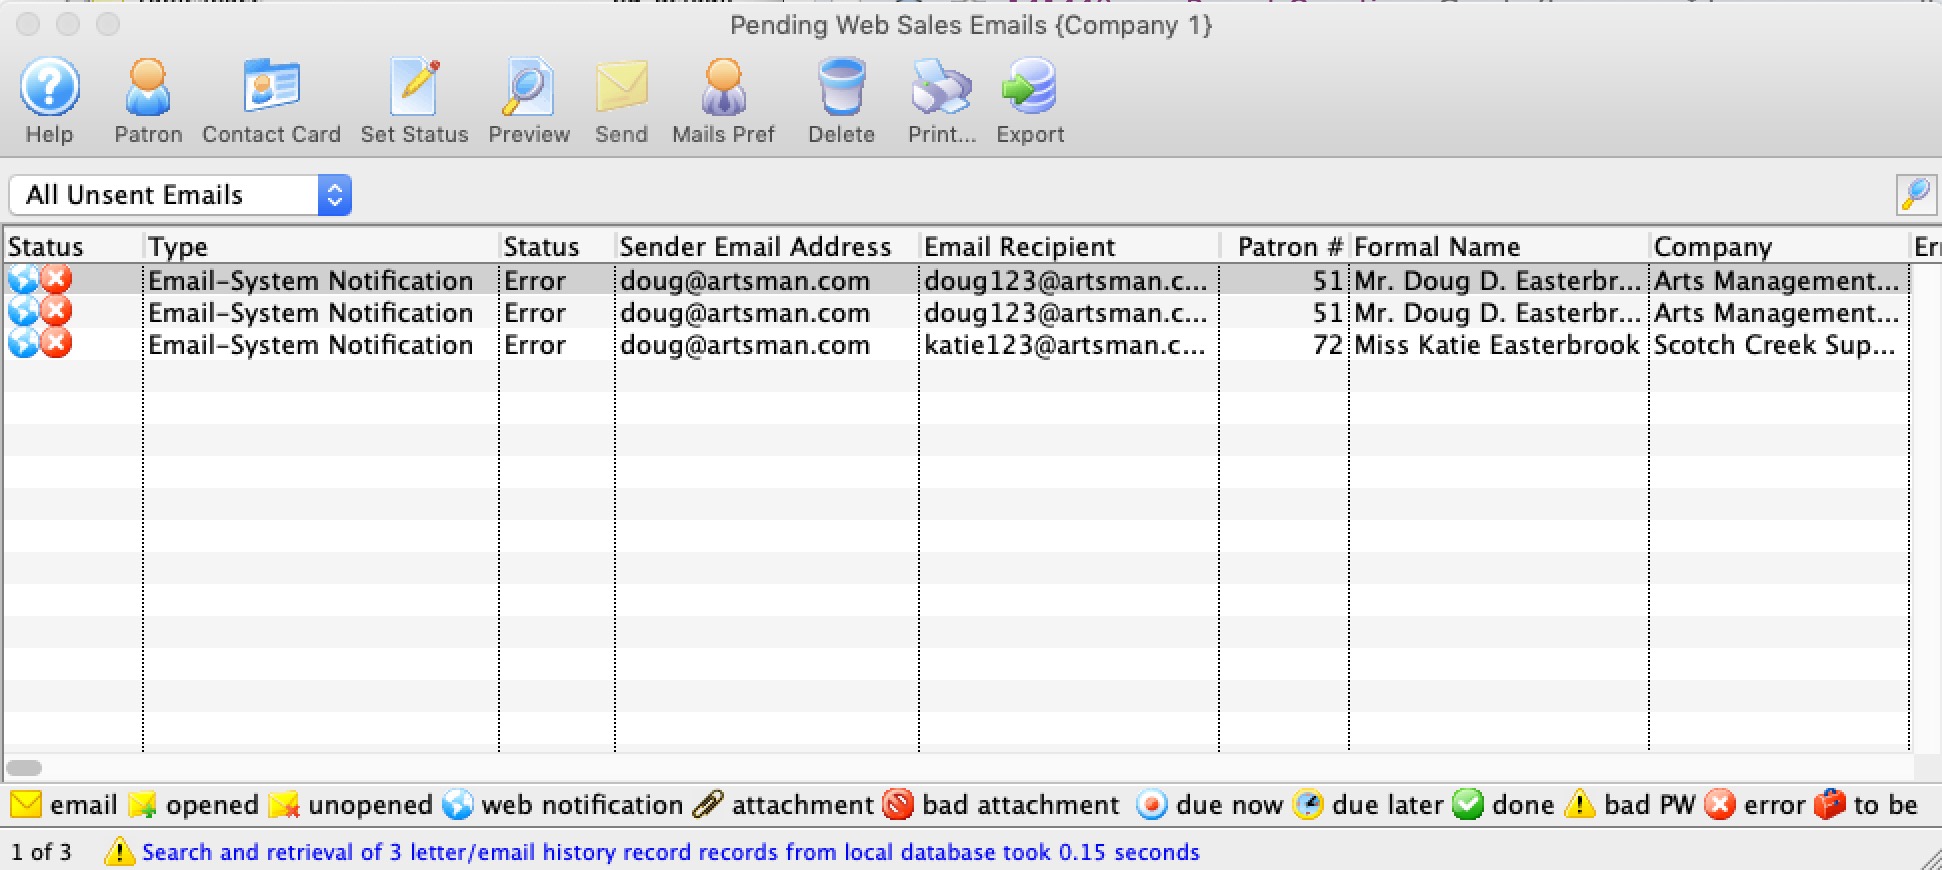
This will display a search list of all unsent emails.
|
Search for pending/unsent emails and then double click on one of them to look at the specific error in the email- if any. This will help determine the course of action, which might be one of those below. |
| Option | Action |
| Patron | Clicking the patron button after selecting an email in the list will open the patron window to whom the email is being sent. You can edit the primary email address and correct it for the future.
You should take this action if you can see that the email address was obviously spelled incorrectly. You may want to contact the patron and get the correct spelling of the email address. |
| Contact Card | This opens the patrons contact card directly so that you can edit the email address to correct it and/or add one in if it is not there.
After correcting an email address for the patron, double click on the unsent email and change the outgoing email address to the one you just entered and the email will reset and then send in a while. |
| Set Status | An email has 3 status codes. It can be Not Done, Done, or be in Error. All emails on this window generally are in in the Error or Not Done status as that is what the purpose of this window is.
Actions that can be take are:
You should take this action if the error message indicates that there was an issue talking to the SMTP server that has been corrected -OR - after correcting an email address. |
| Preview | This allows you to view the contents of the email. |
| Send | Will allow you to change wthen the selected emails may be sent. You can elect send them:
|
| Mail Pref | this will open the mail preference setting of the sender (or company preferences if its a company email) so that you can correct any incorrect password or SMTP settings. |
| Delete | This allows you to view the delete the selected emails completely from the system as long as they are not part of a pledge reminder. |
| This allows you to print the selected rows and columns to the printer | |
| Export | Export the selected records in the list |
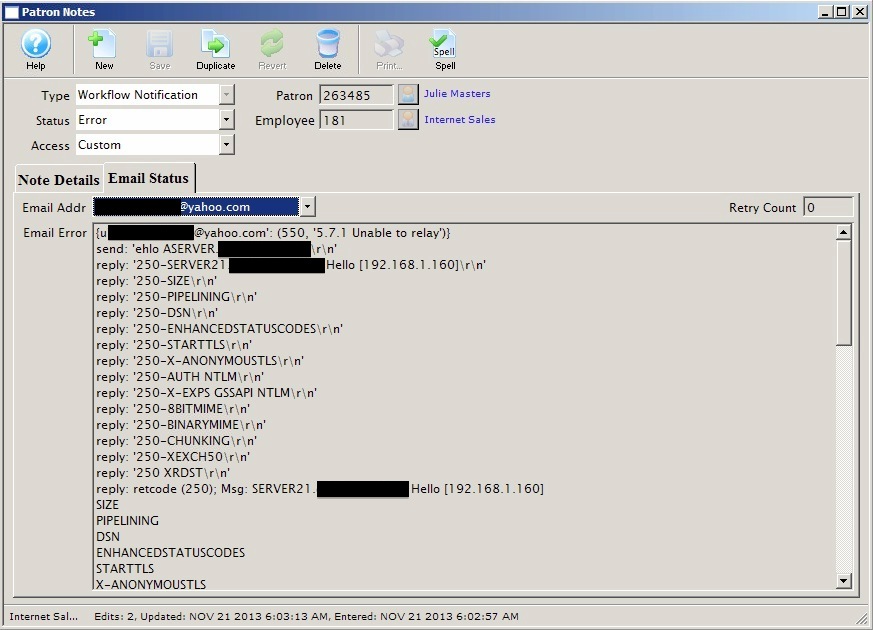
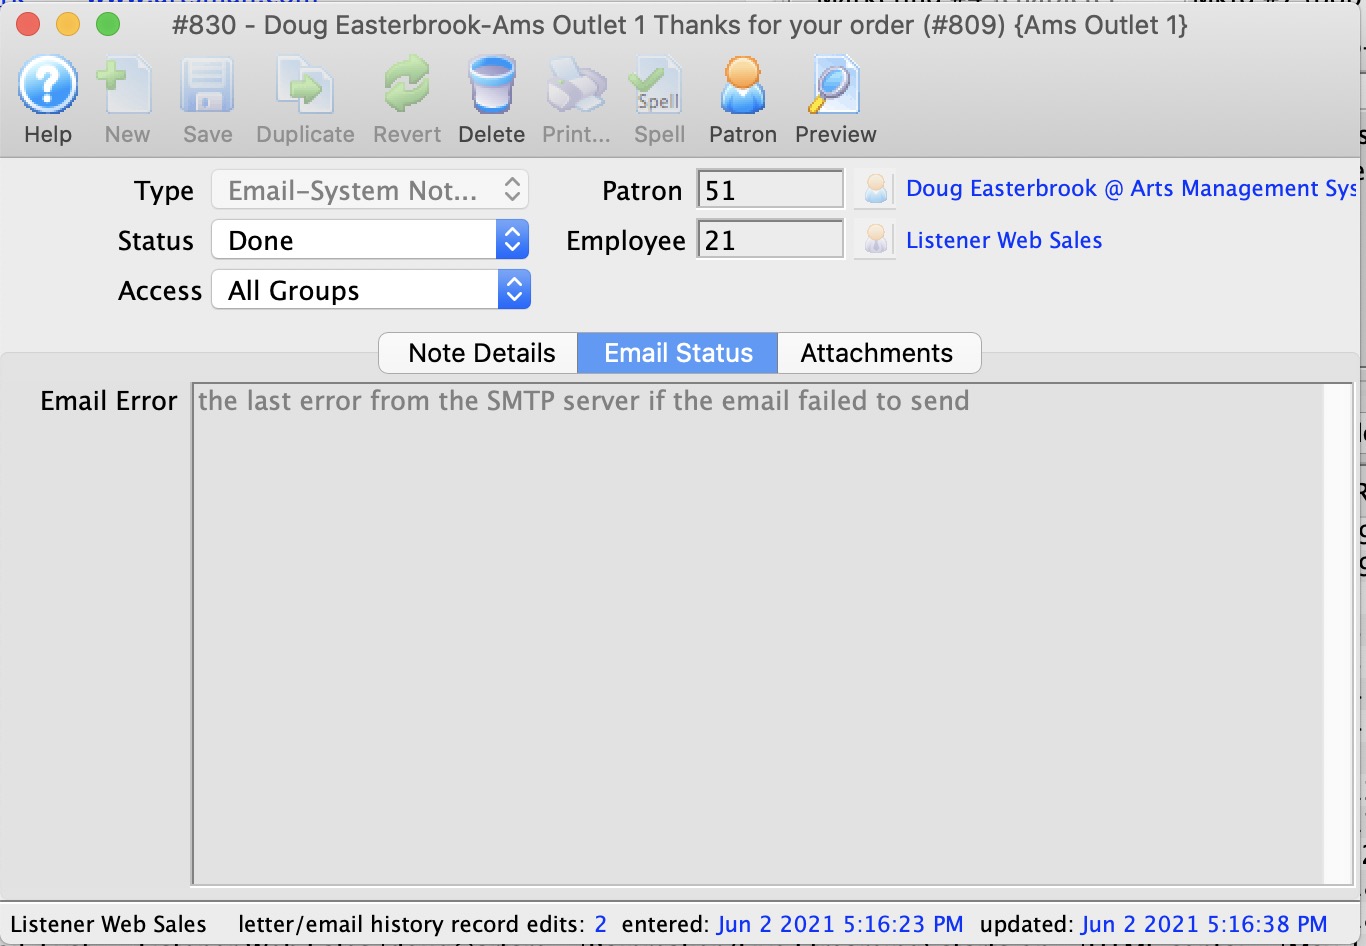
Error Log Detail for Unsent Email
A detail window will open that looks similar to the one below. On the 'email status' tab, any problems with sending that particular email will be shown. If the status tab is blank, it means one of three things:
- the time that the email is scheduled to be sent is not yet upon us.
- the email was sent successfully
- somebody shut down the web listener for some reason.
Note that there an email address drop down. If the patron has more than one email address, you can pick an alternate one to send to; if the issue is with the specific email and not with the email server.
Out of interest, this email shows one common error where the SMTP server is not allowed to relay. This can usually be fixed by entering a user id/password in company preferences or fixing the email server to allow outing emails from the second generation listener machine. Please read for other troubleshooting tips for emails.
|
TM Server supports auth login, clear-text, md5-cram and communication over TLS/StartTLS or SMTPS.
It does not currently support NTLM authentication in Exchange servers. Please use any of the above and TLS/StartTLS for security at this time. |
Verify Email Error Log Daily
|
The most common error is 10060 unable to contact server
This means your TM Server machines are unable to talk to your mail server. Thats usually the fault of your mail server or network. Please reset all emails to 'Not Done' and see if they will send. If they don't go eventually, contact your IT people or email provider and find out what the problem is on their end. |
|
If emails dribble out slowly, it is even more likely to be rate limits at the ISP / Mail Server. Google Mail and Office 365 online accounts are particularly susceptible.
Read about Office 365 rate limits - if TM receives limit messages, it will automatically slow down sending emails for you. It may delay password requests etc, so it is better to use a proper mail server. |
- your email server is not working at the current time (reboot it, or call your ISP)
- the email server is working, but you can't contact it (a rare situation - call your ISP)
- the customer typed in a goofy email address like bob@yahho.com (this is spelt wrong, but a patron is apt to do that).
- There is a valid domain for the email address, but the name is wrong. e.g. the patrons name is b smith but they typed bsmth@myemailserver.com or the email address is just plain wrong. (change the email to as best a guess as you have.
Under such circumstances, there is nothing that you can do to make the mail get sent without reviewing the error list and fixing the problem. This is similar to sending from your own personal outlook account ... you can get the same errors from outlook and so, by analogy, you would take the same action.
How to fix email addresses in Theatre Manager?
- Use the menus to go to Patron Sales->Web Sales Module->Pending/Unsent Emails
- Search for all pending emails
- Look at the 'Error' message column. You can double click on the row to see a full transcript of the interaction between Theatre Manager and your email server. Based on the error message (as per the sample below), you may need to:
 change the patron's email address to correct it. You can pick one from the drop down, or go to the patron and add a new one or edit an existing one. Make sure it is their primary email address, or if the email address in this list is blank, set it as a primary email address.
After fixing the patrons email address in the patron record, CHANGE the email address on the individual email and it will be resent using the new address.
- if emails do not send because your outgoing email credentials are wrong, then fix them in company preferences (Step 2 above)
- if you are getting SMTP: 550 Requested..... messages for most emails, see step 2 above
- if you are getting SMTP: 535 Incorrect authentication data yet test emails work, it is probably because you were sending test emails to someone inside the mail server, rather than outside. In that case make sure you email server allows relay from the inside of the network to the world.
- After correcting the problem, change the status of all the emails from Error to Not Done using the tools on the window.
- Alternately, if you can't figure out why a specific email will not sent, change the status to Done
- The web sales listener will pick up all the Not Done messages and try to resend them after a few minutes.
Emails are not being sent by the web listener
|
The first place to look is the Manage Pending/Unsent Emails screen to look at the error messages behind the emails that did not get sent. You can look at the error message column, or double click on individual emails to look at the error message tab.
The second possibility is that they requested a password reset for an email that does not exist. Refer to finding patrons who request password resets and claim they didn't get an email. |
Based on what you find, you may need to take various actions below:
- If their email address is correct, it may indicate a set up problem in the company preferences smtp settings.
- Some emails may be for a future eblast, and since they have not been sent, you just need to wait until they go.
- If there are many, look at an email on a case by case basis and fix the patron's email address if that is what looks to be wrong. you can gain insight from looking at the error message field.
- Use the status button to mark older emails as 'done'.
- Try to send some of them again if they are recent by marking them as 'not done'
- Or a combo of the above.
Each day, you should review the email error log in Theatre Manager that displays any emails in error status. Errors can come from a few sources.
Check the Patron Email Address
If you notice that the email address is blank in the error log, it means that the primary email address may not have been set for some reason. To fix those:
- Open the patron record
- Go to the Contact Info tab
- Click on an email address (there probably is only one, but if there is more, select the most appropriate one)
- Click on the Set Primary button to set that email address as the primary address
- You may also have to edit the employee's preferences (the gear on the main toolbar) and set the SMTP settings, password, authentication, etc as required
Be sure to check the error log daily.
Check the email settings in Company Preference
- a valid email address
- SMTP mail server
- SMTP port on the mail server (generally 25)
- login account
- user id and password (if required)
- the StartTLS/SMTPS settings
Once the settings are correct, use the 'Test Email' to send a test email from this account to yourself. Verify that the email was sent successfully at the bottom of the Company Preferences screen. If not, adjust the email server parameters until the email is sent successfully. If there is an error using the test email button, you will see the entire STMP dialog which should give you all the information needed to identify the issue.
|
If using gmail, you may need to use secure settings because Gmail is warning users if email comes over insecure servers and may not access email unless it is sent with TLS enabled. |
In some cases, you will see errors like Unable to send email. SMTP: 550 ..... These typically mean that a setting needs adjusted on the SMTP server. Typical errors and actions are:
- SMTP 535 - usually means that the password is incorrect.
- SMTP 550 - usually means that the SMTP server will not allow relaying the email from the listener to the outside world. We see it most often with MS Exchange servers where somebody tightened down the security. This can be remedied by contacting your IT person, showing them the message and asking them to allow relay of emails from the listener to the outside. Alternatively, you may need to specify another SMTP server address
- SMTP 5xx - For other SMTP errors, please read the entire message. This usually tells you why the email could not be sent. The mail box might not be reachable, or there may be no mailbox on the remote mail server for this user (eg: they changed or cancelled their email address).
Once Theatre Manager is able to send emails, then you should change emails in error to not done to send them.
Verify that Ports are open to the SMTP server
If the ports are not open or there are firewall rules in place that prevent an email being sent, it wont get there no matter how hard we try.
Warning of pending emails that have not been sent yet
If you are receiving an error that emails have not been sent by the Web Listener, there are, at first, two possible conditions under which the emails may not have been sent. You can determine which condition is occurring by double clicking on the email in the Web Listener Email Log.
- Condition #1 reports on those that are actually in error, and will give you the reason why the email was not sent. Examples include: an incorrect or 'bad' email address, an SMTP Error, Pause Email settings in Theatre Manager, or specific router ports that need to be opened.
- Condition #2: refers to emails that are pending but may not have been sent yet. This results from either timed emails in a blast email setup, or notifications that are scheduled but have not yet reached their scheduled time to go out. If this is not expected (you do not have any scheduled 'future' email blasts or notifications), please verify that the web listeners are active.
This check happens during each login. Given that most venues send eblasts overnight, seeing something in the morning is indicative of possible issues from the night before.
Virus Application is Scanning Emails
Forgot Password Activity Log
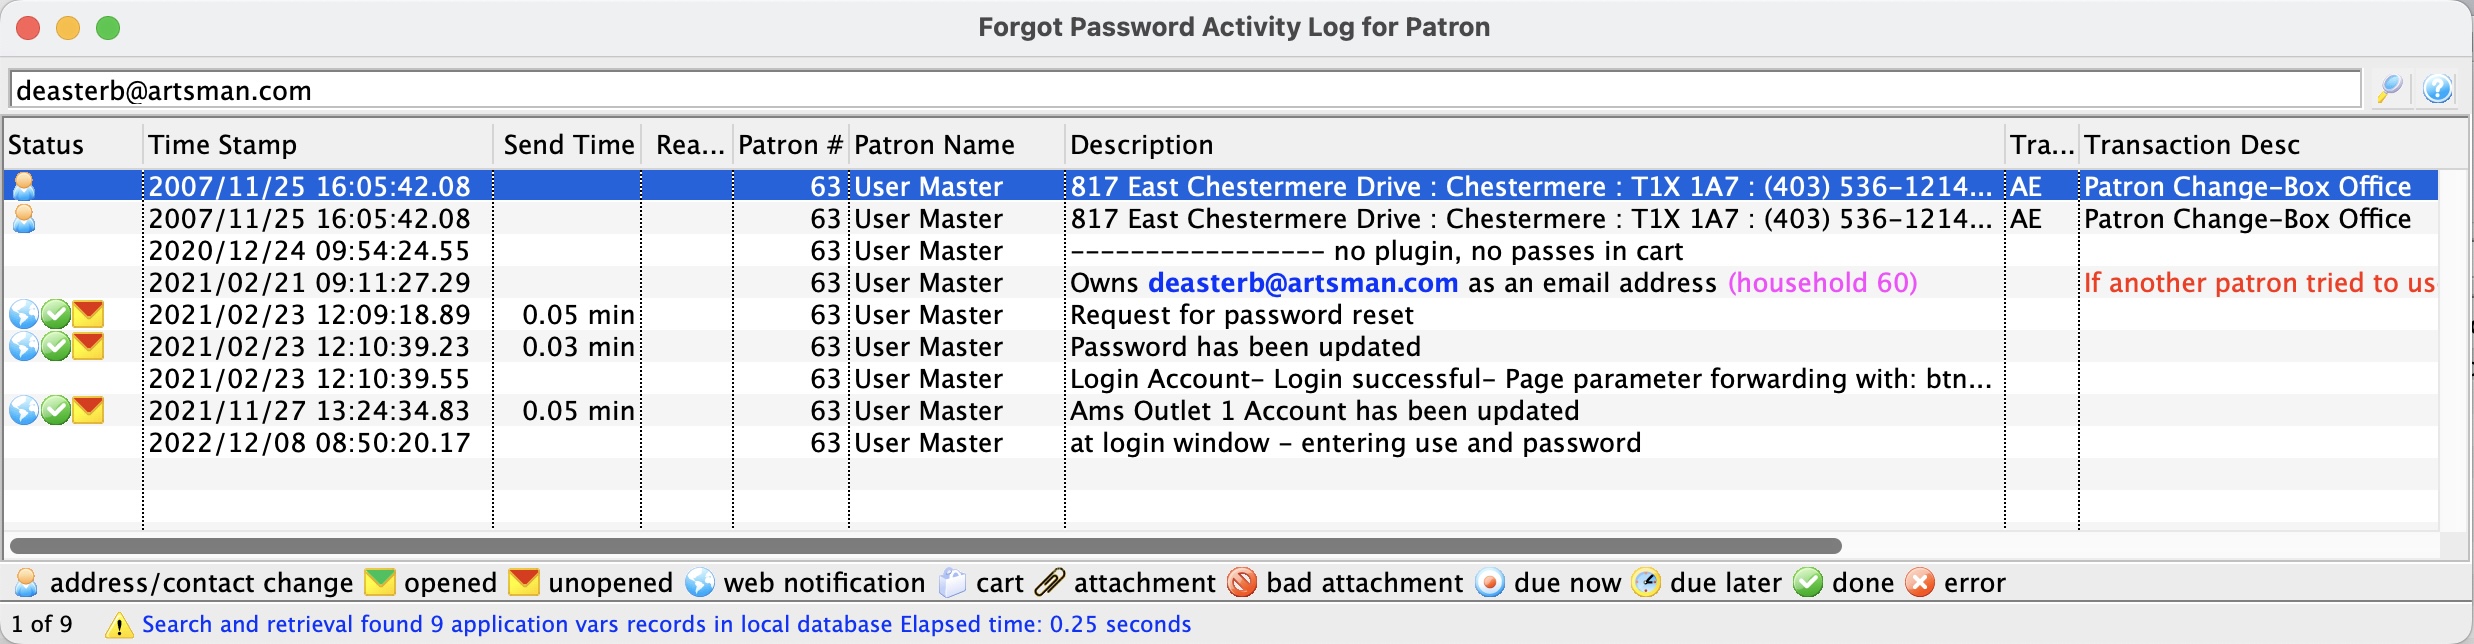
This window shows a log containing a patron's forgotten password behaviour. The entries in the log are curated from:
- Patron transactions showing if the patron was merged, changed their own data online, or had their data changed at the box office. If the box office, for example, changed the email after he password request, it might be an indication that the email address was wrong, and then fixed by box office.
- Patron emails specific to the requesting of passwords and emailing of order confirmations, as well as how long it took TM to send the email and how long it took the patron to read the email. This will tell you how quickly it left TM, and how long the patron took to open it.
- Web logs showing forgotten password requests and issues updating the password including error messages the patron might have received trying to enter their password (like password needs upper case/lower case or a number, etc). If the patron cycles around trying to change the password and never does because of errors, it likely means they are not reading the message on the web page (or the web page/tmError.txt was modified and doesn't show the standard explanatory messages)
What can you see in the logs
The logs are ordered by time stamp. You should be able to see a brief summary of:
- A request for a password email. This would confirm that they did ask for a reset and by the right email address. If the email address did not exist, you would see that message.
- The email sent to the patron. If there is no email, sent, the email did not exist
- If the email exists, attempt to change the password on the email
- If the email does not exist, attempt to create a patron, perhaps using that email address
- Transaction logs indicating that the patron was created, merged, or updated
- and, if the patron finished an order online, you'll see the confirmation email record
What might the forgot password log show
You may see repeats of any of the above behaviour for the patron, so it:
- needs to be carefully read and analyzed to determine what might have prevented them from being successful.
- might indicate when the user last was able to purchase something.
- might indicate somebody who always forgets their email every time
- might indicate somebody who never reads any of their emails, which usually indicates it went to spam
- might indicate if the user was typing as password that does not meet your minimum standards
- .. and more
The log below shows an analysis of what a real user from artsman did to create a set of log entries on a customer database for illustrative purposes.
Where can you access this from
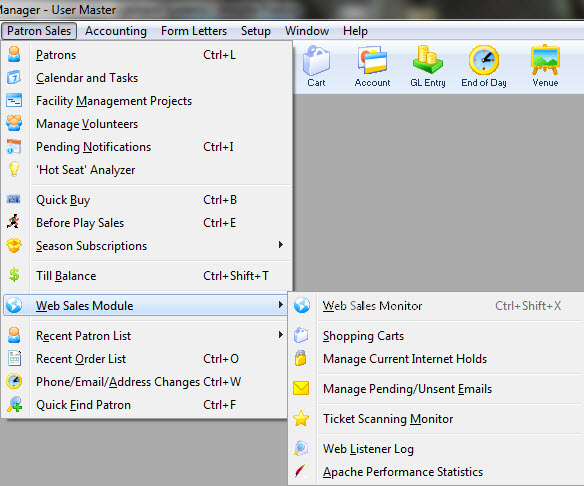
This feature can be accessed from:
- The Web Sales Management menu
- Right-clicking on a patron (with an email) in the patron list window and selecting 'Forgotten Password Log' from the context menu.
- Right-clicking on a patron (with an email) in the Whos In List on the mail list window and selecting 'Forgotten Password Log' from the context menu.
- Clicking the gear icon on an email address in the patron contact card and selecting 'Forgotten Password Log' from the context menu.
- The Web Listener Log if the log entry appears to contain an email
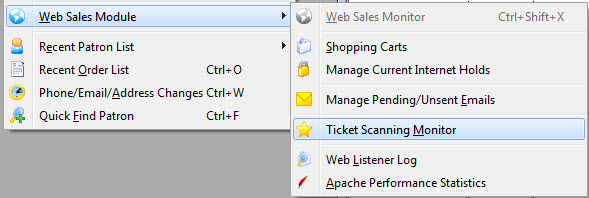
Ticket Scanning Monitor
The Web Sales Listener waits in the background while Theatre Manager is running. The listener allows patrons to connect to the database via the internet. To work, you will need to have Web Sales Enabled in Outlet Preferences, and have your web pages ready for patrons to connect. Click here for Outlet Preferences, Web Listener tab information.
Using the Monitor you can get a detailed work flow analysis of people through different stages or processes, booths, rooms or locations at an event. Each scan is date and time stamped allowing you to analyze work flow, highlight bottle necks, giving you the ability to better plan and optimize resources. Account for all visitors that attend an event for improved security.
To open the Ticket Scanning Monitor, you perform the following steps:
- Choose Patron Sales menu item>>Web Sales Monitor>>Ticket Scanning Monitor.
The Lecco Monitor window opens.
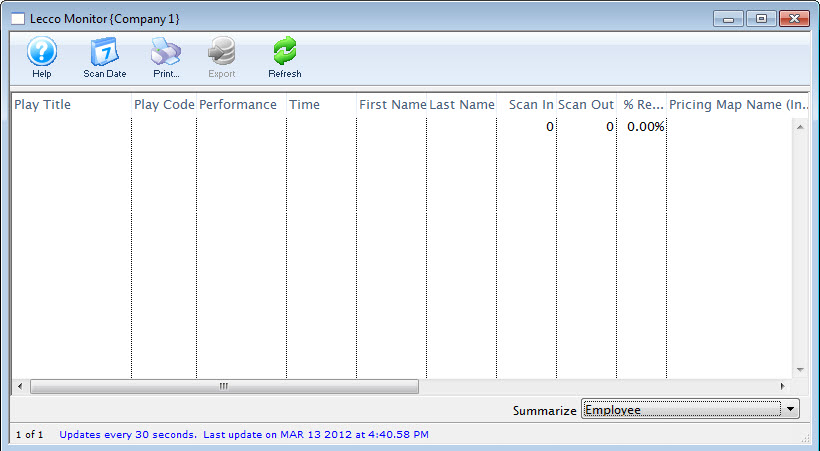
- TXT - Tab Delimited Text
- CSV - Comma Delimited Text
- xls - Excel 97-2004 Workbook
- xlsx - Excel 2008 Workbook
- The Performance /Scanner IP Address
- Employee
- Performance
- Performance / Employee
- Scanner IP
The monitor displays all of the scanning information and allows you to choose what to view and the order you want to view it in.
Parts of the Window
 |
Takes you to this help page. |
 |
Select date - lets you chose a specific date to see the scans on that date. Opens a pop up calendar. |
 |
Prints the list displayed. |
 |
Exports the displayed list as as: |
 |
Refresh - Refreshes the list with the most recent transactions. |
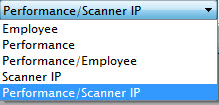 |
You can choose to summarize the list by: |
Column Information |
|
| Play Title | Play title of the performance scanned. |
| Play Code | Code number of the event. |
| Performance | Specific performance of the event. |
| Time | Time the ticket was scanned |
| First/Last Name | First / last name of the patron who purchased the tickets. |
| Scan In | Time Scanned in. |
| Scan Out | Time Scanned out. |
| % Records | The percentage of the records scanned. |
Web Listener Log Detail
This will open a list of log entries and you can search for any range of days, patron, listener, type of log entry, etc. You can:
- also view all log entries for all people or view the logs for a specific cart.
- Search the logs for failed password requests due to unknown email address. This is quite helpful of people say they did not get an email after requesting one - to see if they entered it right. If they did enter it right, you may want to look at Pending Emails in case there is an error in your email setup.
Log of when Emails were sent
- Open up the web listener log
- Search the log Message field content for Batch Mailer
- You will see one type of message that indicates Sent and Failed each with a count.
- A Sent count reflects the number of emails that Theatre Manager was able to send successfully
- A Failed count of other than zero indicates some problem with the email that will need to be diagnosed
- If everything is successful, then nothing to worry about
- The reason for failed emails is usually in a separate line with an error message. if there are a lot of these, then you can edit/fix some reasons by jumping over to the Manage Pending Emails screen to correct invalid email addresses, etc.

Patron did not receive Password Reset Email
- they typed their email address correctly. (we've found that some people don't type anything).
- the email address exists exactly once in the database. Nothing will be sent if the email address:
- does not exist, or
- exists more than once under multiple patrons
- the user checked their email program, including spam/trash folders, on all their devices or computers they can use for reading emails
- the email settings in company preferences are valid.
- and the email is not stuck in the pending email list due to some error
Otherwise they will receive nothing
|
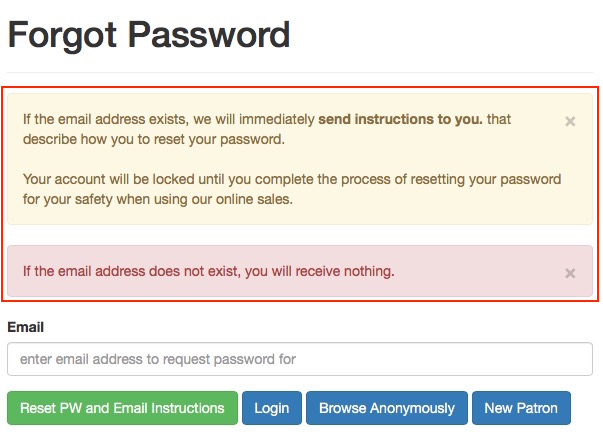 If the patron types an email address that is not in the database, they WILL NOT RECEIVE A WARNING that the email address does not exist. This also occurs if the email exists more than once because it is an error condition.
The reason: PCI compliance and privacy laws (like GDPR) require that a system does not divulge any identifying information like names, addresses, or validity of email addresses to anybody who might be trying to determine who or what is in a database. The sample message from web site clearly indicates they will only receive and email if what they type exists. This approach prevents 'bad guys' from scamming emails elsewhere and determine if an account exists on a second web site, where they could obtain products (Like reprinting tickets they could sell to others on the secondary market) should they be able to guess a login id. Error messages can be changed to divulge more information (like email address exists, but password is invalid). This is not recommended if you wish to implement TM in PCI manner for information security. |
Finding requests for invalid/nonexistent email addresses
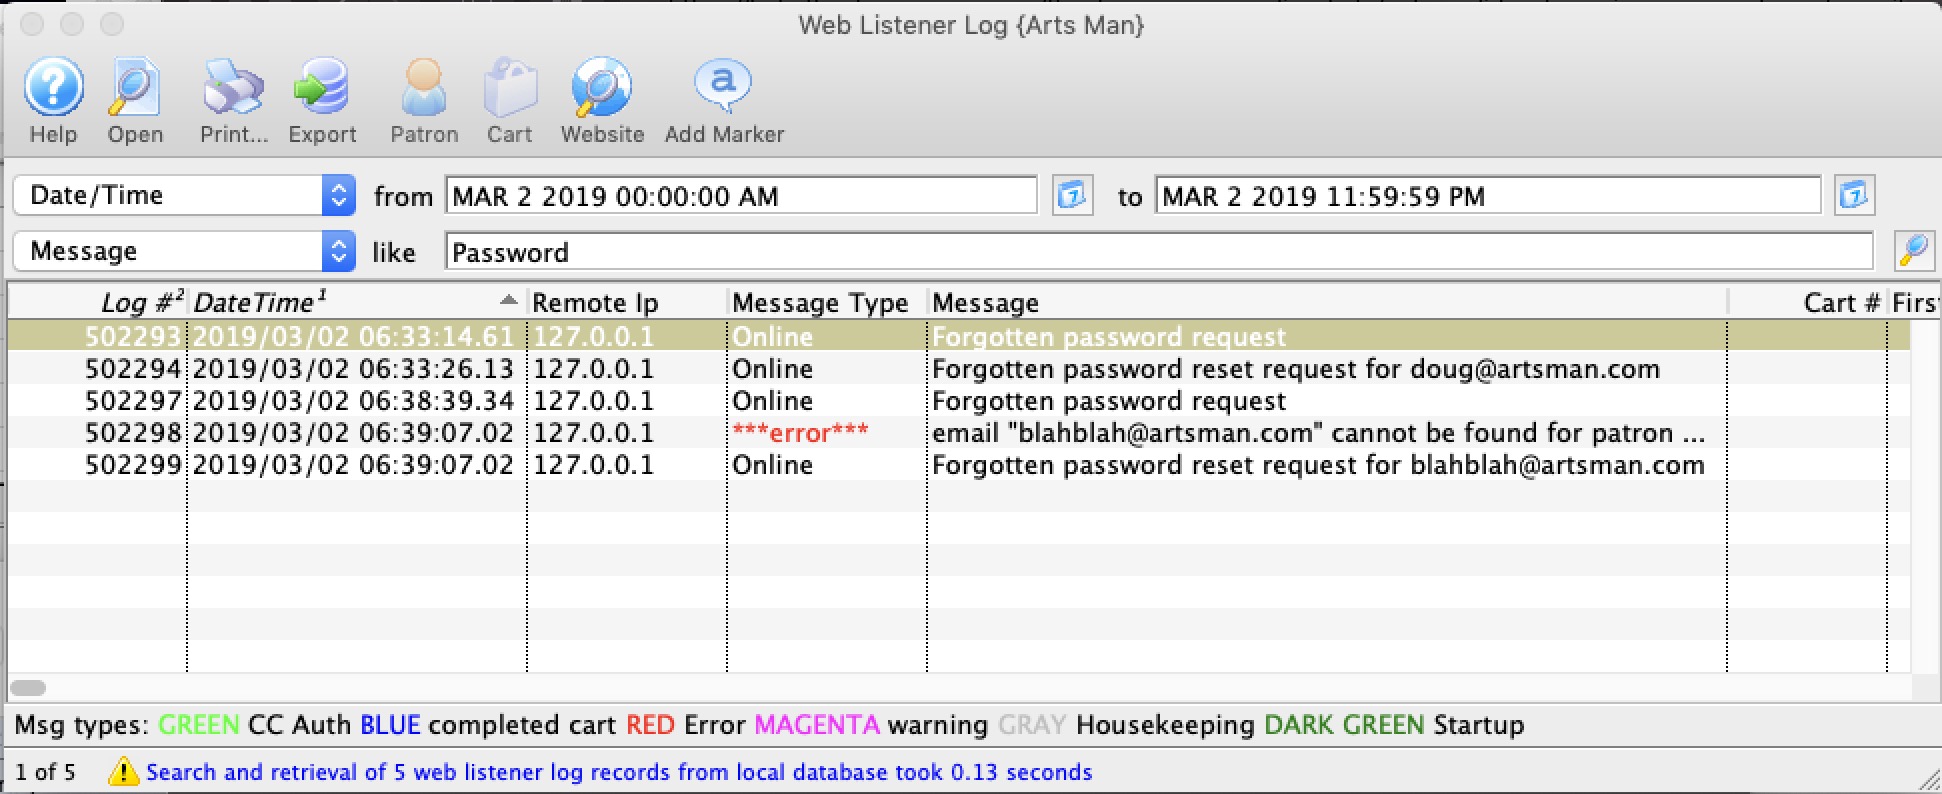
If a patron calls and says that they asked for their password to be reset and did not get an email, you can check to see what email address they used by looking at the web listener logs.
This window is opened from Patron Sales->Web Services->Web Listener Log. For criteria, you may want to use something similar to below:
- Date/Time to narrow things down to a range of days - searching for a month or two is not a problem
- Search within the message text for:
- email does not exist - use Email Cannot to see those people who did not get an email because the email address does not exist.
- email exists multiple times - use Email is linked to see those patrons whose email is in the database at least twice and need de-duplicated using the find duplicate email addresses
Looking for only Failed Password Requests
You can see that there are some attempts to request passwords that did not exist. To verify, first ask when the patron requested their password; then using this window, confirm that this is the reason that they received nothing from the system. If there is no message in the log for the email address they described using the day they had the problem, then you will need to check to see if the email is in the queue pending to be sent, or if it was sent.

Verifying all or Specific Password Requests
The following search might also be used to find both requested and failed password requests. it could also be tailored to only search for part of the email address such as 'artman.com' to see all requests from that one domain. The:
- request message will always appear
- failed message will only appear if there is a failure.
Viewing credit card issues in Web Listener Log (EMV Devices)
|
General troubleshooting steps are found in the EMV pin pad setup at the end of the web page. |
 If you activate a pinpad, you should see 6 entries spread out in the web listener log that might help identify where things are in the communication process. These are:
- the activation of the pin pad
- a payment validation receipt with the request id - saying that we are going to request the CUSTOMER receipt
- a payment validation receipt with the SAME request id - saying that we are going to request the MERCHANT receipt
- a notification that the CUSTOMER RECEPT was retrieved (matching the request ID in step 2)
- a notification that the MERCHANT RECEPT was retrieved (matching the request ID in step 3)
The above messages are followed by a housekeeping message indicating the number of receipts processed and the number that had an error. Normally, that is 1 processed and 0 in error (unless it is declined for some reason)
Viewing credit card issues in web listener log (card not present)
|
If you are looking for problems with one cart, please look at the cart logs to see what the patron has been doing |
- a range of dates and
- the contents of the web log as being 3d-
Once you see the message, you can double click on it to see what the message means. Almost all errors are provided to Theatre Manager from the bank such as:
- Do Not honor! (the bank doesn't like the card)
- Declined! (the bank doesn't like the card
- Hold card! (The bank doesn't like the card - it is probably stolen and the want wants to you keep it)
- Card is Blacklisted (means the venue said they didn't want anybody to use this card
- Emergency processing is on (means that the venue turned the merchant processor into emergeny mode and took the cards anyway
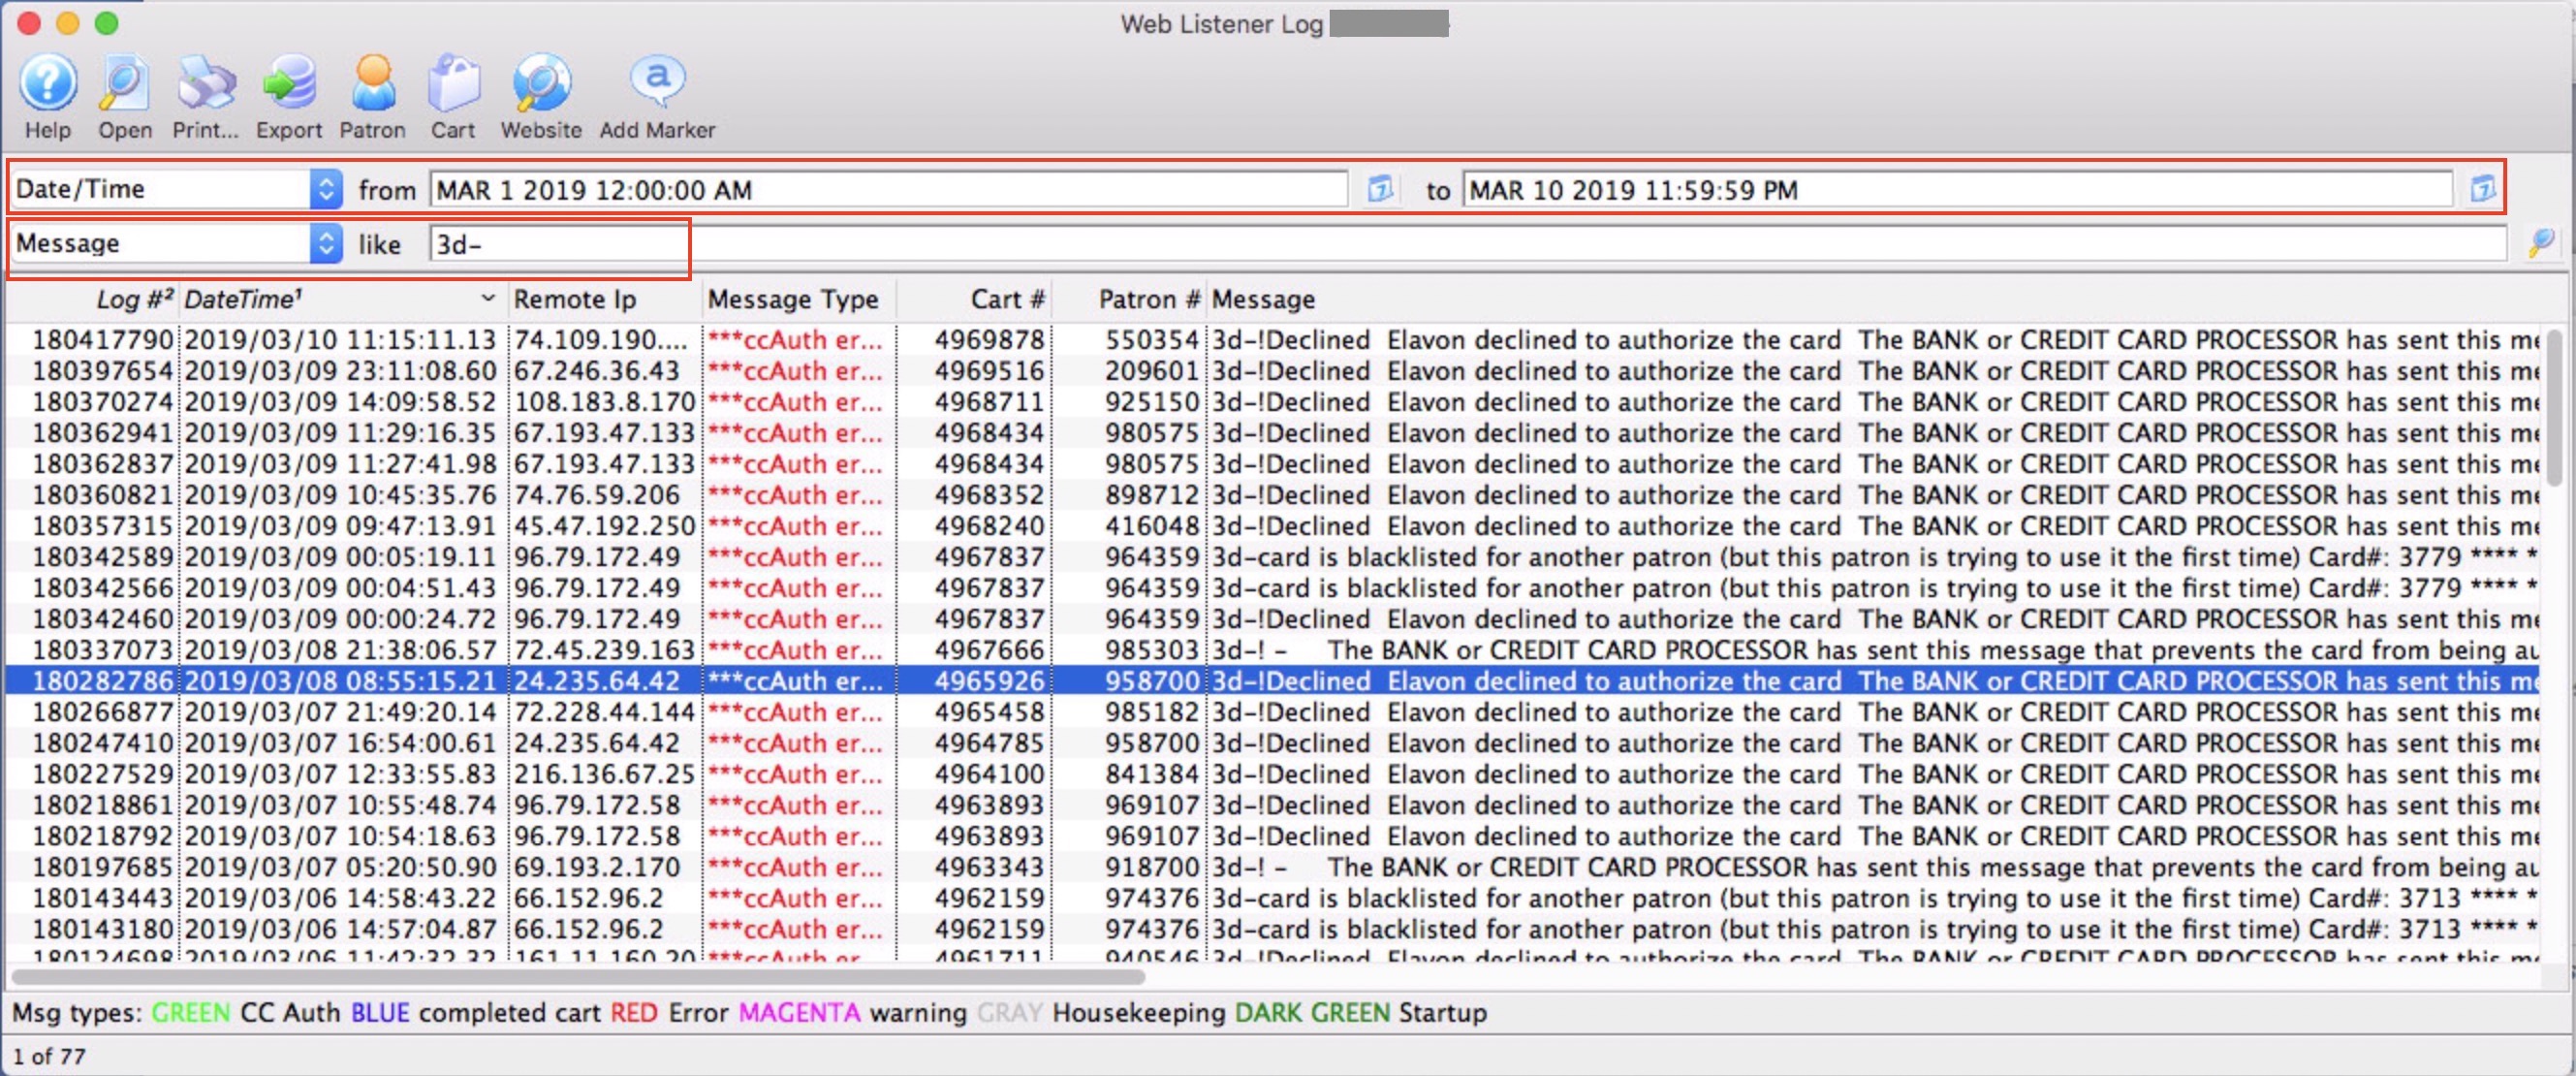
Actions that you can take
- Cart - open up the cart to see far more detail about what the patron has been doing
- Patron - open the patron window directly
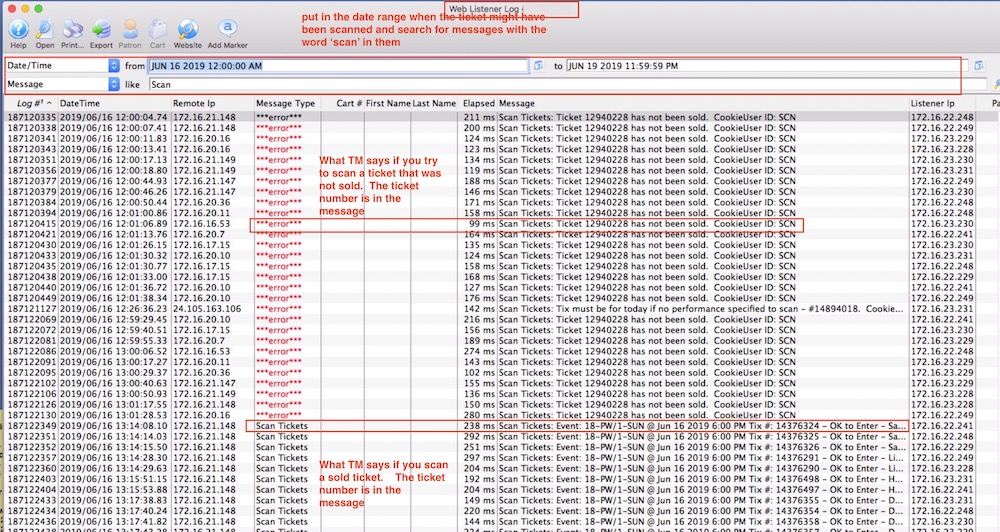
checking for scanned tickets
- for a date range if you know when the ticket was scanned
- the message for the word Scan if you want to see failed scans, successful scans and checkouts
- for the word scan ###### where ###### is the ticket number if you are interested in a particular one
- of whatever combination of criteria you wish.
Note: the logs of scanning are not kept for a long time - only for the retention period set in company preferences.
Managing a Patron Account Online
|
The amount of information a patron has to add to create their own account online is defined on the Setup >> System Preferences >> Mandatory Data tab. Click here for more information. |

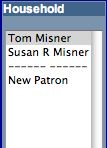
Patrons can edit their own patron account, change their password or add new household members online.
To do so, they must have an existing online account and be logged in to their account.
When a patron arrives at your web sales, they click on the Login  button on the top navigation bar, in the standard templates. If you have customized your web Sales, the placement may be different.
Once logged in, using their email address and password, they then click on the Account  button to gain access to their account.
The patron can edit the contents of the name/address cells and click the Update Account  button at the bottom of the window.
To change their password, the patron clicks on the Change Logon Password  button next to their email address.
To add a new household member, the patron clicks on the New Patron link on the let side bar, and enters the information for the new patron. This adds a new household member to the patron's account (such as a spouse, partner or child).
|
These instructions apply to the standard template pages that are provided as part of the Web Sales module. If your web pages have been modified or customized beyond simply changing the color scheme, then these instructions may differ. |
For information on "skinning" your web sales site to make it look like your own, click here.
Test Drive the Demo
|
Click here to take a look at the web module and its features. You will see a sample web site for a fictional arts or entertainment organization. None of the events are real. |
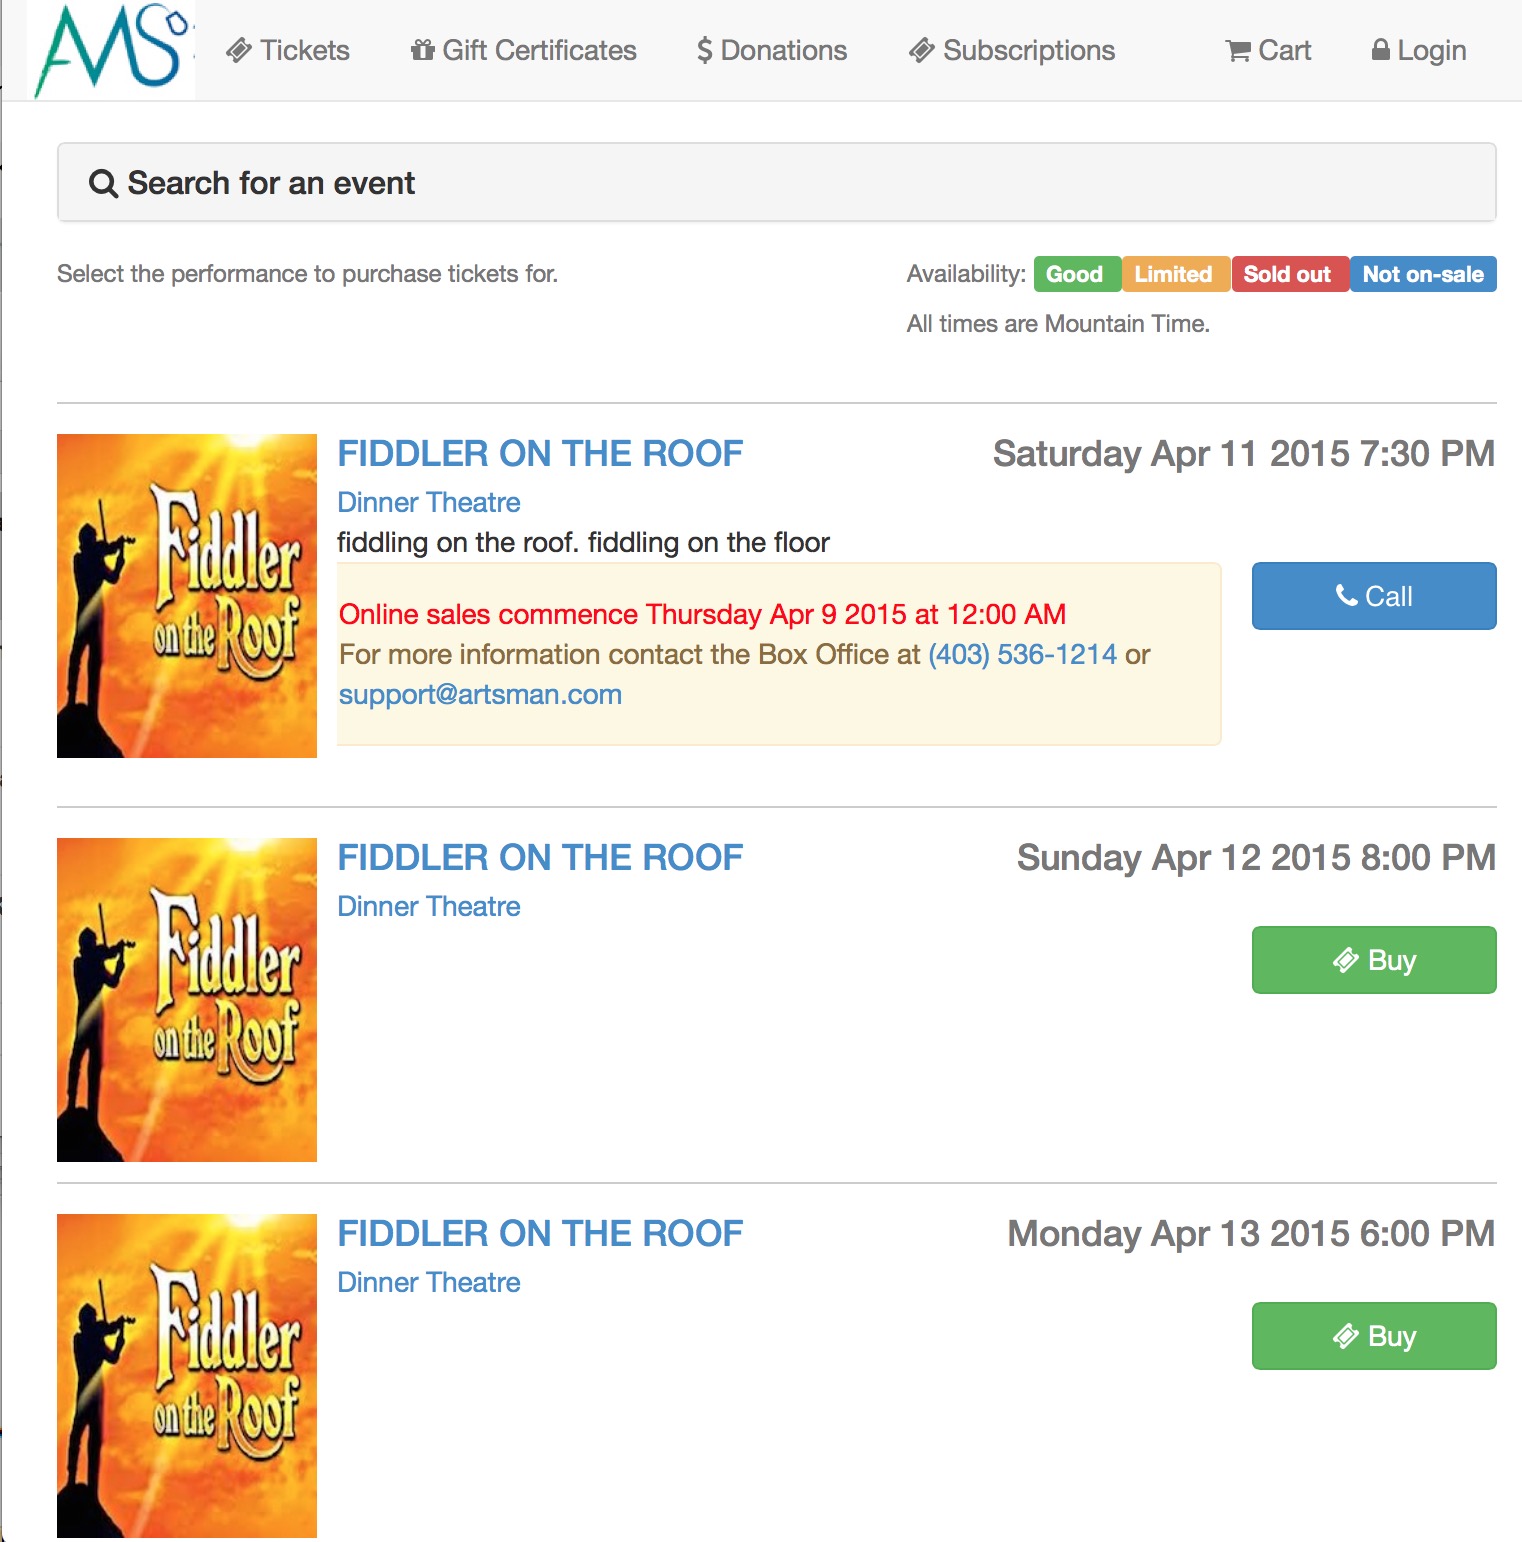
When the sample web pages appear, click on the 'Online Sales' button on the side navigation bar to log in. Please keep in mind the following while you are playing with the demo:
- The demo web site is an example of what a fully integrated web site could look like.
- It contains the base web pages with only a basic colourization. The pages are designed so that your main web site developers can apply some style sheet changes and make it look like your current web site.
- You can also look at some sample web sites where customers have take the sample pages above and altered their appearance for their own purposes.
- The customization guide shows the latitude you would have to make or brand the web experience as your own. Our goal is that the web pages look like your company, not us.
- You may wish to create an account for yourself. This will include your email address and password so that you can sign on again. Use your real email address so that you will see a sample email that can be sent back to confirm you've signed up and your purchase(s) (all these emails are customizable)
- The rest of the information is meant to illustrate the data and processes that could be mandatory at any venue. (You can control this at your site - just as you do today)
- Once you have signed in, you start building a shopping cart. Click on
the buttons at the top to look at various items that are for sale.
In this demo, shopping carts
can contain:
- tickets - we've allowed up to 10 in this demo - you can set this to be anything you want
- donations - you determine the campaigns/funds you wish to make available
- passes/gift certificates - you also determine which ones to sell
- mailing fees
- You can also sign up to belong to specific mail lists

Completing your sample shopping experience
-
When you are done buying what you want, you need to check out - just like at the grocery store. It will ask you for a credit card.
The demo is configured so that it will accept various types of cards. If you want to test a checkout, use:
- Visa #: 4242 4242 4242 4242.
- CVV2 #: 123
- Expiry: Use December of the current year or later
- Some minor notes about the web site:
- You may log in as often as you wish and see you past activity and shopping carts.
- You can buy whatever you want and try to do anything you like.
- We may restore the demo database back to its original state periodically (especially if you buy out the events) in which case any accounts you set up will be erased.
- Any information entered into the demo web site is confidential.
- We do not look at it -and-
- will not contact you if you put your name into the demo.
|
If you would like to contact AMS (or for AMS to contact you), please visit the contact page and make a phone call or send the information request form. We'd be happy to tell you more about the most full featured CRM for arts, entertainment and sports organizations that exists. |
Testing Communication between Listener and Apache
- Open the Command Prompt on the Web Listener computer
- Type telnet and press enter
- Type Open (the IP address of the Apache machine) 5111 and press enter
This would look something like: Open 192.168.1.10 5111
If the web listener can connect to the Apache machine the command prompt will return. If it cannot communicate it will return an error. - Type get /index.html and press enter
A response means the Listener has permissions to access the files on the Apache machine. - Type Quiet