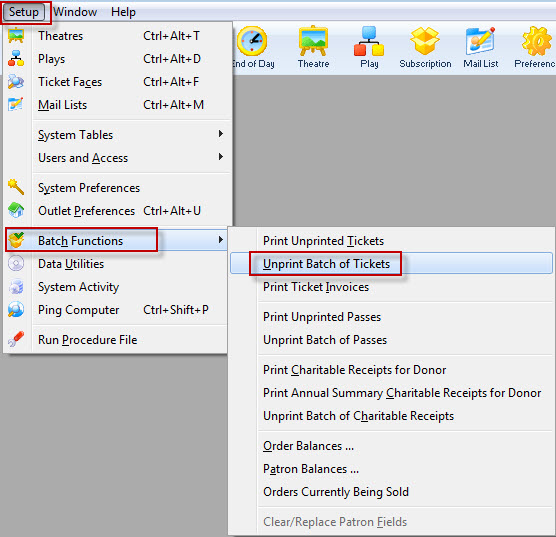
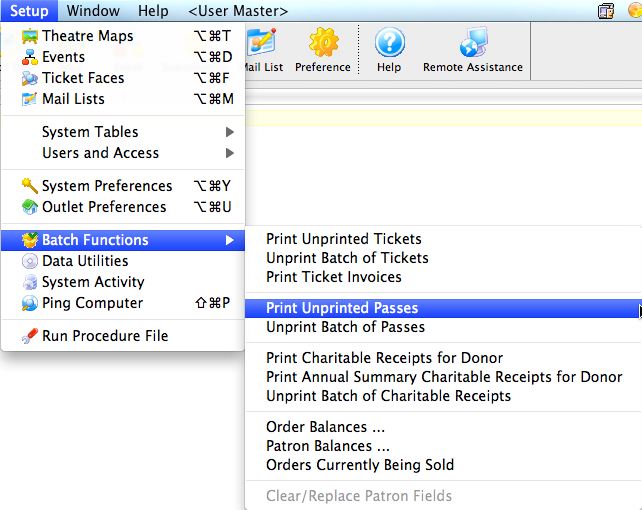
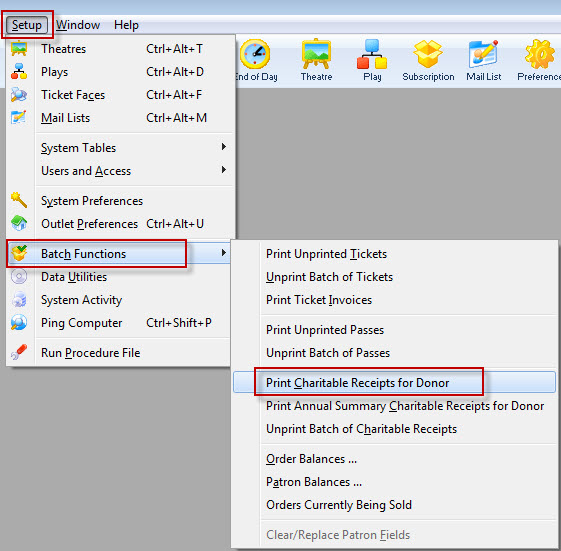
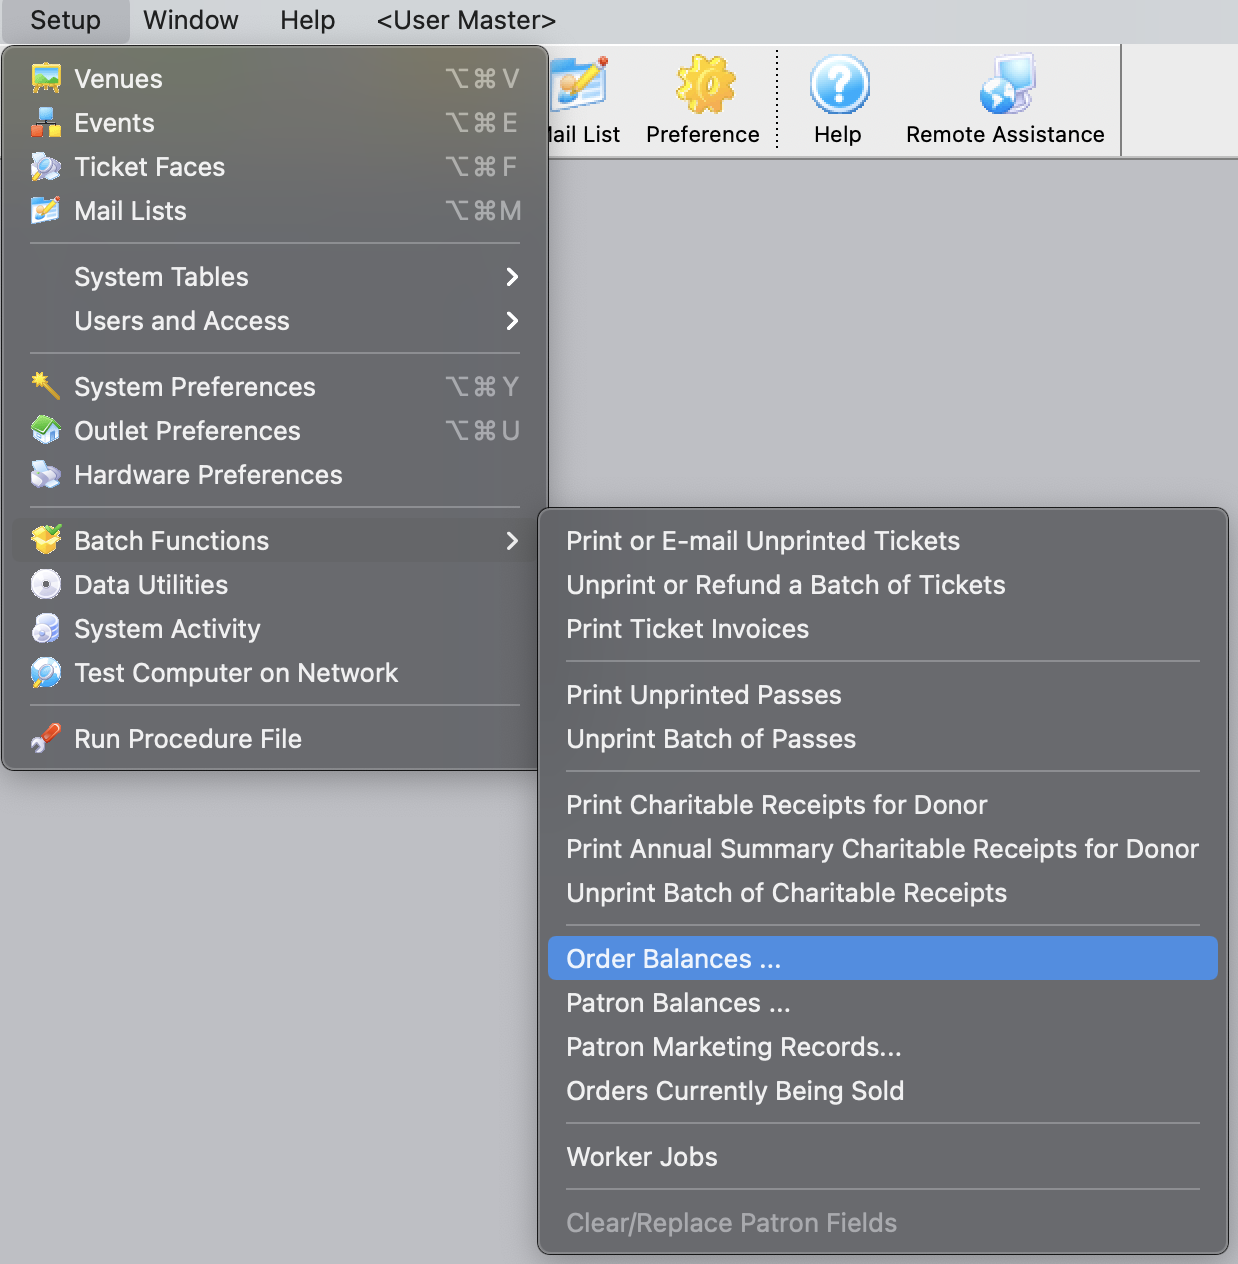
Batch Functions
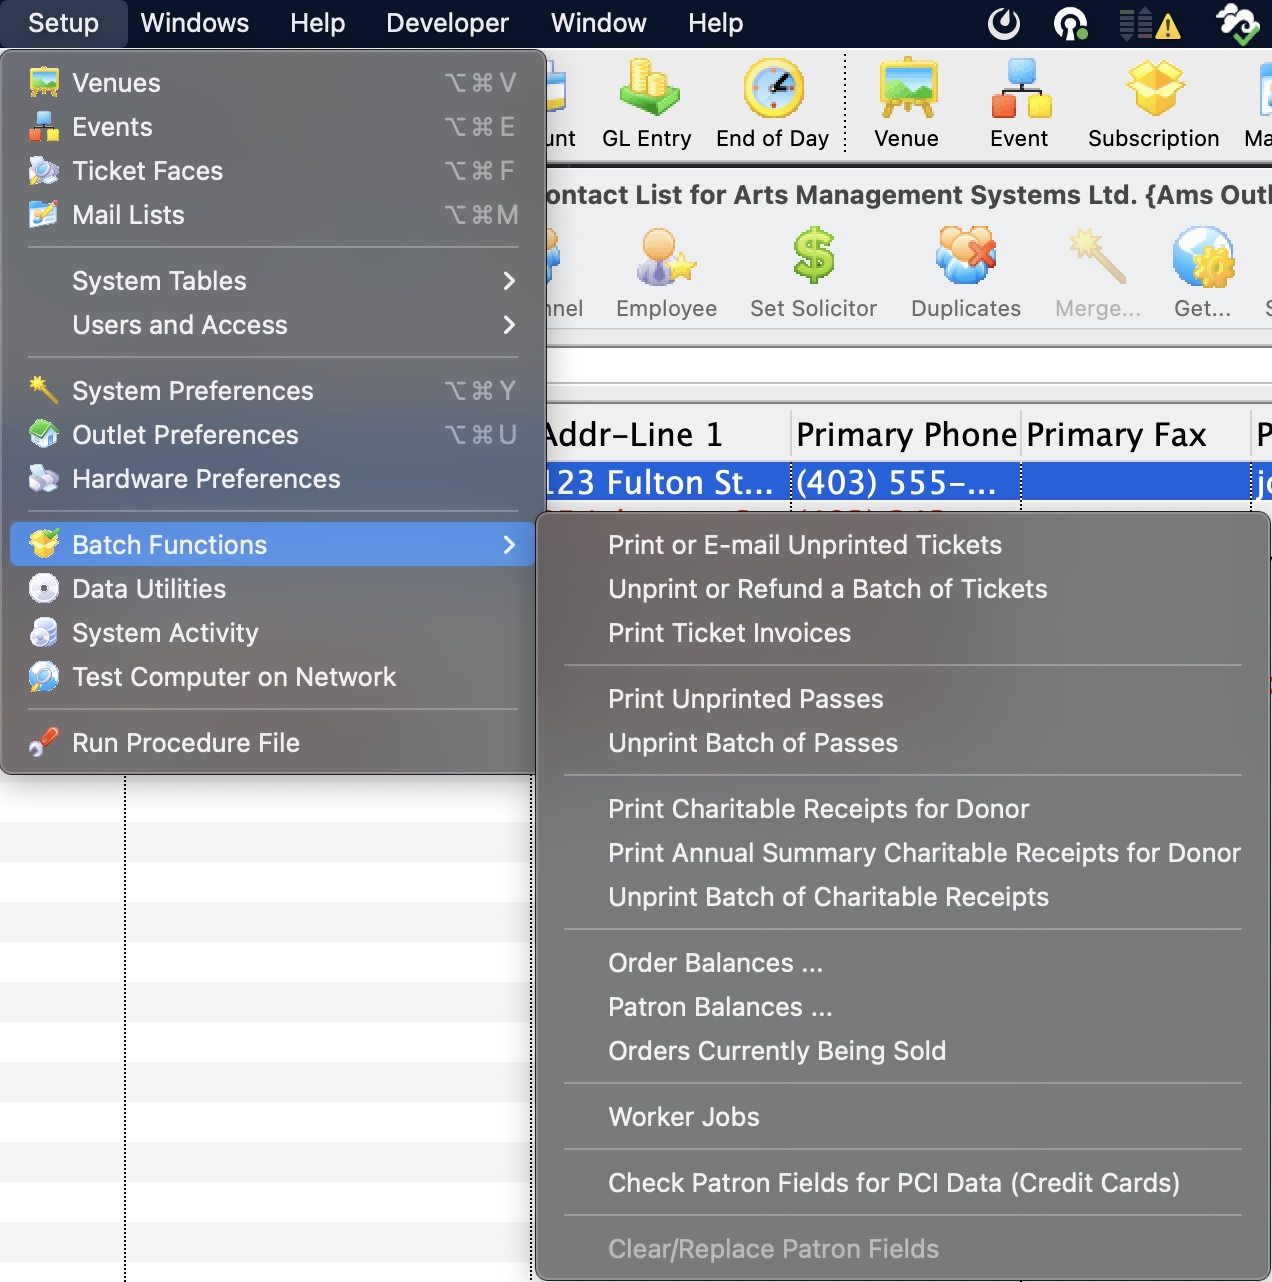 The Batch menu allows a number of batch functions to be performed. Batch functions are used for processing items in a group. For example, the printing of all tickets to a performance that have not been printed is done as a batch function rather than through each patron's record.
- Click Setup on the main menu bar
- Select the Batch Functions sub menu
- Select the item you want from the sub menu
| Print Uprinted Tickets | Used for the printing of all tickets that have not been printed for a performance. For more information on using the Print Unprinted Tickets function, click here. |
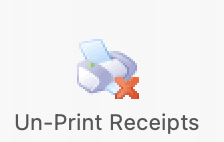
| Unprint Batch of Tickets | Used for reprinting a previously printed batch of tickets. This removes the 'Printed' flag from the tickets. For more information on the Unprint Batch of Tickets function, click here. |
| Print Ticket Invoices | Used for printing all ticket invoices that have been marked for printing. For more information on the Print Ticket Invoices function, click here. |
| Print Unprinted Passes | Used for printing all passes that have not been printed. For more information on the Print Unprinted Passes function, click here. |
| Unprint Batch of Passes | Used for reprinting a previously printed batch of passes. This removes the 'Printed' flag from the pass(es). For more information on the Unprint Batch of Passes function, click here. |
| Print Charitable Receipts for Donor | Used for printing all charitable receipts that have been marked for printing. For more information on the Print Charitable Receipts for Donor function, click here. |
| Print Annual Summary Charitable Receipts for Donor | Used for printing all charitable receipts that have been marked for printing in an Annual Statement style. For more information on the Print Annual Summary Charitable Receipts for Donor function, click here. |
| Unprint Batch of Charitable Receipts | Used for reprinting a previously printed batch of charitable receipts. This removes the 'Printed' flag from the receipts. For more information on the Unprint Batch of Charitable Receipts function, click here. |
| Order Balances | Used for recalculating the order balances of all orders within a given range. For more information on the Order Balances function, click here. |
| Patron Balances | Used for recalculating the patron balances within a given range. For more information on the Patron Balances, click here. |
| Orders Currently Being Sold | Opens a window displaying a list of all orders currently flagged as being sold. This is useful if a workstation crashes in the middle of an order. For more information on the Orders Currently Being Sold function, click here. |
| Worker Jobs | Theatre Manager defers some data managment into worker jobs so that you can continue to use your workstation and sell tickets. The TM servers monitor the jobs and are responsible for making them run at the the right time. For example, jobs that save a users window preferences generally run right away. jobs that create indexes or purge expired data will run off hours.
You may receive a message at startup that some jobs have not run. You can review outstanding jobs and let ArtsMan support know - we'll make sure that they run. |
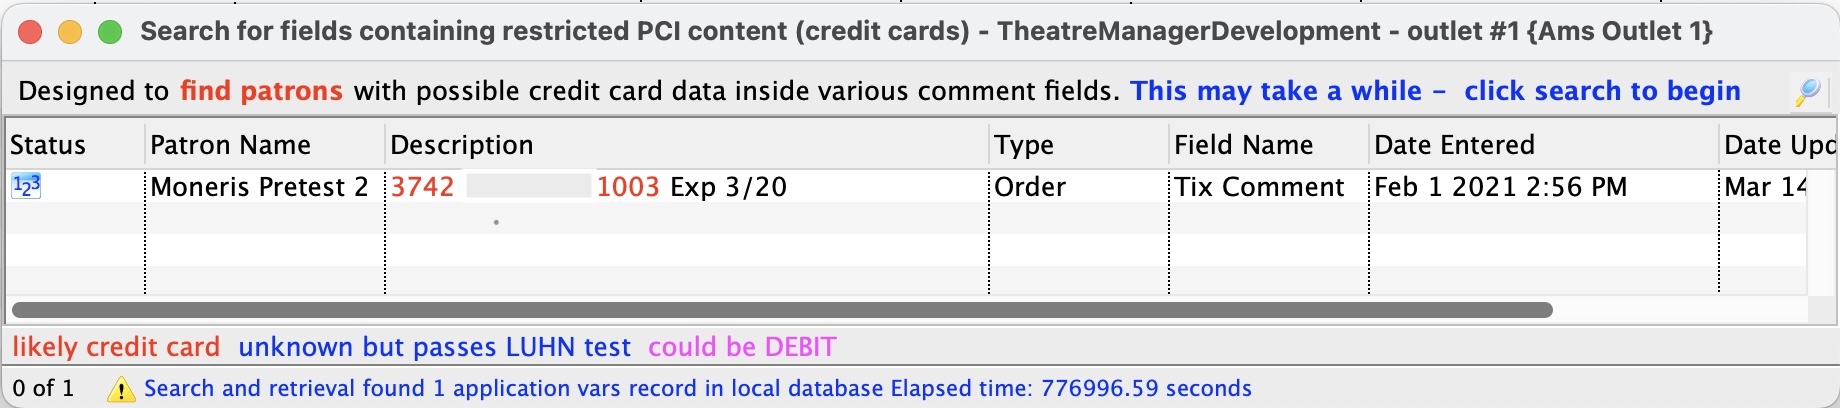
| Check Patron Field for PCI data | This feature is used to search your entire database within a list of note or text data fields that might un-encrypted credit card data.
Under PCI rules, card data shold only be entered in the credit card payment fields. Sometimes, a user or a patorn may put a full credit card number in order notes (instead if setting up a post date payment). This will help you find out what field it might have occurred in and then correct it. When the window opens:
|
| Clear/Replace Patron Fields | This function will be implemented at a later date. |
Print or Email Unprinted Tickets
From the main menu bar, go to Setup >> Batch Functions >> Print Unprinted Tickets.
This will open two windows, with the Parameter window in front.
Parts of the Unprinted Parameters Window
 |
If available, uses the default search criteria for this report. |
 |
If this report has previously been run, this button will add the previous criteria. |
 |
Opens a list of saved criteria for this report. |
 |
Saves the current criteria to be used later. |
 |
Saves the current criteria to be used later and opens a dialog to name this criteria. |
 |
Opens the Add/Edit Parameter window to facilitate adding new criteria. Click here for more information on the Add/Edit Parameter window. |
 |
Opens the currently selected criteria in the Add/Edit Parameter window to allow adjustments. |
 |
Deletes the currently selected criteria. |
| Deletes all criteria from the Search tab. | |
 |
Allows for adjustments to the criteria if more specialization is available. |
 |
Prints a listing of the criteria currently in the Search tab. |
 |
Tests the current criteria to see how many records will be returned. A message will appear at the bottom of the window showing the number of records to be returned. |
 |
Groups the currently selected criteria. This forces the criteria to take precedence in the search. |
 |
Ungroups the currently selected criteria. |
 |
The Search tab is used to enter the criteria to be used in the search of records. For more information on the Search tab, click here. |
 |
The Selection Limits tab is used to enter limits for the number of items to be printed. For more information on the Selection Limits tab, click here. |
 |
The Additional Items tab is used to mark any additional items that should be printed when the batch is printed. For more information on the Additional Items tab, click here. |
 |
The Sort tab is used to determine how the batch should be sorted when printed. For more information on the Sort tab, click here. |
For more information on the Batch Printing window for batch ticket printing, click here.
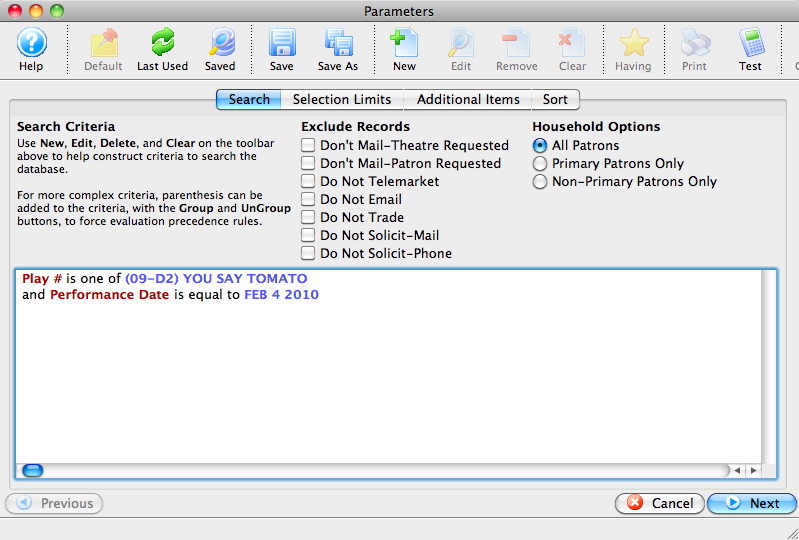
Search tab
The Print Unprinted Tickets function is commonly used to print all tickets for a performance that have not been printed. Multiple performances can be printed in one batch, but it is recommended that each batch be a separate performance.
- From the main menu bar, go to Setup >> Batch Functions >> Print Unprinted Tickets.
This will open two windows, with the Parameter window in front.
- Enter the criteria for the batch.
In the example above, one event and performance date have been selected.
- Click the
 button once the criteria has been entered.
Selection Limits
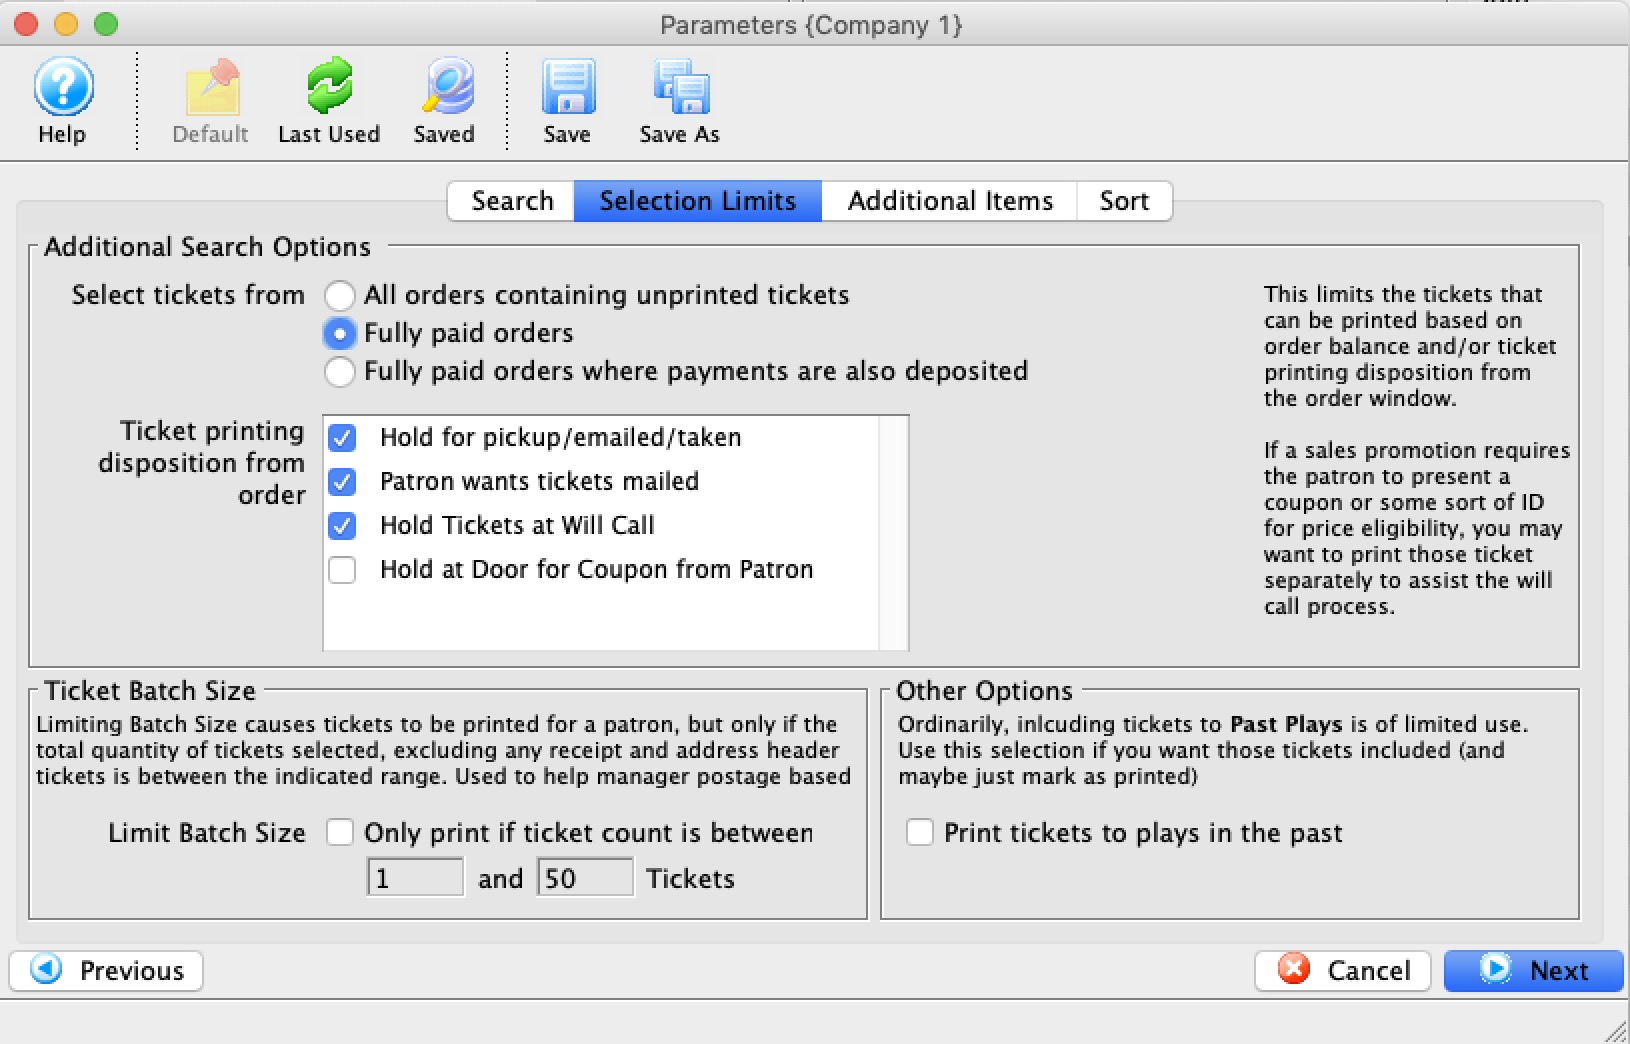
Set the selections in the window. These options include:
| Select Tickets from |
|
| Ticket Printing Disposition |
When an order is taken, the order is marked with how tickets are to be managed. When batch printing, you can include any tickets (not yet printed), that are in orders with one or more of the following status:
|
| Limit Batch Size (optional) | Allows you to limit the batch print size to accommodate ticket printing capacity and stock currently loaded in the printer. |
| Past Plays/Events (optional) | Allows you to print tickets for past events that may not have been printed, if they meet the selection criteria. This is useful if you wish to provide a patron who missed the event with a ticket (as a receipt) of their purchase. |
button.
This will move to the next tab in the Parameter window.
Additional Items tab

Set the additional items to be printed. These items include (each of which are optional):
| Print Address Ticket | Prints an address ticket at the head of each order. This is useful when batch printing season tickets to be mailed. |
| Print Credit Card Receipt | Prints a credit card receipt following each completed order. |
| Include Memberships | Includes membership ticket faces (if one has been assigned in the membership setup). |
| Include Donations | Includes donation ticket faces (if one has been assigned in the donation setup). |
| Mark Tickets as Printed | Changes the ticket printed status on the ticket from "Not Printed" to "Printed." Use this option to indicate in the patron record that the tickets have been printed. |
Click the button.
This will move you to the next tab in the Parameters window.
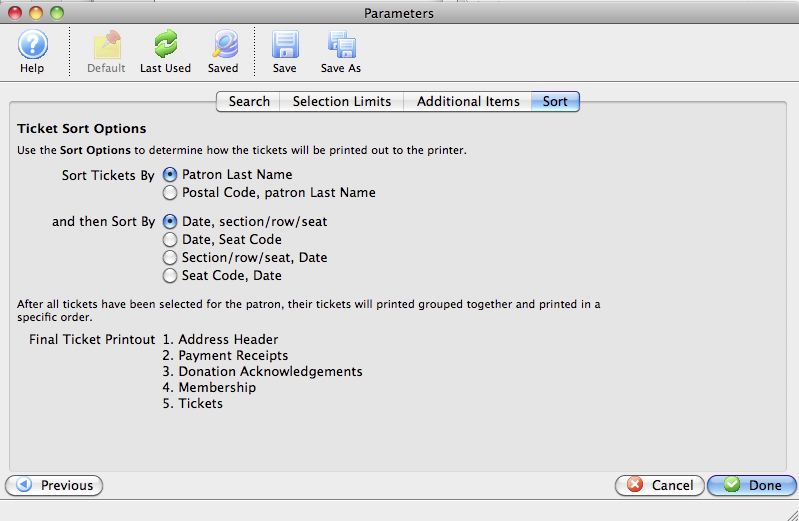
Sort Options
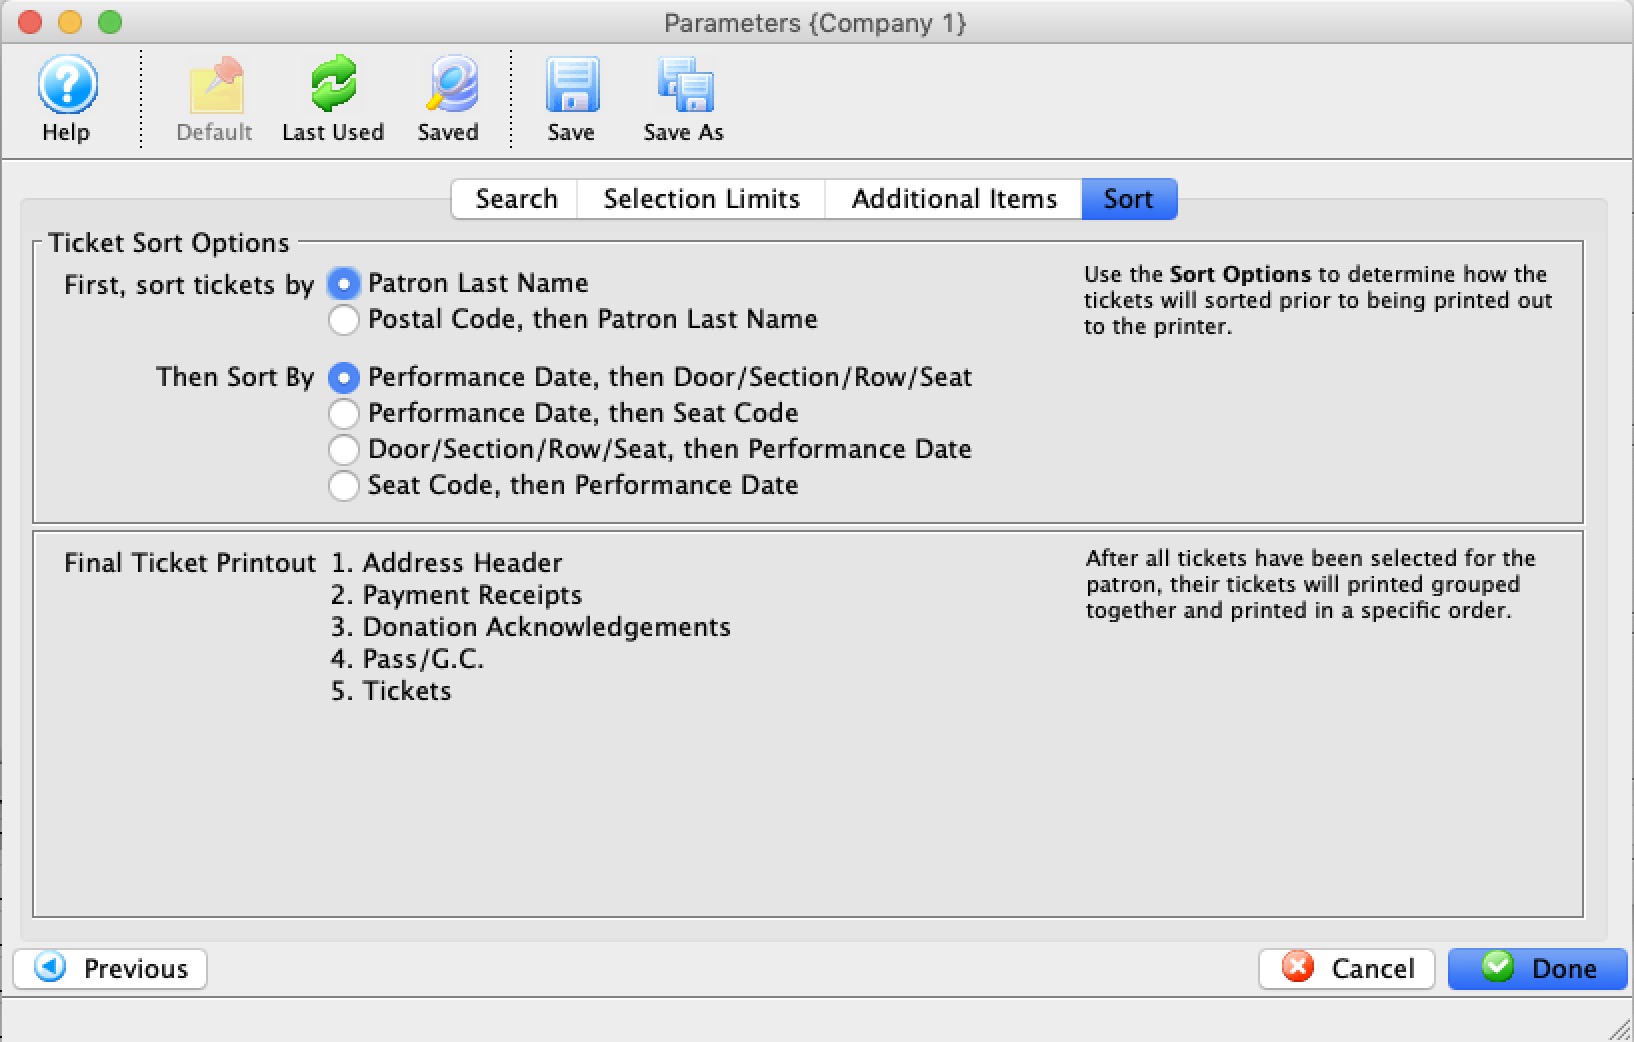
Set the sort options for the tickets. These options include:
| Sort Tickets By | Options to sort either by Patron Last Name or Postal Code, then Patron last Name. The latter can be useful if mailing susbcription tickets by postal code. |
| And then sort by |
|
When complete, click the Done  button.
This will close the Parameters window and reveal the Batch Ticket Printing window.
 |
The type of a field (character, date, numeric) influences the order that the ticket comes out. Refer to the list of field types, especially the note about character fields and it may influence how you set some up. |
Ticket Printing - Ticket Printing Sort Order
- Numeric and Date sort orders are relatively intuitive
- Character sort order may need leading zero's in fields to have them sort in a way you expect. (Seat Code is one we are ofter asked about)
|
Character fields use Character Sorts which is not the same as numeric sort order.
Examples of seat code sort order
|
| Field Name | Sort Order | Sort Type |
| Patron Last Name | Ascending | Character |
| Patron First Name | Ascending | Character |
| Patron Number | Ascending | Numeric |
| Performance Date | Descending | Date |
| Performance Time | Descending | Time |
| Performance Code | Descending | Character |
| Section | Descending | Character |
| Row | Descending | Character |
| Seat | Descending | Character |
| Seat Code | Descending | Character |
The Batch Printing/Emailing Window
The Batch Printing/Emailing window allows for the final options to be set prior to printing a batch.
Parts of the Batch Printing Window
 |
Opens the Parameter window for adjustments to be made to the search parameters. For more information on the Parameters window, click here. |
 |
Opens the selected item. |
 |
Removes the selected item from the batch. |
 |
Reverts to the last saved search criteria. |
 |
Exports the list of items in the batch to a TXT file. |
|
Prints the list of items in the batch. |
| The Ticket Counts tab gives a summary of the items in the batch. Additional final options can also be set prior to printing the batch. For more information on the Ticket Counts tab, click here. | |
| The Selected Tickets tab lists all of the items that will be printed in the batch. For more information on the Selected Tickets tab, click here. |
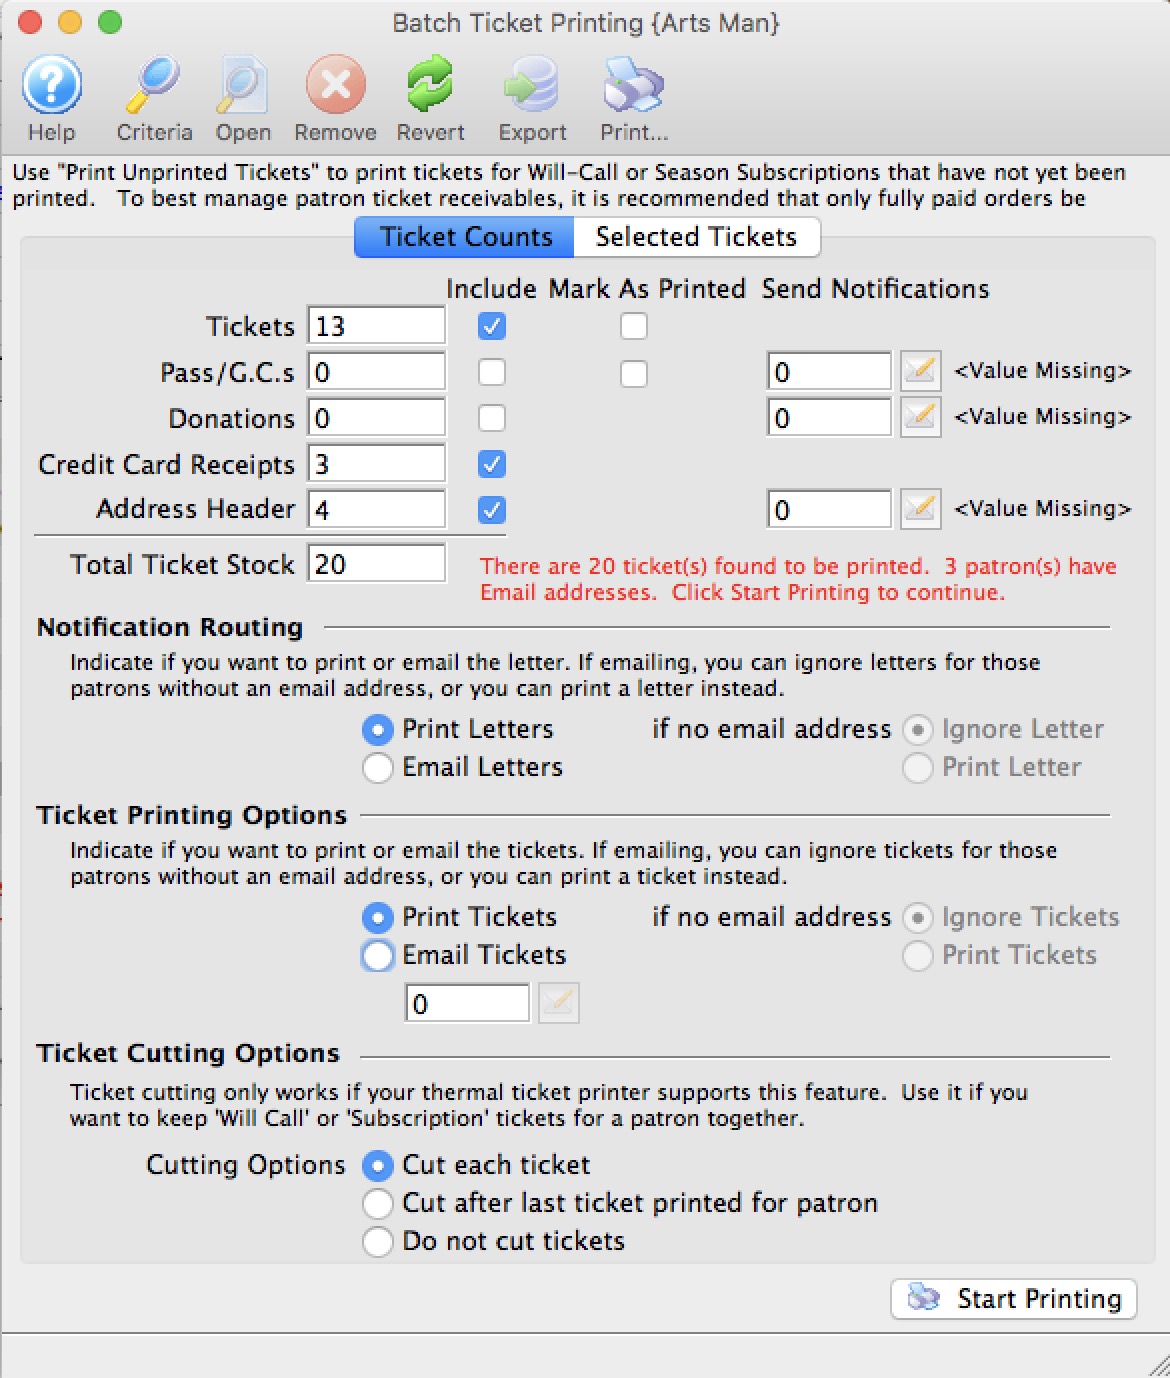
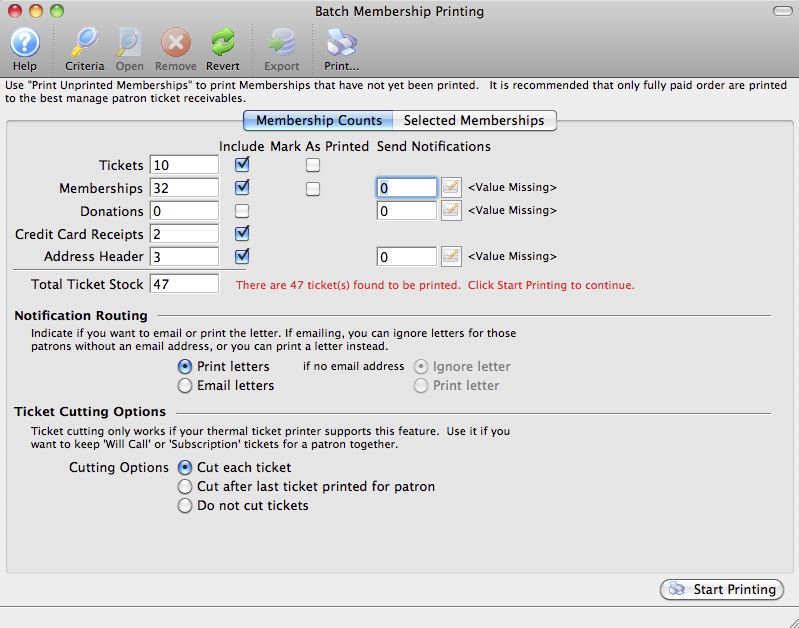
Ticket Counts
Once you have clicked the button on the Sort Options window, the second window in the Batch Print process will come to the front.
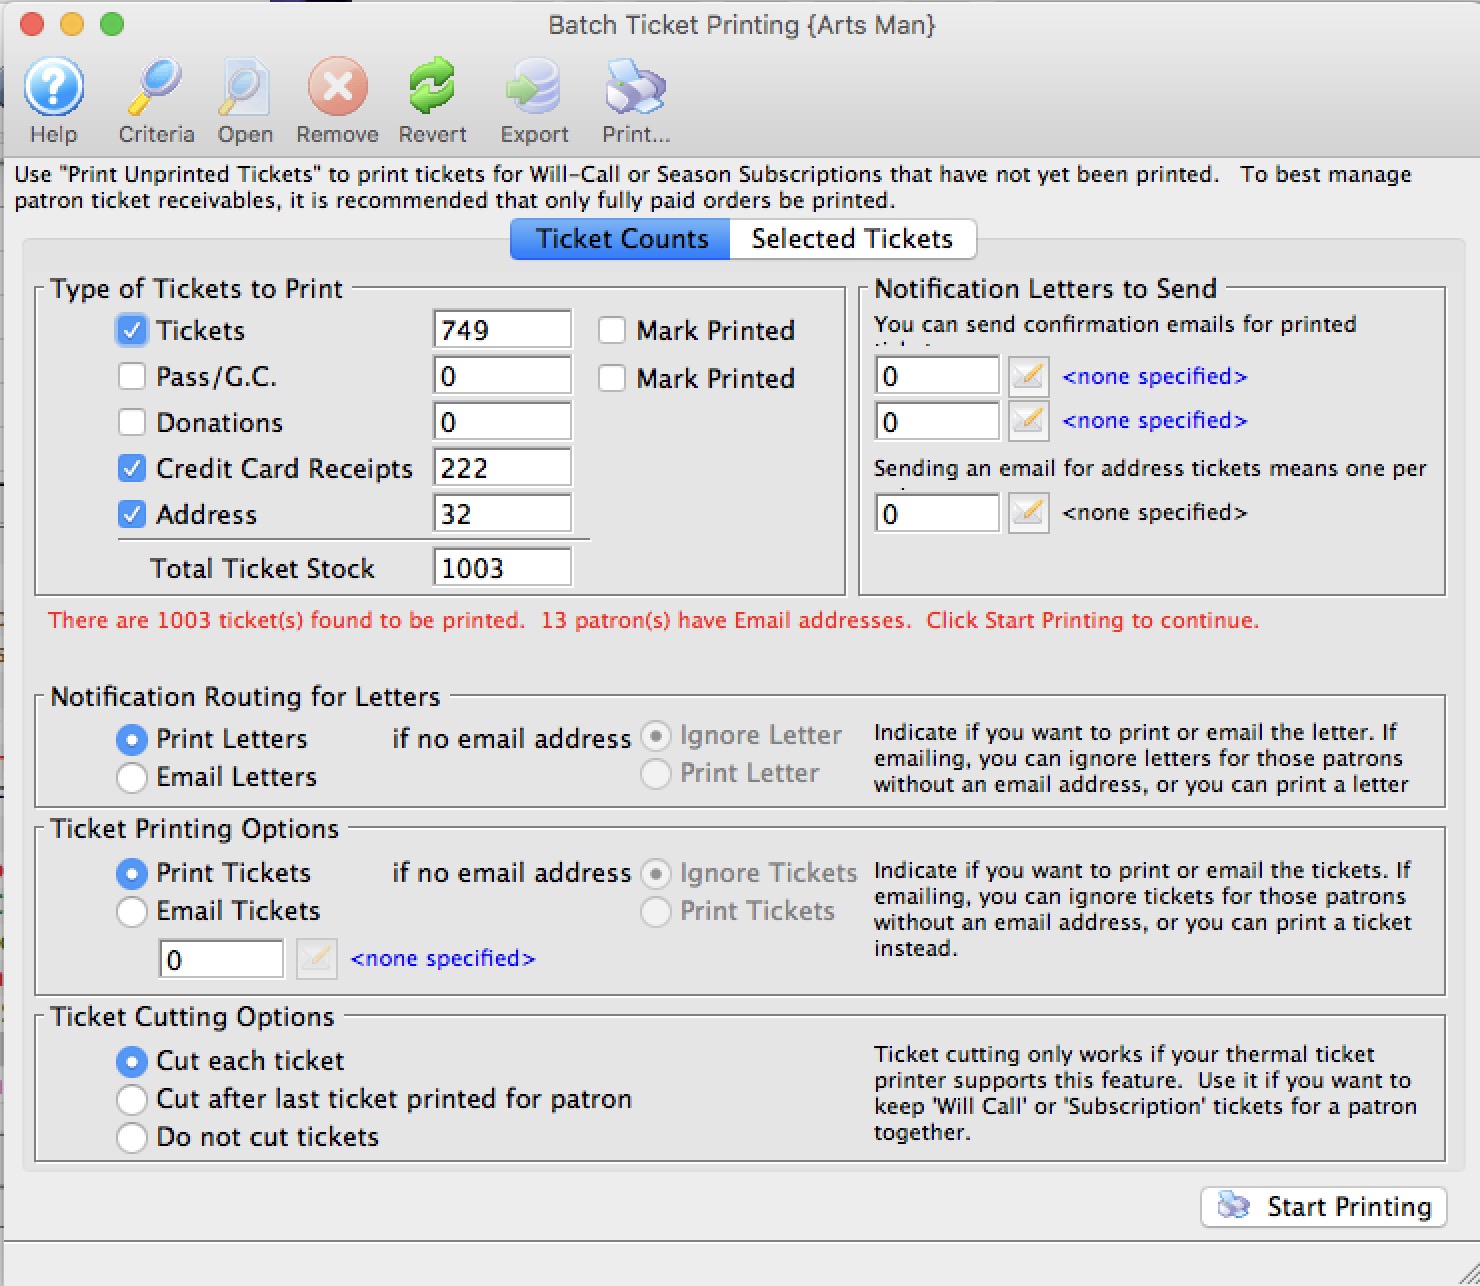
The number of tickets to be printed will appear in the Tickets field. For more information on the Batch Printing window, click here.
Set any final printing options, and click the Start Printing button.
The tickets will now begin printing to the selected ticket printer.
Parts of the Batch Printing Ticket Counts Tab
 |
The Selected Tickets tab lists all of the items that will be printed in the batch. For more information on the Selected Tickets tab, click here. |
| Tickets | The total number of tickets to be printed in the batch. |
| Include | When checked, this item will be printed in the batch. |
| Mark As Printed | When checked, this item will be marked as printed, but nothing will be printed. |
| Memberships | The total number of memberships in the batch. |
| Send Notifications | The letter associated with this item that will be included. |
| Donations | The total number of donations in the batch. |
| Credit Card Receipts | The total number of credit card receipts in the batch. |
| Address Header | The total number of address header tickets in the batch. |
| Total Ticket Stock | The grand total number of tickets that will be printed so that the stock in the printer can be verified prior to printing. |
Notification Routing for Letters/emails confirming tickets have been printed. |
|
| Print Letters | If a notification letter has been created and set for any of the items above (eg tickets, passes, donations), the notification letter will be printed so you can mail it to the patron. |
| Email Letter | If notification letter has been set for any of the items, the notifications will be emailed if the patron has an email address. This is useful for things like 'your season tickets are in the mail'. Optionally you can.
|
Ticket Printing Options |
|
| Print Tickets | If selected, will print all tickets that have been found to print. |
| Email Tickets | If selected, will email tickets (where print at home is enabled) to patrons that have an email address and optionally (when selected):
When you select the email option, you will be asked for the content of the form letter to send/. This can be from pre-existing form letter(s) marked as cover letter for invoice or something you type yourself. Note: you can also manually email tickets at the end of an order on a per order basis if you want. This feature is useful for emailing batches of tickets. |
Ticket Cutting Options |
|
| Cut each ticket - if printer has a ticket cutter | Tells the ticket printer to cut the stock after each ticket. |
| Cut after last ticket printed for patron | Tells the ticket printer to cut the stock after the last ticket for each patron is printed. This has an advantage in that there will be a ribbon of tickets that belongs to a single patron and lessens the chance that the patron will receive the wrong tickets. |
| Do not cut tickets | Tells the printer to not cut the stock until the end of the batch - tickets will not be cut. You will have to find the demarcation between patrons and manually rip the tickets. |
 |
Starts the printing of the batch. |
Selected Tickets Tab
The Batch Printing window allows for the final options to be set prior to printing a batch.
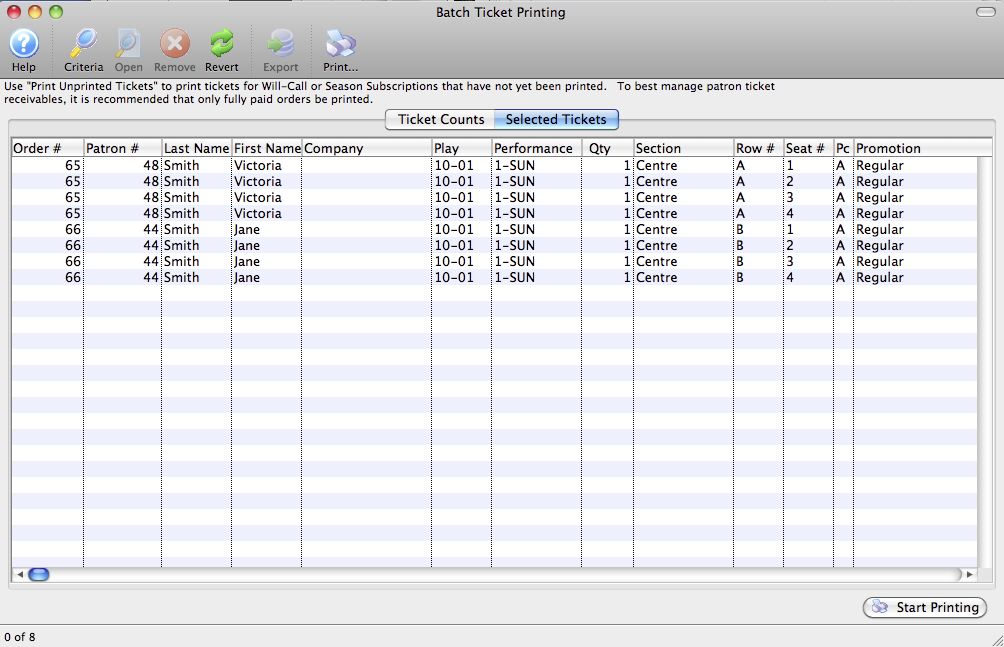
Parts of the Batch Printing Selected Tickets Tab
 |
The Ticket Counts tab gives a summary of the items in the batch. Additional final options can also be set prior to printing the batch. For more information on the Ticket Counts tab, click here. |
| Order # | The Order number associated with the item. |
| Patron # | The Patron Number to whom the tickets were sold. |
| Last Name | The last name of the patron. |
| First Name | The first name of the patron |
| Company | The company of the patron. |
| Event/Play | The event the item is for. |
| Performance | The performance the item is for. |
| Qty | The quantity of the item. |
| Section | The section the ticket is in. |
| Row # | The row number the ticket is in. |
| Seat # | The seat number the ticket is in. |
| PC | The price code that was used with the ticket. |
| Promotion | The promotion that was used with the ticket. |
|
Starts the printing of the batch. |
Other Fields Not Shown |
|
| Total | The total price of the ticket. |
| Date Printed | The date the tickets were printed. Normally blank, but if the tickets were previously printed, their original print date would appear here. |
| Date | The date of the performance. |
| Time | The time of the performance. |
| Play/Event Title | The play or event title. |
| Ticket # | The serial number of the ticket. |
| Notes | Any order notes for the selected ticket. |
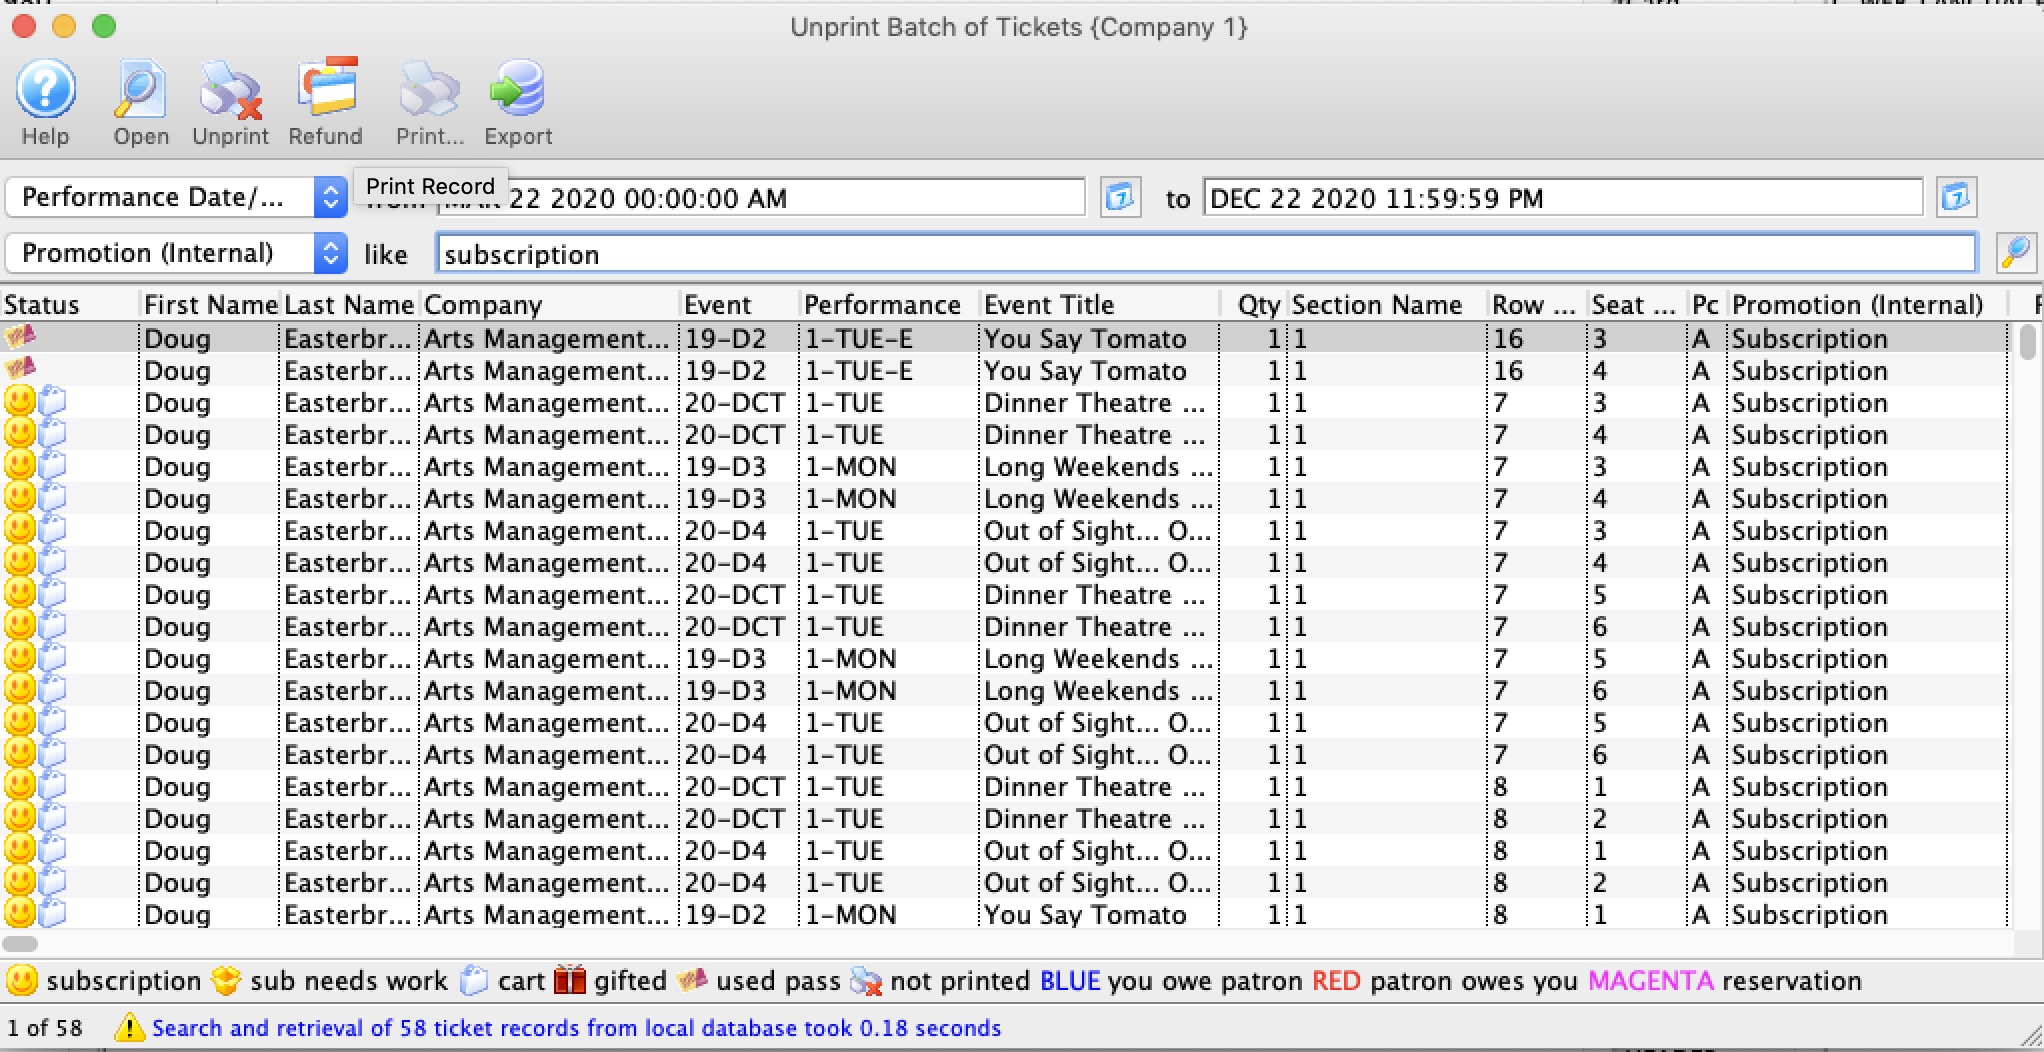
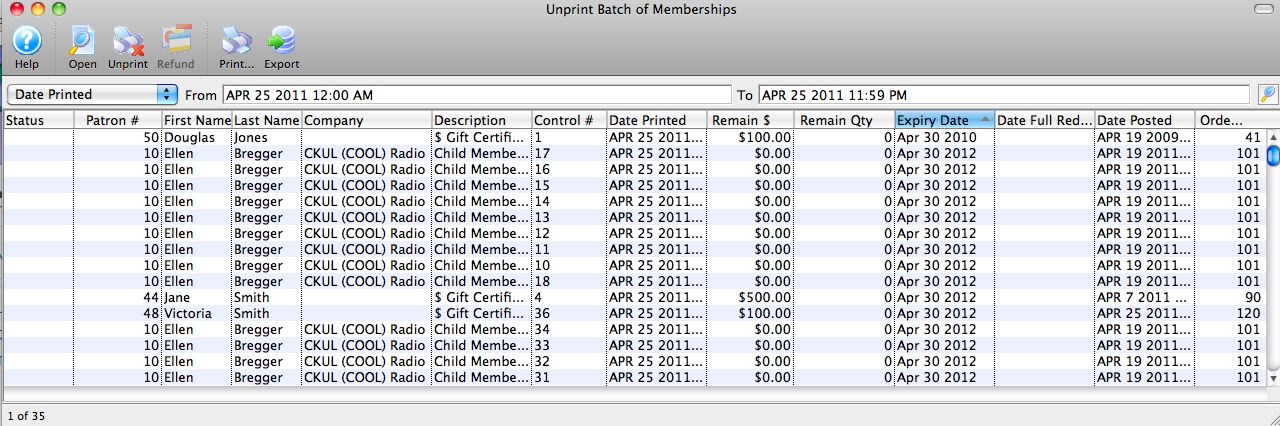
Unprint or Refund Batch of Tickets
The Unprint or Refund Batch of Tickets function allows you to search for tickets in a variety of ways and:
- Unprint the tickets to reset the 'Printed' flag so that they can be printed again. This is helpful when a batch of tickets needs to be reprinted -or-
- perform a mass refund on selected the tickets which can cross event and performance boundaries.
To access the Unprint or Refund Batch Of Tickets function:
From the main menu bar, select Setup >> Batch Functions >> Unprint Batch of Tickets.
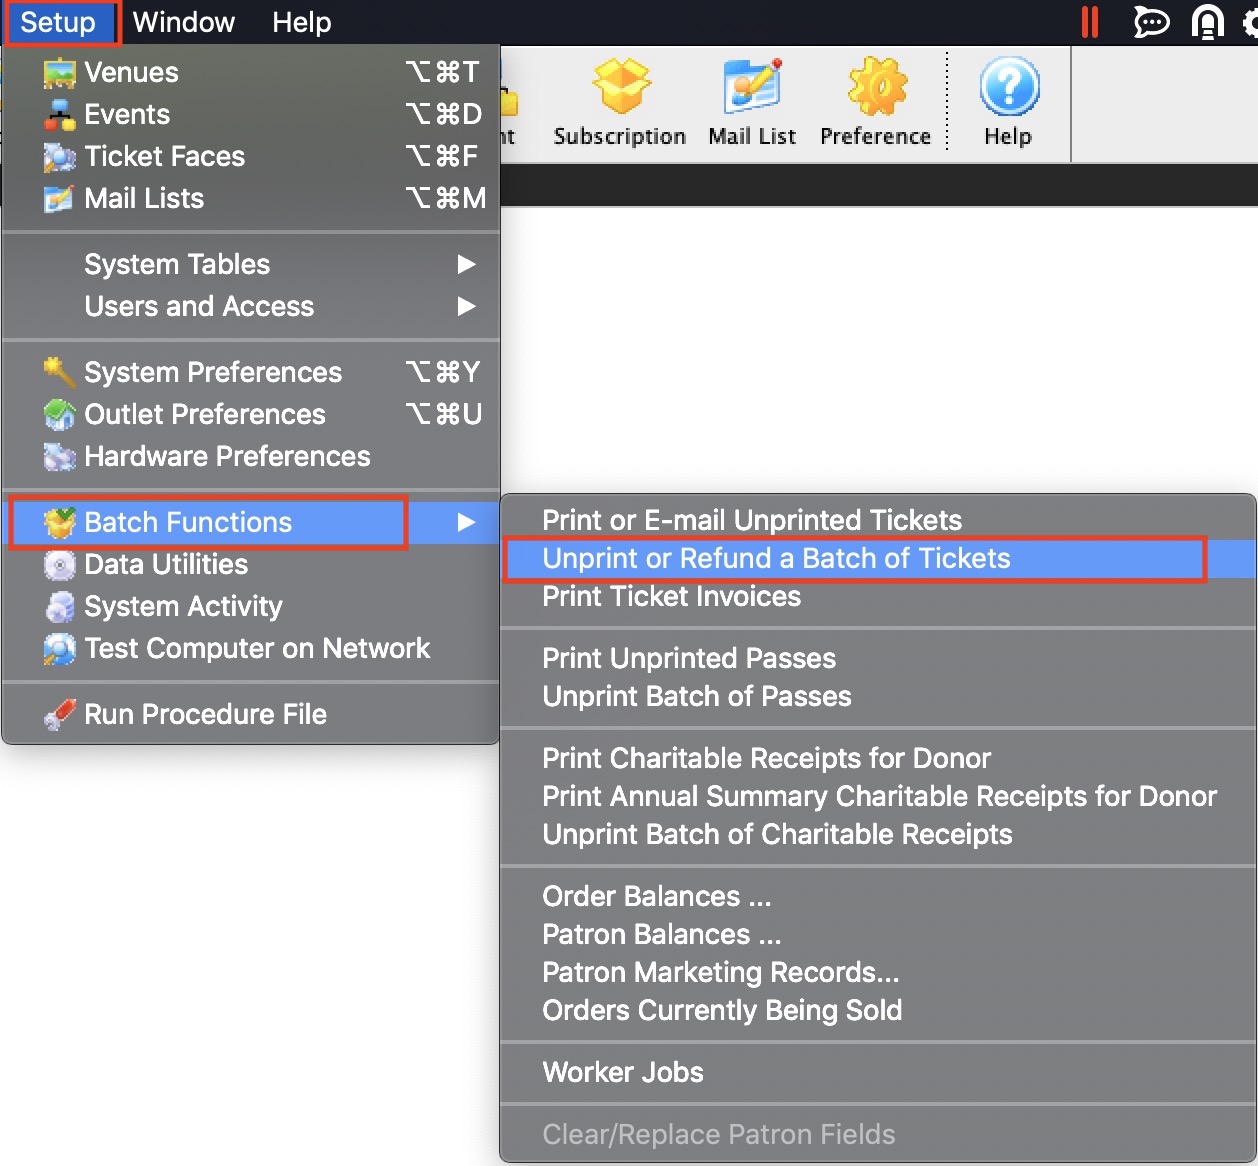
The Unprint or Refund a Batch of Tickets window opens.

Parts of the Unprint or Refund a Batch of Tickets Window
 |
Opens the highlighted ticket detail window. For more on the Ticket Data window, click here. |
 |
Click the Unprint button to set the print status on the selected ticket(s) to "unprinted." |
 |
Clicking the Refund button will open the Refund Wizard and refund the selected tickets using the same tools as mass refunding from the attendance tab on play and dates.
In this window, there are different search options, instead of just being restricted to those attending a performance. |
 |
Prints the selected tickets. This option is only available if the selected tickets have the ticket status of "unprinted." |
Ticket Data Window
The ticket detail window allows you to view the specific details surrounding the sale of the selected ticket.
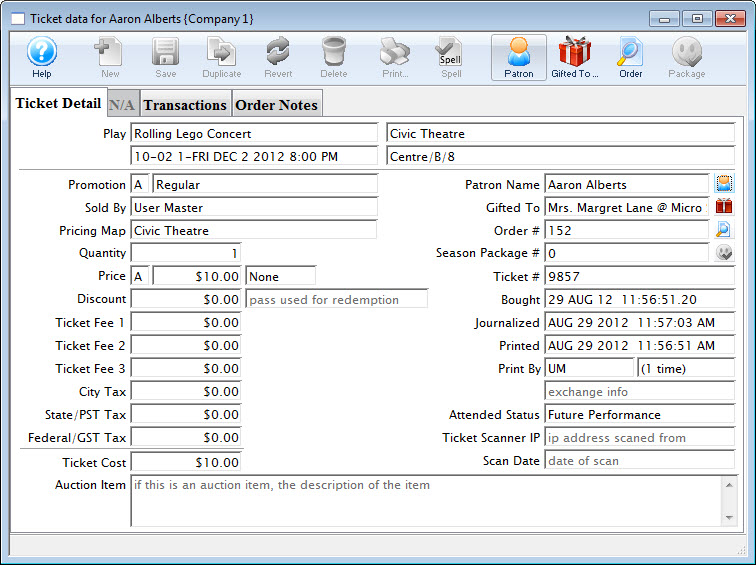
Ticket Detail Tab
The ticket detail window allows you to view the specific details surrounding the sale of the selected ticket.
Parts of the Ticket Detail Tab
Play |
Information about the selected ticket - Event Name, Venue, Performance Date and time and seat |
Promotion |
Letter and Internal description of the promotion code |
Sold By |
Employee who sold the ticket to the patron |
Pricing Map |
Internal name of the pricing map used in the sales window |
Quantity |
Number of tickets. It is always 1 for reserved seating. It maybr more than one for festival events sold as group tickets. |
Price |
Price Code, The base price before markups, taxes discounts. and Tax Codes |
Discount |
Total amount the ticket was discounted due to the promotion used. And the control number and type for the pass g.c. used to discount the price. |
Ticket Fees 1,2 & 3 |
Values for each of the fees added to the ticket. |
Taxes |
Amount of the taxes added to the ticket. |
Ticket Cost |
The total amount of the ticket including discounts, markups, taxes and fees. |
Auction Item |
If this is an auction item, the descripption of the item. |
Patron Name |
Name of the patron who purchased the ticket. Clicking the Patron |
Gifted To |
Name of the patron who the ticket was gifted to. Clicking the Gift |
Order # |
Order number the ticket is part of. Clicking the Search |
Season # |
The Subscrition the tickets are associated with. |
Ticket # |
The internal number of the ticket, assigmned by the system. |
Bought |
The Date and time the ticket was bought. |
Journalized |
The date the ticket was journailzed by the create sales entry process. |
Printed |
The date the ticket was last printed |
Printed By |
The initials of the employee who printed the ticket and how many times the ticket has been printed. |
Attended Status |
Sets to YES if the patron attended. |
Ticket Scanner IP |
The IP Address of the scanner used to scan the ticket |
Scan Date |
The date the ticket was scanned |
 icon opens the Patron Record.
  icon opens the Patron Record.
 Transactions Tab
The Transactions tab allows you to view the specific details surrounding the audit transactions of the selected ticket.
![]()
Parts of the Transactions Tab
Seq # |
The transaction reference number. |
Trans Date |
Date the transaction took place |
Journal No |
Journal Entry reference number. |
Code |
Theatre Manager reference code used to determine the type of transaction. |
Transaction Desc |
Brief description of what the transaction was. |
Order # |
Reference number used to tract the components of the order. |
Play Code |
Play code reference the donation is associated with. |
Performance Code |
Performance code reference the donation is associated with. |
Order Notes tab
The Order Notes tab allows you to view the specific details surrounding the processing of the order of the selected ticket. The tab discloses the Ticket Handling, Why Patron Bought, Ticket Comments, and any Order Notes.
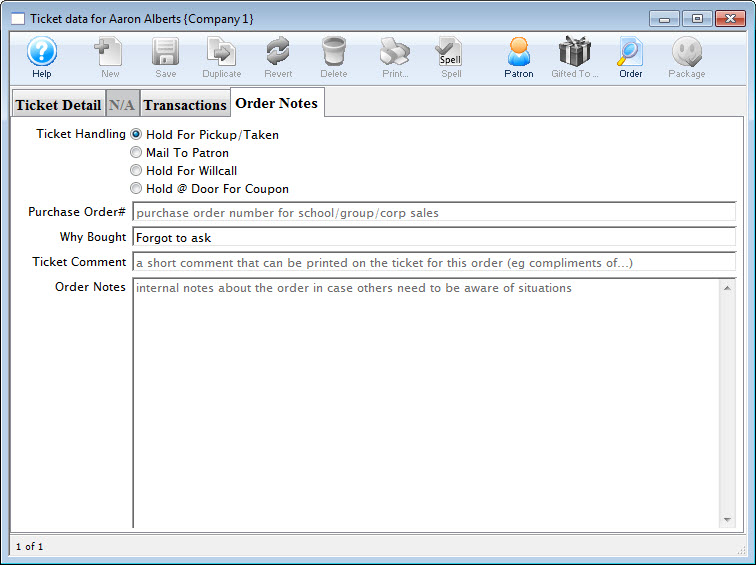
Parts of the Order Noted Tab
Ticket Handling |
Indicates how the ticket handling option are set in the Payments window. Click here for more information. |
Purchase Order # |
Displays the Purchase Order Number if one was entered on the Payments window. Click here for more information. |
Why Bought |
Displays the The Reason Bought if one was entered on the Payments window. Click here for more information. |
Ticket Comment |
Displays any ticket comments entered on the Payments window. Click here for more information. |
Order Notes |
Any specific notes about the order if any were entered on the Payments window. Click here for more information. |
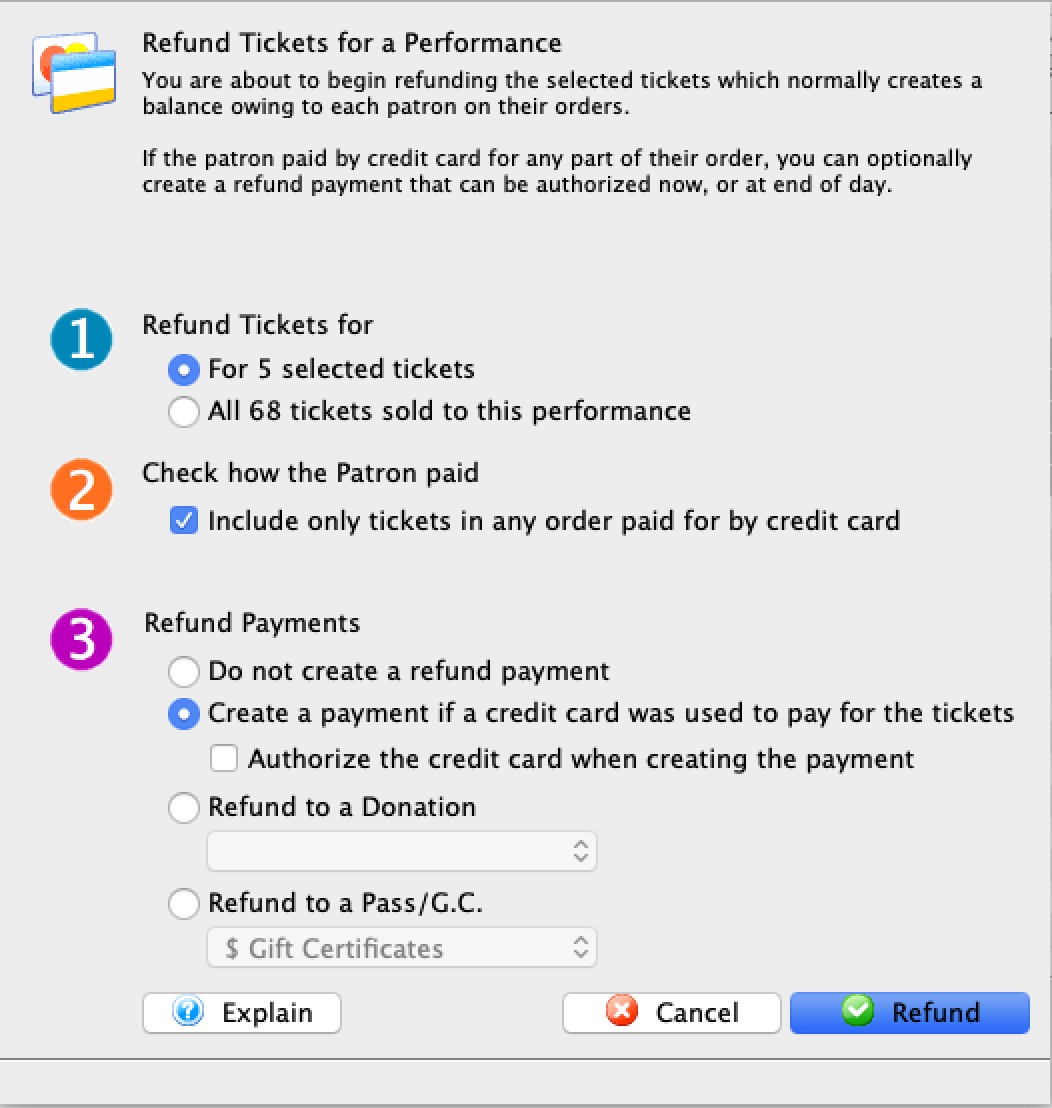
Ticket Refund Wizard
|
It is highly recommended that:
|
|
Please refer to Mass Refunds from Attendance Tab to see detail information about the refund options.
This page only outlines the basic steps. |
Mass Refund of Tickets from Batch Functions->Unprint or Refund a Batch of Tickets
The Ticket Refund Wizard allows you to refund tickets selected tickets the Unprint Tickets window.
- Search for tickets using up to two of: event name, performance date range, type of ticket, season package, etc. Take care that you have found the tickets you want.
- Select the tickets you wish to refund. Options include:
- Refunding only the selected tickets
- Refunding ALL the tickets in the list, which may cross event and performance boundaries
- (optional) Select the option to refund only tickets paid for via Credit Card
- Select whether to refund payments.
Options include:
- Do not create refund payments. Ticket will be refunded, but the payment will not, leaving a credit balance on the patron's account.
- Create a payment if a credit card was originally used to pay for the order. This will add a refund to the credit card that was used to pay for the order, and will appear in your End Of Day.
- Refund the tickets to a donation campaign
- Refund the tickets to a gift certificate
- Click the button.
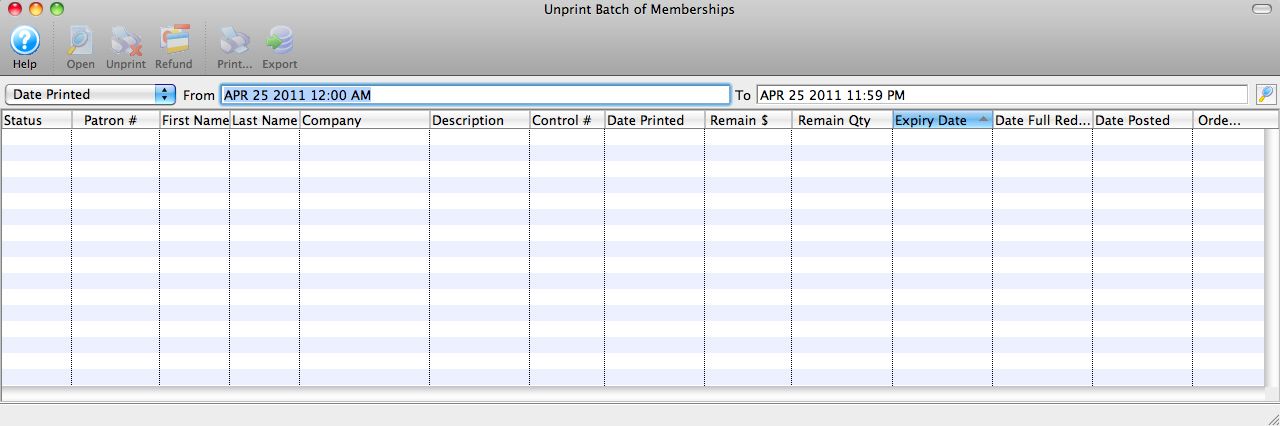
Unprinting a Batch of Tickets
The Unprint Batch of Tickets function allows for the 'Printed' flag to be removed from tickets so that they can be printed again. This is helpful when a batch of tickets needs to be reprinted.
- From the main menu bar, select Setup >> Batch Functions >> Unprint Batch of Tickets.
The Unprint Batch of Tickets window opens.
- Enter the date the tickets were printed in the From and To fields.
- Click the Search
 button to begin the search.
Any tickets printed in the date range given will display.
- Highlight the tickets to be unprinted.
Use the <SHIFT> key to highlight a range of tickets. To highlight multiple individual tickets, hold the <CTRL> key (Windows) or the <OPTION> key (Mac).
- Click the Unprint
 button to remove the 'Printed' flag.
The tickets can now be added to a new batch of tickets to be printed.
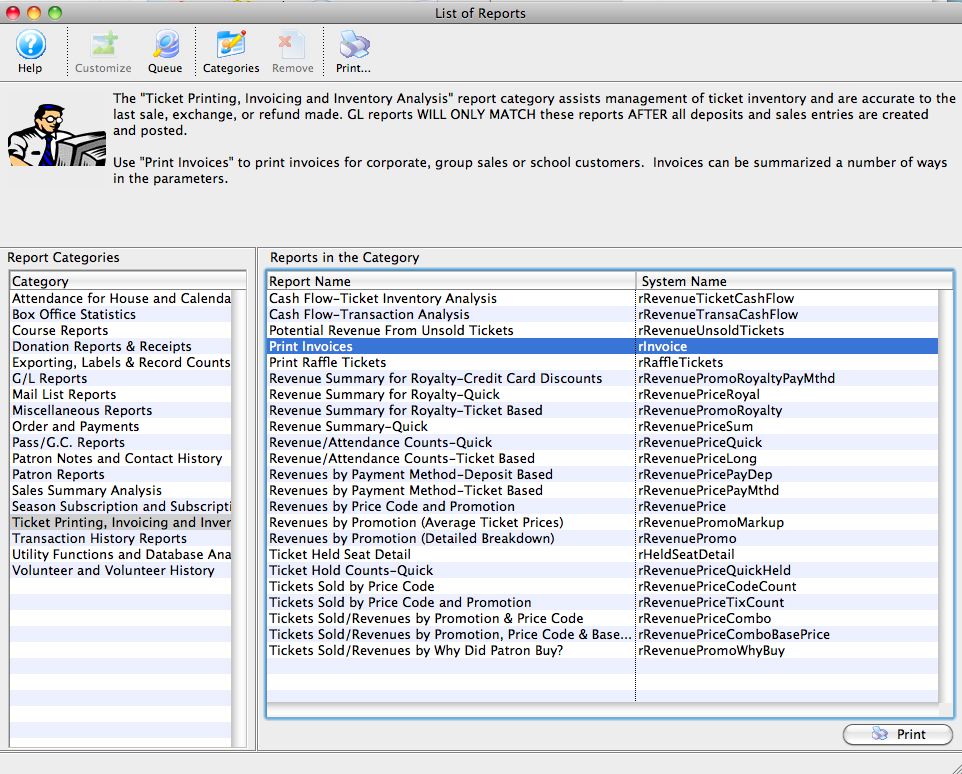
Print Ticket Invoices
Invoices can be created for any order at any time. Using the proper criteria, it is easy to create invoices for orders. To access the Print Ticket Invoices function, you can go to either:
- Setup >> Batch Functions >> Print Ticket Invoices.
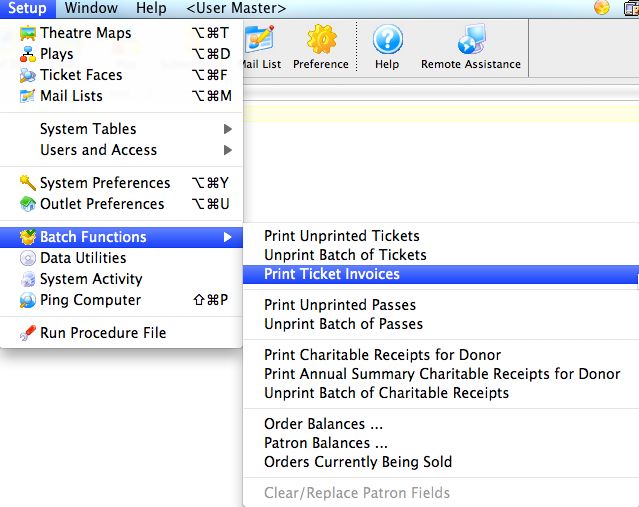
Or through the Reports >> Ticket Printing, Invoicing and Inventory Analysis >> Print Invoices function.
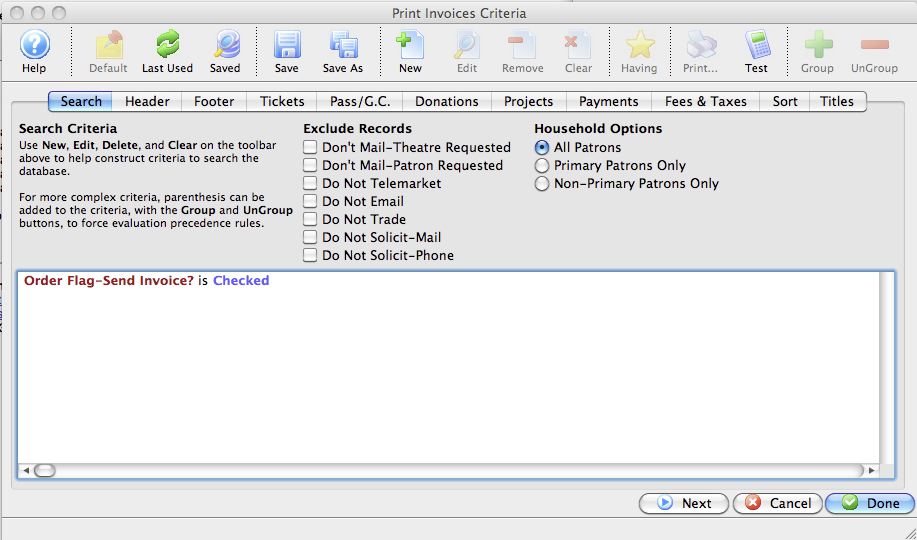
The Print Invoice Criteria window opens.
For more information on the Print Invoice Criteria window, click here.
The Print invoices Criteria Window
Parts of the Print Invoices Criteria Window
|
If available, uses the default search criteria for this report. |
|
If this report has previously been run, this button will add the previous criteria. |
|
Opens a list of saved criteria for this report. |
|
Saves the current criteria to be used later. |
|
Saves the current criteria to be used later and opens a dialog to name this criteria. |
|
Opens the Add/Edit Parameter window to facilitate adding new criteria. Click here for more information on the Add/Edit Parameter window. |
|
Opens the currently selected criteria in the Add/Edit Parameter window to allow adjustments. |
|
Deletes the currently selected criteria. |
| Deletes all criteria from the Search tab. | |
|
Allows for adjustments to the criteria if more specialization is available. |
|
Prints a listing of the criteria currently in the Search tab. |
|
Tests the current criteria to see how many records will be returned. A message will appear at the bottom of the window showing the number of records to be returned. |
|
Groups the currently selected criteria. This forces the criteria to take precedence in the search. |
|
Ungroups the currently selected criteria. |
 |
The Search tab is used to enter the criteria to be used in the search of records. For more information on the Search tab, click here. |
 |
The Header tab is used to enter options regarding the Address Label, format of the invoice (Invoice, Statement, Payment Reminder, Confirmation, or Contract), and layout. For more information on the Header tab, click here. |
 |
The Footer tab is used to enter options for a tear off section, and comments to the recipient. For more information on the Footer tab, click here. |
 |
The Tickets tab is used to choose options for ticket summary and details to be included in the invoice. For more information on the Tickets tab, click here. |
 |
The Membership tab is used to choose options for membership (pass/gift certificate) summary and details to be included in the invoice. For more information on the Membership tab, click here. |
 |
The Donations tab is used to choose options for donation summary and details to be included in the invoice. For more information on the Donations tab, click here. |
 |
The Projects tab is used to choose options for project summary and details to be included in the invoice (Facilities Management module only). For more information on the Projects tab, click here. |
 |
The Payments tab is used to choose options for the payment summary and details to be included in the invoice. For more information on the Payments tab, click here. |
 |
The Fees & Taxes tab is used to choose options for fee and tax summary and details to be included in the invoice. For more information on the Fees & Taxes tab, click here. |
 |
The Sort tab is used to enter the sort order parameters for the printed batch. For more information on the Sort tab, click here. |
 |
The Search tab is used to enter optional titles and descriptions for the printed invoice. For more information on the Titles tab, click here. |

|
Proceeds to the next tab in the Print Invoices Criteria. |

|
Cancels that adding of criteria and returns the user to the Report window. |
|
|
Completes the addition of criteria and the sorting of data, and
begins to generate the report. Click here |
Search Tab
Parts of the Print Invoices Search Tab
Exclude Records |
These checkboxes provide the opportunity to exclude patrons based on the settings within the Marketing tab on the patron record. For more information on the Marketing tab click here. |
Household Options |
Use Household Options to indicate which patrons will receive the invoice. Options include: |
The criteria window |
Criteria used to batch print invoices is entered here using the |
|
|
Proceeds to the next tab in the Print Invoices Criteria. |
|
|
Cancels the adding of criteria and clears the window. |
|
|
Completes the addition of criteria and the sorting of data, and begins to generate the invoice. |
Header Tab
The Header tab allows you to choose options regarding layout of the address portion, the columns included and the overall look of the Invoice.
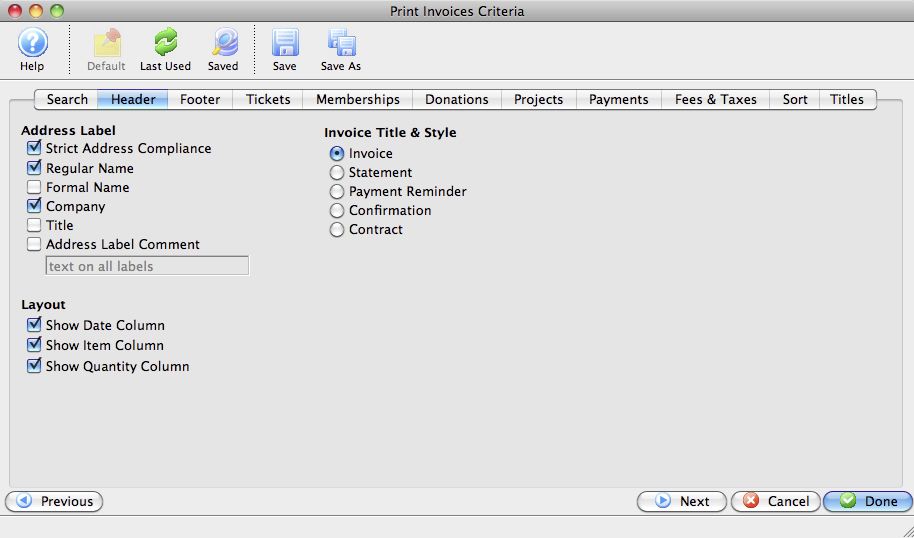
Parts of the Header Tab
Address Label |
Allows you to select how the address portion of the Invoice will appear. |
Layout |
Allows you to select which columns will appear on the Invoice. |
Invoice Title & Style |
Allows you to select the style of the invoice. |
|
|
Returns to the previous tab in the Print Invoices Criteria. |
|
|
Proceeds to the next tab in the Print Invoices Criteria. |
|
|
Cancels the adding of criteria and clears the window. |
|
|
Completes the addition of criteria and the sorting of data, and begins to generate the invoice. |
Footer Tab
The Footer tab allows you to decide whether to include a tear-off section at the bottom of the invoice or not. It also allows you to indicate how many minutes prior to an event patrons should arrive, and add any comments to the invoice.
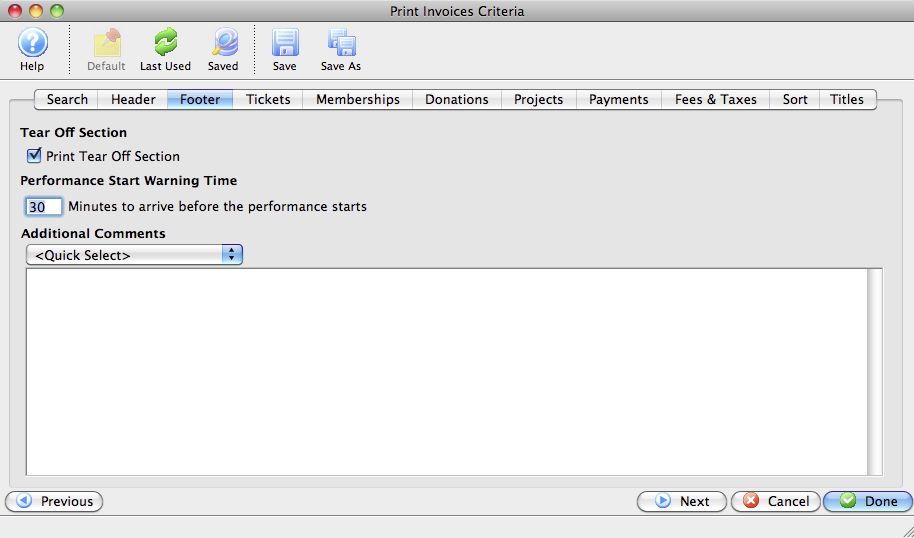
Parts of the Footer Tab
Print Tear Off Section |
By checking this option, a tear off section will appear at the bottom of the invoice. |
Performance Start Warning Time |
Allows entry of a suggested arrival time prior to the performance. Use of this is helpful on invoices to school or tour groups, indicating they should arrive in order to be properly seated. |
Additional Comments |
An opportunity to add any comments to the invoice in the body of the document. Alternatively, you can choose standardized comments from the "Quick Select" drop down. For more information on adding standard invoice comments click here. |
|
|
Returns to the previous tab in the Print Invoices Criteria. |
|
|
Proceeds to the next tab in the Print Invoices Criteria. |
|
|
Cancels the adding of criteria and clears the window. |
|
|
Completes the addition of criteria and the sorting of data, and begins to generate the invoice. |
Tickets Tab
The Tickets tab determines the level of detail regarding the tickets that will be printed on the invoice.
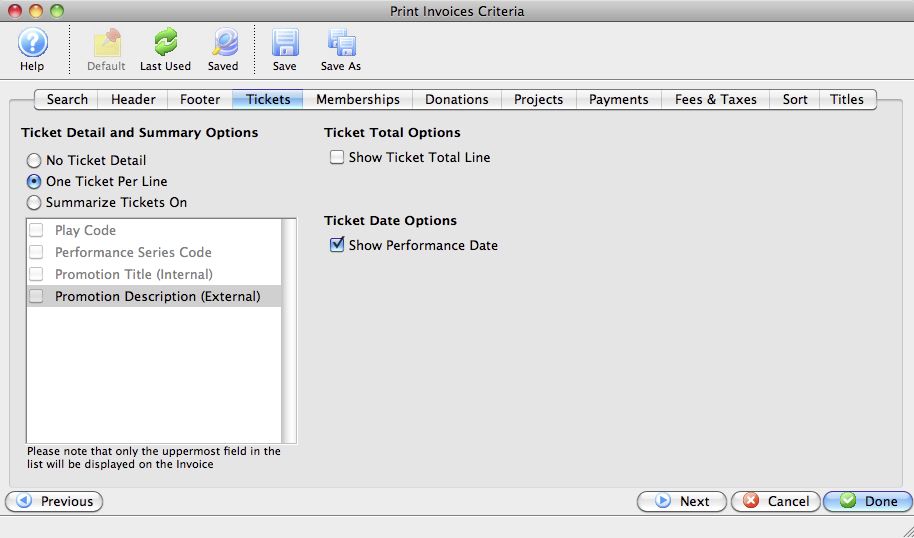
Parts of the Tickets Tab
Ticket Detail and Summary Options |
Determines whether the tickets will be printed (if at all) with a detail of one ticket per line, or summarized. The summary options include: |
Ticket Total Options |
When checked, Theatre Manager will calculate the total dollar amount of the tickets and print it below the ticket detail or summary. |
Ticket Date Options |
When checked, Theatre Manager will print performance dates for the tickets within the invoice. |
|
|
Returns to the previous tab in the Print Invoices Criteria. |
|
|
Proceeds to the next tab in the Print Invoices Criteria. |
|
|
Cancels the adding of criteria and clears the window. |
|
|
Completes the addition of criteria and the sorting of data, and begins to generate the invoice. |
Memberships Tab
The Memberships tab determines the level of detail regarding the memberships that will be printed on the invoice
|
Depending on how your database is configured, this may appear as the GC/Pass tab, or Voucher tab. |
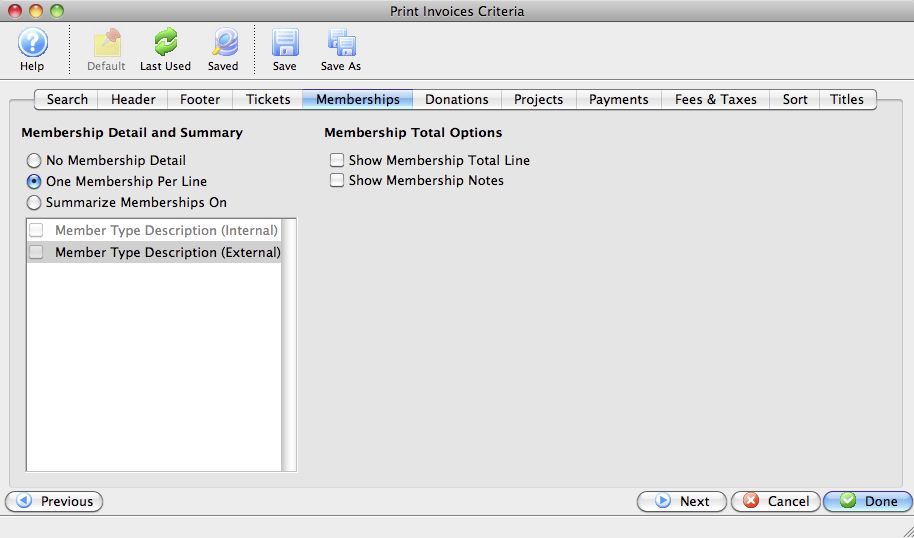
Parts of the Memberships Tab
Membership Detail and Summaryn |
Determines whether the Memberships will be printed (if at all) with a detail of one Membership per line, or summarized. The summary options include: |
Membership Total Options |
Options to include either one or both of Membership total (dollar amount) and any Membership notes, which are drawn from the Membership . For more on adding notes to a Membership, click here. |
|
|
Returns to the previous tab in the Print Invoices Criteria. |
|
|
Proceeds to the next tab in the Print Invoices Criteria. |
|
|
Cancels the adding of criteria and clears the window. |
|
|
Completes the addition of criteria and the sorting of data, and begins to generate the invoice. |
Donations Tab
The Donations tab determines the level of detail regarding the donations that will be printed on the invoice.
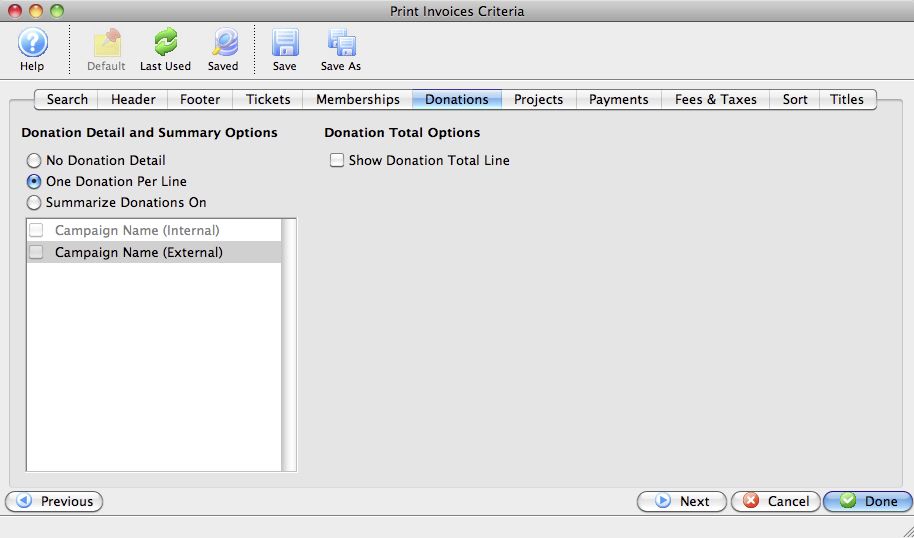
Parts of the Donations Tab
Donation Detail and Summary Options |
Determines whether the Donations will be printed (if at all) with a detail of one Donation per line, or summarized. The summary options include: |
|
|
Returns to the previous tab in the Print Invoices Criteria. |
|
|
Proceeds to the next tab in the Print Invoices Criteria. |
|
|
Cancels the adding of criteria and clears the window. |
|
|
Completes the addition of criteria and the sorting of data, and begins to generate the invoice. |
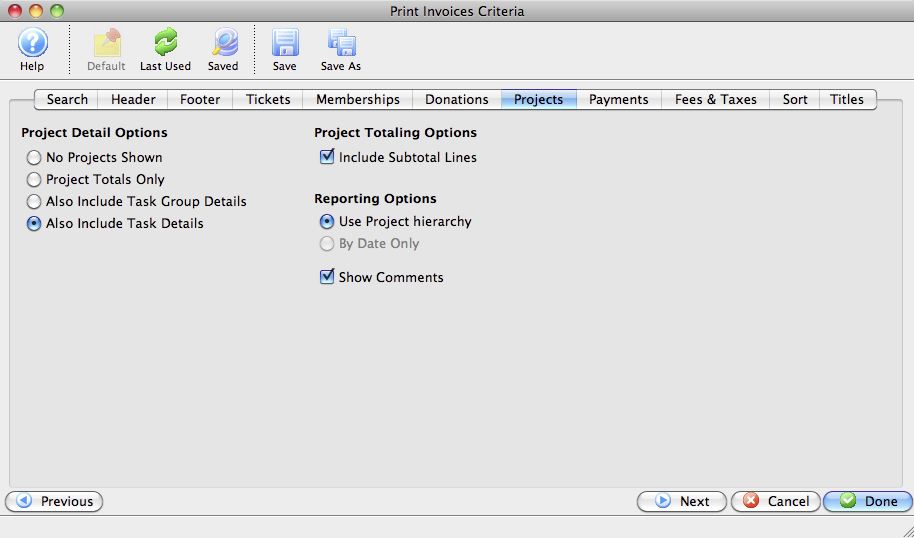
Projects Tab
The Projects tab determines the level of detail regarding the Facilities Management Projects that will be printed on the invoice.
|
This tab will only be available if you have the Facilities Management module. For more information on Facilities Management, click here. |
Parts of the Projects Tab
Project Detail Options |
Determines whether the Projects will be printed (if at all) with a detail of one task per line, or summarized. The options include: |
Project Totaling Options |
Indicates whether each Group will have a subtotal line associated with it. |
Reporting Options |
Includes options to either list items on the invoice by the project hierarchy or by date. Project hierarchy means that the tasks will be listed with the groups, the tasks underneath them, in the order the project displays in in the Gantt chart, regardless of the date order. At current, the "By Date" option has not yet been implemented. |
Show Comments |
When checked, Theatre Manager will show line by line any comments associated with any of the individual tasks in the list. |
|
|
Returns to the previous tab in the Print Invoices Criteria. |
|
|
Proceeds to the next tab in the Print Invoices Criteria. |
|
|
Cancels the adding of criteria and clears the window. |
|
|
Completes the addition of criteria and the sorting of data, and begins to generate the invoice. |
Payments Tab
The Payments tab determines the level of detail regarding the payments that will be printed on the invoice.
Parts of the Payments Tab
Payment Detail and Summary Options |
Determines whether the Payments will be printed (if at all) with a detail of one Payment per line, or summarized. At this time, payments may only be summarized based on payment method (cash, check, Visa, MasterCard, etc.) |
Payment Total Options |
When checked, Theatre Manager will include the total (dollar amount) of any payments. |
|
|
Returns to the previous tab in the Print Invoices Criteria. |
|
|
Proceeds to the next tab in the Print Invoices Criteria. |
|
|
Cancels the adding of criteria and clears the window. |
|
|
Completes the addition of criteria and the sorting of data, and begins to generate the invoice. |
Fees & Taxes Tab
The Fees & Taxes tab determines the level of detail regarding the fees and taxes that will be printed on the invoice.

Parts of the Fees & Taxes Tab
| Tax Options | The options to print are:
|
| Ticket Fee Options | The options to print are:
|
 |
Returns to the previous tab in the Print Invoices Criteria. |
 |
Proceeds to the next tab in the Print Invoices Criteria. |
 |
Cancels the adding of criteria and clears the window. |
 |
Completes the addition of criteria and the sorting of data, and begins to generate the invoice. |
Sort Tab
The Sort tab determines the sort order of the patron invoices that will be printed.

Parts of the Sort Tab
Available Sort Fields |
A list of fields available to sort by. |
|
|
Adds the currently selected field to the sort field list. |
|
|
Removes the currently selected field from the sort field list. |
Selected Sort Fields |
The fields currently used for sorting. Default sort fields may appear here. There is a limit of nine sort fields. |
Sort In Descending Order |
When checked, the currently selected sort field will sort in descending order. |
Upper Case Conversion |
When checked, the currently selected sort field will be converted to upper case letters. |
New Page When Field Changes |
When checked, the currently selected sort field will start on a new page when the field changes. |
|
|
Returns to the previous tab in the Print Invoices Criteria. |
|
|
Proceeds to the next tab in the Print Invoices Criteria. |
|
|
Cancels the adding of criteria and clears the window. |
|
|
Completes the addition of criteria and the sorting of data, and begins to generate the invoice. |
Titles Tab
At this time, changes to this tab do not affect the printed output of the Invoice.
Parts of the Titles Tab
|
|
Returns to the previous tab in the Print Invoices Criteria. |
|
|
Cancels the adding of criteria and clears the window. |
|
|
Completes the addition of criteria and the sorting of data, and begins to generate the invoice. |
Printing Ticket Invoices
Invoices can be created for any order at any time. Using the proper criteria, it is easy to create invoices for orders.
- Go to Setup >> Batch Functions >> Print Ticket Invoices.
This will open the Print Invoice Criteria window.
For more information on the Print Invoice Criteria window, click here.
- Click the New button to add criteria to the search.
This will open the Add/Edit Parameters window.

For more information on the Add/Edit Parameters window, click here.
- Select that appropriate paramaeters based on the invoice to be created, then click the Save
 button.
This will place the parameters in the Search tab of the Print Invoices Criteria window.
- Either adjust the options on the tabs, or click the Done button to display all invoices to be printed.
The invoices will be printed to the screen before being routed to the printer.
- Click the Print
 button at the top of the window to print the invoices.
Alternatively the Invoice can be emailed directly to the patron. To learn more about emailing invoices click here.
Invoice Examples
- Invoice
- Statement
- Payment Reminder
- Confirmation, and
- Contract
Selection of any of these styles will create different invoice formats to be printed.
|
While many of the items included in the invoices in terms of tickets, donations and memberships and their detail and summary level are customizable based on your organizations needs, placement of specific fields has been set by Theatre Manager in an effort to adhere to standard A-10 Window envelope format. Placement of fields such as logo, address (sender and recipient), and the tear off section may not be altered. As an alternative, you may build a Form Letter to use as a completely customized Invoice. For more on building form letters, click here. |
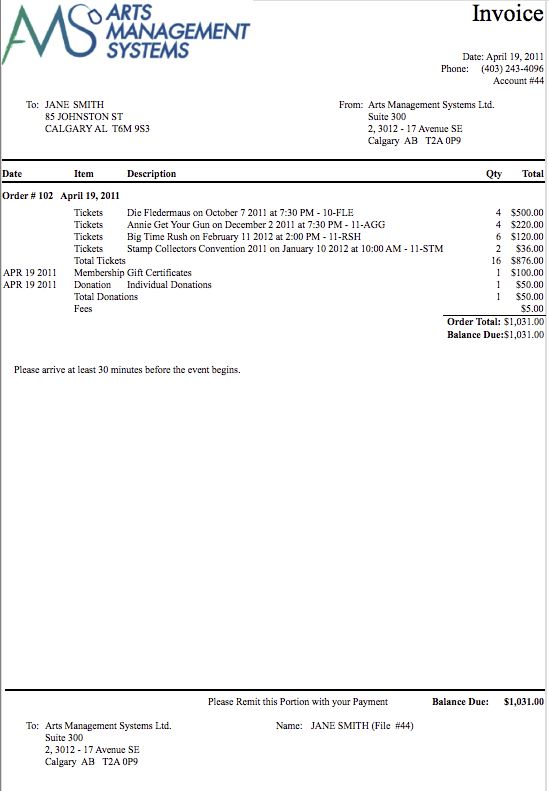
Invoice
An example of an Invoice.
Statement
An example of a Statement.
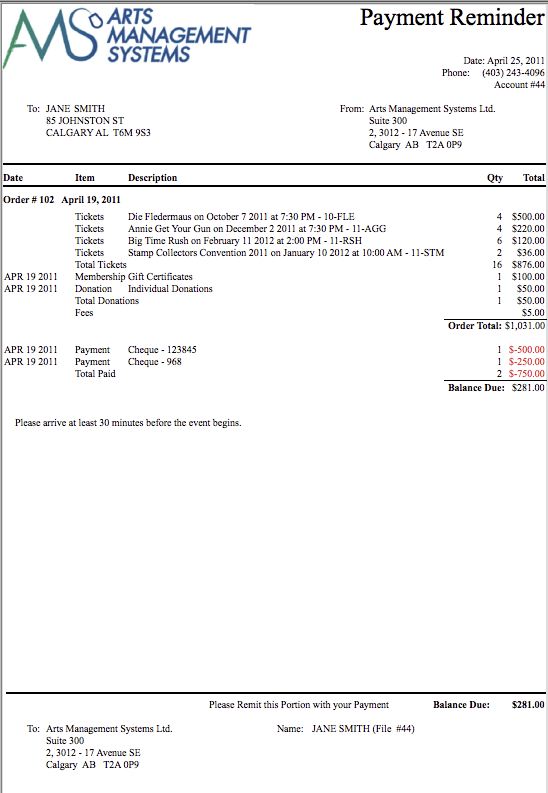
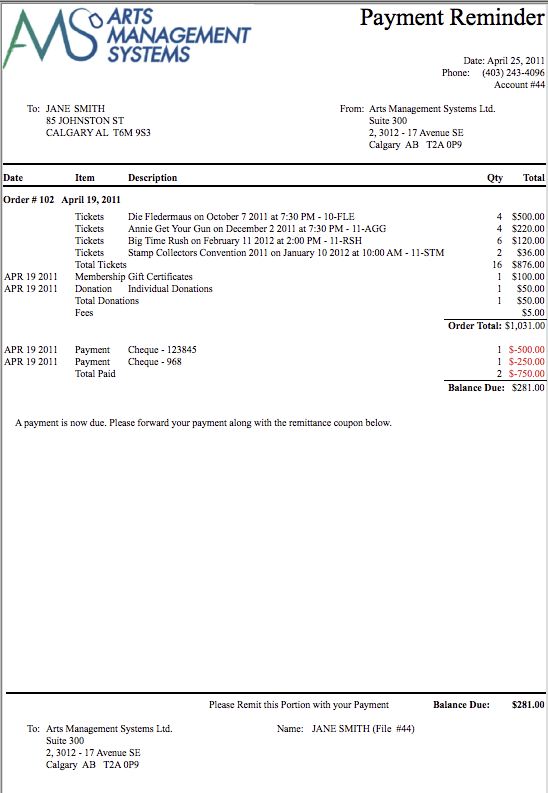
Payment Reminder
An example of a Payment Reminder.
|
The verbiage indicated in the document is customizable under the |
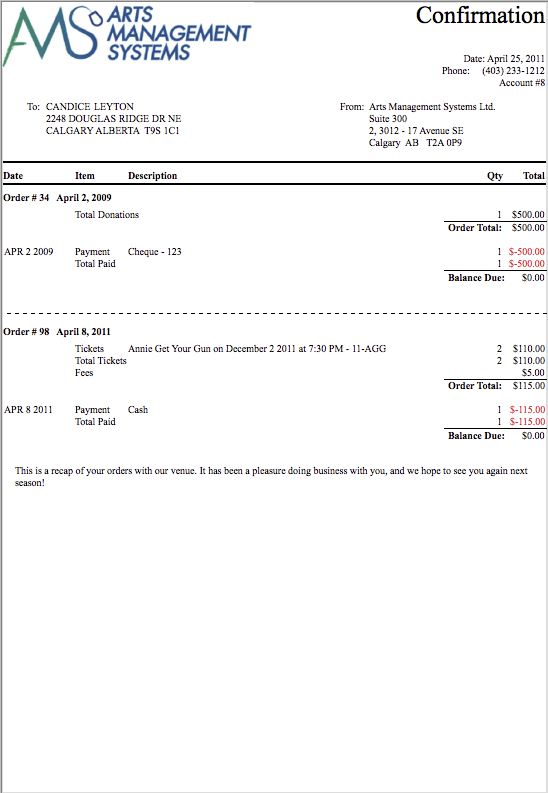
Confirmation
An example of a Confirmation.
|
The verbiage indicated in the document is customizable under the |
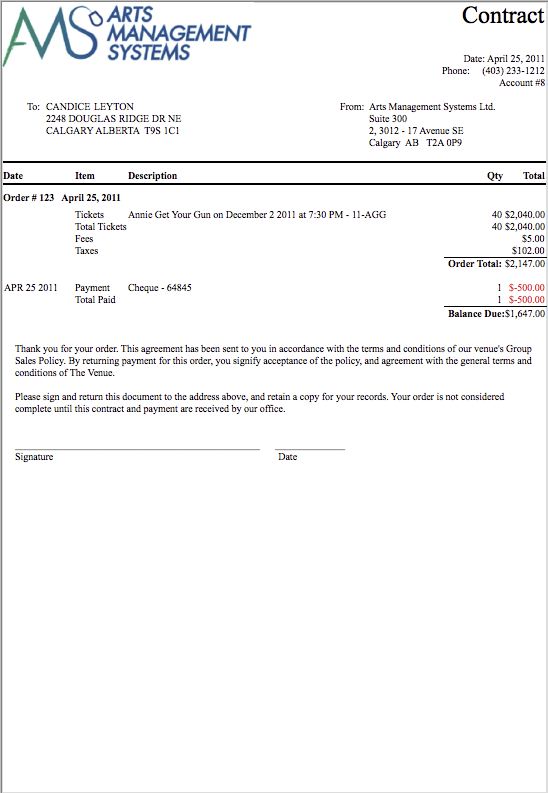
Contract
An example of a Contract.
|
The verbiage indicated in the document is customizable under the |
Print Unprinted Passes
The Print Unprinted Passes function is commonly used to print all passes, memberships, gift certificates and vouchers that have not been printed.
|
Only Memberships and Passes with ticket faces associated with them that have been based on Member Data will be printed |
For more on Membership Setup Overview click here.
For more on creating a ticket face click here.
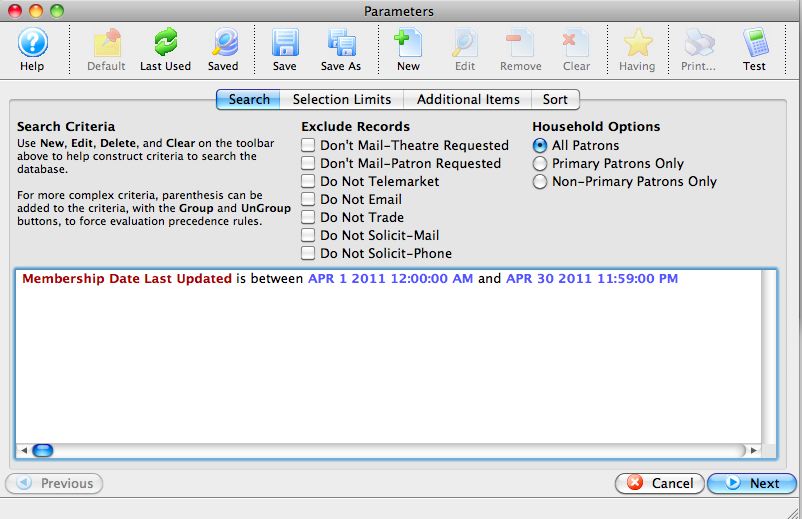
- From the main menu bar, go to Setup >> Batch Functions >> Print Unprinted Passes.
This will open two windows, with the Parameter window in front.
For more information on the Parameters window for batch ticket printing, click here.
- Enter the criteria for the batch.
In the example above, all passes that have been updated in a range have been selected.
- Click the Next button once the criteria has been entered.
This will move to the next tab in the Parameter window.
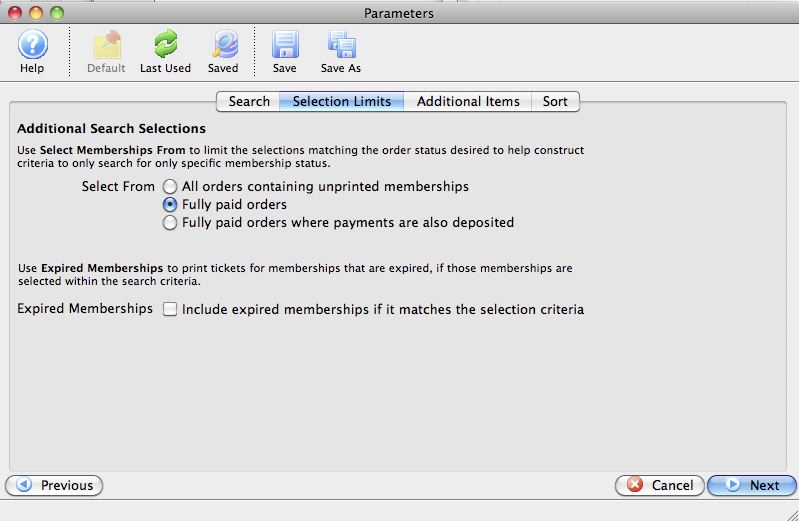
- Set the selections in the window, and then click the Next button.
This will move to the next tab in the Parameter window.

- Set the additional items to be printed, and then click the Next button.
This will move to the next tab in the Parameters window.
- Set the sort options for the tickets, and then click the Done button.
This will close the Parameters window and reveal the Batch Pass Printing window.
The number of passes to be printed will appear in the Memberships field. For more information on the Batch Printing window, click here.
- Set any final printing options, and click the Start Printing button.
The passes will now begin printing to the selected ticket printer.
Unprint Batch of Passes
The Unprint Batch of Passes function allows for the 'Printed' flag to be removed from passes (Memberships, Gift Certificates, Vouchers) so that they can be printed again. This is helpful when a batch of passes needs to be reprinted. To access the Unprint Batch Of Passes function:
From the main menu bar, select Setup >> Batch Functions >> Unprint Batch of Passes.
The Unprint Batch of Passess window opens.
Parts of the Unprint Batch of Passes Window
|
Clicking "Open" with a pass highlighted opens the Membership detail window. For more on the Membership Detail window, click here. |
|
Clicking the Unprint button will set the print status on the selected pass(es) to "unprinted." |
|
Prints the selected pass(es). This option is only available if the selected pass(es) have the print status of "unprinted." |
|
Exports the selected pass(es) to your choice of text or Excel files |
| Status | The current status of the pass |
| Patron # | The Patron Number to whom the pass(es) were sold |
| First Name | The first name of the patron |
| Last Name | The last name of the patron |
| Company | The company of the patron |
| Description | The type of pass |
| Control # | The unique control number of the pass |
| Date Printed | The date the pass was previously printed |
| Remain $ | The remaining dollar amount (if applicable) on the pass |
| Remain Qty | The remaining quantity of admissions (if applicable) on the pass. |
| Expiry Date | The expiration date (if applicable) of the pass |
| Date Full Redemption | The date the pass was fully redeemed (if applicable). |
| Date Posted | The date the sale of the pass was posted to the General Ledger |
| Order # | The Order number associated with the item |
Other Fields Not Shown |
|
| Membership # | The sequence number (not the control number) of the pass within the database |
| Membership Year-Fiscal | The fiscal year in which the pass was originally sold |
Unprinting a Batch of Passes
- From the main menu bar, choose Setup >> Batch Functions >> Unprint Batch of Passes.
The Unprint Batch of Passes window opens.
- Enter the date the passes were printed in the From and To fields.
- Click the Search
 button to begin the search.
Any passes printed in the date range given will appear.
- Highlight the passes to be unprinted.
Use the <SHIFT> key to highlight a range of passes. To highlight multiple individual passes, hold the <CTRL> key (Windows) or the <OPTION> key (Mac).
- Click the Unprint
 button to remove the 'Printed' flag.
The passes can now be added to a new batch of passes to be printed.
Print Charitable Receipts for Donor
 The Print Charitable Receipts for Donor batch function allows you to print all unprinted donation receipts, using parameters such as:
- All Donation Campaigns (or just one) and/or
- Patron Name, and/or
- Calendar Year
The Print Charitable Receipts for Donor is accessed under the Setup>>Batch Functions>>Print Charitable Receipts for Donor menu.
|
Receipts only print if a payment is received, the print options on the donation require one, and the Campaign allows receipts to be printed. |
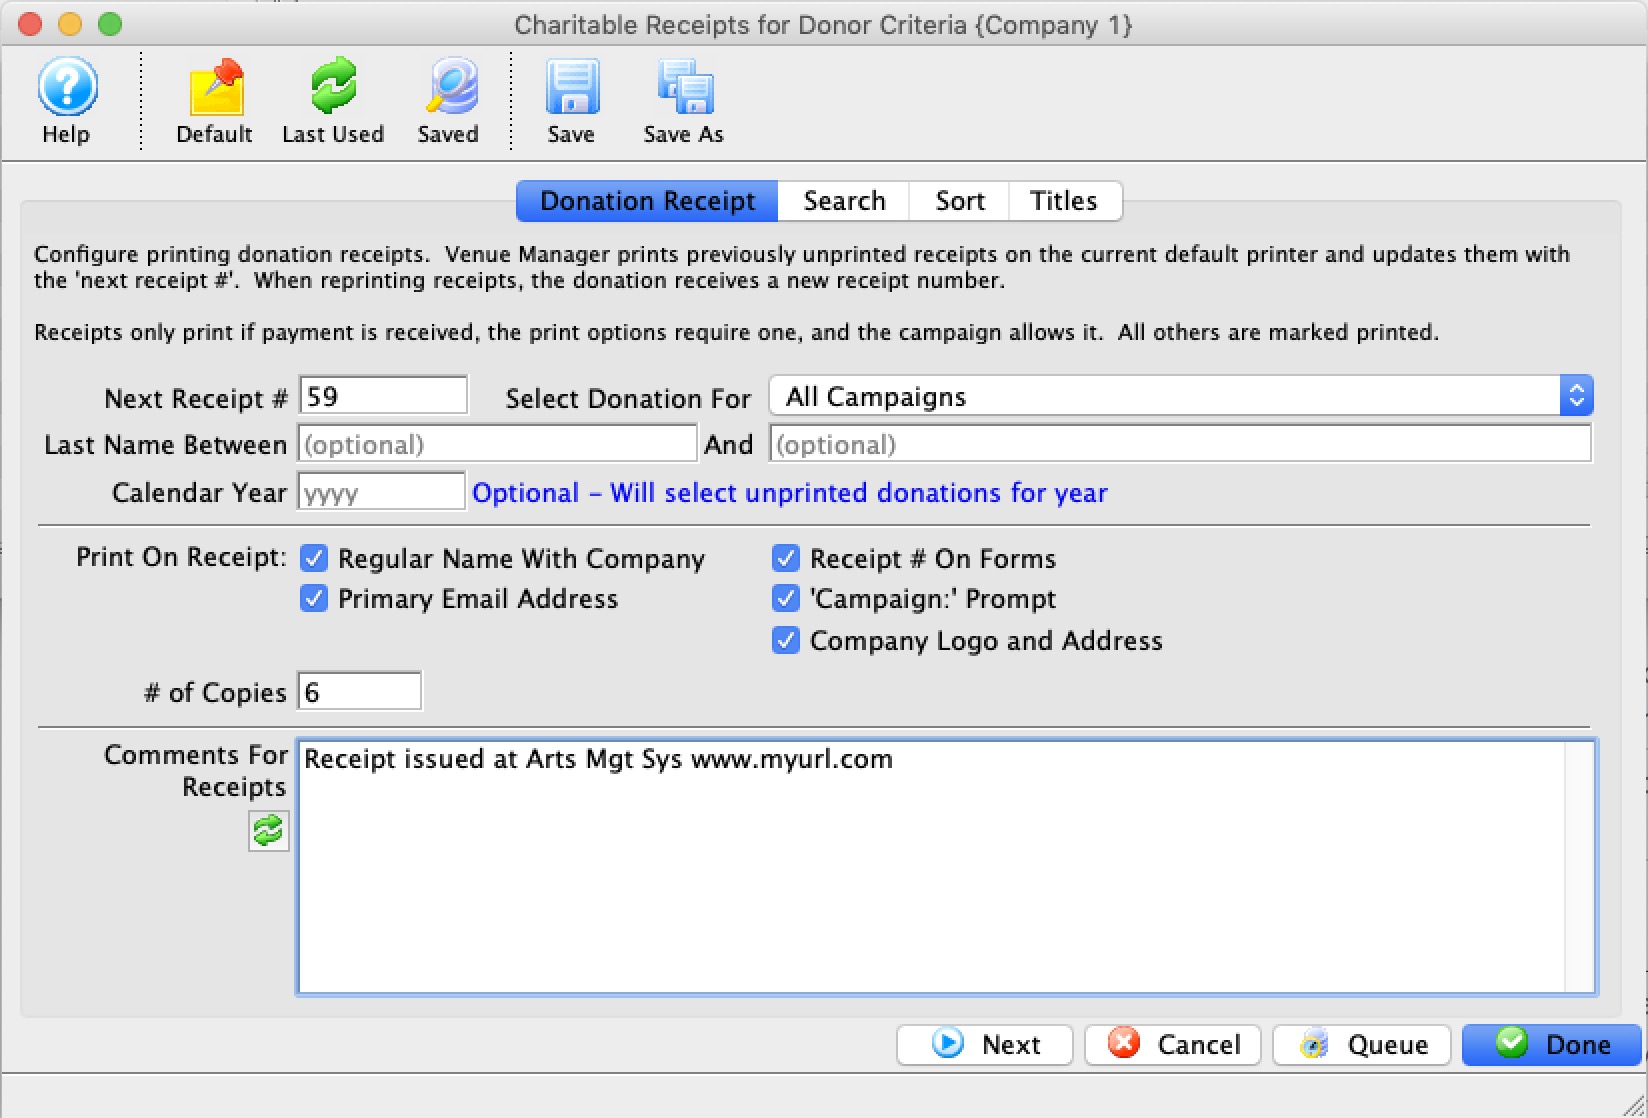
Parts of the Print Charitable Receipts for Donor Window
 |
If this report has previously been run, this button will add the previous criteria |
 |
Opens a list of saved criteria for this report. |
 |
Saves the current criteria to be used later. |
 |
Saves the current criteria to be used later and opens a dialog to name this criteria |
 |
Allows editing of the batch print parameter for included donations. For more on the Donation Receipt tab, click here. |
|
The Sort tab allows adjustment of the sort order of the columns found in the report. For more on the Sort tab, click here. |
|
The Titles tab allows you to give the report a name that is meaningful to your requirements. For more on the Titles tab, click here. |
| |
Proceeds to the next tab in the Charitable Receipts for Donor Criteria. |
|
Cancels that adding of criteria and closes the criteria window. |
|
Completes the addition of criteria and the sorting of data, and begins to generate the donation receipts |
Donation Receipt Report Parameter Tab
Parts of the Donation Receipt Tab
| Next Receipt # | The next starting number for receipts. You may override this value if you wish to assign a different starting number to the next donation receipt number. However after printing this selection of receipts, Theatre Manager will revert back to the "next tax receipt #" as defined in Company Preferences.
If the starting "next tax receipt #" for all future donation receipts is required to be set to a different number, set the "next tax receipt #" in the Company Preferences. |
||
| Select Donation For | A drop down to limit your donation receipts by specific campaign, or All Campaigns. By default, Theatre Manager will include receipts for all campaigns | ||
| Last Name Between | An opportunity to limit the donation receipts to a specific patron or group of patrons based on Patron Last Name. By default, this is normally blank | ||
| Calendar Year | Allows you to print all unprinted charitable receipts for a specific calendar year. This may be used in January to print all unprinted receipts from the previous year.
|
||
| Print on Receipt | Options for including:
|
||
| # of Copies | Allows you to adjust the number of copies printed for each receipt. For example, if you enter "3", you will get a page with 3 copies of the same receipt on the page. This may be helpful if you are providing a copy for the patron, one for the patron's accountant and one for your files | ||
| Comments For Receipts | Allows for limited comments to be printed on the receipts | ||
|
Proceeds to the next tab in the Charitable Receipts for Donor Criteria | ||
| |
Cancels the adding of criteria and clears the window | ||
|
Completes the addition of criteria and the sorting of data, and begins to generate the Charitable Receipts for Donors |

Sort Tab
The Sort tab determines the sort order of the patron invoices that will be printed.
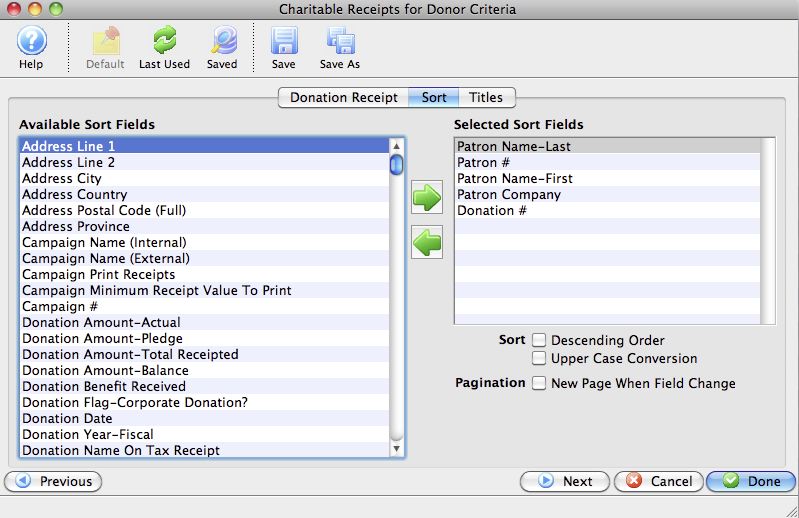
Parts of the Sort Tab
| Available Sort Fields | A list of fields available to sort by. |

|
Adds the currently selected field to the sort field list. |

|
Removes the currently selected field from the sort field list. |
| Selected Sort Fields | The fields currently used for sorting. Default sort fields may appear here. There is a limit of nine sort fields. |
| Sort In Descending Order | When checked, the currently selected sort field will sort in descending order. |
| Upper Case Conversion | When checked, the currently selected sort field will be converted to upper case letters. |
| New Page When Field Changes | When checked, the currently selected sort field will start on a new page when the field changes. |

|
Returns to the previous tab in the Charitable Receipts for Donor Criteria. |
|
|
Proceeds to the next tab in the Charitable Receipts for Donor Criteria. |
|
|
Cancels the adding of criteria and clears the window. |
|
|
Completes the addition of criteria and the sorting of data, and begins to generate the Charitable Receipts for Donors. |
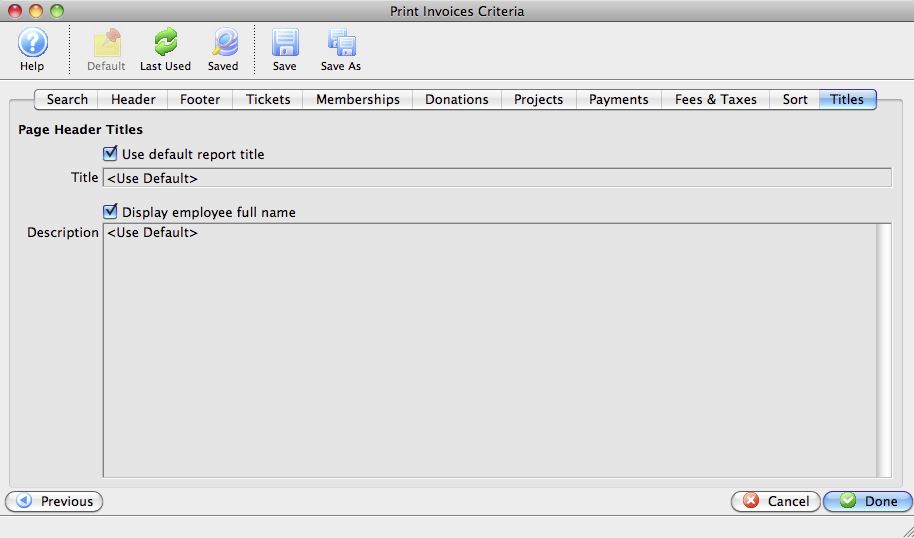
Titles Tab
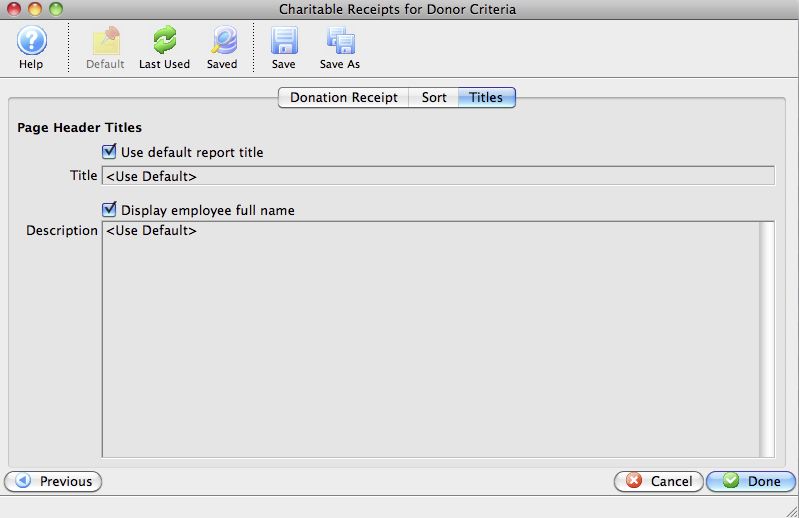
Parts of the Titles Tab
| Page Header Titles | |
| Use default report title | If enabled, the default report tile will print. If disabled, you can specify a specific title for the report. |
| Title | Enter the title you want the report to have. |
| Display employee full name | The name of the employee logged into Theatre Manager will print on the report. |
| Description | You can enter a description of the report and/or the criteria you have selected. |
|
|
Returns to the previous tab in the Charitable Receipts for Donors criteria. |
|
|
Cancels that adding of criteria and closes the window. |
|
|
Completes the addition of criteria and the sorting of data, and begins to generate the Charitable Receipts for Donors. |
Charitable Receipt Example
|
You can place most of the items below like logo, address, signature and other Canada Revenue Agency requirements into company preferences donations tab. |
|
There will be TWO dates on the tax receipt if the date of payment for the donation is different than the date tat the receipt was printed. This is a Revenue Canada requirement for official tax receipts |
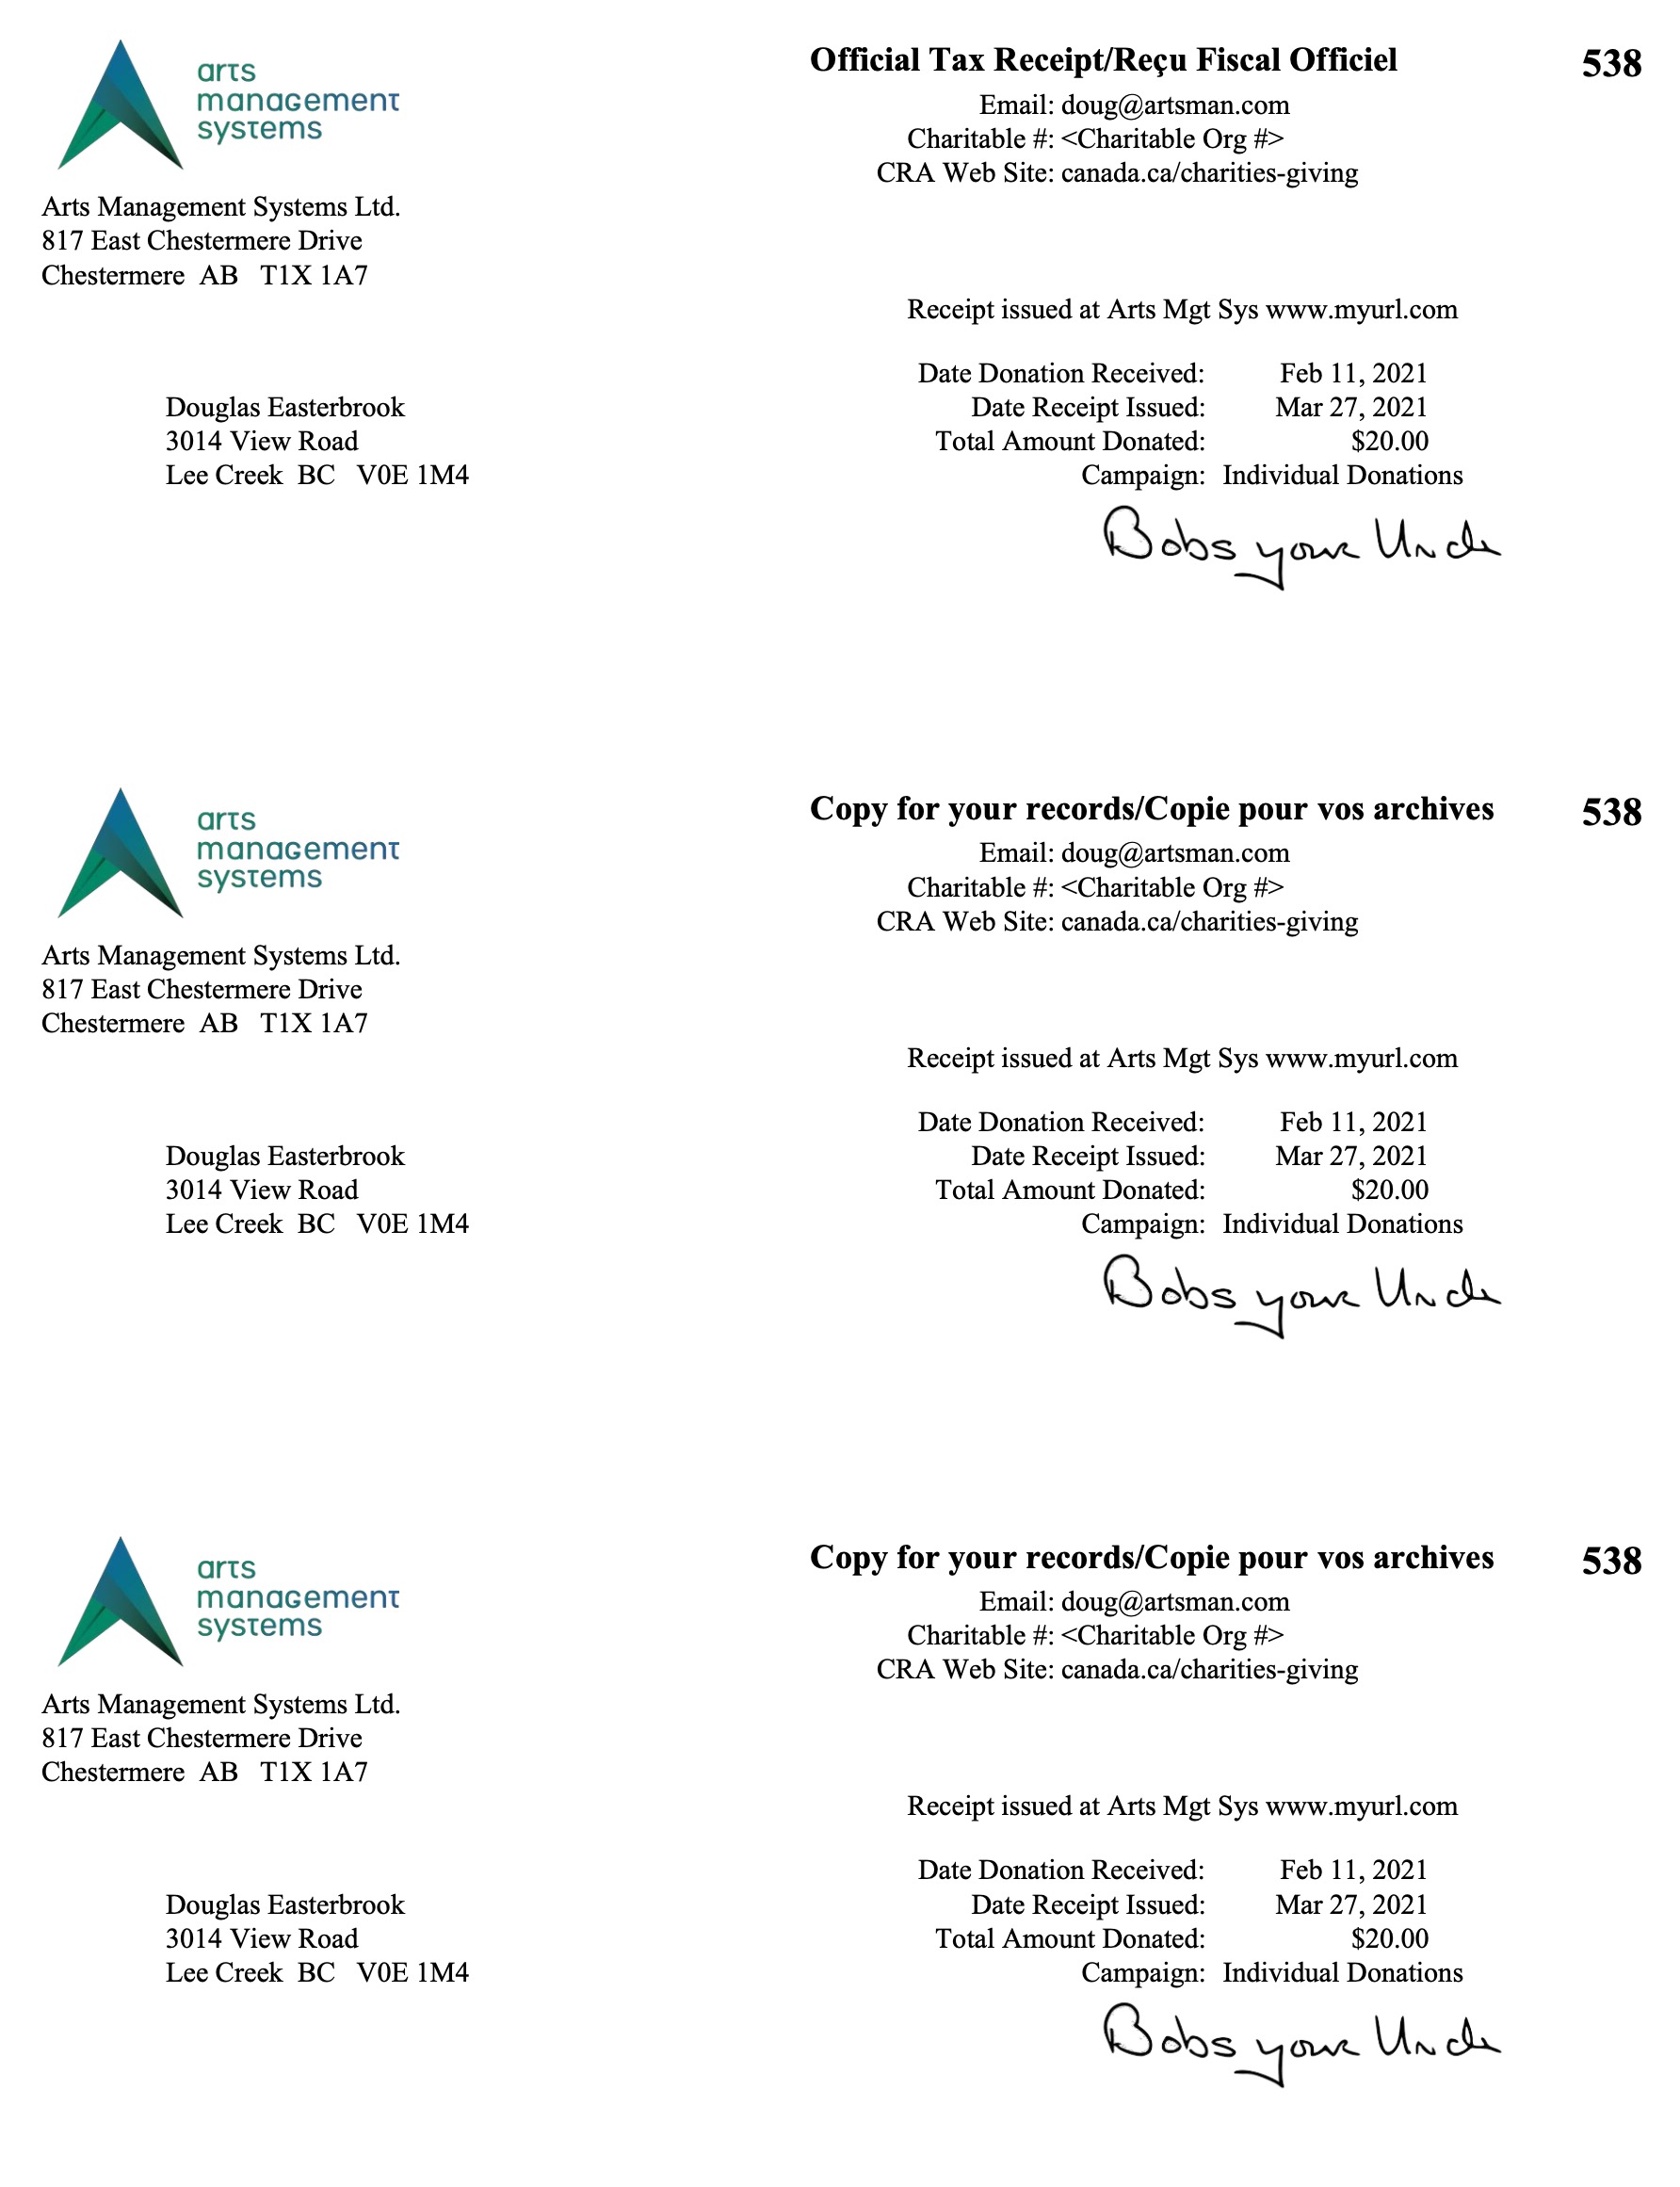 The image to the left an example of a Charitable Receipt
- One per Payment for a donation.
- refer also to Annual Statement Style receipts for an alternative
The parameters used indicated to print 3 copies of each receipt. The intention of donation receipts is that data from the database will be printed on a pre-printed, perforated form that contains other required data for a receipt.
Data preprinted on a tax receipt form is set in Company Preferences and may include (per government requirements):
- Your Company Name
- Your Company Address
- Your Company Phone Number
- Your Company's Tax ID #
In addition, you may want to include:
- A Company Logo
- A signature line
- Other background graphic items or watermarks as desired
Print Annual Summary Charitable Receipts for Donor
The Print Annual Summary Charitable Receipts for Donor batch function allows you to print all unprinted donation receipts in summary format, using parameters such as:
- Campaign
- Last Name, or
- Calendar Year (required for Annual Summary receipts)
|
Receipts only print if a payment is received, the donation receipt print options on the donation require one, and the Campaign allows receipts to be printed. |
The Print Annual Summary Charitable Receipts for Donor is accessed under the Setup>>Batch Functions>>Print Annual Summary Charitable Receipts for Donor menu.
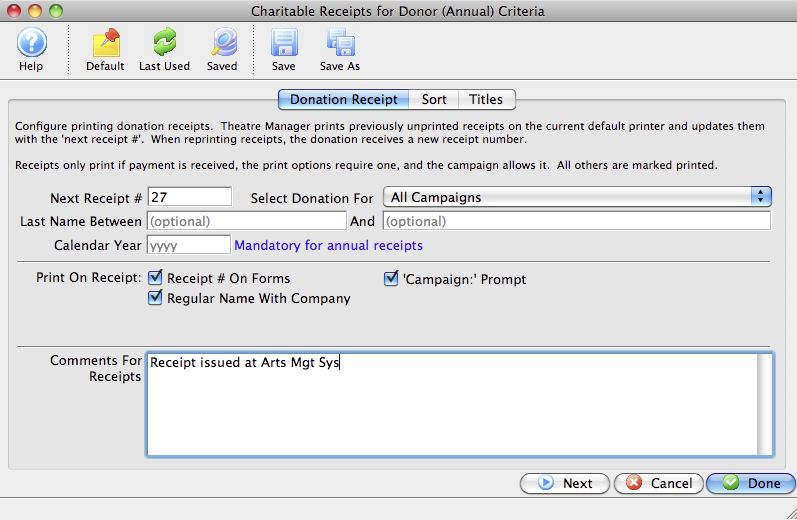
Parts of the Print Annual Summary Charitable Receipts for Donor Window
If this report has previously been run, this button will add the previous criteria. |
|
Opens a list of saved criteria for this report. |
|
Saves the current criteria to be used later. |
|
Saves the current criteria to be used later and opens a dialog to name this criteria. |
|
Allows editing of the batch print parameter for included donations. For more on the Donation Receipt tab, click here. |
|
The Sort tab allows adjustment of the sort order of the columns found in the report. For more on the Sort tab, click here. |
|
The Titles tab allows you to give the report a name that is meaningful to your requirements. For more on the Titles tab, click here. |
|
|
|
Proceeds to the next tab in the Charitable Receipts for Donor Criteria. |
|
|
Cancels that adding of criteria and closes the criteria window. |
|
|
Completes the addition of criteria and the sorting of data, and begins to generate the annual summary donation receipts. |
Annual Summary Charitable Receipt Example
This is an example of an Annual Summary Charitable Receipt for a Donor. The parameters used indicated all gifts in Calendar Year 2010. The intention of donation receipts is that they will be printed on a pre-printed form that contains other required data for a receipt. This data may include (check your local requirements):
- Your Company Name
- Your Company Address
- Your Company Phone Number
- Your Company's Tax ID #
In addition, you may want to include:
- Your Company Logo
- A signature line
- Other graphic items as desired

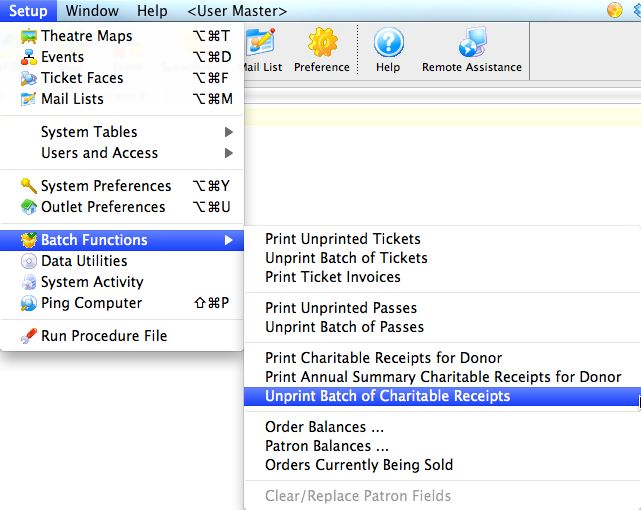
Unprint Batch of Charitable Receipts
The Unprint Batch of Charitable Receipts function allows for the 'Printed' flag to be removed from donation receipts so that they can be printed again.
The Unprint Batch of Charitable Receipts for Donor is accessed under the Setup >> Batch Functions >> Unprint Batch of Charitable Receipts menu.
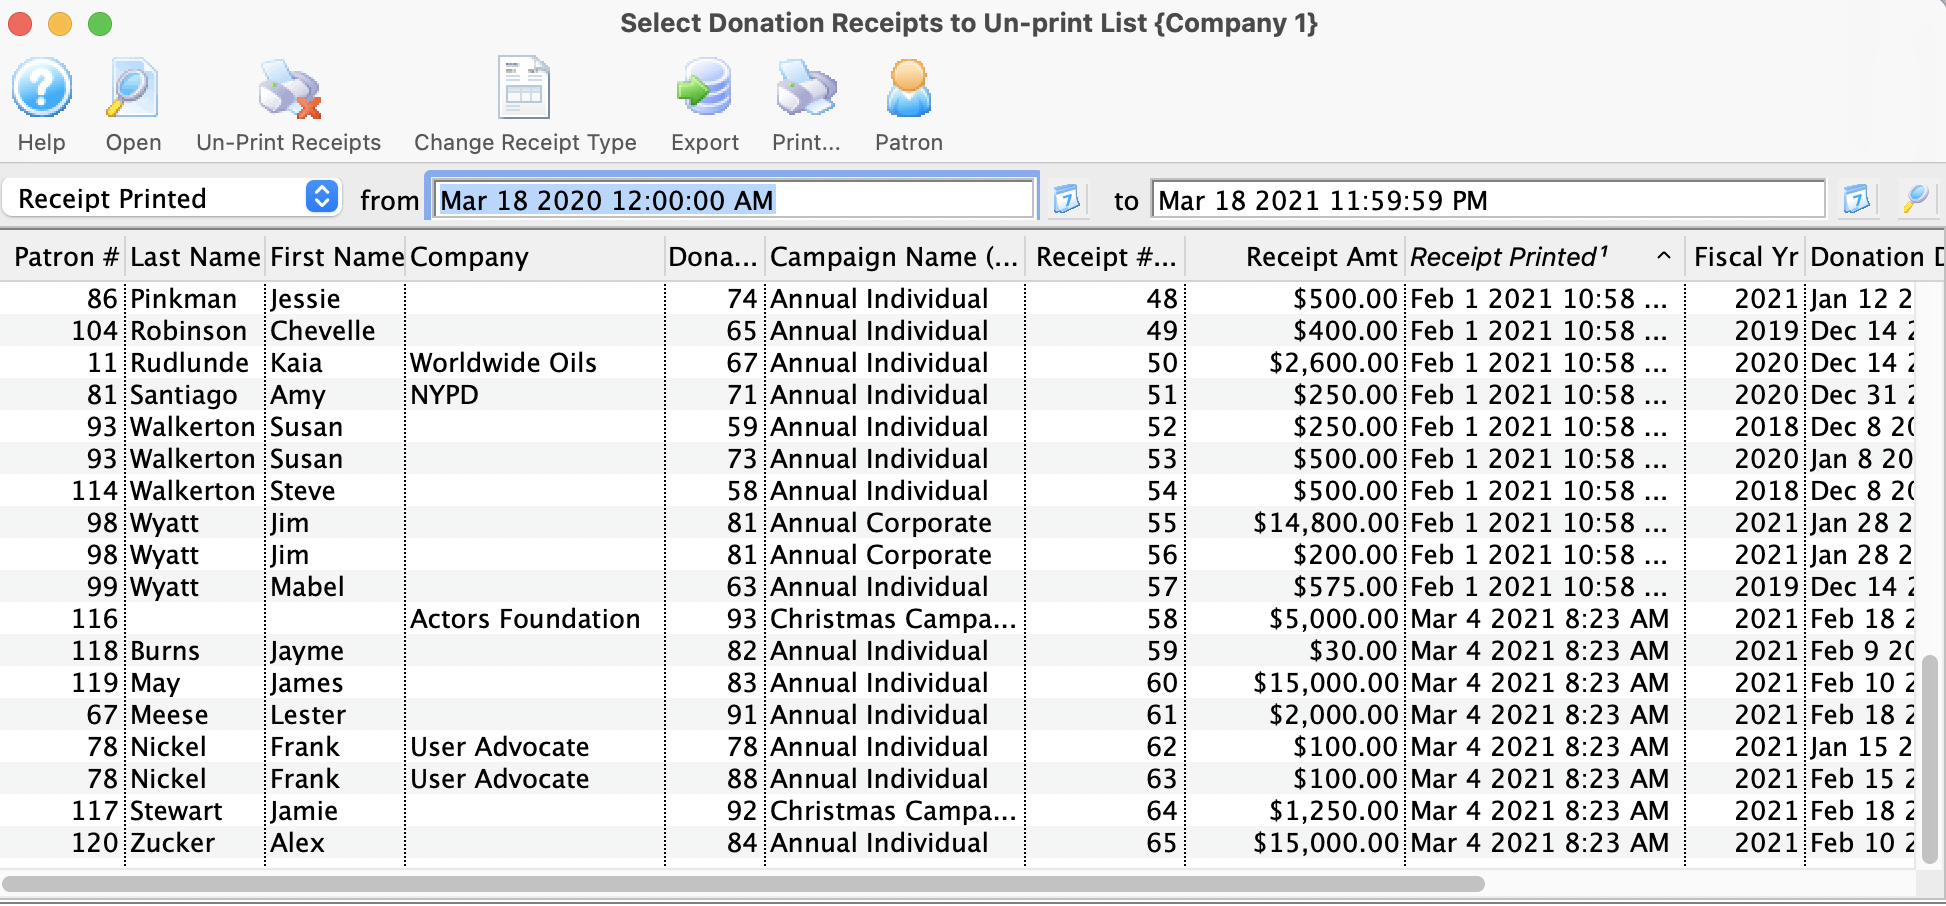
Parts of the Donation Receipts List
 |
Opens the donation record for the selected receipt. |
 |
Unprints the selected receipt(s). |
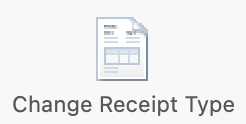 |
Allows the user to select a different Tax Receipt Type for the selected donations.
This is helpful to change multiple donations to one per payment or annual style before you reprint the tax receipts in a different style. |
|
Exports the current Donation Receipt List to a text file for use in Excel. |
|
Prints the Donation Receipt List as shown to a report. |
 |
Opens the Patron record for the selected donor. |
| Last Name | Last name of the donor. |
| First Name | First name of the donor. |
| Company | Company name (if applicable) of the donor. |
| Campaign Name (Internal) | Campaign name (internal) to which the donation was made. |
| Receipt Number | Current receipt number of the selected receipt. This number will be "retired" once the receipt is unprinted. |
| Receipt Amount | Donation amount the receipt is for. |
| Receipt Printed | Date the receipt was previously printed. |
| Fiscal Year | Fiscal Year the donation was attributed to. |
| Donation Date | Date of the donation. |
| Actual Amount | Amount of the originating donation. |
Unprinting a Batch of Charitable Receipts
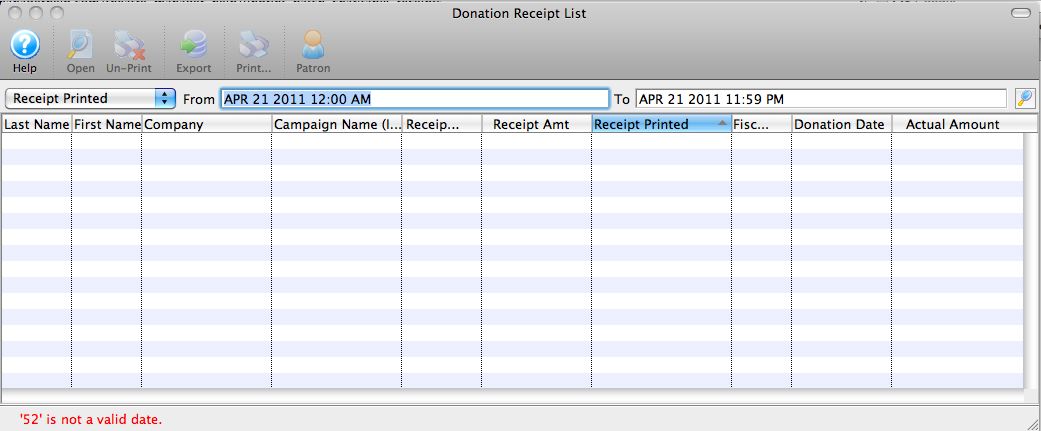
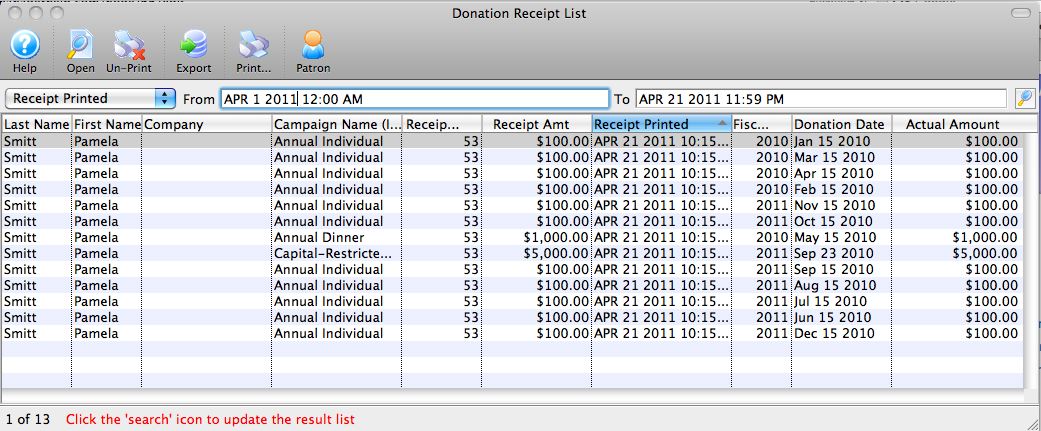
- From the main menu bar, go to Setup >> Batch Functions >> Unprint Batch of Charitable Receipts.
This will open the Donation Receipt List window.
- Enter the date the receipts were printed in the From and To fields.
- Click the Search button to begin the search.
Any receipts printed in the date range given will appear.
- Highlight the receipts to be unprinted.
Use the <SHIFT> key to highlight a range of tickets. To highlight multiple individual tickets, hold the <CTRL> key (Windows) or the <OPTION> key (Mac).
- Click the Unprint button to remove the 'Printed' flag.
The receipts can now be added to a new batch to be printed.
Order Balances ...
This can also be done for one or more orders for a specific patron on the patron's order tab.
- From the main menu bar, go to Setup >> Batch Functions >> Order Balances...
This will open the Verify Order Balances window.
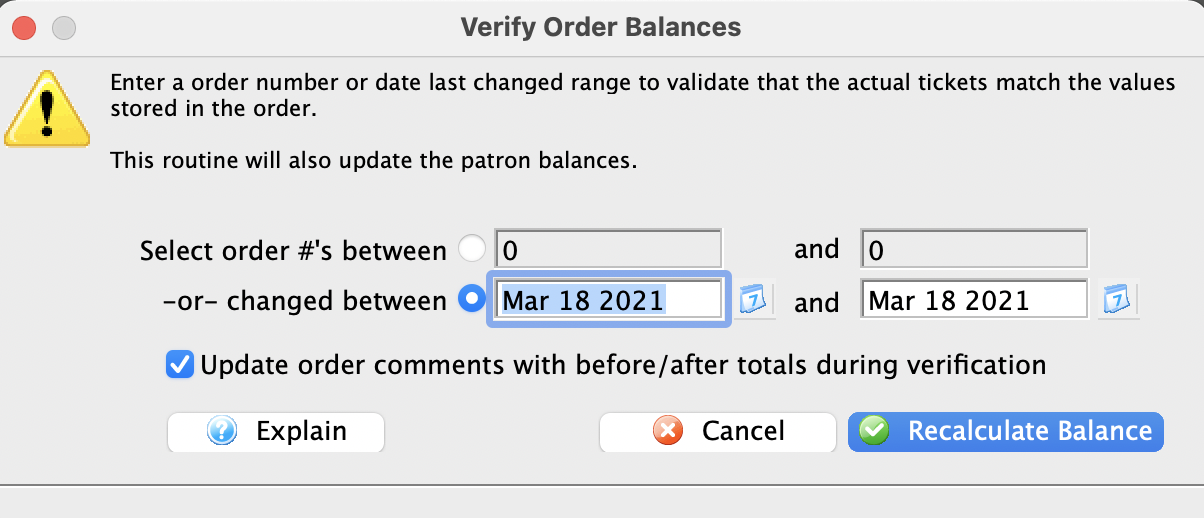
- Enter the range of orders to be verified.
Orders can be verified either based on order number or by a date range of when the order was last changed.
Optionally, you can have Theatre Manager update the order comments field with the order totals from both before and after the recalculation. By default, this option is selected.
- Click the Recalculate Balance
 button.
A confirmation window will appear.
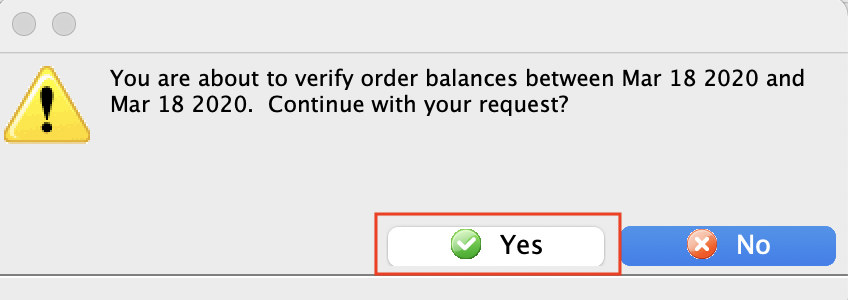
- Click the Yes button.
The orders within the range will now be verified and upon completion, the window will close.
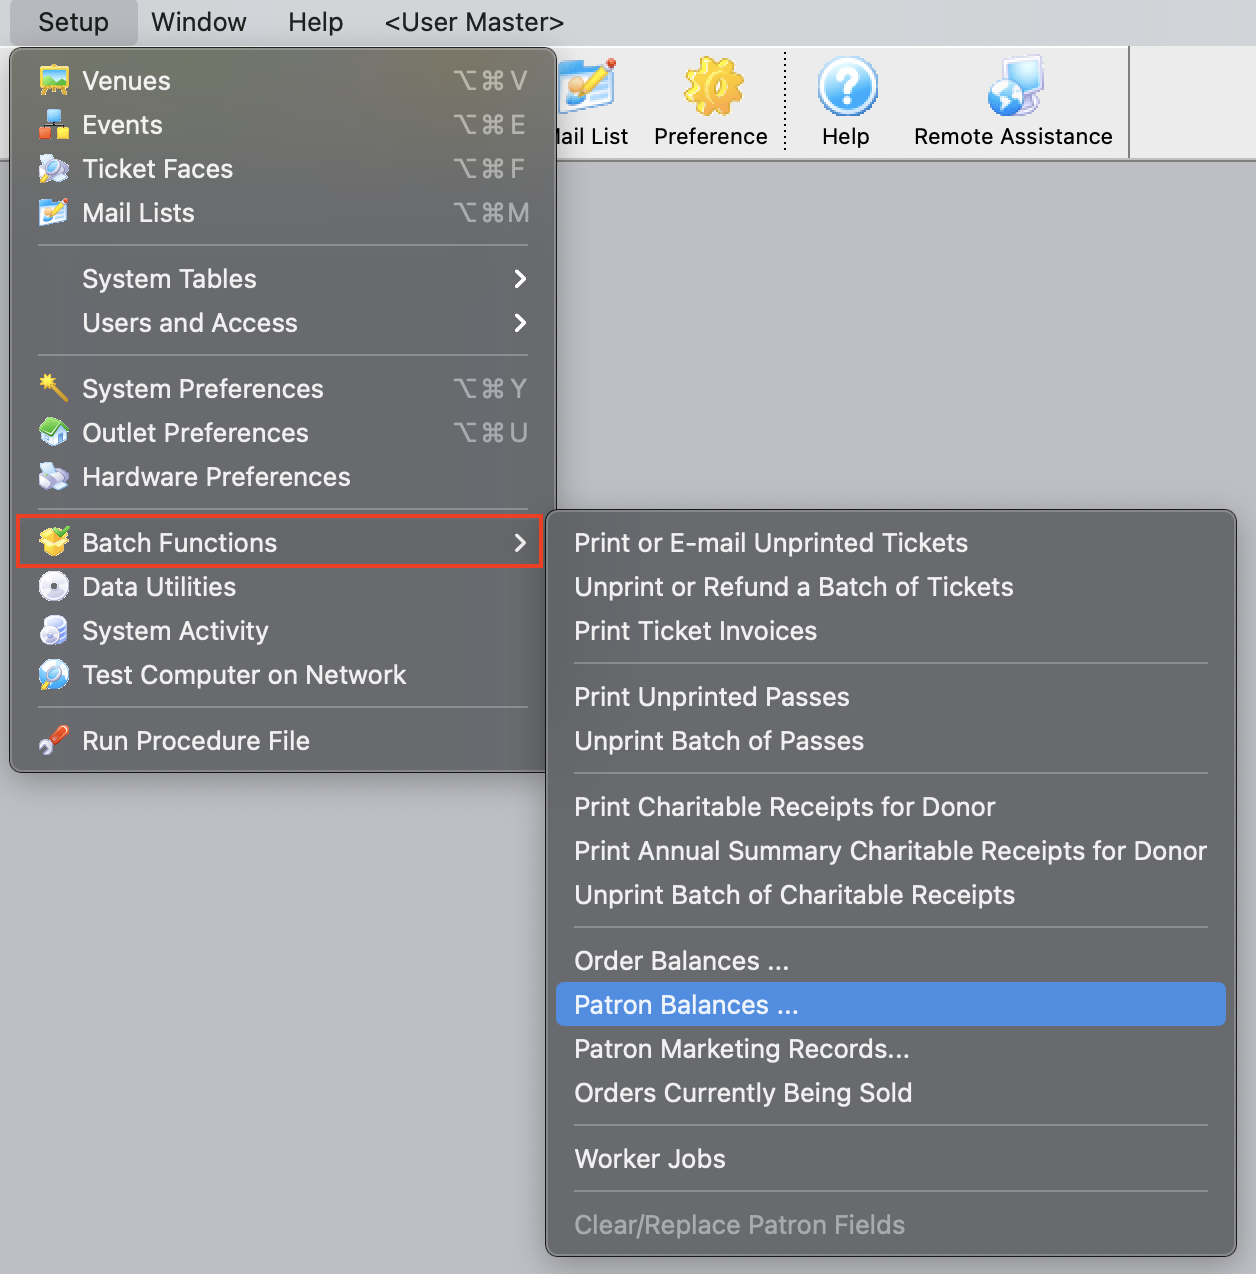
Patron Balances ...
The rebuild Patron Balances function is used to verify that the totals on all the orders for a specified patron are in balance. This is useful when working through problems in the End of Day.
- From the main menu bar, go to Setup >> Batch Functions >> Patron Balances...
This will open the Verify Patron Balances window.
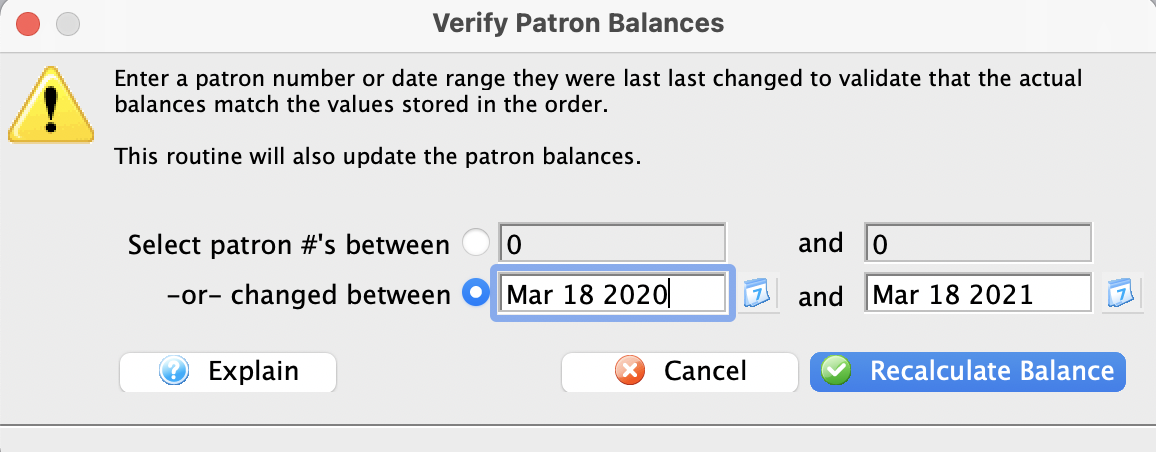
- Enter the range of patrons for whom you wish to verify all order balances (or a single patron).
Patron balances can be verified either based on Patron number or by a date range of when the patron account was last changed.
- Click the Recalculate Balance button
A confirmation window will appear.
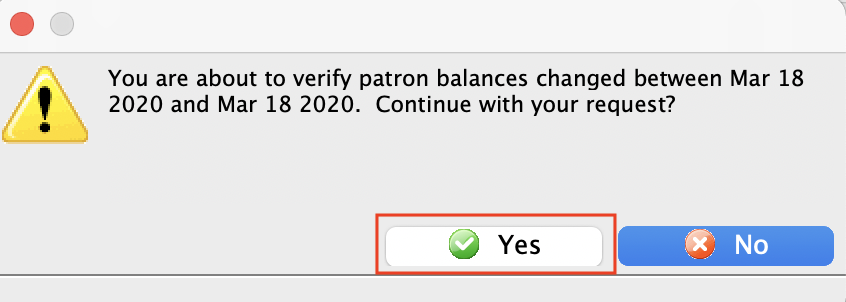
- Click the Yes button.
The patron balances within the range will now be verified and upon completion, the window will close.
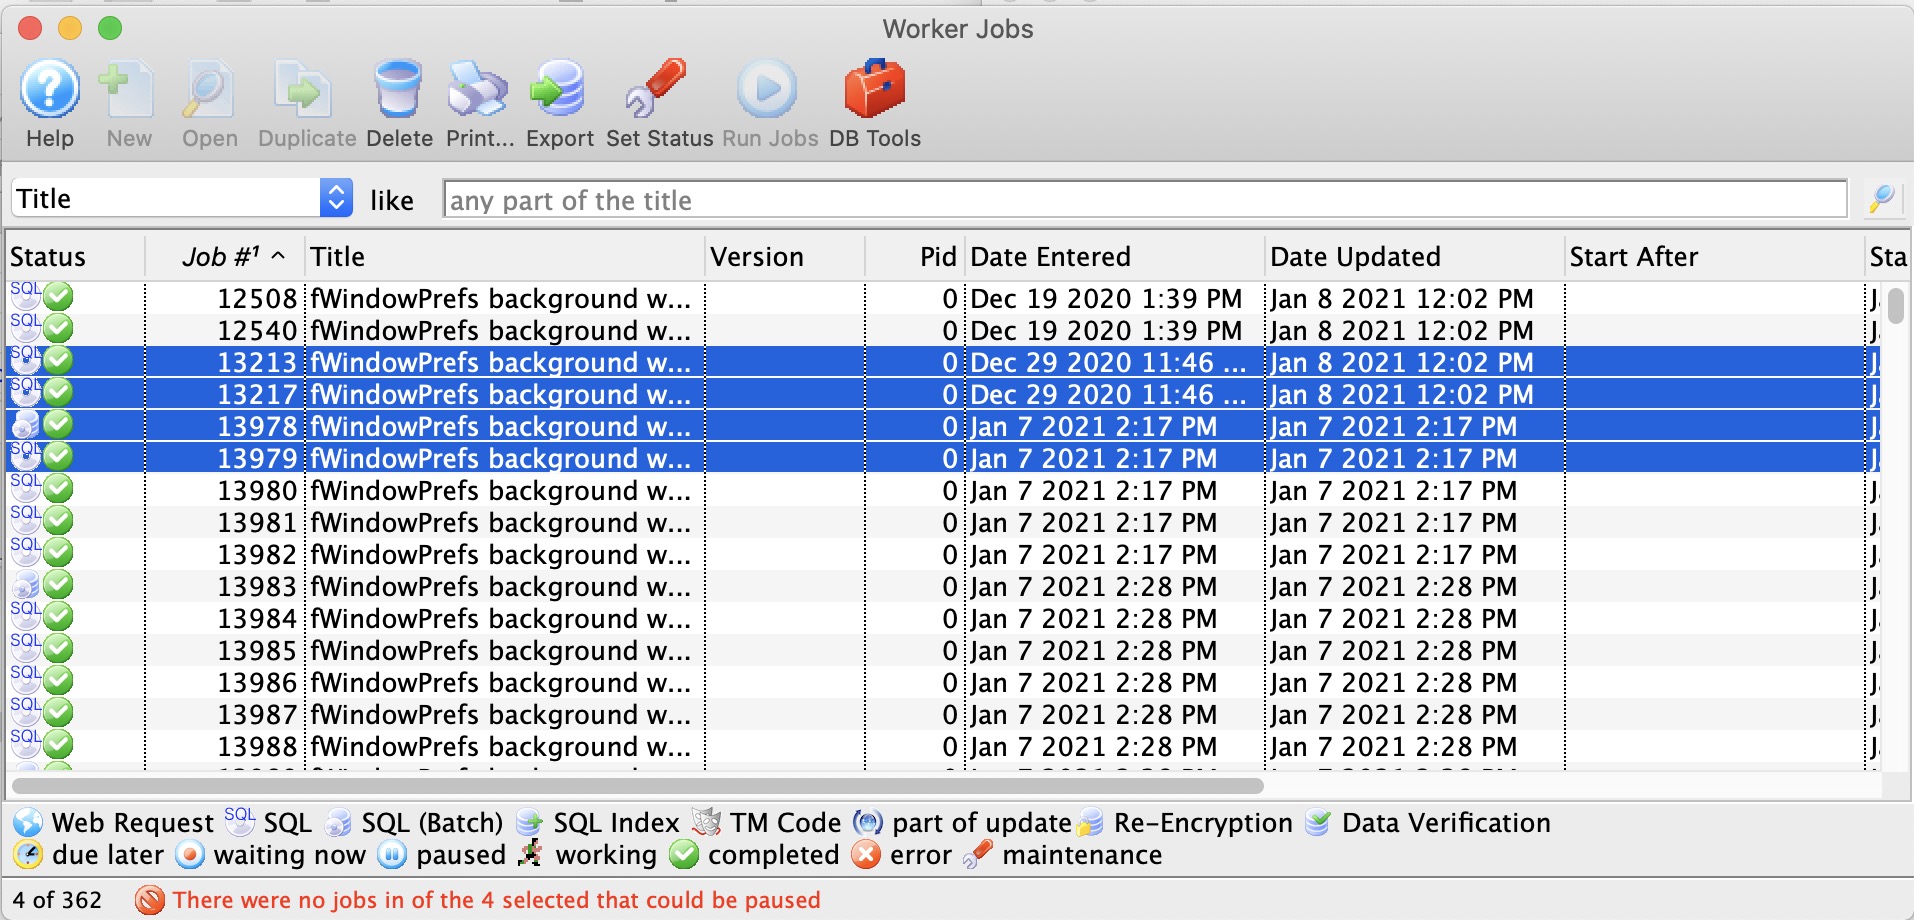
Job List
You can accomplish 3 things on this window:
- Pause a particular job (jobs dependant on that job will no longer run)
- Resume any paused job or job that is in error status (assuming the error condition has been fixed)
|
If a job is stuck in the running state and never ends, or simply will not start, please contact AMS support for assistance.
ONLY AMS SUPPORT CAN RESTART JOBS since we need to see what the job was that failed |
|
If a job looks like it is paused or in error, you may try to use the Set Status button to the status to Resume/Restart Job to see if that clears it up |
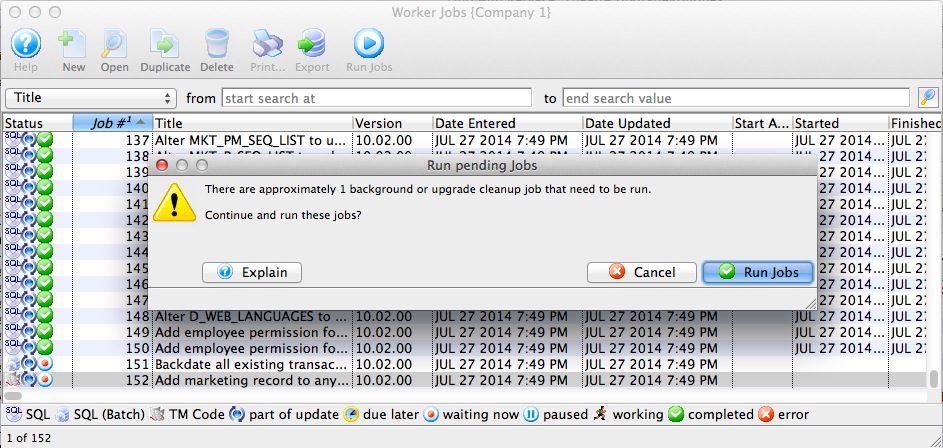
Running Jobs
While the jobs are running, the Application Name status in PGAdmin will show running jobs so that you can tell what processes are doing.
|
If job are stuck or not running, Arts Man will need to start them for you. |
Patron Marketing Record
This should be used if a patron is known to exist in the database (i.e they can be found using quick find) but cannot be found using the patron list window.
Order Currently Being Sold
This may help resolve issues where:
- the End of Day seems to be out of balance or
- if a workstation crashes or is forced quit in the middle of working on an order.
|
NOTE: is an order is in use, users generally cannot see the order in the 'order tab' on the patron window. That is so that nobody attempts to edit, change, or rebuild it. |  |
You should only clear orders where you are absolutely sure nobody is actually working in them.
For any order that is current, please check with any other users to ensure they are not working with that order. |
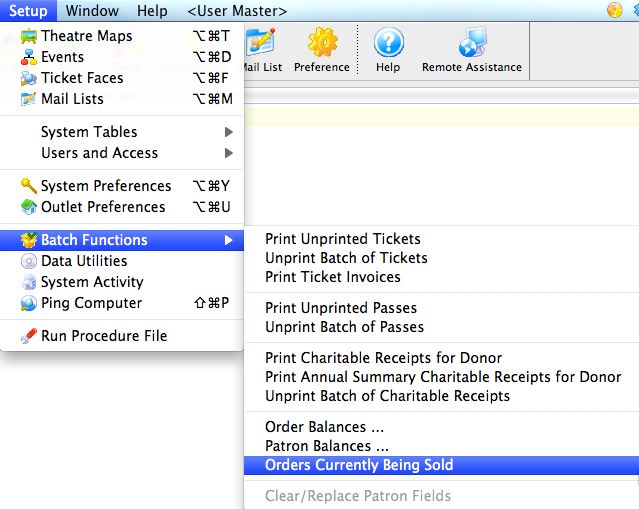
- From the main menu bar, go to Setup >> Batch Functions >> Orders Currently Being Sold.
The Order Currently Being Sold window opens.
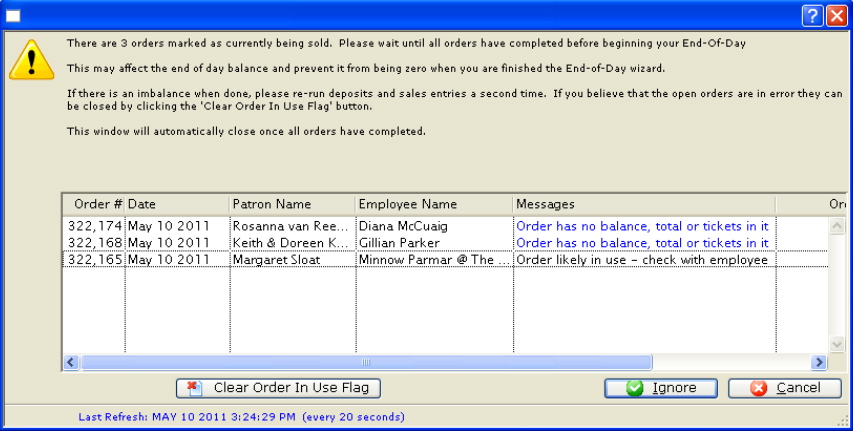
- Select the order you want to clear the 'being sold' flag, by single clicking on it.
You should only clear old orders or those where you are sure nobody is actually working in them. For any order that is current, please check with any other users to ensure they are not working with that order.
- Click the Clear Order In Use Flag
 button.
This will clear the order and allow the order to be accessed again.