System Preferences
System Preferences are used to manage how Theatre Manager behaves for all outlets in the database. (This also applies if there is only one outlet). The items that can be changed generally have to do with system maintenance, overall appearance and general behaviour that all users will experience.
Click on a link to the left to view the details of each tab in this window.
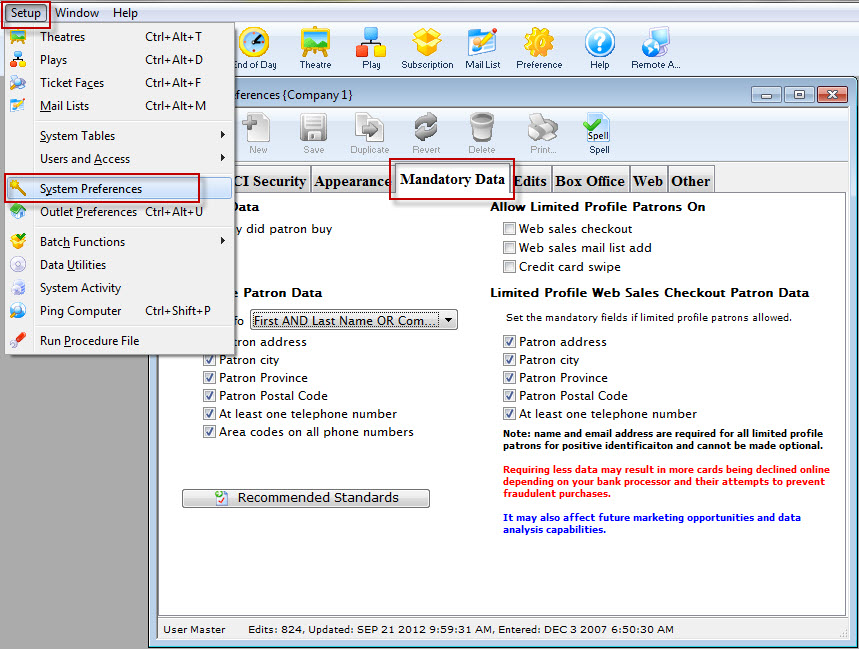
The System Preferences Window is accessed through the Setup >> System Preferences Menu.
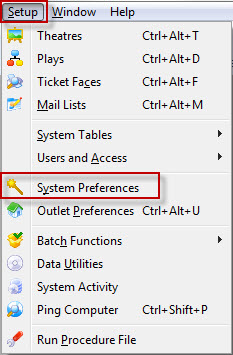
The System Preferences Window opens.
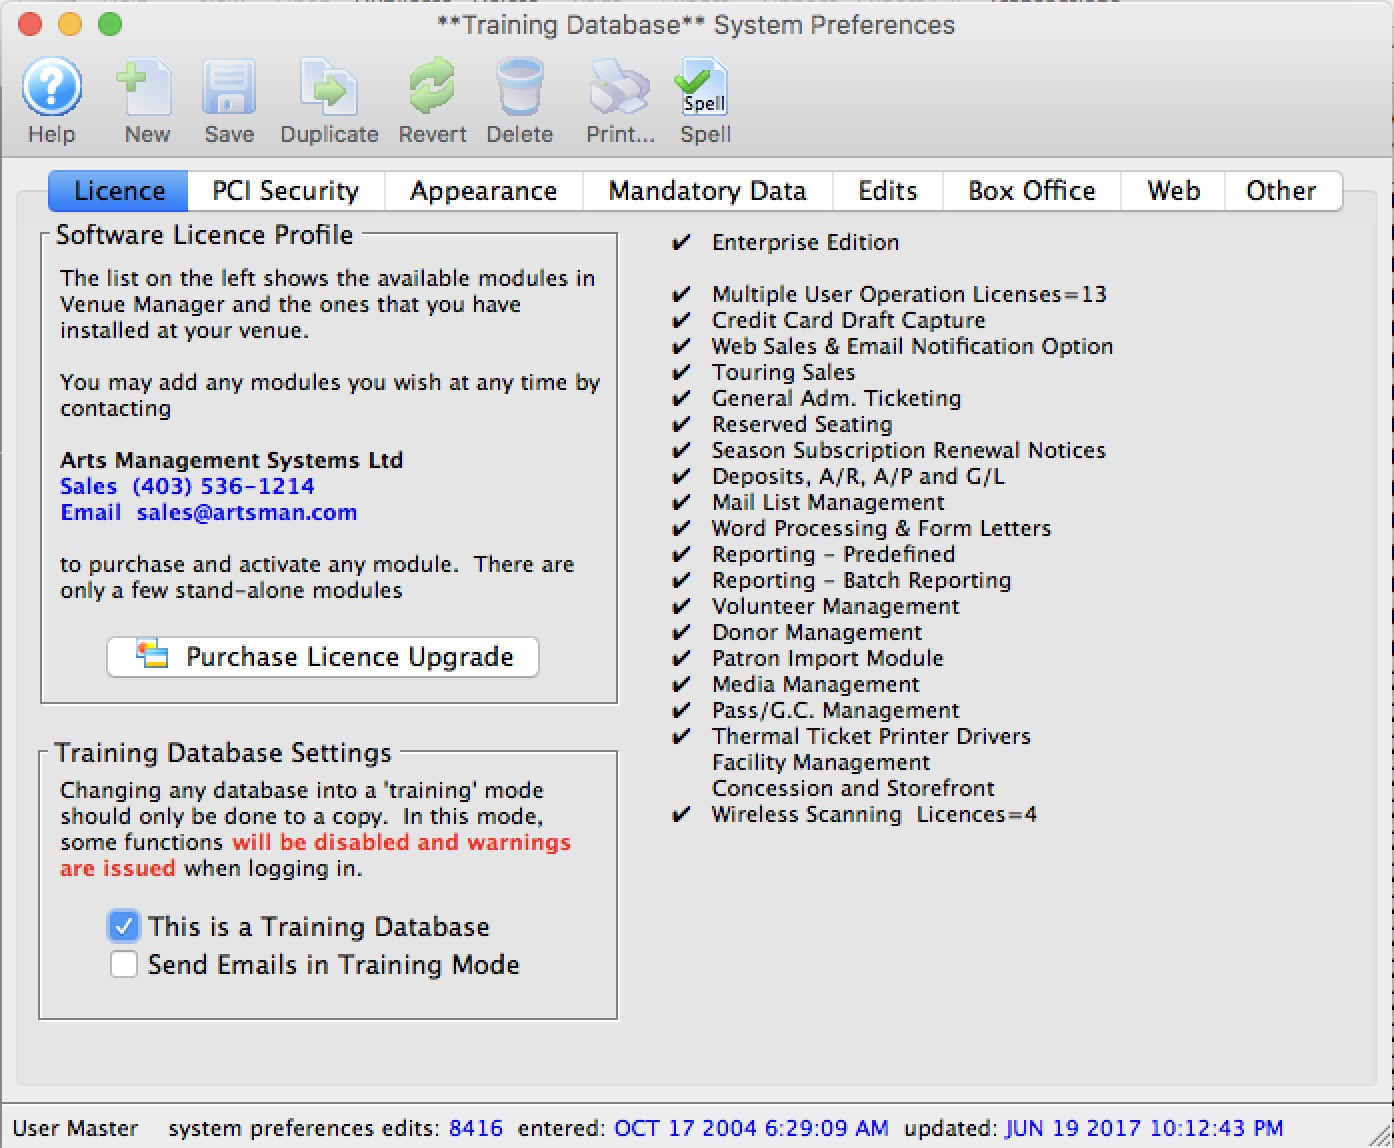
Licence Tab
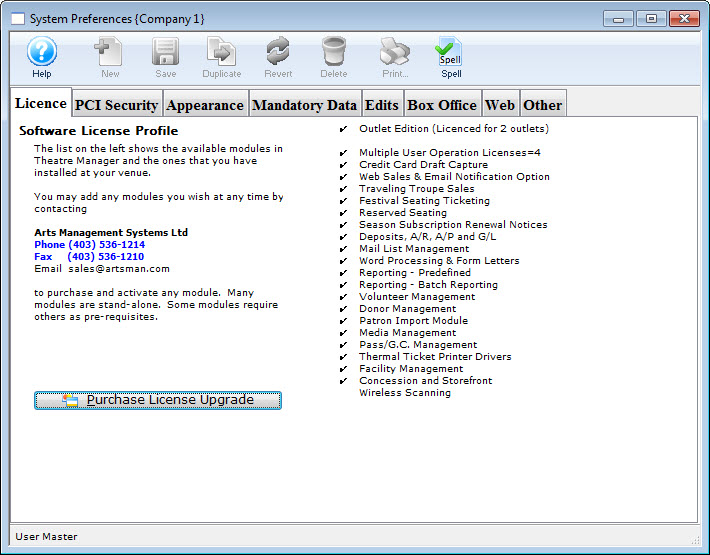
Software License Profile |
|

|
Allows for the entry of a license upgrade. For more information on entering license upgrades click here. |
| Software Features | This is a list of all the possible features that Theatre Manager offers. The features that have check marks beside them are the features that the company currently has access to. In order to receive additional features that the Theatre Manager has to offer the organization must purchase a license upgrade. |
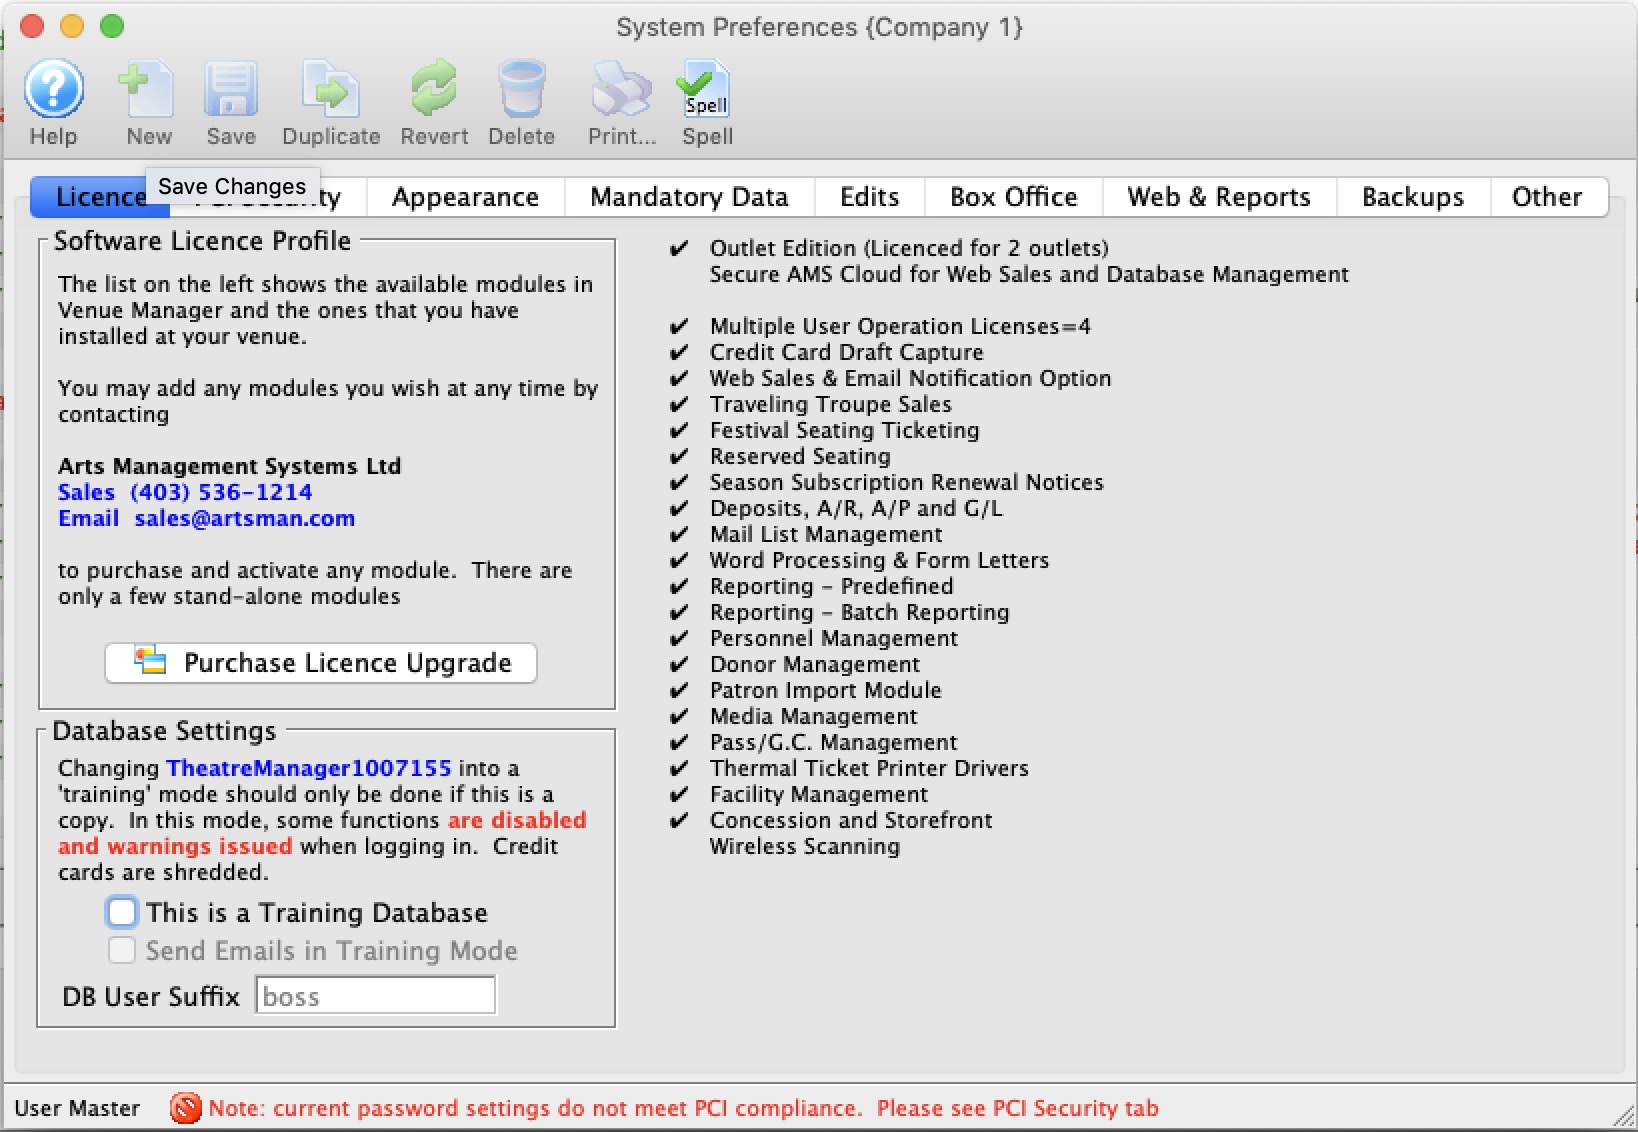
Training Database Settings |
|
| This is a Training Database |
 A venue can set up a database in training mode for use in staff development. This feature should only be used on a copy of a database to flag to Theatre Manager that it will be used in training mode. When a database is set to Training:
|
| Send Emails in Training Mode | If Web Services (a TM server with a housekeeper) is set up for the training database, you can indicate if the web listeners should send out emails as part of the test process. |
| DB User Suffix |
If you have multiple databases on your server, you should enter a unique database marker for each one. This is appended to the employee ID's in the background so that they are unique per database. We recommend:
|
Licence Upgrades
Once a company has purchased a license upgrade the new Customer and License numbers need to be entered to activate the additional features of Theatre Manager.
- Open Setup >> System Preferences
- Click the Purchase License Upgrade
 button.
The Customer and License Number Window will open.
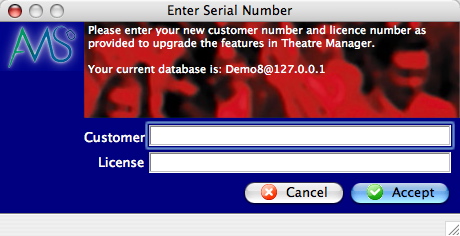
- Enter new customer number.
- Enter new license number.
- Click the Accept
 button.
Theatre Manager will now automatically restart to activate the new features.
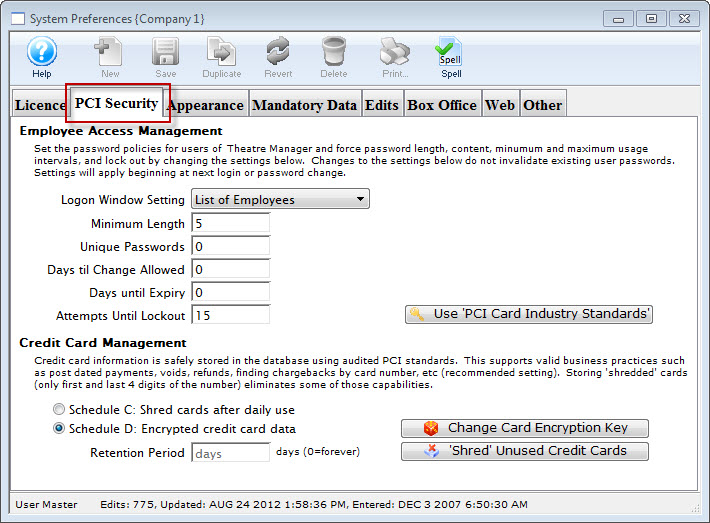
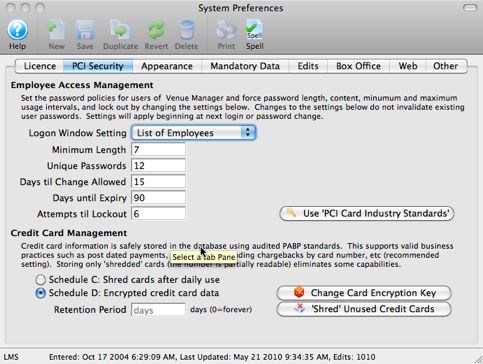
PCI Security Tab
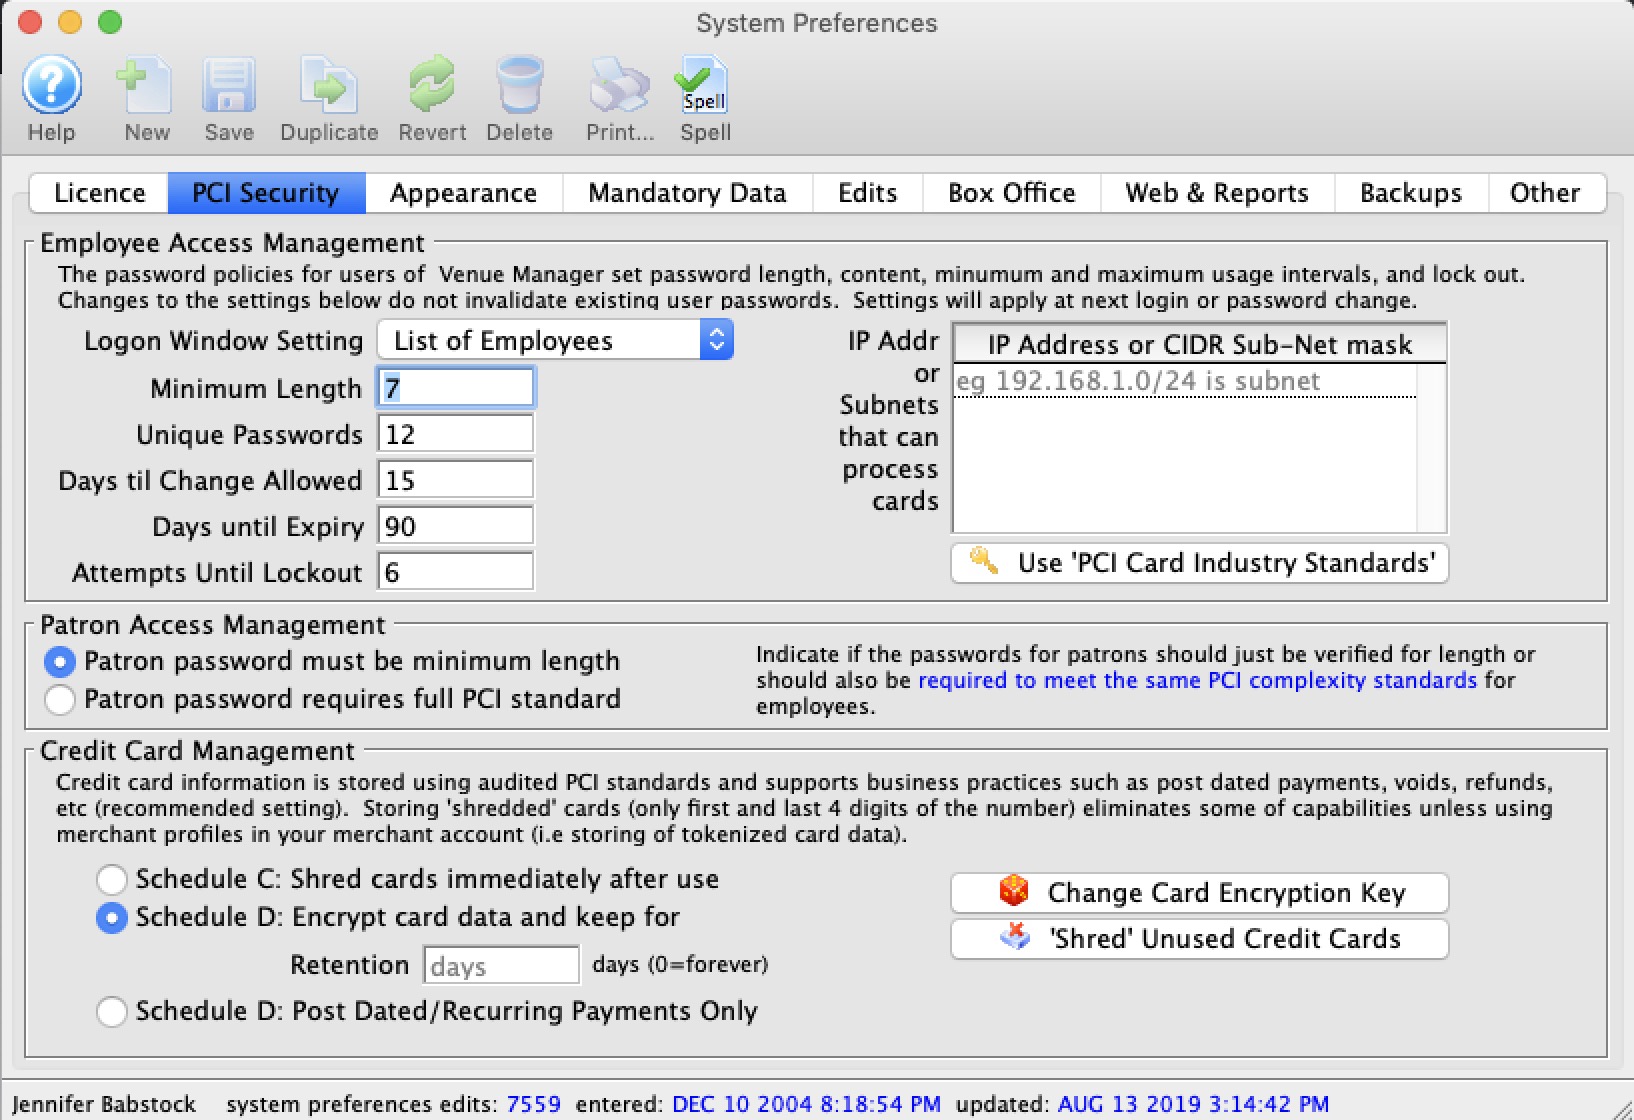
Employee Access Management
| Logon Window Setting | Offers the option to have Employees login:
|
| Minimum Length | Sets the minimum length of logon passwords. For PCI compliance, the minimum length is 7 characters. |
| Unique Passwords | The number of unique passwords required by the system. If set to zero, then passwords are not required to be unique. If set to 2, then the same password may be shared by two employees. If set to 3, then the same password may be shared by three employees. |
| Days til Change Allowed | The minimum number of days that a password must be used before it is allowed to be changed. |
| Days until Expiry | The maximum number of days that a password may be used. For PCI compliance, this must not exceed 90 days. |
| Attempts til Lockout | This determines how many incorrect attempts an employee may make before Theatre Manager will lock them out of the system and must be manually re-instated. |
| IP addresses that can accept cards | PCI documentation indicates that any machine that touches credit card information becomes within scope of PCI compliance requirements. If you identify which machines process credit cards (such as box office), then other machines on the network that are used for reporting, management, etc, can be taken out of scope for PCI compliance.
To do so, you can indicate a white-list specific machines or subnet of machines that will process cards by:
|
 |
Clicking this button changes options to the current PCI Standards for employee passwords and logon attempts. |
Patron Access Management
| Patron Password Complexity |
You can set the required complexity of patron passwords in Theatre Manager to two levels:
|
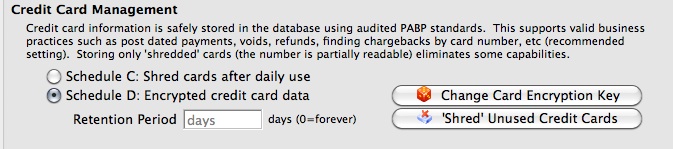
Credit Card Management
Theatre Manager can implement either Schedule "A-EP", "C" or "D" for the Self-Assessment Questionnaire (SAQ) - the choice is yours and is dependant on the merchant processor you've selected.
You can define a retention period for credit card information before it is 'shredded' per PCI DSS standard 3.1
|
Note: Users find ways to type credit card into note fields, more so when using Schedule 'C' compliance because the credit card storage capability has been disabled.
You can use a feature in the Patron List window to search and identify data that could be construed as clear text credit cards attached to patrons. That kind of data would be in violation of PCI guidelines. |
|
A shredded card means that it will be stored in the database as '#### **** **** ####'. This renders the PAN useless for all purposes. However, given the first 4 and last 4 digits of any card, you can still search for the patron. |
 |
Converting from schedule D to Schedule C compliance will shred all cards currently in the database EXCEPT those set up for future post dated payments. Since that business already exists, those few cards will remain until the final post date payment is take for the patron. At that time, the card will be shredded immediately. This prevents disruption of existing commitments to patrons.
Generally, if you want to take post dated payments and retain the minimum card data in the database, use Schedule D with one day retention. |
| Schedule C: Shred cards immediately after use | Using an online payment gateway and the Schedule "C" setting means that cards will not be stored in the database. The PAN is sent to the processor to get the authorization code and token from the merchant provider. Those are stored in TM (not the card itself) and the merchant token is what is used for voiding cards. It puts the workstation in scope of a PCI device, but not the database. |
| Schedule D: Encrypted credit card data | Schedule "D" compliance with about 120 days of retention is sufficient for most venues, especially if you are using post dated payments or may have to deal with refunds for cancelled events. |
| Retention Period | The number of days credit card information will be retained before it is shredded in a Schedule D environment. Normally 90 days will handle most business cases, and the recommended maximum is 365 days. If you set it to one day, then all cards are shredded right away, except those that are saved for post dated payments. |
| Schedule D: Post Dated Payments | This option allows storage of encrypted cards for post dated or recurring payments only. Once the last payment is authorized, the card is shredded. It effectively, is the same as the above option with 1 day retention, except that it is far more restrictive in when Theatre Manager will try to make a stored card. This should result is a venue having vastly reduced exposure risk for stored cards under PCI. |
 |
Generates a completely random 60 character key to use as part of the encryption key process that will be unique to the venue and re-encrypt all cards in the database. |
 |
Immediately shreds credit cards longer than the Retention Period as noted above. |
Search Patron Data for Credit Card Information
 |
Mask PAN when displayed; the first six and last four digits are the maximum number of digits you may display. Not applicable for authorized people with a legitimate business need to see the full PAN. Does not supersede stricter requirements in place for displays of cardholder data such as on a point-of-sale receipt. PCI DSS standard 3.3. |
Use this feature to identify where there may be data attached to patrons that could be construed as a possible clear text credit card in violation of PCI DSS standard 3.3.
When using this search option, patrons will be listed that have a series of 3 or 4 numbers repeated 4 times. This means that anything with at least 12 contiguous digits in the various search fields might result in a match (note: it may not be a credit card).
Searching for at least 13 contiguous digits might find things like 4500 000 000 000 or 5200 0000 0000 0000. It doesn't matter if there are one or more spaces between the numbers or not. Data that will not be found are phone numbers like 518-444-5555. However, it may find conditions where numbers are separated by something other than spaces.
|
When searching for card information, the prospective full credit card number is subjected to the same LUHN test the bank uses to identify if it is a card. If the string of numbers do not pass the LUHN text, it will not be identified as a credit card |
|
A full PCI scan on the raw files in machine with a TM database on it COULD provide FALSE POSITIVES, if you are using SVG maps and pick your own seats. The vector information for points in a map contain a lot of numbers which consistently fool disk level PCI scan's into thinking they are credit cards. |
Fields searched for possible card data are:
- Patron
- general notes, volunteer notes, donor notes, household notes, and the three customizable note fields on the notes tab
- marketing field #5
- donor publication name
- Special Needs Notes
- GST/HST numbers
- Client asset notes entered on the client asset setup in the 'donor' tab on the patron window.
- These could be entered on the various tabs in the patron window.
- Donation
- Donation notes, custom fields, donation publication name, tax receipt name and other donation text fields.
- These would be seen on the donation window.
- Order
- Internal and external order notes and ticket comments
- The order PO number
- These would be seen on an order payment window and can also be seen in a list of orders
- Subscriptions
- The subscription seat change requests
- Credit card
- comments or name on card
- These would be seen on the credit card tab on the patron window.
- Task/Project notes
- on the task comments window or the project description
- Staff/Volunteer History
- Notes on the Activity setup window
- Notes on the history evaluation and duties fields
Fields not searched for any card data
- Transaction card number field (T_CARD_NO) is not validated as it contains reference numbers for other payments (e.g. check #'s). If somebody used any payment method that is not of type credit card -- but they typed a valid card number in the field -- there is not much Theatre Manager can do. Since there is no way to manually place an edit check on check number field to verify that it is an actual check number (that look like credit cards) after the fact in Theatre Manager because that leads to audit issues; such as changing past information which Theatre Manager doesn't allow. If there are credit card numbers in the check # field, then it's a manual task for Arts Management Support to find them and clear them. Please contact Arts Management Support directly if this applies to your specific situation.
- Theatre Pricing map SVG data - which can be false positive
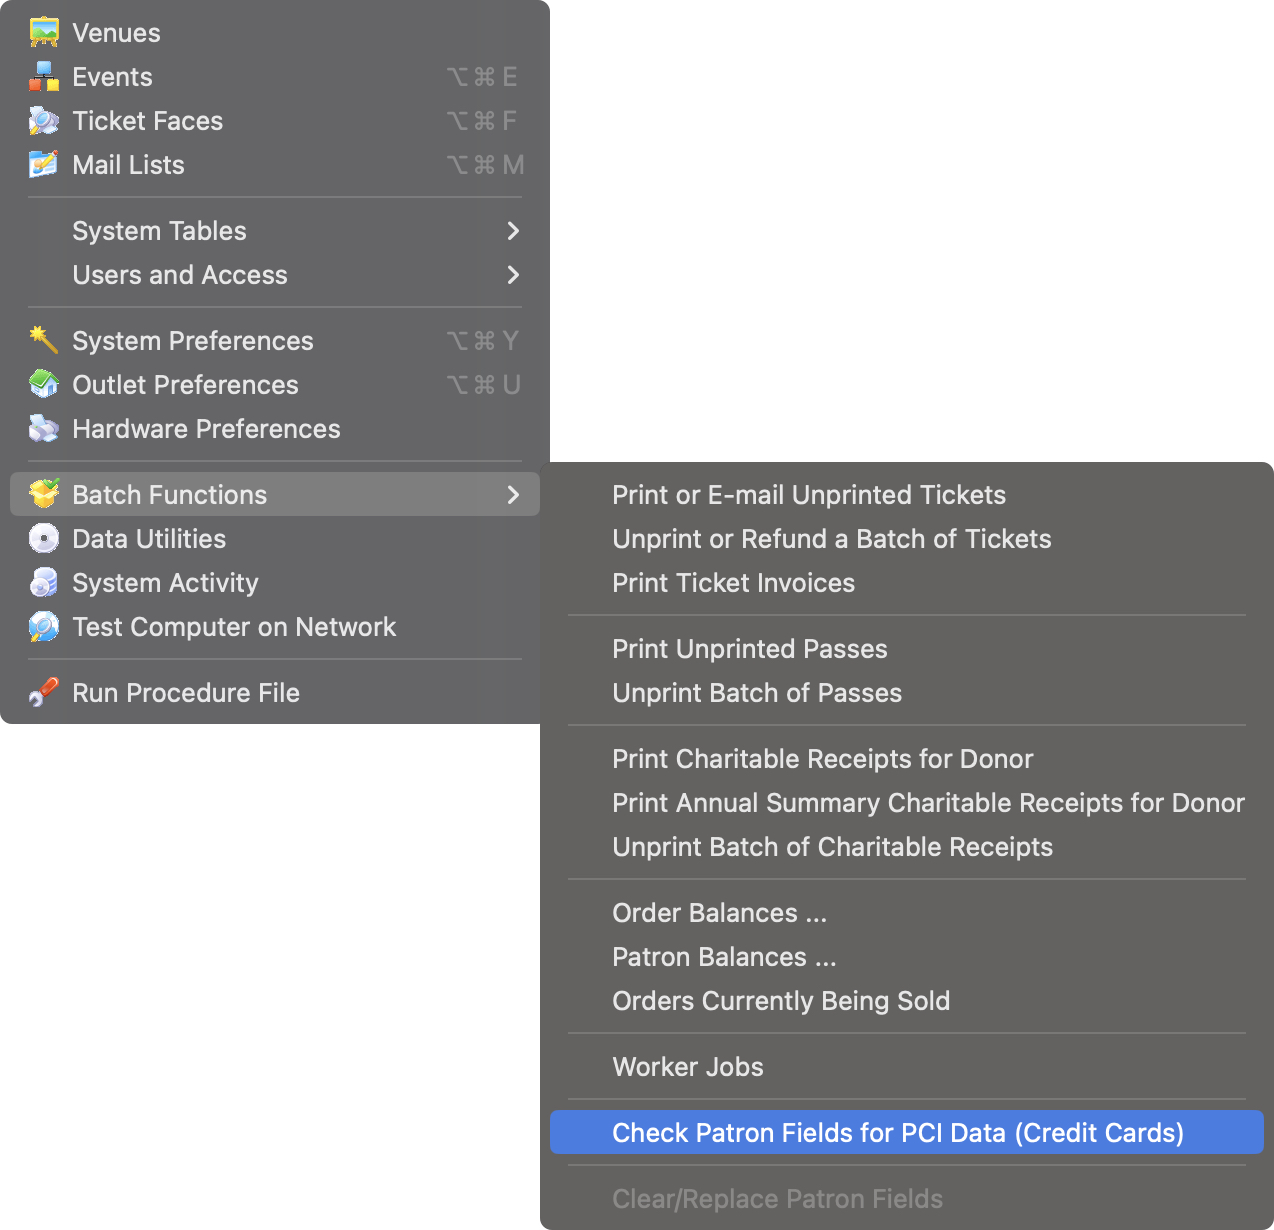
To search the database for credit card information, you perform the following steps:
- Select Setup->Batch Functions->Check Patron Fields For PCI Data
Refer to the menu selection to the right
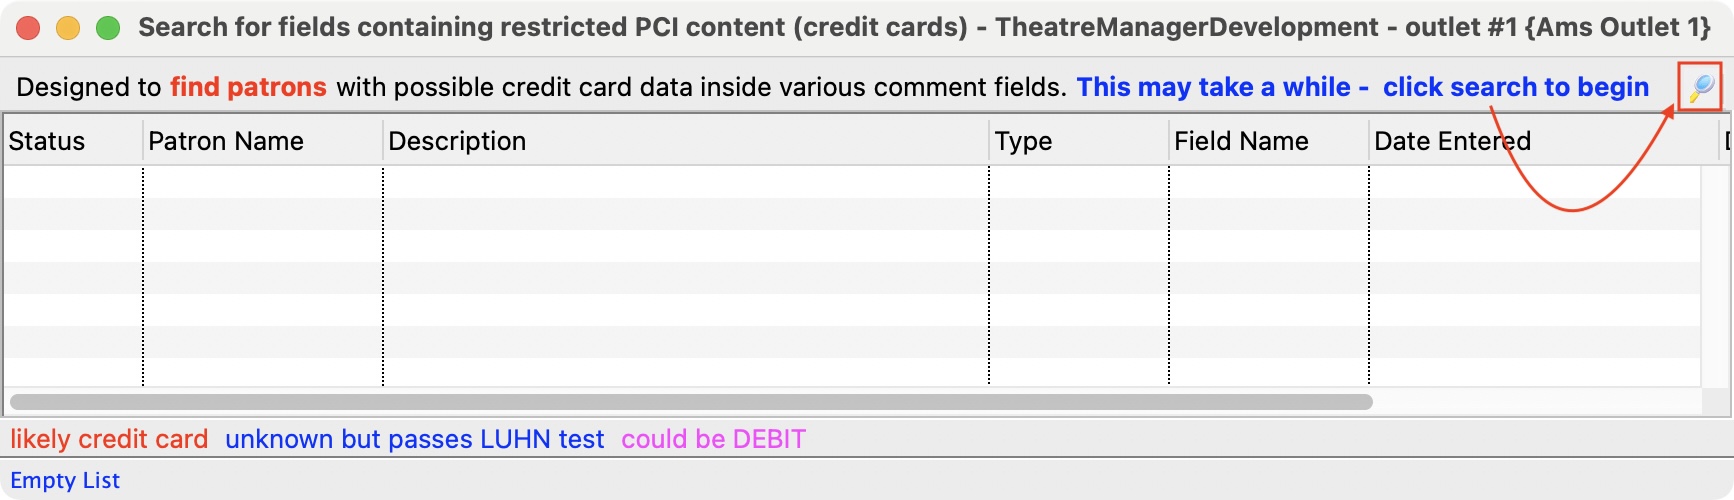
A window opens that allows the search to begin. Follow the instructions:
- Click the search button on the upper right side of the window to begin
- Wait a while as the system is checking many fields and many database records. It might take up to a minute on larger databases
- After clicking the Search
 button.
Any patrons who have a 13 digit or longer string stored in any of the fields indicated will be displayed.
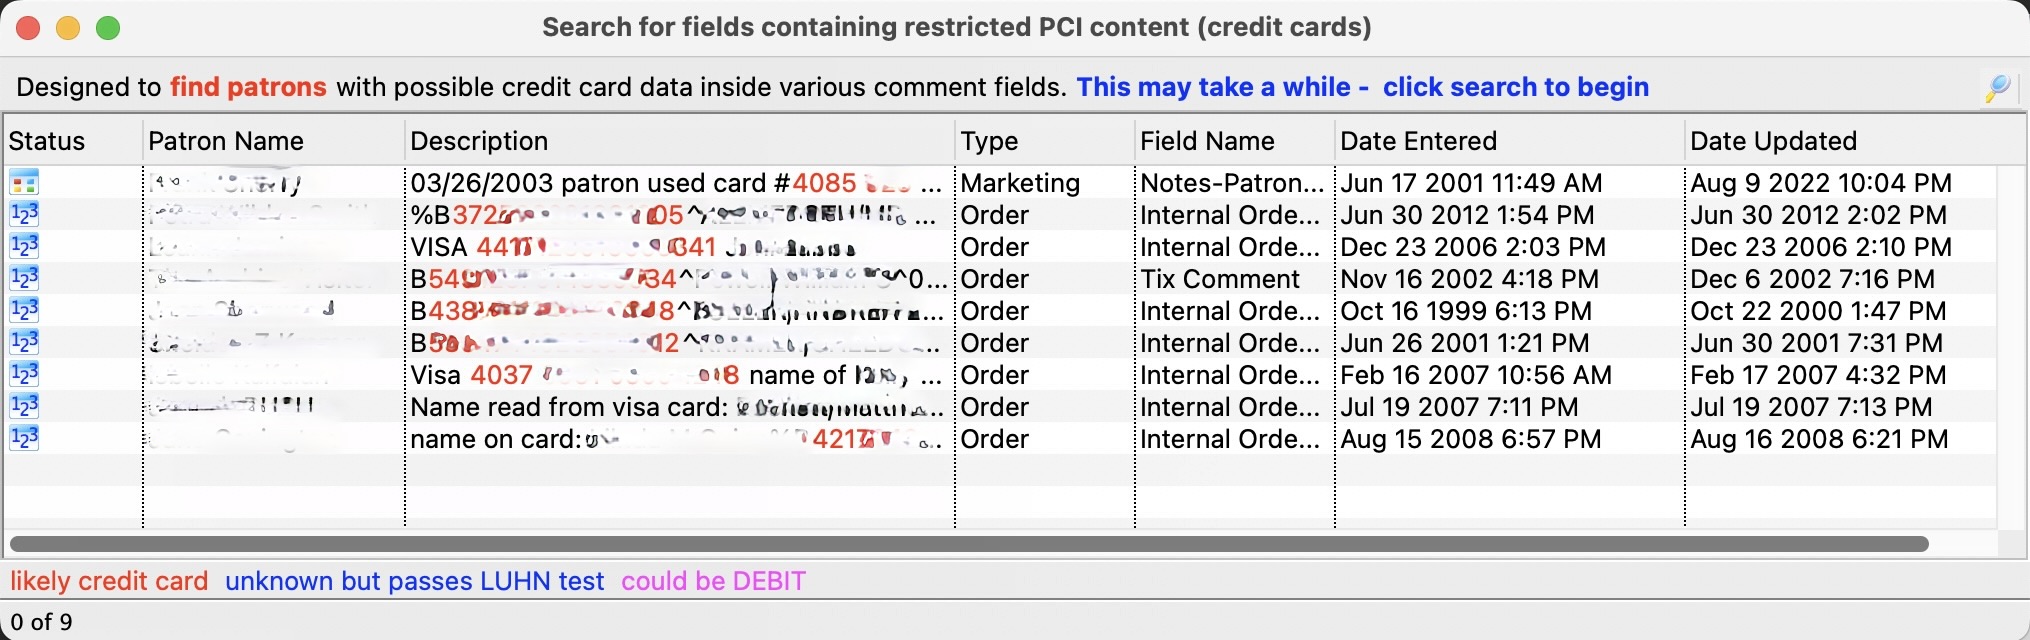
- You can now go through and manually remove the data.
Double click on each line and it will take you to the window where Theatre Manager suspects the issue to be
|
Click the icon to download the checklist. |

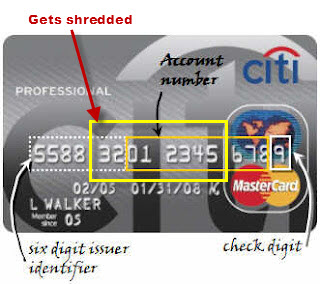
Shredding Credit Cards
In Theatre Manager, 'shredding' credit cards means removing the middle 8 digits of a credit card number so that what is stored in the database is only the first four and last four digits of the number: 1234-xxxx-xxxx-1234. Cards stored in this manner cannot be accessed for use (because those 8 digits aren't masked - they really no longer exist). Users can still search the database for a credit card using the first four and last four digits for reporting and transaction history.
There are two choices for 'Shredding' Credit Cards. The first method, Shredding Unused Credit Cards, allows a venue to set the number of days a credit card is stored in the usual encrypted format in the database (and is therefore available for use as a payment method for post-dated payments or in the patron's credit card tab), and then after that period, a card is considered "unused" and is shredded of its middle 8 digits.
The second method, setting the database to Schedule C: Shred Immediately, will shred cards and never store them in the database. This is rarely used, as it may prevent some common or desirable business functions (and maintaining Schedule D: Encrypted Credit Card data, the default PABP/PCI Compliant method will not prevent those functions).
Shredding Unused Credit Cards
|
this action cannot be undone! |

The simplest solution for venues to have a higher degree of security in their database, than that allowed by the PABP/PCI compliant data encryption of the credit card numbers, is to "shred" unused or old credit cards in patron records.
"Shredding" removes the middle 8 digits of the number and renders the card information unusable (as it is stored - you can still swipe or enter the card again in the future with no problem).To do "shred" a credit card, you perform the following steps:
- Open the PCI Security Tab in Setup > System Preferences.
- Under Credit Card Management, click the Shred Unused Credit Cards button.
A dialogue opens, asking for a retention period during which cards are considered active (and therefore, not "unused"). We recommend at least 90 days, 365 as the longest.

- Click Shred Cards
 to immediately shred cards that have not been used in a number of days greater than that set as the retention period.
Schedule C Shred When Used
|
All the credit card data in theatre Manager is stored using AES256 encryption with rotating keys. An independant company has auditied the safety of the information and practices in theatre Manager to ensure it meets PCI PA/DSS 2.0 storage requirements. Visa has approved Theatre Manager as an application that can accept credit card payments using best practices. |
A venue may choose to shred cards immediately after use for added security. This means that full card data is never stored in the database. Voids can only be done using the merchant providers internal token if you have not yet done end of day. After end of day is completed, refunds require you to input the card number again.
Shredding Credit Cards stores only the first and last 4 digits of a credit card number for informational purposes. For example:
When you shred yoiur credit card date the following business capabilities and functions are impacted:
- You cannot process post dated payments
- You will not be able to refund using the original payment/credit card number. You will have to ask the patron to give you the number again.
- You may not be able to refund an entire event using the card used for purchase
- You will be unable to process automatic season renewal.
- All existing payment / credit card information within the system is now unavailable.
The above are only a few functions that will be impacted.
If your venue wants to shred credit cards after use, you perform the following steps:
- Make a complete backup of your Theatre Manager Database just in case you want to change your mind later. Click here for more information on Backing up.
- Chose main menu item Setup >> System Preferences.
The System Preferences window opens.
- Click the PCI Security tab.
- In the Credit Card Management section, change the radio button to Schedule C: Shred cards immediately after use.

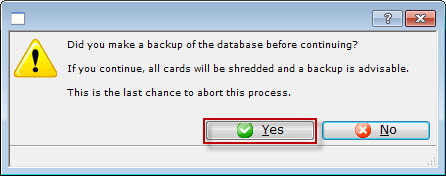
The first Warning dialog opens.
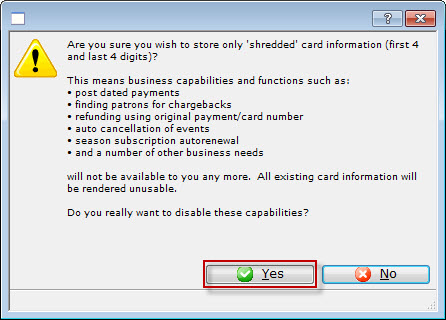
- Click the Yes
 button.
The second Warning dialog opens.
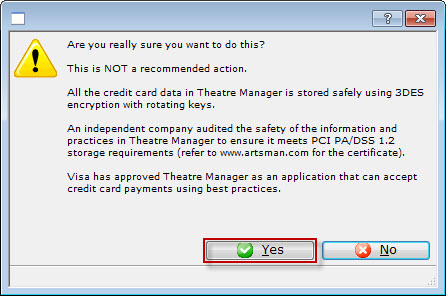
- Click the Yes button.
The third Warning dialog opens.
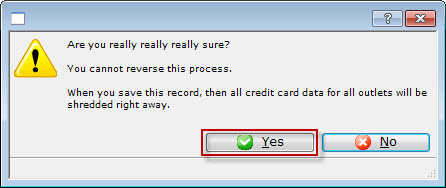
- Click the Yes button.
The fourth Warning dialog opens.
- Click the Yes button.
The Confirmation the data has been shredded data dialog opens.
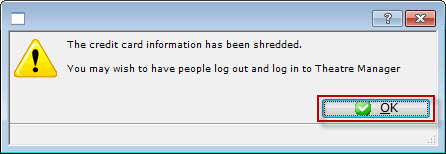
- Click the Yes button.
Changing the Cryptography for Credit Cards
|
Credit cards stored in a database must be encrypted using a key that is distinct to the venue per PCI DSS standard 3.6. This must occur:
|
To change the cryptography of credit card information at any time:
- Log in as Master User
- Go to the System Preferences->Security Tab
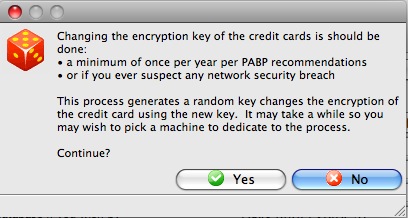
- Click 'Change Card Encryption key' button at the bottom left
You will see a dialog similar to the one below that asks you to confirm the step and the reasons why the step is required. Click 'Yes' to continue.
Some notes about this process:
- Theatre Manager will generate a completely random a 40 character key to use as half of the encryption key process that will be unique to the venue and re-encrypt all cards in the database.
- This encryption key will not be known to the user and will not be known to Arts Management
- You can still use theatre manager while this process occurs to sell tickets and take credit cards.
- This process should be performed at least annually.
- A venue will be reminded to do it after 350 days
- If it is not done, within the required time frame, then it will automatically occur during any upgrade that occurs 350 days since the last time the venue's encryption key was changed
- It should be performed at any time you suspect a security breach to any part of your network (make sure you also address whatever the security breach might have been).
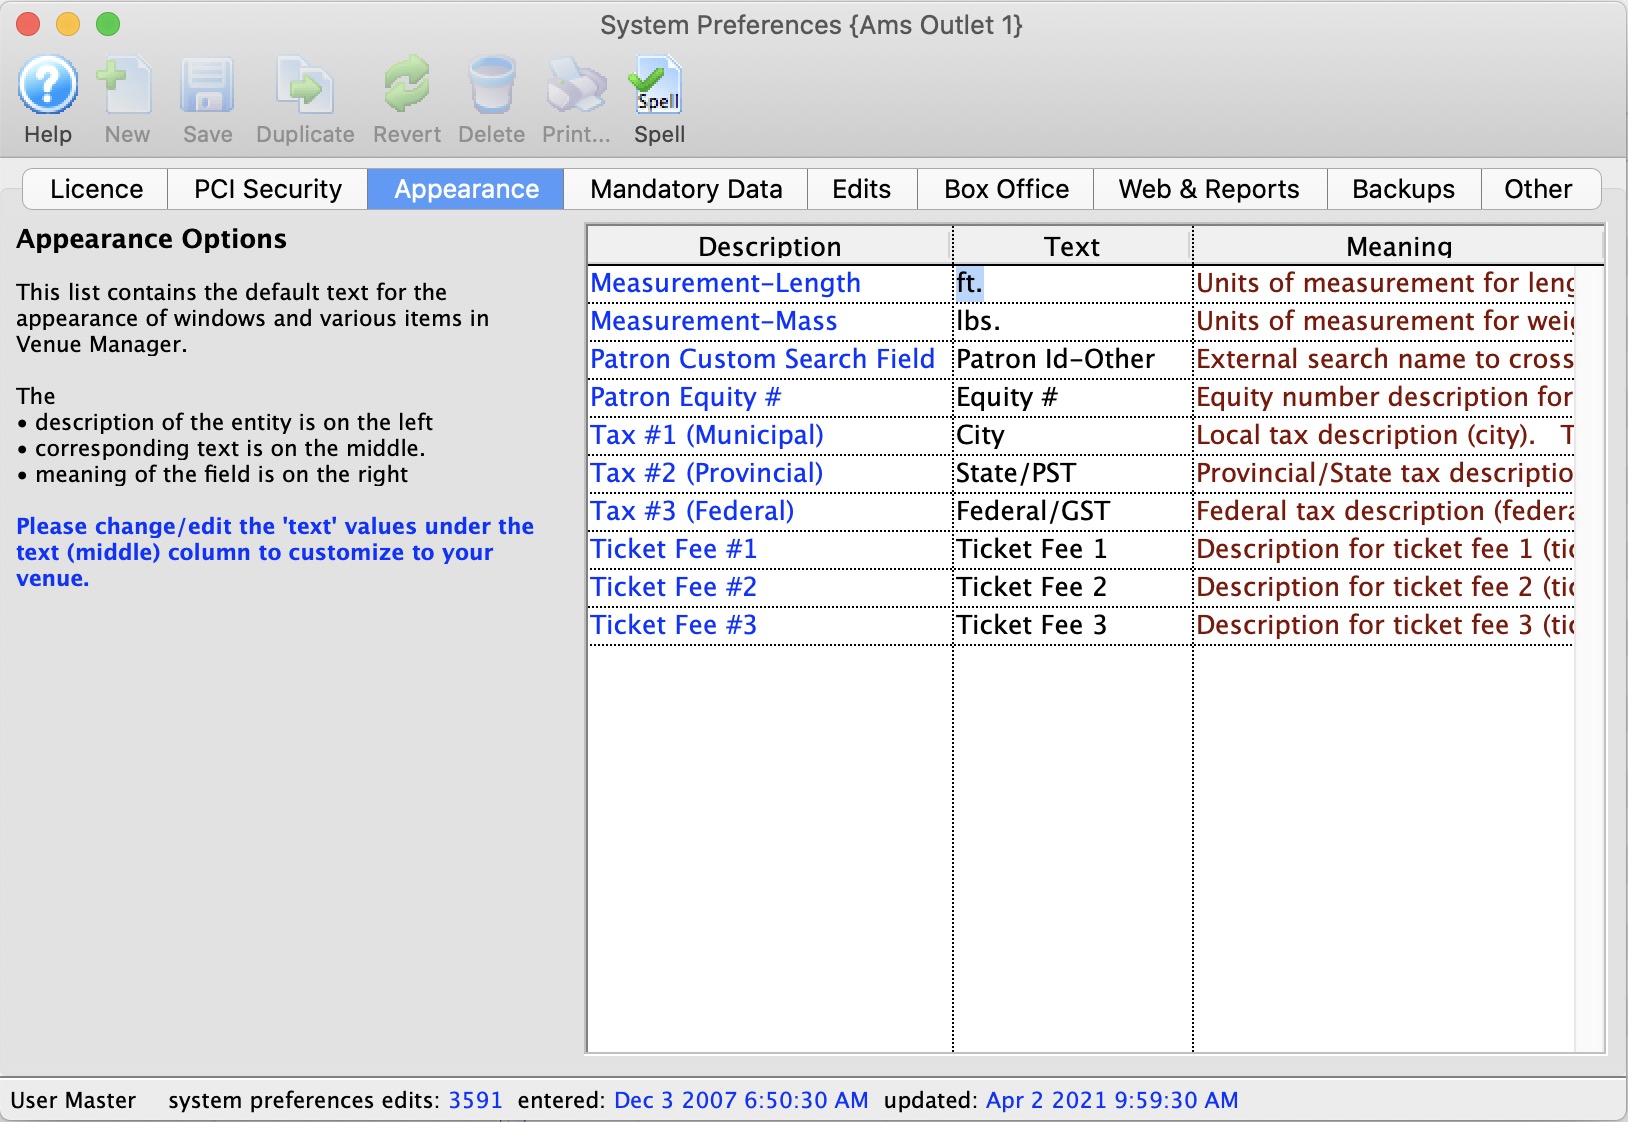
Appearance Tab
The right column contains examples or where the field is used.
Mandatory Data Tab
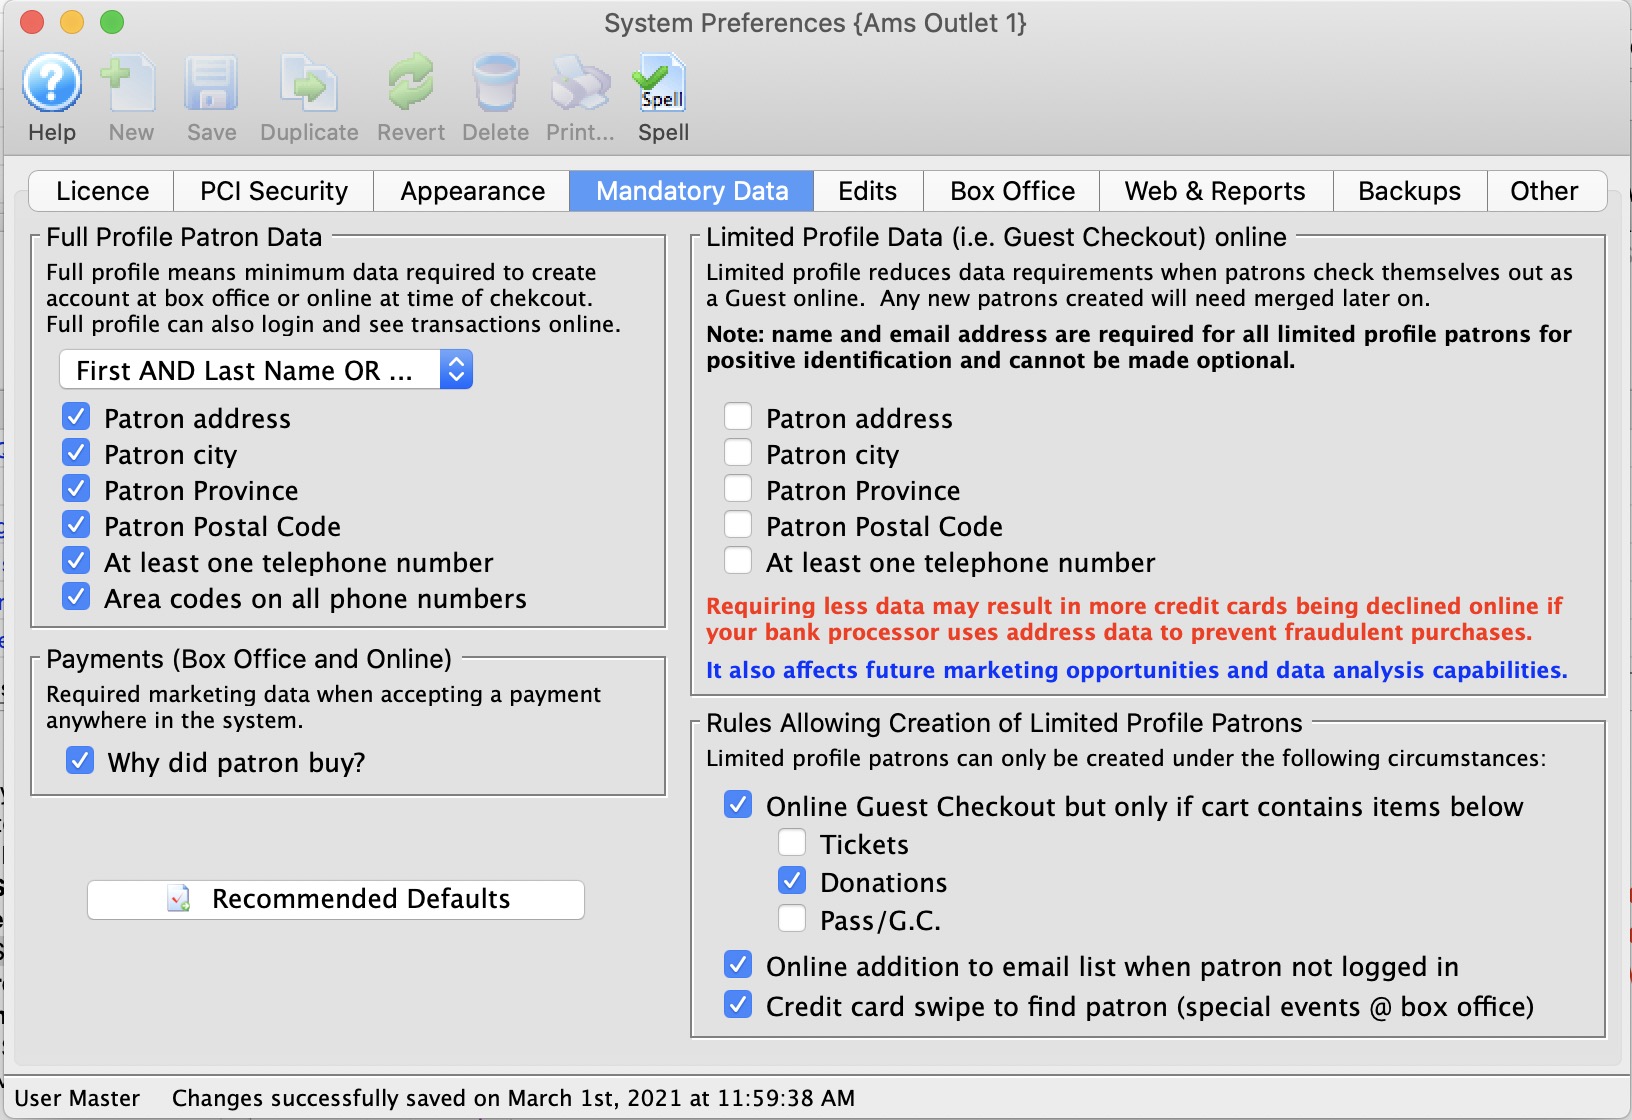
Defining Mandatory Data for Marketing Purposes
On the Mandatory Data tab, you can define which information is required when adding new patrons, households and companies. Normally, you would want:
- Patron name or company so that you can identify the patron when they call back or have tickets printed for them
- Full Address Information (street, city, state/province, zip/postal) so that you can mail items, obtain better credit card rates with AVS (address verification) and better identify patrons with similar names during your next interaction with them
- A Phone Number in case you need to contact them in cases of a show being cancelled, time altered, moved venues, or any other emergency requirement
- Email cannot be made mandatory at the box office since there is no guarantee that a patron has one and email addresses must be unique to a patron or household
Full Profile vs Limited Profile (AKA Guest Checkout)
The behaviour of patrons can be different for phone/walk up sales and to online/web sales. You can indicate what kind of data is mandatory in either case:
- BoxOffice/Phone Orders the left side of the mandatory screen indicates which data is mandatory for patrons who contact you at the box office or via phone. This is considered the complete set of data for a full patron. Typically is is the name, address, and phone information described above
- There are good reasons to have Online Sales follow the same data requirements as box office. Implications include consolidation of all interactions with the same patron under one account.
It is possible to relax those rules and gather less data for online sales by indicating what the minimum data is for Partial Profile Patrons on the right side of the screen. If you gather less data than a full profile, the patron record created is called a Partial Profile patron.
|
Full profile patron information applies to BOTH box office and web sales, unless you choose to allow Guest Checkout for online sales, which has some operational and data merging implications |
|
Guest Checkout causes a NEW Limited Profile Patron to be created each time the patron purchases, unless the patron chooses to supply all the mandatory information of their own volition along with password when buying online.
The reason a new patron is created is to allow theatre manager to provide absolute privacy between online purchases, since the patron has not provided enough identification to allow accounts to be merged automatically. If two people just happen to use the same email address, allowing each to access the others information and tickets is a privacy violation - so Theatre Manager keeps them separate If you use Guest Checkout, the box office will then need to MERGE all patrons in the same household with the same name and email on a periodic basis after determining that they are, in fat, the same patron. |
Full Profile Patron Data Requirements |
|||
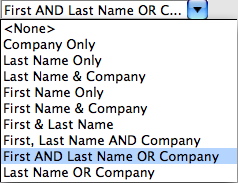
| Name Info | Select what names must be given before a patron record can be saved.
Full profile patron information is for BOTH the box office and web patron sale data, unless you are allowing Limited Patron Profiles for online sales. |
||
| Patron Address | Checking this box means that the patron's address must be entered before a patron record can be saved. Only one out of the two address lines need to contain information. | ||
| Patron City | Checking this box means that the patron's city must be entered before a patron record can be saved. | ||
| Patron Province | Checking this box means that the patron's province must be entered before a patron record can be saved. | ||
| Patron Postal Code | Checking this box means that the patron's postal/zip code must be entered before a patron record can be saved. | ||
| At least on telephone number | Checking this box will require a minimum of one phone number be given before a patron record can be saved. | ||
| Area codes on all phone numbers | Checking this box will require all phone numbers given be accompanied by an area code before a patron record can be saved. These days, this option should always be enabled du to the prevalence of 10 digit dialing and cell phones | ||
Payment Data |
|||
| Why Did Patron Buy | Checking this box means that the reason that the patron has made a purchase must be provided before a sale can be completed.
The why did patron buy data is entered via:
|
||
 |
Pressing this button will set the above options to the default settings that Theatre Manager recommends. | ||
Limited Profile Patron |
|||
| Mandatory Data Options | Please refer to a more complete description of the Limited Patron feature and the ramifications. | ||
Limited Profile Patron Implications (Guest Checkout)
 |
Using the Limited Profile feature is a venue choice. While it allows the patron to specify less information during checkout, it also:
|
|
Guest Checkout causes a NEW Limited Profile Patron to be created each time the patron purchases, unless the patron chooses to supply all the mandatory information of their own volition along with password when buying online.
The reason a new patron is created is to allow theatre manager to provide absolute privacy between online purchases, since the patron has not provided enough identification to allow accounts to be merged automatically. If two people just happen to use the same email address, allowing each to access the others information and tickets is a privacy violation - so Theatre Manager keeps them separate If you use Guest Checkout, the box office will then need to MERGE all patrons in the same household with the same name and email on a periodic basis after determining that they are, in fat, the same patron. |
Limited Profile Patrons are enabled in System Preferences->Mandatory Data tab. If enabled, it allows for Web sales checkout on the web site as an option. The limited patron profile creation and checkout web pages note which fields (e.g. name, address, etc) a venue expects the user to enter.
There are some general pro and cons to using the feature that we've heard from Theatre Manager users that we've listed below. Most venues that try it realize that the burden of data management shifts to the venue and eventually disable it. Most web sites that deal with any sort of shopping cart require full identification these days for fudiciary responsibility to the credit card issuers.
| Pro's | Con's | |
| Full Profile |
|
|
| Limited Profile |
|
|
To enable limited profile patrons/guest checkout:
- Choose Setup >> System Preferences and choose the Mandatory Data tab.
- Under Allow Limited Profile Patrons On there are the following selections:
- Web sales checkout - checking this box enables patrons with limited patron data to buy tickets.
- Web sales mail list add - checking this box enables patrons to sign up for mail lists giving only essential information (email address, name). Click here for more information about this feature.
- Credit card swipe - checking this box will enable patrons to purchase using the information on their credit card (name on the card). This is most useful for auctions and is described further here.
- Make the appropriate selections for your organization's needs.
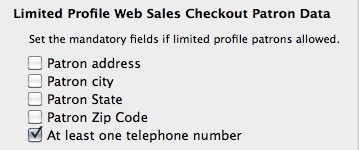
- Next, you define the mandatory fields you want limited profiles to contain in the Limited Profile Web Sales Checkout Patron Data section.
This is where you set the minimum data patrons must provide to access the web sales checkout.
If you mail tickets, please make patron address, city, state and zip code mandatory.
If all tickets are held for will call or print at home, then set as many of these options as you'd like (even none).
Limited Profile Rules
Guest Checkout for Web Sales
Enabling Guest Checkout for online sales means that the patron:
- Can buy online and add items (tickets, gift certificates/passes, donations) to their cart
- Begin the checkout process
- The web sales process will ask them if they want to:
- Log in to a previously created account using their email/password. This attaches the cart to an existing full profile patron.
- Create a new Account which will ask the user to supply all information - and create a new full profile patron
- do a Guest Checkout which will use the data requirements on the right side of the mandatory data window. If the patron enters:
- Only this minimum data and no Password, a Limited Profile Patron is created during guest checkout and an employee may need to subsequently find and merge them (if its a duplicate), or capture more data later. A guest checkout cannot log back in online and see their prior purchases
- All the information and a Password, then a full profile patron will be created. By providing the password, the patron will be able to log in online and review prior purchases.
Guest Checkout Options are Based on Cart Contents
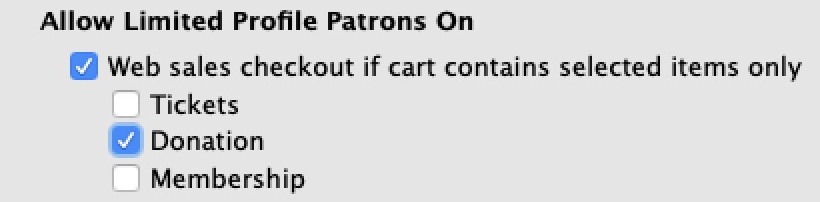 If the Web Checkout limited profile is set, you can restrict when the Limited Profile option is available based on the contents of the cart. The choices are any one or more of:
- Tickets - if only tickets are in the cart, the patron can do limited profile checkout
Do not set this option if you are selling live streaming events (see note below)
- Donations - if only donations are in the cart, the patron can do limited profile checkout
- Pass/Gift Certificate - if only Passes/Gift Certificaes are in the cart, the patron can do limited profile checkout
- If Multiple items are checked, then the patron can check out using limited profile if only those checked items are in the cart. Eg if Donations and tickets are checked, then the patron can use limited profile if a donation and/or ticket are in the cart, but not if a pass is in the cart
What the Patron Sees Online at checkout
If the Limited Profile Patron feature is enabled in System Preferences -> Mandatory Data, the following will apply during checkout:
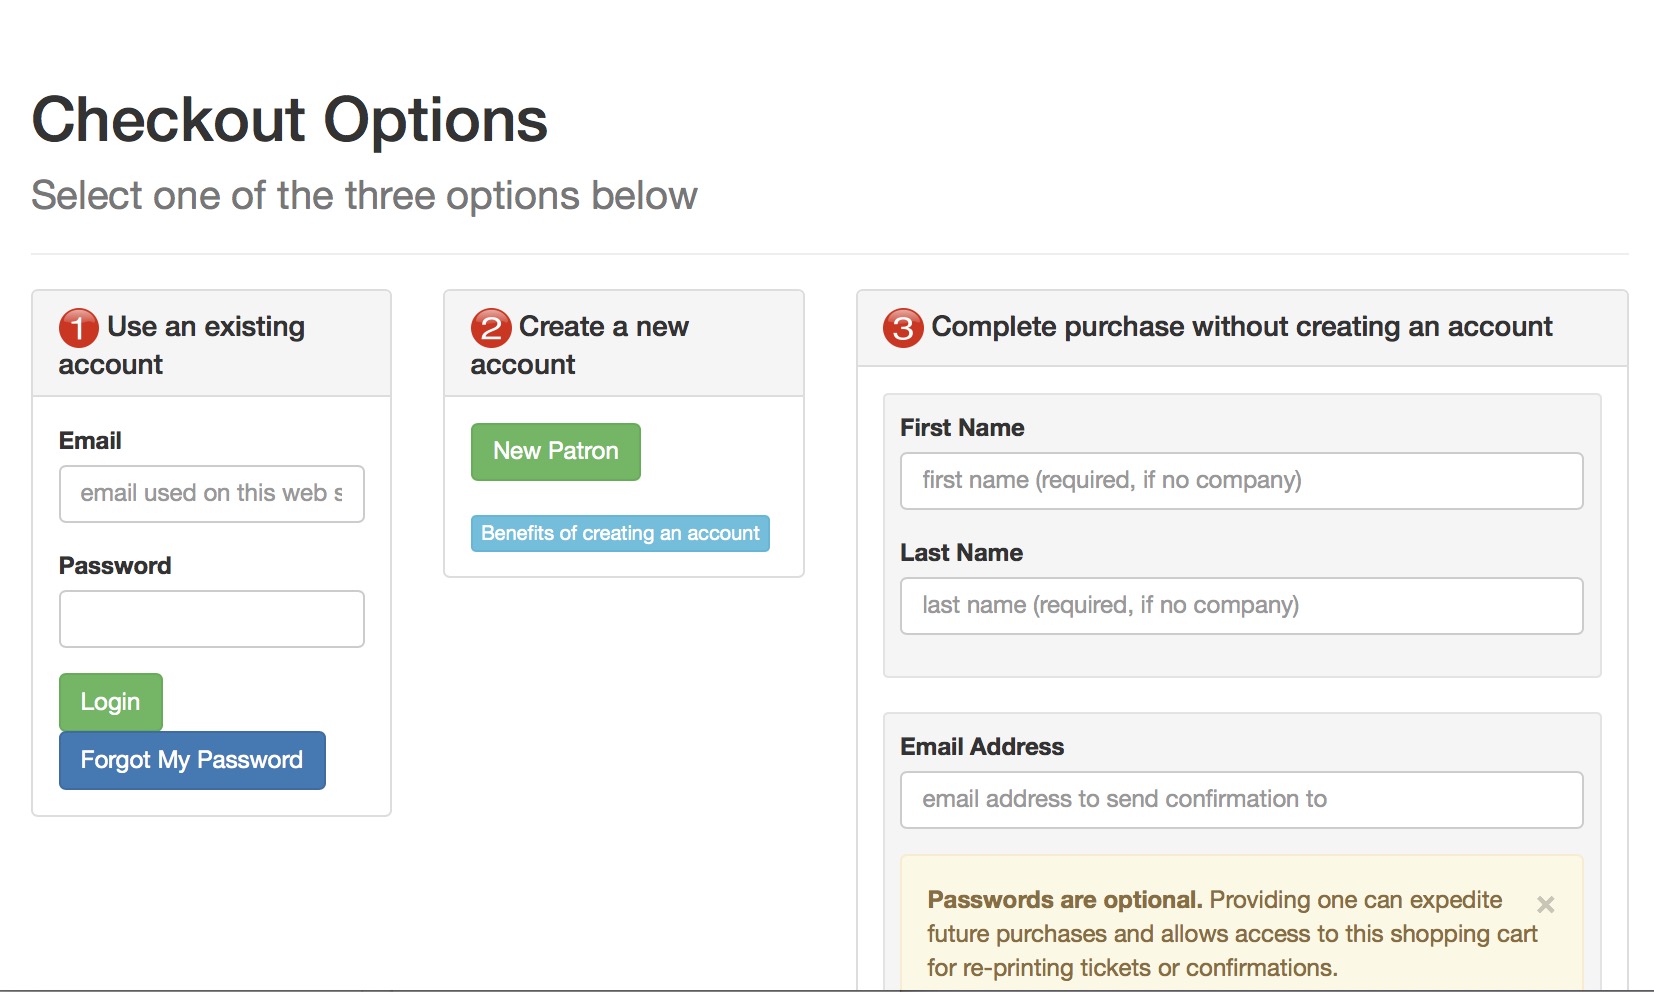
- Patron still has the option of logging in to an existing account to see prior purchases
- Otherwise, a new patron will always be created if they choose the quick checkout process and provide their name & email (at minimum), and other data you deem mandatory
- Theatre Manager always verifies the email address.
- If the email address already exists in the database, this 'new' patron will be added to the existing household.
- If the email does not exist, a brand new household will be created.
A patron who checks a shopping cart out online as a Limited Profile Patron has no login credentials. - Ordinarily, this means they cannot log in and see past purchase history.
- However, if they visit the web site and ask for their password to be emailed, they can log in with their email and password and purchase again. If they do that, they will be required to complete the patron information that they did not complete the first time (thereby becoming a full profile patron),
- If they never log in and simply buy again (they don't ask for their password), they will have to provide their name each time they checkout.
If limited profile is used, it is HIGHLY RECOMMENDED that all events be set to require print at home - so that the customer is emailed their tickets. DO NOT USE limited profile for tickets if the event delivery is live streaming (a this time). If the patron has a full account and buys the streamed event using limited profile and the same email address, this will cause the streamed event to be inaccessible. This is because the patron who logs in using the email, always logs into the main account, but they cannot see events in the limited profile patron.
- At the box office, 'Limited Profile Patrons' are indicated on the patron list using a new icon. If you edit the patron contact card for one of those patrons at the box office, you will then have to complete the missing information before the data can be saved.
- You should implement a data management policy to find and merge 'Limited Profile Patrons' on an ongoing basis if you allow the feature. This is because several records are created for the same patron if they never log in, but use the same email.
"Quick Add" to a Mail List online
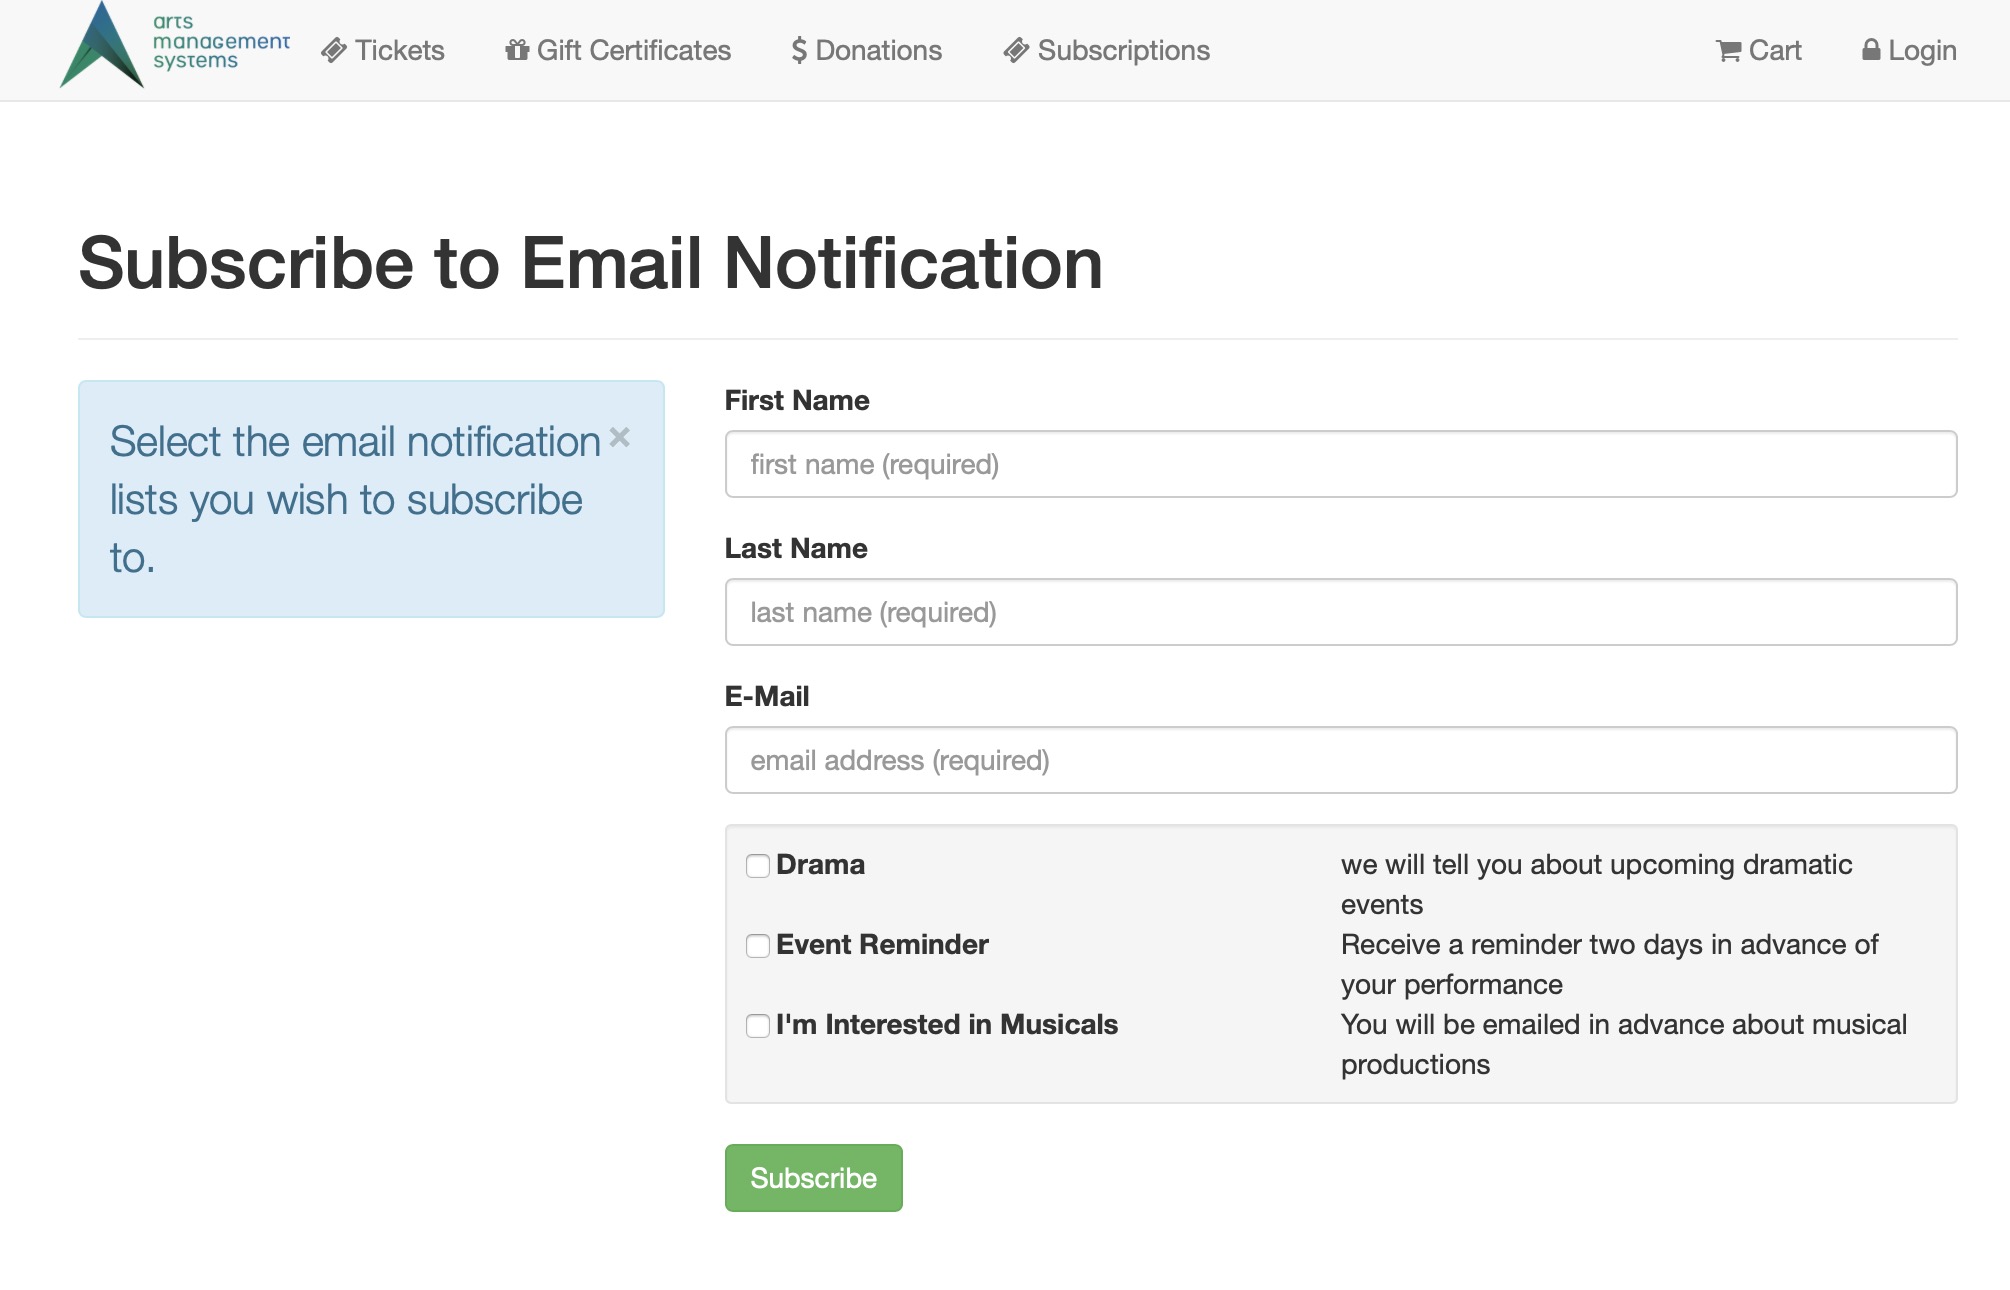 The limited profile patron feature can be used to allow patrons to do a "quick add" to a Mail List online using a quick submit form. This will allow them to be added to a Mail List without providing all the standard patron data normally required for a full log in. Instead, all that will be required is name, address and email.
|
The form is a standard part of the Theatre Manager web pages. Refer to mail list quick add feature.
However: If you wish to place it on your main marketing site, please contact your web designer to implement this advanced web feature in an iframe or equivalent. |
To use this feature:
- the mail list be visible on the internet.
- You must allow limited profile patrons to be added using mail lists
- If the patron's email address already exists within the database and the first and last name match, the existing patron will be added to the mail list.
- However, if the first and last name do not match, a limited patron will be created under the patron owning the emails address.
- Your Box Office staff will need to be vigilant about finding duplicate patrons by email address and merging then created this way.
- At minimum the form will need to collect three fields in order to subscribe the patron to the Mail List:
- First Name
- Last Name
- Email Address
Credit Card Swipe
There is a convenient quick-add feature that creates a patron by swiping their credit card. This might be best used during the admittance process for Auctions. The process works as follows:
- You start by setting the Patron List window to search by credit card. For more info on the Patron List window, click here.
- Then, when you swipe a credit card, it will find the patron if that card number is in the database.
- If the card number does not exist in the database, TM gives you the option to quick add the patron attending the auction.
- Patrons added in this way will be 'limited profile patrons'. That is, the name on the card along with their credit card on file stored in the database.
- In an auction setting, if there are bid packets, you can give the patron the patron number created during the swipe.
- You can now sell auction items to this patron using the auction process.
|
As with any limited profile patron, if you edit their actual address data, you will be required to provide the minimum information normally required of the box office. |
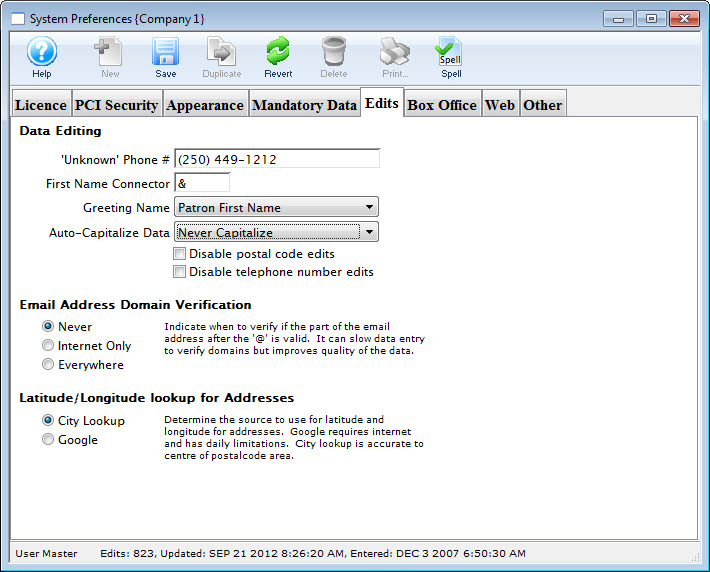
Edits Tab
The Edits tab contains patron data management information for Theatre Manager.
Data Editing |
|
"Unknown" Phone Number |
The phone number which can be used if there is no patron phone number. This number will be ignored when checking for multiple patrons. |
First Name Connector |
The connector which will be used to join first and last names in reports and letters. |
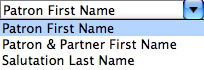
Greeting Name Preference |
The greeting preference used when sending material to patrons. |
Auto Capitalize |
Controls Theatre Manager's ability to set mixed case letters during entry and reduces the necessity to use the shift key. Several methods can be chosen to control this process. |
Disable Postal Code Edits |
If selected, the program will not validate a Countries Postal/Zip code requirements. |
Disable Telephone Number Edit |
If selected, the program will not validate a countries telephone number requirements. |
Email Address Domain Verification |
|
Never |
E-mail addresses will not be verified when entered into Theatre Manager. |
Internet Only |
E-mail addresses will be verified when entered through web sales. |
Everywhere |
E-mail addresses will always be verified when entered into Theatre Manager. This can slow down data entry but is the most accurate. |
Box Office Tab
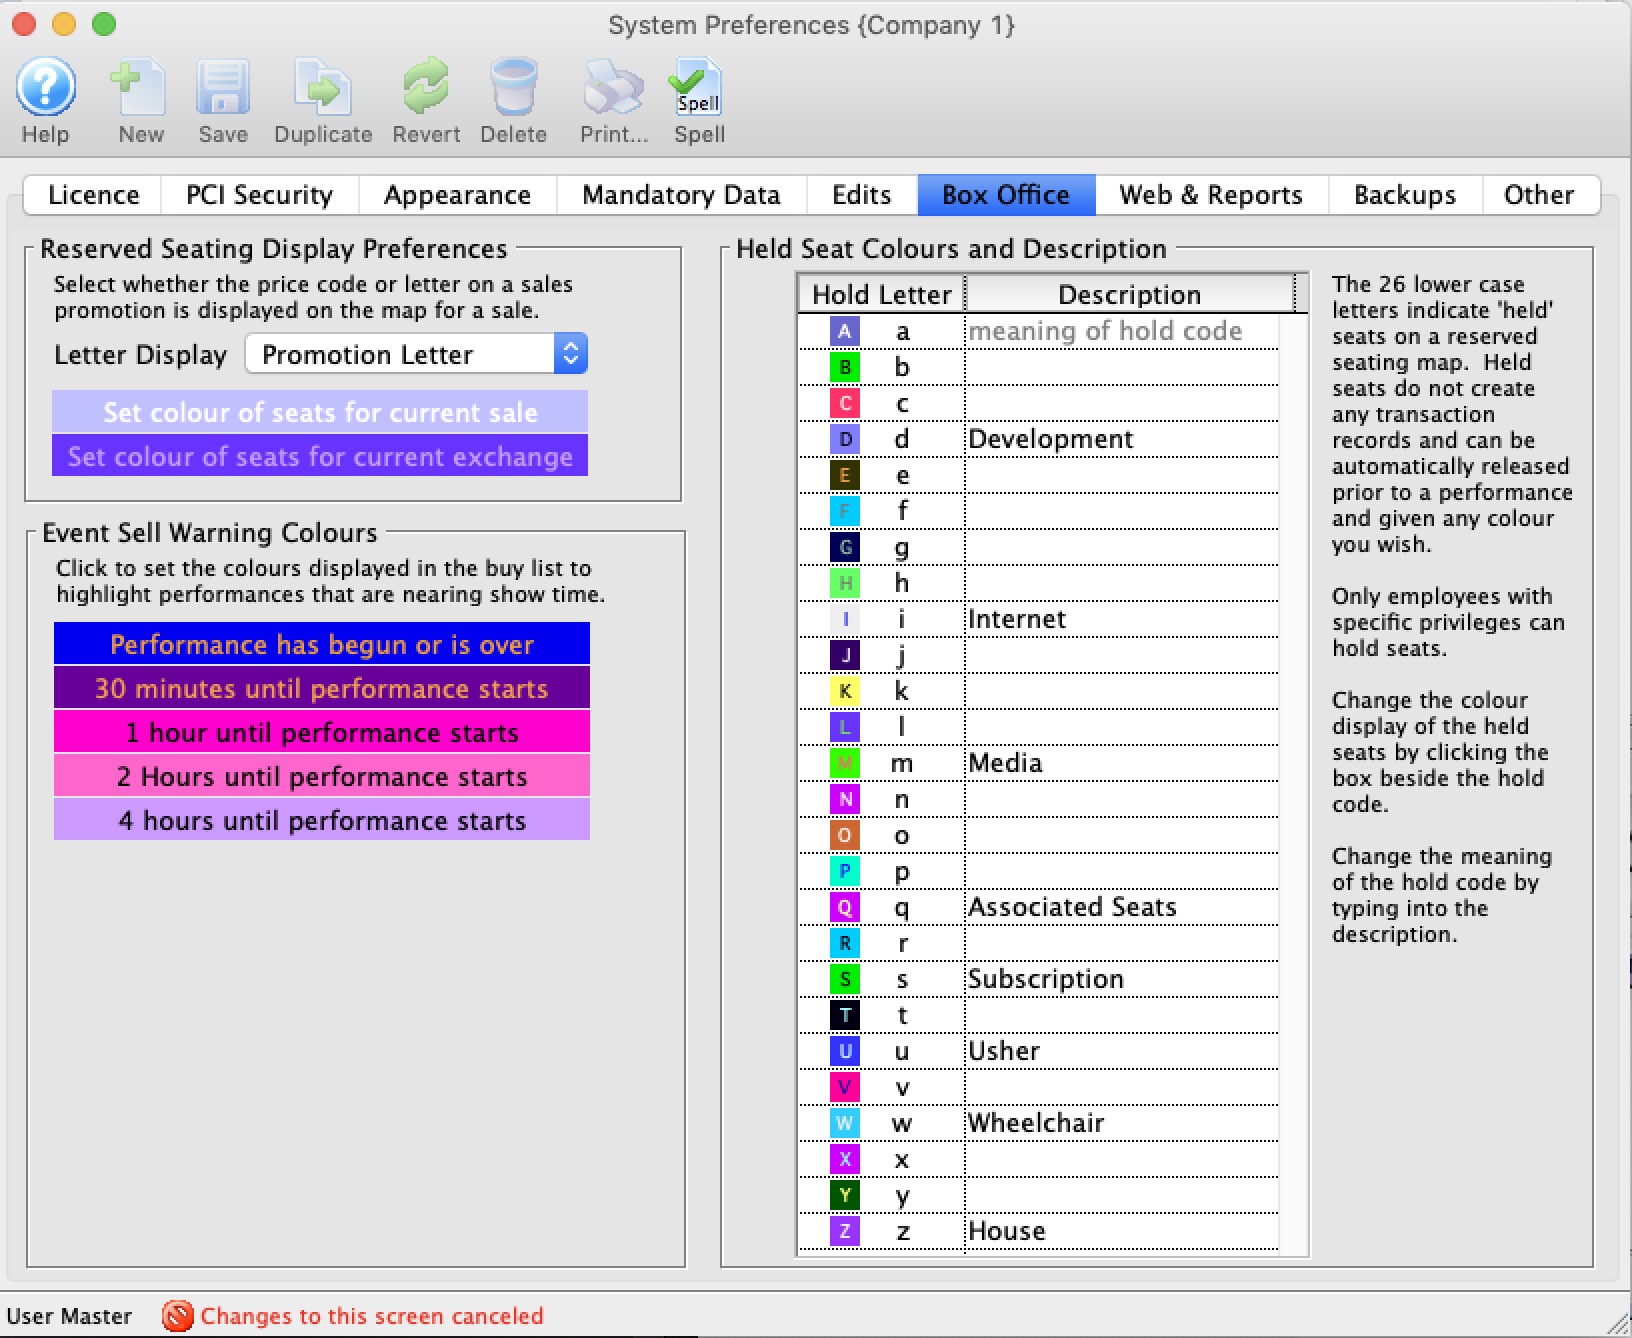
Ticket Reservation Display Letters |
|
| Letter Display | Determine if the price code or the seat code from the Buy Window shows on the seat in the map display.
If you change the setting to or from 'Price Code' and 'Promotion Letter', you will need to verify future performances to change the actual letter display on the map. |
| Set Colour of seats for current sale | Click on this box to bring up the colour palette window. You can select both the foreground and background colours. |
| Set Colour of seats for current exchange | Click on this box to bring up the colour palette window. You can select both the foreground and background colours. |
Play Sell Warning Colours |
|
| Performance has begun or is over | Click on this box to bring up the colour palette window. You can select both the foreground and background colours. |
| 30 minutes until Performance starts | Click on this box to bring up the colour palette window. You can select both the foreground and background colours. |
| 1 hour until Performance starts | Click on this box to bring up the colour palette window. You can select both the foreground and background colours. |
| 2 Hours until Performance starts | Click on this box to bring up the colour palette window. You can select both the foreground and background colours. |
| 4 hours until Performance starts | Click on this box to bring up the colour palette window. You can select both the foreground and background colours. |
Held Seat Setup |
|
| Hold Letter | Clicking on each letter brings up the colour palette window allowing you to select both the foreground and background colours. Seat hold letters are always represented with lowercase letters. |
| Hold Description | You can define the meaning of the seat hold code by entering a description beside each of the 26 lower case letter codes. |
Web and Reports Tab
- are any of them allowed to be active? (i.e. this is a global shutdown switch)
- the hold letter tp be used for internet sales - it is common across all outlets
- the hold letter to be used for social distance or associated seats. The letter selected is also common across all outlets
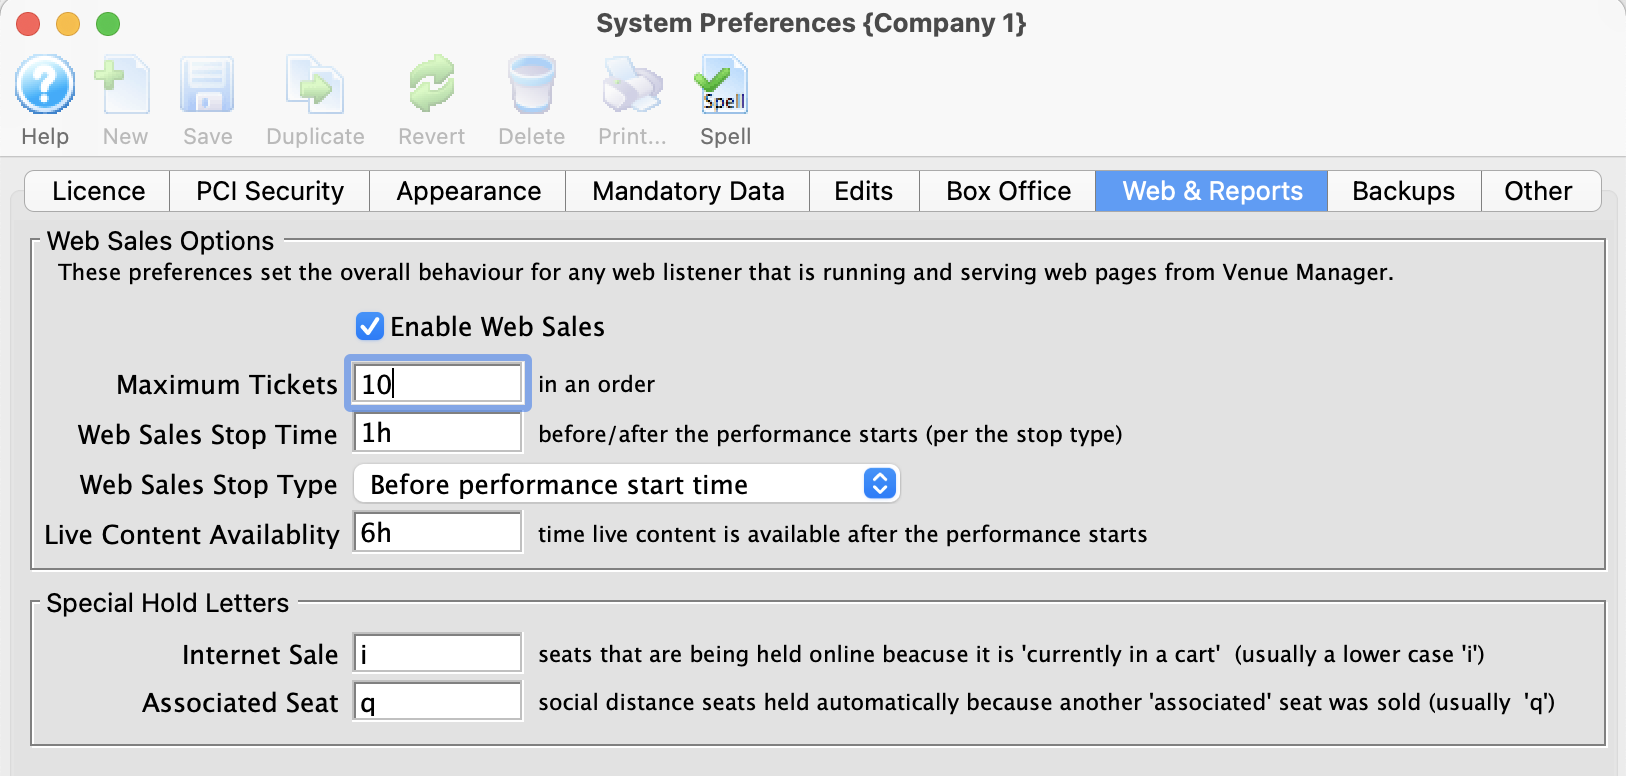
Web Sales Options |
|||
| Enable Web Sales | Checking this box enables the use of the web sales module. | ||
| Maximum Tickets |
The maximum number of tickets that can be purchased in a single web order. This is a global total for all tickets in a cart and can be overridden on the:
|
||
| Web Sales Stop Time | Number of minutes before/after the performance start time in which to remove a performance from the Internet. This is the default time for all Events. This can be overridden in individual events. Click here for the steps on changing the default time on the event.
|
||
| Web Sales Stop Type |
Indicates whether the stop time is before or after the performance begins. Typically, you want the performances to cease being sold online before the actual performance time. However, there are instances where you might to stop sales after the performance starts, such as:
|
||
| Live Content Availability | The default time, in minutes, after the start of a performance in which live streaming sales will be available. | ||
Special Hold Letters |
|
| Internet Sale | Specify the hold letter that will be displayed on the map when a web sale is in progress. We recommend altering the colour of this hold code to make it stand out on the map during the sales process. |
| Social Distance or Associated Seat | Specify the hold letter assigned to associated seats.
The lower case letter q is suggested as the default. These are seats that are held automatically for a patron when they buy a specific set of seats an might be used fort dinner theatre or ADA companion seats. We recommend altering the colour of this hold code to make it stand out on the map during the sales process and afterwards as permanent holds. You can create unique social distance seating on each pricing map to suit your needs. |
Backup Tab
 There are 3 basic settings for backups in this window, and one setting in TM server to make it all work.
Settings in System Preferences
- Backups are always created on the local machine running a TM Server.
You will need to indicate the frequency and how many of these you want to retain
- After a backup is completed, it can be migrated to a remote machine by the TM server.
You can indicate whee you want these backups to go. If you do not pick a remote backup option, then you will have no offsite backups (unless you are using other backup tools that watch for a new file in the backup directory.
- You can change the Error Notification settings to indicate when you want to receive a message at login if backups do not run.
TM Server Settings
Once the setting have been made in system preferences, you will need to designate a TM Server to do the actual backups. This includes the location on that machine where the backups are stored.
Please make sure there is adequate disk space to store all the historical backups you configured above.
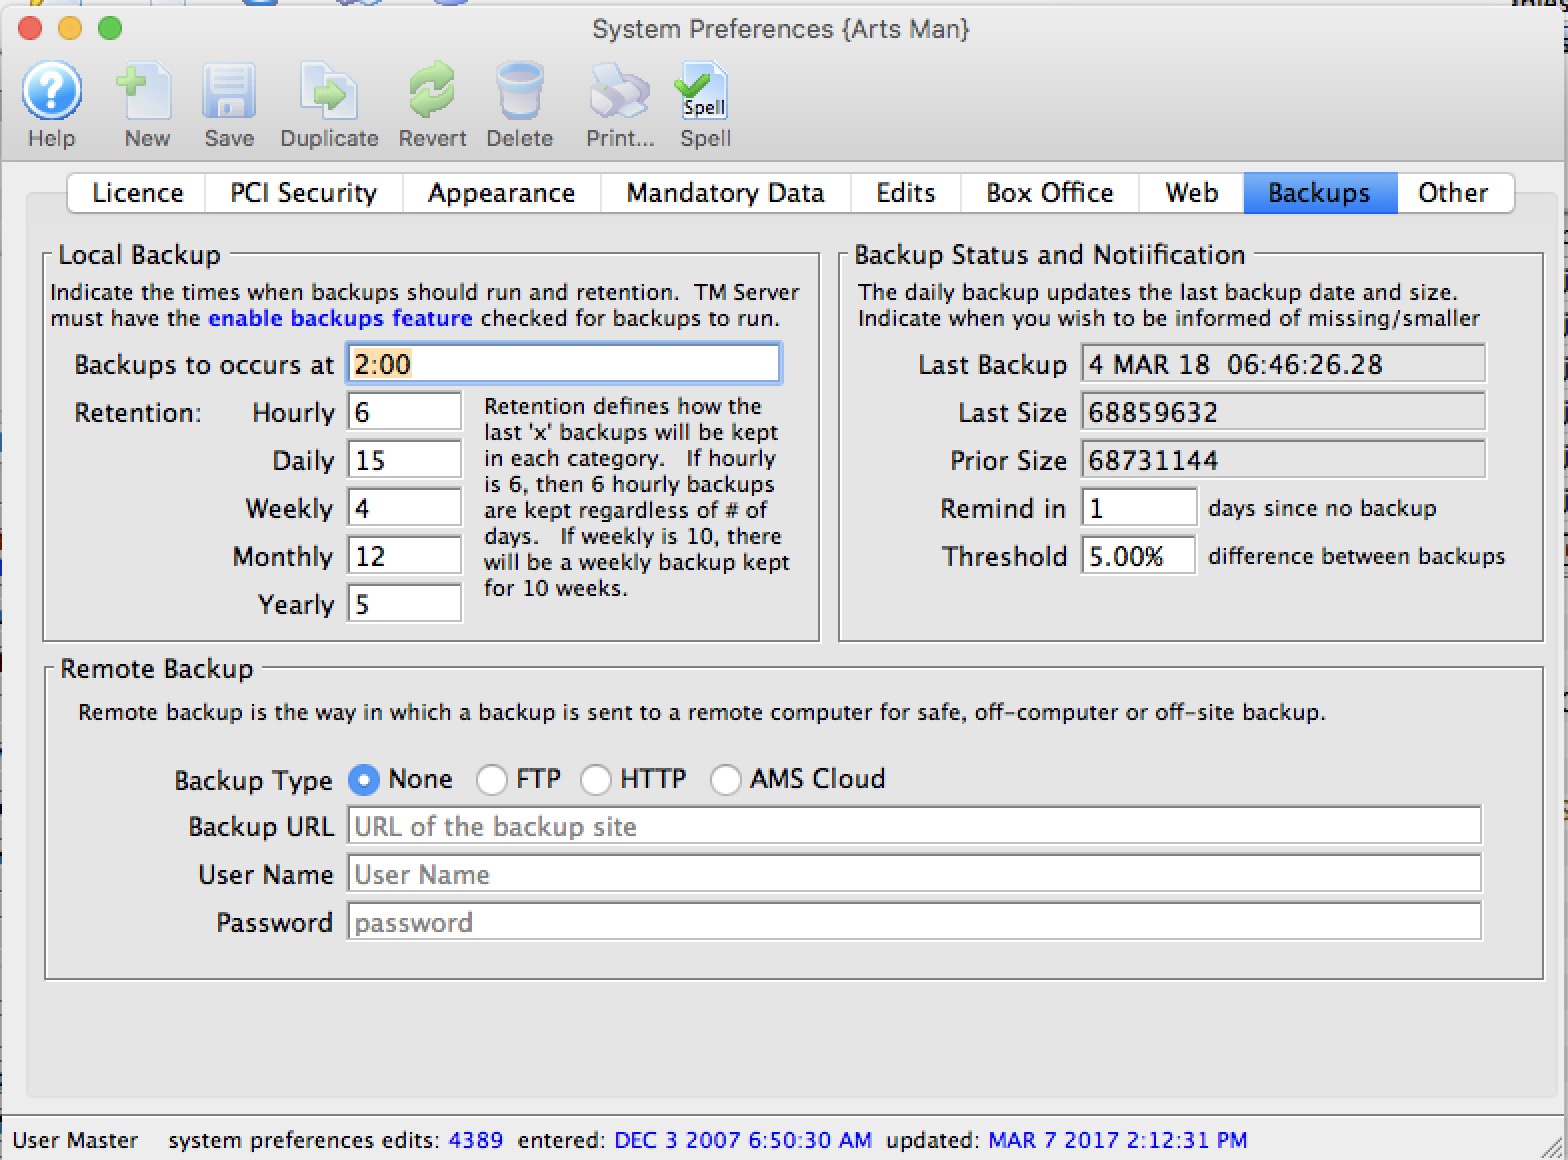
Local Backup Settings
The schedule of backups can be set along with retention. A TM server on a designated machine will coordinate the backups.
See the setup below for the TM server
| Backups Occur at | Enter one or more times of the day that you want backups to run. Generally:
|
| Hourly | The number of hourly backups that you want the system to retain. This number can be greater that the number you want to run in any one day. i\If so, then more are kept across multiple days.
4 to 6 hourly backups are recommended. Example: if you want to keep 9 hourly backups and do 3 backups daily, then you will have 3 backups per day (the hourlies) for each of the past 3 days. |
| Daily | The number of days of daily backups that will be kept.
15 days (half a month) or more is recommended. note: if backups are not run for 5 out of the past 15 days, then 15 days of daily backups means that 15 distinct days are kept, which will be across 20 days in total. |
| Weekly | The number of weeks of weekly backups that will be kept.
Between 4 and 8 weekly backups are recommended Like the above, this is the number of distinct weeks of backups that are kept. If you keep 4 weeks of backups, but one week got missed for some reason, then TM will keep the 5th week as well. |
| Monthly | The number of months of monthly backups that will be kept.
12 or more Monthly backups are recommended |
| Yearly | The number of years that an annual backups should kept.
About 5 yearly backups are recommended You may want to set this to coincide with any government (IRS/CCRA) requirements for electronic storage. |
Remote Backup Settings
This allows you to send the backups off to another machine in the office or offsite if you want to push backups to a second safe place. Its something that we recommend.
| Backup Type | You can indicate what kind of offsite backup you want - the options are:
|
| Backup URL | The URL that the backup will be sent to. Only applicable to the FTP and HTTP methods. For AMS cloud, this will be specified for you |
| User Name | The user name to log into the remote backup location. |
| Password | The password used to log into the remote backup location |
Backup Status and Error Notification
The daily backup script will update the date of last backup in the database.
If the backup does not run, you can decide how long you want to wait without a backup before the message is displayed in Theatre Manager's startup notification window.
| Last Backup | The date and time that the backup script was last known to have run. If this field does not change, then backups are not running. |
| Last Size | The file size of the last backup. This number should generally increase in size. |
| Prior Size | The file size of the second to last backup. This should also increase in size. |
| Remind in | The number of days to wait until a reminder is created at a startup that the backup did not run.
|
| Threshold | Enter a threshold for the differences between the current and the prior backup sizes. If the difference is over the this threshold, you will receive a warning. We recommend it is small - like 0.5% |
Enabling a TM server to do backups
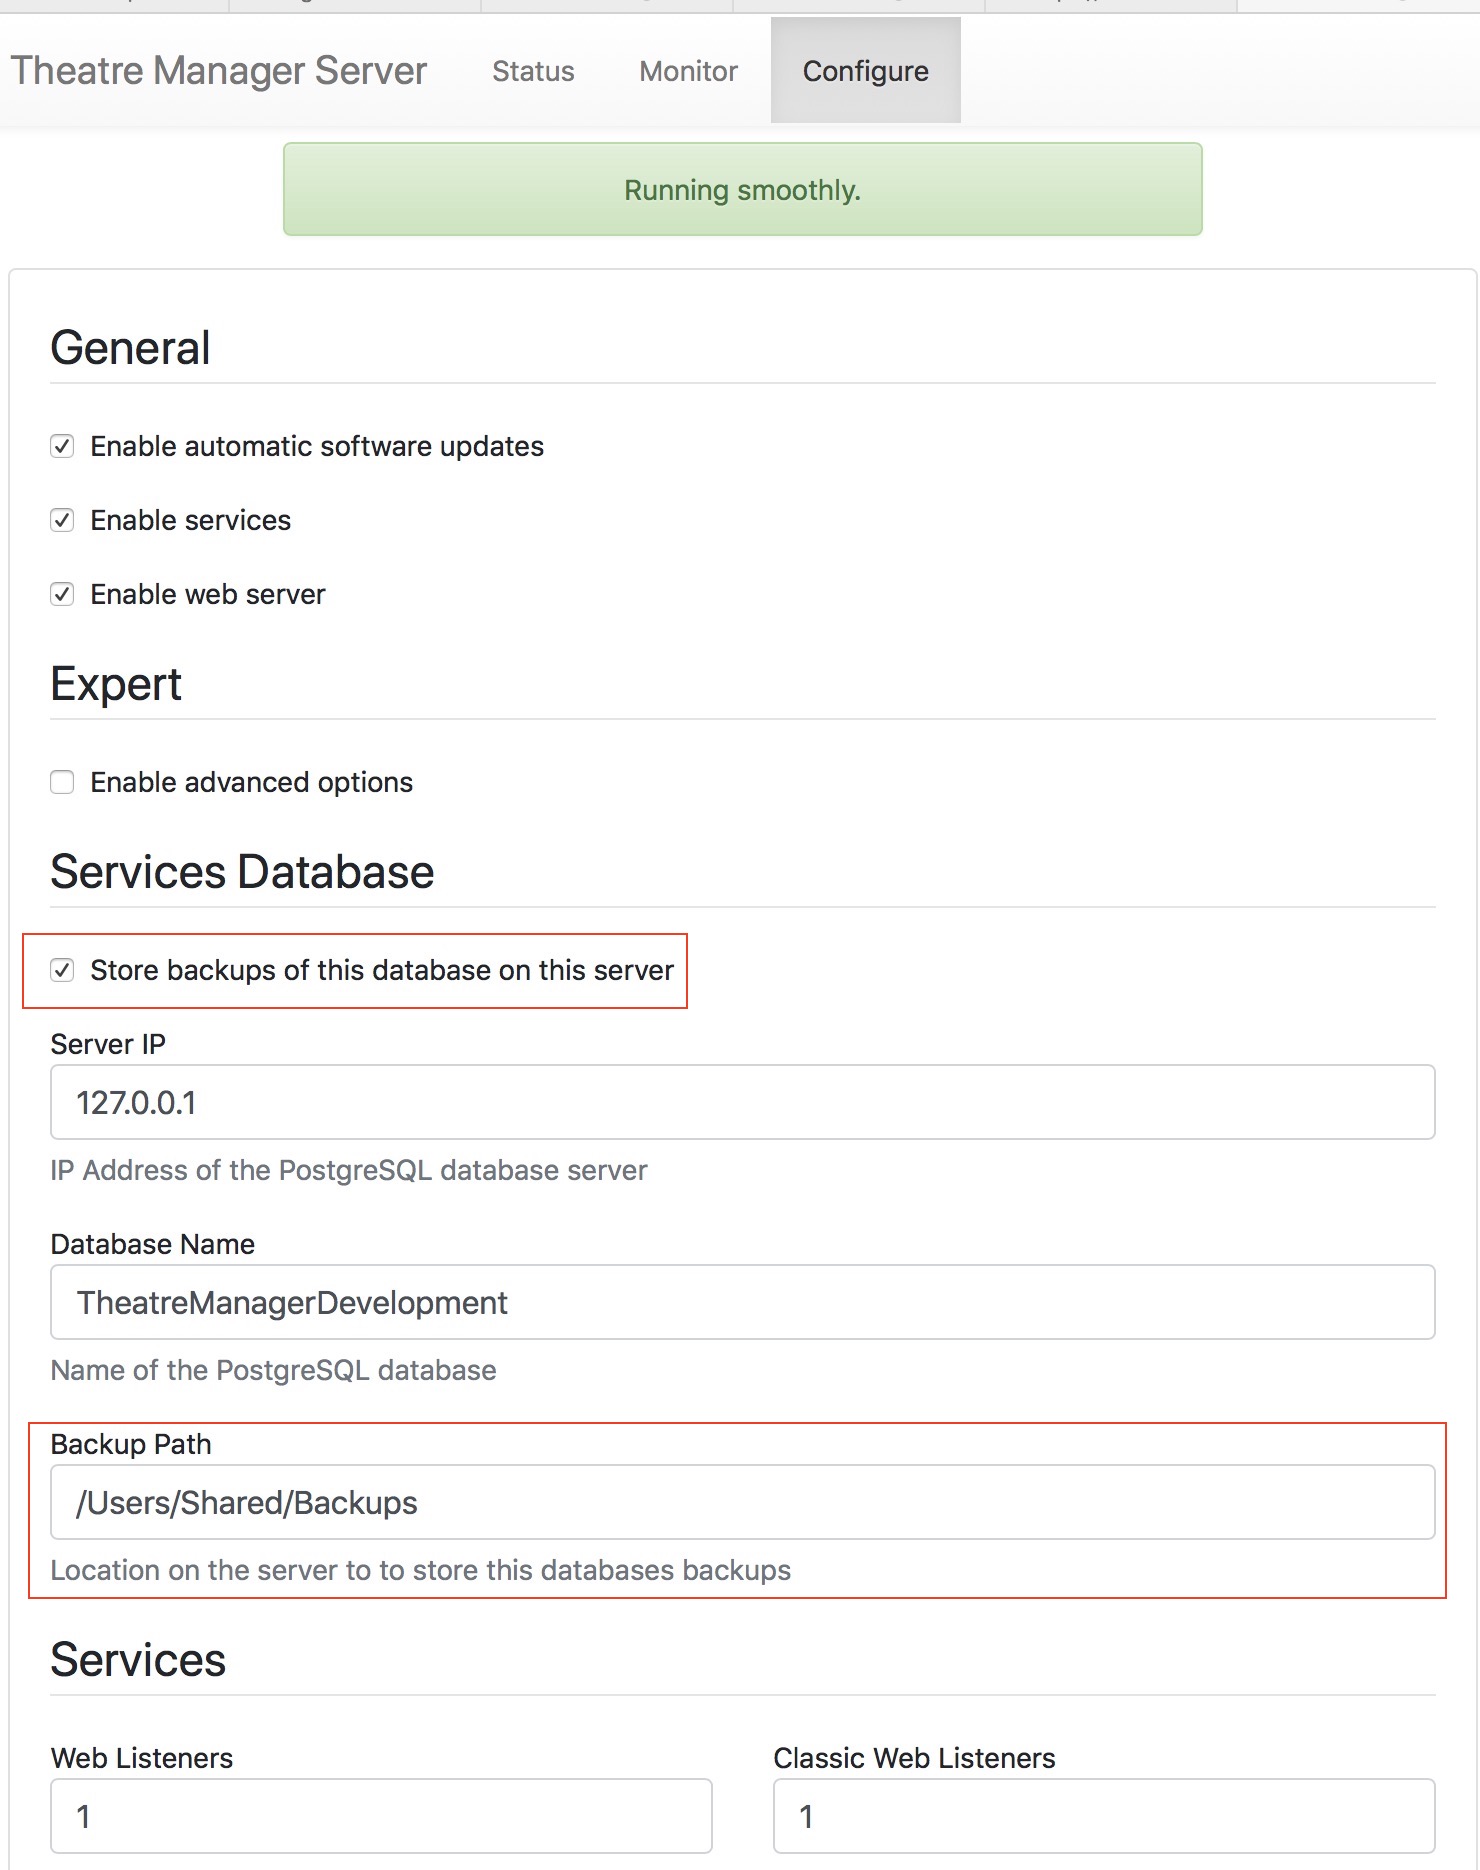 At least one of your TM servers should be enabled for backups. You can access your TM server from the machine it is running on by typing http://127.0.0.1:3012
- This is preferably a listener that is NOT running on the database server so that you easily have local off-machine backups.
- You can enable backups on multiple TM servers if you wish. However it is better to enable push of the database instead to a remote offsite location for better risk management.
Normally, a backup path (shown to the right) is local to the machine. You can make it a network share if you know how to do that.
For example:
| Platform | Local Path | Network Path |
| Windows | C:\BoxOffice\Backups |
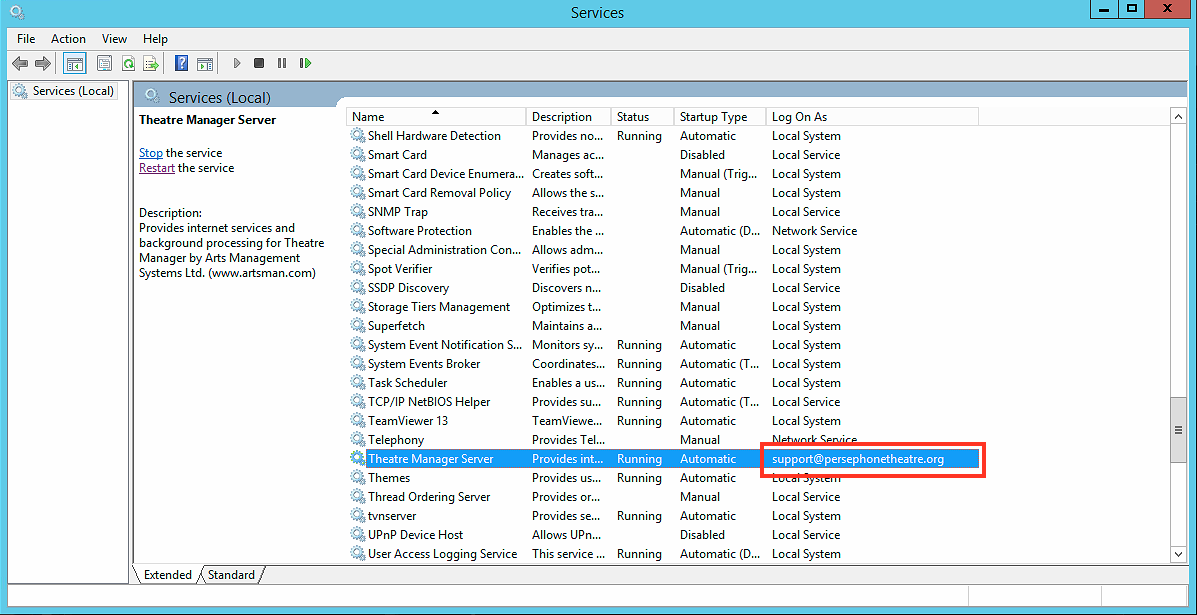 Log TM Server in as user that has access to network file share (i.e. set the service to login as a person with access to the share as per he sample to the right)
|
| MacOS | \BoxOffice\Backups |
You'll have to mount a remote volume that will appear in the volumes directory that you allow read/write access to
|
Manually Initiating a Backup
|
Venues whose database and web services are hosted on the AMS cloud will need to contact support to make a point-in-time backup (eg for year end). |
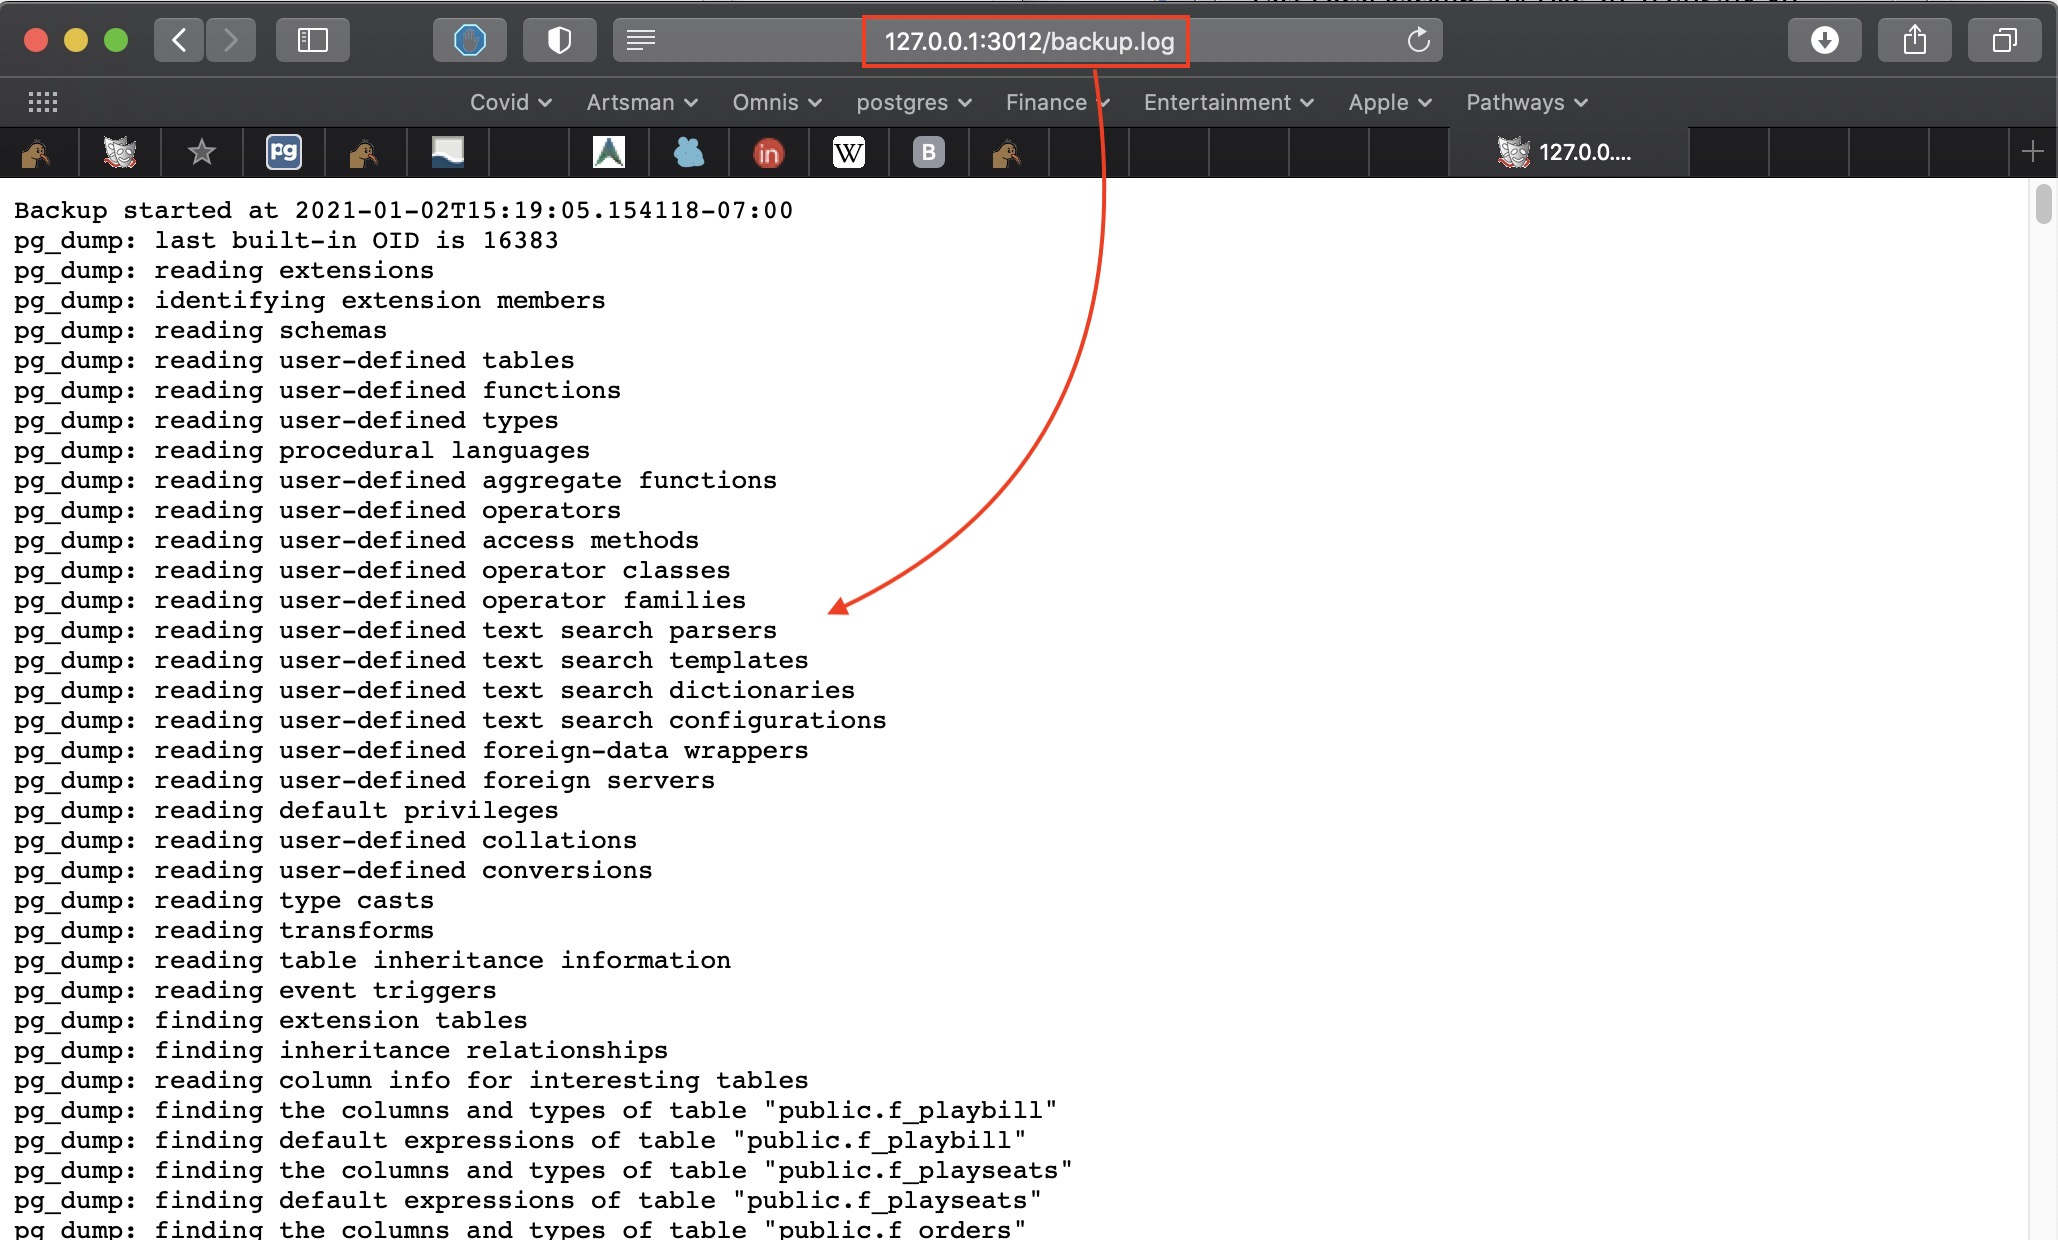 Venues who are self hosted can make a manual backup at any time. The steps are:
- Find the TM Server machine that was configured to run backups.
- On that machine, type http://127.0.0.1:3012 to start the Director and make a backup run. Or, if you are viewing this help page on the same machine that can do backups, just click the link.
- add /backup to the URL on the browser, or type/click http://127.0.0.1:3012/backup.
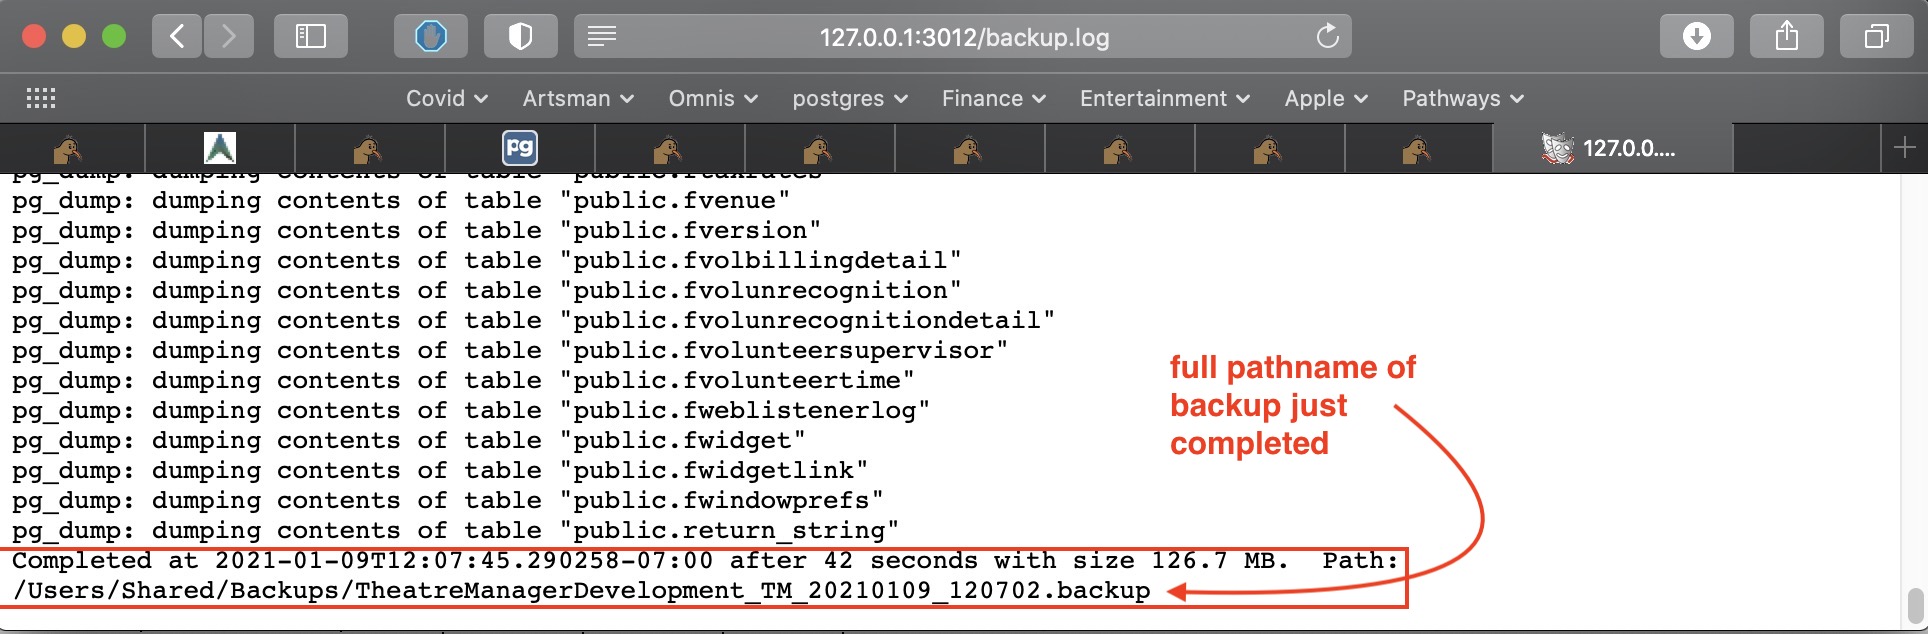
- This will start the actual backup process and the URL will change to backup.log to indicate it is running. A sample of a backup log file is shown to the right.
- Hit the browser's refresh button to see more of the log file as the backup progresses
- When the backup is completed, you'll see a line at the end of the http://127.0.0.1:3012/backup.log that has the full pathname of the backup file.
- When done, if you want to save this backup for a special purpose (eg year end, or before a large import)
- Use the path name to go to the backup folder -and-
- save the backup copy of the database named at the bottom of the long into a place for safekeeping
- Optionally, rename the file after the purpose of the backup, if it convenient
Other Tab
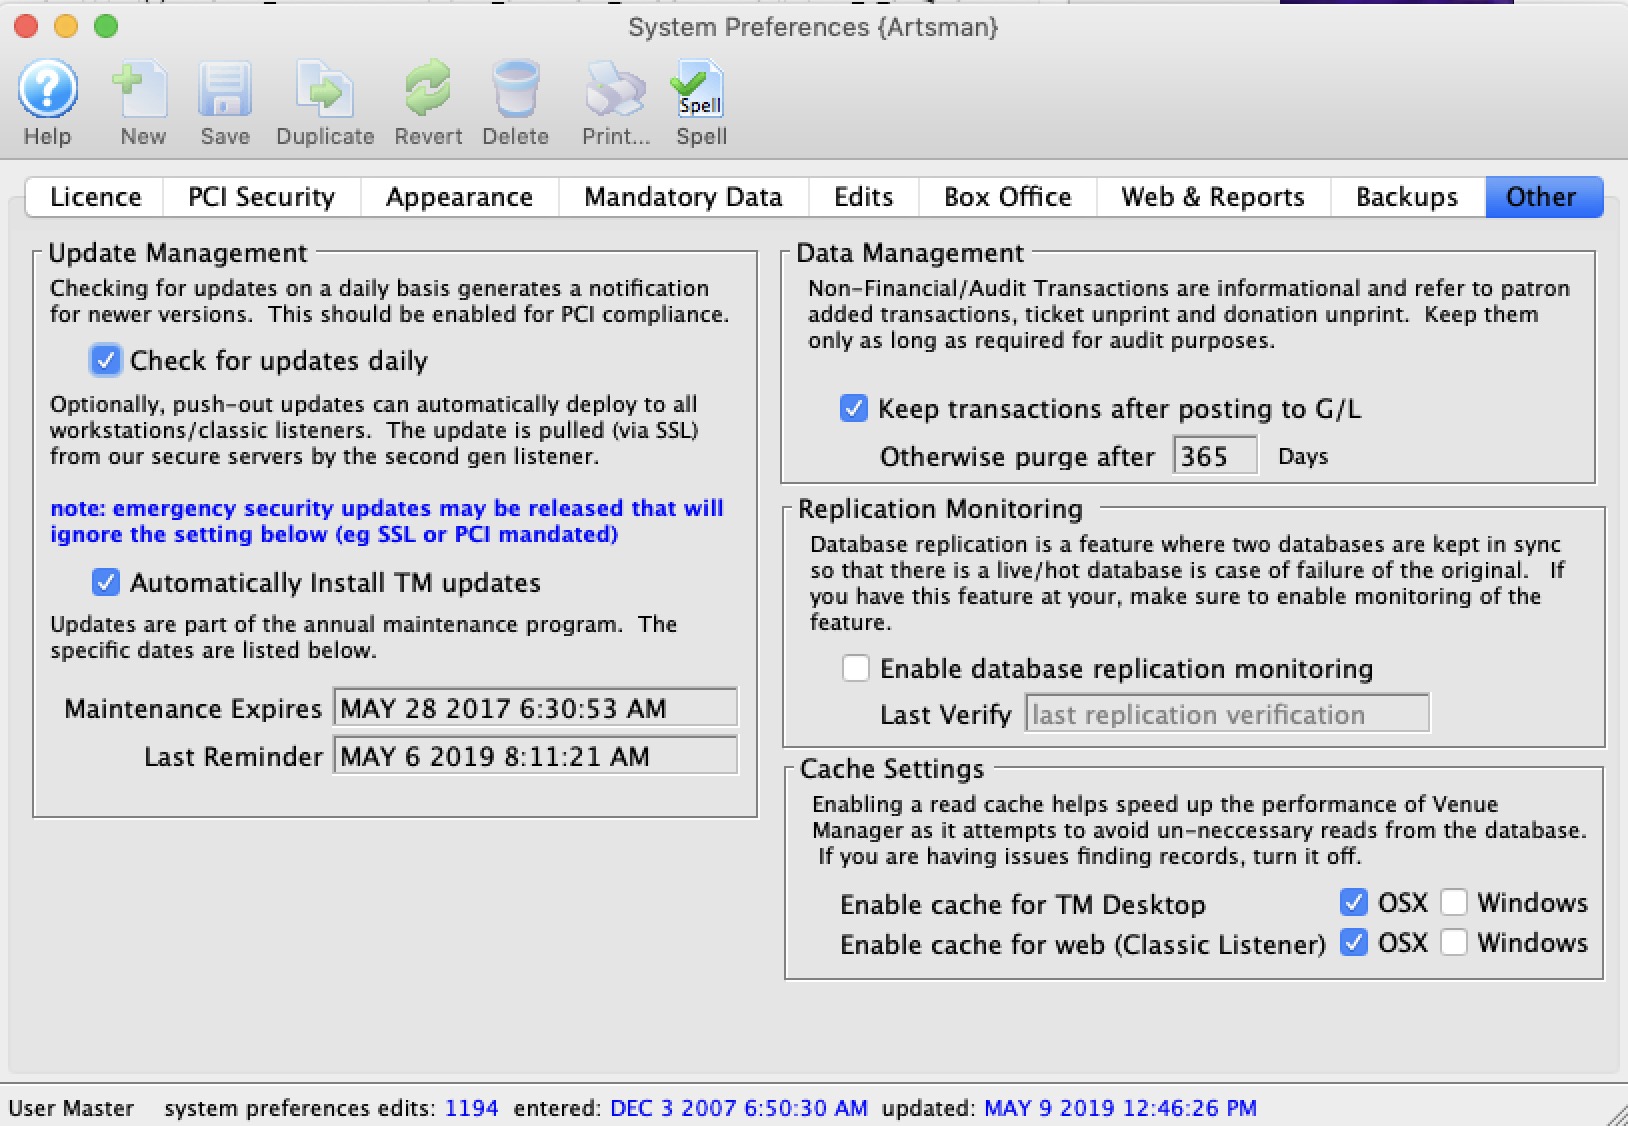
Data Management |
|
| Keep Transactions after posting to the G/L | Checking this box causes some non-financial transactions to be kept after posting to the GL. Unchecking it allows those transactions to be purged after a period of time |
| Otherwise Purge After | Determine the number of days to keep the non-posting transaction records before purging them. |
Update Management |
|
| Check for Updates Daily | When this box is checked, your theatre Manager system will check on a daily basis to see if there is a newer version available. This should be done for PCI compliance by enabling the update checking port for this. No download will happen, it is a notification only. |
| Automatically TM Minor Updates | When enabled
|
Replication Monitoring |
|
| Enable database replication monitoring | Some sites have specifically set up live streaming database replication - in order to have a failover database with the most current information, should the machine hosting it fail.
Replication is done automatically for cloud venues. Self service venues who wish this feature must set it up and maintain it themselves. Enabling this flag will cause Theatre Manager server to monitor the replication process and update the 'last verify' date. This can be used through the API to find out if monitoring is working. if this option is
|
| Last Verify | The date and time that the last replication verification occurred successfully. |
Cache Settings |
|
| Enable cache for Theatre Manager Desktop | Theatre Manager tries to optimize how it reads data from the database and will avoid reaching out to get some data in a number of cases. If you are having trouble with messages saying record not found, when it is really there, you can disable most of the cache.
Uncheck Enable cache for Theatre Manager Desktop to stop the cache being used for the desktop. It will apply to all workstations. You can specify mac platform and windows platforms independently. |
| Enable cache for web sales (Classic Listener) |
Uncheck Enable cache for web sales (Classic Listener) to stop the cache being used in the classic listeners. They have very little need for caching, so you may want to uncheck this if you have problems with some carts checking out a ticket.
You can specify mac platform and windows platforms independently. |