Merchant Accounts
- Provide the required details to communicate with the credit card processing provider
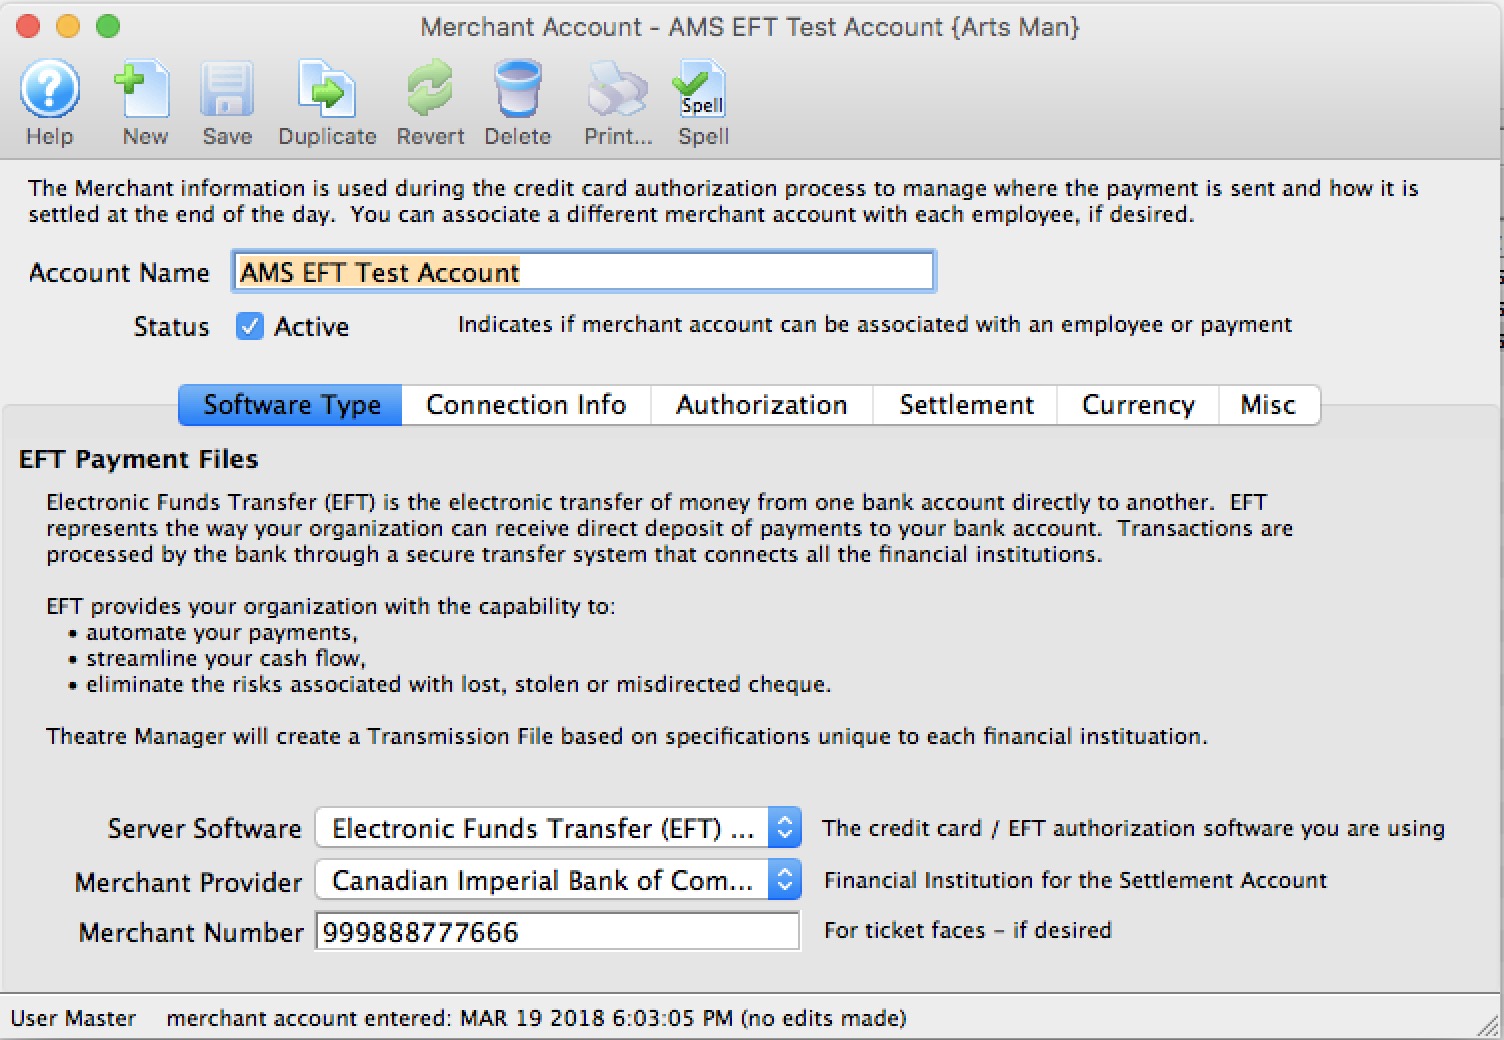
- Set up an Electronic Funds Transfer (EFT) Merchant so that you can take customer information and process repeated payments as selected back institutions. The banks supported by EFT are currently limited - if the setup does not show your bank, please contact us.
Merchant Accounts are accessed by selecting Setup >> System Tables >> Merchant Accounts.

The Merchant Account List window opens.
For more information on the Merchant Account List window click here.
Merchant Account List Window
Parts of the Merchant Account List Window
 |
Inserts a new merchant account. For more information on inserting merchant accounts click here. |
 |
Opens the selected merchant account for editing. For more information on editing merchant accounts click here. |
 |
Creates a copy of the current merchant account. |
 |
Deletes the current merchant account. For more information on deleting merchant accounts click here. |
 |
Generates a report of the merchant accounts to the screen or default print location. |
 |
Exports out a list of merchant accounts in a tab-delimited format. |
 |
Opens the Merchant Profiles window displaying credit card profiles for this merchant account. |
| Merchant # | Unique number used to define the merchant account. |
| Merchant Description | Name of the merchant account. |
| Active | Active status of the merchant account. |
| Emerg | Emergency Mode enabled for merchant account. |
| Status | Indicates if credit cards belonging to this merchant can be used in the box office an/or via web sales. |
| Provider | Name of the Merchant Provider contracted to authorize cards. |
| Server Id | The merchant Server Id for credit card authorizations. |
| Description | The merchant provider you contracted with to authorize credit cards. |
| Country | The currency/country that the merchant provider authorizes in at time of checkout. |
| Outlet-Owner | Outlet responsible for the merchant account. |
Merchant Account Detail Window
 |
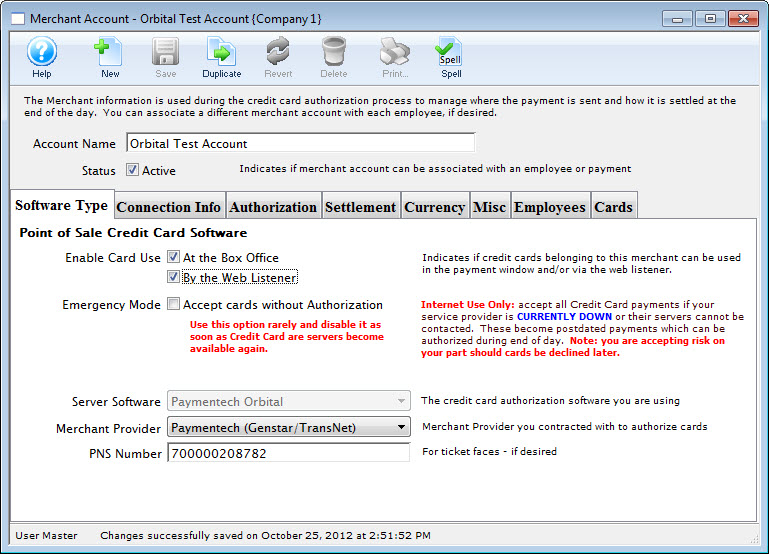
There are two types of merchant accounts as follows:
|
The purpose of the merchant type is dependant on the software type selected half way down the screen.
| Credit Card Merchant Account |
 |
| EFT Account |
 |
Parts of the Merchant Account Detail Window
 |
Inserts a new merchant account. For more information on inserting merchant accounts click here. |
 |
Saves changes made to the currency merchant account. |
 |
Creates a copy of the current merchant account. |
 |
Undoes changes to the last saved point. |
 |
Deletes the current Merchant Account. For more information on deleting merchant accounts click here. |
 |
Checks the spelling of text fields within the merchant account detail window. |
| Account Name | Title for the merchant account. |
| Status | When checked the merchant account is available for use. |
 |
Configuration settings for the server software of the merchant account. For more information on the software type tab click here. |
 |
Access information for the credit card server and/or software. For more information on the connection info tab click here. |
 |
Authorization settings for credit card authorization. For more information on the authorization tab click here. |
 |
End of Day wizard settings for the merchant account. For more information on the settlement tab click here. |
 |
Currency conversion settings (if applicable) for the merchant account. For more information on the currency tab click here. |
 |
Merchant profile setup information for the service provider associated with the merchant account. For more information on the profiles tab click here. |
 |
Merchant contact information for the service provider associated with the merchant account. For more information on the miscellaneous tab click here. |
 |
The staff members in Theatre Manager who are permitted to use this merchant account. For more information on the Employees tab click here. |
 |
The payment methods enabled for use with the merchant account. For more information on the Employees tab click here. |
Software Type Tab

Parts of the Software Type Tab
Point of Sale Credit Card Software | Enable Card Use |
|
|
| Emergency Mode | When enabled, you can accept credit cards without Authorization.
|
||
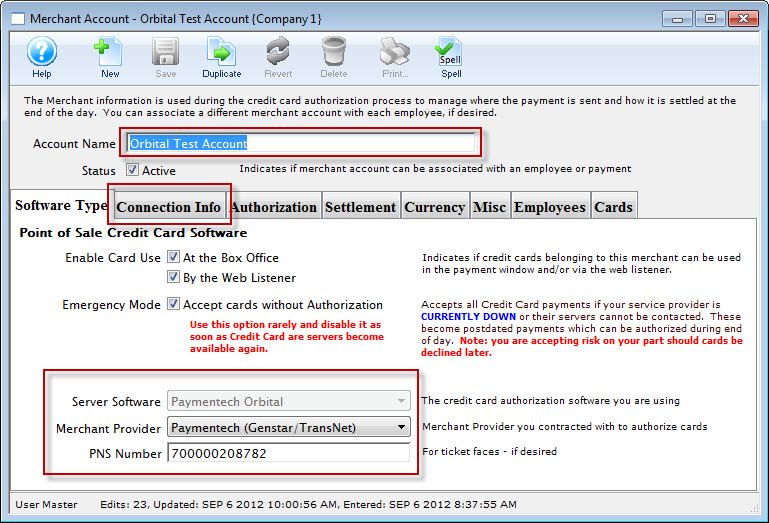
| Server Software | Credit card processing software Theatre Manager will be communicating with. | ||
| Merchant Provider | Merchant provider responsible for credit card authorization. | ||
| Merchant Number | Merchant or client ID number issued by the merchant provider and is placed on the credit card receipt. In this example, PNS is the number for Paymentech. | ||
Connection Info Tab

Parts of the Connection Info Tab
| User Id | Merchant Number or Client User ID on the Credit Card Server | ||
| Password | Password for the Merchant Number or Client User ID used on the Credit Card Server | ||
| Capture Mode | You can choose Host (Bank) Draft Capture or Terminal (Credit Card Server) setting must match the settings provided by the Merchant Provider. | ||
| Primary URL
Port # |
IP address / name of the credit card server and Port # | ||
| Secondary URL | IP address / name of the secondary credit card server | ||
| Terminal ID | Terminal ID | ||
| Bin Number | Bin Number | ||
| Debugging | Click the Display raw response headers for troubleshooting if you are having problems isolating issues with a specific credit card processor. Normally, this is never enabled.
If you do enable it, all credit card authorization requests at the box office will show:
|
Authorization Tab
 |
Otherwise you may see a message like the one to the right if you try pair the devices. |
Parts of the Authorization Tab
Duplicate Authorization Settings |
|
| Box Office Duplicates | Force without Notify checkbox - Transactions to the same card for the same value will not receive a warning indicating a possible duplicate charge to the credit card when checked. It is recommended you leave this unchecked |
| Force Without Notify | Transactions to the same card for the same value will not receive a warning indicating a possible duplicate charge to the credit card when checked. |
| Internet Duplicates | Choice of three Options:
Smart Checking is recommended |
Fraud Prevention |
|||||||
| Fraud Prevention | Send Address/Zip - Zip code and address is sent with the credit card information during processing for verification. This information can decrease processing fees in the USA where applicable.
Send Card Swipe Data - Card swipe data is sent during processing for verification. This can decrease processing fees where applicable.
Send CVV2/CID number - Send the CVV2 number from the back of the card.
IP Address Blocking - Allows the merchant provider to block web sales to specific IP Addresses. 1st Transaction can be refund - Some merchant providers (notably Global Payments acting on behalf of some Banks) may not authorize the first couple of transactions if they are refunds, as a fraud prevention tool. The rules are actually set by the Bank and each service provider follows them. The best approach is to avoid a refund as the first transaction..
|
||||||
Misc Authorization Settings |
|||
| Timeout | Maximum time, in seconds, Theatre Manager will try to process a card:
|
||
| Last Transaction | Displays the last tranaction number at the server | ||
Refund Capability Settings (Varies by Merchant Provider and Agreement)The Credit Card refund capabilities vary by merchant provider and your agreement with them. Merchant providers instituted strong rules for fraud prevention and you may find that you need to ask them for capabilities if you cannot refund credit cards. These options indicate what your contractual agreement is with them and tells Theatre Manager how to attempt to refund money. |
|
| Allow Independent Refunds | Independent refunds are when you enter the patron's credit card and refund any amount to that card. This is how credit cards worked for decades until merchant providers decided to limit this capability.
Refer to the rules for Independent refunds and possible errors before turning this on. Note: you must have encrypted card data for the patron, a prior merchant profile set up for them, or contact the patron for a full credit card number in order to do independent refunds. |
| Allow Linked Refunds | Linked Refunds were created by visa/mastercard to force merchants to only return money to the original card for up to the amount charged on the card to avoid fraud.
Enabling this means your merchant provider allows it. Also set the time frame so that TM knows how far back in time the payment may be before the linked refund might be denied. You can contact your merchant provider and they may increase the amount of time allowed. |
| Allow Linked Refunds on Same Day Payments | Some merchant providers seem to disallow linked refunds on the same day. That might mean you have to void the transaction before doing end of day in order to create the refund. |
| Timeframe | The number of days since the payment was made in which a linked refund is likely to be authorized. For any payment older than that number of days, the refund is likely to be denied. |
Associated EMV Pin Pads (currently Moneris Only) |
|
| StoreId | The store ID for pinpads for Moneris |
| API Key | The API key for pinpads for Moneris |
Settlement Tab
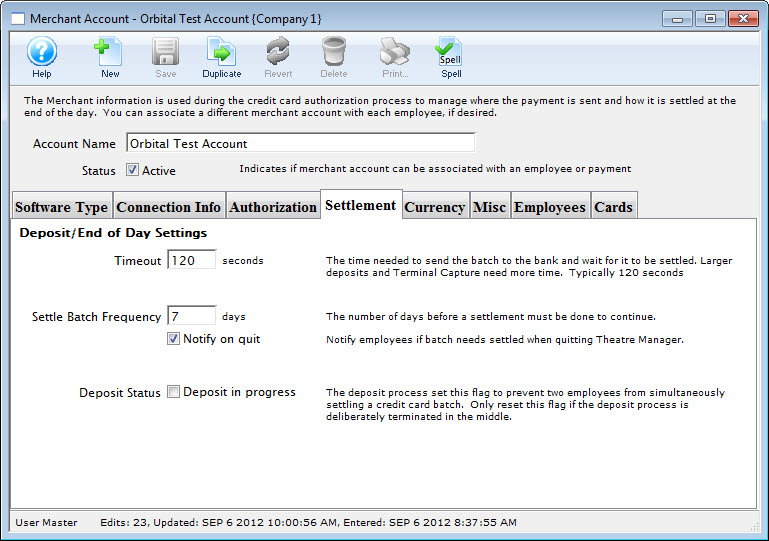
Parts of the Settlement Tab
Timeout |
This is the maximum time, in seconds, that Theatre Manager expects to take to send the completed deposit batch to the bank. Normally, 120 seconds is enough for most processors but if you have larger batches or are using some terminal based authorization, you may need to alter this value. |
||
Settle Batch Frequency |
Indicates the number of days that Theatre Manager will allow process credit cards without settling the batch. After this threshold is exceeded without doing an End of Day, Theatre Manager will display a warning message telling you to close the batch and will not accept any credit cards at the box office. |
||
Notify on Quit |
If checked, an employee will be notified that a batch needs settled when they quit Theatre Manager if it finds any credit cards older than one day that are not yet deposited. In other words, you will only be told if there are cards from a previous day that have not been deposited. |
||
Deposit Status |
This field is checked when an end of day is in process AND a credit card deposit is currently being done for this merchant account through Theatre Manager. You cannot check this box, you can only uncheck it if you are 100% sure there is no settlement occurring for this merchant account (i.e. nobody has end of day open). Unchecking it will reset the end of day and allow a settlement to occur. |
Currency Tab
Normally, credit card accounts are in the same currency for the country you reside in. If you are able to process credit cards in another currency, then you need to know what that is. And it needs to be in your currency exchange table. When a credit card is processed Theatre manager will:
Setup on this tab is particularly important if you are accepting foreign currencies on your website. Click here for more information.
For more information about setting up Currency Exchange details and rates, click here.
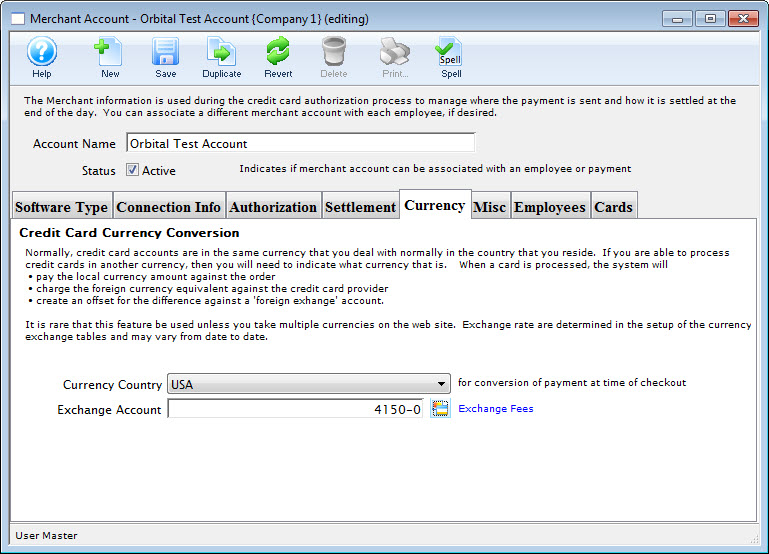
Parts of the Currency Tab
Currency Country |
Select the desired country from the Currency Country drop down. |
Exchange Account |
Enter a G/L Account to allocate the difference from the exchange rate. |
Merchant Profiles
 |
A merchant provider may charge service fees or fixed costs for using this service to offset associated costs with maintaining customer and credit card information on their servers. Moneris charges money; and is not recommended for this feature. |
 |
If you only need to save credit cards for post dated or recurring payments, PCI Schedule D - post dated may suffice for your needs.
Contact your merchant provider customer support representative to determine if there will be any additional fees to your organization. |
Merchant Profiles are for organizations who are concerned with PCI compliance and wish (or are required to) maintain a PCI Schedule-C compliance within Theatre Manager.
Using Merchant Profiles reduces the exposure risk by maintaining full credit card information directly on the merchant provider's secure PCI-certified servers without having the requirement to store and maintain credit card numbers within Theatre Manager's database. Using Merchant Profiles in a PCI Schedule-C setup, allow full access to Theatre Manager's features such as Post-Dated Payments, Recurring Donations, and the Auto-Renew Season Subscriptions which would typically require a credit card number to be kept on file for each subsequent payment.
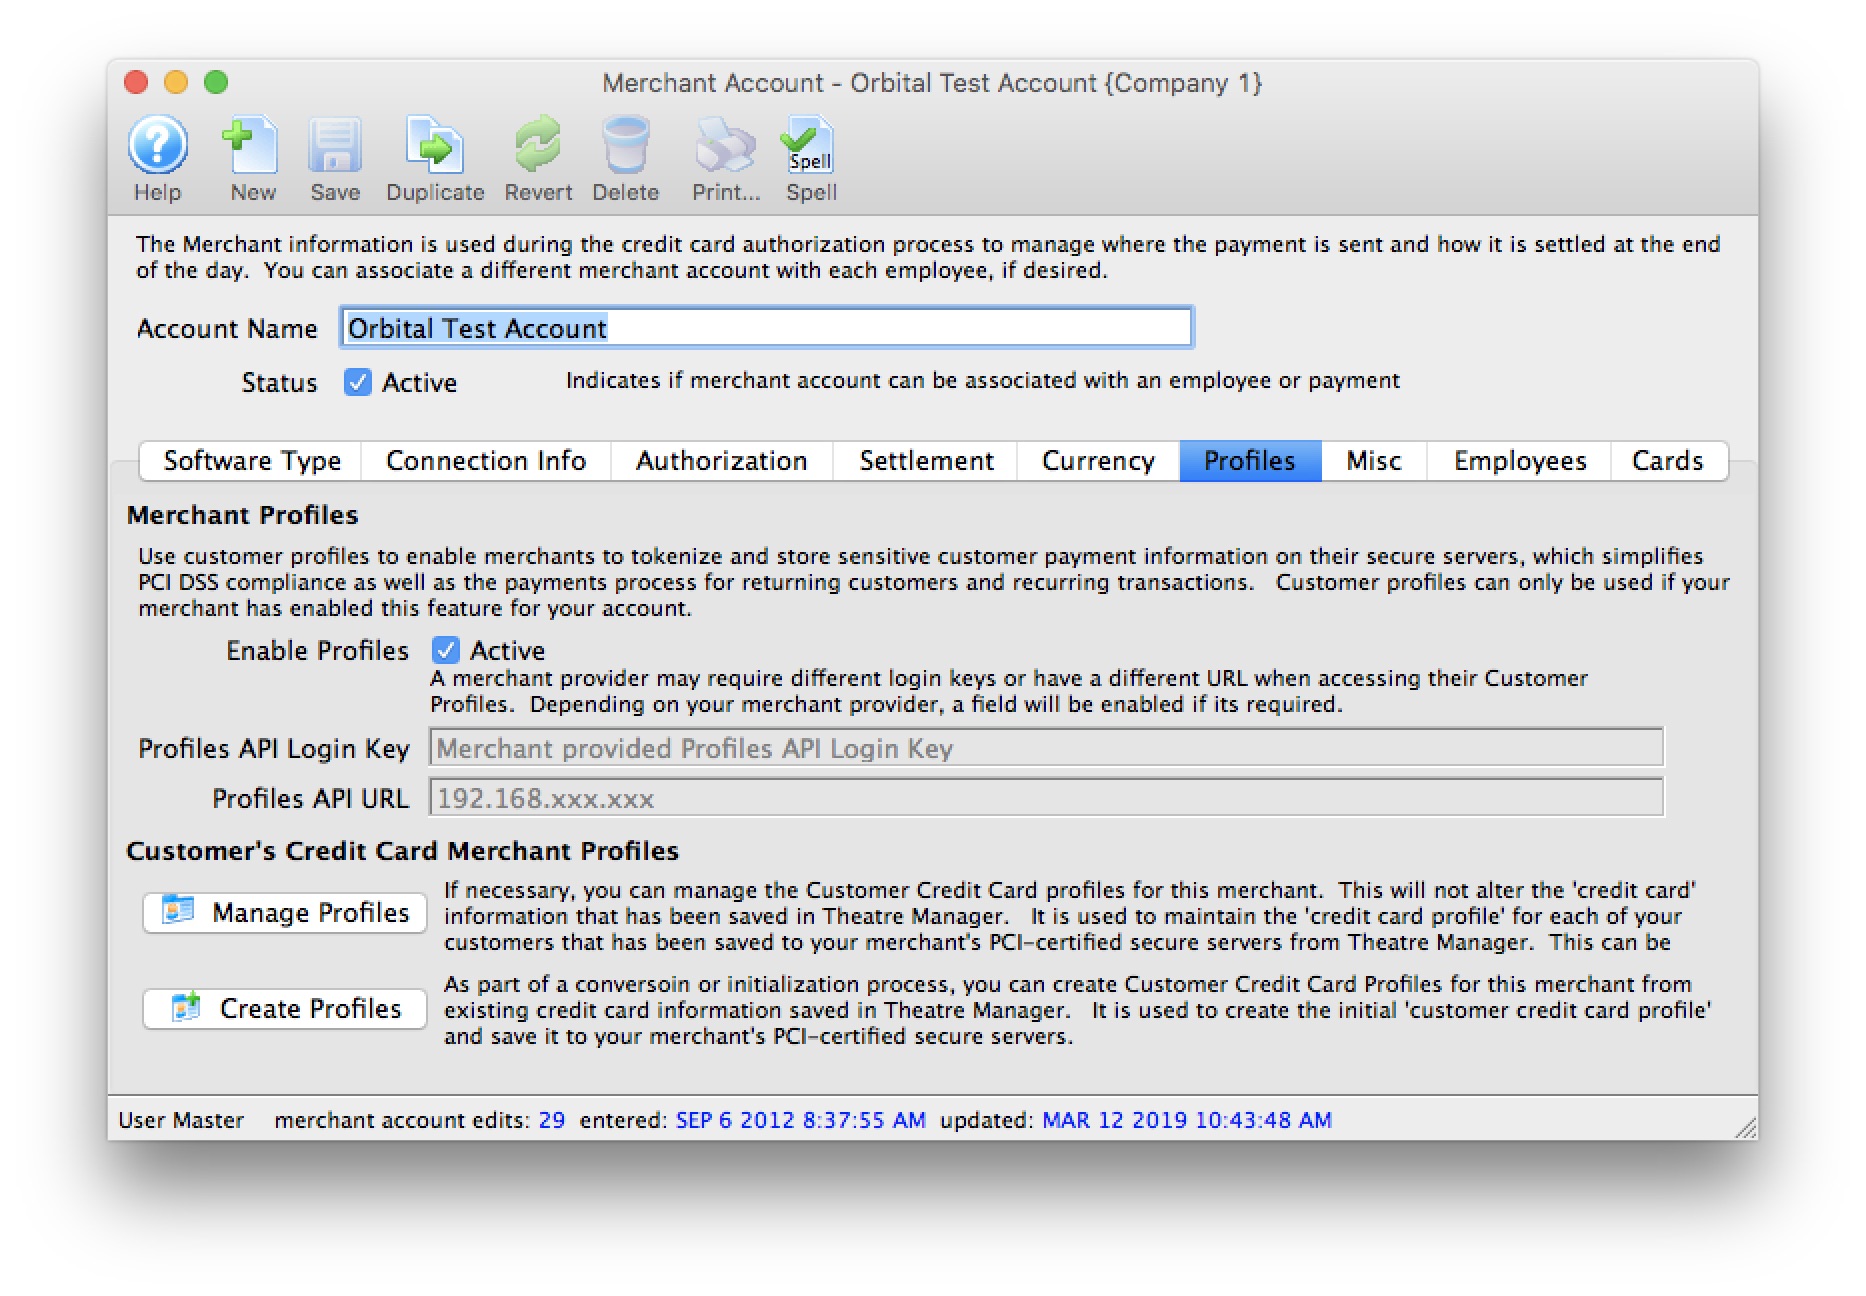
Parts of the Profiles Tab
| Enable Profiles |
|
||||
| Profiles API Login Key | The secure API Key used to access credit card profiles on the merchant provider's server.
|
||||
| Profiles API URL | The IP Address to use to access the Credit Card Profiles on the merchant provider's server.
|
||||
| If necessary, you can manage the Customer Credit Card profiles for this merchant. This will not alter the 'credit card' information that has been saved in Theatre Manager It is used to maintain the 'credit card profile' for each of your customers that has been saved to your merchant's PCI-certified secure servers from Theatre Manager. This can be used to cross reference and match the information between the two systems. | |||||
| As part of a conversoin or initialization process, you can Create Customer Credit Card Profiles for this merchant from existing credit card information saved in Theatre Manager. It is used to create the initial 'customer credit card profile' and save it to your merchant's PCI-certified secure servers. |
How Does This Work?
Merchant Profiles allows you to store credit card numbers directly with your merchant provider, on their servers, and then access those saved credit card numbers at any time for subsequent processing without the cardholder being present.
- During the first interaction using the customer's credit card, the credit card number and limited customer information is transmitted and saved on your merchant provider's server.
- A unique token/key is returned from your merchant provider and stored encrypted within Theatre Manager in replacement of the customer's full credit card number profile.
- Future interactions with the customer such as Post-Dated Payments, Recurring Donations, and the Auto-Renew Season Subscriptions, would then transmit the saved token/key rather than the full credit card number during the authorization process.
- Your merchant provider would then cross-reference this token/key to the actual credit card number during the authorization process within their own systems. At no time is the full credit card number displayed or directly visible during the authorization process.
What are the Benefits and Why Should I Use Profiles?
- Merchant Profiles are for organizations who are concerned with PCI compliance and wish (or are required to) maintain a PCI Schedule-C compliance within Theatre Manager.
- Mitigate the cost and risk of storing customer account data by keeping cardholder profiles in a secure, external database maintained by your merchant provider. This can help you reduce the risk of keeping cardholder data in-house and support your Payment Card Industry (PCI) compliance initiatives by protecting data at-rest.
- Saves time by eliminating the need to rekey a card account number and expiration date for each transaction.
- Allows your organization to make the changeover from Schedule-D to Schedule-C PCI Settings while retaining virturally all Theatre Manager's benefits as if still functioning in a Schedule-D environment.
- For clients currently operating in a Schedule-C environment, enabling merchant profiles would allow future interactions with our customers for Post-Dated Payments, Recurring Donations, and Auto-Renew Season Subscriptions.
- For clients who wish to remain in a Schedule-D environment, previously used credit card numbers are masked to the box office staff members during the payment process. Providing further protection from anyone accessing a patron's full digit card number.

A masked card means that it will be displayed in the payment window as '#### **** **** ####'. This renders the PAN useless for all purposes. However, given the first 4 and last 4 digits of any card, you can still validate you're using the correct merchant profile for authorizing the card.
- For clients who wish to remain in a Schedule-D environment, the function of storing previously used encrypted credit card information will remain the same - even with merchant profiles enabled. Using merchant profiles would add another layer of security protection to the full digit card number from being displayed or accessed.
What Will I See Differently in Theatre Manager?
If your PCI Settings are set to Schedule C to shred cards immediately after use:
- You will not notice much difference at all from what you see now. What the box office will benefit from is the ability to create and maintain future interactions with the customer such as Post-Dated Payments, Recurring Donations, and the Auto-Renew Season Subscriptions, would then transmit the saved token/key rather than the full credit card number during the authorization process.
- If your settings are to default the last used credit card for a patron, you will now see a masked the credit card number default for patrons who have previously purchased. The masked number is ok to accept as is for payments without changing it. The payment will use the merchant profile that was created for that credit card number.
If your PCI Settings are set to Schedule D to retain encrypted credit card data in Theatre Manager:
- The main change you will realize is that Theatre Manager will protect any known credit cards for patrons by only displaying merchant profile for a patron. Initially, it will appear as if all credit cards are missing from Theatre Manager, however, they still exist. They are in the background if access to them is required. After using the function to build merchant profiles for known credit cards, the transition to using merchant profiles will more seamless.
- If your settings are to default the last used credit card for a patron, rather then displaying the full set of credit card digits, it will mask the credit card number for patrons who have previously purchased. The masked number is ok to accept as is for payments without changing it. The payment will use the merchant profile that was created for that credit card number.
- During the payment process, if you're searching for known credit cards for a patron, it will only display credit cards that have a merchant profile created for it. Although Theatre Manager may have the credit card on file, if there is no merchant profile created for it, it will not display. If this is a concern, use the function to build merchant profiles for known credit cards, the transition to using merchant profiles will more seamless.
Steps to Start Using Merchant Profiles
- Contact your merchant provider representative and have them enable the module "Customer Payment Profiles" (*read the stop sign below*) on your merchant account.

Each merchant provider has its own unique name for the setup and maintaining of "Customer Payment Profiles." When talking with your merchant provider, use the following name to describe the feature you'll be activating:
- Authorize.Net - use the feature name Customer Profiles
- Bambora - use the feature name Payment Profiles (Theatre Manager's interface with Bambora to maintain Merchant Profiles is currently under development).
- Elavon - use the feature name Card Manager Transactions
- Moneris - use the feature name Hosted Vault
- Paymentech Oribital - use the feature name Customer Profile Management
- After contacting your merchant provider representative and they have confirmed "Customer Payment Profiles" has been enabled on your merchant account:
- set Enable Profiles to "active" to activate the feature within Theatre Manager.
- For Authorize.Net - set the Profiles API URL.
- For Bambora - set the Profiles API Logon Key anbd the Profiles API URL.
- Save the change to the merchant information.
- Log out of Theatre Manager.
- Log into Theatre Manager to start processing credit cards as normal. Customer Payment Profiles will start to be created automatically for each credit card processed.
Steps to Verify if Merchant Profiles are Being Created
- Follow the steps for Accessing the Merchant Profiles Customer List to view a patron's payment profile.
- If a profile exists, Theatre Manager and your merchant provider are functioning correctly.
- If there are no profiles, contact Arts Management Support to review your Merchant Profile Setup.
Can I Stop Using Merchant Profiles?
Yes, at any time. All pre-existing merchant profiles will remain within Theatre Manager's database for future use if merchant profiles is re-enabled for this merchant account. |
If your PCI Settings are set to Schedule D to retain encrypted credit card data in Theatre Manager, and if you process any new credit cards while the Enable Profiles is inactive, a merchant profile will not be created. If you choose to Enable Profiles later on, it is suggested using the function to build merchant profiles for known credit cards, to make the transition back to using merchant profiles more seamless. |
 |
If your PCI Settings are set to Schedule C to shred cards immediately after use, and if you process any new credit cards while the Enable Profiles is inactive, a merchant profile will not be created. If you choose to Enable Profiles later on, you will require the full credit card number again before processing another new payment for that patron's credit card. |
- Set the Enable Profiles flag to "inactive" to stop the feature within Theatre Manager. This will only inactivate it within Theatre Manager.
- Save the change to the merchant information.
- Log out of Theatre Manager.
- Log into Theatre Manager to start processing credit cards as normal. Customer Payment Profiles will no longer be displayed or created automatically for each credit card processed.
If I change Merchant Providers, will the Existing Merchant Profiles continue to work with the New Provider?
No. The Customer Payment Profile's created by the merchant provider are uniquely linked to that merchant provider and your merchant account number. Customer Payment Profiles cannot be shared between different providers or accounts.
Building Merchant Profiles for Existing Cards
Merchant Profiles can be created and saved on your merchant provider's secure PCI-certified servers using the existing credit card information in Theatre Manager.
This window is used as an analysis tool to determine the critical and primary credit card profiles that should have a Merchant Profile created.
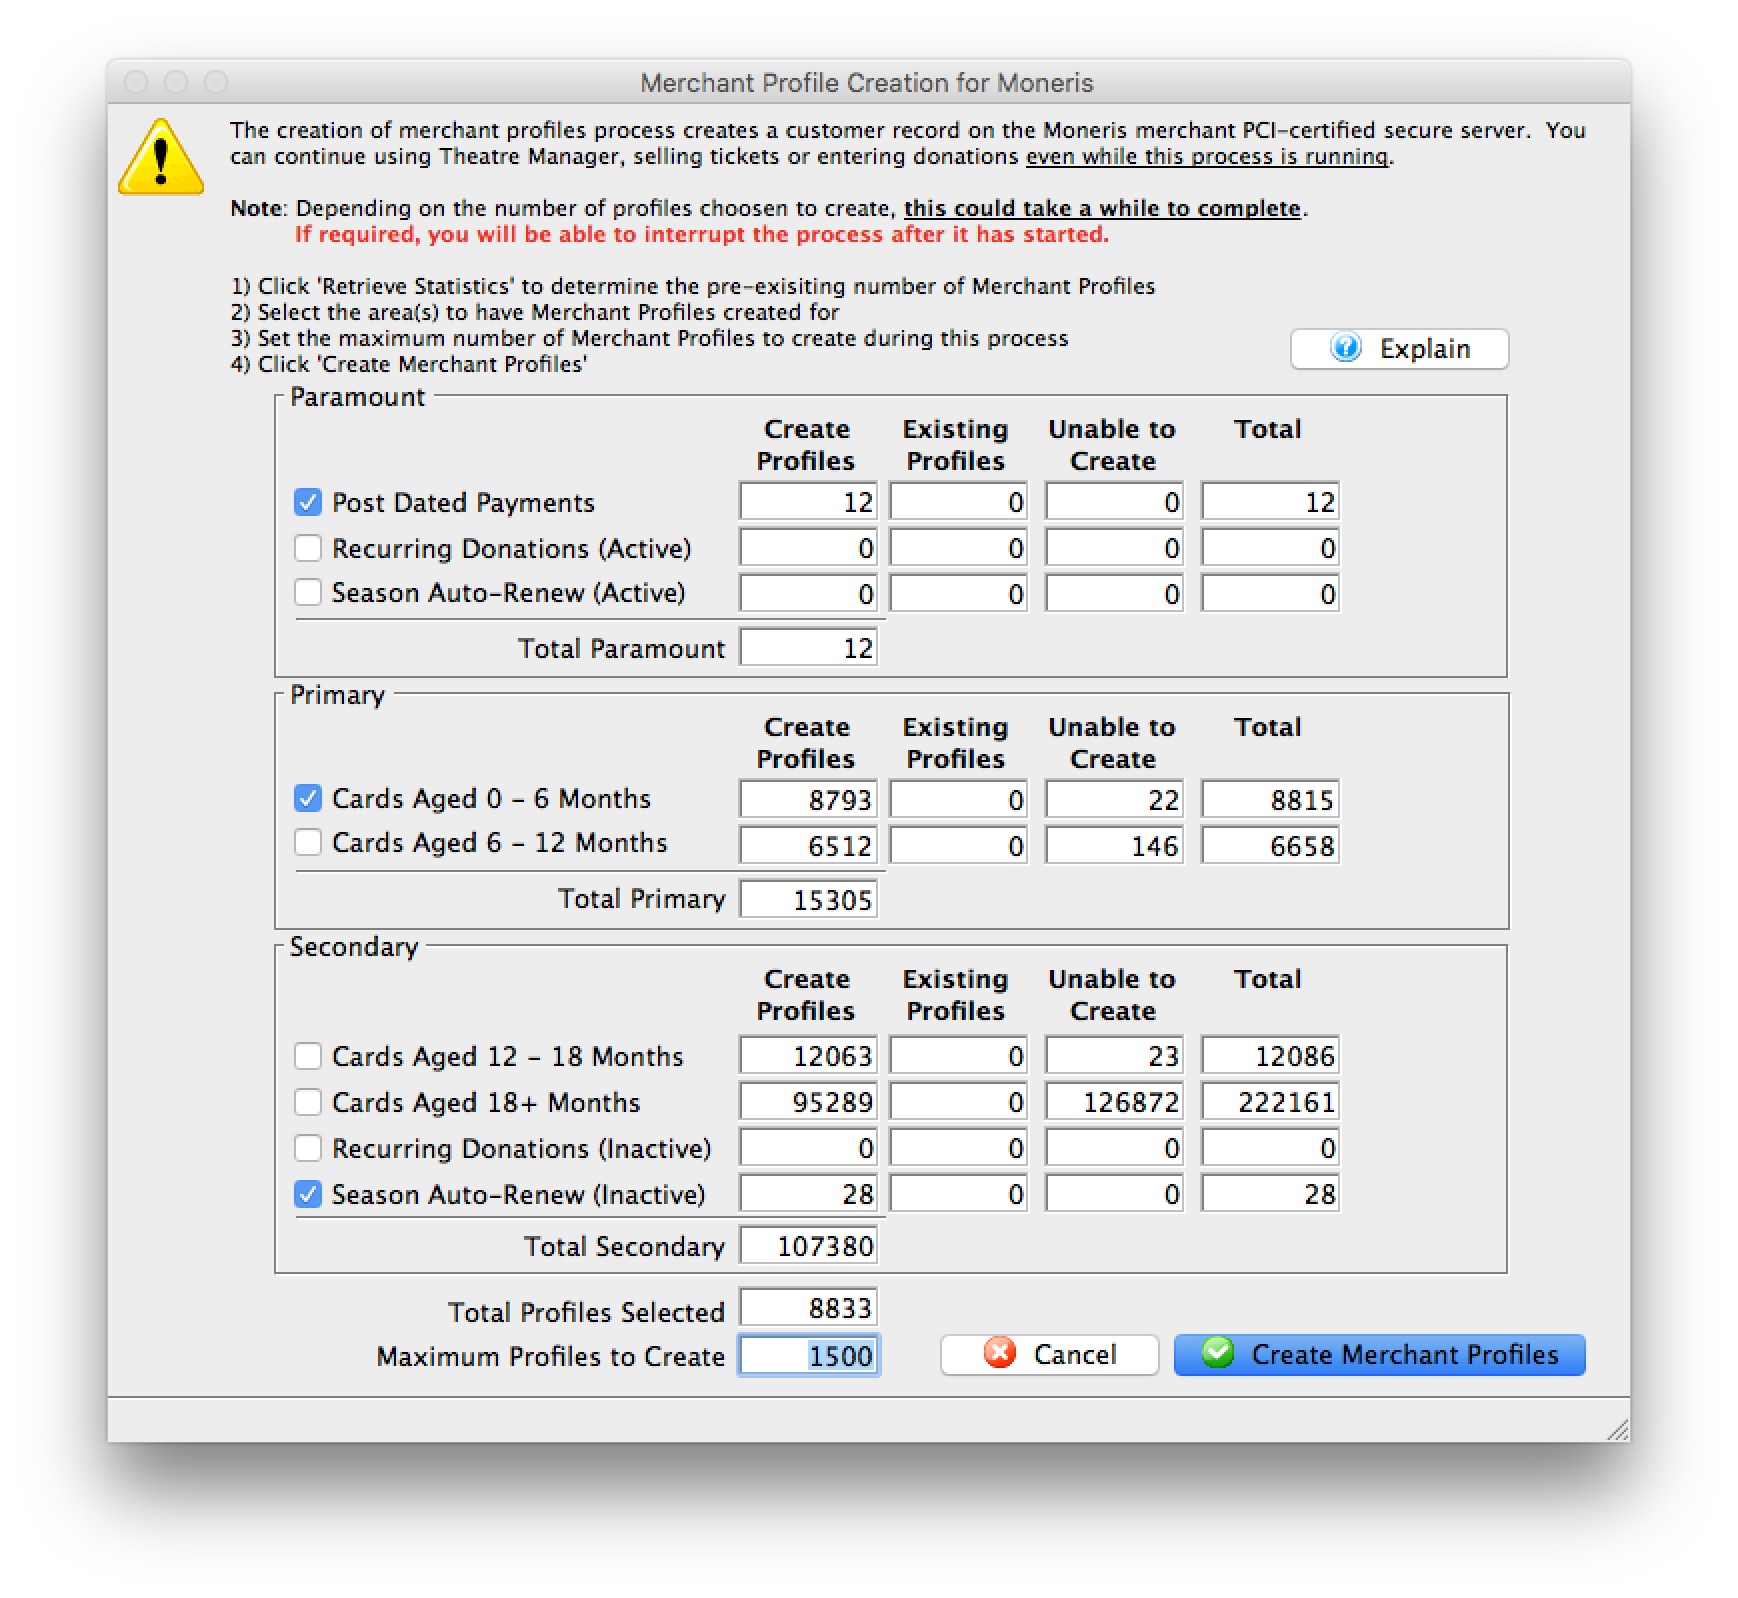
Parts of the Merchant Profiles Creation Window
| Post Dated Payments | Select to include credit cards from non-deposited (future dated) post dated payments. | ||
| Recurring Donations (Active) | Select to include credit cards from active and ongoing recurring donations. | ||
| Season Auto-Renewal (Active) | Select to include credit cards from active Season Subscriptions that are setup with Auto-Renewals. An active season is defined as the current and previous seasons. | ||
| Cards Aged 0 - 6 Months | Select to include credit cards that have been used or updated within the previous 6 months. | ||
| Cards Aged 6 - 12 Months | Select to include credit cards that have been used or updated within the previous 6 to 12 months. | ||
| Cards Aged 12 - 18 Months | Select to include credit cards that have been used or updated within the previous 12 to 18 months. | ||
| Cards Aged 18+ Months | Select to include credit cards that have been used or updated over 18 months ago. | ||
| Recurring Donations (inactive) | Select to include credit cards from inactive or completed recurring donations | ||
| Season Auto-Renew (Inactive) | Select to include credit cards from inactive Season Subscriptions that are setup with Auto-Renewals. An inactive season has the season pages flagged as inactive or is 2+ seasons ago. | ||
| Total Profiles Selected | The total number of credit cards selected to create merchant profiles. | ||
| Maximum Profiles to Create | The maximum number of merchant profiles to create during this process. | ||
 |
Query Theatre Manager's database to determine the possible number of merchant profiles that can be created; the number of existing merchant profiles; and the number of known credit cards that are unable to be used for creating a merchant profile.
|
||
 |
Start the process for creating merchant profiles for the selected credit card numbers.
|
 |
Before proceeding, verify that this merchant account has credit card payment types(i.e. VISA, MC, DISC, AMEX, etc.) created and assigned in code tables. If a payment method does not exist as a credit card type for this merchant, a merchant profile will not be created. |
- Open the Merchant Profile Creation window.
Click here to learn how to access this window.
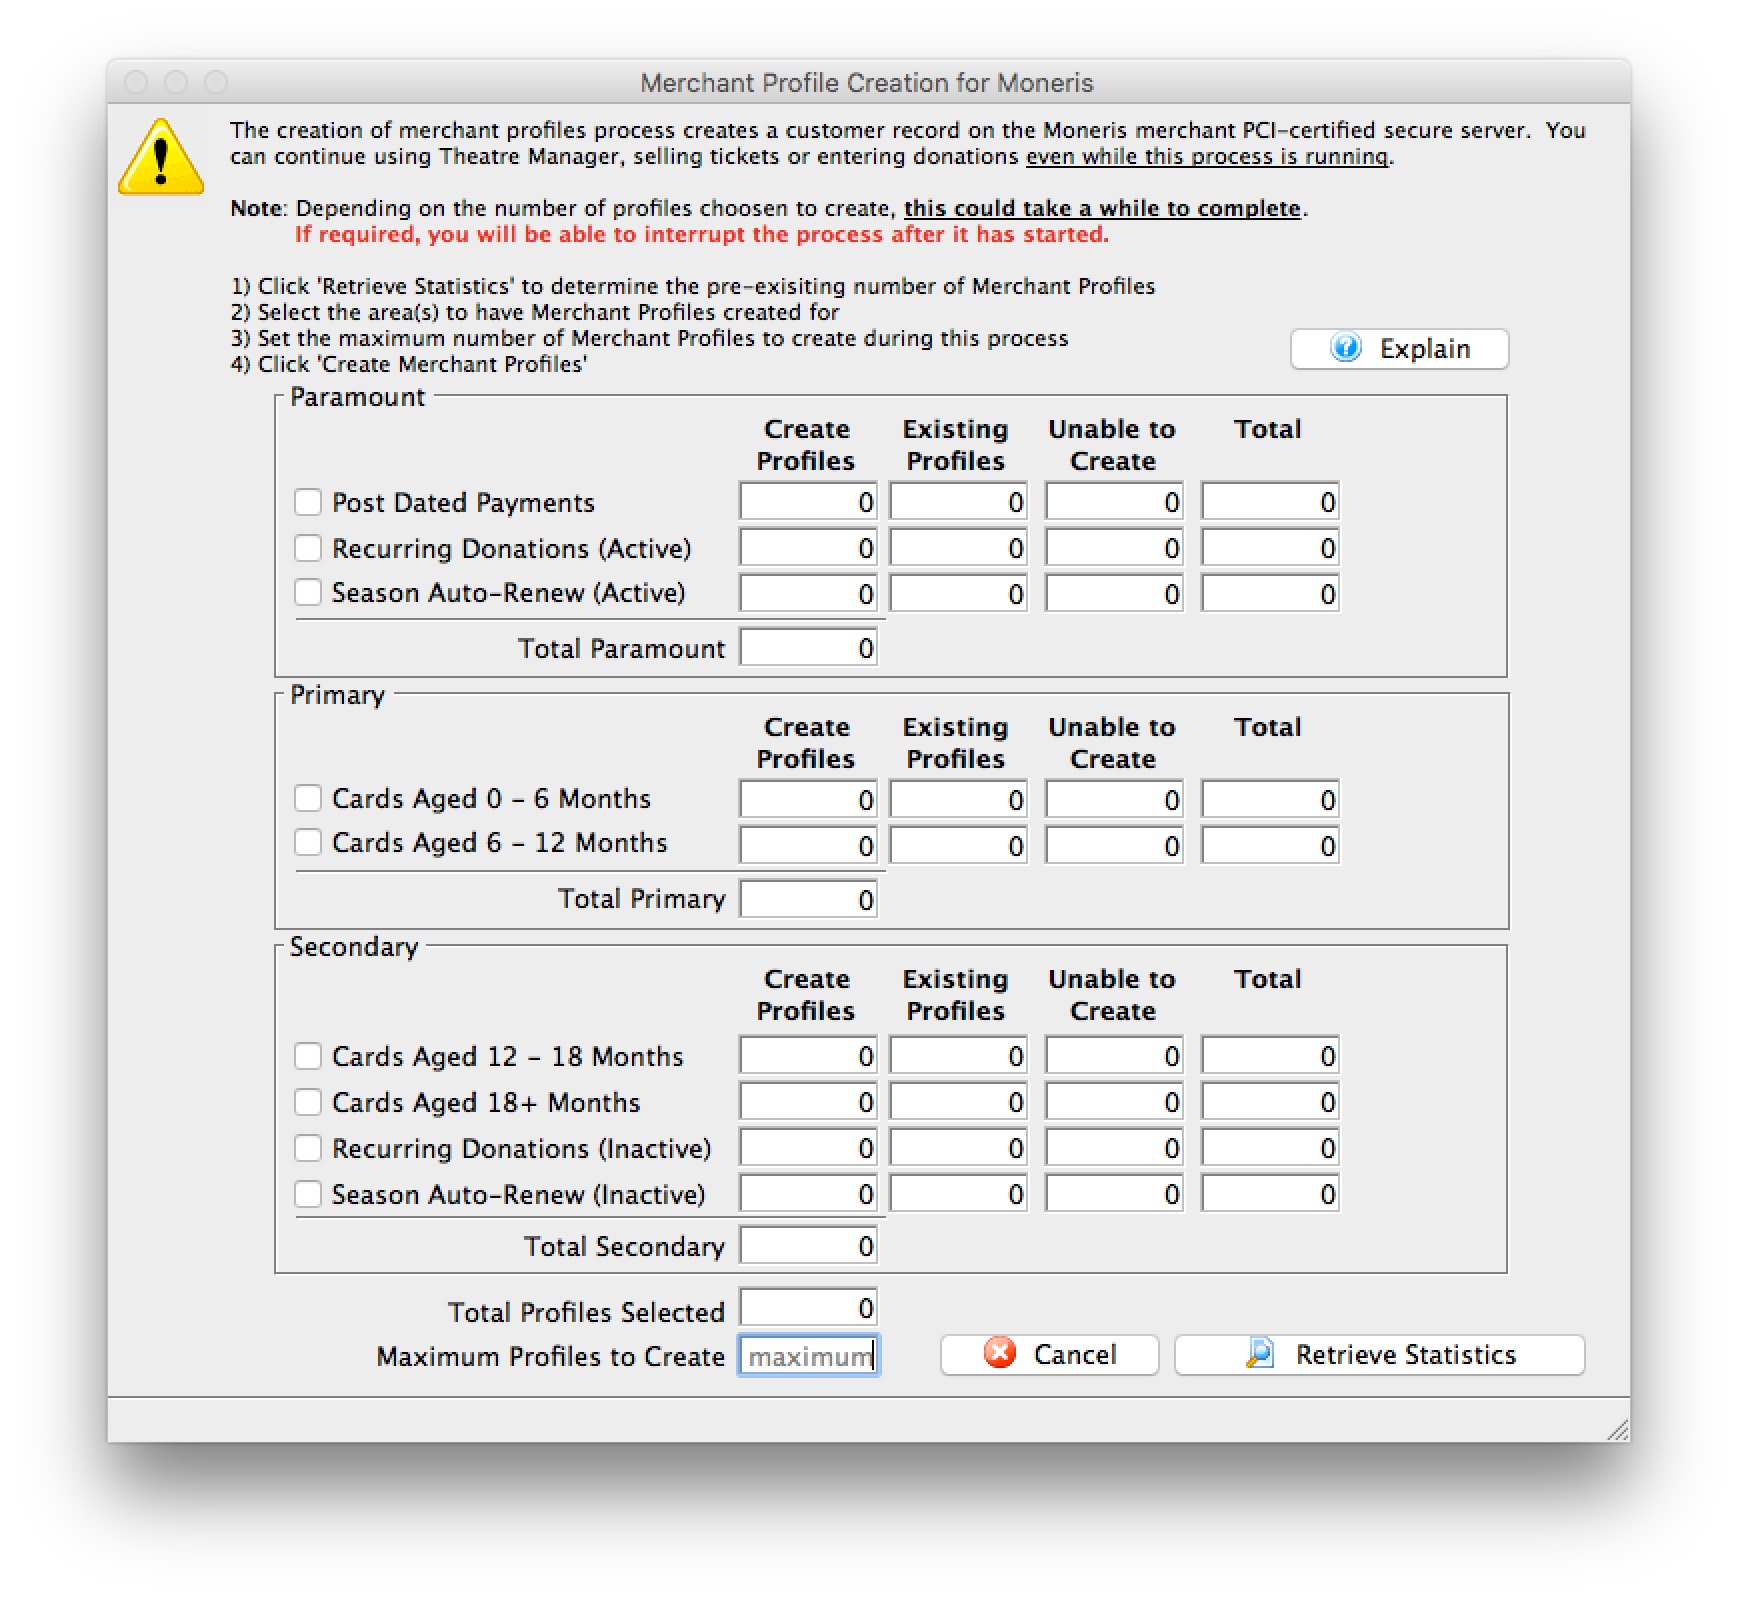
- Click Retrieve Statistics.
A confirmation window will open prior to proceeding.
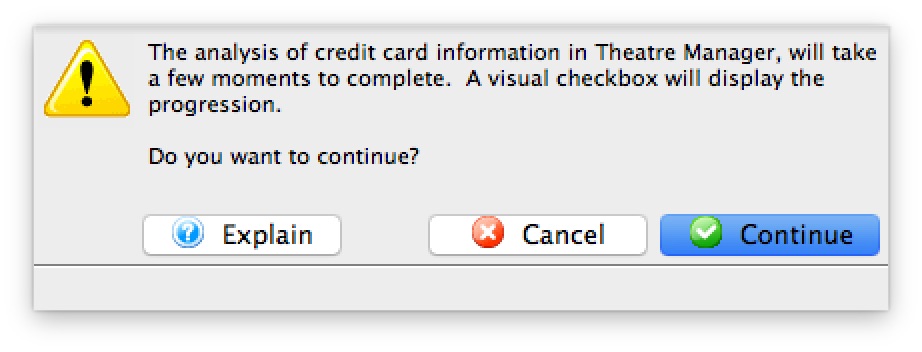

Depending on the number of existing credit cards in Theatre Manager, the credit card analysis tool determining the number merchant profiles to create may take a while to complete. - Click Continue.
A progress checklist window will open.
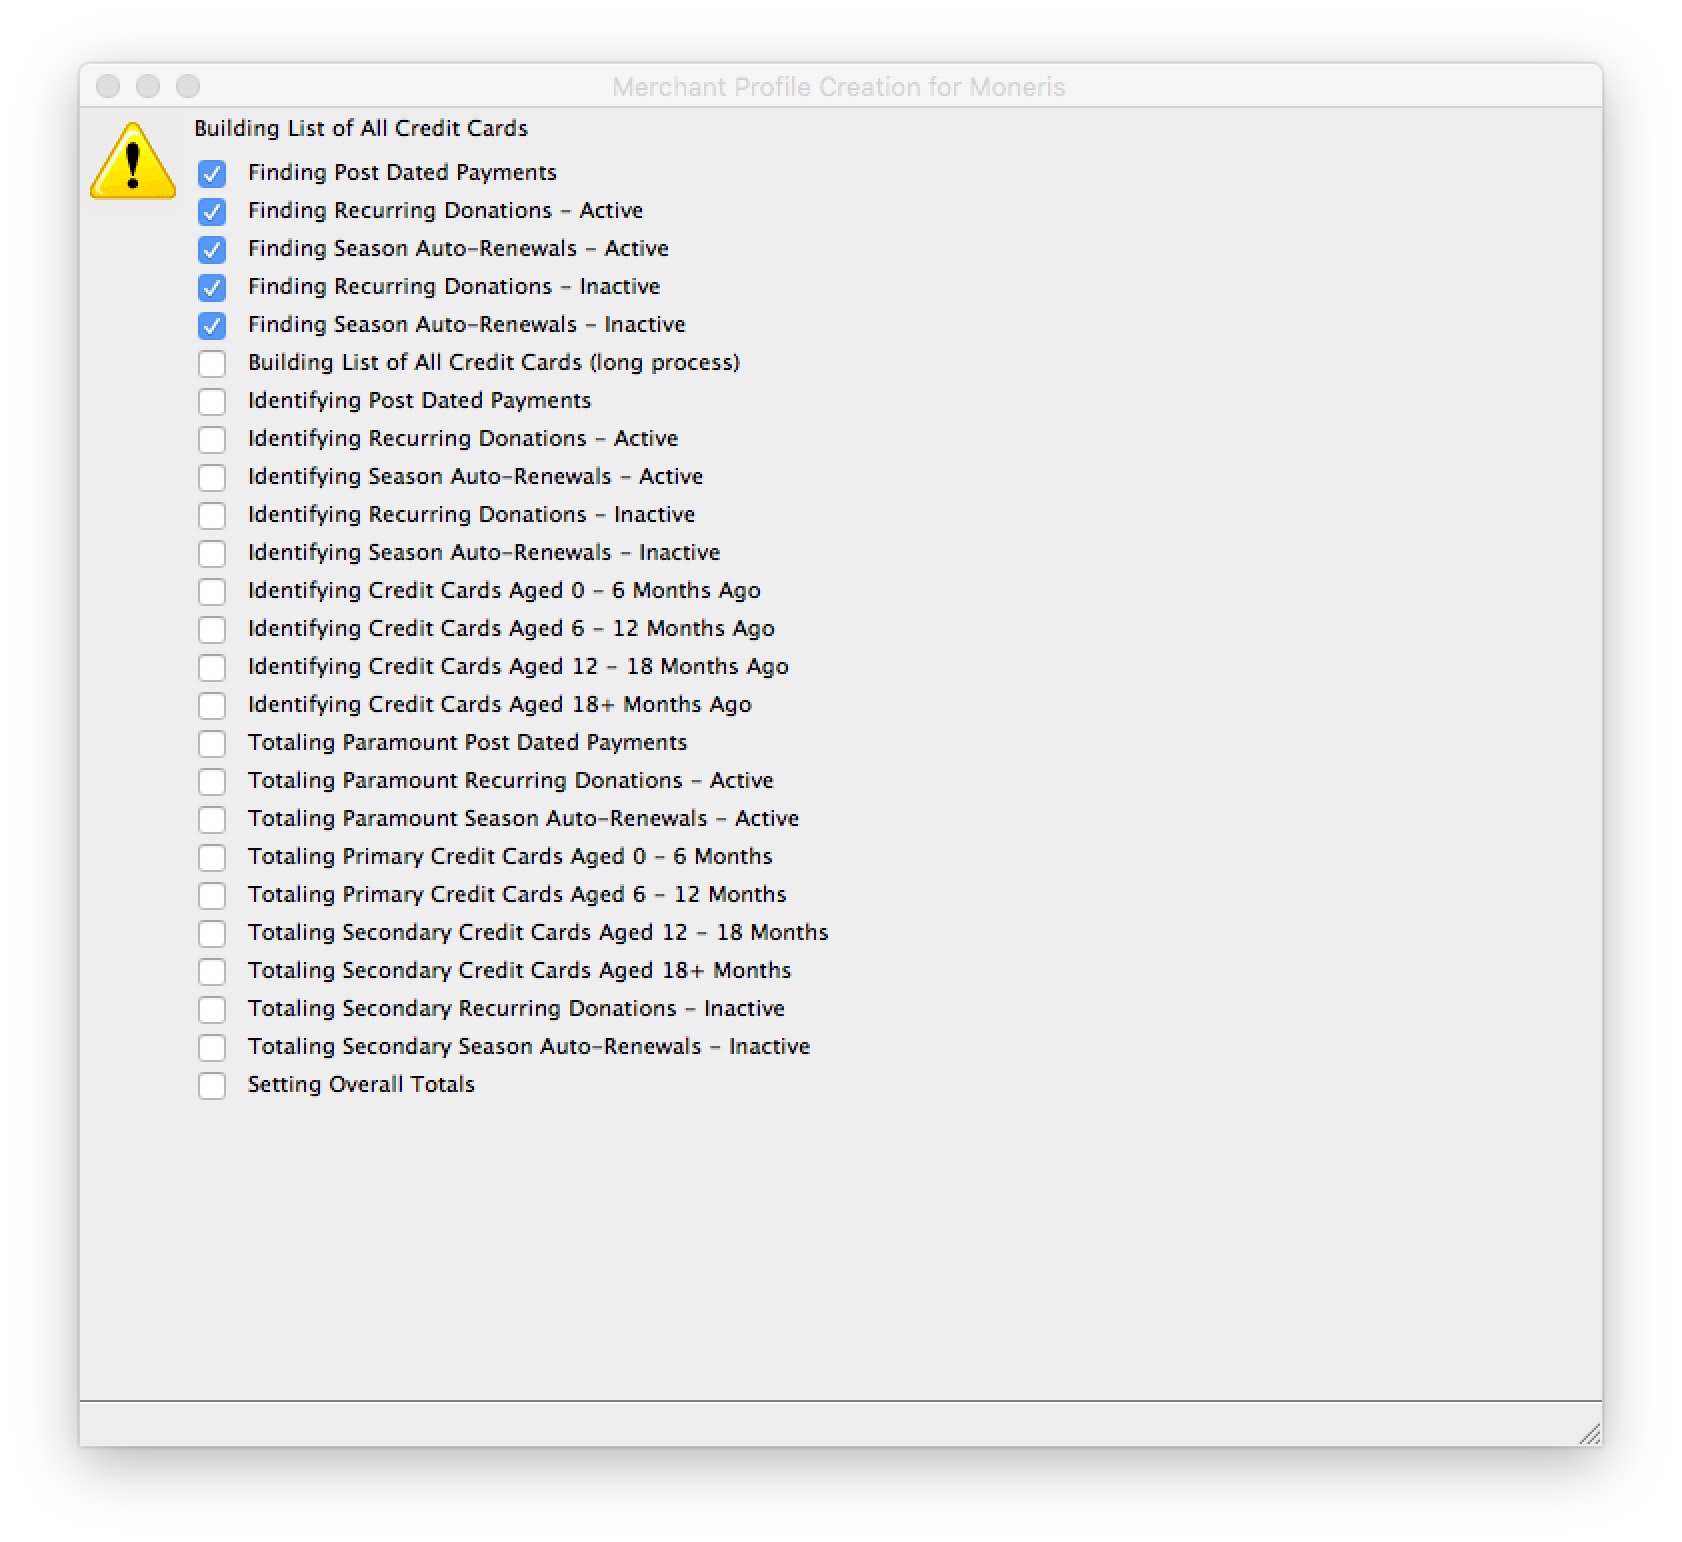
- Select the area(s) to have merchant Profiles created for.
- Set the maximum number of Merchant Profiles to create during this process.

If the Maximum Number of Profiles to Create is less than the Total Profiles Selected, the credit card list will be sorted in the following sequential order in attempts to create the most important credit card profiles first: - Post Dated Payments
- Recurring Donations (Active)
- Season Auto-Renew (Active)
- Cards Aged 0 - 6 Months
- Cards Aged 6 - 12 Months
- Cards Aged 12 - 16 Months
- Cards Aged 18+ Months
- Recurring Donations(InActive)
- Season Auto-Renew (InActive)
- Credit card last used/updated date
- Click Create Merchant Profiles.
A confirmation window will open prior to proceeding.
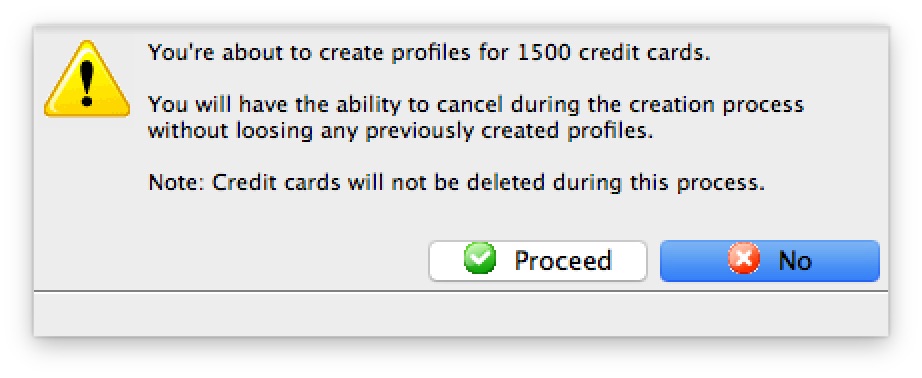

Depending on the number of merchant profiles requested to create, the process may take a while to complete. - Click Proceed.
A progress window will open.
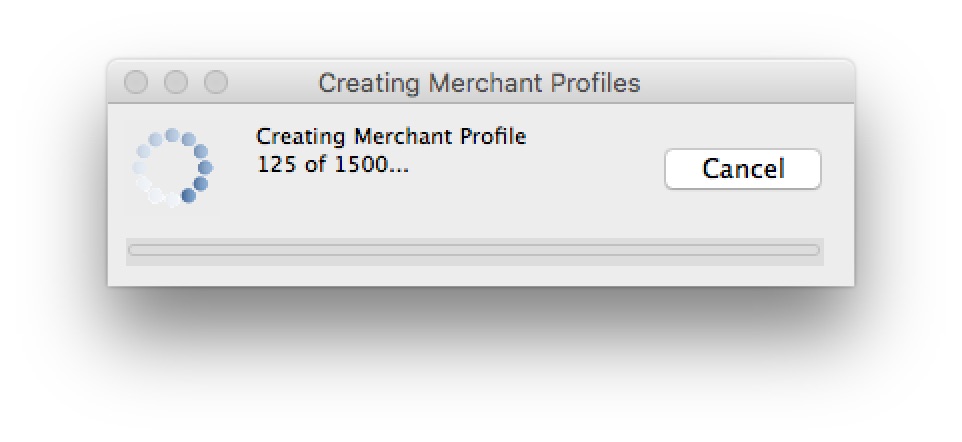

Clicking cancel on the progress window will stop the process. All merchant profiles that have been created up to the time the cancel button was clicked, will remain. - Upon Completion of the Routine.
A status window will open.


If a message that 0 merchant profiles were created after running the Building Merchant Profiles for Existing Cards function: 
- Verify that this merchant account has credit card payment types(i.e. VISA, MC, DISC, AMEX, etc.) created and assigned in code tables.
- Verify the Profiles API Login Key and/or Profiles API URL are valid if your merchant account requires either of these 2 fields.
- Contact your merchant provider representative to confirm they have enabled the "Customer Payment Profiles" feature on your merchant account.
- Authorize.Net - use the feature name Customer Profiles
- Bambora - use the feature name Payment Profiles
- Elavon - use the feature name Card Manager Transactions
- Moneris - use the feature name Hosted Vault
- Paymentech Oribital - use the feature name Customer Profile Management

Each merchant provider has its own unique name for the setup and maintaining of customer's payment profile information. When talking with your merchant provider, use the following name to describe the feature you'll be activating:

Creating a Merchant Profile
Merchant Profiles are created automatically when the Merchant Profile option is enabled for a merchant provider. When a credit card number is provided as a form of payment and a merchant profile does not already exist for this specific patron/payment combination, Theatre Manager will communicate with the merchant provider directly to get a Client Token and Payment Token assigned for the patron's payment information.
Patrons will have a separate Client Token/Payment Token combination for each credit card number used for payment.
|
Merchant Profiles are not shared between merchant providers, even if the merchant account is with the same merchant provider. If you have multiple merchant accounts setup for different operational unit within your organization (i.e. box office sales, internet/web sales and/or development) and each merchant account is enabled to maintain profiles, then a patron could have multiple Client Token/Payment Tokens for the same credit card if the patron provides payment with those different operational units. In most cases the organization only has a single merchant account, thus there would only be a single Client Token/Payment Token for each patron credit card. |
|
For patron credit card security reasons, functionality to manually enter the Client Tokens/Payment Tokens generated by a merchant provider into Theatre Manager is not allowed. |
Deleting a Merchant Profile
- Open the Merchant Profiles List window.
Click here to learn how to access the Merchant Profiles List window.
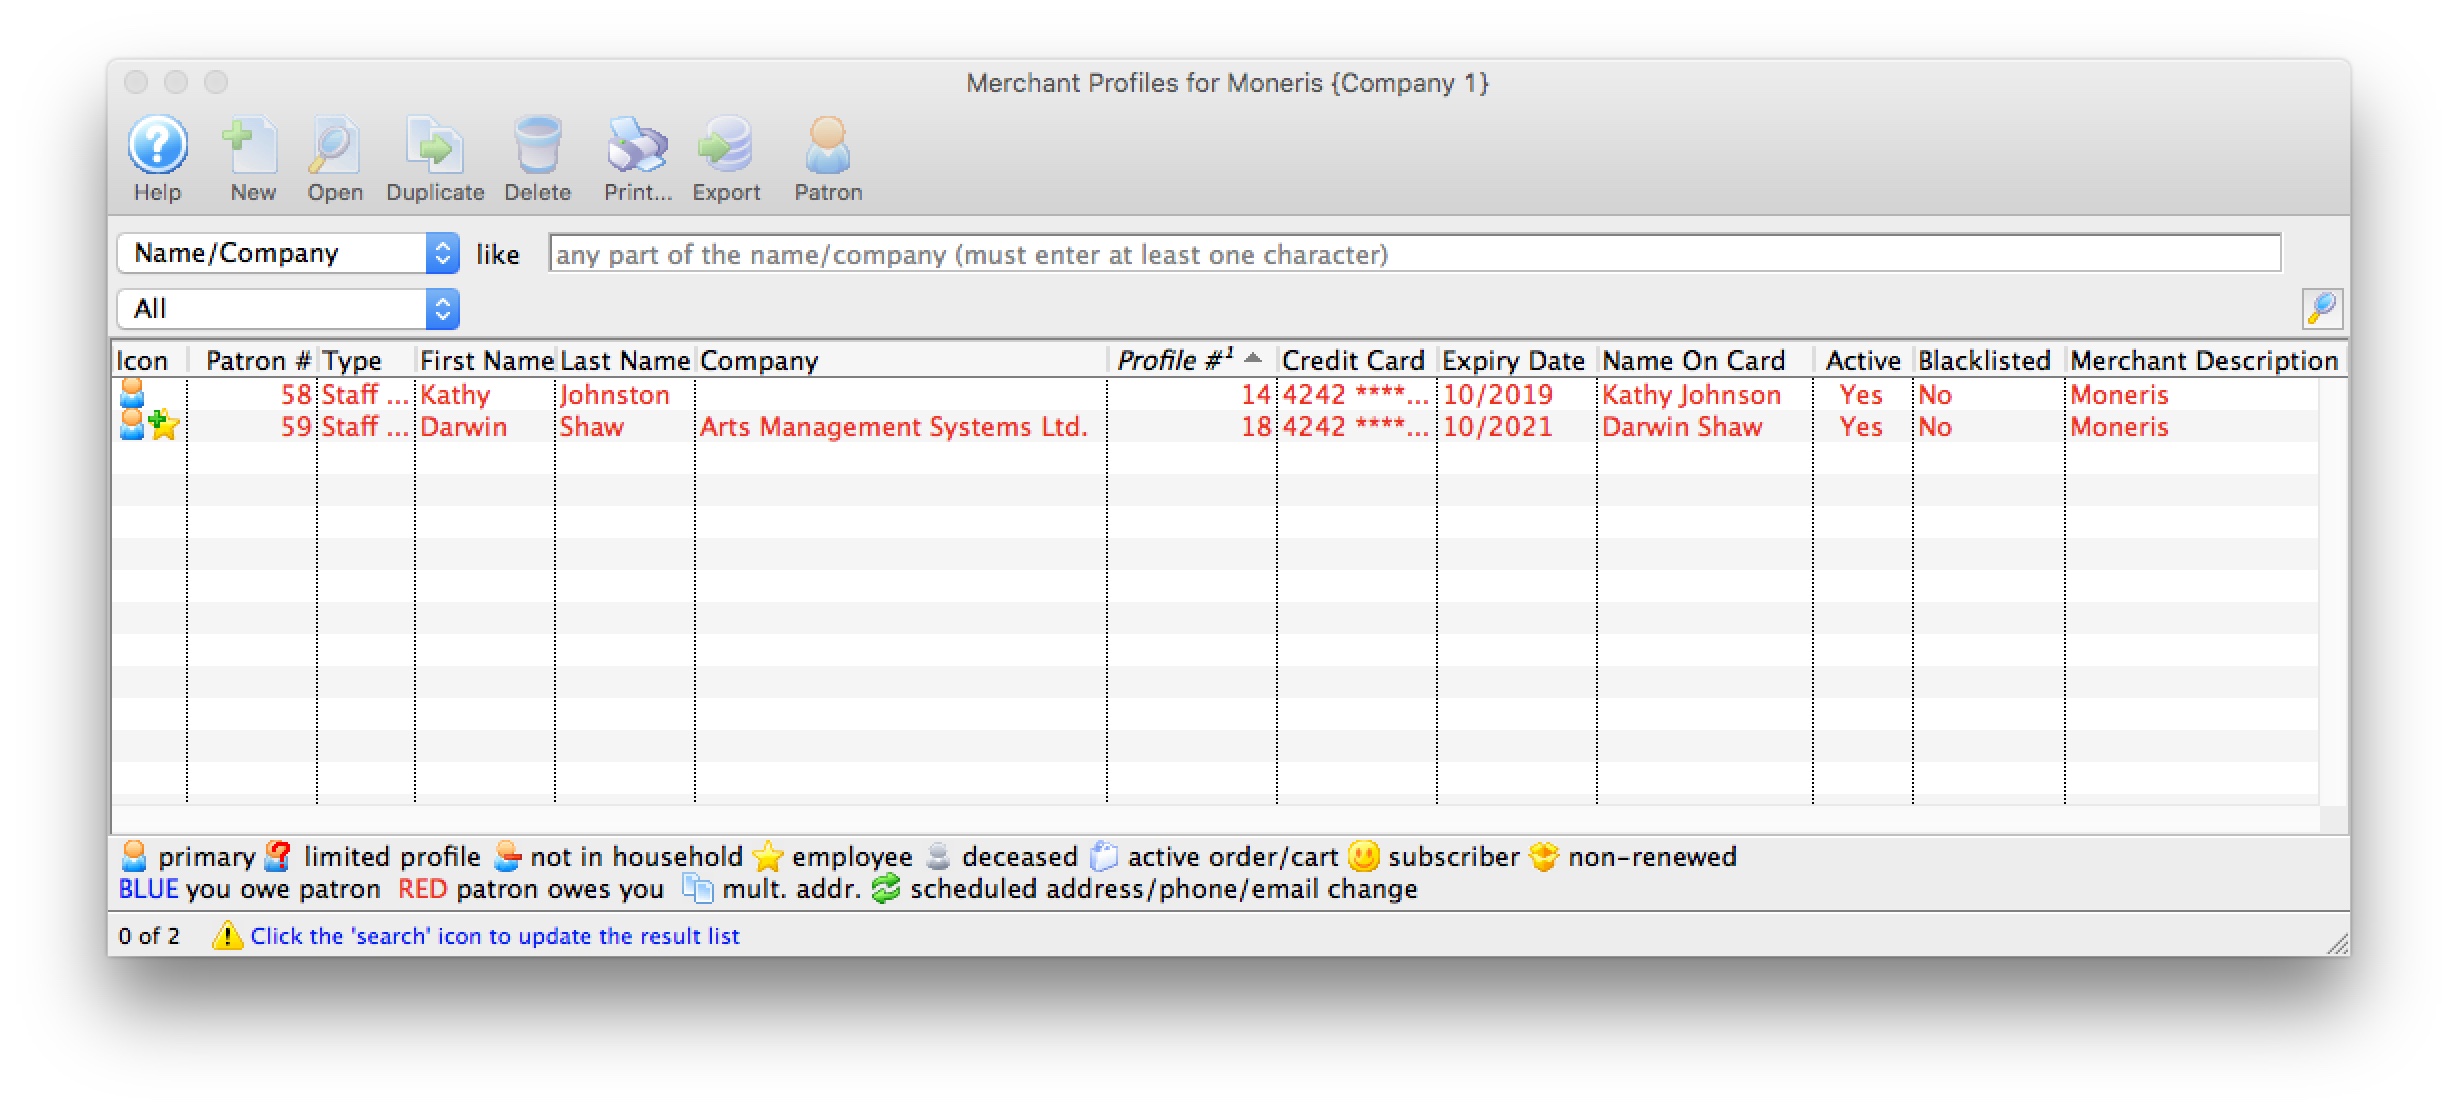
- Select the Merchant Profile to be deleted.
Single click on a Merchant Profile to select it.
- Click the Delete
 button.
The Delete Record confirmation opens.
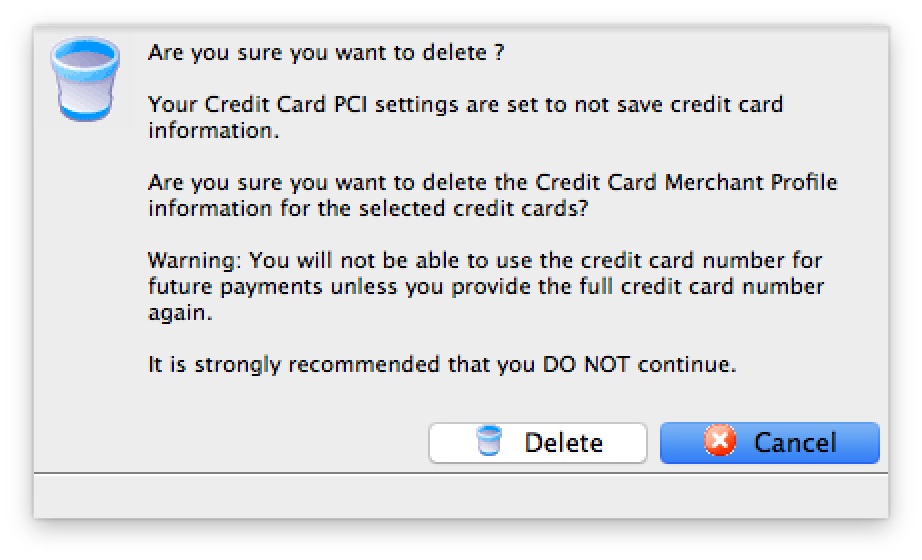
- Click the Delete
 button.
A second Delete Record confirmation opens.
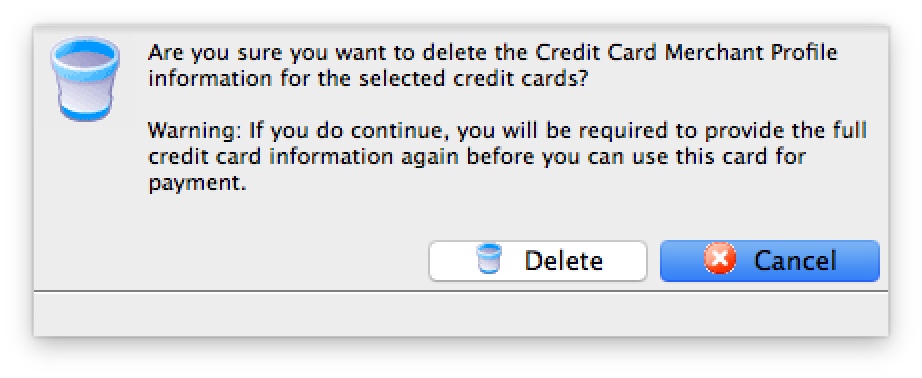
- Click the Delete
 button.
The Merchant Profile from Theatre Manager is now deleted.

Theatre Manager does a best attempt to delete the customer profile from the merchant provider's servers. There could be a circumstance where the customer profile cannot be deleted using the API calls from Theatre Manager. If this occurs, login into your merchant provider's web portal and delete the customer profile manually.
If the Merchant Profile is referenced by other files in the system, you will be unable to delete it and Theatre Manager will not delete the customer profile from the merchant provider's servers.
Merchant Profiles Customer List
The Merchant Profiles List can be used to review the customer profiles created and located on your merchant provider's secure PCI servers. This list can also be narrowed to only patrons on a specific grouping by using select criteria. This window is only visible to an employee if they have been granted access under Employee Setup.

Merchant Profiles List Buttons
 |
Opens the Merchant Profile Detail window for the selected profile. Click here for more information about the profile detail window. |
 |
Deletes the merchant profile. Click here for more information on deleting profiles. |
 |
Prints a report the of the profiles in the merchant profile list to screen or default print location. |
 |
Exports the data from the merchant profiles list into a tab delimited format and saves it to a selected location. |
 |
Opens the Patron record for the selected patron. |
Parts of the Merchant Profiles List Window
| Patron # | The unique identifier for this patron account. |
| Type | Type of Patron account. |
| First Name | The first name of the patron. |
| Last Name | The last name of the patron. |
| Company | The company that the patron works for. |
| Profile # | The company that the patron works for. |
| Credit Card | The credit card number. |
| Expiry Date | Date the card will expire. |
| Name on Card | Name printed on the credit card used for added security when processing the card. |
| Active | The state of the card and if it can be selected to process credit card transactions. Expired, lost or stolen cards can be set to an inactive state. |
| Blacklisted | Indicates if this credit card is blacklisted for this patron. If blacklisted, the patron cannot use the card again unless this card is reset. |
| Merchant # | The unique identifier for this merchant account. |
| Merchant Description | The internal description to identify the merchant account. |
Accessing the Merchant Profiles Customer List
There are a few ways to access the customer payment profiles, depending on the end result.To view all merchant profiles created for a specific merchant:
- Open the Merchant List window.
- Edit the merchant account.
- Click the Profiles tab.
- Click the Manage Profiles button.
To view all merchant profiles for a specific patron:
- Open the Patron Window.
- Click on the Credit Card Tab.
- Right-mouse-click on the patron's credit card list within the patron window.
- Select "Merchant Profiles" from the context pop-up menu.
To view merchant profiles for a specific patron while making a payment:
- Open the Payment Window for an order.
- Choose a credit card payment method from the list of payment options.
- Click on the Credit Card Lookup button.
Merchant Profiles Customer Detail
Parts of the Merchant Profiles Detail Buttons
 |
Deletes the merchant profile. Click here for more information on deleting profiles. |
Parts of the Merchant Profiles Detail Window
| Merchant | The unique identifier and internal description for this merchant account. | ||
| Card Number | The credit card number. | ||
| Expiry Date | Date the card will expire. | ||
| Name on Card | Name printed on the credit card used for added security when processing the card. | ||
| Client Token | The unique identifier assigned by the merchant provider for this patron's customer information. | ||
| Payment Token | The unique identifier assigned by the merchant provider for this patron's payment information.
|
Miscellaneous Tab
The miscellaneous tab is used to provide contact information for your merchant provider. Please put information into these fields so that your staff will know who to contact in case of messages from the merchant provider like 'Hold Card' or 'Decline'. Clients using Orbital can use the information pictured for the name and phone number fields, then the email address of the organization's finance director or accountant. Those using other service providers will need to fill in contact details for their Merchant Provider or bank here.
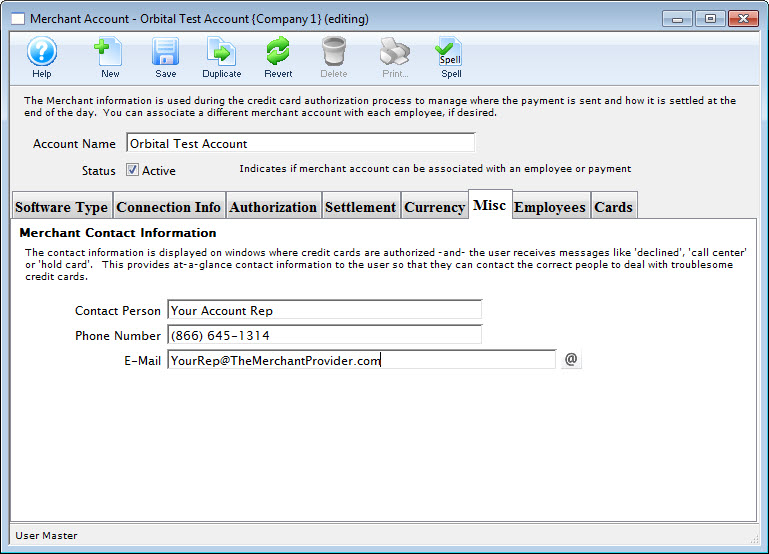
Parts of the Miscellaneous Tab
Contact Person |
Enter the name of the Merchant Contact person when a card comes back as 'declined', 'call center' or 'hold card' |
Phone Number |
Enter the phone number of the contact person |
Enter the e-mail address of the Contact person |
|
Opens an email to be sent to the address listed |
Employees Tab
This is the list of employees that currently use this merchant account. If changing merchant accounts, you might need to change these employees to another merchant record.
If you have multiple merchant accounts (or are retiring an old merchant provider), you can drag employees from the 'employee' tab in one merchant detail window to another to transfer them to another merchant provider.
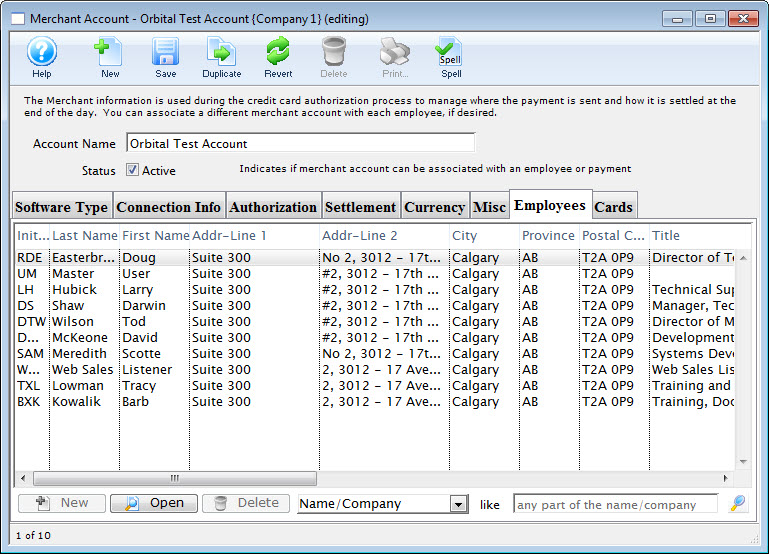
Parts of the Employees Tab
Employee List |
Displays the Employee List of those employees who can use this merchant account. |
Opens the Employee Access window for the selected employee.click here for more information on the Employee Access window. |
Cards Tab
This tab displays the credit cards accepted for authorization by this merchant account.
If you have multiple merchant accounts (or are retiring an old merchant provider), you can open up the card window on both merchant providers and drag the payment types from one merchant account to another. Any post dated payments associated with the old merchant account will be transferred to the new merchant account so they can be authorized in the future properly.
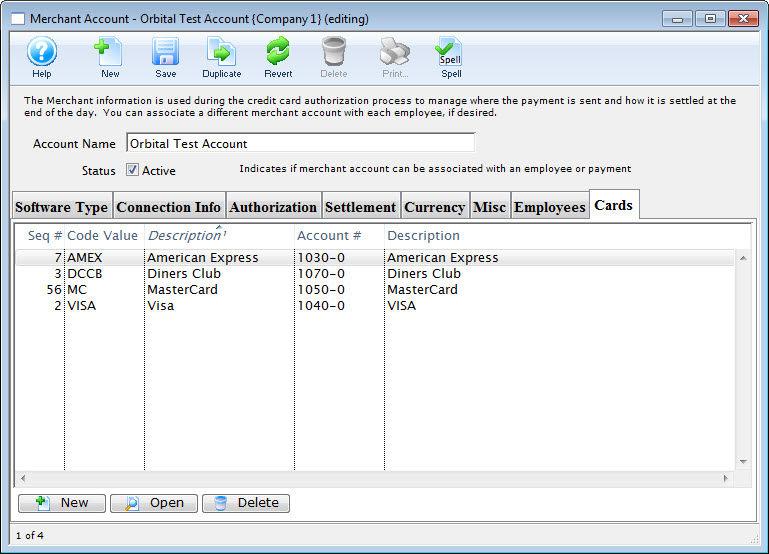
Parts of the Cards Tab
You can add cards from the Payment Methods defined in Code Tables. Click here for more information. |
|
You can open and edit the selected card. |
|
You can remove card that are no longer accepted |
Creating a Merchant Account
- Open the Merchant Account Setup window.
Click here to learn how to access the Merchant Account List window.
- Click the New
 button.
The Merchant Account Detail window opens.

- Enter the Account Name of the Merchant Account.
- Make appropriate Server Software and Merchant Provider selections in their respective drop-down menus.
- Enter the PNS , Account # or Merchant Number provided by the merchant provider.
- Click the Connection Info
 tab.
tab.
The Connection Info window opens.
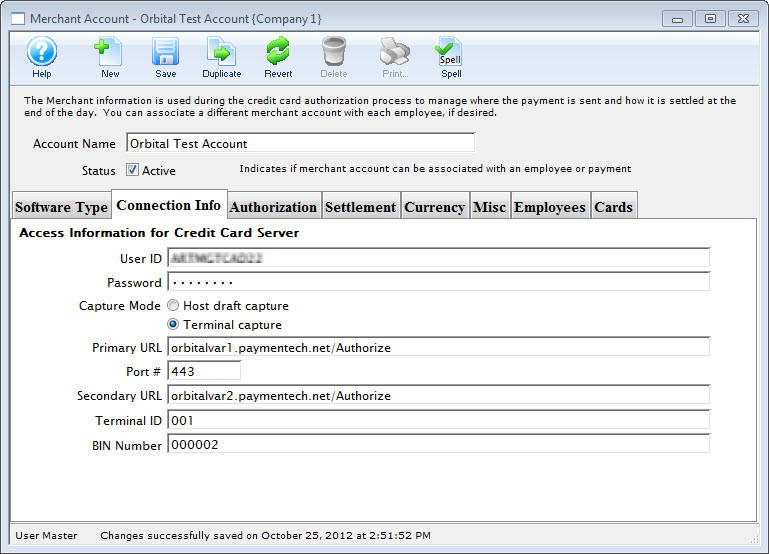
- Enter data in the Merchant Account Connection Info tab, based on the information given by the merchant provider.
For more information on the Merchant Account Connection Info tab click here.
- Click the Authorization
 tab.
tab.
The Authorization window opens.

- Choose the correct authorization settings in the Authorization tab.
For more information on the edits and accounting tab click here.
- Click the Settlement
 tab.
tab.
The Settlement window opens.

- Enter data in the Settlement tab.
For more information on the Settlement tab click here.
- Click the Currency
 tab.
tab.
The Currency tab window opens.

- Enter the currency details for this merchant account.
For more information on the edits and accounting tab click here.
Click the Misc
 tab.
tab.
The Miscellaneous tab window opens.

Enter the merchant providers contact name, telephone and email address.
For more information on the edits and accounting tab click here.
Click the Employees
 tab.
tab.
The Employees tab window opens.

- Use the Add button in the lower left of the tab to add employees who should use this merchant account.
An employee can belong to only one merchant account at a time. For more information on the edits and accounting tab click here.
- Click the Cards
 tab.
tab.
The Employee tab window opens.

- Use the New
 button (in the lower left of the tab) to add credit card payment methods that should use this merchant account.
For more information on the edits and accounting tab click here.
- Click the Save
 button.
The new Merchant Account is now created.
Editing a Merchant Account
To edit a Merchant Account, you perform the following steps:
- Open the Merchant Account List window.
Click here to learn how to access Merchant Account List.
- Select the Merchant Account to be edited.
Single click on a account to select it.
- Click the Open
 button.
The Merchant Account Detail window opens.

- Make changes as needed.
- Click the Save
 button.
The merchant account is now updated and saved.
Deleting a Merchant Account
- Open the Merchant Account List window.
Click here to learn how to access the Merchant Account List window.
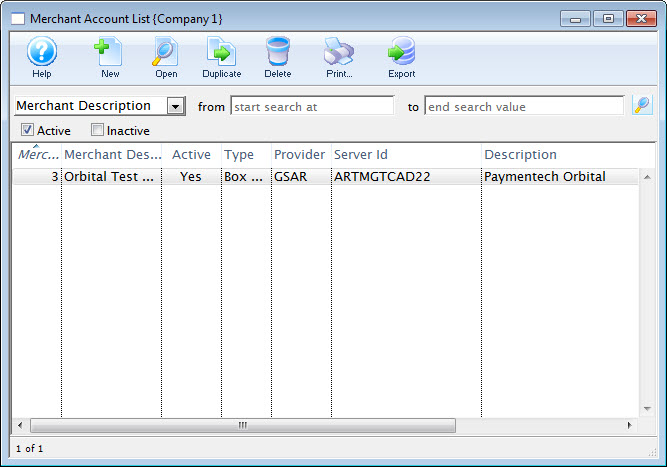
- Select the Merchant Account to be deleted.
Single click on a Merchant Account to select it.
- Click the Delete
 button.
The Delete Record confirmation opens.
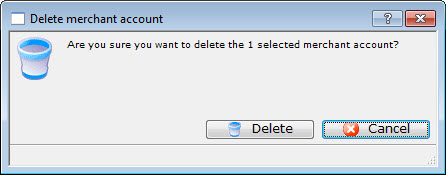
- Click the Delete
 button.
The Merchant Account is now deleted.
If the Merchant Account is referenced by other files in the system, you will be unable to delete it.
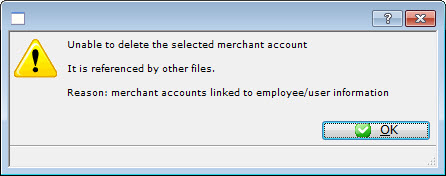
How to Change a Merchant Provider
 |
If considering changing merchant providers, be sure to read about the impact and business ramifications for purchases done with the old provider that might need refunded un the future. |
 |
Before beginning this process, we suggest picking a time that will naturally limit any transactions that could be processed until the new Merchant account is in place. (i.e. earlier in the morning). A switchover can usually be done in 5 minutes or less.
If you wish, you can turn off web sales (only necessary for comfort). |
The general steps covered below are:
- Preparing for the switchover to a new Merchant Account
- Switching Merchant Information in Theatre Manager
- Testing the merchant account
- Migrating Post Dated payments to your new merchant account
- Updating payment Ticket Face to print your New Merchant Account Information
Impact of Changing a Merchant Provider
 |
Changing your Bank is not the same as changing your merchant provider. You can change either/or at any time. Refer to the basic definitions used the credit card industry for more information on roles and responsibilities of either. |
Advantages of Changing Merchant Provider and/or Processor
You may get various benefits such as:
- more amenable rates
- better service when you call them for help
- more supported features such as hosted payments online or pin pads
Disadvantages of Changing Processors
There are disadvantages of changing service providers - most notably:
- Linked Refunds which apply to a specific patron, merchant and order -and-
- merchant profiles which will need to be recreated as patrons by.
If you suspect you might have a significant number of refunds to do for upcoming shows that are or could be cancelled, you might want to:
- hold off on changing your merchant provider until such a time you've got a low exposure on the need to do refunds -or-
- Migrate to the new merchant account, while keeping the old one available/active for future box office returns for a period of time - say a few months, if that option is possible.
Why are refunds problematic during Merchant Changeover?
In recent years, merchant providers have instituted fraud policies that apply one or more of the following rules (Linked Refunds) that mean refunds
- must within a certain number of days of authorization (normally 120, but can sometimes be extended)
- to the same card that was used to purchase
- with a token provided by the merchant provider (changing merchants nullifies the token)
- up to the same amount on the original purchase
- using the same order number
- to the same merchant provider
The rules above are imposed by the credit card companies and they can change at any time. If you change a merchant provider, then at least 3 of the rules above are viiolated:
- #3 (the token),
- #5 (the same order number),
- #6 different provider
The new merchant provider will not allow refunds for any charges done by the old merchant provider.
 |
You may need to ask the new merchant provider to approve you for independent refunds - which they may charge more for, or may not give you that permission.
Note, that Independent refunds of a card used with a new merchant processor means you must ask the patron for their card number again. (linked refunds do not need you to get the card). |
 |
Alternatively, you many need to keep your old merchant provider setup available for a few months for refunds only - until your risk of needing to do a refund to the old provider is past. |
Step 1: Preparing for the switchover to a new Merchant Account
- Set up the information for your new merchant account.
- Do not activate it yet -and-
- Set the new merchant to emergency mode
- Set up NEW credit card payment methods for your NEW merchant accounts
- You will need to go to the payment code table
- Create card payment types for VISA, MCARD, AMEX etc that your new merchant provider accepts
- Associate them with your new merchant provider created in step 1
- You might also want to rename your old VISA, etc payment methods to 'VISA - old merchant provider' so that you know which is which at a glance
- Complete the End of Day Process for your current Merchant Provider.
- Immediately turn your existing merchant provider into emergency mode. This will allow:
- Sales to continue while you complete the switchover
- Cards entered while in emergency mode are not authorized, but will be moved to the new merchant provider as post dated payments (due today).
- Those cards can then be authorized in next end of day against the new merchant account.
- This allows you to maximize sales uptime and minimize web sales outage to minutes.
Step 2: Switching Merchant Information in Theatre Manager
- Goto Setup >> System Tables > Merchant Accounts to see the merchant account list. You should see both your current and your future merchant records.
- Open both your old merchant account and your new one.
- Select the Employee tab on both windows
- Select and drag all employees from the old merchant account to the Employee tab of the new merchant account.
- You will see that all employee names now appear on the new merchant. From this point in, those employees will use the new merchant account.
- On the NEW merchant account window:
- Check the 'Active' flag in the new merchant account
- Uncheck the emergency mode setting in the new merchant account
- Close the new merchant account window
- On the OLD merchant account window:
- Uncheck the Active box in the old merchant account window.
- Close the old merchant account window
Step 3: Testing the merchant account
- processing a test transaction to ensure the new merchant account processes cards correctly.
- Run an End of Day in Theatre Manager to ensure the transaction batches properly.
- Open your online merchant profile and see that the batch is there and closed, with the right amount
Once you are sure the transactions are processing correctly you can then start up the web sales again and employees can log back into the database.
 |
When you make the changeover to the new merchant account, you must
RESTART your web listeners to ensure all web checkouts use the new merchant provider |
Step 4: Migrating Post Dated payments to your new merchant account
These credit card payments are linked to the payment method for the old merchant processor and need to be switched over to the new processor. To do so, repeat the following steps for each credit card type you now accept for your new merchant provider.
 |
The transfer process only does one Credit Card type at a time in case you want to split merchant accounts. User it iteratively to transfer
|
- Go to Setup->System tables and find all your payment methods. You should see a list of your payments like below:
- Open one of the OLD credit card payment methods associated with the OLD merchant provider. It should look like the window below.
- The Migrate Postdated button will be active.
- Click on it and a list of merchant providers will appear.
- Your new one should be visible
- select it
-
You will be asked to confirm that all post dated payments are to be moved to the new merchant provider. Confirm if you wish to continue. If you make a mistake, you can always reverse the process and move from the new merchant provider back to the old one.
- Make the payment method you just transferred the post dated payments from INACTIVE so that it can't be used again.
- Repeat the above steps for each of the other credit cards you are transferring to the new merchant account
 |
NOTE: to help prevent possible mistakes transferring from the old merchant to the new, the NEW merhant account will only appear in the popup list if:
|
Step 5: Updating Payment Ticket Face to print your New Merchant Account Information
These days, most people do not print a credit card receipt, or they email tickets
- Goto Setup >> Ticket Faces
This will open the Ticket Faces List window.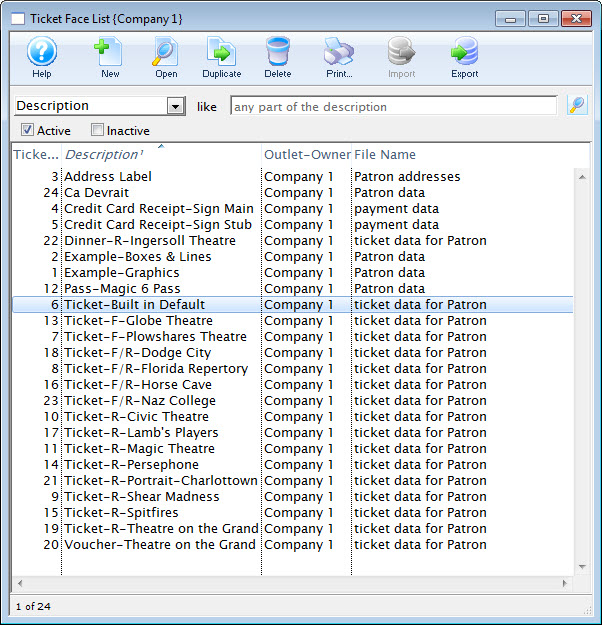
- Locate your Credit Card ticket Face
- Edit the ticket face
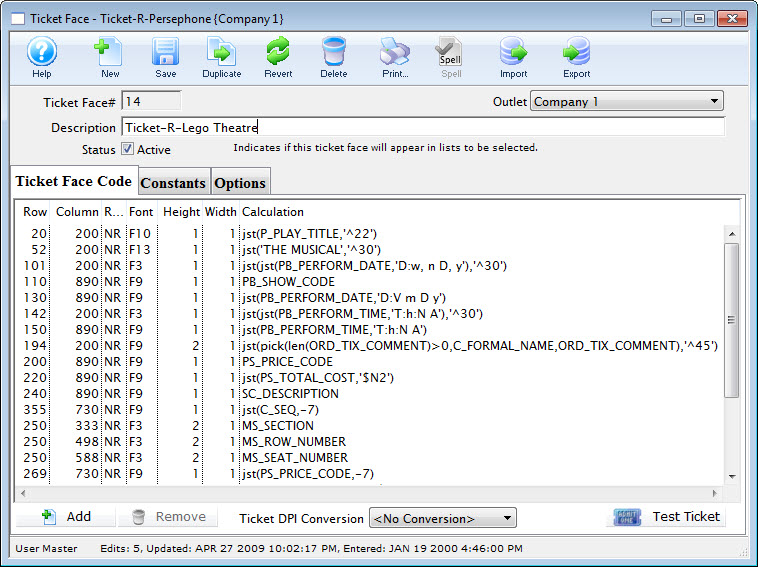
- Locate the line of code that displays your current merchant account number(s) (if they are hard coded on the ticket face). If the field is MM_MERCHANT_NUMBER, then no change is require to your ticket faces
- Edit the line of code to have your new merchant account information
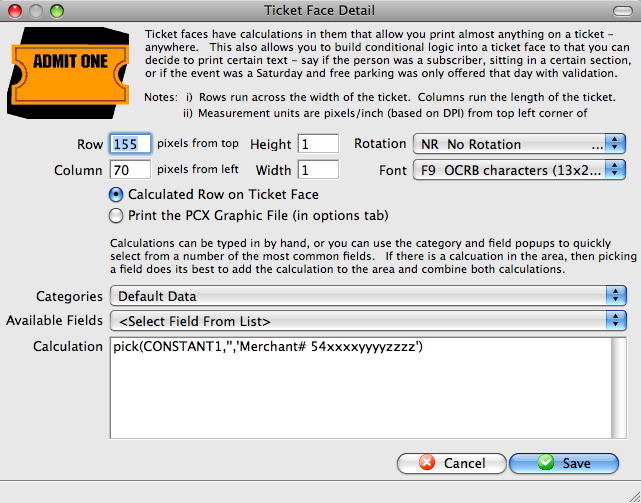
- Click the Save
 button
 - Click Save
 the toolbar

