Employee Setup
Employees can have various levels of access to control their ability to use the different modules of Theatre Manager. Access to Employee Setup is through Setup >> Users and Access >> Employee List.
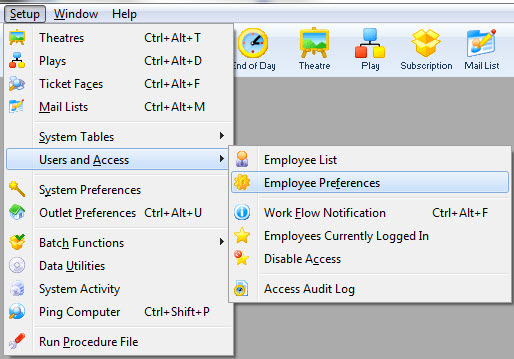
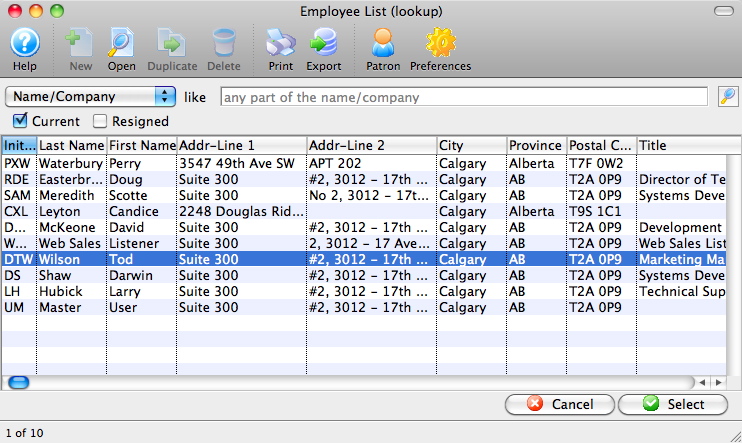
The Employee List window opens. Here you can enter first and/or last name information to search for a specific employee, or simply hit enter while the search fields are blank to pull up a list of all employees.
![]()
For more information on the Employee List click here.
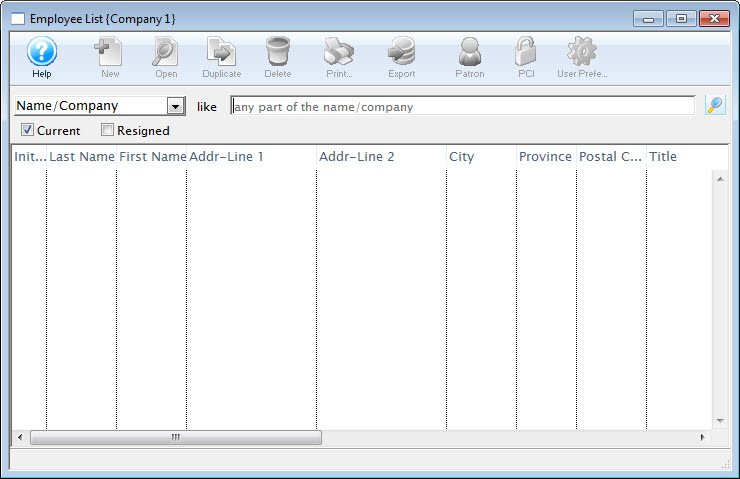
Employee List
The Employee List window can be accessed through Setup >> Users and Access >> Employee List and is used to quickly locate an employee record or to generate a quick list of employees that can be printed.

Parts of the Employee List Window
 |
Opens the Theatre Manager online help. |
 |
This button is not accessible because new employees must be added through the Patron Window. It is on the window for consistency. For more information on adding employees click here. |
 |
Opens the selected employee record for editing. For more information on editing employee access click here. |
 |
This button is not accessible because new employees must be added through the Patron Window. It is on the window for consistency. For more information on adding employees click here. |
 |
Deletes the selected employee. This button is only accessible if the employee can be deleted (if they have no history tied to their login). |
 |
Generates a report of the employee list to the screen or default print location. |
 |
Exports out the employee list in a tab-delimited format. |
 |
Opens the Patron Window. For more information on the Patron Window, click here. |
 |
Open the selected Employee Preferences for the selected employee. For more information on Employee Preferences, click here. |
 |
Merges the selected employee records into one. If you are trying to merge two patrons together that are employees, you must do a two step process:
|
| Initials | Unique employee initials. |
| Last Name | Last name of the employee. |
| First Name | First name of the employee. |
| Address Line 1 | Employee address. |
| Address Line 2 | Employee address. |
| City | City the employee resides in. |
| Province | Province or State the employee resides in. |
| Postal Code | Postal or Zip Code for the employee. |
| Title | Job title of the employee. |
| Tran Source | Department within Theatre Manager the employee is assigned to. |
| Outlet-Owner | If using outlet edition, the outlet the user is assigned to. |
| Primary Phone | Primary telephone number for the employee. |
| Primary E-Mail | Employee's primary email address. |
| Primary Fax | Employee's primary fax number. |
| Web | Employee's web site. |
| Patron # | Employee's patron #. |
Finding Employees in the Employee List Window
To find an employee, you would perform the following steps:
- Click Setup >> Users and Access >> Employee Setup
- Make a selection from the drop down list and enter a value.
To access all employees leave the From and To fields empty.
- Click the Search
 button.
The results of the search are displayed in the Employee List window.
For more information on the Employee List window click here.
Merging Employee Records
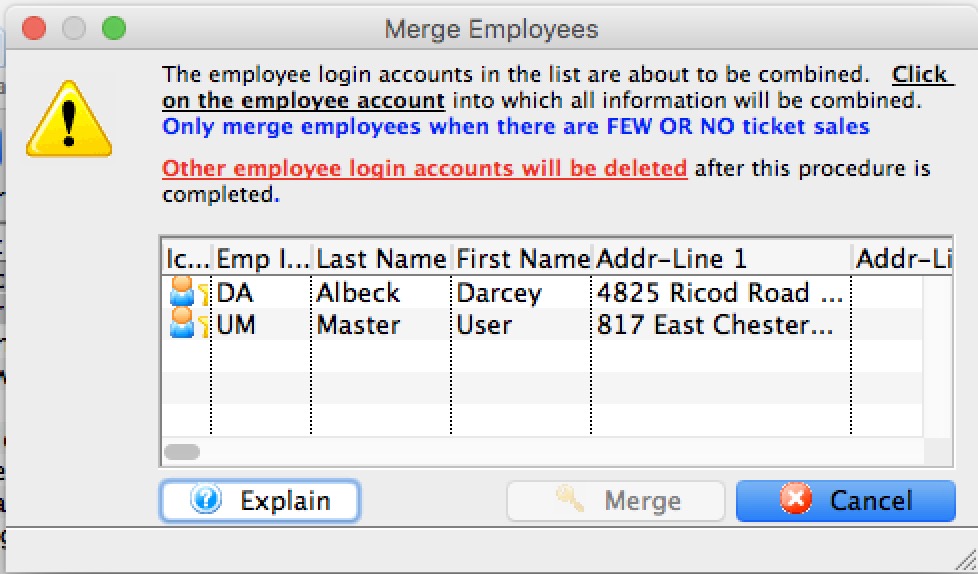 Merging two patrons who are both employees requires two steps:
- You must merge the employee record first. This has the effect of changing all the records where the changed by, entered by, printed by, etc in the first employee to be the employee that you merge into.
- Then you can merge the patron records, since one of the patrons will no longer have an employee record.
Why must two patrons who are employees have their employee records merged first<
The rule is that you cannot merge an employee into a patron. The reason is that every record in the system it tagged with one employee's name or another for the various entered by, changed by, sold by, printed by (etc) fields -- and deleting the employee would leave a referential integrity problem -- records would have missing data.
What if I want to eliminate somebody as an employee
As mentioned above, you can't simply delete the employee record to make them a non-employee.
Normally you would edit their employee record and set a resigned date. This means they can no longer log in while preserving a history of what they changed in transactions - as required for PCI compliance.
However, should you really need to remove an employee record created in error (or who resigned decades ago), there is a simple trick you can use:
- Select all the people you don't want to have an employee record on the employee list.
- ALSO SELECT YOURSELF (or some other template user)
- Merge the selected people together INTO YOURSELF
Effectively you are just assigning all the changed by information from these employees to be yourself. Then it removes person as an employee.
Once they are no longer employees, you can merge the patron records.
Employee Access Window
The Employee window can be accessed in two different areas of Theatre Manager. It can be accessed through
- the Employee List at Setup >> Users & Access >> Employee List by selecting an employee and clicking the Open button. For more information on the Employee List click here.
- Alternatively, the Employee window can be accessed through the Patron List or Window. It can be accessed through
- the Patron List by searching for and highlighting the employee and then clicking the Employee
 button -or-
 - through opening the employee's Patron record and clicking the Employee button.
- the Patron List by searching for and highlighting the employee and then clicking the Employee
Parts of the Employee Window
| |
Opens the Theatre Manager online help. |
|
This button is not accessible because new employees must be added through the Patron Window. It is on the window for consistency. For more information on adding employees click here. |
 |
Saves any edits made to the Employee Window. For more information on editing employee access click here. |
|
This button is not accessible because new employees must be added through the Patron Window. It is on the window for consistency. For more information on adding employees click here. |
 |
Reverts changes made to the employee preference back to the last saved point. |
|
This button is not accessible because employees cannot be deleted. For more information on removing employees click here. |
|
Generates a report of the employee detail and access to the screen or default print location. |
 |
Spell checks any fields that can by typed in. |
|
Opens the Patron Window. For more information on the Patron window, click here. |
 |
Opens the Password Window. For more information on the setting employee's passwords, click here. |
|
Open the selected Employee Preferences for the selected employee. For more information on Employee Preferences, click here. |
 |
Allows access to be copied form one employee to another. For more information on copying employee access click here. |

|
For more information on the Access tab click here. |

|
For more information on the Data tab click here. |

|
For more information on the Functions tab click here. |

|
For more information on the Box Office tab click here. |

|
For more information on the Solicitor tab click here. |

|
For more information on the Facility Management tab click here. |
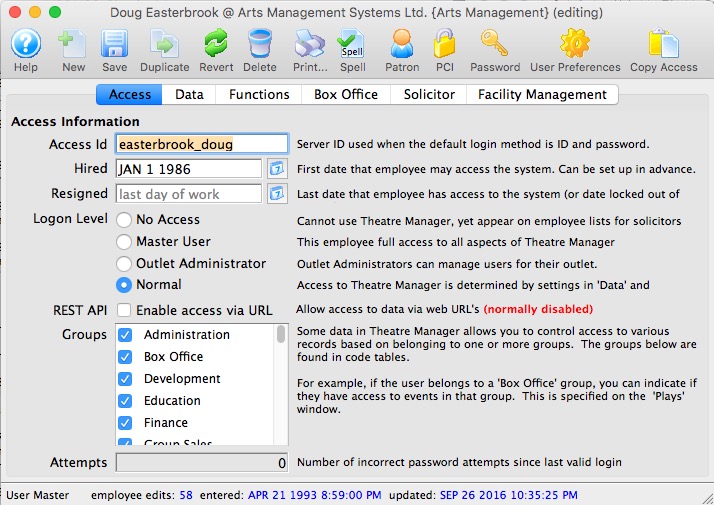
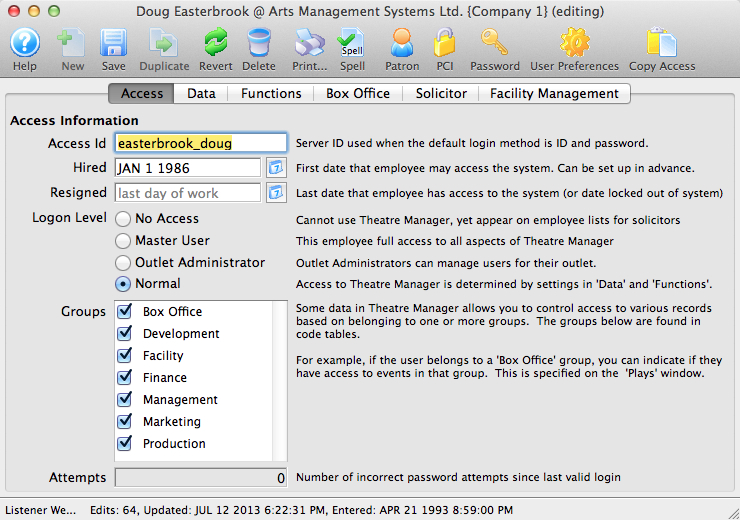
Access Tab
There are five primary user level:
| User Level | Can Do | Cannot Do |
| Master User |
|
|
| Outlet Administrator |
|
|
| Normal User |
|
|
| No Access |
|
|
| API Access Only |
|
|
 |
Venues who have purchased the Outlet Edition of Theatre Manager must have their Outlet Administrator perform employee setup functions. The Master User for the Outlet should only be used to create the Outlet Administrator Employees. |
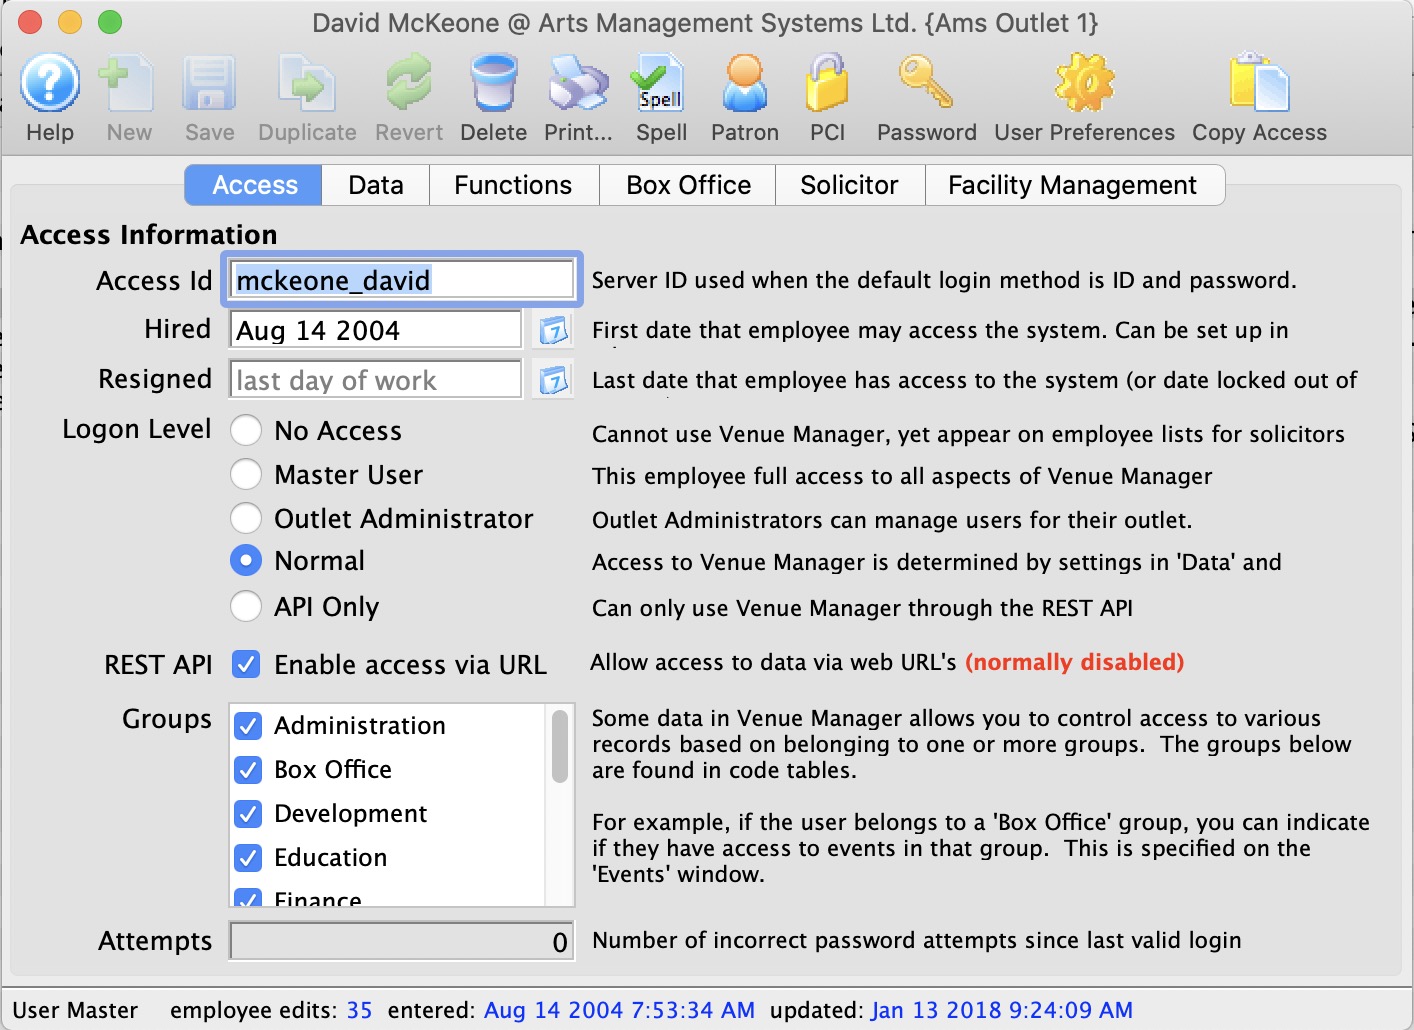
Parts of the Access Tab
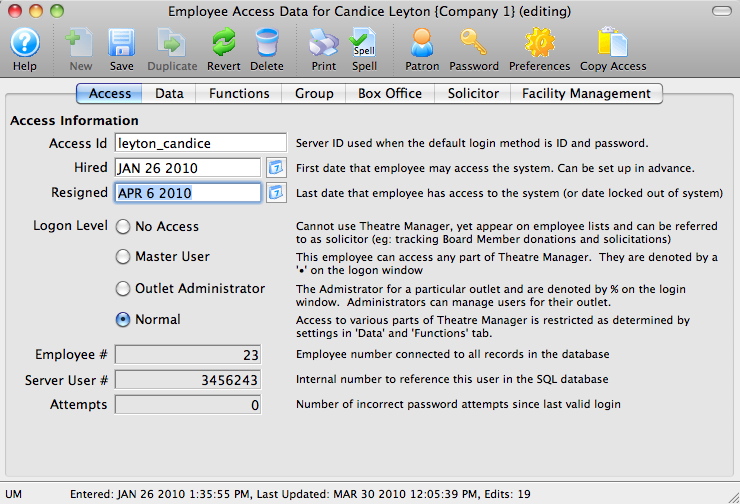
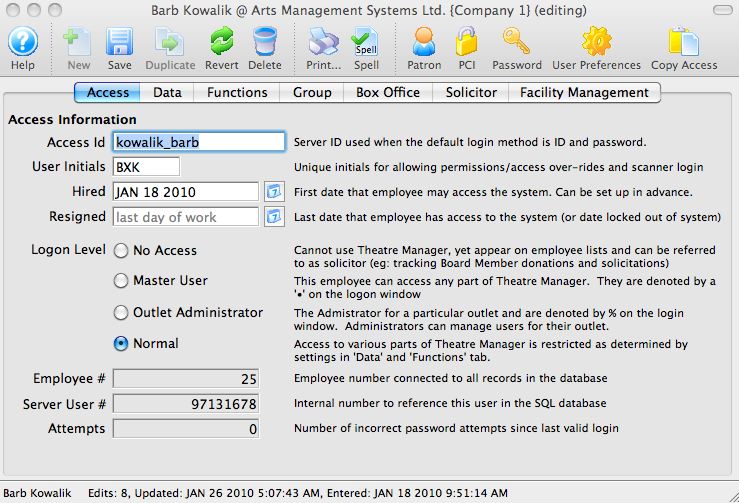
| Access Id | The logon name for the employee when the default logon window is set to Access ID/Password. Refer to the PCI Security Tab of System Preferences for more information. It is also used to identify users logged in to the postgres database for logging, etc. |
| Hired |  Date the employee was hired. The calendar lookup button can be used to select the date.
A future date in this field means that the employee will gain access in the future, but not now. This could be used for setting start dates for interns. |
| Resigned |
Date the employee retired, resigned or left the organization. The calendar lookup button can be used to select the date.
Generally, this date is blank. It can be in the future if you are creating an employee with temporary access and the resigned date is when they are leaving. If an employee makes too many mistakes entering their password and gets locked out, this field will automatically be set by Theatre manager to prevent access. To reinstate an employee's access, a Master User or Outlet Administrator needs to:
|
| Logon Level | Indicates the general user level of the employee
|
| REST API | Click to enable access to the REST API. This is a feature which allows access to the raw data in the database using a URL - and is typically used for web developers or for data analysis tools. |
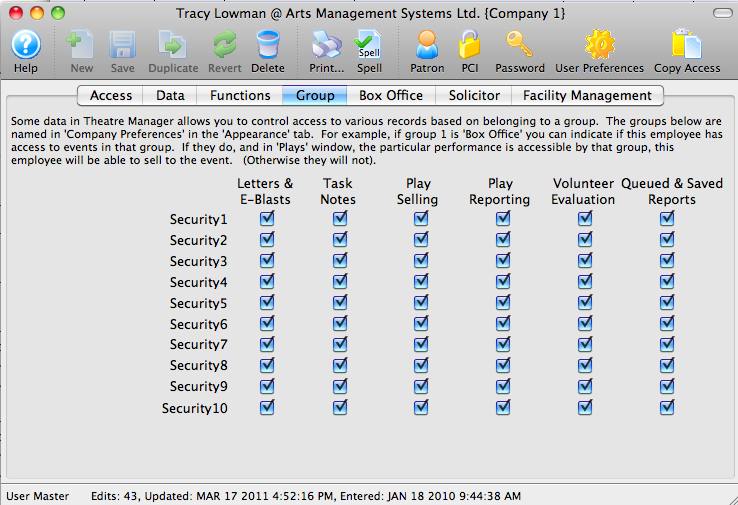
| Groups | Select the functional groups that this employee belongs to. These are used to determine which records the employee can have access to. For exmaple, if somebody has both Marketing and Box Office checked, then they can access any record that is marked accessible by either Marketing or by Box Office.
If somebody has access to 'all' areas then make sure they are all selected. These functional security access groups are set up in code tables. |
| Attempts | The number of times the employee has tried to login with the incorrect password since the last logon. |
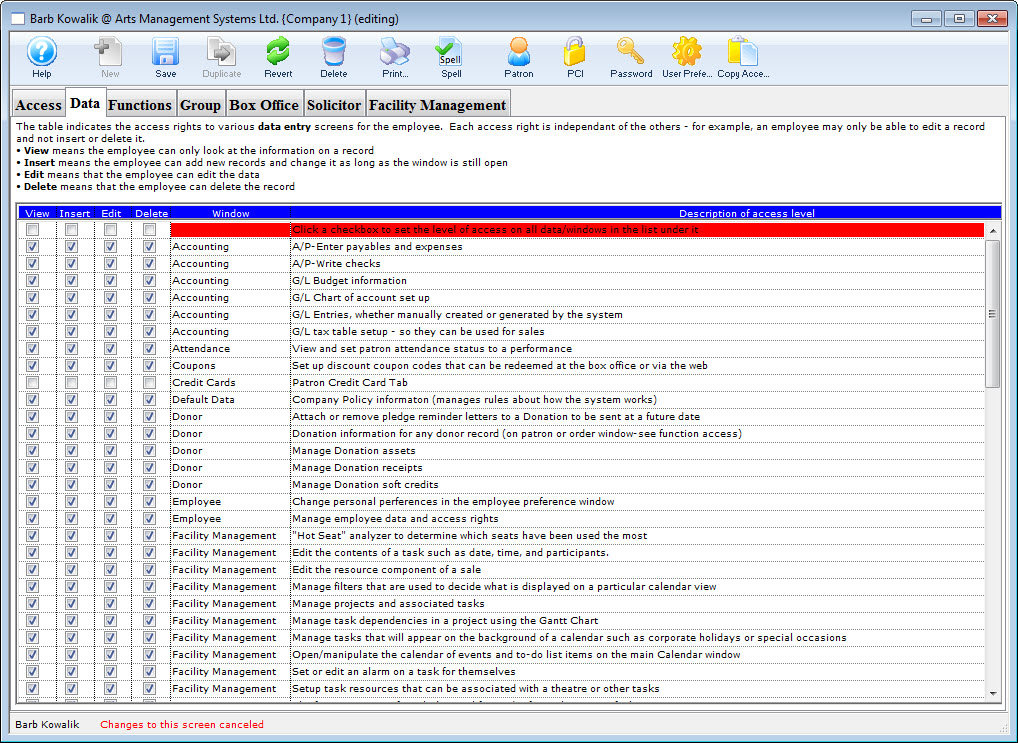
Data Tab
 |
Master users and Outlet Admins cannot access this tab for their own user id because changing any permissions would cause them to lose Master user or outlet admin status.
They can, however, affect settings in these tabs for other users. |
|
Use the filter function to highlight words of interest within the list |
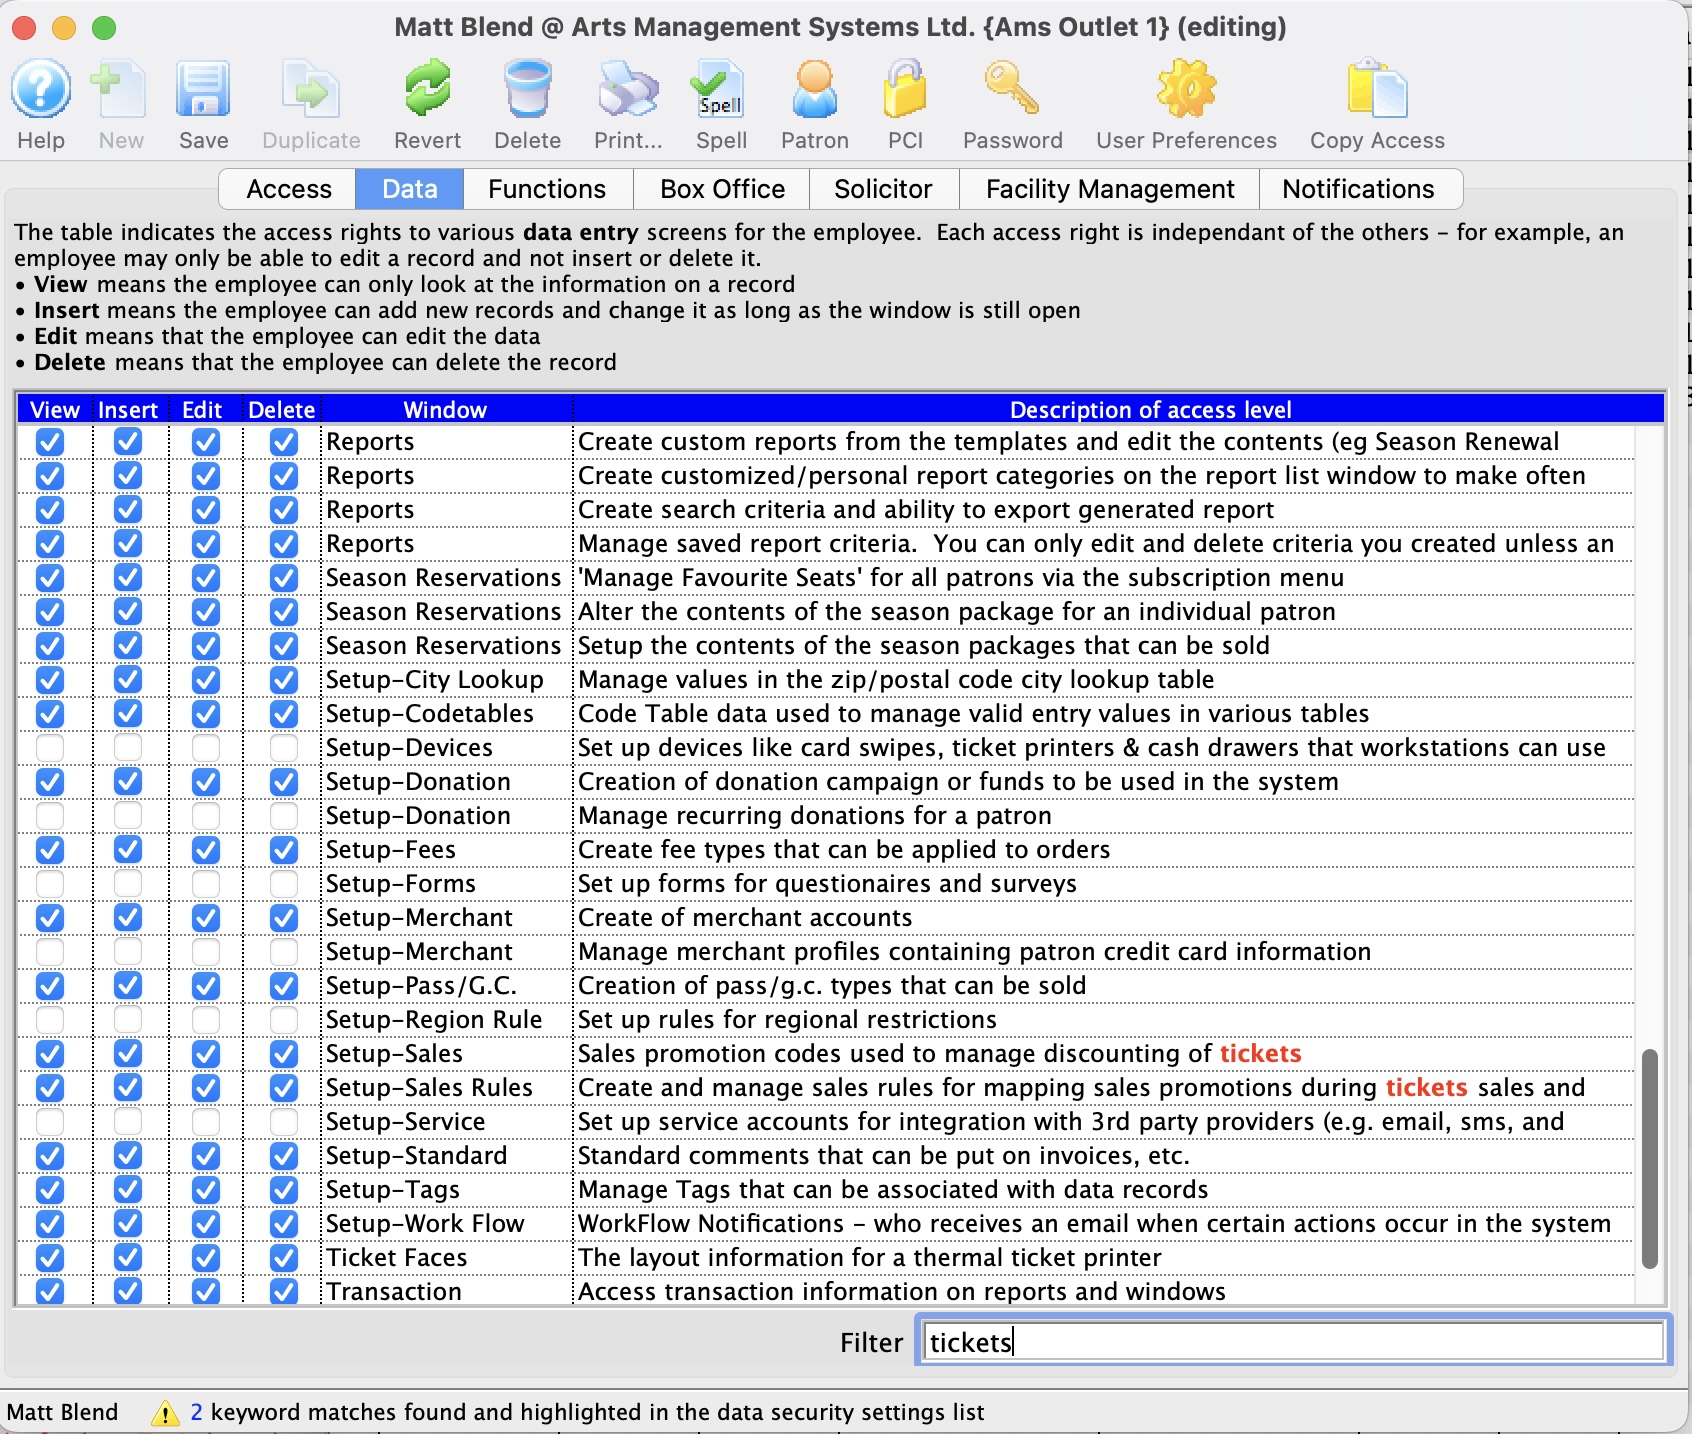
| View | The employee can only look at the information in a record |
| Insert | The employee can add new information and change it as long as the window is open. |
| Edit | The employee can edit information in the specified window. |
| Delete | The Employee can delete the record. |
List of Data/Windows that can be Accessed
| Accounting | A/P-Enter payables and expenses | |
| A/P Write cheques | ||
| G/L Budget information | Provides access to the setup of general ledger budgets for each general ledger account. Details on how each account is compared to the budgeted amount can be viewed | |
| Chart of account set up | ||
| G/L Entries, whether manually created or generated by the system | Provides access to the general ledger entries. For an employee who may need to 'close' or 'cash out' at the end of the day, it is recommended that 'view' access be granted. With 'view' access, the employee will be only able to view the sales and deposit entry created by the End-of-Day wizard, and if required print the desired reports. | |
| G/L tax table setup - so they can be used for sales | Provides access to setup tax tables, to define the table and enter/edit the percentage of tax levied and the g/l account tax will be allocated to | |
| Attendance | View and set patron attendance status to a performance | |
| Coupons | Set up discount coupon codes that can be redeemed at the box office or via the web | |
| Credit Cards | Patron Credit Card Tab | |
| Default Data | Company Policy information (manage rules about how the system works) | Provides access to Default Data settings such as Company name, mandatory data fields, data appearances (custom labels on fields), default fees on ticketing etc. |
| Donor |
Attach or remove pledge reminder letters to a Donation to be sent at a future date |
|
| Donation information for any donor record (on patron or order window-see function access) | ||
| Manage Donor asset tracking | Provides a list on the patron window where you can enter/track patron assets for the purposes of wealth management. | |
| Manage Donation receipts | ||
| Manage Donation soft credits | ||
| Manage DonorSearch Analytic Analysis Results | Provides access to the DonorSearch Analytic List Window, the DonorSearch Analytic Results Detail Window, and to the DonorSearch Importing Analytic Results process. At minimum View access is required to access the DonorSearch context menu, the DonorSearch menu button in Donation Campaigns, and to query the data in mail lists and data exporting. | |
| Employee | Change personal preferences in the employee preference window | |
| Manage employee data and access rights | ||
| Facility Management | Edit the contents of a task such as date, time, and participants | |
| Enter the resource component of a sale | ||
| Manage filters that are used to decide what is displayed on a particular calendar view | ||
| Manage projects and associated tasks | ||
| "Hot Seat" analyzer to determine which seats have been used the most | ||
| Manage task dependencies in a project using the Gantt chart | ||
| Manager tasks that will appear on the background of a calendar such as corporate holidays or special locations | ||
| Open/manipulate the calendar of events and to-do list items on the main calendar window | ||
| Set or edit an alarm on a task for themselves | ||
| Setup task resources that can be associated with a theatre or other tasks | ||
| Fees | The fee component of a sale (eq mail fee, order fee, subscription fee) | |
| Form Letters | Create and change the form letters (anybody can use them) | Provides access to the form letters module. Creating form letters and performing letter merges with information from Theatre Manager's database |
| Manage form letters and letter security from the pass/g.c. window | ||
| Manage form letters and letter security from the patron window | ||
| Mail Lists | Saved results of a query against the database used in reports or finding patrons | Provides access to the setup of mail lists and the patrons who are on each of the mail lists |
| Order | Order information such as ticket printing status and comments | |
| View and edit items in the order window | ||
| Outlet |
Creation of outlets (or departments) as a functional business entity | Provides access the setup of the outlet locations and which employee is assigned to which outlet |
| Set up the Currency Exchange records for multi currency web usage | ||
| Setting up of the commission structure for sales at an outlet | ||
| Packages | Manage Packages of salable items. | |
| Pass GC | Pass/G.C. cards to assign any number of pass/g.c. | |
| Patron | Basic Patron information such as name and address | |
| Favorite seats and season subscription packages, including on the order window | ||
| Manage and Relationships between one or more patrons | Provides access to Relationship tab on the patron window, to establish relationships between two or more patrons | |
| Media information in the tab on the patron window |
Provides access to the setup of media information on individual patron's accounts | |
|
Pass/G.C. detail component of a sale (on the patron or order window-see function access) |
||
|
Pass/G.C. detail component of a sale (on the patron or order window-see function access) |
||
| Patron payment information and prior payments on the order window | Provides access to the patron payments after they have been created | |
| Play | Accounting information and setup for postings & taxes | Provides access to the Accounting area in the play setup |
| Add task resources pertaining to Facility Management | ||
| Main window containing the play & date information | Provides access to the Attendance area in the play setup | |
| Performance dates & management of sales parameters | Provides access to the Performance area in the play setup | |
| Play maps and attendance information | ||
| Play revenue and cash flow information | ||
| Set prices and valid sales promotions | Provides access to the Prices and Promotion area in play setup | |
| Plug-in Code | Import or edit Custom Plug-in Code modules into Theatre Manager | Provides access to Plug-ins, custom coded prices strategies. A Plug in is a system table setting and custom coding by Arts Management Systems to manage unique pricing structures |
| Report Cards | Manage report card templates to be used for course grading | |
| View and edit reportcards assigned to patrons and used for course grading. | ||
| Reports | Create custom reports from the templates and edit the contents (e.g. Season Renewal Notices) | |
| Create search criteria and ability to export generated reports | ||
| Items added to the report queue for later printing and customized report category detail windows | Provides access to the setup of reports to be created and printed during non prime time hours | |
| View and edit saved report criteria | ||
| Season Reservations | 'Manage Favorite Seats' for all patrons via the subscription menu | |
| Alter the contents of the season package for an individual patron | ||
| Setup the contents of the season packages that can be sold | Provides access to the Season Subscription Renewal Notice
process | |
| System Setup | ||
| City Lookup | Manage values in the zip/postal code lookup table | |
| Codetables | Code Table data used to manage valid entry values in various tables | Provides access to the setup of code table settings in the System Table area of Theatre Manager. This area is best restricted to Master Users of Theatre Manager |
| Donation | Creation of donation campaign/funds to be used in the system | Provides access to the set-up of Donation Campaigns and Giving Levels matrixes |
| Fees | Creation of fee types that can be applied to orders | |
| Merchant Account |
Creation of merchant accounts | |
| Pass/G.C. | Creation of Pass G.C. types that can be sold | Provides access to setup Membership types, to enter/edit membership styles and g/l accounts associated with each membership |
| Sales Promotions | Sales promotion codes used to managing discounting if tickets | Provides access to the setup of ticket sales promotions and discount offers |
| Sales Rules | Create and manage sales rules for the discounting of tickets | |
| Standard Comments | Standard comments that can be put on invoices, etc. | Provides access to the setup of standardized comments for ticket invoicing |
| Workflow | Workflow Notifications - who receives an email when certain actions occur in the system | Provides access to the setup e-mail notifications |
| Theatre | Manage theatre capacity, layout and seating names | |
| Ticket Faces | The layout information for a thermal ticket printer | Provides access to the setup of customized ticket face coding for the thermal ticket printers |
| Transaction | Access transaction information on reports and windows | |
| Volunteer | Manage volunteer recognition awards | |
| Manage volunteer time availability | ||
| Volunteer activity history - record of each instance of working in the position (from volunteer or play window) | Provides access to the historical information for each personnel position. Such as each individual time the personnel was an actor, producer, or usher and the unique responsibilities for each position | |
| Volunteer overview information and data entry window | Provides access to the general personnel information on the patron window and on the personnel window | |
| Volunteer positions - the activities that they will do when asked | Provides access to the personnel positions each of the personnel may have held | |
| Volunteer template setup that will be used to let people sign up for positions on the web | ||
| Web Sales | Manage shopping carts for internet sales | Provides access to Web Cart tab on the patron record |
| View and reset web performance statistics gathered from the apache server by the web listener | ||
Functions Tab
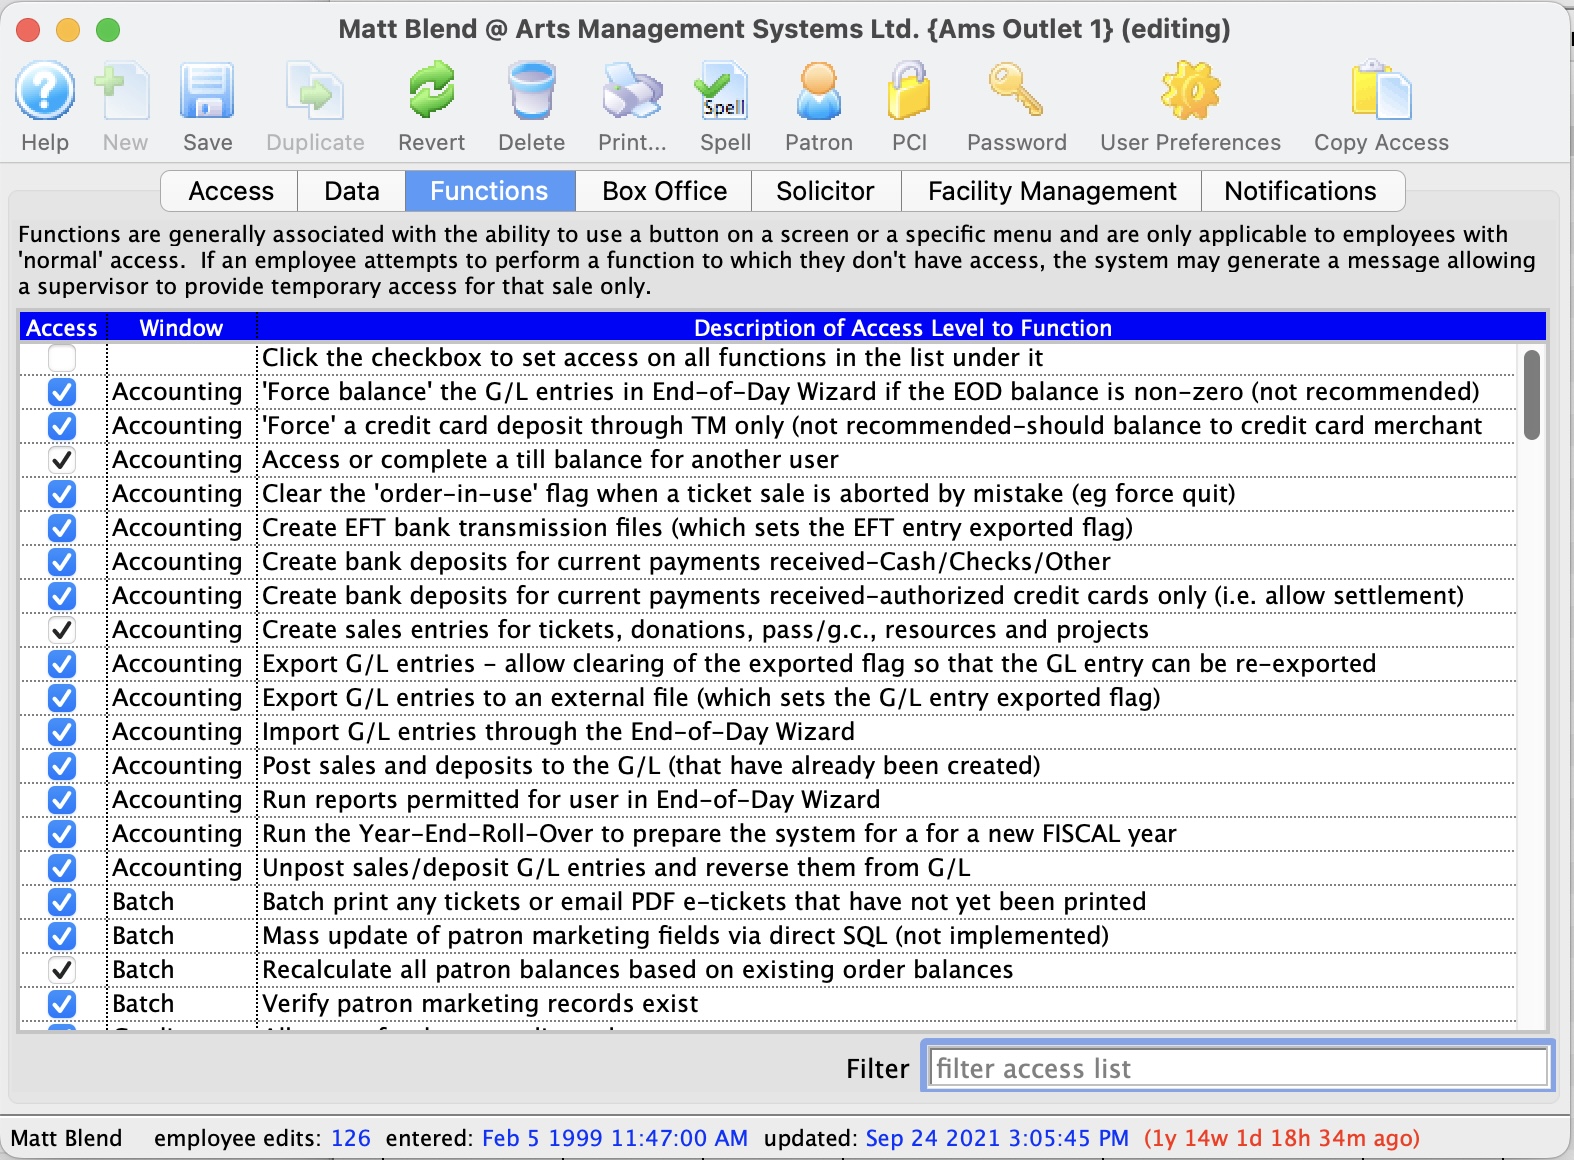
|
Master users and Outlet Admins cannot access this tab for their own user id because changing any permissions would cause them to lose Master user or outlet admin status.
They can, however, affect settings in these tabs for other users. |
|
When creating a new user, the default for credit card access, functions is the minimal, per PCI requirement 7.1.2 |
|
Use the filter function to highlight words of interest within the list |
List of Functions to be Accessed
The following fields are the various functions available in Theatre Manager:
| Accounting | 'Force balance' the G/L entries in End-of-Day Wizard if the EOD balance is non-zero (not recommended). |
| 'Force' a credit card deposit through TM only (not recommended-should balance to CC software). | |
| Access or complete a till balance for another user. | |
| Clear the 'order-in-use' flag when a ticket sale is aborted by mistake (eg force quit) | |
| Create EFT bank transmission files (which sets the EFT entry as being exported) | |
| Create bank deposits for current payments received-Cash/Checks/Other | |
| Create bank deposits for current payments received-authorized credit cards only (ie. allow settlement) | |
| Create sales entries for tickets, donations and memberships | |
| Export G/L entries to a tab delimited file (which sets the G/L entry exported flag) | |
| Import G/L entries through the End-Of-Day Wizard | |
| Post sales and deposit to the G/L (that have already been created) | |
| Run reports permitted for user in End-of-Day Wizard | |
| Run the year end roll over to prepare for a new year | |
| Unpost sales/deposit G/L entries and reverse them from G/L | |
| Batch Functions | Batch print any tickets that have not yet been printed |
| Mass update of patron marketing fields via direct SQL | |
| Recalculate all patron balances based on existing order balances | |
| Verify if marketing record exist for patrons - normally not required | |
| Credit Cards | Allow a refund to a credit card |
| Allow clearing the black listing setting for a credit card so it can/cannot be used by a patron | |
| Allow empty CID or CVV2 number even if required for credit card payments | |
| Allow manual entry of an authorization codeif it is provided by the bank after calling merchant services | |
| Allow use of a black listed credit card on the payment window. | |
| Change to a different merchant account in the payment window (if there are multiple merchant accounts) | |
| Delete authorized credit card payments in TM instead of voiding on Server as well (recommended unchecked) | |
| Delete credit card payments for auto-renewed subscriptions during End of Day deposit process | |
| Deposit current/post dated credit cards (that have not yet been authorized) with authorizing the card | |
| Display all digits of last used charge card on payment window (otherwise remove last 4 digits to force card completion) | |
| Edit the credit card number on any existing payment that has not been deposited | |
| Last used charge card # - display all digits on payment window (otherwise remove all digits - overrides other CC display options) | |
| Over-ride the cash only setting for the patron and accept a credit card | |
| Search for a patron using a credit card number | |
| Shred cards older than 99999 days on the patron window | |
| Use 'force-duplicate' and cause a second charge for same amount for same card #/patron/batch | |
| Use the lookup button on the payment window to see other credit cards for the patron | |
| View entire card number (otherwise show **** and last 4 digits on most reports and screens) | |
| View past EMV PINpad requests to verify completed authorizations have a payment record | Allow employee to enter a credit card number manually EVEN IF USING an EMV PIN PAD (affects PCI audit requirements)
This feature should normally never be enabled. If it is, and the employee has an EMV hardware device associated with their computer, then they will be given an additional choice to manually enter a credit card into Theatre Manager for processing, rather than only being able to use the EMV device to manually enter cards. Enabling affects you CPI audit requirements. |
| Donor | Add donations for a patron while in the patron window |
| Add donations to an order while on the ticket sales window | |
| Permit entering or updating prior fiscal year donations | |
| Clear date that commission paid for the donation | |
| Print donation acknowledgments to the ticket printer | |
| Print donation charitable receipts | |
| Unprint donation charitable receipts for later reprinting | |
| View donors summary information (all non private) at the top of the patron window | |
| View donors summary information (marked PRIVATE) at the top of the patron window | |
| DonorSearch | Allow to request a DonorSearch online analysis |
| Allow to retrieve and download a DonorSearch online analysis | |
| Allow to view a DonorSearch online analysis | |
| Fees | Change a fee used during a 'New Sale' |
| Change a fee used during an 'Exchange' | |
| Change a fee used during the 'Refund' process | |
| Change a fee used during the order 'Modify' process | |
| Enter a negative value for a fee (ie. discount) if able to edit fees on the order window | |
| Form Letters | Merge letters from the form letter list or edit window |
| Print or Batch Print form letters or emails that had been previously assigned to print later | |
| Outlet | Sell tickets at All Locations (regardless of Outlet that created event) |
| Pass/G.C. | Able to renew the pass/g.c. if it is past its expiry date/renewal deadline |
| Add pass/g.c. for a patron while in the patron window | |
| Add pass/g.c. to an order while on the ticket sales window | |
| Change the full redeemable value of the pass/g.c. from the purchase price to confer benefits | |
| Print pass/g.c. tickets | |
| UnPrint pass/g.c. tickets | |
| Allow Extending Expiration Dates on passes. This is available on the pass/GC setup window | |
| Patron | Change the primary address from one address to another |
| Change the primary email from one email to another | |
| Change the primary phone or fax from one phone to another | |
| Clear the cash only flag so that patron can resume using credit cards | |
| Clear the 'do not mail, telemarket, etc.' flags | |
| Merge two or more patron records into the same person and delete the others | |
| Merge/transfer two or more patrons into a common household | |
| Send a patron their email address and web password in an email | |
| Set the cash only flag so that patron cannot use credit cards | |
| Set the 'do not mail, telemarket, etc.' flags | |
| View annual marketing purchase statistics on the patron window at the lower right | |
| Payments | Access and change 'Contractual Notes' on the payment screen |
| Allow entry of payments that cross multiple orders | |
| Delete post dated payments previously entered against the order | |
| Use 'Gift In Kind' as payment method (means G/L account code needed) | |
| Use 'On Account' as payment method on any order (closes without a payment & creates A/R) | |
| Use 'Post Dated Payments' as a payment method which will appear in End of Day on appropriate future date | |
| Use 'pass/g.c.' (current) as payment method | |
| Use pass/g.c. (expired) as payment method | Use pass/g.c. that has not yet been paid for as payment method |
| Plug-In Code | Associate existing custom Plug-in code to any data record |
| Pricing Map | Merge two or more pricing map records into the same theatre and delete the others |
| Project | Change Project from 'Eestimate' to 'Invoice' or visa versa |
| Reports | Print invoices for a patron from the order window or batch functions |
| Run donation reports | |
| Run general reports (the majority of reports) | |
| Run sales summary analysis reports | |
| Run ticket revenue reports | |
| Sales | View 'Transaction Monitoring' window |
| Season Reservations | Print season renewal notices |
| Process a season ticket reservation using the book button | |
| Process season subscription auto renewals (people who get same seats each year) | |
| Unprint season renewal notices so they can be printed again | |
| Tickets | Change default ticket sale/reservation setting to allow tickets to be sold as reservation only (no A/R created) |
| Change the promotion/price code during a quick exchange for a performance that DOES NOT have the employee's security access privileges | |
| Change the promotion/price code during a quick exchange for a performance that the employee has security access to | |
| Confirm attendance at a performance using ticket scanner or entering ticket number | |
| Exchanges | Exchange tickets by transferring them "en masse" from one performance to another on the attendance tab in the play window |
| Exchange tickets to a performance that DOES NOT have the employee's security access privileges | |
| Exchange tickets to a performance that has the employee's security access privileges | |
| Hold tickets to prevent selling them | |
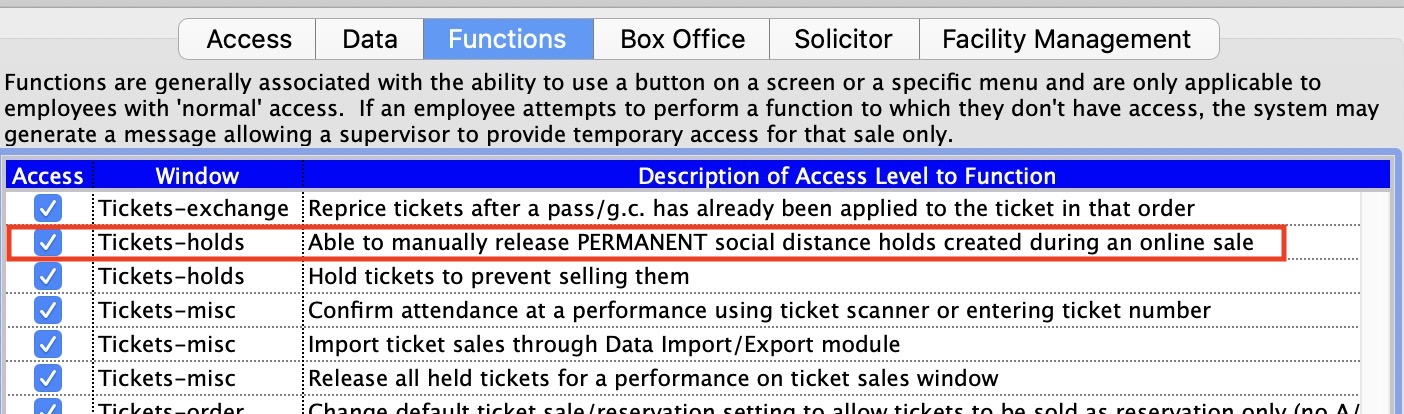
| Able to manually release PERMANENT social distance holds created during an online sale | |
| Print tickets for fully paid order | |
| Print tickets for partially paid order | |
| Recalculate a specific order balance based on its contents | |
| Refund tickets to a performance that DOES NOT have the employee's security access privileges | |
| Refund tickets to a performance that has the employee's security access privileges | |
| Refund tickets when the performance is no longer on sale | |
| Refund tickets when the performance is over | |
| Release all held tickets for a performance on ticket sales window | |
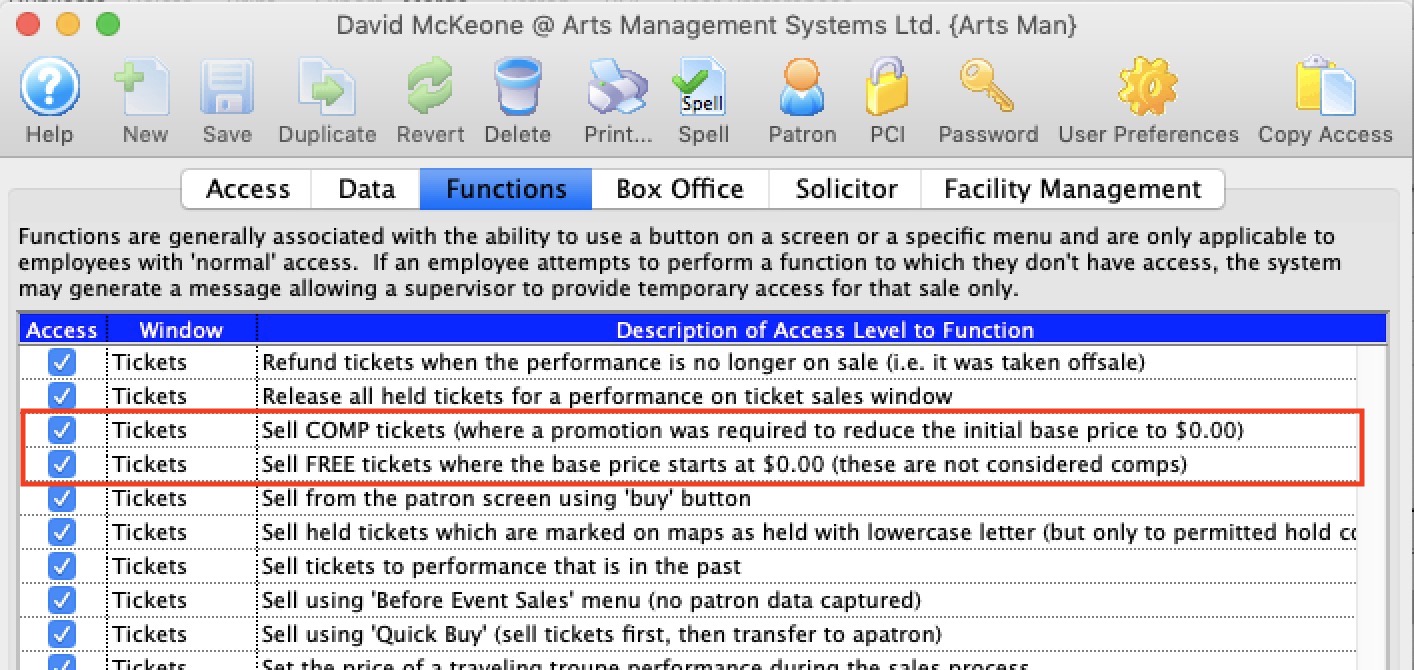
| Sell COMP tickets (where a promotion was required to reduce the initial base price to $0.00) | |
| Sell FREE tickets where the base price starts at $0.00 (these are not considered comps) | |
| Sell from the patron screen using 'buy' button | |
| Sell held tickets which are marked on maps as held with lowercase letter (but only to permitted hold codes in employee record) | |
| Sell tickets to performance that is in the past | |
| Sell using 'Before Event Sales' menu (no patron data captured) | |
| Sell using 'Quick Buy' (sell tickets first, then transfer to a patron) | |
| Set the price of a traveling troupe performance during the sales process | |
| Unprint a ticket (so it can be reprinted later) | |
| Use their personal setting for 'Reservation Only' ticket sales (means no transactions created until first payment) | |
|
Reprice tickets after a pass/gift certificate has been used to pay for the ticket.
After a pass is used, changing the price of a ticket that used the pass means that a the record of where the pass was used will be lost on the ticket (its still in the transactions). It may appear that there are less redemptions from the ticket perspective than on the pass itself. Turning this setting off prevents indiscriminate pass refunding. |
|
|
Exchange a ticket that has a promotion that the employee is not currently entitled to sell.
If ticket has a promotion that is not on the employees 'restricted promotion' list, then they would not be able to exchange the ticket without permission on case by case basis. |
|
|
Refund a ticket that has a promotion that the employee is not currently entitled to sell.
If ticket has a promotion that is not on the employees 'restricted promotion' list, then they would not be able to exchange the ticket without permission on case by case basis. |
|
| Utilities | Open the Data Verify utilities under 'Setup' |
| Purge historical data from the database | |
| Web Sales | Add e-mails to patron correspondence history for mass emailing later |
| Start the web sales listener and become a web listener under their personal user id | |
| View and manage emails pending on the web to resend or cancel them | |
| View ticket scan statistics window |
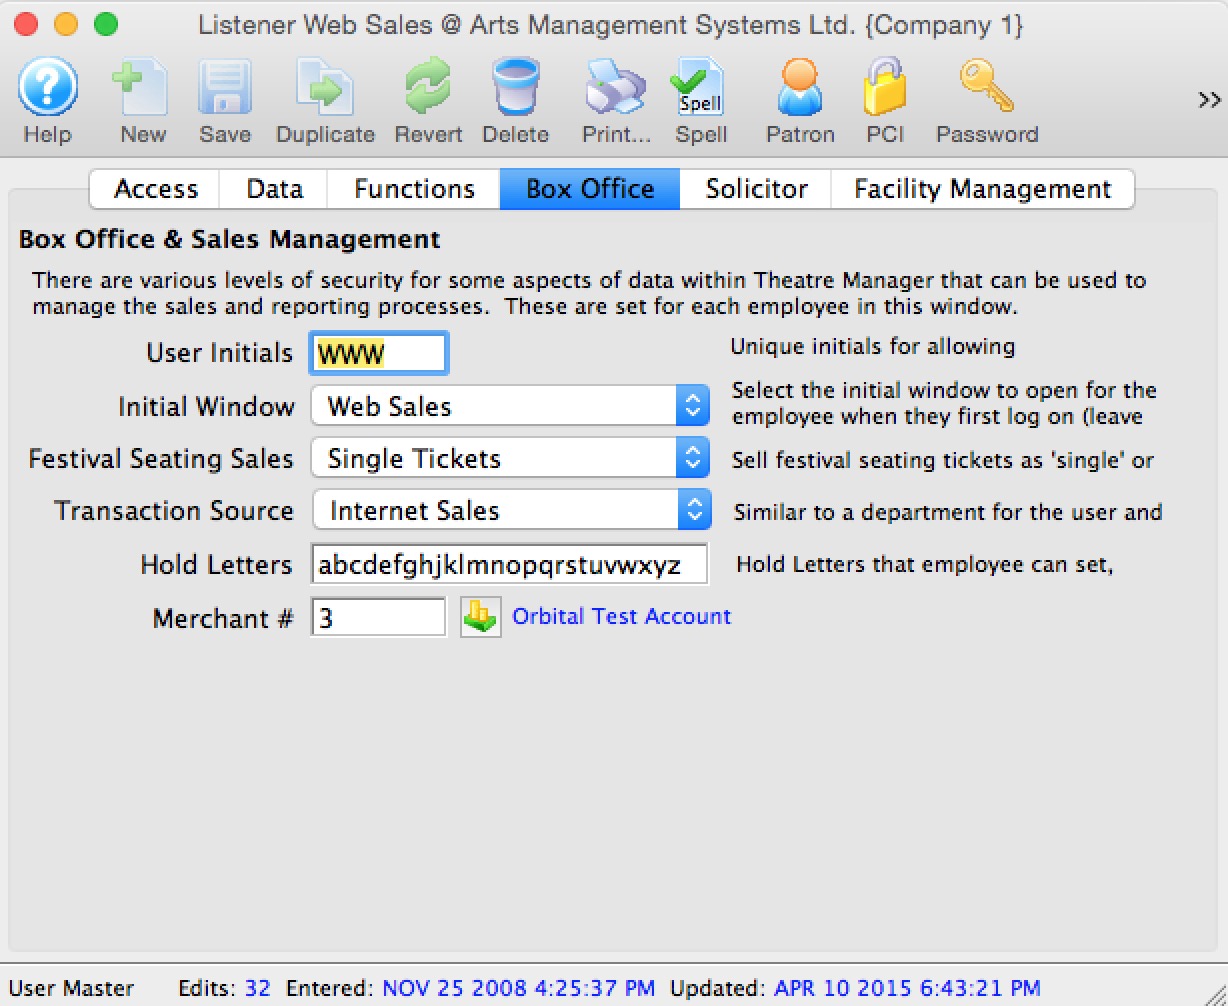
Box Office Tab
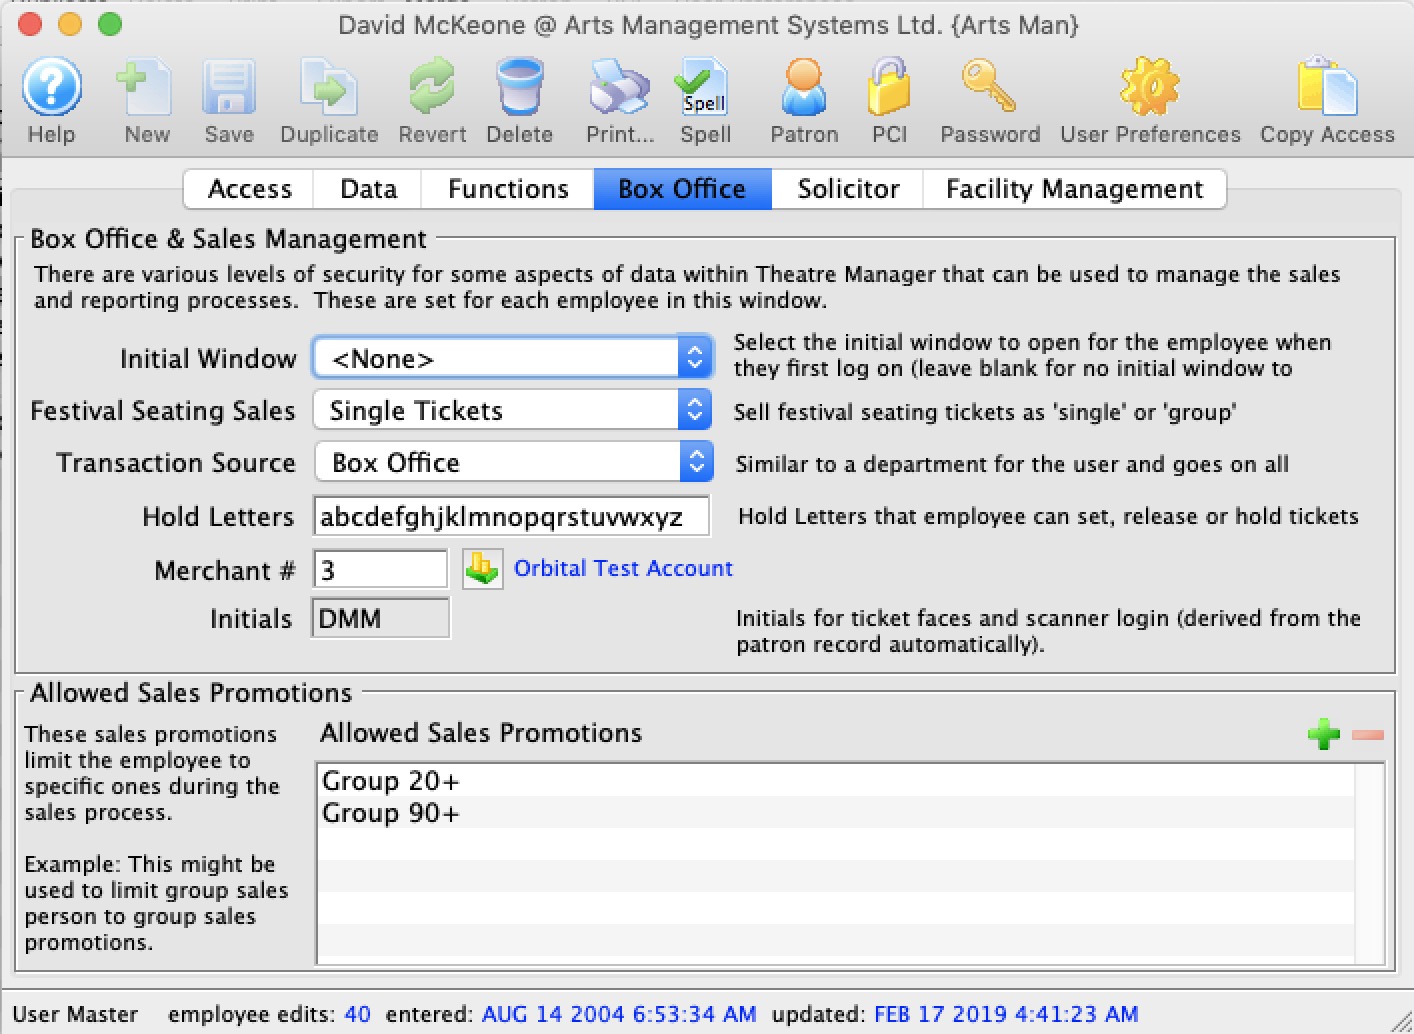
Parts of the Box Office Tab
Box Office and Sales Management |
|||||
| Initial Window |
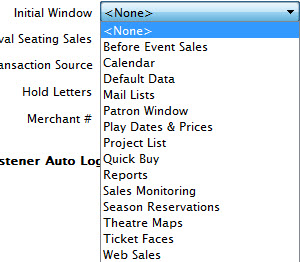 Window that Theatre Manager will automatically
open first when an employee logs on. The initial window may be different
for each employee.
Window that Theatre Manager will automatically
open first when an employee logs on. The initial window may be different
for each employee. |
||||
| Festival Seating Sales | Default for selling festival tickets as a one ticket per admission or one ticket per purchase. | ||||
| Transaction Source | This is the department that the employee works in.
Click here for the Transaction Source code table |
||||
| Hold Letters | These are the Hold letters that the employee can use. They can either set, or release these hold letters for any seat in any performance.
There is a special case for PERMANENT social distance seats booked online. These cannot normally be released by anybody unless they have specific permission as shown below in the employee's permissions in the Function Tab
|
||||
| Merchant # | Merchant account the employee processes credit cards to. | ||||
| Merchant # | Merchant account the employee uses to process credit cards. | ||||
| User Initials |  Employee Initials that are entered into preferences for scanner login. These can be copied from the patron record when modifying the employee's access permissions.
|
||||
| Restricted Sales Promotions | If you enter a list of sales promotions into this field, the employee will only be able to use those promotions when selling a tickets. If at least one of these sales promotions is not enabled for the performance the employee is trying to sell to, they will see no sales promotions and therefore, not be able to sell a ticket at all.
Eg: if the employee can only sell a 'Group' or 'Regular' promotion and neither of those are enabled for a specific performance, then none will appear.
Recommendation for best effectif you wish to use sales promotion restrictions for employees, it might be good practice to:
|
||||
 Do not use this feature to limit access to comp tickets.
Solicitor Tab
If you wish somebody to tracked as a solicitor (like a Board member), you will need to make them an employee and give them no access to login to theatre manager.

Parts of the Solicitor Tab
| Allow Employee to be a Solicitor | When checked an employee can accept donations under their name. |
| Prospects | Total amount of prospective donations generated by the employee. |
| Soft Pledge | Total amount of soft pledges solicited by the employee |
| Soft Credits | Total amount of soft credits solicited by the employee |
| Actual | Total amount of actual donation $ solicited by the employee |
| Total Donations | Total number of donations that have been solicited by the employee |
| Hard Pledges | Amount of hard pledges solicited by the employee. |
| Matching Gifts | Total matching gift donations solicited by the employee. |
| # Gifts Matched | Number of matching gifts solicited by the employee. |
| Written Off | Amount of written off donations solicited by the employee. |
| Balance Owing | Balance of outstanding donations solicited by the employee. |
Facility Management Tab
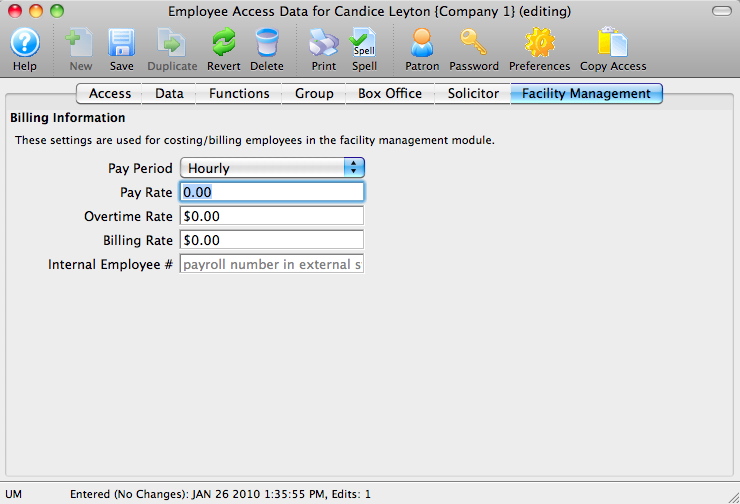
Parts of the Facility Management Tab
| Billing Information | These settings are used for costing/billing employees in the Facility Management module. More more information about Facility Management, click here. |
| Pay Period | The pay period for the employee. Can be Contract Rate, Day Rate, Hourly, Monthly or Weekly. |
| Overtime Rate | An employee's overtime pay rate. |
| Internal Employee # | A payroll number or internal indentifier for an employee (could match external accounting software, etc) |
Notifications Tab
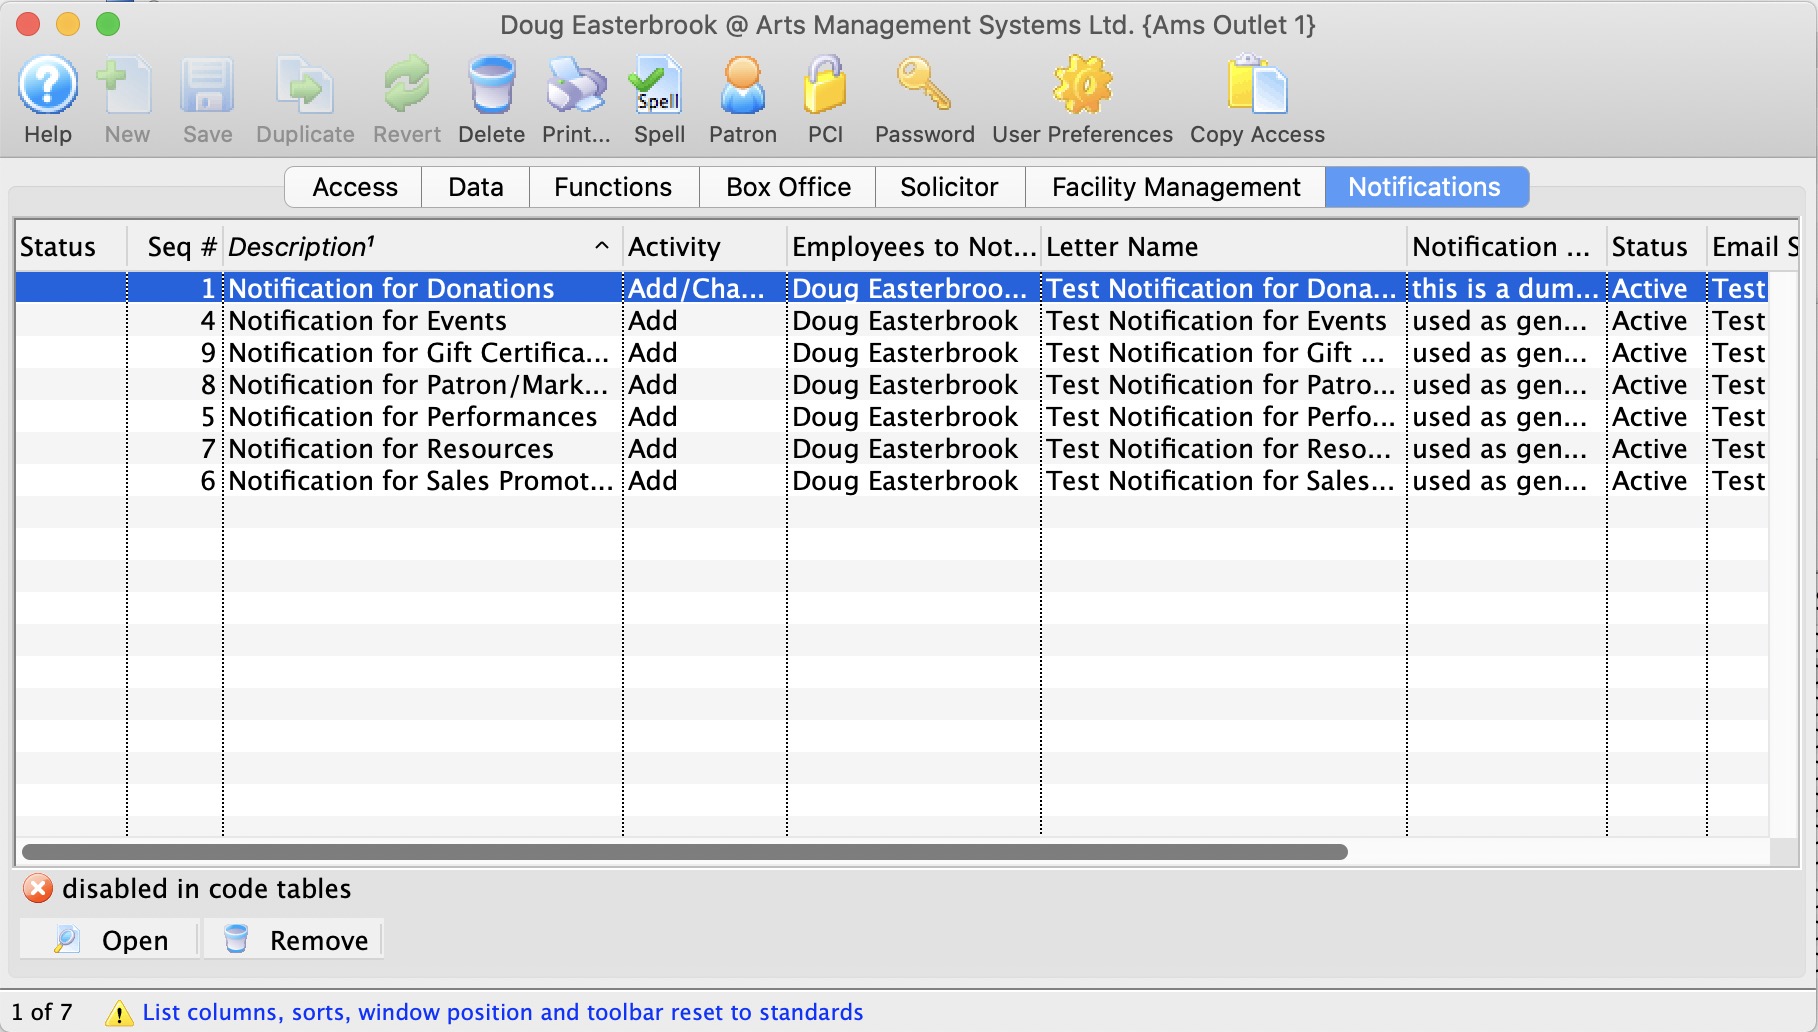
This is a list of workflow notifications that an employee is part of and the current status of the notificaiton. You can
- Open the particular work flow notification to alter it
- Remove the person from the selected work flow notifications
Adding Employees and setting up access rights
Adding Employees
- Login to Theatre Manager as a Master User, or Outlet Administrator where applicable.
- Create a patron record for the employee.
Click here to learn how to create patron records.
- Highlight the employee's patron record from the patron window
- Click the Employee button.
A confirmation dialog opens.
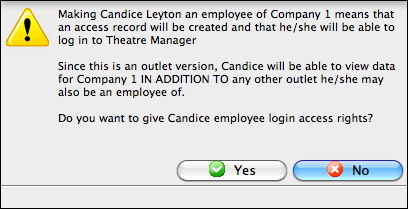
- Click the Yes
 button.
The employee data window opens.

- Click the Password button to set a password for the employee.
For more information on setting an employee password, click here.
- Click the Preferences button to set the employee preferences.
For more information on setting employee preferences, click here.
- Make any required changes to the Access tab.
For more information about the Access tab, click here.
- Make any required changes to the Data tab.
For more information about the Data tab, click here.
- Make any required changes to the Functions tab.
For more information about the Functions tab, click here.
- Make any required changes to the Group
 tab.
tab.
For more information about the Group tab, click here.
- Make any required changes to the Box Office tab.
For more information about the Box Office tab, click here.
- Enter the information on the Solicitor tab.
For more information about the Solicitor tab, click here.
- Enter the information on the Facility Management tab.
For more information about the Facility Management tab, click here.
 |
Sites set up with the Outlet Edition of Theatre Manager must have their Outlet Administrator perform employee setup functions. The Master User in the Outlet Edition is only intended for use in setting up the Outlet Administrator Employees. |
Copy Access from one Employee to another
When inserting a new employee record it may be decided the new employee should receive the exact same access levels to Theatre Manager as a pre-existing employee. If so, copy the access from the existing employee to the new employee. This is a time saving feature so access to data and function levels do not have to be hand-picked for each employee. This function is only used for employees who have Normal Access, as Master Users already have access to everything.
- Open the Employee List window.
Click here to learn how to access the Employee Data window.
- Select the Employee to copy the access to.
Single click on the employee line to select it.
- Click the Open button.
The Employee Data window opens.
- Click the Copy Access button.
The Employee List opens.
- Click the Search button.
These are the employees access can be copied from.
- Select the Employee to Copy Access from.
Single click on an employee to select them.
- Click the Select
 button.
This completes the process. The employee access has been copied.
Adding and Removing Access to Data
- Open the Employee Data window for the Employee.
For information on how to access the Employee Data window click here.
- Click the Data
 tab.
tab.
When a box is checked an employee has the selected access rights to that data. If the box is unchecked an employee does not have the unchecked level of access rights to the data.
For more information on the data tab click here.
- Click on the desired box next to the access level to change the status.
- Click the Save button.
Changes to the Data tab have now been saved.
Adding and Removing Access to Functions
- Open the Employee Data window for the Employee.
For information on how to access the Employee Data window click here.
- Click the Functions
 tab.
tab.
When a box is checked an employee has access to the function. If the box is unchecked an employee can not access the function.
- Click on the box next to the function to change the status.
- Click the Save button.
Changes to the Functions tab have now been saved.
Editing Employee Data
- Open the Employee List window.
Click here to learn how to access the Employee List window.
- Select the Employee to edit.
Single click on an employee to select them.
- Click the Open button.
The Employee window opens.
For more information on the Employee Data window click here.
- Change the employee data as needed.
- Click the Save button to save the changes.
Changing Access Levels
The access level on an employee effects the ability to log into Theatre Manager as well as the areas of Theatre Manager an employee will have access to. It is recommended the Master User employee have Master User access and the remaining employees have variations of Normal access.
- Open the Employee Data window for the Employee.
For information on how to access the Employee Data window click here.
- Click the Access
 tab.
tab.
The current level of access is seen under the Logon Level and is marked by a bullet.
For more information on the access tab click here.
- Click on the circle next to the logon level to change the status.
The options to choose from are No Access, Master User, Outlet Administrator and Normal. Descriptions of the logon levels can be found to the right of the logon levels. - Click the Save button.
Changes to the Access Level have now been saved.
Reinstating Employee Access
You will also need to do this when an Employee enters an incorrect password too many times, as Theatre Manager will lock the Employee out of the program. This is designed to prevent people from accessing the database who should not have access. Fortunately, restoring a user or an employee is quite simple. It also will restore their previous access rights.
Theatre Manager applies a resignation date to the Employee record and removes them from the login window.
|
This process will also work in cases where the Master User has been resigned/locked out. In that case, another Employee with Master User privileges can log in and complete the following process for the Master User account. We also highly recommend setting a primary email for the Master User on its patron account so that users can choose to have an email with the password sent to that email address, in cases where the password is lost or forgotten. |

- Login to Theatre Manager as a Master User or Outlet Administrator.
- Open the Employee List window.
Click here to learn how to access the Employee List window.
- Check the Resigned box in the upper left of the window.
- Search for the Employee.
- Click the Open button.
- Clear the Resigned date field.
- Click the Password button to set a password for the Employee.
- Close the Employee Access Data window.
The Employee now appears in the login window again. They will be able to access Theatre Manager using the password defined above.
- Have the Employee Login
Note: the employee will immediately need to change their password from the temporary one above. This is ti ensure PCI compliance so that only the employee knows their password.
Single click on the resigned Employee to select them.
Click here, for more informtion on setting passwords. You can use a temporary password of your choice because the employee will be required to change their password on first login.
|
In some very rare cases, there will be no other Employees with Master User access to complete the above steps. In those instances, please enable Remote Assistance on the database server machine and contact support@artsman.com with the login id/pw combination so we can reinstate access. |
Removing Employee Access
Because employees have important information tied to their accounts, such as transaction data, you cannot permanently delete them from the system. You can, however, remove their access. This removes them from the active employee list and prevents them from logging into Theatre Manager.
- Open the Employee List window.
Click here to learn how to access the Employee List window.
- Select the Employee.
- Click the Open button.
- Enter the resignation date.
Enter the last day the employee worked.
- Click the Save button.
The employee is removed from the active employee list and will no longer be able to login to Theatre Manager.
Setting Employee Passwords
An employee password can be set, changed or reset if forgotten.
- Log into Theatre Manager as a Master User or Outlet Administrator.
- Open the Employee List window.
Click here to learn how to access the Employee Data window.
- Search for the desired Employee.
Single click on the Employee to select them.
- Click the Open button at the top of the window.
The Employee Data window opens.
- Click the Password button.
The New Password window opens.
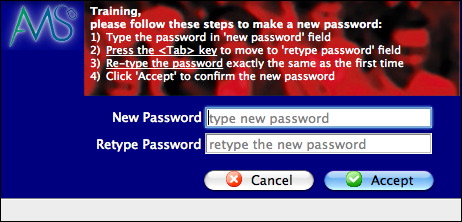
- Enter the password in the New Password field.
- Confirm the new password in the Retype Password field.
- Click the Accept
 button.
The new password is now set for the employee.