Donation Management
 |
Please refer to Donation Features or see how to deal with various data entry scenarios |
Please note that are required to have some system table settings in place before using the donation module. To learn more about Donation System Tables click here.
Accessing Donations
- Open the Patron Record.
For details on locating a Patron Record click here.
- Click the Donation
 tab.
tab.
You can download the Quick Reference Guides (less than 20 pages), Cheatsheets (1-2 pages) and Screencasts (online video demonstrations of the functions with narration) by clicking on the icon.
|
Topic |
Reference Guide |
Cheatsheet |
Flash ScreenCast |
MP4 ScreenCast |
Donations |
||||
| Donations Overview |
|
| ||
| Add a Donation thru the Order Window |
|
| ||
| Refund a Ticket to a Donation |
|
| ||
| Create a Campaign |
|
|
| |
| Pledged Donations |
|
|
| |
| How to Toggle Between Individual & Corporate Donations |
|
|
||
| How to Make a Donation Anonymous |
|
| ||
| Soft Credits |
|
| ||
| Matching Gifts Part 1 - Setting up the Gifter |
|
|
||
| Matching Gifts Part 2 - Adding Gift to a Donation, Running a Report |
|
|
|
|
| Gift In Kind |
|
|
||
| Deleting and Refunding Donations |
|
| ||


Donation Module Features
Theatre Manager can be used to enter and manage donations for your:
- Annual Fund
- Capital Campaign
- Recurring donations
- Donations on a payment plan, or
- Simple Ticket Round-up donation online
- Campaigns with progress bars and suggested donations online
- Special fundraising events, silent and live auctions including raffles, cash advances and checkouts
- Aggregating donations for recognition across campaigns
- Gifts in kind, matching gifts, soft credits
- and almost any scenario
|
For more information on the features of the donation module, you may wish to refer to a number of cheatsheet and videos or the sample data entry scenarios. |
Features Overview
|
For more information on the features of the donation module, you may wish to refer to a number of cheatsheet and videos or the sample data entry scenarios. |
The Development/ Fundraising/ Donation module of Theatre Manager has long been a major portion of the system with a long list of extensive features such as:
- Prospect tracking, including all correspondence and meetings as part of the CRM
- Pledge Schedules & Sending of Payment Reminders (as letters or Emails).
- To-Do's and Contact Notes specific to each donation.
- Allowing multiple Soft Credits per donation.
- Matching Gifts & automatic setup of Matching Gift receivables.
- Modification of the Donation Receipt fields.
- Program Years versus Fiscal Year versus Calendar Year.
- Choice of allowing each donation receipt preference.
- Automatic maintaining of Financial Year for past, current, and future years.
- Maintaining Solicitors, and if they received a commission for getting the donation.
- Allowing Program Giving Levels to be calculated on donations, soft credits, and/or matching gifts or a combination of them all.
- Customized donation specific Marketing Fields.
- Defaults and customization of Program Names.
- Printing of tax receipts based on 7 different printing options.
- Maintains the next contact date for this patron so the patron can become an annual donor.
- Easy creation of Recurring Donations for a donors either in the box office or via online web sales.
- Easy setting of Relationships between the donors, ticket buyers, and volunteers.
- Easy maintenance of who your Matching Gift companies are.
- Specific donor contact marketing flags.
- At a glance overview of donors giving history for the past 8 years, averages, maximums and minimums.
- History tracking of each pledge letter, donation thank you, contact note, and donation tax receipt sent to this patron.
- Direct access to DonorSearch Analytics to immediately access the important and critical information on your existing and potential donors.
- Vast security access and options available that can be defined for each employee determining what they can and cannot do.
Plus the numerous donation detail, summary, giving trends, giving level, reports geared towards telemarketers, board members, development staff, and management.
Sample Donation Scenarios and how to enter them
|
For more information on the features of the donation module, you may wish to refer to a number of cheatsheet and videos. |
What are some sample Donation Scenarios?
| Single donation PAID at time of entry with one payment |
A single donation is one that is entered, paid for and receipted at one time. You would:
|
| Single donation with PAID with multiple post dated payments |
A single donation is one that is entered, with a payment plan for and receipted later. You would:
|
| Single donation where patron PLEDGED to send checks in later on |
A single donation is one that is entered but there is no payment plan. The customer would be sending the checks later in response to as reminder to pay an instalment. You would:
|
| Recurring Donation that repeats forever |
A donation that repeats forever needs to be entered once and then set up to recur. The next donation is automatically generated on the appropriate date. Any existing donation can be turned into recurring. The suggested steps are:
|
| Donation with a non receiptable benefit amount |
 A donation with a benefit amount is entered and paid for like any other donation. The only difference is that the campaign allocated to the donation
Donations with a benefit will show that on the tax receipts for IRS or CRA purposes, while allowing the donation to be recognized within the venue at full value. The tax receipt will effectively indicate: Thanks for your donation of $xxx.xx of which $y.yy is a non receipt-able benefit. It is most often used for special events with dinners, or where there are material benefits conferred or costs incurred by the venue as part of receiving the donation. |
| Prospects, Grants and Foundations |
A government grant or foundation gift is the same as a single donation. Simply enter it. You may want to do the following:
|
| Restricted Donations, Capital Campaigns and Gaming Revenue |
Generally, restricted donations are those that can only be used for a specific purpose or are required to be put into a separate bank account (or tracked appropriately in the GL).
In some locations, funds MUST be placed into a separate account (eg gaming revenue). These are handled as follows
|
| Gifts to multiple campaigns |
Some donations are split amongst two or more campaigns. To do this:
|
| Gifts to multiple years |
Some donations are pledged and split amongst multiple years for ongoing large donations. Eg, a patron might pledge $3000 a year to the virtuoso fund for a 5 year period. If you want the recognition for the total amount of $15,000 for all 5 years, you would handle this as follows:
|
| Pledges Over Multiple Years |
Scenario: a patron that would like to give a total of $10,000.00
over 5 years ($2,000.00 each year). We don't want to record the $10,000
pledge upfront into our General Ledger, creating a large Accounts Payable entry. However we would like to keep
track of the total amount and the progress of the $10,000.00 as it decreases with future payments. What is the best practice in this scenario?
|
| Buy a Seat |
If you are doing a seat naming campaign, the best way to handle it is:
|
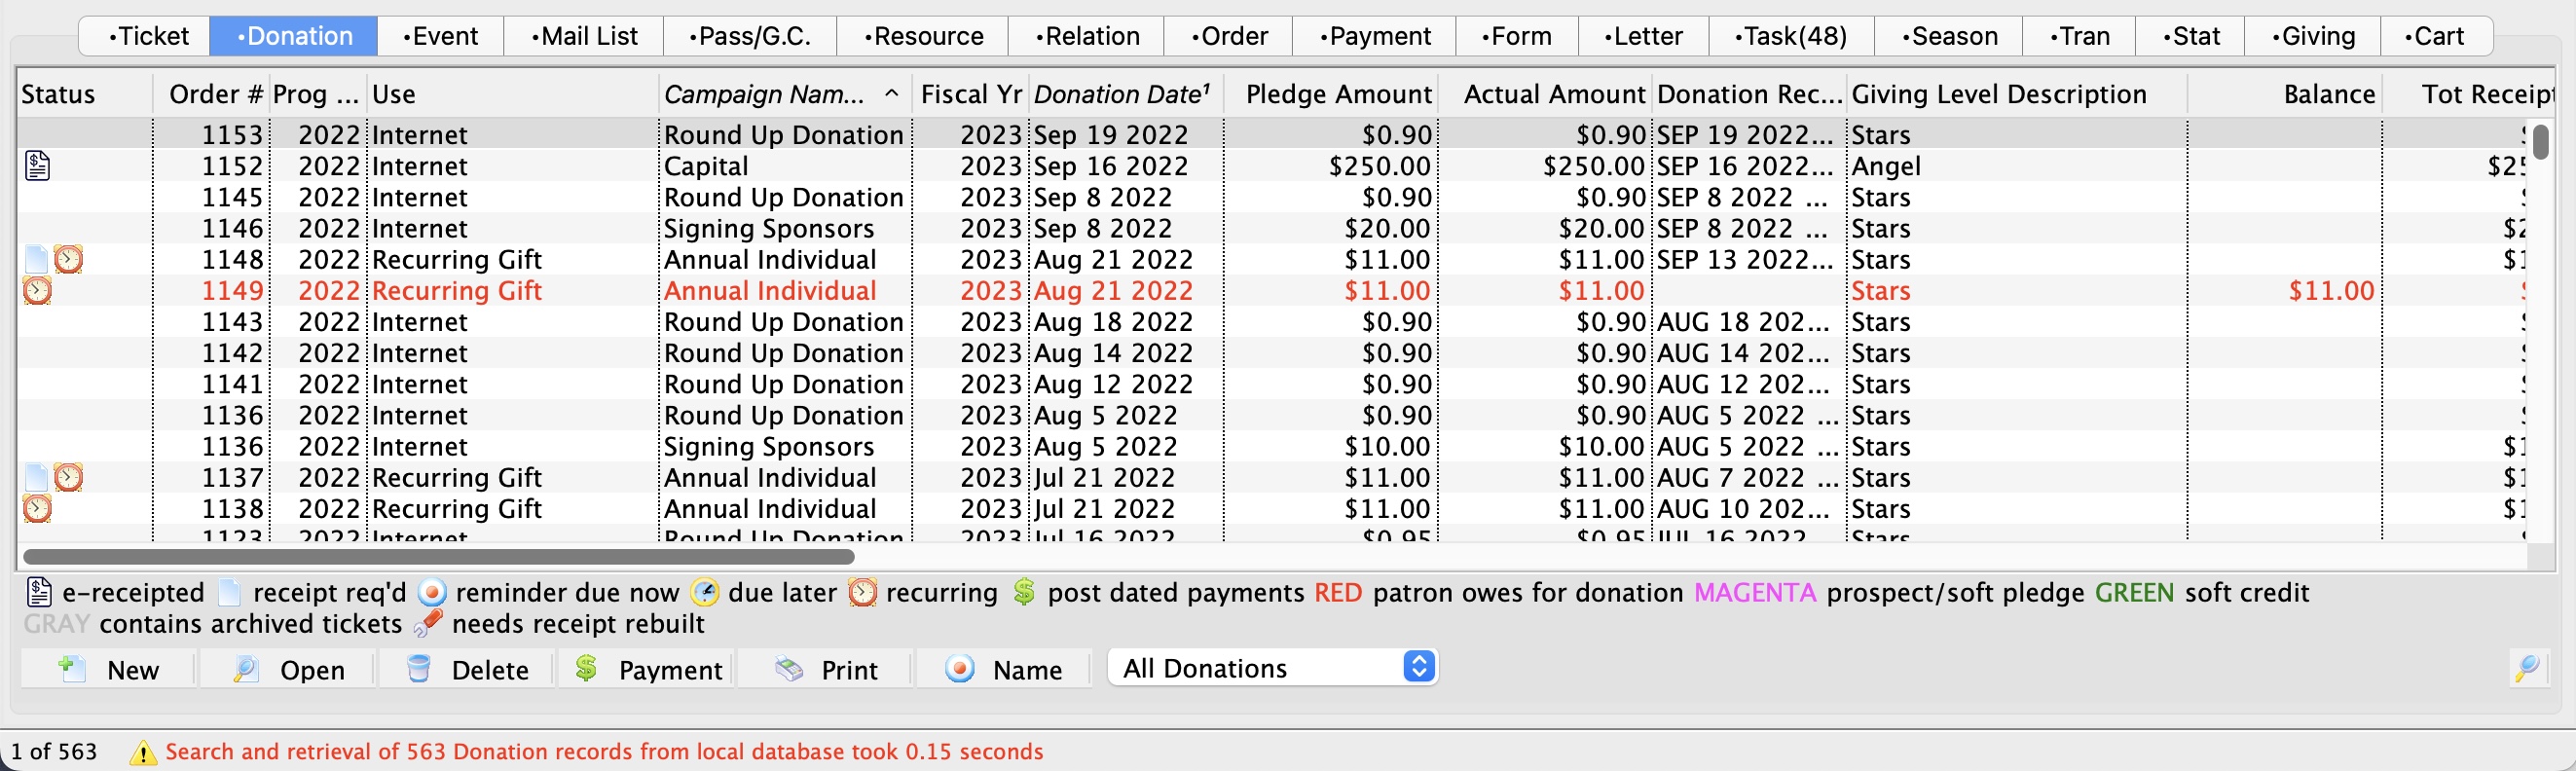
List Window
There are two ways to access the donation list window. The Donation Tab window will let you access other functions of the Donation Module. For instance you can Insert a New Donation from this window or you may access the Donation Detail window from here.
- Open the Patron Record.
For details on locating a Patron Record click here.
- Click the Donation tab.
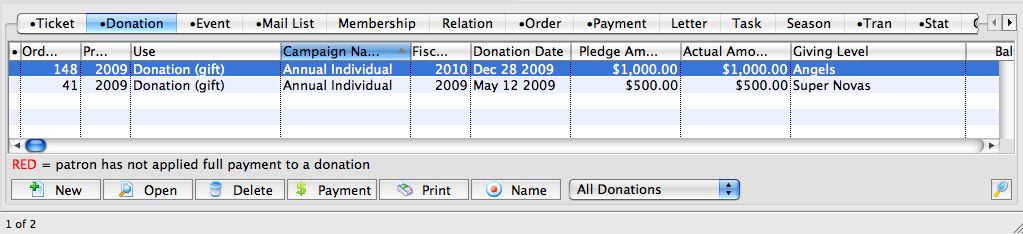
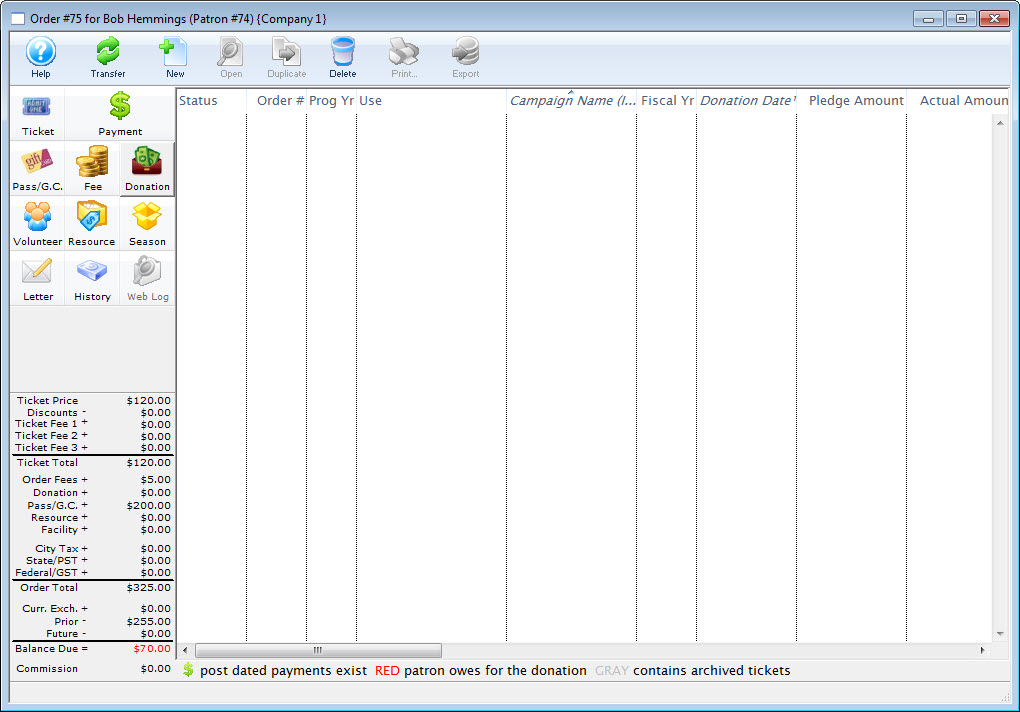
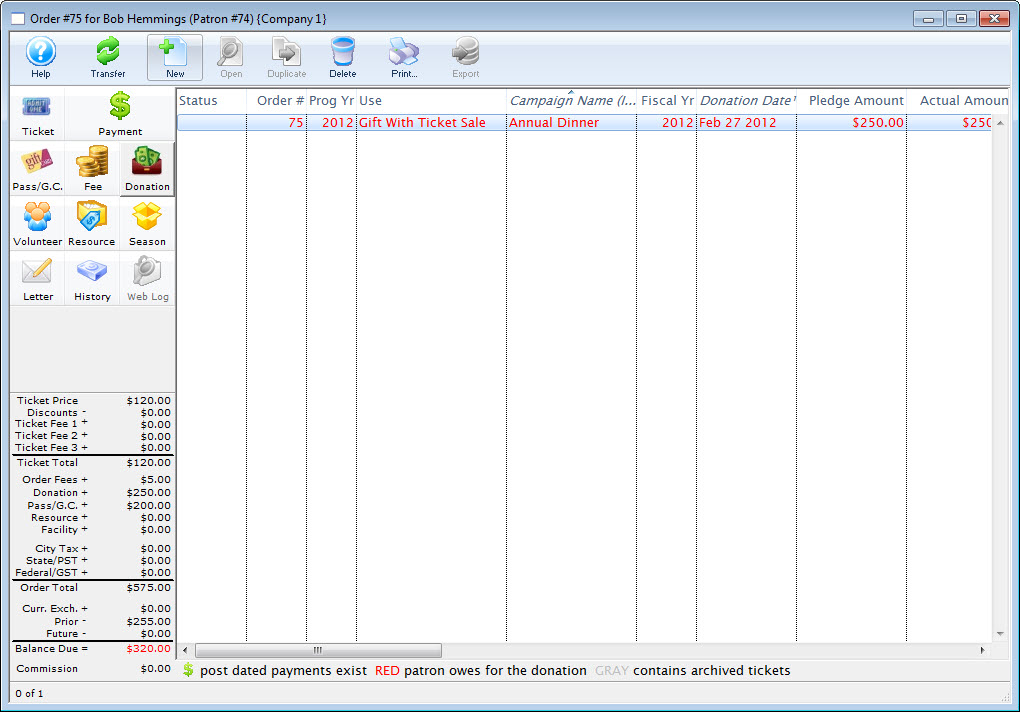
Parts of the Donation Tab
| Order # | Unique number assigned to the order for tracking within Theatre Manager. |
|
Program Year |
The Program Year defines the time frame the donation will be recognized in published material. Use it in reports to print a list of Program Names within the Program Year. |
| Use | The type of donation received. |
| Campaign | Campaign the donation was assigned to. |
| Fiscal Year | The financial year the donation was made within. | Donation Date | Date the donation was recorded in Theatre Manager for. |
| Pledge | The amount the donation was originally entered as. |
| Actual | Amount of money received for the donation. A donation may be made in the form of a Stock and the payment amount may be more of less then the donation amount. For information on Stock gifts click here. |
| Donation Balance | The unpaid difference between the Donation and the Total Payment |
| Donation Amount of Receipt | The amount of the donation that receipts have been issued for. |
 |
Inserts a new donation. For more information on inserting donations click here. |
 |
Opens the selected donation for editing. For more information on editing donations click here. |
 |
Deletes a donation when the tax receipt and prior payments have been removed. For more information on deleting donations click here. |
 |
Opens the donation payment window. For more information on making payments Click here. |
 |
Prints the donation on a ticket if a default ticket face has been associated with the donation. For information on setting up donation campaigns click here. |
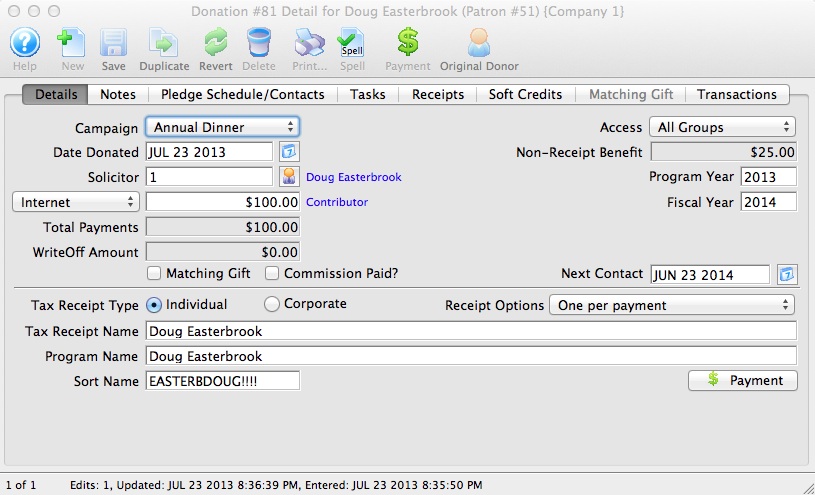
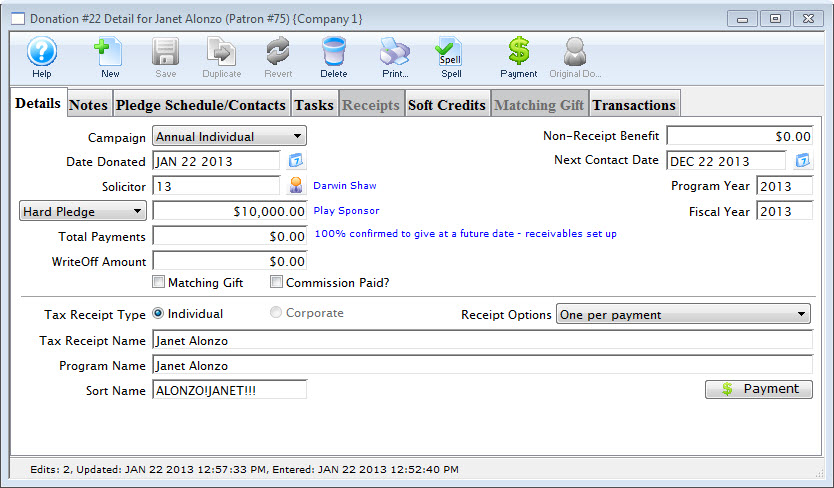
Details Window
- When Inserting Donations the Donation Detail Window is accessed through the donation module or the order window.
- To access a Patron's Donation Detail Window after the donation has been inserted, you can open the patron's Donation tab and the previous donation from there. Double click on any donation line and the Donation Detail Window will appear.
To access the Donation Detail window, you perform the following steps:
- Open the Patron Record.
For details on locating a Patron Record click here.
- Click the Donation tab.
- Click the New button.
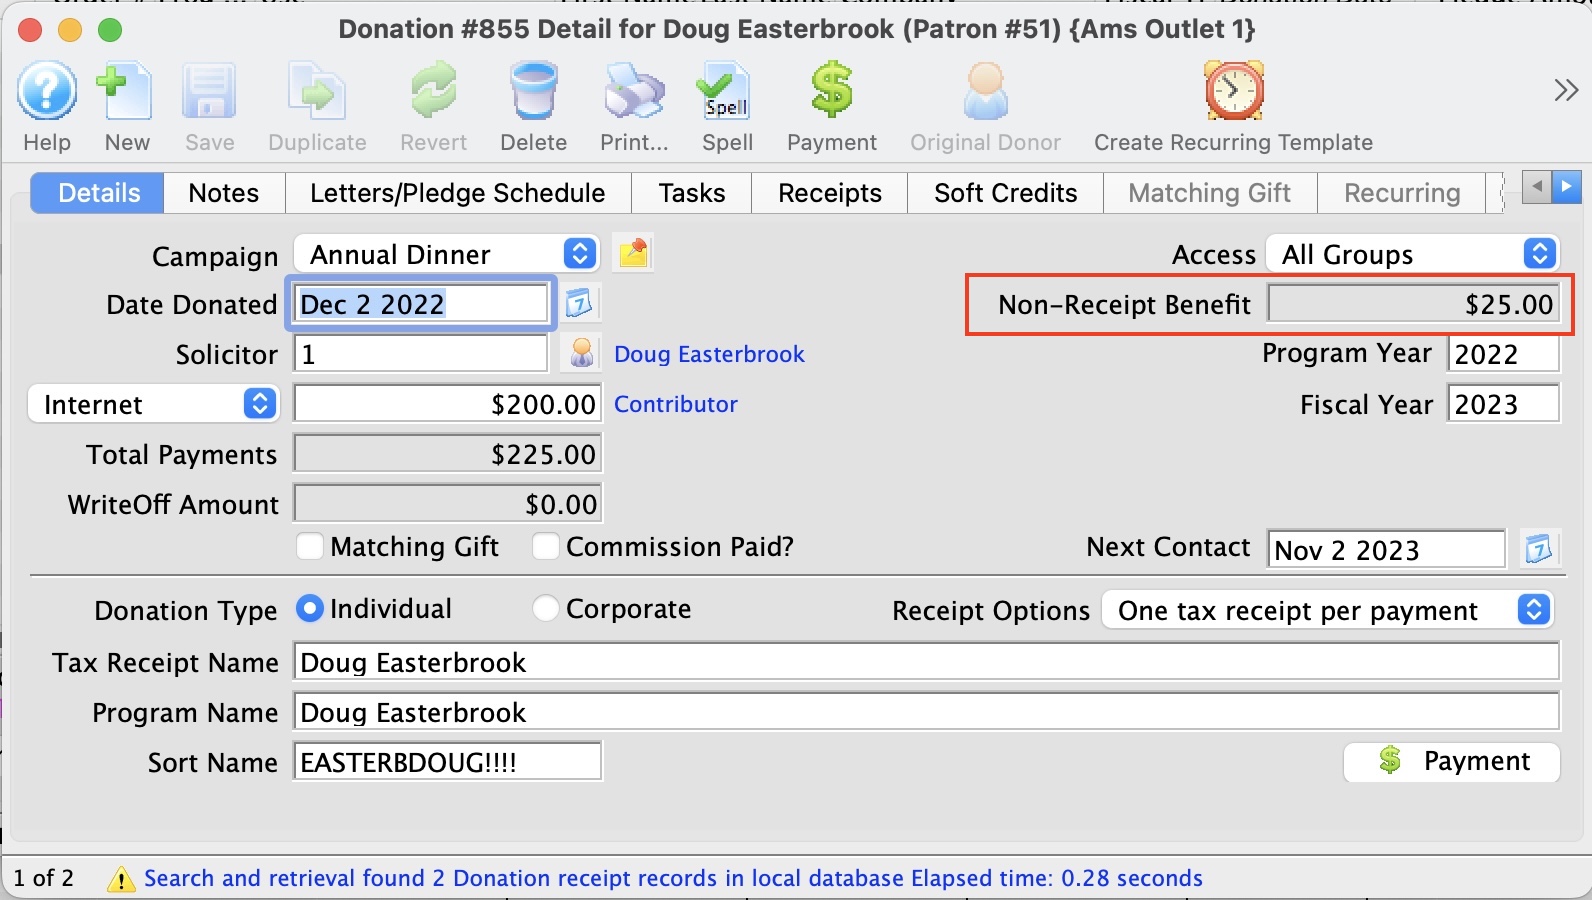
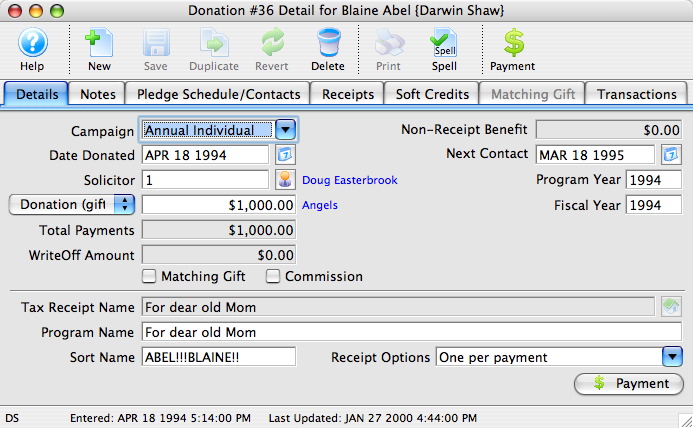
Parts of the Detail Window
 |
Inserts a new donation. For more information on inserting donations click here. |
 |
Saved changes made to the current donation. |
 |
Reverts changes made to the donation back to the last saved point. |
 |
Deletes a donation once the donation receipt and payment have been removed. For more information on deleting donations click here. |
 |
Generates a report displaying the donation details. |
 |
Checks the spelling within the data entry fields. |
 |
Adds a payment to the order. For more information on adding payments click here. |
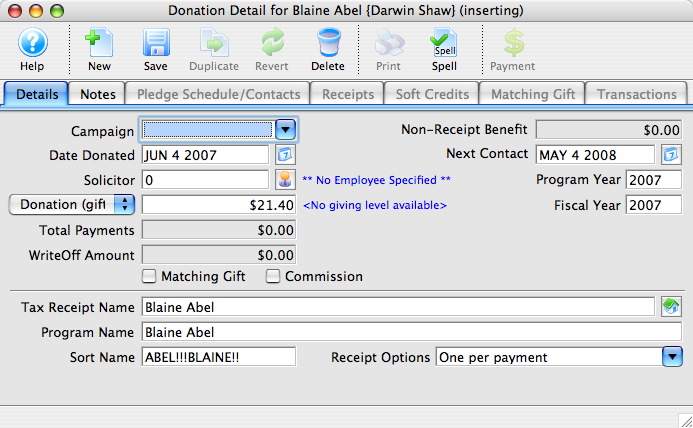
| Campaign | The drop down list contains the possible donation campaign to give the donation to. |
| Date Donated | Enter the date a donation was made or if the donation differ from the default computer date the date can be back dated into a prior calendar year for tax purposes. |
| Solicitor | Select the person responsible for receiving the donation from the drop down. This person must exist in the Employee table (see Setting up an Employee) |
| Donation (gift) |
There are two parts to the actual donation amount:
This amount is normally set up a receivable in Theatre Manager so that the system knows to expect a payment for this amount. It could be one payment or it could be post dated payments. However, the choice in the popup affects whether the GL is informed about the gift. There are generally 4 choices when entering a new gift:
|
| Total Payment | Amount of money received for the donation. A donation may be made in the form of a Stock and the payment amount may be more of less then the donation amount. For information on Stock gifts click here. | WriteOff Amount | The unpaid difference between the Donation and the Total Payment. |
| Matching Gift | Select the Matching Gift if you wish to link this donation to another patron who will also donate as a result of this patron giving a new donation. Click Here for more information. | Commission | Select Commisssion if the employee responsable for the donation receives a persentage of the sale. |
| Access | You can specify the groups of people who can access this donation if you wish to put some sort of restrictions on the record. |
| Non-Receipt Benefit | The amount deducted from the donation receipt to cover taxable benefits received by making the donation. |
| Next Contact | By default, the Next Contact Date is eleven months from the date of the donation. This date can be changed should you require a different date from the default. Use it in reports to print a list of donors that need contacted at that time to ensure that they give on a regular basis. |
| Fiscal Year |
The Fiscal Year defaults from the
|
| Program Year |
The Program Year generally tracks the fiscal year - meaning it is the same. However, you can make the program year an arbitrary year in the future or in the past -- so that you can track totals differently than fiscal year. Changing program year has no effect on financial data. It can be used as selection criteria for creating the program listing.
The allows your FISCAL YEAR to track IRS and CRA reporting/accounting requirements while program year can track your own reporting requirements It defaults to:
|
| Tax Receipt Name |
This field is used to record the name of the individual
who will receive the tax deductible receipt. Theatre Manager prints
a receipt for tax purposes in the name of the individual recorded
here, which could differ from the individual giving the donation.
Please refer to Tax Receipt Name Considerations when entering this field - there are some legal implications. |
| Program Name | This field is used to record how the patron would like to be recognized on the program. Theatre Manager generates a donor recognition report that ensures your donation list is complete and up-to-date. If the Donor wishes to remain anonymous this field should read "anonymous". Click here for more information on making the donation anonymous. |
| Sort Name | The sort name is suggested by Theatre Manager. It is initially based on the last name or company, depending on how the default donor name is selected and it may be changed. The sort name is used to position the donor's name in the program. For example, if the Program Name is 'Anonymous', the sort name could still be 'Smith'. This would cause the program to creating a listing for 'Anonymous' under S. |
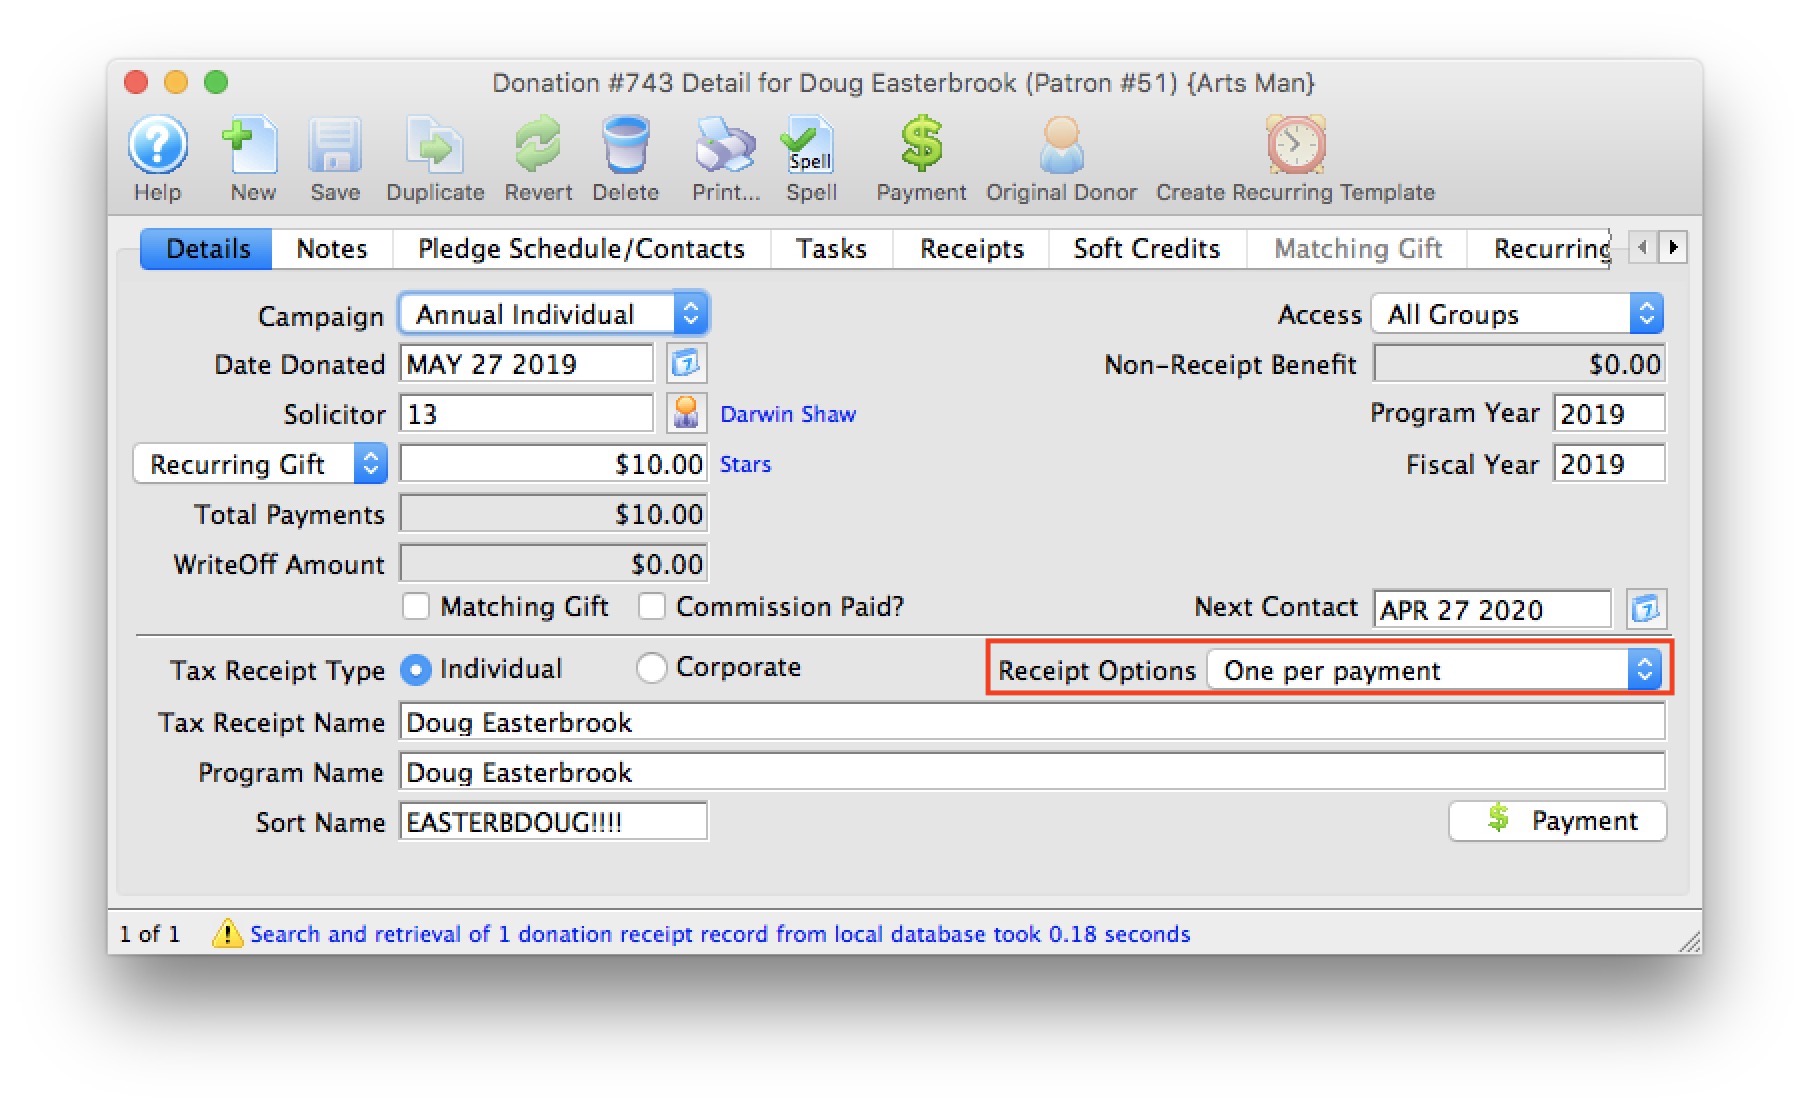
| Receipt Options | Choose how and when receipts should be Printed. The options are described on this web page. |
 |
Click here for details on the Notes tab. |
 |
Click here for details on the Pledge Schedule tab. |
 |
Click here for details on the Receipt tab. |
 |
Click here for details on the Soft Credit tab. |
 |
Click here for details on the Matching Gift tab. |
|
|
Click here for details on the Transaction tab. |
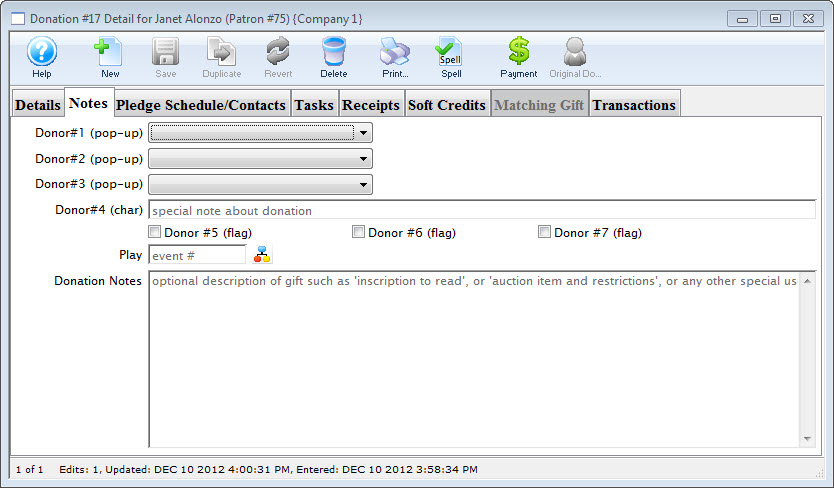
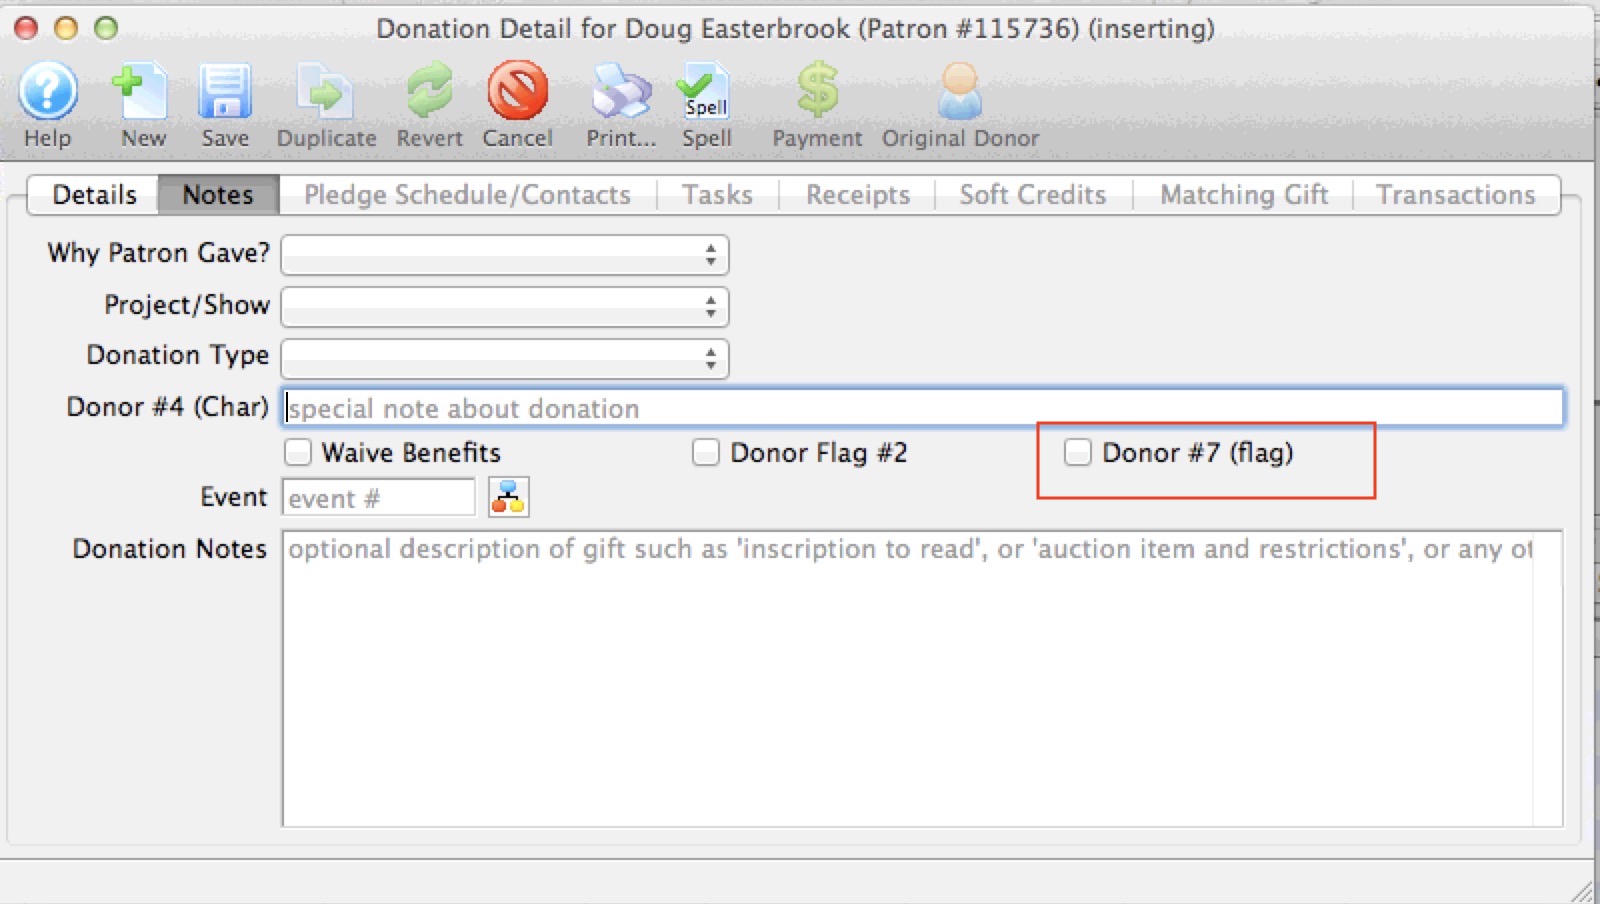
Note Tab
The Notes Tab allows you to select specific donors and event / plays and enter Notes about the selected donation.
Parts of the Notes Tab
| Donor #1 (pop-up) | A customizable pop-up field edited through the code tables. This pop-up can be made a mandatory field in Company Preferences. |
| Donor #2 (pop-up) | A customizable pop-up field edited through the code tables. This pop-up can be made a mandatory field in Company Preferences. |
| Donor #3 (pop-up) | A customizable pop-up field edited through the code tables. This pop-up can be made a mandatory field in Company Preferences. |
| Donor #4 (char) | A customizable character field. This field can be made a mandatory in Company Preferences. |
| Donor #5 (flag) | A customizable Check Box. |
| Donor #6 (flag) | A customizable Check Box. |
| Donor #7 (flag) | A customizable Check Box. |
| Play | Allows you to attach a play to this donation. Use the Event / Play Lookup  button to choose from a list of events / plays. button to choose from a list of events / plays. |
| Donation Notes | Any addition notes to be added to the donation. If the donation was a matching gift, notes to that effect will be automatically placed here. |
|
If any of the customized fields are made mandatory, you will need to edit the TMdonation.html web page in order to successfully accept donations online. |
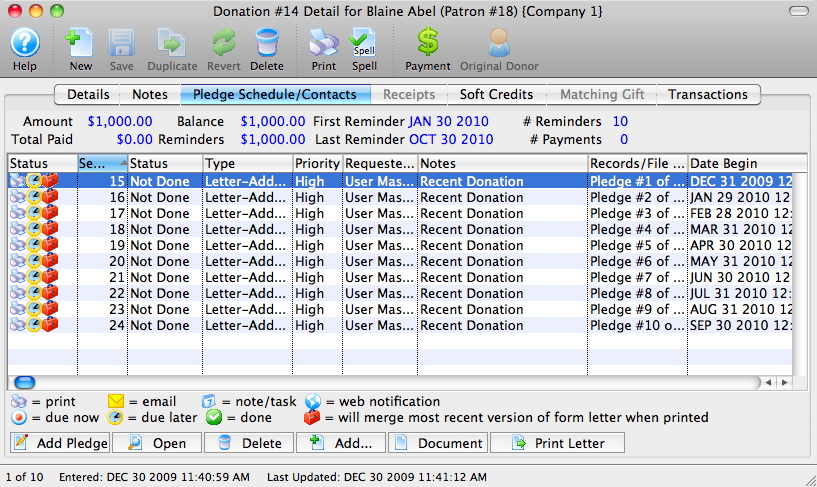
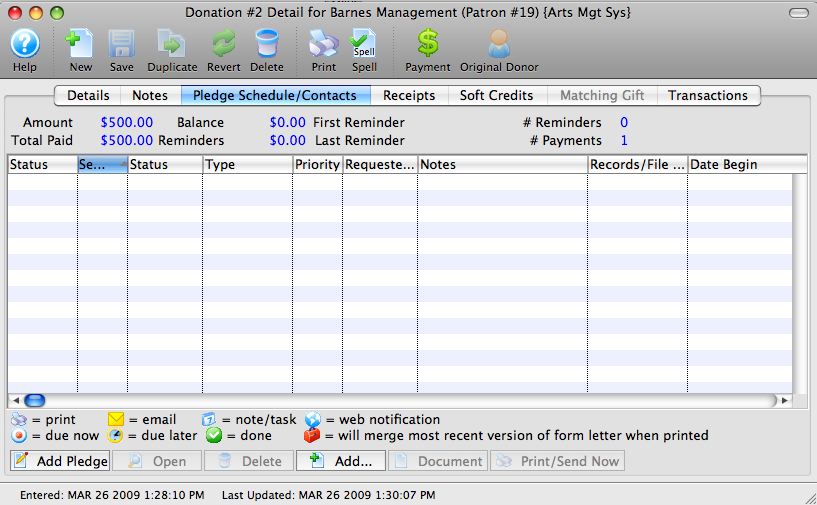
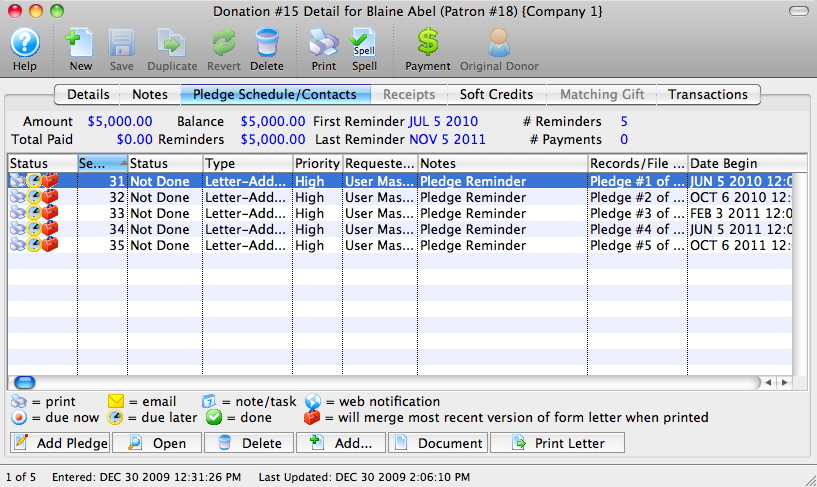
Pledge Schedule & Contacts Tab
This tab can be used to add Pledge Schedules and track all donation Contacts.
Parts of the Pledge Schedule / Contacts Tab
| Status | Pictorial progress of the letter, pledge or email. |
| Seq # | Sequence number of the letter, pledge or email. |
| Status | Verbal progress of the letter, pledge or email. |
| Type | Type of contact detail. |
| Priority | Rating of priority. |
| Requested By | Employee who added the letter, pledge or email. |
| Notes | Name of the letter or email. |
| Records/File Connected to Correspondence | Details of the attached letter, pledge or email. |
| Date Begin | Date the correspondence is set to begin. |
 |
Adds a scheduled pledge reminded to the donation. For more information on scheduled pledges click here. |
|
Opens the selected letter, pledge or email. |
|
Deletes the selected letter, pledge or email. |
 |
Adds a new letter or email to the donation. |
 |
Opens the document that corresponds to the selected pledge, letter or email. |
 |
Prints the selected letter. |
Tasks Tab
Calendars show tasks to be done in a variety of formats. Gantt charts (part of Projects) show tasks associated with each other and the relationships between the various pieces. Invoices use tasks and the associated people and resources as line items in an invoice to bill clients.
You can associate tasks with any number of people who are responsible for making sure the task gets completed. Tasks can be reminders to yourself about upcoming deadlines. Tasks can be used to schedule your time. Tasks can have physical resources assigned to them that may be billed or not.
Notifications or reminders can be set up for tasks so you don't miss a meeting or appointment.
To learn more about tasks and how to add them click here.

Parts of the Tasks tab
| Task # | The sequence number assigned by the database to the task. |
| Status | The current status of the task (Done, Not Done, In Progress, Cancelled). |
| Begin Date | Date the task is set to begin. |
| Date End | Projected completion date of the task. |
| Description | The description of the task. |
| Event Title | The title of the event / play associated with the task (if any). |
| Event Code | The event / play code associated with the task (if any). |
| Perf # | The Performance number associated with the task (if any). |
| Date | The date of the event associated with the task (if any). |
| Time | The time of the performance associated with the task (if any). |
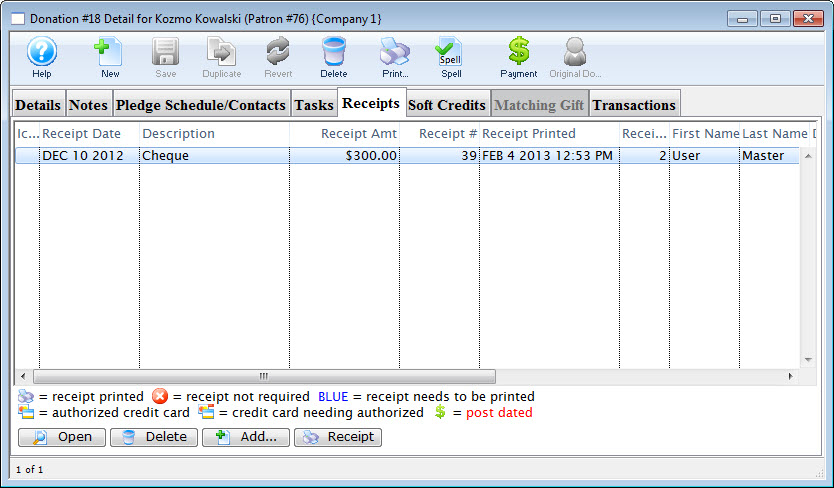
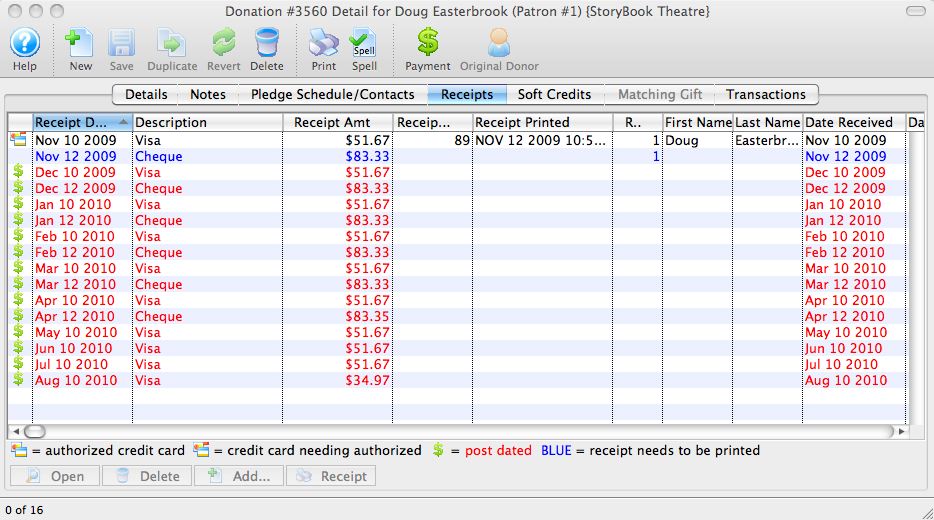
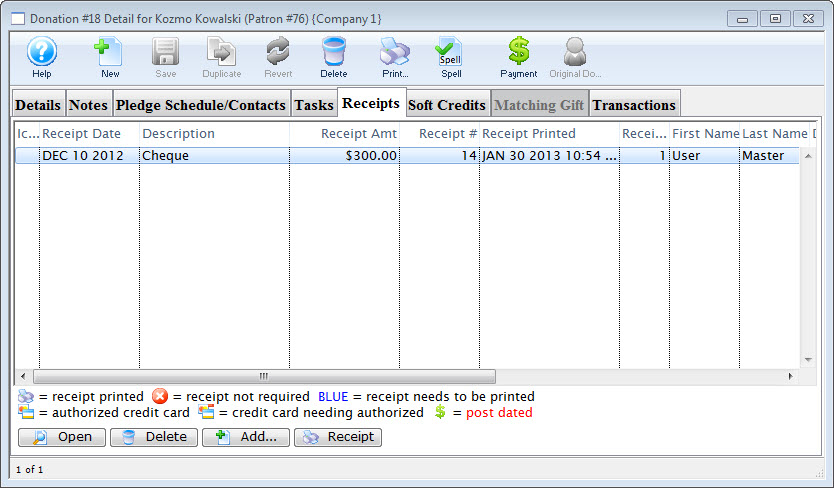
Receipt Tab
|
Please refer to receipt options to see how your choices of when and how receipts should be printed for the donation by Theatre Manager. |
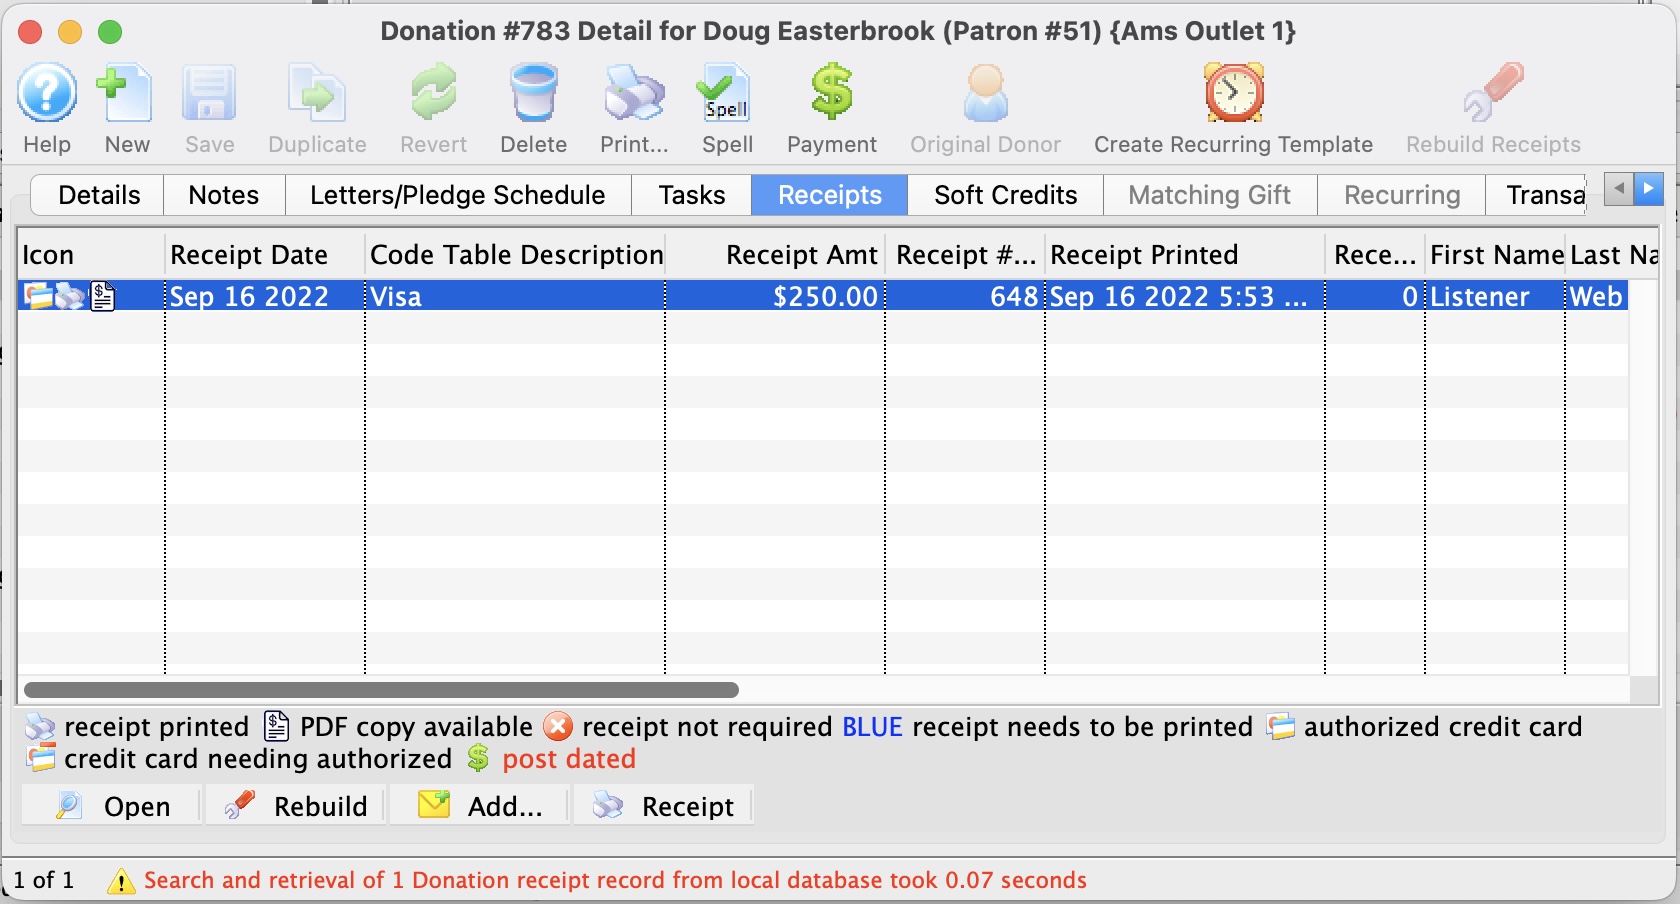
Parts of the Receipt Tab
| Receipt Date | The Date the Receipt was created i.e. The day the payment was received. |
| Description | Method of payment received. |
| Receipt Amount | Amount the receipt was issued for. |
| Receipt # | The number of the receipt. This number is setup in Company Preferences under the Donation Receipts tab. |
| Receipt Printed Date | Date the receipt was printed. |
| Receipt Print Count | Number of times the receipt has been printed. |
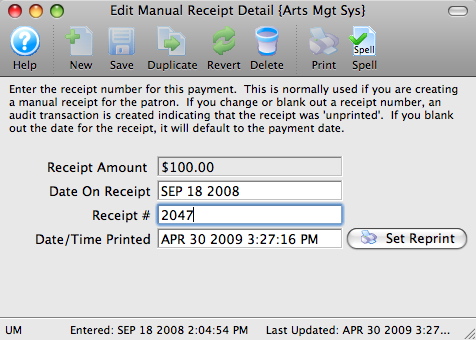
|
Opens the Edit Manual Receipt detail window. |
|
Deletes the selected receipt. If after the receipt is deleted the total donation is greater than the receipted amount Theatre Manager will rebuild the order and recreate the receipts. |
|
Adds a form letter to the selected payment. |
 |
Prints a ticket receipt for the selected payment. |
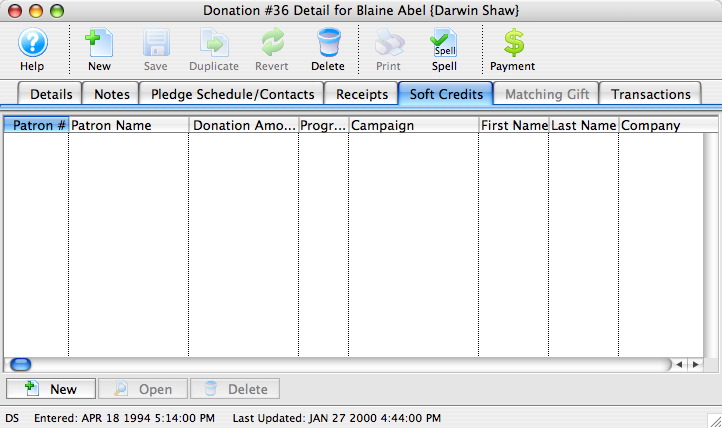
Soft Credit Tab
A Soft Credit is used to attach a patron other then the donor to the donation. The purpose is to recognize a patron for the value of the contributions they helped raise.
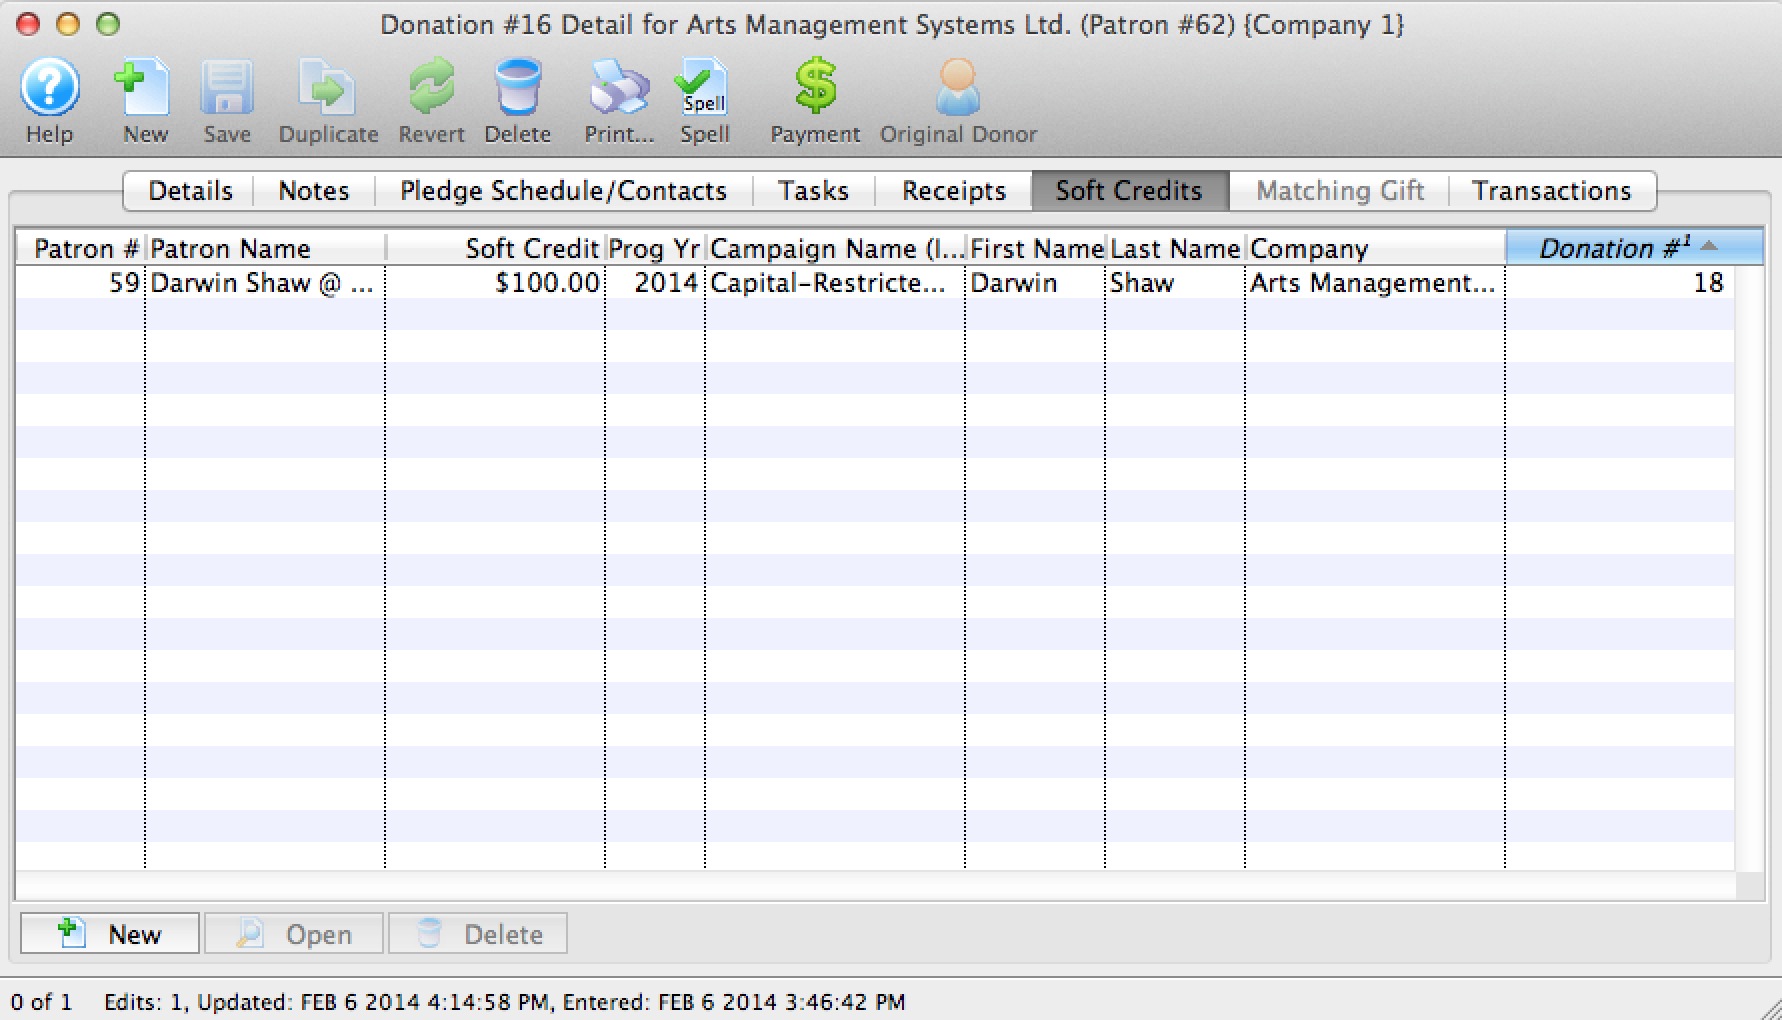
Parts of the Soft Credit Tab
| Patron # | Reference number for the patron associated by the soft credit. |
| Patron Name | First and last name of the patron. |
| Soft Credit | Amount of the donation the patron is to be recognized for. |
| Program Year | The year in which the patron should be recognized in publications. |
| Campaign Name | Campaign the donation was contributed to. |
| First Name | First name of the patron. |
| Last Name | Last name of the patron. |
| Company | Company the patron works for. |
|
|
Inserts a new soft credit. For more information on creating soft credits click here. |
|
Opens the selected soft credit for editing. |
|
Deletes the selected soft credit. |
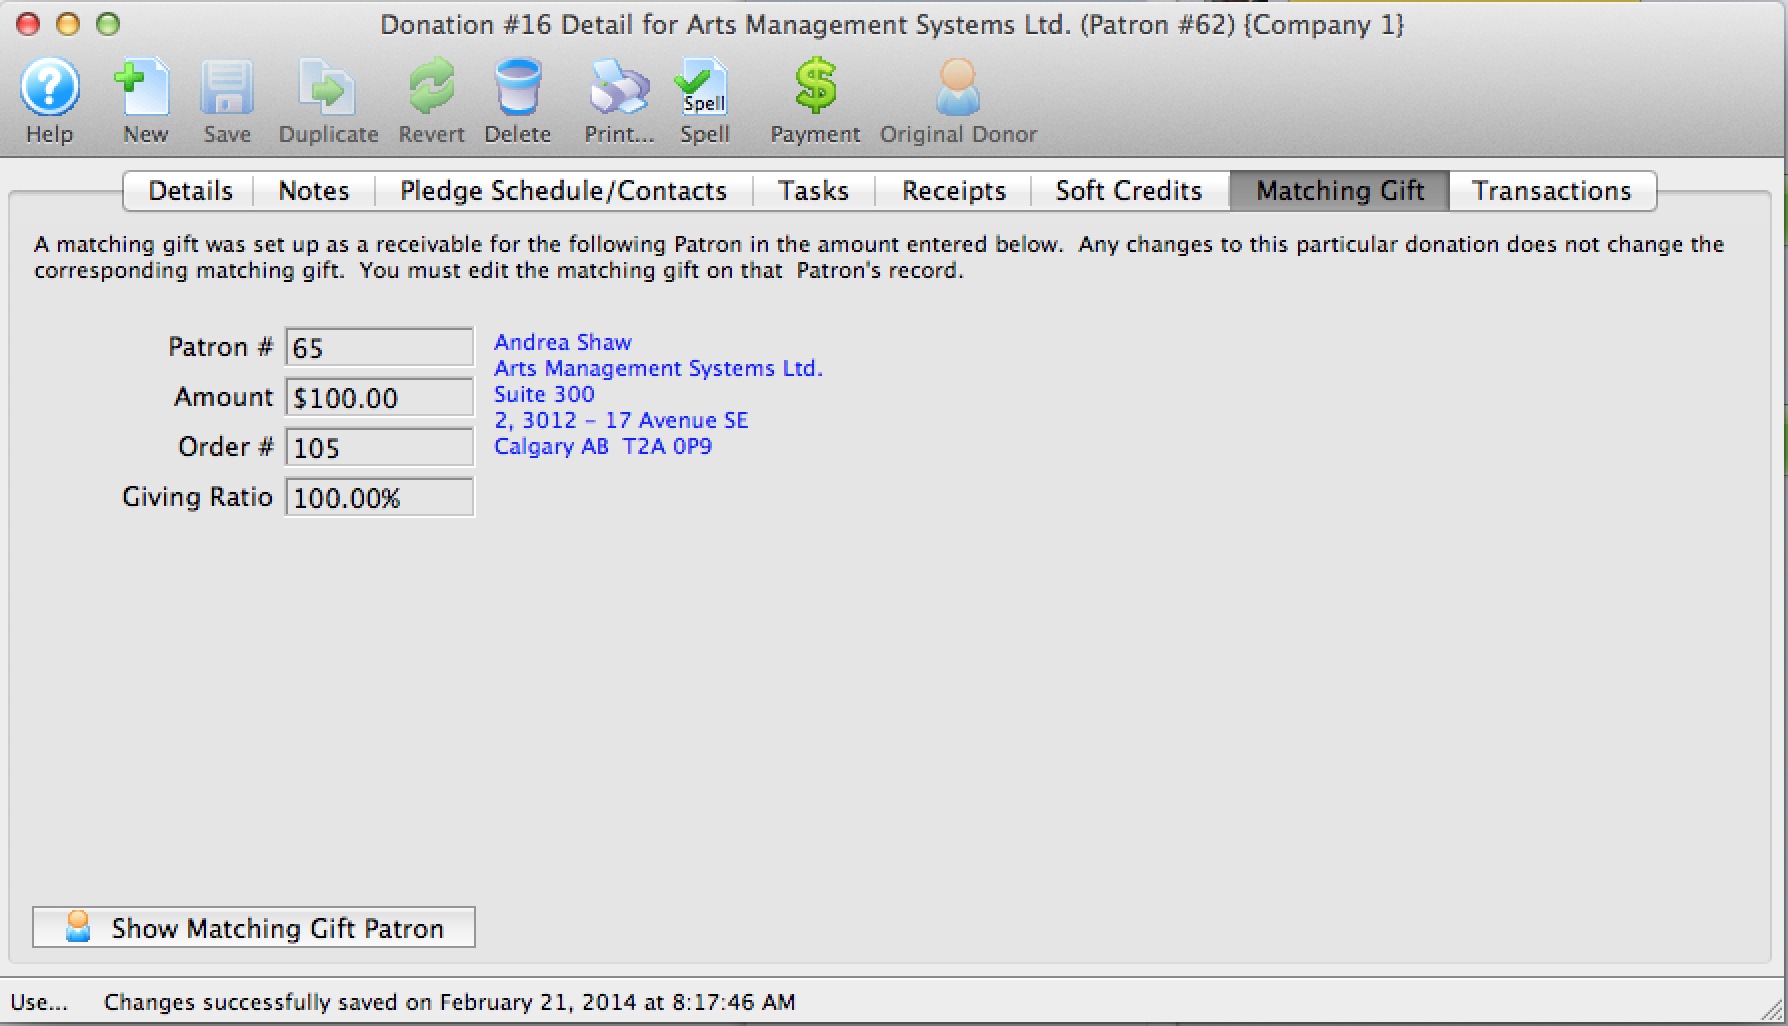
Matching Gift Tab
For details on inserting matching gifts click here.
Parts of Matching Gift Tab
| Patron | Patron number for the matching gift patron. |
| Amount | Value of the donation the matching gift patron will make. |
| Order # | The order number in the matching gift patrons file. |
| Giving Ratio | The percentage the matching gift patron's donation is in relation to the original donation |
 |
Opens the patron record for the matching gift patron. |
Quick reference Information for Matching Gifts
|
Quick reference information for Setting up the Gifter |
Transaction Tab
Parts of the Transactions Tab
| Seq # | The transaction reference number. |
| Trans Date | Date the transaction took place. |
| Journal No | Journal Entry reference number. |
| Code | Theatre Manager reference code used to determine the type of transaction. |
| Transaction Desc | Brief description of what the transaction was. |
| Order # | Reference number used to tract the components of the order. |
| Play Code | Play code reference the donation is associated with. |
| Performance Code | Performance code reference the donation is associated with. |
 |
Opens the selected transaction displaying the transaction details window. |
Campaign Setup
|
You can download the Cheatsheets (1-2 pages) and Screencasts (online video demonstrations of the functions with narration) by clicking on the icons. |
Campaigns are at the heart of the donation module. For accounting and marketing purposes, Theatre Manager allows you to divide your fundraising activities into as many "campaigns" as you wish. You may choose to have a single Annual Campaign that rolls over from year to year, or you may opt to create a new Annual Fund Campaign each year, thereby allowing you to place funds from each year into separate GL account.
While all funds for campaigns are initially processed through your general operating accounts, certain campaigns - such as the Capital Campaign - may actually reside in another bank or bank account. To handle this, Theatre Manager uses a Donation Bank Transfer (or "clearing" account) that signals your accountant to move funds from the main account to the other bank account that is being used for the Capital Campaign. And Theatre Manager handles all this accounting for you through the End Of Day.
Campaigns can be set be used only in specific places (box office vs, the web) and for specific purposes (all ticket returns go to a specific campaign, while general gifts have more options). Solicitors can be set to a specific employee or "champion" or can be left unset so that whomever solicits the donation will get the credit for having done so. This is particularly helpful in "Ticket Round-up" campaigns where Box Office staff can compete to see who raises the most funds.
Each campaign can be assigned a specific "Giving Level Matrix" which is simply a listing of dollar levels and their matching name. For example:
- $0.00 to $99.99 Donor
- $100.00 to $249.99 Friend
- $250.00 to $349.99 Star
- $350.00 to $499.99 Director
- $500.00 to $999.99 Producer
- $1,000.00 to $999,999.99 Playwright
You can also indicate within each level what benefits they may receive for their gift (if any) and record any impact that may have on their taxable receipt amount.
Setting Up Stock Gifts / Donations
We have a number of sites that receive stock donations. The general practice, is to value the stock at time of gift. This is the valuation for the tax receipt the donor receives.
The theatre can keep the stock (perhaps for an endowment investment) or turn it over to a broker to sell it under the direction of the theatre.
The donation value is most often recognized at the time of the gift. The amount actually received can be more or less than that valuation.
To handle this, yopu create a payment method called 'stock gain/loss' to be written off to a special account. You create this new payment method in code tables. For more information on code tables, click here.
For future reference, in the donations notes field, you can include the information regarding amount of shares, at what price, and when you sold them in the donation notes field.
Should you create the GL account as an expense account or revenue account?
The required GL Accounts are:
- Stock (Asset) - only if you keep Stock in the current form as Stock to be sold at a later date
-
Stock Gain/Loss (Revenue GL Account)
The account numbers and actual type are defined by your accountant.
Any brokerage fees (hopefully you have a generous broker who does not keep the fees) are treated the same way as a Gain/Loss on the sale of the stock.
Example A:
Receive $1,000 Stock and keep it as stock
Donation $1,000
| Payment Method | = Stock $1,000 (goes into the GL as a debit/asset) |
| Tax Receipt | = $1,000 |
Sell the Stock ($1,000) that was initially entered as Payment Method Stock for a surrender value of $1,200
| Payment Method | = Stock -$1,000 (to remove the initial stock asset) |
| Payment Method | = Cash $1,200 |
| Payment Method | = Stock Gain/Loss -$200 (goes into the GL as a credit/gain) |
| Tax Receipt | - none at this point because it was already issued during initial receipt of stock |
OR Sell the Stock ($1,000) that was initially entered as Payment Method Stock for a surrender value of $900
| Payment Method | = Stock -$1,000 (to remove the initial stock asset) |
| Payment Method | = Cash $900 |
| Payment Method | = Stock Gain/Loss $100 (goes into the GL as a debit/loss) |
| Tax Receipt | - none at this point because it was already issued during initial receipt of stock |
Example B:
Receive $1,000 Stock, Convert it to Cash for $1,010
Donation $1,000
| Payment Method | = Cash $1,010 |
| Payment Method | = Stock Gain/Loss -$10 (goes into the GL as a credit/gain) |
| Tax Receipt | = $1,000 |
Example C:
Receive $1,000 Stock, Convert it to Cash for $990
Donation $1,000
| Payment Method | = Cash $990 |
| Payment Method | = Stock Gain/Loss $10 (goes into the GL as a debit/loss) |
Tax Receipt $1,000
Donation Entry
- Box Office
- Online
- Pledges
- In conjunction with ticket sales
For more information on the features of the donation module, there are a number of cheatsheet and videos. Click here for a listing of the Donation Module quick reference materials.
Follow through the links below to learn how to enter and maintain donations in Theatre Manager.Inserting a Donation
It is important to recognize that donations can be entered from more then one place in Theatre Manager. You can enter a donation from the donation tab or from the orders window while a patron is purchasing tickets.
Open the Patron Record.
For details on locating a Patron Record click here.
- Click the Donation tab.
- Click the New
 button. The Donation Detail window opens.
Alternatively
To add a Donation to an existing order, or while creating an order, you would:
- In the Orders window, click the Donations
 button.
 - Click the New button in the Order >> Donations toolbar / ribbon bar.
The Donation Detail window opens.
Campaign The drop down list contains the possible donation campaign to give the donation to. Date Donated Enter the date that donation was made. If the donation date differs from the default computer date, you can back date the donation by up to 3 months into a prior calendar year for tax purposes. Donations always appear on tax receipts according to the year on the donation date.
Note that Revenue Canada has stated:
- that the donation date and date entered into the system must both be displayed on a receipt if they are different to deal with year end issues and
- checks entered after actual year end but which are for the prior year.
Solicitor Select the person responsible for receiving the donation from the drop down. This person must exist in the Employee table (see Setting up an Employee) Donation (gift) Click in to the amount field and enter the donation amount. Depending on the selection in the popup to the left, this sets up an as a receivable in Theatre Manager so that the system knows to expect a payment for this amount. It could be one payment or it could be post dated payments. 
In the popup to the left of the amount, the typical choices are listed below. The affect how money is reported to finance to create a receivable.
- Categories that do not report to finance
- Prospect - Indicates that the donation is not real and will not be reported to finance. Use this designation to track key major donations, bequests, likely grants, or other possible funding sources. Amounts can be raised or lowered without affecting financial reports
- Soft Pledge - Similar to prospect. The intention of this category is to indicate that you have verbal (but not written) commitment for a large donation.
- Categories that cause G/L entries to be created
- hard pledge - When you receive any signed paperwork for a pledge that is considered legally binding, use this option. Generally it means people are paying over time. on the odd occasion, you may need to switch a Prospect or Soft Pledge (not reported to finance) over to a Hard Pledge or Donation when all the hard work has been completed and a prospective donation becomes reality.
- Donation (gift) - Generally used for most donations where a check arrives or when advised that a grant proposal has been accepted and money is on the way.
- Donation Refund for Ticket - an option to delineate when refunding tickets and the donation was for the refunded ticket.
Total Payment Amount of money received for the donation. A donation may be made in the form of a Stock and the payment amount may be more of less then the donation amount. For information on Stock gifts click here. There are a number of rules for USA 503c registered charities that may affect the amount entered.
WriteOff Amount The unpaid difference between the Donation and the Total Payment. Matching Gift Select the Matching Gift if you wish to link this donation to another patron who will also donate as a result of this patron giving a new donation. Click Here for more information. Commission Check the Commission Paid box to indicate if a commission was paid to a third party to procure this gift. Theatre Manager will enter the date that the commission was paid. Non-Receipt Benefit The amount deducted from the donation receipt to cover taxable benefits received by making the donation such as a dinner or a show. You will not be able to enter a receiptable benefit unless you have set it up in the donation campaign setup. You may also have to indicate standard benefit amounts at each donation range in the giving level matrix. Next Contact By default, the Next Contact Date is eleven months from the date of the donation. This date can be changed should you require a different date from the default. Use it in reports to print a list of donors that need contacted at that time to ensure that they give on a regular basis. Program Year The Program Year defines the time frame the donation will be recognized in published material. Use it in reports to print a list of Program Names within the Program Year. Fiscal Year The Fiscal Year is selected from the fiscal year set up in default settings. Refer to Accounting for more information Tax Receipt Name This field is used to record the name of the individual who will receive the tax deductible receipt. Theatre Manager prints a receipt for tax purposes in the name of the individual recorded here, which could differ from the individual giving the donation. While you can put anything into the tax receipt name, there are some legal implications. Please refer to this page on the true donor as explained in a Government Of Canada document. If you cannot ascertain the true donor with certainty, you'll need to ask them for any correction. If you still cannot, then you should mark their donation receipt option as No Receipt Required so that the system will not print one. Program Name This field is used to record how the patron would like to be recognized on your program listings. The default name is populated into the program recognition field in the order that follows: - If there is a default donor publication name in the donor tab of the patron window, this will ALWAYS be used as the default publication name.
- If there is 'COMPANY' name in the patron record, then the donation will be set to corporate and the company name will populate in this field. You can easily change it by clicking on individual to set the patron's name in the field
- If the above two options do not apply, then the default is the patron's name, in the format specified in the company preferences
- You can then Change the recognition name manually For example:
- if the Donor wishes to remain anonymous this field should read "anonymous". Click here for more information on making the donation anonymous.
- Or if the name is 'in memoriam' or 'in honor of', then simply change the program name to state 'In Memory of .....'
Sort Name The sort name is suggested by Theatre Manager and is used to DETERMINE THE SORT ORDER of patrons (within a giving level) on the donor program insert reports. It is initially based on the last name or company, depending on how the default donor name is selected and it may be changed. The sort name is used to position the donor's name in the program. For example, if the Program Name is 'Anonymous', the sort name could still be 'Smith'. This would cause the program to creating a listing for 'Anonymous' under S.
In order to maintain a reasonable alphabetic sort order, the sort name starts out with either:
- For individual donations:
- the first 7 characters of the last name (padded with ! if need be)
- the first 7 characters of the first name (padded with ! if need be)
- The first character of the middle name (or a single ! if no middle name)
- -OR- the company name without spaces (for corporate donations)
The sort name is designed so that you can alter the natural sort order of patrons. For example:: - Anonymous typically falls under 'A', but you can force it to appear where the patron's last name would fall, or change sort name to ZZZZ to make it fall at the end
- In Memory of Spot the Family Dog can be made to fall under Spot if you make the sort name Spot or under Family if you make the sort name Family
- Normally, you would not change the sort name, this just gives some extra capability for extraordinary situations like 'In Memoriam' or 'Anonymous' or 'on behalf of' gifts.
Tax Receipt Options  There are a number of options for printing tax receipts, some of which Theatre Manager will handle for you. Please refer to the explanation on what each receipt option means and how the system processes them.
Please read very carefully about Revenue Canada's Policies on issuing tax receipts.. Improper receipting can result in heavy fines. - Enter the Donation Details.
- Proceed to the
 tab if required.
- Click the Payment button.
- Pay for the donation.
Click Payment for additional information.
| Quick reference information Donations Overview |
|
|
Entering a Prospect or Soft Pledge Donation
A prospective donor's name may come from discussions at a Development or Staff meeting, or noticing a donor on another venue's Donor Wall that isn't in your current donor list. it might also be for the purpose of Planned Giving
As soon as you identify a prospective donor, you should start a Prospect Donation in Theatre Manager. This way, you can track the progress of moving the potential donor towards an actual gift.
 |
A Prospect Gift or Soft Pledge will not affect your financials in any way. Entering a Prospect Gift is simply a way of tracking a potential gift without creating any Receivables. |
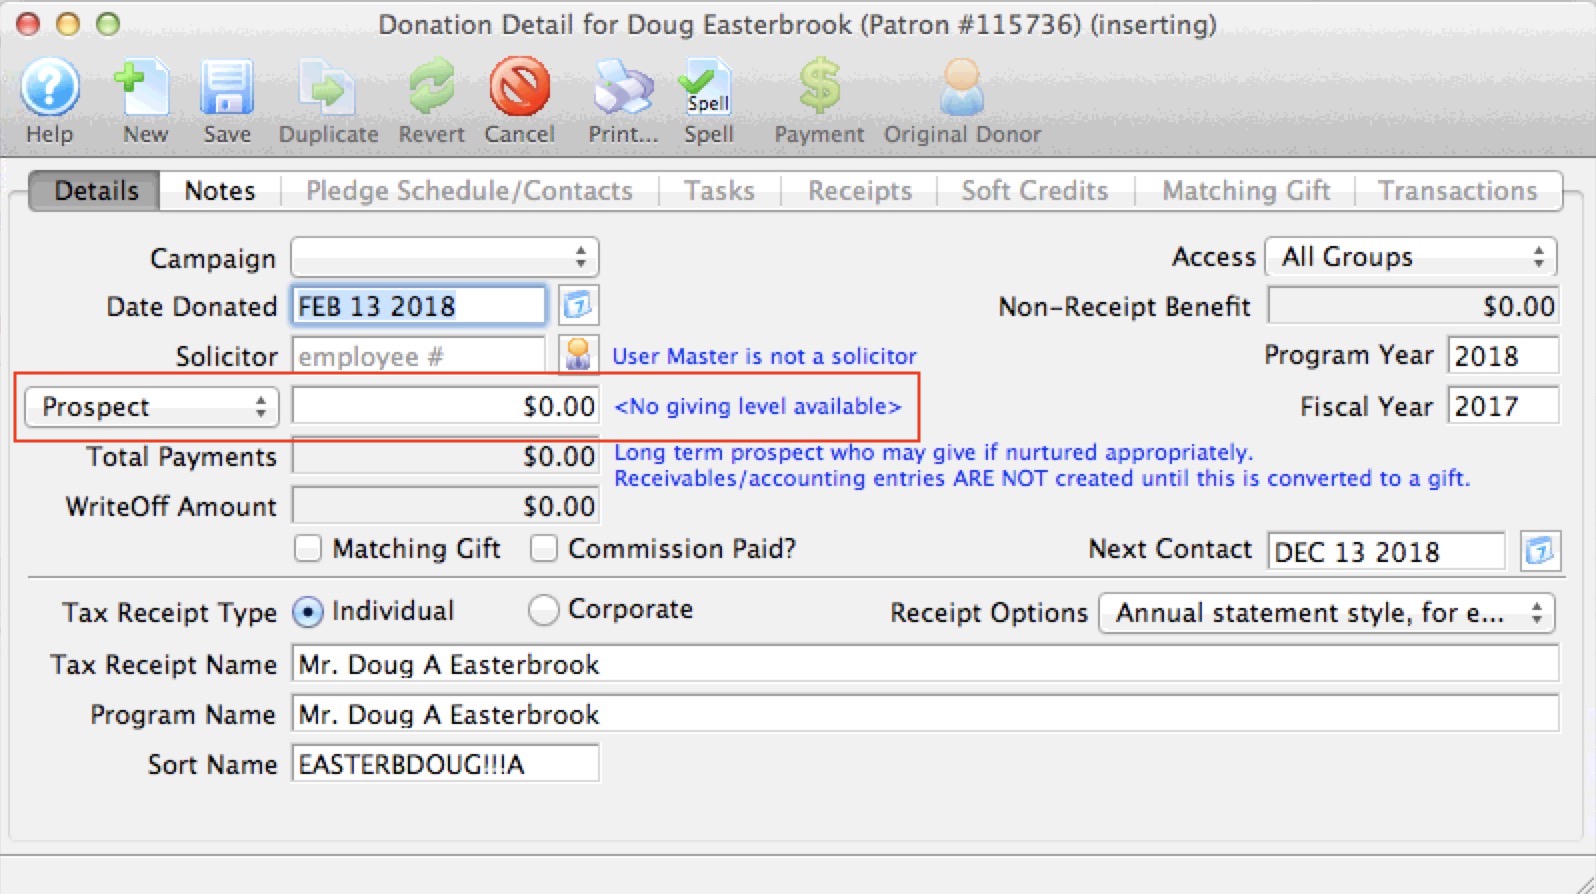
Entering a Prospect Donation
- Start by opening the Patron Record of the prospective donor. For details on locating a Patron Record click here.
- Click the Donation tab.
- Click the New button. The Donation Detail window opens.
- On the left-hand side of the Donation Detail window, you will see a drop down for:
- Prospect
- Soft Pledge
- Hard Pledge
- Donation (gift)
Select "Prospect"
- Complete the remainder of the fields for the prospective gift.
- Click the SAVE button at the top of the Donation Detail window.
|
Alternatively, refer to Enter Donations on the Order Window when already within an order. |
The Donation Detail window opens.
You will also note a change in the blue text to the right of the field. It now says:
Long term prospect who may give if nurtured appropriately. Receivables/accounting entries ARE NOT created until this is converted to a gift.
Some prospect gifts will remain as prospect gifts for a long time - perhaps even forever. They will always be recorded in the Patron Record so you can see what work has been done with this particular Donor.
Using Prospect for Planned Giving
|
A Prospect Gift or Soft Pledge will not affect your financials in any way. Entering a Prospect Gift is simply a way of tracking a potential gift without creating any Receivables. This gives you a place to track all interactions with the patron during the planned giving process. |
Setup and Data Entry
To handle these in Theatre Manager:
- Make a donation campaign, if it is deemed best to have a different one for tracking purposes
- Indicate that the donation be set up as a PROSPECT
- Enter the potential value of the planned gift
- put something in the notes about what the planned gift is for or how you will receive it
- optionally, use one of the custom donation fields for an additional identifier. This image shows that flag #7 is not taken, so you might rename that as 'planned gift' in company preferences if an additional marker is required to simplify pulling some reports.
What to do before you actually receive the Planned Gift
Before you actually receive the planned gift, there will undoubtably be changes to the information, discussions, reporting, etc. You can:
- Use the TASK tab to track meetings , to-do's or such with the potential donor
- In one of the tasks, if you get documentation from the donor, stick it into the attached files tab of the task
- Track any letters you send specific to the planned gift in the pledge Schedule/Contacts tab
- This gives you a central source of all interactions about this specific planned gift with the patron.
What changes when you get the planned gift?
- Change the PROSPECT marker to GIFT - this initiates the financial data to be sent to finance for the GL
- enter the true amount of the planned gift, if it has changed from what you thought
- Enter full payment or any sort of payment plan that the planned gift species -- just like any other donation
- Prepare a tax receipt, any custom acknowledgement for this kind of gift, or any required government forms - which you can also track in the attached files tab of a task
In the end, a planned gift is just like any other donation ..... except it starts its life as a PROSPECT before being converted to an actual gift.
Donation Tax Receipt Name Considerations
|
While you can put anything into the tax receipt name, there are some legal implications. If you are in Canada, please read Revenue Canada's Policy Commentary CPC-010
For those in the USA, you may wish to lookup the details of IRS publication 1771 |
|
Please read about Revenue Canada's extensive policies on issuing tax receipts.. Improper receipting can result in fines. |
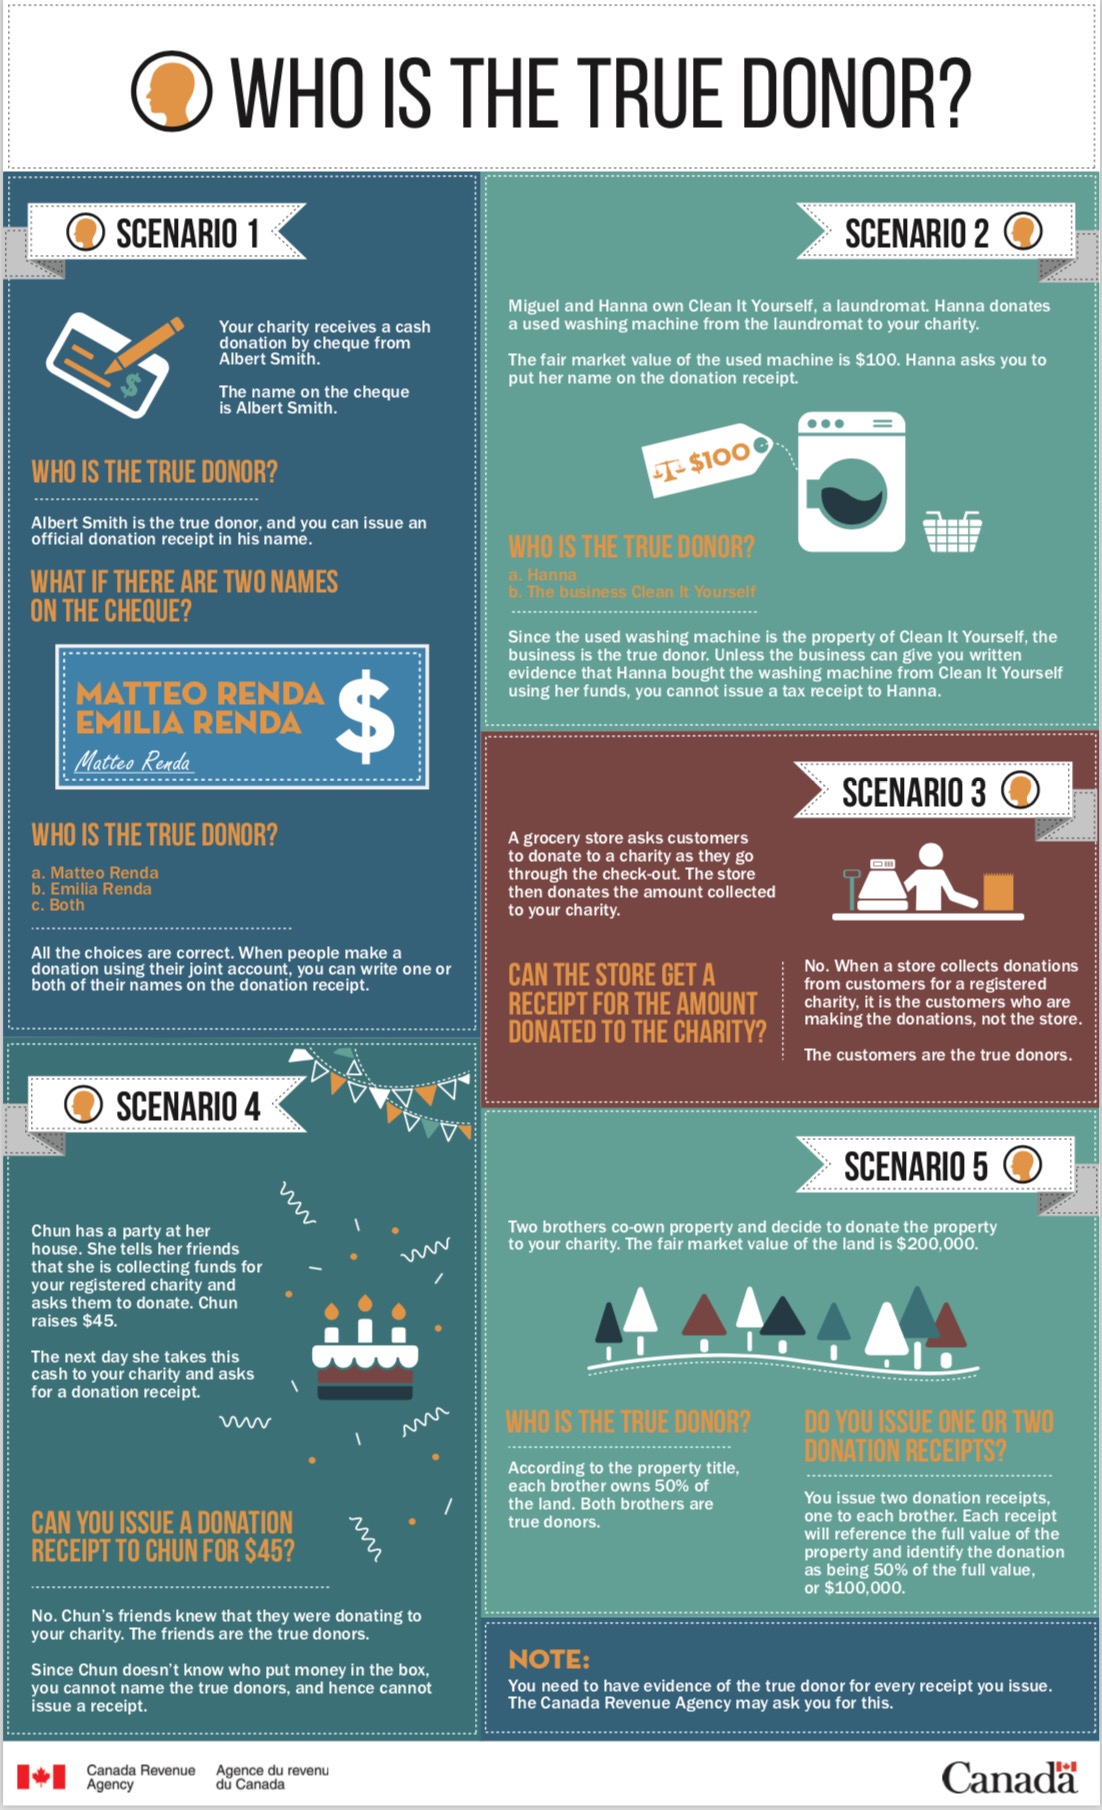
This handy chart below comes from the Revenue Canada web site and illustrates some common examples. In all cases, Revenue Canada indicates the need to highlight the true owner of the donation. If the donors name cannot be ascertained 100%, then no receipt should be issued.
Donation Tax Receipt Options
|
Please read carefully about Revenue Canada's Policies on issuing tax receipts. The CRA web site mentions:
Theatre Manager modelled the contents of receipts after the requirements/samples on Revenue Canada's Web Site.. The US has fewer, although somewhat similar requirements as mentioned in publication 1771 |
|
Read how to batch print receipts that have not been printed. |
|
Please note: receipts are issued for each payment made towards the donation. Receipts are not issued for the donation.
The reason is that donations are only an indication of what the patron intends to give and payments are what they actually gave. A receipt cannot be issued until the payment is made and each payment is given its own receipt number and date. |
Tax Receipt Options
Theatre Manager has a number of tax receipt options that you can set for each donation. In addition there is a setting for each campaign on the edits tab that can be used to only print donations above a certain amount.
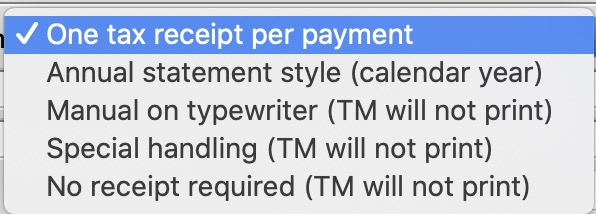
Receipt Options Types Printed by Theatre Manager
- One tax receipt per Payment - is the default. Each payment is issued a separate tax receipt when the payment is received. If there are 10 payments, you will create 10 receipts at when each payment is entered.
- Annual Statement Style (calendar Year) - will print a one page tax receipt for the patron listing all donations in the calendar year marked as using this style of receipt. If a receipt was previously printed, it is so indicated on the statement.
Receipt Options to be handled Manually
- Manual On typewriter - are used when the donation and payments are complex enough and the only way to observe various government regulations is to simply type one up in a word document or on an old fashioned typewriter. Theatre Manager ill not print any receipts for this donation. Once finished the donation receipt, you may want to import a PDF of the document into a task to record what was sent.
- Special Handling - are also used for complex receipting requirements. We suggesting that this be used if you create a form letter for this purpose
- No Receipt Required - there are cases when you should not print a receipt for a donation even if a receipt is normally created for the campaign. Use this option when the true donor cannot be identified, or if the entire donation receives benefit.
If you cannot ascertain the true donor of a gift, select No Receipt Required to comply with Revenue Canada regulations.
Which receipt type to use?
-
One per payment receipts are best suited for:
- Larger donations paid with one or two payments
- When the customer wants a receipt after a payment
- if you want to strictly follow Canada's governmental reporting requirements and use facsimile signatures and/or are using preprinted forms
-
Annual Style receipts are best suited for:
- Donations with many payments or post dated payments
- recurring donations that never end.
- If the client wants for one receipt for all donations in the year
-
Form letters can be used to print receipts if the options provided or the situation warrants something custom to be created.
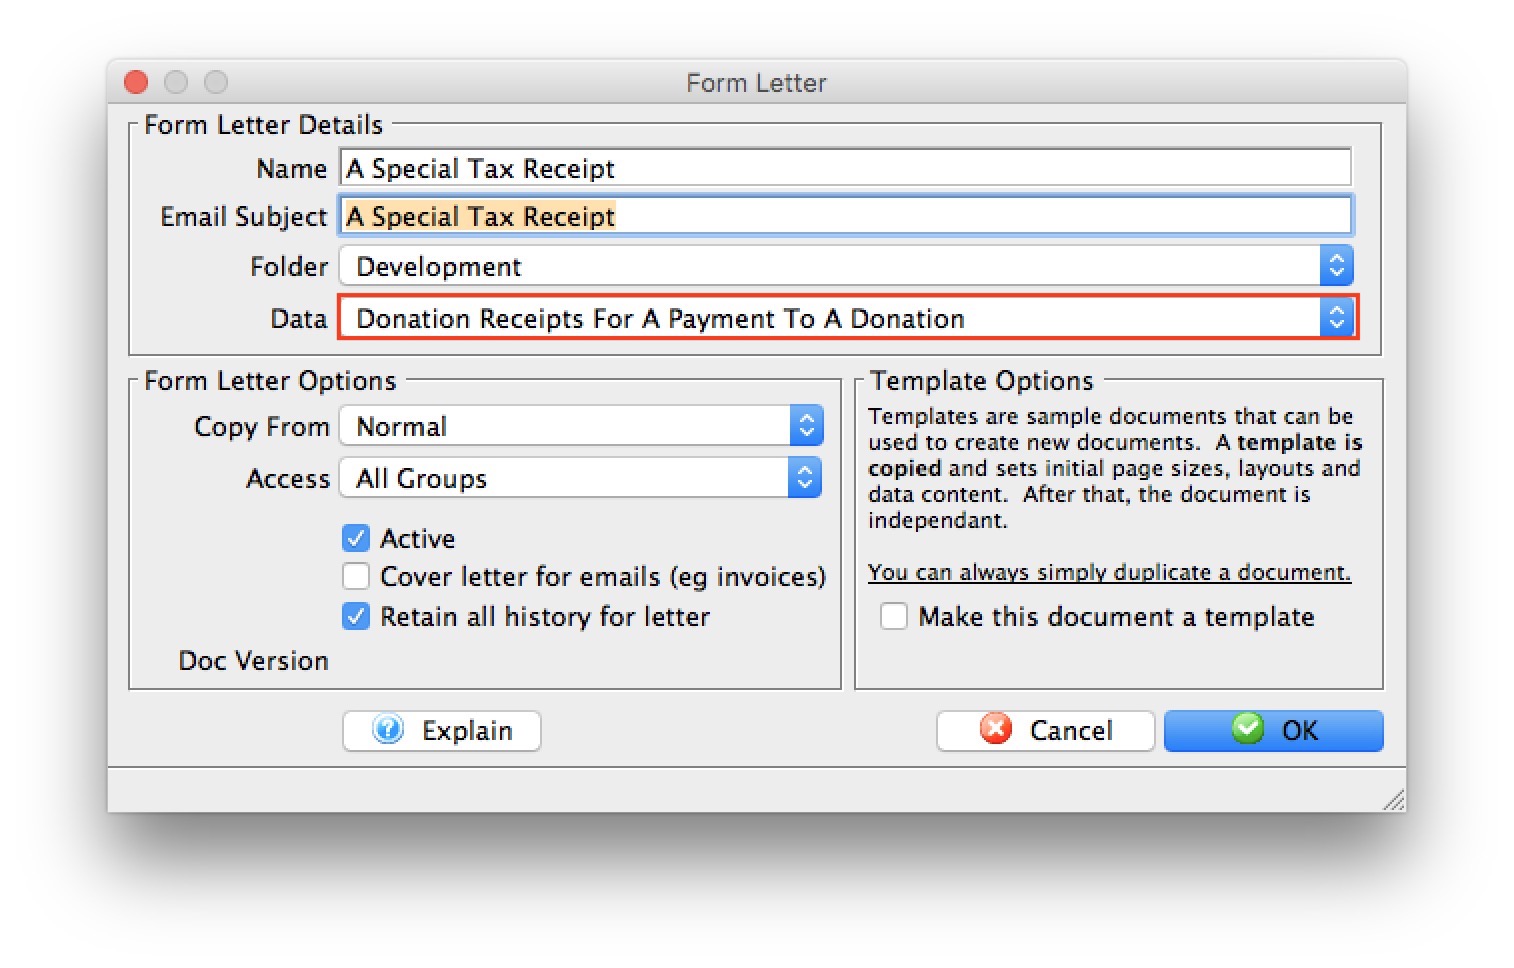 To use form letter receipts:
- Mark the receipt type as Special Handling so that TM will not attempt to print one for each payment
- Make sure to mark your receipts printed manually on the receipt tab - which will generate a receipt number in Theatre Manager
- Create a standard form letter (based on donation receipts file as per the image to the right) and place a table in the form letter containing the receipt data you want to show that also includes the receipt number.
Entering Donations on the Order Window
You can add one or more donations to the same order that contains subscriptions, tickets and/or gift certificates. There are a number of reasons why you may wish to do this:
- A donation that accompanies a season subscription renewal
- A patron may not be able to attend the upcoming event / play and would like to turn in their tickets. Click here for an explanation of how to turn a refunded ticket into a donation.
- A single donation that is targeted for multiple campaigns would be entered in this window. You would enter multiple individual donations to each campaign that add up to the total donation amount. As each donation is added, the total appears at the bottom left od the screen in the financial summary.
- Similarly, donations for a multi year pledge or capital campaign are entered in this manner. Enter a separate donation for each program year that add up to the total expected amount.
Note: Any payment to an order with multiple donations is applied to the individual donations in this order:
- Program Year - this mean that for donations that span multiple years, arrange them so that the program year is entered in the order that you want payments allocated.
- Donation Date - if there are donations for the same program year, then payments are applied according to the donation date.
- Donation Number - if the multiple donations have the same program year and donation date, then the payments are applied to donation in order of the donation number.
|
Once a payment is applied to a an order with multiple donations, you cannot change the allocation of receipts unless you:
|
- In the Order window click the Donation button.
The Order window can be accessed by purchasing ticket, a membership or by simply adding a payment to an existing order.
- Click the New button.
- Enter the Donation Details.
- Click the Save button.
- Close the Donation Detail window.
- Click the Payments
 button.
- Pay for the donation.
Click Payment for additional information.
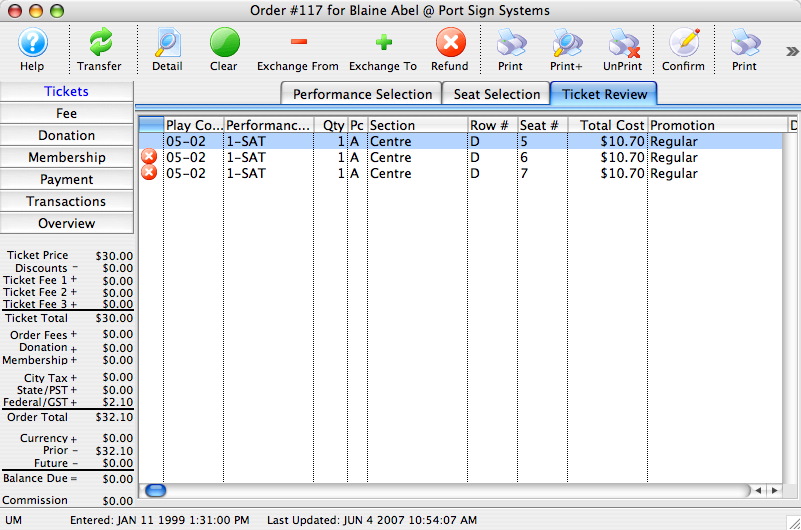
Converting Refunded Tickets to Donations
A patron may come to you and tell you that they cannot attend an upcoming event / play and therefore they would like you to refund their tickets, but they also tell you that they would like the company to keep the money as a donation.
To convert a refunded tick to a donation, you would perform the following steps:
- Open the Patron Record.
For details on locating a Patron Record click here.
- Select the ticket(s) to be refunded.
Only tickets within the same order can be refunded at the same time.
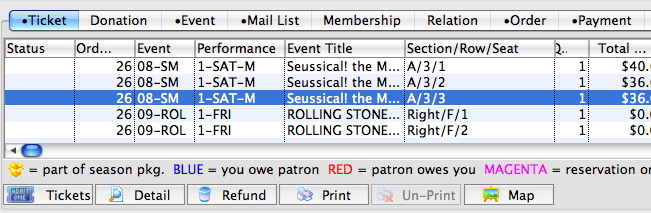
- Click the Refund
 button.
The Order window will open.
- Click the Confirm
 button.
This will release the seats to be refunded back to the Box Office. The order will now have an outstanding CREDIT balance.
- Click the Donations
 button located in the left column of the window.
- Click the New button in the top icon bar.
The Donation Default Settings window will open.
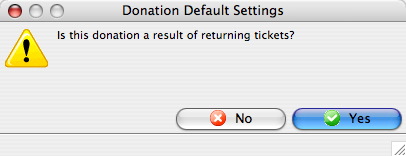
- Click the Yes
 button.
A new Donation Detail window will open.
- Enter the Donation information.
Certain detail information will automatically be inserted by default i.e. Donation Amount and Date Donated. Click Donation Detail for more information on entering Donation information.
- Click the Save
 button.
- Close the Donation window.
The Order window will return. The balance in the lower left corner will be zero.
- Close the Order window to complete the transaction.
Theatre Manager will have refunded the tickets from the patrons account and converted the value of those tickets into a donation. The tickets will then be returned so they can be sold to other patrons.
|
Quick reference information for convertioning a refund to a donation, you can download: |
Creating Anonymous Donations
Some patrons may want to make a donation, but remain anonymous. This can be done easily in Theatre Manager, by changing the Program Name for the donation. When you change this value, the donation will be stored under anonymous for the first letter of the patron's last name. That is, Tom Potimer's anonymous donation will be stored under P Anonymous.
To create an anonymous donation, use the following steps:
- Open the Patron Record.
For details on locating a Patron Record click here.
- Click the Donation tab.
- Click the New button.
- Enter the Donation Details.
- Change the Program Name to Anonymous.
- Click the Payment
 button.
- Pay for the donation.
Click Payment for additional information.
|
Quick reference information on how to make a donation anonymous: |
How to Toggle Between Individual and Company Donations
|
There MUST be a company name in the patron record for a donation to become a Corporate donation. |
You have discovered a donation and receipt for an individual should have been made in the individual's company name. In Theatre Manager, if the donation is not printed (or you unprint it), you can easily change from:
- an individual to their company
- the corporation to the individual, -or-
- one individual name to another in the household
Please be aware of Revenue Canada's Policy Commentary CPC-010 for legal interpretations regarding the donor name in Canada.
For quick reference information, see the following information on Toggling Between Individual and Corporate Donations.
|
For quick reference information on Toggling Between Individual and Corporate Donations |
To toggle between corporate and individual donations, you perform the following steps:
- Open the donation.
Click here for more information on how to open the donation.
- Click the Receipt Tab.
- Double-click on the receipt to apply the changes to.
The receipt detail window opens.
- Click in the Receipt # box and delete the number.
The date will automatically clear from the Date/Time Printed field.
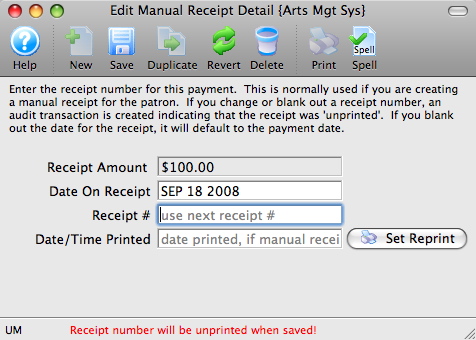
- Click the Save button.
Repeat Steps 3 - 5 for every receipt listed for the donation (if there is more than one).
- Close the receipt detail window.
- Tax Receipt Type: Click the button to change who the donation and receipt is applied to.
Click Corporate if you are switching from an individual donation to a company donation.
Click Individual if you are switching from a company donation, to an individual donation.
When you click the appropriate tax receipt type, the Tax Receipt Name, Program Name and Sort Name fields will switch to the company/individual name.
Setting or Changing the Donation Program Name
If you wish to change the program name (the donor's name as they wish it to appear in the program listing) for a donation it can be done while you are entering the donation. If after the donation has been processed and the patron name on the donation needs to be changed:
- Open the Patron Record.
For details on locating a Patron Record click here.
- Click the Donation tab.
- Select the Donation to change and click the Open button.
- Edit the Program Name as needed.
- Click the Save button.
- Close the Donation Detail window.
The Donation will now be seen under the new name in the Program Name column of the Donation tab.
Pledge Schedule
A Pledge Schedule allows you to assign pledge reminder letters to a donation, so that at a certain time (weekly, monthly, quarterly, etc.) you can print letters reminding donors that their payments are due.
To set up a pledge schedule, you perform the following steps:
- Open the Pledge Schedule/Contacts tab in the Donation Detail window.
Click here to learn more about adding pledges.
- Click the Add Pledge button.
The Donation Pledge Reminder Setup window opens.
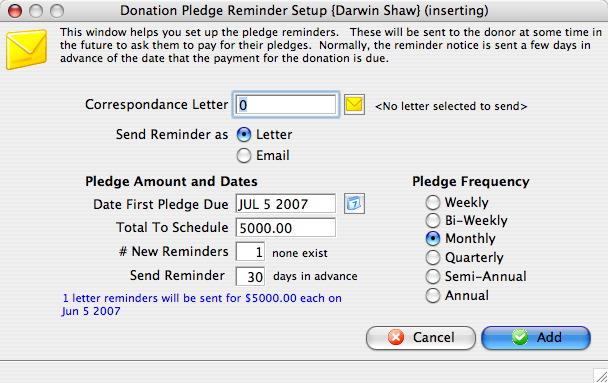
Correspondence Letter Select a letter to be sent as the reminder. Send Reminder as Choose to send pledge reminders as a letter or an email. Date First Pledge Due Date the first reminder will be sent. Total To Schedule Amount added to the pledge schedule at this time. # New Reminders Number of pledge reminders to be added to the donation. Send Reminder Number of days ahead of the pledge due date the letter should be sent out. Pledge Frequency Amount of time reminders are to be spread out over. - Click the Letter Search
 button.
The Form Letter Selection window will open.
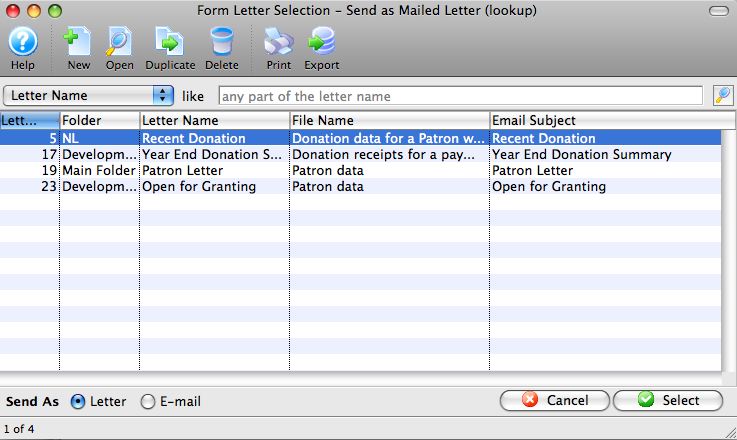
- Select a Form Letter.
Single click on a letter to select it.
- Click the Select
 button.
- Alter the remaining values as required.
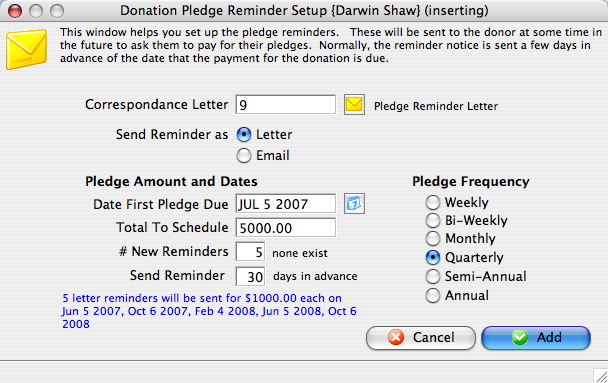
- Click the Add
 button.
| For Quick Reference Pledge Scheduling, You can download: Cheatsheets (1-2 pages) and
Screencasts (online video demonstrations of the functions with narration) |
Cheatsheet |
Mp4 |
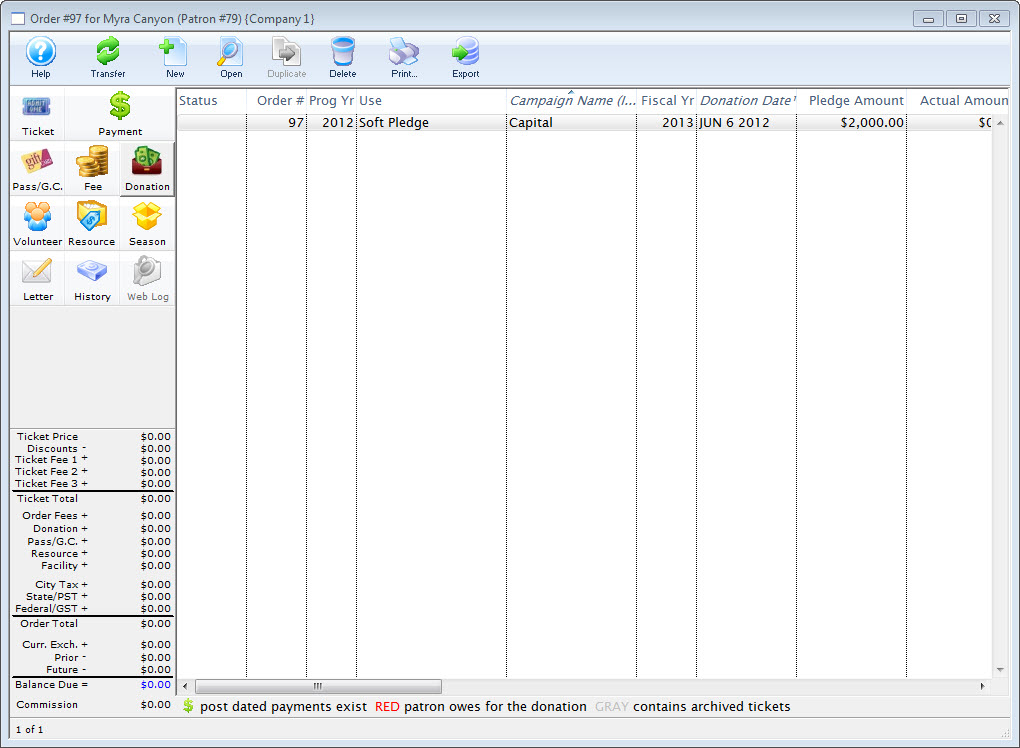
Pledged Donations
A pledged donation is when a patron says they are going to give the company X number of dollars over a period of time. A patron may pledge $600, pay $50 immediately and say they will pay $50 a month so there total for the year is $600. Also they may pledge $600 and ask you to post date the payments to be made once a month on there credit card or postdated cheques. Theatre Manager deals with these types of donations within the Donation Detail window which is opened when a new donation is being made or edited.
| For Quick Reference Pledge Scheduling, You can download: Cheatsheets (1-2 pages) and
Screencasts (online video demonstrations of the functions with narration) |
Cheatsheet |
Mp4 |
Pledges without Postdated Payments
- Open the Patron Record.
For details on locating a Patron Record click here.
- Click the Donation tab.
- Click the New button.
- Enter the Donation Details.
- Click the Pledge Schedule/Contacts tab.
- Click the Add Pledge button.
The Donation Pledge Reminder Setup window will open.
Correspondence Letter
Select a letter to be sent as the reminder.
Send Reminder as
Choose to send pledge reminders as a letter or an email.
Date First Pledge Due
Date the first reminder will be sent.
Total To Schedule
Amount added to the pledge schedule at this time.
# New Reminders
Number of pledge reminders to be added to the donation.
Send Reminder
Number of days ahead of the pledge due date the letter should be sent out.
Pledge Frequency
Amount of time reminders are to be spread out over.
- Click the Letter Search button.
The Form Letter Selection window opens.
- Select a Form Letter.
Single click on a letter to select it.
- Click the Select button.
- Alter the remaining values as required.
- Click the Add button.
- Click the Payment
 button.
- Change the Payment Amount to reflect the amount the patron will pay at the time the donation is created.
- Click the Accept Payment
 button.
- Place the remaining amount of the pledge On Account.
As they pay more of there pledged amount additional payments will be made to the order. For more information on adding payments to an order click here.
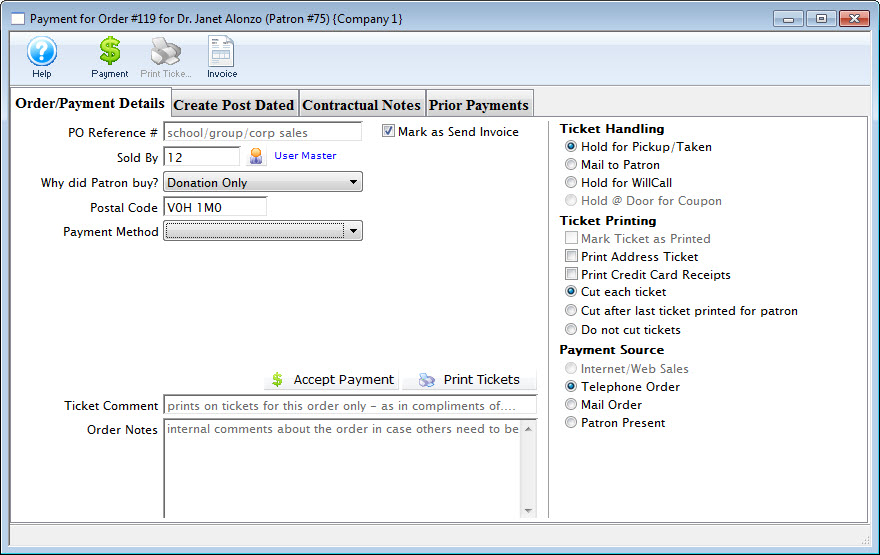
Pledges with Postdated Payments
Another method to deal with the Pledged amount is to use the Create Post Dated tab on the Payment for Order window. Under this tab you can setup a schedule of payments for the pledge.
- Open the Patron Record.
For details on locating a Patron Record click here.
- Click the Donation tab.
- Click the New button.
- Enter the Donation Details.
- Click the Pledge Schedule/Contacts tab.
- Click the Add Pledge button.
The Donation Pledge Reminder Setup window will open.
- Click the Letter Search button.
The Form Letter Selection window will open.
- Select a Form Letter.
Single click on a letter to select it.
- Click the Select button.
- Alter the remaining values as required.
- Click the Add button.
- Click the Payment button.
- Click the Create Post Dated
 tab.
tab.
- Enter the Post Dated Payment details.
For more information on entering post dated payments click here.
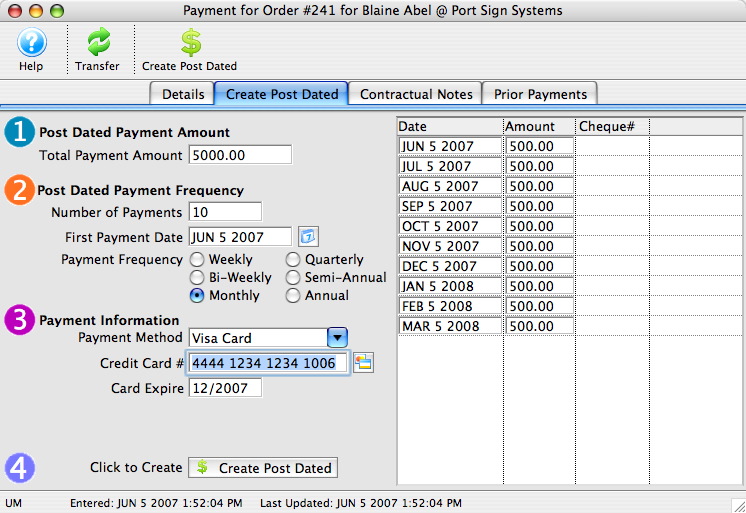
- Click the Create Post Dated
 button.
- Close the Payment for Order window.
Theatre Manager creates the payments for the allotted time period. When viewing the Donation in the Donation tab the Donation Amount Due is blank. The balance is $0.00 because the payments have been guaranteed through the creation of the Post Dated Payments. Theatre Manger will show the posted dated payments in the end of day wizard when they are to be deposited.
Changing the Donor's Credit Card
Sometimes, issues may arise if the payments stretch over a long time. If the:
- customer's card number is changed by the bank, you can change all future payments en masse
- patron wants you to substitute a different card for some or all future payments, use the link above
- expiry date changes, you can use the above process, or you can simply find the card in the patrons account and change the expiry date.
- credit card gets declined in end of day, then remove it from the deposit for a few days.. You might do this is the patron says the card is still valid and they need to put money on it,
- the actual payment dates and schedule need changing, you will need to:
- delete the existing post dated payments
- Add the new post dated payment(s) with the revised payment schedule
Soft Credits
A soft credit is a way to give recognition to someone who 'encouraged' the original hard donation without entering a real donation.
For example:
- Patron 'A' was encouraged to give a real gift or pledge of $500 by a Board member.
- Enter the full donation under Patron 'A'
- In the soft credit tab, you can assign an amount to the Board member that will increase their recognition total in the donation module without causing a real donation to be entered.
- The donation program listing can be told to accumulate real donations, soft credits and matching gifts to provide the aggregate recognition
When producing the program listing, Theatre Manager lets you determine if you want to include soft credits in the summary, just like you can optionally include matching gifts.
Theatre Manager keeps totals for current soft credits, prior year soft credits, and total soft credits - just like it does for actual donations. This means you can find people who had soft credits last year but not this, etc.
Almost all the donation reports have the ability to show soft credit data.
- Click the New button.
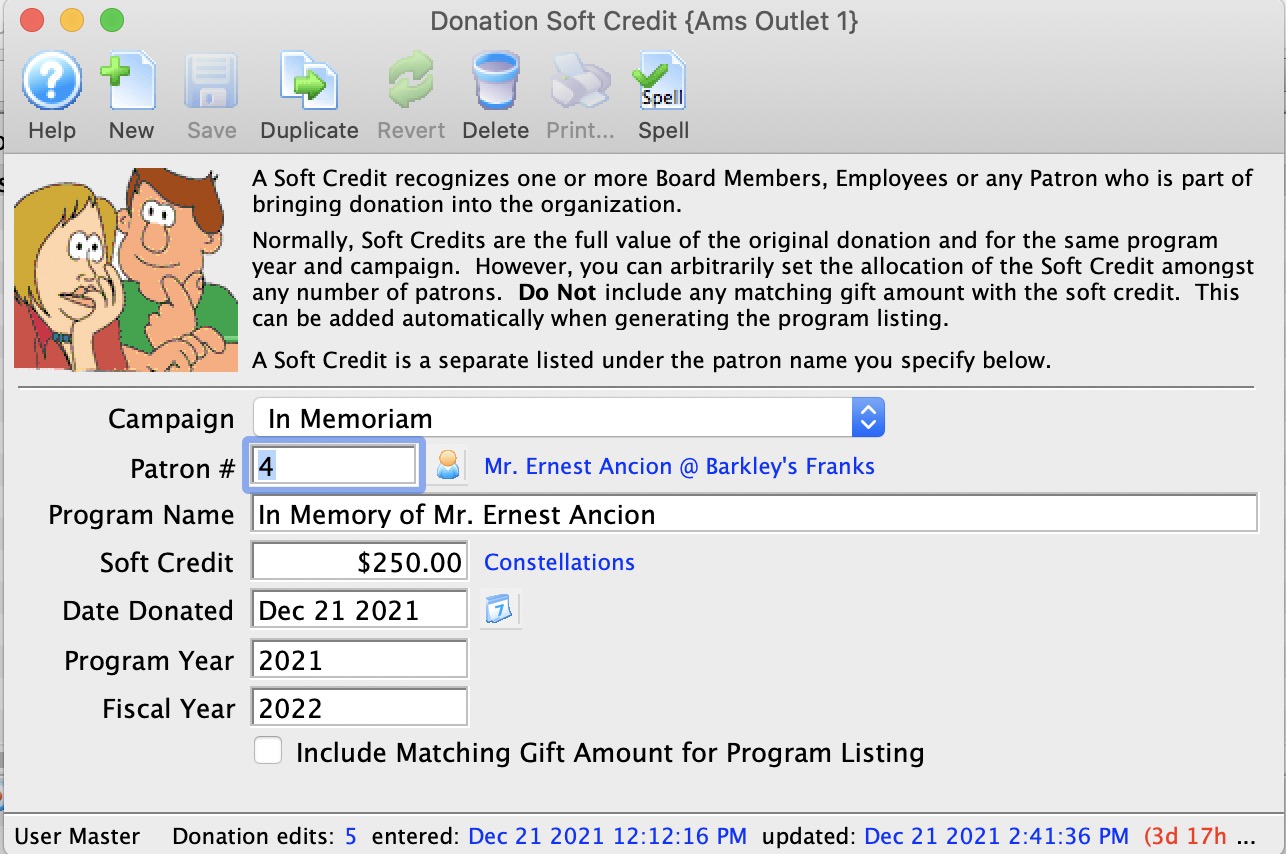
Alter the values as required.
- Click the Save button.
| Patron # | This is the Patron account that you wish to add a soft
credit for. You can use the  button to access the list of records to find the patron.
 |
| Soft Credit | This is the amount of the soft credit that you wish to add. This assigns a giving level to the credit. |
| Campaign | This allows you to set the soft credit for a different campaign than the original donation. This allows you to have a corporate donation, but the person who solicited the donation will be getting the soft credits, which can appear on an individual campaign |
| Program Year | Allows you to determine which program year this soft credit will apply to. This is the year that this soft credit will appear in the Program Insert. |
| Fiscal Year | Allows you to determine which program year this soft credit will apply to. This is the year that this soft credit will appear in the Program Insert. |
| Include matching gift amount... | This allows you to determine whether or not to include the matching gift amount when determining program list recognition. |
| For Quick Reference Soft Credits, You can download: Screencasts (online video demonstrations of the functions with narration) |

Flash |
Mp4 |
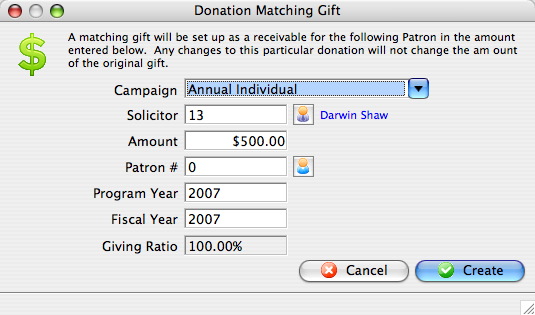
Matching Gift
A Matching Gift is a donation from another patron as a result of the current donation being entered. Example: as a result of Blaine Abel's donation, Jake Belleville would also like to donate by matching his gift. The amount of the matching gift can be less than, the same as, or more than the amount of the current patron's donation.
- Open the Patron record for the patron who will be matching the gift.
In the example about this would be Jake Belleville. For more information on finding a patron click here.
- Click the Match
 tab.
tab.
- Check the Matching Gift box and enter a Matching Gift Ratio.
The Matching Gift Checkbox must be checked if this patron is to be used as a matching gift company.

The Matching Gift Ratio can be altered at the time of the donation by editing the amount the matching gift patron will be donating.

In addition, any minimums or maximums set by the Matching Gift company can be indicated here.

- Click the Save button.
- Open the Patron Record for the Patron making the Donation.
In this example the patron would be Blaine Abel.
- Click the Donation tab.
- Click the New button.
- Enter the Donation Campaign and Donation Amount.
- Check the Matching Gift
 box.
box.
The Donation Matching Gift window will open.
- Click the Patron Search
 icon next to the Patron # field.
Search the contact list to locate the patron making the matching gift. In this example it would be Jake Belleville. For more information on using the Contact List click here.
- Select the Patron who will be matching the donation.
Single click on a patron to select them.
- Click the Select button.
- Enter the Amount of the matching gift.
By default Theatre Manager assumes the matching gift to be the same as the donation. If the ratio has been modified under the donor tab of the matching gift patron that ratio is calculated and inserted in to the matching gift detail. The matching gift can be more or less than the amount of the current donation. Edit the Amount to change the giving ratio.
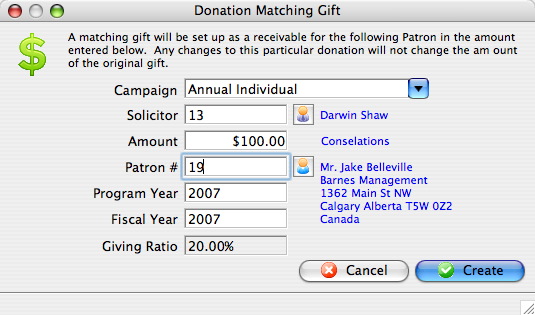
- Click the Create
 button.
Once the payment transaction has been completed the Donation Detail window will return and the Matching Gift tab will be displayed.
- Click the Payment button.
- Pay for the donation.
Click Payment for additional information. Once a payment is received the Donation Detail window will reopen.
- In the Matching Gift tab, click the Show Matching Gift Patron button.
The Donation List Window for the matching gift patron will be opened
- Select the Donation tab.
- Select the Matching Gift donation.
- Click the Open button.
- Click the Payment button.
Pay for the donation if all information is correct
|
You can run the Donation Reports & Receipts >> Donor Program Insert reports (either one) on this data and the matching gift will be included for the individuals donations. |
When running these reports, on the Insert Summary tab click "Add matching gift amount to patron's recognition when calculating their giving level"
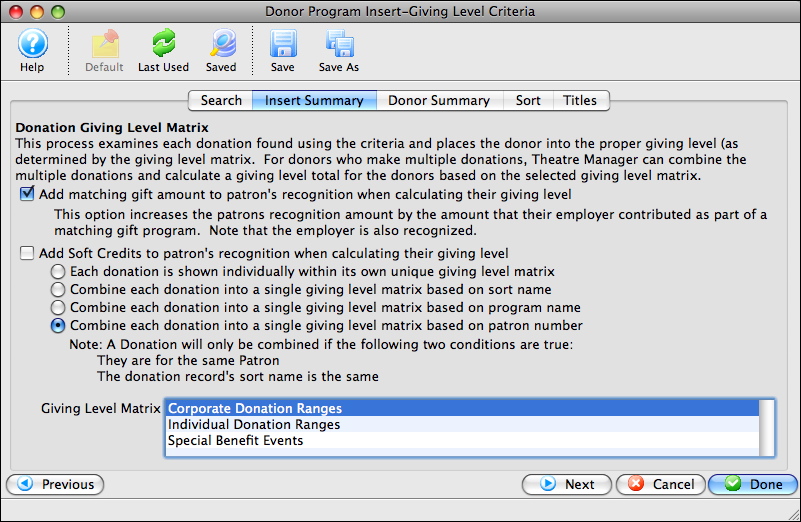
|
Quick reference Information for Matching Gifts Quick reference information for Setting up the Gifter |
|
||
|
Matching Gifts Part 2 - Adding Gift To Donation & Running a Report |
Modifying a Donation
Typical things to change are:
- Increasing the donation amount or modifying any other data on the donation.
- Decreasing the donation amount after it has been receipted
- Modifying one or more program and/or tax receipt names en masse for donations for the patron.
Increasing the Donation Amount
You may wish to modify a donation for various reasons. To add notes, make payments on pledges ect. Modifying a donation is preformed quickly through the Donation Detail Window.
- Open the Patron Record.
For details on locating a Patron Record click here.
- Click the Donation tab.
- Select the Donation to edit.
Single click on a donation to select it.
- Click the Open
 button.
- Change data as needed.
If a receipt has been printed for the donation you will not be able to edit the Tax Receipt Name Field.
- Click the Save button.
The changes have now been made to the donation.
- Close the detail window.
Decreasing the Donation Amount
Donations - Set Donation Name
 button.
The Set Donation name dialog opens.
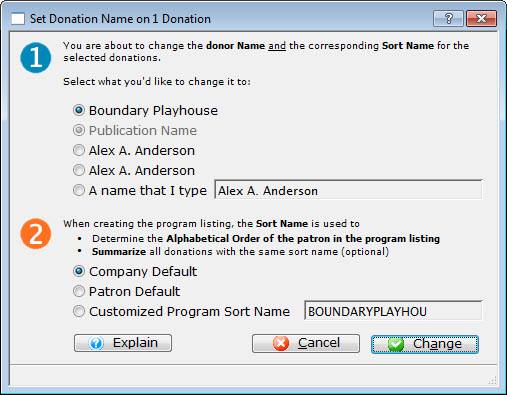
Step 1. You are about to change the donor Name and the corresponding Sort name for the selected donation. Select the name you want to change it to.
|
You are given a number of choices and the option to enter another name. However, please read about Canada's Tax Receipt Name Implications if you want to type something other than the patron's name. |
Step 2. When creating a program listing, the Sort Name is used to determine the aplhabetical order of the patron in the program listing and to summarize all donations with the same sort name. Select the Name you want to change to.
Again you are offered a list you can select from and the option to enter your own Customized Sort Name.
Once you have made your selections, press the Change  button.
You are returned to the Donations tab.
Gift In Kind
Gift in Kind is a donation of gift or services rather than money. For example: the donation of a computer or other office equipment, building materials and paint supplies for props, clothing for wardrobe or the donation of one's time. There is a perceived value for these goods and services which can be considered a donation and are subject to a receipt for tax purposes.
- Open the Patron Record.
For details on locating a Patron Record click here.
- Click the Donation tab.
- Click the New button.
- Select the Donation Campaign from the drop down.
- Fill in the Donation Amount as the appraised amount of the gift.
- Enter remaining information.
- Click the Payment button.
This opens the Order Payment window.
- Select Gift in Kind from the Payment Method drop down menu.
>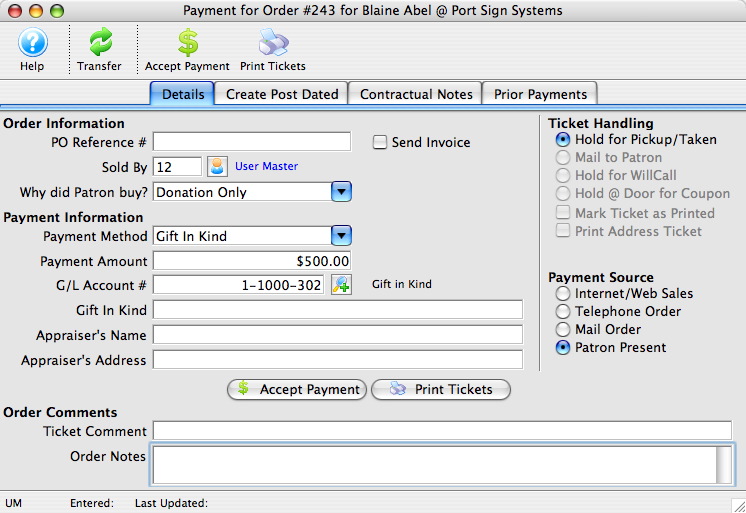
- Enter a description of the Gift In Kind, the Appraiser's Name and the Appraiser's Address for reference.
This information may be required for auditing purposes.
- Click the Accept Payment button.
- Close the Donation Detail Window
The gift in kind donation will now appear on the Donation List window. Details on the payment type can be seen under the Payment
 tab.
tab.
| For Gift In Kind Quick Reference, You can download: Screencasts (online video demonstrations of the functions with narration) |
Flash |
Mp4 |
Splitting an Existing Donation and Payment Across Multiple Campaigns
There can be times when a patron makes a donation and payment to a campaign. After the face, it is discovered the donation should be split across multiple campaigns. Follow the instructions below if this happens.
- Un-print the donation receipt if it has already been printed. For more information on un-printing donation receipts, click here.
- Open the Patron Record.
For details on locating a Patron Record click here.
- Click the Order
 tab.
tab. - Select the Order containing the donation to be changed.
- Click the Open button.
The Order window opens.
- Click the Donation
 button.
 - Highlight the donation to be removed.
- Click the Delete
 button.
The donation will now be deleted and removed from the list.
- Click the New button.
The Donation Detail window opens.
- Enter the donation campaign.
- Enter the price of the donation, adjusted to be split across multiple campaigns.
- Click the Save button to save the donation.
- Repeat Steps 9 to 12 as many times as needed to split the donation across multiple campaigns.
- Close the window.
The payment previously made will be split across all of the donations entered.
Deleting a Donation
- Once a payment has been deleted or reversed, the amounts on the donation can be modified or the donations can be deleted.
- If the donation is deleted -and-
- it is has a matching gift the matching gift
- that matching gift will not be deleted.
- If you require the matching gift to be deleted as well you must repeat the steps for that donation.
- Only donations which have all payments removed may be deleted.
- However refer to reducing the value of a donation to see how to reduce one
- Before you can delete a donation all printed tax receipts associated with the donation must be un-printed.
How to delete a Donations
- Open the Patron Record.
For details on locating a Patron Record click here.
- Click the Donation tab.
- Select the donation to be refunded.
Single click on the donation to select it.
- Click the Open button.
The Donation Detail window opens.
- Click the Payment button.
A Payment Warning appears, indicating there is no payment required for this order.
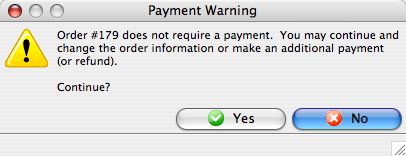
- Click the Yes button.
- Enter a negative payment for the value of the donation.
You can use the Prior Payments
 tab to review how the original payment was made.
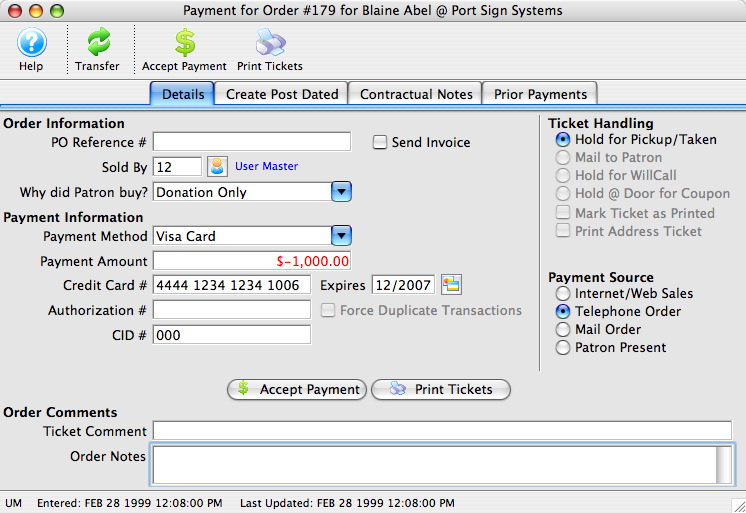
- Click the Accept Payment button.
A Payment Warning dialog opens, indicating the payment made does not complete the order.
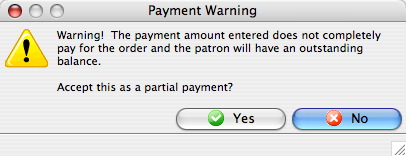
- Click the Yes button.
The Process Another Payment window appears.
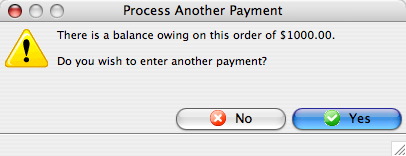
- Click the No
 button.
The Donation Detail window appears.
- Click the Receipts tab.
- Click the Open button.
The Edit Manual Receipt Detail window opens.
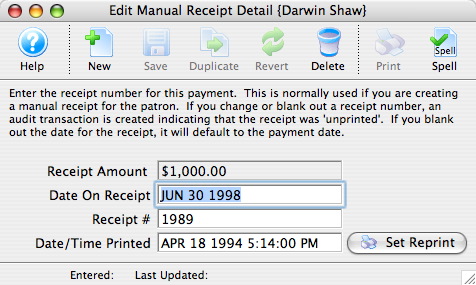
- Delete the Receipt #.
- Close the Edit Manual Receipt Detail window.
- Click the Delete button.
The Delete A Record confirmation window opens.
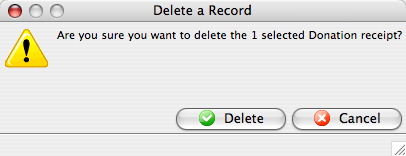
- Click the Delete button.
The receipt is removed from the Donation Detail window.
- Close the Donation Detail window.
The Patron Record will display the Donation
tab. - Click the Delete button.
The Delete A Record confirmation window opens.

- Click the Delete
 button.
The Donation is now deleted from the Patron Record.
| For Quick reference information on Deleting a Donation, You can download: Screencasts (online video demonstrations of the functions with narration) |
Flash |
Mp4 |
Deleting and Refunding Donations
You use this function when a mistake has been made in entering a donation. Once the donation has been deleted, the payment for the donation can be refunded or modified. If the donation to be deleted is accompanied by a matching gift the matching gift will not be deleted. If a matching gift needs to be deleted, the same steps must be repeated for that donation in that patron's record.
Before you can delete a donation, all printed tax receipts associated with the donation must be un-printed.
- Open the Patron Record.
For details on locating a Patron Record click here.
- Click the Donations tab.
- Choose the donation to be deleted.
Single click on a donation to select it.
- Click the Delete button.
A warning dialogue box opens.
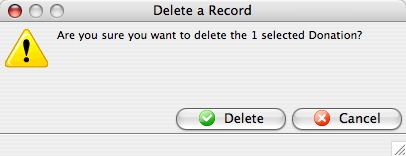
- Click the Delete button.
A note appears at the bottom of the Patron window. The donation has been deleted but not refunded.

- Click the Orders tab.
An outstanding receivables of $21.40 can be seen for Order # 117.

- Select the order to be refunded or modified.
- Click the Payment
 button.
The Payment Order window for the selected Order opens.
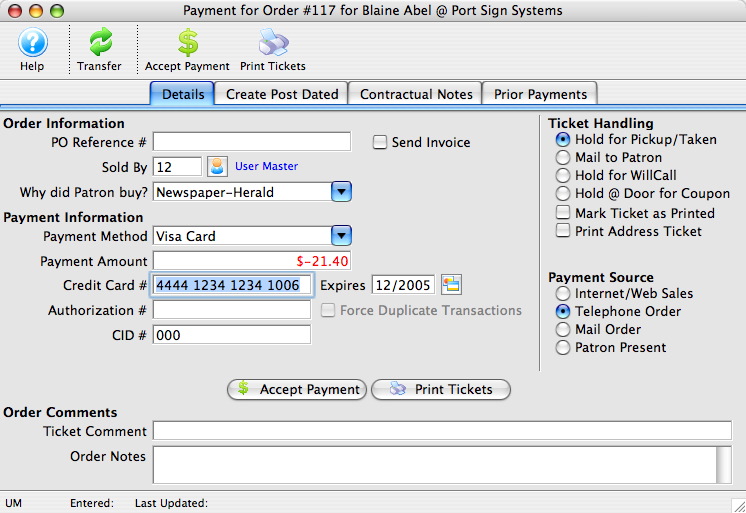
- Select the method in which the patron is to be refunded
That is, Cash or Credit Card if the transaction has been processed. If the original purchase method is unknown, click the Prior Payments
tab to view all previous payments to this order. - Click the Accept Payment button.
The payment and donation have now been refunded.
|
Any donations with receipts printed cannot be deleted until the receipt(s) for that donation are un-printed. Only users with proper security access can un-print receipts. |
| For quick reference information in Deleting and Refunding Donations you can access the following: |
Refunding a Donation
There are three steps to take in order to refund a donation. The first is to refund the payment, second the tax receipt needs to be removed and finally the donation itself needs to be deleted.
- Open the Patron Record.
For details on locating a Patron Record click here.
- Click the Donation tab.
- Select the donation to be refunded.
Single click on the donation to select it.
- Click the Open button.
The Donation Detail window will open.
- Click the Payment button.
A Payment Warning opens, indicating there is no payment required for this order.
- Click the Yes button.
- Enter a negative payment for the value of the donation.
Use the Prior Payments
tab to review how the original payment was made. - Click the Accept Payment button.
A Payment Warning will appear indicating the payment made does not complete the order.
- Click the Yes button.
The Process Another Payment window opens.
- Click the No button.
The Donation Detail window opens.
- Click the Receipts tab.
- Click the Open button.
The Edit Manual Receipt Detail window will open.
- Delete the Receipt #.
- Close the Edit Manual Receipt Detail window.
- Click the Delete button.
The Delete A Record confirmation window opens.
- Click the Delete button.
The receipt will be removed from the Donation Detail window.
- Close the Donation Detail window.
The Patron Record will displaying the Donation
tab. - Click the Delete button.
The Delete A Record confirmation window will appear.
- Click the Delete button.
The Donation is now deleted from the Patron Record.
| For quick reference information in Deleting and Refunding Donations you can access the following: |
Donation Receipt Printing
If you choose to print tax receipts from within Theatre Manager you may need to arrange for customized tax receipt paper. Theatre Manager prints the Recipients Name and Address, the name of the Organization issuing the receipt, the Date of the Donation, the Date of Receipt, the Donation Amount and the Donation Campaign. If Federal or State law requires your receipt to include your organizations address or a government website you may wish to include these on your preprinted tax receipt paper. Please ensure you are aware of all necessary requirements for your tax receipts prior to printing receipts in Theatre Manager.
Follow the links below to learn more about managing donation receipts within Theatre Manager.
|
Canadian tax law allows that if the date of payment and date of printing the receipt are the same, you can print one date on the tax receipt. However, if the payment date is different than the date the receipt is printed, then you must print
Addresses in other countries do not print the 'Date Receipt Issued' on a tax receipt. |
Manually Reprinting or Printing a One-Off Donation Receipt
- reprint a donation receipt, or
- manually print a one-off receipt (as opposed to using the Batch Print function) -or-
- backdate the receipt date if the payment for the donation is entered after year end and you need it to be for the prior calendar year
 |
When editing donation receipts, you CANNOT:
|
|
YOU CAN date a receipt earlier than the payment date. This allows a small leeway for
|
Reprinting a Receipt
- From the Donation tab in the Patron Record, open the receipt that requires a reprint.
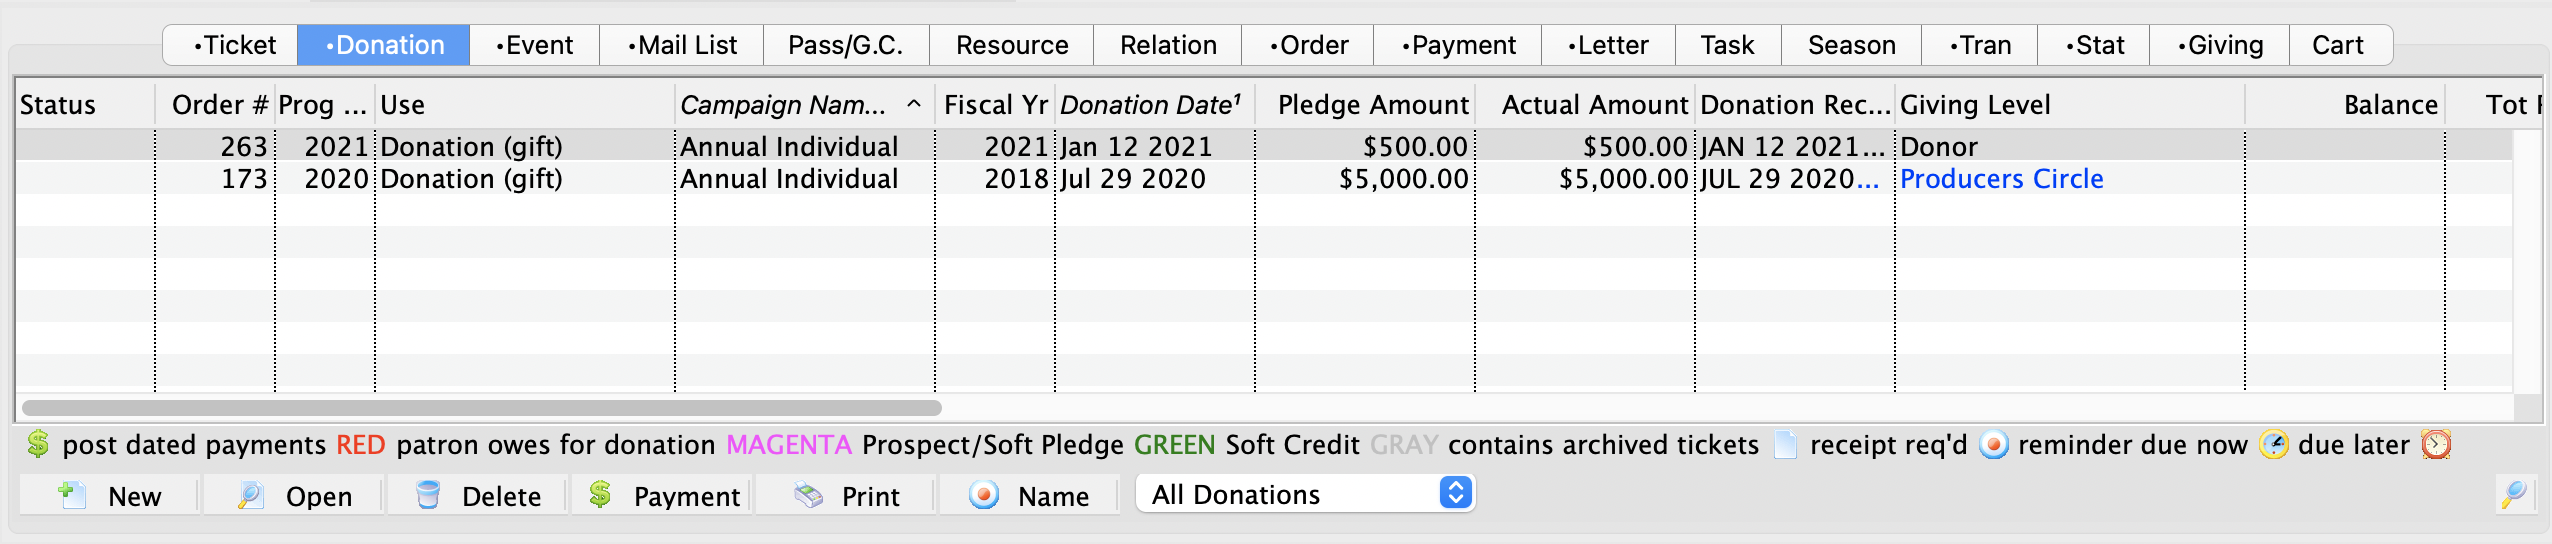
- Inside the Donation Detail window click the Receipt tab. Select the donation and click the Open button.
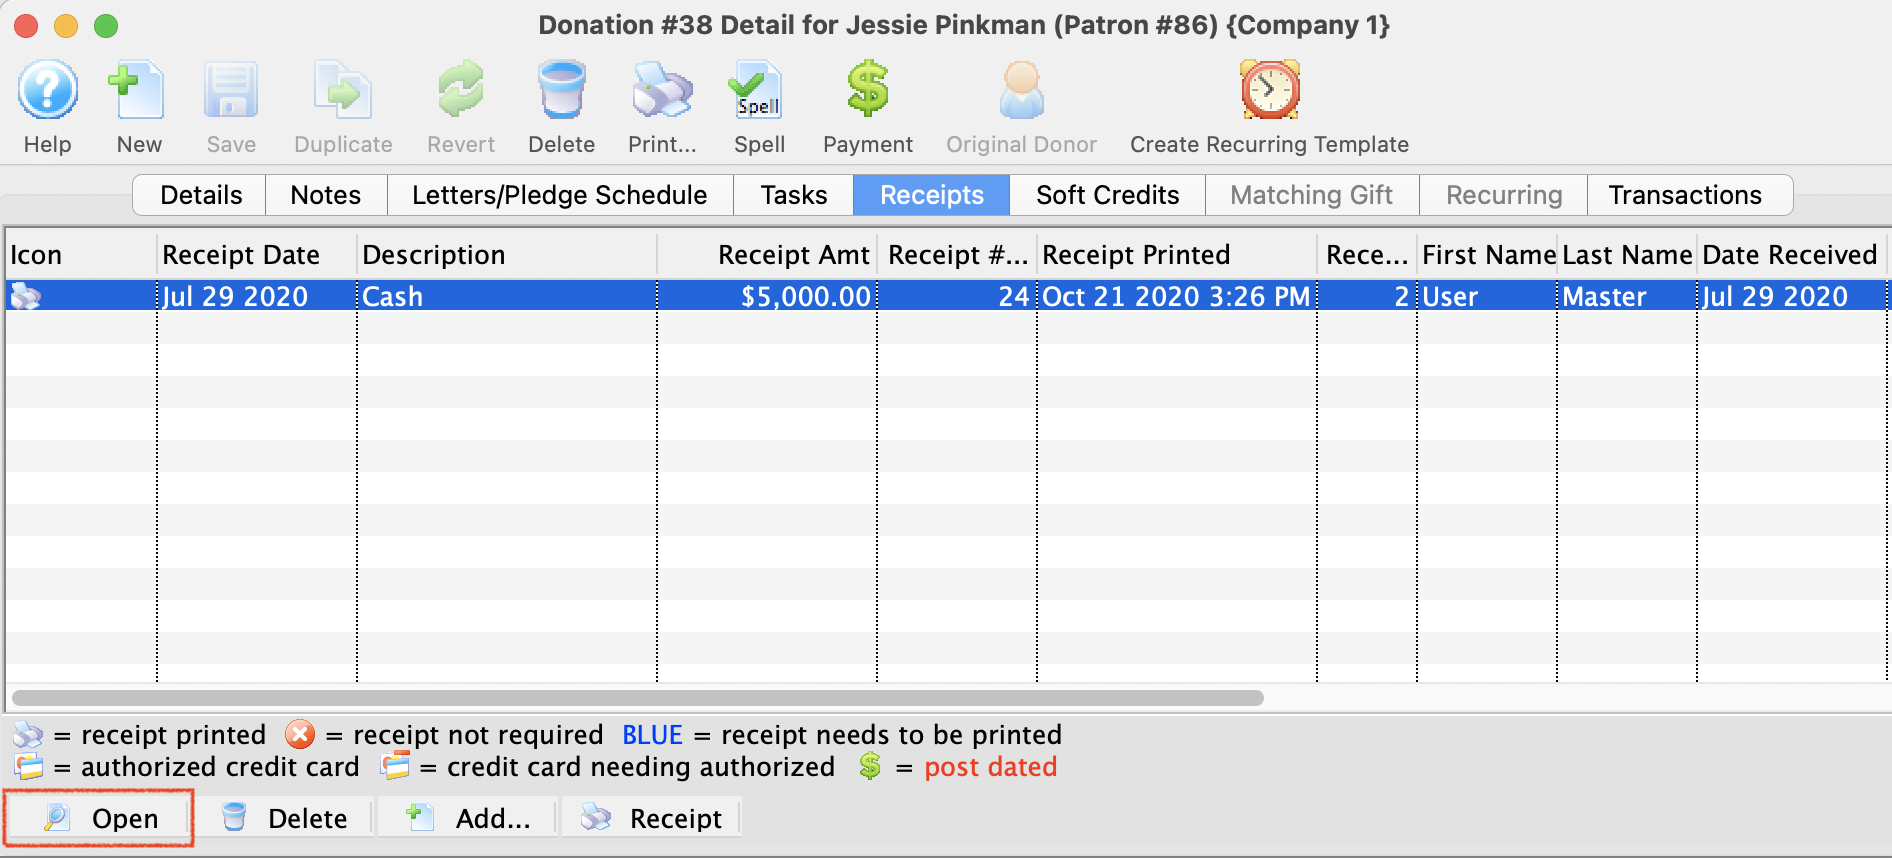
- Inside of the Edit Manual Receipt window, click Set Reprint to reprint the receipt
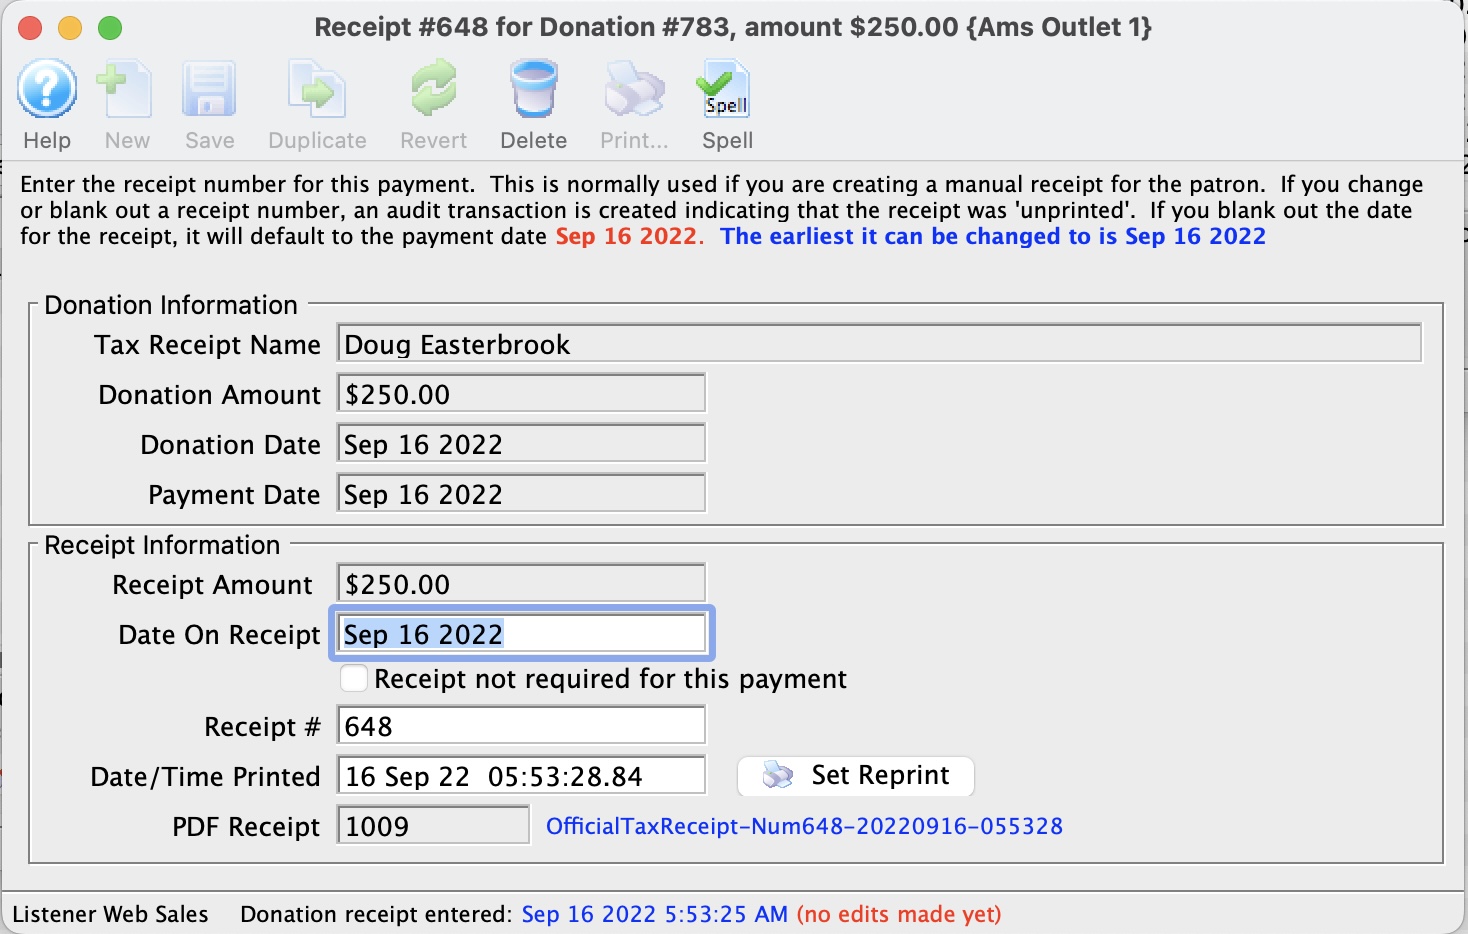 You can
- click the Set Reprint button -or-
- clear the reprint date
The reprint date will default to the payment date on the donation.
You may change it to match the donation date in some cases. For example if the donation comes in right at calendar year end and can be entered for the prior year
This process has un-printed the receipt, setting up the donation to be printed again. Now we can either run a Batch Print for the next set of receipts (and this donation will be included), or, we can manually print the receipt (described below).
Manually Printing a Receipt
- Enter and receive payment for the donation
For further information on this topic refer to Inserting a Donation.
- In the Donation Detail window, click the Receipt tab.
- Select the donation that requires a manual receipt.
- Click the Open button.
The Edit Manual Receipt window opens.
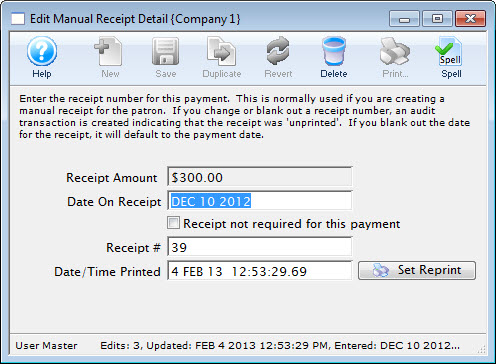
Theatre Manager will fill the date fields with the current date and will set the receipt number to the next number as set up in the Donation Receipts tab of Company Preferences. This can be changed to match the manual receipt if it has not been set up.
|
Click the Set Reprint button if you want to unprint the receipt - so you can then reprrint it using the batch receipt printing. You can also unprint a batch of receipts through another window. |
|
An unprinted donation receipt generates a DU transaction with the old receipt number on it - which you can see in any transaction report or transaction window. |
Printing Receipts from Batch Functions
Donation receipt can be printed from the Donation Detail window individually or on mass through Batch Functions.
The actual process of printing the receipts is quite similar between the three locations. The main difference is that the Donation Receipts in the Reports Window and the Donation Receipts in Batch Functions print all receipts that have the number Zero as the receipt number. Whereas the Receipts that print from Donation List Window are only printed for selected donations. Creating a manual receipt for a patron can be accomplished using the Recording a Manual Receipt. Many of the data defaults for receipt printing are defined in Default Data.
If you choose to print tax receipts from within Theatre Manager you may need to arrange for customized tax receipt paper. Theatre Manager prints the Recipients Name and Address, the name of the Organization issuing the receipt, the Date of the Donation, the Date of Receipt, the Donation Amount and the Donation Campaign. If Federal or State law requires your receipt to include your organizations address or a government website you may wish to include these on your preprinted tax receipt paper. Please ensure you are aware of all necessary requirements for your tax receipts prior to printing receipts in Theatre Manager.
- Open Setup >> Batch Functions.
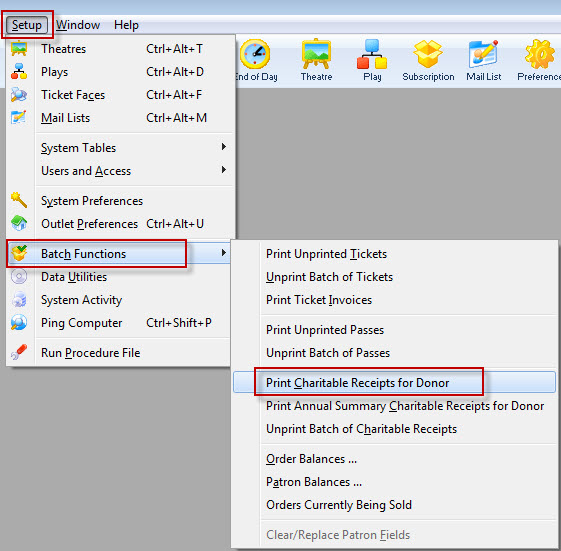
- Select Print Charitable Receipts for Donor.
The Print Charitable Receipts for Donor Criteria window opens.
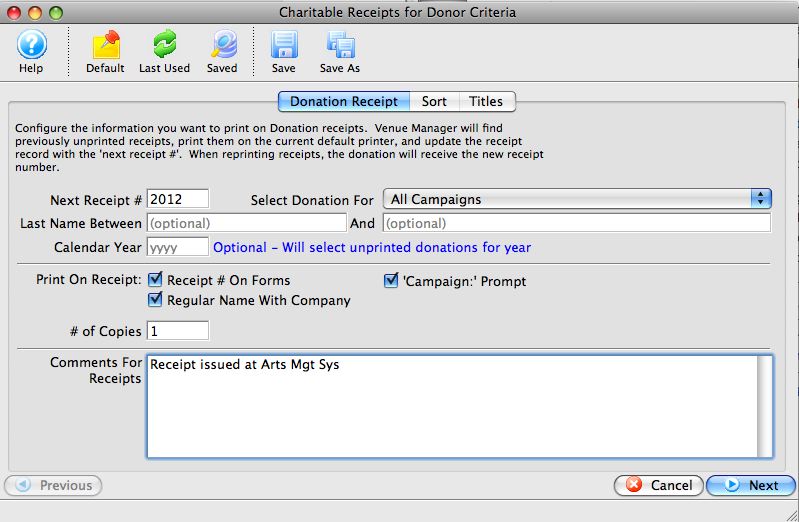
- Adjust the Next Receipt number if necessary.
Next Receipt # defaults to the next receipt number that is set up in the Donation Tab of Company Preferences. You can set this number to any value you desire. If you override this value, it will not update the next available receipt number in Company Preferences.
- Select the campaign you wish to print receipts for - if necessary.
By default, this is set to All Campaigns. However, if you wish to only batch print receipts for a specific campaign, you may choose it here.
- Select Name Between search parameters.
Select the last name of the patron to search the data base. Left blank, Theatre Manager assumes all records.
- Select the Fiscal Year (optional).
Enter the fiscal year that you wish to print the Donation Receipts for.
- Select your print options.
Print Receipt number on Forms Checking this box will print the receipt number on the receipt. Regular Name with Company Checking this box will print either the Patron name if the donation is made by a Corporation and the patron record does NOT include a Company name, or the Company name and the patron name if the donation is made by a corporation and the patron record DOES contain a Company name. 'Campaign:' prompt Checking this box will print the prompt - Select the number of copies you wish to print..
You may wish to print one for the donor and one for your files.
- Include Receipt Comments.
When printing donation receipts you have the option to include a personalized messaged from your organization / company to all of your receipt recipients. All you have to do is type a message into the Comments box and the message will print on the receipt.
- Click the Next
 button.
- Review the Sort option.
- Click the Next button.
- Edit any of the default report titles or 'printed by' options.
- Click the Done
 button.
The receipts will now begin to print to the default printer. Clicking the Cancel
 button will cancel the receipt printing process.
Printing a Receipt from the Donation Detail Window
Use this method if the donation has multiple receipts, i.e. in a post dated donation, and you wish to print only selected receipts.
If you choose to print tax receipts from within Theatre Manager you may need to arrange for customized tax receipt paper. Theatre Manager prints the Recipients Name and Address, the name of the Organization issuing the receipt, the Date of the Donation, the Date of Receipt, the Donation Amount and the Donation Campaign. If Federal or State law requires your receipt to include your organizations address or a government website you may wish to include these on your preprinted tax receipt paper. Please ensure you are aware of all necessary requirements for your tax receipts prior to printing receipts in Theatre Manager.
- Open the Patron Record.
For details on locating a Patron Record click here.
- Click the Donation tab.
The Patron's Donation history is displayed.
- Select the donation needing a receipt printed.
- click the Open button.
The Donation Detail window opens.
- Click the Receipts tab.
- Select the receipts to be printer.
- Click the Receipt
 button.
- Adjust the Next Receipt number if necessary.
Next Receipt # defaults to the next receipt number that is set up in the Donation Tab of Company Preferences. You can set this number to any value you desire. If you override this value, it will not update the next available receipt number in Company Preferences.
- Select the campaign you wish to print receipts for - if necessary.
By default, this is set to All Campaigns. However, if you wish to only batch print receipts for a specific campaign, you may choose it here.
- Select Name Between search parameters.
Select the last name of the patron to search the data base. Left blank, Theatre Manager assumes all records.
- Select the Fiscal Year (optional).
Enter the fiscal year that you wish to print the Donation Receipts for.
- Select your print options.
Print Receipt number on Forms Checking this box will print the receipt number on the receipt. Regular Name with Company Checking this box will print either the Patron name if the donation is made by a Corporation and the patron record does NOT include a Company name, or the Company name and the patron name if the donation is made by a corporation and the patron record DOES contain a Company name. 'Campaign:' prompt Checking this box will print the prompt - Select the number of copies you wish to print..
You may wish to print one for the donor and one for your files.
- Include Receipt Comments.
When printing donation receipts you have the option to include a personalized messaged from your organization / company to all of your receipt recipients. All you have to do is type a message into the Comments box and the message will print on the receipt.
- Click the Next button.
- Choose and Sort options..
You may choose to sort the donation receipts by some other method than the default 'Last Name'.
- Click the Next button.
- Edit any of the default report titles or 'printed by' options.
- Click the Done button.
The Print Charitable Receipts for Donor Criteria window opens.
The receipts will now begin to print to the default printer. Clicking the Cancel
button will cancel the receipt printing process.
Unprinting a Donation Receipt
If donation receipts have been printed by mistake or the wrong receipts have been printed, Theatre Manager will allow you to un-print those receipts. Theatre Manager will actually allow you to un-print any printed donation receipts, but it is recommended that receipts are only un-printed if necessary. If you need to reprint a donation receipt you must first un-print the receipt if it has already been printed then it can be printed again.
|
You can also manually un-print and reprint donation receipts from the donation receipt tab on the donation window. |
|
An unprinted donation receipt generates a DU transaction with the old receipt number on it - which you can see in any transaction report or transaction window. |
- Click Setup >> Batch Functions.
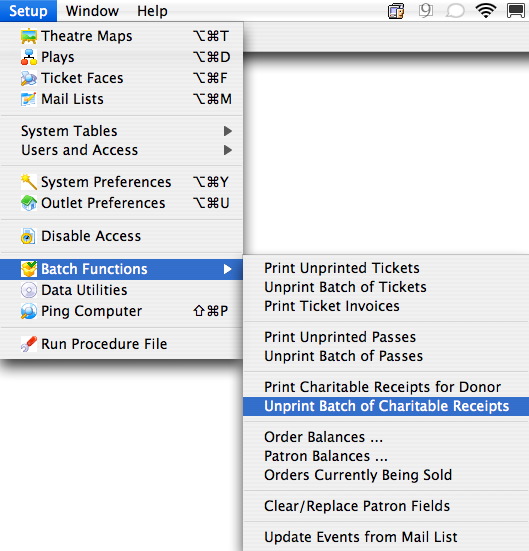
- Select Unprint Batch of Charitable Receipts.
The Donation List window opens.
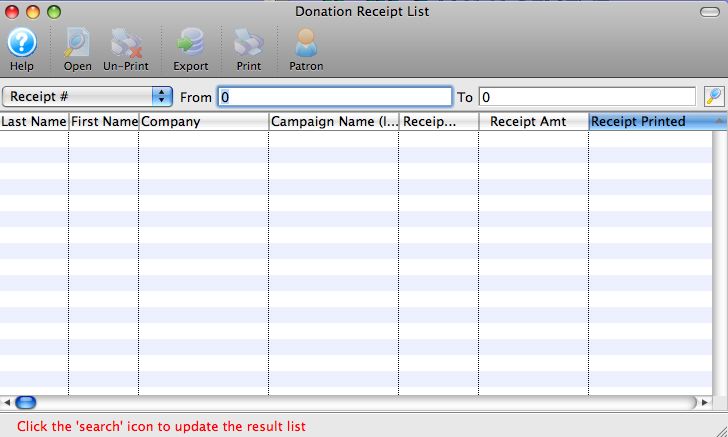
- Enter the Range of Donations Receipt # to
search for.
Use the drop down list to select the Donation Receipt #. For more detailed information about this window click here.
- Click the Search
 button.
For the purpose of this example receipt numbers between 1000 and 3000 have been searched for. A list of donation receipts matching the criteria will be displayed in the list window.
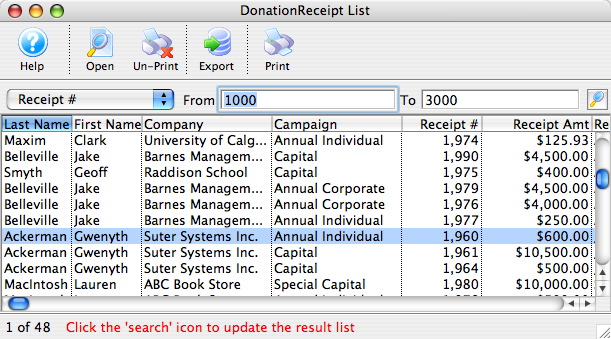
- Highlight the Receipts to Un-print
Click on a receipt to highlight it. To select multiple receipts hold the Ctrl or Appel key while clicking each receipt.
- Click the Un-Print
 button.
The following dialogue box will display.
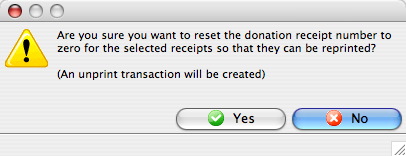
- Click the Yes
button.
The Donation Receipts have now been un-printed. The Donation Receipt Number will reset to zero. The Receipt can now be reprinted if required using the steps in Printing a Donation Receipt.
Unprinting a Donation Receipt from the Donation List Window
To unprint some receipts:
- Select the receipts you want to unprint
- Right click on the lines and use the context menu to unprint the selected receipts
- Confirm that you want to unprint them. note a DU transaction ('donation unprint') will be created that to track that they were unprinted.
Parts of the Donation Receipt List Window
| Last Name | The patron's last name. |
| First Name | The patron's first name. |
| Company | The patron's company name. |
| Campaign | The campaign the patron's donation was given to. |
| Receipt # | This column displays the official charitable tax receipt number of the donation receipt. If the receipt number is zero, then no receipt has been created for the donation, or the receipt has been Un-printed. |
| Receipt Amt | This column displays the amount of the donation the has been receipted to date. |
| Receipt Printed | This column displays the date that the donation receipt was printed. |
Donation from Agency that is really for Individuals.
- Sell a Gift Certificate to the main agency and pay for it using their check
Selling a Gift Certificate to the Agency
- Locate the Patron Record for the Agency who sent a check for donors
- Select the Pass/GC tab and click the BUY button
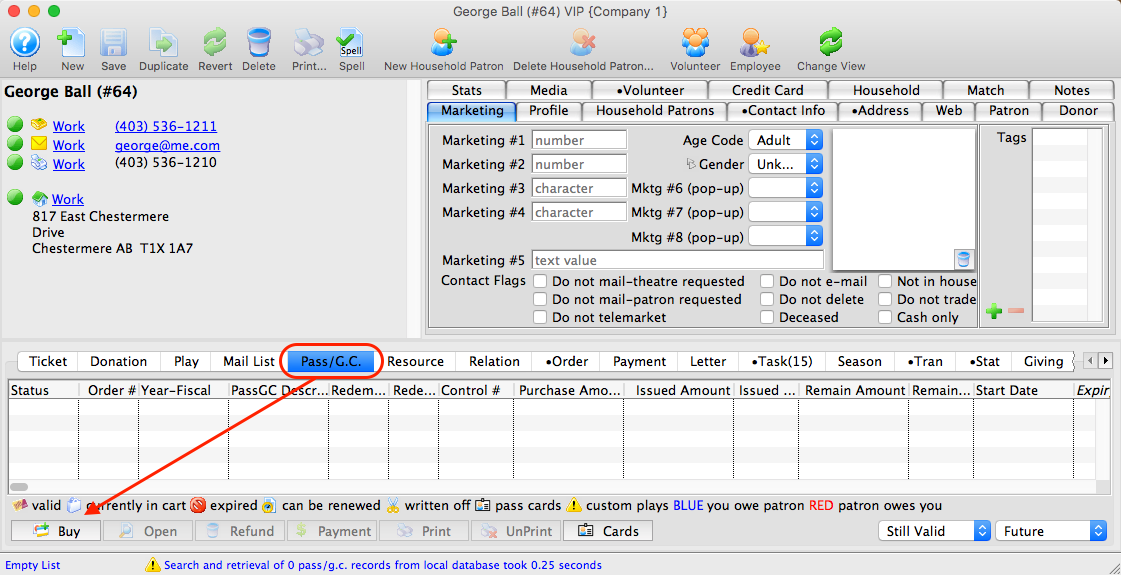
- Sell the Agency a new Dolar Value Gift Certificate.
- Edit the Issued Passes Amount to the full value of the Agency check
- Click Save
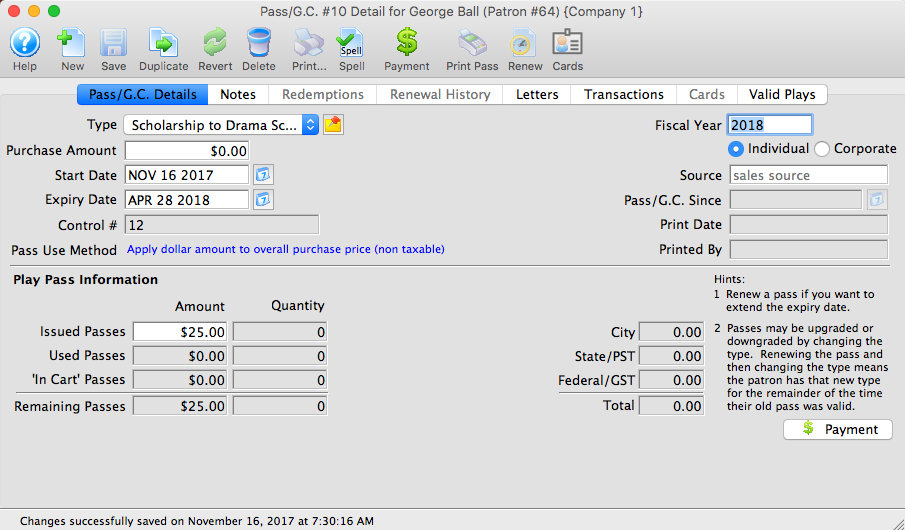
- Enter a donation in their name for the amount they gave
- Pay for the donation using the gift certificate from the main agency
Applying Gift Certificate to Pay for Donation
- When processing the payment for the donation, choose PASS as the payment method
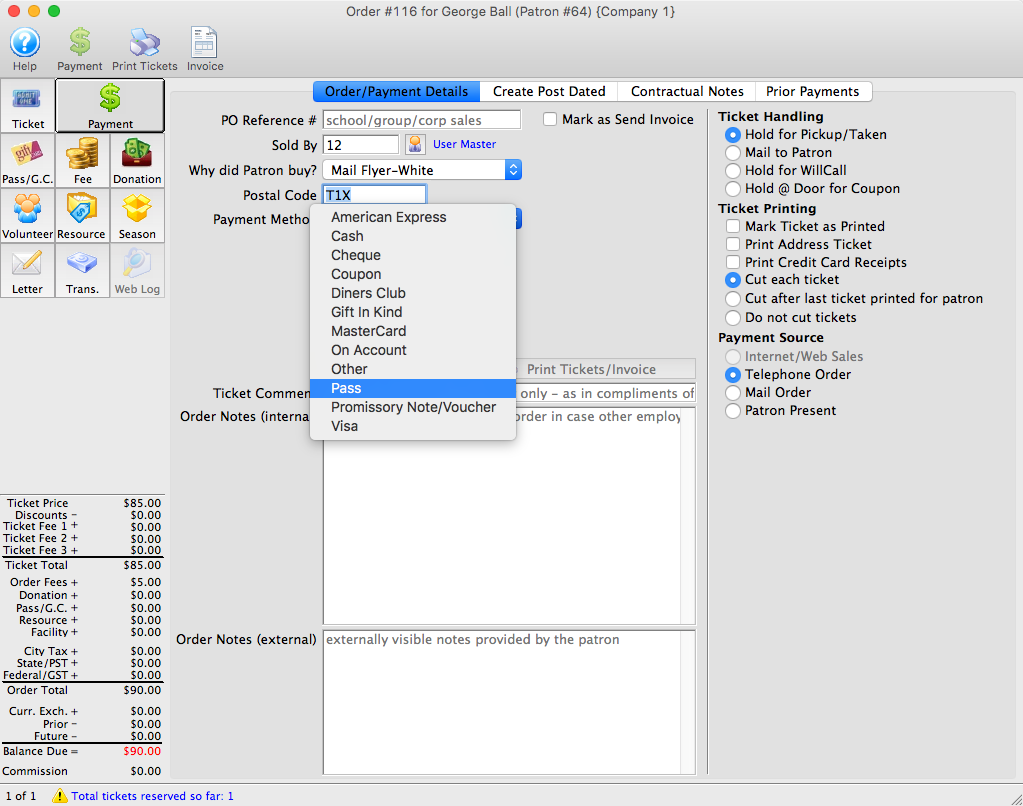
- Locate and apply Agency Gift Certifiacte
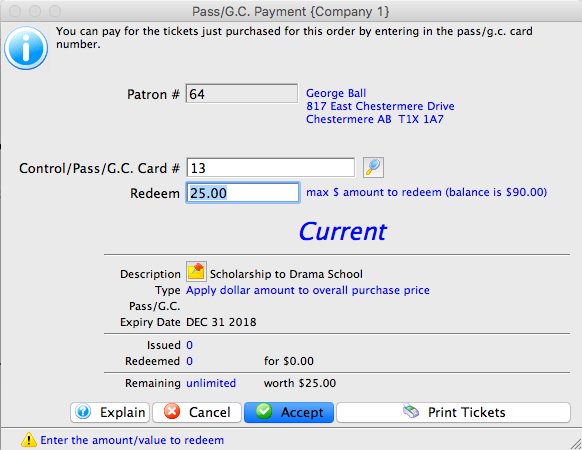
Recurring Donations
|
Recurring donations, once set up, are created during end of day automatically on the date that they are next due.
If somebody is supposed to give their next gift today, End-Of-Day Deposit process will create the donation, the payment and queue up the next one. |
A Recurring Donation is a series of gifts given repeatedly on an open-ended schedule with no specific commitment from the donor. The fundraising is based on encouraging its donors to donate at least on a monthly basis. The donor can decide to end the arrangement at any time or pay indefinitely.
Gift vs. Pledge vs. Recurring Donation
Although similar in nature, there is a difference between these three common donation types.
- Gift - a one time gift given with no expectation of the donor to give again in the future. These can be paid for:
- Single payment at time of gift
- Using post dated payments that spread the payments over a a specified period of time to complete the donation
- Put on account and paid for later when a check arrives.
- Pledge - a promise to pay a specified amount over a predetermined time period. You may (or may not) wish:
- to create pledge reminder emails for these -and-
- use the Pledge Reminder Report to manage these.
- Recurring Donation - a series of gifts given repeatedly on an open-ended schedule.
- Each gift is created as a separate donation with a separate payment.
- The gift can be stopped at any time.
- once the gift has been received, there is no expectation of another gift until perhaps another year goes by.
- After the pledge has been fulfilled, the donor has completed their commitment and another pledge or request for donations starts the process with the donor again.
- For a recurring donation with no specific end date, the donor could continue to donate indefinitely.
Setup Available Through Box Office and Online Donations
Recurring donations can be setup both in the Box Office or via an Online Donation initiated by the patron. In both situations, the ability exists to review Recurring Donation Details and alter the information at anytime.
Reporting of Recurring Donation Revenue for Accounting
Recurring donations are treated as earned revenue when they are received - just as if a normal cash donation was received. There are no Accounts Receivable as each gift has a pre-defined payment method that will be used for each occurrence of the gift.
Employee Permissions Set Up
You must enable a permission under the Users & Access->Employee List for each employee in the Data Tab called Manage recurring donations for a patron.
|
Theatre Manager does not require any additional setup to maintain Recurring Donations within the Donation Campaigns. The existing accounting setup is able to be used. |
Recurring DonationTemplate List Window
|
A recurring donation template contains all the data required to create future donations on an ongoing basis. When a template is processed, the future donation will contain a new order, donation and payment based on the template.
A donation template is NOT a donation per se. A process is run to create a donation and payment from the template. |
|
There are three ways a recurring donation can be created. Please read about all of them. |
To access the Recurring Donation Templates window:
- Choose Setup >> System Tables >> Recurring Donation Templates

The Recurring Donation Template List window opens.

Parts of the Recurring Donation Template List Window
 |
Accesses the Help section for this window. |
|
Inserts a New recurring donation template through the Recurring Donation Template window. For more information on inserting recurring donations click here. |
|
Opens a window to edit a recurring donation through the Recurring Donation Detail window. For more information on editing recurring donations click here. |
 |
Duplicates an existing recurring donation. For more information on duplicating an existing recurring donation click here. |
|
Deletes a recurring donation. For more information on deleting recurring donations click here. |
|
Generates a report of recurring donations to the screen or default print location. |
 |
Exports out a recurring donation template list in a tab-delimited format. |
 |
The patron record opens. For more information on the patron window click here. |
 |
Creates the next scheduled gift for each of the recurring donation templates. For more information on the creating scheduled gifts for recurring donations click here. |
| Recurring # | Unique number assigned to the recurring donation for tracking within Theatre Manager. |
| Patron # | Unique number assigned to the patron for tracking within Theatre Manager. |
| Type | The patron's selected category type. For more information on defining patron types click here. |
| First Name | The patron's first name that has the recurring donation. |
| Last Name | The patron's last name that has the recurring donation. |
| Company | The patron's company name that has the recurring donation. |
| Campaign Name (Internal) | The internal campaign name that receives the recurring donation. For more information on Donation Campaigns click here. |
| Campaign Name (External) | The external campaign name that receives the recurring donation. For more information on Donation Campaigns click here. |
| Start Date | The date the recurring donation was requested to be started. |
| Next Date | The date the next recurring donation is scheduled to be created. |
| End Date | The date that will stop all further gifts from being created by the recurring donation. Once this date has past, no donations will be created. An empty End Date will allow donations to be created into perpetuity. |
| Amount | The amount each gift will be created for each scheduled frequency. |
| Recurring Frequency | How often the donation will be created. |
| Donation Field#1 | The Donation Field #1 value to assign for each gift created by the recurring donation. For more information on defining the Donor#1 Popup Field click here. |
| Donation Field#2 | The Donation Field #2 value to assign for each gift created by the recurring donation. For more information on defining the Donor#2 Popup Field click here. |
| Donation Field#3 | The Donation Field #3 value to assign for each gift created by the recurring donation. For more information on defining the Donor#3 Popup Field click here. |
| Solicitor | The main solicitor for this recurring donation. For more information on defining solicitors click here. |
| Solicitor # | The main solicitor # for this recurring donation. |
| Active | Indicates if the recurring donation is active and will create gifts on the scheduled frequency. |
Creating a Recurring Donation
There are 3 ways to create a Recurring Donation.
- Through the Setup->System Tables->Recurring Donations setup menu. This method is extremely helpful if the patron is a first time donor and hasn't made a previous donation.
- Using an existing donation for a patron, which will define the starting values for the Recurring Donation.
- Using online web sales, the patron can indicate that they wish to setup and start a Recurring Donation.
How to Start A First Time Recurring Donation
To setup a new Recurring Donation for a patron, there are three steps to follow:
- Enter a NEW donation for the amount of the monthly gift and click on the Payment button
- Charge the credit card. This will be the FIRST donation of their Recurring Donation
- With the First Donation charged to the patron's credit card, now use the Recurring Donation Template button to setup the future payment amounts and frequency.

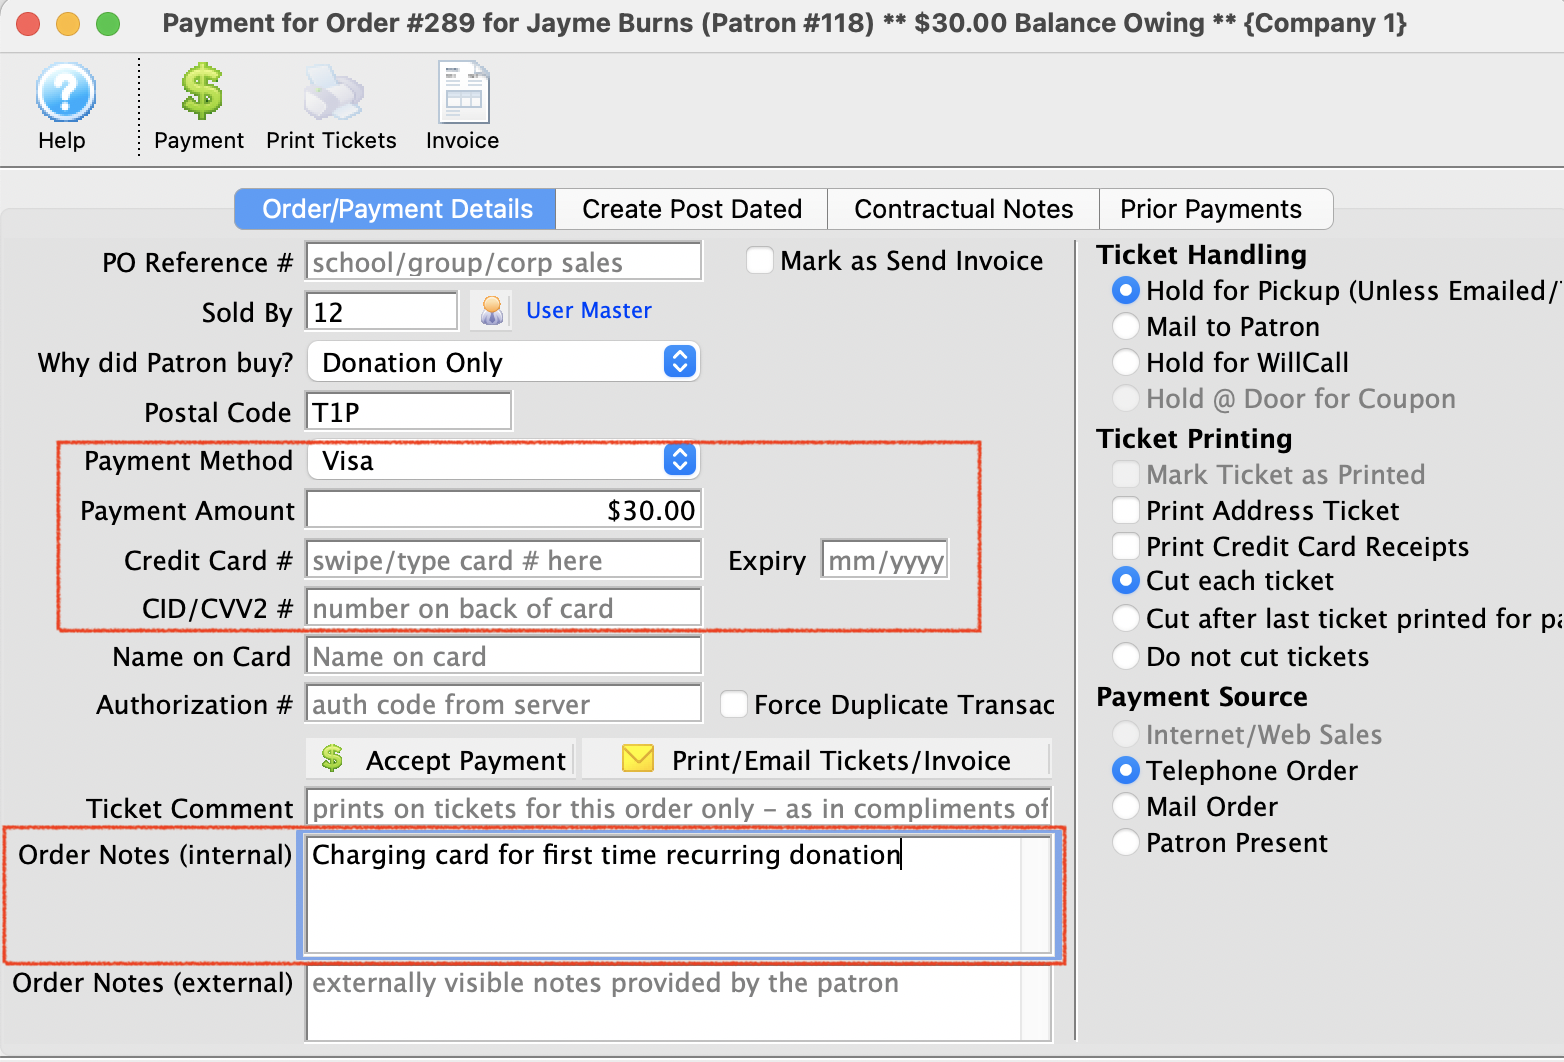
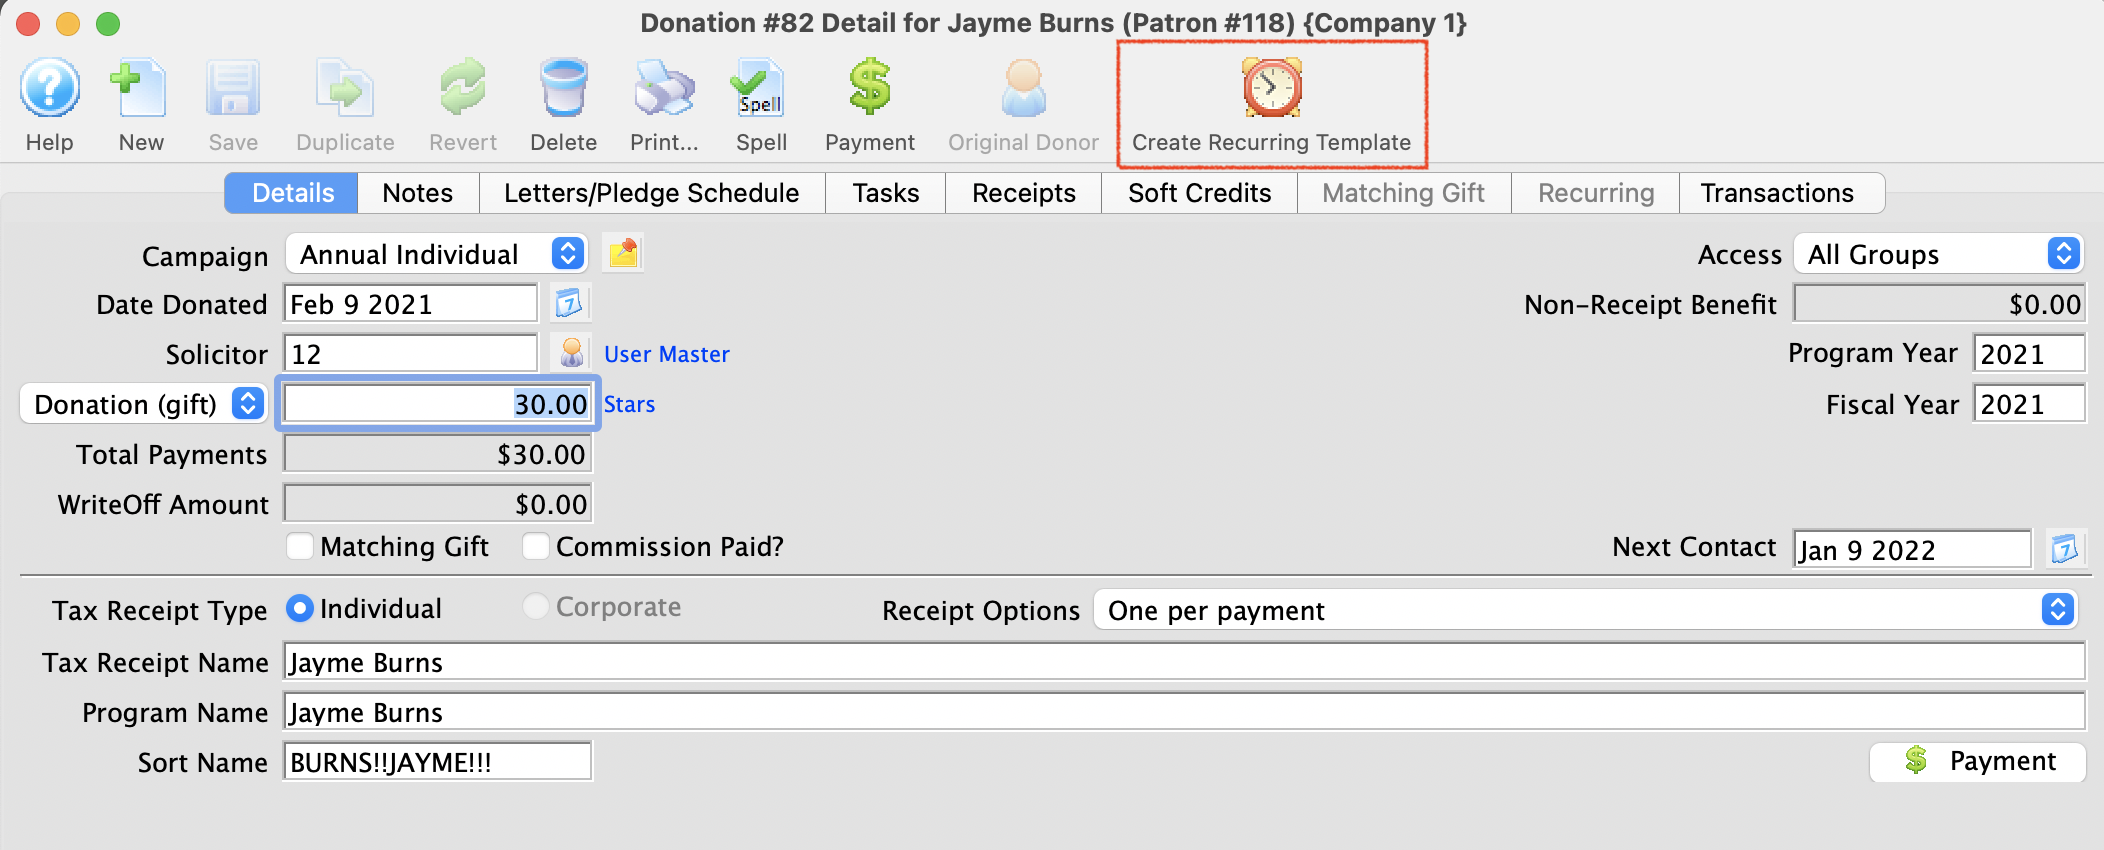
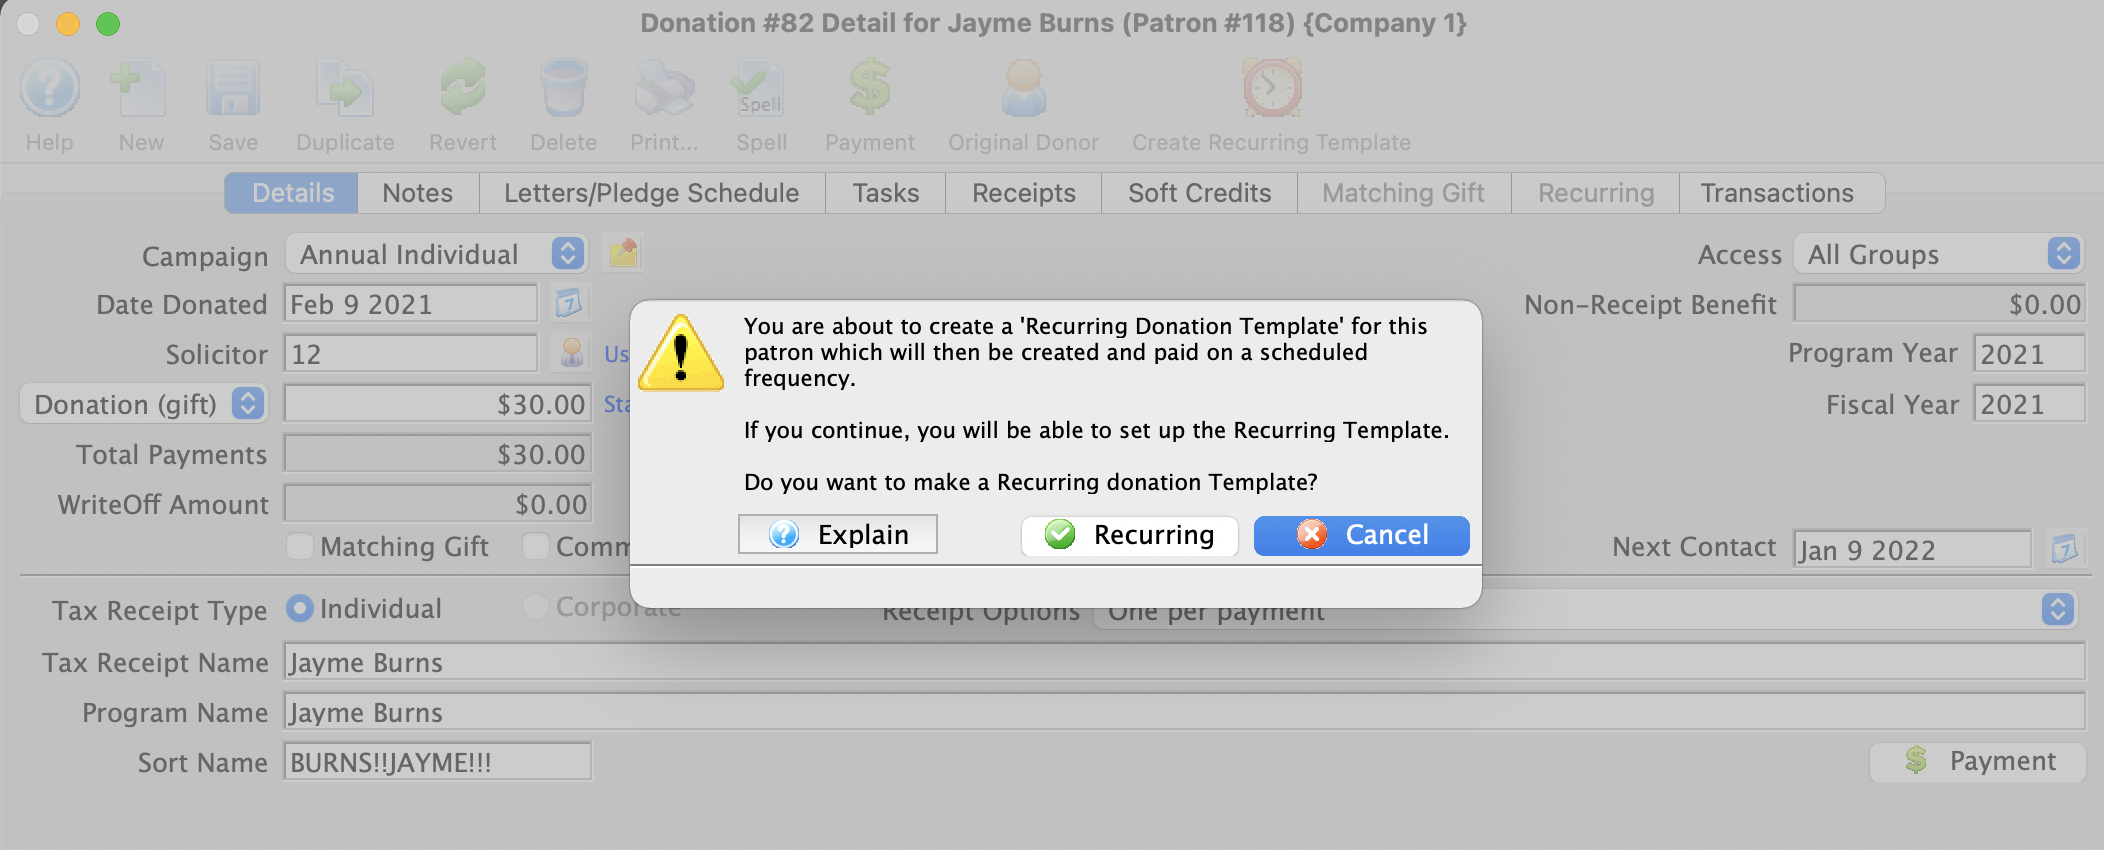
|
A recurring donation template contains all the data required to create future donations on an ongoing basis. When a template is processed, the future donation will contain a new order, donation and payment based on the template.
A donation template is NOT a donation per se. A donation must be created from it. |

Recurring Donations Create From Existing Gift
Using an existing donation as a starting point to populate the Recurring Donation's fields is an easy process. In a situation where the patron may have made a donation and realizes that they wish to become a recurring donor, you're able to transfer the donation information along with the payment information over to the recurring donation.
|
If the donation being used has a donation date of today, it will be automatically linked to the Recurring Donation as the 1st gift. The 'Next Gift Date' will be set in the future based on the 'Frequency'. |
- Open the Patron Record.
For details on locating a Patron Record click here.
- Click the Donation tab.

- Select the Donation to edit.
Single click on a donation to select it.
- Click the Open button.

- Click the Recurring button in the top toolbar.
A confirmation window will open to confirming the creation of a Recurring Donation from the existing donation.

- Click Recurring
 button.
The Recurring Donation will now be created and the Recurring Donation Detail Window will open to allow for any additional changes to the setup.
The payment method for the recurring donation will be the same payment method applied to the originating donation. Only payment methods of type Credit Card and EFT will be applicable; all others will be assigned as 'On Account'.
Recurring Donations Create From Existing Gift - Already Exists Warning Message
When creating a Recurring Donation from an Existing Gift, if the donation selected is associated to an existing recurring donation previously created for the patron, a warning message will appear. In most cases this message will appear when the originating donation selected is of type 'Recurring Gift'.

|
This message is only a warning and will not stop the creation of another Recurring Donation based on this donation. The message is to provide an indicator that a recurring donation already exists for this patron based on the exact same gift information selected. The message is there to prevent a secondary recurring donation from being created by mistake. |
- Open the Patron Record.
For details on locating a Patron Record click here.
- Click the Donation tab.

- Select the Donation to edit.
Single click on a donation to select it.
- Click the Open button.

- Click the Recurring button in the top toolbar.
A confirmation window will open to confirming the creation of a Recurring Donation from the existing donation.
- Click Make More
 button.
The Recurring Donation will now be created and the Recurring Donation Detail Window will open to allow for any additional changes to the setup.
The payment method for the recurring donation will be the same payment method applied to the originating donation. Only payment methods of type Credit Card and EFT will be applicable; all others will be assigned as 'On Account'.
The originating donation will not be associated with the new recurring donation that was just created. It will remain associated with the original recurring donation series.
Recurring Donations Create for an Online Donation
A Recurring Donation can be initiated by the patron during an online donation submission. When the patron fills in the required fields to complete the online donation, the patron selects a recurring frequency from the "How often do you want to make this donation?" pop-up list. During the checkout process, Theatre Manager will automatically create the Recurring Donation based on the information provided with the online donation.
- The Patron accesses online sales.
For further information on Web Page Documentation click here.
- Click the Donation
 tab in the top toolbar.

- Fill in the required donation fields.
The Donation Amount within the online donation will be used as the Recurring Amount for each future recurring occurrence.
- Choose a recurring option for the "How often do you want to make this donation?" choice.

- Click Add Donation to Shopping Cart
 button.
The Recurring Donation request has now be added to the shopping cart along with the originating donation. At this stage in the process, the Recurring Donation has not been created. It has only been requested to be setup by the patron. It will only be created upon successful checkout of the shopping cart.
- Complete the checkout process of the Shopping Cart
The payment method for the recurring donation will be the same payment method used to complete the purchase of the shopping cart. Only payment methods of type Credit Card and EFT will be applicable; all others will be assigned as 'On Account'.
- After a successful checkout has occurred, the Recurring Donation is created.
For reference information to assist the box office in determining the Shopping Cart in which the online patron initiated the request for the recurring donation, the Shopping Cart Number is provided on the Statistics tab of the Recurring Donation Detail Window.
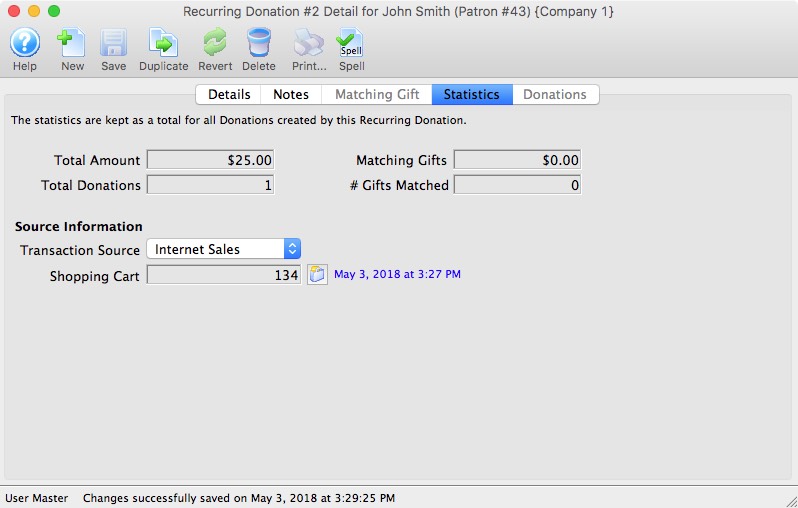
|
If the originating donation is removed from the shopping cart prior to the checkout process, the Recurring Donation will not be created for the patron. |
|
A donation must be added to shopping cart along with the request to initiate the Recurring Donation, before a Recurring Donation will be created for the patron. Upon successful checkout of the shopping cart, this originating donation will be associated as the 1st gift within the series. The Next Gift Date will be set with a future date based on the recurring occurrence chosen by the patron. |
Editing a Recurring Donation
|
Editing a Recurring Donation will not update previously created gifts associated to the recurring donation with those edits being made. Only the future gifts created from the recurring donation will contain the edits. If the edits being made within the recurring donation are required to be made retro-active to the existing gifts, those edits will need to be made directly within each gift's donation record. |
- Open the Recurring Donation window.
Click here to learn how to access this window.
- Click on the recurring donation you want to edit.
- Click the Open button.
The recurring donation detail window will open. Click here to learn more about this window.
Duplicate a Recurring Donation
|
Duplicating a Recurring Donation will not duplicate previously created gifts associated to the recurring donation. Only the Recurring Donation itself will be duplicated. |
- Open the Recurring Donation window.
Click here to learn how to access this window.
- Click on the recurring donation you want to duplicate.
- Click the Duplicate button.
The recurring donation has now been duplicated.
Delete a Recurring Donation
- Open the Recurring Donation window.
Click here to learn how to access this window.
- Click on the recurring donation you want to delete.
The recurring donation must not be tied to a previously created donation in order to be deleted.
- Click the Delete button.
A delete confirmation dialog opens.

- Click the Delete
 button.
The recurring donation has now been deleted.
Recurring Donations Detail Window

Parts of the Recurring Donation Detail Window
|
Opens a new Recurring Donation Detail window to enter a new recurring donation. |
|
Saves the currently open recurring donation. |
| |
Creates a duplicate of the currently open recurring donation. |
|
Can be clicked while editing to revert back to the last time the open recurring donation was saved. |
|
Deletes the recurring donation currently open. |
|
Checks the spelling in the appropriate fields. |
| The Details tab is where you enter the descriptive information about the recurring donation. Click here for more information about the Details tab. | |
| The Notes tab is where you enter default values and notes for the recurring donation. Click here for more information about the Notes tab. | |
| The Matching Gift tab is where you define the matching gift profile of the company who will match this recurring donation. Click here for more information about the Matching Gift tab. | |
| The Statistics tab shows the various total amounts for the selected recurring donation. Click here for more information about the Statistics tab. | |
| The Donations tab displays the list of gifts and matching gifts associated with this recurring donation. From here, you can open the selected donation. Click here for more information about the Donation tab. |
Recurring Donations Detail Window - Detail Tab

Parts of the Recurring Donation Detail Window - Detail Tab
| Active | Indicates if the recurring donation is enabled and currently active to create scheduled gifts. |
| Patron | The patron's account making the recurring donation. |
| Campaign | The drop down list containing the possible donation campaigns to give the donation to. |
| Start Gift Date | The start date for the recurring donation. |
| Next Gift Date | The date for the first recurring donation to occur. |
| Solicitor | Select the person responsible for receiving the donation from the drop down. This person must exist in the Employee table. |
| Recurring Amount | The amount for each recurring donation. |
| Recurring Frequency | The frequency for when a gift will be created for the recurring donation. |
| Matching Gift | Select the Matching Gift if you wish to link this donation to another patron who will also donate as a result of this patron giving a new donation. Click Here for more information. |
| Tax Receipt Type | Indicates if this recurring donation was given by the patron or by the patron's company. |
Parts of the Recurring Donation Detail Window - Payment Information
| Payment Method | Choose the method of payment that will be used for each recurring donation. | ||
| Credit Card |
|
||
| EFT |
|
||
| On Account |
|


Recurring Donations Detail Window - Notes Tab
The Notes Tab allows you to define specific fields for each gift created by the Recurring Donation.

Parts of the Recurring Donation Detail Window - Notes Tab
| Donor #1 (pop-up) | A customizable pop-up field edited through the code tables. This pop-up can be made a mandatory field in Company Preferences. | ||
| Donor #2 (pop-up) | A customizable pop-up field edited through the code tables. This pop-up can be made a mandatory field in Company Preferences. | ||
| Donor #3 (pop-up) | A customizable pop-up field edited through the code tables. This pop-up can be made a mandatory field in Company Preferences. | ||
| Donor #4 (char) | A customizable character field. This field can be made a mandatory in Company Preferences. | ||
| Donor #5 (flag) | A customizable Check Box. | ||
| Donor #6 (flag) | A customizable Check Box. | ||
| Donor #7 (flag) | A customizable Check Box. | ||
| Recurring Notes | Additional important information or general background information about this recurring donation.
|
Recurring Donations Detail Window - Matching Gift Tab

Parts of the Recurring Donation Detail Window - Matching Gift Tab
| Campaign | The drop down list containing the possible donation campaigns to give the donation to. | ||
| Solicitor | Select the person responsible for receiving the donation from the drop down. This person must exist in the Employee table. | ||
| Patron | The matching gift company account making the recurring donation.
|
||
| Matching Gift Ratio | The percentage the matching gift patron's donation is in relation to the original donation. | ||
| Match Amount | Value of the donation the matching gift patron will make.
|
Recurring Donations Detail Window - Statistics Tab

Parts of the Recurring Donation Detail Window - Statistics Tab
| Annual Summaries/Projections
Contains a backward look at actual amounts and a forward look at projections over a 6 year period. |
|
| Actual 2021 | This is the total recurring donations from TWO years ago based on this template. (the 2021 refers to the year and will change as time moves forward. |
| Actual 2022 | This is the total recurring donations from ONE years ago based on this template. (the 2022 refers to the year and will change as time moves forward. |
| Estimate 2023 | This is a combination of the actual recurring donations created this year plus an estimate of the future recurring donations not yet created. For example:
|
| Projected 2024 | This is the projected total donations ONE year in the future based on this recurring donation template.
|
| Projected 2025 | This is the projected total donations TWO years in the future based on this recurring donation template.
|
| Projected 2026 | This is the projected total donations TWO years in the future based on this recurring donation template.
|
| Overal Actual Amounts
contains the summary of every donation that has been created because of this recurring donation template. |
|
| Total Amount | Total amount of gifts created for the recurring donation. |
| Total Donations | Number of gifts created for the recurring donation. |
| Matching Gifts | Total amount of matching gifts created for the recurring Donation. |
| # Gifts Matched | Number of matching gifts created for the recurring donation. |
| Source Information | |||
| Transaction Source | The source location where the recurring donation was entered. | ||
| Shopping Cart | The websales shopping cart number in which the patron confirmed their request to create this recurring donation.
|
||
Recurring Donations Detail Window - Donations Tab

Parts of the Recurring Donation Detail Window - Donations Tab
| Status | Icon based indicators on the various aspects of the donation. |
| Order # | The order number is a reference number for the order. |
| Prog Yr | Program Year. |
| Use | Indicates the source detailing hose the donation was received. |
| First / Last & Company Name | Name of the patron making the donation. |
| Campaign Name | Name of the campaign the donation was applied to. |
| Fiscal Year | The accounting Fiscal Year the donation was made. |
| Donation Date | Date the donation was made. |
| Pledge Amount | The amount the patron pledged to this donation. |
| Actual Amount | The actual amount the patron has confirmed they will donate towards their original pledged amount. |
| Giving Level | What level of giving the donation is at. |
| Balance | Outstanding balance of the pledged amount remaining to the paid. |
| Total Receipted | The amount of the donation that has been issued paayment/receipts. |
| Soft Credit | The total amount of Soft Credits that have been applied to the donation. |
| Program Name | How the patron would like to be recognized on the program. |
Recurring Donations Create Scheduled Gifts from Templates
This process will process the Recurring Donation Templates and create gifts/donations for each recurring donation template whose 'Next Gift Date' is up-to or equal to the date the process is run.
|
If the 'Next Gift Date' spans a timeline where multiple gifts are to be created based on the combination of 'Next Gift Date, 'Frequency', and the 'date the process is run'; each gift created will have the appropriate Donation Date as if the process was run on the date it was scheduled to be created. |
|
Scheduled Gifts for Recurring Donations are reviewed and created in the following areas:
|
- Choose Setup >> System Tables >> Recurring Donations from the Main Menu.
The Recurring Donations List window opens.
Click here for information about the recurring donation window.
- Click the Recurring button .
The confirmation window will open confirming the request to create gifts from the recurring donations.

- Click Create Gifts
The gifts will now be created.
- Click OK
 after reviewing the completion message.
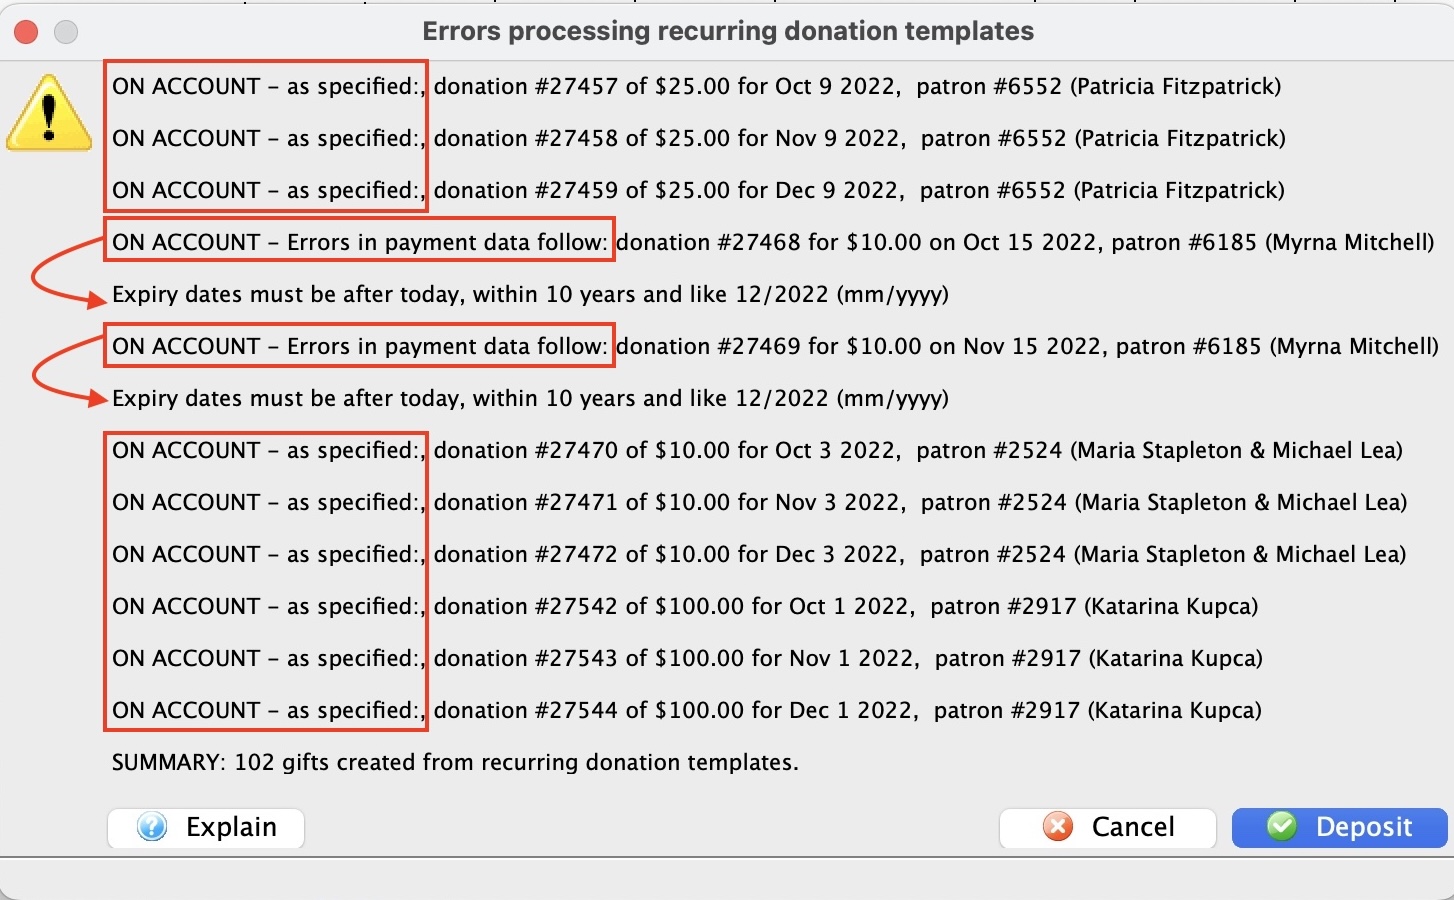
Restricting Access To Donor Information
This function is used to restrict employee access to the donor tab within the patron window. For details on setting access within Employee Setup click here.
- Open the Patron Record.
For details on locating a Patron Record click here.
- Click the Donor
 tab.
tab.

- Check the Private
 box.
box.
If the Publication Name is left blank a warning screen will appear.
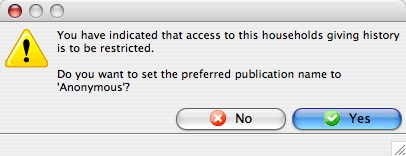
- If the preferred Publication Name is to be Anonymous click the Yes button.
Anonymous will be entered in the Publication Name field.
If the patron Publication Name needs to be entered click the No
button. Enter the patron Publication Name.
The donor's General Donor Notes are now restricted to employees with security clearance to this tab. It is important to note that the actual donation history in the lower part of the screen is not restricted with this option, but rather in Employee Setup on the Data tab.
To allow viewing of the donor's information
- Open the Patron Record.
For details on locating a Patron Record click here.
- Click the Donor tab.
- Uncheck the Private box.
A warning screen will appear asking if you are sure you wish to allow access to there information.
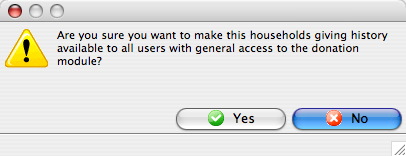
- Click the Yes button to allow access to all users or the No
button to keep the information restricted.
Reducing a Donation or splitting an existing donation into multiple donations
Occasionally, you may need to reduce the amount of a specific donation. Examples might be:
- the donor may have donated with a subscription and a change in the subscription might mean a slight reduction in the donation -or-
- you need to split an existing donation amount into two or more donations if the donor decides that they want to give to multiple separate campaigns instead of the one campaign they originally indicated.
|
A donation amount cannot be reduced if receipts have been printed already for the patron.
You would need to un-print some receipts to create the audit trail before reducing it in value. |
|
Splitting a donation consists of reducing the donation first followed by adding another donation to the existing order. |
Reducing the amount of an donation:
- Locate the patron's record.
- Go to the Donation tab.
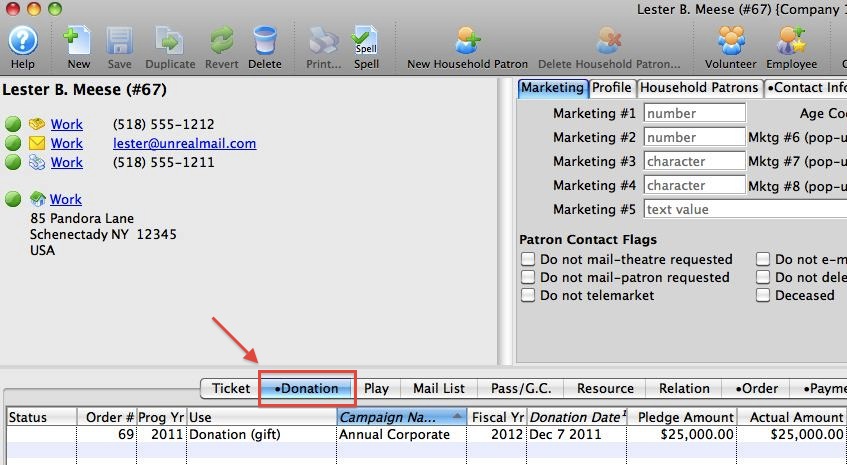
- Double click on the donation you wish to reduce in amount.
The donation record opens.
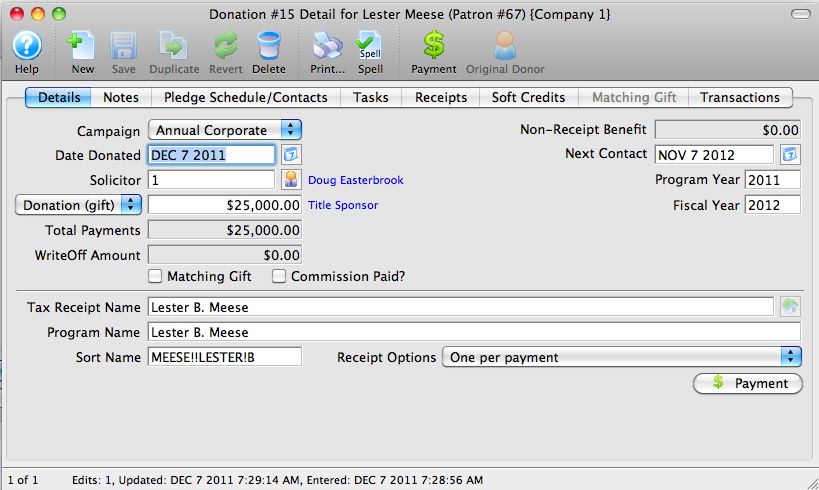
- Reduce the amount of the donation.
There are two things that can happen when you reduce the amount of the donation and click save.
- If the unprinted receipts amount allows a reduction, then you'll see a message below that indicates it is ok to reduce the donation.
- If too many receipts have already been printed, then you will need to un-print some before reducing the amount. See the next step
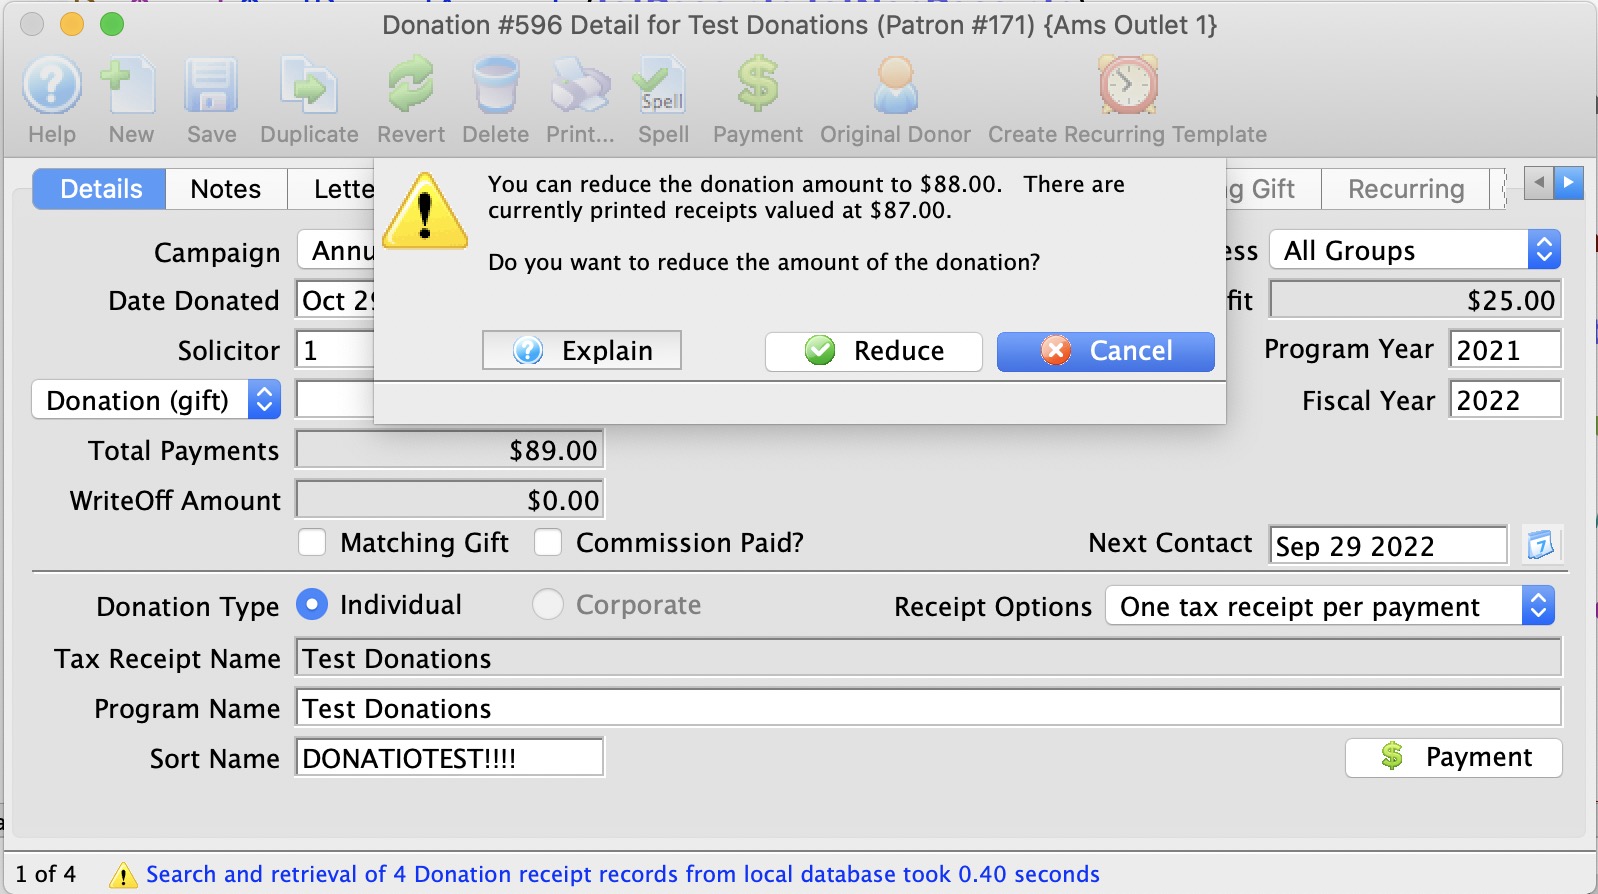
-
Un-print sufficient donation receipts
If you cannot reduce the amount of a donation, you will need to un-print enough receipts to allow for the reduction in the donation. To do this:
- Go to the 'receipts' tab
- Select some receipts that are printed. There may only be one. In the case of post dated payments, there may be more.
- Right click and select unprint receipts for selected donation for later printing
- Confirm any dialog that appears
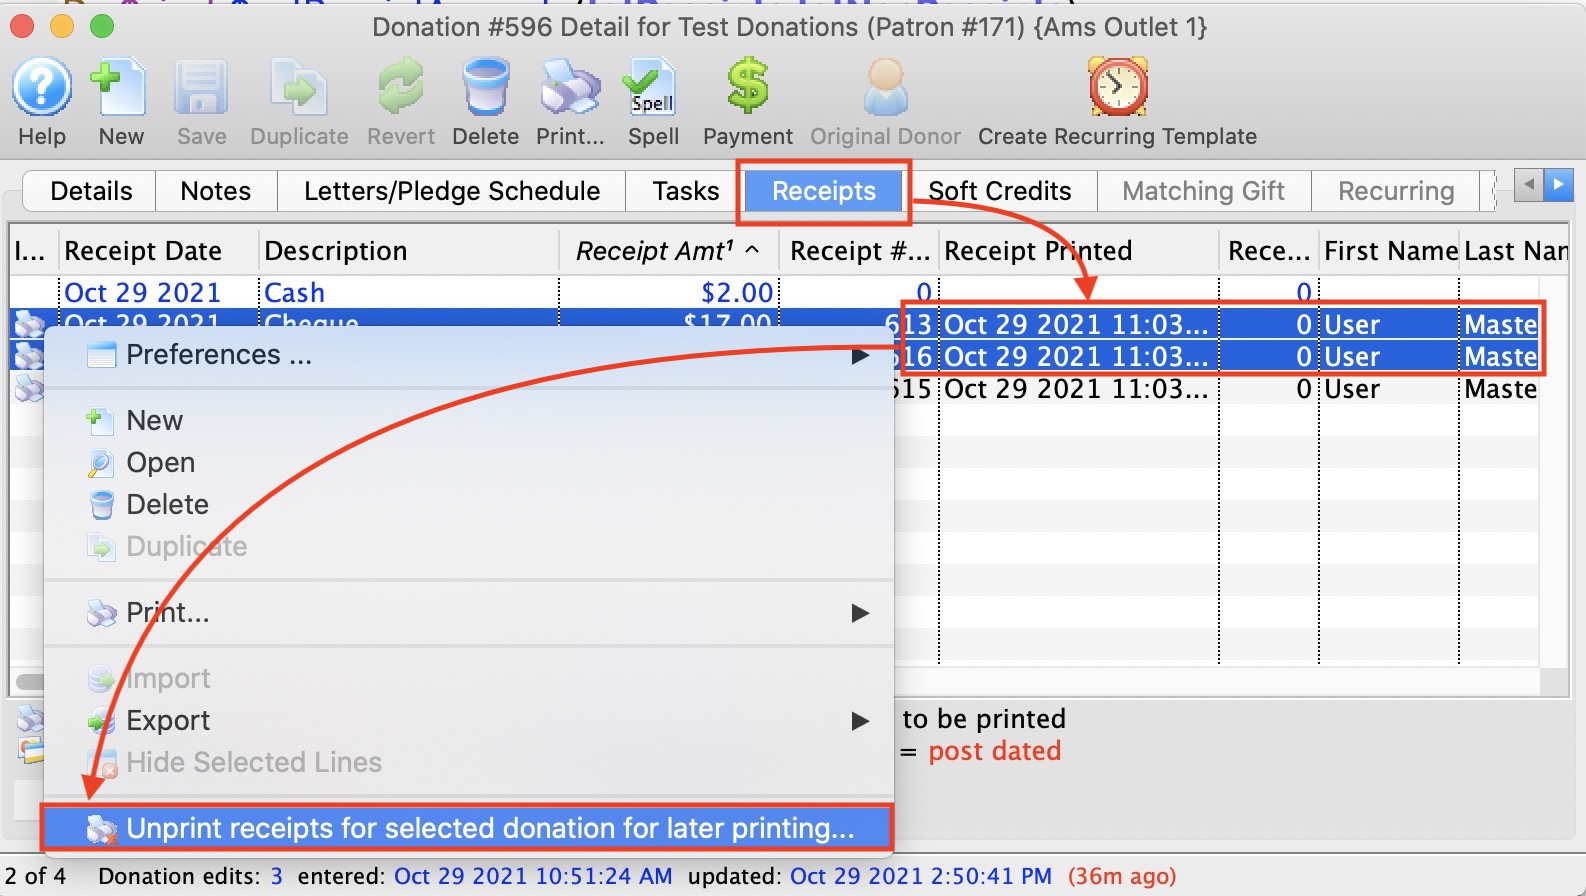
Making the split donation
After reducing the amount of the original donation and saving it, you can thne make a new donation to the same order for the amount that you reduced it.
- Click the New button on the donation that you just reduced in amount.
This adds a new donation to the existing order.
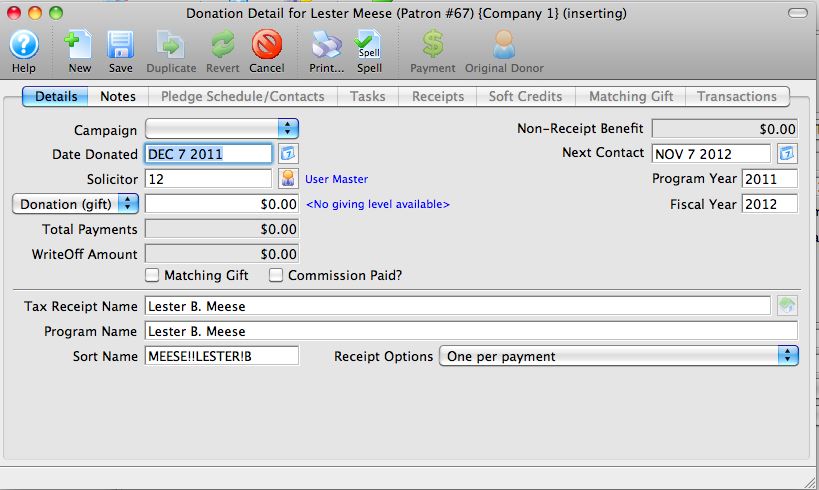
- Set the donation amount, campaign, solicitor, notes, etc for the split/second portion of the donation.
- Click the button.
- Close the window.
The first donation detail window will still be open. Close it too.
- In the end, there will be no new payments required if the split donation makes up the difference for the old donation.
DonorSearch Analytics
Take the guesswork out of fundraising. Convert patrons into donors.
DonorSearch can help you convert your patrons into members and donors, motivate smaller donors to increase their support, and strengthen your relationships with important supporters.
Using wealth, philanthropy and other databases, along with their proprietary algorithms and manual oversight, DonorSearch can offer you:
- Where your alumni are and what they're doing
- Their wealth levels and capacity to give
- Philanthropic history and the causes they support
- Connections they have with others who support you
Prospect with confidence.
DonorSearch can help you evaluate, with a high degree of confidence, your prospects’ wealth (whether they can donate) and their past philanthropy, which is a strong indicator of whether they will donate.
You'll have the critical information you need about your prospects to:
- Boost attendance
- Improve personal communications
- Decrease your daily workload
- Build valuable relationships
Theatre Manager has integrated an interface directly with DonorSearch allowing easy interaction between your existing Theatre Manager patron and donor information to the analytic analysis warehouse of information.
|
Theatre Manager provides an interface directly to DonorSearch. Accessing DonorSearch's wealth of information and analytic analysis of potential donor profiles requires an account be set up and maintained directly with DonorSearch. To contact DonorSearch about your prospect research needs, please contact Donor Search at info@donorsearch.net or call (410) 670-7880 or visit their website at http://www.donorsearch.net for further information. |
DonorSearch API Key
The DonorSearch API Key is a unique identifier used with all transactions between DonorSearch and Theatre Manager. It acts as the place holder for a "Username" and "Password" that the end user would enter into the DonorSearch Web Portal directly if not accessing the data via Theatre Manager.
This process will return the API Key. You will only be able to return the API Key once. After an API Key is created for your account, it is not retrievable this way again. Attempting to run this same process will report "Error". There are two reasons for the "Error" message will occur:
- The username and password are an invalid combination.
- The API Key has already been generated.
If this message occurs please reach out to your DonorSearch contact after ensuring you have entered the appropriate required fields.
If you have previously generated your API Key and know exactly what the API Key is, you can enter it directly into the API Key field.
Retrieving API Key
- Use the Setup menu and clicking on Company/Outlet Preferences.
- Click the Donation tab.
- Click the DonorSearch API Settings button.
The DonorSearch API Setup window opens.
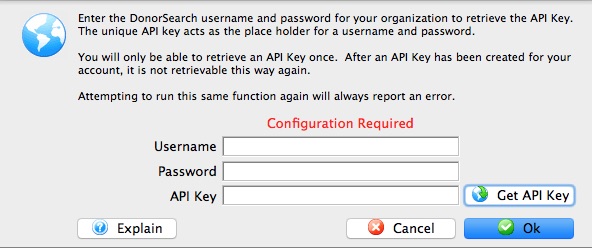
Username The account name provided by DonorSearch to access your organization's account. Password The password provided by DonorSearch to access your organization's account. API Key DonorSearch's unique identifier used with all transactions between the DonorSearch API and other outside parties. - Enter the "Username" provided by DonorSearch for your account setup.
- Enter the "Password" provided by DonorSearch for your account setup.
- Click the Get API Key button.
- Click OK.
- Click Save in the window toolbar.
The DonorSearch API Key has now been updated and saved within Theatre Manager.
|
Theatre Manager provides an interface directly to DonorSearch. Accessing DonorSearch's wealth of information and analytic analysis of potential donor profiles requires an account be set up and maintained directly with DonorSearch. To contact DonorSearch about your prospect research needs, please contact Annette Zakuto at annette@donorsearch.net or call 401-988-4978 or visit their website at http://www.donorsearch.net for further information. |
DonorSearch Submitting New Searches
There are 2 methods of sending in requests to DonorSearch for analysis on your donors. An exported Text File Submission and Direct Submission. The exported file offers more information to match on and generates a more higher degree of successful data matching, however a direct submission offers a more quick turnaround on immediate information about your donor. Regardless of your choice of submitting new searches, the steps to complete the process are virtually the same.
To begin with a search, you will need to determine which patrons you wish to submit for analysis on. This could be from:
- the "Who's In tab" on a mail list of potential or existing donors
- the list of existing donors from a previous donation campaign
- the Patron window Donor's tab
Once you have determined the patrons you wish to submit, proceed wth one of the following submission choices:
- Direct Submission - offers a more quick turnaround on immediate information about your donor.
- Text File Submission - generates a more higher degree of successful data matching and additional information about your prospect.
DonorSearch Direct Submission
To begin with a search, you will need to determine which patrons you wish to submit for analysis on. This could be from:
- the "Who's In tab" on a mail list of potential or existing donors
- the list of existing donors from a previous donation campaign
- the Patron window Donor's tab
Submitting a New Search Request
- Select the patrons to request a new search for.
- the "Who's In tab" on a mail list of potential or existing donors
- the list of existing donors from a previous donation campaign
- the patron window donor's tab
If your submitting a request from the Patron window Donor's tab, there is no patron selection required. Proceed with the next step by Right-Clicking anywhere on the donation listing.
- Right-click on the selected patrons
A context menu will pop-up

- Choose menu option DonorSearch Analytics >> Request Analysis
The Export Donor Information for DonorSearch Analytics window opens
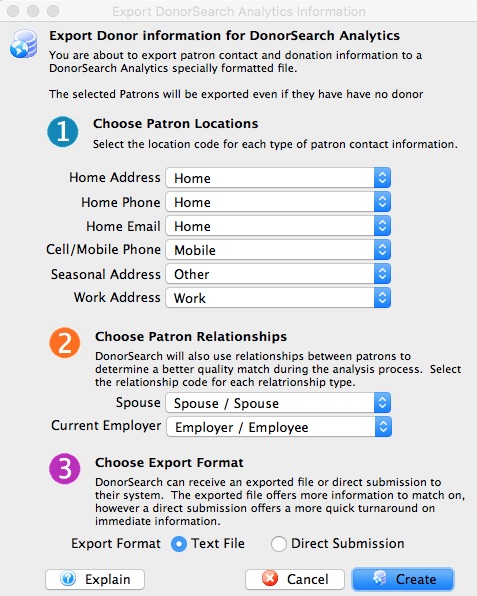
Choose Patron Locations DonorSearch will use the addresses submitted to provide a better quality match the exact patron you are requesting analysis on.
Home Address Select the location code that best matches the patron's home address. Home Phone Select the location code that best matches the patron's home phone. Home Email Select the location code that best matches the patron's home email. Cell/Mobile Phone Select the location code that best matches the patron's cell or mobile phone. Seasonal Address Select the location code that best matches the patron's seasonal/vacation address. Work Address Select the location code that best matches the patron's work address. Choose Patron Relationships DonorSearch will also use relationships between patrons to determine a better quality match during the analysis process.
Spouse Select the relationship code that best matches the patron's spouse. Current Employer Select the relationship code that best matches the patron's current employer or the location where they currently work. Choose Export Format DonorSearch can receive a direct submission or an exported text file to their system as the source of information for the patron.
Direct Submission Select this option to send information immediately for a more quick turnaround immediate response for a high-level analysis. Text File Select this option to create a text file to send to DonorSearch can for an in-depth analysis. - Make the selections within the submission window.
- Choose "Direct Submission" for the Choose Export Format choice.
- Click the Create button.
- Review the response message to confirm the patron information has been submitted for analysis.
- Click OK
- Proceed to the steps on how to Retrieve Analytic Results from DonorSearch.
Direct Submission Data Sent
The DonorSearch Direct Submission sends a portion of the patron's information as part of the analysis process. The more information Theatre Manager has about the patron, the better the results and experience using DonorSearch will be. Below are the list of fields sent when processing a request.
Information Sent During Direct Submission Request
|
The asterisk (*) denotes minimum required information for a Direct Submission. Patron's not meeting the minimum requirements will be excluded from the submission. |
|
NOTE: DonorSearch is only able to match on addresses within the USA, US Virgin Islands, Puerto Rico, Guam, and Marshall Islands. Addresses outside of these locations will be excluded from the submission. If a patron's address is excluded resulting in the patron not meeting the minimum requirements, the patron will be excluded from the submission. |
- *Patron #
- *Patron First Name
- Patron Middle Name
- *Patron Last Name
- Patron Suffix
- Patron Age (Current)
- *Patron Address Line 1
- Patron Address Line 2
- *Patron City
- *Patron State
- *Patron Zip Code
- Spouse First Name
- Spouse Middle Name
- Spouse Last Name
- Employer Name
- Business Address Line 1
- Business Address Line 2
- Business City
- Business State
- Business Zip Code
- Seasonal Address Line 1
- Seasonal Address Line 2
- Seasonal City
- Seasonal State
- Seasonal Zip Code
DonorSearch Text File Submission
To begin with a search, you will need to determine which patrons you wish to submit for analysis on. This could be from:
- the "Who's In tab" on a mail list of potential or existing donors
- the list of existing donors from a previous donation campaign
- the Patron window Donor's tab
Submitting a New Search Request
- Select the patrons to request a new search for.
- the "Who's In tab" on a mail list of potential or existing donors
- the list of existing donors from a previous donation campaign
- the patron window donor's tab
If your submitting a request from the Patron window Donor's tab, there is no patron selection required. Proceed with the next step by Right-Clicking anywhere on the donation listing.
- Right-click on the selected patrons
A context menu will pop-up
- Choose menu option DonorSearch Analytics >> Request Analysis
The Export Donor Information for DonorSearch Analytics window opens
Choose Patron Locations DonorSearch will use the addresses submitted to provide a better quality match the exact patron you are requesting analysis on.
Home Address Select the location code that best matches the patron's home address. Home Phone Select the location code that best matches the patron's home phone. Home Email Select the location code that best matches the patron's home email. Cell/Mobile Phone Select the location code that best matches the patron's cell or mobile phone. Seasonal Address Select the location code that best matches the patron's seasonal/vacation address. Work Address Select the location code that best matches the patron's work address. Choose Patron Relationships DonorSearch will also use relationships between patrons to determine a better quality match during the analysis process.
Spouse Select the relationship code that best matches the patron's spouse. Current Employer Select the relationship code that best matches the patron's current employer or the location where they currently work. Choose Export Format DonorSearch can receive a direct submission or an exported text file to their system as the source of information for the patron.
Direct Submission Select this option to send information immediately for a more quick turnaround immediate response for a high-level analysis. Text File Select this option to create a text file to send to DonorSearch can for an in-depth analysis. - Make the selections within the submission window.
- Choose "Text File" for the Choose Export Format choice.
- Click the Create button.
- Choose the name and location of where the export text file should be placed.

- Click Save
- Review the response message to confirm the location where the file was saved.
- Click OK
- Proceed to the steps Upload the Text File to DonorSearch.
|
The export text file is already formatted and prepared based on data submission requirements from DonorSearch. |
|
After you have received back the analytic results on the patrons you uploaded to DonorSearch, proceed to the steps on how to Import Analytic Results from DonorSearch. |
Text File Data Provided
The DonorSearch Text File Submission sends additional patron's information then the Direct Submission process to allow a more in-depth analysis of the patron. This allows for a higher degree of accuracy during the patron matching process and provides the opportunity for a further detailed analytic result. The more information Theatre Manager has about the patron, the better the results and experience using DonorSearch will be. Below are the list of fields sent when processing a request.
Information Sent During Text File Submission Request
|
The asterisk (*) denotes minimum required information for a Direct Submission. Patron's not meeting the minimum requirements will be excluded from the submission. |
|
NOTE: DonorSearch is only able to match on addresses within the USA, US Virgin Islands, Puerto Rico, Guam, and Marshall Islands. Addresses outside of these locations will be excluded from the submission. If a patron's address is excluded resulting in the patron not meeting the minimum requirements, the patron will be excluded from the submission. |
- *Patron #
- Patron Salutation
- *Patron First Name
- Patron Middle Name
- *Patron Last Name
- Patron Suffix
- Patron Age (Current)
- Patron Date of Birth
- Patron Home Phone
- Patron Email Address
- *Patron Address Line 1
- Patron Address Line 2
- *Patron City
- *Patron State
- *Patron Zip Code
- Spouse First Name
- Spouse Middle Name
- Spouse Last Name
- Spouse Age (Current)
- Spouse Date of Birth
- Employer Name
- Business Address Line 1
- Business Address Line 2
- Business City
- Business State
- Business Zip Code
- Seasonal Address Line 1
- Seasonal Address Line 2
- Seasonal City
- Seasonal State
- Seasonal Zip Code
- Patron First Gift Date (in Theatre Manager)
- Patron First Gift Amount
- Patron Last Gift Date (in Theatre Manager)
- Patron Last Gift Amount
- Patron Largest Gift Date (in Theatre Manager)
- Patron Largest Gift Amount
- Patron Total Gift Count (in Theatre Manager)
- Patron Total Gift Amount
- Custom Field 1 - Patron #
- Custom Field 2 (not used)
- Custom Field 3 (not used)
- Custom Field 4 (not used)
- Custom Field 5 (not used)
- Custom Field 6 (not used)
- Custom Field 9 (not used)
- Custom Field 10 (not used)
- Custom Field 11 (not used)
- Custom Field 12 (not used)
- Custom Field 13 (not used)
- Custom Field 14 (not used)
- Custom Field 15 (not used)
- Custom Field 16 (not used)
- Custom Field 17 (not used)
- Custom Field 18 (not used)
- Custom Field 19 (not used)
- Custom Field 20 (not used)
Upload Text File to DonorSearch
The Theatre Manager export text file is already formatted and prepared based on data submission requirements from DonorSearch. This step transfers the patron prospects exported from Theatre Manager to DonorSearch for processing.
- Log into the DonorSearch Web Portal.
- Click the
 Tab.
Tab.
The Upload File section will appear.
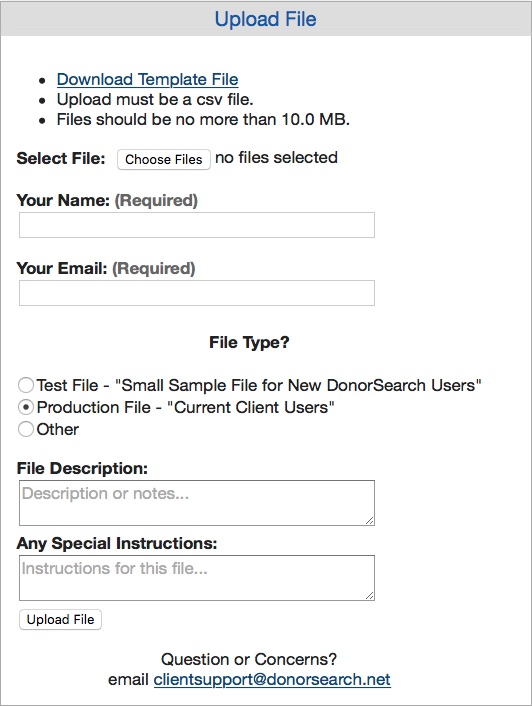
- Click
 to select the Theatre Manager export text file.
 - Enter your first and last name into the "Your Name" field.
- Enter your Email address into the "Your Email" field.
- Select Production File = Current Client Users for the "File Type".
- Enter a File Description to describe the type of prospects being uploaded.
- Enter Any Special Instructions you may have for the file being uploaded.
- Click
 to upload the Theatre Manager export text file.
The file will be uploaded to DonorSearch for processing. It may take a few moments to complete the upload process depending on the filesize and speed of your internet access.
|
It is recommended that you send a direct email to your DonorSearch Contact to notify them that a prospect file has been uploaded. This will enable them to follow the process on their side to get the results back to you as quickly as possible. Your DonorSearch Contact will be able to provide an estimated time when the results will be ready. |
|
After you have received back the analytic results on the patrons you have just uploaded, proceed to the steps on how to Import Analytic Results from DonorSearch.. |
DonorSearch Retrieve Analytic Results
The following process is for retrieving the analytic results from requests to DonorSearch that were perform through the Direct Submission option.
|
If your submitted a Text File for processing and are wanting to import those results into Theatre Manager, you will need to follow the steps at Importing DonorSearch Analytic Results. |
Before beginning with the retrieval process, you will need to determine which patrons you wish to retrieve the analysis on. This could be from:
- the "Who's In tab" on a mail list of potential or existing donors
- the list of existing donors from a previous donation campaign
- the Patron window Donor's tab
Retrieving Analytic Results
- Select the patrons that you requested a new search for.
- the "Who's In tab" on a mail list of potential or existing donors
- the list of existing donors from a previous donation campaign
- the patron window donor's tab
If your retrieving a request from the patron window donor's tab, there is no patron selection required. Proceed with the next step by Right-Clicking anywhere on the donation listing.
- Right-click on the selected patrons
A context menu will pop-up
- Choose menu option DonorSearch Analytics >> Retrieve Analysis
- Review the response message confirming the analytic results information has been downloaded into Theatre Manager.
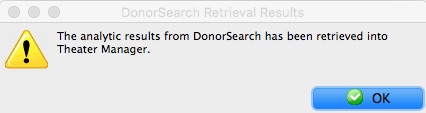
- Click OK
- Proceed to the steps on how to View Analytic Results window from DonorSearch.
|
Hint: If your unable to remember exactly which patrons you need to retrieve analytic results for, proceed directly to the DonorSearch Analytic Results window. From there, you're able to easily determine which patrons require retrieval of results and download them too. |
|
Note: The results returned from DonorSearch during a direct submission are limited compared to the detailed information provided within the DonorSearch Web Portal. The returned results are intended to offer a quick turnaround on immediate information about your donor:
If your looking for additional information to be maintained in Theatre Manager, you can export the data results from the DonorSearch Web Portal and import those results into Theatre Manager following the steps at Importing DonorSearch Analytic Results. |
DonorSearch Importing Analytic Results
The following process is for importing the analytic results from DonorSearch that were through the Text File option.
|
If your submitted a Direct Submission for processing and are wanting to retrieve those results into Theatre Manager, you will need to follow the steps at Retrieving DonorSearch Analytic Results. |
|
The access to import DonorSearch menu option, an employee must have either Insert or Edit access to the "Donor - Manage DonorSearch Analytic Analysis Results" Data Security functions. in their employee profile. |
Importing Analytic Results
- Goto menu options File >> Import/Export >> Donation >> DonorSearch Analytic Results.
This will open the Import Data Window.

- Click Select button.
- Select the file that was provided from DonorSearch containing the analytic results.
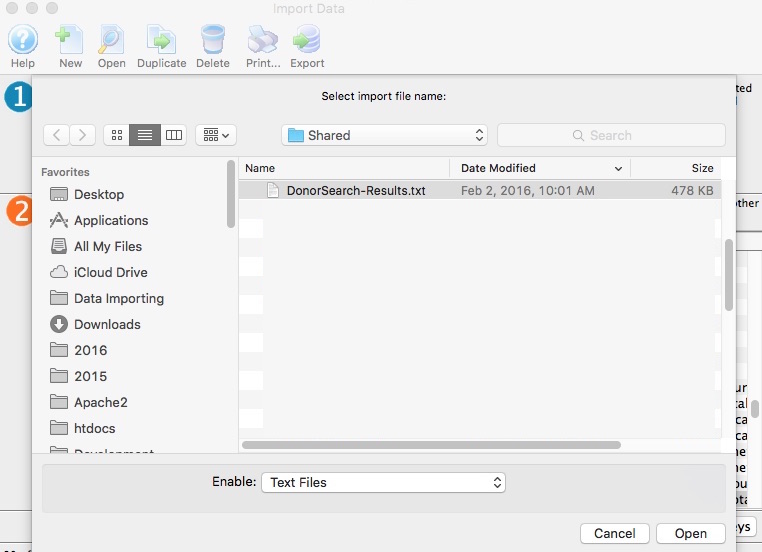
- Click Open button.
- Match Fields to the Database.
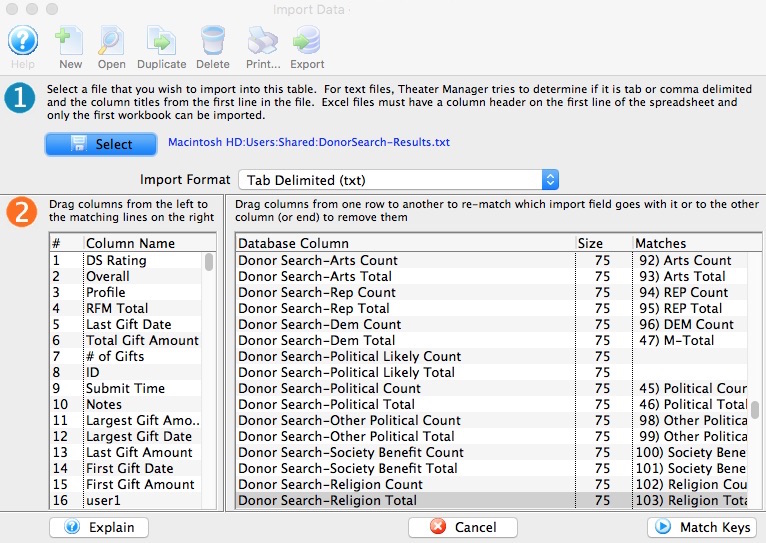
- Click Match Keys button.
- Select Key Field to Match On.

In most cases, select "DS_PROFILE_LINK - DonorSearch-Profile Link"
- Click Set Options button.
- Select Data Import Options.

In most cases, select "Import all data as new records"
- Click Import button.
- Click Import to proceed with the import process.
- Proceed to the steps on how to View Analytic Results in Theatre Manager from DonorSearch.
DonorSearch View Analytic List Window
The DonorSearch Analytic Results List window displays the retrieved/downloaded analytic analysis for your organization. From this window your able to continue your analysis of your potential and existing donors as you manage their movements through your donation campaigns.
Opening the DonorSearch Analytic Results List Window
- From the Donation Campaign List Window
- Click
 in the window menu
- Click
- From the "Who's In tab" on a mail list of potential or existing donors, or from the list of existing donors from a previous donation campaign.
- Right-click on the selected patrons
A context menu will pop-up
- Choose menu option DonorSearch Analytics >> DonorSearch Analytic Results
- Right-click on the selected patrons
- From the Patron window Donor's tab
- Right-click anywhere on the list of donations
A context menu will pop-up
- Choose menu option DonorSearch Analytics >> DonorSearch Analytic Results
- Right-click anywhere on the list of donations
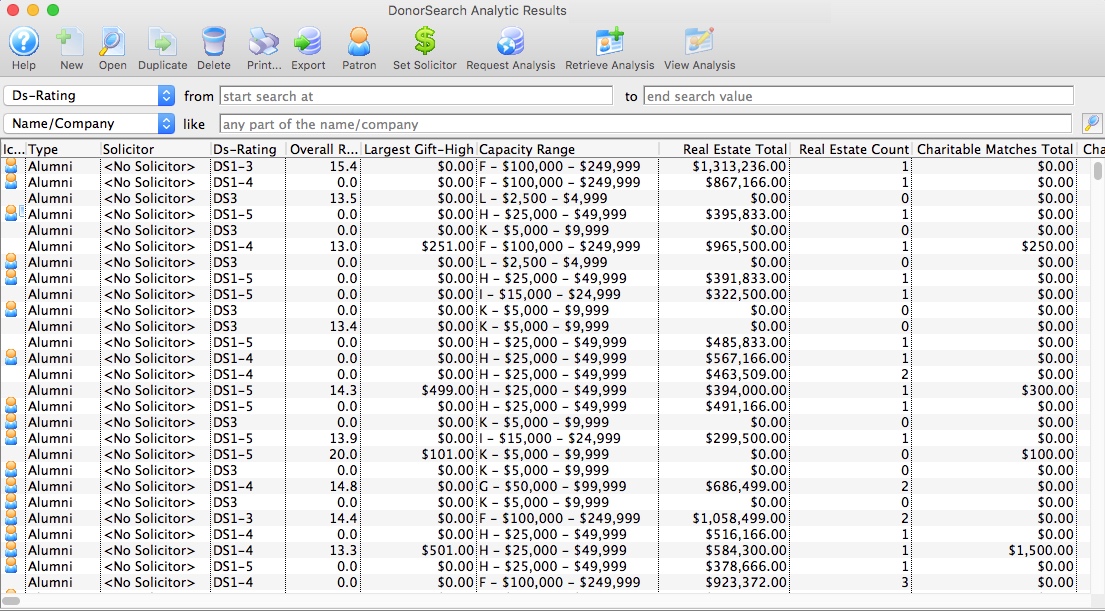
Parts of the DonorSearch Analytic Results List Window
|
Not available in this window. |
|
Opens the selected DonorSearch Analytic Result for the selected patron. |
|
Not available in this window. |
|
Deletes the selected analytic results. This only deletes the result from Theatre Manager. DonorSearch retains the record until it has been deleted manually through the DonorSearch Web Portal. |
|
Generates a report of all listed analytic results to the screen or default print location. |
|
Exports the data from the analytic results list into a selected file format and saves it to a selected location. |
 |
Opens the Contact Card for the selected patrons in the list. |
 |
Assigns a donor solicitor to the selected patrons in the list. |
 |
Requests a New DonorSearch Analysis for the selected patrons in the list. |
 |
Retrieves the DonorSearch Analytic Results for the selected patrons in the list. |
 |
Go directly to the DonorSearch Web Portal and view the DonorSearch Analytic Results for the selected patrons in the list. |
Analytic Results Search
Search options require parameters to search within. The most common search parameter is From/To. This option allows for a start and end range to be entered for the search. It can limit down the list quickly and can be as specific as needed. The second most common search parameter is Like. Like returns results containing the value entered for the search.
| All | View all analytic results. |
| Submit Time | Searches for the date that the DonorSearch record was processed. |
| DS-Rating | Searches for the ranking of a prospect's ability and propensity to make $5,000+ donations. |
| Overall Rating | Searches for the confidence level of name matching to donor records. Anything over 17 indicates a high degree of confidence. |
| PGID-Rating | Searches for the prospect's likelihood to be a planned gift donor based upon a combination of internal giving history and age. 0 = no info found; 1 = least likely; 7 = most likely. If there is no internal giving history, the rating will be based on external giving (to other nonprofits), and will not be as accurate. |
| Largest Gift-High | Searches for the largest gift found when the exact amount and/or a range of giving are reported. |
| Largest Gift-Low | Searches for the lowest gift found when the exact amount and/or a range of giving are reported. |
| Capacity Range | Searches for the amount a donor can give as a "stretch" gift over a five-year period, based on his/her wealth. |
| Real Estate Total | Searches for the estimated value of all real estate owned by the patron. |
| Patron # | A patron number starting from one number to another. If the exact number is know this can be entered in both fields. The patron assigned that number will appear as the result. |
| Name/Company | Enter a part of the patron's first name, last name or company. All three fields in the database will be searched for a record containing like information. i.e. "Ab" returns Blaine Abel, Julie Abel and Lauren MacIntosh of ABC Book Store. |
| First Name | The first letter, part of or all of the patron's first name. The more entered the more accurate the results will be. This field only searches the first name field within the database. |
| Last Name | The first letter, part of or all of the patron's last name. The more entered the more accurate the result will be. This field only searches the last name field within the database. |
| Company | The first letter, part of or all of the patron's company name. The more entered the more accurate the result will be. This field only searches the company name field within the database. |
DonorSearch Analytic Results Detail Window
The DonorSearch Analytic Results Detail Window displays all of the analysis results from DonorSearch on your patron.
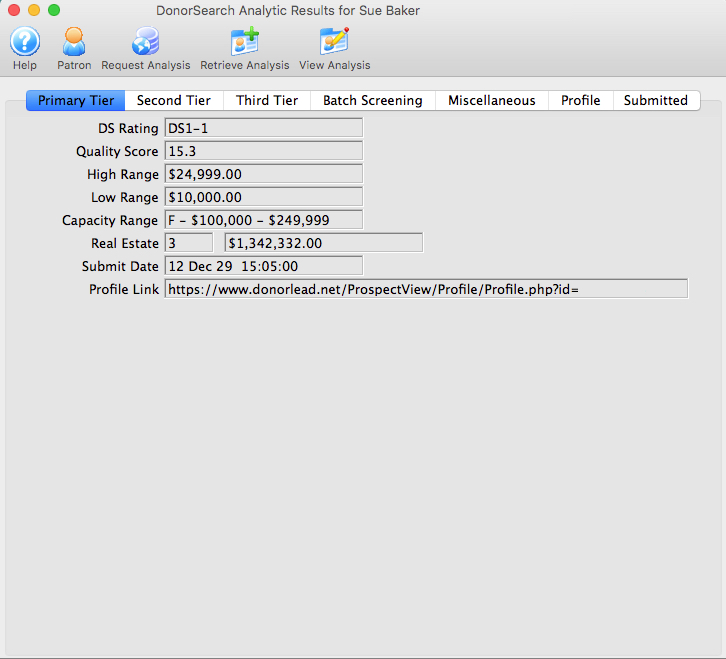
Parts of the DonorSearch Analytic Results Detail Window
|
Opens the Contact Card for the selected patrons in the list. |
|
Requests a New DonorSearch Analysis for the selected patrons in the list. |
|
Retrieves the DonorSearch Analytic Results for the selected patrons in the list. |
|
Go directly to the DonorSearch Web Portal and view the DonorSearch Analytic Results for the selected patrons in the list. |
| Primary Tier displays the essential results to be used in reviewing the donor's analysis. This information is suggested be referenced when building mail lists for prospects for your donation campaigns. | |
| Second Tier displays the important information about the donor. | |
| Third Tier displays information of significance about the donor. | |
| Batch Screening displays the group of fields used to house batch screen information created during the batch processing (Text File) submission. The values on this tab represent analysis results comparing to the other patrons submitted within the same batch processes. | |
| Miscellaneous displays the counts and total amounts for various areas of interest found for this patron during the analysis. | |
| Profile displays the additional information provided by Theatre Manager to DonorSearch during the batch processing (Text File) submission. | |
| Submitted displays the statistical information of actual gifts made by this donor that was exported by Theatre Manager to DonorSearch during the batch processing (Text File) submission. The statistical information of actual gifts shown is based on the exact information contained within Theatre Manager at the time the export occurred. Any donation activity within Theatre Manager after the submission, may alter the current and up-to-date statistical information shown on the patron window statistics tab. |
DonorSearch Results Primary Tier
Primary Tier displays the essential results to be used in reviewing the donor's analysis. This information is suggested be referenced when building mail lists for prospects for your donation campaigns.
Parts of the Primary Tier Tab
| DS Rating | A ranking of a prospect's ability and propensity to make $5,000+ donations. |
| Quality Score | Confidence level of name matching to donor records. Anything over 17 indicates a high degree of confidence. Note that in the comprehensive Profile, each piece of data is individually scored for confidence. |
| High Range | This indicates the largest gift found when the exact amount and/or a range of giving are reported. |
| Low Range | This indicates the lowest gift found when the exact amount and/or a range of giving are reported. |
| Capacity Range | The amount a donor can give as a "stretch" gift over a five-year period, based on his/her wealth. The individual philanthropy and wealth report on each prospect includes two capacity ranges: one based on wealth and one based on previous philanthropy. |
| Real Estate Count | Number of properties owned by the donor. |
| Real Estate Total | Estimated value of all real estate owned by the donor. |
| Submit Date | The date that the DonorSearch record was processed. |
| Profile Link | A link to the prospect's complete wealth and philanthropic profile on the DonorSearch web portal. |
DonorSearch Results Second Tier
Second Tier displays the important information about the donor.
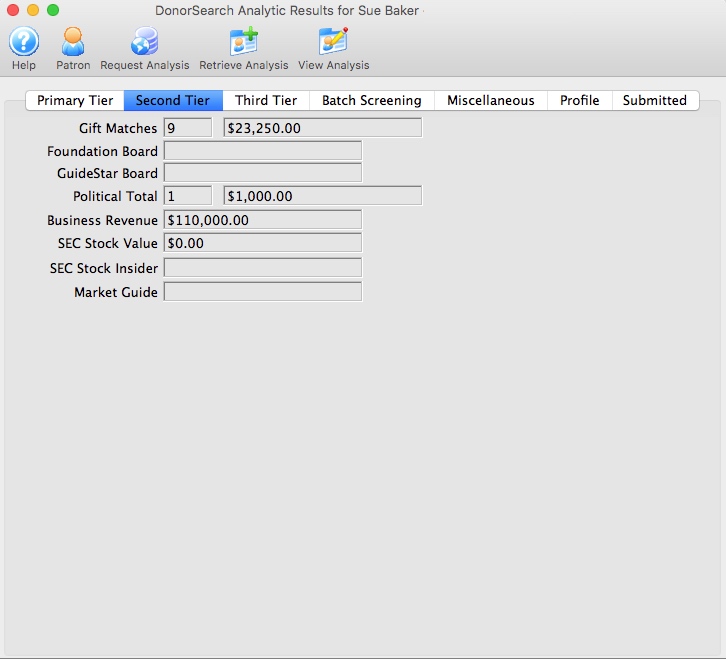
Parts of the Second Tier Tab
| Gift Matches Count | Number of unique positive matches to outside giving history found for the record. This quantity does not include "maybe" donations. |
| Gift Matches Total | The dollar amount of all positive matches to outside giving history found for the record. This total does not include "maybe" donations. |
| Foundation Board | Identifies whether the prospect is on the board of a foundation. M = maybe, Y = yes, and a Blank = no data match found. |
| GuideStar Board | Indicates whether the prospect is on the board of a grant-seeking foundation. |
| Political Total Count | Number of federal and state political gifts found (note that not all states report political giving). |
| Political Total | Total amount of political giving found; Maybe indicates gifts that may not be tied to that donor. This is a strong philanthropy indicator: 15K in 15 political gifts typically indicates a 5-7 figure charitable gift elsewhere. |
| Business Revenue | Dollar value of revenues at a Dun & Bradstreet firm at which the prospect is an executive-level employee. These revenues are reported by the company or estimated by Dun & Bradstreet, and thus may be distorted. |
| SEC Stock Value | Dollar value of any SEC reported stock options. |
| SEC Stock Insider | Identifies whether the prospect has stock options related to being a company insider or high-ranking employee who must report stock transactions to the SEC. Y = Yes, M = Maybe, Blank = no data match found. |
| Market Guide | Identifies whether the prospect has been matched to the Reuters Market Guide database on company insiders. M = Maybe, Y = Yes, and Blank = no data match found. |
DonorSearch Results Third Tier
Third Tier displays information of significance about the donor.
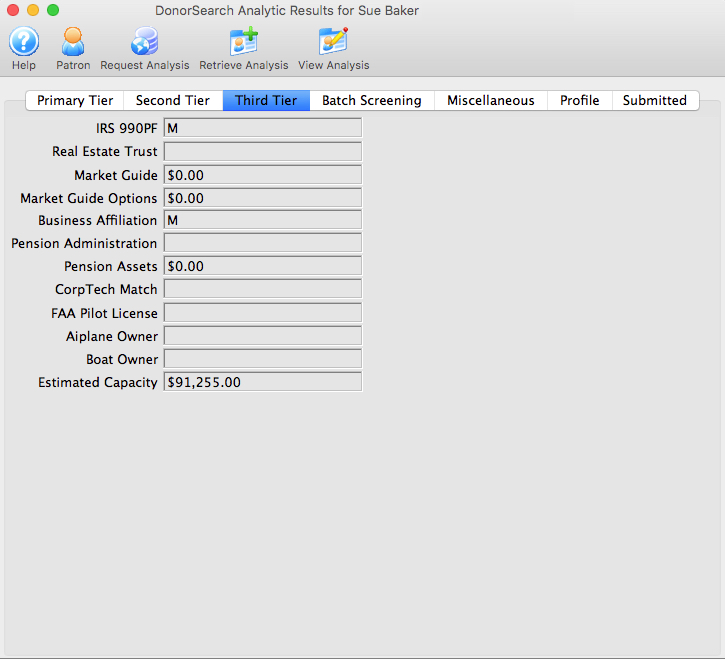
Parts of the Third Tier Tab
| IRS 990PF | Identifies whether the prospect is associated with a namesake grant-giving foundation. M = maybe, Y = yes, and Blank = no data match found. |
| Real Estate Trust | Real Estate Trust owned by the donor. Y = yes, M = maybe, Blank = no information found. |
| Market Guide | Dollar value of any Market Guide reported company compensation for a given year. |
| Market Guide Options | Dollar value of any Market Guide reported stock options executed. |
| Business Affiliation | Identifies whether the prospect has been matched to a Dun & Bradstreet firm at an executive level position. Y = Yes, M = Maybe, Blank = no data match found. |
| Pension Administration | Identifies whether the prospect has been matched to the Larkspur SEP/Keogh Pensions database as having deferred income or a qualified pension plan. Y = Yes, M = Maybe, Blank = no data match found. |
| Pension Assets | Dollar value of Larkspur/Keogh pension plan or deferred income; not all assets may belong to the prospect. |
| CorpTech Match | Indicates if the prospect is profiled in the CorpTech database, a database of business executives in high technology manufacturing, development and service companies. Y = Yes, M = Maybe, Blank = No. |
| FAA Pilot License | Identifies if the prospect has a pilot's license and is in the FAA database. Y = Yes, M = Maybe, Blank = No. |
| Airplane Owner | Identifies if the prospect is an airplane owner. Note that corporate aircraft will not be listed, nor will fractional or timeshare ownership. Y = Yes, M = Maybe, Blank = No. |
| Boat Owner | Identifies if the prospect is a boat owner and is in the Coast Guard database. Y = Yes, M = Maybe, Blank = No. |
| Estimated Capacity | Estimated 5-year gift capacity for the prospect based on wealth and external philanthropy. |
DonorSearch Results Batch Screening
Batch Screening displays the group of fields used to house batch screen information created during the batch processing (Text File) submission. The values on this tab represents an internal analysis of the relationship you have with each of your prospects within the same batch processes. It does not compare your donors to other organizations in creating the ratings shown.
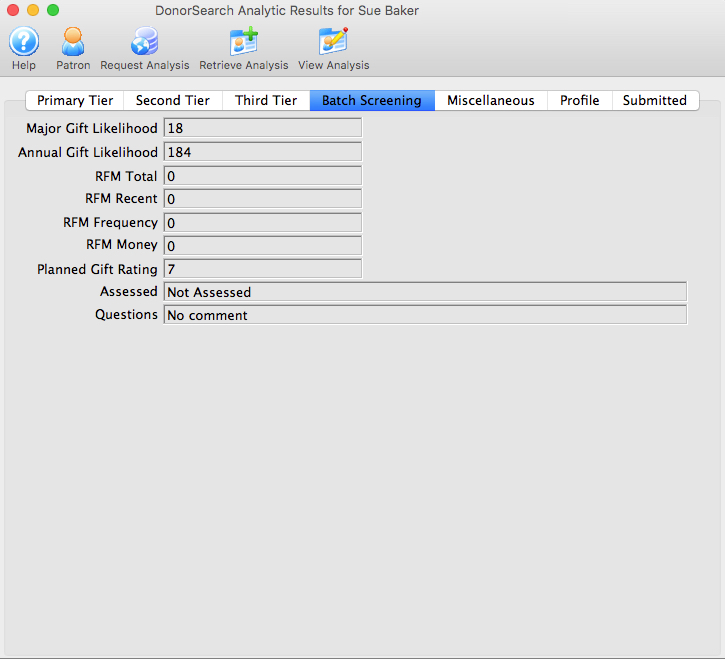
Parts of the Batch Screening Tab
| Major Gift Likelihood | Prospect's likelihood to be an major gift donor based upon a combination of external giving and giving history to the client's organization (if available). 300 = most likely; 0 = least likely. |
| Annual Gift Likelihood | Prospect's likelihood to be an annual fund donor based upon a combination of external giving and giving history to the client's organization (if available). 300 = most likely; 0 = least likely. |
| RFM Total | An internal analysis of the relationship you have with each of your prospects, using a formula that includes how RECENTLY your prospect has given to you, how FREQUENTLY your prospect has given to you, and the total amount of MONEY given. Scale of 1-300. 300 is the highest rating and indicates the greatest likelihood of donating. This analysis is only available if an organization has supplied giving data on a particular donor; prospects who are non-donors will not have an RFM score. RFM is calculated using your donor data only; it does not compare your donors to other organizations. |
| RFM Recent | An internal analysis of the relationship you have with each of your prospects, using a formula that includes how RECENTLY your prospect has given to you. RFM is calculated using your donor data only; it does not compare your donors to other organizations. |
| RFM Frequency | DonorSearch analytics show that RFM Frequency is the best indicator of future philanthropy. A donor whos given a gift annually for 15 years is much more likely to donate again than someone whos given one large gift one time. |
| RFM Money | The donor whos given you the most amount of money, for example, will be scored 100 in the RFM Money category, regardless of how much he/she has given. The top 1% of all your donors, in terms of amount, will receive a score of 100, the next most generous donors will receive an RFM Money score of 99, etc. RFM is calculated using your donor data only; it does not compare your donors to other organizations. |
| Planned Gift Rating | Prospect's likelihood to be a planned gift donor based upon a combination of internal giving history and age. 0 = no info found; 1 = least likely; 7 = most likely. If there is no internal giving history, the rating will be based on external giving (to other nonprofits), and will not be as accurate. |
| Assessed | DonorSearch manually assesses the top 200 prospects in your database as quality assurance that all data is correct to an 85-90% level at no extra charge. Additional assessments may be purchased. |
| Questions | Questions DonorSearch had when manually processing the profile’s assessment. |
DonorSearch Results Miscellaneous
Miscellaneous displays the counts and total amounts for various areas of interest found for this patron during the analysis.
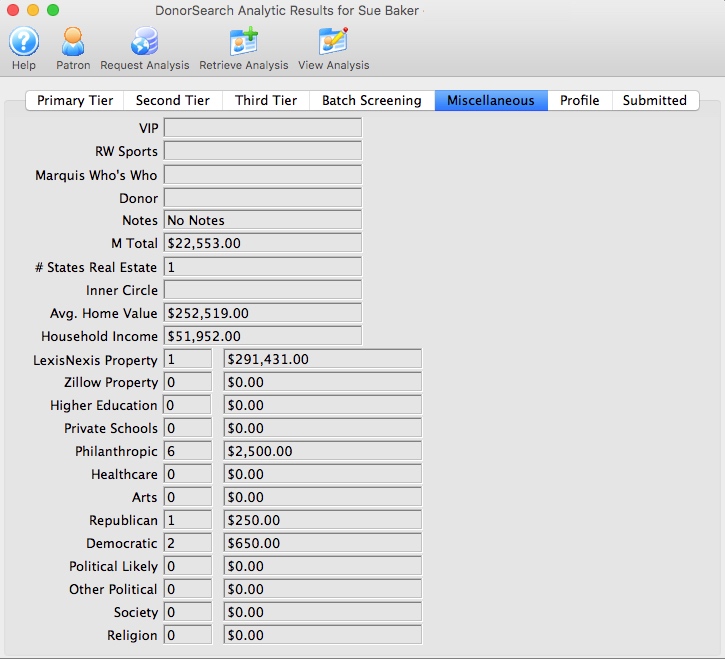
Parts of the Miscellaneous Tab
| VIP | Used only for Daily Patient Screening; identifies most potentially philanthropic patients. | ||
| RW Sports | A list of professional athletes from many of the premier professional U.S. sports leagues. Information includes birthplace, age, team, position, and salary for athletes from MLB, NFL, NHL, NBA, the PGA Tour, the LPGA Tour, ATP, WTA and the Sprint Cup NASCAR Series. Compiled from various sources, it is one of the most diverse collections of data on athletes available. M = Maybe Match. Y = Match. | ||
| Marquis Who's Who | Identifies if the prospect is in the Marquis' Who's Who, which offers biographical and professional information to help you create a more complete profile on your prospect. Who's Who information is contained in the complete philanthropic and wealth profile of each donor. Y = Yes, M = Maybe, Blank = No. | ||
| Donor | Notes about the donor from DonorSearch. | ||
| Notes | Custom notes manually entered into DonorSearch about this profile. These notes are entered by the organization via the DonorSearch Web Portal. | ||
| M Total | The total dollars donated that are not positive matches to the individual.
|
||
| # States Real Estate | Number of states where donor owns property. | ||
| Inner Circle | Helps you find connections between your current board of directors/executives/supporters and potential donors. This shows the number of inner circle matches the individual/prospect has. Inner Circle will compare your list to the thousands of board affiliations found in Who Knows Who, and highlight the matches in the section labeled Inner Circle in each prospective donor's detailed profile. | ||
| Avg. Home Value | Average property value for the zip code in which the prospect resides. | ||
| Household Income | Median household income for the zip code in which the prospect resides. | ||
| LexisNexis Property Count | Number of properties owned according to LexisNexis. | ||
| LexisNexis Property Total | Value of real estate according to LexisNexis. | ||
| Zillow Property Count | Number of properties owned according to Zillow. | ||
| Zillow Property Total | Value of real estate according to Zillow. | ||
| Higher Education Count | Number of gifts found to universities, colleges and two-year colleges. | ||
| Higher Education Total | Dollar amount of gifts found to universities, colleges and two-year colleges. | ||
| Private Schools Count | Number of gifts found to private schools, academies, and other educational institutions that aren't included in the Higher Education Count. | ||
| Private Schools Total | Dollar amount of gifts found to private schools, academies, and other educational institutions that aren't included in the Higher Education Count. | ||
| Philanthropic Count | Number of gifts found to philanthropic and grant-making organizations. | ||
| Philanthropic Total | Dollar amount of gifts found to philanthropic and grant-making organizations. | ||
| Healthcare Count | Number of gifts found to healthcare agencies. | ||
| Healthcare Total | Dollar amount of gifts found to healthcare agencies. | ||
| Arts Count | Number of gifts found to organizations whose main mission is related to the arts, culture or humanities. | ||
| Arts Total | Dollar amount of gifts found to organizations whose main mission is related to the arts, culture or humanities. | ||
| Republican Count | Number of gifts found to Republican candidates for federal and state offices. Due to reporting requirements, contributions to PACs and other political organizations are not included. Note that not all states report political contributions. | ||
| Republican Total | Dollar amount of gifts found to Republican candidates for federal and state offices. Due to reporting requirements, contributions to PACs and other political organizations are not included. Note that not all states report political contributions. | ||
| Democratic Count | Number of gifts found to Democratic candidates for federal and state offices. Due to reporting requirements, contributions to PACs and other political organizations are not included. Note that not all states report political contributions. | ||
| Democratic Total | Dollar amount of gifts found to Democratic candidates for federal and state offices. Due to reporting requirements, contributions to PACs and other political organizations are not included. Note that not all states report political contributions. | ||
| Political Likely Count | Total count of political giving found that are most likely by this prospect. | ||
| Political Likely Total | Total amount of political giving found that are most likely by this prospect. | ||
| Other Political Count | Number of gifts found to candidates for federal and state offices who are not Republicans or Democrats. Due to reporting requirements, contributions to PACs and other political organizations are not included. Note that not all states report political contributions. | ||
| Other Political Total | Dollar amount of gifts found to candidates for federal and state offices who are not Republicans or Democrats. Due to reporting requirements, contributions to PACs and other political organizations are not included. Note that not all states report political contributions. | ||
| Society Count | Number of gifts found to organizations whose main mission is related to a society benefit; these are organizations whose mission doesn't fit other philanthropic categories. | ||
| Society Total | Dollar amount of gifts found to organizations whose main mission is related to a society benefit; these are organizations whose mission doesn't fit other philanthropic categories. | ||
| Religion Count | Number of gifts found to religious organizations. | ||
| Religion Total | Dollar amount of gifts found to religious organizations. |
DonorSearch Results Profile
Profile displays the additional information provided by Theatre Manager to DonorSearch during the batch processing (Text File) submission.
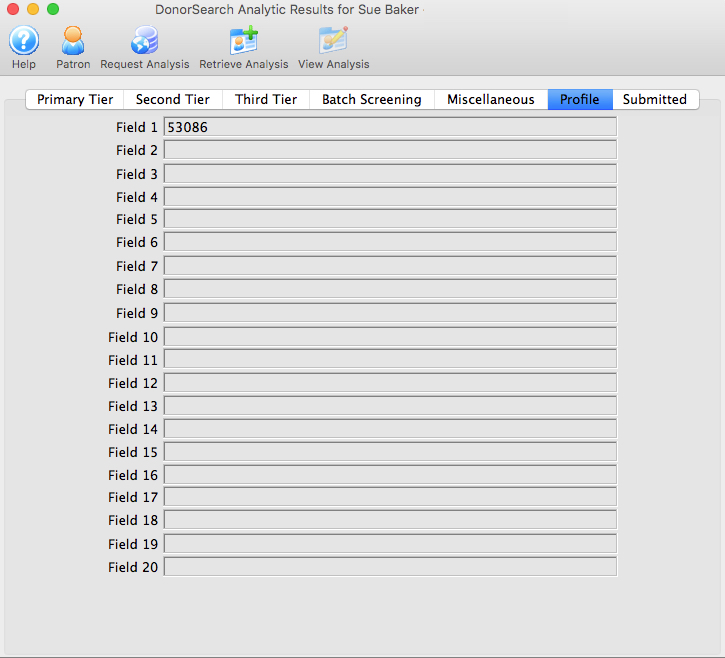
Parts of the Profile Tab
| Field 1 | User Field #1 supplied by Theatre Manager; they are included for your convenience when submitting your file(s) for screening. Values in User Fields are not used in the analytic process. This field represents the SEARCH ID used to link this patron account to the information in the DonorSearch Web Portal. |
| Field 2 | User Field #2 supplied by Theatre Manager; they are included for your convenience when submitting your file(s) for screening. Values in User Fields are not used in the analytic process. |
| Field 3 | User Field #3 supplied by Theatre Manager; they are included for your convenience when submitting your file(s) for screening. Values in User Fields are not used in the analytic process. |
| Field 4 | User Field #4 supplied by Theatre Manager; they are included for your convenience when submitting your file(s) for screening. Values in User Fields are not used in the analytic process. |
| Field 5 | User Field #5 supplied by Theatre Manager; they are included for your convenience when submitting your file(s) for screening. Values in User Fields are not used in the analytic process. |
| Field 6 | User Field #6 supplied by Theatre Manager; they are included for your convenience when submitting your file(s) for screening. Values in User Fields are not used in the analytic process. |
| Field 7 | User Field #7 supplied by Theatre Manager; they are included for your convenience when submitting your file(s) for screening. Values in User Fields are not used in the analytic process. |
| Field 8 | User Field #8 supplied by Theatre Manager; they are included for your convenience when submitting your file(s) for screening. Values in User Fields are not used in the analytic process. |
| Field 9 | User Field #9 supplied by Theatre Manager; they are included for your convenience when submitting your file(s) for screening. Values in User Fields are not used in the analytic process. |
| Field 10 | User Field #10 supplied by Theatre Manager; they are included for your convenience when submitting your file(s) for screening. Values in User Fields are not used in the analytic process. |
| Field 11 | User Field #11 supplied by Theatre Manager; they are included for your convenience when submitting your file(s) for screening. Values in User Fields are not used in the analytic process. |
| Field 12 | User Field #12 supplied by Theatre Manager; they are included for your convenience when submitting your file(s) for screening. Values in User Fields are not used in the analytic process. |
| Field 13 | User Field #13 supplied by Theatre Manager; they are included for your convenience when submitting your file(s) for screening. Values in User Fields are not used in the analytic process. |
| Field 14 | User Field #14 supplied by Theatre Manager; they are included for your convenience when submitting your file(s) for screening. Values in User Fields are not used in the analytic process. |
| Field 15 | User Field #15 supplied by Theatre Manager; they are included for your convenience when submitting your file(s) for screening. Values in User Fields are not used in the analytic process. |
| Field 16 | User Field #16 supplied by Theatre Manager; they are included for your convenience when submitting your file(s) for screening. Values in User Fields are not used in the analytic process. |
| Field 17 | User Field #17 supplied by Theatre Manager; they are included for your convenience when submitting your file(s) for screening. Values in User Fields are not used in the analytic process. |
| Field 18 | User Field #18 supplied by Theatre Manager; they are included for your convenience when submitting your file(s) for screening. Values in User Fields are not used in the analytic process. |
| Field 19 | User Field #19 supplied by Theatre Manager; they are included for your convenience when submitting your file(s) for screening. Values in User Fields are not used in the analytic process. |
| Field 20 | User Field #20 supplied by Theatre Manager; they are included for your convenience when submitting your file(s) for screening. Values in User Fields are not used in the analytic process. |
DonorSearch Results Submitted
Submitted displays the statistical information of actual gifts made by this donor that was exported by Theatre Manager to DonorSearch during the batch processing (Text File) submission. The statistical information of actual gifts shown is based on the exact information contained within Theatre Manager at the time the export occurred. Any donation activity within Theatre Manager after the submission, may alter the current and up-to-date statistical information shown on the patron window statistics tab.
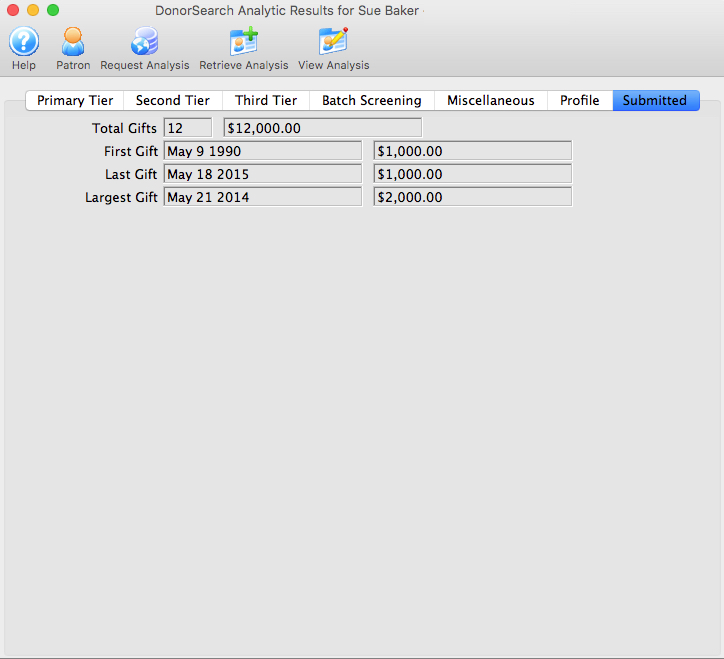
Parts of the Submitted Tab
| Total Gifts Count | Total Gift Count supplied by Theatre Manager; used to calculate RFM. |
| Total Gifts | Total Gift Amount supplied by Theatre Manager; used to calculate RFM. |
| First Gift Date | First Gift Date supplied by Theatre Manager; used to calculate RFM. |
| First Gift Amount | First Gift Date supplied by Theatre Manager; used to calculate RFM. |
| Last Gift Date | Last Gift Date supplied by Theatre Manager; used to calculate RFM. |
| Last Gift Amount | Last Gift Amount supplied by Theatre Manager; used to calculate RFM. |
| Largest Gift Date | Largest Gift Amount supplied by Theatre Manager; used to calculate RFM. |
| Largest Gift Amount | Largest Gift Date supplied by Theatre Manager; used to calculate RFM. |
DonorSearch Web Portal
DonorSearch offers a direct web portal to the ProspectView Plus web serviced database. ProspectView Plus is designed as a visual, interactive display of the generated detailed profiles containing philanthropic and wealth information.
|
This visual portion will only work via a web browser. |
Parts of the DonorSearch Web Portal Login Window
| Username | The account name provided by DonorSearch to access your organization's account. |
| Password | The password provided by DonorSearch to access your organization's account. |
| Login | After entering in the Username and Password, click the "Login" button to access your organization's account. |
|
For access to the web portal's user manuals, screening manuals, training manuals, other resources materials related to DonorSearch, or for information on how to use the DonorSearch Web Portal, log into the web portal website at https://www.donorlead.net and visit the "Customer Resources" tab. |
|
Theatre Manager provides an interface directly to DonorSearch. Accessing DonorSearch's wealth of information and analytic analysis of potential donor profiles requires an account be set up and maintained directly with DonorSearch. To contact DonorSearch about your prospect research needs, please contact Annette Zakuto at annette@donorsearch.net or call 410-988-4978 or visit their website at http://www.donorsearch.net for further information. |