Detail Marketing Tabs
Marketing Tab

The Marketing Tab displays the marketing details for the current patron. These fields are useful in capturing additional ‘specific’ yet common information about patrons that can be used in the future to create a target market group. Often these fields are used to record information about a patron origin to the database, status, programming preferences, organization affiliations etc. Note that the same data appears on the Volunteer window
This information can be used in a query to collect this group of patrons for a direct marketing purpose.
Parts of the Marketing Tab
Personalized Marketing FieldsThere are restrictions on the content of the marketing fields. This is not customizable. These fields are not intended to capturing large amount of information on any given patron but rather short “common denominators”. It is necessary to restrict these fields to that data collected is consistent throughout each patron file. The following list details the restrictions of each marketing field. |
|
| Marketing Field One | This field is a numeric field, restricted to 30 numbers and is searchable. |
| Marketing Field Two | This field is a numeric field, restricted to 30 numbers and is searchable. |
| Marketing Field Three | This field is an alphanumeric field, restricted to 10 letter/digit combination and is searchable. |
| Marketing Field Four | This field is an alphanumeric field, restricted to 10 letter/digit combination and is searchable. |
| Marketing Field Five | This field is an alphanumeric field, restricted to 60 letters/digit (including spaces) and is not are readily searchable. |
| Age Code | This field contains a pull down menu, which can be edited in the Age Codes tab in Code Tables. Click here for more information on Age Code Code Table.. |
| Marketing Field Six (Pop-up) | This field contains a pull down menu. This menu is created in the Marketing #6 tab in Code Tables. Click here for more information on Marketing Field #6 Code Table. |
| Marketing Field Seven (Pop-up) | This field contains a pull down menu, which can be edited in the Marketing #7 tab in Code Tables. Click here for more information the Marketing Field #7 Code Table. |
| Marketing Field Eight (Pop-up) | This field contains a pull down menu, which can be edited in the Marketing #8 tab in Code Tables. Click here for more information on the Marketing Field #8 Code Table. |
Patron Contact Flags |
|
| Do Not Mail - Theatre Requested | Used when the company decides it will not mail particular patrons. That is, the company may have lost contact with a patron or it is not necessary to mail board members. |
| Do Not Mail - Patron Requested | Used when a patron asks the company not to mail them. |
| Do Not Telemarket | Used when a patron requests not to be Telemarketed. |
| Do Not E-mail | Used when a patron does not want to be contacted via E-mail. |
| Do Not Delete | Used when the patron is never to be removed from the database. This also prevents the patron from being merged with other patrons. |
| Deceased | Used if the patron has passed away. These patrons cannot be printed on labels or emailed to |
| Not in Household | Used if the patron has left a company but there is a lot of data that should remain with the company. In a sense, acts like deceased, but is clearly marked different. These patrons cannot be printed on labels or emailed to |
| Do Not Trade | Used when the patron does not want their contact information traded with other sources. |
| Cash Only | Used when the ONLY payment method accepted for patron is cash.
Credit cards or checks are no longer accepted. If the patron attempts to buy online using their account, any credit card they enter as a payment will respond back as if it were declined - effectively preventing them from buying online. If the patron calls in, you can still take over their shopping cart and complete the sale.
Employee functions settings, have permissions to indicate who can
|
| Gender | Used to allocate a patron's gender as being one Male, Female or Unknown. The gender can be manually flagged here or automatically flagged when a salutation is applied to a patron's record. The setup of salutations in the codes allows for a gender to be allocated. Gender can be used in search criteria for reports, exporting and mail lists. | Patron Photo | You can drag and drop an image of the patron onto the patron's record. For more information on image size and types click here. |
| Tags | You can add any number of tags to the patron. |
Uses for custom Marketing Fields
- 2 are alphabetic
- 2 are alpha/numeric
- 1 is a Text field
- 3 are drop-down lists
- one field, Age Code, is predefined in Theatre Manager.
These fields can be custom labeled to reflect the information chosen to record. For more information on customizing the marketing field label please click here.
It is not always easy to initially define a use for these marketing fields. The following examples come from practical uses that our customers have made of them.
Source: Most users will set aside one field for 'source'. Specifically, a code that indicates how the customer first came to be in the database. This can be useful when analyzing marketing efforts. For example; if the local paper is called 'The Rag' and the organization advertises in it weekly, number the ads as 9701, 9702, etc. for each ad in 1997. If the customer first came to be in the database because of ad #4, their source would be TR9704. This allows examination of the effectiveness of different media, ad placement, size, etc.
Year Youngest/Year Oldest: For our children's theatre venues, some keep track of the year when the youngest was born. This allows them to manage the transition of their 'little' customers through the theatre seasons. There comes a point when children feel they are to old to come to shows and would rather be with their friends ... until they have children of their own and the cycle begins again and the organization can now market to Grandma!
Government Officials: City/municipal, Provincial/State, Federal. This could be a marketing field to record the patron’s political affiliation. At a glance the system can produce a list of all patrons who are Federal Officials. Create a mail list of these patrons for special invite purposes etc.
Genre: Comedy, Drama, Musical - useful to record a patron overall preferences or type of performance they generally like to attend. However, using a Mail List to maintain this information is more beneficial.
County/Township: A marketing field used to record the county for patrons. Information that is not readily recorded in the address section and could be useful for grouping patrons based on their location.
Patron Type: A marketing field used to record the type of patron account. For example, corporation, foundation, granting agency, individual, school, etc.
School District: A marketing field used to record the school district and age category for patrons. Information that is not readily recorded in the address section and could be useful for grouping patrons based on their location and age category.
This is really general but certainly there is no limit to the types of marketing fields that can be created.
Marketing Ideas
Marketing to the Customer
Marketing really depends on the buying habits of the customers. Good things to assist the process are:
Sell the next season during the last show of the previous year. If the organization had a good show/season , it is easy to pick up 20% or more subscribers for the next year. Make sure that the price that the subscriber can buy for is the lowest possible (e.g. do not invent a discount to be used later in the year that makes the early subscriber think that they should have waited). Typical discounts for early season subscriptions is 20-25% or 5 shows for the price of 4. Something that will enhance those sales is a deadline where regular subscription prices are only 10-15% discounts.
There is usually a local paper section that everybody reads for movie listings, entertainment guides, upcoming events. Choose that paper and advertise in it. A suggestion for a season that starts in the fall is to put something in the paper that coincides with early renewals -- it can usually be included with advertising for the last show of the previous year.
Decima Research (A Canadian study in the arts industry in the early 1990's) indicated that 50% of the people make their buying decision 4 weeks in advance of the show. So for a 4 week run, start advertising 4-5 weeks in advance and throughout the show. Also, most people read a specific days newspaper. In Calgary, the 'Scene' comes out on Friday - so Friday is an extremely good day to advertise; followed by a Tuesday advertisement.
People listen to radio on the way to work; so a contract deal with a local radio station for a few free tickets for a caller as long as the giveaway is done during the morning driving hour is a good thing. Depending on the type of theatre, give away a show package that is less than the average number of attendees - so that they will be compelled to buy one or more tickets. (e.g. For children's theatre, the average attendance is 3.5 (one adult and 1-3 children, so give away only two tickets).
Getting names in the database is very important for direct mail. Good 'guerrilla' tactics are:
Have a draw for a meal for two at a local restaurant - but the patron must provide name, address, telephone number, etc. Drawing is done on the last performance. Now the names can go into the database. Chances are the local restaurant will give the organization the meal in exchange for some tickets.
Use a 2 for 1 coupon book and make the coupons valid for slow performances (e.g. Wednesdays or Thursday). Some people will do anything for a discount and the organization gets their name.
Do some co-op advertising with a local business and use their mail list. A clothing store or electronics place where they record names is a good thing - ideas may include 10% off a tie with purchase of a ticket or 10% of a ticket with purchase of a tie -- they do the mailer with the theatre's flyer and everybody wins.
Organize some special days where the people get to interact with the production people. Examples are:
Talk back to the director day.
Special award night.
Autograph day for the kids where actors sign for the kids in the lobby.
Sleep-overs in the theatre (the organization can charge a bundle for the tickets).
Theatre Tour and wine tasting night.
Remember to use a mail list. Once people buy, target them for similar shows and they will buy again. They just need to be asked. A telemarketing campaign to people on the list who have not yet bought subscriptions during the last show and before the early discount arrives is a very good thing. Best time to get people is between 5:00-8:00pm. And the caller needs to have a good script like:
Noticed you came to our show for the first (or second) time...
How did you like it...
Anything that would have improved your experience and made it more enjoyable...
Would you like to be our partner next year and come to all shows...
etc., etc., etc.,
It's all about building a personal relationship with the customer.
Determining When the Customer will Buy
The ideal time to sell tickets is dependent on the customer base purchasing habits. Evaluate if the customer base plans out their activities, or whether they wait until the last minute to make a purchase decision. Once the organization determines the purchasing habits, then determine the most effective time to advertise the event, at which time, be prepared to start selling tickets. There is no need to advertise unless the customers are in a situation to buy.
The organization may find that people typically buy tickets first thing in the morning (e.g. 9:00 am), over an extended lunch hour (11:30 am - 2:00 pm) and there is always a rush before 5:00 pm. In the hour before the event, there will be walk up sales so plan on having the box office open at least an hour and a half before the event starts.
For a large community or city where there is competition with other events, start advertising and selling tickets 6 to 8 weeks in advance to insure that they purchase the organization's tickets first before another organizations tickets. For a smaller community or town where there is less competition with other events, start advertising and selling tickets 3 to 4 weeks in advance.
If the event adverting is focused for children, the organization may find that many tickets will be purchased at the last minute, as children get sick; go to birthday parties; have recreational activities (soccer, hockey, baseball) and the parents may not make a decision to go until the event is within the next few days. With events focused on adults, the organization normally can count on them more, so the organization may see that they will purchase tickets more in advance as they plan what they will be doing in the upcoming weeks.
Again, the key to determining when the best time to sell tickets has to start with knowing the purchasing habits of the potential customers and knowing the audience that the organization is trying to attract.
And remember to use Theatre Manager to assist in finding out purchasing trends. Theatre Manager's cash flow report tells when people buy for a show. It's very important because the organization should see two or three major humps. One at early season renewal, one in the fall when the season subscription campaign occurs, and sales start to rise about 4 weeks in advance of the show. There should be mini spikes after a prior day's advertising. (e.g. Friday should see some extra Saturday sales, or a Tuesday advertising should see some Wednesday sales). If not, move around the advertising to different days, or move around to different advertisers.
Profile Tab

This tab provides a place to save some more personal information about the patron
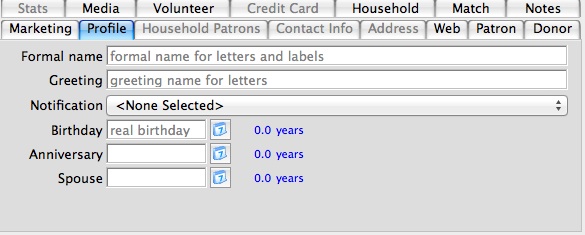
Parts of the Profile Tab
| Formal Name | The patrons formal name. The formal name is a combination of the Salutation, the First name, the Initial and the Last name. |
| Greeting | Displays the name the patron likes being called in every day life. It is quite often the patron's first name or a version of it. |
| Birthday | Date of the Patrons Birth. Use the Calendar  button to select a date or type a date in the field provided. button to select a date or type a date in the field provided. |
| Anniversary | Patrons Anniversary date. Use the Calendar button to select a date or type a date in the field provided. |
| Spouse | Patrons Spouses birthday. Use the Calendar button to select a date or type a date in the field provided. |
| Notification | Select an electronic notification from the drop down. This will send an electronically generated letter to a designated employee alerting that employee of activity in the patrons record. |
Resizing images to fit into Theatre Manager
- Placing full resolution pictures into a database rapidly increases the size of the database and affects backup times. For example: a single 5 magapixel picture takes as much room as approximately 5000 patrons in the database.
- Sending emails or eblasts with large images affects the delivery of the eblast to customers with slow internet connections or who like to receive their emails on mobile devices.
- Sending high resolution screenshots to our support team was filling our database and affecting support
We've chosen to assist you in managing your database size by limiting the size of images that can be put into the Theatre Manager database. In order to fit pictures into the image space on the PROFILE tab of the patron record, they need to reduced to under 500kb in size. Ideally, 100kb is a good target size for most images. The question is how to change a high resolution picture or screenshot into a lower resolution and then place it in a Theatre Manager database or send it as an e-blast or email attachment.
Using Image Converters
There are tools available for you to use and a fairly common shareware application is GIMP. The following describes how to use gimp on Windows. GIMP on the Mac OS requires xWindows to be installed. However, on the Mac, you can use Apple-Shift-4 to capture a specific area of the screen or use a tool like Snapz Pro (not free) which we use for our documentation.
GIMP (GNU Image Manipulation Program)
GIMP is a free download from the internet and the web site contains information about downloading, installing, using, and enhancing it. This site also serves as a distribution point for the latest releases. To use GIMP to capture a screen image and reduce its overall memory size:
In the Main Palette:
- Go to the FILE menu
- Choose CREATE, and then Screen Shot
- Click the GRAB A SINGLE WINDOW
- Use the +hand tool to grab the active window where your image resides (you will crop the window in the next step
- Use the selection tools (the dotted rectangle or dotted lasso) to highlight the desired area.
- You can also manipulate the image in any way you see fit, including flipping, rotating, or airbrushing.
Back in the Main Palette
- Go to the IMAGE menu
- Click CROP TO SELECTION
- Proceed to the FILE menu
- Choose SAVE AS
- Use the SELECT FILE TYPE to change the file format to JPG. JPGs are the only file format that will import into the PROFILE tab in Theatre Manager.
- Click SAVE
-
A window will pop up that allows you to change the Image Quality. Quite simply:
High Quality = More KB and more storage space
Low Quality - Fewer KB and soemthing that is better for storage in databases or use in eblasts - Use the slider to adjust the image quality so that the final image is under 500KB.
- Click SAVE
Household Patron Tab
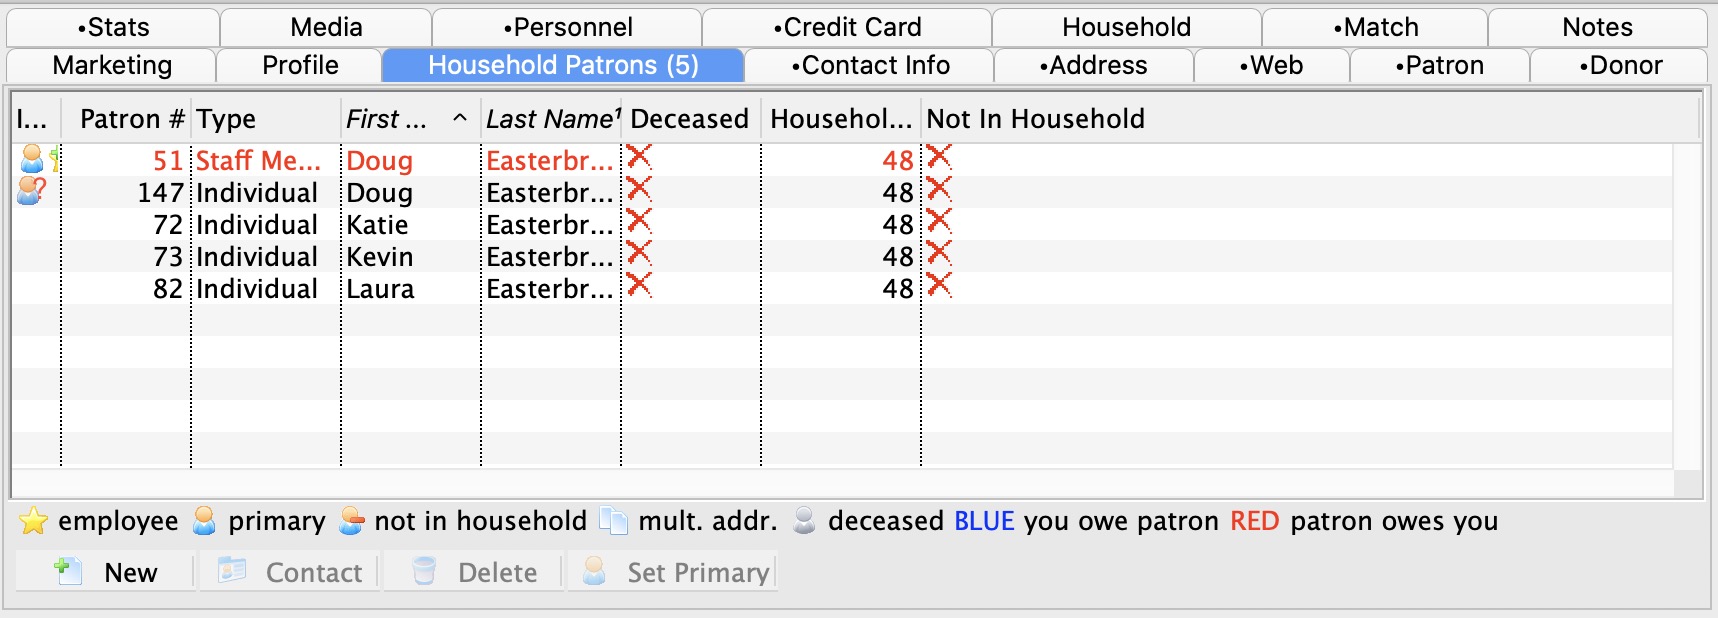
This tab is used to view all members of the household.
Parts of the Household Patrons Tab
| Patron # | Unique number used as reference for the patron. |
| First Name | First name of the patron. |
| Last Name | Last name of the patron. |
| Household # | Unique number used as reference for the household. |
 |
Adds a new member to the household. For more information on adding a member to a household click here. |
 |
Opens the patron contact card. For more information on the patron contact card click here. |
 |
Deletes a member of the household. |
 |
Changes the primary contact person for the household. The primary household person is recognized by the  symbol. To set a patron as the primary of the household, highlight the patron in this window, click Set Primary button. symbol. To set a patron as the primary of the household, highlight the patron in this window, click Set Primary button. |
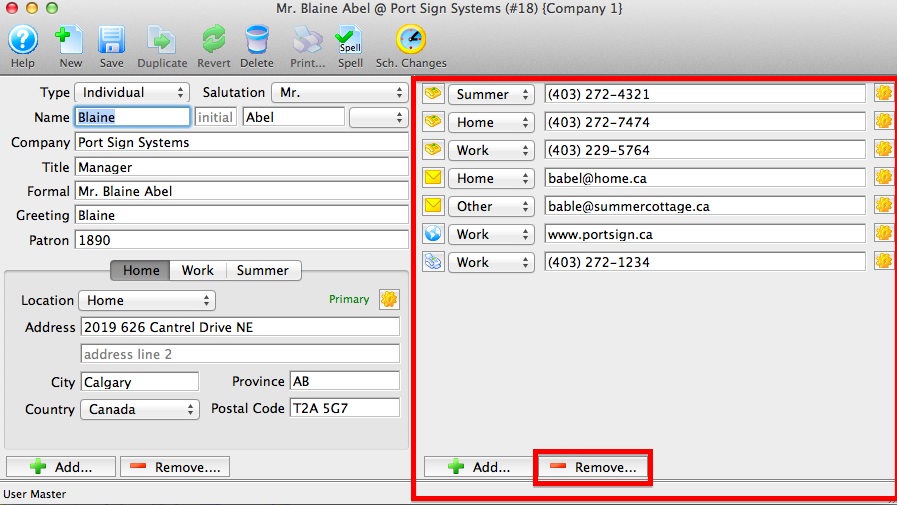
Contact Info Tab
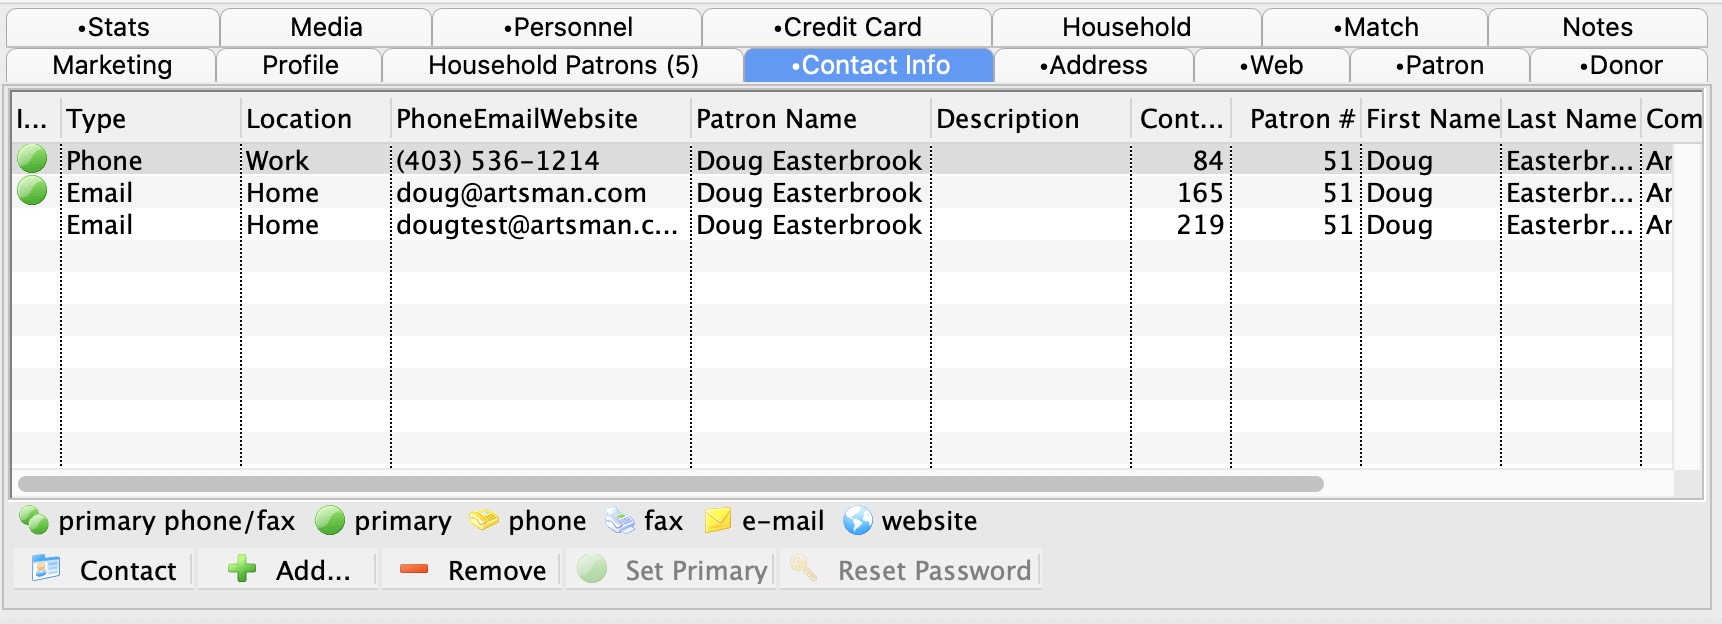
This tab is used to show all the contact information for a patron or phone, fax, email and web links. You can alter key preferences from the list or you can go to the patron contact card to add, edit or delete any of the contact information.
Parts of the Contact Info Tab
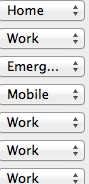
| Type | An image representing the type of contact information represented on this line. Contact data can be one of:
|
||||
| Location | The location for the patron information. This is a customizable field and the values are defined in Code Tables | ||||
| Phone/Email/Website | The detailed contact information. | ||||
|
Opens the patron's Contact Card so that you can edit their contact information, including:
|
||||
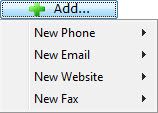 |
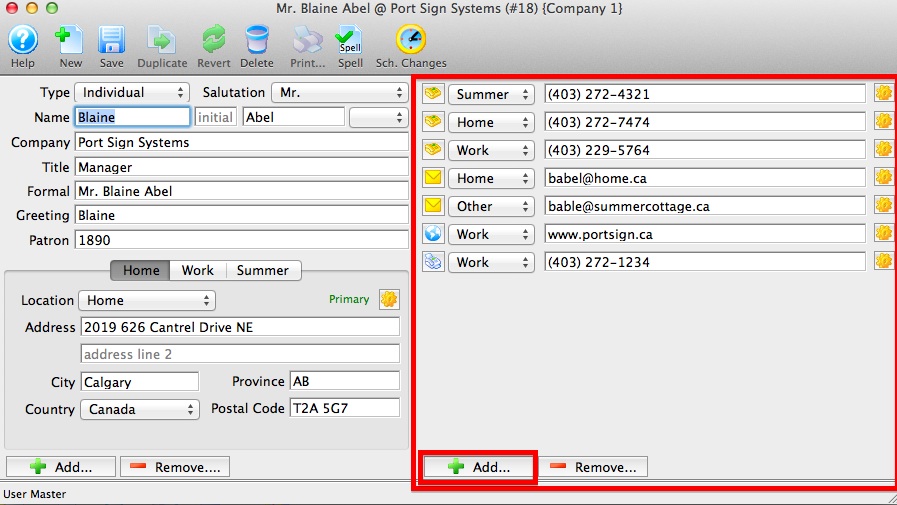
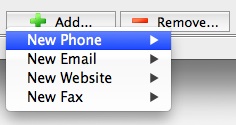
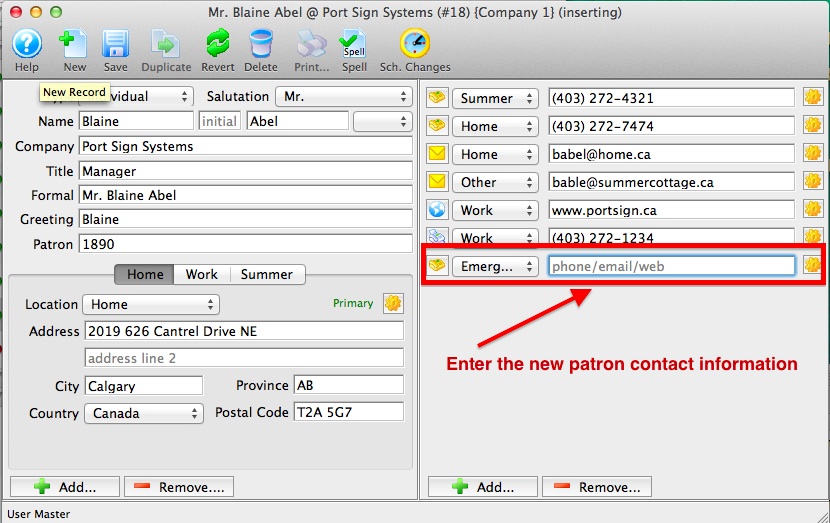
Adds a piece of contact information to the patrons record. Each selection opens another flyout to select. When you make your selection, the patron's Contact Card opens to the field selected. | ||||
 |
Removes the highlighted piece of contact information from the patron record. | ||||
|
Changes the highlighted information to the primary contact information for the patron. The primary information is recognized by the  symbol. symbol. |
||||
 |
 You will be asked if you want to reset the patron's email password for the email you selected.
If you continue, this causes:
|
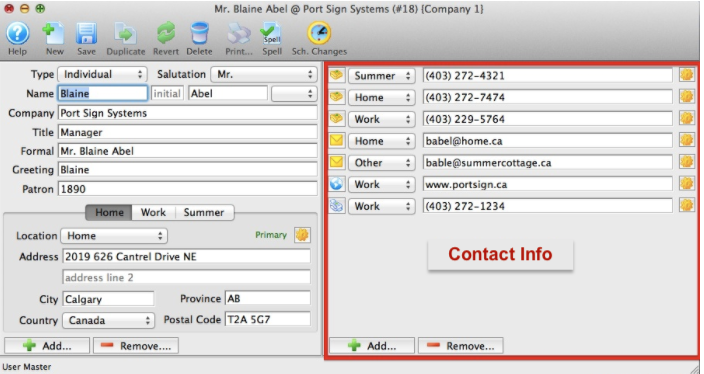
Patron Contact Card
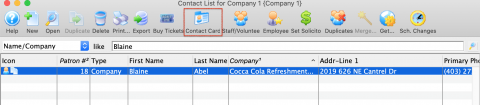
The patron Contact Card is accessible without opening a Patron Record from the Contact List window by clicking on the Contact Card icon in the toolbar. It can also be opened once on the Patron Record by double-clicking on any patron name in the Household Member List window
Parts of the Contact Card

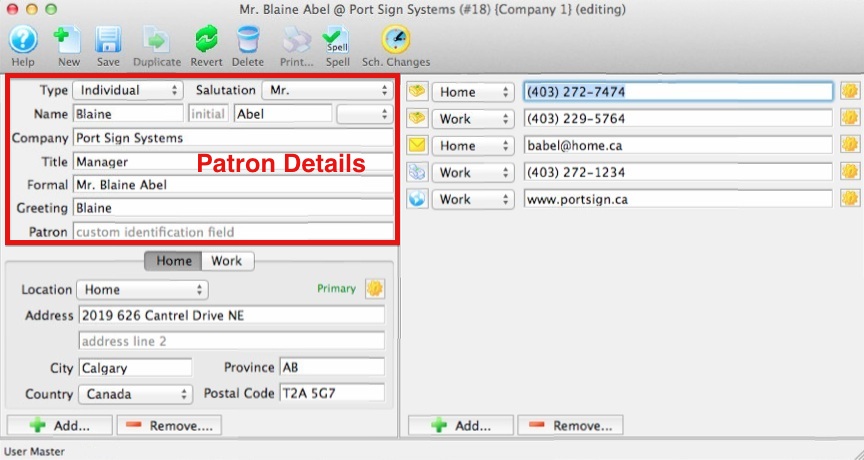
The patron contact card has three parts to it, Patron Details, Address and Contact Info.
The Patron Details area stores information on the Type of patron, their Company and Title, their proper Salutation, Formal and Greeting Names. Some of these fields maybe marked as Mandatory Data Fields and require data to be entered and can not be left blank. Mandatory Data Fields are located in Company Preferences.
The Address area stores patron mailing information; their Address, City, State/Province, Country and Zip/Postal Code. A Patron can have many different addresses stored here as need. Some examples: a patron may have a winter home, summer home and several work addresses. Some of these fields maybe marked as Mandatory Data Fields and require data to be entered and can not be left blank. Mandatory Data Fields are located in Company Preferences.
The Contact Info area stores information on how to reach a patron by Home Phone, Work Phone, Mobile/Cell, Home Fax, Work Fax, Home Email or Work Email. There can be as many lines of contact information as needed.
Patron Contact Card - Tool Bar
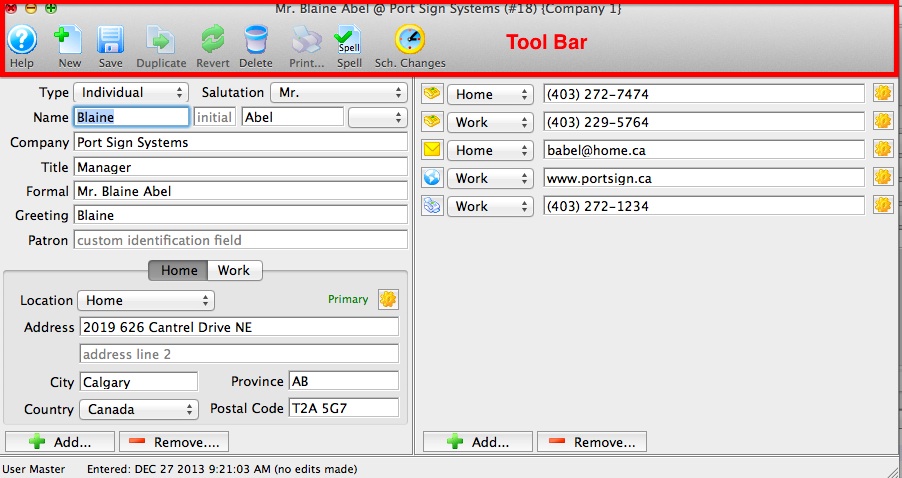
Parts of the Contact Card Tool Bar
The Tool Bar has many helpful function buttons.
 |
Connects to Theatre Manager Online Help for the Patron Contact Card. |
 |
Inserts a New patron contact card for another patron in the same household. |  |
Allows Contact Card to be saved. |
 |
Not applicable. |

|
Returns the content/text back to the saved content/text prior to any recent changes. |

|
Removes the patron record providing there is no financial transactions associated with the patron. |

|
For future development. |

|
Spell check. |

|
Displays a list of the Scheduled Changes for the patron. |
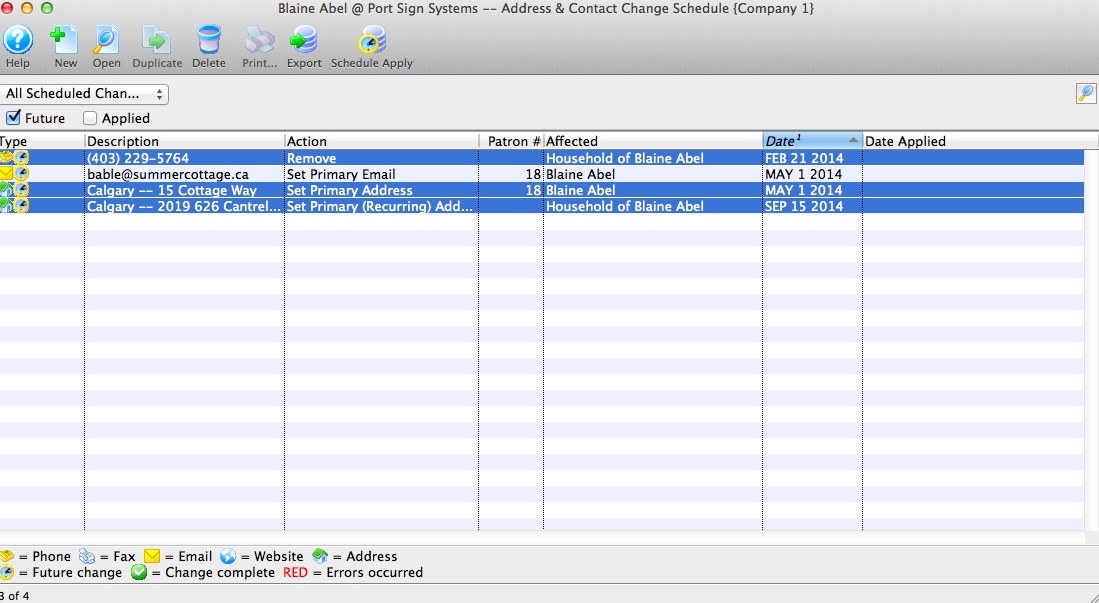
Patron Contact Card - Scheduled Changes
Scheduled Changes Window
This window displays a list of address and contact change schedules. A patron may have more than one address where they reside during different times of the year. For example they may have a summer home and would like to receive mailings at their summer home from June to September. An address can be schedule to change from their permanent to their summer address and then back to their permanent address in September.
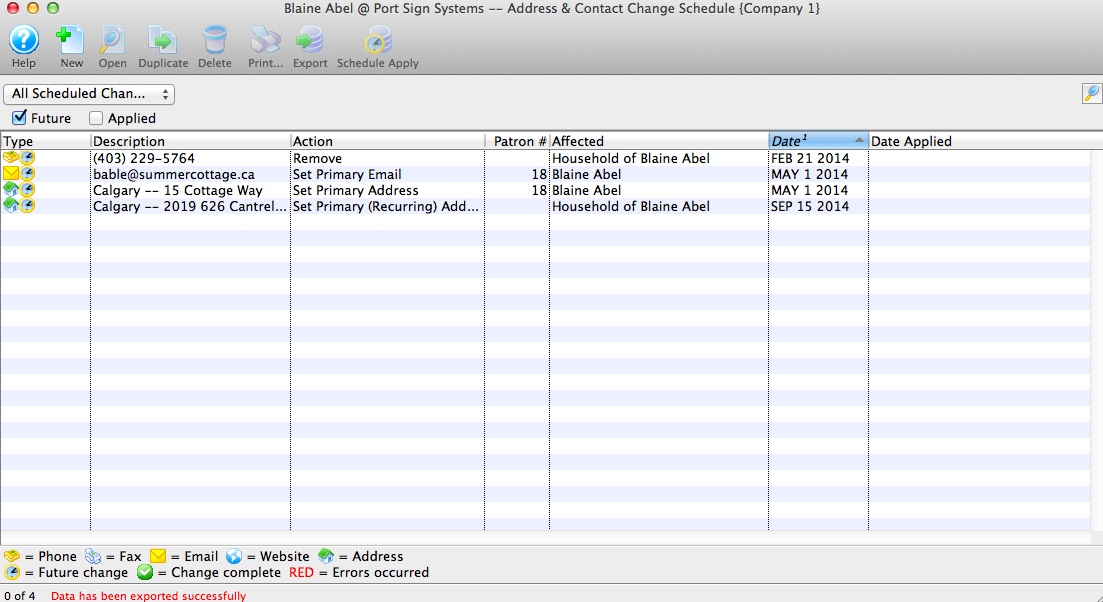
Parts of the Scheduled Changes Window
|
Connects to Theatre Manager Online Help for the Scheduled Changes. |
|
Inserts a New address for patron. |  |
Allows an existing scheduled change from the list in the window to be opened for viewing or editing. |
|
For future development. |
|
|
Removes the scheduled change record. |
|
For future development. |
 |
Allows for the list of Scheduled Changes to be exported to a tab delimited or MS Excel workbook file. |

|
Rather than waiting until it's scheduled date, the contact information can be change now. |
|
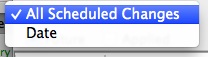
Search criteria for Schedule Change window can be set by Date range, by All Schedule Changes, Future or Applied. |
Editing Scheduled Change
When you make a scheduled address or phone change , you likely need yo make TWO scheduled changes. For example:
- If a person is moving in the future, you would set up a ONE-TIME change for:
- The new address and the specific date in the future when you want it to be effective -and-
- some time beyond that (say a couple of months), a scheduled deletion of the old address so that it is no longer in the patron record
- If the patron is a snowbird and is regularly changing addresses, you would indicate a RECURRING change:
- for the month/day that address 1 becomes effective each year
- for the month/day that address 2 should become effective each year
 |
This feature can also be reached by using the "gear" icon next to the contact on the Contact Card |
- Use the Schedule Change button to open the Schedule Change window.
- Double click on a Scheduled Change to the selected line in the display window.
- Address or Contact Change wizard will pop up.
- Make required changes to any step(s)and save.
Note: In each of the 4 steps only one item within each step can be selected for change. If you need to make another change to a different contact information, simply create another New record to schedule the next change.
Apply Schedule Change Now
Rather than waiting until it's scheduled date for an automactic change, the contact information can be manually changed by using the Schedule Apply button from the toolbar.
- Use the Schedule Change button to open the Schedule Change window.
- Highlight the contact information line in the Schedule Change window.
- Click the button.
Clicking Schedule Apply button changes the effective date to be today's date. The 'Set Recurring' function will continue to exist for future scheduled effective dates, even though the contact information has been updated through this process.
Exporting A List of Schedule Changes
Allows for individual or groupings of Scheduled Changes to be exported to a tab delimited or MS Excel workbook file.
- Use the Schedule Change button to open the Schedule Change window.
- Highlight one or all Scheduled Change lines.
- Click Export button.
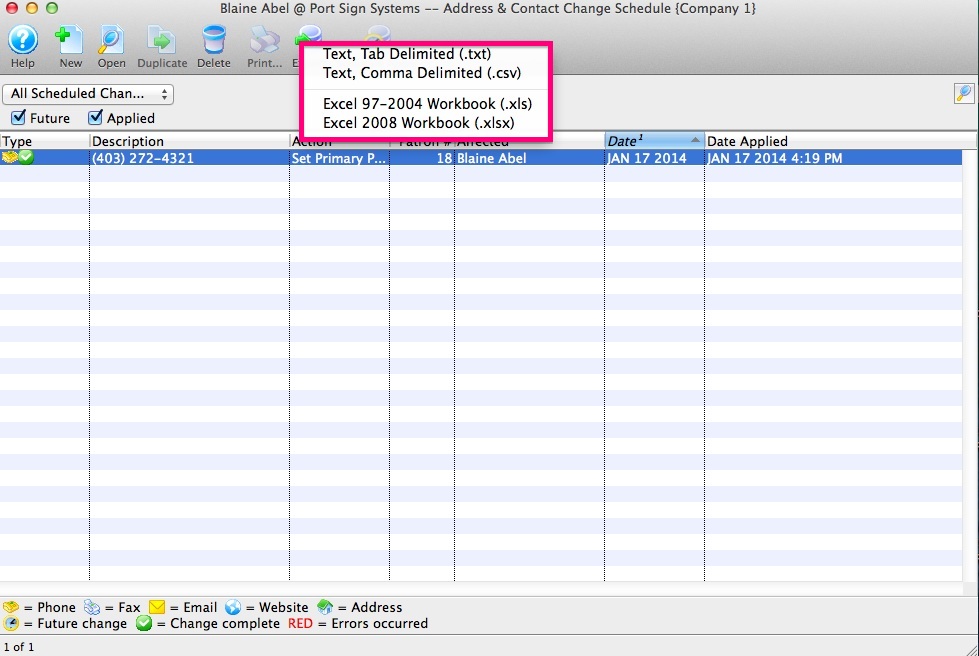
- Select a Tab Delimited or MS Excel workbook file and save.
Patron Contact Card - Details
Patron Details
In this area, some Patron Detail data fields may be marked as Mandatory Data fields within the Company Preferences. These pieces of information must be entered in order to save changes to the contact card.
| Type | The Type of patron record that is being entered. For example: Individual, Company, or School. The Type of patron field is apart of the Code Tables and can be edited and customized. |
| Salutation | Formal Salutation for the patron. The Salutation field is apart of the Code Tables and can be edited and customized. |
| Name First | First Name of the patron. This is a Mandatory Data field. |
| Name Init | Middle Initial of the patron. |
| Name Last | Last Name of the patron. This is a Mandatory Data field. |
| Suffix | Suffix for the patron if applicable. The Suffix field is apart of the Code Tables and can be edited and customized. |
| Company | Company the patron is associated with. This is a Mandatory Data field. |
| Title | Title within the company the patron is associated with. |
| Formal | The Formal Name of the patron (including salutation) usually used for donation requests. This field provides the patron donor name for program listing unless the name is altered in the Publication Name found under the Donor Tab.
The Formal Name is auto populated by the First and Last Name fields. The auto populate can be manually over written by highlighting the text in this field and typing over it. |
| Greeting | A Greeting (or familiar name - such as first name or nickname) for the patron. The Greeting preference is set in System Preferences under the Edits Tab.
The Greeting is auto populated by the First Name field. The auto populate can be manually over written by highlighting the text in this field and typing over it. |
| Patron | A custom 30 character identification field. Designated for an external number for a patron that can also be used to find patron. Possible usage are for student/faculty numbers or a number in any other external system that you may need to communicate with. |
Patron Contact Card - Address
Address
There can be many different address locations for one patron stored within the Address. Some address information may be marked as Mandatory Data within the Company Preferences. If a field is marked as Mandatory Data it must be entered in order to save changes to the contact card.

| Location | Location of the patron's address. The patron Location field is apart of the Code Tables and is used to categorizes addresses, phone numbers, emails and web site addresses. In the Location drop down there are three default options Home, Work and Other available. | ||
| Address | Address of the location. There are two Address lines available
for more complex addresses. When a second address line is used, check formatting when printing address labels and ticket face.
|
||
| City | The City or town for the address provided. To assist in quickly adding a patron, a default City can be displayed when adding new patrons. The default City is set through Mandatory Data in Company Preferences under default values on patron insert. The default City comes from the City field under the Company tab in Company Preferences. | ||
| Province/State | The Province or State where the city is located. The Province or State field is apart of the Code Tables. To assist in
quickly adding a patron, a default province or state can be displayed.
The default Province or State is set through Mandatory Data in Company Preferences under default values on patron insert.
The default Province or State comes from the Province or State field under the Company Tab in Company Preferences.
The screen is able to display either "Province" or "State". The tab name "Province" or "State" may be renamed in the Appearance tab under Company Perfrences. |
||
| Country | The Country where the province or state is located. The Country field is apart of the Code Tables. To assist in quickly adding a patron, a default Country can be displayed. The default Country comes from the Country field under the Company tab in Company Preferences. | ||
| Postal Code/Zip Code | The Postal Code or Zip Code field records the patron's postal identification number. Postal Codes format automatically to capital letters. Zip Codes format automatically to add hyphens when 9 numbers are entered. Edit checks warn if numbers or letters are entered incorrectly. The screen is able to display either 'Postal Code' or 'Zip Code'. The tab name "Postal Code" or "Zip Code" may be renamed in the Appearance tab under the Company Preferences. | ||
 |
Adds another address to the Patron. | ||
|
Removes a location from the address area. Click here for more information on removing. | ||
 |
Provides several options related a patron's address. For example, you can schedule future address changes. |
Link Another Address
- Open the Patron Window.
Click here for information on opening the Patron Window.
- Click the Address
 in the patron window.
Click the Contact Card
button.The contact card window opens.
Click the Add button in the lower left corner.
An address location drop opens. Select the new address location.
Enter the new address information.

Close the contact card to save the information ot the patron record.
The new address is now added to the contact card.
Remove Linked Address
- Open the Patron Window.
Click here for information on opening the Patron Window.
- Click the Address in the patron window.
- Click the Contact Card button.
The contact card opens.
- Click the Remove
 button in the lower left corner.
Select the address to remove.

A warning dialog opens.
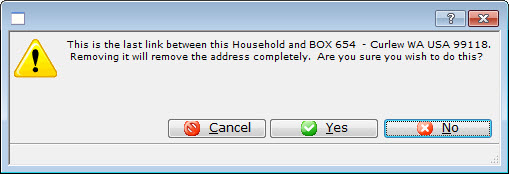
- Click the Yes
 button.
A confirmation dialog opens.
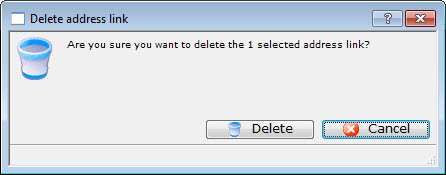
Click the Delete
button.The contact information is now removed from the contact card.
Patron Contact Card - Contacts
Contact Info
There can be as many lines of contact information within the contact area as are needed. Location types can be customized to meet needs.

| Type of contact information for the patron. |
 |
Location of the contact. For information on how to edit this drop down field click here. |
| Contact | Contact information for the patron. |
|
Adds a piece of contact information to the patrons record. Each selection opens another flyout to select. When you make your selection, the patron's Contact Card opens to the field selected. |
|
Removes the highlighted piece of contact information from the patron record. |
Add Contact Information
A patron may have as many contact types such as phone numbers, email addresses, fax numbers or websites as are needed.
- To Add a new contact type to patron's record, click on the ADD button at the bottom of the the Contact window.
- Select the type of contact to add Phone, Email, Website or Fax. A sub menu will populate off of each of these contact types.
Mouse over or roll over the contact type and end by clicking the contact type and the location in the sub menu.
- Enter the patron contact information in the new line provided and SAVE.
Remove Contact Information
When a patron's contact type(s) changes or becomes no longer valid, the phone number, email address, fax number or website can be remove as long as it NOT the primary contact.
- To Remove a contact type from the patron's record, click on the REMOVE button at the bottom of the Contact window.
- Select the type of contact to remove Phone, Email, Website or Fax. A sub menu will populate off of each of these contact types.
Mouse over or rollover the contact type and end by clicking the contact type and the location in the sub menu.
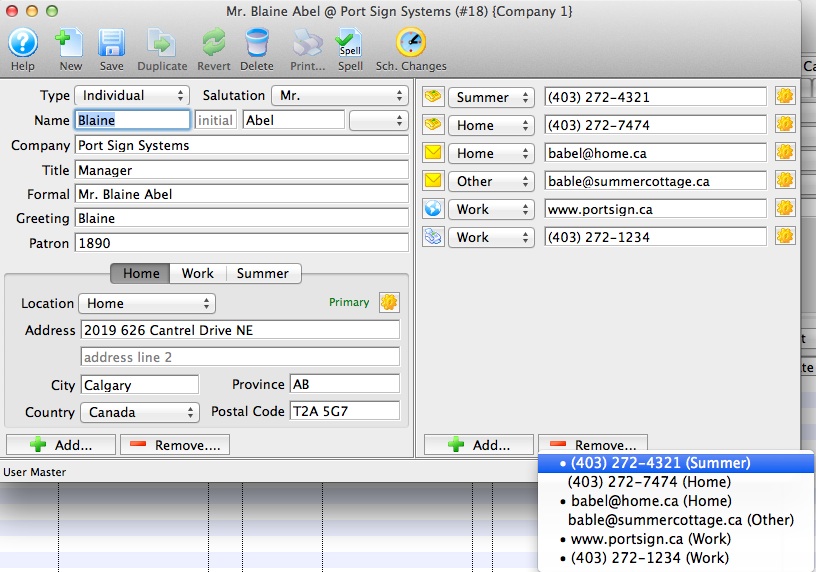
- Confirm the contact to remove.
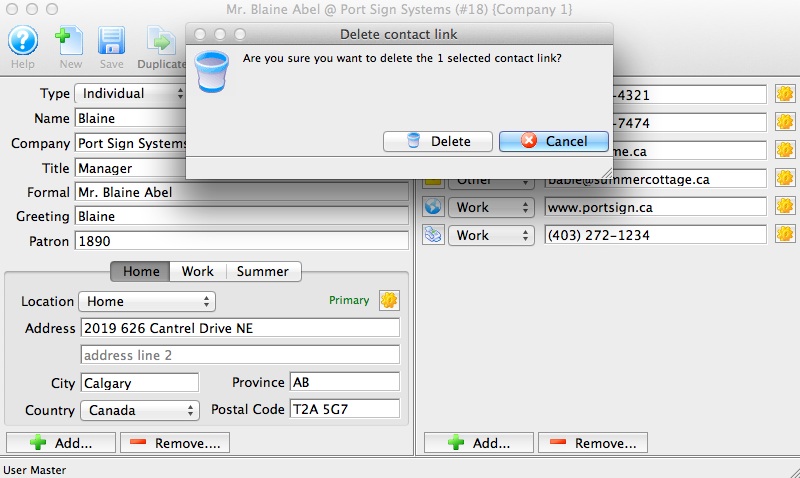
Alternate Way To Remove A Contact
- Click on the "Gear" next to the contact. A sub window appear. Mouse over or rollover the Remove Now and end by clicking.
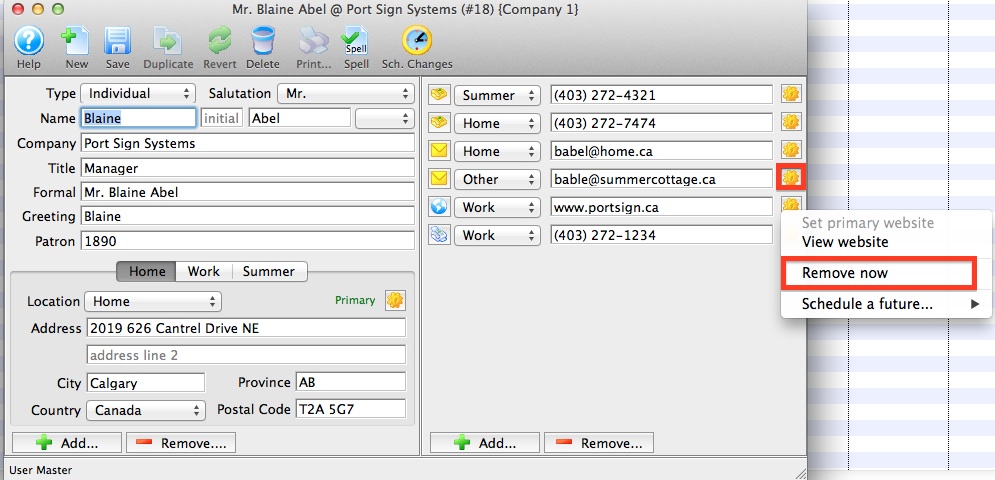
- Confirm the contact to remove.
Using the "Gear" Buttons
 button on the Contact Card can be used for several functions depending on the contact field the gear button is next to. For example, with these buttons you can:
- Schedule the removal of a phone, fax, email, website or address.
- Schedule a change to the primary phone, fax, email, website or address as a one-time occurrence (and then change it back again at a later date).
- Show a map of the patron's address.
- Show the weather at the patron's address.
- Send an email to the patron.
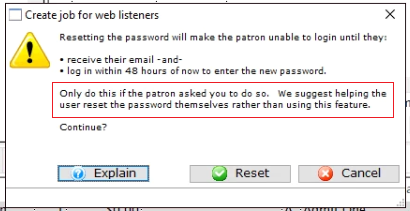
- Reset the web sales password for the patron's account and send a one-time login email.
- If its an email address, then you can ask the system to display a Forgotten Password Reset Log which shows effort around the patron trying to login, forget their password, their success and checkouts
Sending a Patron an online password reset email
If a Patron calls and asks for their online password because they have either forgotten it, or don't know that they have one, you can send them a one-time password reset email so they can reset the password themselves.
|
For security reasons, you cannot send the patron their actual current password.
You can only:
|
- Locate their Patron Record
- Open their Contact Card
- On the Contact Details panel, click the
 next to their email address
 - Choose the option for Reset web sales password and send one-time login email
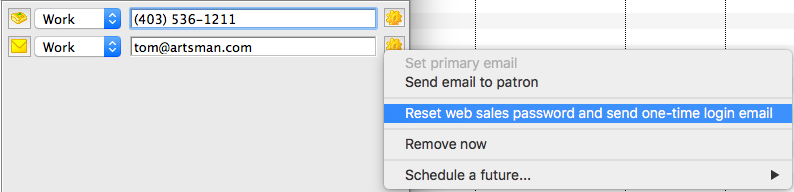
The email will go out immediately. Have the Patron check their inbox for a new email. They can then follow the prompts in the email to change their password.
It is exactly the same email that the patron would receive if they had initiated the password reset themselves online
|
If the email does not appear in the Patron's inbox within a few minutes, it may have gone to their "SPAM" or "Junk" folder. Have them check those folders. If it is there, they should also adjust their Mail Settings so that future emails from you are not also placed there. |
|
An email will not be sent it there are two patrons in separate households with the same email address. If this is the case, you will need to de-dup the email addresses before it can be sent. |
Address Tab
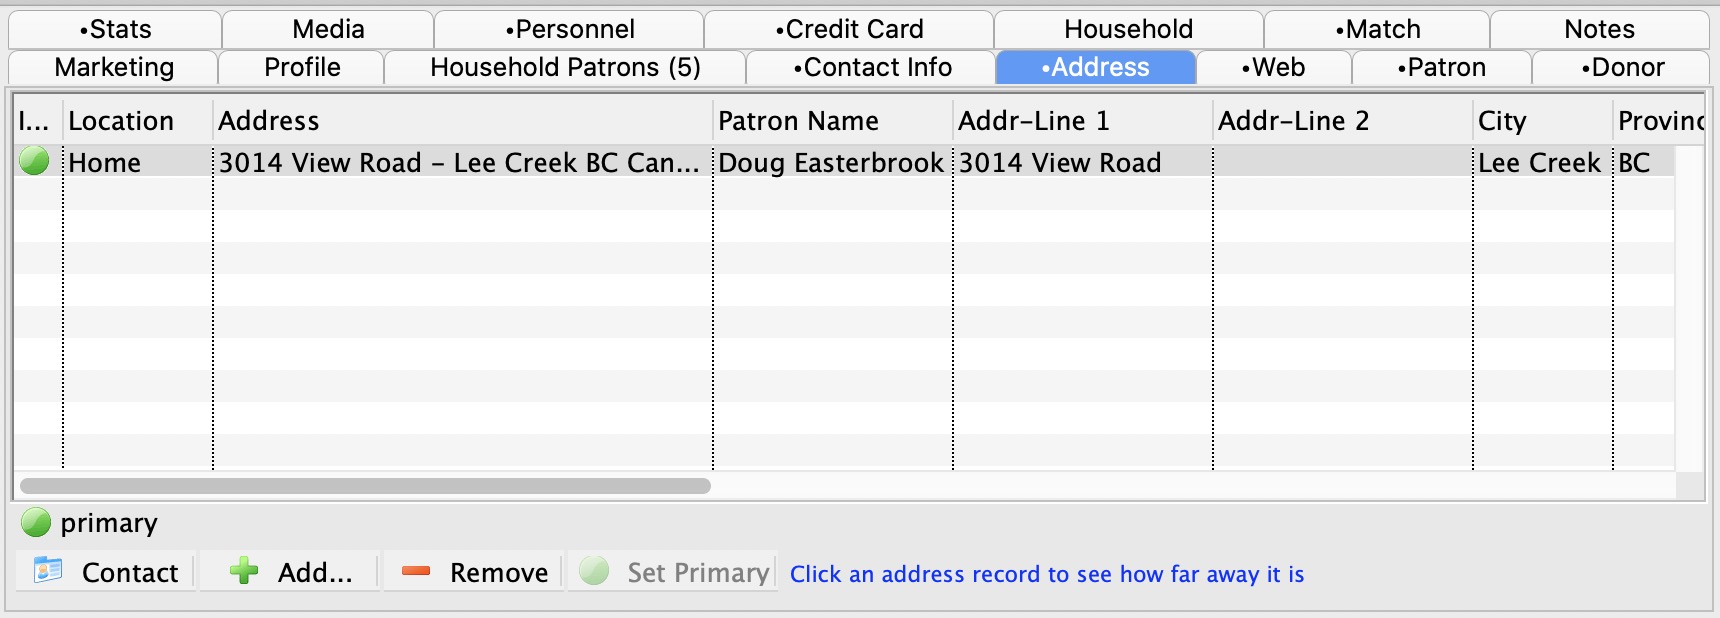
This tab is used to store address information for a patron.
Parts of the Address Tab
| Location | The location for the patron information. This is a customizable field. Click here to edit the options. |
| Addr-Line 1 | Patrons street address or P.O. Box. |
| Addr-Line 2 | Additional line for patron address details if needed. |
| Addr-City | City of the address. |
| Province | Province or state of the address. |
| Postal Code | Postal code or zip code of the address. |
| Country | Country of the address. |
| |
Opens the patron contact card. Click here to learn more about the contact card. |
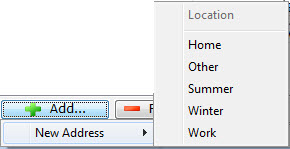
 |
Clicking Add, opens a flyout to select the address type you want to add (Home, Others, Summer, Winter, Work). Making a selection, opens the Contact Card with the correct tab for that address added for data entry. Click here to learn more about the contact card. |
| |
Removes an address from the patrons record. |
|
Changes the primary address for the patron. The primary address is recognized by the symbol. |
 |
Highlighting a patron's address in the window changes the display to show the number of miles/kilometers from the patron's home to the address set in Company Preferences. The calculated distance will replace the existing text and now display like this:  |
Address Functions
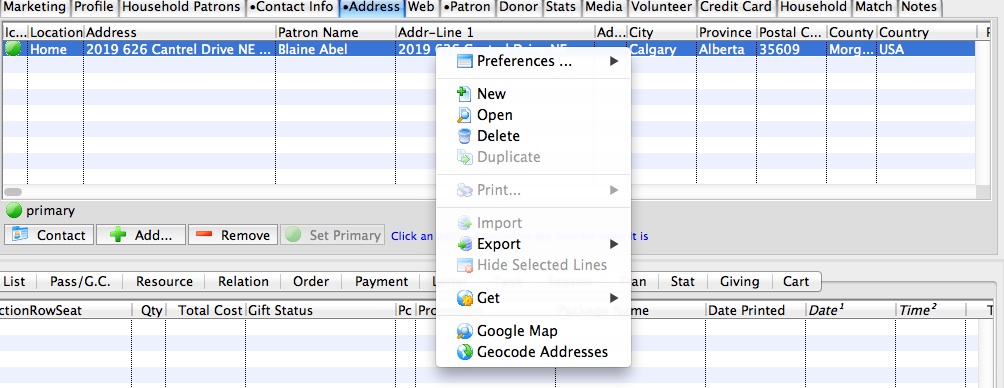
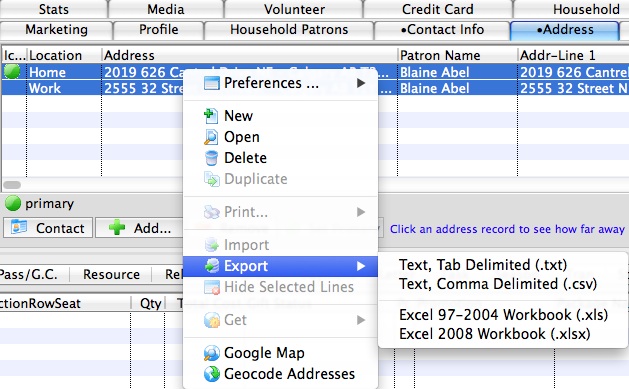
When a Patron's address is highlighted from the Address Tab several additional functions are available setting column Preferences, Add, Open or delete a patron address, Export, Get Google Map and Geocode Address.
Additional Address Features
| Preferences | These Preferences pertain to the Patron window Toolbar allowing the Toolbar to be customized. Customizations include Hide and Show Toolbar or Text Under icons. Icon size can also be customized Small Icons. | changing-column-preferences
| New | Adds a new address to patron's record. |
| Open | Opens a selected address from patron's record. |
| Delete | Removes an address from patron's record, unless it is the primary address for the patron. If the primary address needs to be removed, set another address on the account to the primary address. |
| Duplicate | For future development. |
| For future development. | |
| Import | For future development. |
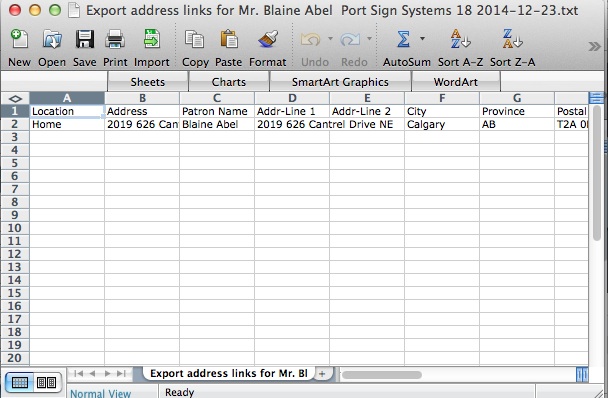
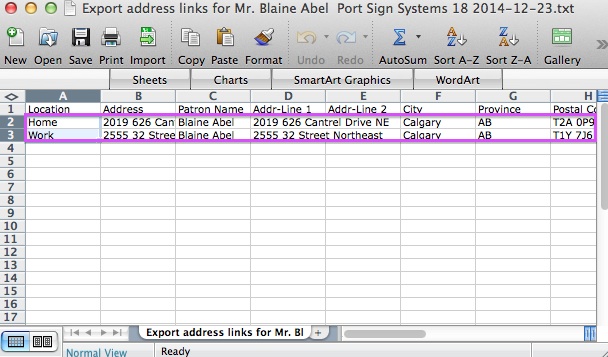
| Export | Allows for the patron address record to be exported to text or MSExcel document. Exported data includes: Patron number, address lines 1 and 2, city, Province/State, country, first and last names household number and title. |
| Hide Selected Lines | For future development. |
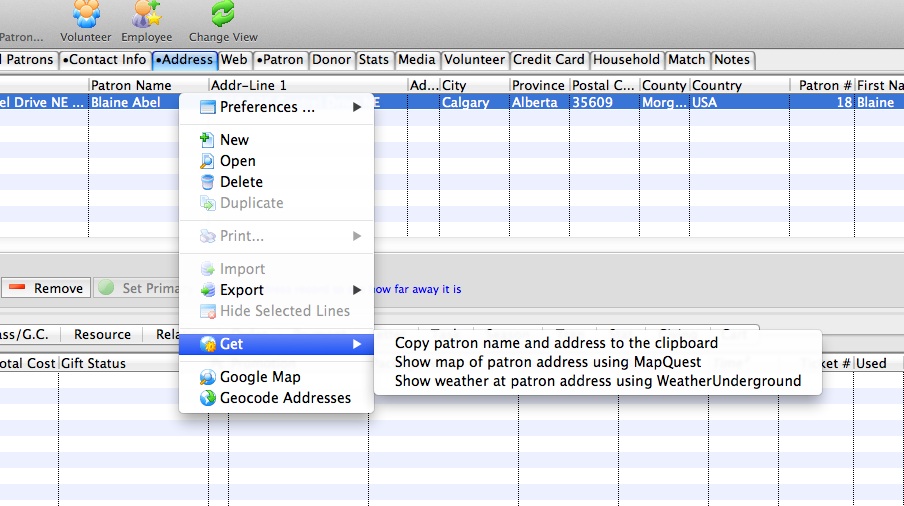
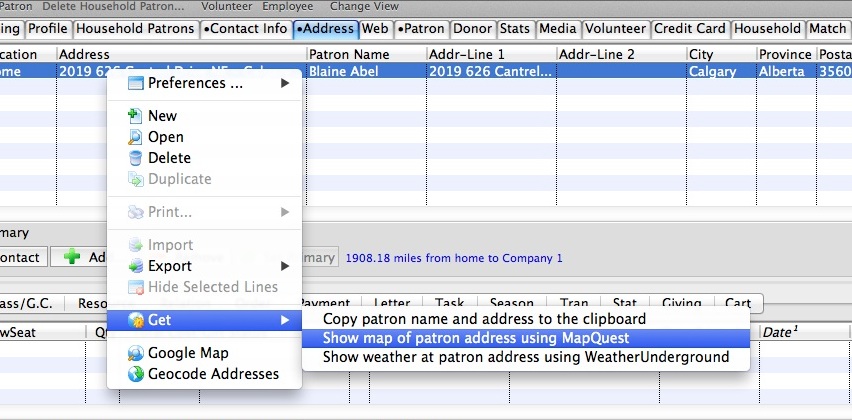
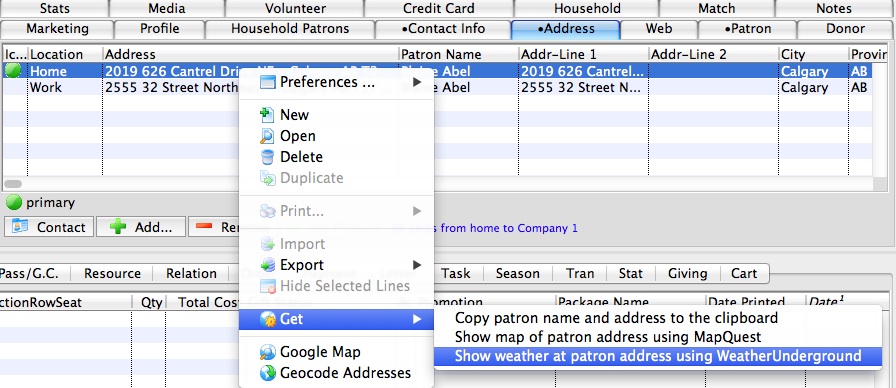
| Get | Allows the patron's address to copy patron name and address to the clipboard, Show map of address using MapQuest through a Web browser, and show weather at patron address using WeatherUnderground through a Web browser. |
| Google Map | Allows the patron's address to link directly to Google Map through a Web browser. | Geocode Addresses | Allows for the patron's address(es) be converted a into a geographic location using latitude and longitude. |
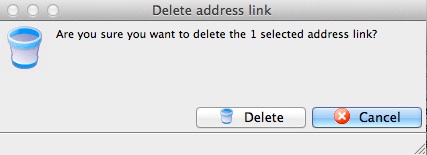
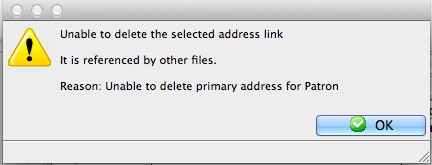
Delete or Remove A Patron Address
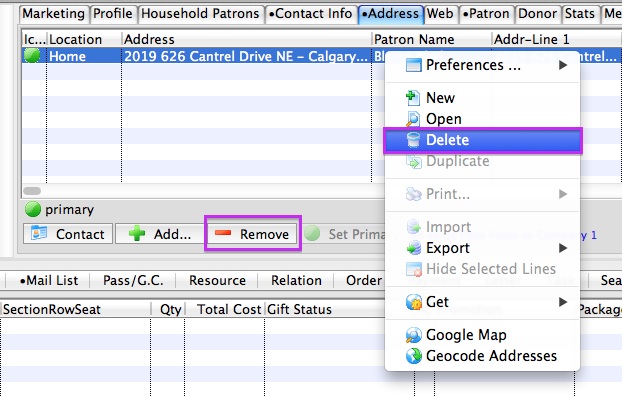
A Patron's address can only be removed or deleted when the address is not the primary address on the patron's account.
There are two methods to Remove or Delete a patron address.
Select the patron address. Use the Remove button at the bottom of the Address Tab window. OR Right click on the address will bring up a flyout menu. Click on Delete.
|
If the address is the primary address, it can not be deleted. |
Export Patron Address
Patron's name and address can be exported to a spreadsheet through the Address Tab. Exporting multiple patron's name and addresses at once and can be done by highlighting multiple different patron records from the Patron Contact List Window.

|
If the patron has more than one address, all or selected addresses can be exported to the same file. |
Geocode Addresses
- to get generalized information from the zip code/postal code table (zip codes are accurate only to a fairly large area and Postal Code may ba accurate to street (for cities) or area (for rural postal codes)
- or use Google Maps to obtain data - which is generally more accurate to the buildings actual location.
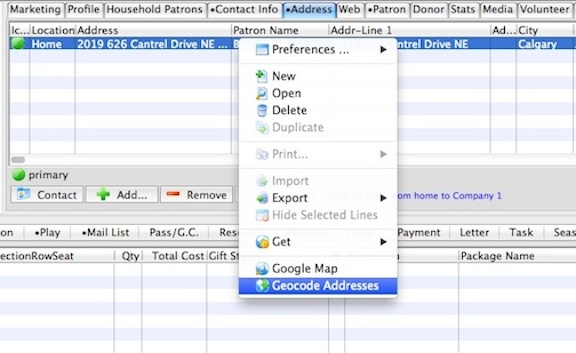
The database will display a message like the one below in the bottom left corner of the Patron Address Tab indicating that geocoding of addresses can not be performed because Google look up for Addresses has not been set in System Preferences. No database error message indicates Google has been enabled in System Preferences.

|
Google may limit the number of addresses being geocoded in a given day. |
Geocoding an address makes use of data from a street geographic information system where the street network is already mapped within the geographic coordinate space. Each street segment is attributed with address ranges (e.g. house numbers from one segment to the next). Geocoding takes an address, matches it to a street and specific segment (such as a block, in towns that use the "block" convention). Geocoding then interpolates the position of the address, within the range along the segment. More can be found on the Web by searching geocoding addresses.
Distance Patron Address is from Venue
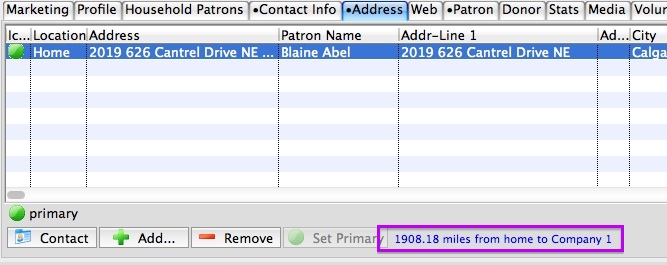
Theatre Manager uses the geocode of the patron's address to determine the patron's distances from your venue. The distance from your venue is determined by the address listed in Default Company Information in Company Preferences.
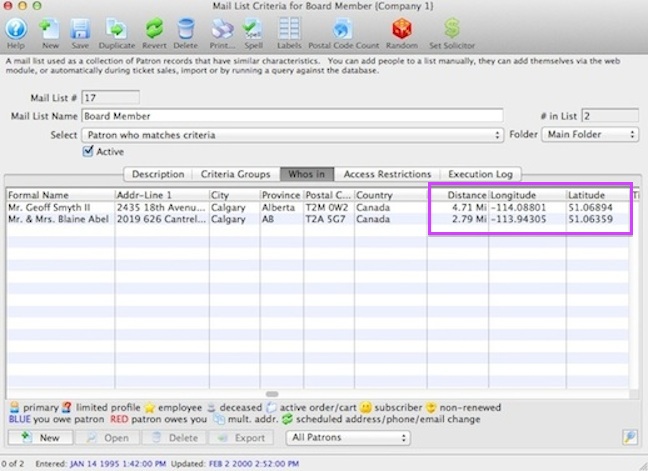
Mail List with Address Latitude and Longitude
Get Function
There are three Get functions related to a patron's address from the Address Tab. The Get function can also be used through the Patron Contact List Window. These are helpful actions within Theatre Manager related to patron data that is commonly used.
- Copy patron name and address to the clipboard.
- Show map of patron address using MapQuest.
- Show weather at patron address using Weather Underground.
Copy Patron Name and Address to the Clipboard
Theatre Manager allows the patron name and address to be copied the clipboard. Then the name and address can then be pasted into any document by using the Edit >> Paste menu.
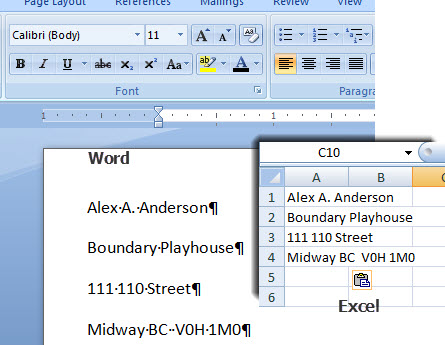 For more information on how to Copy Patron Name and Address to the Clipboard Click here.
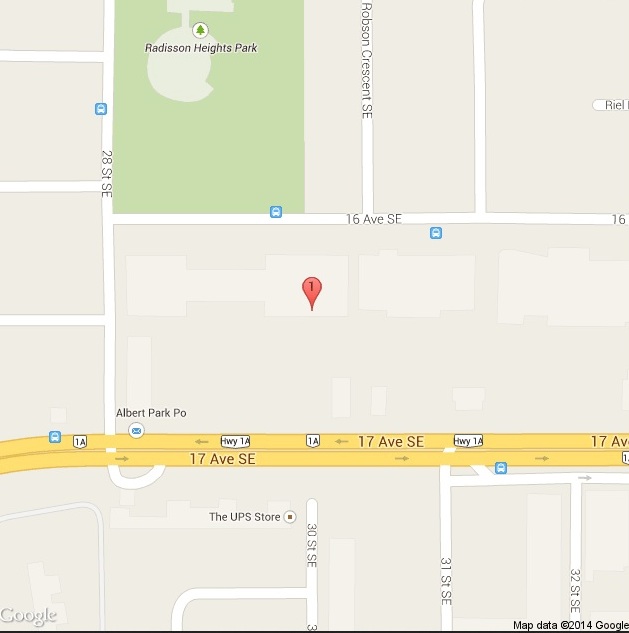
Show Map of Address using MapQuest through a Web Browser
Theatre Manager takes the patron address and opens MapQuest through a web browser. This will display an interactive map showing the patron's address. From here MapQuest, provides directions to or from the patron address.
Show Weather at Patron Address using WeatherUnderground through a Web browser
Theatre Manager takes the patron address and opens WeatherUnderground in a web browser. WeatherUnderground web site provides real-time information surrounding the patron's address.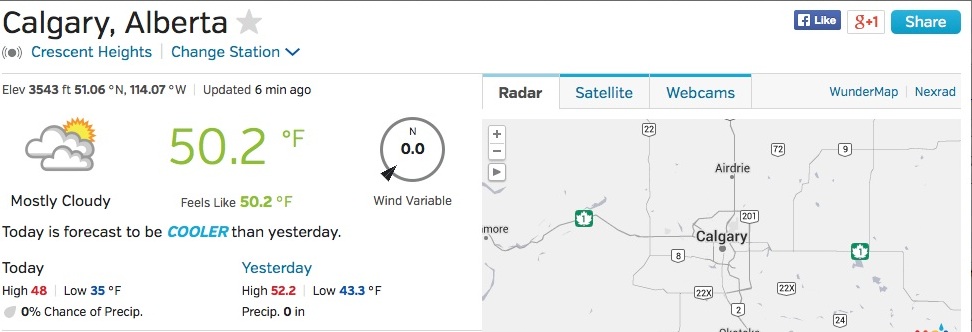
Copy Patron Name and Address to the Clipboard

|
If the patron has more than one address, all or selected addresses can be copied to the clipboard to the same time. |
Show Map of Address using MapQuest through a Web Browser
The Get function of the Address Tab allows a patron's address be used in MapQuest to pin point where the patron lives. Show Map of Address using MapQuest through a Web Browser will display an interactive map showing the patron's address. MapQuest provides directions to or from the patron address.
|
This feature can also be reached by using the "gear" icon next to the contact on the Contact Card |
Show Weather at Patron Address using WeatherUnderground through a Web browser
The Get function of the Address Tab allows a patron's address be used to pin point the current weather where the patron lives. Show Weather at Patron Address using WeatherUnderground through a Web browser will display an interactive map showing real-time weather information surrounding the patron's address.
|
This feature can also be reached by using the "gear" icon next to the contact on the Contact Card |
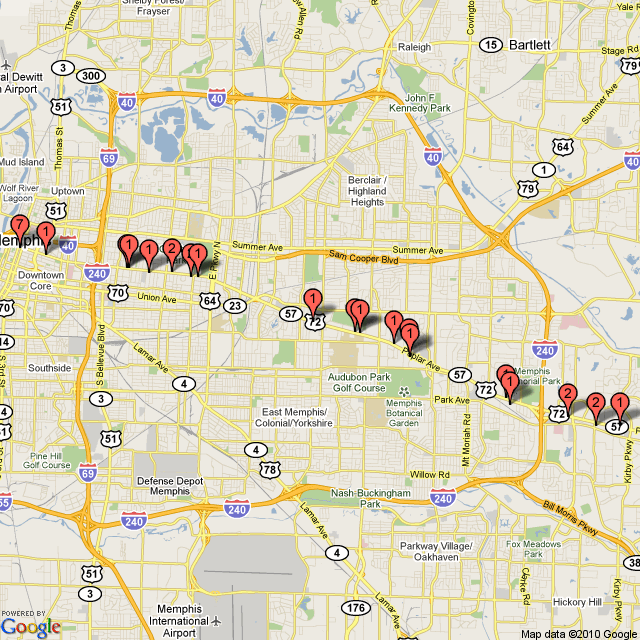
Google Map
The Google Map function allows Theatre Manager to use the patron's single or multiple address(es) to plot the patron's address on a Google Map. The web browser displays a static map of the patron's address(es). Google Maps is also available through Patron Contact List, the WHO's IN Tab of a Mail List of Patrons, or anywhere a listing of patrons are generated.

|
If there is more than one address for the patron, several addresses can be selected and displayed on the same static map. This is helpful if you wish to see a graphic representation of where your patron, subscribers or donors live.
|
|
Needing an interactive map to get directions to a patron's address use the Show Map Address Using MapQuest Through Web Browser |
Web Tab
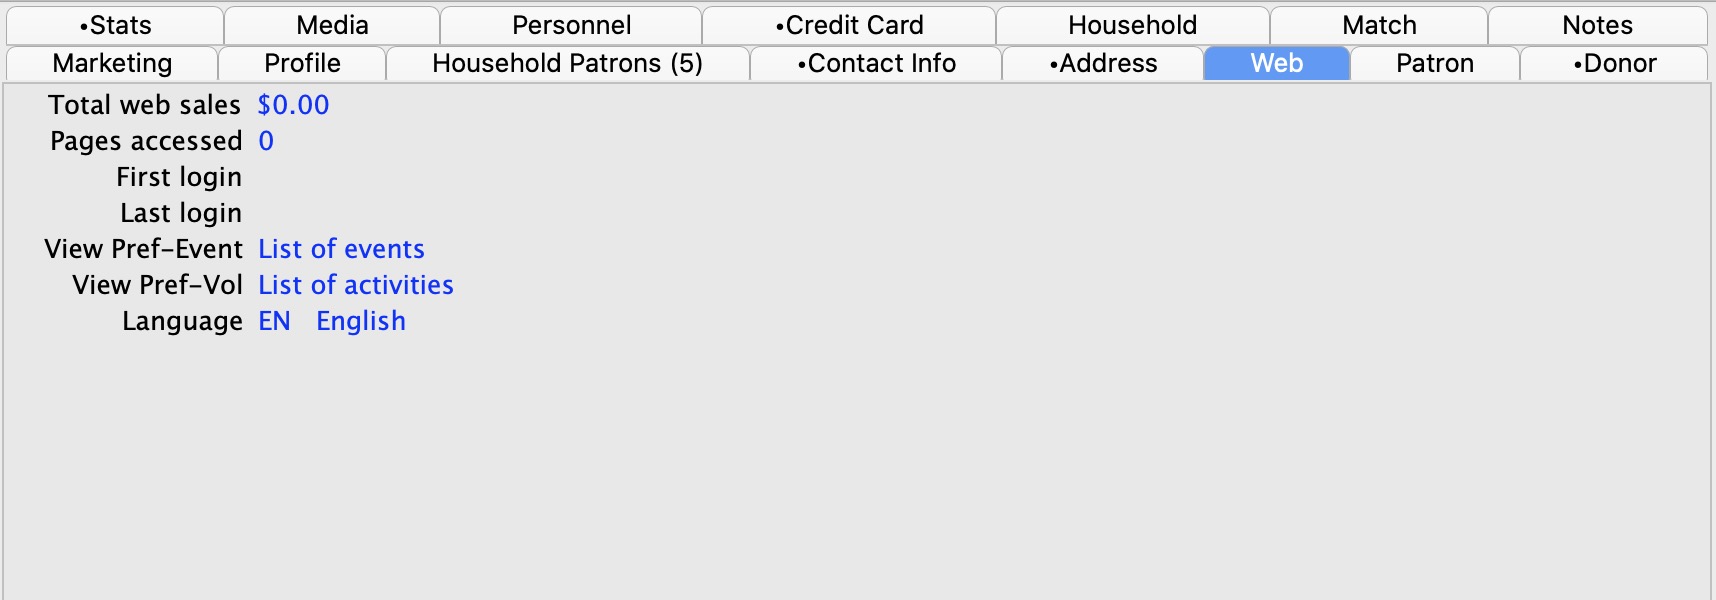
The web tab is used to keep track of a patron's history of purchases over the internet.
Parts of the Web Tab
| Total Web Sales | Total value of sales over the web. |
| Pages Accessed | Number of pages accessed by the patron. |
| First Login Date | The first time the patron logged into the website. |
| Last Login Date | The last time the patron logged into the website. |
Patron Tab
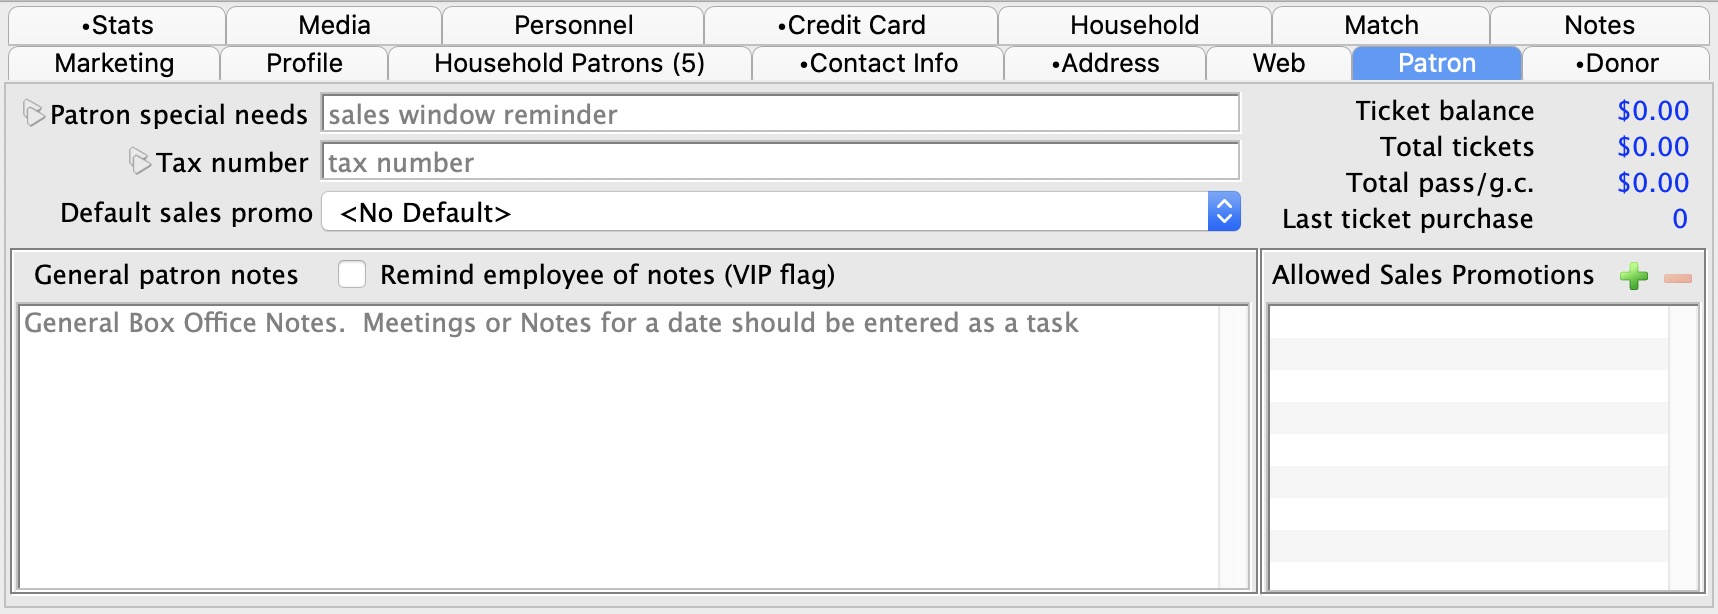
This tab gives a brief overview of the patrons financial history with the company.
Parts of the Patron Tab
| Patron Special Needs | A high priority note employees need to be aware of during sales. For example: Patron requires wheelchair seating. This note appears in the orders window during purchasing. | ||||
| Tax number | If this patron has a Tax Exempt number, you may enter it here. This field is only for reference, however. To automatically remove the taxes, be sure to add the Tax Exempt number to the Household tab. | ||||
| Default Sales Promotion | An option to select a default sales promotion when this patron purchases tickets (if the sales promotion is available).
|
||||
| Allowed Sales Promotions |
If the patron is a tour operator, reseller, or school where you want them to receive specific pricing at the box office, you can enter one or more sales promotions on their record. By doing so, only those sales promotions can be used to sell tickets for the patron- none of the others that the box office normally has access to will be seen.
For example, you might associate a group price and a bus driver comp with the patron - and thats the only price that they can be charged. If those promotions are not available on a performance, you cant sell a ticket to them.
|
||||
| Remind Employee of Notes | When checked and you open the patron window, it makes a audible beep and opens to the patron tab instead of the default marketing tab.
There is no pop up displayed to keep movement during a sale process faster - it allows you to read the notes and move on without having to acknowledge a confirmation message. |
||||
| General Patron Notes | Notes about the individual patron. | ||||
| Ticket Balance | Amount of money due from or to the patron. A red number means the patron owes the company, a blue number means the company owes the patron. | ||||
| Total Tickets | Total amount of money spent on tickets by the patron. | ||||
| Total Memberships | Total amount of money spent on membership items by the patron. | ||||
| Last Ticket | Last year the patron purchased tickets. |
Donor Tab
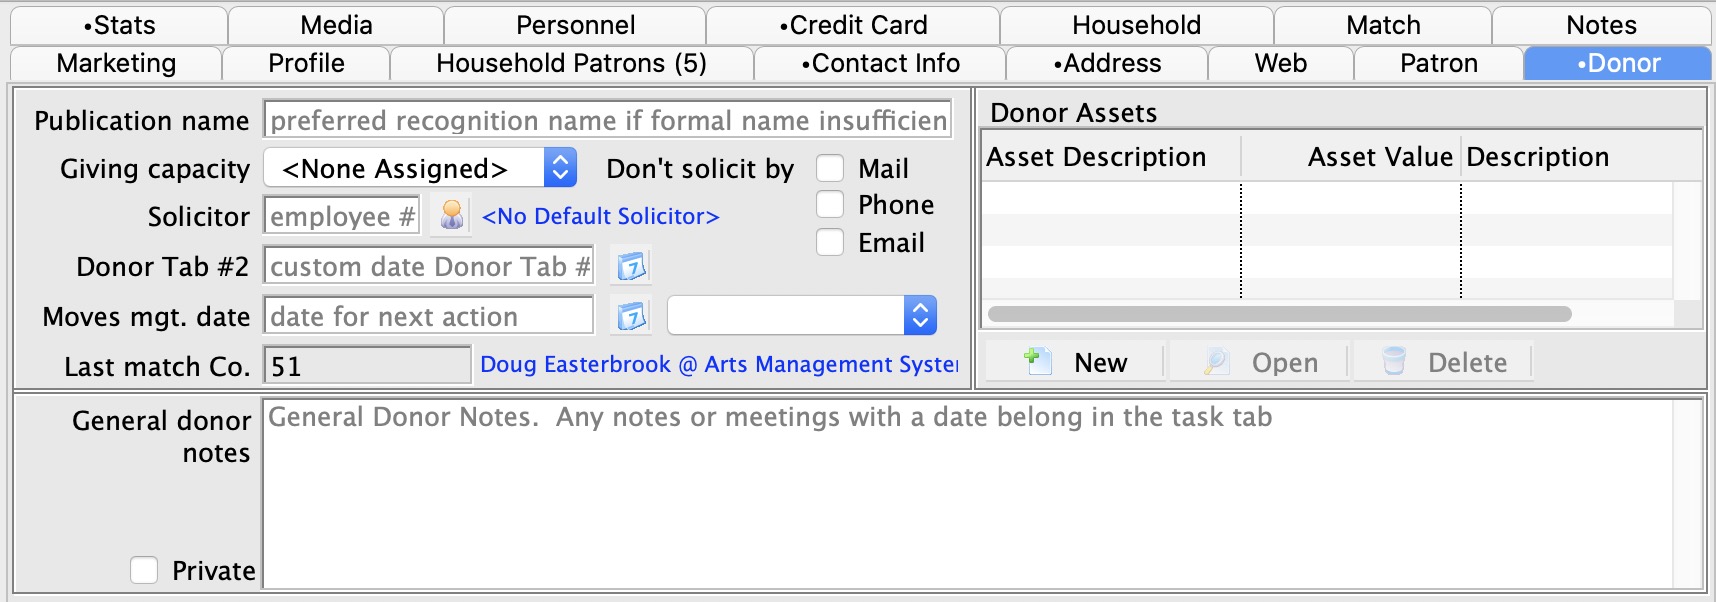
The donation tab provides a brief look at the donation defaults for a patron.
Parts of the Donor Tab
| Publication Name | This is how the patron generally wishes to be recognized.
Normally this is left blank for most patrons, but if patron has a specific request for all donations, enter something here. It was intended for foundations, granting agencies, and matching gift corporations that have specific recognition needs. However, it can be used for any patron. Refer to the actual entry of a donation to see how the program name is populated. |
| Giving Capacity | Expectation of the patrons giving range within a specific time frame. |
| Don't solicit by: | The options are:
|
| Solicitor | Assigns a specific employee as solicitor for this patron. |
| Donor Tab #2 | Donor Date field. |
| Moves Mgt Date | Use to track the date a patron reached a selected level within the moves management structure. The calendar button can be used to select a date. |
 |
Donor level. Allows you to choose a donation selections level. |
| Last Match Co. | The company and individual who last matched the donors gift. |
| General Donor Notes | Any general notes about the donor that are not related to a specific donation. |
| Private | Restricts the view of the patron's donation info from general users of Theatre Manager. For more information on restricting access to donor information click here . |
| Asset Tracking | If you wish to track key assets for a donor, you can enter them into the list on the upper left. This allows you to identify high net worth individuals.
This is described in more detail in donor asset tracking |
Donor Asset Tracking
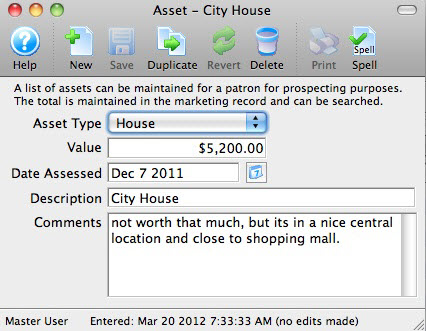 If you are tracking planned giving, a list of assets owned by the patron can be displayed. This allows employees (with permission) to see and/or edit a list of assets (and optionally, the value) for a patron for major gift prospecting. There are separate permissions for this feature and the window will not be shown if an employee does not have permission to see the data.
Click the new, edit or delete buttons under the asset list to edit various aspects of the assets, including the value and when it was valued. A total of all assets is displayed to the right at the bottom of the statistical information column.
 |
Refer to the Donor Assets Code Table to create or edit code table values used in this window. |
|
A user must have access to the asset tracking data in their employee permissions, otherwise this list is not displayed in the window. You can choose to have only key development staff members see this information.
|
Stats Tab
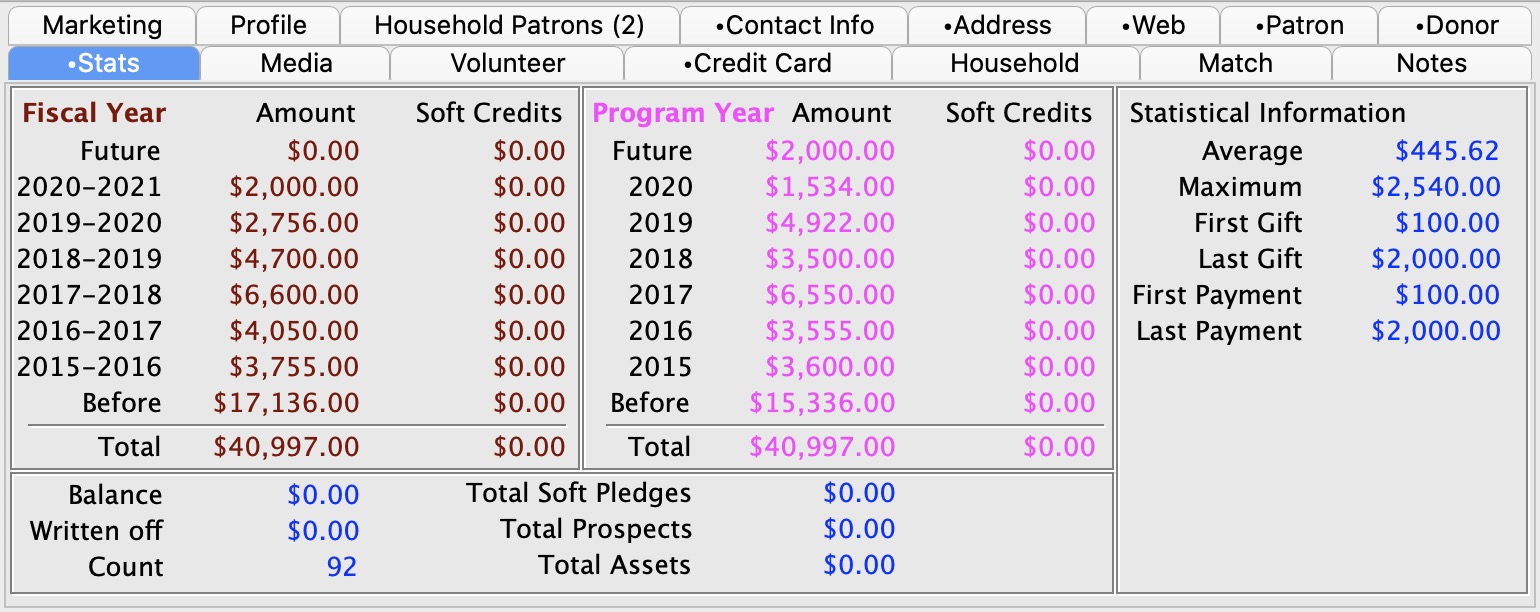
This tab displays some summary statistics on the donations the patron has made. The data is separated into:
- Fiscal year - past 6 and future
- Program year - past 6 and future
- Balance, and totals for soft credits and pledge amounts
- An indication of minimum, maximum gifts and when they were given
Meaning of Fiscal and Program Year
The Fiscal Year for a donation is displayed using the current fiscal year from company preferences, accounting tab. All accounting is done based on fiscal year.
The Program Year for a donation generally tracks the fiscal year - meaning it is the same. However, you can make the program year an arbitrary year in the future or in the past -- so that you can track totals differently than fiscal year. Changing program year has no effect on financial data. It can be used as selection criteria for creating the program listing.
Calendar Year is derived from the date of the donation for tax receipt purposes.
|
The totals are displayed on mail lists and a few other places within the system. They are handy for quickly finding people based on total donations.
However, if you want to distinguish based on campaigns or other donation fields, you may need to use mail lists to identify and contact people. |
Media Tab
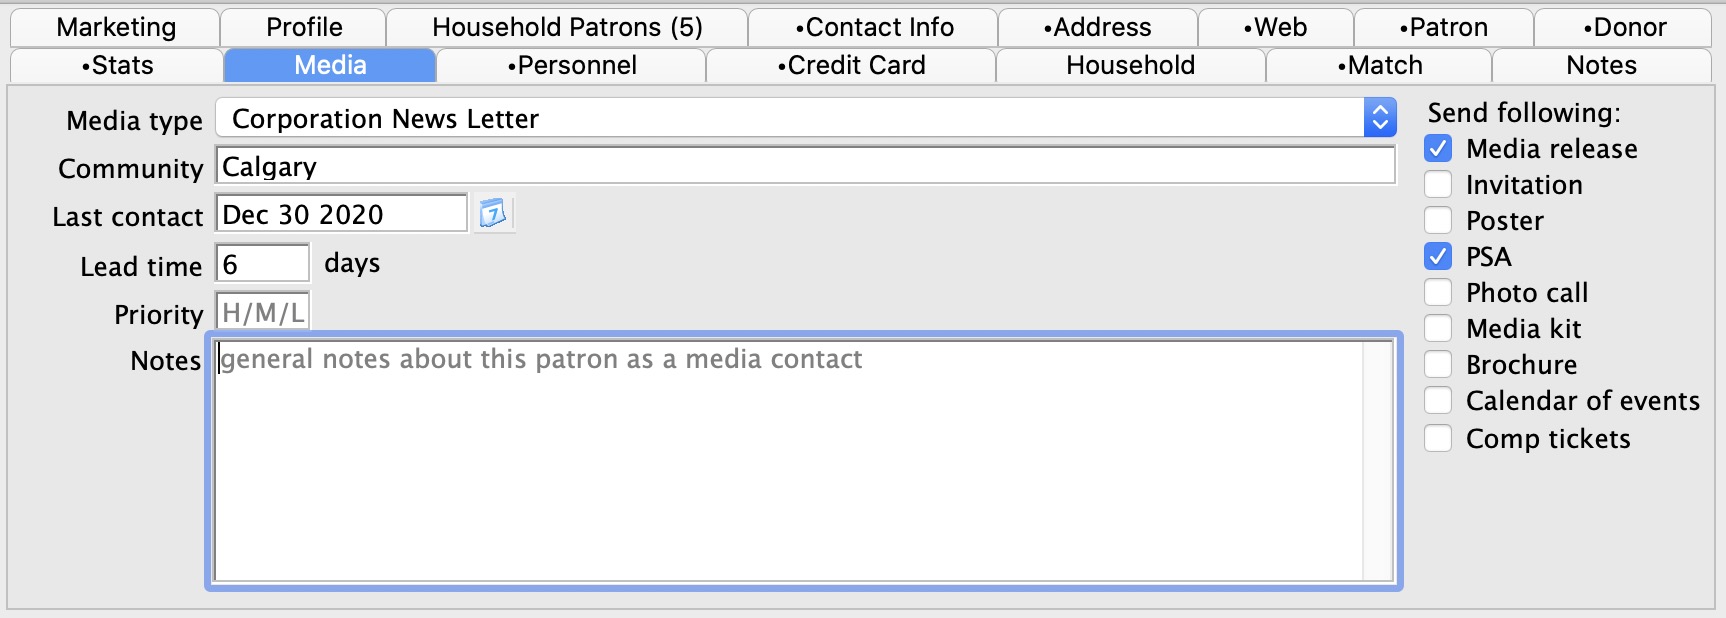
The Media Tab is used to keep track of patron's who are member's of the media and the marketing materials they could best but to use.
Parts of the Media Tab
Media Information |
|
| Media Type | Record the type of media that the patron works with. To select a media type, open the drop down list and click on the desired choice. The list of media type can be altered in the Media Types Code Table. Click here for more information. |
| Community | The area in which the media type spans. Television for example would span the entire city, so the user might put a city name in the community field, or the media could be a community paper and it only spans one or two communities, so the user would put the community name(s) in the field. The Community defaults to the City entered in the patron window. |
| Last Contact | Last time the media member was contacted. |
| Lead Time | Number of days (in advance) the media members need to be aware of an event in order to advertise it. |
| Priority | Rating media contacts for accurate distribution of limited advertising materials. |
| Notes | Relevant notes about the media contact. |
Send Following |
This is what the media member requires in order to properly advertise the event. Add a check mark by clicking in the box next to the required items. |
| Media Release | Does the Media Member require a Press Release? |
| Invitation | Does the Media Member receive an Invitation? |
| Poster | Does the Media Member receive a Poster to display? |
| PSA | Does the Media Member require a Public Service Announcement? |
| Photo Call | Does the Media Member receive Photo opportunities? |
| Media Kit | Does the Media Member receive a Media Kit? |
| Brochure | Does the Media Member receive a Brochure? |
| Calendar of Events | Does the Media Member receive a Calendar of the Theatre's Events? |
| Comp. Tickets | Does the Media Member receive Complimentary Tickets? By
placing a check mark in the Comp Tickets box another field will appear
alongside Comp. Tickets which allows room to define the number of tickets the
media member is to receive. Enter the standard number of complimentary
tickets for this contact. This is a security feature. When the media
member calls to request their complimentary tickets, check
this field to see how many tickets they are to receive.
|
 An entry in this field does not actually
reserve complimentary tickets for the media patron.
An entry in this field does not actually
reserve complimentary tickets for the media patron.
Volunteer Tab
The Volunteer Tab is used to show which patrons are volunteering for an play. Click Here for more information on setting volunteers.
Parts of the Volunteer Tab
| Status | Select the appropriate one of the following:
|
| Passport # | The Passport number of the individual |
| Equity # | The equity number of the individual |
| Height | The height of the individual |
| Weight | The weight of the individual |
| General Volunteer Notes | General notes about the volunteer |
| Last Activity | Displays the year the individual last volunteered |
| Total History | The number of times the individual has volunteered |
| Awarded Hours | Number of hours the volunteer has worked that have been awareded |
| Total Hours | The total number of hours the individual has worked as a volunteer |
Credit Card Tab
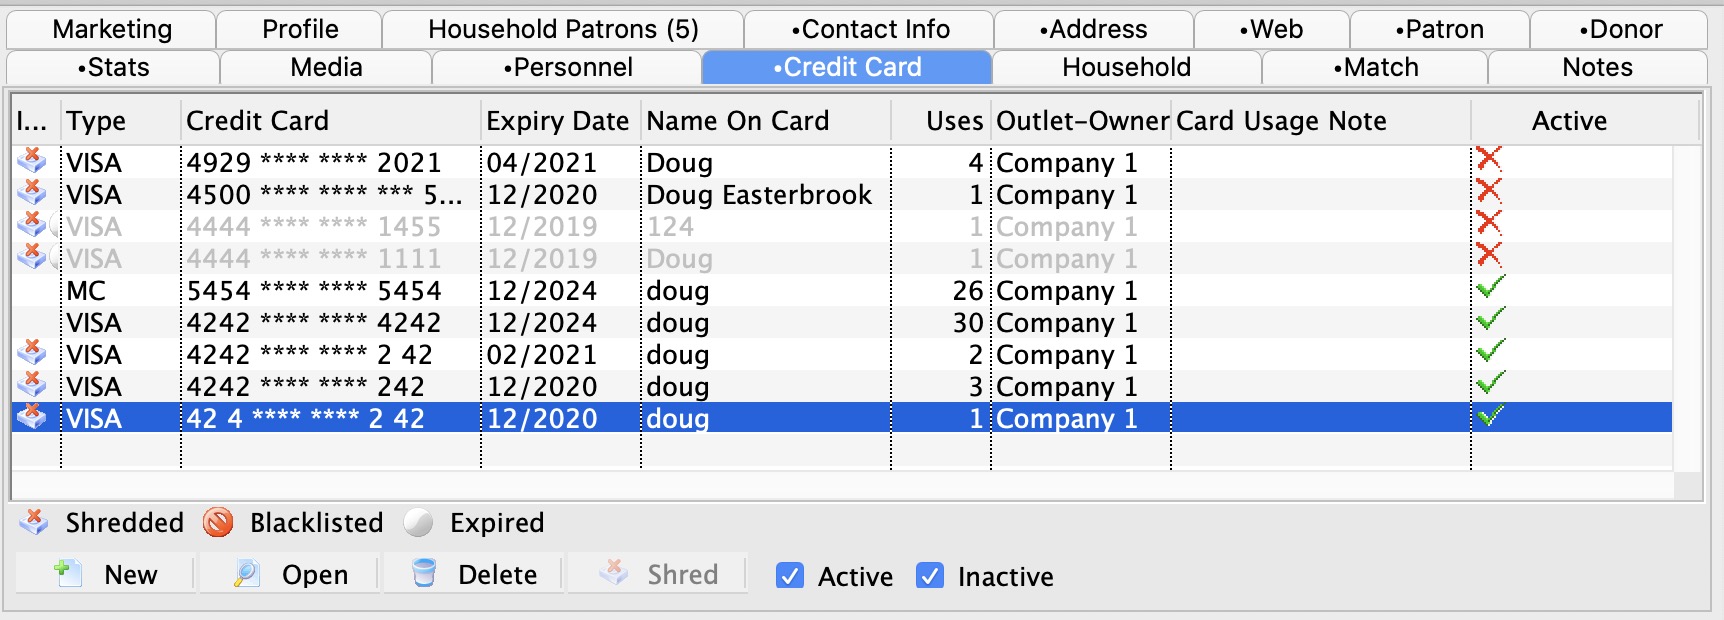
This tab stores the patrons credit card history for records and auditing purposes. Data in this tab is visible to an employee if they have been granted access under Employee Setup.
|
If you want to black list the card and prevent it from being used in Theatre Manager, edit the card and click the black list checkbox |
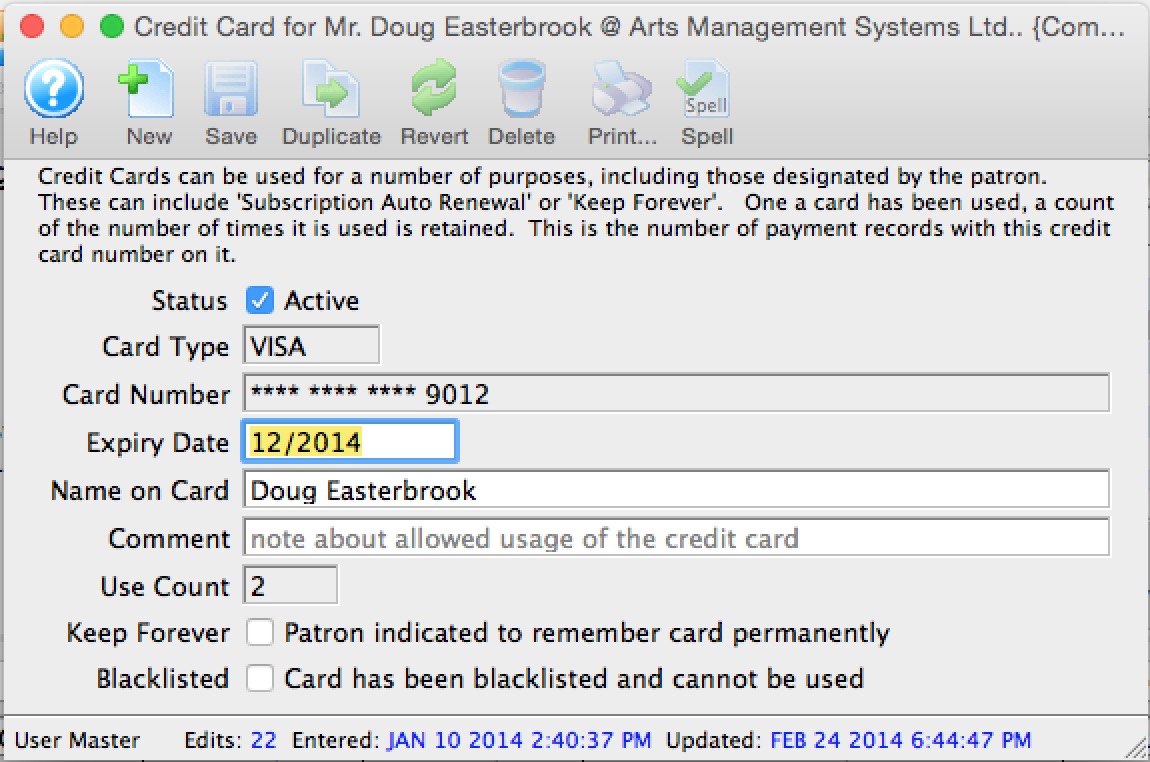
Parts of the Credit Card Tab
| Type | Credit card type. e.g. Visa, Master Card, American Express. |
| Name on Card | Name printed on the credit card used for added security when processing the card. |
| Credit Card | The credit card number |
| Expiry Date | Date the card will expire. |
| Uses | Once a card has been used, a count of the number of times it is used is retained. This is the number of payments records with this credit card number on it. |
|
Adds a new credit card to the patrons file. Click here for more information on Adding New Credit Cards. |
 |
Opens the credit card detail window for editing. Click here for more information on Editting a Credit Cards. |
|
Deletes a credit card from the patron file. Once credit cards without transaction history can be deleted from the patron record. Click here for more information on Deleting a Credit Card. |
 |
Shred the selected credit card records if they exceed the minimum retention policy of # days. Theatre Manager can implement either Schedule "C" or "D" for the SAC. You can define a retention period for credit card information. Click here for more information. |  |
Determines the state of the card and if it can be selected to process credit card transactions. Expired, lost or stolen cards can be set to an inactive state. |
Add New Credit Card
- Open the Credit Card
 tab.
tab.
- Click the New button.
The Credit Card detail window opens.
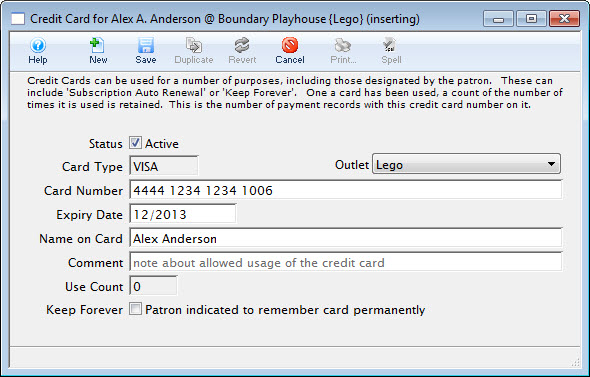
- Enter the credit card number.
Theatre Manager will determine the card type and populate the type into the Card Type field.
- Enter the Expiry Date for the credit card.
- Type the name from the card exactly how it appears.
This is an optional process all though it allows for stronger security when processing the card.
- Enter any comments about the card as needed.
The Use Count will increase as the patron uses the card over and over.
- Click the Save
 button.
- Close the Credit Card detail window.
The card information now appears in the Credit Card tab.
Changing a Credit Card Expiry or Purpose
- Expiry Date for an existing card. A change will affect all future authorizations for post dated payments.
- Name on the card if it was swiped incorrectly.
- Blacklist status - you can black list a card which can be used to prevent this card from being used again.
- If the same card number is in use by other patrons, you may be prompted to also blacklist those patrons.
- Only employees with permissions in functions tab can clear the blacklist status.
|
If you need to change the card number used on future post dated credit cards, please refer to changing post dated credit card. You could change the expiry date using this process. |
- Open the Credit Card tab.
The Credit Card tab is located on the Patron Window.
- Select the Credit Card to be edited.
- Click the Open
 button.
The Credit Card detail window opens.
- Make changes as needed.
- Click the Save button.
- Close the Credit Card detail window.
The card information is now updated in the Credit Card tab.
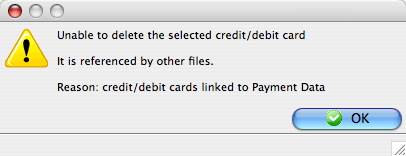
Delete a Credit Card
- Open the Credit Card tab.
The Credit Card tab is located on the Patron Window.
- Select a credit card.
Select a credit card by single clicking on it.
- Click the Delete button. One of two messages will open:
The message below indicates the card has been used for previous transactions within Theatre Manger. For record and auditing purposes the card can not be removed from the patrons record.
This message indicates the card has no previous transactions history within Theatre Manger.It can deleted from the system.
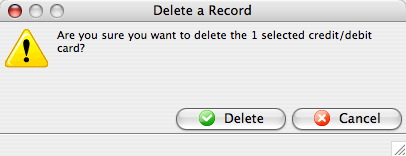
- Click the Delete button.
The credit card is now removed from the patrons file.
Household Tab
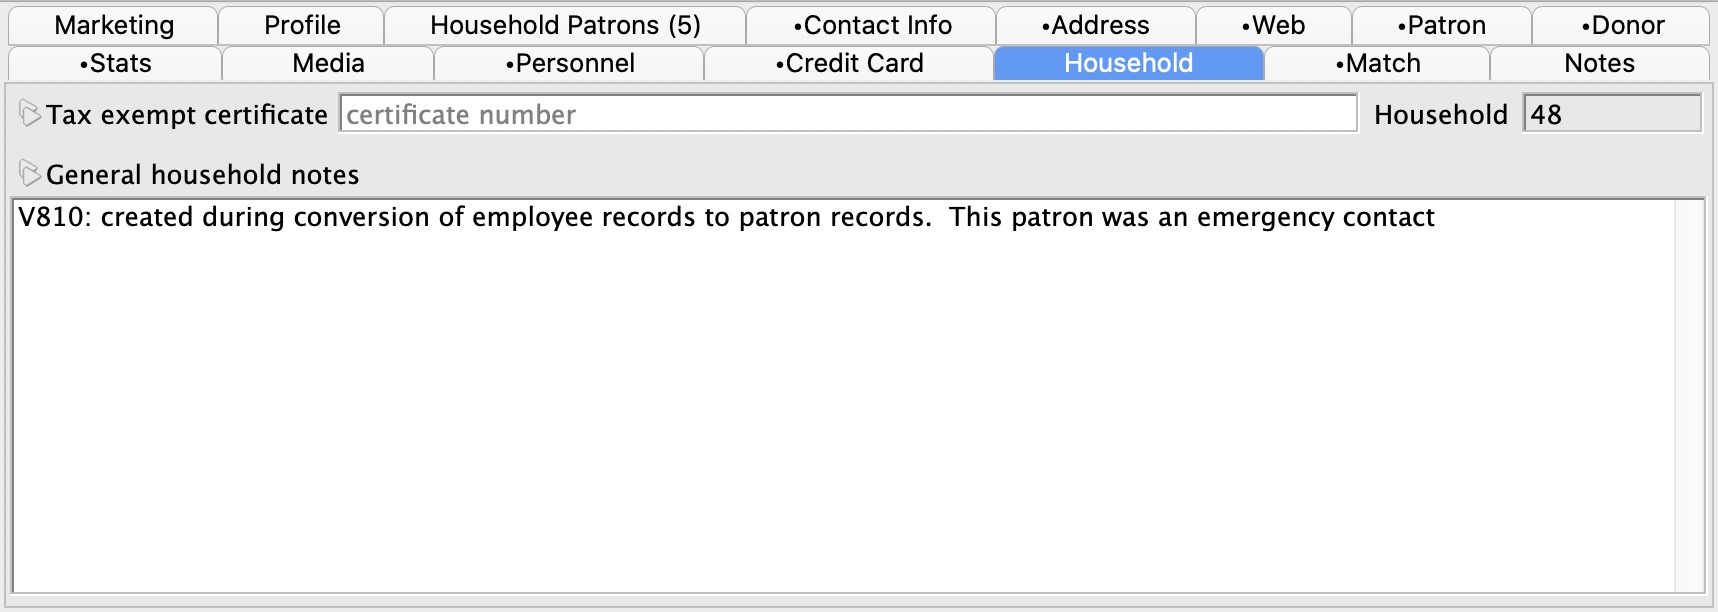
This tab stores information related to all members of the household. Changes to this tab will effect all members of the household.
Parts of the Household Tab
| Tax Exempt Certificate | When entered Theatre Manager will not charge taxes to the patron. |
| Household General Notes | Notes about the household. Notes entered in this field will be viable in the household tab of each household member. Notes changed in one record will effect all records. |
Match Tab
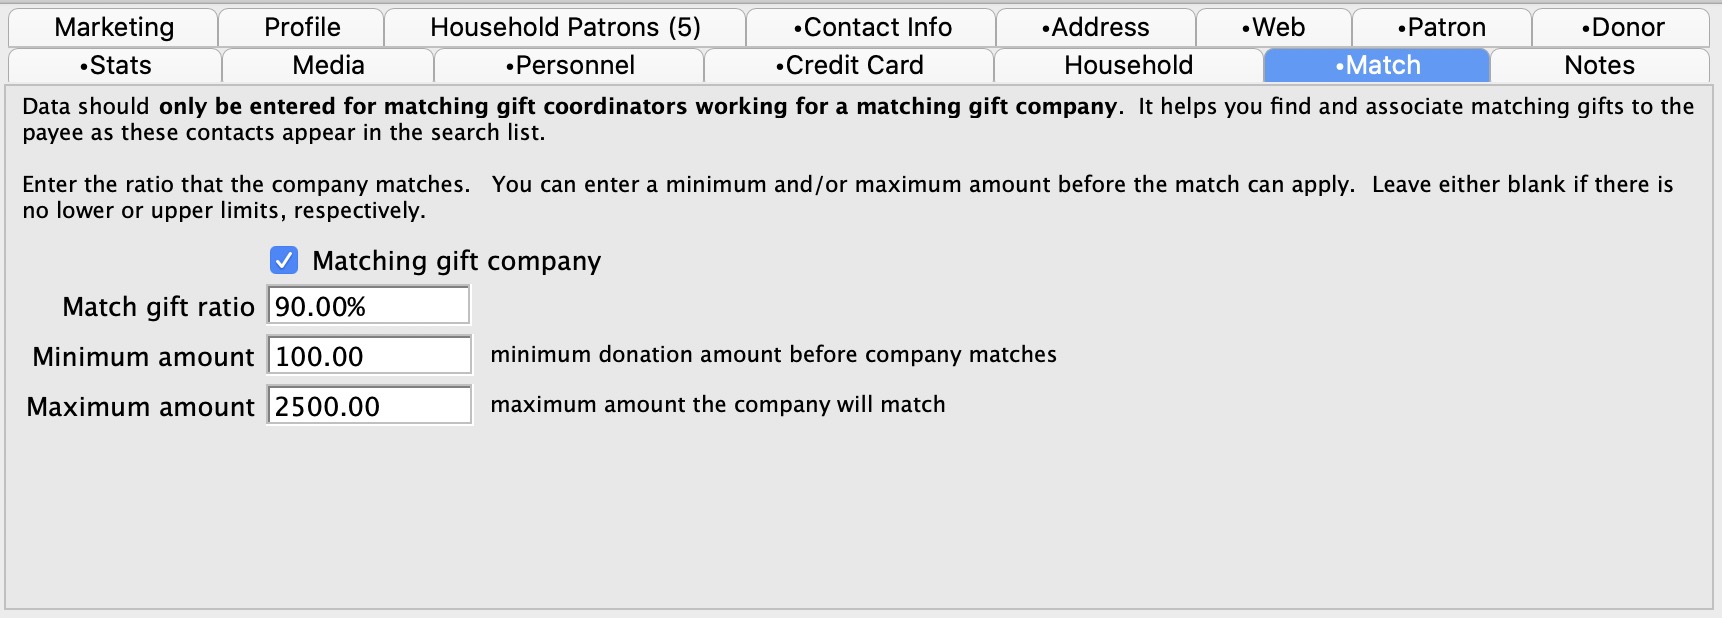
The Match tab allows you to indicate that a particular patron record is that of a Matching Gift Company.
Parts of the Match Tab
| Matching gift company | A checkmark indicates that this patron record is of a Matching Gift Company. |
| Match gift ratio | The ratio of the donor's gift that the company will match. |
| Minimum amount | The minimum threshold below which the company will not match (if applicable). This field is optional. |
| Maximum amount | The maximum threshold above which the company will not match (if applicable). This field is optional. |