Ticket Printing
- Defining the Ticket Faces, click here.
- Setting up your ticket printers, click here.
- If you are having trouble with printing to the ticket printer, click here.
Emailing Tickets from the box office
- emailing of PDF tickets from the box office after setting up company preferences (to allow email of PDF tickets) and then following instructions below
- printing of PDF e-tickets at the box office if necessary
- emailing invoices from the box office
 |
If you find you cannot send an e-ticket, please refer a list of possible reasons why it cannot |
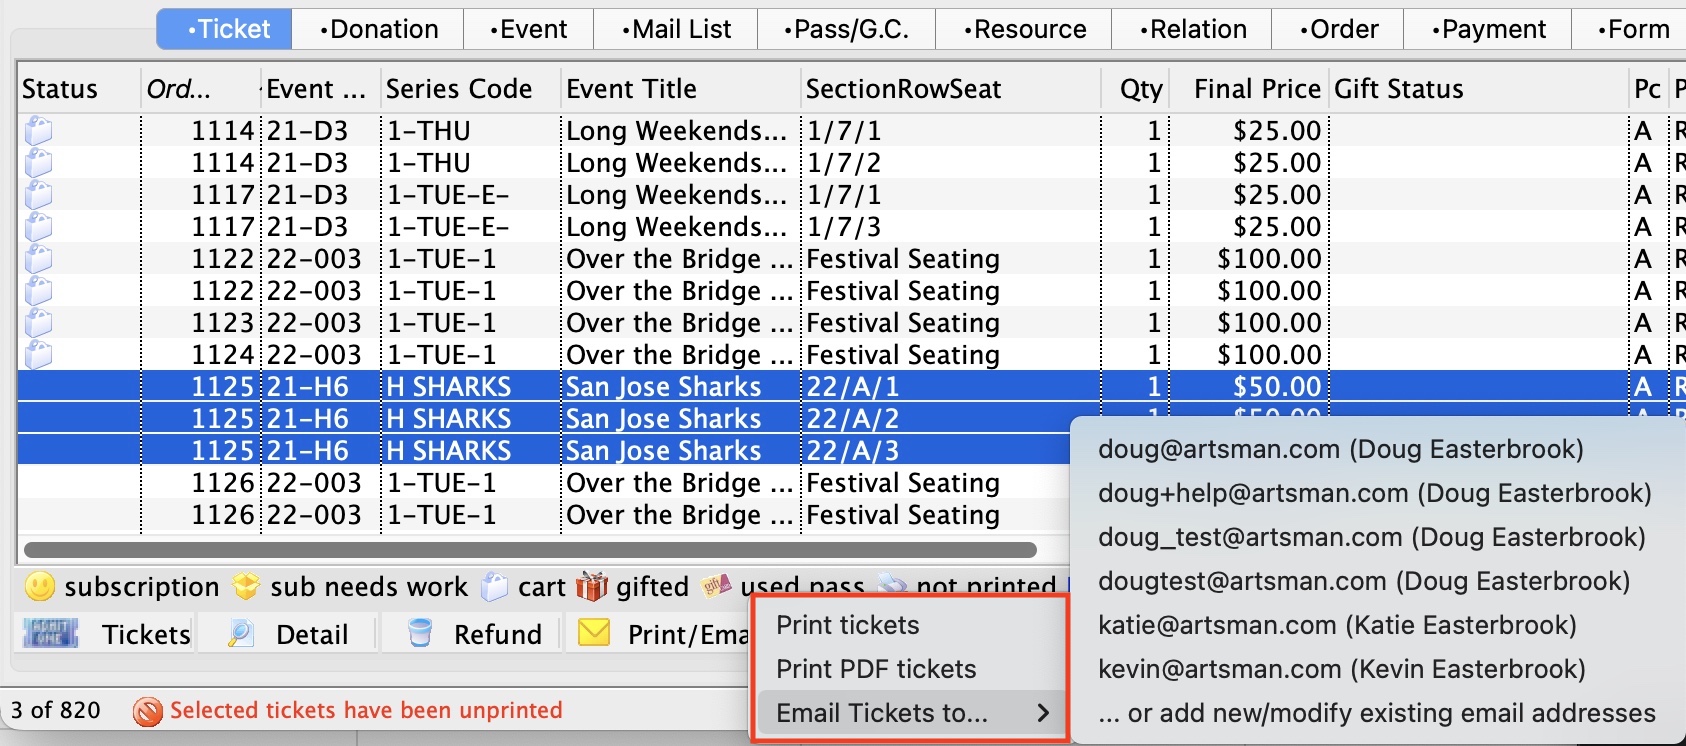
Emailing (or printing) PDF tickets from box office
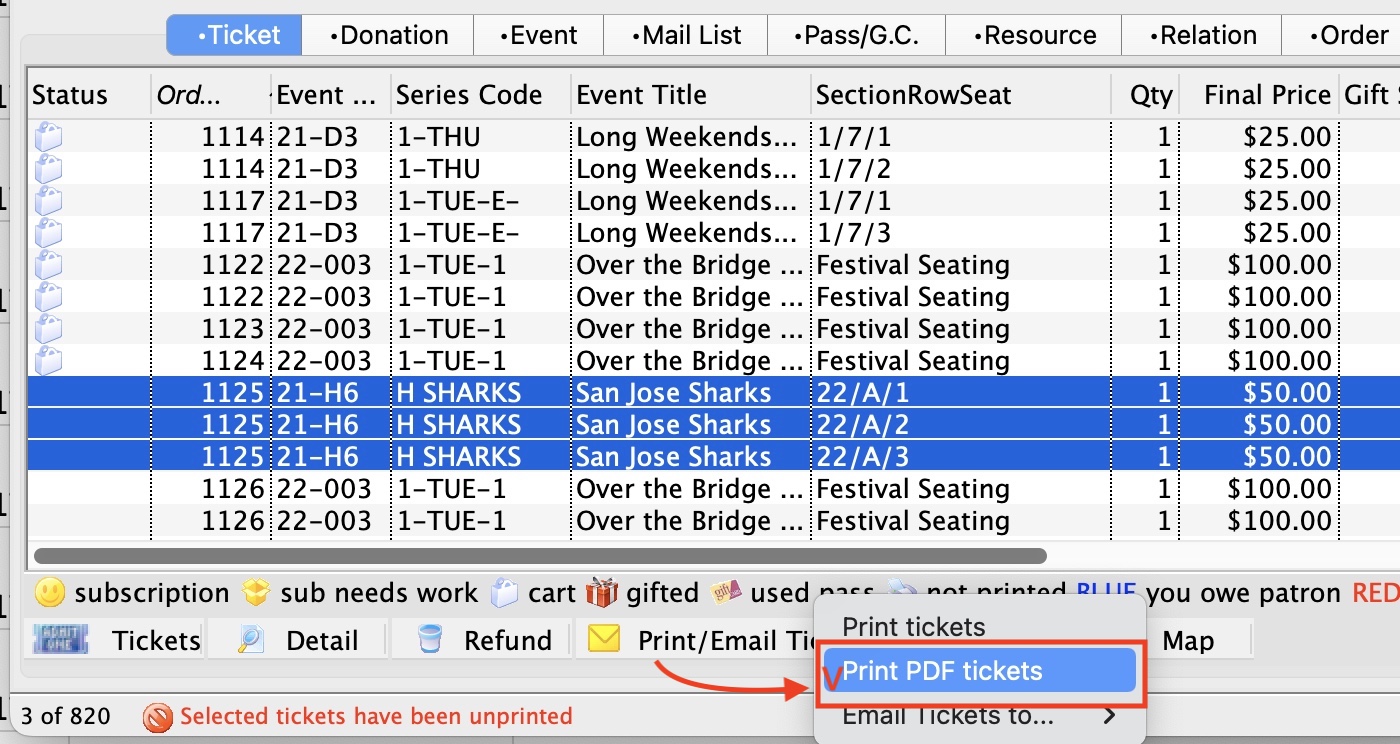
If emailing tickets from box office is enabled (and providing tickets meet the criteria described in the setup screen help), then tickets can be printed from:
- The patron 'ticket' list (see image below - the print tickets button gets replaced by a print/email tickets button)
- The order window on the payment screen
- The batch ticket print process
 If you select email tickets, or print PDD tickets and the system determines that they cannot be emailed or printed, you'll see a message similar to the image at the right.
Please refer to Factors That Prevent Tickets from being emailed for more information in this message.
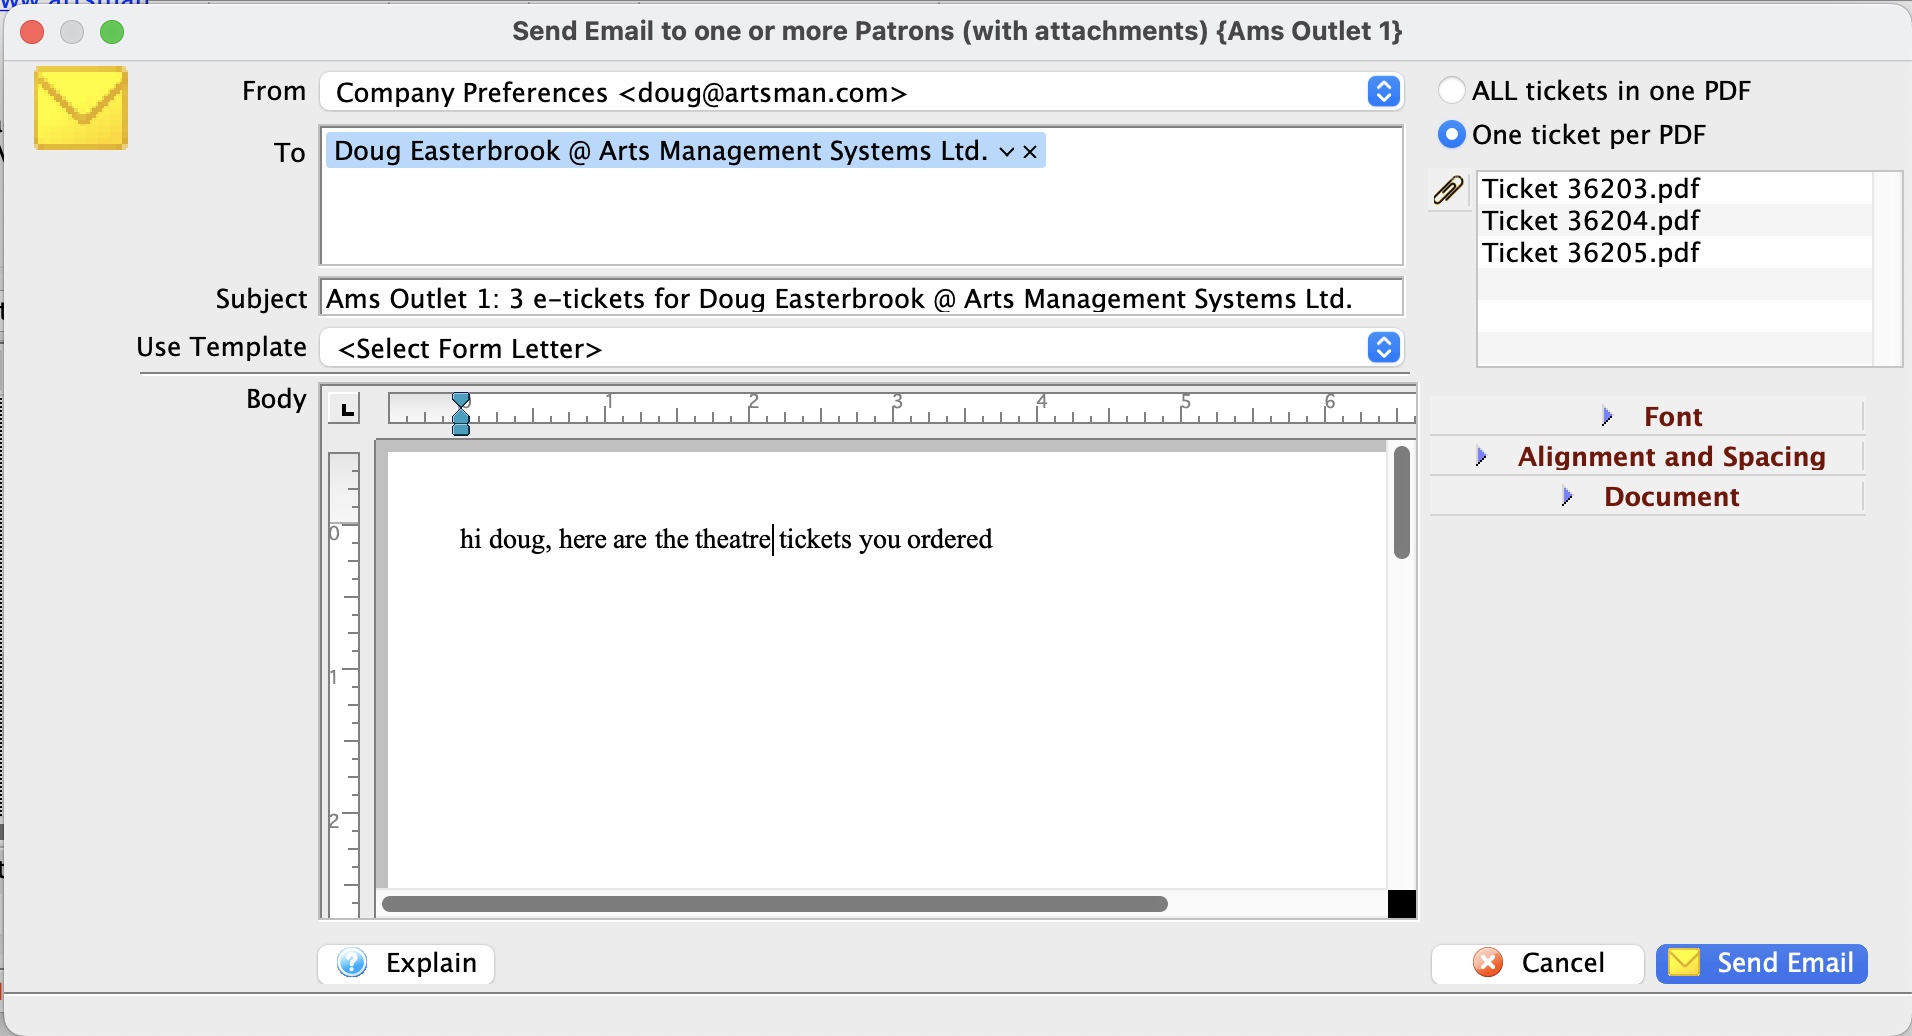
Emailing PDF e-ticket options
When emailing tickets, the options on the window below are:
- Tickets as attachments
Selecting how you want the tickets attachments on the right side will show the feedback in the attachment list. The default for this window is set in company preferences, web options, Ticket Delivery Options/Fees
Choices are:
- ALL tickets in one PDF - placing all tickets in a single PDF attachment - which will take all the tickets that are printed and put them into one PDF document to send to the patron. This might be useful for group sales.
- One ticket per PDF - as individual PDF attachments - which creates one PDF attachment per ticket and adds it to the email being sent
- Templates and email content:
- From: specify if the PDF tickets are coming from you or from the web listener user id
- To: allows selection of any of the email addresses that belong to the patron.. If you want to change the default, type part of the name or email address and the system will present valid selections to you for that patron and/or household
- Subject: is the subject of the PDF e-ticket email
- Template: if you have set up emails that can be used as part of emailing to a patron, then pick a form letter template to fill out the letter. The text will be placed in the body and can be edited.
- Body: is the text of an message that forms the body of an email. You can free form the letter, or use something from a template, or select a template and modify the text in any way you see fit
Printing PDF tickets at the box office
 Normally you would use a thermal ticket printer to quickly print tickets for a performance while at the box office. The cost per ticket is quite a bit lower with thermal tickets, and some patrons consider thermal tickets to be the only "real" tickets.
However, it is still possible to print a PDF e-ticket on a local laser or inkjet printer if:
- you happen to be in a remote location without a ticket printer, -or-
- your ticket printer ip cannot be set or cannot be connected to on the network for any reason (refer to IP setup for ticket printers if this is the issue) -or-
- if it breaks down (a generally rare occasion)
Steps to print an e-ticket ticket to a local printer
- If you are given the option of printing tickets for a patron, click the button Print/Email Tickets
- Select Print PDF Ticket from the submenu
-
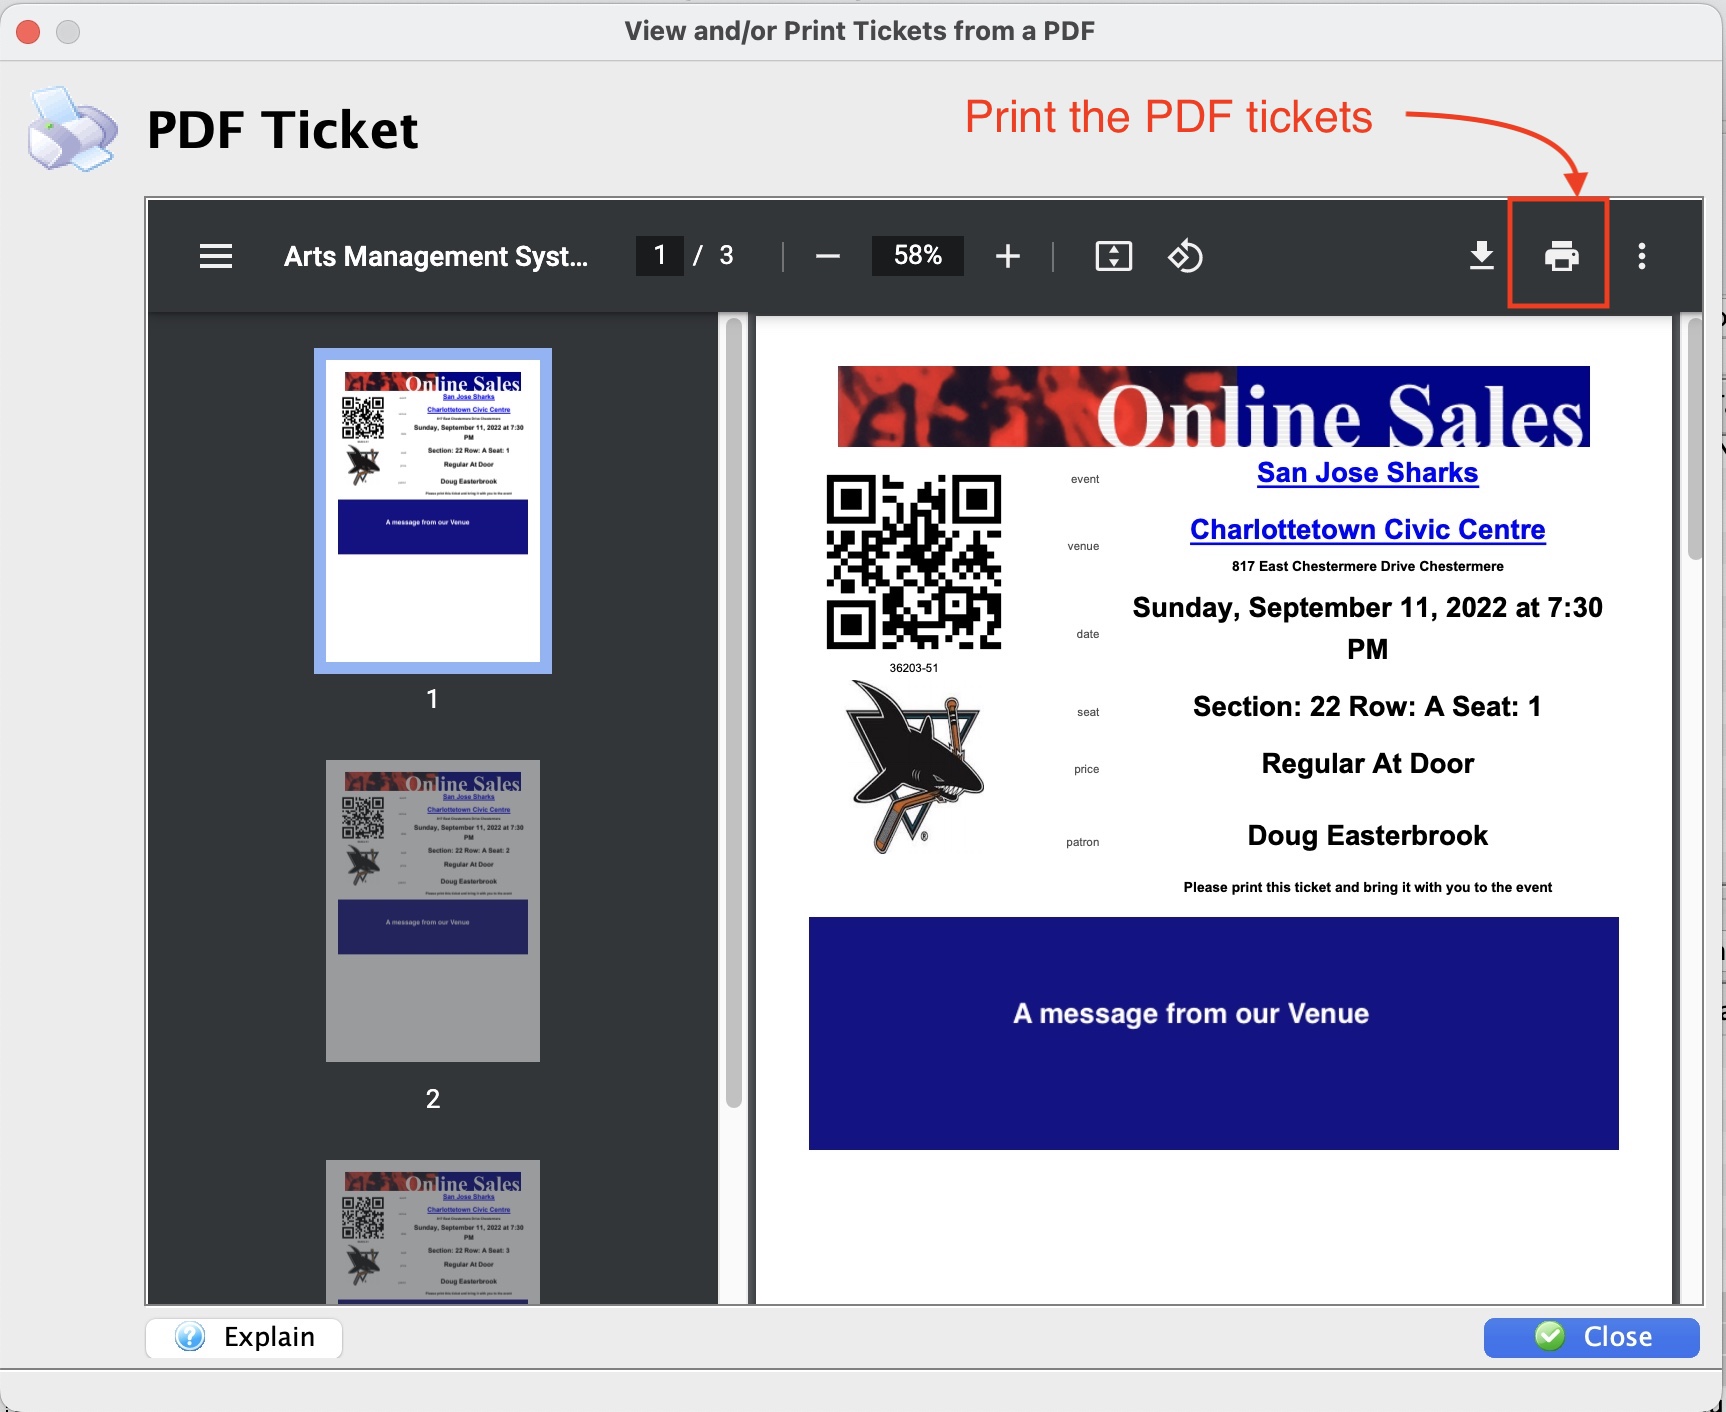
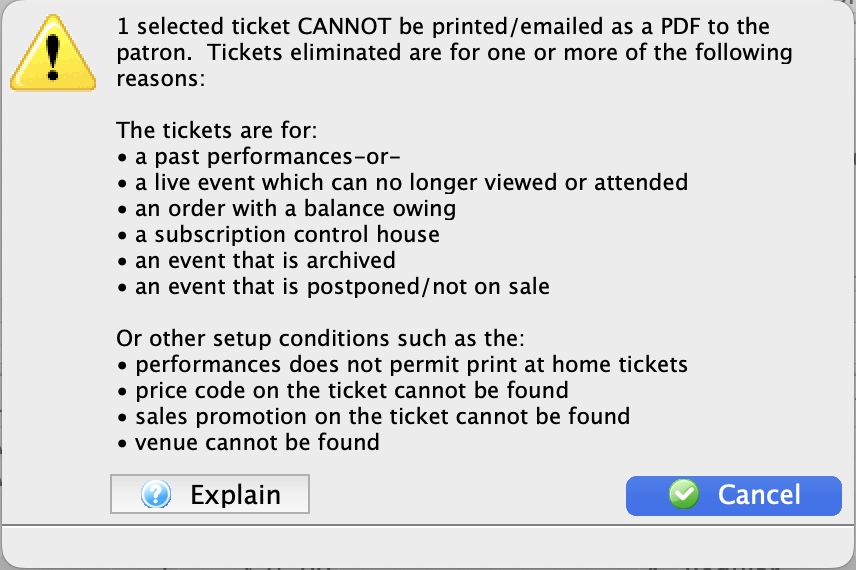 A PDF Ticket window will open similar to below. If tickets cannot be printed (eg there are no print at home or they are for a past performance), you will see a message indicating a list of possible reasons will appear.
Please refer to Factors That Prevent Tickets from being emailed for more information in this message.
- When you see the PDF ticket widow, you will see a thumbnail of tickets and an image of each ticket on the screen. You can enlarge the window if need be. At the top tight of the window above the ticket images are two icons:
- Printer Icon click to print the ticket to a selected desktop laser or inkjet printer. These tickets will not print on your ticket printer
- Download Icon click this if you want to download the ticket to disk
|
NOTE: as soon as you see the tickets as a PDF, they have been marked printed by Theatre Manager. if you close this window without printing, you will need to Unprint the tickets on the patron window before you can print them again. |
Printing Season Tickets
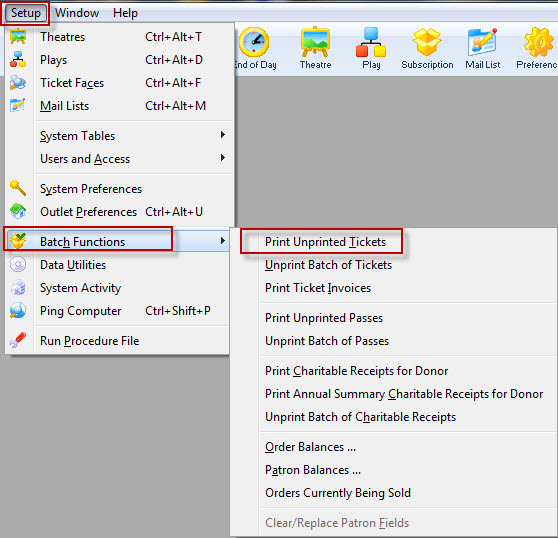
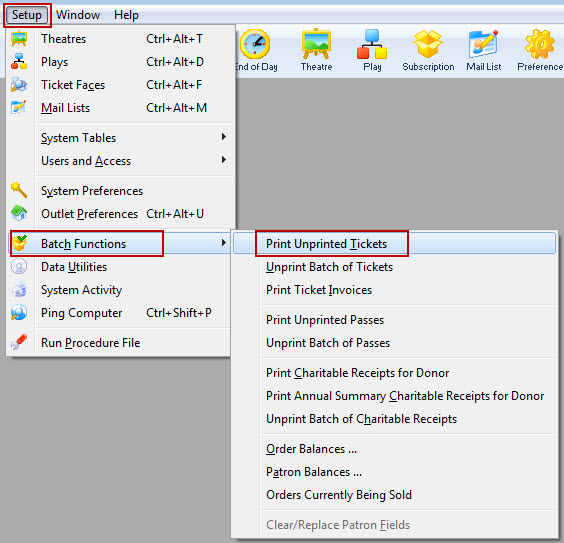
- Choose Setup >> Batch Functions >> Print Unprinted Tickets.
The Batch Ticket Printing window and the Parameters window will both open.
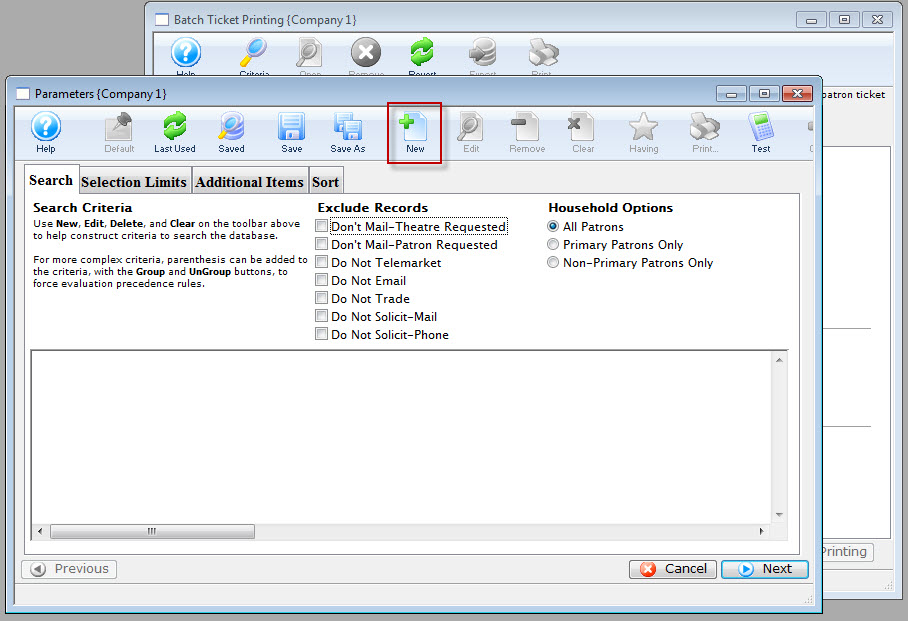
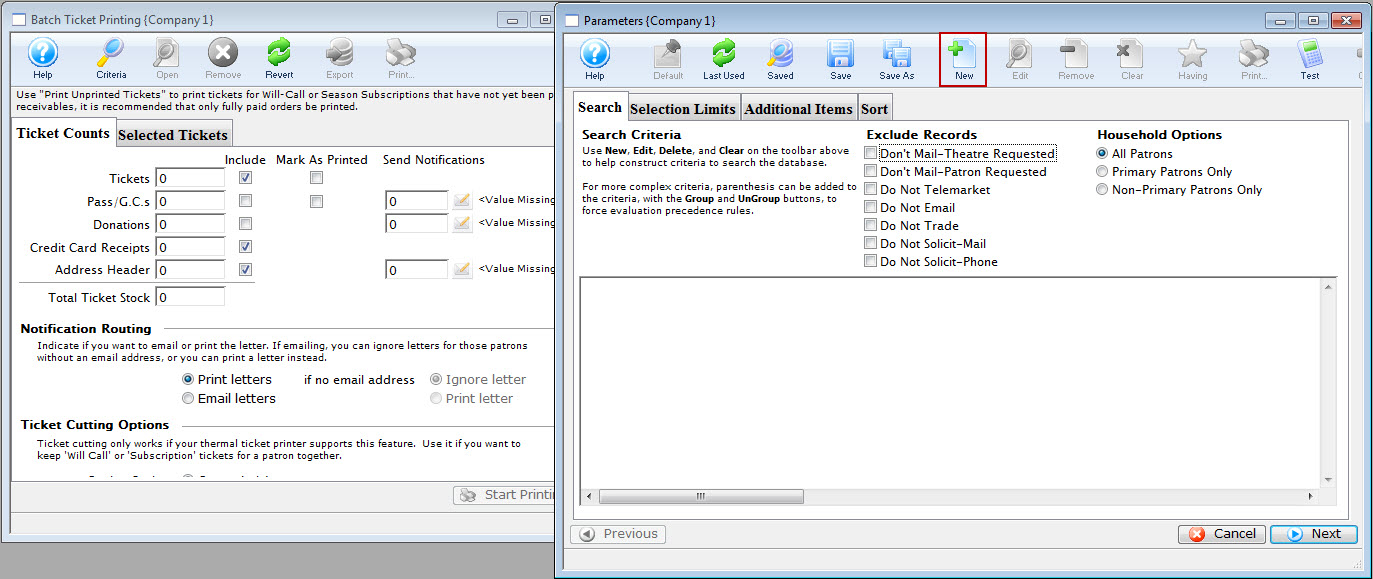
- Click the New
 button
to add a new criteria to the parameters window.
button
to add a new criteria to the parameters window.
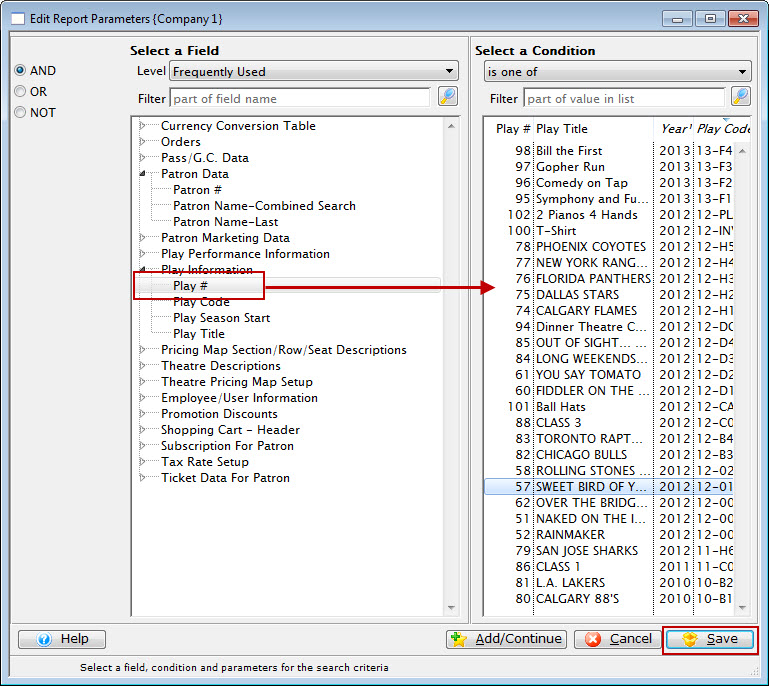
The Add/Edit Criteria window opens.
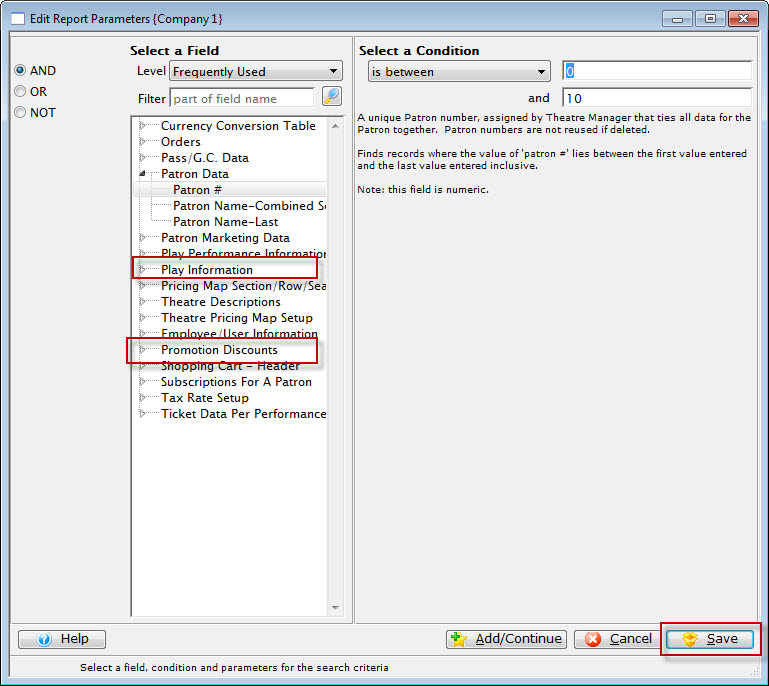
- Select the search Criteria for the tickets to print and
press the Save
 button.
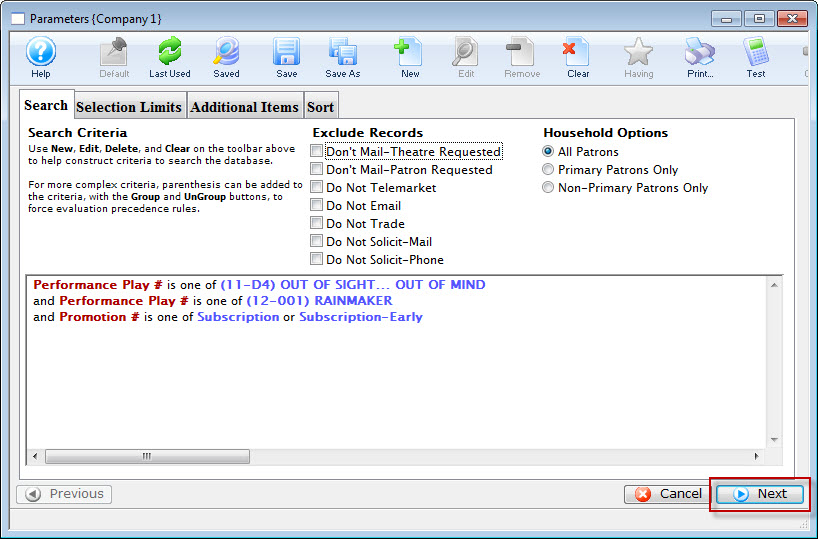
Click here for more information on report criteria. The example above shows criteria that would print all unprinted tickets with the performance codes matching those of the season subscription and with either a subscription or early-subscription price code. To get this criteria, select Promotion # on the left hand side, and select Subscription and Early Subscription on the right hand side.
- Click the Next
 button.
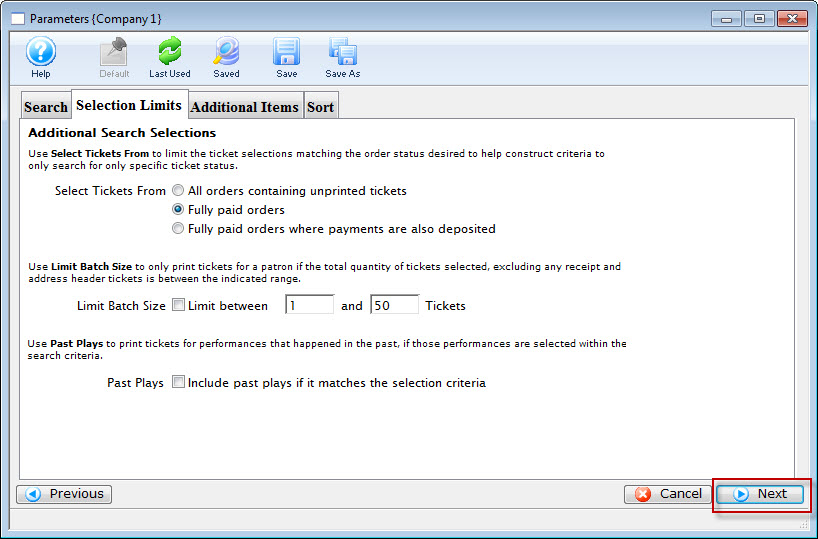
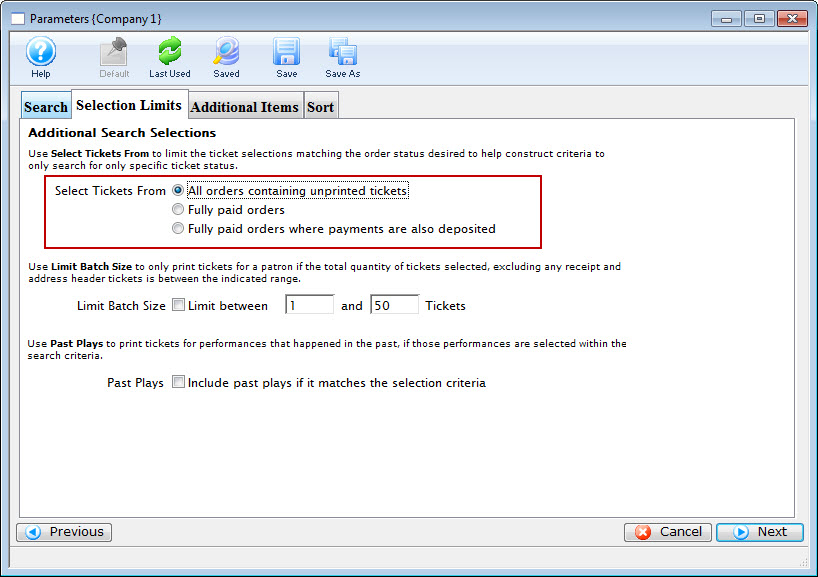
- Choose the option for "All Orders containing unprinted orders."
Select Tickets From
All Orders containing uprinted tickets
Will only select tickets meeting the criteria and that are marked as unprinted.
Fully paid orders
Will only select tickets meeting the criteria and that the order is fully paid for.
Fully paid orders where payments are also deposited
Will only select tickets meeting the criteria and that the order has been process through the End of Day.
Limit Batch Size
Limit between
This allows the batch to print only patron orders that are between the minimum and maximum limit.
Past Plays
Include past play if it matches the search criteria
This will allow tickets to be printed for performances that have occurred already provided they meet the criteria.
- Click the Next button.
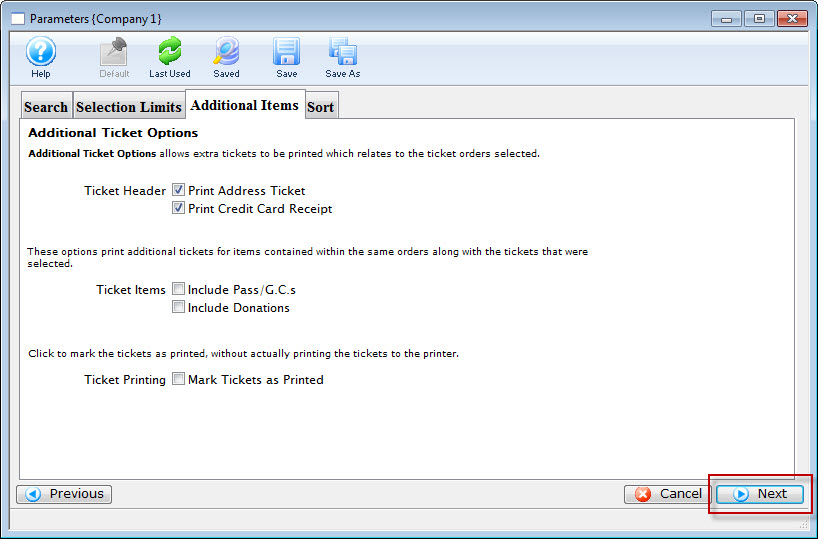
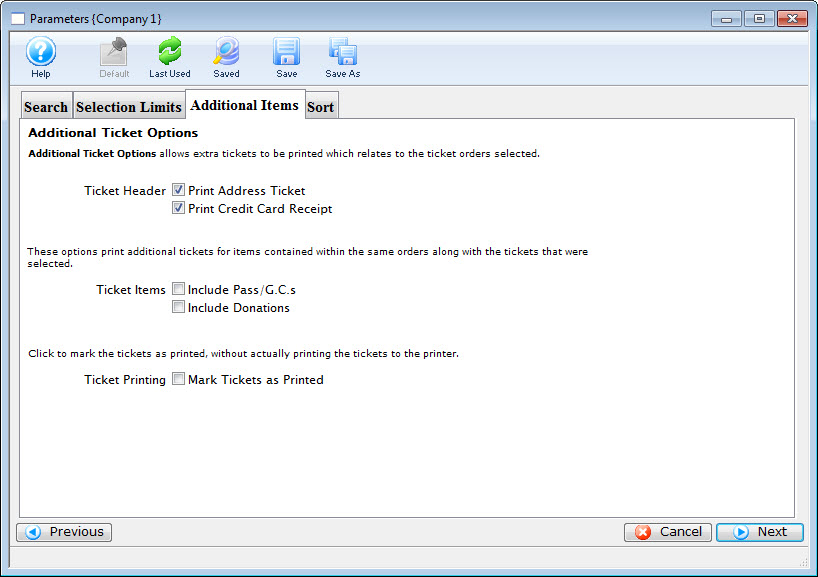
- Select the applicable data for the tickets to print.
Ticket Header
Print Address Ticket
Prints an additional ticket containing the address information of the patron.
Print Credit Card Recipt
Prints an additional ticket containing the credit card receipt if a credit card was used to pay for the order.
Ticket Items
Include Memberships
Prints an additional ticket if a Membership purchase was included on the same order.
Include Donations
Prints an additional ticket if a Donation purchase was included on the same order.
Ticket Printing
Mark Tickets as Printed
This option will print no tickets, but still mark the tickets as printed.
- Click the Next button.

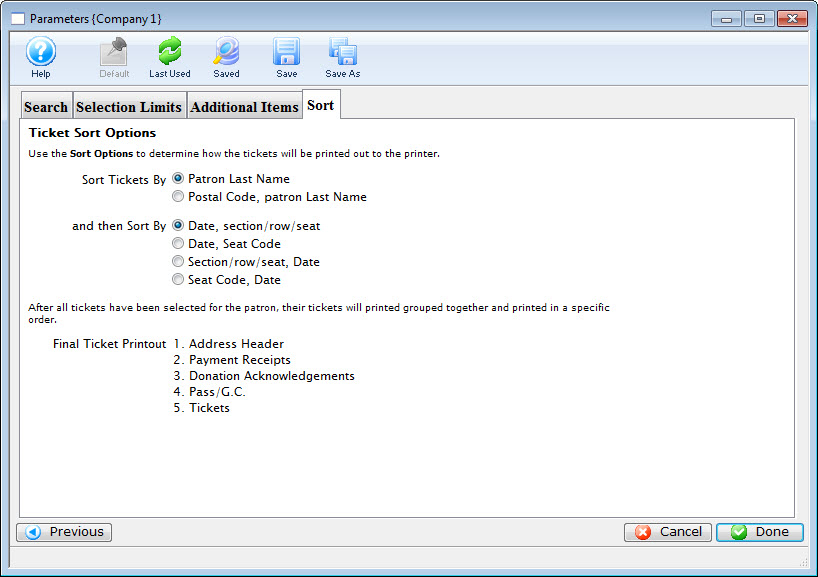
Sort Tickets By
Patron Last Name
All tickets will print in alphabetical order based on the patron's last name.
Postal Code, Patron Last Name
All tickets will be grouped together by postal code, and each group will be in alphabetical order based on the patron's last name.
and then Sort By
Date, Section/Row/Seat
For tickets to multiple performances, the individual tickets will be sorted by the performance date and then the seats.
Date, Seat Code
For tickets to multiple performances, the individual tickets will be sorted by the performance date and then the seat codes.
Section/Row/Seat, Date
For tickets to multiple performances, the individual tickets will be sorted by seat and then by the performance date.
Seat Code, Date
For tickets to multiple performances, the individual tickets will be sorted by seat code and then by the performance date.
- Click the Done
 button.
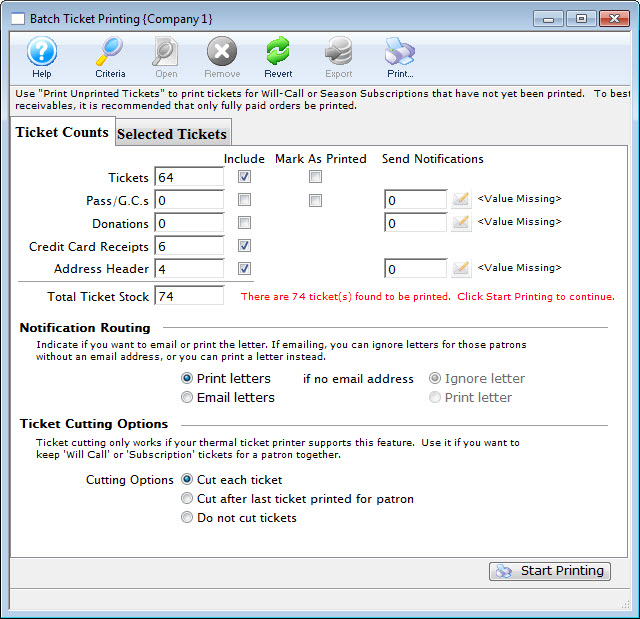
You are returned to the Ticket Printing window.
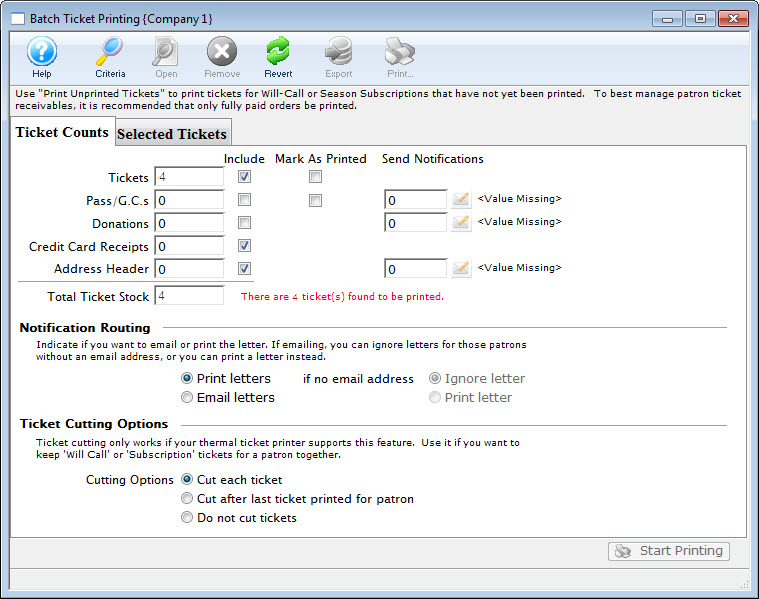
- This window will display the total number of tickets based on the
criteria, and allow any final changes to be made.
Click here for more information about this window.
- Click the Start Printing button when the batch is ready to print.
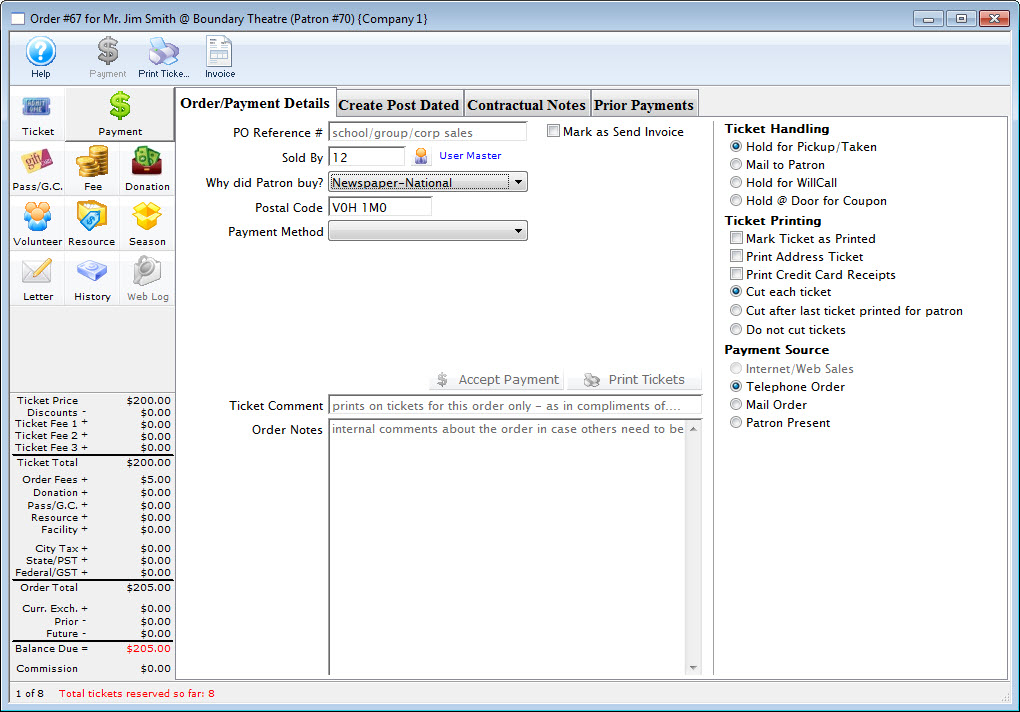
Printing Tickets at Time of Purchase
To print tickets the ticket printer preferences need to be set and the ticket printer configured. Click here for more information on configuring Practical Automation printers and Click here for more information on configuring BOCA ticket printers. Click here for more information on setting Employee Ticket Printer preferences.
- Purchase tickets the patron wants to buy.
Click here for information on buying tickets.
- Enter the method of payment and other required information on the Payment Window.
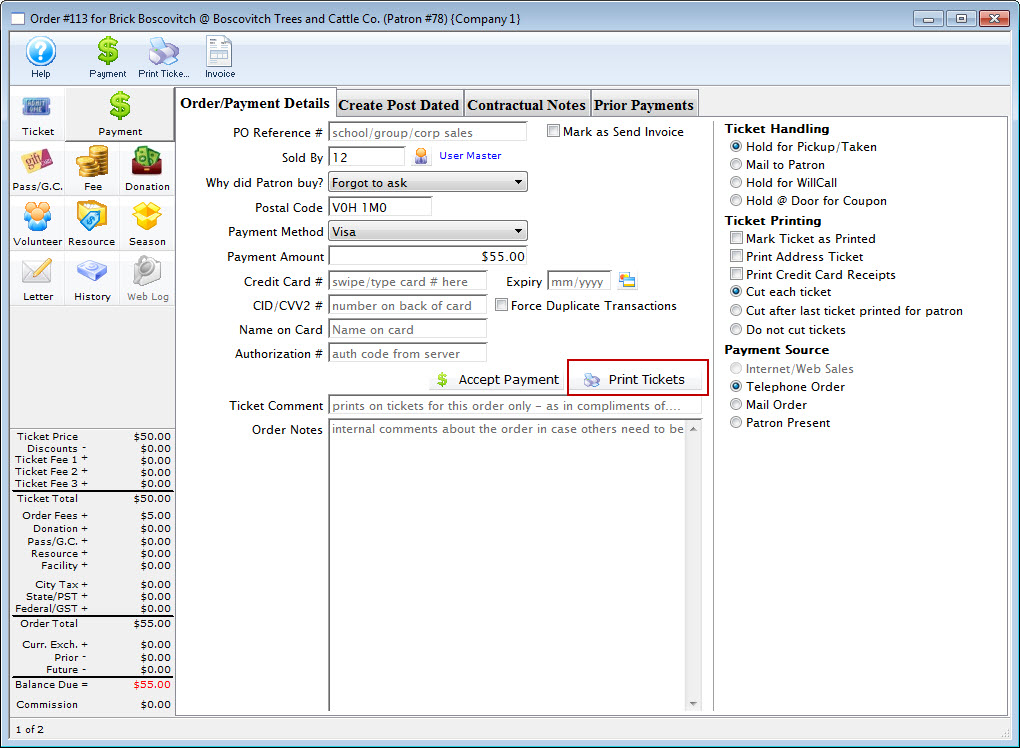

Note the two options on the right. If you select print an address ticket and click print tickets, the address ticket along with the admission tickets will be printed.
Click here for more information on creating a payment method.
- Click the Print Tickets
 button.
Clicking print accepts the payment information, prints the tickets to the specified printer, closes the ticket purchase windows and returns to the Patron Window with the purchased tickets displayed.
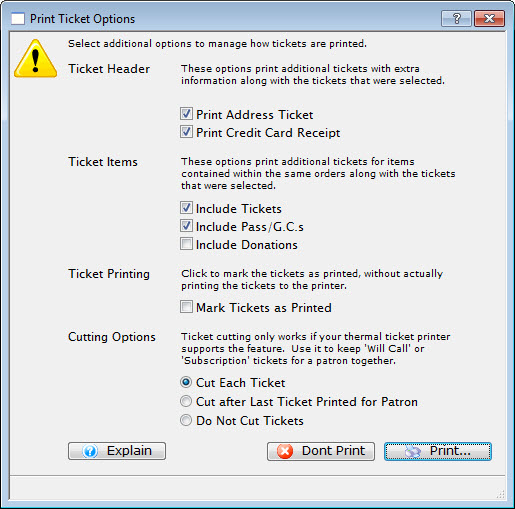
Print Ticket Options
During the payment process, there are options for how the tickets will be printed. Some options depend on your Box Office policy, while others depend on the type of printer you may have. Most Practical Automation printers automatically cut after each ticket face is printed.
Box Office policy items include:
- Mark Tickets as Printed
- Print Address Ticket
- Print Credit Card Receipts
These options can be defaulted in Setup->Company Preferences on the Ticket Faces tab.
Printer hardware options include:
- Cut each ticket
- Cut after last ticket printed for patron
- Do not cut tickets
The Ticket Printing options appear on the right hand side of the Payment window.
Options in Ticket Printing
| Mark Tickets as Printed | This option will mark the tickets as printed, but not print them. This is useful when you are simply tracking attendance and do not want to actually print tickets for the event. This setting will apply to all tickets within the order. Optionally, you can set "Mark tickets as Printed (but do not print)" in the Event setup. For more information on this setting in Event setup click here. |
| Print Address Ticket | This option will print an address ticket for the patron to whom the order was sold. The primary address in the patron record will be used. In order to print a credit card receipt, the specific credit card receipt ticket face must be identified in Setup>>Company Preferences on the Ticket Faces tab. For more information on ticket faces click here. For more information on the Ticket Faces tab, click here. |
| Print Credit Card Receipts | This option will print credit card receipts if a credit card (or multiple cards) were used to pay for the order. In order to print a credit card receipt, the specific credit card receipt ticket face must be identified in Setup>>Company Preferences on the Ticket Faces tab. For more information on ticket faces click here. For more information on the Ticket Faces tab, click here. |
| Cut each ticket | If your printer allows tickets to be printed without cutting them, this option instructs the printer to cut after each ticket (standard cutting). |
| Cut after last ticket printed for patron | If your printer allows tickets to be printed without cutting them, this option will cut a group of tickets after each patron's order is complete. When batch printing tickets, this option can be useful to group tickets for a patron together and provide a "fan-fold" ticket set for each patron. |
| Do not cut tickets | If your printer allows ticket to be printed without cutting them, this option will not cut tickets at all. This can be used for Season Subscription tickets so they can be mailed to the patron in a "fan-fold" format. |
Printing From the Plays and Dates Window
- Open the Plays and Dates Window.
Click here to learn how to access this window.
- Find the play to print tickets for.
Click here to learn how to find plays.
- Click the Attendance
 tab.
tab.
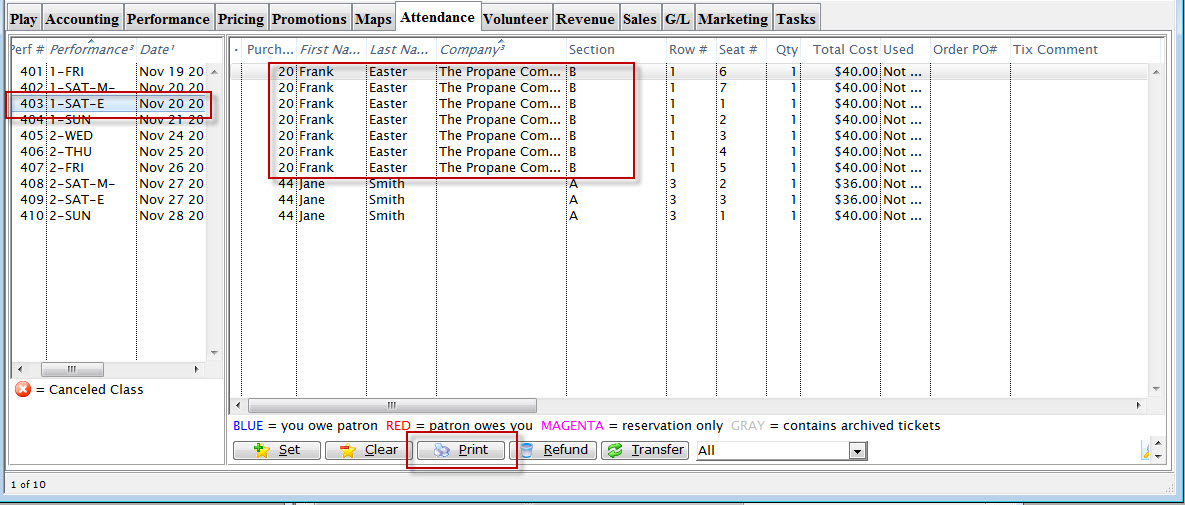
- Select the performance to print tickets for.
Select the performance from the left of the window by single clicking it.
- Select the ticket(s) to print.
- Click the Print Tickets
 button.
- Confirm the printer setup.
Click here for more information.
- Click OK / Print on the printer setup window.
The tickets will print and the user will be returned to the Plays and Dates Window.
Printing Individual Tickets
After purchasing tickets, the tickets will appear in the ticket display area of the Patron Window.
- Find the patron to print tickets for.
Click here to learn how to find patrons.
- Click the Ticket
 tab.
tab.
- Select the ticket(s) to be printed

- Click the Print button.
The tickets will now be printed.
Holding down the <OPTION> key (Mac) or <CTRL> key (PC) when printing tickets will open another window allowing for further ticket printing options.
If the order on which these tickets reside is marked as Reservation Only, when the tickets are printed, the order will be taken off of Reservation Only, and an Accounts Receivable will be created for these tickets.
Reprinting Tickets
There are two options which can be used to reprint tickets either reprint the tickets of an individual patron or reprint an entire batch. Both methods require the user to "Unprint" the tickets then print the again.
Individual Patron Tickets
- Find the patron to reprint tickets for.
Click here to learn how to find patrons.
- Select the tickets to reprint.

- Click the Un-Print
 button.
There are security settings in Theatre Manager to enable the unprinting of tickets. Click here to learn more about security features.
The tickets will be unprinted. Keep the tickets selected.

- Click the Print button.
- Confirm the printer setup and click the Print Button.
The tickets will be reprinted.
Searching for Tickets
- Open the Ticket List Window.
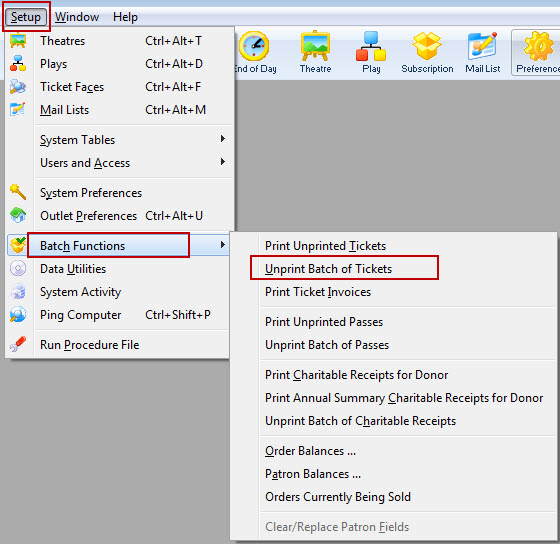
This is done through the Setup >> Batch Functions >> Unprint Batch of Tickets.
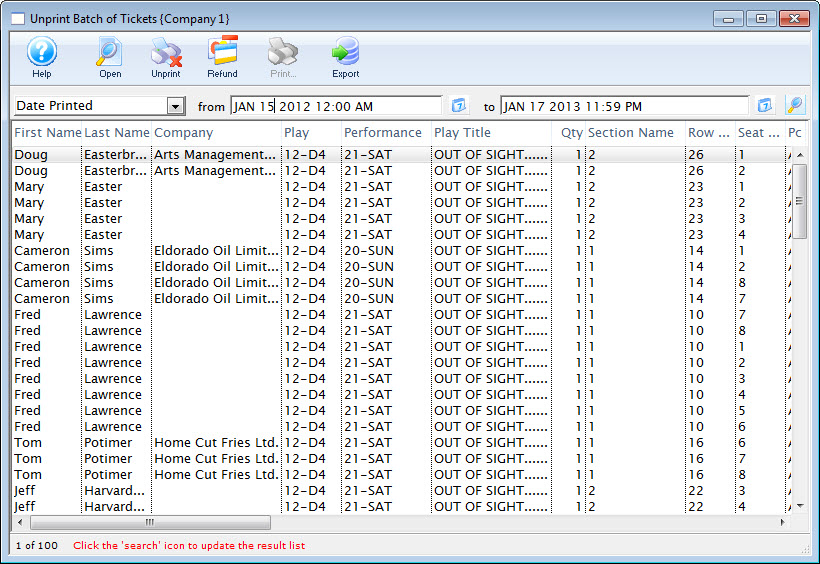
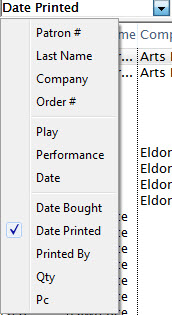
- Select the parameter you would like to search by.
Use the pull up menu in the upper right corner of the window.
- Enter your search criteria in the From and To Fields.

- Click the Search
 button.
All results matching your criteria are displayed in the window.
You can now view the ticket details, unprint, refund, or repost tickets from this window. Click here for more information about unprinting tickets. Click here for more information about refunding tickets.
Unprinting Ticket
Unprinting tickets sets the print status of the selected tickets to not printed.
This is done through the Setup >> Batch Functions >> Unprint Batch of Tickets.
Click here for more information on searching for tickets.
 button.
The tickets are reset to unprinted.
Printing from the Patron Window
The Patron's tickets tab shows a summary of all tickets bought by the patron. They may be shown by different types and years using the pull down bar in the bottom left corner. Refer to Examining Purchases if the user cannot view patron tickets. For a description of the buttons on this window and the procedure to sell a ticket are described in Selling Tickets.
To print a ticket from the Patron tickets tab, you perform the following steps:
- Find the patron you want to print the tickets for.
Click here to learn how to find patrons.
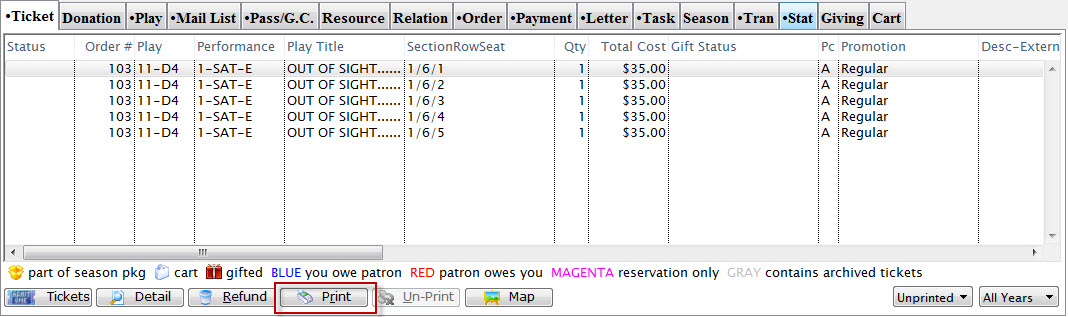
- Highlight the tickets to print and click the button.
The Print Ticket Options window opens.
Review the options.
- Click the Print button.
Will Call Ticket Printing
Ticket printing for Will Call tickets (tickets to be held at the door for patron pickup the night of the show) is a simple batch print of tickets using the following method.
- Access Print Unprinted Tickets is through the Setup >> Batch Functions menu.
The Batch Ticket Printing window and the Parameters window will both open.
- Click the New button
to add a new criteria to the parameters window.
The Add/Edit Criteria window opens.
- Select the search Criteria for the tickets to print and
press the Save button.
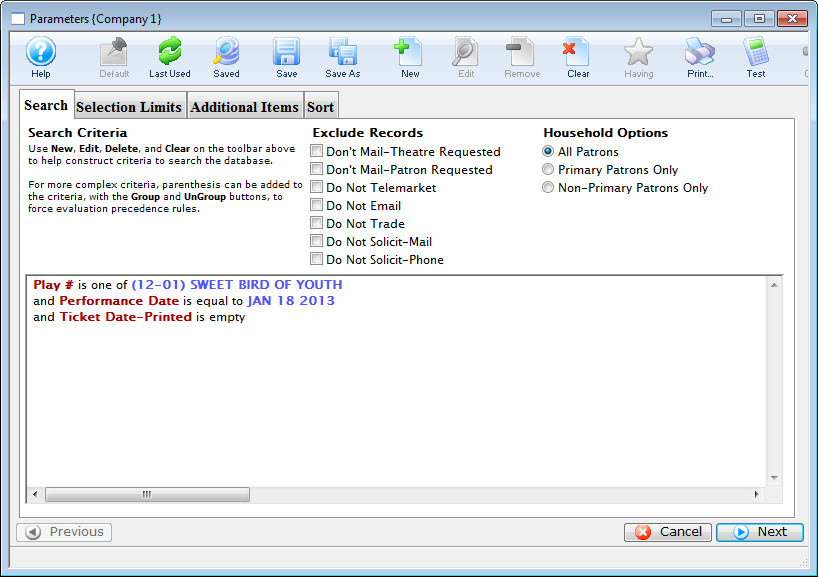
The example above shows report criteria that would print all unprinted tickets with the performance matching Sweet Bird of Youth and occuring on January 18, 2013.
You may wish to add additional criteria to specify certain groups of tickets. For example:
- Promotion Ticket Type is one of Season (prints all your season subscriber tickets for this evening)
- Promotion Flag - Requires Coupon is Checked (can help you set aside tickets where a Student ID or other coupon is required before the tickets can be claimed)
- Click the Next
 button.
- Choose the option for "All Orders containing unprinted orders."
Select Tickets From
All Orders containing uprinted tickets Will only select tickets meeting the criteria and that are marked as unprinted. Fully paid orders Will only select tickets meeting the criteria and that the order is fully paid for. Fully paid orders where payments are also deposited Will only select tickets meeting the criteria and that the order has been process through the End of Day. Limit Batch Size
Limit between This allows the batch to print only patron orders that are between the minimum and maximum limit. Past Plays
Include past play if it matches the search criteria This will allow tickets to be printed for performances that have occurred already provided they meet the criteria. - Click the Next button.
- Select the applicable data for the tickets to print.
Ticket Header
Print Address Ticket Prints an additional ticket containing the address information of the patron. Print Credit Card Recipt Prints an additional ticket containing the credit card receipt if a credit card was used to pay for the order. Ticket Items
Include Memberships Prints an additional ticket if a Membership purchase was included on the same order. Include Donations Prints an additional ticket if a Donation purchase was included on the same order. Ticket Printing
Mark Tickets as Printed This option will print no tickets, but still mark the tickets as printed. - Click the Next button.
Sort Tickets By
Patron Last Name All tickets will print in alphabetical order based on the patron's last name. Postal Code, Patron Last Name All tickets will be grouped together by postal code, and each group will be in alphabetical order based on the patron's last name. and then Sort By
Date, Section/Row/Seat For tickets to multiple performances, the individual tickets will be sorted by the performance date and then the seats. Date, Seat Code For tickets to multiple performances, the individual tickets will be sorted by the performance date and then the seat codes. Section/Row/Seat, Date For tickets to multiple performances, the individual tickets will be sorted by seat and then by the performance date. Seat Code, Date For tickets to multiple performances, the individual tickets will be sorted by seat code and then by the performance date. - Click the Done button.
This will return the user to the Ticket Printing window.
- This window display the total number of tickets based on the
criteria, and allow any final changes to be made.
Click here for more information about this window.
- Click the Start Printing
 button when the batch is ready to print.
Ticket Printing at an Offsite Location
- Remote ticket printing using a printer with an parallel connection.
- Remote ticket printing using a printer with an ethernet port in it
Remote Ticket Printing-Ethernet via RDP/Teamviewer
|
This setup assumes that your are connecting to you ticket server using Remote Desktop, Teamviewer or some other remote access program. |
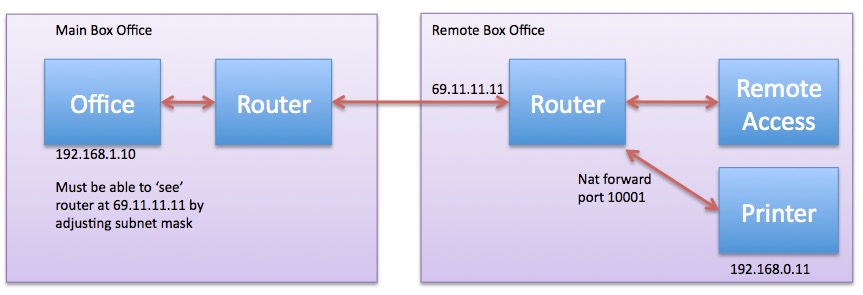
Things you will need:
- A Printer with an Ethernet connection
- A portable router that supports NAT forwarding of the ticket printer port at the remote site.
Setup:
- A portable router that can be taken to the offsite location will be needed.
- Set an internal IP addresses of the portable router that is the SAME subnet range as the office network. As some examples:
- if in the office the IP range is 192.168.0.x, then the IP addresses behind this portable router should be the same 192.168.0.x. This will ensure the Printer can be used in both networks without having to alter it's IP address.
- Alternatively, you can use network addresses that are close (eg 192.168.1.x on your main lan and 192.168.0.x at the remote box office) and adjust the subnet mask to be something like 255.255.0.0
- Take the router, printer and computer to the offsite location. Plug everything into the portable router.
- Use Microsoft Remote Desktop (Macintosh or Windows vis MSTSC) or Teamviewerto remotely access a computer in the main office.
- Enter a NAT forwarding rule in the router that forwards port 10001 to the IP address of the ticket printer. For example if your printer is at 192.168.0.15, then make a rule that forwards 10001 to that IP address.
- At the remote site, find out what the external IP address of the outside router is. This can be done by visiting www.whatismyip.com. In this example lets say the external IP is 77.12.34.56. This is where the internet thinks the router is located.
- In Theatre Manager click the Preference button at the top of the window (the yellow cog). Select the Ticket Printers tab. The IP displayed will most likely be the internal IP address of the Ticket Printer.
- Change the IP address of the ticket printer to the address supplied in step 6 above.
- Test print a ticket.
*** at this point all should work, except, the printer WILL NOT.
What you've effectively done is told Theatre Mananager to send the ticket info outside your office and all the way along to your router. Your router then says, not me, pass it inside the router to your printer (using the NAT rule).
When the ticket printer returns to the office the machine that was accessed remotely using TeamViewer will need to have the Preferences updated. Log back into Theatre Manager and click the Preference button. Select the Ticket Printers tab and change the IP address back to the address within the local network. Each time the ticket printer is taken offsite use the www.whatismyip.com site to determine the IP address to be entered for the ticket printer.
Remote Ticket Printing-Parallel
Things you will need:
- A Printer with a parallel connection
- A windows based computer with XP or later.
- A real parallel port on your remote computer or laptop (it can be via a PCMCIA add on card if need be
- Windows Terminal Server 2003 or later in your computer room.
- A connection to the internet at the remote box office.
|
Try the setup in your office to make sure it works before going to the remote location. |
|
This will only work if you DO NOT install a local printer driver on the computer at the remote box office or on the terminal server and assign it to LPT1. |
Setup:
The setup assumes that the printer will be connected to LPT1. If you are using LPT2 or another port, substitute it for all instructions below.
- Remove any printer driver you may have installed on the computer at the remote location that is attached to LPT1.
- Set up a remote desktop connection to the terminal server
- In the options for the RDC connection, make sure you share the PORTS in the local resources.
- Make the connection via RDC to the terminal server (must be terminal server 2003 or greater
- Log into Theatre Manager
- Go to the preferences for the user and click ticket printer -- and make sure LPT1 is selected as the ticket printer
- Test print a ticket.
Troubleshooting
If you are running into issues, have a look at one or more of the following:
- Make sure you DO NOT have a printer set up for LPT on the remote machine. In fact, remove all printers that you are able to remote
- DO NOT allow windows to automatically install a printer driver for you when it discovers the parallel ticket printer
- Restart the remote computer and make sure that the ticket printer rolls a ticket forward and backward on startup
- Make sure that there is a real parallel port in the device. (it can be a PCMCIA printer device. A USB to parallel device is not a real parallel port.
- Make sure that your setup for Remote Desktop is set to share the local ports.
- Make sure that your terminal server allows local ports to be shared from the remove device.
- Make sure that the printer has tickets in it
- Make sure that the clutch is down inside the printer so that the rollers can engage the printer
- Watch to see if the ticket printer receives any data when you click 'test print' in theatre manager. One of the lights will flash
- If it will not work on one machine, try another machine in your office. It make just be the machine.
Remote Ticket Printing-Ethernet and Local Lan
|
This setup assumes that your remote router is to be connected to a local network at the remote site -- and that it gives out IP addresses that you can control. If using a Mobile Thumb Drive to connect to the internet, refer to the alternate instructions for mobile/ethernet because this setup will not work. |
Things you will need:
- A Printer with an Ethernet connection
- A portable router other then those in the current network.
- Your postgres server set to allow connections from the remote location
- A relatively high speed internet connection at both ends
|
This installation assumes that your remote router is to be connected to a local network at the remote site and port 10001 can be configured. If using a Mobile Thumb Drive to connect to the internet, refer to the alternate instructions for mobile/ethernet because this setup will not work. |
Setup:
- A portable router that can be taken to the offsite location will be needed.
- Set an internal IP addresses of the portable router that is the SAME subnet range as the office network. As an example, if in the office the IP range is 192.168.0.x, then the IP addresses behind this portable router should be the same 192.168.0.x. This will ensure the Printer can be used in both networks without having to alter it's IP address.
- Take the router, printer and computer to the offsite location. Plug everything into the portable router.
- Use Teamviewer to remotely access a computer in the main office.
- Enter a NAT forwarding rule in the router that forwards port 10001 to the IP address of the ticket printer. For example if your printer is at 192.168.0.15, then make a rule that forwards 10001 to that IP address.
- At the remote site, find out what the external IP address of the outside router is. This can be done by visiting www.whatismyip.com. In this example lets say the external IP is 77.12.34.56. This is where the internet thinks the router is located.
- In Theatre Manager click the Preference button at the top of the window (the yellow cog). Select the Ticket Printers tab. The IP displayed will most likely be the internal IP address of the Ticket Printer.
- Change the IP address of the ticket printer to the address supplied in step 6 above.
- Test print a ticket.
*** at this point all should work, except, the printer WILL NOT.
What you've effectively done is told Theatre Mananager to send the ticket info outside your office and all the way along to your router. Your router then says, not me, pass it inside the router to your printer (using the NAT rule).
When the ticket printer returns to the office the machine that was accessed remotely using TeamViewer will need to have the Preferences updated. Log back into Theatre Manager and click the Preference button. Select the Ticket Printers tab and change the IP address back to the address within the local network. Each time the ticket printer is taken offsite you can use an online service (Example: https://mxtoolbox.com/whatismyip/) to determine the IP address to be entered for the ticket printer.
Remote Ticket Printing-Using a Mobile Internet Device
Things you will need:
- A Printer with an Ethernet connection
- A portable router other then those in the current network that has a USB port for the mobile internet thumb drive and can be configured to setup a VPN
- For OSX
- A licensed copy of TeamViewer.
- For Windows
- Remote Desktop and Terminal services -OR-
- A licensed copy of TeamViewer.
- A Mobile Thumb Drive for internet connection
Setup:
- Establish a VPN tunnel between your local network and the remote computer. Remote Box Office
- Set the ticket printer to a static IP address within the subnet of the remote location. Setting the IP address of the ticket printer. You will have to check your remote router when connected to the mobile internet device to determine the subnet that is issued. This may change each time.
- Take the router, printer and computer to the offsite location. Plug everything into the portable router.
- Use Teamviewer to remotely access a computer in the main office.
- In Theatre Manager click the Preference button at the top of the window (the yellow cog). Select the Ticket Printers tab. The IP displayed will most likely be the internal IP address of the Ticket Printer.
- Change the IP address of the ticket printer to the address set in step 2 above.
- Test print a ticket.
*** at this point all should work, except, the printer WILL NOT.
When the ticket printer returns to the office the machine that was accessed remotely using TeamViewer will reset the IP address to what it was previously before step 2. Log back into Theatre Manager and click the Preference button. Select the Ticket Printers tab and change the IP address back to the address within the local network. Each time the ticket printer is taken offsite you will need to reset the IP address of the ticket printer and set the user preferences in Theatre Manager.