Ticket Selling
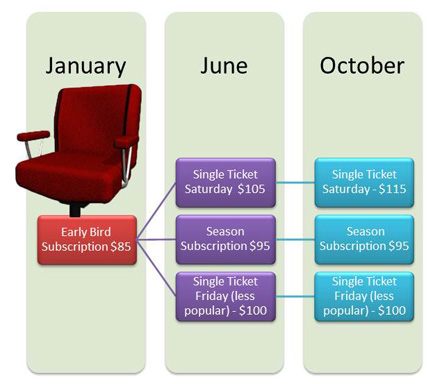
Adding Price Codes to a Map
Counting Tickets Printed on Printers/from Inventory
|
If you are looking at reminders to manage inventory, TM will track each ticket printed and tell you when you reach a threshold based on settings in Company preferences -> Ticket Faces. You will need to update the inventory count when you get a new batch of tickets. |

Run the reports that best fit your organization based on the types of tickets your organization prints.
How many tickets has a specific printer printed
If you are looking for how many tickets have come out of a specific printer, you can ask the ticket printer for its Print count to do this:
- Make a dummy ticket face
- Add the following code to it (the field is under the misc category and is called the internal ticket number) -and-
- Run a test ticket
The number on the ticket that is printed will have the total number of tickets that the printer has ever printed, including test tickets, real tickets, diagnostic tickets, etc.

How Many EVENT Tickets Have Been “PRINTED” Over A Specific Time
| Report | Ticket Printing, Invoicing and Inventory Analysis >> Revenues by Promotion (doesn’t matter which one you choose) |
| Criteria | Ticket Data For Patron >> Ticket Date Bought >> is between (define your specific time period) AND Ticket Data For Patron >> Ticket Date-Printed is NOT EMPTY |
Using this criteria, from the report criteria window, click  – this will give you a record count, which is the number of TICKETS printed. Record this number and continue with additional reports based on the types of tickets your organization prints.
How Many EVENT Tickets Have Been “UNPRINTED” Over A Specific Time
| Report | Transaction History Reports >> Transaction History List |
| Criteria | Patron Transactions >> Tran Code is one of TU (Ticket Unprint) AND Patron Transactions >> Trans Date is between – (Critical to match this date with the Ticket Date Bought) |
Using this criteria, from the report criteria window, click – this will give you a record count, which is the number of TICKETS UNPRINTED. Record this number and continue with additional reports based on the types of tickets your organization prints.
How Many PAYMENT RECEIPT Tickets Have Been Printed Over A Specific Time
| Report | Order and Payments >> Payment Summary |
| Criteria | Payment Data >> Payment Date – Received is between (define your specific time period) AND Payment Data >> Payment Date – Receipt Printed is NOT EMPTY |
Using this criteria, from the report criteria window, click – this will give you a record count, which is the number of PAYMENT RECEIPT tickets. If your organization prints multiple credit card receipts for a payment, this will not be included in this record count. Record this number and continue with additional reports based on the types of tickets your organization prints.
How Many MEMBERSHIPS, PASSES, GIFT CERTIFICATES Tickets Have Been Printed Over A Specific Time
| Report | Report Category: Membership Reports >> Membership Summary |
| Criteria: | Membership Data >> Membership Date First Entered is between (define your specific time period) AND Membership Data >> Membership Date Card Printed is NOT EMPTY |
Using this criteria, from the report criteria window, click – this will give you a record count, which is the number of MEMBERSHIP, PASS, GIFT CERTIFICATE tickets. Record this number and continue with additional reports based on the types of tickets your organization prints.
How Many ADDRESS Tickets Have Been Printed Over A Specific Time
This data is tricky to use a report to get results. Instead of a report, we use an assumption that if you print a credit card receipt, then you probably printed an address label too. With that assumption, record the number of Payment Receipts for the number of ADDRESS tickets printed and continue with additional reports based on the types of tickets your organization prints.
If you print WILL CALL tickets in batch mode for each performance and print an address header ticket for each patron, then that will increase the overall number of tickets. This number of address header tickets will need to be estimated based on the average number of will call used for each performance, and the number of performances that occurred during the time period you are tracking the number of tickets printed.
How Many SECOND PROMOTION Tickets Have Been Printed Over A Specific Time
| Report | Ticket Printing, Invoicing and Inventory Analysis >> Revenues by Promotion |
| Criteria: | Ticket Data For Patron >> Ticket Date bought >> is between (define your specific time period) AND Ticket Data For Patron >> Ticket Date-Printed is NOT EMPTY AND Promotion Discount >> Promotion # is one of (select ALL the promotions that are set to print a second ticket if this sales promotion is selected.) |
Using this criteria, from the report criteria window, click – this will give you a record count, which is the number of SECOND PROMOTION TICKETS printed. Record this number and continue with additional reports based on the types of tickets your organization prints.
The Fudge Factor Tickets
Add in 5% +/- tickets that cannot be accounted for in the above reports. Things such as: - Test tickets, when using/developing a new ticket face
- Multiple credit card receipts
- Waste during the loading of new ticket stock
- Crumpled tickets due to improper stacking/storage over time
The Approximate Number of Ticket Stock Used
Add up the record counts from each ticket type report and add in the fudge factor. You now have a reasonable count from the database of how many tickets you have printed over a specific time period.Demand Based Pricing and Seat Selection
Demand based or Dynamic pricing is managed through
- Vertical Scaling - where the base prices of tickets are lowered or raised for a performance based on a fluxuation in demand -AND/OR-
- Horizontal Scaling - where more seats are made available at specific price codes within the venue. For example, you can expanding the area where 'main floor' pricing is to include the balcony or sides because the event or performance is selling well.
Some organizations choose to implement a higher price schedule when ticket sales are in high demand. Likewise, prices may need to be lowered in an effort to bring more patrons in. Demand based pricing allows you to change the Pricing map while sales are currently ongoing. There are a few Theatre Manager tools that can help you.
Vertical Scaling
To implement vertical scaling, simply change the base price of tickets for on the event set up screen for:
- one or more price codes
- on one or more performances.
Horizontal Scaling
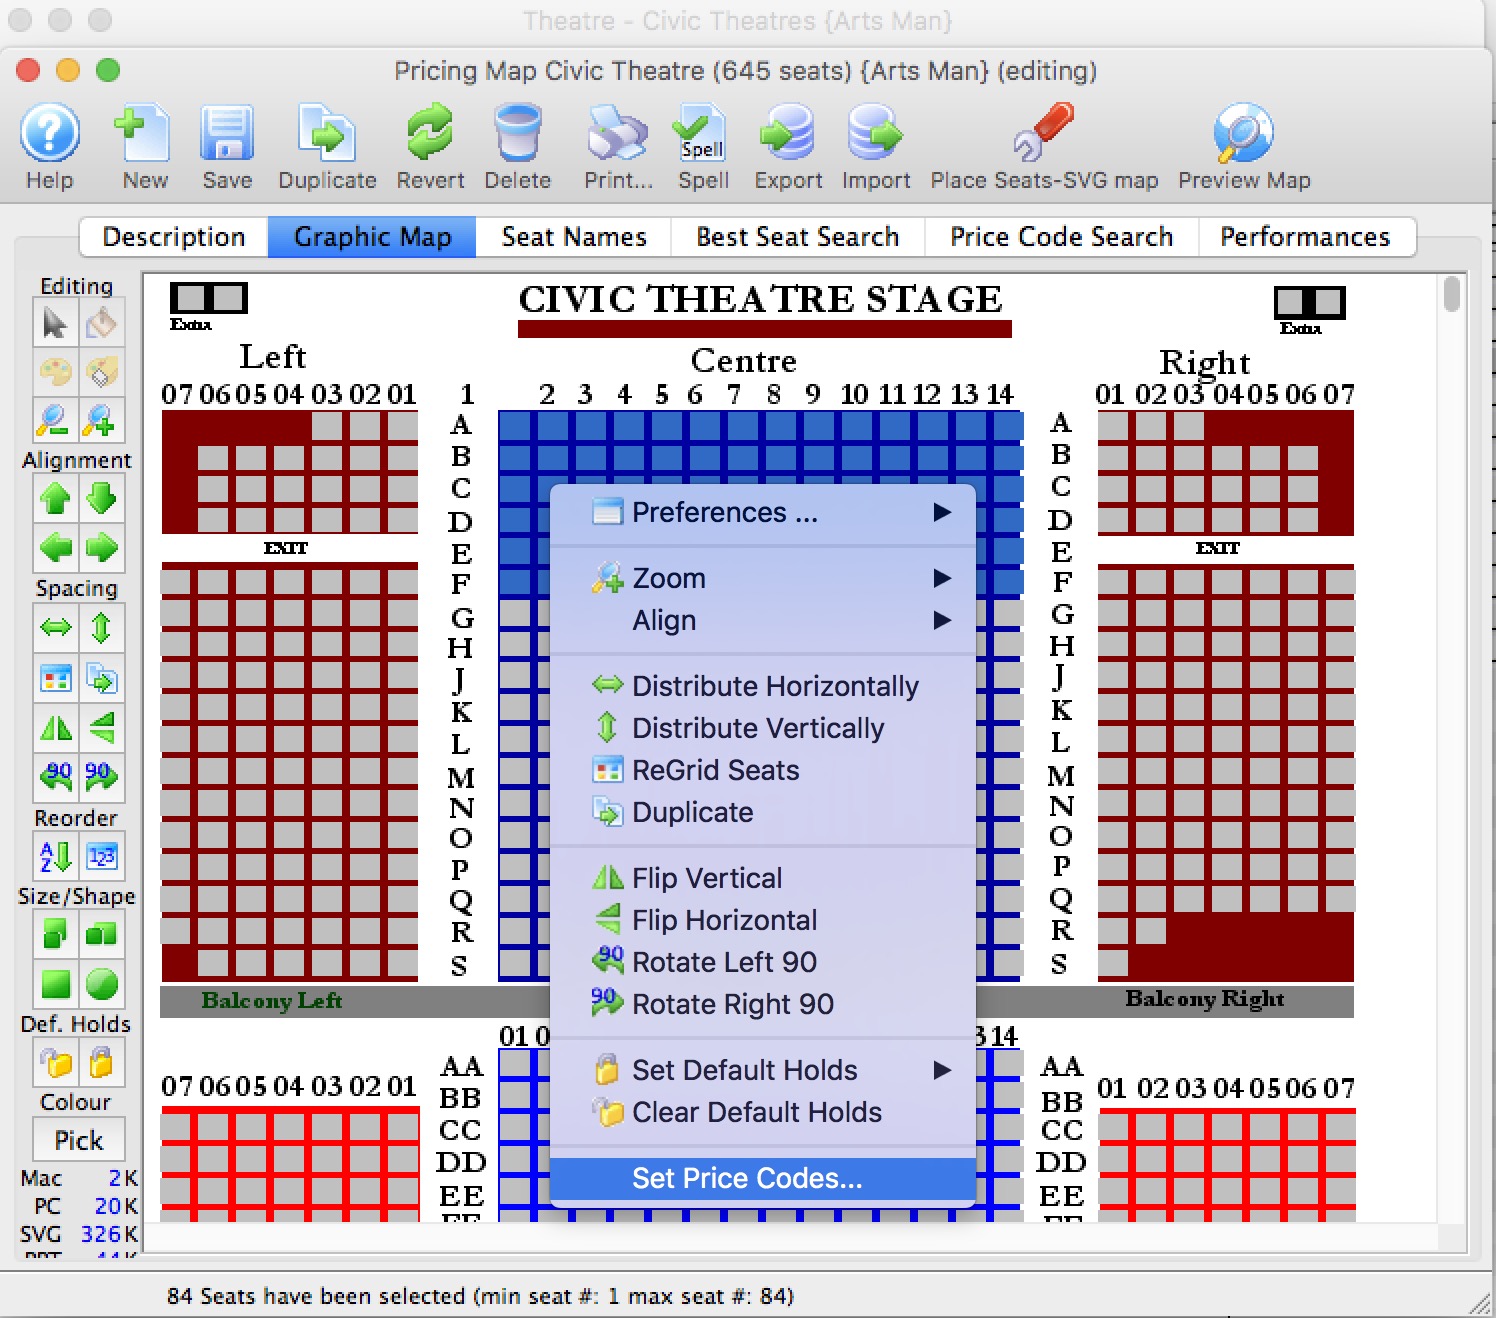
A new pricing map lets you implement horizontal scaling very quickly - meaning changing which seats are price code A, B, C etc. If you have created multiple pricing maps in a venue, all you need do is one of the following:
- Edit the price map you are using for price code scaling and on the Graphic Map tab, simply
- Select a bunch of seats
- Right click on one of them
- Pick 'Set Price Codes...' to assign one or more new price code to the seat
- Enter the new price code
- The new price codes takes effect immediately on all venues associated with price map
- Change the price codes for specific performances in the middle of a sale to re-scale the seating sections in a venue dynamically.
- Change the pricing maps for an entire event if you want to move the event from one venue to another or to use a different map within the one venue.
- Change the methodology and order that seats are offered online based on the new pricing map. This may be useful for dinner theatre sales as the performance is sold and fewer seats are available.
|
There are rules for switching venues or pricing maps. The new venue or pricing map must:
|

Helpful Tools
- Using the The Ticket Printing, Invoicing and Inventory Analysis - Tickets Sold/Revenues by Promotion and Price Code report, you can determine which seats have been sold and which price codes you may want to change.
- The Hot Seat Analyzer. You can use it to:
- Determine the usage frequency of seats in a venue and/or the revenue capacity of a particular seat.
- Find out if the current price zones in the venue are appropriate or if they should be allocated differently to accommodate customer preferences in your venue.
Using the tool, you may replace the typical bands of seats with different pricing on aisles or zones in the venue.
Determining when Pricing changed
- changing a promotion code discount values or tax rates on the fees
- changing some component of the underlying map such as which price codes or promotions are available for a seat or section
- using dynamic pricing to change the prices codes available in a section
- changing thebase price of a ticket for a price code
- enabling and disabling promotions
- changes to the base tax rate when moving from GST to combined HST
- and more
Because so many variables affect pricing, there is no direct record of the changes to any one component of prices, other than the person who last changed it. In addition, changes to prices, events, venues, promotions and tax rates should be limited to specific employees, reducing the need to track who changed them.
If you want an indirect audit trail or go back and see the effect of a change of any of those items, you can use the transaction list to look at ticket sales. The key fields to display in the list (and potentially export) are: dates, original price, discount, taxes, fees, final price, tax rate, promotion, price code, event, performance, venue, pricing map and who created the transaction.
Armed with that information, you can look at price changes and see the effect, plus who is mort likely to have made it, assuming that somebody tested the price change (because there should be a ticket sale and refund with an employee name on it).
![]()
Remove Order Fee from Free Admission Gift Certificate or Pass
|
|
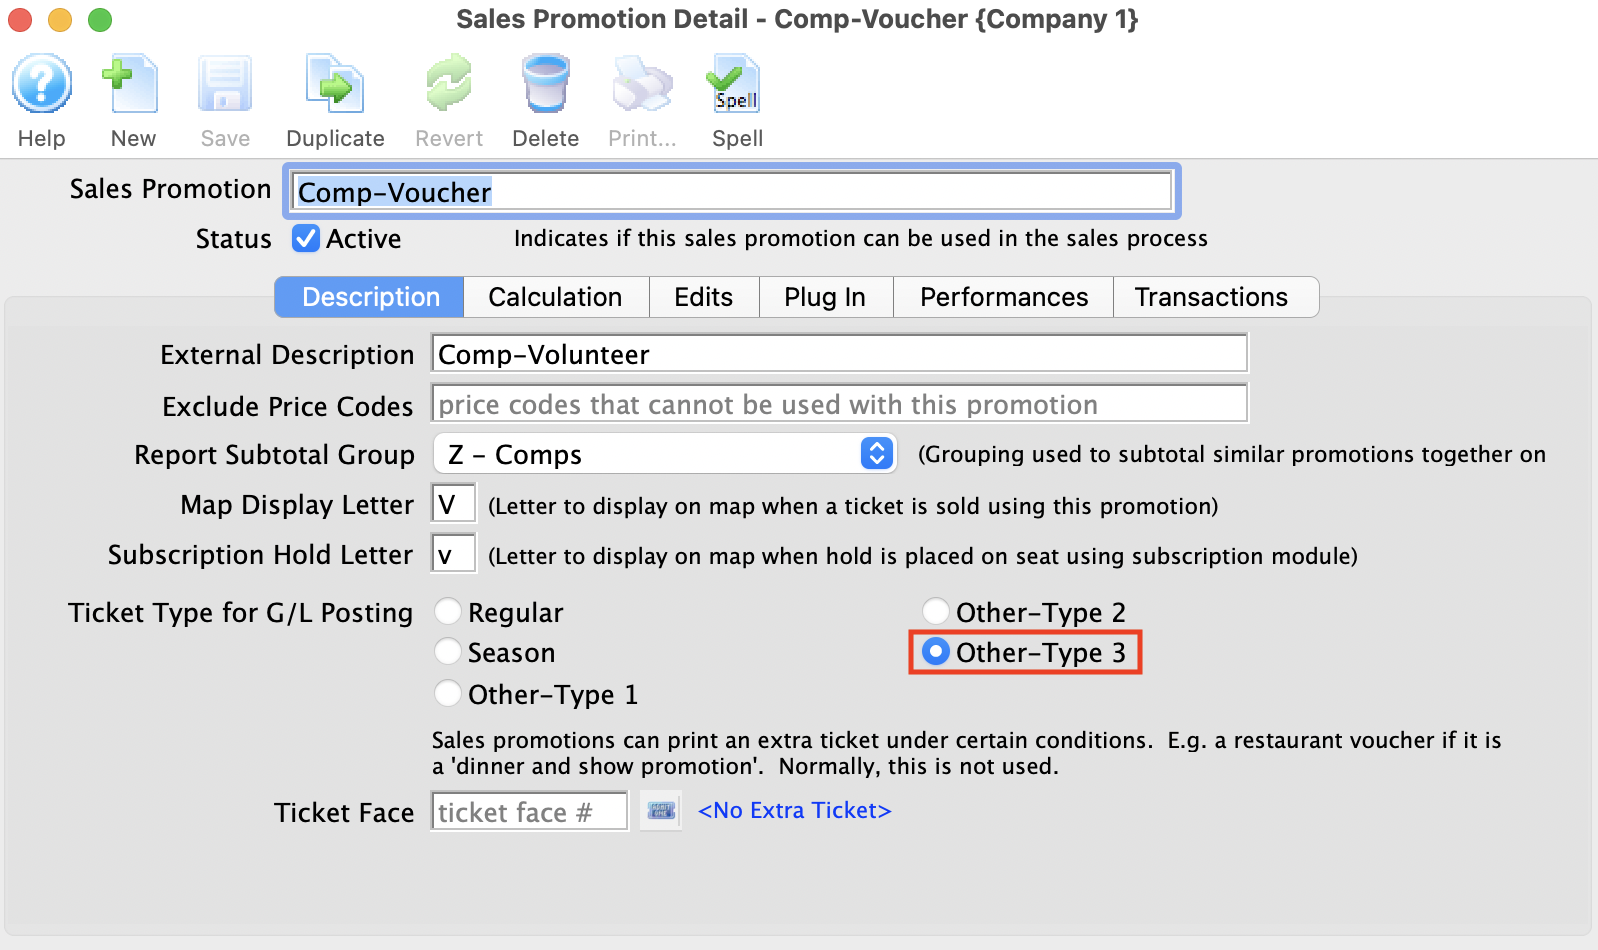
When the converted comp Sales Promotion used in the Sales Rule for the Free Admission Gift Certificate or Pass is set to Regular Ticket Type for G/L posting and the box office and internet order fee is also set to apply to Regular, an order fee is applied automatically to the order.
Setup to prevent the order fee from being applied to a comp Sales Promotion:
Sales Promotion Setup
On the Description Tab of a Comp Sales Promotion change the Ticket Type for G/L Posting bullet to any of the Other-Type options not currently using, like Other-Type 3. The option name selected can later be customized from Company Preferences under Appearances Tab.
Box Office and Online Order Fee Setup
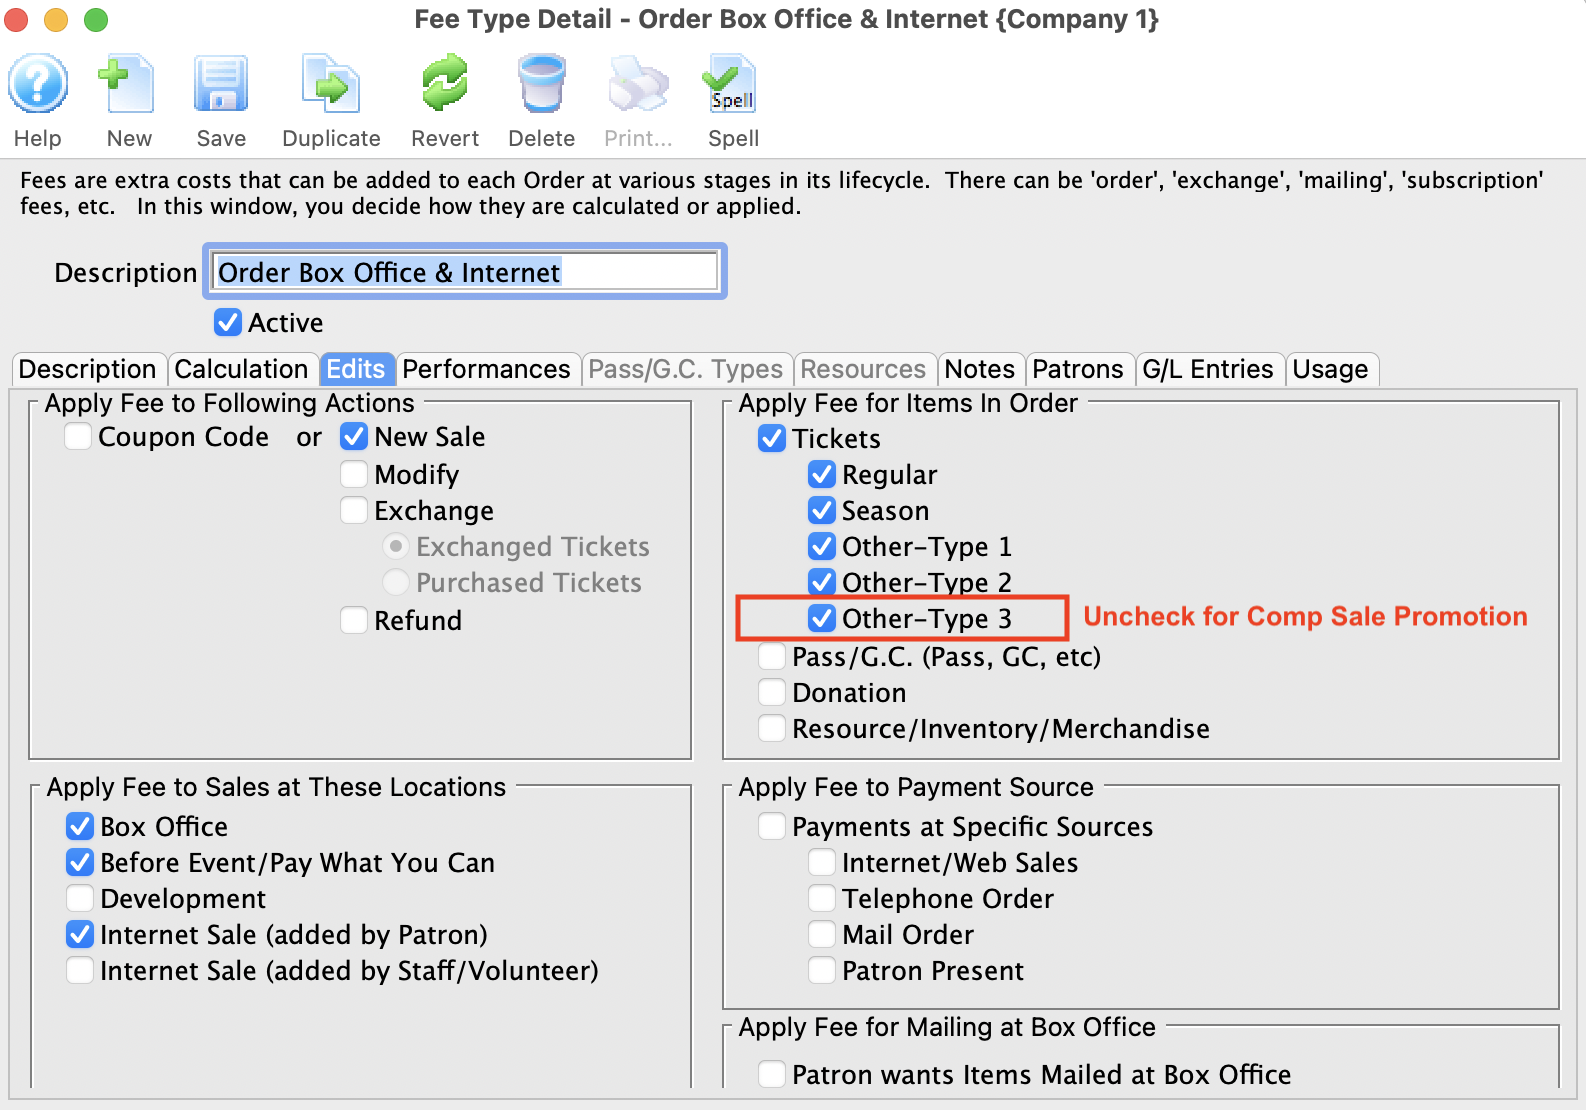
On the Edits Tab of the Fee setup, uncheck the option that corresponds to Ticket Type For G/L Posting in the comp Sales Promotion, e.g. Other-Type 3. Now the order fee is set to ignore applying this fee to the comp Sales Promotion when in an order on the Internet or from the box office.
Secondary Ticket Outlet Voucher Redemption
Unlike conventional sales, the ticket buyer is not the actual patron. The patron is the Secondary Ticket Reseller and this is the person/company that we record the ticket sales against in order to manage receivables. The ticket buyer is a customer of the Secondary Ticket Reseller and we record that information, if it can be obtained, in Theatre Manager's ticket comment.
Typically, the sales and redemption process follows the picture and general steps below:
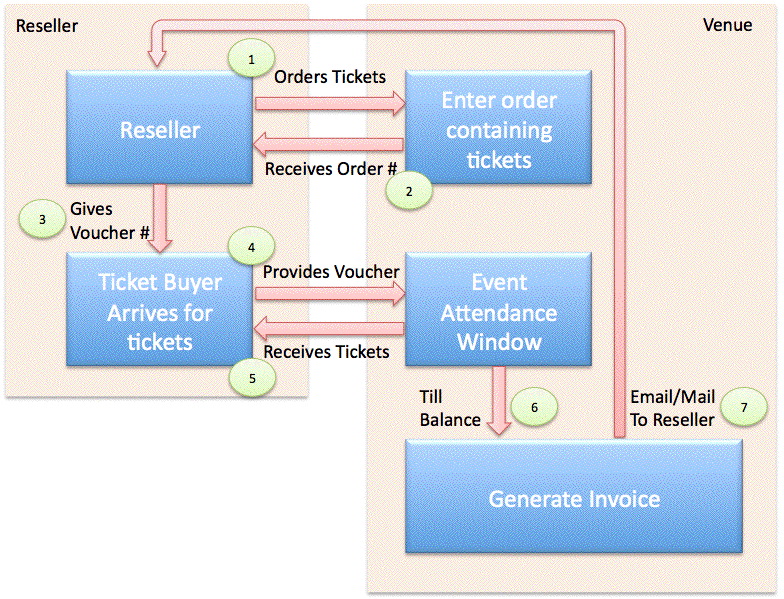
- The Secondary Ticket Reseller advertises themselves as a place where you can get tickets to all the major attractions in an area
- The ticket buyer comes to town for a visit and may stop at any one of the Secondary Ticket Resellers where they receive advice on the best 'hot shows' in town.
- When the ticket buyer selects some events, (1) the Secondary Ticket Reseller will call the venue direct (or may have a customer sections of seats set aside for them) and book some specific tickets. At this time, the Secondary Ticket Reseller may provide only an internal voucher number for the venue's reference to act as a booking number.
- At time of sale, the venue would
- Provide Theatre Manager's (2) Order Number as a reference back to the Secondary Ticket Reseller to provide to the ticket buyer for confirmation at pickup time.
- Enter any voucher number that the secondary reseller gives to the box office into the PO Field as a reference. (It may not be provided, depending on the reseller).
- Enter the ticket buyer's name into the ticket comments in Theatre Manager as a cross reference - and so that the patron could be found at will call prior to the show. Note, some venues like to stick the patron name after the PO number and keep all data in one field - placing in ticket comments allows for printing of the real patron's name on the ticket.
- It may also be advisable to adjust the ticket face so that the ticket comment prints on the ticket face if this has not already been done
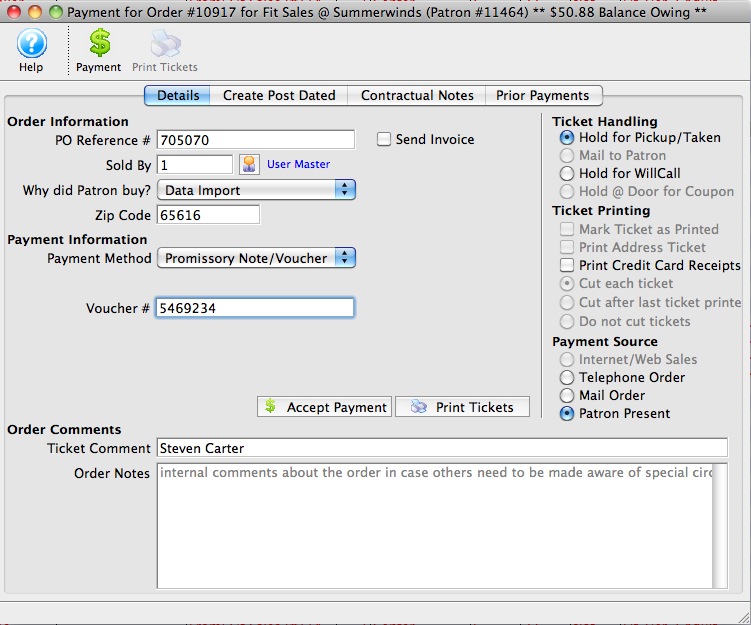
- (3) The Secondary Ticket Reseller will give the ticket buyer a Promissory Note/Voucher number as proof of the financial transaction.
- The ticket buyer would then arrive at the venue prior to show time to get their tickets. At this time, they will need to (4) provide the actual promissory note/voucher from the Secondary Ticket Reseller to the venue
- At time of ticket redemption, the venue needs to:
- Enter the voucher number for tracking and future receivables purposes. Note that the ticket buyer is not actually paying for the tickets, the Secondary Ticket Reseller will do that later.
- (5) Print the tickets for the ticket buyer
- (6) Reconcile the vouchers received in the till prior to end of day to ensure money can be collected
- At time of billing the reseller, the venue will need to:
- (7) Print an invoice to the Secondary Ticket Reseller that shows the voucher numbers on it
- Use the Theatre Manager invoice/email feature to sent it to the Secondary Ticket Reseller
- Collect the money actually owed for the tickets and enter it as the true payment method to complete the A/R process
In Theatre Manager, the 'Promissory Note/Voucher' payment method can assist tracking these non-cash payments without affecting the receivables balances and provide a perfect audit trail.
Time of Sale
 At time of sale of a ticket to a Secondary Market Reseller, it may be important to capture a few things with the purpose of:
- Being able to identify the eventual ticket buyer when they arrive. We suggest asking the Reseller for the ticket buyers name and entering it into the ticket comments in Theatre Manager as a cross reference. This should allow the box office to find that the patron at will call prior to the show when they show up to collect their tickets.
- Giving some recognizable number to the reseller to give to the ticket buyer. We suggest providing Theatre Manager's Order Number as a reference.
- Finding some way to cross reference the order back to the Reseller. If the Reseller has a voucher or a purchase order number, we suggest putting it in the PO reference number so that both reseller and venue can cross reference the order.
- Gather some statistics. We suggest asking the reseller the zip code of the ticket buyer so you can at least get some statistics based on approximate zip/postal code to find out where people are coming from.
Most Theatre Manager ticket faces print the patron name on the ticket. In this case, the actual patron is the reseller because they are buying the ticket. It may also be advisable to adjust the ticket face so that the final ticket buyer you enter into the ticket comment also prints on the ticket face.
|
In many cases, you may not be able to get the name and address of the final ticket buyer from a reseller. If not, the above should suffice for identification purposes. If you are able to get the name and address information, you may also want to also enter the ticket buyer into Theatre Manager and use the ticket gifting feature to gift the ticket from the Reseller to the Ticket Buyer as a way to have more complete marketing data for future email, mail or mail list building and reporting. |
Ticket Redemption
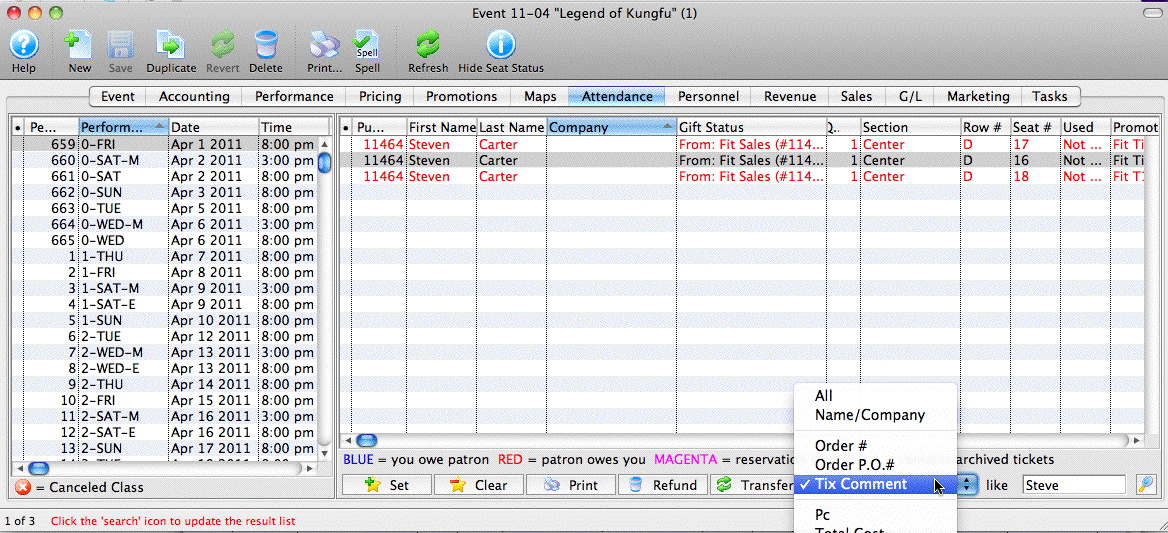
Step 1: Find the Buyer
If we have entered the ticket buyer's name into the ticket comment, then we can use the search at the lower left of the window to find the patron as per the example below. WE are assuming that the patron who books the ticket is the one that shows up. However, if they do not, you can find the ticket by Secondary Market Reseller name, their Voucher number, the order confirmation number you gave the Reseller or a few other search fields.
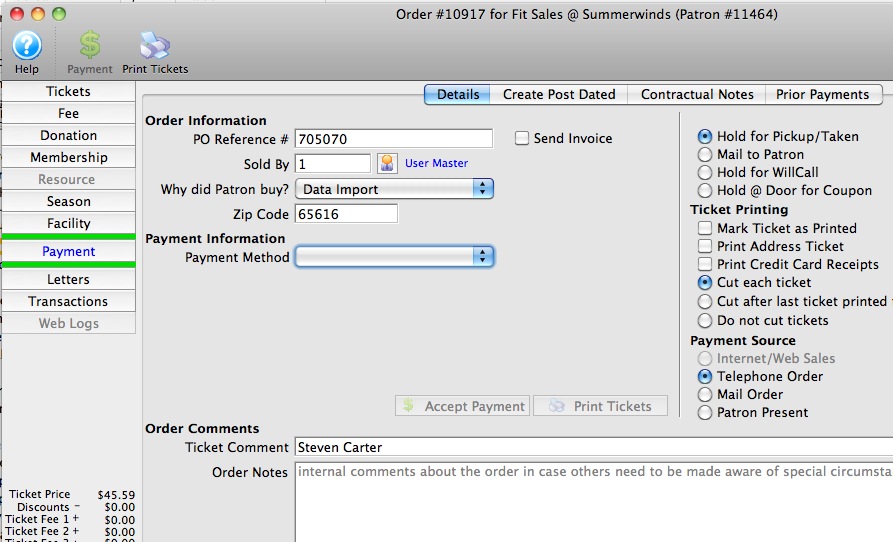
Step 2: Add the Voucher to the Order
Once the tickets/order is found, right click on the order and apply payment to the order as per the example below.
Since most Secondary Market Resellers do not pay until invoiced, we are doing this for two reasons:
- Enter the voucher number that the ticket buyer gave you which is really a Promissory Note - a promise to pay later upon presentation of the voucher. To do this:
- select the payment method called 'Promissory Note/Voucher' and enter the voucher number and accept payment. There is no payment amount because it is a future promise to pay and you do not have any money yet. (Note that the payment type may have been renamed at your venue)
- Select 'On Account' as the second payment method and click 'Print Tickets' which will print the tickets so that the patron can enter the venue and we know who has picked up their tickets. and close the payment window.
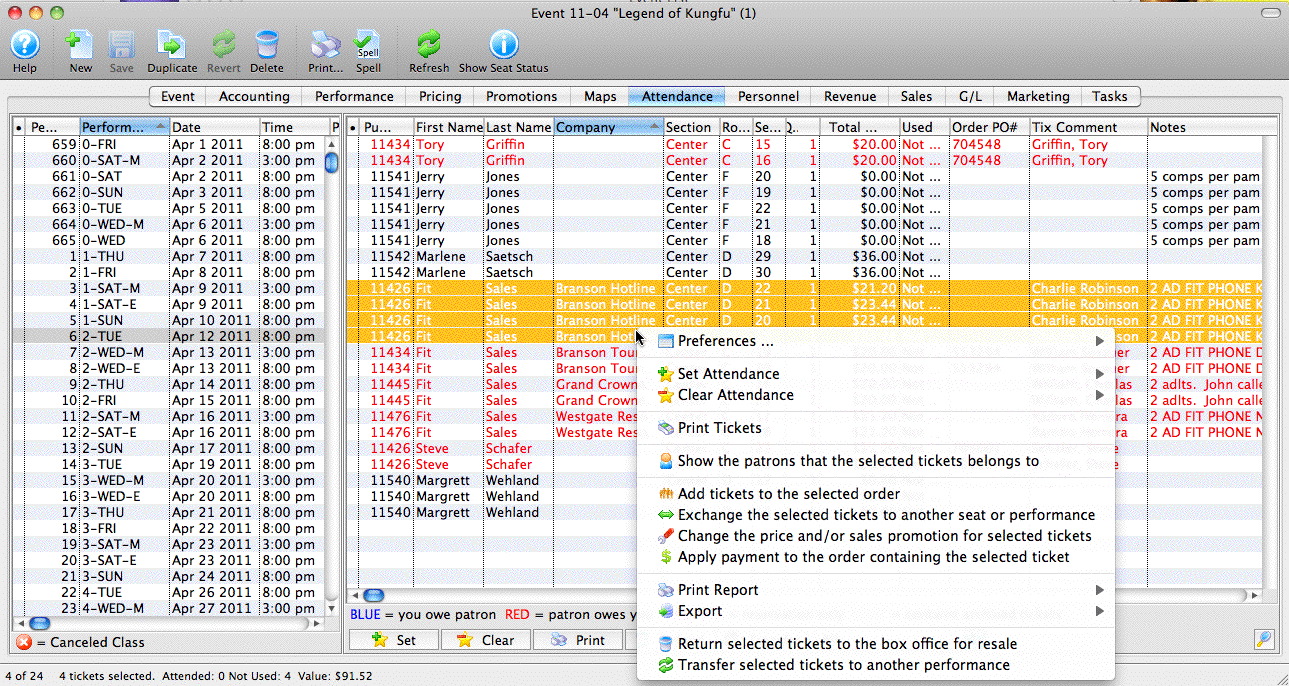
Note that the context menu in step 1 has additional options such as adding tickets to the order, exchanging tickets, changing the price - most of the actions you may need to quickly do when the ticket buyer walks up to the box office.
You can also double click on the ticket to see the ticket detail and from there proceed to the order. At that time you have a full range of capabilities of editing the order that you would anywhere else in Theatre Manager.
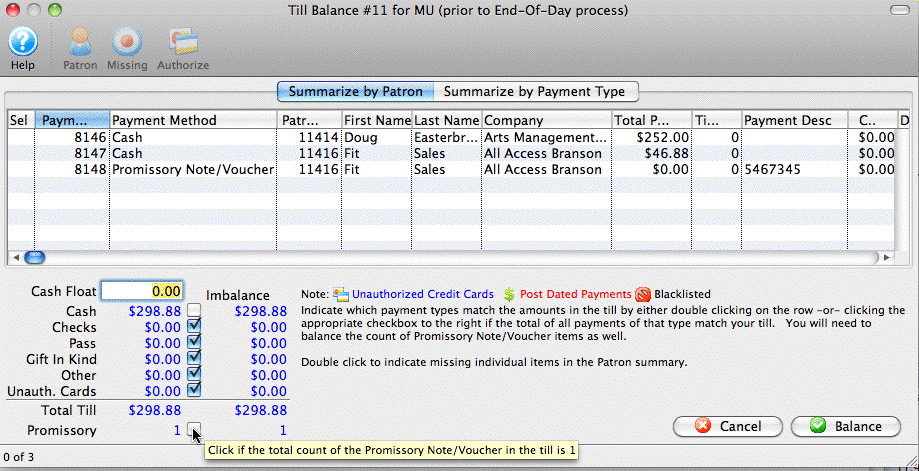
Step 3: Balance the Till
At the end of the day, the voucher numbers will appear in your till balance as per the picture below so that you can account for them. There is a checkbox at the bottom left of the till balance to indicate if the count of vouchers matches. However, we recommend balancing them by Secondary Reseller name one at a time for accuracy.
Billing the Secondary Market Reseller
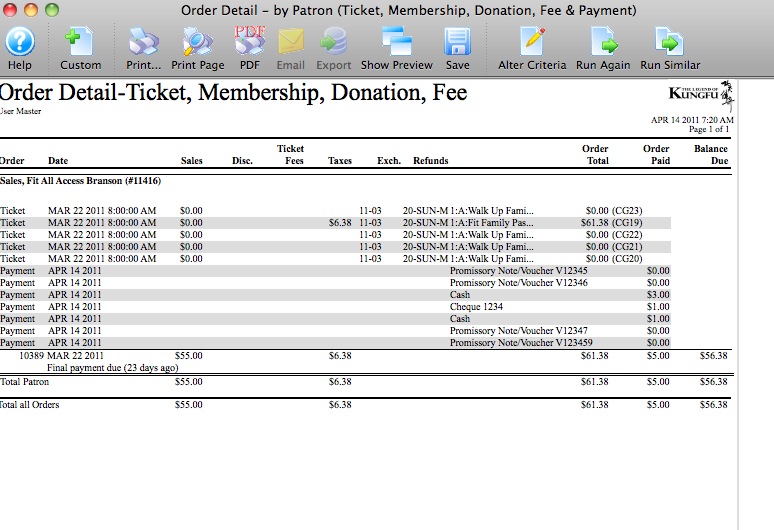 There are a some reports that are useful for managing the receivables from any Secondary Market Reseller. Typically, one would use the Accounts Receivable report to identify who owes you money. You can also use the order detail report that includes tickets and payments as per the picture on the right for a trail of all things in the order.
The invoice report on the patron window will also be helpful. If you:
- open up the patron record for the Secondary reseller
- click on the order tab to see all orders in 'red' where the reseller owes you
- uncheck the 'Include Closed Orders' checkbox at the bottom of the order list to see only the orders where you are owed money -- and then --
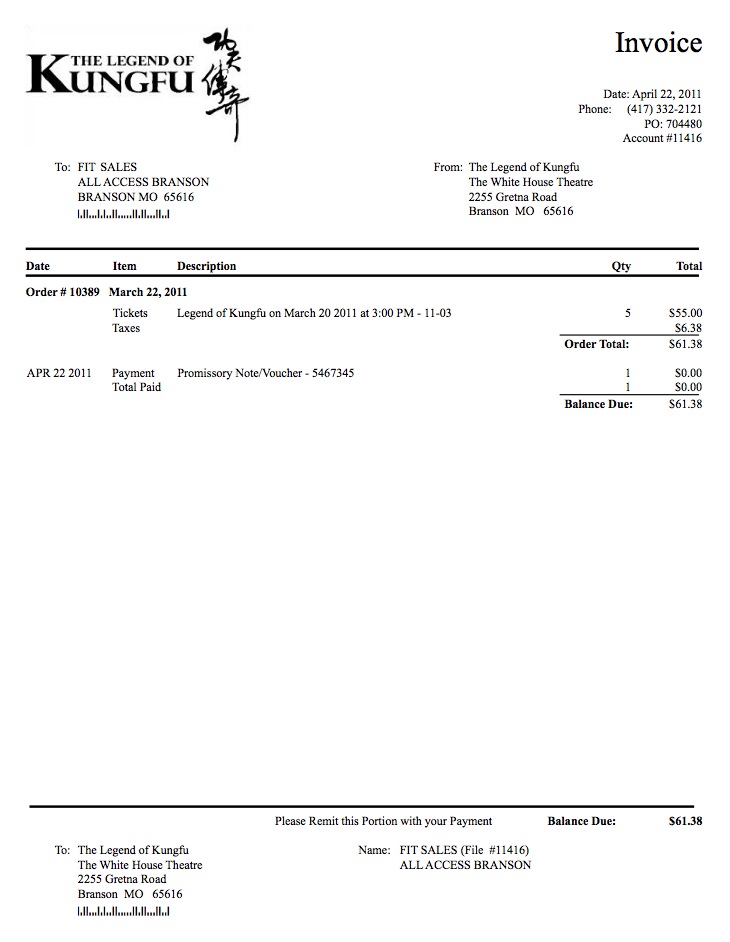
- select all those orders (or the appropriate ones) and click the invoice button, you will see a report like below
Once you see the invoice on the screen, you can click the 'email button to email it to the Secondary Market Reseller, or you can print it as a PDF, or you can print it and then mail it as appropriate.
Setting up General Admission Roadhouse/Consignment Ticket Sales
If the Event is taking place at your venue you will not need to create a new map. You can use the existing Venue. However, you may need add another price code to the map to assist with tickets sold at your venue verses those taken to be sold at another location. We'll talk more about that in a moment.
If the Event is not taking place at your venue a new map will be needed. The online help link to Adding a A New Venue gives you the details on setting up a new Venue. When building the pricing map for the venue, please keep in mind it is a General Admission Event. This means you will not need to follow the steps for the Graphic Map, Seat Names or Best Available tabs. The only information required will be the Description tab.
- When entering the details for the description tab ensure you enter two letters in the Price Codes field. They can be A and B if you like. One will be for tickets sold from your venue and the other for those sold offsite.
Next you add your event(s). Click here for information on Setting up a Festival Seating Event.
Click here for setting up Reserved Seating Event.
- While setting up your event, you define your price codes. We will stick with A and B in this example. A could be the tickets that you are selling and B could be the tickets sold outside of your box office.
- Seats sold at Price Code A will have whatever markup you are taking for selling the tickets
- B will have whatever price is being collected by the Promotion/Sold Off Site.
This will be one of the methods you use to clearly indicate the tickets were issued for a value but you never received the money. Click here for more information on how to set up the price codes.
You should also set up a new sales promotion to track the off site ticket sales. That way they will be highly visible to you. Sales promotions are used during the ticket purchase process to indicate how the base ticket price is to be altered to arrive at the final ticket price. This will indicate which tickets are yours and which are not. When you sell them, you should use a promotion specifically for these tickets.
You can create a new Promo called Consignment. Click here for more information on Adding a Promotion.
You will need to sell your tickets to the Promotion/Offsite. To help you keep track of the sales and ensure you do not have debuits unaccounted for, you will need to add a New Payment Type for the Promotion/Sold Off Site.
- First, you will need to add a new GL Account. Click here for directions on adding a new GL Account.
When you add this new account, ensure it is set up as a LIABILITY.
- Then add a new Payment Type to the System Code Tables, using the new GL Account you have set up. Give it a distinctive Name such as "Consignment Sales".
Click here for directions for adding the new Payment Type.
Now you can print the tickets ahead of time at your box office for the Promotion/Sold Off Site. The process would be:
- Create a "Promoter" patron record.
- Sell tickets to the Promoter's Account, select the price code B and use Payment Method "Consignment Sales". Click here for information on selling tickets.
- Print the tickets, just like you would when selling to a regular patron, using the Payment Method "Consignment Sales".
Now you have the tickets for their sales.
You can now generate reports helpful to costs breakdowns and tickets sold. Revenue by Payment Method Ticket Basedis a break down by payment method and dollar amount - this will give you an amount to exclude when paying the Consignee (by dollar amount). Tickets Sold by Price Code and Promotion gives you a count of your sales, listing all of the tickets that came in on consignment.
To return tickets from the Promotion/Sold Offsite you refund back on same payment method. Click here for more information on refunding tickets.