You are here

Wireless Scanner Setup - Windows Mobile - Communication Parameters

Subscribe to Syndicate

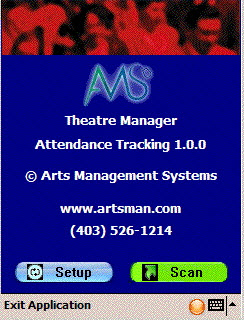
If the previous step was set up right and the scanner is mated to the network, you can click the start menu, programs and the click on the AMS Tickets application It may take a couple of seconds or so to start as the scan program is synchronizing time with a time server and making sure the clock on the program is set properly. When it does start, you will see the screen at the side. Now we can set up scanning for an event. This must be done in advance of each performance that you are scanning tickets for.

All that needs to be done is set up some parameters.

Click the 'Setup' button on the screen.

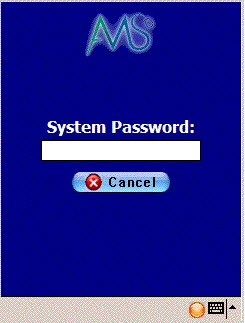
You will be asked for a system password to change the settings for the performance. Type '123' (this can be changed) and once the password is right, the next window will automatically appear.

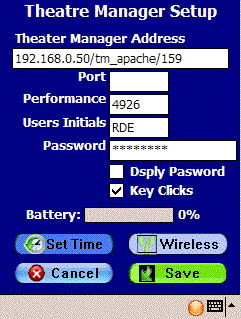
version 7 sample setup

When you open the preferences window using either of the two methods above, you have some fields that must be filled in. These are below (note you may want to press the orange button on the keyboard twice to turn it into num-lock on mode):

  • IP address: this is the IP address of the web listener that will be responding to checkin and checkout requests.
    • For version 6: enter the physical address of the listener such as 192.168.0.2
    • For version 7: enter the address of the apache server/firewall such as tickets.yourdomain.com/tm_apache/159. the tickets.yourdomain.com is the same value you place in company preferences under the web settings. The '159' is the company preference number. In multi-outlet venues, this number will be different for each outlet.
  • Port: this is the port number that the web listener 'listens on'
    • For version 6: enter the IP address the listener listens on, typically 5111
    • For version 7: leave blank for port 80, type 443 if you have set up SSL and allow access via secure sockets. It generally is not needed.
  • User Initials: this is the upper case initials for the user doing the scanning. This person does not need to be able to log on to TM for any other reason. You might wish to create one or more generic ID's for this purpose (because the password in this screen is clear text)
  • Password: the password used for these User Initials to log on to Theatre Manager. Note that the password is case sensitive. Unless you allow lower case passwords, you will generally enter this as upper case.
  • Performance #: enter the performance number that you are scanning for.
    • If you enter a ticket number, then tickets for any other performance will be rejected. Use this method if you want absolute certainty that patrons are entering the correct venue
    • If you leave this blank, then any ticket for any event that day can be scanned. Use this only if you have a festival situation occurring and patrons could have purchased tickets to any one of a number of events to obtain entry to the area you are scanning for.
  • Other Buttons:
    • Key Clicks: check this to that you receive audible feedback from typing numbers.
    • Set Time: forces the time on the Windows Mobile device to match the time on the Web Listener. Effectively this will be the same as the time on the database server. If you do not set this, it will occur automatically each time you start the ticket scanning program.
    • Wireless: opens the wireless setup information as per the top of this page.
    • Cancel: does not save the changes to the memory of the device
    • Save: saves the changes.

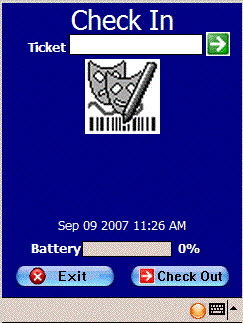
There is one other preference that can be set before we begin scanning. This indicates whether we are scanning the person into the venue, or scanning them as they leave to indicate that the ticket was not used

You can access this option directly from the main screen where the scan & setup buttons are. Click the 'Scan' button and you will see a screen like the one on the left.

At the bottom is a 'checkout' button with a red arrow. This means the mode is currently 'check in' and you click this button to change the mode to 'checkout'. It will also change the arrow at the top from green (checkin mode) to red (checkout mode)

If there is a green arrow with 'check in' at the bottom, then the current mode is 'checkout' mode. Click the 'Checkin' button to change the mode to checkin.

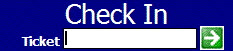
If you are scanning patrons into the venue, the top of the screen looks like the picture to the right. Notice that the text says 'Check In' and the arrow is green.
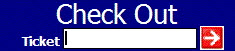
If you are checking patrons out of the venue, the text at the top of the screen says 'Check Out' and the arrow is red.