Inserting a Donation
It is important to recognize that donations can be entered from more then one place in Theatre Manager. You can enter a donation from the donation tab or from the orders window while a patron is purchasing tickets.
Open the Patron Record.
For details on locating a Patron Record click here.
- Click the Donation
 tab.
tab.
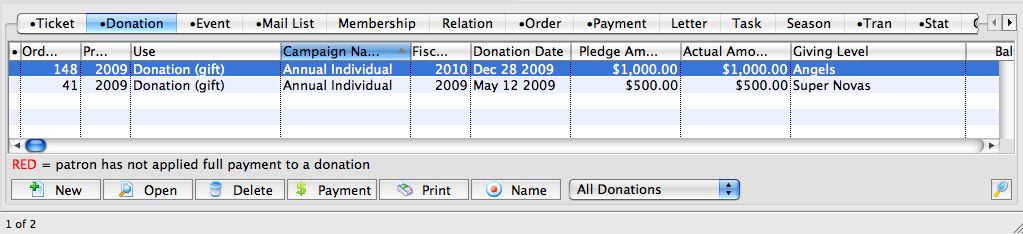
- Click the New
 button. The Donation Detail window opens.
Alternatively
To add a Donation to an existing order, or while creating an order, you would:
- In the Orders window, click the Donations
 button.
 - Click the New button in the Order >> Donations toolbar / ribbon bar.
The Donation Detail window opens.
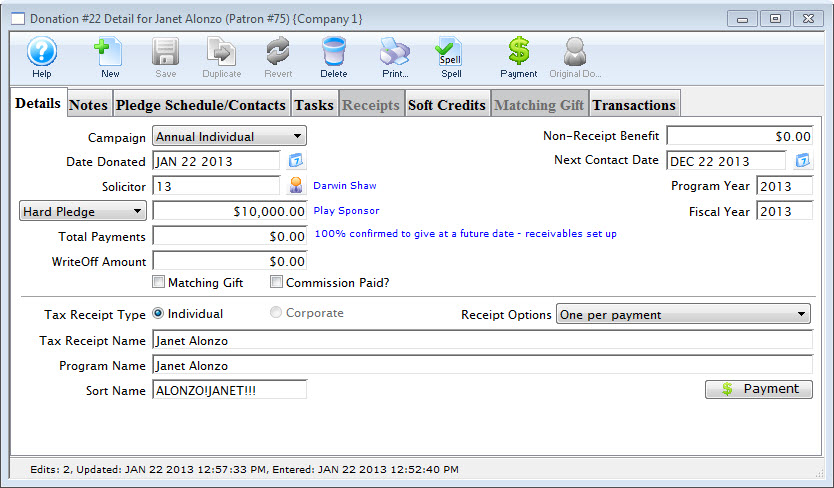
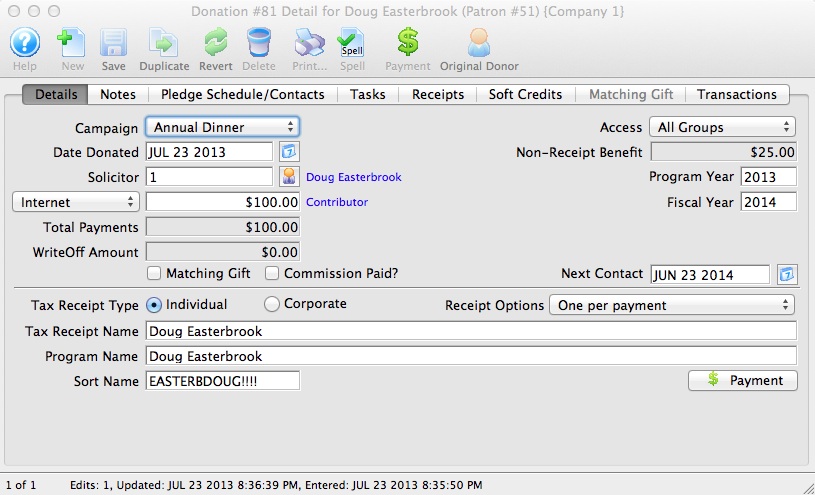
Campaign The drop down list contains the possible donation campaign to give the donation to. Date Donated Enter the date that donation was made. If the donation date differs from the default computer date, you can back date the donation by up to 3 months into a prior calendar year for tax purposes. Donations always appear on tax receipts according to the year on the donation date.
Note that Revenue Canada has stated:
- that the donation date and date entered into the system must both be displayed on a receipt if they are different to deal with year end issues and
- checks entered after actual year end but which are for the prior year.
Solicitor Select the person responsible for receiving the donation from the drop down. This person must exist in the Employee table (see Setting up an Employee) Donation (gift) Click in to the amount field and enter the donation amount. Depending on the selection in the popup to the left, this sets up an as a receivable in Theatre Manager so that the system knows to expect a payment for this amount. It could be one payment or it could be post dated payments. 
In the popup to the left of the amount, the typical choices are listed below. The affect how money is reported to finance to create a receivable.
- Categories that do not report to finance
- Prospect - Indicates that the donation is not real and will not be reported to finance. Use this designation to track key major donations, bequests, likely grants, or other possible funding sources. Amounts can be raised or lowered without affecting financial reports
- Soft Pledge - Similar to prospect. The intention of this category is to indicate that you have verbal (but not written) commitment for a large donation.
- Categories that cause G/L entries to be created
- hard pledge - When you receive any signed paperwork for a pledge that is considered legally binding, use this option. Generally it means people are paying over time. on the odd occasion, you may need to switch a Prospect or Soft Pledge (not reported to finance) over to a Hard Pledge or Donation when all the hard work has been completed and a prospective donation becomes reality.
- Donation (gift) - Generally used for most donations where a check arrives or when advised that a grant proposal has been accepted and money is on the way.
- Donation Refund for Ticket - an option to delineate when refunding tickets and the donation was for the refunded ticket.
Total Payment Amount of money received for the donation. A donation may be made in the form of a Stock and the payment amount may be more of less then the donation amount. For information on Stock gifts click here. There are a number of rules for USA 503c registered charities that may affect the amount entered.
WriteOff Amount The unpaid difference between the Donation and the Total Payment. Matching Gift Select the Matching Gift if you wish to link this donation to another patron who will also donate as a result of this patron giving a new donation. Click Here for more information. Commission Check the Commission Paid box to indicate if a commission was paid to a third party to procure this gift. Theatre Manager will enter the date that the commission was paid. Non-Receipt Benefit The amount deducted from the donation receipt to cover taxable benefits received by making the donation such as a dinner or a show. You will not be able to enter a receiptable benefit unless you have set it up in the donation campaign setup. You may also have to indicate standard benefit amounts at each donation range in the giving level matrix. Next Contact By default, the Next Contact Date is eleven months from the date of the donation. This date can be changed should you require a different date from the default. Use it in reports to print a list of donors that need contacted at that time to ensure that they give on a regular basis. Program Year The Program Year defines the time frame the donation will be recognized in published material. Use it in reports to print a list of Program Names within the Program Year. Fiscal Year The Fiscal Year is selected from the fiscal year set up in default settings. Refer to Accounting for more information Tax Receipt Name This field is used to record the name of the individual who will receive the tax deductible receipt. Theatre Manager prints a receipt for tax purposes in the name of the individual recorded here, which could differ from the individual giving the donation. 
While you can put anything into the tax receipt name, there are some legal implications. Please refer to this page on the true donor as explained in a Government Of Canada document. If you cannot ascertain the true donor with certainty, you'll need to ask them for any correction. If you still cannot, then you should mark their donation receipt option as No Receipt Required so that the system will not print one. Program Name This field is used to record how the patron would like to be recognized on your program listings. The default name is populated into the program recognition field in the order that follows: - If there is a default donor publication name in the donor tab of the patron window, this will ALWAYS be used as the default publication name.
- If there is 'COMPANY' name in the patron record, then the donation will be set to corporate and the company name will populate in this field. You can easily change it by clicking on individual to set the patron's name in the field
- If the above two options do not apply, then the default is the patron's name, in the format specified in the company preferences
- You can then Change the recognition name manually For example:
- if the Donor wishes to remain anonymous this field should read "anonymous". Click here for more information on making the donation anonymous.
- Or if the name is 'in memoriam' or 'in honor of', then simply change the program name to state 'In Memory of .....'
Sort Name The sort name is suggested by Theatre Manager and is used to DETERMINE THE SORT ORDER of patrons (within a giving level) on the donor program insert reports. It is initially based on the last name or company, depending on how the default donor name is selected and it may be changed. The sort name is used to position the donor's name in the program. For example, if the Program Name is 'Anonymous', the sort name could still be 'Smith'. This would cause the program to creating a listing for 'Anonymous' under S.
In order to maintain a reasonable alphabetic sort order, the sort name starts out with either:
- For individual donations:
- the first 7 characters of the last name (padded with ! if need be)
- the first 7 characters of the first name (padded with ! if need be)
- The first character of the middle name (or a single ! if no middle name)
- -OR- the company name without spaces (for corporate donations)
The sort name is designed so that you can alter the natural sort order of patrons. For example:: - Anonymous typically falls under 'A', but you can force it to appear where the patron's last name would fall, or change sort name to ZZZZ to make it fall at the end
- In Memory of Spot the Family Dog can be made to fall under Spot if you make the sort name Spot or under Family if you make the sort name Family
- Normally, you would not change the sort name, this just gives some extra capability for extraordinary situations like 'In Memoriam' or 'Anonymous' or 'on behalf of' gifts.
Tax Receipt Options  There are a number of options for printing tax receipts, some of which Theatre Manager will handle for you. Please refer to the explanation on what each receipt option means and how the system processes them.
Please read very carefully about Revenue Canada's Policies on issuing tax receipts.. Improper receipting can result in heavy fines. - Enter the Donation Details.
- Proceed to the
 tab if required.
- Click the Payment
 button.
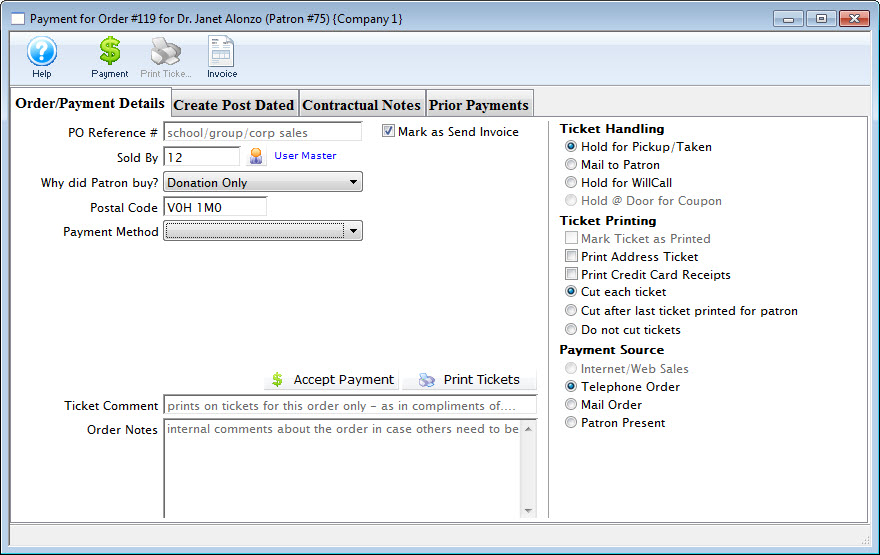
- Pay for the donation.
Click Payment for additional information.
| Quick reference information Donations Overview |
|
|


Entering a Prospect or Soft Pledge Donation
A prospective donor's name may come from discussions at a Development or Staff meeting, or noticing a donor on another venue's Donor Wall that isn't in your current donor list. it might also be for the purpose of Planned Giving
As soon as you identify a prospective donor, you should start a Prospect Donation in Theatre Manager. This way, you can track the progress of moving the potential donor towards an actual gift.
 |
A Prospect Gift or Soft Pledge will not affect your financials in any way. Entering a Prospect Gift is simply a way of tracking a potential gift without creating any Receivables. |
Entering a Prospect Donation
- Start by opening the Patron Record of the prospective donor. For details on locating a Patron Record click here.
- Click the Donation tab.
- Click the New button. The Donation Detail window opens.
- On the left-hand side of the Donation Detail window, you will see a drop down for:
- Prospect
- Soft Pledge
- Hard Pledge
- Donation (gift)
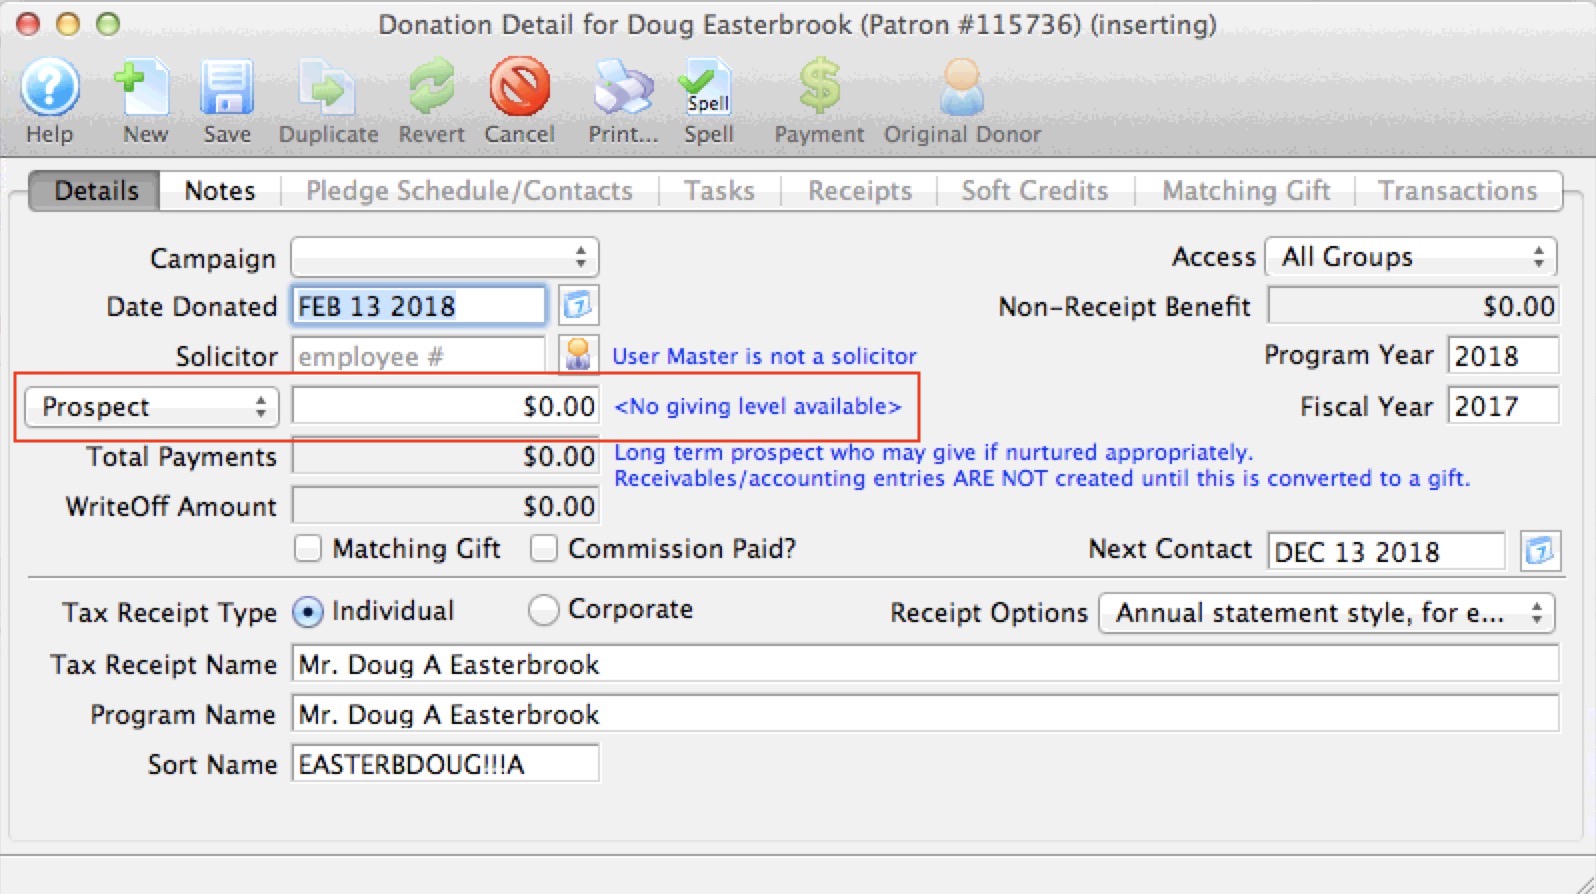
Select "Prospect"
- Complete the remainder of the fields for the prospective gift.
- Click the SAVE button at the top of the Donation Detail window.
|
Alternatively, refer to Enter Donations on the Order Window when already within an order. |
The Donation Detail window opens.
You will also note a change in the blue text to the right of the field. It now says:
Long term prospect who may give if nurtured appropriately. Receivables/accounting entries ARE NOT created until this is converted to a gift.
Some prospect gifts will remain as prospect gifts for a long time - perhaps even forever. They will always be recorded in the Patron Record so you can see what work has been done with this particular Donor.
Using Prospect for Planned Giving
|
A Prospect Gift or Soft Pledge will not affect your financials in any way. Entering a Prospect Gift is simply a way of tracking a potential gift without creating any Receivables. This gives you a place to track all interactions with the patron during the planned giving process. |
Setup and Data Entry
To handle these in Theatre Manager:
- Make a donation campaign, if it is deemed best to have a different one for tracking purposes
- Indicate that the donation be set up as a PROSPECT
- Enter the potential value of the planned gift
- put something in the notes about what the planned gift is for or how you will receive it
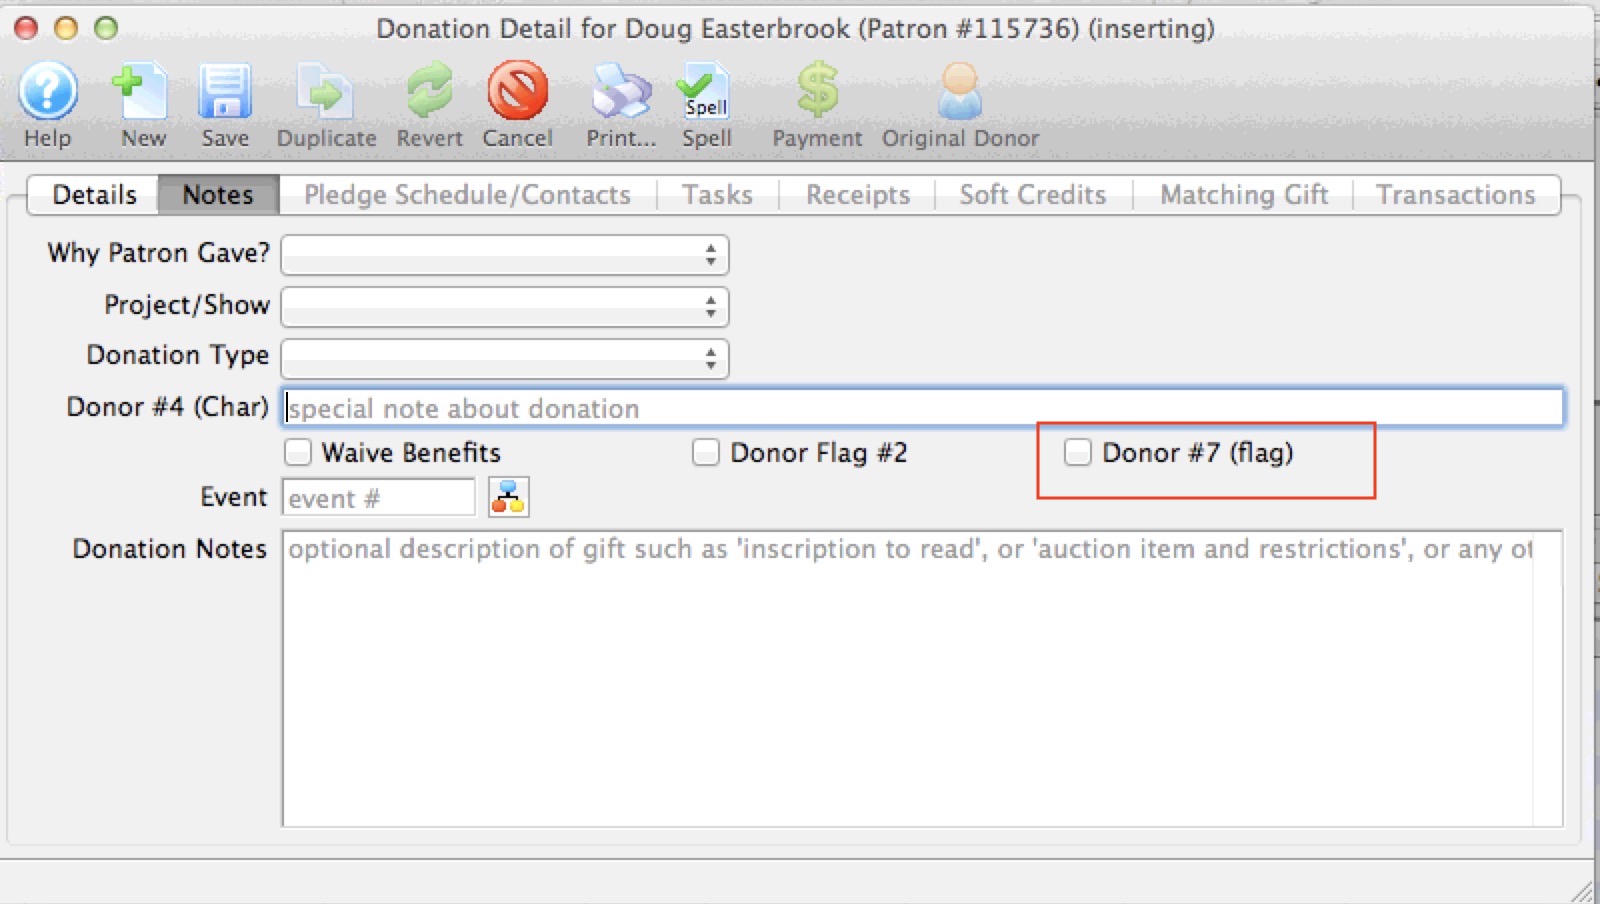
- optionally, use one of the custom donation fields for an additional identifier. This image shows that flag #7 is not taken, so you might rename that as 'planned gift' in company preferences if an additional marker is required to simplify pulling some reports.
What to do before you actually receive the Planned Gift
Before you actually receive the planned gift, there will undoubtably be changes to the information, discussions, reporting, etc. You can:
- Use the TASK tab to track meetings , to-do's or such with the potential donor
- In one of the tasks, if you get documentation from the donor, stick it into the attached files tab of the task
- Track any letters you send specific to the planned gift in the pledge Schedule/Contacts tab
- This gives you a central source of all interactions about this specific planned gift with the patron.
What changes when you get the planned gift?
- Change the PROSPECT marker to GIFT - this initiates the financial data to be sent to finance for the GL
- enter the true amount of the planned gift, if it has changed from what you thought
- Enter full payment or any sort of payment plan that the planned gift species -- just like any other donation
- Prepare a tax receipt, any custom acknowledgement for this kind of gift, or any required government forms - which you can also track in the attached files tab of a task
In the end, a planned gift is just like any other donation ..... except it starts its life as a PROSPECT before being converted to an actual gift.
Donation Tax Receipt Name Considerations
|
While you can put anything into the tax receipt name, there are some legal implications. If you are in Canada, please read Revenue Canada's Policy Commentary CPC-010
For those in the USA, you may wish to lookup the details of IRS publication 1771 |
|
Please read about Revenue Canada's extensive policies on issuing tax receipts.. Improper receipting can result in fines. |
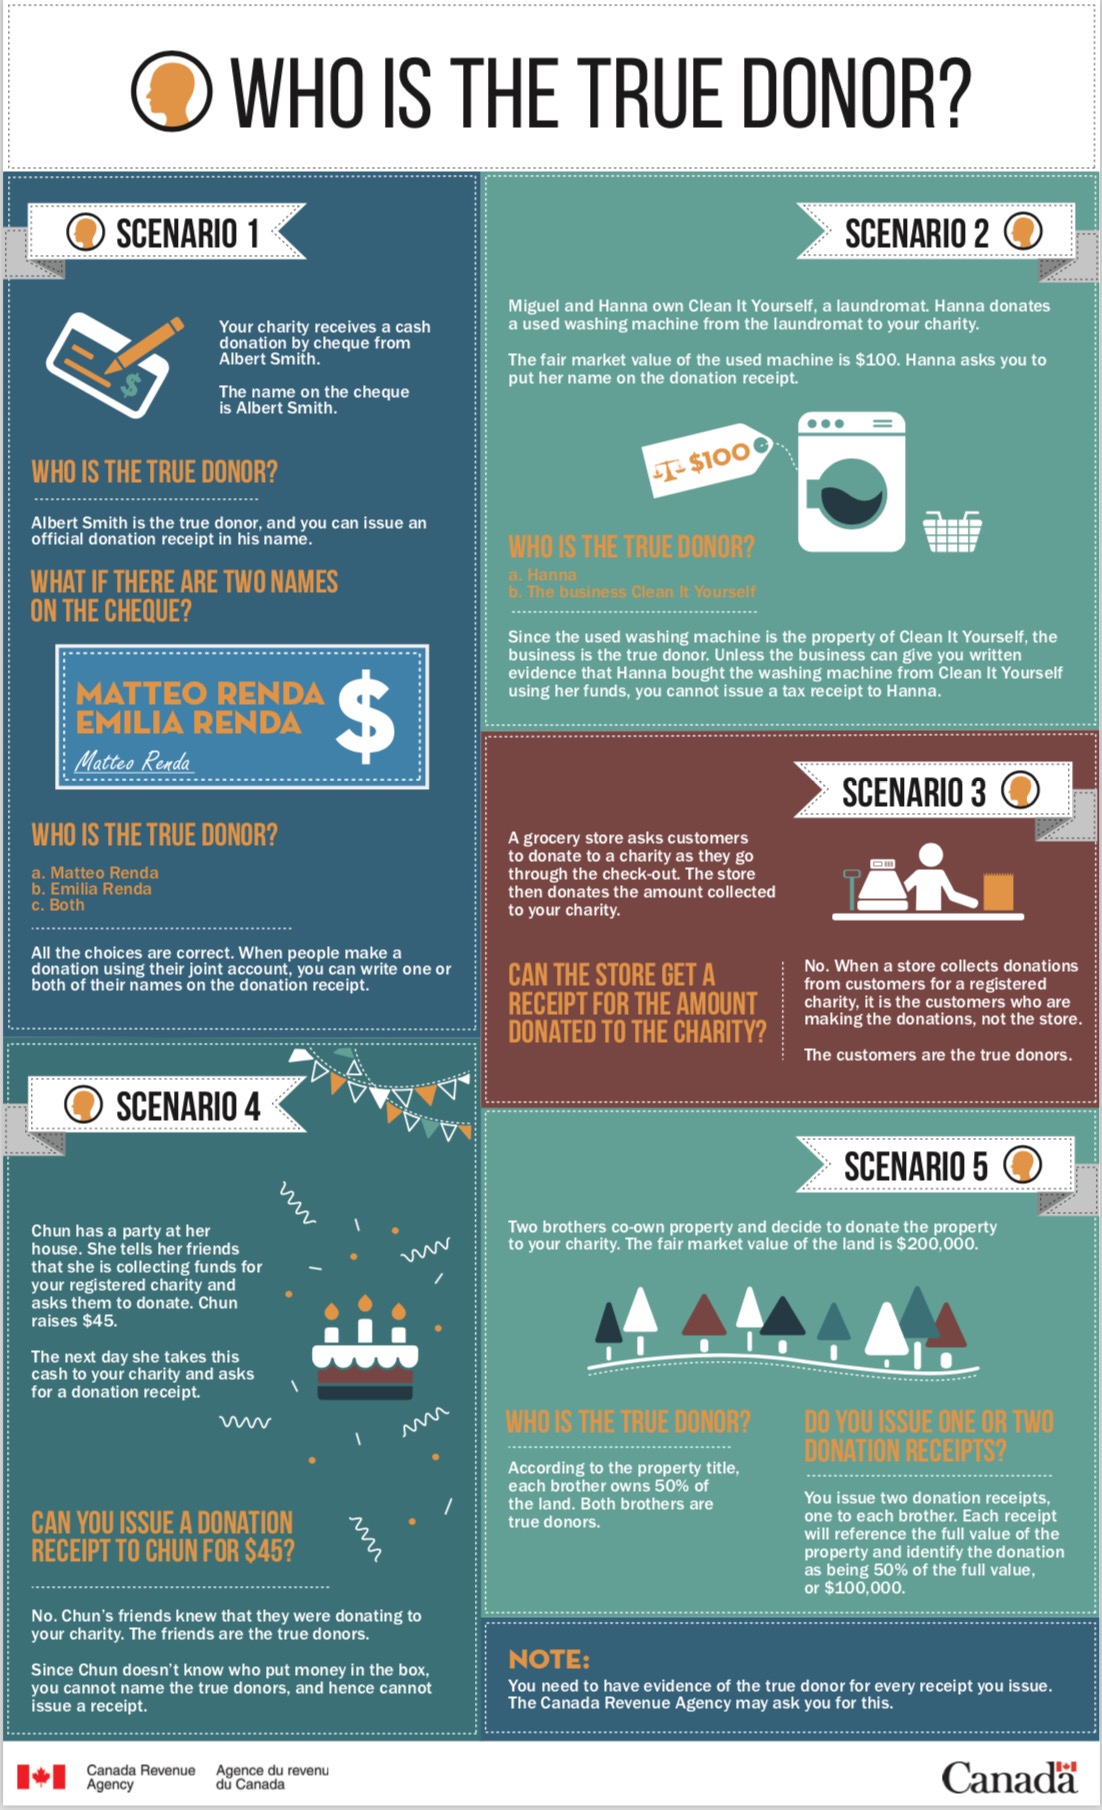
This handy chart below comes from the Revenue Canada web site and illustrates some common examples. In all cases, Revenue Canada indicates the need to highlight the true owner of the donation. If the donors name cannot be ascertained 100%, then no receipt should be issued.
Donation Tax Receipt Options
|
Please read carefully about Revenue Canada's Policies on issuing tax receipts. The CRA web site mentions:
Theatre Manager modelled the contents of receipts after the requirements/samples on Revenue Canada's Web Site.. The US has fewer, although somewhat similar requirements as mentioned in publication 1771 |
|
Read how to batch print receipts that have not been printed. |
|
Please note: receipts are issued for each payment made towards the donation. Receipts are not issued for the donation.
The reason is that donations are only an indication of what the patron intends to give and payments are what they actually gave. A receipt cannot be issued until the payment is made and each payment is given its own receipt number and date. |
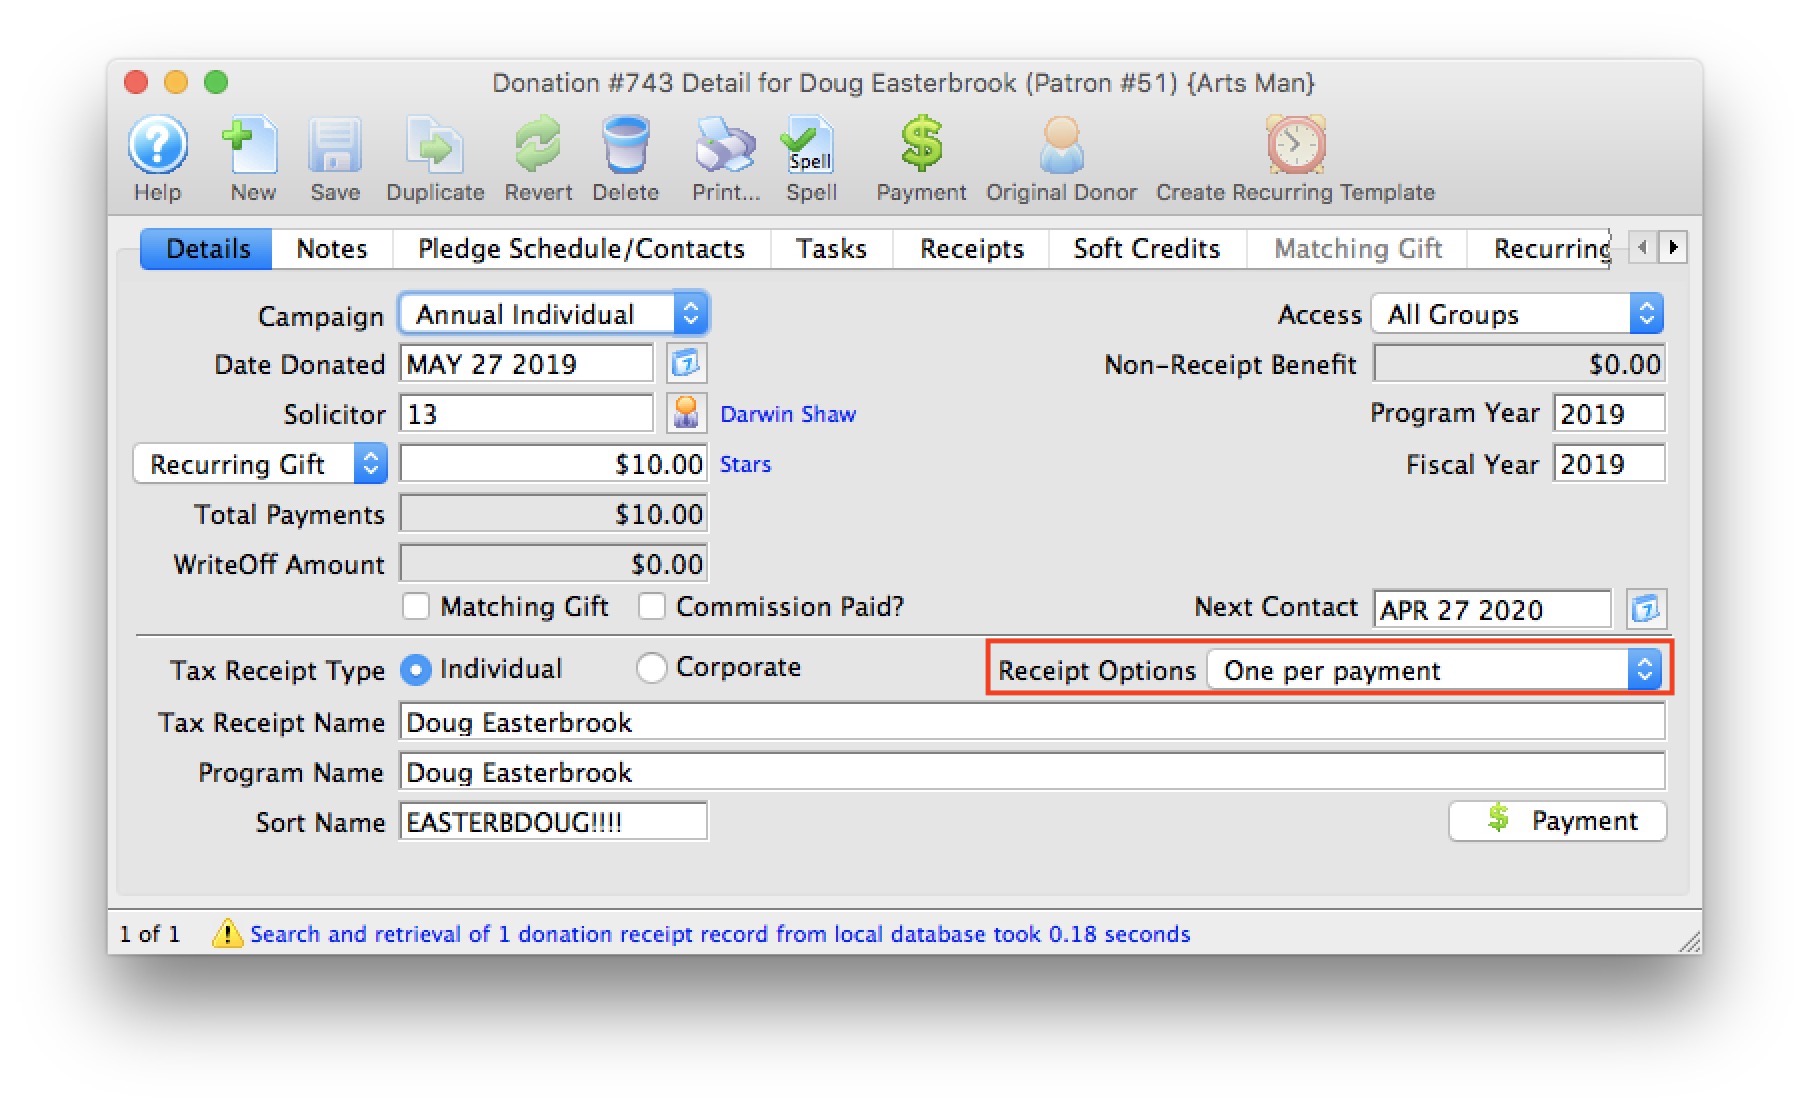
Tax Receipt Options
Theatre Manager has a number of tax receipt options that you can set for each donation. In addition there is a setting for each campaign on the edits tab that can be used to only print donations above a certain amount.
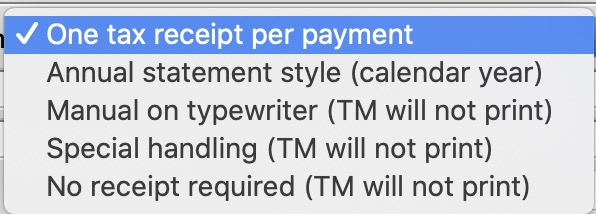
Receipt Options Types Printed by Theatre Manager
- One tax receipt per Payment - is the default. Each payment is issued a separate tax receipt when the payment is received. If there are 10 payments, you will create 10 receipts at when each payment is entered.
- Annual Statement Style (calendar Year) - will print a one page tax receipt for the patron listing all donations in the calendar year marked as using this style of receipt. If a receipt was previously printed, it is so indicated on the statement.
Receipt Options to be handled Manually
- Manual On typewriter - are used when the donation and payments are complex enough and the only way to observe various government regulations is to simply type one up in a word document or on an old fashioned typewriter. Theatre Manager ill not print any receipts for this donation. Once finished the donation receipt, you may want to import a PDF of the document into a task to record what was sent.
- Special Handling - are also used for complex receipting requirements. We suggesting that this be used if you create a form letter for this purpose
- No Receipt Required - there are cases when you should not print a receipt for a donation even if a receipt is normally created for the campaign. Use this option when the true donor cannot be identified, or if the entire donation receives benefit.
If you cannot ascertain the true donor of a gift, select No Receipt Required to comply with Revenue Canada regulations.
Which receipt type to use?
-
One per payment receipts are best suited for:
- Larger donations paid with one or two payments
- When the customer wants a receipt after a payment
- if you want to strictly follow Canada's governmental reporting requirements and use facsimile signatures and/or are using preprinted forms
-
Annual Style receipts are best suited for:
- Donations with many payments or post dated payments
- recurring donations that never end.
- If the client wants for one receipt for all donations in the year
-
Form letters can be used to print receipts if the options provided or the situation warrants something custom to be created.
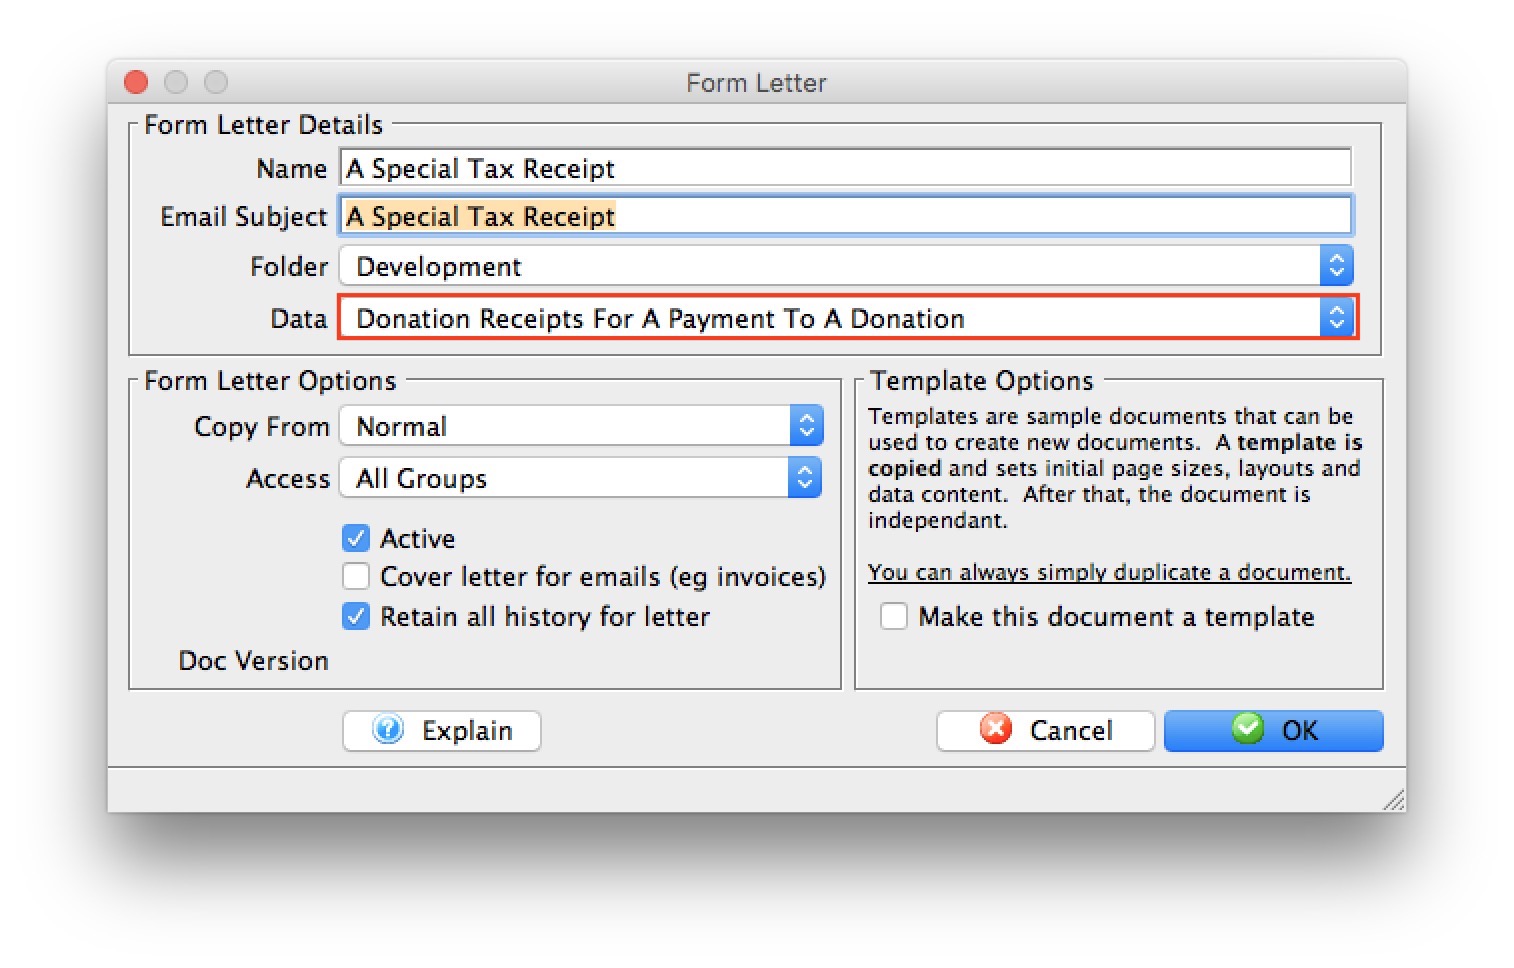 To use form letter receipts:
- Mark the receipt type as Special Handling so that TM will not attempt to print one for each payment
- Make sure to mark your receipts printed manually on the receipt tab - which will generate a receipt number in Theatre Manager
- Create a standard form letter (based on donation receipts file as per the image to the right) and place a table in the form letter containing the receipt data you want to show that also includes the receipt number.
Entering Donations on the Order Window
You can add one or more donations to the same order that contains subscriptions, tickets and/or gift certificates. There are a number of reasons why you may wish to do this:
- A donation that accompanies a season subscription renewal
- A patron may not be able to attend the upcoming event / play and would like to turn in their tickets. Click here for an explanation of how to turn a refunded ticket into a donation.
- A single donation that is targeted for multiple campaigns would be entered in this window. You would enter multiple individual donations to each campaign that add up to the total donation amount. As each donation is added, the total appears at the bottom left od the screen in the financial summary.
- Similarly, donations for a multi year pledge or capital campaign are entered in this manner. Enter a separate donation for each program year that add up to the total expected amount.
Note: Any payment to an order with multiple donations is applied to the individual donations in this order:
- Program Year - this mean that for donations that span multiple years, arrange them so that the program year is entered in the order that you want payments allocated.
- Donation Date - if there are donations for the same program year, then payments are applied according to the donation date.
- Donation Number - if the multiple donations have the same program year and donation date, then the payments are applied to donation in order of the donation number.
|
Once a payment is applied to a an order with multiple donations, you cannot change the allocation of receipts unless you:
|
- In the Order window click the Donation button.
The Order window can be accessed by purchasing ticket, a membership or by simply adding a payment to an existing order.
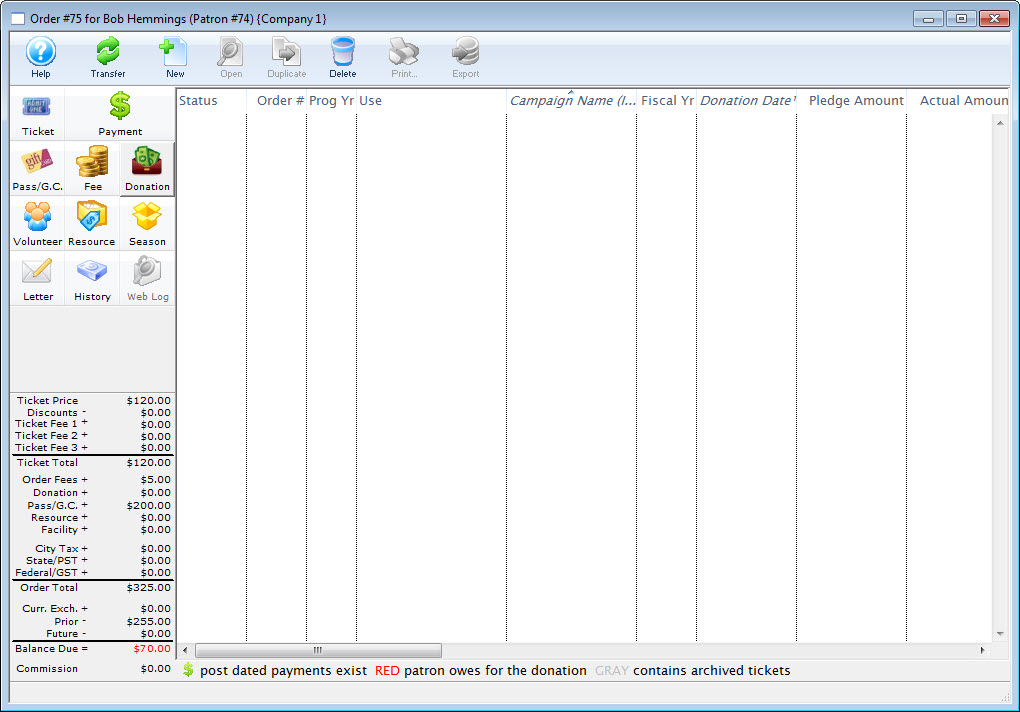
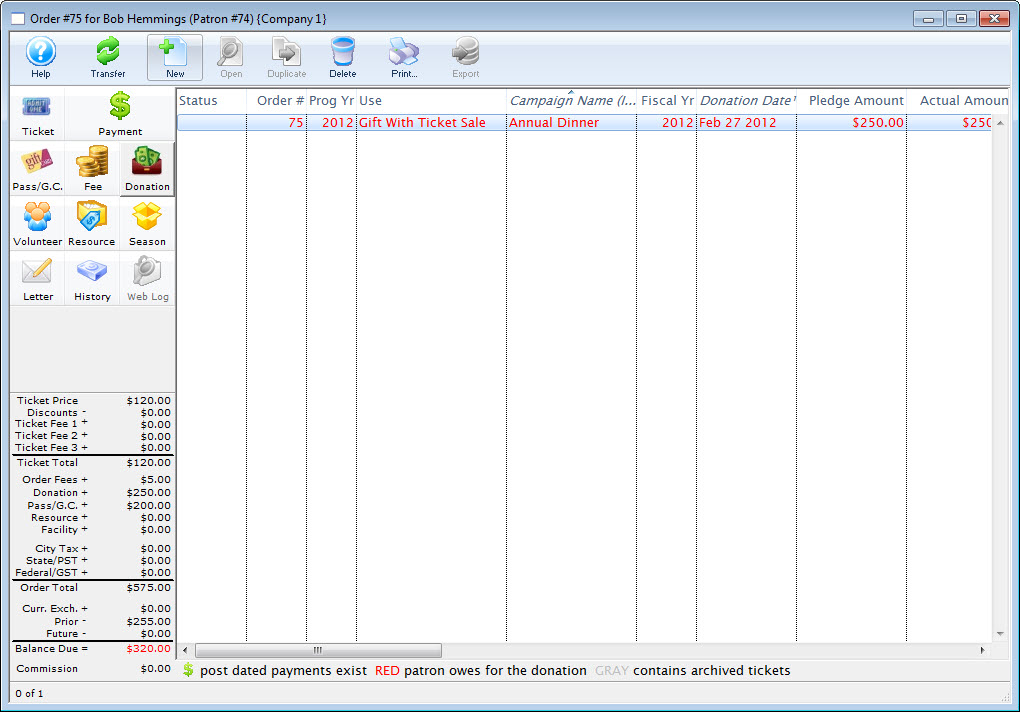
- Click the New button.
- Enter the Donation Details.
- Click the Save
 button.
- Close the Donation Detail window.
- Click the Payments
 button.
- Pay for the donation.
Click Payment for additional information.