Branding web sales to make it look like the main web site
 Theatre Manager comes with a set of web pages that can be dropped in place so you can have web sales running in very short order. These web pages provide all the functionality of the web sales component of Theatre Manager including ticket sales, online donations, gift certificate sales, managing the shopping cart, and much more.
While these web pages contain all the functionality, many venues like to change the look of the web pages to 'brand' the pages in their own image. To brand a site, the recommended steps are below. We recommend making a minimum of changes to the pages as it means that you can upgrade pages when we add future functionality quite easily. This is possible because we have tried to isolate the required changes to a few files at most. In practice, this works out very well.
The general approach to branding the web site is:
- Use the sample pages and review the sales process. Also see examples of what others have done to show possibilities.
- Create a custom page design as the first step. Then use the standard pages as they are before making deeper changes.
- There are notes within Theatre Manager that get merged into the web pages. These describe search options, sales text, notes, maps etc that display on the web. It allows control of a number of changes to remain in the hands of the end user (a bit like a CMS).
- Only as a final step, adjust the text content on a few important web pages. Likely, there should only be changes required for mailing, box office hours and a couple of other pages.

If you do want to change a page, copy that page into the same location in the WebPagesEN folder and make the changes to the COPY. Theatre Manager will reference the WebPagesEN folder first when looking for a web page then the default pages from within the TMServer if it finds none.
Try to minimize changes to pages as it affects ability to upgrade pages later on.
Before anything can be changed, you need to know where the web pages are. They are always installed in the WebPages folder of the Tm Web server that is set up when Theatre Manager is first installed. If you need remote access to this folder, we suggest using a GIT checkin/checkout process to edit pages locally and push the pages to your web server..
Types of Pages
The Web Sales Modules is comprised of a number of different pages, such as, the content pages, login page, shopping cart and checkout pages to name a few. To change the pages to be specific to your venue, your web developer/designer will need to edit the appropriate pages.
The links on the side navigation beginning here, will guide you through the pages in the Web Sales Module and give you detailed information on how each web page is used by module.
You can alter the source code of the Web Sales pages to suit your needs. However, if you do, Arts Management Systems is not responsible for supporting or debugging errors that may occur.
|
Please ensure you have a backup of the web pages prior to make changes. |
Throughout this section of the help, you will see
|
Programmer's Note: These notes provide the web developer/designer with further information on how to customize the web pages. |

|
Programmer's Note: Remember that changing the name of any of the html files that come with the Web Sales Module will require you to check that any pages that link to the new renamed page has been revised to accomodate for that change. Otherwise you will have broken links or errors on your pages |
Adjusting Content on Important Web Pages
The other caveats:
- Do not change the names of any field within a <form> tag or an <input> tag
- Do not adjust any calculation between a <field> and </field> tag without consulting with an Arts Management Systems support person first. These calculations and field names are items merged back into a page from the database before it is sent to the user and in effect, are the guts of the web process
Other than those general rules, open any page with your favorite page editor and make changes as you like. The pages that we find venues change most often are:
- TMError.txt - to alter some of the error message text for some error conditions
- tmTemplates/tmContact.html - to adjust any text around how to contact the venue
- tmTemplates/tmnavButtons.html - to adjust which buttons are acceptable for the venue at the top of the page
- TMdonation.html - to add comments about online giving
- tmScripts/themeCDN.html - to set the bootstrap theme for the web pages with a CDN backing it up
Changing Page Design
Editing Bootstrap Themes
|
The fastest and best way to completely alter the look of the web pages is to change the theme using a customization tool like Bootstrap Live Customizer.
This can be done in minutes |
Alternatively the custom.css file can be altered to define individual element within the pages.
Location of Web Pages for ticketing site
The web pages for the ticketing site:
- are located in a folder on the Web Listener computer (for those clients who self host) -or-
- are located in a git repository (for clients using Artsman Cloud Hosting).
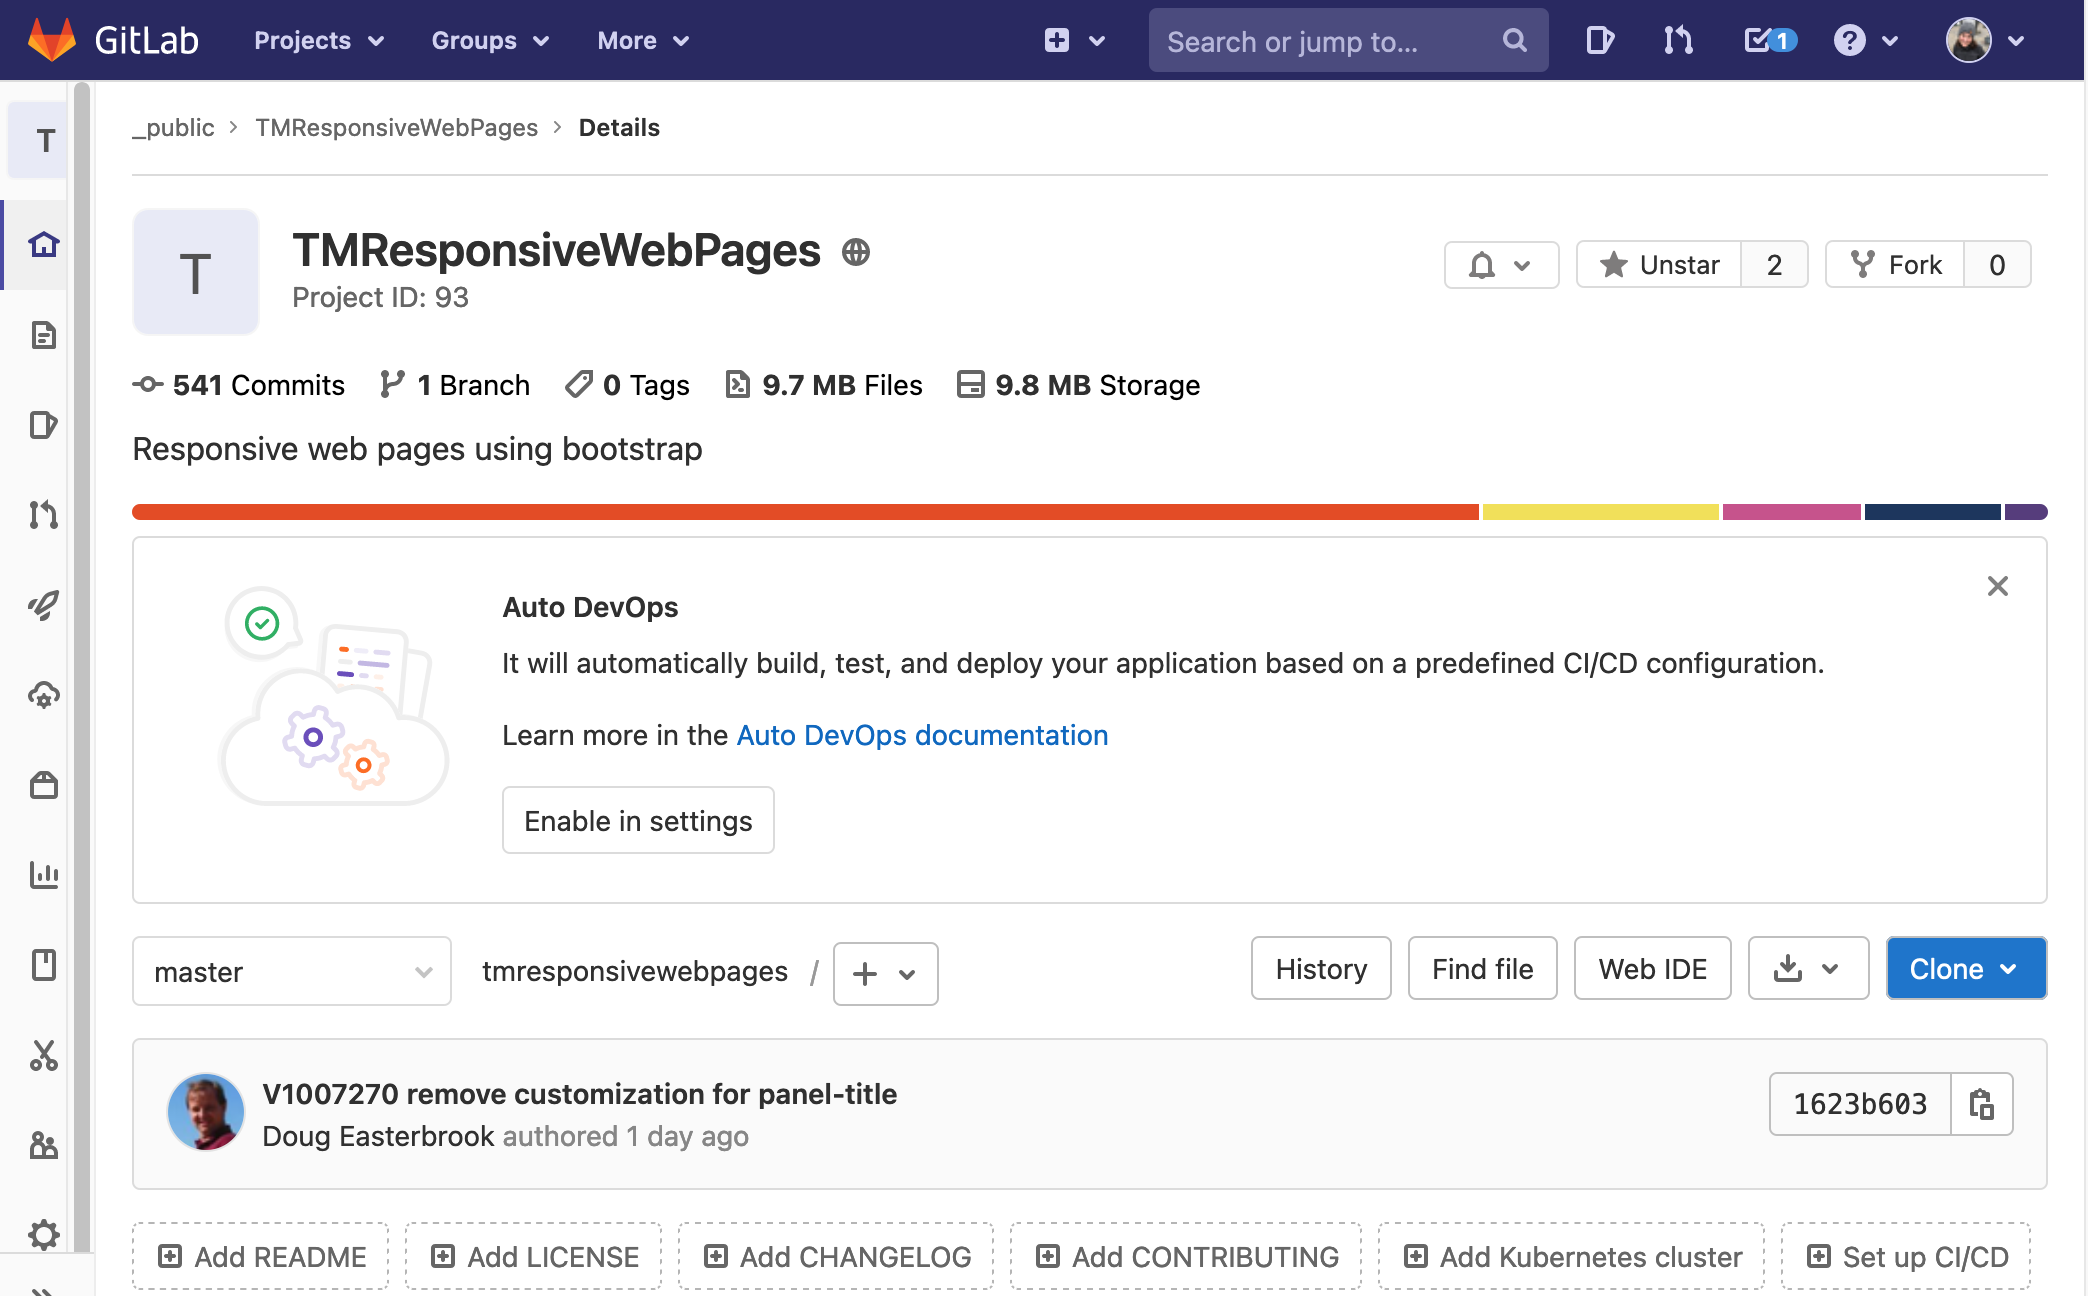
The web page file structure consists of a WebPagesEN folder containing only those pages previously customized. A full set of the default pages are can be download from
https://gitlab.artsman.com/_public/tmresponsivewebpages.
When making edits to existing pages the latest default page should be downloaded and copied to the corresponding page within the local folder.
Updating the Logo
The logo at the top of the ticketing site in the navigation bar is a company logo. The quickest way to update the image would be to create a tmCompanyLogo.jpg file and place it in the /WebPagesEN/tmGifs folder. This will replace the default image.
Alternatively an image can be added to the /WebPagesEN/tmGifs folder and the tmnavButtons.html page (located in the /WebPagesEN/TMtemplages folder) can be updated with the image name.
Additional Edits
Other commonly edited web pages are:
- tmEventAdDefault.html - the ad at the bottom of the print at home ticket
- tmEventBannerDefault.html - the banner at the top of the print at home ticket
- tmContactHours.html - to include the hours that the box office is typically open
- tmnavButtons.html - add or remove buttons in the navigation bar to reflect the kind of items you sell online
- tmSocialMedia.html - to provide the complete URL's of your venue's social media links
- favicon.ico - to provide a customized icon for your venue in the browser URL bar.
Removing Crimson Navigation Buttons
In the default stylePages.css, the buttons within the online sales will appear red when using an Internet Explorer browser. For some clients, this works with their default pages. Others would prefer not to have the buttons appear in red. Please see the steps below on how to alter the buttons.
- On the Apache machine navigate to the /WebPagesXX/tmGifs folder.
- Open the styleButtons.css page using an html editing tool.
- Locate the following line:
filter:progid:DXiMageTransform.microsoft.Gradient(GradientType=0,StartColorStr='#ff800000',EndColorStr='#ff333333');
- Add a /* before the line.
- Add a */ after the line but before the } symbol.
- Repeat the above two steps for all four filter lines within the styleButtons.css file.
- Save the changes.
- Clear the cache on the web listener to reflect the change.
GitHub Desktop
GitHub Desktop is one of many third party tools that can be used for accessing web pages hosted on the Artsman Cloud in a git repository. Git is a distributed version-control system. It's great at tracking who made changes to what and when.
To setup access to your specific company web pages via Git, email support@artsman.com with the full name of the employee who will be allowed to make changes to your pages, and their company email address. For security and tracking purposes, only employee specific email addresses are accepted, like "johnsmith@example.com".
To use GitHub Desktop simply download and install the program. Clone the git repository pages to your computer for editing locally. After edits are made Commit and Push to the master branch of the repository directly through GitHub Desktop.
|
Only previously customized web pages will appear in the Artsman Cloud git repository for your organization. If the page you wish to edit does not appear on your local machine it may not have previously been edited. You'll need to download the default responsive pages and move that desired page to the corresponding folder on your local machine before making edits. Your repository should only contain customized web pages.
Remember to download the latest responsive pages each time before you begin making edits. |
Inital Setup
- Copy the Repository URL
- Clone the repository to local machine
Using GitHub Desktop
- Pulling recent changes
- Committing Changes
- Pushing Changes
Copy GitLab Repository URL
The GitLab Repository URL is needed when cloning the repository locally. The steps below should only need to be done once per repository during the initial setup.
Copy GitLab Repository URL
- In a browser navigate to https://gitlab.artsman.com
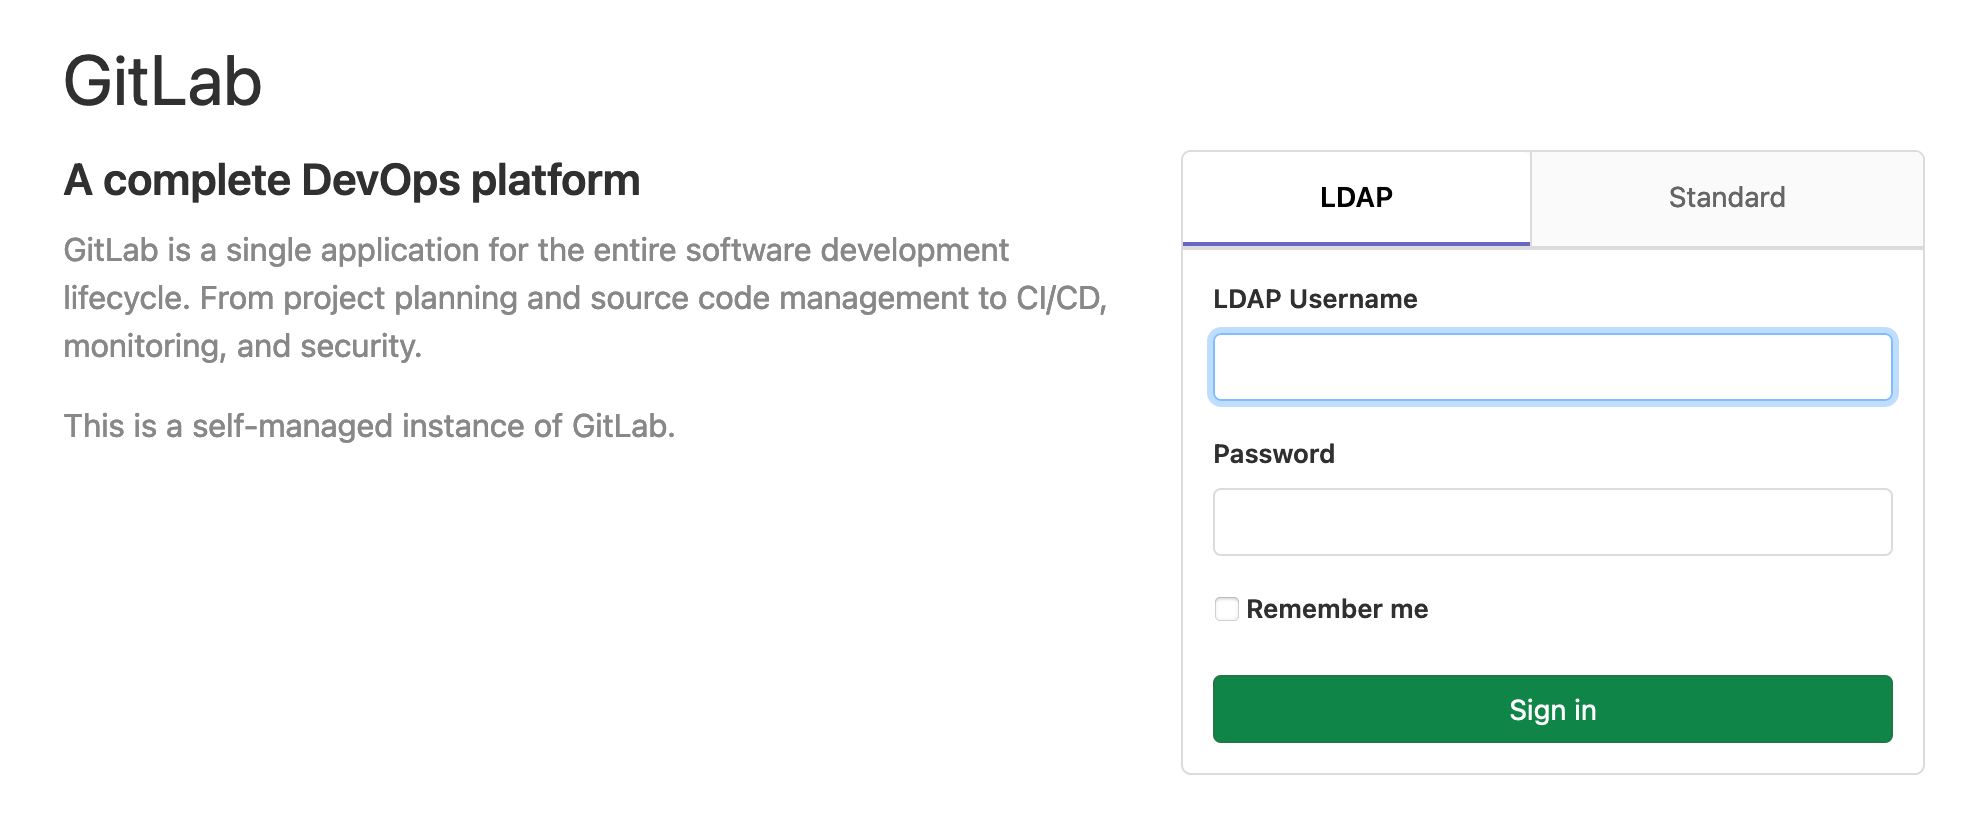
- Select the Standard tab
- Enter your Email Address and Password
Login information is requested through the Artsman Support team. If you have not previously been provided access please email the support team. When access is granted an email will be sent directly from GitLab to your email with steps for setting a password and logging in.
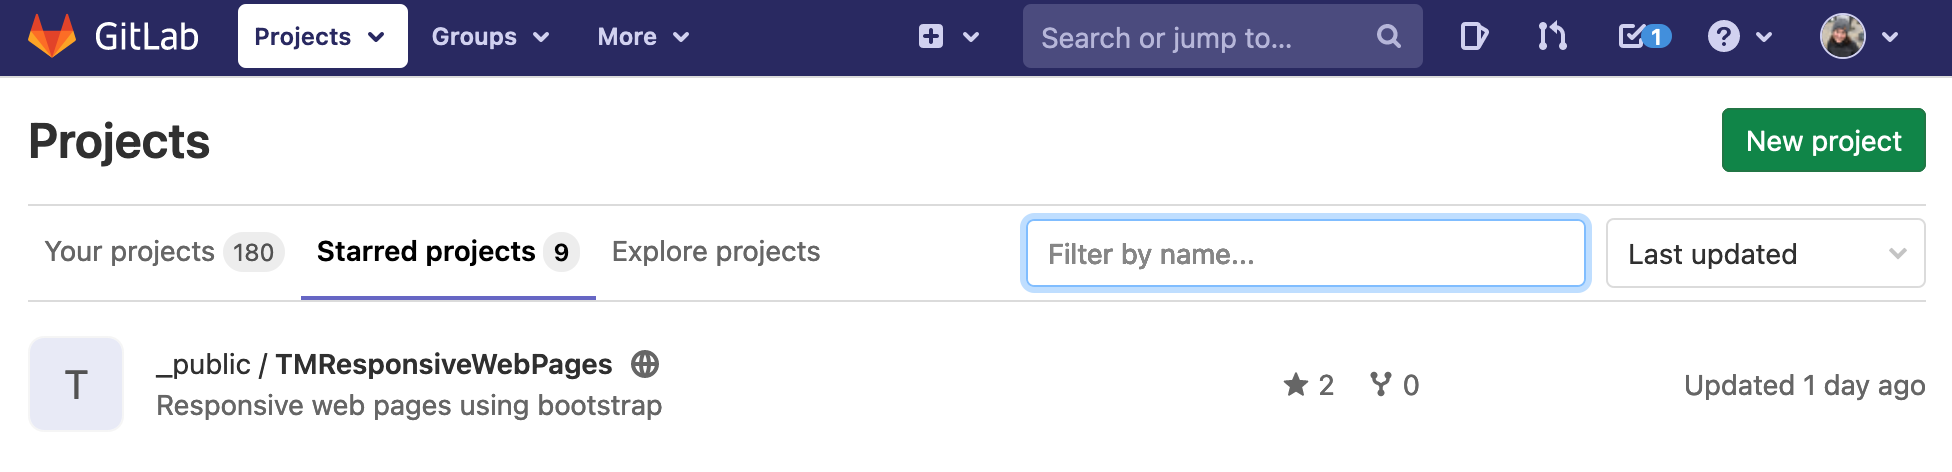
- Click the repository you wish to clone
- Click the blue Clone button
- Click the copy button next to the Clone with HTTPS URL

This will copy the URL for the repository to your computers clipboard making it ready to paste into GitHub Desktop for cloning.
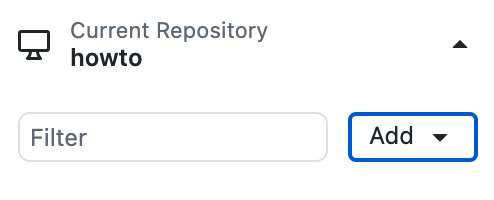
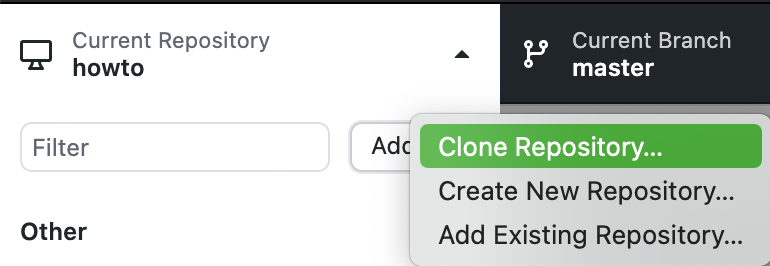
Cloning Repository to GitHub Desktop
Cloning a Repository to GitHub Desktop
- Open GitHub Desktop
- Click the arrow next to Current Repository to expand the menu
- Click the Add button
- Select Clone Repository...
- Select the URL tab at the top of the window
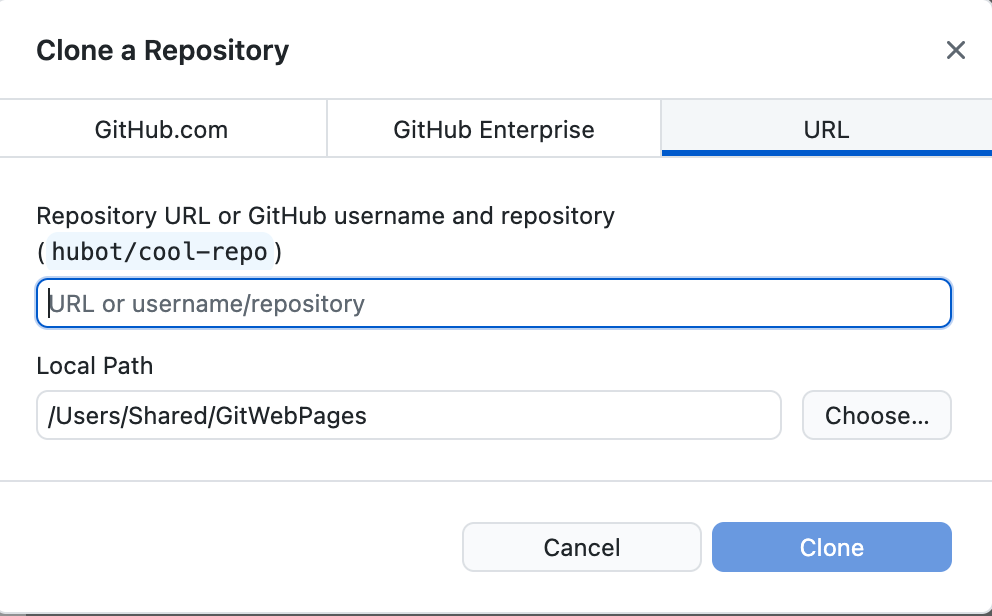
- Enter the URL copied from the git repository
- Select the desired location to save the pages
- Click the Clone button
You may be prompted to enter the your login credentials for the GitLab repository.
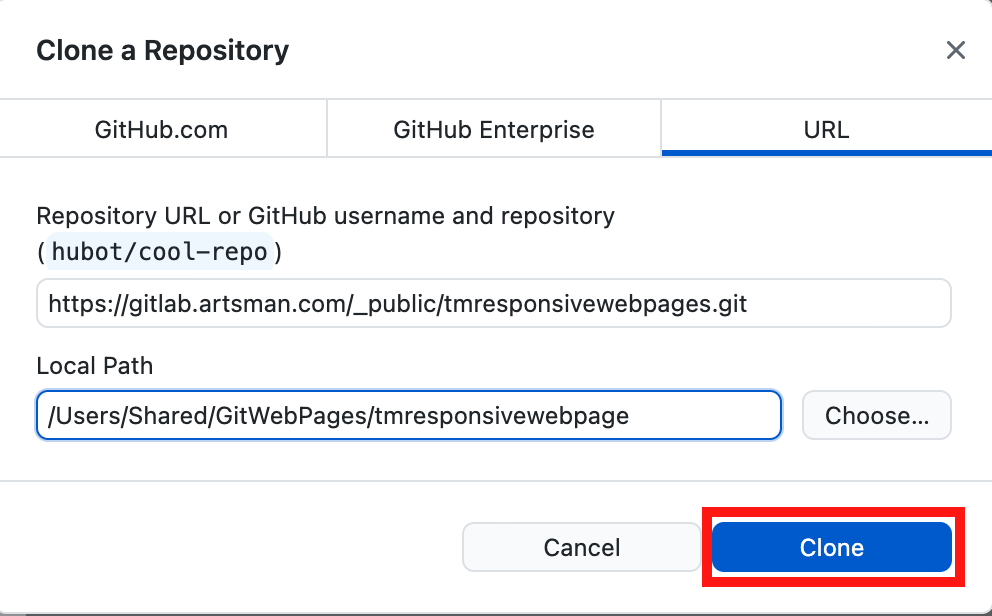
The web pages are now copied to your local computer for editing. When editing new pages always make sure to use the latest version of the responsive pages to ensure the page you are working on contains all the latest features.
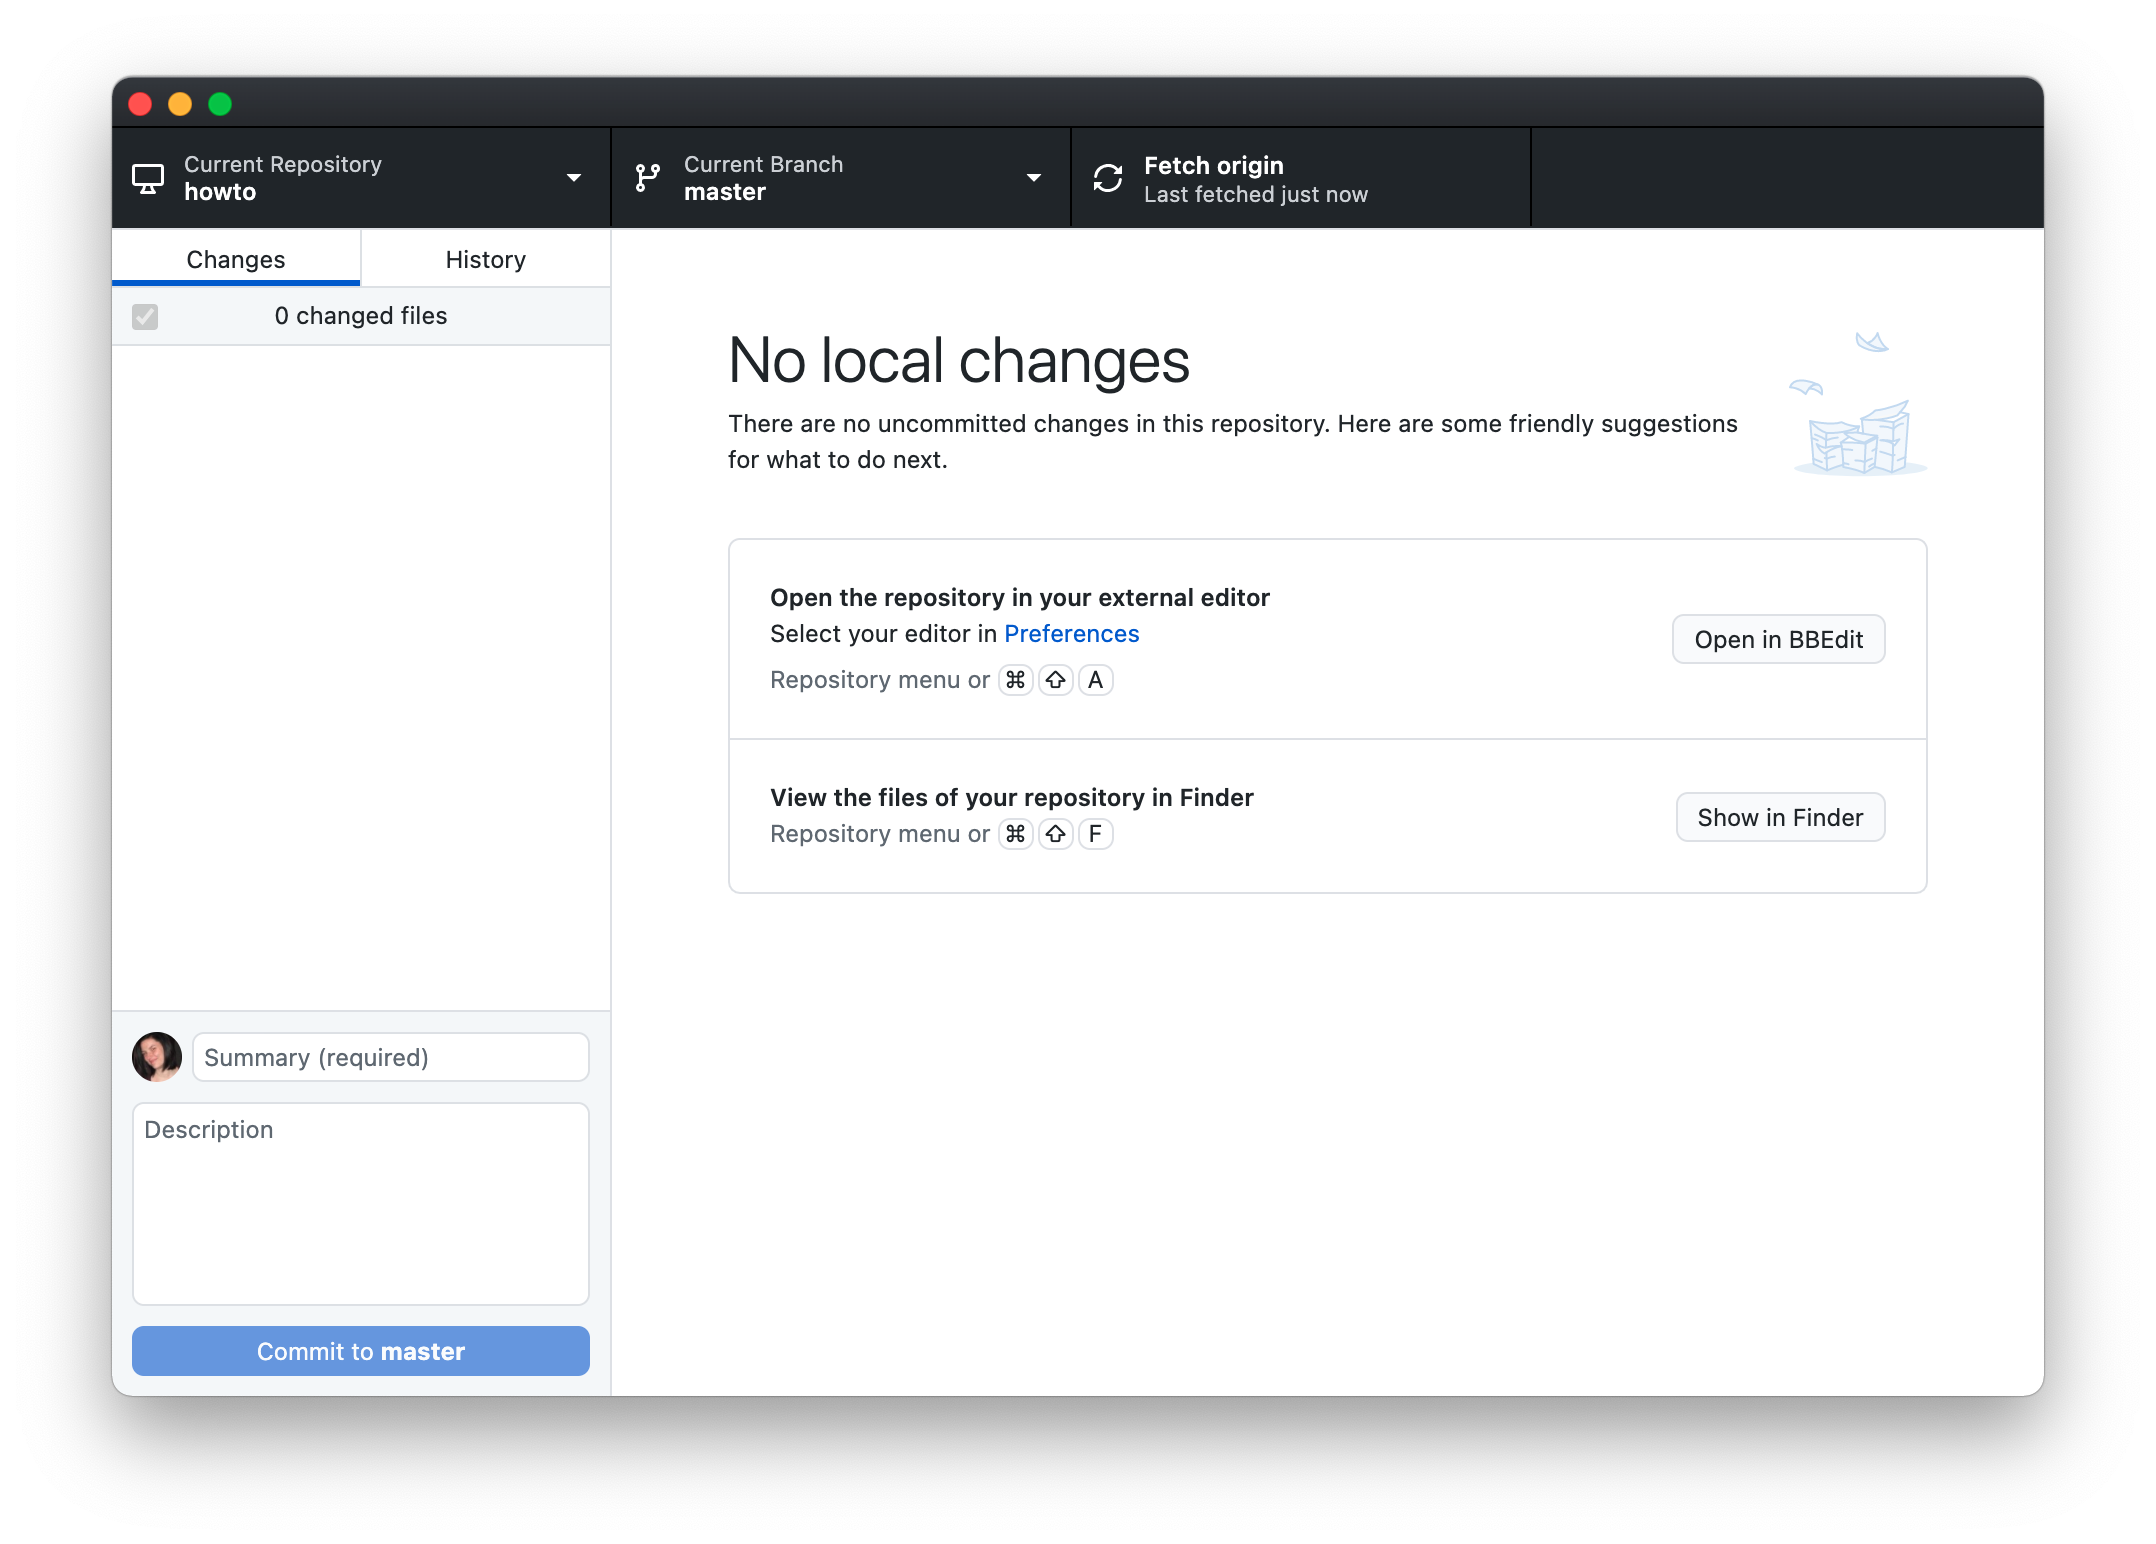
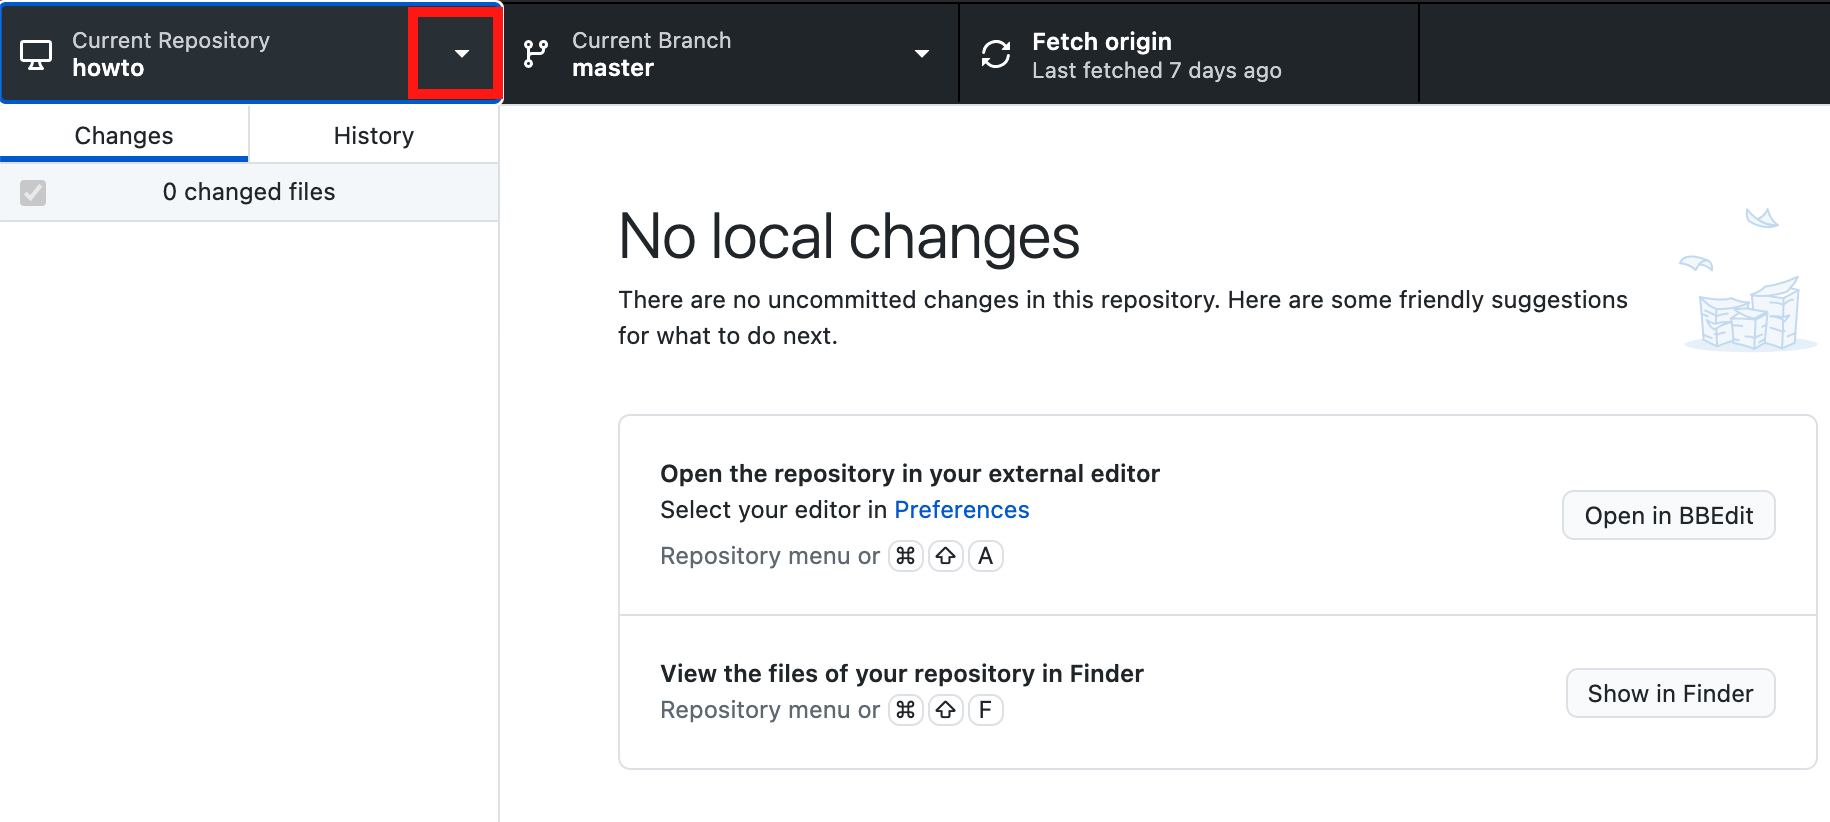
Pull changes from GitHub Desktop
It's important to always start any web page editing by Pulling changes from the existing repository. This ensures any changes made that are not currently in your local repository are pulled to your machine before you begin making edits.
Missing the step of Pulling means you may need to Rebase before completing the process of adding your changes to the repository. Rebasing a repository with conflicting changes requires a deeper understanding of git. For further information please see GitHub online documentation for assistance.
Pulling Changes from GitHub Desktop
- Open GitHub Desktop
GitHub Desktop is great at picking up when new pages are available in a repository. Changes are often detected within moments of opening the program and notifications can be seen in the main display.
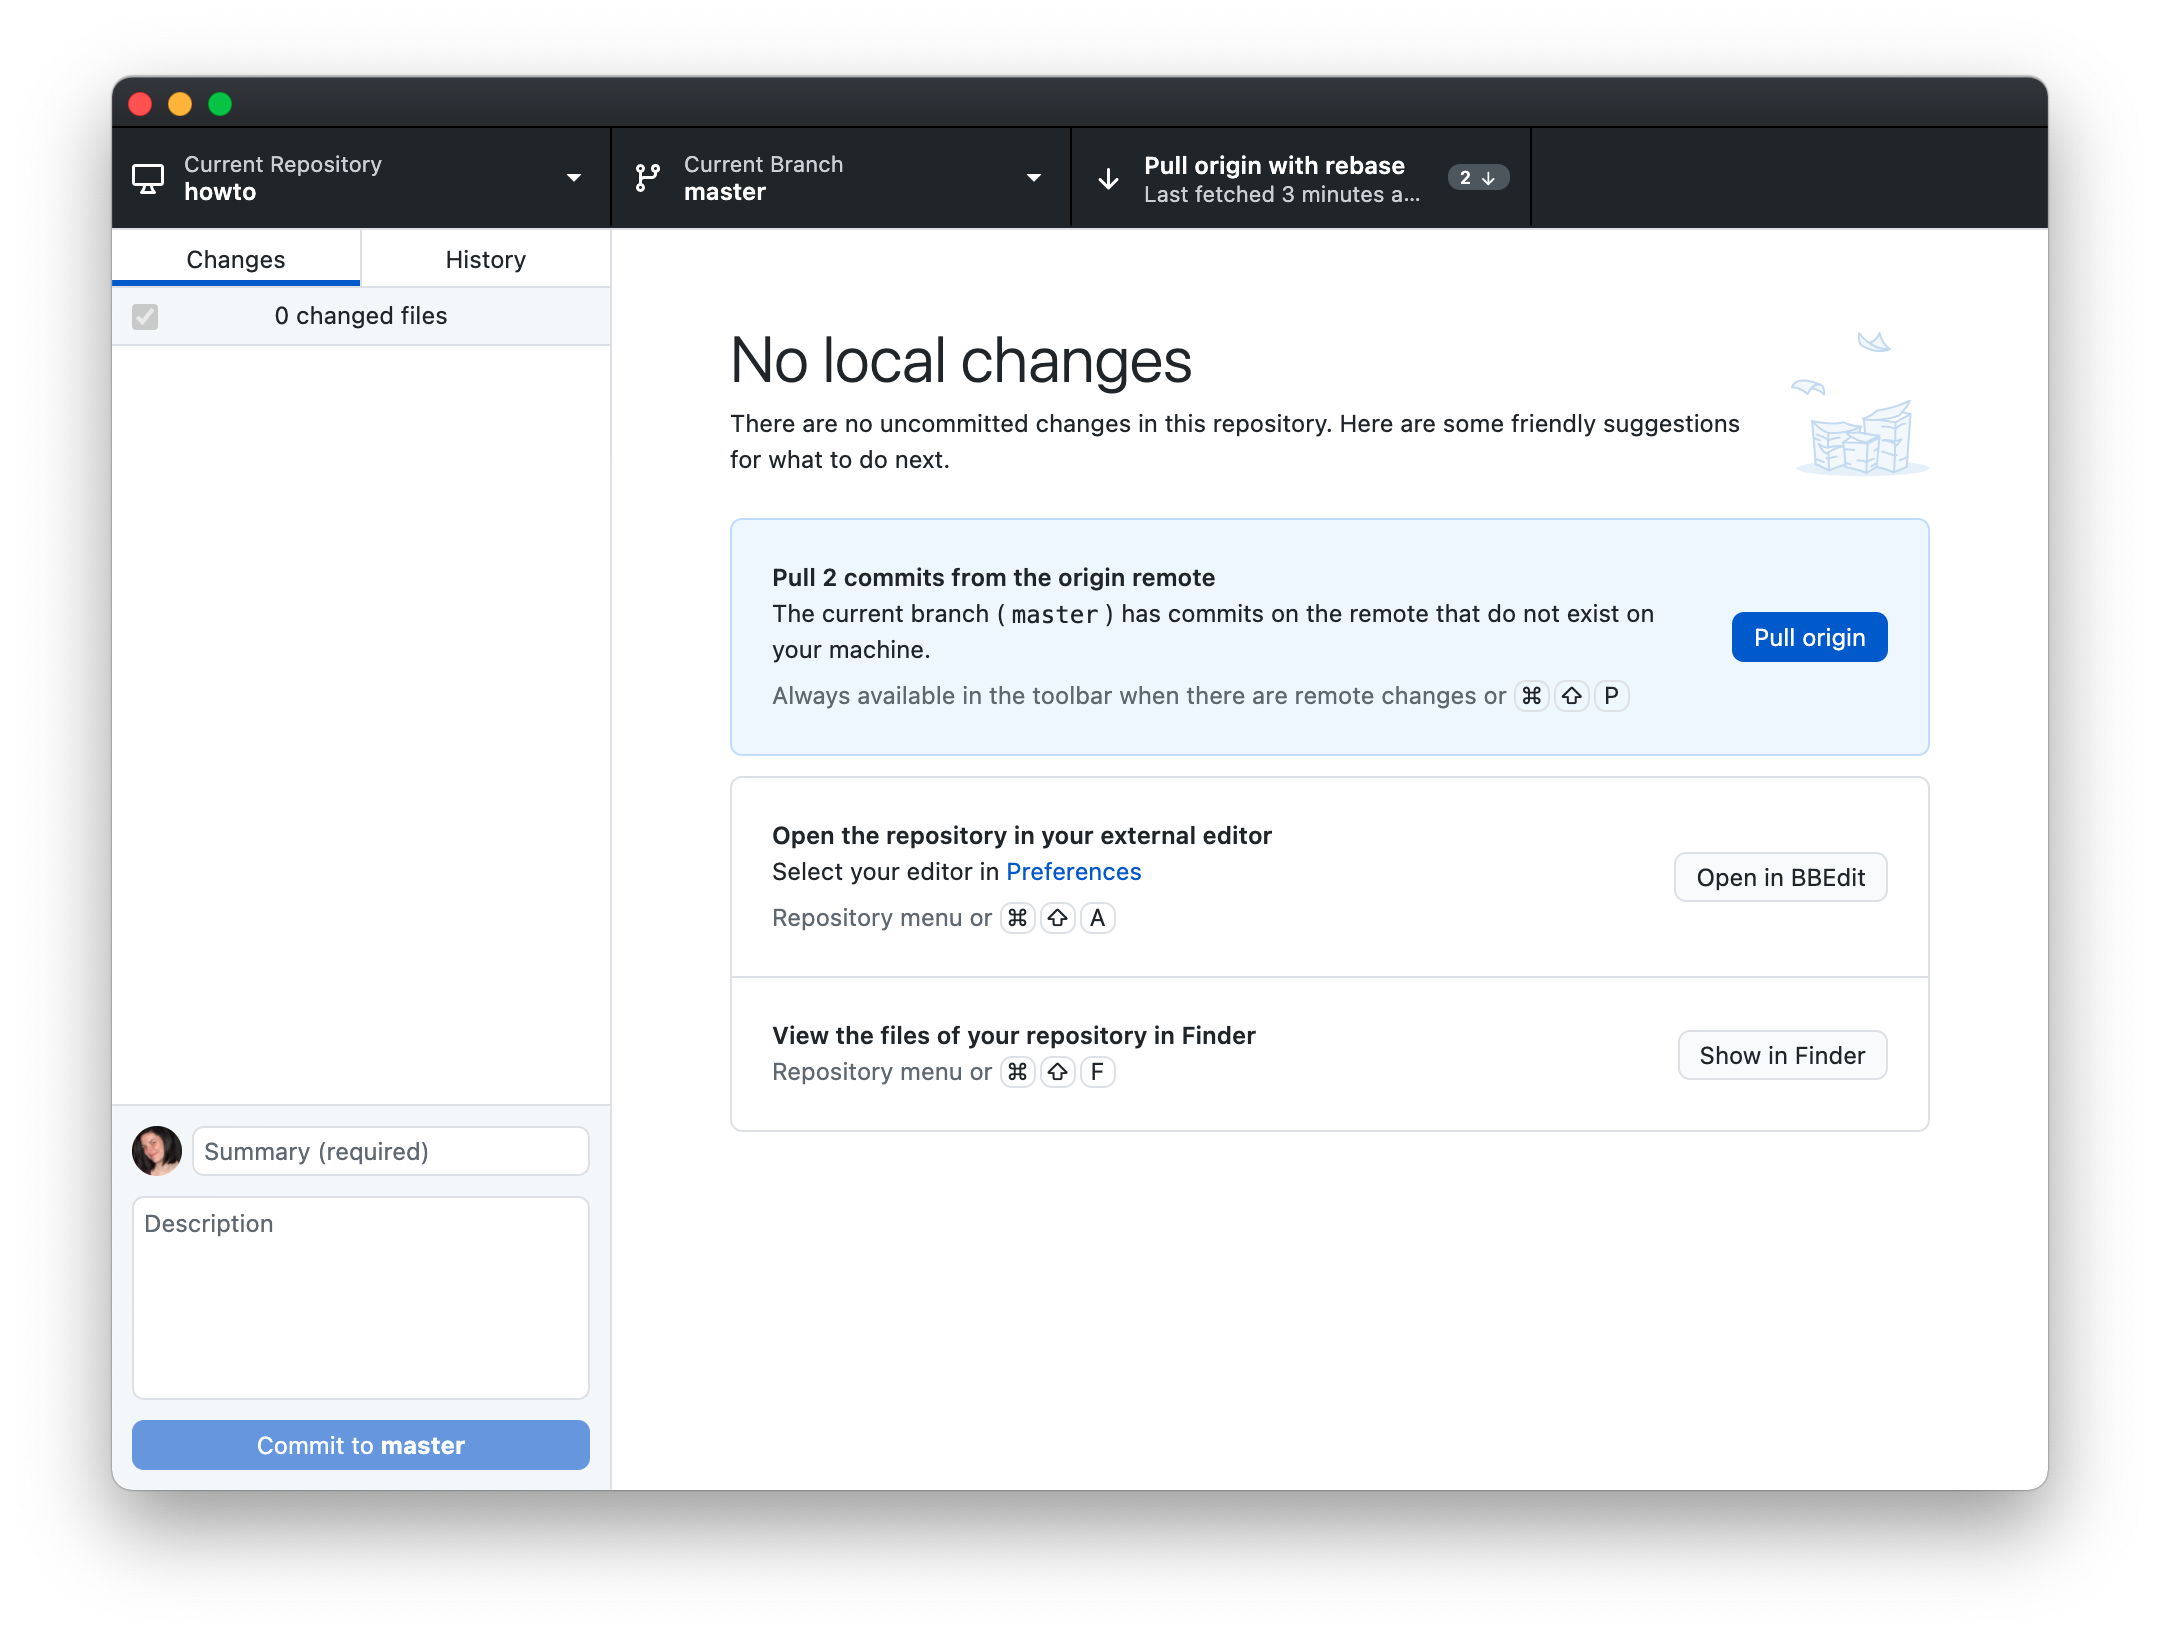
- Click the Pull Origin button to pull changes to your local repository
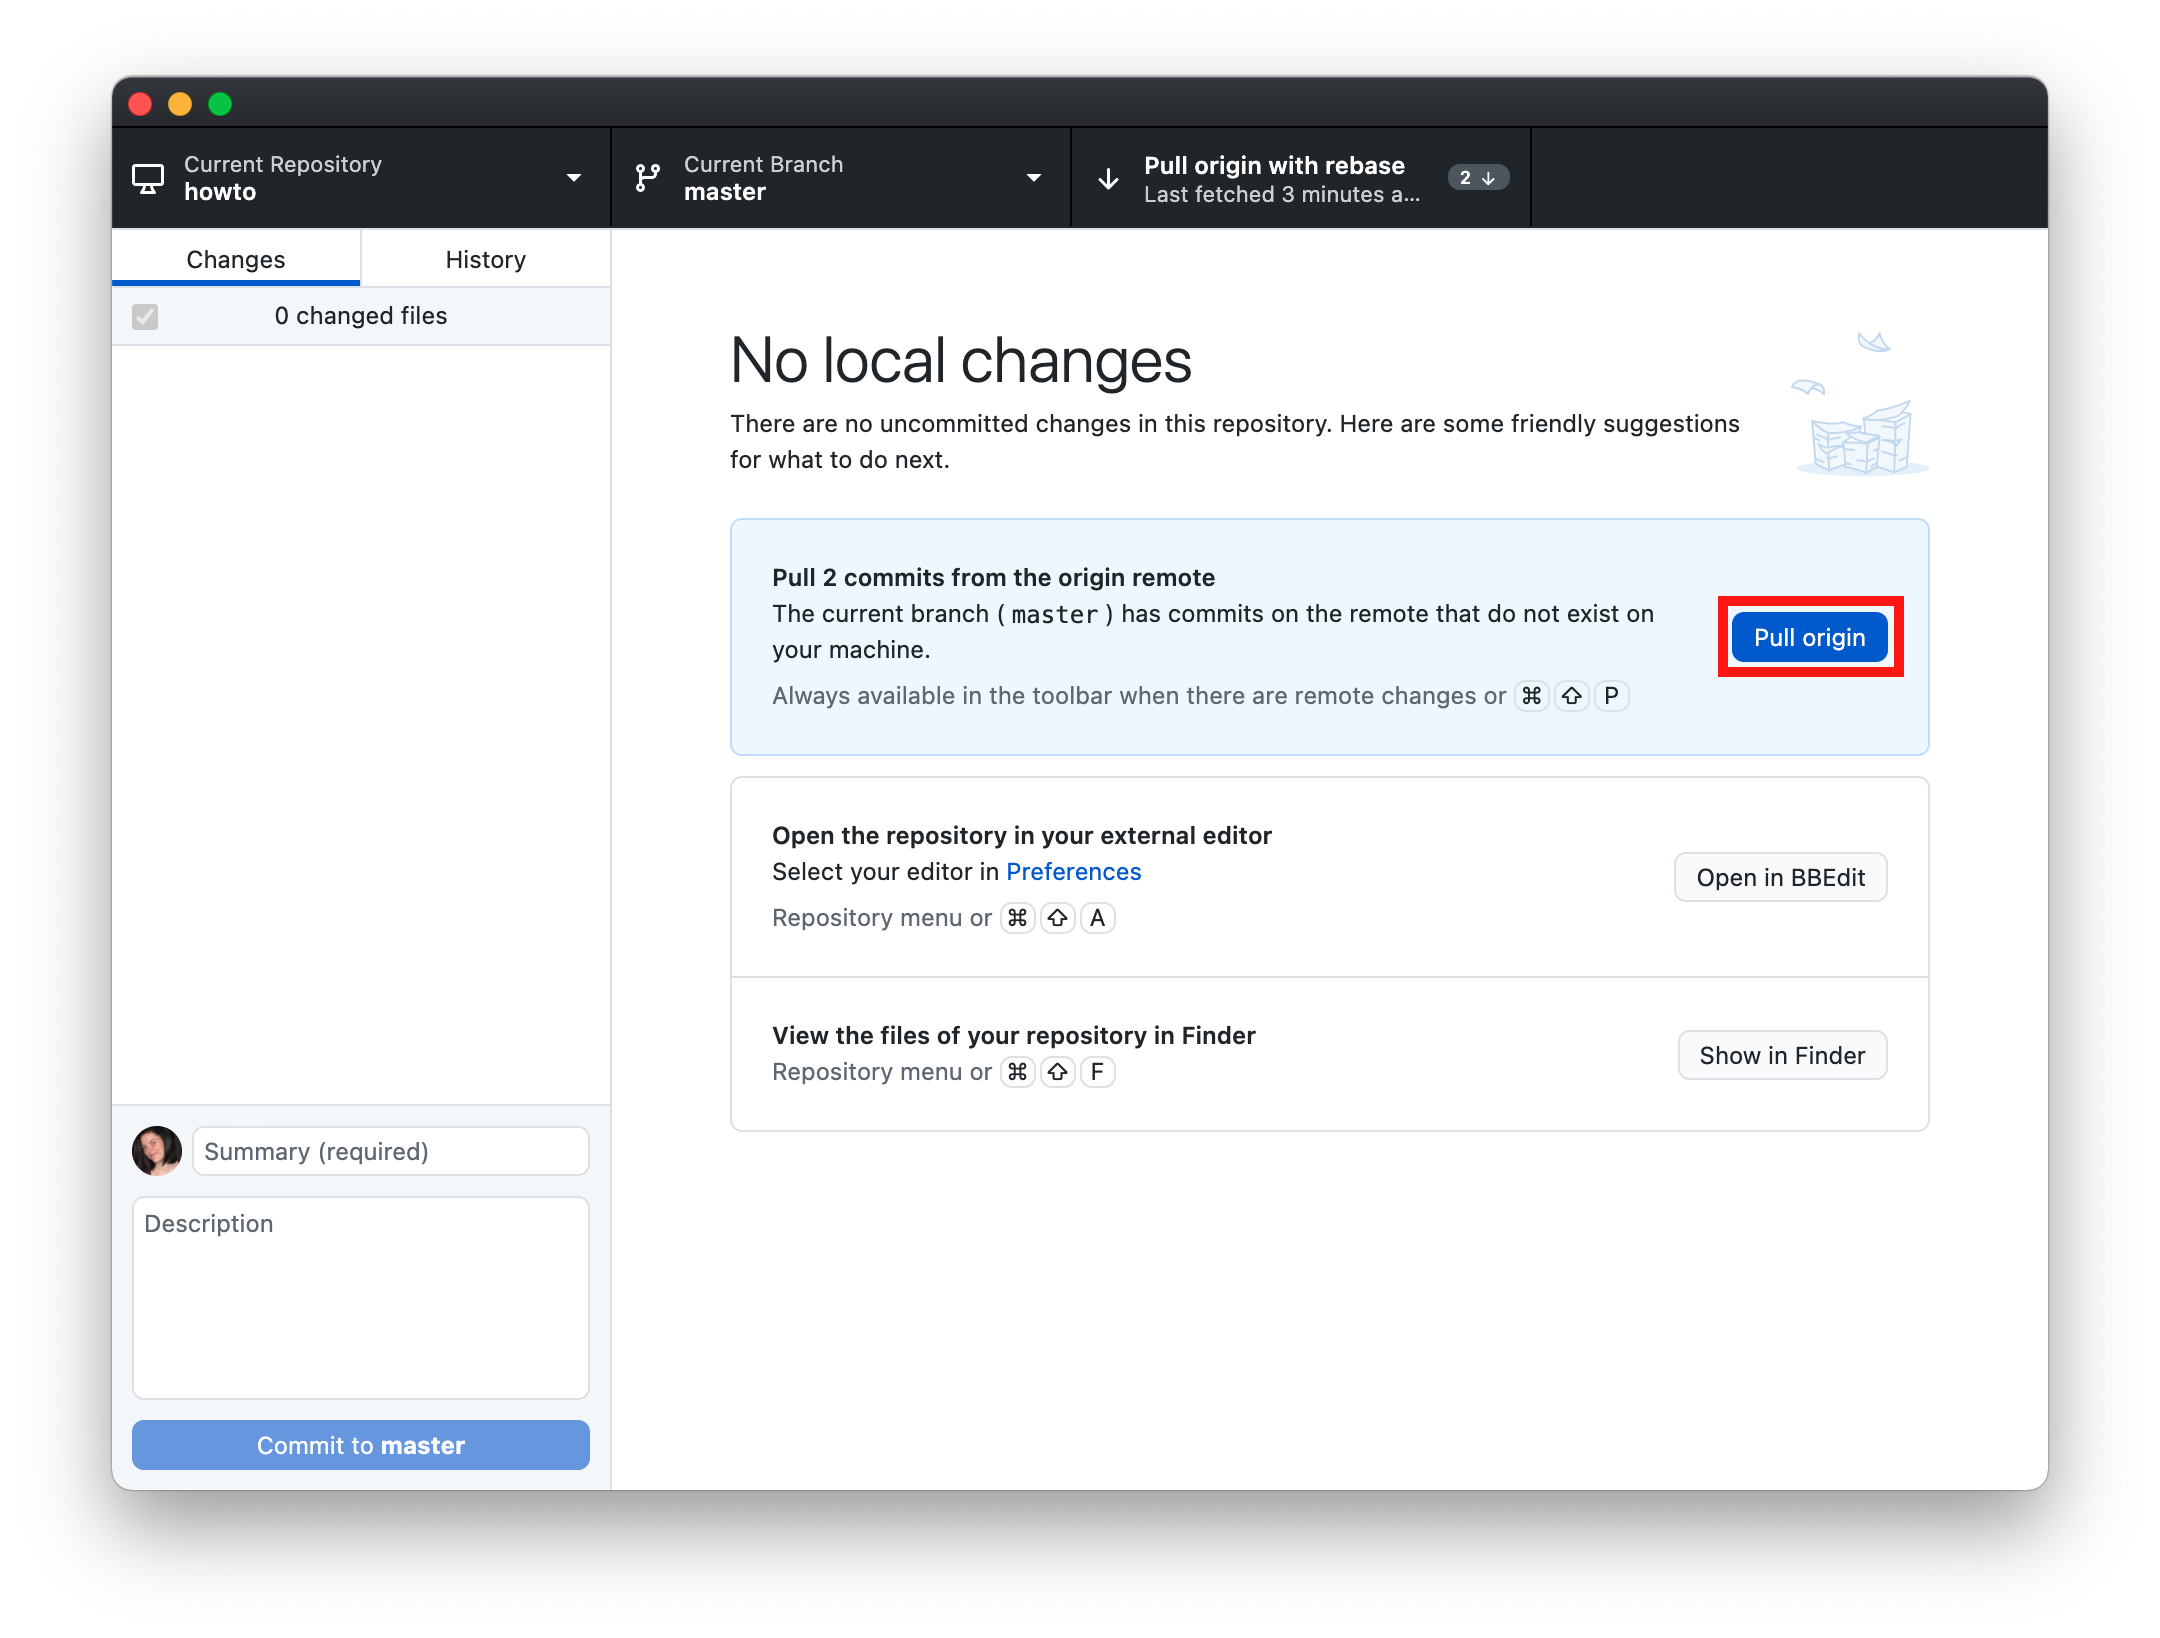
Any changes previously waiting to be pulled will now be in the folder on your local machine. The web pages are ready to be edited.
Committing changes to GitHub Desktop
Once web pages have been editing locally they need to be Committed before they are Pushed to the Artsman cloud repository. This allows you to add select changes while continuing to make edits.
Committing Changes to GitHub Desktop
- Ensure pages that have completed edits are selected
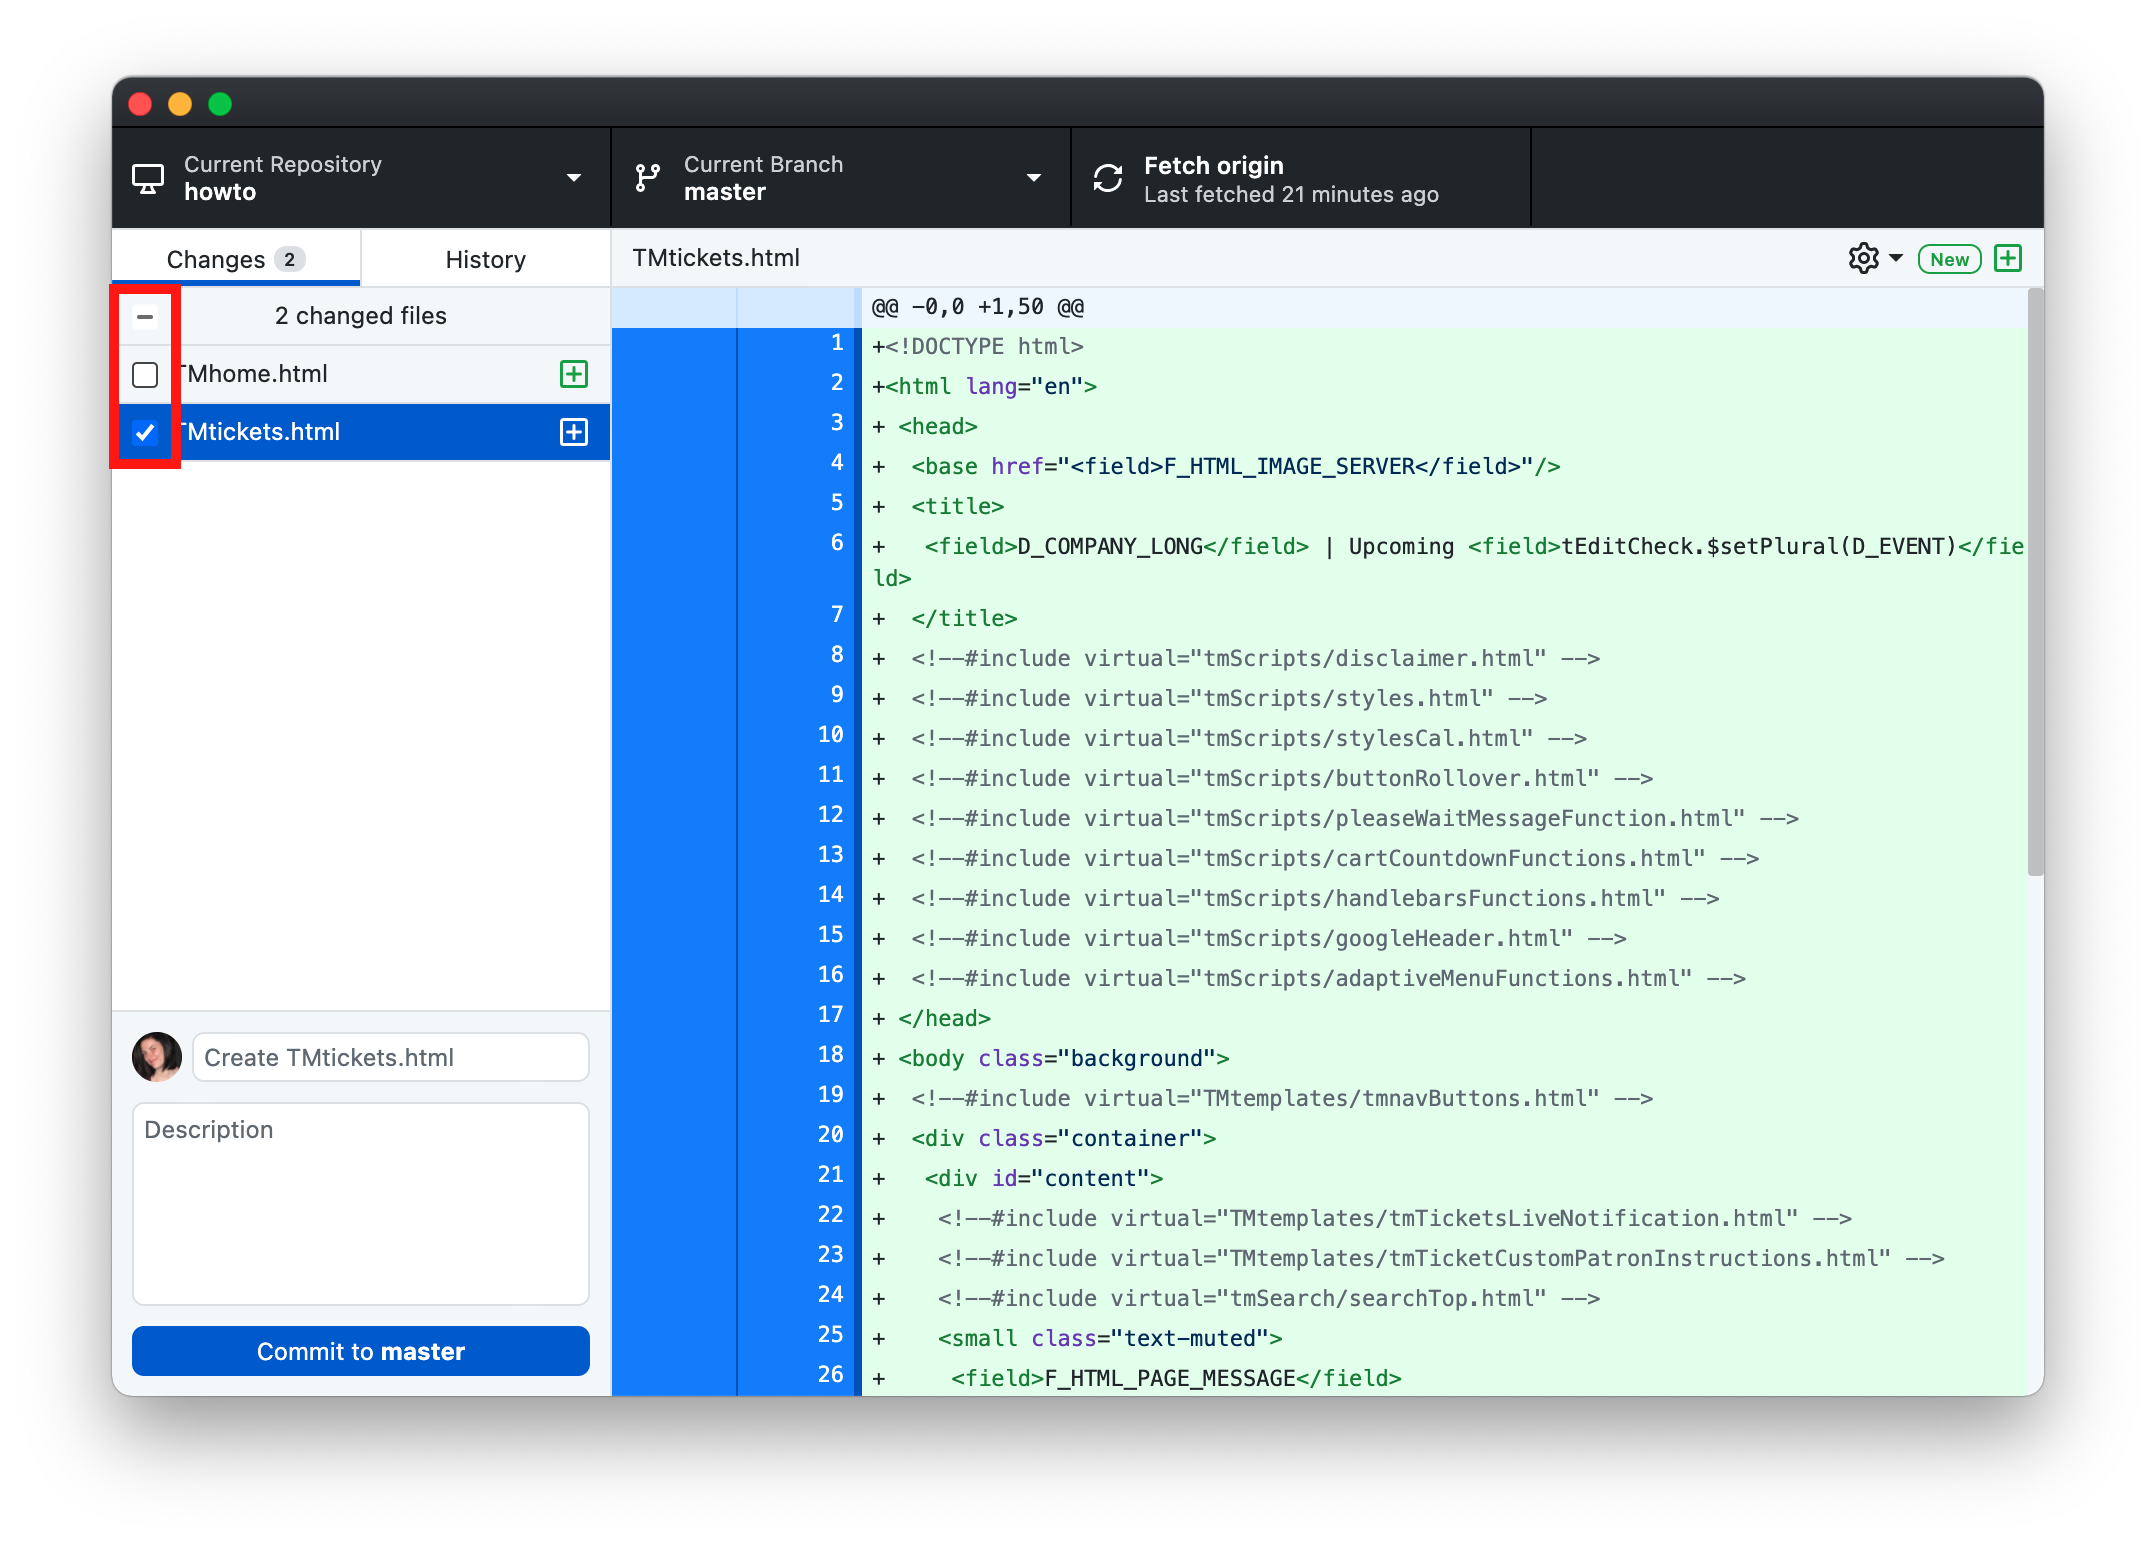
- Enter a title and details for the commit
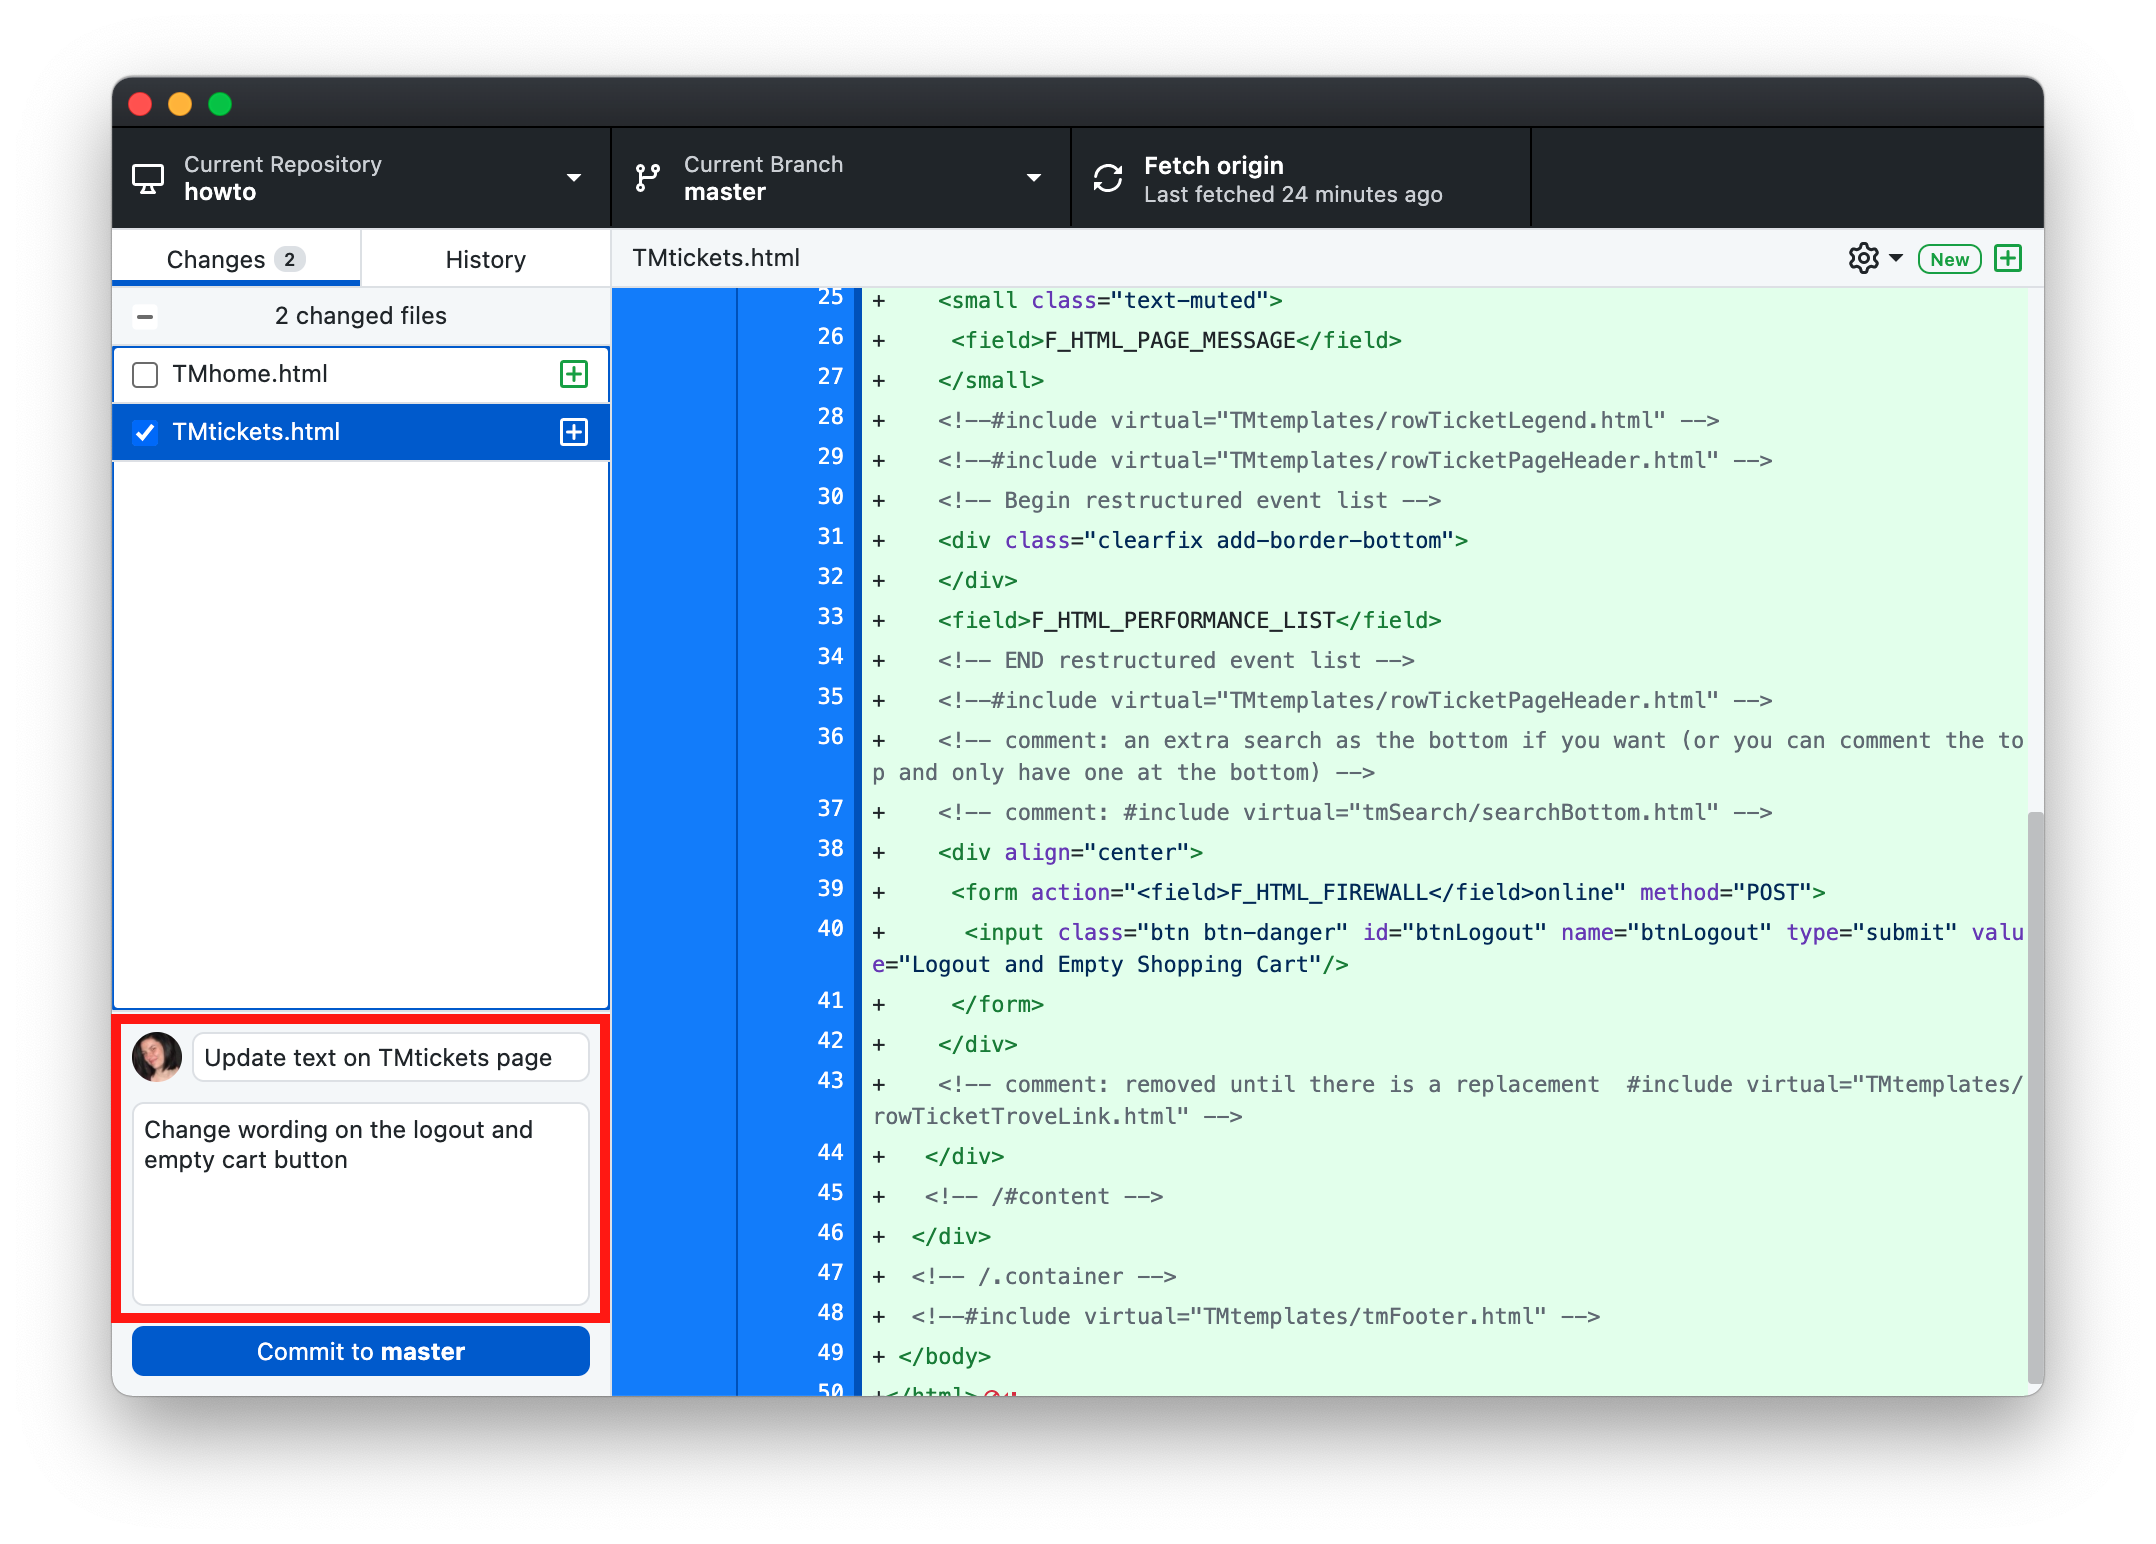
- Click the Commit to master button
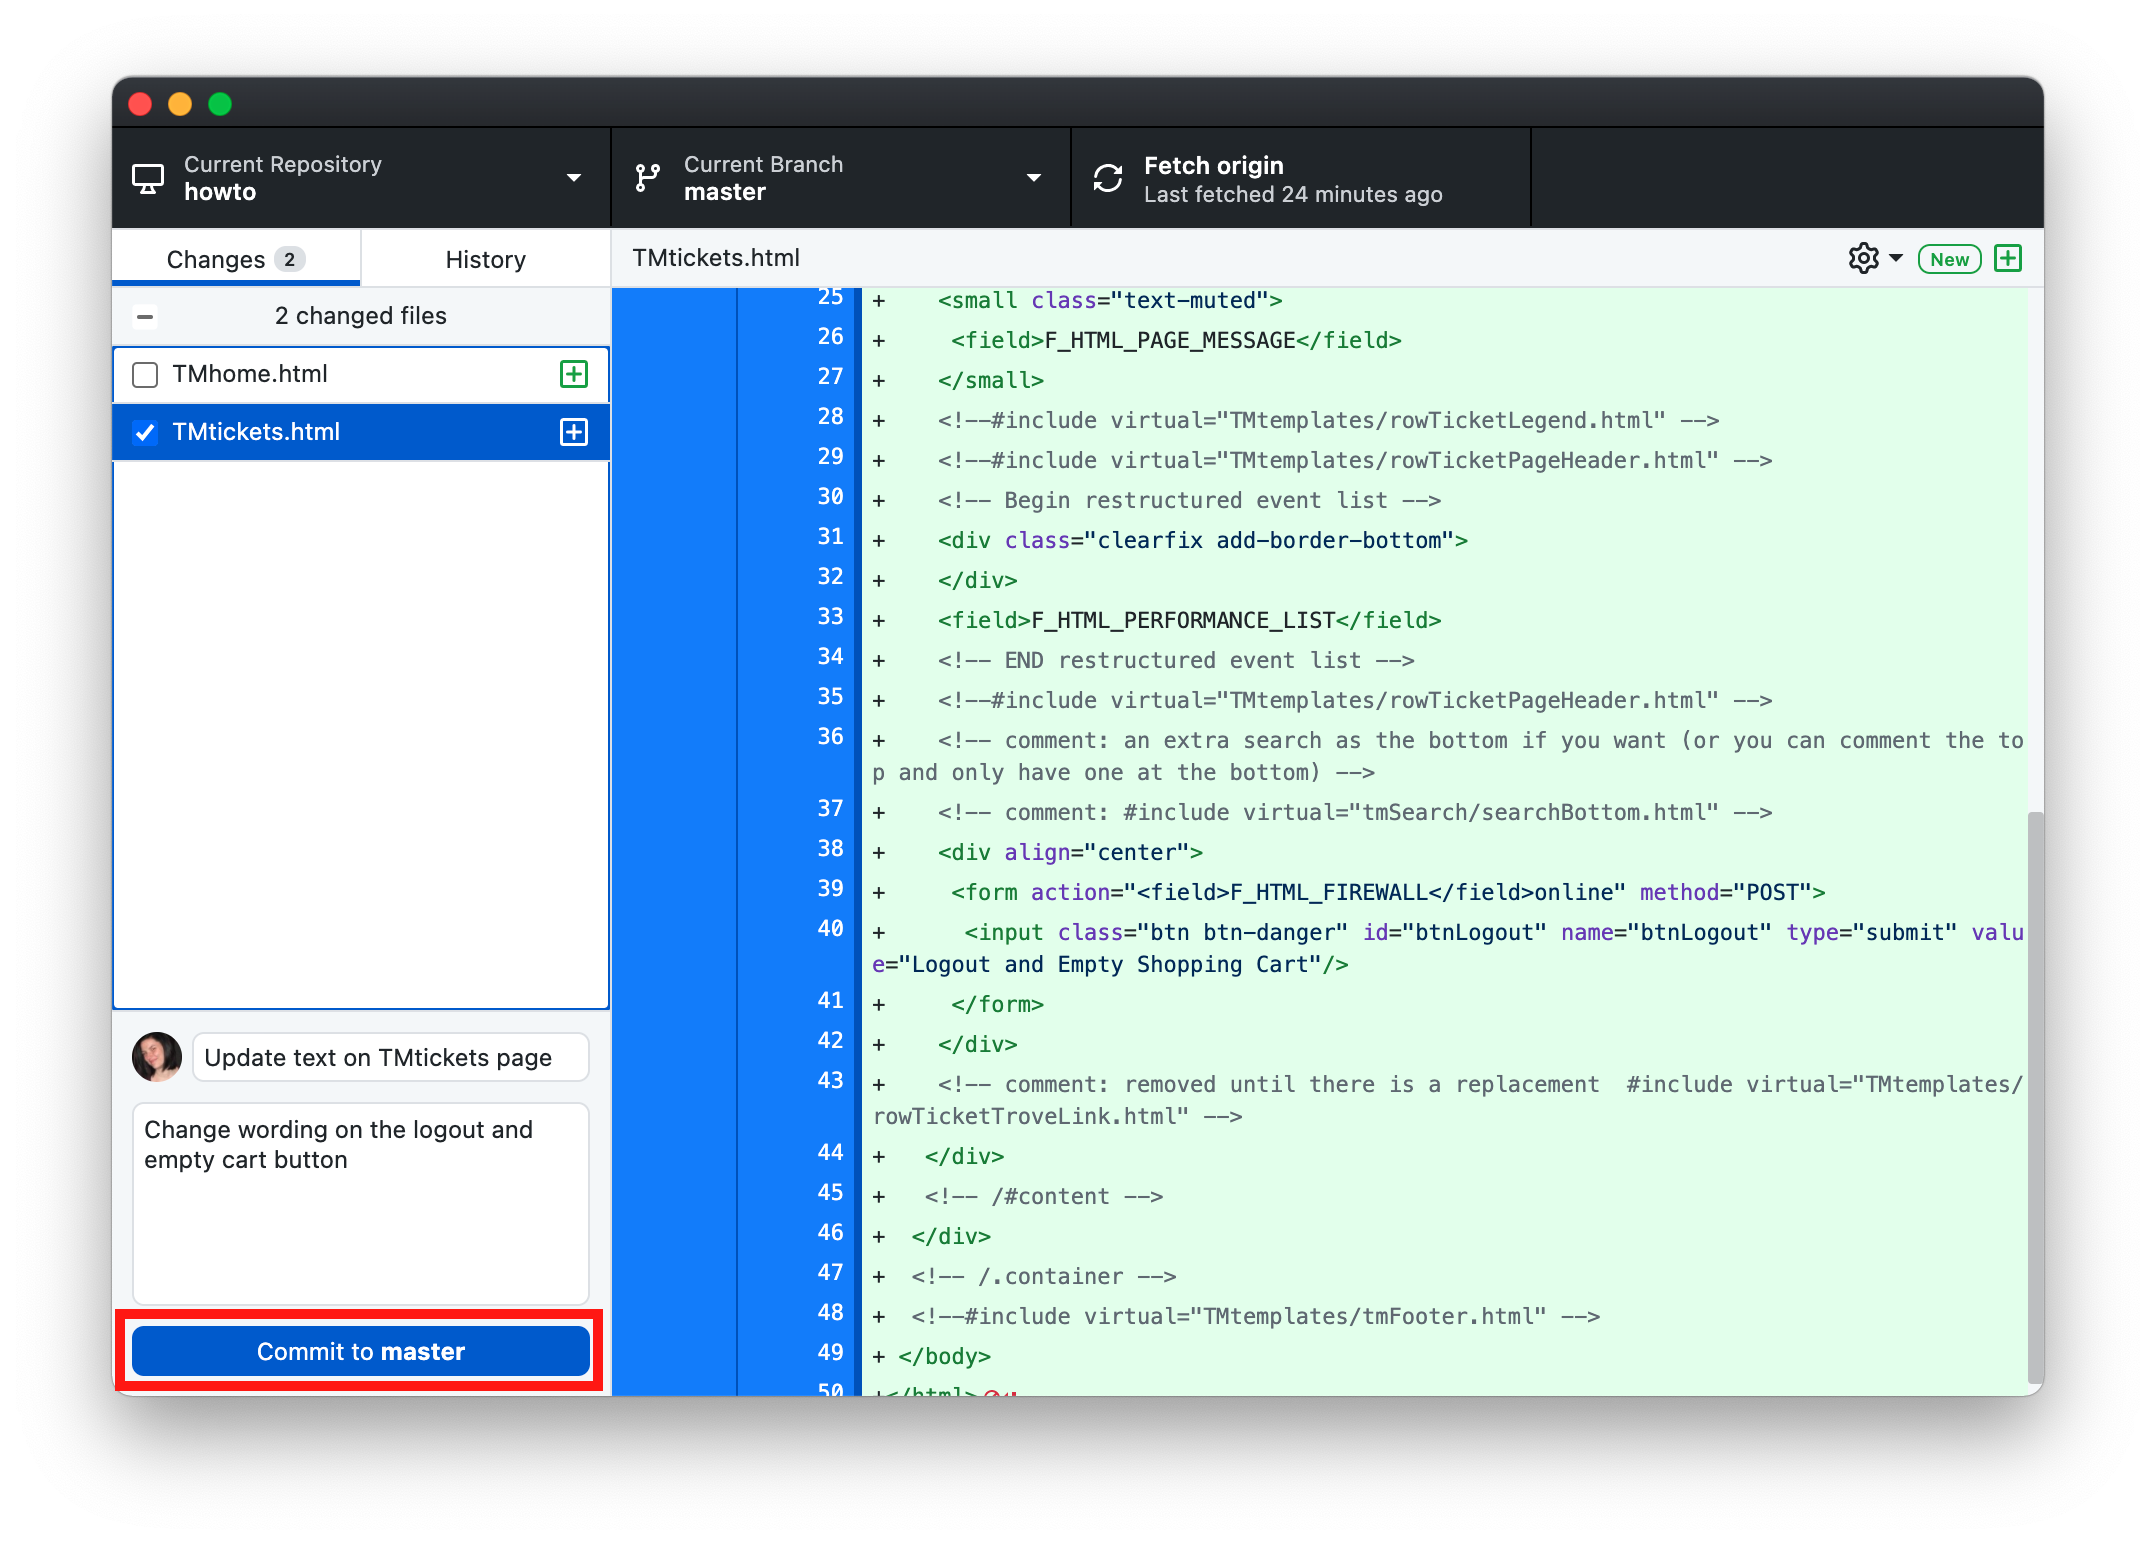
These changes are now ready to be pushed to the repository.
Push Changes to GitHub Desktop
Pushing changes moves the pages up to the Artsman git repository. Only pages that have been Committed can be Pushed. Once the pages have been pushed they run through a series of tests before they are available to be accessed by the web listener. To see edits following the test process you many need to clear the cache on the web listener.
Pushing Changes to GitHub Desktop
- Click the Push origin button
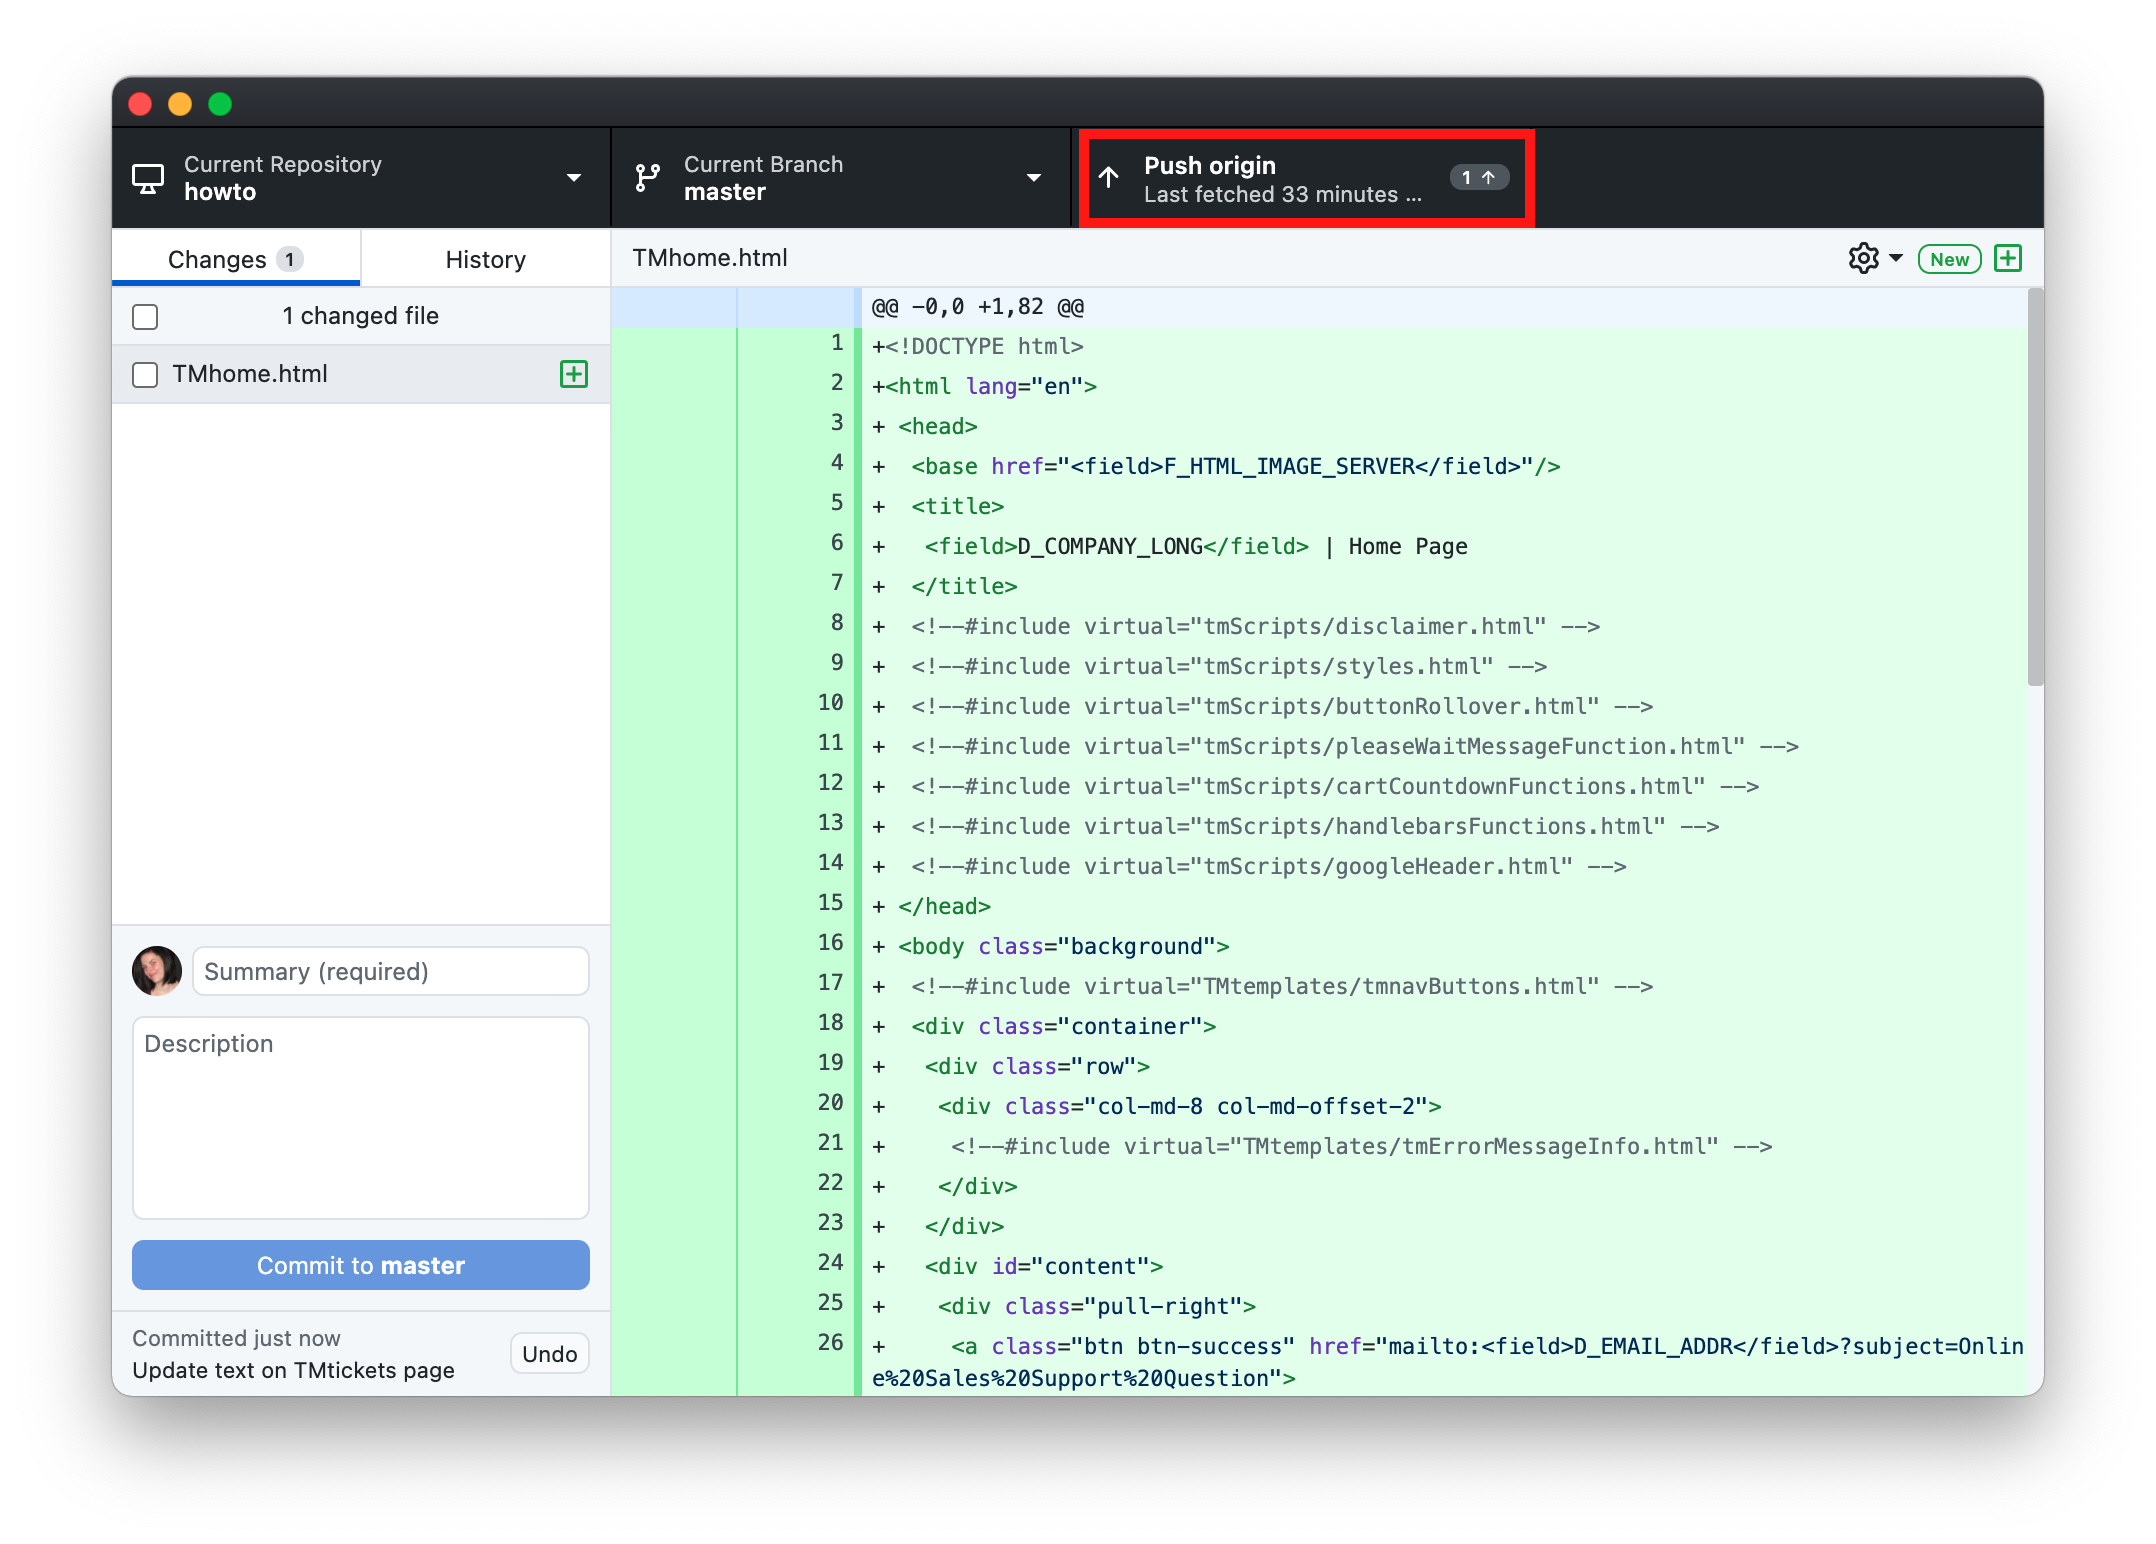
Changes have now been added to the online repository. Most changes will appear online within moments of editing. Items that are more deeply cached may require a clear cache and occasionally a restart of the Theatre Manager server. If you do not see your changes after clear the cache in Theatre Manager please contact the support team assistance.
Bootstrap Live Customizer
- use the bootstrap live customizer page,
- download the customized theme/CSS files, -and-
- how to implement the changes.
Choose a Starting Theme
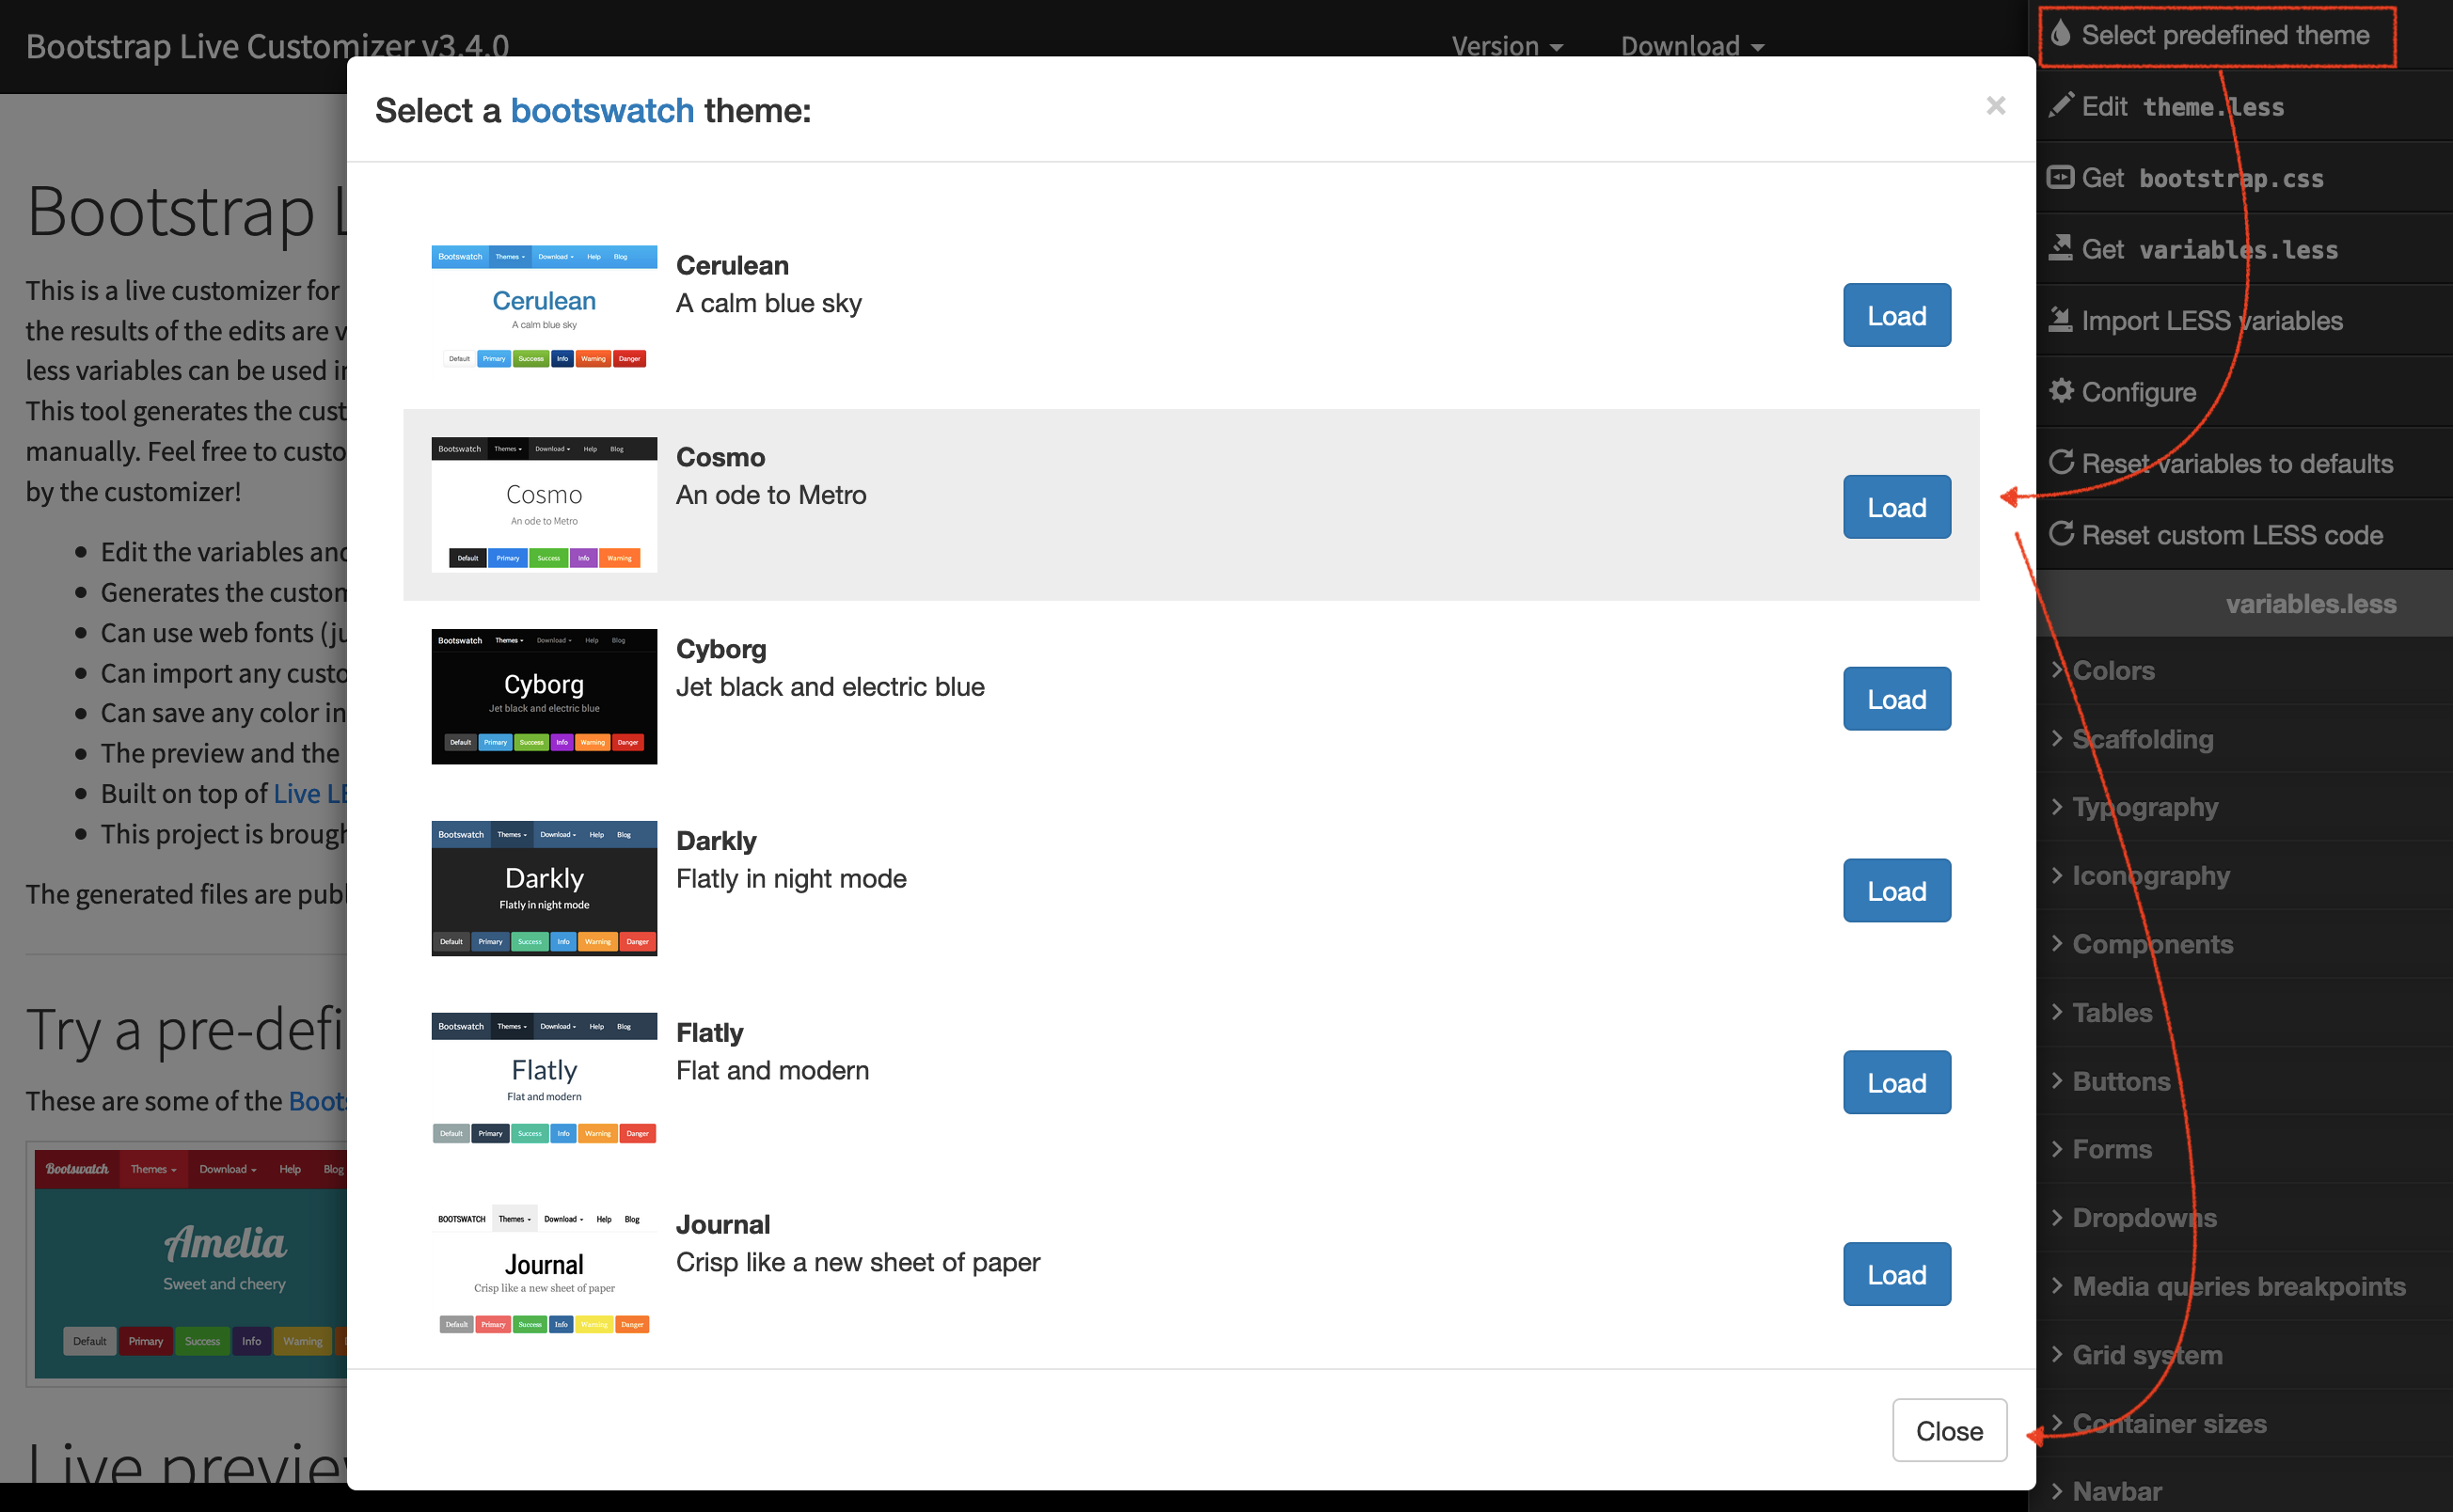
- Open the Bootstrap Live Customizer web site.
- In the top right corner, click Select predefined theme.
- Select a predefined theme and click Load
- Click the Close button in the lower right hand corner of the popup window to confirm the theme.
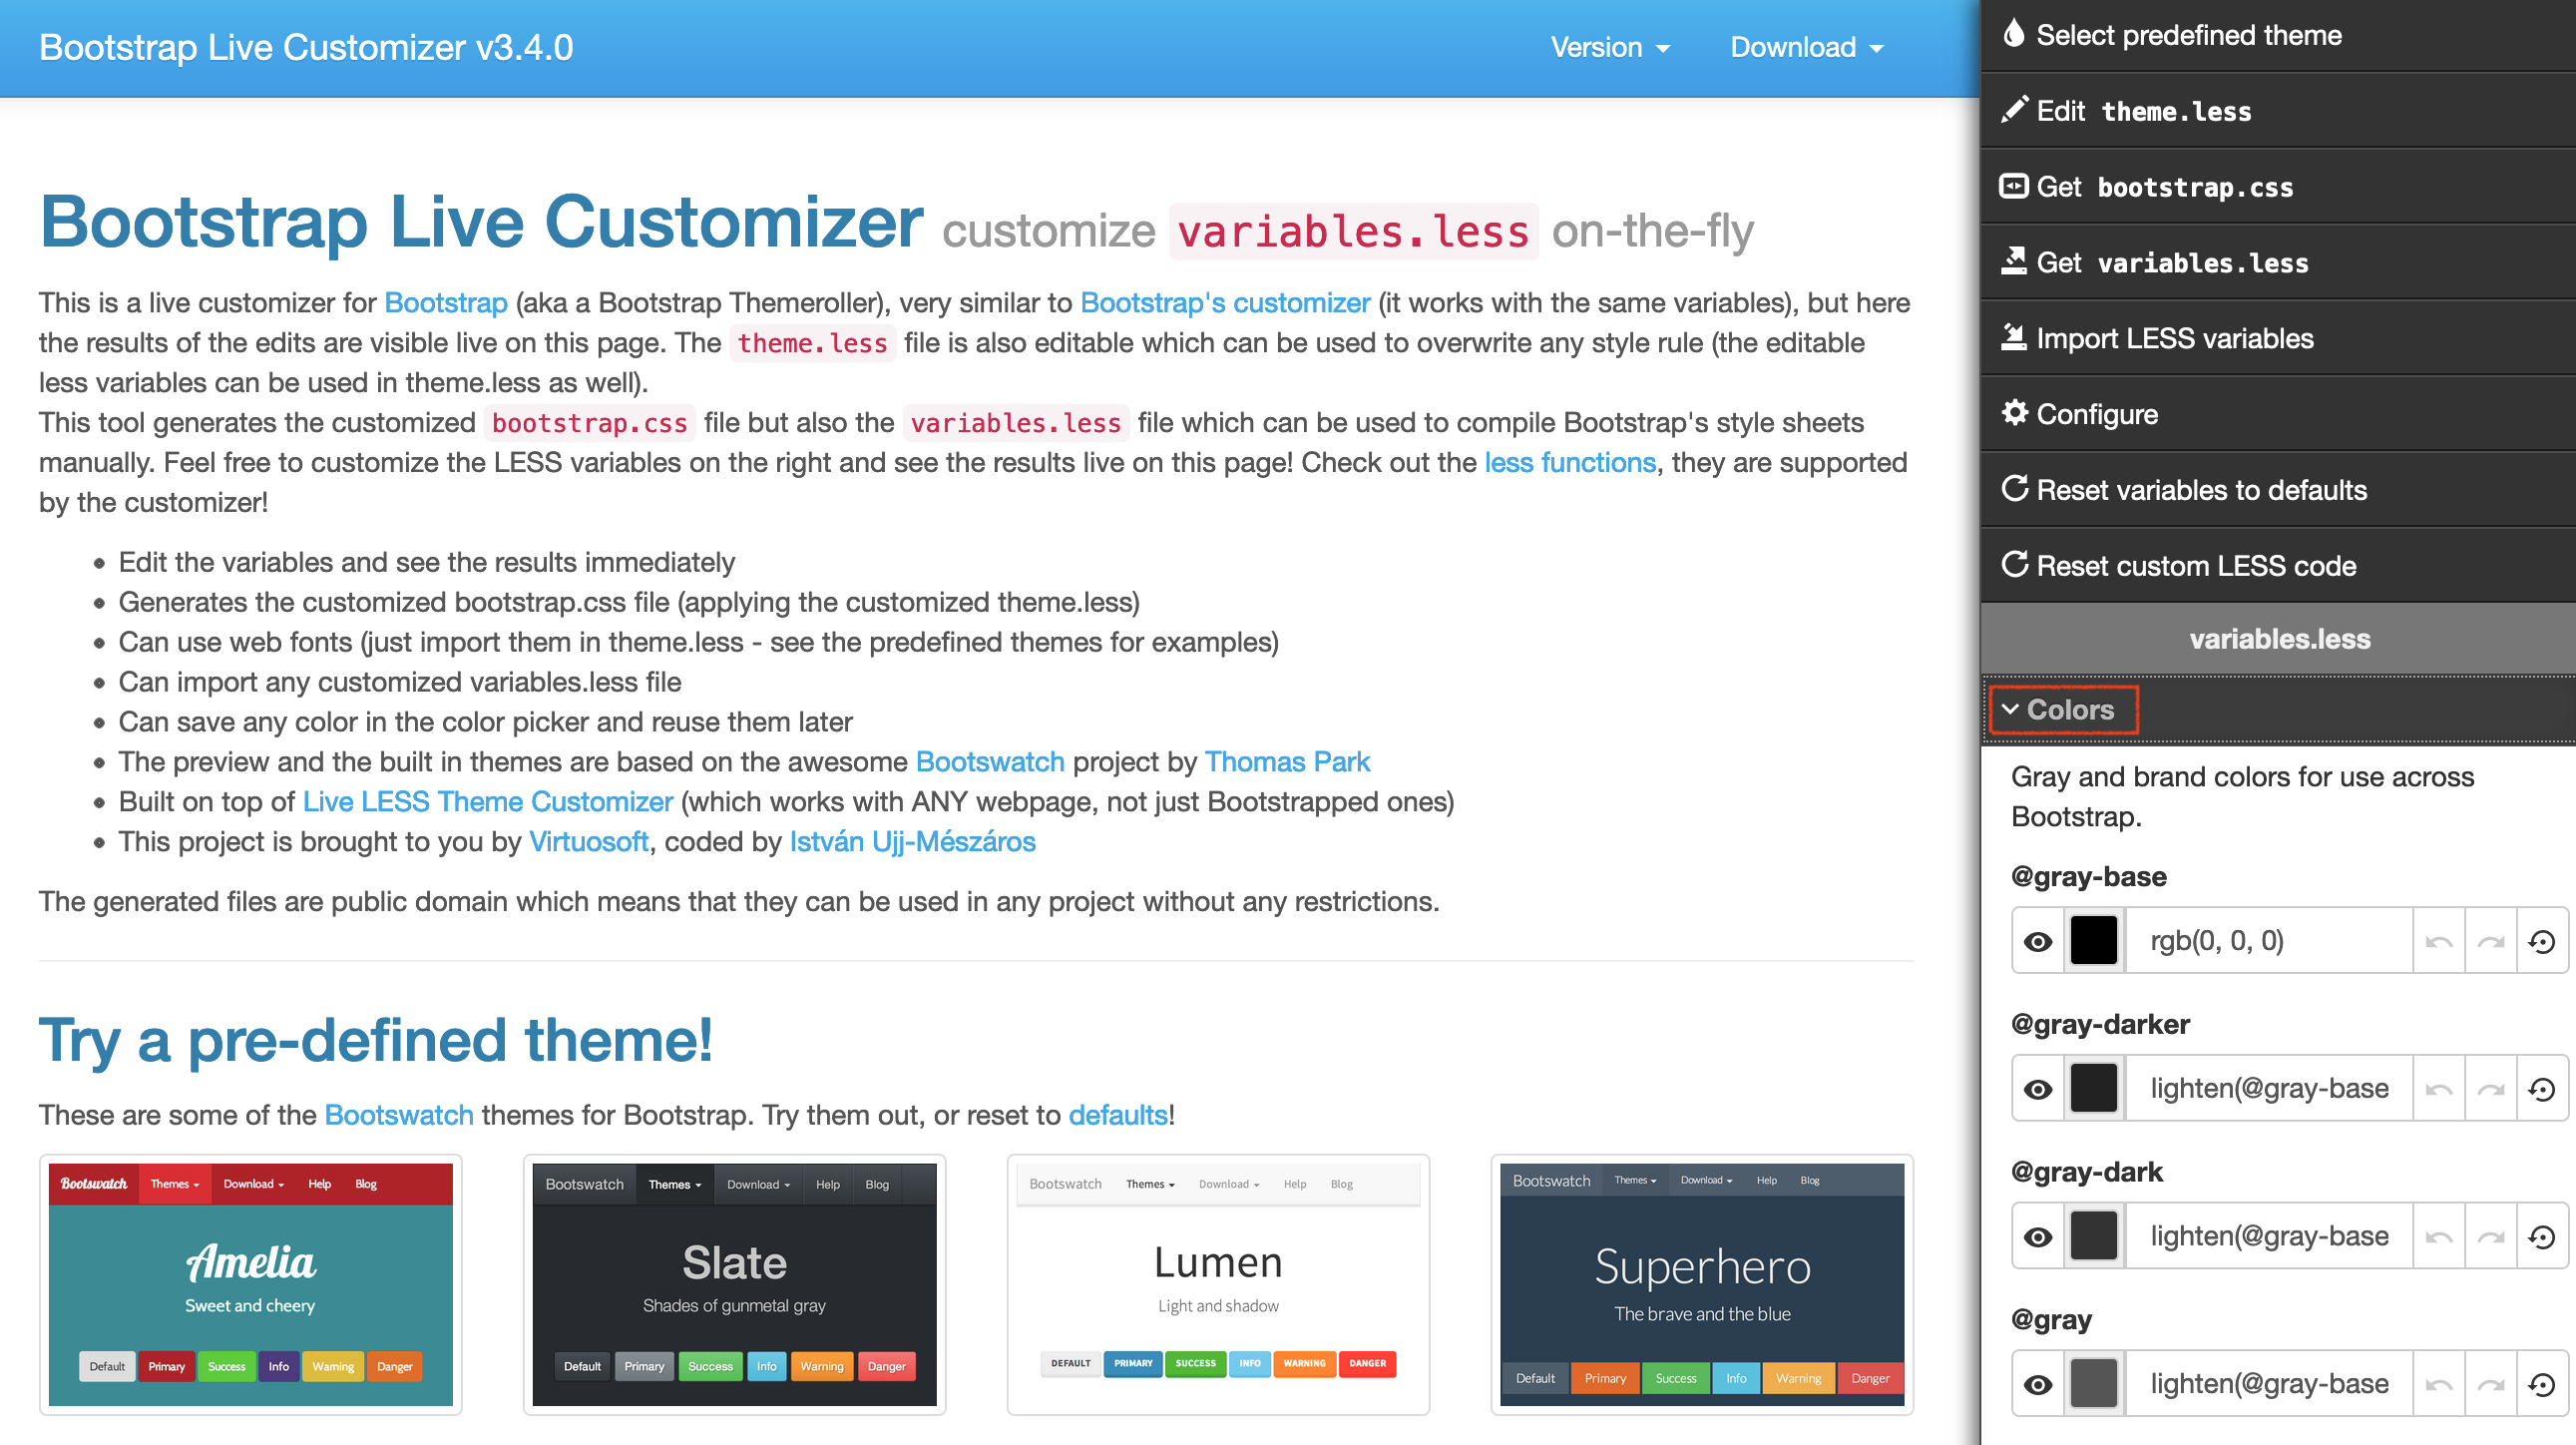
Customize the Theme
- Click Colors in the right column.
- Enter the RBG or HEX value color for each of the default Brands.
- In the body of the page Hover over a Button/Tables/Forms/Alerts/etc. and click the related variables button pop up to the right side of the window.
- Update the colors for the related variables in the fields on the right of the page.
Download Customizations
- Click Download at the top right of the page.
- Select bootstrap.min.css.
- The bootstrap.min.css file will download to the designated browser downloads folder.
The Download button can also be used to save the variables.less file, which can be used in the future to further change the theme in the Bootstrap Live Customizer
Placing the Customized Theme
- Create a new folder at /WebPagesEN/tmScripts/theme
- Create a new folder at /WebPagesEN/tmScripts/theme/css
- Copy the fonts folder at /WebPagesEN/tmVendor/bootstrap-3.4.1/fonts in the default web page templates to /WebPagesEN/tmScripts/theme/fonts in your customized web page templates
- Place the theme.min.css in the /WebPagesEN/tmScripts/theme/css folder on the Web Listener computer.
- Place the variables.less in the /WebPagesEN/tmScripts/theme/css folder on the Web Listener computer. (To save for future customization changes)
- Update the /WebPagesEN/tmScripts/themeLocal.html and /WebPagesEN/tmScripts/themeCDN.html pages:
- Comment out the current style reference and
- add the following link to the bottom of the page to use your personalized style sheets:
<link href="tmScripts/theme/css/theme.min.css" rel="stylesheet" />
- After putting the new theme in place, clear the web listener cache and your web pages should display the new design.
|
If your web pages are hosted on Artsman Cloud and you do not have access to the git repository, please send the customized bootstrap.min.css and variables.less file to support and we'll put the customized theme in place for you. |
Correcting Crimson Navigation Buttons
This page is under construction.
Make Changes within Theatre Manager for Web Content
The kinds of changes that fall into this category and involve no web design work are:
- Pagination of the list of events presented to the user
- Maps showing recommended seats or the seats in the venue
- Search setup for finding best seating
- Naming of events, gift certificates, passes, season subscription packages, donation campaigns
- Naming of sales promotions, price codes and display options for these two fields
- Naming of mail lists that users can sign up to
- Allowing people to browse anonymously for tickets - or- required to sign in at the beginning
- Print at home ticketing
- Availability of coupon codes on the web
- Comments and text to describe performances, events, donations, passes, subscriptions, etc
- Onsale dates for events
- Time outs for sales in a shopping cart
- and a number of other business processes
These kinds of changes are simple text changes to various data fields within Theatre Manager or changes to options in the Company Preferences area. Most do not require any changes by a web designer as they are daily operational aspects of TM.
|
It is possible to add some html tags to some of the large descriptive fields like the event description. If there are html tags in those fields, you can have additional control over the display of text. eg, you can include <b><em><a><img> type tags very easily to create a desired look without changing pages. |
Permitted Web Ticket Printing Options
There are three options available for ticket handling in online sales.
- A patron can request their tickets to be mailed,
- Tickets can be printed at home, or
- Tickets can be held for will call.
The options available to the patron depend on the organization's policies. To set these options go to Setup >> Company Preferences and select the Web Options tab.
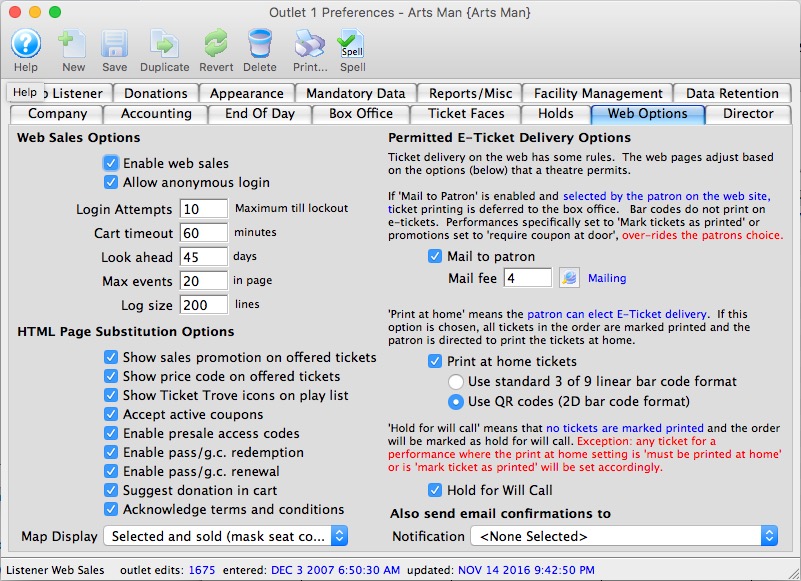
Mail To Patron
The Mail to Patron option, when checked, displays a button in the TMcart.html, TMcheckoutNoPayment.html and TMcheckout.html pages. When a patron clicks the button, the Order Ticket Mailed Status changes to 'Patron Wants Tickets Mailed.' This criteria can be used to batch print the tickets at the box office.
When the 'Mail to Patron' button is checked, a Mail Fee from the Fee Tables must be selected. The fee does not have to have a dollar value associated with it but is mandatory for the setup.
If the box is not checked, the button providing the option to have tickets mailed will not be visible. Removing the check from this box does not mean the default text on the checkout page regarding mailing options changes. The TMcheckout.html page may need to be altered to exclude the mailing details if an organization does not mail tickets.
|
If a patron selects mailing of tickets BUT there is a sales promotion that requires a coupon in the shopping cart, the mail tickets to patron setting is ignored and replaced by HOLD @ WILLCALL FOR COUPON. This can be changed in the sales promotion edits tab |
Print At Home
When the 'Print At Home' option is checked the patron can choose to check a box in the online sales process indicating they wish to print thier own tickets. This provides the option for the organization to allow patrons to print bar codes for some events and not others.
Checking the 'Print At Home' option will allow a bar code to be printed for performances where 'Print at home' is enabled at the Event or Performance level. This feature allows for later scanning when the patron arrives at the venue. There are two choices for bar code format:
- Standard 3 of 9 linear bar code format - this will print a picket fence bar code and is only suggested if you are using the Motorola MC55 scanners which do not understand any other bar code format.
- QR Codes (2D bar code format) - this is the preferred option and recommended in all other cases for additional security.. The Lineapro bar code scanners can read this format easily.
If a patron chooses to print their tickets at home, the Ticket Printed field is updated with the date and time of the completed cart. The tickets are marked as printed in Theatre Manager. When a batch print of unprinted tickets is performed, the tickets printed at home will not be included.
Hold For Will Call
If the options to mail tickets or print them at home are not enabled the default option is to 'Hold for Will Call.' This insinuates the patron will be picking up their own tickets. By default, if the 'Mail to Patron' and 'Print at Home' options are enabled but the patron does not choose either, the Order Status is set to 'Hold for Will Call.' 'Hold for Will Call' simply means there are no special handling rules for the tickets.
When the 'Hold for Will Call' box is checked, it allows the patron to choose not to print thier tickets or have them mailed. In some cases an organization may insist the patron' tickets not be held at will call. Unchecking the box forces the patron to choose between printing their tickets or having them mailed. This often happens when there will not be staff to manage ticket pick-ups at the venue prior to the performance.
Logical Order of the Checkboxes
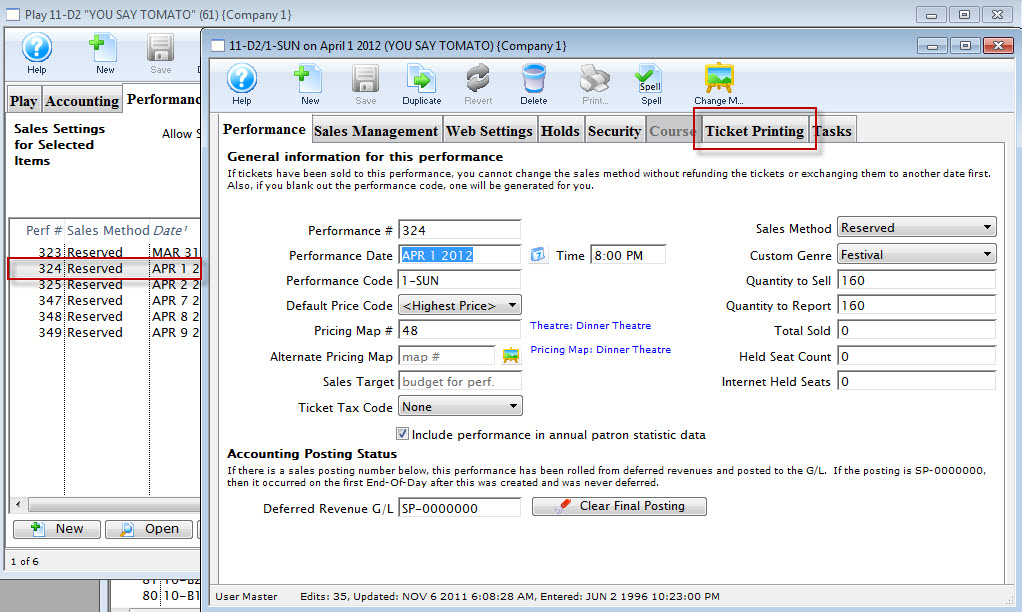
There is a hierarchy to how the Permitted E-Ticket Delivery Options work. When the options listed are checked, they also become available for the Event and for the Performance.
- Condition #1: If a Delivery Option is to be available online, it needs to be checked in the Web Options tab of Setup >> Company Preferences. The option can be made available for select events or performances (see below). However, if the option is not enabled in Company Preferences it will not be accessible within the desired Events.
- Condition #2: The default Delivery Option needs to be set in the Event tab of an Event Setup.
- Condition #3: If the condition for a select Performance should differ from the Event default, it can be altered. Select the Performance tab within the Event Setup and double click on the Performance. Choose the Ticket Printing tab and indicate the default for the selected Performance.
Turning on Print at Home Option For a Selected Event or Performance
To turn on the print at home option for a selected event or performance, you complete the following steps:
- Turn on "Print at Home Tickets" in Company Preferences >> Web Options.
Click here for more information on the Web Options tab.
- Open the Event you want to allow patrons to print their own tickets to.
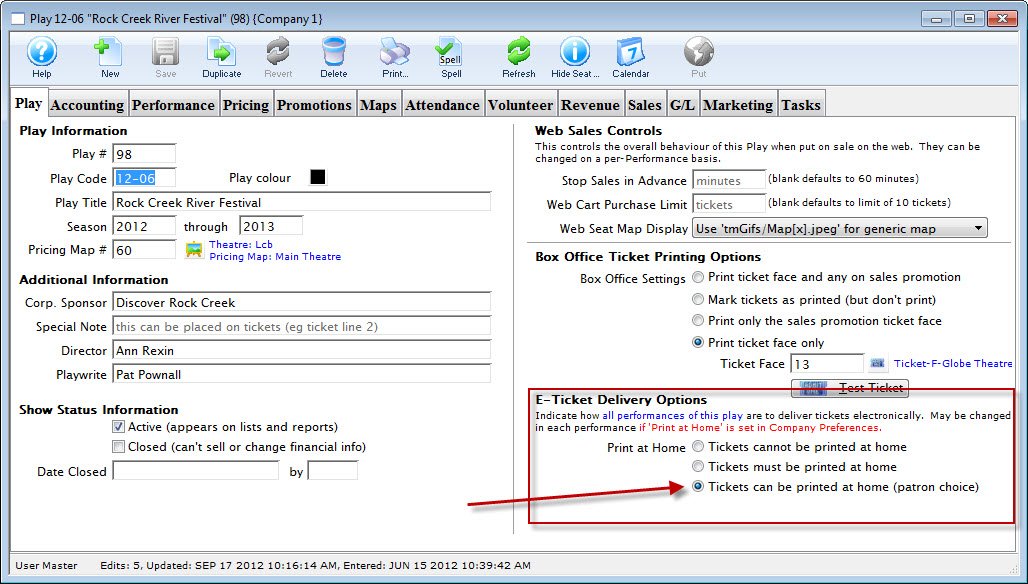
Click here for more information on finding events.
- Enable Tickets can be printed at home (Patron Choice) for the event. Click the Save
- Click the Turn On
 button.
Tickets for the Event and all of the performances can now be printed at home.
- Open the correct performance in the Performances tab of the Event Window and select the Ticket Printing tab.
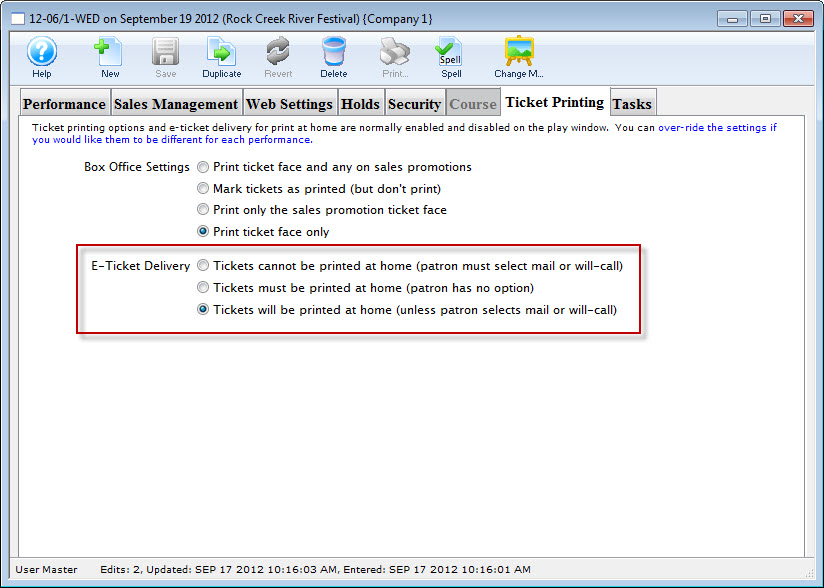
- Choose Tickets Cannot be printed at home (patron must select mail or will-call) for the performances you do not want patrons to print at home.
 button.
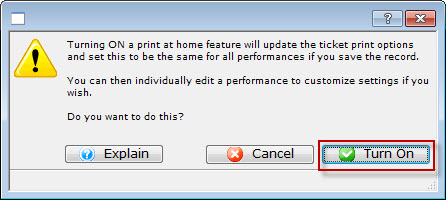
The confirmation dialog telling you "Turning on the print at home feature will update the ticket print options amd set this to be the same for all performances if you save the record. You can then individually edit a performance to customize settings if you wish.
To turn OFF Print at Home for selected performances, you complete the following steps:
Web Designer Testing Environment
Many of our clients engage the services of, or have in-house, a web designer who prefers to customize the online ticketing web site themselves. Arts Management Systems is often asked how to set it up so that web designers can work independently and off site in a testing environment and see the effects of changes to the online ticketing web pages before making it live. The following outlines the steps to take to create a Web Designer Testing Environment:
Step #1: Duplicate the Current Web Templates
The directory for all the online web pages is located on the Web Server and depending on the platform:
- Mac HD>> BoxOffice >> WebPages >>1 if your Web Listener is Mac -and-
- Window Local C: >> BoxOffice >> WebPages >> 1 if your Web Listener is a Windows machine.
- Duplicate the WebPagesEN folder and name the copy WebPagesTS (where TS denotes Test).
|
AMS Cloud or GIT users need to do somerthing similar:
|
Step #2: Setup Remote Access
- For AMS Cloud users already using Git
- Skip to step 3
- For self hosted venues
- Consult with your IT Department to establish a way to get web pages to the web server.
- We recommend a Git repository established through Arts Management so that you push your web pages to our site and they are then migrated to your web site.
Step #3: Testing Changes in a Web Browser.
- Change the files in WebPagesTS folder as desired using your favourite editor. This will not affect your live web pages.
- Migrate the changes to your web server
- If editing the pages directly on the web server, you have nothing to do for this step
- If using Git, just push in your changes
- If using some alternate method like FTP, of file sharing, move the pages to your web server
- Force reloading the web Cache. There are 3 ways to do this:
- By accessing the director and clearing the web page cache (self hosted only)
- By asking AMS support for the special URL to clear web cache using a browser (it is not documented here on purpose)
- By clearing the cache in company preferences inside Theatre Manager
- Test the Page changes
The TM Server is designed to be multi language. It comes provided with English (WebPagesEN) and French (WebPagesFR). To use the test pages, you just need to 'switch languages' using
https://tickets.myserver.com/TheatreManager/1/online&event=0&lang=TS where tickets.myserver.com is replaced with your ticket subdomain.
- Switch Back to English after testing
https://tickets.myserver.com/TheatreManager/1/online&event=0&lang=EN
Step #4: Place the newly edited files.
When you like some or all of the pages you have changed in WebPagesTS
- Save a copy of the original pages in WebPagesEN so you can revert them back if need be
- Copy the tested pages from WebPagesTS into WebPagesEN folder in the same folder structure
- Migrate the changes to your web server using the same method as Step 3
- Test test your web pages again .. just to make sure. And do a complete checkout.
https://tickets.myserver.com/TheatreManager/1/online&event=0&lang=EN
Customization Ideas
Each client is provided the standard web pages designed by Arts Management Systems. Some organizations choose to make minor adjustments to they style sheets in order to reflect their default homepage. Others choose a more customized design of the pages. Examples of customized pages can be found on the Sample Web Sites page.
Below you will find some examples other sites have used in their customization process. These examples can be used to create a more personal feel to your web site. If you are not familiar with html we would strongly recommend contacting your web designer for assistance.
Adding a Merchandise Button
There are many naming conventions for adding a merchandise button to the online ticketing site. Some organizations add a Shop button, others a Merchandise button and others a Rental button. The name of the button depends on the use of the resource module in Theatre Manager and the content to be accessed. The icon for the button may also vary depending on the buttons use. Options for the icon can be found on the Font Awesome website. We encourage you to use the naming convention and icon that work best for your organization.
Adding the Code
- Open the tmnavButton.html page
The page tmnavButton.html is located in the WebPagesEN/TMtemplates folder.
- Add the following HTML to the page:
<li>
   <a href="<field>F_HTML_FIREWALL</field>login?merchandise=0">
   <i class="fa fa-shopping-cart">
   </i>
      Merchandise
   </a>
</li>
The recommended location would be after the Tickets, Gift Certificates and Donation buttons and before the Subscription button.
Adding a Button for a Specific Donation
- "Add $10 to support our Theatre School!"
- "Give $50 to our Annual Fund Drive!"
- "Support Music in our community! Add $25 to your order"
Or any other needs your Marketing and Development Department can identify.
This process includes web page editing. If you have a web designer on hand, they can perform these edits. If you wish to contract with Arts Management Systems to perform these or any customizations for you, please contact the Support Team at support@artsman.com
|
Note: There is a difference between:
|

Adding the coding to the web page.
- Select the web page you wish to add the button to.
The most commonly used page is rowCartDonationSuggestion.html.OPTIONAL- An include directive can be added to any of these pages:
- The Home Page (tmHome.html)
- The Login page (tmLogin.html)
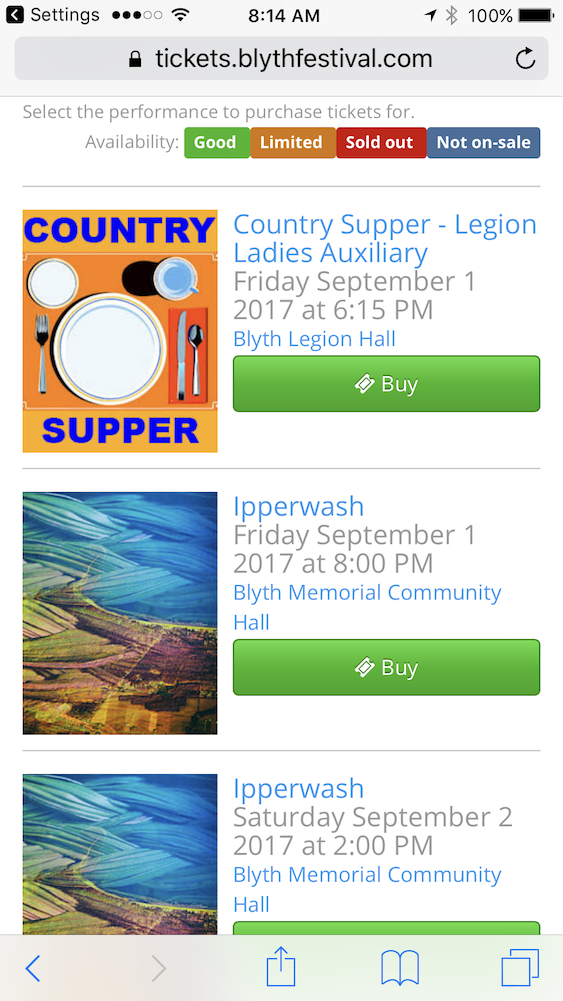
- The Shopping Cart (tmCart.html), which is pictured below.
- Replace the existing contents with the following HTML to the page:
<field>pick(F_DONATION_ALLOWED,'<!-- comment: based on setting in company preferences to show suggested donation','')</field>
<!--#include virtual="TMtemplates/tmMessageDismiss.html" -->
<div class="container" align="center">
<form action="<field>F_HTML_FIREWALL</field>online" METHOD=POST>
<input class="btn btn-success" name="btnDonationAccept"type="submit" value="ADD $10 TO SUPPORT OUR THEATRE SCHOOL DEVELOPMENT"/>
<input id="DD_DC_SEQ" name="DD_DC_SEQ" type="hidden" value="41"/>
<input id="DD_AMOUNT_PLEDGE" name="DD_AMOUNT_PLEDGE" type="hidden" value="10"/>
</form>
</div>
<field>pick(F_DONATION_ALLOWED,'-->','')</field> - Ensure that:
- The HTML is outside ALL OTHER FORMS on the page you add it to.
- You change the ’10’ to the suggested amount’.
- You change the ’41’ to the proper campaign sequence number from within Theatre Manager.
- You change the ‘add $10 to support….’ to reflect the text you wish to use on the button.
- You include any mandatory donation fields by using including DD_FLDx_FC_SEQ references.
Adding a Donor Field
There are fields in the Notes tab of a Donation that can be added to the tmDonationHiddenFields.html so they appear on the TMdonation.html page in order to collect more details about the donation. The example below accesses the Donor#4 field. This is a text field. The patron can type information into the field within the online sales and the details will populate in the Donor#4 field in Theatre Manager once the Order is complete.
This process includes web page editing. If you have a web designer on hand, they can perform these edits. If you wish to contract with Arts Management Systems to perform these or any customizations for you, please contact the Support Team at support@artsman.com

Adding the coding to the web page.
- Select the web page you wish to add the field to.
The most commonly used page is tmDonationHiddenFields.html. - Add the following HTML to the page:
<div class="form-group">
<label for="DD_FLD4"> In Memory of...
</label>
<input class="form-control" id="DD_FLD4" maxlength="100" name="DD_FLD4" type="text" value="<field>DD_FLD4</field>"/>
</div> - Test:
- The field appears in the correct location within the web page.
- The text populates into the correct field in Theatre Manager when a Donation is added online.
Altering the Header and Ad on the Print At Home and PDF Ticket
This web page provides instructions for:
- Changing the default pageHeader or ticketAd for all print at home tickets
- Creating a custom pageHeader or ticketAd for all performances of a single EVENT
- Creating a custom pageHeader or ticketAd for a single PERFORMANCE

Changing the default footer and/or header for ALL print at home tickets
The easiest way to update the header and/or footer for a print at home ticket is to create new files and place them into the WebPagesEN >> tmGifs folder.
- pageHeader.gif - is the name of the page header file. In the example above, it is 75 pixels high and 700 pixels wide.
- ticketAd.png - is the name of the Ad at the bottom of the page. The sample image is 200 pixels high and 700 pixels wide.
In general, the width of each of the images should remain around 700 pixels. The height of the images can vary as long a the total height of both images causes the print at home ticket to remain on one page. You could, for example, make the top image 50 pixels high and use the remaining pixels in the lower area.
The sample pages were crated with conservative heights. You could probably get away with a total of 400 pixels or more in height between the header and footer.
Changing the footer and/or header for a SPECIFIC EVENT
If you want to change the header or footer for a single event, you can create a web page that over-rides the header and/or footer. This allows you to have:
- specific sponsors or instructions in the 'ticketAd.png' for an event or
- a different header for your mainstage, or classes, or inventory or streaming events if you wish.

As an example, let say you want to change the header (and/or) footer for only event 109 (See No Evil).
| Changing the Header |
|
||
| Changing the Footer |
|
Changing the footer and/or header for a SPECIFIC PERFORMANCE
If you want to change the header or footer for a single performance within the event, you can create a web page that overrides the header and/or footer. This allows you to have:
- specific sponsors or instructions in the 'ticketAd.png' for the performance or
- a different header for a performance such as the final performance of a class, or for a touring or streaming performance
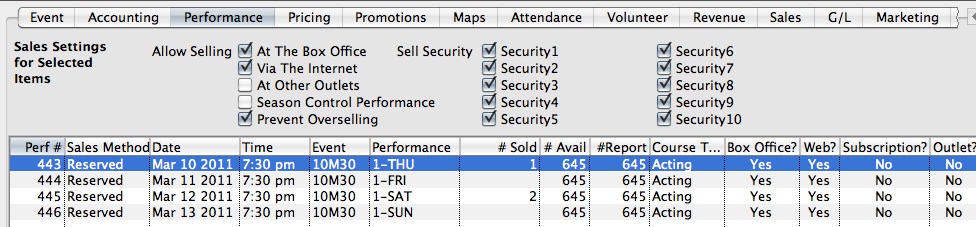
As an example, let say you want to change the header (and/or) footer for only event 443.
| Changing the Header |
|
||
| Changing the Footer |
|
|
Print at home tickets must be enabled in company preferences and for specific events before a patron can print them. |
|
In the instructions below, the names of images and files are case sensitive. Please make sure they match exactly. |
Button to Apply a Specific Coupon Code
The lines below are an example of how to create a button that will apply a specific Coupon Code to the online cart. This button can be added to any page within the online sales. It would most commonly appear on the TMtickets.html page or the TMcart.html page.
This process includes web page editing. If you have a web designer on hand, they can perform these edits. If you wish to contract with Arts Management Systems to perform these or any customizations for you, please contact the Support Team at support@artsman.com

Adding the coding to the web page.
- Select the web page you wish to add the field to.
The most commonly used page is TMtickets.html. - Add the following HTML to the page:
<form action="<field>F_HTML_FIREWALL</field>online" METHOD=POST>
<input class="btn btn-success" name="btnCouponAccept" onclick="process()" type="submit" value="Click To Receive Our Special Promotion"/>
<input type="hidden" id="CH_CODE" name="CH_CODE" value="1234">
<input name='param' type='hidden' value ='altbtn=btnGetEventList'>
</form> - Ensure that:
- You uncomment the div statement.
- You change the ’1234’ to the proper coupon code value from within Theatre Manager.
- You change the ‘Click To Receive Our Special Promotion’ to reflect the text you wish to use on the button.
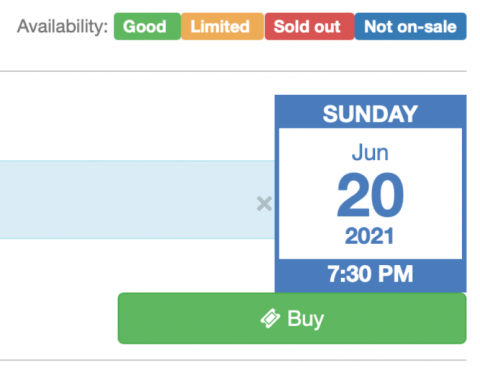
Customizing the Event Date and Time Display
The Event Buy options can be edited and displayed in two different ways. The two options for the 'Buy' button when purchasing Events online are detailed below. We have the conventional 'Buy/Reserve' option;

There is also the option to change that display to show both the Date and Time within the Buy Button itself, option example below.
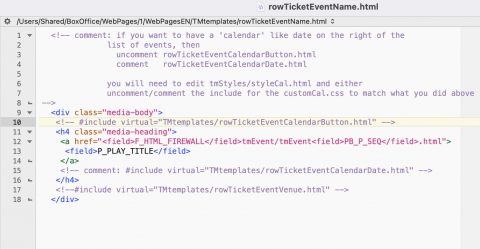
Adding the Code
Options for editing the Buy button can be found by accessing and editing the rowTicketEventName.html.
If you want to have a 'calendar' like date on the right of the list of Events, then uncomment rowTicketEventCalendarButton.html, and comment rowTicketEventCalendarDate.html.
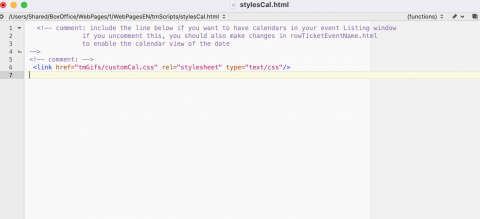
You will need to edit tmScripts/styleCal.html
and either uncomment/comment the include for the customCal.css to match what you did above.
Direct Purchase Button for a Member Type
The lines below are an example of a button that will add a specific member type to the cart with a fixed value and quantity. This button can be added to any page within the online sales. It would most commonly appear on the TMpass.html page or the TMcart.html page.
This process includes web page editing. If you have a web designer on hand, they can perform these edits. If you wish to contract with Arts Management Systems to perform these or any customizations for you, please contact the Support Team at support@artsman.com

Adding the coding to the web page.
- Select the web page you wish to add the field to.
The most commonly used page is TMpass.html. - Add the following HTML to the page:
<div align="right">
<form action="<field>F_HTML_FIREWALL</field>online" method="POST" role="form">
<input name="MT_SEQ" type="hidden" value="23"/>
<input name="PS_QUANTITY" type="hidden" value="1"/>
<input class="btn btn-success" name="btnReservePass" onclick="process()" type="submit" value="Purchase/Renew a Voting Membership for $150"/>
</form>
</div> - Ensure that:
- The HTML is outside ALL OTHER FORMS on the page you add it to.
- You change the '23' to the proper member type sequence number from within Theatre Manager.
- You change the 'Purchase/Renew a Voting Membership for $150' to reflect the text you wish to use on the button.
Eliminating the Pricing Selection List
The html code below will provide a single option for pricing rather the the price code drop down list that is currently a part of the online sale pages. This text most commonly would effect the TMticketsPrice_MapDefault.html and TMsubscriptionPriceMapDefault.html pages.
<input name=SC_DESCRIPTION type=hidden value="<field>F_HTML_PROMOTIONS_LIST.1.SC_SEQ</field>>
<field>F_HTML_PROMOTIONS_LIST.1.PC_SEQ</field>
<field>F_HTML_PROMOTIONS_LIST.1.SCD_ORIGINAL_SC_SEQ</field>
<field>F_HTML_PROMOTIONS_LIST.1.SCD_ORIGINAL_PRICE_CODE</field>
<field>F_HTML_PROMOTIONS_LIST.1.SCD_SAVINGS</field>
<field>F_HTML_SELECTED</field>
<field>pick(D_WEB_SHOW_PROMOTION,'',con(F_HTML_PROMOTIONS_LIST.1.SC_DESCRIPTION,' '))</field>
<field>pick(D_WEB_SHOW_PRICE_CODE,'',con(F_HTML_PROMOTIONS_LIST.1.PC_DESCRIPTION,' '))</field><field>F_HTML_PROMOTIONS_LIST.1.PS_TOTAL_COST</field>
Hiding General Admission Arrival Notes
When setting up an event, that is not a Course or Reserved seating performance, the General Admission (Festival Seating) Sales Method is used. This allows for flexibility in capacity. It is commonly used for Live Stream or Pre Recorded videos. This poses a challenge when purchasing online as the default web pages display arrival notes that do not apply to Live events.
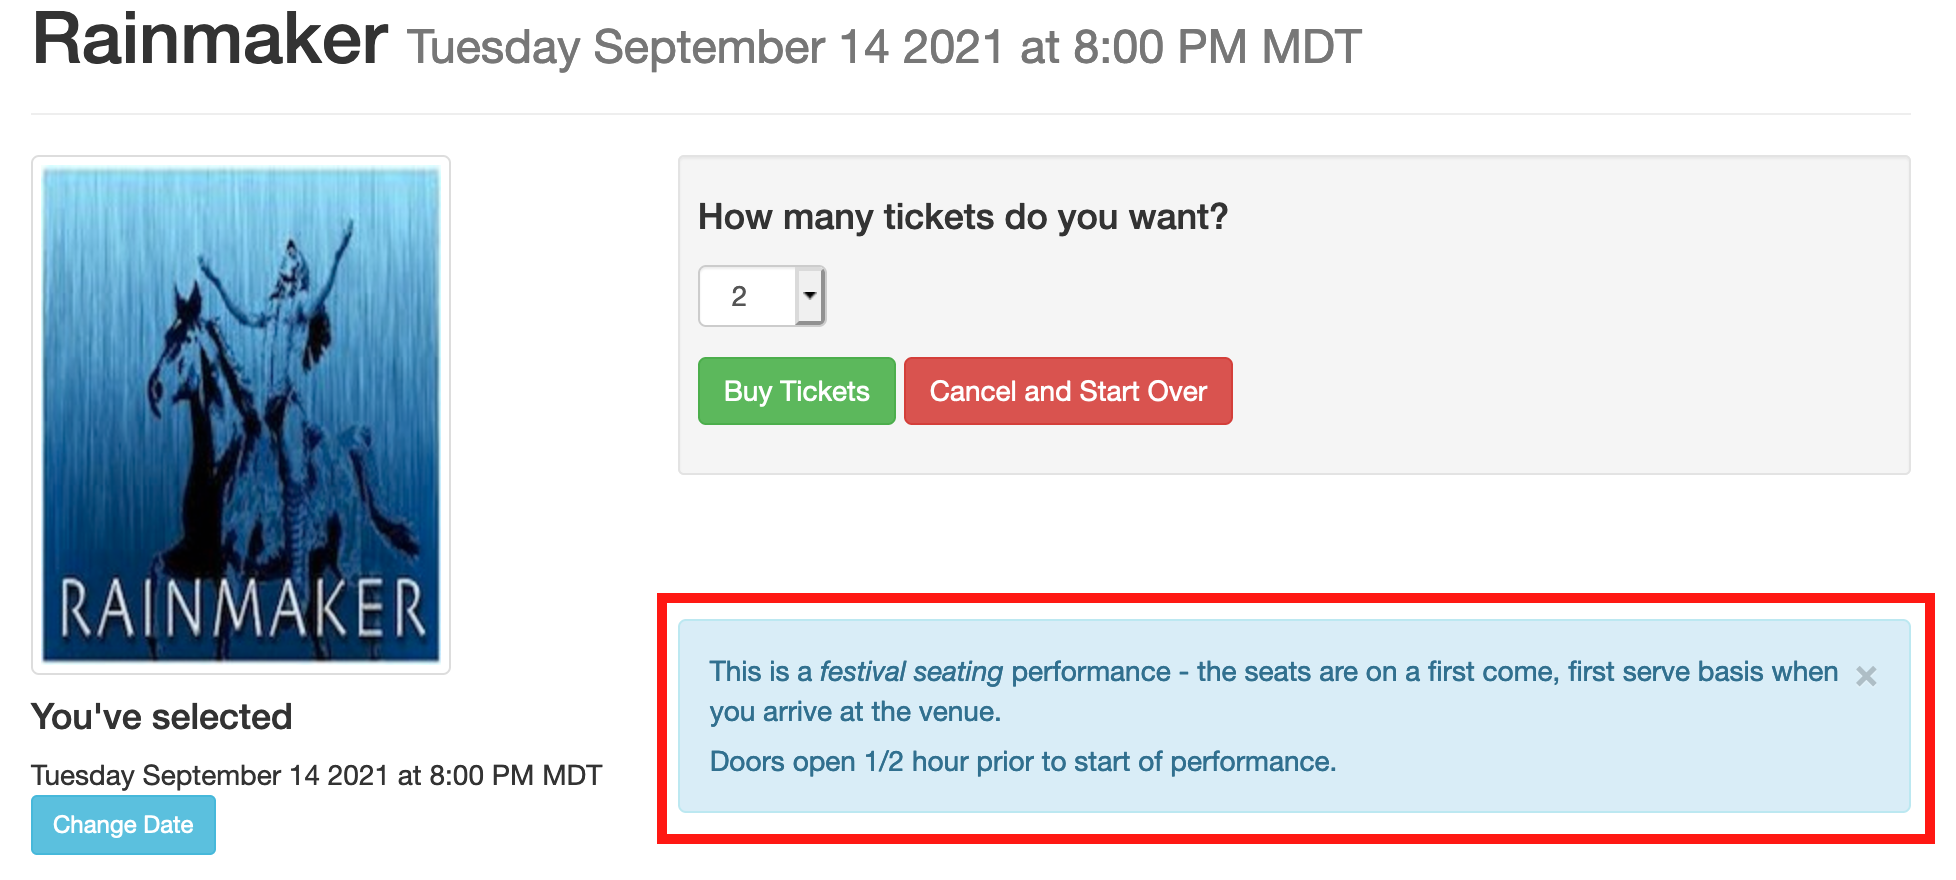
Hiding these notes requires created a customized web page referencing the Map Sequence number from Theatre Manager and the Sales Method. Below are the steps for removing the box containing the text from the page. Alternatively, a custom page containing notes specific to the streaming event could be created and added in place of the existing general admission arrival notes.
|
The steps below assume a basic understand of HTML and web page editing. Please contact your web designer should you need assistance with completing web page edits. |
Finding The Map Sequence Number
- Open the Venue List window in Theatre Manager.
Click here for steps on how to access the Venue List window.
- Double-click on the Venue in the list to open it.
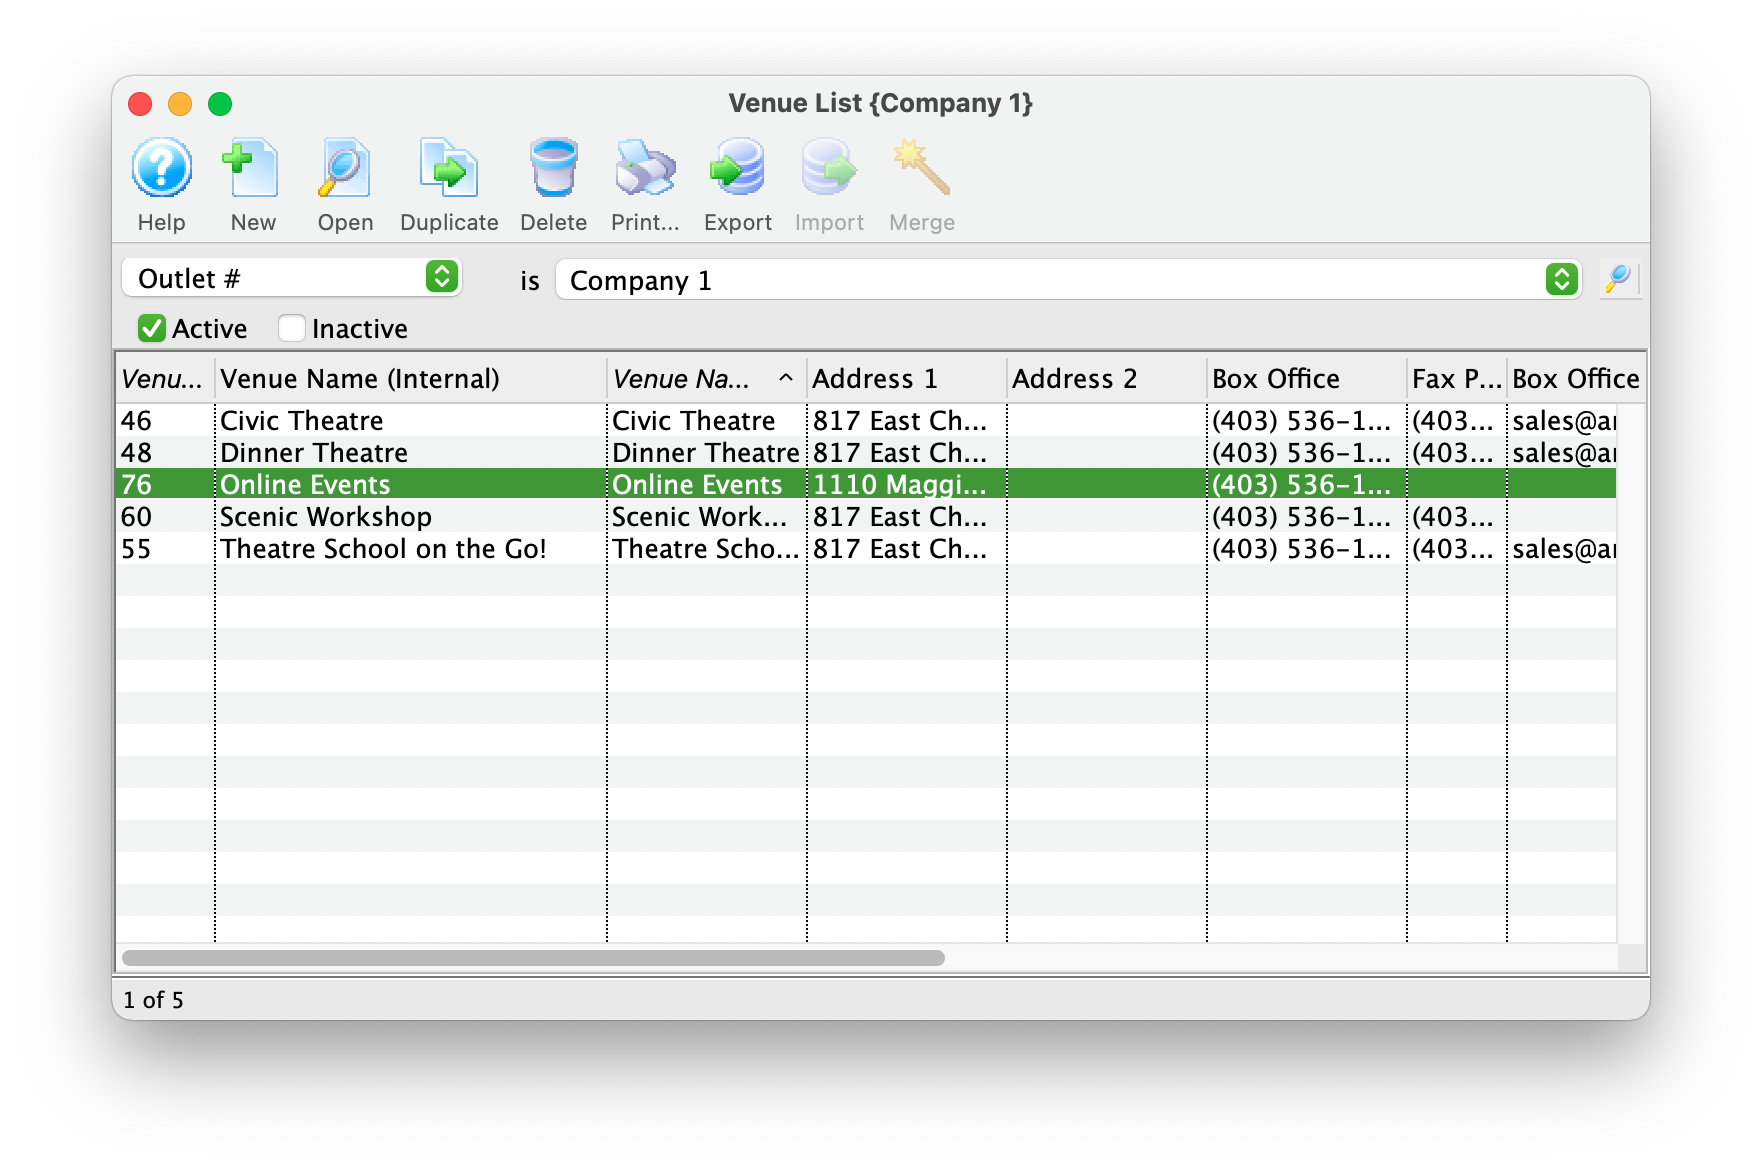
- Double-click the map in the right column.
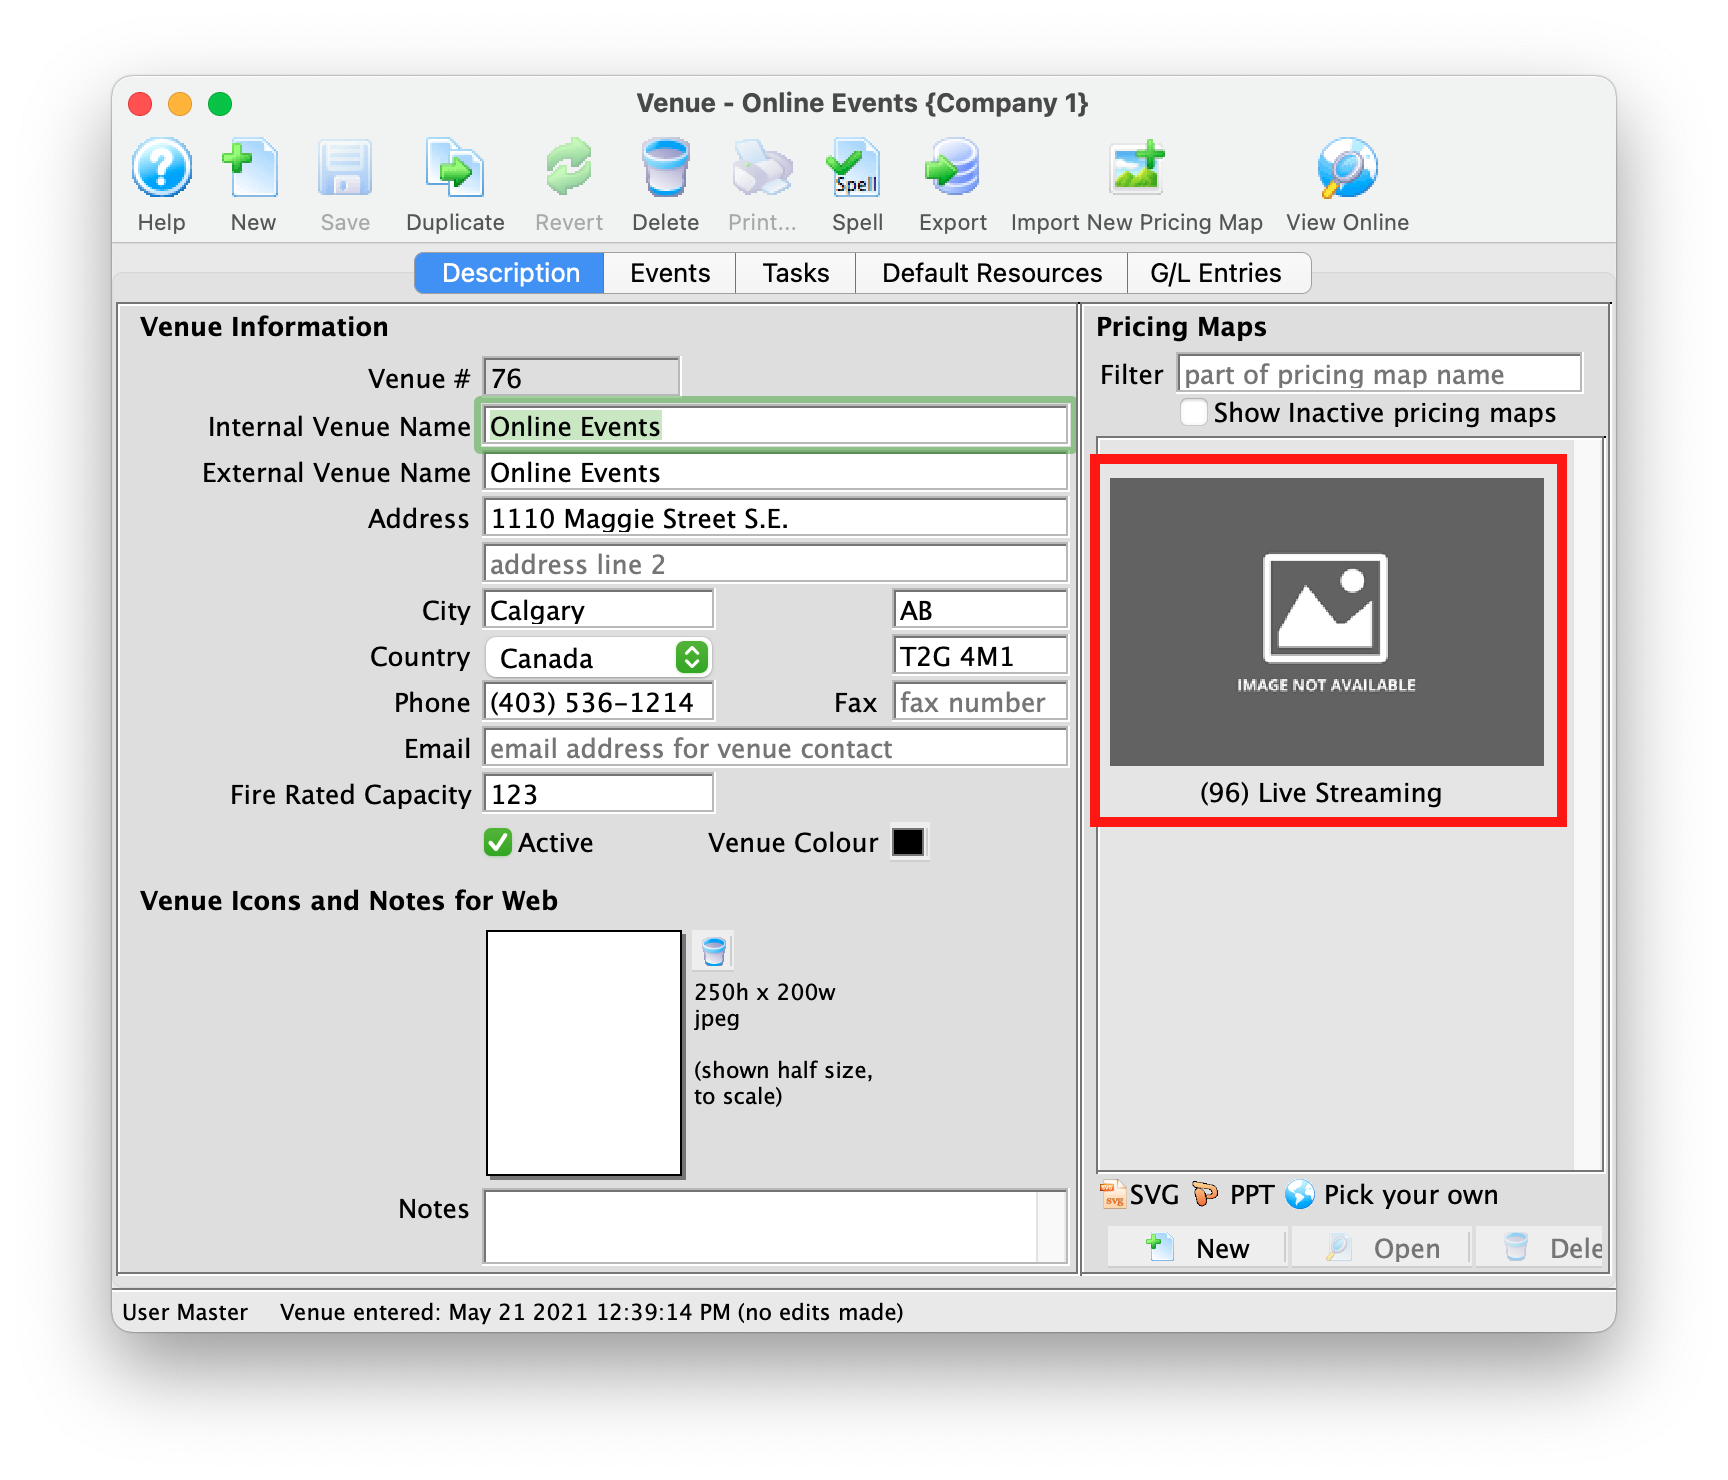
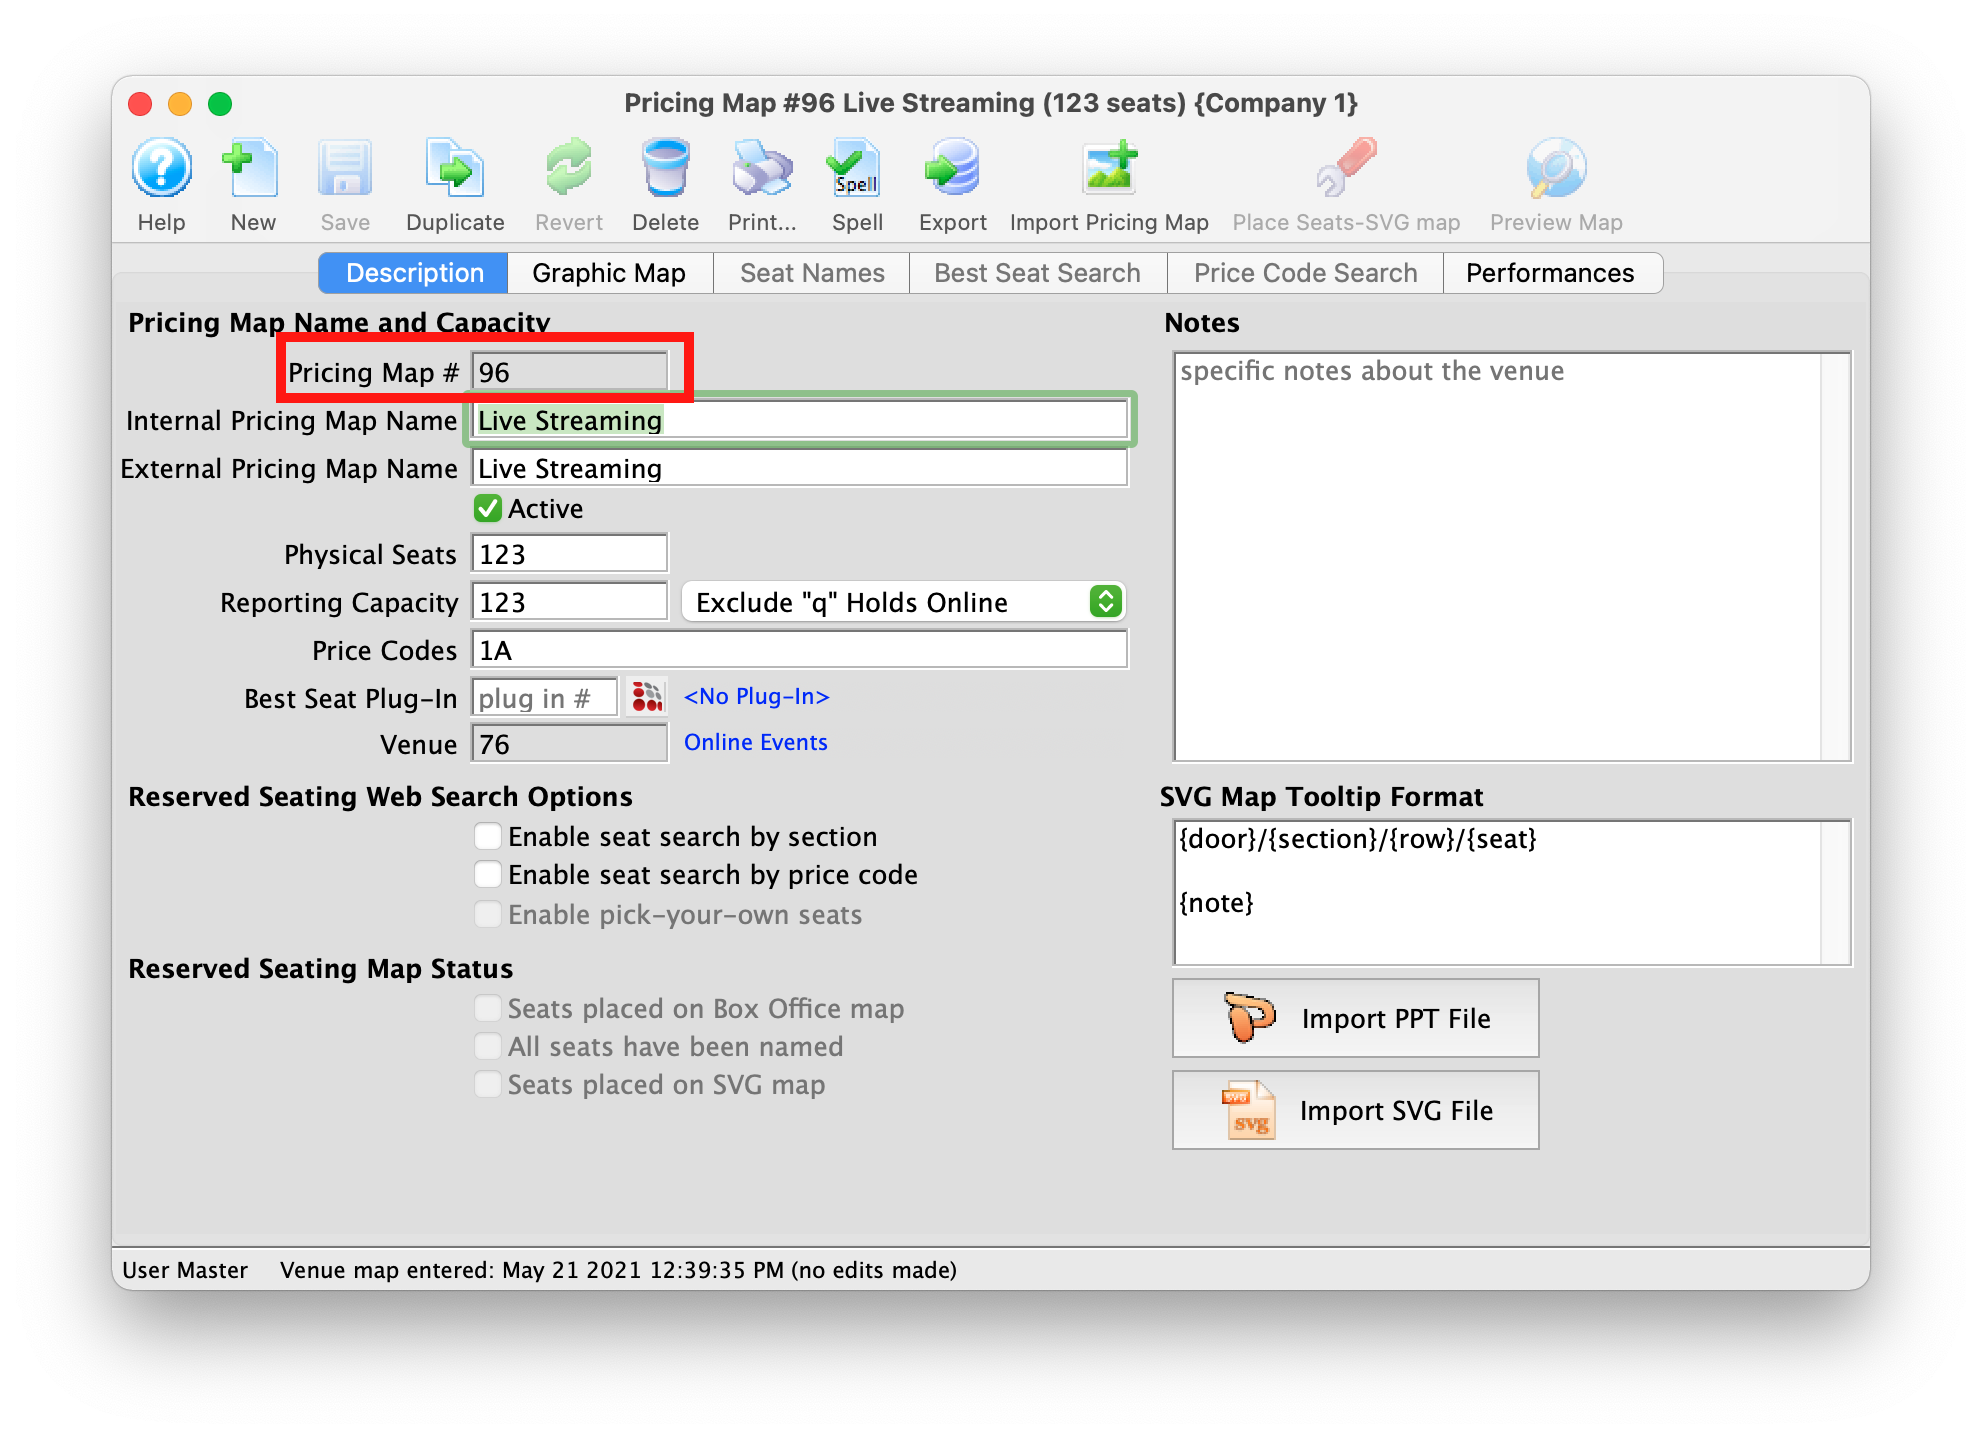
- Take note of the Pricing Map number.
Create A Custom Web Page
The page containing the arrival notes is the TMticketsSection_MapDefaultf.html page located in the tmMaps folder. The " f " at the end of the page name indicates the Festival Seating page. This is the page that requires customization.
- Download the latest default web pages.
- Navigate to the /1/WebPagesEN/tmMaps folder.
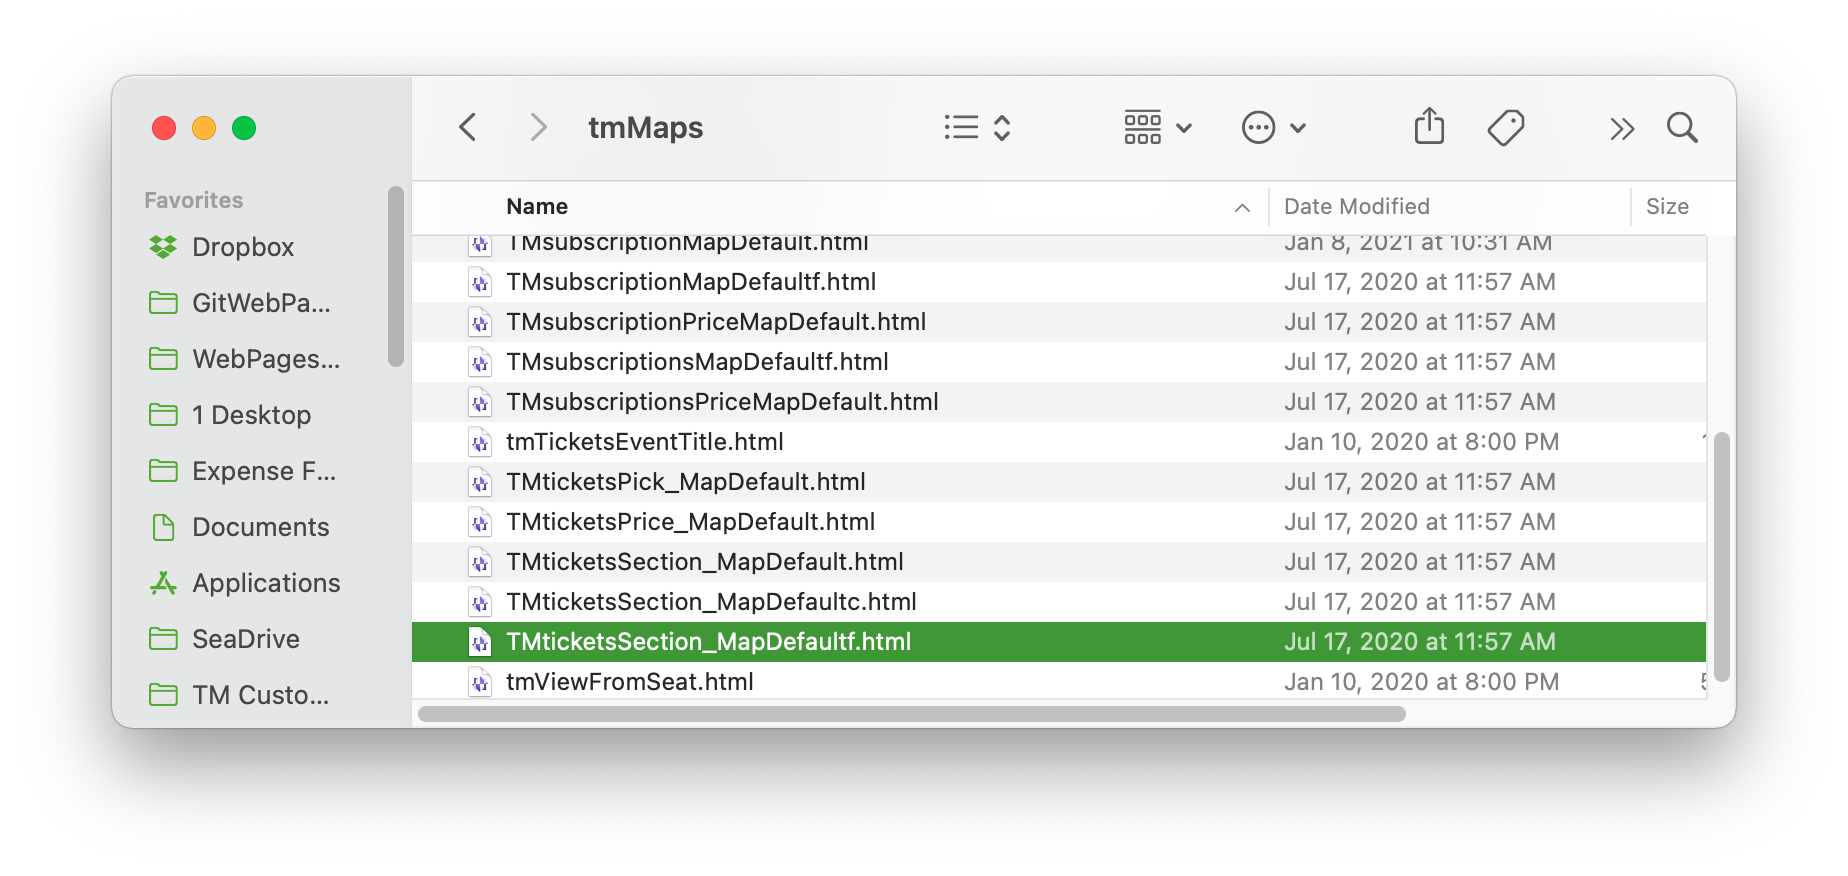
- Copy the TMticketsSection_MapDefaultf.html to the organizations /WebPagesEN/tmMaps folder.
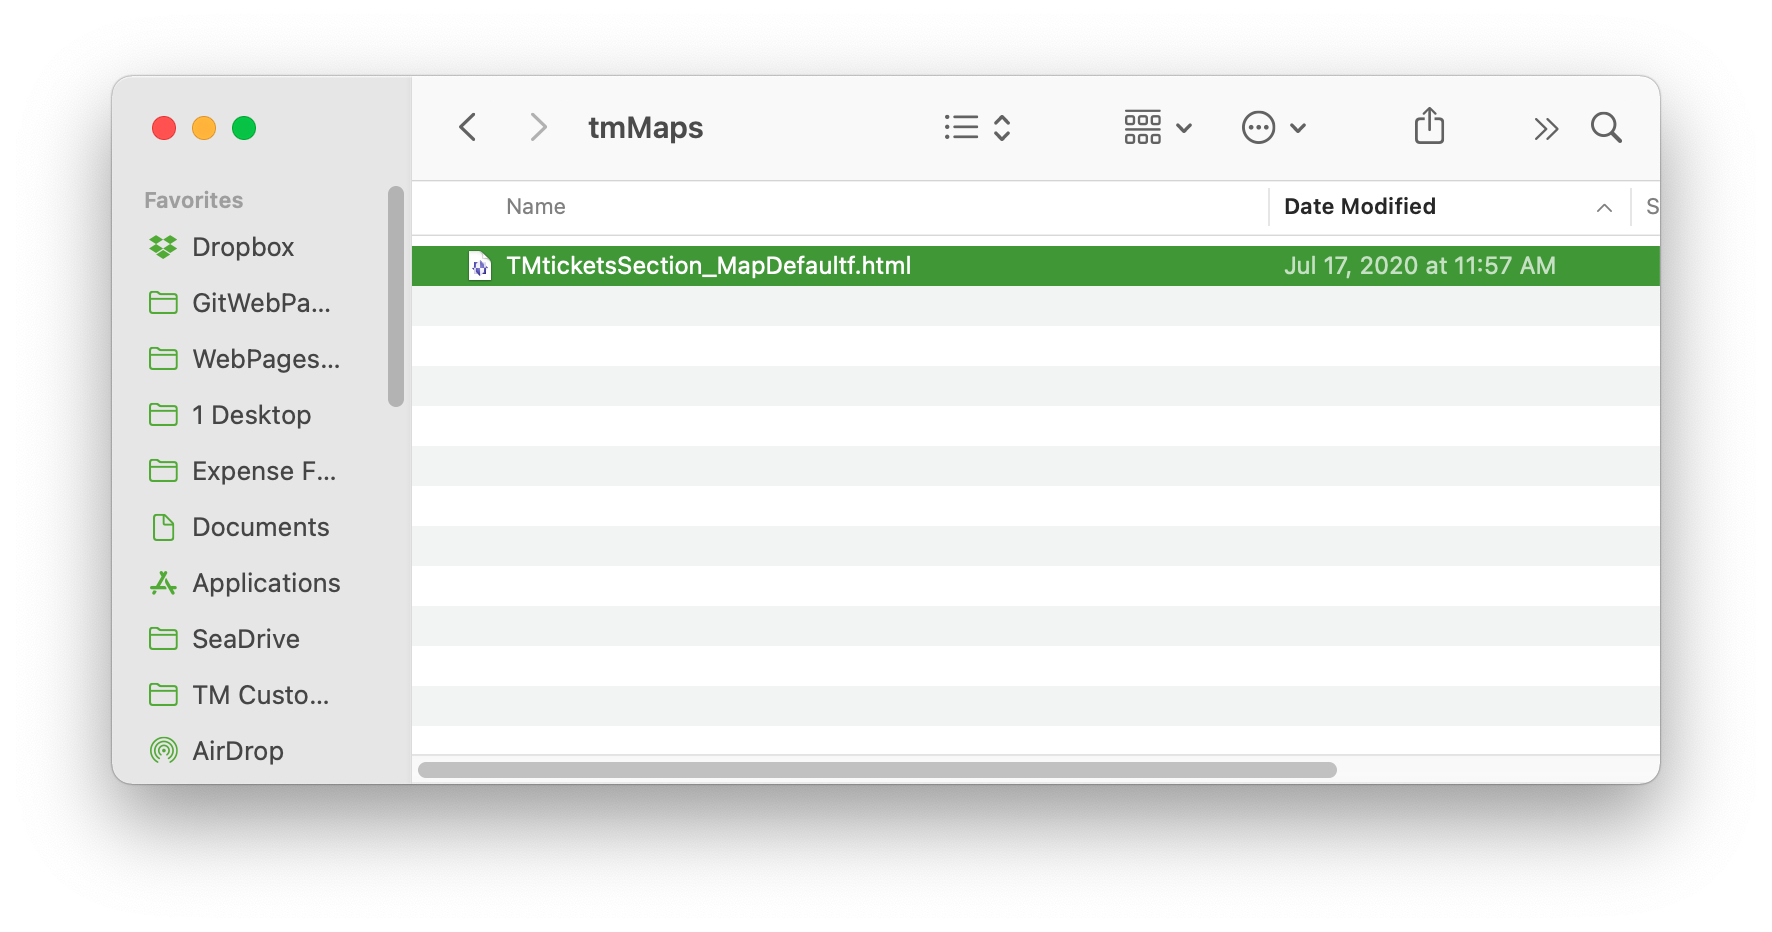
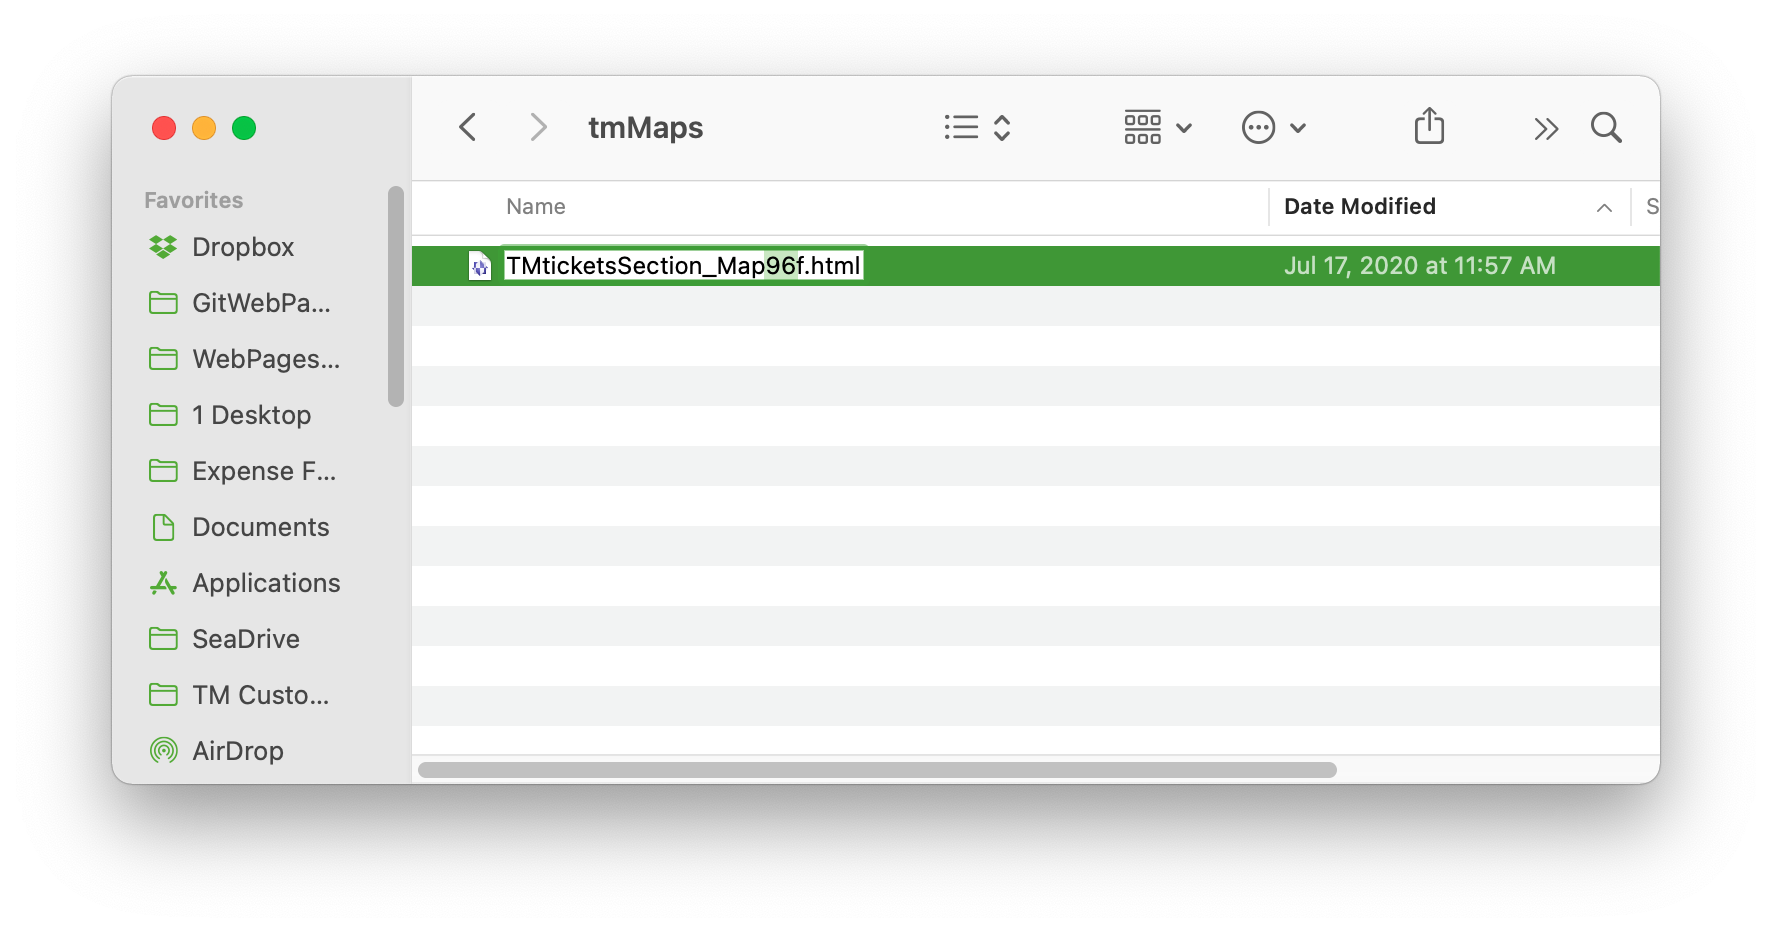
- Delete the word Default from the name of the page and replace it with the Pricing Map Number being extra careful not to remove the " f " at the end of the title.
Editing The Web Page
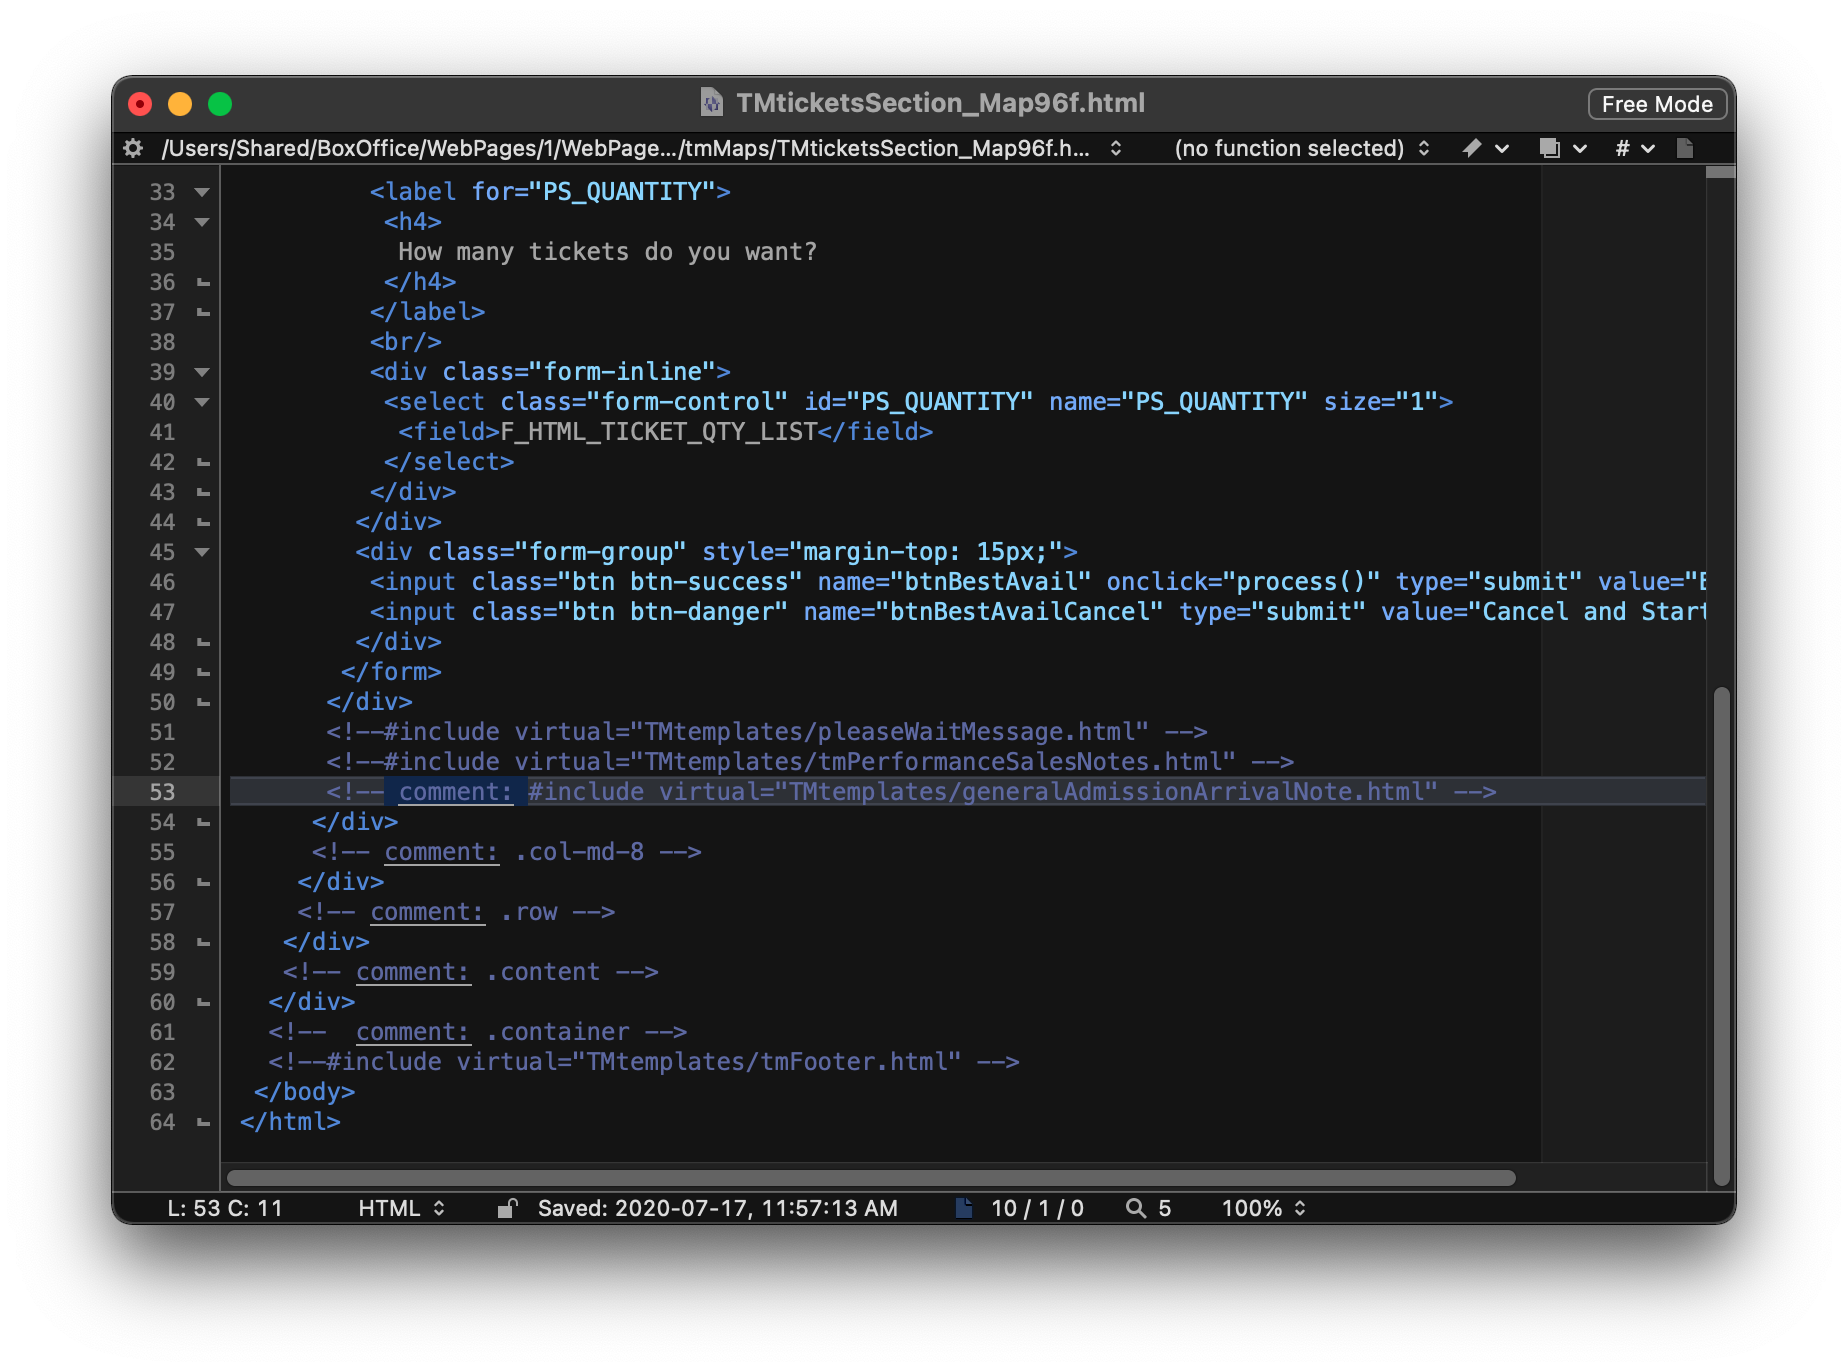
The final step is to edit the web page. The steps below outline how to remove the notes from the page.
- Open the Custom Web Page from above using a tool like NotePad++ or BBEdit.

- Scroll down to Line 53.
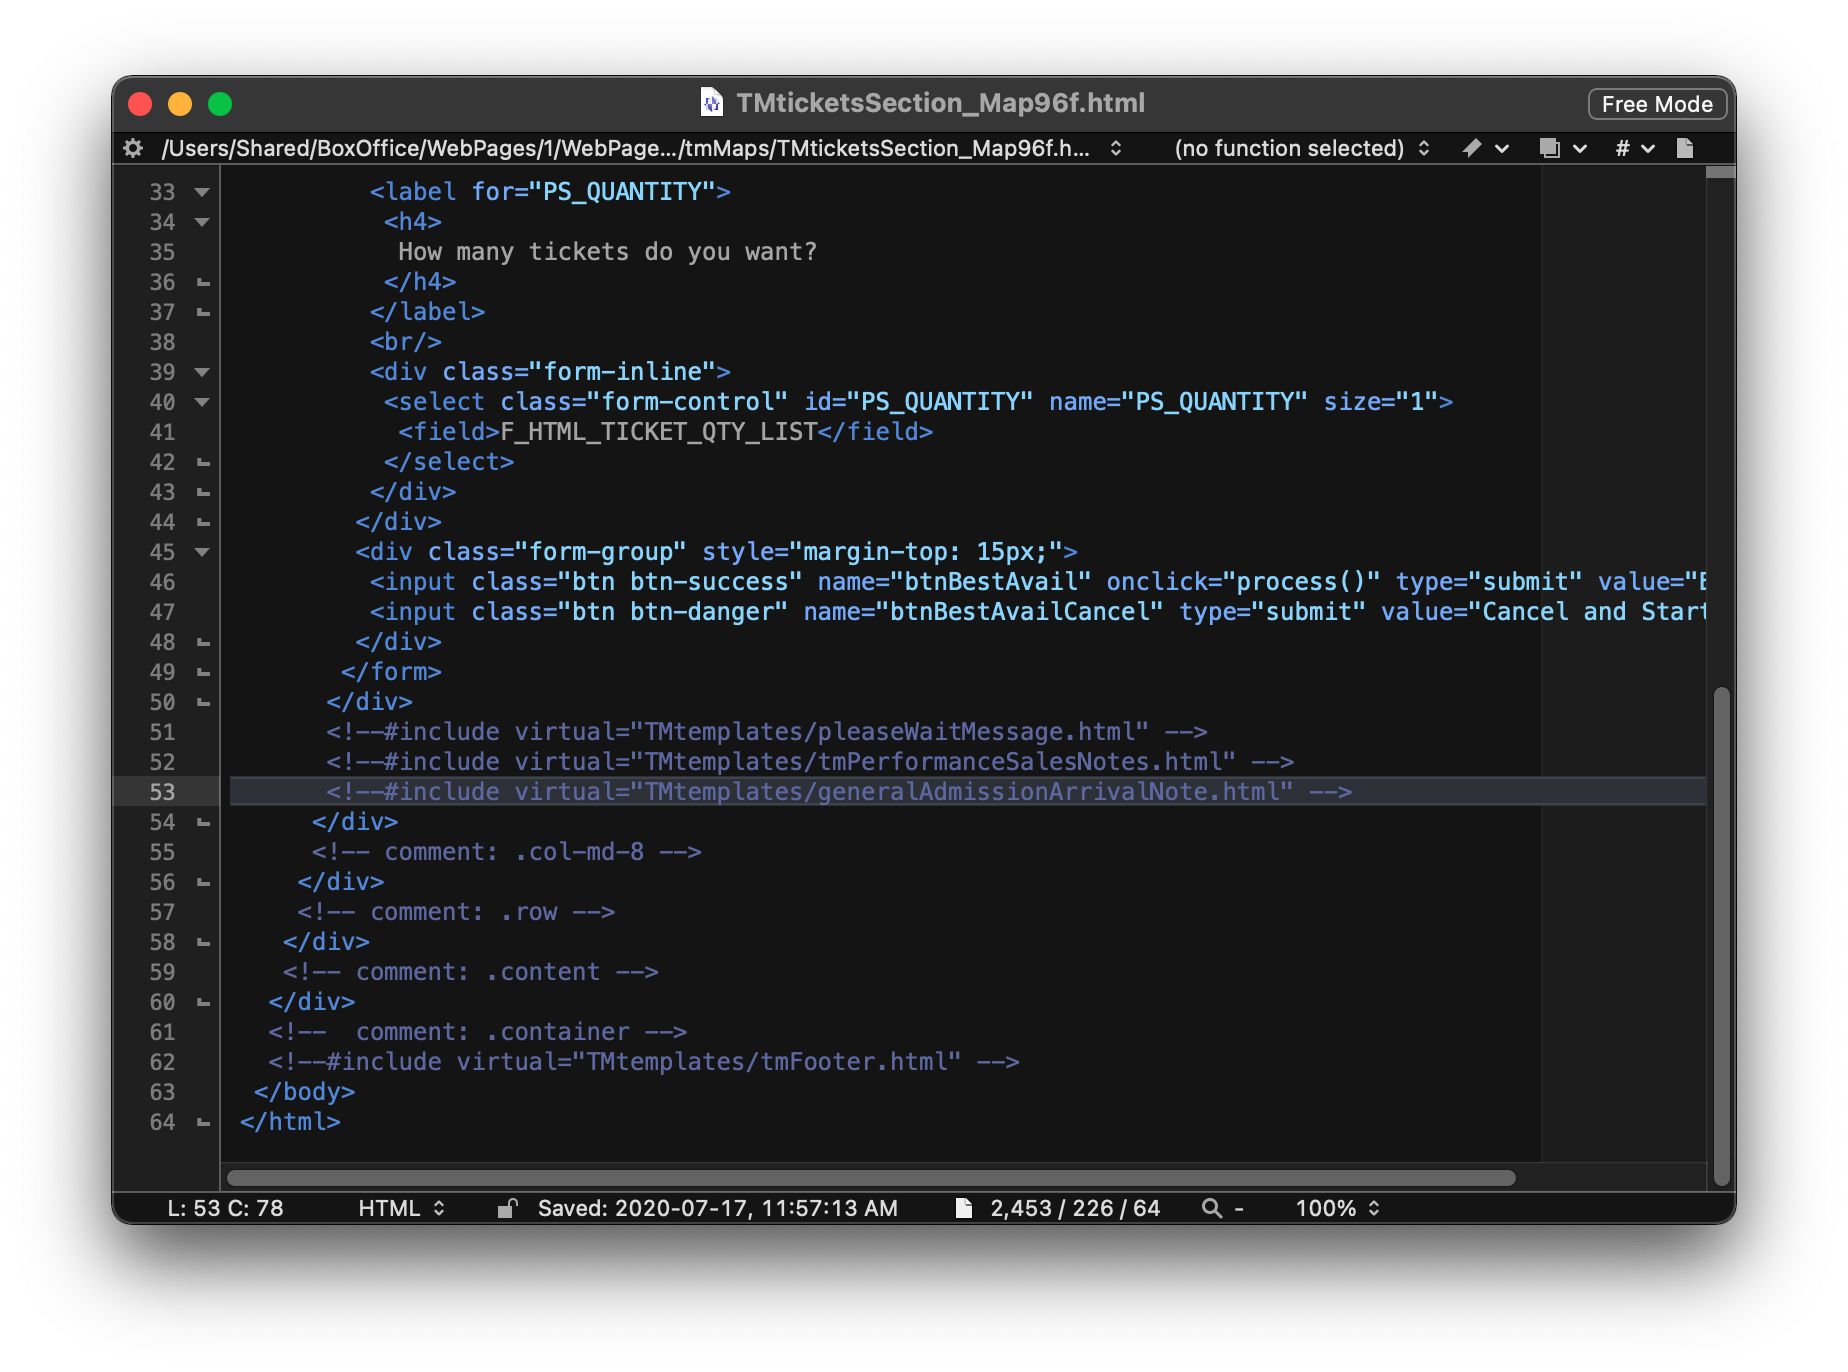
- Comment out the include statement for the generalAdmissionArrivalNotes.html.
Mandatory Donation Fields
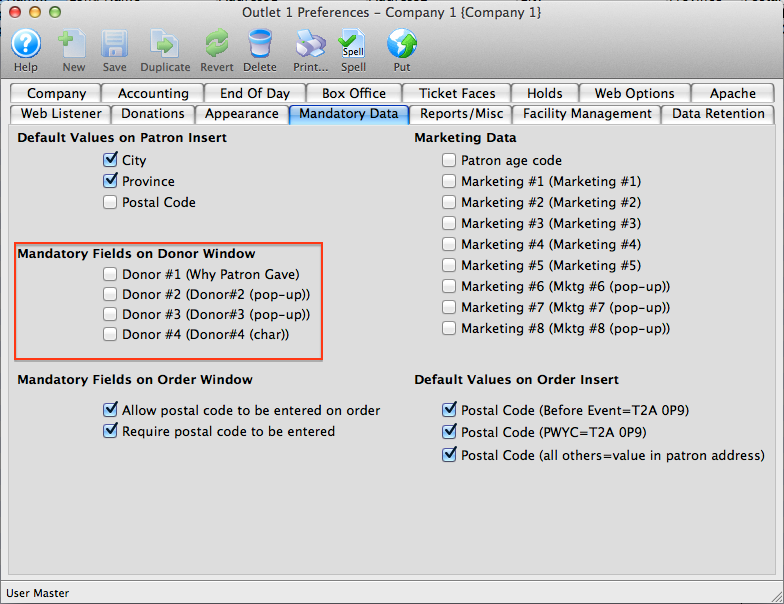
If you have any mandatory fields set for donations (such as "Why Patron Gave" or other field on the Notes tab), then your online donors will need to have this field filled in for them automatically. Otherwise, they will not be able to donate online as the database will require the field, and the patron has no way of entering it. To determine which fields may be mandatory, go to:
- Setup >> Company Preferences >> MANDATORY DATA tab
To correct this for online sales, you have two options:
Option 1: Editing the web page (recommended)
This process includes web page editing. If you have a web designer on hand, they can perform these edits. If you wish to contract with Arts Management Systems to perform these or any customizations for you, please contact the Support Team at support@artsman.com
If you still wish those fields to be mandatory for the Box Office or Development Department, then you will need to make a slight adjustment to the tmDonationHiddenFields.html web page.
The process starts by obtaining a Sequence Value from Theatre Manager
- Determine which field is set to be Mandatory.
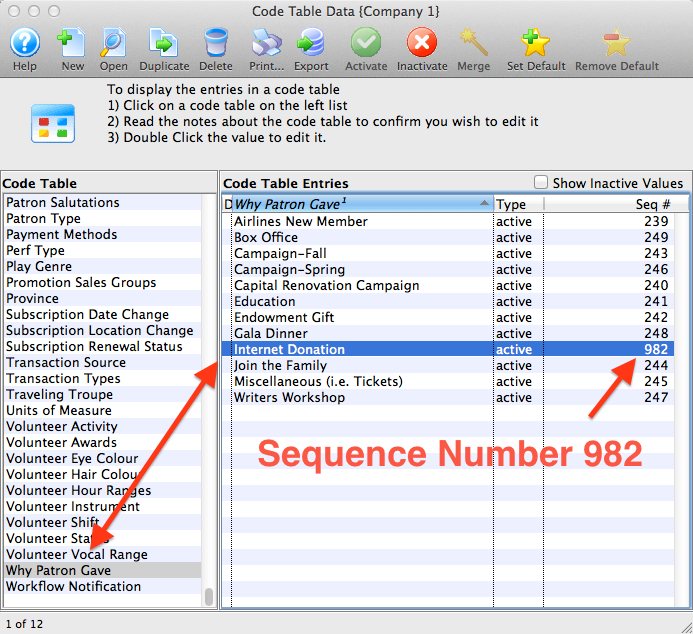
- In Theatre Manager, go to Setup>>System Tables>>Code Tables.
- Look under the Donor #1, #2, #3 pop-up (or if the field has been renamed, look under its name).
- Choose which value is going to be the default value. In this example, we've chosen Internet Donation.
- Obtain the Sequence number for that value You may have to RIGHT click on a column header to show all the available columns, and select the Sequence number. In this example, the Sequence number is 982.

Now you will need to go edit the tmDonationHiddenFields.html web page, located in the TMtemplates folder.
- Move a copy of the tmDonationHiddenFields.html web page into the TMtemplates folder.
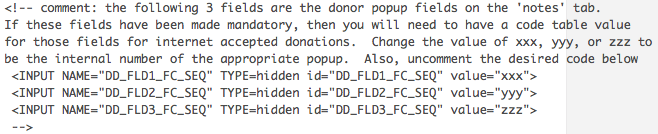
- Open the tmDonationHiddenFields.html page and locate the following:
- Make the desired edits If the Sequence Number of the value you want to default to for Donation Field #1 = 982, then the line of code would look like this:
- Save the edited page in the TMtemplates folder.
This allows you to set a "default" value on these fields for web sales.
<!-- comment: the following 3 fields are the donor popup fields on the 'notes' tab.
If these fields have been made mandatory, then you will need to have a code table value
for those fields for internet accepted donations. Change the value of xxx, yyy, or zzz to
be the internal number of the appropriate popup. Also, uncomment the desired code below
<INPUT NAME="DD_FLD1_FC_SEQ" TYPE=hidden id="DD_FLD1_FC_SEQ" value="xxx">
<INPUT NAME="DD_FLD2_FC_SEQ" TYPE=hidden id="DD_FLD2_FC_SEQ" value="yyy">
-->
<INPUT NAME="DD_FLD3_FC_SEQ" TYPE=hidden id="DD_FLD3_FC_SEQ" value="982">
Option 2: A global change
You can make the field non-mandatory. This will make the field not required for both Web Sales and in the Box Office/Development Office. To make this global change:
- Go to Setup >> Company Preferences >> MANDATORY DATA tab
- Simply UNcheck the mandatory field options.
You will see a section for "Mandatory Fields on Donor Window" as noted above.
Navigation Buttons
There are two groups of buttons:
- Menu Navigation Buttons
- Data Submit/Navigation Buttons
The menu Navigation buttons reside within the TMtemplates/tmnavButtons.html file, and are dynamically imported into each page via the <include> command. The command looks like:
<!--#include virtual="TMtemplates/tmnavButtons.html" -->
and creates buttons that look like:

Since buttons are subject to style changes, we are able to use the Bootstrap Style Sheets to make them fit whatever concept your site incorporates, such as:


These buttons default to the bootstrap stylesheets for the 'nav navbar-nav' class.and can be enhanced in the custom.css style sheet
Data Submit/Navigation Buttons
The other buttons in each page serve different purposes by sending data to the database. These buttons work exactly the same way as the menu buttons only they allow Theatre Manager to receive the data that has been entered into the page and then load a new page page based on that data. An example of this would be to click on the Buy Tickets button
![]() which will take the patron to the TMtickets.html page allowing you to select a performance to buy tickets for. The Data Submit buttons will look like the following
which will take the patron to the TMtickets.html page allowing you to select a performance to buy tickets for. The Data Submit buttons will look like the following ![]() (although the words may vary)
(although the words may vary)
The Data Submit buttons default to the stylesheets for the 'btn' class and can be modified with 'btn-success', 'btn-warning', 'btn-info' and others such as 'btn-small'
Buttons Commands
This is a list of the button commands that Theatre Manager requires. They are entered as the name="xxx" portion of each input tag.
These commands cannot be altered.
- btnLogin
- btnLoginAccount
- btnLoginFromDetail
- btnHome
- btnHistoricalCart
- btnHistoricalCartDetail
- btnAccount
- btnAccountRequest
- btnAccountAdd
- btnAccountUpdate
- btnPassword
- btnPasswordCancel
- btnPasswordAccept
- btnPasswordRequest
- btnPasswordSend
- btnMailList
- btnMailListAdd
- btnMailListRemove
- btnTicket
- btnGetEventRange - Deprecated. use btnGetEventList instead. This button uses btnGetEventList anyway
- btnGetEventAll - Deprecated. use btnGetEventList instead. This button uses btnGetEventList anyway
- btnGetEventList
- btnSelectEvent
- btnBestAvailCancel
- btnBestAvail
- btnReserveCancel
- btnReserveTicket
- btnPass
- btnReservePass
- btnPassAmountCancel
- btnPassAmountAccept
- btnDonation
- btnDonationAccept
- btnCart
- btnCartRemoveItem
- btnMailFeeAdd
- btnCheckout
- btnCheckoutAccept
- btnLogout
- btnLogoutCancelOrder
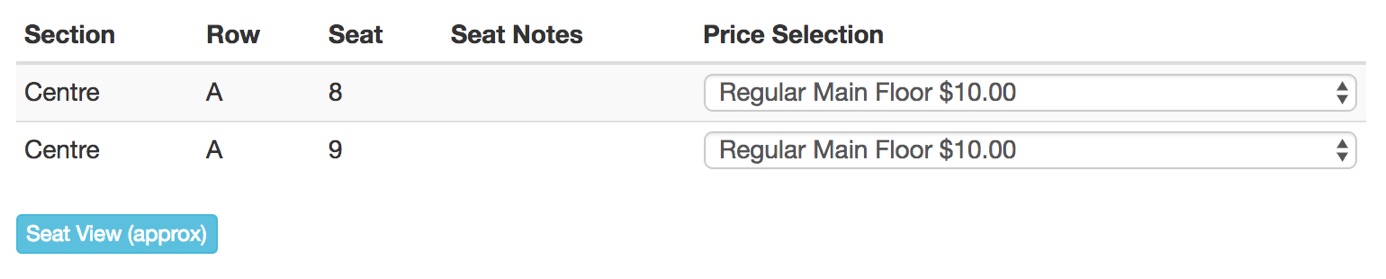
Seat View for Web Sales
When purchasing a ticket online a link can be added offering the patron an opportunity to see the view from their selected seats prior to adding tickets to their cart. This option requires some setup in order to work successfully online.
Once the setup is in place, the seat view button will become available. Clicking the button will open a new tab in the browser displaying the seat view image.
Adding the Seat View Image
- Take a picture from each seat or from one seat that will represent multiple seats inside the venue.
- On the Web Listener computer, create a tmSeatView folder inside the WebPagesEN/tmGifs folder to store the seat view images.
- Place all the seat view images into the tmSeatView folder ensuring the naming convention for each image is clear.
Updating the Theatre Map
- In Theatre Manager, open the Theatre Map.
For details on how to access the Theatre Map window, click here.
- Select the Seat Names tab.
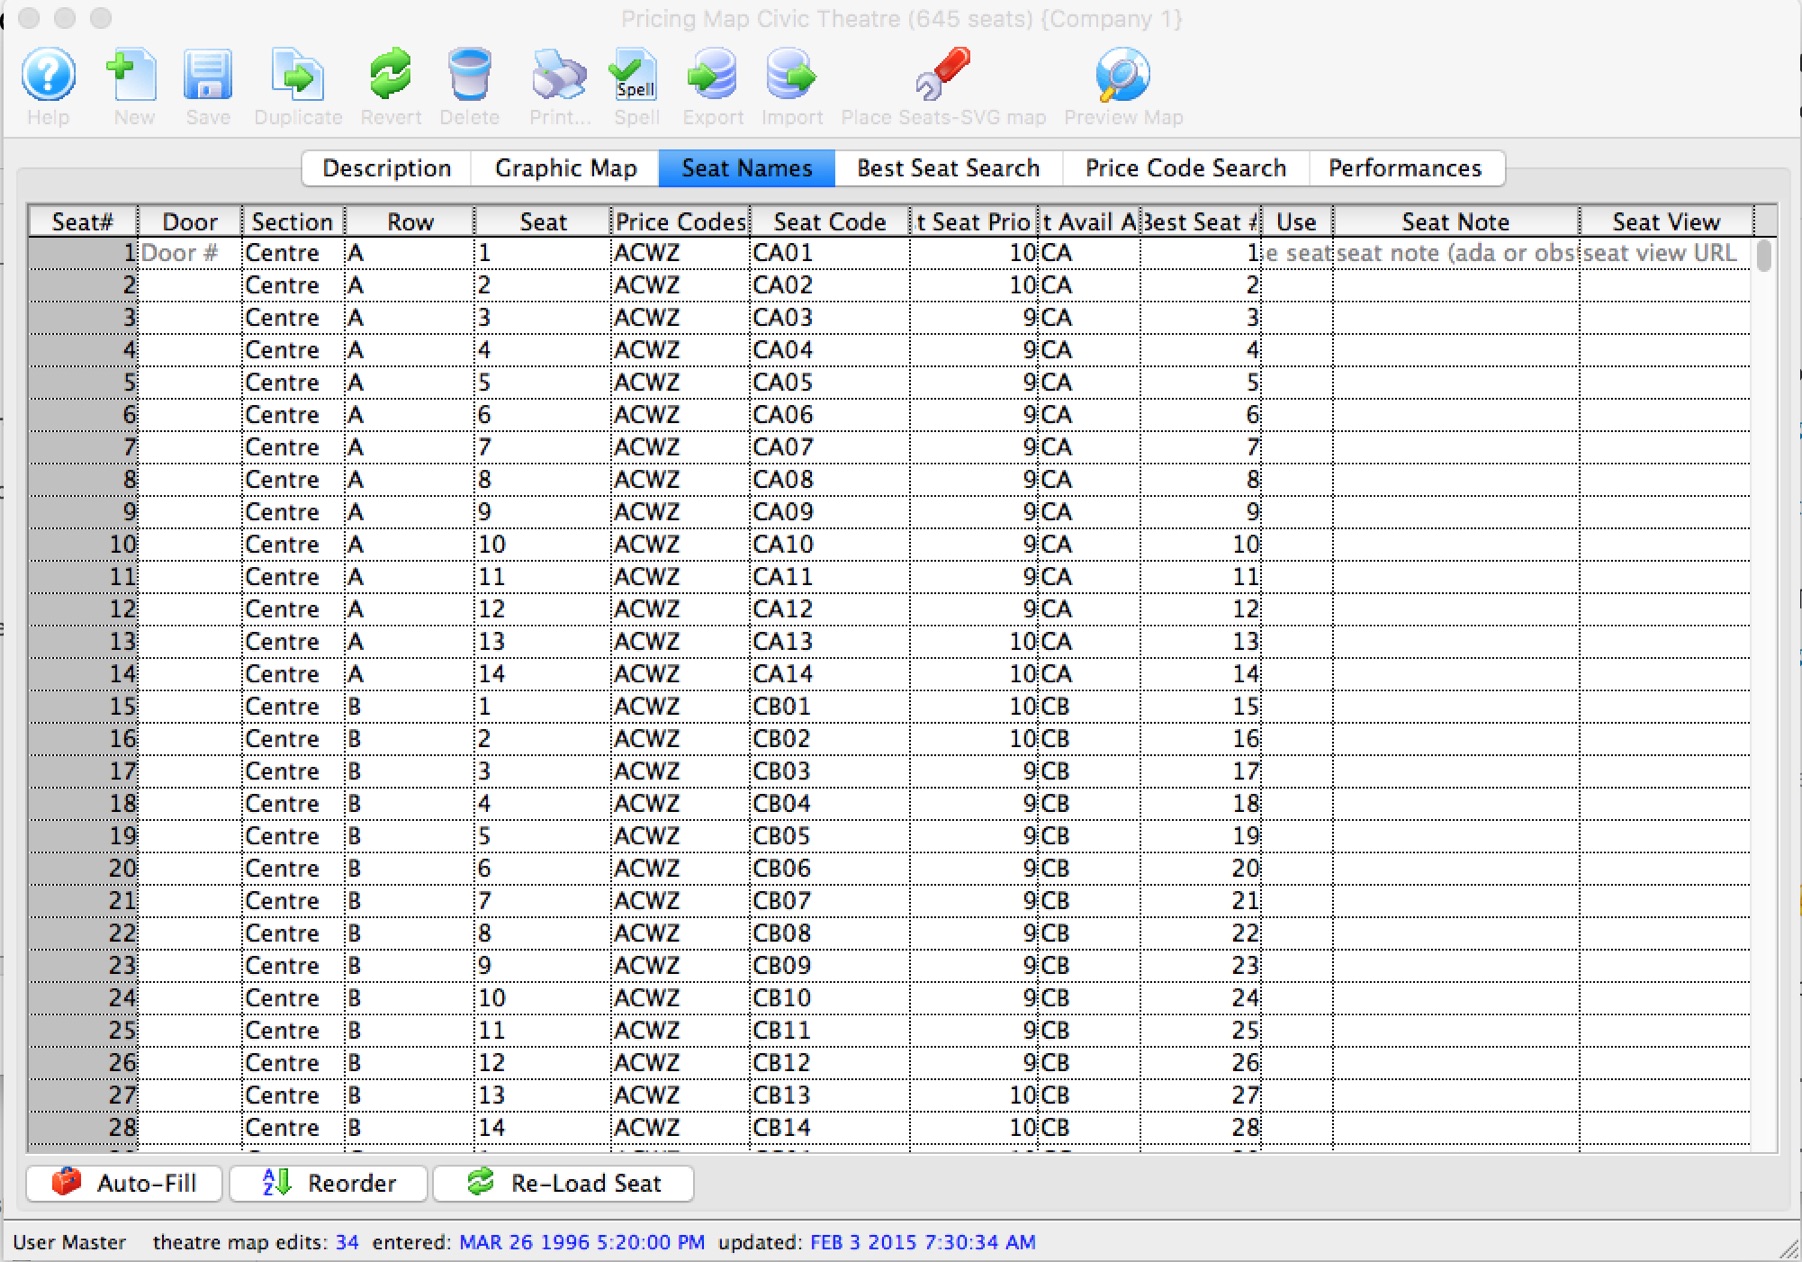
For more information on the Seat Names tab, click here.
- Update the far right Seat View column next to each seat with the name of the seat view image placed in the tmSeatView folder above. The column should contain the full name of the seat view image including the extension. You can use the same image for a row or area of the venue if the seat view doesn't change that much. Examples:
If you:
- use your smart phone or digital camera to take a picture from the middle of row 'H' on the left of the theatre, that image could represent the view from all of row 'H' and perhaps even row 'J' and 'K'.
- Retrieve that image from your camera and reduce its physical file size so that it is about 50 to 75K (at most - since most cameras take at least 4 megabit pictures, and sharply reducing the image size is important for web performance).
- You might rename that file ViewFromRowHJK.jpg so that you know what it is at a glance
- Place that picture into the tmSeatview folder described above
- put the name of the file ViewFromRowHJK.jpg into the Seat View column for all the seats in rows 'H', 'J', and 'K'.
- repeat for the next view from a seat picture you take of the venue
- Save and close the Map.
Editing the Seat View Web Page
- Copy the tmViewFromSeat.html web page into the WebPagesEN/tmMaps folder.
- Edit the tmViewFromSeat.html page using a tool like NotePad++ or BBedit.
- Update Line 8 with the desired text to appears as the link online.
Once the above steps are complete, restart the Web Listener to clear any previously cached web pages.
Sold Seat Colour Online
The default appearance for unavailable seats online is the FontAwesome icon of a person. When a map contains many small seats this may not be ideal as the people might appear to overlap. It may be more desirable to have the unavailable seats appear in a solid colour (or other icon) separate from available seats and suggested seats.
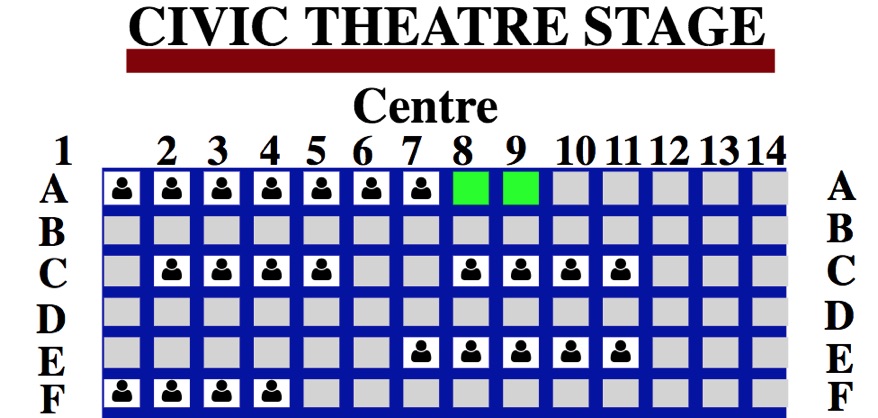
To make this change you will want to edit the tmPickYourSeatMapDisplay.html web page. Locate line 43, it should look like this:
<object class="embed-responsive-item" data="<field>F_HTML_SEATMAP</field>&reserved_colour=00FF00&reserved_only=false&format=pick&unavailable_color=FFFFFF &unavailable_text=&seat_font=FontAwesome&seat_font_load=cdn" id="venue_map">
Change Line 43 to be:
<object class="embed-responsive-item" data="< field>F_HTML_SEATMAP< /field>&reserved_colour=00FF00&reserved_only=false&format=pick&unavailable_color=000000&unavailable_text=" " id="venue_map">
This will remove the people (seat_font=FontAwesome&seat_font_load=cdn) and make the sold seats appear black (unavailable_color=000000). The colour of the unavailable seats can be updated to the desired HEX colour.
For additional features regarding changing the map online please click here.
Altering the Number of Lines in the Pricing List
This process includes web page editing. If you have a web designer on hand, they can perform these edits. If you wish to contract with Arts Management Systems to perform these or any customizations for you, please contact the Support Team at support@artsman.com

Edit the code on the web page
- Select the web page to edit.
The most commonly used pages are rowTicketReserved.html, rowTicketFestival.html, and rowTicketCourse.html. - Locate the following HTML on the page:
<select class="form-control" id="SC_DESCRIPTION" name="SC_DESCRIPTION" size="1"> - Edit the following
- Change the size="1" to the number of lines you wish see to displayed.
- The sample above shows a size="3" to show 3 price lines.
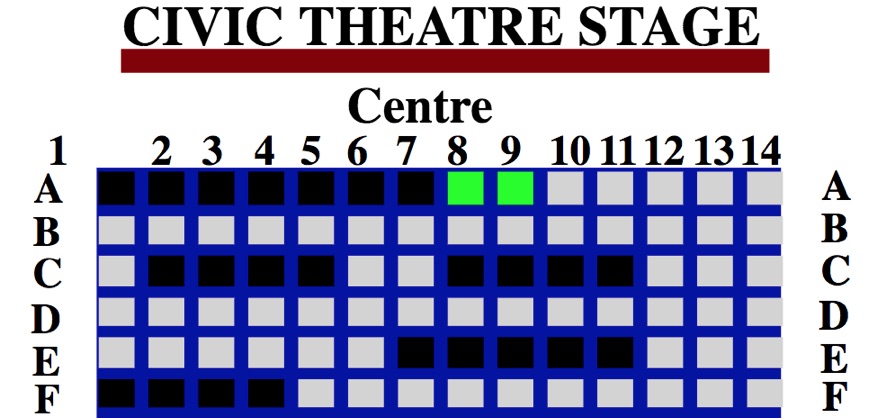
Navigation Button To Select Performances
A button, directing you to a select list of Performances, can be created in the navigation buttons at the top of the online sales windows. This button can be used for Courses, Opening Nights, Special Events or other performances where you want to list a select group of Performances.
The key for this button is flagging the Performances with the same reference and using that reference in the button to pull the desired shows. The setup requires editing the performances and adding the button to the online sales.
To flag the performances, you perform the following steps:
- Click the Event
 button in the main theare manager tool bar.
 - Search for and open the desired Event.
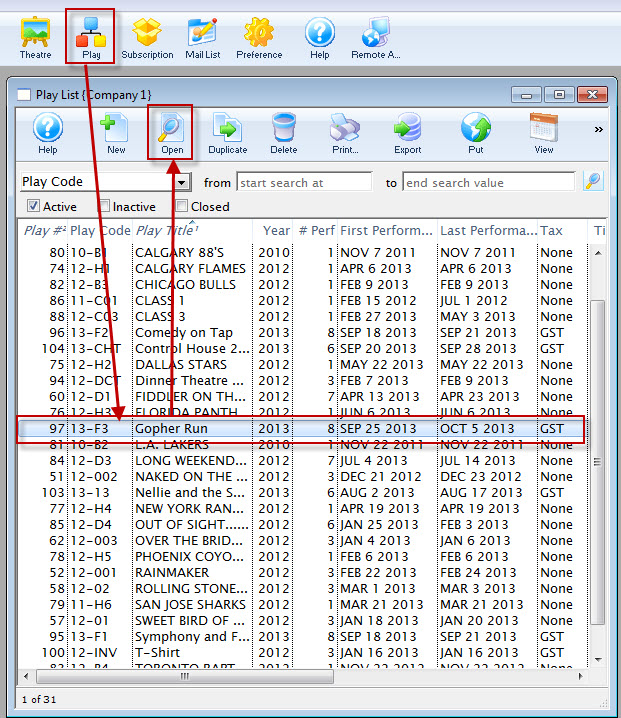
- Select the Performance tab.
Open the desired Performance.
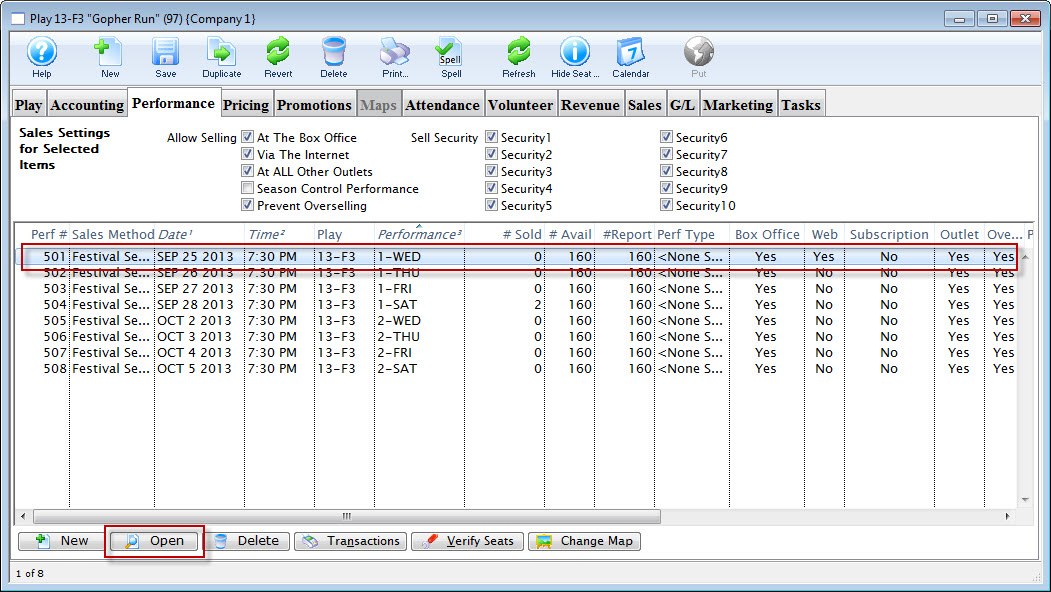
- Select the Web Settings tab, and enter a value in the Performance Flag field.
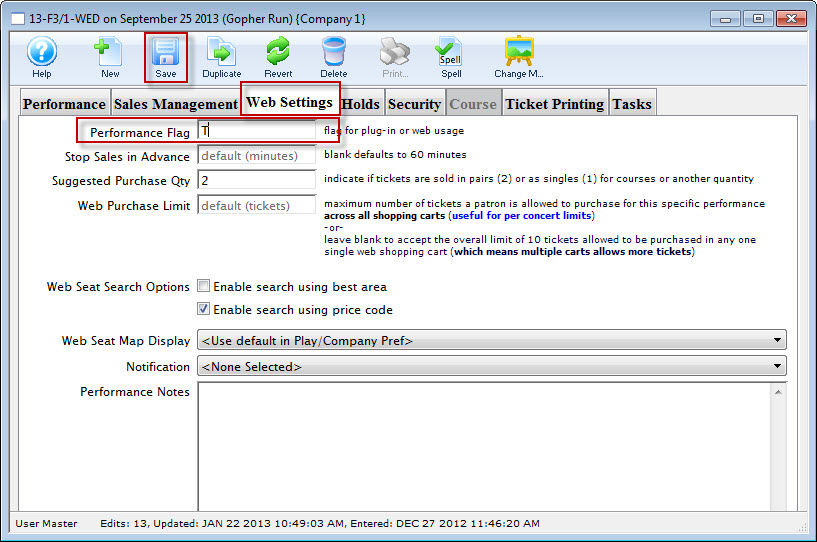
In our example we have used the letter T.
- Save and close the window.
Adding The Button
A button can be added to the existing buttons across the top on the online sales window. Edit the tmnavbuttons.html page.
This process includes web page editing. If you have a web designer on hand, they can perform these edits. If you wish to contract with Arts Management Systems to perform these or any customizations for you, please contact the Support Team at support@artsman.com

Adding the coding to the web page.
- Select the web page you wish to add the field to.
The page to edit is tmnavButtons.html. - Add the following HTML to the page:
<li>
<a href="<field>F_HTML_FIREWALL</field>login?event=0&search=PB_PERF_FLAG='T'">
<i class="fa fa-ticket">
</i>
Special Performances
</a>
</li> - Edit the following
- You change the 'Special Performances' text to reflect the text you wish to use for the button.
- Update the letter 'T' to match the letter used when setting up the Performances
Navigation Button for Courses
A button can be added to the tmnavButtons.html which provides a link directly to courses currently available for sale online.
This process includes web page editing. If you have a web designer on hand, they can perform these edits. If you wish to contract with Arts Management Systems to perform these or any customizations for you, please contact the Support Team at support@artsman.com

Adding the coding to the web page.
- Select the web page to edit.
The page to edit is tmnavButtons.html. - Add the following HTML to the page:
<li>
<a href="<field>F_HTML_FIREWALL</field>login?event=0&search=PB_SALES_METHOD='6'">
<i class="fa fa-ticket">
</i>
Theatre Classes
</a>
</li> - Edit the following
- Change the 'Theatre Classes' text to reflect the text you wish to use for the button.
Sales Methods
Buttons can be created for all 7 types of Sales Methods. The most common online options are:
- Sales Method 1 - Festival/General Seating
- Sales Method 2 - Reserved Seating
- Sales Method 3 - Inventory
- Sales Method 6 - Courses
Purchase Option for a Specific Member Type
The lines below are an example of a button that will add a specific member type to the cart with a fixed value. This button can be added to any page within the online sales. It would most commonly appear on the TMpass.html page or the TMcart.html page.
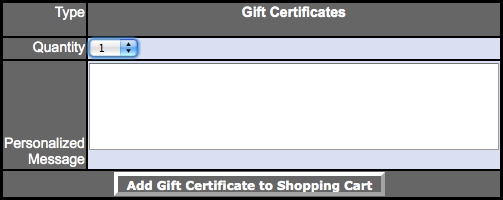
<TABLE width="345" BORDER=0 CELLPADDING=1>
<TR>
<TD WIDTH=92 class="tablerowheader" align="center">
<P align="right">Type</P>
</TD>
<TD width="240" class="tablerowheader">
<FORM ACTION="<field>F_HTML_FIREWALL</field>online" METHOD=POST><DIV ALIGN="center">
<label for="Team"><strong>Gift Certificates</strong> </label>
<input type="hidden" name="MT_SEQ" value="14">
</DIV>
</TD>
<TR>
<TD WIDTH=92 class="tablerowheader">
<P align="right">Quantity</P>
</TD>
<TD class="tablerowdetail">
<select name="PS_QUANTITY" size="1" id="PS_QUANTITY">
<option value="1" selected>1</option>
<option value="2">2</option>
<option value="3">3</option>
</select>
</TD>
</TR>
<TR>
<TD valign="top" class="tablerowheader" align="right">Personalized Message</TD>
<TD class="tablerowdetail" align="left">
<textarea name="M_NOTES" cols="50" rows="5"><field>M_NOTES</field></textarea>
</TD>
</TR>
<tr class="tablerowheader">
<td colspan=2 align="center">
<input name="btnReservePass" type=submit value="Add Gift Certificate to Shopping Cart" class="new" onMouseOver="pviiClassNew(this,'newover')" onMouseOut="pviiClassNew(this,'new')" onClick="process()">
</FORM>
</TD>
</TR>
</TABLE>
Redirecting the Add Code Button
When entering a coupon code in the online sales the patron clicks the Add Code button. This button appears in the TMtickets.html and TMcart.html pages. The button accepts the coupon or access code and returns the patron to the TMtickets.html page.
This process includes web page editing. If you have a web designer on hand, they can perform these edits. If you wish to contract with Arts Management Systems to perform these or any customizations for you, please contact the Support Team at support@artsman.com

Edit the code on the web page
- Select the web page to edit.
The page to edit is tmTicketsPresalesCoupon.html. - Locate the following HTML on the page:
<input name="param" type="hidden" value="altbtn=btnGetEventList"/> - Edit the following
- Change the 'btnGetEventList' text to 'btnCart'.
Custom Genre
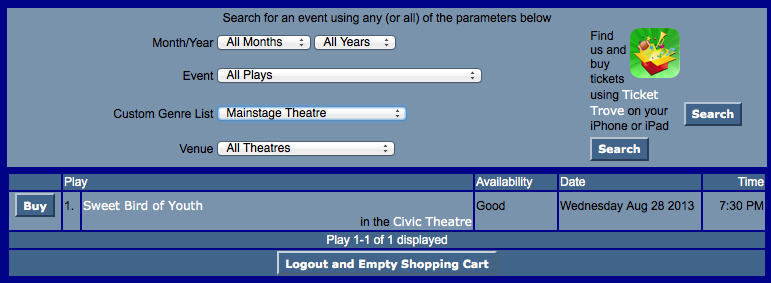
The Genre setting with Theatre Manager are directly connected to the Ticket Trove application. This means the drop down is restricted to the current list of options and is not available for customization. You can however, create your own custom genre lookup using the Event code used to define each event within Theatre Manager OR the Performance Flag field which is associated with each performance within the database. This allows you to group together different types of performances or events and create your own sort options within the online sales.
Custom Genre using Event code
Using the Event Code within Theatre Manager you can create your own customized drop-down for genre. Lets consider you have three style of theatre programming; Mainstage, Theatre for Young Audiences and Alternative Theatre. You can use a value of the event code to create a custom genre search for the web sales process. You then comment out on the TMtickets.html and add code to reference the Event Code.
|
The Event Genre will still apply in the TicketTrove application. |
When building events in Theatre Manager an event code is created. The event code consists of 6 characters with a default assumption that the code begins "XX-" where XX it traditionally the year/season of the event. Following the [-] dash you can then add your value. In this example lets assume MXX, YXX and AXX where M represents MainStage, Y represents Theatre for Young Audience and A represents Alternative Theatre.
When Building your Mainstage Series of events your event codes could look something like 13-M01 for the first mainstage event, 13-M02 for the second mainstage event and similar for the Theatre for Young Audiences ( 13-Y01 ) and Alternate Theatre (13-A01). Then considering the 4th character in the code i.e.: M for MainStage, Y for Young Audiences and A for alternative you would add coding to your template to result in a lookup that would appear like the following.
See Adding code to Web Page for details.
Adding Code to Web Page
The customized code can be added to the TMtickets.html page. Look for the Genre field on the template; lines 76 to 80.

Add the comment values to comment out the present Genre Drop Down as follows:

Then copy and paste the following code either above or below the Genre code you comment out and you will have your new custom Genre lookup based on the value within the event code. Note that you can have as many lookups based on any value of the code you wish. Simply add as many [ option value="position('M' in P_SHOW_CODE)=4">Mainstage Theatre ] as you need. In this example we evaluate the fourth character in the Event code where M will show you MainStage Theatre.
<tr>
<td align="right">Custom Genre List</td>
<td>
<select name="search" id="search">
<option value="">"any kind"</option>
<option value="position('M' in P_SHOW_CODE)=4">Mainstage Theatre</option>
<option value="position('Y' in P_SHOW_CODE)=4">Theatre for Young Audiences</option>
<option value="position('A' in P_SHOW_CODE)=4">Alternative Theatre</option>
</select>
</td>
<td align="left">
<input name="btnGetEventList" type="submit" id="Search" value="Search" class="new" onMouseOver="pviiClassNew(this,'newover')" onMouseOut="pviiClassNew(this,'new')" onClick="process()"></td>
</tr>
Once the code above has been added to the TMtickets.html page the page should be saved in the WebPagesEN folder. Clear the Cache on the web listener and refresh the page in the browser. The updated changes should now be visible and available to select.
Your Web Templete will then appear as follows:

Your new lookup will then display as:

When selection is made and the search button is clicked it will return all events in this example with an event code 13-M.
Custom Genre using Performance Field #1
Using the Performance Flag field within Theatre Manager you can create your own customized drop-down for genre. You then comment out on the TMtickets.html and add code to reference the Performance Flag.
|
The Event Genre will still apply in the TicketTrove application. |
To create your own customized Genre for online reporting, you perform the following steps:
Step 1 - Rename the Custom Genre Field
The first step is renaming the existing Performance Flag to something that will make sense in the future. This is done in Company Preferences.
- Click Setup >> Company Preferences.
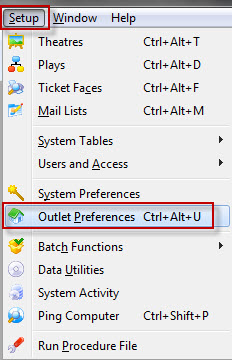
The Preferences window opens.
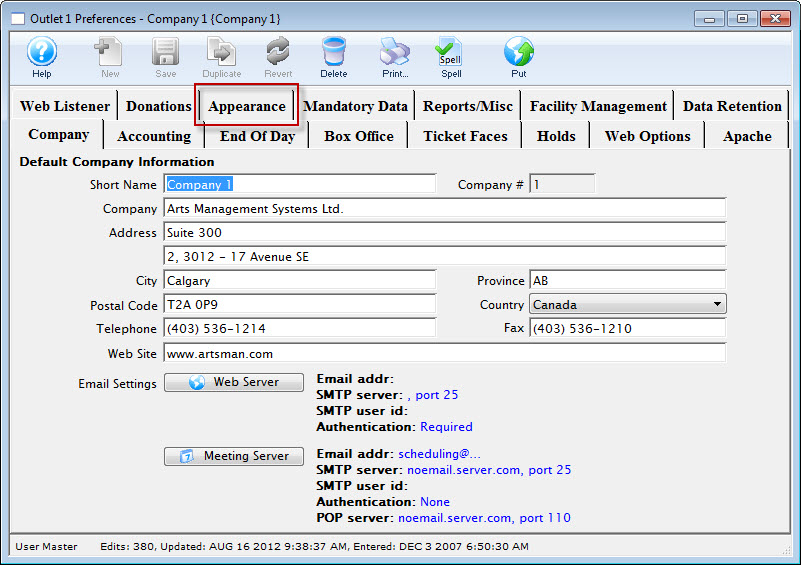
- Select the Appearance tab.
- Scroll down to Performance Field #1 (lookup).
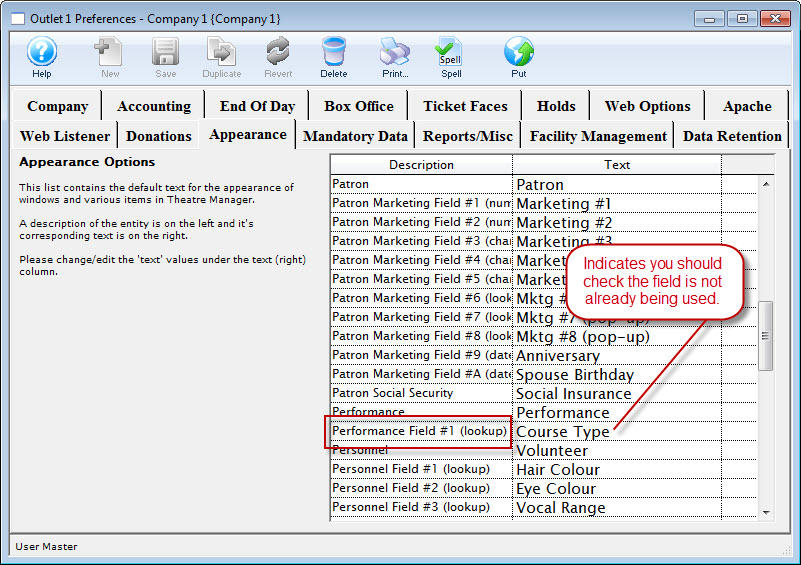
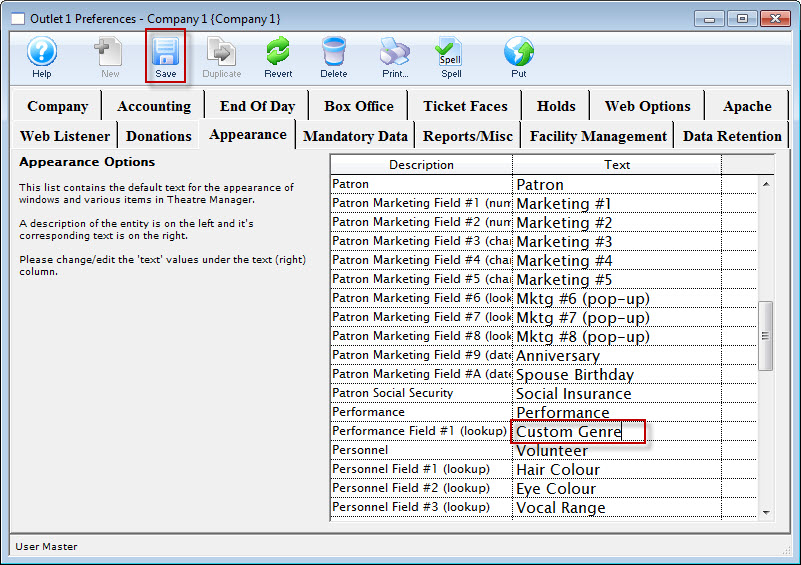
- Click in the field to the right of the Performance Field #1 and change the text to Custom Genre.
- Click the Save button.
- Close the Company Preferences.
|
The Performance Field #1 may be used in other parts of Theatre Manager (such as course). If the fiedl contains something other than Perf Type, double check it is NOT being used elsewhere before changing any information. |
Step 2 - Add Custom Genre Options
Yoiu can now add a unique list of Genres to your database. You do this in the code table. Click here for more information on Theatre Manager's Code Tables.
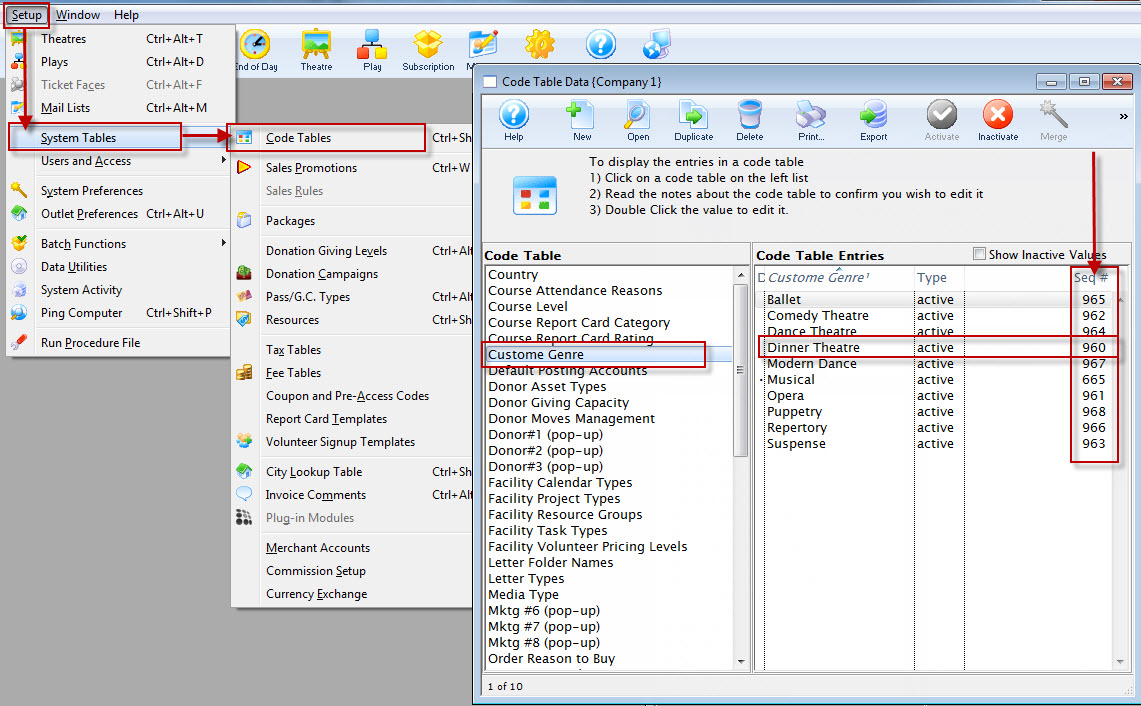
- Click Setup >> System Tables >> Code Tables.
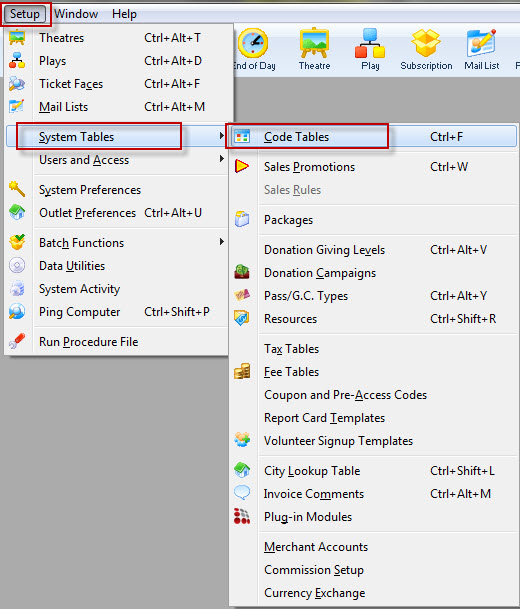
- Single click on the Custom Genre option in the left column.

This is not to be mistake with the default Play Genre for the TicketTrove application.
- Click the New
 button.
The Custom Genre (inserting) window opens.
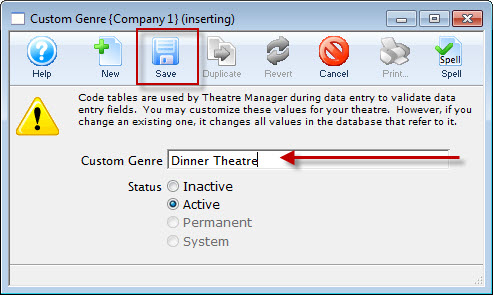
- Enter the name of the Genre to be added to the database.
Options may include items currently found in the Event Genre as well as those unique to the organization.
- Click the Save
 button and close the new Genre.
Repeat steps 3 through 5 above until all Genre's have been entered.
- Close the Code Tables window.
Step 3 - Setting a Custom Genre
Once the list of Genres is created, you need to assign them to each Performance. This method allows for flexibility between individual Performances.
- Click the Event
 button at the top of the window in Theatre Manager.
The event list opens.
- Search for and open the desired Event.
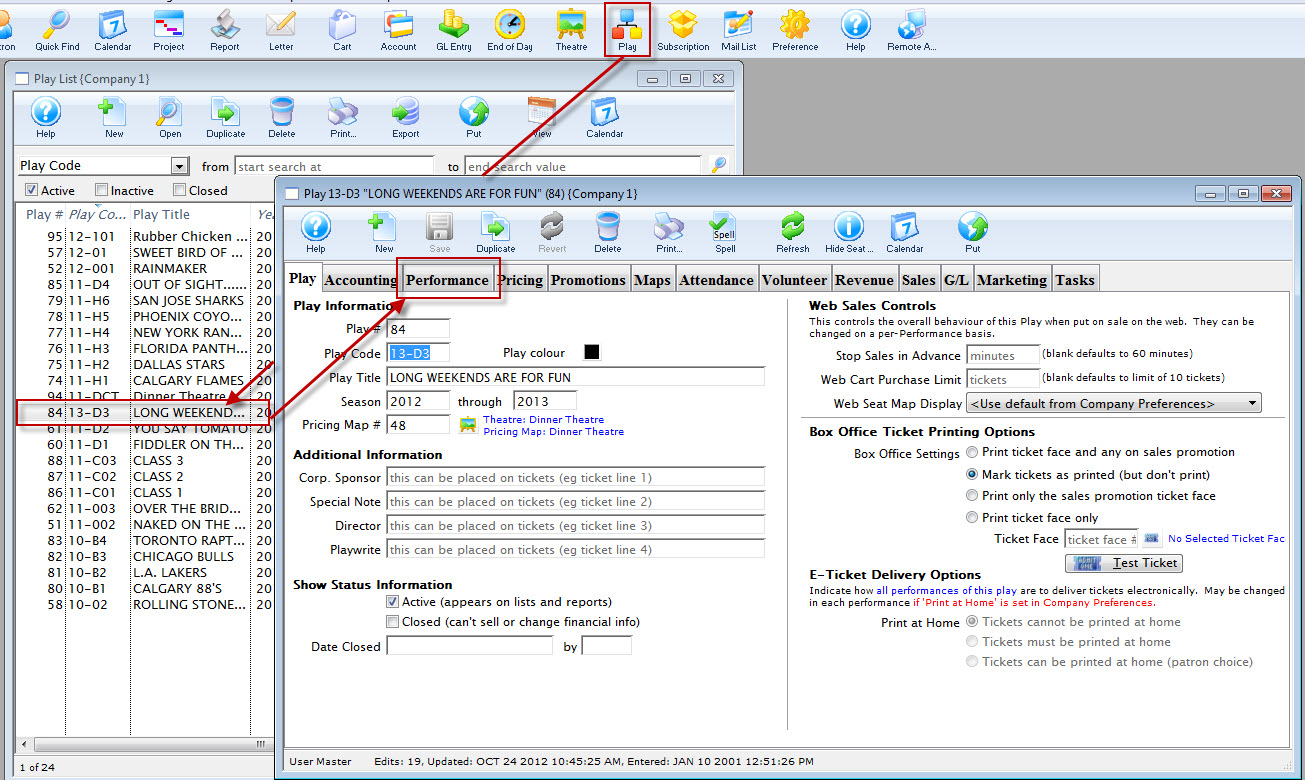
- Click the Performance tab.
- Open the Performance and select the desired Genre from the drop down.
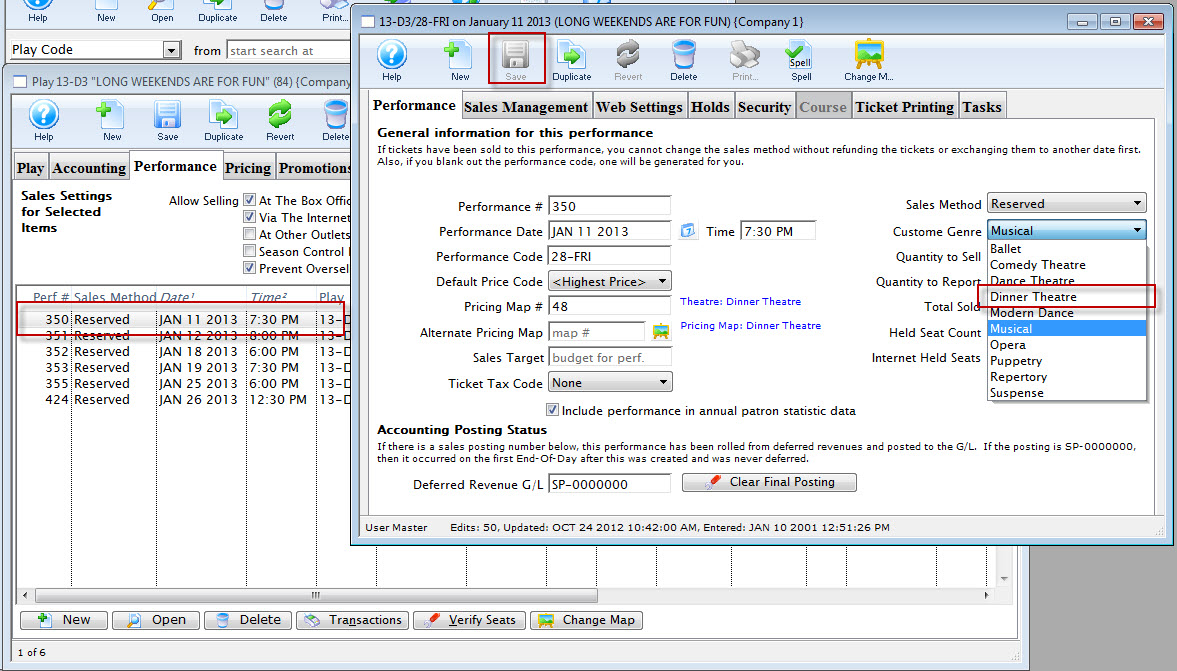
- Click the Save button and close the Performance detail window.
Repeat the steps until all Performances have a Genre.
- Close the Event window.
Step 4 - Locating the Custom Genre Sequence Number
Each Custom Genre is assigned a unique sequence number when you add it to the database. This sequence number is needed to add the Custom Genres to the online sales web page.
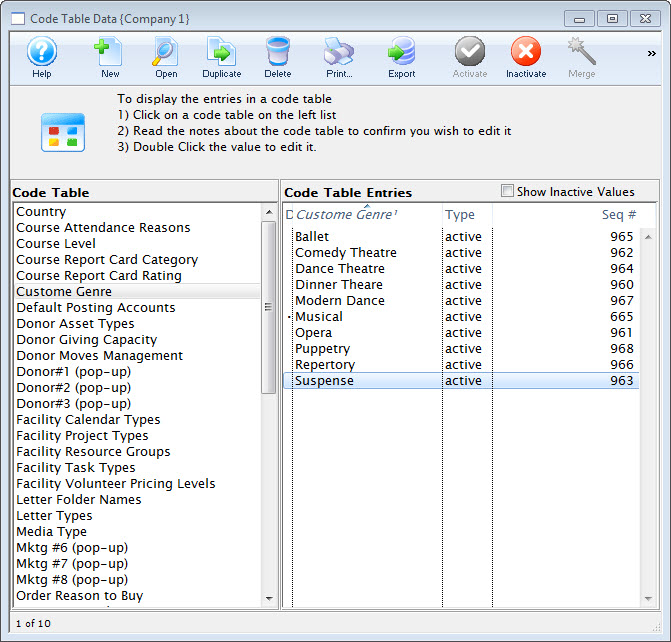
- Click Setup >> System Tables >> Code Tables.
- Choose the Custom Genre option in the left column.
This is not to be mistake with the default Play Genre for the TicketTrove application. The Sequence number will appear in the left column.
- Take note of the Sequence number and the corresponding Genre name.
5 - Adding Code to Web Page
The customized code can be added to the TMtickets.html page. Look for the Genre field on the template; lines 76 to 80.
Add the comment values to comment out the present Genre Drop Down as follows:
Then copy and paste the following code either above or below the Genre code you comment out and you will have your new custom Genre lookup based on the value of the Performance Field #. The code can be found below. The PB_TYPE1_FC_SEQ is followed by a number. This number is the Custom Genre Sequence number from above. Note that you can have as many lookups based value of the Sequence number you wish. Simply add as many [ option value="PB_TYPE1_FC_SEQ='XXX'">Comedy ] as you need.
<tr>
<td align="right">Custom Genre List</td>
<td>
<select name="search" id="search">
<option value="">"any kind"</option>
<option value="PB_TYPE1_FC_SEQ='955'">Comedy</option>
<option value="PB_TYPE1_FC_SEQ='956'">Drama</option>
<option value="PB_TYPE1_FC_SEQ='957'">Recital</option>
</select>
</td>
<td align="left">
<input name="btnGetEventList" type="submit" id="Search" value="Search" class="new" onMouseOver="pviiClassNew(this,'newover')" onMouseOut="pviiClassNew(this,'new')" onClick="process()"></td>
</tr>
The result will be the same as shown for the Event code of the previous page.
Once the code above has been added to the TMtickets.html page the page should be saved in the WebPagesEN folder. Clear the Cache on the web listener and refresh the page in the browser. The updated changes should now be visible and available to select.