Naming Seats for the Price Map
 |
Making changes to the Seat Names file of existing maps used for events either active or past may affect the tickets sold in terms of placement. Prior to making edits to "live" maps, please contact Arts Management Systems support at support@artsman.com . |
 |
Seat codes and seat numbers are also discussed on other pages. |
Alphabetic Sorting on Computers
For purposes of discussing the following pages, you need to be aware of how computers sort alphabetic information. In some columns (door, section, row, seat), we likely do not care and can simply call the seats what they are. For most other columns, you need to be aware how computers sort things (Seat Code and Best Available Area). You will need to remember this when building a strategy for assigning best seats automatically
| Door, Section, Row, Seat |
Every seat must be given a physical location that the patrons understand. Theatre Manager provides a four level naming convention of door, section, row and seat (entrance door is optional). Each of these fields is alpha-numeric, so directions to the seat can be provided that represent the venues current naming conventions. Examples:
|
||
| Seat Code |
Seat codes need to be created in a mannder so that they sort properly using alphabetic sort. For example: computers sort alpha-numeric values like:
This way, when you print the tickets out for an order, they will print in the proper numeric sequence by seat code. If the highest seat number in your venue is three digits such as 115, then be sure to use three digits throughout (001, 002, 003, etc.) A good example of seat codes for Orchestra Left, AA 1 through 101 would be OLAA001, OLAA002 etc through OLAA101 |
||
| Best Available Area |
Generally, Best area is very similar to the Seat Code, but without the actual seat number on it. If the seat code for Orchestra Left, AA 101 is OLAA101, then the Best Area might be OLAA.
You many need some additional characters on the best area if you need to separate left side and right side of a vomitorium or aisle and its the same row. But in general, the Best Area defines a unique row, or pert of a row where if seats are purchased in that area, they are considered to be together.
|
||
| Best Seat Number |
These should be in sequential order within a Best Available Area so that Theatre Manager knows which seats are together.
For example: if your Orch Left, Row AA is Best Area is OLAA as per the above discussion on Best Area, then you would want seats to be in increasing order from the Aisle to the edge of the venue. Number the seats like 1 (for seats 109), 2 (for seat 108), 3 (for seats 107) etc up to 9 (for seat 101) then start the next row at seat 10 (in other words, do not duplicate the best seat numbers). |
|
In order to determine the Best Seats, Theatre Manager can use a two-pass system. This two-pass system can protect seats for a second pass. This is particularly helpful in a dinner theatre setting where two seats to each table want to be sold before additional seats to the table are sold. Please click the link above for more information on this advanced topic. |
Naming Seats
- Ensure all seats are in logical sequence.
- Click the Seat Names
 tab.
tab.
- The Initial Seat Setup confirmation window will appear.
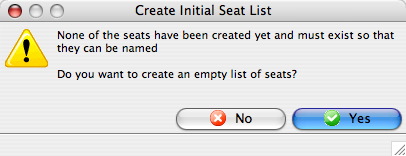
Click the Yes
 button.
The Seat Names window will populate.
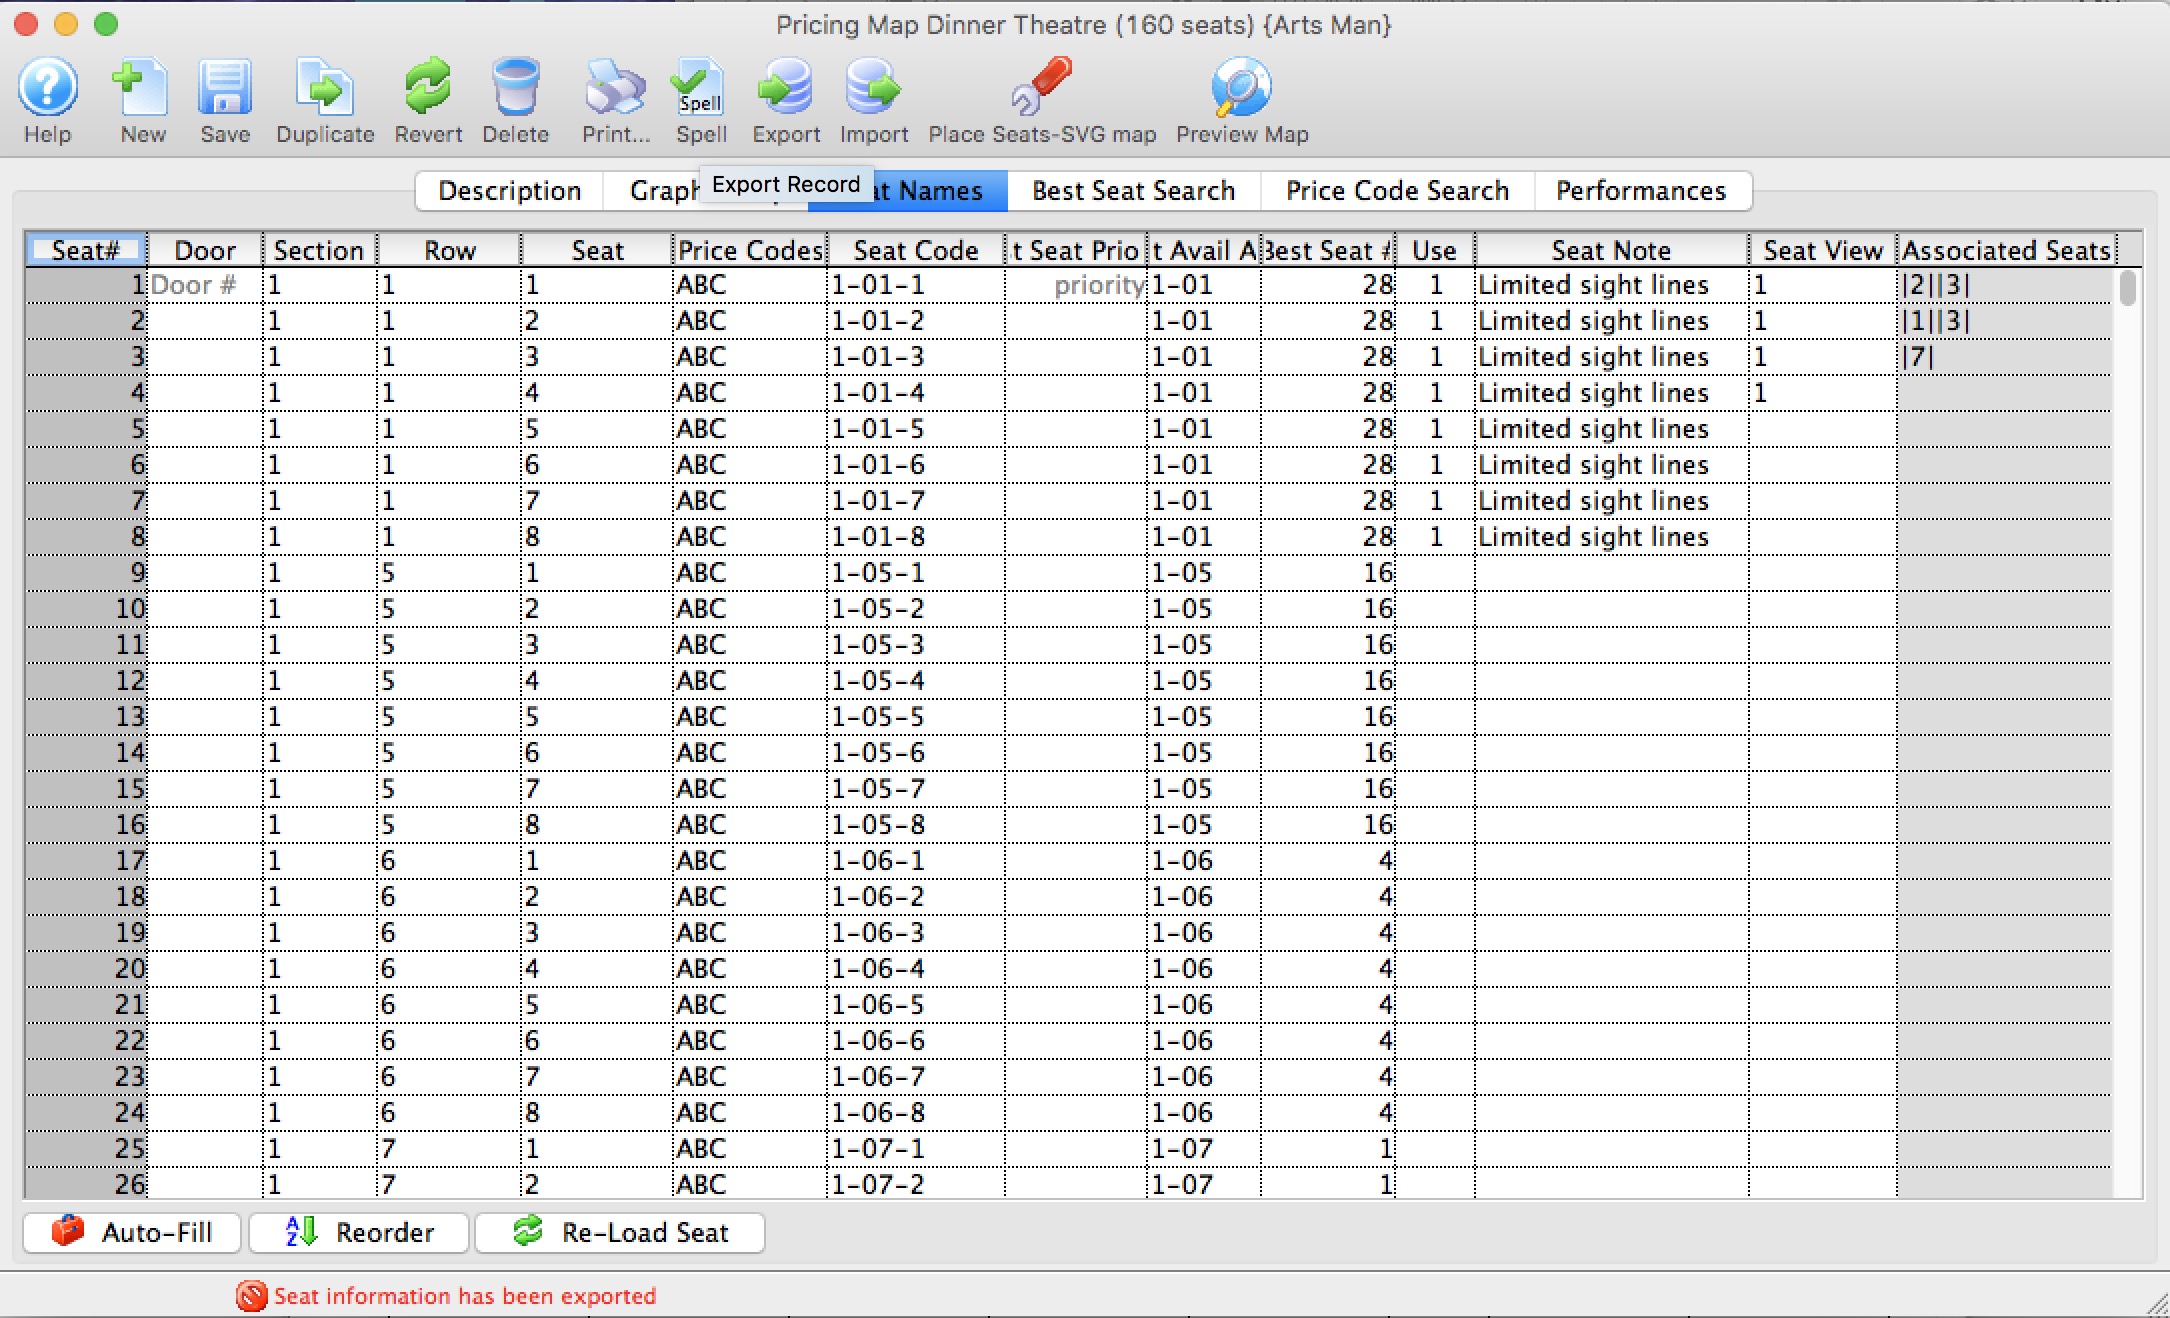
- There are two options for inputting seat names:
a) Export the data out of Theatre Manager to a file and open the data in a spreadsheet program such as Microsoft Excel, edit and save the document in a tab-delimited format and import them back into Theatre Manager.
b) Click into each field in Theatre Manager and enter the data manually. Theatre Manager will assist in populating some of the data using predefined equations.
- Enter values for Section, Row and Seat Code.
Change the values of these fields to something meaningful to the theatre.
- Indicate which price codes are valid for the seat.
If the seat is in the front row, then a balcony price code would not be valid.
- Enter the Best Available Area and Best Available #.
Theatre Manager will use the area and number to create a sequential order from which to decide what the best available seats are. Have the best seats (or the seats to sell first) in a higher (ie. A-D) alphabetical area. The seat numbers are used for the system to decide on how many seats are available in an area.
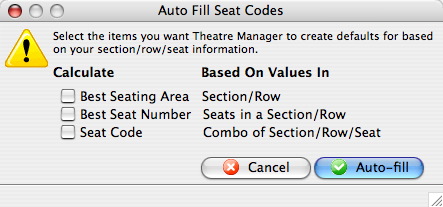
If entering names manually in Theatre Manager, the Auto-Fill
 button can be used to assign the best seating area, best seat number and the seat code.
- Repeat the above steps until all data for all the logical seats are entered for the venue.
- Click the Save
 button.
All seats must be named before the data can be saved.
Return to the Graphic map tab and hold the mouse over seats at random. Double check the seat location is correct and that each seat is named properly.
|
Using Excel is, by far, the easiest method of naming the seats. |
|
A few handy tricks when naming seats:
|
|
If you change a venue map, when there are events already on sale, you MUST verify the seats on each performance to re-index the new name to the seat in the event. Click here, for more information on verifying seats. |
Exporting Seat Names
You can export Seat Names to a text file for easy editing in most spreadsheet programs.
- Open the Pricing Map for editing.
Click here to learn how to edit Pricing Maps.
- Click the Seat Names
 tab.
tab.
The Seat Names window opens.

- Click the Export
 button.
- Choose your export format from the options from the list:

The Export Seat Names window opens.
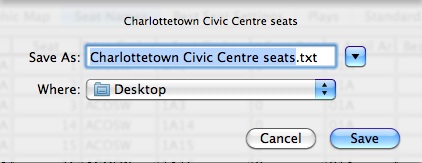
- Select the directory to export the seat names file to and change the file name as needed.
- Click the Save
 button.
The seats are exported to the selected directory in a text file in tab delimited format. The file can then be opened in most spreadsheet programs for editing.
Click here to learn how to Import the seat names file.
Importing Seat Names
When importing seat names the file must be in tab delimited format ie. after each entry there is a tab space and a carriage return at the end. Most spreadsheet programs should be able to save in this formation.
- Open the Pricing Map for editing.
Click here to learn how to open Pricing Maps.
- Click the Seat Names
 tab.
tab.
The Seat Names window opens.

- Click the Import
 button.
The Import Seat Name window opens.
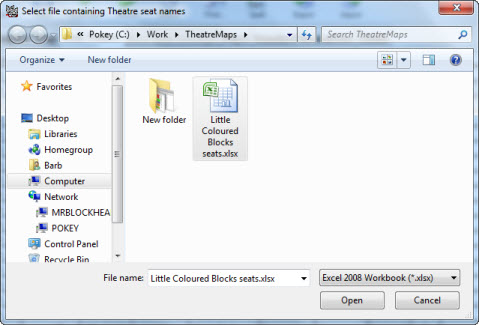
- Select the file containing the seat names to be imported.
The following file formats are supported:
- Excel (.xls)
- Excel (.xlxs)
- Tab delimited (.txt)
- Comma Delimited (.csv)
- Click the Open
 button.
The file will be imported into Seat Names window.
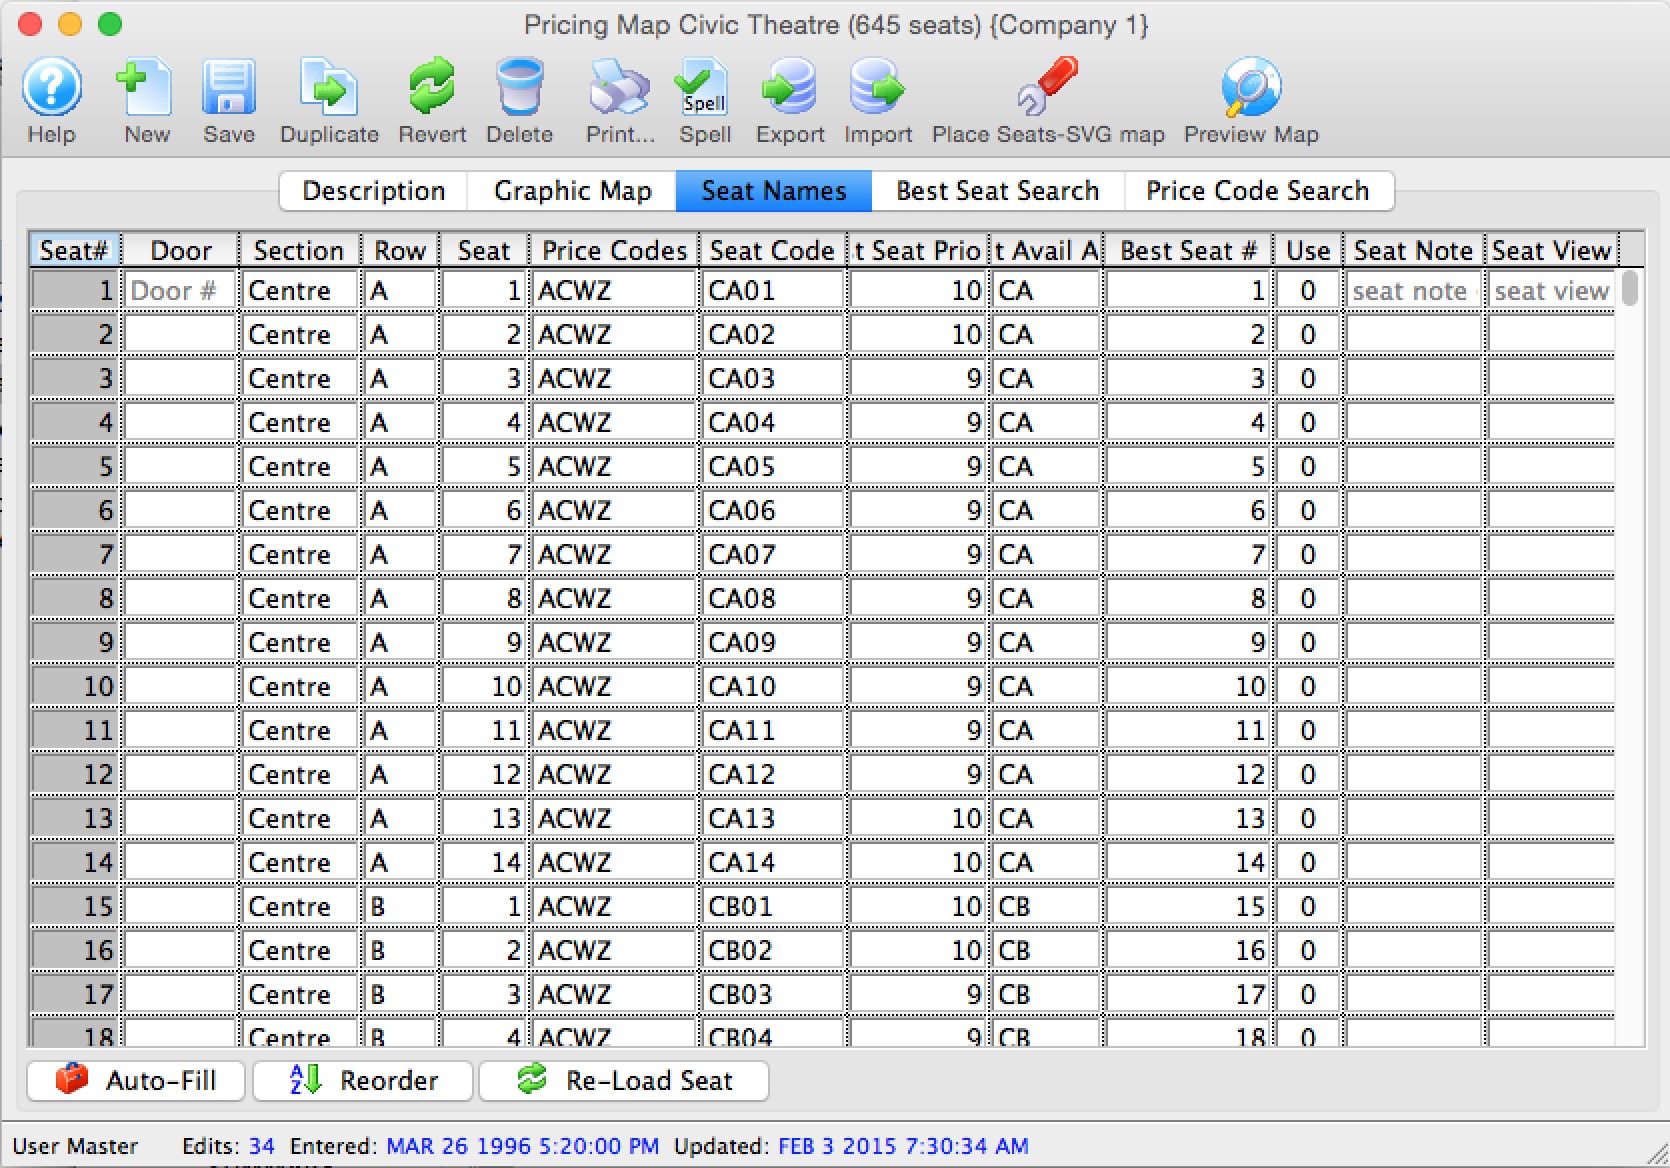
- Click the Save
 button.
The seat names have now been imported into Theatre Manager.
 |
If your spreadsheet has empty lines at the end, which are hard to see for find, you might see a message line the one below.
Theatre Manager is asking if you want lines with a logical seat number of zero and no Door/Section/Row/Seat data to be ignored. |
Changing Seat Names
|
Making changes to the Seat Names file of existing maps used for events either active or past may affect the tickets sold in terms of placement. Prior to making edits to "live" maps, please contact Arts Management Systems support at support@artsman.com . |
- Open the Pricing Map Window.
Click here to learn how to access the window.
- Click the Seat Name
 tab.
tab.

- Edit the seat names by clicking in a cell and changing the values
This is similar to adding seat names.
- Click the Save
 button to save the seats to the database.
If any plays/events have been created using this map the seats for each performance will need to be verified. This will update the tickets with the new seat information. Click here to learn how to verify seats.
How Theatre Manager Assigns Seats
In an effort to keep patrons who purchase multiple seats together, Theatre Manager will keep an order from crossing an aisle. In addition, the "Best Seat Algorithm" will also keep a single seat from remaining in a row. This means that if a party of 4 is looking for seats in a row that has only 5 seats, Theatre Manager will move on to the next row that has 6 or more seats so that an empty "single" isn't left. It is difficult to fill single seats, so they can be detrimental to maximizing your revenue.
To prevent Theatre Manager from assigning seats that span aisles, you need to set them up properly on the Seat Names tab.
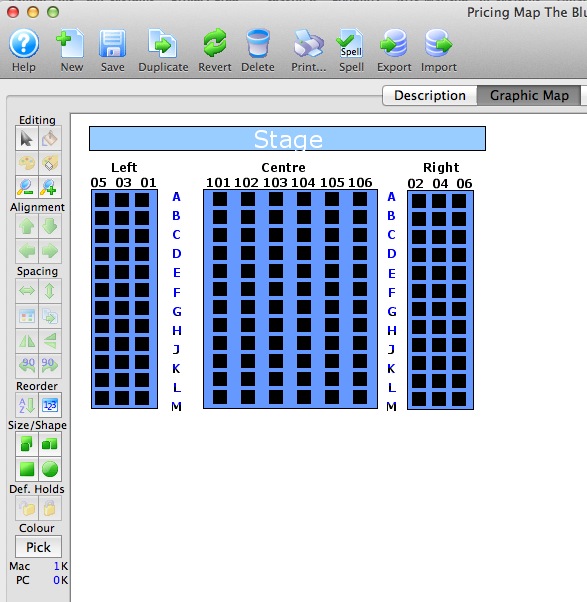
In this example, the venue has three seats in the left and right sections and six in the center section. When you set up the seat names, you want to ensure when four seats are selected, they do not go across the aisle, but are selected together. In this case, that means any groups of four or more will always be seated in the center section. The exception is if they choose the option online to have their seats separated.
Seats in a theatre are typically numbered from aisle to wall, or, in the case of the center sections, from left to right. Seat numbering is also typically Odd numbers on the left, Even numbers on the Right, and sequentially in the 100's in the center. The Rows are lettered front to back A - Z.
Seats in an arena are often simply numbered sequentially across the row, which is also numbered, but may be lettered. Theatre Manager accommodates all numbering and lettering schemes.
The example below is for the small theatre above.
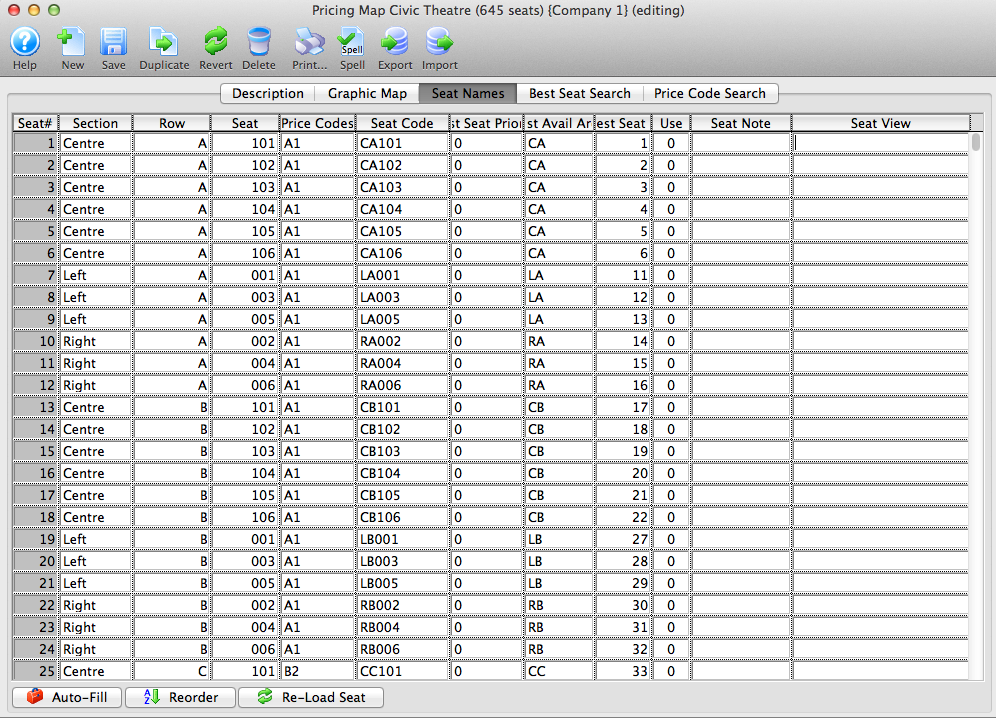
In the Seat Names tab of the pricing map, check the Section, and Best Available columns.
| Seat Numbers |
The seats numbers are names as you would naturally use them:
5, 3, 1, aisle 101, 102, 103, 104, 105, 106, aisle, 2, 4, 6 |
| Best Available Area |
The Best AVAILABLE AREA column takes into account the alpha sort order and should read
The the next row would be: |
| Best Seat Number |
For each seat in the Best Available Area above, you must identify the best seat number -- the order in which the seats are offered to the customer.
|
This way, Theatre Manager knows where there are natural breaks and how to suggest seats to people.
The Two-Pass system - Naming Seats for Dinner Theatre, Cabaret Seating, and Small Venues
For online sales, we have implemented a mechanism that tries to prevent leaving single seats and maximize your revenue. This web page is geared towards online sales only because Box Office personnel can do anything they wish to dress the house accordingly.
If you have the Seat Names file designed correctly for your venue, you can use web sales to accomplish a lot and fill your house. As humans, we have a great deal more perception abilities to make allowances for subtle changes in situations - but online, computers need to deal with hard parameters of sales rules.
For the vast majority of a venue, assigning the Best Available Area to go straight across a row, and then thread up and down through the venue makes a lot of sense. After all, most people want front and center, middle and center, or balcony front. It starts to breakdown in fringe seats at the edges of venues or the loges, or those odd little corners in venues that are usually in the least desirable seat areas. It also tends to breakdown in Dinner Theatre settings where you have lots of tables, but they only hold two or four patrons each (although we've seen six, eight or even ten seats at a table).
Therefore, Theatre Manager uses a 'two-pass' mechanism which can handle leftover seats for online sales in case the good seats have been taken.
This gives you:
- Revenue protection for the key seats
- A way to manipulate the lower quantile seats while still doing the best for revenues - and still allowing some to be left as singles.
Dinner Theatre and Cabaret Seating
Naming of seats on a Graphic Map for a Dining Room or Cabaret setting may need some adjustments in order to enable the booking of tables, specifically online booking where selecting best available is the default option. Consider a dining room setup of a series of tables of four where you will seat a party of two, three or four at a table. With no adjustments to the seat name chart of your Theatre Map the following could happen:
|
|
|
To achieve a favorable result we introduce the use of # ('pound'), and apply it to the Best Available Area code of the Seat Names in your Theatre Map setup.
You will need to edit the Best Available Area code on the seats as follows: The seat name of Table 1 may look like this.

By applying the # to two of the four seats as shown in the next image will result in the following.

Patron A requests two of four, or all four seats, and this table will be offered. Because when the # is applied to the Best Available Area code, the remaining two of four unsold seats will not be offered to the next Patron. Theatre Manager will then offer Table 2 - or the next table with seats available. Note that the use of the pound on a seat causes Theatre Manager to overlook that seat.
Now this scenario presents a problem for a patron seeking three seats. If you use # for two of the four seats at tables of four, there won't be a successful request for three seats as Theatre Manager will never leave one remaining seat.
If parties of three are a frequent booking for your venue, then what you need to do is to consider a selection of tables where you edit the Best Available Area code to utilize the two-pass system for only one of the four seats at the table as in the following image.

So the rule to follow when using the # to overlook seating is this:
Small Venue Seating
The same two-pass system can be applied when venues have sections with only three seats in a single row (typically on the sides of smaller venues, or the corners of 'Theatre in the Round').
For example, let's say you only have three seats on the Left side of Row A. We will assume that the seats are all empty and you did not use the '#' in the Best Seat Area.

If a patron asks online for one or three seats, they would get them. They would not get them if they asked for two. Theatre Manager would move the patron back a little bit in the venue until it could find two seats PLUS at least two left over.
Seats that are in the front row on the side are likely to be nearer to the tail end of desirable - probably in the last quartile. They are certainly not the absolute best seats in the house, which are generally more towards the center. So now you have a bit of flexibility to decide what to do with them if they are not going to be the first offered to patrons or the first that are snapped up in the Box Office.
If we use the best seat area and name them as follows:

Then this invokes the two-pass strategy for those seats. If all seats are open (in the entire venue), then if a patron asks for:
- One or three seats - nothing will be offered
- Two seats - then Seats 1 and 2 will be offered
So patrons wanting one or three seats will be moved back a couple of rows. Remember that this front-side area is low on the desired scale.
Now, suppose you have a full house and there are very few seats left to sell. But these three in the front-side, Row A, are all still available. If a patron asks for:
- One or three seats, nothing will be offered (See below)
- Two seats, then they will get something
Since we can't disappoint patrons wanting one or three seats, and if Theatre Manager cannot find any other seats in the venue, it will remember that it bypassed these ones and go back to them for a second pass. So, Theatre Manager will say:
- One seat requested - offer Seat 1
- Three seats requested - offer them all
- Two seats requested - offer Seats 1 and 2
Thus, the search process is designed so that:
- The majority of seats are taken care of in the first pass. This is how patrons work and how Box Office Managers dress the house normally.
- A second pass can be invoked if you are coming down to the wire (say the last quartile) where you want to be a little freer with how seats are offered.
Associated Seats
- ADA seats - where you want to automatically hold a companion seat for a period of time if the primary wheelchair seat is sold - at least until you can determine the patron's requirements
- Dinner Theatre Seating - especially where there are a number of two-top tables that are beside each other. In this case, if a patron buys one seat at a table, then the other can be held so that nobody sits opposite the purchaser. Other two-tops that are side by side can be separated for dining privacy.
- Social Distance Seating - where if somebody buys a seat, all seats around it are held automatically
How do associated seats sales work?
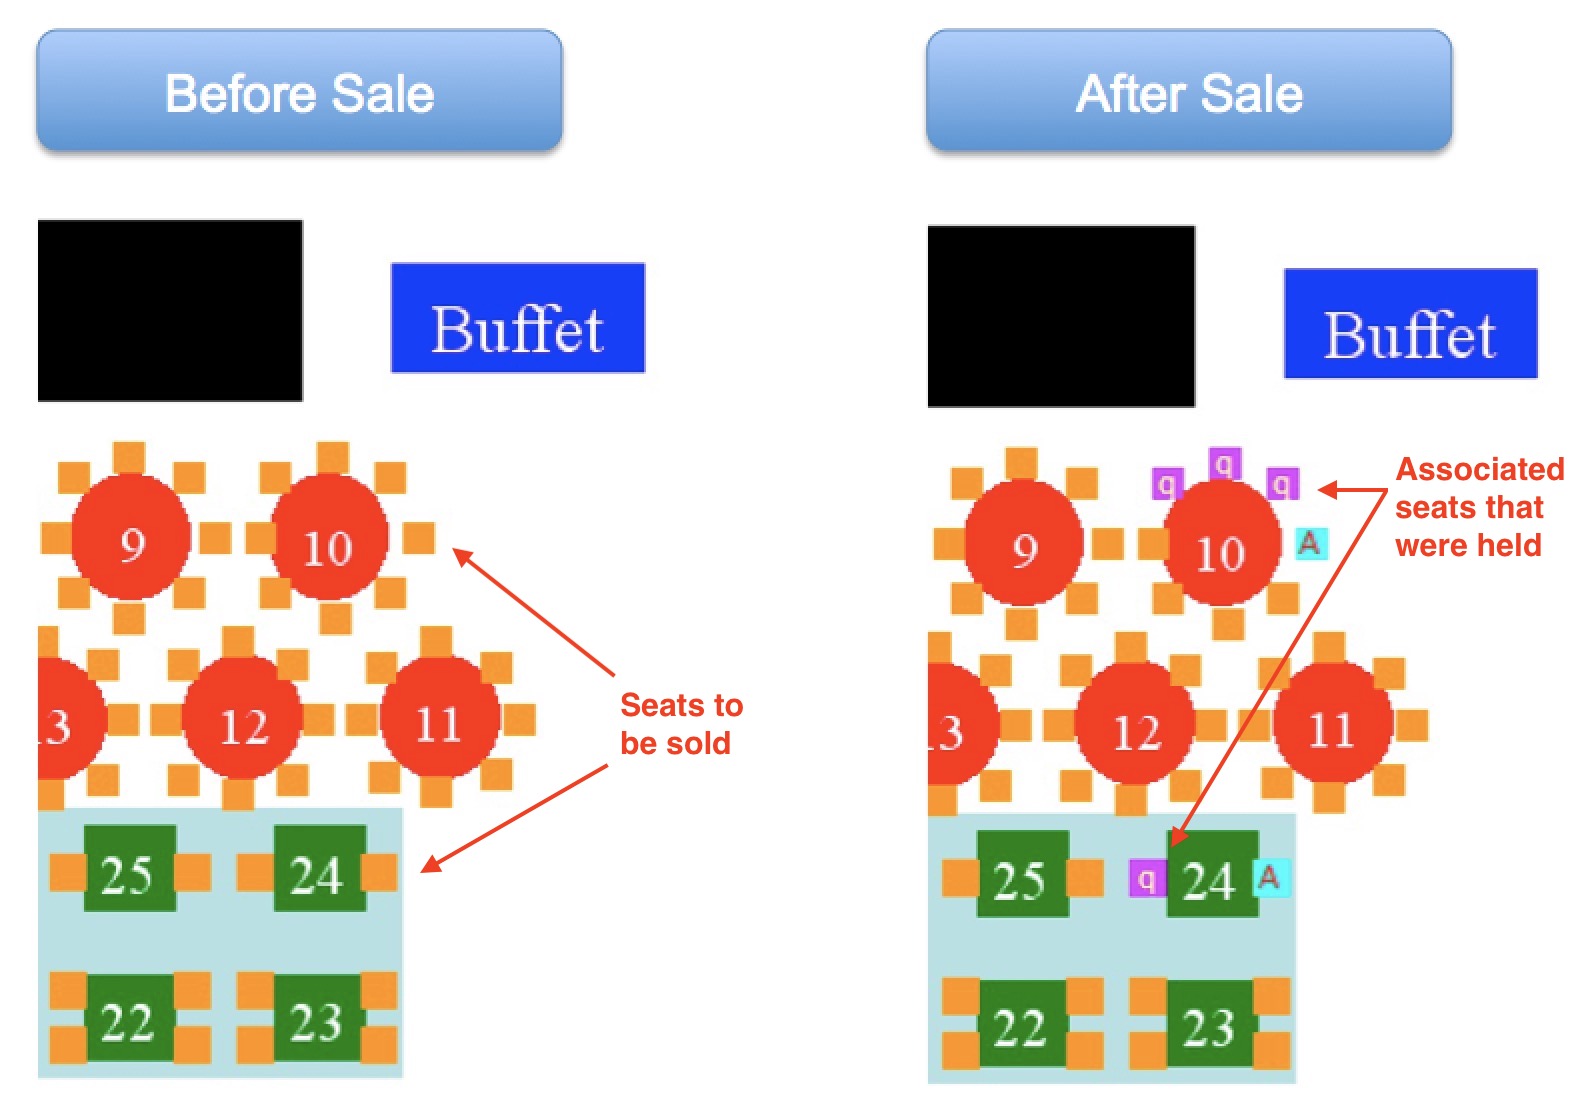
In the example below, the left image shows part of a venue that has not had sales yet. Some of the tables contain associated seats.
- After clicking or selecting seats on the map to sell (refer to the ones that will be selected on the left)
- The associated seats are immediately held using the (hold code in system preferences) to prevent sale by others (refer to the right diagram).
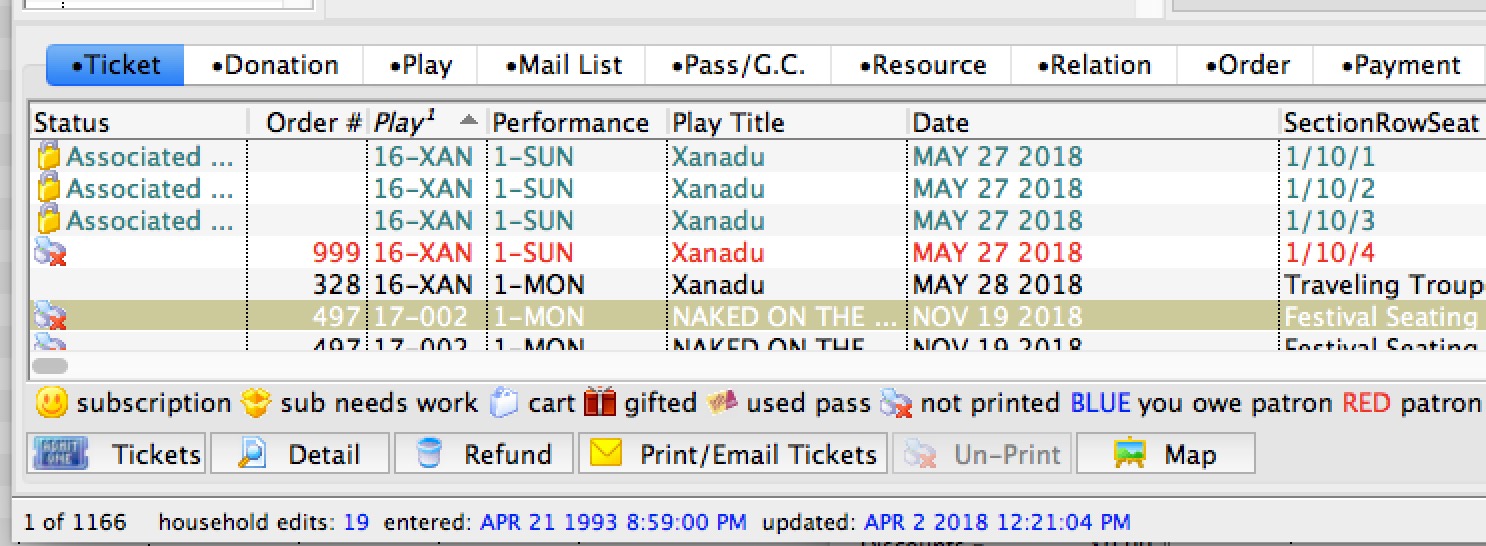
In the patron ticket window, the seats will show up as holds with the word Associated Seats in the icon column. These seats can easily be sold to the patron at a later date, if desired.
Where do associated seats work?
The short answer - everywhere a ticket is sold. Examples are:
- Selling a ticket online If:
- One or more seats are held in a cart, all associated seats are also held until the patron picks other seats using Next Best Seatsor using Pick your Own.
- The patron checks out, the holds are made permanent.
- The cart is abandoned, the associated seats are released
- At the box office during selecting a seat. It may be easier to drag select multiple associated seats when selling rather than clicking on them one at a time, otherwise you'll need to over-ride the hold
- During sale of a seat for a subscription package. All associated seats are held for all performances during the sale, if possible
 |
When making seats associated:
|
 |
You cannot use associated holds until an associated hold letter is specified in System Preferences |
Editing Associated Seats
 |
Normally you would use the Social Distance Map feature to create these graphically within Theatre Manager.
However, if you like excel formulas and want to create an initial social distance map for later tweaking, you can also set the associated social distance seats an import them. |
Associated seats can also be shown in the tab on the Seat Names tab on the Theatre Pricing Map window in the last column called Associated Seats. In the example, you can see that seats 1, 2 and 3 are associated with each other in some way.

Setting Associated seats
There are 2 ways to set an clear associated seats. You can:
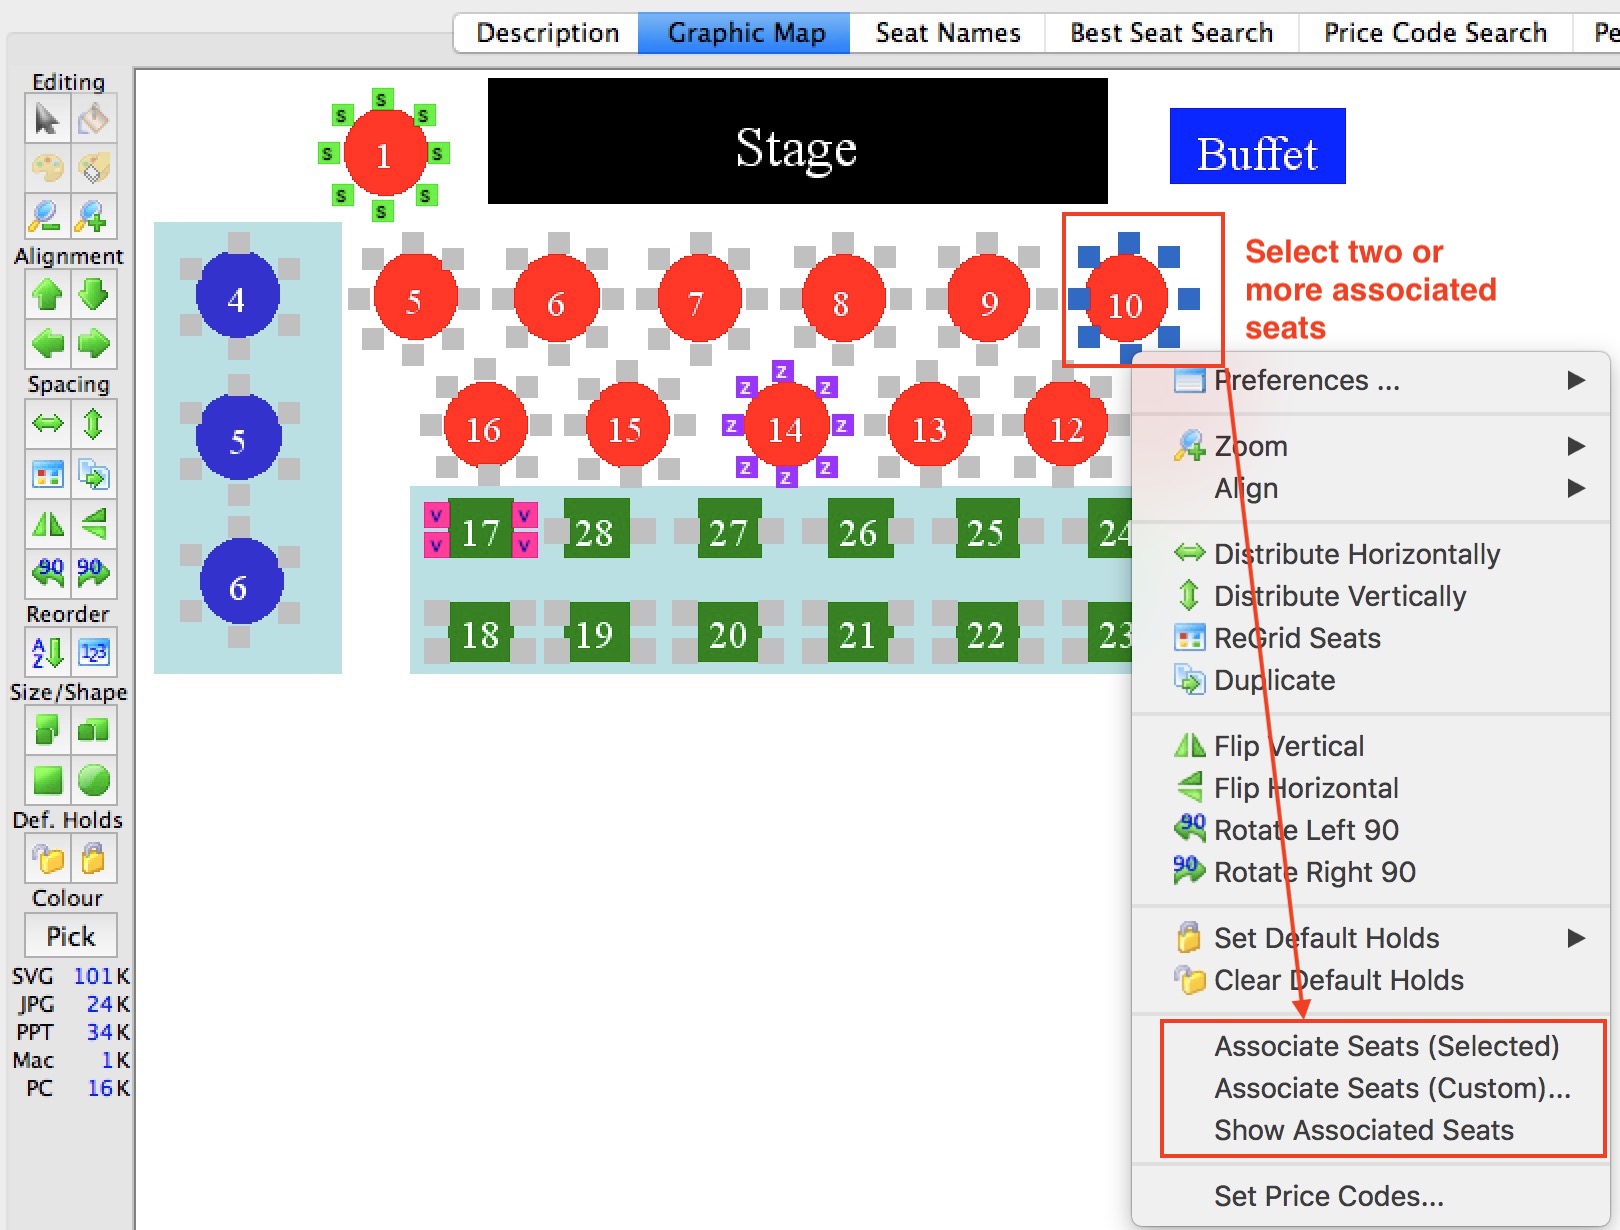
- On the Social Distance Map, use the context menu to select two or more seats to associate them with each other bidirectionally. In this example, seats 1, 2 and 3 are dependant on each other so that:
- if any one is sold, the others will be held and
- if one is released, the others will be freed from hold.
- Export the map, edit the associated seats, and import them. With this approach, you can make one directional associations where:
- if seat 1 is sold, then 2 and 3 are held
- yet if seat 3 is sold, the other two night not be affected.
Editing the Associated Seats on the Map tab
The simplest way to set associated seats when there are only a few of them is to:
- Use the Graphic Map tab
- Select some seats that are associated - a table for example
- Use the context menu to associate the seats. any previous associations for the selected seats will be cleared and re-associated with each other.
- Repeat as required for all seats.
Editing the Associated Seats by Exporting/Importing
If you wish, you can edit the seat map in Excel to create the associated seats. This allows you to created custom uni-directional associations in any way you want.
To do so
- Export the Seat Names file
- In the column called Associated Seats, type the seat numbers that are associated, separated by a comma
- Import the Seat Names file
For example, the image below shows some more complex associated seat setup that were edited in the seat names file:
- if only seat 49 is sold (released), then Theatre Manager will hold (release) seats 50 through 56 as associated holds
- if seat 55 or 56 is sold (released), then Theatre Manager will only hold (release) seat 51 (might be an example of a companion seat)
- if seat 51 is sold (release), Theatre manager hold (release) seats 49 and 50 (which means that seats 55 and 56 per the above line are not affected).

Using Associated Seats For Social Distancing
 |
Normally you would use the Social Distance Map feature to create these graphically within Theatre Manager.
However, if you like excel formulas and want to create an initial social distance map for later tweaking, you can also set the associated social distance seats an import them. |
 |
You will need to decide how many seats you want to hold around the one being sold. It could be that:
|
It is possible to create a social distancing sales map using associated seats with purpose of:
- You sell a seat and the specified seats around the one you just sold are taken off sale
- If you release that seat, it will release the seats around it.
General steps to set up a social distancing sales map
The following is a recommended process for setting up social distance seating:
- Select and edit a venue you want to implement social distancing for
- Select the pricing map that you currently use and right-Click to duplicate it
- After duplicating the pricing map:
- edit the pricing map and:
- Change the internal name of the map to indicate it is for social distancing
- Alter any price codes if you want to offer fewer
- Click on the Graphic Map tab and
- edit the pricing map and:
- Edit your ticket face and add the zone number to the ticket face in some prominent way
- Find the events in the future and change the pricing map to the new one you just edited.
- Add some performance notes similar per the image below to give the patrons some assurance, or customize your ticket event list to indicate that the performance is sold with social distance in mind.
What does the Social Distance Map look like online?
