tmMaps Folder
Custom pages can be created based on the venue by duplicating the existing default page. The word Default in the page name is then replaced with the map number. The map number is located in the Map # column under Setup >> Venue Maps in Theatre Manager.
There are three TMticketSection_MapDefault pages that look very similar. The page ending in a C is for courses. The page ending in a F is for festival seating or general admission performances. The page without an additional letter is for reserved seating performances. A custom page can be created for these three types of ticket sale and made specific to the venue.
TMsubscriptionMapDefault.html
Description:
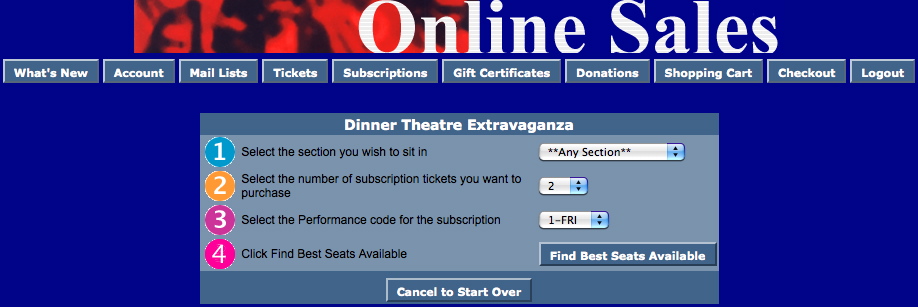
- This page allows the patron to choose the subscription details they would prefer for Reserved seating events.
- Step 1 is a drop down of seating sections pulled from the Best Seat Settings tab from within the Map in Theatre Manager. Depending on the seat configuration of your venue (in particular dinner theatre seating), your Seat Name file may have been setup for a two-pass approach to Best Available seating. For more information on the two-pass system click here.
- Step 2 allows the patron to choose the number of subscriptions they wish to purchase. The quantity is limited to the number of tickets allowed to be sold per Order within Theatre Manager.
- Step 3 indicates the day of the week the patron wishes to attend. This drop down is populated when there is more then one performance date within the season package.
- Step 4 confirms the options as they are indicated about and takes the patron to the TMsubscriptionPriceMapDefault.html page.
Location:
htdocs/1/WebPagesEN/tmMaps
Able to Call Page(s):
Called By Page(s):
Page(s) Referenced:
TMsubscriptionMapDefaultf.html

Description:
- For Future Implementation
- This page allows the patron to choose the subscription details they would prefer for Festival Seating/General Admission events.
- Step 1 allows the patron to choose the number of subscriptions they wish to purchase. The quantity is limited to the number of tickets allowed to be sold per Order within Theatre Manager.
- Step 2 indicates the day of the week the patron wishes to attend. This drop down is populated when there is more then one performance date within the season package.
- Step 3 confirms the options as they are indicated about and takes the patron to the TMsubscriptionPriceMapDefault.html page.
Location:
htdocs/1/WebPagesEN/tmMaps
Able to Call Page(s):
Called By Page(s):
Page(s) Referenced:
TMsubscriptionPriceMapDefault.html

Description:
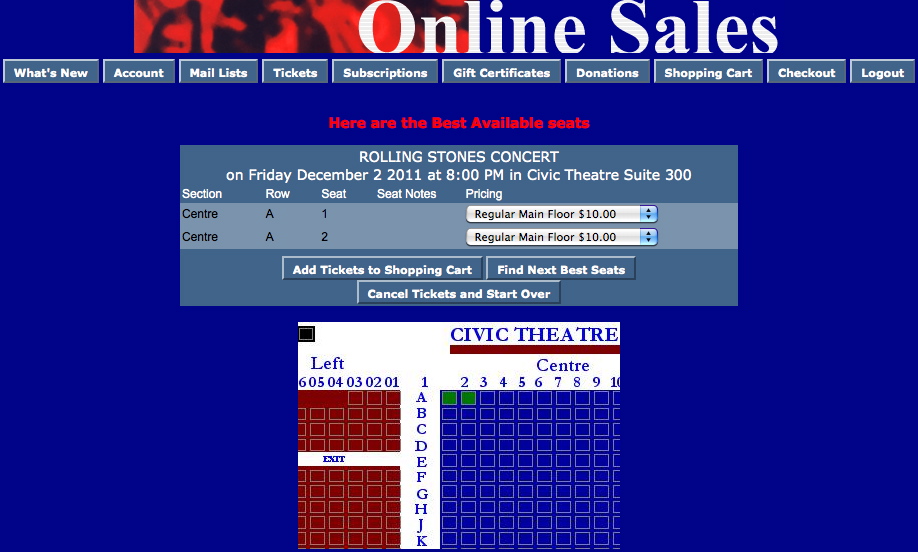
- Allows the patron to review the best available seating option within the section they choose from the TMsubscriptionMapDefault.html page. The best available seats are indicated in the Seat Names tab of the Map within Theatre Manager. The Best Avail Area and Best Seat # columns determine the order of the seats. Depending on the seat configuration of your venue (in particular dinner theatre seating), your Seat Name file may have been setup for a two-pass approach to Best Available seating. For more information on the two-pass system click here.
- The drop down next to the seat location allows the patron to choose the appropriate price for the seat. The pricing options in the list are pulled from the event within Theatre Manager. Only prices that are indicated as Season pricing will be available in the drop down.
- The patron can click the Next Best Available button and they will be presented with the next option for available seats within the section.
Questions and Answers:
Q:How can the Pricing drop down order be altered?
A: The pricing drop down is sorted in descending order based on highest price to lowest price. The promotion external description will determine the sort if there are two or more price points of the same value. Promotions sort in ascending order. For steps on how to access the sales promotion click here. Please note not all Promotions or Price Codes are available online and altering promotions will only need to be done for those options that appear online.
____________________________________________________________
Q: How do you remove the price code name from the Pricing drop down?
A: Select the Web Options tab under Setup >> Company Preferences in Theatre Manager. Remove the check from the Show Price Code option in the Permitted Ticket Printing Options section of the page. Clear the cache on the web listener for the change to take effect. For detailed steps on how to clear the cache in Theatre Manager click here.
____________________________________________________________
Q: How do you remove the Promotion from the Pricing drop down?
A: Select the Web Options tab under Setup >> Company Preferences in Theatre Manager. Remove the check from the Show Sales Promotion option in the Permitted Ticket Printing Options section of the page. Clear the cache on the web listener for the change to take effect. For detailed steps on how to clear the cache in Theatre Manager click here.
____________________________________________________________
Location:
htdocs/1/WebPagesEN/tmMaps
Able to Call Page(s):
Called By Page(s):
Page(s) Referenced:
TMsubscriptionsMapDefaultf.html
Description:
- For Future Implementation
Location:
htdocs/1/WebPagesEN/tmMaps
Able to Call Page(s):
Called By Page(s):
Page(s) Referenced:
TMsubscriptionsPriceMapDefault.html
Description:
- WEB PAGE CURRENTLY UNDER CONSTRUCTION
Location:
htdocs/1/WebPagesEN/tmMaps
Able to Call Page(s):
Called By Page(s):
Page(s) Referenced:
TMticketsPrice_MapDefault.html
Description:
- Displays the best available seating option within the section the patron chose from the TMticketsSection_MapDefault.html page. The best available seats are indicated in the Seat Names tab of the Map within Theatre Manager. The Best Avail Area and Best Seat # columns determine the order of the seats. Depending on the seat configuration of your venue (in particular dinner theatre seating), your Seat Name file may have been setup for a two-pass approach to Best Available seating. For more information on the two-pass system click here.
- The patron can click the Next Best Available button and they will be presented with the next option for available seats within the section.
- The drop down next to the seat location allows the patron to choose the appropriate price for the seat. The pricing options in the list are pulled from the event within Theatre Manager. Only prices available online will be displayed in the drop down. Season Subscription online pricing does not appear in the drop down.
Questions and Answers:
Q: How can the Pricing drop down order be altered?
A: The pricing drop down is sorted in descending order based on highest price to lowest price. The promotion external description will determine the sort if there are two or more price points of the same value. Promotions sort in ascending order. For steps on how to access the sales promotion click here. Please note not all Promotions or Price Codes are available online and altering promotions will only need to be done for those options that appear online.
____________________________________________________________
Q: How do you remove the price code name from the Pricing drop down?
A: Select the Web Options tab under Setup >> Company Preferences in Theatre Manager. Remove the check from the Show Price Code option in the Permitted Ticket Printing Options section of the page. Clear the cache on the web listener for the change to take effect. For detailed steps on how to clear the cache in Theatre Manager click here.
____________________________________________________________
Q: How do you remove the Promotion from the Pricing drop down?
A: Select the Web Options tab under Setup >> Company Preferences in Theatre Manager. Remove the check from the Show Sales Promotion option in the Permitted Ticket Printing Options section of the page. Clear the cache on the web listener for the change to take effect. For detailed steps on how to clear the cache in Theatre Manager click here.
____________________________________________________________
Q: How can I make the entire map display?
A: Change the selected_border value in the image reference near the bottom of the page to be 999.
____________________________________________________________
Q: How can I change the color the seats appear as on the map?
A: Change the selected_color in the image reference near the bottom of the page to the desired hex color value.
____________________________________________________________
Q: How do you change the map image at the bottom of the page so it does not display the image from within Theatre Manager?
A:Add the desired image to the tmGifs folder with the WebPages. Comment out the existing image reference line at the bottom of the page. Add a new image reference for the desired image. The full path name is not required. /tmGifs/image.jpg can be used ad this page is already referencing the WebPages through the base reference.
____________________________________________________________
Location:
WebPages/1/WebPagesEN/tmMaps
Able to Call Page(s):
- TMcart.html
- TMticketsMaxPurchased.html
- TMticketsPrice_MapDefault.html
- TMticketsSection_MapDefault.html
- TMticketsSection_MapDefaultc.html
- TMticketsSection_MapDefaultf.html
Called By Page(s):
- TMticketsSection_MapDefault.html
- TMticketsSection_MapDefaultc.html
- TMticketsSection_MapDefaultf.html
Page(s) Referenced:
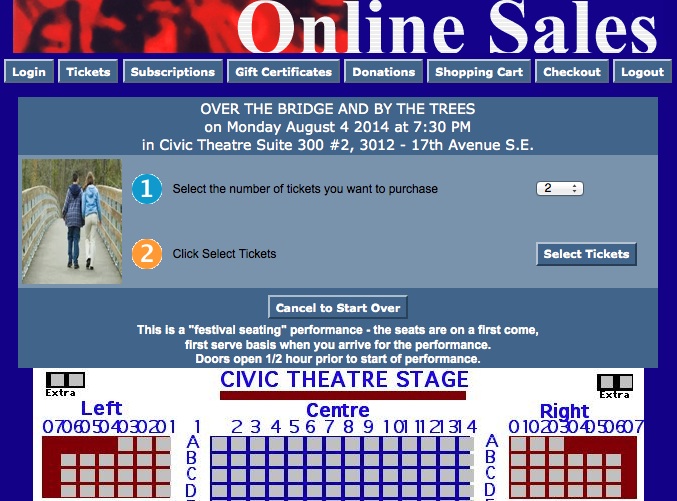
TMticketsSection_MapDefault.html
Description:
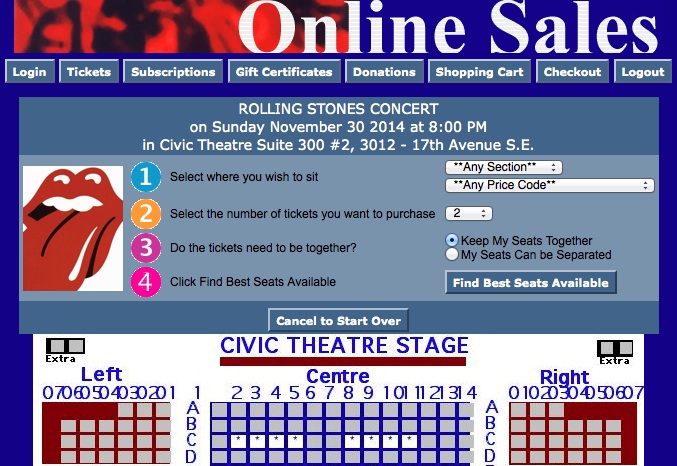
- This pages is specific to reserved seating performances.
- The patron can choose the ticket options they would prefer to add to their cart.
- The event title, date and time are pulled from Theatre Manager based on the selection from the previous window.
- Step 1 is a drop down of seating sections pulled from the Best Seat Settings tab from within the Map in Theatre Manager.
- Step 2 allows the patron to indicate the number of tickets they wish to purchase. The quantity is limited to the number of tickets allowed to be sold per Order within Theatre Manager.
- Step 3 searches the database for the preferences from the above steps. It loads the TMticketsPrice_MapDefault.html page.
- The map is pulled directly from the Theatre Manager database. The page can be duplicated and the word Default changed to the map number from within Theatre Manager. The page can then be edited to display an image specific to the venue.
- Web sales produces seats using the Best Seat settings within each venue map. For more information on the Best Seat settings, click here. Depending on the seat configuration of your venue (in particular dinner theatre seating), your Seat Name file may have been setup for a two-pass approach to Best Available seating. For more information on the two-pass system click here.
Questions and Answers:
Q: Can I replace the map image with an image of my own?
A: Yes, the image can be replaced. Place the desired image in the tmGifs folder. Locate the line containing the F_HTML_SEATMAP references towards the bottom of the page. Comment out the line. Add an image reference to the page calling the desired image from the tmGifs folder. Please note the reference should only require the folder name (tmGifs) and the full image name.
____________________________________________________________
Q: Can I change the default value in the drop down for number of seats to purchase?
A: Yes, you can. The default value is controlled in the Performance details. It can be altered by going to Setup >> Events and searching for the desired event. Double click on the event and select the Performance tab. Double click on the desired performance to open the Performance Detail window. Select the Web Settings tab. The Suggested Purchase Qty field determines the default value in the drop down within the online sales.
____________________________________________________________
Q: Can I increase/decrease the value in the drop down for number of seats to purchase?
A: Yes, you can. This value is controlled by the over all cart limit, event limit and performance limits.
- The cart limit is located in Setup >> System Preferences under the Web tab. It's controlled by the Maximum Tickets field. This value determines the total number of tickets that are allowed per cart. If the patron has already added tickets to their cart the drop down will decrease by the number of tickets in the cart.
- The Event limit is in the Eventtab of the Event Setup. The Web Purchase Limit defaults to the cart limit from above. However, a value can be entered into the field to alter the total number of tickets that can be purchased over all for the Event. This means if there are several performances this is the total tickets for all performances. If an event has a maximum of 8 tickets regardless of performances this is where the value would be set.
- Finally, the Performance limit is controlled in the Web Settings tab. This is located by selecting the Performance tab in the Event and double clicking on the performance. The Web Purchase Limit field controls the maximum tickets per performance that can be purchased. If an event has a limit of four tickets per performance this is where the value would be set.
Location:
htdocs/1/WebPagesEN/tmMaps
Able to Call Page(s):
Called By Page(s):
Page(s) Referenced:
- buttonRollover.html
- constantALLPRICECODES.txt
- constantANYSECTIONS.txt
- pleaseWaitMessage.html
- pleaseWaitMessageFunction.html
- setBEST_AREA_SEARCH_LIST.html
- setBEST_AREA_SEARCH_LISTempty.html
- setBEST_PRICE_CODE_SEARCH_LIST.html
- setBEST_PRICE_CODE_SEARCH_LISTempty.html
- setTICKET_QTY_LIST.html
- setTICKET_QTY_LISTempty.html
- step1.gif
- step2.gif
- step3.gif
- styleButtons.css
- stylePages.css
- TMError.txt
- tmFooter.html
- tmnavButtons.html
TMticketsSection_MapDefaultc.html
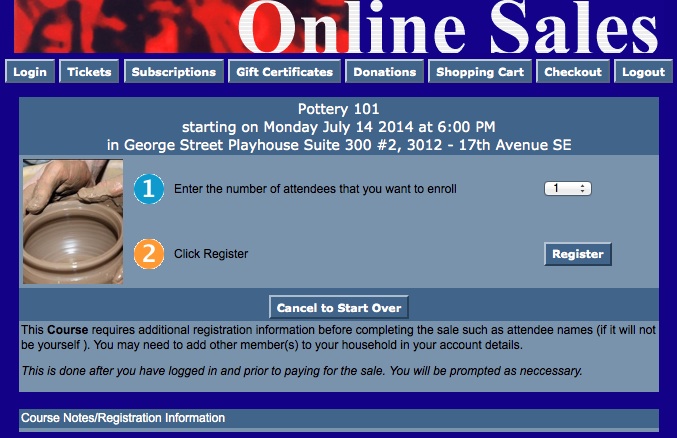
Description:
- This pages is specific to Courses. Note the c at the end of the page name.
- The patron can choose the ticket options they would prefer to add to their cart.
- The event title, date and time are pulled from Theatre Manager based on the selection from the previous window.
- Step 1 allows the patron to choose the number of admissions to the course they wish to purchase. The quantity is limited to the number of tickets allowed to be sold per Order within Theatre Manager.
- Step 2 searches the database for the preferences from the above steps. It loads the TMticketsPrice_MapDefault.html page.
- For details on how to setup a course click here.
Questions and Answers:
Q: Can I replace the map image with an image of my own?
A: Yes, the image can be replaced. Place the desired image in the tmGifs folder. Locate the line containing the F_HTML_SEATMAP references towards the bottom of the page. Comment out the line. Add an image reference to the page calling the desired image from the tmGifs folder. Please note the reference should only require the folder name (tmGifs) and the full image name.
____________________________________________________________
Q: Can I change the default value in the drop down for number of seats to purchase?
A: Yes, you can. The default value is controlled in the Performance details. It can be altered by going to Setup >> Events and searching for the desired event. Double click on the event and select the Performance tab. Double click on the desired performance to open the Performance Detail window. Select the Web Settings tab. The Suggested Purchase Qty field determines the default value in the drop down within the online sales.
____________________________________________________________
Q: Can I increase/decrease the value in the drop down for number of seats to purchase?
A: Yes, you can. This value is controlled by the over all cart limit, event limit and performance limits.
- The cart limit is located in Setup >> System Preferences under the Web tab. It's controlled by the Maximum Tickets field. This value determines the total number of tickets that are allowed per cart. If the patron has already added tickets to their cart the drop down will decrease by the number of tickets in the cart.
- The Event limit is in the Eventtab of the Event Setup. The Web Purchase Limit defaults to the cart limit from above. However, a value can be entered into the field to alter the total number of tickets that can be purchased over all for the Event. This means if there are several performances this is the total tickets for all performances. If an event has a maximum of 8 tickets regardless of performances this is where the value would be set.
- Finally, the Performance limit is controlled in the Web Settings tab. This is located by selecting the Performance tab in the Event and double clicking on the performance. The Web Purchase Limit field controls the maximum tickets per performance that can be purchased. If an event has a limit of four tickets per performance this is where the value would be set.
Location:
htdocs/1/WebPagesEN/tmMaps
Able to Call Page(s):
Called By Page(s):
Page(s) Referenced:
TMticketsSection_MapDefaultf.html
Description:
- This pages is specific to Festival Seating/General Admission seating performances. Note the f at the end of the page name.
- The patron can choose the ticket options they would prefer to add to their cart.
- The event title, date and time are pulled from Theatre Manager based on the selection from the previous window.
- Step 1 allows the patron to indicate the number of tickets they wish to purchase. The quantity is limited to the number of tickets allowed to be sold per Order within Theatre Manager.
- Step 2 searches the database for the preferences from the above steps. It loads the TMticketsPrice_MapDefault.html page.
- The map is pulled directly from the Theatre Manager database. The page can be duplicated and the word Default changed to the Pricing Map number from within Theatre Manager. The page can then be edited to display an image specific to the venue.
Questions and Answers:
Q: Can I replace the map image with an image of my own?
A: Yes, the image can be replaced. Place the desired image in the tmGifs folder. Locate the line containing the F_HTML_SEATMAP references towards the bottom of the page. Comment out the line. Add an image reference to the page calling the desired image from the tmGifs folder. Please note the reference should only require the folder name (tmGifs) and the full image name.
____________________________________________________________
Q: Can I change the default value in the drop down for number of seats to purchase?
A: Yes, you can. The default value is controlled in the Performance details. It can be altered by going to Setup >> Events and searching for the desired event. Double click on the event and select the Performance tab. Double click on the desired performance to open the Performance Detail window. Select the Web Settings tab. The Suggested Purchase Qty field determines the default value in the drop down within the online sales.
____________________________________________________________
Q: Can I increase/decrease the value in the drop down for number of seats to purchase?
A: Yes, you can. This value is controlled by the over all cart limit, event limit and performance limits.
- The cart limit is located in Setup >> System Preferences under the Web tab. It's controlled by the Maximum Tickets field. This value determines the total number of tickets that are allowed per cart. If the patron has already added tickets to their cart the drop down will decrease by the number of tickets in the cart.
- The Event limit is in the Eventtab of the Event Setup. The Web Purchase Limit defaults to the cart limit from above. However, a value can be entered into the field to alter the total number of tickets that can be purchased over all for the Event. This means if there are several performances this is the total tickets for all performances. If an event has a maximum of 8 tickets regardless of performances this is where the value would be set.
- Finally, the Performance limit is controlled in the Web Settings tab. This is located by selecting the Performance tab in the Event and double clicking on the performance. The Web Purchase Limit field controls the maximum tickets per performance that can be purchased. If an event has a limit of four tickets per performance this is where the value would be set.
Location:
htdocs/1/WebPagesEN/tmMaps
Able to Call Page(s):
Called By Page(s):
Page(s) Referenced:
tmPickYourSeatMapDisplay.html
at the bottom of the page is an <img> tag that shows the actual map:
<img src="<field>F_HTML_SEATMAP"</field>&reserved_colour=007700&reserved_boundary=true&reserved_seat_border=5&format=svg" width="80%"/>
- Pick your seat formats with interactivity
- pick - Special Case. If you have pick your own seats turned on, this is the preferred format. It will give you an svg graphic that is interactive and the patron can use to pick their seats is on. It forces always show sold seats on the map, regardless if it is turned off in Theatre Manager.
- svg - will also display in svg format. However, this format respects the show sold seats option for the performance. It may not be useful for pick your own as somebody wouldn't know which other seats are taken, but it could be useful to show people where their seats are.
- Static Formats with no interactivity
- png - you will only get a png image in a static map. You cannot pick your owns seat and the map has no interactivity
- jpeg - similar to png, except the image is in jpeg format
- pdf - similar to png, except it is a pdf
- use true, yes,y, or 1 for a zoomed in area around the reserved seats
- false, no,n, or 0 for a full sized map (or do not specify the parameter)
- If true, the map displayed to the user will contain a rectangle outlining the viewable area that would be shown if reserved_only was specified. This encircles the offered seats and clearly indicates where in the venue the user will sit.
- If the reserved_only parameter is not specified at the same time as this parameters, then the map is shown at full size, with the rectangle around the seats.
 |
See also tmpickYourSeatScripts.html for some options that can be made regarding zoom controls on scripts that handle the maps. |
| format=xxx | specifies the graphic format in which to display your seat maps on a web page.
|
||
| reserved_only=false |
specifies that the map image to be drawn contains only a zoomed in sub-set of the entire map, centred around the seats that are offered to the patron. It the parameter is ignored if the map is in pick-your-own-seat mode. Values are:
|
||
| reserved_boundary=true |
Indicates that a boundary is to be drawn around the seats that are offered to the user (not avaliable when map is in pick-your-own mode)
|
||
| reserved_seat_border=## | Specifies the distance (in seats) from the offered seats where the reserved_boundary will be placed. Reasonable values are 2 seats around the reserved seats or 4 seats around the reserved seats | ||
| reserved_boundary_color=FF0000 | Specifies the colour of the boundary drawn around the seats that are offered (if not using pick your own) | ||
| reserved_boundary_width=xx | Specifies the width of the boundary drawn around the offered seats (if not using pick your own). The default size is 3/4 of the average width of seats on the map. You can make it more or less. | ||
| seat_color=FF0000 |
Specifies the colour of the unsold (available) seats on the map as a RGB hex string.
i.e. FF0000 means bright red and 007700 is green |
||
| selected_color=000000 | Specifies the stroke (border) color of the selected seats as a RGB hex string. These seats that a patron is picking on the reserve your seat map. | ||
| reserved_color=FF0000 | Specifies the fill color of the temporarily held best seats as a RGB hex string | ||
| unavailable_color=00FF00 | Specifies the fill color of the unavailable seats as a RGB hex string. Seats are unavailable if they are already sold to another patron or held for any reason. | ||
| unavailable_text=X | Specifies the single character that will be used to put in seats that are not available. This over-rides the '*' that TM will put in unavailable seats. You can use any ascii character you want such as 'X'. You may even use %20 (space), which if used in conjunction with unavailable_color will provide a solid square for unavailable seats. | ||
| seat_font=X | The font to use for seat labels when using mouseover to show the door/section/row/seat and seat description (depends on what the description setup is in the SCG map on the pricing map setup) | ||
| seat_size=X | The size of the fonts on the seat labels | ||
| seat_font_scale=X | SVG scaling factor to apply to the font size (depends on the scale used when constructing the SVG map) | ||
| seat_font_load=X | "embed": base64 embedded font, "local": locally loaded font from tmVendor, "cdn": remotely loaded font from Content Delivery Network (CDN) |
tmPickYourSeatScripts.html
There is a comment in the file about halfway down (on/around line 41-42) that looks like:
// Initialize the widget with new pan and zoom values

 widget.init();
- pan_step_distance: default is 800 pixels -- and that is the incremental step distance that the image goes left/right or up/down when the left/right up/down buttons are clicked. SVG maps can be very large (as far as pixels go, so 800 is not really much movement -- and it is dependant on the overall size of the map
- zoom_multiple: default is 0.1 (10%) percent and that is the percentage of zoom in/out when using the zoom buttons on the map.
To add the parameters to the web page code and create different settings, you would edit the two lines above so that they look like:
// Initialize the widget with new pan and zoom values

widget.init( {

“pan_step_distance”: 800,

“zoom_multiple”: 0.1

} )
|
These values do not apply when the patron is using a touch device because the hand gestures of pinch and swipe take over and the 'controls' are hidden from the user. They only work for the controls when they are visible on a computer web page. |
|
See also tmPickYourSeatMapDisplay.html for some options that can be made regarding colouring and fonts on the actual SVG map as the user interacts with the pick your seats process. |