Editing data on the Mail List Window
Accessing the Mail List Window
To access the Mail List window you perform the following steps:
To access the list of mail lists, you perform the following steps:- Click Setup >> Mail Lists from the main Theatre Manager menu.

Alternatively, you can select the Mail List button
 from the Main Theatre Manager toolbar / ribbon bar.
The Mail List search window opens.
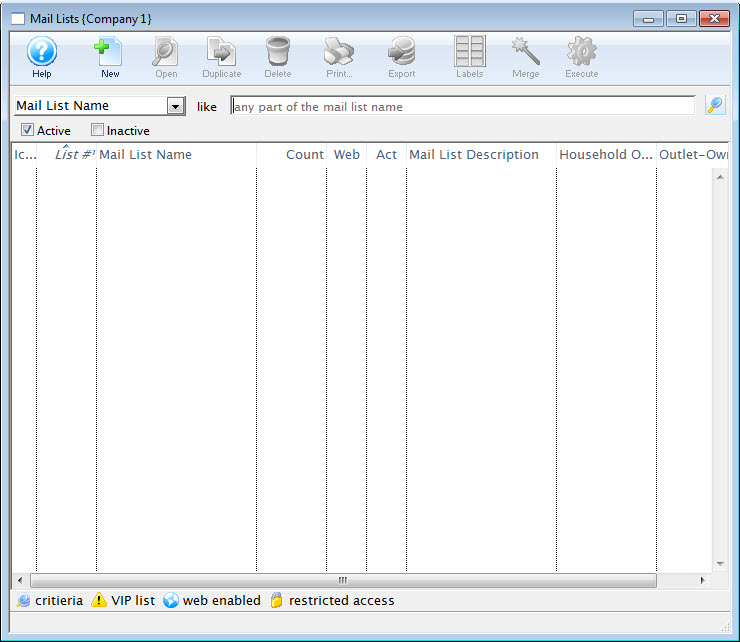
- Select a Mail List search option.
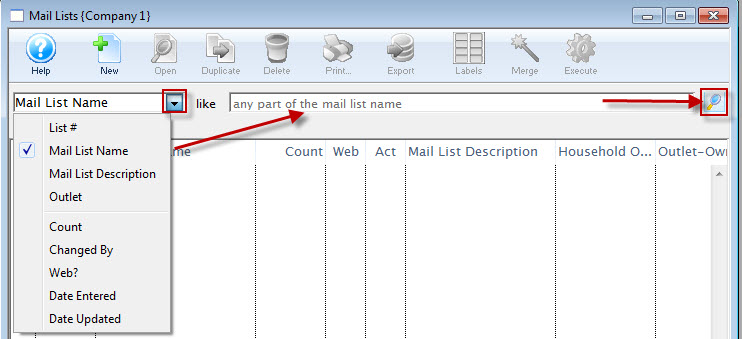
- Enter a search range.
- Click the Search
 button.
The list of Mail Lists fitting the search opens.

- Select a Mail List and click the Open
 button.
The Mail List Criteria window will open. Alternatively, you can simply double click on the Mail List name.
For more information on the Mail List window click here.
Parts of the Mail List Window
 |
Opens a new Mail List window. |
 |
Saves changes made to the Mail List. |
 |
Creates a copy of the open Mail List. |
 |
Reverts back to the last save point. |
 |
Deletes the open Mail List. |
 |
Generates a report to the screen or default print location displaying the details of the Mail List. |
 |
Checks the spelling of typed items within the current tab. |
 |
Opens the mailing label window to create mailing labels for patrons included in the Mail List. |
 |
Provides a report by zip code of all patrons in the Mail List. |
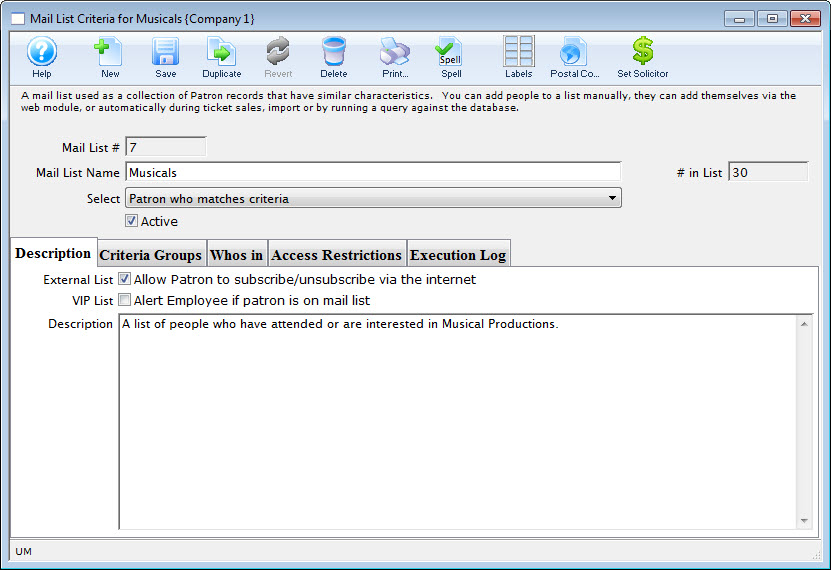
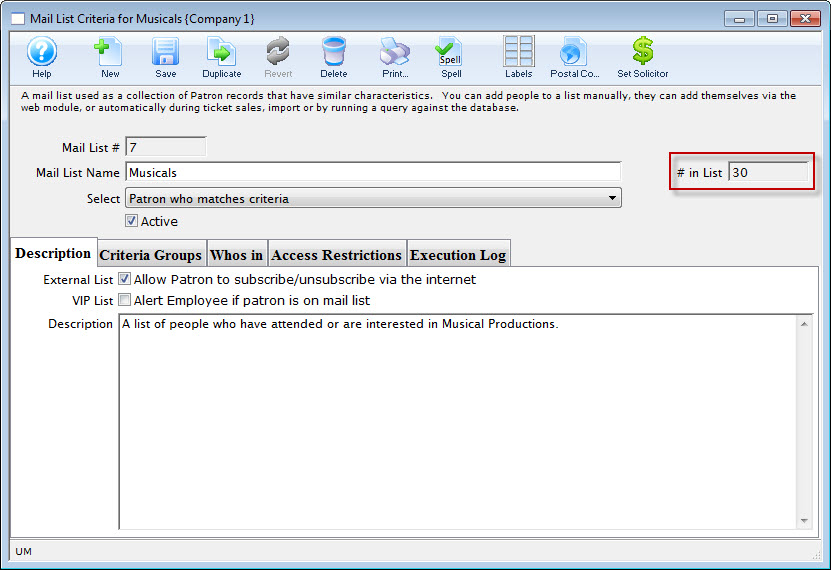
| Mail List # | Computer generated number for the Mail List. |
| Mail List Name | Brief name of the Mail List |
| Select |
Drop Down List:
|
| Active | Active / Inactive Flag |
| Outlet | Outlet that created the Mail List. |
| Access Groups | Specify which groups of people can access the data |
| # in List | Number of patrons currently in the list. |
 |
Information about the Mail List and its behaviors. Click here for more information. |
 |
The criteria groups for building the mail list. Click here for more information. |
 |
List of Patrons who are in the mail list. Click here for more information |
 |
List of who may change this mail list. Click here for more information. |
 |
List of the dates and times the mail list was executed. Click here for more information. |
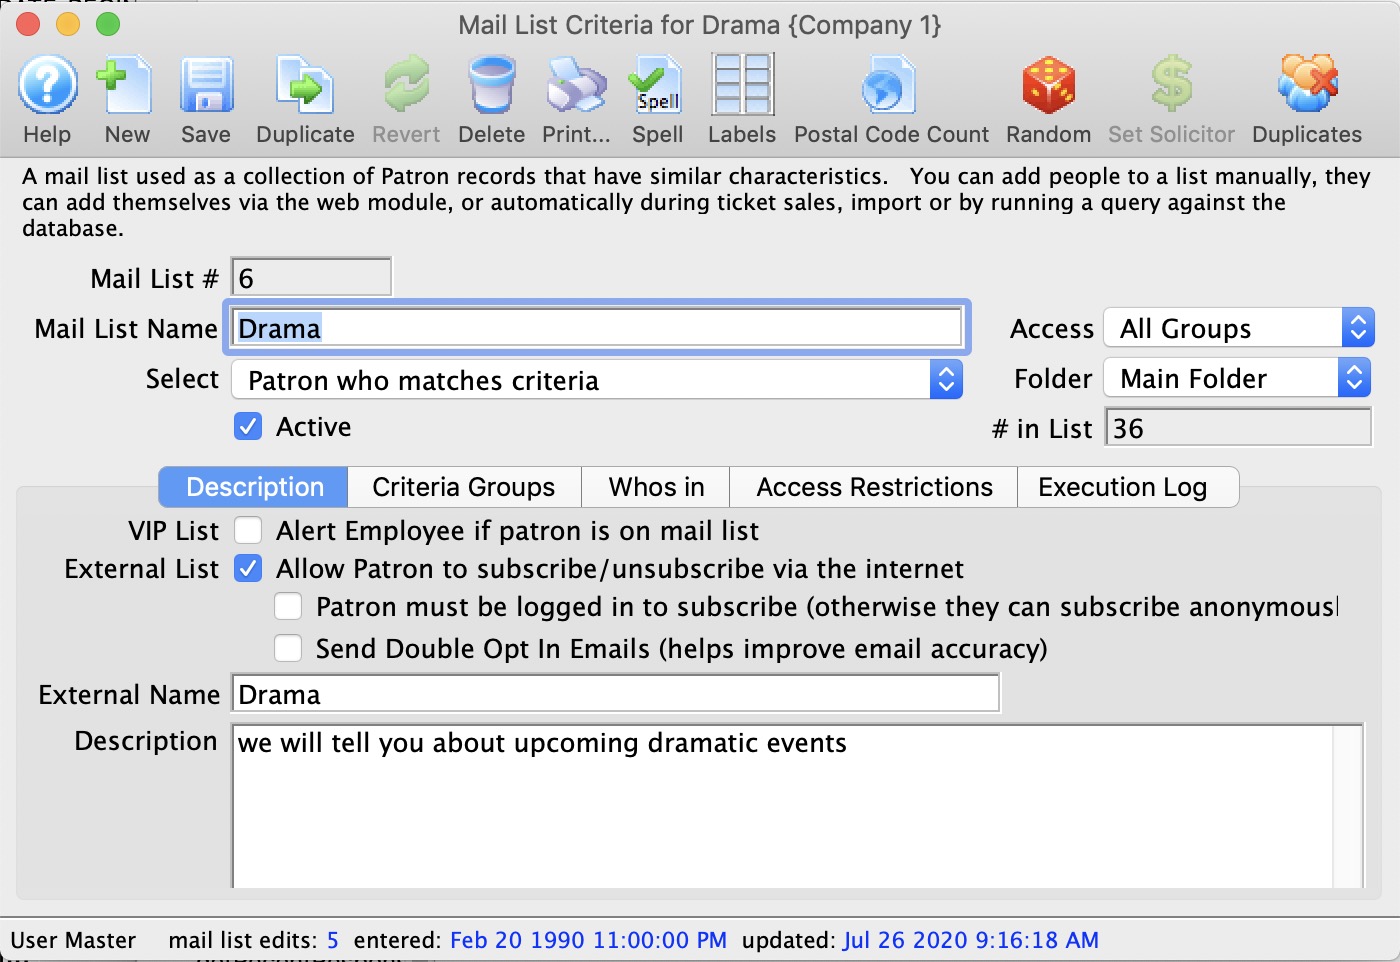
Description Tab
| VIP List | Alert Employee if patron is on the mail list. If a patron is marked on a list as a VIP, the employee will be reminded that the patron is on the list via a popup-dialog window each time they open the particular patron's record. |
| External List | Allow Patrons to subscribe/unsubscribe via the internet. For most mail lists, this is never checked. However, if it is checked, this flag allows patrons to add (or remove) themselves to the mail list using the online sales module.
Possible uses for this setting on mail lists are where the customer can elect to belong (or remove themselves) such as:
|
| Patrons must be logged in to subscribe |
If this is:
|
| Double Opt in Emails | This feature is only valid for mail lists that are 'external'. If enabled, then patron who is added to the mail list (manually or automatically) will be sent an email asking them to confirm that they want to be on the list. If the patron:
This feature is very useful
|
| Description | Detailed description of the purpose of the mail list (in 'descriptive plain language') so that others will understand its purpose or suggested usages. |
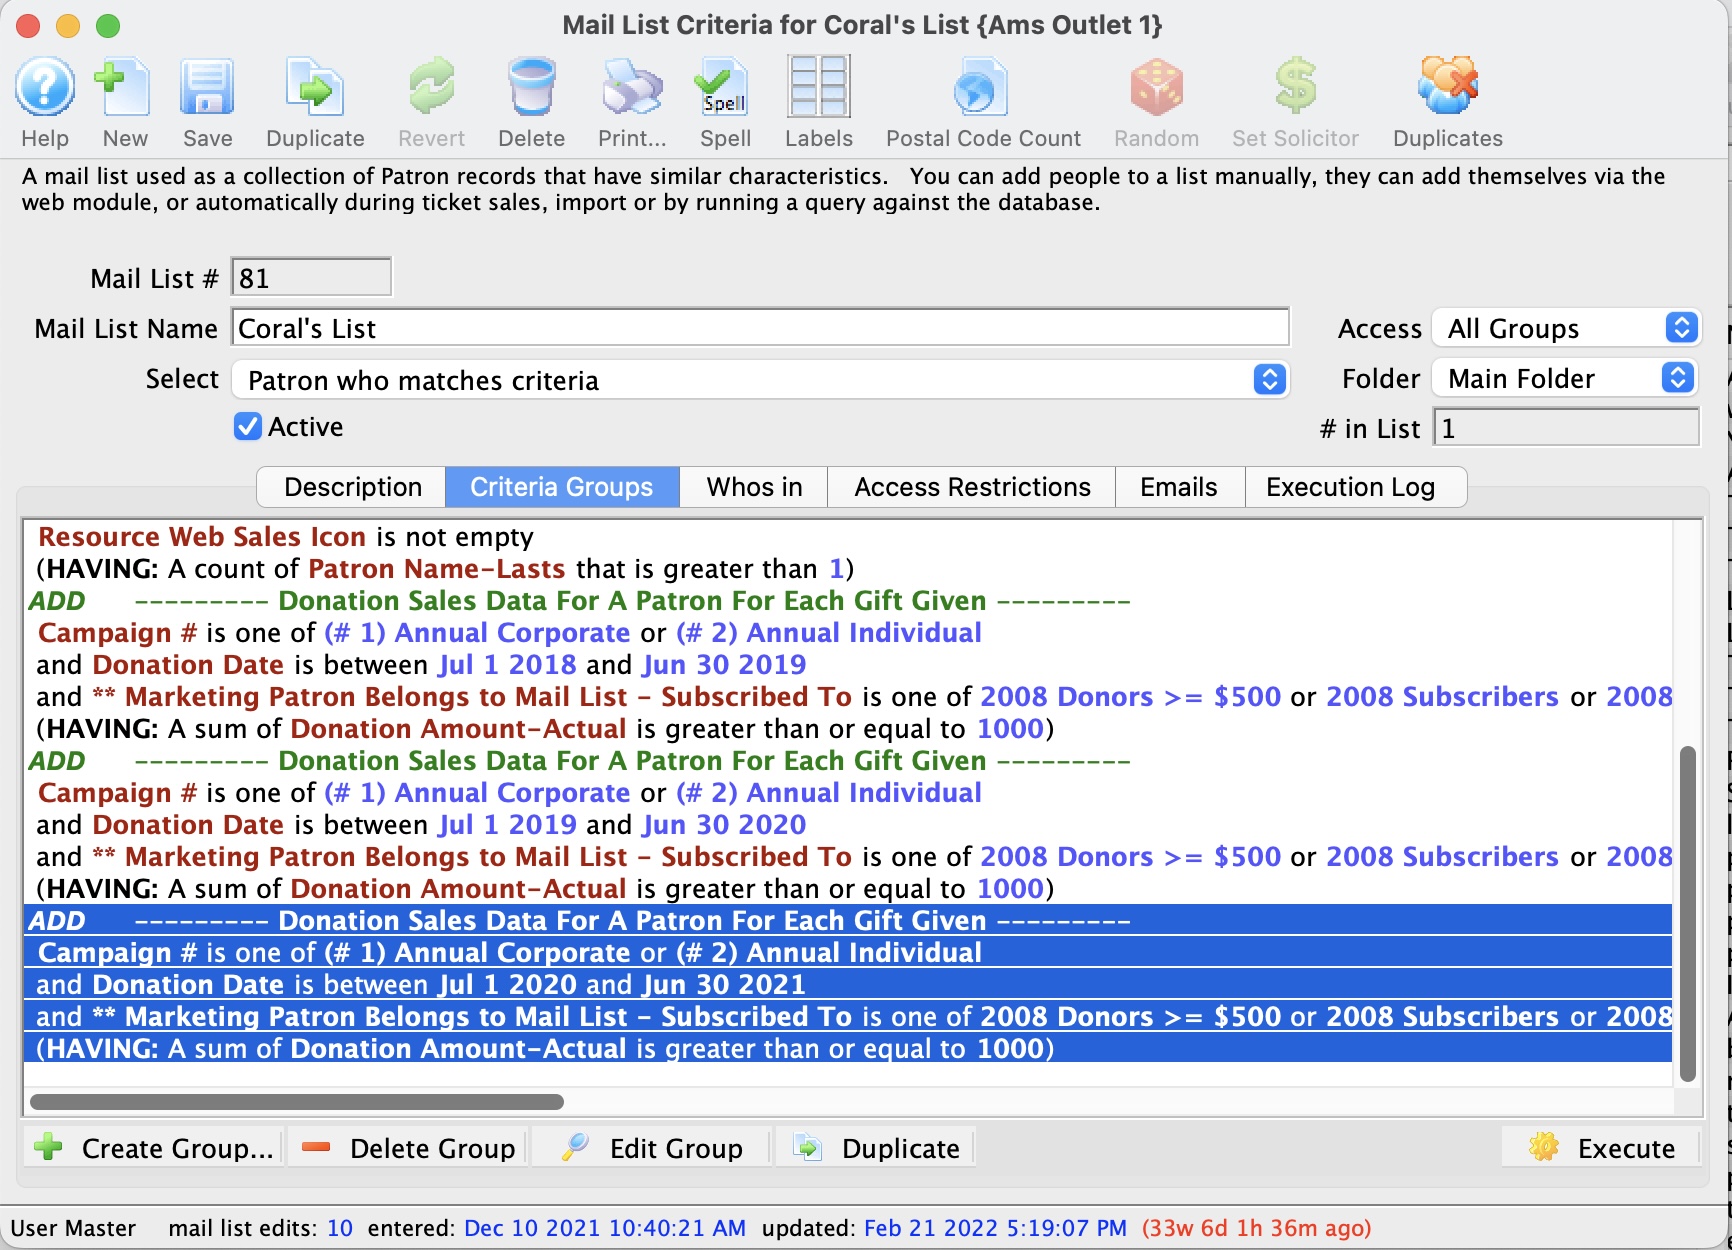
Criteria Groups Tab
 |
Inserts criteria for a Mail List. Click here for more information on adding new criteria. |
 |
Removes the selected criteria. |
 |
Opens the parameter window for the selected criteria. |
 |
Rebuilds the mail list based on the selected criteria. |
 |
Verifies the number of patrons in the Mail List. |
| Duplicate | will take the criteria group that you have selected and make a duplicate of it
at the end of the list of criteria. By way of example, this is useful when you need to
|
 |
You can reorder groups of criteria on a window by clicking on one and dragging it. |
|
You can also drag a group of criteria from one mail list window to another. If you have built some criteria that you like and want to use portions of them in another mail list, just highlight the group and drag it to this window on another mail list. |
Draging Criteria Groups to Another Mail List
- Select the group you like (see left window)
- Drag it to another criteria group window

Re-Arranging Grouping of Criteria
- Click the line of criteria to be moved to select it.
- Click and hold the mouse button to "pick up" the group.
- Drag the criteria up or down the list and release the mouse button where it should be placed.
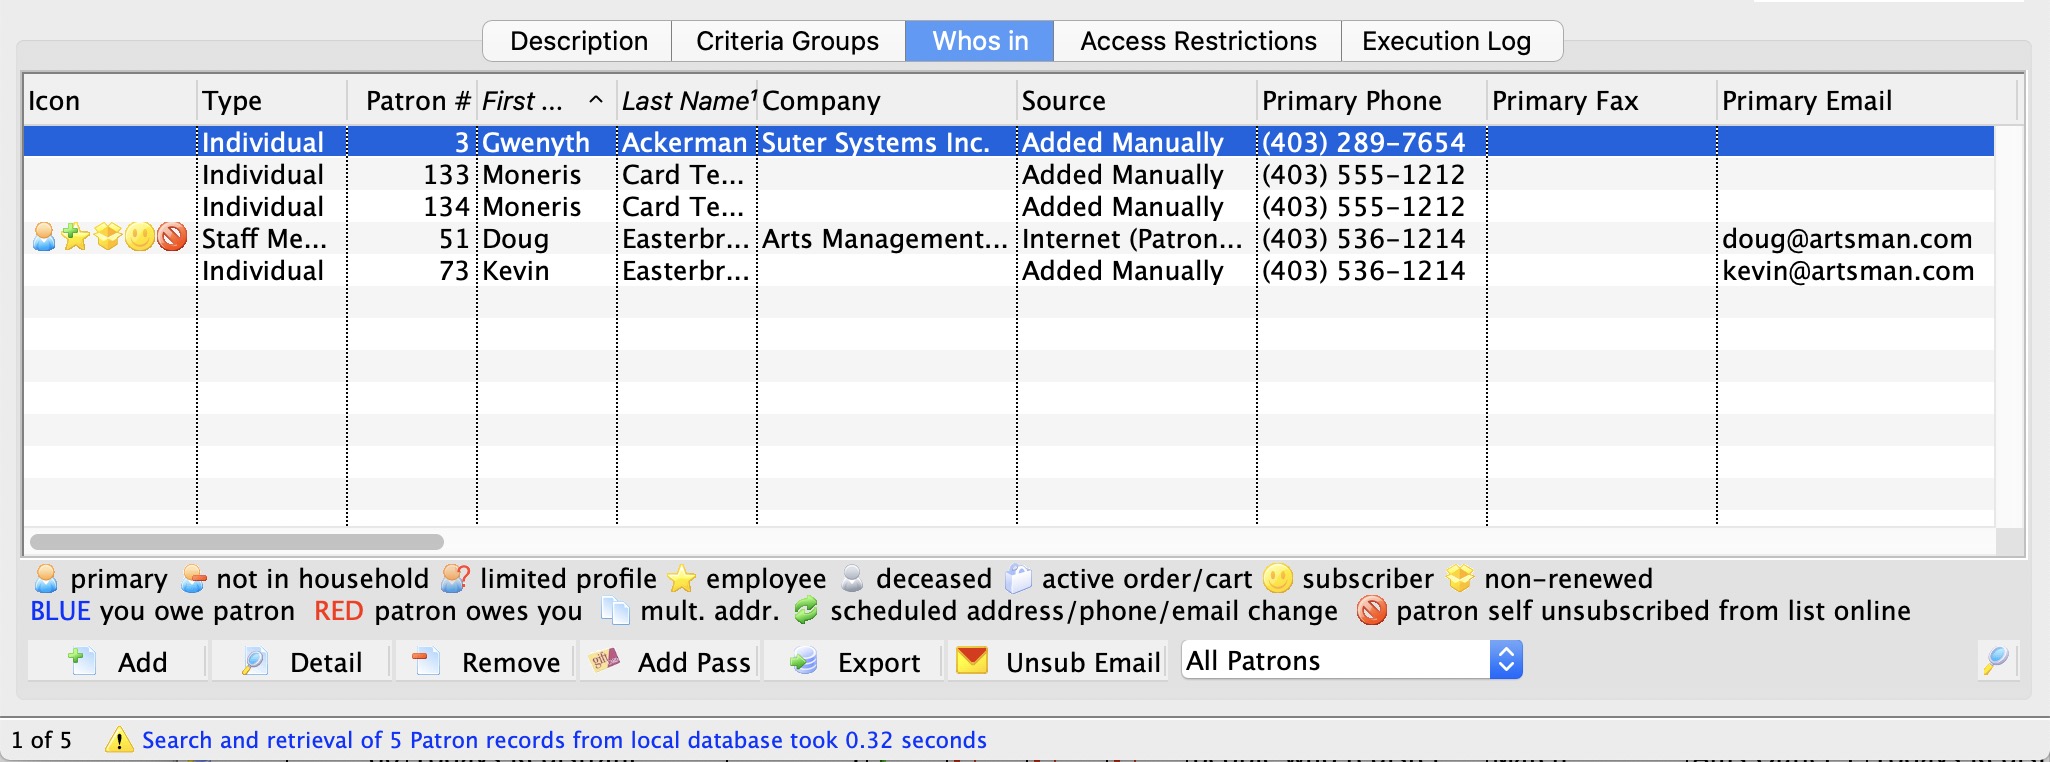
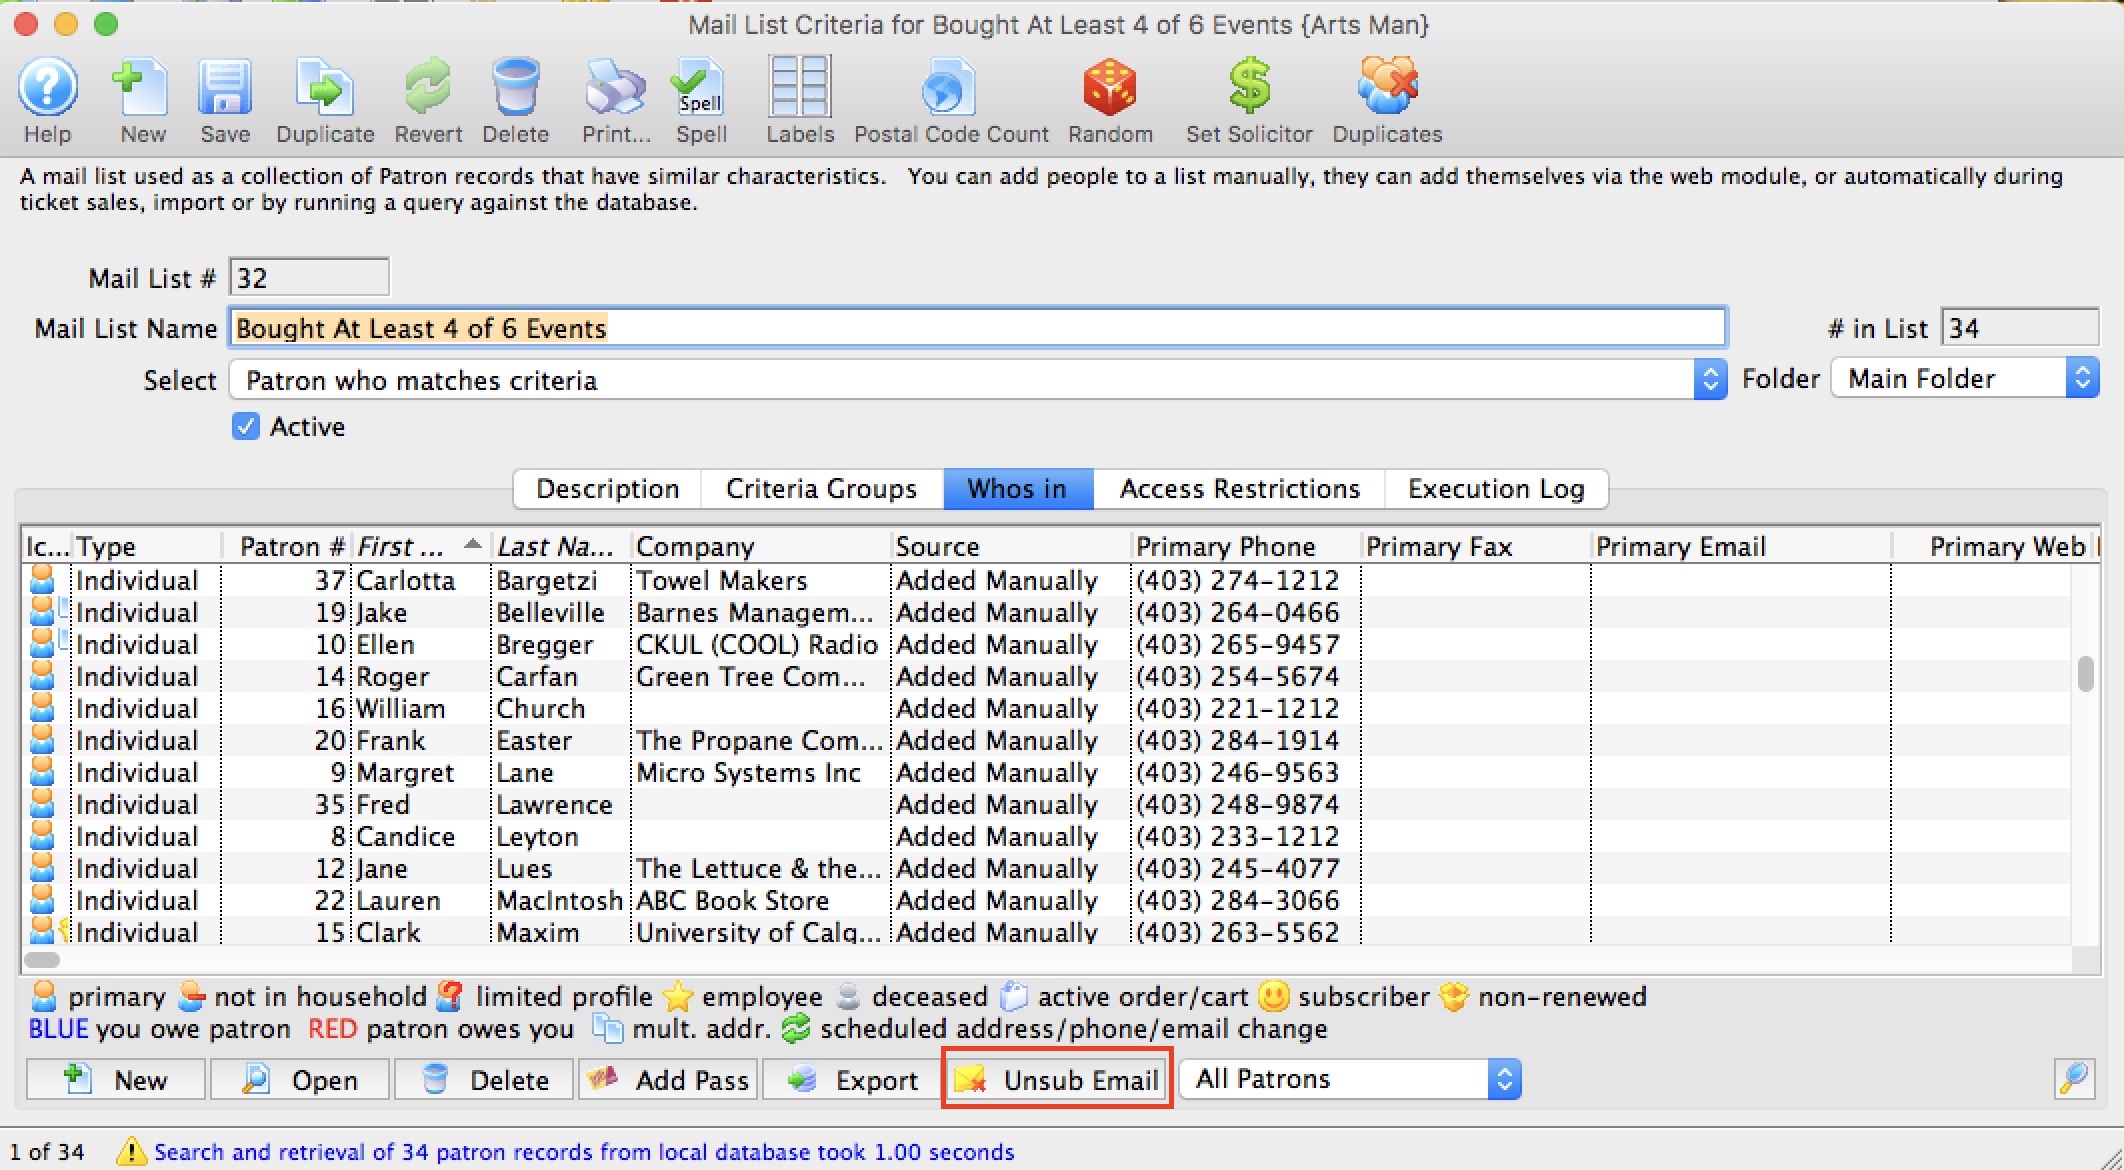
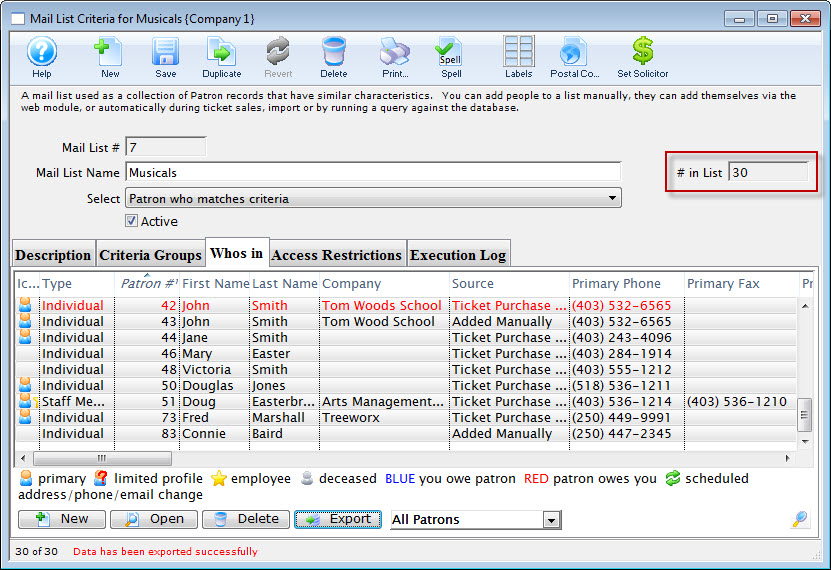
Who's In Tab
- generate mail labels
- determine distance from your venue
- export them
- use them in criteria for reports or other mail lists
- drag individuals from one mail list to another to place them into two lists
- use the list to allow people to subscribe and unsubscribe to marketing lists online
- drag them onto tasks to indicate who is invited.
|
Tracking unsubscribes: If a patron unsubscribes from the mail list online, they are not removed from the mail list. Their record gets marked with an unsubscribed date. This tracks who no longer wants information from your venue for a specific purpose.
This can be very useful for CASL purposes to track explicit opt outs and when the patron opted out. |
|
You may alter the subscribe status using the add and remove buttons as described below. |
| Type | Customizable field that allows for classification of patrons by type (Individual, Student, Staff, etc.) |
| Patron # | Unique number assigned to a patron. |
| Patron Name | Patrons first, last name and business. |
| Source | How the patron came to be in the mail list:
|
| Primary Phone | Patron primary contact telephone number. |
 |
 Clicking on the New button causes a pop up to be shown that lets you:
|
 |
Opens the patron window of the selected patron. |
 |
 Clicking on the Remove button causes a pop up to be shown that lets you:
|
 |
Export the selected rows of contact information from a Mail List. If you want everybody in the list, select all the rows (or click on a line and the Ctrl-A or Cmd-A select them all) before clicking the export button.
|
| Add Pass | Can be used to add a pass or gift certificate to a number of patrons at the same time. |
| Unsub Email | Can be used to process an unsub/bounce file from an external emailer program and remove patrons from a mail list or remove their email addresses permanently. |
 |
Search options for finding patrons within the selected Mail List. |
|
Search's the selected Mail List for patrons matching the selected search criteria. |
Using the Unsubscribe feature
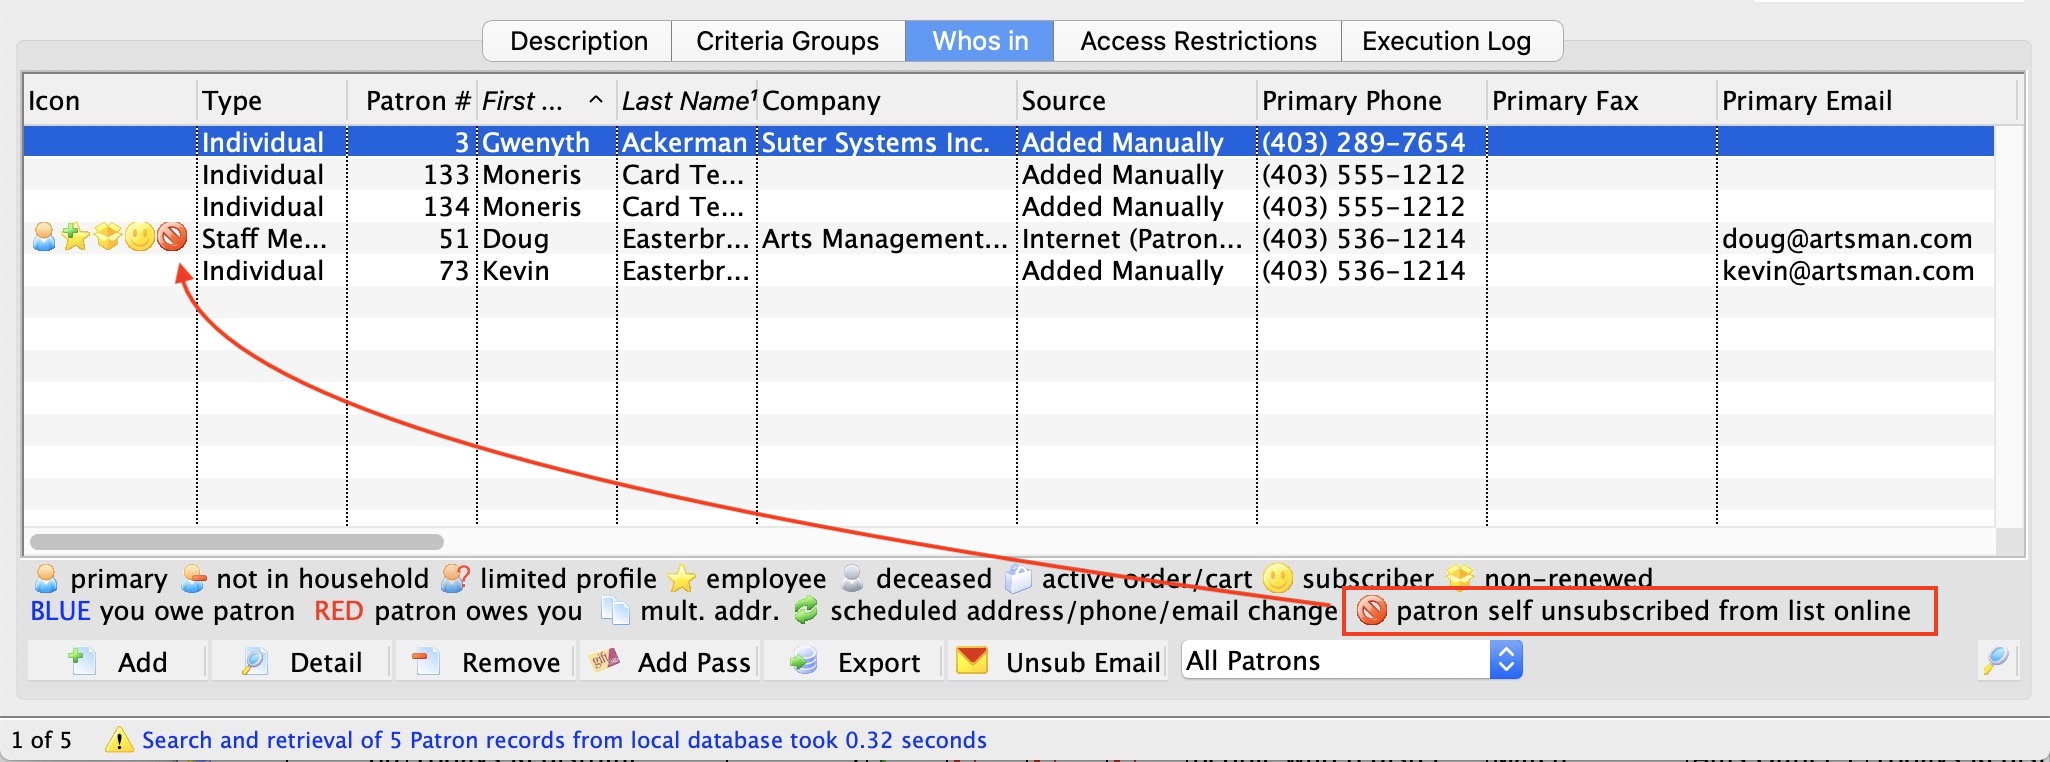
In the sample list above, one patron is marked as unsubscribed online. One of the columns in the list contains the unsubscribe date, so you know when people no longer wanted to be part of the mail list.
When building other mail lists or running reports, there are two key selection criteria that lets you select these people:
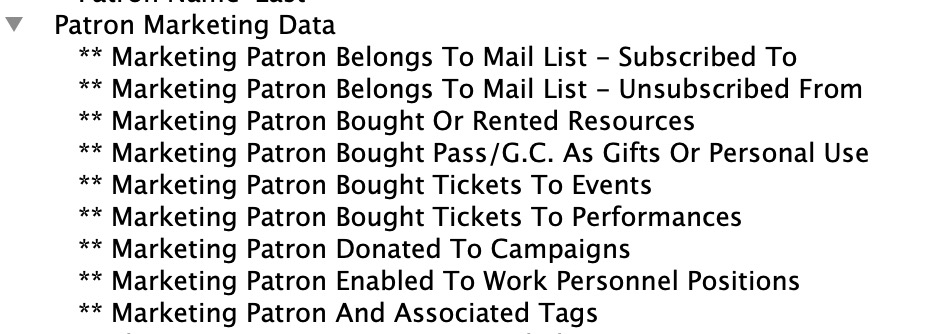 Marketing Patron Belongs to Mail List - Subscribed to
When used, this will find all the people in the mail list - except those patrons who unsubscribe themselves online. This makes selecting people on a public mail list easy. You don't need to worry about who doesn't want email since they are automatically ignored.
- Marketing Patron Belongs to Mail List - Unsubscribed from
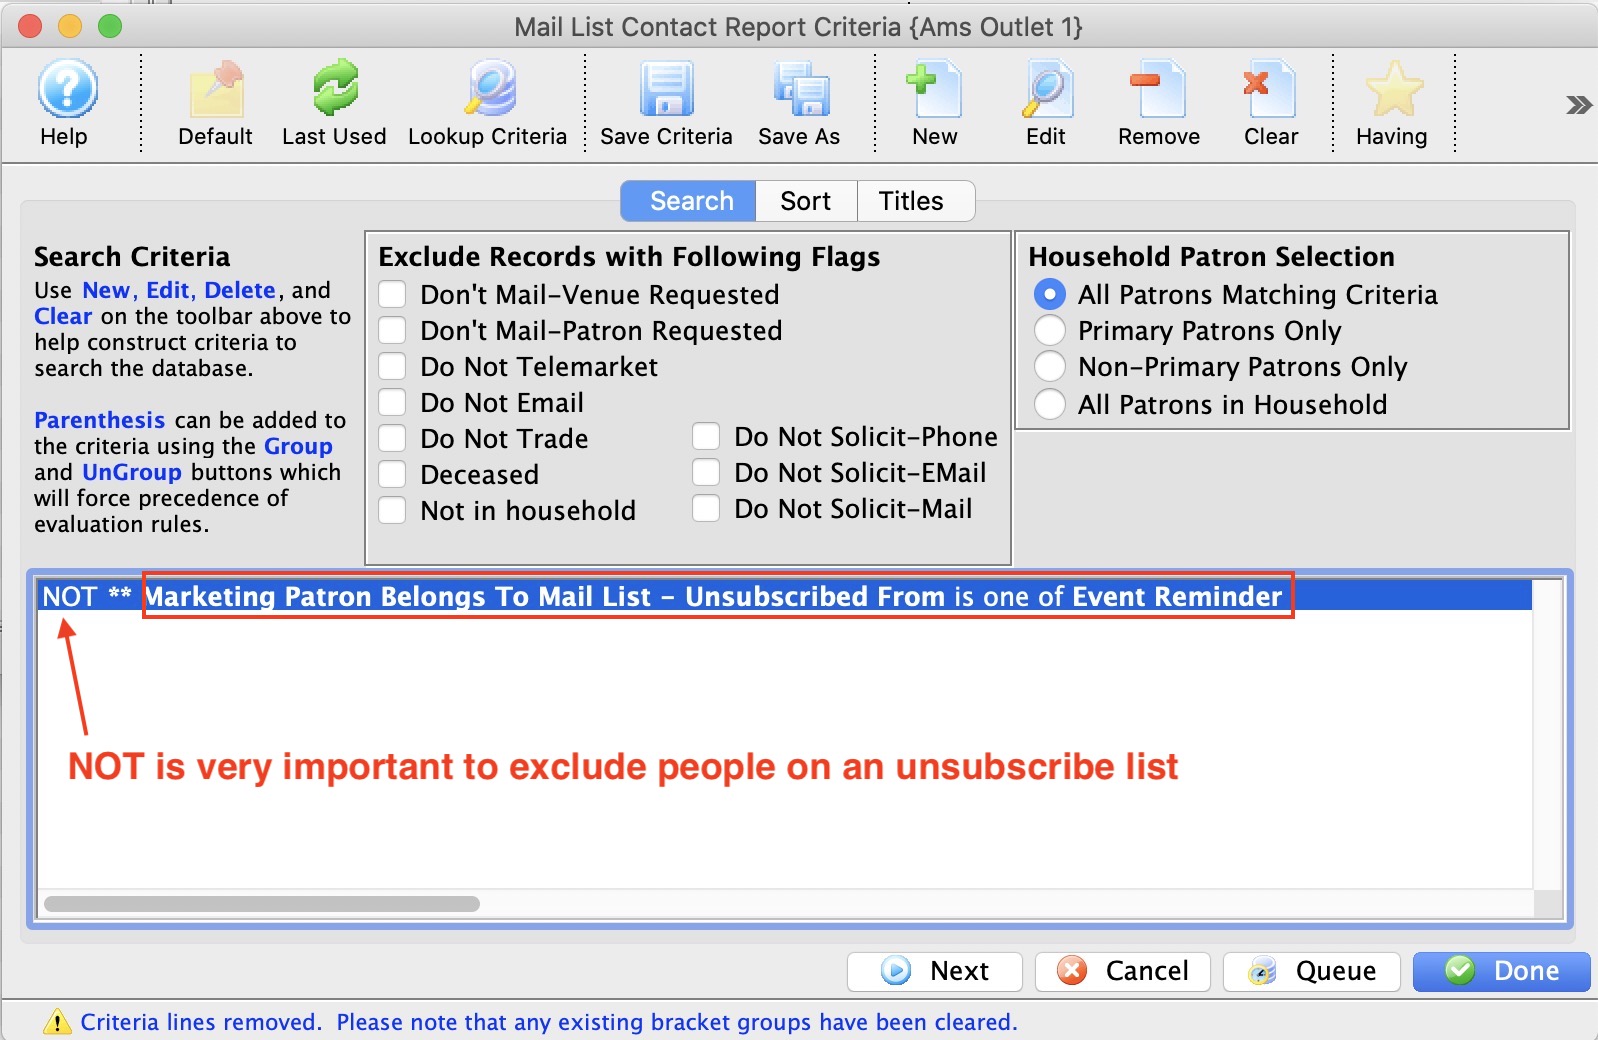
This search criteria only picks people who have unsubscribed. Its best use might be for an eblast mail list where people say they no longer want a specific type of eblasts.
You can include patrons in your normal way and then use this list to eliminate people in the unsubscribed list using something like the criteria below.
Access Restriction Tab
- If you are on the access restriction list, you can add, rebuild and remove people from the list - and you can delete the mail list in entirety.
- If the list of employees is empty, anybody can add, rebuild or remove people from the list
|
If you want to hide this list from some people, use the Access Feature at the top part of the window. |
|
Preventing employees from altering the contents of the mail list does not prevent them from deleting the entire mail list unless you implement data permissions on the employee record (prevent delete of mail lists) or hide the mail list (as above) |
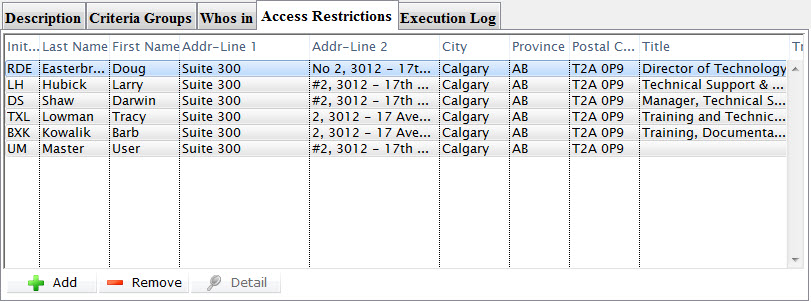
| First | First name of the employee. |
| Last | Last name of the employee. |
| E-mail address for the employee. | |
 |
Grants an employee access to the Mail List. |
 |
Removes an employee from having access to a Mail List. |
 |
Opens the employee data window for the selected employee. |
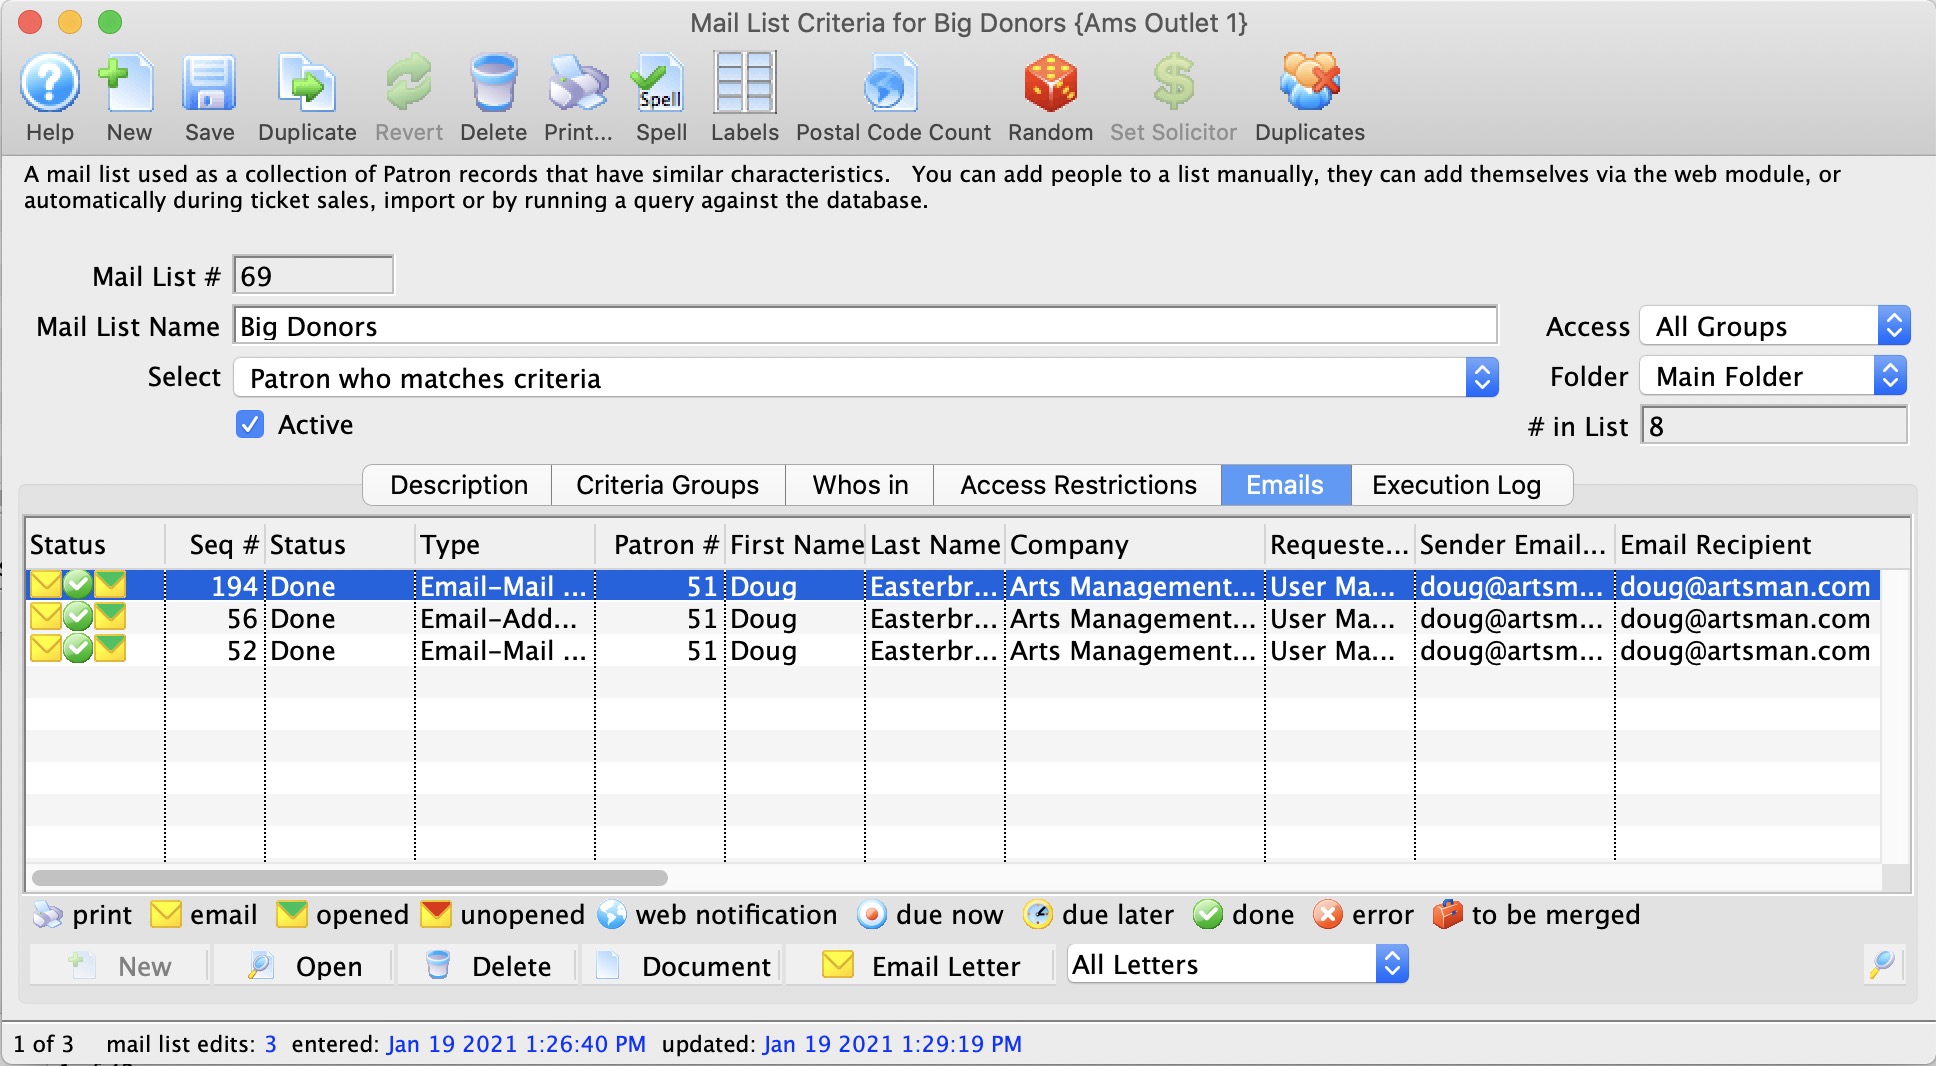
Emails associated with Mail List
|
For mails to appear in this list, they MUST have been sent out using and unsubscribe list in the form letter merge. |
You can:
- Search by date sent to see what went out on a particular day or for a time period
- Search by letter to see who got a particular bit of correspondence.
- You can see who opened it the letter
- Highlight a number of the lines based on status to see how many were sent and how many were opened
- Have a look to see what is due the future
- Select a number of emails and:
- change their status to Not Done to resend them -or-
- mark them done if you need to have them on the patron's file but never intended to send them, -or-
- delete them - which means that the patron could no longer unsubscribe from the email.
Execution Log Tab
List of the dates and times the mail list was executed.
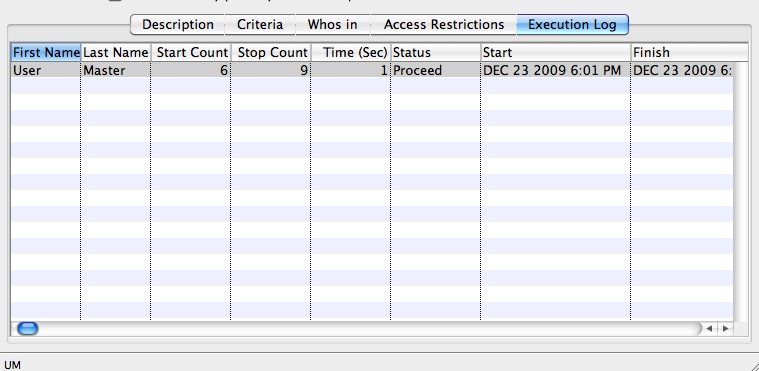
| First | First name of the employee who ran the mail list. |
| Last | Last name of the employee who ran the mail list. |
| Start Count | Number of patrons in the list before the list is executed. |
| Stop Count | Number of patrons in the list after the list is executed. |
| Time (Sec) | Amount of time in seconds the mail list took to populate. |
| Status | The method chosen to populate the mail list. This will be one of:
|
| Start | The date and time at which the instance of the mail list was begun. |
| Finish | The date and time at which the instance of the mail list finished running. |
Remove Patrons using External Email Unsub/Bounce file
- Remove people from a mail list based on patron number -and/or-
- Remove email addresses completely from the database
|
This process will remove people from mail lists and (optionally) email addresses from the database.
Please ensure you have a recent backup in case you delete data you do not want to delete. The only remedy is to restore a backup database, export the data and then use the patron import processes to bring it back in. |
Preparation of Data
Most email services external to Theatre Manager have a feature to export patrons who unsubscribed from the emailer, or whose emails bounced. You will need to create a file that:
- has (at minimum) a patron number, email address and status. All other fields are ignored. You do not need to get the field names correct as they are matched later.
- The status must either be:
- unsub to indicate that the patron has unsubscribed from the mail list. Theatre Manager only looks at the first 5 characters, so you can use unsubscribe or any other variation.
- bounce to indicate that the email was not deliverable. Theatre Manager only looks at the first 5 characters, so you can use bounc, bounce, bounced or any variation.
- It can be in excel format, tab delimited or comma delimited

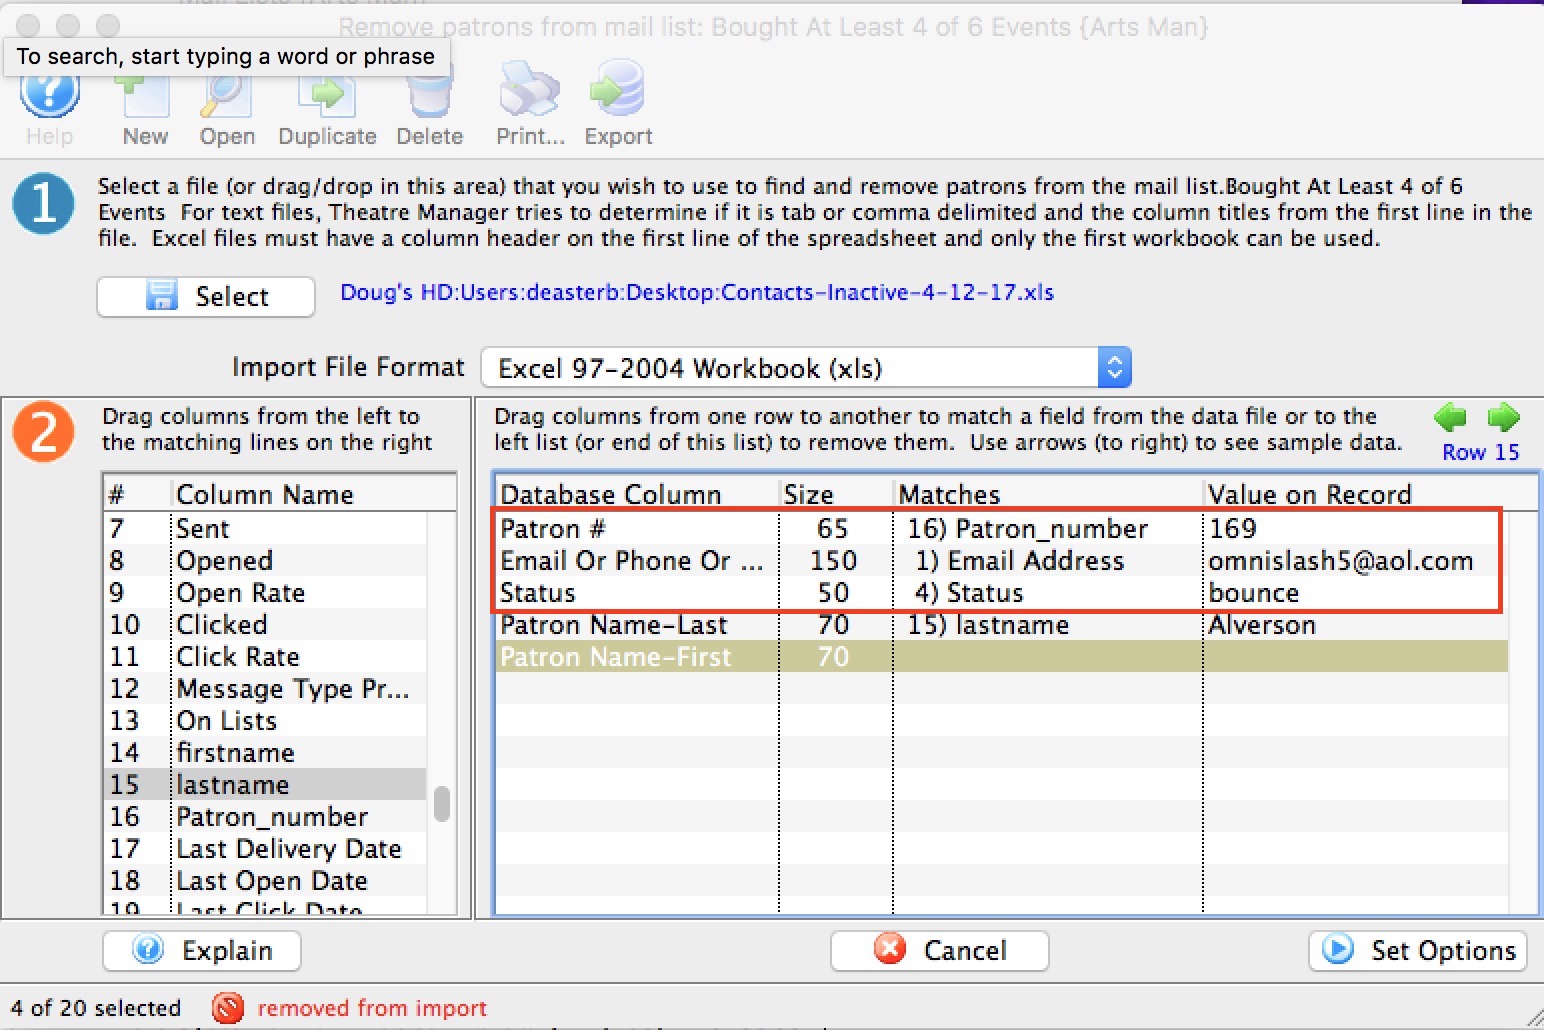
Importing the file to remove patrons from a mail list
To begin the process, open up a mail list window to the Whos In Tab. You can either:
- Click the Unsub Email button which will ask you for the file you prepared above -or-
- Drag the file you prepared above on top of the list of patrons.
Match up the following fields:
- Patron Number - note, any row with no patron number, or a patron number not found in the database will be ignored. This means:
- if you merged people together and then they unsubscribed, TM cannot will not find them in the database and they cannot be unsubscribed from the mail list.
- It will also not unsubscribe people who are only in the mail list program database and not in Theatre Manager since they don't have a Theatre Manager Patron Number
- Email Address - the email address from the mail list program
- Status - which contains the first 5 letters of either unsub or bounce. Any other status codes are ignored.
There are two functions that the unsubscribe process can support which are indicated on this screen. You can:
- Remove People from a mail list. The patron's email address is retained in Theatre Manager - they are simply deleted from the mail list based on patron number matching. Since there are two status codes in the import file, you can elect to remove based on:
- unsub - the patron has indicated that they don't want emails from you by actively unsubscribing from an eblast you sent out. This option reflects the patron's intent
- bounce - The external email package does not know if the patron got the email from you. A bounce could mean many things such as: an invalid email address, the patron's email sever is not currently working, or their email server is rejecting your email as spam. A bounce does not necessarily mean bad email. Multiple bounces from many emails increases the likely hood of the email address being bad, so you may need to track the bounces for a while before using this option.
- Completely delete the email address from the database - if you get a lot of bounces, you can elect to DELETE the email address from the database. This option should be used sparingly because it will DELETE the email address from the database and disassociate it from ALL PATRONS IN A HOUSEHOLD that are sharing the email address.
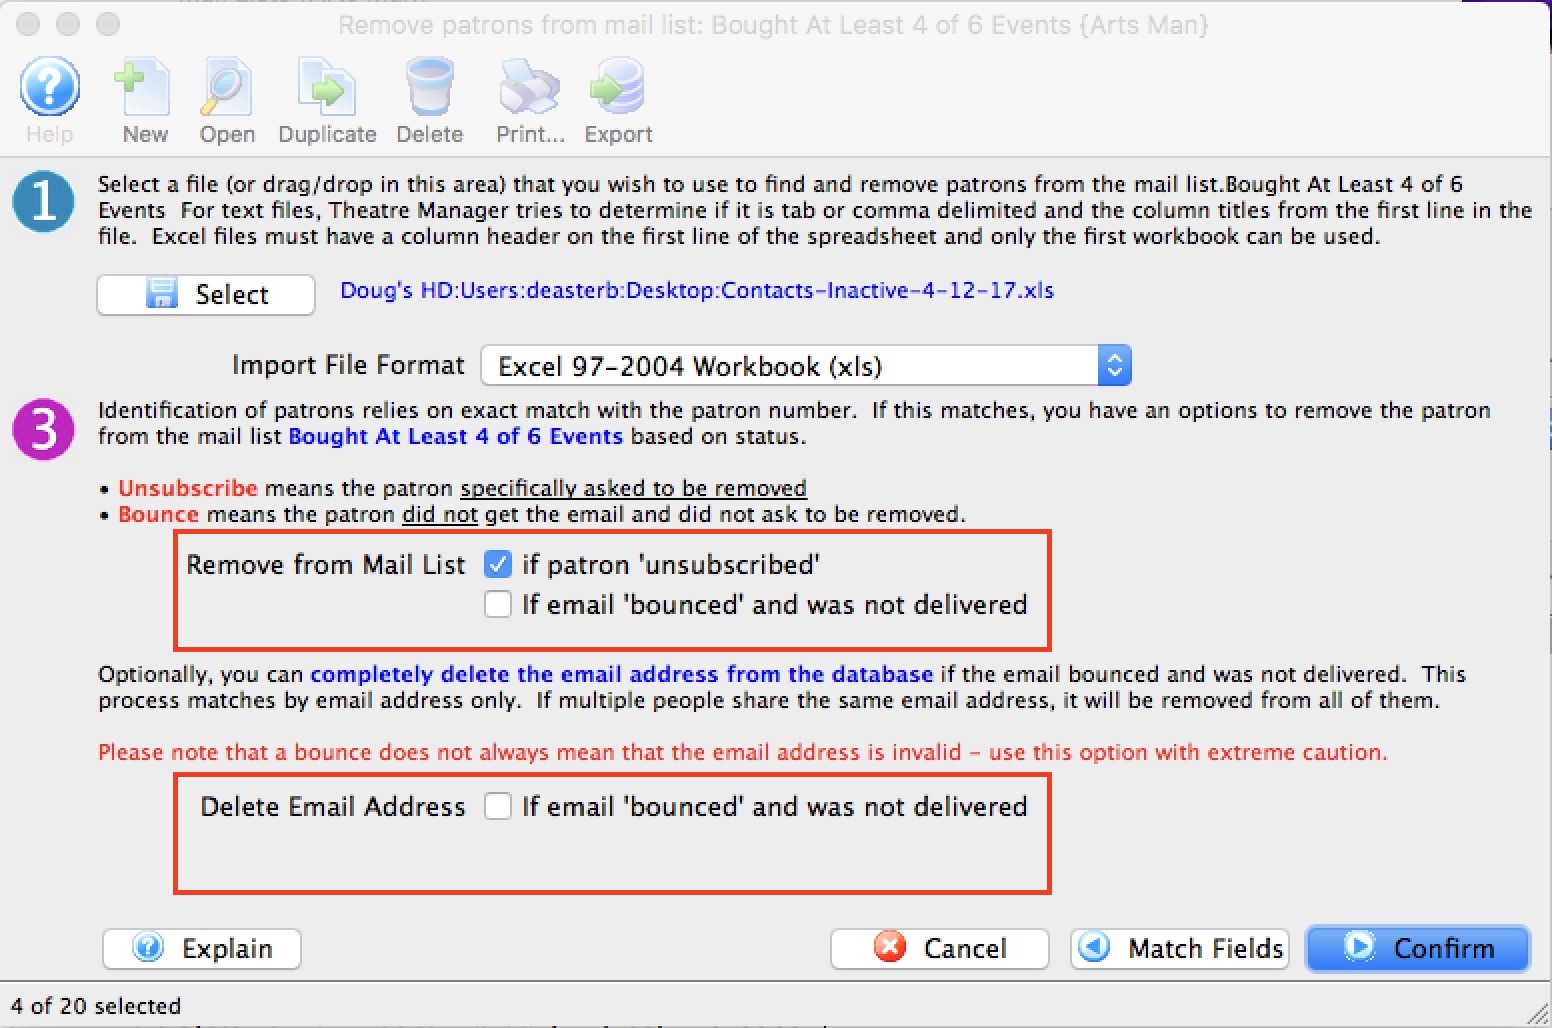
The final step is to confirm what you want to do. It suggests a backup be made since the process cannot be undone without going to a backup.

Removing a Patron Through the Mail List Window
This method is useful for removing multiple patrons from a mail list when they do not have common information. If the patrons all have common information (e.g. they all are non-donors) use the Mail List Database Query method of removal.
To remove a patron through the mail list window, you perform the following steps:
- Open the Mail List Window.
Click Here to learn how to open the window.
- Find the mail list to remove patrons from.
- Click the Who's In
 tab.
tab.
- Select the patrons you want to remove from the mail list.
Single click on a patron to select them or use the Ctrl key (PC) or the Command/Apple key (Mac) to select multiple patrons.
- Click the Remove
 Button.
The patron has been removed from the list.
Selling Passes/Gift Certificates to a number of Patrons
You can add those passes to the patron record one at a time, or you can add them EN MASSE to selected people in a mail list.
|
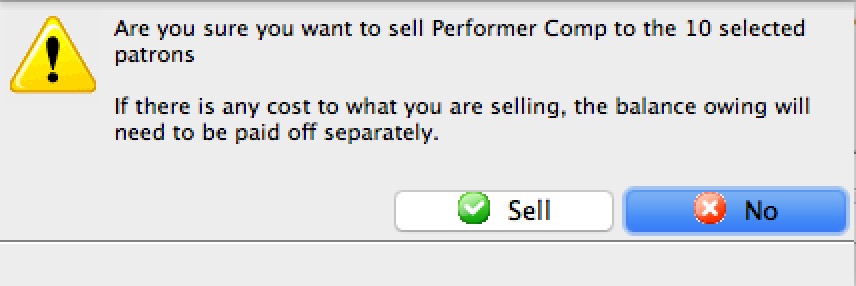
This process can sell a lot of passes or gift certificates quickly. It does not provide a process to pay for any that generate a balance owing by the customer.
If passes are sold that require payment, you may find it easier to pay for them on the Patron Tab in the pass setup window. |
Process of selling a Pass/Gift Certificate to Multiple Patrons
Open up a mail list that contains the people that you want to sell the passes/gift certificates to and go to the Whos In tab on the mail list window. The start of the process is:
- Select the patrons who you want to give the pass to
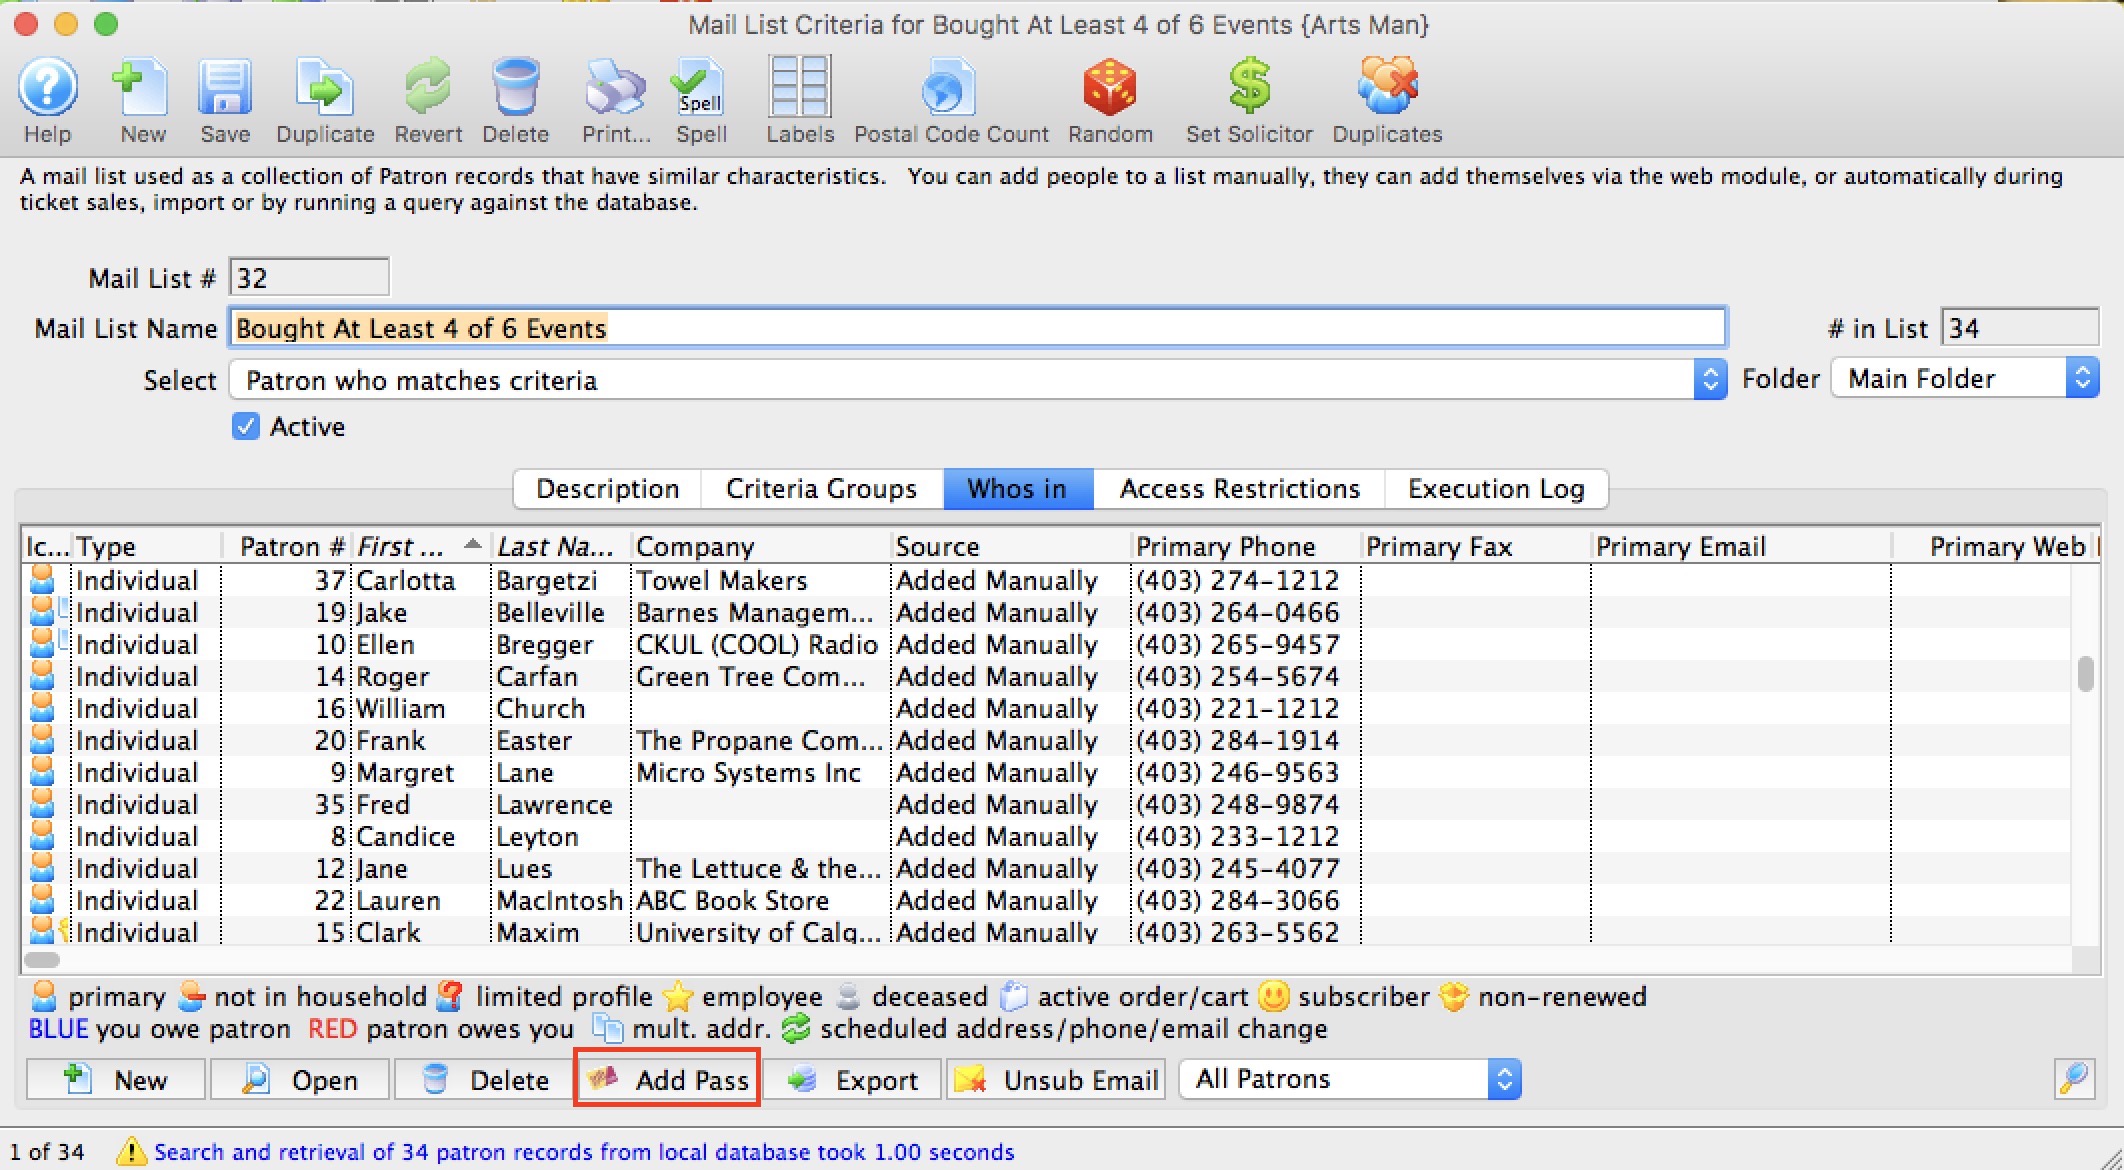
Then do one of the following two steps:
- Click the Add Pass button (above window) and then pick a pass/gift certificate type from the pop up list -or-
- Open the pass type list and drag one of them onto the selected patrons
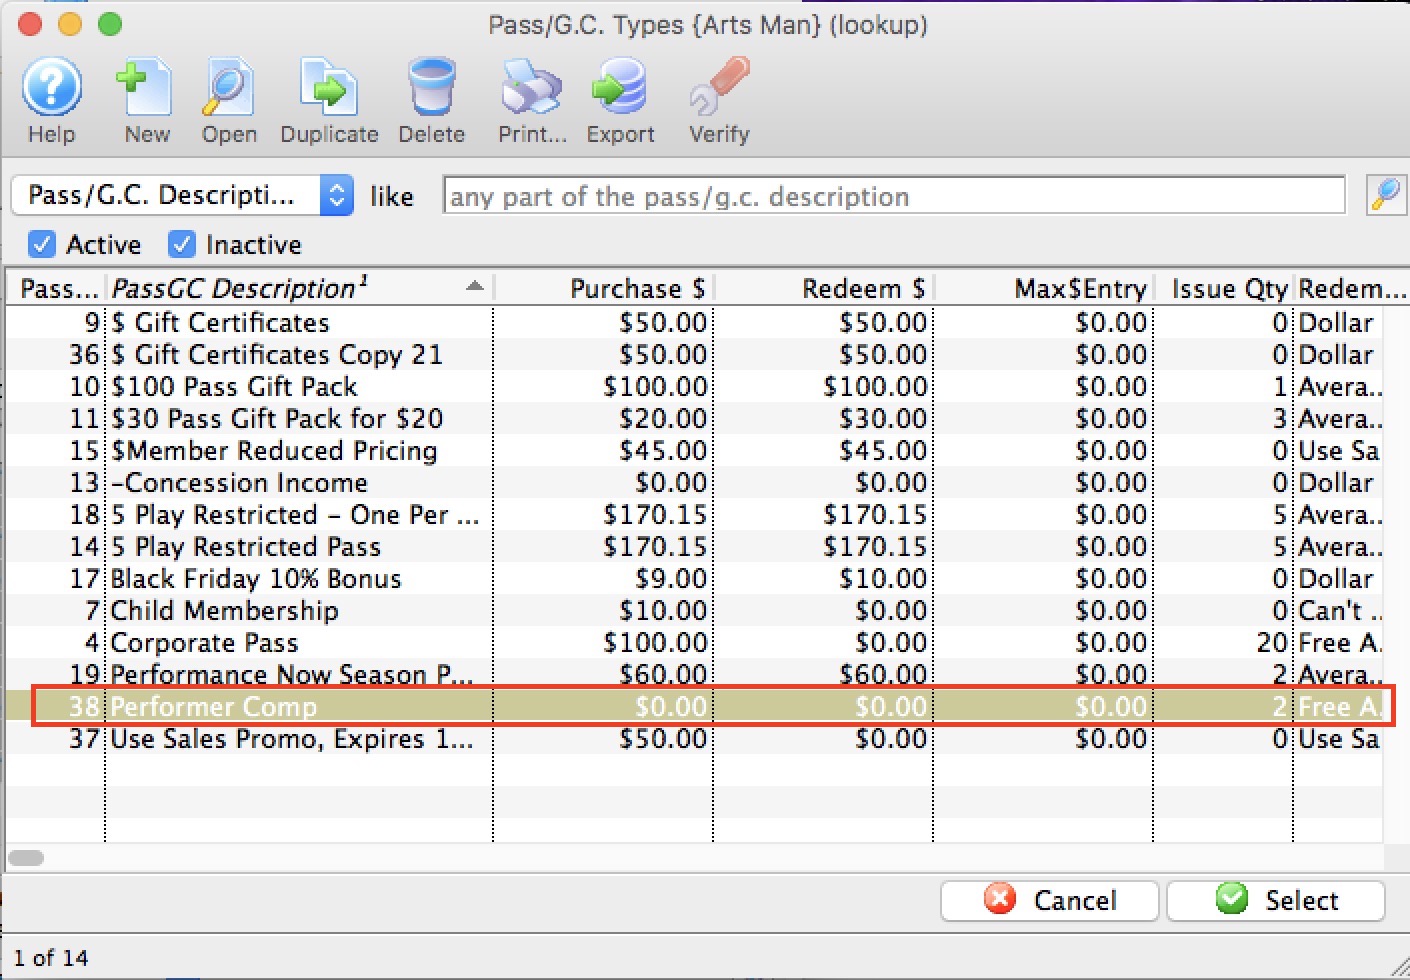
Once you have picked a pass to sell to the selected patrons, you will see a confirmation message.
Who is on the Mail List
Once a mail list has been created or found you may wish to view the patrons belonging to the list. By viewing the Who's In tab of the Mail List,
- patrons can be viewed or removed from the list
- you can export the data
- you can print labels for the patrons in the list using the mail lable button
- do maps of where selected people live (context menu)
- and more
To view a patron on the mail list, you perform the following steps:
- Open the Mail List widow.
Click here for more information on opening the window.
- Find the mail list required.
Currently there are 30 patrons attached to this mail list as seen by the # in List to the right of the window.
- Click the Whos In tab.
The Who's In information will be displayed.
For more information on this window click here.