Employee Preferences Window
Parts of the Employee Preferences Window
 |
Opens the Theatre Manager online help. |

|
This button is not accessible because new employees must be added through the Patron Window. It is on the window for consistency. For more information on adding employees click here. |

|
Saves changes made to the employee preferences. |

|
This button is not accessible because new employees must be added through the Patron Window. It is on the window for consistency. For more information on adding employees click here. |
 |
Reverts changes made to the employee preference back to the last saved point. |
 |
This button is not accessible because employees cannot be deleted. For more information on removing employees click here. |
 |
Generates a report of the employee detail and access to the screen or default print location. |
 |
Spell checks any fields that can by typed in. |
 |
Opens the Password Window. For more information on the setting employee's passwords, click here. |
 |
Ticketing and membership default search criteria. For more information on the patron tab click here. |
 |
Sales defaults for the employee. For more information on the box office tab click here. |
 |
Reporting preferences for the employee. For more information on the reports tab click here. |
 |
Spell check default settings. For more information on the spell checker tab click here. |
 |
Status bar location. For more information on the windows tab click here. |
 |
Email setup for the employee. For more information on the Email tab click here. |
 |
Facilities setup for the employee. For more information on the Facilities tab click here. |
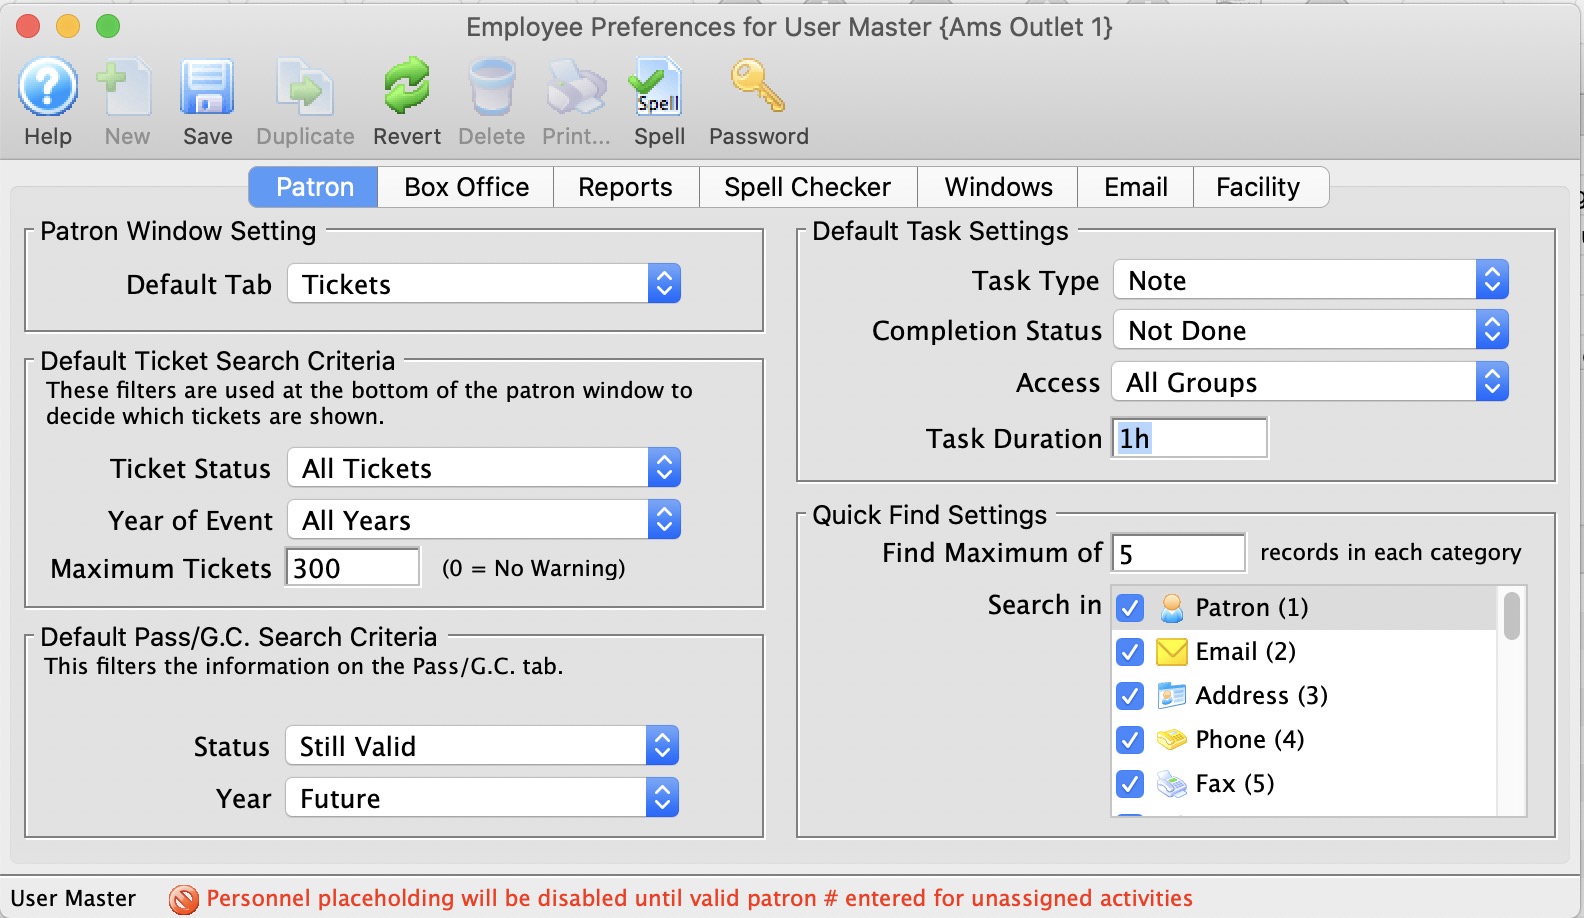
Employee Prefs: Patron Tab
Parts of the Patron Tab
Patron Window Setting |
|
| Default Tab | You can choose which tab on the lower half of the patron window you want to land on when opening a patron window to suit your work flow best |
Default Ticket Search Criteria |
|
| Ticket Status | Choose the types of tickets to be displayed in the ticket tab. There are three choices: All Tickets, Printed Tickets, and Unprinted Tickets. If Printed Tickets was selected then all tickets displayed would be tickets that have already been printed, or marked as printed. |
| Year of Play | Choose the year of the tickets to be displayed in the ticket tab. There are 6 choices: The future year, the current year, previous year, two years prior, Current Year and All Years. If the current year was selected then all tickets displayed would be for events that take place in the current year. |
| Maximum Tickets | The maximum number of ticket to be displayed in the patron window when the patron record is loading. If a patron has more tickets than the number specified in this field, in this case 300, then a message will appear when you open that patron record informing you that 300 tickets have been found would you like to add 300 more. Clicking yes will display another 300 tickets, if there are that many more. If there are less then 300 it will just display the remainder of the tickets. By clicking no, then only the first 300 tickets will be displayed. |
Default Pass /G.C. Search Criteria |
|
| Status | Choose the types of membership to be displayed in the membership tab. There are three choices: All Memberships, Invalid, and Valid. If Valid was selected then all memberships displayed would be active and not yet expired. |
| Year | Choose the year of the memberships to be displayed in the membership tab. There are 6 choices: The future year, the current year, previous year, two years prior, Current Year and All Years. If the current year was selected then all memberships for the current year would be displayed. | Default Task Settings |
| Task Type | Select which task you would like as your default when creating a new one |
| Completion Status | Indicate if you would like new tasks set to 'Not Done', 'In Progress', or 'Done' |
| Access | The default access to be set on a task when creating new tasks |
| Duration | how long should your default task be? Durations are set in text format so that you can express many things. eg:
|
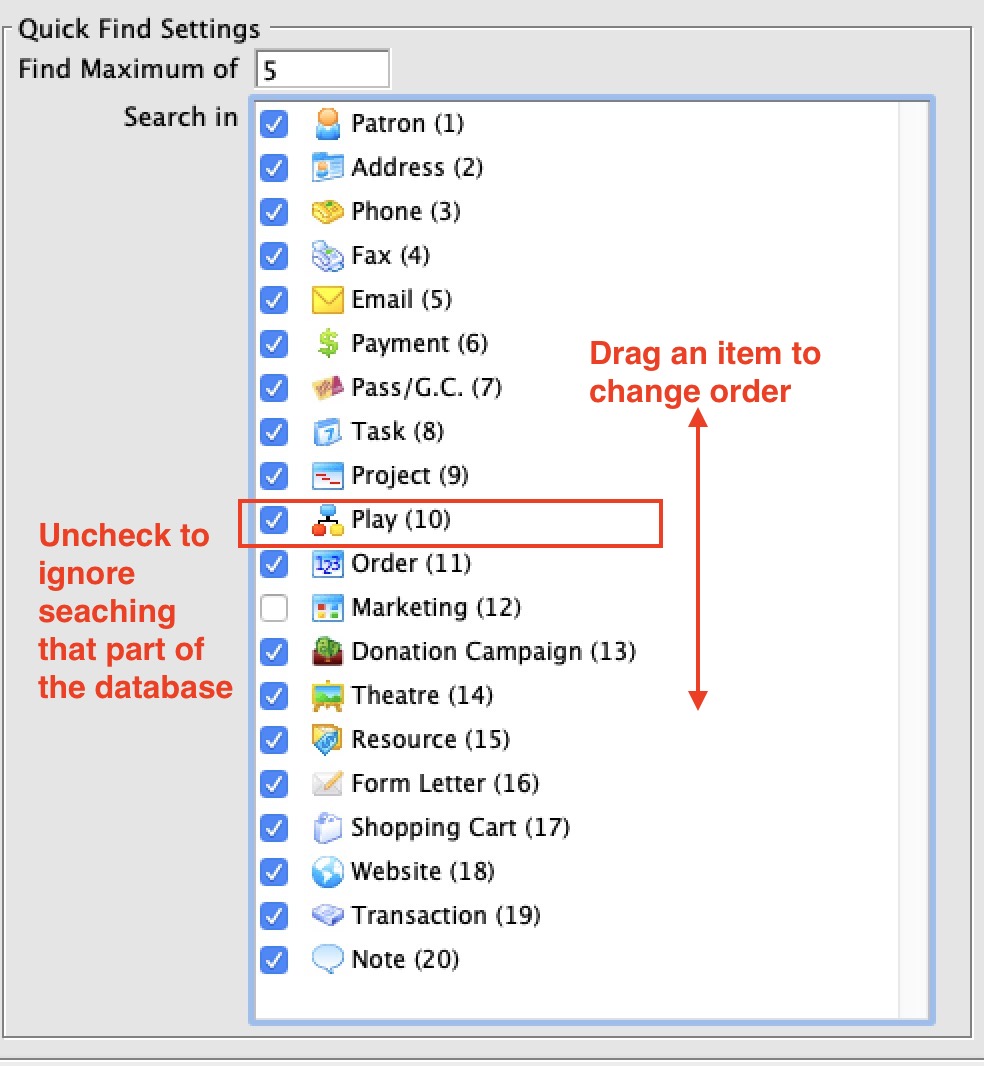
Default Quick Find Sort Order |
|
| Find a Maximum of | Determines the maximum number of values displayed in each of the categories you wish Theatre Manager to search for the quick find. |
| Search in |
Allows the employee to choose what values are shown when using Quick Find, and in what order they are displayed (drag and drop the listings to change their sort order).
|
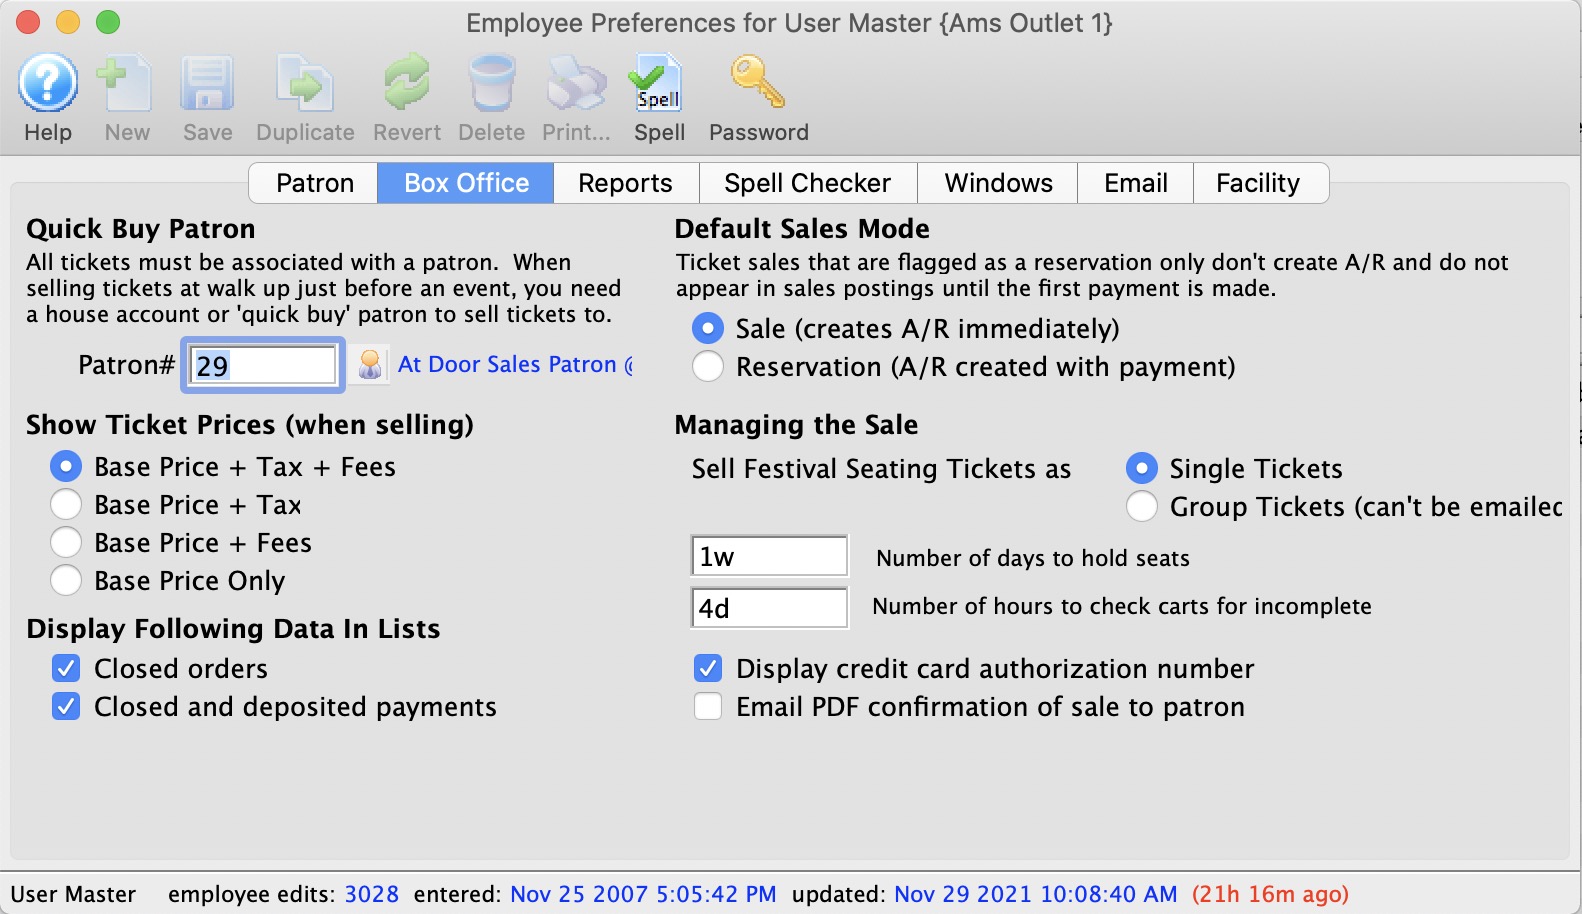
Employee Prefs: Box Office
Parts of the Box Office Tab
| Quick Buy Patron | This field requires a valid patron number. The patron number entered should be for a patron who was specifically set up to act as a quick buy / before event sales patron. A quick buy / before event sales patron is a dummy patron account (not a real person), and because the patron is set in user preferences each user can have their own Quick Buy / Before Event Sales Patron. | ||
Show Ticket Prices (when selling) |
|||
| Base Price + Tax + Fee | Ticket price is displayed as the base price plus tax any any fees associated with the sales promotion. | ||
| Base Price + Tax | Ticket price is displayed as the base price plus tax. | ||
| Base Price + Fees | Ticket price is displayed as the base price plus fees associated with the sales promotion. | ||
| Base Price Only | Ticket price is displayed as the base price only. | ||
Display Following Data In List |
|||
| Closed orders | Fully paid orders will be displayed. | ||
| Closed and deposited payments | Payments for fully paid orders will be displayed. | ||
Default Sales Mode |
|||
| Sale | Purchases are recognized as an accounts receivable at the time of purchase. If payment is made the accounts receivable is cleared. If no payment is made the tickets remain on account until payment is received. | ||
| Reservation | Purchase is not recognized as an accounts receivable until the first payment or donation is received. This will only take effect if permitted in accounting setup in company preferences and is not a recommended practice. | ||
Managing the Sale |
|||
| Single Tickets | Festival seating tickets are issued as one ticket per admission. | ||
| Group Tickets | Festival seating tickets are issues as one ticket per event (i.e. one ticket may be good for 10 admissions). This is intended for group sales like bus tours, school performances etc. where the size of the group will vary as the tour operator/teacher firms up their numbers.
|
||
| Default number of days to hold Seats | Default number of days a patron seat request will be held for an event. | ||
| Number of hours to check carts for incomplete sales | Number of hours that must pass before notification of any checked out - but incomplete - carts that might present an issue and need some action. These carts can be seen in the Shopping Cart list. | ||
| Display credit card authorization number | Credit card authorization number is displayed in the payment window before completing a sale. | ||
| Email PDF confirmation of sale to patron | Indicates that the Employee PREFERS to email a PDF copy of the sale confirmation to the patron for a box office or phone order. If this is:
|
Cash Drawer Port | If using an electronic cash drawer, the port on which it communicates. There are some prerequisites for using the cash drawer as it is older style technology:
|
| Delay /60 Sec | The amount of seconds of delay before the cash drawer opens. | ||

Employee Prefs: Reports Tab
Parts of the Reports Tab
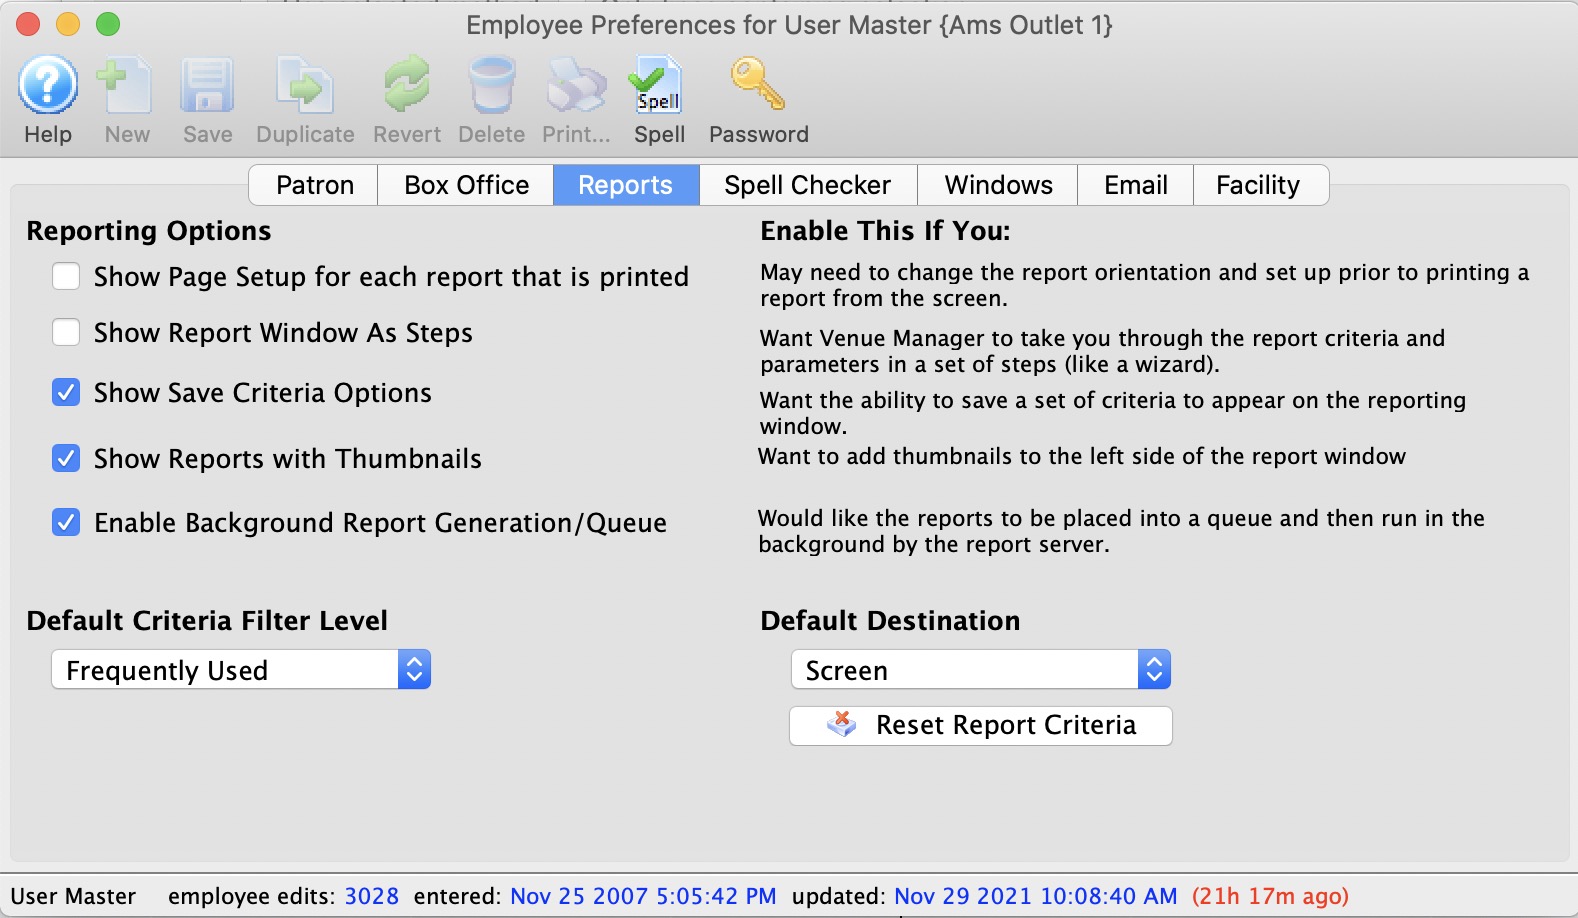
Reporting Options |
|
| Show Page Setup for each report | When checked the user will always be given the opportunity to change the page orientation and paper size before printing a report even if the default destination is to the screen.
|
| Show Report Window As Steps | Changes the criteria window to a series of Next/Previous windows rather then tabs. This assists infrequent users in entering relevant information. |
| Show Saved Criteria Options | When unchecked, will remove the Save Criteria buttons to reduce the number of buttons in the criteria window for simplicity. |
| Show Report in 'Page Preview' Mode | When checked, reports on screen are displayed is actual view with the paper outline.
Note: this is the now the default for 64 bit Theatre Manager and cannot be disabled. The reports also show thunmbnails and you can zoom in using the context menu. |
| Enable Background Report Generation | When checked, reports can be sent to a background queue where they will run on a TM server instead of your workstation. It means you can have multiple reports running simultaneously and view them using the Queue button on the report window. |
| Default Criteria Filter Level | Can change the default criteria filter level to make choosing fields for search criteria more simple. Options are: All, Frequently Used and Essential. |
| Default Destination | A drop down list allowing users to specify the default print location. There are five options: Clipboard, File, Page Preview, Printer, Screen. |
 |
Removes, clears, resets any of the saved report criteria and report export settings. |
Employee Prefs: Spell Checker
Parts of the Spell Checker Tab
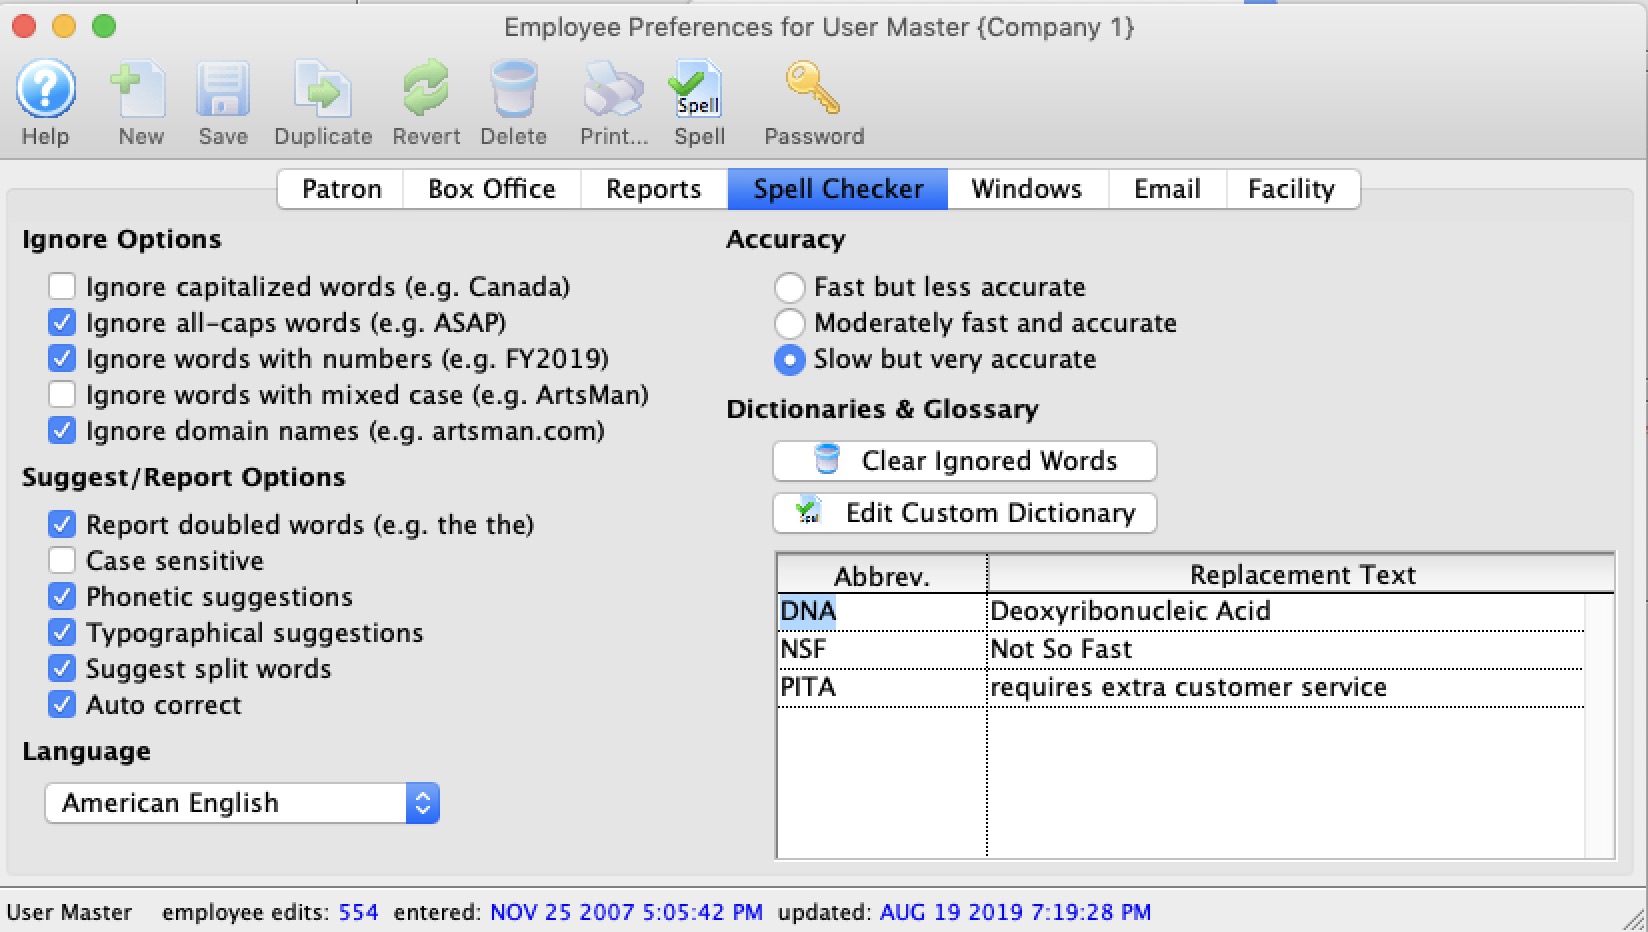
Ignore Options | |
| Ignore capitalized words | Ignores capitalized words found in mid sentence. An example may be a day of the week or a country. |
| Ignore all-caps words | Ignores words completely capitalized. An example may be a radio station or acronym. |
|
Ignore words with numbers |
Ignores words that contain both letters and numbers. An example may be an event code. |
| Ignore words with mixed case | Ignores mixed case words. An example may be ArtsMan. |
| Ignore domain names | Ignores domain names for email or web sites. Often domain names are a combination of words that run together. An example would be artsman.com |
Suggest / Report Options |
|
| Report doubled words | Detects same words typed side by side. An example would be the the. |
| Case sensitive | Locates words that should be capitalized but are not. An example would be canada. |
| Phonetic suggestions | Displays word suggestions that sound like the miss spelt word. Either phonetic suggestions or typographical suggestions must be selected in order for spell check to provide suggestions. |
| Typographical suggestions | Displays word suggestions that appear similar to the miss spelt word. Either phonetic suggestions or typographical suggestions must be selected in order for spell check to provide suggestions. |
| Suggest split words | Displays suggestions for words that appear to run together. |
| Auto correct | Detects words within the selected dictionary marked as Auto Change and correct them without prompting. An example may be teh changing to the. |
Language |
Select a language to spell check in. Choices are American English, British English, Dutch, French, German, Italian, and Spanish. |
Accuracy |
|
| Fast but less accurate | A fast scan of the source document which may provide less accurate spell check results. |
| Moderately fast and accurate | A quick scan of the source document which moderate accuracy. |
| Slow but very accurate | A slow, accurate scan of the source document. |
Dictionaries and Glossary |
|
| |
When ignore all is selected during spell check the words are stored for future reference. Clear ignores removes these words from the stored reference. |
 |
Edit the spell check dictionary. Exclude, Ignore, Conditionally Changes and Auto Changes can be adjusted in the dictionary. |
| Abbreviations |
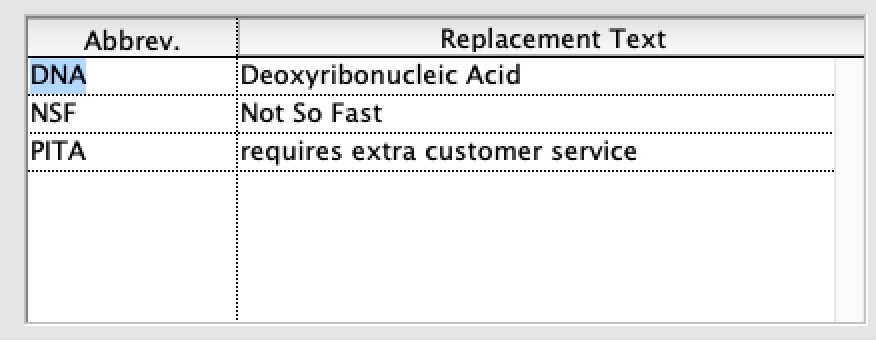 enter any short forms and what you would like them expanded to. These short forms work in most fields and can be used to quickly replace the text you type with a more prosaic version.
There are some standard (built in) short forms like:
so you could type a short form like xNow NSF and it would expand to 2019-08-20 6:28 am Not So Fast using both the standard abbreviation and one you created for yourself. |
Employee Prefs: Windows Tab
Parts of the Windows Tab
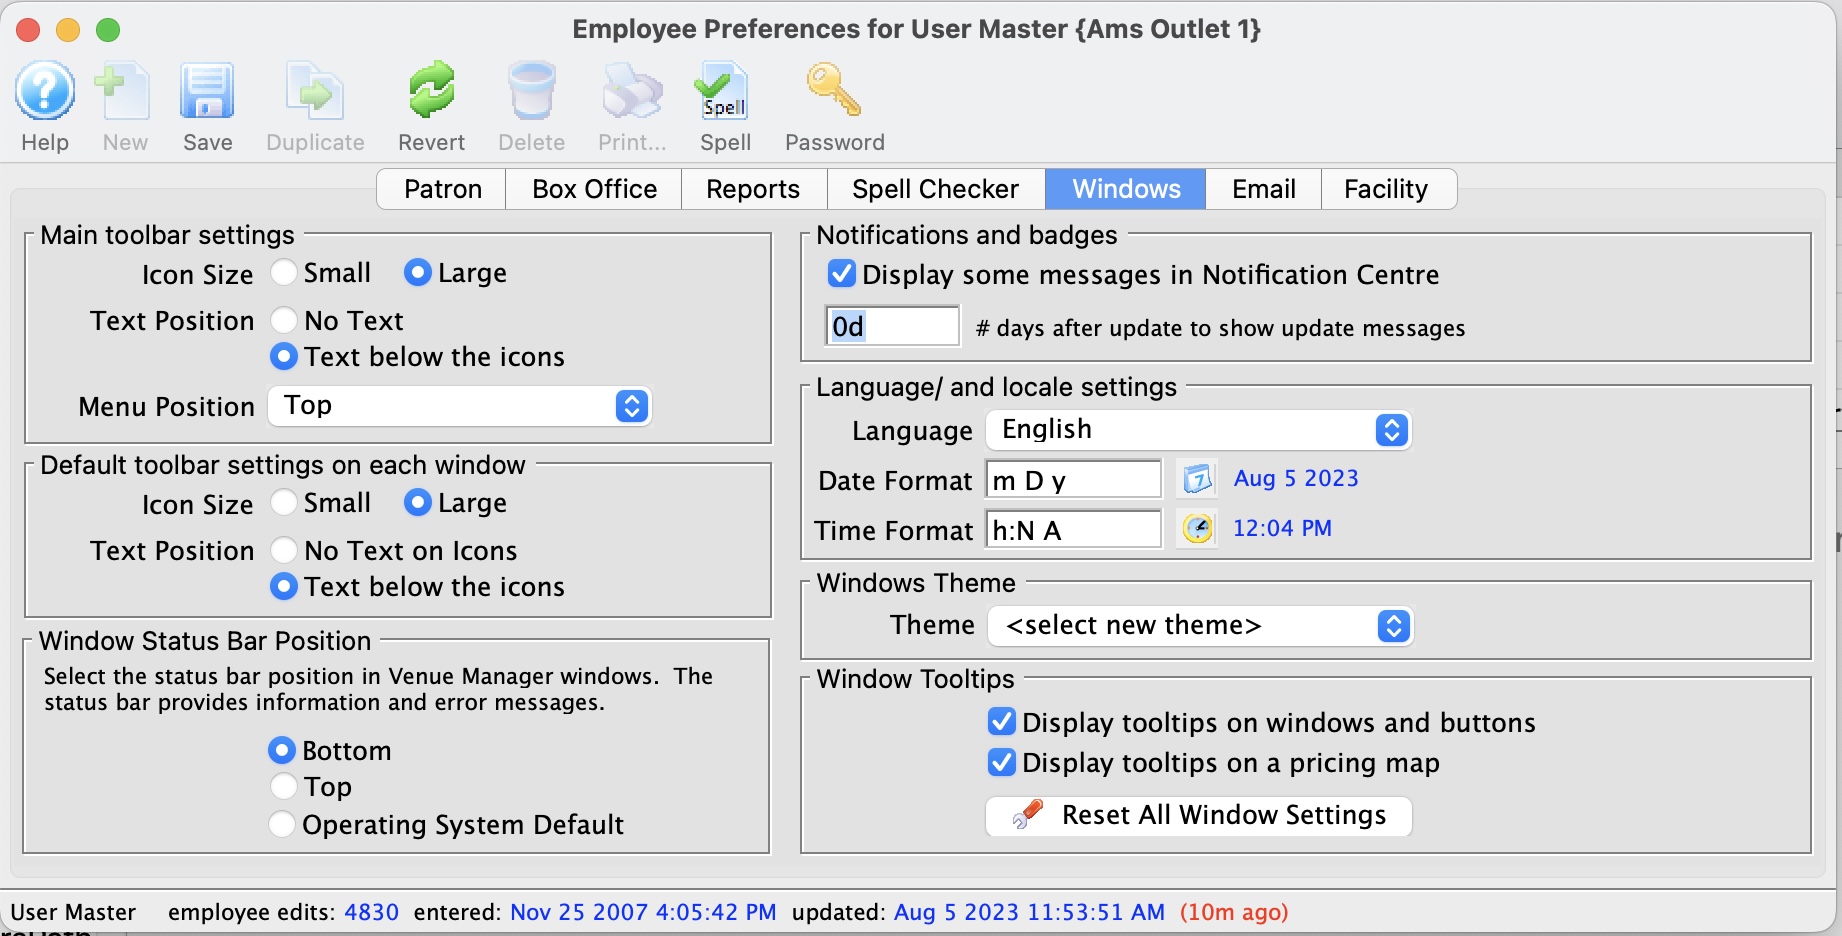
Main Toolbar Settings |
Settings for main Theatre Manager toolbar. |
| Icon Size | Choice between Small and Large icons. |
| Text Position | Can either have no text or text showing below icons. |
| Menu Position | Where you would like the menu positioned on the screen: None, Top, Bottom, Left, Right, Floating |
Window Tooltips |
|
| Display tooltips on windows and buttons | Displays tips on windows and buttons when the mouse is hovered over top of the window or button |
| Display tooltips on a theatre map | Displays seat information when mouse is hovered over top of seat on a theatre map |
| Reset Window Positions |
 This will reset all window positions and other column and sort settings back to the default when clicked. Optionally, if you are a master user, you can reset for all user. Otherwise, only your settings are cleared.
The steps are:
|
Notifications and Badges |
|
| Display some messages in notification centre | Displays some alerts in the notification centre on your Macintosh (no Windows equivalent as of yet) |
| # Days to show update messages |
You can set the number of days that update notices will show in the daily notification window on startup of TM. This can be useful if you've been away and want to see auto-updates or manually installed updates. Clicking on a row in the notification window will let you click 'explain' to see the release notes.
Set this number to zero if you do not want any notifications than an update occurred. |
Preferred Toolbar Icon Settings |
|
| Icon Size | Choice between Small and Large icons. |
| Text Position | Can either have no text or text showing below icons. |
Windows Status Bar Position |
|
| Position | Where you would like Theatre Manager status bar positioned. This status bar displays information and any errors you may receive. Options are: Bottom, Top, or Operating System Default |
Windows Theme |
|
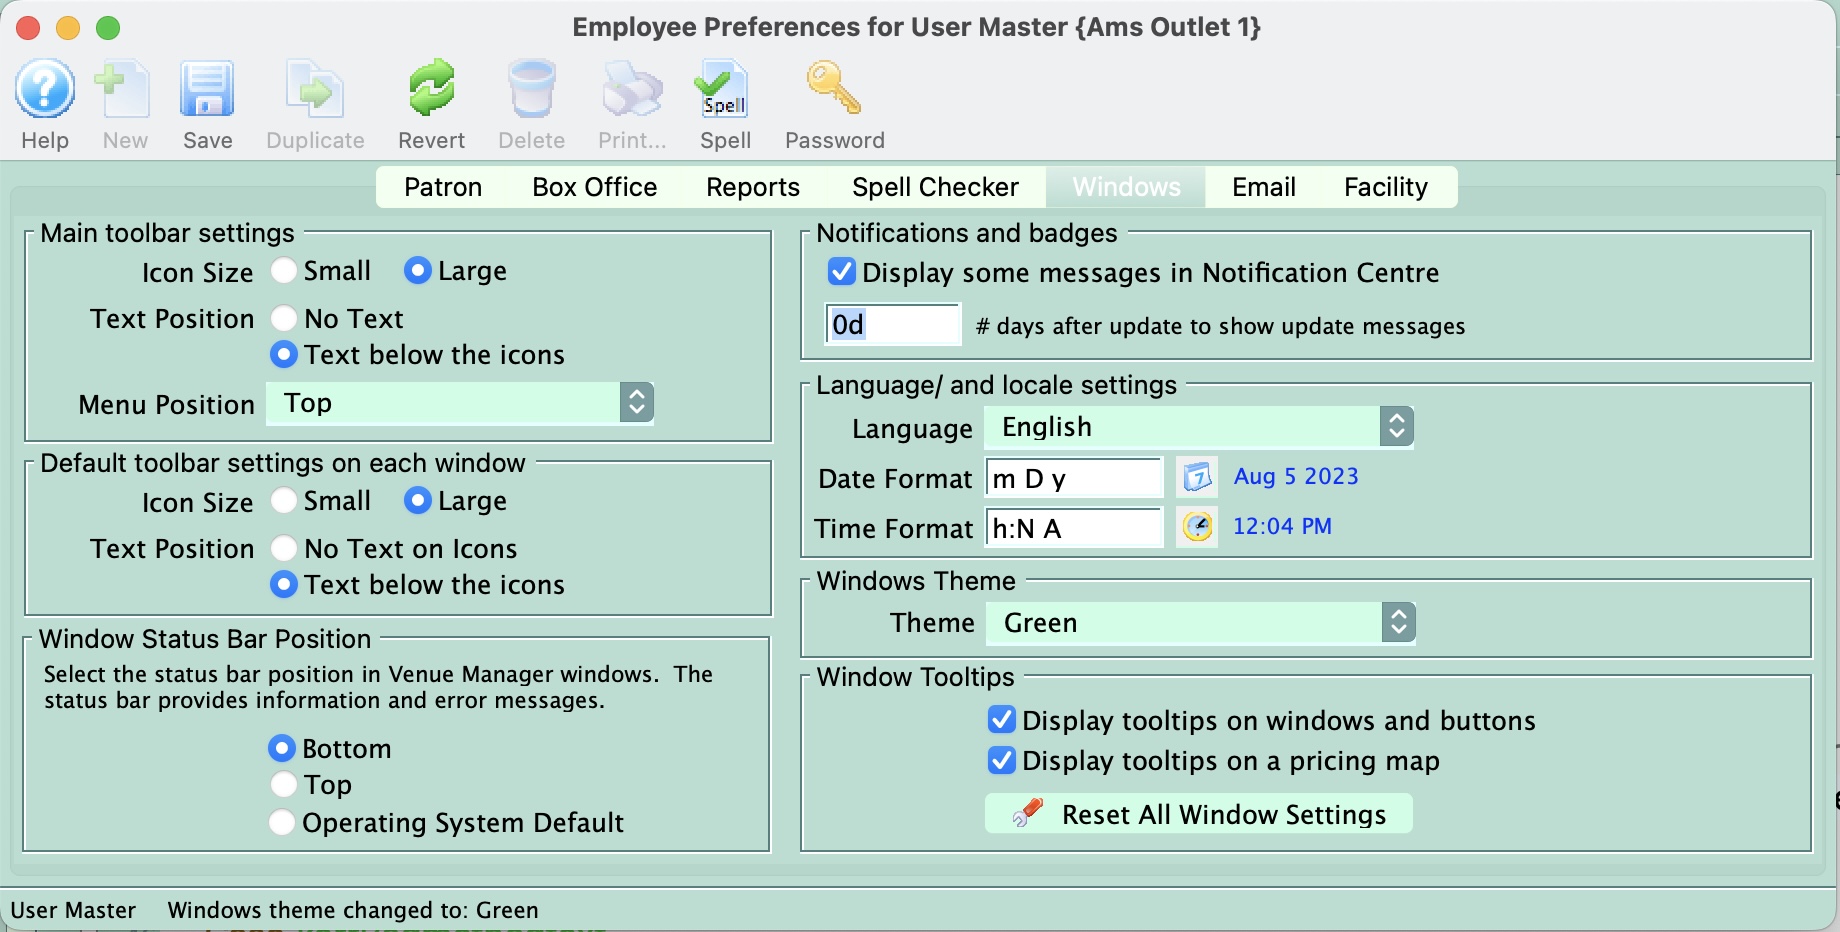
| Theme | 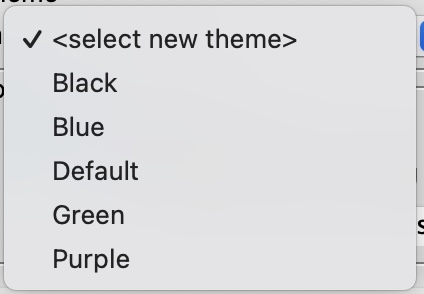 You can set the general colour theme of Theatre Manager which affects every window, instantly. Choose the theme from the drop down. Using default sets it back to the Theatre Manager default for the platform.
Note: a new walk-around install of Theatre Manager on your machine may automatically reset the theme to default. This is an example of the window using the green theme.
|
Language/Locale Settings |
|
| Language Preference | Sets default Language, Date and Time. Click on the drop down bar to select a language - Deutsch, English, Espanol, Francais or Italiano. |
| Date Display | Click on the calendar icon to set the default date. A popup window will provide a listing date formats from which to chose. |
| Time Display | Click on the clock icon to set the default time. A popup window will provide a listing time formats from which to chose. |
Employee Prefs: Email Tab
Parts of the Email Tab
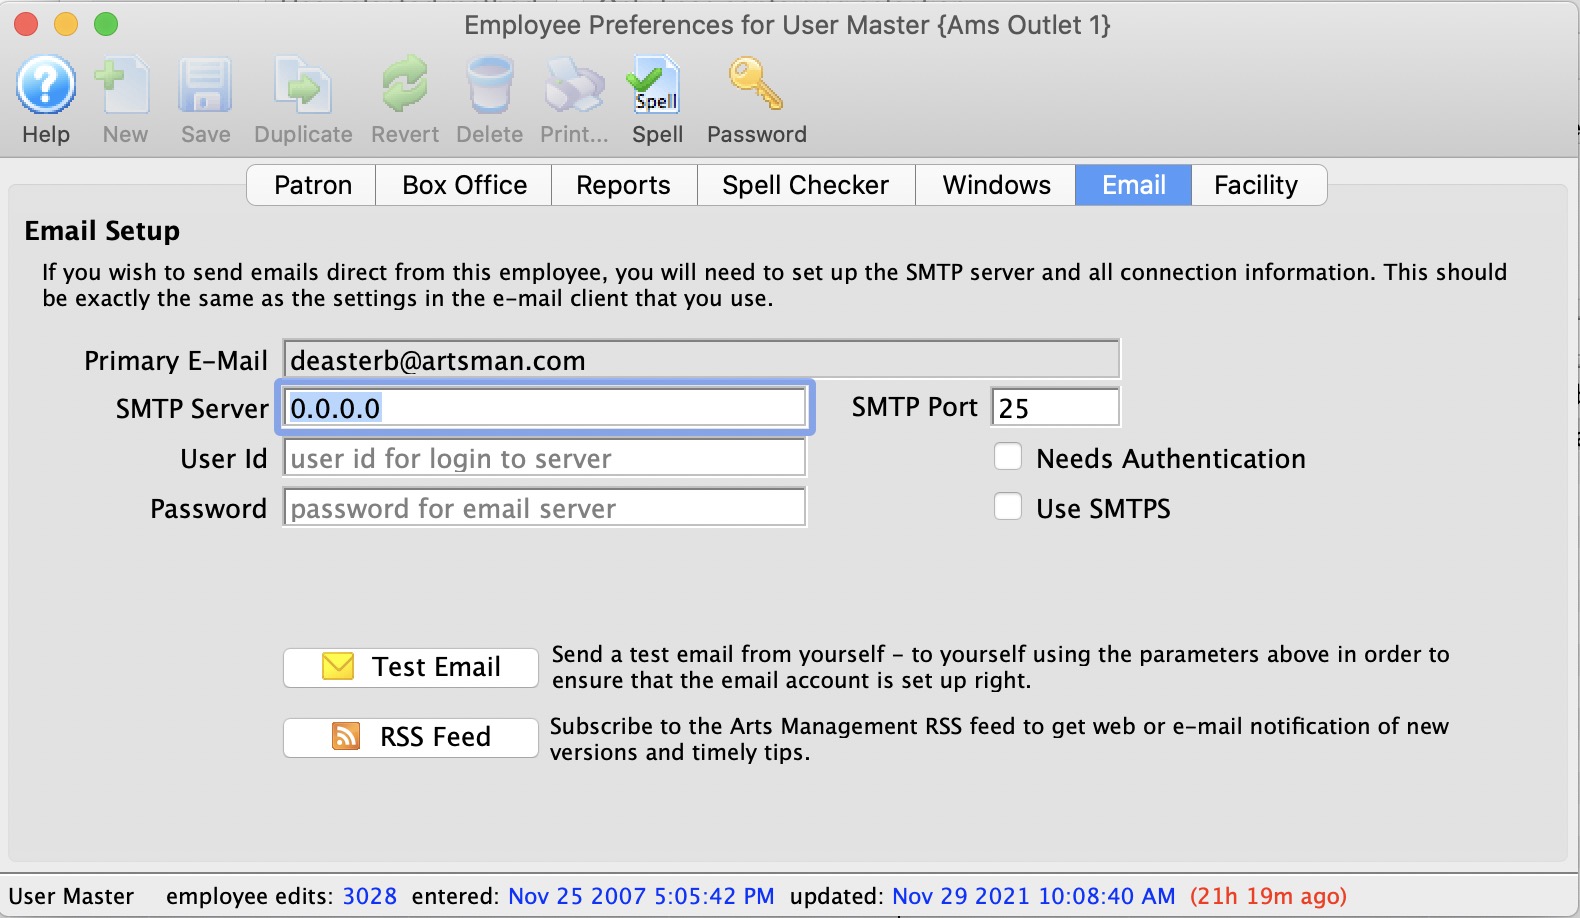
Email Setup | |
| Primary E-Mail | Automatically generated from the primary email as set up on the employee's patron record. |
| SMTP Server | The company's SMTP server to send emails to/from this employee. |
| SMTP Port | Usually 25 - the port used to talk to the SMTP server for email sending to/from the web listener for this employee. |
| User Id | In cases where authentication is necessary, the employee's email user id login for the SMTP server. |
| Password | In cases where authentication is necessary, the employee's password for their user id for the SMTP server. |
| Rate Limited Until | If the field is visible, you will see a rate-limit timestamp. This indicates the next time that TM will attempt to send an email using this account since it believes you have reached your maximum allowable email limit as determined by your ISP. |
| Needs Authentication box | Check this box if authentication is required to access the SMTP server. Encryption methods of NONE, LOGIN, PLAIN, CLEARTEXT, and CRAM-MD5 are supported. |
| Use SMTPS box | Check this box if the SMTP server requires SMTPS for connection. TLS/StartTLS are supported automatically. |
 |
Click the Test Email button to send a test email using the SMTP settings as entered. |
Employee Prefs: Facility Tab
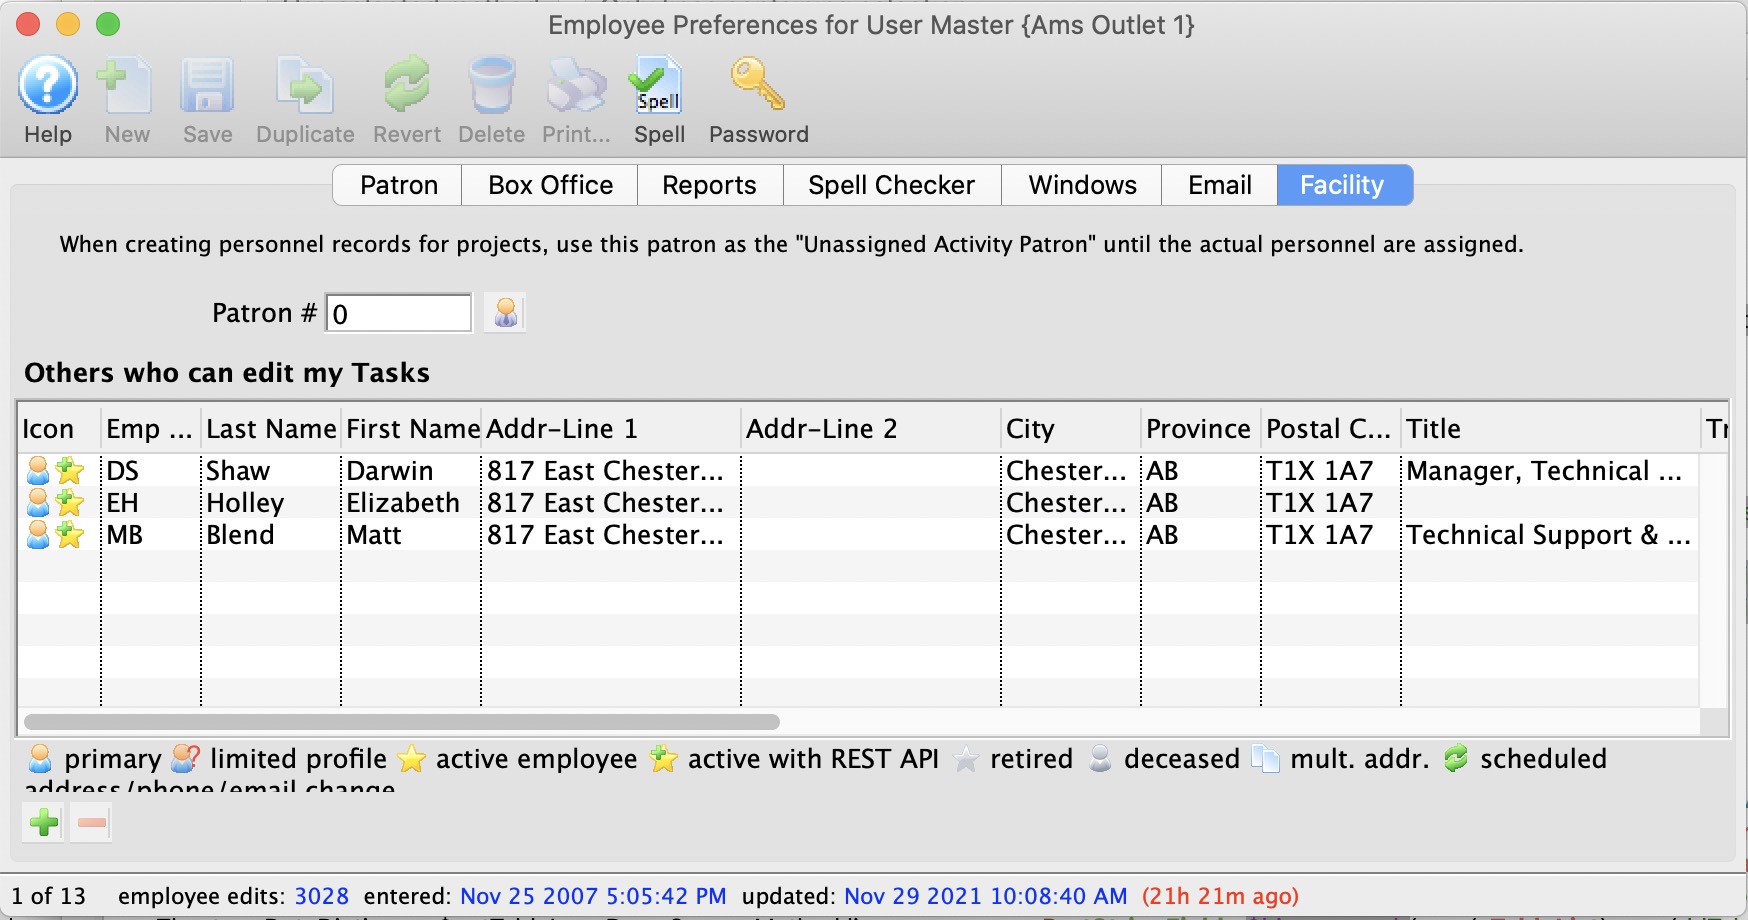
In the Facilities tab of Employee Preferences you can effect users abilities to edit calendar items and tasks.
Parts of the Facility Tab
| Unassigned Activity Patron | Enter a default unassigned activity patron here as a placeholder for personnel assigned to specific project tasks to be used while those personnel are still being set up. The purpose of this patron is so that you can assign placeholders for tasks in the Facility Management module. When Theatre Manager assigns a placeholder patron, it needs to know who that patron is - so by adding it to the Employee Preferences file, Theatre Manager connects the generic patron to the placeholder.
This way, you can have a task that requires 5 people, but not yet know who those 5 people are. You can add 5 generic patrons to the task, then replace them with real patrons when you are ready. It is also used in the volunteer/personnel tab in events and dates to bulk set up the people needed to work a performance. If you are receiving the message: "Personnel placeholding will be disabled until valid Unassigned Activity Patron # entered." then you will need to add a generic patron to this cell. |
| Others who can edit my tasks | Here you can assign delegates who can edit your calendar task information. This prevents others from changing your tasks by supplying a list. Use the green plus and red minus buttons at the bottom left of the table to add or remove patrons from this list. |