End of Day Wizard Window
Since Theatre Manager treats sales and payments as separate items, the user needs to do four steps each day to balance. We recommend completing all steps by the end of the day -or- next morning prior to the day's sales.
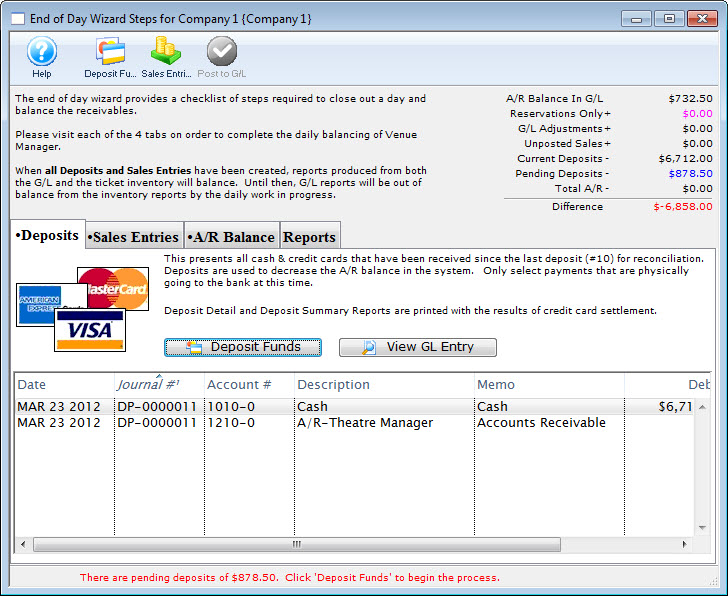
Parts of the End of Day Wizard Window
Toolbar/Ribbon Bar

 |
Help - Opens the online help. |
 |
Deposit Funds - Selects all undeposited payments by payment date and creates a bank deposit |
 |
Sales Entries - Creates G/L entries based on all new sales transaction in Venue Manager |
 |
Post to G/L - Posts the G/L Entries that comprise the 'end of day' totals to the ledger |
 |
The calculator located in the upper right hand corner of the window is used to track where the balance stands as the user progresses through the End of Day process. |
 |
The Deposits tab is used for creating deposits to send to the bank. For more information on the Deposits tab, click here. |
 |
The Sales Entries tab is used to journalize all sales entries to the General Ledger. For more information on the the Sales Entries tab, click here. |
 |
The A/R Balance tab is used to journalize all outstanding A/R to the General Ledger. For more information on the A/R Balance tab, click here. |
 |
The Reports tab is used for printing reports when the End of Day process is complete. For more information on the Reports tab, click here. |
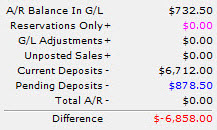
Deposit Tab
Parts of the Deposit Tab
|
The Sales Entries tab is used to journalize all sales entries to the General Ledger. For more information on the the Sales Entries tab, click here. |
|
The A/R Balance tab is used to journalize all outstanding A/R to the General Ledger. For more information on the A/R Balance tab, click here. |
|
The Reports tab is used for printing reports when the End of Day process is complete. For more information on the Reports tab, click here. |
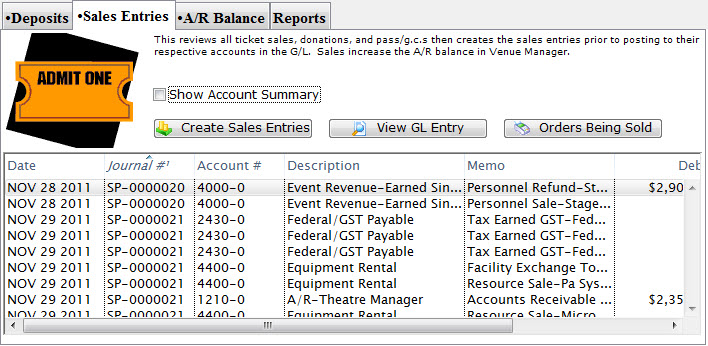
| Date | The date the journal was created. |
| Journal # | The journal to which the payment(s) was posted. |
| Account # | The unique account number for the payment type. |
| Description | A description of the account. |
| Memo | A detailed description of the journal. |
| Debit | Deposits will debit their corresponding account number for the payment type. |
| Credit | All deposits will credit Accounts Receivable in the General Ledger. |
 |
Deposits outstanding funds. For more information on using the Deposits tab, click here. |
 |
Opens the Transaction History window with information on the payments received. |
Step 1: Deposit Detail Window
- is used to identify payments made since the last deposit that can be taken to the bank or settled in a credit card batch
- Remove any post dated credit card payments that cannot be authorized or checks that cannot be found.
- Replace the credit card number or expiry date on a post dated credit card payment to allow it to be authorized
- aggregate them into a 'batch' to take to the bank and create a deposit posting/GL entry (DP-xxxxxxxx) that can be used by the end of day process.

|
The deposit window is designed to match exactly the money put into your bank account -- so that it make it easy to reconcile your bank statement with your accounting program. If you cannot authorize (or find) a post dated payment, or do not want to take specific payment to the bank, REMOVE it from the deposit so that the deposit list matches exactly what will be put into the bank in a single deposit. |
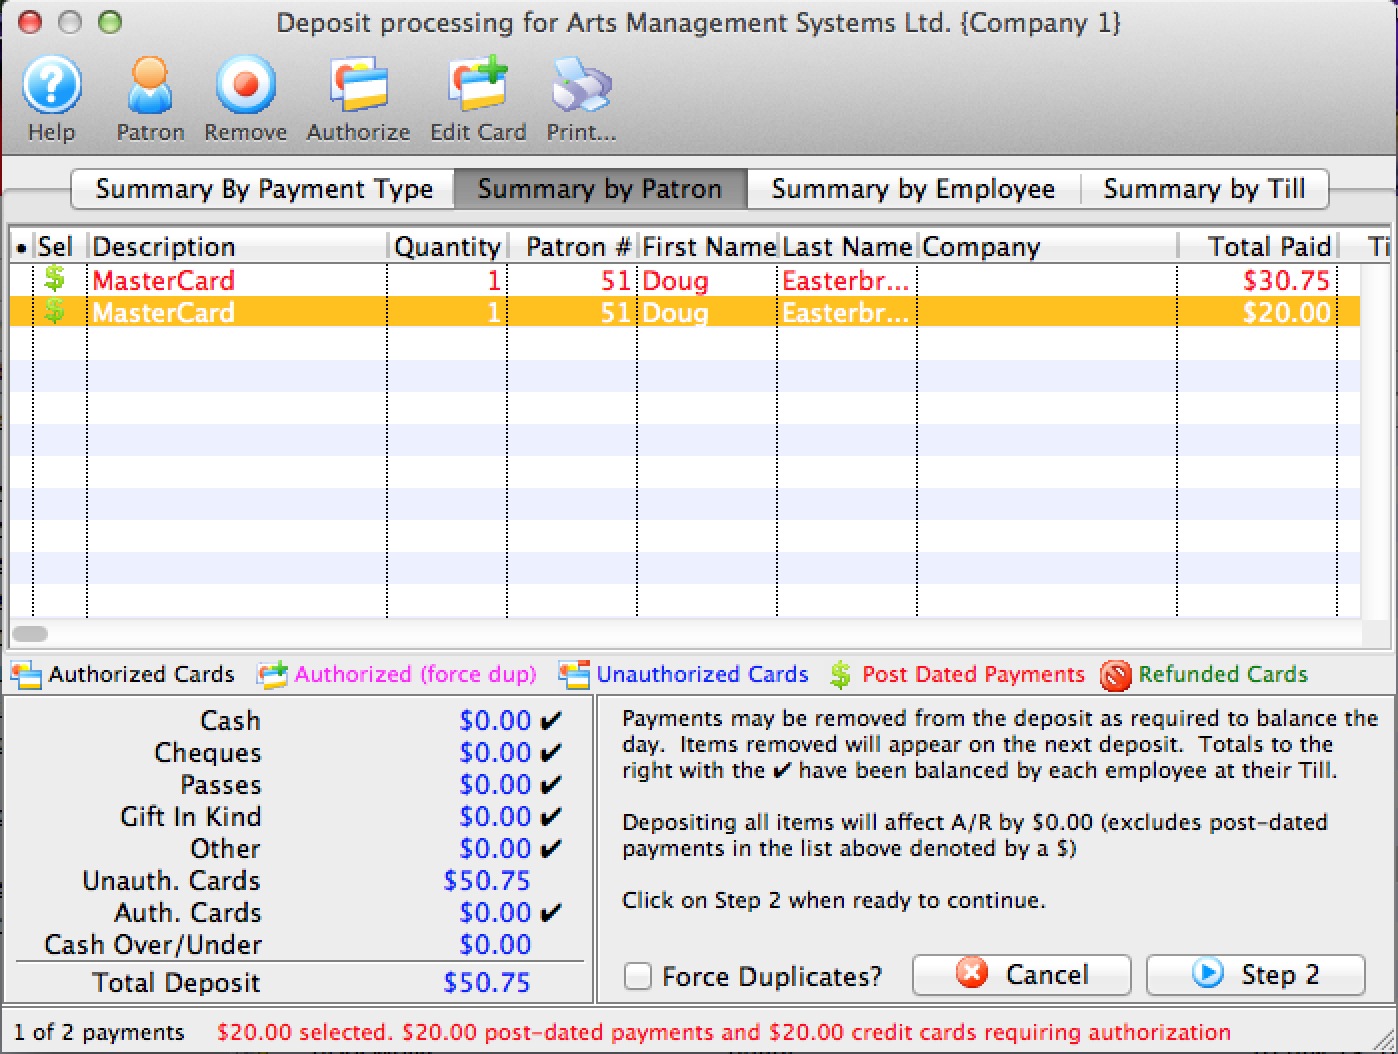
Parts of the Deposit Window
|
Opens the online Help. |
 |
Opens the Patron record for the associated payment. Only valid on Summary by Patron tab. |  |
Removes the selected payments from the deposit. This only removes (not delete) a post dated credit card payment from a deposit. Once a payment is removed, the deposit total will be smaller. The removed payment will re-appear the next time you run the deposit window. Hopefully in that time frame, you will have a replacement credit card or the customer will have topped up the balance on the card so it can be authorized.
While valid on all tabs, the effect is a little different, depending on the tab you are on:
|
 |
Authorizes the selected payments through the credit card server if necessary. Valid on all tabs for credit cards |
 |
Allows you to change the card that a post dated payment was being charged to - in case of a decline and the patron provides a replacement credit card for the purchase.
This option is only valid on the Summary by Patron tab where you can select the individual payment that you want to change. |
 |
Prints a list of the payment in the Deposit window. |
 |
Summarizes the payments in the deposit by payment type. |
 |
Summarizes the payments in the deposit by patron. |
 |
Summarizes the payments in the deposit by the employee who received them. |
 |
Summarizes the payments in the deposit by the till they were associated with. |
| Description | A description of the payment. |
| Quantity | The number of payments. |
| Patron # | The patron number of the patron the payment is associated with. |
| First Name | The first name of the patron associated with the payment. |
| Last Name | The last name of the patron associated with the payment. |
| Company | The company associated with the payment. |
| Received By | The employee who received the payment. |
| Total Paid | The total amount of the payment. |
| Till # | The till number the payment is associated with. |
| Payment Desc | A description of the payment. |
| Date Received | The date the payment was received. |
| Merchant | The merchant used to process the payment. |
| Date Updated | The last date the payment was updated. |
| Troutid | |
| Auth. # | The authorization number of the payment if it was a credit card. |
| Credit Card | The credit card number used to make the payment. |
| Payment # | The payment number. |
| Cash | The amount of cash received with the payment. |
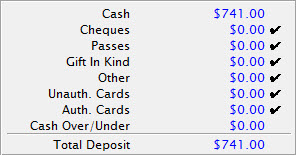 |
The breakdown of all the deposits received and the total deposit amount. |
| Force Duplicates? | If there are similar transactions that seem like duplicates and need to be authorized, this will force the transactions through on the credit card server. Duplicate transactions are rejected by default. |
 |
Cancels the Deposit window. |
 |
Moves to Step Two of the deposit process. |
Change Post Dated Credit Card
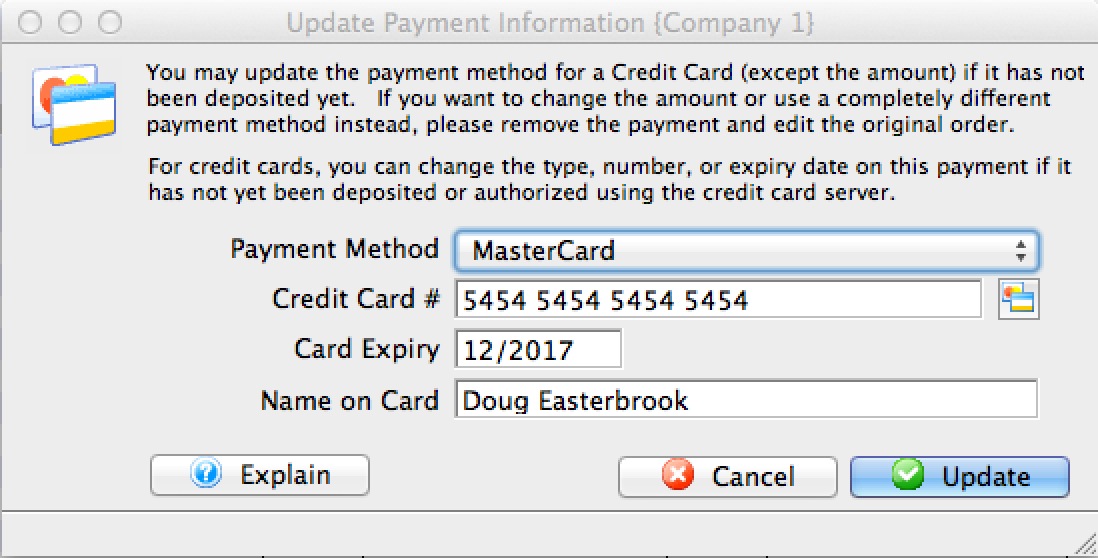 If a credit card has not yet been authorized because
- it is a post dated payment or
- you were operating using emergency mode
- 'Summary by Patron' tab of the Deposit window
- 'Summary by Patron' tab on the Till balance List
- Payment list on the patron window
- Prior payment list on the Order window -or-
- If the card is used for recurring donations:
- you need to change it on the recurring donation window in the payment section PRIOR to the next recurring donation being created.
- If the recurring donation was created and the card wont authorize, change the card number in the Deposit window (item #1 above)
 Simply:
- select one or more unauthorized credit cards in the list of payments
- make sure that they are for the same patron
- Right click to edit it using a context menu. (The deposit and till balance windows also have an icon at the top of the window).
- You will see a window that lets you put in the credit card details similar to the one above right.
- Type in (or swipe) a new credit card, expiry, and name on card.
- Alternatively, use the lookup to select a prior existing card from the patron's list of credit cards
- When you update the payment, it will replace the new card on all the existing, selected, not-yet-authorized payments.
|
When you next to end of day and need to authorize the payments, they will authorize using the replacement credit card. |
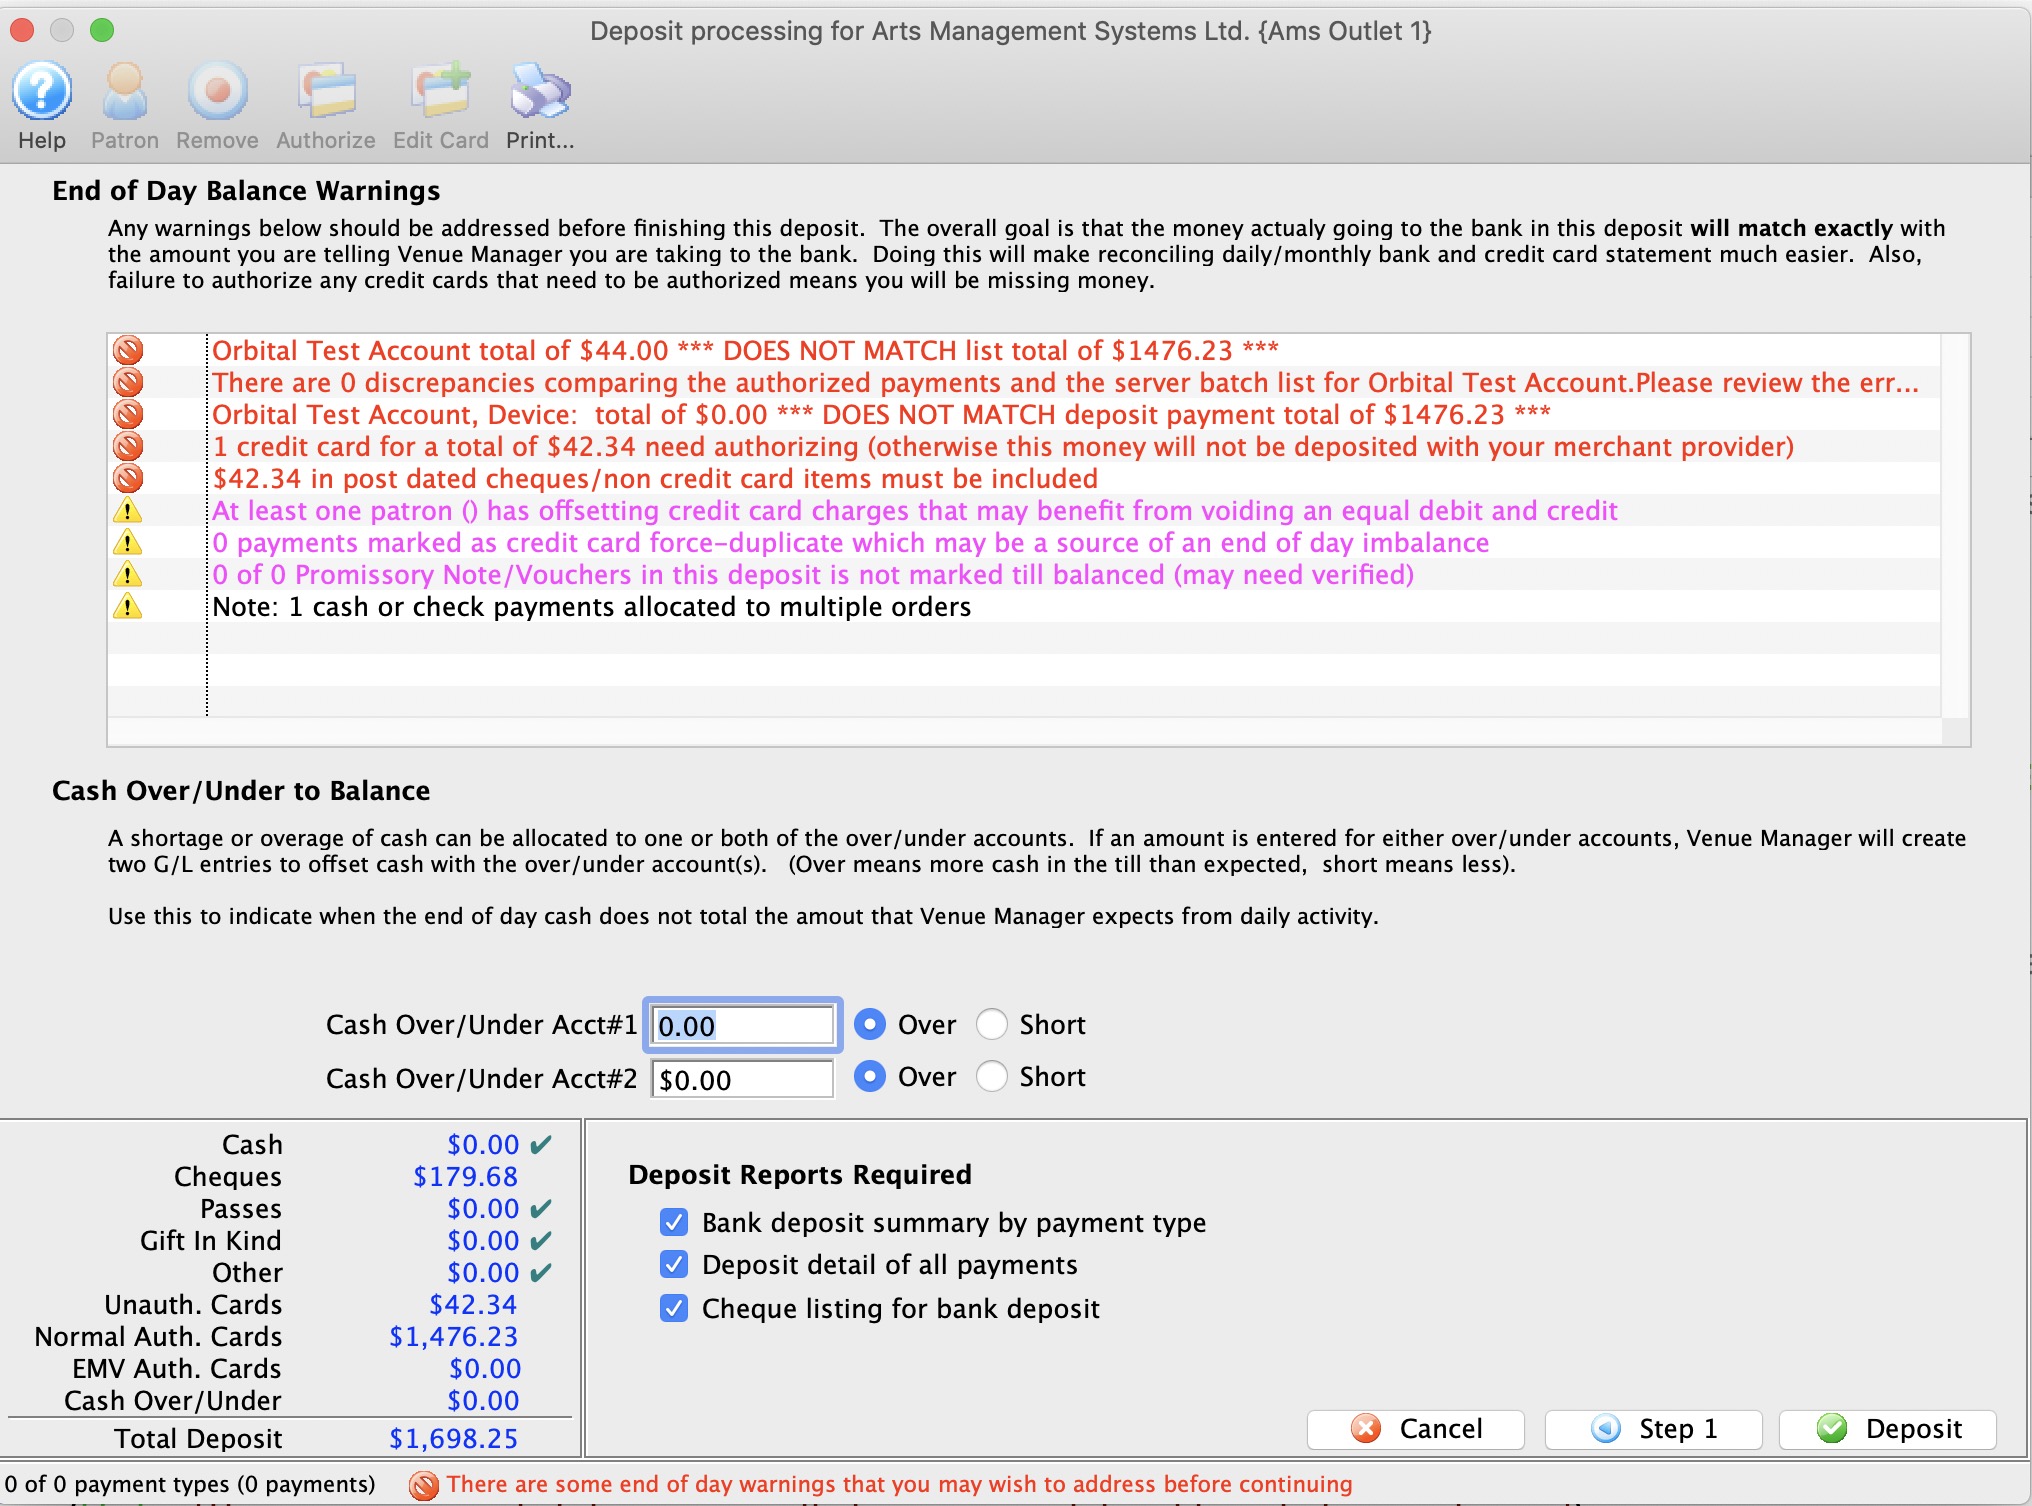
Step 2: Confirming the Deposit
End of Day Balance Warnings
Step 2 of the deposit process shows possible issues
- balancing credit cards through web sales
- balancing credit cards accepted through an EMV Devices
- with outstanding/unprocessed post dated payments that may need to be found and
- Authorized if they are credit cards (or removed if they will not authorize)
- found in your safe if they are checks and confirmed for value and date so you can take them to the bank
- where debit/credit offsets for credit cards that could be cancelled and save credit card fees
- in authorize.net end if somebody forced a prior end of day
- etc.
Cash Over Under
If you find cash in emplioyee tills to be over/under, you can enter the amounts here and a GL entry will be created for your over/under balancing account. This is used to bring A/R into line.
Deposit Reports
Click to indicate which deposit reports you want printed. Normally, the pertinent one is the check listing. All of them can be recreated at any time in the future
Sales Entry Tab
Parts of the Sales Entries Tab
|
The Deposits tab is used for creating deposits to send to the bank. For more information on the Deposits tab, click here. |
|
The A/R Balance tab is used to journalize all outstanding A/R to the General Ledger. For more information on the A/R Balance tab, click here. |
|
The Reports tab is used for printing reports when the End of Day process is complete. For more information on the Reports tab, click here. |
| Date | The date the journal was created. |
| Journal # | The journal to which the payment(s) were posted. |
| Account # | The unique account number for the payment type. |
| Description | A description of the account. |
| Memo | A detailed description of the journal. |
| Debit | Debits will be created for there corresponding account number in the G/L. |
| Credit | Credits will be created for there corresponding account number in the G/L. |
| Play Code | Event the sales entry is associated with. |
 |
Enable the checkbox to summarize the data by account number. |
 |
Begins the process of journalizing the sales entries to the General Ledger. For more information on the Sales Entry Creation process, click here. |
| |
Opens the G/L entry associated with the selected items. |  |
Opens a window to view any orders currently in the process of being sold which may affect the End of Day balance. |
A/R Balance Tab
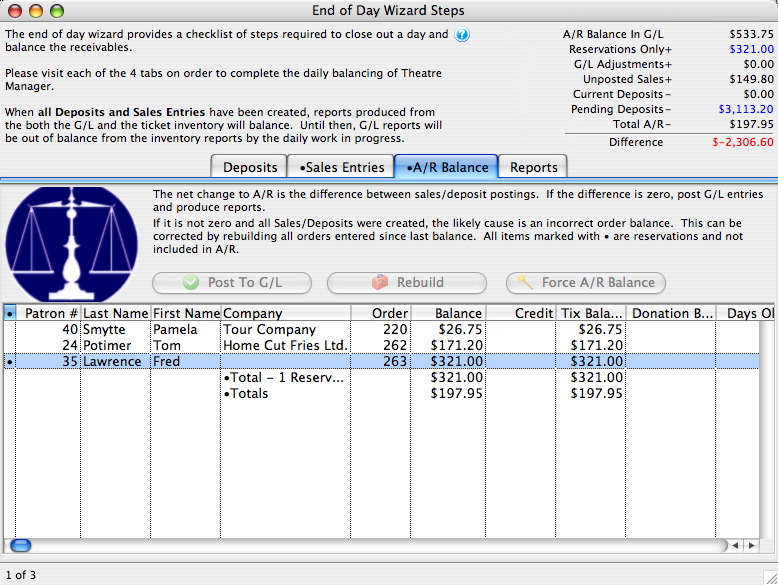
Parts of the A/R Balance Tab
|
The Deposits tab is used for creating deposits to send to the bank. For more information on the Deposits tab, click here. |
|
The Sales Entries tab is used to journalize all sales entries to the General Ledger. For more information on the the Sales Entries tab, click here. |
|
The Reports tab is used for printing reports when the End of Day process is complete. For more information on the Reports tab, click here. |
| Patron # | The number of the patron who made the order. |
| Last Name | The patron's last name. |
| First Name | The patron's first name. |
| Company | The patron's company if applicable. |
| Order | The order number. |
| Balance | Outstanding balance on the order. |
| Debit | The patron account is debited for purchase of tickets, memberships, etc.. |
| Credit | The patron account is credited for refunds and returns. |
| Tix Balance | The amount of the total which is due for tickets. |
| Donation Balance | The amount of the total which is due for donations. |
 |
Post the accounts receivable to the General Ledger. For more information on the Post to G/L process, click here. |
 |
Rebuilds the balances of the orders. |
 |
Creates a balancing entry in the GL for a Box Office write-off. |
End of Day Wizard Reports Tab
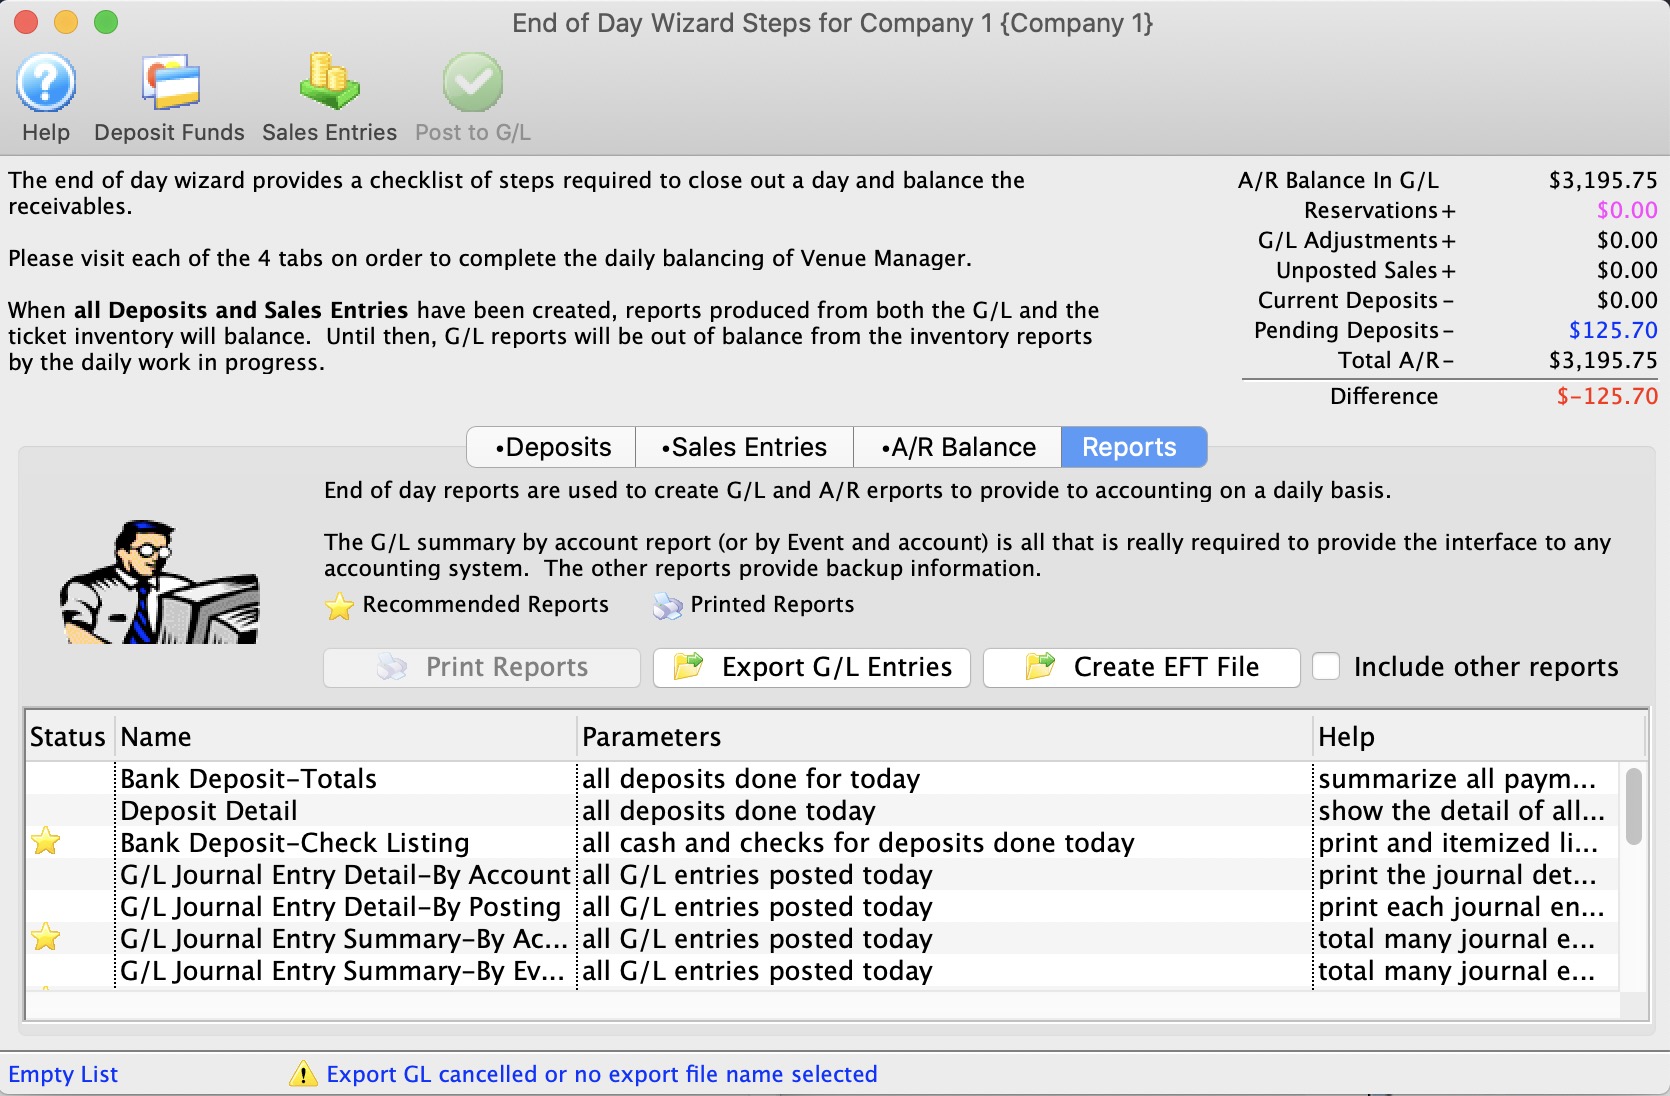
Parts of the Reports Tab
|
The Deposits tab is used for creating deposits to send to the bank. For more information on the Deposits tab, click here. |
|
The Sales Entries tab is used to journalize all sales entries to the General Ledger. For more information on the the Sales Entries tab, click here. |
|
The A/R Balance tab is used to journalize all outstanding A/R to the General Ledger. For more information on the A/R Balance tab, click here. |
 |
Prints the selected report to the screen. |
 |
Exports all not-yet-exported general ledger entries to disk for use in another program. If you do not export one day, this button ensures the files are created the next time it is used for all past (not-yet-exported) GL entries. If you:
|
| Create EFT File | If you are using EFT within your organization and have set the EFT Merchant Account, you can export your EFT data, ready to upload to your bank. |
| Printed | Denotes whether the report has been printed. A 'Yes' will appear when it has. |
| Report Description | A description of the report. |
| Report Parameters | The parameters that are used for the report. |
| Report Help | A lengthier description of the report. |
Multiple End of Days/Reports on the Same Day
The reason for only producing the reports once per day (after the LAST posting for the day) is that the default criteria in the reports at end of day default the criteria to be everything for that day out of convenience to you. Meaning, if you post three times in one day, the end of day reports produce an aggregate of the 3 postings.
If you wish to separate the postings into parts of a day, you can:
- access the same reports under Theatre Managers Reporting system (General Ledger section) and put criteria into separate the day into parts. For example, use criteria in the reports for GL DATE POSTED between midnight and noon. Or from Noon to 4 pm.
- or when looking at a finished report in the end of day, click the criteria button and change the criteria to reflect only the part of the day you are interested in