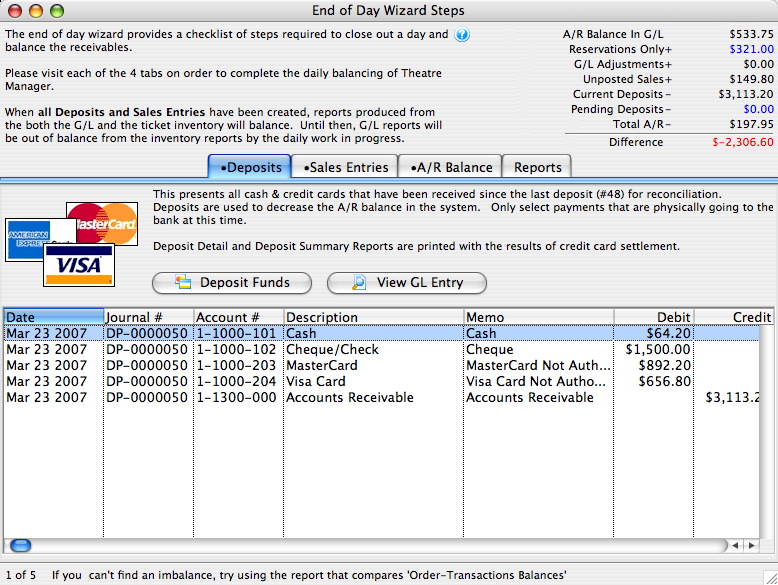
Using the End of Day Wizard
The End of Day wizard is simple to use. It allows you to process all necessary accounting transactions from one location. There are three steps in using the End of Day wizard:
Once the above steps are run the Reports tab can be used to generate the desired reports for entering details in the accounting software. The most commonly generated reports are indicated with stars next to them.
Deposit In The End Of Day
 |
Recurring donations are created during end of day deposit automatically on the date that they are next due. |
- Open the End of Day Wizard window.
For more information on the End of Day Wizard window, click here.
- Start with the Deposits tab (which will be blank). Click the Deposit Funds
 button.
The Bank Deposits window opens.
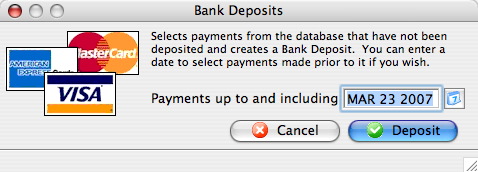
- Enter the date up to including the date you want to make the deposit.
- Click the Deposit
 button.
The Deposit window opens.
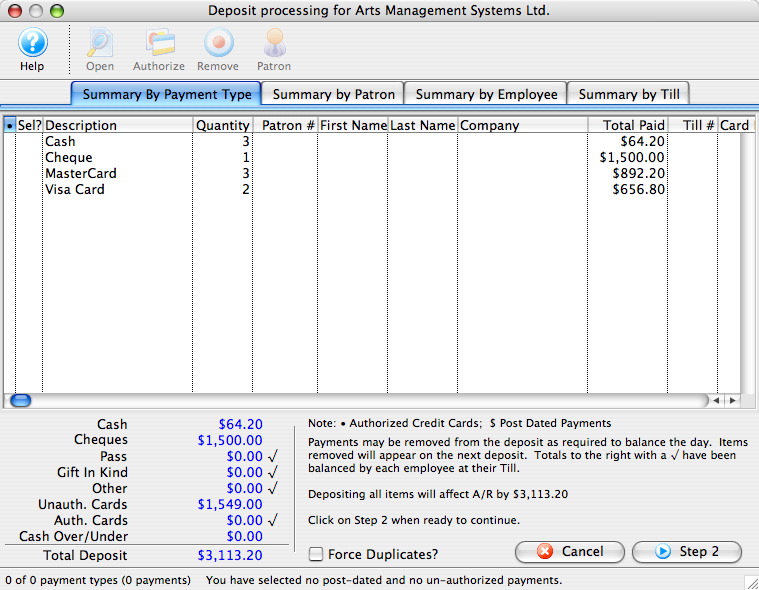
For more information about the Deposits window, click here.
- Click the Step 2
 button to continue with the deposit.
The Confirm Deposit window opens.
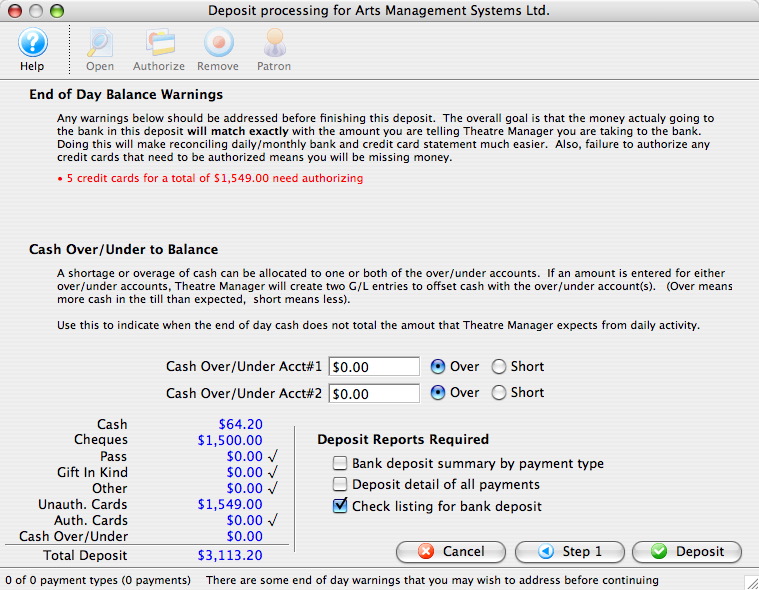
If the Box Office or Concession tills have an overage or shortage, fill the fields with the correct amount to show it as over or short.
- Click the Deposit button to continue with the transaction.
The Deposit Confirmation opens.

- Click the Deposit button to continue.
Any reports selected are generated to the screen for printing. You are returned to the End of Day Wizard window with the deposits displayed.
To continue the End of Day process with adding Sales Entries, click here.
Using the End of Day Wizard with Paymentech Orbital
-
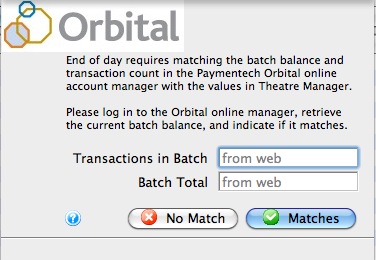
Completing the End of Day when setup using Paymentech Orbital is exactly the same as completing the standard End of Day as outline in the previous page. There is however one new step which requires logging into the Orbital Account, retrieving the credit card batch summary and entering the values into Theatre Manager. Access to your Orbital Account is defined in Step #5 below.
- Open the End of Day Wizard window. Click
 button from the main Theatre Manager Toolbar / Ribbon Bar.
For more information on accessing the End of Day wizard, click here.
- Start at the Deposits tab which will be blank. Click the Deposit Funds
 button.
The Bank Deposits window opens.
- Enter the date up to which the user would like to make the deposits.
Traditionally, accept the current default date to deposit all payments up to the moment.
- Click the Deposit
 button.
The Deposit window with the Orbital feature window opens.
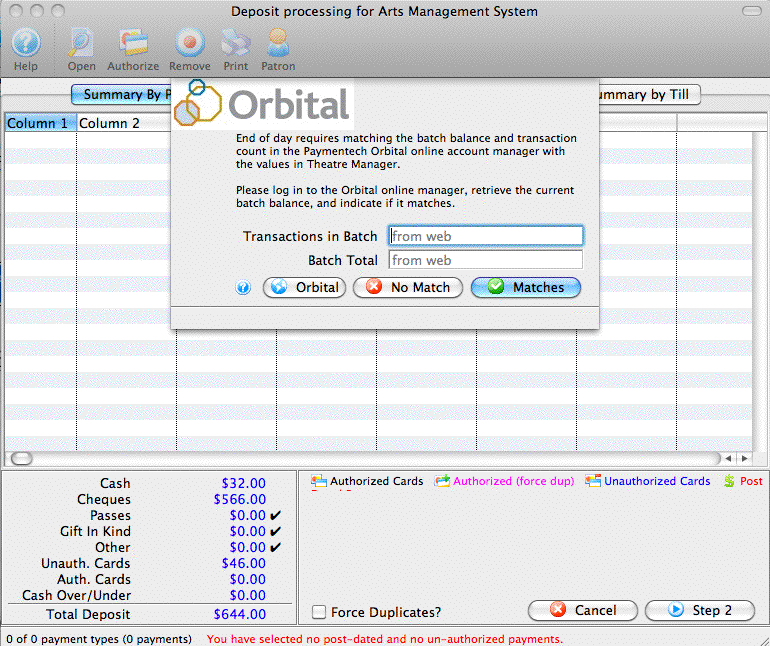
- Click the Orbital
 button to access your Orbital Virtual Server account, obtain your transaction count and total. Enter the number of Transactions in Batch and the value for the Batch Total obtained from your Virtual Server Account.
For more information about the Orbital Virtual Server window, click here.
- Click the Matches
 button to continue.
- Click the Step 2 button to continue with the deposit.
The Confirm Deposit window opens.
If the Box Office or Concession tills have an overage or shortage, fill the fields with the correct amount to show it as over or short.
- Click Deposit to continue with the transaction.
The Deposit Confirmation window opens.
- Click the Deposit button to continue.
Any reports selected will be generated to the screen for printing. The user will be returned to the End of Day Wizard window with the deposits displayed.
To continue the End of Day process with adding Sales Entries, click here.
Finding the Paymentech Orbital Balance
|
Theatre Manager assumes you have turned off auto-settle in the admin settings and that Theatre Manager will do the settlement. Do not settle the batch using the Orbital interface. |
To find the batch total, you will need to:
- log into the Orbital Virtual Server for your merchant account with your user id and password.
- Click on the 'Open Batch' link at the top of the web page and you will see the page below
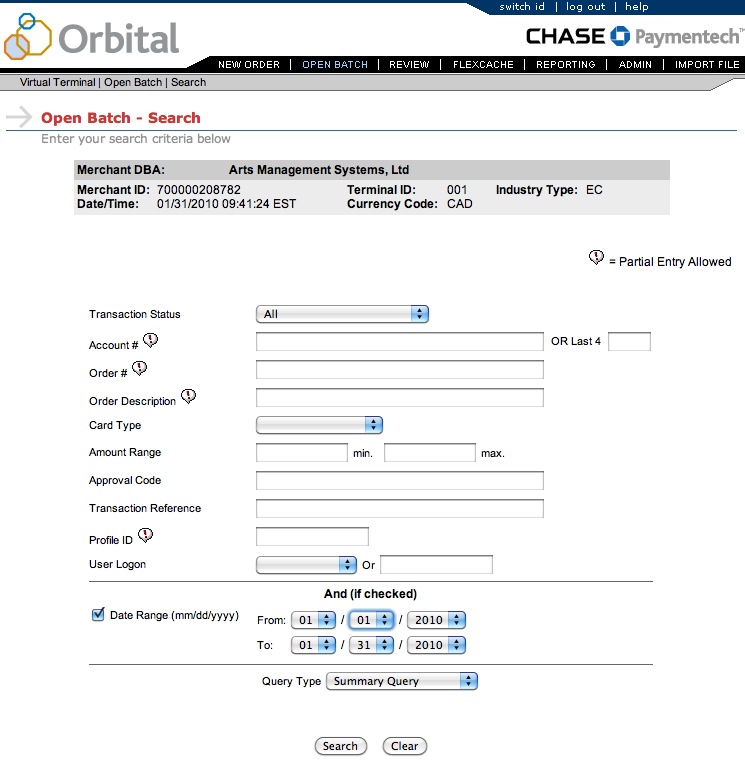
- On the 'Open Batch - Search' window, change the following search parameters. Others should be blank.
- Remove the check next to Date Range.
- Set the Query Type to be Summary Query
- Click the Search button
- When the screen below is shown, look for the values in the middle of the screen called
- Total Count in the 2nd last column of the second table. In this example it is 1 and represents the number of transactions
- Net Amount in the last column of the second table. In this example it is 2.00 and represents the total value of the current batch that has not yet been settled. You will want these total which include any refunds that may have been purchased
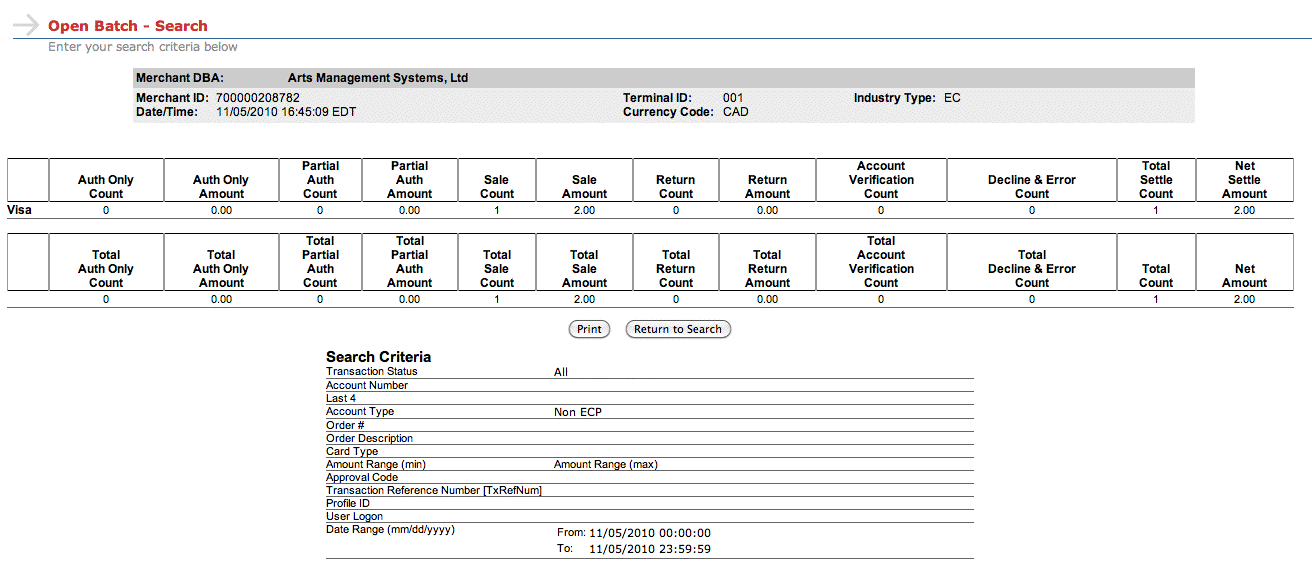
- When you have both those values, place them into the dialog window of the Theatre Manager Deposit process in the window show below and click Matches.
These values may be zero if there are no credit cards waiting to be settled.
If you do not know the balances or have already forced settled a batch, click No Match (this is not the normal practice).
Authorize.Net End Of Day Process
End of day in Authorize.net is similar to any other merchant provider. You follow the basic end of day process outlined previously. However, Authorize.Net operates with one little (but important to know) difference compared to the other credit card service providers.
Most providers allow you to authorize cards, get a batch total, and then settle the batch. Each 'settlement' results in a batch being flushed to your bank. If you settle twice a day, you will likely have two entries in your bank account.
Authorize.net allows one batch per day. You can settle in Theatre Manager as many times as you want and all of them will be aggregated into one single batch that appears on your bank statement. That single batch is 'swept' into your bank account at a time of your choosing (set by each merchant in the online interface in authorize.net and can be changed at any time). We recommend that you set the batch sweep to be approximately 12 hours after the time you regularly do your end of day processing. For instructions on setting the sweep time, click here. For example:
- If you do your end of day in at 8 in the morning, then setting the automatic sweep to between evening and midnight would allow sufficient time for correction.
- If you typically do your end of day before going home for the evening, then a sweep of all settled cards at 4 am would be a good idea.
The following describes how Authorize.net differs (slightly) as it may be important to understand the effects if you need to create more than 1000 transactions between each end of day. (This is a very large number of transactions and is rarely exceeded - even by large venues and onsale dates).
|
Authorize.net also has an online Merchant Login where you can view your current charges at any time -and- review current unsettled transactions and past batches. |
|
Your Authorize.net account must have permission to call the Transaction Details API in order to settle. It is a permission your service provider must give you. |
Authorize.net Authorization
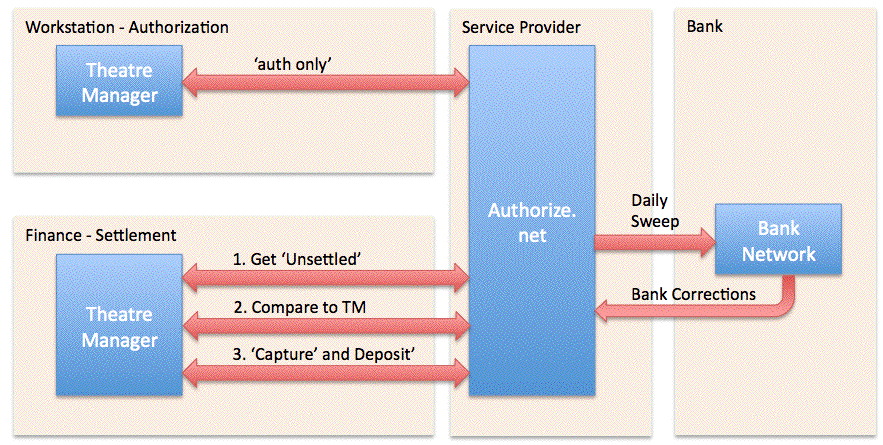
To enable the level of End-of-Day reconciliation that Theatre Manager users have come to expect, the authorization in Authorize.net is done a little differently.
- Each authorization is sent using a mode called 'auth only'. This gives you an authorization number and a guaranteed hold on the patrons credit card - just like a full authorization - for up to 30 days, or until released. The situation where you would personally experience 'auth only' is when checking into a hotel where a hold is put on your card for the duration of your stay.
- In Theatre Manager, the amount 'held' is the exact amount of the sale (it is never more, nor less). Refer to the top part of the diagram above - Theatre Manager simply asks Authorize.net to guarantee a hold on the right amount of funds.
Authorize.net Settlement
There is a quick additional setup step inside the Authorize.net online interface to allow settlement from within Theatre Manager. Click here for instructions. The Authorize.net settlement process is also a little different because of the authorization process, yet provides some interesting benefits. In general, when you decide to settle your batch:
- Theatre Manager retrieves all the unsettled 'auth only' transactions from Authorize.net. However, Authorize.net will only send the most recent 1000 transactions back to Theatre Manager. This should be perfectly fine for almost every venue almost every day.
-
Theatre Manager compares those transactions on a one-by-one basis to the payments that have not yet been deposited. In theory, they should match exactly. If they do, Theatre Manager goes on to the next step. If the transactions do not match exactly, then a short list of discrepancies is shown that can only be:
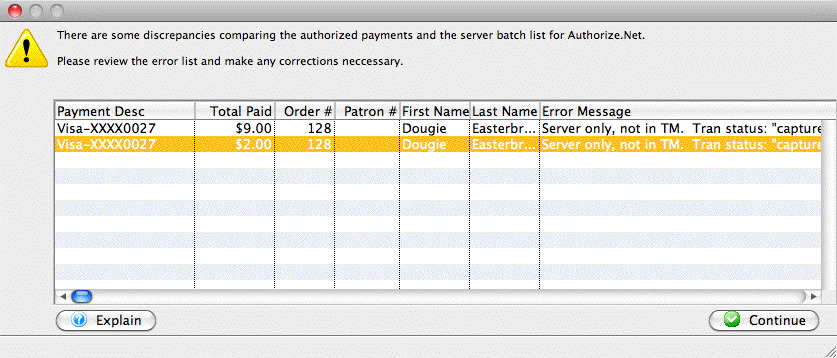

Very important - please read the error message column to see if: - The transaction is in Authorize.net and not in Theatre Manager -OR-
- The transaction is in Theatre Manager and not authorize.net
- Payments in Authorize.net that are not in Theatre Manager.
This might happen if
- You settled the match in Authorize.net manually the previous day and did not settle TM. If this is the case, you will see multiple lines in the list .. and the total should match prior days deposit plus today's business
- a user logs in to the Authorize.net online interface using their web browser and authorizes a card independently of Theatre Manager (this in itself is a no-no). In other words, something that should never happen.
- there is a communication error after Theatre Manager sends the authorization - and before Authorize.net can send on back. If these happen, then you will probably already know about it and need only void the card in Authorize.net to make both balance.
- There is some sort of communication error during end of day and TM settles the batch, but they payments were not marked as 'capture' in Authorize.net. If that happens, you will have a continuing out of balance that is constant day-after-day. To fix it:
- find the payments in Authorize.net that were part of the batch that had the problem. Conveniently, the eod of day will provide an audit list for you (it things they are missing in TM, but they are not).
- mark them captured manually in Authorize.net so that the same payments are both captured in auth.net and already previously deposited in TM.
- there is a chargeback from visa - in which case it might show up as a discrepancy. The advantage is that you will know about these when they happen and can correct it in Theatre Manager immediately.
- Payments in Theatre Manager that are not in Authorize.net.
The only reasons where this would occur is:
- refunds processed after end of day and before the daily sweep. (Which you should avoid).
- If you have turned on auto-settle in the online authorize.net interface -- which would never be set up that way during the install and you should change Authorize.net to self settle.
- Once you are satisfied that the payment matches the Authorize.Net batch, you settle Theatre Manager by clicking on the final deposit button on the end of day deposit window. Theatre Manager has to do the EOD a little differently than simply settle:
- Theatre Manager will go through each of the payments that match from the step above and tell Authorize.net to 'capture' the card. Capturing the card means that the hold is removed and instantly replaced with a binding authorization
- These 'captured' cards sit in the batch at Authorize.net and are 'swept' once a day to move them all into the bank, just like other authorization software.
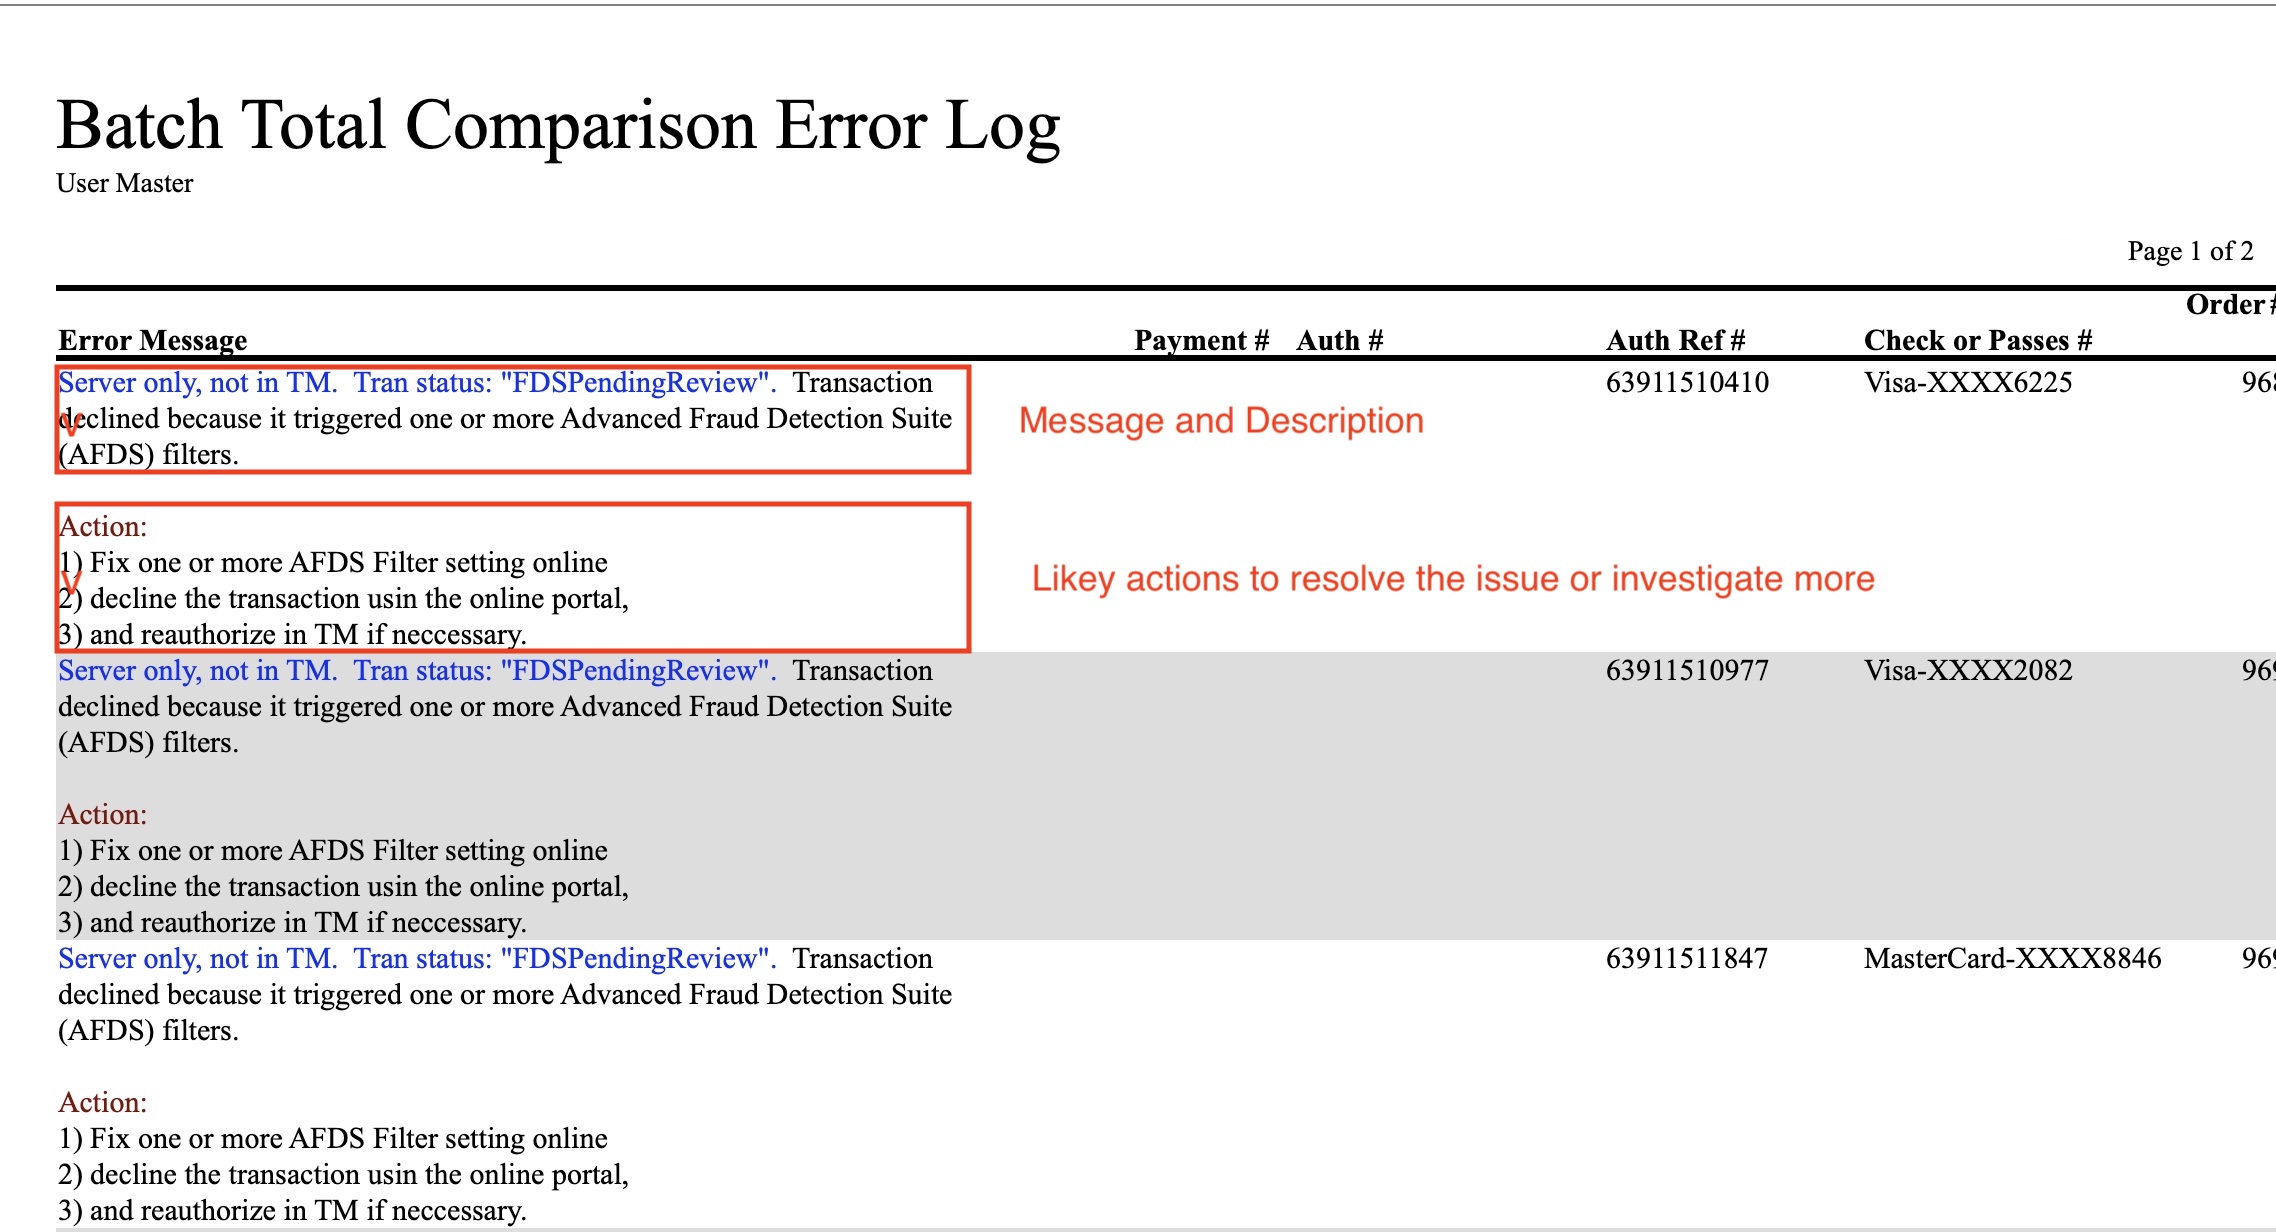
Balancing audit Messages in Authorize.net end of day
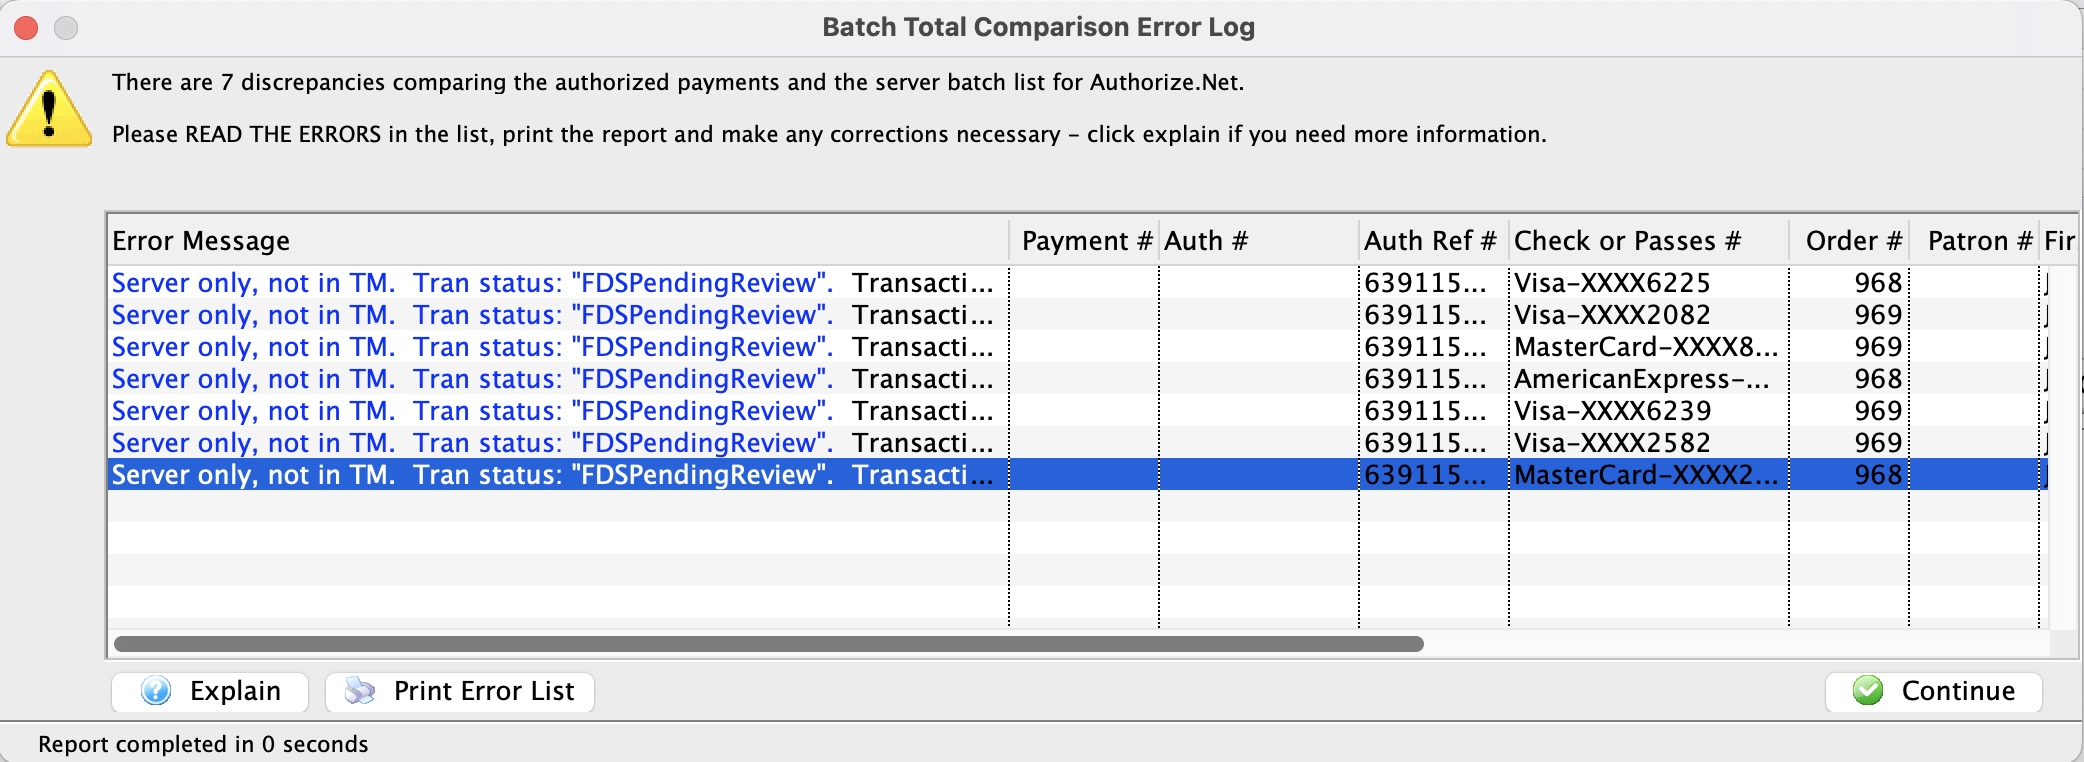
When you see this window:
- Make the error column wider as it may give you enough information to help you diagnose the issues
- Click 'Print Error List' to see actions that you might take to solve the problem which is included with the message description. See a sample report below.
- Contact support if you need further explanation of the message and what to do.
Special Note on Authorize.net refund processing
|
Refunds are processed immediately by Authorize.net.
If you do a lot of refunds before the sweep time and settle end of day after the sweep time, you may be told that you are out of balance by what seems to be the total amount of your refunds.
See explanation why Authorize.net processes refunds right away. |
Implications of the Authorize.net EOD approach
|
Refunds are processed immediately by Authorize.net. YOU CANNOT VOID A REFUND.
If you fail to settle a batch containing a refund before the authorize.net sweep time, you will receive a warning during the end of day that the batch may be out of balance (even if it is not). Your balance will appear be out by the total amount of refunds you processed before the sweep time. You will see this every time you:
|
|
Set your sweep time (in authorze.net settings on their web page) to be about an hour after you normally do your end of day to minimize the messages about refunds. |
There are a few subtle implications of the way Authorize.net works that you may encounter in your reconciliation. Most venues should not see them, but in case you do, these are:
- Multiple Ends-Of-Day: If you do an end of day more than once per day, you will still only see one deposit to your bank because the batch is never closed. Authorize.net 'sweeps' all 'captured' cards once per day and moves them into your bank. This may be useful as Theatre Manager can aggregate EOD into one posting if desired.
- Running End-Of-Day during the Sweep: The Authorize.net bank sweep should be set to run 6 hours after typical end of day. We recommend avoiding doing an end of day in Theatre Manager when the 'sweep' normally occurs otherwise part of a TM batch might be 'swept' to the bank on one day and the rest on the net day - resulting in a split batch. All a 'split batch' does is require you to use a calculator two add two numbers on a bank statement together to compare to your accounting system.
- Setting the Sweep Time: is dependant on when you typically do end of day because of how REFUNDS in a batch are dealt with (see below). We suggest setting the sweep time to 6 hours after the time that you normally do end of day to give the best chance of a refund falling into the current day business. For example, if you do end of day:
- each night, then 2:00 am is a good choice for the sweep time.
- each morning, then we suggest 2:00pm for the sweep time.
- Refunds in the batch. There is a difference between a VOID and a refund. A void cancels out an existing charge and there will be no issues during EOD because of voids. However, if a credit card charge is DEPOSITED in theatre manager and you want to refund that money some days or months later, the only way to do so with the independent refund feature in Authorize.net. You must explicitly enable this feature and if you do so:
- you SHOULD limit who can provide refunds -and-
- you MUST DO END OF DAY TO SETTLE YOUR TM BATCH in the same day that you did the REFUND in order to see it in the end of day BEFORE THE SWEEP TIME HAS OCCURRED.
Authorize.net automatically 'captures' refunds immediately (we wish it didn't) so if you don't settle before the sweep, it will appear like you are out of balance and have an additional refund transaction in TM that does not seem to be in Authorize.net. In reality, you are most likely in balance because the refund just got placed in the previous day's batch. You will need to look in the previous day's batch for the refund to make sure you don't refund twice.
Addressing Auth.net refund process if it gets deposited before you get a chance to do end of day:
- Start the end of day deposit.
- You will get a discrepancy doing end of day. TM will say the batch doesn't match and provide the edit log.
- Read the description in each line of log to see if it gives additional info.
- If the errors in the log are all refunds from the prior day and they are in the settled batch on auth.net's online portal, then they are already in auth.net -- so just settle the batch
- If the errors are new authorizations, contact support. it means you'll need to check yesterdays settlement to see if somebody forced it.
- Voids in Batch are when you authorize a charge and then void it before settlement. Authorize.net will leave a transaction on their size for ZERO dollars. This may result in TM showing the 'void' in the audit list at the end of the day. Please verify that the amount is zero. It is also for your protection to ensure that somebody did not authorize then void without anybody in finance knowing about it.
- More that 1000 authorizations between End Of Day: It is very rare that ay venue will have 1000 distinct transactions in any one day - and likely only on a heavy on-sale day. 1000 authorizations might reflect well over $0.5M per day. On the rare day that you may have more than 1000 authorizations, you may wish to plan your day and:
- Run an end of day when you are nearing 1000 transactions. This is because Authorize.net will retrieve only the most recent 1000 transactions and doing an end of day approximately every 1000 transactions means that the standard settlement process will run normally, providing a good edit list if possible mistakes.
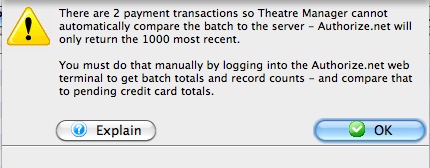 On a really busy day, you can simply use the methodology for large batches and settle everything after all goes quiet for the day. If Theatre Manager cannot do the normal settlement process for Authorize.net, you will get a message similar to the one at right informing you. At that point you will need to get a batch total from the online interface -- and compare it manually to the Theatre Manager total. When both agree, simply close the batch and settle as normal. TM will avoid the payment balancing step (due to the Authorize.net 1000 transaction download limitation) and set all cards to 'capture'. The bank sweep will get them the next day and move them to your bank as normal.
Totals for Large Authorize.net Batches
This should only be required when there are more than 1000 transactions in a batch. This is due to a limitation on the Authorize.net servers which only returns the 1000 most recent transactions (suitable for most days business). If you are in a day with more than 1000 transactions, use the batch total and transaction count to compare to the totals in theatre manager and then force settle. TM will then change all cards to 'capture' them.
If there are less than 1000 transactions in the batch, Theatre Manager should identify discrepancies automatically.
Please note that a batch may appear out of balance if there are refunds in a batch, which is affected by your choice of sweep time. Check for voided payments in the Theatre Manager edit list -> error message column and make sure that they are expected.
|
Theatre Manager assumes you have turned off auto-settle in the admin settings and that Theatre Manager will do the settlement. Do not settle the batch using the Authorize.net interface. |
To find the batch total, you will need to:
- log into the Authorize.net Merchant Login window and enter your user id and password for your merchant account.
- Click on the 'Reports' link at the top of the web page and you will see the page below

- Click on the 'Transaction Statistics' on the left side.
- Set the Transaction Type to Unsettled.
- Click the Run Report button
- When the screen below is shown, look for the values in the right side of the screen near the bottom:
- Total Count in the last column. In this example it is 11 and represents the number of transactions
- Net Amount in the last column. In this example it is 1,053.27 and represents the total value of the current batch that has not yet been settled.
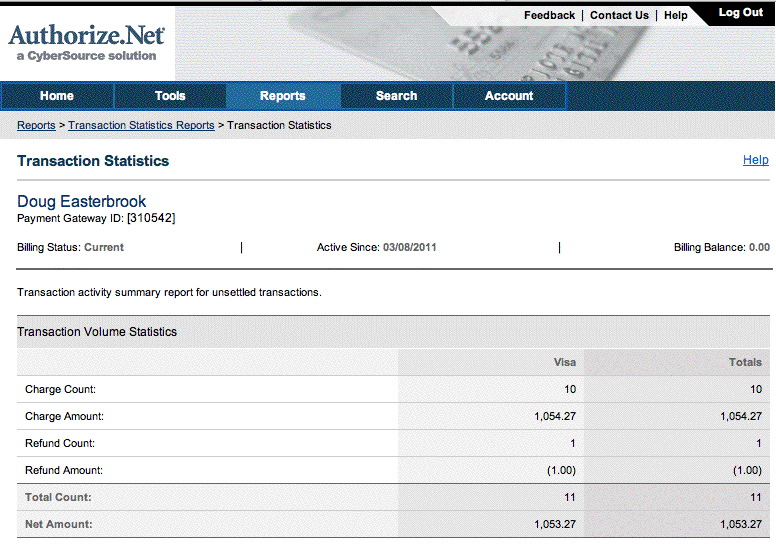
- When you have both those values, compare them to the credit card total for that batch in Theatre Manager and continue if in balance. If not in balance, then you will need to compare the payment list in TM with the transaction audit list on the server.
Elavon End of Day
-
Completing the End of Day when setup using Elavon is exactly the same as completing the standard End of Day as outline in the previous page. There is however one new step which requires logging into the Elavon Account, retrieving the credit card batch summary and entering the values into Theatre Manager. Access to your Orbital Account is defined in Step #5 below.
- Open the End of Day Wizard window. Click button from the main Theatre Manager Toolbar / Ribbon Bar.
For more information on accessing the End of Day wizard, click here.
- Start at the Deposits tab which will be blank. Click the Deposit Funds button.
The Bank Deposits window opens.
- Enter the date up to which the user would like to make the deposits.
Traditionally, accept the current default date to deposit all payments up to the moment.
- Click the Deposit button.
The Deposit window with the Elavon feature window opens.
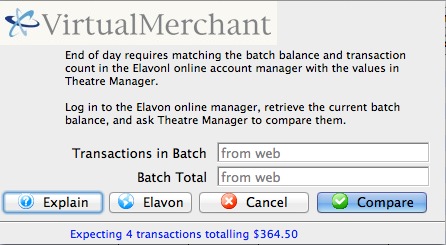
- Click the Orbital
 button to access your Elavon VirtualMerchant account, obtain your transaction count and total. Enter the number of Transactions in Batch and the value for the Batch Total obtained from your VirtualMerchant Account.
For more information about the Elavon VirtualMerchant window, click here.
- Click the Matches button to continue.
- Click the Step 2 button to continue with the deposit.
The Confirm Deposit window opens.
If the Box Office or Concession tills have an overage or shortage, fill the fields with the correct amount to show it as over or short.
- Click Deposit to continue with the transaction.
The Deposit Confirmation window opens.
- Click the Deposit button to continue.
Any reports selected will be generated to the screen for printing. The user will be returned to the End of Day Wizard window with the deposits displayed.
To continue the End of Day process with adding Sales Entries, click here.
Finding the Elavon Balance
|
Theatre Manager assumes you have turned off auto-settle in the admin settings and that Theatre Manager will do the settlement. Do not settle the batch using the Elavon interface. |
To find the batch total, you will need to:
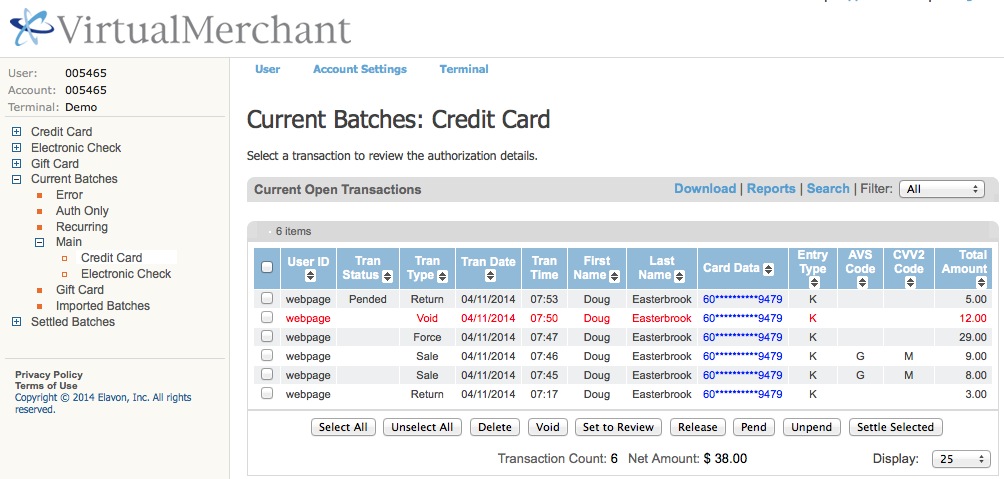
- log into the Elavon VirtualMerchant for your merchant account with your user id and password.
- Click on the Current Batches link at the left of the web page
- Click on the Main link (you may see info here, but if there are returns, they do not appear until you click 'Credit Card')
- Click on the Credit Card link and you will see a page like below showing the 'Current Batches: Credit Card' page
|
Elavon may have some items in the list above marked as pending or set to review in the 'Tran Status' column, especially for returns.
You should:
|
- Look at the bottom of the screen. You may (or may not) wish to alter the number of lines to display at the bottom right.
At the bottom centre, look for the following information:
- Transaction count - in the example it says 6. However, there is one VOID in the list that Theatre Manager will no longer know about. Subtract the voids from the total and enter that as the transactions count.
Example 6 (total) - 1 (voids) = 5 (net transactions)
- Net Amount - in the example, it is $38.00
- Transaction count - in the example it says 6. However, there is one VOID in the list that Theatre Manager will no longer know about. Subtract the voids from the total and enter that as the transactions count.
- When you have both those values, place them into the dialog window of the Theatre Manager Deposit process in the window show below and click Matches.
These values may be zero if there are no credit cards waiting to be settled.
If you do not know the balances or have already forced settled a batch, click No Match (this is not the normal practice).
Past Elavon Batches
To do so, you will need to:
- log into the Elavon VirtualMerchant for your merchant account with your user id and password.
- Click on the Settled Batches link at the left of the web page
- Click on the Main link and you will see a page like below showing the 'Settled Activity' page
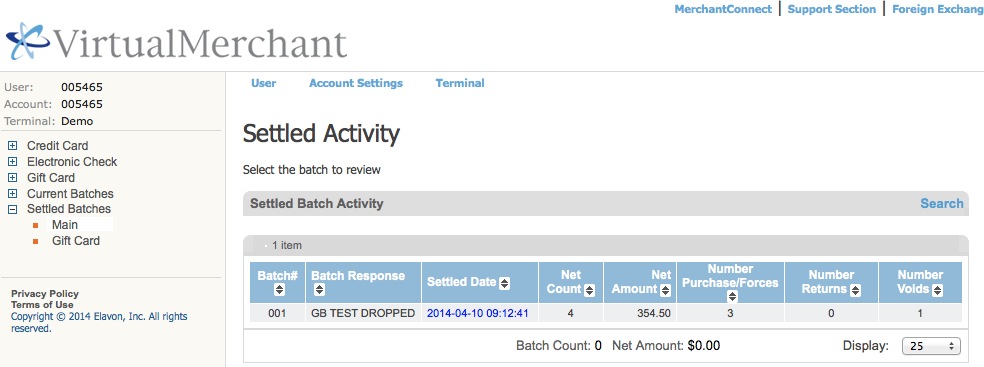
- you can double click on a 'blue' batch number under the 'settled date' column to see the detail in it
- you can also use the search functions.
- For more information or assistance, please refer to the virtual merchant user manual or call Elavon
Moneris Pinpad End of Day
End of day pin pad settlement
If you are using Moneris Pin Pads for authorizing credit cards at the box office, Theatre Manager will:
- set the proper amount on the device for each authorization or refund
- Capture the partial credit card and token to create the payment record in Theatre Manager
- Interrogate the machine totals during end of day to make sure they match - and-
- Settle each pin pad that has a balance on it when you do the end of day that includes cards processed on it
|
Normally, there should be no imbalances. However, if you do get one, it may look like the message below that tells you
|
Out Of Balance Correction
If you receive an imbalance it will tell you whether the discrepancy is in the totals and/or the number of transactions. You may have to go to the device batch totals and find out which credit card charges should not be there and remove them from Theatre Manager and/or the device to make things balance.
The message will identify what Theatre Manager thinks is out of balance (money, and/or # transactions, and pin pad)
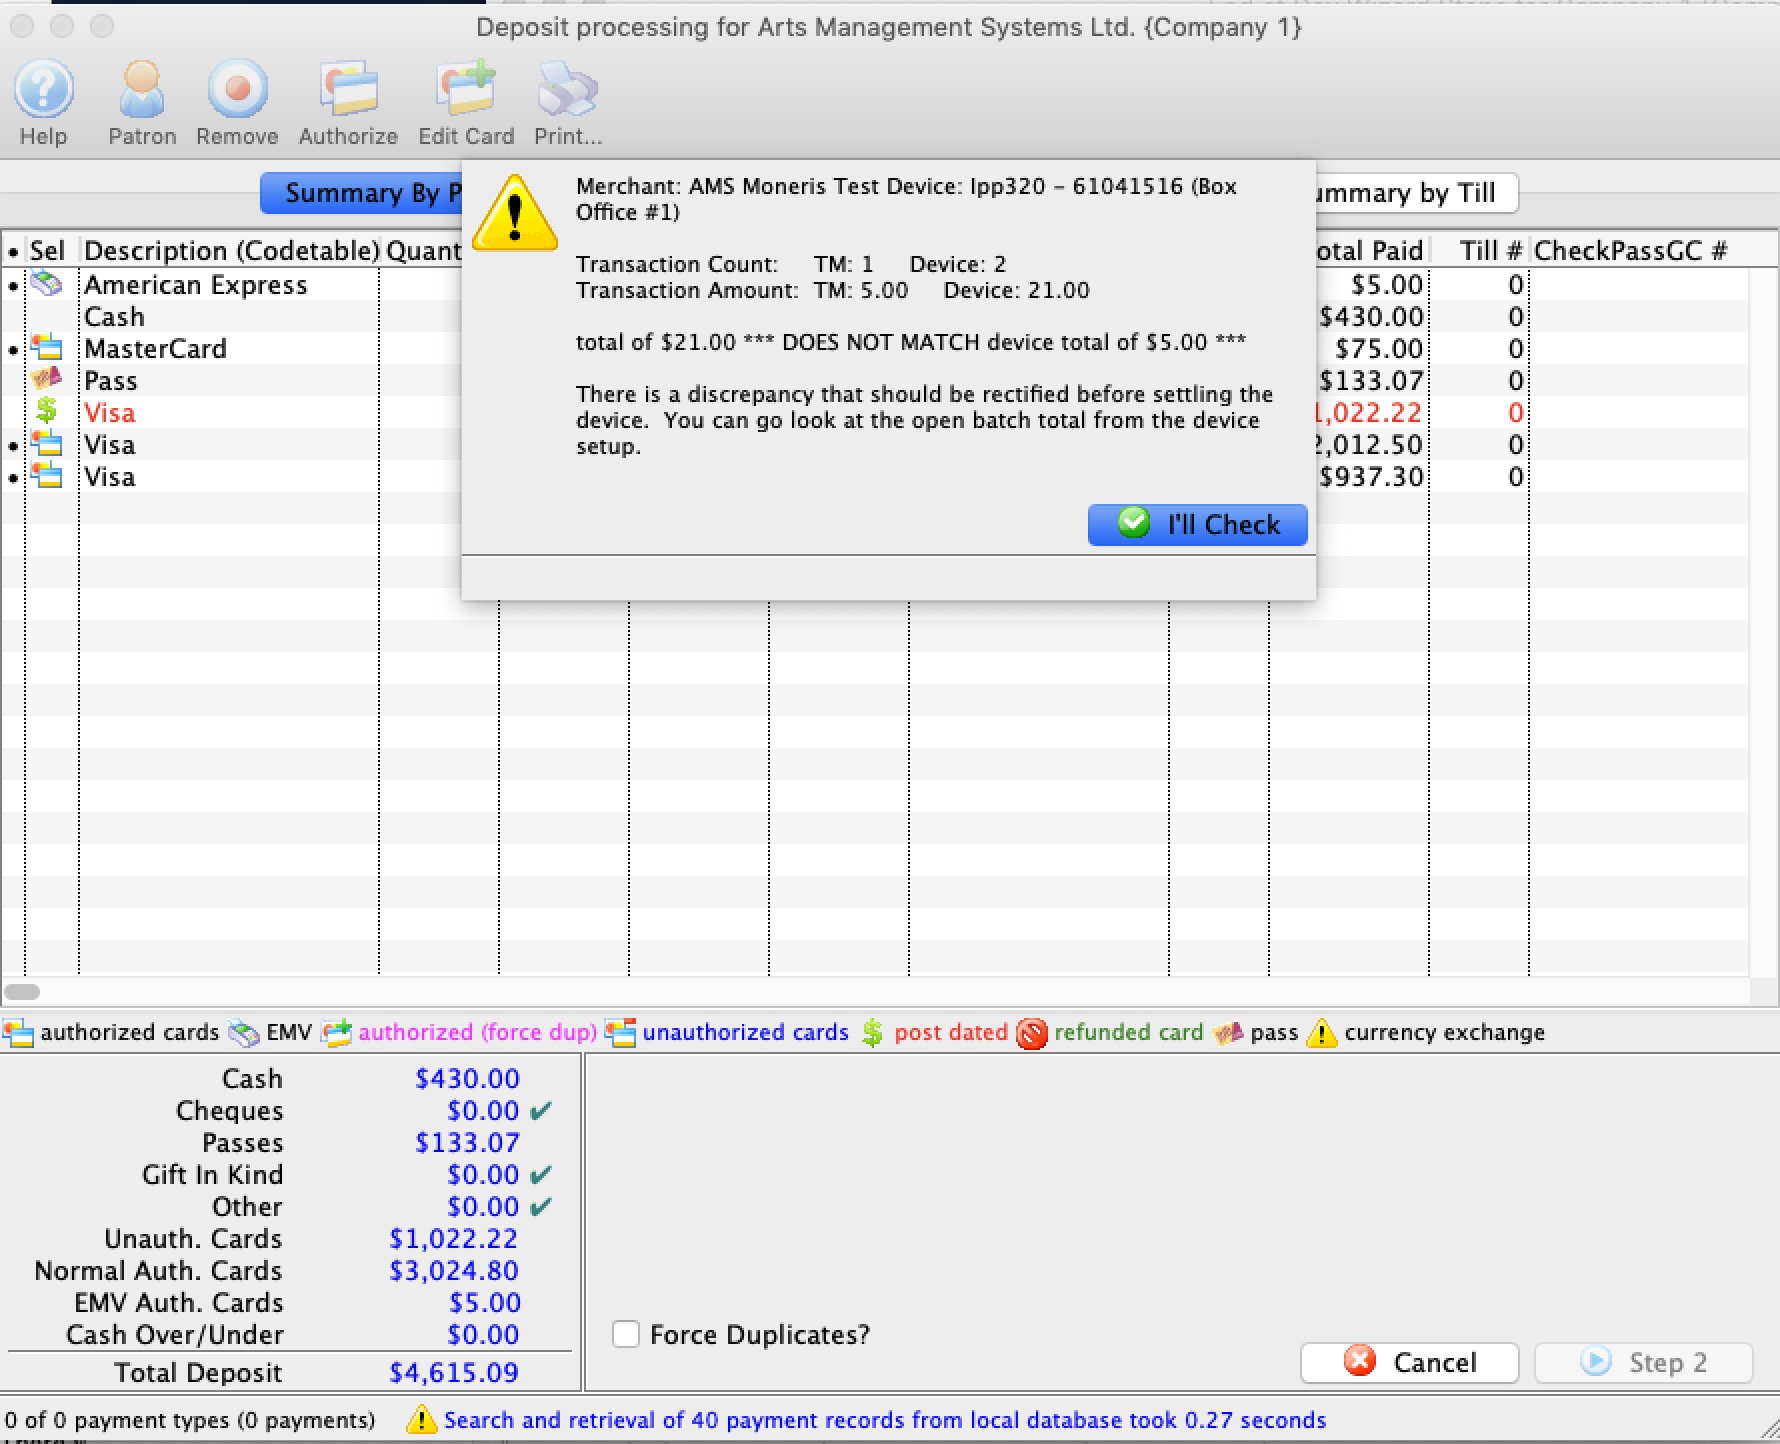
Who to contact first depends depends on who thinks they have more transactions
Use the following to determine who to contact:
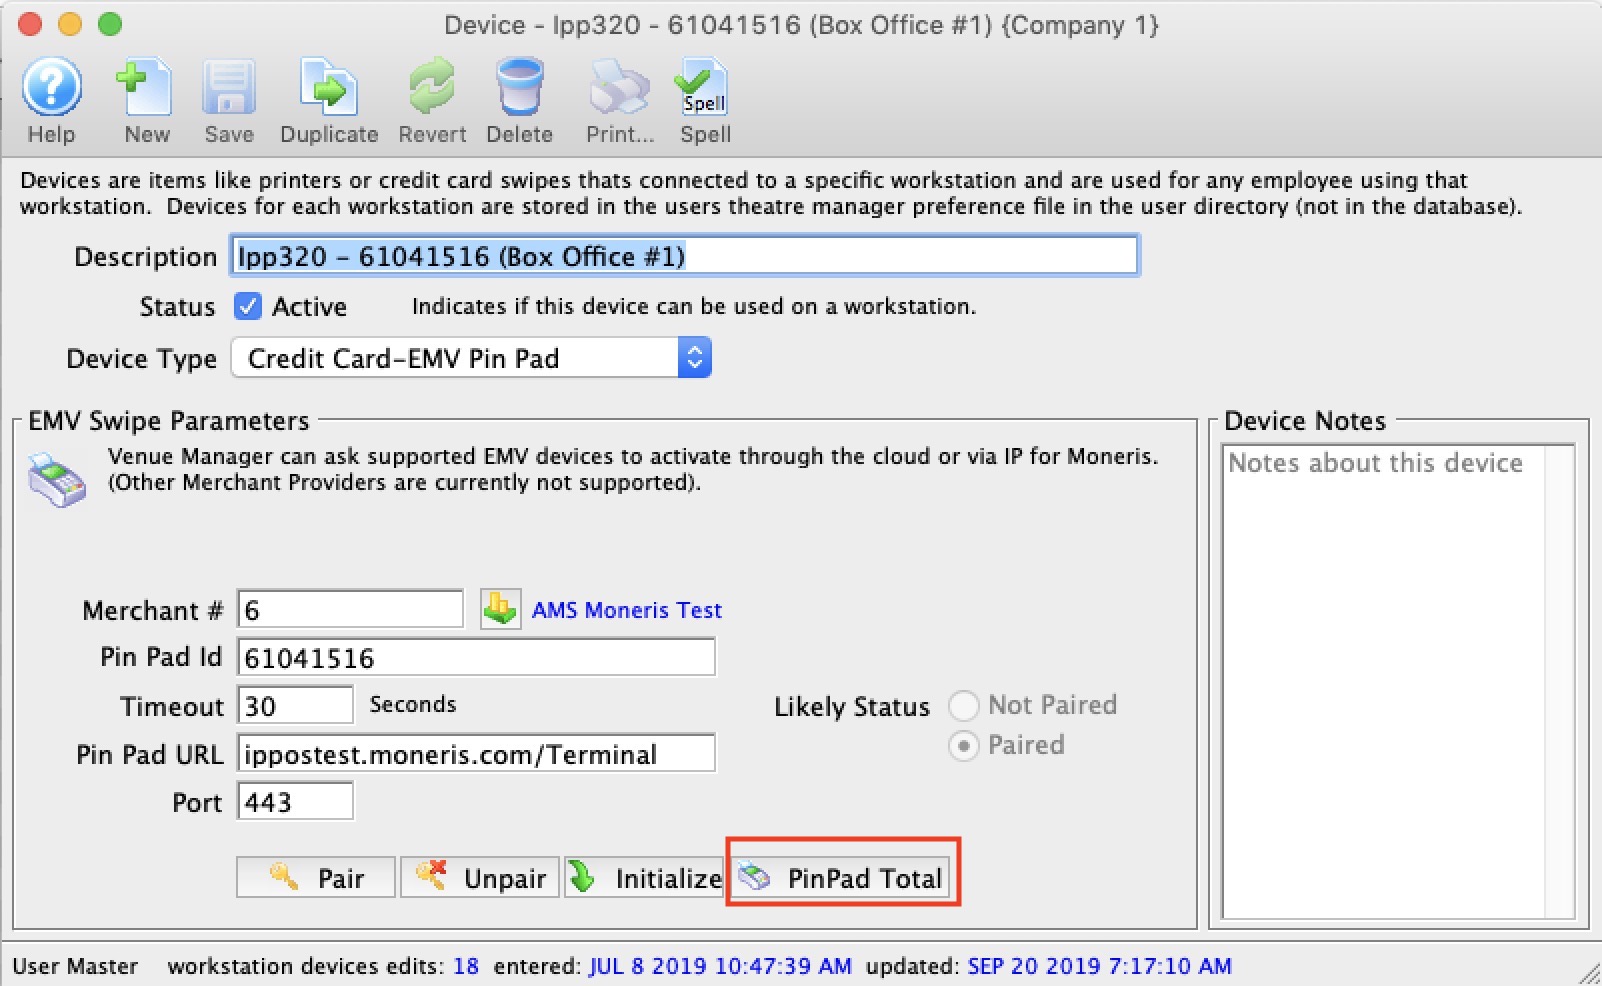
- Please look at the Batch Total on the device setup identified as being out of balance (see image for the button)
- COMPARE that to the Payment Request List for the pin pad for the appropriate time span (since last pin pad settlement)
- if TM thinks there are:
- fewer transactions than Moneris - see if there are some request(s) that was not processed by TM. This can likely be addressed by contacting Artsman support.
- more transactions than Moneris then contact Moneris, using the Payment Request List as your audit log. They should be able to see everything you see and they can explain the discrepancy.
You will need Moneris's assistance removing them from the device if that is needed to balance to Theatre Manager.
Creating Sales Entries
The purpose of creating sales entries is to:
- Create sales transactions for sales that occurred on the web
- Take all sales transactions (tickets, donations, gift certificates, etc) and create G/L entries that aggregate the sales since the last time this process was run.
- Find all ticketed events eligible for rolling over revenues from deferred to earned and make G/L entries for those sales
- Run some daily clean up activities such as:
- removing patrons from double opt-in mail lists if they have not responded within the limit in company preferences.
- Deleting old shopping carts per the retention periods in company preferences
- Deleting old eblasts and letter correspendance per the retention periods in company preferences
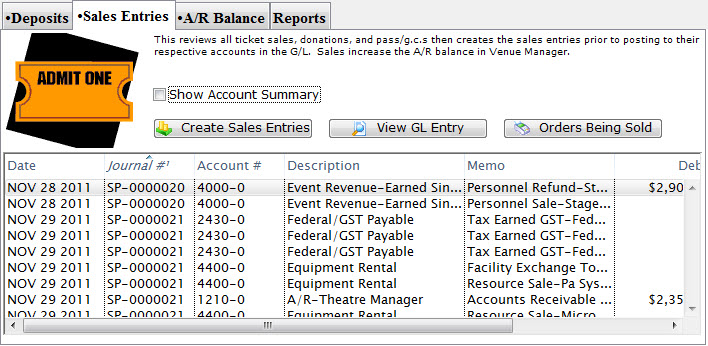
- Click the Sales Entries tab.
- Click the Create Sales Entries
 button.
This will open the Create Sales Entry Window allowing the user to journalize the Accounts Receivable. Depending on settings in company preferences->accounting tab, you may also want to select conversion of some orders from reservation only to earned income, especially if the performance has just occurred.
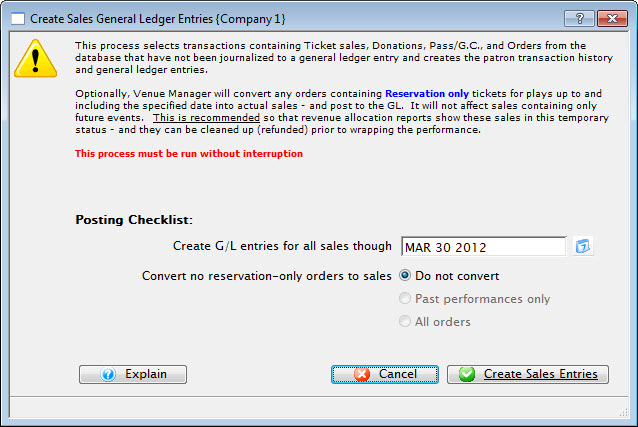
- Enter the date up to which Theatre Manager should journalize the A/R.
- Click the Create Sales Entries
 button.

A window displays the progress.
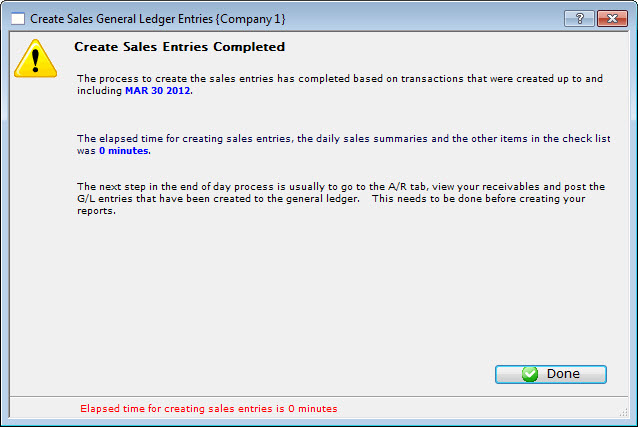
- Click the Done
 button.
The Sales Entry process is completed and you return to the Sales Entry tab.
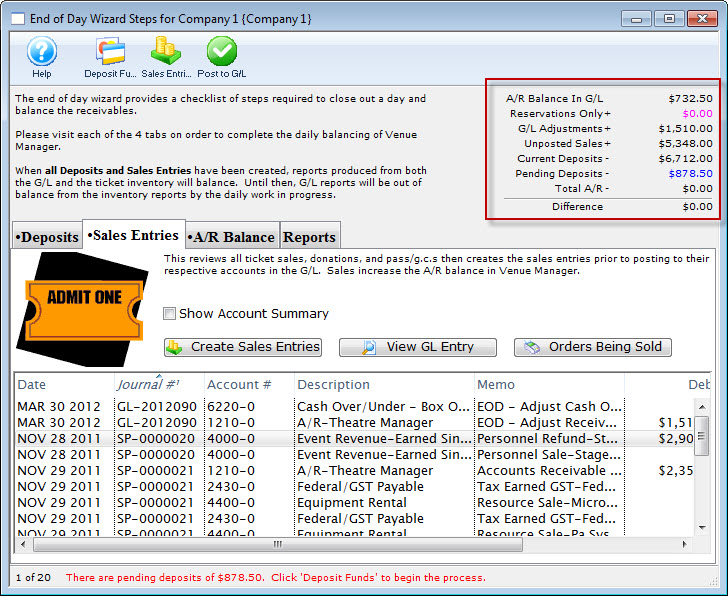
All the Sales Entries will be displayed under the Sales Entries tab.
In the upper right hand corner of the End of Day wizard, the amount should be zero to show that the Deposits and Sales Entries are in balance. If they are not, then research will need to be done to determine where the problem is. For more information on finding the imbalance, click here.
The unposted sales and deposits must now be posted to the GL. For more information on posting to the General Ledger, click here.
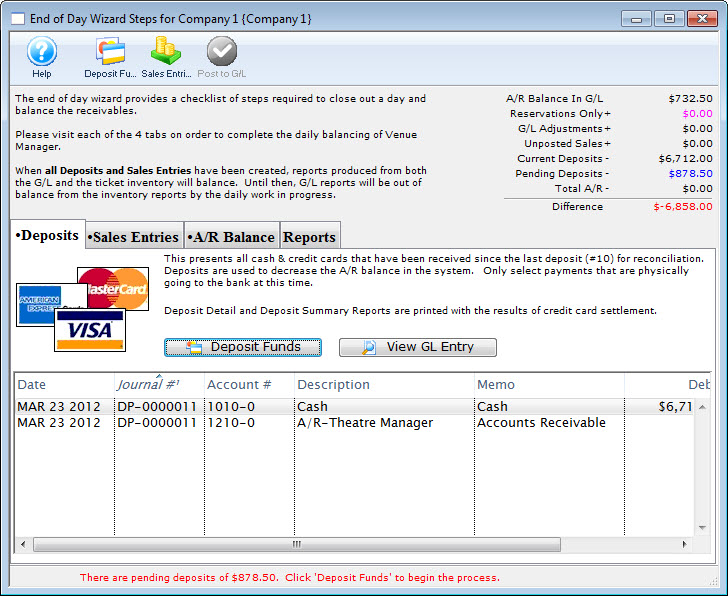
Posting To The GL
When payment has not been received for goods or services, the balance is recorded under Accounts Receivable.
- Click the A/R Balance Tab on the End of Day wizard.
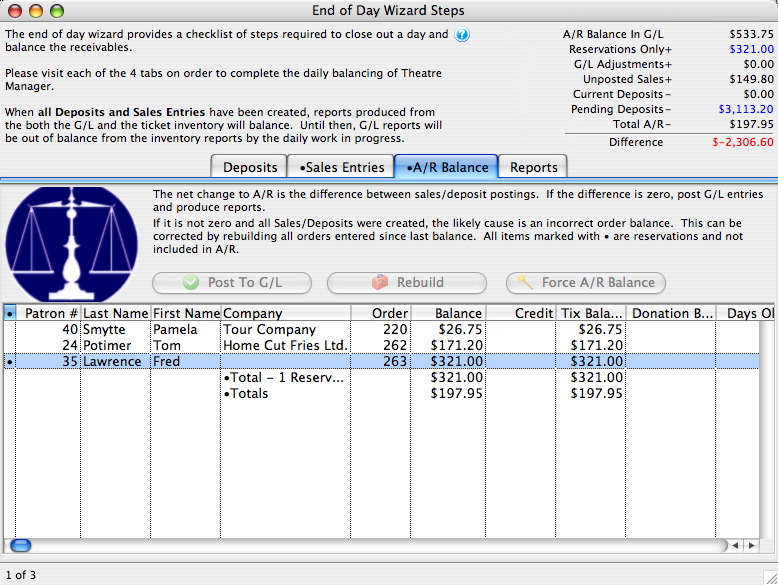
- Click the Post to GL
 button.
The confirmation window opens.
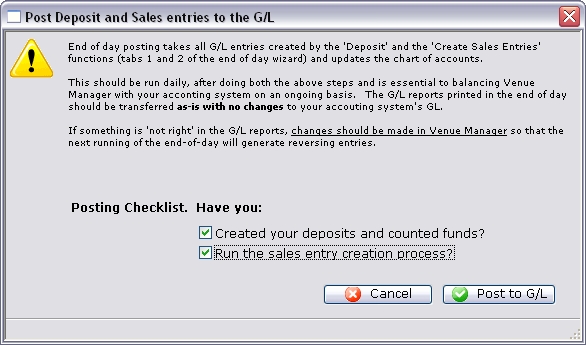
- Answer both questions by checking the box, then click the Post to GL button.
The unposted sales are added to the A/R Balance in the General Ledger and balance with the Patron A/R.
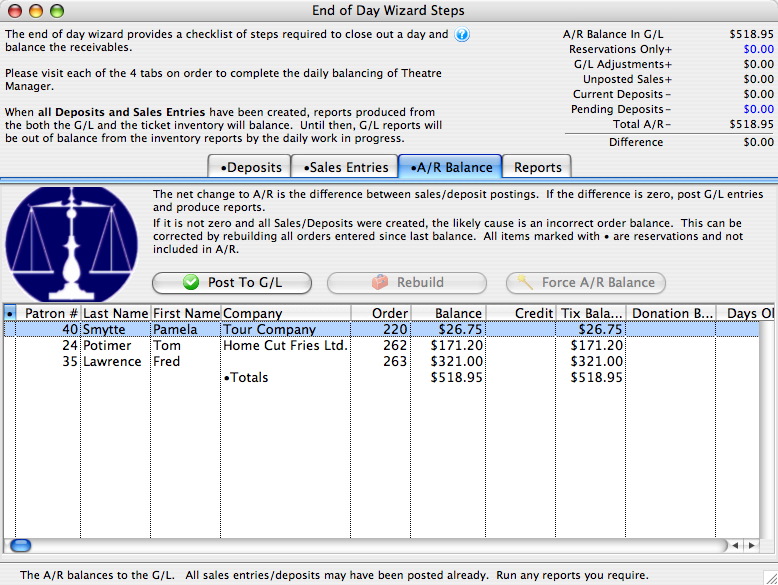
The upper right hand corner of the End of Day wizard should still be zero. If it is not, click here for more information on finding the problem.
A variety of reports can be printed based on the new General Ledger entries by using the Reports Tab. For more information on printing reports, click here.
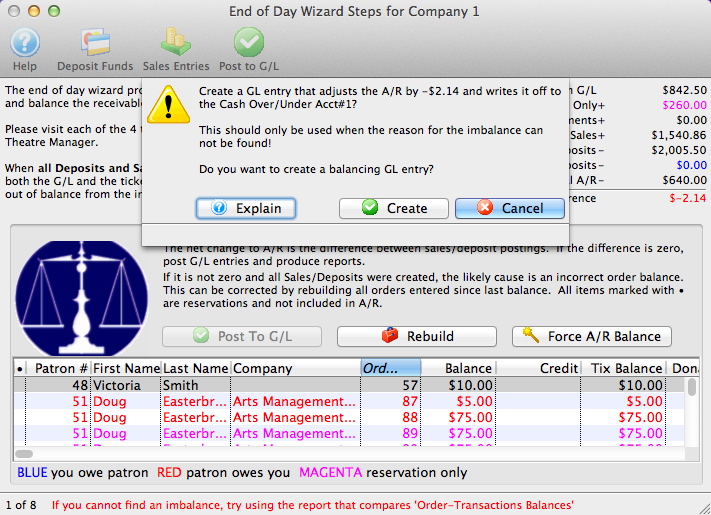
Force A/R Balance
You are presented with a message, similar to the one below, indicates the amount of the imbalance and asks if you want to create a balancing entry against the cash over/under account.
Before continuing, please make sure you have done all steps to determine the source of a possible imbalance BEFORE using the 'Force A/R Balance' function. If you cannot "find" your error, please contact the support team prior to completing this action. Forcing an EOD imbalance and writing it off is a last resort activity and you should have at least tried redoing the end of day and checking order/transaction balances.