The Form Letters Menu
Alternatively, you can open Form Letters via the Letters  button on the main Theatre Manager toolbar / ribbon bar.
Quick Reference information (Quick Reference Guides, Cheatsheets and Videos) is available for some Form letter functionalty. Click here to access the Form Letter specific links.
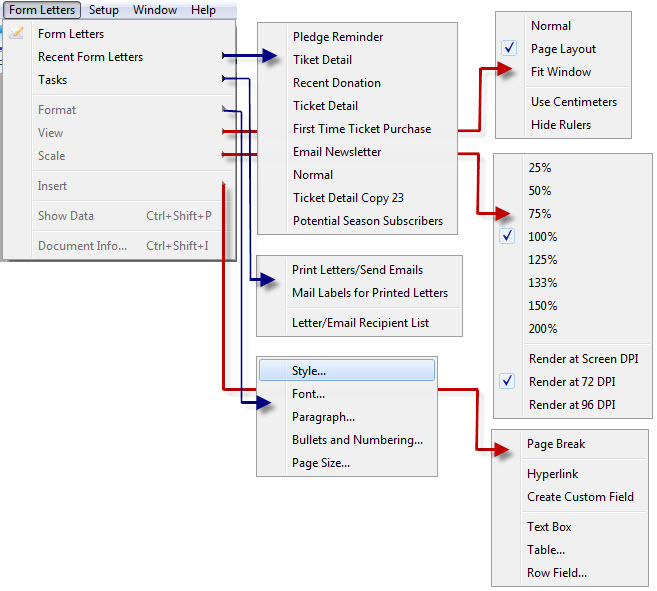
Parts of the Form Letter Menu
| Form Letters | This selection opens the Form Letter List window. Click here for more information on the Form Letter List window. |
| Recent Form Letters | This sub-menu lists recently accessed form letters for editing, and merging. For more information on the Recent Form Letters menu, click here. |
| Tasks | This sub-menu allows access to the printing features for letters and labels. For more information on the Tasks menu, click here. |
| Format | This sub-menu allows access to the different format features available when creating or editing a letter. For more information on the Format menu, click here. |
| View | This sub-menu allows changing the view options for the current document. For more information on the View menu, click here. |
| Scale | This sub-menu allows changing the zoom options for the current document. For more information on the Scale menu, click here. |
| Insert | This sub-menu allows the insertion of objects into the current document. For more information on the Insert menu, click here. |
| Show Data | Clicking on this menu option will convert all merge fields to date taken from the database. This is for viewing how the letter will look when merged. |
| Document Info | This will open the Form Letter Info Window for the current document. For more information on the Document Info window, click here. |
Search Function
You may search for donation receipts using a variety of fields. The search fields can be selected from the drop down list located in the upper left portion of the window.
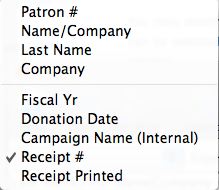
| Patron # | Use this search field to locate donation receipts for a range of, or a specific patron number. |
| Name/Company | Use this search field to locate donation receipts for a particular patron, or a range of patrons based on letters in their last name or company name. |
| Last Name | Use this search field to locate donation receipts for a particular patron, patrons with the same last name, or a range of patrons based on letters in their last name. |
| Company | Use this search field to locate donation receipts based on the company a patron works for. |
| Fiscal Year | Use this search field to locate donation receipts based on the fiscal year that the donation was received. |
| Donation Date | Use this search field to locate donation receipts based on the actual date that the donation was received. |
| Campaign Name (Internal) | Use this search field to locate donation receipts based on the internal name of the campaign type assigned to them. |
| Receipt # | Use this search field to locate donation receipts based on the receipt numbers that were assigned to them. |
| Receipt Printed | Use this search field to locate donation receipts based on the actual date that the donation receipts were printed. |
| From and To | Use these fields to enter in search parameters based upon the field you are using to search. |
 |
This button will begin a search for donation receipts that match the specific search criteria set in the from and to fields. |
 |
Opens the selected Donations Detail window. |
 |
Unprints the receipt for the selected Donation. |
 |
Exports the data from the Donation Receipt List out of Theatre Manager as a tab-delimited file to be used in other programs. |
 |
Generates the Donation Receipts List as a report with the results of the searched for patrons found in the displayed list. |
Form Letter List Window
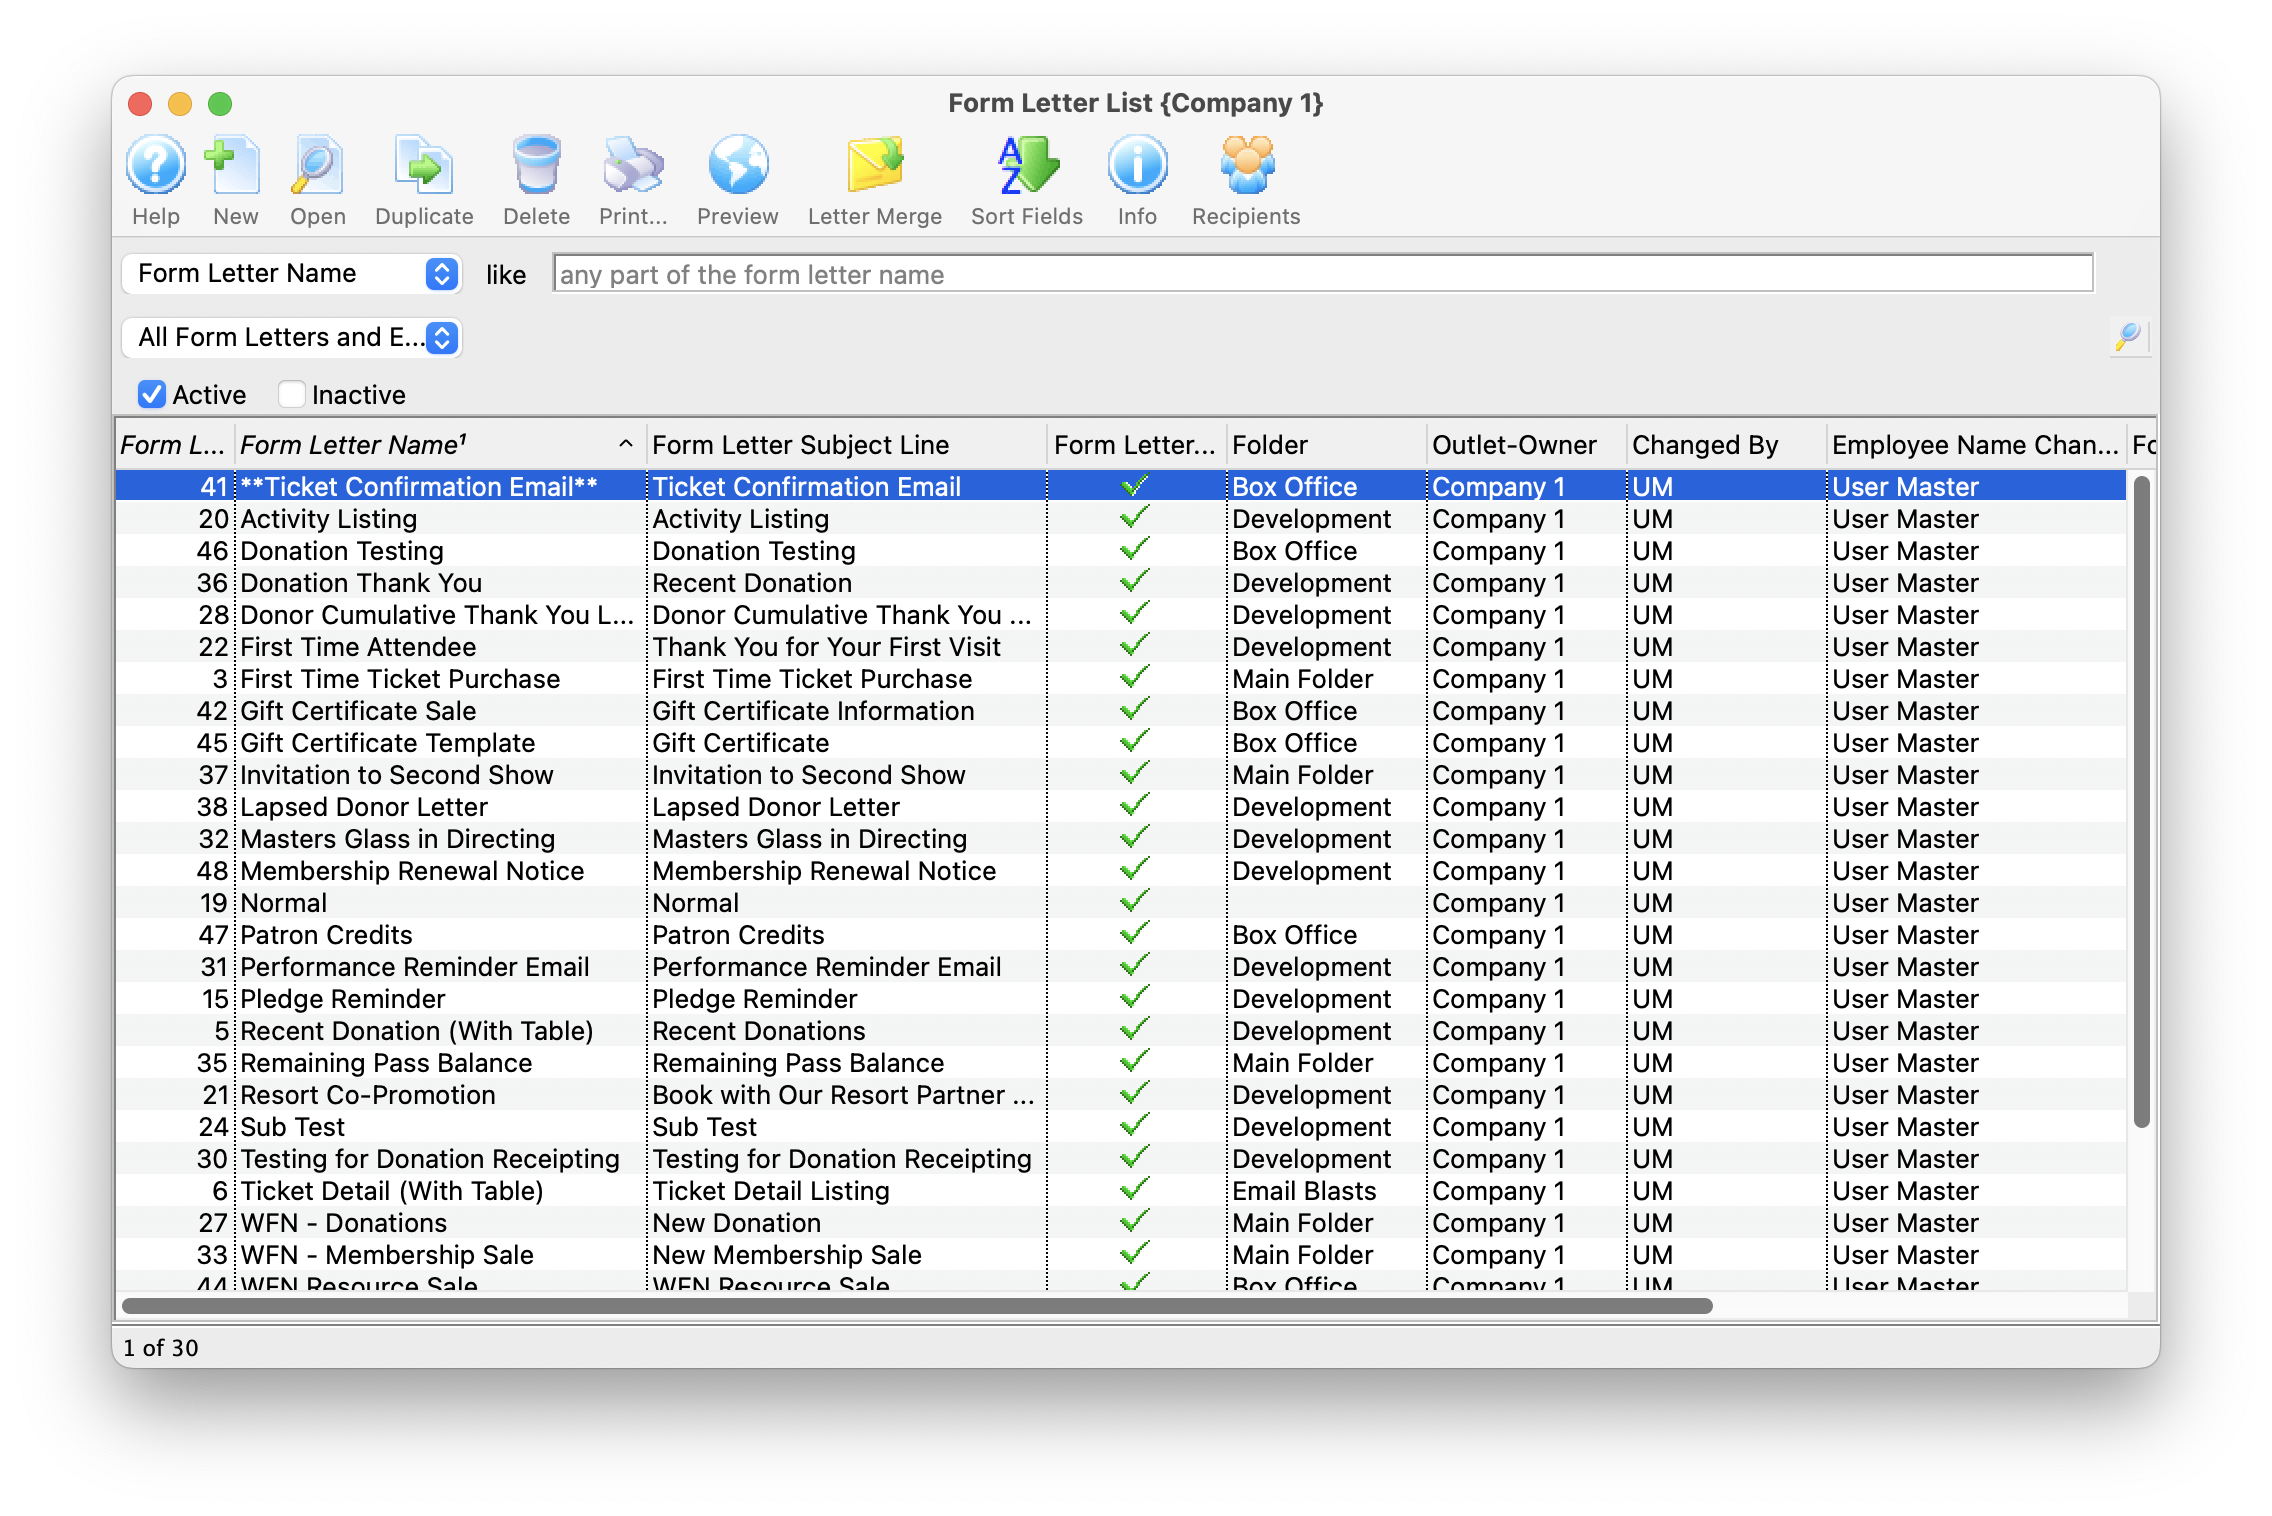
The Form Letter List Window is opened by accessing the Form Letters Menu >>
Letters >> Open or Rename Form Letters or by clicking on the Letters button on the main toolbar.
Quick Reference information (Quick Reference Guides, Cheatsheets and Videos) is available for some Form letter functionalty. Click here to access the Form Letter specific links.
Parts of the Form Letter List Window
 |
Opens the Form Letter Window and created a new Form Letter. Click here for more information on creating a Form Letter. |
|
Opens the currently selected Form Letter. Click here for more information on finding a Form Letter. |
 |
Duplicates the currently selected Form Letter. Click here for more information on duplicating a Form Letter. |
 |
Deletes the currently selected Form Letter. Click here for more information on deleting a Form Letter. |
|
Prints the currently selected Form Letter. Click here for more information on printing a Form Letter. |
 |
Displays the Form Letter Info Window for the currently selected Form Letter. Click here for more information on this window. |  |
Opens a list of patrons who have been sent correspondence from a selected Form Letter |
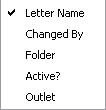 |
Drop down menu allowing for different ways to search for a Form Letter. |
| |
Allows for searching for a Form Letter via text matching the selected field in the Drop Down List. Pressing the search button with noting entered, displays the full listing of letters. |
| Letter Name | The file name of the letter currently displayed. |
| Active? | Shows whether the letter is currently active for use. |
| Is Template | Shows whether the letter is a template to be used for the creation of other letters. |
| Template Name | Shows the name of the template used in the creation of the letter. |
| File Name | The data set being used for the merge fields of the letter. |
| Folder | The folder that the letter is currently saved under. |
Recent Form Letters Menu
This menu shows a list of recently used form letters to more quickly access the most recent letters.

Form Letter Tasks Menu
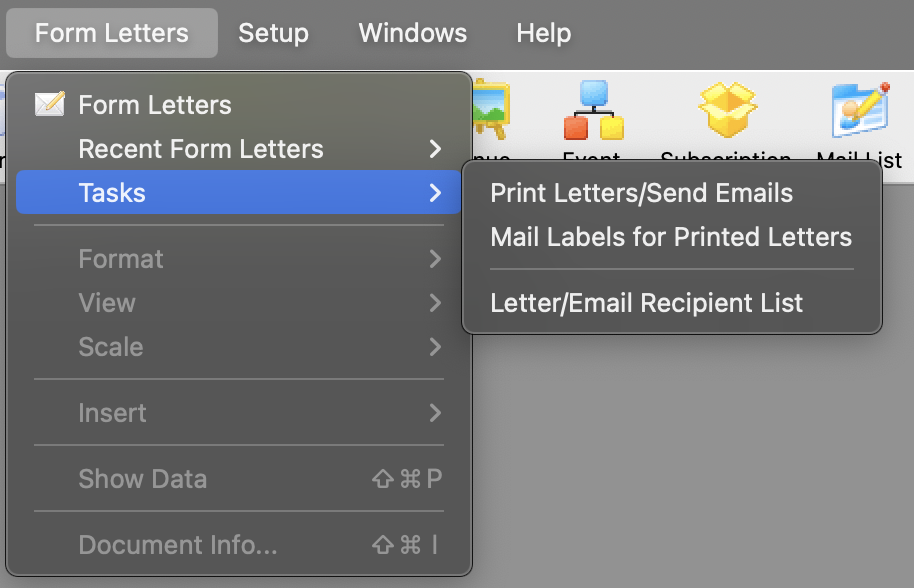 This menu is used for creating new form letters, editing existing form letters, and merging form letters with data.
Parts of the Tasks Menu
| Print Letters / Send Emails | Begins the batch print process for letters and/or the batch process for sending e-mails. For more information on printing letters and sending emails click here. |
| Mail Labels for Printed Letters | Allows you to print labels. Click here for more information on printing labels. |
| Letter / Email Recipient List | Allows you to find out who received a letter or eblast and/or look at the current status of a series of letters. click here for more information on the email / recipient listing. |
Formatting
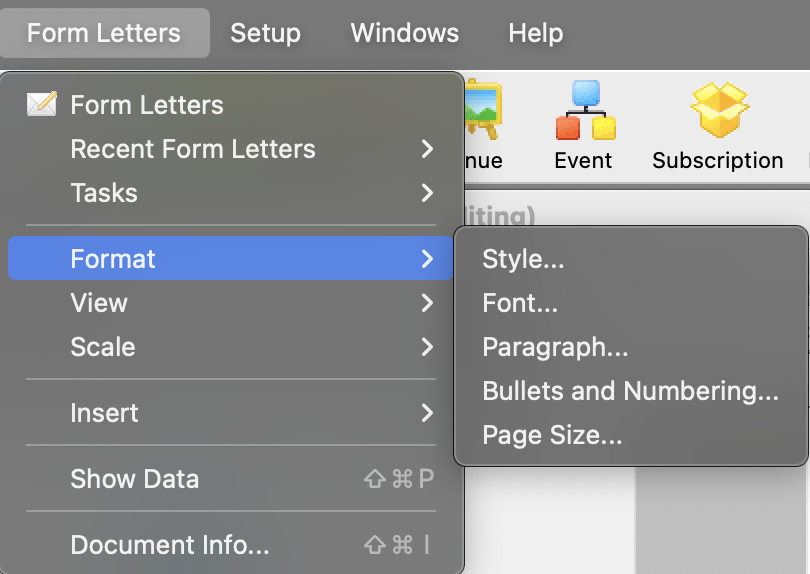
Format Menu Items
 The Format menu is used for adjusting the format of the text and paragraphs of the letter. Some of these options are also available in:
- The context menu for the word processor window
- Some keyboard shortcuts
Parts of the Format Menu
| Style | This opens up the Format Style window for changing the style of the text based on an existing style (or to make a new style. |
| Font | This opens the Format Font Format Font window for changing the font of the text. |
| Paragraph | This opens the Paragraph Properties window for changing the format of paragraphs in the letter. |
| Bullets and Numbering | This opens the Bullets and Numbering window for formatting text with bullets or numbering. |
| Page Size | This opens the Format Page Size window for the adjusting the properties of the document. |
Format Style
 The Style Menu is a sub level of the Format Menu under Form Letters. The Style
Menu lists templates of the most used font styles and sizes. It allows setting
the style and size in which the text will be displayed, or to change the
style and/or size of the currently selected text.
The Style Menu is a sub level of the Format Menu under Form Letters. The Style
Menu lists templates of the most used font styles and sizes. It allows setting
the style and size in which the text will be displayed, or to change the
style and/or size of the currently selected text.
Some of these options are also available in:
- The context menu for the word processor window
- Some keyboard shortcuts
Parts of the Format Style Converter
 |
Adjusts the style of the selected template. For more information on the style tab click here. |
 |
Sets the font for the selected template. For more information on the font tab click here. |
 |
Defines the paragraph dimensions for the selected template. For more information on the paragraph tab click here. |
 |
Determines the bullet and numbering format for the selected template. For more information on the numbering tab click here. |
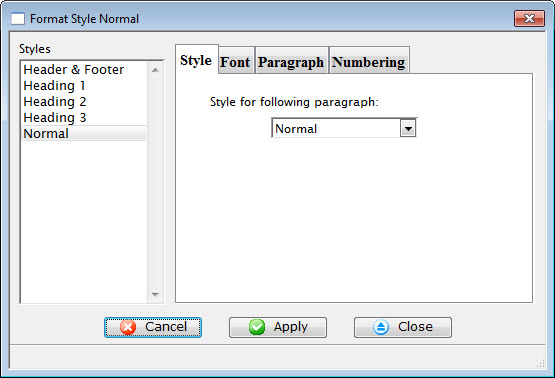
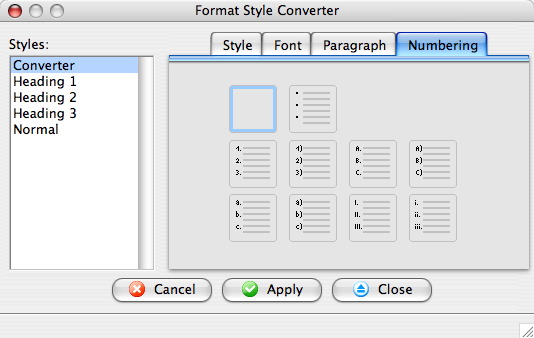
Style Sheet Tab
Displays the styles available in the document and allows you to both alter the style sheet and choose the style for the following paragraph.
Parts of the Style Tab
| Converter | This style is a 12 point Geneva font. |
| Heading 1 | This style is typically used for the first heading of a section. It is a 16 point Helvetica font. |
| Heading 2 | This style is typically used for a second-level heading in a section. It is a 14 point Helvetica font. |
| Heading 3 | This style is typically used for a third-level heading in a section. It is a 13 point Helvetica font. |
| Normal | This style is typically used for the body of a paragraph. It is a 12 point Times New Roman font. |
Font Tab
Font Tab |
|
| Font | A drop-down menu listing all available fonts that can be used in the letter. |
| Font Size | A drop-down menu listing standard point sizes for the font selected. Sizes may also be entered in the field manually. |
| Style | This style section refers to the style of the font. The available options are Bold, Italics, and Underlined. |
| Text Color | The color of the text may be changed either by:
|
| Script | The script section allows for the text to be formatted as either Superscript or Subscript. |
Format URL for Link
 Links are useful in eblasts to help you direct the patron to a specific area in the web site to begin the buying process and track the reason people came to the web site using the tmsource feature of a link
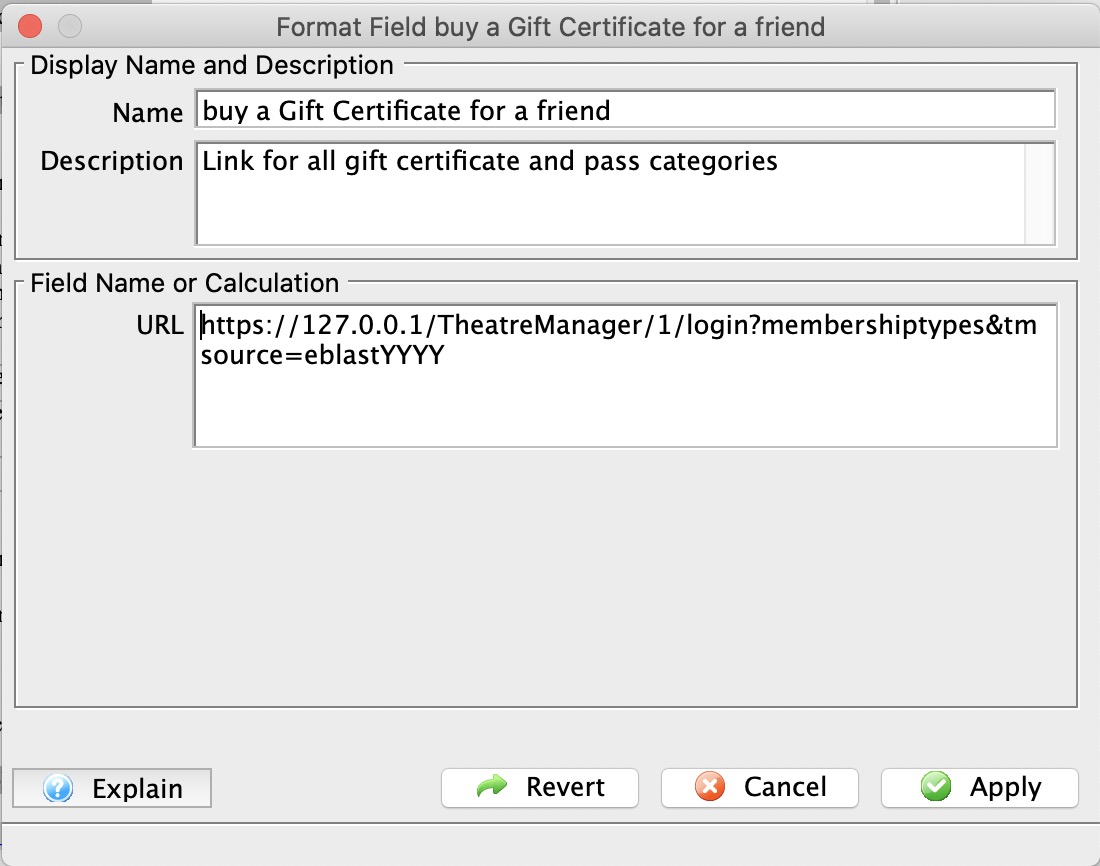
You can right-click on text to format it a Link or to edit the URL for an existing link.
You can alter the:
- Name of the link which is displayed on the letter for the patron to click on
- Description of the field which is the tooltip displayed when you run your mouse over the field. It will default to explain what link you have chosen
- URL that clicking on the link will display in your browser.
Selecting a link
You can type in any link you want such as your marketing web site URL or the ticketing web site.
The context menu has a helper to help you quickly insert a URL for various parts of your ticketing web site.
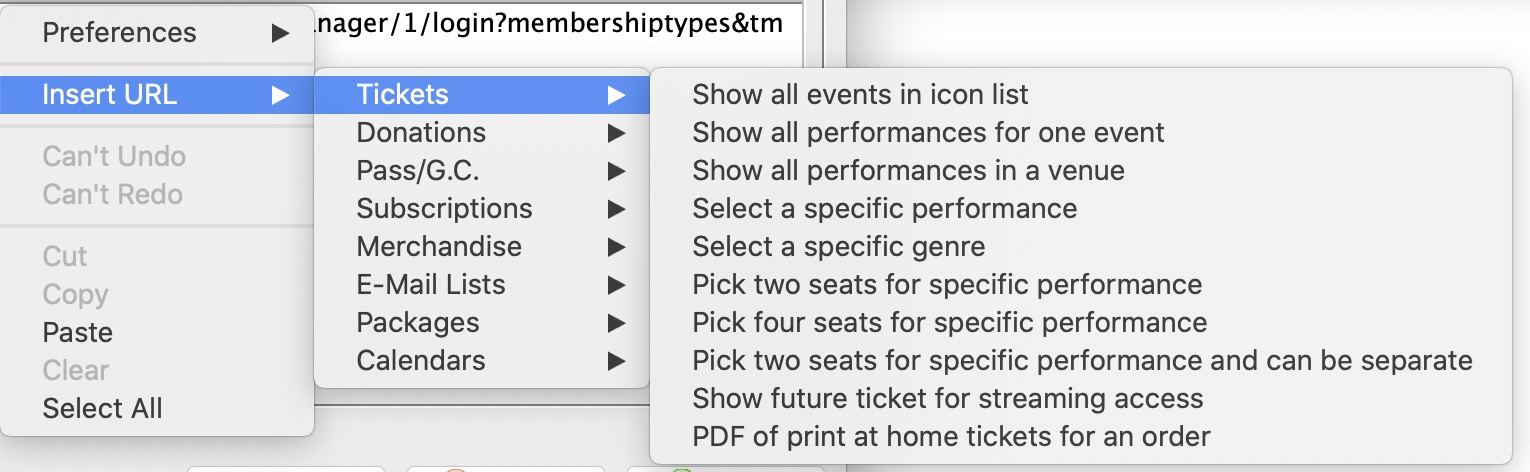 For example, if you want to place a link to show all events:
- Right click on the URL field
- Select Insert URL
- Select Tickets category of URL's
- Select Show All Events in Icon List
- The Description will change to describe what the link does as a helpful tip to you
- The URL will be changed to the link that will accomplish that task
- Some links will have XXX or QQQ in them. It the link is for a donation campaign, the XXX need to be changed to one of your donation campaigns.
 |
For more information about a URL that is inserted, please refer to redirecting links |
|
The parameter tmSource is automatically appended to the end of all links with an example value. Please change it to make sure you do eblast referral tracking. |
Formatting Fields and Calculations or a Form Letter
 You can double click on fields to alter some formatting of the field and some other options. You can alter the:
- Name of the field which is displayed on the letter, if you prefer something different than the standard.
- Description of the field which is the tooltip displayed when you run your mouse over the field.
- Calculation that the field will display. This is normally only a single database field selected from the context menu as per the example to the right.
- Formatting of the field (numeric, date, text, currency, etc) by using the popup.
- Number of decimals if it is a numeric field
- Aggregation of the field if it is of a type that can be aggregated.
- Typically this lets you display maximum, minimum, total or average value of all the records that might appear on a consolidated letter
- It is only effective on a document designed to display multiple records in a table
- Note: If a field has aggregation set on it, it appears yellow in the document
Adding a calculation containing one or more fields
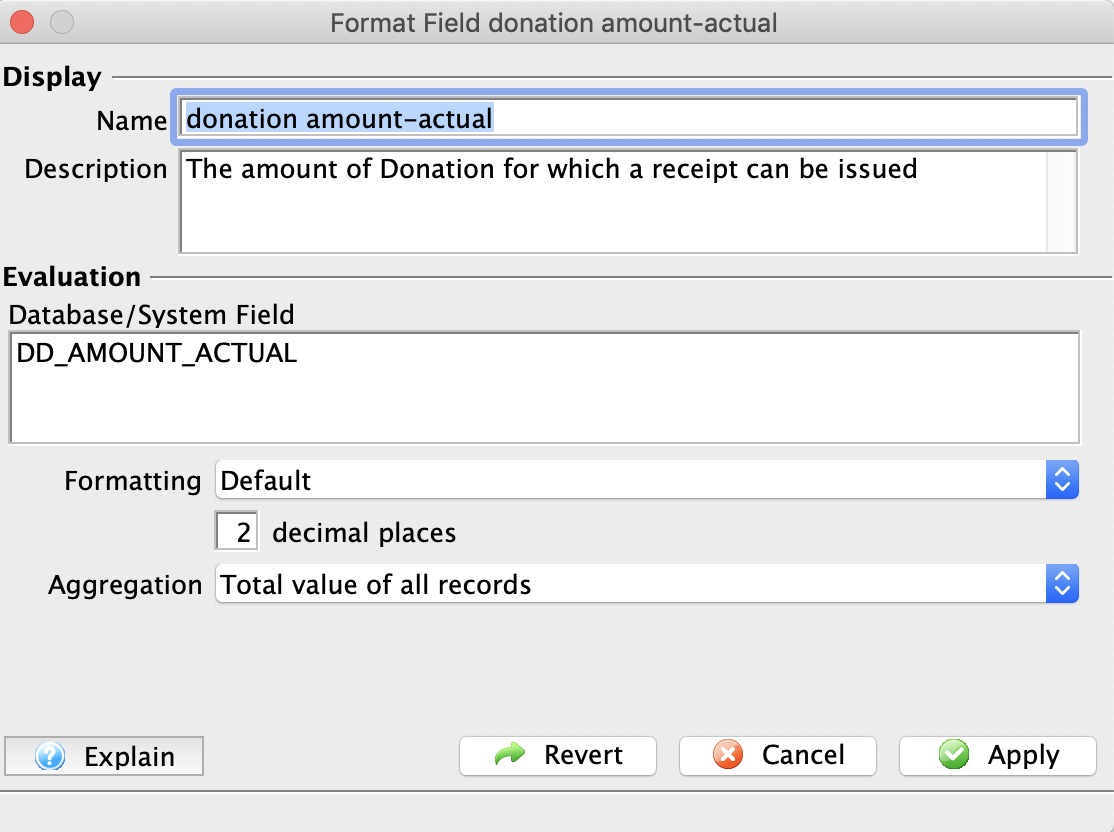
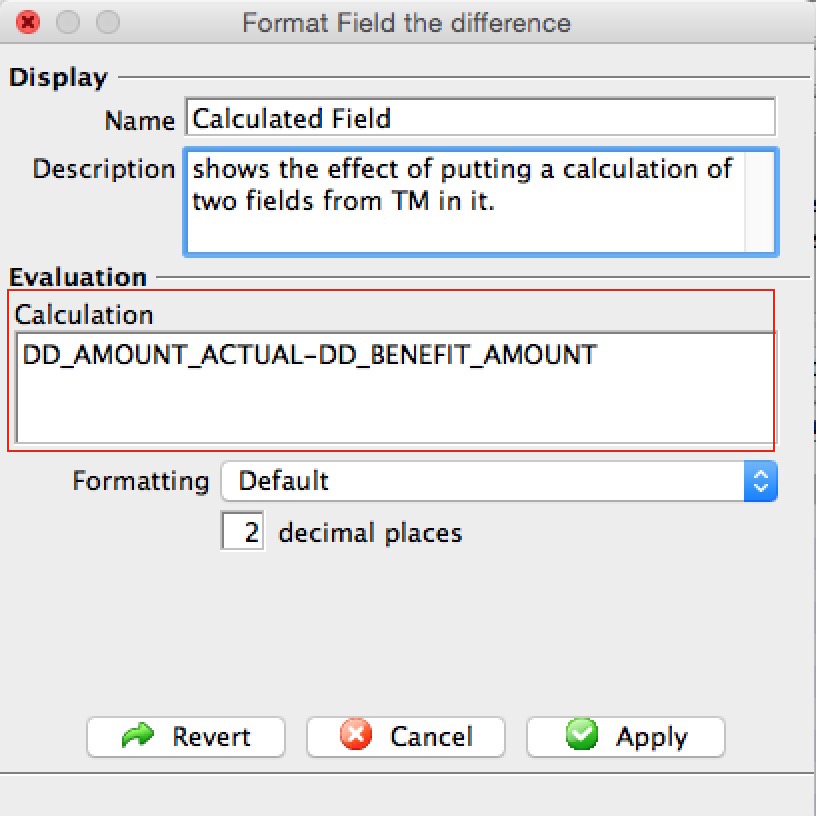
The one time you may wish to change all the options available for a field is when you want to have a calculation occur between multiple fields. The example below shows calculating the net deductible donation amount based on the difference between the actual donation amount and the benefit. In this case, the sample shows the calculation changed and all other items in the screen changed to reflect it on the document.
An obvious question is how to get the names of the fields for a calculation. You can use a simple trick:
- Insert each the fields onto the form letter that you might want to put in the calculation
- Double click on those fields
- Write down the name of the field from the 'evaluation' field
- Close the window
 Insert one of the fields a second time (or copy/paste it). This is what we will use as the calculated field.
- Change the Database/System Field area to contain a calculation based on multiple variables. In this example, the field
DD_AMOUNT_ACTUAL was changed to be the calculation
DD_AMOUNT_ACTUAL-DD_BENEFIT_AMOUNT
- hit the tab key and the Database/System Field will change to Calculation if it contains valid fields to let you know that Theatre Manager recognizes the calculation
- You may wish to change the name and description to indicate what you've done - and the next person to edit the letter will know from the name of the calculation what it means.
- Change the Database/System Field area to contain a calculation based on multiple variables. In this example, the field
- Print some samples of the letters - reviewing the date on the letter to see if it is right
- Then remove any fields from the letter that you don't really want the patron to see, but you added to the letter to get the field names
Once you've created a calculation, you should also be able to use it to create a custom field and do conditional printing.
Paragraph Tab
Paragraph Tab |
|
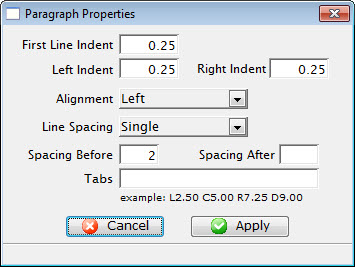
| First Line Indent | Sets the indent of the first line of each paragraph. |
| Left Indent | Sets a left indent to all lines of a paragraph. |
| Right Indent | Sets a right indent to all lines of a paragraph. |
| Alignment | A drop-down menu allowing for the adjustment of the alignment of the paragraph. The available options are Left, Center, Right, and Justified. |
| Line Spacing | A drop-down menu to set the spacing between lines in a paragraph. The available options are Single, 1.5, and Double. |
| Spacing Before | Sets the spacing before each paragraph. |
| Spacing After | Sets the spacing after each paragraph. |
| Tabs | Sets any tab stops that should be on the page. L=Left, C=Centre, R=Right, D=Decimal followed by a number where the tab stop occurs.
For example: a tab stop o L2.50 would a Left Tab at 2.5". Tabs can be set usin the toolbar as well. |
Numbering Tab
Parts of the Bullets and Numbering Window |
|
 |
Text is not in list format or removes list format from selected text. |
 |
Converts the text to a list with bullets. |
 |
Converts the text to a list with numbers and a period separator. |
 |
Converts the text to a list with numbers and a parentheses separator. |
 |
Converts the text to a list with upper case letters and a period separator. |
 |
Converts the text to a list with upper case letters and a parentheses separator. |
 |
Converts the text to a list with lower case letters and a period separator. |
 |
Converts the text to a list with lower case letters and a parentheses separator. |
 |
Converts the text to a list with roman numerals and a period separator. |
 |
Converts the text to a list with roman numerals and a parentheses separator. |
Format Font Window
 The Font Menu is a sublevel of the Format Menu under Form Letters. The Font
Menu allows the changing of the font and size of the text for input, or
to change text that is currently selected.
The Font Menu is a sublevel of the Format Menu under Form Letters. The Font
Menu allows the changing of the font and size of the text for input, or
to change text that is currently selected.
Some of these options are also available in:
- The context menu for the word processor window
- Some keyboard shortcuts
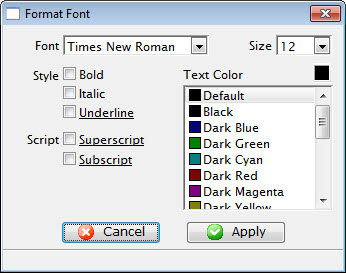
Parts of the Format Font Window
| Font | A drop-down menu listing all available fonts that can be used in the letter. |
| Font Size | A drop-down menu listing standard point sizes for the font selected. Sizes may also be entered in the field manually. |
| Style | This style section refers to the style of the font. The available options are Bold, Italics, and Underlined. |
| Text Color | The color of the text may be changed either by using the color picker button on the right hand side, or the list of default colors below. |
| Script | The script section allows for the text to be formatted as either Superscript or Subscript. |
 |
Closes the Format Font window without applying any changes. |
 |
Applies the changes to the text and closes the Format Font window. |
Paragraph Properties
 The Paragraph Menu is a sublevel of the Format Menu under Form Letters. The
Paragraph Menu allows the adjustment of the paragraphs in the letter.
The Paragraph Menu is a sublevel of the Format Menu under Form Letters. The
Paragraph Menu allows the adjustment of the paragraphs in the letter.
Some of these options are also available in:
- The context menu for the word processor window
- Some keyboard shortcuts
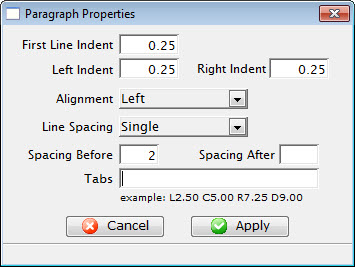
Parts of the Paragraph Properties Tab
| First Line Indent | Sets the indent of the first line of each paragraph. |
| Left Indent | Sets a left indent to all lines of a paragraph. |
| Right Indent | Sets a right indent to all lines of a paragraph. |
| Alignment | A drop-down menu allowing for the adjustment of the alignment of the paragraph. The available options are Left, Center, Right, and Justified. |
| Line Spacing | A drop-down menu to set the spacing between lines in a paragraph. The available options are Single, 1.5, and Double. |
| Spacing Before | Sets the spacing before each paragraph. |
| Spacing After | Sets the spacing after each paragraph. |
| Tabs | Sets any tab stops that should be on the page. An example of a tab stop would be L2.50 which places a Left Tab at 2.5". |
|
Closes the Format Font window without applying any changes. |
|
Applies the changes to the text and closes the Format Font window. |
Format Page Size Window
 The Page Size Menu is a sublevel of the Format Menu under Form Letters. The
Page Size Menu allows the adjustment of the size and orientation of the letter..
The Page Size Menu is a sublevel of the Format Menu under Form Letters. The
Page Size Menu allows the adjustment of the size and orientation of the letter..
Some of these options are also available in:
- The context menu for the word processor window
- Some keyboard shortcuts
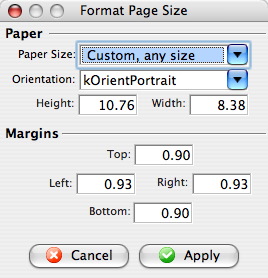
Parts of the Format Page Size Window
Paper |
|
| Paper Size | The drop-down menu displays a list of standard paper sizes. The user may also enter custom sizes below or select the custom format from the list. |
| Orientation | The drop-down menu allows a change between orientating the paper in Portrait or Landscape. |
| Height | Displays the height of the paper when a size is selected above or allows the user to enter a custom height. |
| Width | Displays the width of the paper when a size is selected above or allows the user to enter a custom width. |
Margins |
|
| Top | Sets the size of the top margin in inches. |
| Left | Sets the size of the left margin in inches. |
| Right | Sets the size of the right margin in inches. |
| Bottom | Sets the size of the bottom margin in inches. |
|
Closes the Format Font window without applying any changes. |
|
Applies the changes to the text and closes the Format Font window. |
Format Picture or Image
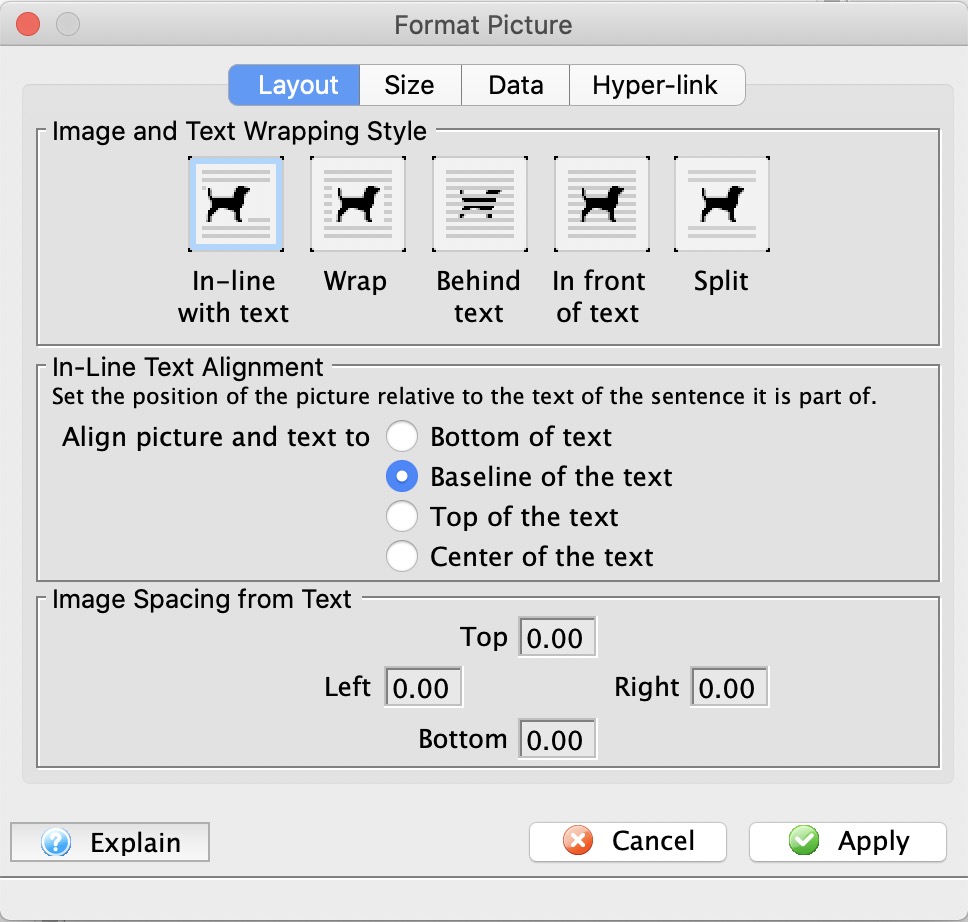 This allows you to format many aspects of a picture such as:
- How text wraps around the image
- How the text aligns to the top or bottom of text
- The amount of spacing from the image and the rest of the text in all directions
- Alter the size of the picture for display purposes
- Keep the aspect ratio
- Give the image a name and description for documentation purposes
- A URL to open when the image is clicked
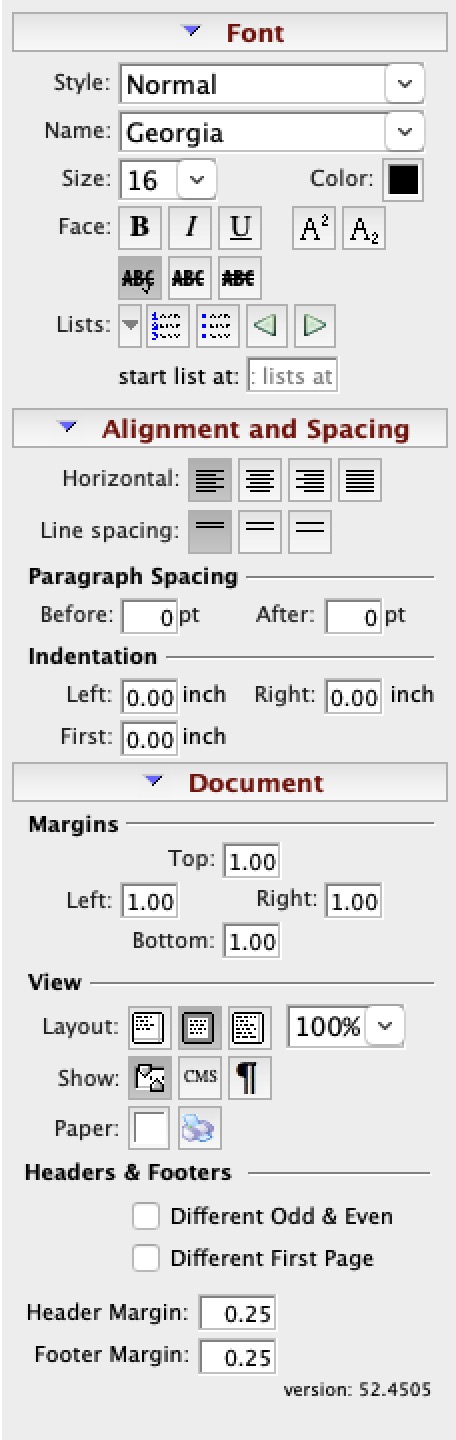
The Formatting Palette
- The context menu for the word processor window
- The Form Letter menus on the main Theatre Manager menu bar
- Some keyboard shortcuts
Parts of the Formatting Pallette
Font |
|
|
| Style | Templates for font styles. A style may be applied to text to change its formatting. Drop down the menu to change the style. | |
| Name | Name of the current font. Drop down the menu to change the font. | |
| Size | Size of the current font. Drop down the menu to change the size. | |
| Color | Color of the font. Drop down the menu to view the color picker. | |
| Face | Affects the special format of the text. This allows for Bold, Italic, Underlined, Superscript and Subscript text. | |
| Lists | Inserts a list into the current text. The list can be in numbered or bulletted format. The list can also be indented or outdented. | |
Alignment and Spacing |
||
| Horizontal | Changes the horizontal alignment of the text to either Left, Center, Right or Justified. | |
| Line Spacing | Changes the spacing between lines to 1 line, 1.5 lines or 2 lines. | |
Paragraph Spacing |
||
| Before | Changes the spacing between a new paragraph and the preceding paragraph. | |
| After | Changes the spacing after a paragraph and before the following paragraph. | |
Indentation |
||
| Left | Changes the indenation of text on the left side. | |
| Right | Changes the indentation of text on the right side. | |
| First | Changes the indentation for the first line of a paragraph. | |
Document |
||
Margins |
||
| Top | Changes the size of the Top margin of the document. | |
| Left | Changes the size of the Left margin of the document. | |
| Right | Changes the size of the Right margin of the document. | |
| Bottom | Changes the size of the Bottom margin of the document. | |
View |
||
| Layout | Changes the Layout View of the document between:
|
|
| 100% | You can set the zoom in/out of the document view. | |
| Show | The first button will turn on the rulers and the second button will change the rulers from inches to centimetres.
Also on the View Menu |
|
| Show Paragraph | the show paragraph icon will show the hidden text markers like tabs, paragraph markers and other invisible non-breaking spacing characters | |
| Paper Colour | Drop down menu allows for changing the color of the paper via a color picker. | |
| Paper Size |
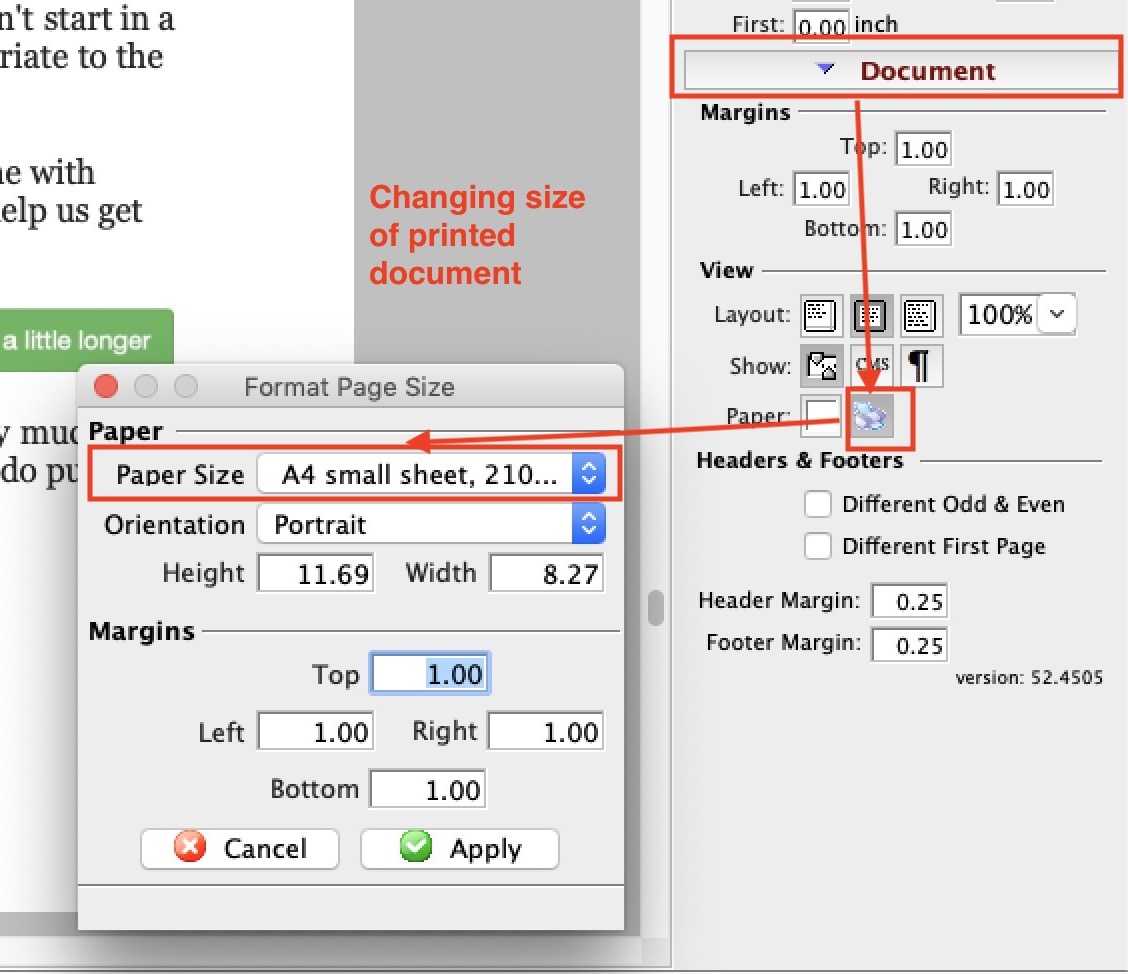 Opens a window that lets you set some page size characteristics based on common paper sizes, or ones that you might want to customize.
This also available on the context menu and the Format Menu |
|
Headers & Footers |
||
| Different | Check for different Odd and Eve and/or Different first page headers and footers | |
| Margins | Define the margins for the headers and footers | |
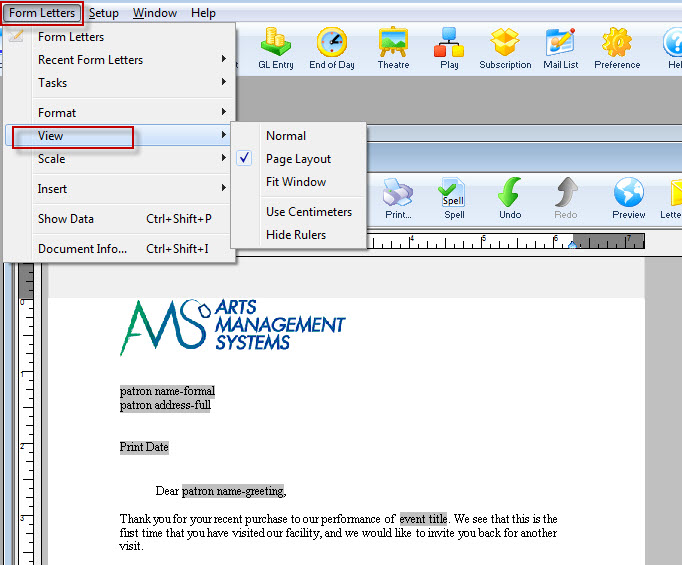
View Menu
The View menu is used for adjusting the view of the letter in the Form Letter Window.
Parts of the View Menu
| Normal | The Normal command displays normal view (active when checked), to display page breaks as horizontal lines, and to not display headers and footers. |
| Page Layout | The Page command displays page layout view (active when checked), to display a document as it will print. The page outline, text, margins, headers, footers and objects display in their actual size and position. |
| Fit Window | This sets the Form Letter window to Fit Window view. This view sets the zoom size of the letter to fit the size of the window. |
| Use Centimeters | This converts the ruler from inches to centimeters. If it says "use centimeters" then inches are currently in use. |
| Hide Rulers | This turns on or off the rulers in the Form Letter window. If it says "hide rulers" then rulers are currently visible. |
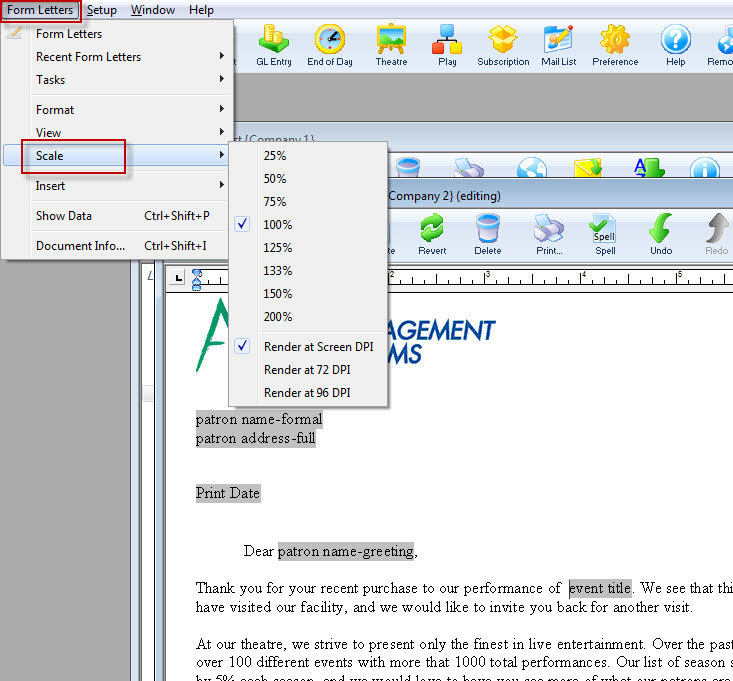
Scale Menu
The Scale menu is used for adjusting the zoom of the letter in the Form Letter Window.
Parts of the Scale Menu
| 25% | Sets the view of the letter at 25% zoom. |
| 50% | Sets the view of the letter at 50% zoom. |
| 75% | Sets the view of the letter at 75% zoom. |
| 100% | Sets the view of the letter at 100% zoom. |
| 125% | Sets the view of the letter at 125% zoom. |
| 133% | Sets the view of the letter at 133% zoom. |
| 150% | Sets the view of the letter at 150% zoom. |
| 200% | Sets the view of the letter at 200% zoom. |
| Render at Screen DPI | Renders the letter and images at the DPI of the screen. |
| Render at 72 DPI | Renders the letter and images at 72 DPI. |
| Render at 96 DPI | Renders the letter and images at 96 DPI. |
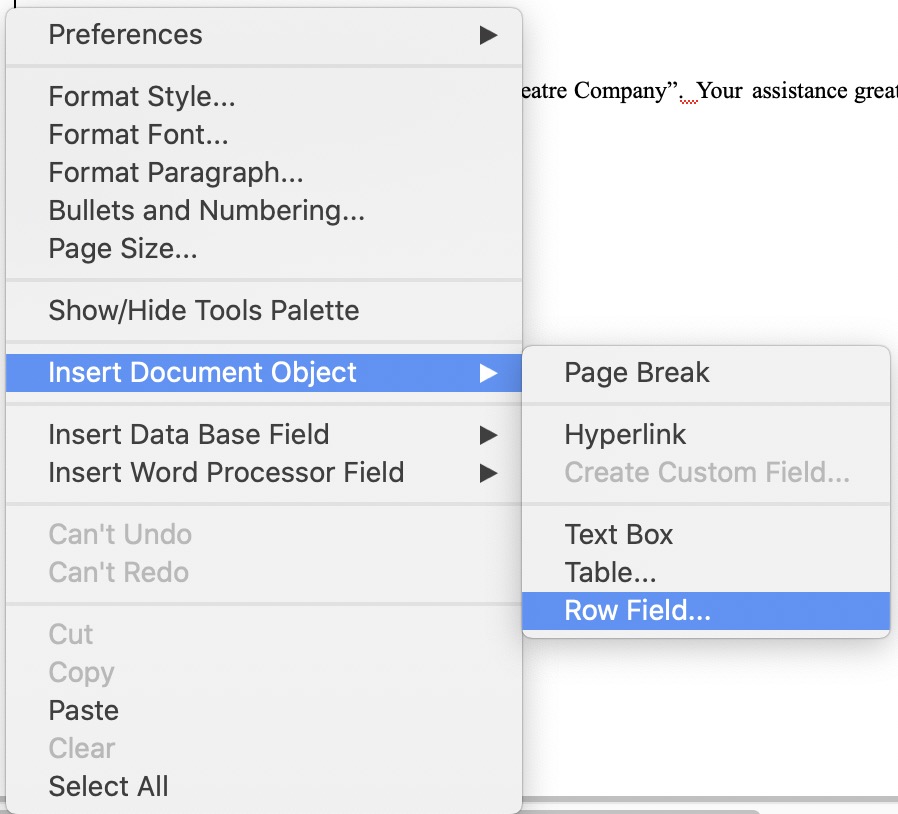
Insert Menu
The Insert menu is used for inserting special objects into the letter. An example of these objects would be hyperlinks or tables.
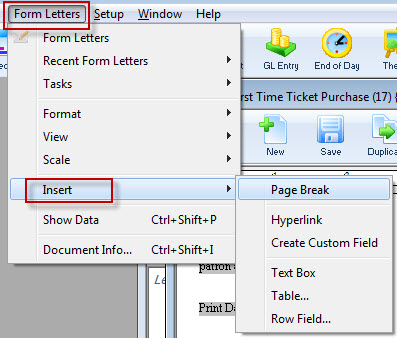
| Page Break |  |
Inserts a page break into the letter. A page break will force any text following the page break to start on a new page. |
| Hyperlink |  |
Inserts a hyperlink into the letter. A hyperlink is typically used to create a clickable link to a web URL. |
| Create Custom Field | 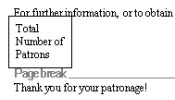 |
Inserts a custom field into the letter. These are specialty fields that are not found within the standard Theatre Manager merge fields. For more information on inserting custom fields click here. |
| Text Box |  |
Inserts a Text Box into the letter. The text box is typically used to create a section of text that is movable in the letter. |
| Table | 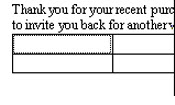 |
Opens the Insert Table window. Tables are used to format text into rows and columns. For more information on inserting tables click here. |
| Row Field | 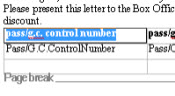 |
Opens the Insert Row Fields window. Row Fields are used to insert data in table format into the letter. This would typically be used to display a list of tickets or donations. For more information on inserting row fields click here. |
Insert Custom Field Window
|
Custom fields are different than calculated fields in a document. A custom field is used for conditional documents and paragraphs. In some cases, they can be built from any text, fields or calculated fields. |
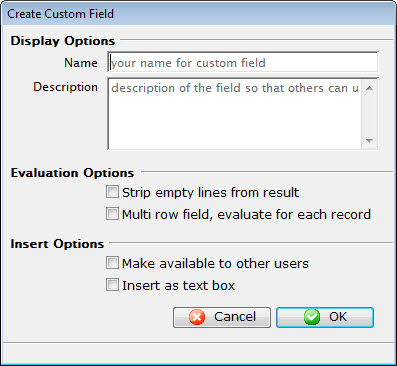
Parts of the Insert Custom Field
Display Options |
|
| Name | Enter a name for the custom field. |
| Description | Enter a description of what the custom field does. |
Evaluation Options |
|
| Strip empty lines from result | When checked, Theatre Manger will remove any empty lines from the data returned. |
| Multi row field, evaluate for each record | When checked, Theatre Manager will remove any empty lines from the data returned, and check on a line by line basis. |
Insert Options |
|
| Make available to other users | Makes the custom field available to other users. |
| Insert as text box | Inserts the custom field as a text box. |
 |
Cancels the current operation. Closes the window and performs no action. |
 |
Performs the current operation. This will add or alter the custom field that has been created. |
Insert Table Window
The Table menu is used for inserting a table into the letter. Tables allow text to be formatted into rows and columns in order to create a better presentation.
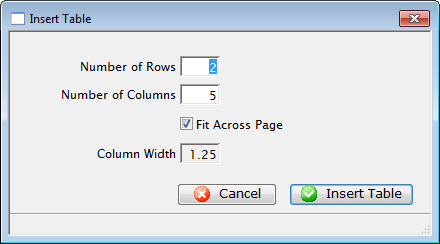
Parts of the Insert Table Window
| Number of Rows | The number of rows to create the table with. |
| Number of Columns | The number of columns to create the table with. |
| Fit Across Page | When checked, Theatre Manager automatically determines the column width in order to fit the table to the full width of the letter. |
| Column Width | The width of the columns to be set when the table is created. |
| |
Cancels the current operation. Closes the window and performs no action. |
 |
Performs the current operation. This will add the table to the letter. |
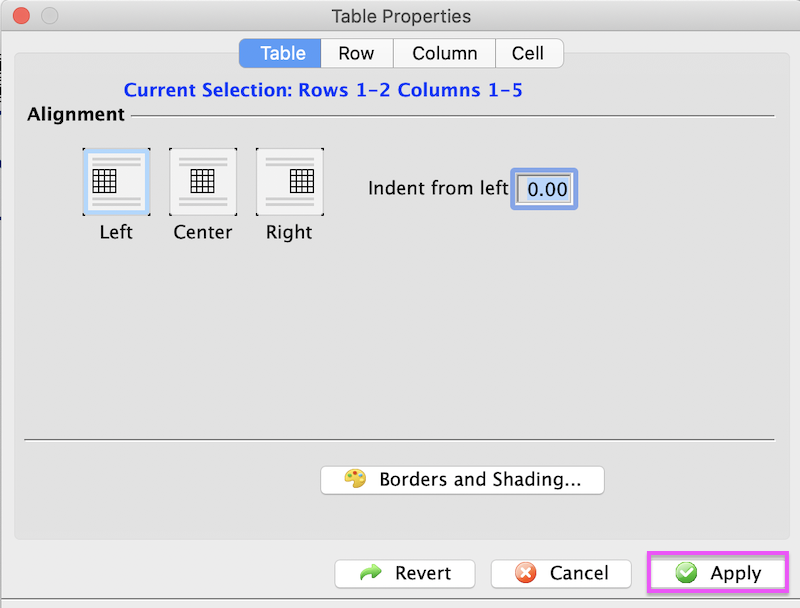
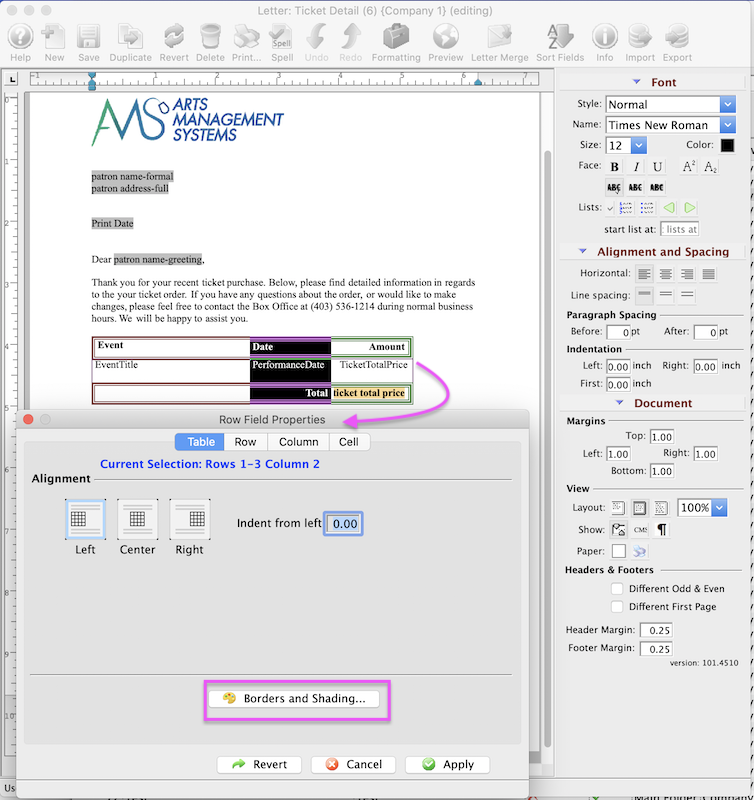
Table Borders and Shading
Formatting table Borders and Shading options are accessible after a table or row field table is inserted into a Form Letter. Borders and Shading is part of the table properties.
- Accessing Borders and Shading options right-click anywhere on the inserted table, select Table, Borders and Shading.
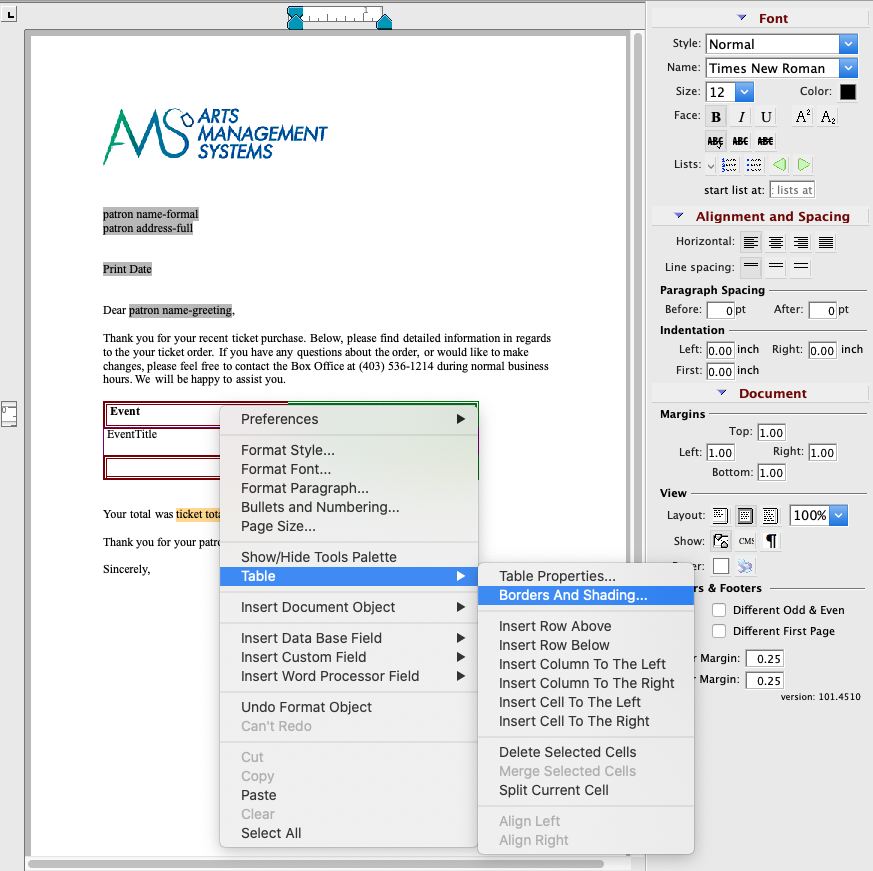
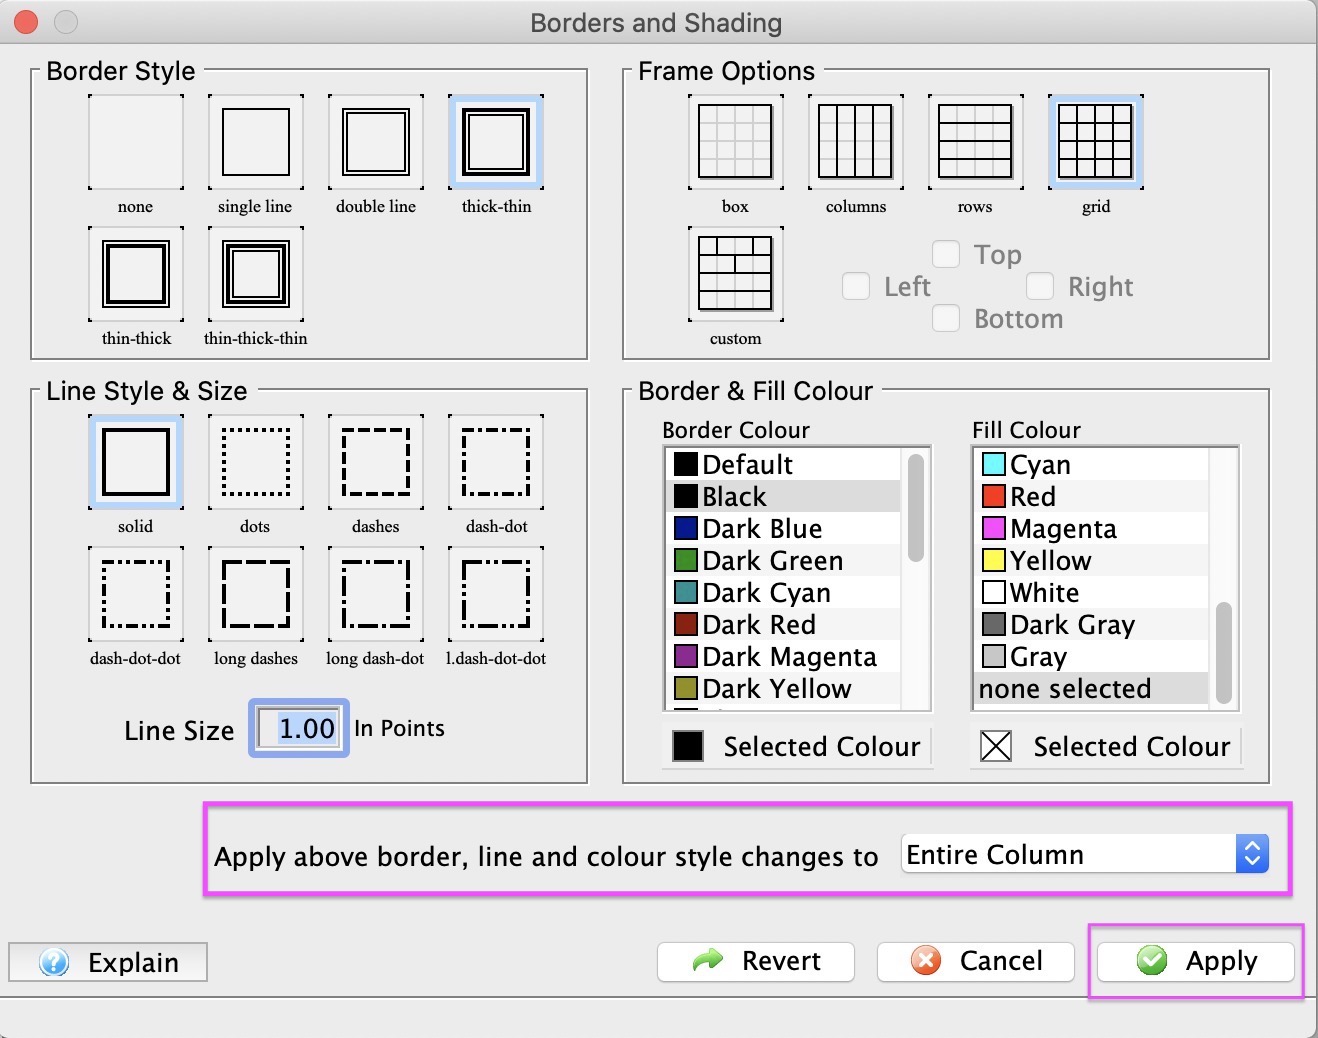
- Set Borders and Shading attributes there are 5 attribute options for Borders and Shading:
- Border Style
- Frame Options
- Line Style, Colors
- Line Size
-
Apply edits by selecting an option from the dropdown menu where changes are to be applied to the table, then click the Apply button.
- To complete the update and apply changes to Table. Closing the Borders and Shading window will set the Applied Changes. From the Table Property Window, click Apply button from the Table Property window.
Insert Row Field Window
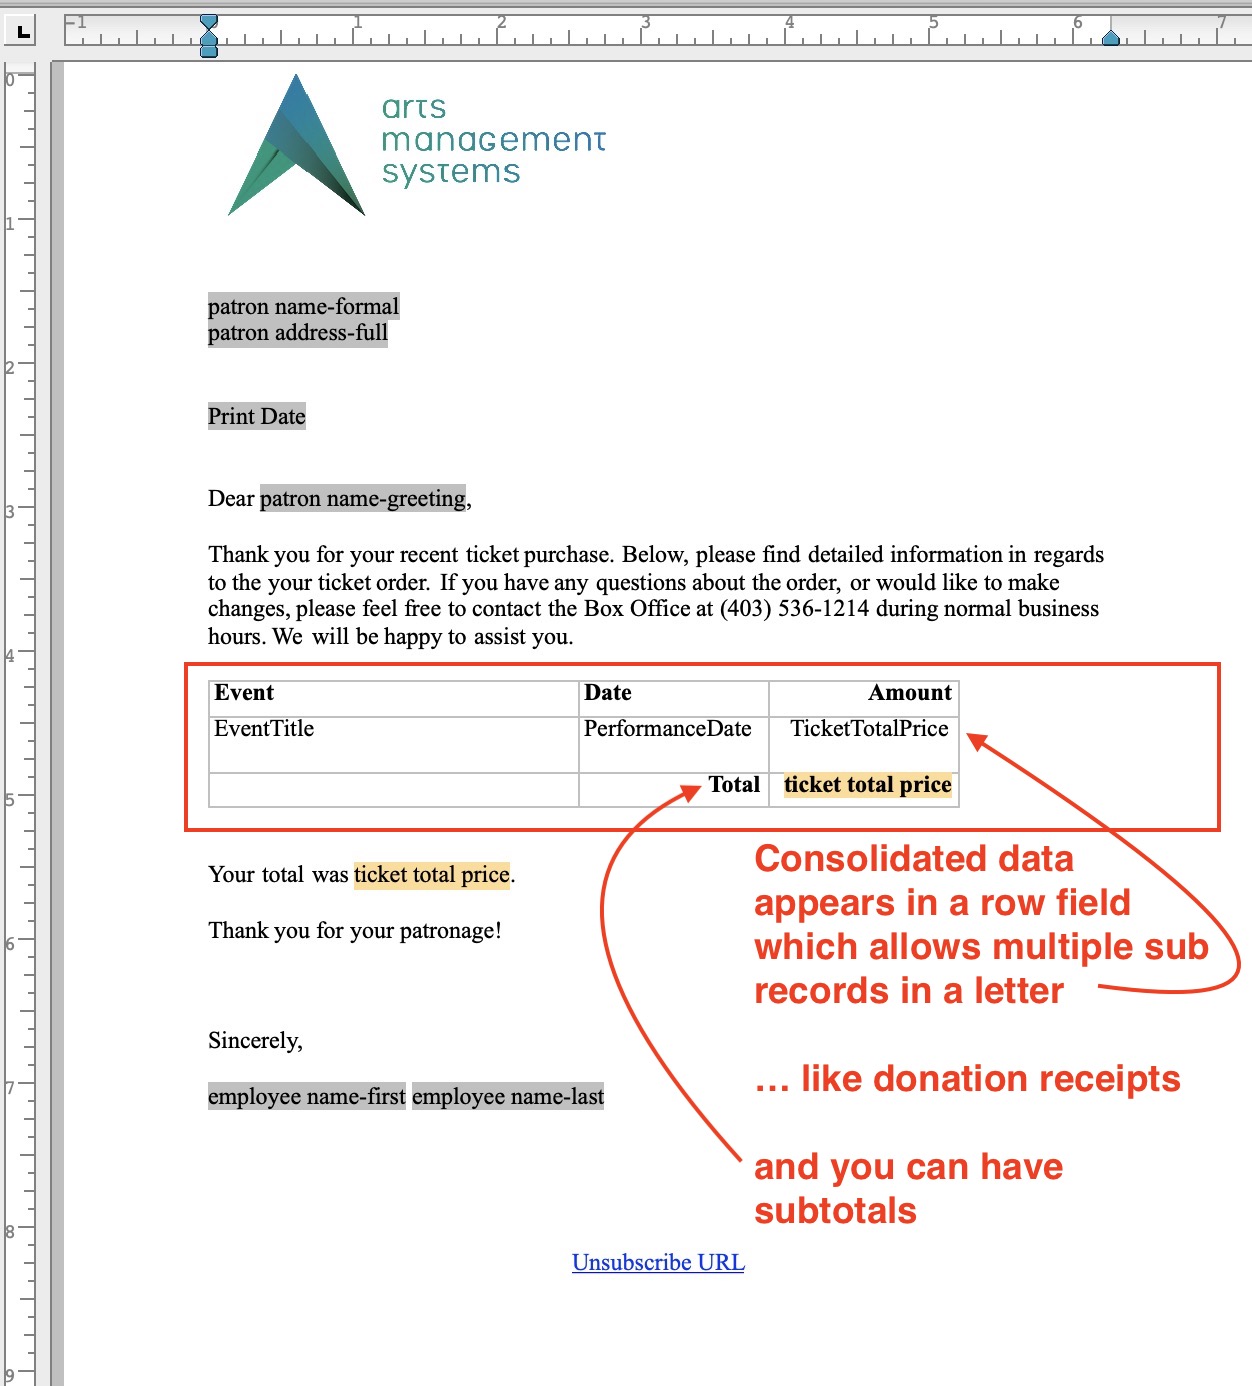
 The Row Field menu item is used for inserting a table with data fields into the letter. This table consists of columns of data fields to present a list of information. This is typically used in form letters to list things like the examples below:
- tickets that have been purchased for an order, subscription or what have you.
- donations that have been made for a year, a specific campaign, or part of an ongoing-never ending donation
- volunteer of staff activity assignments for an upcoming period of time
- a notice of gift certificates that are still active, available and assigned to a patron so that they can redeem them
- or anything else where you want a list of some data on the form letter.
Row fields can have:
- Multiple columns of data from related records in the database
- Column headers
- Detail rows containing the data for each column
- Subtotals, averages, max and minimum on rows that are numeric
- Separate subtotals, averages, etc outside the row field
Sample of Row Field In a Form Letter
Sample of empty Row Field
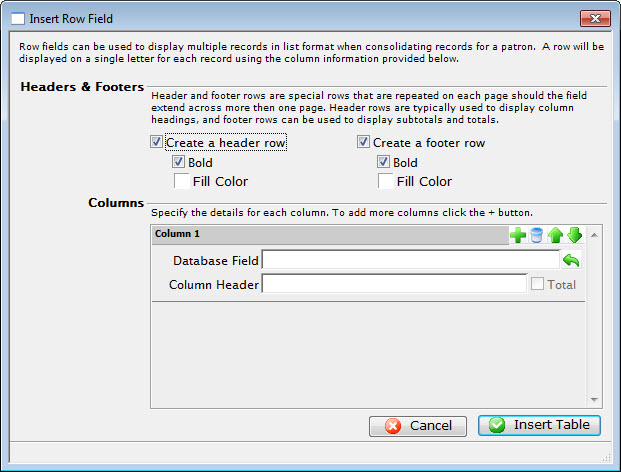
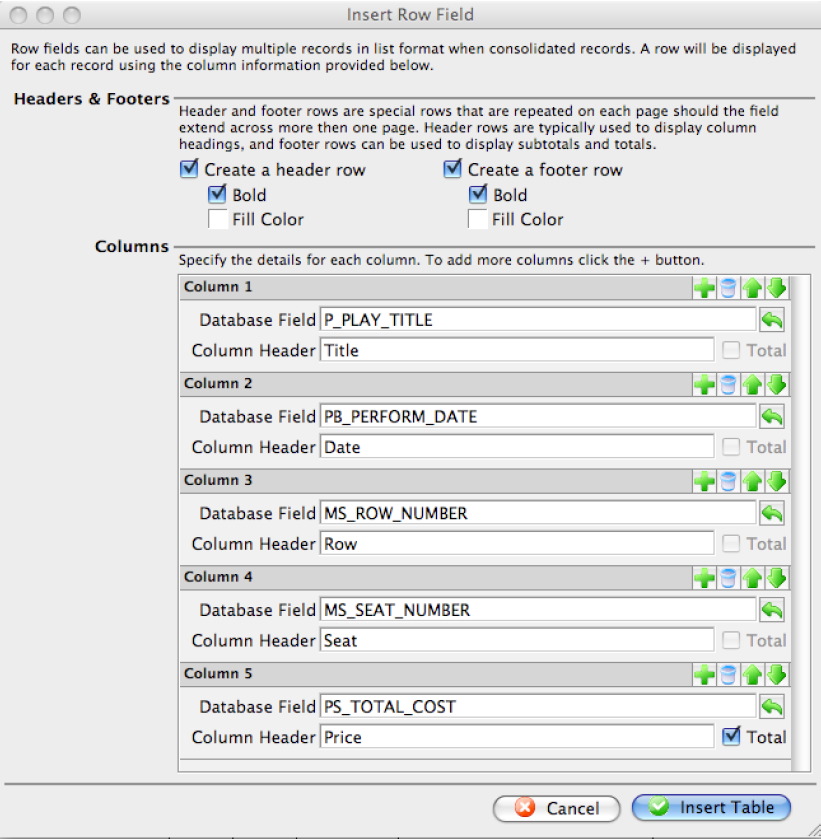
Parts of the Insert Row Field Window
Headers & Footers |
|
| Create a header row | Creates a header row for the table listing the fields that are used. |
| Bold | Sets the header row in bold typeface. |
| Fill Color | Allows changing the color of the header row background. |
| Create a footer row | Creates a footer row for the table. The footer row typically contains sub-totals of the information in the table. |
| Bold | Sets the footer row in a bold typeface. |
| Fill Color | Allows changing the color of the footer row background. |
Columns |
|
 |
Adds another row field to the table. |
 |
Deletes the row field from the table. |
 |
Moves the placement of the row field up. This will place the column farther left in the table. |
 |
Moves the placement of the row field down. This will place the column farther right in the table. |
| Database Field | The database field to be used as a column header. |
 |
Displays a drop-down menu to allow the lookup of database fields. |
| Column Header | Allows a description to be entered as the column header rather than using the database field. |
| Total | When checked, the total will be displayed for this field instead. |
| |
Cancels the current operation. Closes the window and performs no action. |
| |
Performs the current operation. This will add the table to the letter. |
Sample of row field for some ticket data
The example below shows a row field containing some ticket data. Refer to creating a ticket example for more information.