How to Change a Merchant Provider
 |
If considering changing merchant providers, be sure to read about the impact and business ramifications for purchases done with the old provider that might need refunded un the future. |
 |
Before beginning this process, we suggest picking a time that will naturally limit any transactions that could be processed until the new Merchant account is in place. (i.e. earlier in the morning). A switchover can usually be done in 5 minutes or less.
If you wish, you can turn off web sales (only necessary for comfort). |
The general steps covered below are:
- Preparing for the switchover to a new Merchant Account
- Switching Merchant Information in Theatre Manager
- Testing the merchant account
- Migrating Post Dated payments to your new merchant account
- Updating payment Ticket Face to print your New Merchant Account Information
Impact of Changing a Merchant Provider
 |
Changing your Bank is not the same as changing your merchant provider. You can change either/or at any time. Refer to the basic definitions used the credit card industry for more information on roles and responsibilities of either. |
Advantages of Changing Merchant Provider and/or Processor
You may get various benefits such as:
- more amenable rates
- better service when you call them for help
- more supported features such as hosted payments online or pin pads
Disadvantages of Changing Processors
There are disadvantages of changing service providers - most notably:
- Linked Refunds which apply to a specific patron, merchant and order -and-
- merchant profiles which will need to be recreated as patrons by.
If you suspect you might have a significant number of refunds to do for upcoming shows that are or could be cancelled, you might want to:
- hold off on changing your merchant provider until such a time you've got a low exposure on the need to do refunds -or-
- Migrate to the new merchant account, while keeping the old one available/active for future box office returns for a period of time - say a few months, if that option is possible.
Why are refunds problematic during Merchant Changeover?
In recent years, merchant providers have instituted fraud policies that apply one or more of the following rules (Linked Refunds) that mean refunds
- must within a certain number of days of authorization (normally 120, but can sometimes be extended)
- to the same card that was used to purchase
- with a token provided by the merchant provider (changing merchants nullifies the token)
- up to the same amount on the original purchase
- using the same order number
- to the same merchant provider
The rules above are imposed by the credit card companies and they can change at any time. If you change a merchant provider, then at least 3 of the rules above are viiolated:
- #3 (the token),
- #5 (the same order number),
- #6 different provider
The new merchant provider will not allow refunds for any charges done by the old merchant provider.
 |
You may need to ask the new merchant provider to approve you for independent refunds - which they may charge more for, or may not give you that permission.
Note, that Independent refunds of a card used with a new merchant processor means you must ask the patron for their card number again. (linked refunds do not need you to get the card). |
 |
Alternatively, you many need to keep your old merchant provider setup available for a few months for refunds only - until your risk of needing to do a refund to the old provider is past. |
Step 1: Preparing for the switchover to a new Merchant Account
- Set up the information for your new merchant account.
- Do not activate it yet -and-
- Set the new merchant to emergency mode
- Set up NEW credit card payment methods for your NEW merchant accounts
- You will need to go to the payment code table
- Create card payment types for VISA, MCARD, AMEX etc that your new merchant provider accepts
- Associate them with your new merchant provider created in step 1
- You might also want to rename your old VISA, etc payment methods to 'VISA - old merchant provider' so that you know which is which at a glance
- Complete the End of Day Process for your current Merchant Provider.
- Immediately turn your existing merchant provider into emergency mode. This will allow:
- Sales to continue while you complete the switchover
- Cards entered while in emergency mode are not authorized, but will be moved to the new merchant provider as post dated payments (due today).
- Those cards can then be authorized in next end of day against the new merchant account.
- This allows you to maximize sales uptime and minimize web sales outage to minutes.
Step 2: Switching Merchant Information in Theatre Manager
- Goto Setup >> System Tables > Merchant Accounts to see the merchant account list. You should see both your current and your future merchant records.
- Open both your old merchant account and your new one.
- Select the Employee tab on both windows
- Select and drag all employees from the old merchant account to the Employee tab of the new merchant account.
- You will see that all employee names now appear on the new merchant. From this point in, those employees will use the new merchant account.
- On the NEW merchant account window:
- Check the 'Active' flag in the new merchant account
- Uncheck the emergency mode setting in the new merchant account
- Close the new merchant account window
- On the OLD merchant account window:
- Uncheck the Active box in the old merchant account window.
- Close the old merchant account window
Step 3: Testing the merchant account
- processing a test transaction to ensure the new merchant account processes cards correctly.
- Run an End of Day in Theatre Manager to ensure the transaction batches properly.
- Open your online merchant profile and see that the batch is there and closed, with the right amount
Once you are sure the transactions are processing correctly you can then start up the web sales again and employees can log back into the database.
 |
When you make the changeover to the new merchant account, you must
RESTART your web listeners to ensure all web checkouts use the new merchant provider |
Step 4: Migrating Post Dated payments to your new merchant account
These credit card payments are linked to the payment method for the old merchant processor and need to be switched over to the new processor. To do so, repeat the following steps for each credit card type you now accept for your new merchant provider.
 |
The transfer process only does one Credit Card type at a time in case you want to split merchant accounts. User it iteratively to transfer
|
- Go to Setup->System tables and find all your payment methods. You should see a list of your payments like below:
- Open one of the OLD credit card payment methods associated with the OLD merchant provider. It should look like the window below.
- The Migrate Postdated button will be active.
- Click on it and a list of merchant providers will appear.
- Your new one should be visible
- select it
-
You will be asked to confirm that all post dated payments are to be moved to the new merchant provider. Confirm if you wish to continue. If you make a mistake, you can always reverse the process and move from the new merchant provider back to the old one.
- Make the payment method you just transferred the post dated payments from INACTIVE so that it can't be used again.
- Repeat the above steps for each of the other credit cards you are transferring to the new merchant account
 |
NOTE: to help prevent possible mistakes transferring from the old merchant to the new, the NEW merhant account will only appear in the popup list if:
|
Step 5: Updating Payment Ticket Face to print your New Merchant Account Information
These days, most people do not print a credit card receipt, or they email tickets
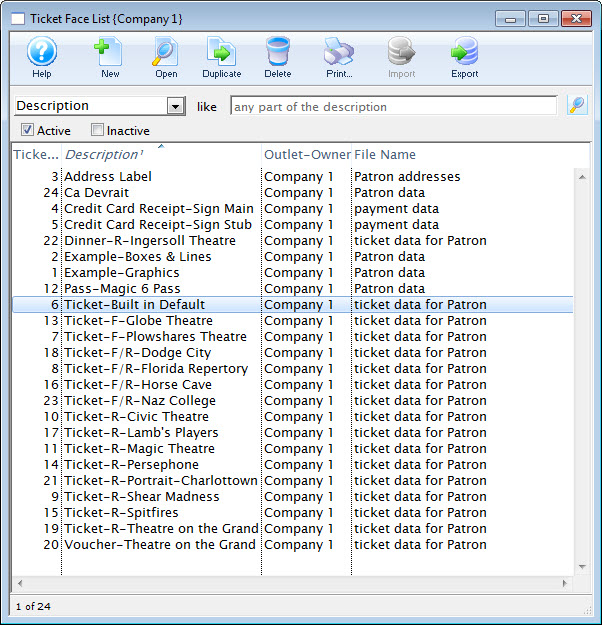
- Goto Setup >> Ticket Faces
This will open the Ticket Faces List window.
- Locate your Credit Card ticket Face
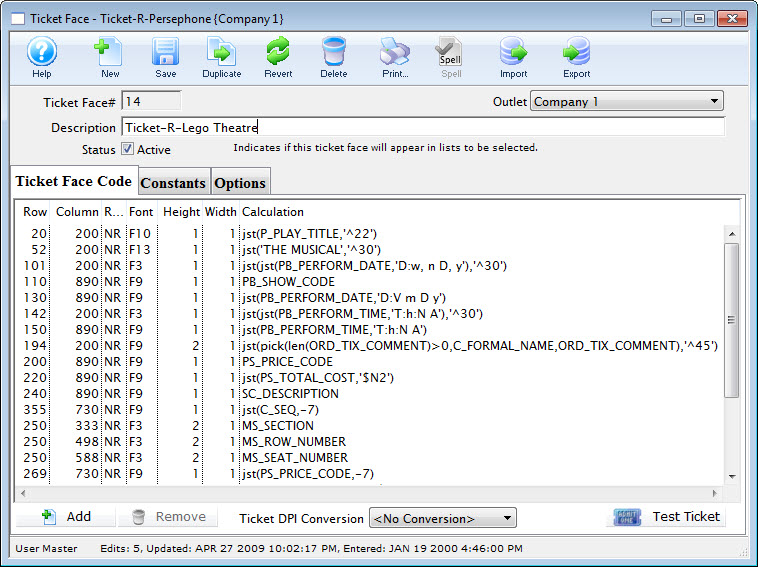
- Edit the ticket face

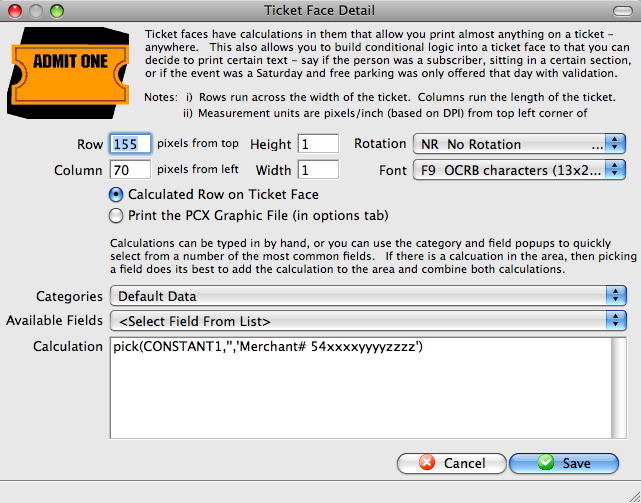
- Locate the line of code that displays your current merchant account number(s) (if they are hard coded on the ticket face). If the field is MM_MERCHANT_NUMBER, then no change is require to your ticket faces
- Edit the line of code to have your new merchant account information

- Click the Save
 button
 - Click Save
 the toolbar