Mail Lists - what are they?
 |
Mail Lists are always about WHO. If your question is WHO has purchased tickets or WHO has made a donation your answer is likely to be found in a Mail List. |
|
However, if you are looking for WHAT they donated, or WHEN they volunteered, or WHY they bought tickets, then your answer will be in a report - not a Mail List. |
A mailing list can be directed at a certain group of patrons based on some attribute they share, such as age, location or a viewing choice. Many mail lists can be created and a patron can belong to numerous lists. Several lists can be combined to create one list. Mail lists are easily deleted when no longer required. A mailing list has a number of applications, particularly in marketing. By targeting a mailing list to specific patrons information is aimed at those most likely to be interested while saving money by avoiding those who are not. For example:
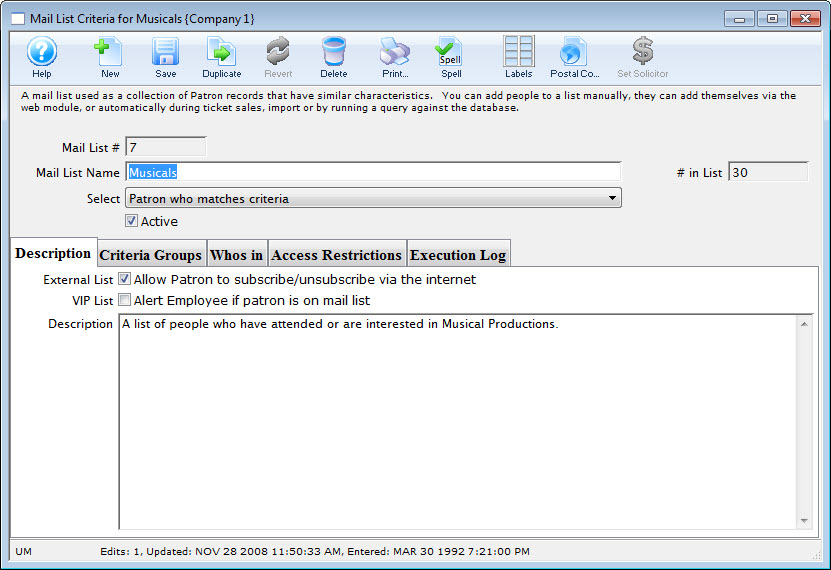
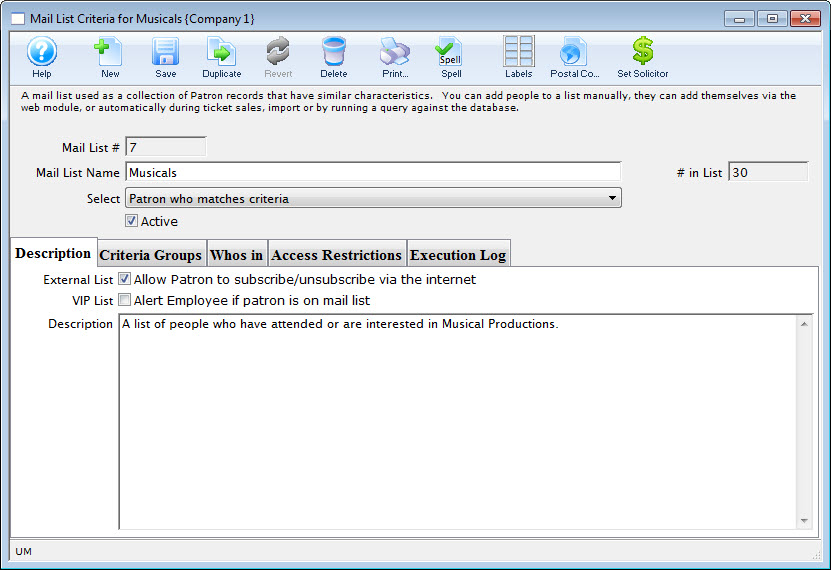
A Musicals mail list can be created for all patrons who have attended musical productions, or manually added to the list because they have shown an interest in purchasing a ticket to a future musical. You can then use this list to send personalized letters, print labels, or create reports.
This list can also be used to create another mail list. For example:
You can use the Musicals mail list to create another mail list that includes everyone on the musicals mail list but exclude patrons who have purchased tickets to the current musical.
Theatre Manager's reporting capabilities also create lists. For example, mailing labels for patrons who bought tickets today can be created using reports. Similarly lists of patrons with tickets to a particular play, lists of personnel, a general mail list, and lists of donors can be created from reports.
The difference between lists generated from Theatre Manager's report module and lists generated from mail lists are:
A patron must be added to a mail list to be included in a report.
The patron record remains attached to a mail list until it is removed.
Mail Lists can include patrons selected at random.
A list generated from reports requires the included patrons must meet the specified criteria.
The reporting module's search capabilities locates records that meet the search criteria entered. If the criteria changes, or the data recorded on the patron record changes, the patron may no longer be included on the list the next time a report is generated.
|
Mail lists should be avoided for things that Theatre Manager does for you automatically such as general mail lists, ticket purchases, and actual donors. |
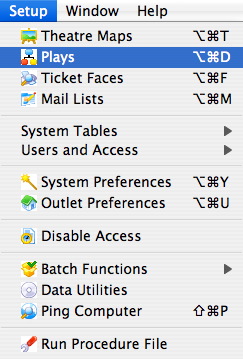
Mail Lists can be accessed in the menu through Setup >> Mail Lists.

| You can download the Cheatsheets (1-2 pages) and Screencasts (online video demonstrations of the functions with narration) by clicking on the icon. |
Cheatsheet (pdf) |
Flash ScreenCast |
MP4 ScreenCast |
| Create a Mail List |
|
|
|
| Creating a Query |
|
| |
| Deleting Mail Lists |
|
| |
| Merging Mail Lists |
|
| |
| Conditions Cheatsheet |
|


Mail Lists - List Window
- Click Setup >> Mail Lists from the main Theatre Manager menu.

Alternatively, you can select the Mail List button
 from the Main Theatre Manager toolbar / ribbon bar.
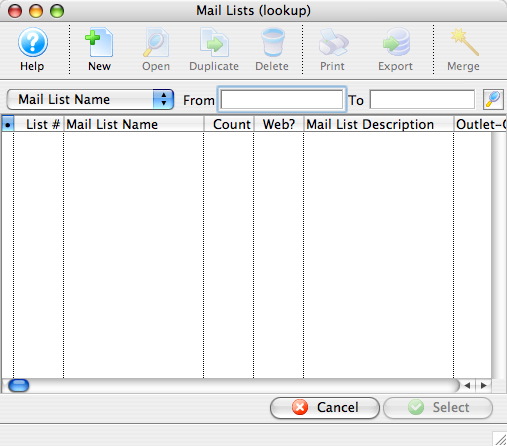
The Mail List search window opens.
- Select a Mail List search option.
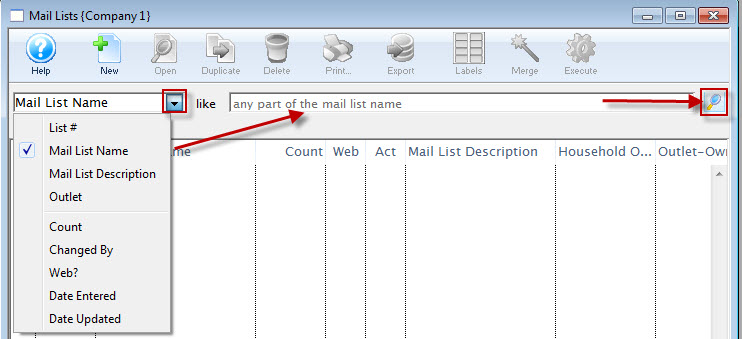
- Enter a search range.
- Click the Search
 button.
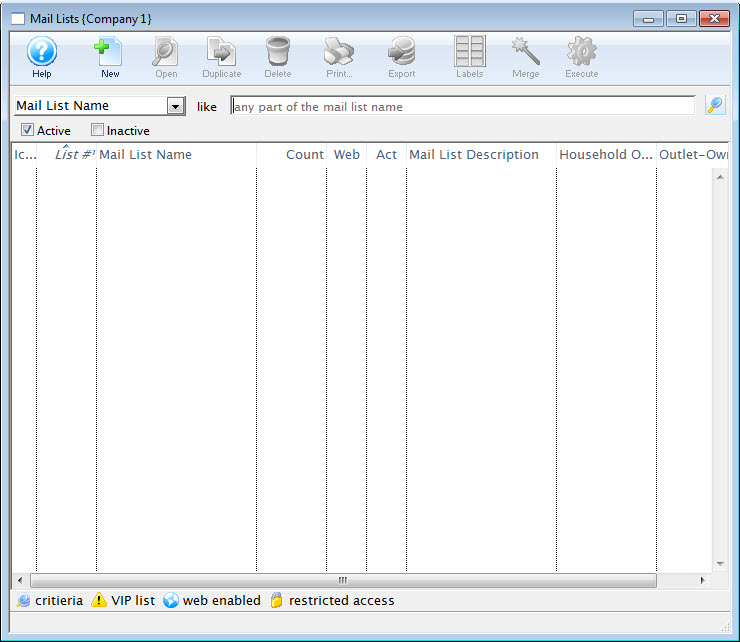
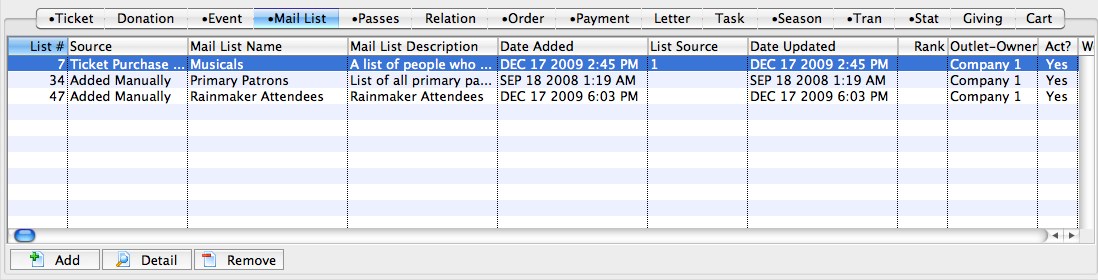
The list of Mail Lists fitting the search opens.

From this window two or more Mail Lists can be merged into one. Click here to learn how to merge mail lists.
Creating a Mail List
| You can download quick reference information for Creating a Mail List by clicking on the icon. |
Cheatsheet (pdf) |
Flash ScreenCast |
MP4 ScreenCast |
To create a new mail list, you perform the following steps:
- Open the Mail List - List window.
For more information on accessing the Mail List window, click here.
- Click the New
 button.
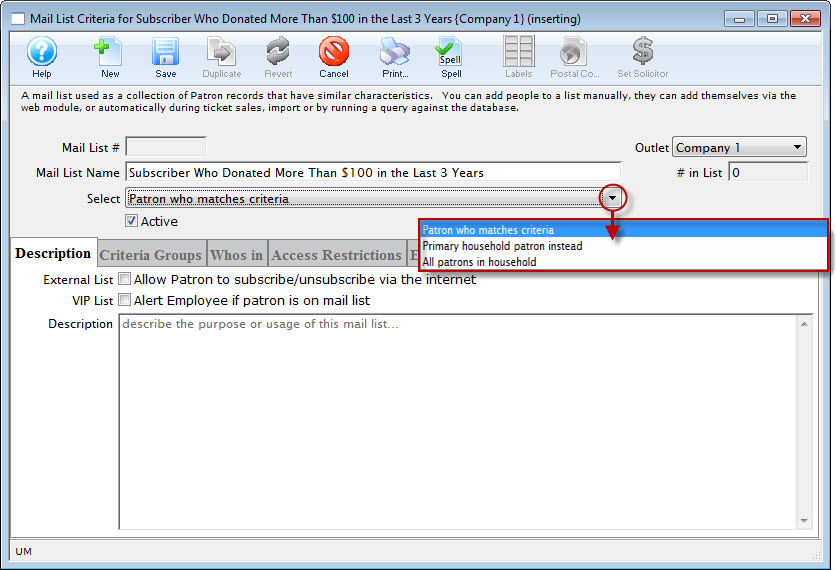
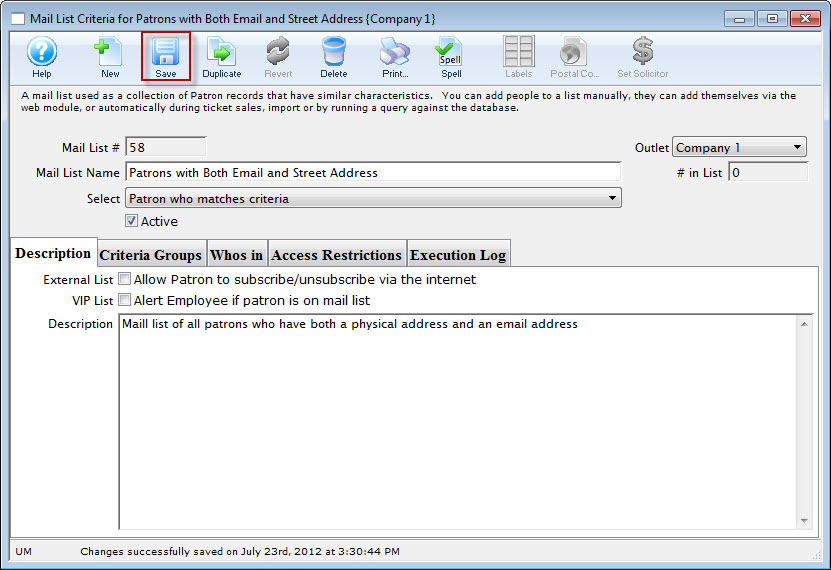
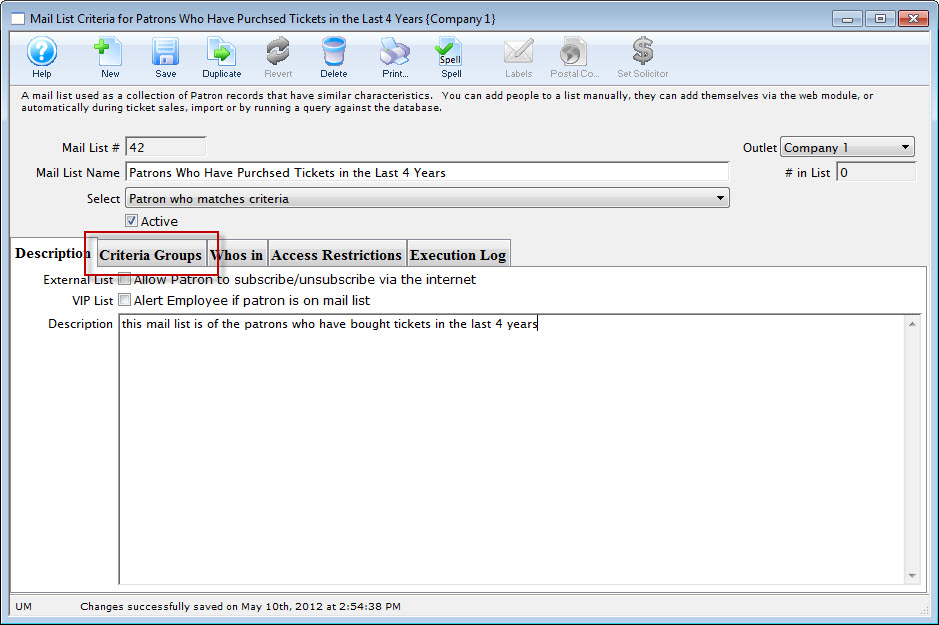
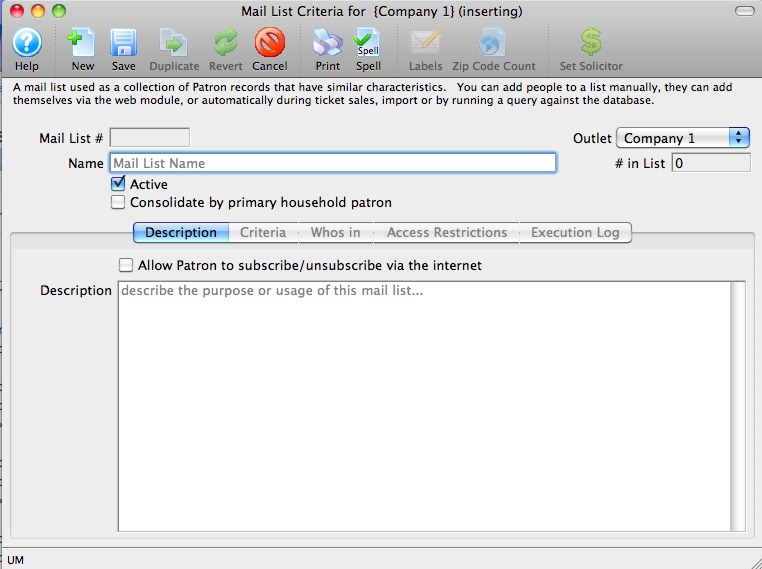
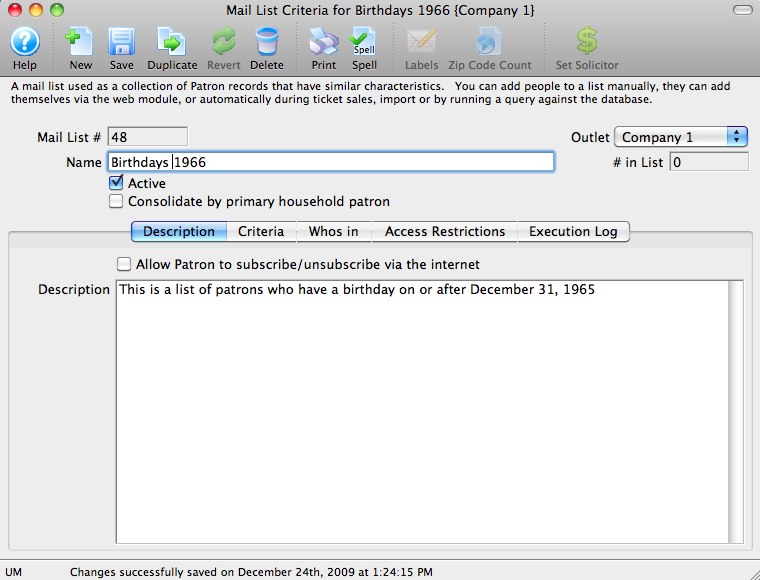
The Mail List Criteria (inserting) window opens.
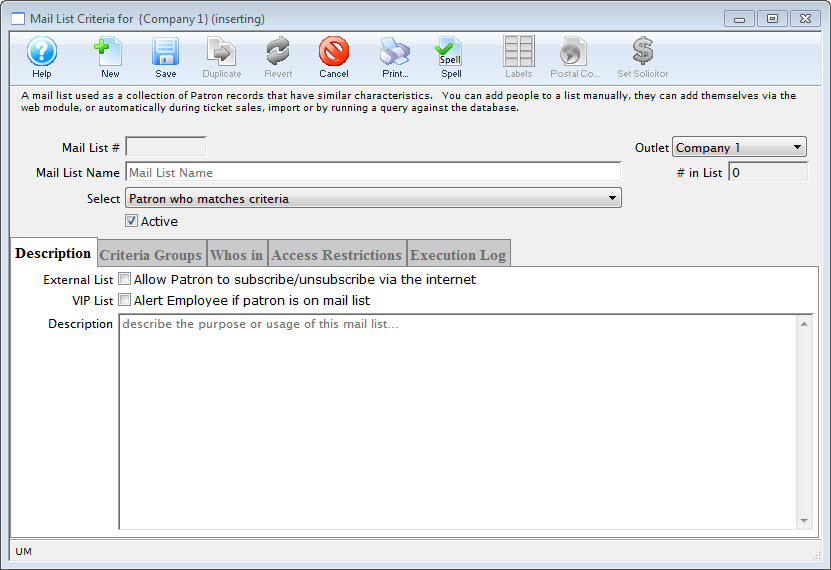
- In the Name field, enter a short name for the Mail List.
- Make a selection for the names to be included on the list.
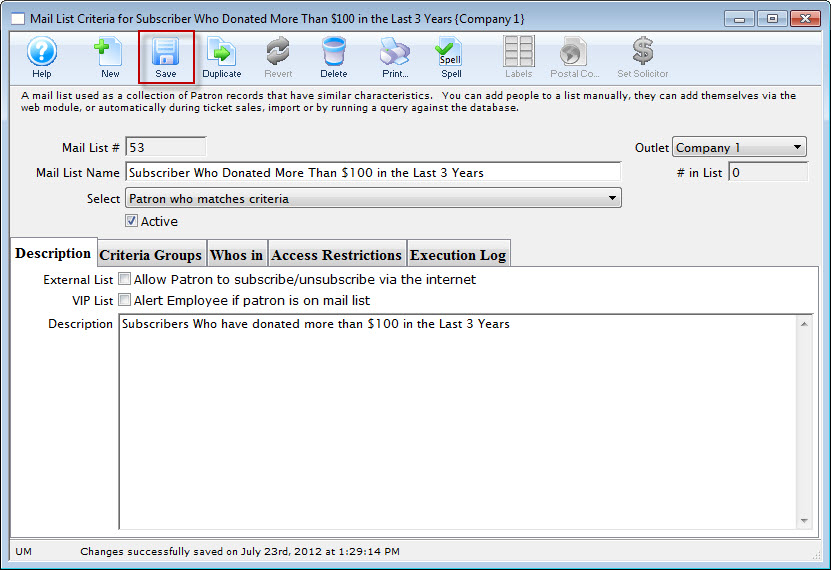
- In the Description tab, select the appropriate flags and in the description field, enter a detailed description for the Mail List.
This is extremely important for other users who may use the mail list. If the description of the list is good it will not need to be deciphered to understand the reason for the list.
- Click the Save
 button.
 - You can now add the criteria for your mail list.
Click here to learn how to add your criteria.
Patrons can now be added to the list. There are several techniques for adding patrons to the mail list. You can:
<
Deleting Mail Lists
| You can download quick reference information for Deleting Mail Lists by clicking on the icon. |
Flash ScreenCast |
MP4 ScreenCast |
Deleting a mail list will remove the reference in the patrons file prior to deleting the mail list.
|
Deleting a mail list will not delete the patron information, it will only delete the patron's reference to the mail list. |
- Open the Mail List - List window.
For more information on accessing the Mail List window, click here.
- Search for the mail list(s) you want to delete.
The mail lists matching your criteria are displayed.
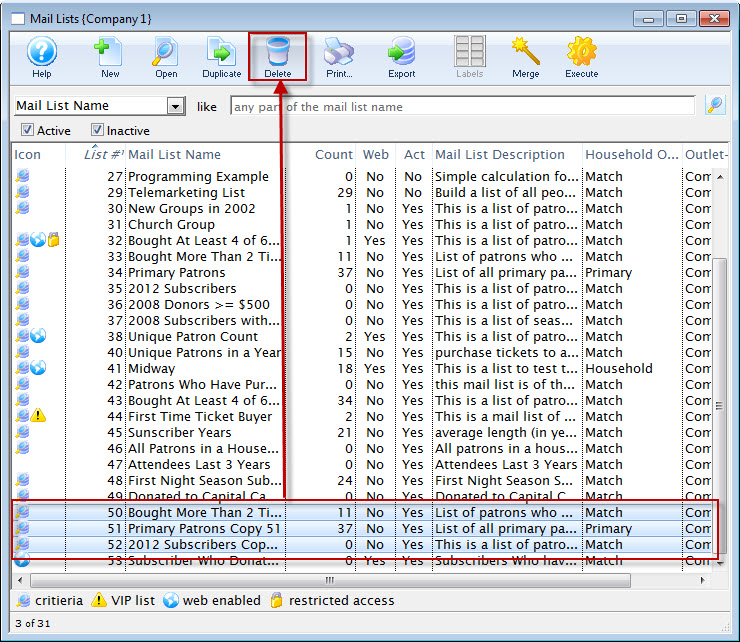
- Highlight the Mail List(s) you want to delete.
- Click the Delete
 button.
A Delete Confirmation dialog opens.
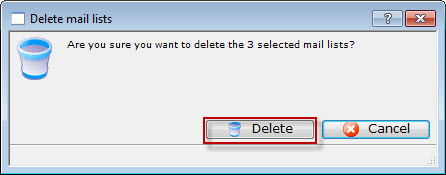
- Click the Delete button.
A second warning message opens.
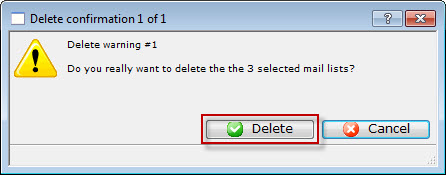
- Click the Delete button.
A message displays at the bottom of the Mail List window
 verifying the list(s) are deleted. All associations between the patrons and the mail list will be removed.
Merging Mail Lists
| You can download quick reference information for Merging Mail Lists by clicking on the icon. |
Flash Screencast |
MP4 Screencast |
Merging mail lists allows you to merge the data of many mail lists into one large list. Merging mail lists will only copy the data of the patrons belonging to the list. The criteria for the merged list will be the same as that of the list you select in step # 4.
- Open the Mail List - List window.
For more information on accessing the Mail List window, click here.
- Search for the mail list(s) you want to delete.
The mail lists matching your criteria are displayed.
- Select the lists you wish to merge by holding down the Ctrl (PC) or Command/Apple (Mac) key.
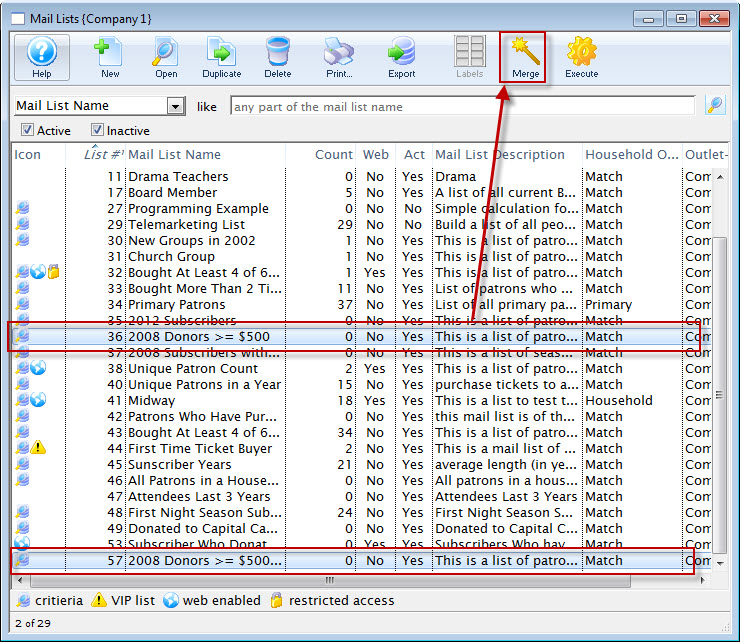
- Click the Merge
 button.
The Merge Mail Lists window opens.
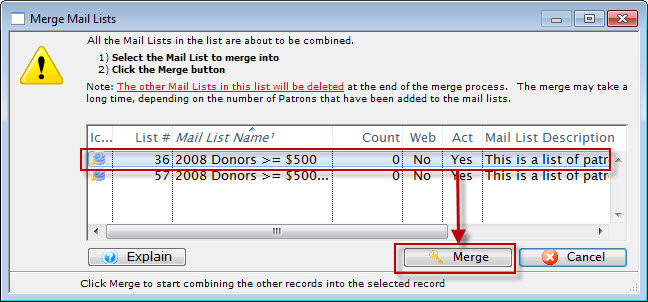
- Select the mail list you want to merge all the lists into.
- Click the Merge
 button.
The following warning dialog opens.
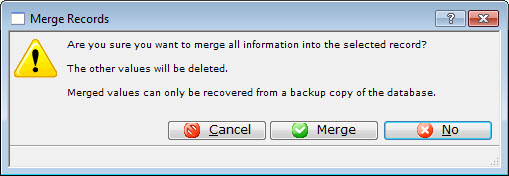
- Click the Merge
 button.
The Mail Lists are now merged together. All patrons belonging to the selected Mail Lists will be merged into the chosen list. Patrons will only appear on the combined list once.
Parts of the Mail List - Lists Window
The Mail List Lists window allows you to:
- Access the mail lists already on your system to edit, duplicate, delete, export, create labels and merge one or more lists.
- Add new mail lists
- and Execute a selected individual mail list.
Parts of the Mail Lists List Window
|
Opens the Mail List Criteria window. Click here for more information on creating a Mail List Query. |
 |
Opens the selected Mail List. |
 |
Creates a copy of the selected Mail List(s). |
|
Deletes the selected Mail List(s). |
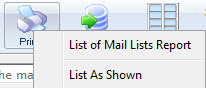 |
Generates a report to the screen or default print location displaying the details of the Mail List Listing. Choices are all lists or with the specific flags and search criteria selected. |
 |
Exports the selected record(s). |
 |
Opens the mailing label window to create mailing labels. Click here for more information on Address Labels. |
|
|
Opens the Merge Mail Lists window to merge two (or more) selected mail lists. Click here for more information on merging mail lists. |
 |
Rebuilds and executes the criteria in the selected mail list(s). |
| Icon |  Displays icons of the flags enabled in the mail list Displays icons of the flags enabled in the mail list |
| List # | Computer generated number for the mail list. |
| Mail List Name | Brief name of the mail list |
| Count | Number of times the mail list has been executed |
| Web | If patrons can add or remove themselves from the mail list via the web site |
| Act | If the mail list is active or inactive |
| Mail List Description | Description of the mail list as entered on the description tab of the mail list window. |
Mail List Queries
| You can download quick reference information for Creating a Query by clicking on the icon |
Flash ScreenCast |
MP4 ScreenCast |
Creating the query requires some planning and foresight. To start, you must decide what criteria you want the patrons to meet. If you are looking for very specific patrons, you must know what makes them unique from the rest. You may also narrow down your search by removing certain data from a returned query.
|
There are rules around creating a list of deceased patrons. The names and information of deceased patrons can never be emailed to or have mailing labels printed - ever. If you require a listing of deceased patrons, you can create a mail list of those patrons and print or export the completed listing. Theatre Manager will ask if you want to export deceased patron data when it notices you trying to do that. |
Creating a Database Query
| You can download quick reference information for Creating a Query by clicking on the icon |
Cheatsheet |
To create a Query, you would perform the following steps:
- Open the Mail List - List window.
For more information on accessing the Mail List window, click here.
- Click the New button.
The Mail List Criteria (inserting) window opens.
- In the Name field, enter a short name for the Mail List.
- Make a selection for the names to be included on the list.
- In the Description tab, select the appropriate flags and in the description field, enter a detailed description for the Mail List.
This is extremely important for other users who may use the mail list. If the description of the list is good it will not need to be deciphered to understand the reason for the list.
- Click the Save
 button.
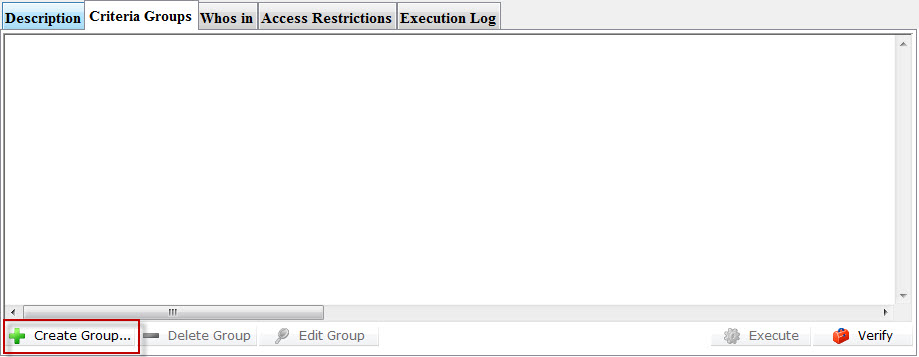
 - Click the Criteria Groups
 Tab.
Tab.
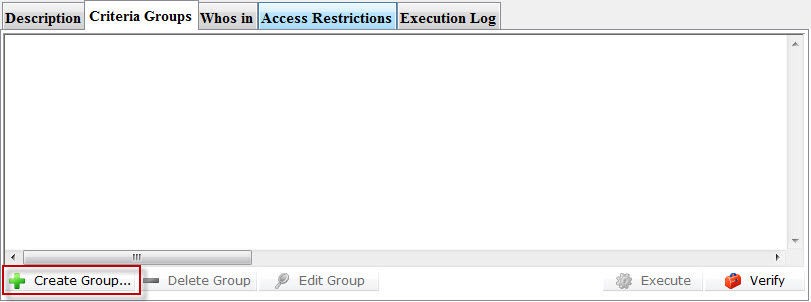
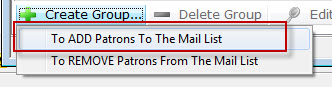
- Click the Create Group
 button.
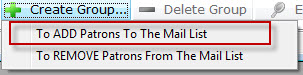
- Choose To Add Patrons To The Mail List.
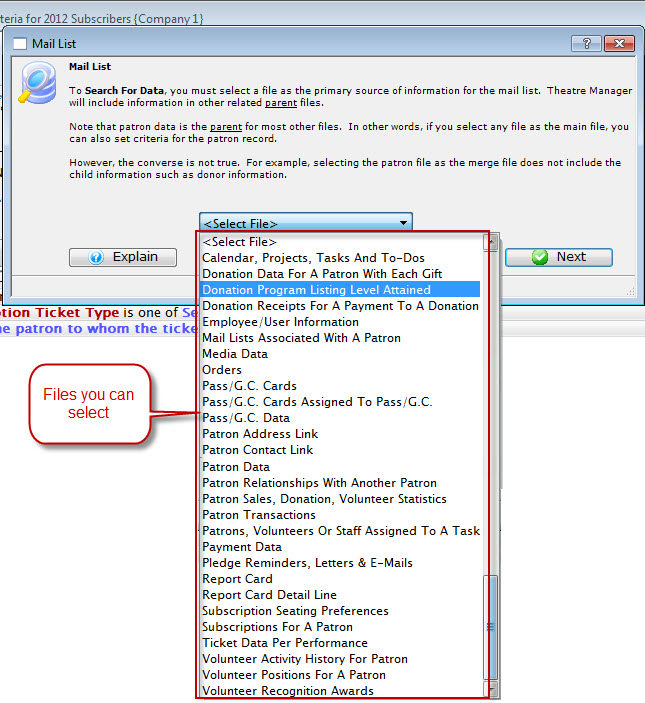
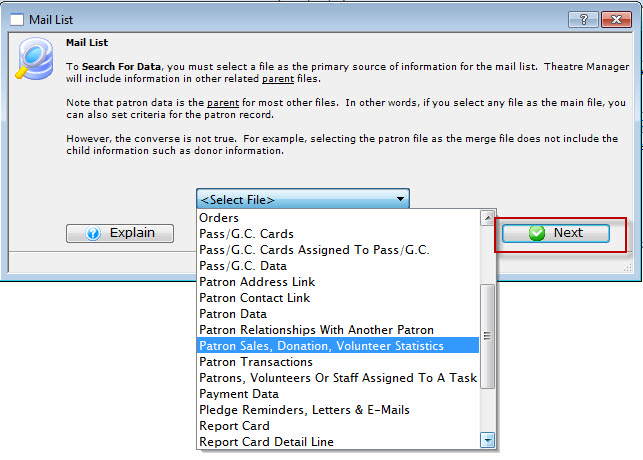
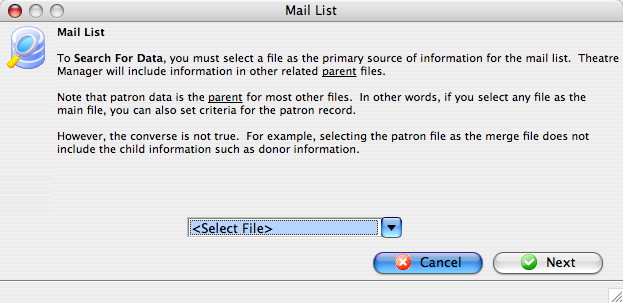
The Mail List Data Selection window opens. To search for data, you must select a file for the primary source of information for the mail list. Theatre Manager will include information in related parent files.

Patron Data is the PARENT for most data stored in Theatre Manager. When defining criteria, if you select any file as the main file, you can also set criteria for the patron record.
However, the converse is NOT true. Selecting the patron file as the Merge File, it does not include the child information - such as donor inormation.
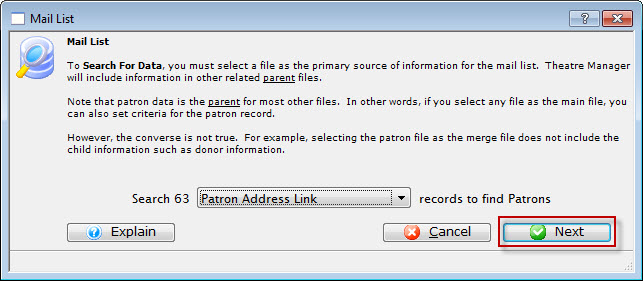
Select a file that contains the data you are searching for. As the example list is searching for patrons who have made donations; the file to use would be "Patron Address Link". Click here for more information on selecting the file.
- Select the "Patron Address Link" file..
- Click the Next
 button.
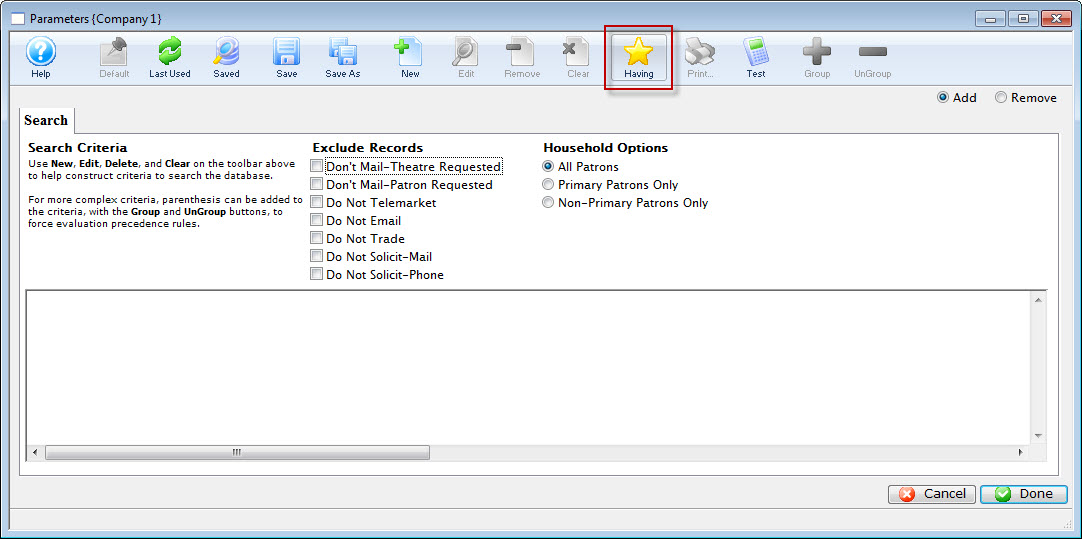
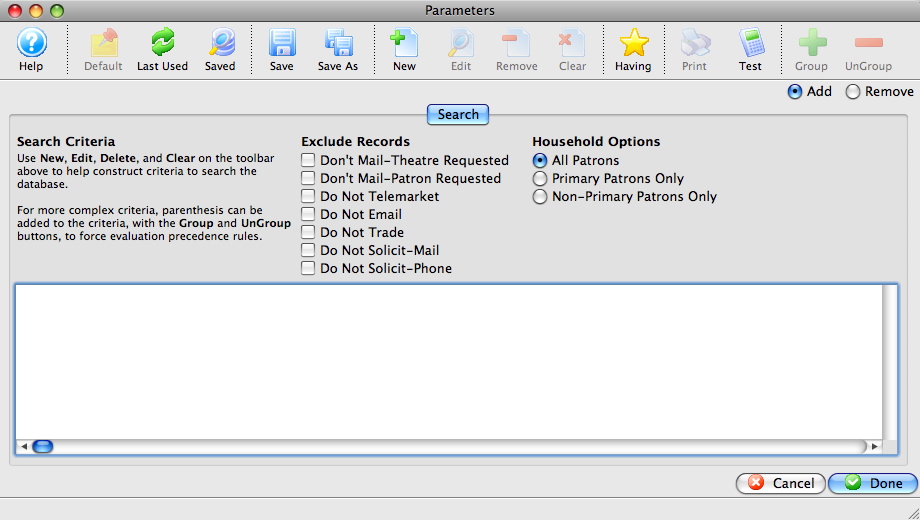
The Parameter window opens.
Click here for more information on this window. This tab displays the added criteria for the query on the database.
- Click the New button.
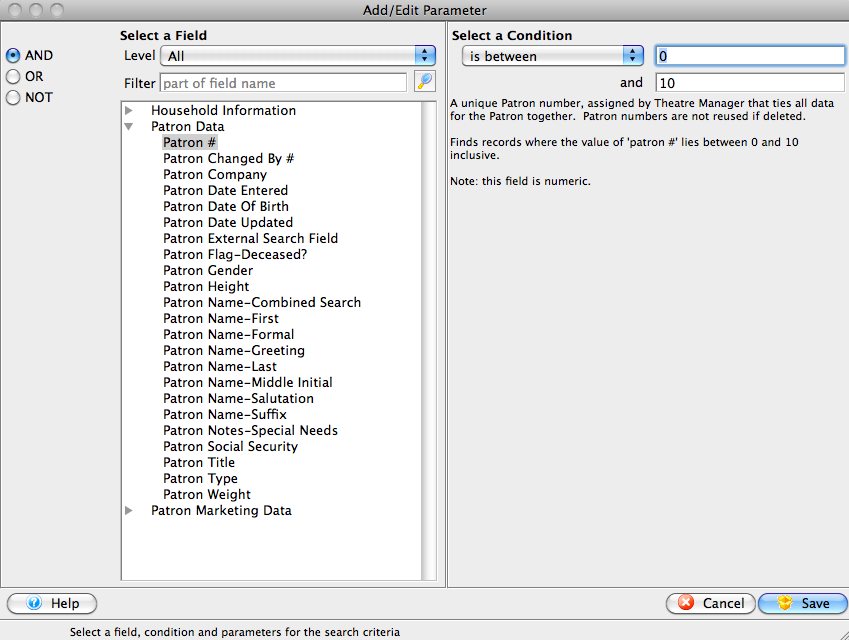
The Add/Edit Parameter window opens.
The list contains all the possible searchable fields available in your selected file. The selections on the top left side of the window (and, or, not) are used for searching multiple fields when more then one line of criteria is added within the same file. Click Here for an overview of conditions and search criteria.
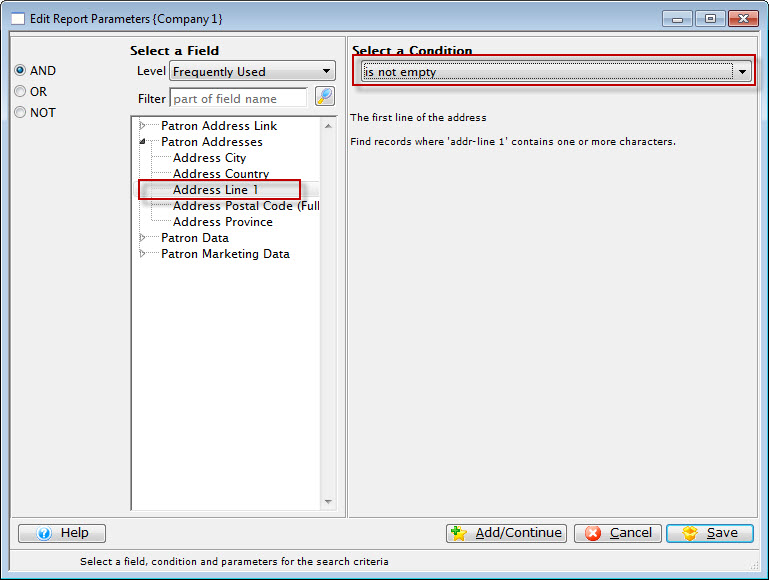
- Select the field to search.
In this example "Patron Addresses>>Address Line 1", will be the selected search field criteria.
- Select a condition, in this example "is not empty".
The condition displayed above will find any patron has aan entry in the street address section of the Patron Record.
- Click either:
- Add / Continue
 if adding another search criteria to the file.
The Criteria window remains open until save or cancel is clicked.
- Save
 if the search criteria for this file is complete.
The Parameter window will return and the entered criteria will appear in the list.
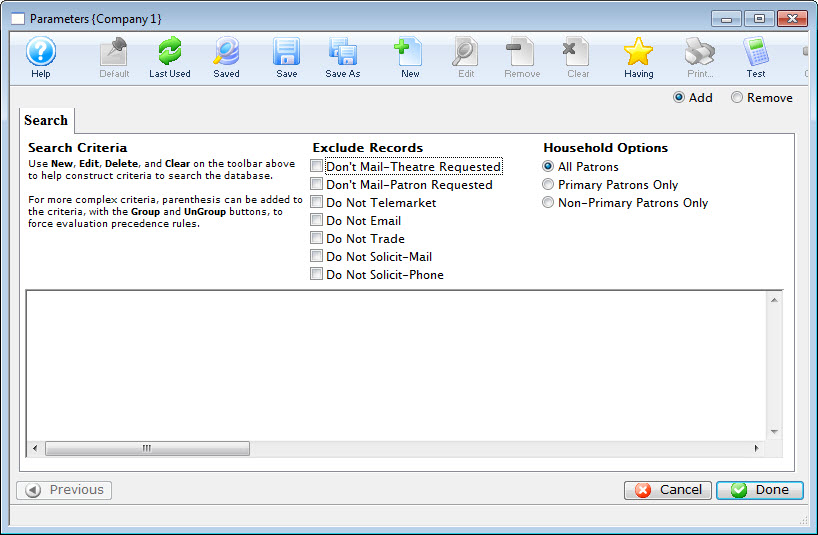
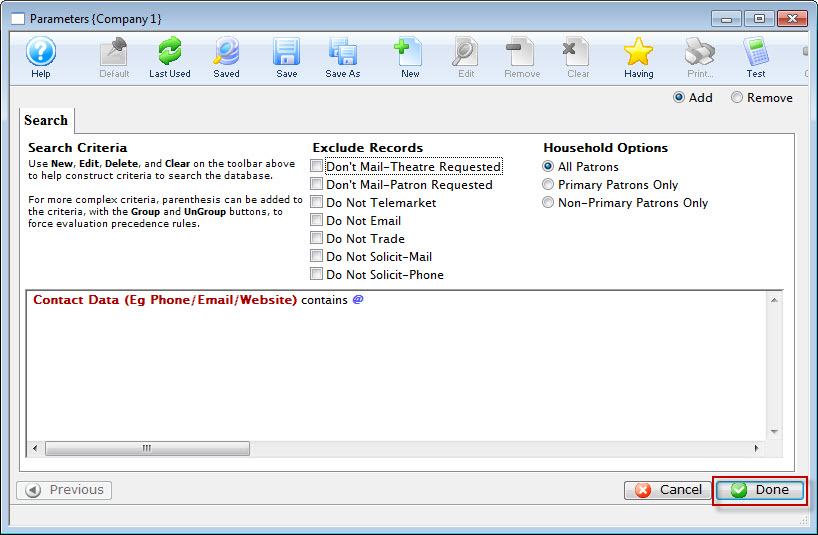
- Under Exclude Records, enable the "Don't Mail-Theatre Requested" and the "Don't Mail-Patron Requested" flags, and click the Done
 button.
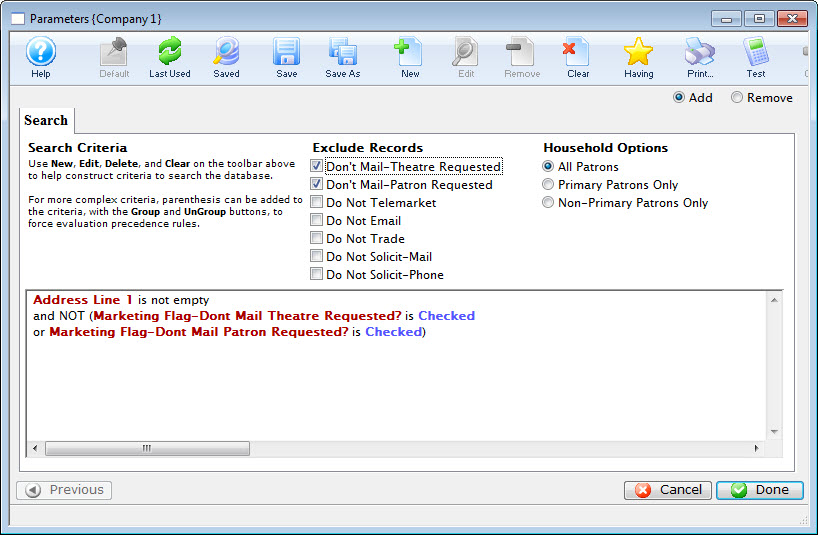
Now the group and its criteria have been added to the main query. For this example, another group needs to be added to include the patrons who have email addresses.
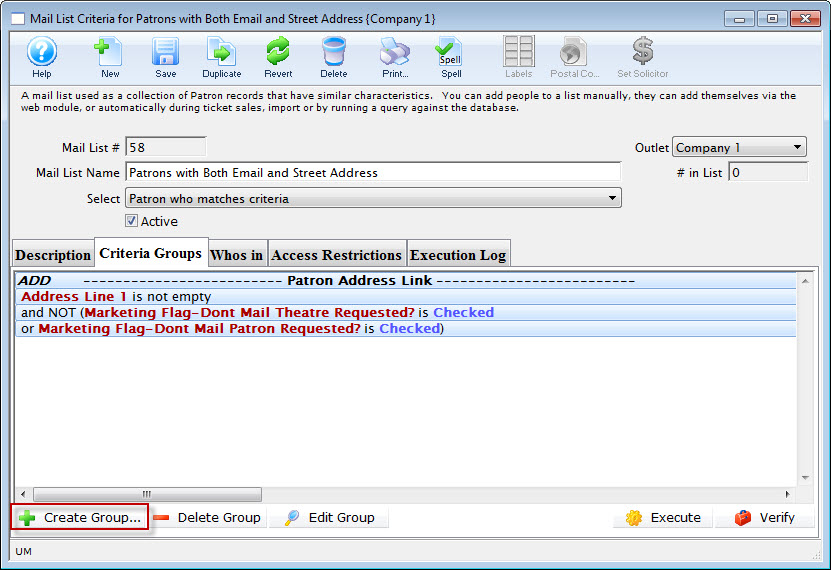
- Click the Create Group button.
- Choose To Add Patrons To The Mail List.
Choose a file containing the required data. This example requires the "Patron Contact Link" file.
- Click the Next button.
- Click the New button in the Parameters window.
In the Edit/Add Parameters window, leave the And
 button selected. The field for this example would be "Patron Contact Data>>Contact Data (eg Phone/email/website)" while the condition would be "contains" and parameter would be "@" (to search for an email address).
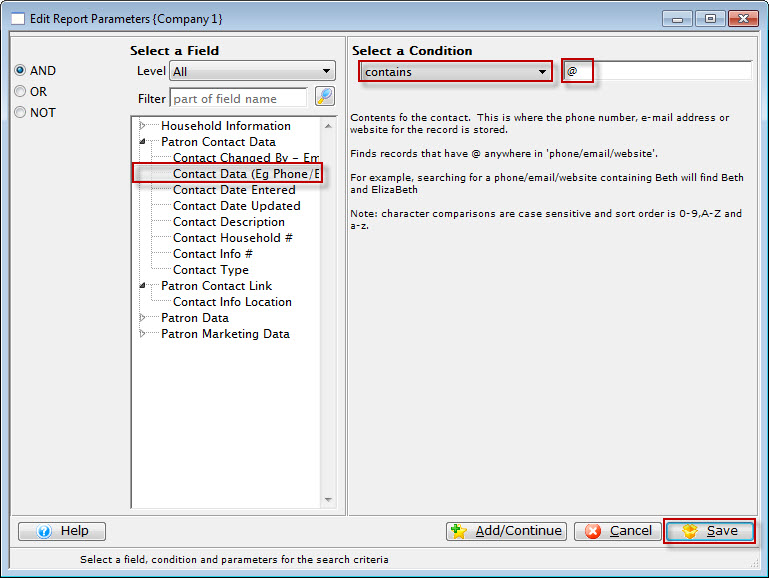
- Click the Save button.
- Click the Done button.
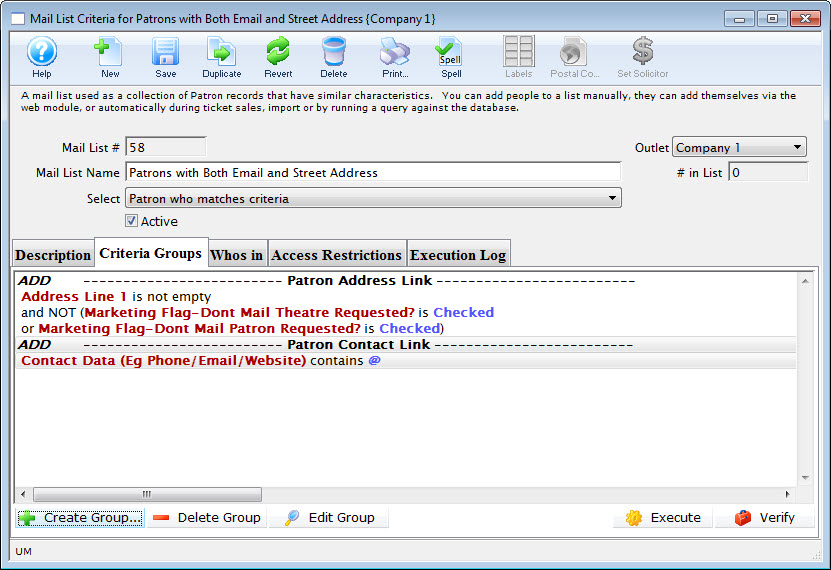
Both of the Search Criteria are added to the query. The group criteria says add any patron who has volunteered their time as well as any patron who has made a donation to the list.
Now, all the criteria have been added to satisfy the description, the database can be searched.
- Want to keep a printed format of your Mail List criteria
- Want to share your criteria with others in the office who may not use Theatre Manager
- Want to email the precise criteria you have been working on to support@artsman.com to ask for help. Emailing a PDF is preferred as it shows all of the criteria, the Description (so we know what you are trying to accomplish), the conjunctions (AND, OR, NOT) and operators (is between, is greater than, is equal to, etc.) used in the criteria. This is the preferred method for Support to receive your criteria help request.
- Click the Execute
 button to begin the Query.
The patrons satisfying the first criteria will be found and added to the list. Once complete, the second criteria will be performed and any patrons matching the second criteria will be added. Any patron matching both criteria will only be displayed once. The Mail List will default to the Who's In
 tab displaying all patrons who match the criteria and are in the list.
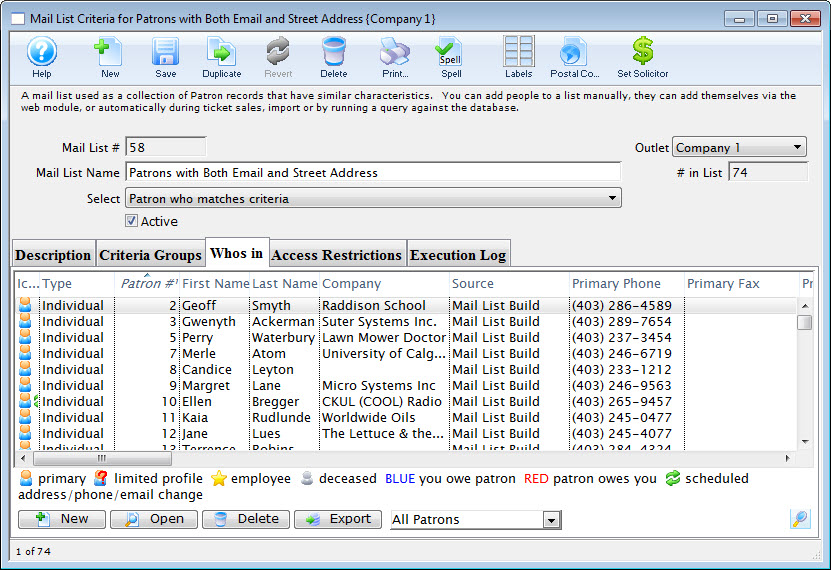
You are returned to the Parameters window.
If you have criteria that you'd like to print and save, while on the
tab, click the  PRINT button at the top of the window. You will get a report that you can then print or save to PDF. This can be handy when you:
- Add / Continue
You can now enter the Criteria.
Complex Query Criteria
If you are designing a very specific mail list you will need to use some complex criteria to ensure you receive the desired data. Complex criteria uses brackets combined with operators and conditions to find specific groups of data. Click Here to view the different types of operators and conditions along with a description of their function.
Mail list of Patrons in a Household With More than One Member
Mail Lists can answer many different "Who" questions.
To create a Mail List that answers the question of the number of Patron Households that have more than one patron, you perform the following steps:
- Click the Mail List button in the main Theatre Manager toolbar / ribbon bar.
The Mail Lists window opens.
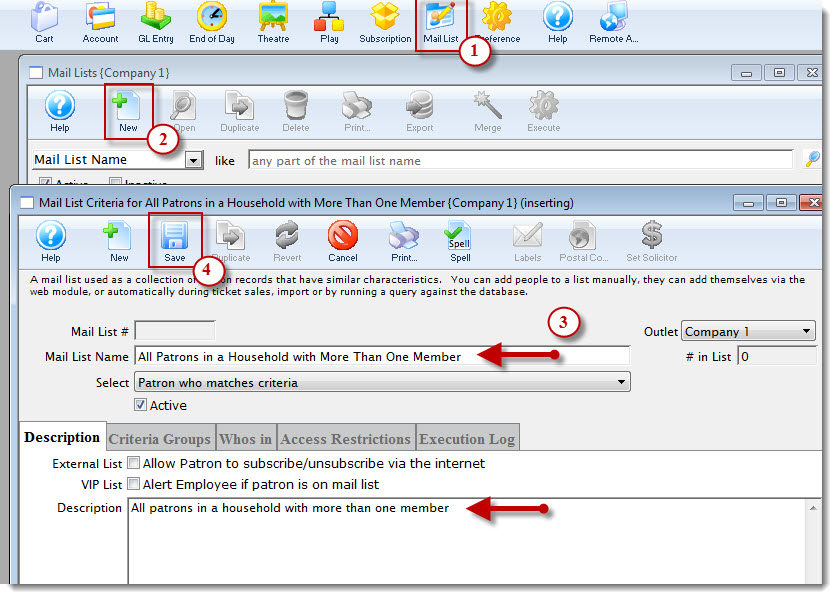
- Click the New button.
The Mail List Criteria window opens.
- Enter a descriptive name in the Mail List Name field and enter a description int the Description tab.
- Click the Save button.
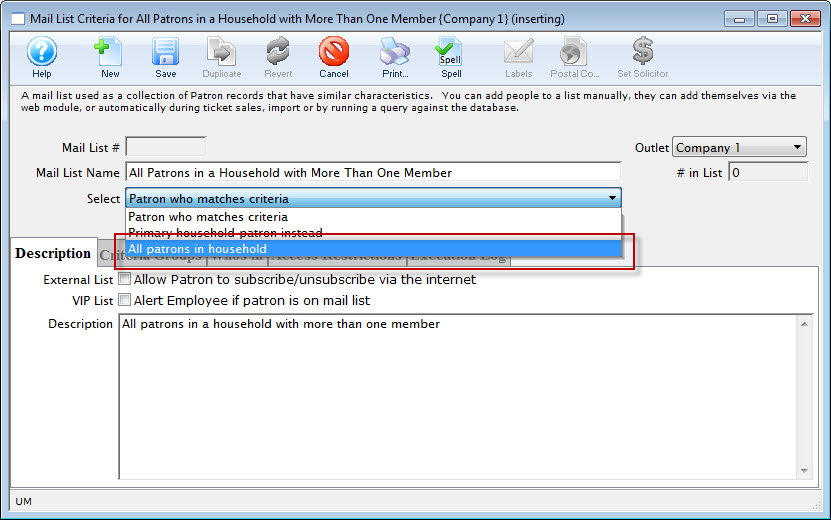
- Change the select drop down to All Patrons In Household and Save .
- Click the Criteria Groups tab.
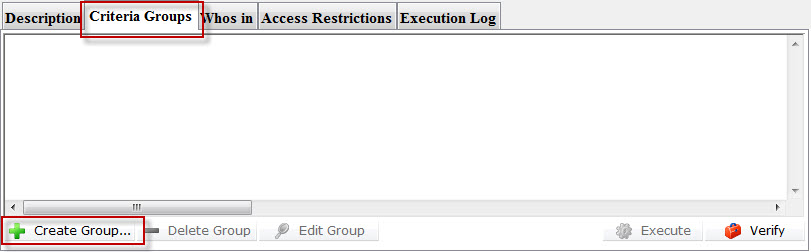
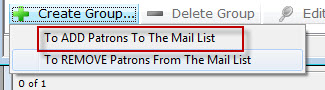
- Click the Create Group
 button and chose To ADD Patrons To The Mail List.
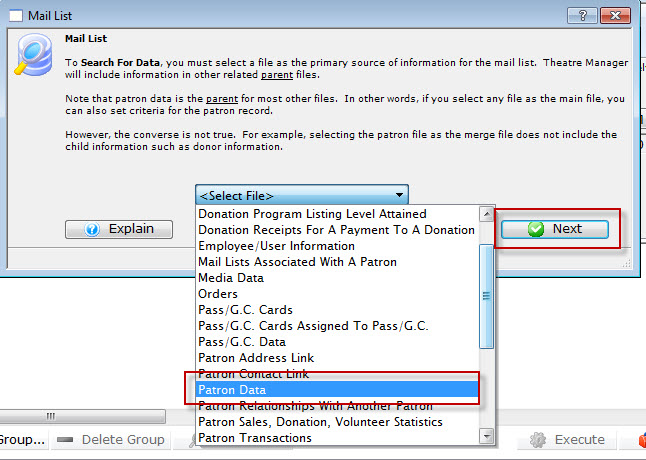
- Chose Patron Data from the drop down list, then click the Next button.
The The Parameters Search window opens.
- Click the New button.
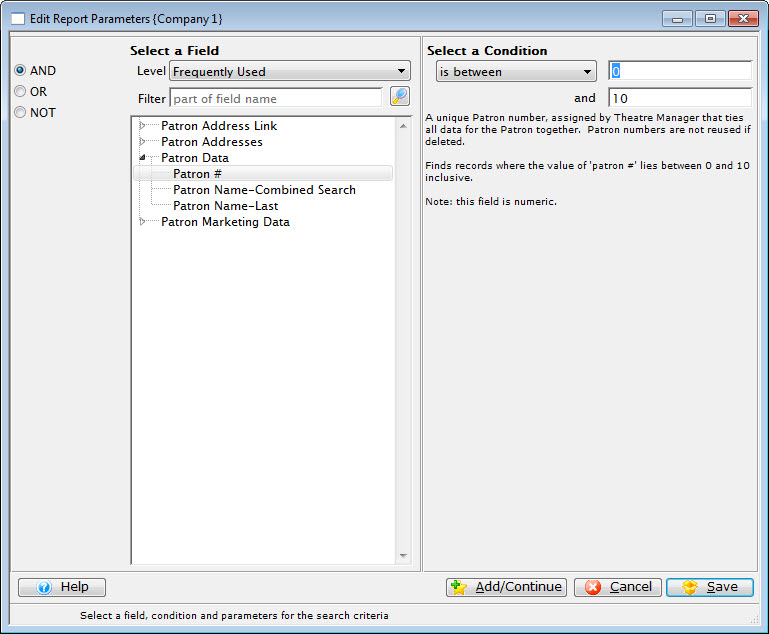
The Edit Report Parameters window opens.
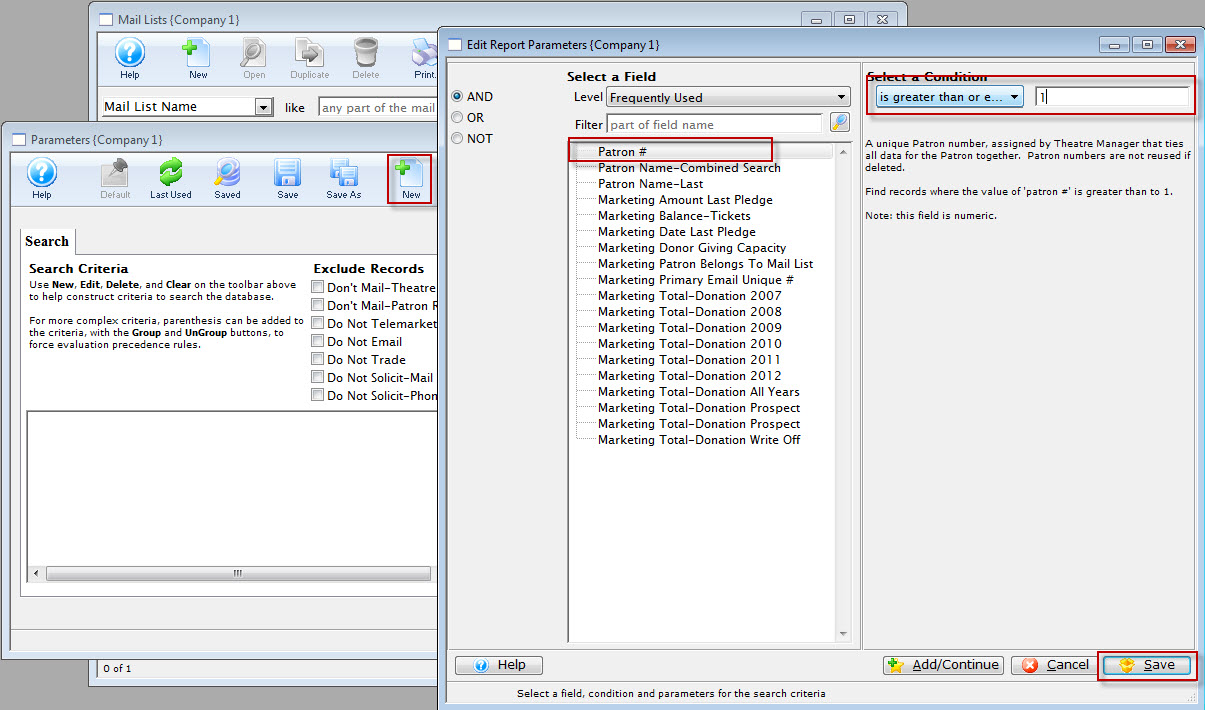
- Choose Patron # and select the condition - is greater than or equal to 1.
- Click the Save
 button.
You are returned to the Parameters window, Search. Note your selected criteria Patron # is greater than or equal to 1.
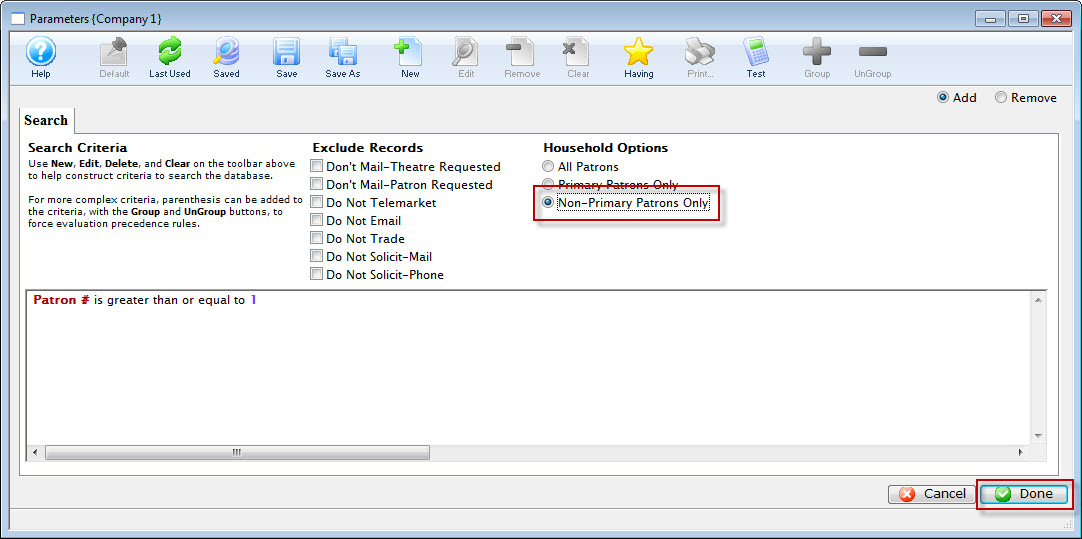 button.
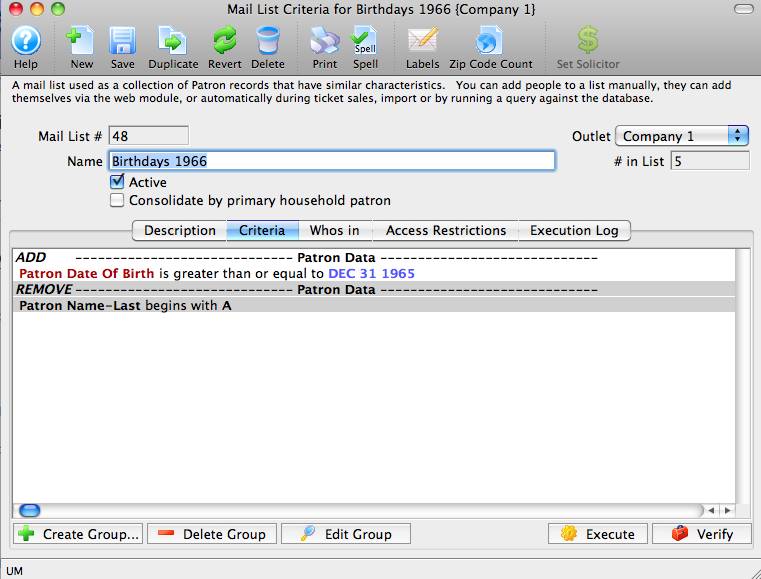
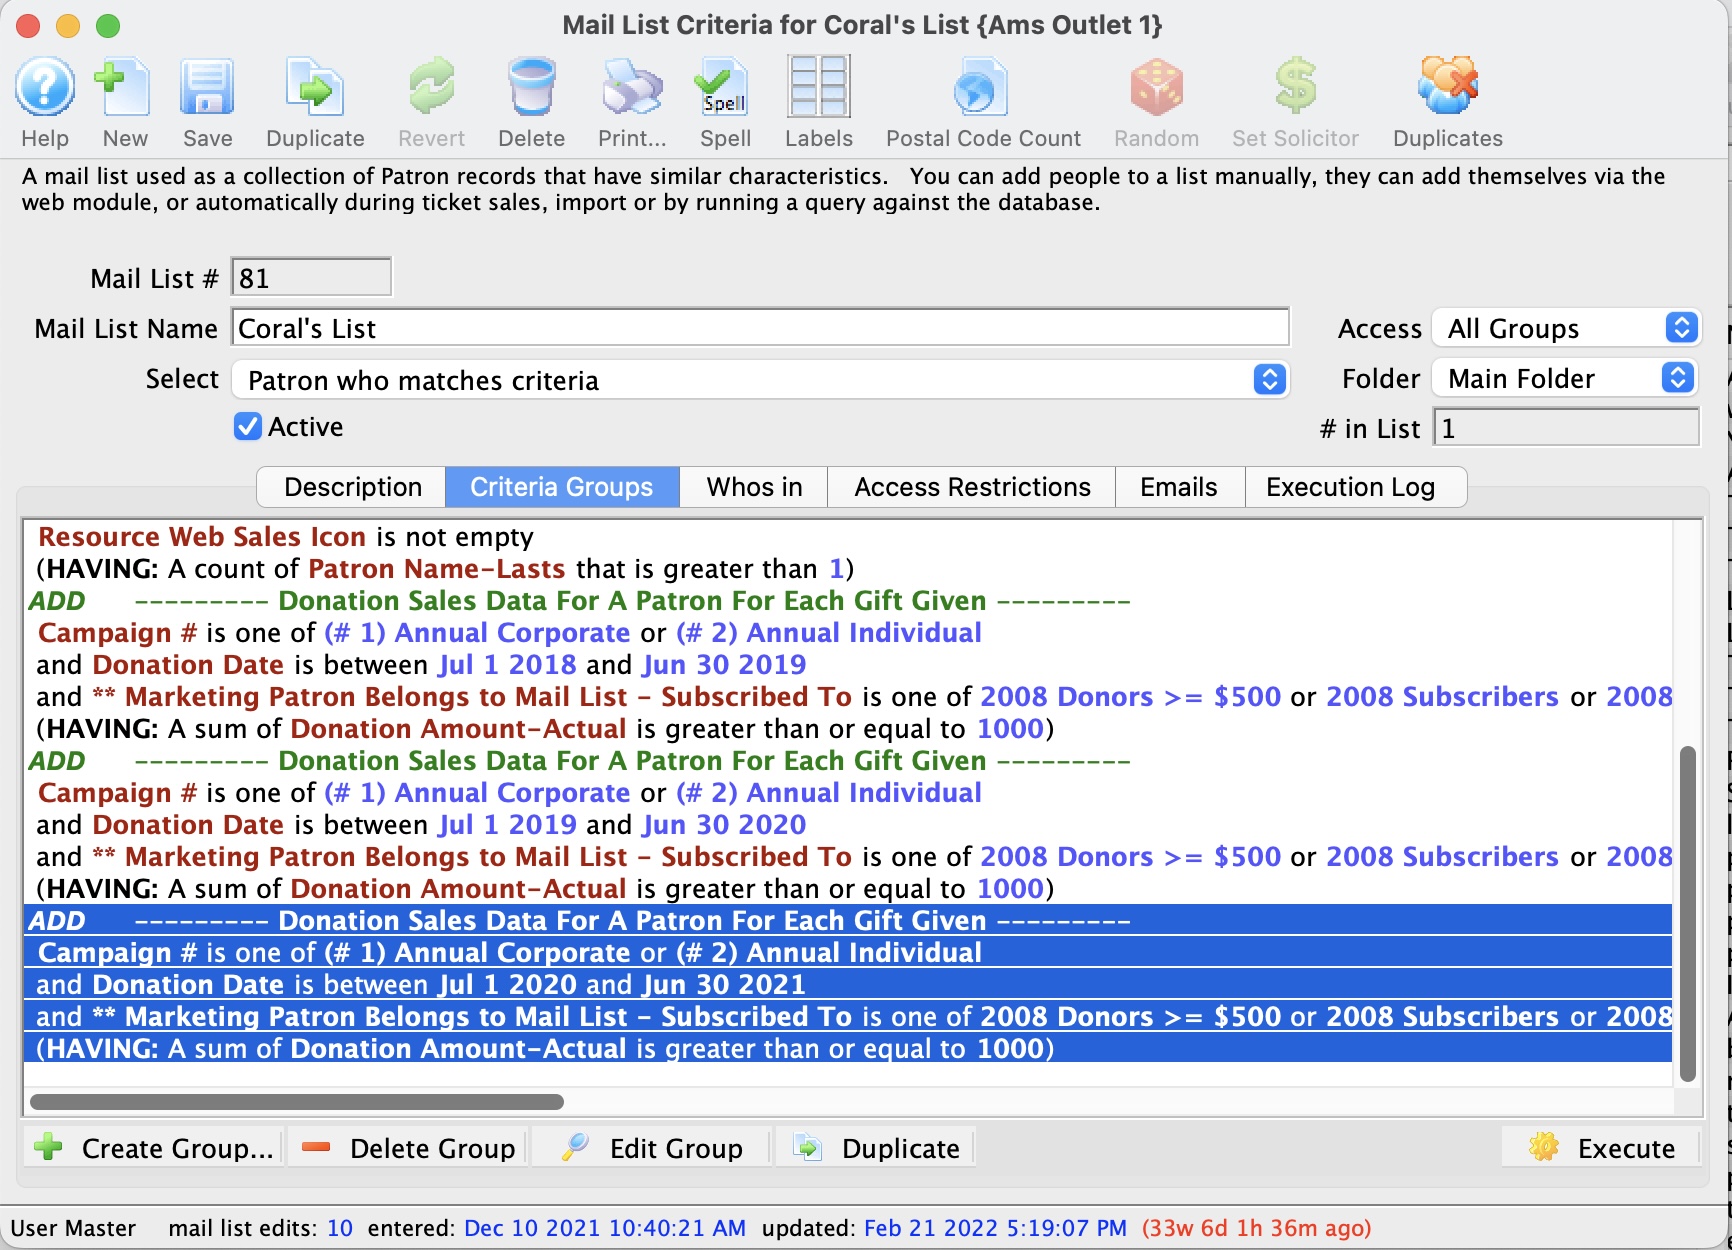
You are returned to the Mail List Criteria window. Your final criteria should look EXACTLY like below.
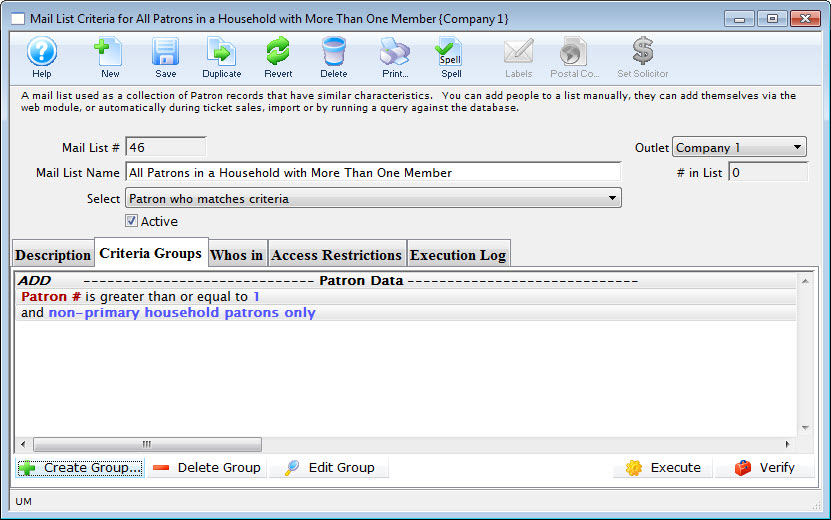
You now have a list of all patrons in the database who are part of a TM household with at least one primary member and one tertiary member.
The Mail List Search window opens.
Mail Lists - Rebuilding a Mail List
After creating mail list criteria and building the mail list, over time some of the patrons on the mail list may no longer meet the criteria to belong to the mail list. The most effective way to remove the patron that no longer meet the criteria is to rebuild the list.
- Open the Mail List Window.
Click Here to learn how to access this window.
- Find the mail list you would like to rebuild.
- Click the Execute button.
The following warning screen will open.
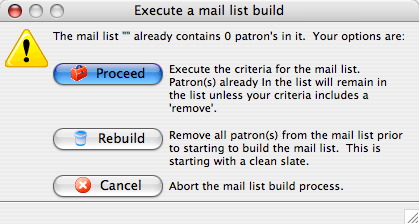
- Click the Rebuild
 button.
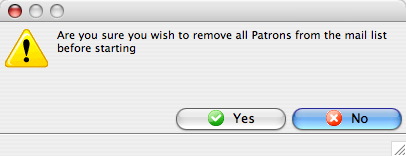
- Click the Yes
 button.
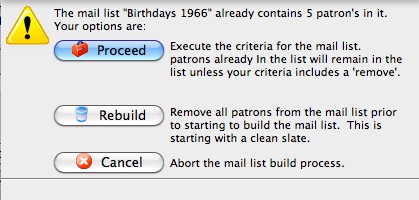
This will remove the current patrons from the list and perform the query again on the new data. Clicking Proceed would have left all current patrons in the list, added patrons who fit the entered criteria and only remove patrons who fit within any "remove" criteria.
Parameters for Mail Lists Window
Parts of the Criteria for Group from Mailing List Window
 |
Default search or sort order for the selected Parameters. |
 |
Inserts the last used criteria for the merge field selected. |
 |
Displays saved criteria options within the selected merge field. |
|
Saves selected criteria. |
 |
Saves the entered criteria to be used again. |
|
Opens the criteria window to insert new criteria. |
 |
Opens the criteria window and allow for modifications. |
 |
Removes the selected line of criteria. |
| Removes all lines of criteria in the parameters window. | |
 |
Inserts brackets around lines of criteria. |
 |
Removes brackets around lines of criteria. |
 |
Searches the database for patrons who "have" a specified line of criteria. Having criteria is criteria that is based on aggrigate values within the search. Click here for more information on using Having. |
 |
Cancels the entry of criteria. |
|
Completes the entry of criteria. |
Having Criteria
- find donors HAVING a total of all donations over xxx
- find ticket buyers having purchased to multiple distinct events for the current season
- find subscribers that have a subscriber package set up for all of the last 10 years
- find gift certificate purchasers with an average gift certificate purchase over $25
- find auction item buyers with a maximum purchase over $1000 for all items bought
For example: if you used criteria to find all subscriber records in the past 5 years, you would get 1, 2 ,3 4 or 5 records - depending on how many years the person has been a subscriber. Since we know each subscription package has a year associated with it, if you make a having criteria that is having a unique count of subscription year >= 4, you would find people who were 4 or 5 year subscribers.
To create the query, you need two things:
- A normal query that finds all the records you want to aggregate in some way. eg: tickets with date sold since 2004 and price paid > 0
- An additional having clause that uses one field for the aggregation. eg
- sum price paid >500 -or-
- count ticket #> 50 -or-
- distinct count event # > 4
- Open the Mail List you want to add the criteria to.
The Mail List Criteria window opens.
- Click the Criteria Groups tab.
- Click the create Group button.
- Make your selection to Add or Remove Patrons from the listing.
The Mail List dialog opens.
- Select the file for the primary source of information for your list. Then click the Next
 button.
The Parameters window opens.
- Click the Having
 button.
The Edit Report Parameters window opens.
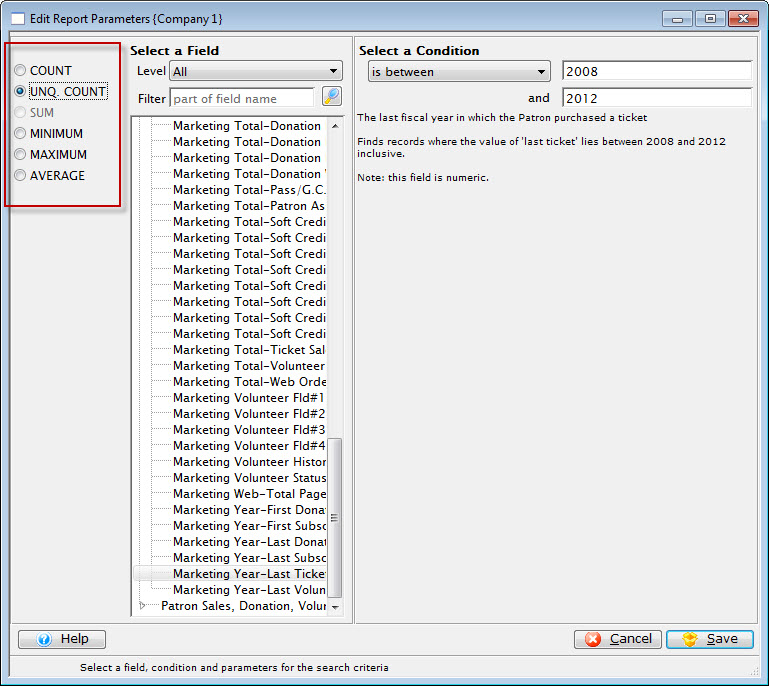
Note the criteria for selection on the left side of the window gives yous different options to choose from.
- Make your selections for the Criteria, and when complete, click the Save
 button.
You are returned to the Parameters window and your criteria selection appears in the search.
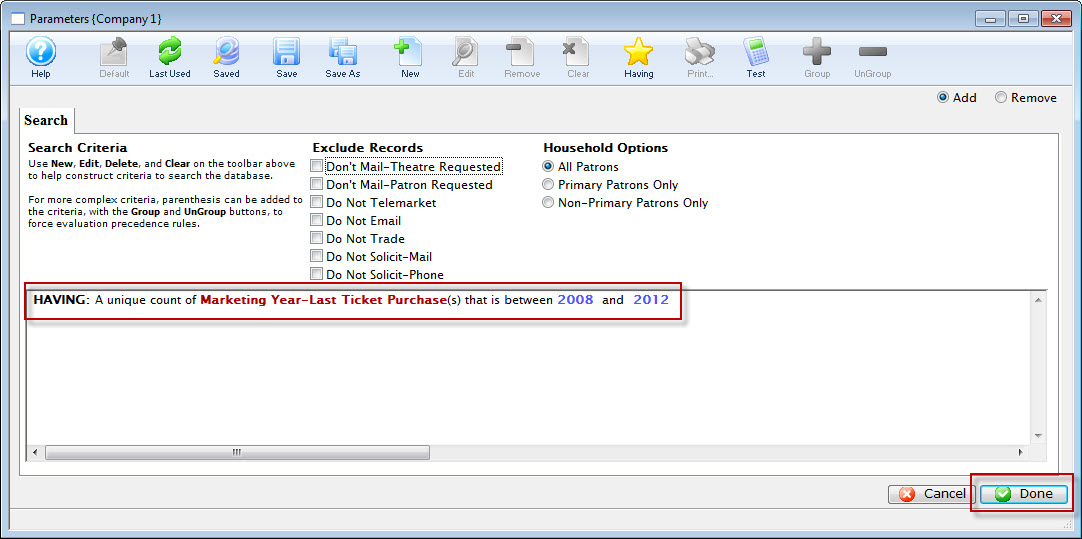
- Click the Done button.
You are returned to the Mail List window.
- Click the Execute
 to execute your search.
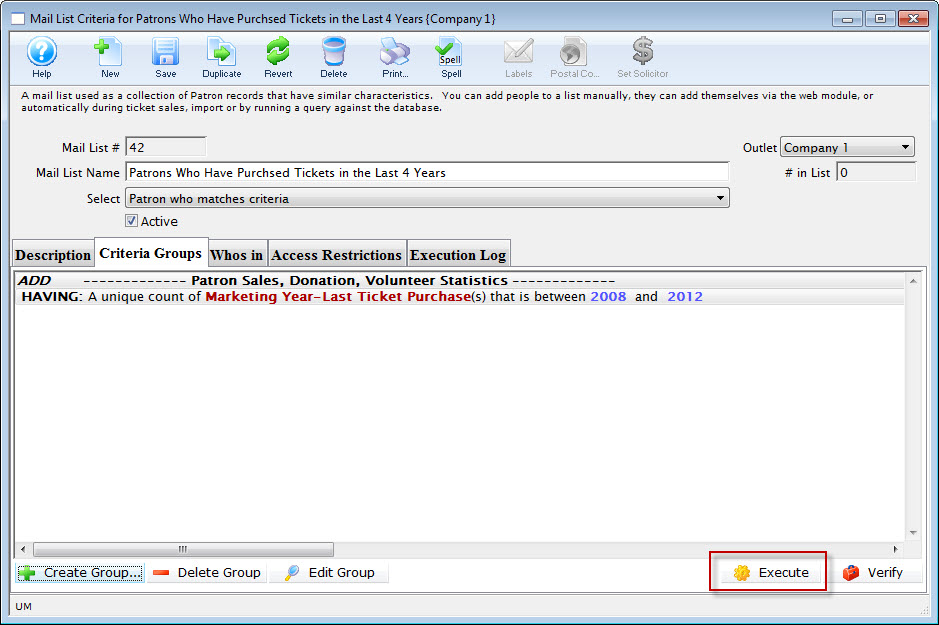
Donations HAVING given in more than xx years
How to find people who have given:
- between xx times in the past number of years
- more than a xx times in the past number of years
Normal Criteria
The normal criteria is optional. If you don't specify anything, you will retrieve all donations. Some things you might want to include in criteria are one or more of:
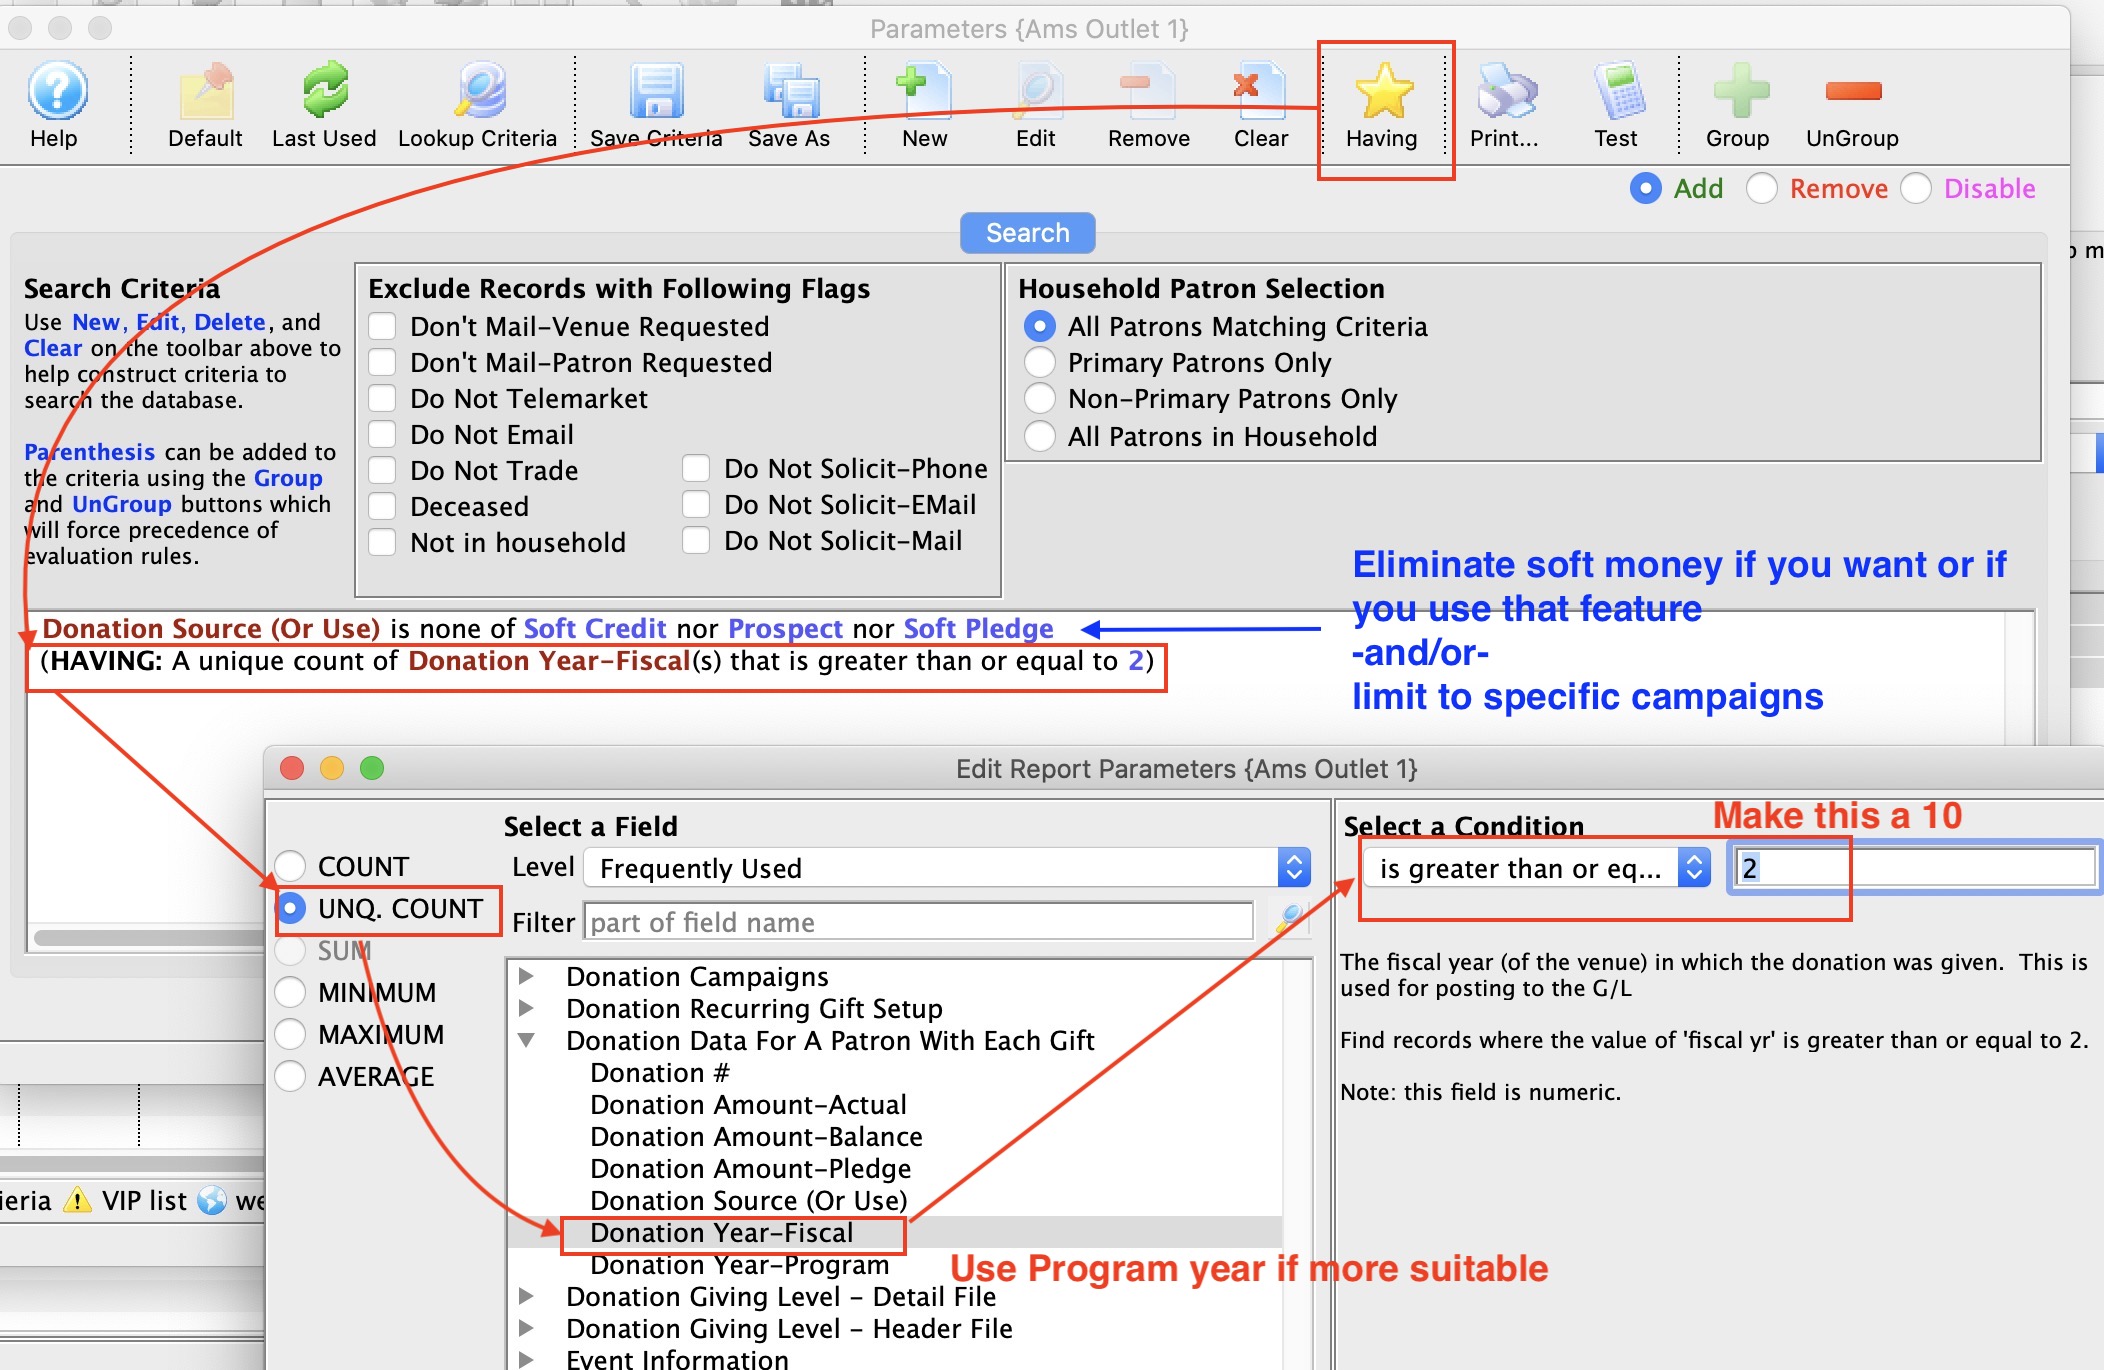
- criteria to eliminate soft credits, prospects, and hard pledges which are not real money - unless you want to count those amounts towards the patrons giving
- donation date range - if you only want to look at a range of years, or only every second year, or only leap years, or anything you want ...
- Donation Campaigns - if you want to limit search to certain campaigns
- Donation actual amount - if you want to limit search to individual donations between a certain range, over a certain range, or anything you want
- belongs to mail list - if you want to find subscribers in your list, or volunteers, or people who bought giver certificates, or people who returned tickets for donations - anything simple or complex that you want relating to the patron
In short, you can limit the donations selected to ANY criteria you could enter (or select all donations)
Having Criteria
The HAVING clause re-examines the set of data is found using the normal criteria. It then imposes a further restriction on the aggregate set of data. Examples could be:
- the data must HAVE a UNIQUE number of fiscal years donated >=2 per patron (the example above) -or-
- the total count of donations must be >6
- the average donation across the number of years selected must be between x and y
- the distinct number of campaigns given to must between x and y
- and much more
Having - Patrons with count of tickets
The query is based on ticket data for a patron and you can add other criteria such as:
- Only specific shows in the past
- A certain fiscal year, season or range of seasons
- People who have donated money in the past and are large purchasers
- patrons who paid for their tickets (eg total cost > 0)
The example below shows the user of Ticket Quantity from the ticket data per performance in the having clause to obtain people who bought more than 20 tickets (in all time). The first line of criteria was added to make sure that they were Paid tickets and not comps.

Removing Patrons Through a Query
If you wish to remove a large number of patrons from a list and they all have a common feature, using a query is the best technique. It is the same procedure as adding a new group except for selecting the Remove function. To ensure that you are removing the correct patrons, place the remove criteria group as the last group to be performed. Click here to learn how to rearrange groups.
- Open the Mail List Window.
Click Here to learn how to open the window.
- Find the mail list you want to remove the patrons from.
- Click the Criteria Groups tab.
The Criteria Groups for the selected mail list are displayed.
- Click the Create Group
 button.
- Choose "To Remove Patrons From The Mail List".
The group selection dialog opens.
Select a file which contains data all patrons to be removed from the list have in common.
Using the Example List created in Adding Patrons to a Mail List Through a Database Query patrons with last names starting with the letter A will be removed.
The "Patron Data" file will be used for this example.
- Select "Patron Data" from the drop-down list and click the Next
button.
The Parameters window opens.
Click Here for a detailed description of the window.
- Click the New button.
The Add/Edit Parameters window opens.
- Select the field to search by.
For this example the "Patron Name-Last " field.
- Fill the search parameters with the information to search by.
For the example use "begins with A".
- Click the Save button.
The Parameters window returns and the selected criteria will appear in the window.
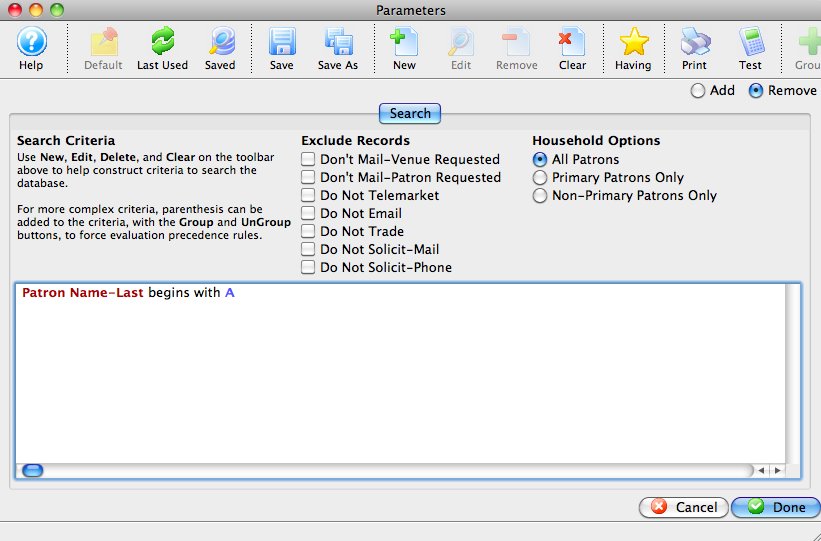
- Click the Done
 button.
The Mail List Criteria window returns.
- Click the Execute button.
An Options dialog opens.
- Click the Rebuild button.
A confirmation dialog is displayed.
- Click the Yes
 button.
Theatre Manager will highlight each group as it is executed.
The Mail List Criteria window opens to the Who's In
tab. Patrons with last names starting with the letter A will now be removed from the list.
Methods to Add Patrons to a Mail List
6 of these are described on the following pages. The additional method is to randomize an existing mail list:
- to make marketing A-B lists or
- to facilitate lottery ticket sales
Adding Patrons to a Mail List Through a Database Query
If you wish to add a large number of patrons from a list and they all have a common feature, using a query is the best technique. It is the same procedure as adding a new group.
To add a patron to a mail list throgh a database query, you perform the following steps:
- Open the Mail List Window.
Click here to learn how to open the window.
- Click the New button in the Mail List Criteria window toolbar / ribbon bar.
- Enter a Name for the new list.
This should be a short, but descriptive name for quick reference.
- Enter a detailed description of the mail list.
This is extremely important for other users who may use your mail list. If you describe the criteria of the list well, they will not need to attempt to decipher the code.
- Click the Save button.
You can now begin to enter your groups of criteria.
- Click the Criteria Groups Tab.
- Click the Create Group
 button.
- Choose "To Add Patrons To The Mail List".
The data selection window opens.
Select a file containing data all of the patrons required on the list will have in common. Using the Example List created in Creating a Database Query we want to add all of the patrons born in 1966 or greater.
The "Patron Data" file will be used for this example. - Select a file which contains the required data and click the Next
button.
The Parameters window opens.
Click Here for a detailed description of the window.
- Click the New
 button.
The Add/Edit Parameters window opens.
- Select the field to search by.
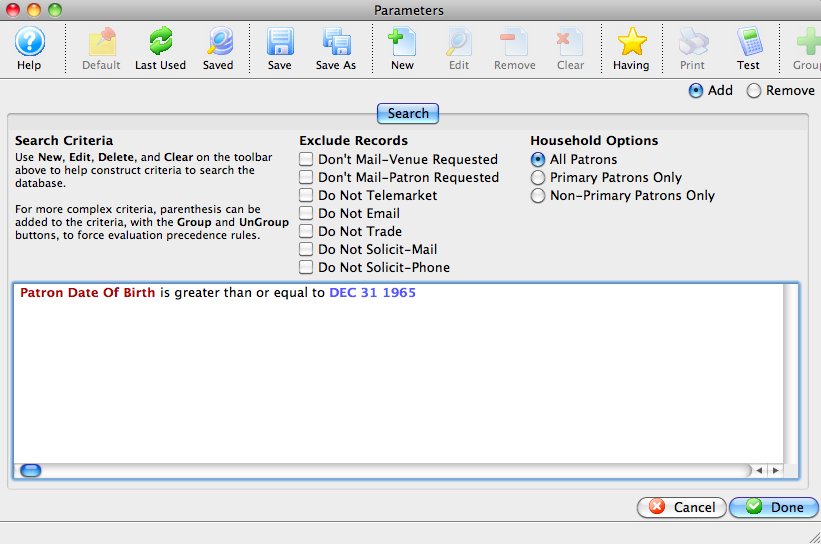
For the example you would use the "Patron Date of Birth" field.
- Fill the search parameters with the information to search by.
For the example, use "is greater than or equal to" and the date December 31 1965.
- Click the Save button.
The Parameters window returns and the selected criteria is displayed in the window.
- Click the Done button.
The Mail List Criteria window returns.
- Click the Execute button.
If this is the first time the list has been executed, Theatre Manager will highlight each group as it is executed, then the Mail List Criteria window will open to the Who's In
tab. Only patrons whose birthdays fall after December
31st 1965 will be added to the list.If the mail list has been executed previously, the Previously Executed dialog opens.
- Click the Proceed
 button.
If the mail list has not been updated for some time, click the Rebuild
button. This ensures all data is current.
Adding Patrons to a Mail List Through a Ticket Purchase
This method of adding patrons to mail lists, can capture all of the patrons who purchased a ticket(s) for a play. When you set up a play in the Plays and Dates window, there is an option to apply a default mail list. For every ticket bought for that play, Theatre Manager will add the patron to the default mailing list, if the patron is not currently already associated with it.
For example, there may be a general mail list for musicals and many musical productions over the year. If a patron is attending their first musical they will be automatically added to the default mail list. This is an excellent tool to market for a specific genre of productions.
To add patrons to a mail list through a ticket purchase, you perform the following steps:
- Click Setup from the menu and click Plays.
The Play List window opens.
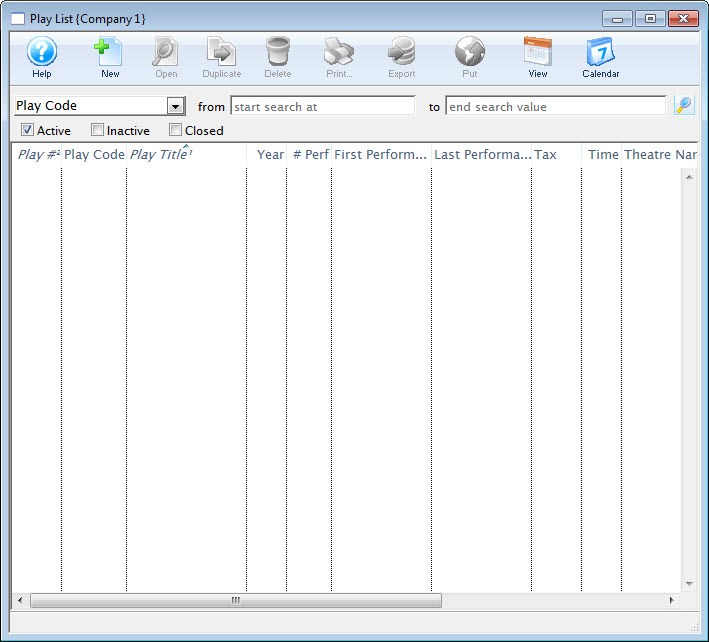
- Enter the search criteria and click the Search button.
- Select the Play and click the Open button.
- Click the Marketing
 tab.
tab.
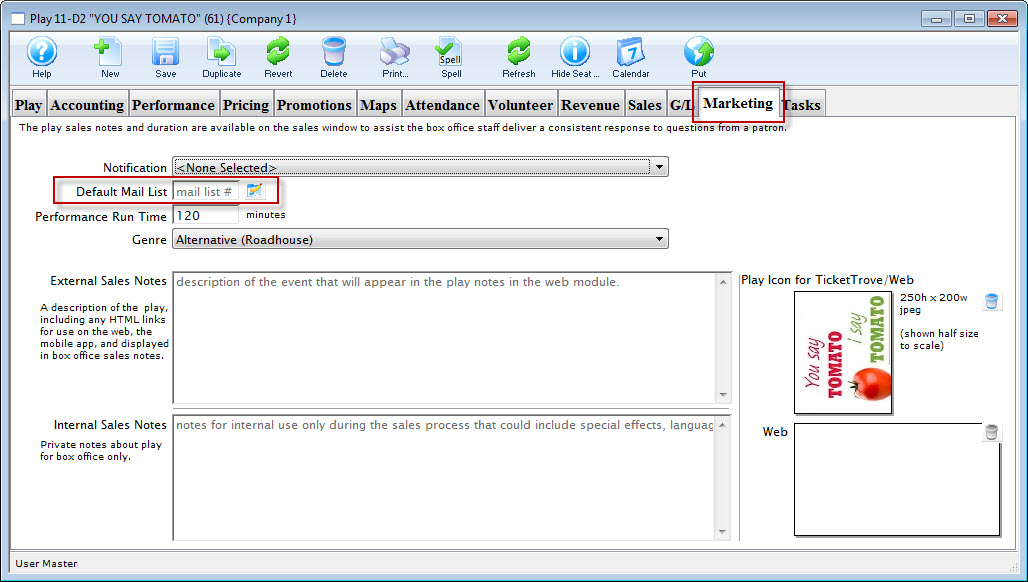
Locate the Default Mailing List field.
- Click the Search For A Value
 button.
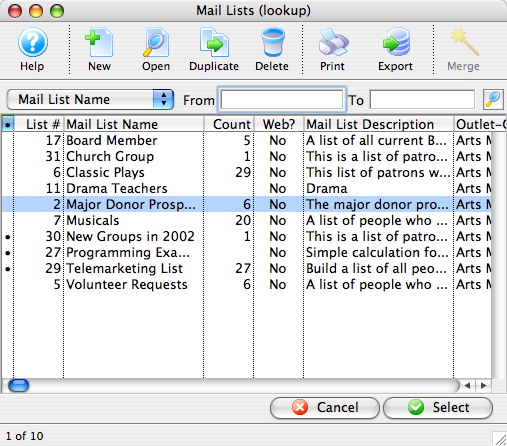
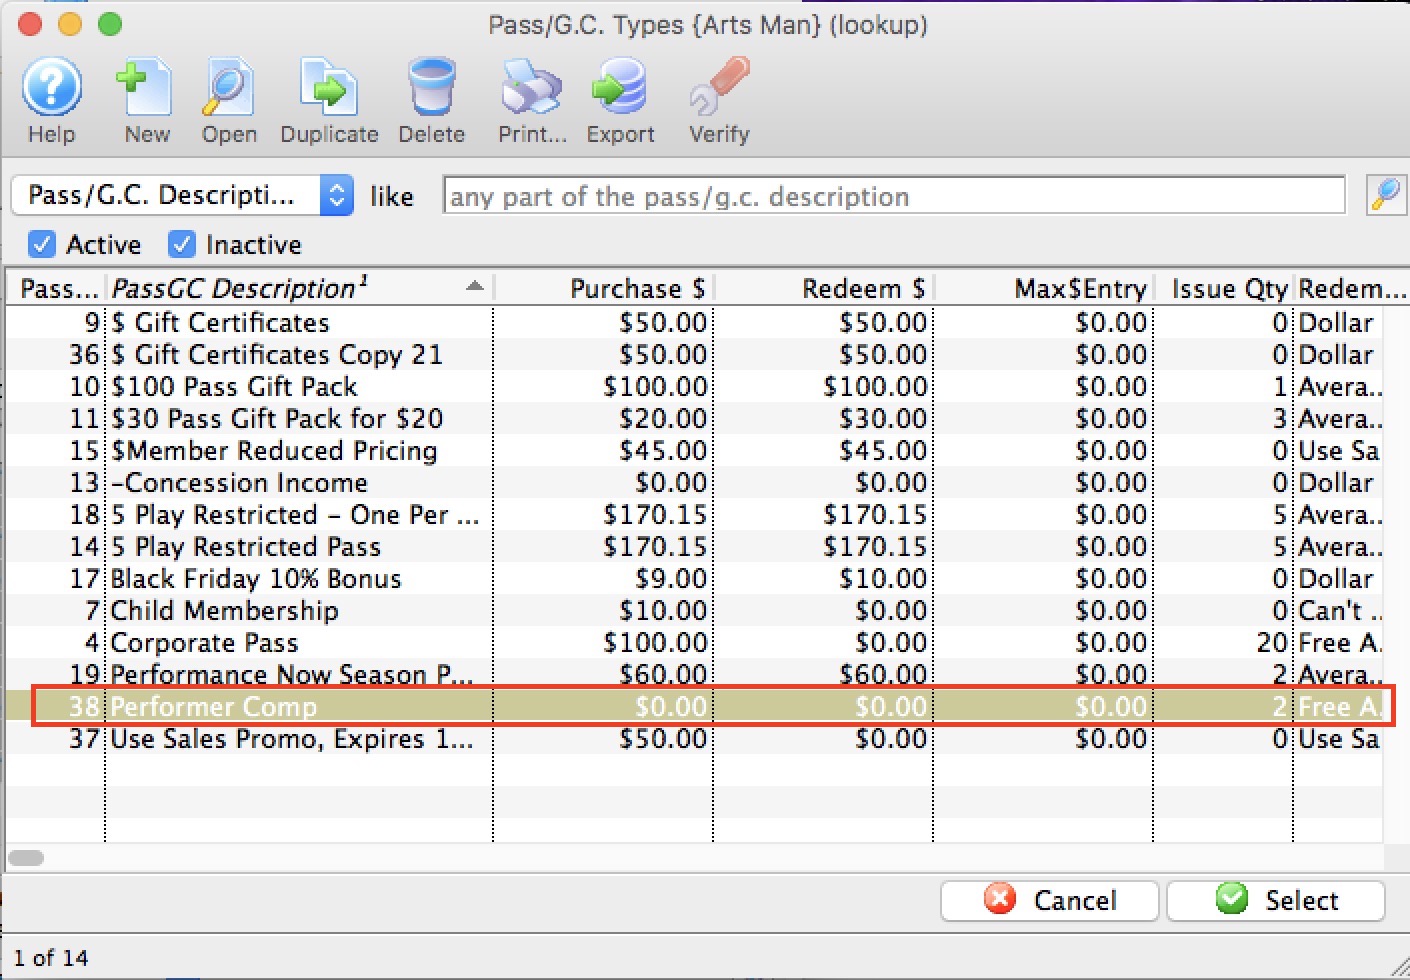
The Mail Lists window opens.
- Enter the search criteria at the top of the Mail List Lookup window and click the Search
 button.
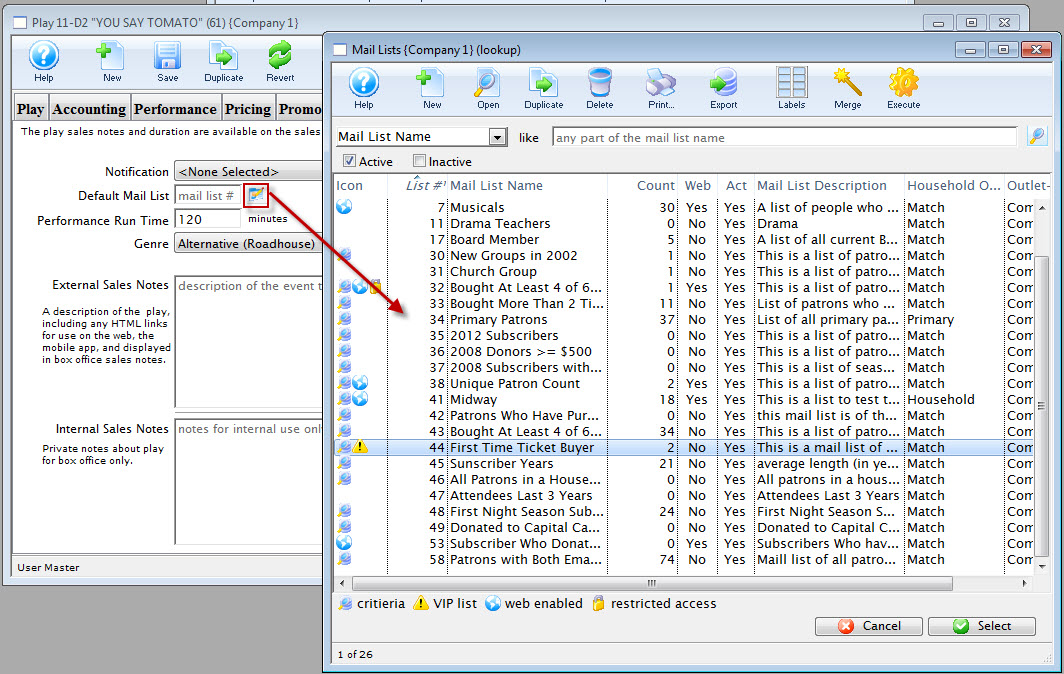
Mail Lists marked with a
 have search criteria implemented for them.
That is, patrons could be added to those lists by searching the database for the specified criteria.
have search criteria implemented for them.
That is, patrons could be added to those lists by searching the database for the specified criteria. - Click a Mail list to highlight and click the Select
 button.

Every patron who buys a ticket for the production will be added to the "Musicals" mail list.
For more information on setting up Plays and Dates refer to the System Setup section and click on Events and Dates.
Adding Patrons to a Mail List Through the Batch Function
To add patrons to a mail list through the batch functions, you perform the following steps:
From the Mail List Window, you can quickly add patrons manually, if you have their patron number. Occasionally, the patrons you want to add to a mail list may belong to a report you have just printed, and you wish to add them to a list. Using the batch function you can quickly add the patrons manually by their patron number.
- Open the Mail List Window.
Click Here to learn how to access the window.
- Find the Mail List to add the patron to.
- Click the Who's In
 tab.
tab.
- Click the New
 Button.
The Contact List opens.
- Enter the search criteria for the patron and click the Search button.
Highlight patrons in the contact list who belong in the Mail List by single clicking on them.
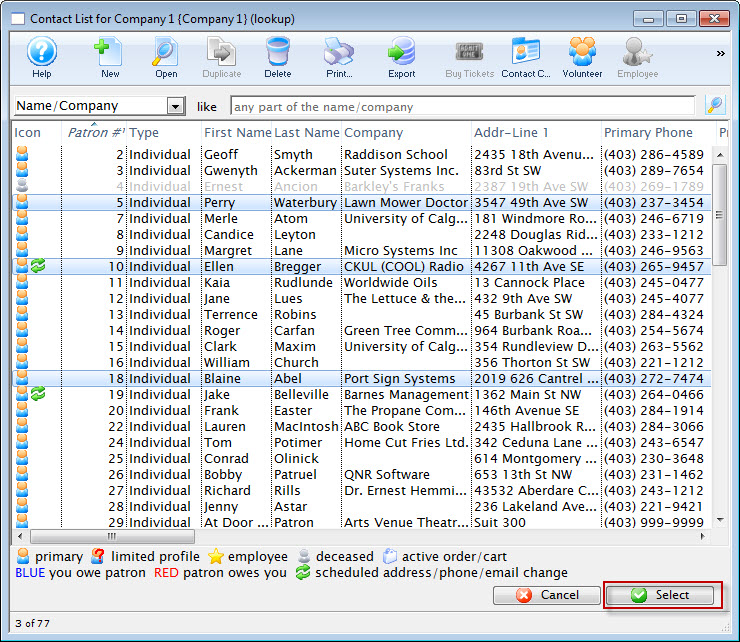
- Click the Select button.
The patron has now been added to the list. If the patron is already a member of the mail list you will hear a beep and receive the message that the patron is already on the list. Repeat this step until all the patrons have been entered.
Adding Patrons to a Mail List Through the Patron Window
Adding a single patron to a mail list is accomplished thought the Patron Window. To add more than one patron see Adding patrons through a ticket purchase or Adding patrons through a database query. Patrons may also choose to Subscribe or Unsubscribe to a list via the internet.
To add patrons to a mail list through the Patron window, you perform the following steps:
- Click the Mail List Tab
 tab in the Patron window.
To learn more about accessing the patron window click here. You can now view all mail lists the patron belongs to.
- Click the Add
 button to add the patron to mail lists.
The Mail Lists Lookup window will open.
- Enter the search criteria and click the search button.
Mail lists within the criteria will appear in the list. The mail lists which contain criteria are marked with a bullet.
- Select the mail list(s) to which you would like to add the patron.
- Click the Select
 Button.

|
|
|
Allowing Patrons to Subscribe or Unsubscribe Via the Internet
|
In order to subscribe to a Mail List online, a patron must be logged in to their online account - OR - you must have enabled the limited profile patron feature for web sales and mail list addition. |
- Find the mail list you want to allow patrons to subscribe to or unsubscribe from.
The example shows wording you might use for setting up ticket sales by lottery. This can be used for many purposes requiring patron consent like:
- Tell me about audtions
- Keep me informed about musicals
- Special Events interest me
- Tell me about last minute deals
- etc.
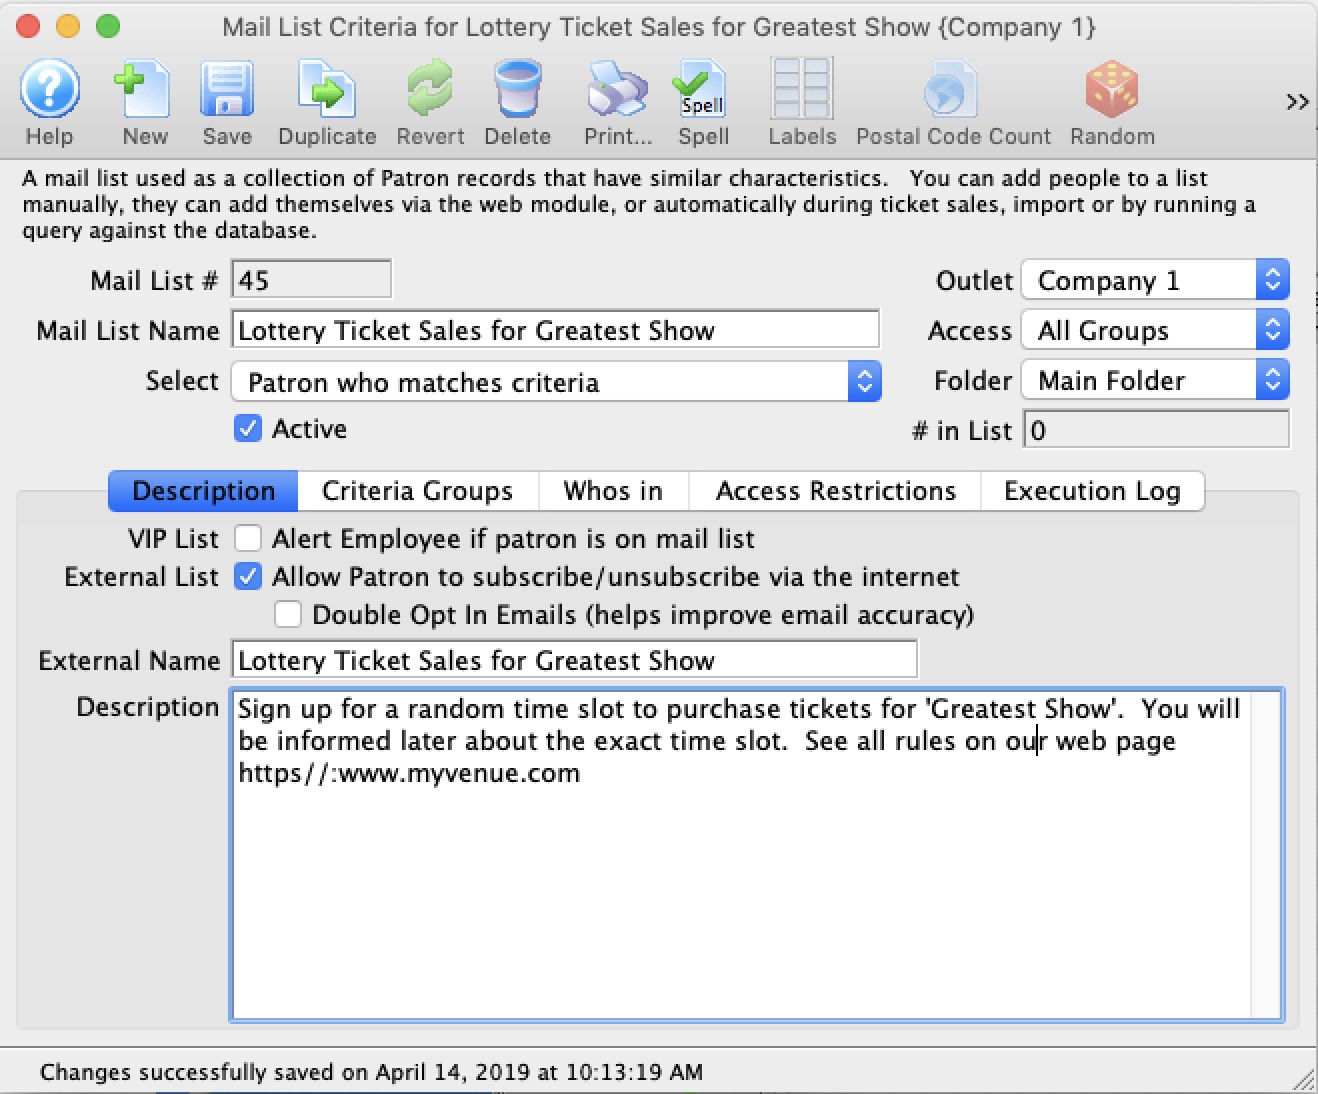
- Click the Allow patron to subscribe/unsubscribe via internet flag.

A check mark will appear in the box. Patrons logged into the database through the web sales module can now subscribe/unsubscribe to this mail list.
- Optionally, click on double opt in email
If double opt in is set, the patron will get an email asking them to confirm they opted in. This feature - tracks explicit consent per CASL anti spam laws -and/or-
- can be used to verify accuracy of email addresses submitted online since the patron must confirm them. It might be wise to do this for some mail lists to confirm that the patrons are real.
- Repeat for each mail list needing access via the internet.
Mail Lists - adding patrons through drag and drop
Editing data on the Mail List Window
Accessing the Mail List Window
To access the Mail List window you perform the following steps:
To access the list of mail lists, you perform the following steps:- Click Setup >> Mail Lists from the main Theatre Manager menu.
Alternatively, you can select the Mail List button
from the Main Theatre Manager toolbar / ribbon bar.
The Mail List search window opens.
- Select a Mail List search option.
- Enter a search range.
- Click the Search button.
The list of Mail Lists fitting the search opens.
- Select a Mail List and click the Open button.
The Mail List Criteria window will open. Alternatively, you can simply double click on the Mail List name.
For more information on the Mail List window click here.
Parts of the Mail List Window
|
Opens a new Mail List window. |
|
Saves changes made to the Mail List. |
|
Creates a copy of the open Mail List. |
 |
Reverts back to the last save point. |
|
Deletes the open Mail List. |
 |
Generates a report to the screen or default print location displaying the details of the Mail List. |
 |
Checks the spelling of typed items within the current tab. |
|
|
Opens the mailing label window to create mailing labels for patrons included in the Mail List. |
 |
Provides a report by zip code of all patrons in the Mail List. |
| Mail List # | Computer generated number for the Mail List. |
| Mail List Name | Brief name of the Mail List |
| Select |
Drop Down List:
|
| Active | Active / Inactive Flag |
| Outlet | Outlet that created the Mail List. |
| Access Groups | Specify which groups of people can access the data |
| # in List | Number of patrons currently in the list. |
 |
Information about the Mail List and its behaviors. Click here for more information. |
|
|
The criteria groups for building the mail list. Click here for more information. |
 |
List of Patrons who are in the mail list. Click here for more information |
 |
List of who may change this mail list. Click here for more information. |
 |
List of the dates and times the mail list was executed. Click here for more information. |
Description Tab
| VIP List | Alert Employee if patron is on the mail list. If a patron is marked on a list as a VIP, the employee will be reminded that the patron is on the list via a popup-dialog window each time they open the particular patron's record. |
| External List | Allow Patrons to subscribe/unsubscribe via the internet. For most mail lists, this is never checked. However, if it is checked, this flag allows patrons to add (or remove) themselves to the mail list using the online sales module.
Possible uses for this setting on mail lists are where the customer can elect to belong (or remove themselves) such as:
|
| Patrons must be logged in to subscribe |
If this is:
|
| Double Opt in Emails | This feature is only valid for mail lists that are 'external'. If enabled, then patron who is added to the mail list (manually or automatically) will be sent an email asking them to confirm that they want to be on the list. If the patron:
This feature is very useful
|
| Description | Detailed description of the purpose of the mail list (in 'descriptive plain language') so that others will understand its purpose or suggested usages. |
Criteria Groups Tab
|
Inserts criteria for a Mail List. Click here for more information on adding new criteria. |
 |
Removes the selected criteria. |
 |
Opens the parameter window for the selected criteria. |
|
Rebuilds the mail list based on the selected criteria. |
 |
Verifies the number of patrons in the Mail List. |
| Duplicate | will take the criteria group that you have selected and make a duplicate of it
at the end of the list of criteria. By way of example, this is useful when you need to
|
|
You can reorder groups of criteria on a window by clicking on one and dragging it. |
|
You can also drag a group of criteria from one mail list window to another. If you have built some criteria that you like and want to use portions of them in another mail list, just highlight the group and drag it to this window on another mail list. |
Draging Criteria Groups to Another Mail List
- Select the group you like (see left window)
- Drag it to another criteria group window

Re-Arranging Grouping of Criteria
- Click the line of criteria to be moved to select it.
- Click and hold the mouse button to "pick up" the group.
- Drag the criteria up or down the list and release the mouse button where it should be placed.
Who's In Tab
- generate mail labels
- determine distance from your venue
- export them
- use them in criteria for reports or other mail lists
- drag individuals from one mail list to another to place them into two lists
- use the list to allow people to subscribe and unsubscribe to marketing lists online
- drag them onto tasks to indicate who is invited.
|
Tracking unsubscribes: If a patron unsubscribes from the mail list online, they are not removed from the mail list. Their record gets marked with an unsubscribed date. This tracks who no longer wants information from your venue for a specific purpose.
This can be very useful for CASL purposes to track explicit opt outs and when the patron opted out. |
|
You may alter the subscribe status using the add and remove buttons as described below. |
| Type | Customizable field that allows for classification of patrons by type (Individual, Student, Staff, etc.) |
| Patron # | Unique number assigned to a patron. |
| Patron Name | Patrons first, last name and business. |
| Source | How the patron came to be in the mail list:
|
| Primary Phone | Patron primary contact telephone number. |
|
 Clicking on the New button causes a pop up to be shown that lets you:
|
 |
Opens the patron window of the selected patron. |
 |
 Clicking on the Remove button causes a pop up to be shown that lets you:
|
 |
Export the selected rows of contact information from a Mail List. If you want everybody in the list, select all the rows (or click on a line and the Ctrl-A or Cmd-A select them all) before clicking the export button.
|
| Add Pass | Can be used to add a pass or gift certificate to a number of patrons at the same time. |
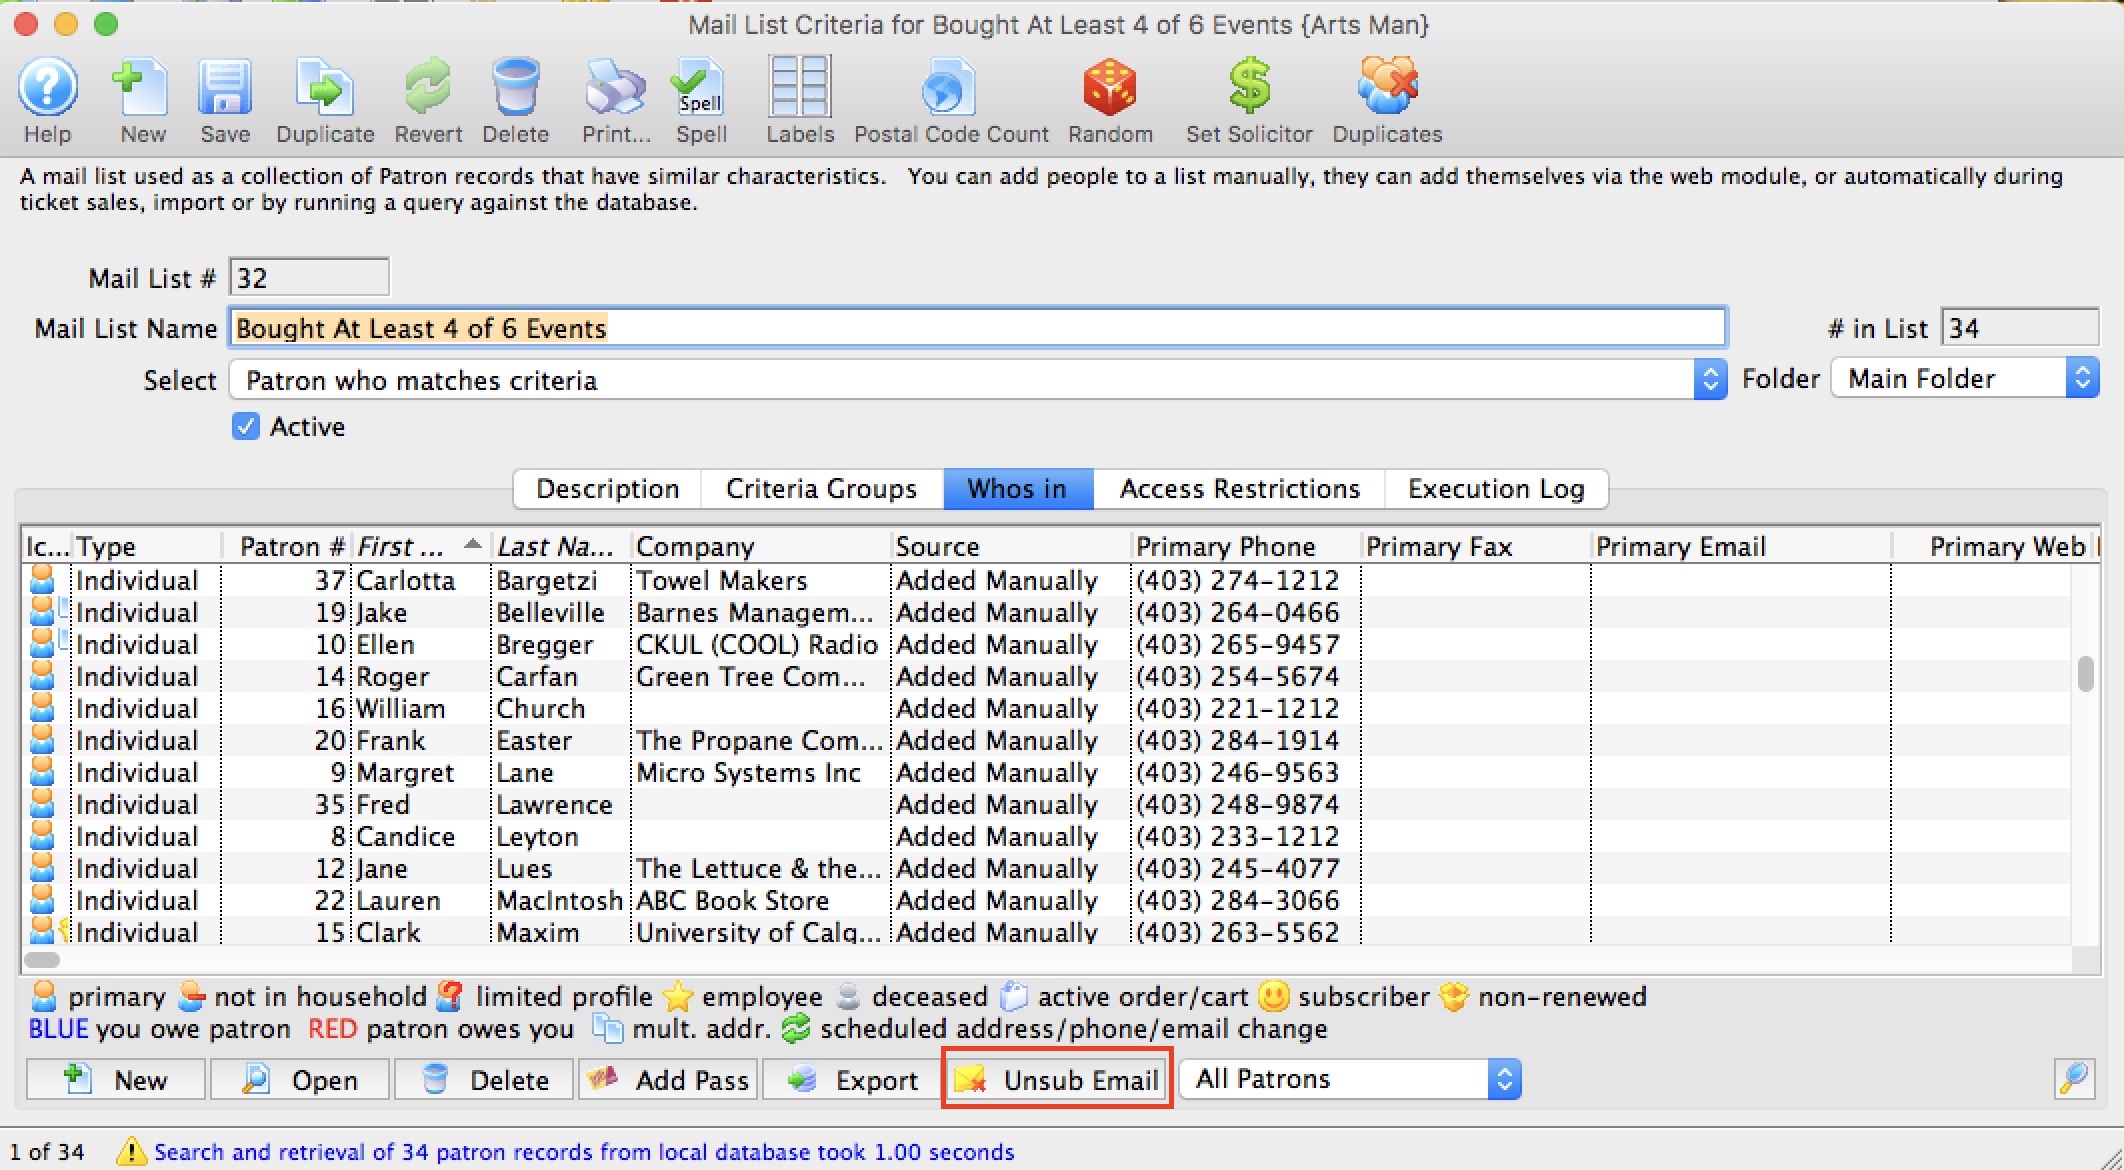
| Unsub Email | Can be used to process an unsub/bounce file from an external emailer program and remove patrons from a mail list or remove their email addresses permanently. |
 |
Search options for finding patrons within the selected Mail List. |
|
Search's the selected Mail List for patrons matching the selected search criteria. |
Using the Unsubscribe feature
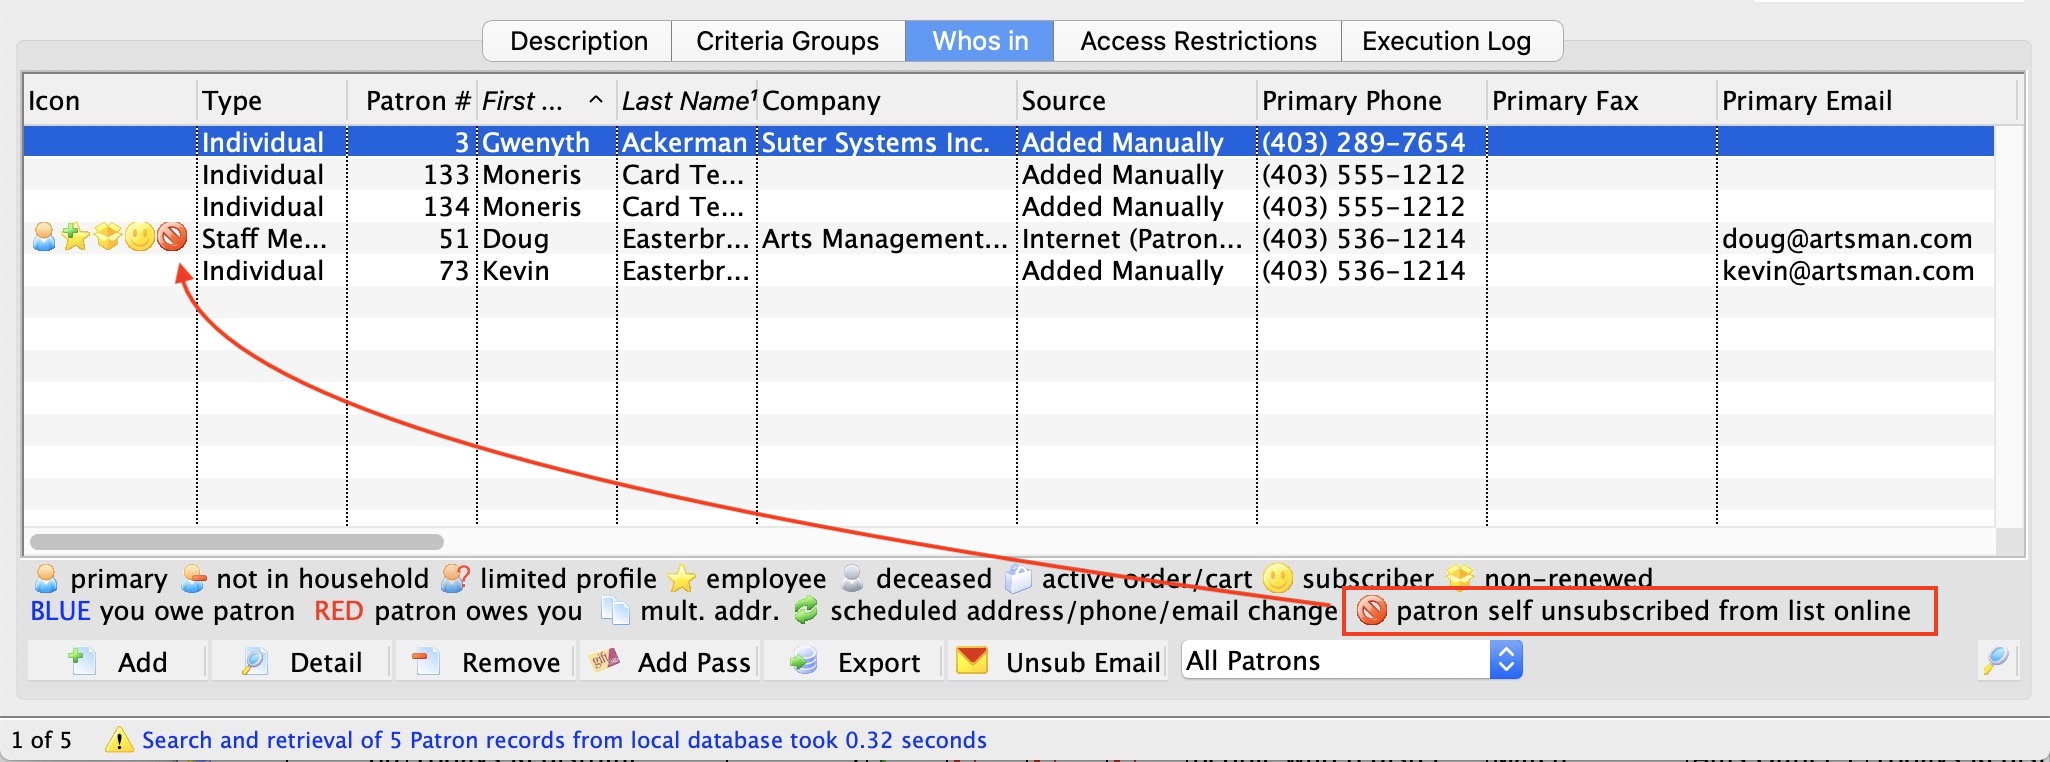
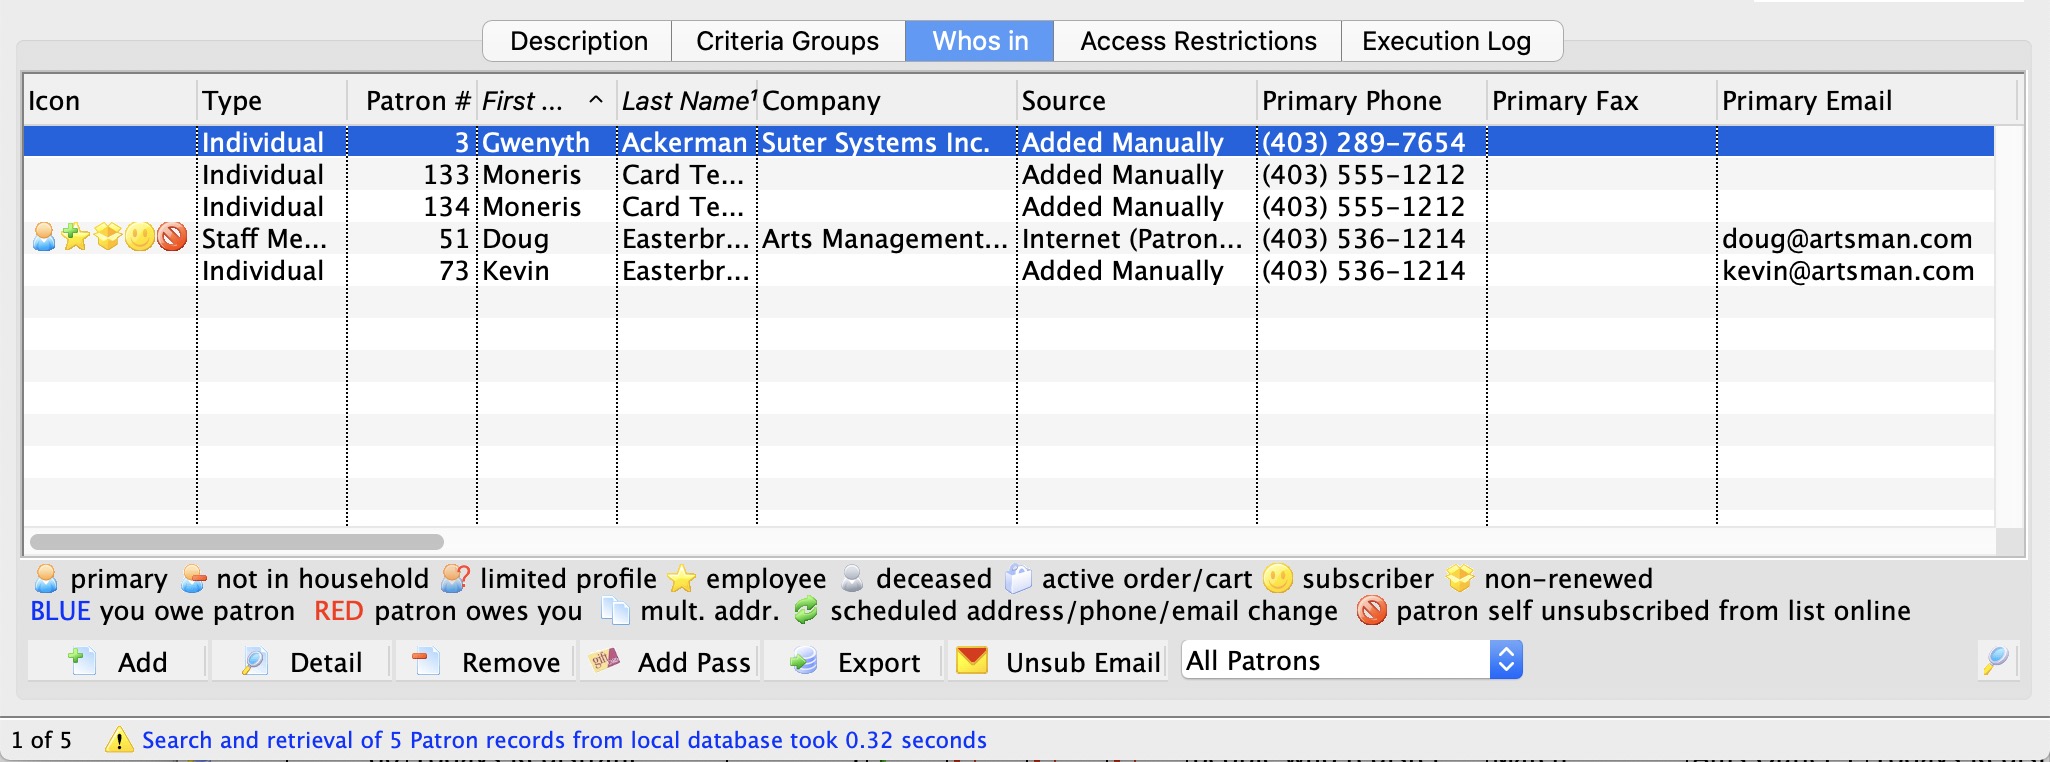
In the sample list above, one patron is marked as unsubscribed online. One of the columns in the list contains the unsubscribe date, so you know when people no longer wanted to be part of the mail list.
When building other mail lists or running reports, there are two key selection criteria that lets you select these people:
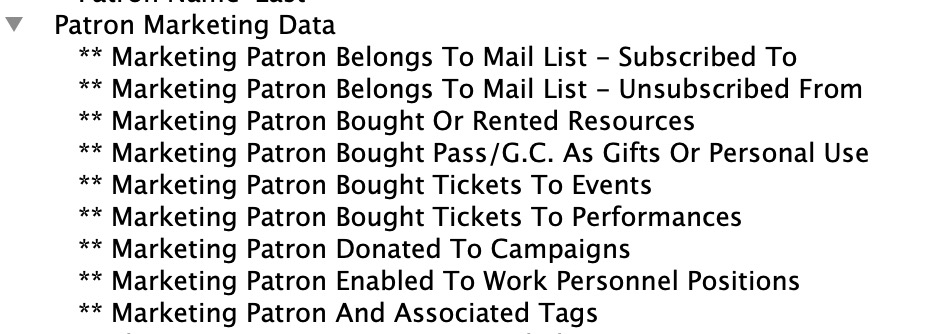 Marketing Patron Belongs to Mail List - Subscribed to
When used, this will find all the people in the mail list - except those patrons who unsubscribe themselves online. This makes selecting people on a public mail list easy. You don't need to worry about who doesn't want email since they are automatically ignored.
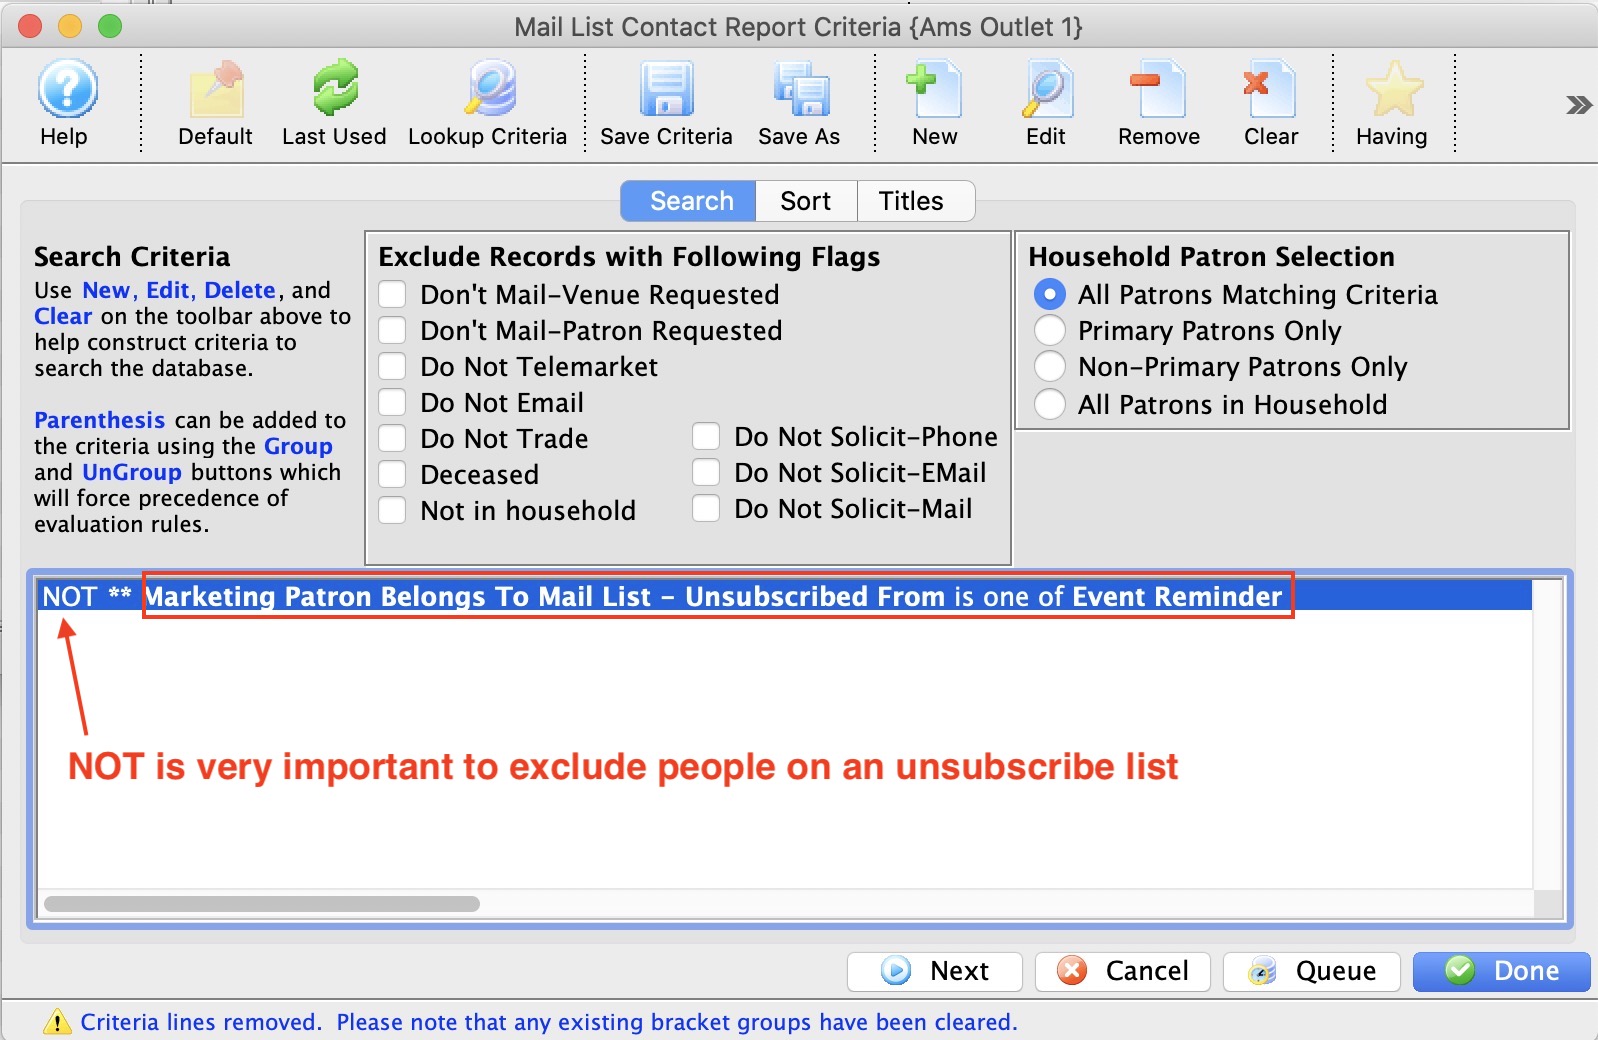
- Marketing Patron Belongs to Mail List - Unsubscribed from
This search criteria only picks people who have unsubscribed. Its best use might be for an eblast mail list where people say they no longer want a specific type of eblasts.
You can include patrons in your normal way and then use this list to eliminate people in the unsubscribed list using something like the criteria below.
Access Restriction Tab
- If you are on the access restriction list, you can add, rebuild and remove people from the list - and you can delete the mail list in entirety.
- If the list of employees is empty, anybody can add, rebuild or remove people from the list
|
If you want to hide this list from some people, use the Access Feature at the top part of the window. |
|
Preventing employees from altering the contents of the mail list does not prevent them from deleting the entire mail list unless you implement data permissions on the employee record (prevent delete of mail lists) or hide the mail list (as above) |
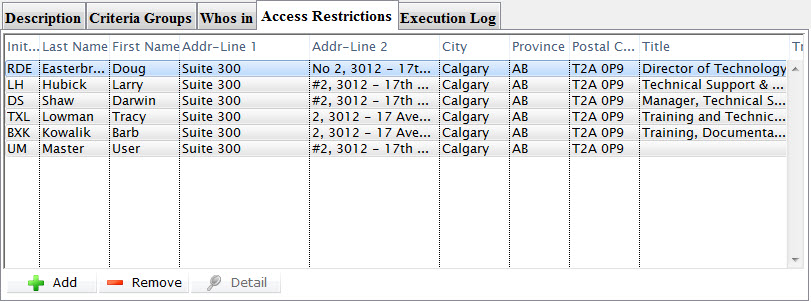
| First | First name of the employee. |
| Last | Last name of the employee. |
| E-mail address for the employee. | |
 |
Grants an employee access to the Mail List. |
 |
Removes an employee from having access to a Mail List. |
 |
Opens the employee data window for the selected employee. |
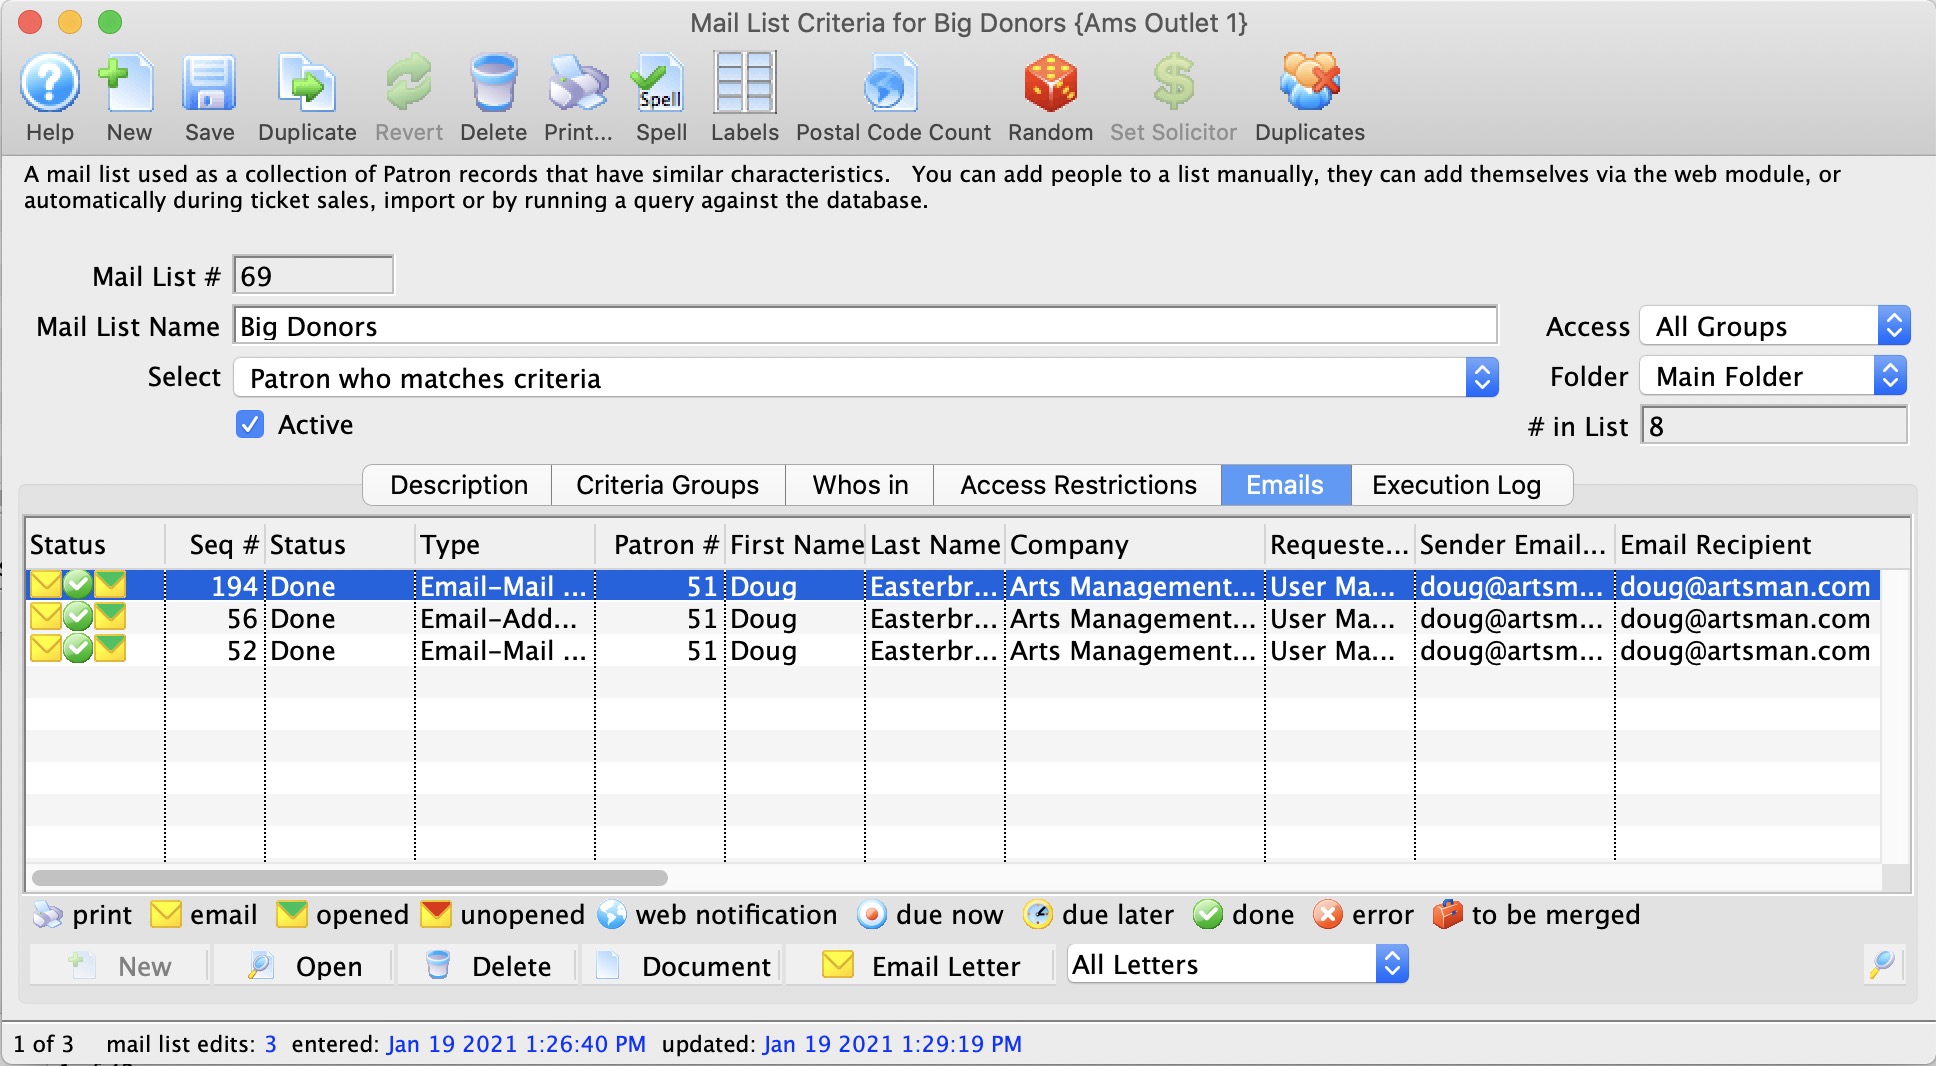
Emails associated with Mail List
|
For mails to appear in this list, they MUST have been sent out using and unsubscribe list in the form letter merge. |
You can:
- Search by date sent to see what went out on a particular day or for a time period
- Search by letter to see who got a particular bit of correspondence.
- You can see who opened it the letter
- Highlight a number of the lines based on status to see how many were sent and how many were opened
- Have a look to see what is due the future
- Select a number of emails and:
- change their status to Not Done to resend them -or-
- mark them done if you need to have them on the patron's file but never intended to send them, -or-
- delete them - which means that the patron could no longer unsubscribe from the email.
Execution Log Tab
List of the dates and times the mail list was executed.
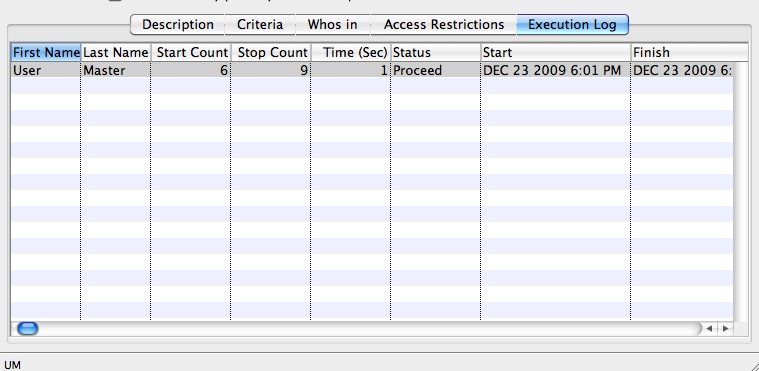
| First | First name of the employee who ran the mail list. |
| Last | Last name of the employee who ran the mail list. |
| Start Count | Number of patrons in the list before the list is executed. |
| Stop Count | Number of patrons in the list after the list is executed. |
| Time (Sec) | Amount of time in seconds the mail list took to populate. |
| Status | The method chosen to populate the mail list. This will be one of:
|
| Start | The date and time at which the instance of the mail list was begun. |
| Finish | The date and time at which the instance of the mail list finished running. |
Remove Patrons using External Email Unsub/Bounce file
- Remove people from a mail list based on patron number -and/or-
- Remove email addresses completely from the database
|
This process will remove people from mail lists and (optionally) email addresses from the database.
Please ensure you have a recent backup in case you delete data you do not want to delete. The only remedy is to restore a backup database, export the data and then use the patron import processes to bring it back in. |
Preparation of Data
Most email services external to Theatre Manager have a feature to export patrons who unsubscribed from the emailer, or whose emails bounced. You will need to create a file that:
- has (at minimum) a patron number, email address and status. All other fields are ignored. You do not need to get the field names correct as they are matched later.
- The status must either be:
- unsub to indicate that the patron has unsubscribed from the mail list. Theatre Manager only looks at the first 5 characters, so you can use unsubscribe or any other variation.
- bounce to indicate that the email was not deliverable. Theatre Manager only looks at the first 5 characters, so you can use bounc, bounce, bounced or any variation.
- It can be in excel format, tab delimited or comma delimited

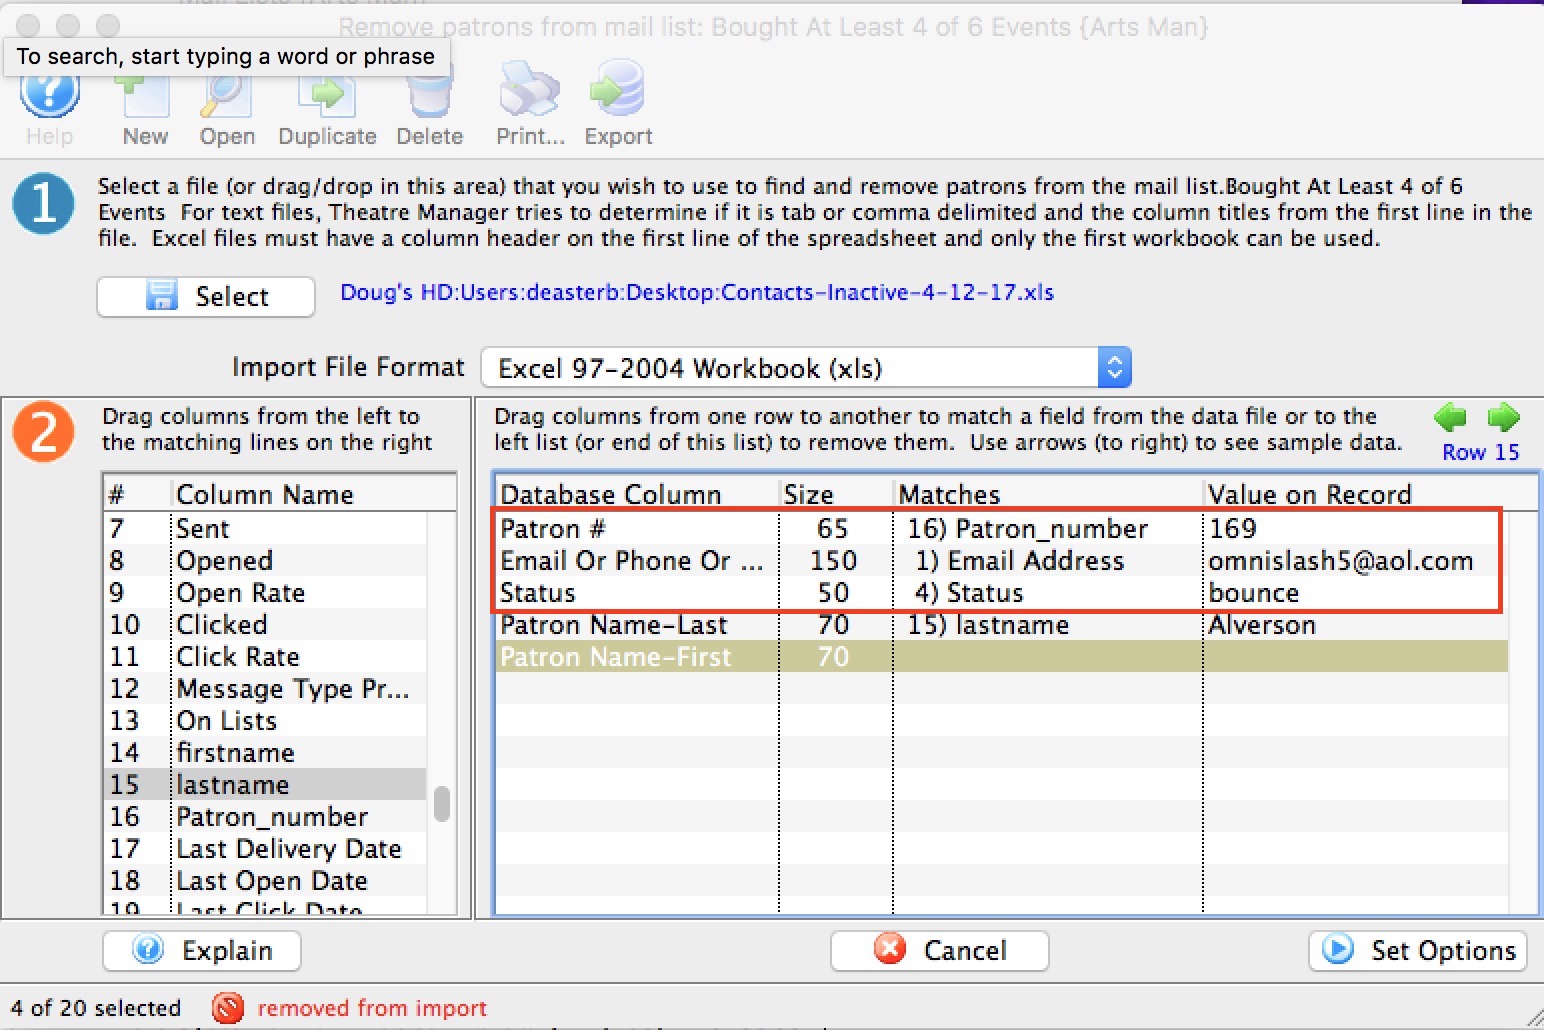
Importing the file to remove patrons from a mail list
To begin the process, open up a mail list window to the Whos In Tab. You can either:
- Click the Unsub Email button which will ask you for the file you prepared above -or-
- Drag the file you prepared above on top of the list of patrons.
Match up the following fields:
- Patron Number - note, any row with no patron number, or a patron number not found in the database will be ignored. This means:
- if you merged people together and then they unsubscribed, TM cannot will not find them in the database and they cannot be unsubscribed from the mail list.
- It will also not unsubscribe people who are only in the mail list program database and not in Theatre Manager since they don't have a Theatre Manager Patron Number
- Email Address - the email address from the mail list program
- Status - which contains the first 5 letters of either unsub or bounce. Any other status codes are ignored.
There are two functions that the unsubscribe process can support which are indicated on this screen. You can:
- Remove People from a mail list. The patron's email address is retained in Theatre Manager - they are simply deleted from the mail list based on patron number matching. Since there are two status codes in the import file, you can elect to remove based on:
- unsub - the patron has indicated that they don't want emails from you by actively unsubscribing from an eblast you sent out. This option reflects the patron's intent
- bounce - The external email package does not know if the patron got the email from you. A bounce could mean many things such as: an invalid email address, the patron's email sever is not currently working, or their email server is rejecting your email as spam. A bounce does not necessarily mean bad email. Multiple bounces from many emails increases the likely hood of the email address being bad, so you may need to track the bounces for a while before using this option.
- Completely delete the email address from the database - if you get a lot of bounces, you can elect to DELETE the email address from the database. This option should be used sparingly because it will DELETE the email address from the database and disassociate it from ALL PATRONS IN A HOUSEHOLD that are sharing the email address.
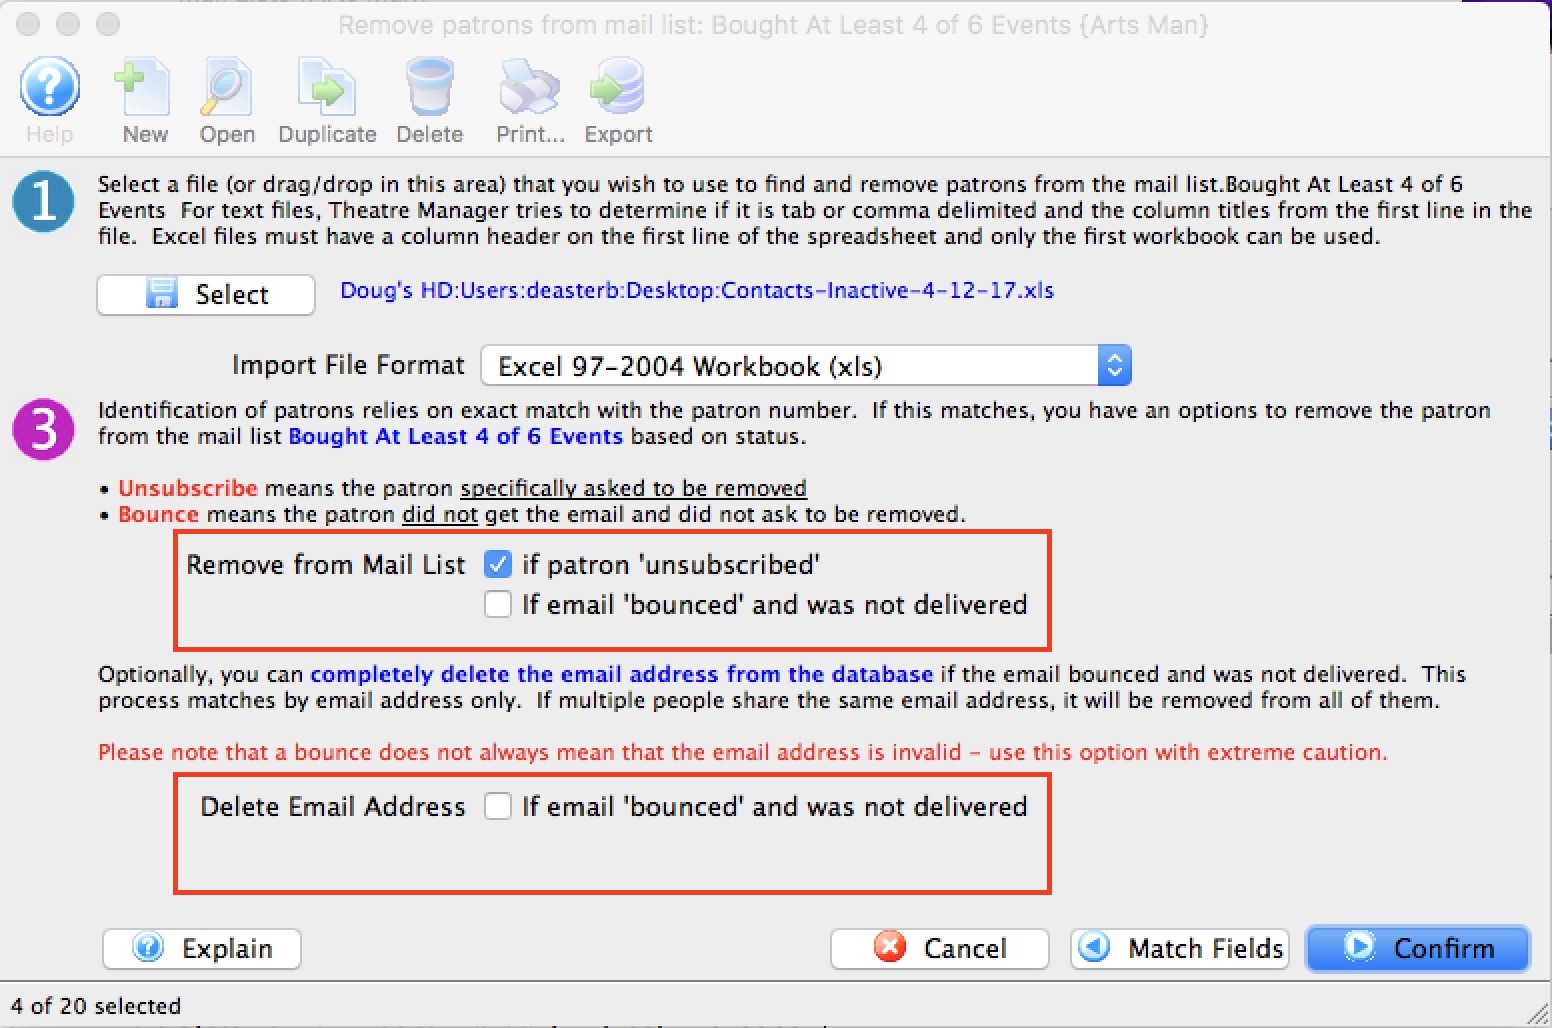
The final step is to confirm what you want to do. It suggests a backup be made since the process cannot be undone without going to a backup.

Removing a Patron Through the Mail List Window
This method is useful for removing multiple patrons from a mail list when they do not have common information. If the patrons all have common information (e.g. they all are non-donors) use the Mail List Database Query method of removal.
To remove a patron through the mail list window, you perform the following steps:
- Open the Mail List Window.
Click Here to learn how to open the window.
- Find the mail list to remove patrons from.
- Click the Who's In tab.
- Select the patrons you want to remove from the mail list.
Single click on a patron to select them or use the Ctrl key (PC) or the Command/Apple key (Mac) to select multiple patrons.
- Click the Remove
 Button.
The patron has been removed from the list.
Selling Passes/Gift Certificates to a number of Patrons
You can add those passes to the patron record one at a time, or you can add them EN MASSE to selected people in a mail list.
|
This process can sell a lot of passes or gift certificates quickly. It does not provide a process to pay for any that generate a balance owing by the customer.
If passes are sold that require payment, you may find it easier to pay for them on the Patron Tab in the pass setup window. |
Process of selling a Pass/Gift Certificate to Multiple Patrons
Open up a mail list that contains the people that you want to sell the passes/gift certificates to and go to the Whos In tab on the mail list window. The start of the process is:
- Select the patrons who you want to give the pass to
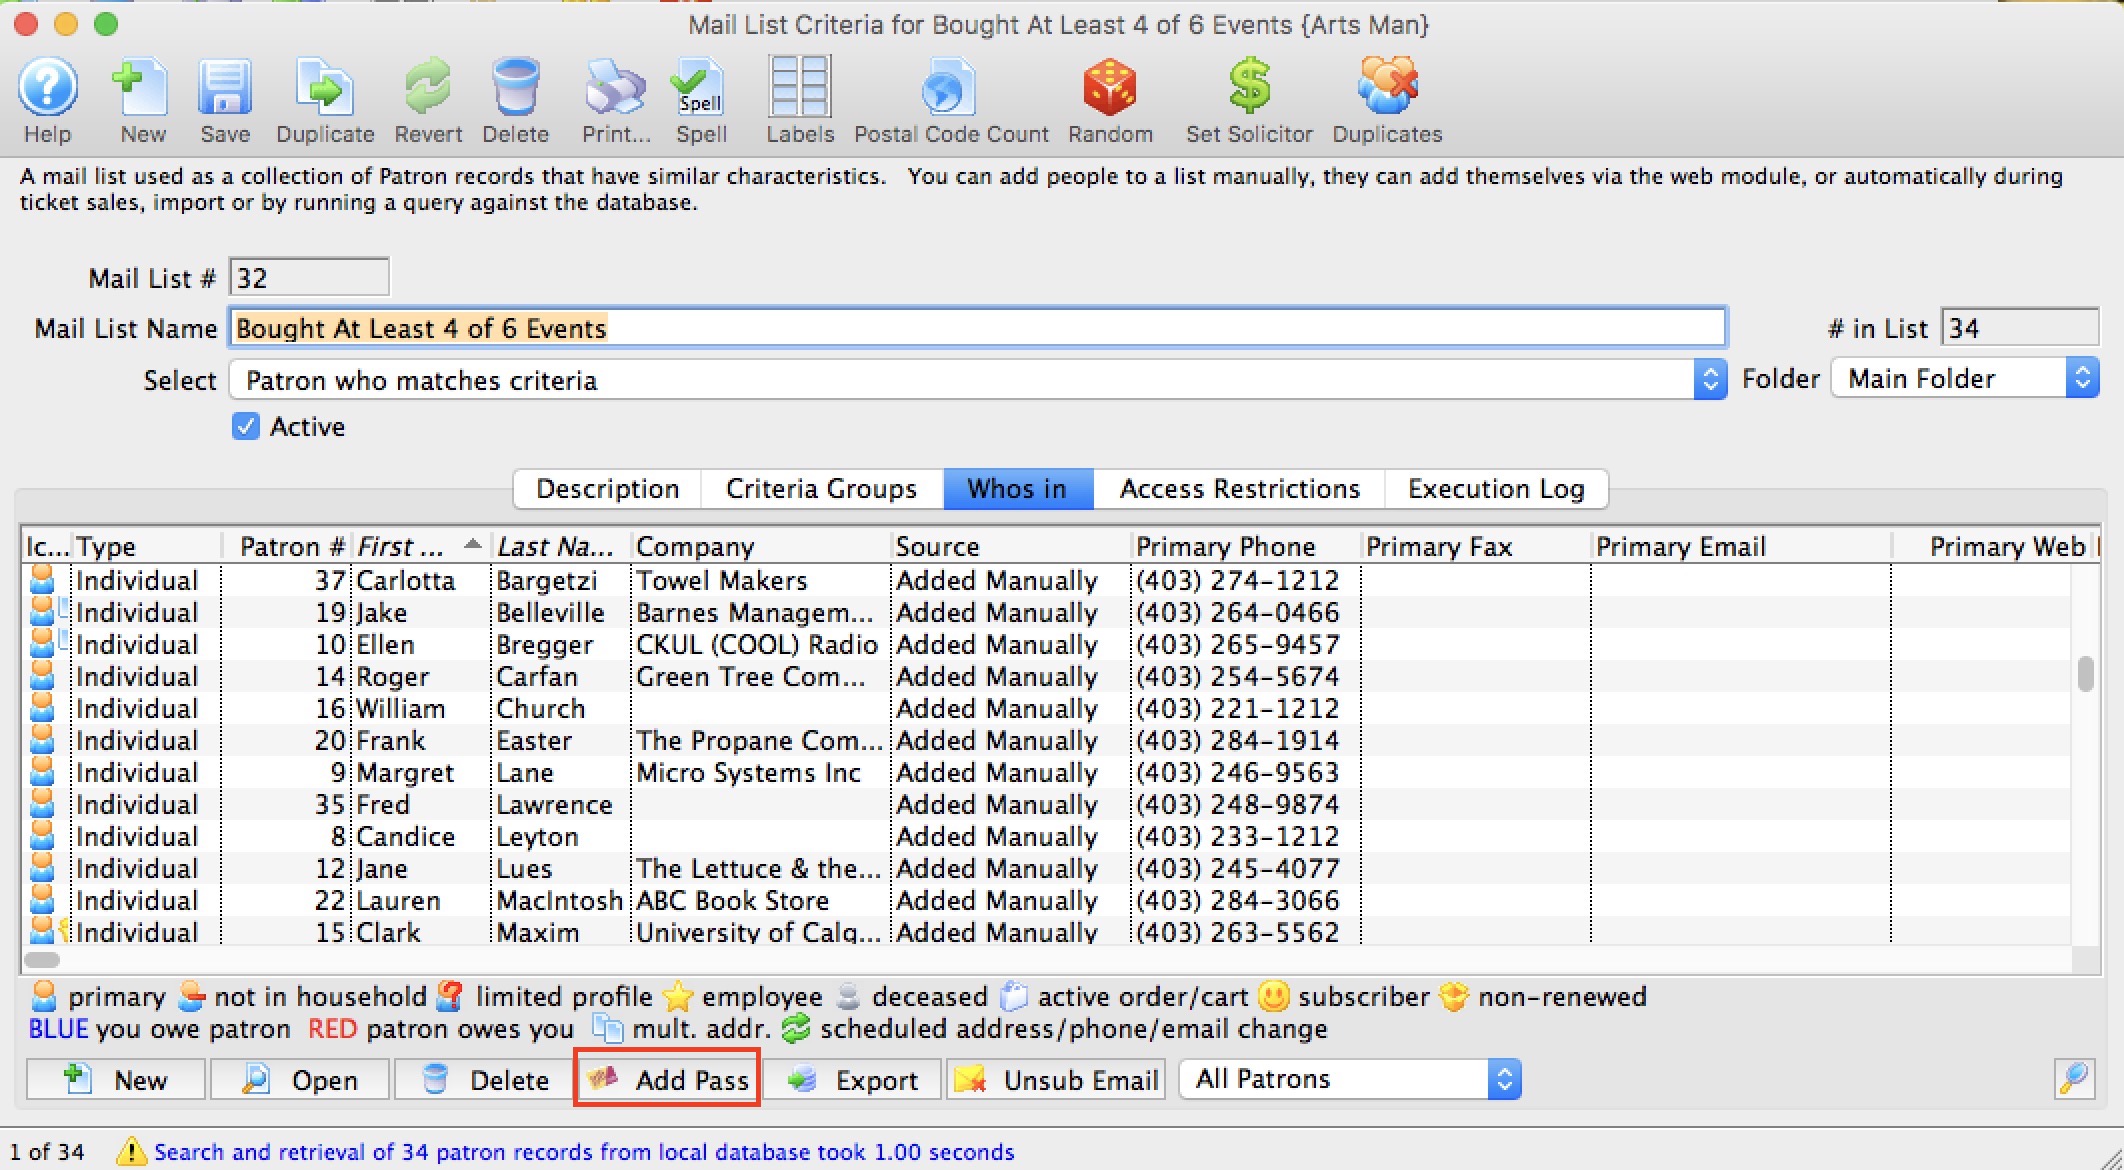
Then do one of the following two steps:
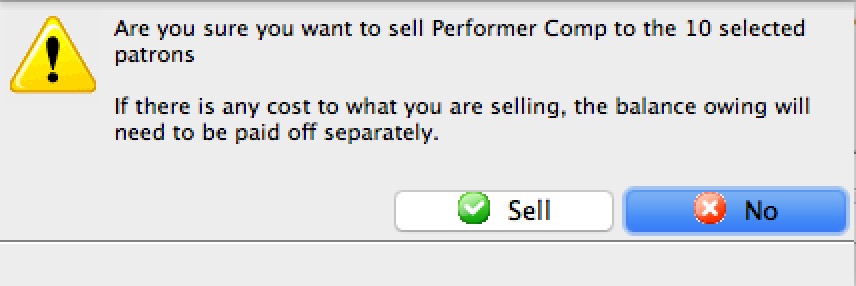
- Click the Add Pass button (above window) and then pick a pass/gift certificate type from the pop up list -or-
- Open the pass type list and drag one of them onto the selected patrons
Once you have picked a pass to sell to the selected patrons, you will see a confirmation message.
Who is on the Mail List
Once a mail list has been created or found you may wish to view the patrons belonging to the list. By viewing the Who's In tab of the Mail List,
- patrons can be viewed or removed from the list
- you can export the data
- you can print labels for the patrons in the list using the mail lable button
- do maps of where selected people live (context menu)
- and more
To view a patron on the mail list, you perform the following steps:
- Open the Mail List widow.
Click here for more information on opening the window.
- Find the mail list required.
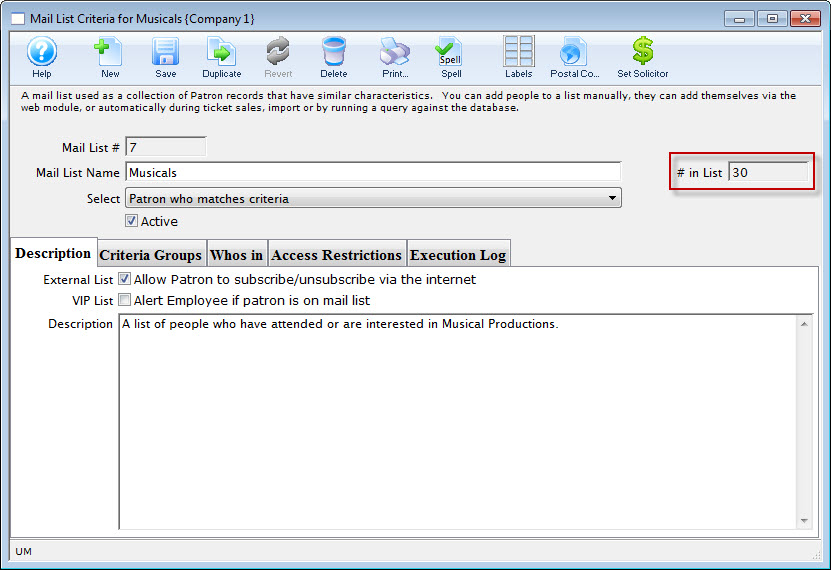
Currently there are 30 patrons attached to this mail list as seen by the # in List to the right of the window.
- Click the Whos In tab.
The Who's In information will be displayed.
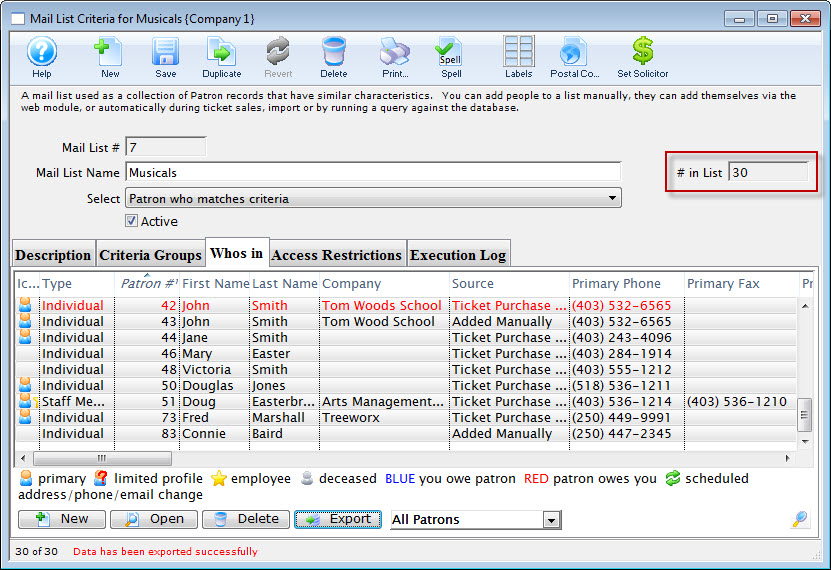
For more information on this window click here.
Removing Patrons from a Mail List
Removing the patron through the Mail List Window or Mail List Query methods are useful if you need to remove more than one patron from a mail list. Removing patrons throughout the Patron Window is useful if specific information is known about the patron you can use to locate their record (e.g. patron #).
To remove a patron from the mail list, you perform the following steps:
- Click the Mail List Tab tab in the Patron window.
To learn more about accessing the patron window click here. You can now view all mail lists the patron belongs to.
- Single click on the Mail List the patron should be removed from.
- Click the Remove button.
The patron is now removed from the list.
Exporting Patrons from a Mail List
You can export patron data from a mail list into:
- Text, Tab Delimited (.txt)
- Text, Comma Delimited (.csv)
- Excel 97-2004 Workbook (.xls)
- Excel 2008 Workbook (.xlsx)
|
Exporting data from a Mail List means you export the names, addresses, phone numbers, and other general marketing data from the results of the Mail List. It is important to remember the Mail List results, for example, of a criteria set to "All Donors of $5,000 or more" does not list their donations. Rather, the results are a list of patrons who match the criteria. Similarly, a Mail List of Patrons who "Subscribe to the 2011 Main Stage Season" does not list their seats - only their names, addresses, phone number, etc. To obtain data on donations, subscriptions, ticket purchases, etc., you must use the results of the Mail List as criteria in a report. Mail Lists provide a list of patrons - not a list of data regarding the criteria that was used. |
- Open the mail list you want to export patron data from.
For more information on accessing the mail list window click here.
- Click on the Whos In
 tab.
tab.

For more information on the Whos In and other mail list tabs click here.
During the export process, all of the columns displayed in the Whos In window will be exported. Click here, for information on how to change the displayed columns.
- Highlight all the records you want to export. If you want the entire list, highlight the top record, then SHIFT+click on the bottom record.
- Click the export
 button.
Your operating system's Save dialog wil open.
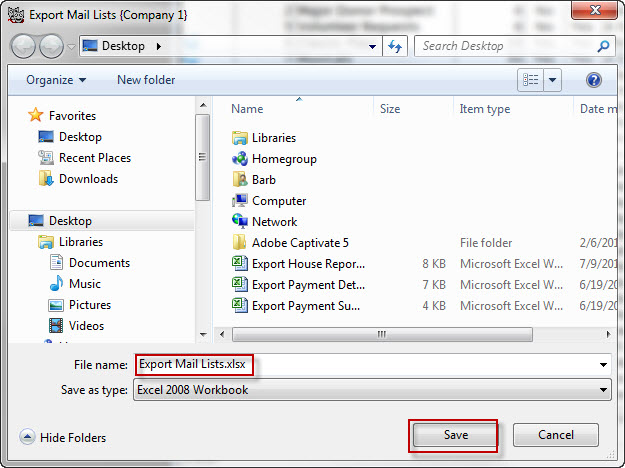
- Enter the name and the location of where you wish to save the file and click "Save".
The file will now be saved in the location you specified.
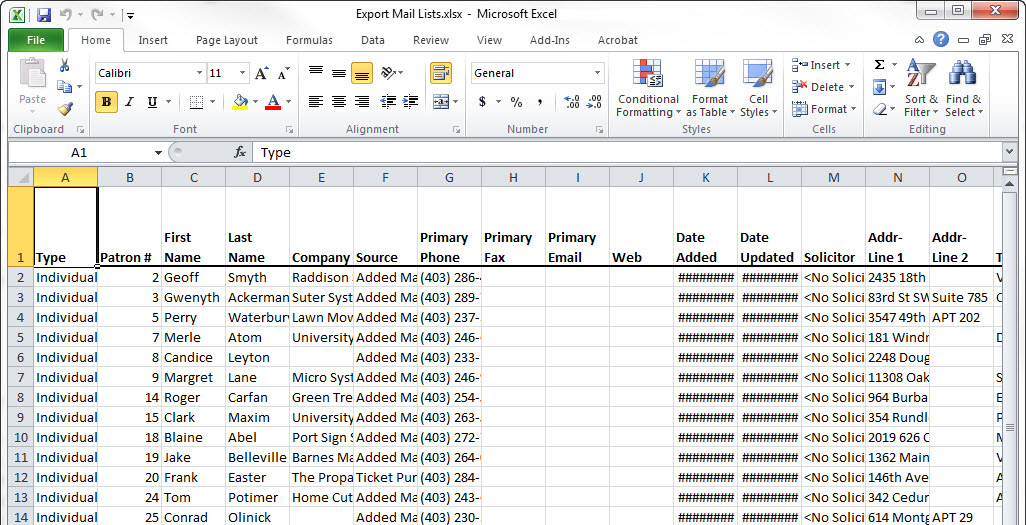
-
To view the file, you can use a program, such as Excel.
Mail List Double opt in
- Explicit Consent which is implemented using a mail list that is set up as either
- single opt-in -or-
- double opt-in
- Implied consent which occurs if a client initiated activity with you (any sales or phone contact) where you have up to two years to contact them via email without asking their permission
|
Explicit Consent is implemented in Theatre Manager using:
| |
Implied Consent:
|
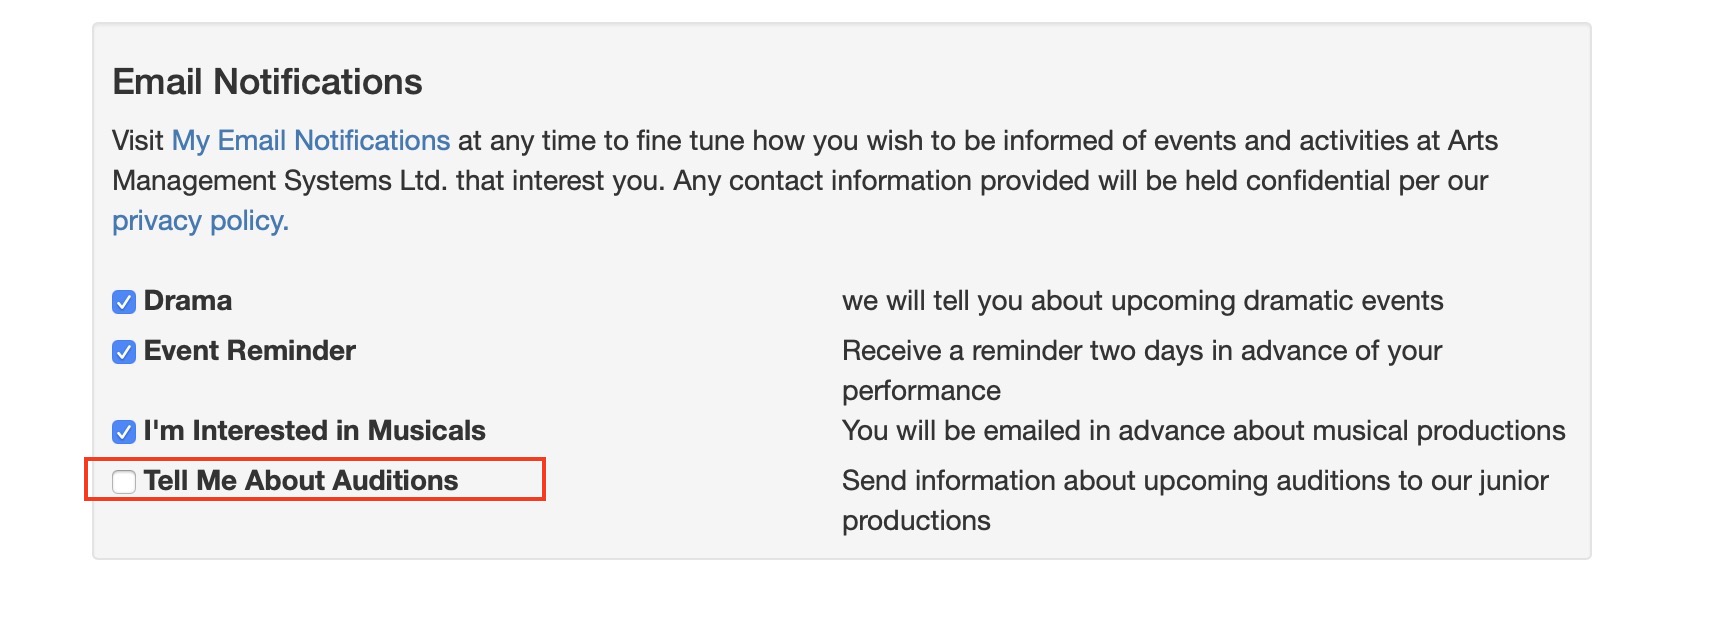
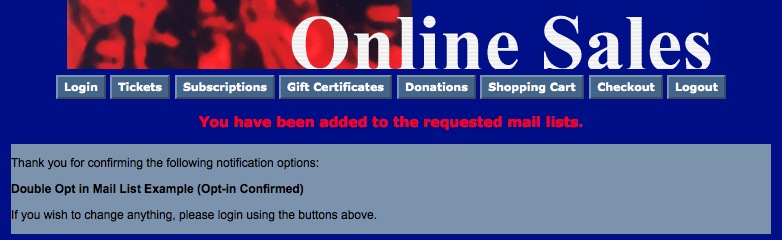
What does an Explicit Consent mail list look like on the Web for the end user?
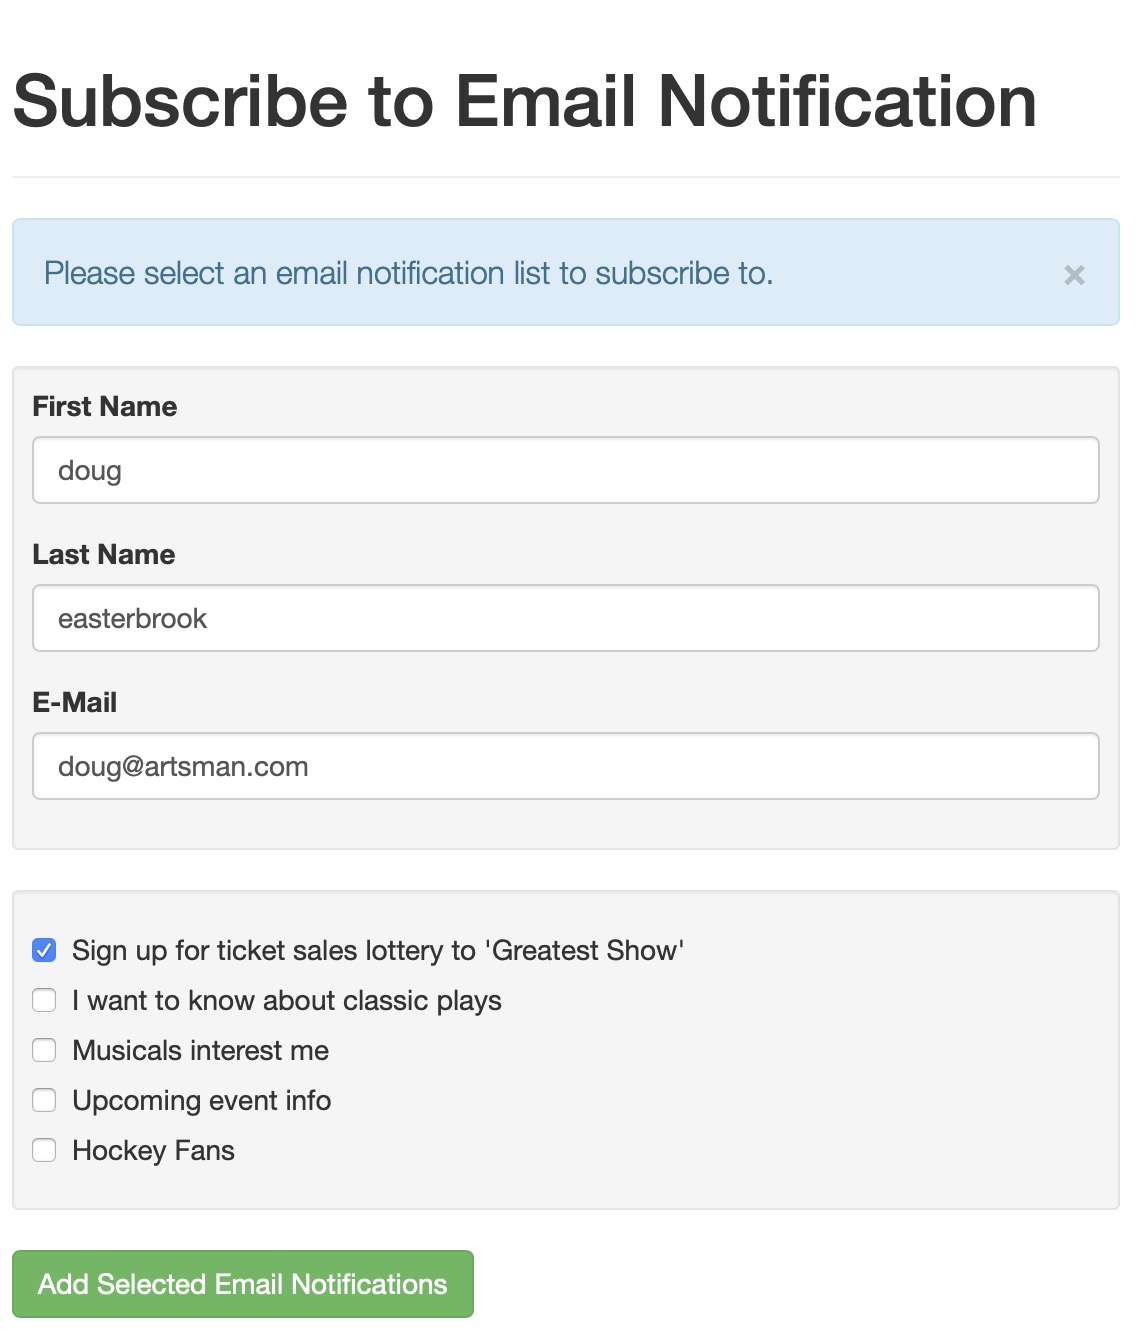
When one or more email notification lists are set up to allow people to sign in, they will look like this on the patrons account page. (they also show on the mail lists window).
Setting up a double opt-in mail list that will appear on the web
A double opt in mail list has two key settings on the mail list setup window:
- The mail list must be marked that the patron can subscribe to it via the internet (i.e. they can add or remove themselves from the list membership)
- It has the 'double opt in' flag checked.
- confirms the addition by clicking on a link, then they will be confirmed on the mail list with a 'double opt in' status. This also confirms the email address and records when the patron gave consent.
- does not confirm the addition to the mail list, then they will be removed from the list in approximately 24 hours (based on the value for 'keep unconfirmed mail list').
- Open the mail list you want to use for the subscribe online with double opt-in.
For more information on accessing the mail list window click here.
- Click on the Description tab.
The screen should look like the one below.
A best practice is to make sure that the 'Double Opt-In' option that is highlighted IS NOT CHECKED when building the list for the first time. If it is, then any patron added to the mail list in any manner will receive an email instantly. 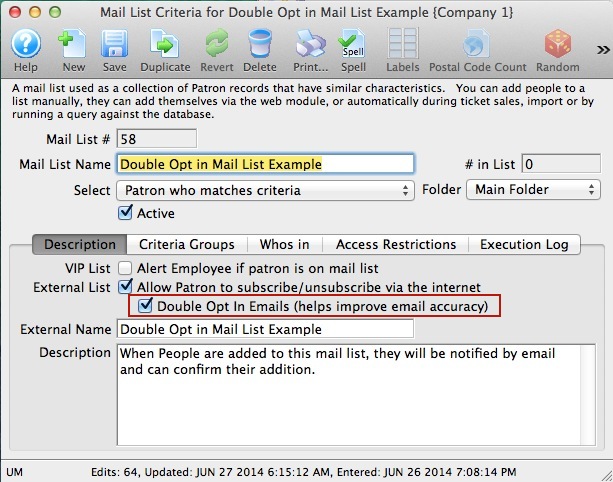
- Add Patrons to the mail list in any manner you wish.
You can use any of the standard ways to get people added to the mail list such as:
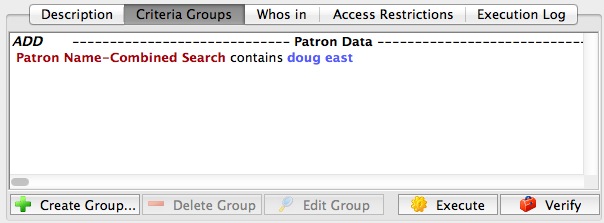
- Using criteria to build a list of patrons of interest (see the picture below for a simple example)
- dragging another mail list onto the who's in window to add all people in the mail list
- dragging people from the patron list
- Using the 'new' button on the who's in window to add a patron
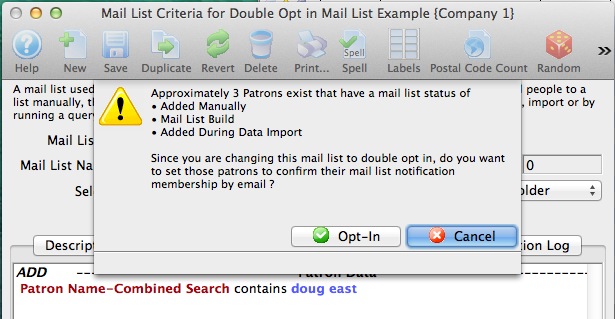
- On the Description Tab, click the 'double-opt in' option
Theatre Manager will tell you that there are people in the mail list that have not received a notification per the image below. It will only consider those that have the mail list source status codes of
- Added Manually (meaning you dragged and dropped them into the list)
- Added via a mail list build (meaning criteria was executed to find people)
- Added during some sort of data import exercise
Click the opt-in button if you want to start generating an email for the patrons in the list with the 3 status codes above. If you click cancel, then you can still do it again by un-clicking the double opt in' button and saving, then clicking the double opt in button again to repeat the process.
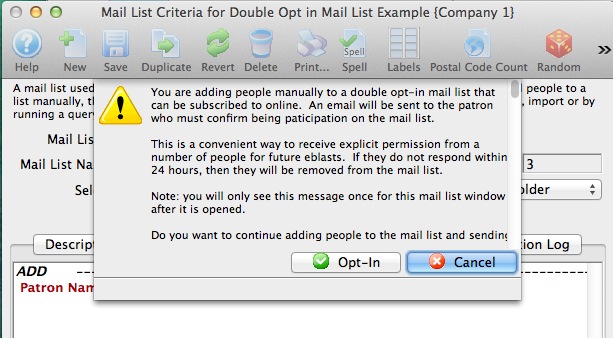
- Confirm you want to email to people using the 'double-opt in' option
You are given a second chance to confirm you want emails to go to patrons having the mail list status codes above. This question is asked ONCE after opening the mail list detail window as a WARNING. After that, the message no longer displayed to you. After getting this once, you can continue to drag and drop other people only the list quickly and emails will be sent without a message.
- On the 'Whos's In' tab, view the status of patrons.
If the patron has an email address, the status of the patron will be 'Internet (opt -in'). That means and email has been sent to the patron and they have not responded to the email to confirm them being part of the mail list.
Patrons who do not have an email address will retain their original mail list source. If you find an email for them, you can add it to the patron address, and then change the opt in status again to send out the remainder of the emails. People with pending opt-in status will NOT receive a second email.

- What the Patron sees in their inbox
An email will be sent to the patron that looks like below and is from the tmPatronUpdateEmailBoxOfficeOptIn.html web page. It will have your background and CSS stylings. The difference is that if there are 'double-opt-in' mail lists as part of the update, then the patron will see the new text highlighted in red. That is the link they will need to click to confirm the opt-in.
When they click the link, they will be taken to your web site and see the confirmation page below (tmMaillistVerifyOptin.html)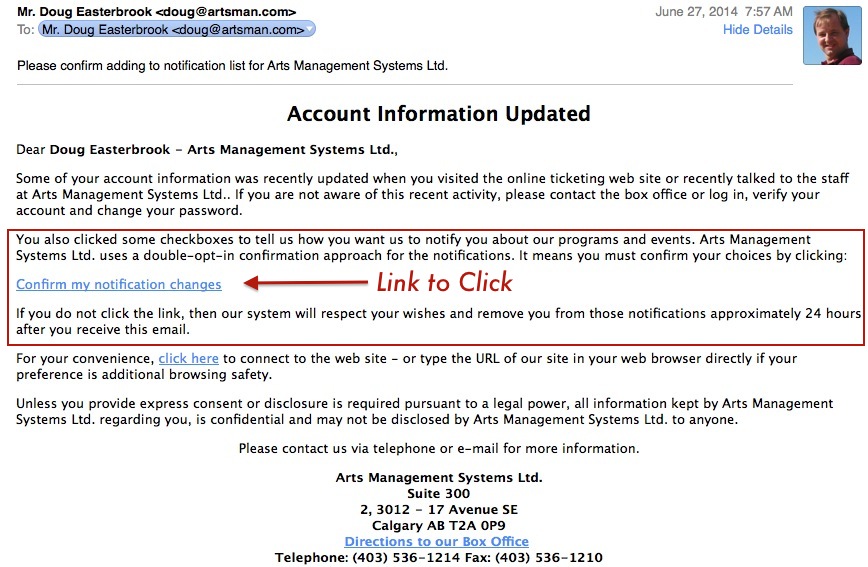
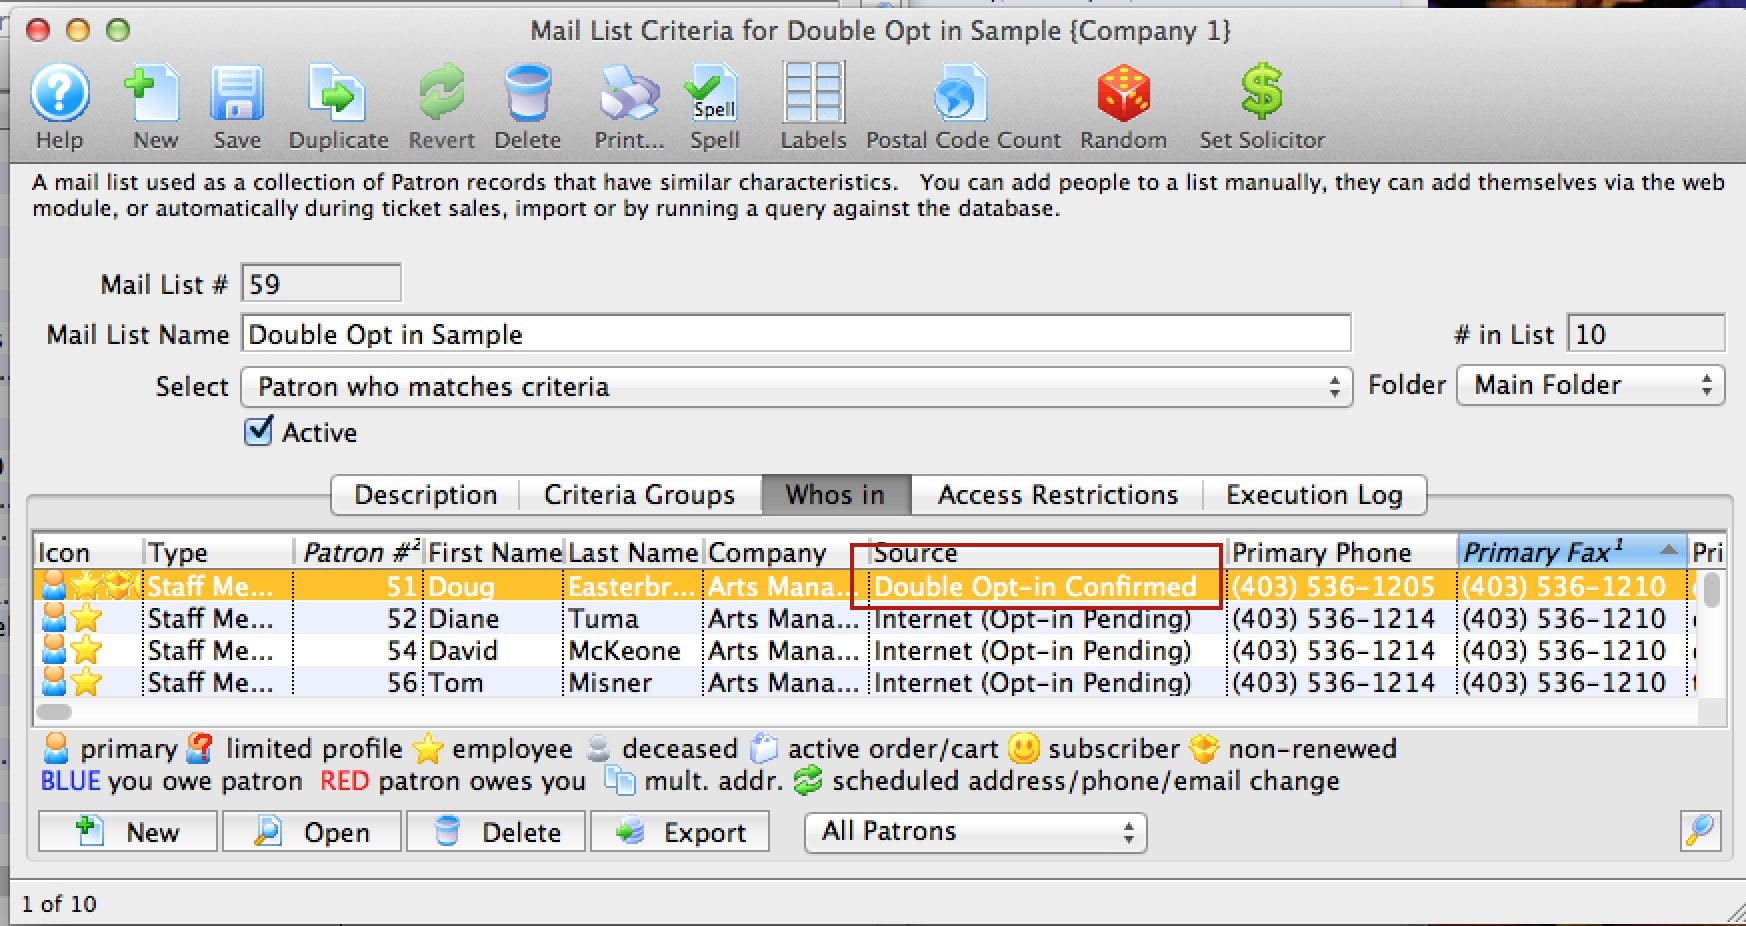
- What the Venue sees in the mail list
After the patron confirms participation in the mail list through double opt-in, the status of that person's mail list entry will change to 'Double Opt-in'. It also records the date of the opt-in.
Randomizing Mail Lists
- Creating a number of random lists for a lottery based on sale system. The resultant mail lists can be used with different on sale coupon/pre-access codes to distribute times to patrons to buy online
- Generate a random subset of the people in a mail list for marketing purposes like surveys or invitations to special events
- Taking a general mail list that is slightly bigger than a mail out budget and deciding (randomly) who should get mailers.
- Breaking up a larger list of patrons into a few random groupings if you want to distribute the e-blast across a number of multiple sendings.
The steps below indicate how to create a random list of patrons. A few thoughts about these lists.
- You can create random lists and add people manually or by adding criteria to them if you wish
- You can take people off a random mail list - as you would any other list
- You can e-blast or merge data to print letters for these lists
- You can run reports to see revenue or activity for patrons on a random list
- You can add the list to pre-access codes to and change when they are available to allow staggered onsales
- and much more.
Steps to Create Random Lists
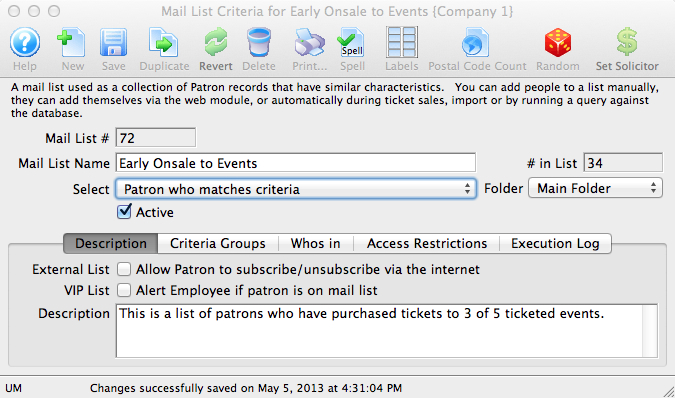
Before creating a random list, you must already have found the patrons you want and placed them into an existing list. For example, if you have a list of members, or new donors, or volunteers, start with that list by opening it up to display it as below.
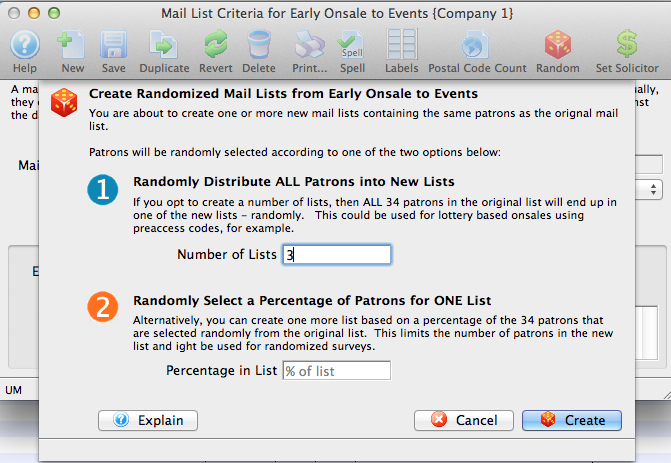
Click on the 'Random' Icon in the toolbar and you will see a window similar to below. There are two options that you can select:
- Randomly distribute ALL patrons into new lists. Type in the number of new lists you wish to create. Theatre Manager will automatically create those mail lists for you and then assign the patrons in the original list to ONE OF the new lists at random. Patrons will not appear in more than one list and the number of people in each list should be more or less approximately equal. Some lists will have more (or less) patrons due to the random nature of the process.
- Randomly Select a Percentage of Patrons for ONE list take a different approach. Type in the percentage of people you would like in the new list that will be created. Theatre Manager will select them at random from the existing mail list and put them into the new list (up to the specified percentage of patrons). It will never place more than the specified percentage of patrons into the list.
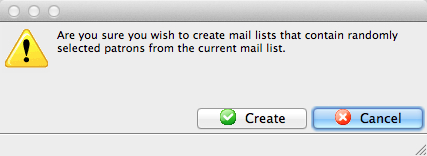
Confirm whether you want to continue creating the mail lists containing random people.
When you are done, if you look at the list of mail lists, you will see the appropriate number of new mail lists. The titles of those lists will start with the same name as the one you used to randomize. They will end with a comment indicating which of the random lists it was.
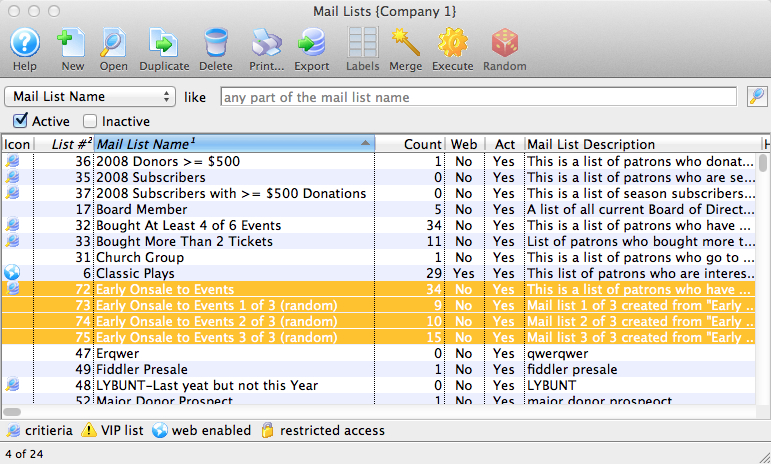
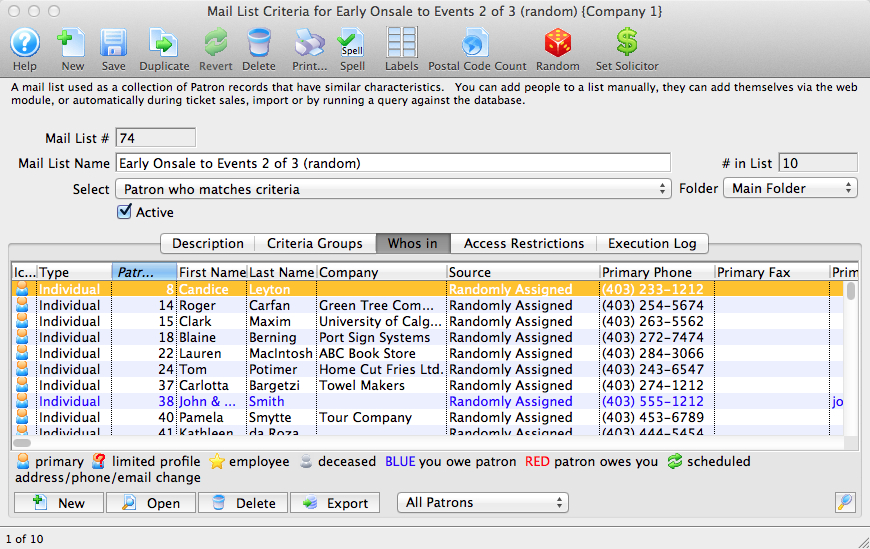
There is a new status on any window that shows who is in a mail list (or the mail lists that a patron belongs to. If you look at the 'source' column, it indicates that the patron was 'Randomly Assigned' to the list (instead of added at box office, or self added on internet, etc.). This is one way to know how the people got on this list.
Selling tickets by Lottery (how to)
|
Lottery based ticket sales are a way to fairly and equitably sell tickets to a large number of people by spreading out ticket sales across a longer period of time - so that an instantaneous free-for-all on your web site will not overwhelm your hardware. |
- many more people want tickets than are available
- you expect the tickets to go like hotcakes and, most likely, vastly overwhelm your hardware's capabilities
- you want the patrons to sign up in advance to say that they are interested in having a chance to buy the tickets
- and then you randomly decide:
- which of those people will actually get a shot to buy the tickets -and-
- the unlucky ones do not get a chance during the onsale because they lost the lottery - but might be able to buy later when the tickets are placed onsale, unannounced.
General Steps to do a lottery based Onsale
How, you ask? There are a few things that need to be set up as summaried below and explained in detail afterwards. You will need:
- A self subscribing double opt-in mail list to track the above patrons who want to be in the lottery
- These patrons will need to sign in and create a full account (if they don't have one already)
- A merge process to look for duplicate patrons in the mail list - eg same person, multiple emails - so that they can't game the system.
- Extract a random group of patrons from the mail list and organize into presales groups
- One or more coupons that allow presales access to the event
- Set up auto-release holds that release in waves
- An eblast to winning patrons telling them when their access time to the tickets are
- An eblast to losing patrons to tell them they are not in the lottery.
|
Note: this intentionally spreads out web sales across time so that your servers have less load at any given time. eg, if there are 10 lottery slots, hardware/servers required to handle a single onsale need only be 1/10th as powerful to handle a lottery spread out over time (which becomes 10 mini-onsales). |
Step 1: Make a mail list that people can self subscribe to
You will need to make a mail list that lets patrons to add or remove themselves online.
- Give it an external name of Lottery Sales sign up for 'the event' or what ever seems obvious to the patrons.
- The description should describe the purpose of the list, when the date range of the actual onsales occur and a link to your marketing page that describes how the lottery system will work and that not everybody is guaranteed a spot, but that it is random
- Make sure the mail list is double opt-in which will ensure that the email addresses are real since the patron needs to confirm it (it prevents people creating dummy emails).
- Refer to the instructions to make a mail list patrons can self subscribe to
- If patrons call the box office to be part of the lottery, you can manually add them to this list, just make sure you:
- Make sure that they have an email address on their account
- If you have to add an email address for the patron, use the reset password feature to send them an email to indicate its better to make a password right away (i.e. well before before the onsale)
- Merge any duplicate records together for the patron that may exist
Step 2: Send an email to patrons asking them to sign up
You can use the form letter feature to send an email to patrons asking that they sign up to the lottery mail list. You will need to:
- Make a mail list of patrons you want to send the form letter email to
- Create a form letter inviting them to join the lottery for the tickets:
- Include in the content of the form letter, a link to quick add the patron to a mail list. It might look like one of the two options below:
- https://tickets.yourvenue.com/TheatreManager /1/login?maillistquickadd=0 to take people to an email option to quickly sign up and which makes partial patrons for new email addresses -or-
- https://tickets.yourvenue.com/TheatreManager /1/online?btnMailList which has people sign in and then they can manage all their mail lists
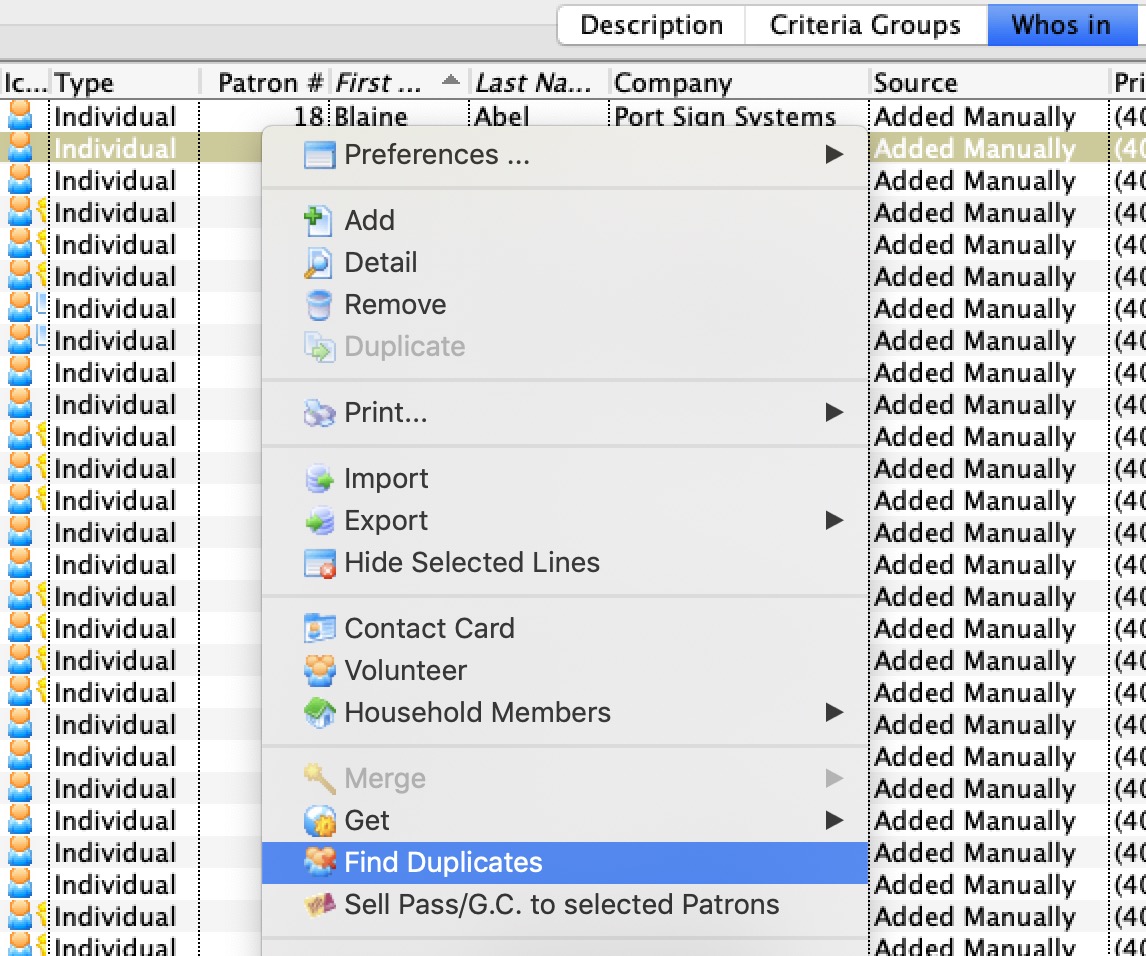
Step 3: De-duplicate and merge people
Now that you've collected a lot of people in to the 'Lottery' mail list, you may still need to de-duplicate entries before the actual onsale. Why is that? One of the tenets of mail lists is that patrons can only be in the list once. Very true, but if a patron signed up multiple times using different email addresses, you may want to do some merging by:
- Open the 'lottery' mail list
- Go to the Whos in tab
- Right click on the list to see the context menu and pick find duplicates
- This will limit the search for duplicates to people within the list. Try a few broad brush searches like:
- Combined name
- Last Name and First Name
- Name and phone number
- You may also want to sort the list by various fields and see if you can identify and merge duplicates that way. eg:
- Sort by phone and see what you can find
- Or sort by email
Step 4: Randomize the mail list
As the date of the lottery nears, you need to look at:
- the total number of people in the list,
- the number of available tickets,
- and match to approximate load that your servers can manage
- The first randomization is used to extract approximately 10,000 out of 90,000, or 12% of the patrons into a new mail list to identify the people who you are eligible for ticket sales by lottery (option 2 in the randomization image to the right)
- The second randomization will take the new list and break it into 10 more or less equal groups of people in 10 new mail lists. It is these last 10 mail lists that we'll use for emailing and coupons in the next steps (option 1 in the randomization image to the right)
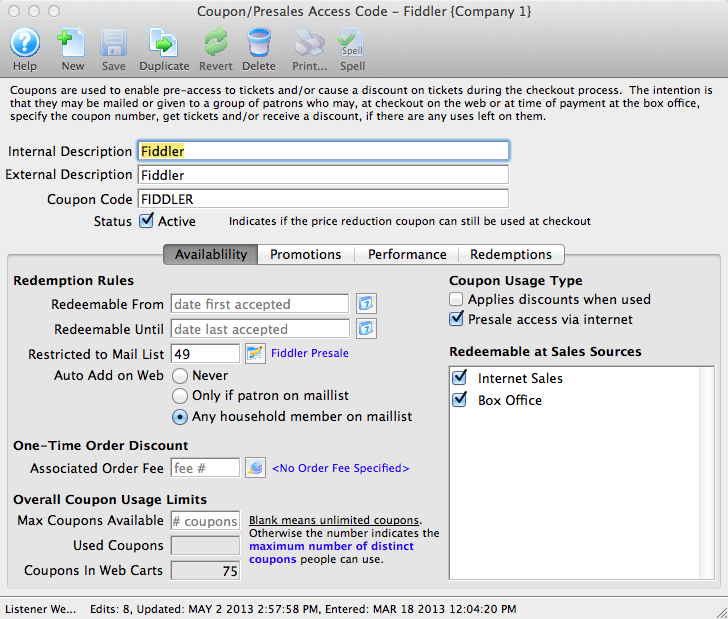
Step 5: Make Pre-access Coupons
Per the example above, if we have 10 lottery sales groups, then we will need to make 10 preaccess coupons with the following characteristics:
- Internal Descriptions might be 'Lottery Group 1' through 'Lottery Group 10'
- Internal Description is displayed to the patron on the shopping cart and should be simply something like 'Pre Sales access to the Greatest Event time xx:xx to yy:yy'
- Make each one restricted to ONE OF the final 10 random lists created in step 4
- Set the coupon to be Auto Add in Web and for Any household member
- Make the coupon usage type Presales access via internet
- For the Redeemable From and Redeemable to dates, set up distinct sales times on each coupon such as
- Monday 10:00am to noon
- Monday noon to 2:00pm
- Monday 2:00pm to 4:00pm
- Tuesday 10:00am to noon
- etc.
Make the time periods suitable to how your patrons buy online, although for an onsale like this, they will probably just come to your web site.
- In the Performance tab, select the performances that the lottery presales are for
- In the Notes tab, you can create html links that will show the event as a convenience for the patron. Contact ArtsMan support and we can help with the link and button names. These will appear on the cart window as an aid to the Patron
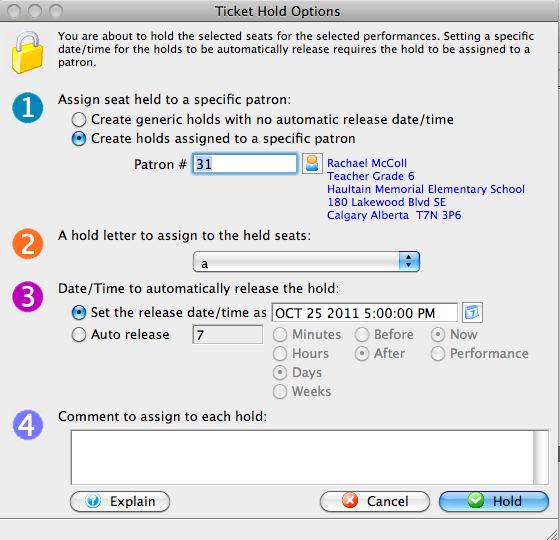
Step 6: Create auto release holds
This step can be done at any time but needs to be ready before the onsale. The idea is to select and hold an equal proportion of tickets for the performance and auto release them at the same time just prior to the onsales time slot - eg. a couple of minutes or so. To do this:
- Go to the Maps Tab for the event that you are going to sell
- If there are 10 onsales slots, you want to:
- hold 10% of the tickets in each performance
- for a specific patron - you may want to make a specific before-event-sales patron for this onsale that you can merge into the standard before-event-sales patron later
- and coordinate the release time to match the coupon access time in step 5 above
|
At this point, the Lottery is set up. You have:
|
Step 7: Inform each patron of their lottery time
This uses Theatre Manager's Eblast capability to merge and send a letter to each of the winning lottery participants informing them of their time slot.
- Create a different form letter for each of the winning lottery groups
- Put the access time range for that lottery group into the letter
- Into the letter, add a
- direct link to the event if you are selling one event and to multiple performances
- direct link to a performance if you are only selling to one performance for the onsale
- direct link with seats selected where you might automatically pick the maximum number of seats allowed (not necessarily beside each other) and you are using pick your own. Then the patron need only remove some seats and pick their price.
- Eblast that letter to the patrons that won
Step 8: Inform those Patrons that did not win the lottery to buy tickets
You'll also need to create a mail list of those that did not win in the lottery to let them know that they mighrt get some singles after the onsale is over
- Create a letter to send to the patrons that did not win.
- Make another mail list of all people in that applied and remove those that won
- eblast those in this final mail list of people not selected
Sample Mail List Queries
Mail Lists explained through a Venn Diagram
- find all patrons who donated money this year
- find all patrons who donated money last year
- find all patrons who donated money any year before this year
- find all Patrons who donated in a specific period to certain campaigns
The above concept also applies to any data in Theatre Manager such as ticket buyers last year, subscribers this year, gift certificate users in the past 3 years, volunteers since the beginning of time, etc.
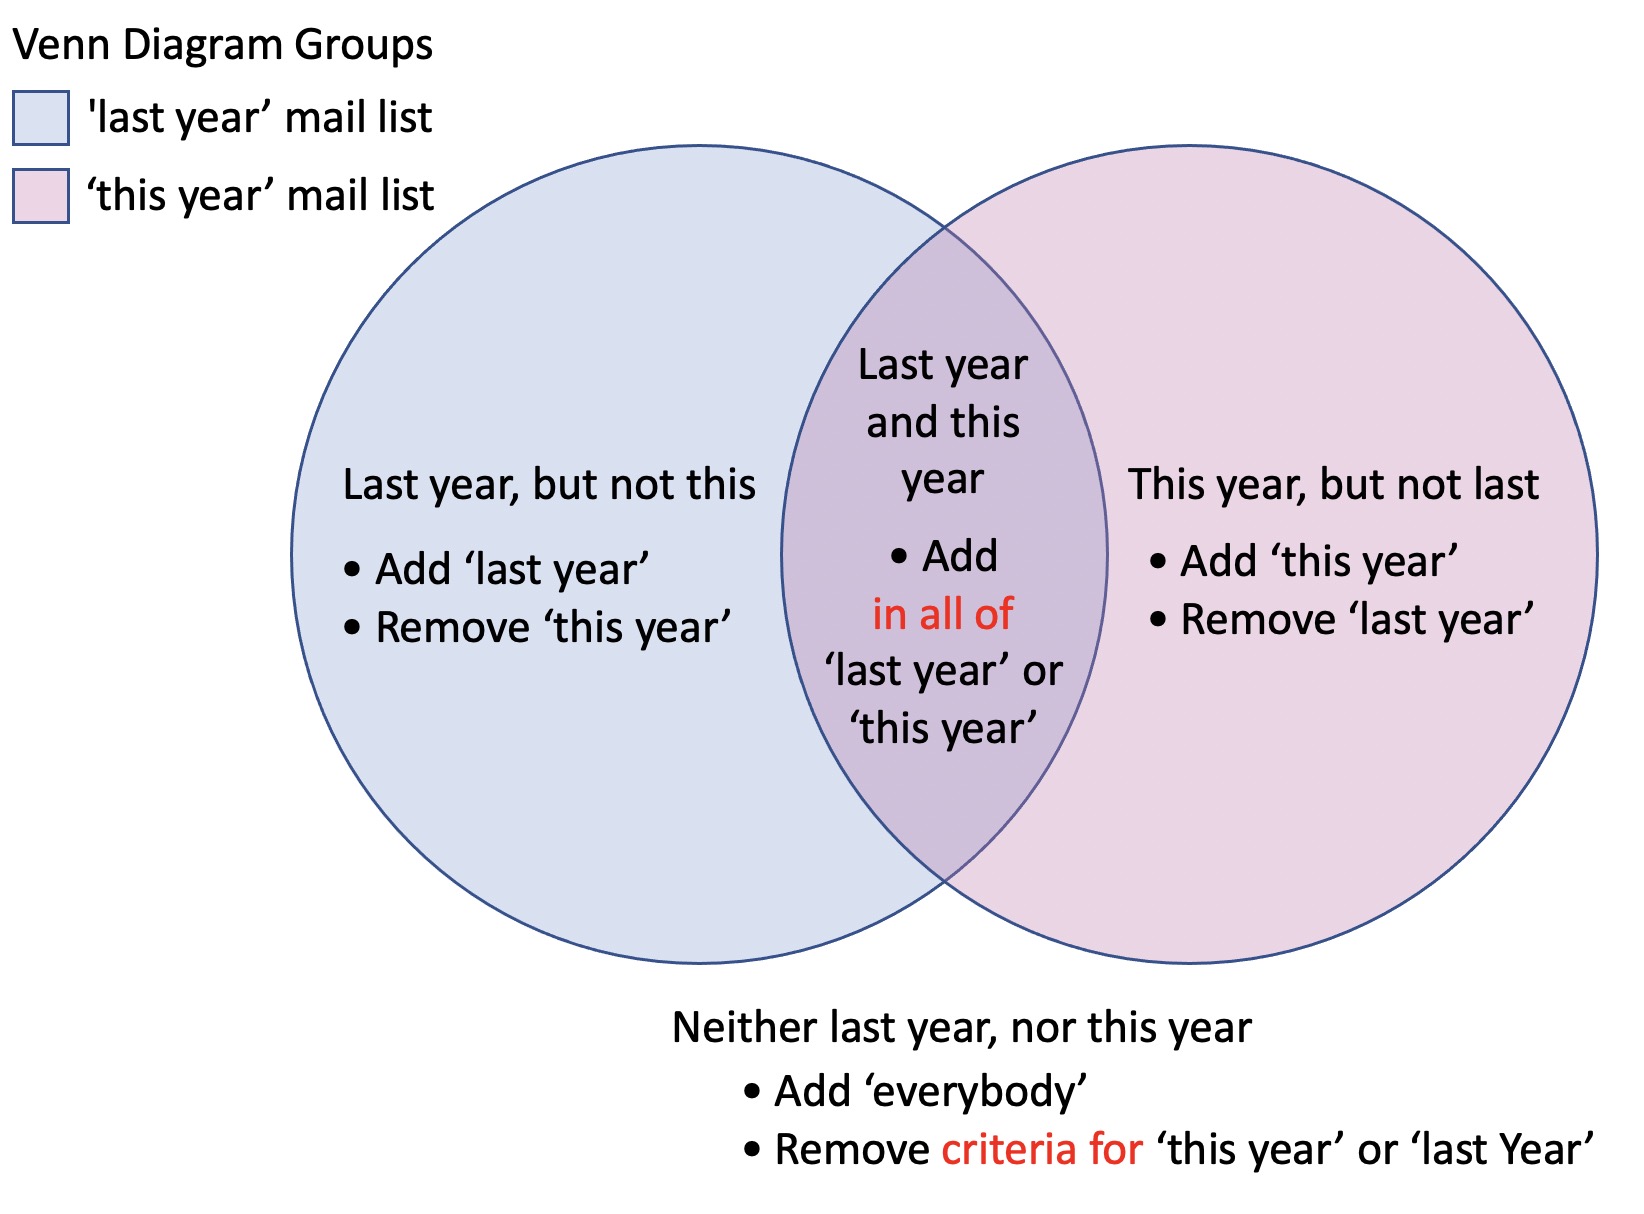
There are 4 combinations that seem a little harder that might require either 'Add' and 'Remove' groups or more than one mail list as illustrated in the Venn Diagram above. These slightly more complex groups are:
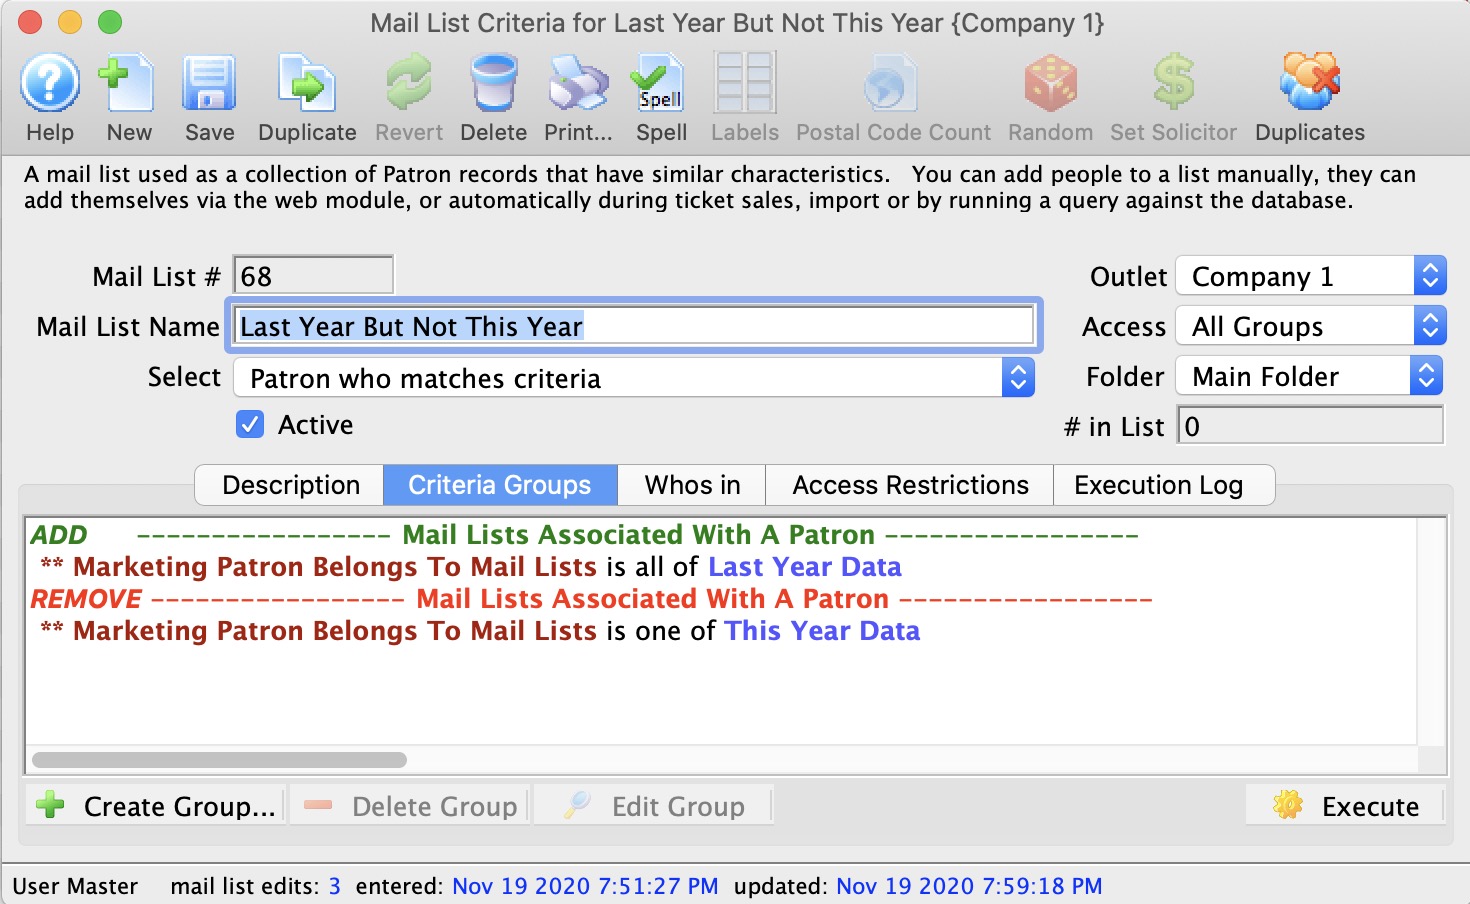
- Blue group but not in Pink - or in the example above Patrons who did something last year but not this year. This type of group describes two very common data base search needs:
- per the example above LYBUNT - last year but not this
- SYBUNT - some year but not this
- Pink group but not in Blue - or using the example above Patrons who did something this year but not last year
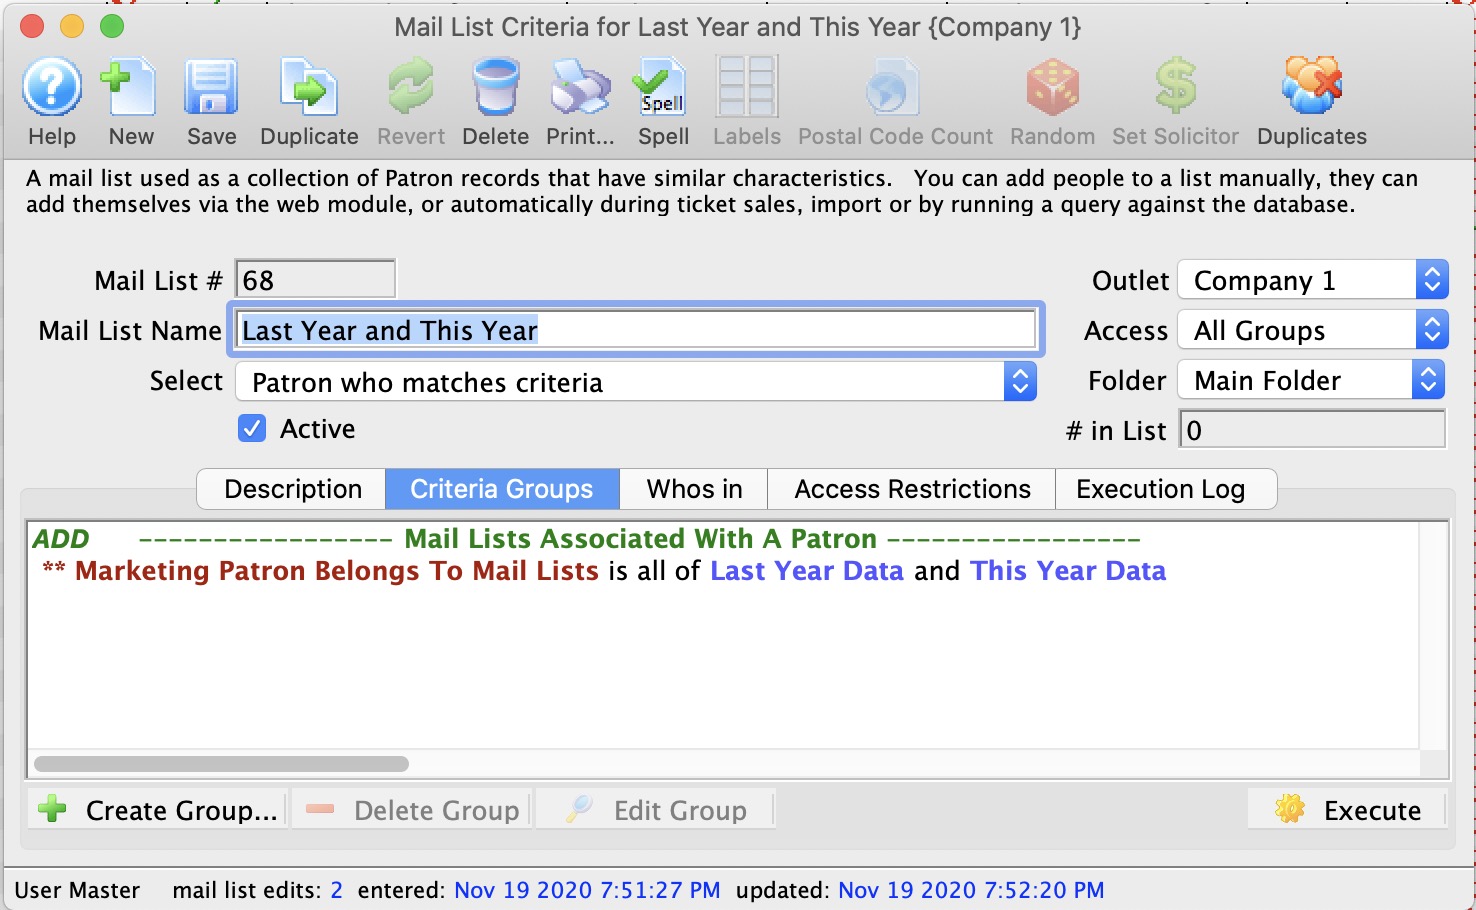
- in both Blue and Pink groups - or per the example above Patrons who did something in both years
- in neither Blue and Pink groups - or Patrons who did not do anything in either year
|
The key difference in the above searches is that multiple data records must be considered before the patron is selected. In the simple example of gave last year but not this, Theatre Manager needs to consider two DISPARATE SETS of data records to find the difference. |
|
Multiple criteria are represented by add/remove groups .. which you can think of as combining multiple Venn Diagrams together. |
|
Individual criteria groups can use the having clause to create very powerful queries that find very targeted groups of patrons.
eg: you can find all donors that gave 3 or more times last year and didn't give 5 or more times the year before. |
Last year but not this(Blue group but not in Pink) One way of thinking of this is people who are in one group, but not the other. There are two ways to accomplish this:
|
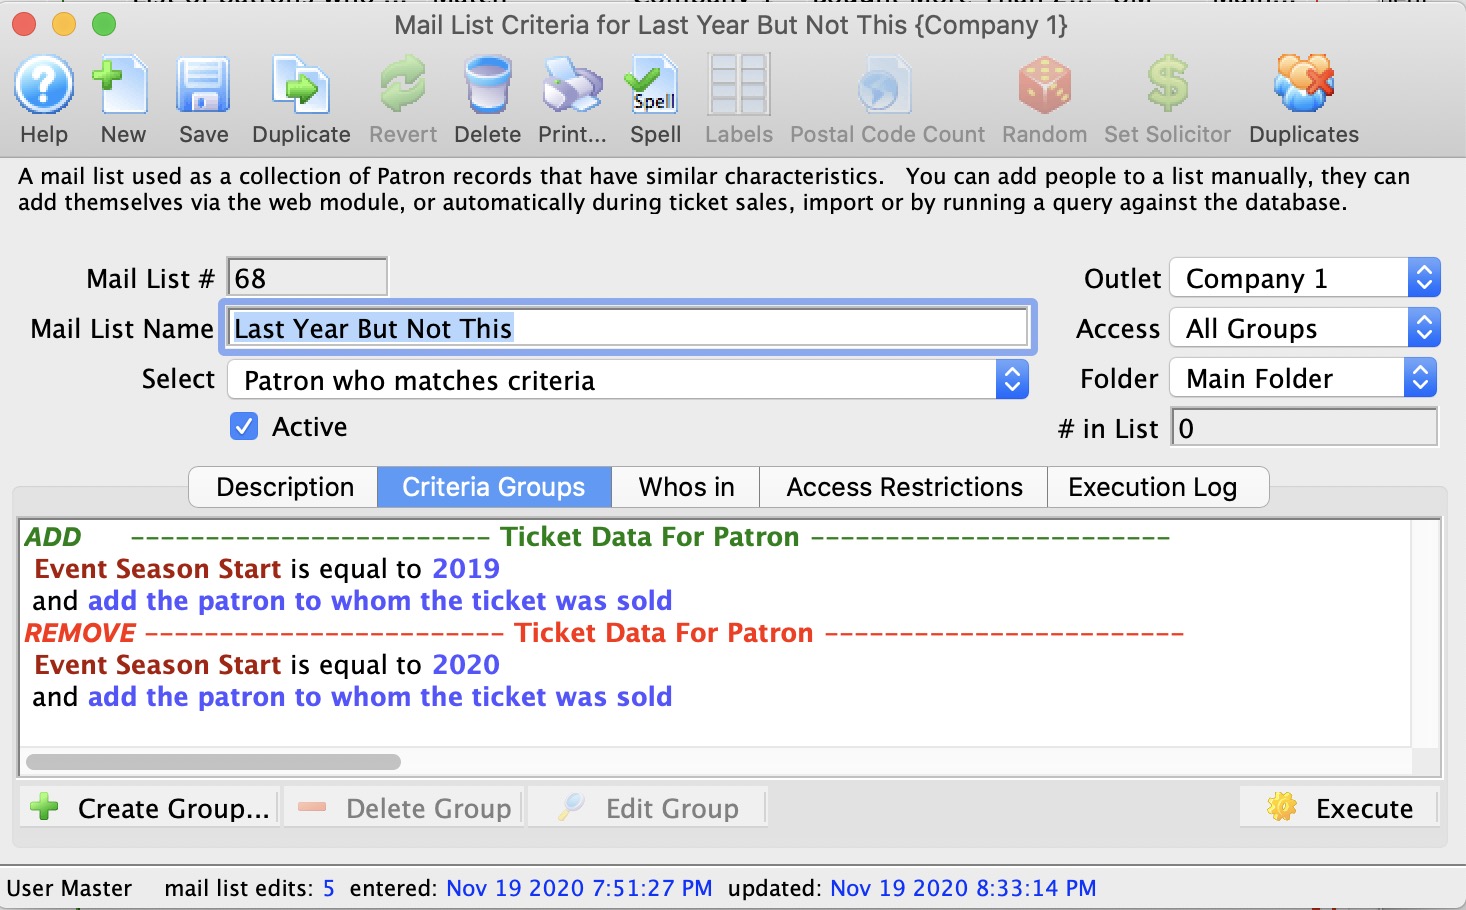
The above example shows:
This is similar to the above since it has both add and remove groups. The criteria within the group just happens to refer to previous mail lists that have been built to identify the SETS of patrons. |
||
This year but not last(Pink group but not in Blue) This is similar to the case for 'last year but not this'. The criteria is simply reversed - since in both cases you are taking one SET (group) of patrons and removing the second SET (group) of patrons. Again, you can:
|
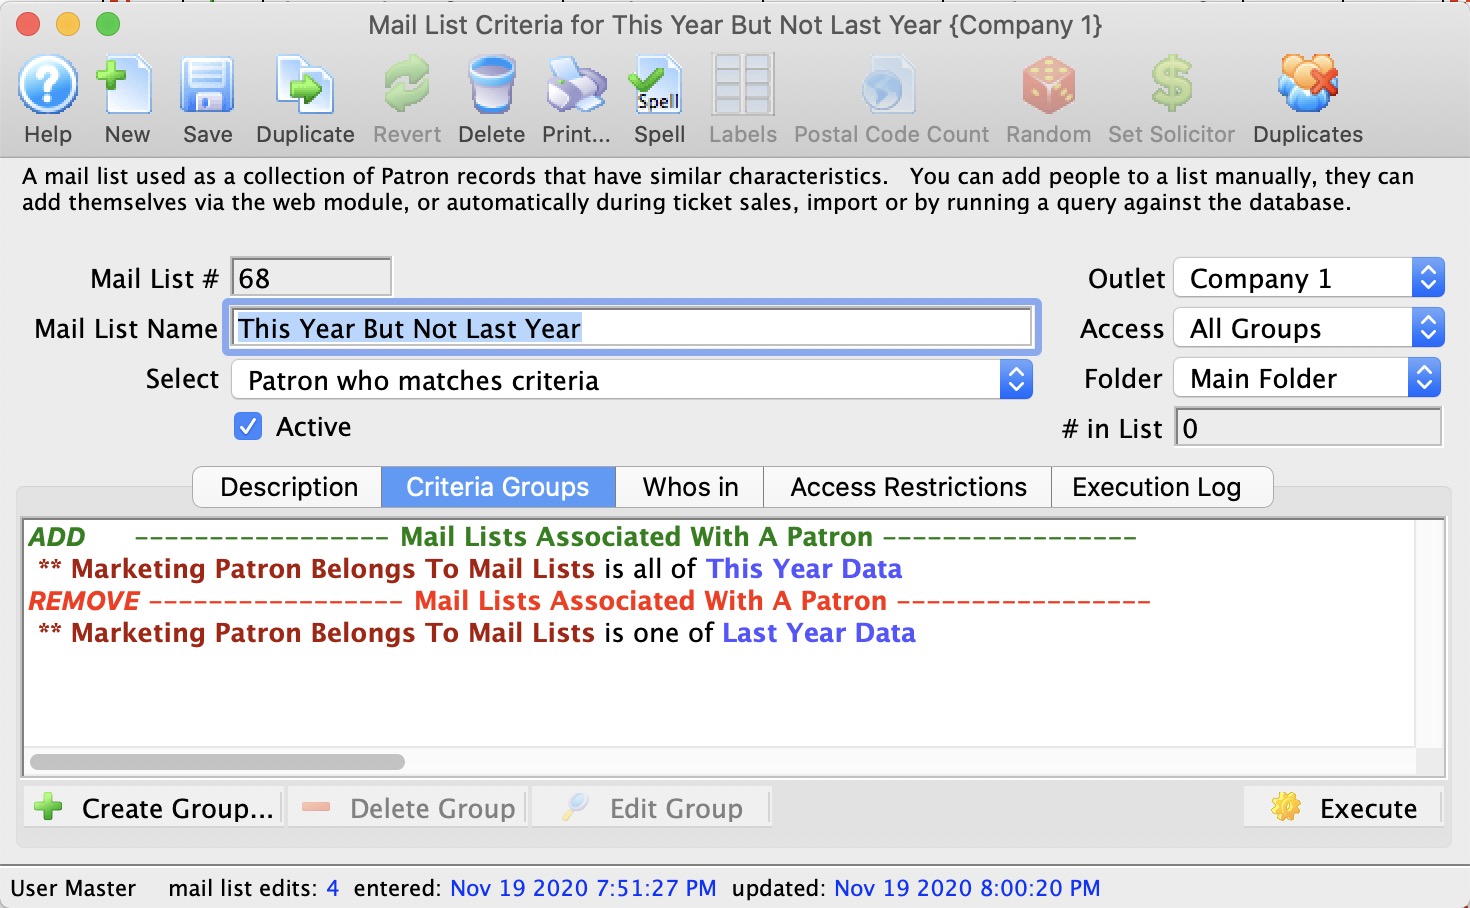
This example shows the use of two mail lists to find the difference in the groups of people. You could use the add and remove group approach as per the previous example. |
||
In both groups(in both Blue and Pink) Something that must be in two groups is called the intersection set. To find patrons like this in theatre manager, you need to do it be creating two temporary lists. eg:
|
|
||
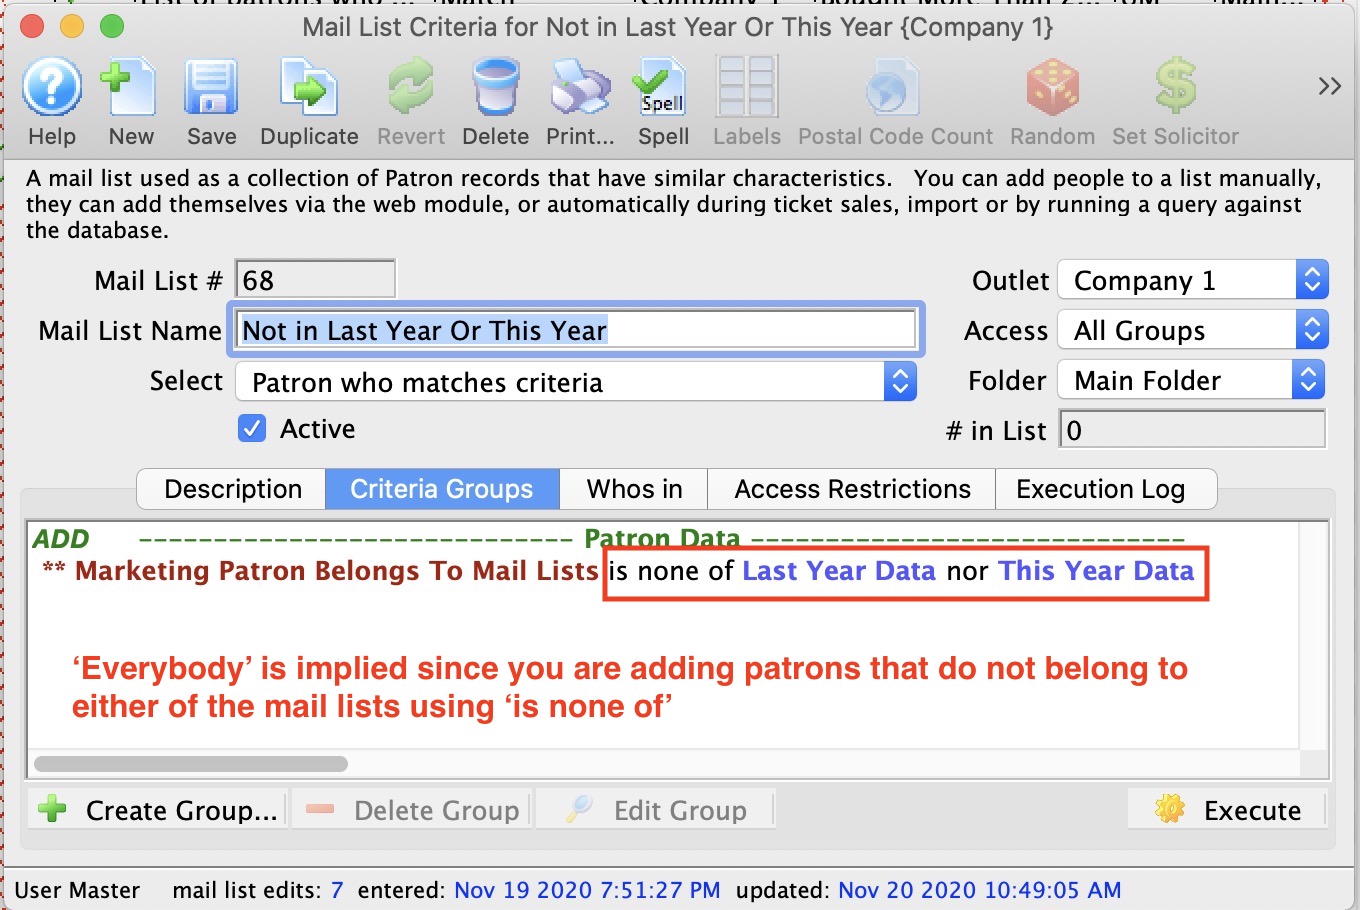
In neither groupNOT in Blue and NOT in Pink) Finding people in neither group is a little tricky. You need to find the group of everybody you are considering and then remove group 'A' and then remove group 'B'. You can do it in one of three ways:
|
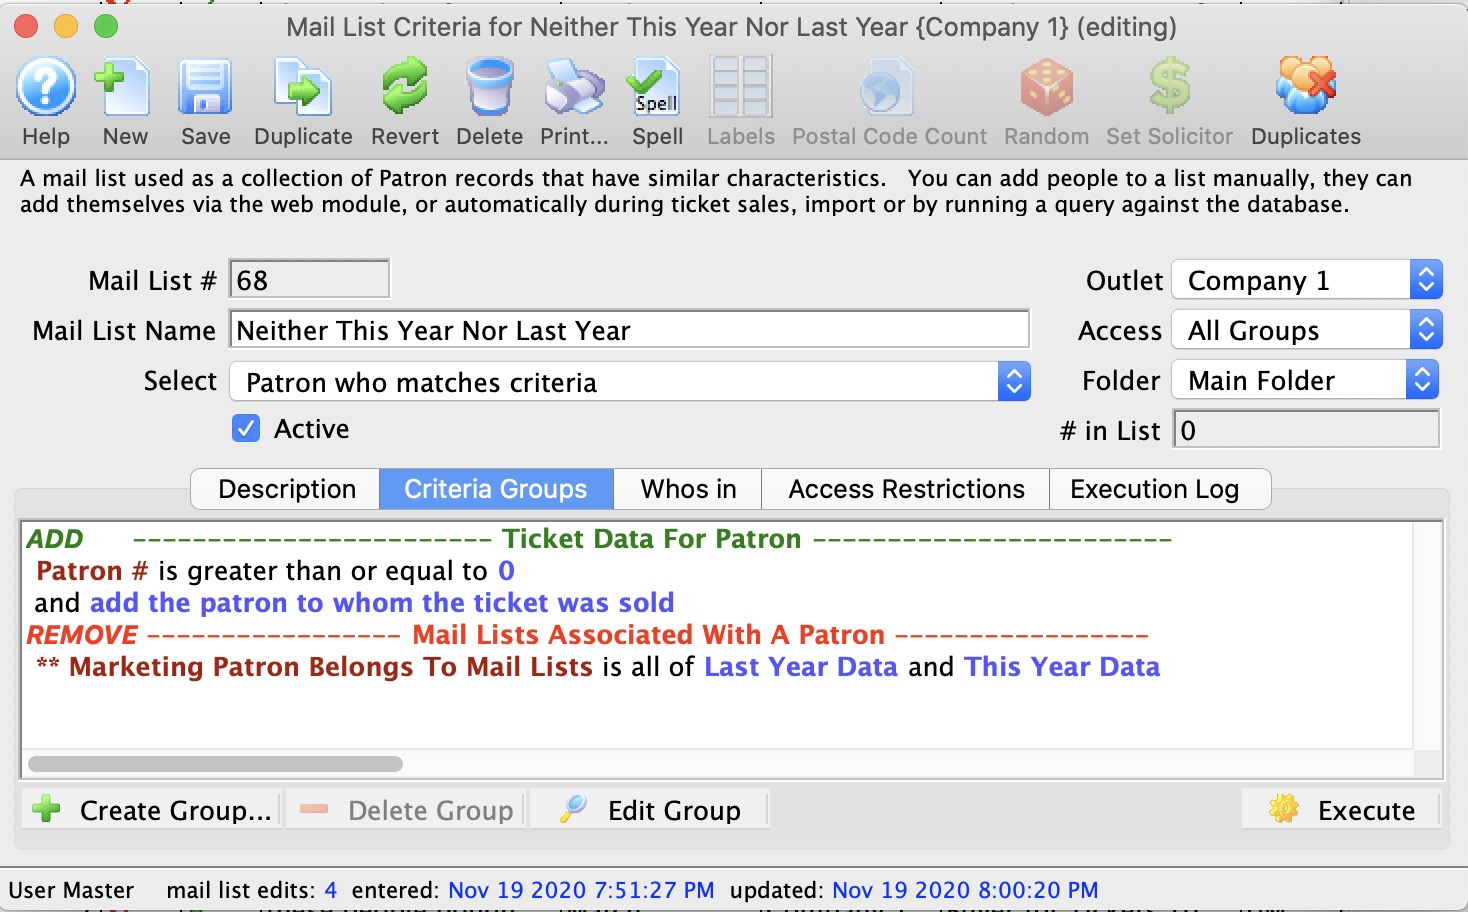
In this example, everybody is explicitly defined as all patrons with a patron number greater than zero and the remove group says patrons belongs to mail lists 'is all of' last year or thins year. They means remove patrons who are on both prebuilt mail lists (or all people who are not in last year or this year)
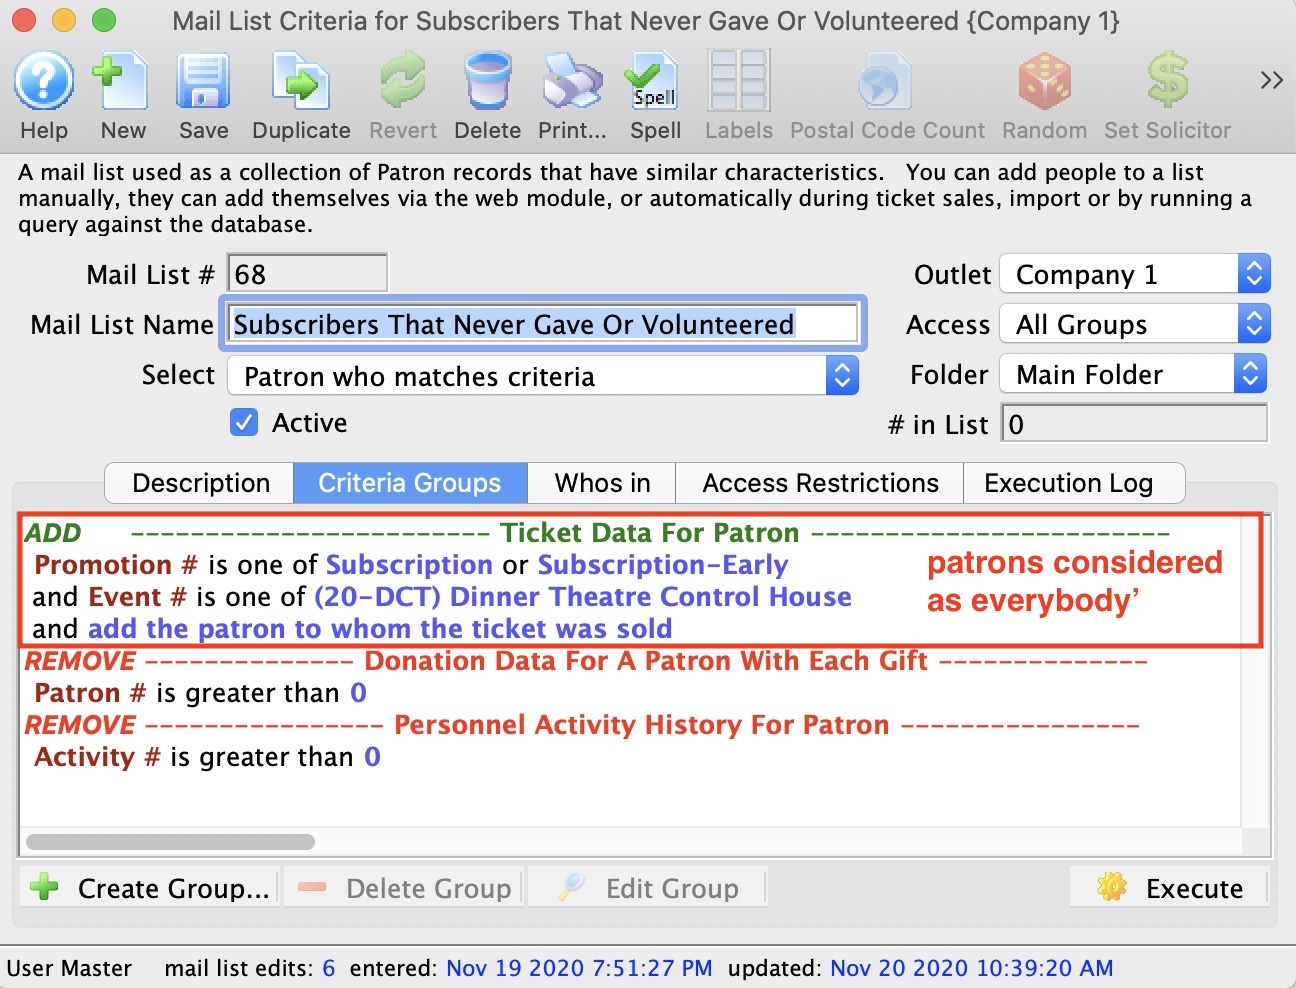
In this sample, everybody is patrons who are subscribers and part of the control house for dinner theatre. It then removes all donors and them removes all volunteers.
This results in subscribers who have never donated or volunteered.
In this example, we are looking for everybody who does not belong to any of the two prebuilt mail lists. Everybody is implied since Theatre Manager scans for all data, unless explicitly told not to. In this case, Theatre Manager was told to only include people 'in none of' the mail lists. |
Combining Mail Lists
By combining mail lists you can gain access to the data of many lists and from that data form a new list. Unlike merging the mail lists, you are able to keep the original mail lists and their data intact and unchanged.
To combine mail lists, you perform the following steps:
- Open the Mail List Window.
Click Here to learn how to open the window.
- Click the New button.
The Mail List Inserting window opens.
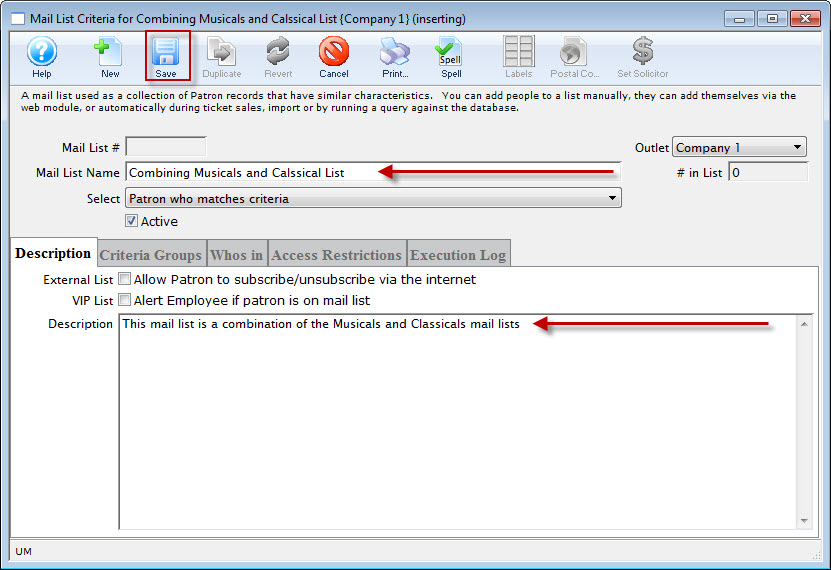
- Enter a Name and Description for the list.
- Click the Save button.
- Click the Criteria Groups tab.
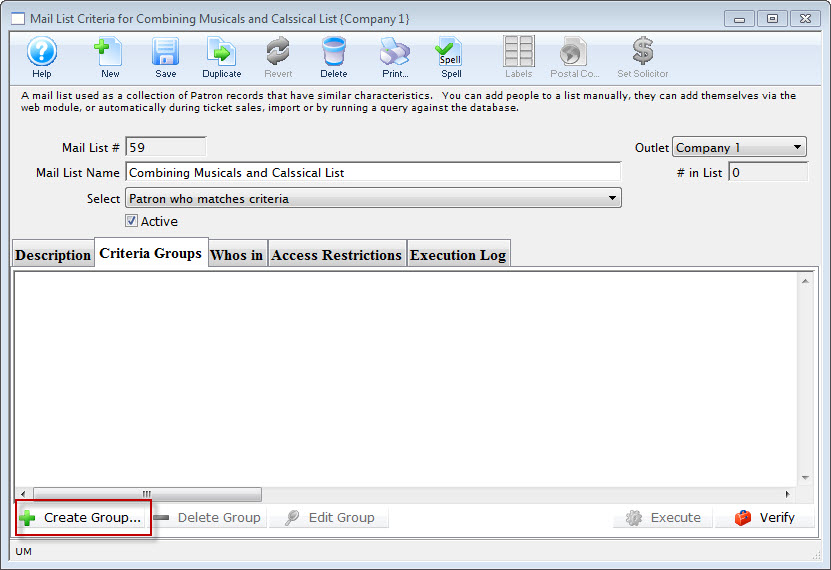
- Click the Create Group button and select To Add Patrons to a Mail List.
- Select Mail Lists Associated with a Patron.
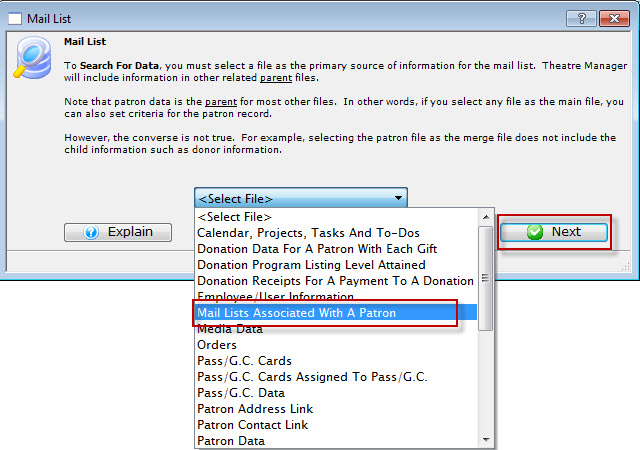
- Click the Next button.
The Parameter window opens.
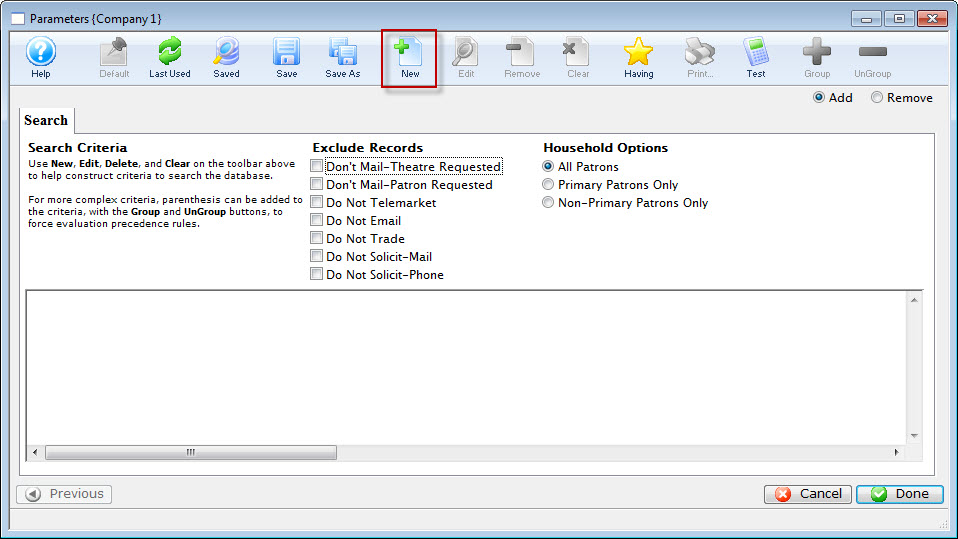
- Click the New button.
The Add/Edit Parameter window opens.
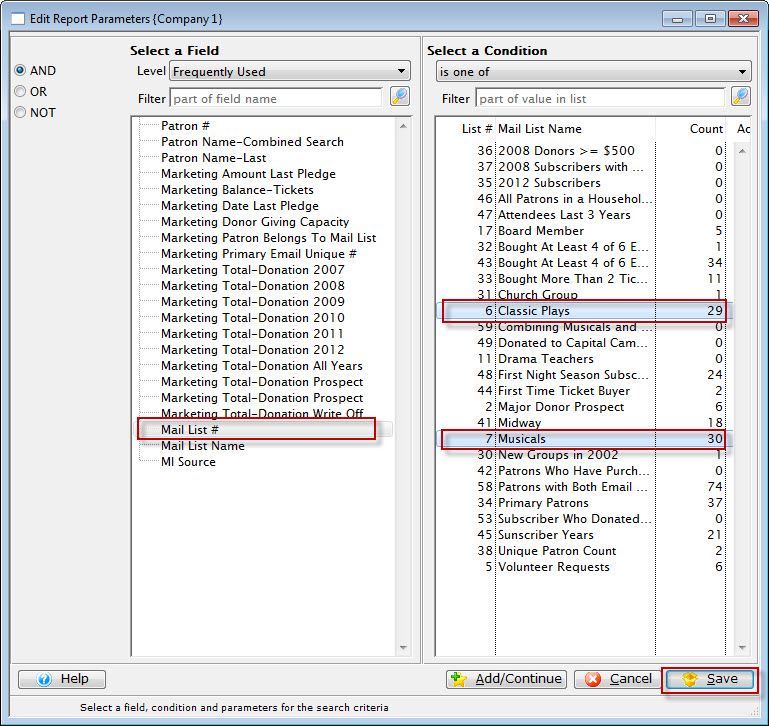
- Select a field and condition.
For this example the field will be "Mail List #" found under Mail List Setup and the condition will be "is one of"
- Select the mailing lists to be combined.
Hold the Ctrl (PC) or Command (Mac) key to select multiple lists at a time.
- Click the Save button.
You are returned to the Parameters window.
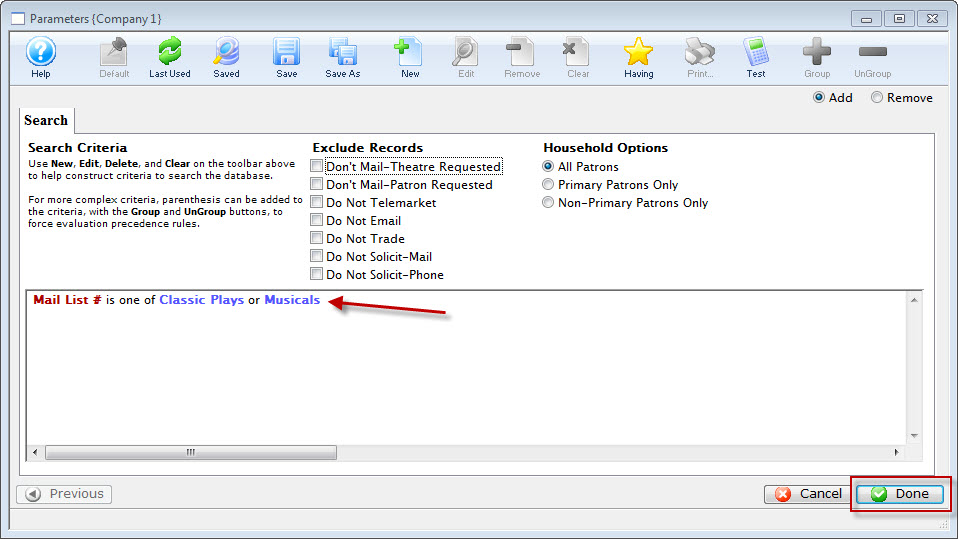
- Click the Done button.
You are returned to the Mail List Criteria window.
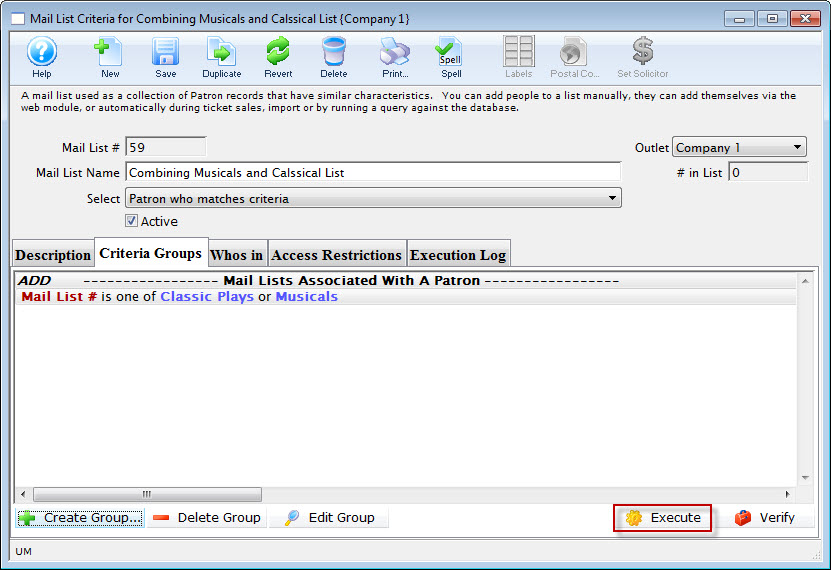
- Click the Execute button.
The data from the selected mail lists will be combined.
If the criteria is changed in one of the combined mail lists the combined mail list must be executed again to update the information.
LYBUNT - Last Year but not this year
You can apply it in many ways to ANY DATA in the database. For example, Patrons who:
- volunteered the past 3 years, but not this year
- Donated every even year, but not this year
- Subscribed 4 years ago but not 3 years ago
- Lapsed donors who donated last year but did not buy a ticket this year
- This example is interesting because it was applied to different types of data -- the data file for the second criteria (tickets) is not the same as the data for the first (donations)
In Theatre Manager, to identify WHO falls into this category, we use a mail list with two groups.
- The first group adds people to the mail list using criteria from the past
- The second group removes people from the mail list using criteria from the present
In the the example below, a very simple data range has been used for both criteria. You can make the criteria as complex as possible, by including items such as:
- date range
- Multiple Campaigns
- Certain Giving Levels
- Address where the patron lives
- and more
IN ALL CASES, THE CONCEPT IS THE SAME -- add people matching data, then remove people matching other data to find out who used to be part of the group and is now not part of the group. Refer to editing mail lists to create your query to find what you want.

Variation: Removing all household members
|
Variation: Sometimes you may want to remove people if anybody in the household gave the second year. This means you must remove primary and non-primary members of the household (in two steps) |
This is possible, but involved a small nuance to the remove steps.:
- Create an add step to add patron who donated, volunteered, purchased tickets, or what have you.
- Create the first remove step and indicate to remove Primary patrons only.
- Create the second remove step with similar criteria, except this time, indicate to remove Non-Primary patrons only.
When removing Primary FOLLOWED BY removing Non-Primary patrons, you will end up removing all patrons in the household.

Mail List of Attendees to Multiple Events
- donated multiple times
- volunteered multiple times
- received multiple mailings or eblasts
- bought multiple gift certificates
The general steps to find purchasers to multiple events are:
- Open the Mail List Window.
Click here to learn how to open the window.
- Click the New button.
The Mail List Inserting window opens.
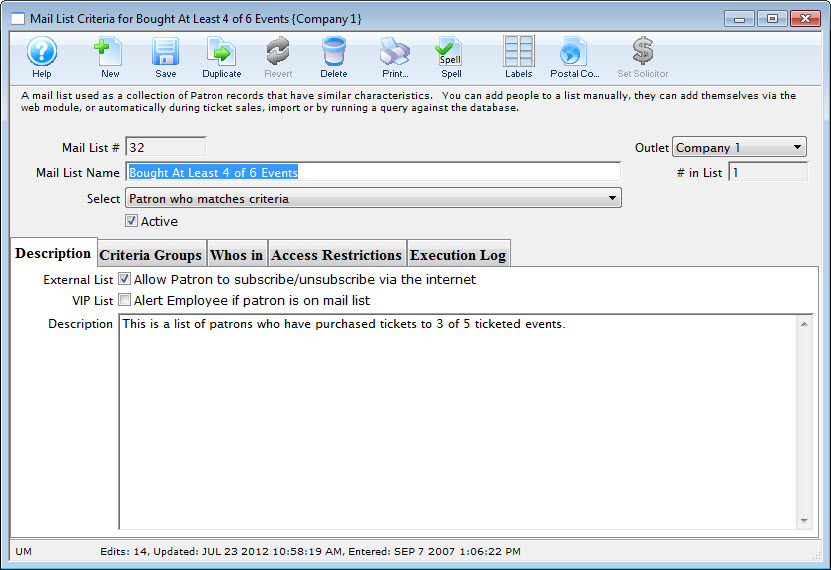
- Enter a Name and Description for the list.
- Click the Save button.
- In the Criteria Groups tab, click the Create Group button.
- Choose To Add Patrons to the Mail List.
- In the drop down list, choose ticket data per performance.
- Click the Next button.
The Edit Report Parameters window opens.
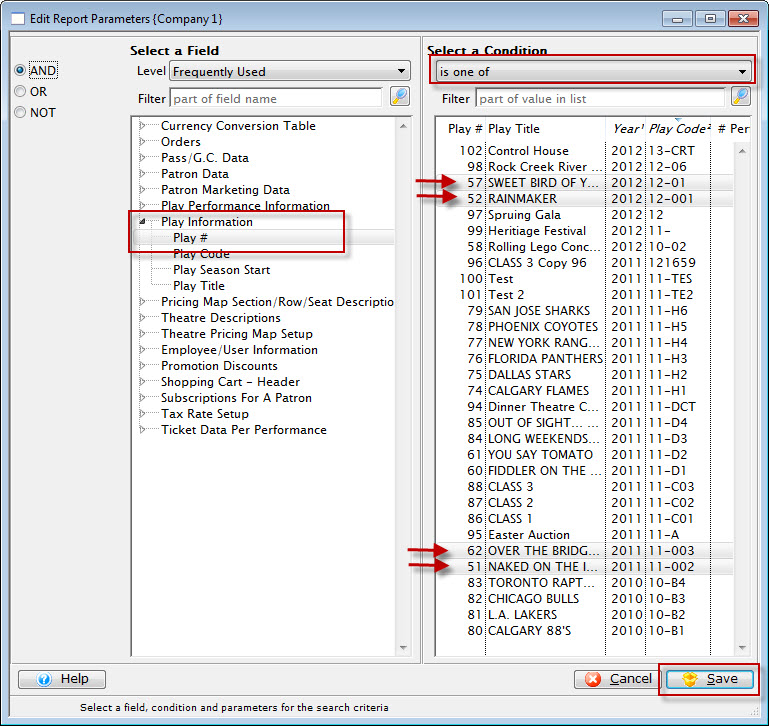
- Select the criteria 'Play #' or 'Event #' (depending on what your venue calls it) and then select multiple events from the pick list
- After you have completed making your selections, click Save.
You are returned to the Parameters window.
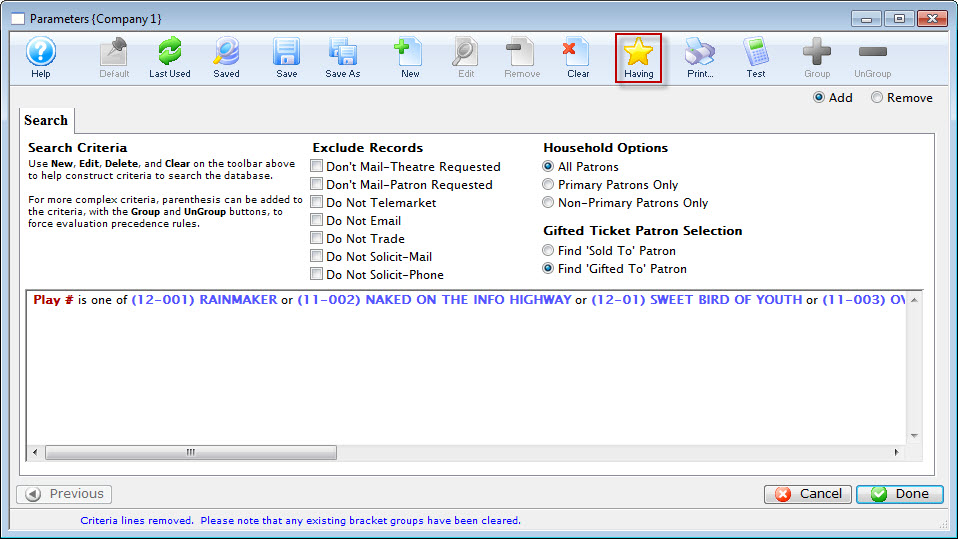
- Click the Having button on the Parameters window.
- Click Save.
The Mail List Data Selection dialog opens.
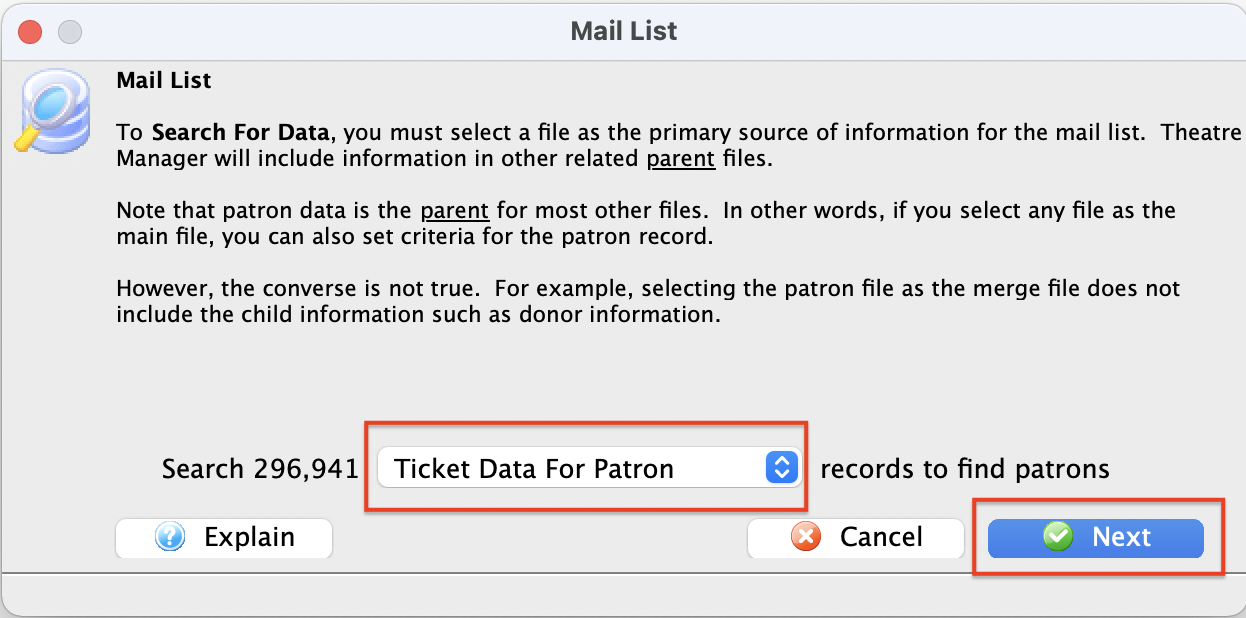
The having criteria should be the 'Event #'.
Pick Unique count on the left.
On the right, enter the range of unique events such as between 3 and 6.
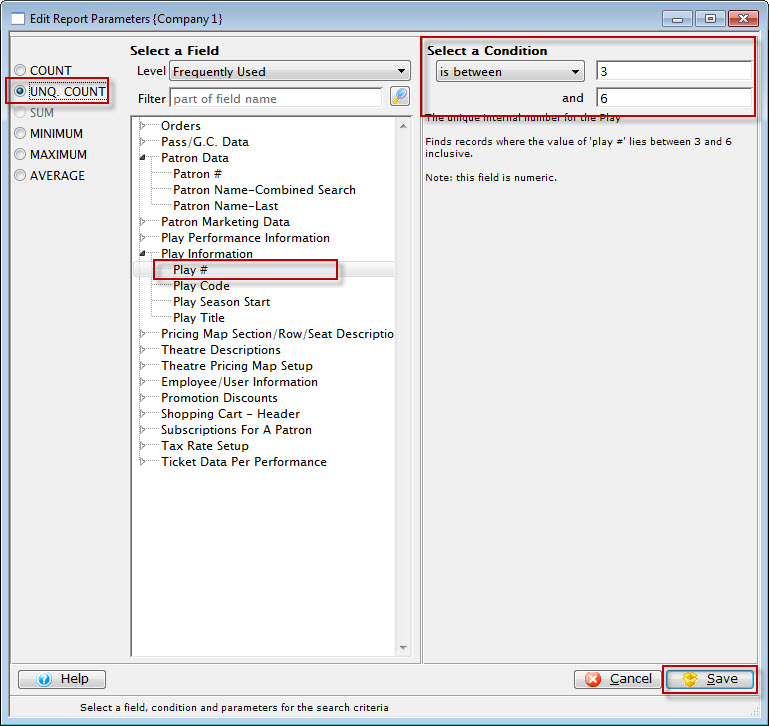
When you execute the mail list, you will get people who have bought 'distinct' events out of the criteria you selected.
You can make the first part of the criteria as complicated as you wish, such as 'all regular tickets' that were 'sold by user xxx' and were 'sold on a thursday afternoon' just by adding more lines to the regular criteria as you've done before.
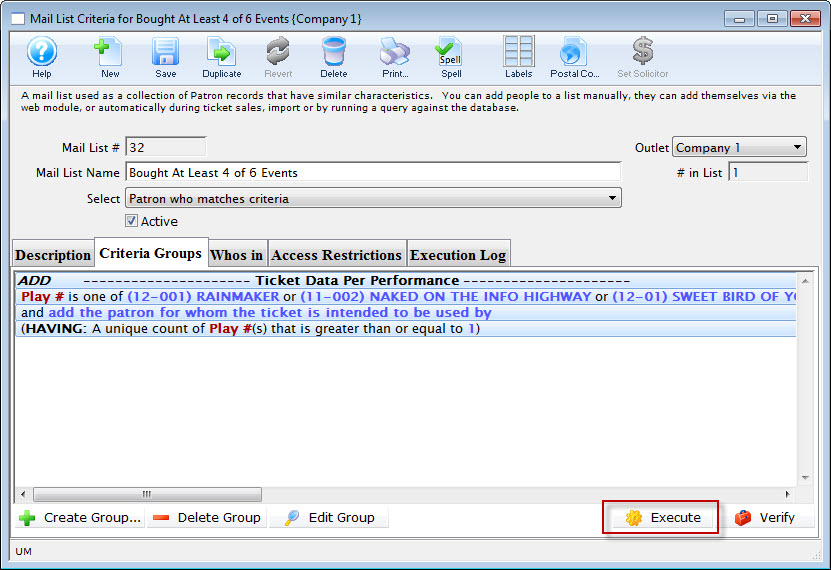
Mail List of Patrons Attending an Event
In this example, of creating a mail list of Patron Attending an Event, the event name will be "Rolling Lego Concert". This mail list will only function if the Confirm Attendance function is being used.
- Open the Mail List Window.
Click here to learn how to access this window.
- Click the New button.
- Enter a detailed name for the list.
- Enter a detailed description of the mail list.
This mail list is comprised of patrons who attended the recent Rolling Lego Concert.
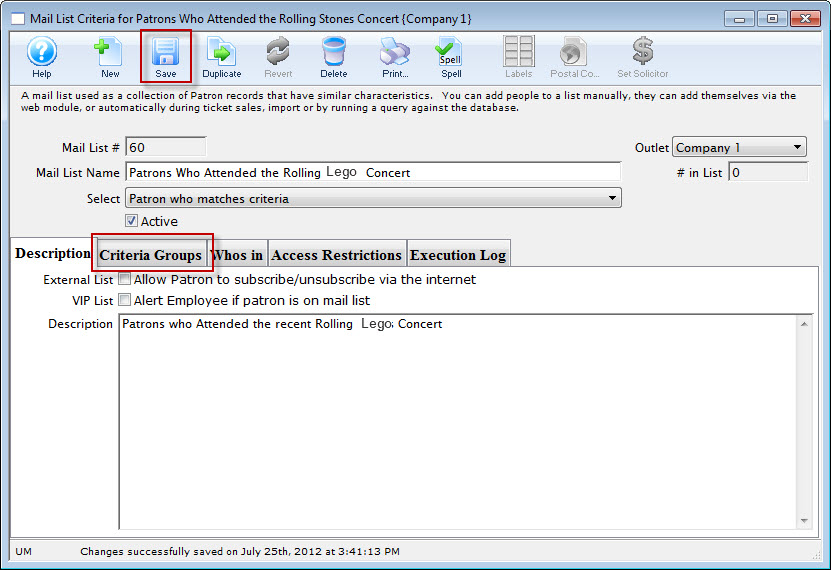
- Click the Save button.
Once this information has been entered you can now begin to enter your criteria.
- Click the Criteria Groups tab.
- Click the Create Group button.
- Choose To Add Patrons to the Mail List.
The Mail List Data Selection dialog opens.

- Choose "Ticket data per Performance" file.
- Click the Next button.
The Parameter window opens.
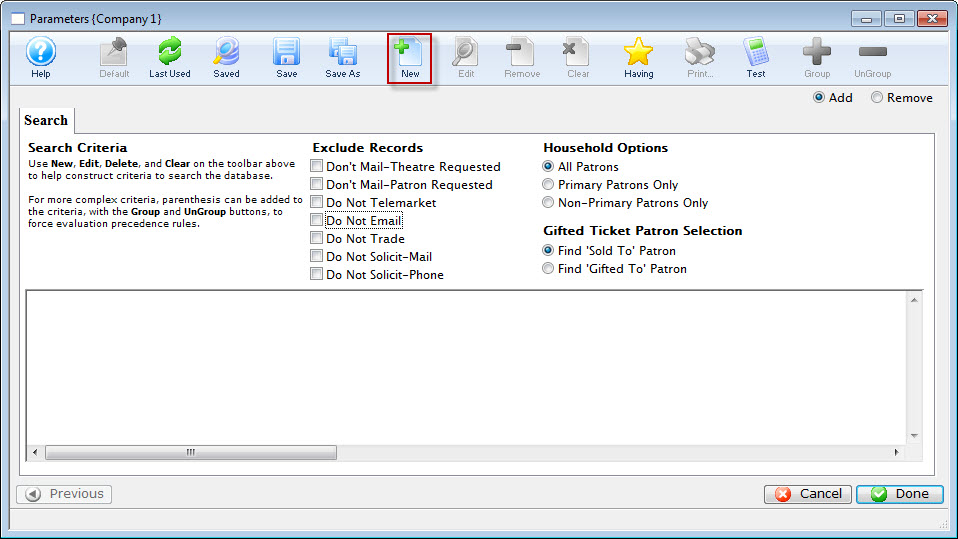
- Click the New button.
The Add/Edit Parameter window opens.
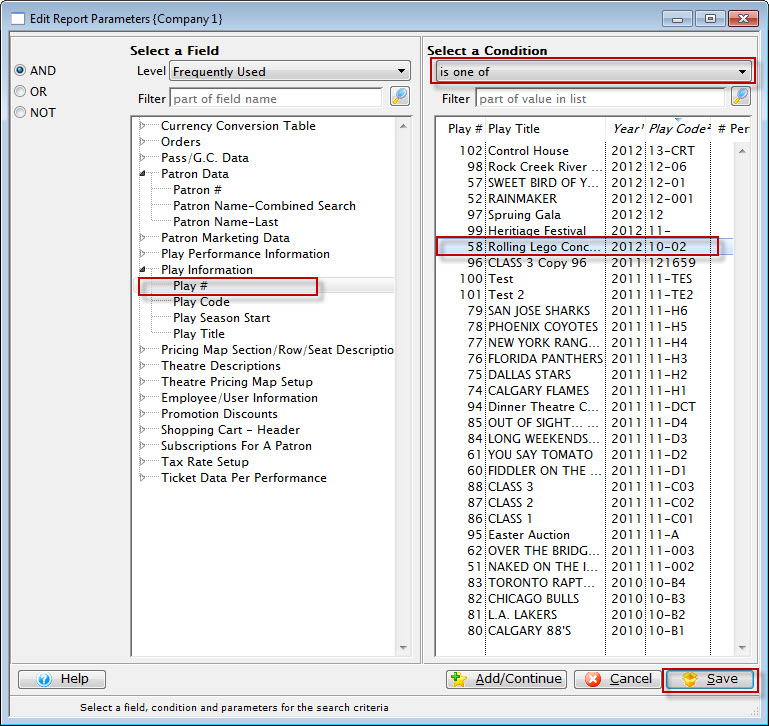
- Choose "Play #", "is one of", select "Rolling Lego Concert".
- Click the Save button.
You are returned to the Parameter window.
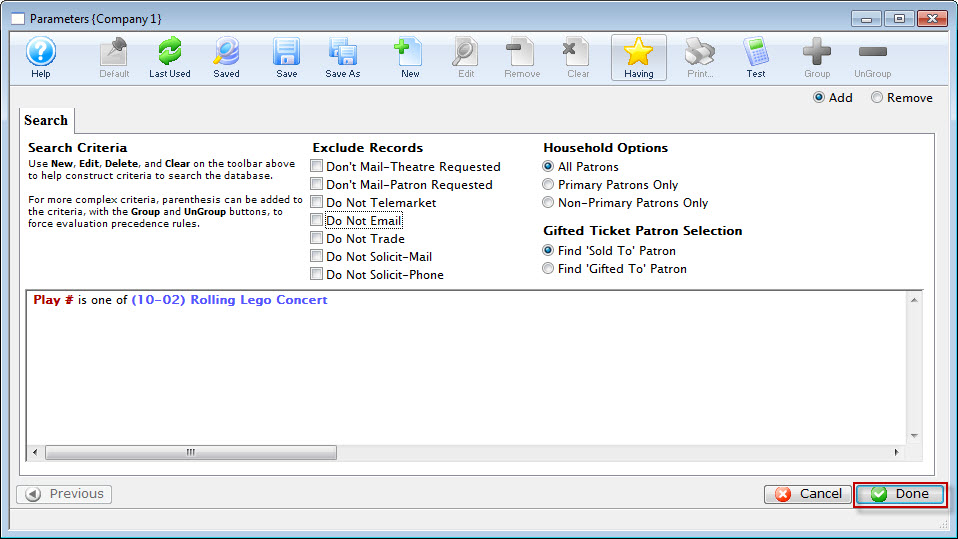
- Click the Done button.
You are returned to the Mail List Criteria Groups tab.
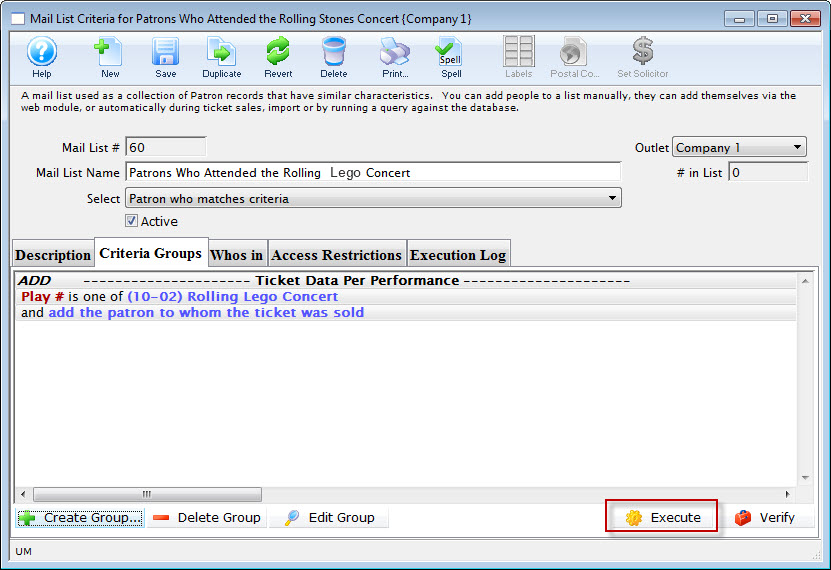
- Click the Execute button.
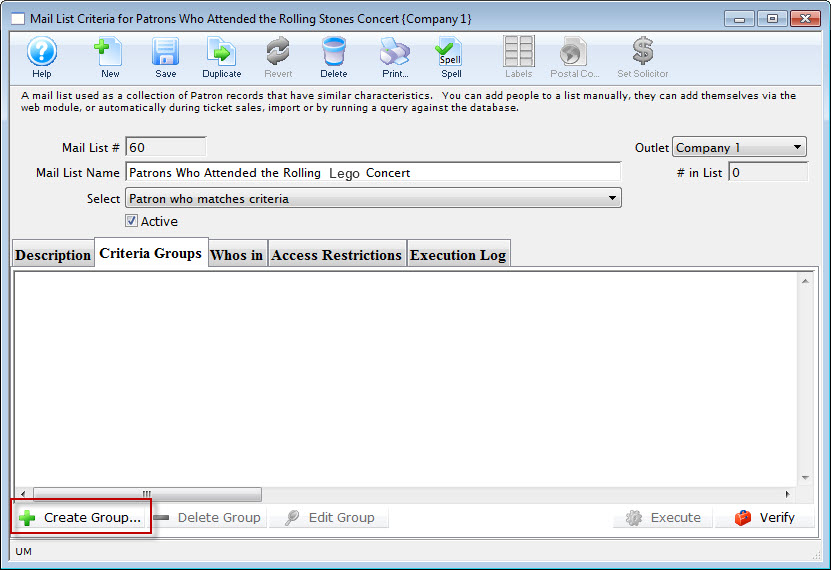
Mail List of Patrons Whose Combined Payments in a Year total XXXX Plus
- Add Group: Choose Donation Receipts for a payment to a donation
- Criteria: Donation Date is between January 1, 2012 and Dec 31, 2012
- and Donation Receipt date is between January 1, 2012 and Dec 31, 2012
- Having The sum of Donation Receipt Amount is greater than or equal to $1200
This will give you a list of donors who have donated between the time frame where the sum of the receipts ( payments ) is $1,200 +
|
If you want to know donors who have donated in the past whose sum of their receipts during this time span is greater than or equal to $1,200 - do not use Donation Date is between XX and YY. |
The steps to find Patrons Whose Combined Payments in a Fiscal Year total $####+ are:
- Open the Mail List Window.
Click here to learn how to open the window.
- Click the New button.
The Mail List Inserting window opens.
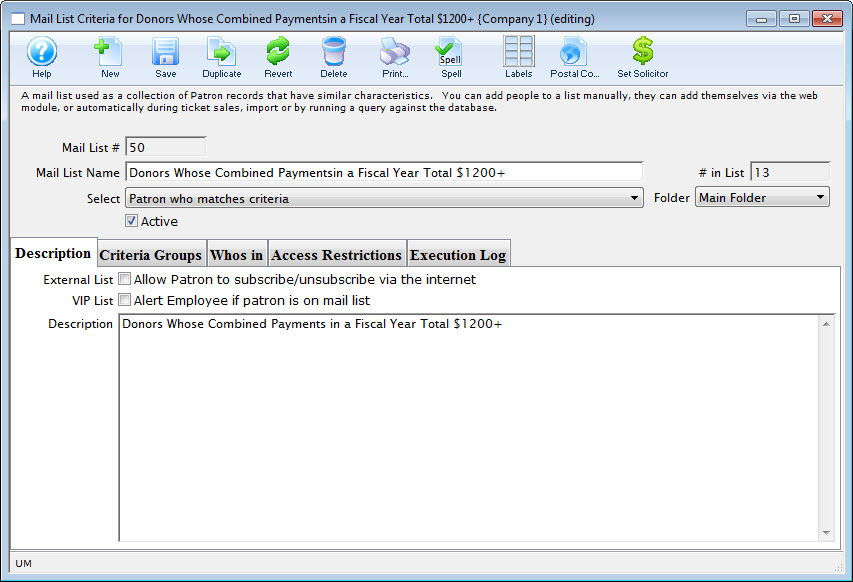
- Enter a Name and Description for the list.
- Click the Save button.
- In the Criteria Groups tab, click the Create Group button.
- Choose To Add Patrons to the Mail List.
- In the drop down list, choose Donation Receipts for a Payment.
- Click the Next button.
The Edit Report Parameters window opens.
- Click the New button to open the Edit Report Parameters window.
- Select the criteria Donation Date is between (Date Start of desired span) and (Date End of desired span).
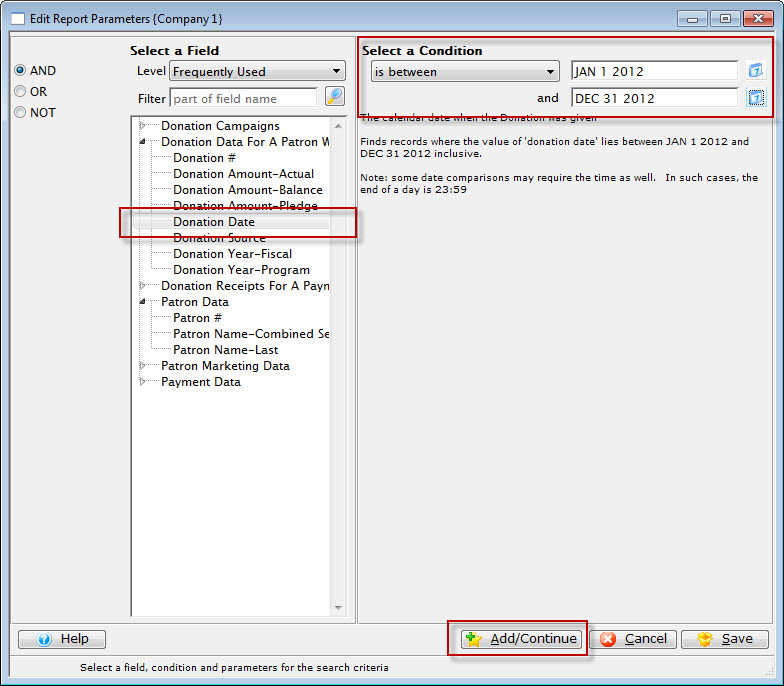
- Click the Add/Continue
 button.
- Select the criteria Donation Receipt Date is between (Date Start of desired span) and (Date End of desired span).
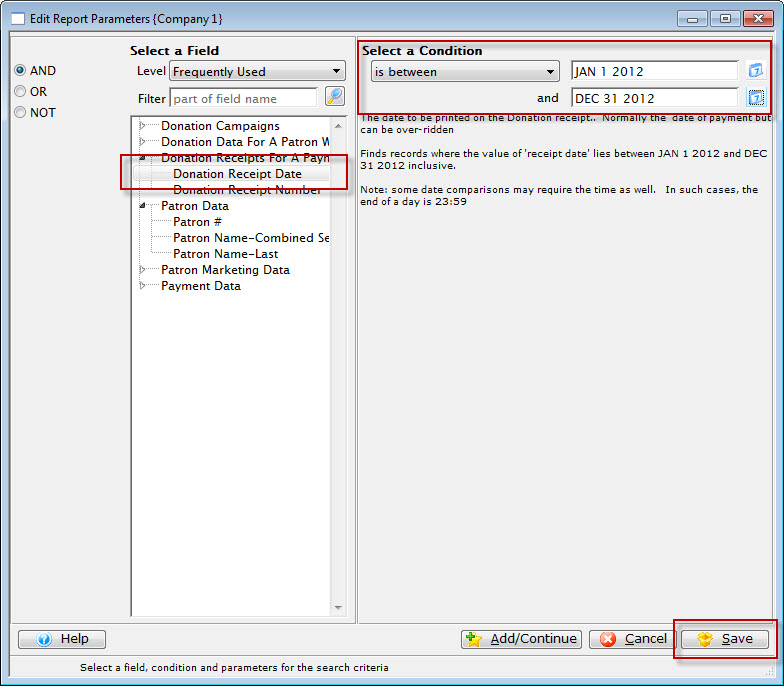
- Click the Save button.
You are returned to the parameters window.
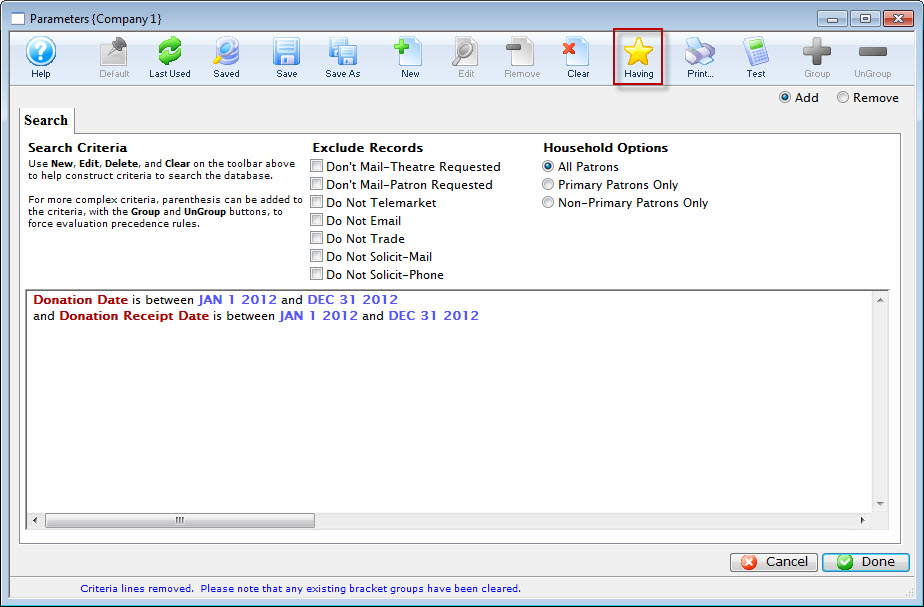
- Click the Having button.
The Add Parameters window opens.
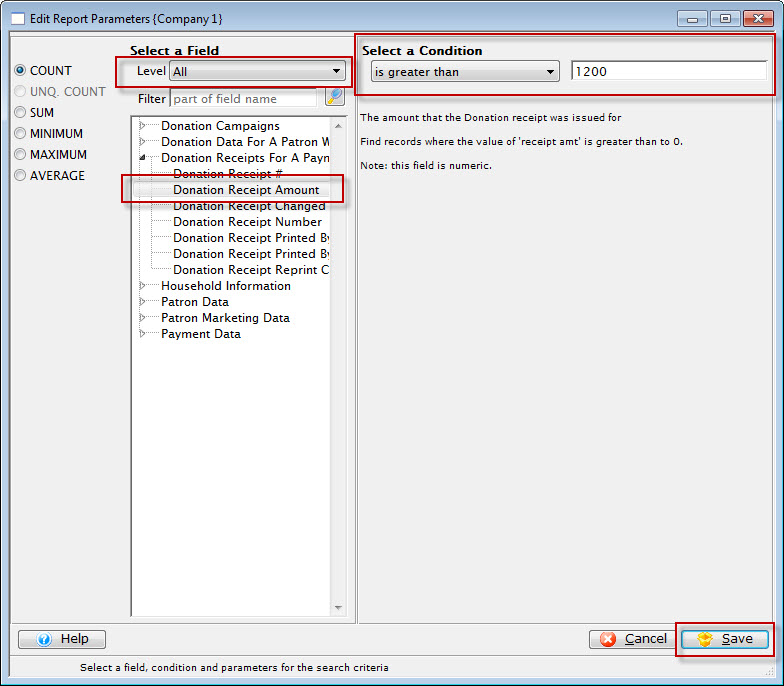
- Select Level All, the Choose the Category Donation Receipts for a Payment >> Donation Receipt Amount. Then entyer the Condition is greater than and enter the amount.
This will restrict the list to all donors whose combined PAYMENTS in the date range specified totals the amount you want plus.
For example: A list of donors whose combined payments in the fiscal year totalled $1200+.
- Click the Save button.
You are returned to the parameters window.
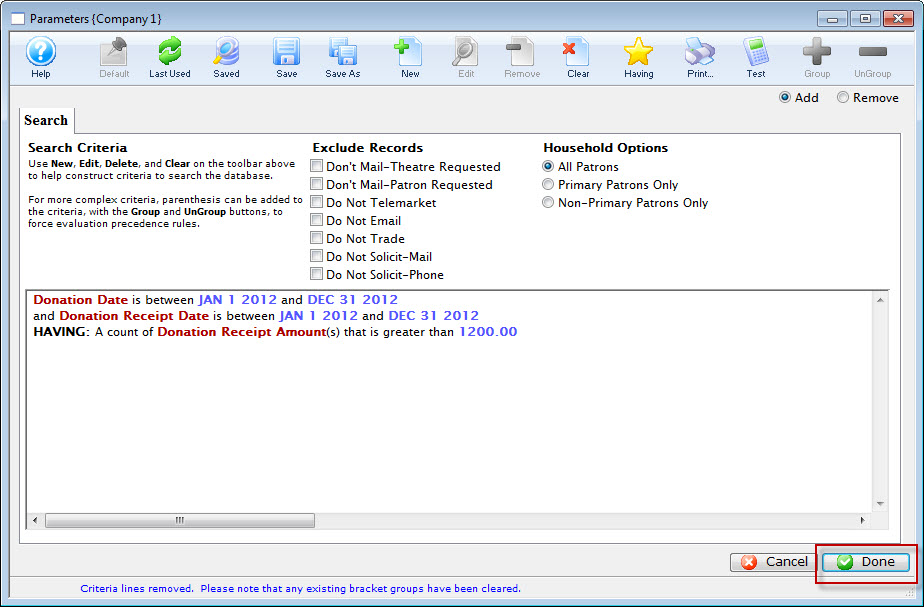
- Click the Done button.
You are returned to the Criteria Groups tab.
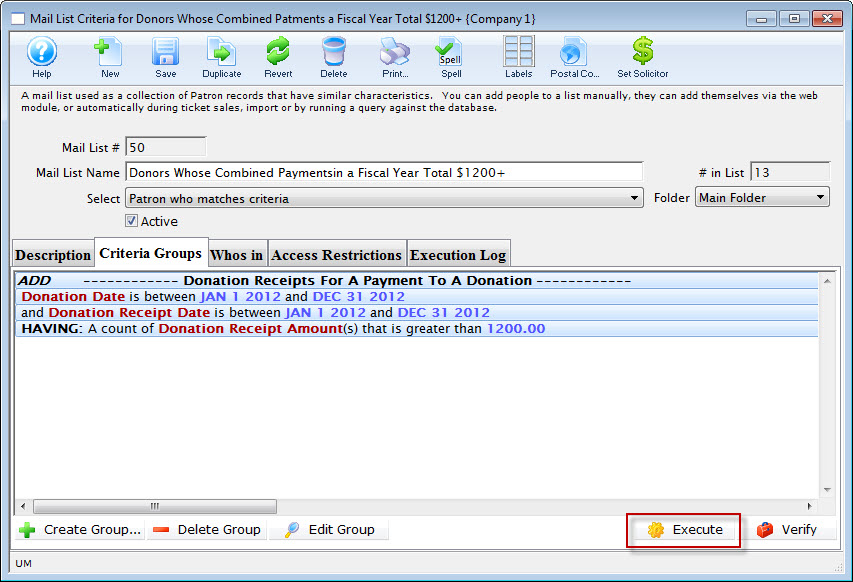
- You can now execute your querry.
The Mail List Data Selection dialog opens.
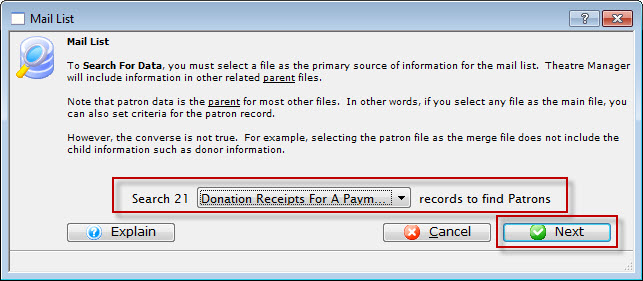
Mail List of all Current Subscribers
To create a mail list of all of your current subscribers, you perform the following steps:
- Open the Mail List Window.
Click Here to learn how to access this window.
- Click the New button.
- Enter a detailed name for the list.
2012 Subscribers.
- Enter a detailed description of the mail list.
This is a list of patrons who are season subscribers for the year.
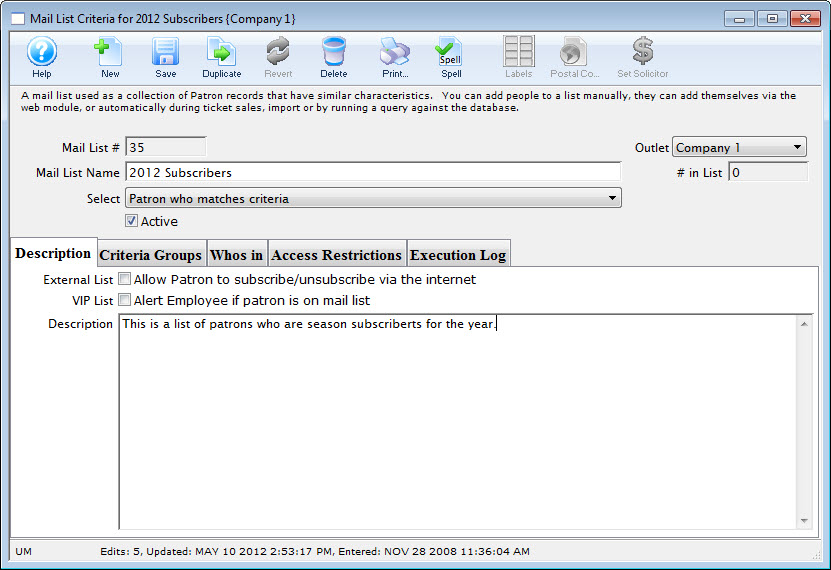
- Click the Save button.
- Click the Criteria Groups tab.
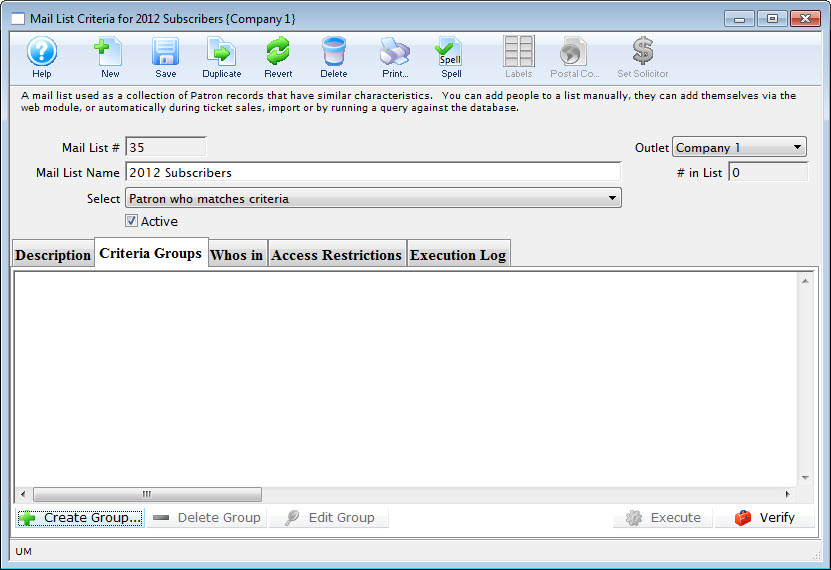
- Click the Create Group button.
- Choose To Add Patrons to the Mail List.
The Mail List Data Selection dialog opens.
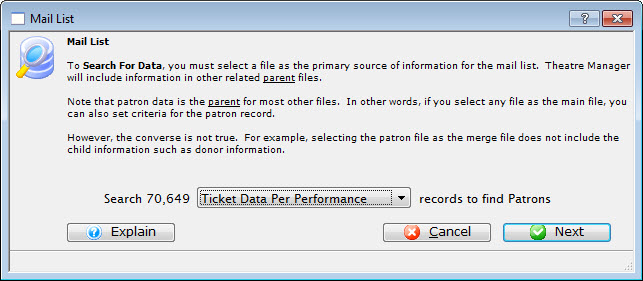
- Choose the "Ticket Data per Performance" file.
- Click the Next button.
The Parameter window opens.
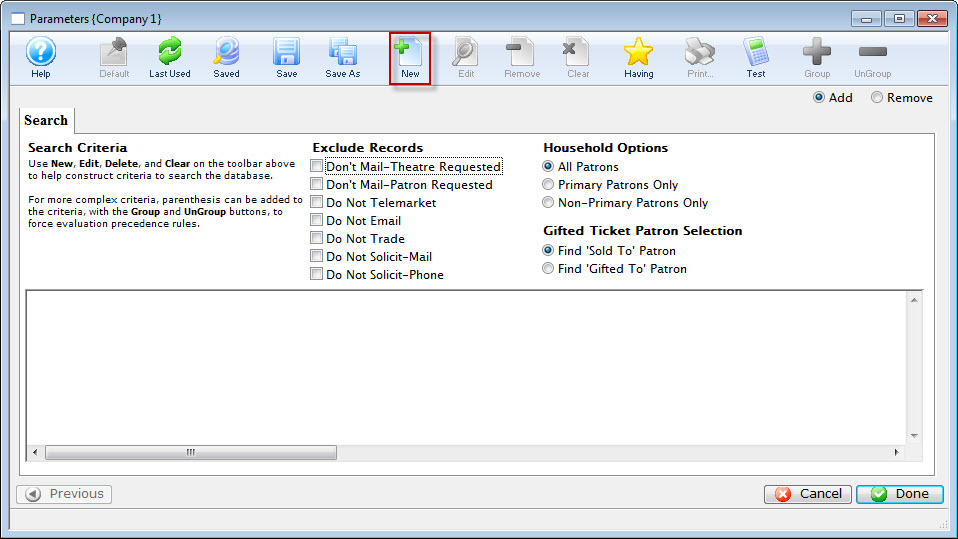
- Click the New button.
The Add/Edit Parameter window opens.
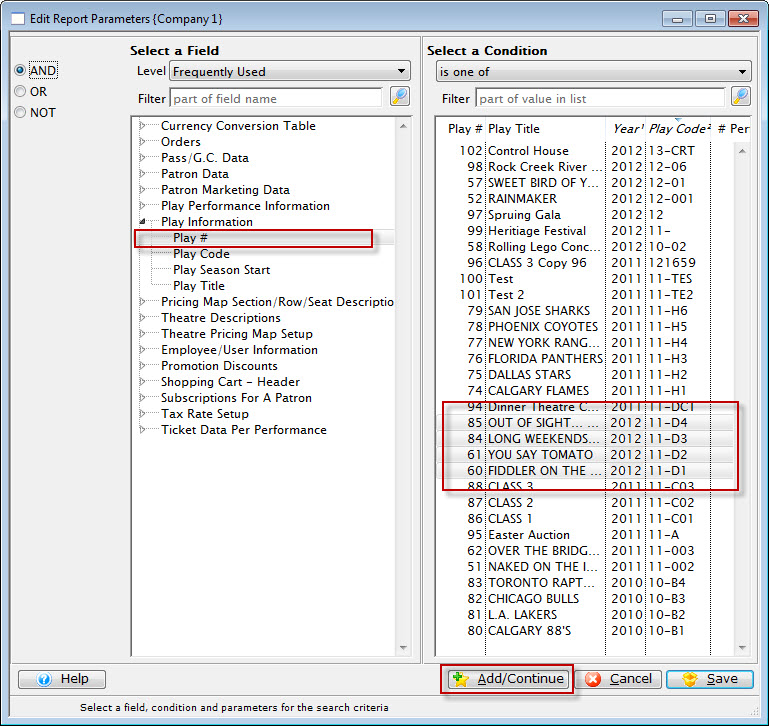
- Choose the Play Number, is one of, select the plays which are in the season subscription package.
- Click the Add / Continue button.
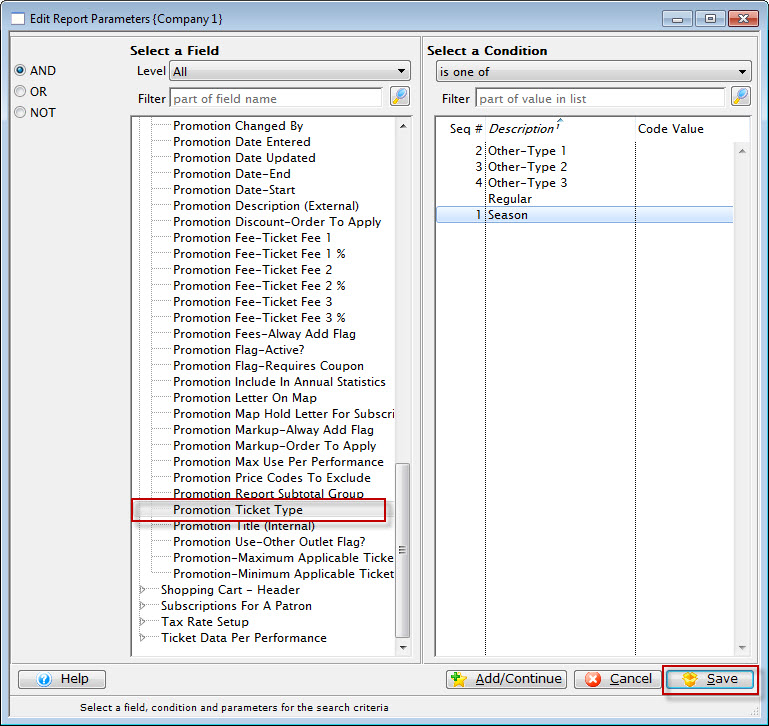
- Choose Promotion. is one of, select the promotion codes for all of the subscription types.
- Click the Save button.
You are returned to the Parameters window.
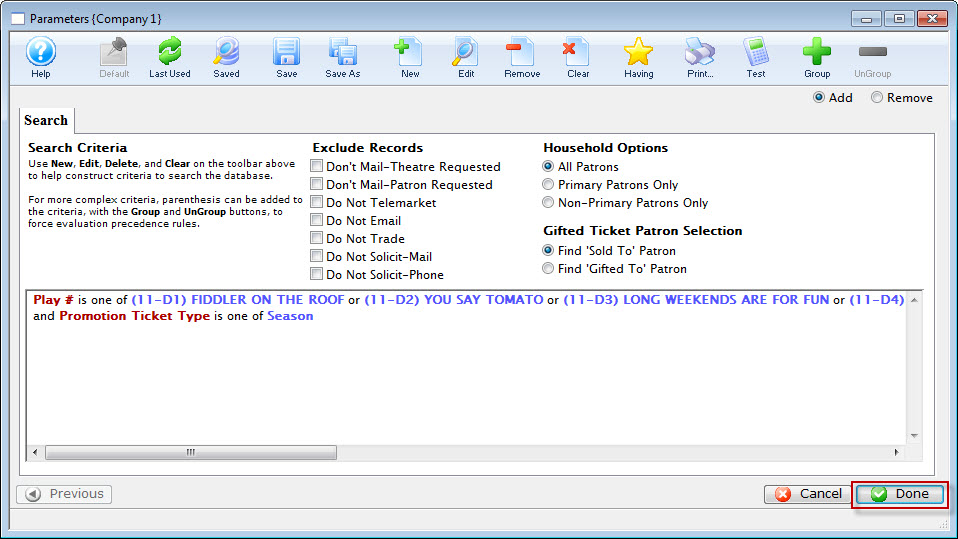
Order of Criteria is very important. If we had selected the Promotion FIRST, The query would search for the Subscription promotions in ALL performances, then search for the matching performance codes. To optimize searching, you would search for the performances and then the matching promotions. Click here to learn how to re-arrange criteria.
- Click the Done button.
You are returned to the Mail List, Criteria Groups tab.
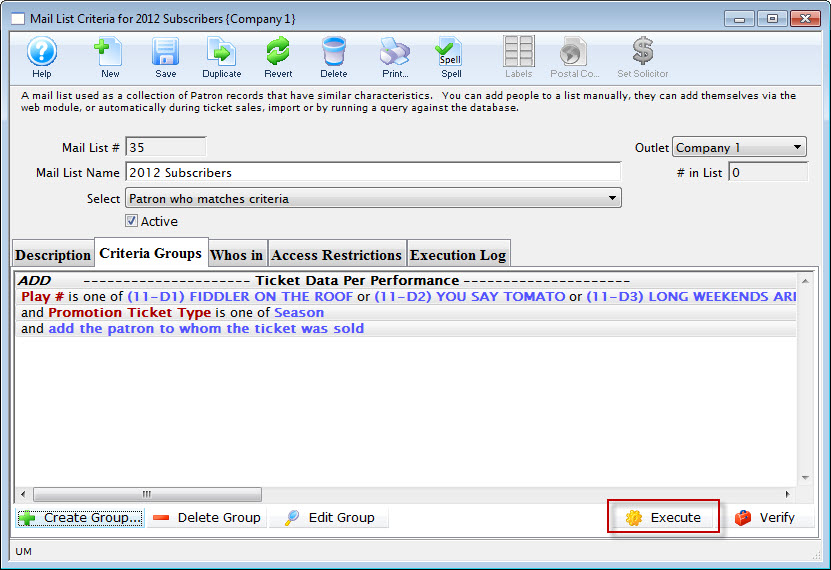
- Click the Execute button.
Patrons With/Without Primary Email Address
In the sample picture below, the criteria shows 'Primary Email Address'. You can just as easily search for the other 'primary' fields when adding them to the criteria. So you can use primary email address, primary fax, etc in any query.
The trick is that if somebody:
- has an email address, then the primary email address unique # will be non-zero. If that is the case, use criteria like the picture below, but change it to
Marketing Primary Email Unique # <> 0
- does NOT have any email address, then the primary email address unique # will be ZERO. The picture shows the criteria to find people without emails.
This criteria can be combined with just about any other criteria.
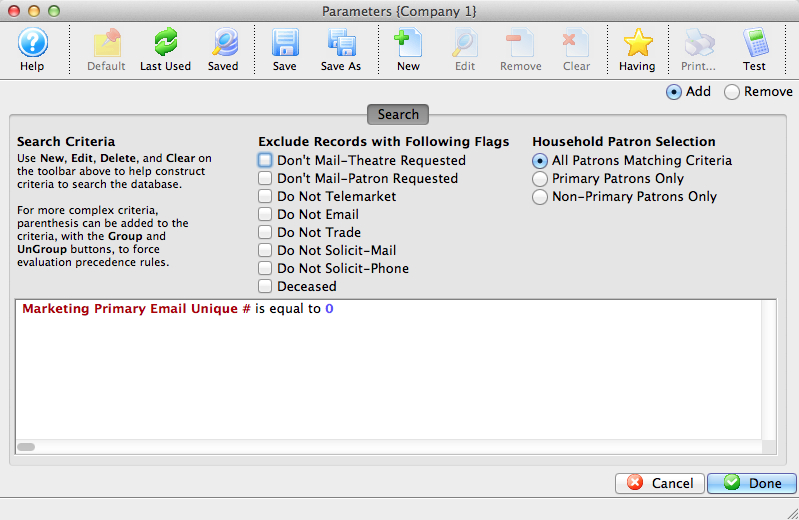
File Selection for Queries - Considerations
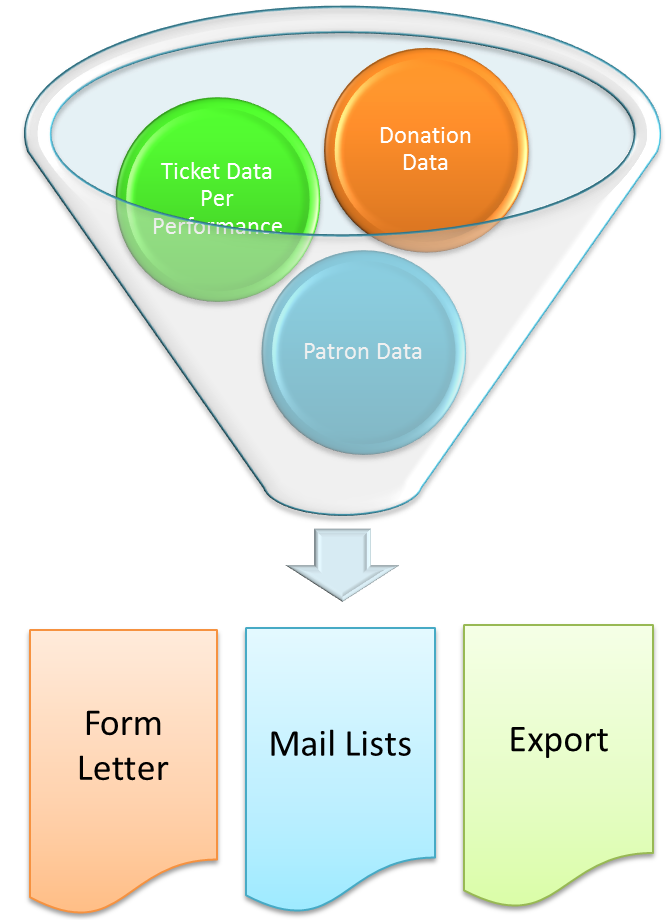
The most important step in mail list building, exporting data, or creating form letters is the selection of the correct 'file' to be used on order to point Theatre Manager off in the right direction to retrieve the data you want.
When you select a file, you are able to access all data in that file and all data in the database relating to that file which is above it in the database relationship hierarchy. This is a mouthful, so what does it mean?
You start by picking the data you want to see and most times is it not 'Partron' -- as patrons are almost always connected to any file you select. Here are some examples:
- If you want your form letter to contain information about a donation, then you select the 'donor data for a patron' (refer to selecting the file for letters). This means: You can put the date of donation and donation amount on the letter. You have access to any data related to the donation such as campaign/fund, patron, marketing information, order and primary address.
- If you were to open a donation window, this corresponds to the data you see on the screen, plus the patron data comes along because the donation is for a person.
- If you want the export to contain information about a gift certificate, then you pick the 'gift certificate data' file (it might be called pass/GC data, depending on what your venue named this part of Theatre Manager). With that, you are also able to access patron, order, marketing data, and Pass/GC setup information because it is all connected to the record.
- if you want the mail list to find patrons that came to events, you need to look at their tickets to know that they attended a show. Think of this LIKE looking at the ticket stubs. Doing this means you get all related information such as the price, promotion, event, performance, venue, order, marketing data, patron and address that the ticket was mailed to.
- If you wished to access the schedule for a volunteer (or personnel), you would access the 'Volunteer activity history for a patron'. This lets you see when you have scheduled them, along with the position, marketing data, patron and their address - all data that is automatically associated with each volunteer activity.
The words letter, export and mail list can be used interchangeably in the examples above because the process is the same for all three - depending on what you are doing.
In each case, the file selected was the actual data you wanted to see not the patron record. It just happens that all the data is related to patron, so you can have that data as part of the export as well.
|
If you have previously built a mail list that contains data from a different part of the database, you can use the patron belongs to a mail list field as part of the query for any data selection -- because this data is actually stored on the patron marketing record and is available in all queries. |
|
Theatre Manager also has a REST API for those wishing to automate certain data extractions for reports or transfer to another system. |