Draw: Building a Map
| Editing Tools Cheatsheet |
|

- Create the graphic map or picture of the venue for box office sales
- Set up your seating layout by placing seats.
- Set up or reorder the logical order of the seats on a map.
- When done changing seats, you will need to update the pick your own seats map for online sales

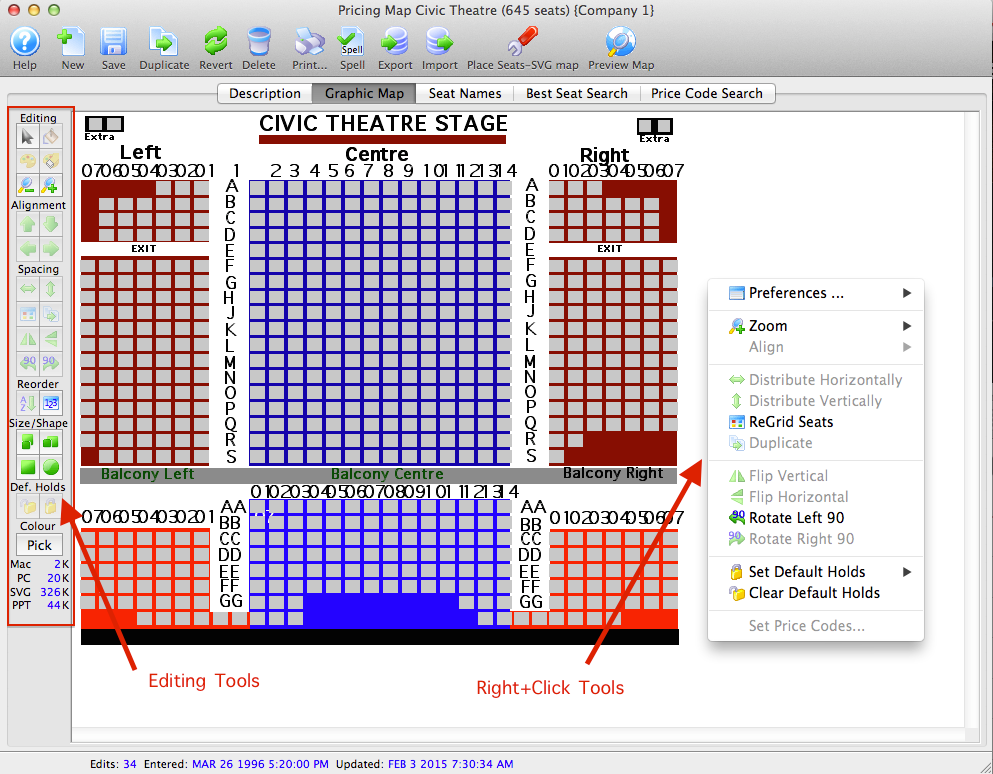
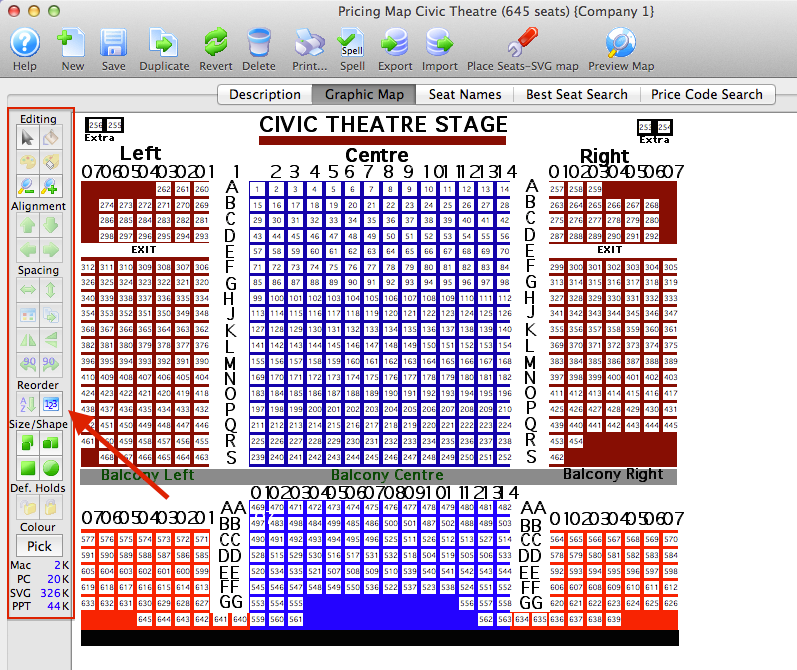
Parts of the Graphic Map Tab
| Selection arrow. | |
 |
Adds a grid of seats to the map. |
 |
Adds a single seat to the map. |
 |
Removes selected seats from the map. |
 |
Zoom in on a selected section of the map. |
 |
Zoom out on a selected section of the map. |
 |
Aligns to the top of the selected seats. |
 |
Aligns to the bottom of the selected seats. |
 |
Aligns to the left of the selected seats. |
 |
Aligns to the right of the selected seats. |
 |
Evenly distributes selected seats horizontally based on the position of the end seats of the row. |
 |
Evenly distributes selected seats vertically based on the position of the end seats of the column. |
 |
Re-grids the seats allowing for adjusting the number of columns and spacing. |
 |
Duplicate the selected seats. |
 |
Flip selected seats horizontally. |
 |
Flip selected seats vertically. |
 |
Rotate selected seats 90 degrees to the left. |
 |
Rotate selected seats 90 degrees to the right. |
 |
Sort selected seats in ascending order. |
 |
Show / Hide seat numbers on the map. |
 |
High of the selected seats from 8 - 20. |
 |
Width of the selected seats from 8 - 20. |
 |
Set selected seats as squares. When selected prior to placing seats new seats will appear as squares. |
 |
Set selected seats as circles. When selected prior to placing seats new seats will appear as circles. |
Creating the Graphic for the Map - Step 1
Click here, for quick reference information for Venues and Maps
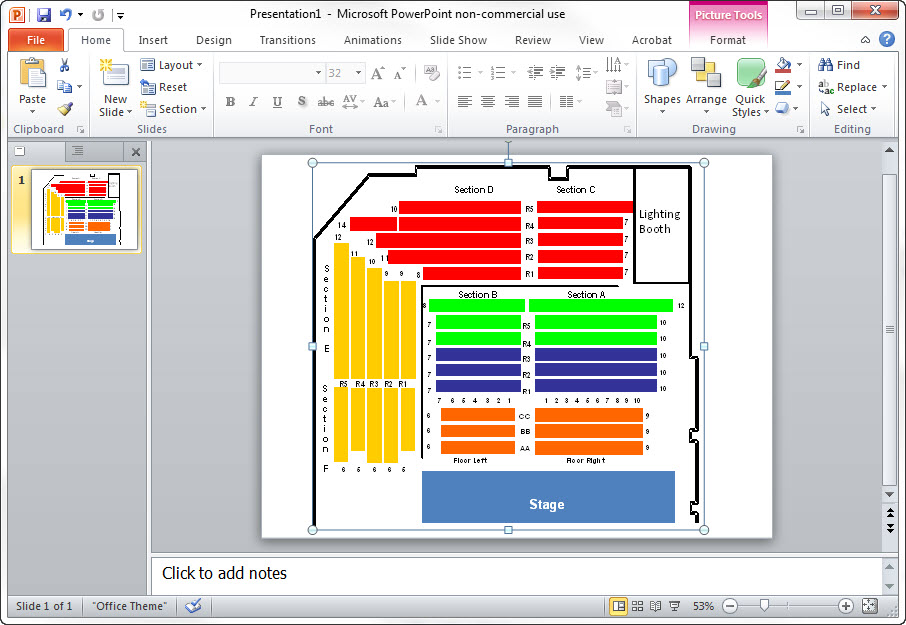
Theatre map graphics or pictures are not required if the venue is used for festival (General Admission) or Traveling Troupe ticket sales. If the intention is to sell reserved seats visually, a graphic representation of the theatre will need to be drawn in a graphic application and then placed into Theatre Manager. At this time, Arts Management recommends using a PowerPoint slide to draw the graphic image as it allows for small file size, and images can be saved in the correct format for both PC and Mac use.
|
If you intend to use the Select Your own Seats Online feature, your map will also need to be converted into an SVG file. You will need to have a PowerPoint or .emf file to start with, then convert it to SVG using OpenOffice |

Optimizing Graphic Map Size
|
Use vector based graphics (lines, squares, circles, letters, colour, etc) on your maps and do not use picture/image files (jpegs, tiffs, bitmaps, etc) or high bit depth (shadings and transparency) in order to minimize the size of the final graphic. Think simple - the graphic map that sits behind the seat squares does not need to be an elaborate representation of the venue. The purpose is to allow Box Office staff and online patrons to easily visualize the sections/zones within the venue. |

You can do a fantastic map with lines circles and colour using vector graphics and the file size will be 50K +/-. Adding a picture can jump the size to a megabyte without trying. Smaller file sizes result in faster performance transferring the maps from the database and building the suggested seat graphics for the web. Theatre Manager limits the graphic map file size to less than 500kb for PC's, less than 200kb for Mac's. Less is more.
Once you have created the graphic in PowerPoint, you can save it - as well as the SVG map - directly within the pricing map setup in Theatre Manager.
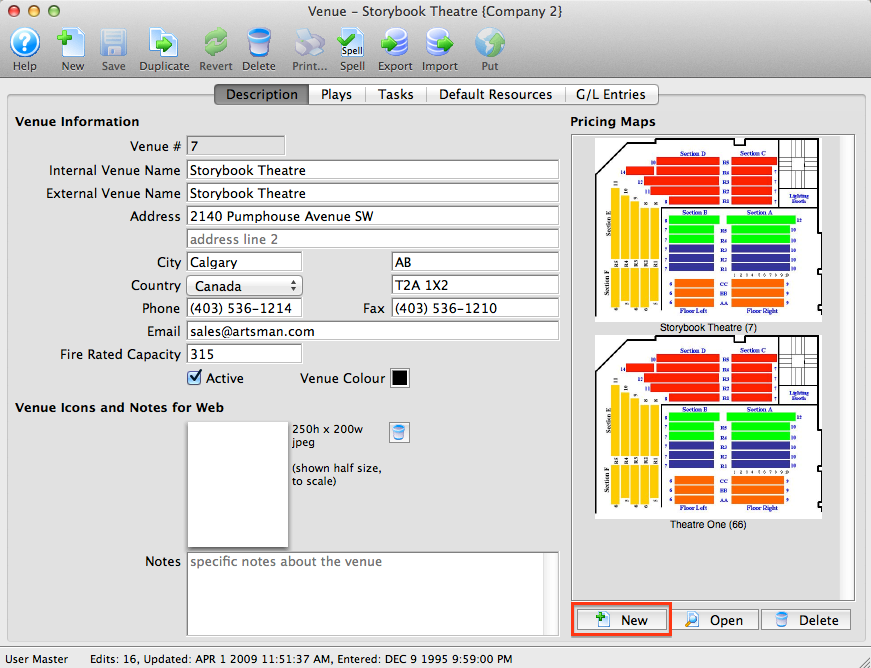
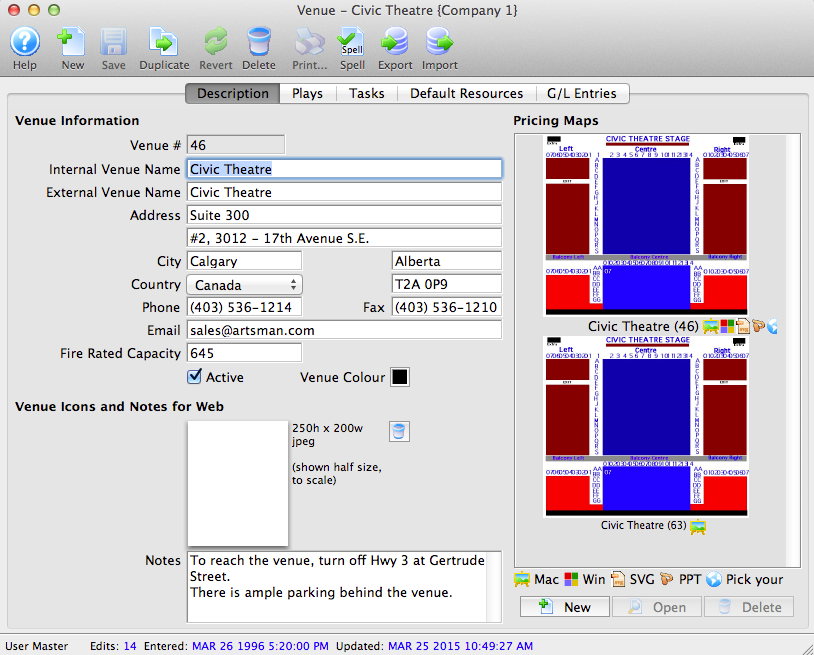
Adding the Graphic Map
As noted earlier in this section, each Venue can contain multiple Pricing Maps.
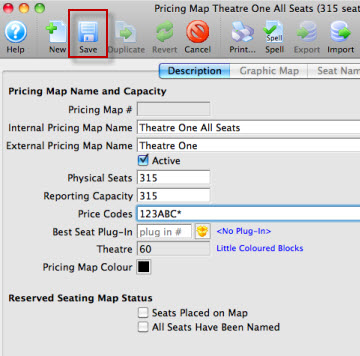
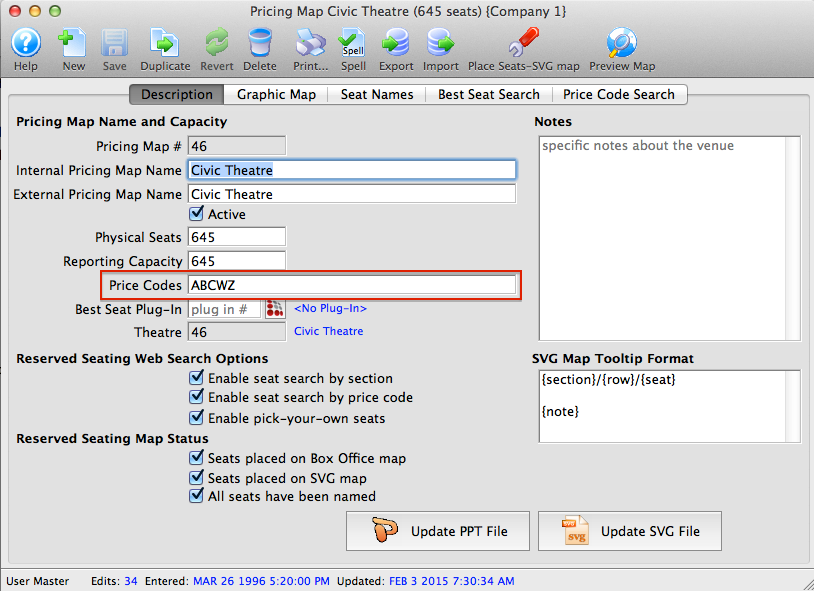
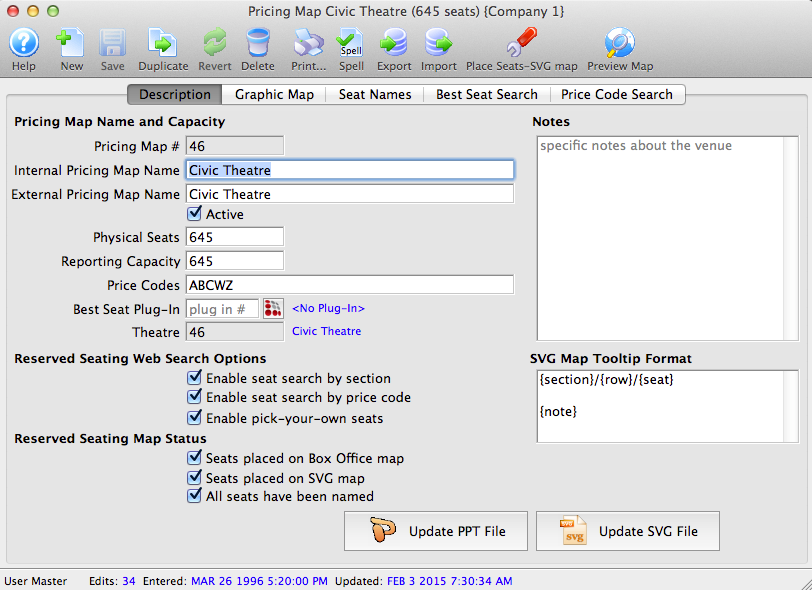
- To add a new Pricing map, click the New
- Enter the Price Map Name and Capacity information.
- Enter the Price Codes you wish to use on this Pricing Map.
- Enable or disable the default Reserved Seating Search options you wish to use for this Pricing Map.
- Click here for more information about Enabling seat search by section.
- Click here for more information about Enabling seat search by Price Code.
- Click here for more information about Enabling Pick Your own Seats online.

The "Seats Placed" and "Seats Named" checkboxes will automatically populate when the map is complete.
- When complete, click the Save
 button.
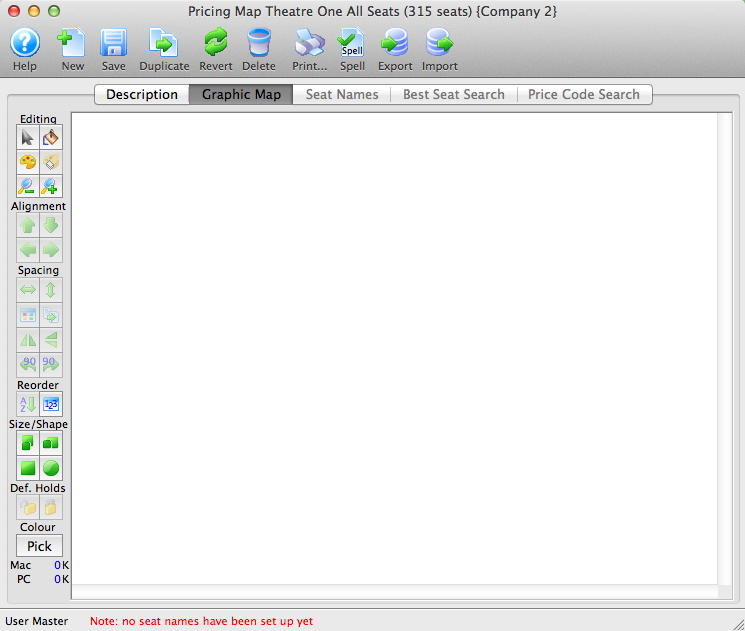
You can now add the Graphic Map.
- Click the Graphic Map
 tab.
tab.
The Graphic Map tab opens. Click here for more information on the graphic map tab.
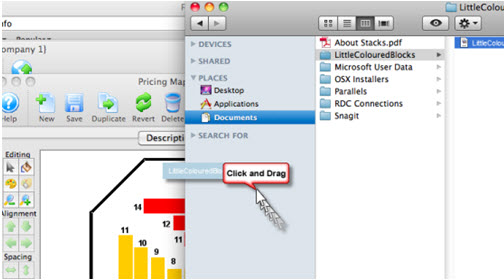
- Drag and Drop your graphic onto the Graphic Map page.
Click here for information on creating your graphic map in a program outside of Theatre Manager.
You can now add your seats to the map.
 button in the Theatre window.
The Pricing Map opens. Click here for more information on the Pricing Map window.

Importing a Graphic Map
|
All graphic maps start with e PPT document that is exported to an SVG |
When needed, open the PowerPoint image file in OpenOffice to create the SVG file.
The easiest way to place an SVG graphic map file is to simply DRAG the file from the folder it is located in and DROP it in the white space of the  tab in Theatre Manager.
- Open the Theatre Map Window.
Click here to learn how to access the window.
- Click on the Venue you wish to import a Graphic Map to, and then click the
Open
 button.
- Double-click on the Pricing Map on the right-hand side where you want to add a graphic.
- Click on the Graphic Map tab.
- DRAG the SVG file from the folder it is located in and DROP it in the white space of the Map Tab inside Theatre Manager.
The Pricing Map opens. Click here for more information on the Pricing Map window.
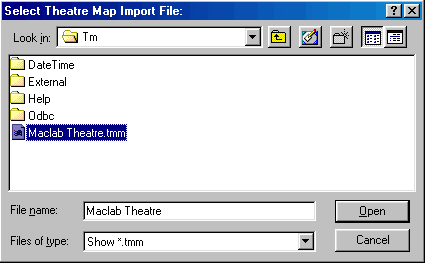
Importing Theatre Map Files from other Venues
If your organization performs at another venue that also uses Theatre Manager, it may be helpful to import the Pricing Map they use rather than to build a map from scratch. You can edit the Pricing map later to reflect your Price Zones, however the graphic itself along with all the seats and their positioning can be imported into your database using this method. This can save you considerable time over creating a new Pricing Map. Please feel free to contact Arts Management Systems if you need assistance in discussing sharing the file with the other venue.
The map you wish to import must have been exported out of the neighbouring organization's database using the .tmm (TM Map Interchange) format.
To export a map using the .tmm format, perform the following steps:
- Open the Pricing Map that you want to save as a .tmm file.
- Click the
 button.
- Choose "TM Map Interchange Format (.tmm)" from the menu
- Save the file to a thumb drive or other location where you can retrieve it easily
To import a Theatre Map file, you would perform the following steps.
- Create a venue (if you do not already have one) for the imported Pricing Map.
- Open the Pricing Map Window for the venue.
Click here to learn how to access the window.
- Click the Import
 button.
The Import Theatre Map window opens.
- Select the Theatre Map File you exported above.
- Click the Open
 button.
The Theatre Map window opens.
Add Price Codes to an Existing Pricing Map
Price Codes are composed of letters, numbers or characters and - in general - represent geographic regions of the venue. For example, "A" may represent the Orchestra Section, while "B" represents the Balcony. Furthermore, you can have multiple Price Codes on each seat that mean different things. An Orchestra seat may have both "A" and "1" enabled for "Single" (A) and "Subscription" (1) pricing.
When additional Price Codes are required for an event / play they need to be added at the map level. The Price Codes then become accessible in the Pricing tab of Events/Plays setup using the same map.
To add price codes, you perform the following steps:
- Click the Venue / Theatre
 button in the main Theatre Manager toolbar / ribbon bar.
The Theatre List window opens.
- Select the Theatre /Venue.
The Venue / Theatre window opens.
- Choose the Pricing map requiring the additional price codes (double click on it).
For more information on building a new map click here.
- Add the desired letter(s) to the Price Code field.
Price Code letters, numbers and symbols should be entered side by side without spaces, commas, dashes or other separators.
- Select the Seat Names tab at the top of the window.
For more informaton on the seat names tab click here.
- Add the letter(s) entered above in the Price Code column next to each seat needing access to this code. Alternatively the seat names can be exported, altered outside of Theatre Manager and imported back into the map.
For more information exporting seat names click here. For more information importing seat names click here.
- Click the Save
 button at the top of the window.
- Close the map.
The Price Code(s) have now been added to the Events / Plays using this map number. You may need to review existing Events / Plays to disable the new Price Code. You may also want to review the Disabled Price Codes field of your Sales Promotions to ensure the new Price Code is disabled where required.
For more information on disabling promotions click here.
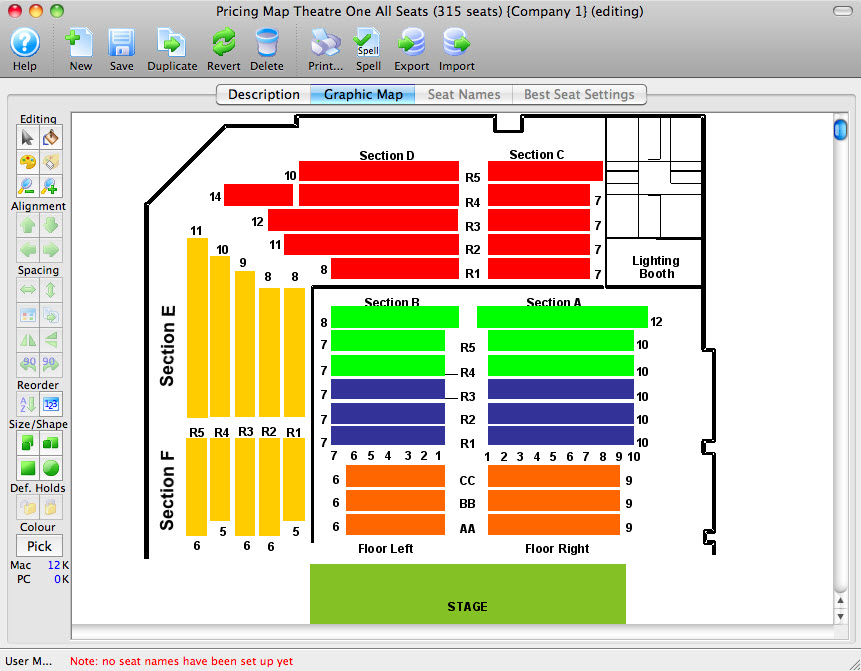
Placing Seats on a Pricing Map - Step 2
When you use reserved seating, you need to place those seats on the graphic map in Theatre Manager. Prior to placing seats on the Pricing map, a graphic representation of the venue must be placed into the graphic map window. Click here for more detail. If the venue is non-graphical or will be used for festival seating (General Admission) or traveling troupe ticket sales, placing seats on the map is not required.
|
One of the keys to being successful in map building is to save your work frequently. |
- Click Setup >> Venue.
The Venue List window opens.
- Select the Venue, and click the Open
 button.
The Theatre window opens.
Click here to learn how to create a map if the map you want has not yet been created. - Choose the Map you want to add the seats to and click the Open
 button.
The Pricing Map window opens.
Click Here for a detailed description of this window and it's functions.
- Click the Graphic Map tab.
The graphic map window is displayed. You use the editing tools and the right-click menu tools to add your seats to the map.
- Decide if the seats will be square or circular.
Select the appropriate shape button
.Round seats typically indicate "wheelchair" or ADA access seats.
- Click Add Grid of Seats button.
This will open the Add Block of Seats window to add a section of seats. The Add Seat
button adds single seats to the map. 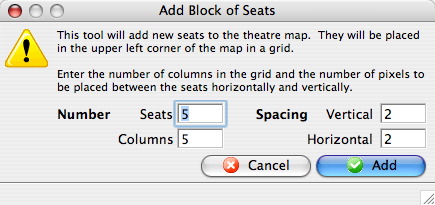
Number of Seats Enter the number of seats to be added. (It will default to the total number of seats remaining to be added to the theatre and will decrease as seats are added). Number of Columns Enter the number of columns (left to right) to place the seats into a grid. Spacing Vertical The number of pixels of vertical spacing (up and down) between the seats. Spacing Horizontal The number of pixels of horizontal spacing (left and right) between the seats. - Click the Add
 button.
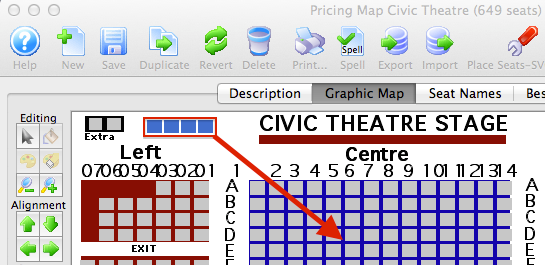
This will place a grid (block) of seats in the upper left corner of the theatre map. Click on one of the added seats and drag the grid of seats into the appropriate place on the theatre map. Continue adding seats (grid by grid) until the total number of seats have been placed on the graphic representation.
- Click the Save button.
Save frequently while adding seats. If an errors is made the Revert
 button can be used to return to the last saved point.
 - Select a row or column or seats.
Place the mouse above the upper left corner of the first seat to select, click and hold the mouse button and encircle the seats to align. Release the mouse to highlight the seats. To select multiple seats hold the <SHIFT> key and click on each seat.
- Duplicate similar section of the venue as needed.
Duplicates selected seats. Flips the selected seats vertically. Flips the selected seats horizontally. Rotates the selected seats 90 degrees to the left. Rotates the selected seats 90 degrees to the right . - Align the seats.
Once all the seats have been placed on the graphic representation, use the alignment buttons to ensure seats are straight within each row and column.
Be careful to not align a group of horizontal seats to the left or right (or vertical seats to the top or bottom) as they will "stack" on top of each other, and then need to be deleted and re-added.
Aligns the selected row with the top most seat in that row. Aligns the selected row with the bottom most seat in that row. Aligns the selected column to the left most seat in the column. Aligns the selected column to the right seat in the column.
Ensure seats are evenly spaced and distributed using the functions described below.
Evenly distributes the selected seats horizontally. Evenly distributes the selected seats vertically. Opens the Distribute Seats Window allowing the selected seats to be distributed both horizontally and vertically. 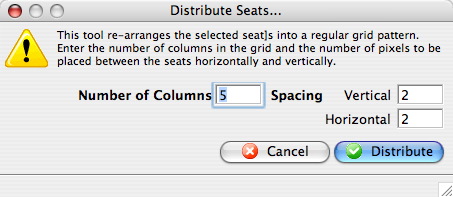
A few handy tricks when placing seats:
- Create a "ruler" out of 6 horizontal seats to use as an alignment guide for vertical columns. Do the same using 6 vertical seats to align rows. This allows you to easily align two seats directly over the last block of seats, two "spaces" representing an aisle, and two more seats directly over the next block of seats. Now you have perfect aisles.
- When placing seats individually in a horizontal line, place the first (and only the first) seat at the correct height. Place all subsequent seats in that row slightly below the correct height. Then use the alignment tool to bring all the subsequent seats up to the level of the first (and only) perfectly placed seat. The same is true for vertical placement (left and right).
- If your rows are offset (Row A has 17 seats, Row B has 18 seats, Row C has 17 seats, etc.), once you have the seats roughly placed, select the first seat in every other row by Control+clicking on them, and aligning them to the left or right. Then redistribute the seats in that row based off the perfectly placed first seat.
- While it may be enticing to place the seats in an arc if your venue is set up this way, because the Box Office will be selecting the seats by drawing a line through them or a box around them, arcs make it difficult to select seats in a single row. The best way to place the seats is always in a straight line.
- If you have side sections that are identical but oddly shaped (each row is a different length), build one section, then highlight it completely and use the duplicate tool, then the flip tool to add the opposing side.
- Click the Save button.
When all seats are placed the next step is to arrange the seats in a logical order so Theatre Manager can connect each seat to its name. Click here for information on reordering logical seats.

- Select the seat(s) that you want to hold on the graphic map. Then click on the hold tool, and select a letter code to hold the seat(s) with.
- When you are done, choose the Save Button.
Determining the color of sold seats on a map
In the creation of the graphic map, the image is actually performing many roles which are:
- Allowing you Draw and move seats (in this mode, they are gray)
- Set default Holds for the venue
- Show price zones which also allows you to set the Highlight color for price codes and sold seats at the box office.
- Set Social Distance seating
- Set Entry zones into the venue
When selling seats, the display color of the seat is determined when the map is created. You can determine the color of the sold seat by either:
- The Sales Promotion group used to sell the seat
- The Price Code used to sell the seat
|
If you add/change Map Display Letters on a Sales Promotion, you may want to update the map colours as described below. If you do not, the standard sold color of a yellow background having a text color of black will occur for the new/changed items. |
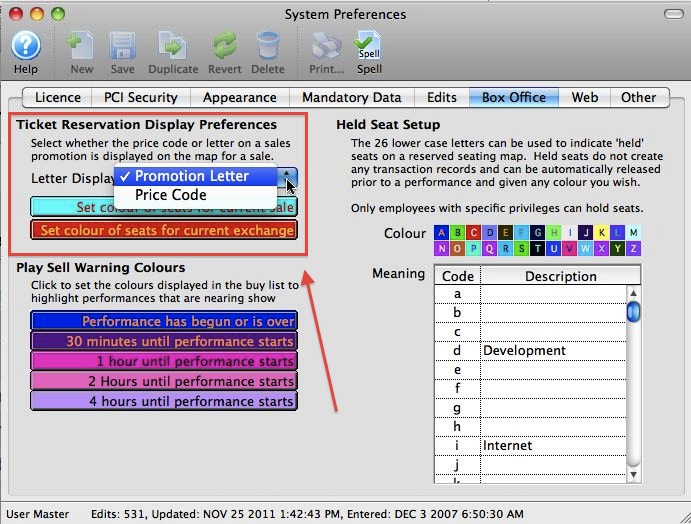 The setting that determines which parameter the colour will be based on is found in Setup -> System Preferences -> Box Office tab, in the Ticket Reservation Display Preferences area.
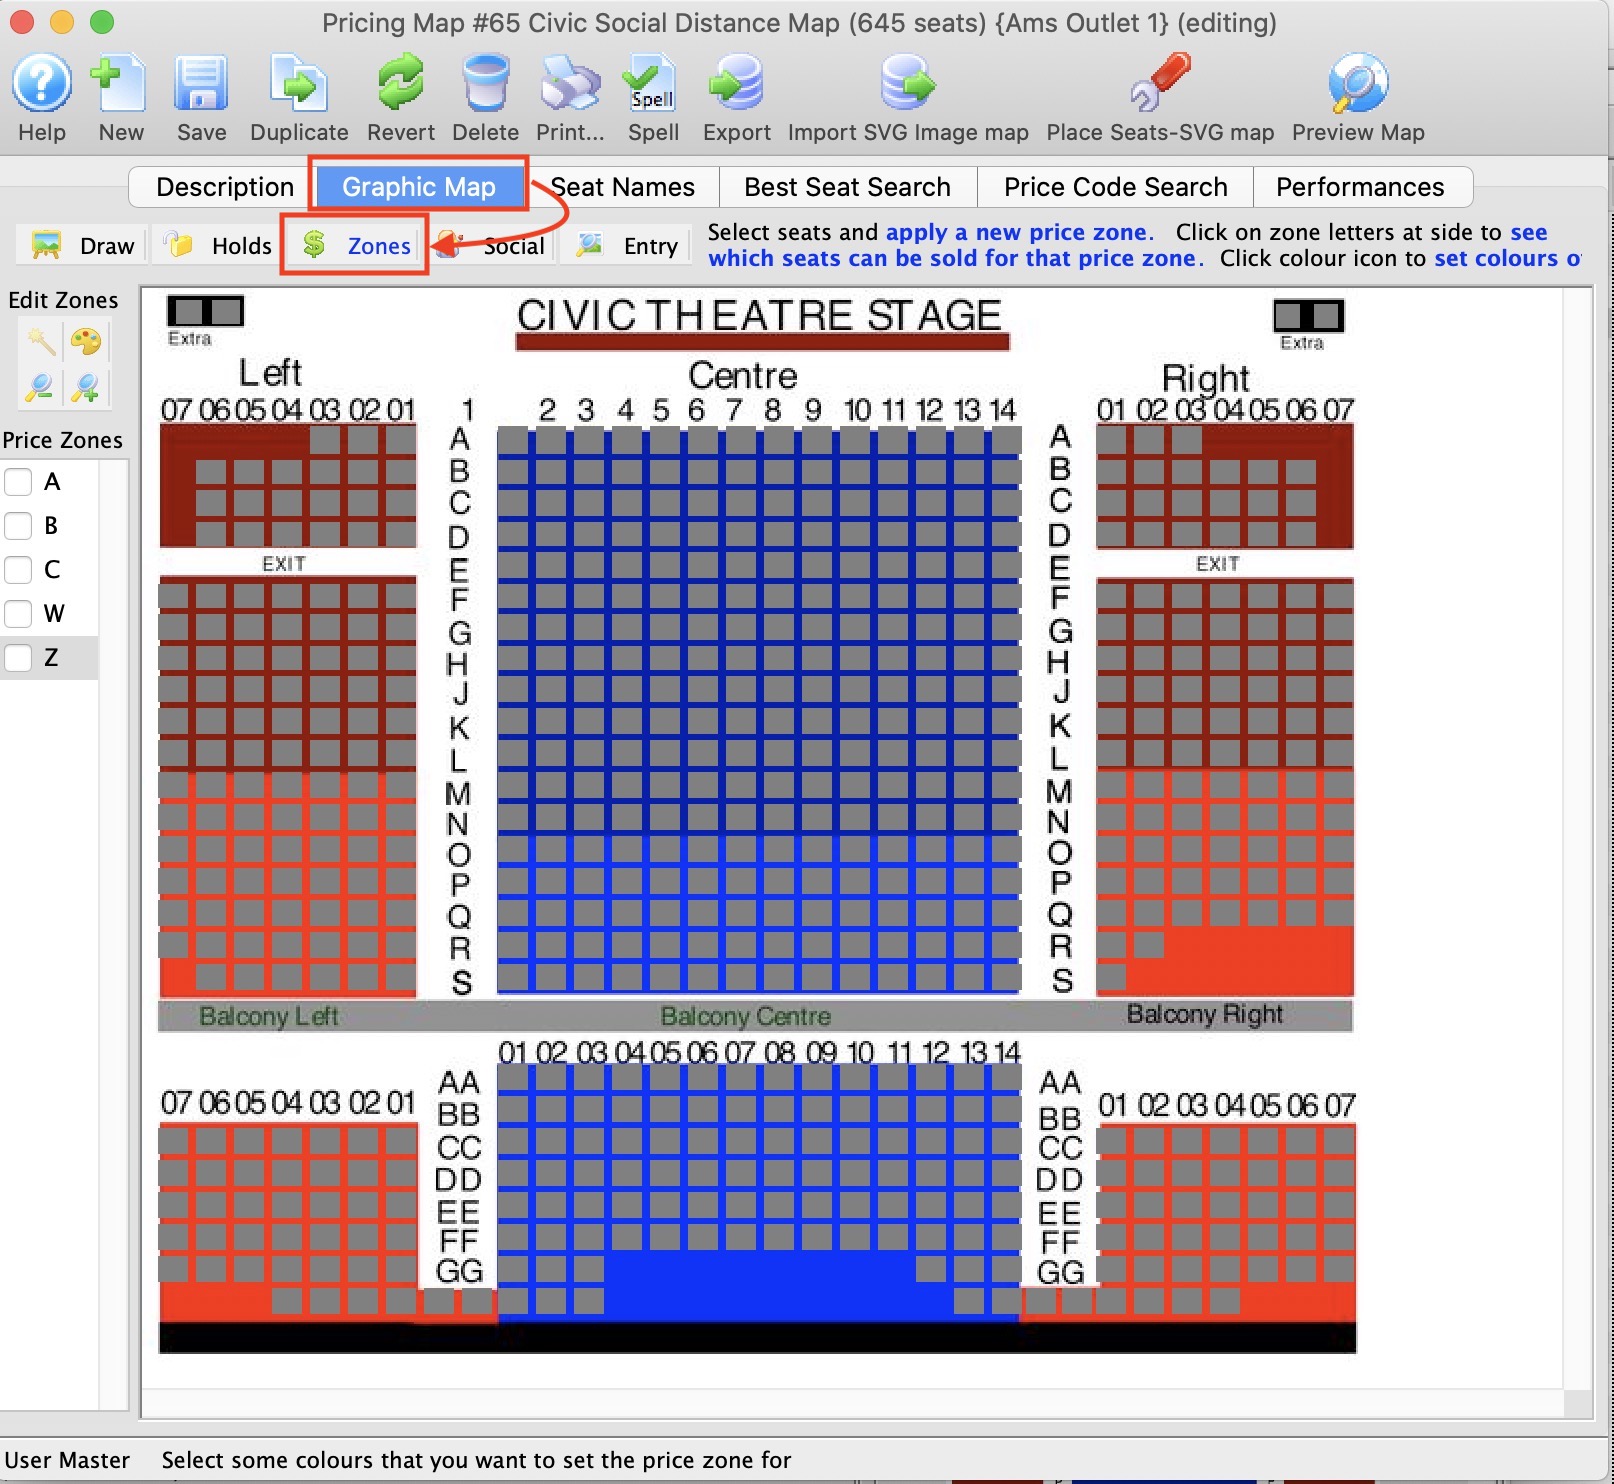
Click Zones under the Graphic Map tab
Initially, when you show the Pricing Zones on the map, all the seats are displayed as grey
To set the colours for sold seats:
- Click the colour button at the top right corner of the tool bar to change the colours. Theatre Manager gets all the letters from the price codes or sales promotions (depending on what you show on the map) and places them in a random fashion on the map.
- Click on a seat to change the color for that Sales Promotion Letter/Price Code when that letter is displayed on the map in sale mode.
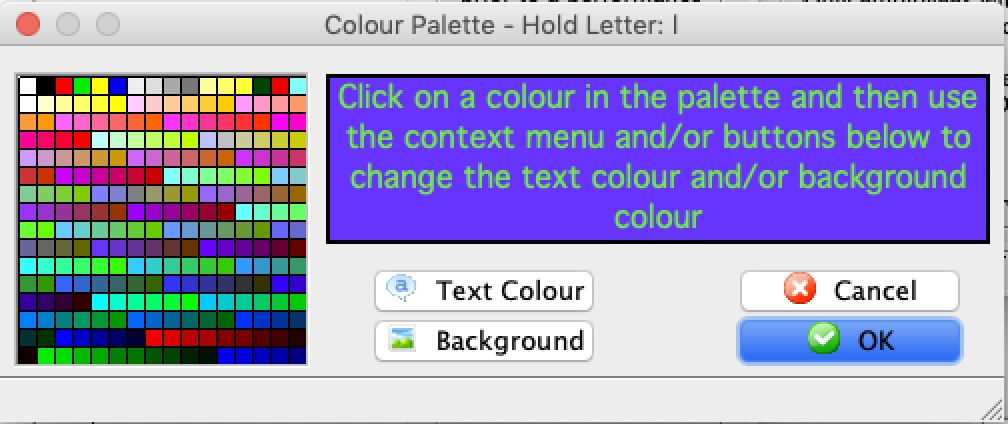
- Choose a colour from the colour palette.
- Click
 to finish 'pick' mode. All seats will return to gray.
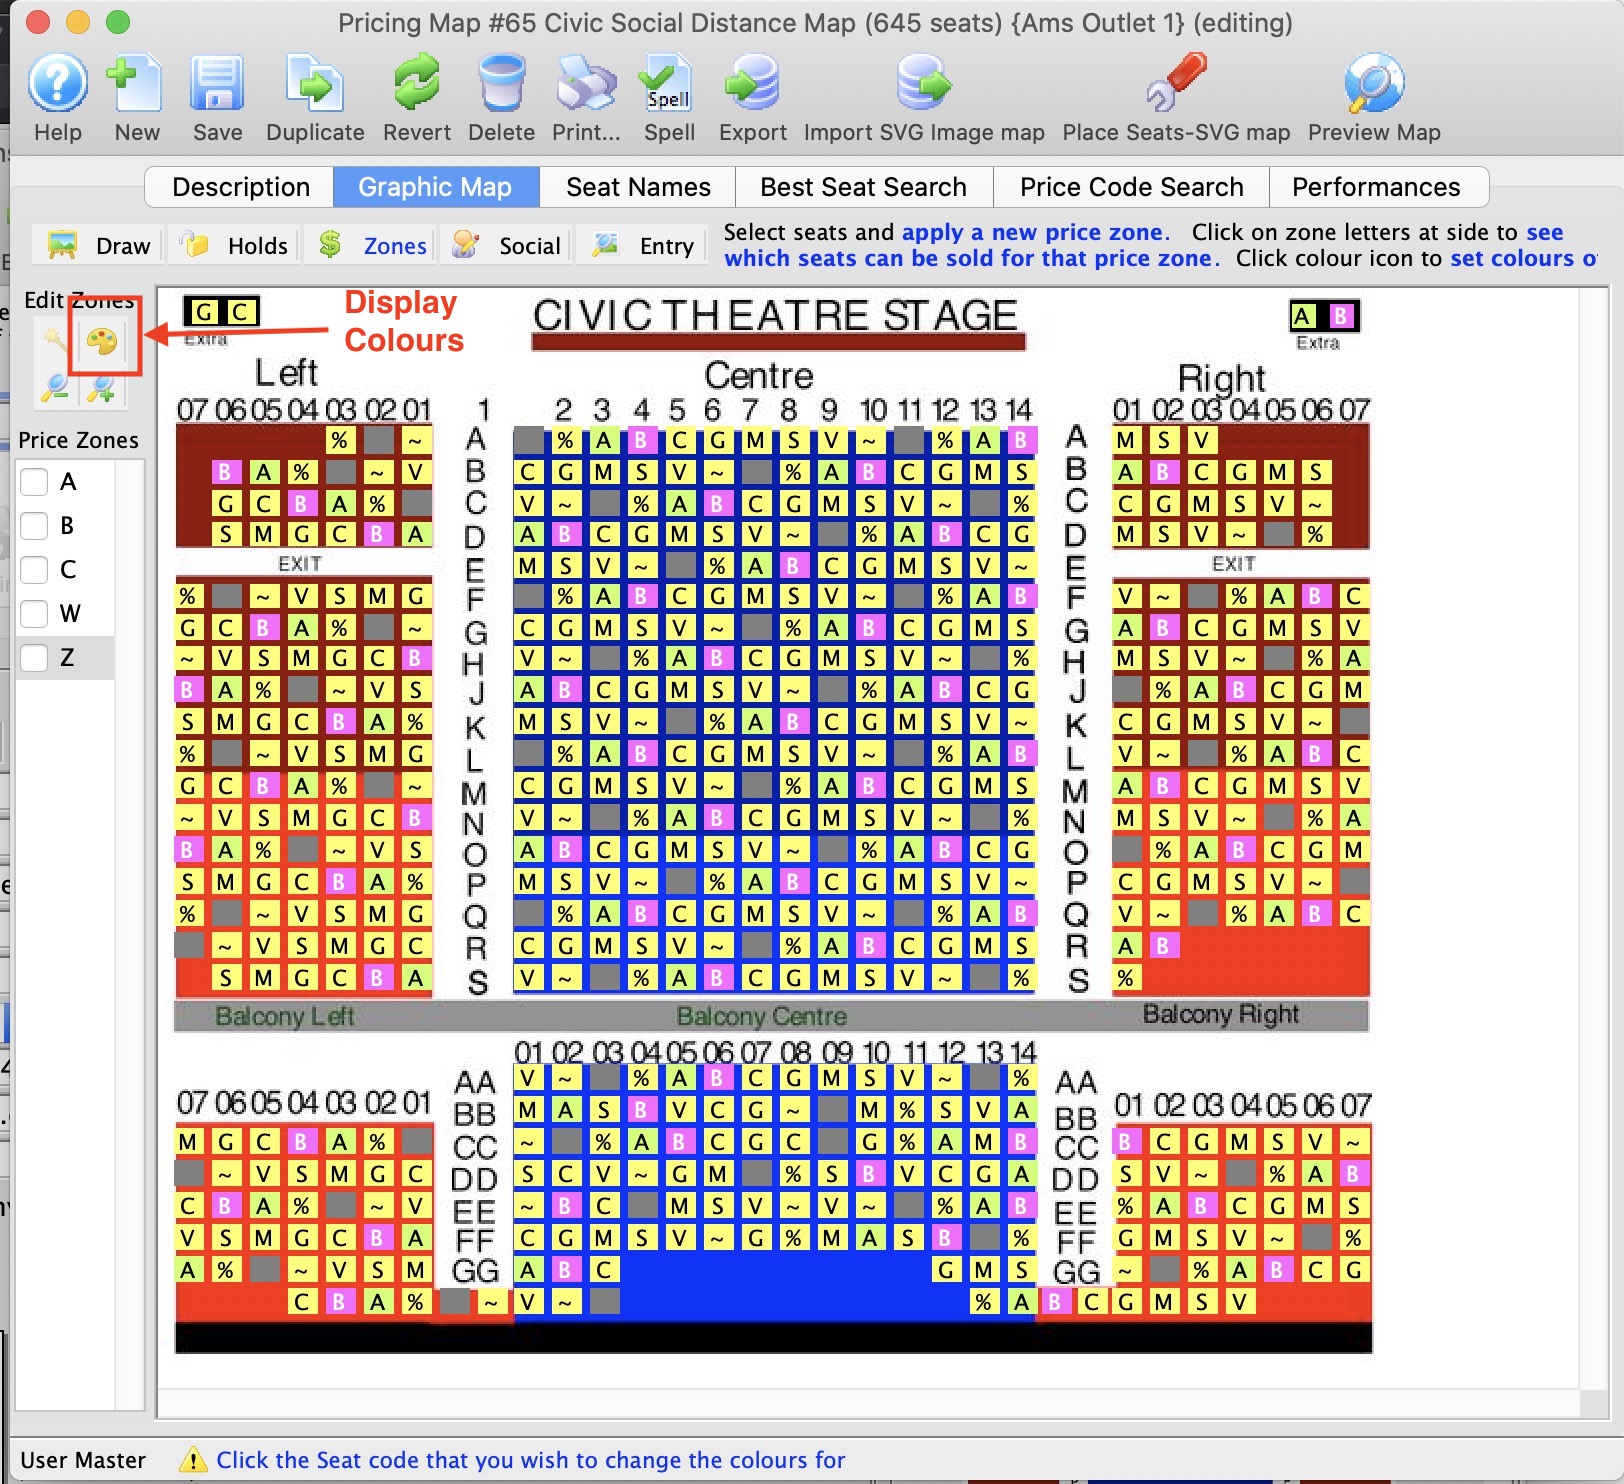
You can use the same process to change the 'unsold' seats from their default gray to another color. Simply click on a gray seat while in 'Pick' mode and set the color to your desired choice.
The actual colors are not visible to the user until the seat is sold, even though it is set in design mode.
Creating the Logical Seat Order - Step 3
Once you have placed all the seats on the map, the next step is to set those seats into a specific order so that the system can assign them the physical seating descriptions.
Each seat has its own number called a logical seat. The logical seats start numbering at 1, and continue through to the physical number of seats in the theatre. This is analogous to having a serial number stamped under each seat.
Since there are no two theatres, arenas, or performance spaces that are exactly alike, it is very difficult for Theatre Manager to automatically know what the seat names will be in the real world. Each seat in the Map is assigned a logical seat number, and those numbers can be arranged as needed. Once they are in a sequence that is easy to predict, each logical seat number is assigned a name. For example:
- Logical Seat # 1 would really be called Section Right, Row A, Seat 1.
The "serial numbers" just need to be arranged sequentially, and then named in the same sequence.
- Click the 123 button on the left of the map.
This shows each logical seat number, in the order that the seats were laid down. The number might be difficult to see, depending on the resolution of the monitor. Zoom in on the map for a closer view or hold the mouse over a seat to see its logical seat number.
- Select a section of seats to reorder.
This is done by clicking the mouse outside of a section of seats, holding down the mouse button and dragging a box around the section. Hold the Shift key on the keyboard while dragging a box to select multiple sections.
If there are multiple sections in the space, it may be easier to reorder the sections one at a time. If the space is arranged in rows and columns, and is roughly rectangular, it can be reordered all at once.
The reorder routine works horizontally and vertically, so seats must be in even rows and columns to work correctly. If a seat is above another seat, it will be assigned a non-sequential number based on the direction that is being reordered from.
For venues that have seating on angles, each row may need to be reordered individually to ensure each seat within each row gets the next sequential number.
- Click the Reorder button.

- Enter the first seat number for the section being reordered.
If reordering the first section, start with seat # 1. If reordering a section, after having already reordered other sections, make sure the seat number is the next sequential number from the last seat in the section previously reordered. This will ensure logical seat numbers are not taken from seats that have already been reordered.
- Decide which direction to reorder the seats.
Seats can be reordered starting in one corner, horizontally then vertically, or vertically then horizontally. Select the starting point from the sets of radio buttons surrounding the yellow square. The note inside the yellow square will indicate the direction Theatre Manager will sort the sequence.
- Click the Reorder
 button.
- Repeat steps 2 through 6 to reorder any other sections.
Once the seats have been reordered, you are ready to begin naming the seats. For more information of naming seats click here.
|
A few handy tricks when setting the Logical Seat order:
|