REST API Overview
- web developers to augment your main marketing web site and pull data from theatre manager. This data could be used to show upcoming events (eg icons, text, dates, times, on sale status, etc)
- selected employees to pull specific data or aggregated date for analysis
- producers or other external companies that are enabled to see some data for their events.
The data can be delivered in a number of formats like plain text, (tab and comma delimited), JSON, EXCEL, HTML and some graphical formats.

 |
The data from the REST api can be used on a marketing web site to push the user over to the bootstrap based commerce pages provided by Arts Management, using links, as described in this documentation page. |
Requirements for REST API access
- At least one web sales listener enabled in the Director.
- The web listener is the process that responds to the API request.
- Web sales are not required to be enabled to the outside world - but if you do online tickets sales, you need to be aware that extensive use may require additional web listener processes.
The person needing REST API access must be set up as an employee in the database - this means only specified employees can have access.
- and have the checkbox REST API: enable access via url on the employee access tab
- the employee does not neccessarily have to be able to log into Theatre Manager desktop, but they:
- must have an employee record
- must not be resigned
- can have any user level from:
- no access to normal access, or
- you can set the user to API only which means they cannot log into TM but can use the REST api.
- Permissions in the Employee Data tab to indicate which data can be accessed via the REST api.
- Have logged into the online web sales site and created an account, which requires:
- at least one email address associated with their patron account (multiple emails for an employee are ok)
- and a password that allows them log into the web store
- A workstation, browser, or toolset that is capable of connecting using TLS 1.2 or later for security. If you can't connect, try latest firefox, chrome and/or on windows 10 or some smart phone.
- (optional) Consider requiring complex passwords via a setting in system preferences. online - which will also affect your regular patrons as well.

Note: At this time, the web store password is probably different than the employee's Theatre Manager login account since they can set it themselves online. We recommend informing staff who are given access to the REST API to use complex passwords (or if you wish, make it mandatory). Since most people will not the API enabled for their employee account, they would be largely unaffected.
Logging in to the REST API
- As a human using a browser or other program to view data. You will be prompted for a user id and password as per the help page.
- From a program which submits requests and manages the data that returns. Current options are HTTP Basic Authentication or JWT
Logging in to the REST API From Browser
 |
The email address and password for the REST APR are the SAME as the email address and password for logging into the ticket web site.
For first time users:
|
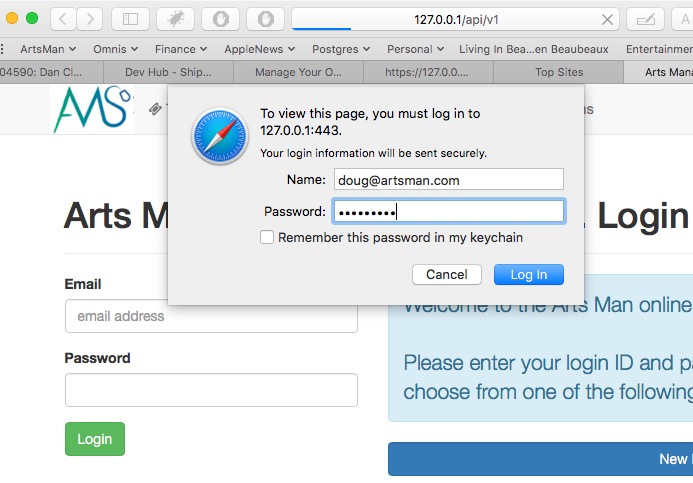 To begin using the API from a program or a browser, you need to start the login process. To do so send an https request that looks like:
https://tickets.yourvenue.org/api/v1
all examples use https://127.0.0.1/api/v1 as the example. please replace with your web site URL.
The server will respond with a login screen where you provide:
- The email address you use to log into the web site such as
myemail@venue.orgNote: if you have multiple logins in an outlet version of TM so there is ambiguity as to who you are, you may need to type your email address followed by:
- ;outlet=xx such as
myemail@venue.org;outlet=xx-and/or- - ;patron=yy such as
myemail@venue.org;outlet=xx;patron=yy
- ;outlet=xx such as
- the Password you use for online sales
If you get your password wrong, you will see the login window again.
 |
 If you get your password correct, but are not enabled to use the API in your employee preferences, you will see a message similar to the one of the right that says API Access Disabled
You will need to enable API access to continue. |
Successful access to API
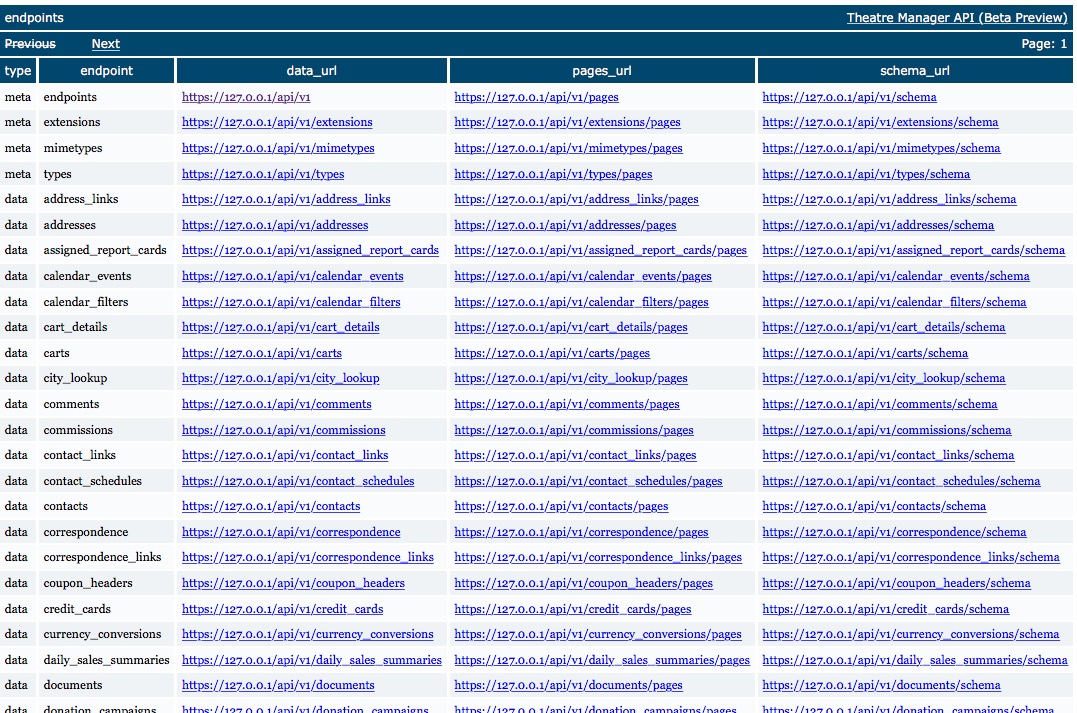
If you see the window below showing a list of the top level end points, you have successfully accessed the API.
Logging in to the REST API As Programmer
- HTTP Basic Authentication The httpWatch web site describes the general process. Since it all occurs via TLS, this is quite secure
- JSON web Tokens (JWT). Refer to the wikipedia description for more info.
Employee Permissions Affect Endpoints
 |
 Just having access to the rest api does not mean you can see the database. The permissions set for the employee in the Data Tab in employee preferences limit the data which the employee can see in the API endpoints.
If you see the message to the right, it could simply mean no permission has been provided as shown below. |
REST API Top Level Endpoints
- will give you specific information that relates to the link. eg there is a patron end point that provides information about the patron and a ticket end point that focuses on ticket information
- can be modified to only select specific columns
- can have a sort order provided and data will return in that order
- can have a query provided to only select data that you want
- can also show some associated data (eg ticket date can show the patron, event and performance it is for
The end points are show in this manner so that they are discoverable. This means you can follow any one of them and see what kind of information it provides and can discover where it will lead.
 |
Remember to replace 127.0.0.1 in the example urls https://127.0.0.1/api/v1 with your web site URL (eg tickets.yourvenue.org) |
 |
https://127.0.0.1/api/v1 will give you the top level endpoints for the entire schema. |

Key columns in the top level endpoint list
| Column | Purpose |
| type |
This is one of
|
| endpoint |
This is the endpoint name that can be added to the base url of the API to show the data. They are generally self describing and are case-sensitive.
For example, the endpoint carts will provide a list of shopping carts when added to the URL such as |
| data_url | The data_url is provided so that you can easily click on the endpoint and see data from the database, if you are permitted to see that data within the Theatre Manger database as an employee. For the carts endpoint, the data_url is the same as above, i.e. |
| pages_url |
When the word pages is added to the data_url, the API will send the data back as pages of information with a default 25 lines of data per page. You can use next and previous to page through the data. For example
https://127.0.0.1/api/v1/carts/pages You can navigate directly to a page of information by adding a ?page=x parameter (other parameters are discussed later). For example: |
| schema_url |
If the word schema is added to the data_url, the API will provide a description of the columns in the particular endpoint. Using the carts endpoint as an example, the URL will be:
https://127.0.0.1/api/v1/carts/schema Example of schema descriptions for Carts:
|
| apps | Shows the version of the applications supported by the current TM server |
REST API accessing images
However, if you would like the images that are on web pages, please refer to Accessing Images. With this you can show images that are in Theatre Manager on other web pages just be referring to them with the Theatre Manager build in URL.
If you are going to use those images in a front end marketing web site (eg wordpress or what have you), then we also suggest creating an image cache that is refreshed periodically to help lower the actual traffic to the commerce part of the web site.
REST API Output Formats
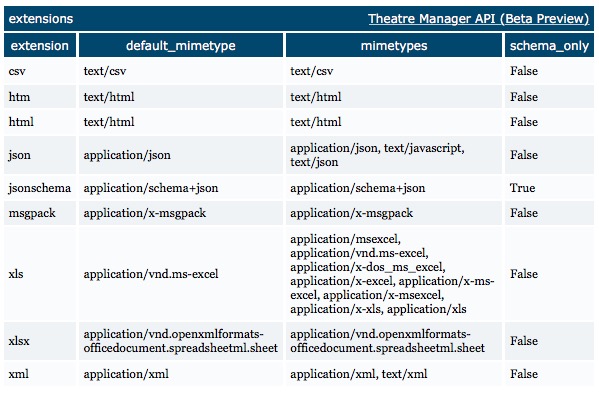 The default output format for the REST API is in a human readable and navigable html format. That is not always the easiest for a web developer to deal with in a program, so the API offers a number of output formats that can be viewed using https://127.0.0.1/api/v1/extensions which produces a list like the one to the right.
Some example output formats are below and they may be supplemented as need be:
- csv - comma delimited values
- html - output from the database viewable in html format (the default)
- json - data is delivered in json format, probably the best for programming
- xls/xlsx - data is sent in excel spreadsheet format, probably best for subsequent analysis by end users
- xml - also a programmer based format
Using one of the other output formats
It is very easy to use one of the other output formats. For example, to request that the output be in json format, simply add .json to the url.
After logging in to the REST API, try the following examples to get the sample page above in different formats:
- https://127.0.0.1/api/v1/extensions.json
- https://127.0.0.1/api/v1/extensions.xls (note, this will download a spreadsheet)
- https://127.0.0.1/api/v1/extensions.xml
This applies to all URL's in the REST API - using carts for example:
REST API Sorting data
You can:
- add multiple sort fields, separated by a '+' as long as the fields are recognized for the endpoint
- sort in descending order by prefacing the field name with a '-'.
Examples of sorting data are:
- https://127.0.0.1/api/v1/patrons?sort=company - sort patron data by company
- https://127.0.0.1/api/v1/patrons?sort=-company - sort patron data by company in DESCENDING order
- https://127.0.0.1/api/v1/patrons?sort=last_name+first_name - sort patron data by last name, then first name
- https://127.0.0.1/api/v1/patrons?sort=last_name+-first_name - sort patron data by last name, then first name in DESCENDING order
- https://127.0.0.1/api/v1/events?sort=year+title+-first_performance_date - sort event data by year, title and then first performance date in DESCENDING order
REST API Querying for Specific Results
- the Unique iD which allows you to access a specific record in any table using it's unique ID number.
- A Query which can contain multiple search parameters which provide restrictions that limit the rows of data that are returned.
- the page=xx parameter to provide a limited subset of data of approximately 25 lines. The data does not come back in any particular order unless a sort parameter is also given.
REST API Accessing a Specific Record using ID
Some examples of accessing a specific record are:
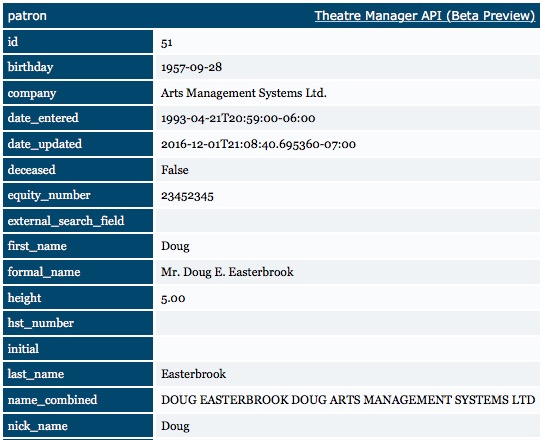
- https://127.0.0.1/api/v1/patrons/51 - will show you data for patron 51 from the patrons table (see example to the right)
- https://127.0.0.1/api/v1/patrons/51.json - will show you data for patron 51 from the patrons table (in json format)
- https://127.0.0.1/api/v1/events/85 - will show you data for event 85 from the events table.
REST API Query Parameter
- a condition which is a field name followed by a ':', followed by the search value, with or without quotes.
- multiple conditions can be used by putting a '+' between each of them
- single or double quotes are required if the value contains a space
Format
q=first_name:john+last_name:smith+-company:ibm
You can:
- add multiple search conditions, separated by a '+' as long as the fields are recognized for the endpoint
- where each each search condition is generally in the form field:value
- negate any query by prefacing the field name with a '-'. Example a <= search, when negated, becomes >
- put () around searches if you want to set the order of precedence. Example: (field1:value1+field2:value2)|(field3:value3+field4:value4)
Search Parameters by Variable Type
Conditions used in queries vary based on variable type. The following is a generalized list:
| Variable Type | parameter in URL | Meaning |
| Numeric | field:value | field equals value (null can be used as value) |
| field:>value | field greater than value | |
| field:>=value | field greater than or equal to value | |
| field:<value | field less than value | |
| field:<=value | field less than or equal to value | |
| field:value1..value2 | field must be between value1 and value2 | |
| field:[value1, value2, value3] | field must be one of value1, value2 or value3
No space is required because fields are numeric |
|
| Character | field:=value | field equals value using case sensitive match (null can be used as value).
eg first_name:=Bob will find Bob, but not bob |
| field:='value' | field equals value using case sensitive match and where value can have spaces
eg first_name:='Bob and Betty' will find Bob and Betty, but not bob And Betty |
|
| field:*value* | field contains value where * is a wildcard that marches any characters (case insensitive) before and/or after value.
eg first_name:*bob* will find Bob, bob, bobby, and bebob |
|
| field:value | field is like the value using case insensitive search
eg first_name:bob will find Bob, bob but not bobby |
|
| field:'value' | field is like the value using case insensitive search where value can have spaces
eg first_name:'bob 5' will find Bob 5, bob 5 but not bobby |
|
| field:[value1, value2, value3] | field is one of value1 or value2, or value3 (case insensitive).
eg first_name:[bob, ted, alice] will find bob, Bob, ted, tED, AliCe note: a space is required after each comma |
|
| field:[value1*, value2*, value3] | field is one of value1 or value2, or value3* (case insensitive and value3 starts with)
eg first_name:[bob, ted, ale*] will find bob, Bob, ted, alex, alecia, alexandra note: a space is required after each comma |
|
| field:=[value1, value2, value3] | field is one of value1 or value2, or value3 (case sensitive).
eg first_name:=[Bob, Ted, alice] will find Bob, Ted, Alice, bur not bob, ted or alice |
|
| field:[value1, value2, value3] | field is like one value1, value2, or value3 (case insensitive). This uses postgres 'ilike' comparator
eg first_name:[Bob, Ted, alice] will find Bob, Ted, Alice, bob, ted, alice, teddy, bobbie, boBBie, fested ... note: a space is required after each comma |
|
| search:["value1", "value2"] | does a postgres text search on the data in the endpoint.
eg search:["Bob", "art"] will find Bob, Bobbie, Art and Arts Management Systems (searches in all name and company fields"). |
|
| Boolean | field:value | field equals, which is either true, false or null |
| Date | field:value | field equals value, value specifed in yyyy-mm-dd format, or null |
| field:>value | field greater than value in yyyy-mm-dd format | |
| field:>=value | field greater than or equal to value in yyyy-mm-dd format | |
| field:<value | field less than value in yyyy-mm-dd format | |
| field:<=value | field less than or equal to value in yyyy-mm-dd format | |
| field:value1..value2 | field must be between value1 (yyyy-mm-dd format) and value2 (yyyy-mm-dd format) | |
| field:[value1, value2, value3] | field must be one of value1 (yyyy-mm-dd format), value2 (yyyy-mm-dd format) or value3 (yyyy-mm-dd format) |
Packed Seq Fields/Packed Lists
These are special de-normalized lists of record connections. Examples of these fields are 'bought for plays', 'belongs to mail lists', 'associated with tags' where the specific record can be associated with multiple other records. A patron can belong to many mail lists. A play, donation campaign, or patron can be associated with many tags and searching for records with these markers can provide access to an arbitrary group of data, such as searching for all events with a tag.
| Packed Lists | field:[value1, value2, value3] | field is one of value1, value2 or value3 where all values are internal record numbers that you would have found by some other means.
eg tag_ids:[5,6,7] will find all records with tag ids of 5, 6 or 7 |
| field:=[value1, value2, value3] | field contains all seq #s of value1, value2 or value3 where all values are internal record numbers that you would have found by some other means.
eg tag_ids:=[5,6,7] will find all records marked with tag ids of 5, 6 and 7 |
Some Examples using the q= parameter are:
REST API Using Pagination
A quick way to see a sample of data is to use page=1. When you display a page, you will have next and previous on the html page so that you can navigate to next or previous pages easily.
There are some parameters that you can use to limit the amount of data:
- page=XX - will show the XXth page of data, based on a default page size of 25 rows of data per page. For example, page=2 will show rows 26 to 50 data
- page_size=YY - alters the page size from 25 rows of data per page to YY rows of data per page. It can be used in con with the page=XX parameter.
- page_size=all - removes any page size limit for this query when displaying via html
- split_size=ZZ -
- page_size=all&stream=1 - is a very special combination of parameters that creates a continuous stream of all data and returns it from the API as fast as it can. Any program requesting data using this parameter needs be be able to parse the data in real time, as fast as it can because it could return a rather large set of data. It should not be used for viewing data.
Examples using pagination to limit results:
- https://127.0.0.1/api/v1/patrons?page=1
page 1 of the patron table, rows 1 to 25 - https://127.0.0.1/api/v1/events?page=2
page 2 of the event listing, which is rows 26 to 50 of the data - https://127.0.0.1/api/v1/events?page=2&page_size=10
return page 3 of the event data, paginated at 10 rows per page (effectively this is record 21 to 30) -
https://127.0.0.1/api/v1/patrons/pages?include_first&include_last&sort=last_name+first_name&only=page+page_rows+row+page_url+first_name+last_name
sort the patron table by last name/first name and then, in a summary table, show the first and last person in each page group.
REST API Selecting Columns
Each column you want to see in your output is separated with a + (plus sign)
Examples:
- https://127.0.0.1/api/v1/patrons?only=first_name+last_name+company - show first, last and company from the patron table
- https://127.0.0.1/api/v1/events?only=id+year+title+total_sold+sales_notes - show id, year, title, total_sold (to all performances) and sales notes from the event
REST API Adding Alias Names to Column
patron.id:patno renames patron.id to patno on output
Examples:
-
https://127.0.0.1/api/v1/contact_links?only=patron.id:patno+patron.first_name:fname+patron.last_name:lname+patron.date_updated:updated+contact.contents:email
renames:
- patron.id to patno
- patron.first_name to fname
- patron.last_name to lname
- patron.date_updated to updated
- contact.contents to email
-
https://127.0.0.1/api/v1/contact_links?only=patron.id:patno+patron.first_name:fname+patron.last_name:lname+patron.date_updated:updated+contact.contents:email+contact.type_id:type&q=contact.type_id:2
adds
- an alias for the contact.type_id to be type and
- searches for only email addresses using q=contact.type_id:2, where type_id = 2 means emails
-
https://127.0.0.1/api/v1/contact_links?only=patron.id:patno+patron.first_name:fname+patron.last_name:lname+patron.date_updated:updated+contact.contents:email+contact.type_id:type&q=contact.type_id:2+patron.date_updated:>='2016-01-01'
adds a compound query:
- q=contact.type_id:2+patron.date_updated:>='2016-01-01'
- looking for email addresses for patrons that were updated after jan 1, 2016
-
https://127.0.0.1/api/v1/contact_links?only=patron.id:patno+patron.first_name:fname+patron.last_name:lname+patron.date_updated:updated+contact.contents:email+contact.type_id:type&q=contact.type_id:2+contact.date_updated:>='2016-01-01'
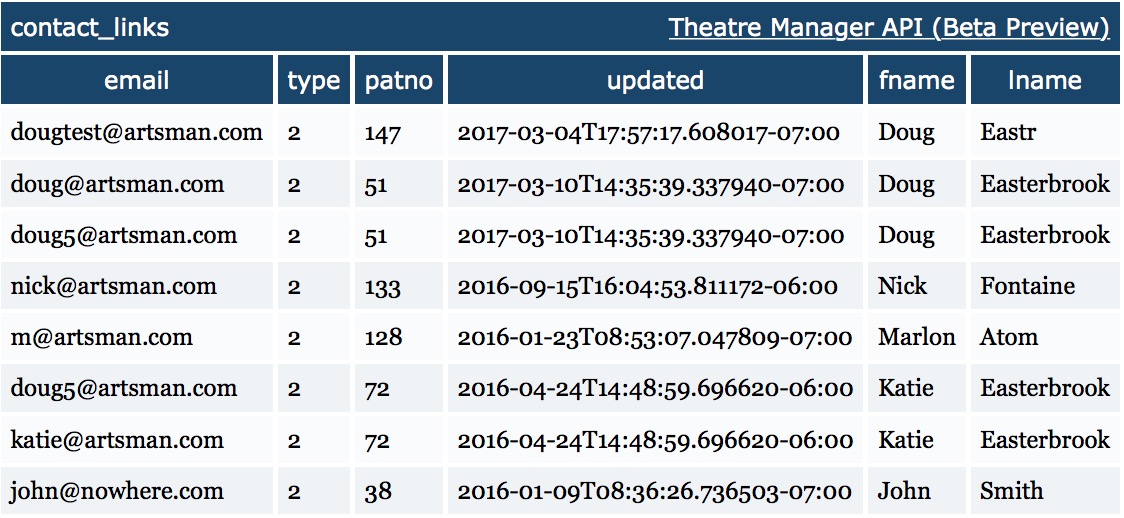
subtly changes the previous example by:
- using a compound query q=contact.type_id:2+contact.date_updated:>='2016-01-01'
- looking for email addresses where it was the email address that was updated after jan 1, 2016 since it is looking for when the contact.date_updated changed.
REST API Adding Relationships to Other Tables
The starting place is finding what data is related to a particular endpoint using the related feature. The following shows:
- https://127.0.0.1/api/v1/patrons/related - relationships to any patron record
- https://127.0.0.1/api/v1/patrons/51/related - relationships for a specific patron record (#51) which can be followed to see data for that patron.
- https://127.0.0.1/api/v1/marketing/related - relationships for a particular marketing record for the patron so that you can retrieve things like the primary email address, phone, or physical address
Examples are:
- https://127.0.0.1/api/v1/performances?q=perform_datetime:2016-01-01..2016-12-31&include=event
In addition to data from the performance endpoint there is now data from the event endpoint on the end of each row of data. - https://127.0.0.1/api/v1/performances?q=perform_datetime:2017-01-01..2017-12-31&only=event.title+event.show_code+series_code+perform_datetime
Shows event title, show code, series code and performance date/times for performances between 2017-01-01 and 2017-12-31 - https://127.0.0.1/api/v1/performances?q=perform_datetime:>2016-01-01&only=event.title+event.show_code+series_code+perform_datetime+venue.name+venue.address_line_one+venue.city
Shows events title, show code, series code and performance date time for performances after 2016-01-01 and adds the name, address and city of the venue from that relationship - https://127.0.0.1/api/v1/performances.csv?q=perform_datetime:>2016-01-01&only=event.title+event.show_code+series_code+perform_datetime+venue.name+venue.address_line_one+venue.city
Same as above, except in CSV format - https://127.0.0.1/api/v1/performances.json?q=perform_datetime:>2016-01-01&only=event.title+event.show_code+series_code+perform_datetime+venue.name+venue.address_line_one+venue.city
Same as above, except in JSON format - https://127.0.0.1/api/v1/marketing?only=patron.first_name+patron.last_name+patron.company+primary_email.contents+primary_address.address_line_one+primary_address.city
Show patron names and the primary address and email.
REST API - showing relationships
https://127.0.0.1/api/v1/orders/related
Other Examples:
- https://127.0.0.1/api/v1/orders/related
Relationships for orders - https://127.0.0.1/api/v1/patrons/related
Relationships for patrons - https://127.0.0.1/api/v1/carts/related
Relationships for all cart related items - https://127.0.0.1/api/v1/orders/related?group=type+refers_to&agg=count&sort=-type
Count of other tables that refer to orders by adding aggregate, sort and grouping functions
REST API summarizations, aggregations and groupings
group=round(date_bought,1,month):purchase_date&agg=count+sum(total_cost)+avg(total_cost)
The group= allows you to summarize by text, number, boolean and date fields. You can also provide a function to summarize by parts of a date field.
Examples of the group= clause:
- group=last_name - group patrons for summary by last name
- group=company+last_name - group patrons for summarization by company and last name
- group=date_bought - group the tickets by ticket the date they were bought - which may be of limited use as it contains time stamp
- group=round(date_bought,1,month):purchase_date - group the tickets by date bought, but rounded to monthly increments. You can change a date grouping to be rounded to any interval, like 10 minute intervals
Examples of the agg= clause:
Query Breakdown:
Params are broken up by the ampersand &
- Only sold tickets: q=-date_bought:null
- Group by the purchase month: group=round(date_bought, 1, month)
- Name it purchase_date
- For each group aggregate the count of tickets, the total cost of tickets, and the average cost of each ticket: agg=count+sum(total_cost)+avg(total_cost)
Examples
- https://127.0.0.1/api/v1/tickets?q=-date_bought:null&group=round(date_bought,1,month):purchase_date&agg=count+sum(total_cost)+avg(total_cost)
retrieve all sold tickets (date bought is not empty) and aggregate the count, total cost, average cost into groupings of date_bought, rounded by month
REST API full syntax
- [ item ] - means that this part of the syntax is optional
- [item, ....] - means that the item can be repeated
- item1 | item2 - means you can use either Item1 or Item2 in the syntax
https://RestServerURL/api/v1 [/endpoint]
Putting it all together
the following examples show some of the power of the api to get exactly what you want.
- https://127.0.0.1/api/v1/patrons?only=first_name+last_name+company&sort=last_name+first_name
retrieve first, last and company fields from the patrons endpoint and sort by last name, then first name - https://127.0.0.1/api/v1/patrons?only=first_name+last_name+company&sort=last_name+first_name&q=-last_name:smith
retrieve only first, last and company from the patrons endpoint and sort by last name, then first name. use a query to eliminate any patron with the last name smith from the list. - https://127.0.0.1/api/v1/patrons?only=first_name+last_name+company&sort=last_name&q=last_name:smith
retrieve first, last and company from the patrons endpoint, sort by last name. use a query to eliminate any patron with the last name smith from the list. - https://127.0.0.1/api/v1/patrons?only=first_name+last_name+company&sort=last_name&q=last_name:smith
retrieve first, last and company from the patrons endpoint, sort by last name only searching for people called 'smith' and exporting as JSON format - https://127.0.0.1/api/v1/carts?q=status_id:4&only=date_checkout+order_id+patron_id+total_cost+order_notes&sort=-date_checkout
get a list of all checked out shopping carts (status_id=4) and sort them in descending order by checkout date
REST API Some Fun Queries:
A List of Ticket for an event

This shows a list of tickets purchased for an event, the people who bought it and the order total.
- The endpoint is tickets since we need to be looking for tickets, since patrons, performances, events and orders are all related to the purchased ticket https: //127.0.0.1/api/v1/tickets?
- The query is : patron >0, order >0 and event 61 or q=patron_id:>0+order_id:>0+event_id:[61]
- the fields are: event title, series, date, patron id, name, order total and balance
only=event.title+performance.series_code+performance.perform_datetime+patron.id+patron.first_name+patron.last_name+patron.formal_name+order.id+order.total_amount+order.balance
- Full REST API query
A List of orders for an event

This is a summary of people buying tickets for an event - the purchasers are grouped by order.
- The endpoint is tickets since we need to be looking for tickets, since patrons, performances, events and orders are all related to the purchased ticket
https: //127.0.0.1/api/v1/tickets?
- The query is : patron >0, order >0 and event 61 or q=patron_id:>0+order_id:>0+event_id:[61]
- the fields that are grouped are: event title, series, date, patron id, name, order id, somewhat similar to the above query
group=event.title+performance.series_code+performance.perform_datetime+patron.id+patron.first_name+patron.last_name+patron.formal_name+order_id
- however, some data that is repeated can best be shown if it is aggregated such as:
- sum of ticket quantity and total cost (since this is per ticket values)
- minimum of total amount and order balance (we use the minimum to get the value once per order)
- Full REST API query is:
Primary phone numbers for a patron with locations

Accessing Calendars From Web Site
- All events that are currently in the future
- Events that a patron has purchased tickets to - which is restricted to the patron who purchased the tickets
- Volunteer/Staff Activities that a patron has been assigned to
 |
ICS files are convenient ways to share calendar information and can be done in two ways:
|
Subscribing to External Calendars
The following links may assist you to link or subscribe to a Theatre Manager ICS calendar using you calendar. IF the links are not correct or ut of date, please use Google to search for Subscribing to calendars with ... to see if it helps.
Wikipedia publishes a list of calendar applications with ICS support. This might be helpful getting started with calendar integration.
 |
The subscriber to a calendar may have to set the refresh time in the calendar - See iCal example |
All Events in the Database
These include:
- ICS format - which can be imported into a web object that understands importing ICS files
https://tickets.yourvenue.org/TheatreManager/1/calendars/upcoming_events.ics
- full interactive web page - which might suitable for embedding in another web site or on your commerce web site
https://tickets.yourvenue.org/TheatreManager/1/calendars/upcoming_events?view=month&start=2018-07-01
The parameters are optional:
- view= can be one of: month (the default), week or list
- start=, if provided, should be in yyyy-mm-dd format. the default is this month.
- You can use a pseudo XML export format using the Export Events URL
- You can also use an event list export using the REST api. This is the only query that requires an API login since sales information could also be accessed
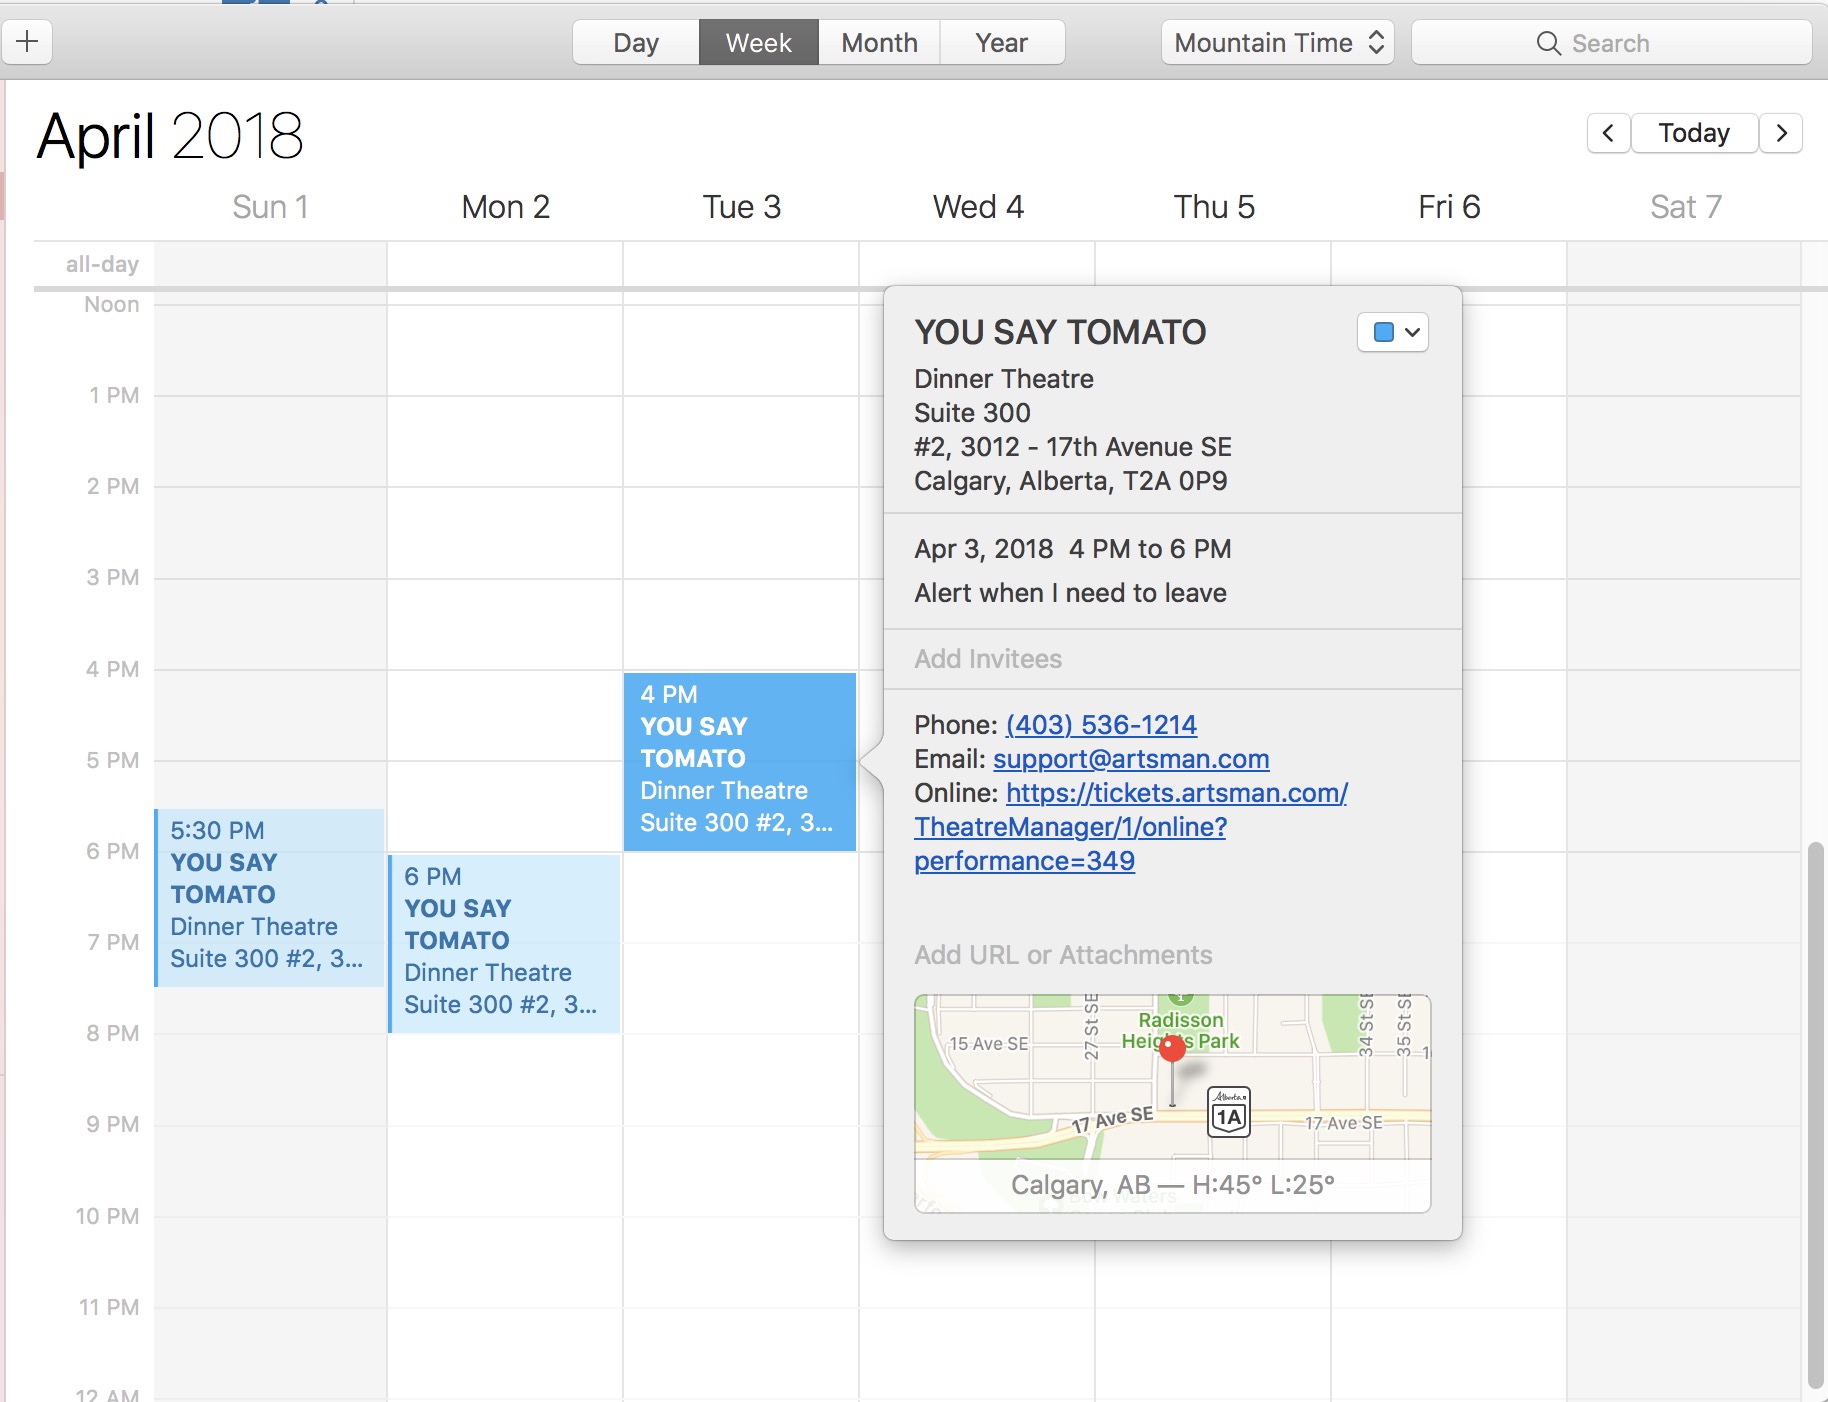
The sample calendar was pulled from our test database as an ICS file. It was opened in iCal to show the content:
- The date of the event
- The time that the event starts
- The duration of the event, based on the duration set in event setup->Marketing tab
- and in the detail, the person who downloaded the calendar can see the location, contact information, and a link to buy a ticket
Exporting Event Information for a marketing web site
 |
Please refer to the REST API introduced in Dec 2016. The REST API replaces this feature while providing more control over who can access data.
However, while exportevents still works on TM 10.07.xx, its use may be deprecated in the future depending on use. |
Exporting event lists
This feature (we suggest using the REST API going forward) can be used to export event details using an https request exportevents if you are using Theatre Manager's online sales. Online sales are a central location of data displaying details for upcoming events.
 |
This data can be used to feed web pages specific information, such as titles, dates, times and ticket availability (e.g. good, limited, sold out, etc.) of events. The data is presented in an XML style layout and can be customized so the tags are compatible with how you want them exported.
You can use the extracted information to publish data from TM into a custom calendar object and automate creation of buy now links. |
The address used to view the export is:
https://tickets.yourvenue.org/TheatreManager/1/exportevents (** deprecated)
NOTE: Refer to the REST API equivalent showing event id, name and sales notes.
where:- tickets.yourvenue.org is the name of your ticketing web site
is required - 1 is the outlet number at the site you normally use
- exportevents is the function you want the TM server to do
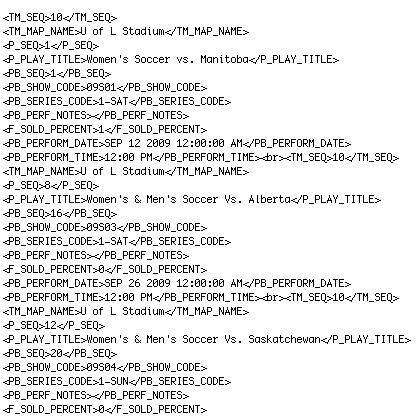
You can preview this information in a browser prior to programming a custom interface. To review the data, right click on the displayed list and select View Source. This will display the beginning and ending XML tags for each field and a <br> tag after each set of record rows. A sample of the data is below:
Formatting an Export
You can reformat data to appear in a different order. Fields can be removed or additional event and performance related fields added. Calculations can be set based on existing data to provide required information for customized fields. Some of the field references are:
TM_SEQ - Map Number
TM_MAP_NAME - Map Name
P_SEQ - Event Number
P_PLAY_TITLE - Event Title
PB_SEQ - Performance Number
PB_SHOW_CODE - Event Code
PB_SERIES_CODE - Performance Code
PB_PERF_NOTE - Performance Notes
F_SOLD_PERCENT - Percent of Seats Sold for this Performance
PB_PERFORMANCE_DATE - Performance Date
PB_PERFORMANCE_TIME - Performance Time
To alter the information exported, you need to edit rowTicketEventExportCustom.html
You can have have several variations of this page to be used for different exports. When a desired format is required, the page names can be altered so the required export is using the name rowTicketEventExportCustom.html.
The rowTicketEventExportCustom.html page is referenced by the TMticketsExportCustom.html page.
Customizing an Export
The export address can be altered to include or exclude certain information.
For example:
This export address will export only information for Event number 246 if it takes place in venue 18, is in the year 2012 and is available for sale online.
Additional options that can be added to the address are listed below:
&year=YYYY - displays the performances for the specific year where YYYY is the desired year
&event=X - displays the performances for the specific event where X is the event sequence number from Theatre Manager
&venue=Z - displays the performances for the indicated venue only, where Z is the venue sequence number from Theatre Manager
&abletosell=1 - displays ONLY the events available for sale online (this is the default if not supplied)
&abletosell=0 - displays events that are available for sale and/or those events that are not yet available for sale online
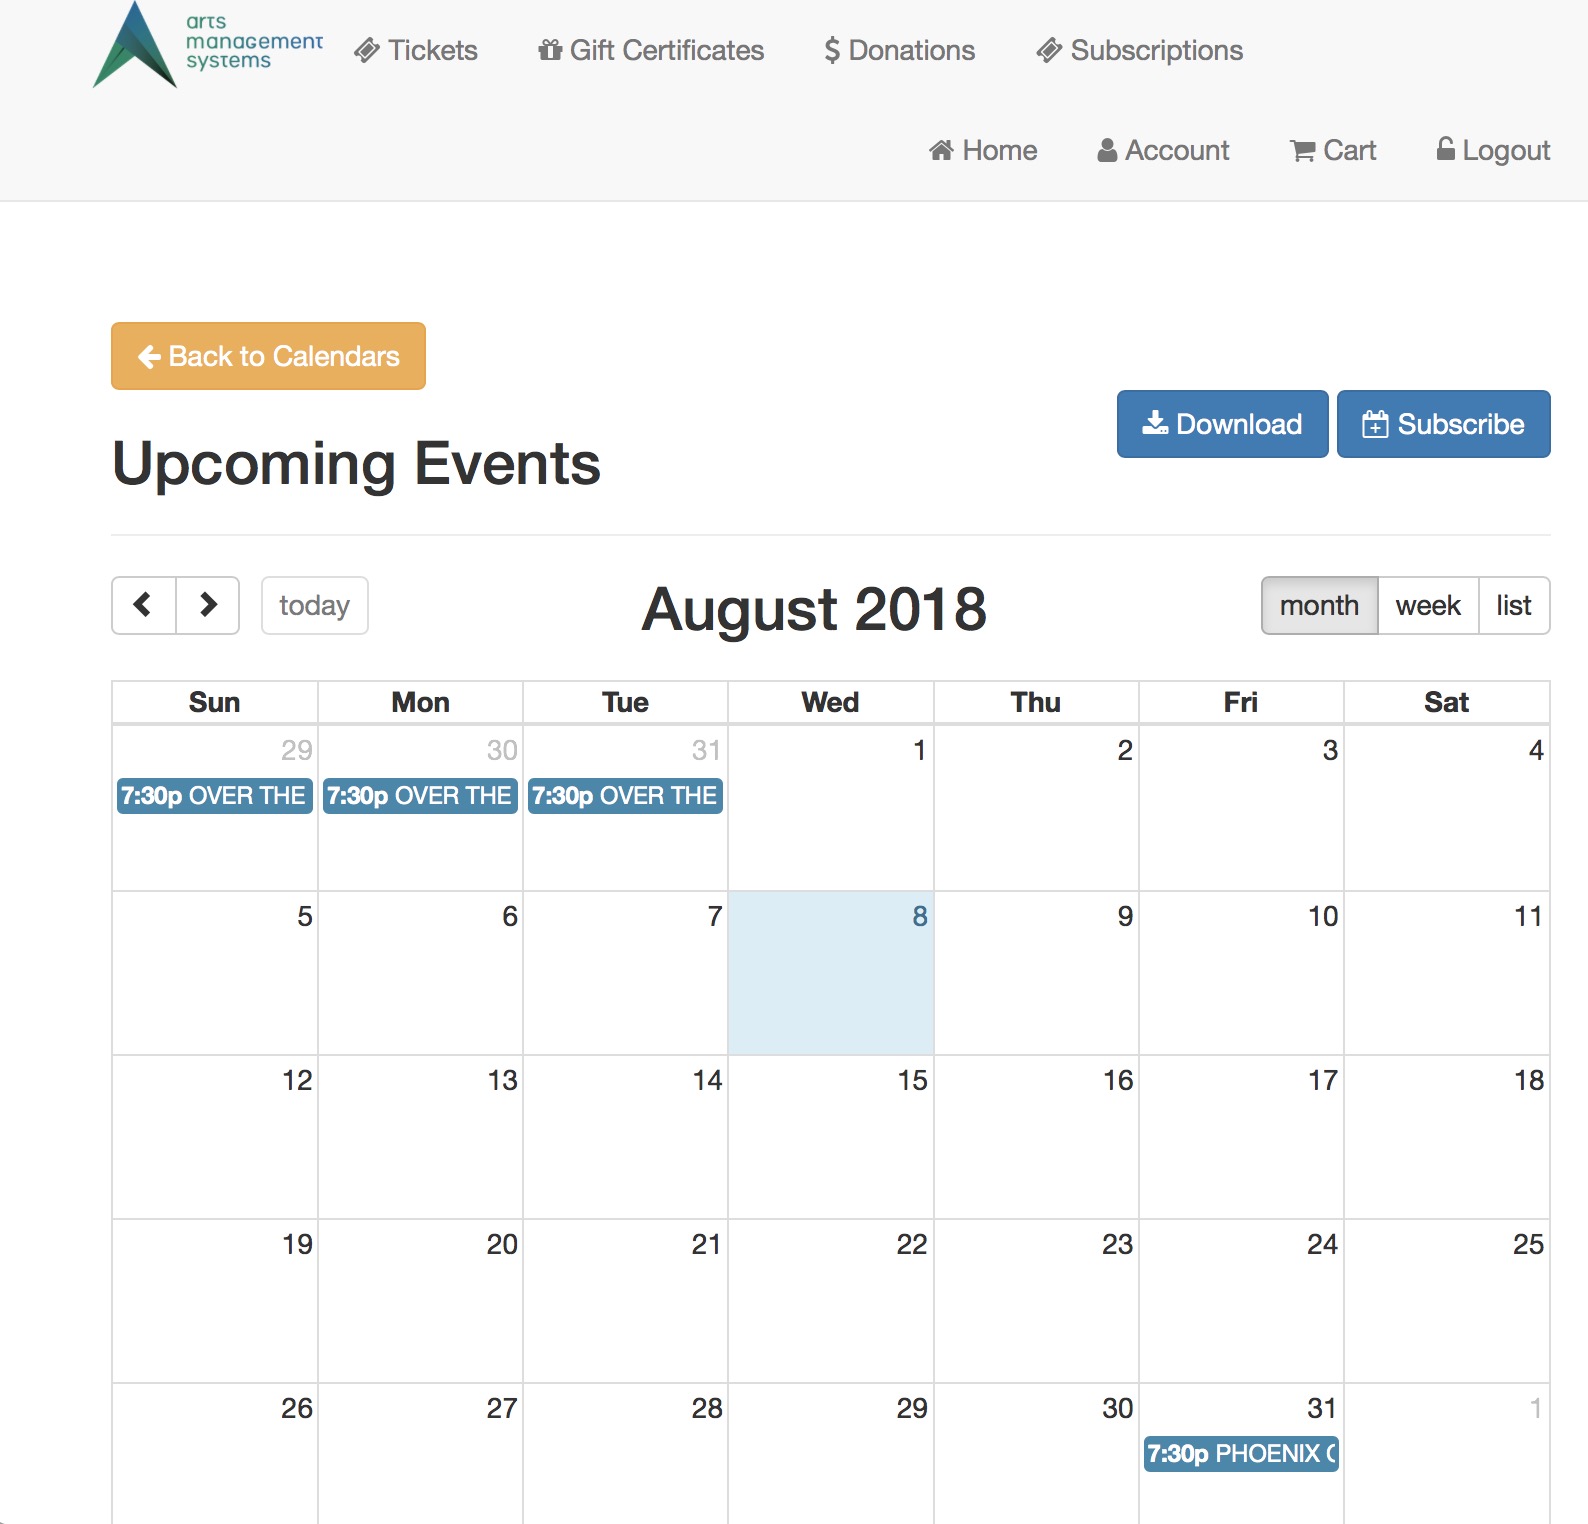
Events that a patron has purchased
https://tickets.yourvenue.org/TheatreManager/1/calendars/my_upcoming_events.ics?t=token
This shows events that a patron has purchased a part of their web checkout. It requires an authentication token to be created if you want to subscribe to it. Otherwise, it can be viewed online if the patron is logged in.
Volunteer/Staff activities assigned to a Patron
This shows this list of volunteer or staff activities assigned to a patron. it can be accessed as:
- a downloadable ICS file
https://tickets.yourvenue.org/TheatreManager/1/calendars/my_upcoming_activities.ics
- as a web page (the patron has to log in) using
https://tickets.artsman.com/TheatreManager/1/calendars/my_upcoming_activities?view=month&start=2018-07-01
The parameters are optional:
- view= can be one of: month (the default), week or list
- start=, if provided, should be in yyyy-mm-dd format. the default is this month.
Subscribing to Calendars
For example:
- I can be assigned to usher, work backstage, attend various rehearsals, or be part of a committee. Activities assigned to me can appear on my iPhone.
- Single or Subscription tickets that I purchase can appear with the performance dates and times on my computer calendar and my tablet
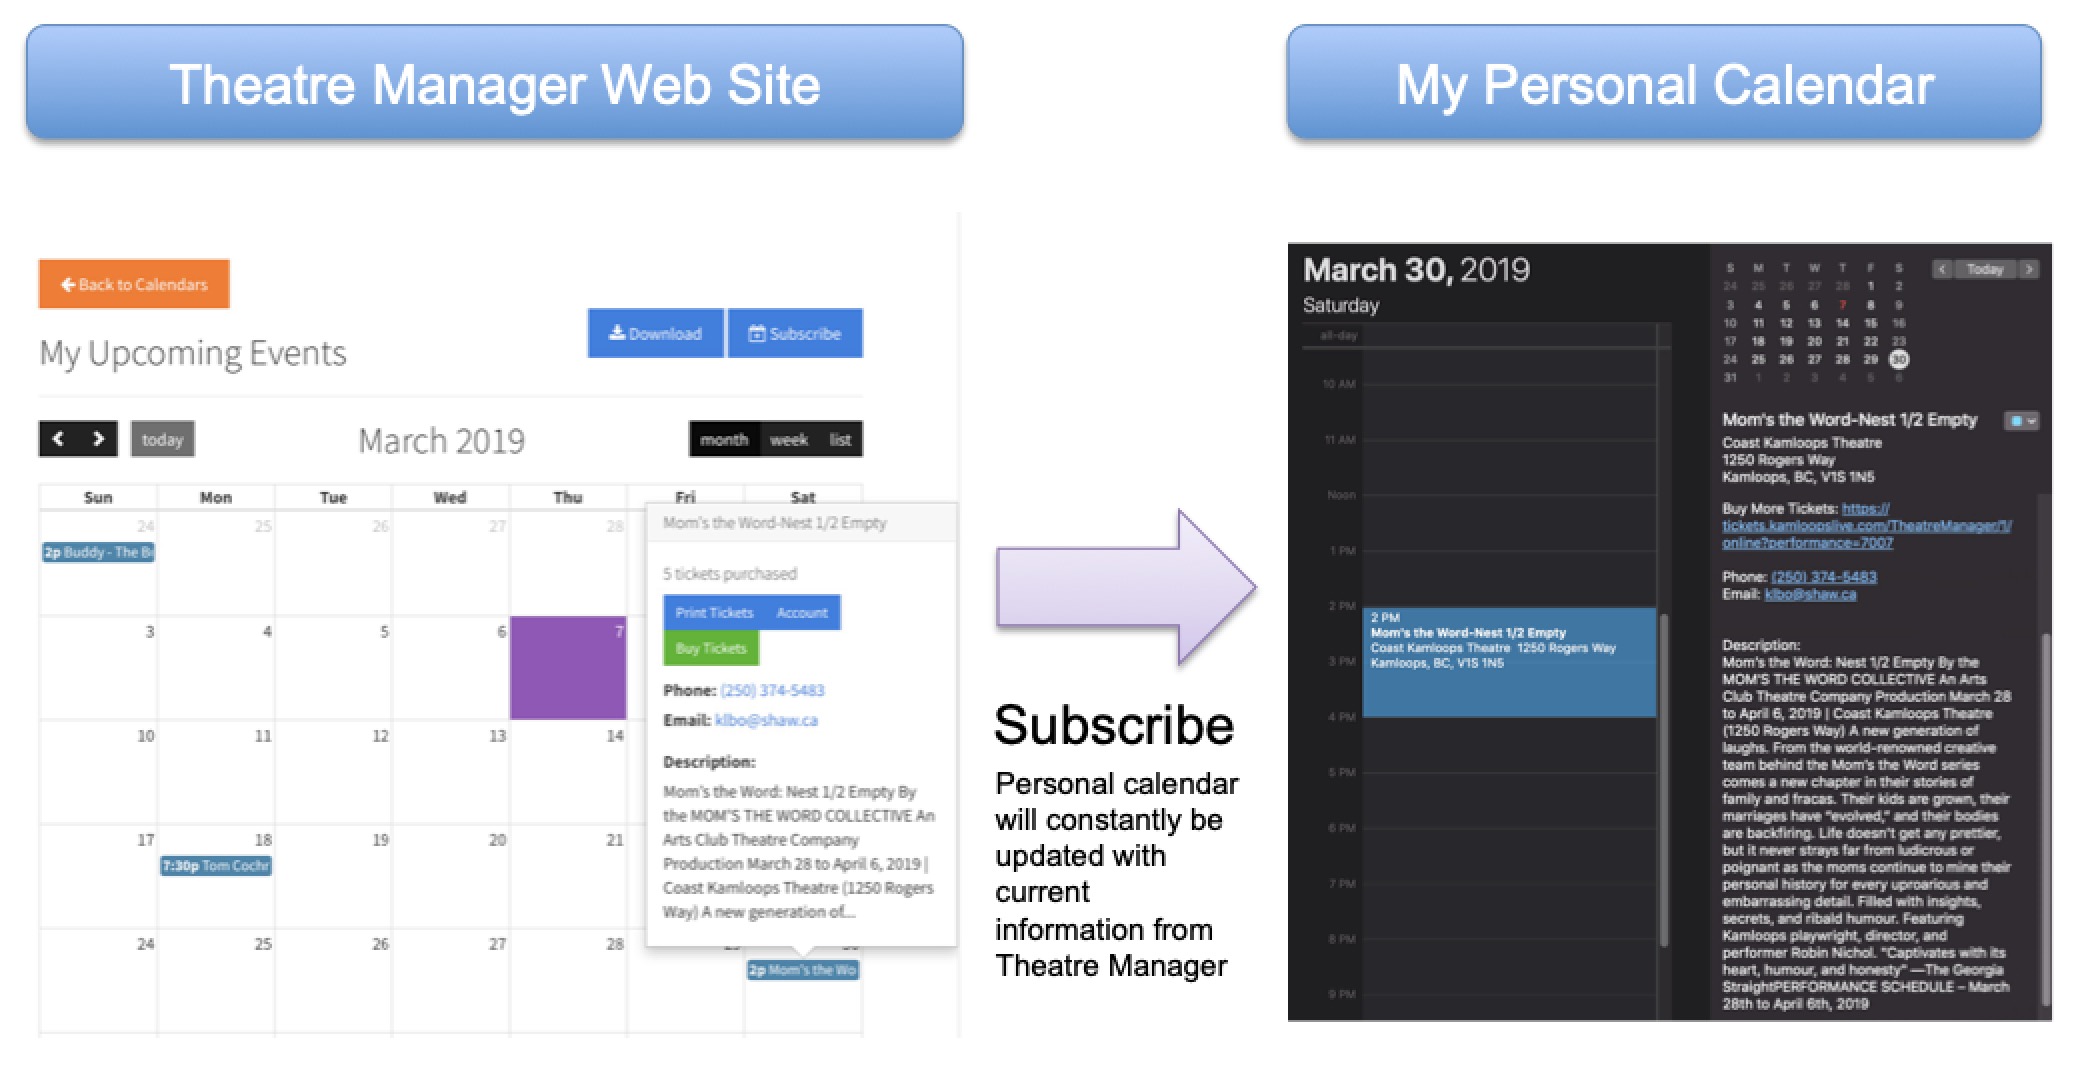
The Key is Subscribing to a Calendar from the Web Site
This feature is available to anybody involved with your venue and who can log into the website.
To keep a private calendar up to date in your tool of choice (eg iCal, Outlook, calendar on a phone), you will need to do the following three stems one time only:
- Log into the web site using your patron email address.
- Create a calendar Access Token (you can reset it periodically if you want to change your security token - but doing so means you will need to resubscribe to the calendar)
- add the calendar to your personal calendar by one of two methods:
- Easy: click the subscribe button on the calendar (upper right of the web page) which should automatically add a link to this calendar into your preferred calendar tool set up on the current device -OR-
- If your personal device cannot process the click; obtain the url to the calendar and manually open your tool of choice to use their Subscribe feature -OR-
- If you want it on a different device than you are looking at, copy the link and email it to yourself. Then open the email on the other device.
Alternatively, you can Download and Import a Calendar
If you do not want your calendar linked to Theatre Manager and receive automatic updates, you can get the calendar data into your device by:
- Looking at the calendar and download it (or receive it in a ticket email confirmation)
- double click the ICS file on your device to add it to your calendar.
Making a Calendar Access Token
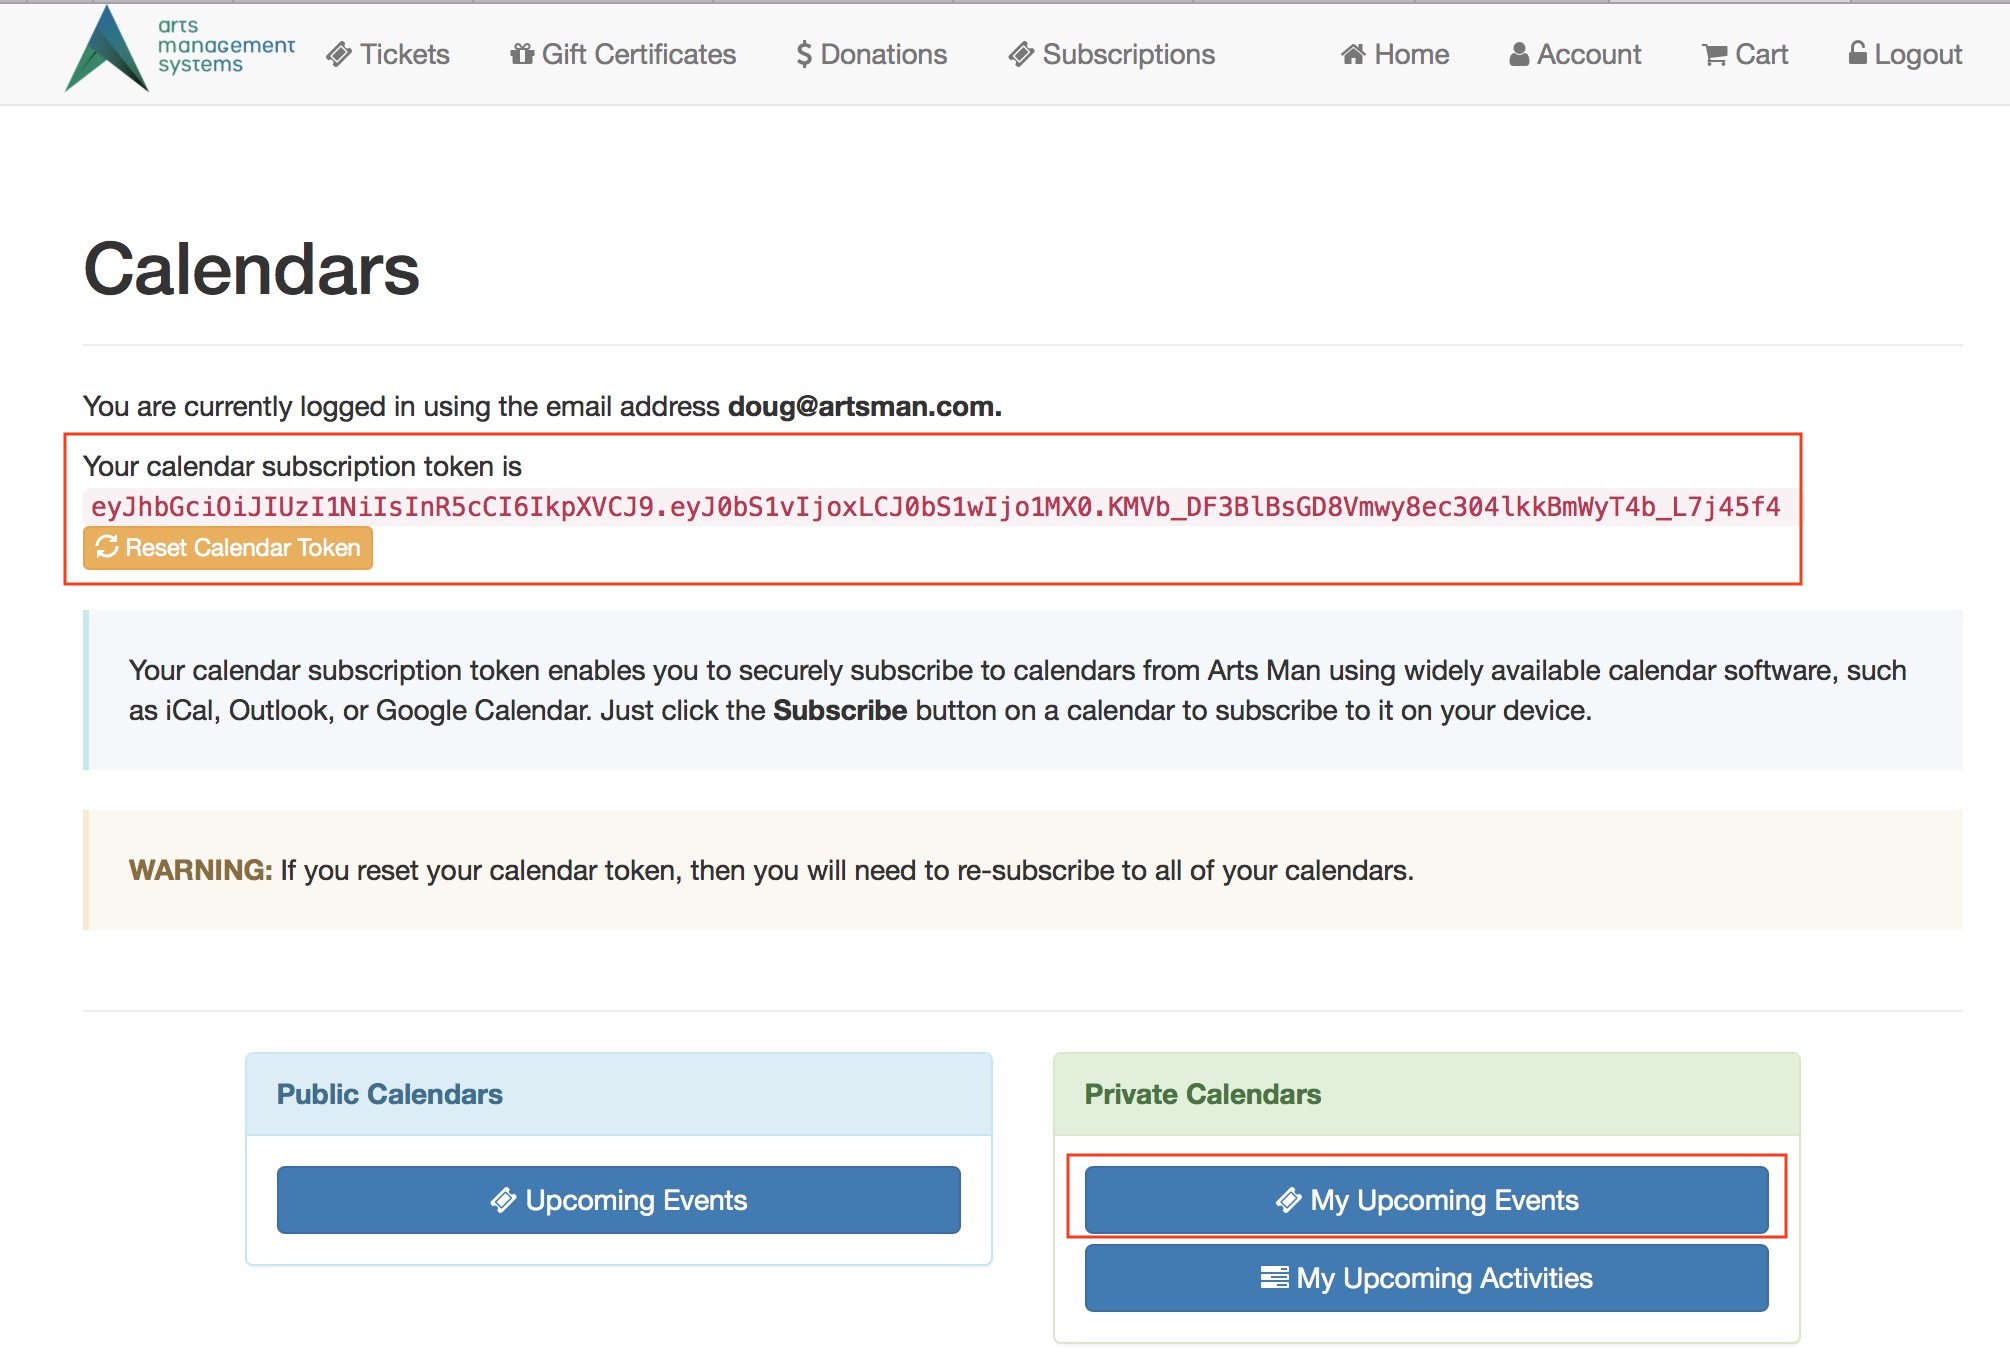 the person wishing to subscribe to a specific calendar will need to:
- Log in to the ticketing web site
- Go to the Home Page->Calendars part of the web page (see example image above)
- Obtain a Calendar Token:
- Make their first Calendar token if one does not exist. You cannot subscribe to a calendar unless you have a token unique to your login id
- If desired, the Calendar Token can be reset by the patron (ie. person logged int) periodically for security -- and if this is done, you will need to set up your personal calendar(s) again.
- The Calendar Token is displayed on the web page as shown in the example -- it is a long string at the top of the page and you can copy it for use in your calendar tool of choice.
 There are two ways to subscribe to the calendar:
- When viewing any specific Calendar, there is a Subscribe button on the upper right of the web page that should automatically add the calendar to your calendar Tool of choice. For example, on MacOS, this will generally add it to your iCal calendar.
- If an automatic subscribe does not happen, or you want to add the calendar to another device or another calendar, you can manually add the URL specific to the Calendar you are viewing.
iCal: Easy Subscribing Example
Subscribing takes three steps:
- Find the calendar you want to subscribe to
- Click the Subscribe button that is usually to the upper right of the calendar, as highlighted in the image below.
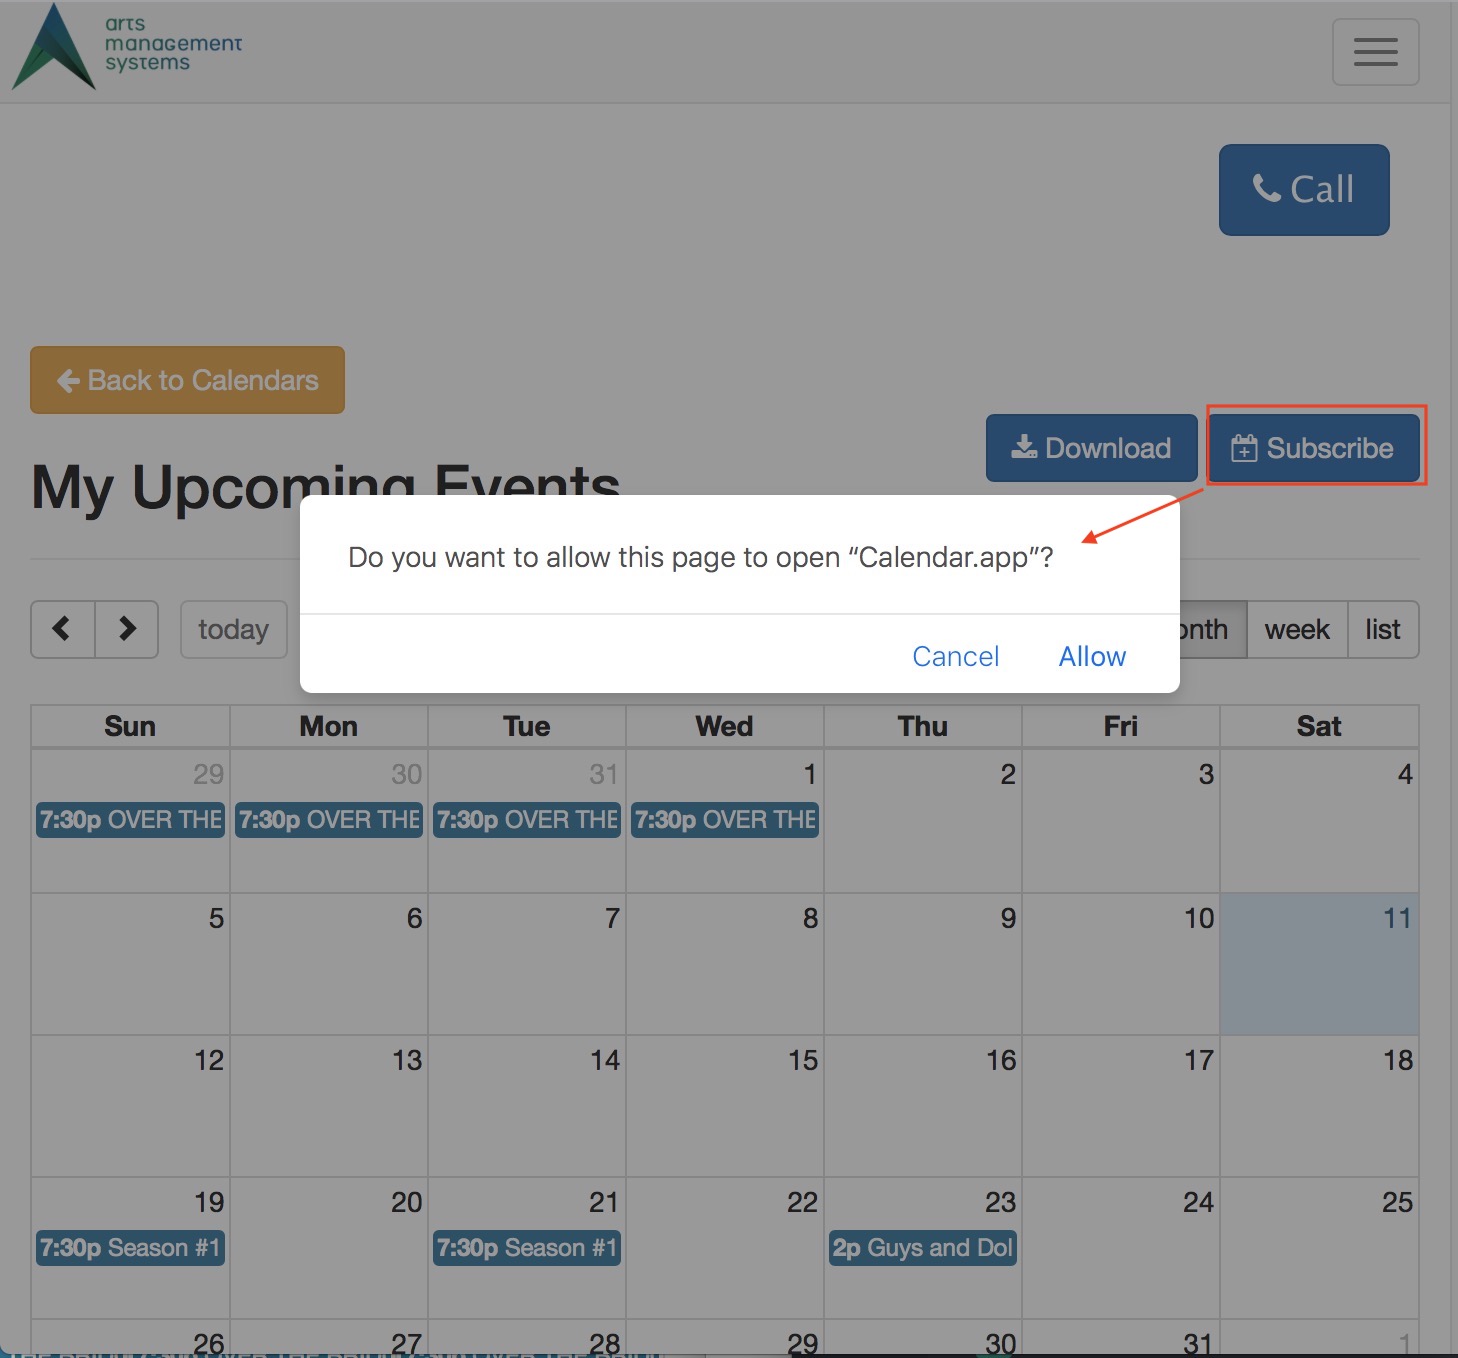
- You will be prompted to add it to your calendar. If not, see example for manually adding the link

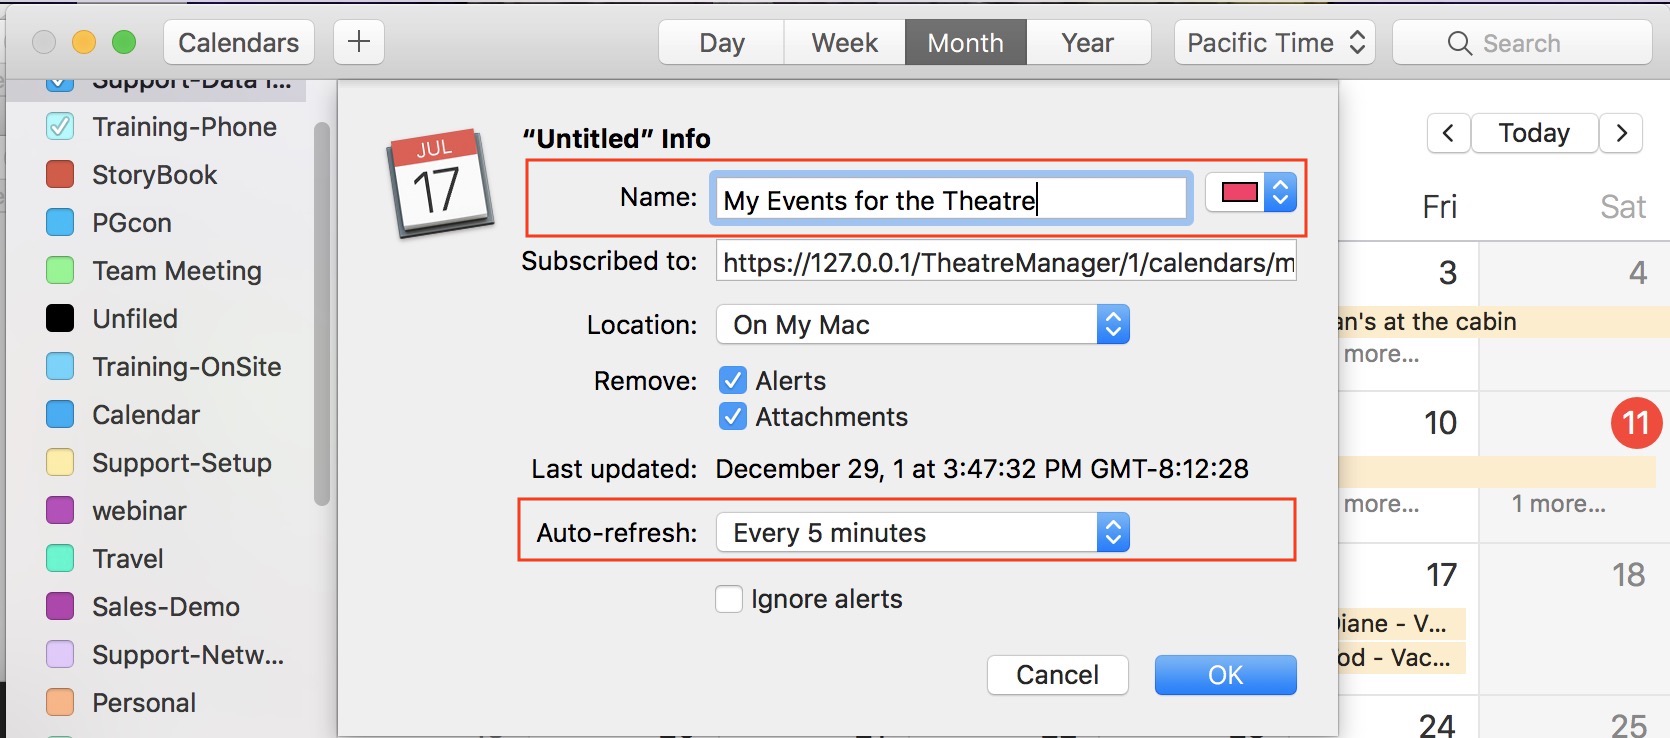
- You will need give the calendar a title and should probably change the refresh rate on the calendar to be more frequent than once per week.
iCal: Subscribing using the URL
When your calendar program does not automatically open from the Subscribe link
On some devices (and operating systems), subscribing to a calendar may take a few manual steps. This example shows how to do these steps with iCal. If you are using a different calendar program like outlook, or an older android device, you may have to do these steps manually.
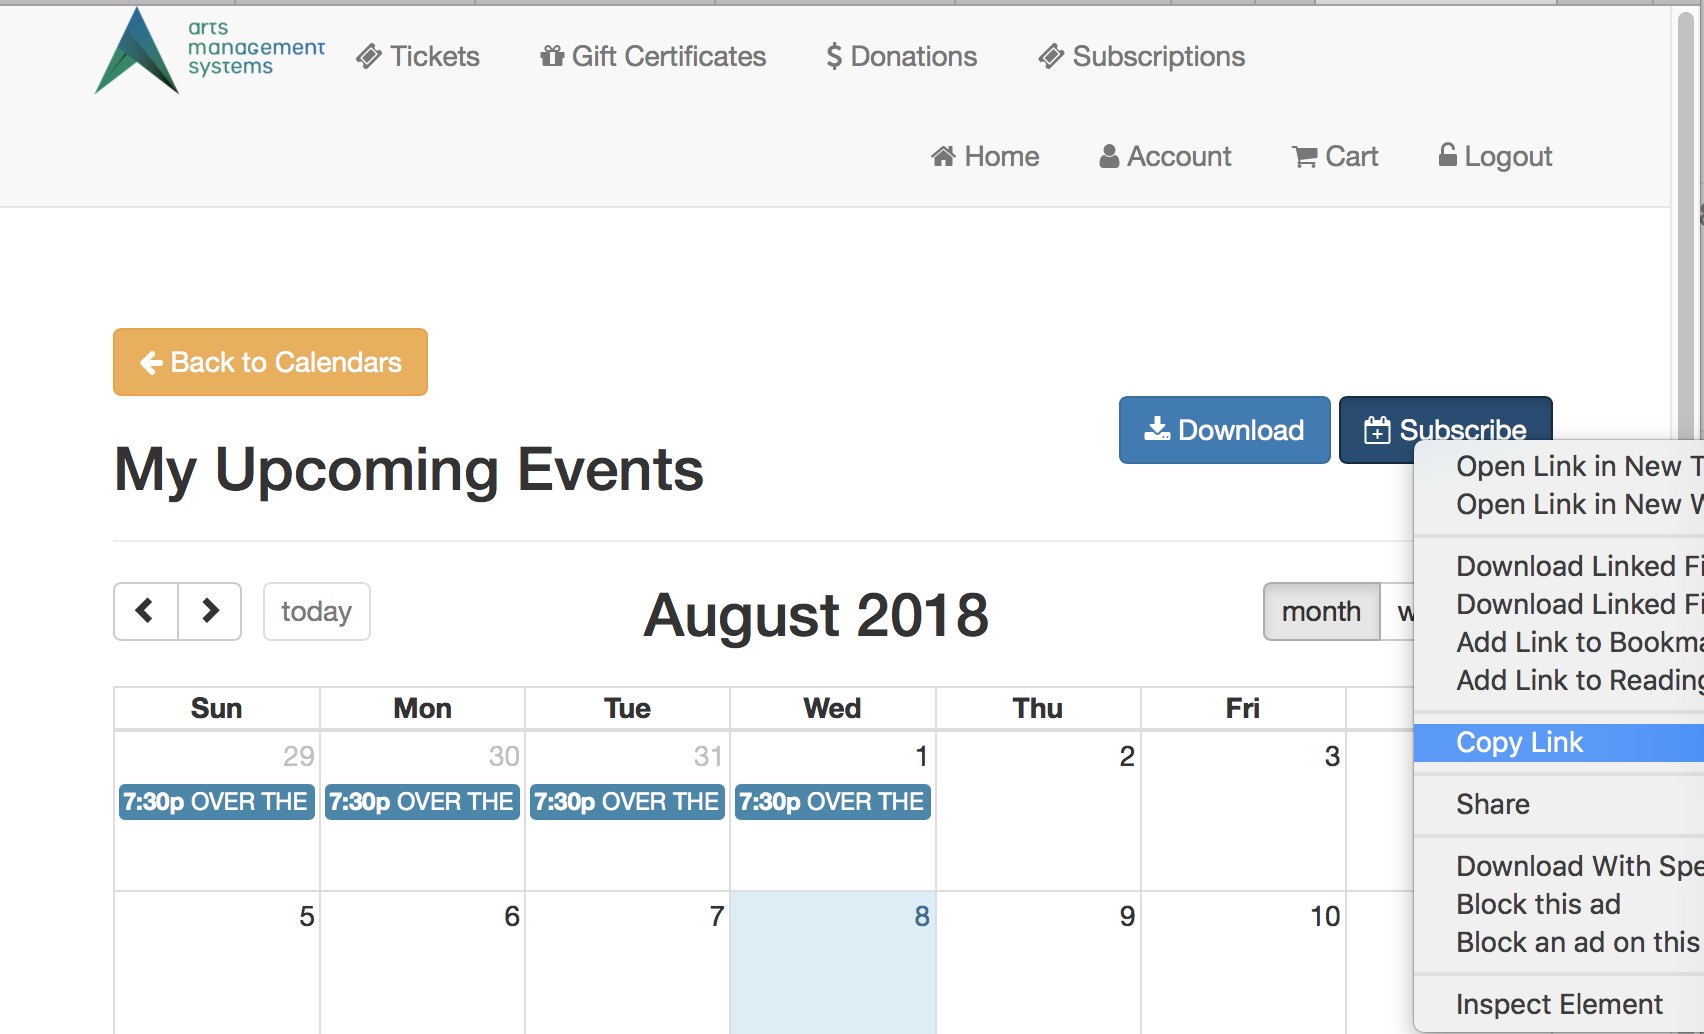
- First, find the calendar that you want to subscribe to and click the subscribe link (upper right). You computer should automatically add it to your calendar, or it may download the ICS file containing the calendar data.
- If the calendar was downloaded, right click on the subscribe button and chose copy link
-
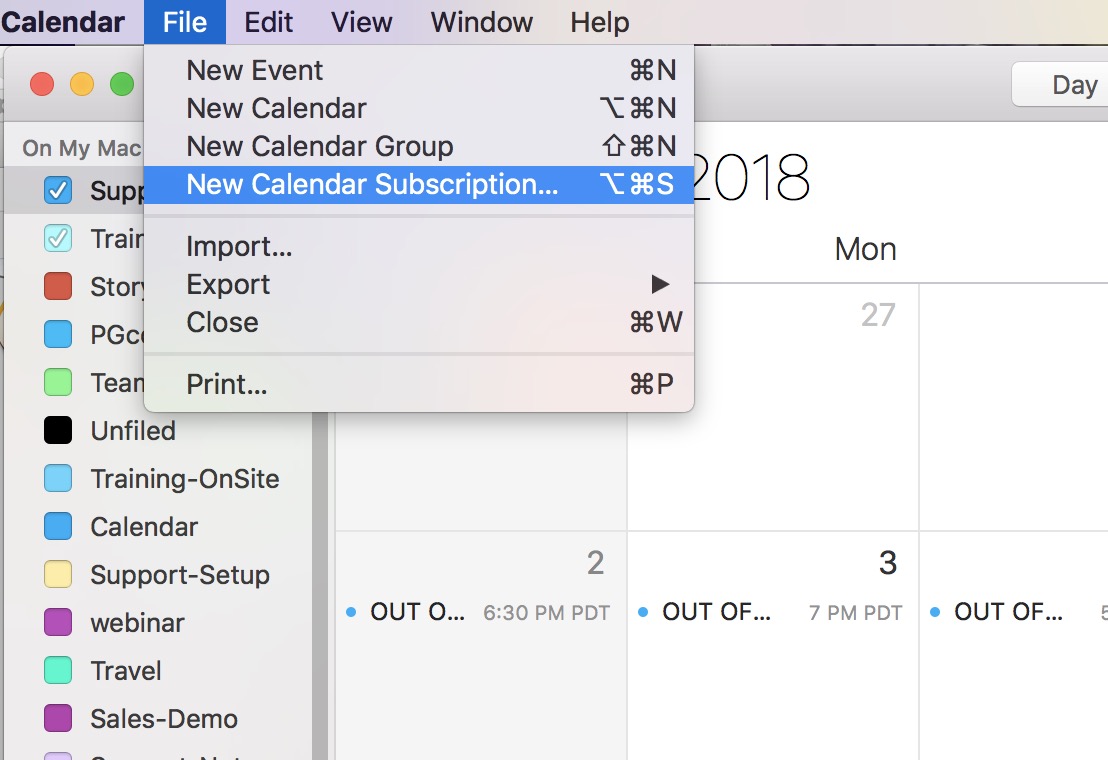
Open iCal and select File->New Calendar Subscription
-
Paste in the URL. In general, it looks like:
tickets.yourvenue.org/TheatreManager/1/calendars/my_upcoming_events.ics?t=personal_token
where:
- my_upcoming_events.ics is the name of the calendar - and is found on the URL of the web browser
- t=personal_token is your personal identity token which generally looks like t=eyJhbGciOiJIUzI1NiIsInR5cCI6... and comes from making the calendar access token.

-
Name the Calendar and paste in the link
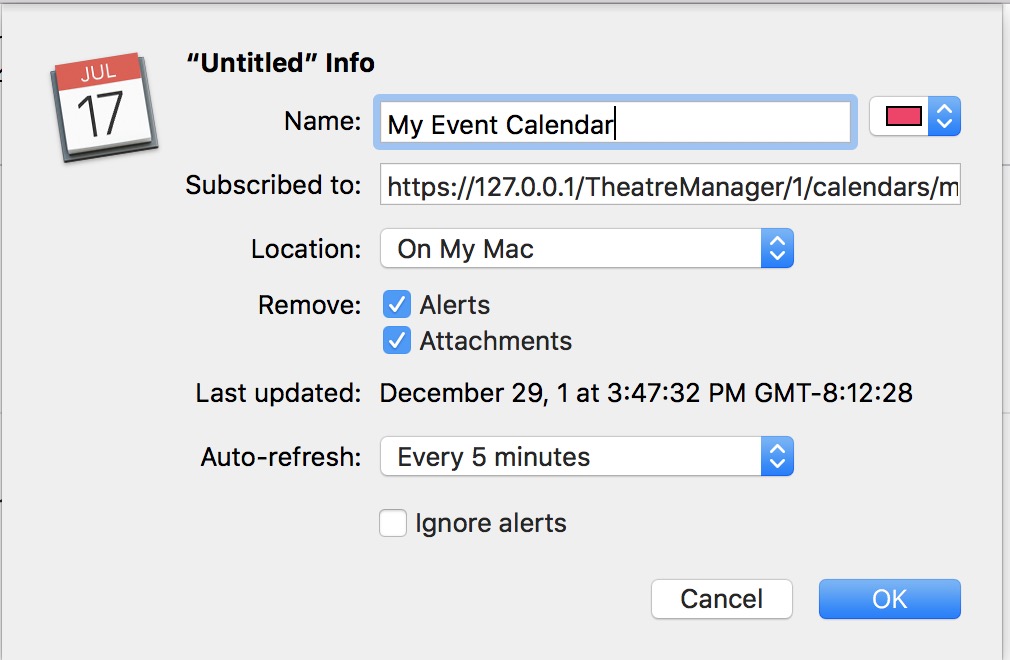
By default, a new calendar that you subscribe to in iCal will update itself weekly, so change that to 5 minutes. If you make a mistake and do not set the calendar frequency to 5 minutes, you can change it later by clicking on the calendar on the right side of iCal, and doing a right click-get info.
