Creating G/L Entries
Theatre Manager is designed to automatically facilitate a number of the processes involved with creating and tracking postings to the General Ledger. To review these postings, the G/L Entries window can be used. For more information on the G/L Entries window, click here.
How Theatre Manager Works with the G/L
There are three types of General Ledger entries created by Theatre Manager:
- Deposit entries that summarize payments by the method of payment such as cash, check, credit card, other and custom payment types.
- Sales entries that summarize the revenue received for ticket sales (and refunds, exchanges), donations and passes, gift certificates and memberships.
- Manual entries that record periodic transactions, such as the payment of tax liabilities, corrections to reallocate revenue, year end activities and any adjustments needed to balance the A/R.
Timing for Creating Deposit and Sales Entries
Deposits and sales entries can be created at any time. The organization can create them any number of times per day. In order to balance the A/R in Theatre Manager, the two entries should be created for the same time period and at the same time.
The End of Day Wizard takes the user through this process and identifies any transactions that are out of balance. For more information on the End of Day wizard, click here. It can also be done manually using the various menu items under the accounting menu.
To simplify revenue analysis, the sales entry should be created immediately after the deposit entry.
Normally:
- The deposit and sales entry should be created daily.
- Only one sales entry is created for the same time period as the deposit.
However, a sales entry is automatically created for each revenue date since the last sales entry was created. Should the user decide not to create sales entries for a week, running the process will create a Sales Posting for each day that sales occurred in that week period.
Recommended Daily Practice
The End of Day wizard should be run at the end of each business day (or first thing the next morning) to create deposit and sales entries. To segregate daily business, the entries should be created prior to entering new sales and payments (corrections excepted). Creating the journal entries prior to entering new sales and recording payments, prevents combining deposits and sales for two periods in the same general ledger entry.
All ticketing and payment corrections and errors should be completed prior to creating a deposit or a sales entry.
To simplify analysis of the sales and deposit entries, create the minimum number of sales and deposit entries as necessary in any given day. If more than one is created, the user must remember to combine everything for that day in your search criteria before analyzing them.
Time Stamps on Transactions
Reviewing transactions for any time period is made possible by the date and time stamps that are placed on each transaction when it is created.
Time stamps are attached to transactions -- ticket sales, refunds, exchanges, and payments -- and are created at the time the transaction was entered into Theatre Manager. Time stamps identify the date and time that the transaction occurred and enable reports to summarize transactions for specific time periods.
Transactions created to "correct errors" are dated for the time they occurred. Orders, payments, refunds, or exchanges created today to correct yesterday's errors are date and time stamped today. Any amounts included in the transaction are included in the deposit and sales entries created today. Any transactions required to correct yesterdays transactions should be journalized in a sales and deposit entry prior to new sales being created. These transactions should be included in yesterdays "Deposit and Sales Analysis".
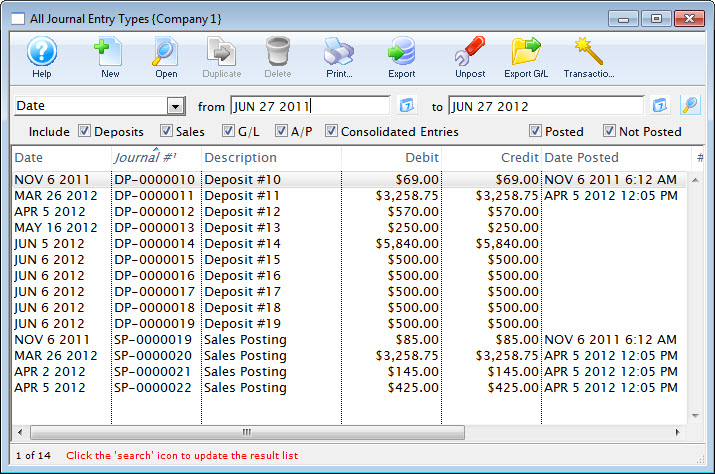
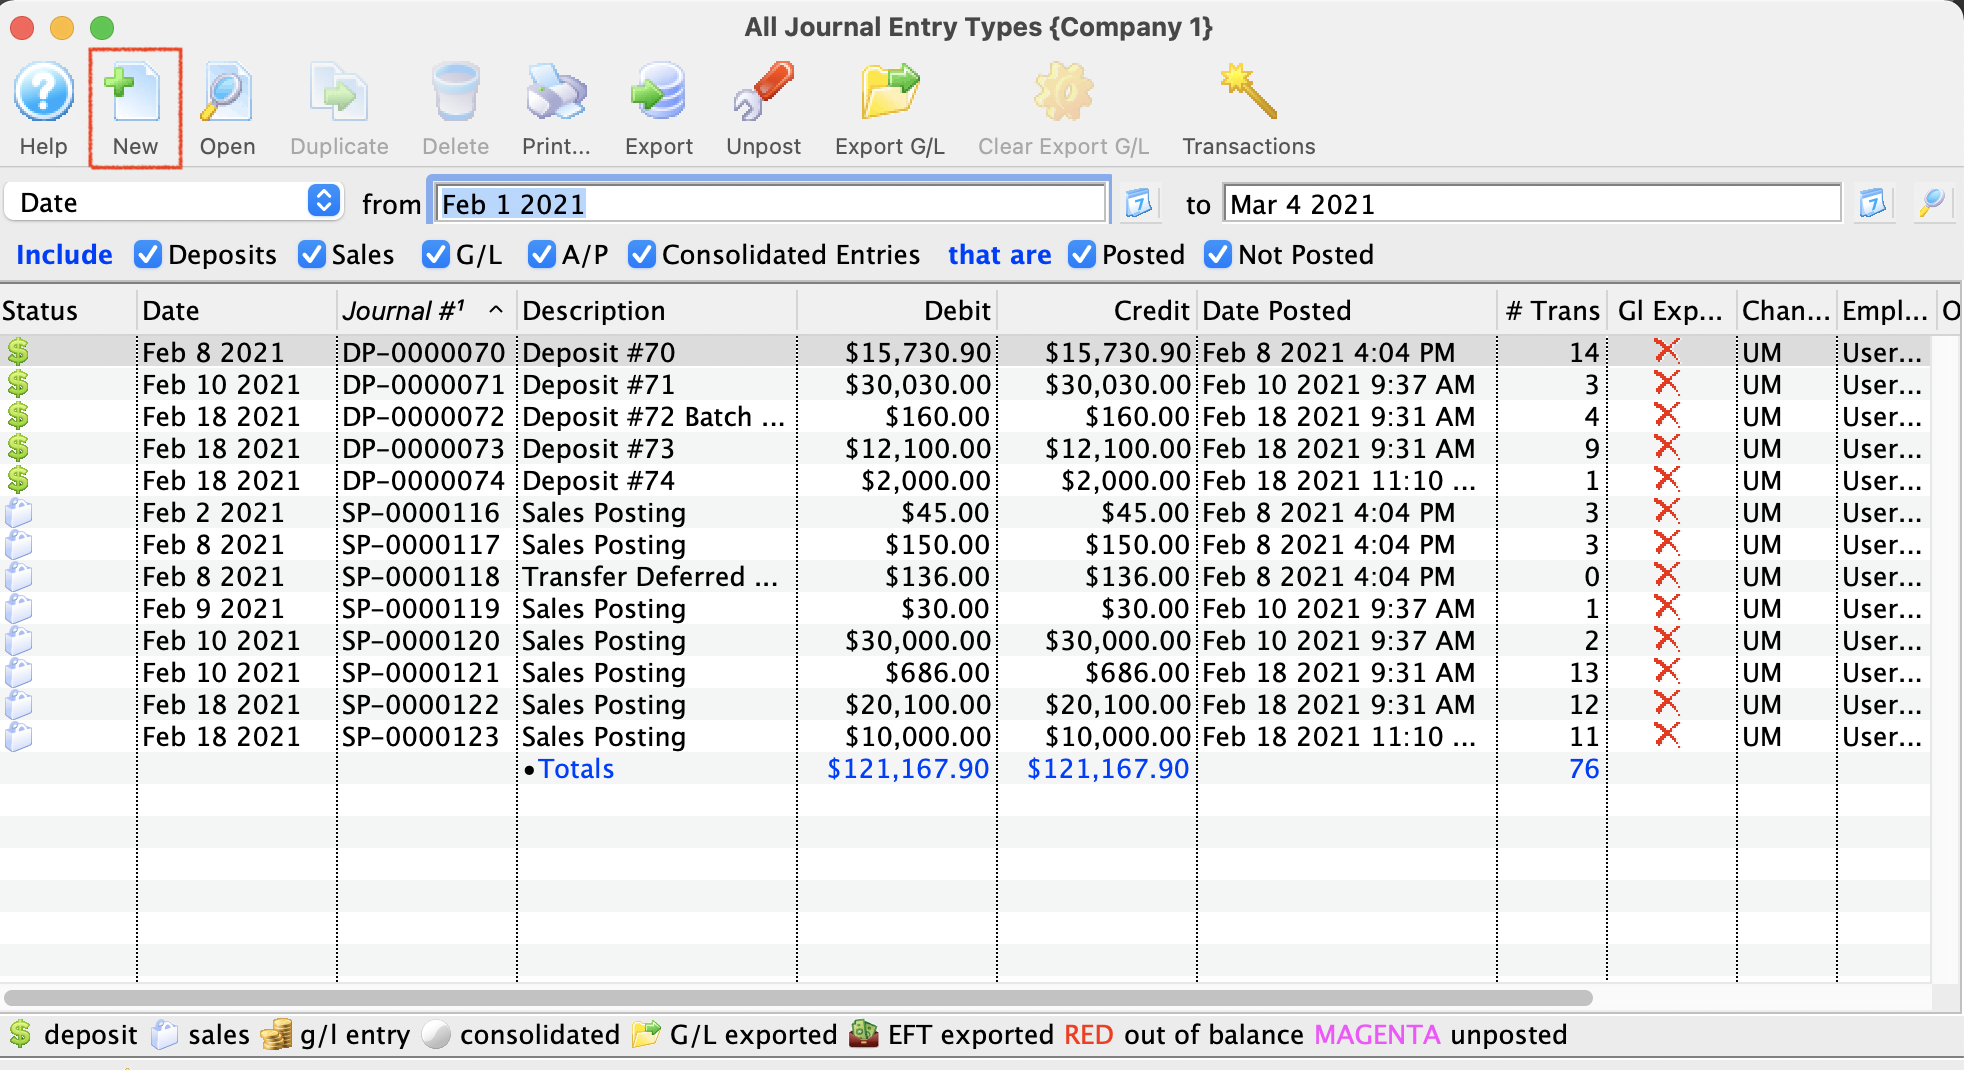
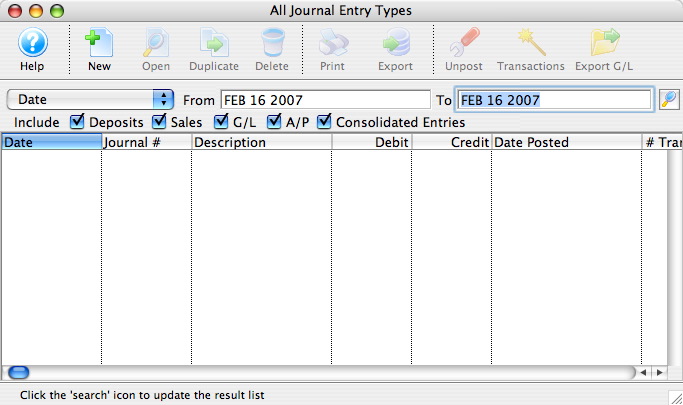
The General Ledger Entries Window
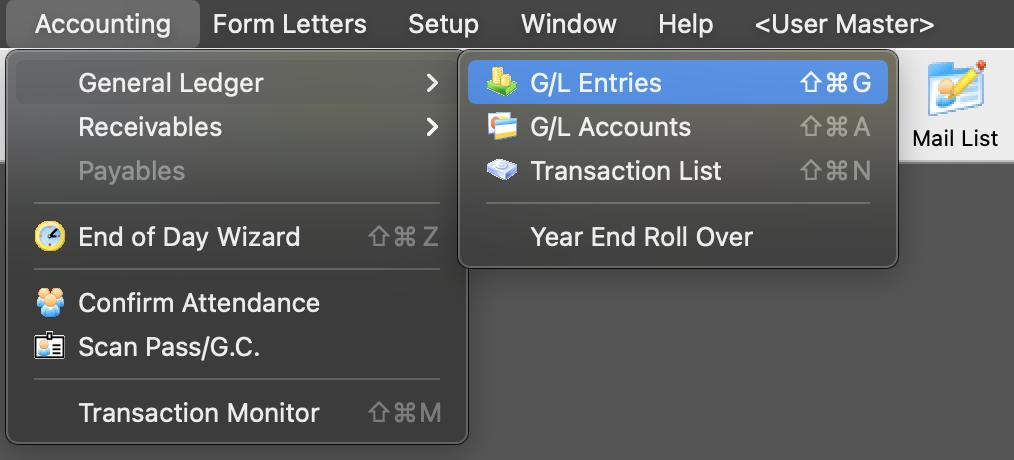
This window is accessed through the Accounting >> General Ledger >> G/L Entries menu. The window displays the transactions which have been posted to the G/L during the times defined in the search criteria.
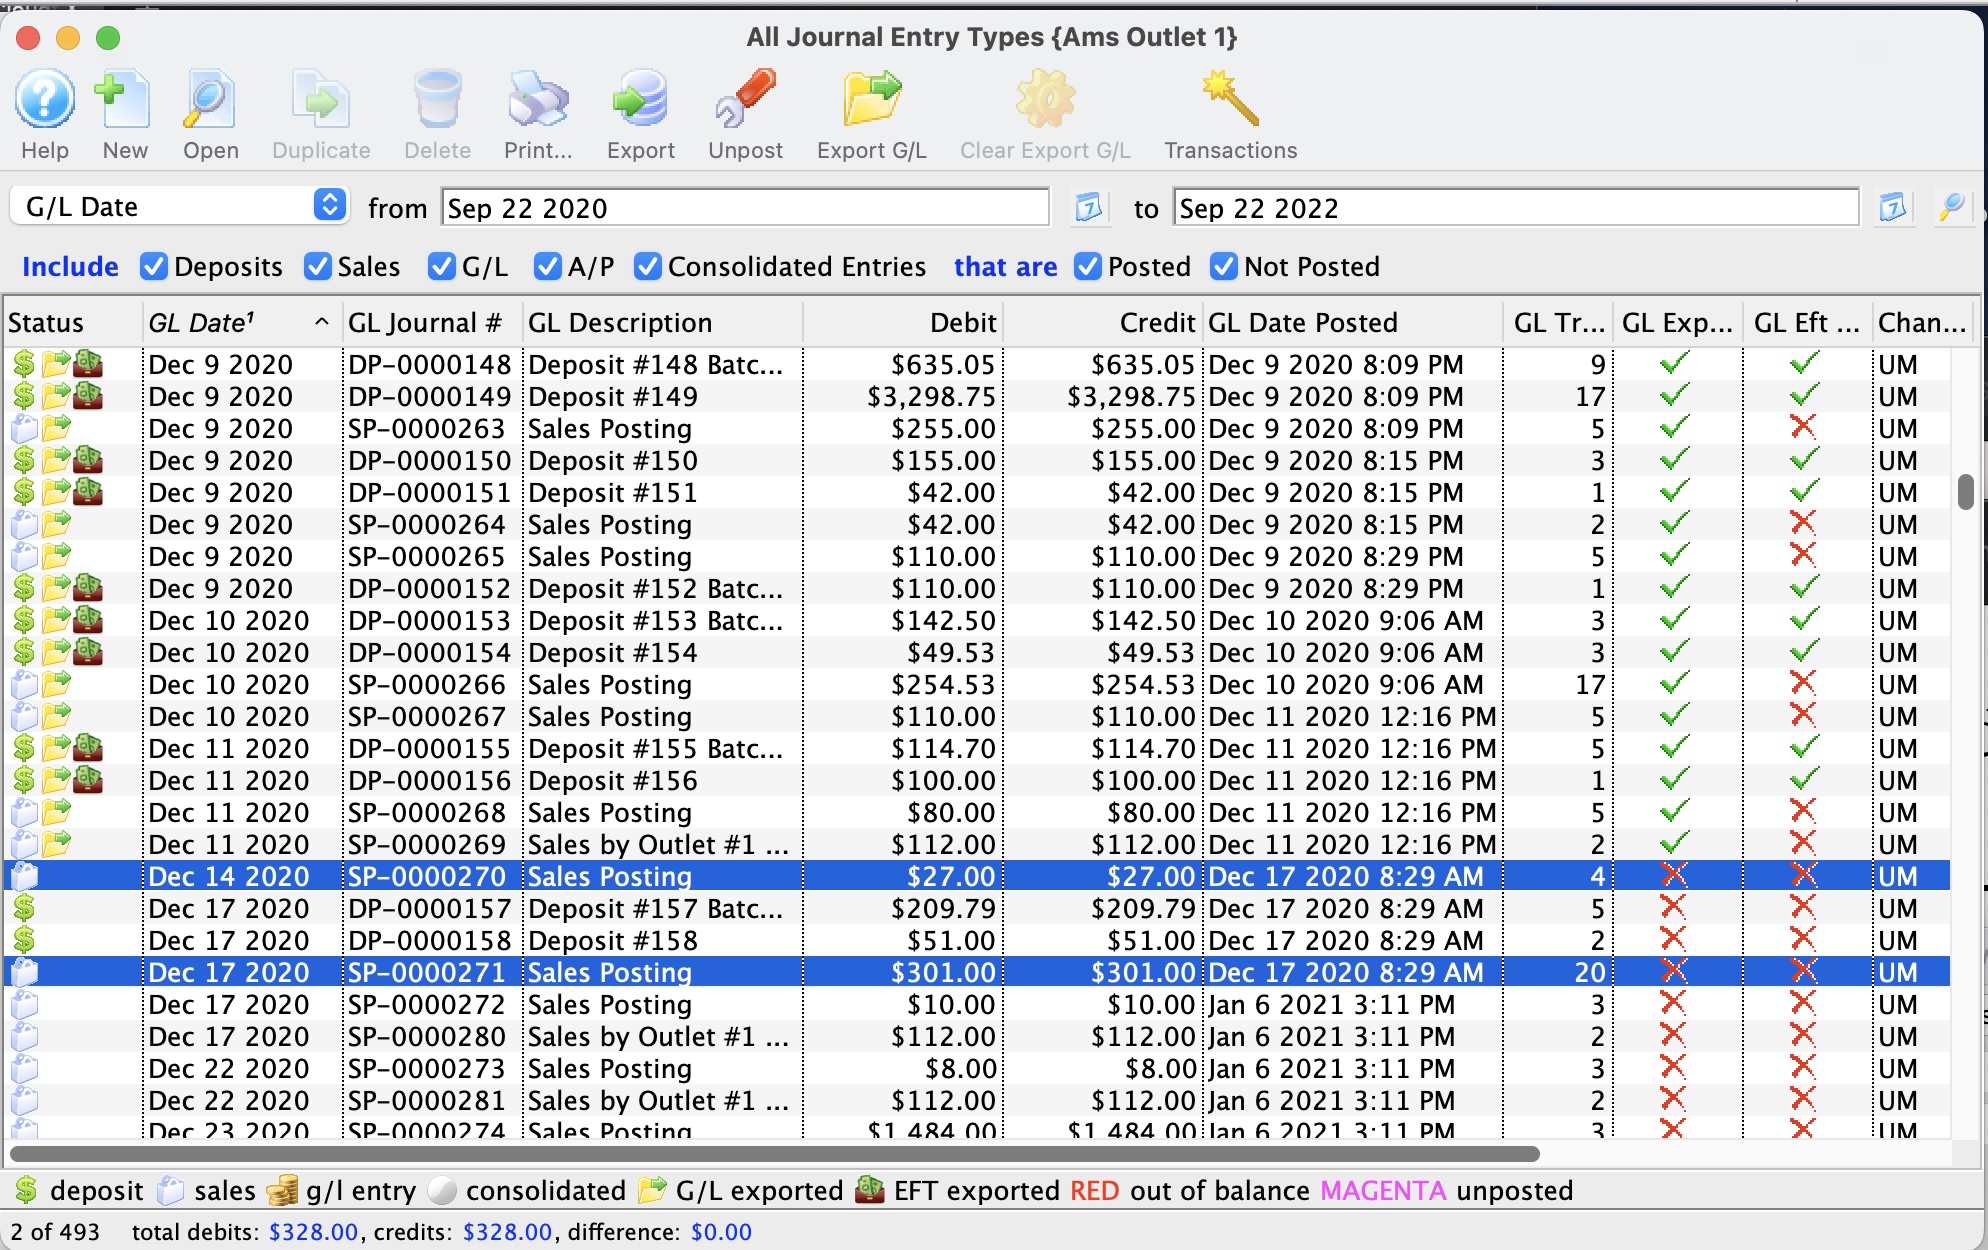
Parts of the G/L Entry Window
 |
Begins the creation of a new general ledger entry. For more information on creating manual entries, click here. |
 |
Opens the selected entry in the G/L Entry Detail window. For more information on the G/L Entry Detail window, click here. |
 |
This function is unavailable in this window. |
 |
This function is unavailable in this window. |
 |
Prints a copy of the currently selected entry. |
 |
Exports a copy of the currently selected entry. This only exports the selected lines to a text file. For an export of the GL entry in a special accounting format, use the Export G/L button. |
 |
Exports the detail of the selected entry. For more information on using the Export G/L function, click here. |
| Clear Export GL | Resets the Exported Flag on the GL entry so that it can be exported again in the GL Accounting Export Format that is specified in Company Preferences. |
 |
For the selected G/L entry, this button can be used to
|
| Opens the selected entry in the Transaction History window to allow the user to see all transactions incorporated into the entry. For more information on the Transaction History window, click here. | |
 |
The search criteria options available for the window. |
| From To | The search criteria to be used for the search. |
 |
Begins the search process. |
| Include: | The types of accounts to be included in the search. Check the box next to the ones to be included. |
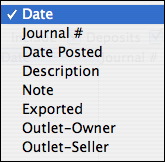
| Date | When the entry was added to the General Ledger. |
| Journal # | The journal number assigned to the entry. |
| Description | A brief description of the entry. |
| Debit | The amount which was debited. |
| Credit | The amount which was credited. |
| Date Posted | The date which the entry was posted. |
| # Trans | The number of transactions which the entry is composed of. |
| Exported | Notes whether the entry has been exported or not. |
Reviewing the Transactions for a General Ledger Entry
- Open the G/L Entries window.
For more information on the G/L Entries window, click here.
- Select the entry to be viewed.
For more information on finding a G/L entry, click here.
Creating Manual GL Entries
Steps to Create A Manual GL Entry
In the Main Menu, selecting Accounting -> General Ledger -> G/L Entries
- Inside of the Journal Entry Type Window, Click the New button
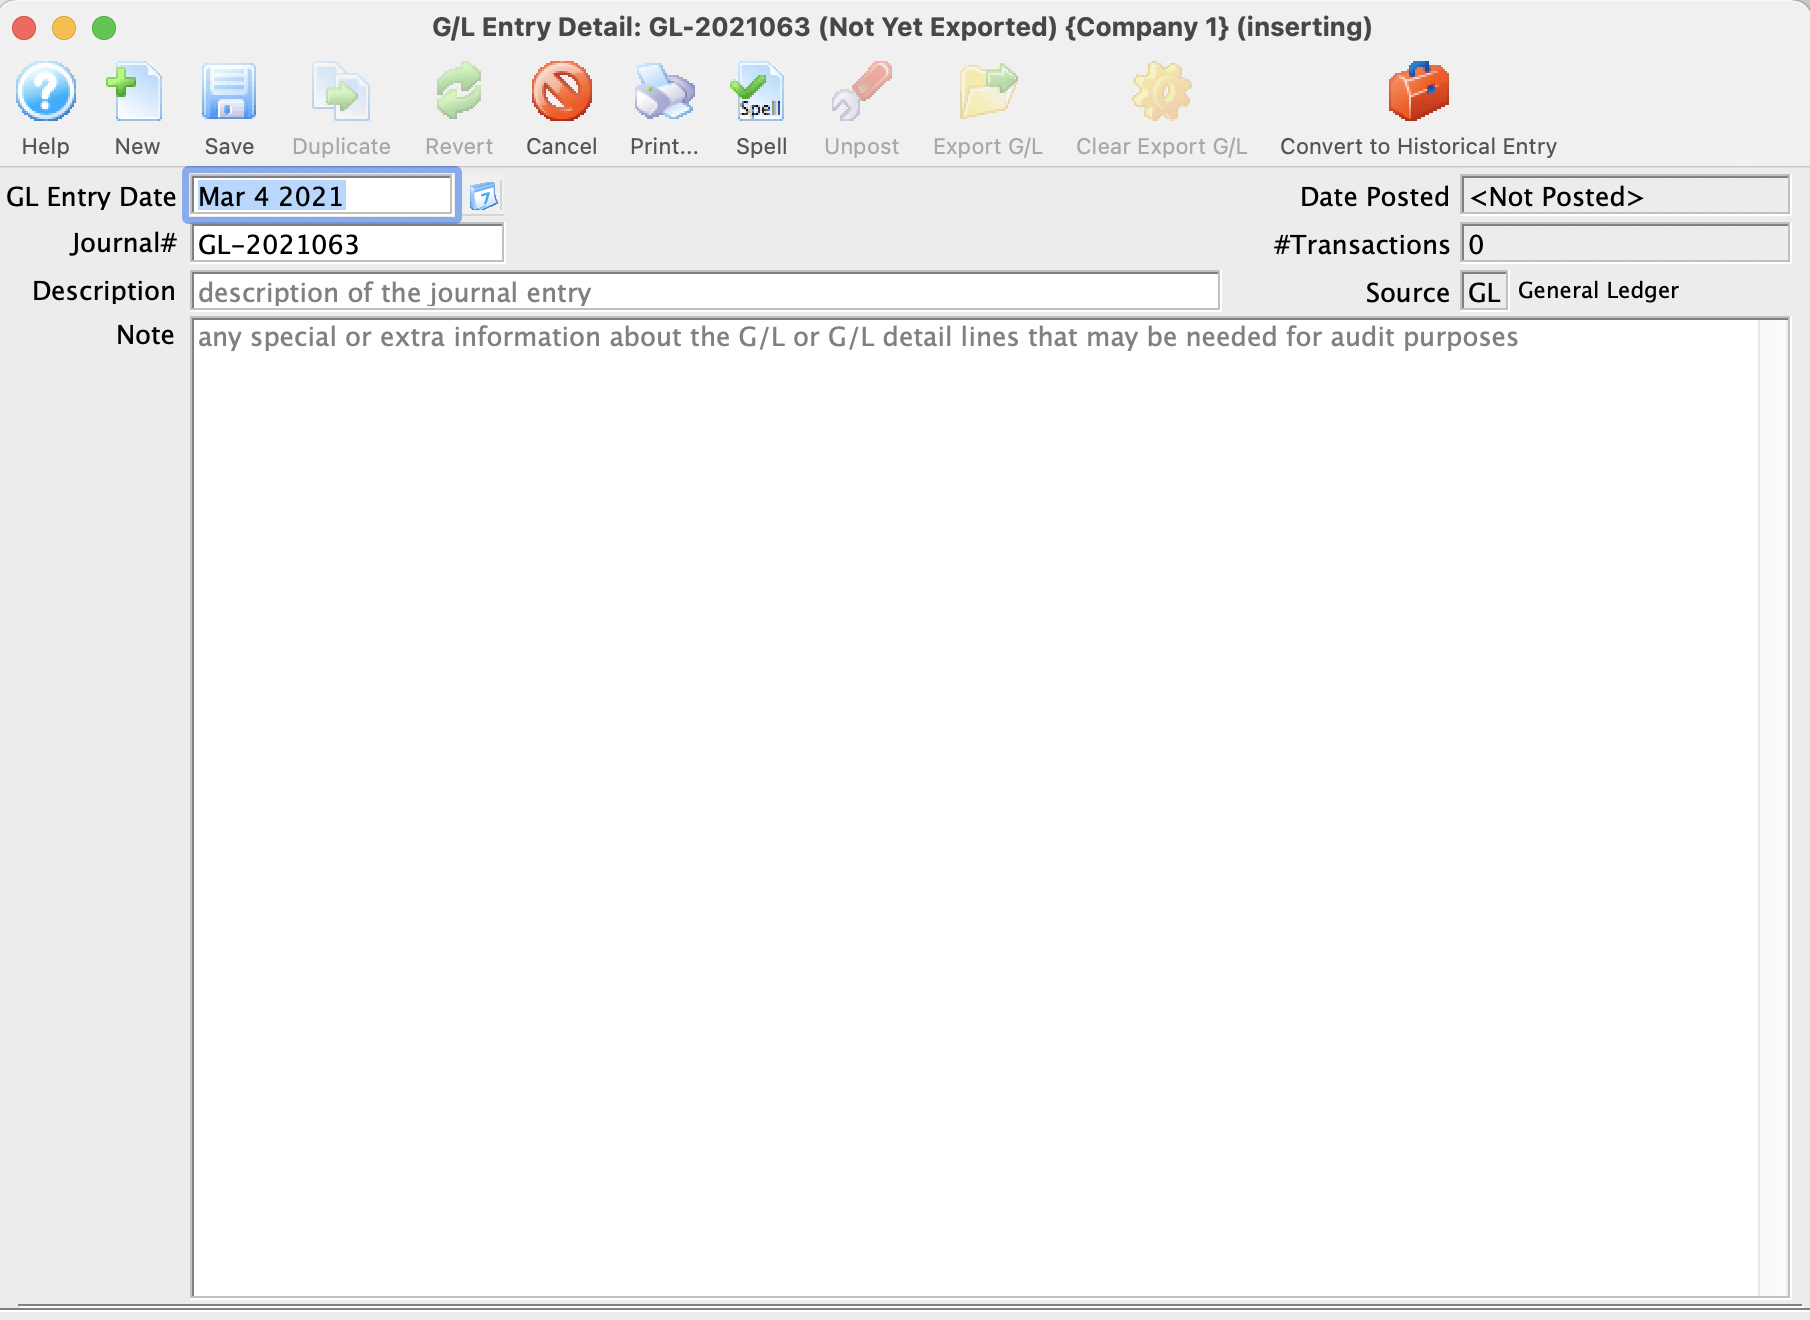
- This opens up the GL Entry Detail Window. To start, enter the date you are creating the entry.
- Enter a Description for the entry.
- Enter a detailed note indicating the reason for the entry.
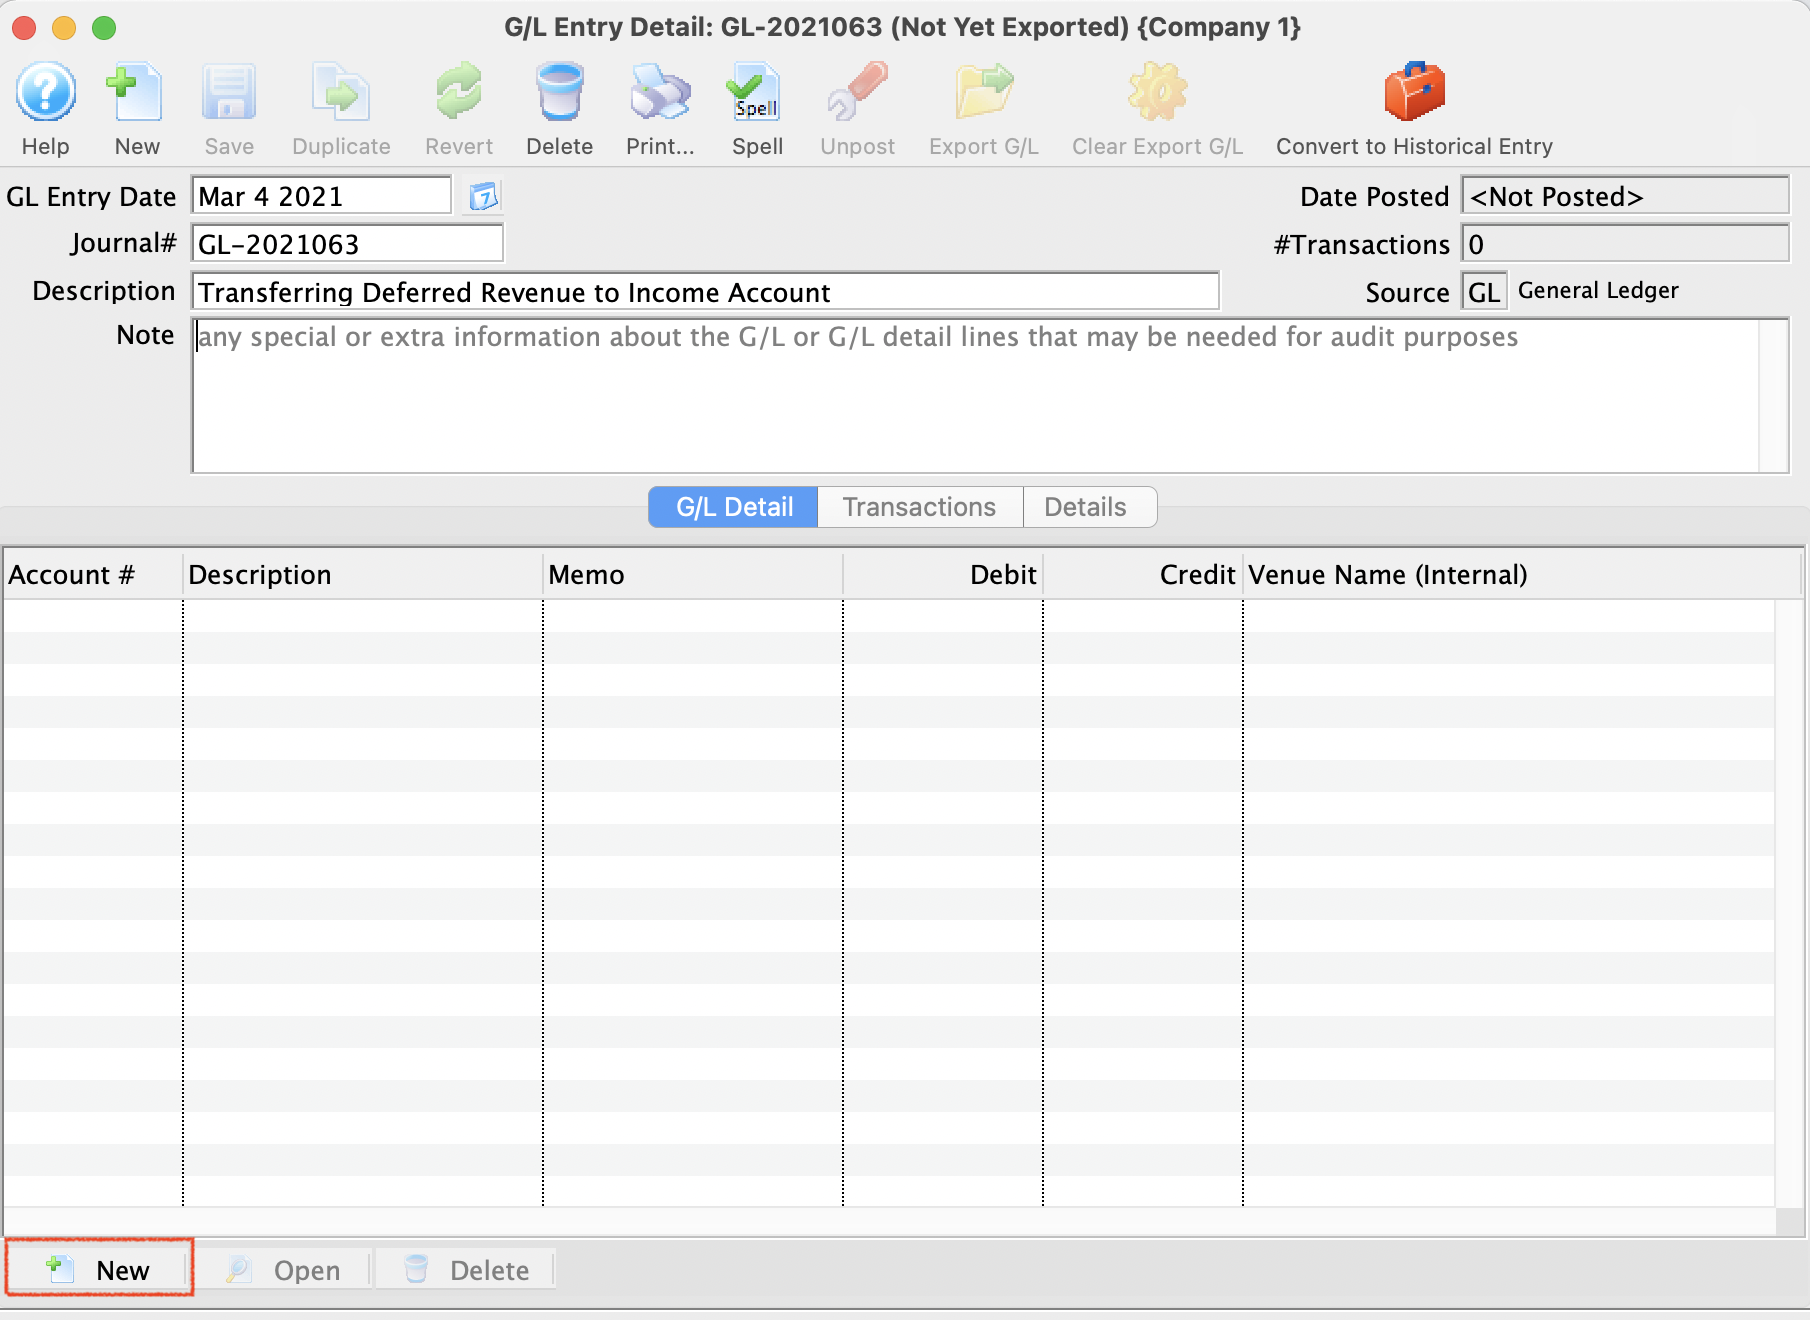
- Click the Save button at the top of the window. After clicking Save, the G/L Entry Detail Window will update to allow input of the actual G/L entry.
- Click the New button in the lower left corner of the G/L Entry Detail window.
- Click the account icon to the right of the Account field.
- Select the CREDIT G/L account.
- Click the Select button in the lower right corner to select the account number.
- If this GL Entry is for a specific event, use the lookup to locate the event code.
- Enter the Amount of the CREDIT.
- Click the OK button.
- Click the New button in the lower left corner of the G/L Entry Detail window.
- Click the account icon to the right of the Account field.
- Select the DEBIT G/L account.
- Click the Select button in the lower right corner to select the account number.
- If this GL Entry is for a specific event, use the lookup to locate the event code.
- Enter the amount of the DEBIT.
- Click the OK button.
Depending on the date, the entry will be posted the next time the End of Day Wizard is run and the Post to G/L step is taken.
Inserting/Editing A G/L Entry
 When you double click on a GL entry, you can see information about the posting such as:
- The account code it will post to
- A memo code that describes the purpose of the G/L entry
- The amount
- Whether it is a debit or credit to the GL entry
There is also a tab that lets you specifically associate the G/L entry with some items in theatre manager.
For example, if the G/L entry is related to a
- ticket sale - it should have an event code and venue as part of the GL entry for tracking profit/loss by event. This helps in reconciliation of events in the GL tab. No other GL entries should have event or venue
- pass/gift certificate sale or redemption - it should have an entry under the Membership tab, which will be called whatever you names passes or gift certificates. This helps reconciliation on the G/L tab in the setup of the pass/Gift certificate. No other GL entries should have a pass number.
- anything else - should not have anything filled in either of the above fields
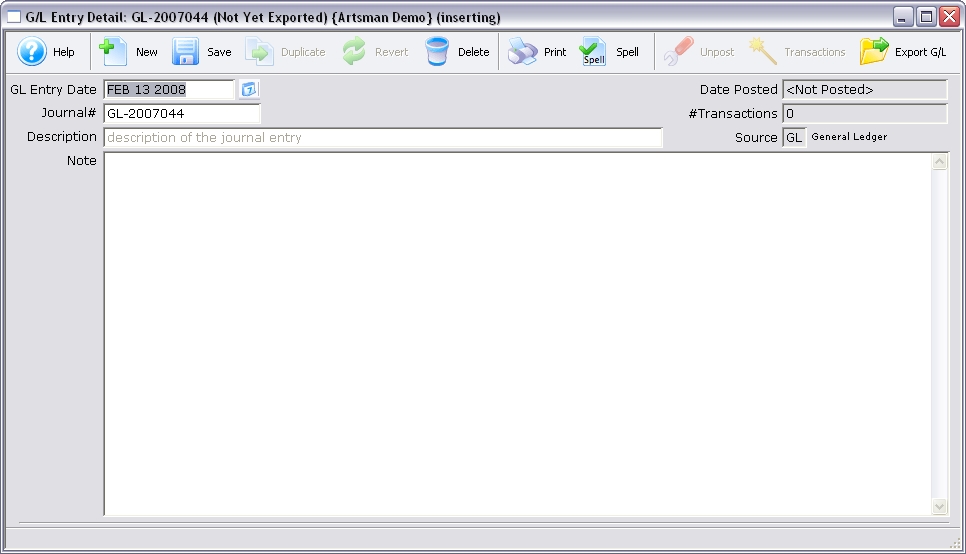
General Ledger Entry Detail Window
Parts of the G/L Entry Detail Window
 |
Begins the creation of a new general ledger entry. For more information on creating manual entries, click here. |
 |
Saves the general ledger entry. |
|
Duplicates the general ledger entry. |
 |
Reverts to the last saved version of the general ledger entry. |
|
Deletes the general ledger entry. |
|
Prints a copy of the general ledger entry. |
 |
Checks the spelling of all text entry fields. |
|
Reverses or unposts the currently selected entry. For more information on using the Unpost function, click here. |
| |
Exports the detail of the selected entry. For more information on using the Export G/L function, click here. |
| Convert to Historical Entry | May be used one time only if the Year End Rollover created and End Of Day imbalance |
| G/L Entry Date | The date the entry was created. |
 |
A mini-calendar for the purpose of date lookup. |
| Journal # | The journal entry number for the general ledger entry. |
| Description | A short description of the entry. |
| Note | A more detailed description of the entry. |
| Date Posted | The date the entry was posted to the general ledger. |
| # Transactions | The number of transactions included in the entry. |
| Source | The source of the entry. |
 |
The G/L Detail tab is used for adding the debits and credits to the different general ledger accounts. For more information on the G/L Detail tab, click here. |
| The Transactions tab is used to see all transactions that are incorporated into the entry. For more information on the Transactions tab, click here. |
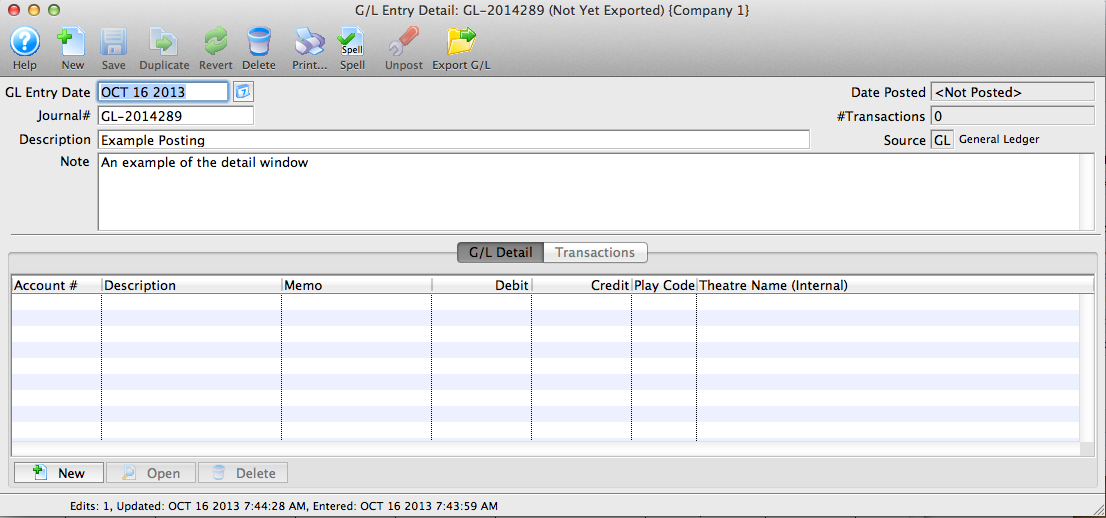
G/L Entry Tab
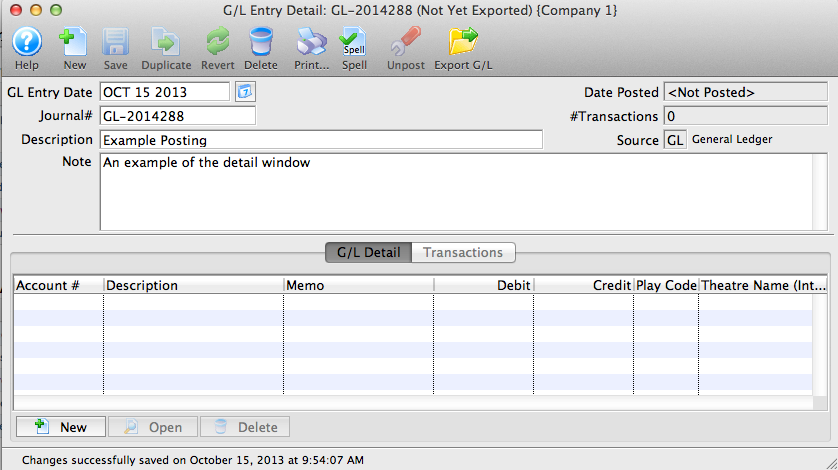
You use the General Ledger Entry Detail window for creating new G/L entries and examining posted entries.
Parts of the G/L Entry Detail Window's G/L Detail Tab
| The Transactions tab is used to see all transactions that are incorporated into the entry. For more information on the Transactions tab, click here. | |
| Account # | The account number used in the transaction. |
| Description | A description of the transaction. |
| Memo | The memo associated with the transaction. |
| Debit | The debit amount of the transaction. |
| Credit | The credit amount of the transaction. |
| Event / Play Code | The event / play code associated with the transaction. |
 |
Creates a new G/L transaction. |
 |
Opens the selected G/L transaction. |
 |
Deletes the selected G/L transaction. |
Entry Detail - Transactions Tab
The General Ledger Entry Detail window is used for examining posted entries.
![]()
Parts of the G/L Entry Detail Transaction Tab
|
The G/L Detail tab is used for adding the debits and credits to the different general ledger accounts. For more information on the G/L Detail tab, click here. |
| |
Begins a search of the transactions. |
| Include | The types of transactions to include. To remove a type from the search, uncheck the box next to the item. |
| Seq # | The sequence number of the transaction. |
| Trans Date | The date of the transaction. |
| Journal No | The journal number of the transaction. |
| Code | The transaction code associated with the transaction. |
| Transaction Desc | A description of the transaction. |
| Order # | The order number associated with the transaction. |
| Event / Play | The event / play associated with the transaction. |
| Performance | The performance associated with the transaction. |
| Type | The type of transaction. |
| Description of Entry | A description associated with the entry of the transaction. |
|
This function is not available in this window. |
|
Opens the Transaction Detail window. |
|
This function is not available in this window. |
Creating a General Ledger Sales Entry
The Revenue Date Ending is be the last revenue date orders are to be selected for the sales entry. Orders which have been realized as revenue and have not been journalized will be selected if they are on or prior to this date. Refer to Default Data General Ledger Setup for more information on determining when an order is realized as revenue. The current date will automatically be displayed in the revenue date field.
When balancing is done the day of the sales, the date used will be the current date.
When balancing is done the day after the sales, the date used will be the previous days date -- the date the sales were entered. If correcting ticket orders caused new ticket orders, ticket exchanges, or ticket refunds, then the date used will be the current date -- when this is performed, new ticket sales that have been realized as revenue will be included in the sales entry creation.
It is recommended that if the balancing is performed the day after the ticket sales, then new ticket sales are not entered until the previous days sales are balanced. Creating the sales entry creates a general ledger entry that summarizes the sales revenue. A separate entry is created for each date which sales, exchanges, and refunds were recorded. When the entries are created daily and no corrections are made after posting, only one entry per day is created. When entries are created the day after sales, and corrections caused new orders, exchanges, or refunds to be created, two sales entries will be created for the same revenue date. One entry is created for the date of the original sale and the second entry is for the corrections entered the day after. The two sales entries must be manually combined when balancing to the deposit entry. If several days passed since the last Create Sales Entry was created, several sales entries are created, one for each day ticket activity was recorded.
- Open the Main Menu Accounting >> Create Sales Entry.

The Journal Entry Types window opens.
- Click the New button.
A G/L Entry Detail window opens.
- Enter a Description of the entry and a detailed Note highlighting the reason for the entry.
- Click the Save button.
The entry is now created.
- The GL Entry window will change to allow you to add lines to the entry.
- Click the button at the bottom of the entry to add debits and credits as needed.
A balanced entry will require the debits and the credits to add up to the same value. If the debits and credits do not balance it will cause the End of Day to be out of balance. The entry will need to be corrected before you can Post to the GL.
- Add the details to the G/L Account Detail
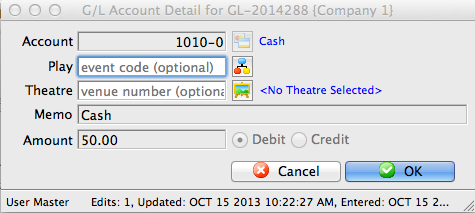
- Account: The GL Account for this Credit or Debit
- Play/Event (Optional): The Play, Event or Game that this entry applies to
- Theatre/Venue (Optional): The Theatre or Venue that this entry applies to
- Memo: A short description of why this entry is being made
- Amount: The credit or debit amount for this entry
- Debit or Credit "radio" buttons: Allows you to choose whether this is a Debit or Credit entry.
- Close the entry to save the changes.
|
Note: By adding the optional Play or Venue values, the GL entry can be tagged to that specific event or venue. Therefore, you can adjust values manually, as well as calculate the revenues by Venue. This could be helpful if you wish to compare how well Venue A does, compared to Venue B. |

During the next End of Day, when the Post to GL step is done the entry will be journalized and posted.
Exporting General Ledger Entries
 |
The General Ledger data can only be exported once. The entry is flagged as being exported when it is done so no one exports it twice by mistake.
If you lose the export file, you'll need to clear the export flag using the Clear Export G/L button in the toolbar prior to exporting the entry again. |
 |
GL Entries can only be exported if they:
|
Exporting General Ledger Entries allows you to take the entries and import them into your accounting software package. They can be exported in one of two places with the same result and the export format is defined in company preferences. You can export:
- selected from the list of general ledger entries window. Only the ones you select can be exported, and only if they are not already exported
- all not-yet-exported GL entries using the export button on the final tab of the End of Day Wizard. This gives an automatic way of picking up all the latest GL entries that have been posted and its the preferred location to do the export
Exporting G/L Entries from the list
- Click the G/L Entries button at the top of the window in Theatre Manager.
- Set the date in the To and From fields for the transactions to be exported, and click the Search button.
- Select the entries to be exported.
- Click the Export G/L button.
The user's operating system's Save dialog opens.
- Enter a filename to save the export under and click the OK button.
The file will now be saved in Tab Delimited format for import into another program. Please reference the program's help section for information on importing.
Correcting Transactions in the G/L
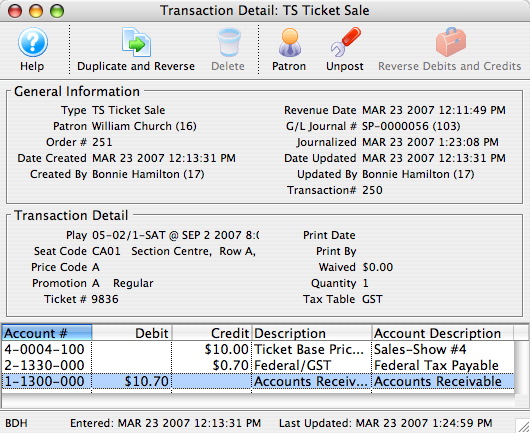
The Transaction Detail displays all information pertaining to a specific transaction. To view the detail of a particular transaction, select the transaction tab on a Patron's record and double click on the transaction. For more information on accessing the Patron Transaction tab, click here.
|
|
- Click the Transaction
 Tab in the patron window.
The Transaction History Record opens.

Click the Search
button to view all transactions. 
- Double clicking on the selected transaction opens the Transaction Detail window.
- Click Duplicate and Reverse
 button.
A transaction can be duplicated (and reversed) to make a correction to a transaction that has already been journalized to the General Ledger. The result of duplicating a transaction is an un-posted journal entry which reverses the debit or credit result of the original transaction. This un-posted journal entry will be journalized the next time an End of Day, Create Sales Entry routine is generated.
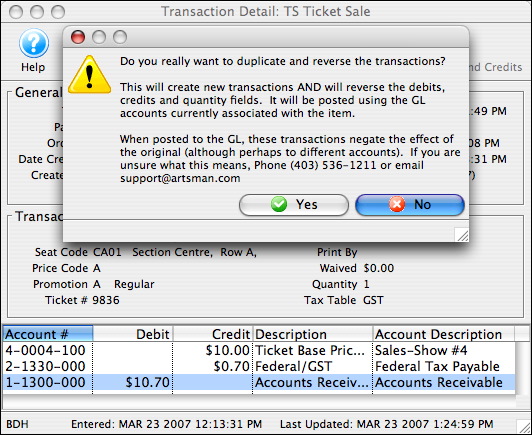
Click the No
 Button to cancel duplicating and reversing the transaction.
 - Click the
 to reverse debit or credit created in error.
You use this to correct a transaction that has been created in error and has not yet been journalized to the General Ledger resulting in a reversal of the debit or credit created by this transaction. It can only be preformed by Arts Management. This is an option rarely used.