Select your Own Seat Setup Steps
|
NOTE: In order to see changes to pick-your-seat map online, you must re-create the pick your own seat map following the instructions. This is required for any changes to the main map such as:
|
What the Patron Sees
 Select your own seats allows patrons to click on specific seats on a map online after an initial set of best seats has been selected by Theatre Manager. The process is designed for speed and flexibility for varying degrees of sales volumes. When the sales volume exceeds hundreds of sales per minute, obtaining seats through a pick-first process would be extremely difficult (can't click fast enough). Refer to What the Patron Sees for more detail.
Setup Pick Your Seats Process
Making an SVG map for use with pick your own seats can take as little as a few minutes if you have the original PPT Powerpoint file. The general steps are:
- Use one of Open Office or Adobe Illustrator and follow the instructions to Export your PPT as an SVG file
- Import the SVG map into Theatre Manager
- Use the Place Seats wizard and view/test the map
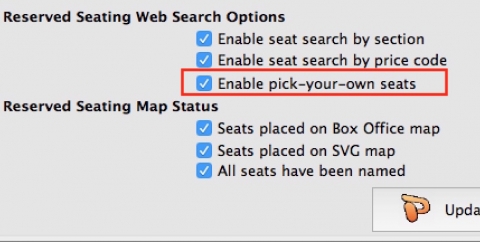
- Enable Pick Your Own checkbox on the pricing map
Use of pick your own seats can be:
- Enabled for all performances that using a specific a pricing map -and optionally-
- Disabled for some specific performances using the performances web settings if you don't want to use the feature.
|
There are some pre-requistes a venue must complete prior to enabling select-your-own-seat. You must
|
|
Pick your own is designed for modern browsers: IE11 and up, Safari, Chrome, Opera, Edge, Firefox running on Windows, OSX, IOS and Android. The few remaining users of IE 10 and earlier represent less than 4% of the marketplace. They:
|
Create SVG map for Pricing Map
 |
To make an SVG map, please find your original Powerpoint document, or if you've imported it into TM for safekeeping, you can export it to get the original file.
You must also have completed the steps to set up the graphic map under the Graphic Map tab for box office sales. |
Making an SVG Map from the Powerpoint document
The best way we have found to create a very useable SVG map will closely match your existing box office maps is to use Open Office (free) and your original PPT document. NOTE: Users must use the older Power Point file format of .ppt. The newer, default format of .pptx, can cause issues when being converted to .SVG.
- If you have not done so, export your PPT map from the database or find the original source document
- Tidy up your PPT document using Powerpoint before converting it to SVG.
- Use one of the following software options to convert a PPT into SVG format
- Open Office 4.1.4 (Recommended - free) or later which can be obtained from www.openoffice.org
- Adobe Illustrator CS6 (paid) - this can be found online for downloads - which we know some customers use. We have not tried the Adobe Illustrator Creative Cloud CC product (since it locks you into a subscription).
Note: after you have created an SVG document that is to your liking, you can use OpenOffice to make your PPT map edits from that point forward if you feel comfortable using it as an editing tool as well as a graphics format conversion tool.
Exporting the Original PPT Map
|
After making your final changes to the graphic map, you should save it to the database so that you can retrieve it later on - should you want to alter and aspect of the map or use it to make another pricing map for dynamic pricing.. |
Saving the original (Powerpoint) copy of the Map into the Database
Saving the original file that was used to create the maps:
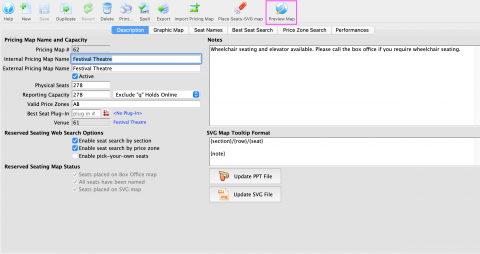
- Select the Description tab on the Pricing Map editing window.
- Click on your powerpoint document
- Drag it on top of the button that will be labelled 'Import PPT File' or 'Update PPT File' as indicated below
- Release the mouse
- If the message at the bottom of the screen indicates 'Source PPT document imported', you are done.

Exporting the Original PPT Map from the Database
If you have saved the original source drawing/map in the database as recommended, you can export it out again. Traditionally, we have used Powerpoint to create maps, but it has always been possible to use other drawing tools like OpenOffice.
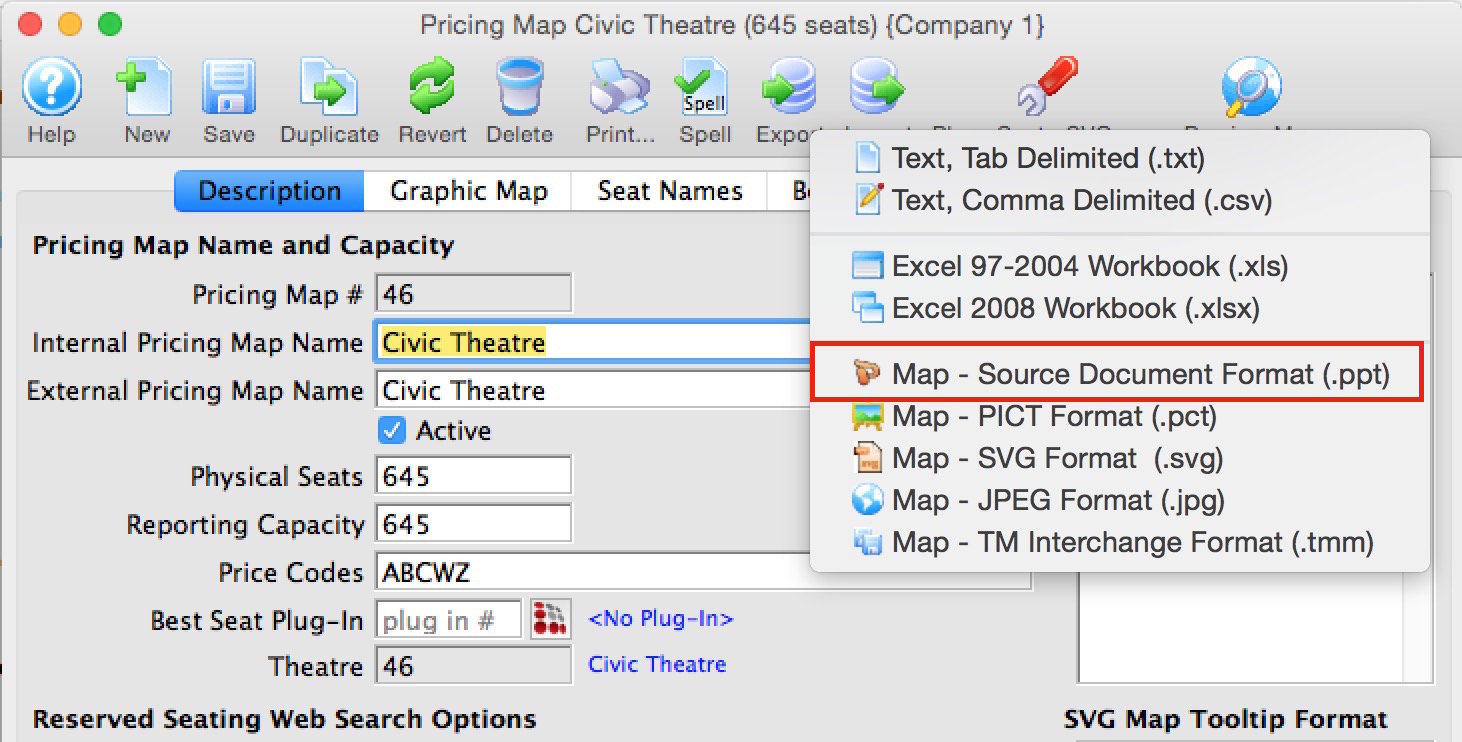
- Click on the Description Tab
- Click on the Export toolbar icon at the top of the screen
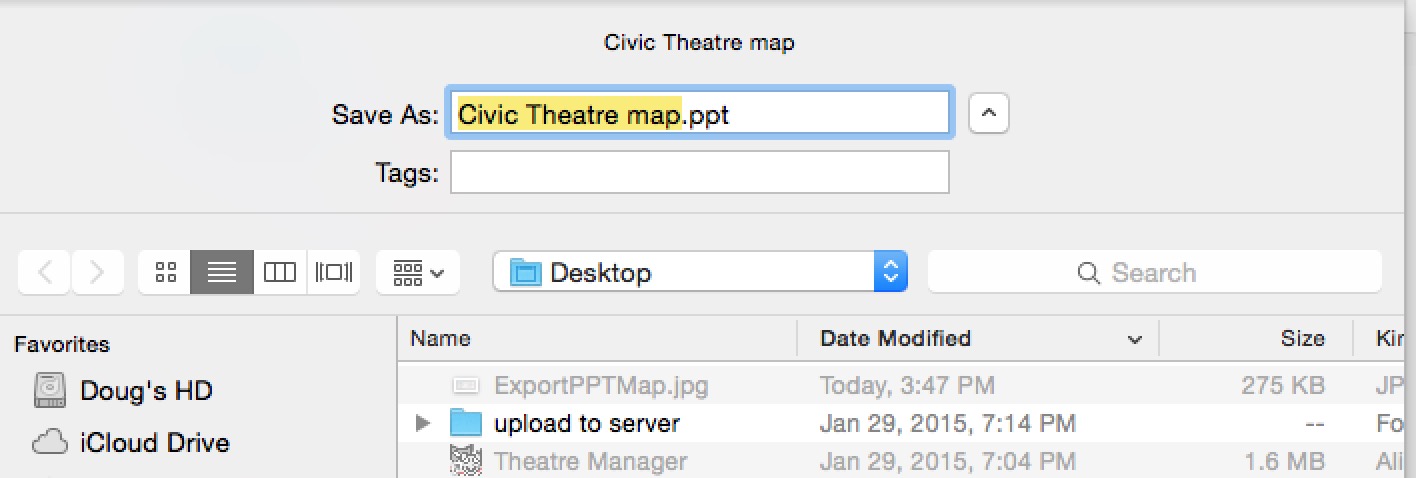
- Select Map - Source Document Format (.ppt)
- Select the location to save the file- the desktop is a good place for working with it. It will default to a name that matches your pricing map name.
Prepare the PPT Document the First Time
 If this is the first time you are converting the pricing map PPT document to SVG to prepare it for pick-your-own seats, there are a few steps that will help in the process. Once you are happy with the map and it converts nicely to SVG, you should not have to do this step again.
- Open the document in Powerpoint (any version should work - these steps were tested with office 2008 for mac)
-
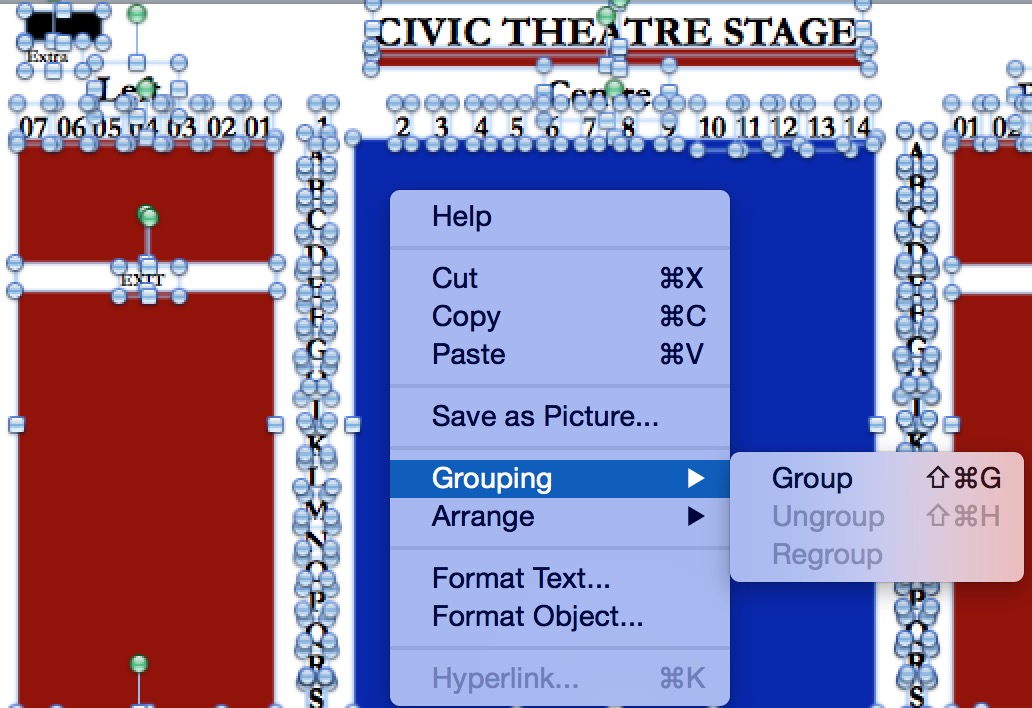
UNGROUP all objects:
- Select ALL of the objects on the drawing and UNGROUP them.
- Repeat the above steps until you can no longer ungroup any items on the picture
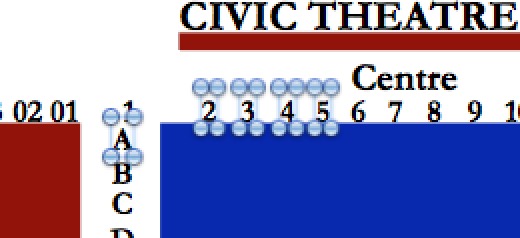 Fix any row or seat # text that used spaces to separate text and turn each row or seat # into individual objects. To do this:
- Look for the names of rows and/or seat numbers (as per the diagram)
- Make sure seat or row number is its own object. If not, re-do them so that they are and put things in the same position
- Each item must also be either vertical or horizontal. They cannot be rotated.
- Remove any large empty objects that contribute nothing to the map. Some maps seem to have a large white background object that is extraneous.
- We recommend that if you have a lot of white space at one end of your map or at the bottom that you crop the white space to make it look better online. You can do this by:
- Saving a copy of the PPT document before starting
- Select ALL objects on the Map
- If there is a lot of white space at the top or left of the document, dragging all objects the map up and to left to provide what you think is an acceptable margin
- Note the approximate amount of space you may wish to remove from right and bottom to make the map have a balanced margin
- Cut ALL the objects from the Map so that the map is empty.
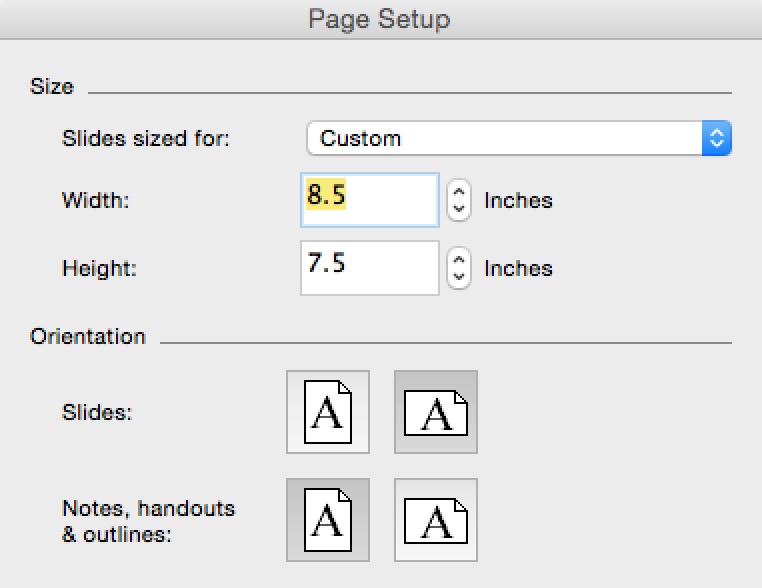 Go to Page Setup
- Write down the width and height measurements
- Subtract the amount of whitespace from the width and height. For example, if the document looks to have 2 inches of white space on the right, then make the width 2 inches smaller
- PASTE the objects back in to the document.
- If there is too much (or not enough) white space, then CUT all items, change the page size dimensions and PASTE again.
- Repeat until you like the look of the picture
|
If you make changes to the location of the background objects while tidying things up or altering the page size, please remember to update the box office sales map:
|
Convert PPT to SVG (using OpenOffice)
- Open Office is free. Use Version 4.1.4 or later from the link above.
- Some venues have used Adobe Illustrator CS6 effectively.
This page describes using then for its picture conversion capabilities (eg PPT to SVG).
- Open the PPT document Open Office. You can do this by using the File->Open menu after starting OpenOffice or you can drag your PPT document onto the empty window
- Select File->Export option as per the picture below:
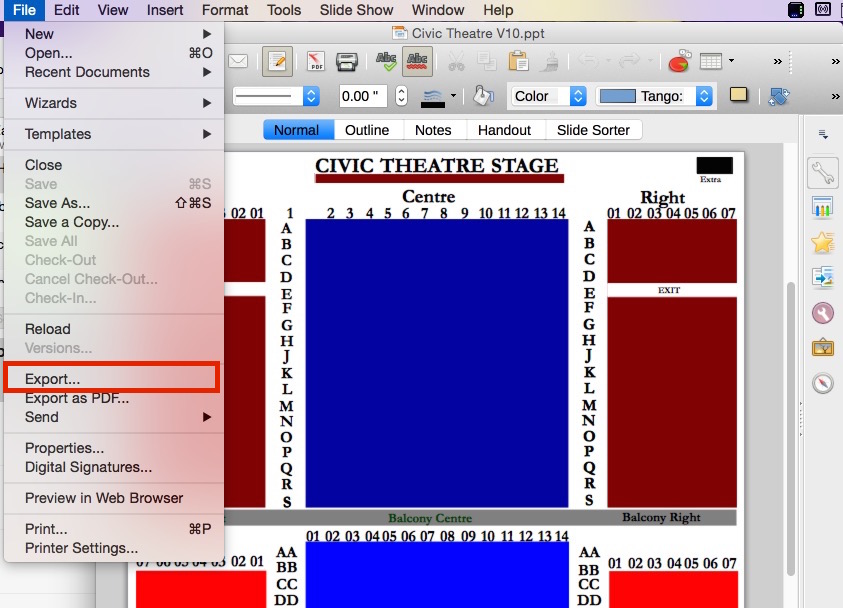
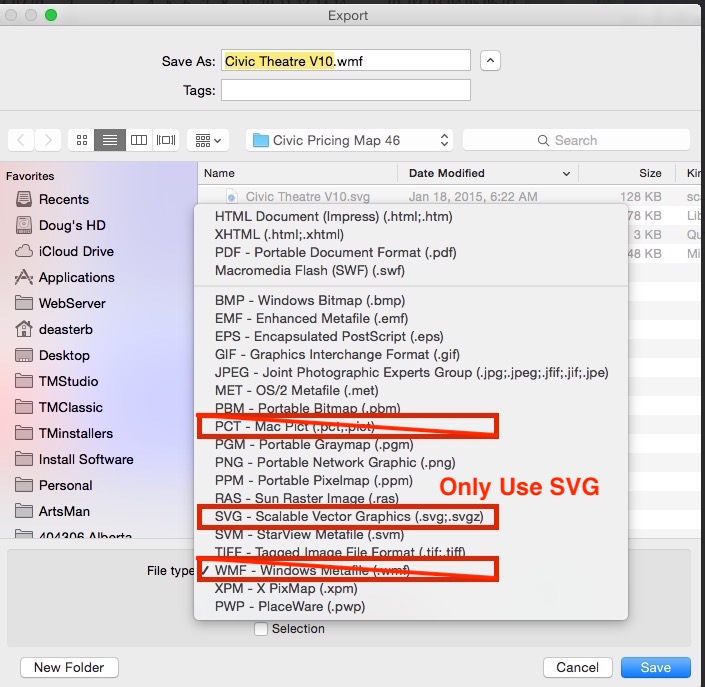
- When the File dialog opens, click the file type option and pick the export file type. There are a number of options but the ONE of interest is:
- SVG - Scaleable Vector Graphics - which is the one we will pick to get the SVG file
Merging Map with Pick-Your-Seats
|
Before doing this process, you must have created your SVG map and have it available or already have it imported. |
The merging maps process is required before you can enable pick your own seats online. It takes a previously created SVG map and automatically adds in the seat locations, tooltips, and the customized code that will make the maps work online
There are 4 steps:
- Import the SVG map into the Theatre Manager pricing map
- Set up or change the tooltip format to assist the Patron making a purchase online.
- Use the Place Seats SVG Map Wizard to merge in seat locations and tooltips to make the final map for pick your own online
- Previewing the SVG map and then testing it with online sales
|
You can repeat this process as many times as you want. It is usually just a click of a button and you will need to do it:
|
Importing SVG Map
To do this:
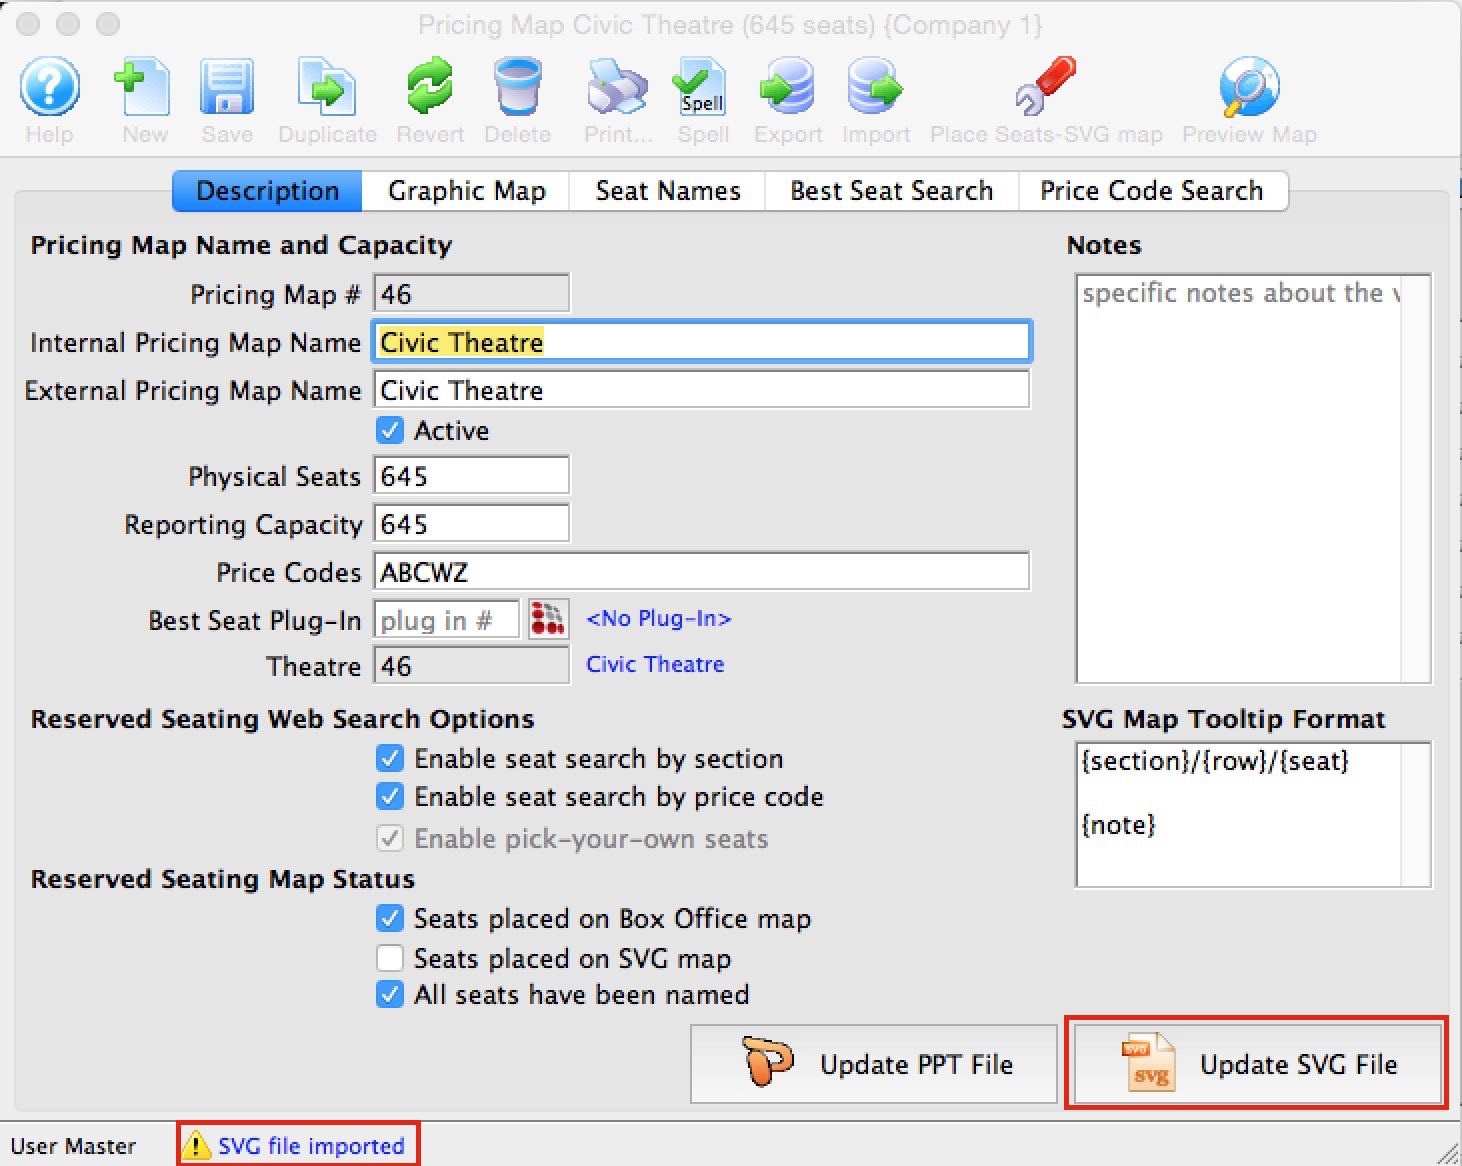
- Select the 'Description' tab on the Pricing Map editing window.
- Click on your SVG document
- Drag it on top of the button that will either be labelled 'Import SVG File' or 'Update SVG File' as indicated below
- Release the mouse
- If the message at the bottom of the screen indicates 'SVG file imported', you have completed the first step.
Set seat-tip Format for SVG Map
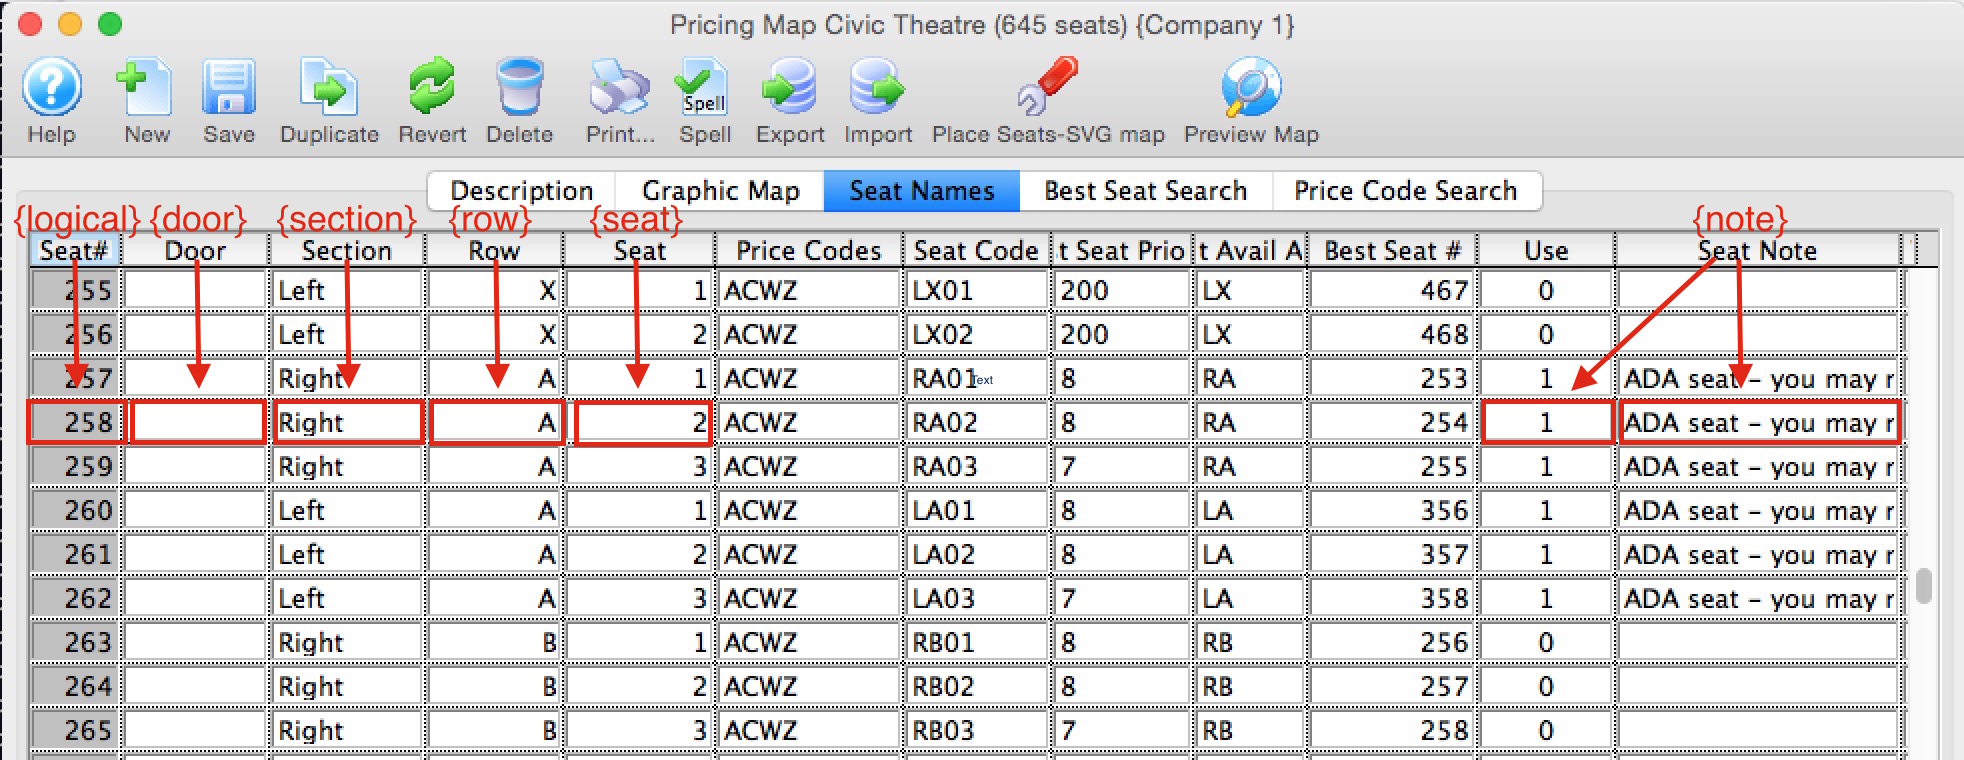
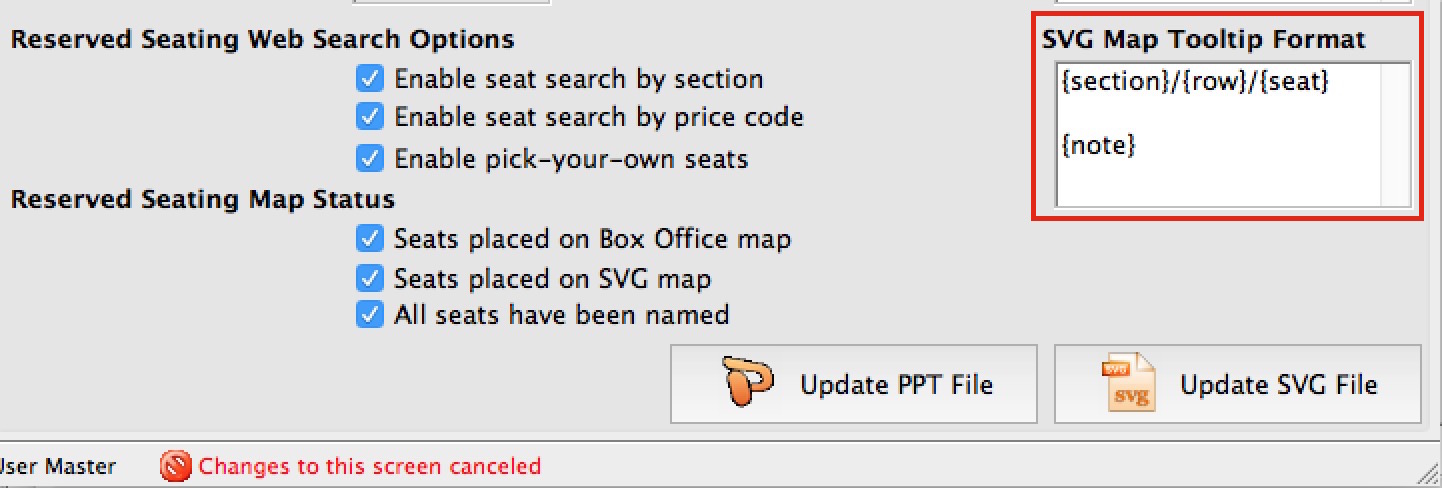 The example to the right causes the online map to show the {section}/{row}/{seat} and two lines below that, the seat {note} (if one exists).
To edit this field, simply type how you want the seat tip to look and which fields you want. You may use keywords, fixed text, and newlines to make it look as you wish such as:
- One or more of the following key words, in any order, which will be replaced by the actual values on each seat. Note: the { } are required and bolding was used for clarity only:
- {door} - adds the door description used for entry into the tip
- {section} - adds the section description to the tip
- {row} - adds the row into the tip
- {seat} - adds the seat number into the tip
- {notes} - adds the special seat notes to the tip - but only if the 'use' column in the seat names is set to 1
- {logical} - adds the logical seat number to the tip.
- Any standard text that you want which might assist the user. For example the tip can look like:
- {section} - {row} - {seat}
- Section: {section} Row: {row} Seat: {seat} Patrons should enter by door {door}
- Area: {section} Table #: {row}
- You can also add new lines if you want some data on separate lines
The diagram below shows how the seat tip fields relate to the columns on the Seat Names tab.
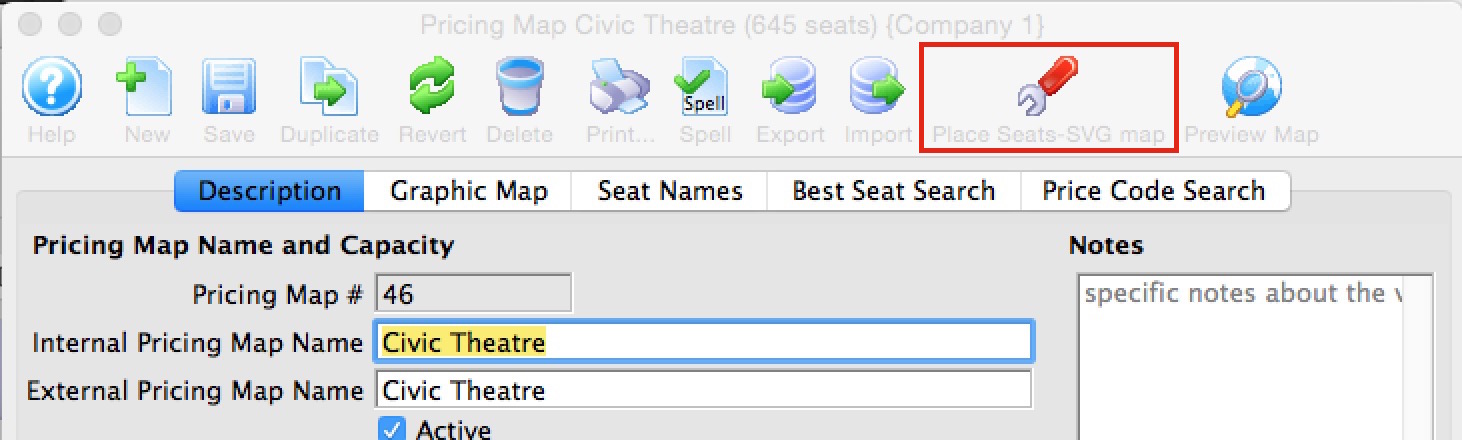
Place Seats SVG map Wizard
After preparing the SVG map per the previous instructions, you will need to use this wizard to merge the map with the rest of the programming code that will actually make it work. Fortunately, this is automated and is a quick process.
- Click the Place Seats SVG Format button on the toolbar to start the process. If you cannot, then make sure you have imported an SVG map .
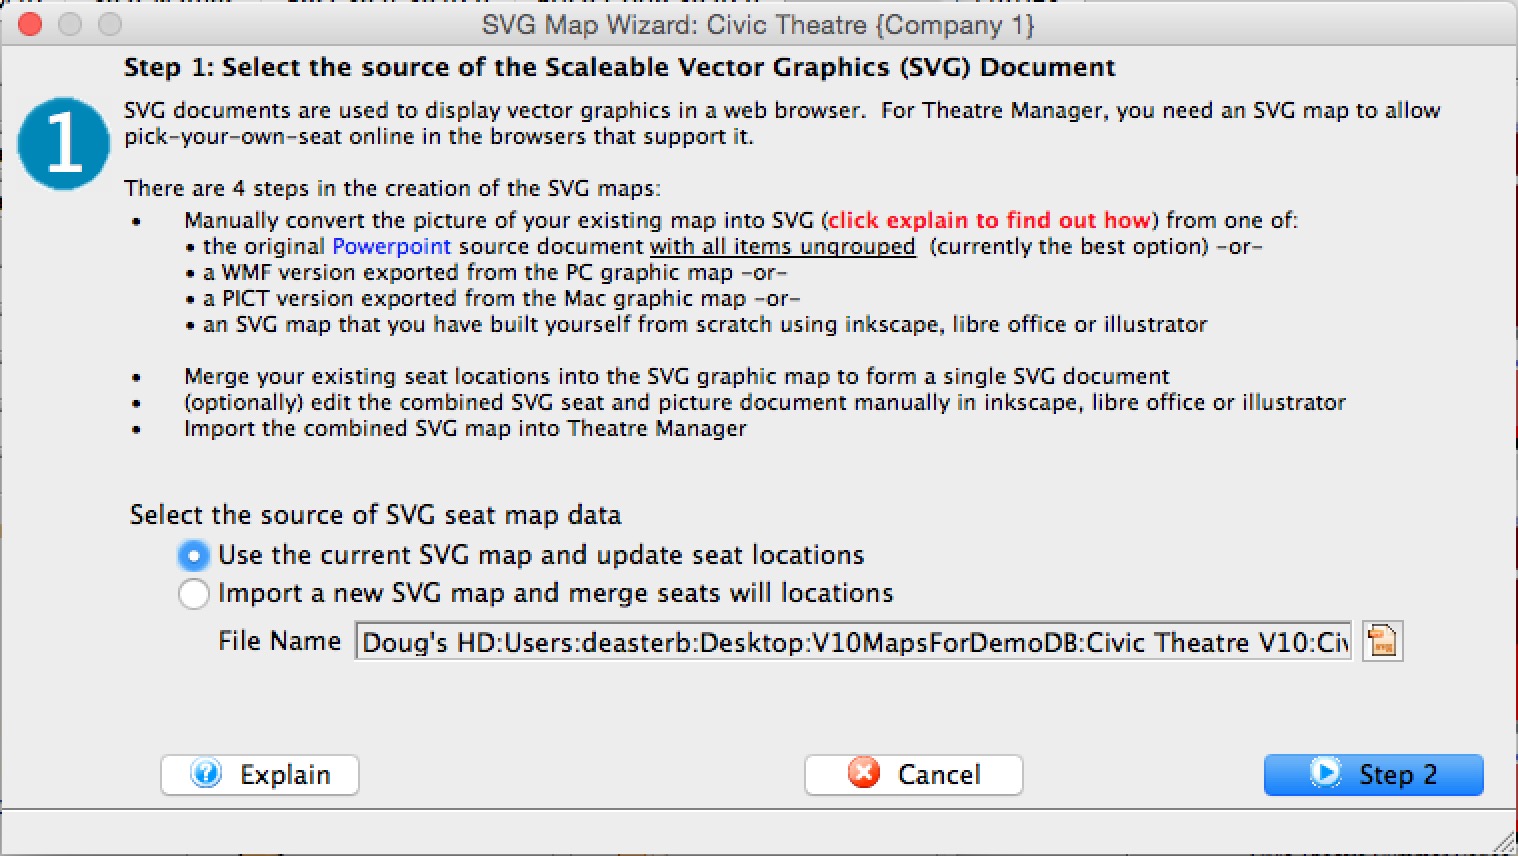
- The first step in the wizard asks you where to get your SVG map from. You can either:
- Use the SVG map that you have already imported into TM. If you select this option, it will replace all seat locations and seat tips in the existing map. This option may be best if all you are doing is changing seat tips, seat names, or have moved some seats on the graphic map.
- Specify the file name of the SVG graphics file and import a fresh copy prior to merging in the seat locations and tooltips. This option is better if you have completely edited or changed colours or background on the map and have made a new SVG file.
- Click Step 2 when ready to continue
-
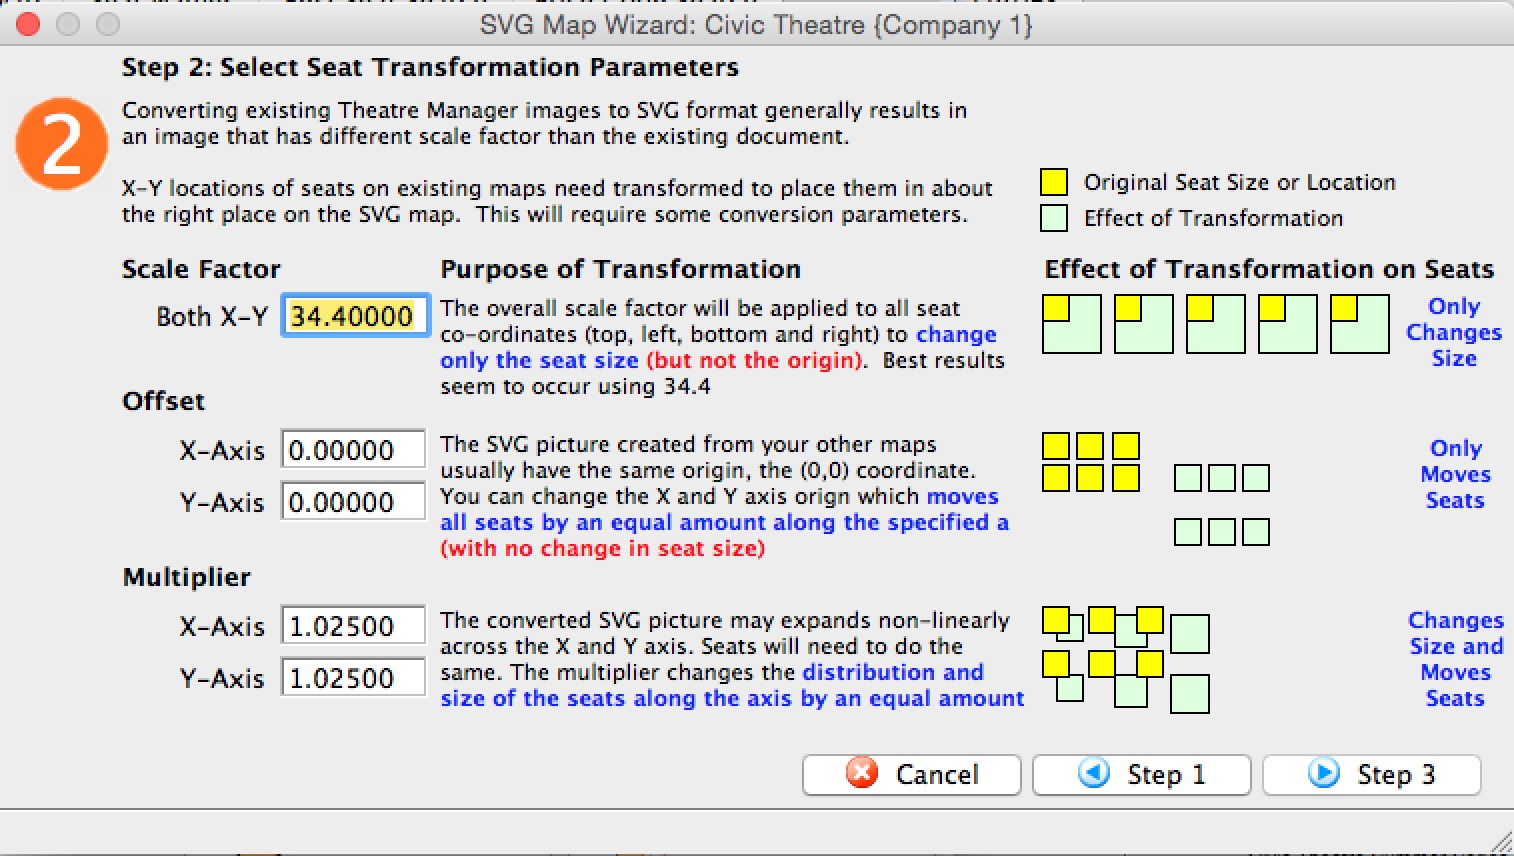
The second step copies the seating locations of the graphic map used for box office and automatically transforms existing seat locations so that they can be used with the SVG map.
Historically, different vector based image formats for the web use different scaling and origins. This means that X-Y seat locations for the box office maps have to be 'adjusted' slightly to work with the SVG map. This window shows the standard values that have been found to work with almost all powerpoint maps so far (providing that they have been cleaned up of a couple of things). If you are using an SVG exported from Powerpoint, you should not have to change any of these parameters - but in case you find you need to (eg: an export from Adobe Illustrator), the meaning of them are:
- Scale Factor (default is 34.4). Each seat on the map has a top-left and bottom-right X-Y position on the background image. The scale factor multiplies each X or Y position by the fixed amount to make seats 'bigger' but leave the origin of the seats the same. In other words, seats will not move - just get bigger to match the SVG background. (From customer reports, Adobe's setting may be 1.0 - meaning don't multiply)
- Offset (default 0.0). All maps and seats should start at the same origin, typically the 0,0 co-ordinate. If you want to move every object by the same amount in the X and/or Y direction, provide a value for the offset. This simply moves seats one way or another. It does not affect size or shape.
- Multiplier (default 1.025). This transformation is applied after the previous two. All seat co-ordinates are multiplied by the factors to stretch the seat locations out a little in the X and/or Y directions. (from customer reports, Adobe's setting is 1.0)
- Click Step 3 when ready to continue
- The online maps have some customer assistance capabilities that can be added in. Select the ones you wish:
- Seat tips can be displayed when a patron hovers over a seat, or they can be left off the map.
- Indicate if you want to see a preview of the map after completing the process. It will open in your browser and you can interact with it by stretching it or trying the tooltips
- Click Done when ready to continue

Testing An SVG Map Online
The Preview Button
After you have placed your seats on the Pricing Map, you can quickly Preview the Map Online by selecting the Preview Map button. This will jump you to the view of what patrons see online, and the preview displays the TM seats placed on the SVG file.
Enabling the Pick Your Seat Option
The online select-your-seat process has predefined computer code associated with each seat and it can be turned on in the Description tab of the Pricing Map itself.
Testing online sales
You can test the online sales process by previewing the Event online, and running through the sales process. You can test all the Promotions, move from seat to seat, and test on mobile devices to ensure that the Map can be pulled and pinched the way you need it in terms of sizing.
Manually Editing an SVG Map
|
Editing an SVG map to add stylistic flourishes is possible, but Arts Management provides no support for maps changed in this manner. If an edit breaks the 'select-your-seats', you will need to figure out the cause or recreate the SVG map again. |
- OpenOffice (free)
- Adobe Illustrator CS6 (paid)
You must make sure that you do not change any of the SVG id and class markers that identify the seat locations for Theatre Manager. You can change a number of stylistic components, add legends, or do as you wish. Manually editing a map has some steps:
- You must have first:
- Used your PPT to create the initial SVG map
- and merged it with seat locations using the wizard
- Then you can do the following any number of times:
- Export the merged SVG from Theatre Manager using the Export button on the toolbar and selecting SVG - Format
- Edit it using one of the SVG graphic tools described above (Open Office, Illustrator) or any other one that you find works for you.
- Import the manually adjusted SVG Map back into Theatre Manager
- Preview the map
- Test using the map online to by tickets
Pick Your Seat - what the Patron sees

Select your own seats allows patrons to click on specific seats on a map online after an initial set of best seats has been selected by Theatre Manager. The process is designed for speed and flexibility for varying degrees of sales volumes. When the sales volume exceeds hundreds of sales per minute, obtaining seats through a pick-first process would be extremely difficult (can't click fast enough).
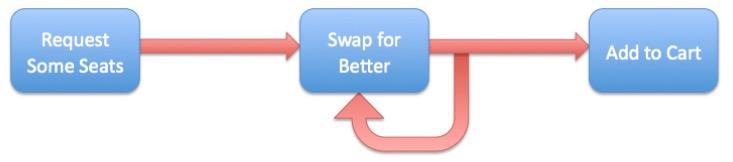
To ensure that patrons are satisfied, even in high volume scenarios, Theatre Manager uses the following process:
- First, offer patrons tickets using the best seats process. (Patron is now guaranteed at least those tickets)
- Then, allow patrons to spend as much time as they wish attempting to swap for seats more suited to their tastes, without losing their original seats.
- Also, allow patrons to 'reposition' the best seats algorithm by swapping for seats in the desired area, and then finding new best seats near the desired area.
The images below indicate what the patron will see online:
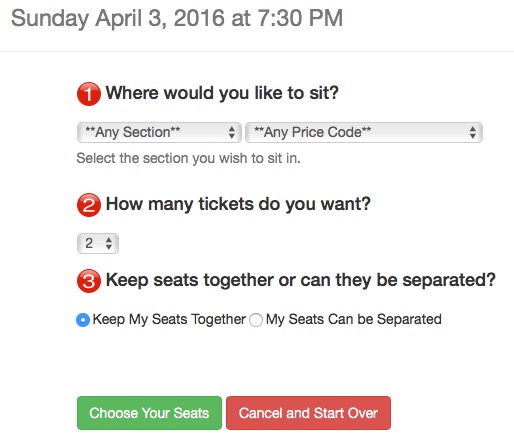
- The patron finds the event in the usual manner and clicks the buy button.
- They are presented with the normal quick selection process where they can select a location, price, quantity of tickets and whether the seats must be together or can be apart.
They then click the Find Best Seats to get a starting set of seats.
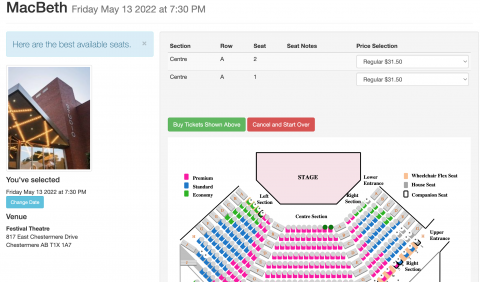
-
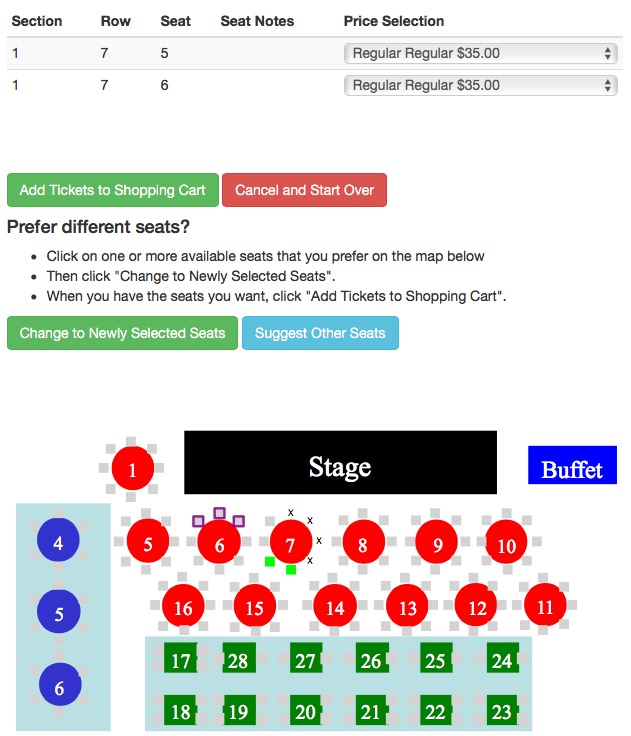
Seats are offered to the patron. They can change prices for the selected tickets and add them to the cart as they normally would. Alternatively, if they wish to have different seats, they can:
- Highlight:
- other seats in the map to get the new seats - or -
- existing seats in addition to new seats to get more seats - or -
- fewer tickets
- Click Swap for Selected Seats to change the tickets they are being offered -and-
- Repeat the above process as often as they want
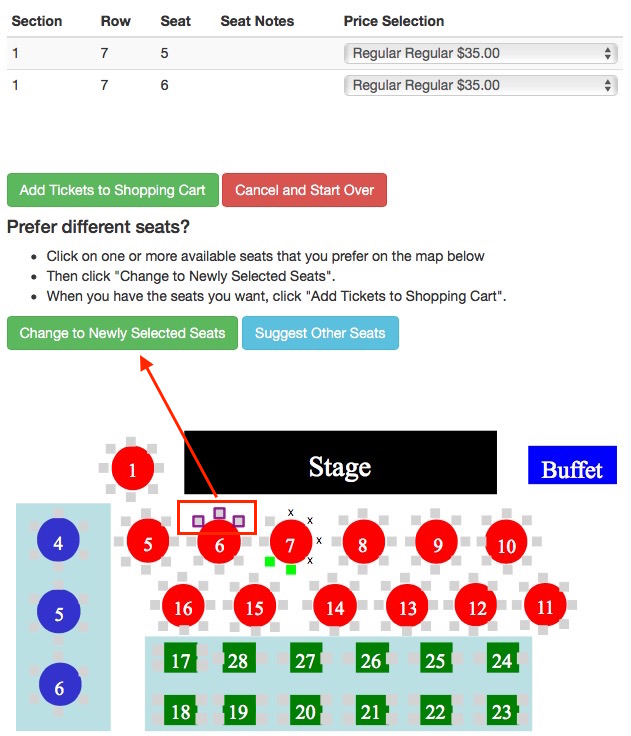
- Highlight:
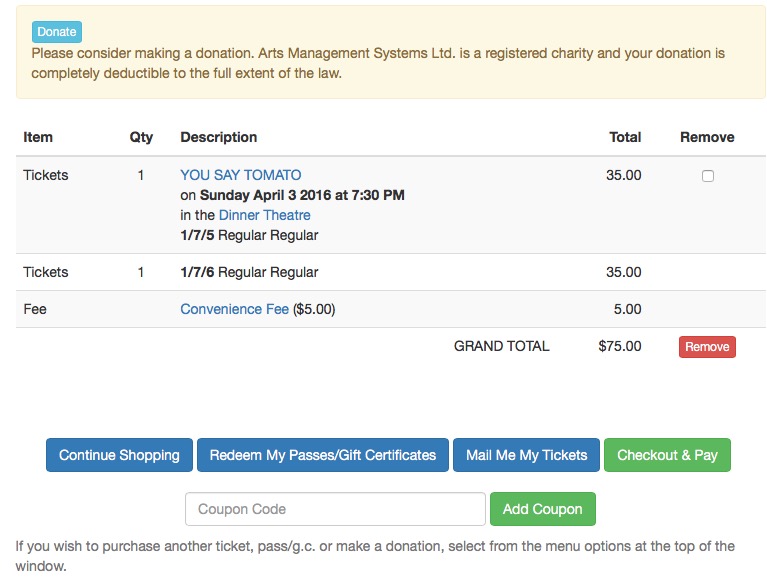
- When Add tickets To Cart is clicked, the most recent selection of seats in the top area is added to the cart.