Ticket Faces
With Theatre Manager you can customize ticket faces when printing on BOCA or Practical Automation compatible printers. You can:
- Select the information to be printed on a ticket
- Define where the information is printed on the ticket.
- Determine the size of the fonts printed on the ticket.
- Assign different ticket faces to different plays.
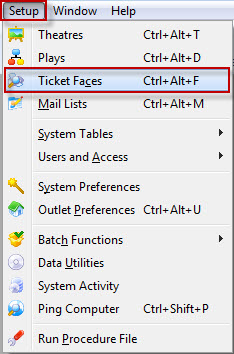
The process of creating a customized ticket face does involve some trial and error to align information and font sizes. To access the Ticket faces window you:
- Choose Setup >> Ticket Faces from the Main Menu.
The Ticket Face List window opens.
Click here for more information on the Ticket Face List window.
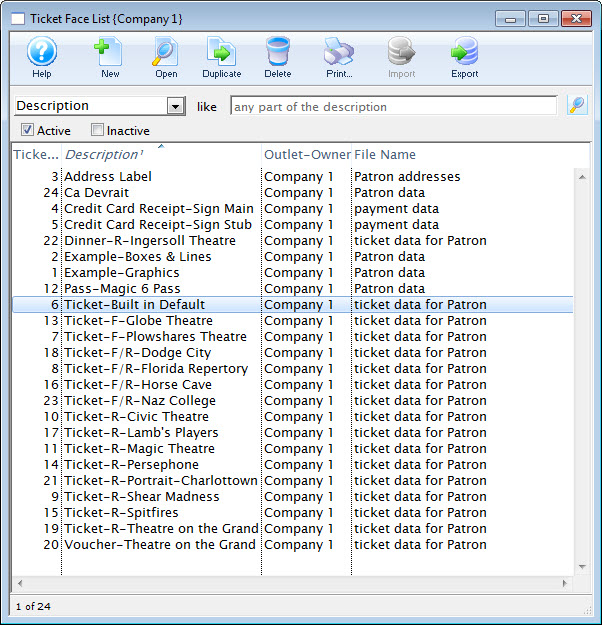
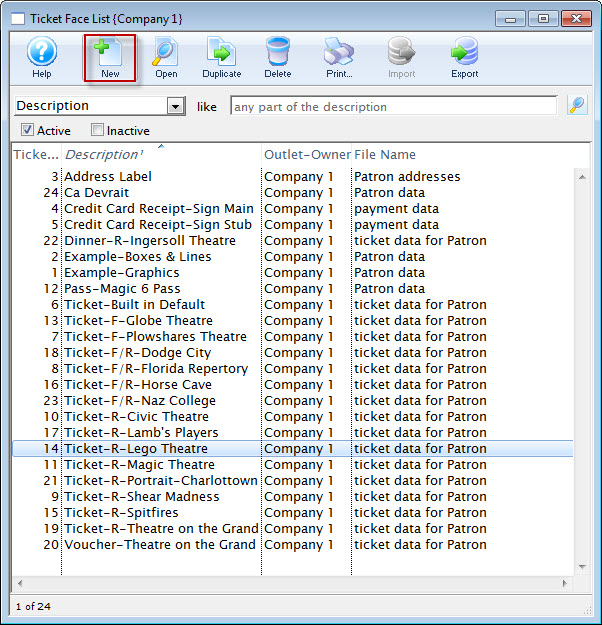
Ticket Face List Window
Parts of the Ticket Face List Window
 |
Inserts a new ticket face. For more information on creating new ticket faces click here. |
 |
Opens the selected ticket face for editing. For more information on editing ticket faces click here. |
 |
Creates a duplicate copy of the current ticket face. |
 |
Deletes the selected ticket face. For more information on deleting ticket faces click here. |
 |
Generates a report of all listed ticket faces to the screen or default print location. |
 |
Imports a tmf format ticket face into Theatre Manager. |
 |
Exports a ticket face out of Theatre Manager in a tmf format. |
| Merge | Merges the selected ticket faces together. All ticket faces that are being merged must be based on the same file for the merge to be allowed. |
| Description | Search option for the ticket face. Select a search parameter that best suits the ticket face to be located. |
| From | Starting range of the ticket face search. |
| To | Ending range of the ticket face search. |
 |
Search button to execute the search. |
| Ticket# | Unique number assigned by Theatre Manager to track the ticket face. |
| Description | Name of the ticket face. |
| Outlet-Owner | Outlet responsible for the ticket face. |
| File Name | Data the ticket face is composed of. |
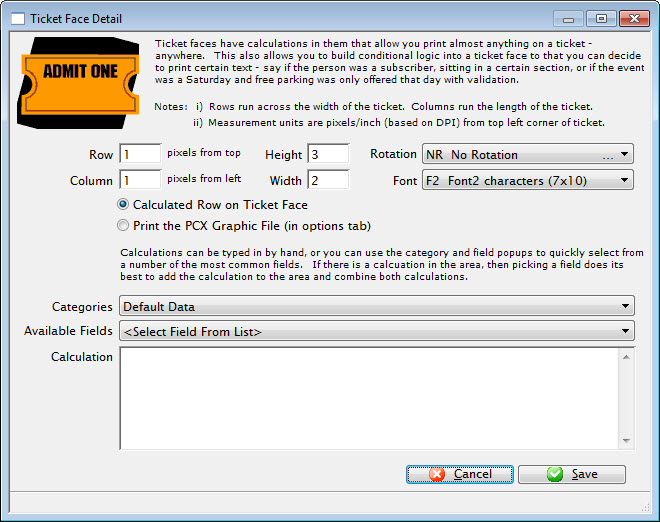
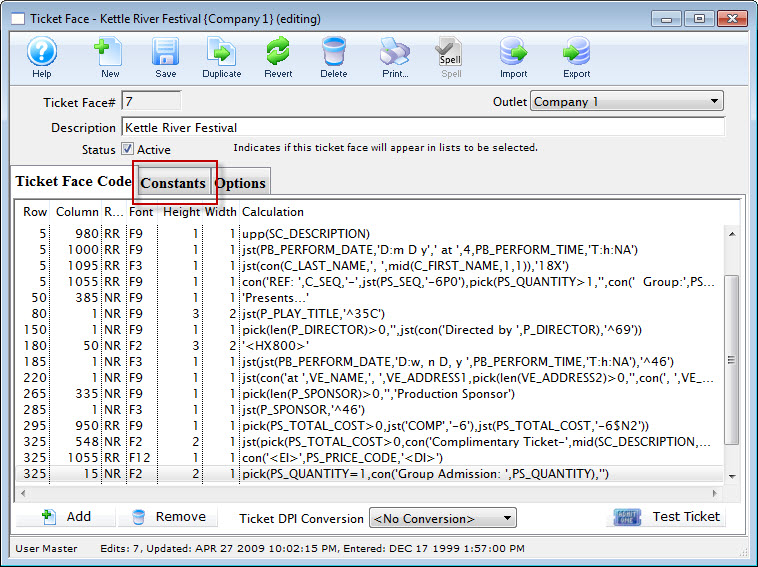
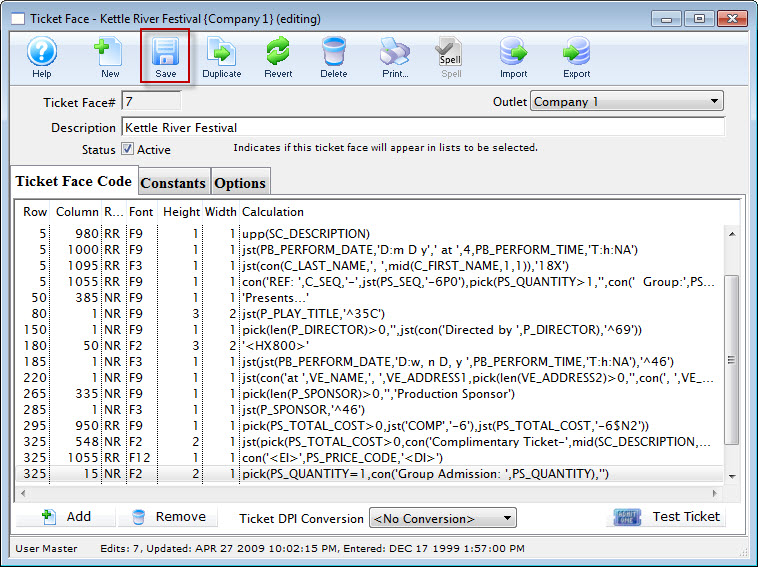
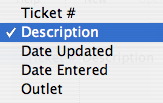
Ticket Face Detail Window
The Ticket Face Detail window displays all of the information about a ticket.
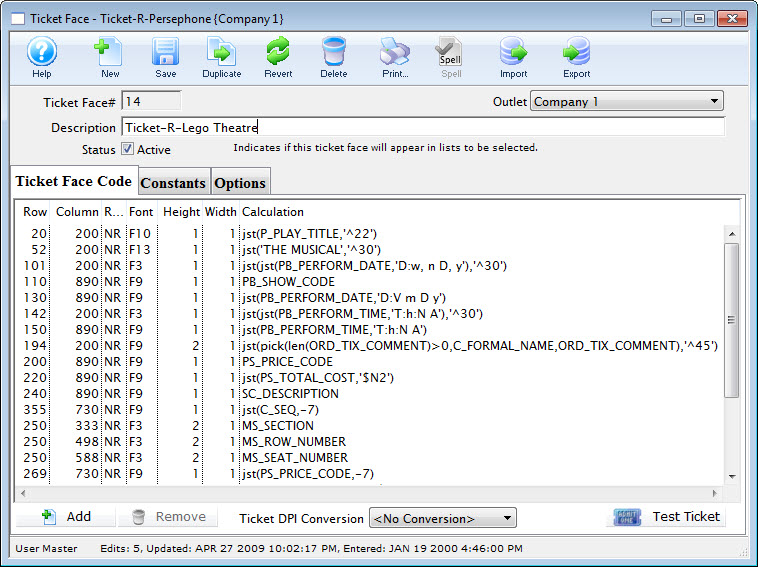
Parts of the Ticket Face Detail Window
|
Inserts a new ticket face. For more information on creating new ticket faces click here. |
 |
Saves changes made to the current ticket face. |
|
Creates a duplicate copy of the current ticket face. |
 |
Reverts changes made to the ticket face back to the last saved point. |
|
Deletes the selected ticket face. For more information on deleting ticket faces click here. |
|
Generates a report of the ticket faces to the screen or default print location. |
| Ticket Face# | Unique number given to the ticket face by Theatre Manager |
| Outlet | Outlet responsible for the ticket face. |
| Description | Name of the ticket face, if it is for a ticket, receipt, renewal notice etc. |
 |
Code used to create the ticket face. For more information on the ticket face code tab click here. |
 |
Equations calculated prior to printing the ticket. For more information on the constants tab click here. |
 |
Additional options for ticket printing. For more information on the options tab click here. |
 |
Adds a line to the bottom of the ticket parameters and opens the Ticket Face Detail window. For more information on the Ticket Face Detail window click here. |
 |
Removes the currently selected lines from the ticket face. |
| Ticket DPI Conversion | Allows the conversion of the row and column information to a different DPI. |
 |
Enables printing of a sample ticket to the printer. Ensure the printer is correctly set up in the options tab. This is designed to print a sample ticket with sample information. To see an actual ticket with correct information the ticket face number must be entered into the Plays and Dates information for a particular play. Sell tickets to a test patron account and print them as a final test of the ticket design. |
Ticket Face Code Tab
Parts of the Ticket Face Code Tab
| Row | Row the calculation is applied to |
| Column | The column the calculation is applied to |
| Rotation | The rotation of the data |
| Font | The font used to display the data |
| Height | The height of the characters |
| Width | The width of the characters |
| Calculation | Exports the ticket calculations |
|
Add a line to the ticket face calculations.
|
|
Remove a line from the ticket face calculations. |
| Ticket DPI Conversion | Allows the conversion of the row and column information to a different DPI. |
|
Enables printing of a sample ticket to the printer. Ensure the printer is correctly set up in the options tab. This is designed to print a sample ticket with sample information. To see an actual ticket with correct information the ticket face number must be entered into the Plays and Dates information for a particular play. Sell tickets to a test patron account and print them as a final test of the ticket design. |
Constants Tab
You use constants to add to ticket face equations. Constants replace long lines of equation that need to be repeated or in conjunction with pick statements. A pick statement may read if the constant is not met to print one thing on the ticket but if the constant is met to print something completely different. Constants allow for more editing options and can be used as many times as is needed in the ticket face.
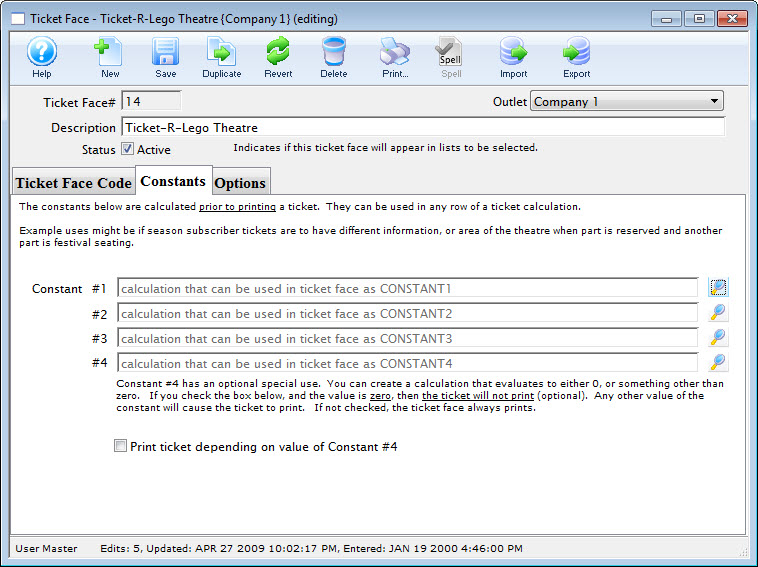
Parts of the Constants Tab
| Constant #1 | First constant equation. |
| Constant #2 | Second constant equation. |
| Constant #3 | Third constant equation. |
| Constant #4 | Fourth constant equation. |
|
Opens the constant equation window. For more information on creating constants click here. |
| Print Ticket Depending on Value of Constant #4 | If the value of constant #4 equals zero the ticket face will not print. |
Ticket Face Constants
You use constants to add to ticket face equations. Constants replace long lines of equation that need to be repeated or in conjunction with pick statements. A pick statement may read if the constant is not met to print one thing on the ticket but if the constant is met to print something completely different. Constants allow for more editing options and can be used as many times as is needed in the ticket face.
An example of a constant value is:
- CON(PATRON_FIRST_NAME,' ',PATRON_LAST_NAME).
- Print the patron's first name, a space and the patron's last name.
This statement says:
Rather then having to type this information several times, CONSTANT1 can be typed to generate the patron's name. A more complicated constant may be used within the ticket face when something other then the regular ticket information is to be printer.
In addition to acting as a constant, line #4 can be set to require a value equaling something other then zero. If the value of the equation is zero, a ticket will not print. This feature can be used when a ticket is not required if a patron meets specified conditions.
Adding a Constant
- Open the Ticket Face List window.
Click here to learn how to access this window.
- Select the ticket face you are adding a constant to.
Single click on a ticket face to select it.
- Click the Open button.
- Click the Constants tab.
- Click the Lookup button.
The Constants Detail window opens.
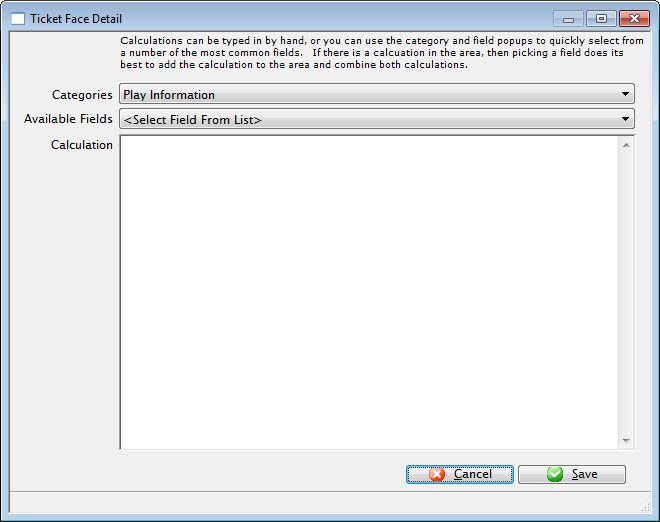
- Enter the Constant equation.
To enter information under 'Calculation', click on 'Category' drop-down list.
Once you have selected an option, click the 'Available Fields' drop-down list.
This pop-up menu has two columns.
The left column is the fields to be entered and the right column is the sample information. Select a field (for example - company name). The information that appears in the field calculation (D_COMPANY) instructs the printer to put the company name (found in Company Preferences) in this location on the ticket.
You can type this information into the field calculation, however, if all event data is typed onto the ticket face, this prevents the tickets from being able to be used for other events. Click here for more information on Calculations.
- Click the Save
 button.
The Constant has now been added to the ticket face and can be used in conjunction with other equations.
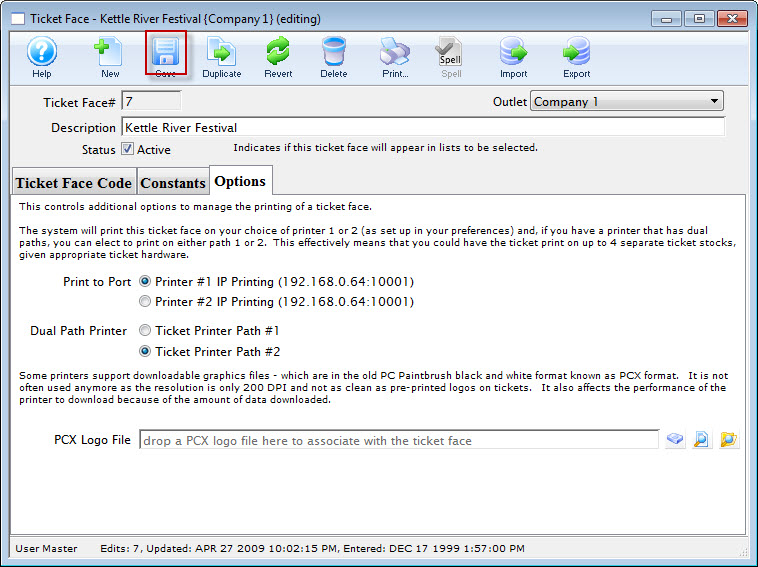
Options Tab
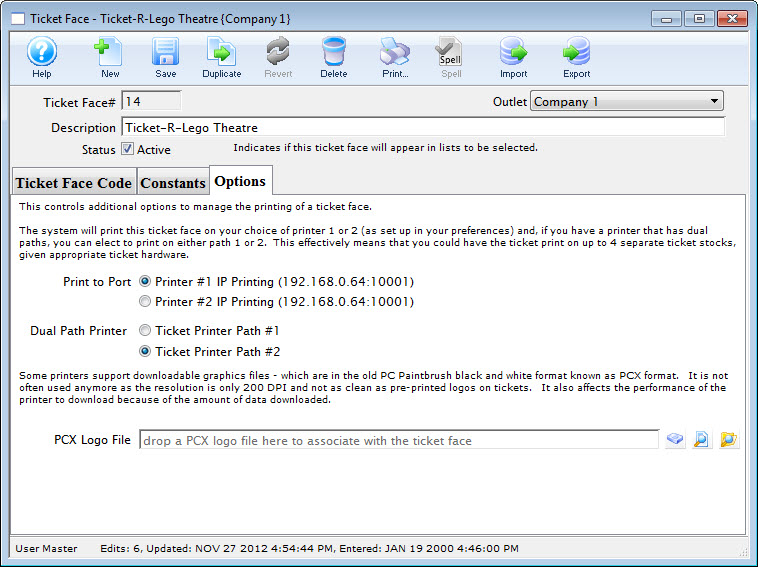
Parts of the Options Tab
Print to Port |
|||
| Printer #1 | Option 1 for ticket printing. Any ticket printed using this ticket face will be sent to the printer specified in the hardware setup as printer #1
This allows you to print a batch of tickets to two printers with different stock in them, depending on the event purchased. Printers do not have to be identical types or models or ports. |
||
| Printer #2 | Option 2 for ticket printing. Any ticket printed using this ticket face will be sent to the printer specified in hardware preferences identified as printer #2.
This allows you to print a batch of tickets to two printers with different stock in them, depending on the event purchased. Printers do not have to be identical types or models or ports - they have to be the same manufacturer. |
||
Dual Path Printer |
|||
| Ticket Printer Path #1 | Port 1 on the ticket printer. Select this option if the ticket should print to this port. | ||
| Ticket Printer Path #2 | Port 2 on the ticket printer. Select this option if the ticket should print to this port. | ||
Logo |
|
||
| PCX Logo File | File name of the logo to be printed on the ticket | ||
 |
Search button to locate the logo file. | ||
 |
Opens the logo in it's designated program for viewing. | ||
 |
Opens the folder the logo resides in. | ||
Creating a Ticket Face
- Open the Ticket Face List window.
Click here to learn how to access the Ticket Face List window.
- Click the New button.
An empty Ticket Face Detail window will open.
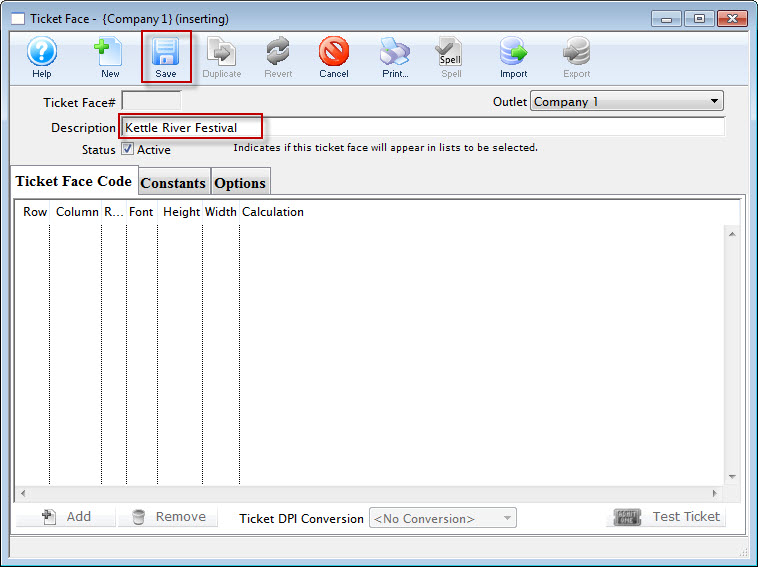
- Enter the name for the ticket face in the description field.
- Click the Save button.
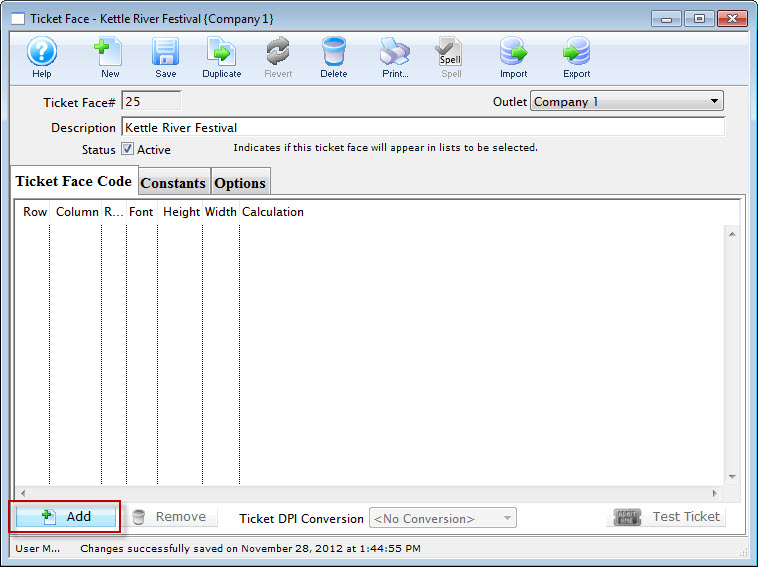
- Click the Add button.
The Ticket Face Detail window opens.
For more information on the Ticket Face Detail window click here.
- Enter a Calculation.
To enter information under 'Calculation', click on 'Category' drop-down list. Select an option and click the 'Available Fields' drop-down. The left column of this pop-up contains the fields to be entered and the right column shows sample information. Select a field (for example, company name). The information that appears in the field calculation (D_COMPANY) instructs the printer to put the company name (found in Company Preferences) in this location on the ticket.
You can type information directly into the field calculation, however, if all event data is typed onto the ticket face, it can not be used for other events. Click here for more information on Calculations.
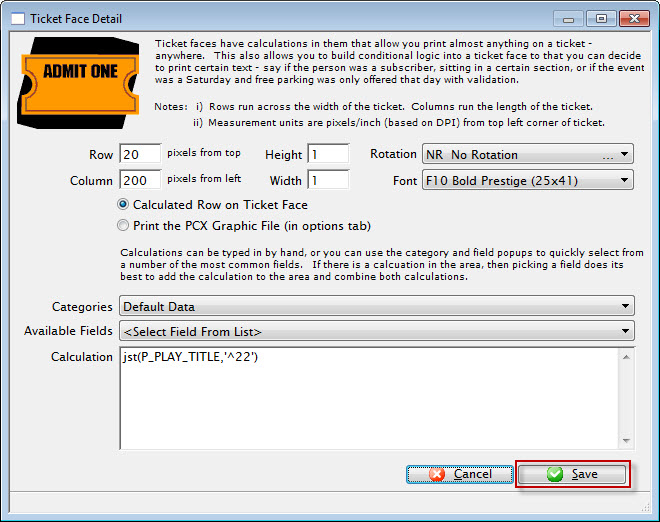
- Click the Save button.
The equation is added to the ticket face.
- Click the Constanats tab.
- Enter constants as needed.

- After you have entered your constant, click the Save button.
- Click the Options tab.
- Select the default printer settings for this ticket face.
For more information on the Options tab click here.
- Click the Ticket Face Code tab.
- Click the Save button.
The changes to the ticket face have now been saved. Click the Test Ticket
button to preview the ticket.
For example, you need to have your ticket face for a single performance ( the second Saturday) not print the price for that night and the pricing is applicable to 3 promotions.
You would enter the Constant PB_SERIES_CODE='2-Sat'+SC_DESCRIPTION='MTP Single Tickets'|SC_DESCRIPTION='Manager Discretion Comp'|SC_DESCRIPTION='Media Comp'
For more information on adding constants click here.
Editing Ticket Faces
- Open the Ticket Face List window.
Click here to learn how to access the Ticket Face List window
- Select the search option.
Choose from the drop down the most effective search option.
- Enter the From and To range.

- Click the Search button.
A list of ticket faces meeting the search criteria opens.
- Select the ticket face you want to change.
Single click on a ticket face to select it.
- Click the Open button.
The Ticket Face Detail window opens.
- Make changes to the ticket face as needed.
For more information on editing lines in a ticket face click here.
Use the Revert
to undo changes to the last saved point. - Click the Save button.
The changes to the ticket face have now been saved.
Formatting Ticket Faces
- Double click on a line to open up the Ticket Face Detail window.
- Change the row parameter.
- Click the Save button.
The changes have now been accepted for this line.
- Click the Test Ticket button.
A sample ticket will print for review.
Row Placement
When you are formatting ticket faces, you need to think in Rows and Columns.
Row
The number of rows on a ticket face is dependent on the resolution of the ticket printer in dots per inch (DPI). The total number of rows is equal to the total number of dots that could be printed in the height of the ticket. To calculate the total number of rows available, multiply the DPI of the ticket printer, times the height of the ticket. For example:
- If a printer has 200 DPI resolution, it prints 200 dots
per inch. A two inch high ticket will have 400 dots or rows.
By entering 300 into the row perimeter, you instruct the printer to start printing the information at the 300th dot, or 1.5 inches from the top of the ticket.
- If the printer is 100 DPI there are 200 dots
in the height.
By entering 150 in the row parameter, you instruct the printer to start printing the information at the 150th dot or 1.5 inches from the top of the ticket.
Column Placement
- If the printer has 200 DPI resolution, it prints 200
dots per inch. A 5 inch wide ticket will have 1000 dots or columns.
By entering 300 into the column parameter, you instruct the printer to start printing the information 1.5 inches from the left edge of the ticket.
- If the printer is 100 DPI there are 500 dots in the
width.
By entering 150 in the column parameter you instruct the printer to start printing the information 1.5 inches from the left edge of the ticket.
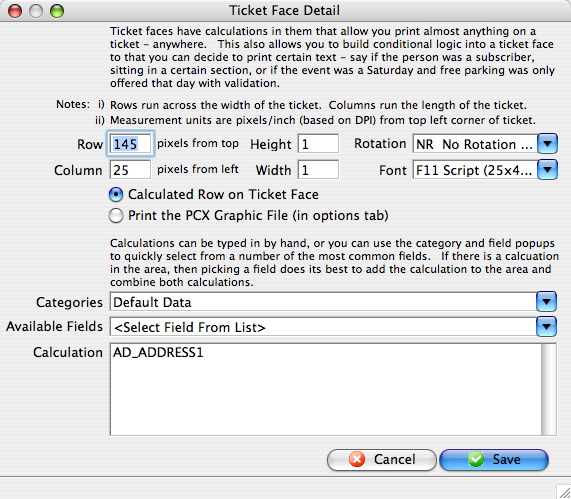
Font Name
Beside the name of the font, there is a number bracketed number. This refers to the number of dots (or pixels) in each character.
A (5 x 7) font means that the font is designed to print each character 5 dots wide and 7 dots high on the ticket face.
You can alter the size of the font by changing the height or width parameter in the ticket face to make it bigger in one or both directions.
Font Height
For example:
- if the font selected is (5 x 7) pixels -and-
- the height set at 4
Font Width
For example:
- if the font selected is (5 x 7) pixels -and-
- the width set at 2
Font Rotation
The options are:
- NR (No Rotation) means no rotation and information is printed horizontally along the ticket face.
- RL (Rotate 90+) means rotate the text clockwise (to the left) and print from the top to bottom.
- RR (Rotate 90-) means rotate the text counter clockwise (to the right) and print from the bottom of the ticket to the top.
- RU (Rotate 180) means print the text upside down on the ticket face.
Note: the row and column settings indicate where the text starts to print. If you are printing using the rotation RR from bottom to top, then you may wish to have a row that is near the bottom of the ticket (and vice versa for RL)
Calculation on Ticket
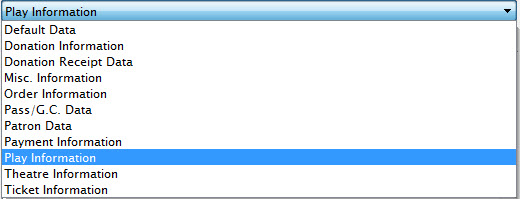
Both methods can be used to build a ticket. Available fields are divided into several groups.
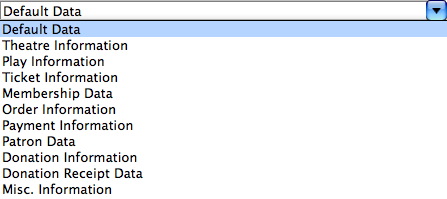
| Default Data | Enables the placement of information about the company contained in the Company Preferences setup. For example, the company name, address, and telephone numbers. | ||
| Theatre Information |
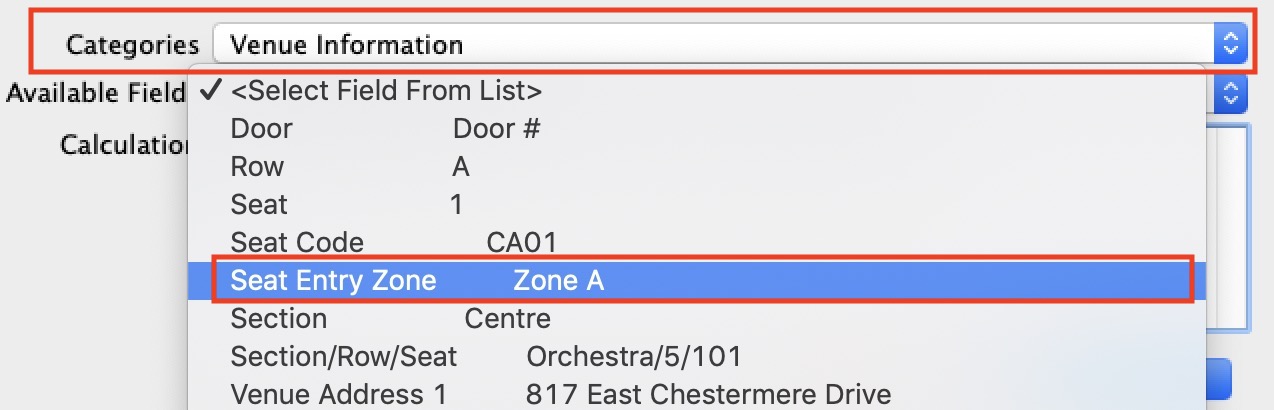 Enables the placement of information about the Theatre pricing Map associated with the play. For example:
|
||
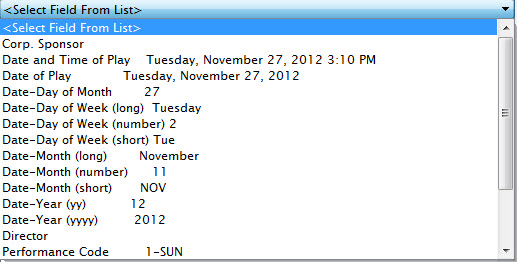
| Play Information | Enables the placement of information about the Plays and Dates associated with the ticket. For example, the play title, play date and time, and play sponsor. | ||
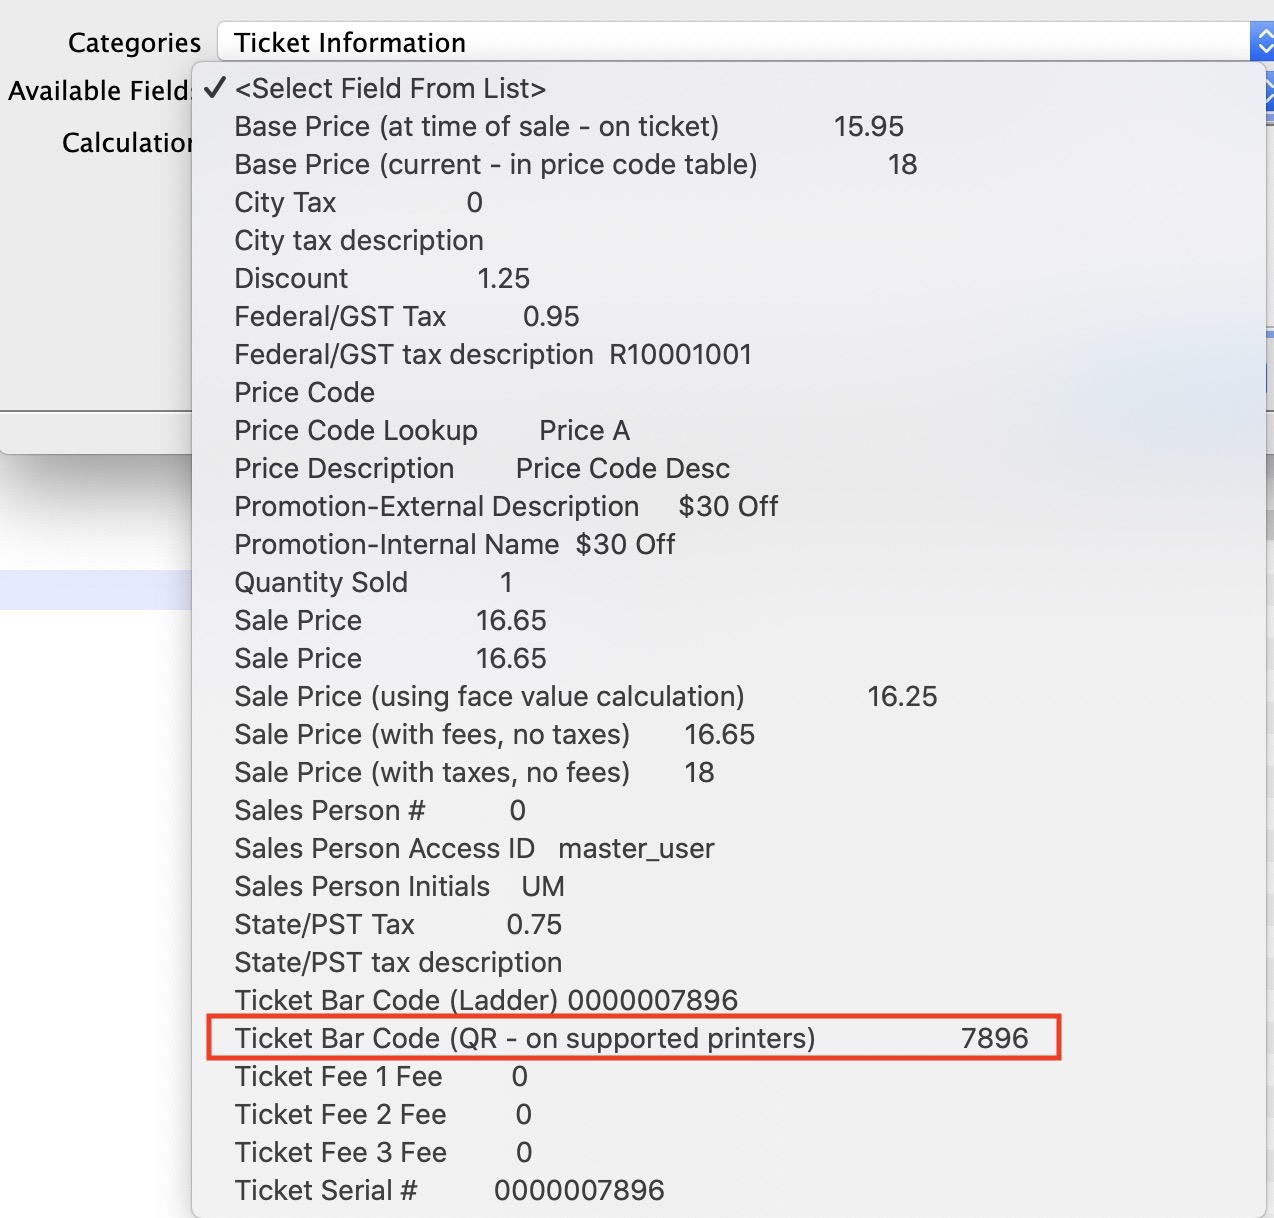
| Ticket Information |
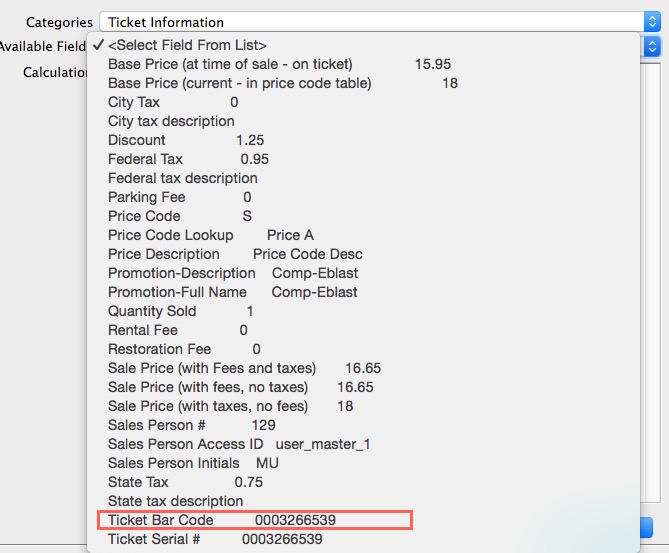 Enables the placement of information about the ticket sold to the patron. For example, the price paid, price discounts, and the ticket serial number. The ticket serial number is a unique number generated by Theatre Manager for each ticket.
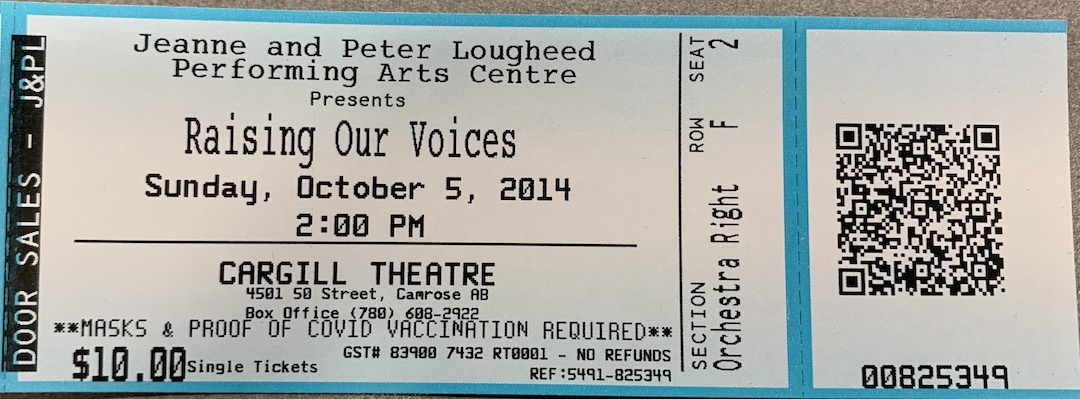
The unique number can be printed on any ticket along with the ticket bar code field in ladder format as shown in the picture or as a QR code if using Microcom printers. All you have to do is select the bar code and make sure it prints clearly and entirely on the ticket (but not on a perforation). Some interesting ticket calculations:
|
||
| Pass/GC/Member Data |
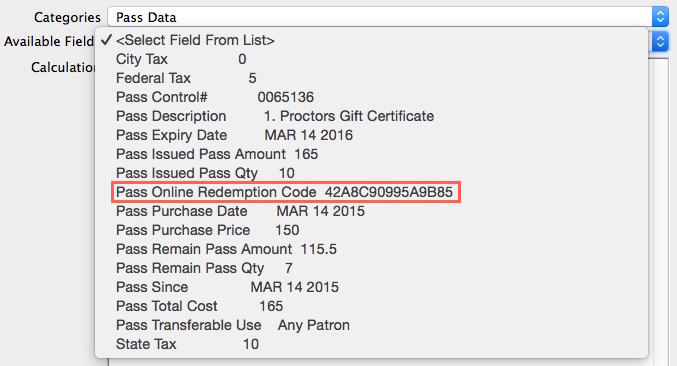 Enables the placement of information about the pass, gift certificate, or membership
sold to the patron. For example, purchase date, expiry date, member type, control number, and online redemption password.
Enables the placement of information about the pass, gift certificate, or membership
sold to the patron. For example, purchase date, expiry date, member type, control number, and online redemption password.
|
||
| Order Information | Enables the placement of information about the order created when the ticket was sold to the patron. For example, the order date and total order dollar amount outstanding. | ||
| Payment Information | Enables the placement of information about the payment made by the patron. For example, payment type, total payment value, and the credit card number. | ||
| Patron Information | Enables the placement of information about the patron. For example, the patron name, address, and telephone numbers. | ||
| Donation Information | Enables the placement of information about the donation made by the patron. For example, the campaign, donation date, and the total donation amount outstanding. | ||
| Donation Receipt Data | Enables the placement of information about the donation receipt as it pertains to donation of a patron. For example, the receipt number, date the receipt was issued and the value of the receipt. | ||
| Miscellaneous Information | Enables the placement of printer created information. For example, drawing boxes, drawing lines, and printing the internal ticket printing counter. The internal ticket printer number is a number generated by the printer every time a ticket is printed. If the same ticket is printed 4 times, each ticket will have an unique number. |
Calculation Commands
|
Quick reference information for Calculation Commands |

 |
Calculation commands are great if you know the name of the field and you want to manipulate it.
However, sometimes you may need to add a new field from a pick list in order find the name of what you want. |
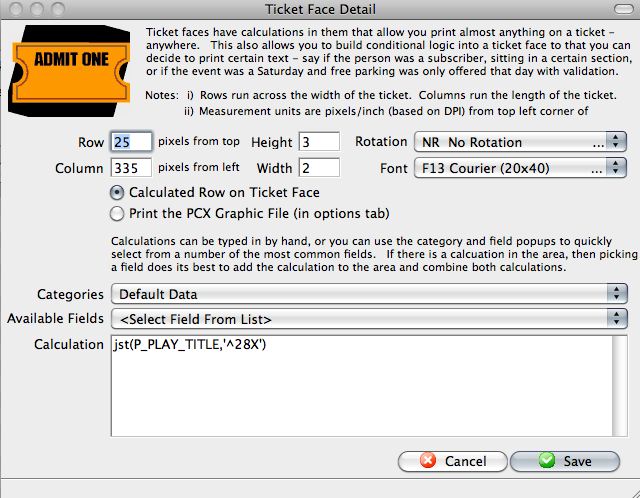
The third line of the sample screen C_HOME_PHONE has no formatting in the field calculation.
This instructs the printer to left justify the home phone of the patron starting in row 15 and column 1040. To justify the phone number place the field in brackets and prefix it with the letters 'jst'. Follow the field (inside the bracket) with a comma and a single quote to start the formatting instructions, enter the formatting instructions, and close with a single quote.
For example, jst(C_HOME_PHONE,'-8') formats the field calculation to allocate 8 spaces for the home phone number and to right justify when printing.
String Justification
| String | Description | Example |
| jst () |
jst(string1,number1,string2,number2,string3,number3,...) Returns a string containing the specified string left or tight justified with sufficient spaces added to make a total length specified by number. The jst() function also includes concatenation. If number is negative the resulting string is right justified, if the number is positive the string is left justified; number must be in the range of 1 to 999. |
|
| ^n | (caret) Causes the data to be centered in the field n characters wide. |
|
| -n | (minus) Causes the data to be right justified in a field n characters wide. |
|
| $ | Places a $ sign in front of the data. |
|
| Pc | Causes the part of the field not filled by the data to be filled by character c. |
|
| X | Causes the data to be truncated if its length exceeds the field length. The default is not to truncate. |
|
| U | Causes the data to be converted to upper case. |
|
| L | Causes the data to be converted to lower case. |
|
| C | Causes the data to be capitalized. |
|
| Nnn | Causes the data to be treated as a fixed decimal number with nn decimal places. |
|
| E | Applies to numbers only and displays a blank when the number is zero. |
|
| , | Applies to numbers only and adds commas as number separators. |
|
String Functions
| String | Description | Example |
| cap() |
Returns the capitalized representation of a string, that is, the first letter of each and every word in the string is capitalized. |
|
| con(string1, string2, [,string3] ...) |
Returns a string concatenating or combining two or more string values.
Theatre Manager will build concatenations. Simply select more than one field from the available fields list when editing the field calculation. To format the concatenation simply treat the concatenation as one field calculation. |
First name, address, and postal code information together on the same line and places a slash between each item. Formatting is limited to the group of fields linked together.
Centers section, row, and seat number in a space 38 characters wide. A comma and row precede the row number and separate it from the actual number. A comma and seat precede the seat number and separate it from the actual number.
Prints 'Saturday, December 21 1998 Time: 8:00 PM'. The printing would be centered in a 50 character space. |
| len() | Returns the length of the string, that is, number of characters. |
|
| low() | Returns the lower case representation of a string. Any non-alphabetic characters in the strings are unaffected by low(). |
|
| mid( string, position, length) | Returns a substring of a specified length, starting at a specified position, from a larger string. If position is less than 1 it is taken as 1, that is the first character; if it is greater than the length of the string, an empty string is returned. If length is greater than the maximum length of any substring of string starting at position, then the returned substring will be the remainder of string starting at position.. |
|
| pos(substring, string) | Returns the position of a substring within a larger string. The substring must be contained within string in its entirety for the returned value to be non-zero. |
|
| upp() | Returns the upper case representation of a string. Any non-alphabetic characters in the strings are unaffected by low(). |
|
| tStringFields.$splitString( String1, width, segment) |
Returns the Nth segment from the string string where the string is broken into even word boundaries that are no no longer than width.
CR's LF's, Tabs are converted to spaces and double spaces are then removed from within the string. |
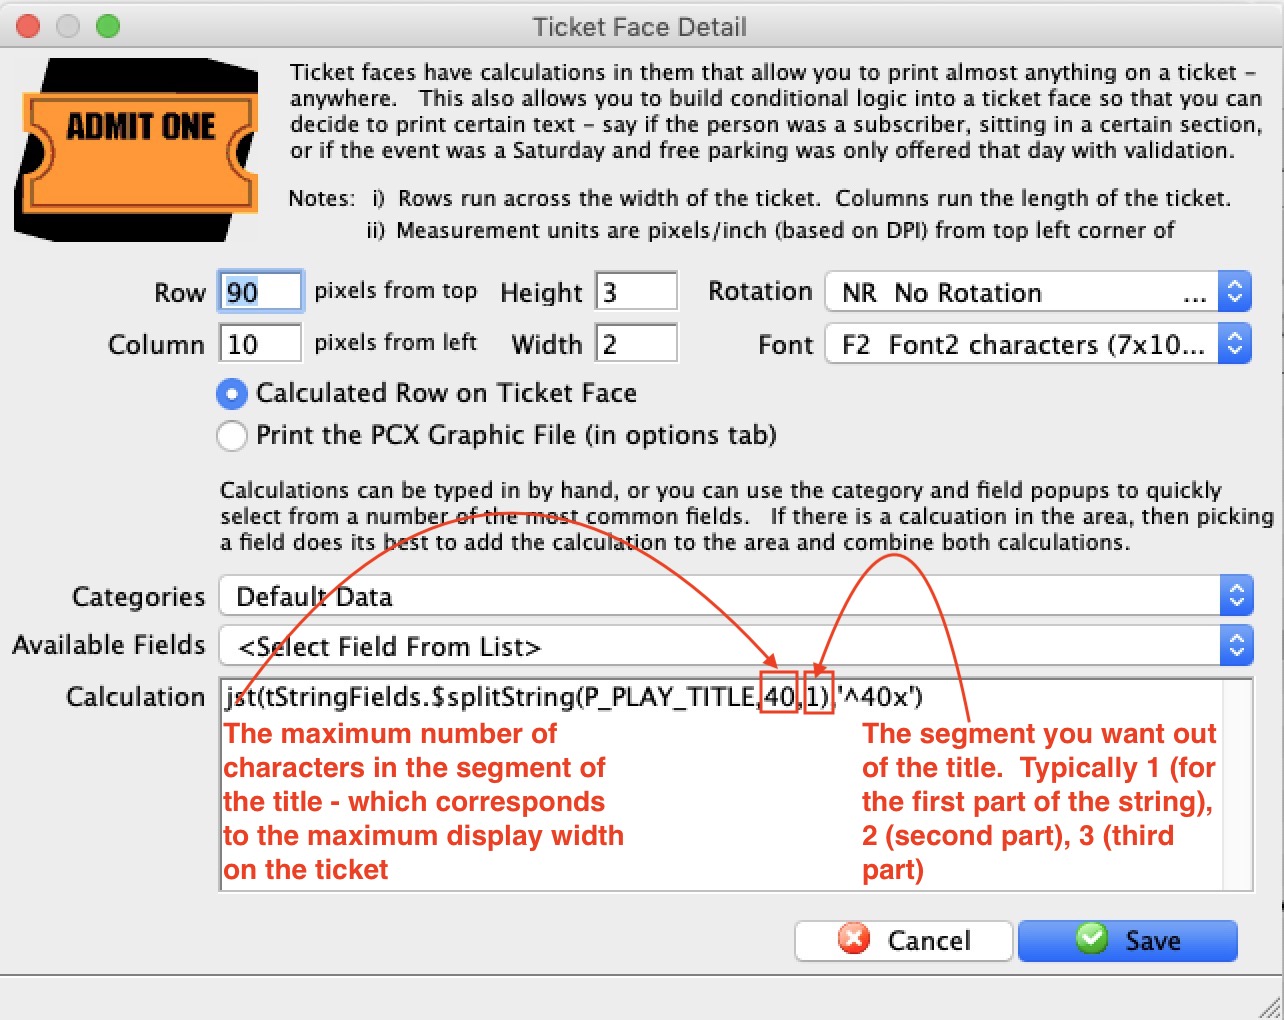 example: tStringFields.$splitString(P_PLAY_TITLE,1)
will take a long string like P_PLAY_TITLE and find entire words within the width of 40 characters and return only those. eg, for a title like:
|
| tTicket.$getReceipt( Pixels) | Prints a Moneris EMV receipt on the ticket printer using the font and rotation indicates. The receipt starts printing at the row and column specified. Each successive line will be separated by the number of DPI in the parameter. |
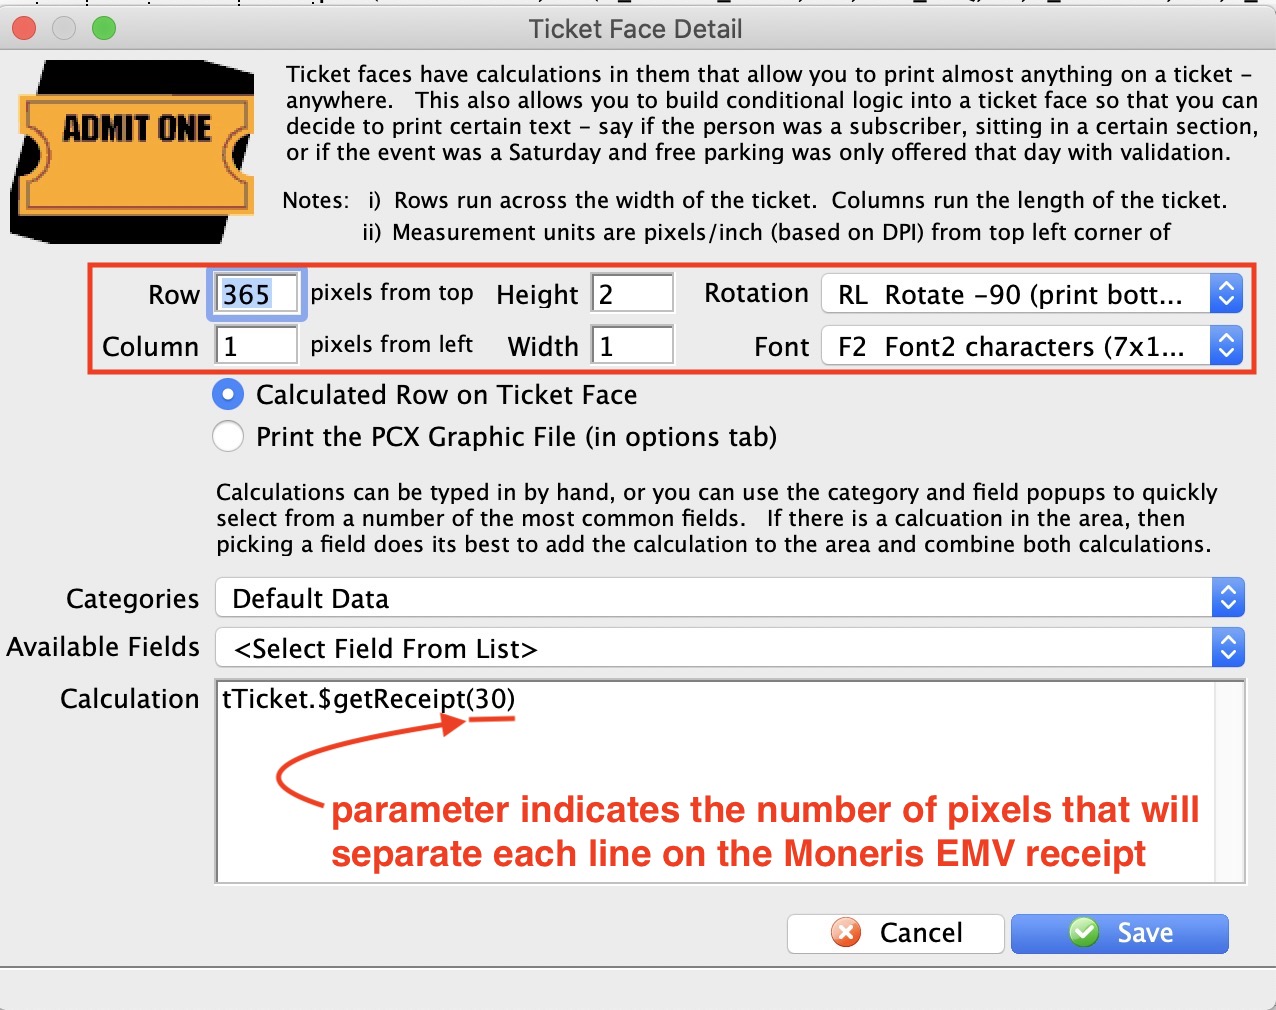 This function is best if it is the only thing in the calculation. If the payment was not taken through a Moneris EMV machine, you will want to print regular payment information instead. A sample payment receipt has been created for you that you can import which handles both EMV and internet credit card receipts in one ticket face.
|
Date/Time Functions
The date/time functions operate on a datestring to return date values or strings representing some part of a date/time. A datestring is a string recognizable as a date using a date format.
| String | Description | Example |
| dat(datestring| number [,dateformat]) |
Converts a datestring or number to a date value using a second optional argument, a dateformat string. The date formatting string can be composed of the following symbols:
|
|
| dim(datestring,number) |
Increments a datestring by a number of months. Months containing different numbers of days are accounted for. Jan 31 96 increased by one month gives Feb 29 96, but beware, Feb 29 96 decreased by one month (using a negative number) returns Jan 29 96, not Jan 31 96. |
|
| dtcy(datestring) |
Returns the year and century of a datestring as a string. |
|
| dtd(datestring) | Returns the day part of a datestring unless it is part of a calculation when it is returns as a number. |
|
| dtm(datestring) | Returns the month part of a datestring. |
|
| dtw(datestring) | Returns the week part of a datestring. |
|
| dty(datestring) | Returns the year part of a datestring. |
|
| tim(timestring[,timeformat]) |
Converts a timestring to a time value using a second optional argument, a timeformat string. The time formattinG string can be composed of the following symbols:
|
|
Lookup Functions
The lookup functions provide a method for selecting items from a list of values.
| String | Description | Example |
| max(value1[,value2]...) |
Returns the maximum value from the list of values. The values should all be numbers when numeric comparison is used or all strings when string comparison is used. |
|
| min(value1[,value2]...) | Returns the minimum value from the list of values. The values should all be numbers when numeric comparison is used or all strings when string comparison is used. |
|
| pick(number,value0,value1,[value2]...) |
Selects an item from a list of string or numeric values. The number argument is rounded to an integer and used to select the item. value0 is returned if the result is 0, value1 if the result is 1, value2 if the result is 2, and so on. If the number is less than zero or greater than the number of values in the list, then an empty value is returned. The list of values can be a mixture of string and numeric values. |
|
Number Functions
| String | Description | Example |
| abs(number) |
Returns the magnitude of a real number ignoring its positive or negative sign. |
|
| int(number) |
Returns the integer part of a number; it does not round to the nearest integer. |
|
| mod(number1,number2) | Returns the remainder of a number division, that is, when number1 is divided by number1 to produce a remainder; it is a true modulus function. |
|
| rnd(number,dp) |
Rounds a number to a specified number of decimal places by dp . |
|
Labels
Entering a label, or string of characters that will be the same on every ticket, is accomplished by placing the label in single quotes.
Ontario Face Value Requirements for Ticket Price
- The content of the 'Fave Value' of a ticket is set up in Company Preferences->Ticket Options
- For e-tickets, the display of the face value is enabled in the Web Options Tab. if set, then print at home tickets and web carts will automatically show the face value along with final price.
- There is a ticket face calculation (illustrated below) that calculates the Face Value for the ticket face prior to printing it. All you need to do is include it on your ticket faces. where desired
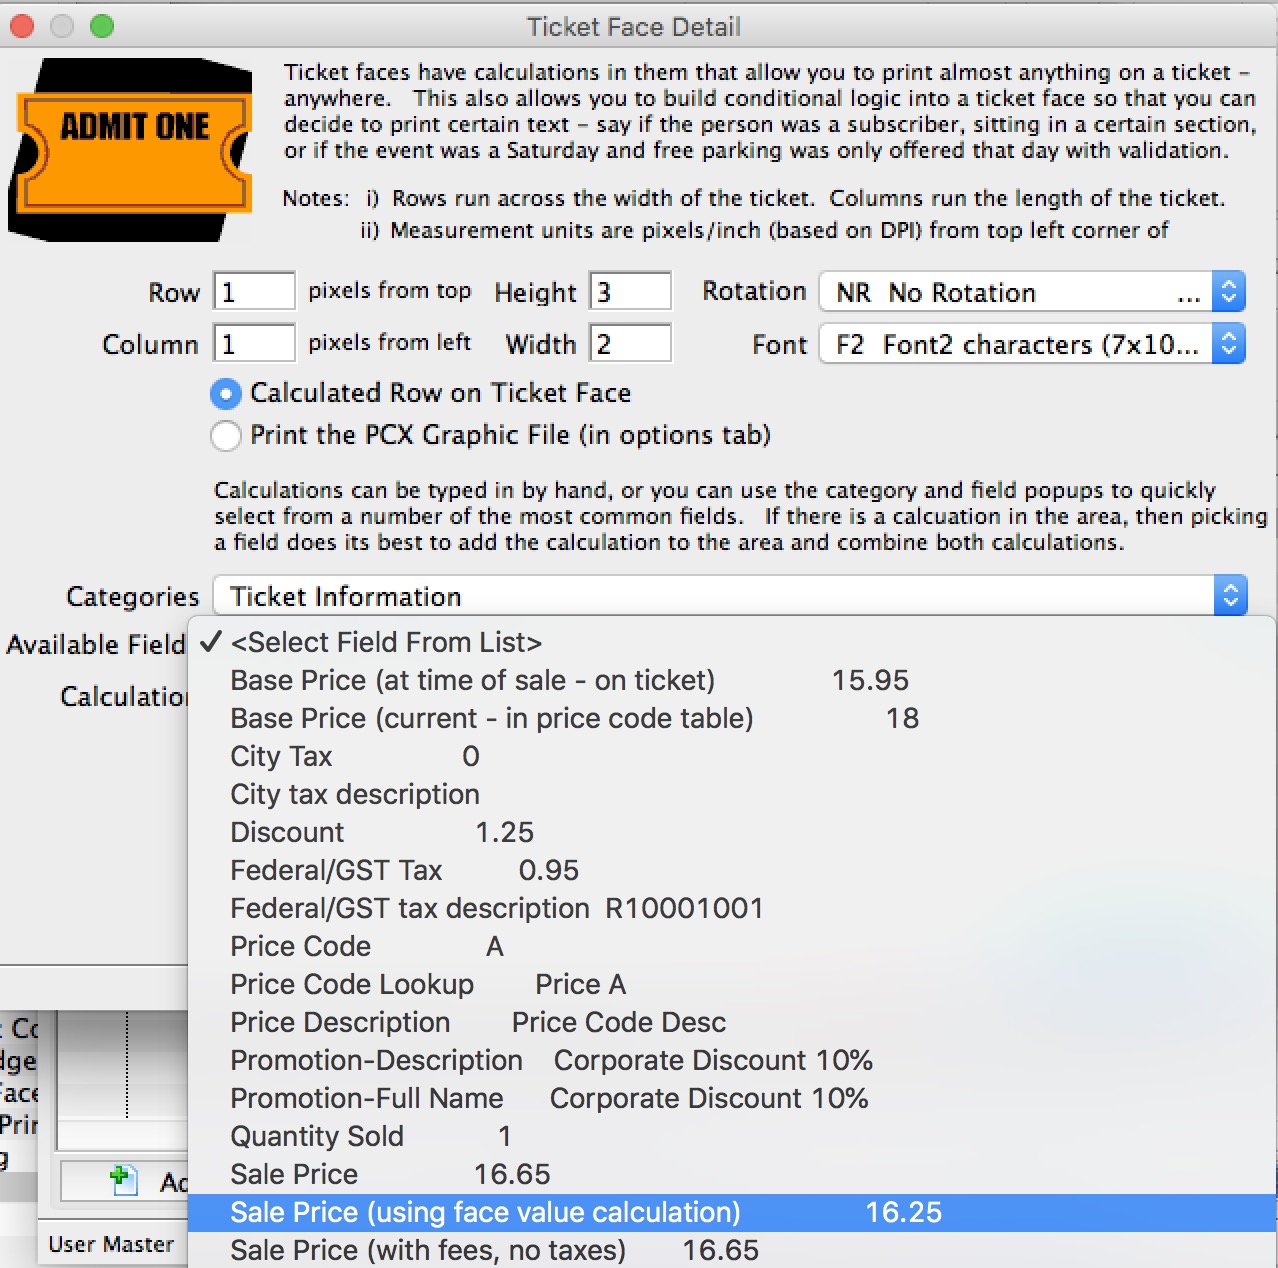
Adding Face Value field to a ticket face
- add a new calculation to the ticket face
- Select Ticket Information as the category
- Select Sale Price (using Face Value calculation) to insert the field into the ticket face
- Place the face value field where you want it on the ticket and save
- Make sure to test your ticket
- Repeat for all affected tickets.
QR Codes and Printer Compatibility
|
As of September 2021, we are aware of two ticket printers that can print QR codes on the ticket face:
|
|
Practical Automation does not support QR codes at time of writing and older printers are not field upgradeable. |
Sample Ticket with QR code
Inserting QR code into a Ticket Face
 To add a QR code to a ticket face, you need to make sure that the area yo want to print it on is big enough and is high contrast.. Usually that means an ALL-WHITE stub area. If the area you chose to print the QR code on has darker coloured background you may find scanning times increased.
The steps are:
- Insert a new calculation line in your ticket face.
- Select Ticket Information from the Categories field
- Select QR code from the Available Fields in the image to the right.
- That will add the correct calculation to your ticket face as per the image below

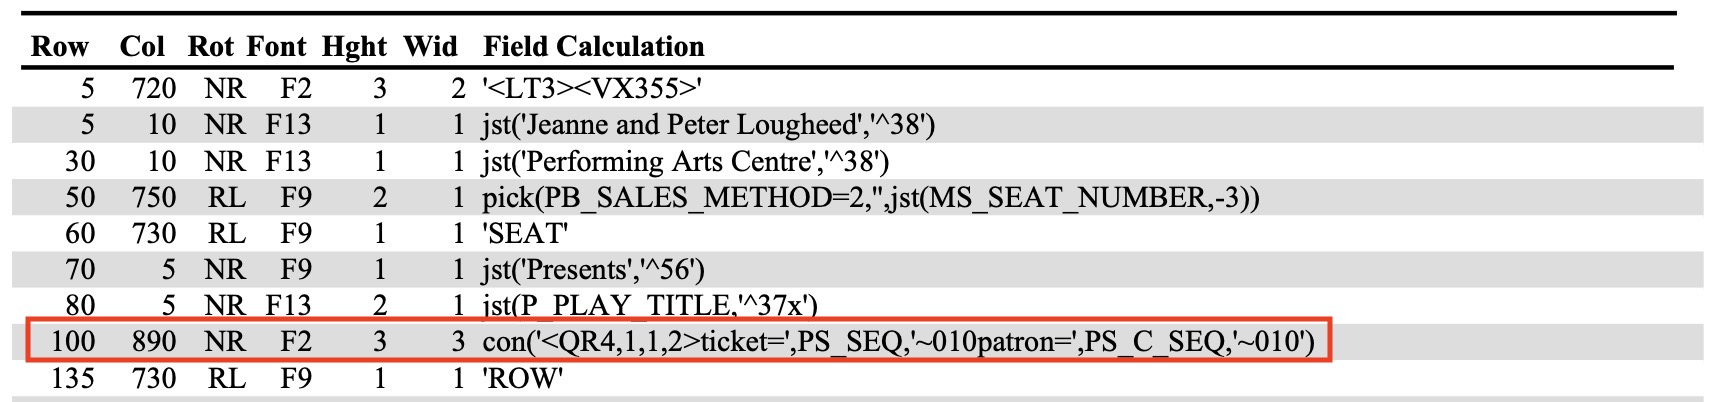
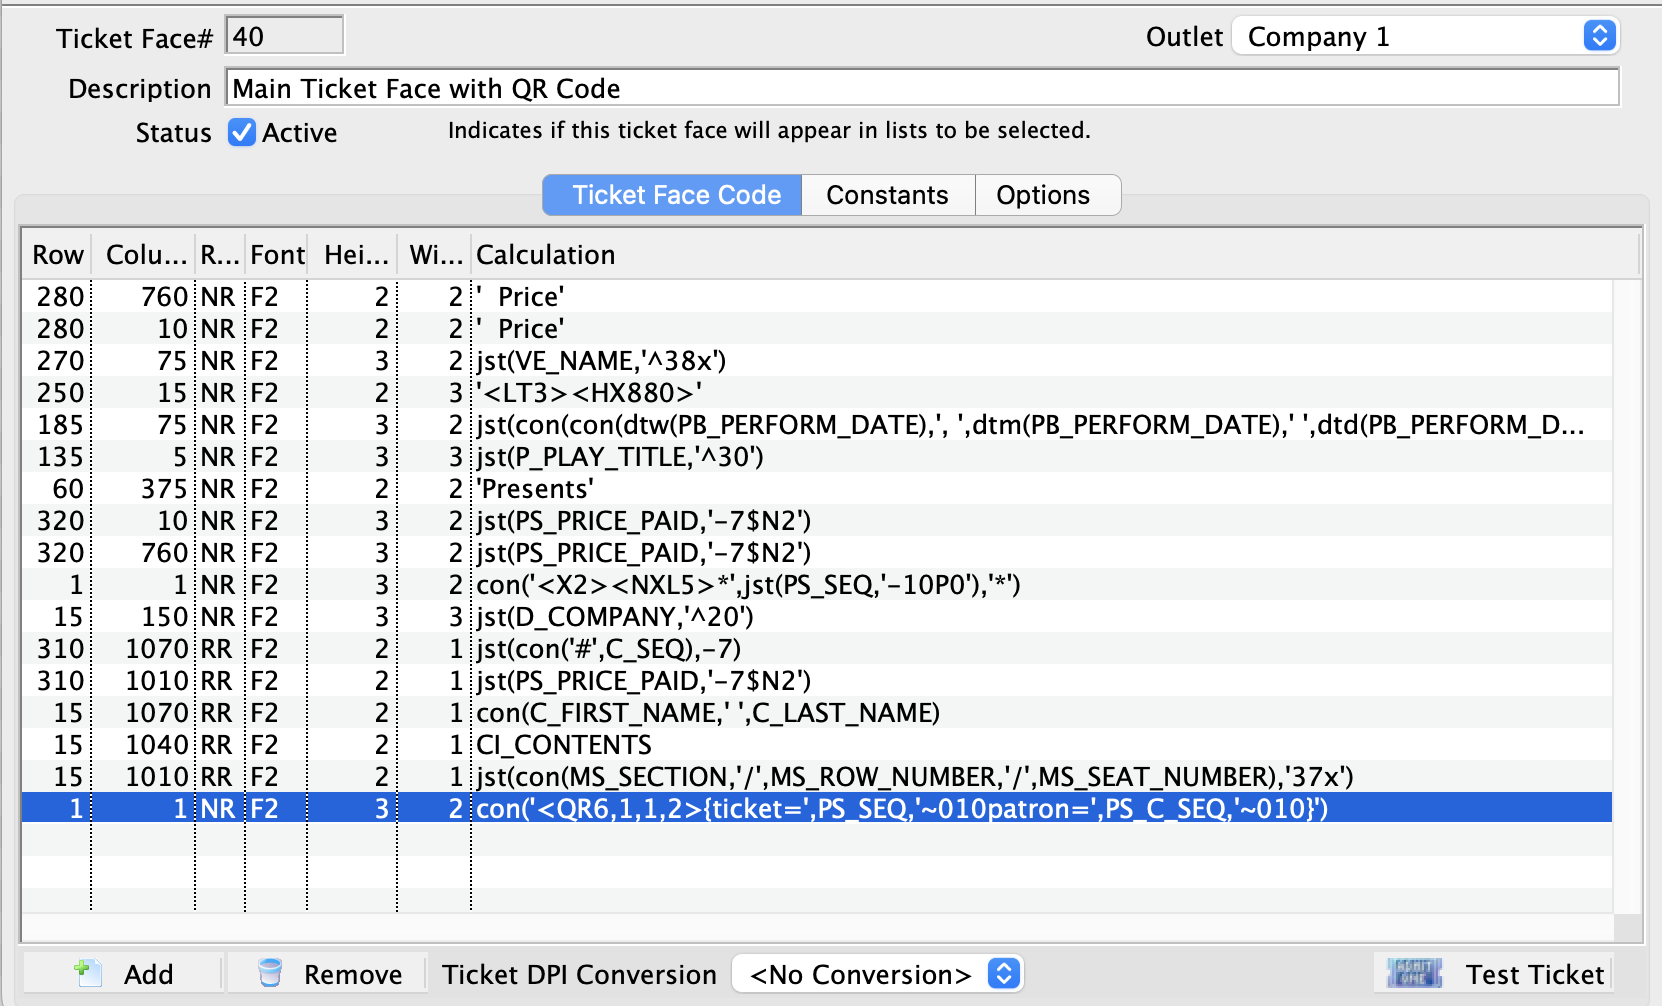
If you are using a Boca printer you will need to update the default QR code with additional characters. Where the default code looks like: con('<QR6,1,1,2>ticket=',PS_SEQ,'~010patron=',PS_C_SEQ,'~010')
backets will need to be added to the con statement following the QR references to make the code look like this:
con('<QR6,1,1,2>{ticket=',PS_SEQ,'~010patron=',PS_C_SEQ,'~010}')
- Change the Column to about 890 or so - so that it prints on the stub. The ticket example above uses 890 in the ticket face code shown in the next diagram.
- The Row might need to be adjusted a little to move the QR code away from the edge of the ticket and center it across the narrow part of the ticket. The ticket example above uses 100 in the ticket face code shown in the next diagram.
- You may need to remove some of the other fields that are on the stub area of the ticket face
- Test the ticket face with QR code
- Do a test print to see that it works
- Do a test scan of the ticket using your scanners to see that it works. Working only means that the scan is successful and that the ticket will likely be rejected as not being sold, or not for this day, etc
- Adjust the ticket face as necessary and reprint and retest
Sample QR Code from the above ticket exmaple

Explaining the QR code format
<QR#,#,#,#>{barcode text}
NOTE: You should not change the parameters in the QR code without talking to AMS support. Only adjust the position of the QR code on the ticket face using the Row and Column settings.
All of the Quick Response (QR) bar code command parameters are optional. If omitted default values will be used. The QR command and the barcode text is all that is required. For example the command
The Parameters, explained in order, are:
1 is the default for Theatre Manager and is required
Point size
we have found that '4' to '6' are suitable sizes for a bar code on a ticket stub
Apply Tilde
When Apply Tilde is equal to 1, the tilde (~) may be used to recognize some special characters in the input data.
Encode Mode
The data represented in the symbol may be compressed by changing the encoding mode, if certain text is being encoded. Valid values are:
Error Correction
The level of Reed Solomon error correction level placed in the symbol. More error correction creates a larger symbol that can withstand more damage. Valid values are:
{barcode text}
Do not change any values in this - otherwise ticket scanning will not work.
QR Code for Scanning Gifted Tickets
Scanning tickets that have been gifted to another patron in the database require the gifted patron number be included in the QR code inserted on the Ticket Face. The existing ticket face with a QR code can be updated to include the gifted patron number:
- Open the existing Ticket Face that has a QR code

- Locate the line of code in the Ticket Face that looks like this:
con('<QR6,1,1,2>{ticket=',PS_SEQ,'~010patron=',PS_C_SEQ,'~010}')
- Double-click to open this line of code.
-
Replace the entire code with this updated version:
con('<QR6,1,1,2>{ticket=',PS_SEQ,'~010patron=',pick(PS_INTENDED_FOR_C_SEQ>0,PS_C_SEQ,PS_INTENDED_FOR_C_SEQ),'~010}')
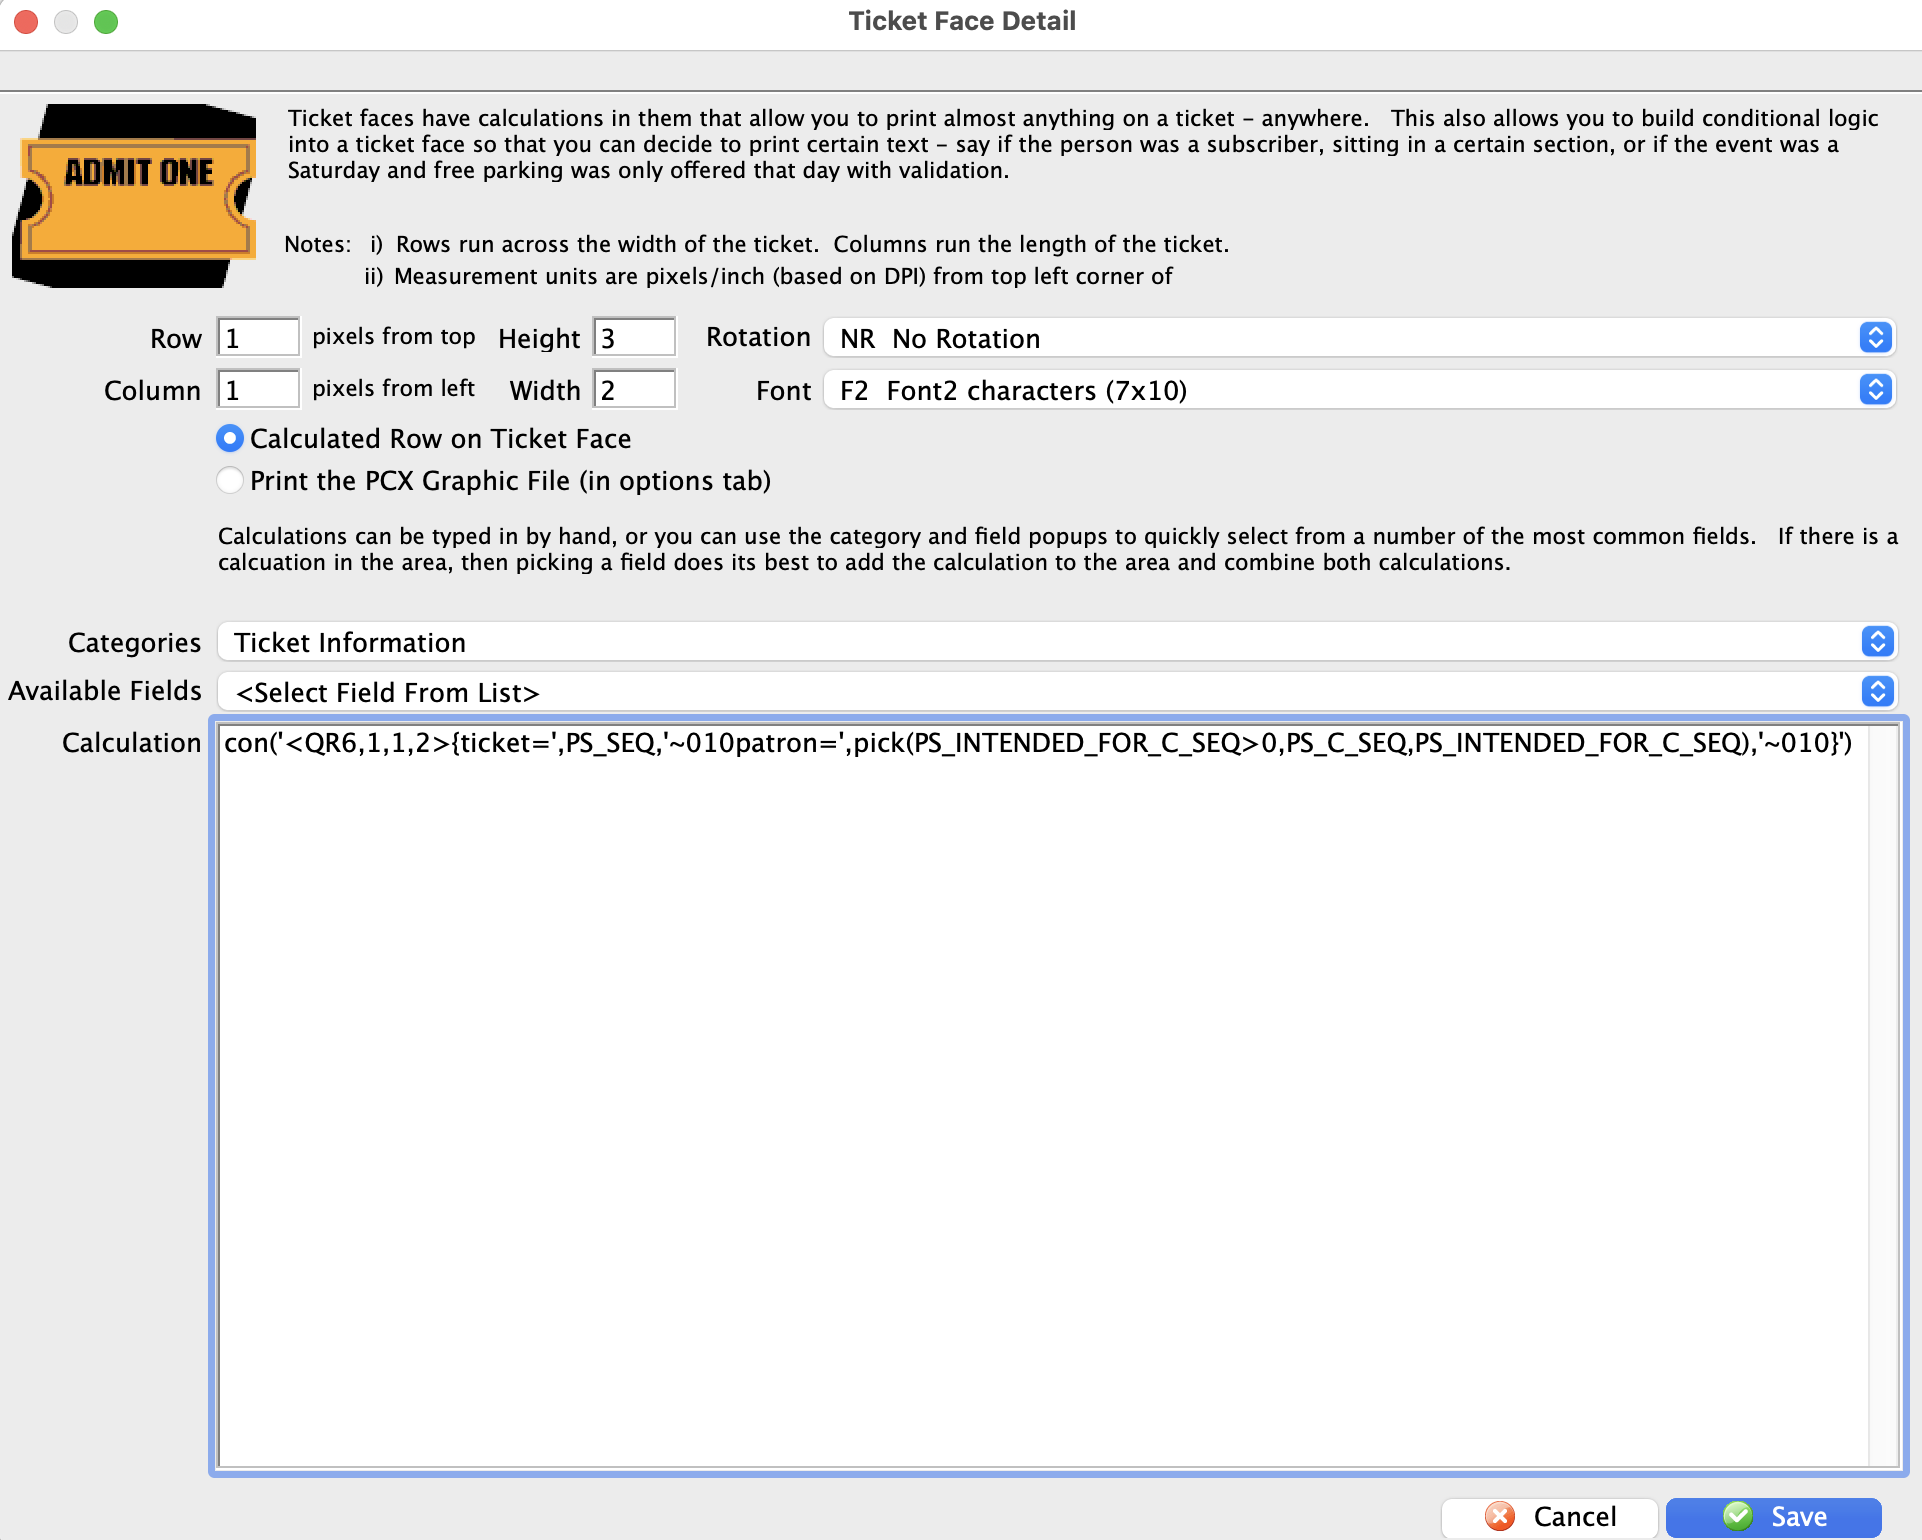
Any tickets that have previously been Gifted and printed prior to updating the ticket face code can be unprinted and reprinted. This will ensure they can be scanned at the time of entry.
Exporting Ticket Faces
- Open the Ticket Faces List window.
Click here to learn how to access this window.
Click here for a detailed description of this window and it's functions.
- Select the ticket face to be exported.
Single click on a ticket face to select it.
- Click the Export button.
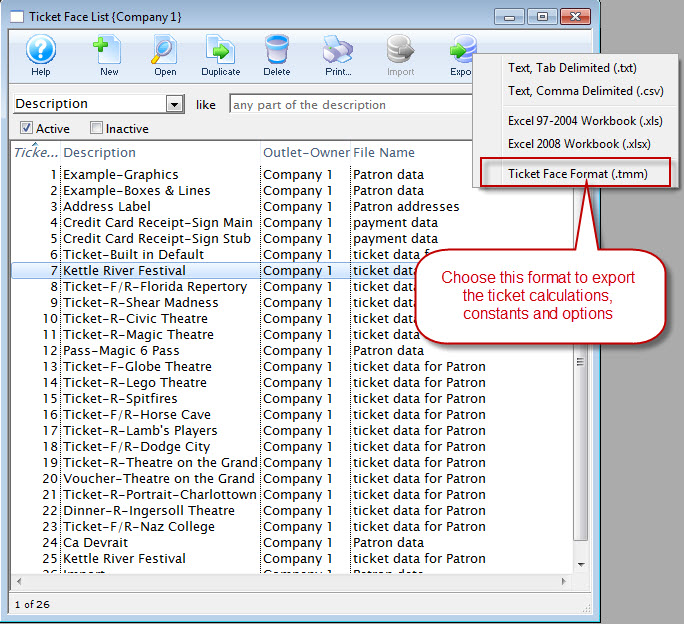
The Export Ticket Face dialog opens for your operating system.
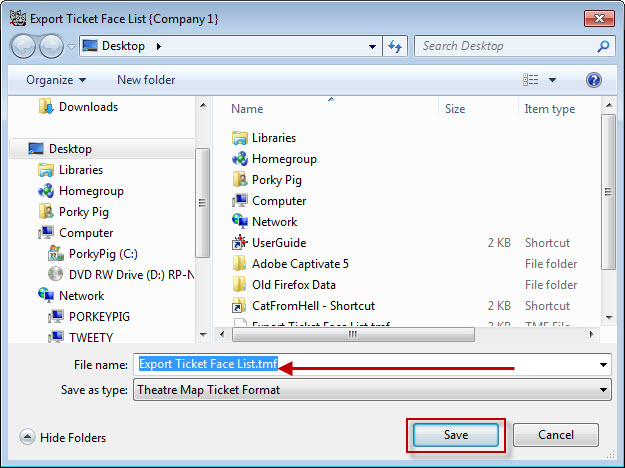
- Browse to the location to save the file.
- Give the file a unique name the file.
- Click the Save button.
The ticket face will be exported as a .tmf file to the specified location.
Adding Accented Letters to a Ticket Face
|
Printing accented letters on tickets limits you to using Font F13.
This means for any field that has an accented letter within it, the line must use font F13 (other lines of coding can be any other font you wish). This is the only available font within the default language for the ticket printer that uses the extended ASCII character set. Click here to download a table of Font 13 codes or refer to the table at the bottom of this help page. |
Why don't thermal printers support accents in all fonts?
Automatic printing of French or other European characters is not easily done using ticket printers. To understand why, is a bit of a trip through computer history. ASCII (American Standard Code for Information Interchange) is a character encoding system based on the English Alphabet. ASCII codes represent text in computers, communications equipment, printers and any other device that uses text. ASCII first came from telegraphic codes. Its first commercial application was a code for teleprinters. It began in the 1960s and the last update to the character set was in 1986. It was the standard world wide until 2008 when it was surpassed by UTF-8.
As computer technology spread, the ASCII character set spread with it and the Europeans decided to get creative and put some accented characters in some of the empty slots in the character set -- where these characters was not standardized into the exteneded ASCII set until the 1970's. Because of this the characters are non-standard and their placement in the listing in irregular.
Because this was a large problem, they invented UTF-8 (about 1992 http://en.wikipedia.org/wiki/UTF-8) , the universal character set. UTF 8 is designed to hold 2 billion plus character combinations, including the entire Chinese character set. All new computers, realizing that foreign language is a benefit, support this. Theatre Manager is fully UTF8 -- you can put accented characters into the database. You can print them on reports. You can add them to emails. all those products also understand UTF8 so characters are no issue.
Unfortunately, it is not the same for the ticket printers. Ticket printers do not understand UTF 8. They are limited to ASCII and a few variations. The only font supplied with the printers is the extended ASCII set in Font 13. Click here to access the Practical Automation Printer manual.
How to use FONT 13 to get accented characters
In some instances, a Play or Event title or other piece of information you need to print on a ticket face, includes an accented letter. The following instructions will allow you to make that edit.
- Chose Setup --> Ticket Faces to open the Ticket Face List Window.
For more information on the click here.
- Create a new ticket face, or a duplicate of an exiting ticket face.
This will allow you to continue using the original ticket face for your events that do not require any accented characters. For more information on designing ticket faces, please click here.
- Double-click the line of ticket face code to edit to include the accented text.
This opens the Ticket Face Detail window for that line of code.
For information about formatting ticket faces, click here.
- Select Font F13 from the Font Drop Down Menu.
 .
.
Selection of any font, other than F13, will print "?" for the character. Any other fonts available do not reference the extended ASCII character set.
- Enter the Code con(chr(128),'a devrait 'chr(136)'tre moi')
To add the title:Ça devrait être moi
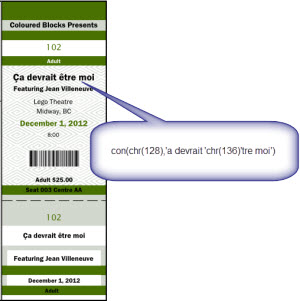
In order to have accented characters appear on a ticket face, you will need to HARD CODE the accent onto the ticket face. For Example, to have Théatre appear on a ticket face,
Click here to download a table of Font 13 codes.

Font 13 Characters and Numbers
Click here to download a table of Font 13 codes.
| Dec | Char | Description | Dec | Char | Description |
| 128 |
Ç | Latin upper case C with cedilla | 192 | Graphic Character | |
| 129 |
ü | Latin lower case u with diaeresis | 193 | " | |
| 130 |
é | Latin lower case e with acute | 194 | " | |
| 131 |
â | Latin lower case a with circumflex | 195 | " | |
| 132 |
ä | Latin upper case A with circumflex | 196 | " | |
| 133 |
à | Latin lower case a with grave | 197 | " | |
| 134 |
å | Pilcrow sign | 198 |
ã | Latin lower case a with tilde |
| 135 |
ç | Latin lower case c with cedilla | 199 |
à | Latin upper case A with tilde |
| 136 |
ê | Latin lower case e with circumflex | 200 | Graphic Character | |
| 137 |
ë | Latin lower case e with umlaut | 201 | " | |
| 138 |
è | Latin lower case e with grave | 202 | " | |
| 139 |
ï | Latin lower case i with umlaut | 203 | " | |
| 140 |
î | Latin lower case i with circumflex | 204 | " | |
| 141 |
ì | Double low line | 205 | " | |
| 142 |
Ä | Latin upper case A with grave | 206 | " | |
| 143 |
Å | Section sign | 207 | " | |
| 144 |
É | Latin upper case E with acute | 208 |
ð | Latin lowercase eth |
| 145 |
æ | ligature | 209 |
Ð | Latin uppercase Eth |
| 146 |
Æ | Latin upper ligature | 210 |
Ê | Latin upper case E with circumflex |
| 147 |
ô | Latin lower case o with circumflex | 211 |
Ë | Latin upper case E with umlat |
| 148 |
ö | Latin lower case o with umlaut | 212 |
È | Latin upper case E with accent |
| 149 |
ò | Latin lower case o with grave | 213 | Latin lower case dotless i | |
| 150 |
û | Latin lower case u with circumflex | 214 |
Í | Latin upper case I with accent |
| 151 |
ù | Latin lower case u with grave | 215 |
Î | Latin upper case I with circumflex |
| 152 |
ÿ | Latin lower case y with umlaut | 216 |
Ï | Latin upper case I with umlaut |
| 153 |
Ö | Latin upper case O with umlaut | 217 | Graphic Caracter | |
| 154 |
Ü | Latin upper case U with umlaut | 218 | " | |
| 155 |
ø | Small slashed zero | 219 | " | |
| 156 |
£ | Pound Sign | 220 | " | |
| 157 | Ø | Large slashed zero | 221 | " | |
| 158 |
x | Times | 222 |
Ì | Latin upper case I with grave |
| 159 |
ƒ | Latin lower case f with hook | 223 | Graphic Character | |
| 160 |
á | Latin lower case a with acute | 224 |
Ó | Latin upper case O with accent |
| 161 |
í | Latin lower case i with acute | 225 |
ß | Eszett or Sharp S |
| 162 |
ó | Latin lower case o with acute | 226 |
Ô | Latin upper case O with circumflex |
| 163 |
ú | Latin lower case u with acute | 227 |
Ò | Latin upper case O with grave |
| 164 |
ñ | Latin lower case n with tilde | 228 |
õ | Latin lower case O with tilde |
| 165 |
Ñ | Latin upper case N with tilde | 229 |
Õ | Latin upper case O with tilde |
| 166 | ª | feminine ordinal indicator | 230 |
µ | Micro sign |
| 167 |
º | Degree Symbol | 231 |
þ | Lower case letter Thorn |
| 168 |
¿ | Inverted Question Mark | 232 |
Þ | Upper case letter Thorn |
| 169 | ® | Registered Trade Mark - note it is not the 'tm' symbol | 233 |
Ú | Latin upper case U with acute |
| 170 |
¬ | Not sign | 234 |
Û | Latin upper case U with circumflex |
| 171 |
½ | Fraction one half | 235 |
Ù | Latin upper case U with grave |
| 172 |
¼ | Fraction one quarter | 236 |
ý | Latin lower case y with acute |
| 173 |
¡ | Reversed Exclamation Mark | 237 |
Ý | Latin upper case Y with acute |
| 174 |
« | Left-pointing double angle quotation mark | 238 | Graphic character | |
| 175 |
» | Right-pointing double angle quotation mark | 239 | " | |
| 176 |
| Graphic character | 240 | " | |
| 177 | " | 241 | " | ||
| 178 |
| " | 242 | " | |
| 179 | " | 243 | " | ||
| 180 | " | 244 | " | ||
| 181 |
Á | Latin upper case A with acute | 245 | " | |
| 182 |
Â
| Latin upper case A with circumflex | 246 | " | |
| 183 |
À | Latin upper case A with grave | 247 | " | |
| 184 | © | Copyright | 248 | " | |
| 185 |
| Graphic Character | 249 | " | |
| 186 | " | 250 | " | ||
| 187 |
| " | 251 | " | |
| 188 | " | 252 | |||
| 189 |
¢ | Cent Sign | 253 | " | |
| 190 |
¥ | Yen | 254 | " | |
| 191 | Graphic Character | 255 | " |
Adding Quotes to Text on a Ticket Face
There are times when the text on a Ticket Face may be required to appear in quotes. This can be done with the use of single quotes around a set of double quotes. An example would be:
' "I have quotes" '
The text opens and closes with single quotes. Within the single quote are double quotes that will appear on the ticket as a part of the text. You can have as many double quotes as are required within the single quotes.
Deleting a Ticket Face
|
Once a ticket face has been deleted, it is gone. If a particular ticket face is not useful at present, you can mark it inactive by removing the check from the Active box on the Ticket Face Detail Window for that ticket face. |

To delete a ticket face, you perform the following steps:
- Open the Ticket Faces List window.
Click here to learn how to access this window.
Click here for a detailed description of this window and it's functions.
- Select the ticket face to delete.
Single click on a ticket to select it.
- Click the Delete button.
The delete confirmation dialog opens.
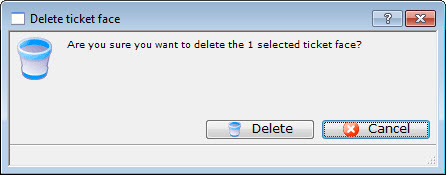
- Click the Delete
 button.
The ticket face is removed from Theatre Manager.
Accented Characters and Ticket Faces
FGL will print some accented characters, however, it will only print in Font F13. Since Font F13 is generally impractical for text usage on an entire ticket face, and to allow clients to use the entire range of fonts provided by Practical Automation/BOCA printers, Theatre Manager strips accents before it sends the ticket data to the ticket printer.
In order to have accented characters appear on a ticket face, you will need to HARD CODE the accent onto the ticket face. For Example, to have Théatre appear on a ticket face,
- Start by creating a new ticket face, or a duplicate of an exiting ticket face. This will allow you to continue using the original ticket face for your events that do not require any accented characters. For more information on designing ticket faces, please click here.
- Make a line that says "Theatre" on the ticket face.
- And a second line that says "`" (that's an accent).
- Place the accent appropriately on the face so it appears over the e.
This will work for hard coded words, but not for database generated fields such as names.
So while Theatre Manager can print the accented é to a regular printer (for reports and such), it will not print to a ticket printer because of the print language used by the printer.
For Macintosh alternate keys (for non-ticket printing usage) click here.
For PC alternate keys (for non-ticket printing usage) click here.