Tasks
Tasks are at the heart of the Facility Management module.
For more information about the Facility Management module click here. To read more specifically about tasks and their place within Facility Management, click here.
|
Some task and calendar features are available to users who do not have the Facility Management module, but their usage is limited. |
Calendars show tasks to be done in a variety of formats. Gantt charts (part of Projects) show tasks that are associated with each other and the relationships between the various pieces. Invoices use tasks and the associated people and resources as line items in an invoice to bill clients.
Tasks can be associated with any number of people who are responsible for making sure it gets completed. Tasks can be reminders to yourself about upcoming deadlines. Tasks can be used to schedule your time. Tasks can have physical resources assigned to them that may be billed or not.
Notifications or reminders can be set up for tasks so you don't miss a meeting or appointment.
Tasks can be associatied with calendar time, or they can roll forward everyday until you do it (the task).
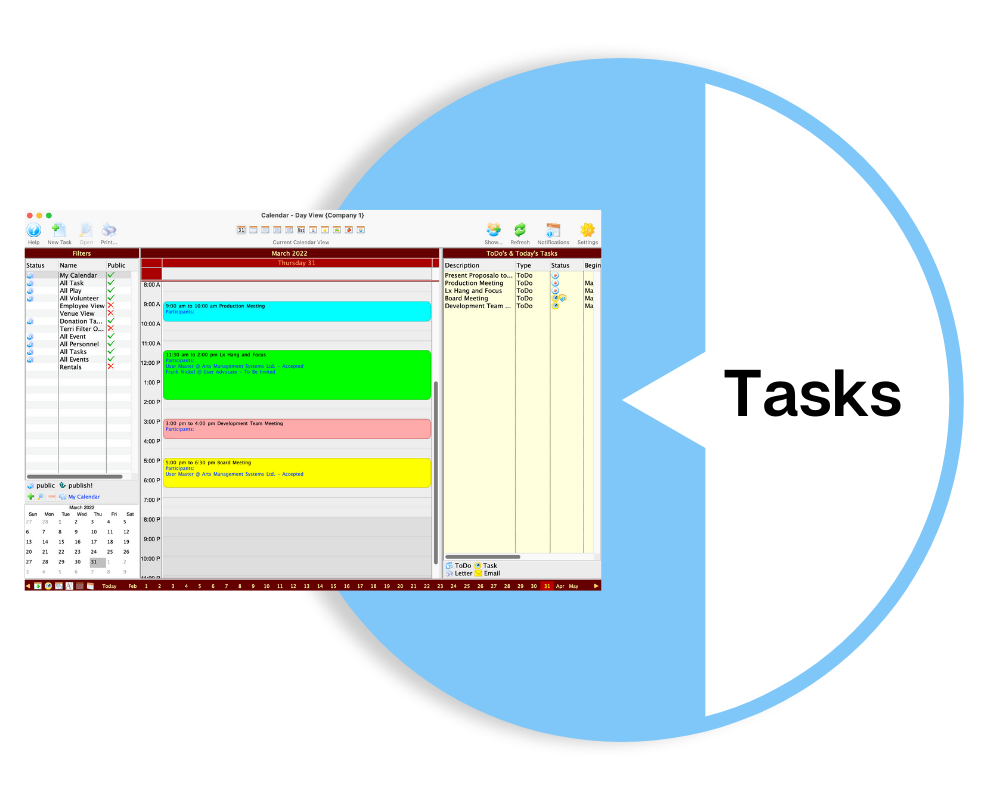
You can enter tasks in a variety of places, but the most common are probably from the Calendar window and from the Project window
The Calendar is the easiest and often the most convenient way to enter Task information. With the filters, you can show (or hide) items om the calendar for the project / task that you want to look at. You also change tasks most often from the calendar, however, you can also change tasks from:
- Venue window
- Event window
- Donation window
- Project Detail window
- Project Gantt View Window
- Volunteer window
- Patron window
- Order window
It does not matter where you move or change a task, once you move or edit it, it changes it everywhere.
What is a Task?
A task can represent anything you want to have show up on a calendar or appear on an invoice for a client. Because of its flexibility, it is important to understand all the different kinds of information that can be stored in a task so that you can determine which options to use for your particular situation.
- Tasks can be associated with plays or events
- Tasks can be associated with a particular show or performance
- Tasks can be associated with patrons or employees
- Tasks can show in the background of a calendar for all users
- A person can be assigned as the "owner" of a task
- Individuals can set alarms on tasks for themselves
- Tasks can have date and time ranges, such as meeting start and end times
- Tasks can be indicated as ToDo-type tasks that have only a necessary completion date
- Tasks can have resources assigned to them, such as the number of chairs needing to be set up in a venue, equipment being rented, or the actual rental of a room
- Tasks can have personnel assigned to them, such as the worker's billing hours for an event
When you ask the question "Can I use a task for .....?" the answer is probably Yes.
Adding a Task
- the Menu bar
- the right-click context menu in the Project window
- the New button at the bottom of the Project window
- The new task button in the Calendar toolbar / ribbon bar.
No matter how you get to the task window, data entry is the same.
- Select a Task Type. Task Types can change some of the fields in the Detail window.
Task Types tell TM the other fields which need to be required in the lower half of the window. It is the edit checking process to ensure you enter all the right information. The task you are creating then has a cross-check or edit-check based on it.

Click here for more information on the Detail Window and a description of its functions.
- Enter a start date and time.
To use the calendar and clock, click the
 button. The duration is calculated for you.
 - You can select a status and a priority from the drop-down lists.
These are helpful if there are a number of participants. You can keep track of who has done what and where they are at in the timeline.
- Choose Active or Private. This displays events differently, depending who you are.
- You can choose a Calendar Colour. Different colours can help you to keep track of different types of scheduling, or different projects.
- The task owner can be changed if necessary. By default the task owner is the person who is creating the task.
- If a Task is associated with a project, the Project number will also appear on the description.
For a complete description of this window and the changes different Task types can make, click here.
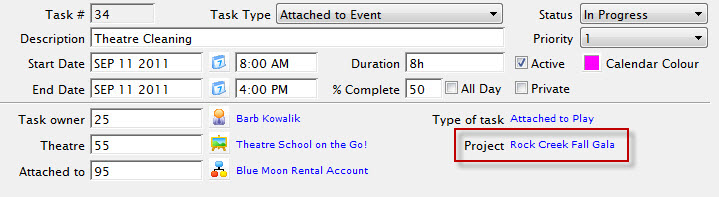
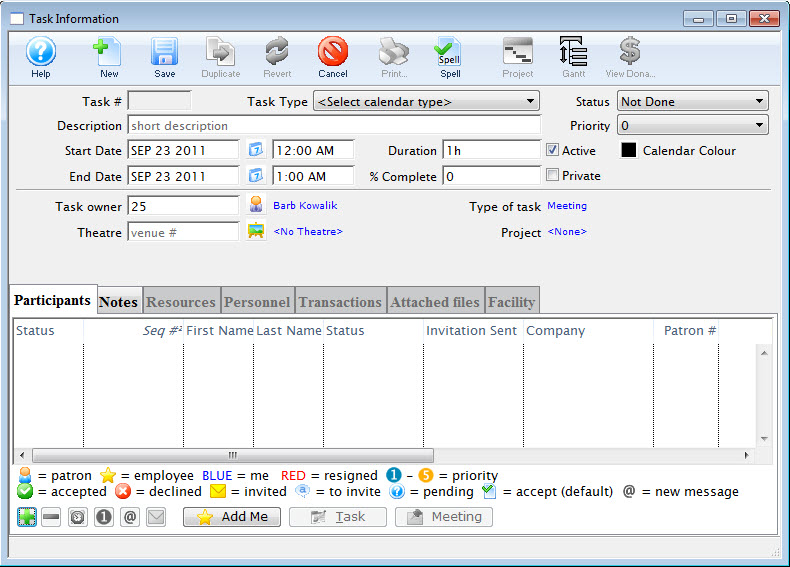
Task Detail Window
The Task Detail window is where you define your tasks.
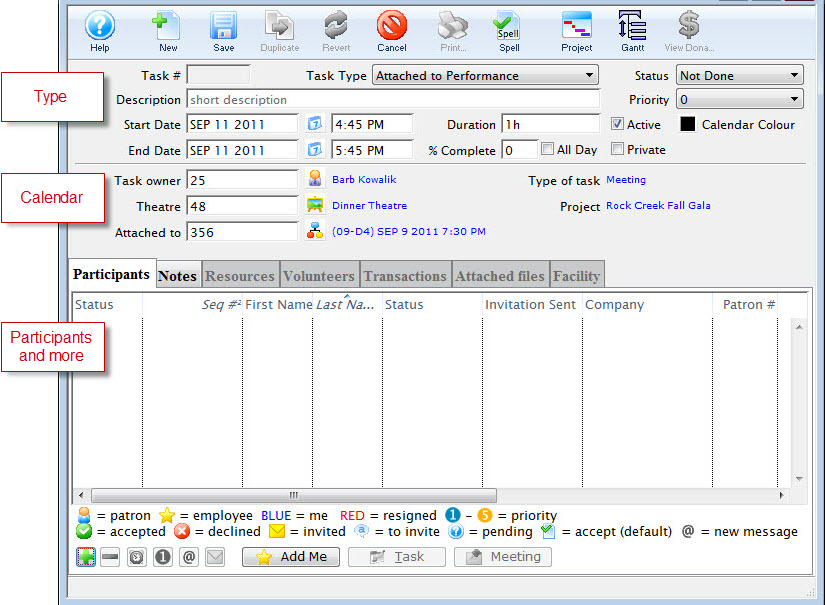
Parts of the Task Detail Window
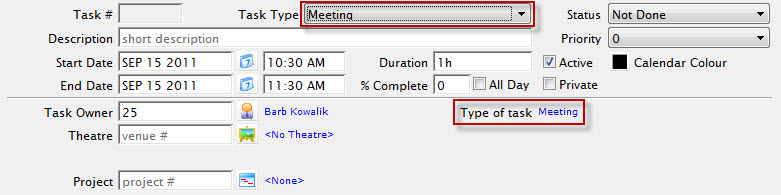
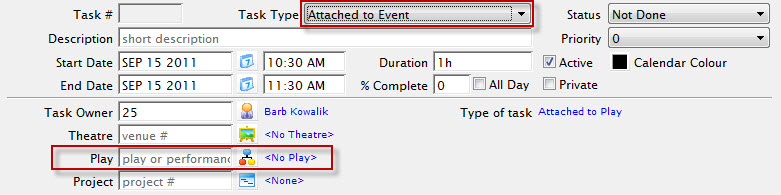
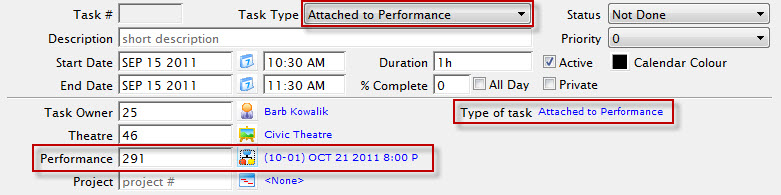
| Task Type | Task Type tells Theatre Manager which other fields need to be required in the lower half of the window. It’s the EDIT checking process to make sure that we have all the right information. The task you are creating will then have a cross-check or edit check based on the task type. Theatre Manager comes with 8 standard task types. |
| Meeting | A Meeting task is just a normal task that is not connected to a particular event / play or performance.
|
| Attached to an Event / Play | If you choose to attach a task to a particular event / play, an additional
field will display on the window where you can select which one to attach it to.
|
| Attached to a Performance | If you choose to attach a task to a particular performance, an
additional field will display on the window where you can select which one
to attach it to.
|
| Background | 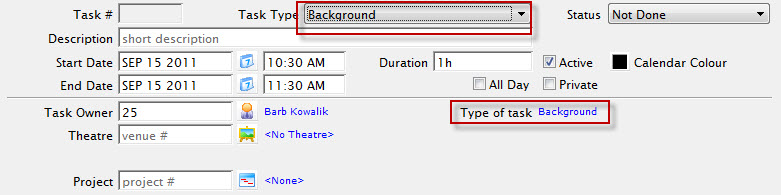 |
| Notification | Only the Note tab is available
|
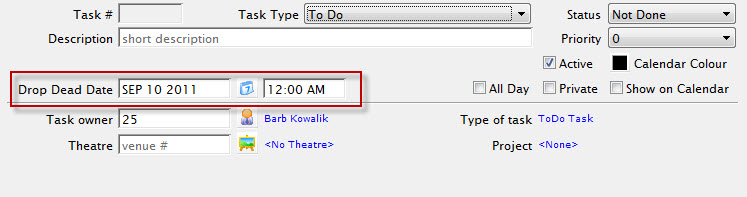
| ToDo | ToDo Tasks do not have a starting and ending date and time, as a meeting would have, or painting the floor would have when preparing for a performance. They only have a "drop-dead" date... the very last day that this task/ToDo needs to be completed by.
You cannot have a ToDo Task as part of a project, because items in a project must have beginning and ending dates. ToDo's only show in the sidebar for the Calendar and remain until they have been marked as Done. ToDo Tasks would typically be used for things like project or grant deadlines. By clicking the Show on Calendar checkbox, the ToDo will also show on the calendar. (This is not the default behavior for ToDo items.)
|
| Project | If a task is part of a project, the project name will be displayed.
|
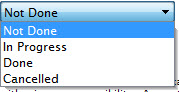
| Status | To change the Status, click the Status Drop down. |
| Description | Enter a Description for the task. |
| Priority | |
| Duration | The duration of the project is indicated (but cannot be edited). A duration of 1w 5d 10h 30m would indicate an elapsed time of 1 week, 5 days, 10 hours, 30 minutes. |
| Start and End Date and Time |  To use the calendar and clock, click the |
| Active flag | Tasks with the Active flag unchecked are not normally found in queries or on calendars. Private shows the events differently, depending who you are. |
| Colour |
|
| All Day Checkbox | Marking a task as All Day sets its starting and ending date from midnight to 11:59 PM and displays it in the all-day area for calendars displaying in one of the day views. |
| Private | Marking a task Private will only display the description on the owner's calendar, the calendar of designated editors, and those who are participants in the task. Others just see "Private" |
| Task Owner | By default, the person entering the task is the owner.  Information about the task can only be changed by the owner, an editor assigned by the owner, or a system administrator. Information about the task can only be changed by the owner, an editor assigned by the owner, or a system administrator. |
| Theatre | Displays the venue number if a venue has been assigned to the task. Clicking the Theatre button opens the Theatre Maps List Lookup. Click here for more information on the Theare Maps List. button opens the Theatre Maps List Lookup. Click here for more information on the Theare Maps List. |
| Event / Play | Displays the Event / Play number if one has been assigned to the task. Clicking the Event / Play  button opens the Event / Play List Lookup. Click here for more information on the Event / Play List. button opens the Event / Play List Lookup. Click here for more information on the Event / Play List. |
| Tabs | |
 |
Click here to go to the Particpants Tab page for a complete expanation of the tab and its functions. |
 |
Click here to go to the Notes Tab page for a complete expanation of the tab and its functions. |
 |
Click here to go to the Resources Tab page for a complete expanation of the tab and its functions. |
 |
Click here to go to the Personnel Tab page for a complete expanation of the tab and its functions. |
| Click here to go to the Transactions Tab page for a complete expanation of the tab and its functions. | |
 |
Click here to go to the Attached Files Tab page for a complete expanation of the tab and its functions. |
 |
Click here to go to the Facility Tab page for a complete expanation of the tab and its functions. |

 Status displays the current status of the project. Once the last task on the project is marked as Done or Cancelled, the project status is automatically marked as Done. Conversely, if the project is marked as Done, all attached tasks that are not already marked as Cancelled are automatically marked as Done. If you mark a task as Done, it no longer shows on the day's tasks on the ToDo's & Today's Tasks.
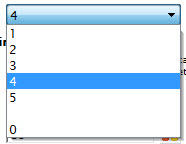 You can set a Priority for the project. (0 is considered "No Priority".) This is the default priority given to any tasks associated with this project.
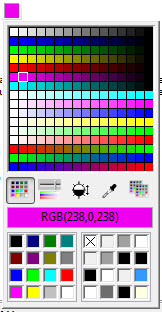 You can select a specific colour from the pallete to override the standard colour of this task in the calendar. By selecting a colour other than black, a task can be given a colour different from the default. This overrides all other colour settings.
Participants Tab
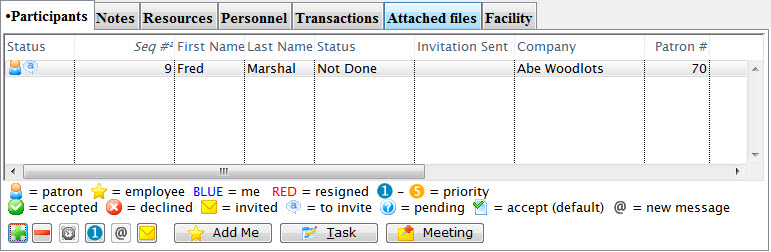
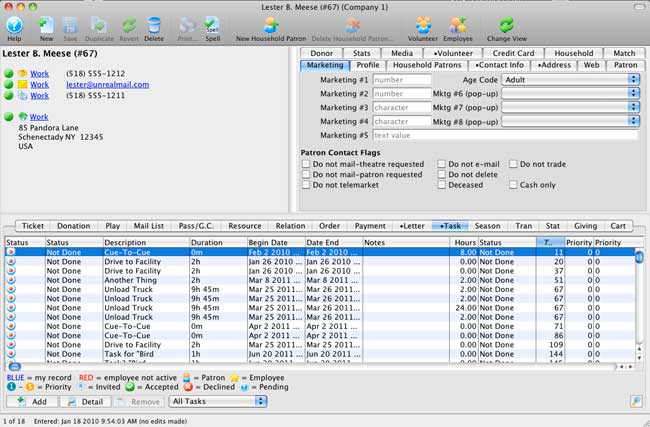
Task Participants are people you wish to associate with the task. If volunteers are associated with the task, you will see them both on the volunteer tab and in the task participants list.
In the participants tab:
- You can select employees or patrons
- You can invite external people and place on their iCal/Outlook calendar
- Volunteers dragged here automatically create a volunteer history record
- You can add all people from a mail list (e.g. board members, staff list)
- You can set priorities
- You can set alarms
- You can accept meetings and set status
The main sections are listed below. Click on a link to learn more about the features.
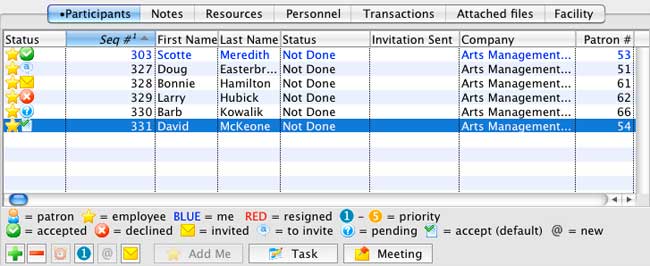
Parts of the Task Participants Window
| Status |
Up to 3 icons can be displayed for each participant. these are:
A participant's status is changed by selecting a line and clicking the Meeting |
| First /Last Name | First and last Name of the Patron selected to be a participant in the task |
| Status | Displays the status selected using the Task button |
| Invitation Sent | Displays the date the invitation was sent to the participant |
| Company | |
| Patron # | The Theatre Manager Patron number for the participant |
| Priority | 1-5 as selected using the Priority  button button |
| Response Date | Date the participant responded to the task request |
 |
Opens the Contact List so you can add a participant to the task. Click here for information on adding a participant to a task. |
 |
Removes the selected participant from the task. |
 |
Participants can set an alarm for themselves. Click here for more information on setting Alarms. |
| |
Sets the priority for the selected participant. 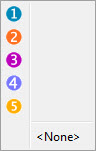 |
 |
Acknowledge a meeting response. When a task participant has responded to an Email request to come to a meeting, the Status of that person displays an "@". To acknowledge that you have seen the change, select the line and click the button. The indicator will go away. It will also no longer show in the Notifications window. |
 |
Resets the selected participant to recieve Email messages. |
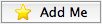 |
Add Me (the current user) as a task participant. When you add yourself to a task, the meeting status is automatically set to Accepted, since it is assumed you know about and intend to go to a meeting you have put yourself in.< td> |
 |
Each participant can mark the status of their
portion of the task by selecting a line from the list and clicking the
task button. Choices from the flyout menu are: Not Done, Done, In Progress, or Cancelled. Once the last person has marked their portion of the task as Done, the task itself is automatically marked as as Done. |
 |
You can set the status by clicking on the Meeting button. |
 - Patron or
 - or an Employee
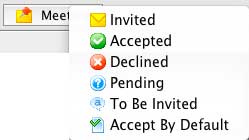
  - Invited
  - Accepted
  - Declined
  - Pending
  - To Be Invited
  - Accept by Default
  or can be left at 0 for tasks not requiring a priority setting. The priority can be changed by selecting a line in the list and clicking on the Priority
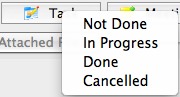
 . The status is also changed if the person responds to the iCalendar invitation sent out by Email.
A line in the list will display in  for My record and
  if the employee is no longer active.
Adding a Participant to a Task
Participants can easily be added to a task. To add a participant, you would perform the following steps:
- In the Calendar window, click the New
 button.
The Task Information window opens.
- Enter the Details for the Task (task type, description and other relevant information), and click the Add button.
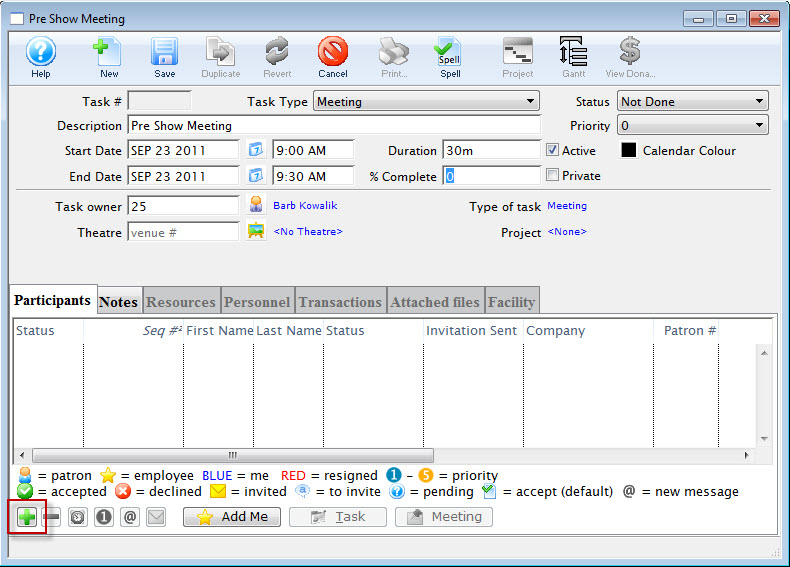
The Contact List window opens.
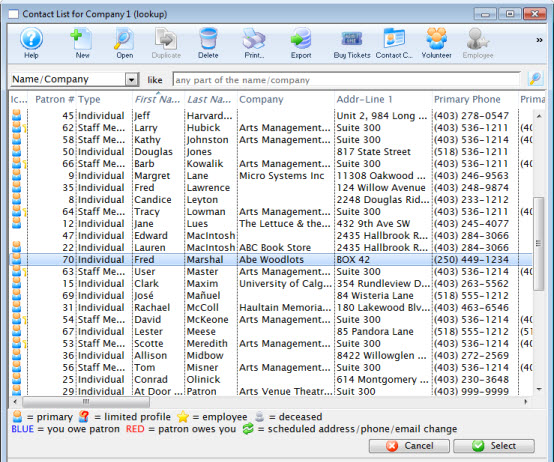
- Highlight the patron you want to add as a participant and double-click or click the select button or drag and drop the selected participant.
If the participant you want is not in the contact list, you must add them to the patron list.
Click here for more information on adding patrons to the database.
- The participant is added to the task.
Responding to a Task Request
If you have added another patron/employee/volunteer as a participant to a task, they are set to To Be Invited or Accept by Default, depending on the default settings in Company Preferences.
Click here for more information on Company Preferences.- When a participant to a task logs in to the database, a Notifications window opens, if they have not responded to the invitation.
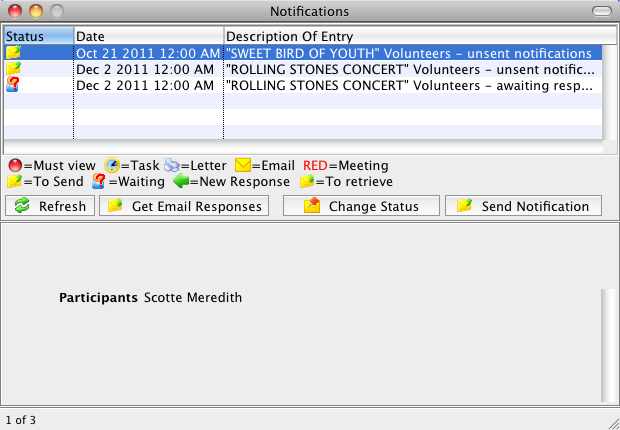
- You respond to an invitation by selecting your name in the task participants list and selecting a meeting status of Accepted, Declined, or Pending (have not decided yet).
When a task participant (or volunteer) is assigned to a task, if their status has been set to To Be Invited, they will appear in the Notifications window indicating that an Email needs to be sent to let them know about the meeting (or volunteer opportunity).
- When you select the lines in Notifications and Send Notification, an Email is sent with an iCalendar attachment.
The information is loaded into their calendar on their individual machine. When they respond back to the meeting, Theatre Manager will update the meeting status.
Click here for more information on Notifications.
- Double-click on a line in the list to see that task and respond to the invitation.
Notes Tab
The Notes tab allows you to provide additional text description for some task types. Note you create are sent with meeting invitations - agenda style, plain text.
Notes can also be included in invoices.
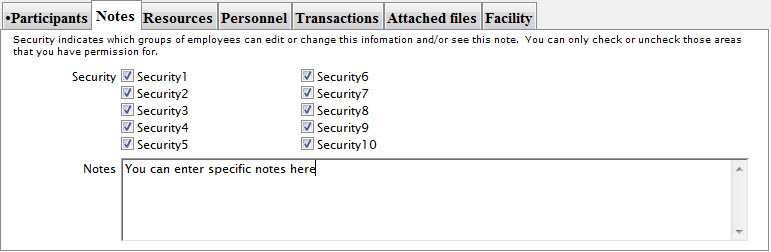
Notes also can have security associated with them. The levels of security are defined by the levels you have set for the functioning groups in your organization. For example:
- Marketing
- Finance
- Administration
- Box Office
- Development
- Sound
- Backstage
These descriptions for ‘Security1, Security2, Security3, etc.’ can all be changed. Who should be able to see/know about this task. It’s a way to restrict to only having certain departments access to the data.
Notes can be included on invoices. For example, you can allocate a ‘cost’ for this task. These notes may help justify the reasoning for the ‘cost’.
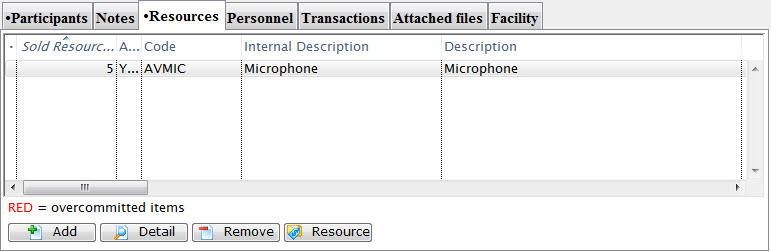
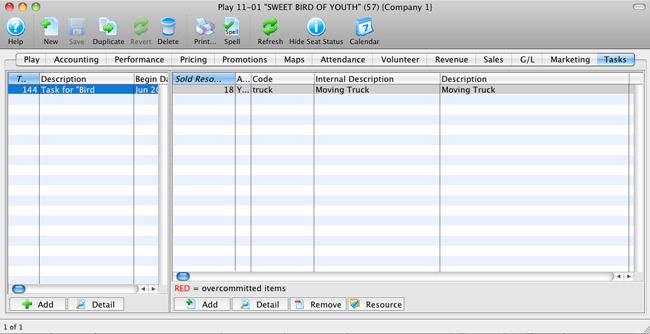
Resources Tab
The Resources Tab shows all of the resources that have been associated with a task. Resources can include actual items either in inventory (consumable items) or capital items (i.e., sound boards, chairs, etc.) as well as space rental details or anything else necessary for completing this task. These resources and their prices can be part of the invoice if these tasks are part of a project that is billed.
For information on how to enter your organization's Resources into Theatre Manager, please visit the help page for setting up Task Resources.
Parts of the Resources Tab
| Active | Status of the resource (generally active or inactive) |
| Code | A unique code that has been assigned to the resource |
| Interal Description | Name that shows in the resource list and elsewhere in Theatre Manager |
| External Description | The name of the resource that is viewable by the general public |
| Quantity | Numbers of the resource selected |
| Notes | Any notes specific to the resource as defined on the Resource's Notes tab |
| Cost | The replacement cost per unit of the resource |
| Price | The amount charged per use of the resource |
| Group | The resource group to which the resource belongs |
| Task # | The task number as displayed in the task # field of the Task window |
| Resource # | The unique number in the database assigned to the particular resource |
| Income Acct | The income account used for the selected resource when it is sold or rented/ |
| Expense Acct | The 'Cost of Goods' expense account to be used for the resource when it is purchased for later sale. |
| Date Entered | The date the resource was assigned to the task |
 |
Adds a new resource to the Task. Click here to learn how to add a resource to a task. |
 |
View the detail for the selected resource |
 |
Removes the selected resource from the task |
 |
Opens the resource window for the selected item. Click here for more information on the Resource Detail window. |
Adding a Resource to a Task
To add a resource to a task, you perform the following steps:
- In the Task window, Choose the Resources tab and click the Add button.
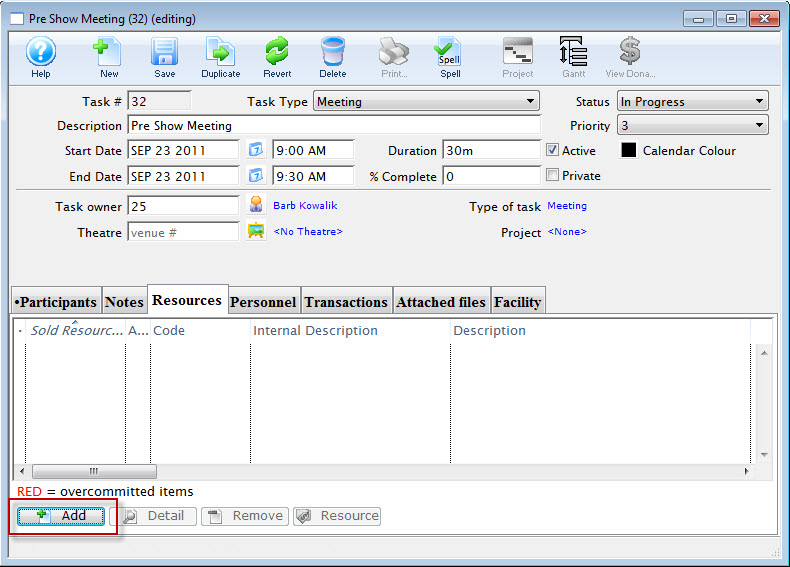
The Resource List Lookup opens.
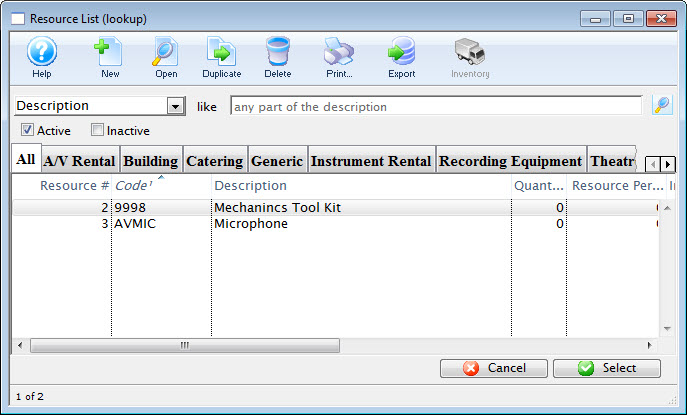
- Choose the resource you require from the listings and double click or click the select button.
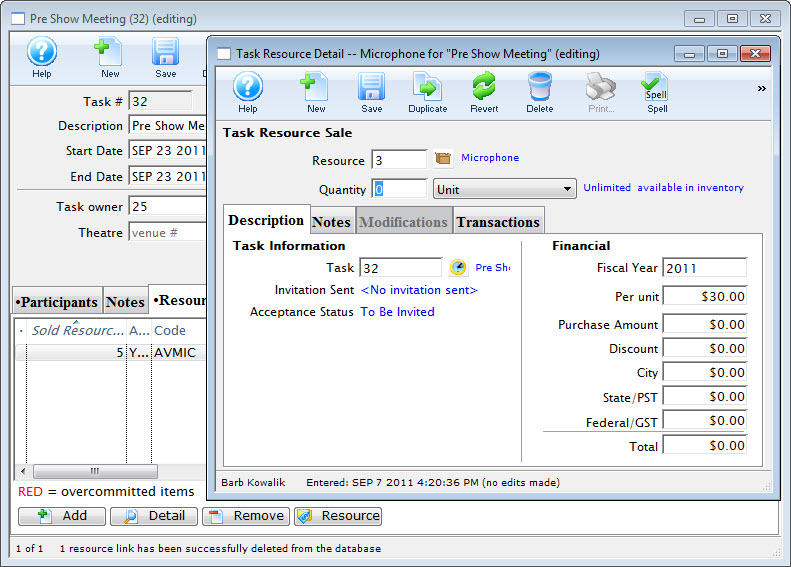
The resource is added to the task and the Task Resource Detail dialog opens.
- Review the Detail and close the dialog.
The resource is now "booked" for the task.
Personnel Tab
Personnel associated with a task are different then volunteers. Personnel is where we are tracking people based on their abilities - or - their skill levels. For example:
- Master Carpenter
- Sound Technician
- Light Technician
- Costume Designer
- Backdrop Painter
The Personnel Tab shows all of the Personnel (or volunteers) with the skill required for the task.
Personnel refer to any person associated with a task for billing purposes. The personnel must be set up as volunteers (whether or not they are being paid for their work) with specific activities assigned to them, allowing the personnel to perform that duty/function. This is the only way to bill for hours worked on a project. These personnel and their costs can be part of the invoice if these tasks are part of a project that is billed.
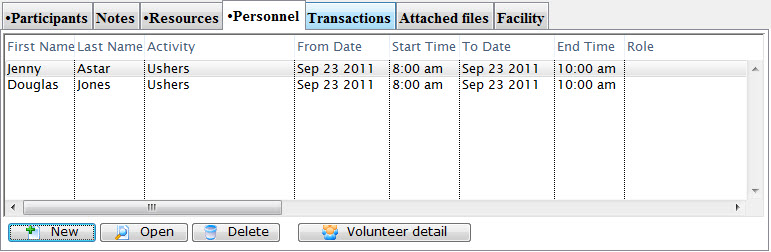
In this tab, you can add a volunteer to the record and aggregate hours.
Dragging a volunteer into this tab creates a participant record automatically. For information on how to enter your organization's Volunteers into Theatre Manager, please visit the help pages for setting up Volunteer Activities and Personnel Management - Volunteer Window.
Parts of the Personnel Tab
| First/Last Name | The First / Last Name of the selected Personnel | |
| Activity | The Activity selected for this personnel. Cick here for information on the volunteer activity code table. | |
| From / To Date | The From and To Dates the personnel selected will be associated with the task. | |
| Start / End Time | The Start and End Times the personnel selected will be associated with the task | |
| Play Code | If an event / play is associated with the task, the code for the event / play is displayed | |
| Play Title | If an event / play is associated with the task, the Title for the event / play is displayed | |
| |
Adds new Personnel to the Task.  |
Opens the Activity window for the selected Personnel |
 |
Removes the selected Personnel from the task | |
 |
Opens the Volunteer History window for the selected Personnel. |
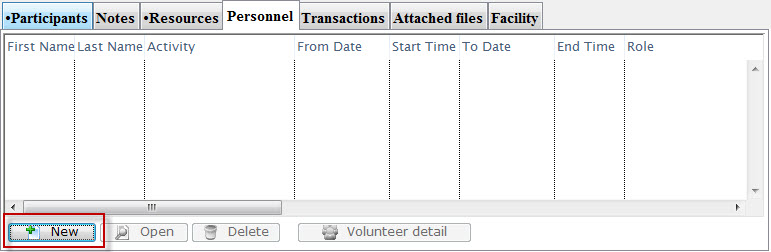
Adding Personnel to a Task
To add a personnel to a task, you perform the following steps:
- In the Task window, Choose the Personnel tab and click the Add button.
The Active Volunteer List Lookup opens.
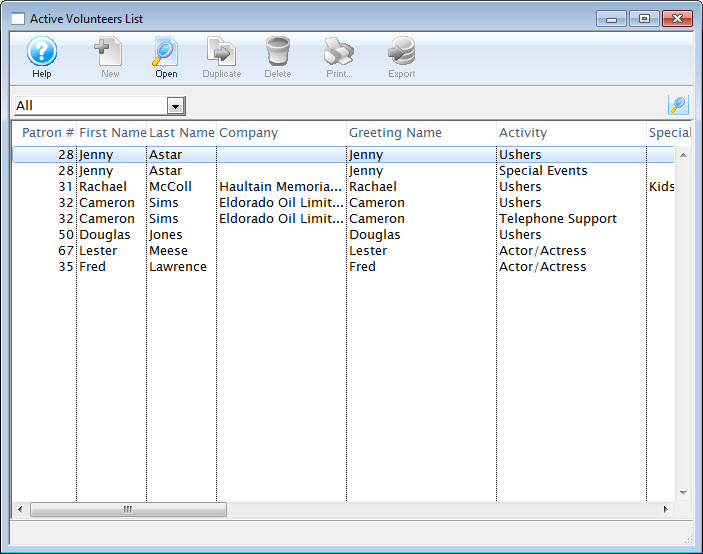
- Click on the Personnel you want, hold and "drag" the names from the volunteer listing to the Task window.
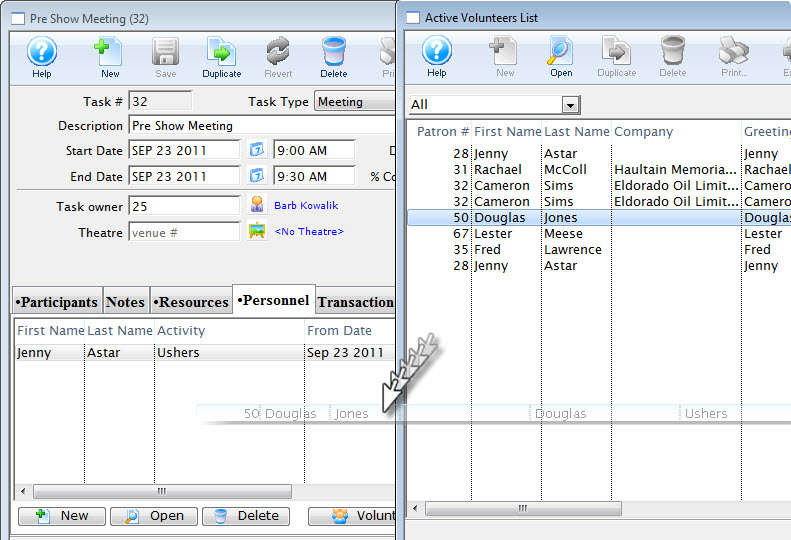
The resource is added to the task and the Task Resource Detail dialog opens.
The personnel are now "booked" for the task.
Transactions Tab
![]()
The Transactions tab displays any transactions associated with the task, after the project status has been changed from 'Estimate' to 'Invoice'. The transactions can be viewed in this screen, but cannot be edited.
![]()
Attached Files Tab
Files of any type can be attached to a task or porject record in the database. These files are then stored in the database. This is safer than storing on file server, for example, grants, directions, budgets and documents. Because they are stored in Theatre Manager, they can be opened right out of Theatre Manager.
 |
If you make changes to the file and save them, you MUST drag the file back to the list to save the current version when you are done.
Theatre Manager has no way to tell if you have made changes to the document and saved those changes, so you must explicitly re-save the document back to the database by dragging it back into the list. |
|
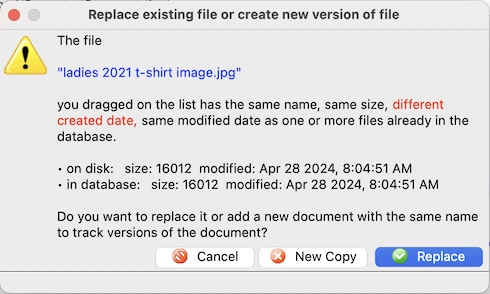
If you drag a file of the same name as exists in the task, Theatre Manager will ask if you want to:
|
|
|
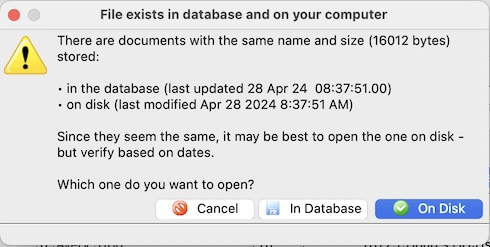
If you try to extract the file from the database and it finds that it still exists in the original pathname, Theatre Manager will ask if you want to replace that existing one with the one from the database |
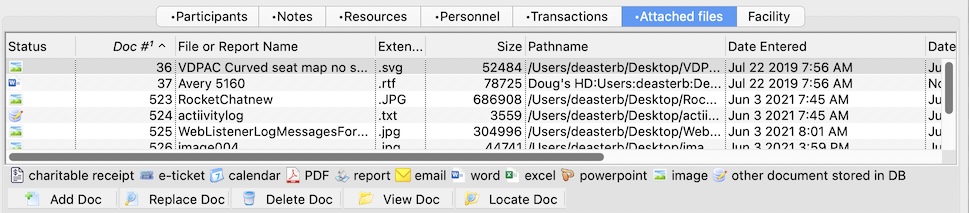
Parts of the Attached Files Tab
| Doc | The Number of the document in the database. |
| Status | Indicates the document is loaded into the database. |
| Name | The file name for the document. |
| File Extention | The type of document (as indicated by it's extention). |
| Size | The size of the document. |
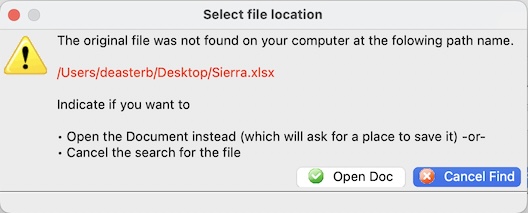
| Link | Where the document was ORIGINALLY located on your computer. Theatre Manager will check that pathname when trying to export -- to make sure that the file does not exist. if it does exist, you'll get a warning asking if you want to replace it. |
| Date Entered | The date the document was uploaded to the database. |
| Date Updated | The date a document was changed. |
| Changed By | The Employee number of the participant who attached the document to the task. |
| Task | The task number the document is attached to. |
 |
To attach a file or document, click on the Add Doc button, or drag the file from your hard drive to the list. A line will be added to the list indicating the name of the file, its location on disk, size, etc. |
| Replace Doc |
To completely replace the document with another one, click on the Replace Doc button, or drag the file from your hard drive onto the list.
If a file is dragged onto the list:
|
| Delete Doc | To delete a file or document, click on the Delete Doc button. This will remove the file from the database, but will not touch the original item from the disk. |
| View Doc |
To view an attachment stored in the database, click on the View Doc button.
|
| Locate Doc |
Theatre manager stores the original pathname to the file. You can ask the system to open that file location. If the original document path
|
Facility Tab
The Facility tab shows task information most often used if the task is part of a project. When printing invoices for projects, either estimates or actuals can be used. The values to use are seen on the Facility tab of each Task Detail window.

Parts of the Facility tab
| Estimate and Actual | If a project has a billing type of Estimate, the value in the Estimate column is used. If a project has billing type Invoice, it uses the values from the Actual column, based on the actual resources and personnel records attached to the task. |
| Check Boxes | Include in Statistics - Uncheck to exclude a task from Statistics. (Not yet implemented)
Include in Invoice - Uncheck to suppress printing of a specific task on the invoice. |
| Task Vendor | A Vendor may be attached to a task. This indicates that the vendor is responsible for performing this task and allows you to subcontract out portions of a project to others. While you can attach the vendor at this time, vendors do not yet show up in reports. |
| Order # | The order number displayed, is the one Theatre Manager has assigned to the Project this task is attached to. |
| Date Posted | The date the Order was posted. |
| Attendance | You can track the expected attendance (Expected) and actual number who attended (Attended) for a task. This is useful when have a meeting or gathering and wish to track the expected number, for planning purposes, and the actual number attended, for historical purposes. |
Task Toolbar
Most of the items on the toolbar perform the expected standard functions.

An exception is the Duplicate button. It will create a duplicate of the current task in a new window, ready for editing. It does not duplicate the task participants.
If the task is part of a project, click the Project to open the Project Detail window.
If the task is part of a project, click the Gantt to open the Gantt window for the project.
If the task is attached to a donation in the donation window, click View Donation to open the Donation window for the associate donation.
Tasks in the Event / Play Window
Any tasks associated with an event / play can also be seen in the Event / Play window. From here you can add tasks and associate them with resources, so you can create all the tasks needed for a particular event / play. These can then be added to a project and billed.
Tasks are added on the left side. Once a task has been added, you can select the task and add the resource on the right side.
Click on the Calendar button in the window's top toolbar to view all tasks, performances, and/or volunteers associated with the event / play in a new calendar.
Tasks in the Client Window
Many times, the use of tasks is better than entering dated notes into the patron notes window.
Tasks in the Donation Window
Setting Alarms
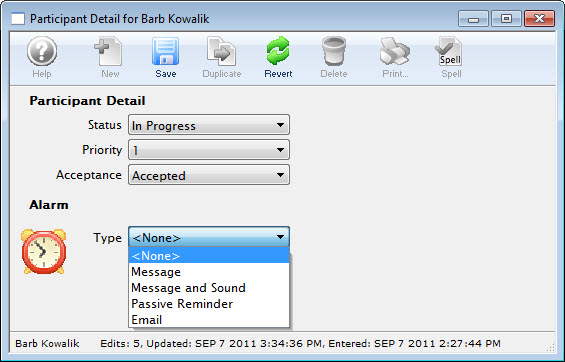
To set an alarm for a task, you perform the following steps:
- In the Task window, click the Alarm button.

The Task Alarm settings open.
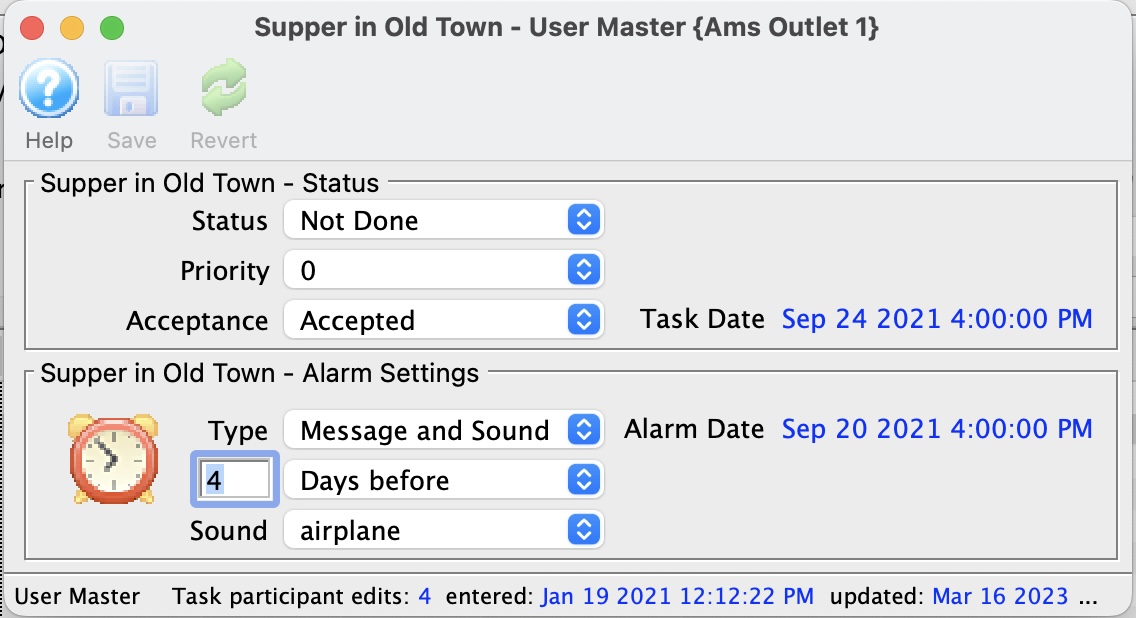
- You can enter the Status, Priority and Acceptance.
Values entered or changed and save here, affect the individual participant and are displayed in the participant's line of the participant tab of the Task window. - Select the Type of Alarm.
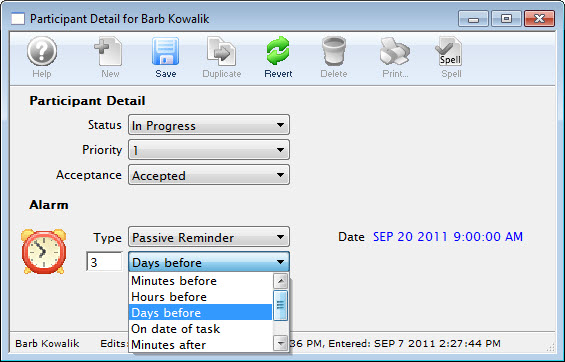
- Once you have made your selection, you have the opportunity to choose the timing of the alarm.
- Choosing Message and Sound adds another drop down list - Sound.
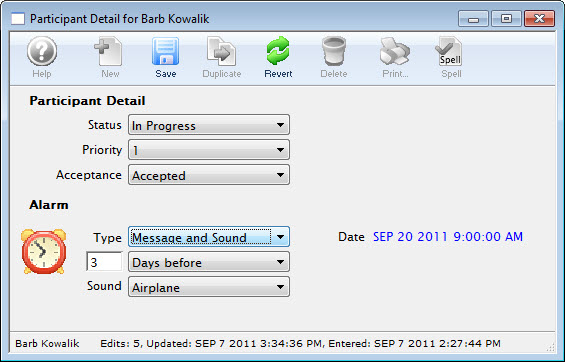
There are some Default sounds that are part of Theatre Manager. You can add your own sounds by creating a 'sounds' folder in the Theatre Manager Preferences directory and placing '.wav' files in it.
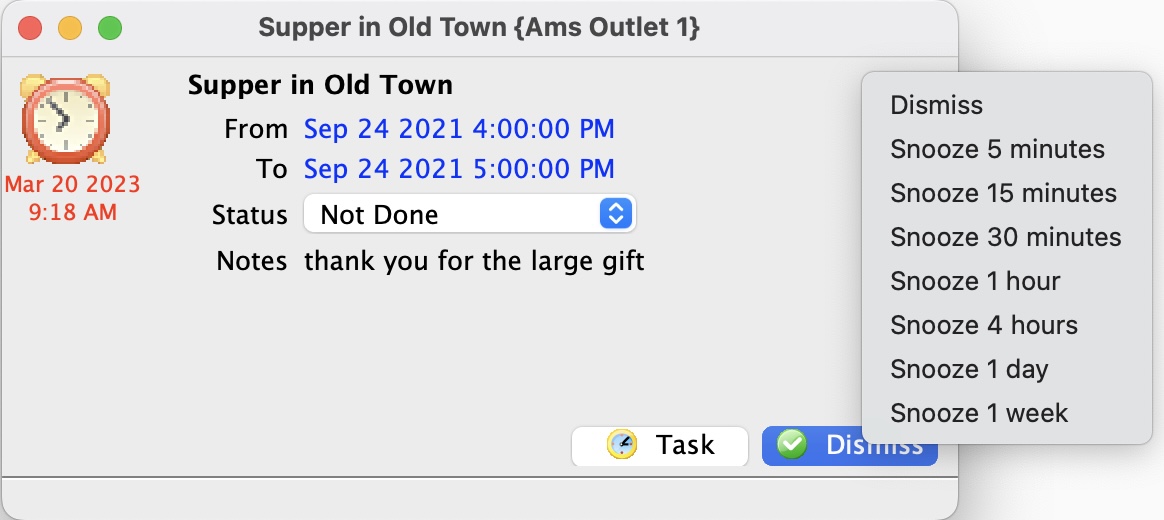
When the time comes for the alarm to go off, if you have selected you want a visible alarm instead of a background alarm, the following window displays as a notification:
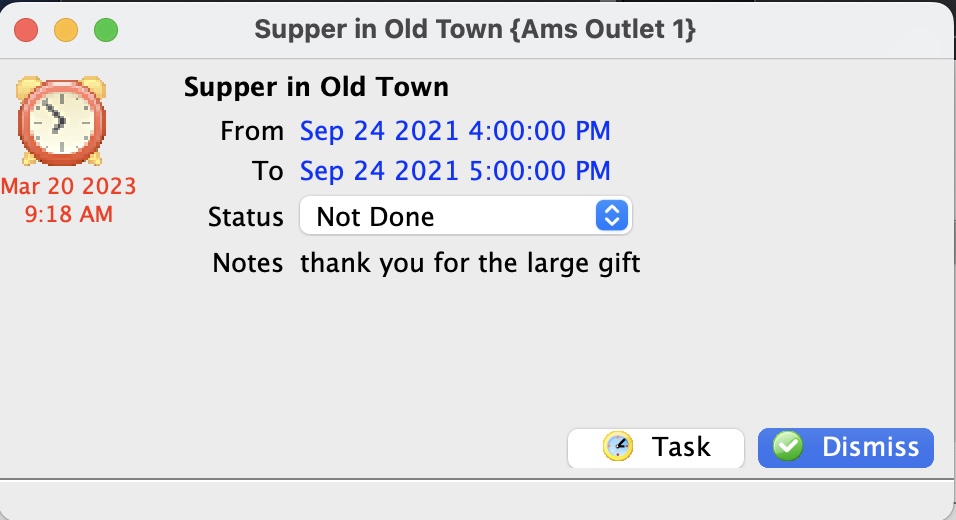
You can also dismiss the alarm outright or snooze it for a little while by clicking the dismiss button and indicating what you want to happen to your alarm:
Conflict Checking
When adding task participants or volunteers to a task, the Facility Management module will check to see if that person is already scheduled within one hour of that time to help avoid double-booking. You will be asked if it is OK to schedule this person so closely.
It also checks when you try to book tasks into the same venue at the same time that are not part of the same project. If the possible conflicts are part of the same project there is no warning because it would be expected that multiple tasks could be occurring in the same venue.