Web Sales
Use this section to answer a number of common questions about web sales issues.
"Your" Venue
 |
If you reached this, it means that the venue that you were trying to buy tickets from has an incorrect setting in their web services. |
If you have a moment to help the venue, please:
- Use the back button to go back to the page that was in error
- Take a screen shot -or- make a short description of the page you were on, including any error messages
- Then, contact the venue directly and describe this problem to them so that they can fix your issue going forward.
Allowing Concierges to Buy 'on account' using Passes
There are situations when an outside organization would like to book tickets through web sales as a cashless transaction. This can be achieved by creating a specialPass/Gift Certificate. The key to remember is, everything purchased through web sales requires full payment. Online payments are in the form of credit cards or Pass/Gift Certificates.
The box office can create and purchase the special Pass/Gift Certificate on the patron/organization’s patron account. When the organization logs onto their patron account on web sales, they are able to access the special Pass/Gift Certificate associated with their account to complete the ticket purchase.
The special Pass/Gift Certificate must be fully paid for before using it online. When the special Pass/Gift Certificate is purchased through the box office a post-dated payment can be applied to the order. This post-dated payment should be set in the future, past the event date so it never gets deposited. This would allow for the payment to be replaced with a real payment after the special Pass/Gift Certificate is used online.
Create special Pass/Gift Certificate for a dollar value required to cover tickets. Click here for instruction on creating a Pass/Gift Certificate.
Box office to purchase special Pass/Gift Certificate
- Purchase the special Pass/Gift Certificate on patron's account
- Pay for Pass/Gift Certificate with a post-dated payment due in the future, past the event date so it never gets deposited
Organization uses special Pass/Gift Certificate online
- Patron goes online, selects tickets to purchase and logs into their patron account
- Applies gift certificate to redeem tickets
- Checkout
Box office Reconciliation after the organization has redeemed the special Pass/Gift Certificate online
- Reduce value of gift certificate to amount used if necessary
- Print and send invoice to organization, if required
- Remove post dated payment from gift certificate
- Replace with real payment form
Clearing the Cache for Online Sales
|
The two methods described below will clear all caches on ALL WEB LISTENERS.
If the expected page changes do not appear, please check your web listener error log. It is likely that there is a page error or the actual html document is not saved as a UTF8 formatted document. |

Clearing the Cache within Theatre Manager
The advantage to this method is that if you do not have direct access to the Web Listener machine, you can clear the cache from any machine running Theatre Manager.
- Click Setup >> Company Preferences.
- Select the Director Tab tab.
- Click the
 to the right of the Last Cache Clear field.
The 'Last Cache Clear' date will update with the current date and time. The web listeners will detect the change in short order and start loading the new pages
Clearing the Cache using the Director
![]() If you have ready access to at least one of your listeners, then you may choose to clear the cache directly from within the Web Listener itself.
If you have ready access to at least one of your listeners, then you may choose to clear the cache directly from within the Web Listener itself.
- Locate the machine(s) that act as the Web Listener(s).
- Type
or click on the link if you are viewing this help on the web listener machine.
- Click the Clear Cache button
Customizing Reminder Emails
|
Email reminders must be enabled for the performances that you wish to send an automatic reminder for. |
 Theatre Manager has the ability to send automatic Reminder Emails to patrons who purchase to a performance. A generic email template tmEvents/tmLiveEventReminderEmailDefault.html is used by default.
This template can be customized by:
- Event - which will send the same custom email to all performances in the event -or-
- Performance - which supports sending a custom email to a performance
Customizing the Reminder Email by Event
|
Email reminders must be enabled for the performances that you wish to send an automatic reminder for. |
- Download a copy of the Responsive Web Pages from Artsman's public Web page repository
- Click on the link above to open your browser in the repository
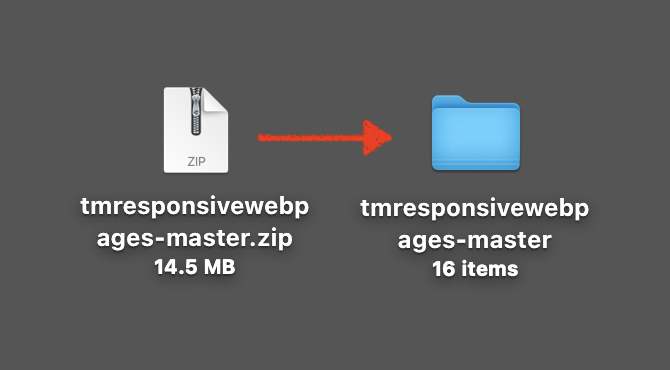
- Click on the download link on the upper right of the repository as per the image below
- Select Zip as the download option
- Open the .zip folder to your desktop or location of your choosing

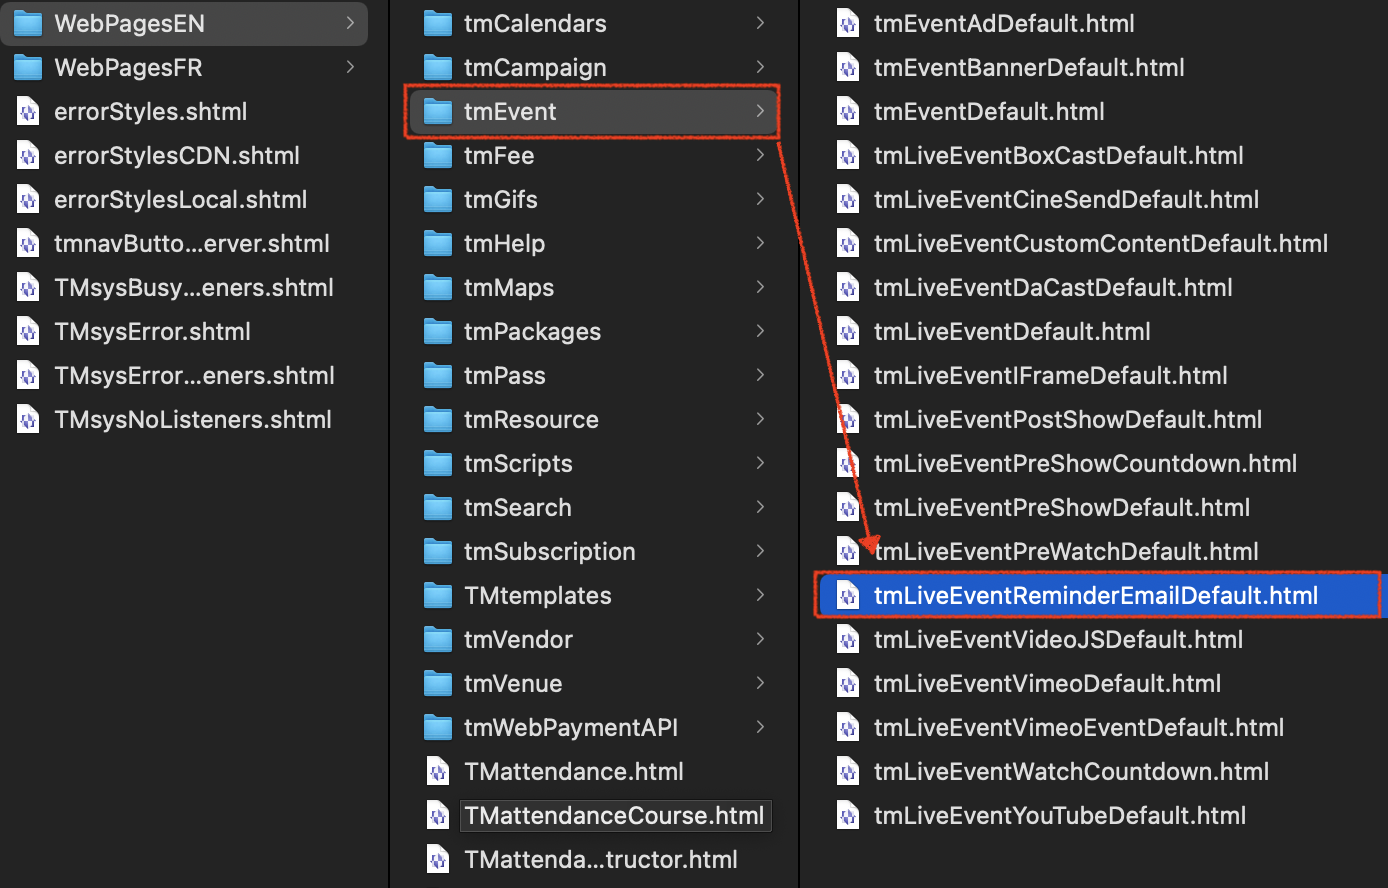
- Navigate to the WebPagesEN -> tmEvent folder and copy the file "tmLiveEventReminderEmailDefault.html"
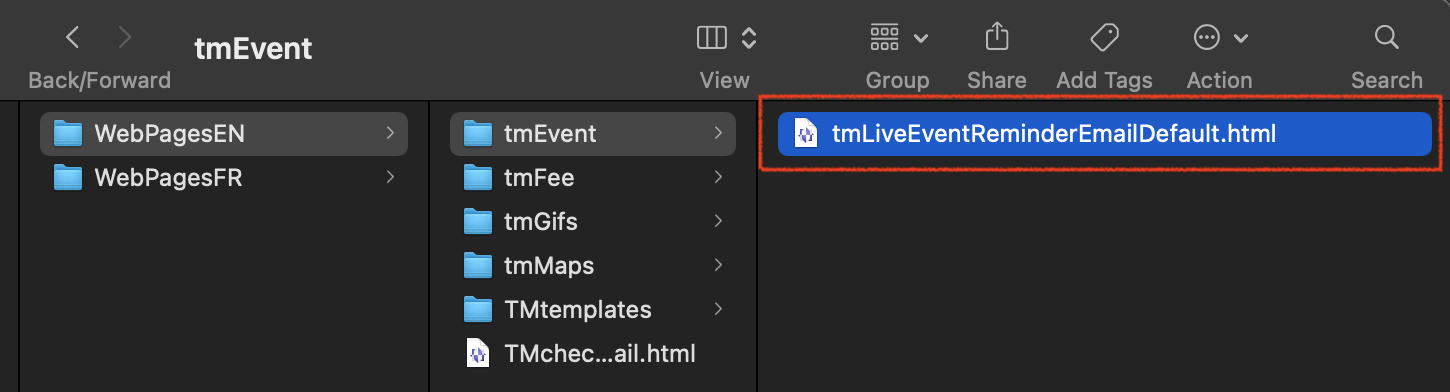
- Paste the file in your WebPagesEN -> tmEvent folder on your Web Listener computer.
Be prepared for your Web Pages directory to look different than the images in this help page. Your WebPagesEN directory will only show html files your organization has previously customized. If you do not have a tmEvent folder in your WebPagesEN directory, simply create a new folder with that name. Below is an example of a customized WebPagesEN directory:
- To customize the Reminder Email for a specific Event there are 3 steps:
- Copy and Paste the file so you have a duplicate of the tmLiveEventReminderEmailDefault.html in the tmEvent folder
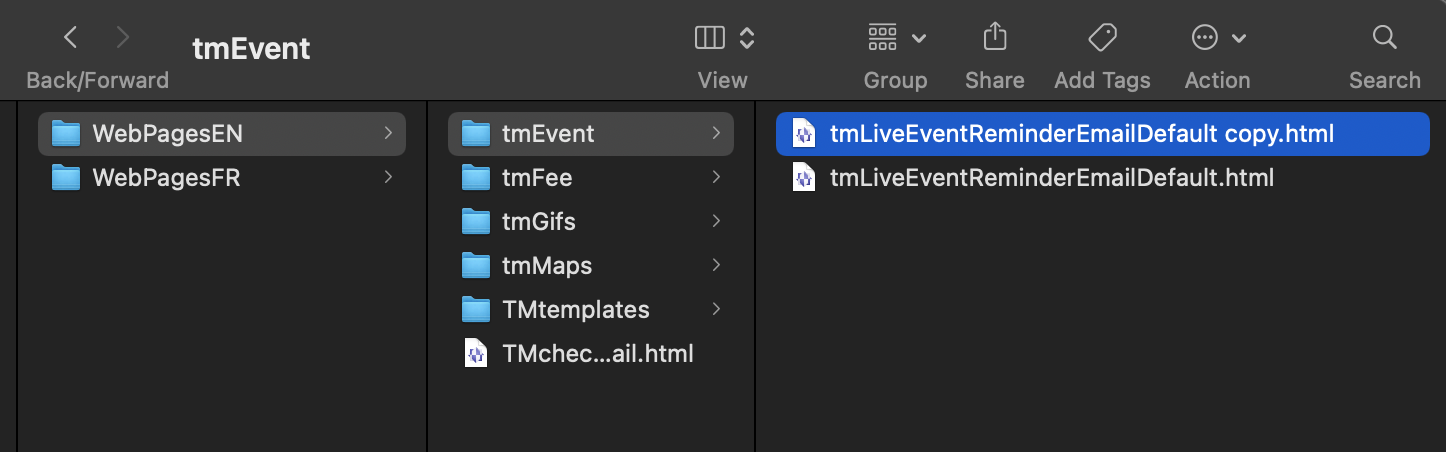
- Edit the duplicated file and change the end of the file name. Replace the word "Default" with the Event # you want this Reminder Email to correspond with.
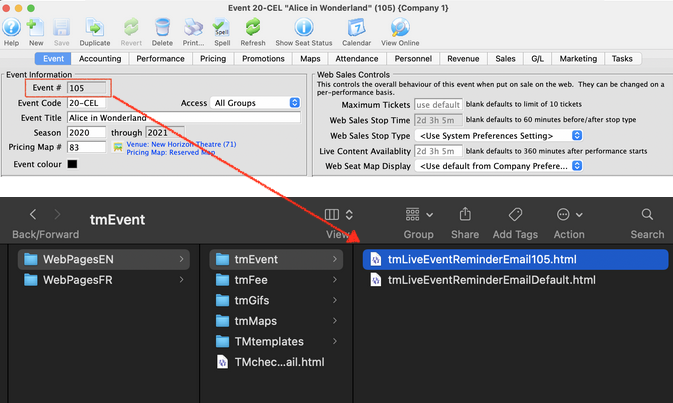
- Edit and Save your changes. Be sure to use an HTML friendly editor like Notepad ++ (PC) or BBEdit (Mac)
- Copy and Paste the file so you have a duplicate of the tmLiveEventReminderEmailDefault.html in the tmEvent folder
Theatre Manager will now look in the WebPagesEN -> tmEvent folder for any customized emails by event. If it finds none, it will send the tmLiveEventReminderDefault.html template.
Customizing the Reminder Email by Performance
|
Email reminders must be enabled for the performances that you wish to send an automatic reminder for. |
- Download a copy of the Responsive Web Pages from Artsman's public Web page repository
- Click on the link above to open your browser in the repository
- Click on the download link on the upper right of the repository as per the image below
- Select Zip as the download option
- Open the .zip folder to your desktop or location of your choosing
- Navigate to the WebPagesEN -> tmEvent folder and copy the file "tmLiveEventReminderEmailDefault.html"
- Paste the file in your WebPagesEN -> tmEvent folder on your Web Listener computer.
Be prepared for your Web Pages directory to look different than the images in this help page. Your WebPagesEN directory will only show html files your organization has previously customized. If you do not have a tmEvent folder in your WebPagesEN directory, simply create a new folder with that name. Below is an example of a customized WebPagesEN directory:
- To customize the Reminder Email for a specific Performance there are 3 steps:
- Copy and Paste the file so you have a duplicate of the tmLiveEventReminderEmailDefault.html in the tmEvent folder
- Edit the duplicated file and change the end of the file name. Replace the word "Default" with the word "Performance" followed by the Performance # from Theatre Manager you want this Reminder Email to correspond with.
An example of the final file name would look like "tmLiveEventReminderEmailPerformance536.html" where "536" equals the Performance # in Theatre Manager
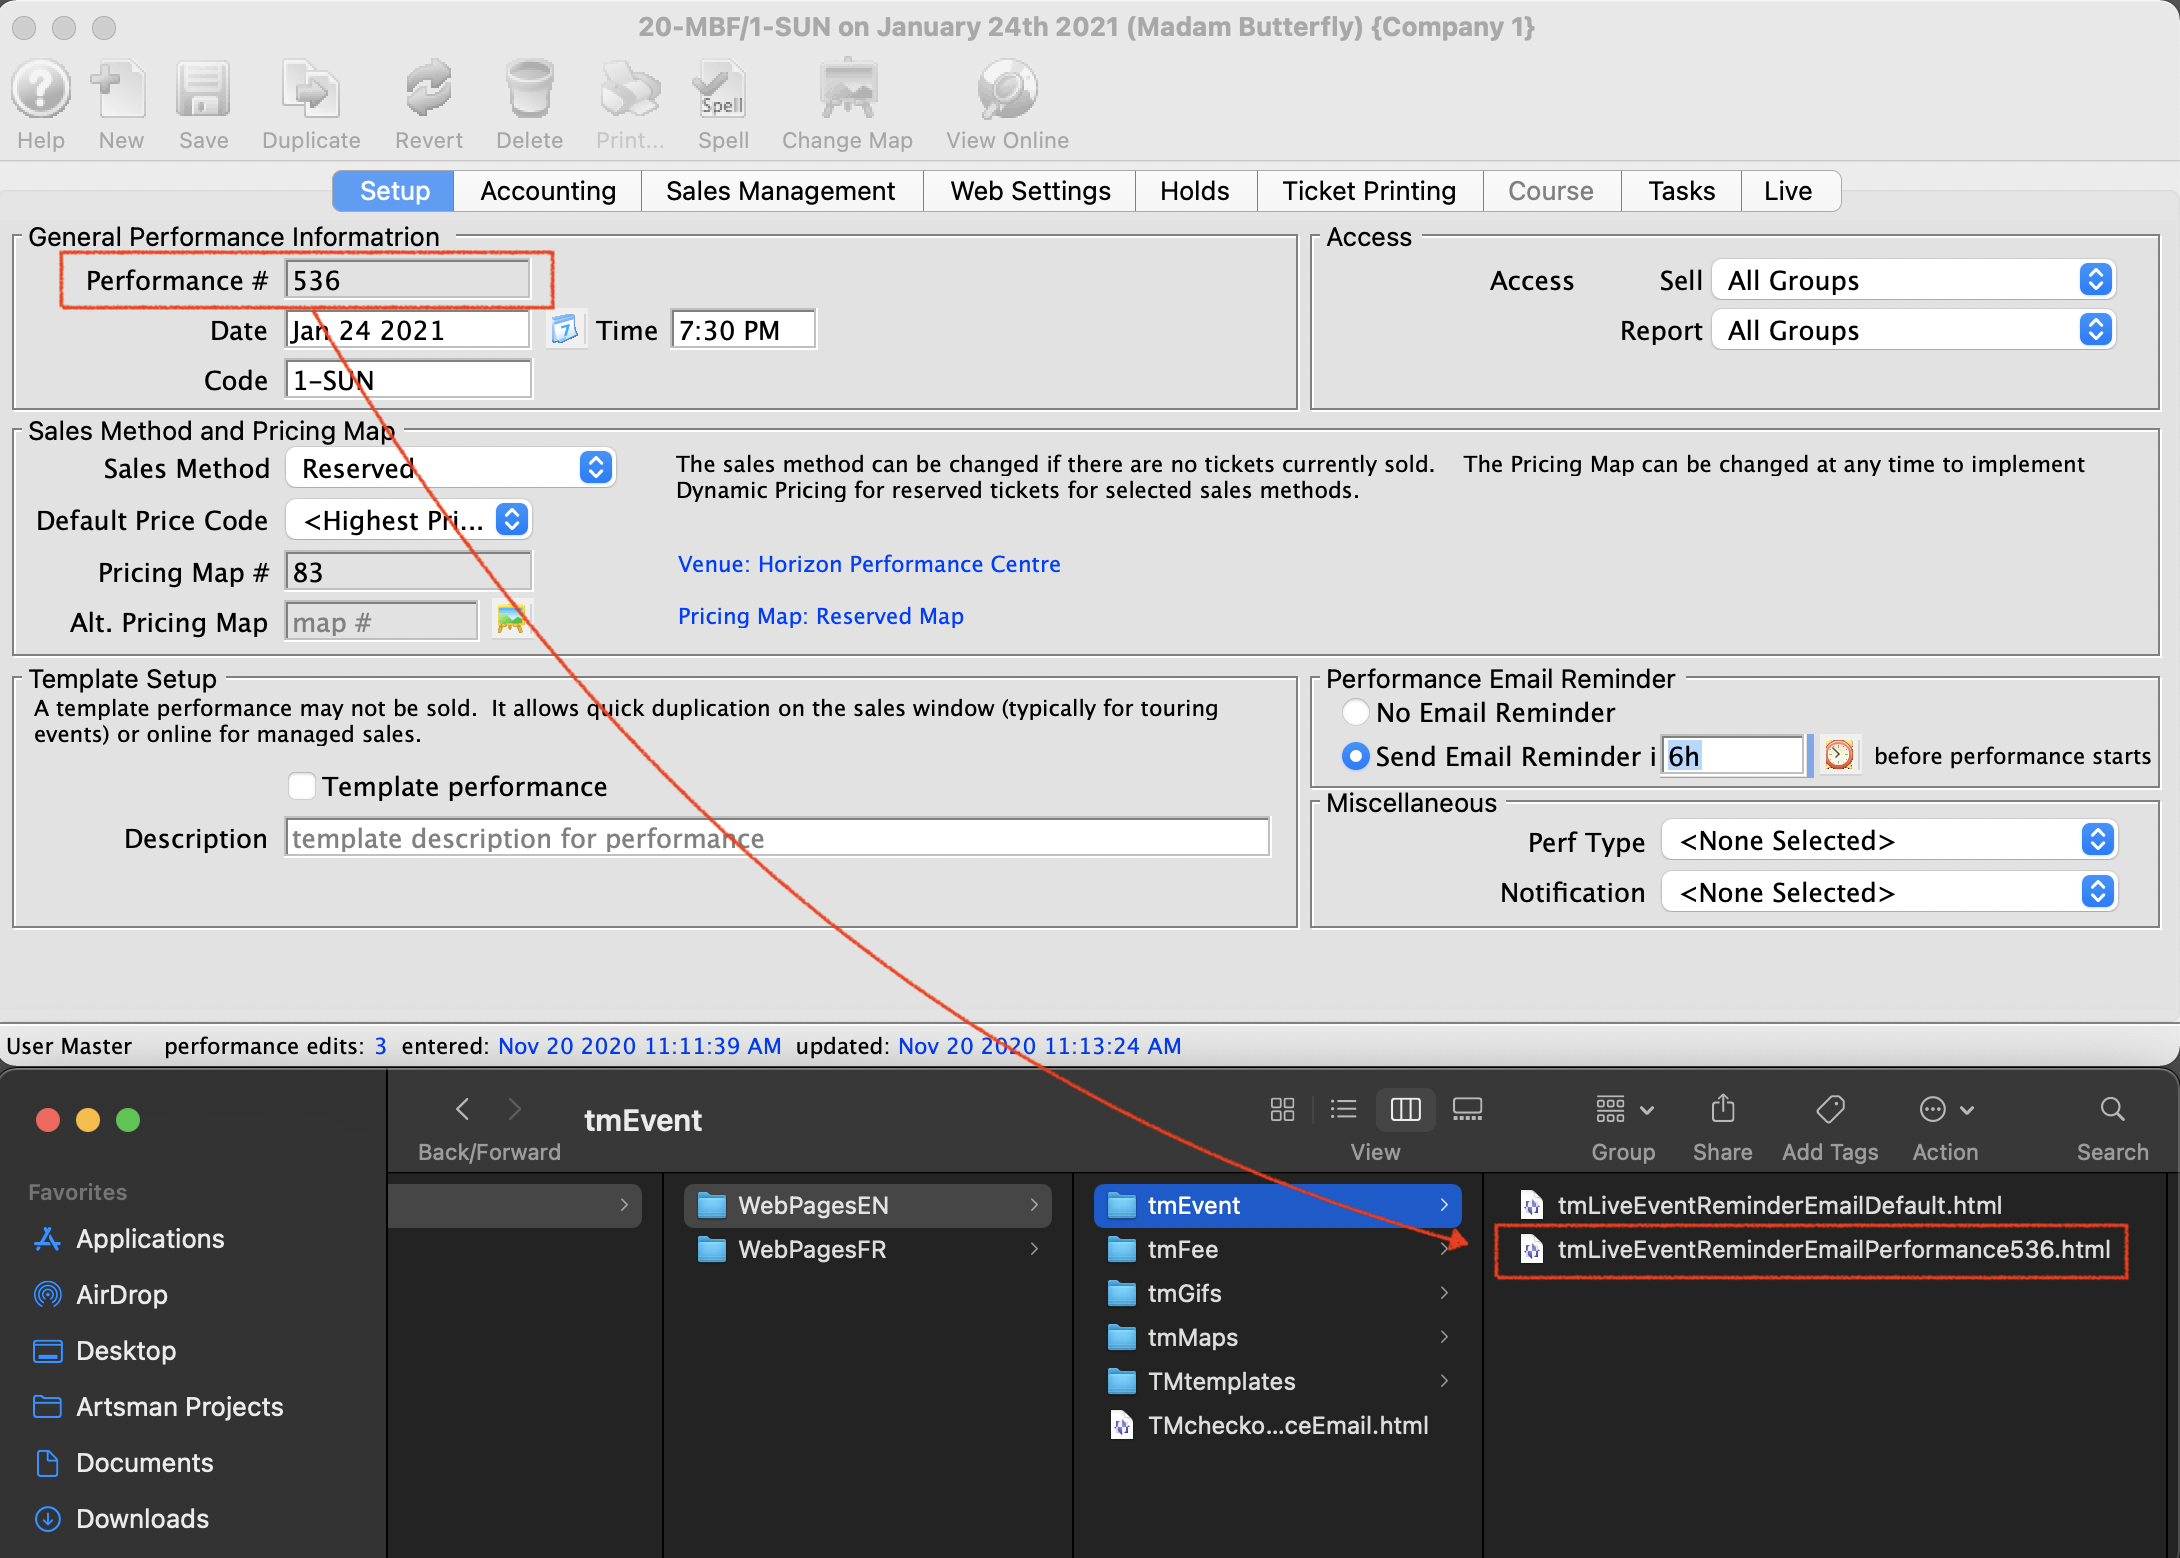
- Edit and Save your changes. Be sure to use an HTML friendly editor like Notepad ++ (PC) or BBEdit (Mac)
- Copy and Paste the file so you have a duplicate of the tmLiveEventReminderEmailDefault.html in the tmEvent folder
Theatre Manager will now look in the WebPagesEN -> tmEvent folder for any customized emails by Performance. If it finds none, it will send the tmLiveEventReminderDefault.html template.
IE and other Older Browser Peculiarities
IE and Pick Your Own Seat peculiarities
|
Starting on January 12, 2016, Microsoft will support only the most current version of Internet Explorer for each operating system. Starting on that date and for Windows 7, only Internet Explorer 11 will be supported by Microsoft for technical support and security updates.
Theatre Manager pick your own seat generally supports IE 11 and above as long as the users browser is not falling back to an earlier compatibility mode - anybody with older IE can still buy seats using the suggest next seat button. |
|
If you see some artifacts on a windows browser when accessing your web site, you will need to migrate to the nginx web server. Most venues already have this. |
We're sorry if we have to apologize for Microsoft historically not following standards yet again. Older versions of Internet explorer and soon to be extinct browsers currently hold about 4% or less of the market place and we elected to make choose your own seats for the future, knowing that these 4% of people may see some odd effects with pick your own seat.
Frankly - there is nothing we can do when IE renders things incorrectly.
Typical issues that they might have are:
- pick your own seats will not work at all - and thats because their browser does not support SVG graphics. Generally, most browsers should display a map.
- pick your own seats may display random 'trash' looking characters at the top of the map on IE 10. It may not affect functionality - it just looks awful. Sadly, some versions of IE will not properly tell you that it is IE, so putting workarounds into code to hide maps is not worth the effort.
- and if you have properly disabled TLS 1.0 protocol as per PCI compliance, they won't see the web site or other commerce sites that have also properly implemented PCI compliance.
Patrons Complain They are Not Receiving Email
- Are there any unsent/pending emails?
Click here to go to the page on managing Pending and Unsent emails.
If there are no unsent emails, then they were sent out by the web listener.
- Can you send an email to yourself?
Try adding an email to your patron record and see if it sends. The best test is if your 'test' email address is for gmail, hotmail, the phone company or some other server outside your company's email domain.
- Did the patron's check their junk mail box or do they have any email filters redirecting the emails?
You can ask them the above questions and resend the email confirmation, while they are on the phone, to see if they receive it.
To do this, you perform the following steps:
- Open up the patron window.
- Go to the Letters tab.
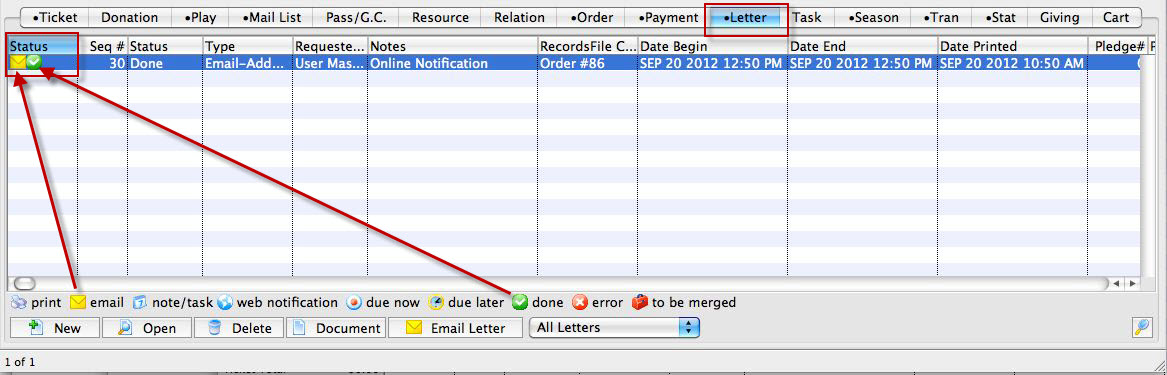
- Right-click on the order confirmation email and change the status from Done to Not Done.

The change status confirmation dialog opens.
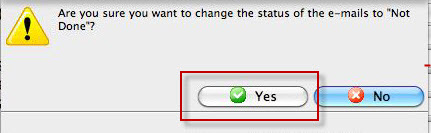
- Click the Yes
 button.
The letter tab shows the status has changed to Not Done.
- Close the window.
By changing the status to 'Not Done', the Web Listener will resend out the order confirmation email.
Wait for about 1 minute, then double click on the email confirmation.
- Does it say 'Done' or 'Error'?
If Done, then it was sent.
If Error, then we need to review the error message from within the window to take corrective action.
|
If gmail is your email service provider, they will rate-limit outgoing emails. This means that they only allow so many per day and then they may halt them. So the first thing to check is traffic volume, especially if some go and some do not. There are some other service providers that may do the same thing. |
Port 80 Already In Use
It's possible for a network to be setup in such a way that Port 443 is forwarded to the Apache machine for online sales and Port 80 is not. Often Port 80 is in use by another application within the network. The online sales will run however this can impact the patrons ability to access the online sales.
The Patron can click on a direct link to the website (https://tickets.yourvenue.org) and reach the online sales site. However, if they try to type tickets.yourvenue.org in the address bar by default the browser will take them to http://tickets.yourvenue.org.
Notice there is no S after the http. The http uses Port 80 to connect to Apache. Apache then redirects the site to httpS://tickets.yourvenue.org/TheatreManager/1/login which then hands the connection over to Port 443 since the link is now using httpS.
It is recommend that Port 80 is also forwarded so that when someone tries to type the address of the online sales site into their browser they are more likely to get to the ticketing site rather then experience errors indicating the site may not be working.
Options for working around a network where Port 80 is already in use are listed below:
- Change the exchange server settings to use a port other than 80. This becomes a case of what is more important, that end customers can reach web sales on a standard HTTP port, or staff use an alternate port when using exchange from home. Arts Management Systems believes the customers and standard should prevail and so the answer is change Port 80 for exchange to something else.
- Get another external IP dedicated to the exchange server so that both can use Port 80. One will be through tickets.yourvenue.org:80, the other will be a different external ip.
- Do some HTTP magic on the IIS server to redirect the path. On apache, there is a module called mod-rewrite, or you can create proxy settings so that anything with /TheatreManager/..... in the http path name in it gets sent off to Port 80 on the web listener. There should be something similar in IIS.
- Don't serve exchange on the outside so that its not a problem any more and leave Port 80 on the single IP for customer web purchases
Preparing for a Big Onsale
If an Organization is expecting a large 'on sale' for a popular event, it is important to be prepared if the expected sales volume or pattern online might be very different than normal.
Onsale Preparation
| Step | Purpose |
| Step 1 | Check Pricing At The Box Office.
It's important to ensure pricing - both at the box office and online - are correct prior to the onsale date. To check pricing at the box office, sell a ticket to a patron record. The ticket does not need to be paid for. Use the Ticket Review tab to ensure the final price is accurate. The ticket can then be released by going back to the Seat Selection tab and clicking the Release All button. If there are multiple ticket prices or performances, each should be selected and reviewed. |
| Step 2 | Check Pricing For Online Sales.
Pricing for online sales should be reviewed in advance of the actual on sale date for the performances. The best way to do this without offering the event to the general public is to setup a pre access coupon code. This will allow you to purchase tickets online without making the event available to the public. |
| Step 3 | Set Performance Onsale Date and Time.
The date and time the performance should be available for sale can be set in advance. This allows Theatre Manager to make the performances available at the box office and/or online without someone having to turn them on. The option for the box office can be different than online if needed. To set the onsale date and time:
Theatre Manager will make the performance available on the date and at the time entered. |
| Step 4 | Hold Tickets For Sale at Box Office.
Some organizations are concerned tickets will sell too quickly on the web and seats will not be available for those patrons who wish to purchase tickets in person at the box office on the day of the on sale. The web listener will sell any available ticket not sold or held. To ensure tickets are available for sale to patrons at the box office tickets can be held in the map with a select hold letter. Employee Permissions in the Box Office tab of Employee setup can be altered to only allow access to this select hold letter during the on sale. Box Office staff can sell these held seats to patrons in person as needed. |
| Step 5 | Contact Arts Management Systems.
Contact Arts Management Systems to review any additional setup, recommendations or upgrade requirements. Arts Management Systems can test the current setup for load and make any necessary arrangements for temporary licensing. |
| Step 6 | Set Up Additional Web Listeners.
One or two web listeners may be enough to handle the traditional day-to-day activity of online sales. However, as the demand increases, so will the need for more listeners. Most organizations will run one Web Listener and two Classic Listeners per work station. Depending on the resources available on the machine, the number of Web Listeners and Classic Listeners can in increased. The larger the anticipated on sale the greater the number of listeners that will be needed. To ensure enough listeners are running additional computers may need to be used. This requires installing and configuring the Theatre Manager Server. Arts Management systems is happy to help with this process. |
| Step 7 | Turn Off Marketing Images Online.
Turning off the marketing images will speed up the web sales process. The Web Listener will not need to spend resource sending the image and the page will load more quickly. To turn off the images in Theatre Manager:
|
| Step 8 | Check Phone System.
Check to ensure the phone system can handle the demand of the pending onsale. If the phone system goes down patrons will not be able to reach the box office to purchase tickets. Speak with your telephone service provider and review the setup to make sure the office is prepared. Update hold or wait messages to reflect the reason for possible delay in response times for those patrons who do not directly reach the box office. Update hold or wait messages for the main office number in the event patrons try to gain access to tickets through this phone number as well. |
| Step 9 | Advertise.
Advertise the correct location for patrons arriving in person to purchase tickets. Add signs on the exterior of the building if needed to help patrons form lines in the correct locations. Include in your advertising the correct phone number for patrons to call. This will help prevent patrons from dialing administration telephone numbers in an effort to find tickets. Add a direct link to purchase tickets to the Event on the main web site. This will help patrons access the performances they want quickly and with less confusion. |
| Step 10 | Prepare the Box Office Space.
Ensure extra staff are scheduled as needed. Stock work stations with additional supplies such as pens, envelopes or ticket stock if needed. Check floats and make sure additional rolls of coin are available if needed. |
| Step 11 | Prepare the Lobby or Waiting Area.
Put out stanchions to form lines if available. Provide waiting patrons coffee and play music in the waiting space to help make the waiting process more enjoyable. |
Setting a Performance Stop Sales Time
The purchase availability of a performance can be defined for online sales using the stop time settings in Theatre Manager. These settings are controlled at three levels. They consist of:
- System Preferences
- Event (overrides System Preferences)
- Performance (overrides Event)
The web sales module reads these setting in a hierarchy looking first to the Web Settings tab in the Performance Detail window. If performance settings are not defined it then looks to the Event tab of the Event setup and finally to Web & Reporting tab of System Preferences. In other words Theatre Manager looks to the System Preferences first. If you make changes to an Event then it uses the Event settings in place of the System Preferences. If you customize the Performance it uses those settings instead of the Event.
|
The web sales stop time affects emailing of PDF tickets
You cannot email tickets from the box office if the performance is no longer onsale online. This would be after the start time plus/minus any 'web sales stop time'. |
|
Refer to a more complete list of reasons preventing tickets being emailed and some places to look |
System Preferences
System Preferences is accessible by logging into Theatre Manager as the Master User. In the Web & Reports tab there are options listed for Web Sales Stop Time and Web Sales Stop Type. These two settings will define the default performance stop time for Theatre Manager.
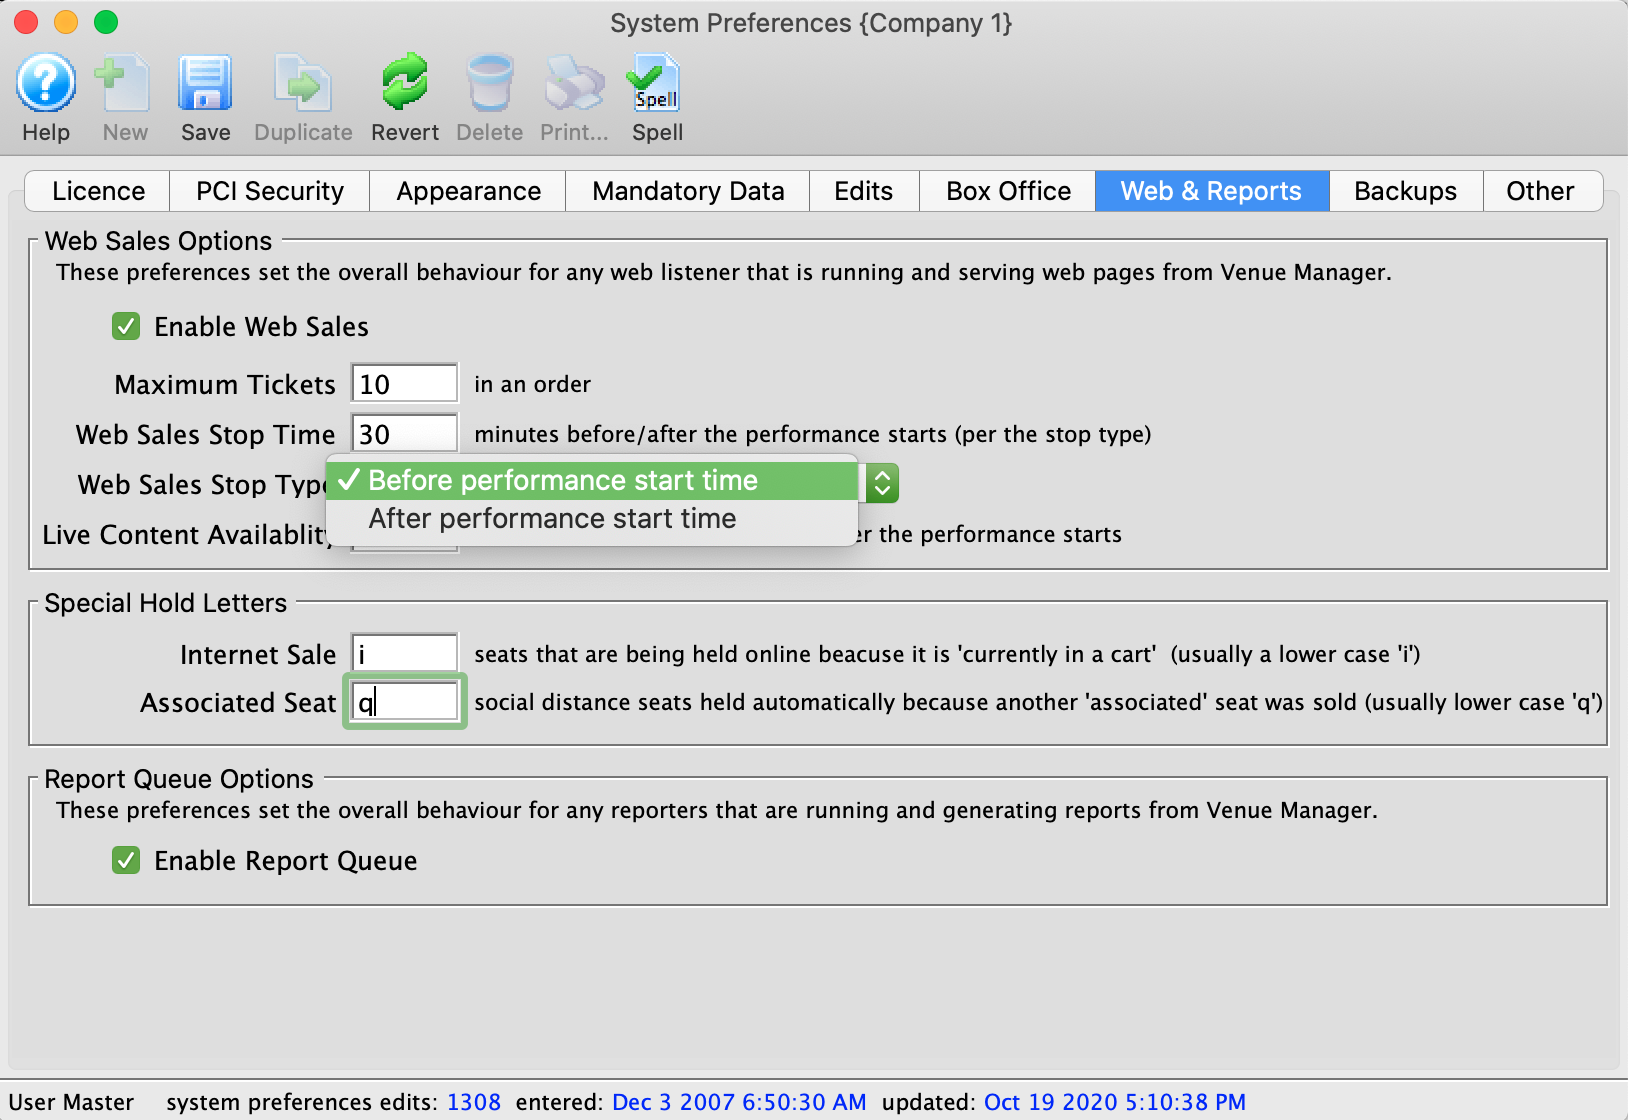
| Web Sales Stop Time | The number of minutes before/after the start time of the performance that it will be displayed online for purchase. |
| Web Sales Stop Type | Indicates if the performance stop time for online sales will be before or after the start time of the performance.
Before performance start time: online sale are available for up to the allocated number of minutes in the Web Sales Stop Time field prior to the date/time of the performances. This cutoff prevents sales from happening the defined number of minutes prior to the performance. After performance start time: the performance will be available for sale following the performance date/time and will continue to be available for sale up to the number of minutes defined in the Web Sales Stop Time. |
Event
A traditional theatre experience may have a sales cutoff time 30 minutes prior to the performance to allow for printing and preparing will call tickets. However, there are times when a performance may continue to be available past the performance start date/time. Some examples include:
- All Day Events - where you want online sales to be available after the gates open
- Courses - where you may want to allow late registration, say up until the the second class
- On Demand Streaming - where a video streamed through the ticketing site can be purchased after the original start date/time
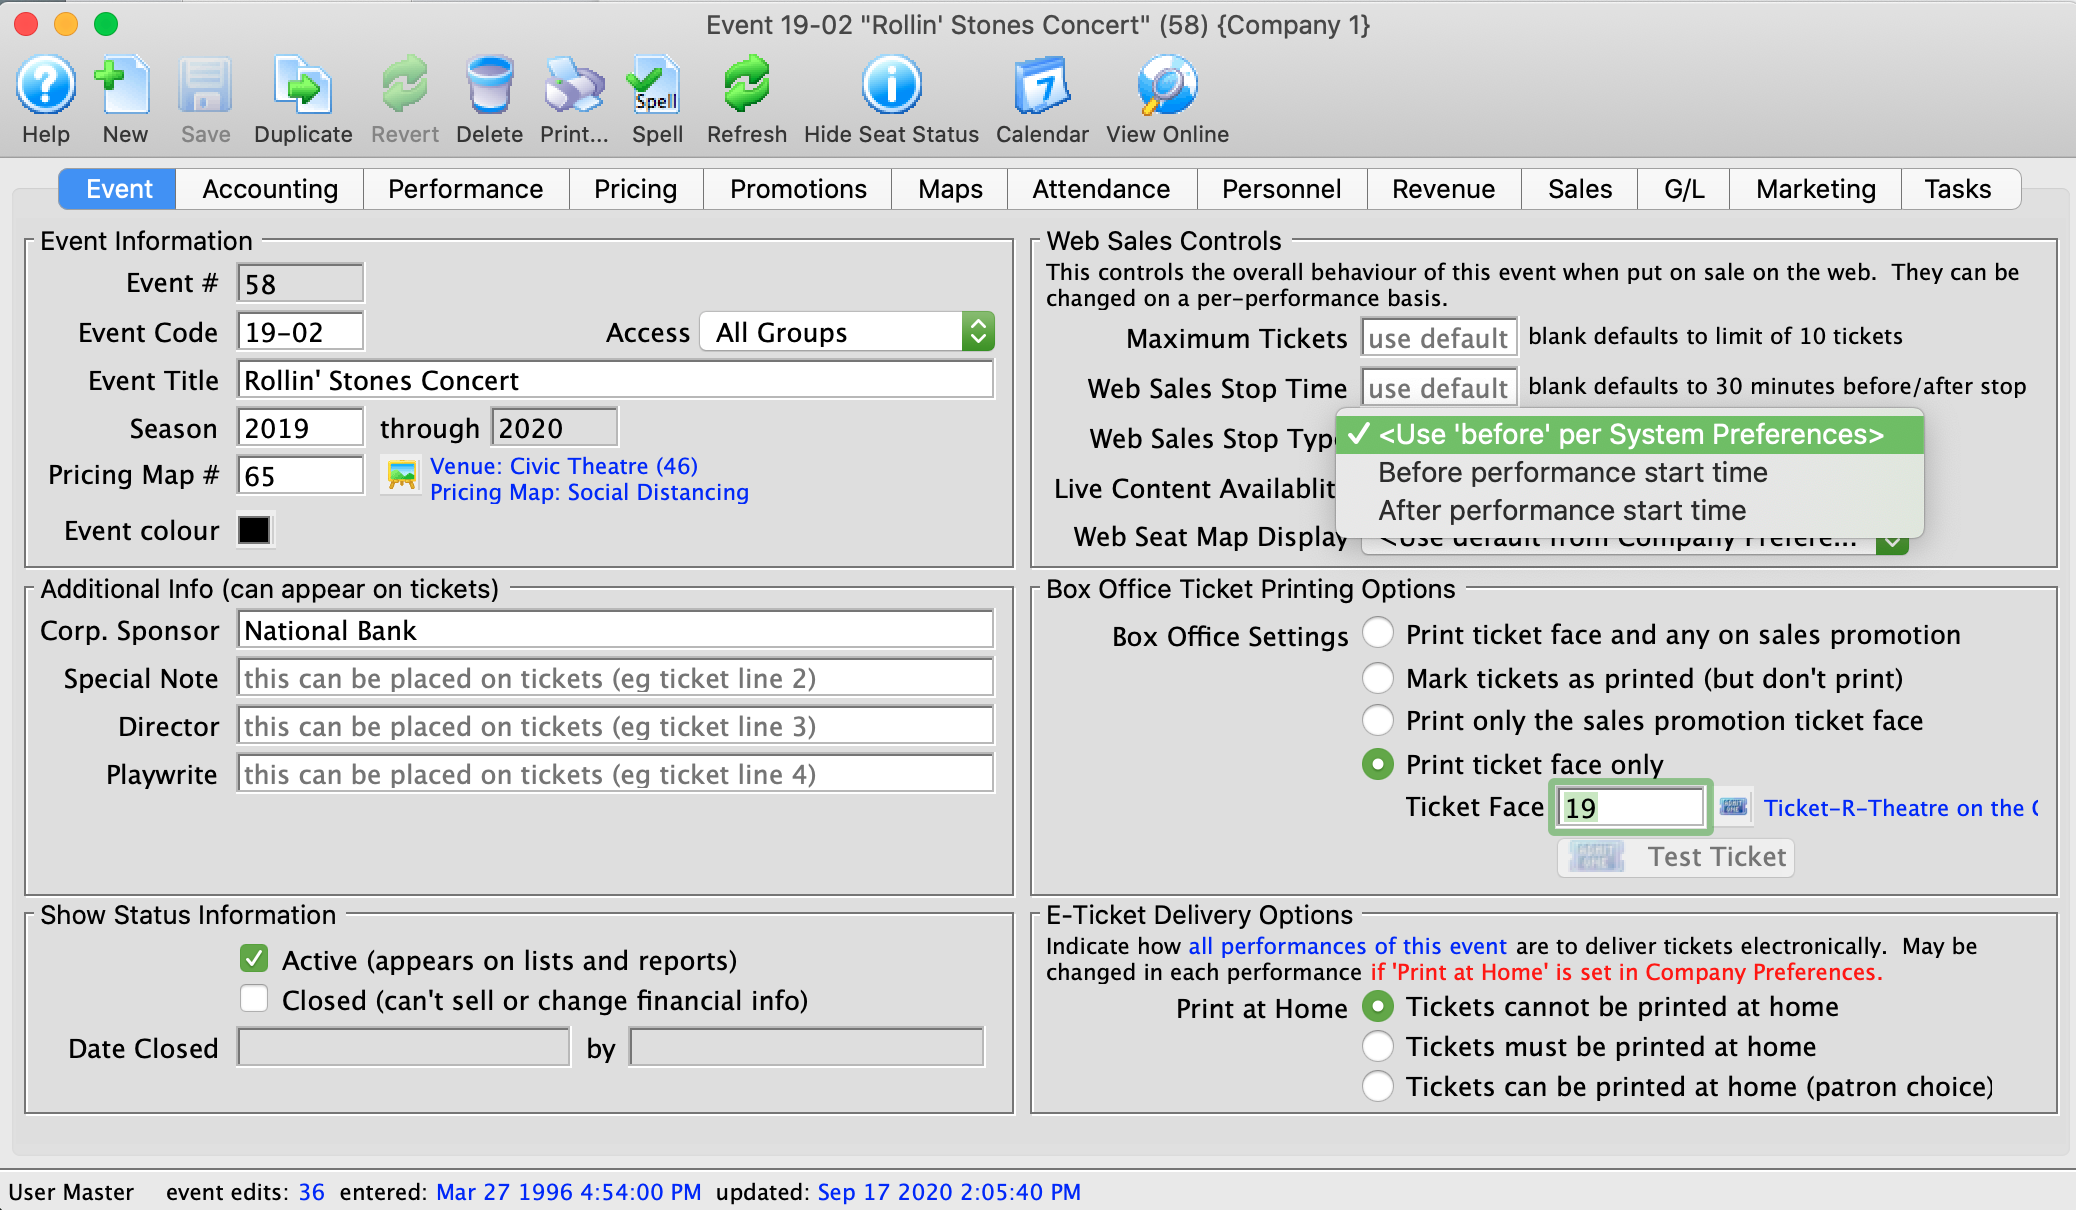
| Web Sales Stop Time | The number of minutes before/after the start time of the performance that it will be displayed online for purchase. |
| Web Sales Stop Type | Indicates if the performance stop time for online sales will be before or after the start time of the performance.
<Use System Preferences Setting>: uses the default option for System Preferences. Before performance start time: online sale are available for up to the allocated number of minutes in the Web Sales Stop Time field prior to the date/time of the performances. This cutoff prevents sales from happening the defined number of minutes prior to the performance. After performance start time: the performance will be available for sale following the performance date/time and will continue to be available for sale up to the number of minutes defined in the Web Sales Stop Time. |
Performance
In an Event where one performance is setup for patrons physically attending the venue and another for live streaming, the sales approach may be different. The ticket sales for those attending in person may stop 30 minutes in advance of the show to allow for printing tickets at will call. Where the live streaming performance may be available for sale following the start time of the performance allowing patrons to purchase and join the event even after it's complete.
The Web Settings tab is located in the Performance Detail window. This is accessed by double clicking on a Performance anywhere in the Event setup.
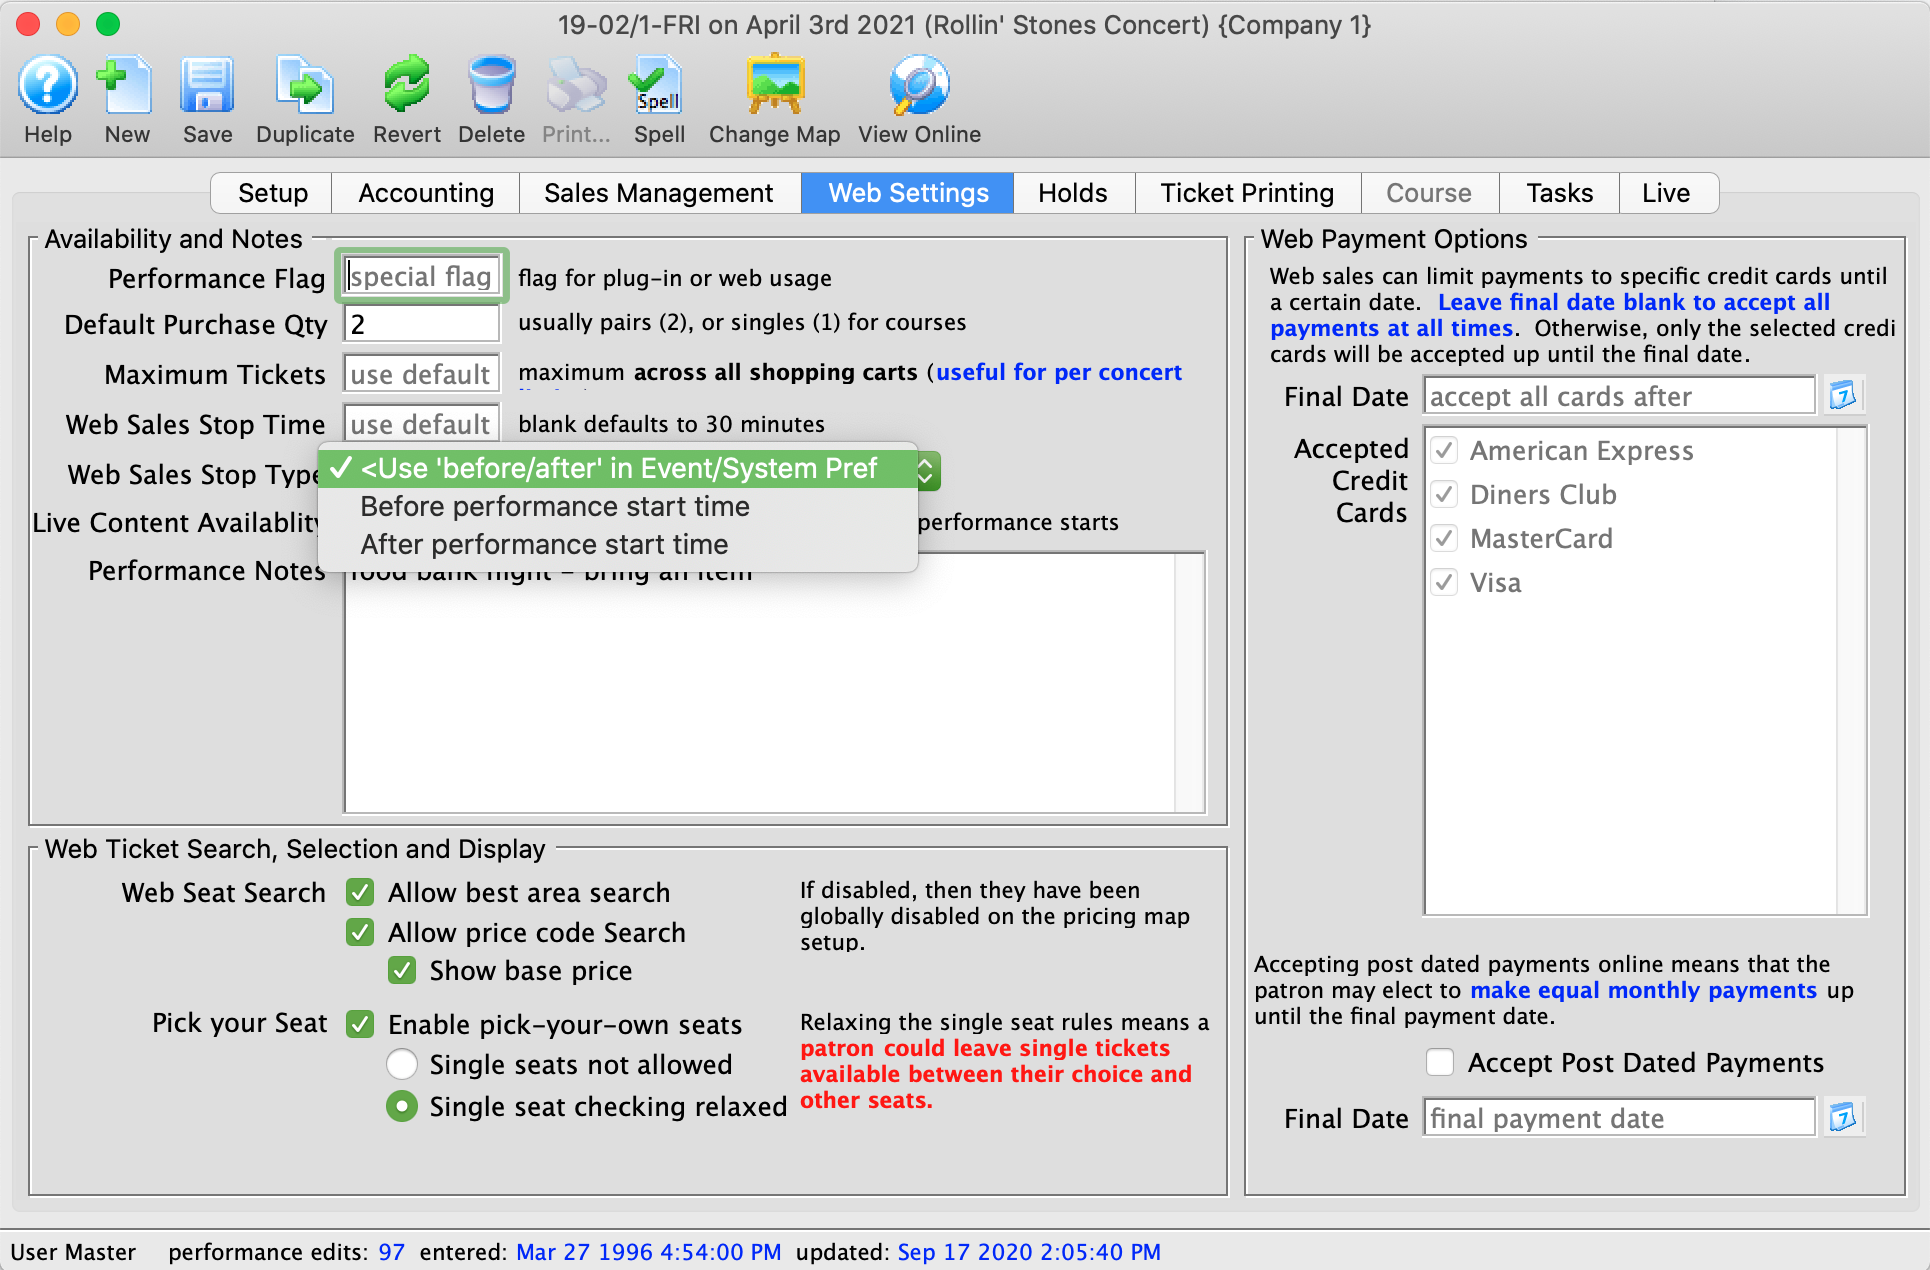
| Web Sales Stop Time | The number of minutes before/after the start time of the performance that it will be displayed online for purchase. |
| Web Sales Stop Type | Indicates if the performance stop time for online sales will be before or after the start time of the performance.
<Use Event Setting>: uses the setting in the Event. The Event may be set to use the default setting in System Preferences. Before performance start time: online sale are available for up to the allocated number of minutes in the Web Sales Stop Time field prior to the date/time of the performances. This cutoff prevents sales from happening the defined number of minutes prior to the performance. After performance start time: the performance will be available for sale following the performance date/time and will continue to be available for sale up to the number of minutes defined in the Web Sales Stop Time. |
Factors That Prevent Tickets from being emailed
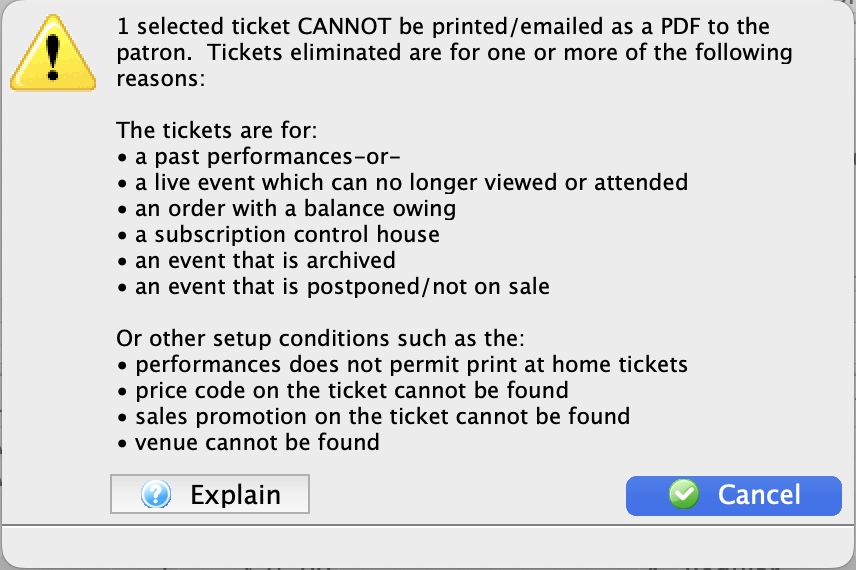 You may receive a message that eliminated tickets from being emailed from the box office that looks similar to the one on the right.
If tickets cannot be emailed to people, typical reasons are:
- The tickets are for a performance in the past. You can look at the performance date and time on the patron's ticket list to determine if this was the reason and if the performance dates are wrong, change them in event setup
- A live event which can no longer be viewed or attended or sold. This means that the viewing time for a live performance is over, or it cannot be sold online. Refer to this web page.
- An order with a balance owing. If people owe you money for tickets, Theatre Manager will not allow them to be emailed as a control feature. Pay off the balance of the order and then send the tickets. These tickets will appear red on the patron's ticket list
- A subscription control house. Subscription control houses are performances which are holders for patrons favourite seats. These are not real tickets and cannot be printed. You can verify this on the event setup in the performance list.
- An event that is archived. If you have archived the event, meaning no more changes or sales to it, you cannot print tickets for it. Normally, events are archived after the run is over, so this would not normally happen to anybody. Verify the archived status in the event setup at he bottom left of the window.
- An event that is postponed or not on sale. If you have set the status of the performance to postponed or cancelled, the event or inactivated it or made it not on sale at box office or online for any reason, you cannot email tickets for it
Other setup Issues that might cause tickets to not print
- The performance does not permit print at home tickets. Print at home tickets feature needs to be enabled for the performance that the tickets are for, otherwise you cannot email them.
- Price Code for the ticket cannot be found if you try to print a ticket for a performance and the price code for the ticket in patron's ticket list cannot be found in the performance price table, you can't print the tickets. Normally, this should never happen. You may want to look at the price code on the ticket, and the pricing setup in events and dates to make sure the ticket has an existing price code and it is enabled.
- The sales promotion cannot be found. Every ticket is sold with a sales promotion and these cannot be deleted if used on a ticket or a transactions. This condition should never happen. If the sales promotion is blank in the patron's ticket list, contact AMS support.
- The Venue cannot be found. Every ticket must be in a venue. This condition should never happen. If the venue in the patron's ticket list is blank, contact AMS support.
- The pricing map cannot be found. Every ticket must be associated with a pricing map. This condition should never happen. If the venue/pricing map in the patron's ticket list is blank, contact AMS support.
Using Emergency Mode Setting - Merchant Account Setup
 |
Only use the 'Emergency Mode' option if your merchant provider appears offline or unreachable and does not provide card authorizations.
Turn off 'Emergency Mode' as soon as credit card servers become available/reachableagain. |
Should your credit card service provider become unavailable (a very very rare case indeed), you can switch the merchant into emergency mode. Theatre Manager web sales will then verify the credit card and expiry date for format and other appropriate edits and then allow all web sales to continue. The cards payments are marked as post dated so that they are immediately visible in the next end of day where they can be authorized. The intent is to allow any large on sales to continue in the unforeseen circumstance that the service provider is down with a level of risk management that a venue may be comfortable with.
 |
In emergency mode, the card has not been authorized yet, however, the customer generally does not have any tickets from phone or web orders. If a card cannot be authorized in end of day, you still have time to cancel the order or cancel the tickets.
For walk up sales, this may represent a risk of a card that cant be authorized in the future, yet the customer may have the tickets -- you will need to evaluate if it would be acceptable amount of risk to accept (or tell the customer you'll email the tickets once the card is approved). |
To set up emergency mode, you perform the following steps:
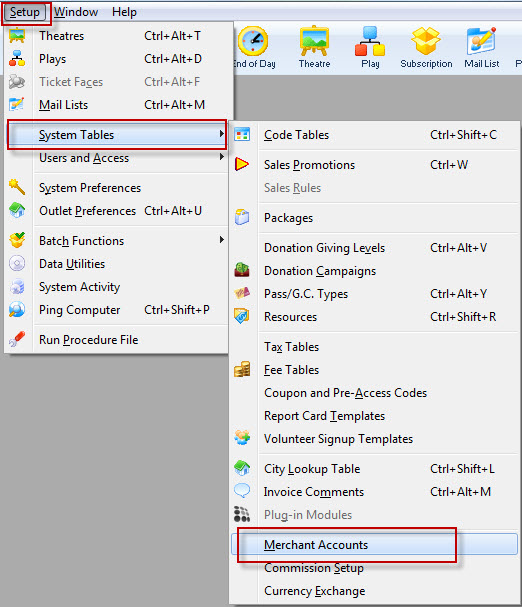
- Choose Setup >> System Tables >> Merchant Accounts.
The Merchant Account List opens.
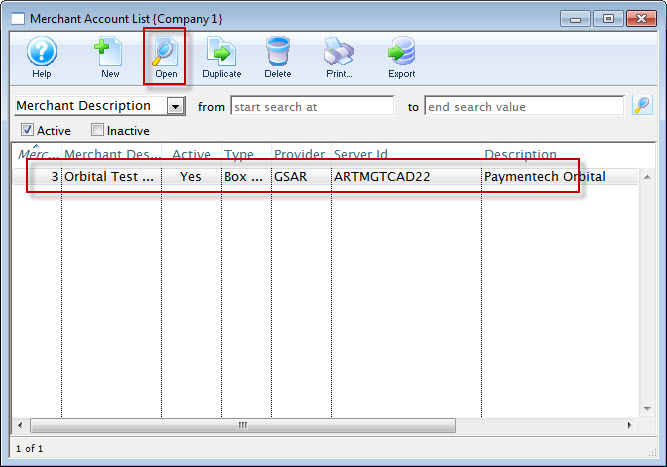
- Click the Open
 button.
The Merchant Account window for the selected account opens.
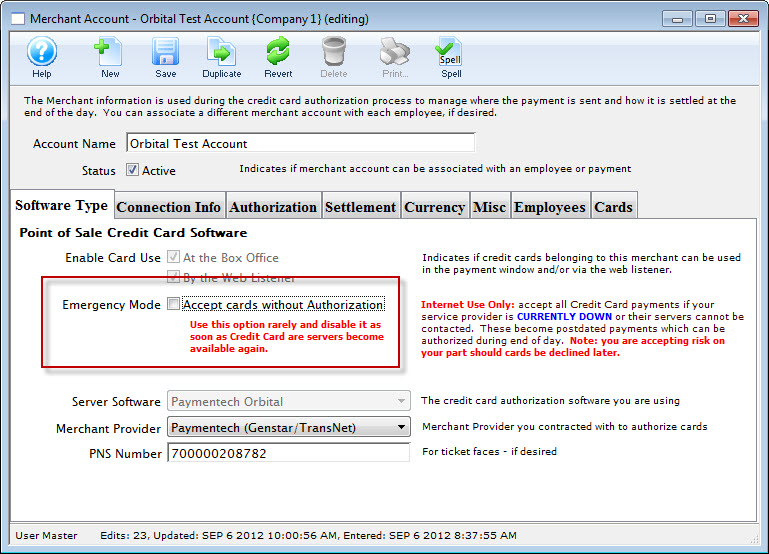
- To enable Emergency Mode, click the check box.
A confirmation dialog opens.
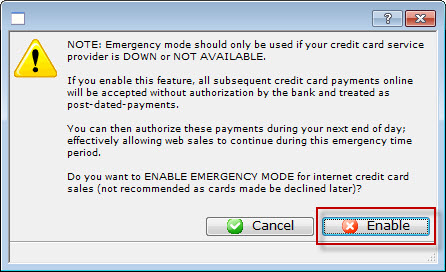
- The dialog states:
- Emergency mode should only be used if your credit card service provider is DOWN or NOT AVAILABLE.
- If you enable this feature, all subsequent credit card payments online will be accepted without authorization by the bank and treated as post-dated-payments.
- You can then authorize these payments during your next end of day; effectively allowing web sales to continue during this emergency time period.
- Do you want to ENABLE EMERGENCY MODE for internet credit card sales (not recommended as cards made be declined later)?
- To enable Emergency Mode, choose the Enable
 button.
You are returned to the Merchant Account window.
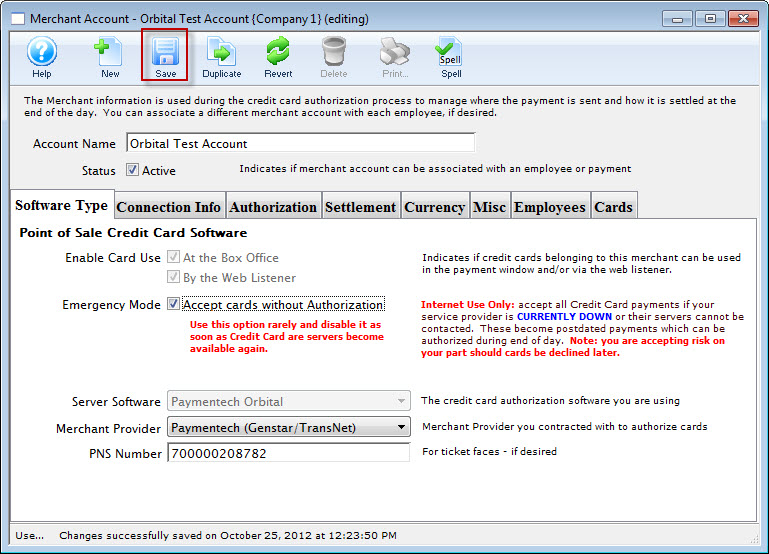
- Click the Save
 button.