Customization Ideas
Customization Ideas
Each client is provided the standard web pages designed by Arts Management Systems. Some organizations choose to make minor adjustments to they style sheets in order to reflect their default homepage. Others choose a more customized design of the pages. Examples of customized pages can be found on the Sample Web Sites page.
Below you will find some examples other sites have used in their customization process. These examples can be used to create a more personal feel to your web site. If you are not familiar with html we would strongly recommend contacting your web designer for assistance.
Adding a Merchandise Button
Adding a Merchandise Button
There are many naming conventions for adding a merchandise button to the online ticketing site. Some organizations add a Shop button, others a Merchandise button and others a Rental button. The name of the button depends on the use of the resource module in Theatre Manager and the content to be accessed. The icon for the button may also vary depending on the buttons use. Options for the icon can be found on the Font Awesome website. We encourage you to use the naming convention and icon that work best for your organization.

Adding the Code
- Open the tmnavButton.html page
The page tmnavButton.html is located in the WebPagesEN/TMtemplates folder.
- Add the following HTML to the page:
<li>
   <a href="<field>F_HTML_FIREWALL</field>login?merchandise=0">
   <i class="fa fa-shopping-cart">
   </i>
      Merchandise
   </a>
</li>
The recommended location would be after the Tickets, Gift Certificates and Donation buttons and before the Subscription button.
Adding a Button for a Specific Donation
Adding a Button for a Specific Donation
- "Add $10 to support our Theatre School!"
- "Give $50 to our Annual Fund Drive!"
- "Support Music in our community! Add $25 to your order"
Or any other needs your Marketing and Development Department can identify.
This process includes web page editing. If you have a web designer on hand, they can perform these edits. If you wish to contract with Arts Management Systems to perform these or any customizations for you, please contact the Support Team at support@artsman.com
 |
Note: There is a difference between:
|

Adding the coding to the web page.
- Select the web page you wish to add the button to.
The most commonly used page is rowCartDonationSuggestion.html.OPTIONAL- An include directive can be added to any of these pages:
- The Home Page (tmHome.html)
- The Login page (tmLogin.html)
- The Shopping Cart (tmCart.html), which is pictured below.
- Replace the existing contents with the following HTML to the page:
<field>pick(F_DONATION_ALLOWED,'<!-- comment: based on setting in company preferences to show suggested donation','')</field>
<!--#include virtual="TMtemplates/tmMessageDismiss.html" -->
<div class="container" align="center">
<form action="<field>F_HTML_FIREWALL</field>online" METHOD=POST>
<input class="btn btn-success" name="btnDonationAccept"type="submit" value="ADD $10 TO SUPPORT OUR THEATRE SCHOOL DEVELOPMENT"/>
<input id="DD_DC_SEQ" name="DD_DC_SEQ" type="hidden" value="41"/>
<input id="DD_AMOUNT_PLEDGE" name="DD_AMOUNT_PLEDGE" type="hidden" value="10"/>
</form>
</div>
<field>pick(F_DONATION_ALLOWED,'-->','')</field> - Ensure that:
- The HTML is outside ALL OTHER FORMS on the page you add it to.
- You change the ’10’ to the suggested amount’.
- You change the ’41’ to the proper campaign sequence number from within Theatre Manager.
- You change the ‘add $10 to support….’ to reflect the text you wish to use on the button.
- You include any mandatory donation fields by using including DD_FLDx_FC_SEQ references.
Adding a Donor Field
Adding a Donor Field
There are fields in the Notes tab of a Donation that can be added to the tmDonationHiddenFields.html so they appear on the TMdonation.html page in order to collect more details about the donation. The example below accesses the Donor#4 field. This is a text field. The patron can type information into the field within the online sales and the details will populate in the Donor#4 field in Theatre Manager once the Order is complete.
This process includes web page editing. If you have a web designer on hand, they can perform these edits. If you wish to contract with Arts Management Systems to perform these or any customizations for you, please contact the Support Team at support@artsman.com
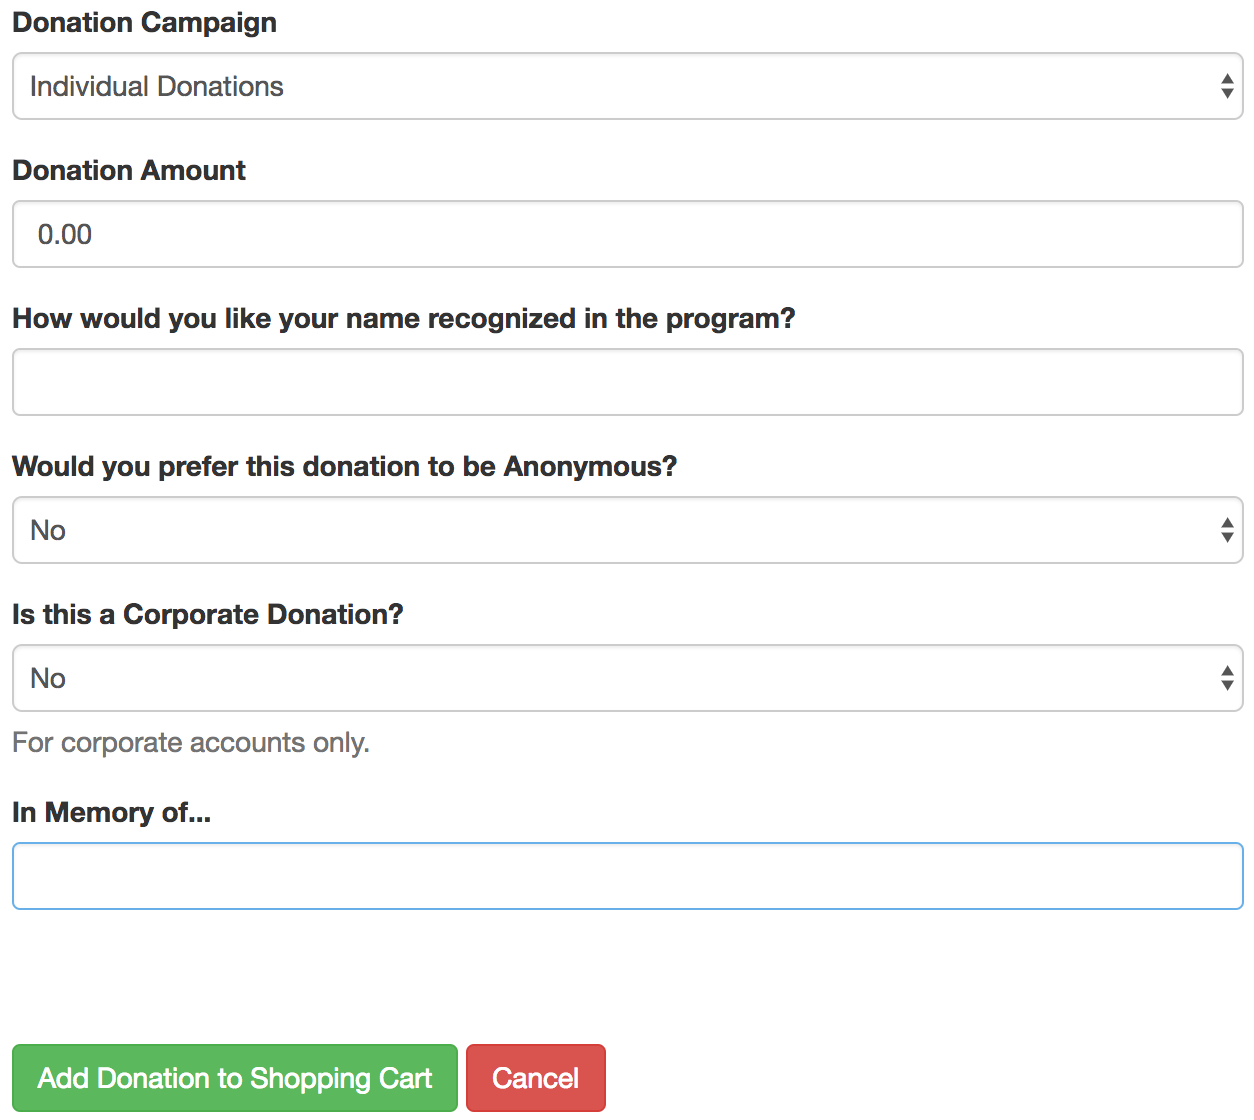
Adding the coding to the web page.
- Select the web page you wish to add the field to.
The most commonly used page is tmDonationHiddenFields.html. - Add the following HTML to the page:
<div class="form-group">
<label for="DD_FLD4"> In Memory of...
</label>
<input class="form-control" id="DD_FLD4" maxlength="100" name="DD_FLD4" type="text" value="<field>DD_FLD4</field>"/>
</div> - Test:
- The field appears in the correct location within the web page.
- The text populates into the correct field in Theatre Manager when a Donation is added online.
Altering the Header and Ad on the Print At Home and PDF Ticket
Altering the Header and Ad on the Print At Home and PDF Ticket
This web page provides instructions for:
- Changing the default pageHeader or ticketAd for all print at home tickets
- Creating a custom pageHeader or ticketAd for all performances of a single EVENT
- Creating a custom pageHeader or ticketAd for a single PERFORMANCE
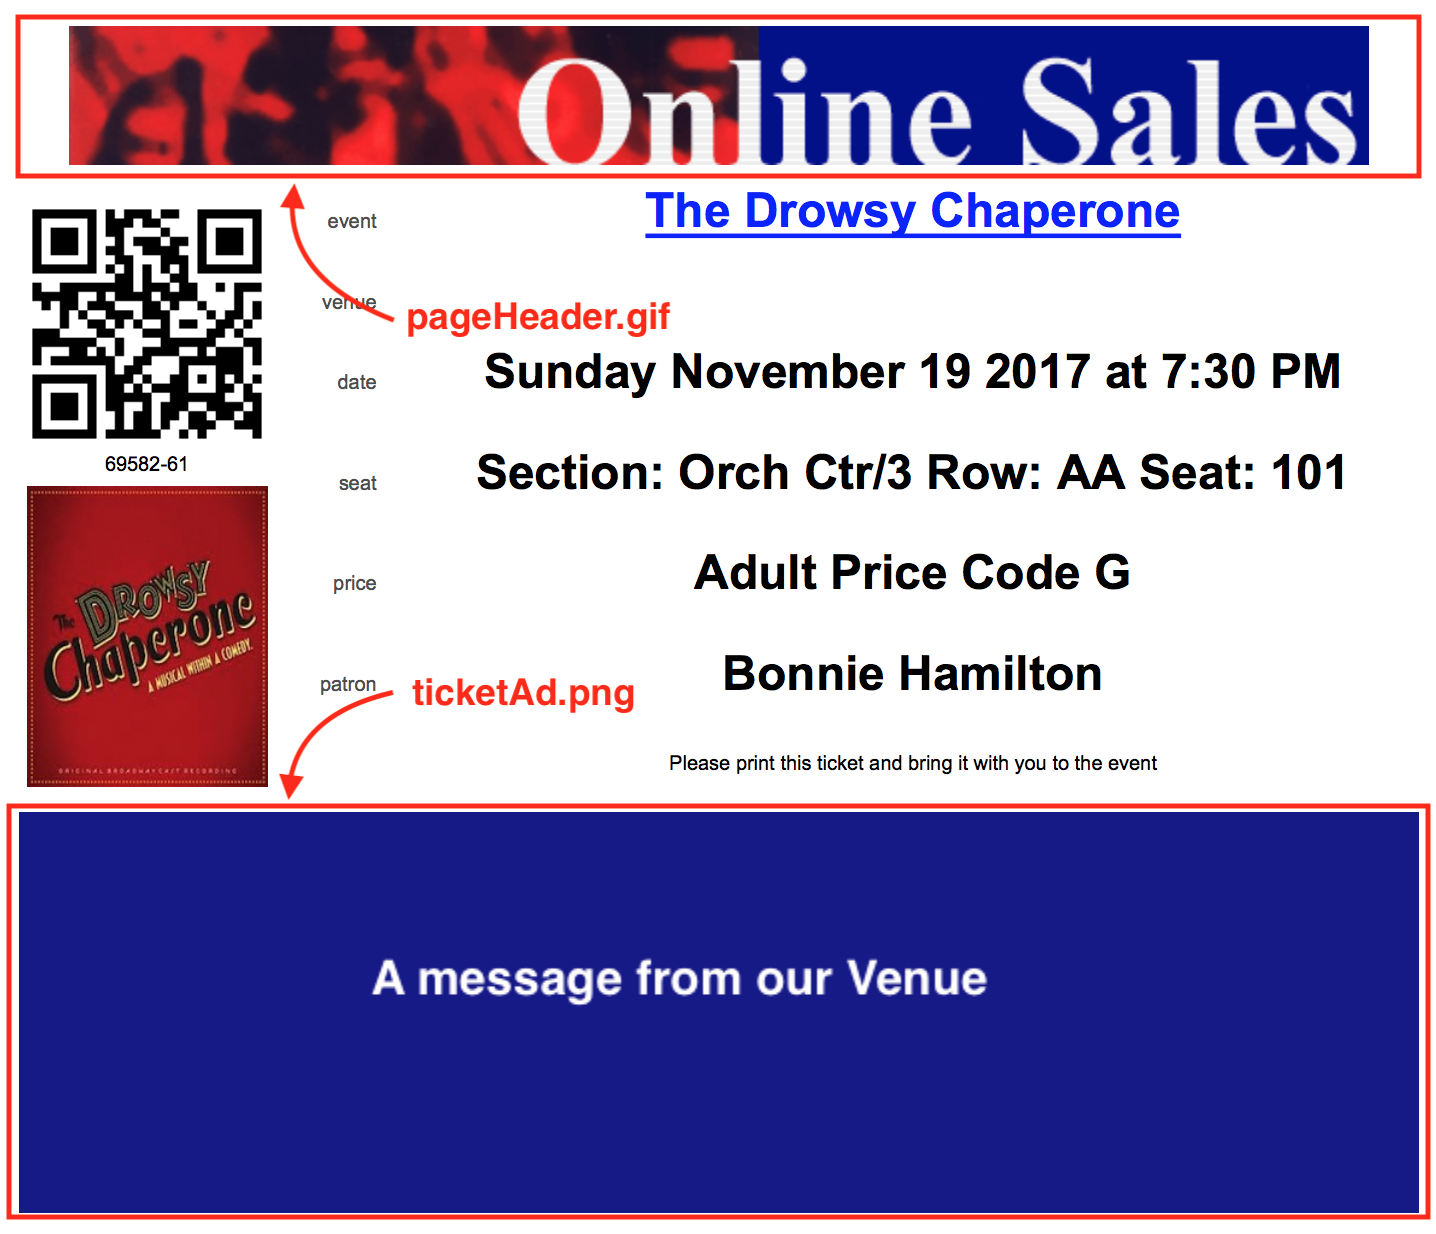
Changing the default footer and/or header for ALL print at home tickets
The easiest way to update the header and/or footer for a print at home ticket is to create new files and place them into the WebPagesEN >> tmGifs folder.
- pageHeader.gif - is the name of the page header file. In the example above, it is 75 pixels high and 700 pixels wide.
- ticketAd.png - is the name of the Ad at the bottom of the page. The sample image is 200 pixels high and 700 pixels wide.
In general, the width of each of the images should remain around 700 pixels. The height of the images can vary as long a the total height of both images causes the print at home ticket to remain on one page. You could, for example, make the top image 50 pixels high and use the remaining pixels in the lower area.
The sample pages were crated with conservative heights. You could probably get away with a total of 400 pixels or more in height between the header and footer.
Changing the footer and/or header for a SPECIFIC EVENT
If you want to change the header or footer for a single event, you can create a web page that over-rides the header and/or footer. This allows you to have:
- specific sponsors or instructions in the 'ticketAd.png' for an event or
- a different header for your mainstage, or classes, or inventory or streaming events if you wish.

As an example, let say you want to change the header (and/or) footer for only event 109 (See No Evil).
| Changing the Header |
|
||
| Changing the Footer |
|
Changing the footer and/or header for a SPECIFIC PERFORMANCE
If you want to change the header or footer for a single performance within the event, you can create a web page that overrides the header and/or footer. This allows you to have:
- specific sponsors or instructions in the 'ticketAd.png' for the performance or
- a different header for a performance such as the final performance of a class, or for a touring or streaming performance
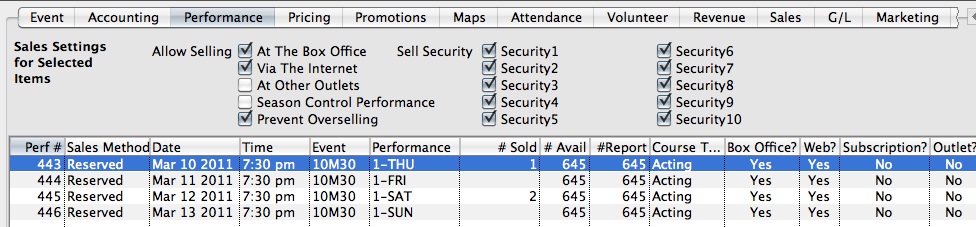
As an example, let say you want to change the header (and/or) footer for only event 443.
| Changing the Header |
|
||
| Changing the Footer |
|
|
Print at home tickets must be enabled in company preferences and for specific events before a patron can print them. |
|
In the instructions below, the names of images and files are case sensitive. Please make sure they match exactly. |
Button to Apply a Specific Coupon Code
Button to Apply a Specific Coupon Code
The lines below are an example of how to create a button that will apply a specific Coupon Code to the online cart. This button can be added to any page within the online sales. It would most commonly appear on the TMtickets.html page or the TMcart.html page.
This process includes web page editing. If you have a web designer on hand, they can perform these edits. If you wish to contract with Arts Management Systems to perform these or any customizations for you, please contact the Support Team at support@artsman.com
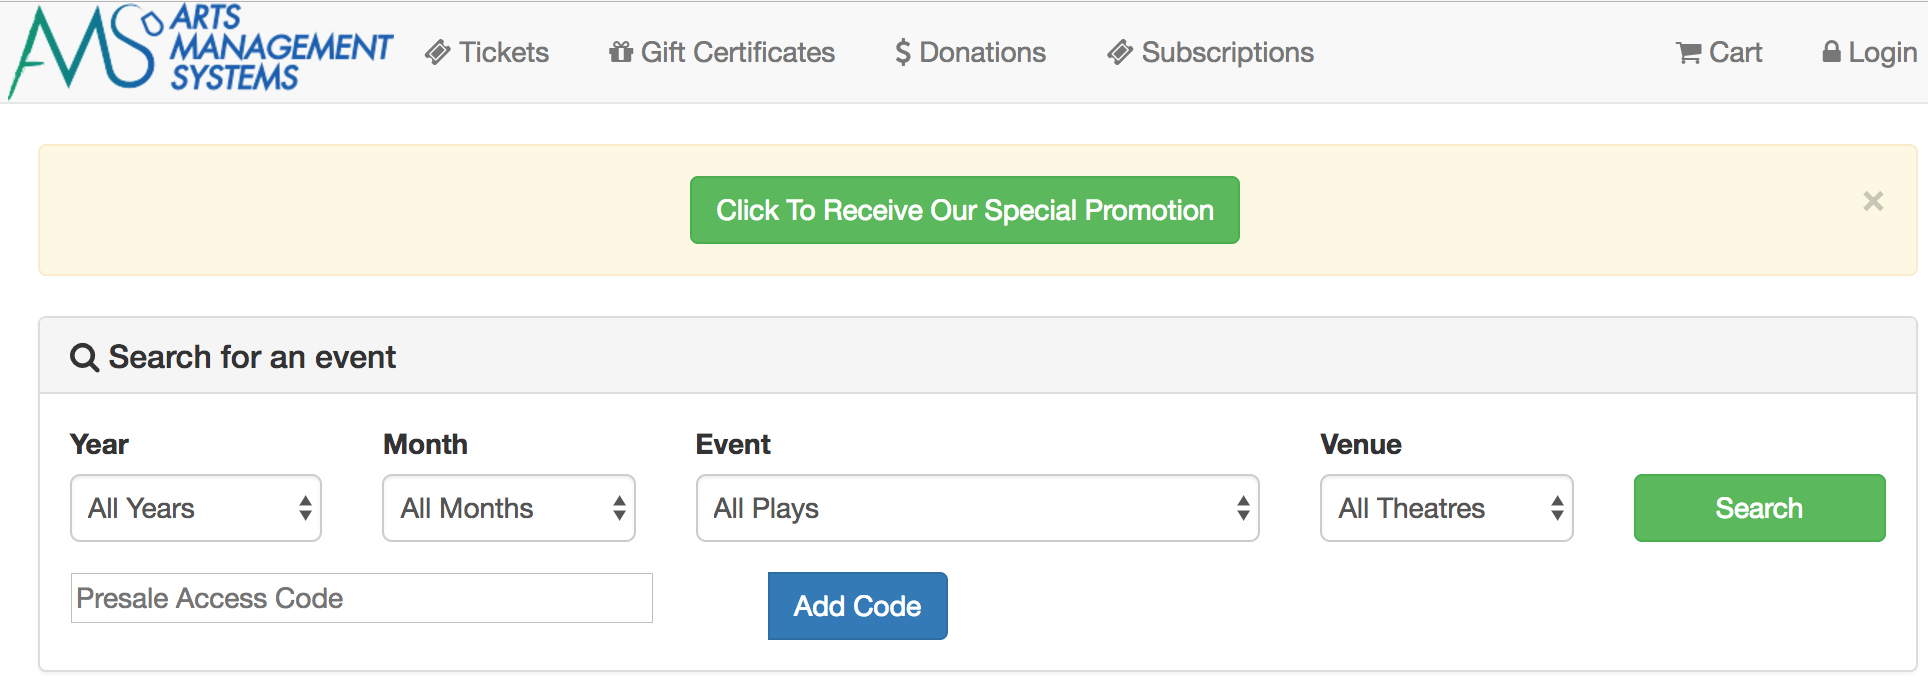
Adding the coding to the web page.
- Select the web page you wish to add the field to.
The most commonly used page is TMtickets.html. - Add the following HTML to the page:
<form action="<field>F_HTML_FIREWALL</field>online" METHOD=POST>
<input class="btn btn-success" name="btnCouponAccept" onclick="process()" type="submit" value="Click To Receive Our Special Promotion"/>
<input type="hidden" id="CH_CODE" name="CH_CODE" value="1234">
<input name='param' type='hidden' value ='altbtn=btnGetEventList'>
</form> - Ensure that:
- You uncomment the div statement.
- You change the ’1234’ to the proper coupon code value from within Theatre Manager.
- You change the ‘Click To Receive Our Special Promotion’ to reflect the text you wish to use on the button.
Customizing the Event Date and Time Display
Customizing the Event Date and Time Display
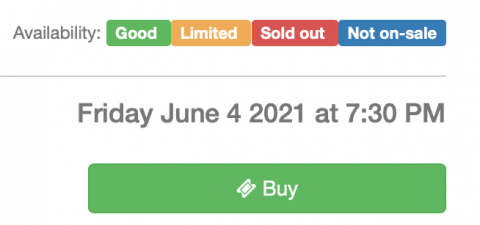
The Event Buy options can be edited and displayed in two different ways. The two options for the 'Buy' button when purchasing Events online are detailed below. We have the conventional 'Buy/Reserve' option;
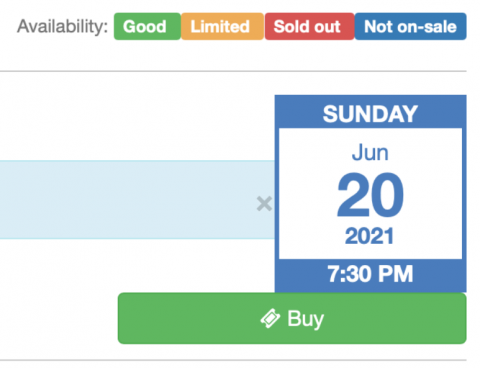
There is also the option to change that display to show both the Date and Time within the Buy Button itself, option example below.
Adding the Code
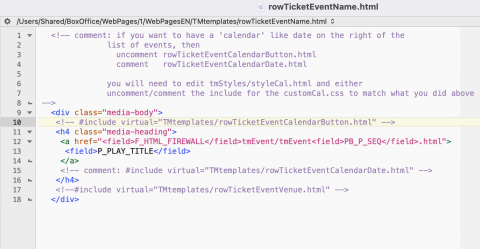
Options for editing the Buy button can be found by accessing and editing the rowTicketEventName.html.
If you want to have a 'calendar' like date on the right of the list of Events, then uncomment rowTicketEventCalendarButton.html, and comment rowTicketEventCalendarDate.html.
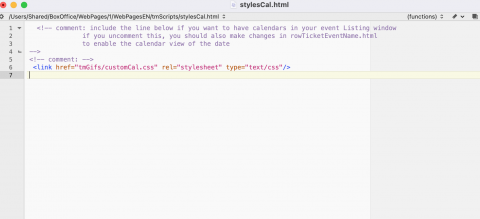
You will need to edit tmScripts/styleCal.html
and either uncomment/comment the include for the customCal.css to match what you did above.
Direct Purchase Button for a Member Type
Direct Purchase Button for a Member Type
The lines below are an example of a button that will add a specific member type to the cart with a fixed value and quantity. This button can be added to any page within the online sales. It would most commonly appear on the TMpass.html page or the TMcart.html page.
This process includes web page editing. If you have a web designer on hand, they can perform these edits. If you wish to contract with Arts Management Systems to perform these or any customizations for you, please contact the Support Team at support@artsman.com

Adding the coding to the web page.
- Select the web page you wish to add the field to.
The most commonly used page is TMpass.html. - Add the following HTML to the page:
<div align="right">
<form action="<field>F_HTML_FIREWALL</field>online" method="POST" role="form">
<input name="MT_SEQ" type="hidden" value="23"/>
<input name="PS_QUANTITY" type="hidden" value="1"/>
<input class="btn btn-success" name="btnReservePass" onclick="process()" type="submit" value="Purchase/Renew a Voting Membership for $150"/>
</form>
</div> - Ensure that:
- The HTML is outside ALL OTHER FORMS on the page you add it to.
- You change the '23' to the proper member type sequence number from within Theatre Manager.
- You change the 'Purchase/Renew a Voting Membership for $150' to reflect the text you wish to use on the button.
Eliminating the Pricing Selection List
Eliminating the Pricing Selection List
The html code below will provide a single option for pricing rather the the price code drop down list that is currently a part of the online sale pages. This text most commonly would effect the TMticketsPrice_MapDefault.html and TMsubscriptionPriceMapDefault.html pages.
<input name=SC_DESCRIPTION type=hidden value="<field>F_HTML_PROMOTIONS_LIST.1.SC_SEQ</field>>
<field>F_HTML_PROMOTIONS_LIST.1.PC_SEQ</field>
<field>F_HTML_PROMOTIONS_LIST.1.SCD_ORIGINAL_SC_SEQ</field>
<field>F_HTML_PROMOTIONS_LIST.1.SCD_ORIGINAL_PRICE_CODE</field>
<field>F_HTML_PROMOTIONS_LIST.1.SCD_SAVINGS</field>
<field>F_HTML_SELECTED</field>
<field>pick(D_WEB_SHOW_PROMOTION,'',con(F_HTML_PROMOTIONS_LIST.1.SC_DESCRIPTION,' '))</field>
<field>pick(D_WEB_SHOW_PRICE_CODE,'',con(F_HTML_PROMOTIONS_LIST.1.PC_DESCRIPTION,' '))</field><field>F_HTML_PROMOTIONS_LIST.1.PS_TOTAL_COST</field>
Hiding General Admission Arrival Notes
Hiding General Admission Arrival Notes
When setting up an event, that is not a Course or Reserved seating performance, the General Admission (Festival Seating) Sales Method is used. This allows for flexibility in capacity. It is commonly used for Live Stream or Pre Recorded videos. This poses a challenge when purchasing online as the default web pages display arrival notes that do not apply to Live events.
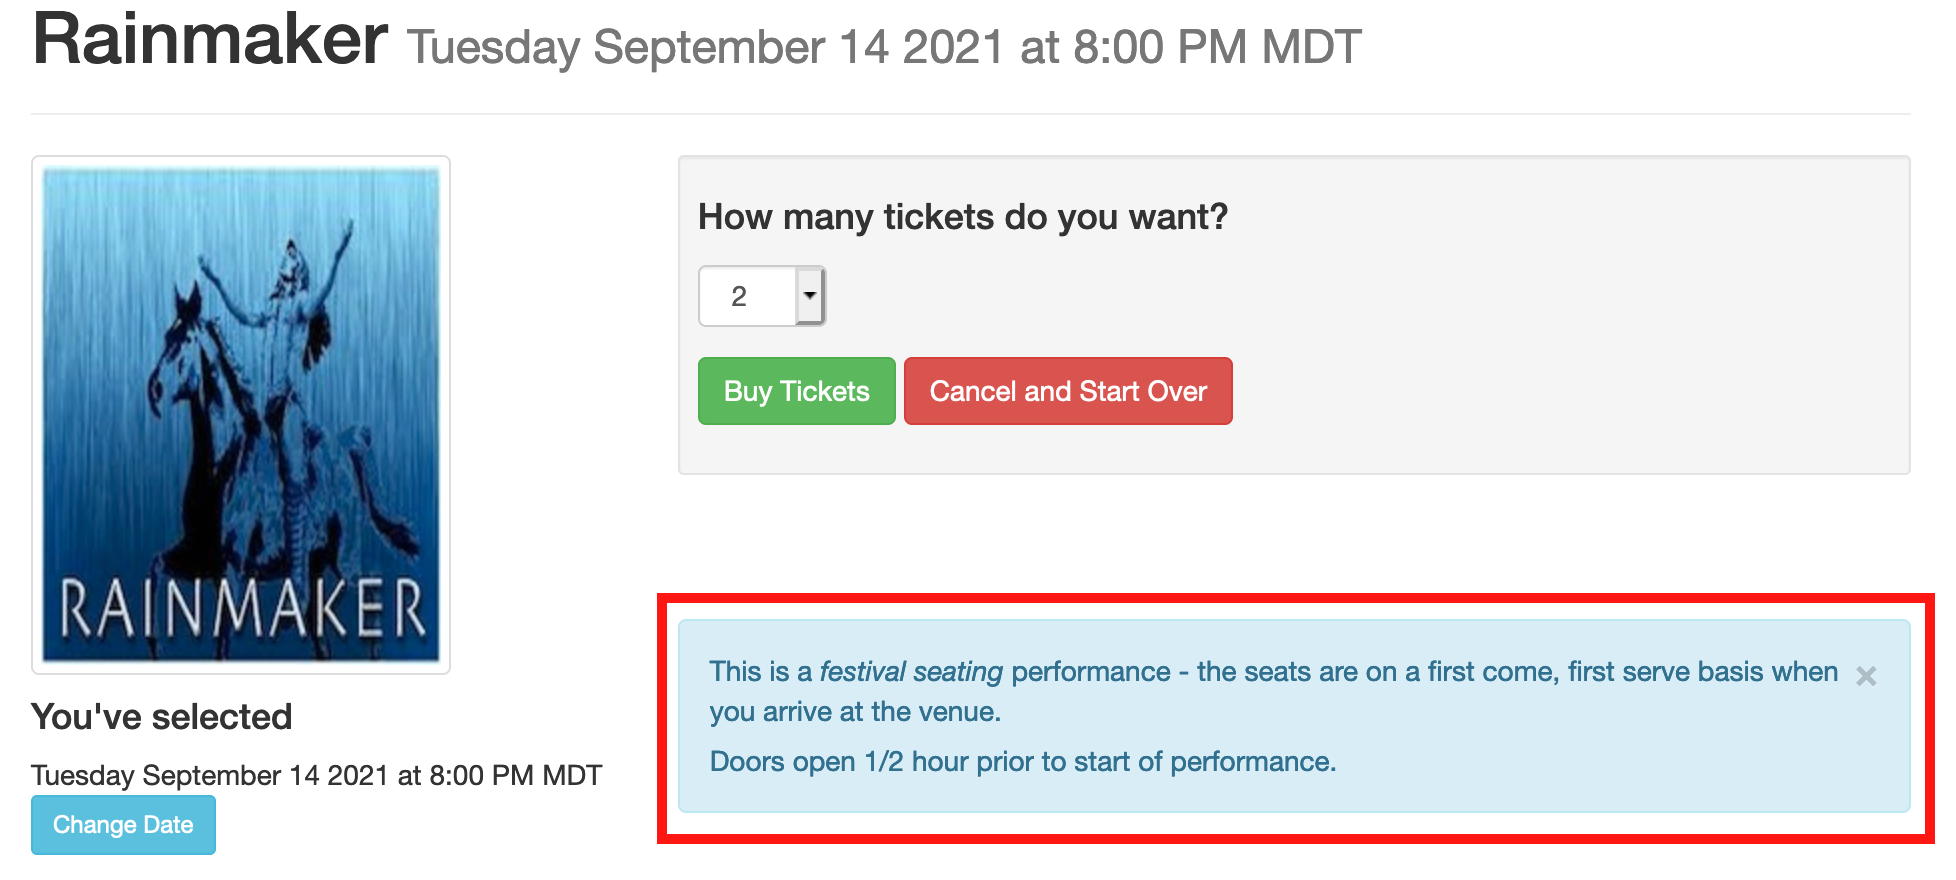
Hiding these notes requires created a customized web page referencing the Map Sequence number from Theatre Manager and the Sales Method. Below are the steps for removing the box containing the text from the page. Alternatively, a custom page containing notes specific to the streaming event could be created and added in place of the existing general admission arrival notes.
|
The steps below assume a basic understand of HTML and web page editing. Please contact your web designer should you need assistance with completing web page edits. |
Finding The Map Sequence Number
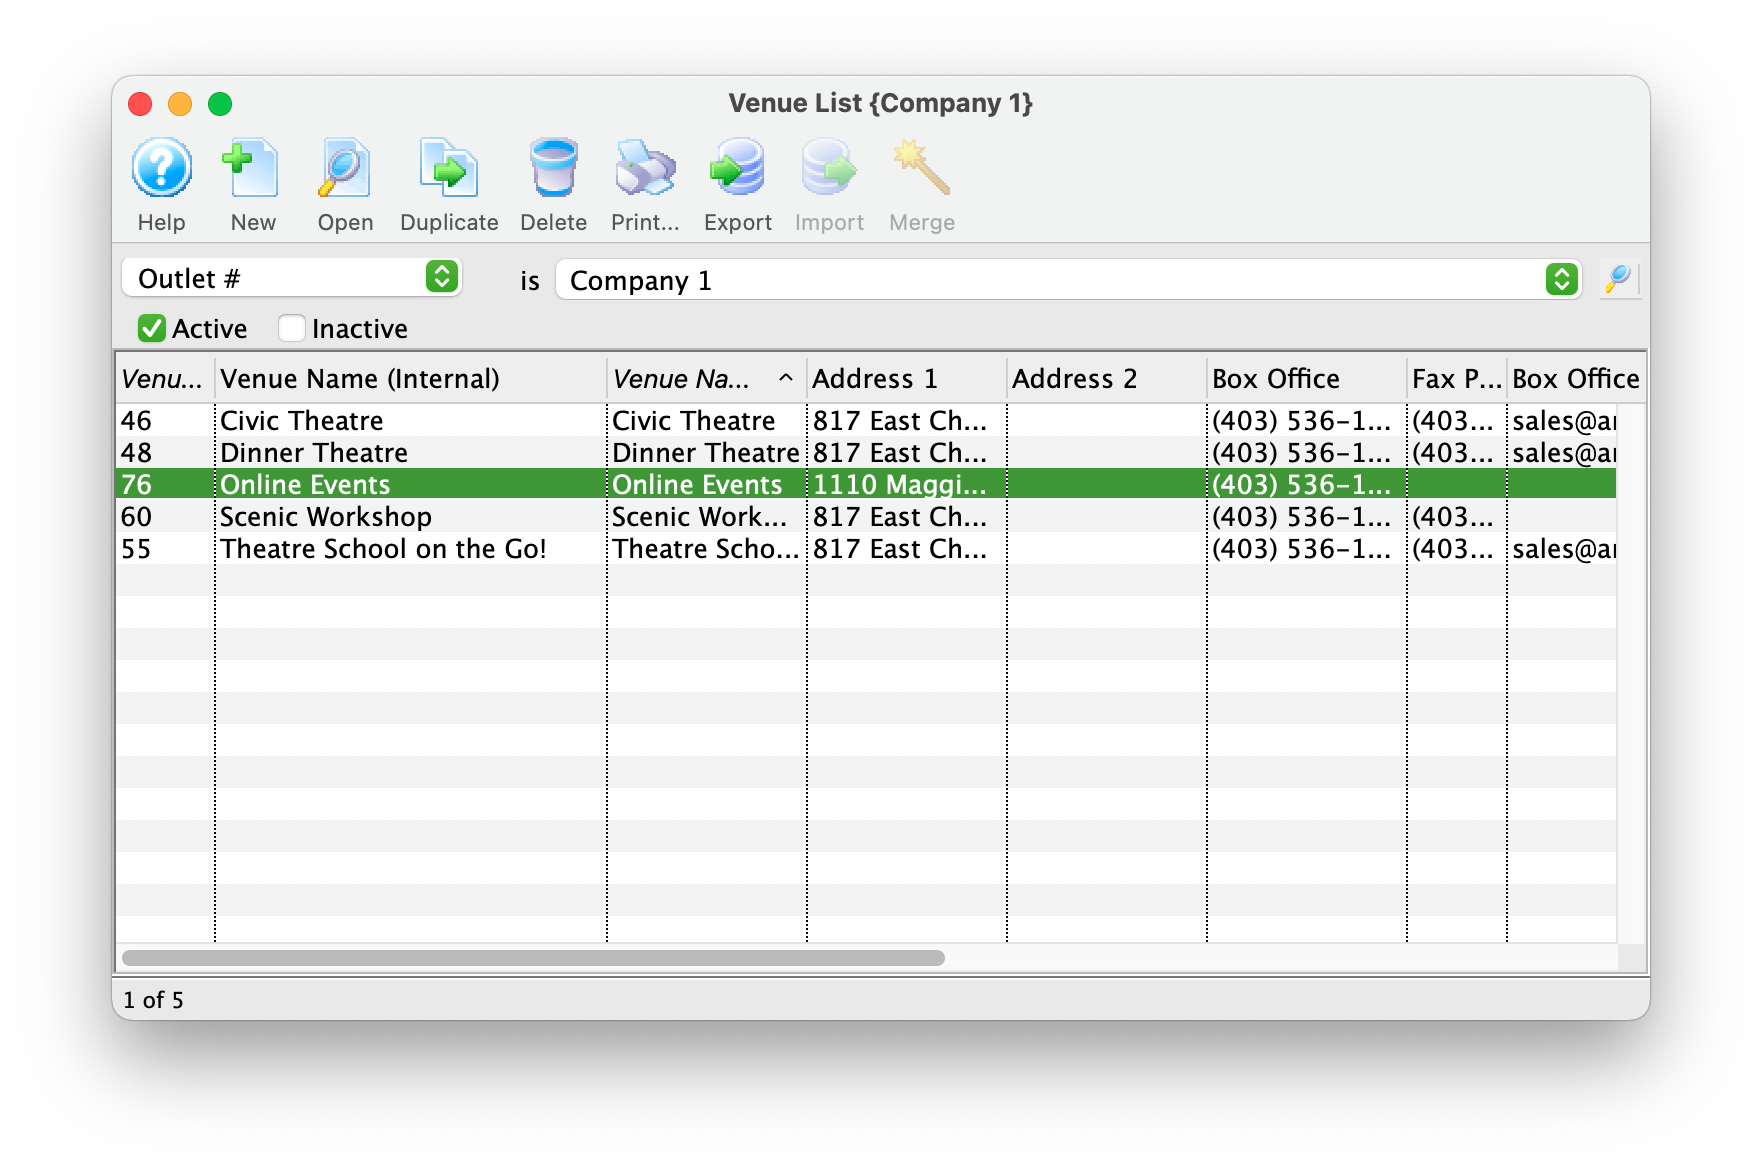
- Open the Venue List window in Theatre Manager.
Click here for steps on how to access the Venue List window.
- Double-click on the Venue in the list to open it.
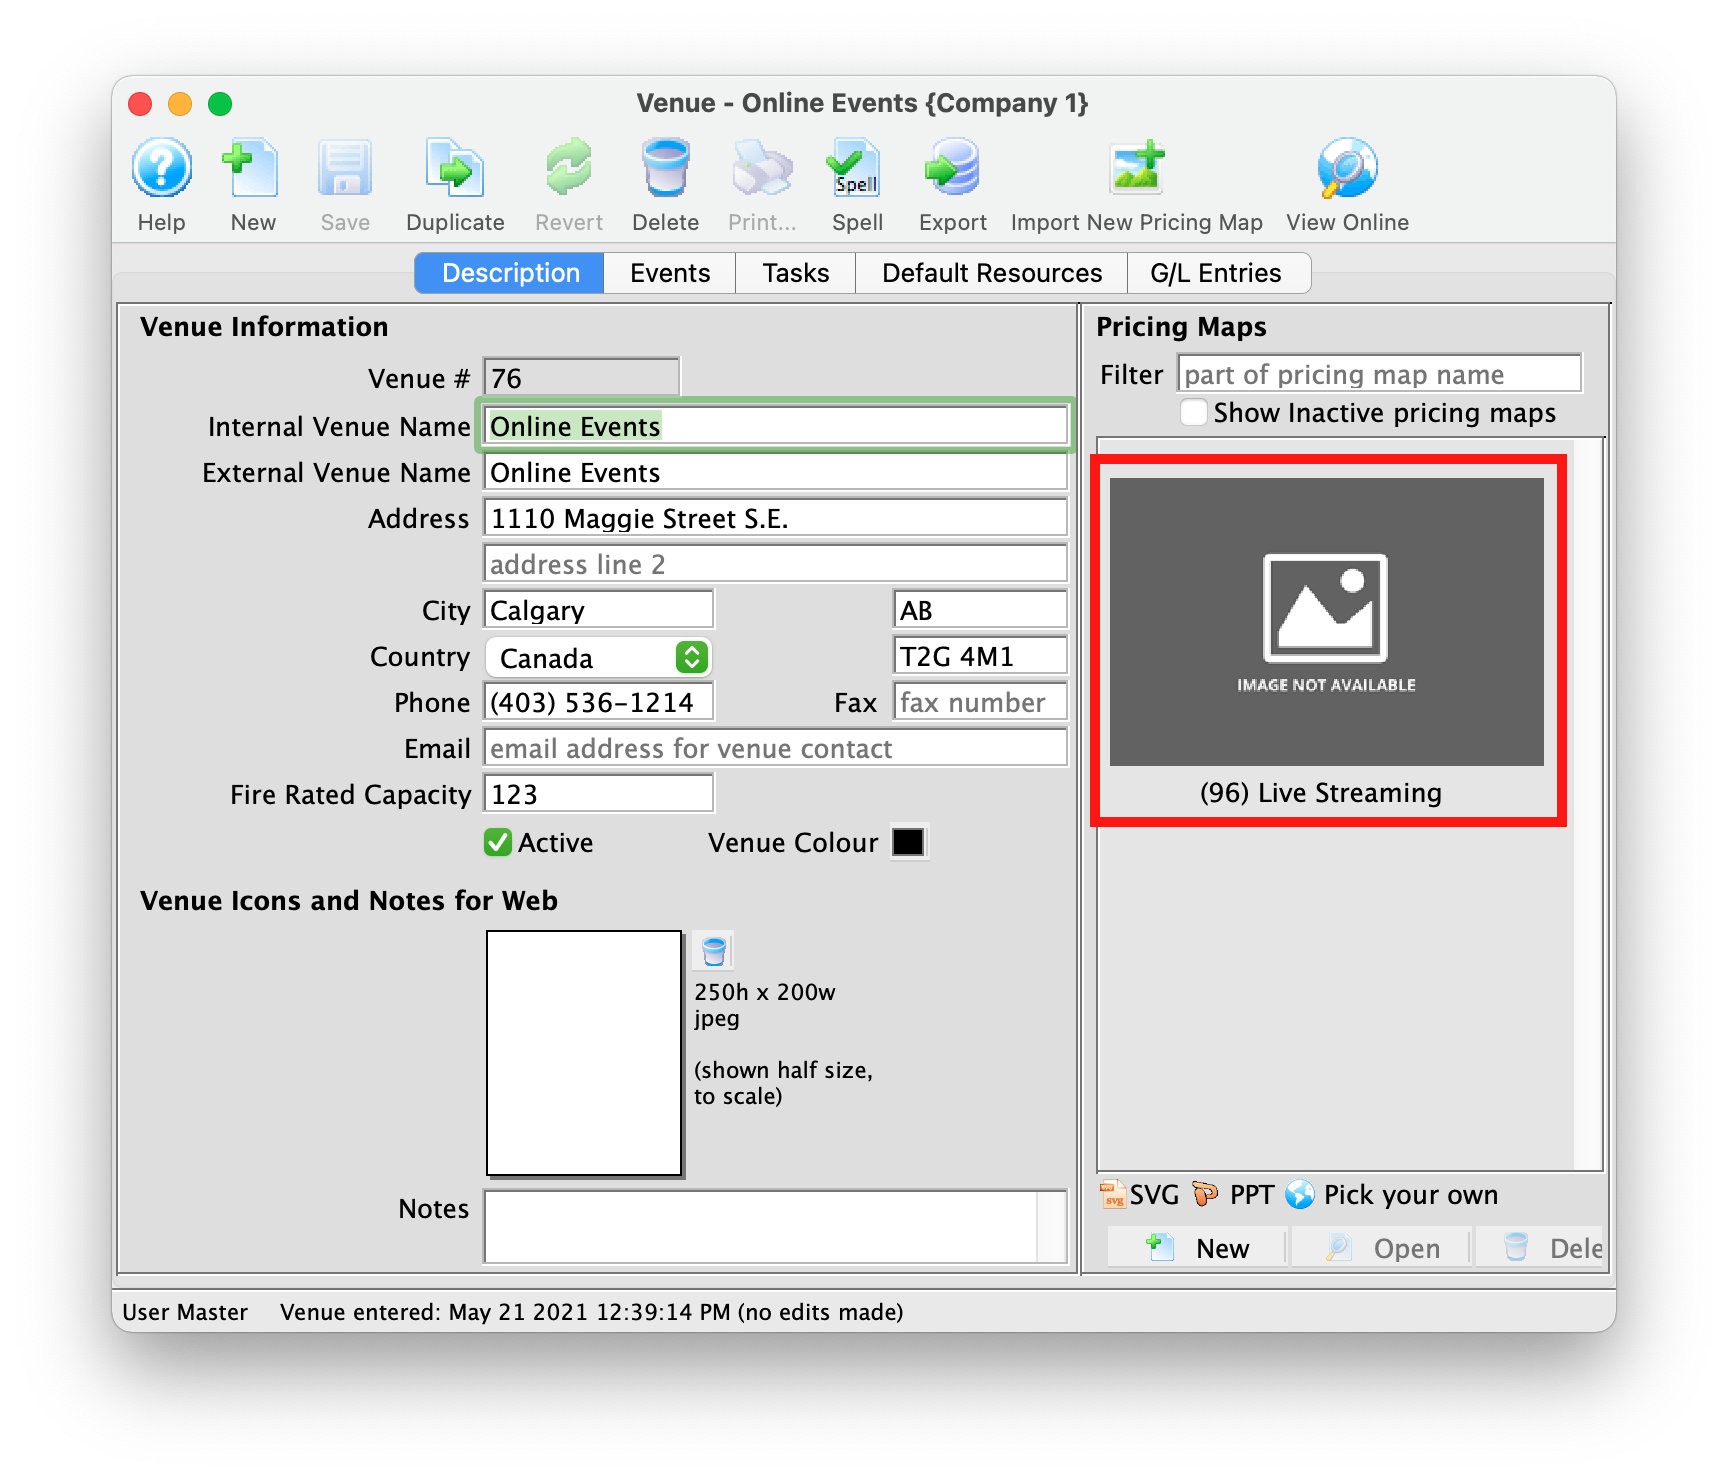
- Double-click the map in the right column.
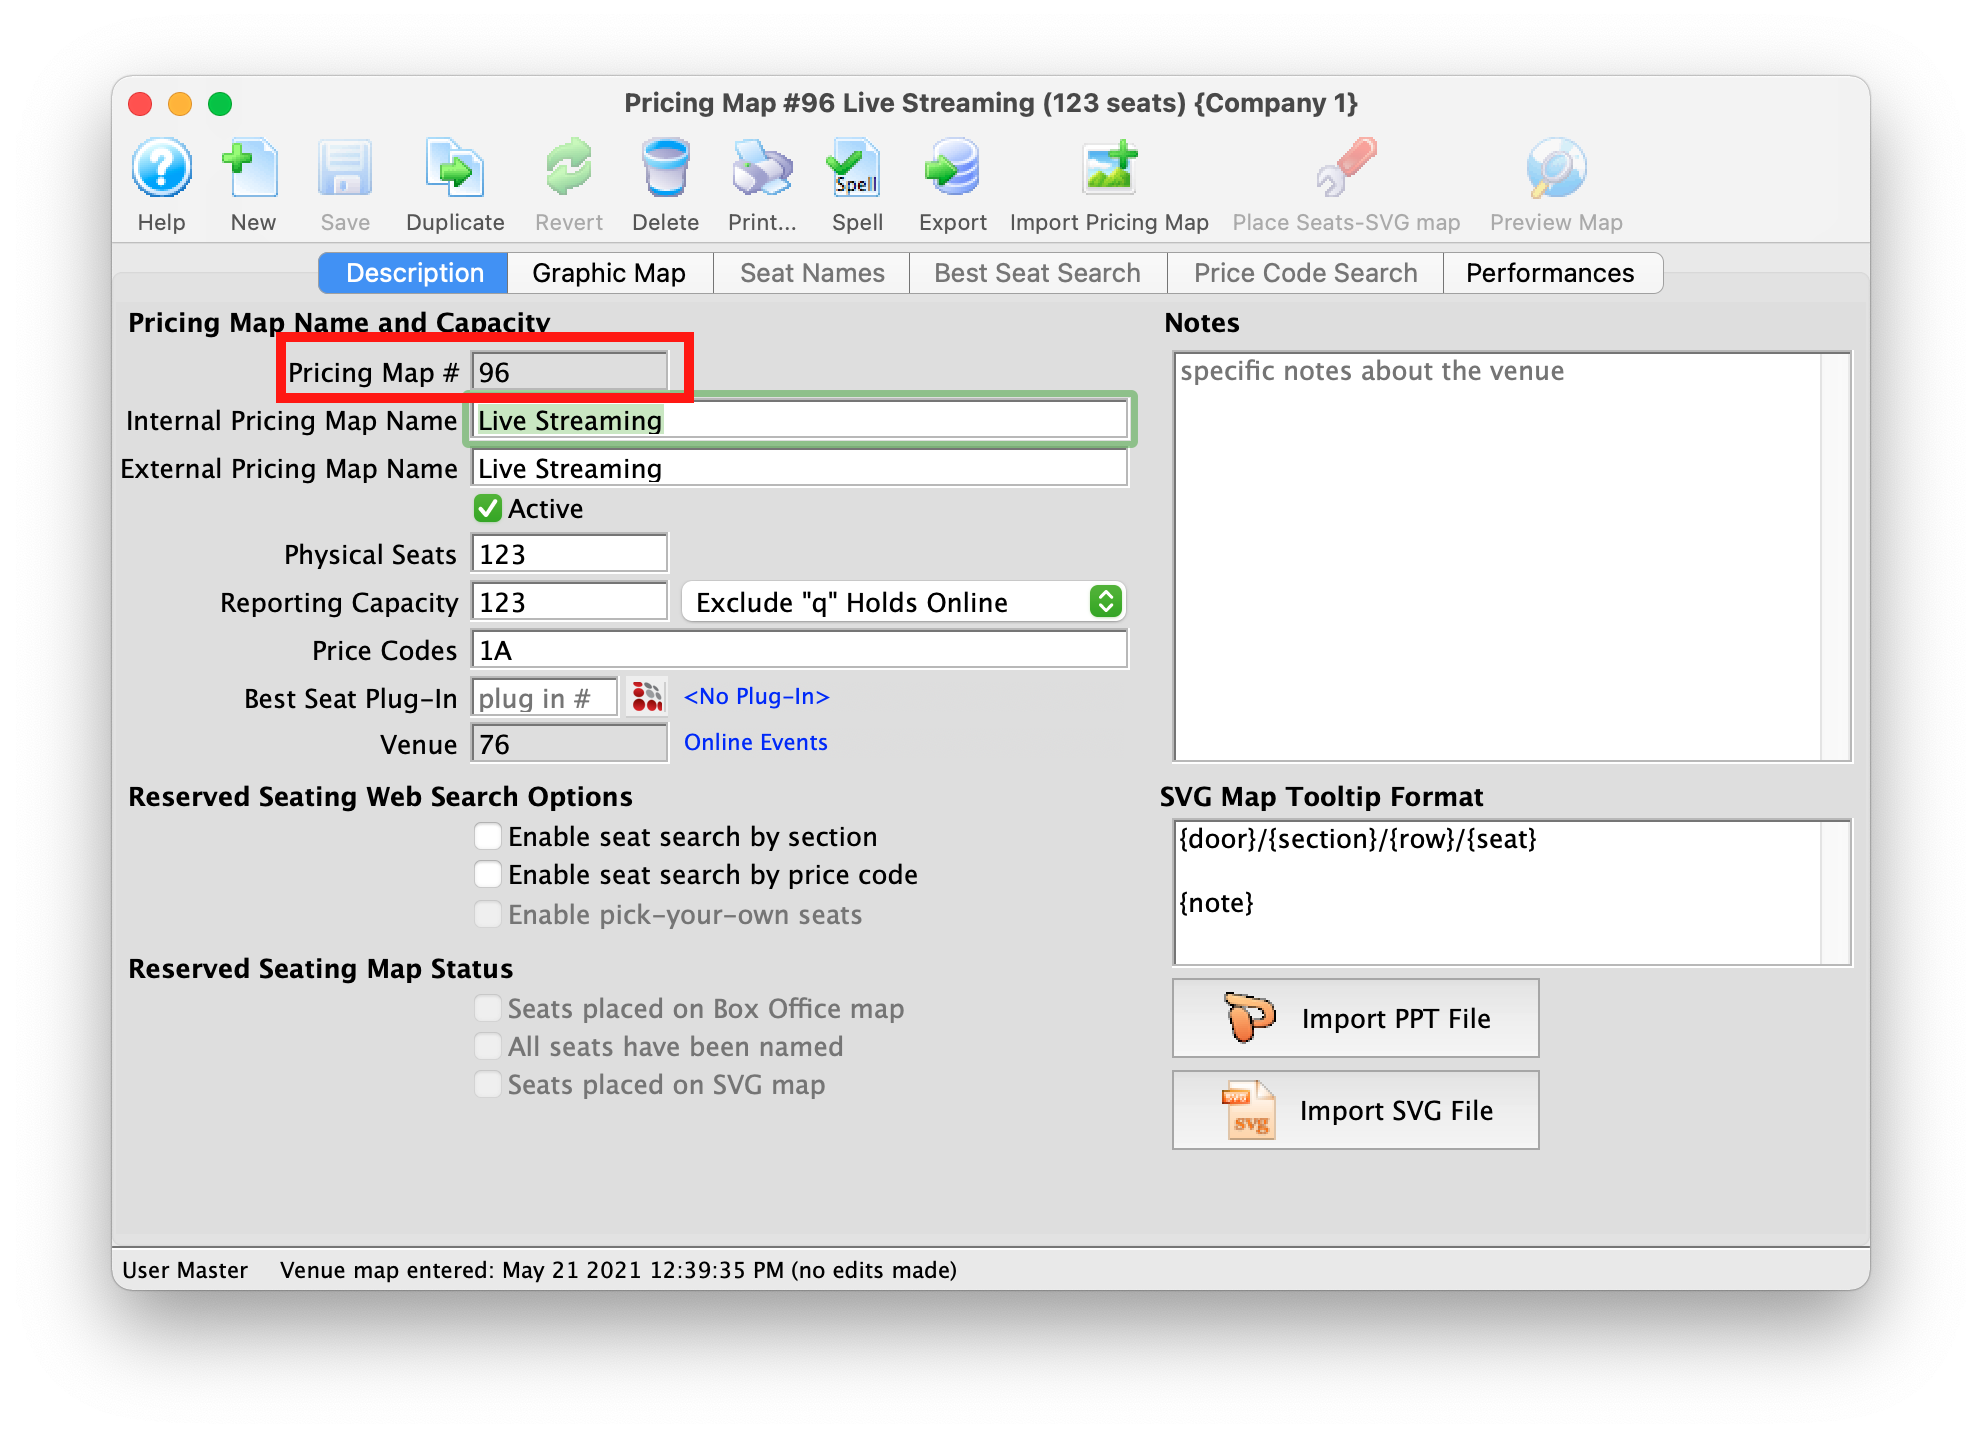
- Take note of the Pricing Map number.
Create A Custom Web Page
The page containing the arrival notes is the TMticketsSection_MapDefaultf.html page located in the tmMaps folder. The " f " at the end of the page name indicates the Festival Seating page. This is the page that requires customization.
- Download the latest default web pages.
- Navigate to the /1/WebPagesEN/tmMaps folder.
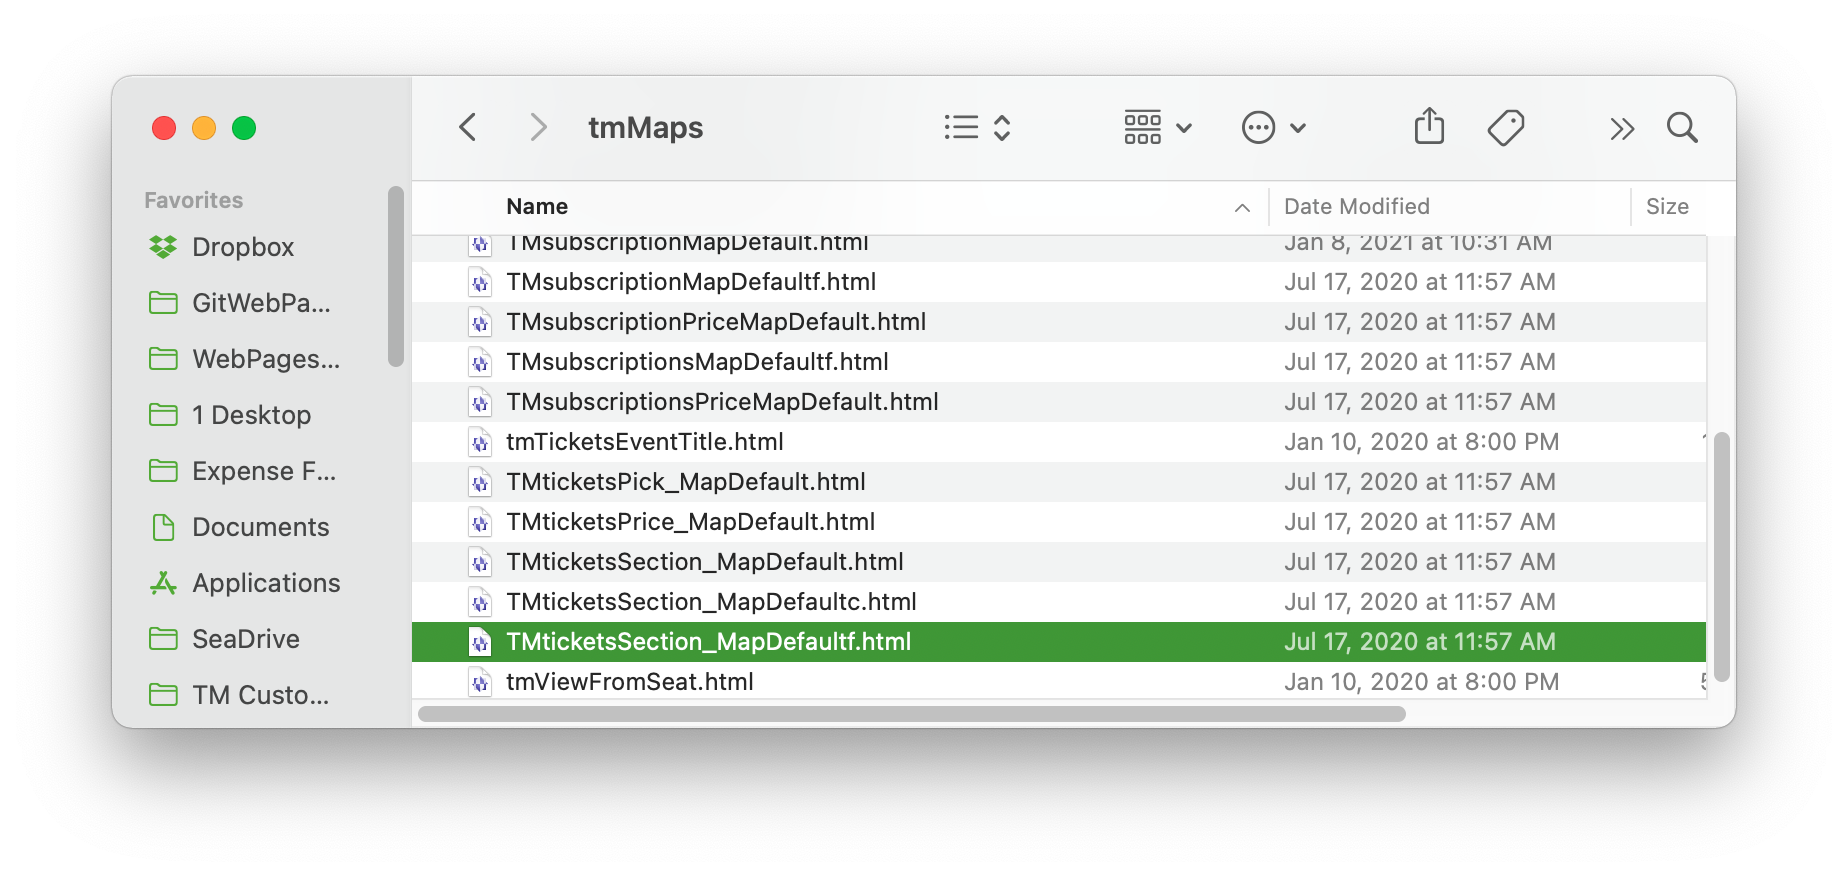
- Copy the TMticketsSection_MapDefaultf.html to the organizations /WebPagesEN/tmMaps folder.
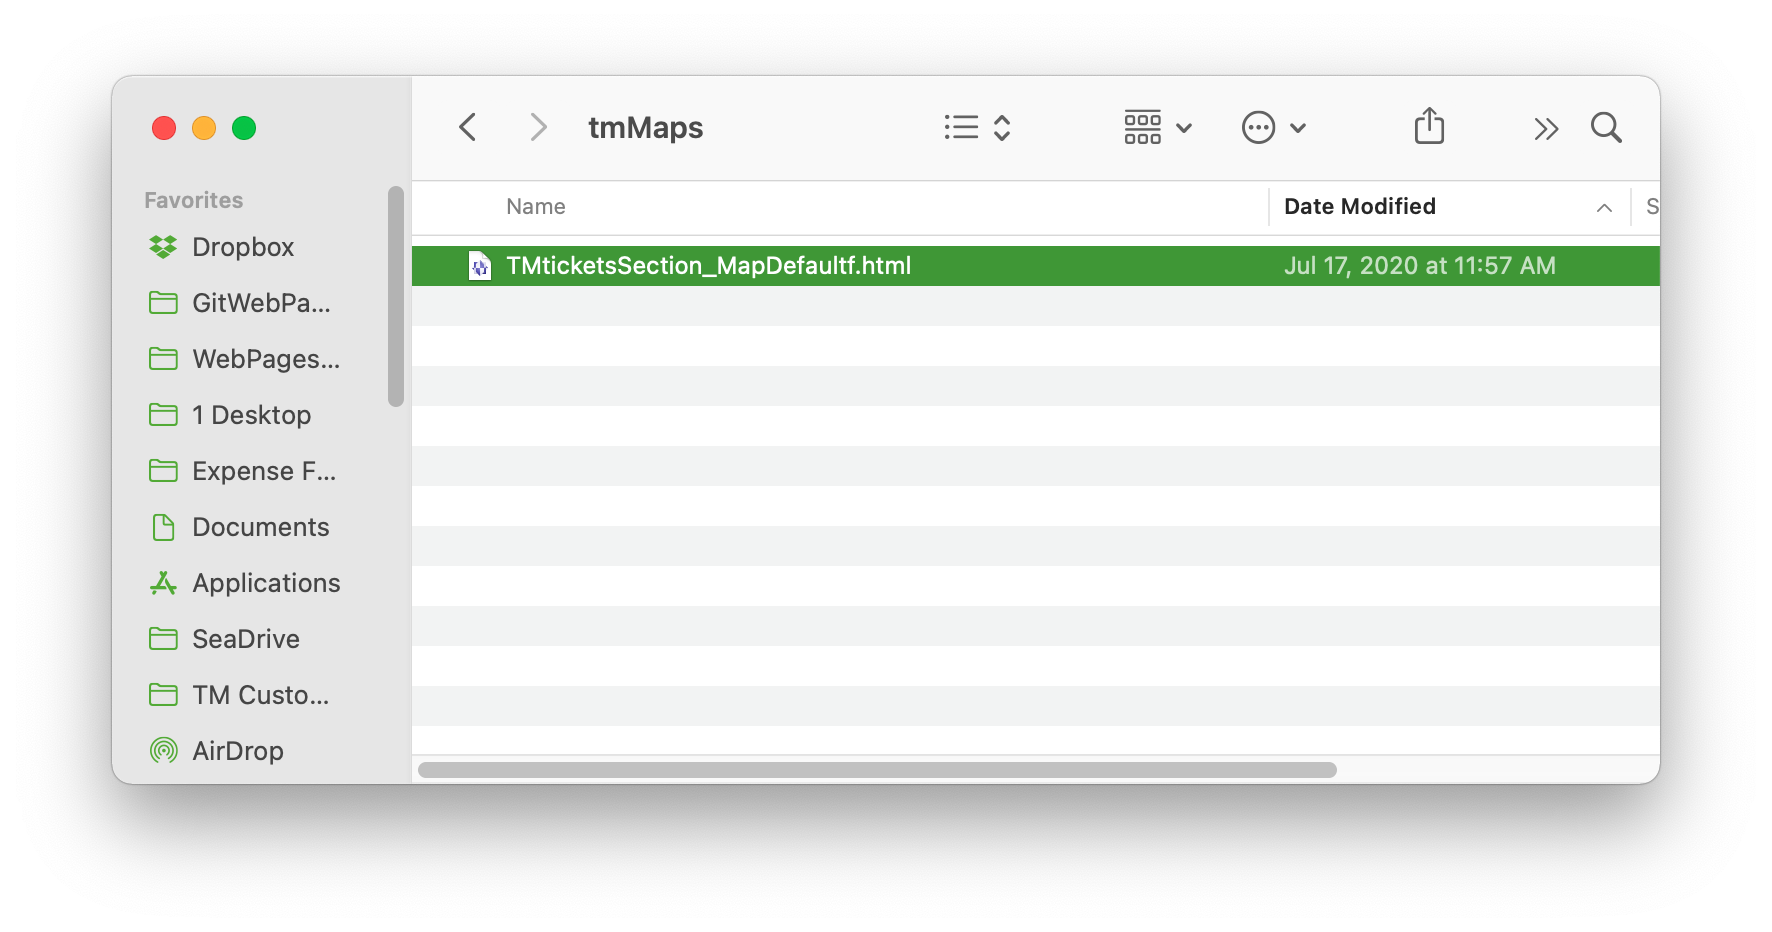
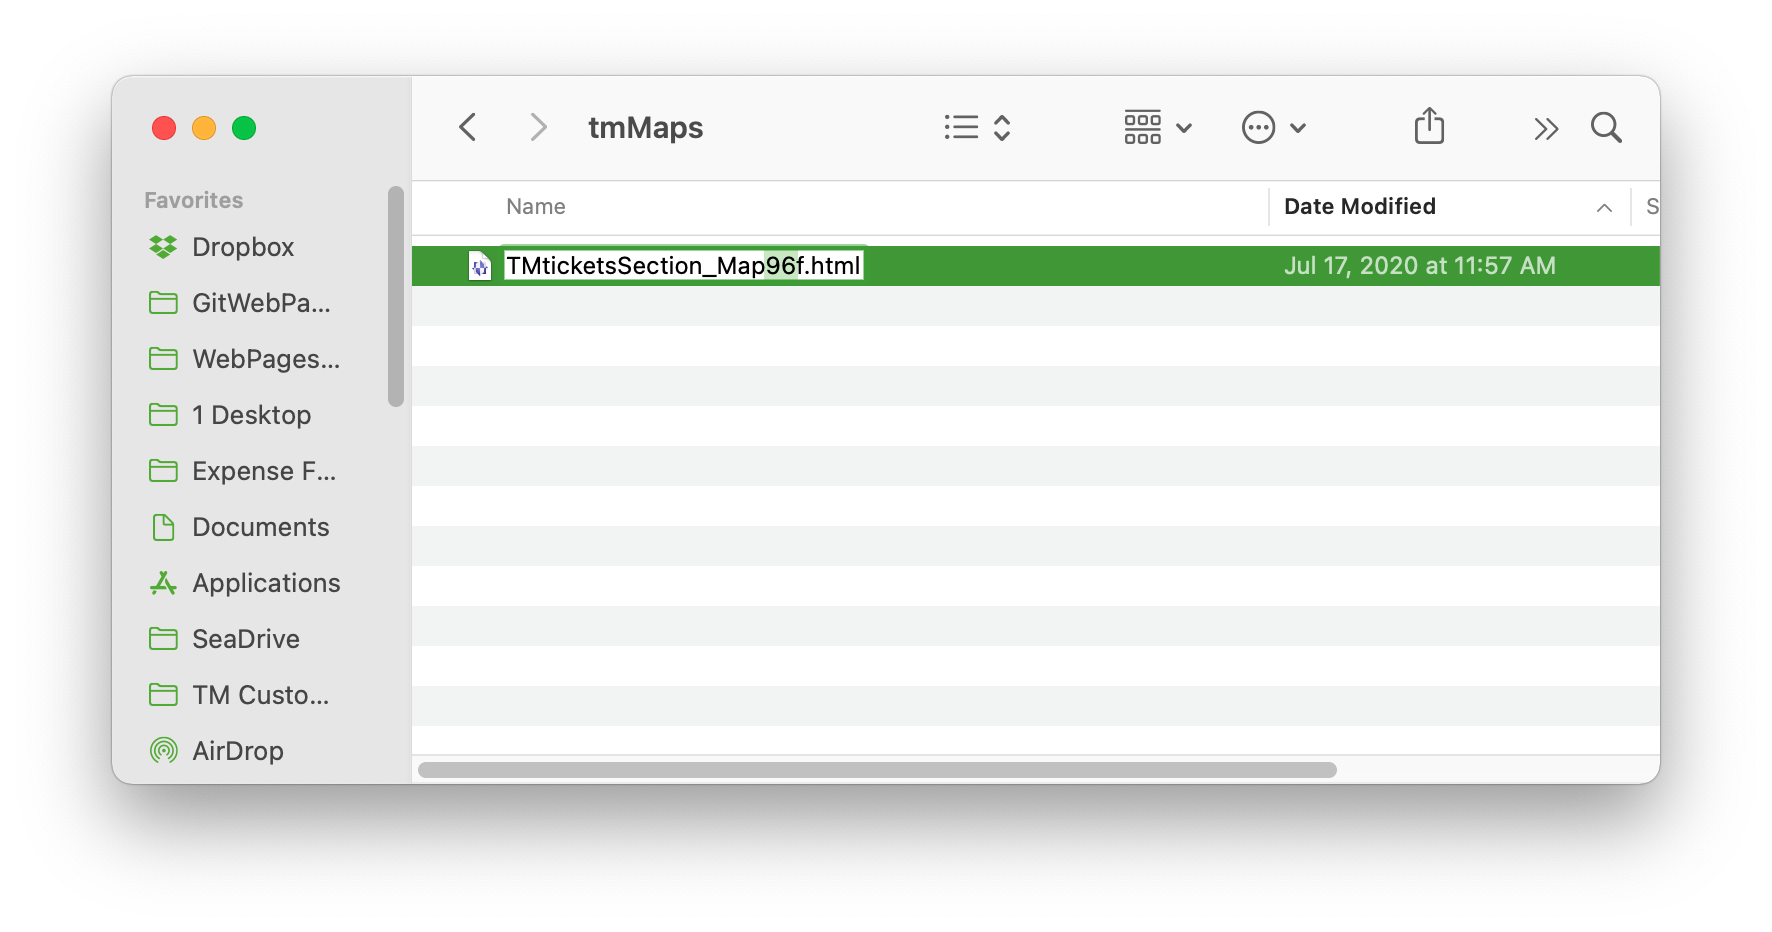
- Delete the word Default from the name of the page and replace it with the Pricing Map Number being extra careful not to remove the " f " at the end of the title.
Editing The Web Page
The final step is to edit the web page. The steps below outline how to remove the notes from the page.
- Open the Custom Web Page from above using a tool like NotePad++ or BBEdit.

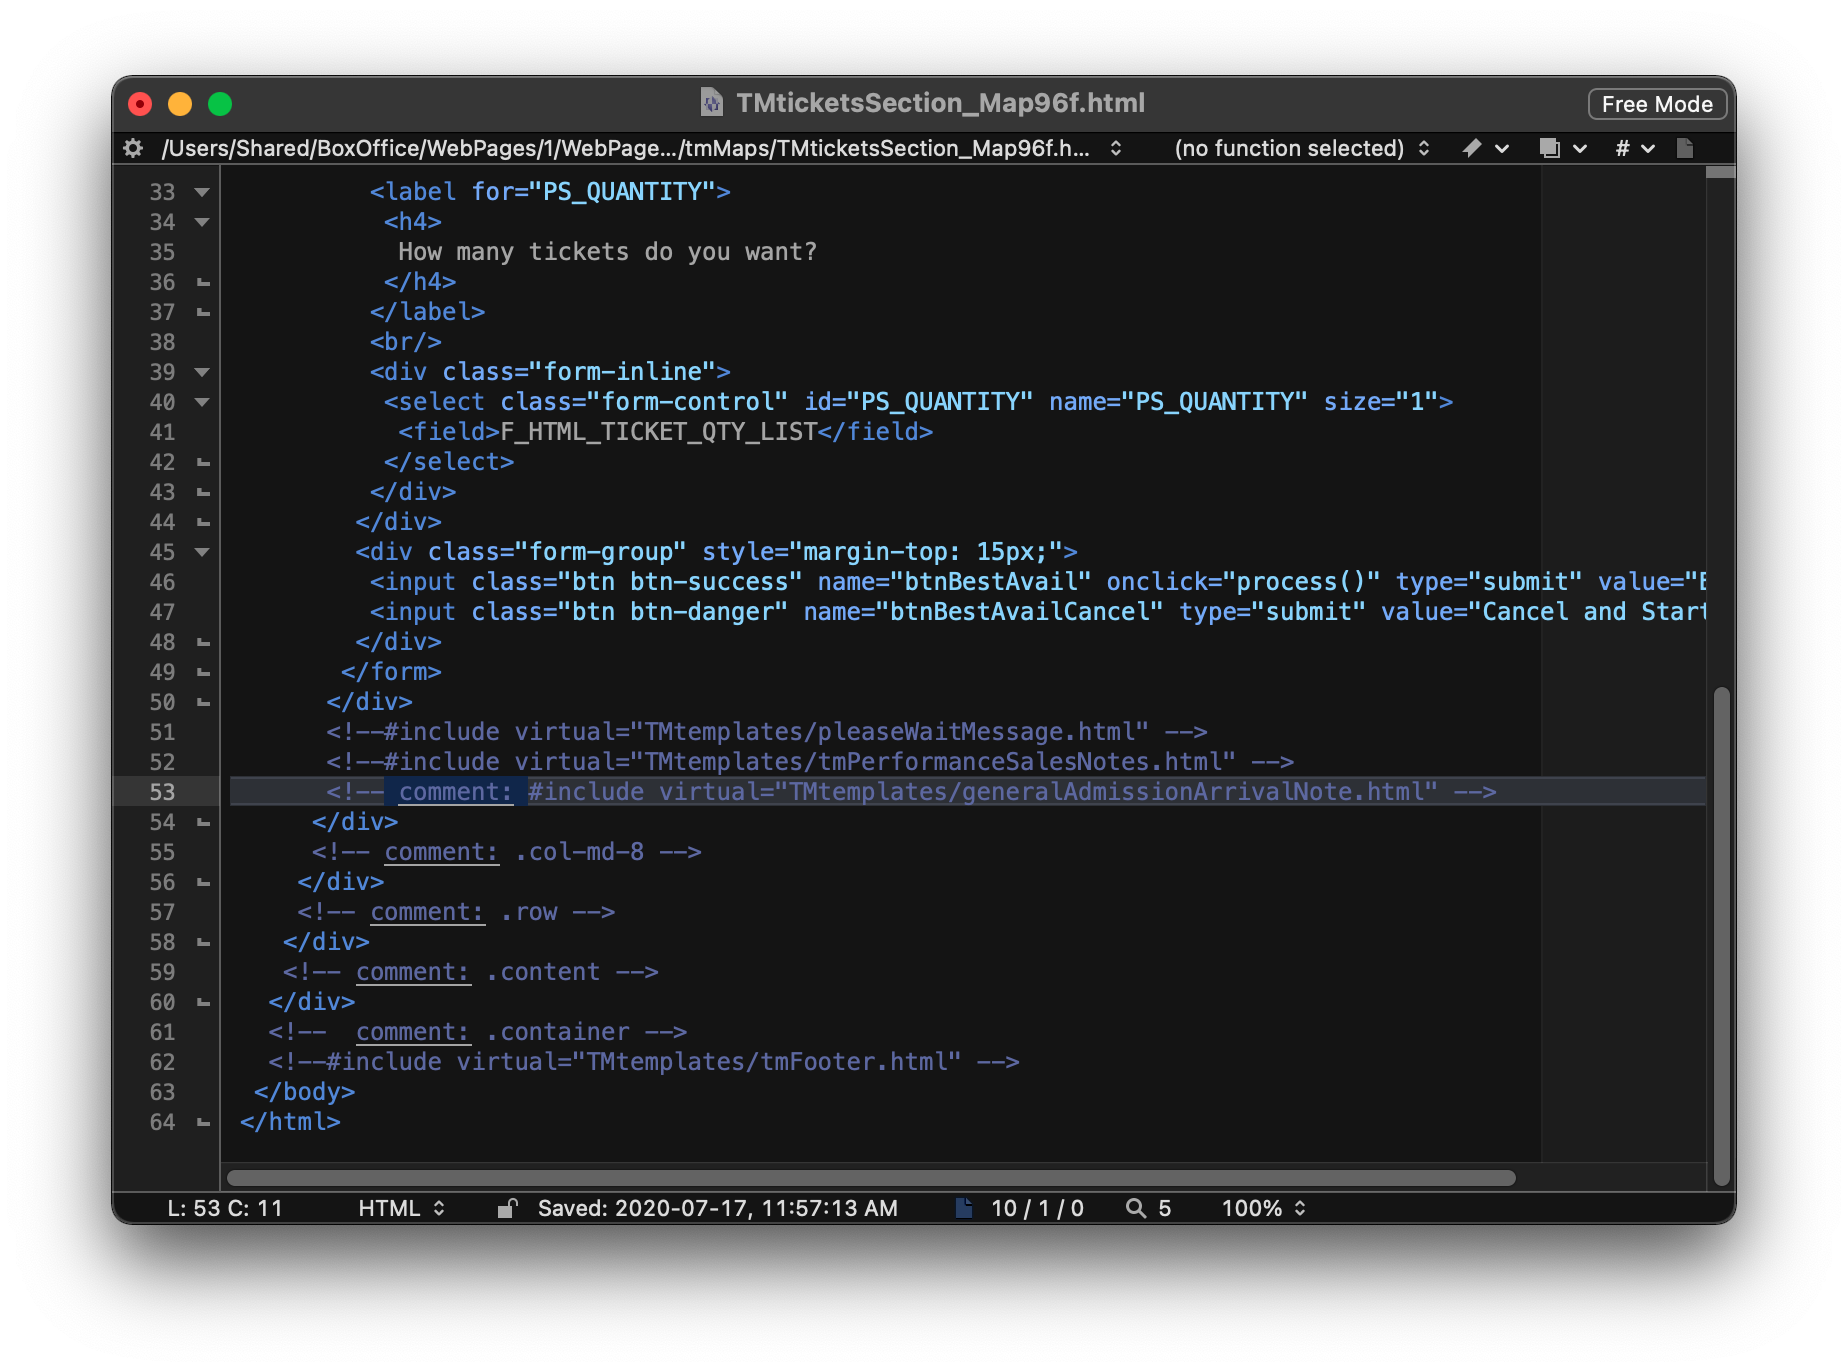
- Scroll down to Line 53.
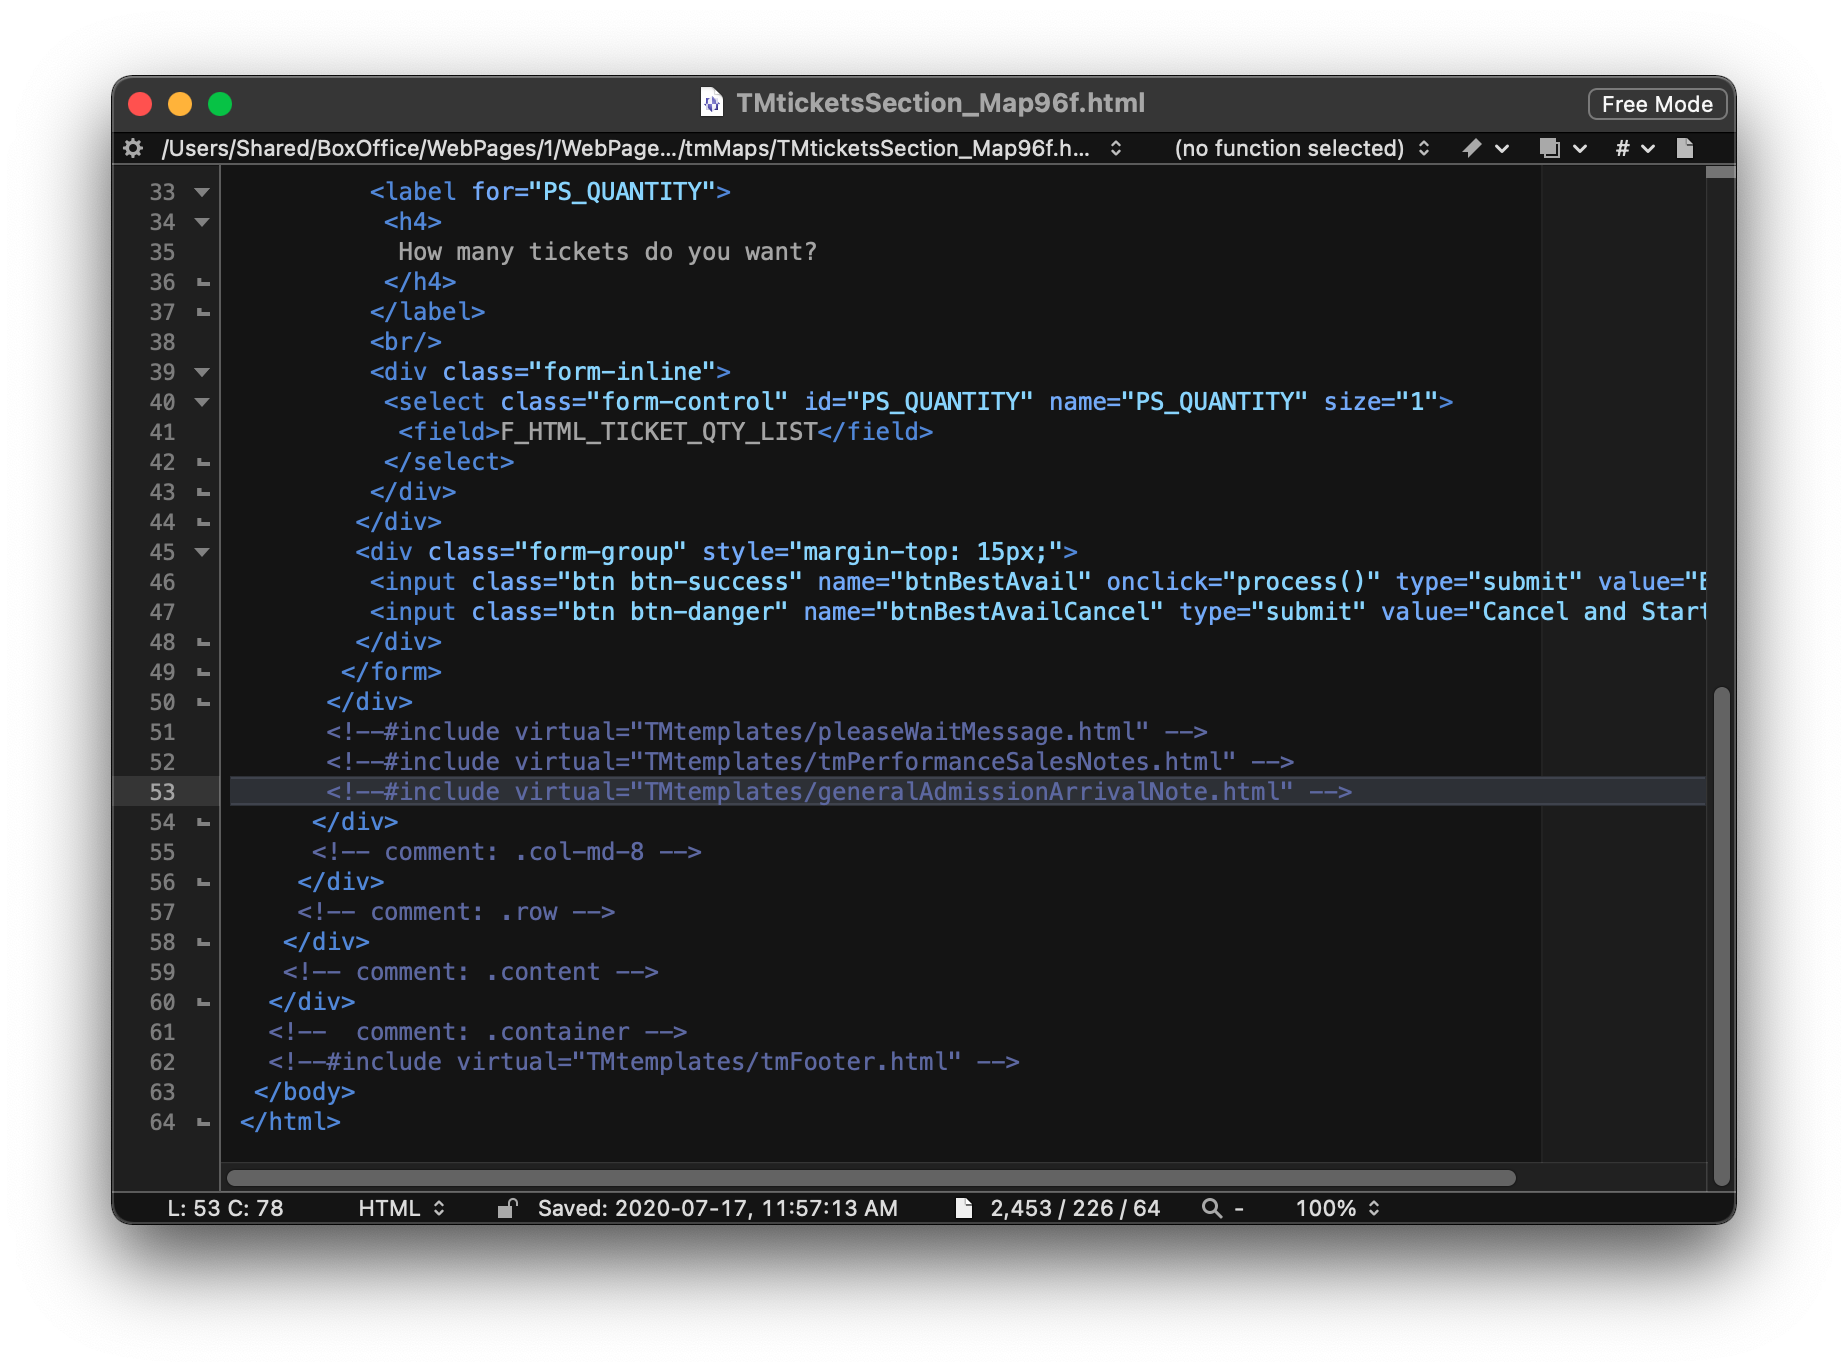
- Comment out the include statement for the generalAdmissionArrivalNotes.html.
Mandatory Donation Fields
Mandatory Donation Fields
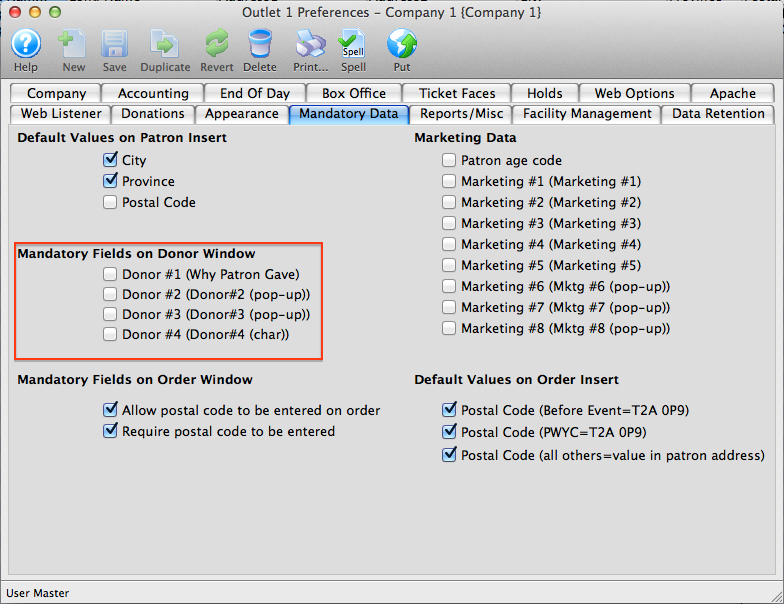
If you have any mandatory fields set for donations (such as "Why Patron Gave" or other field on the Notes tab), then your online donors will need to have this field filled in for them automatically. Otherwise, they will not be able to donate online as the database will require the field, and the patron has no way of entering it. To determine which fields may be mandatory, go to:
- Setup >> Company Preferences >> MANDATORY DATA tab
To correct this for online sales, you have two options:
Option 1: Editing the web page (recommended)
This process includes web page editing. If you have a web designer on hand, they can perform these edits. If you wish to contract with Arts Management Systems to perform these or any customizations for you, please contact the Support Team at support@artsman.com
If you still wish those fields to be mandatory for the Box Office or Development Department, then you will need to make a slight adjustment to the tmDonationHiddenFields.html web page.
The process starts by obtaining a Sequence Value from Theatre Manager
- Determine which field is set to be Mandatory.
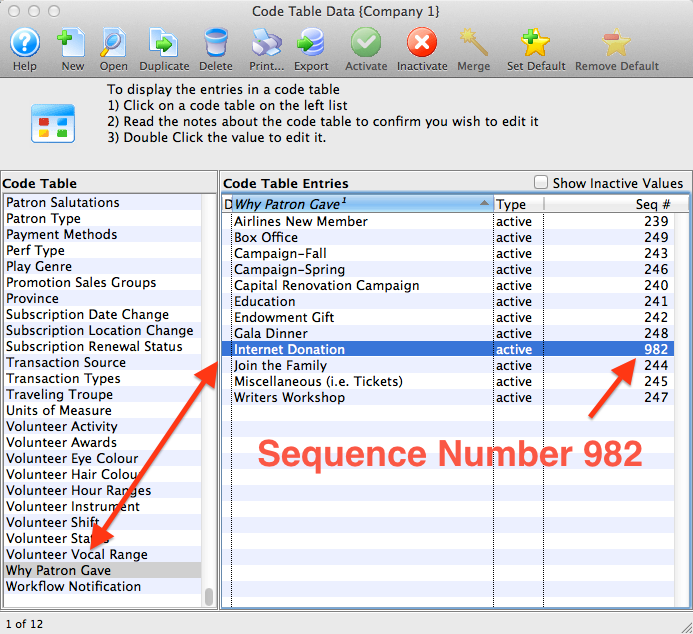
- In Theatre Manager, go to Setup>>System Tables>>Code Tables.
- Look under the Donor #1, #2, #3 pop-up (or if the field has been renamed, look under its name).
- Choose which value is going to be the default value. In this example, we've chosen Internet Donation.
- Obtain the Sequence number for that value You may have to RIGHT click on a column header to show all the available columns, and select the Sequence number. In this example, the Sequence number is 982.
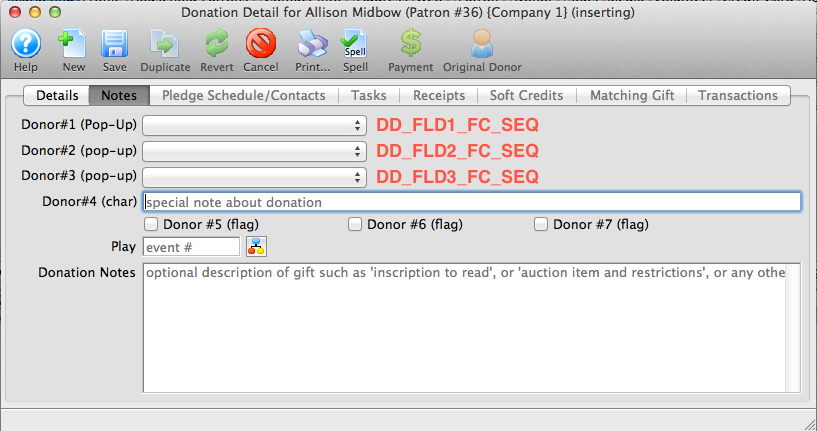
Now you will need to go edit the tmDonationHiddenFields.html web page, located in the TMtemplates folder.
- Move a copy of the tmDonationHiddenFields.html web page into the TMtemplates folder.
- Open the tmDonationHiddenFields.html page and locate the following:
- Make the desired edits If the Sequence Number of the value you want to default to for Donation Field #1 = 982, then the line of code would look like this:
- Save the edited page in the TMtemplates folder.
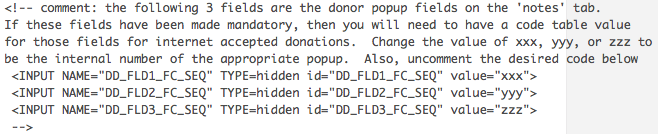
This allows you to set a "default" value on these fields for web sales.
<!-- comment: the following 3 fields are the donor popup fields on the 'notes' tab.
If these fields have been made mandatory, then you will need to have a code table value
for those fields for internet accepted donations. Change the value of xxx, yyy, or zzz to
be the internal number of the appropriate popup. Also, uncomment the desired code below
<INPUT NAME="DD_FLD1_FC_SEQ" TYPE=hidden id="DD_FLD1_FC_SEQ" value="xxx">
<INPUT NAME="DD_FLD2_FC_SEQ" TYPE=hidden id="DD_FLD2_FC_SEQ" value="yyy">
-->
<INPUT NAME="DD_FLD3_FC_SEQ" TYPE=hidden id="DD_FLD3_FC_SEQ" value="982">
Option 2: A global change
You can make the field non-mandatory. This will make the field not required for both Web Sales and in the Box Office/Development Office. To make this global change:
- Go to Setup >> Company Preferences >> MANDATORY DATA tab
- Simply UNcheck the mandatory field options.
You will see a section for "Mandatory Fields on Donor Window" as noted above.
Navigation Buttons
Navigation Buttons
There are two groups of buttons:
- Menu Navigation Buttons
- Data Submit/Navigation Buttons
The menu Navigation buttons reside within the TMtemplates/tmnavButtons.html file, and are dynamically imported into each page via the <include> command. The command looks like:
<!--#include virtual="TMtemplates/tmnavButtons.html" -->
and creates buttons that look like:

Since buttons are subject to style changes, we are able to use the Bootstrap Style Sheets to make them fit whatever concept your site incorporates, such as:




These buttons default to the bootstrap stylesheets for the 'nav navbar-nav' class.and can be enhanced in the custom.css style sheet
Data Submit/Navigation Buttons
The other buttons in each page serve different purposes by sending data to the database. These buttons work exactly the same way as the menu buttons only they allow Theatre Manager to receive the data that has been entered into the page and then load a new page page based on that data. An example of this would be to click on the Buy Tickets button
 which will take the patron to the TMtickets.html page allowing you to select a performance to buy tickets for. The Data Submit buttons will look like the following
 (although the words may vary)
The Data Submit buttons default to the stylesheets for the 'btn' class and can be modified with 'btn-success', 'btn-warning', 'btn-info' and others such as 'btn-small'
Buttons Commands
This is a list of the button commands that Theatre Manager requires. They are entered as the name="xxx" portion of each input tag.
These commands cannot be altered.
- btnLogin
- btnLoginAccount
- btnLoginFromDetail
- btnHome
- btnHistoricalCart
- btnHistoricalCartDetail
- btnAccount
- btnAccountRequest
- btnAccountAdd
- btnAccountUpdate
- btnPassword
- btnPasswordCancel
- btnPasswordAccept
- btnPasswordRequest
- btnPasswordSend
- btnMailList
- btnMailListAdd
- btnMailListRemove
- btnTicket
- btnGetEventRange - Deprecated. use btnGetEventList instead. This button uses btnGetEventList anyway
- btnGetEventAll - Deprecated. use btnGetEventList instead. This button uses btnGetEventList anyway
- btnGetEventList
- btnSelectEvent
- btnBestAvailCancel
- btnBestAvail
- btnReserveCancel
- btnReserveTicket
- btnPass
- btnReservePass
- btnPassAmountCancel
- btnPassAmountAccept
- btnDonation
- btnDonationAccept
- btnCart
- btnCartRemoveItem
- btnMailFeeAdd
- btnCheckout
- btnCheckoutAccept
- btnLogout
- btnLogoutCancelOrder
Seat View for Web Sales
Seat View for Web Sales
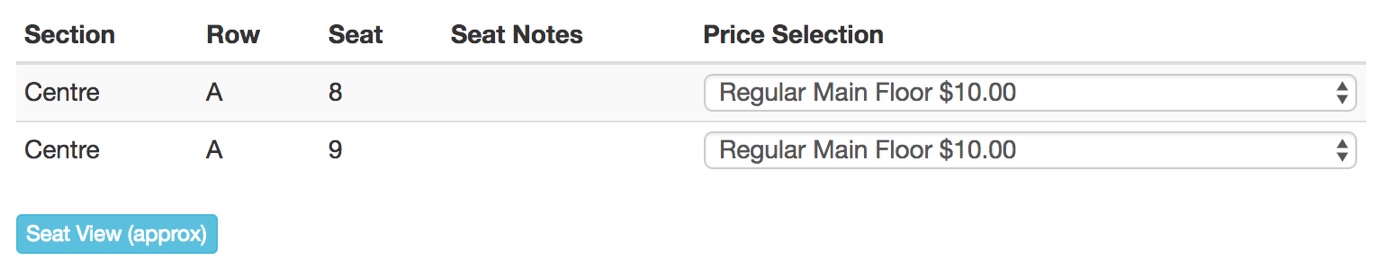
When purchasing a ticket online a link can be added offering the patron an opportunity to see the view from their selected seats prior to adding tickets to their cart. This option requires some setup in order to work successfully online.
Once the setup is in place, the seat view button will become available. Clicking the button will open a new tab in the browser displaying the seat view image.
Adding the Seat View Image
- Take a picture from each seat or from one seat that will represent multiple seats inside the venue.
- On the Web Listener computer, create a tmSeatView folder inside the WebPagesEN/tmGifs folder to store the seat view images.
- Place all the seat view images into the tmSeatView folder ensuring the naming convention for each image is clear.
Updating the Theatre Map
- In Theatre Manager, open the Theatre Map.
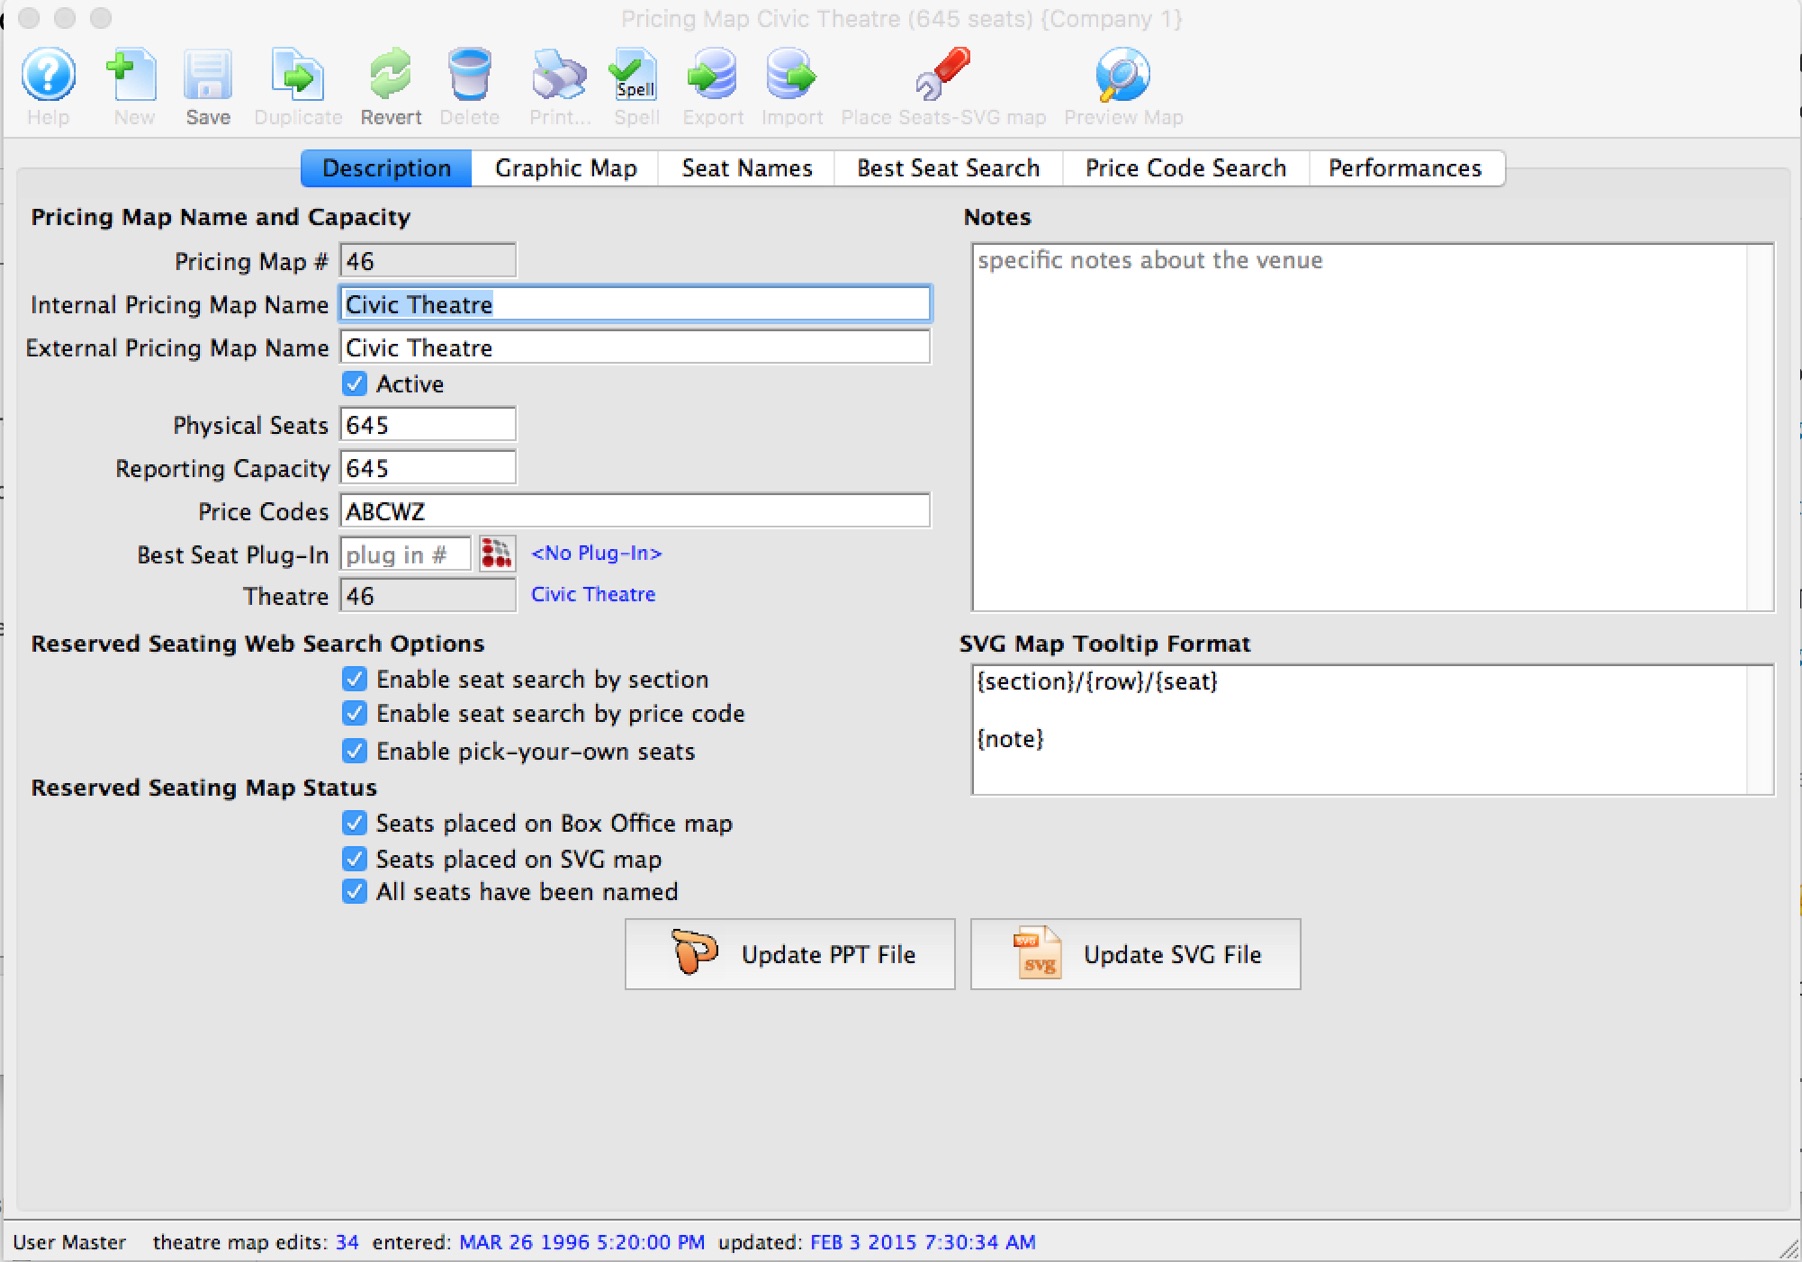
For details on how to access the Theatre Map window, click here.
- Select the Seat Names tab.
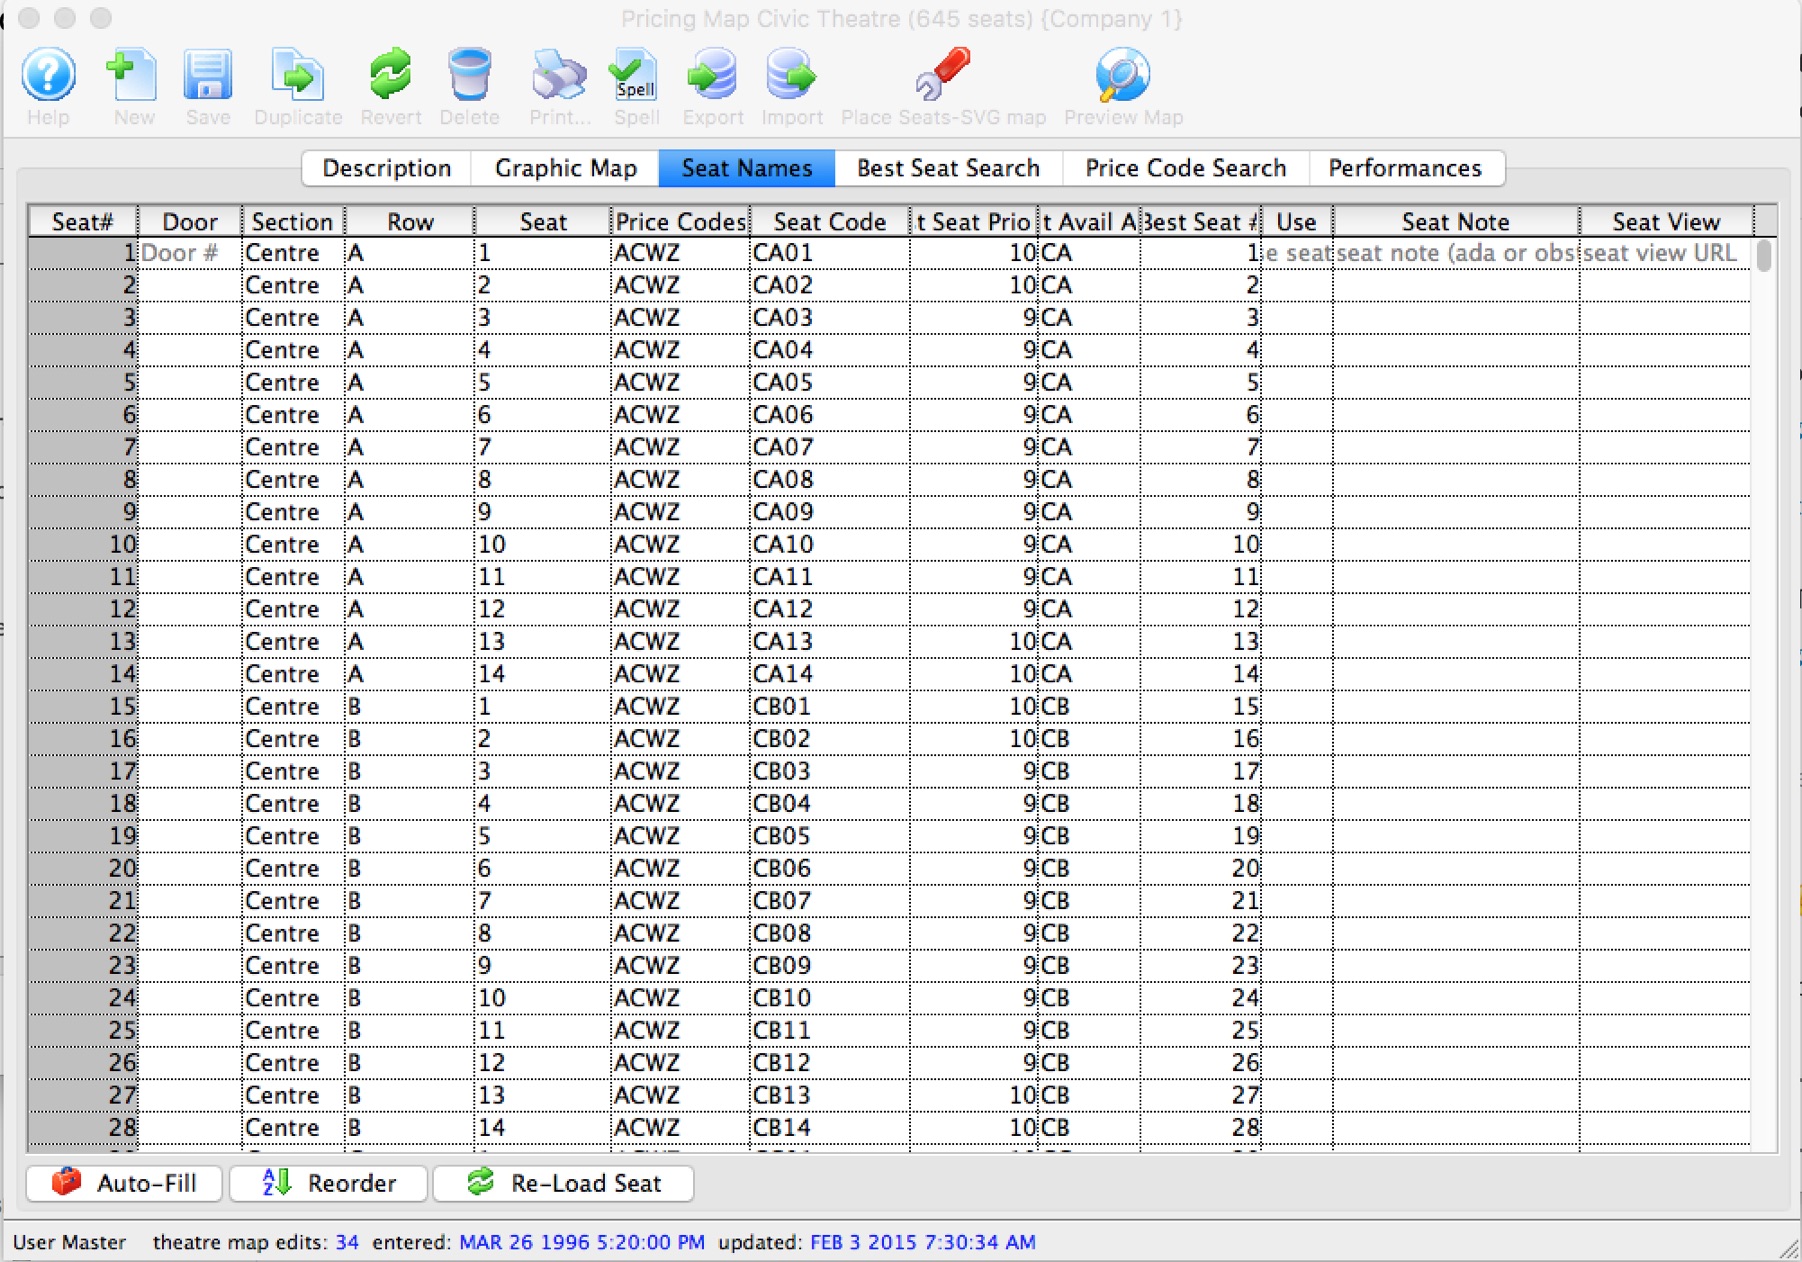
For more information on the Seat Names tab, click here.
- Update the far right Seat View column next to each seat with the name of the seat view image placed in the tmSeatView folder above. The column should contain the full name of the seat view image including the extension. You can use the same image for a row or area of the venue if the seat view doesn't change that much. Examples:
If you:
- use your smart phone or digital camera to take a picture from the middle of row 'H' on the left of the theatre, that image could represent the view from all of row 'H' and perhaps even row 'J' and 'K'.
- Retrieve that image from your camera and reduce its physical file size so that it is about 50 to 75K (at most - since most cameras take at least 4 megabit pictures, and sharply reducing the image size is important for web performance).
- You might rename that file ViewFromRowHJK.jpg so that you know what it is at a glance
- Place that picture into the tmSeatview folder described above
- put the name of the file ViewFromRowHJK.jpg into the Seat View column for all the seats in rows 'H', 'J', and 'K'.
- repeat for the next view from a seat picture you take of the venue
- Save and close the Map.
Editing the Seat View Web Page
- Copy the tmViewFromSeat.html web page into the WebPagesEN/tmMaps folder.
- Edit the tmViewFromSeat.html page using a tool like NotePad++ or BBedit.
- Update Line 8 with the desired text to appears as the link online.
Once the above steps are complete, restart the Web Listener to clear any previously cached web pages.
Sold Seat Colour Online
Sold Seat Colour Online
The default appearance for unavailable seats online is the FontAwesome icon of a person. When a map contains many small seats this may not be ideal as the people might appear to overlap. It may be more desirable to have the unavailable seats appear in a solid colour (or other icon) separate from available seats and suggested seats.
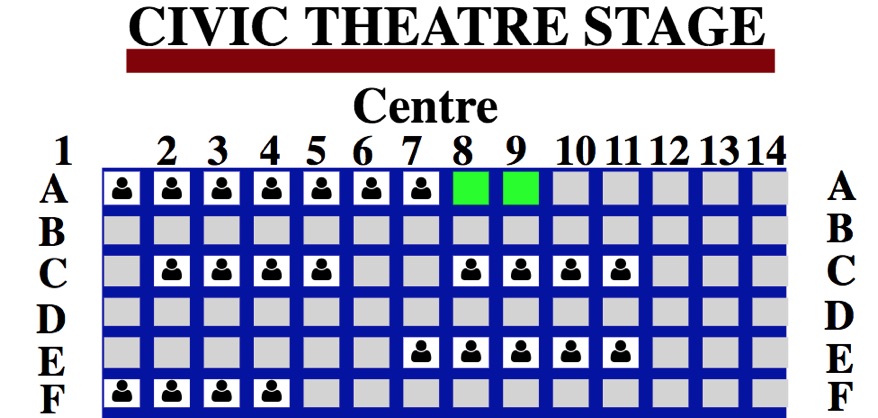
To make this change you will want to edit the tmPickYourSeatMapDisplay.html web page. Locate line 43, it should look like this:
<object class="embed-responsive-item" data="<field>F_HTML_SEATMAP</field>&reserved_colour=00FF00&reserved_only=false&format=pick&unavailable_color=FFFFFF &unavailable_text=&seat_font=FontAwesome&seat_font_load=cdn" id="venue_map">
Change Line 43 to be:
<object class="embed-responsive-item" data="< field>F_HTML_SEATMAP< /field>&reserved_colour=00FF00&reserved_only=false&format=pick&unavailable_color=000000&unavailable_text=" " id="venue_map">
This will remove the people (seat_font=FontAwesome&seat_font_load=cdn) and make the sold seats appear black (unavailable_color=000000). The colour of the unavailable seats can be updated to the desired HEX colour.
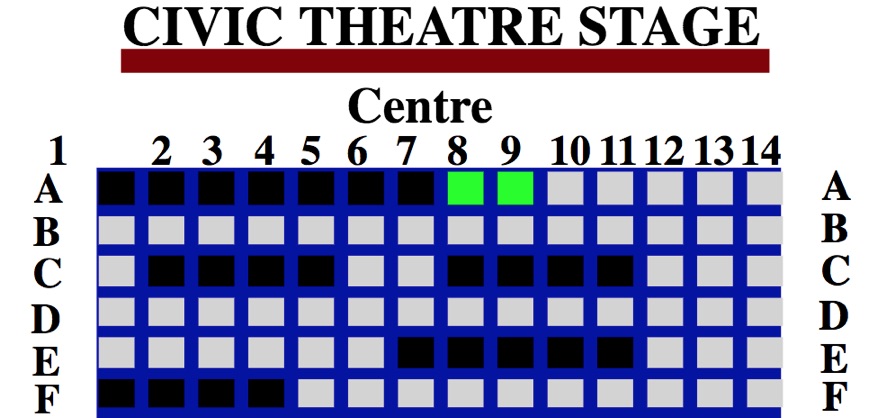
For additional features regarding changing the map online please click here.
Altering the Number of Lines in the Pricing List
Altering the Number of Lines in the Pricing List
This process includes web page editing. If you have a web designer on hand, they can perform these edits. If you wish to contract with Arts Management Systems to perform these or any customizations for you, please contact the Support Team at support@artsman.com
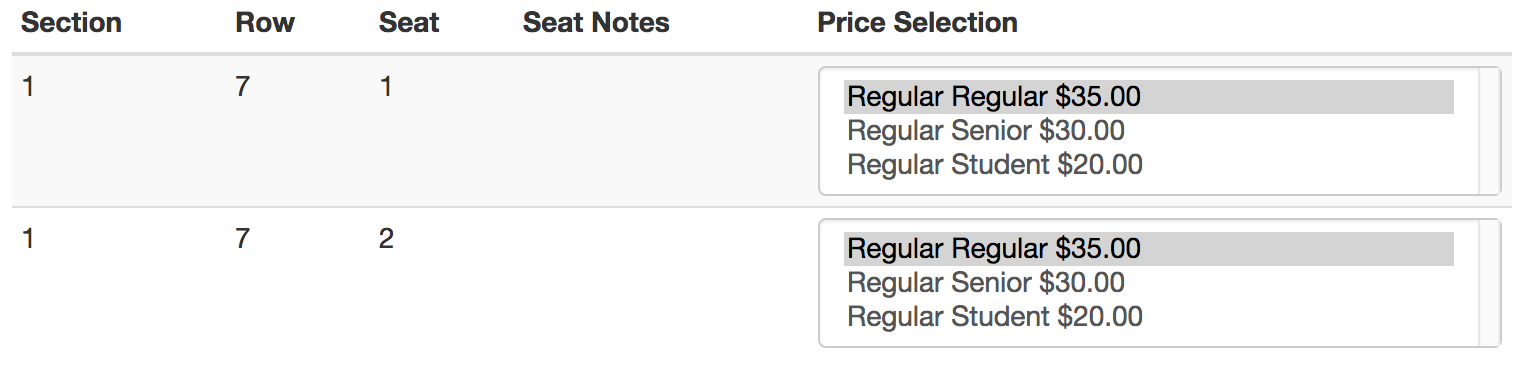
Edit the code on the web page
- Select the web page to edit.
The most commonly used pages are rowTicketReserved.html, rowTicketFestival.html, and rowTicketCourse.html. - Locate the following HTML on the page:
<select class="form-control" id="SC_DESCRIPTION" name="SC_DESCRIPTION" size="1"> - Edit the following
- Change the size="1" to the number of lines you wish see to displayed.
- The sample above shows a size="3" to show 3 price lines.
Navigation Button To Select Performances
Navigation Button To Select Performances
A button, directing you to a select list of Performances, can be created in the navigation buttons at the top of the online sales windows. This button can be used for Courses, Opening Nights, Special Events or other performances where you want to list a select group of Performances.
The key for this button is flagging the Performances with the same reference and using that reference in the button to pull the desired shows. The setup requires editing the performances and adding the button to the online sales.
To flag the performances, you perform the following steps:
- Click the Event
 button in the main theare manager tool bar.
- Search for and open the desired Event.
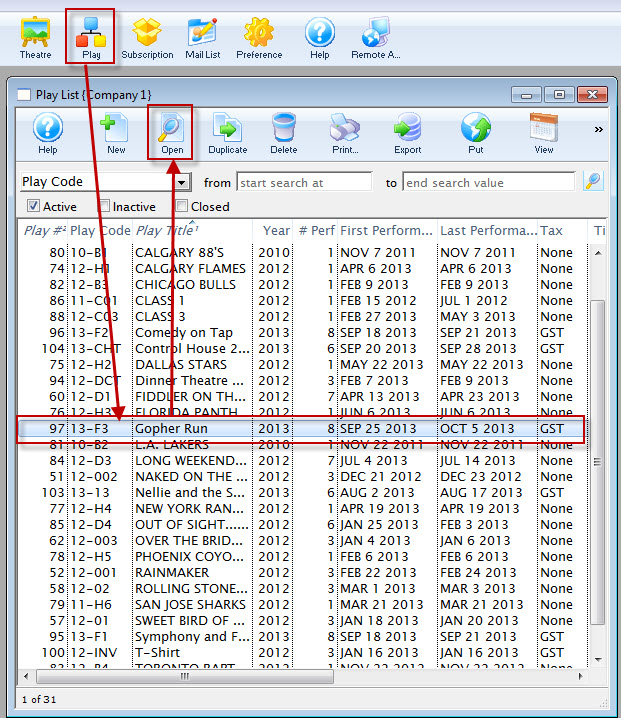
- Select the Performance tab.
Open the desired Performance.
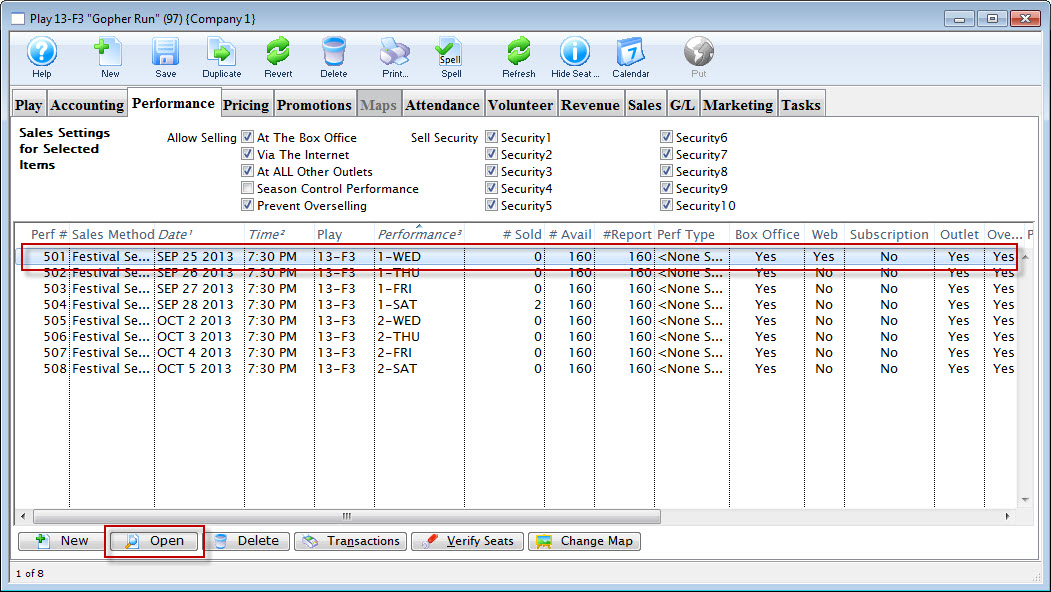
- Select the Web Settings tab, and enter a value in the Performance Flag field.
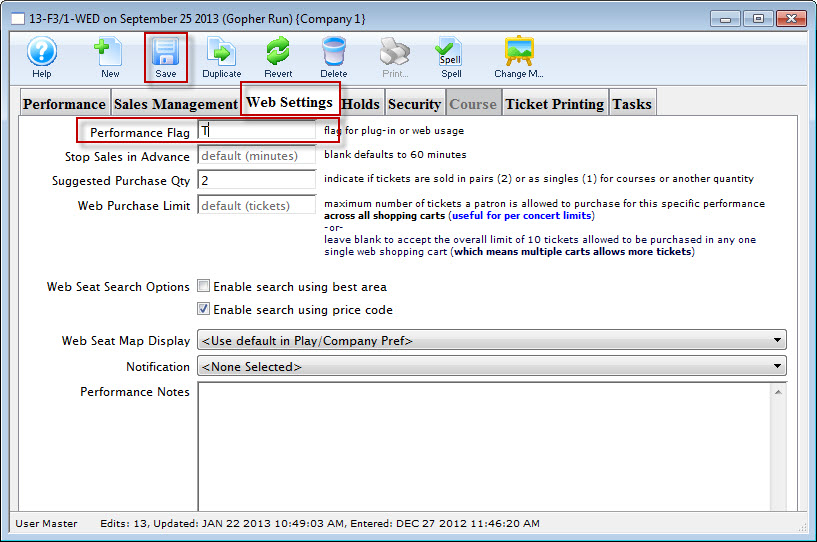
In our example we have used the letter T.
- Save and close the window.
Adding The Button
A button can be added to the existing buttons across the top on the online sales window. Edit the tmnavbuttons.html page.
This process includes web page editing. If you have a web designer on hand, they can perform these edits. If you wish to contract with Arts Management Systems to perform these or any customizations for you, please contact the Support Team at support@artsman.com

Adding the coding to the web page.
- Select the web page you wish to add the field to.
The page to edit is tmnavButtons.html. - Add the following HTML to the page:
<li>
<a href="<field>F_HTML_FIREWALL</field>login?event=0&search=PB_PERF_FLAG='T'">
<i class="fa fa-ticket">
</i>
Special Performances
</a>
</li> - Edit the following
- You change the 'Special Performances' text to reflect the text you wish to use for the button.
- Update the letter 'T' to match the letter used when setting up the Performances
Navigation Button for Courses
Navigation Button for Courses
A button can be added to the tmnavButtons.html which provides a link directly to courses currently available for sale online.
This process includes web page editing. If you have a web designer on hand, they can perform these edits. If you wish to contract with Arts Management Systems to perform these or any customizations for you, please contact the Support Team at support@artsman.com

Adding the coding to the web page.
- Select the web page to edit.
The page to edit is tmnavButtons.html. - Add the following HTML to the page:
<li>
<a href="<field>F_HTML_FIREWALL</field>login?event=0&search=PB_SALES_METHOD='6'">
<i class="fa fa-ticket">
</i>
Theatre Classes
</a>
</li> - Edit the following
- Change the 'Theatre Classes' text to reflect the text you wish to use for the button.
Sales Methods
Buttons can be created for all 7 types of Sales Methods. The most common online options are:
- Sales Method 1 - Festival/General Seating
- Sales Method 2 - Reserved Seating
- Sales Method 3 - Inventory
- Sales Method 6 - Courses
Purchase Option for a Specific Member Type
Purchase Option for a Specific Member Type
The lines below are an example of a button that will add a specific member type to the cart with a fixed value. This button can be added to any page within the online sales. It would most commonly appear on the TMpass.html page or the TMcart.html page.
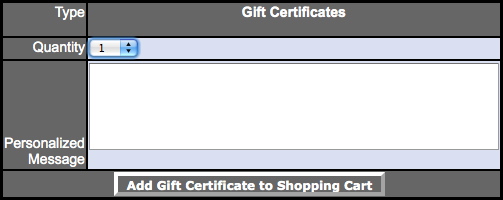
<TABLE width="345" BORDER=0 CELLPADDING=1>
<TR>
<TD WIDTH=92 class="tablerowheader" align="center">
<P align="right">Type</P>
</TD>
<TD width="240" class="tablerowheader">
<FORM ACTION="<field>F_HTML_FIREWALL</field>online" METHOD=POST><DIV ALIGN="center">
<label for="Team"><strong>Gift Certificates</strong> </label>
<input type="hidden" name="MT_SEQ" value="14">
</DIV>
</TD>
<TR>
<TD WIDTH=92 class="tablerowheader">
<P align="right">Quantity</P>
</TD>
<TD class="tablerowdetail">
<select name="PS_QUANTITY" size="1" id="PS_QUANTITY">
<option value="1" selected>1</option>
<option value="2">2</option>
<option value="3">3</option>
</select>
</TD>
</TR>
<TR>
<TD valign="top" class="tablerowheader" align="right">Personalized Message</TD>
<TD class="tablerowdetail" align="left">
<textarea name="M_NOTES" cols="50" rows="5"><field>M_NOTES</field></textarea>
</TD>
</TR>
<tr class="tablerowheader">
<td colspan=2 align="center">
<input name="btnReservePass" type=submit value="Add Gift Certificate to Shopping Cart" class="new" onMouseOver="pviiClassNew(this,'newover')" onMouseOut="pviiClassNew(this,'new')" onClick="process()">
</FORM>
</TD>
</TR>
</TABLE>
Redirecting the Add Code Button
Redirecting the Add Code Button
When entering a coupon code in the online sales the patron clicks the Add Code button. This button appears in the TMtickets.html and TMcart.html pages. The button accepts the coupon or access code and returns the patron to the TMtickets.html page.
This process includes web page editing. If you have a web designer on hand, they can perform these edits. If you wish to contract with Arts Management Systems to perform these or any customizations for you, please contact the Support Team at support@artsman.com

Edit the code on the web page
- Select the web page to edit.
The page to edit is tmTicketsPresalesCoupon.html. - Locate the following HTML on the page:
<input name="param" type="hidden" value="altbtn=btnGetEventList"/> - Edit the following
- Change the 'btnGetEventList' text to 'btnCart'.
Custom Genre
Custom Genre
The Genre setting with Theatre Manager are directly connected to the Ticket Trove application. This means the drop down is restricted to the current list of options and is not available for customization. You can however, create your own custom genre lookup using the Event code used to define each event within Theatre Manager OR the Performance Flag field which is associated with each performance within the database. This allows you to group together different types of performances or events and create your own sort options within the online sales.
Custom Genre using Event code
Custom Genre using Event code
Using the Event Code within Theatre Manager you can create your own customized drop-down for genre. Lets consider you have three style of theatre programming; Mainstage, Theatre for Young Audiences and Alternative Theatre. You can use a value of the event code to create a custom genre search for the web sales process. You then comment out on the TMtickets.html and add code to reference the Event Code.
|
The Event Genre will still apply in the TicketTrove application. |
When building events in Theatre Manager an event code is created. The event code consists of 6 characters with a default assumption that the code begins "XX-" where XX it traditionally the year/season of the event. Following the [-] dash you can then add your value. In this example lets assume MXX, YXX and AXX where M represents MainStage, Y represents Theatre for Young Audience and A represents Alternative Theatre.
When Building your Mainstage Series of events your event codes could look something like 13-M01 for the first mainstage event, 13-M02 for the second mainstage event and similar for the Theatre for Young Audiences ( 13-Y01 ) and Alternate Theatre (13-A01). Then considering the 4th character in the code i.e.: M for MainStage, Y for Young Audiences and A for alternative you would add coding to your template to result in a lookup that would appear like the following.

See Adding code to Web Page for details.
Adding Code to Web Page
The customized code can be added to the TMtickets.html page. Look for the Genre field on the template; lines 76 to 80.

Add the comment values to comment out the present Genre Drop Down as follows:

Then copy and paste the following code either above or below the Genre code you comment out and you will have your new custom Genre lookup based on the value within the event code. Note that you can have as many lookups based on any value of the code you wish. Simply add as many [ option value="position('M' in P_SHOW_CODE)=4">Mainstage Theatre ] as you need. In this example we evaluate the fourth character in the Event code where M will show you MainStage Theatre.
<tr>
<td align="right">Custom Genre List</td>
<td>
<select name="search" id="search">
<option value="">"any kind"</option>
<option value="position('M' in P_SHOW_CODE)=4">Mainstage Theatre</option>
<option value="position('Y' in P_SHOW_CODE)=4">Theatre for Young Audiences</option>
<option value="position('A' in P_SHOW_CODE)=4">Alternative Theatre</option>
</select>
</td>
<td align="left">
<input name="btnGetEventList" type="submit" id="Search" value="Search" class="new" onMouseOver="pviiClassNew(this,'newover')" onMouseOut="pviiClassNew(this,'new')" onClick="process()"></td>
</tr>
Once the code above has been added to the TMtickets.html page the page should be saved in the WebPagesEN folder. Clear the Cache on the web listener and refresh the page in the browser. The updated changes should now be visible and available to select.
Your Web Templete will then appear as follows:
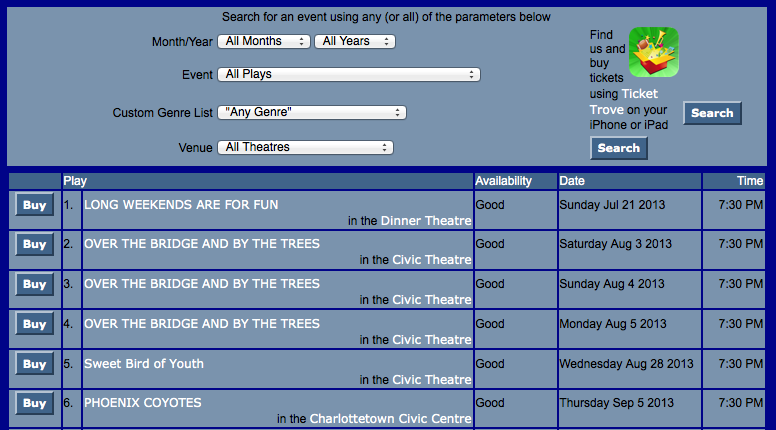
Your new lookup will then display as:
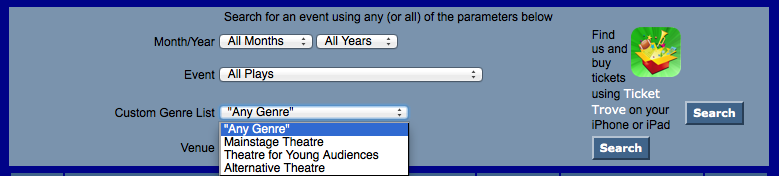
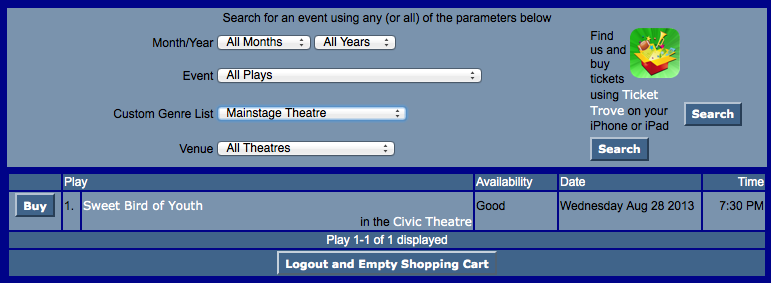
When selection is made and the search button is clicked it will return all events in this example with an event code 13-M.
Custom Genre using Performance Field #1
Custom Genre using Performance Field #1
Using the Performance Flag field within Theatre Manager you can create your own customized drop-down for genre. You then comment out on the TMtickets.html and add code to reference the Performance Flag.
|
The Event Genre will still apply in the TicketTrove application. |
To create your own customized Genre for online reporting, you perform the following steps:
Step 1 - Rename the Custom Genre Field
The first step is renaming the existing Performance Flag to something that will make sense in the future. This is done in Company Preferences.
- Click Setup >> Company Preferences.
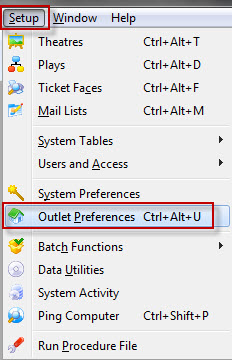
The Preferences window opens.
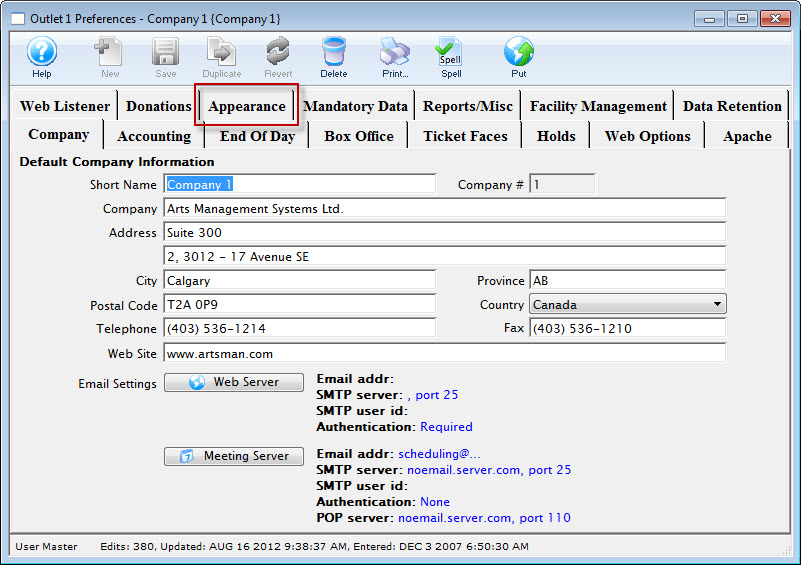
- Select the Appearance tab.
- Scroll down to Performance Field #1 (lookup).
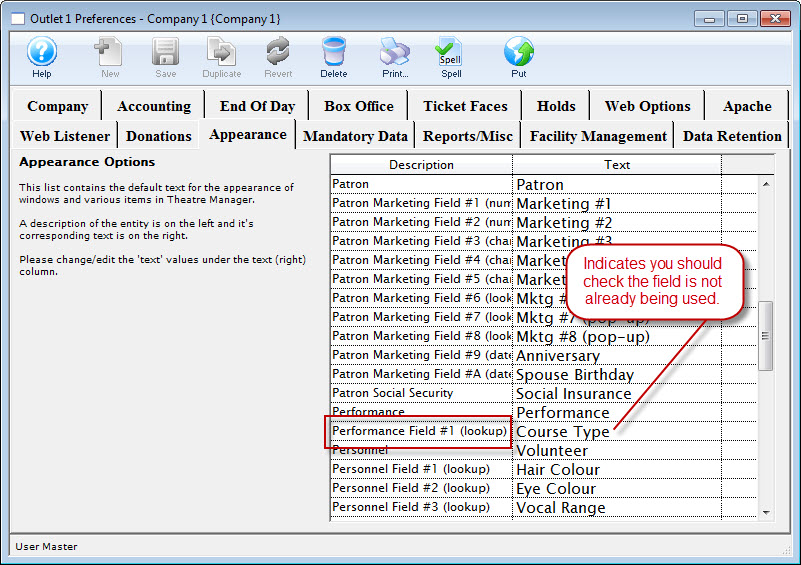
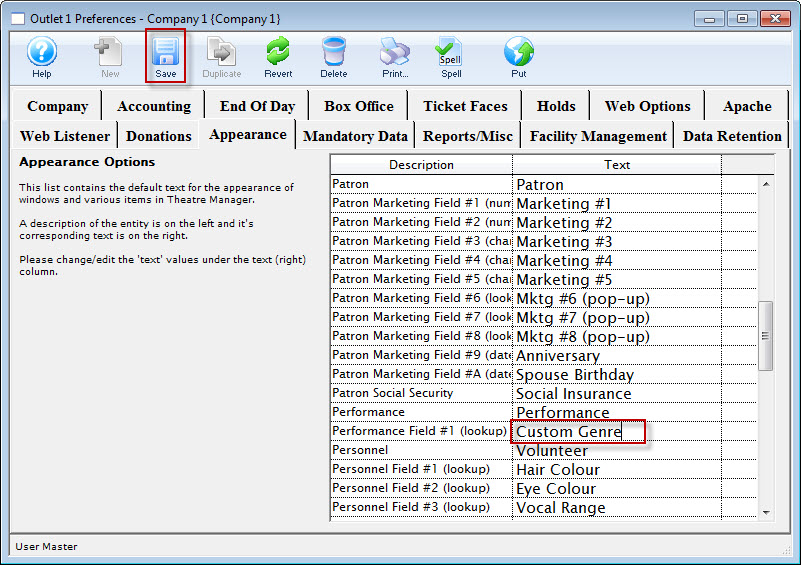
- Click in the field to the right of the Performance Field #1 and change the text to Custom Genre.
- Click the Save
 button.
- Close the Company Preferences.
|
The Performance Field #1 may be used in other parts of Theatre Manager (such as course). If the fiedl contains something other than Perf Type, double check it is NOT being used elsewhere before changing any information. |
Step 2 - Add Custom Genre Options
Yoiu can now add a unique list of Genres to your database. You do this in the code table. Click here for more information on Theatre Manager's Code Tables.
- Click Setup >> System Tables >> Code Tables.
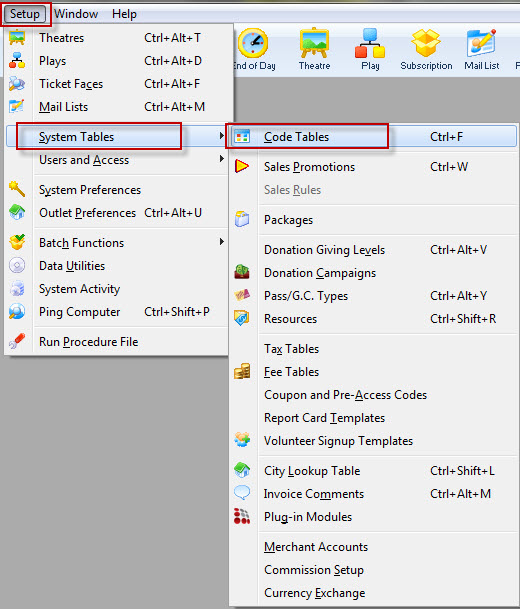
- Single click on the Custom Genre option in the left column.
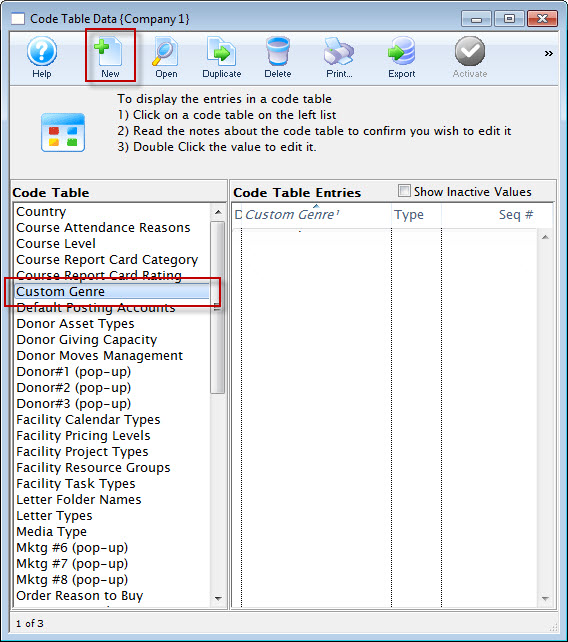

This is not to be mistake with the default Play Genre for the TicketTrove application.
- Click the New
 button.
The Custom Genre (inserting) window opens.
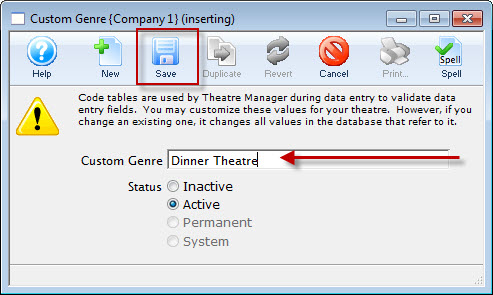
- Enter the name of the Genre to be added to the database.
Options may include items currently found in the Event Genre as well as those unique to the organization.
- Click the Save
 button and close the new Genre.
Repeat steps 3 through 5 above until all Genre's have been entered.
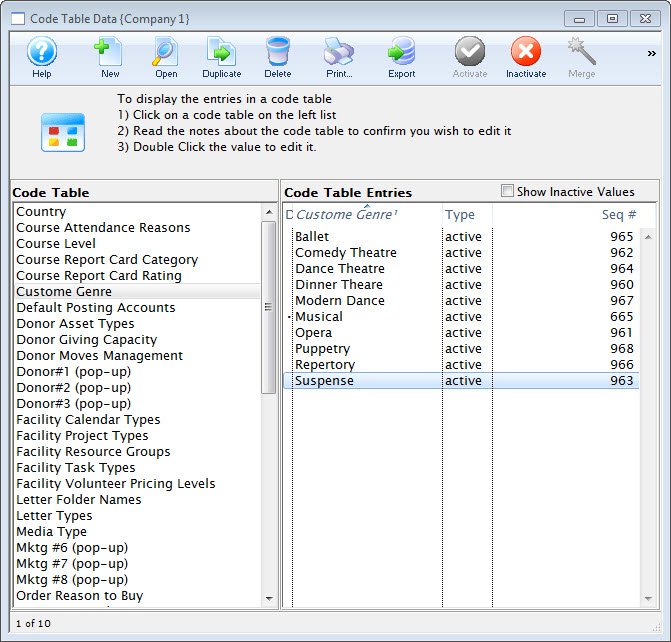
- Close the Code Tables window.
Step 3 - Setting a Custom Genre
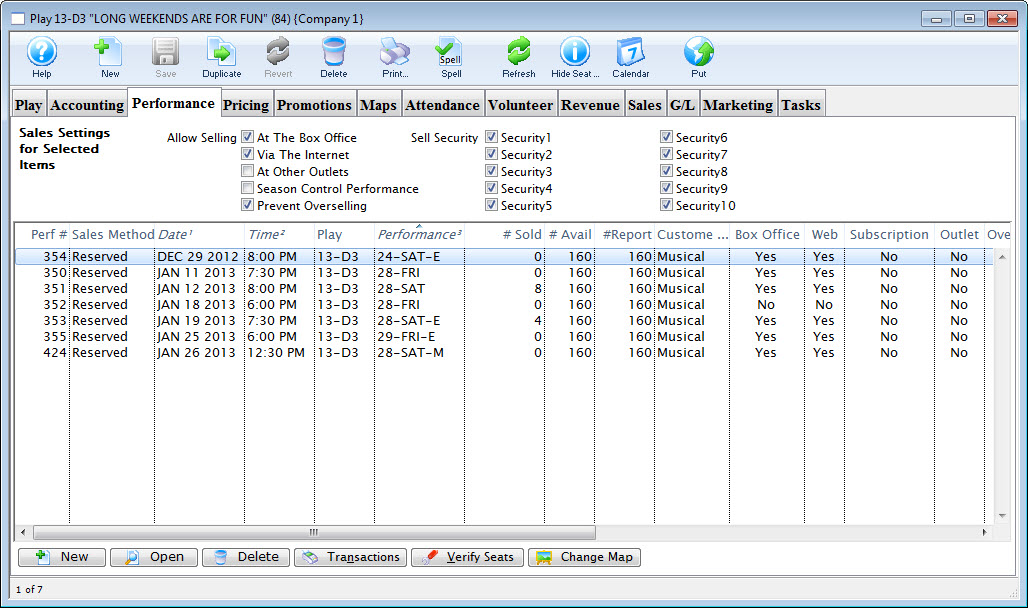
Once the list of Genres is created, you need to assign them to each Performance. This method allows for flexibility between individual Performances.
- Click the Event
 button at the top of the window in Theatre Manager.
The event list opens.
- Search for and open the desired Event.
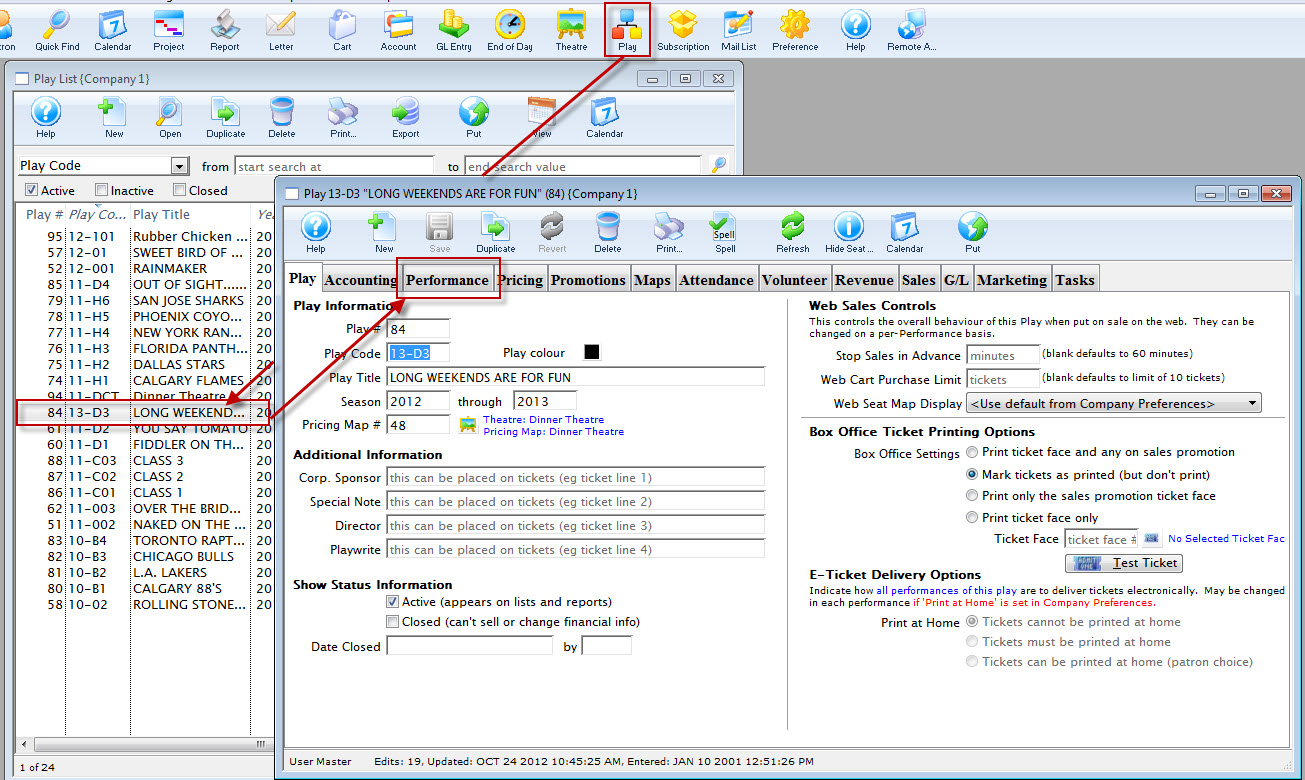
- Click the Performance tab.
- Open the Performance and select the desired Genre from the drop down.
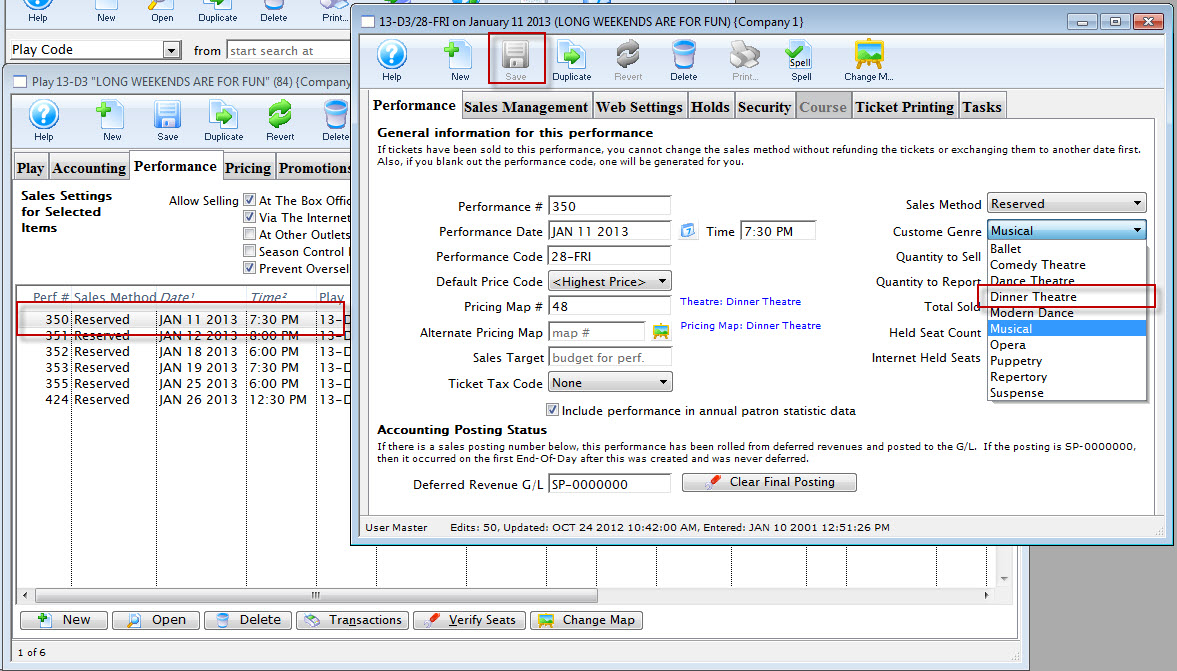
- Click the Save button and close the Performance detail window.
Repeat the steps until all Performances have a Genre.
- Close the Event window.
Step 4 - Locating the Custom Genre Sequence Number
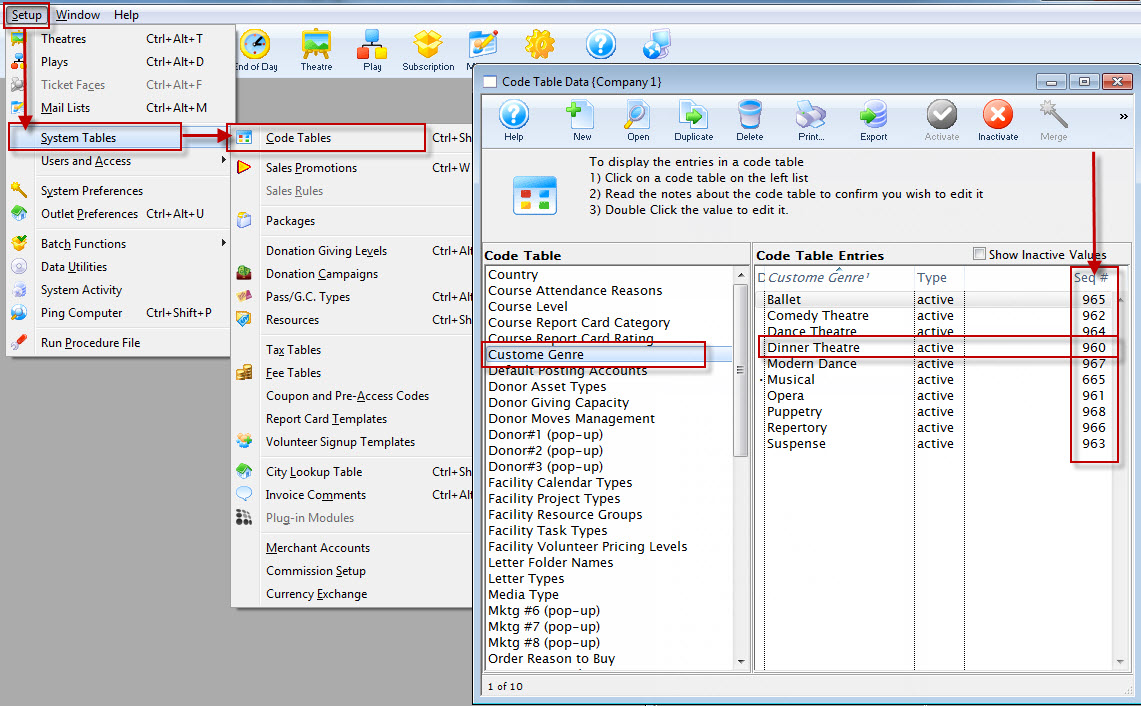
Each Custom Genre is assigned a unique sequence number when you add it to the database. This sequence number is needed to add the Custom Genres to the online sales web page.
- Click Setup >> System Tables >> Code Tables.
- Choose the Custom Genre option in the left column.
This is not to be mistake with the default Play Genre for the TicketTrove application. The Sequence number will appear in the left column.
- Take note of the Sequence number and the corresponding Genre name.
5 - Adding Code to Web Page
The customized code can be added to the TMtickets.html page. Look for the Genre field on the template; lines 76 to 80.
Add the comment values to comment out the present Genre Drop Down as follows:
Then copy and paste the following code either above or below the Genre code you comment out and you will have your new custom Genre lookup based on the value of the Performance Field #. The code can be found below. The PB_TYPE1_FC_SEQ is followed by a number. This number is the Custom Genre Sequence number from above. Note that you can have as many lookups based value of the Sequence number you wish. Simply add as many [ option value="PB_TYPE1_FC_SEQ='XXX'">Comedy ] as you need.
<tr>
<td align="right">Custom Genre List</td>
<td>
<select name="search" id="search">
<option value="">"any kind"</option>
<option value="PB_TYPE1_FC_SEQ='955'">Comedy</option>
<option value="PB_TYPE1_FC_SEQ='956'">Drama</option>
<option value="PB_TYPE1_FC_SEQ='957'">Recital</option>
</select>
</td>
<td align="left">
<input name="btnGetEventList" type="submit" id="Search" value="Search" class="new" onMouseOver="pviiClassNew(this,'newover')" onMouseOut="pviiClassNew(this,'new')" onClick="process()"></td>
</tr>
The result will be the same as shown for the Event code of the previous page.
Once the code above has been added to the TMtickets.html page the page should be saved in the WebPagesEN folder. Clear the Cache on the web listener and refresh the page in the browser. The updated changes should now be visible and available to select.