Overview of the Theatre Manager Workspace
The Theatre Manager uses a desktop for the standard interface. Think of the desktop as a workspace where you can access everything you need to operate Theatre Manager, such as Donation Management, Facility Management, Patron Management, Mail Lists, etc.
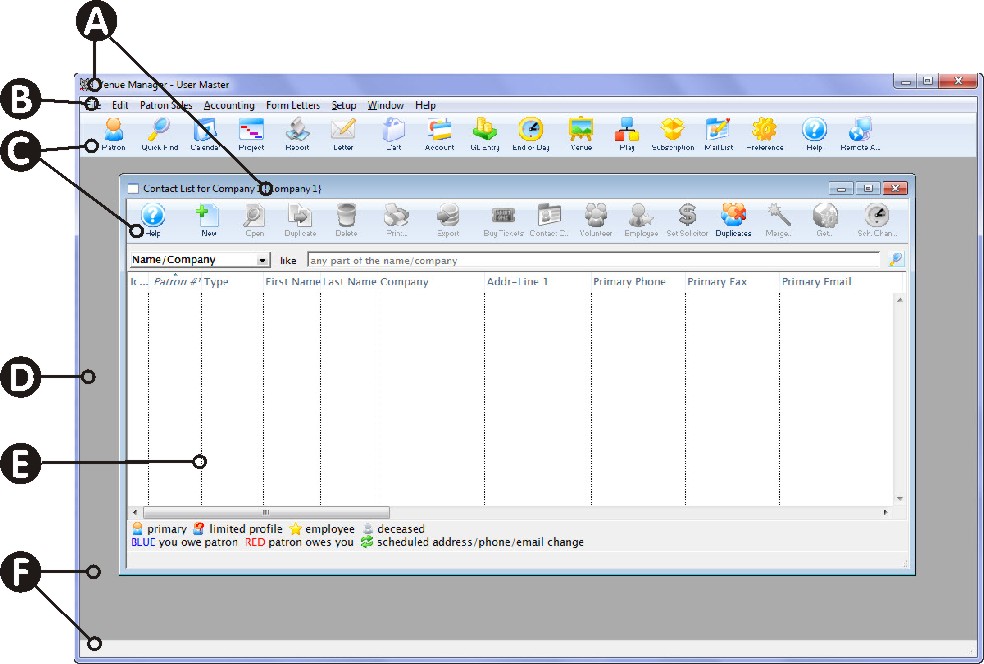
The desktop contains:
| A | Title Bar The Name of the application, and within the workspace, it also
contains:
|
| B | Menu Bar is located at the top and includes the titles of the drop down list functions. |
| C | Toolbar / Ribbon contain Icons leading to the most commonly used functions |
| D | Desktop work space |
| E | Function open in the desktop work space |
| F | Status Bar |
Other functions available within the Theatre manager workspace are:
Tooltips
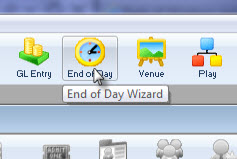
Move the mouse pointer around the screen and you'll see popup tooltips that identify what toolbar buttons do.
Right-Click Menus
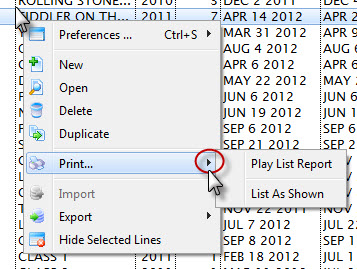
Right-click menus are found in many of the function windows and bring up a context menu of functions. These can also contain fly-out menus.
Main Toolbar / Ribbon Bar

 |
The main toolbar bar provides quick access to key data in Theatre Manager |
The Buttons
The Main Toolbar/Ribbon Bar gives you quick access to the following functions:
 |
Click here for more information on the Patron List window. You can option+click on the patron icon to see a list of the most recent 20 patrons you have accessed and quickly open their patron window. This is the same list as the recent patron list. Use it as a short cut, or as a reminder of the last patrons you interacted with. |
 |
Quick Find - Find a patron in the database using the patron number. Click here for more information on Quick Find. |
 |
Calendar - Show multiple Calendars with plays, tasks and other activities which can be used for facility management and scheduling. Click here for more information on Calendars. |
 |
Project - Facility Management projects, schedules tasks and activities. The Facility and Workflow Management module allows you to coordinate events, people, and resources across your organization's available venues. You can pull from and create information in your database to manage your venue, your staff and volunteers, your resources and your clients. With this module, the data coordination is presented in multiple visual ways allowing you to easily view and understand the relationships among all those variables. Click here for more information on Facility Management. |
 |
Report - List of reports. Click here for more information on Theatre manager Reporting. |
 |
Letter - List of form letters. Click here for more information on Form Letters. |
 |
Cart - List of shopping carts. Click here for more information on Shopping Carts. |
 |
Account - Chart of accounts. Click here for more information on the Chart of Accounts. |
 |
GL Entry - General Ledger entries. Click here for more information in GL Entries. |
 |
End of Day - End of day wizard. Click here for more information on the End of Day. |
 |
Map - List of theatres and their attached maps. Click here for more information on Theatre Maps. |
 |
Play - Play list. Click here for more information on Plays. |
 |
Subscription - Manage favorite seats for subscriptions. Click here for more information on Season Subscriptions. |
 |
Mail List - Mail lists and quick labels for patrons on a Mail List. Click here for more information on Mail Lists. |
 |
Preference - Employee preferences. Click here for more information on Employee Preferences. |
 |
Help - Access TheatreManagerHelp.com which contains the most recent documentation, procedures and FAQ's about Theatre Manager |
 |
Remote Assistance - Activates the remote assistance application to permit Arts Management Systems's support staff to access your machine remotely and assist you. To schedule remote assistance, please phone (888) 536-5244, ext. 1 or email support@artsman.com |
Toolbar Options
 Toolbar options allow you to customize:
- Toolbars
the way your toolbars appear both on the main window, specific window toolbars and on floating toolbars. By default, the toolbars all appear with large icons and text beneath them indicating what the icon does.
- You can customize the main toolbar by right clicking on the Main Theatre Manager toolbar.
- The toolbars on each window can be altered directly from the toolbar within each window.
- Menu (windows only)
On windows, you can also decide if you want the MENU bar to appear or not at the top of the window. To just toggle it on or off by 'checking' or 'unchecking' it.
To access the Toolbar Options on any window, simply Right-click on the toolbar. If you are presented with a menu of options (some windows take you directly to Toolbar Options), choose Preferences, then select your toolbar options.
To revert back to the System Default, you have two options:
- Go to Setup>>Users & Access>>Employee Preferences>>WINDOWS tab, and click on the
 button.
 - Right-click on the toolbar, select Preferences, and click the
 option.
|
This resets all window settings to the System Defaults, including any customized column placement. |
The Toolbar Options Window
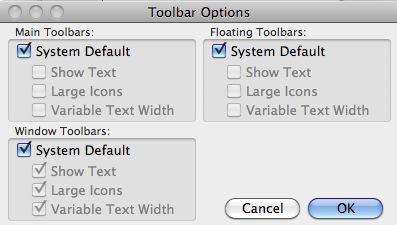
In the default mode, the Main Toolbar appears as indicated below.

By deselecting the "System Default" you have the following options:
- Show Text
- Large Icons
- Variable Text Width
Each one of these options may be used separately, or in conjunction with each other and are customizable on a per user basis.
By deselecting the Show Text option, the text will disappear from below the icons.

By deselecting the Large Icons option, the icons will get about 50% smaller.
![]()
By deselecting the Variable Text Width option, the text will stay at a fixed width, cutting off longer text selections.

Quick Find
Quick Find is designed for finding some needles in a haystack within the theatre manager Database. The quick-find window does a live search of text across a number of database records.
For example, searching for 123 might bring up an order, an address, a company with that in the name, a shopping cart or other interesting things.
Quick-Find finds the top 5 (by default) records in specific categories which can be set in Employee Preferences
To open quick Find, you can:
- Click the Quick Find
 button in the main Theatre manager tool bar / ribbon bar.
Alternatively
At any time press the [Ctrl] and [F] keys.
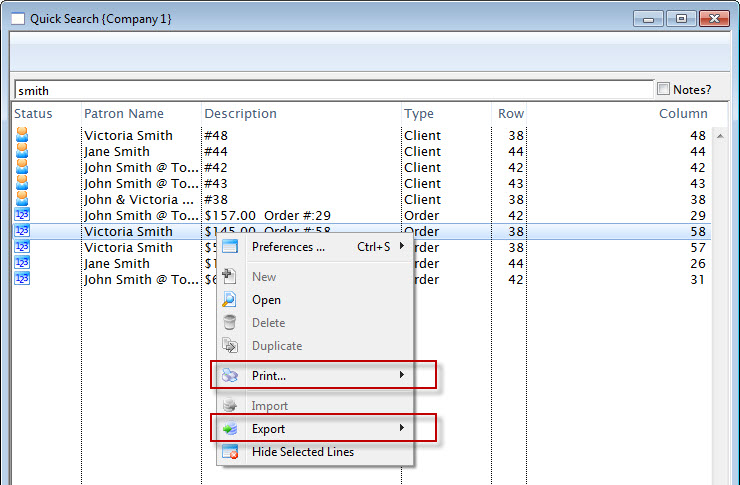
The Quick Search window opens.
Quick find shows:
- the most recently updated records found
- that match the criteria you entered
- in each category you have allowed to be search in your employee preferences.
The quick search window can be printed or exported.
Selecting a Date or Time
When looking up date and time fields, clicking on the ![]() icon will produce the Calendar/Date Search window. If the criteria you are using searches a date field only, the time will not appear.
icon will produce the Calendar/Date Search window. If the criteria you are using searches a date field only, the time will not appear.
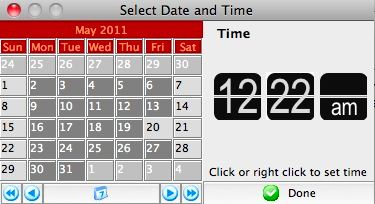
Calendar Functions
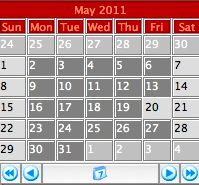
The date search window allows you to select any date to use as a parameter. You can select any date by simply double-clicking on it.
There are also navigation tools available to help you move forward or backward on the calendar:
|
|
Click this button to move the calendar back one month. |
|
|
Click this button to move the calendar back one year. |
|
|
Click this button to move the calendar forward one month. |
|
|
Click this button to move the calendar forward one year. |
|
|
Click this button to directly select from any of the upcoming 12 months, or the same month from the next 5 years. |
Time Functions
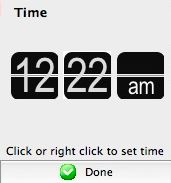
To change the hour, you can click on the top of the field to forward an hour. it rolls from 12 back to 1. Click on the bottom to go back an hour.
For minutes, if you click the 'left' side, it will go up/down by 10 minutes at a time. If you click on the right side of the minute, it will go up/down a minute at a time. This provides both a "fast" and a "slow" mode of changing the time.
If you right click on any part of the hour, you can pick 1 to 12.
If you right click on any part of the minutes, you can quick set the time to the quarter hour (00, 15, 30 or 45)
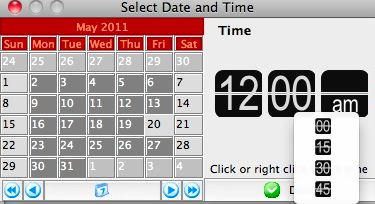
If you click on the am/pm, it toggles. If you right click, you get to pick am or pm directly.


