Different Modes of Selling Tickets
Patron Ticket Sales
Before Event Sales
Before Event Sales is designed to reserve and print tickets quickly for patrons who purchase tickets prior to a performance. All tickets sold using this method are sold to the same patron and can be sold within the same order or given separate orders.
Preparation
Before Event Sales can be sold for reserved and festival seating performances. To begin insert a new patron to be used as the default patron for the event. The patron's name could reflect the play the tickets are being sold to.
 | It is recommended that each employee has their own individual Before Event Sales Patron. This can be defined in the Employee Preferences. Click here for more information. |
Enter the last name as the event code (e.g. 01-02) and the first name as 'Before Event Sales'. When multiple terminals are used to conduct Before Event Sales at the same time it is recommended that a separate patron account be set up for each terminal. In the case of multiple terminals, enter the last name as the play code (e.g. 01-02) and the first name as 'Before Event Sales 2'.
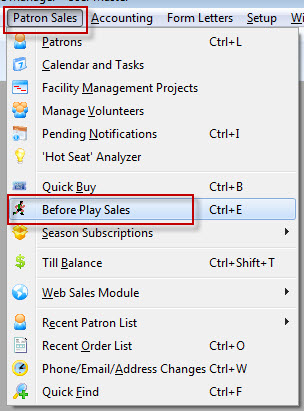
- Open the Before Event Sales Patron Window.
- Enter or Confirm the Before Event Sales patron number.
If this is a Pay What You Can performance please refer to the help page here for more information.
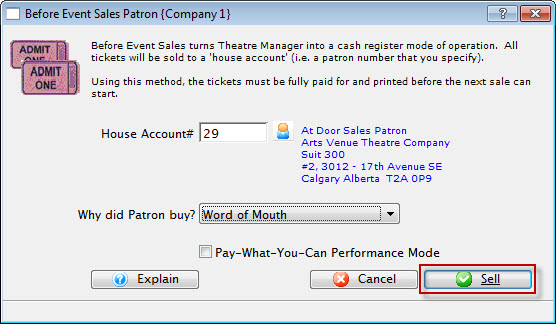
- Click the Sell
 button.
- Select the performance(s) that you will be selling tickets to.
Do this by single clicking on the performance. If the performance is not listed search for it using the search fields.
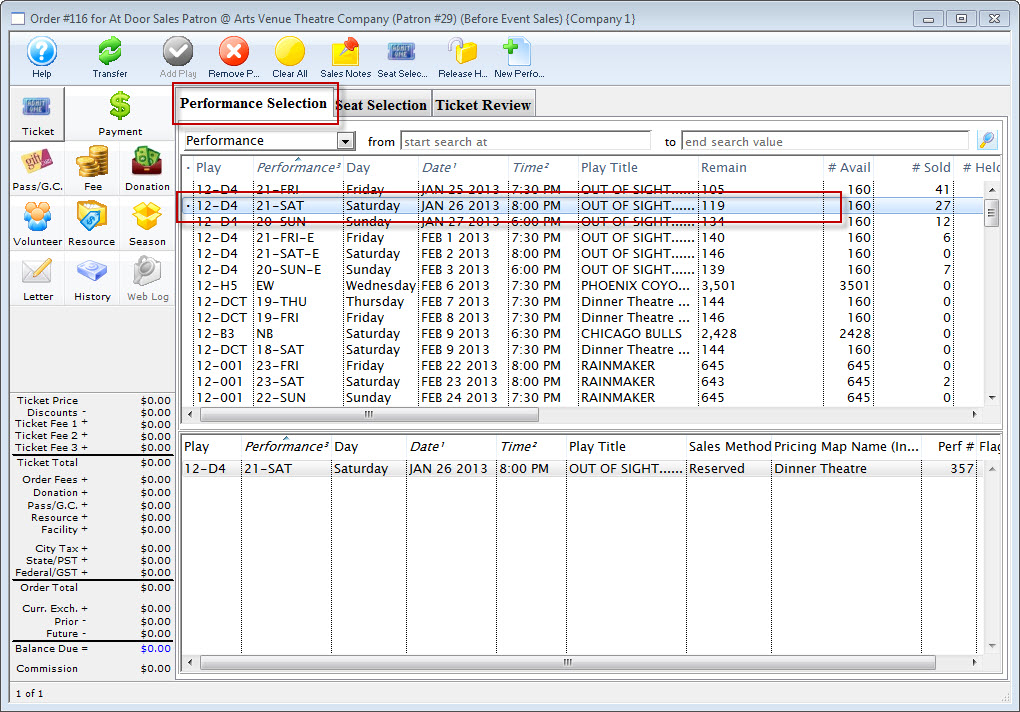
Click here to learn how to search for Performances. Click here for a detailed description of this window and its functions.
- Click the Seat Selection
 tab.
tab.
- Reserve the tickets.
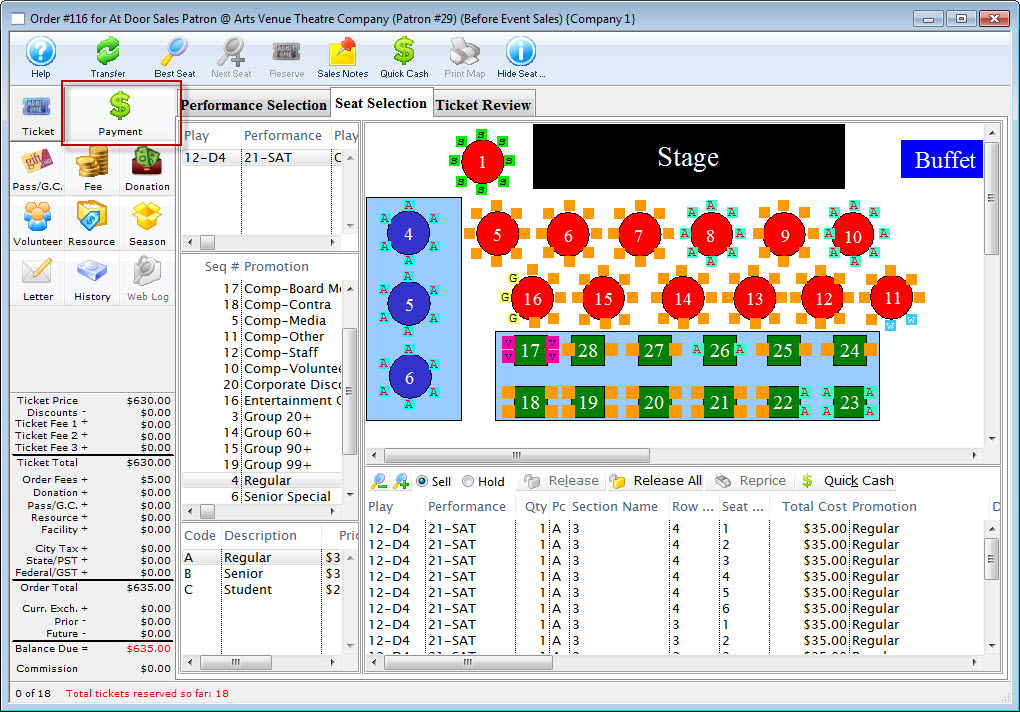
Click here to refer to the section Festival Seat Sales.
Click here for more information on Reserve Seat Sales.
- Click the Payments
 button in the left column.
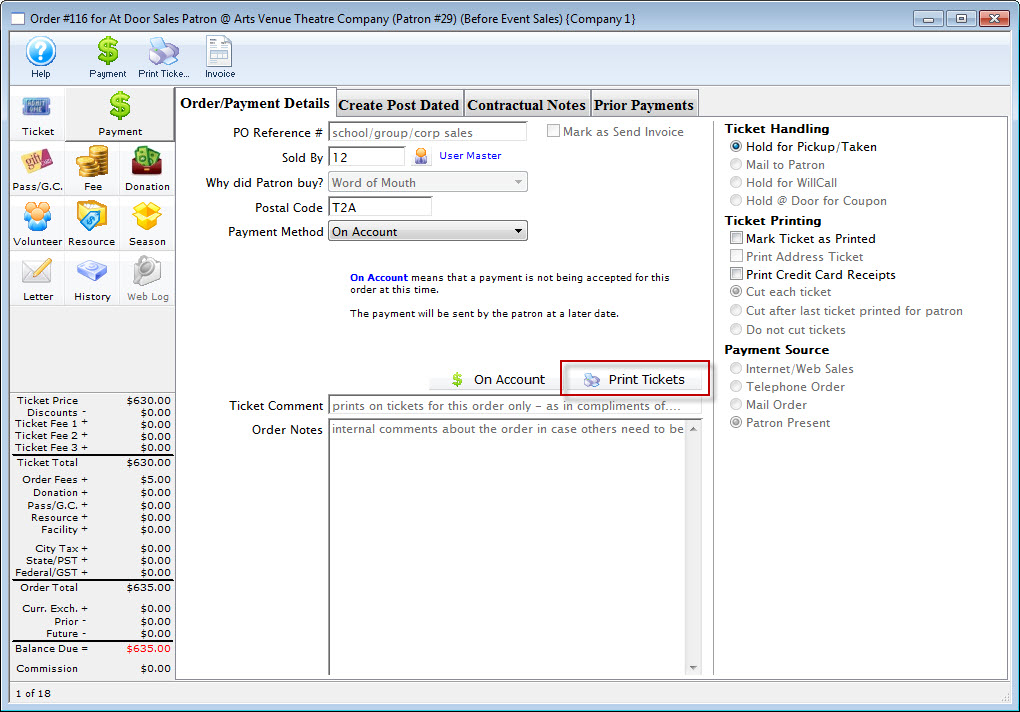
- Enter in the payment information.
Click here for more information on creating a payment.
- Click the Print Tickets
 button.
Clicking this button accepts the payment, prints the tickets and returns you to the Ticket Sales Window to make more ticket sales.
- Repeat steps 6 - 8 until finished with the current Before Event Sales Buy List.
- Close the window.
Pay What You Can Sales
Pay-What-You-Can Ticket (PWYC)
Philosophy
Pay-What-You-Can (PWYC) is intended to allow the sale of tickets to any performance of any event and collect from the patron any amount that they can offer toward the cost of those tickets. For example: If they only have $10 and the admission price is $15 the ticket can be sold a "pay what you can ticket". Ultimately this method of sale allows patrons from any economic status to attend your events and for those patrons who may not attend because of ticket price this becomes an offering of an affordable option.
Typically, Pay-What-You-Can tickets are for predetermined nights and sold only at the door the night of the performance. The tickets are sold as before event sales tickets to a house patron account. As these are rush tickets, a patron name and marketing information is usually not entered into Theatre Manager. You will need to set a performance as enabled for pay what you can.
This feature of Theatre Manger is accessed through the Before Event Sales routine. During this process any ticket sold may be sold at the regular admission price or by simply editing the amount of payment on the payment window. The ticket price is then converted and averaged over the number of tickets based on that payment amount entered. It is intended as an offering of any remaining seats just prior to performance time; RUSH seating. Although the intention for PWYC is for rush seating just prior to the event, there are options described below that will allow your organization to have reservations for the PWYC performance and just process the offering the patron provides for the tickets on the night of the performance.
The benefit of the PWYC feature is you are able to maintain the capability to capture attendance and sales values. The set-up and use of PWYC is described below:
| Option #1 | Pros | Cons |
| Option one would be to use Theatre Manager's Before Event
Sales Routine and selecting the Pay What You Can option during that set-up. Tickets are sold at time of request - RUSH at the door! Setting
this up is detailed in the Preparation section below.
NOTE: the performance must be set up to accept PWYC in the performance detail, otherwise you cannot use PWYC for a performance. |
|
|
| Options #2 | Pros | Cons |
| Manually accept PWYC money in a discrete collection box and take a manual head count as patrons pass through the gate/wicket. After the performance has started, then sell a matching number of tickets to the number of patrons who passed through the gate/wicket and enter the entire amount as one large payment. Theatre Manager will then allocate an average price to each and every admission ticket to the generic PYWC House account. |
|
|
| Options #3 | Pros | Cons |
|
This is similar to option #2, except in this case you are preprinting tickets ($0.00 value) for patrons to give them as they enter into the performance.
|
|
|
| Option #4 | Pros | Cons |
|
Providing the option of taking reservations for the PWYC performance. This option allows the pre-sales of PWYC and capturing of patron information, attendance, and revenue values for an event - in advance of the performance. Begin by setting up a series of sales promotion for PWYC. Refer to the Sales Promotion Set-up for more information. Flag the sales promotion as "Coupon Required" for added controls on batch printing of tickets. Example of Sales Promotion:
Enable the sale promotions specific to the performance of the event for PWYC. This way, these sale promotions will not be inadvertently used on sales to other non-PWYC performances. Capture the patron information and record the sale as a PYWC using the "PWYC-Reservation" sales promotion. This reserves the patron a ticket for the performance at a $0.00 value. Why record the reservation at $0.00? Because, even if the patron indicates the value of offering they will provide, still record the value as a $0.00 for two reasons:
When the patron is present to claim the ticket, edit the ticket value by using Quick Exchange to change the sales promotion to one of the PWYC dollar amount (PWYC-$1.00, or PWYC-$2.00, or PWYC-$3.00, etc) depending on how much the patron chooses to pay on average for each ticket. This will adjust the ticket price and record the correct revenue amount for the sale. For example, if the patron purchases 2 tickets and offers $10.00, then during the Quick Exchange process each ticket would get a "PWYC-$5.00" sales promotion. Adding both tickets together would be the sum of the total offering. |
|
|
Preparation
Before Event Sales can be sold for reserved and festival seating performances. To begin insert a new patron to be used as the default patron for the event. The patron's name could reflect the play the tickets are being sold to.
 |
It is recommended that each play requiring Before Event Sales have its own Before Event Sales patron account. This will prevent any one patron account from becoming too large. As well it is recommended that each employee has their own individual Before Event Sales Patron. This can be defined in the Employee Preferences. Click here for more information. |
Enter the last name as the event code (e.g. 01-02) and the first name as 'Before Event Sales'. When multiple terminals are used to conduct Before Event Sales at the same time it is recommended that a separate patron account be set up for each terminal. In the case of multiple terminals, enter the last name as the play code (e.g. 01-02) and the first name as 'Before Event Sales 2'.
 |
To improve performance in selling tickets using Before Event Sales, close all open windows prior to starting the process. |
- Open the Before Event Sales Patron Window.

- Confirm the Before Event Sales patron number.
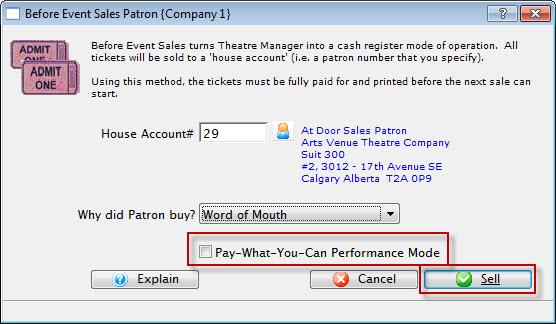
- Select Pay What You Can

- Click the Sell
 button.
- Select the performance(s) that tickets are being sold to.
Do this by single clicking on the performance. If the performance is not listed search for it using the search fields.
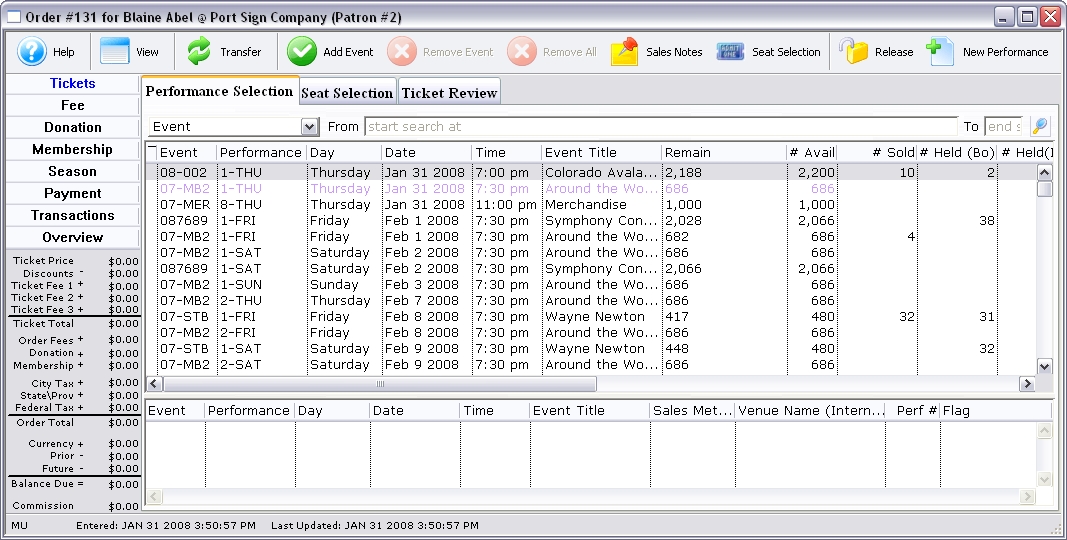
Click here to learn how to search for Performances.
Click here for a detailed description of this window and it's functions.
- Click the Seat Selection
 tab.
tab.
- Reserve the tickets.

Click here for more information on Festival Seat Sales. Click here for more information on Reserve Seat Sales.
- Click the Payments
 button in the left column.
The Payment Window will open.

- Change the payment amount to what the customer wishes to pay.
Click here for more information on accepting payments.

The payment amount for all tickets was $42.80 which has been changed in the above picture to $40.00. The amount entered here will be used to calculate the price of the tickets. i.e. 4 tickets will be $9.43 + tax(6%) = $40.00
Using this sales method creates no Accounts Receivable and you will provide no change to the patron.
- Click the Print Tickets
 button.
Theatre Manager will recalculate the ticket prices and print the tickets.
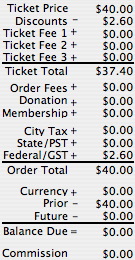
The ticket prices are calculated by taking the total price they were sold for subtracting order fees and taxes and using the remaining amount as the ticket price. The difference between the original and final prices is recorded as a discount. As you can see in this window the original ticket price was $42.80 and since the patron only paid $40.00 Theatre Manager takes that as the total order amount (i.e. plus tax and order fees). The individual ticket prices are then calculated and in total the discount was $2.60.
Quick Buy Ticket Sales
Quick Buy - Reserved or Festival Seating
Quick Buy is designed to reserve tickets quickly for patrons prior to getting the patron's name and information. All tickets sold using this method are sold to the same patron, creating a new order for each group of tickets. After reserving tickets using the Quick Buy method, the ticket orders are transferred to the actual patron's account who purchased the tickets. Quick Buy can be done for reserved and festival seating performances.
Preparation
Insert a new patron to be used as the Quick Buy patron for the sales. The patron's name could reflect the fact that it is the Quick Buy Patron. Enter the last name as the last two digits for the current year (e.g. 98-) and the first name as 'Quick Buy'. When multiple terminals are used to conduct Quick Buy Sales at the same time, a separate patron account could be set up for each terminal. In the case of multiple terminals, enter the last name as the last two digits for the current year (e.g. 98-) and the first name as 'Quick Buy 2'.
| It is recommended that each Theatre Manager user have their own Quick Buy patron account. This will prevent any one patron account from becoming too large. This can be defined in the Employee Preferences. Click here for more information. |
- Access Quick Buy in the Patron Sales menu.
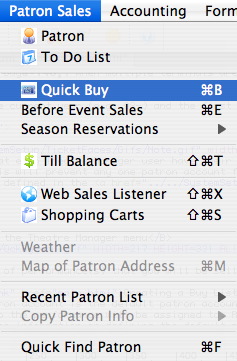
- Create the Buy List of performance(s) that the user will be selling
tickets to.
The Quick Buy patron account is the default patron account to which all the tickets sold to the performance will be assigned to. Click here for more information on Employee Preferences and defining the default patron account to be used when performing Quick Buy Sales.
- Click the Seat Selection
 tab.
tab.
- Reserve tickets as would be done with a real patron's account.
Click here for more information on Festival Seat Sales. Click here for more information on Reserve Seat Sales.
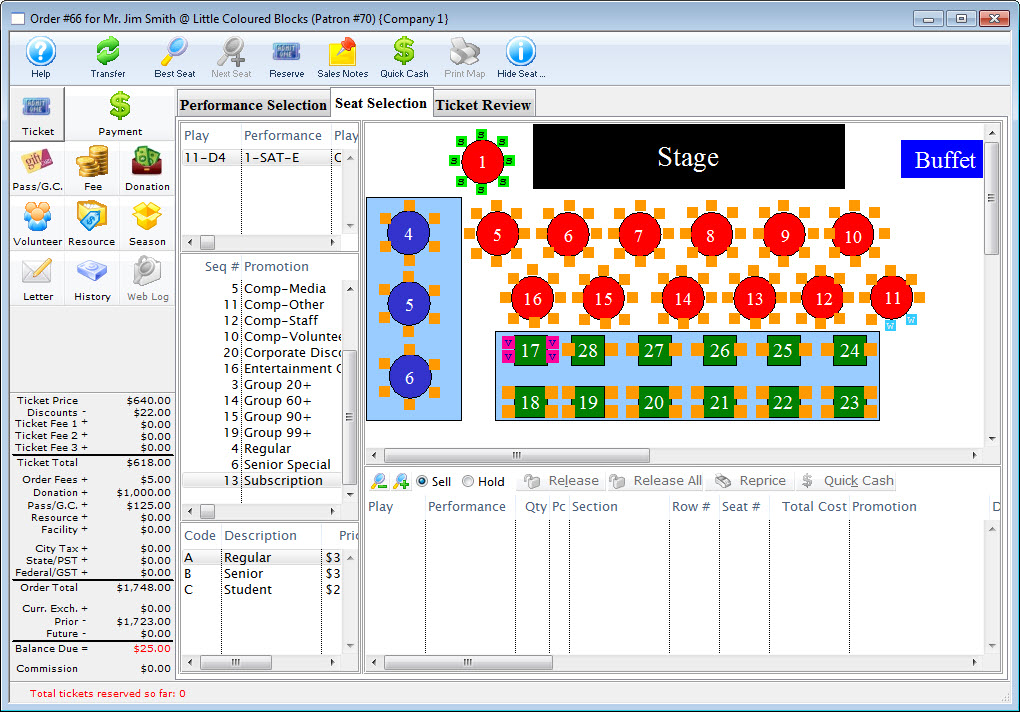
- Click the Transfer
 button.
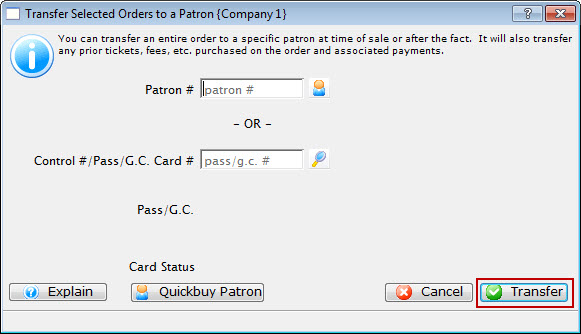
From this window there are the following options:
- Add a new Patron. Click here for information.
- Search for a Patron by Name. Click here for information.
- Search for a Patron by Member Card #. Click here for information.
- Reverting back to the QuickBuy Patron by using the Quick Buy Patron
 button
will use the
Quick Buy Patron the user has setup.
- Once the patron or member card is entered their information will be
displayed in the window.

- Verify the information and click the Transfer
 button.
A confirmation window will appear.
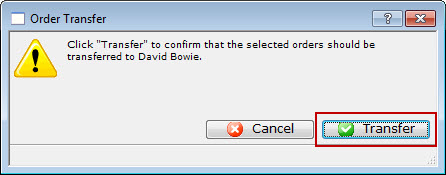
- Click Yes
 to transfer the order.
- Click the Payment
 button
to receive payment for the ticket(s).
Click here to learn how to accept payments.