TeamViewer Access
TeamViewer Access
Typically, you only need to click on an item on the tool bar.
However, there may be some reasons why you can't get into Theatre Manager. The other options below are alternative ways to provide remote access.
Teamviewer from Theatre Manager Menu
Teamviewer from Theatre Manager Menu
- Login to Theatre Manager as yourself
Note: We may need you to have master user password available in case we need to visit parts of the application you cannot access
- Click the Remote Assistance button on the upper right of the toolbar.
- A new window will appear displaying an ID and Password.
It may take a few moments for the ID to populate. If the ID does not populate it may be the network security settings do not allow for communication on port 80 or 5938.
- Reply to an existing email from the Support Team for the Current Case with the ID and Password.
A new email should be avoided when sending the Session ID and Password.
This button is found on the right side of the toolbar located across the top of the Theatre Manager window.

Teamviewer: Using free version for remote access
Teamviewer: Using free version for remote access
If you use it for free and you use it often, you may get prompted by the software that it thinks you are using it for commercial purposes. Unless you buy a licence (like ArtsMan has), you may see time limited or restricted use. We see this message rarely, but we have seen it.
 |
Teamviewer is great for remote access and work at home.
However, If you want to set up a remote box office, use a VPN, Remote Desktop, or a locally installed version of TM with a VPN in order to get ticket printing |
How to use Teamviewer
If you want to use it for remote access, you will need to:
- Download a full version of Teamviewer onto a machine in your office and install it. If you want multiple remote accesses to be available, you will need to install in on multiple machines. We suggest using WORKSTATIONS for this purpose - do not install it on your servers for ongoing remote access - it is considered a security risk
- Configure the above installation of teamviewer with a permanent password - make it longish, use special characters, numbers, letters, etc. you may, or may not want to allow file transfers.
- Record the ID and the permanent password
- Download a full version of Teamviewer onto your laptop or machine at home
- use the version from home to connect to the ID and password you recorded above
- Use Theatre Manager and the rest of the machine as you normally would
Some Notes about Teamviewer use
- Teamviewer is a great option as it does not require a configuration change to be made in your firewall appliance. You just start it, and it works
- However:
- You cannot share printers using teamviewer, so printing tickets is not possible remotely
- You cannot share disks, although you can use a file transfer tool to move files to/from one machine to the other
TeamViewer from Login Window
TeamViewer from Login Window
- Open Theatre Manager.
This can be done by double clicking on the theatre masks icon on the desktop.
- In the login screen, click the Change Data File button at the bottom of the window.
- Click the Remote Assistance button in the Select a Database window.
- A new window will appear displaying an ID and Password.
It may take a few moments for the ID to populate. If the ID does not populate it may be the network security settings do not allow for communication on port 80 or 5938.
- Reply to an existing email from the Support Team for the Current Case with the ID and Password.
A new email should not be created to send the ID and Password.
TeamViewer from Application Folder
TeamViewer from Application Folder
TO ACCESS THE FILE ON A PC:
- Open My Computer.
- Navigate to C:\Program Files\Theatre Manager\Theatre Manager\Remote Support
- Double click on the AMSQuickSupport icon to start the application.
- A new window will appear displaying an ID and Password.
It may take a few moments for the ID to populate. If the ID does not populate it may be the network security settings do not allow for communication on port 80 or 5938.
- Reply to an existing email from the Support Team for the Current Case with the ID and Password.
A new email should not be created to send the ID and Password.
TO ACCESS THE FILE ON A MAC:
- Open the Applications folder
- RIGHT-click on the Theatre Manager application
- Select Show Package Contents
- Open the Content/MacOS/Remote Support folder.
- Double click on the AMSQuickSupport icon.
- A new window will appear displaying an ID and Password.
It may take a few moments for the ID to populate. If the ID does not populate it may be the network security settings do not allow for communication on port 80 or 5938.
- Reply to an existing email from the Support Team for the Current Case with the ID and Password.
A new email should not be created to send the ID and Password.
TeamViewer as a download
TeamViewer as a download
- Download the TeamViewer installer to the desktop using the links below:
THE INSTALLATION FILE FOR PC:
http://www2.artsman.com/Software/AMSQuickSupportPC.zipTHE INSTALLATION FILE FOR MAC:
http://www2.artsman.com/Software/AMSQuickSupportMac.zip - Extract the TeamViewer installer to the desktop.
- Open the AMSQuickSupport folder on the desktop.
- Double click on the AMSQuickSupport icon to start the application.
- A new window will appear displaying an ID and Password.
It may take a few moments for the ID to populate. If the ID does not populate it may be the network security settings do not allow for communication on port 80 or 5938.
- Reply to an existing email from the Support Team for the Current Case with the ID and Password.
A new email should not be created to send the ID and Password.
For more information on TeamViewer and how it functions please click here.
TeamViewer Permissions for Mac
TeamViewer Permissions for Mac
In order to have full access to TeamViewer, the Mac OS requires certain system preferences to be enabled. These settings ensure the person connecting can see the desktop, move the mouse, and transfer files when needed.
Venture and Higher
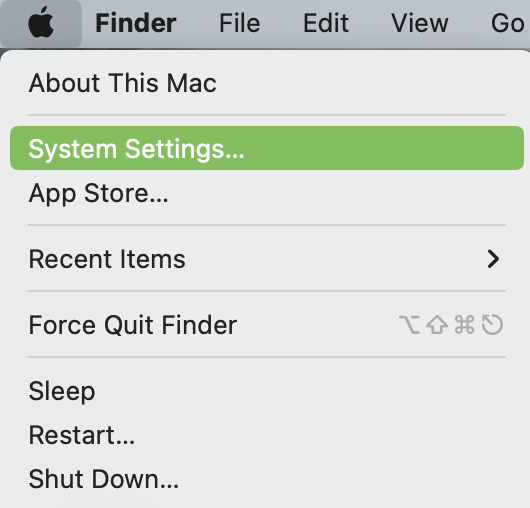
- Click Open System Settings
- Select Privacy & Security in the left column
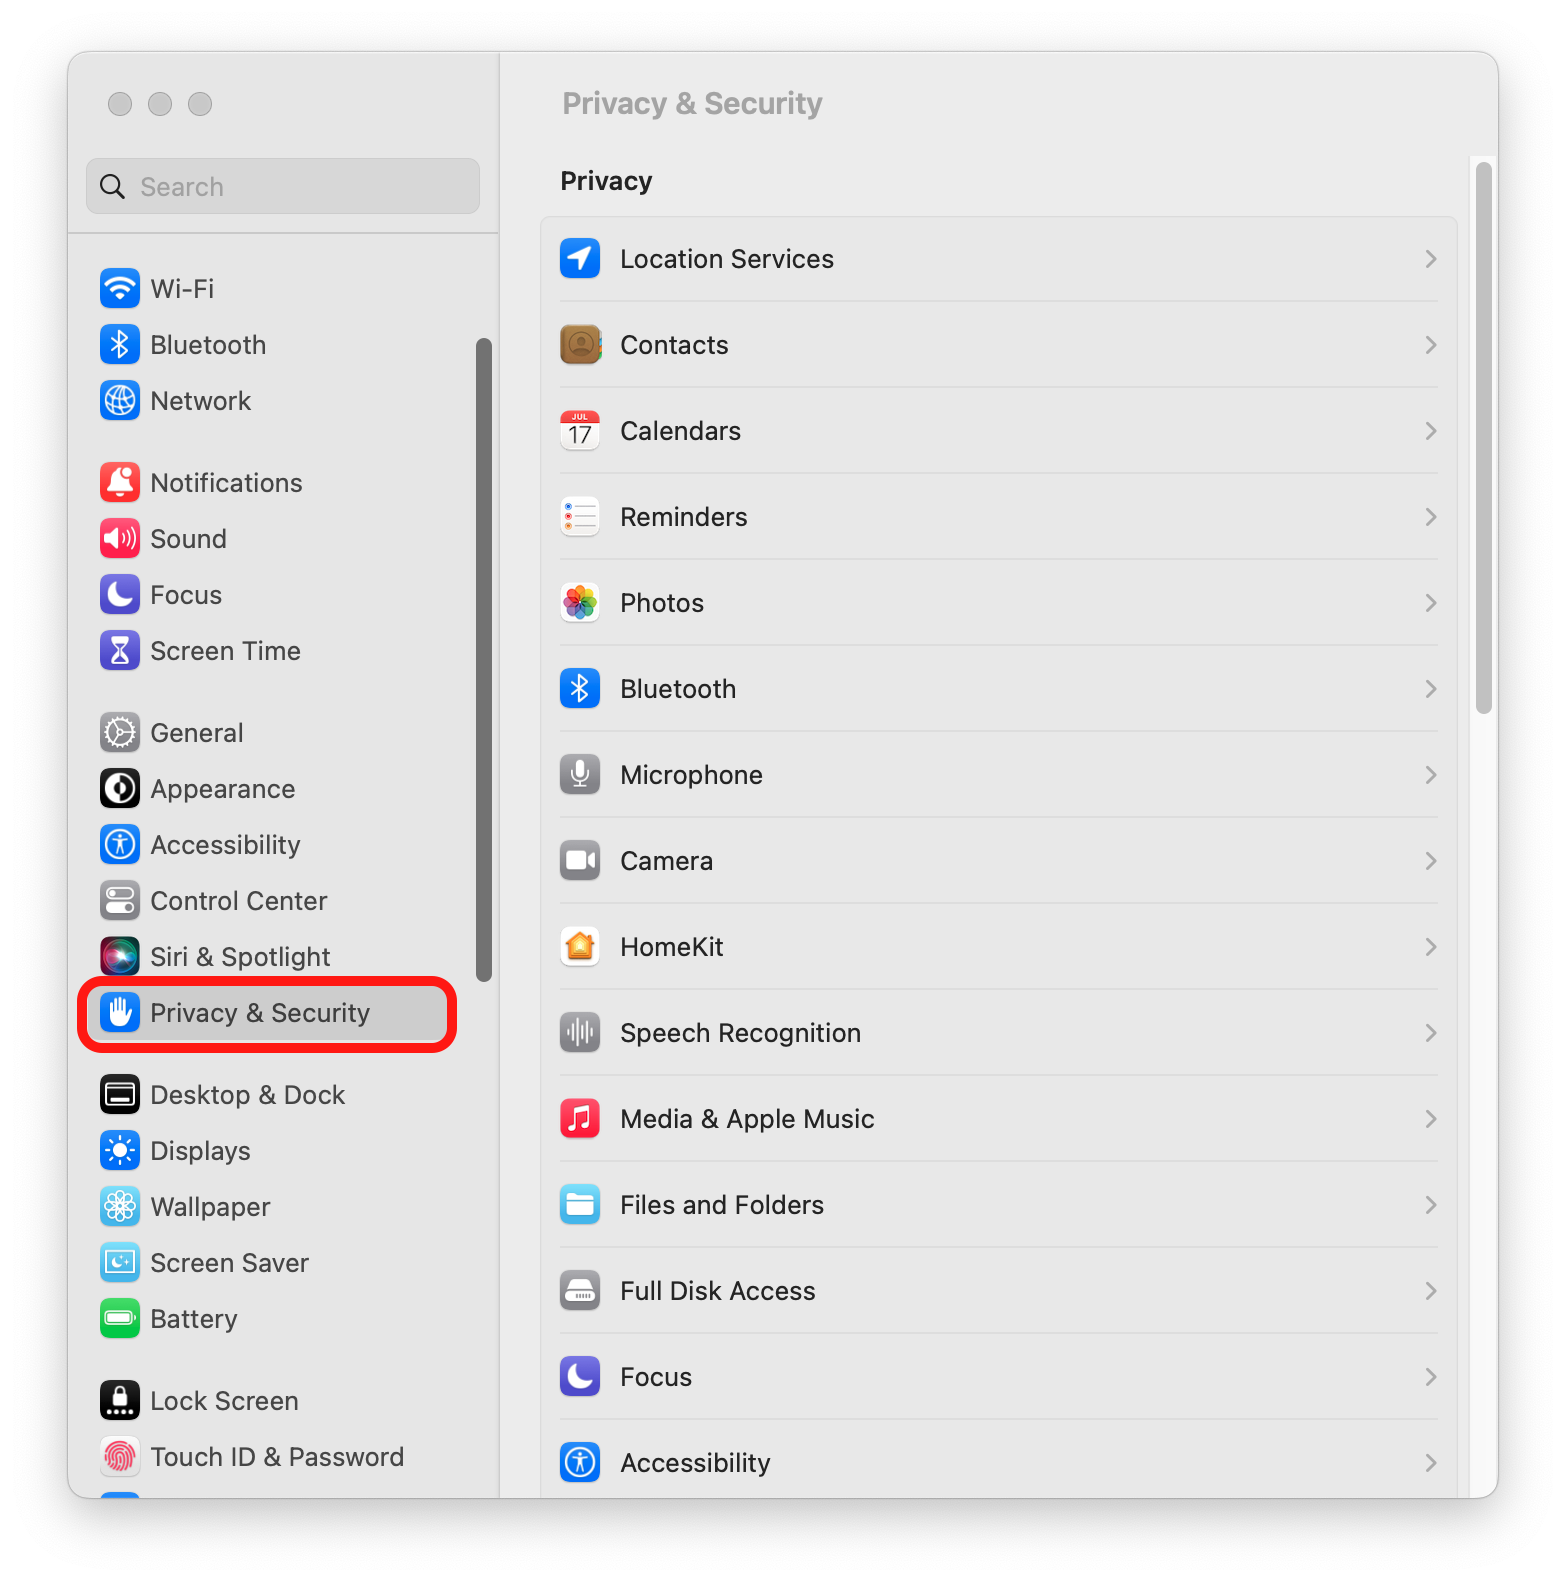
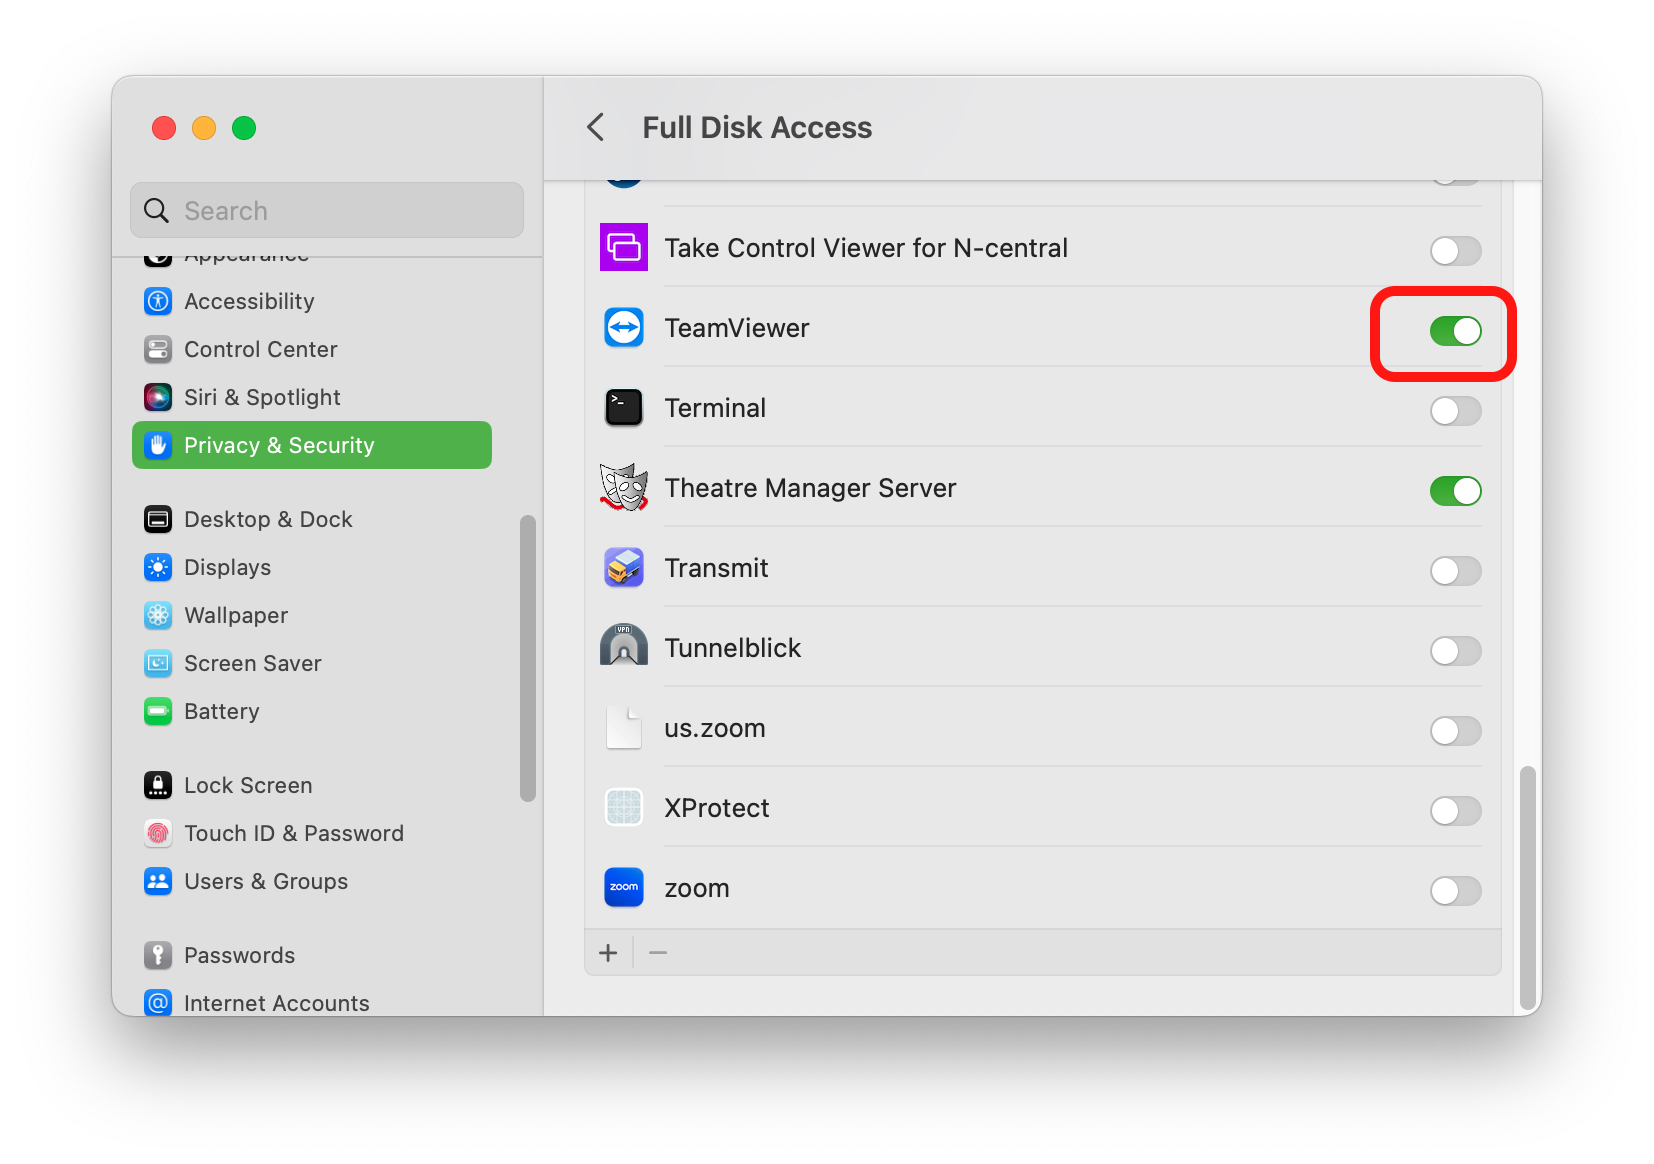
- Select Full Disk Access
- Use the + icon to add TeamViewer (if not already in the list) and move the slider to the right
- Enter the OS User password
- Click Later
- Click the back arrow at the top of the left column
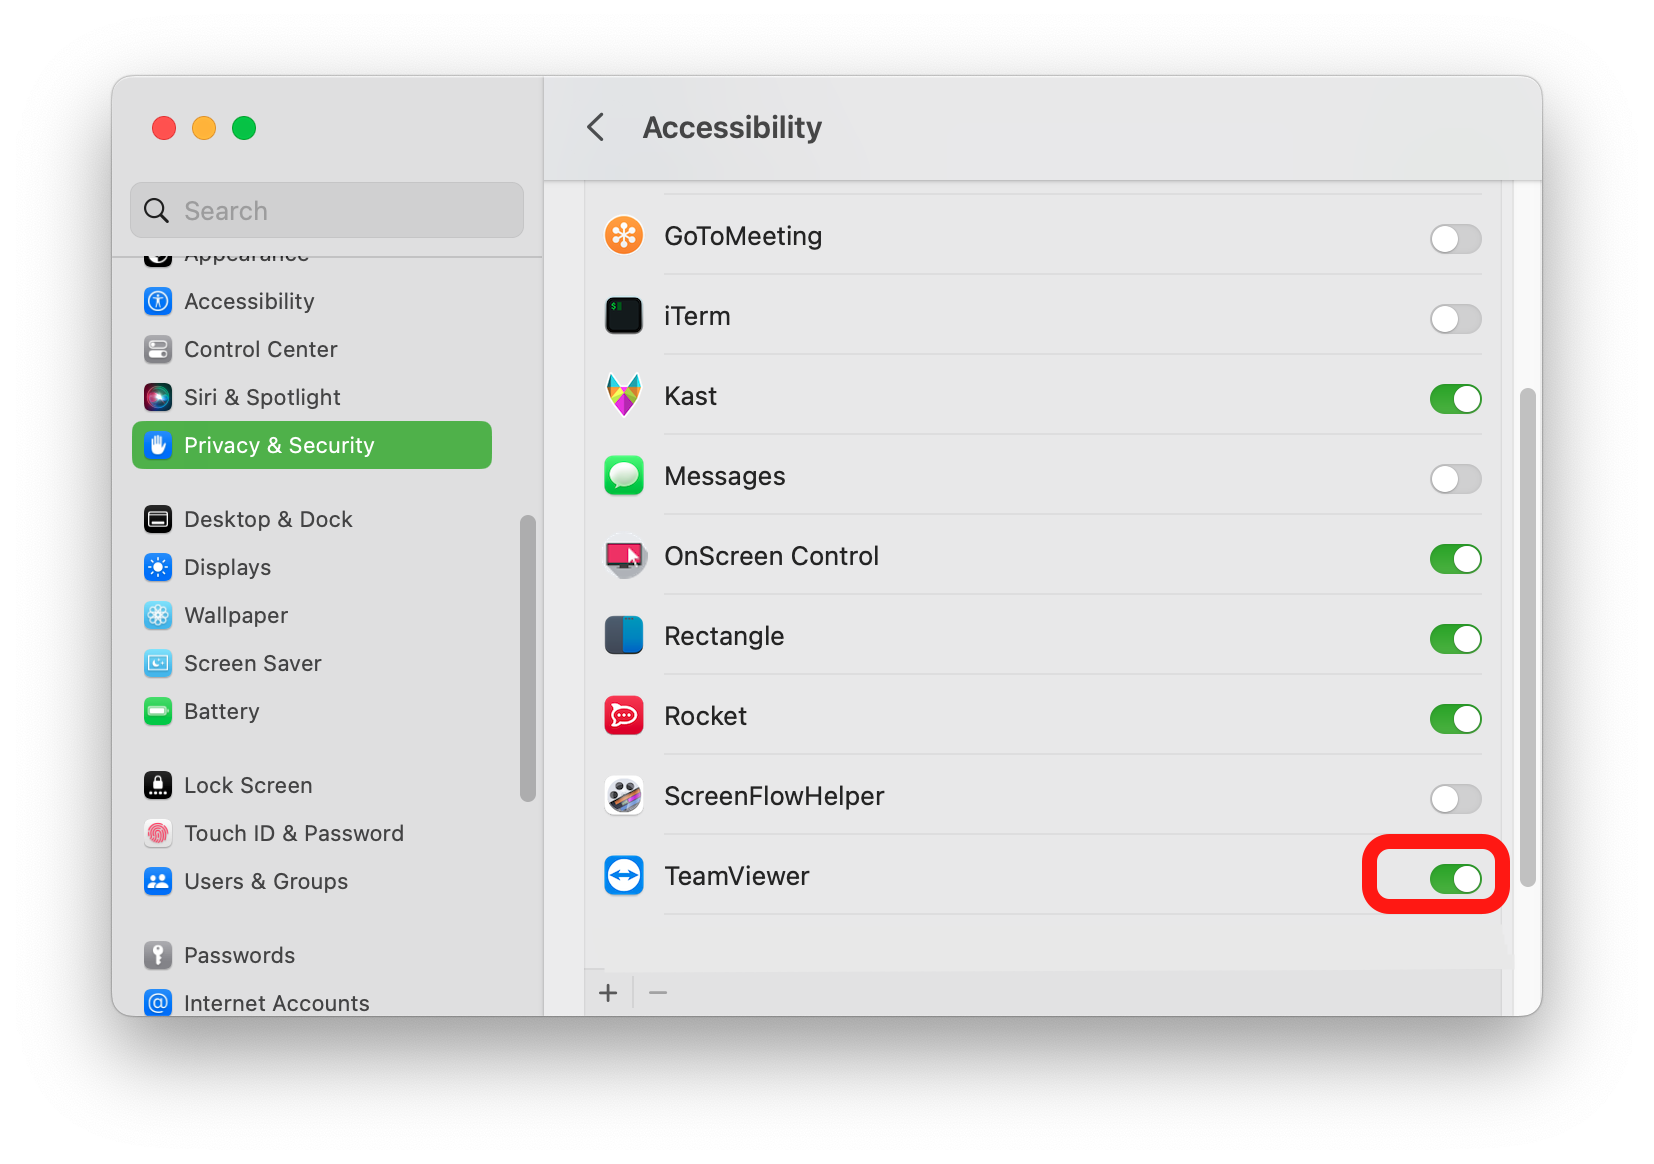
- Select Accessibility
- Use the + icon to add TeamViewer (if not already in the list) and move the slider to the right
- Click the back arrow at the top of the left column
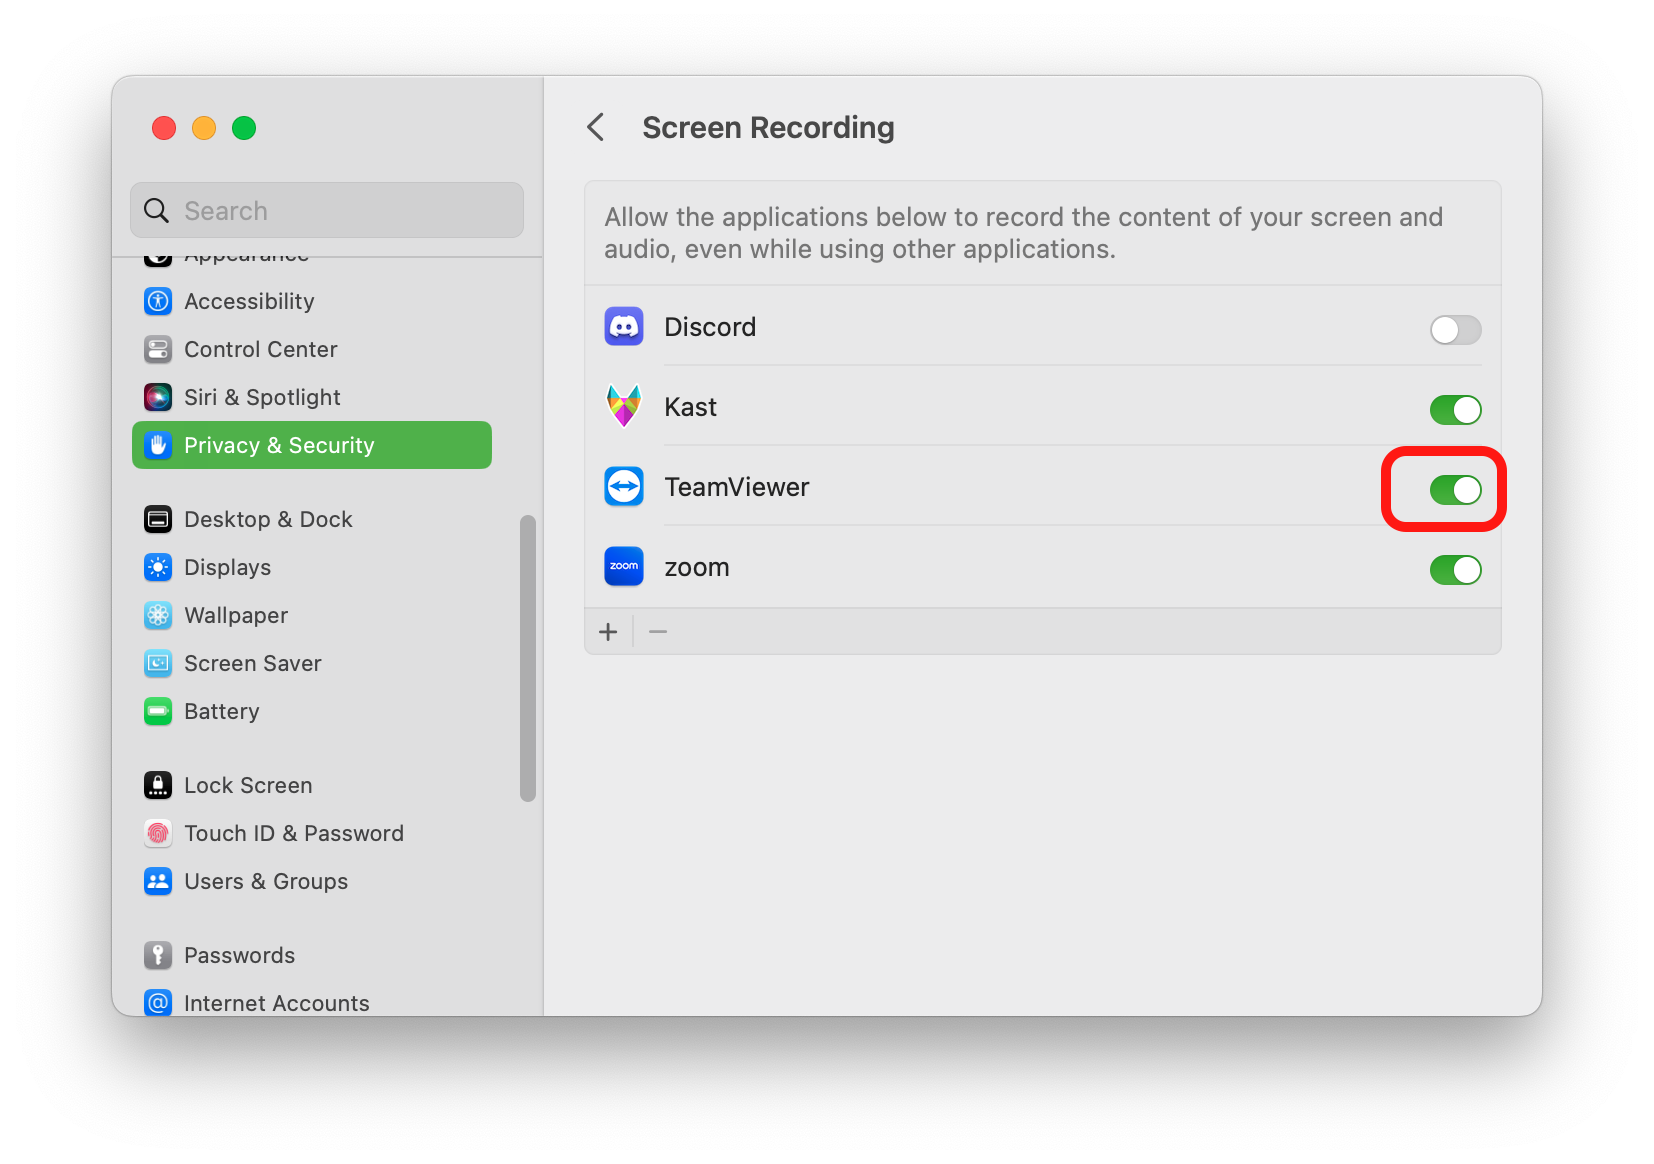
- Select Screen Recording
- Use the + icon to add TeamViewer (if not already in the list) and move the slider to the right
- Click the back arrow at the top of the left column
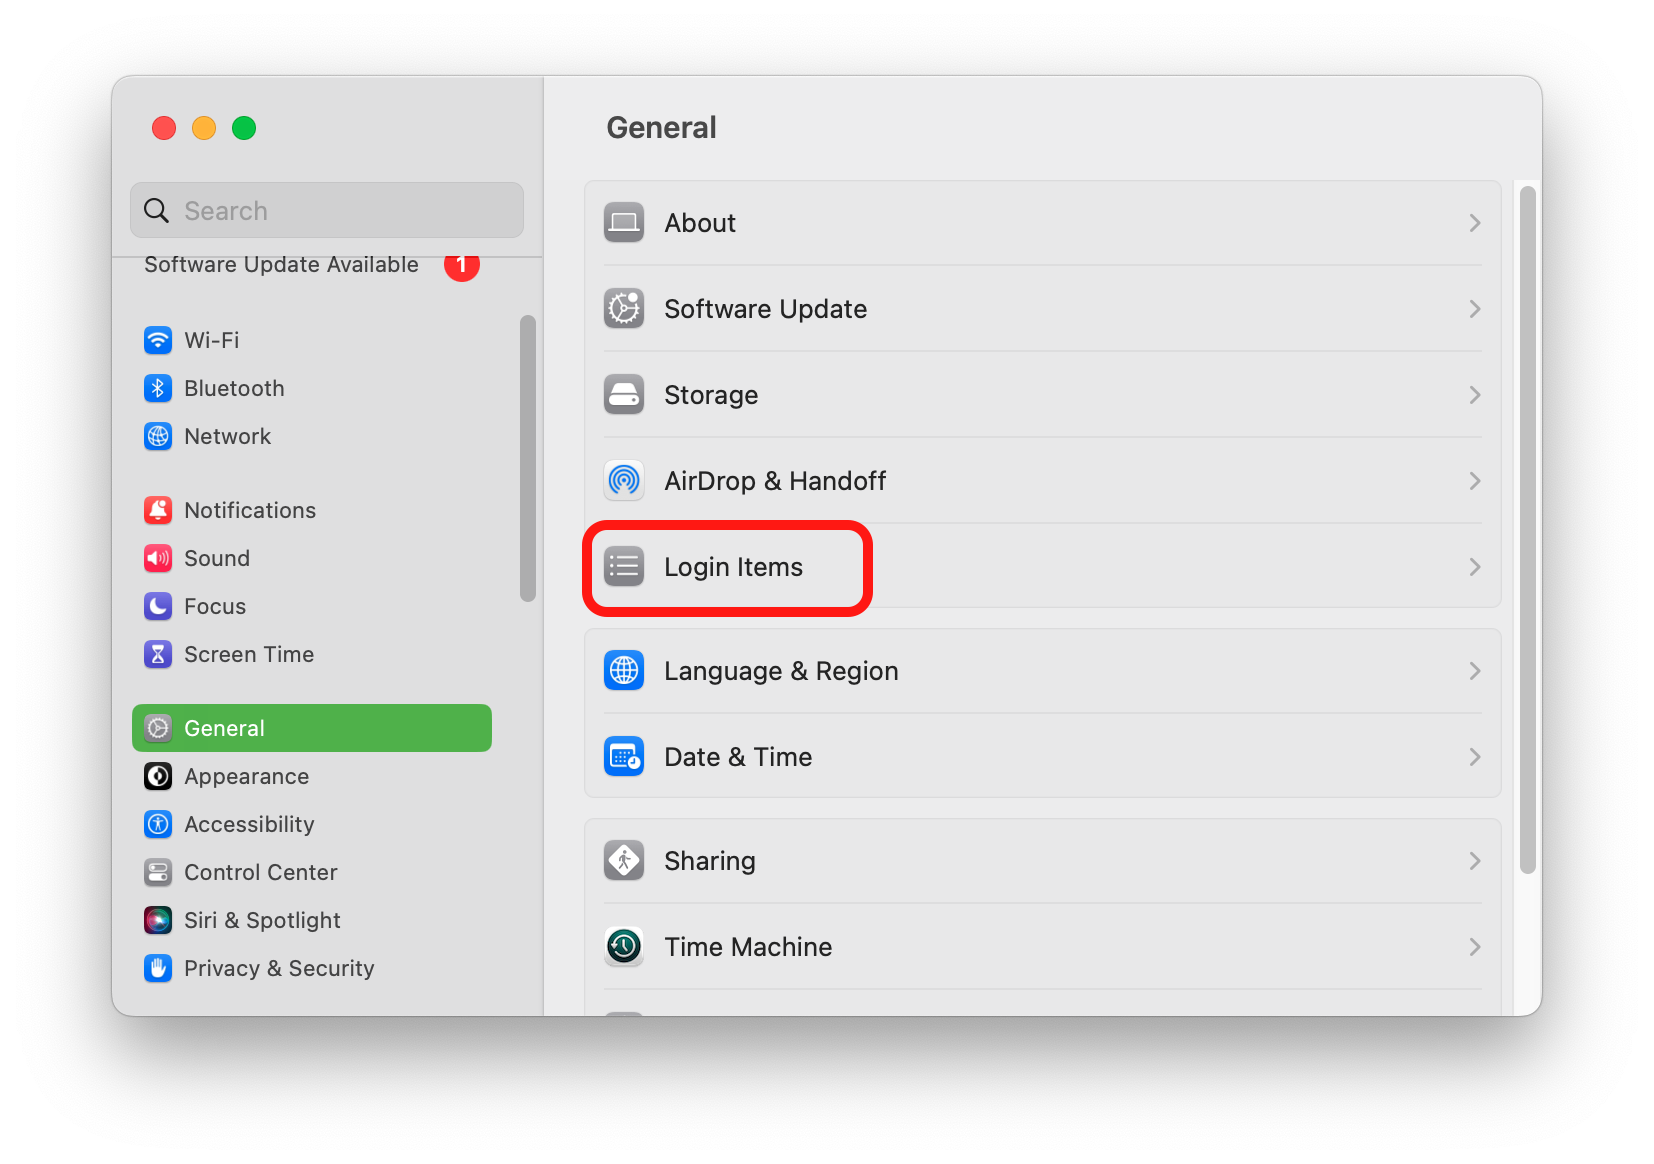
- Select General in the left column
- Select Login Items in the right column
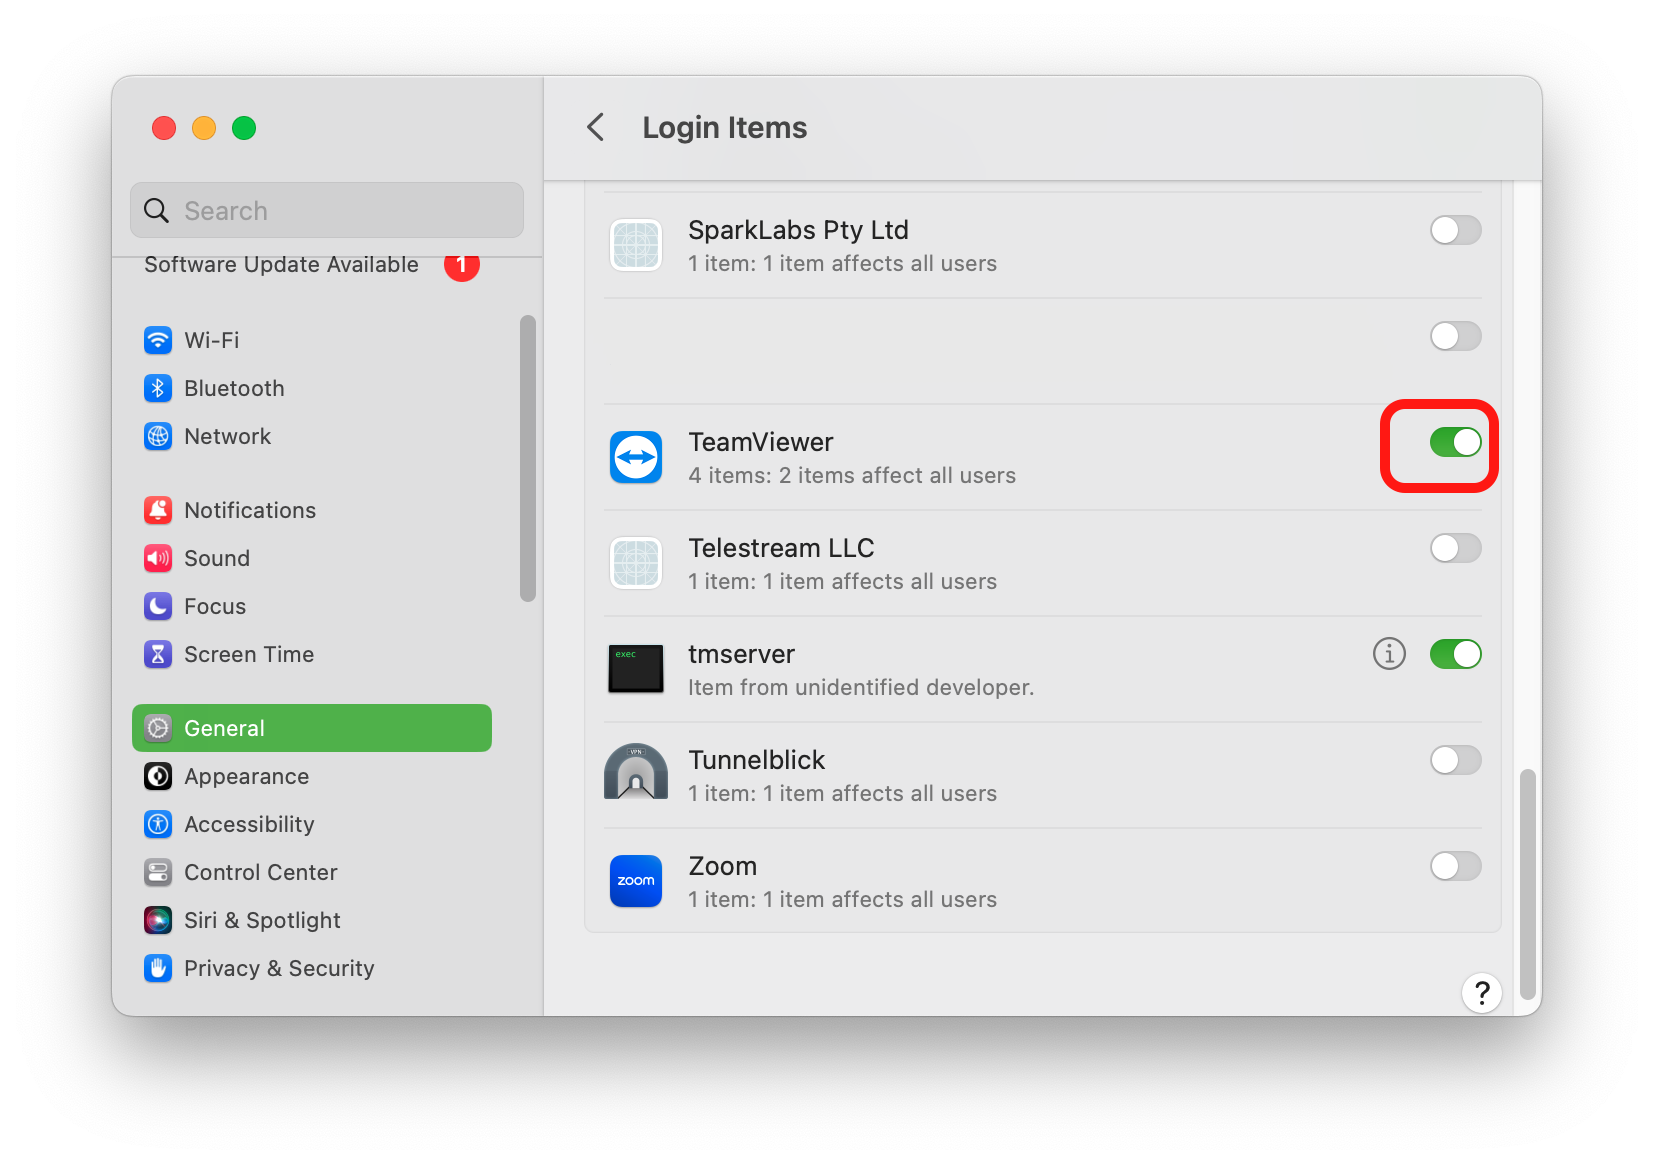
- Under Allow in Background, move the slider next to TeamViewer to the right
- Close System Settings