Formatting
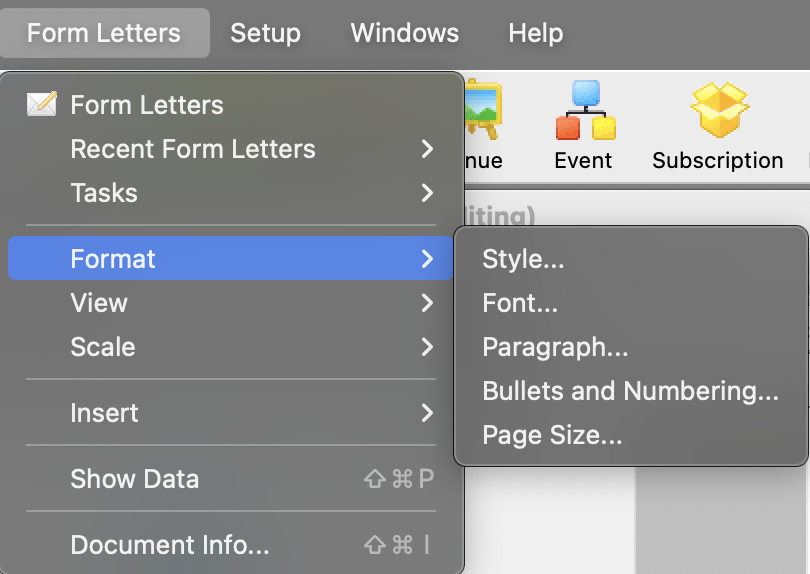
Format Menu Items
 The Format menu is used for adjusting the format of the text and paragraphs of the letter. Some of these options are also available in:
- The context menu for the word processor window
- Some keyboard shortcuts
Parts of the Format Menu
| Style | This opens up the Format Style window for changing the style of the text based on an existing style (or to make a new style. |
| Font | This opens the Format Font Format Font window for changing the font of the text. |
| Paragraph | This opens the Paragraph Properties window for changing the format of paragraphs in the letter. |
| Bullets and Numbering | This opens the Bullets and Numbering window for formatting text with bullets or numbering. |
| Page Size | This opens the Format Page Size window for the adjusting the properties of the document. |
Format Style
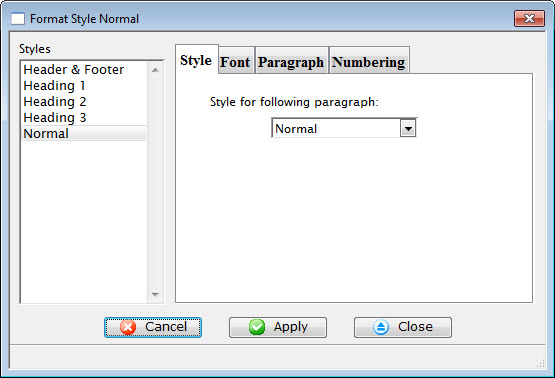 The Style Menu is a sub level of the Format Menu under Form Letters. The Style
Menu lists templates of the most used font styles and sizes. It allows setting
the style and size in which the text will be displayed, or to change the
style and/or size of the currently selected text.
The Style Menu is a sub level of the Format Menu under Form Letters. The Style
Menu lists templates of the most used font styles and sizes. It allows setting
the style and size in which the text will be displayed, or to change the
style and/or size of the currently selected text.
Some of these options are also available in:
- The context menu for the word processor window
- Some keyboard shortcuts
Parts of the Format Style Converter
 |
Adjusts the style of the selected template. For more information on the style tab click here. |
 |
Sets the font for the selected template. For more information on the font tab click here. |
 |
Defines the paragraph dimensions for the selected template. For more information on the paragraph tab click here. |
 |
Determines the bullet and numbering format for the selected template. For more information on the numbering tab click here. |
Style Sheet Tab
Displays the styles available in the document and allows you to both alter the style sheet and choose the style for the following paragraph.
Parts of the Style Tab
| Converter | This style is a 12 point Geneva font. |
| Heading 1 | This style is typically used for the first heading of a section. It is a 16 point Helvetica font. |
| Heading 2 | This style is typically used for a second-level heading in a section. It is a 14 point Helvetica font. |
| Heading 3 | This style is typically used for a third-level heading in a section. It is a 13 point Helvetica font. |
| Normal | This style is typically used for the body of a paragraph. It is a 12 point Times New Roman font. |
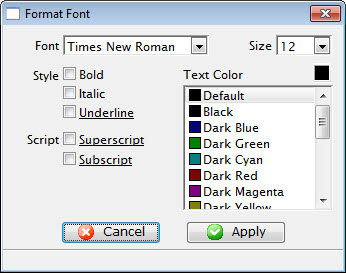
Font Tab
Font Tab |
|
| Font | A drop-down menu listing all available fonts that can be used in the letter. |
| Font Size | A drop-down menu listing standard point sizes for the font selected. Sizes may also be entered in the field manually. |
| Style | This style section refers to the style of the font. The available options are Bold, Italics, and Underlined. |
| Text Color | The color of the text may be changed either by:
|
| Script | The script section allows for the text to be formatted as either Superscript or Subscript. |
Format URL for Link
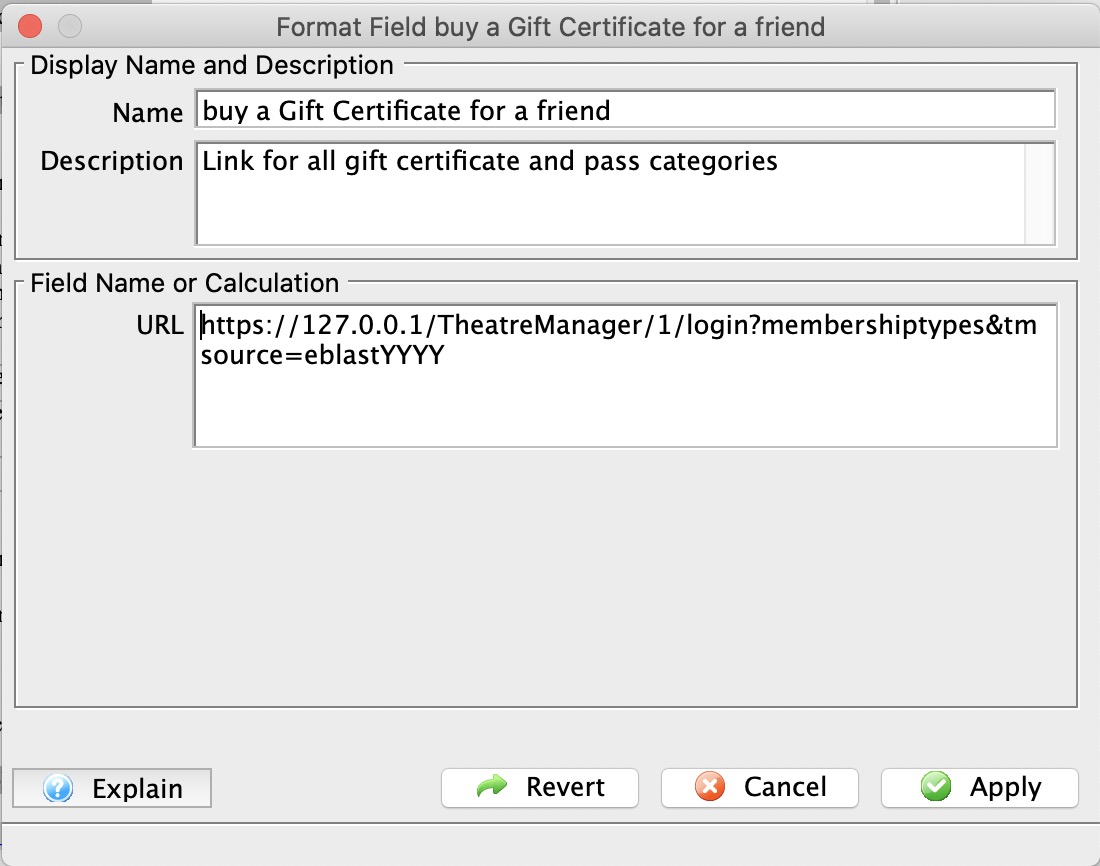 Links are useful in eblasts to help you direct the patron to a specific area in the web site to begin the buying process and track the reason people came to the web site using the tmsource feature of a link
You can right-click on text to format it a Link or to edit the URL for an existing link.
You can alter the:
- Name of the link which is displayed on the letter for the patron to click on
- Description of the field which is the tooltip displayed when you run your mouse over the field. It will default to explain what link you have chosen
- URL that clicking on the link will display in your browser.
Selecting a link
You can type in any link you want such as your marketing web site URL or the ticketing web site.
The context menu has a helper to help you quickly insert a URL for various parts of your ticketing web site.
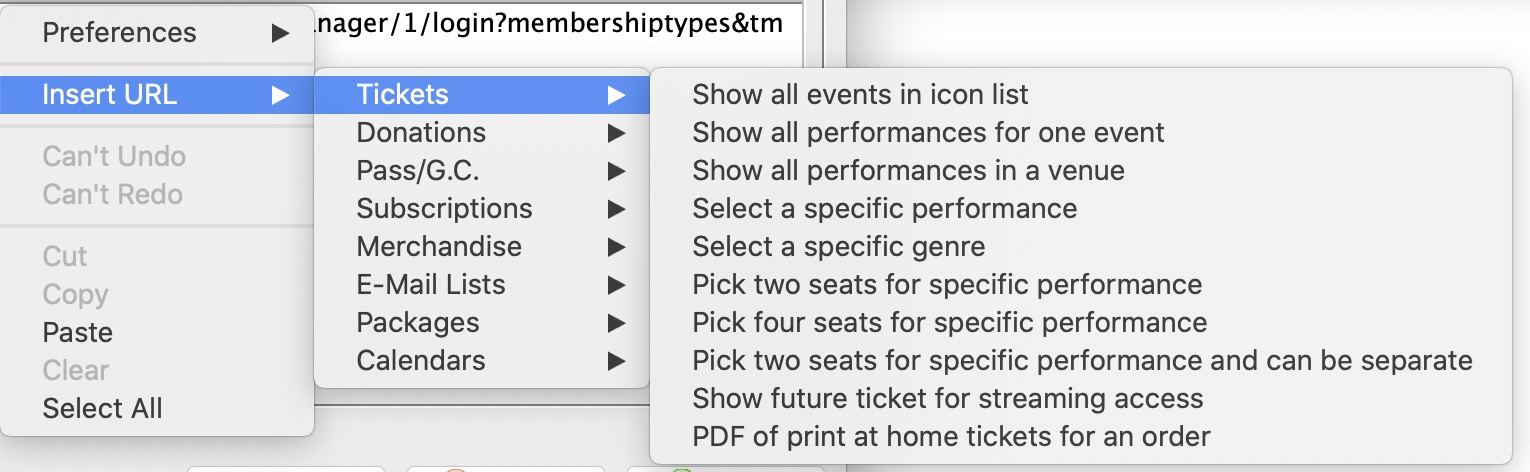 For example, if you want to place a link to show all events:
- Right click on the URL field
- Select Insert URL
- Select Tickets category of URL's
- Select Show All Events in Icon List
- The Description will change to describe what the link does as a helpful tip to you
- The URL will be changed to the link that will accomplish that task
- Some links will have XXX or QQQ in them. It the link is for a donation campaign, the XXX need to be changed to one of your donation campaigns.
 |
For more information about a URL that is inserted, please refer to redirecting links |
|
The parameter tmSource is automatically appended to the end of all links with an example value. Please change it to make sure you do eblast referral tracking. |
Formatting Fields and Calculations or a Form Letter
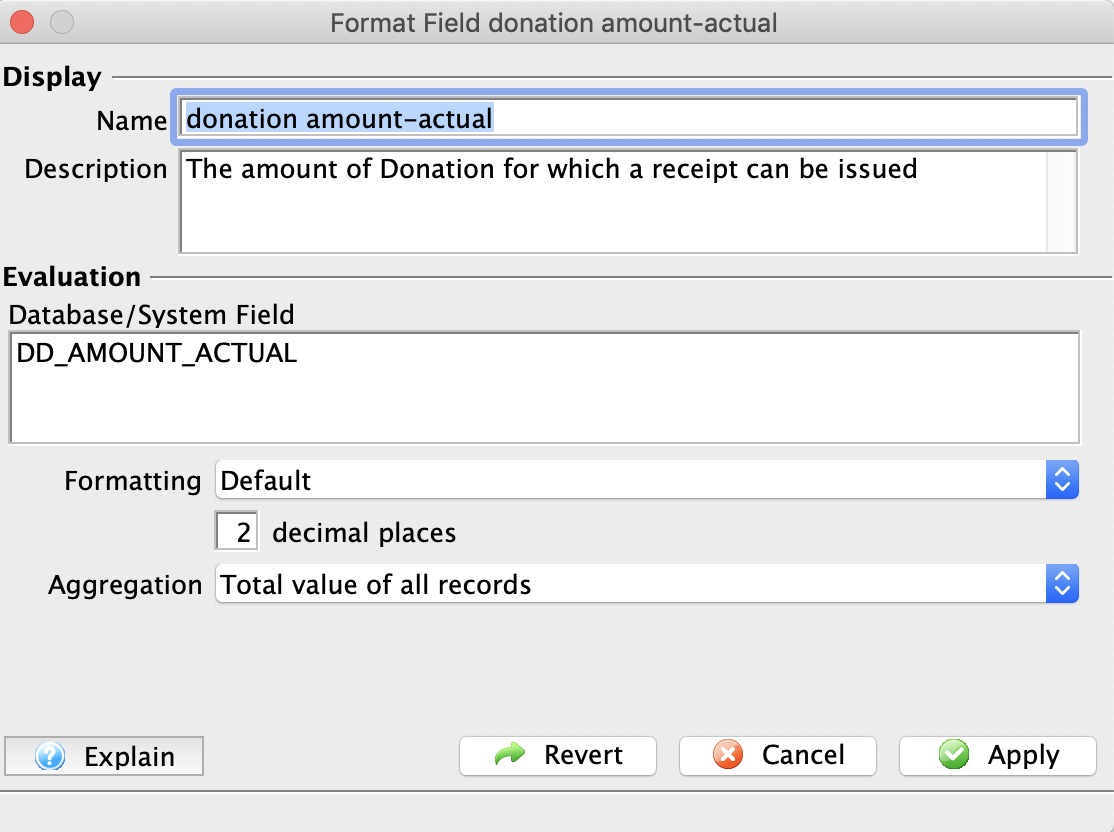 You can double click on fields to alter some formatting of the field and some other options. You can alter the:
- Name of the field which is displayed on the letter, if you prefer something different than the standard.
- Description of the field which is the tooltip displayed when you run your mouse over the field.
- Calculation that the field will display. This is normally only a single database field selected from the context menu as per the example to the right.
- Formatting of the field (numeric, date, text, currency, etc) by using the popup.
- Number of decimals if it is a numeric field
- Aggregation of the field if it is of a type that can be aggregated.
- Typically this lets you display maximum, minimum, total or average value of all the records that might appear on a consolidated letter
- It is only effective on a document designed to display multiple records in a table
- Note: If a field has aggregation set on it, it appears yellow in the document
Adding a calculation containing one or more fields
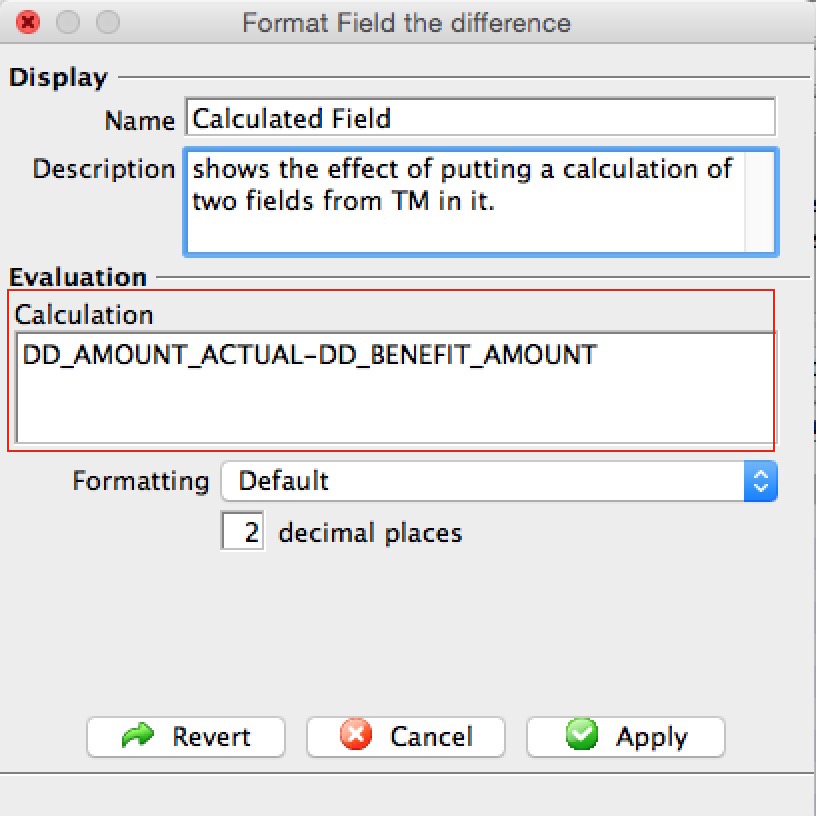
The one time you may wish to change all the options available for a field is when you want to have a calculation occur between multiple fields. The example below shows calculating the net deductible donation amount based on the difference between the actual donation amount and the benefit. In this case, the sample shows the calculation changed and all other items in the screen changed to reflect it on the document.
An obvious question is how to get the names of the fields for a calculation. You can use a simple trick:
- Insert each the fields onto the form letter that you might want to put in the calculation
- Double click on those fields
- Write down the name of the field from the 'evaluation' field
- Close the window
 Insert one of the fields a second time (or copy/paste it). This is what we will use as the calculated field.
- Change the Database/System Field area to contain a calculation based on multiple variables. In this example, the field
DD_AMOUNT_ACTUAL was changed to be the calculation
DD_AMOUNT_ACTUAL-DD_BENEFIT_AMOUNT
- hit the tab key and the Database/System Field will change to Calculation if it contains valid fields to let you know that Theatre Manager recognizes the calculation
- You may wish to change the name and description to indicate what you've done - and the next person to edit the letter will know from the name of the calculation what it means.
- Change the Database/System Field area to contain a calculation based on multiple variables. In this example, the field
- Print some samples of the letters - reviewing the date on the letter to see if it is right
- Then remove any fields from the letter that you don't really want the patron to see, but you added to the letter to get the field names
Once you've created a calculation, you should also be able to use it to create a custom field and do conditional printing.
Paragraph Tab
Paragraph Tab |
|
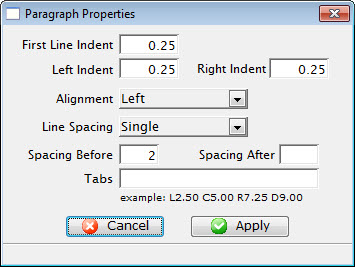
| First Line Indent | Sets the indent of the first line of each paragraph. |
| Left Indent | Sets a left indent to all lines of a paragraph. |
| Right Indent | Sets a right indent to all lines of a paragraph. |
| Alignment | A drop-down menu allowing for the adjustment of the alignment of the paragraph. The available options are Left, Center, Right, and Justified. |
| Line Spacing | A drop-down menu to set the spacing between lines in a paragraph. The available options are Single, 1.5, and Double. |
| Spacing Before | Sets the spacing before each paragraph. |
| Spacing After | Sets the spacing after each paragraph. |
| Tabs | Sets any tab stops that should be on the page. L=Left, C=Centre, R=Right, D=Decimal followed by a number where the tab stop occurs.
For example: a tab stop o L2.50 would a Left Tab at 2.5". Tabs can be set usin the toolbar as well. |
Numbering Tab
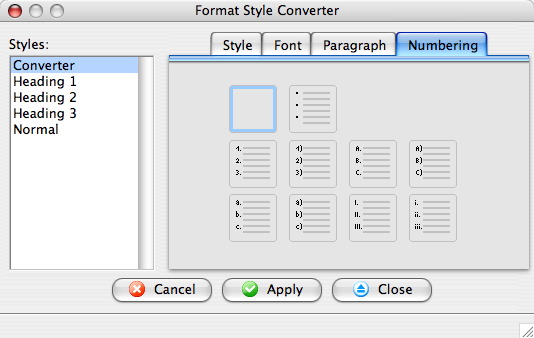
Parts of the Bullets and Numbering Window |
|
 |
Text is not in list format or removes list format from selected text. |
 |
Converts the text to a list with bullets. |
 |
Converts the text to a list with numbers and a period separator. |
 |
Converts the text to a list with numbers and a parentheses separator. |
 |
Converts the text to a list with upper case letters and a period separator. |
 |
Converts the text to a list with upper case letters and a parentheses separator. |
 |
Converts the text to a list with lower case letters and a period separator. |
 |
Converts the text to a list with lower case letters and a parentheses separator. |
 |
Converts the text to a list with roman numerals and a period separator. |
 |
Converts the text to a list with roman numerals and a parentheses separator. |
Format Font Window
 The Font Menu is a sublevel of the Format Menu under Form Letters. The Font
Menu allows the changing of the font and size of the text for input, or
to change text that is currently selected.
The Font Menu is a sublevel of the Format Menu under Form Letters. The Font
Menu allows the changing of the font and size of the text for input, or
to change text that is currently selected.
Some of these options are also available in:
- The context menu for the word processor window
- Some keyboard shortcuts
Parts of the Format Font Window
| Font | A drop-down menu listing all available fonts that can be used in the letter. |
| Font Size | A drop-down menu listing standard point sizes for the font selected. Sizes may also be entered in the field manually. |
| Style | This style section refers to the style of the font. The available options are Bold, Italics, and Underlined. |
| Text Color | The color of the text may be changed either by using the color picker button on the right hand side, or the list of default colors below. |
| Script | The script section allows for the text to be formatted as either Superscript or Subscript. |
 |
Closes the Format Font window without applying any changes. |
 |
Applies the changes to the text and closes the Format Font window. |
Paragraph Properties
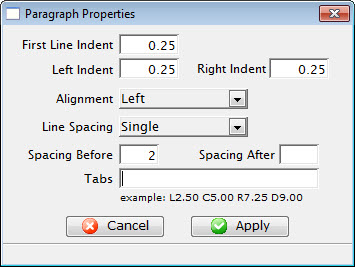 The Paragraph Menu is a sublevel of the Format Menu under Form Letters. The
Paragraph Menu allows the adjustment of the paragraphs in the letter.
The Paragraph Menu is a sublevel of the Format Menu under Form Letters. The
Paragraph Menu allows the adjustment of the paragraphs in the letter.
Some of these options are also available in:
- The context menu for the word processor window
- Some keyboard shortcuts
Parts of the Paragraph Properties Tab
| First Line Indent | Sets the indent of the first line of each paragraph. |
| Left Indent | Sets a left indent to all lines of a paragraph. |
| Right Indent | Sets a right indent to all lines of a paragraph. |
| Alignment | A drop-down menu allowing for the adjustment of the alignment of the paragraph. The available options are Left, Center, Right, and Justified. |
| Line Spacing | A drop-down menu to set the spacing between lines in a paragraph. The available options are Single, 1.5, and Double. |
| Spacing Before | Sets the spacing before each paragraph. |
| Spacing After | Sets the spacing after each paragraph. |
| Tabs | Sets any tab stops that should be on the page. An example of a tab stop would be L2.50 which places a Left Tab at 2.5". |
|
Closes the Format Font window without applying any changes. |
|
Applies the changes to the text and closes the Format Font window. |
Format Page Size Window
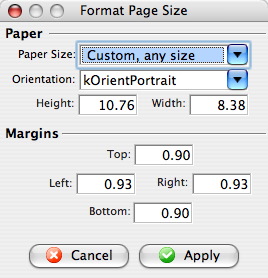 The Page Size Menu is a sublevel of the Format Menu under Form Letters. The
Page Size Menu allows the adjustment of the size and orientation of the letter..
The Page Size Menu is a sublevel of the Format Menu under Form Letters. The
Page Size Menu allows the adjustment of the size and orientation of the letter..
Some of these options are also available in:
- The context menu for the word processor window
- Some keyboard shortcuts
Parts of the Format Page Size Window
Paper |
|
| Paper Size | The drop-down menu displays a list of standard paper sizes. The user may also enter custom sizes below or select the custom format from the list. |
| Orientation | The drop-down menu allows a change between orientating the paper in Portrait or Landscape. |
| Height | Displays the height of the paper when a size is selected above or allows the user to enter a custom height. |
| Width | Displays the width of the paper when a size is selected above or allows the user to enter a custom width. |
Margins |
|
| Top | Sets the size of the top margin in inches. |
| Left | Sets the size of the left margin in inches. |
| Right | Sets the size of the right margin in inches. |
| Bottom | Sets the size of the bottom margin in inches. |
|
Closes the Format Font window without applying any changes. |
|
Applies the changes to the text and closes the Format Font window. |
Format Picture or Image
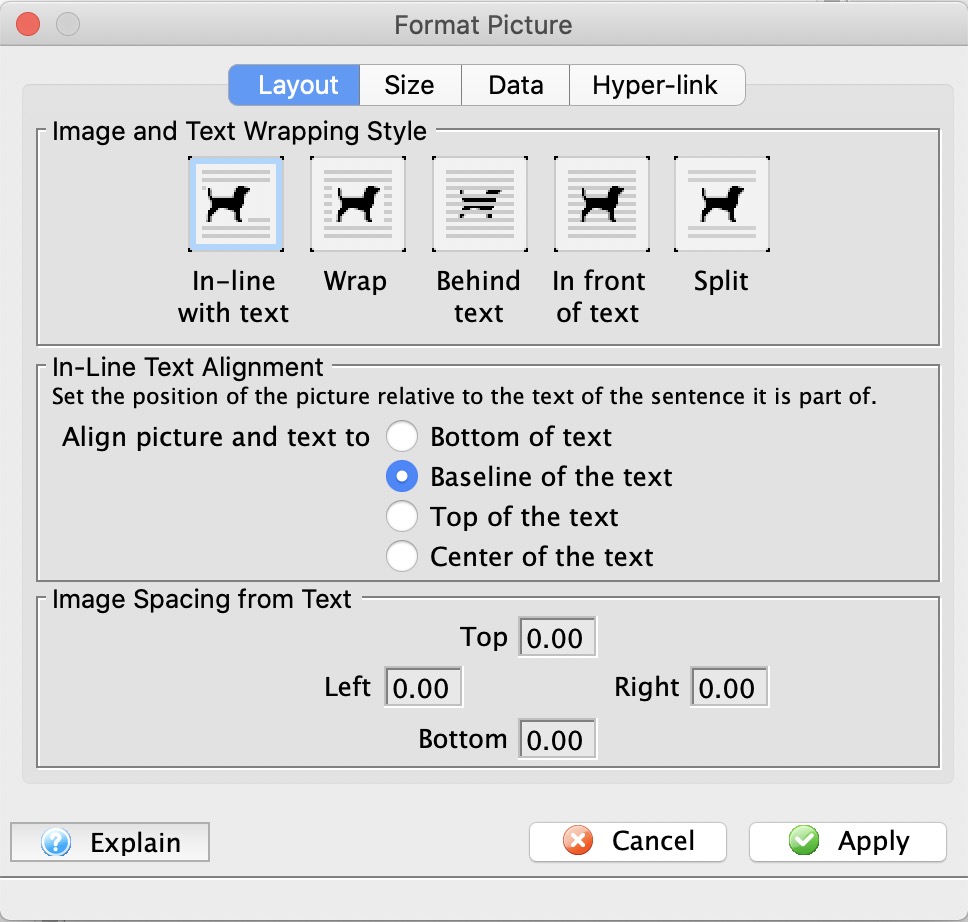 This allows you to format many aspects of a picture such as:
- How text wraps around the image
- How the text aligns to the top or bottom of text
- The amount of spacing from the image and the rest of the text in all directions
- Alter the size of the picture for display purposes
- Keep the aspect ratio
- Give the image a name and description for documentation purposes
- A URL to open when the image is clicked
The Formatting Palette
- The context menu for the word processor window
- The Form Letter menus on the main Theatre Manager menu bar
- Some keyboard shortcuts
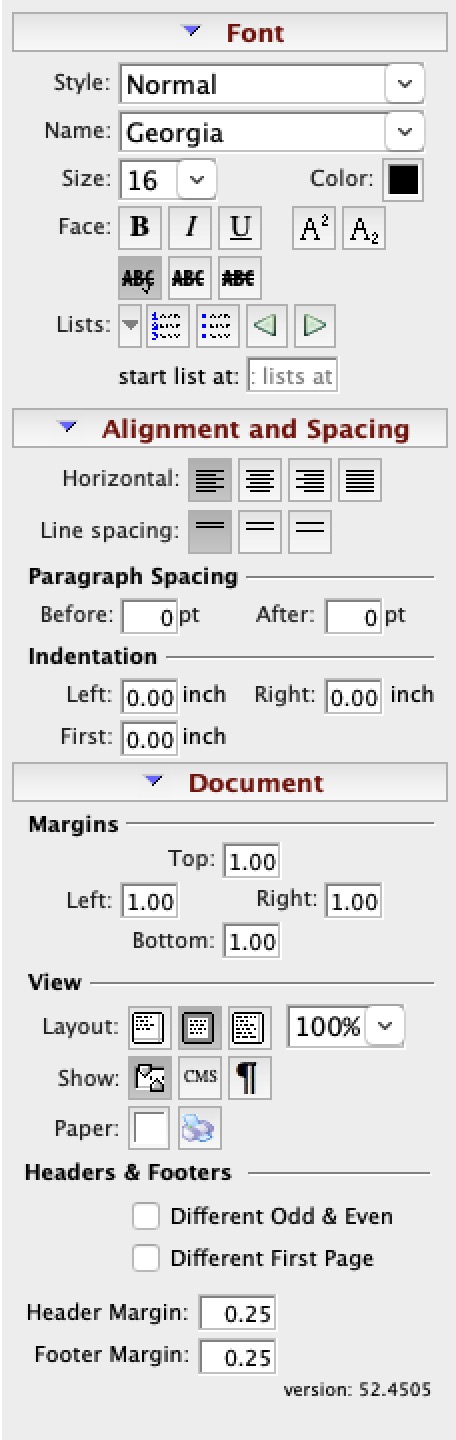
Parts of the Formatting Pallette
Font |
|
|
| Style | Templates for font styles. A style may be applied to text to change its formatting. Drop down the menu to change the style. | |
| Name | Name of the current font. Drop down the menu to change the font. | |
| Size | Size of the current font. Drop down the menu to change the size. | |
| Color | Color of the font. Drop down the menu to view the color picker. | |
| Face | Affects the special format of the text. This allows for Bold, Italic, Underlined, Superscript and Subscript text. | |
| Lists | Inserts a list into the current text. The list can be in numbered or bulletted format. The list can also be indented or outdented. | |
Alignment and Spacing |
||
| Horizontal | Changes the horizontal alignment of the text to either Left, Center, Right or Justified. | |
| Line Spacing | Changes the spacing between lines to 1 line, 1.5 lines or 2 lines. | |
Paragraph Spacing |
||
| Before | Changes the spacing between a new paragraph and the preceding paragraph. | |
| After | Changes the spacing after a paragraph and before the following paragraph. | |
Indentation |
||
| Left | Changes the indenation of text on the left side. | |
| Right | Changes the indentation of text on the right side. | |
| First | Changes the indentation for the first line of a paragraph. | |
Document |
||
Margins |
||
| Top | Changes the size of the Top margin of the document. | |
| Left | Changes the size of the Left margin of the document. | |
| Right | Changes the size of the Right margin of the document. | |
| Bottom | Changes the size of the Bottom margin of the document. | |
View |
||
| Layout | Changes the Layout View of the document between:
|
|
| 100% | You can set the zoom in/out of the document view. | |
| Show | The first button will turn on the rulers and the second button will change the rulers from inches to centimetres.
Also on the View Menu |
|
| Show Paragraph | the show paragraph icon will show the hidden text markers like tabs, paragraph markers and other invisible non-breaking spacing characters | |
| Paper Colour | Drop down menu allows for changing the color of the paper via a color picker. | |
| Paper Size |
 Opens a window that lets you set some page size characteristics based on common paper sizes, or ones that you might want to customize.
This also available on the context menu and the Format Menu |
|
Headers & Footers |
||
| Different | Check for different Odd and Eve and/or Different first page headers and footers | |
| Margins | Define the margins for the headers and footers | |