
Main menu
You are here
Main Postgres Server Changes
 |
Replication is a feature of postgres and is automatically set up for cloud venues. Self service venues may set this up if they wish - the support team is unable to help you. |
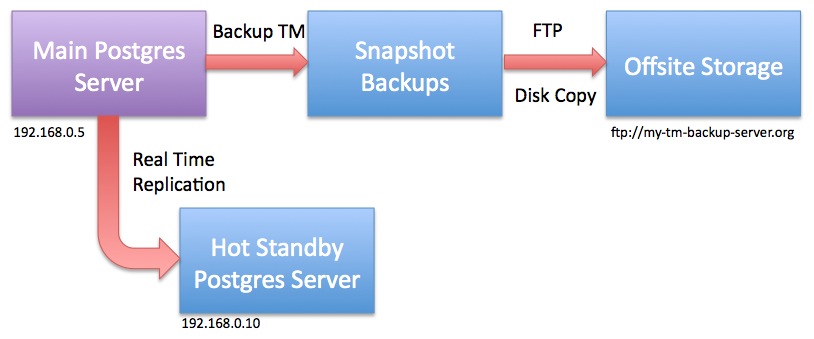
For the purposes of the example, let's assume per the diagram that
- the main database server is at 192.168.0.5 and
- the hot standby server is at 192.168.0.10
|
Do not restart any of the Postgres servers until told to do so. |
Changes to postgresql.conf
You can make these changes using PGAdmin ('Tools->Server Configuration') or by using Terminal and VI to navigate to the Data folder and edit the file. This assumes you know how to make these changes. Note that there are ' (quotes) around the RSYNC parameters below. In PGAdmin, you will not need to enter them - in VI, you will need to enter them.
These settings tell Postgres to send enough information from the master to the slave. You can read about these parameters in the official documentation and adjust them as needed.
|
wal_level = replica max_wal_senders = 10 wal_keep_segments = 32 archive_mode = on archive_command = 'rsync -aq %p postgres@192.168.0.10:/Library/PostgreSQL/10/archive/%f' archive_timeout = 60 |
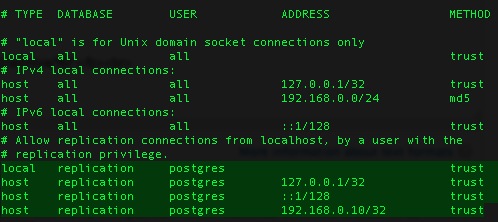
Changes to pg_hba.conf
Edit the pg_hba.conf file and scroll down to the bottom. There should already be 3 lines that have replication in them which will need to be uncommented and permissions set to 'trust'. Add a line that tells the master server that the 'replication' server is at 192.168.0.10 as per the last line. Replace with the IP address of your hot standby server.
Ensuring rsync permissions work
You must to establish secure credentials between the main Postgres server and the standby server to enable rsync to transfer the files using the command above. It requires some Terminal commands and knowing what you are doing. It may be easier to have two Terminal sessions working.
| As Admin User |
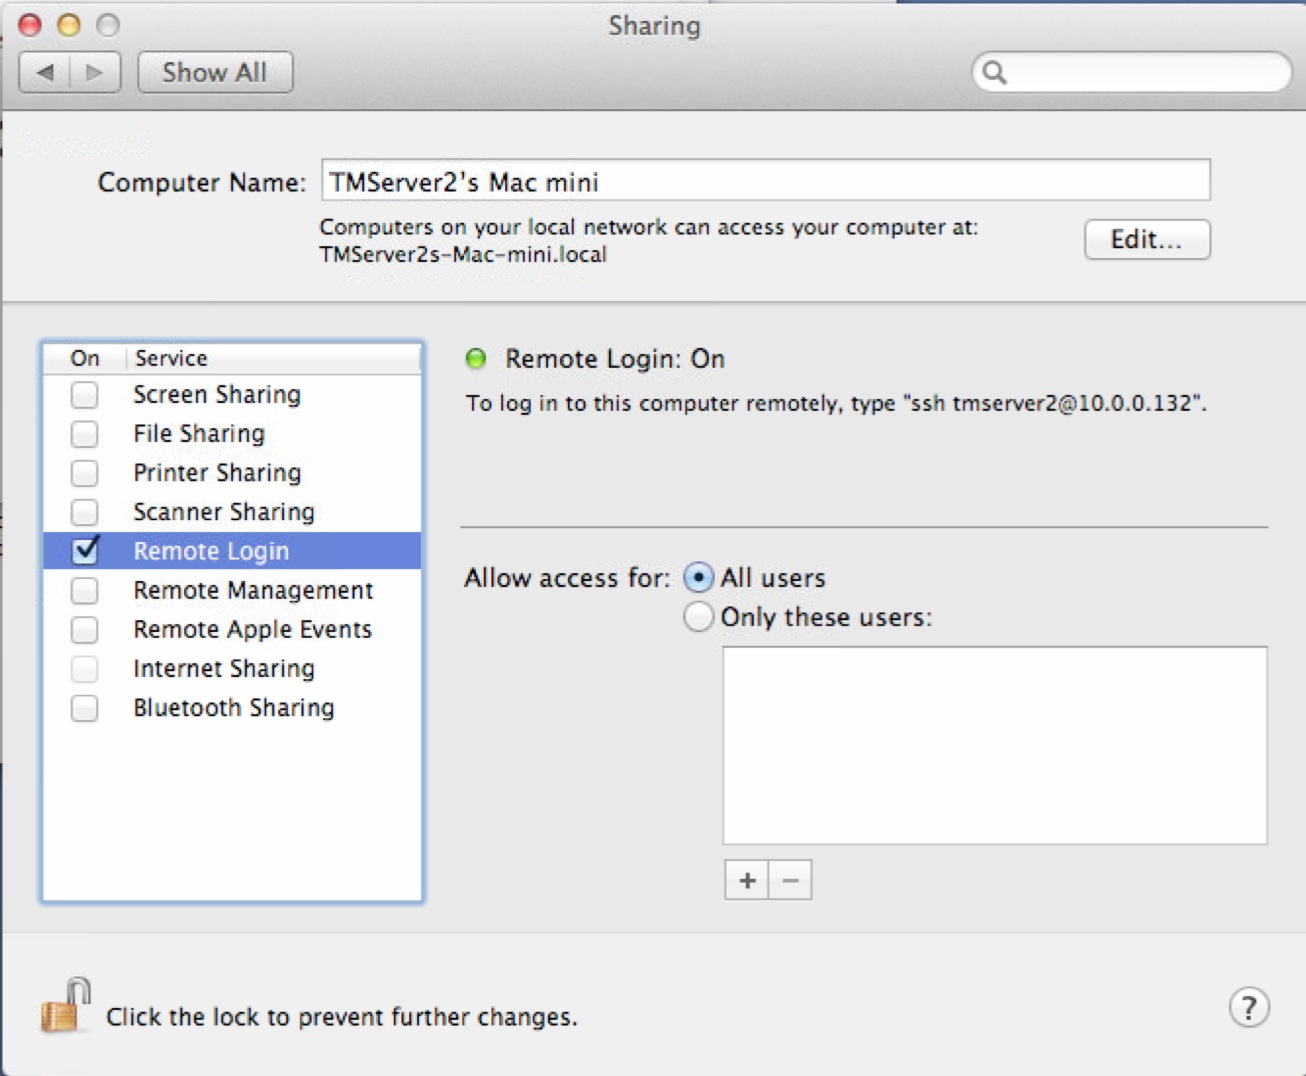
ON THE BACKUP SERVER, Open System Preferences and go to the 'Sharing'. Make sure 'Remote Login' is enabled. It can be set to all users -or- if you want to limit users, make sure the postgres user is in the list.
Make the '.ssh' folder and 'archive' folder for the postgres user in the postgres user's home directory /Library/PostgreSQL/10 and provide access to it. DO THE SAME four commands on the both the MAIN and on the HOT STANDBY server. |
|
sudo mkdir /Library/PostgreSQL/10/.ssh sudo chown postgres:daemon /Library/PostgreSQL/10/.ssh sudo chmod 700 /Library/PostgreSQL/10/.ssh |
(only postgres should have rwx access to the .ssh directory) |
|
sudo mkdir /Library/PostgreSQL/10/archive sudo chown postgres:daemon /Library/PostgreSQL/10/archive |
|
|
|
| As postgres User | ON THE MAIN SERVER,
use ssh-keygen to create a key/certificate file for SSH access and move it to the hot standby. Again, we are assuming that the hot standby will be 192.168.0.10 - replace with your hot standby IP address as required.
|
|
su - postgres cd /Library/PostgreSQL/10/.ssh/ ssh-keygen -b 4096 -t rsa -f id_rsa -P '' |
|
| (note: the end of the command is two single quotes in a row) | |
| you should get a response like:
Generating public/private rsa key pair. |
|
| touch authorized_keys cat id_rsa.pub >> authorized_keys chmod 400 id_rsa scp authorized_keys postgres@192.168.0.10:/Library/PostgreSQL/10/.ssh |
|
|
You should get a response as below
The authenticity of host '192.168.0.10 (192.168.0.10)' can't be established. Then type the following to SSH to the remote machine. You should no longer be asked for a password. If you cannot do this, then replication will not work. |
|
| ssh postgres@192.168.0.10 |
|
| It should respond with a prompt and you can type | |
| exit |
|
If you are not able to connect to the remote machine without typing a password, you may need to do one of:
|