The Patron Window
|
This section presumes you:
|

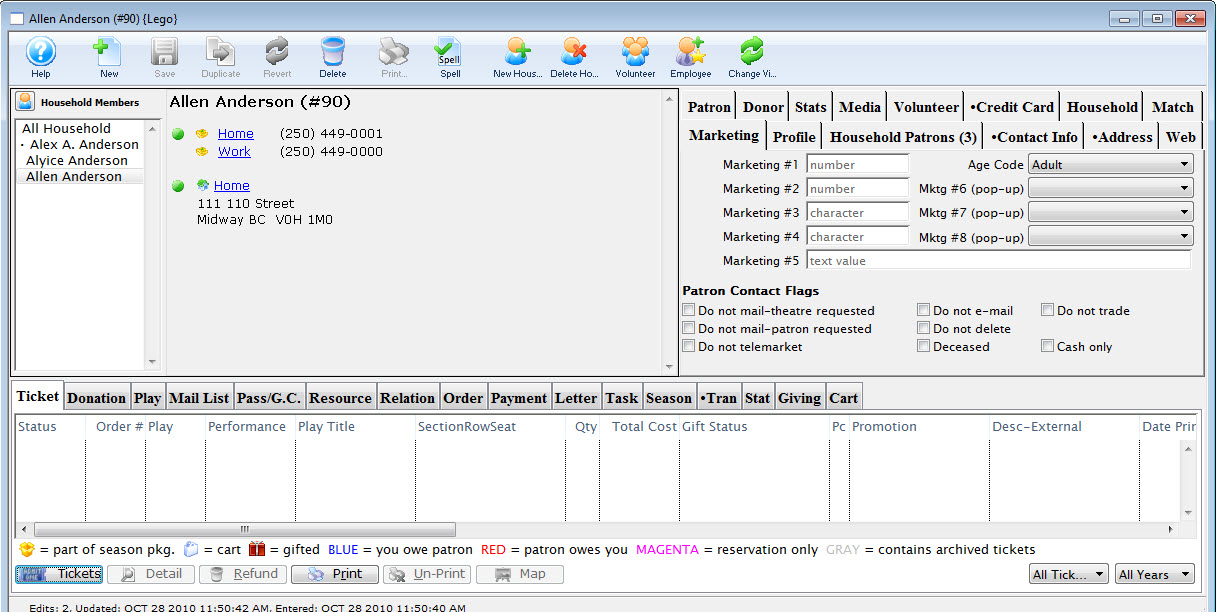
The heart of Theatre Manager is the Patron Window. This window contains demographic data on the patron, the patron's ticket and donation history, order and payment records, and a great deal more. The Patron record is the central jumping off point to other places in Theatre Manager.

A 'Patron' is any person for whom information is recorded. Patrons may be ticket buyers, subscribers, volunteers, staff, donors, potential donors, media, members, vendors - just about anyone who has a relationship with your company on any level. And all this data can be accessed through the Patron window.
The Patron window is comprised of three basic parts.
- Patron Personal Information.
- Patron Detail Tabs.
- Patron Account Tabs.
Throughout the tour, you will be introduced to each of these parts.
|
From here you can:
|

Finding a Patron Record
|
This section presumes you:
|
To bring up a Patron Record:
- Click the Patron
 button in the main toolbar.
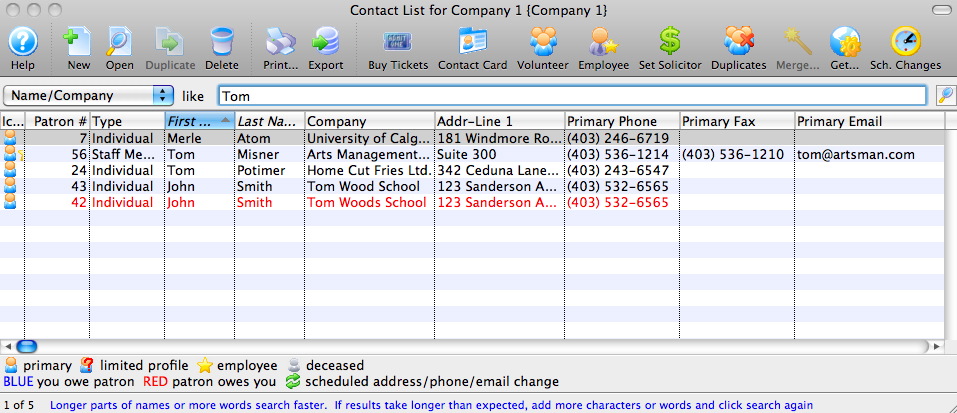
The Contact List window opens.
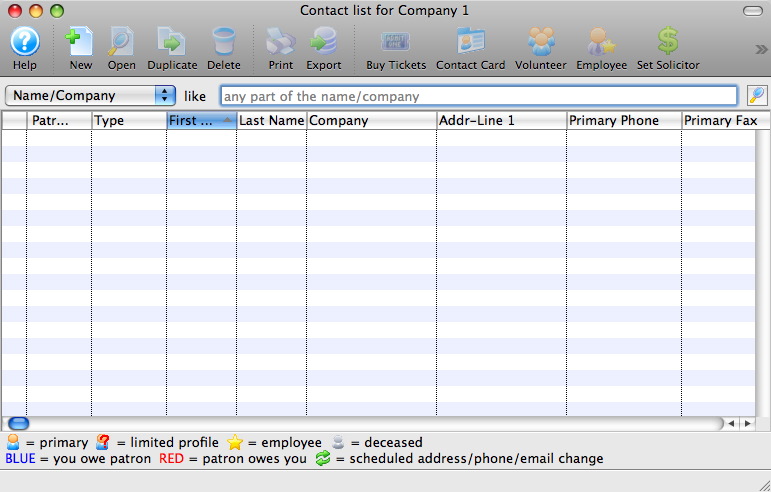
- Select a search option.
In this example the Name / Company search option is selected. The Name / Company search option searchs for what you type in the First Name, Last Name or Company fields. This search option is special because it will search anywhere in the field, meaning the name or company does not need to start with what you type in, it can be in the start, middle or end. For example, if you search for Don, the search will return Don, Macdonald and Mastadon.
- Type a name (or portion of a name) into the "Like" field.
Theatre Manager allows the use of the '%' wildcard when searching. The % wildcard substitutes for normal characters in a search string. For example, to search for people that sound like 'Smith', you could use 'Sm%th'. To search for all people who live on Main, you could use '% main' (this could find 123 Main Street, 895 Main Avenue, etc).

- Click the Search
 button.
The results of the search will appear in the contact list.
Alternatively, you can click 'Enter' on your keyboard.
- Click the
 column header.
This is located at the top left-hand corner of the patron list window. When it is selected, the list of patrons will sort by patron number. Clicking other column headers will sort the list by that column. An underlined column header indicates the column that the list is sorted by. Sorting in reverse order is also possible by simply double clicking on the column header. You can also sort by more than one column at once by holding down the SHIFT key (Windows and Mac) and clicking on the additional column(s) you wish to sort by. You can sort by up to nine columns.
- Single click on the patron searched for.
- Click the Open
 button.
Optionally, you can double-click on the patron in the list.
The patron record opens.
 |
Try it out. Look for a patron with the last name of 'MacIntosh'. If you aren't sure if it is 'M-A-C' or just 'M-C', only type in the 'Intosh' portion. Whose phone number is 403-254-5674? Hint: you'll have to change the search parameter to find this one!. |
|
And the answer is...
|


|
From here you can:
|
Patron Detail Tabs
|
This section presumes you:
|
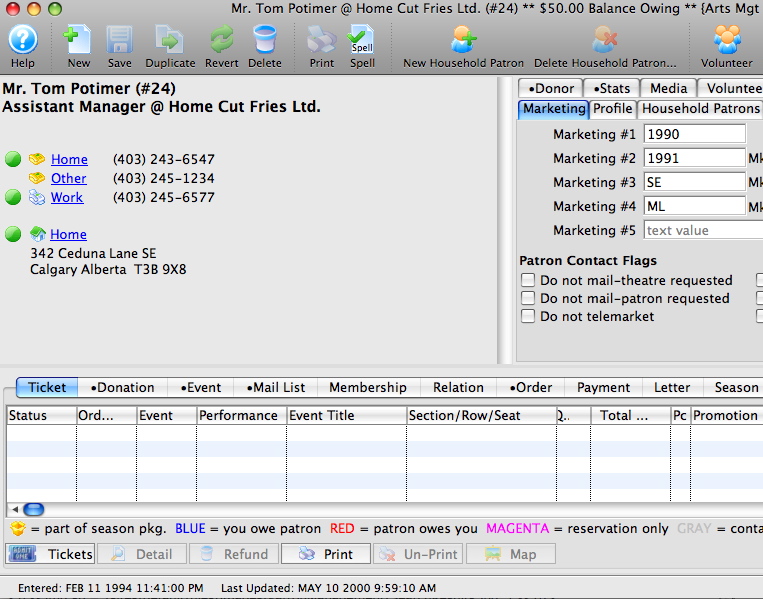
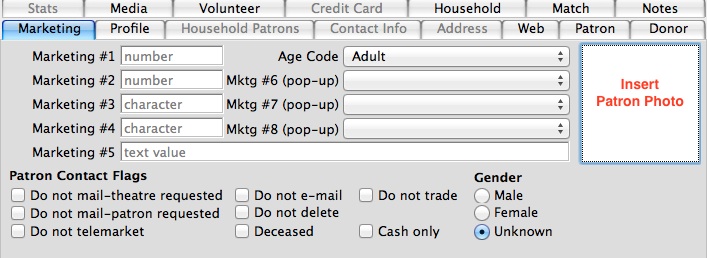
The Patron Detail Tabs are located in the upper right hand corner of the Patron window. With one exception, the Marketing tab is automatically selected when you open a patron record.

The one exception is if there is information stored in the Patron tab, and the 'Remind Employee of Notes' checkbox is enabled.
Clicking on a tab will highlight the tab.
In some instances, one of the tabs may have a bullet preceding its name. The bullet lets the user knows that there is information stored in the tabbed field. For example, entering information in the donor module causes a bullet to appear on the Donor Tab.
From here you can:
- Return to the top page to learn about how to navigate through the demonstration tutorial.


Entering a New Patron Record
|
This section assumes you:
|
A good policy is to check to see if a patron is in the database, before you begin to enter a new one in. So the first step to adding a new patron is to see if they are already there.
|
Try it out. Look for your favorite movie star. Are they in the database? To look for them, use the steps in Finding a Patron Record. |
Since they are not in the database, you'll need to add them in.
Patrons can be added to the database as an individual or as a member of a household. A household groups together common buying units or patrons that share some of the same contact information. A household might be workers in a company, members of a service group, a family in a home. The word household can be customized under the Appearance tab in Company Preferences.
When inserting a patron, Theatre Manager creates a unique number for each new record that is entered. This number is the patron number. Patron numbers cannot be reused if a patron is deleted or merged. The amount of information that is to be entered upon initial patron insertion is determined by the user. Using the Mandatory Data Tab found under the menu System Preferences, the user is able to set mandatory fields for patron insertion. This means that the user decides which patron fields must be entered before the new patron record can be saved. In other words, if fields have been made mandatory, then Theatre Manager will not save a new record if one or more of the mandatory fields are not filled in.
There are two different ways to insert a patron. The first is via the Contact List and the second is the Patron Window.
|
Quick reference information for Adding a New Patron |


- Click the Patron button on the main Theatre Manager toolbar / ribbon bar.
The Contacts For Window will open.
- Click the New
 button.
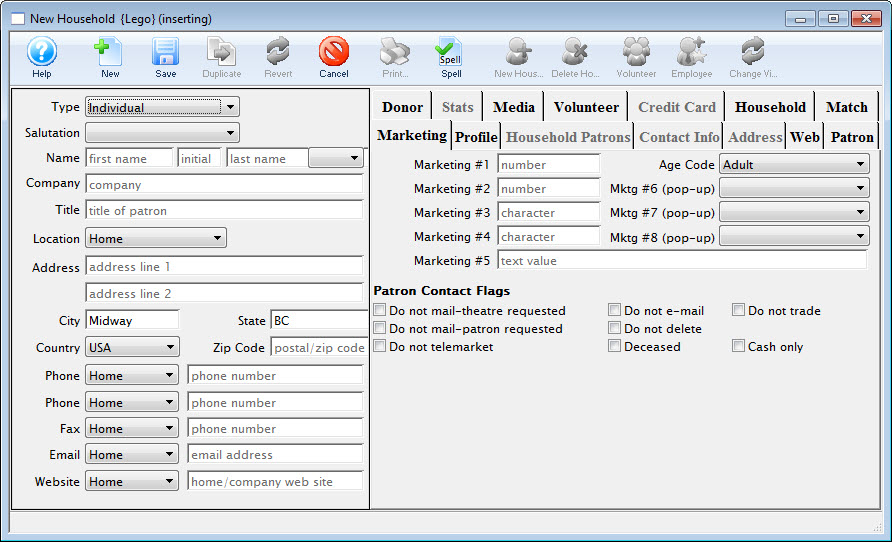
The New Household Insert window will open.
-
Enter mandatory patron fields.
The patron's basic information should be filled in. For more information on setting mandatory fields click here. All mandatory fields must be filled in or Theatre Manager will display a message in red at the bottom of the window describing which fields must be completed before the patron can be saved.
- Click the Save
 button.
The patron record is saved in the database and a patron window will open for the new patron. The new patron has now been added to the database. They will now appear on the Contacts List window.
Inserting a New Household from the Patron Window
- In the patron window click the New button.
The New Household (Inserting) window will open.
- Enter mandatory patron fields.
The Patron's basic information should be filled in. For more information on setting mandatory fields Click here. All mandatory fields must be filled in or Theatre Manager will display a message in red at the bottom of the window describing which fields must be completed before the patron can be saved.
- Click the Save button.
The patron record is saved in the database and a patron window will open for the new patron.
Inserting a New Household Member from the Patron Window
- Use the Contact List to locate a member of the existing household.
Click here for more information on the Contact List.
Single click on the existing member of the household and click the Open
button. The patron window for the selected patron will open.
- Click the New Household Patron
 button.
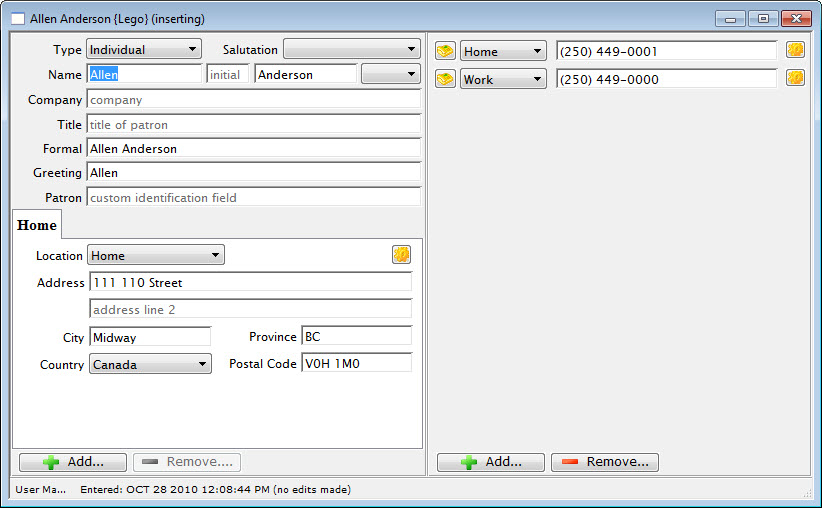
The Patron Contact Card (inserting) window will open.
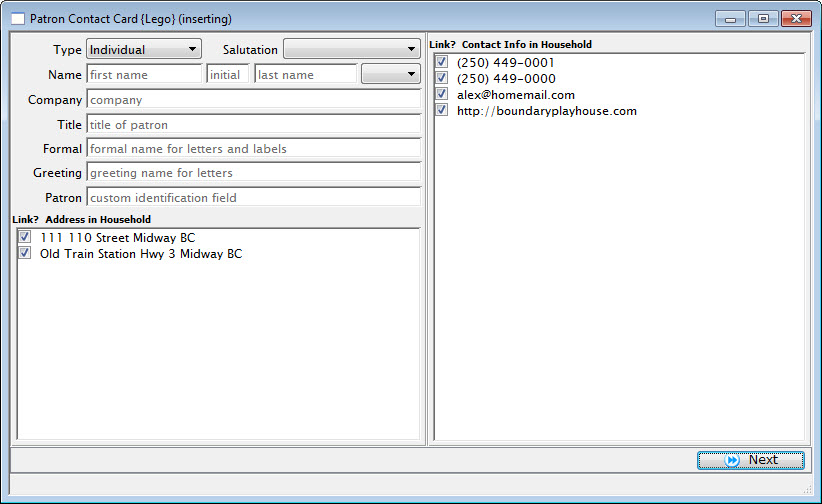
- Enter the mandatory patron fields.
For more information on setting mandatory fields Click here. Each patron must have one address and one piece of contact information. Deselect the addresses or contacts that are not connected to the patron. This can be done by clicking once on the check box. The check mark will disappear. All mandatory fields must be filled in or Theatre Manager will display a message in red at the bottom of the window describing which fields must be completed before the patron can be saved.
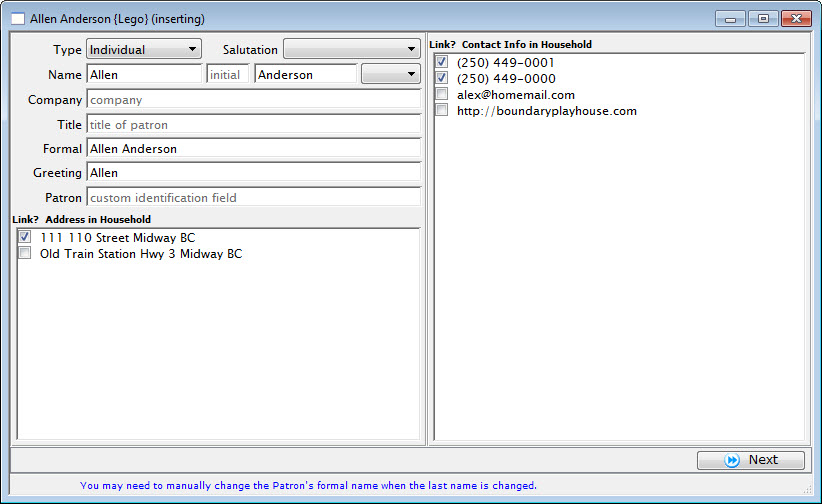
Click the Next
 button.
The contact card for the new patron will open. Details such as marketing information, donor history and patron details can be added to the record.
Click the Close Window
 button.
The new patron record is now saved in the database. The patron now appears in the household.
|
|
Editing, Updating or Deleting a Patron Record
|
This section assumes you:
|
The process of inserting and saving a new patron record is fully
demonstrated in the section Entering
a New Patron Record.
Updating patron records is an ongoing process as people move, get new phone numbers or email addresses, add family members to their household, or need to be separated into households of their own. In general, we use a rule to keep our records fully updated and accurate:
When we listen to our patrons, we use our EAR:
- We get it Early,
- We get it All,
- We get it Right
- Early. Just as soon as you are aware of an addition, change or deletion of data for a patron record, you should update the record at that time. Then, when you need it, it is there - rather than having to "backfill" data when you want it.
- All. Collect all the information. Even if you think it may not be valuable today, it may be tomorrow. Your Development and Marketing Departments will thank you when they wonder how many Hearing Impaired patrons you have, and you can answer them! Get everyone in the household so that when Mrs. Jones calls in to buy additional tickets for their guests, she can see where Mr. Jones purchased the original tickets.
- Right. Incorrect information does nobody any good. So if you are going to collect the information, make sure it is accurate. Get the proper spelling of a patron's name. Spell their street address correctly. Look for similarly named patrons in the database and determine if this is the same patron, and if so merge the patrons into a corrected file.
Keeping the data clean and accurate keeps your organization ready for mailings, sales and contacts, and keeps you looking professional.
To Edit or Update a Patron Record
- Locate a patron record.
- Click on the Household Patrons tab, or the Contact info tab, or the Address tab.
- Click on the
 button in the lower left corner.
This will open the Contact window.

You may make any necessary changes within the Contact card that you need to update the file, including Adding or removing an address.
To Delete a Patron Record
It is important to remember that Theatre Manager does not allow you to delete patron records except in very specific circumstances. The concept is that even if a patron moves away or passes, you still want to maintain records of the activity they enjoyed while they were with you. A patron may move away and then return. Or you may wish to keep records of what the patron enjoyed while they were alive for donation requests from their estate.
If a patron has done any transactions with you - bought a ticket, made a donation, purchased a gift certificate, pass or a subscription, then they cannot be deleted. Theatre Manager simply will not let them. You may, at your discretion, mark them as "Deceased" on the Marketing tab in their patron record. If a patron is marked as deceased, a warning will pop-up if you attempt to sell tickets to them, reminding you that they are no longer with us. Additionally, deceased persons are not added to Mail Lists - so you don't make the mistake of mailing your brochure to a widow/widower. You can, however, accept a donation from a deceased person, in the event their estate makes a bequest.
In the event that you have a patron in your database that you wish to delete, and they meet the above criteria (never bought a ticket, never made a donation, never had a financial transaction of any kind), you may:
- Locate the patron you wish to delete.
- Click the
 button.
 - Confirm the deletion.
- Return to learn about navigating in Theatre Manager.
- Learn about finding a patron record.
- Learn about entering a new patron record.
- Jump to selling a ticket.
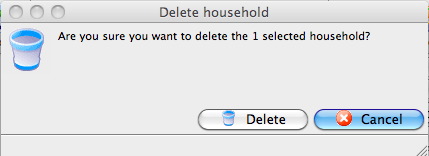
The patron will be deleted.
|
From here you can: |