Attendance Tracking/Ticket Scanning
Theatre Manager handles tracking of tickets that were used at an event which can be accomplished in one of three ways:
- Via Events & Dates - scanning stubs using a "wired" or "tethered" scanner or typing in the ticket number
- Using "wireless" hand held scanners that communicate with your web site URL
- Using a tablet (or computer) to manage attendance to:
- Via a web page - scanning stubs using a tethered scanner or typing in the ticket number
Each option was built for a different purpose and have some pro's and con's associated with them. These are outlined in the table below. All methods:
- Allow you to enter ticket numbers for a specific event to record attendance. It can be done by scanning the bar codes on a printed or web ticket -or- if the bar code fails, typing it in manually.
- Have a range of messages that tell you if the ticket was used already to gain admittance, if it is for the wrong night, etc.
- Can be used in conjunction with each other - meaning, you can use all 3 methods simultaneously if you wish.
| Events & Dates This method of verifying attendance requires you to open the Events and Dates window (or access it from the Accounting->Confirm Attendance Menu). |
|
Pros
|
Cons
|
| Web Site Interface This method uses computers equipped with a web browser to communicate to the web listener to track attendance. |
|
Pros
|
Cons
|
| Wireless Scanners This option uses iPhone/iPod wireless scanners and a custom ArtsMan application to scan tickets and send the information to a web listener that checks the person in and out of a venue based on ticket number for that performance. |
|
Pros
|
Cons
|
Scanning Tickets using Wireless Scanners
- Contact ArtsMan Sales Dept to purchase a ticket scanner and licence (iOS device NOT included with purchase of scanner)
- Buy or get an iPhone or iPod donated that fits the ticket scanner you are going to purchase in step 1
- Install the ticket scanning software and mate with the network (usually a one time task).
- Set up the preferences to scan a particular event (once before the show)
- Scan the tickets as people enter and exit the venue.
Similar to the Web Scan method, you need to:
- get the event number from plays and dates, and
- the ticket web site address and
- enter it into the preferences for Linea Pro.
You use the scanner to check patrons in (step 3) or check them out of (step 4) the venue.
 |
iOS device not included with purchase of scanner/licence. It must be acquired separately |
|
Ensure you fully charge the devices before a performance so they have a full battery level. There is nothing worse than having the battery run out in the middle of admitting patrons. If necessasry, test the device while it is in the charger cradle and to make sure that it will still scan. |
 |
New Linea Pro scanners may arrive at your location not fully charged and occasionally drain completely during shipping or if they have not been used in a long time. In such instances, the scanner will appear non-responsive and probably won’t power up in a charging station. The solution is to remove it from any accessories (pistol grip) and plug it in directly with the provided mini-USB cable. It should start to charge normally within 1-2 hours at most.
If the scanner is still unresponsive after leaving it plugged in for a couple of hours, only then would something more serious be likely. |
|
Print at home is wonderful and when enabled for a performance, it becomes the default ticket handling method online. Tickets are marked printed and the customer is prompted to download or print their tickets.
Print at home may be new behaviour for patrons at your venue. If so, we suggest doing an initial educational eblast to your current online purchasers that might mention things like:
|
Step 1 - Installing Scanner Software
- Install the TM Scanner app on an iPhone/iPod
- Add the purchased Linea Pro Scanner attachment around the iOS device
- Test the scanner on some sample tickets in your environment
|
The purchase of the linea pro scanner/licence does not include an iOS device.
It must be acquired separately |
For installation instructions, click on the picture of the scanner.
|
TM Scanner - with Linea Pro Bar Code Scanner
|
The purchase of the linea pro scanner/licence does not include an iOS device.
It must be acquired separately |

|
The TM Scanner bar code scanner application can be used on iOS with a device like an iPhone in conjunction with a hardware scanner from Linea Pro.
|
 To use this application, you will need to:
- Make sure your ticket face has a bar code that goes all across the ticket so that it can be scanned more easily. Refer to adding a field to the ticket.
- Provide your own iPod or iPhone
- iOS 10 is currently the earliest compatible OS
- It is always recommended to keep the devices updated to the latest version of iOS, in order to maintain security compatibility
- Download the app from Apple's App Store. The app is free and may be installed on any number of devices that you wish.
- Contact our sales department to:
- Purchase the Linea Pro to match your iOS device for rapid scanning.
- Add scanner licensing to your second generation listener (happens automatically when you purchase the above scanner hardware)
- You can also type the ticket number on the screen as an option if you don't want to have a scanner. This approach is far less efficient than having scanner hardware as the ticket number is manually typed rather than scanned.
- Make some settings in the TM Scanner app to talk to your web server
- Set the print at home barcode to QR Code format.
Step 2 - Setting Base Options in the Scanner
Most often, the settings can be made once and left alone if the intent is to scan tickets on the day of the show.
Scanner User Id in TM
The setup steps for a user id for scanning are:
- Create a patron in Theatre Manager with a suitable name, like 'Ticket Scanner'. You could even make them a household member of your other special TM id's like the 'Master User' or 'Web Listener'
- Turn the user into an employee
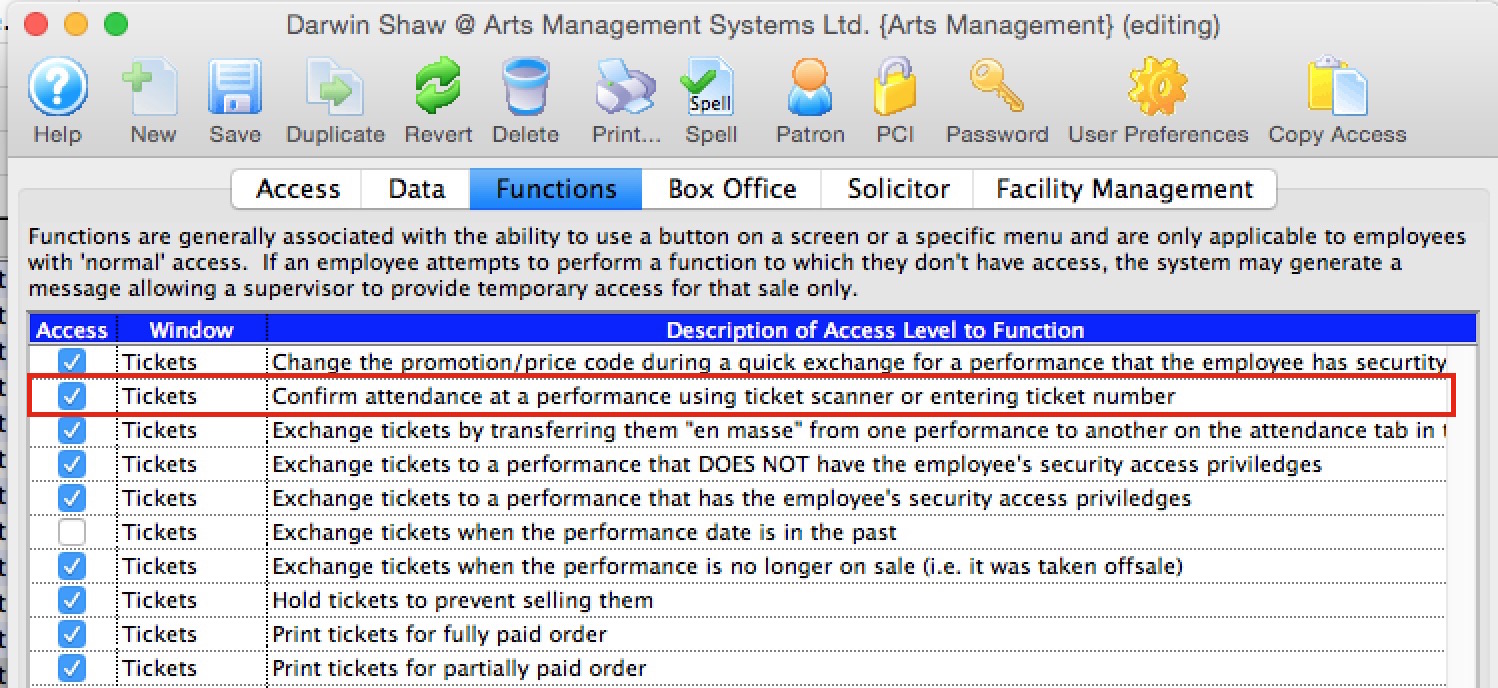
- The only settings and permissions that the ticket scanner id really needs is:
- a unique set of initials to log in with. These are created automatically when the employee login is created and can be found on the employee window
- The Employee initials are placed in the scanner setup field on the device you are using to do the scanning.
- This active user must is allowed to log in
- the permission to Confirm Attendance at a Performance as per the image below.
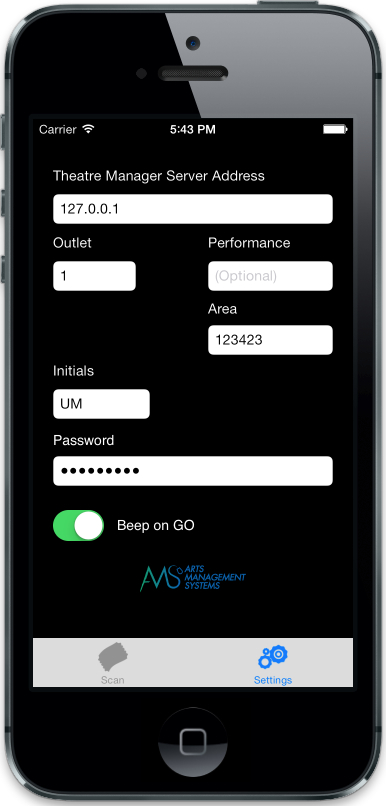
Scanner Prefs - Linea Pro TM Scanner application
 |
You may protect access to this entire screen (or parts of it) using an iPhones built in Accessibility Feature |
Some configuration settings need to be made on the iPhone or iPod prior to using the Linea Pro scanner to scan tickets. These are very simple, and are all contained on one screen on the iPhone/iPod.
When using the TM Scan application, click on the settings icon at the bottom right of the screen to make changes to the settings. When done, click on the scan button at the lower left.
The values of the fields are in the table below and some troubleshooting steps are at the end.
| Theatre Manager Server Address | This is the URL address of the web listener that will be responding
to checkin and checkout requests. Enter the address of either:
|
| Outlet | This is the company number (normally 1). In multi-outlet venues, this number will be different for each outlet. |
| Performance (optional) | You can enter the performance number that you are scanning for or leave it empty. Both options affect which tickets will be accepted by the scanner.
Please refer to the scanner rules for more detail. |
| Area (optional) | This is an optional number that you may assign to scans. It is intended to identify entrance to a specific venue in the case where one ticket allows a patron access to one or more places and you need to monitor how many people are in each area. The venue number must exist in Theatre Manager and does not need to be the same as the venue for the ticket. Example: the ticket could be for a game or circus in an arena. However, there may be a 'bar tent' or 'children's play area' that only ticket holders can go to -- so you can scan them into those auxiliary areas for capacity tracking.
Normally, this field is not entered. |
| User Initials | This is the uppercase initials for the user ID in Theatre Manager doing
the scanning. This person does not need to be able to log on to TM for
any other reason. You might wish to create a generic ID for
this purpose.
The user initials for the scanner must be unique within each outlet. |
| Password | The password used for these User Initials to log on to
Theatre Manager.
Note: Passwords are case sensitive per PCI compliance. Please ensure you get the case correct. |
| Beep on go | This function can be turned on if you want a beep to sound when a valid scan is entered. If this is off, the scanner will only vibrate - which may be nice if you are scanning in an area where silence is better. A higher pitched longer beep occurs if an invalid scan is attempted. |
Troubleshooting the scanner
|
The first trouble shooting technique if you can't scan tickets, is to open safari on the iOS device and see if you can connect to your ticketing web site.
If you cannot, then usually the issue is the DNS on the wifi router you are connected to. |
|
If some devices can scan tickets and others cannot on the same network, then compare the versions of iOS on the devices to find out which version is working. |
Linea Pro Scanner Check Battery Health & RFID Laser
 Infinite Peripherals offers an app via the Apple Store to download and install on iPod or iPhone devices used with the Linea Pro Scanner sleds.
 The app is called IPCSupport and can only be downloaded from the apple store on your iOS device.
This app will provide:
- the battery health of the scanner device
- the ability to test the infrared laser.
- Note: There are other features in this app that are NOT applicable because the Linea Pro is using Theatre Manager's TM Scanner ticket scanning software.
Only use the Device for battery health and RFID to test infrared laser.
Protecting Scanner Preferences Using Accessibility
 If you wish to manage access to parts of you scanners so that volunteer ushers or unauthorized person cannot click on
check out or the settings buttons on your scanner, Apple provides a great solution through the accessibility feature on the iPhone or iPod touch.
If you wish to manage access to parts of you scanners so that volunteer ushers or unauthorized person cannot click on
check out or the settings buttons on your scanner, Apple provides a great solution through the accessibility feature on the iPhone or iPod touch.
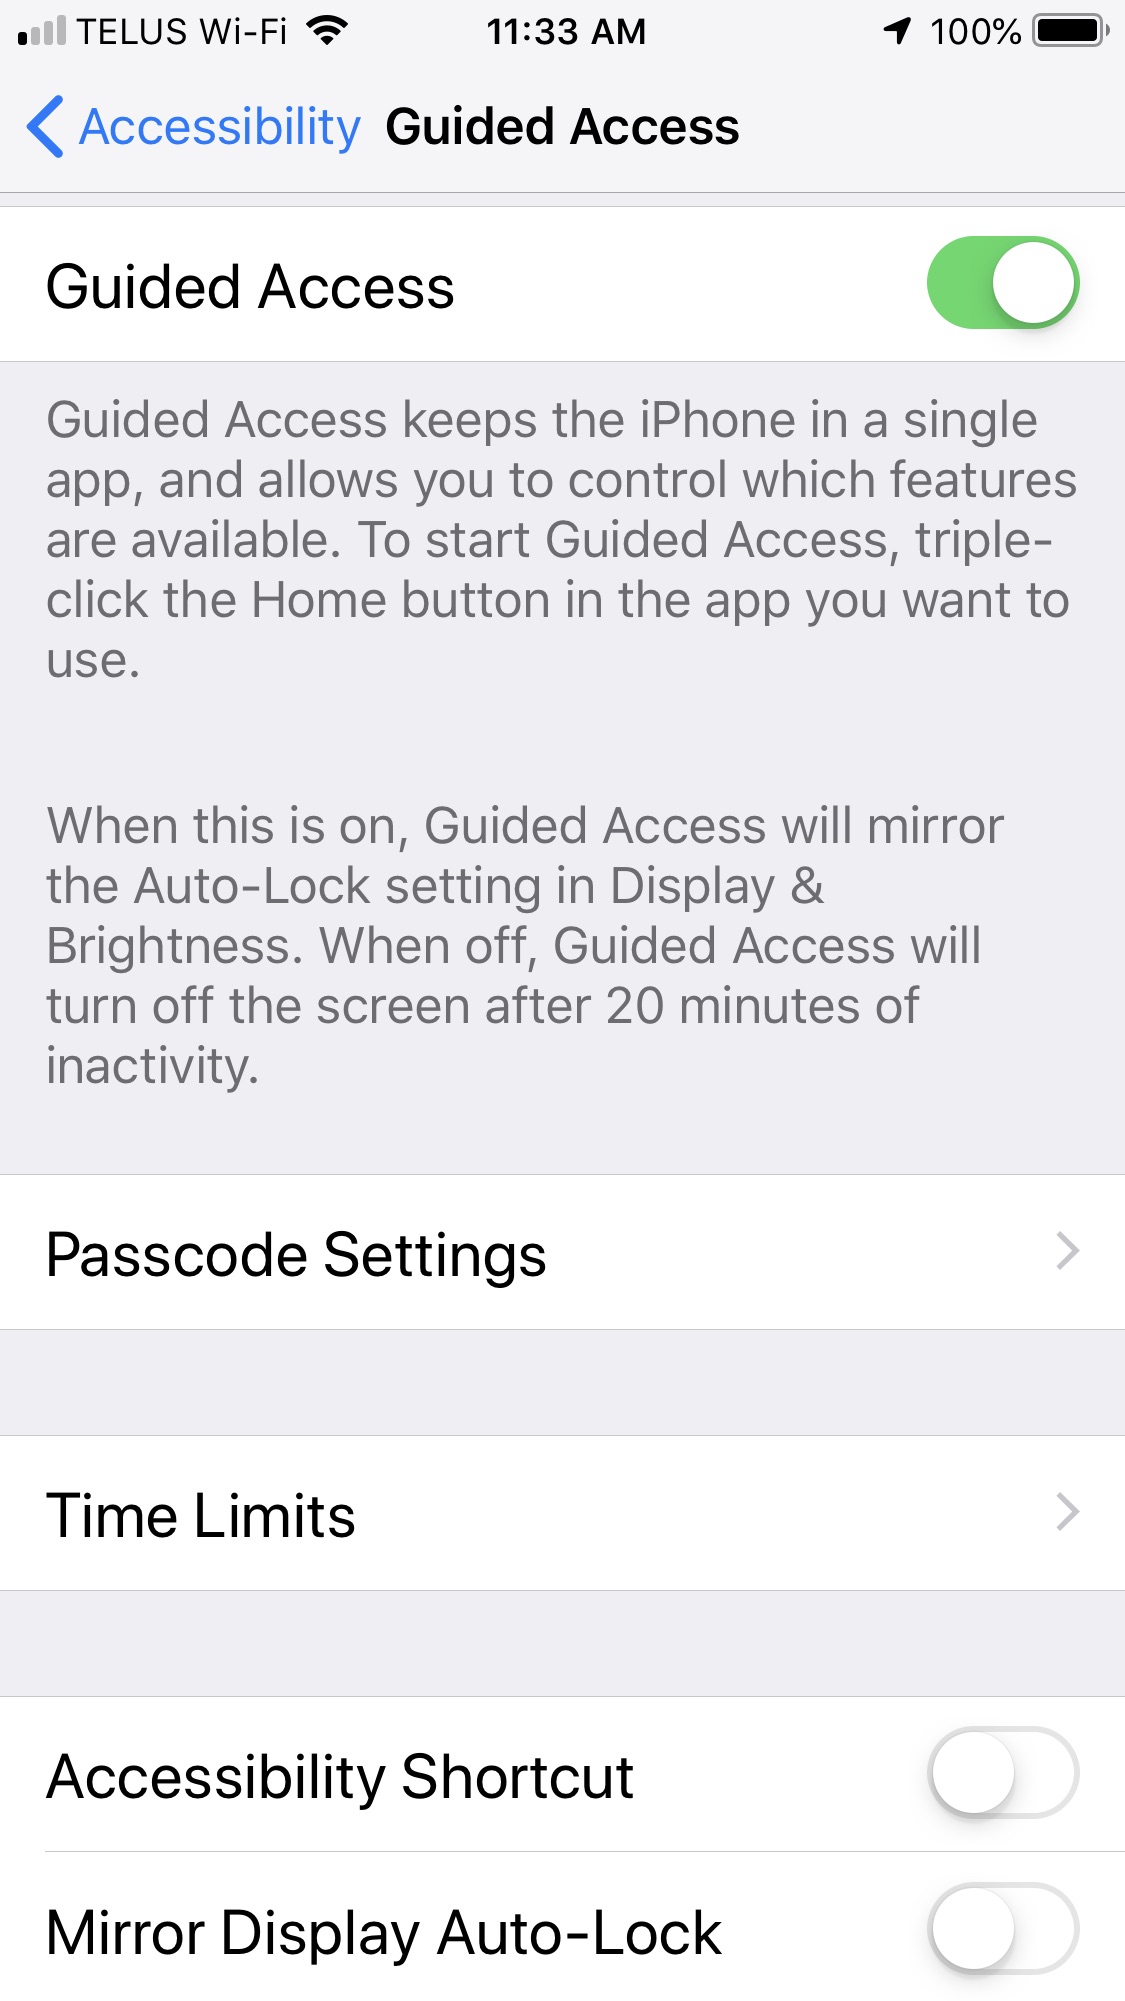
Guided Access limits your iOS device to a single app and lets you control which features are available. You can turn on Guided Access when you let a volunteer use your device, or when accidental gestures might distract you..
To Enable Guided Access
- open the Settings application and navigate through
- General
- Accessibility
- Guided Access (as per the screen to the right)
- Turn on Guided Access.
- Tap Passcode Settings, then
- tap Set Guided Access Passcode.
- Enter a passcode, then reenter it.
To set up Guided Access for a Specific Application
Open the app that you want to manage (eg TM Scan - for purposes of this example) and decide if you want to control access to the entire settings tab or only parts of it.
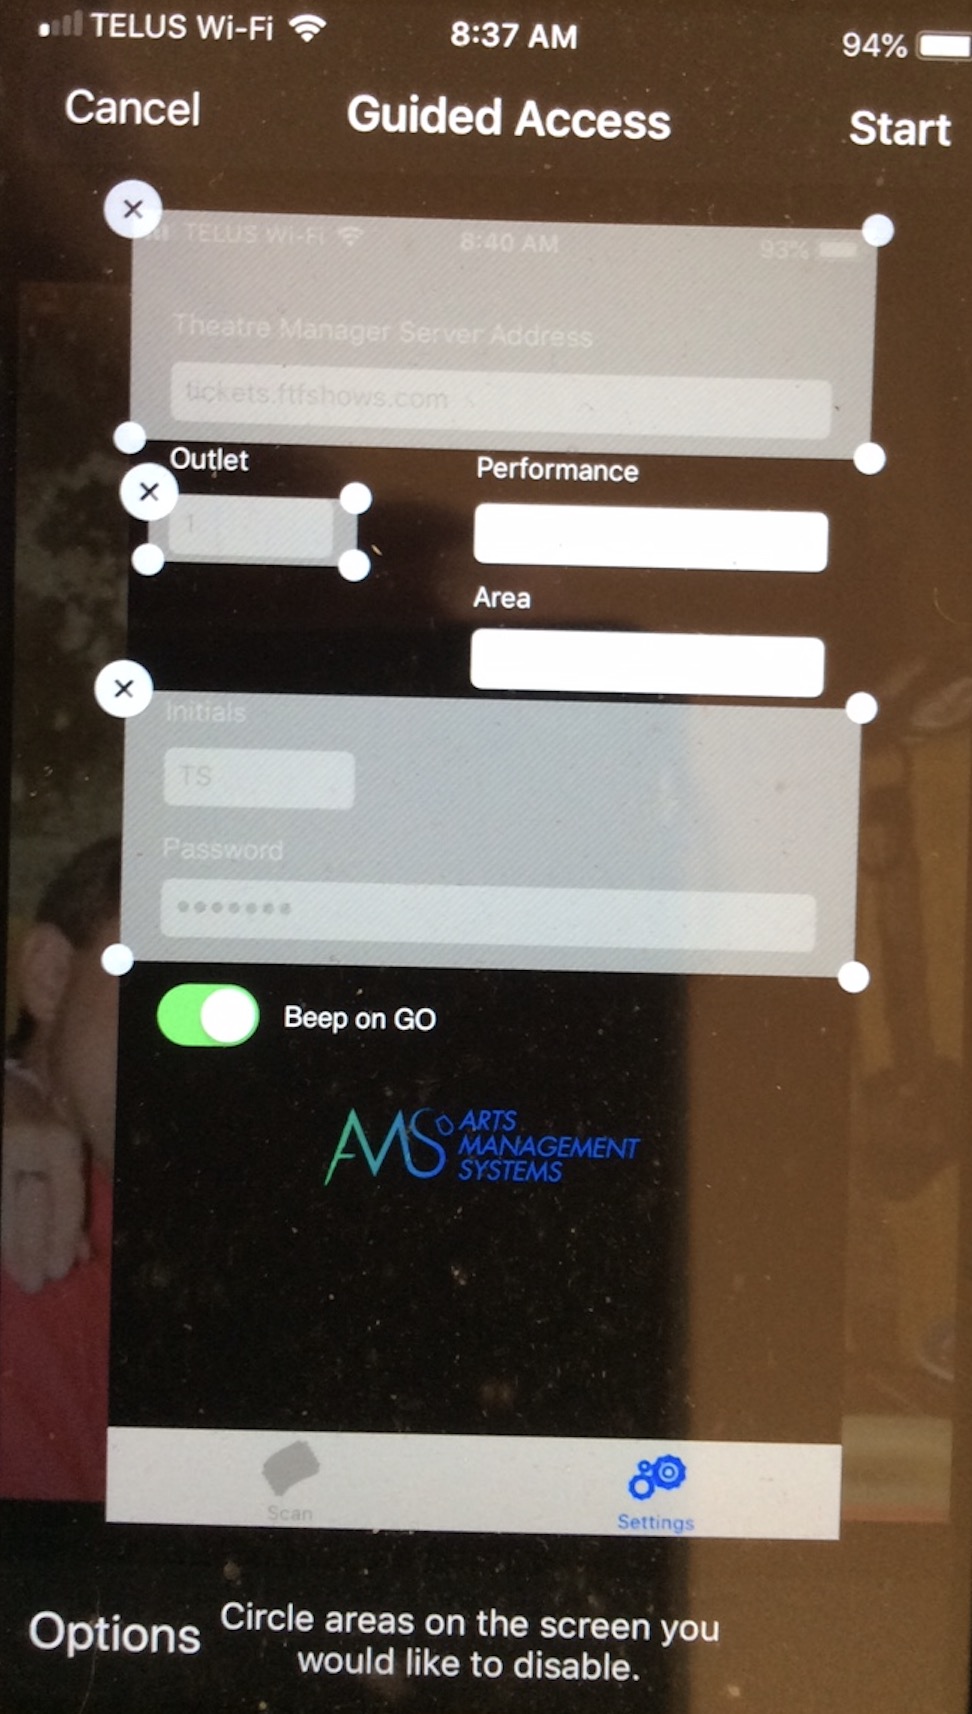
Option 1: Control Access to Multiple Specific Parts of Settings Tab
This can be used to limit access to some parts of the settings. You might use this approach if you want to allow staff to only change of the performance
- Click on Settings
- Triple-click the Home button.
-
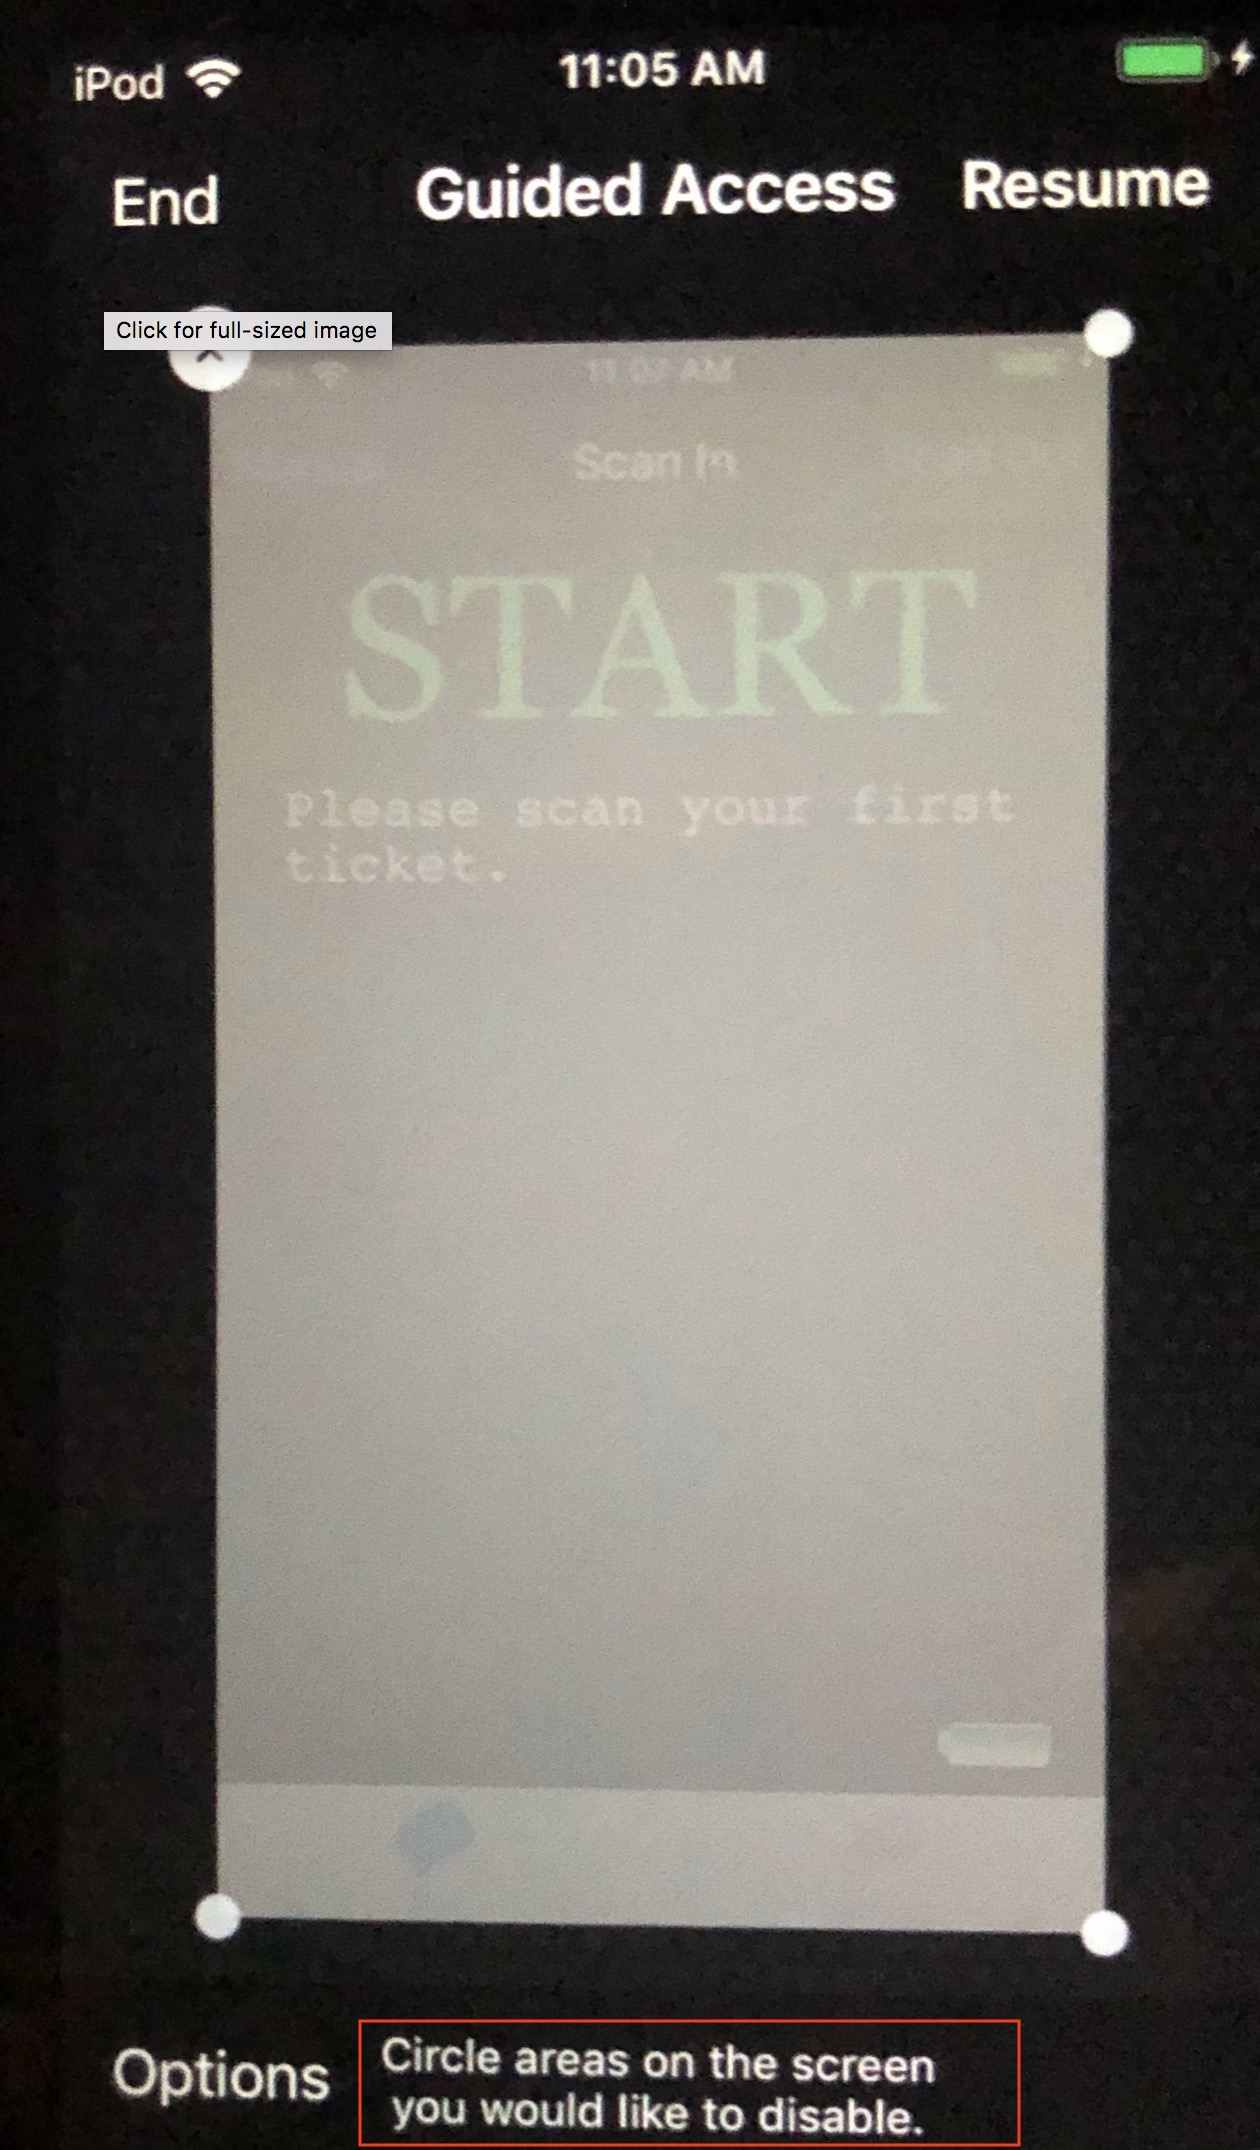
If you want to manager parts of your screen to stop responding to touch, use one finger to circle those areas. You can move or resize the circle, or tap the X to remove it. In our example to the right we have selected the:
- URL to the ticketing web site,
- Outlet (if you are scanning for multiple organizations in an outlet version, you may not want to select this
- ID and Password
- Refer to scanner settings for meaning of the fields to decide what you want to protect. You could, if you want, protect the entire screen
- Tap Start.
- Stay on the main screen
Option 2: Control Access to an entire screen
This can be used to limit access to some parts of the settings. You might use this approach if you want to allow staff to only change of the performance
- Click on Settings
- Triple-click the Home button.
- Select all the fields on the screen
- Adjust the corners of the rectangle as need be by dragging them
- Tap Start.
- Stay on the main screen
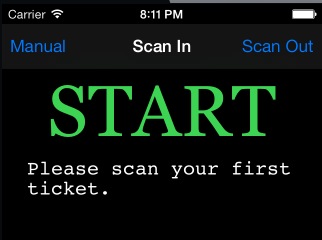
Step 3 - Checking a Patron INTO the venue
| TM Scanner (iPhone/iPod) |
 |
|
| If you have trouble doing a scan, you can enter the ticket number manually. To do so: |
|
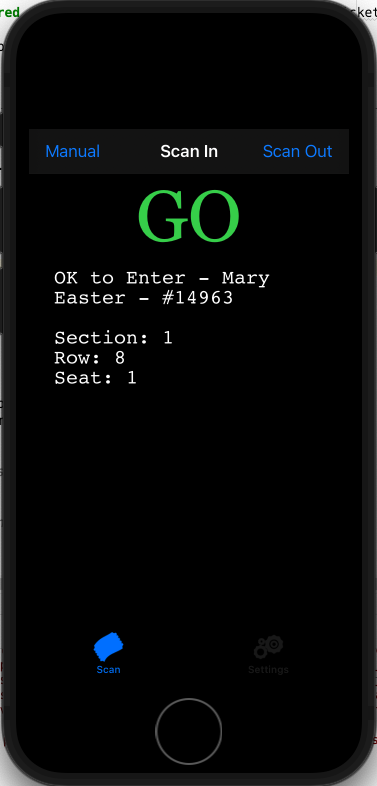 A successful scan looks similar to the image on the right.
it will include:
|
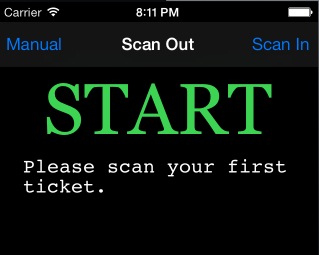
Step 4 - Checking a Patron OUT of the venue
The process is very similar for both scanners.
| TM Scanner (iPhone/iPod) |
 |
|
| If you have trouble doing a scan, you can enter the ticket number manually. To do so: |
|
Ticket Scanner Acceptance Rules
|
Entering a performance number or leaving it blank the scanner setup preferences directly affects which tickets the scanners will accept or reject.
These apply to checkin or checkout of the venue. |
If you enter a Specific Performance Number into the scanner
While providing a performance number is generally the best option, it is especially important If you have multiple venues or multiple events on the same day.
- Tickets for any other performance will be rejected.
- The scanner will accepts tickets if the performance date is midnight or earlier. It means you:
- can scan tickets for an event that goes on today because it has todays date on it
- can scan ticket stubs you put aside from a prior days performance if you wish, up to any number of days in the past
- cannot scan tickets for any event with tomorrows date on it
- Provide this parameters if you want absolute certainty that patrons are entering the correct venue.
- Find the performance number from the list within the event window
If you leave the Performance Number zero or blank
If you generally have one event per day, it may work best leaving the performance number blank as there is no configuration changes required for each day. You just need to pick up the scanners and use them.
- Tickets for any event/play that day will be accepted.
- Ticket for any other day will be rejected. (Provide specific performance number to scan prior days events)
- Use this if you have
- a festival situation occurring and patrons could have purchased tickets to any one of a number of events / plays to obtain entry to the area you are scanning for.
- a multi venue situation where you quickly move scanners from one venue to another and don't want operators to enter performance numbers
- Note: If you enter a zero in this field, tickets for events occurring on any other day will return the message that the ticket is for a future event, and is not valid on this date.
Tricking the scanning process for future performances
|
If you want to scan for tomorrow's performance for some reason, then:
|
Print-at-Home and coupon requirements
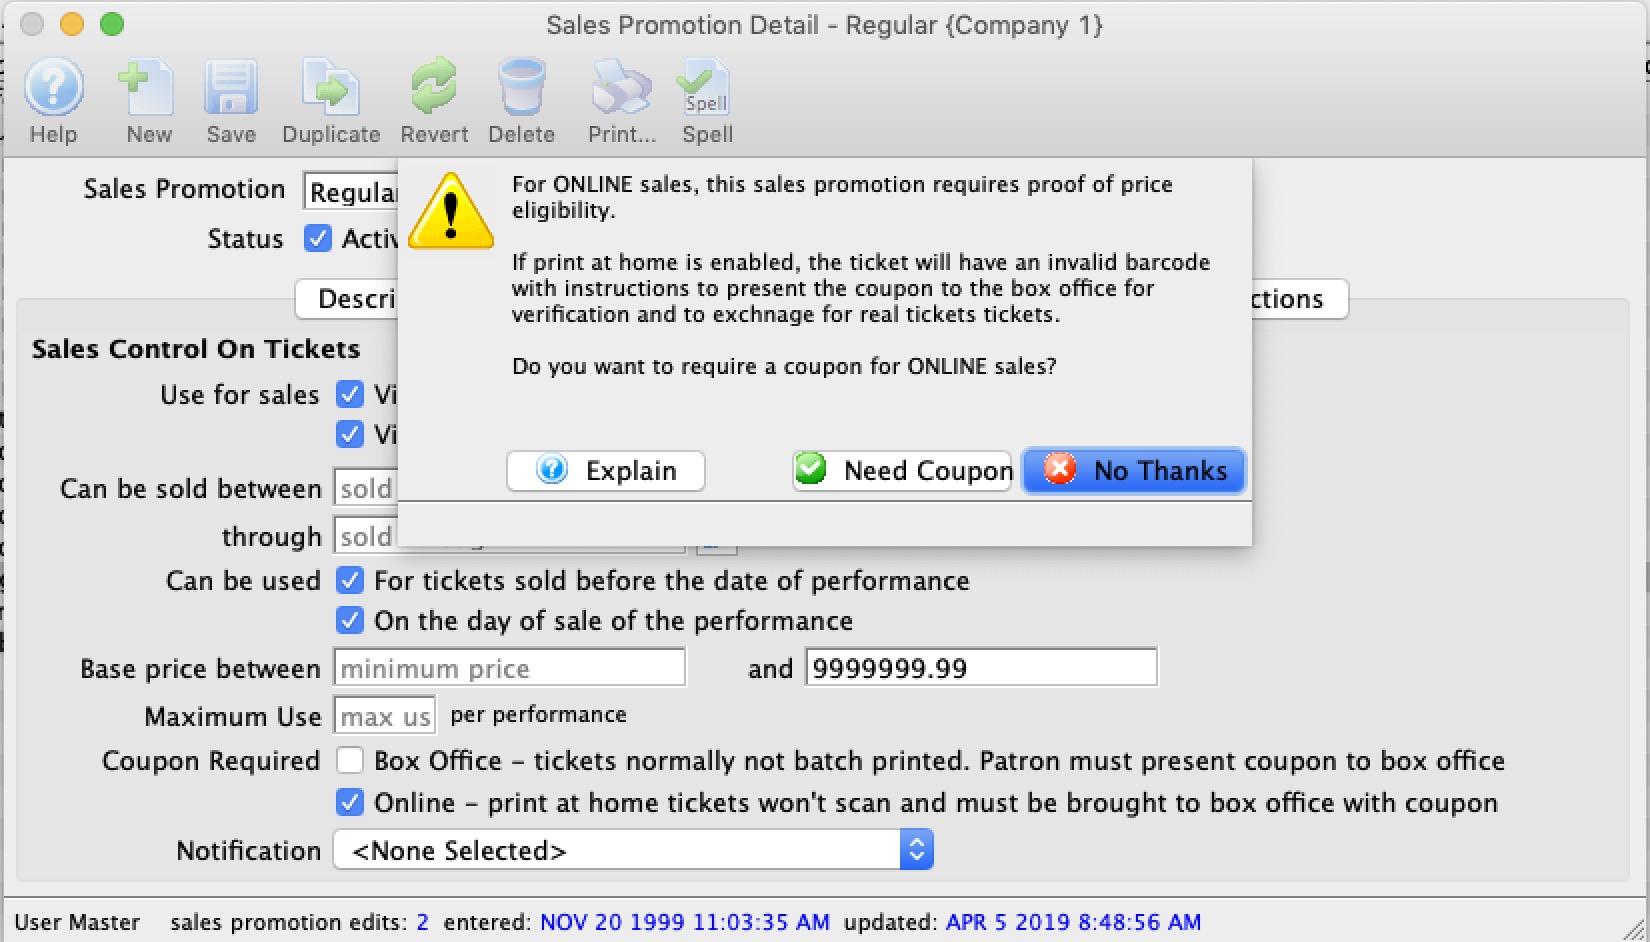
If a sales promotions is explicitly marked with the requirement for a coupon when sold online, then the following happens:
- if the patron prints at home - all tickets in the order will be printed - this is so that a patron has the same number of tickets as their online order
- The tickets that require an online coupon will have an invalid bar code. This means that the ticket cannot be scanned into the venue in anyway.
- There will be instructions on the ticket to take the print-at-home copy to the box office or will call to have it exchanged for a hard ticket stock ticket - which of course can be scanned.
- This way the box office can verify price eligibility for the promotion, such as AAA discount, 2 for 1 coupon, Active Military - any reason at all.
Scanning Tickets using Tethered Scanner
With a tethered unit, you follow a similar process as outlined below:
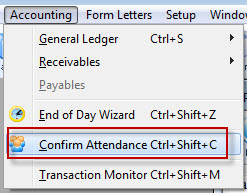
- From the main menu bar, choose Accounting >> Confirm Attendance.
The Patron Attendance list window opens.
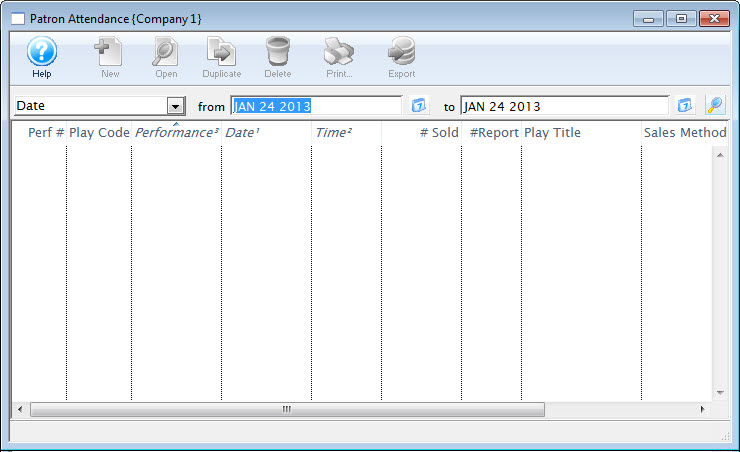
- Enter Search Criteria.
The search criteria is entered in the From and To fields and is based on the field listed in the drop down list.
- Click the Search
 button.
A list of performances opens.
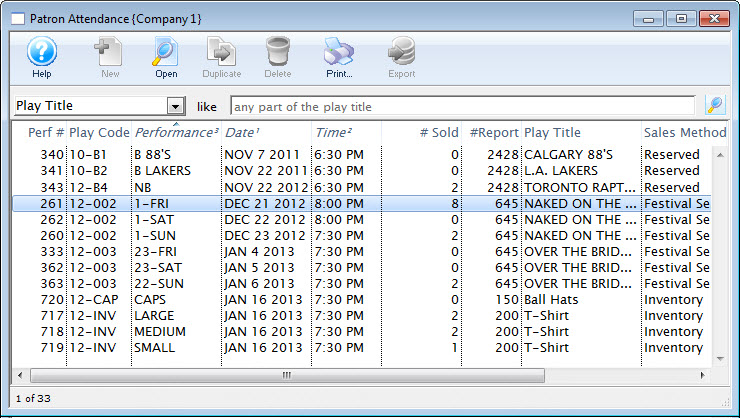
- Double click on a performance to select it. Once selected, the performance will open.
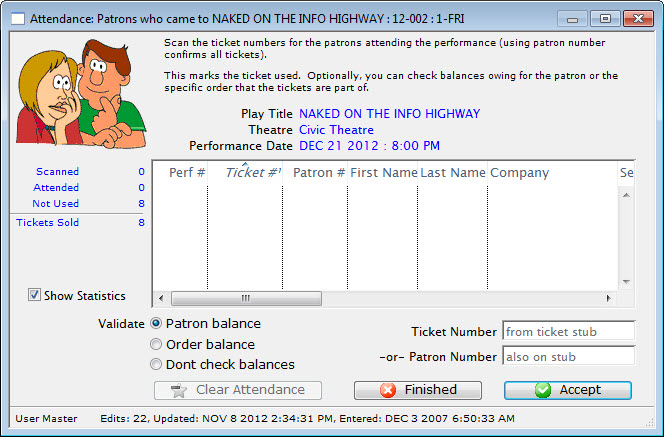
- Enter the patron number, ticket number or click in the ticket number field and scan the ticket.
If you enter the patron number, all of the tickets the patron purchased will appear in the window. If you enter the ticket number or scanning the ticket, only that ticket will appear.
- Click the Accept
 button.
To speed up the process, press the <RETURN> key to accept the ticket # / Patron #. If you are using a bar code scanner, set the default to include an automatic <RETURN> after each scan. If the tickets have a bar code on them, then either the patron number or the ticket number can be scanned in. It depends on what information has been encoded in the bar code.
If too many tickets have been selected, and not all should be marked as attended, highlight those to remove and click the Clear Attend
 button. The tickets are removed from the list.
 - Click the Finished
 button when all data has been entered .
This marks all tickets entered in the list as Attended.
Scanning Tickets using Web Interface
|
While this kind of scanning will still work, we recommend a linea pro bar code scanner |
The web scanning interface is really quite easy to set up. You will need:
- A computer
- A USB bar code scanner (CCD is best)
- A bar code on your hard tickets and your web tickets printed at the time of sale, and
- A permanent net connection to the web listener
To start, you need to know the following:
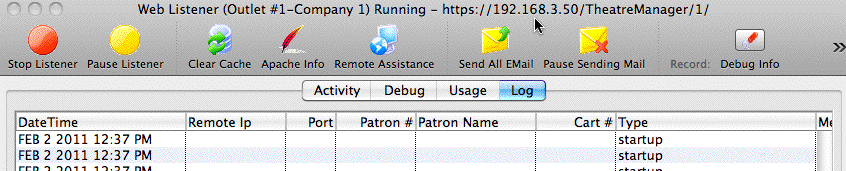
| Performance Number | You need to know the performance number of the event that is occurring. You can find this by opening up the Events & Dates window, and clicking on the Performance tab. The first column of the performance list is the performance number. In the example below, you can see the performance number as #323 for the Apr 2, 2011 performance. |
| Web IP Address | You need to know the listener IP address (internal). You find this by looking at the web listener on the title bar. In the example below, it is https://192.168.3.50:5111 (note - 192.168.3.50 is the IP address and 5111 is the port number to use if you are using the wireless scanners)
|

Once you have the setup information, then you can begin the process of tracking attendance.
- On any computer, start the web browser of your choice (Safari, Firefox, Internet Explorer, etc.)
- Enter the IP address of the listener (along with the attendance page) in the following manner. This is the IP address you found above, along with the actual attendance page called 'TMattendance.html'.

|
If you want to track attendance at a remote venue using this method, you can use the web listener and the path name will resemble https://tickets.yourvenue.com/TheatreManager/1/TMattendance.html |
Once the browser page is started, you should see something like the following page. On it, you must fill in:
- The performance number from above (in this example -- 323)
- Your user initials (in this example -- RDE), and
- Your password (Password are case sensitive. For most sites, you will enter it in all upper case).
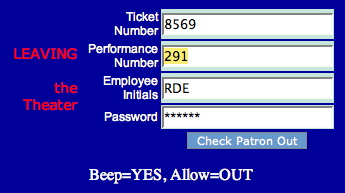
Put the performance number into both the upper area and the lower area. The upper area checks people into the venue who have not entered the venue. The lower area tracks people leaving the venue so that they may re-enter later.
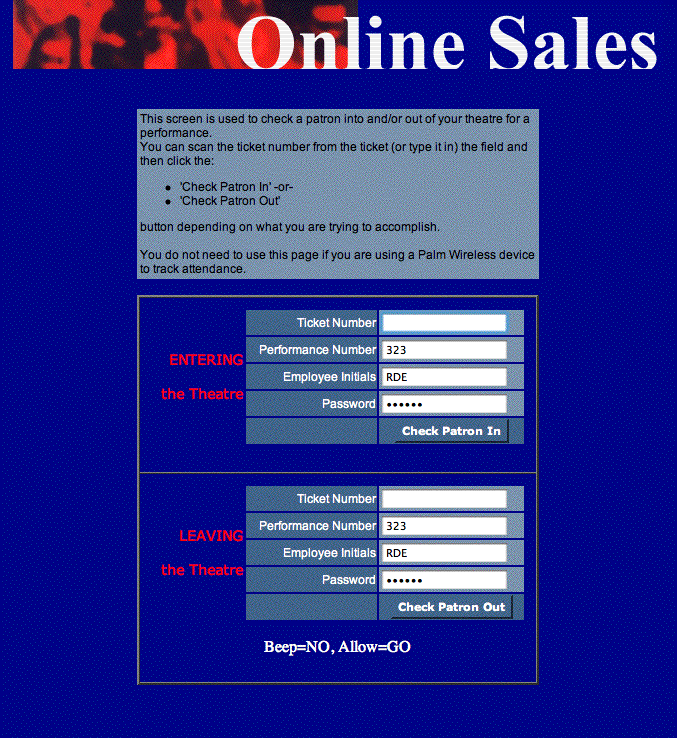
Entering the Venue
Once the web page is on the screen
- Place the cursor in the Ticket Number cell.
- Aim the scanner at the bar code on the ticket
- Pull the scanner's trigger
- Click the "Check Patron In" button on the web page (see NOTE below)
- Scan tickets until all patrons are in the venue.
When you click the "Check Patron In" button, a message is sent to the web listener and it responds with a message. For possible messages, see below.
|
If your scanner is programmed to automatically enter a "carriage return" after the click (see the scanner's User Manual to program), then you do not need to click the "Check Patron In" button. Alternatively, after scanning, you can click the ENTER key on your keyboard. |
| Action | Possible messages |
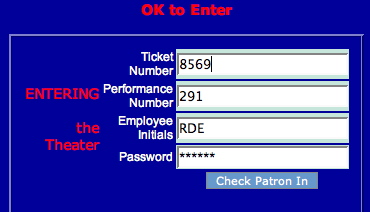
| Ticket Not Used Yet | For a ticket that is valid for admission, the message will display "OK to Enter." In this case, the ticket number is '8569' and the user is informed to allow access.
|
| Ticket Already Used | If the ticket has already been marked as used then you will see a message similar to the one below. |
| Not Sold | If you try to scan a ticket Theatre Manager thinks has not been sold, you will get a message similar to that below.
This may happen if the ticket was sold and then exchanged but the original ticket was never destroyed (as part of the box office procedures).
|
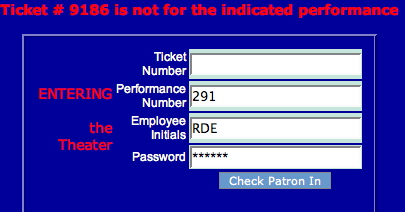
| Wrong Performance | If the ticket that is entered is sold, but it is for the wrong performance, then you will receive a message like the one below.
|

Leaving the Venue
Sometimes people need to leave the venue. If you have scanned them in, then they cannot enter again because the ticket was already used. The only way to allow them to leave, and then return is to check them out of the venue. That will mark their ticket as un-used. They can then enter again at any access point that supports ticket scanning (or manual entry of tickets).
You are not required to use this approach for re-entry. You can ignore this process and use the traditional 'hand stamp' method (or similar protocol).
| Action | Possible messages |
| Patron is Leaving the Venue | In the lower area, scan the bar code (or type the ticket number) to indicate that the patron is leaving the venue. The input screen will look like the following.
if the patron was properly scanned into the venue, you will get a message like the following in the standard message area.
|
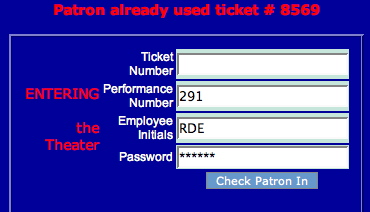
| Ticket Not Used | If the ticket was used and the patron has been scanned out of the venue -or- if the patron was never in the venue in the first place, you will get a message similar to the one below. This is useful to let you know when "Elvis has left the building."
|
| Not Sold | If you attempt to scan a ticket that Theatre Manager thinks is currently not sold, then you will get a message to that effect (similar to the "Check In" message) |
| Wrong Performance | If the ticket that is entered is sold, yet it is for the wrong performance, then you will receive a message to that effect (similar to the "Check In" message). |
Determining Used/Unused tickets
|
Note: It doesn't matter how the tickets were scanned (wireless, typed in manually, or tethered scanner), each of these methods will give the same result. In reports, the criteria you want to use is Ticket Scan Flag-Patron Came to the Event is equal to No (they didn't get scanned) Yes (they were scanned) |
Things you can do..
- The Ticket Scanning Monitor can be used in real time on the night of the event to see the flow of people into the venue. It can be useful for house management to know when to close the doors, or to hold them open should there be a weather related event occurring. This has the number of tickets scanned in (and out), the performance If multiple are happening that day) and the percentage of people in the house.
- The manual ticket scanning window will show the number of tickets told to the performance, the scanned count and the unused count on the window. It is a quick way of seeing one performance at a glance.
- On the play window in the attendance tab, there is a tab that indicates the ticket use (scanned/not scanned) status. This has 3 values:
- Future Event - indicates that the performance is for the future so we cannot tell if it was used or not.
- Attended - indicates the people who have been scanned into the venue.
- Not Used - refers to any ticket that was sold, but not scanned into the venue
- Using any Ticket Inventory Report, you can search for only tickets that were scanned (used) or those that were not scanned (not used). This can be used in conjunction with other criteria to do things like find:
- the number of subscribers who did not attend
- which board members came
- the number of people given a comp that did not show up
- etc
The criteria to use in reports is Ticket Scan Flag-Patron Came to the Event is equal to No (they didn't get scanned) Yes (they were scanned)