Ticket Printing at an Offsite Location
- Remote ticket printing using a printer with an parallel connection.
- Remote ticket printing using a printer with an ethernet port in it
Remote Ticket Printing-Ethernet via RDP/Teamviewer
|
This setup assumes that your are connecting to you ticket server using Remote Desktop, Teamviewer or some other remote access program. |

Things you will need:
- A Printer with an Ethernet connection
- A portable router that supports NAT forwarding of the ticket printer port at the remote site.
Setup:
- A portable router that can be taken to the offsite location will be needed.
- Set an internal IP addresses of the portable router that is the SAME subnet range as the office network. As some examples:
- if in the office the IP range is 192.168.0.x, then the IP addresses behind this portable router should be the same 192.168.0.x. This will ensure the Printer can be used in both networks without having to alter it's IP address.
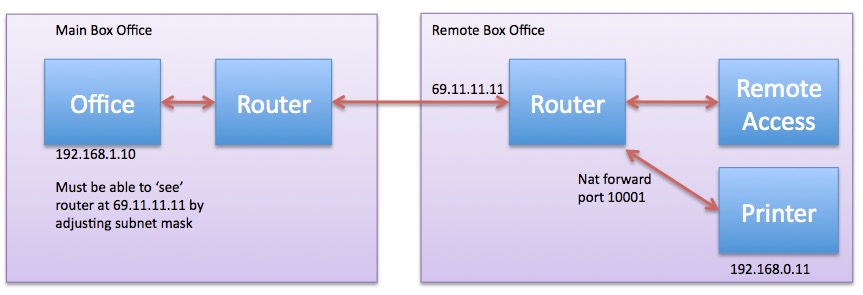
- Alternatively, you can use network addresses that are close (eg 192.168.1.x on your main lan and 192.168.0.x at the remote box office) and adjust the subnet mask to be something like 255.255.0.0
- Take the router, printer and computer to the offsite location. Plug everything into the portable router.
- Use Microsoft Remote Desktop (Macintosh or Windows vis MSTSC) or Teamviewerto remotely access a computer in the main office.
- Enter a NAT forwarding rule in the router that forwards port 10001 to the IP address of the ticket printer. For example if your printer is at 192.168.0.15, then make a rule that forwards 10001 to that IP address.
- At the remote site, find out what the external IP address of the outside router is. This can be done by visiting www.whatismyip.com. In this example lets say the external IP is 77.12.34.56. This is where the internet thinks the router is located.
- In Theatre Manager click the Preference button at the top of the window (the yellow cog). Select the Ticket Printers tab. The IP displayed will most likely be the internal IP address of the Ticket Printer.
- Change the IP address of the ticket printer to the address supplied in step 6 above.
- Test print a ticket.
*** at this point all should work, except, the printer WILL NOT.
What you've effectively done is told Theatre Mananager to send the ticket info outside your office and all the way along to your router. Your router then says, not me, pass it inside the router to your printer (using the NAT rule).
When the ticket printer returns to the office the machine that was accessed remotely using TeamViewer will need to have the Preferences updated. Log back into Theatre Manager and click the Preference button. Select the Ticket Printers tab and change the IP address back to the address within the local network. Each time the ticket printer is taken offsite use the www.whatismyip.com site to determine the IP address to be entered for the ticket printer.
Remote Ticket Printing-Parallel
Things you will need:
- A Printer with a parallel connection
- A windows based computer with XP or later.
- A real parallel port on your remote computer or laptop (it can be via a PCMCIA add on card if need be
- Windows Terminal Server 2003 or later in your computer room.
- A connection to the internet at the remote box office.
|
Try the setup in your office to make sure it works before going to the remote location. |
|
This will only work if you DO NOT install a local printer driver on the computer at the remote box office or on the terminal server and assign it to LPT1. |
Setup:
The setup assumes that the printer will be connected to LPT1. If you are using LPT2 or another port, substitute it for all instructions below.
- Remove any printer driver you may have installed on the computer at the remote location that is attached to LPT1.
- Set up a remote desktop connection to the terminal server
- In the options for the RDC connection, make sure you share the PORTS in the local resources.
- Make the connection via RDC to the terminal server (must be terminal server 2003 or greater
- Log into Theatre Manager
- Go to the preferences for the user and click ticket printer -- and make sure LPT1 is selected as the ticket printer
- Test print a ticket.
Troubleshooting
If you are running into issues, have a look at one or more of the following:
- Make sure you DO NOT have a printer set up for LPT on the remote machine. In fact, remove all printers that you are able to remote
- DO NOT allow windows to automatically install a printer driver for you when it discovers the parallel ticket printer
- Restart the remote computer and make sure that the ticket printer rolls a ticket forward and backward on startup
- Make sure that there is a real parallel port in the device. (it can be a PCMCIA printer device. A USB to parallel device is not a real parallel port.
- Make sure that your setup for Remote Desktop is set to share the local ports.
- Make sure that your terminal server allows local ports to be shared from the remove device.
- Make sure that the printer has tickets in it
- Make sure that the clutch is down inside the printer so that the rollers can engage the printer
- Watch to see if the ticket printer receives any data when you click 'test print' in theatre manager. One of the lights will flash
- If it will not work on one machine, try another machine in your office. It make just be the machine.
Remote Ticket Printing-Ethernet and Local Lan
|
This setup assumes that your remote router is to be connected to a local network at the remote site -- and that it gives out IP addresses that you can control. If using a Mobile Thumb Drive to connect to the internet, refer to the alternate instructions for mobile/ethernet because this setup will not work. |
Things you will need:
- A Printer with an Ethernet connection
- A portable router other then those in the current network.
- Your postgres server set to allow connections from the remote location
- A relatively high speed internet connection at both ends
|
This installation assumes that your remote router is to be connected to a local network at the remote site and port 10001 can be configured. If using a Mobile Thumb Drive to connect to the internet, refer to the alternate instructions for mobile/ethernet because this setup will not work. |
Setup:
- A portable router that can be taken to the offsite location will be needed.
- Set an internal IP addresses of the portable router that is the SAME subnet range as the office network. As an example, if in the office the IP range is 192.168.0.x, then the IP addresses behind this portable router should be the same 192.168.0.x. This will ensure the Printer can be used in both networks without having to alter it's IP address.
- Take the router, printer and computer to the offsite location. Plug everything into the portable router.
- Use Teamviewer to remotely access a computer in the main office.
- Enter a NAT forwarding rule in the router that forwards port 10001 to the IP address of the ticket printer. For example if your printer is at 192.168.0.15, then make a rule that forwards 10001 to that IP address.
- At the remote site, find out what the external IP address of the outside router is. This can be done by visiting www.whatismyip.com. In this example lets say the external IP is 77.12.34.56. This is where the internet thinks the router is located.
- In Theatre Manager click the Preference button at the top of the window (the yellow cog). Select the Ticket Printers tab. The IP displayed will most likely be the internal IP address of the Ticket Printer.
- Change the IP address of the ticket printer to the address supplied in step 6 above.
- Test print a ticket.
*** at this point all should work, except, the printer WILL NOT.
What you've effectively done is told Theatre Mananager to send the ticket info outside your office and all the way along to your router. Your router then says, not me, pass it inside the router to your printer (using the NAT rule).
When the ticket printer returns to the office the machine that was accessed remotely using TeamViewer will need to have the Preferences updated. Log back into Theatre Manager and click the Preference button. Select the Ticket Printers tab and change the IP address back to the address within the local network. Each time the ticket printer is taken offsite you can use an online service (Example: https://mxtoolbox.com/whatismyip/) to determine the IP address to be entered for the ticket printer.
Remote Ticket Printing-Using a Mobile Internet Device
Things you will need:
- A Printer with an Ethernet connection
- A portable router other then those in the current network that has a USB port for the mobile internet thumb drive and can be configured to setup a VPN
- For OSX
- A licensed copy of TeamViewer.
- For Windows
- Remote Desktop and Terminal services -OR-
- A licensed copy of TeamViewer.
- A Mobile Thumb Drive for internet connection
Setup:
- Establish a VPN tunnel between your local network and the remote computer. Remote Box Office
- Set the ticket printer to a static IP address within the subnet of the remote location. Setting the IP address of the ticket printer. You will have to check your remote router when connected to the mobile internet device to determine the subnet that is issued. This may change each time.
- Take the router, printer and computer to the offsite location. Plug everything into the portable router.
- Use Teamviewer to remotely access a computer in the main office.
- In Theatre Manager click the Preference button at the top of the window (the yellow cog). Select the Ticket Printers tab. The IP displayed will most likely be the internal IP address of the Ticket Printer.
- Change the IP address of the ticket printer to the address set in step 2 above.
- Test print a ticket.
*** at this point all should work, except, the printer WILL NOT.
When the ticket printer returns to the office the machine that was accessed remotely using TeamViewer will reset the IP address to what it was previously before step 2. Log back into Theatre Manager and click the Preference button. Select the Ticket Printers tab and change the IP address back to the address within the local network. Each time the ticket printer is taken offsite you will need to reset the IP address of the ticket printer and set the user preferences in Theatre Manager.