Step 2 - Setting Base Options in the Scanner
Most often, the settings can be made once and left alone if the intent is to scan tickets on the day of the show.
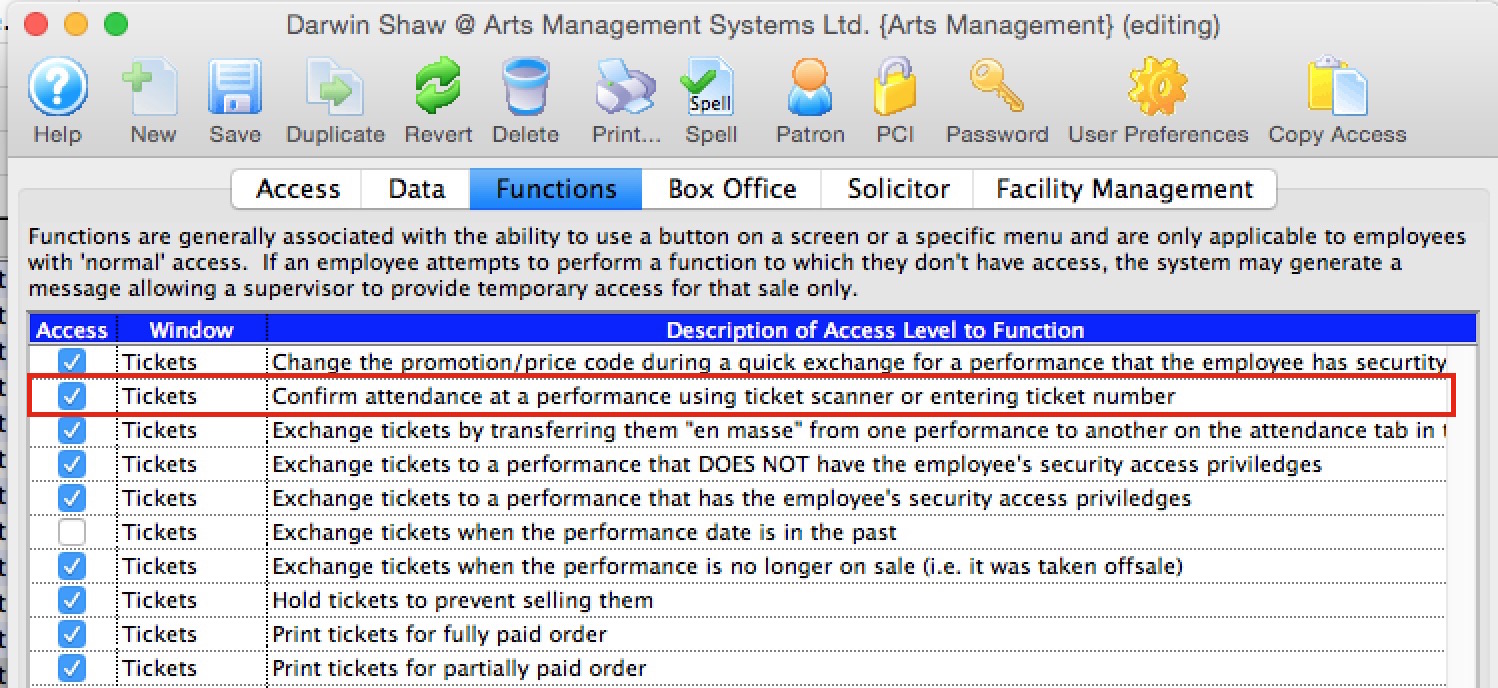
Scanner User Id in TM
The setup steps for a user id for scanning are:
- Create a patron in Theatre Manager with a suitable name, like 'Ticket Scanner'. You could even make them a household member of your other special TM id's like the 'Master User' or 'Web Listener'
- Turn the user into an employee
- The only settings and permissions that the ticket scanner id really needs is:
- a unique set of initials to log in with. These are created automatically when the employee login is created and can be found on the employee window
- The Employee initials are placed in the scanner setup field on the device you are using to do the scanning.
- This active user must is allowed to log in
- the permission to Confirm Attendance at a Performance as per the image below.
Scanner Prefs - Linea Pro TM Scanner application
 |
You may protect access to this entire screen (or parts of it) using an iPhones built in Accessibility Feature |
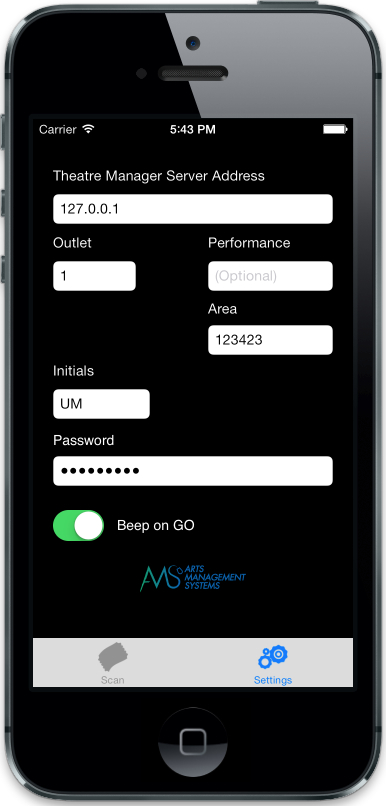 Some configuration settings need to be made on the iPhone or iPod prior to using the Linea Pro scanner to scan tickets. These are very simple, and are all contained on one screen on the iPhone/iPod.
When using the TM Scan application, click on the settings icon at the bottom right of the screen to make changes to the settings. When done, click on the scan button at the lower left.
The values of the fields are in the table below and some troubleshooting steps are at the end.
| Theatre Manager Server Address | This is the URL address of the web listener that will be responding
to checkin and checkout requests. Enter the address of either:
|
| Outlet | This is the company number (normally 1). In multi-outlet venues, this number will be different for each outlet. |
| Performance (optional) | You can enter the performance number that you are scanning for or leave it empty. Both options affect which tickets will be accepted by the scanner.
Please refer to the scanner rules for more detail. |
| Area (optional) | This is an optional number that you may assign to scans. It is intended to identify entrance to a specific venue in the case where one ticket allows a patron access to one or more places and you need to monitor how many people are in each area. The venue number must exist in Theatre Manager and does not need to be the same as the venue for the ticket. Example: the ticket could be for a game or circus in an arena. However, there may be a 'bar tent' or 'children's play area' that only ticket holders can go to -- so you can scan them into those auxiliary areas for capacity tracking.
Normally, this field is not entered. |
| User Initials | This is the uppercase initials for the user ID in Theatre Manager doing
the scanning. This person does not need to be able to log on to TM for
any other reason. You might wish to create a generic ID for
this purpose.
The user initials for the scanner must be unique within each outlet. |
| Password | The password used for these User Initials to log on to
Theatre Manager.
Note: Passwords are case sensitive per PCI compliance. Please ensure you get the case correct. |
| Beep on go | This function can be turned on if you want a beep to sound when a valid scan is entered. If this is off, the scanner will only vibrate - which may be nice if you are scanning in an area where silence is better. A higher pitched longer beep occurs if an invalid scan is attempted. |
Troubleshooting the scanner
|
The first trouble shooting technique if you can't scan tickets, is to open safari on the iOS device and see if you can connect to your ticketing web site.
If you cannot, then usually the issue is the DNS on the wifi router you are connected to. |
|
If some devices can scan tickets and others cannot on the same network, then compare the versions of iOS on the devices to find out which version is working. |
Linea Pro Scanner Check Battery Health & RFID Laser
 Infinite Peripherals offers an app via the Apple Store to download and install on iPod or iPhone devices used with the Linea Pro Scanner sleds.
 The app is called IPCSupport and can only be downloaded from the apple store on your iOS device.
This app will provide:
- the battery health of the scanner device
- the ability to test the infrared laser.
- Note: There are other features in this app that are NOT applicable because the Linea Pro is using Theatre Manager's TM Scanner ticket scanning software.
Only use the Device for battery health and RFID to test infrared laser.
Protecting Scanner Preferences Using Accessibility
 If you wish to manage access to parts of you scanners so that volunteer ushers or unauthorized person cannot click on
check out or the settings buttons on your scanner, Apple provides a great solution through the accessibility feature on the iPhone or iPod touch.
If you wish to manage access to parts of you scanners so that volunteer ushers or unauthorized person cannot click on
check out or the settings buttons on your scanner, Apple provides a great solution through the accessibility feature on the iPhone or iPod touch.
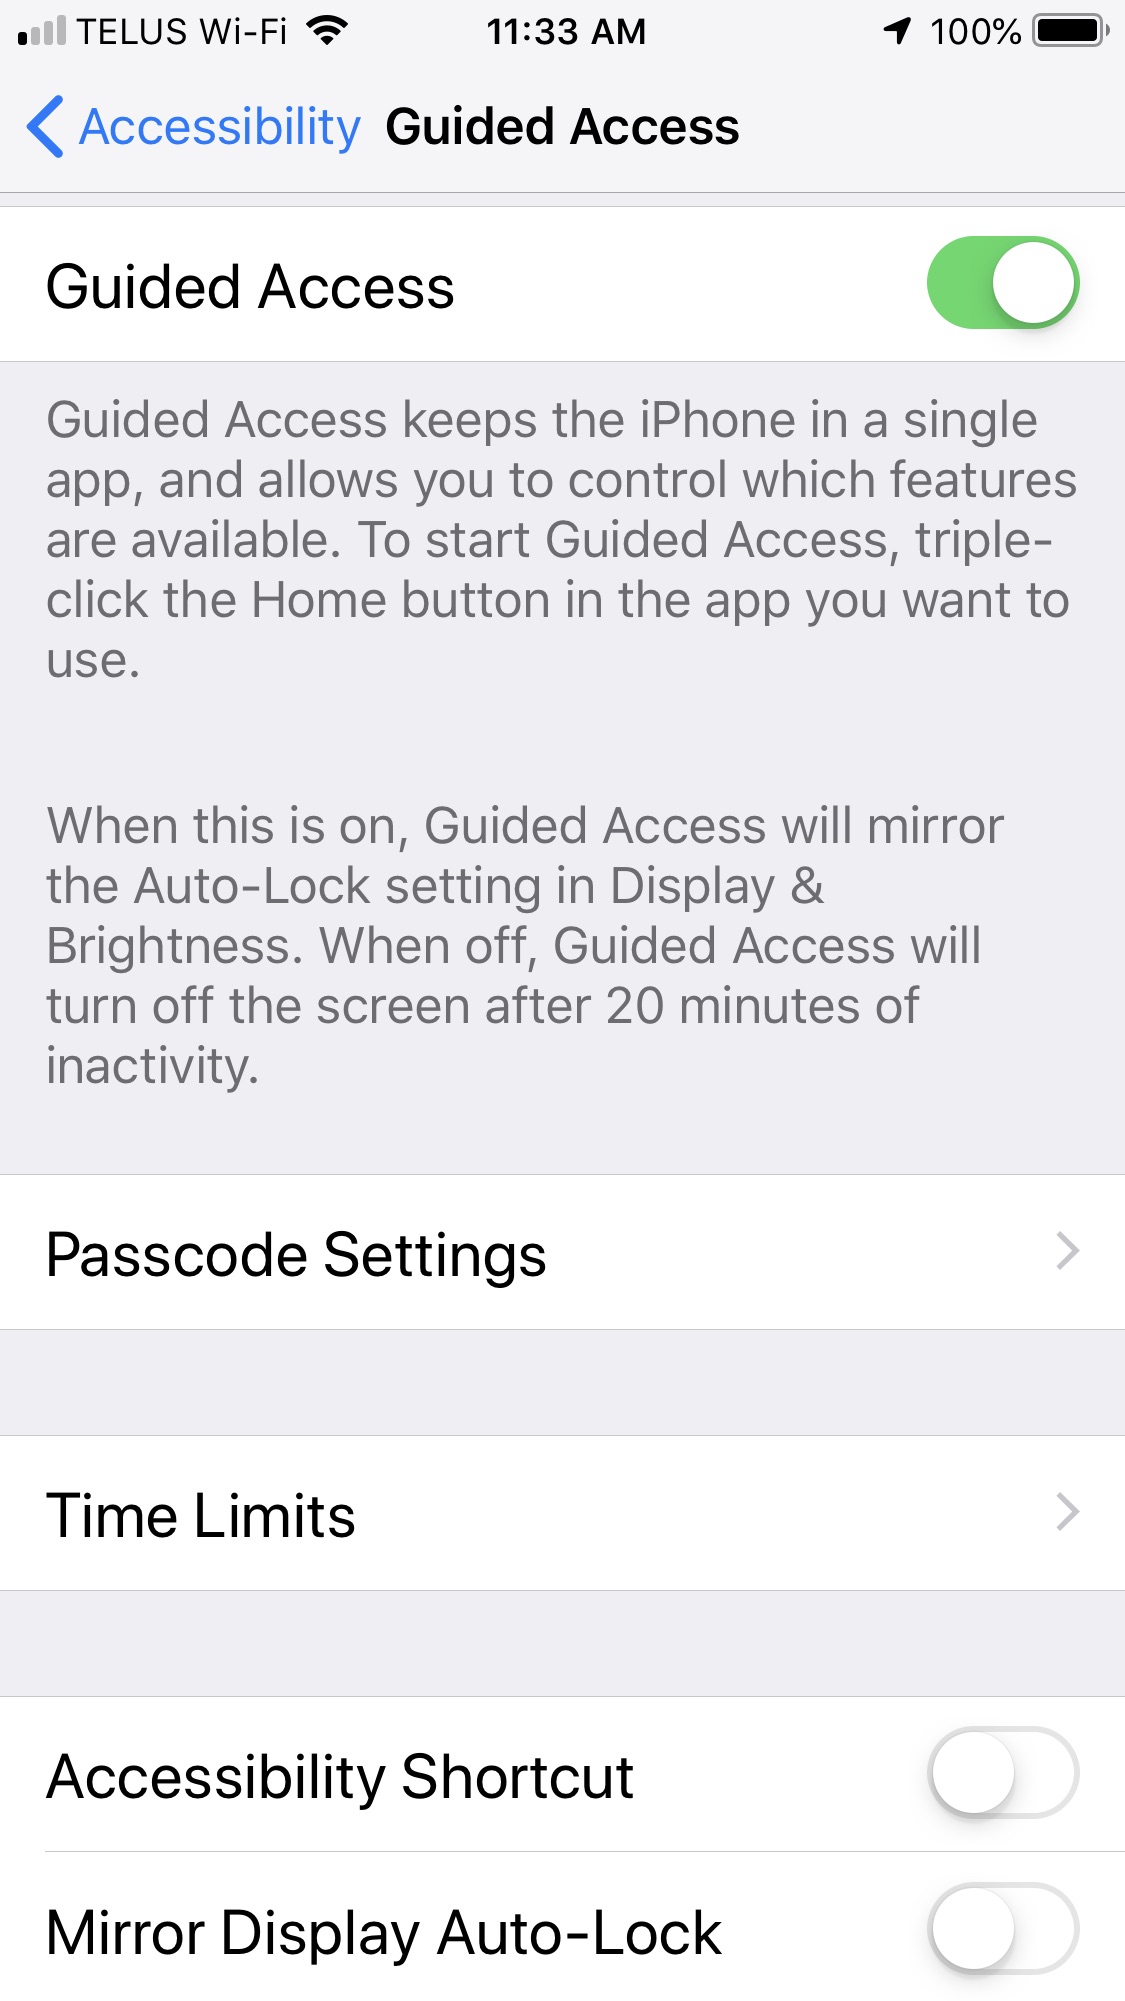
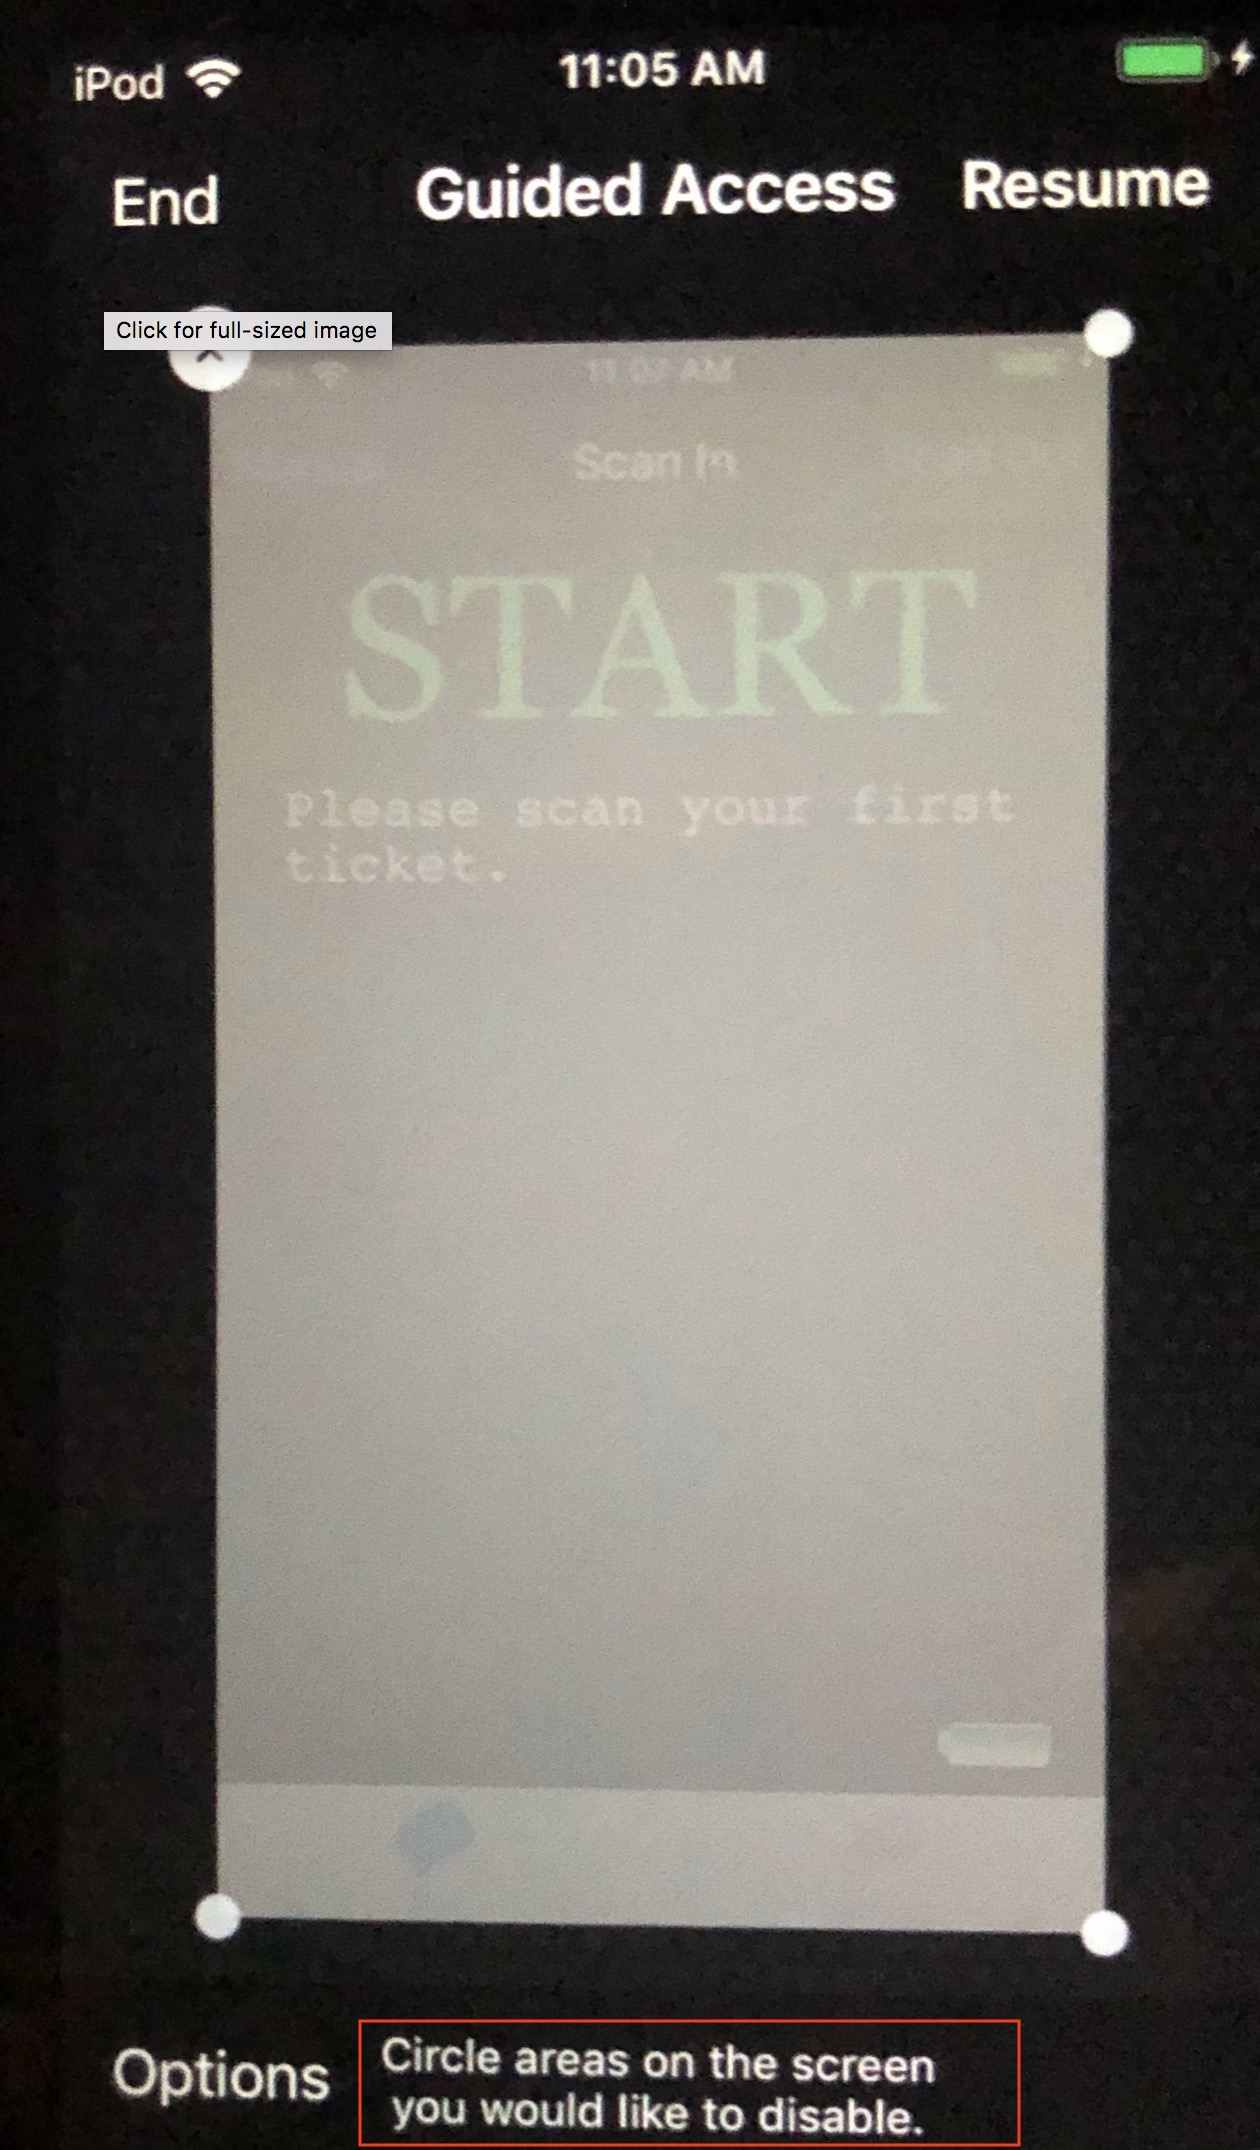
Guided Access limits your iOS device to a single app and lets you control which features are available. You can turn on Guided Access when you let a volunteer use your device, or when accidental gestures might distract you..
To Enable Guided Access
- open the Settings application and navigate through
- General
- Accessibility
- Guided Access (as per the screen to the right)
- Turn on Guided Access.
- Tap Passcode Settings, then
- tap Set Guided Access Passcode.
- Enter a passcode, then reenter it.
To set up Guided Access for a Specific Application
Open the app that you want to manage (eg TM Scan - for purposes of this example) and decide if you want to control access to the entire settings tab or only parts of it.
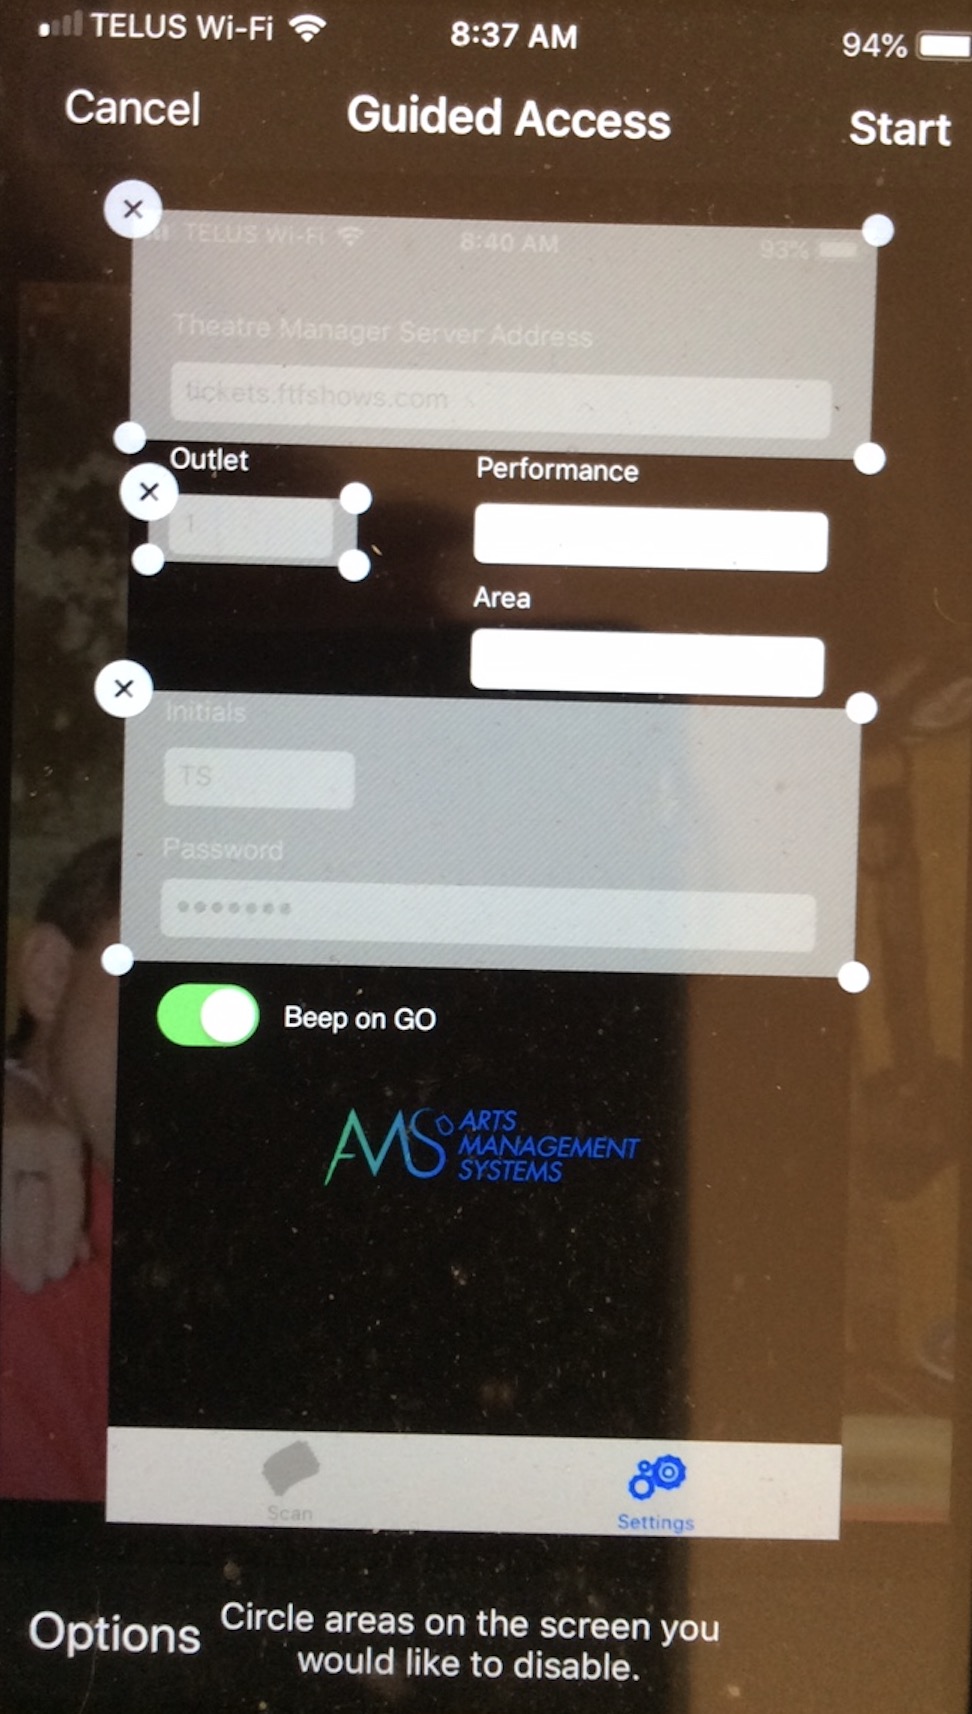
Option 1: Control Access to Multiple Specific Parts of Settings Tab
This can be used to limit access to some parts of the settings. You might use this approach if you want to allow staff to only change of the performance
- Click on Settings
- Triple-click the Home button.
-
If you want to manager parts of your screen to stop responding to touch, use one finger to circle those areas. You can move or resize the circle, or tap the X to remove it. In our example to the right we have selected the:
- URL to the ticketing web site,
- Outlet (if you are scanning for multiple organizations in an outlet version, you may not want to select this
- ID and Password
- Refer to scanner settings for meaning of the fields to decide what you want to protect. You could, if you want, protect the entire screen
- Tap Start.
- Stay on the main screen
Option 2: Control Access to an entire screen
This can be used to limit access to some parts of the settings. You might use this approach if you want to allow staff to only change of the performance
- Click on Settings
- Triple-click the Home button.
- Select all the fields on the screen
- Adjust the corners of the rectangle as need be by dragging them
- Tap Start.
- Stay on the main screen