Editing an Event / Play
Editing Performances
Each series of performances can be edited after being created. You may be required to change the time or date of the performance or some other attribute. There are different editing options for each of the different sales methods, however they are similar. Before details are explained about editing each performance type. It is useful to know how to access the series detail window so you can start editing.
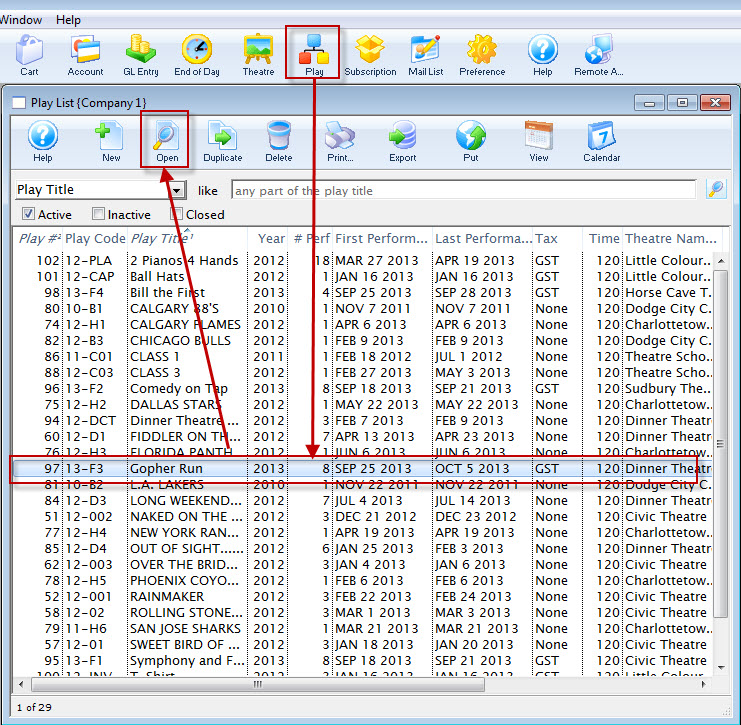
- Find the Event with the performance you wish to edit.
Click here to learn how to find events.
- Open the Event / Play Setup window.
Double click on the event/paly or press the Open
 button.
The Event/Play opens.
- Click on the Performances tab.
The Performance Tab opens.
- Double click on a performance to open the Performance Detail Window.
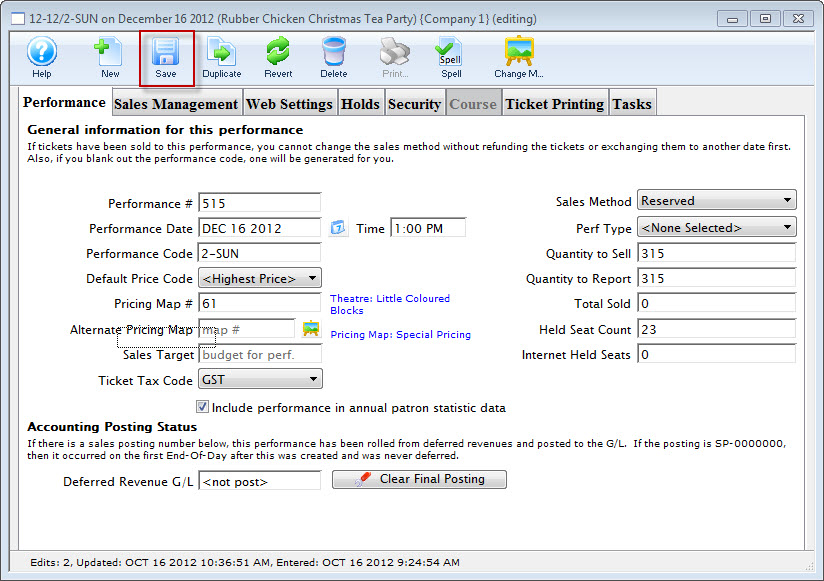
The detail window is the same for each sales method. Depending on the sales method you may not have access to some fields. Click here for a detailed description of this window.
Allow a Performance to be Sold at Another Outlet
If you allow a performance to be sold at another outlet, you can now specify which outlets have the capability so that each performance can be sold by different people.
|
You will need to enable the promotions for another outlet. Click here for more information on enabling promotions for another outlet. |
To allow a performance to be sold at a different outlet, you perform the following steps:
- Open the required event.
- Click the Performance Tab.
If you have enabled the Performance Codes, you can enable Allow Selling at ALL other outlets.

To enable selling at other outlets for specific performances:
- Open the selected performance.
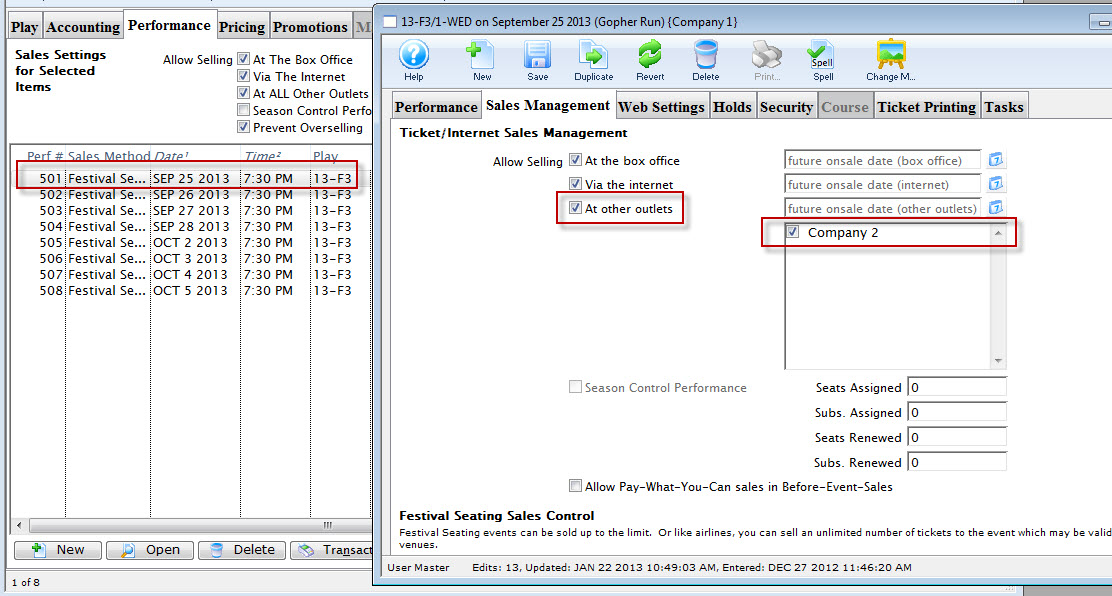
- Open the Sales Management tab.
Click here for more information on the Sales Management tab.
- Enable At other outlets.
Outlets that can sell the tickets, for the performance can be selected from the list on the right.
Changing a Performance From Reserved to General
Changing a Performance From Reserved to General Admission / Festival Seating
There are times when a performance sales method may need to be changed from Reserved seating to General Admission seating. The director/promoter may have changed their mind about the seating configuration, the performance may have been build incorrectly, or social impact may mandate the change.
A performance can always be updated from Reserved to General Admission even if seats have already been sold. Tickets previously allocated to a reserved seat are simply changed to no longer reflect a seat allocation in the database. However, a performance cannot be moved from General Admission to Reserved seating after seats have been sold as Theatre Manager has no way of knowing where to seat patrons who have previously purchased. The steps below outline how to change a performance after it has been built.
- Find the event / play you want to hold seats for.
Click here to learn how to find an event / play.

- Open the event / play by selecting it in the list and clicking Open or by double clicking it.
- Select the Performance tab

- Open the Performance Detail window
Each performance will need to be updated one at a time.

- Click the Sales Method drop down.

- Select General Admission or Festival Seating depending on your database configuration.

- Click Yes to the continue message.

- Select the Accounting tab in the Performance Detail window.

- Update the Quantity to Sell field to accurately reflect the total number of seats to be sold for the Performance.

The steps above can be repeated for each performance within an event as needed. Once a performance has been updated it can be marked available for sale at the Box Office and Online.
Live Web Content
 |
Live streaming content is set up in the Live tab in the performance's detail window and is described below. |
|
If you set a time limit in a watch window, and somebody exceeds it, so that that cannot see their event. Clear their attendance flag and then they can re-watch the item. |
Live Content Styles:
- Video streaming for an online-only event
- Embedded iFrame
- Mobile-friendly "Custom Content" for the performance
Live Video Performance (Virtual Events)
Online-only video performances allow you to show streaming video at a specific time to ticket buyers. The video can either be pre-recorded or live streaming, depending on your selected video provider.
Supported Video Providers:
- Vimeo Setup - web site for Vimeo
- YouTube setup - web site for YouTube
- DaCast Setup - web site for DaCast
- Video.js Setup - web site for Video.js
- CineSend Setup - web site for CineSend
- BoxCast Setup - web site for BoxCast
Aside: Producing Video Content
If you're looking for tools to start recording and streaming live video, then a good place to start is OpenBroadcaster Software (OBS). The OBS Beginner Tutorial gives a good introductory video walkthrough. OpenBroadcaster Software supports a wide range of video providers. The primary way to use OBS is to send an RTMP Stream to the video provider. In turn the video provider will "duplicate" the stream and send it out to all live users. In other words, the video provider handles all the bandwidth required to broadcast your stream to hundreds, or even thousands, of users.
Live Experience
Theatre Manager comes with a default set of web pages for a full live video experience. The experience has three parts
Discovery
Users can enter the live show by clicking the Watch button under Tickets for Upcoming Performances in their home

Users will also be made aware of any Live tickets they have if they are logged in and have a ticket to a live performance occurring in the next 6 hours.

Pre-Show
The pre-show helps build excitement for the upcoming event. It has a countdown timer that let's users know when the event will begin

Show
The in-show displays a minimal frame for the video, so that the video content is front and center

Supplementary content (Coming Soon)
Supplementary content is information that you'd like to be available on an attendee's smartphone, for the duration of the event. This type of content is most suited to events that are interactive and require audience participation. For example, an outdoor festival that might have maps to various activities. Or a "Theatre in the Wild" event where audiences can self-direct to one of several small performances in different locations.
Common Questions
Question: Zoom is designed for video conferencing. Can it be integrated as a video streaming option?
Answer: We've looked into Zoom however it might not be the choice that you're looking for. At least not directly embedded streaming links into the Theatre Manager web pages. Zoom makes the assumption that what you're doing is more of a webinar -- that everyone in the meeting is an active participant. For live streaming events, that's often not the case. Usually, one person is doing the filming while the others are watching.
If you're attempting to use Zoom purely for it's easy-setup, you may want to consider one of two things:
- Connect Zoom to Vimeo Live
- Switch setups to OpenBroadcaster Software for streaming to Vimeo. It's quite easy.
If you're using Zoom because you want audience participation, then that's something else entirely. Zoom does have integration points with web pages which would require engineering effort within your webpages to treat the interaction that it allows the audience interaction in the correct way.
You could very easily do this kind of event outside of the live streaming portion of Theatre Manager by sending Zoom invites to the patron's email address via a Form Letter email. The attendance reports could be used to know who to let into the class or not, and you could mark attendance using a Course Attendance Report or in Theatre Manager directly.
You may also be interested in the Managed Courses feature in Theatre Manager, which can allow user web access to setting a class attendance. That would allow the Meeting Moderator or Class instructor that isn't a Theatre Manager employee to mark attendance, and also see who is in their meeting/class.
Question: Using the free version of Vimeo, the webpage the video is embedded in appears not to be secure as I can see the video ID link in the HTML coding of the page. A patron can right click and find the static link by both via the "save as..." function or the inspect element function. The "save as..." function is the most concerning for us as it is the most simple and easily exploitable. Can the web page security be updated to prevent this?
Answer: The Theatre Manager web sales and the Vimeo and YouTube links that are embedded in the page are secured by HTTPS, which ensures that the content streamed to your user's computers is private and can not be seen by other users. Theatre Manager requires that level of security in order to pass PCI compliance, and we take that notion of security very seriously. Theatre Manager is very secure for your users.
When it comes to Live Streaming video though, what you're referring to is the Gate Control required for a live streaming event, such that only ticket buyers are allowed access to the stream. As of today, that is only possible with Vimeo when using the paid Premium Live Streaming Plan.
The Vimeo feature you'd need is called "Domain Privacy", and it allows you to restrict playback of a video to only people that are viewing the video from your website, which requires a Theatre Manager login and a Theatre Manager ticket to watch. In other words, while people could copy and paste the Vimeo link, it wouldn't help them, because the video would only play through your site's tickets.yourcompanyname.com URL.
The reason that this is the only way for true Gate Control is that it's not possible to fully obfuscate or hide the link that's embedded in the page. There are some ways to attempt to disable that right-click context menu, but many browsers won't respect those options because the same options can be used to make abusive websites. Further, there are actually many other ways that you can see the Vimeo or YouTube link beside right-click, and your patrons could copy and paste it from those as well. YouTube, for example, has no controls for Domain Privacy and so it's not possible for us to restrict the video to only your website.
You're left with a couple choices:
- Trust. Hope that people just don't share the link, or if they do, hopefully it doesn't impact sales enough to matter. This option is part of the "free" package options, but your sales could be lower than they might otherwise be with good Gate Control. You could even potentially acknowledge that it's possible, and have a "plea" on the website that mentions the importance of buying a ticket -- the idea seems far fetched, but many news sites have had success with similar pleas for adblockers.
- Use Vimeo Professional with Domain Privacy: This will allow you full Gate Control, and it won't matter if users copy and paste links, because they won't work outside your website.
In this instance we're at the mercy of the video CDNs -- YouTube and Vimeo -- and what their options allow us to do. Of the two choices, Vimeo is the more flexible, and the one we currently recommend. We'll continue to look for other CDNs that can guarantee tight Gate Control on the web site for live streaming.
Editing Price Codes
There are two different reasons for editing price codes:
One - to initially set up the prices for the price codes.
Two - to alter an all ready set up price.
- Select the Play you want to adjust and click the Open button.
- Open the Pricing tab.
For more detailed information about the Pricing Tab, click here.
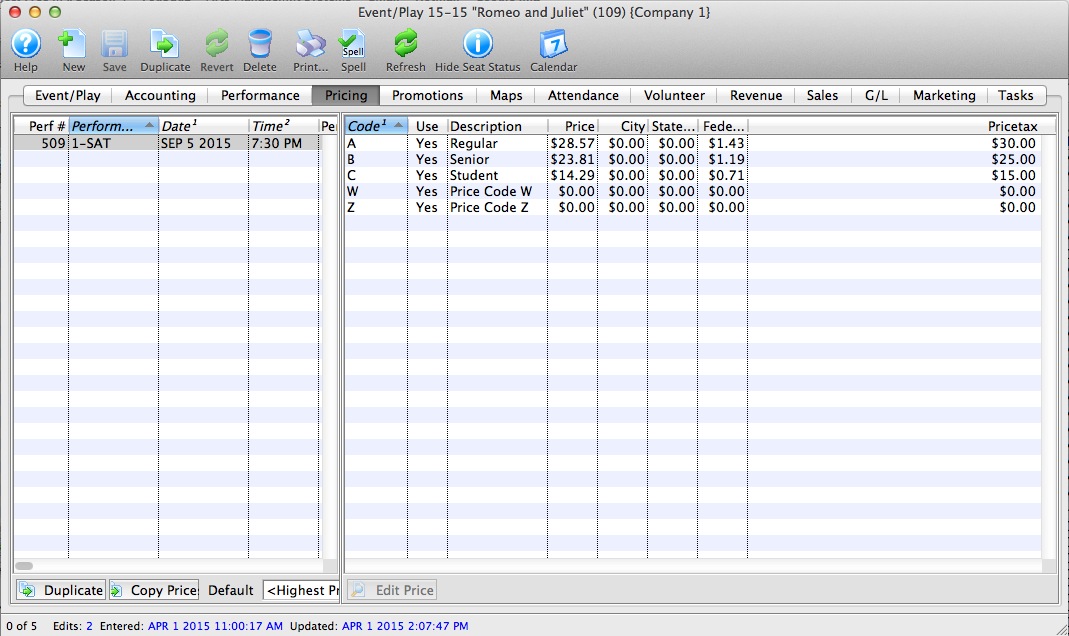
- Select the Performance that you want to Edit Price Codes for.
Do this by clicking on the specific performance from the performance list on the left side of the Play Setup window. The prices for this performance will display in the price list on the right side of the Play Setup Window.
- Select the the Price Code you want to edit and click the Edit Price
 button.
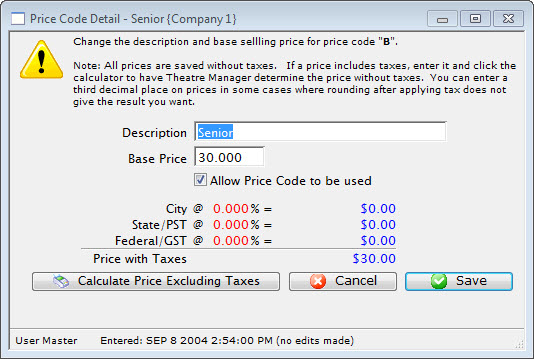
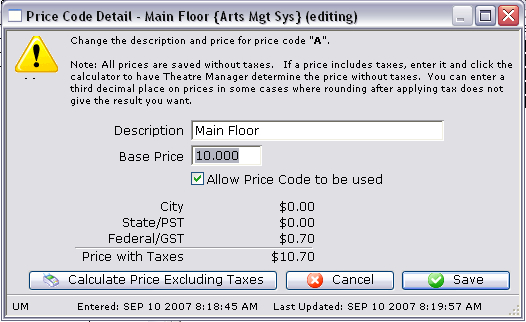
- Enter a description for the Price Code.
Common price code descriptions are Adult, Student, Senior, etc.
- Enter a Base Price.
The price that is entered here is the ticket price before taxes have been added on. If your company likes to have nice round ticket prices after taxes then you can use the Calculate Price Excluding Tax Feature. It is explained further down the page.
- Click Save
 button.
Doing this accepts the changes to the price code. Clicking Cancel
 would canceled the changes.
Calculating Prices Excluding Taxes
- Enter the Selling Price you want to end up with after taxes.
In this example we will use $10.00 and a 7% tax rate.
- Click the Calculate Price Excluding Taxes
 Button.
The selling price will now display as the price before taxes. In this example the $40.00 Price Code turned into a $38.099 Price Code. Look to the calculation to see how the tax was broken out to create $10.00 final price ticket.
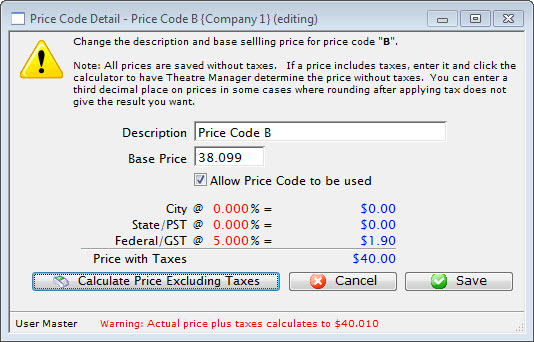
- Click Save button.
This accepts the changes to the price code.
Verifying Seats
|
If you change a venue map, when there are events already on sale, you MUST verify the seats on each performance to re-index the new name to the seat in the event. |

This is an internal database verification that ensures all tickets have been created and are properly setup. The verification routine has one key function - to determine if there are any missing reserved seats. This should never happen - verification will detect and correct the issue.
- Click the Event
 button in the Theatre Manager ribbon bar.
- Locate the Event with the Performances to be Verified.
- Open the Event by double clicking on it.
- Select the Performance tab.
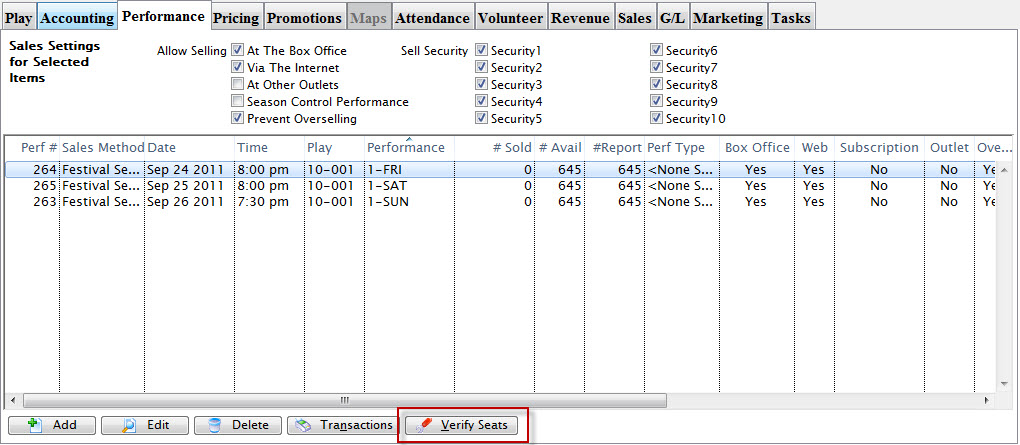
Single click on the performance to be verified. You can select multiple performances at a time if needed.
- Click the Verify Seats
 button.
The Verify Seats warning dialog opens.
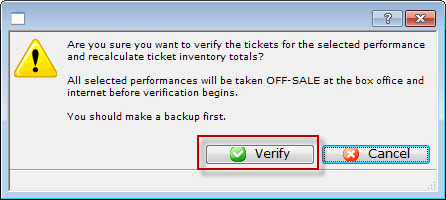
- To continue, click the Verify
 button.
The progress bar at the bottom of the window will state the function and the progress.
When the Verify process has completed, the Performances will no longer be available for sale at the Box Office. They will need to be marked as available before tickets can be sold.
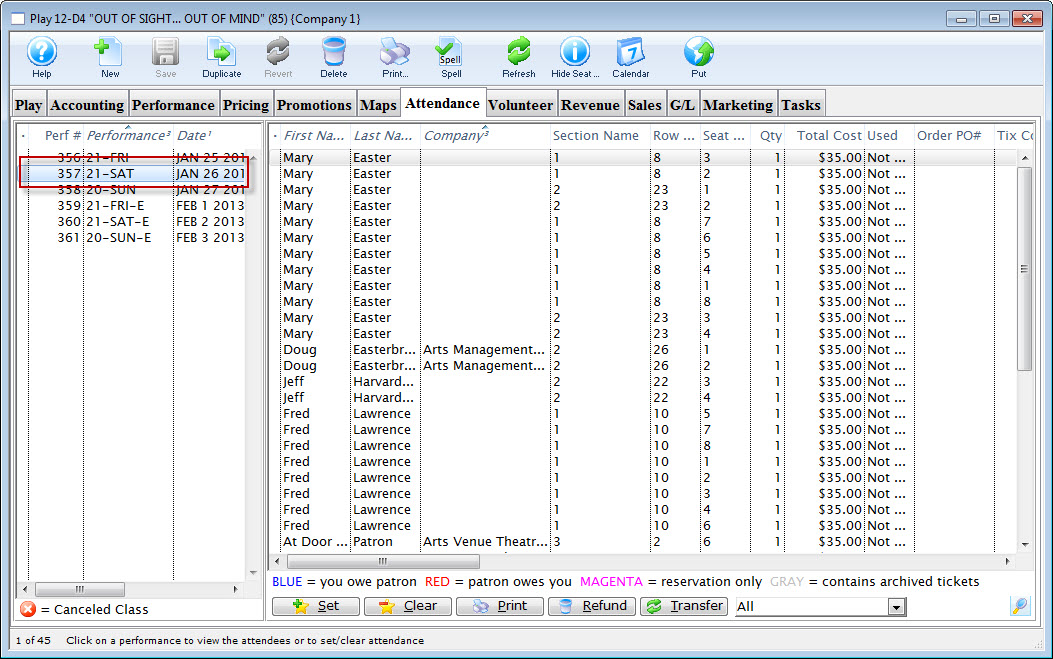
Setting Attendance
You use setting attendance to keep track of how many patrons attended a performance versus the number of tickets sold. This feature is beneficial for deciding how much can be oversold to a festival house. You may have discovered there is a consistent 'no show' rate of 15% to 20% and can then adjust sales to match the trend. Another use for this feature is calculating royalties based on the number of patrons that actually attended the performance, not based on the number of tickets sold.
|
It is important to remember that this feature only works if you have the ticket and the patron number printed on the ticket, or a bar code that contains one or both of those numbers. |
To set attendance, you perform the following steps:
- Click the
 button in the Theatre Manager Ribbon bar.
- Double click on the Play / Event to set attendance for.
- Click the Attendance
 tab.
tab. - Select the performance to set attendance for.
Choose the performance by clicking on the corect date in the column on the left side of the Attendance Tab.
- Click the
 button.
The Set Attendance button is only accessible if the performance you have selected has already taken place or will be performed that day.
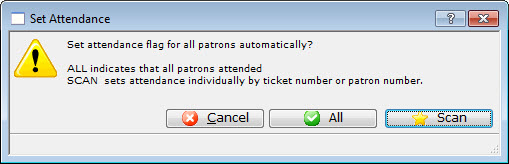
- Click the All
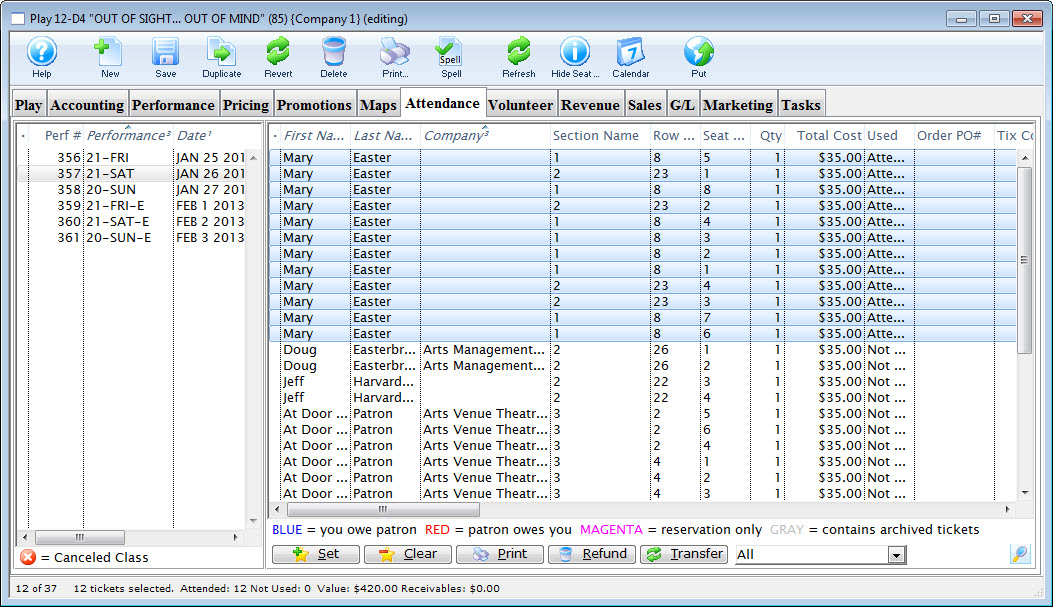
 button to set the attendance flag to "Attended" for all patrons and tickets.
Use this option if you are sure that all the tickets were redeemed for the performance.
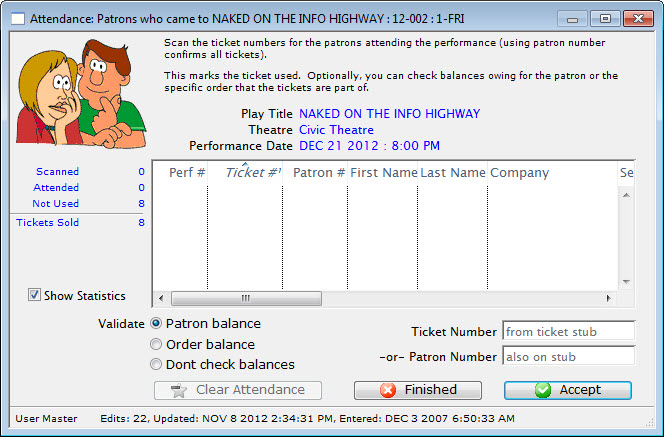
- Click the Scan
 button to manually enter attendance.
The 'Attendance: Patrons who came' window opens.

- Enter the patron number, ticket number or click in the ticket number field and scan the ticket.
If you enter the patron number, all of the tickets the patron purchased will appear in the window. If you enter the ticket number or scanning the ticket, only that ticket will appear.
- Click the Accept
 button.
To speed up the process, press the <RETURN> key to accept the ticket # / Patron #. If you are using a bar code scanner, set the default to include an automatic <RETURN> after each scan. If the tickets have a bar code on them, then either the patron number or the ticket number can be scanned in. It depends on what information has been encoded in the bar code.
If too many tickets have been selected, and not all should be marked as attended, highlight those to remove and click the Clear Attend
 button. The tickets are removed from the list.
 - Click the Finished
 button when all data has been entered .
This marks all tickets entered in the list as Attended.
Clear Tickets Incorrectly Marked as Attended From a Play
To clear tickets incorrectly marked as 'Attended' from a play, you perform the following steps:
If a mistake is made in setting attendance, attendance for the entire performance (or optionally, specific tickets) can be cleared.
|
If you set a time limit in a watch window, and somebody exceeds it, so that that cannot see their event. Clear their attendance flag and then they can re-watch the item. |
- Click the button in the Theatre Manager Ribbon bar.
- Double click on the Play / Event to clear attendance for.
- Click the tab.
- Select the performance you want to Clear Attendance from.
The tickets for that performance are displayed in the attendance list.
- If clearing attendance for a select group of tickets, highlight them in the right hand window.
- Click the
 button.

- Click the All button to clear the attendance flag for all patrons and tickets.
- Click the
 button to only clear attendance for the tickets selected.
Selecting a Performance for Attendance
You can select a performance you want to set attendance for from the Patron Attendance window.
To Start selecting a performance, you perform the following steps:
- From the main menu bar, choose Accounting >> Confirm Attendance.
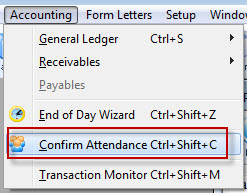
The Patron Attendance list window opens.
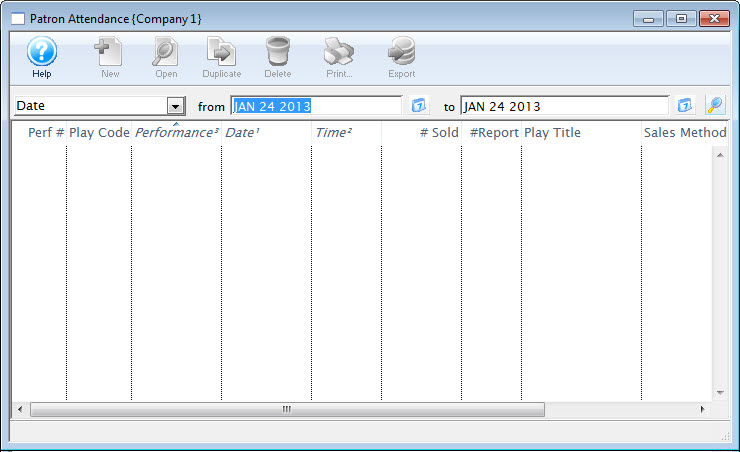
- Enter Search Criteria.
The search criteria is entered in the From and To fields and is based on the field listed in the drop down list.
- Click the Search
 button.
A list of performances opens.
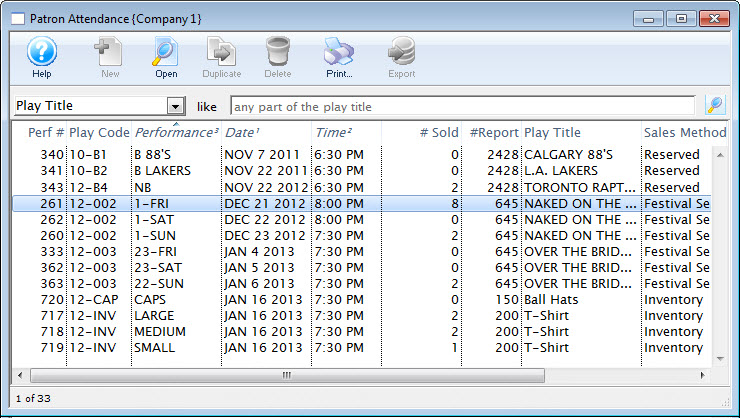
- Double click on a performance to select it. Once selected, the performance will open.
- Continue at Step 8 of the Set Attended section of Setting Attendance.
Adding a Fee to a Ticket Price
There are times you will want to add a fee to a ticket price. For example, adding a fee when selling tickets for another group.
The steps below outline how to add a fee to a ticket price.
- Add a Fee to a Sales Promotion.
- For information on creating a sales promotion click here.
- On the promotion Calculation tab, enter the fee you wish to charge into Ticket Fee box 1. - Alter the event Account tab.
- Select the event the fee is to be applied to. For more information on events click here.
- Under the event Accounting tab, specify what G/L account the ticket fee should be posted to in the Ticket Fee 1 Account box under the Earned Revenue Accounts (Fees) section.
- For more information on the accounting tab click here. - Alter the event Pricing tab.
- Under the event Pricing tab, alter the prices for performances if the fee is to be built into the price.
- For more information on the Pricing tab click here - Enable the promotion for the event performances.
- Enable the promotion from Step 1 under the Promotions tab.
- For more information on the Promotions tab click here.
You have now successfully set-up the ticket fee. When the Sales Promotion you created is selected during the ticket sales process, it will add the fee on top of the base ticket price.
Change the Map For an Event
You can change the Pricing Map an event uses, even if it is reserved seating. it works best if the venues are the same and you are just changing price zones for dynamic pricing. however, you can change to any other venues (larger or smaller) with some ramificatiosn
 |
You can be change a venue to another while sales are occurring. The process takes moments.
You may want to refer to how to Create a new pricing map. |
|
If you change to a venue that is a completely different orientation with more or fewer seats and no tickets have been sold, you may just have to verify seats for the affected performances.
HOWEVER, if it is a reserved seating performance:
|
There are rules for switching Pricing Maps. The new Pricing Map must:
- Be active.
- Have the same valid price codes in the new Pricing Map.
- Have the same seating capacity and seats must be named (reserved seating only).
- When changing the reserved seating map for an event, you can select some other Pricing Map.
- When changing the reserved seating map for one performance, you can only select other pricing maps within the venue.
- When changing the map for a general admission performance, you set the alternate venue as before.
- If using the Outlet Edition, the map MUST be owned by the same outlet. People from outside your outlet cannot change pricesmaps or price codes for you.
To change the Pricing Map, you perform the following steps:
|
If the new map has a price code that is not in the map you copied from, it will NOT be available to add. Also, If you are replacing the pricing map for one or more performances, you must ensure all maps being used have the same price codes. Your pricing map can have unused price codes in its description. |
- Click the Play/Event button.
The Play list opens.
- Find the specified event and click the Open button.
The Play / Event window opens.
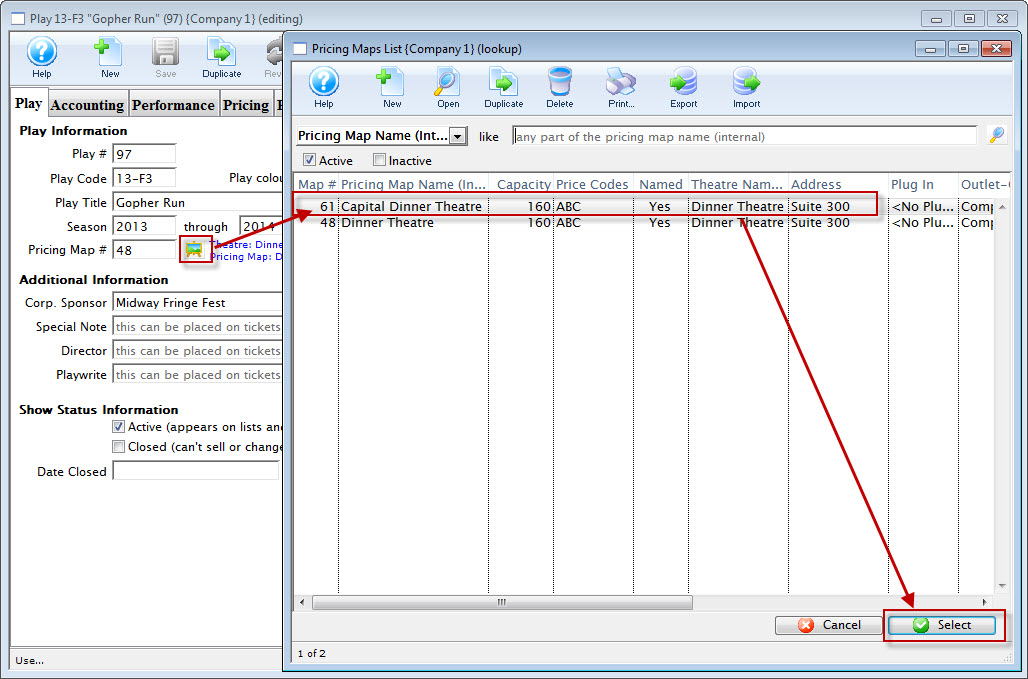
- Click the Venue
 button.
The pricing map list window opens, displaying the alternate maps that match the Pricing Map rules.
- Choose the appropriate map and click the Select
 button.
The Change Map Confirmation opens.
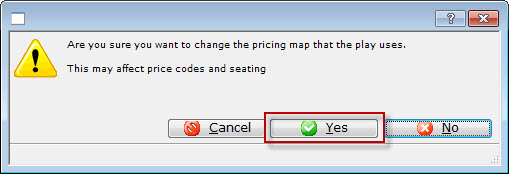
- Click the Yes
 button.
- Verify Seats if capacities are different
Refer to Verifying seats which might be needed after changing venues for a performance.
Ramifications of different Venue Orientation
- Case 1: all general admission performances
- Case 2: reserved seating performance with nothing sold to it yet
- Case 3: changing maps to a venue with the same orientation, seating and capacity - probably duplicated from another map and created for price zone changes
- Case 4: changing map for another venue with completely different seating, orientation, size and with tickets sold
CASE 1: General Admission Performances
You can change the venues at any time.
CASE 2: Reserved Seating Performances with no seats sold
If there are no seats sold yet to the reserved seating performance, then there is little impact.
- Change to the new venue (whether it has more os less seating capacity
- Verify the seats in the performances
- you can now sell tickets
CASE 3: Venue with same orientation and reserved seating, seats can be sold
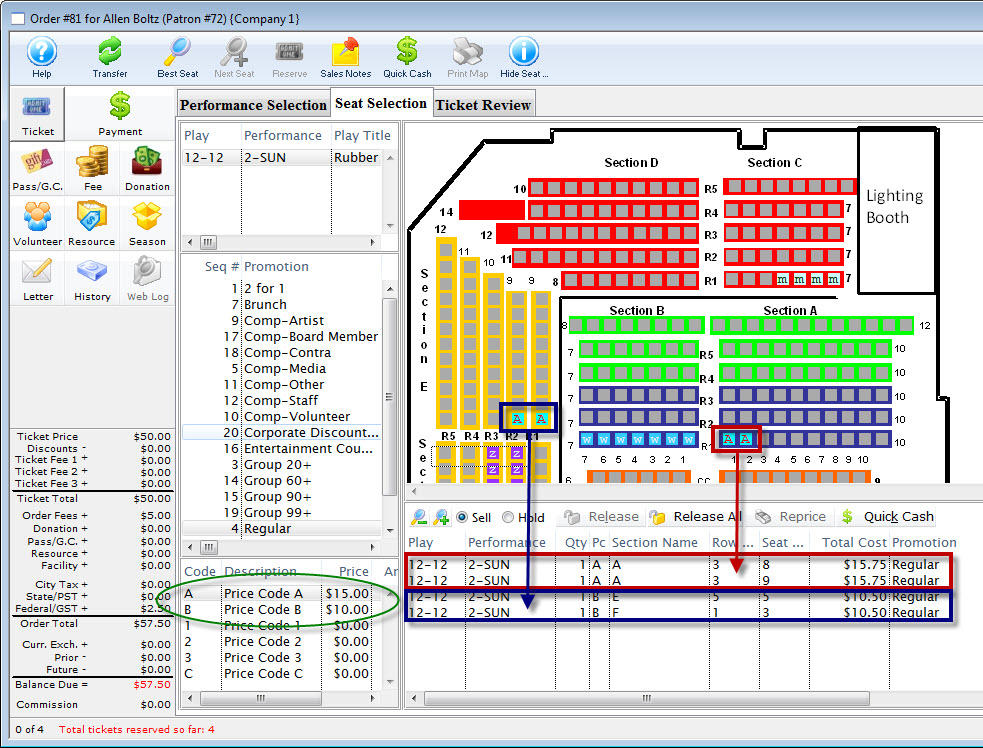
If a venue is really the same, with same seats, similar size, with perhaps a few seats removed for orchestra pit, or if the price zones are different for the purpose of dynamic pricing.... then change the venue that the performance is in.
However, if seats are already sold, be aware of the following ramification. Seats in the new venue have the same seat numbers as the original venue. This may cause patrons to be split into different areas.
Refer to the image and the description below:
If you simply used the new venue and made more seats, then people may not have seats where you think.
This happens because Theatre Manager:
CASE 4: Reserved seating events with seats sold and completely different venue orientations
Another approach that may help avoid the issue below is using the Transfer seats from one performance to another.
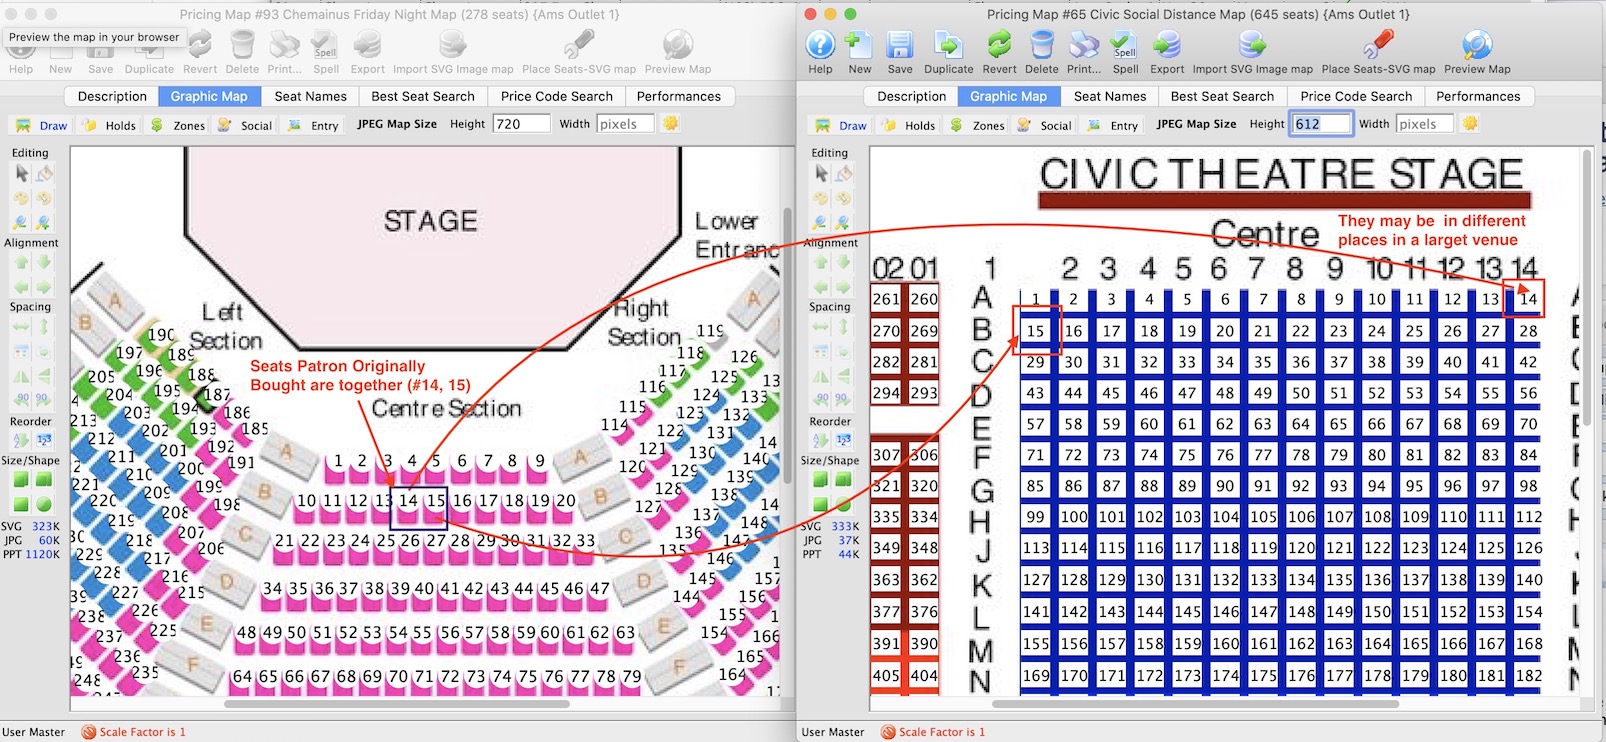
The left venue represents 'smaller' venue.
The right venue represents a larger venue
so, changing a venue in this manner, while it works, is really intended for moving to spaces that are equivalently set up -- as in dynamic pricing.
Updating Holds on a Map
Updating Holds on a Map
There are times when the map in a performance may need to be updated to reflect the default holds on the venue map for the event. The performance may have been built without using default map holds or the map for the event/performance may have been updated and include new holds. The steps below provide an outline on how to update the performance to reflect the holds using in the venue map:
- Find the event / play you want to hold seats for.
Click here to learn how to find an event / play.
- Open the event / play by selecting it in the list and clicking Open or by double clicking it.
- Select the Maps tab

- Highlight the Performance(s) on the left side of the window.
Should you need to hold seats for multiple performances at a time simply select multiple date/times from the list on the left side of the window.

- Right click on the Map to view the options menu.

- Select Hold All Seats On "Return To..." Hold Map

Once the holds have been updated seats will be held with the default letters from the venue map for those performances selected on the left. All holds appear as lower case letters on the map. Changing the hold colour can be done in the Box Office tab of Systems Preferences by a Master User.

Deleting a Performance
Hiding a Performance
Normally you want to delete a performance completely (see next section), but if you cant, then:
- Find the performance as per below and try delete it, as per the instructions below
- if it won't delete, then target="_blank">double click the performance to edit it. Change:
- The performance date to be the first day of the run
- The performance code to be something like 'DONTUSE'
- Set it so that it can't be on sale at the box office or online
- for added safety, put an on-sale date in that is AFTER the date of the performance for both online and box office - that way if anybody ever changes the onsale flags, it will prevent the performance from showing up
Rules for Deleting a Performance:
You can only truly delete a performance if:
- You have "Delete" user privileges the Play information under the data tab of Employee Setup.
- The play must not be archived.
- No tickets have been sold to the performance.
- No transactions created for this performance.
To start, you perform the following steps:
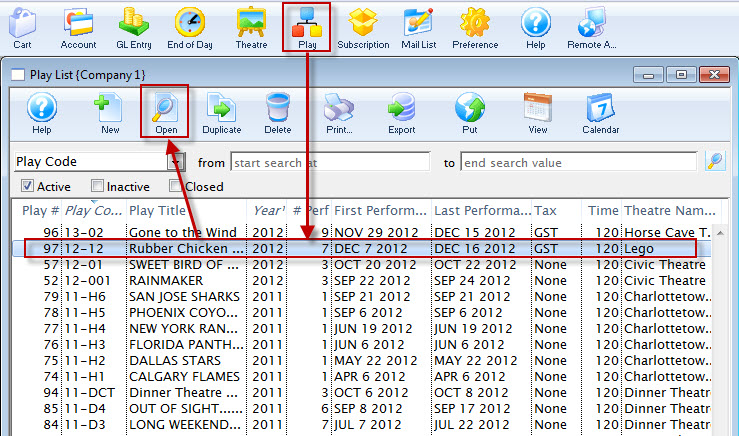
- Open the Play List Window.
Click here for more information on opening the Play list window.
- Open the Play you want to remove the performance from.
- Review the Performance Tab to ensure that no ticket have been sold to the performance.

- Click the Delete
 button.
The Delete Performance dialog opens.

- Click the Delete Button to delete the performance.
|
Note the # SOLD column in the performance list. Quantity must be zero for each performance in the list. |
Change The Map For Specific Performances
Your venue is running a special event. Perhaps, one evening performance is to only have two Price Codes. All the seats on the main floor of the theatre are to be sold at the Adult Price only (your price code A) and all the raised seats are to be sold at a different Price Code, Price Code B. Or you want to implement Demand Pricing for the event where you can change the price codes for a range of seats.
You have created a new map for your venue. Click here for more information on creating the new map. Once the map is created, you can now go on and change the map for the specified performance.
|
To move from one map to another the maps must be within the same venue. They should contain the same number of seats and have identical seat codes. The maps will should probably contain the same Price Codes, however the new map may have more or less Price Codes than the original.
If there are new price codes in the new venue, you must view event and click on price tab to receive a message to add price codes. Only then can new base price codes be added to a performance. |
- Click the Play/Event button.
The Play list opens.
- Find the specified event and click the Open button.
The Play / Event window opens.
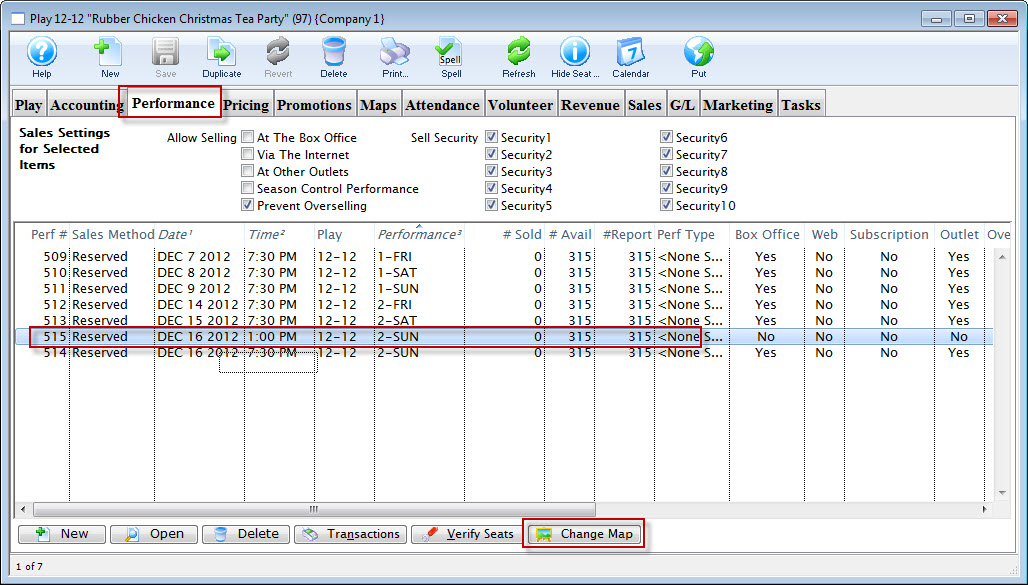
- Click the Performance tab. Highlight the specific performance and click the Change Map
 button.

The Pricing Map list for the selected venue opens.
- Choose the map you require.
- Click the Select button.
A confirmation dialog opens.
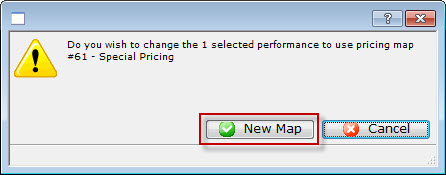
- To complete the change of the map for the selected event / play, click the New Map
You are returned to the Performance tab.
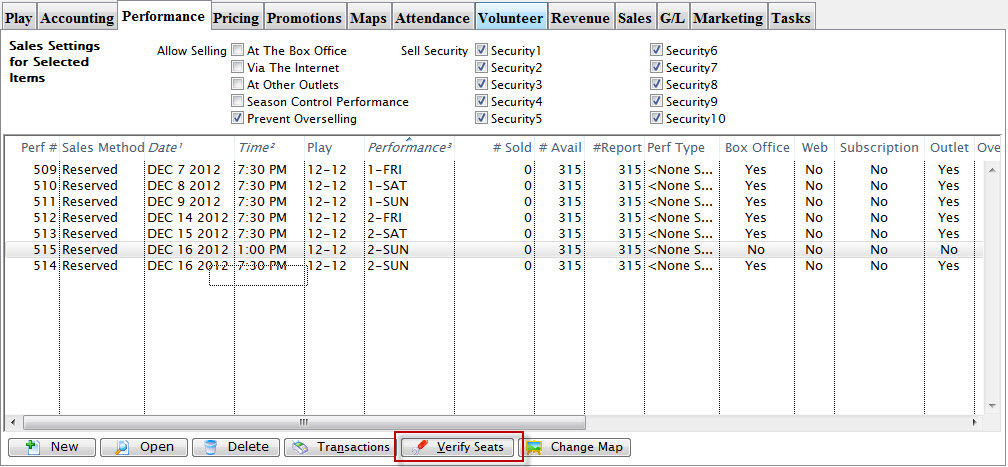
- Click the Verify Seats
 button.
The Verify Seats confirmation dialog opens.
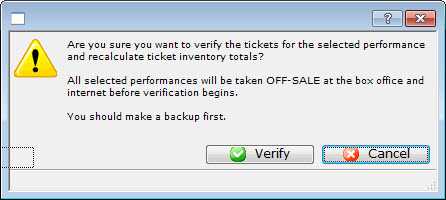
- Click the Verify
 button.
You are returned to the Performance tab.
- Open the performance and review all tabs to ensure all the information is correct.
If you have made any changes, make sure you click the Save
 button.
You can now select seats for the special event from the special map.