Authorize.net Installation
 |
Authorize.net implements either user ID and password authentication over HTTPS connections to provide compliance with PCI DSS 4.1 |
Please contact Arts Management to discuss the process of getting a Merchant Account from Authorize.net or use the merchant provider contact info and inform them that you will be using Theatre Manager as they are aware of the proper setup.
After Authorize.net has provided you with a merchant account, installation is quite straightforward. Once set up, funds gets authorized as 'Card Not Present' and then deposited right to your own bank upon settlement from Theatre Manager. This account information you are provided is all you need in the merchant setup windows (in the pages that follow) to begin secure credit card authorization.
Authorize.net needs one account set up for authorization and one for online viewing of the account data. You can set up multiple accounts for online access of the data, so some people can view data and others have more access to transactions and history.
- Authorize.net - uses the Merchant Portal via a web browser to "view the transactions" that have occurred. This account setup might need to be used during the End Of Day deposit process to verify transactions if you have more than 1000 authorizations between each End of Day.
- Merchant User ID and Password - uses Authorize.net to allow authorizations to occur and be settled but not be viewed. This information is what needs to be entered into Theatre Manager's Merchant account to allow authorizations to occur.
 |
The user IDs and passwords for both of the above are different and should not be interchanged or confused with each other. Follow the appropriate setup steps for each. |
|
After following the setup for both accounts, make sure to:
|
Authorize.net contact information
Shannon Maher, Sr.
Sales Manager
National Merchant Alliance
7415 West 130th Street, Suite #270
Overland Park, KS 66213
(913) 906-9595
smaher@nmainfo.com
Authorize.Net Gateway Account
The User ID and Password setup is arranged by Arts Management from Authorize.Net and is entered into the Setup --> System Tables --> Merchant Accounts window as below:
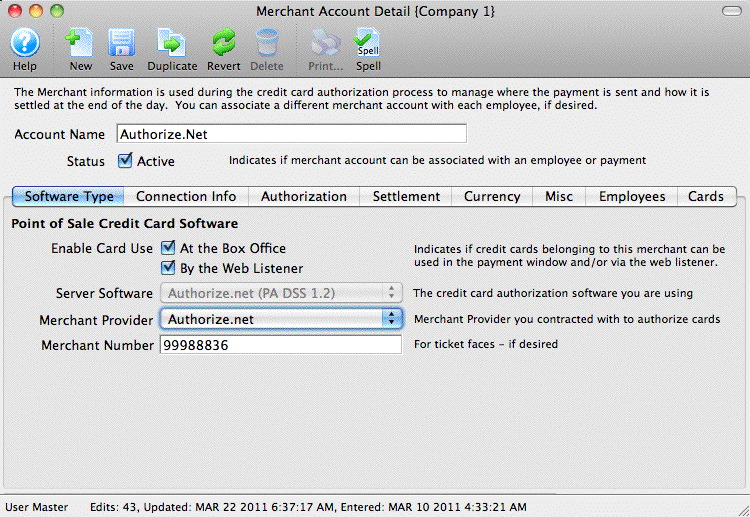
Software Type
The following values are set on the software type tab per the diagram below:
- Set the server software to be Authorize.net
- The merchant provider will automatically be set for you
- The merchant number is for use on ticket faces and for contacting Authorize.Net support.
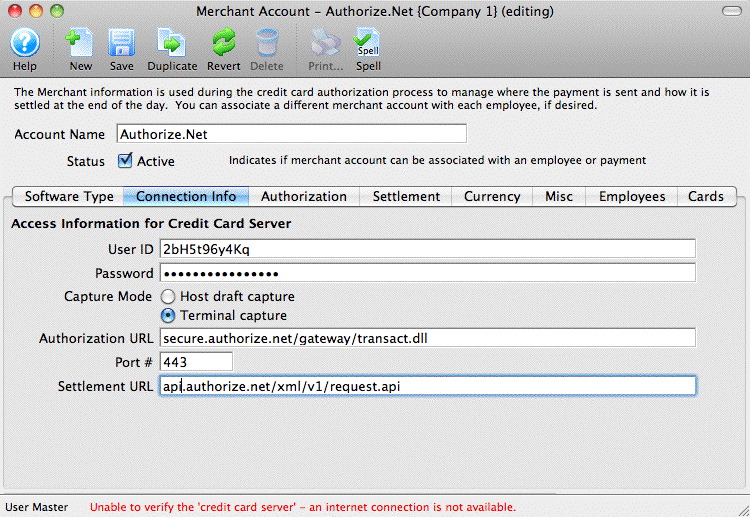
Connection Info
The following entries are set on the Connection Info tab per the diagram below:
- User/Server ID - provided through Authorize.net. The user ID remains constant for the life of the account and is generally an MD5 version of your main account UserID
- Password - the password is auto generated for you. You can change it via the online interface to generate a new 'secret' key. If you do that, you can expire your old password right away or allow both old and new to co-exist for up to 24 hours.
- Primary URL - is always secure.authorize.net/gateway/transact.dll and is used for authorization only
- Secondary URL - is always api.authorize.net/xml/v1/request.api and is used during the settlement process.
- Port - is always 443
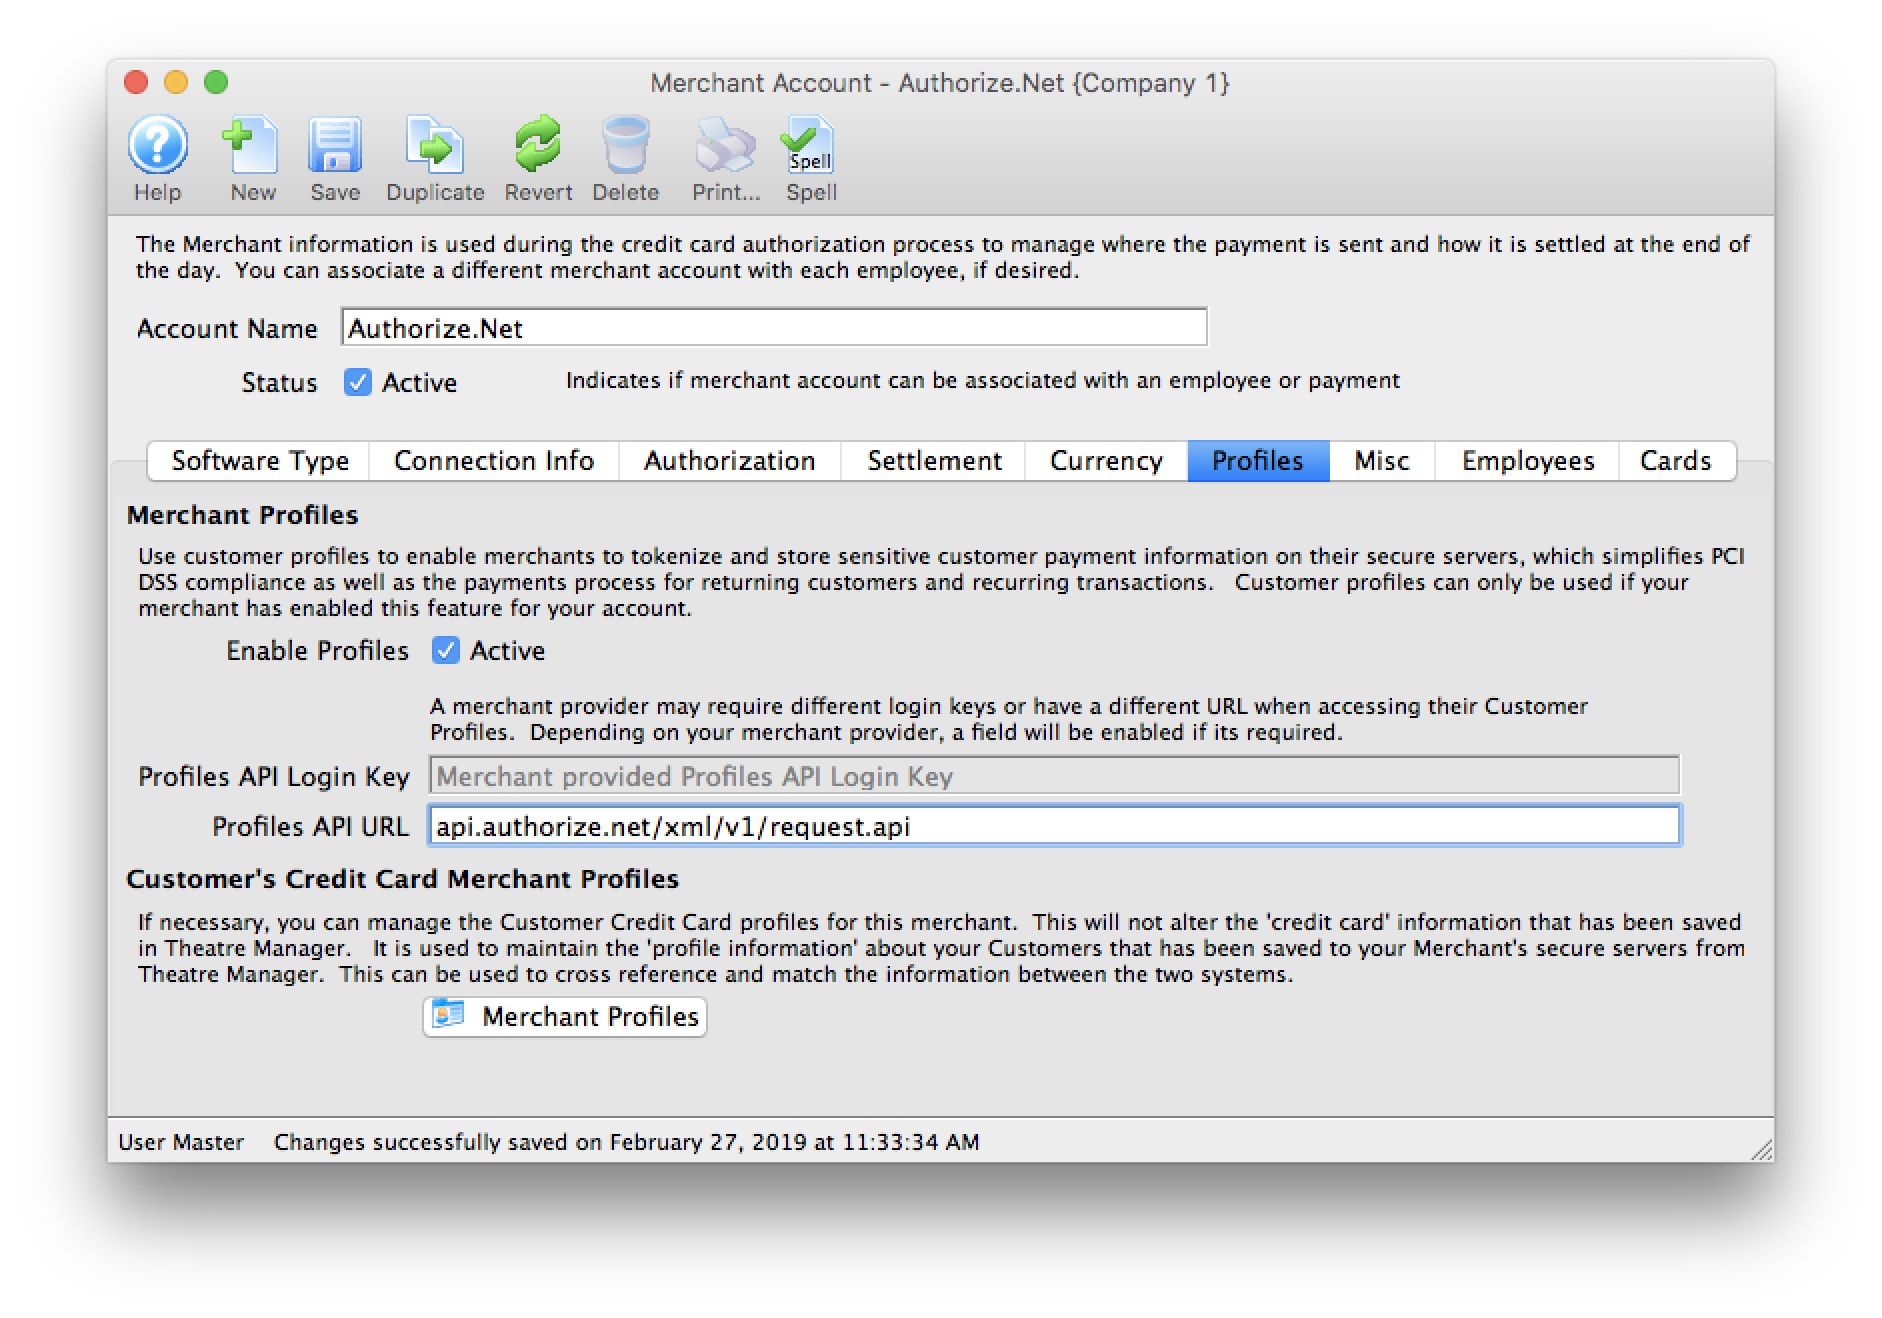
Merchant Profiles
The following entries are set on the Profiles tab per the diagram below if you are going to use merchant profiles and have an agreement with your merchant provider:
- Enable Profiles - set to Active if Merchant Profiles will be used.
- Profiles API Login Key - not required. Authorize.Net uses the same connection information from the Connection Info tab.
- Profiles API URL - is always api.authorize.net/xml/v1/request.api
 |
Refer to Merchant Profiles for further information on functionality. |
Testing Authorize.net
- Find yourself in the database or create a new patron for yourself
- Create a new order and attempt to buy a ticket or Gift Certificate
- On the payment window, select the credit card you want to use and do a test authorization
- If you get an authorization with a message indicating AVS match and/or CVV2 match, then the setup is correct
- Log in to your Authorize.net Online Merchant Account and view the batch to see that your transaction is there
- In Theatre Manager, void the credit card payment and then confirm in the Online Merchant Account that the charge is marked as void
Trouble Shooting
Authorization Response looks like HTML or XML
 If you get an authorization response that:
- looks like it is HTML or XML and indicates that it was not authorized:
- specifically indicates that the API key is wrong
If you merchant account still doesn't authorize after verifying it, log in to the Authorize.net Online Merchant Account and
- Click on 'Account' button at the top.
- Click on the MD5 hash at the middle of the screen
- Get a new MD5 hash key (API Key) for your account and put it into the merchant setup screen - connection info tab under the password
- Try to authorize a card again
Error on Settlement
If an error occurs during the initial part of settlement, you may not have the 'Transaction Details API' enabled. If this occurs, log in to the Online Merchant account and then
- Click on 'Account' button at the top.
- Click on the Transaction Details API link
- Enter the answer to your 'secret question'
- Click Enable Transaction Details API button if it is not already enabled
If issues persist, contact Arts Management and let us know so that we can help get it corrected.
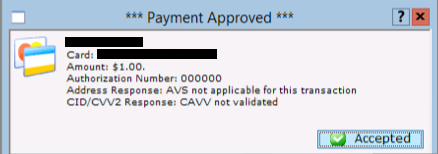
Authorization Number: 000000
When processing a test charge, if you get an Authorization Number: 000000, this means the account is still in TEST mode at Authorize.net. Log into your Authorize.net account, and change the setting from TEST mode to LIVE mode.
Specific Authorize.net Account Settings
- Apply to Authorize.net to allow unrestricted refunds for your venue.
- Enable transaction details so that Theatre Manager can obtain batch information and allow End of Day settlement.
- Specify the sweep time where Authorize.net takes completed End of Day transactions and moves them to the bank.
Setting Transaction IP Velocity Filter
Authorize.net allows you to define the number of transactions received from the same IP address within the course of an hour. The default value in the gateway is set to 10 transactions per hour. This setting, while helpful for fraud detection, does not take into account the number of transactions processed at the box office and needs to be increased.
- Open your online gateway to Authorize.net and select Fraud Detection Suites in the right column.
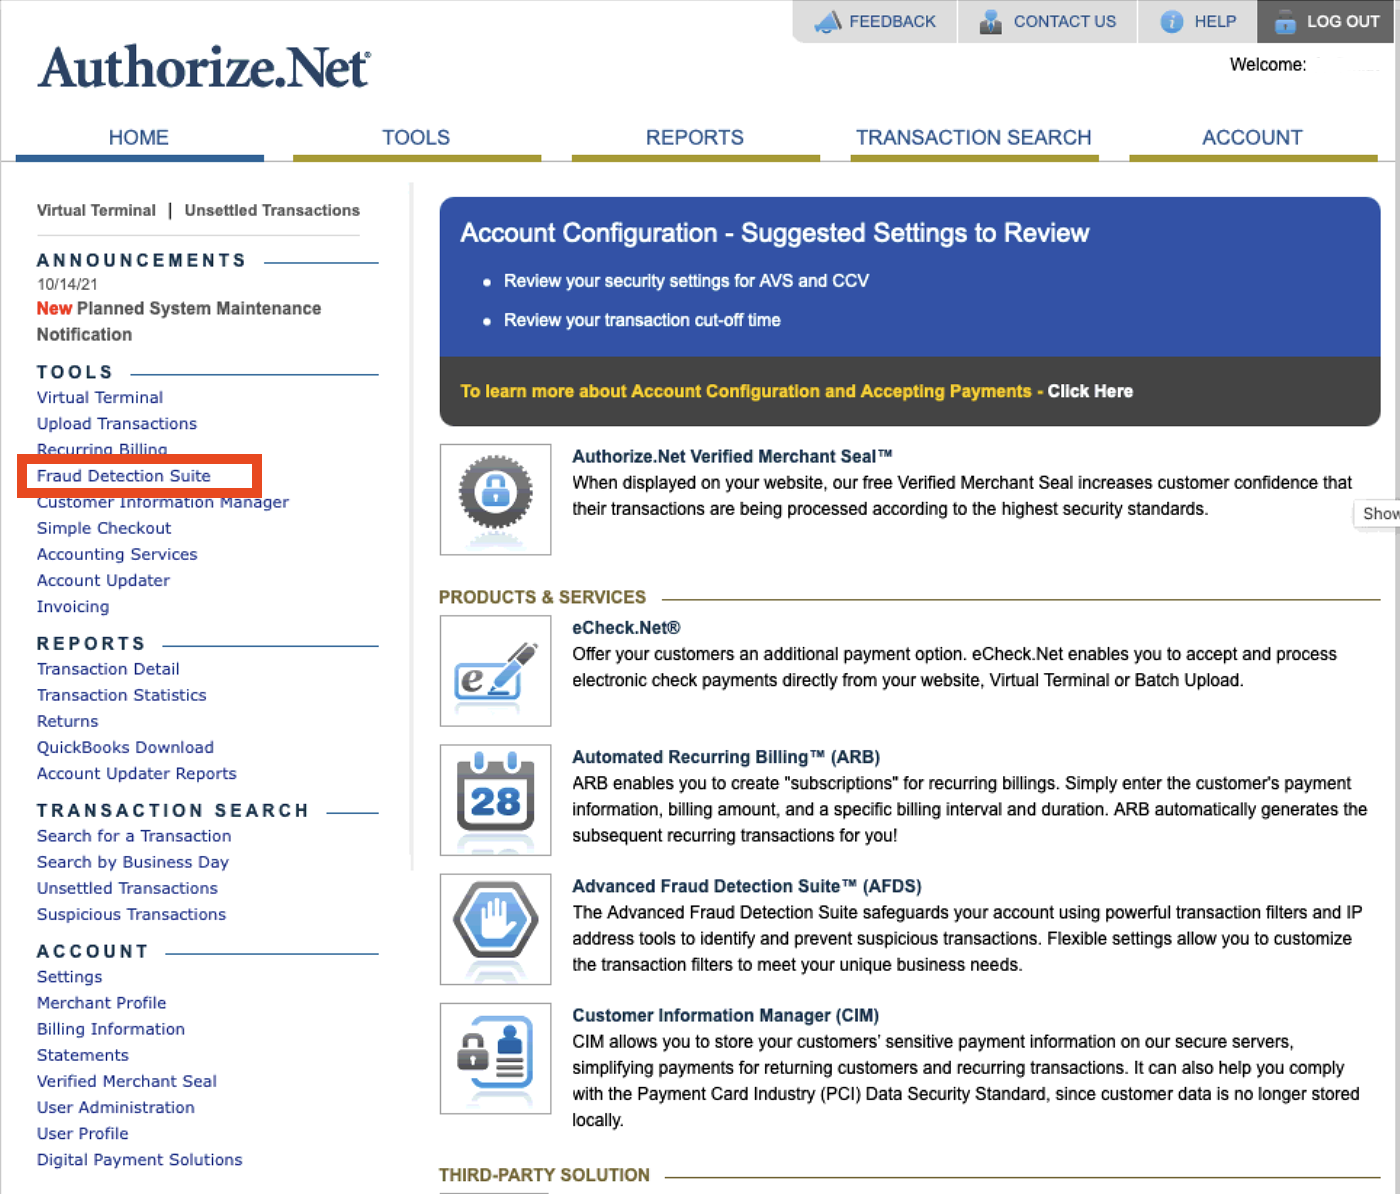
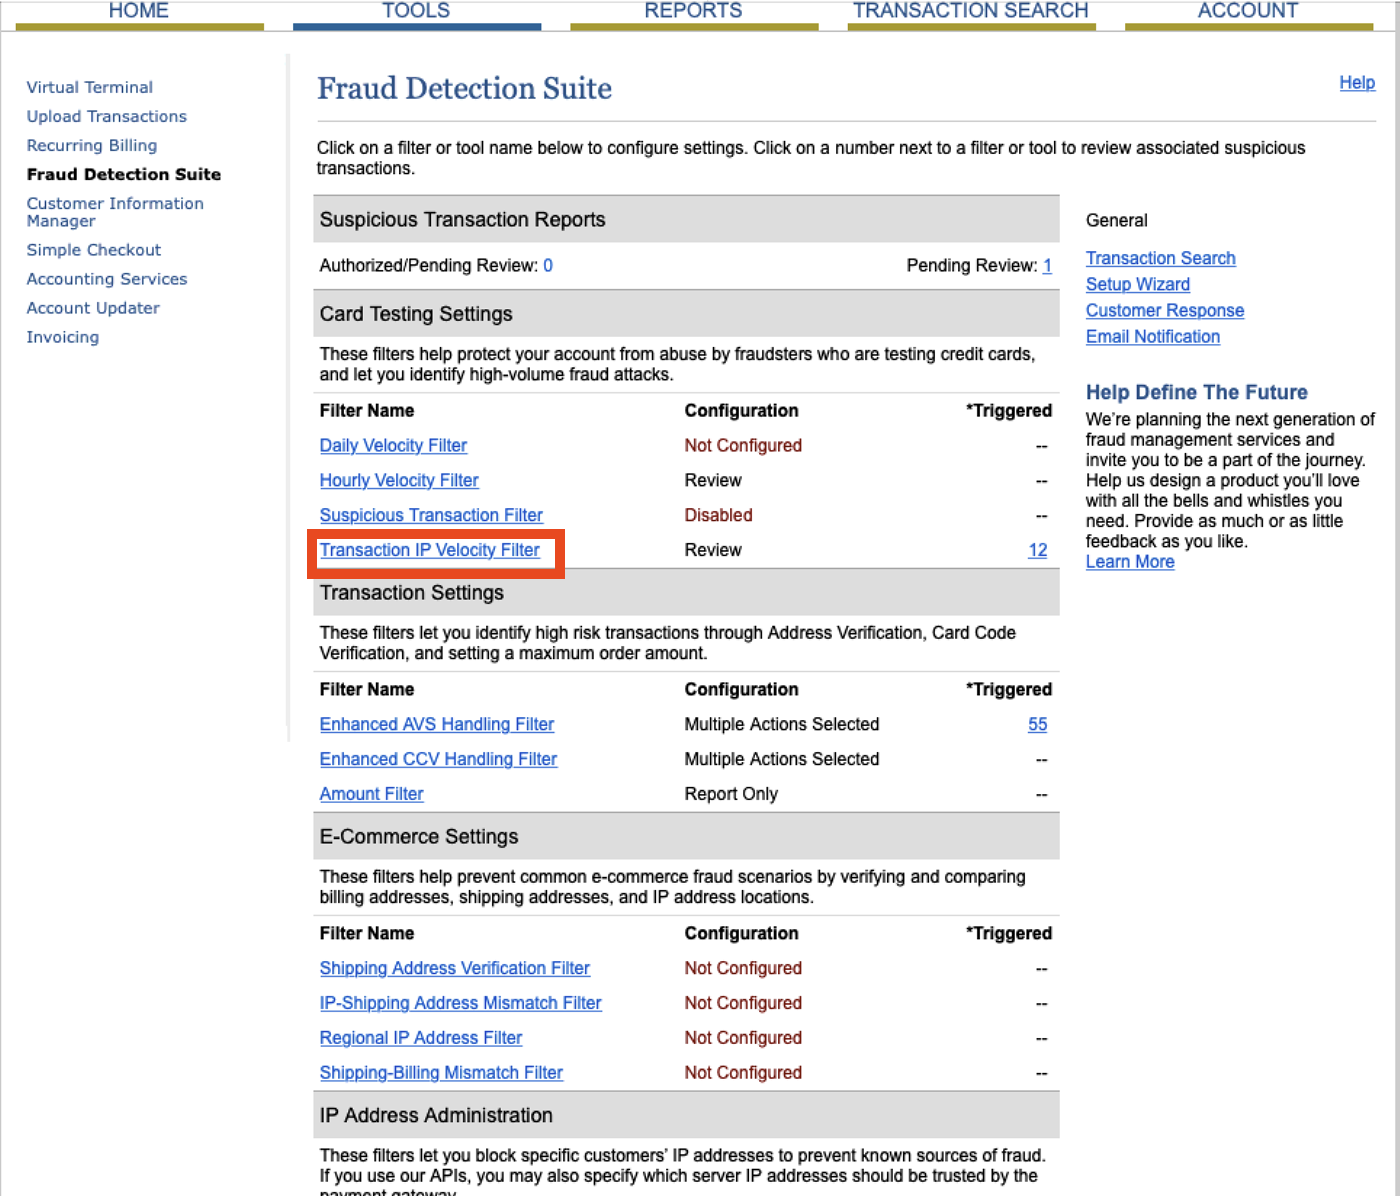
- Under Card Testing Settings select Transaciton IP Velocity Filter
- In the Transaction IP Velocity Threshold section of the page increase the Allow transactions from the same IP address per hour value.
This value should be set based on the number of transactions your organizations processes in the office per hour during peak sales times. Depending on the size of your organization this may mean 50, 100, or possible 500.
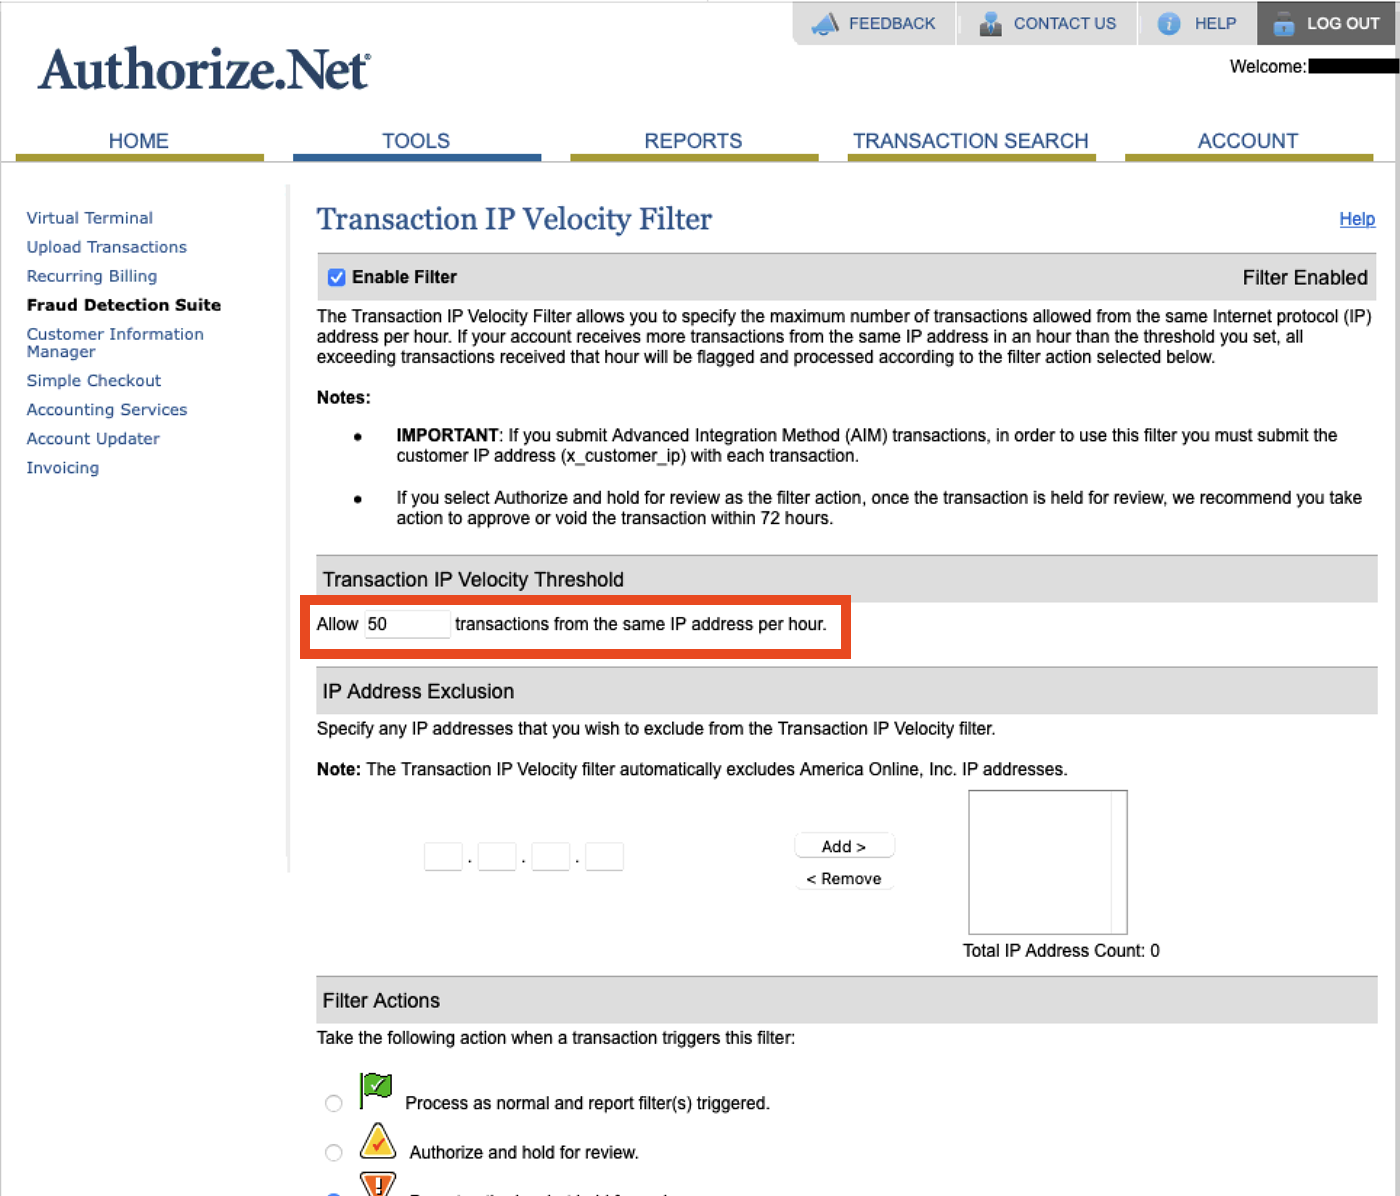
- Click the Save button at the bottom of the window.
Transaction Receipt Email
Authorize.net sends an email to the Gateway user for each payment processed through the account. This feature can be disabled using the steps below. You will be required to
- In the Authorize.net Gateway select Account at the top of the window.
- Select User Profile in the left column and click the Edit Profile Information button under Profile and Security Settings.
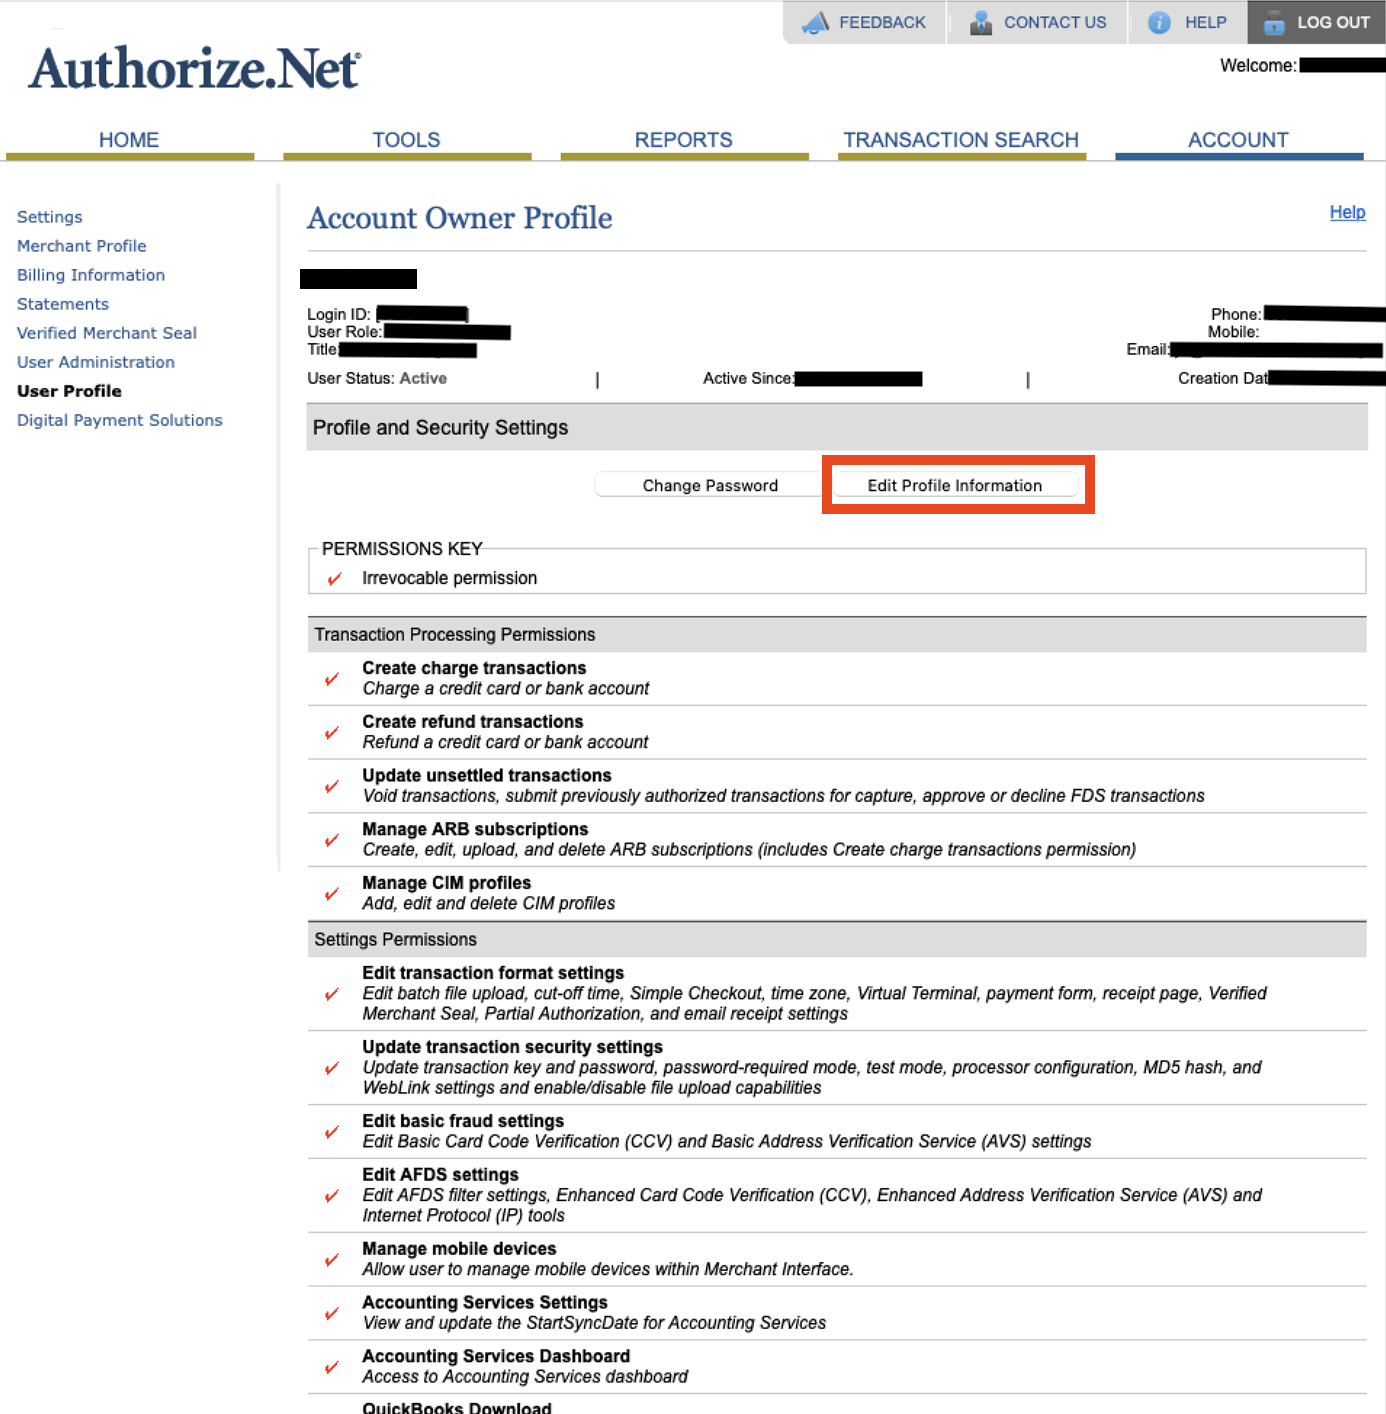
- Under Transaction Emails remove the check next to Transaction Receipt.
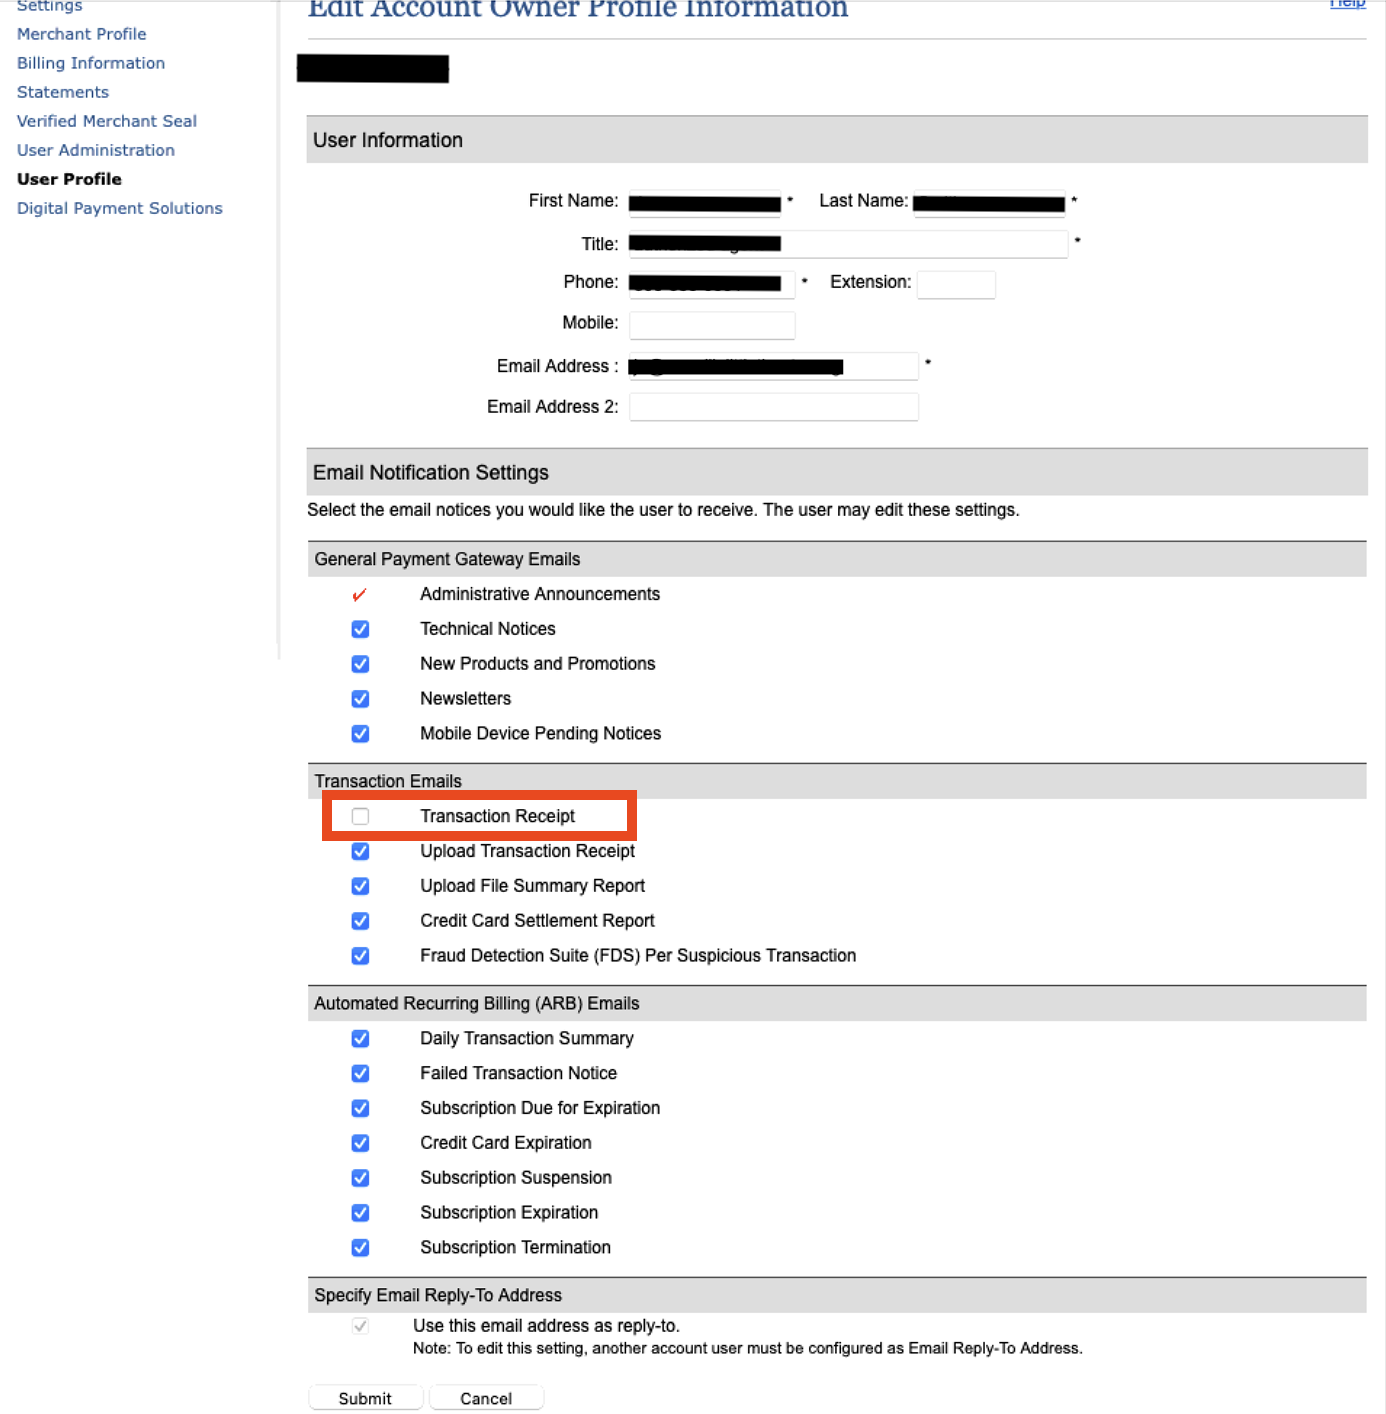
- Scroll to the bottom of the page and click the Save button.
Clicking Save will generate a pop-up window asking to send a verification pin to the email address on the account. Follow the steps and add the pin to complete the process.
Authorize.net Address Verification Settings
To set these parameters, you perform the following steps:
- Open your online gateway to Authorize.net and choose Account >> Settings.
The main Settings window opens.
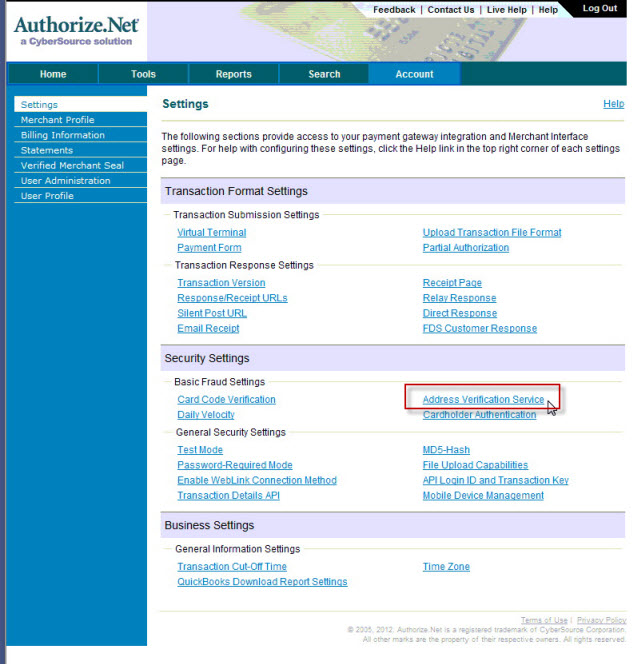
- In the Security Settings section, click on Address Verification Service.
The following window displays.
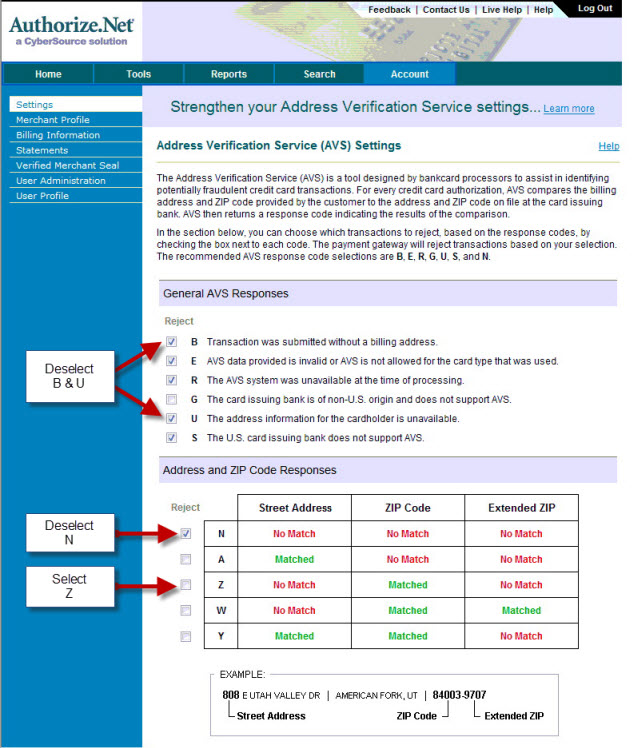
- Ensure the following settings are enabled:
General AVS Responses
B - Transaction was submitted without a billing address √ E - AVS Data provided is invalid or AVS is not allowed for the card type used √ R - The AVS system was unavailable at the time of processing G - The card issuing bank is of non-US origin and does not support AVS. U - The address information for the cardholder is unavailable √ S - the US card bank does not support AVS Address and Zip Code Resources
N A √ Z W Y
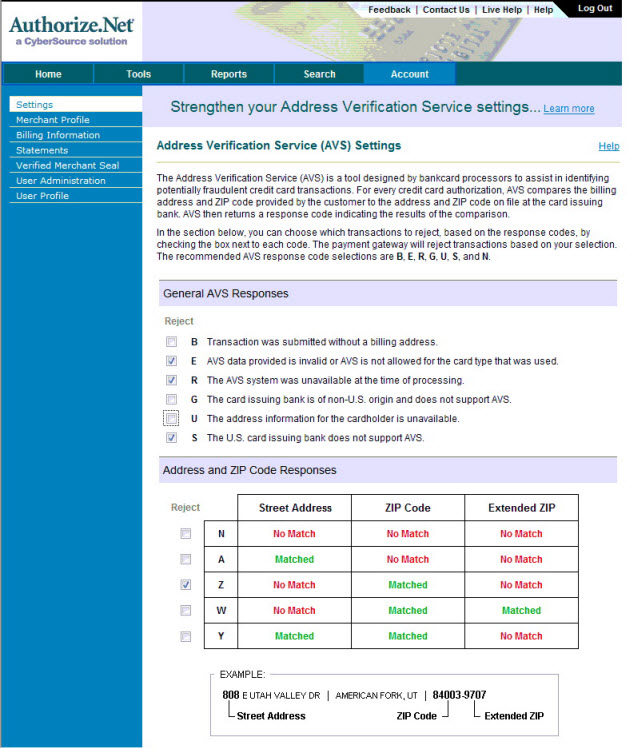
When complete, your page will look like the following:
Allowing refunds with Authorize.net
http://www.authorize.net/files/ecc.pdf
|
NOTE: You do not need this feature if you typically refund money against the original order within 120 days of purchase and up to the original authorized amount.
An occasional refund needed that is past 120 days can be accomplished via the Authorize.net web interface. Only apply for this feature if you constantly need to refund money outside the original order and/or outside 120 days (and don't wish to refund to a gift certificate for store credit. |
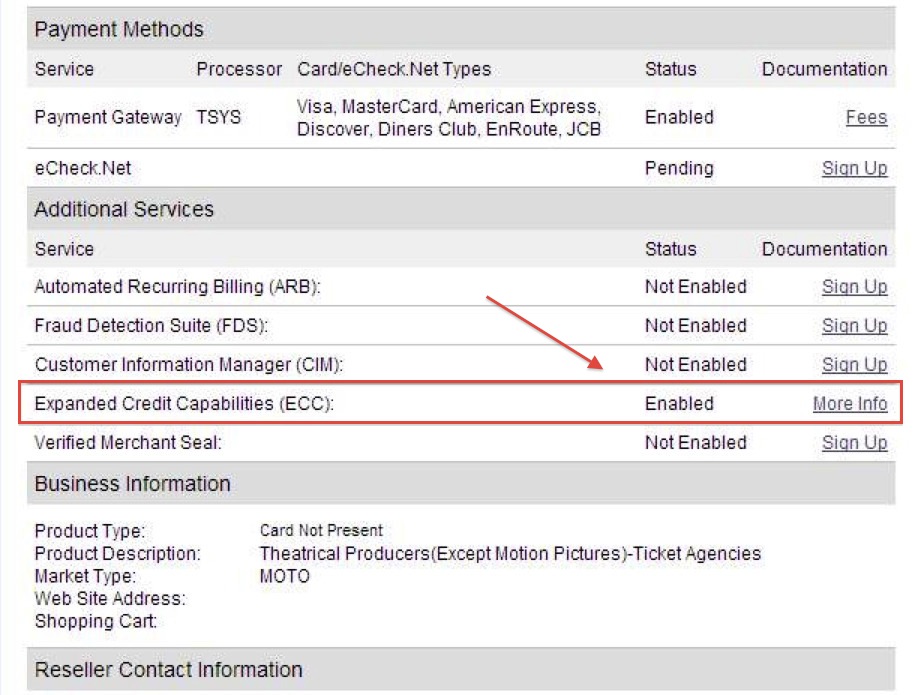
Once the form is filled out, faxed back to Authorize.net, and processed by Authorize.net's customer support team, clients will be able to process refunds through Theatre Manager - sometimes within hours, sometimes up to 2 days later. The sure way to know is to check the status of your Expanded Credit Capabilities.
To check the status of your Expanded Credit Capabilities, you can look directly within the gateway for your Authorize.net account.
- Go to the home page
- Click on the Merchant Profile link on the left hand side
A series of settings will appear, including 'Additional Services.' The Expanded Credit Capabilities should read 'Enabled."
|
This is only for processing refunds in a separate batch, after the End of Day deposit has been done for the original charge. In cases where the card is to be refunded before settlement, users should instead Void and Delete the payment in Theatre Manager. Then the tickets can be refunded to clear the order balance that will be created when the payment is voided. There is no additional setup required through Authorize.net in order to process voids. |
|
Refunds are processed immediately by Authorize.net. YOU CANNOT VOID A REFUND
If you fail to settle a batch containing a refund before the Authorize.net sweep time, you will receive a warning during the End of Day that the batch may be out of balance (even if it is not). |
|
It is also important to note that the ECC form will allow users to run a refund in any amount to a card without matching up the refund amount to the original charge. Because of this, there are a couple of important considerations:
|
Enabling Transaction Details API in order to settle during End of Day
- Log into your Authorize.net account
- Select the Account button at the top right of the toolbar
- Choose Settings from the Menu at the left
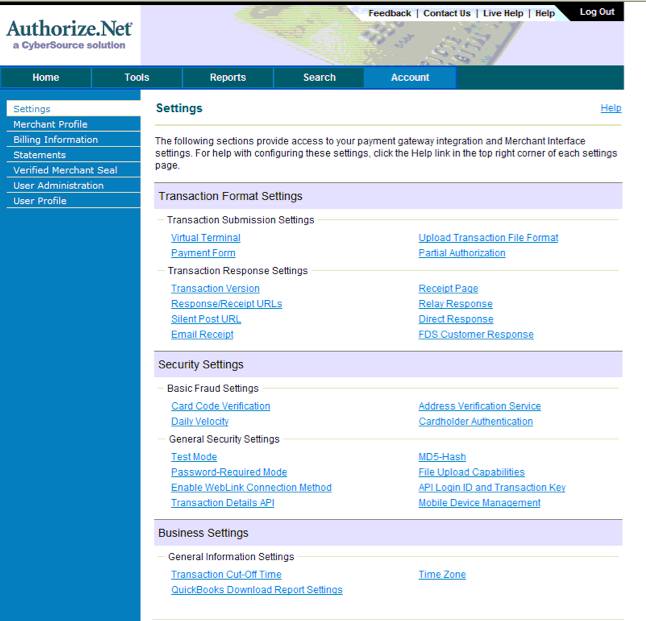
- Select the Transaction Details API option under Security Settings
- You will be prompted to enter your secret question/answer that you set up when you created your account. Then click the Enable Transaction Details API button
- You will be taken back to the main Settings screen. To check that the settings have taken effect, go back to Transaction Details API
- When enabled, your screen shows you an option to Disable as below (do not do this).
- You will now be able to settle through the Theatre Manager End of Day Wizard. For more information about the Wizard, click here.
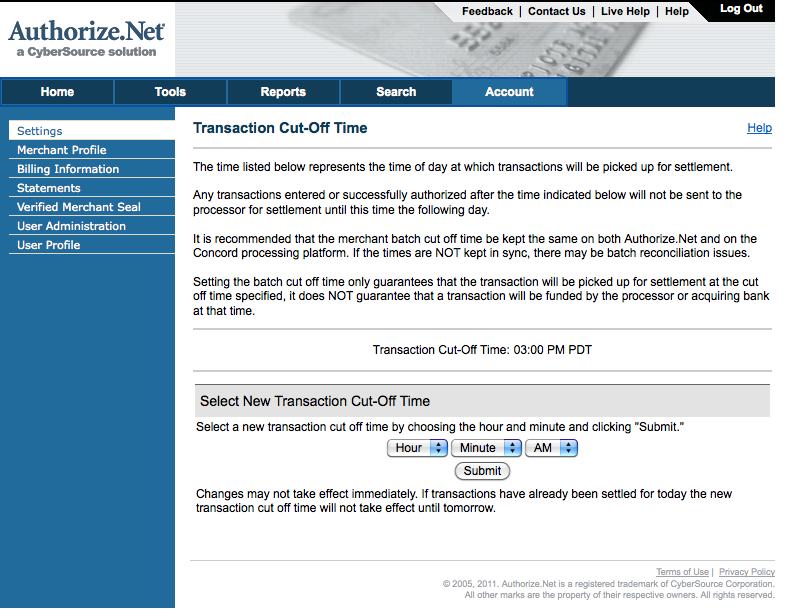
Setting the Sweep Time for Settlement
- Sign in to the Authorize.net interface
- Choose the Virtual Terminal option at the left
- Choose the Transaction Cut-Off Time option under Business Settings.
- You'll see the current sweep or settlement time in the middle of the page (3:00 PM PDT in the example). Change the time using the drop down choices at the bottom of the page and click Submit. Our recommendation is to set this time sometime between 12AM and 4AM local time.
Authorize.Net Troubleshooting
- The official status for Authorize.net web site
- The developer web site which may indicate some troubles before the official status site
- The debug option in the merchant set up which can be used to show the raw data for the request sent to authorize.net and the response received from their servers.
- Make sure your Authorize.net API key is correct in Theatre Manager - you may want to test your account again and/or follow the setup procedures to verify your account info is entered properly