Setting up a Course
Courses are set up in Theatre Manager just like any other event - in the Plays Window.
|
Your version may have been changed from the default "Plays" to "Events" or another similar title. |
To set up a course, you perform the following steps:
- Chose Main Theatre Manager menu item Setup >> Plays.
Alternatively
Click the Plays button in the Theatre Manager toolbar / ribbon bar.
The Play List Window opens.

- Click the New
 button in the Play List toolbar / ribbon bar to create a new record.
The Plays and Dates Window opens.
Entering the Course Title Information
To enter course title information, you perform the following steps:
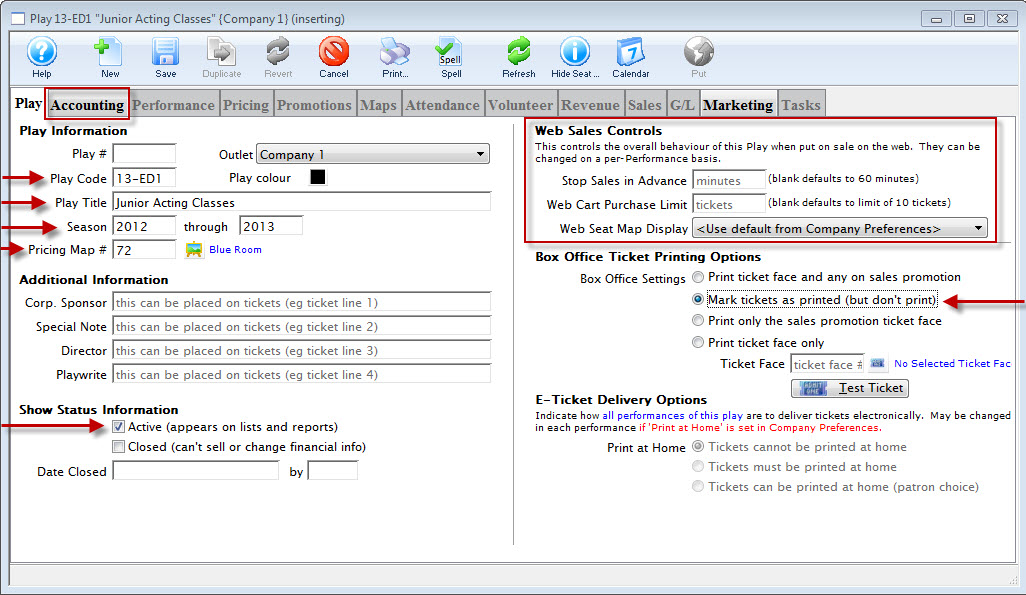
- Enter a Play Code for the Course.
In this the example - 13-ED1
Enter a code that is easy to remember and follows the naming conventions you may already have set at your venue for Play Codes. Play Codes must be unique and cannot be used again for future plays or courses. - Enter a Play Title that corresponds to the title of the Course.
- Enter the season information that corresponds to the timing of the Course.
- Enter a Pricing Map.
If you have not set up a Venue specifically for Courses, you may want to do so. It can be a Festival Seating (or General Admission) map, but one needs to be entered here. Click here for information about setting up a new Pricing Map.
- Ticket information does not have to be entered if no tickets will be printed for the course.
If this is the case, choose "Mark tickets as printed (but don't print)" under Ticket Printing Information.
- Ensure the Active Status box is checked.
This way, the course will show in the Plays List for purchase.
- Enter any Web Sales Controls desired on the top right.
For example:
If Advance sales shut off at a certain time before the start of the class or
If a patron is limited to the number of admissions they may purchase for this specific course (otherwise the program default limit on ticket purchases will apply).
- Make appropriate Ticket Printing selections.
|
You must enter Accounting information in the Accounting tab before you can Save the record. |

Accounting information is discussed on the next page.
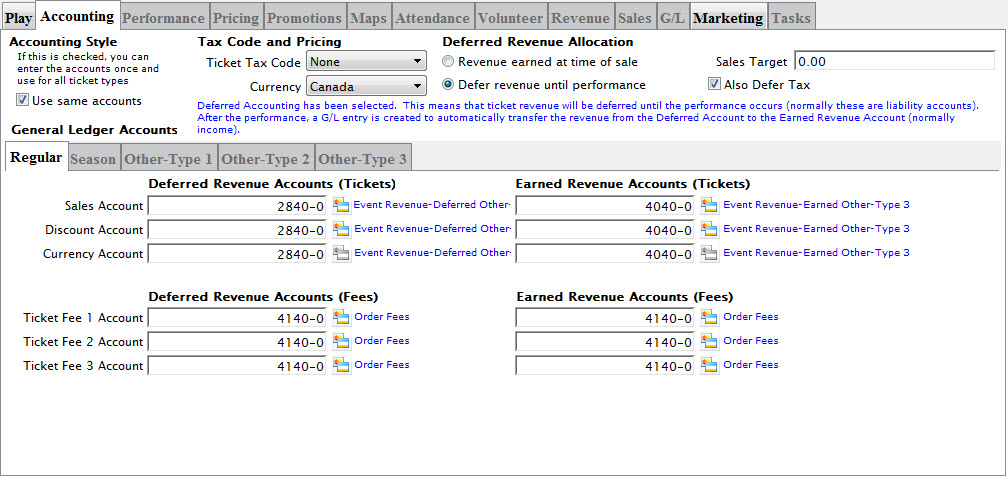
Course Accounting Information
The Accounting Tab information is the same as for any other Play or Event.
For more information about the Accounting Tab, click here.
You may want to set up specific liability and income accounts in your Chart of Accounts to correlate to course revenues. To read about adding accounts to your G/L, click here.
Assigning the Course Genre
|
Genre is a general classification for events that is common to all Theatre Manager customers.
You cannot edit the Genre Table |
There are approximately 70 genre classifications which are used in the TicketTrove iPhone/iPad app and on the event search window on the web to help customers find entertainment to their liking. For Example: Customers can look for drama, hockey games, musicals, symphonies, ballet, etc.
Specifying a genre for a course or event is required.
Genres are listed in the Play / Event Genre code table. Click here for information on the Genre table.
To specify the Genere for your course, you perform the following steps:
- Click on the Marketing tab.
- Click the drop down list to select the appropriate Genre from the list.
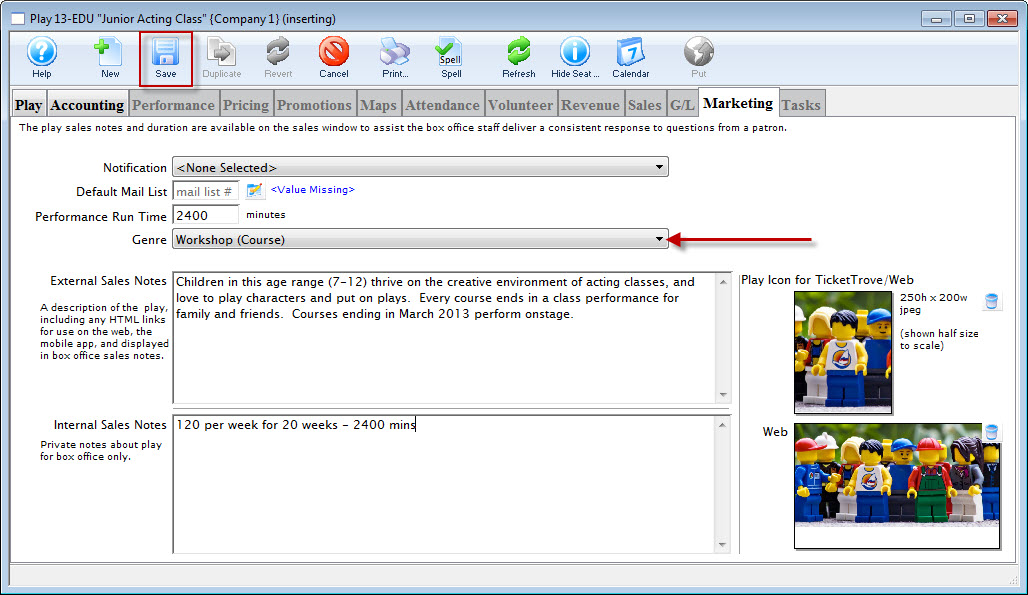
- Enter other information as required by your organization.
- When complete, click the Save
 button.
You can now go on and add classes (as performances).
Adding Course Performances (Classes)
To add Performances (or Classes) to your Course, select the Performance tab of the Plays and Dates window.
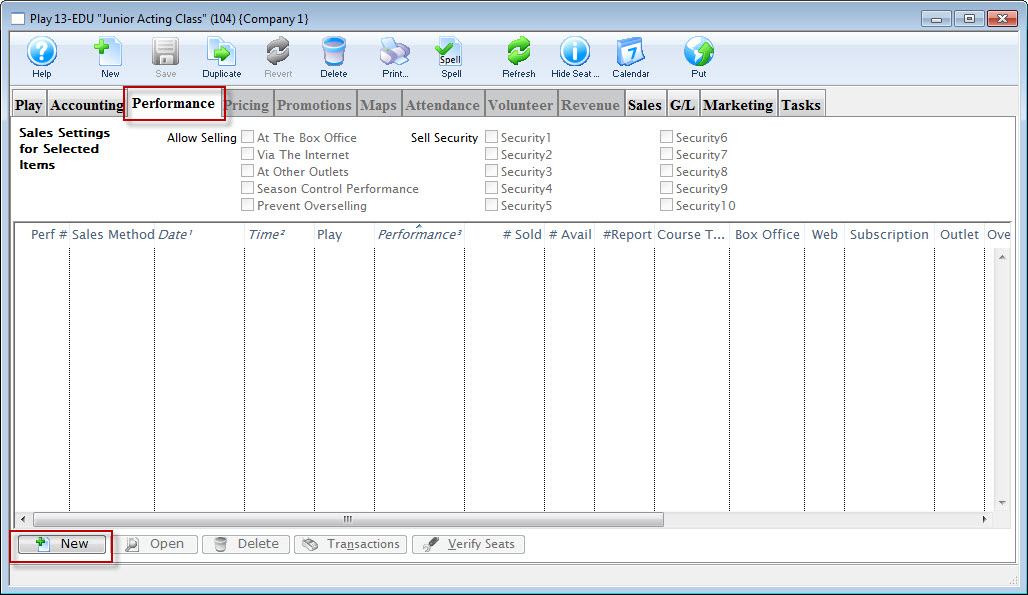
- Click the New
 button.
The Performance Wizard opens, beginning with Step One (details begin on the next page).
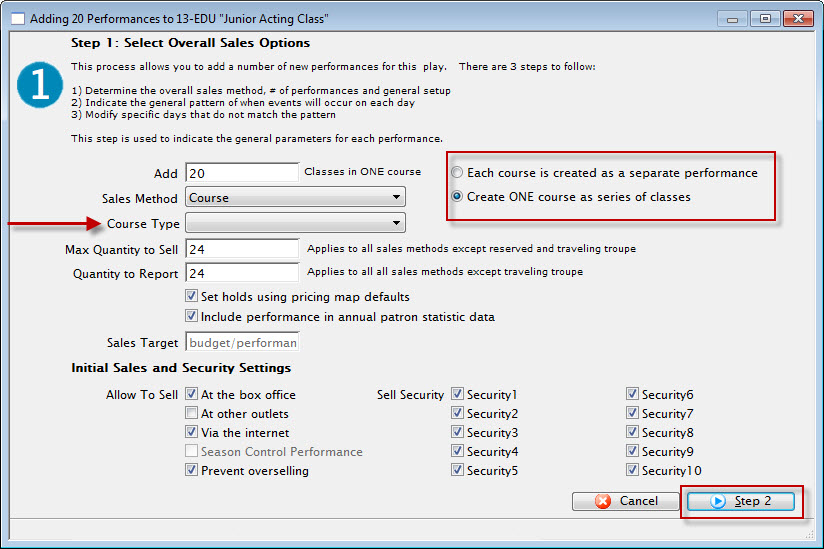
Adding A Class - Step One
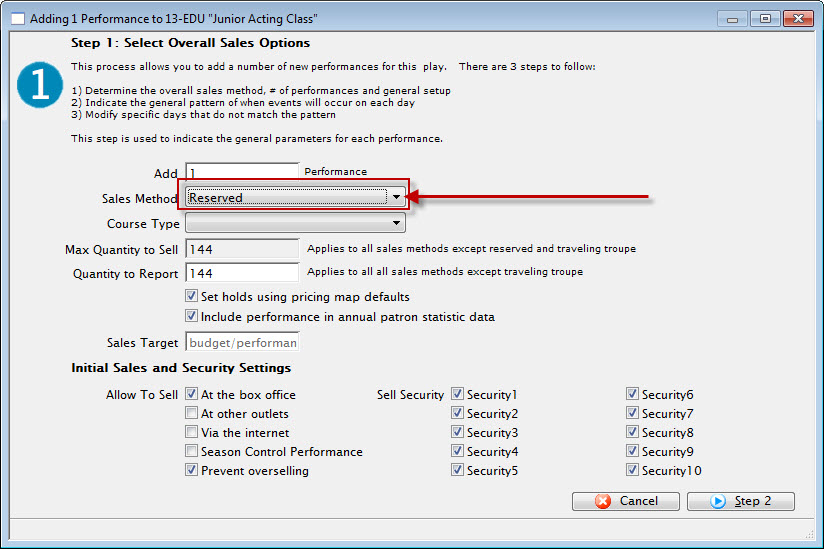
To add a class, you perform the following steps:
- Enter the number of Classes that will fall under this Course.
In this example - 20.
- Select "Course" as the Sales Method.
When "Course" has been selected, you will be given an option to either:

The difference is:
Each course is created as a separate performance Create ONE course as series of classes You can have multiple performances in your Course for patrons to choose from.
They can attend one session (or performance) and not the others.
This is useful if you are going to have one single class offered at several different times (just like any other event with multiple performances).
The individual classes can be sold separately
You are creating one Course that is a series of Classes
Patrons sign up to attend the whole series (this is the case in the example photos).
They purchase the entire series at once rather than separately.
Performance Field #1 is customizable. It is used for descriptions of a performance.
For example: You could use this field to group courses (or performances) by type--acting, voice, movement, etc (or drama, comedy, musical, etc).
- You can change the name of this field by following the instructions found here. In this example, the Field name has been changed to Course Type.
- You can populate options in this field by going to Setup >> System Tables >> Code Tables.
Locating the name of the field (which is whatever you have changed it to in Company Preferences) and following the instructions found here.
- The quantity to sell is based on the venue assigned to the Course.
If you think the Course may oversell the size of the venue, or if there is the possibility of adding more chairs to a venue, you can increase the quantity now.

you cannot increase the quantity to sell once the Course has been created. Changing the venue will not increase the quantity to sell.
The only way to increase the quantity is to create another event with a larger venue and move all the students out of this one and into the new one.
If there is a possibility of a higher quantity to sell, increase that value now.
- Check the boxes next to the sales outlets for the course (the box office, the internet, etc).
You cannot set a performance for sale Via the Internet until after pricing and promotions are set. You can check the box for Via the Internet at this step, but you will have to go back and edit the performance after setting Prices and Promotions and click Via the Internet under the Performance Tab of the Plays & Dates Window for the Course. For more information about this tab, click here.
- Set any appropriate Security controls for your venue.
- When you have everything set correctly, click the Step 2 button at the bottom right of the window.
Adding A Class - Step Two
In Step 2, you setup the pattern for the course. In this example, the course is running 1 day per week for 20 weeks at 4:30 pm.
- In Step Two, you set the date of the first session of the Course.
You can use the calendar lookup to the right of the data field to help choose the correct date.
- Use the sliders to select the number of Daily Performances for the classes in the course.
Make sure they correspond to the date you selected as a start date (for example, if you select Feb 1 and Feb 1 is a Monday, then you can't set Monday to zero performances).
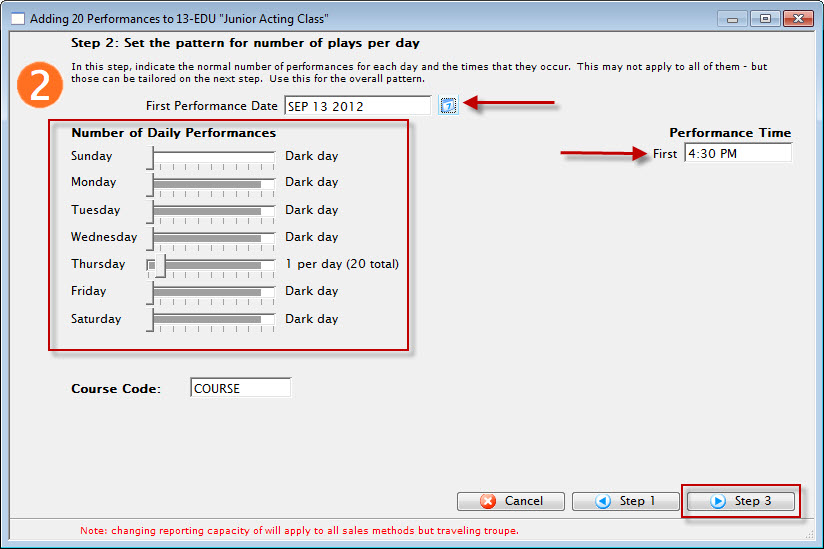
- Set the performance time for the start of each class in the course.
- Click the Step 3 button in the bottom right of the window.
Adding A Class - Step Three
In Step Three, you are presented with a Calendar View of the Classes in the Course.
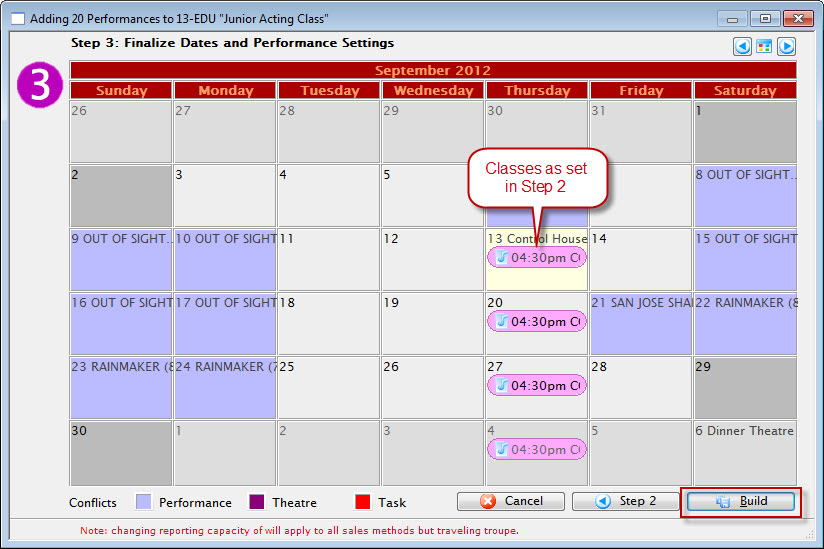
- If one or more of the classes starts at a different time than the Performance Time set in Step Two, you can drag that instance of the class on the Calendar to the appropriate start time for that class. You can also move classes to another day.
- When the Calendar looks the way you want, click the Build button in the bottom right corner.
The Build Performance dialog opens.
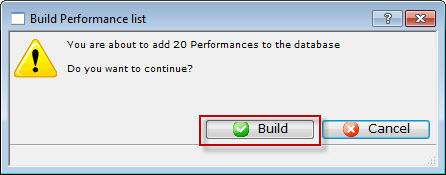
- Click the Build
 button to add your performances to the database, or Cancel to go back to the Steps.
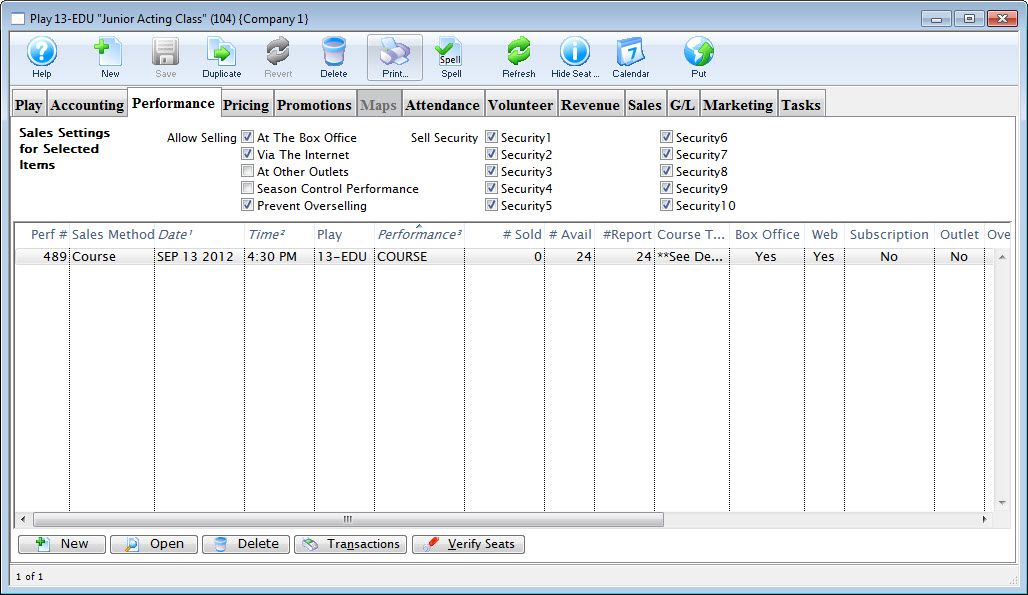
When you have completed building your classes, you are returned to the Performance Tab of the Plays and Dates window. The Course just entered populates window.
Setting Course Pricing
You set course pricing the same way Price Codes are set for any other Play or Event.
To set the price codes for your course, you perform the following steps:
- In the Play window, click the Pricing tab.
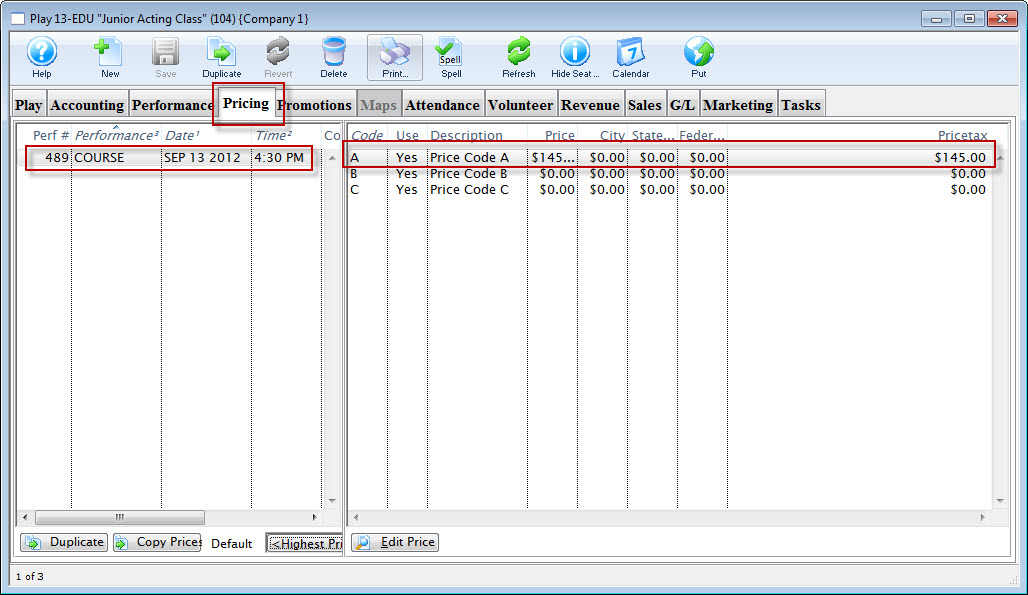
- On the left side of the window, highlight the course.
This enables the Price Codes on the right for editing.
- Double click on each Price Code to open the Price Code Detail window.
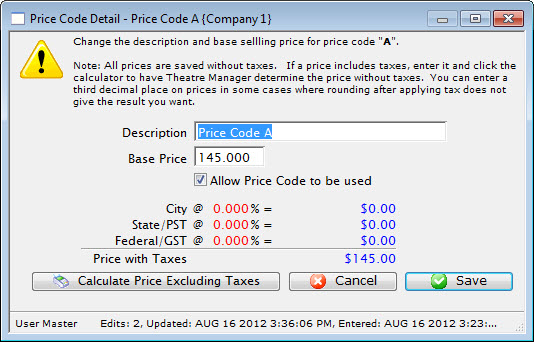
- Name the Price Code Description and/or set the price.
- When complete, click the Save
 button.
For more information about Price Codes, click here.
Enabling Course Promotions
Promotions, like Price Codes, are set in Courses the same way they are set for Plays or Events.
To set the price codes for your course, you perform the following steps:
- In the Play window, click the Promotions tab.
- On the left side, highlight the Course to populate the promotions for that Course in the list on the right.
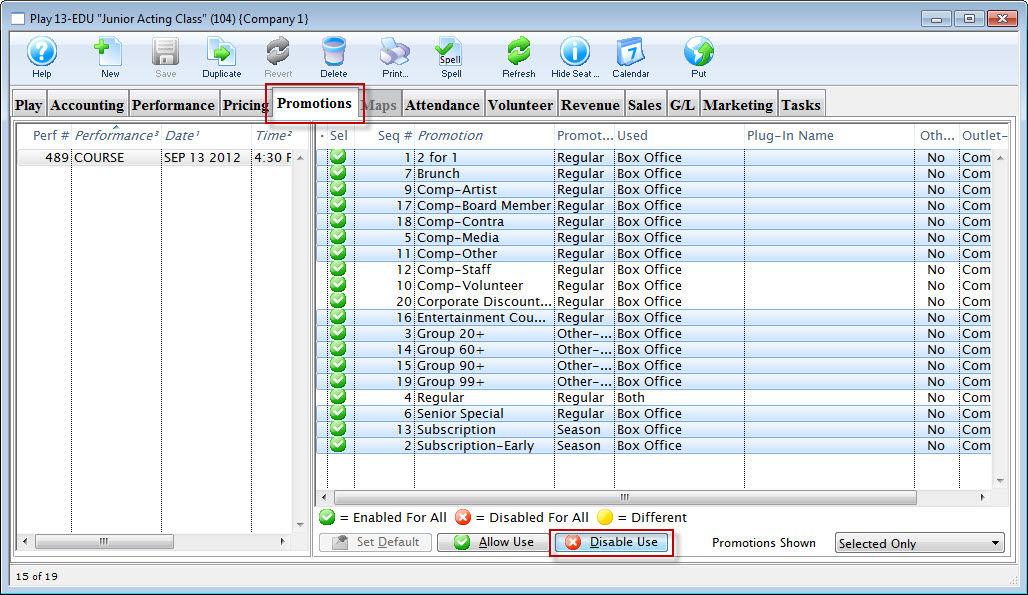
- Highlight promotions you do not want to use for that Course and click the Disable
 button to turn those promotions "off".
Promotions are set to "Enabled" by default.
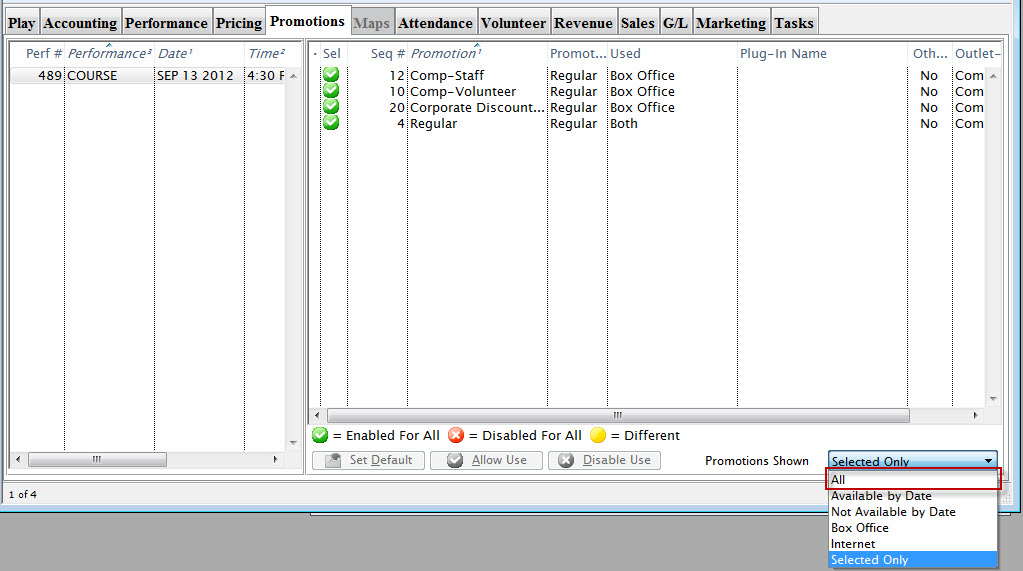
If you change your mind or later decide to allow a promotion for use in the Course, you may have to change the drop-down in the bottom right corner to show All promotions (it may be set to only display enabled promotions)
- Highlight the one or ones you'd like to enable and click the Allow Use
 button to turn those promotions back "on".
For more information about Promotions, please click here.
Once you have completed the entire process from entering the course title, accounting information, performances, prices and promotions, you are ready to start selling Courses.
If you want to make further adjustments to the Course, click here for information about accessing the Performance Detail tabs.
Redirecting link on your main website specifically for Courses
Creating a link to courses entails using the &search parameter in the event URL. By picking the right &search parameter you can:
- Show all courses by using the parameter &search=PB_SALES_METHOD=6 in the link. This is, by far, the easiest as
- it simply shows all courses -and-
- is immediately effective when new courses are created.
- Show selected events which can in the &search parameter. A sample is shown later on this help page.
- This has the advantage of allowing events sold as courses as well as a final 'parent' performance to be found in one list.
- It has the disadvantage that the web page link must be changed each time you have a new course
- A hybrid approach that may have a &search parameter that show all events sold as courses or some specific 'finale' performances.
An example of showing a link specific courses (Option 2 above)
A company has three Courses that are one-time events or workshops. Patrons can pick and choose or select all three if they'd like.
In our example, the company wants a link redirecting patrons to the list of Events/Courses (we'll discuss a need for a list of Performances/Classes further down).
In the Event List in Theatre Manager, the Courses look like this:
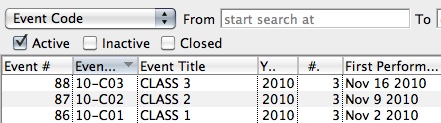
The Event # column is the one at the far left.
Those unique Event #'s - 86, 87, and 88 in the example - will belong to only the corresponding Event in the database and no others.>
"x, y and z" are representative of those unique Event #'s in the search string in the link discussed above for creating a link to a list of Events.
A link to these Courses will look like:
https://tickets.myserver.com/TheatreManager/1/login&event=0&search=P_SEQ IN(86,87,88)Similarly, you can create a link to a list of specific Performances for sale. This can be useful if your organization offers a Course made up of a series of Classes which can be purchased separately.
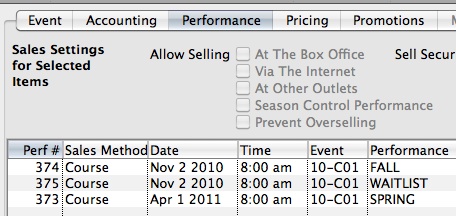
In this case, the Performance # works as the unique identifier for each Class in the Course.
Under the Course (Event) Setup, in the Performance Tab, the Perf # column is on the far left of the list of performances:
In the example image, the Perf #'s are 373, 374 and 375. A link to a list of those Classes would look like:
https://tickets.myserver.com/TheatreManager/1/login&event=0&search=PB_SEQ IN(373,374,375)
Care should be taken when creating Courses and Classes that you change the Sales Method to "Course" in the Performance Setup stage of the Course Setup.
Online patrons can purchase a Course and then assign another patron as the attendee for the Course (helpful in cases where the parent buys a class for a child who will be attending). For this option to be available, Courses must be setup as Sales Method - Course. For more information about Courses in Theatre Manager, click here.