Bambora Installation
 |
Bambora implements user id and password authentication over https connections to provide compliance with PCI DSS 4.1 |
|
A unique feature of Bambora allows refunding against an original credit cards purchase, even if the credit card has been shredded. This is useful for venues that do not wish to store credit cards and may need to refund to cancelled events periodically long after the original payment. |

Please contact Arts Management to discuss the process of getting a Merchant Account from Bambora.
After Bambora has provided you with a merchant account, installation is quite straightforward. Once set up, funds gets authorized as 'Card Not Present' and then deposited right to your own bank upon settlement from Theatre Manager. This account information you are provided is all you need in the merchant setup windows (in the pages that follow) to begin secure credit card authorization.
Bambora needs an account setup for authorization and one for online viewing of the account data. You can set up multiple accounts for online access the data so some people can view data and others have more access to transactions and history.
- Bambora - uses the Merchant Portal via a web browser to "view the transactions" that have occurred. This account setup might need to be used during the EOD deposit process to verify transactions as required.
- Merchant User ID and Password - uses Bambora to allow authorizations to occur and be settled but not be viewed. This information is what needs to be entered into Theatre Manager's Merchant account to allow authorizations to occur.
|
The user ids and passwords for both of the above are different and should not be interchanged or confused with each other. Follow the appropriate setup steps for each. |
After following the setup for both accounts, make sure to:
- test the gateway
- Disable requirements for CVV2 and AVS in the online interface and allow those be managed from Theatre Manager merchant setup and set each employee to require CVV2.
Bambora Setup - Contact Information
- Settle any existing credit card batch (run an End of Day)
- Create a new merchant account in Theatre Manager
- Follow the steps to change your merchant provider
Then you can start using Bambora.
If you have any questions directly related to your Bambora merchant account setup, please contact your Bambora Representative directly. Contact Arts Management if you have questions about how to setup Theatre Manager to reference and authorize credit cards using your Bambora account.
Bambora Gateway Account
The User ID and Password setup is arranged by Arts Management from Bambora and is entered into the Setup --> System Tables --> Merchant Accounts window as below:
Software Type
The following values are set on the software type tab per the diagram below:
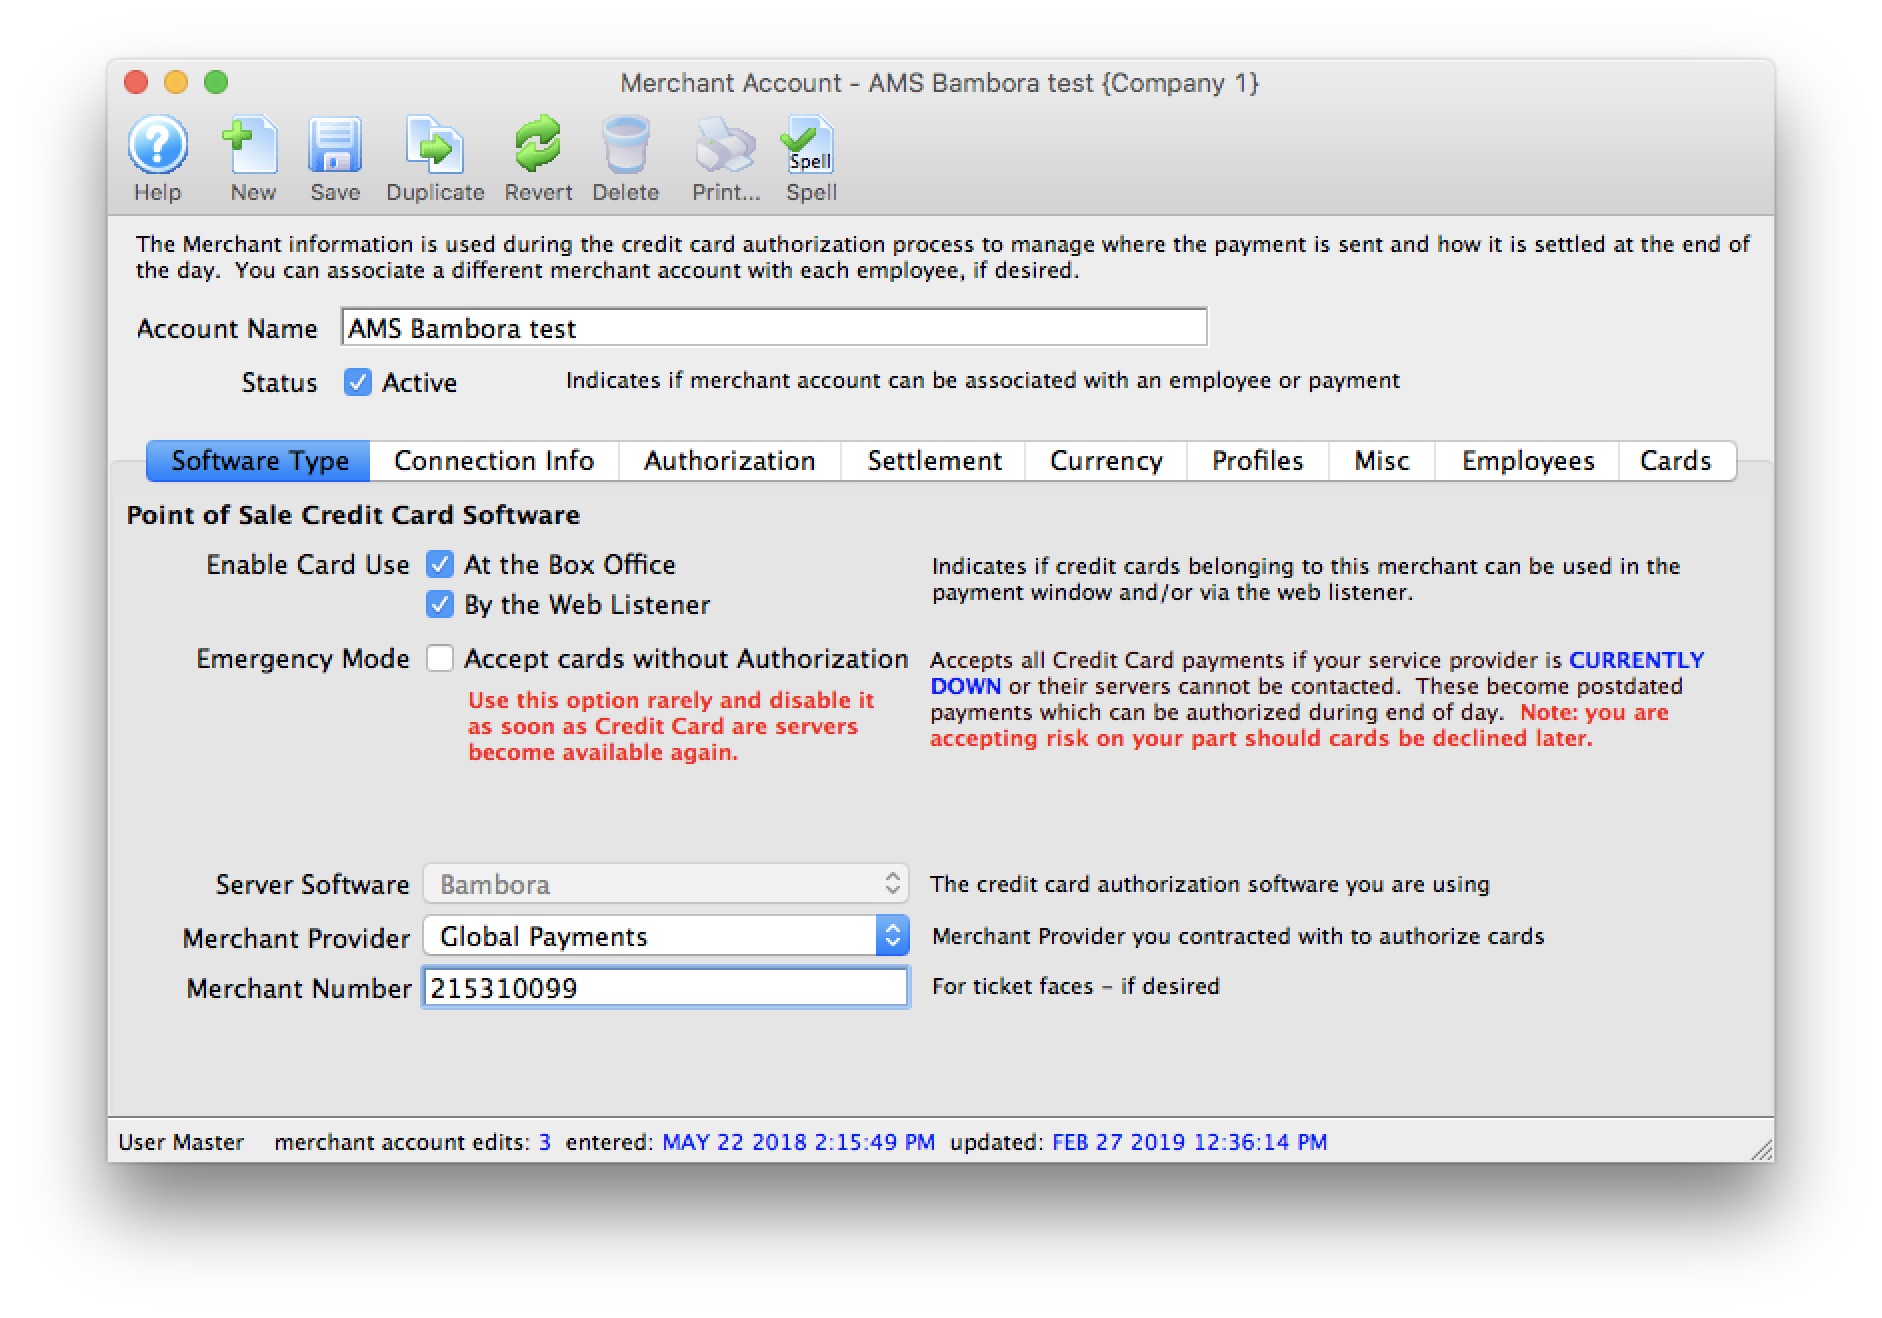
- Set the server software to be Bambora.
- The merchant provider - select the merchant services provider.
- The merchant number is for use on ticket faces and for contacting Bambora support.
Connection Info
The following entries are set on the Connection Info tab per the diagram below:
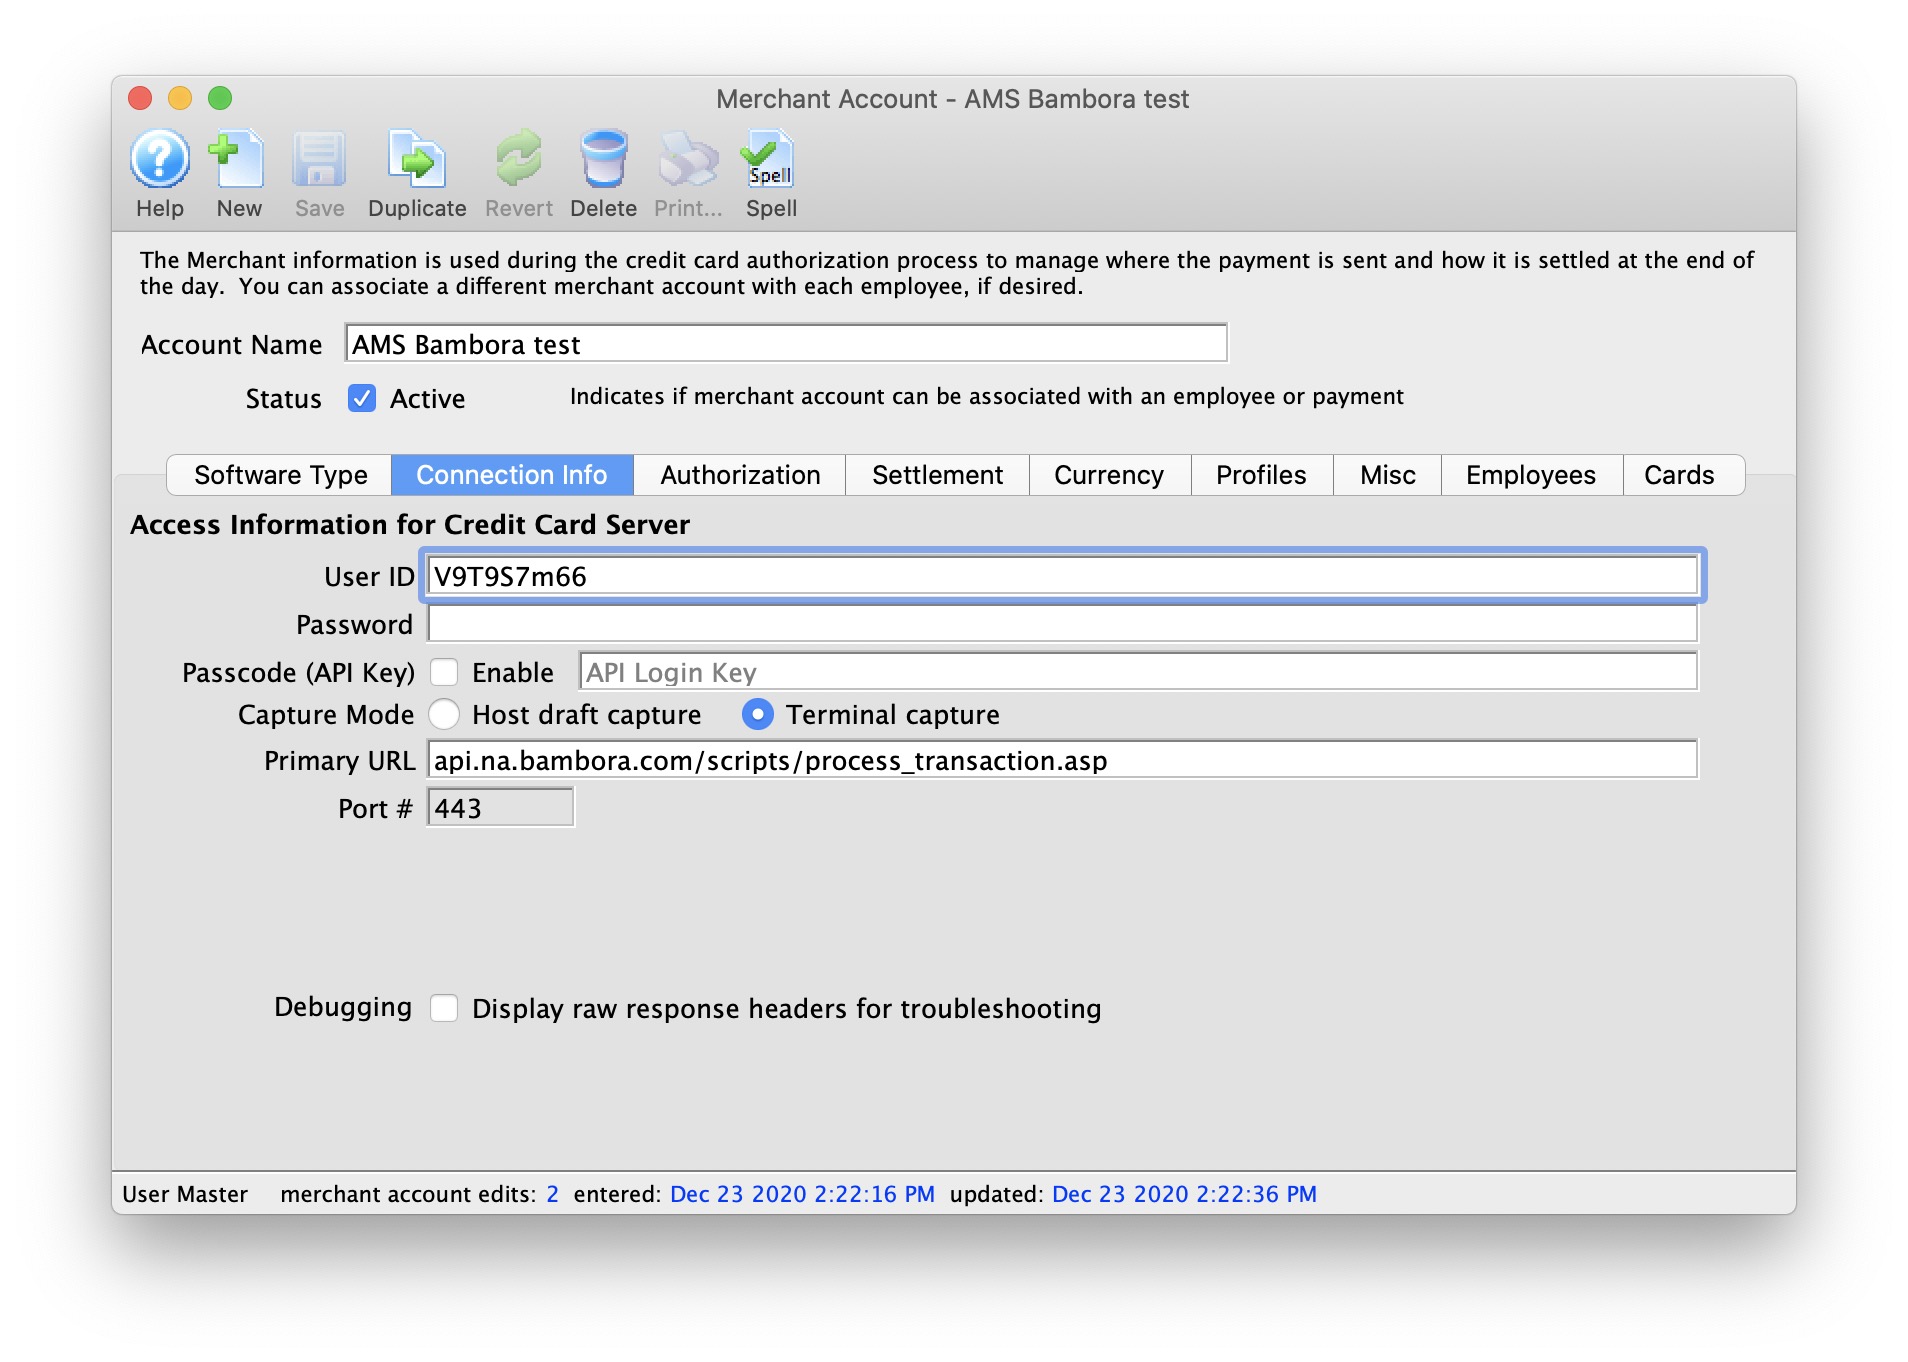
- User ID - provided through Bambora. The user id remains constant for the life of the account.
- Password - the password is auto generated for you. You can change it via the online interface to generate a new 'secret' key. If you do that, you can expire your old password right away or allow both old and new to co-exist for up to 24 hours.
- Passcode (API Key) Enabled - check this box if using the Payment Passcode API feature for connections rather than suppling the User ID/Password combination for each transaction processed.
- Passcode (API Key) - Payment API Passcode. The passcode (different then the User ID Password) assigned to the merchant account via the online Bambora web portal.

If Merchant Profiles are enabled and you get an authentication error, you might be using your Profiles API Key instead of your Payments API Key, so double check!
- Capture Mode - select Host Capture or Terminal Capture for End-Of-Day deposit processing.
- Primary URL - is always api.na.bambora.com/scripts/process_transaction.asp
- Port - is always 443
Merchant Profiles
|
Theatre Manager's interface with Bambora to maintain Merchant Profiles is currently under development. This feature has been disabled for activation until completion of the enhancement. |
The following entries are set on the Profiles tab per the diagram below:

- Enable Profiles - set to Active if Merchant Profiles will be used.
- Profiles API Login Key - Unique Profiles API Key for your Bambora merchant account. This identifier is different than the Merchant ID and User ID on the Connections tab.
Creating and modifying Payment Profiles requires you use your Profiles API Key. If you get an authentication error you might be using your Payments API Key, so double check!
- Profiles API URL - is always api.na.bambora.com/v1/profiles This URL is different than the URL on the Connections tab.
|
Refer to Merchant Profiles for further information on functionality. |

Employee and Card Setup
- To assign employees to this merchant account, click on the 'Employee' tab and find the employees to assign. In a multi merchant setup situation, drag only those employees that will use this merchant account as the default.
While some employees may have permission to use multiple merchant accounts, viewing their name here is the default merchant account assigned to them for charging cards. If the employee wants to use another merchant account, they will need to select it on the payment window.
- Click on the 'card' tab to select which credit card payment methods are associated with this merchant account.
If you need to have multiple merchant accounts and both are to take Visa (for example), you will need two Visa payment methods and assign one of them to each merchant account.
|
if you are switching from one merchant services provider software to another, you can open both merchant accounts and drag the employees from one window to the other. You can do the same for the credit card payment methods - to make the switch easy and fast. |
Any future dated 'post dated payments' associated with the card you drag to another merchant provider will automatically be re-assigned to authorize on the new merchant provider card network.
Testing Bambora
- Search for yourself in the database or create a new patron that is yourself
- Create a new order and buy a ticket
- On the payment window, select the credit card you want to use and do a test authorization
- If you get an authorization with a message indicating AVS match and/or CVV2 match, then the setup is correct
- Log in to your Bambora online account and view the batch to see that your transaction is there
- In Theatre Manager, void the credit card payment. It will appear in Bambora that the charge is still there with as a PA (pre-auth). That means it will be ignored
- Try another authorization and then do an End Of Day (i.e. SETTLEMENT) and make sure the amount makes it to the bank in the next day or so
Trouble Shooting Bambora Issues
- If you get a response that looks like it is HTML or XML and indicates that it was not authorized, then your user id/password is probably wrong (please verify), or something is incorrectly set up in Bambora and you will have to contact their merchant support group.
- If you get a message during end of day that will not allow cards to settle, make sure your provider has set you up to allow BACKEND transactions. These are used to convert 'authorize-only' transactions that are done during to the day to 'PAC' (fully processed) transactions during the end of day process
Bambora Web Terminal
- The Bambora Transaction List which is a filter that can be used to show the transactions of interest in a specific date range.
- You can see the Transaction Detail about any line by clicking on the credit card icon in each row. At the bottom of each transaction detail is a small table listing all other transactions that are related so that you can see a history pertaining to an authorization.
Transaction List
The Bambora transaction list lets you view the transactions that have occurred. Normally, you would only want to see those since the last end of day, but you can decide which data you want to view. To alter the search, the top part of the list contains date search range, the ability to limit the number of transactions per page and more. You may also view more detail about a transaction by clicking the credit card icon that is on the same line as the transaction.
The important thing to note is the types of transactions and how Theatre Manager creates them. Specifically:
- All payments sent for authorization will have a transaction type of 'PA'. This means Pre-Authorization. It is only a hold on the customers credit card. The the end of day is not done, this money will fall off the transaction list and you will not get your money.
- When you do End of Day, Theatre Manager takes all payments that it authorized that day and turns them into 'PAC' - effectively completing them. Transactions that are 'completed' are swept to your bank at 11:59:59 pm. This means a few things
- If you do not do end of day on any specific day, nothing will go to the bank until you compete an end of day.
- If you two multiple end of days in the same day, Theatre Manager sees them as more than one posting. Bambora aggregates all the PAC's into one amount on your bank statement.
- You will see AT LEAST TWO transactions for each customer. You will see a PA transaction and then you will see a corresponding PAC transaction that completes the PA. A successful authorization is a PA with a blue checkmark followed by a transaction some time later that is a PAC with a blue checkmark.
- You may see some 'R' transactions -- or refunds. Those are always swept to your bank each night, even if you do not do an end of day. Sorry, but that's the way Bambora works. We suggest making absolutely sure that you do an end of day in each day that refund occurs. For that reason, you may wish to limit who can do refunds.
Transaction Detail

The Bambora transaction detail contains a lot of information about the payment, most of which is self explanatory. It is accessed by clicking on the 'credit card' icon on the list window.
Theatre Manager currently uses 3 of the reference fields at the bottom of the screen to provide:
- ref1 - contains the Theatre Manager patron number on the account that the ticket was sold under
- ref2 - contains the Theatre Manager order number
- ref3 - contains the name of the user who processed the credit card
At the bottom of the detail window is a table that shows the related transactions.
Related Transactions
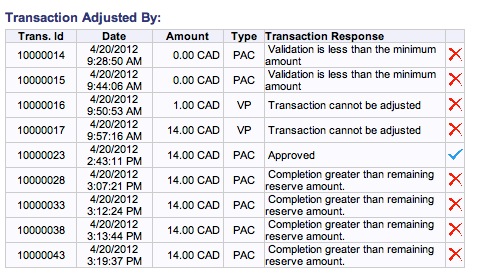
At the bottom of the transaction detail, there is a table that shows all the related transactions in Bambora. This is probably most pertinent to the original 'PA' transaction. If it has been converted to a 'PAC' transaction, you will see multiple lines as part of the Transaction Detail window that shows all the other transactions that affected this transaction.
Ultimately, all that matters is that you see a blue checkmark beside the PAC transaction, which means it was swept to the bank. In the example below, we see one.
Implication from Interrupted End of Day
However, we also see a number of other transactions with a red X that are related to the PA. If you see those, it may be because an error caused the EOD process to stop (without finishing in Theatre Manager) and so you re-ran it. Bambora only allows one PAC for each PA. A second PAC gives an 'error' but does not affect the outcome.